

Page 1
DIGISCAN M
SP
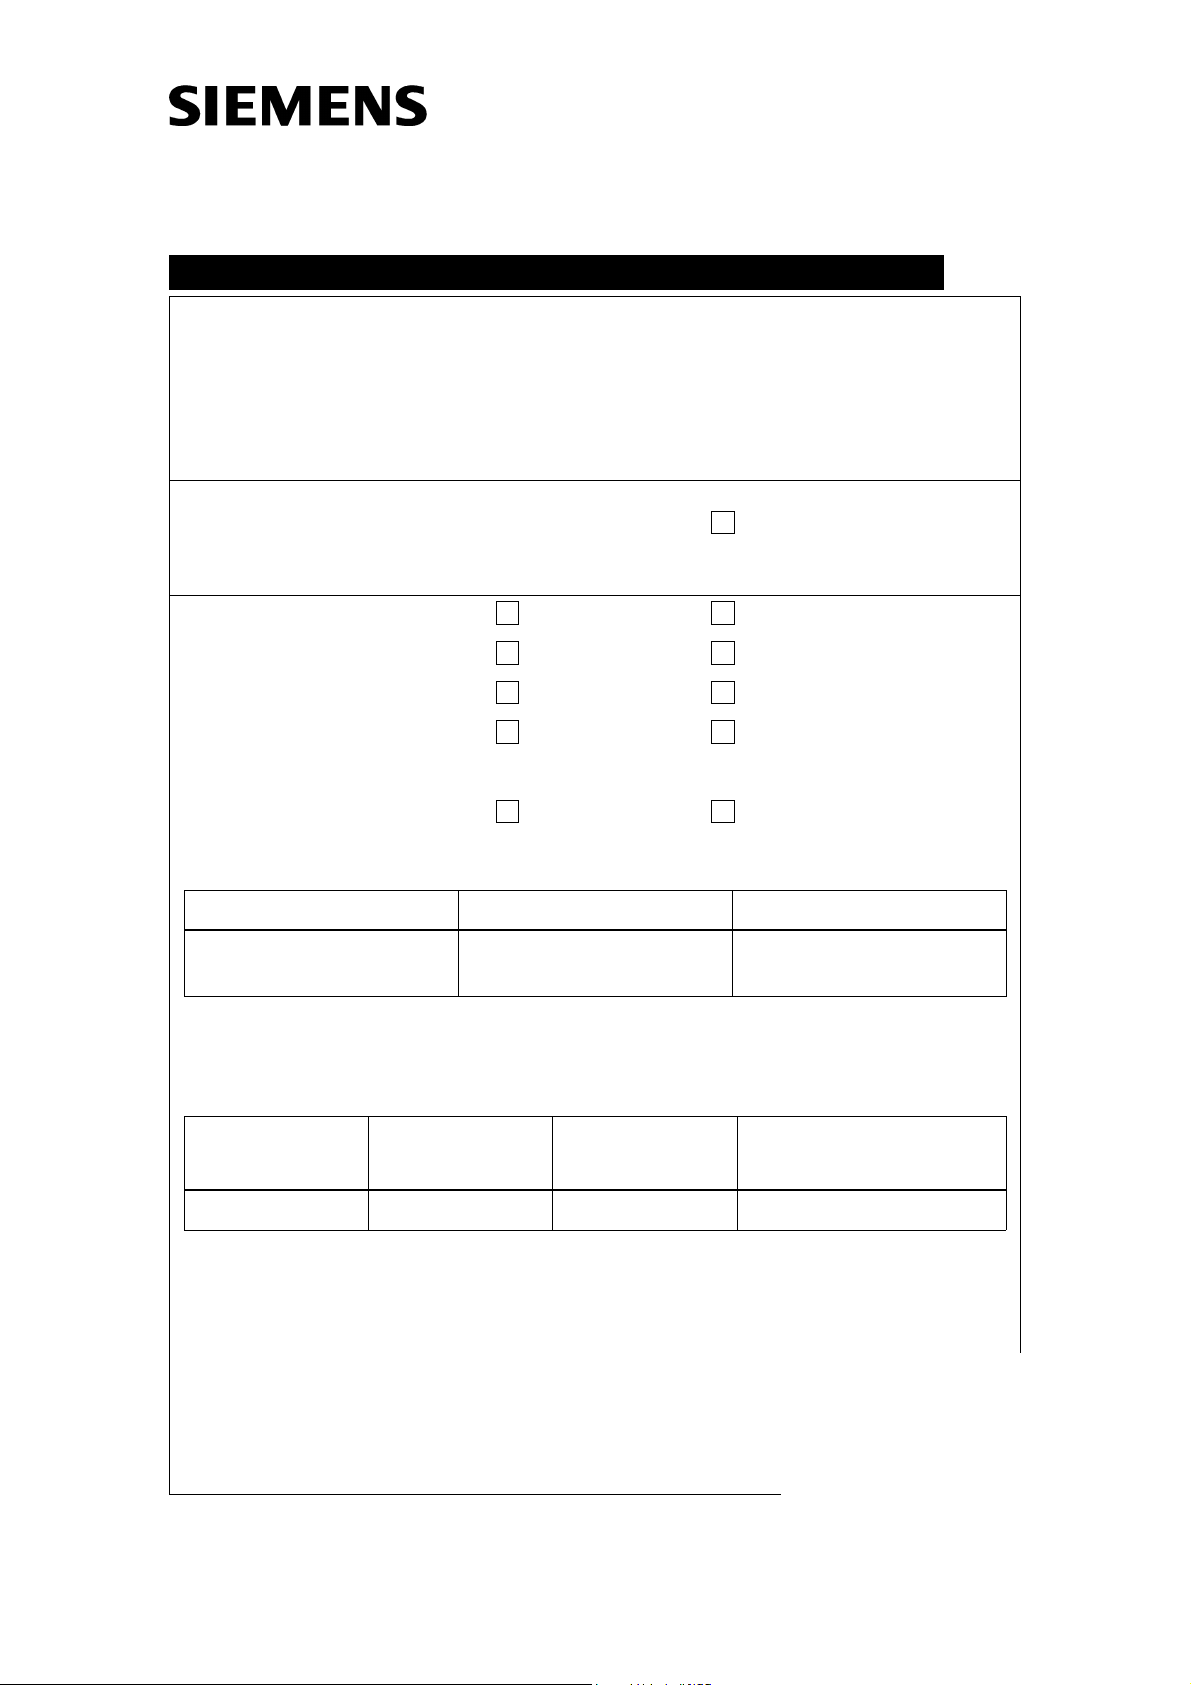
Update Instructions
Title:
Reason for update: Performance
Urgency: Immediate Within 3 months
Update materials required? Yes No
Material free of charge? Yes No
Return of parts? Yes No
Estimated completion time: 3 hours Number of CSE’s: 1 (one)
Customer Information? Yes No
Systems/Products affected/System identifying IVK
Name Material No. Serial No.
Update from ASCR2/ASCR2B to ASCR3
X
X
X
SP004/03/P
X
X
X
DIGISCAN M 66 01 970 1001 - 1006, 1008, 1012,
1015 - 1018
Remark:
Components affected/to be modified
Name Material No. Serial No. Component status
affected
n.a. n.a. n.a. n.a.
Remark:
© Siemens AG 2003
Chg. Rev. No.: RBN S2090042
Name: Engman/Bark
Dept.: CS PS 24/SPS
Print No.: SPB7-420.896.01.02.02 Doc. Gen. Date: 02.03
Replaces: SPB7-420.896.01.01.02 66 53 864 Page 1 of 4
The reproduction, transmission or use
of this document or its contents is not
permitted without express written
authority. Offenders will be liable for
damages. All rights, including rights
created by patent grant or registration
of a utility model _or_ design,_are_
reserved.
Page 2

0 - 2 Revision
Document Revision Level
This document corresponds to the version/revision level effective at the time of system delivery. Revisions to hardcopy documentation are not automatically distributed.
Please contact your local Siemens office to order current revision levels.
Disclaimer
The installation and service of equipment described herein is to be performed by qualified personnel
who are employed by Siemens or one of its affiliates or who are otherwise authorized by Siemens or
one of its affiliates to provide such service.
Assemblers and other persons who are not employed by or otherwise directly affiliated with or authorized by Siemens or one of its affiliates are directed to contact one of the local offices of Siemens or
one of its affiliates before attempting installation or service procedures.
DIGISCAN M SPB7-420.896.01 Page 2 of 4 Siemens AG
Rev. 02 02.03 CS PS 24/SPS Medical Solutions
Page 3

Contents 0 - 3
Page
1 _______General Information ____________________________________________1 - 1
Systems/Products Affected . . . . . . . . . . . . . . . . . . . . . . . . . . . . . . .1 - 1
Reason for the Update . . . . . . . . . . . . . . . . . . . . . . . . . . . . . . . . . 1 - 1
Prerequisites . . . . . . . . . . . . . . . . . . . . . . . . . . . . . . . . . . . . . .1 - 2
Special Tools / Documents . . . . . . . . . . . . . . . . . . . . . . . . . . . . . . .1 - 2
Ordering Information . . . . . . . . . . . . . . . . . . . . . . . . . . . . . . . . . .1 - 2
Contents of the Update Kit . . . . . . . . . . . . . . . . . . . . . . . . . . . . . . . 1 - 2
Return of Parts . . . . . . . . . . . . . . . . . . . . . . . . . . . . . . . . . . . . . 1 - 3
2 _______Installation ____________________________________________________2 - 1
Barcode Reader Cable connections. . . . . . . . . . . . . . . . . . . . . . . . . . .2 - 1
Acquisition Workstation . . . . . . . . . . . . . . . . . . . . . . . . . . . . . . . . . 2 - 3
3 _______Function- and Image Quality Check _______________________________3 - 1
Switch on the System . . . . . . . . . . . . . . . . . . . . . . . . . . . . . . . . . .3 - 1
Function Check of the Acquisition Workstation . . . . . . . . . . . . . . . . . . . . .3 - 1
Image Quality Check . . . . . . . . . . . . . . . . . . . . . . . . . . . . . . . . . . 3 - 2
4 _______Final Work Steps _______________________________________________4 - 1
Labeling . . . . . . . . . . . . . . . . . . . . . . . . . . . . . . . . . . . . . . . . .4 - 1
Final Work Steps . . . . . . . . . . . . . . . . . . . . . . . . . . . . . . . . . . . .4 - 2
Customer Information . . . . . . . . . . . . . . . . . . . . . . . . . . . . . . . . . .4 - 2
5 _______Update Completion Form ________________________________________5 - 1
Completion Protocol. . . . . . . . . . . . . . . . . . . . . . . . . . . . . . . . . . . 5 - 1
Siemens AG SPB7-420.896.01 Page 3 of 4 DIGISCAN M
Medical Solutions Rev. 02 02.03 CS PS 24/SPS
Page 4

0 - 4 Contents
This page intentionally left blank.
DIGISCAN M SPB7-420.896.01 Page 4 of 4 Siemens AG
Rev. 02 02.03 CS PS 24/SPS Medical Solutions
Page 5

General Information 1
Systems/Products Affected 1
DIGISCAN M system (material no. 66 01 970) with version ASCR2/ASCR2B installed in
serial number interval 1001 - 1018.
See table below for detailed designation of affected systems.
1 - 1
Country Number of
Update Kits
Austria 1 1015
France 2 1002, 1003
Germany 3 1005, 1006,1017
Malaysia 1 1008
Netherlands 1 1016
Norway 1 1018
South Africa 1 1012
Spain 1 1004
Sweden 1 1001
Tab. 1 List of affected systems
Serial Number on
DIGISCAN M
Reason for the Update 1
New features added and software corrections according to customer complaints are
made.
The version ASCR3 have the following new features:
• Examination of silicone breasts (customer complaint)
• Auto Filming (Auto Print)
• New position of image text (customer complaint)
• Communication switch (Opdima - DIGISCAN M)
• Printer release AGFA 4500, 4500M, 5200, Fuji FMDPL (LAN + server)
• Tool tips
• More languages (French and Spanish)
• Image processing PEM (Pattern Enhancement processing fo r Mammography)
configurable
• Image Parameter setting for PEM & MFP (Multi-objective Frequency Processing)
Corrections made from version ASCR2/ASCR2B:
• Error in file Hosts while installing ASCR2
• Wrong focus written to DICOM file
• Barcode Reader change from PS2 to RS232
• Image Quality improvements (new LUT)
Siemens AG SPB7-420.896.01 Page 1 of 4 DIGISCAN M
Medical Solutions Rev. 02 02.03 CS PS 24/SPS
Page 6

1 - 2 General Information
Prerequisites 1
Version ASCR2/ASCR2B must be installed.
Special Tools / Documents 1
• Calibrated luminance meter
Ordering Information 1
The following update kit has to be ordered from CSML (SAP Distribution Channel, factory
2050):
DIGISCAN M Update Kit BL4 -> ASCR3 66 24 089 X052E
Contents of the Update Kit 1
Update kit 66 24 089 contains the following parts:
Pos. Quantity Material No. Name
1 1 66 24 469 Software CD ASCR3 incl. syngo
2 1 66 24 477 W2000 Installation CD for syngo ASCR3 VB10A
3 1 66 53 864 Update Instructions SP004/03/P (this document)
4 1 66 31 027 Instructions for use, English
5 1 66 31 035 Instructions for use, German
6 1 66 31 043 Instructions for use, French
7 1 66 31 050 Instructions for use, Spanish
8 1 66 31 068 Instructions for use, Swedish
9 1 66 47 288 Supplement to Instructions for use, English
10 1 66 47 379 Supplement to Instructions for use, German
11 1 66 47 361 Supplement to Instructions for use, French
12 1 66 47 387 Supplement to Instructions for use, Spanish
13 1 66 47 395 Supplement to Instructions for use, Swedish
14 1 66 31 670 Syngo Operating Instructions CD, English/German
15 1 66 31 688 Syngo Operating Instructions CD, English/French
16 1 66 31 696 Syngo Operating Instructions CD, English/Spanish
17 1 66 31 076 Quality Control Manual, English
Tab. 2 Contents of update kit.
DIGISCAN M SPB7-420.896.01 Page 2 of 4 Siemens AG
Rev. 02 02.03 CS PS 24/SPS Medical Solutions
Page 7

General Information 1 - 3
Pos. Quantity Material No. Name
18 1 66 31 084 Quality Control Manual, German
19 1 66 31 092 Quality Control Manual, French
20 1 66 31 100 Quality Control Manual, Spanish
21 1 66 31 118 Quality Control Manual, Swedish
22 1 66 08 090 Binder with Technical Documentation
23 1 66 24 261 Barcode Reader Cable
24 1 66 24 287 Barcode Reader Unit Cable
25 1 66 24 402 Dongle with Licence Key CD
Tab. 2 Contents of update kit.
Return of Parts 1
No parts shall be returned.
Siemens AG SPB7-420.896.01 Page 3 of 4 DIGISCAN M
Medical Solutions Rev. 02 02.03 CS PS 24/SPS
Page 8

1 - 4 General Information
This page intentionally left blank.
DIGISCAN M SPB7-420.896.01 Page 4 of 4 Siemens AG
Rev. 02 02.03 CS PS 24/SPS Medical Solutions
Page 9

Installation 2
Barcode Reader Cable connections 2
1. Remove the two old barcode reader cables from the system. Remove the old
barcode reader unit cable from the barcode reader by inserting an unfolded paperclip into the small hole on the barcode reader. Press and at the same time pull out
the cable.
2. Remove the barcode decoder and connect the keyboard cable to the keyboard
interface on the back of the Acquisition Workstation.
3. Connect the new barcode reader unit cable (mat. no. 66 24 287) to the barcode
reader.
4. Mount connector DB9F and connector marked “SCANNER” to one of the cable
holders according to Fig. 1.
2 - 1
SCANNER
Cable to mouse
Acquisition workstation
Fig. 1 Barcode cable mounted on cable holder
1 lock washer
nut
Cable holder
Barcode scanner
FFDM00620
Siemens AG SPB7-420.896.01 Page 1 of 6 DIGISCAN M
Medical Solutions Rev. 02 02.03 CS PS 24/SPS
Page 10

2 - 2 Installation
5. Fit the cable holder to the cable outlet cover with a new longer screw (16 mm) and
two washers.
2 washers
Screw
Fig. 2 Top-down view cable holder
Fig. 2 Top-down view cable holder
SCANNER
Cable outlet cover
FFDM00093
6. Connect the other two ends of the barcode reader cable to the Barcode Scanner
Interface and Mouse Interface on the back of the Acquisition Workstation.
Mouse Interface
Barcode Scanner Interface
Fig. 3 Connection of barcode reader cable on
Acquisition Workstation
FFDM00619
DIGISCAN M SPB7-420.896.01 Page 2 of 6 Siemens AG
Rev. 02 02.03 CS PS 24/SPS Medical Solutions
Page 11

Installation 2 - 3
Acquisition Workstation 2
Preparation 2
• Patient and examination data must be saved from the local database onto an external
data medium, e.g. MOD, CD-R or archive system. For information about archiving, see
DIGISCAN M Instructions for use, SPB7-420.201.01...
CAUTION
CAUTION
A software installation will erase the hard disk completely.
Patient and examination data will get lost.
Archive patient and examination data from the local database.
Due to syngo bugs, the Backup/Restore functionality is not 100%
ensured.
• Check if there is a backup of the syngo configuration, otherwise perform a backu p
according to chapter 8 in DIGISCAN M Software, Acquisition workstation, SPB7-
420.816.01...
• Check if there is a protocol of the syngo configuration, otherwise write down all settings
in the document DIGISCAN M Software, Acquisition workstation, SPB7-420.816.01...
• Check if there are any optional customer specific configuratio ns and write them down.
• Replace the old dongle with the new one (mat. no. 66 24 402).
Installation and configuration of software ASCR3 2
Install and configure software ASCR3 according to the following chapters in DIGISCAN M
Software, Acquisition workstation, SPB7-420.816.01...:
• Chapter 3: Software installation if no pre-installed ASCRx.
- Exclude BIOS settings.
• Chapter 8: Backup/Restore.
- Perform a Restore of the backup.
• Chapter 5: Syngo configuration.
- Enter Local Service.
- Select Configuration.
- Check if all previous syngo configurations are there, if not correct configuration.
- Select the LUT Files in the selection menu on the left under DICOM.
Siemens AG SPB7-420.896.01 Page 3 of 6 DIGISCAN M
Medical Solutions Rev. 02 02.03 CS PS 24/SPS
Page 12

2 - 4 Installation
- Leave as it is.
- The next screen appears by clicking on > in the action bar.
DIGISCAN M SPB7-420.896.01 Page 4 of 6 Siemens AG
Rev. 02 02.03 CS PS 24/SPS Medical Solutions
Page 13

Installation 2 - 5
- Check that the LUTs for the DXMGImage is "Linear".
If not, select "Linear". Select Save in the action bar if changes have been made to save
the values that were entered. Acknowledge the message “...successfully saved” with OK.
Select Next or Finish in the action bar.
Select Home in the navigation bar and restart the AWS.
Siemens AG SPB7-420.896.01 Page 5 of 6 DIGISCAN M
Medical Solutions Rev. 02 02.03 CS PS 24/SPS
Page 14

2 - 6 Installation
• Chapter 8: Backup / Restore.
- Perform a backup of the new syngo configuration.
NOTE
Due to a known problem in the syngo software an error message
(Fig. 4) will appear when the Home button is clicked. This error
message is located behind the Configuration window and must be
closed before the Service Home Menu will appear. To solve this
problem move the Configuration window, locate the error message window and click the OK button to close it. The same message will appear a second time. Click OK again to close it. To
return to the Home Menu window click on the Home button in the
Configuration window.
Fig. 4 Error message window
Start-up 2
Start-up the Acquisition Workstation according to the following chapters in DIGISCAN M
Start-up, SPB7-420.815.01...:
• Chapter 2: Start-up of the Acquisition Workstation
- Install service images
- Configuration of the barcode scanner
Check 2
• Open file "WINNT / System 32 / drivers / etc / HOSTS" with the Notepad and check if the
following row is seen:
- 192.168.1.100 fcr 5000-n
• If not, add it.
• Save changes.
DIGISCAN M SPB7-420.896.01 Page 6 of 6 Siemens AG
Rev. 02 02.03 CS PS 24/SPS Medical Solutions
Page 15

Function- and Image Quality Check 3
Switch on the System 3
• Switch on the image reader.
- Booting takes approximately 5 minutes until the utility screen will be displayed.
• Switch on the MAMMOMAT 3000 Nova.
• Switch on the viewing station (option) and start the application.
• Switch on the hardcopy camera (recommendation).
• Switch on the acquisition workstation and login as meduser.
- After approximately 30 seconds the Examination task card will be displayed.
• Register all IP cassettes according to DIGISCAN M Instructions for use,
SPB7-420.201.01
Function Check of the Acquisition Workstation 3
Image transfer 3
3 - 1
NOTE
For detailed information how to perform an examination, see
DIGISCAN M Instructions for use, SPB7-420.201.01... .
• Activate the Examination task card at the acquisitio n workstation.
• Click on the Patient Registration button and register a patient with the following entries:
Last name: enter the name “Function check”.
Date of Birth: enter the current date.
Sex: select Other.
• Click on the Exam button to finish the registration.
• Slide the L-cc label on the object table into the beam path.
• Expose an 18x24 mm IP cassette in the MAMMOMAT 3000 Nova using a
4 cm plexi.
• Read barcode for exposed IP cassette.
• Read the projection view barcode L-cc.
• Read the IP cassette in the image reader.
• After approximately 100 seconds, the image should have arrived at the acquisitio n
workstation.
• Click on the End of examination button to exit the examination.
• Depending on the work routine of the hospital, ensure that the image is archived on the
MOD and/or CD-R, and/or sent to an archive system and/or viewing station.
• Following the above-listed procedure, expose and read out another image. Use the
same patient data but slide the R-cc label into the beam path and read the projection
view barcode R-cc.
• After the last image was displayed on the acquisition workstation, check in the Patient
Browser that the two images have been filed in one folder.
Siemens AG SPB7-420.896.01 Page 1 of 2 DIGISCAN M
Medical Solutions Rev. 02 02.03 CS PS 24/SPS
Page 16

3 - 2 Function- and Image Quality Check
Filming (option) 3
• Activate the Viewing task card.
• Call up Options > Configuration... > Filming Layout.
• Select the Series tab.
• Under Aspect Ratio select Original Image.
• Press Apply and then OK.
• Select one of the images in the Patient Browser.
• Call up Patient > Copy to Film Sheet in the main menu or by using the symbol keypad.
• Switch to the Filming task card.
• In Camera tab, select Film Size Inch 11x14.
• Call up Film > Expose Film Sheet.
• Check that the image is exposed in normal size and without any deformation.
Make sure that the two projection views displayed in the image are shown from the same
side.
Image Quality Check 3
Perform the test "Display and print conformity" in the DIGISCAN M Quality Control
Manual, SPB7-420.210.01... and fill out the Test report protocol accordingly.
DIGISCAN M SPB7-420.896.01 Page 2 of 2 Siemens AG
Rev. 02 02.03 CS PS 24/SPS Medical Solutions
Page 17

Final Work Steps 4
Labeling 4
Version Label 4
Replace version label ASCR2 on the back of the acquisition wo rkstation with version label
ASCR3.
4 - 1
Fig. 1 Version label on the acquisition workstation
Version label
0413
Made in Sweden
Siemens-Elema AB, S171 95 Solna, Sweden
MODEL NO.:
SERIAL/LOT No.:
FFDM00251
Siemens AG SPB7-420.896.01 Page 1 of 2 DIGISCAN M
Medical Solutions Rev. 02 02.03 CS PS 24/SPS
Page 18

4 - 2 Final Work Steps
Final Work Steps 4
• Update the system documentation.
Update the revision level, the operating instructions and the technical documentation.
Fill out, and if needed, make a copy of the attached "Completion Protocol/ Update
Completion Form" and file it in the corresponding System Binder/User Handbook.
• This update includes an IVK.
- Changes in the IVK structure must be reported to the management system to correct
the installed volume.
• Updates that have already been completed prior to publication of this UI must also be
reported.
• The update is reported as follows:
- The modification reply cards (Type 606) previously distributed with the publication of
updates no longer apply.
- The modification reply report has to be prepared by authorized personnel using an
application on the Intranet.
Customer Information 4
Inform the customer about the new features, corrections made from earlier version and
that the Instructions for Use and technical documentation is updated and available.
DIGISCAN M SPB7-420.896.01 Page 2 of 2 Siemens AG
Rev. 02 02.03 CS PS 24/SPS Medical Solutions
Page 19

Update Completion Form 5
Completion Protocol 5
The update with the number SP004/03/P has been completed.
Material Number: ......66 01 970..........
5 - 1
Serial Number: ................................
Customer: ................................ Site: ................................
Customer No.: ................................
Name ( CSE ): ................................ Telephone: ................................
Country: ................................ Location: ................................
Date: ................................ Signature: ................................
Remark: ....................................................................................................
....................................................................................................
NOTE
Siemens AG SPB7-420.896.01 Page 1 of 2 DIGISCAN M
Medical Solutions Rev. 02 02.03 CS PS 24/SPS
After completing the update, make a copy of this page, fill it out
and file it in the corresponding System Binder/User Handbook.
Page 20

5 - 2 Update Completion Form
This page intentionally left blank.
DIGISCAN M SPB7-420.896.01 Page 2 of 2 Siemens AG
Rev. 02 02.03 CS PS 24/SPS Medical Solutions
 Loading...