

Page 1

Loskarn Oswald
ARCADIS Varic
Configuration
System
SP
Configuration Guide
08080017
Print No.:
Replaces: SPR-310.843.01.02.02
SPR2-310.843.01.03.02
© Siemens AG
The reproduction, transmission or use
of this document or its contents is not
permitted without express written
authority. Offenders will be liable for
damages. All rights, including rights
created by patent grant or registration
of a utility model or design, are
reserved.
English
Doc. Gen. Date: 08.04
2003
Page 2

2 Revision / Disclaimer
1Revision / Disclaimer
Document revision level
The document corresponds to the version/revision level effective at the time of system
delivery. Revisions to hardcopy documentation are not automatically distributed.
Please contact your local Siemens office to order current revision levels.
Disclaimer
The installation and service of equipment described herein is to be performed by qualified
personnel who are employed by Siemens or one of its affiliates or who are otherwise
authorized by Siemens or one of its affiliates to provide such services.
Assemblers and other persons who are not employed by or otherwise directly affiliated
with or authorized by Siemens or one of its affiliates are directed to contact one of the
local offices of Siemens or one of its affiliates before attempting installation or service procedures.
ARCADIS Varic SPR2-310.843.01.03.02 Siemens AG
08.04 CS SD 24
Page 2 of 120
Medical Solutions
Page 3

Table of Contents 3
1- 0Table of Contents
1 _______ Definitions and Abbreviations _____________________________________ 6
Overview. . . . . . . . . . . . . . . . . . . . . . . . . . . . . . . . . . . . . . . . . . . . . . . . . . . . . . . . . . . . . . 6
2 _______ General Remarks ________________________________________________ 8
General Information . . . . . . . . . . . . . . . . . . . . . . . . . . . . . . . . . . . . . . . . . . . . . . . . . . . . . 8
Reboot, Restart and Shutdown . . . . . . . . . . . . . . . . . . . . . . . . . . . . . . . . . . . . . . . . . . . . 9
3 _______ Country-specific Settings ________________________________________ 10
Country-specific Keyboard Layout and User Interface. . . . . . . . . . . . . . . . . . . . . . . . . . 10
4 _______ Imaging System Syngo Configuration______________________________ 11
Service Software . . . . . . . . . . . . . . . . . . . . . . . . . . . . . . . . . . . . . . . . . . . . . . . . . . . . . . 11
Opening the Service Software . . . . . . . . . . . . . . . . . . . . . . . . . . . . . . . . . . . . . . . . . 11
Configuration. . . . . . . . . . . . . . . . . . . . . . . . . . . . . . . . . . . . . . . . . . . . . . . . . . . . . . . 14
Local Host. . . . . . . . . . . . . . . . . . . . . . . . . . . . . . . . . . . . . . . . . . . . . . . . . . . . . . . . . . . . 17
Site Info 1 . . . . . . . . . . . . . . . . . . . . . . . . . . . . . . . . . . . . . . . . . . . . . . . . . . . . . . . . . 17
System . . . . . . . . . . . . . . . . . . . . . . . . . . . . . . . . . . . . . . . . . . . . . . . . . . . . . . . . . . . 18
Service . . . . . . . . . . . . . . . . . . . . . . . . . . . . . . . . . . . . . . . . . . . . . . . . . . . . . . . . . . . 18
Customer and Address . . . . . . . . . . . . . . . . . . . . . . . . . . . . . . . . . . . . . . . . . . . . . . . 19
Site Info 2 . . . . . . . . . . . . . . . . . . . . . . . . . . . . . . . . . . . . . . . . . . . . . . . . . . . . . . . . . 20
TCP / IP LAN . . . . . . . . . . . . . . . . . . . . . . . . . . . . . . . . . . . . . . . . . . . . . . . . . . . . . . 21
Users. . . . . . . . . . . . . . . . . . . . . . . . . . . . . . . . . . . . . . . . . . . . . . . . . . . . . . . . . . . . . 24
Monitor Type . . . . . . . . . . . . . . . . . . . . . . . . . . . . . . . . . . . . . . . . . . . . . . . . . . . . . . . 25
Security. . . . . . . . . . . . . . . . . . . . . . . . . . . . . . . . . . . . . . . . . . . . . . . . . . . . . . . . . . . . . . 27
Settings . . . . . . . . . . . . . . . . . . . . . . . . . . . . . . . . . . . . . . . . . . . . . . . . . . . . . . . . . . . 27
Service . . . . . . . . . . . . . . . . . . . . . . . . . . . . . . . . . . . . . . . . . . . . . . . . . . . . . . . . . . . . . . 29
Mail . . . . . . . . . . . . . . . . . . . . . . . . . . . . . . . . . . . . . . . . . . . . . . . . . . . . . . . . . . . . . . 29
FTP . . . . . . . . . . . . . . . . . . . . . . . . . . . . . . . . . . . . . . . . . . . . . . . . . . . . . . . . . . . . . . 30
Auto Transfer . . . . . . . . . . . . . . . . . . . . . . . . . . . . . . . . . . . . . . . . . . . . . . . . . . . . . . 32
Event Log . . . . . . . . . . . . . . . . . . . . . . . . . . . . . . . . . . . . . . . . . . . . . . . . . . . . . . . . . 33
Backup/Restore . . . . . . . . . . . . . . . . . . . . . . . . . . . . . . . . . . . . . . . . . . . . . . . . . . . . 34
Licensing. . . . . . . . . . . . . . . . . . . . . . . . . . . . . . . . . . . . . . . . . . . . . . . . . . . . . . . . . . 35
SNMP . . . . . . . . . . . . . . . . . . . . . . . . . . . . . . . . . . . . . . . . . . . . . . . . . . . . . . . . . . . . 36
DICOM . . . . . . . . . . . . . . . . . . . . . . . . . . . . . . . . . . . . . . . . . . . . . . . . . . . . . . . . . . . . . . 39
General . . . . . . . . . . . . . . . . . . . . . . . . . . . . . . . . . . . . . . . . . . . . . . . . . . . . . . . . . . . 39
Character Set . . . . . . . . . . . . . . . . . . . . . . . . . . . . . . . . . . . . . . . . . . . . . . . . . . . . . . 40
Offline Devices . . . . . . . . . . . . . . . . . . . . . . . . . . . . . . . . . . . . . . . . . . . . . . . . . . . . . 41
Network Nodes . . . . . . . . . . . . . . . . . . . . . . . . . . . . . . . . . . . . . . . . . . . . . . . . . . . . . 43
Print Devices. . . . . . . . . . . . . . . . . . . . . . . . . . . . . . . . . . . . . . . . . . . . . . . . . . . . . . . 46
HC Overview. . . . . . . . . . . . . . . . . . . . . . . . . . . . . . . . . . . . . . . . . . . . . . . . . . . . . . . 50
LUT Files. . . . . . . . . . . . . . . . . . . . . . . . . . . . . . . . . . . . . . . . . . . . . . . . . . . . . . . . . . 51
HIS/RIS Nodes . . . . . . . . . . . . . . . . . . . . . . . . . . . . . . . . . . . . . . . . . . . . . . . . . . . . . 54
Import/Export . . . . . . . . . . . . . . . . . . . . . . . . . . . . . . . . . . . . . . . . . . . . . . . . . . . . . . . . . 58
Directories. . . . . . . . . . . . . . . . . . . . . . . . . . . . . . . . . . . . . . . . . . . . . . . . . . . . . . . . . 58
EPRI . . . . . . . . . . . . . . . . . . . . . . . . . . . . . . . . . . . . . . . . . . . . . . . . . . . . . . . . . . . . . . . . 61
Server . . . . . . . . . . . . . . . . . . . . . . . . . . . . . . . . . . . . . . . . . . . . . . . . . . . . . . . . . . . . 61
Siemens AG SPR2-310.843.01.03.02 ARCADIS Varic
Medical Solutions
08.04 CS SD 24
Page 3 of 120
Page 4

4 Table of Contents
External Devices . . . . . . . . . . . . . . . . . . . . . . . . . . . . . . . . . . . . . . . . . . . . . . . . . . . . . . . 62
Paper Printer . . . . . . . . . . . . . . . . . . . . . . . . . . . . . . . . . . . . . . . . . . . . . . . . . . . . . . . 62
. . . . . . . . . . . . . . . . . . . . . . . . . . . . . . . . . . . . . . . . . . . . . . . . . . . . . . . . . . . . . . . . . . 63
System Management . . . . . . . . . . . . . . . . . . . . . . . . . . . . . . . . . . . . . . . . . . . . . . . . . . . 64
Master . . . . . . . . . . . . . . . . . . . . . . . . . . . . . . . . . . . . . . . . . . . . . . . . . . . . . . . . . . . . 64
Agent Controls. . . . . . . . . . . . . . . . . . . . . . . . . . . . . . . . . . . . . . . . . . . . . . . . . . . . . . 64
Applications. . . . . . . . . . . . . . . . . . . . . . . . . . . . . . . . . . . . . . . . . . . . . . . . . . . . . . . . . . . 66
Pat. Registration . . . . . . . . . . . . . . . . . . . . . . . . . . . . . . . . . . . . . . . . . . . . . . . . . . . . 66
Viewer . . . . . . . . . . . . . . . . . . . . . . . . . . . . . . . . . . . . . . . . . . . . . . . . . . . . . . . . . . . . 67
CorRea . . . . . . . . . . . . . . . . . . . . . . . . . . . . . . . . . . . . . . . . . . . . . . . . . . . . . . . . . . . 68
MPPS . . . . . . . . . . . . . . . . . . . . . . . . . . . . . . . . . . . . . . . . . . . . . . . . . . . . . . . . . . . . 69
Worklist Results. . . . . . . . . . . . . . . . . . . . . . . . . . . . . . . . . . . . . . . . . . . . . . . . . . . . . 70
5 _______ ARCADIS Imaging System Configuration ___________________________ 72
Imaging System . . . . . . . . . . . . . . . . . . . . . . . . . . . . . . . . . . . . . . . . . . . . . . . . . . . . . . . 72
Valid Main System. . . . . . . . . . . . . . . . . . . . . . . . . . . . . . . . . . . . . . . . . . . . . . . . . . . 72
Initial Installation . . . . . . . . . . . . . . . . . . . . . . . . . . . . . . . . . . . . . . . . . . . . . . . . . . . . 72
Not an Initial Installation . . . . . . . . . . . . . . . . . . . . . . . . . . . . . . . . . . . . . . . . . . . . . . 73
Application Fields . . . . . . . . . . . . . . . . . . . . . . . . . . . . . . . . . . . . . . . . . . . . . . . . . . . 73
Examination Set Configuration . . . . . . . . . . . . . . . . . . . . . . . . . . . . . . . . . . . . . . . . . 74
Edge Enhancement Filters . . . . . . . . . . . . . . . . . . . . . . . . . . . . . . . . . . . . . . . . . . . . 74
Windowing LUT . . . . . . . . . . . . . . . . . . . . . . . . . . . . . . . . . . . . . . . . . . . . . . . . . . . . 75
Importing and Activating Logarithm LUTs . . . . . . . . . . . . . . . . . . . . . . . . . . . . . . . . . 76
Metering Sections File . . . . . . . . . . . . . . . . . . . . . . . . . . . . . . . . . . . . . . . . . . . . . . . . 78
Display Settings. . . . . . . . . . . . . . . . . . . . . . . . . . . . . . . . . . . . . . . . . . . . . . . . . . . . . 79
Subtraction Parameters. . . . . . . . . . . . . . . . . . . . . . . . . . . . . . . . . . . . . . . . . . . . . . . 80
Operating Mode Subtraction (DSA). . . . . . . . . . . . . . . . . . . . . . . . . . . . . . . . . . . . . . 81
Operating Mode Roadmap . . . . . . . . . . . . . . . . . . . . . . . . . . . . . . . . . . . . . . . . . . . . 82
Power Off Parameters . . . . . . . . . . . . . . . . . . . . . . . . . . . . . . . . . . . . . . . . . . . . . . . . 83
Brightness Control . . . . . . . . . . . . . . . . . . . . . . . . . . . . . . . . . . . . . . . . . . . . . . . . . . . 84
Auto Gamma Disabled . . . . . . . . . . . . . . . . . . . . . . . . . . . . . . . . . . . . . . . . . . . . . . . 84
Camera . . . . . . . . . . . . . . . . . . . . . . . . . . . . . . . . . . . . . . . . . . . . . . . . . . . . . . . . . . . 85
Circle Mask . . . . . . . . . . . . . . . . . . . . . . . . . . . . . . . . . . . . . . . . . . . . . . . . . . . . . . . . 86
6 _______ ARCADIS Main System Configuration ______________________________ 87
Download . . . . . . . . . . . . . . . . . . . . . . . . . . . . . . . . . . . . . . . . . . . . . . . . . . . . . . . . . . . . 88
C-Arm . . . . . . . . . . . . . . . . . . . . . . . . . . . . . . . . . . . . . . . . . . . . . . . . . . . . . . . . . . . . 88
Configuration. . . . . . . . . . . . . . . . . . . . . . . . . . . . . . . . . . . . . . . . . . . . . . . . . . . . . . . . . . 89
Main System . . . . . . . . . . . . . . . . . . . . . . . . . . . . . . . . . . . . . . . . . . . . . . . . . . . . . . . 89
Load Counter. . . . . . . . . . . . . . . . . . . . . . . . . . . . . . . . . . . . . . . . . . . . . . . . . . . . . . . 90
Options . . . . . . . . . . . . . . . . . . . . . . . . . . . . . . . . . . . . . . . . . . . . . . . . . . . . . . . . . . . 90
Current Limitation . . . . . . . . . . . . . . . . . . . . . . . . . . . . . . . . . . . . . . . . . . . . . . . . . . . 91
Buzzer . . . . . . . . . . . . . . . . . . . . . . . . . . . . . . . . . . . . . . . . . . . . . . . . . . . . . . . . . . . . 92
Adjustment . . . . . . . . . . . . . . . . . . . . . . . . . . . . . . . . . . . . . . . . . . . . . . . . . . . . . . . . . . . 94
Generator Adjust. . . . . . . . . . . . . . . . . . . . . . . . . . . . . . . . . . . . . . . . . . . . . . . . . . . . 94
Load Counter. . . . . . . . . . . . . . . . . . . . . . . . . . . . . . . . . . . . . . . . . . . . . . . . . . . . . . . 94
Camera Rotation . . . . . . . . . . . . . . . . . . . . . . . . . . . . . . . . . . . . . . . . . . . . . . . . . . . . 94
Collimator, X-Iris . . . . . . . . . . . . . . . . . . . . . . . . . . . . . . . . . . . . . . . . . . . . . . . . . . . . 94
Display X-Iris . . . . . . . . . . . . . . . . . . . . . . . . . . . . . . . . . . . . . . . . . . . . . . . . . . . . . . . 94
ARCADIS Varic SPR2-310.843.01.03.02 Siemens AG
08.04 CS SD 24
Page 4 of 120
Medical Solutions
Page 5

Table of Contents 5
Collimator Slot Diaphr. . . . . . . . . . . . . . . . . . . . . . . . . . . . . . . . . . . . . . . . . . . . . . . . 94
Display Slot Diaphr. . . . . . . . . . . . . . . . . . . . . . . . . . . . . . . . . . . . . . . . . . . . . . . . . . 94
Diamentor . . . . . . . . . . . . . . . . . . . . . . . . . . . . . . . . . . . . . . . . . . . . . . . . . . . . . . . . . 94
Dose Rate . . . . . . . . . . . . . . . . . . . . . . . . . . . . . . . . . . . . . . . . . . . . . . . . . . . . . . . . . 95
Monitoring. . . . . . . . . . . . . . . . . . . . . . . . . . . . . . . . . . . . . . . . . . . . . . . . . . . . . . . . . . . . 96
MSY Actual Values . . . . . . . . . . . . . . . . . . . . . . . . . . . . . . . . . . . . . . . . . . . . . . . . . . 96
7 _______ Backup & Restore ______________________________________________ 97
Service Software . . . . . . . . . . . . . . . . . . . . . . . . . . . . . . . . . . . . . . . . . . . . . . . . . . . . . . 97
Opening the Service Software . . . . . . . . . . . . . . . . . . . . . . . . . . . . . . . . . . . . . . . . . 97
Backup . . . . . . . . . . . . . . . . . . . . . . . . . . . . . . . . . . . . . . . . . . . . . . . . . . . . . . . . . . . . . 101
Backup . . . . . . . . . . . . . . . . . . . . . . . . . . . . . . . . . . . . . . . . . . . . . . . . . . . . . . . . . . 101
Restore . . . . . . . . . . . . . . . . . . . . . . . . . . . . . . . . . . . . . . . . . . . . . . . . . . . . . . . . . . . . . 106
Restore . . . . . . . . . . . . . . . . . . . . . . . . . . . . . . . . . . . . . . . . . . . . . . . . . . . . . . . . . . 106
8 _______ Network Checklist _____________________________________________ 116
. . . . . . . . . . . . . . . . . . . . . . . . . . . . . . . . . . . . . . . . . . . . . . . . . . . . . . . . . . . . . . . . . . . 116
Person responsible for network configuration at customer site . . . . . . . . . . . . . . . 116
System network data . . . . . . . . . . . . . . . . . . . . . . . . . . . . . . . . . . . . . . . . . . . . . . . 116
Network data for HIS/RIS network partner (only with HIS/RIS option) . . . . . . . . . . 117
Network data for reporting console/archiving system . . . . . . . . . . . . . . . . . . . . . . . 117
Network data for reporting console/archiving system . . . . . . . . . . . . . . . . . . . . . . . 118
9 _______ Changes to Previous Version____________________________________ 120
Siemens AG SPR2-310.843.01.03.02 ARCADIS Varic
Medical Solutions
08.04 CS SD 24
Page 5 of 120
Page 6

6 Definitions and Abbreviations
1Definitions and Abbreviations
2-
Overview 0
Abbreviation Definition
ACR NEMA American College of Radiology, National Electrical Man-
ufacturers Association
BIOS Basic Input Output System, lowest PC configuration level
AET Application Entity Title, name of DICOM service partici-
pating in the communication either as a user (SCU) or
the provider (SCP).
CD Compact Disc
CDR Compact Disc, Recordable
COMP/ON Computer on
CSE Customer Service Engineer
DICOM Digital Image Communication in Medicine (ACR NEMA
standard)
DHCP Dynamic Host Configuration Protocol, assignment proce-
dure of the numeric IP address to nodes, in which blocks
of addresses are "lent" to clients on a first-come,
first-served basis. Typically, DHCP is combined with
WINS so an IP address is both dynamically assigned
and automatically associated with a domain name. This
can be combined with DNS, resulting in a dynamically
assigned numeric IP address that is automatically associated with both NetBIOS and Internet names.
DNS Domain Name Services, address resolution procedure
whereby numeric IP addresses are associated with
names in the Internet format.
FTP File Transfer Protocol, a client-server application that
transfers files from one computer to another.
Gateway A display that controls traffic between two networks
using factors above the network level.
HIS Hospital Information System
LAN Local Area Network (here: always Ethernet)
LMHOSTS Address resolution procedure in which numeric IP
addresses are statically associated with NetBIOS
names. The LMHOSTS file is checked to see whether
the name is being addressed in this file.
Navigator Main operating console
MC Main Console
MOD Magnetic Optical Disk
ARCADIS Varic SPR2-310.843.01.03.02 Siemens AG
08.04 CS SD 24
Page 6 of 120
Medical Solutions
Page 7

Definitions and Abbreviations 7
NetBIOS Network Basic Input Output System, a collection of net-
work services and programming interfaces. NetBIOS
services run on network protocols such as TCP/IP.
NIC Network Interface Card, an expansion card that provides
a physical connection to the network.
OI Operating Instructions
PB Patient Browser
PPP Point-to-Point Protocol, a data link and network protocol
designed for use over serial connections (such as dial-up
modems).
RAS Remote Access Services, a Windows NT service that
supports dial-in and dial-out connections for modems
and ISDN.
RIS Radiology Information System
Router A multiport computer or a dedicated hardware compo-
nent that examines network level addresses for data
packets and, if necessary, retransmits them on a different network.
SC Satellite Console
SCU Service Class User
SCP Service Class Provider
SYS/ON System on (i.e., the complete system)
TCP/IP Transport Control Protocol/Internet Protocol, the stan-
dard protocol for networks.
UI User Interface
USC Uptime Service Center
URL Uniform Resource Locator
VPN Virtual Private Network
WINS Windows Internet Name Service, an address resolution
procedure whereby numeric IP addresses are dynamically associated with NetBIOS names. It is possible to
combine DNS and WINS.
WIP Work in Progress
Siemens AG SPR2-310.843.01.03.02 ARCADIS Varic
Medical Solutions
08.04 CS SD 24
Page 7 of 120
Page 8
8 General Remarks
2General Remarks
3-
General Information 0
NOTE
NOTE
NOTE
• Activities to be performed are labeled with a bullet point.
- Indented text under the activity to be performed contains
general information.
¹ Results and events are labeled with an arrow in front of
the indented text.
Depending on the progress of the configuration, the “Next” button
can also be displayed as the “Finish” button.
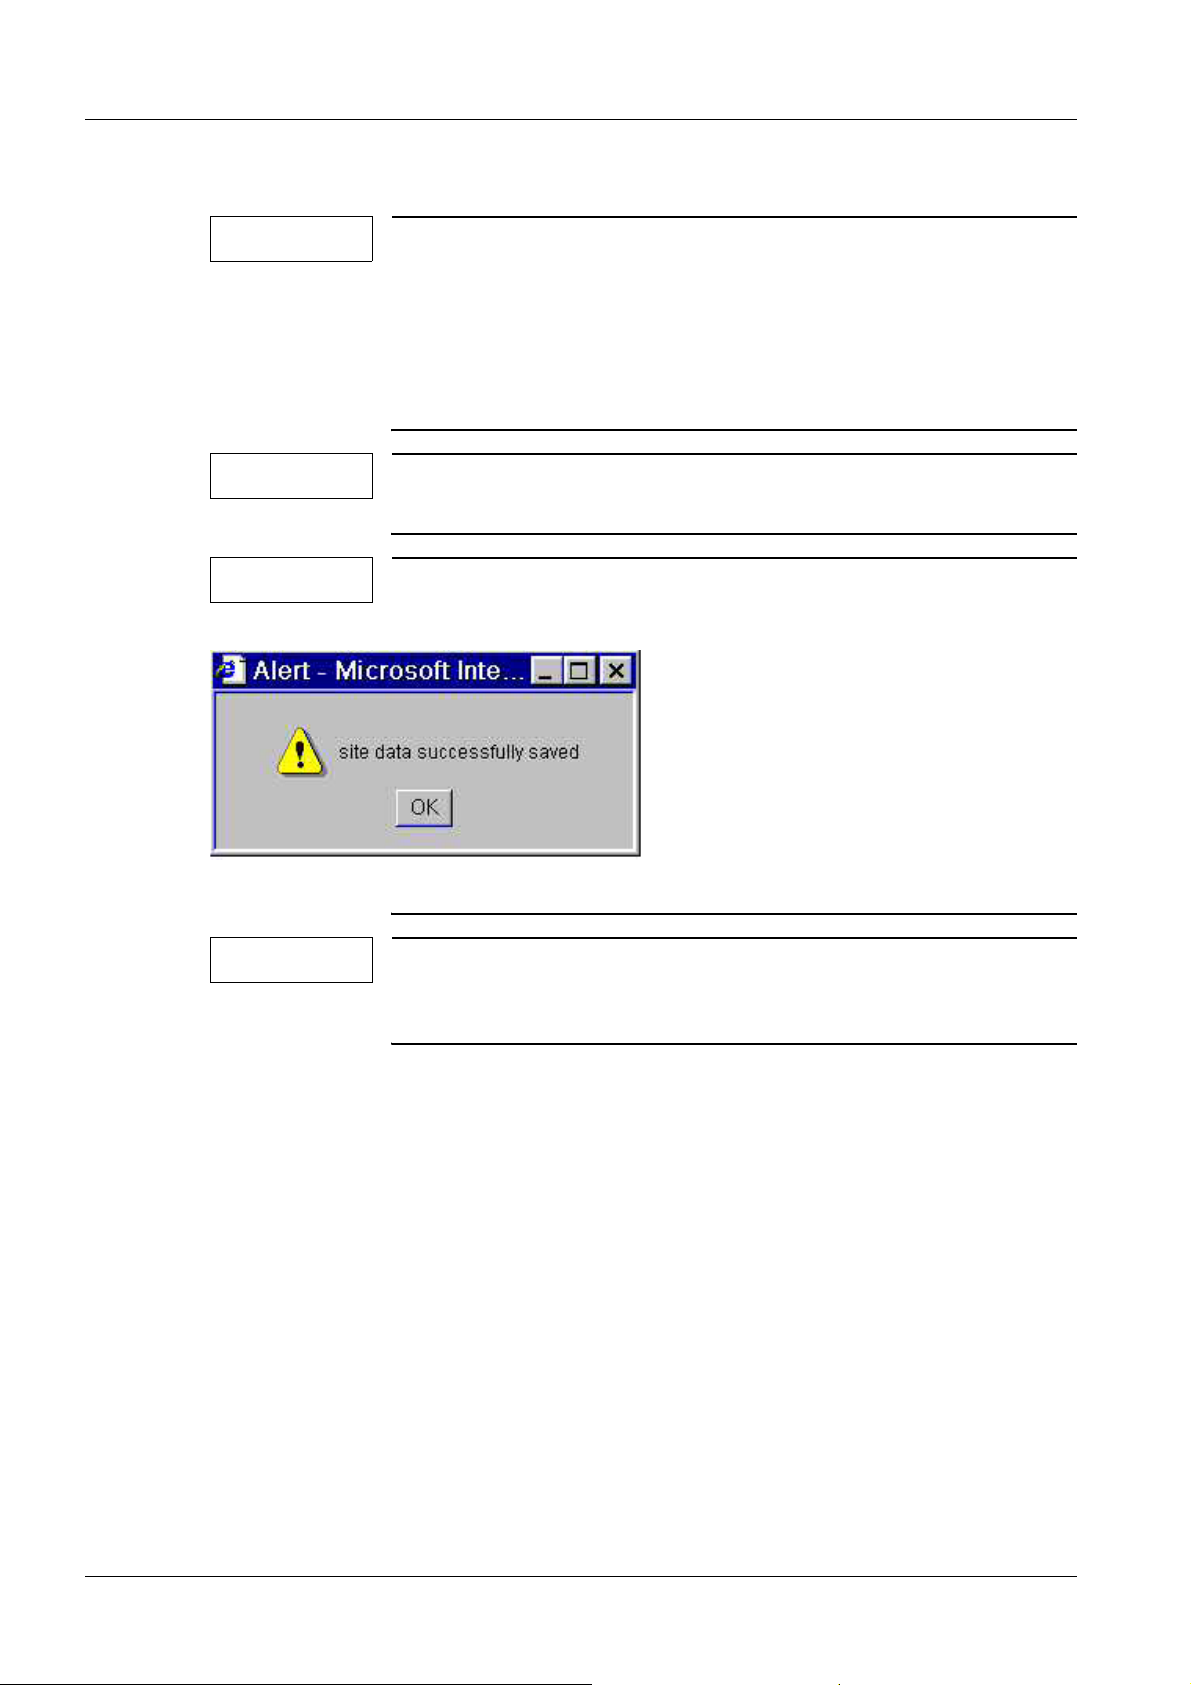
Once the "Save” button has been selected in the individual
screens, the message "..... successfully saved” appears following
a successful save. Please:
NOTE
• Select "OK".
Should problems arise when making changes in the Service UI, attempt to resolve them first by powering the system completely off
and then powering it on again.
ARCADIS Varic SPR2-310.843.01.03.02 Siemens AG
08.04 CS SD 24
Page 8 of 120
Medical Solutions
Page 9
General Remarks 9
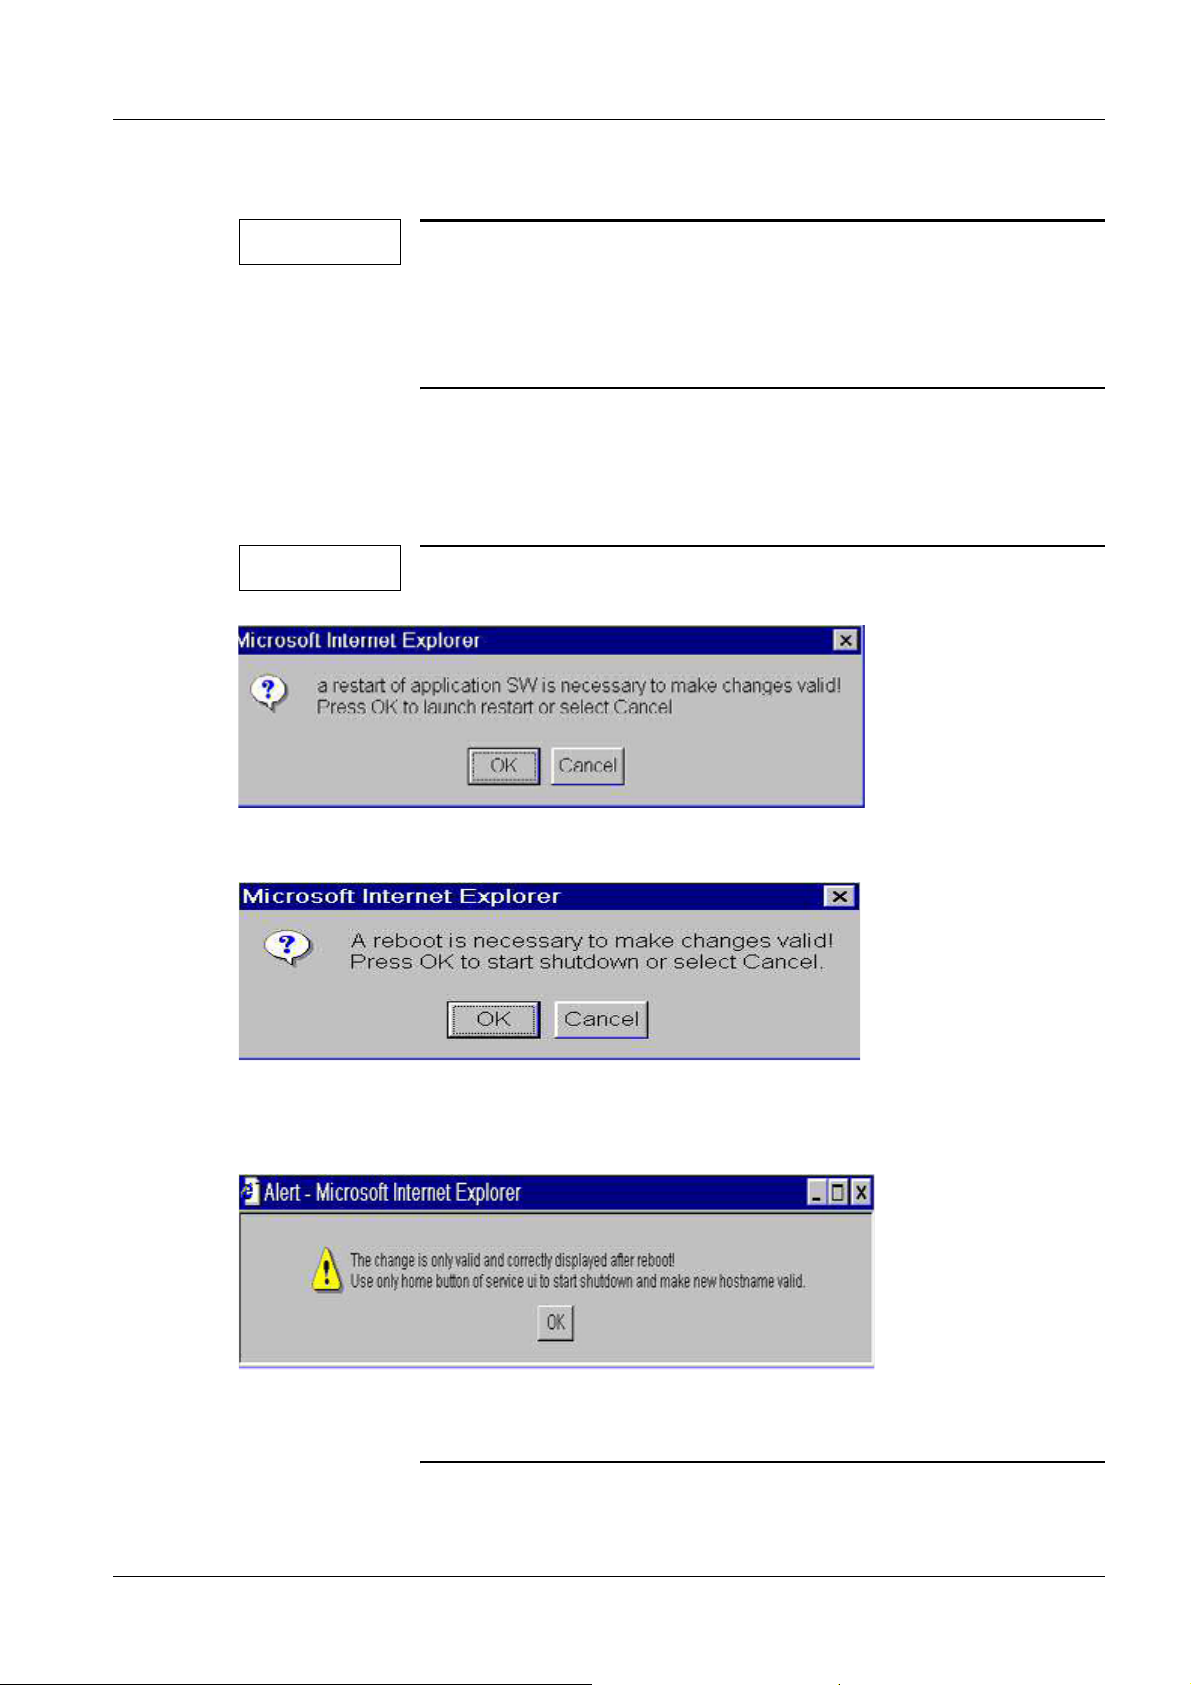
Reboot, Restart and Shutdown 0
NOTE
If one of the following messages appears, proceed as described in the note.
NOTE
To activate changes in the system, a "shutdown" must always be
performed, i.e., the complete system must be switched off and
switched back on again.
A “shutdown" must always be performed when configuration is
complete.
Restart
Reboot
• If one of the above windows is displayed, click on "OK".
Reboot
• If this window is displayed, click on "OK".
• Click on "Home".
Siemens AG SPR2-310.843.01.03.02 ARCADIS Varic
Medical Solutions
08.04 CS SD 24
Page 9 of 120
Page 10

10 Country-specific Settings
3Country-specific Settings
4-
Country-specific Keyboard Layout and User Interface 0
You can choose English and German as the keyboard layout.
• Select “Configuration” under Options.
• Double-click “Regional and Language Options".
• Select “Regional Options”.
• Select the language under “Standards and formats”.
• Select “Languages”.
• Click on “Detail”.
- This is where the keyboard language is set.
• Select “Add” under “Installed services”.
• Select the desired language.
• Click on “ok”.
¹ The keyboard language will be displayed.
• Select the desired language under “Default input language” in the “drop-down menu”.
• Click on “ok”.
• Click on “ok”.
¹ The following is displayed:
The “Regional Settings" have been changed.
Therefore, you need to restart the application.
Do you want to restart the application now?
• Click on “ok”.
- When this is done, the settings will be accepted.
ARCADIS Varic SPR2-310.843.01.03.02 Siemens AG
08.04 CS SD 24
Page 10 of 120
Medical Solutions
Page 11

Imaging System Syngo Configuration 11
4Imaging System Syngo Co nfiguration
5-
Service Software 0
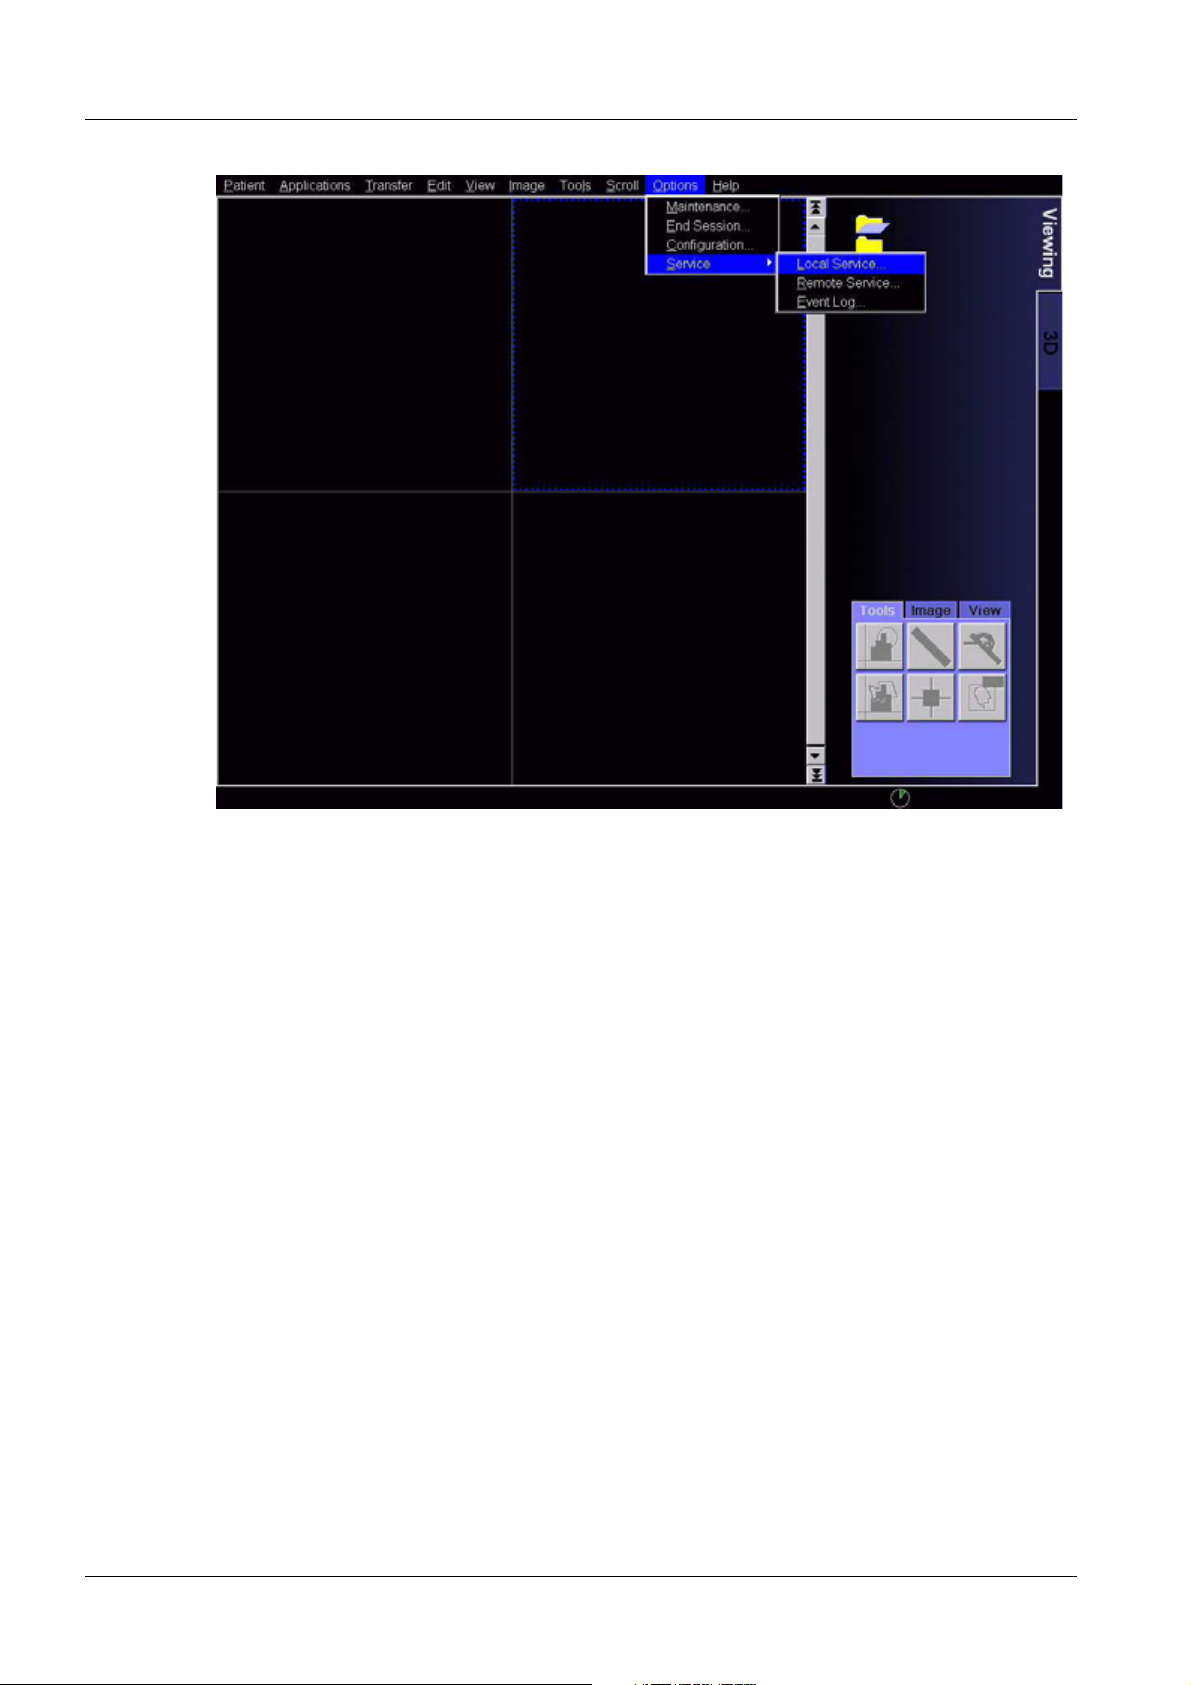
Opening the Service Software 0
• Select "Service" under Options.
Fig. 1: C06_5_01
Siemens AG SPR2-310.843.01.03.02 ARCADIS Varic
Medical Solutions
08.04 CS SD 24
Page 11 of 120
Page 12
12 Imaging System Syngo Configuration
Fig. 2: C06_5_02
• Select "Local Service".
ARCADIS Varic SPR2-310.843.01.03.02 Siemens AG
08.04 CS SD 24
Page 12 of 120
Medical Solutions
Page 13
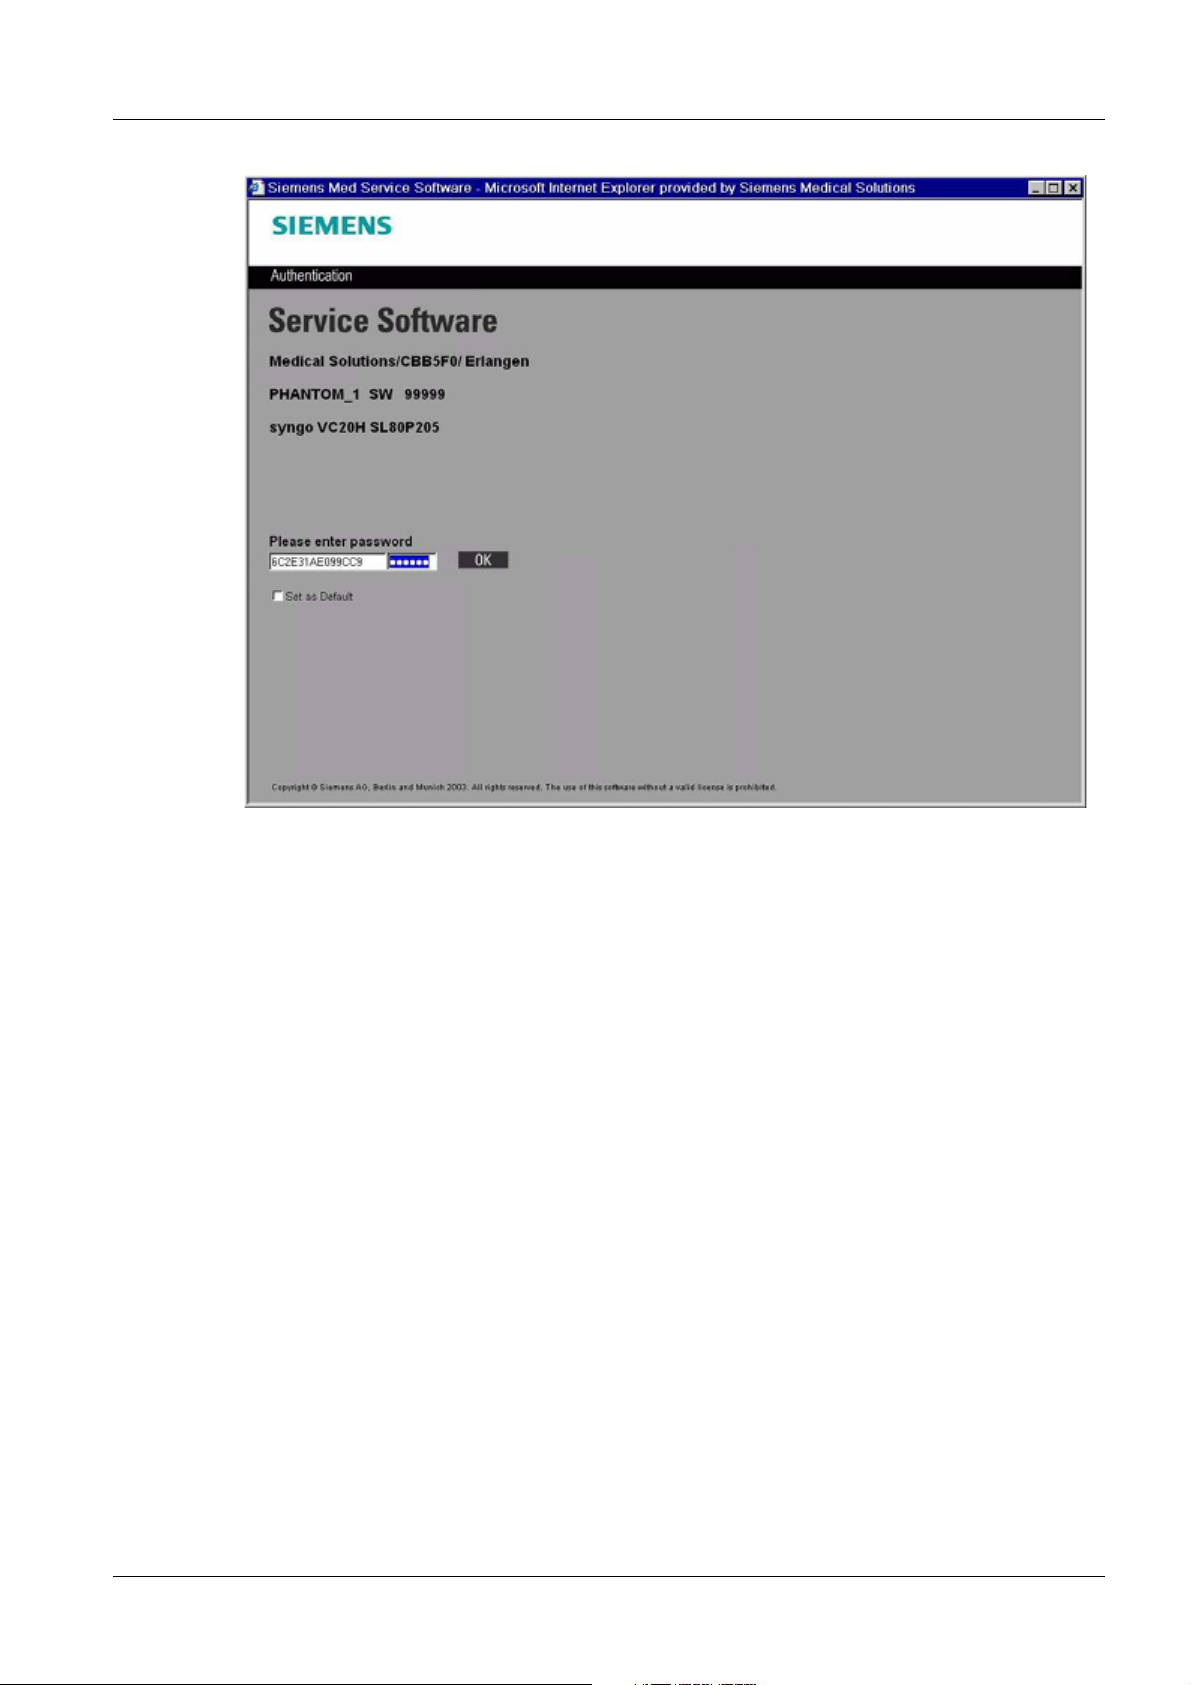
Imaging System Syngo Configuration 13
Fig. 3: C06_5_03
• Enter the service key under "Please enter password".
• Select "set as default".
• Verify with "OK".
- The Service Home menu appears.
Siemens AG SPR2-310.843.01.03.02 ARCADIS Varic
Medical Solutions
08.04 CS SD 24
Page 13 of 120
Page 14

14 Imaging System Syngo Configuration
Fig. 4: Home Menu
Configuration 0
• Select "Configuration".
ARCADIS Varic SPR2-310.843.01.03.02 Siemens AG
08.04 CS SD 24
Page 14 of 120
Medical Solutions
Page 15
Imaging System Syngo Configuration 15
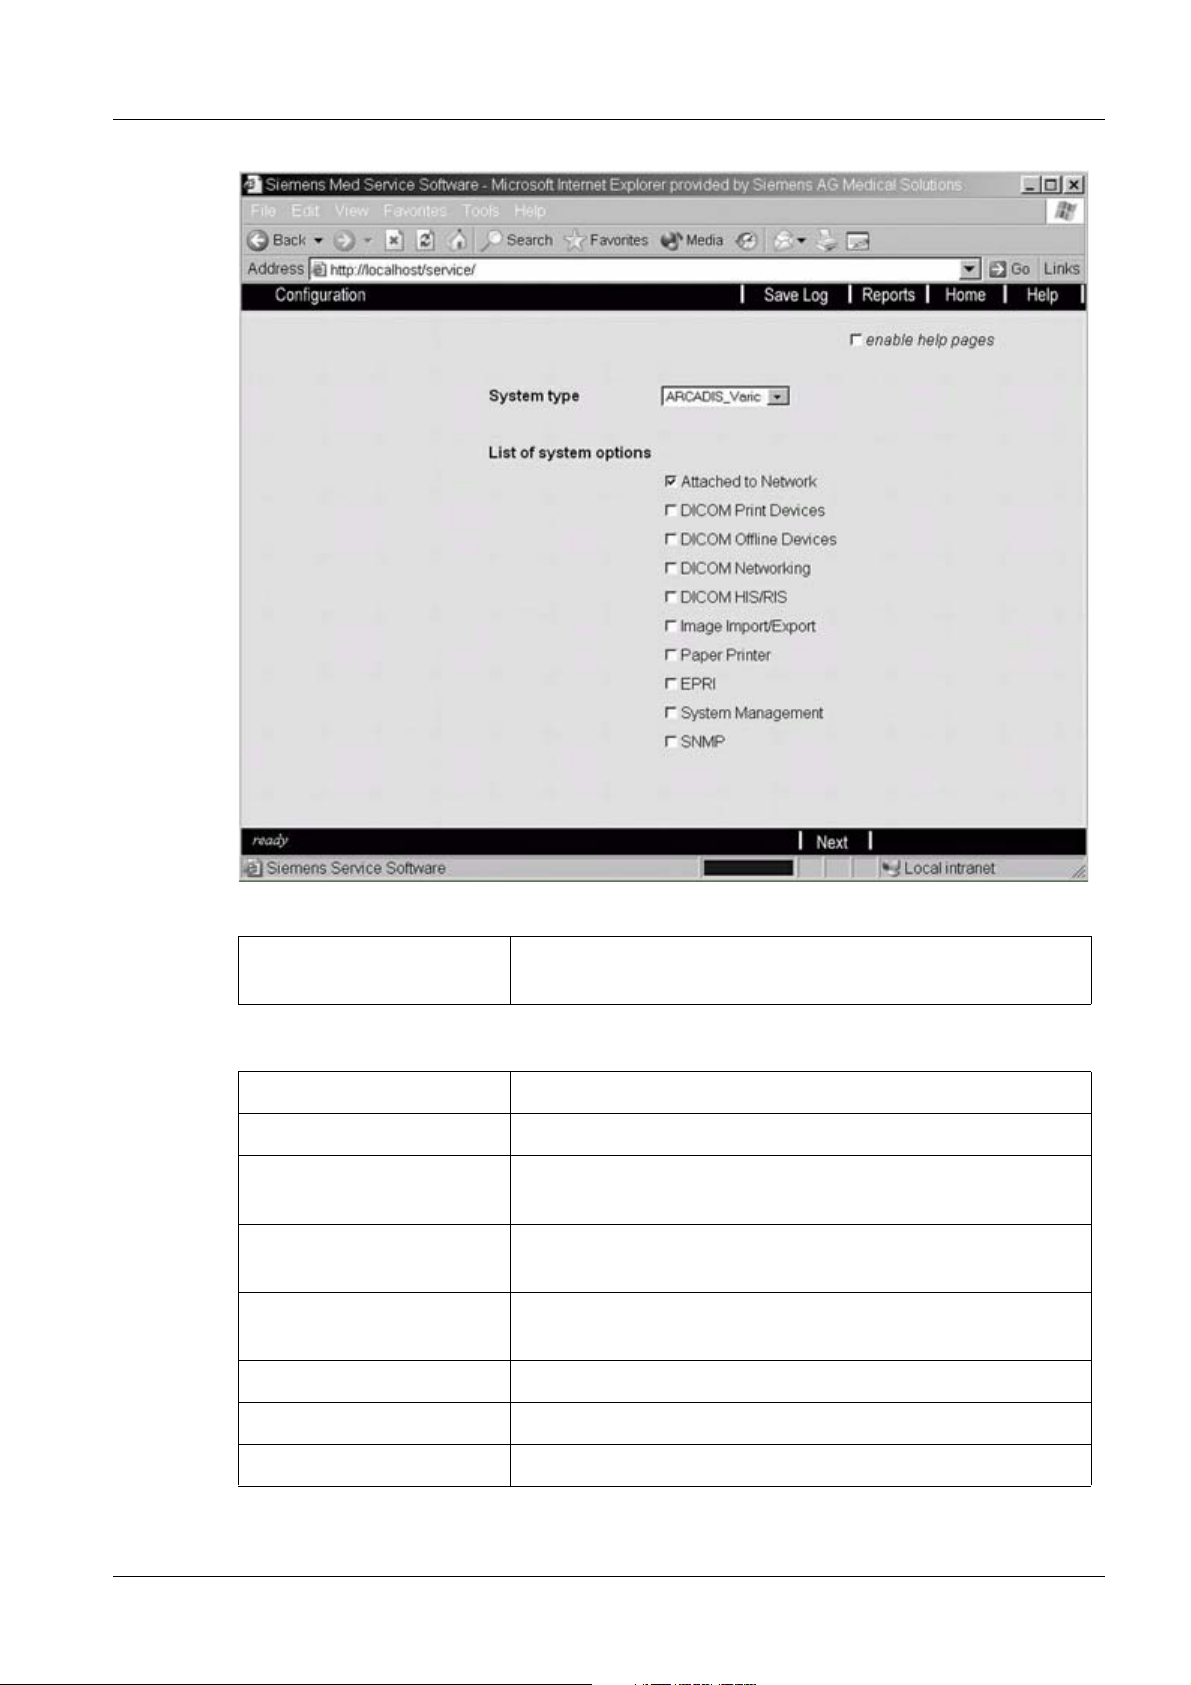
Fig. 5: List of system options
System type Depending on the system, select ARCADIS Varic or
ARCADIS Orbic.
The following system options can be selected.
Attached to network TCP/IP LAN (Local Network) for local system
DICOM Print Devices DICOM Basic Print service for laser cameras.
DICOM Offline Devices DICOM Media Storage on off-line media such as MOD
and CD-R.
DICOM Networking DICOM Storage and Query/Retrieve to remote network
nodes
DICOM HIS/RIS DICOM Basic Worklist for Radiology (Hospital) Info Sys-
tems
Image Import/Export Import/export of DICOM images to/from the file system.
Paper Printer Format for local printers (LPT1 or USB)
EPRI Electronic Patient Record Interface
Siemens AG SPR2-310.843.01.03.02 ARCADIS Varic
Medical Solutions
08.04 CS SD 24
Page 15 of 120
Page 16
16 Imaging System Syngo Configuration
System Management System Management Agent
SNMP Simple Network Management Protocol for Network Topol-
ogy. This is not used for ARCADIS.
Enable Help Pages Help pages will be displayed between the configuration
masks.
• Select the configured system options.
- Do not select SNMP.
• Click "Next".
Fig. 6: Service >> Backup/Restore (Inst)
• Click "Next".
ARCADIS Varic SPR2-310.843.01.03.02 Siemens AG
08.04 CS SD 24
Page 16 of 120
Medical Solutions
Page 17
Imaging System Syngo Configuration 17
Local Host 0
Site Info 1 0
• Select "Site Info".
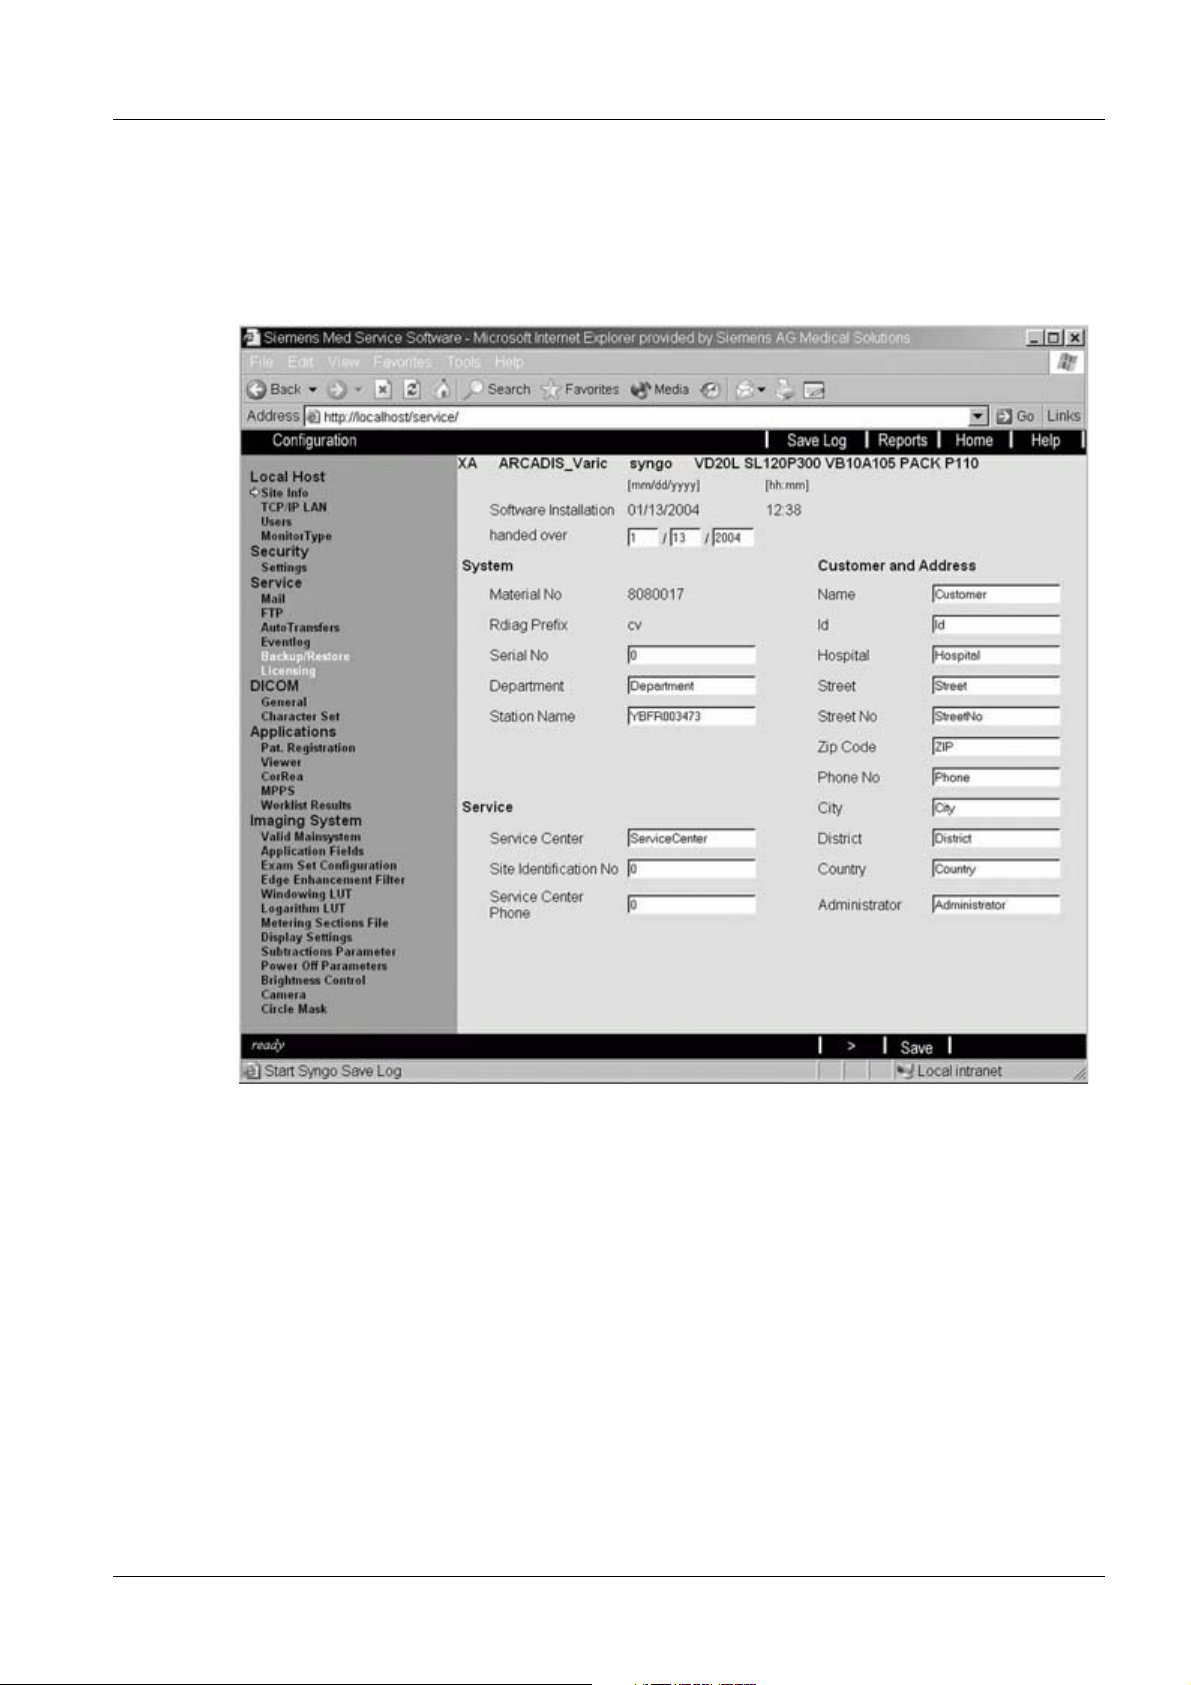
Fig. 7: Local Host >> Site Info 1
Software Installation
This date is set automatically during software installation; it cannot be changed.
Handover
• Enter the date and time when the system was handed over to the customer.
Siemens AG SPR2-310.843.01.03.02 ARCADIS Varic
Medical Solutions
08.04 CS SD 24
Page 17 of 120
Page 18

18 Imaging System Syngo Configuration
System 0
Material No.
This material no. is entered automatically once the "system model" has been selected in
the previous screen.
“80 80 017” is displayed under “Material No.” for the ARCADIS Varic.
“80 81 080” is displayed under “Material No.” for the ARCADIS Orbic.
Rdiag Prefix
This name is entered automatically once the "system model" has been entered in the previous screen. It is needed to generate a unique name for the remote transfer.
“cv” is displayed under “Rdiag Prefix” for the ARCADIS Varic.
“co” is displayed under “Rdiag Prefix” for the ARCADIS Orbic.
Serial No.
• Enter the serial number of the main system.
- ARCADIS Varic 10000 to 19999
- ARCADIS Orbic 20000 to 29999
NOTE
Department
The serial number is mandatory. It may not include any characters
other than the numbers 0 to 9.
• Enter the department in which the system is located.
Station Name
• Enter the “Computer name” here.
- This is the same as the one you had to enter under TCP/IP LAN “Computer name" or
is the same as you already entered during installation.
Service 0
Service Center
• Enter the name of the responsible service center here.
Site Identification Number
• Enter the site identification number.
Service Center Phone
• Enter the telephone number of the responsible service center.
ARCADIS Varic SPR2-310.843.01.03.02 Siemens AG
08.04 CS SD 24
Page 18 of 120
Medical Solutions
Page 19

Imaging System Syngo Configuration 19
Customer and Address 0
Name
• Enter the name of the customer.
ID
• Enter the Identification number of the customer.
Hospital
• Enter the name of the hospital.
Street
• Enter the street name.
Street No.
• Enter the street number.
Zip Code
• Enter the zip code.
Phone No.
• Enter the phone number.
City
• Enter the city.
District
• Enter the state/province.
Country
• Enter the country.
Administrator
• Enter the name of the administrator who is responsible for this system in this field.
• Select “>”.
Siemens AG SPR2-310.843.01.03.02 ARCADIS Varic
Medical Solutions
08.04 CS SD 24
Page 19 of 120
Page 20
20 Imaging System Syngo Configuration
Site Info 2 0
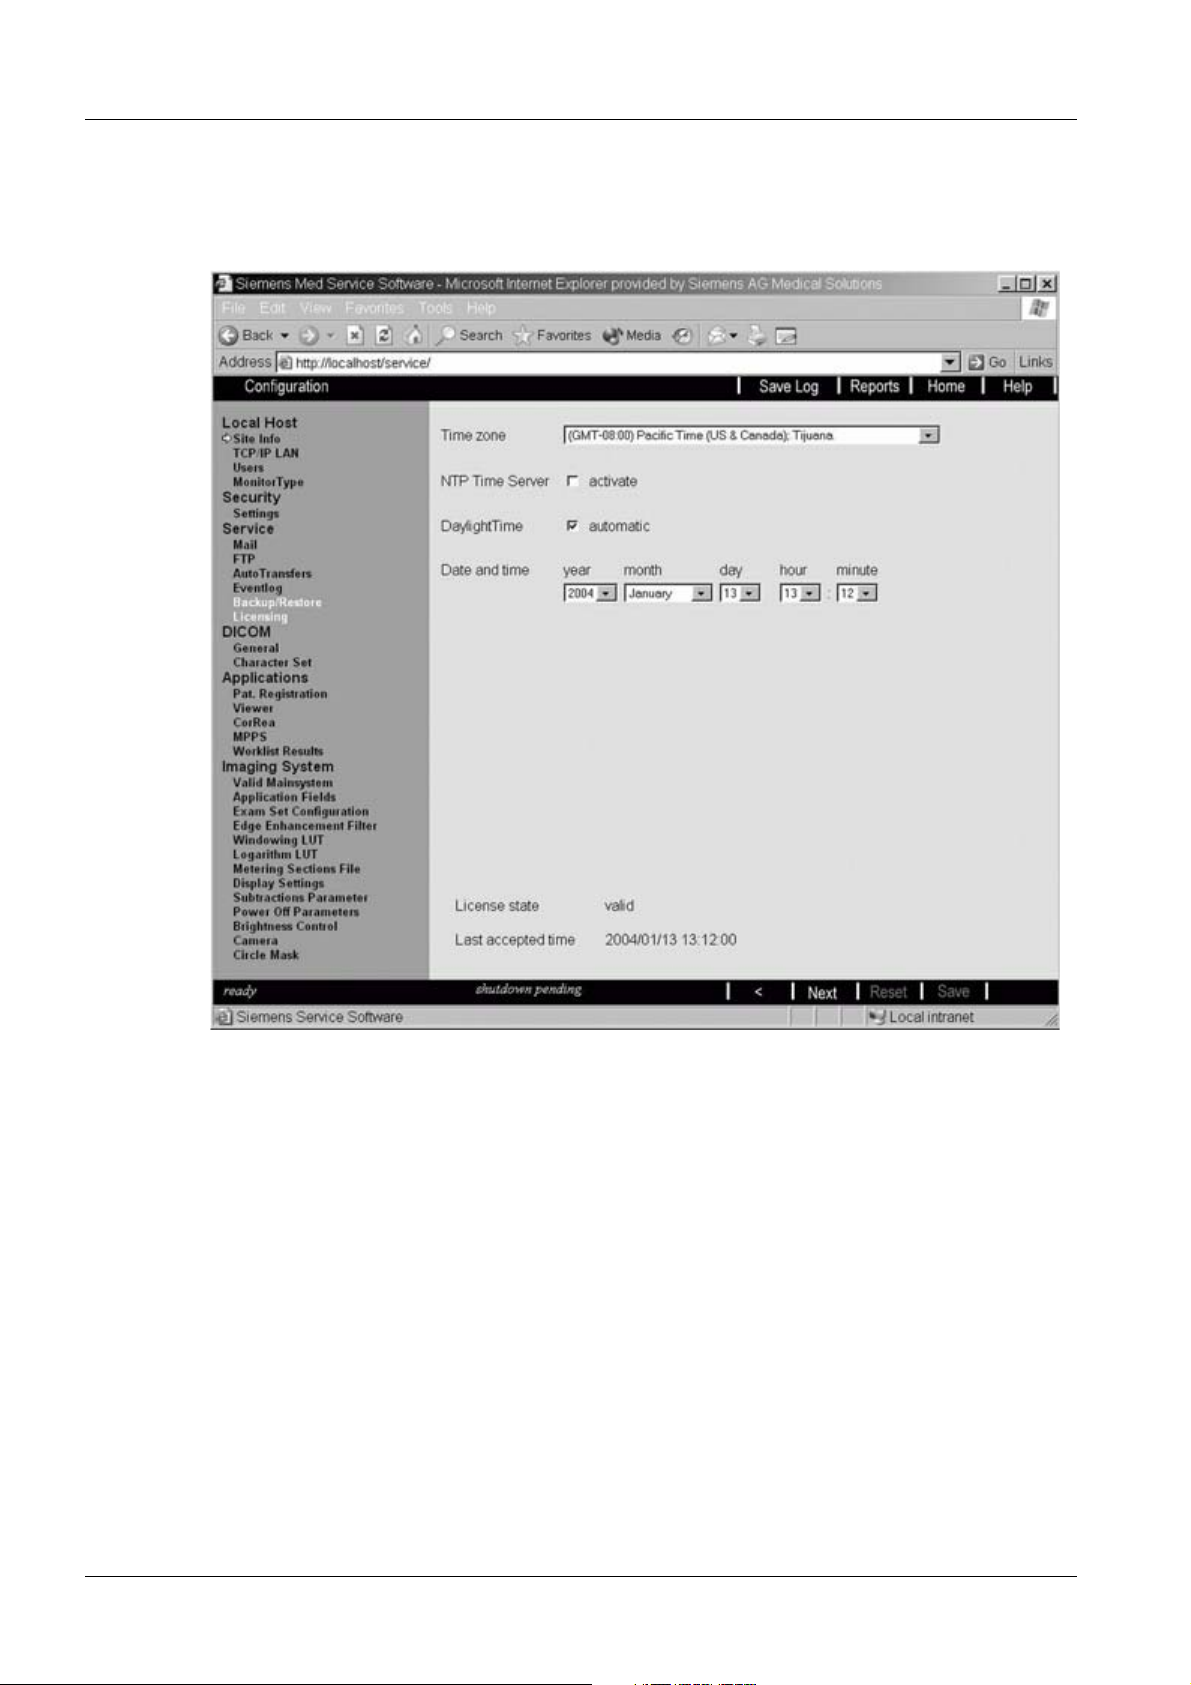
Setting the Time Zone
Fig. 8: Local Host >> Site Info 2
Time Zone
• Select the "time zone".
- depending on the location of the system
NTP Time Server
• Do no select “NTP Time Server”.
Select this only if the time is to be controlled via an NTP server at the customer’s location.
• If the customer has requested that “NTP Time Server” be selected, you must also enter
the IP address of the NTP server.
Daylight Time
If the NTP time server was activated, these values are automatically accepted and no setting can be made.
ARCADIS Varic SPR2-310.843.01.03.02 Siemens AG
08.04 CS SD 24
Page 20 of 120
Medical Solutions
Page 21

Imaging System Syngo Configuration 21
• Select "Daylight Time" automatic.
• Select the values for "Date and time".
• Click "Save".
¹ The following message appears: “You are going to change the time settings..."
• Click "OK"; ">".
• Click "Next".
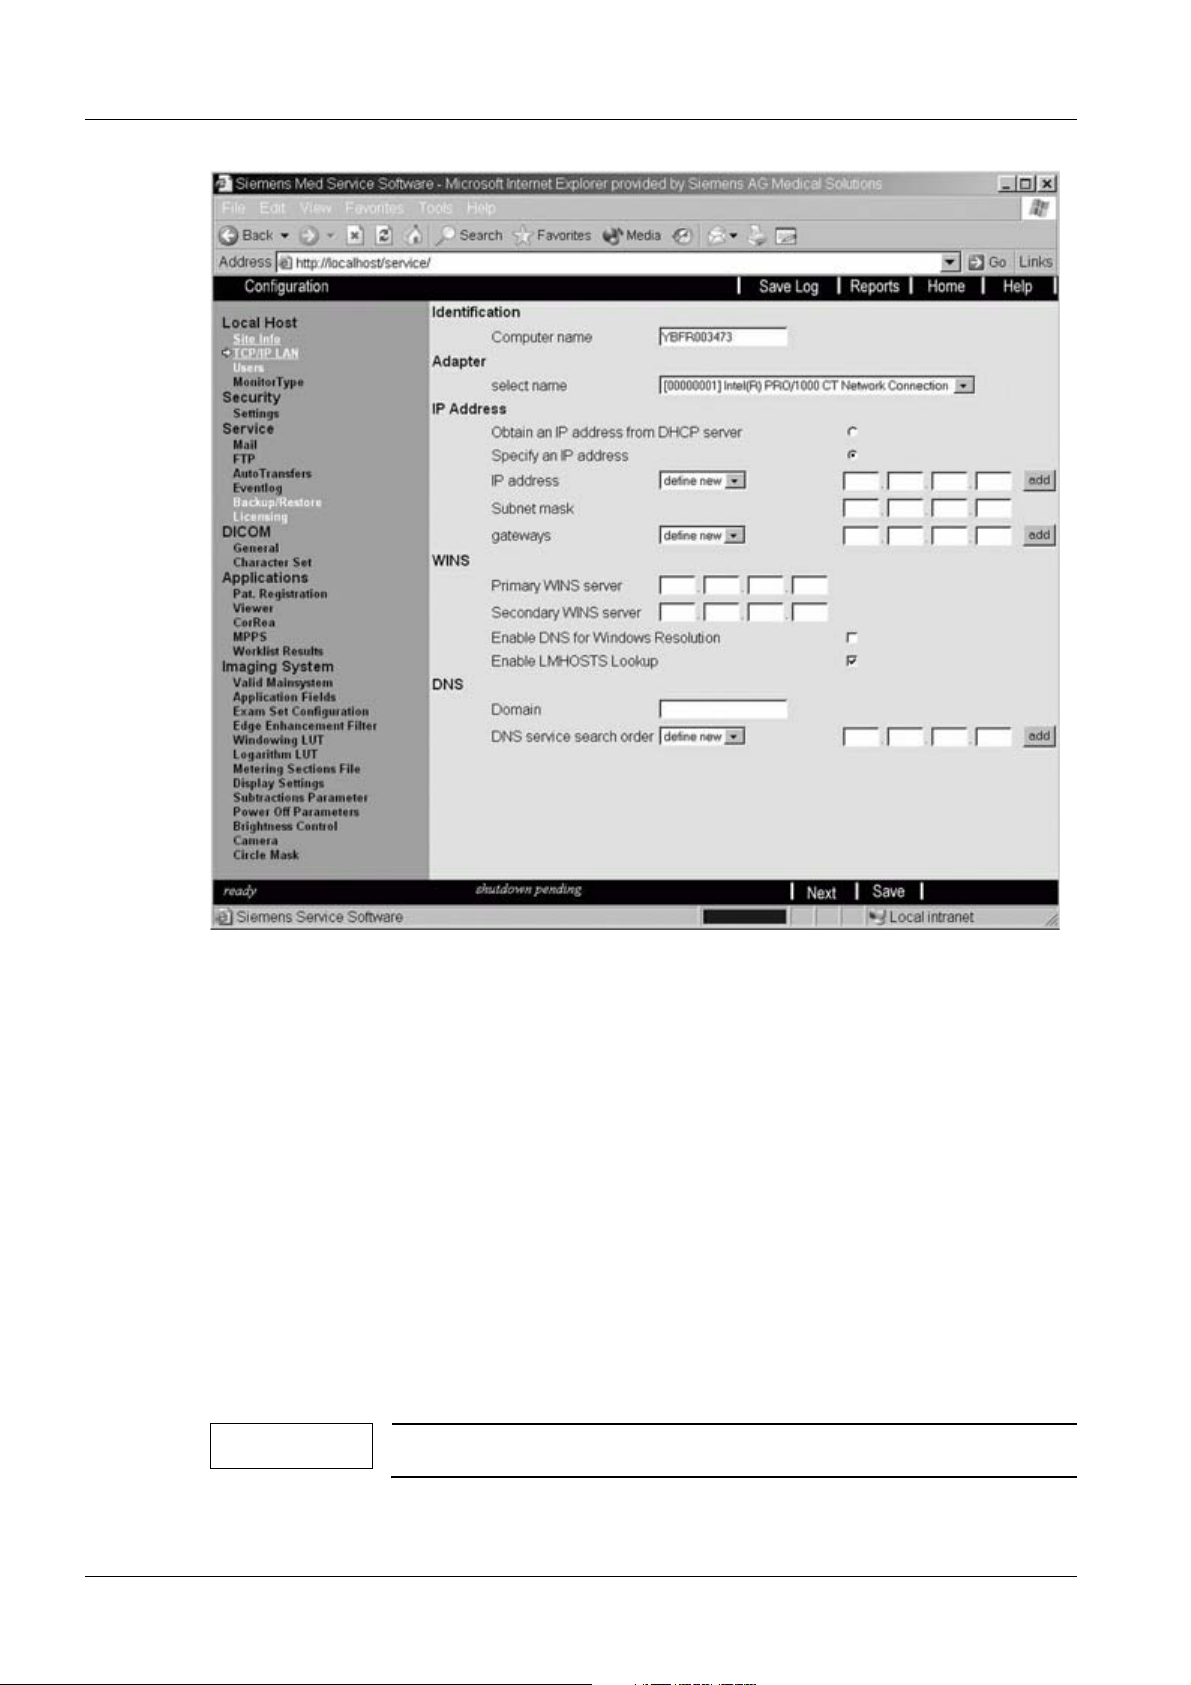
TCP / IP LAN 0
Requirements
When configuring the TCP/IP LAN properties, you need to decide the type of TCP/IP LAN
support your system requires. The project manager is responsible for obtaining the necessary data from the hospital’s network administrator or from the Siemens Uptime Service
Center.
NOTE
If the customer cannot provide a unique IP address, you need to
request a unique IP address from your Uptime Service Center.
They can create unique IP addresses by means of the “IP Reservation Tool" in the TD Intranet (Product Information - Applications
and Utilities). In this case, no DHCP, DNS, or WINS needs to be
configured.
• Select TCP/IP LAN:
Siemens AG SPR2-310.843.01.03.02 ARCADIS Varic
Medical Solutions
08.04 CS SD 24
Page 21 of 120
Page 22
22 Imaging System Syngo Configuration
Fig. 9: Local Host >> TCP/IP LAN
Identification
Computer name
• Check the computer name and change it, if necessary.
Adapter
Select Name
• Select “ [1] Intel (R) PRO/ 1000 CT Network Connection” under “select name”.
IP Address
Obtaining an IP Address from the DHCP Server
NOTE
ARCADIS has not been released for use with a DHCP server.
• Do not select “Obtain an IP address from DHCP server”.
ARCADIS Varic SPR2-310.843.01.03.02 Siemens AG
08.04 CS SD 24
Page 22 of 120
Medical Solutions
Page 23

Imaging System Syngo Configuration 23
Specifying an IP Address
• Select “Specify an IP address".
IP Address
• If the IP address 192.168.1.1. appears, delete it.
• Enter the protocol address that corresponds to the system under “IP address”.
Subnet mask
• Enter the “Subnet mask” address.
Gateway
• Enter the “Gateway” address if available.
NOTE
WINS
(Windows Internet Naming Service)
Primary WINS Server
If your system is or is supposed to be connected via an ISDN router to the RDIAG server responsible for you, please refer to the "Siemens Remote Service" chapter.
• Do not enter anything under “Primary WINS server“.
Secondary WINS Server
• Do not enter anything under “Secondary WINS server“.
Enabling DNS for Windows Resolution
• Do not select “Enable DNS for Windows resolution".
Enabling LMHOSTS Lookup
• Do not select “Enable LMHOSTS Lookup".
DNS (Domain Name Server)
Domain
• Do not enter anything under “Domain“.
DNS Service Search Order
• Do not select or enter anything under “DNS service search order “.
• Select “Next”.
Siemens AG SPR2-310.843.01.03.02 ARCADIS Varic
Medical Solutions
08.04 CS SD 24
Page 23 of 120
Page 24
24 Imaging System Syngo Configuration
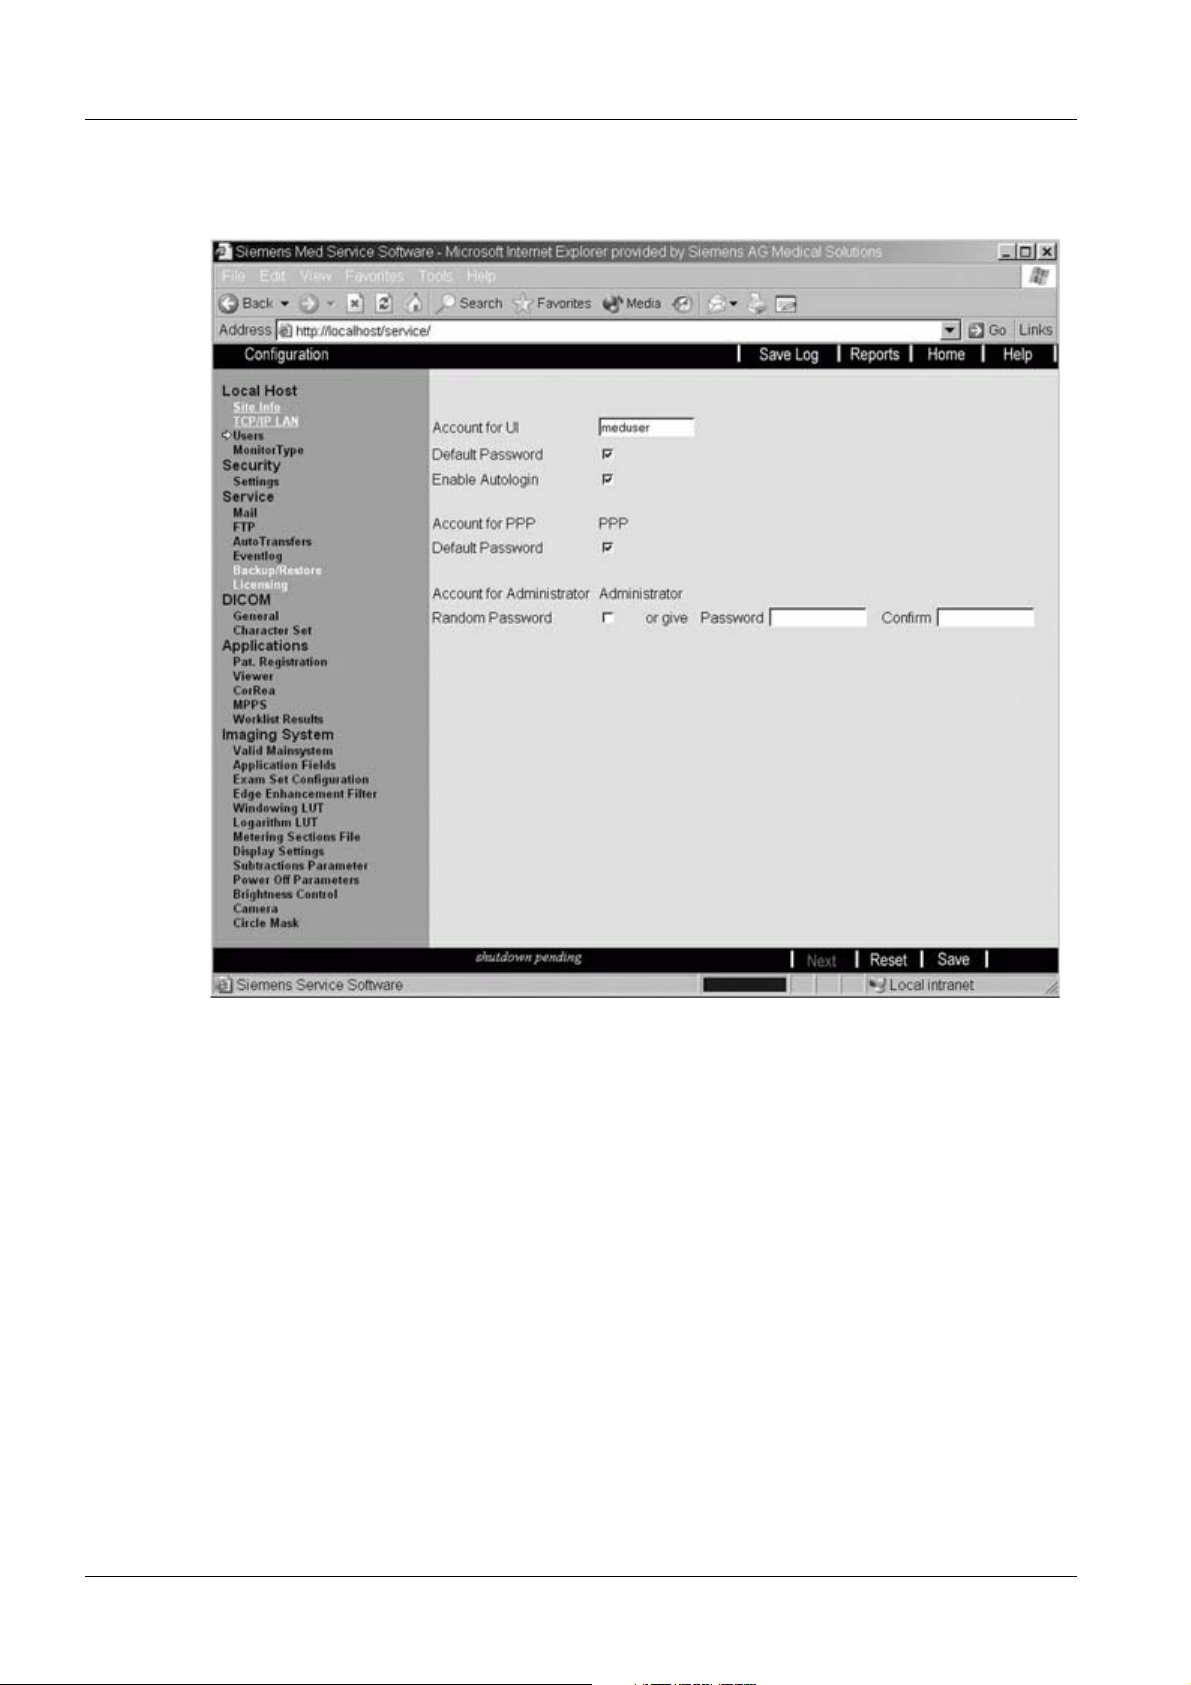
Users 0
• Select "Users".
Fig. 10: Local Host >> Users
Account for UI
• Verify that "meduser" is entered under Account for UI.
Default Password
• Highlight the "default password".
Enabling Autologin
• Highlight "Enable Autologin".
Account for PPP
No setting possible.
Default Password
• Highlight "Default Password".
ARCADIS Varic SPR2-310.843.01.03.02 Siemens AG
08.04 CS SD 24
Page 24 of 120
Medical Solutions
Page 25

Imaging System Syngo Configuration 25
Account for Administrator
Random Password
Without HIPPA configuration
• Highlight "Random Password".
- When this is done, the system generates a random password.
As a result, it is not possible to log on as the administrator.
• Click "Save".
• Click "Next".
With HIPPA configuration
• Enter the administrator password under “Password".
• Re-enter the administrator password under “Confirm".
• Click "Save".
• Click "Next".
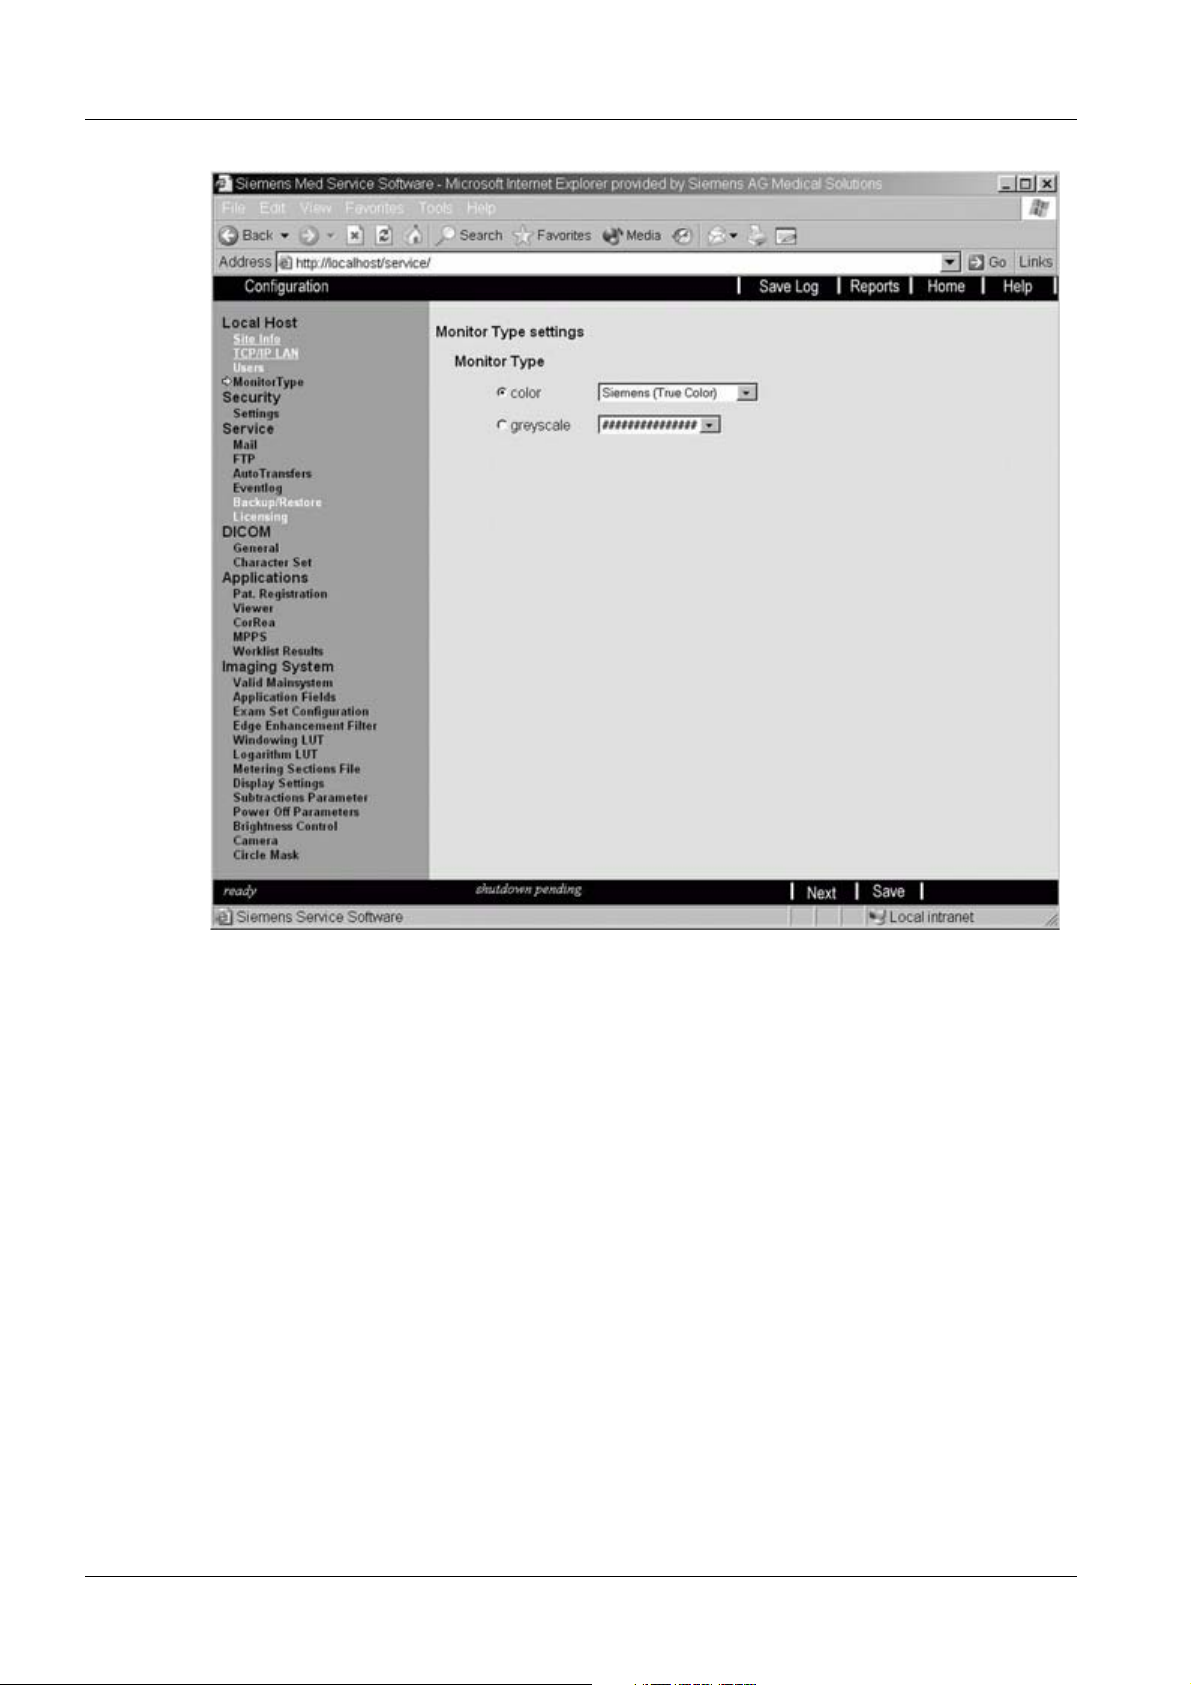
Monitor Type 0
• Select "Monitor Type".
Siemens AG SPR2-310.843.01.03.02 ARCADIS Varic
Medical Solutions
08.04 CS SD 24
Page 25 of 120
Page 26
26 Imaging System Syngo Configuration
Fig. 11: Local Host >> Monitor Type
Monitor Type
• Select “color”.
- Regardless if the monitor is black-and-white or color.
• Select “Siemens (Pseudo color)”.
• Click “Save".
• Click “OK”.
ARCADIS Varic SPR2-310.843.01.03.02 Siemens AG
08.04 CS SD 24
Page 26 of 120
Medical Solutions
Page 27
Imaging System Syngo Configuration 27
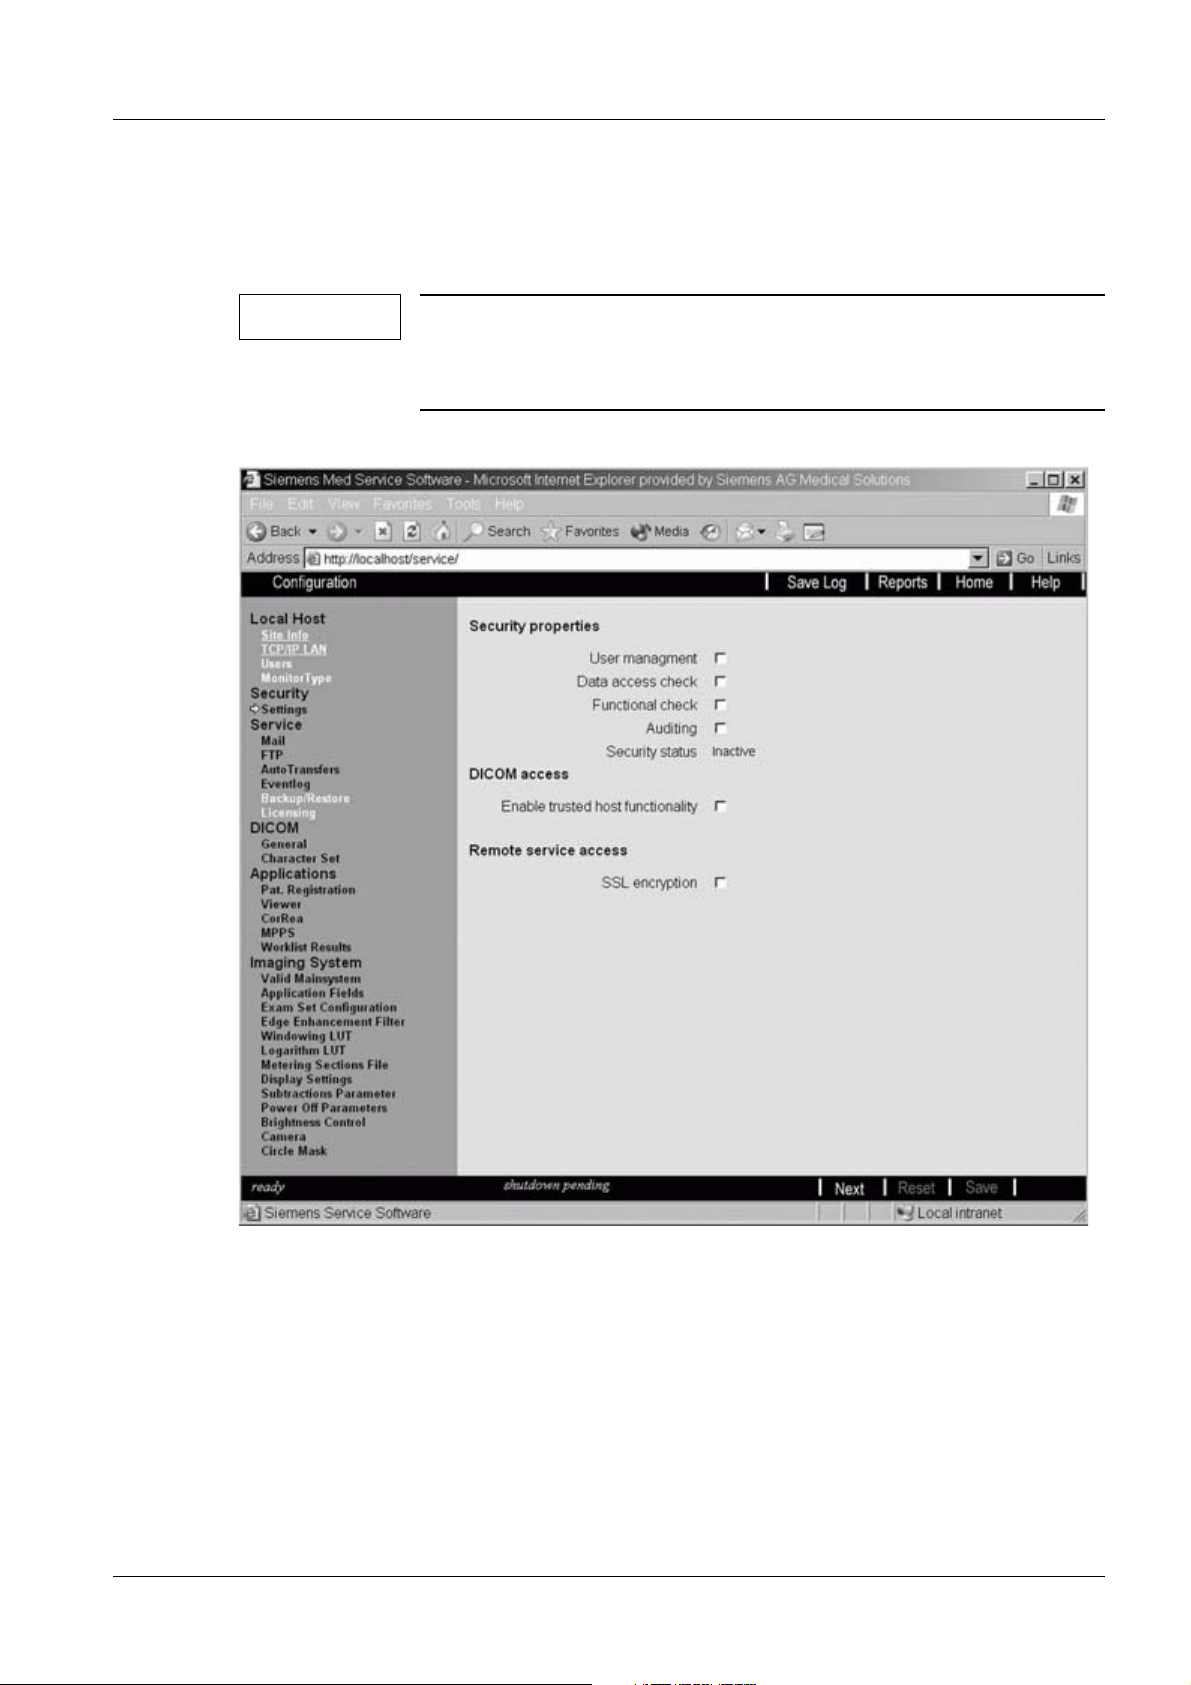
Security 0
Settings 0
NOTE
Only trained service technicians can make settings on this page.
If you made changes and saved them here, you must perform a
completely new installation of the system software to reset them!
• Select "Settings".
Fig. 12: Security >> Settings
Local Security Features
User Management
• Do not select "User Management".
Data Access Check
• Do not select "Data access check".
Siemens AG SPR2-310.843.01.03.02 ARCADIS Varic
Medical Solutions
08.04 CS SD 24
Page 27 of 120
Page 28

28 Imaging System Syngo Configuration
Functional Check
• Do not select "Functional check".
Auditing
• Do not select "Auditing".
DICOM Access
Enabling the Trusted Host Functionality
• Do not select "Enable trusted host functionality".
Remote Access Service
SSL Encryption
• Do not select "SSL encryption".
• Click “Next".
ARCADIS Varic SPR2-310.843.01.03.02 Siemens AG
08.04 CS SD 24
Page 28 of 120
Medical Solutions
Page 29
Imaging System Syngo Configuration 29
Service 0
NOTE
Perform the following steps.
If the system is connected to remote, perform the procedures in
the “Installation of Siemens Remote Service” document, Print
Number SP00-000.816.02.01.xx.xx, after you finish configuring the
service software.
Mail 0
This menu item allows you to configure the mail target for the Auto Report function and for
the Service center provided in the Customer User Interface under Option - Remote Service.
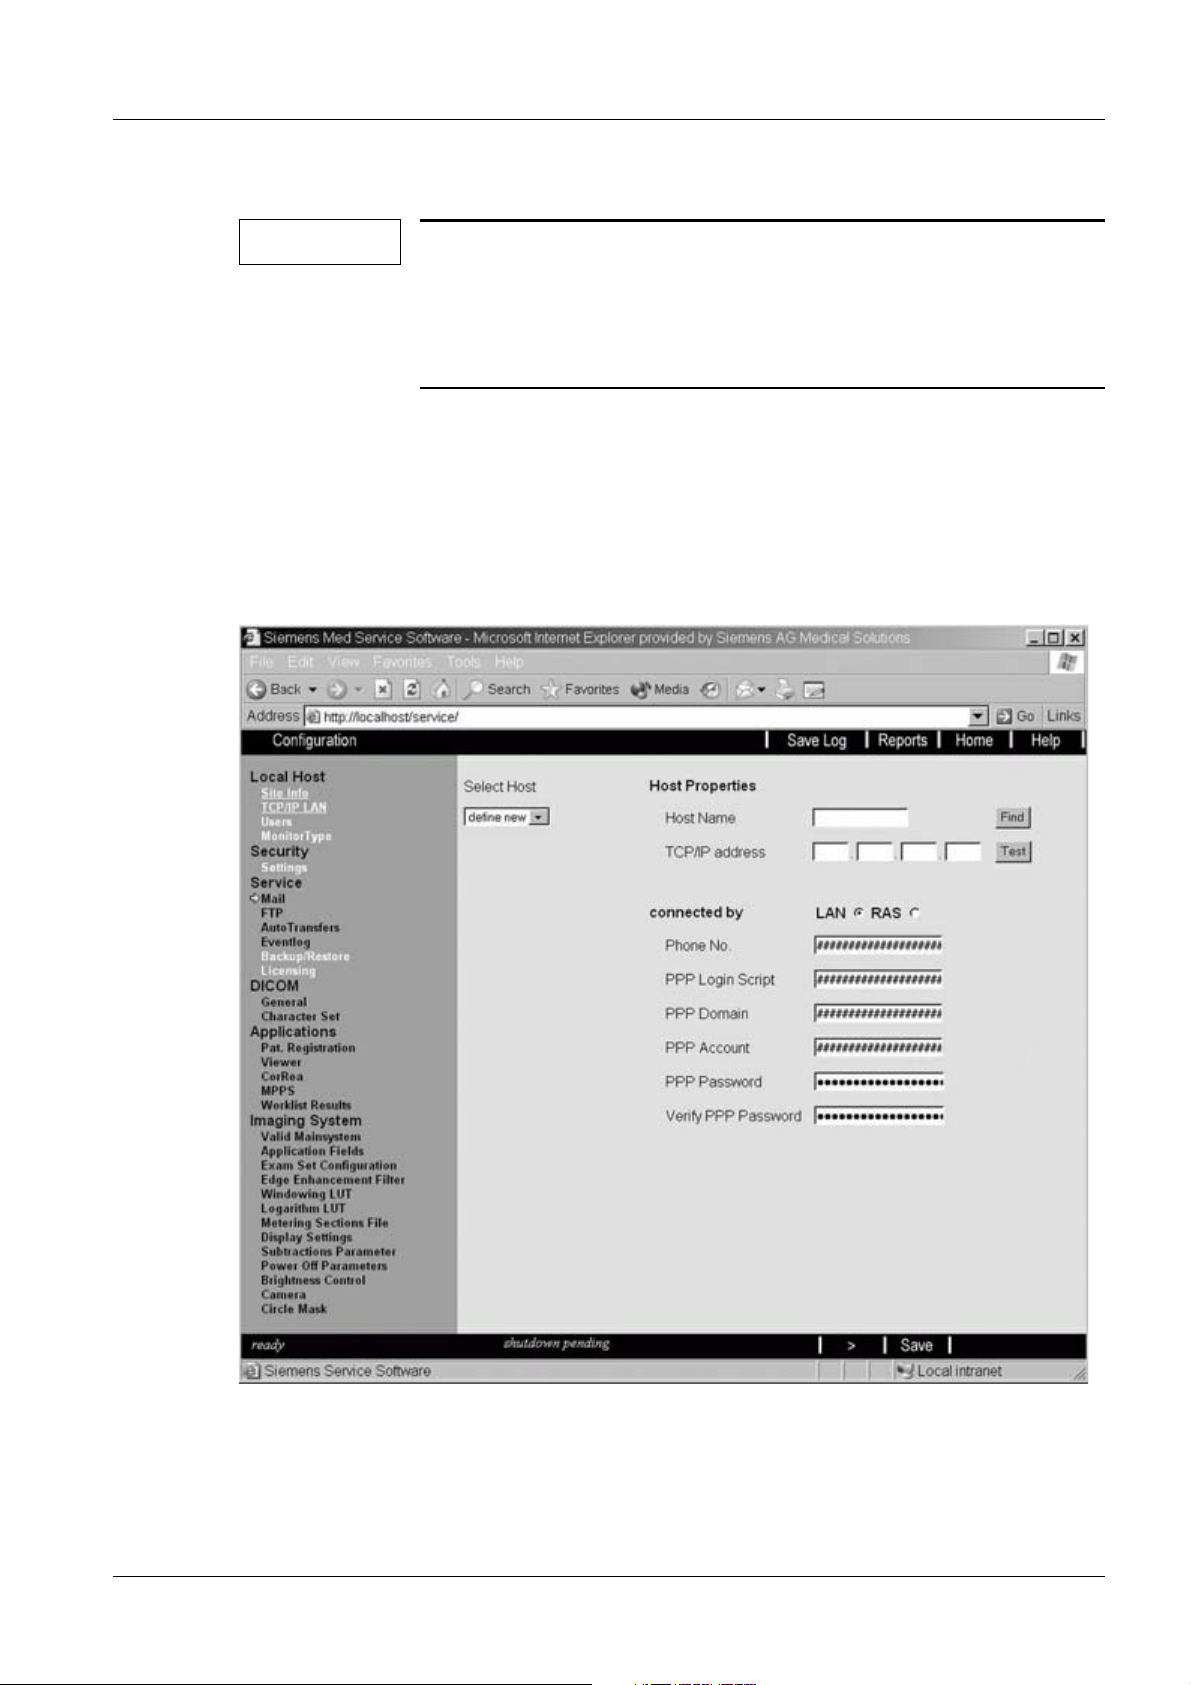
• Select "Mail" under Service.
Fig. 13: Service >> Mail 1
Host Properties
• Do not make any entries.
Siemens AG SPR2-310.843.01.03.02 ARCADIS Varic
Medical Solutions
08.04 CS SD 24
Page 29 of 120
Page 30
30 Imaging System Syngo Configuration
• Select ">".
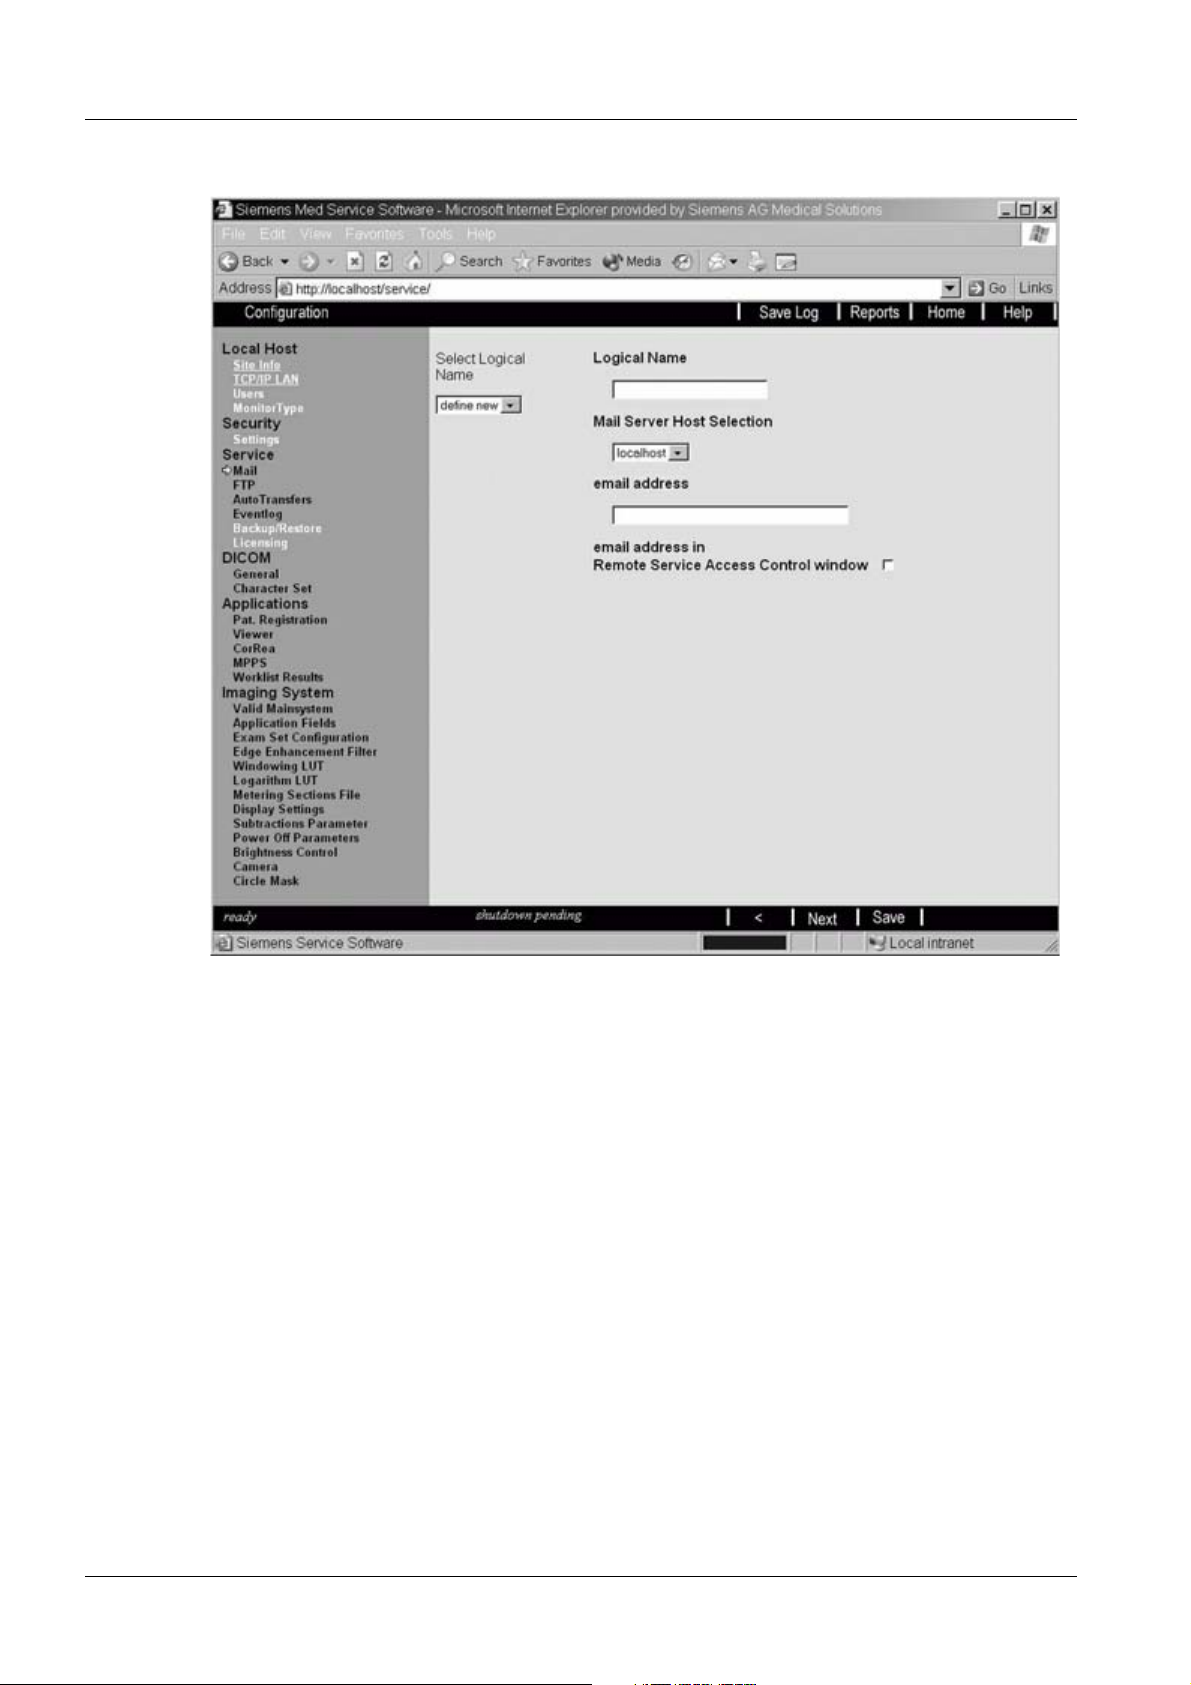
Fig. 14: Service >> Mail 2
Logical Name
• Do not make any entries.
• Select "Next".
FTP 0
This menu item makes it possible to configure the file transfer target (FTP) for the Auto
Report and for the File&Image Tool functions.
A target is comprised of an FTP server and an FTP account on which this server can be
reached via LAN (e.g., a router).
• Select "FTP".
ARCADIS Varic SPR2-310.843.01.03.02 Siemens AG
08.04 CS SD 24
Page 30 of 120
Medical Solutions
Page 31

Imaging System Syngo Configuration 31
Fig. 15: Service >> FTP 1
Host Properties
• Do not make any entries.
• Select ">".
Siemens AG SPR2-310.843.01.03.02 ARCADIS Varic
Medical Solutions
08.04 CS SD 24
Page 31 of 120
Page 32

32 Imaging System Syngo Configuration
Fig. 16: Service >> FTP 2
Logical Name
• Do not make any entries.
• Select "Next".
Auto Transfer 0
• Select "Auto Transfers".
ARCADIS Varic SPR2-310.843.01.03.02 Siemens AG
08.04 CS SD 24
Page 32 of 120
Medical Solutions
Page 33

Imaging System Syngo Configuration 33
Fig. 17: Service >> Auto Transfers
• Select "Activate automatic transfers".
• Select "Next".
Event Log 0
The "Event log" function allows you to customize the contents of the event log in your service software.
• Select "Event Log".
Siemens AG SPR2-310.843.01.03.02 ARCADIS Varic
Medical Solutions
08.04 CS SD 24
Page 33 of 120
Page 34

34 Imaging System Syngo Configuration
Fig. 18: Service >> Event log
Log only Service Messages
• Check whether "Log only Service Messages" is activated.
Display Service Messages
• Check whether "Display Service Messages" is activated.
Display Sequence Number
• Check whether "Display Sequence Messages" is activated.
• Click "Save".
Backup/Restore 0
• Select "Backup Restore".
ARCADIS Varic SPR2-310.843.01.03.02 Siemens AG
08.04 CS SD 24
Page 34 of 120
Medical Solutions
Page 35

Imaging System Syngo Configuration 35
Fig. 19: Service >> Backup / Restore
• Do not make any entries.
• Click "Next".
Licensing 0
Various applications are protected with a license key. This "licensing" function allows you
to display and modify an existing application license or to add new application licenses to
the system.
NOTE
• Select "Licensing".
All licenses can be requested from the UPTIME Service Center,
CS HSC 1 (+49 9191-188080).
Siemens AG SPR2-310.843.01.03.02 ARCADIS Varic
Medical Solutions
08.04 CS SD 24
Page 35 of 120
Page 36

36 Imaging System Syngo Configuration
Fig. 20: Service >> Licensing
• Do not make any changes; the licenses were already downloaded during software in-
stallation.
• Click "Finish".
SNMP 0
• Select "SNMP".
ARCADIS Varic SPR2-310.843.01.03.02 Siemens AG
08.04 CS SD 24
Page 36 of 120
Medical Solutions
Page 37

Imaging System Syngo Configuration 37
Fig. 21: Service >> SNMP 1
• Do not make any changes.
• Click <“>".
Siemens AG SPR2-310.843.01.03.02 ARCADIS Varic
Medical Solutions
08.04 CS SD 24
Page 37 of 120
Page 38

38 Imaging System Syngo Configuration
Fig. 22: Service >> SNMP 2
• Do not make any changes.
• Click "Next".
ARCADIS Varic SPR2-310.843.01.03.02 Siemens AG
08.04 CS SD 24
Page 38 of 120
Medical Solutions
Page 39

Imaging System Syngo Configuration 39
DICOM 0
DICOM allows you to specify the parameters for the DICOM communication interfaces of
your system and of the remote systems.
AET = Application Entity Title
General 0
• Select "General".
Fig. 23: DICOM >> General 1
Local Application Entity Titles
HIS / RIS
• Enter the AET for HIS / RIS here.
Study transfer
• Enter the AET for Study Transfer here.
Siemens AG SPR2-310.843.01.03.02 ARCADIS Varic
Medical Solutions
08.04 CS SD 24
Page 39 of 120
Page 40

40 Imaging System Syngo Configuration
Print
• Enter the AET for Print here.
• Click ">".
Fig. 24: DICOM >> General 2
• Do not make any changes on this page.
• Select "Next".
Character Set 0
• Select "Character set".
ARCADIS Varic SPR2-310.843.01.03.02 Siemens AG
08.04 CS SD 24
Page 40 of 120
Medical Solutions
Page 41

Imaging System Syngo Configuration 41
Fig. 25: DICOM >> Character Set 5
DICOM Default Character Set
• Select "Allow only one character set".
• Select "ISO_IR 100":
- The settings need to be changed only if required by the keyboard.
ISO IR 6 for USA (ASCII)
ISO IR 13 for Japan
Offline Devices 0
Using Offline Devices, you can make settings for DICOM off-line devices (Media Storage)
on the local host.
• Select "Offline Devices".
Siemens AG SPR2-310.843.01.03.02 ARCADIS Varic
Medical Solutions
08.04 CS SD 24
Page 41 of 120
Page 42

42 Imaging System Syngo Configuration
Fig. 26: DICOM >> Offline Devices
• Select "define new".
• Select CD_RW under "Logical name".
• Select "Archive Device" if the CD-RW is being used as the archive.
Drive Type
• Select "CD-RW drive".
• Select "Read/Write" under Access.
• Select "8" speed under Recording.
• Do not select “Optical Disk Drive” and “default”.
• Do not select “SPI file system”.
Drive Letter
• Select "R:\".
SCSI Settings
• Do not select anything under “Adapter”.
• Do not select anything under “Bus”.
• Do not select anything under “Target”.
ARCADIS Varic SPR2-310.843.01.03.02 Siemens AG
08.04 CS SD 24
Page 42 of 120
Medical Solutions
Page 43

Imaging System Syngo Configuration 43
Network Nodes 0
The DICOM nodes for Storage (Send and Receive) and Query/Retrieve are defined here.
Please note that DICOM printers and the Radiology Information System (RIS) are not
configured here.
The image transfer or Query/Retrieve targets entered can be selected in the "Transfer Send to..." menu of the Viewer or Patient browser.
The entered Query/Retrieve targets can be selected in the "Patient Search" menu of the
Viewer or Patient browser.
• Select "Network Nodes" under DICOM.
Fig. 27: DICOM >> Network Nodes 1
Host Properties
Network Nodes not available:
• Select ">".
• Select ">".
Network Nodes available:
• Select "Define new" under Select Host.
Siemens AG SPR2-310.843.01.03.02 ARCADIS Varic
Medical Solutions
08.04 CS SD 24
Page 43 of 120
Page 44

44 Imaging System Syngo Configuration
Host Name
• Enter the host name.
TCP / IP Address
• Enter the IP address.
Connected by
• Select "LAN".
• Select "Save".
• Select ">".
General Node Properties
Fig. 28: DICOM >> Network Nodes 2
Logical Name
• Select "Define new".
Editing the Name
• Enter the name under "Edit Name".
ARCADIS Varic SPR2-310.843.01.03.02 Siemens AG
08.04 CS SD 24
Page 44 of 120
Medical Solutions
Page 45

Imaging System Syngo Configuration 45
Host
• Under "Host", select the name entered on the previous page.
Application Entity Properties
AE Title
• Select "Define new".
- The AETs already configured are shown in this drop-down list.
Editing the AE Title
• Enter a name in the "Edit AE Title" field.
Port Number
• Enter the port number for the DICOM unit.
• Click "Add".
• Do not select Verification.
Supported DICOM Services
Select the DICOM services that the customer has purchased and should be performed by
the corresponding system.
NOTE
Storage
“Storage" must be selected as a minimum.
Changes should only by made by an application engineer due to
possible impact on the customer interface.
• Select "Storage".
• Select Retrieve if the particular DICOM unit is to support query.
• Click "Save".
• Do not make any changes under "Storage".
Storage commitment
• Select Storage Commitment if the particular DICOM unit is to be configured as the Stor-
age Commitment Provider.
Query
• Select Query if the particular DICOM unit is to support query.
• Select "patient root" under Provides DICOM query model.
Siemens AG SPR2-310.843.01.03.02 ARCADIS Varic
Medical Solutions
08.04 CS SD 24
Page 45 of 120
Page 46

46 Imaging System Syngo Configuration
Retrieve
• Select Retrieve if the particular DICOM unit is to support retrieve.
• Click "Save".
Print Devices 0
Here you define the DICOM laser cameras that are connected to your system via DICOM
Basic Print. A local printer is NOT A DICOM printer!
This system does not support the SPCI/SPDI camera interface.
NOTICE
NOTE
NOTE
Print Devices 1
If a printer needs to be deleted, e.g. following an incorrect entry,
the correct sequence of Print Devices 3 to Print Devices 1 must be
observed.
¹ Otherwise, problems can occur, e.g. in the “Filming”
application card, in the user interface or when making
registration settings.
You will find the installation instructions for each released camera
on CB-DOC under Installation in the “Camera” catalog.
Configuring “Print Devices" without the necessary DICOM license
will result in a system error.
The error can only be corrected by performing a completely new
installation!
• Verify that the required DICOM Basic License is available.
- To do so, proceed as follows:
In the Service software, go to -> Configuration --> Service--> Licensing.
“ASPIA_DICOM_BASIC....”should be listed under Licenses.
• Select Print Devices.
ARCADIS Varic SPR2-310.843.01.03.02 Siemens AG
08.04 CS SD 24
Page 46 of 120
Medical Solutions
Page 47

Imaging System Syngo Configuration 47
Fig. 29: DICOM >> Print Devices 1
Host Properties
• Select "Define new" under Select Host.
Host Name
• Enter the host name of the DICOM camera.
TCP / IP Address
• Enter the IP address.
Connected by
• Select "LAN".
• Select "Save".
• Under Select Host, select the host name entered for the DICOM camera.
• Select ">".
Siemens AG SPR2-310.843.01.03.02 ARCADIS Varic
Medical Solutions
08.04 CS SD 24
Page 47 of 120
Page 48

48 Imaging System Syngo Configuration
Print Devices 2
Fig. 30: DICOM >> Print Devices 2
General Node Properties
Logical Name
• Select "Define new".
Editing the Name
• Enter the name under "Edit Name".
Host
• Under "Host", select the name entered on the previous page.
Application Entity Properties
AE Title
• Select "Define new".
- The AETs already configured are shown in this drop-down list.
ARCADIS Varic SPR2-310.843.01.03.02 Siemens AG
08.04 CS SD 24
Page 48 of 120
Medical Solutions
Page 49

Imaging System Syngo Configuration 49
Editing the AE Title
• Enter a name in the "Edit AE Title" field.
Port Number
• Enter the port number for the DICOM unit.
• Click "Add".
• Do not select Verification.
Supported DICOM Services
Print
• Select "Print".
• Select "Save".
• Select ">".
Print Devices 3
Fig. 31: DICOM >> Print Devices 3
Selecting the HC Device
• Select "Define new" under Select HC device.
Siemens AG SPR2-310.843.01.03.02 ARCADIS Varic
Medical Solutions
08.04 CS SD 24
Page 49 of 120
Page 50

50 Imaging System Syngo Configuration
HC Device
• Enter the name of the camera.
- This will be displayed in the customer interface in the "Print" register.
Default Camera
• Select this option to define the camera as the standard camera.
The other cameras need to be selected in the customer user interface via a drop-down list
in the "Print" register.
General Settings
Type
• Select "DICOM Printer".
Class
• Select your released DICOM camera in the drop-down list.
Do not make any other changes on this page.
If your camera is not yet released or not in the list, contact the responsible Headquarters
Support Center.
• Select "Save".
HC Overview 0
NOTE
The customer can manipulate and test certain camera settings with the "Hard Copy Overview" menu.
• Select "HC Overview".
This menu has no meaning for the service engineer, since the settings and tests can also be performed in the “print device" menu.
ARCADIS Varic SPR2-310.843.01.03.02 Siemens AG
08.04 CS SD 24
Page 50 of 120
Medical Solutions
Page 51

Imaging System Syngo Configuration 51
Fig. 32: DICOM >> HC Overview
• Do not make any changes under HC Overview.
• Select "Next".
LUT Files 0
This menu allows you to import, remove, and select LUT files (Look Up Table) for DICOM
Basic Print. Currently, no tool is available for modifying a lookup table (LUT Editor).
NOTE
• Select "LUT Files".
The Correction LUT for the system can be found under “XRFImage”.
Siemens AG SPR2-310.843.01.03.02 ARCADIS Varic
Medical Solutions
08.04 CS SD 24
Page 51 of 120
Page 52

52 Imaging System Syngo Configuration
Fig. 33: LUT Files 1
• Do not make any changes.
• Click “>".
ARCADIS Varic SPR2-310.843.01.03.02 Siemens AG
08.04 CS SD 24
Page 52 of 120
Medical Solutions
Page 53

Imaging System Syngo Configuration 53
Fig. 34: LUT Files 2
• Select “Correction LUT”.
• Select XAImage.
• Verify that “xa” is selected.
• Click "Save".
Max. Density
• Do not make any changes.
Overall Maximum Density
• Verify that the value is 3.00; if not, enter this value.
Interpolation for Printing
• Verify that “Cubic” is selected.
Mode
• Do not make any changes.
• If changes were made to one of the previous items, select "Save".
Siemens AG SPR2-310.843.01.03.02 ARCADIS Varic
Medical Solutions
08.04 CS SD 24
Page 53 of 120
Page 54

54 Imaging System Syngo Configuration
HIS/RIS Nodes 0
Configuration of a Hospital Information System (HIS) or Radiology Information System
(RIS) that supports DICOM Basic Worklist or the Detached Study Transfer Service. In
many cases, the RIS will be connected via an interface box such as the Mitra Broker
(MagicLink HL7).
HIS / RIS Nodes 1
• Select "HIS/RIS Nodes".
Fig. 35: HIS / RIS Nodes 1
Host Properties
• Select "Define new" under Select Host.
Host Name
• Enter the host name of the HIS / RIS node.
TCP / IP Address
• Enter the IP address.
Connected by
• Select "LAN".
ARCADIS Varic SPR2-310.843.01.03.02 Siemens AG
08.04 CS SD 24
Page 54 of 120
Medical Solutions
Page 55

Imaging System Syngo Configuration 55
• Select "Save".
• Under Select Host, select the host name entered for HIS / RIS.
• Select ">".
Fig. 36: HIS / RIS Nodes 2
General Node Properties
Host
• Under "Host", select the name entered on the previous page.
Logical Name
• Select "Define new".
- The DICOM worklist request will run in the background and only one HIS/RIS can be
selected. As a result, the logical name is not displayed in the customer user interface.
Editing the Name
• Enter the name under "Edit Name".
- Any name can be selected.
Siemens AG SPR2-310.843.01.03.02 ARCADIS Varic
Medical Solutions
08.04 CS SD 24
Page 55 of 120
Page 56

56 Imaging System Syngo Configuration
Application Entity Properties
AE Title
• Select "Define new".
- The AETs already configured are shown in this drop-down list.
Editing the AE Title
• Enter a name in the "Edit AE Title" field.
Port Number
• Enter the port number for the DICOM unit.
• Click "Add".
• Do not select Verification.
Supported DICOM Services
Basic Worklist
NOTE
Basic Worklist has to be selected as the minimum.
• Select "Basic Worklist".
Query Waiting Time
• Enter 20 sec., if not already listed.
Max. Query Match Number
• Enter 200 matches, if not already listed.
Query Interval
• Enter 60 minutes, if not already listed.
NOTE
Default Basic Worklist Node
To activate the automatic DICOM Worklist polling function, you
must select “HIS/RIS update Worklist in Background’ under “Option - Configuration - Patient Registration" in the customer user interface.
• Select "Default Basic Worklist node".
Performed Procedure Step
NOTE
ARCADIS Varic SPR2-310.843.01.03.02 Siemens AG
Do not edit this item if MPPS is being used.
Page 56 of 120
08.04 CS SD 24
Medical Solutions
Page 57

Imaging System Syngo Configuration 57
At the beginning and following patient acquisition, the DICOM Service Modality Performed
Procedure Step (MPPS) sends data to the information system (e.g., RIS). Select this
option if the selected information system is the destination to be used for this DICOM service.
Default Catalog Name
• If codes are used, enter the name of the coding catalog being used in the information
system.
- MPPS uses codes instead of readable values.
Default Catalog Version
• If codes are used, enter the name of the coding catalog the information system uses.
Default PPS Node
• Select "Default PPS Node".
• Click "Save".
Siemens AG SPR2-310.843.01.03.02 ARCADIS Varic
Medical Solutions
08.04 CS SD 24
Page 57 of 120
Page 58

58 Imaging System Syngo Configuration
Import/Export 0
The system allows the import or export of DICOM images from / to the file system. In this
section, you need to specify the location of the import / export directories. They are
located on the system or on a shared directory.
For shared directories, you first need to configure the host on which the shared directory
is located.
To import / export DICOM images, you need to select "Transfer - Import from Off-Line" or
"Import / Export to Off-Line" in the customer user interface.
Directories 0
• Select "Directories".
Fig. 37: Import / Export >> Directories 1
Host Properties
• Select "Define new" under Select Host.
Host Name
• Under “Host Name”, enter the computer name of the system.
ARCADIS Varic SPR2-310.843.01.03.02 Siemens AG
08.04 CS SD 24
Page 58 of 120
Medical Solutions
Page 59
Imaging System Syngo Configuration 59
TCP / IP Address
• Enter the IP address.
Connected by
• Select "LAN".
• Select "Save".
• Select the host name entered under Select Host.
• Select ">".
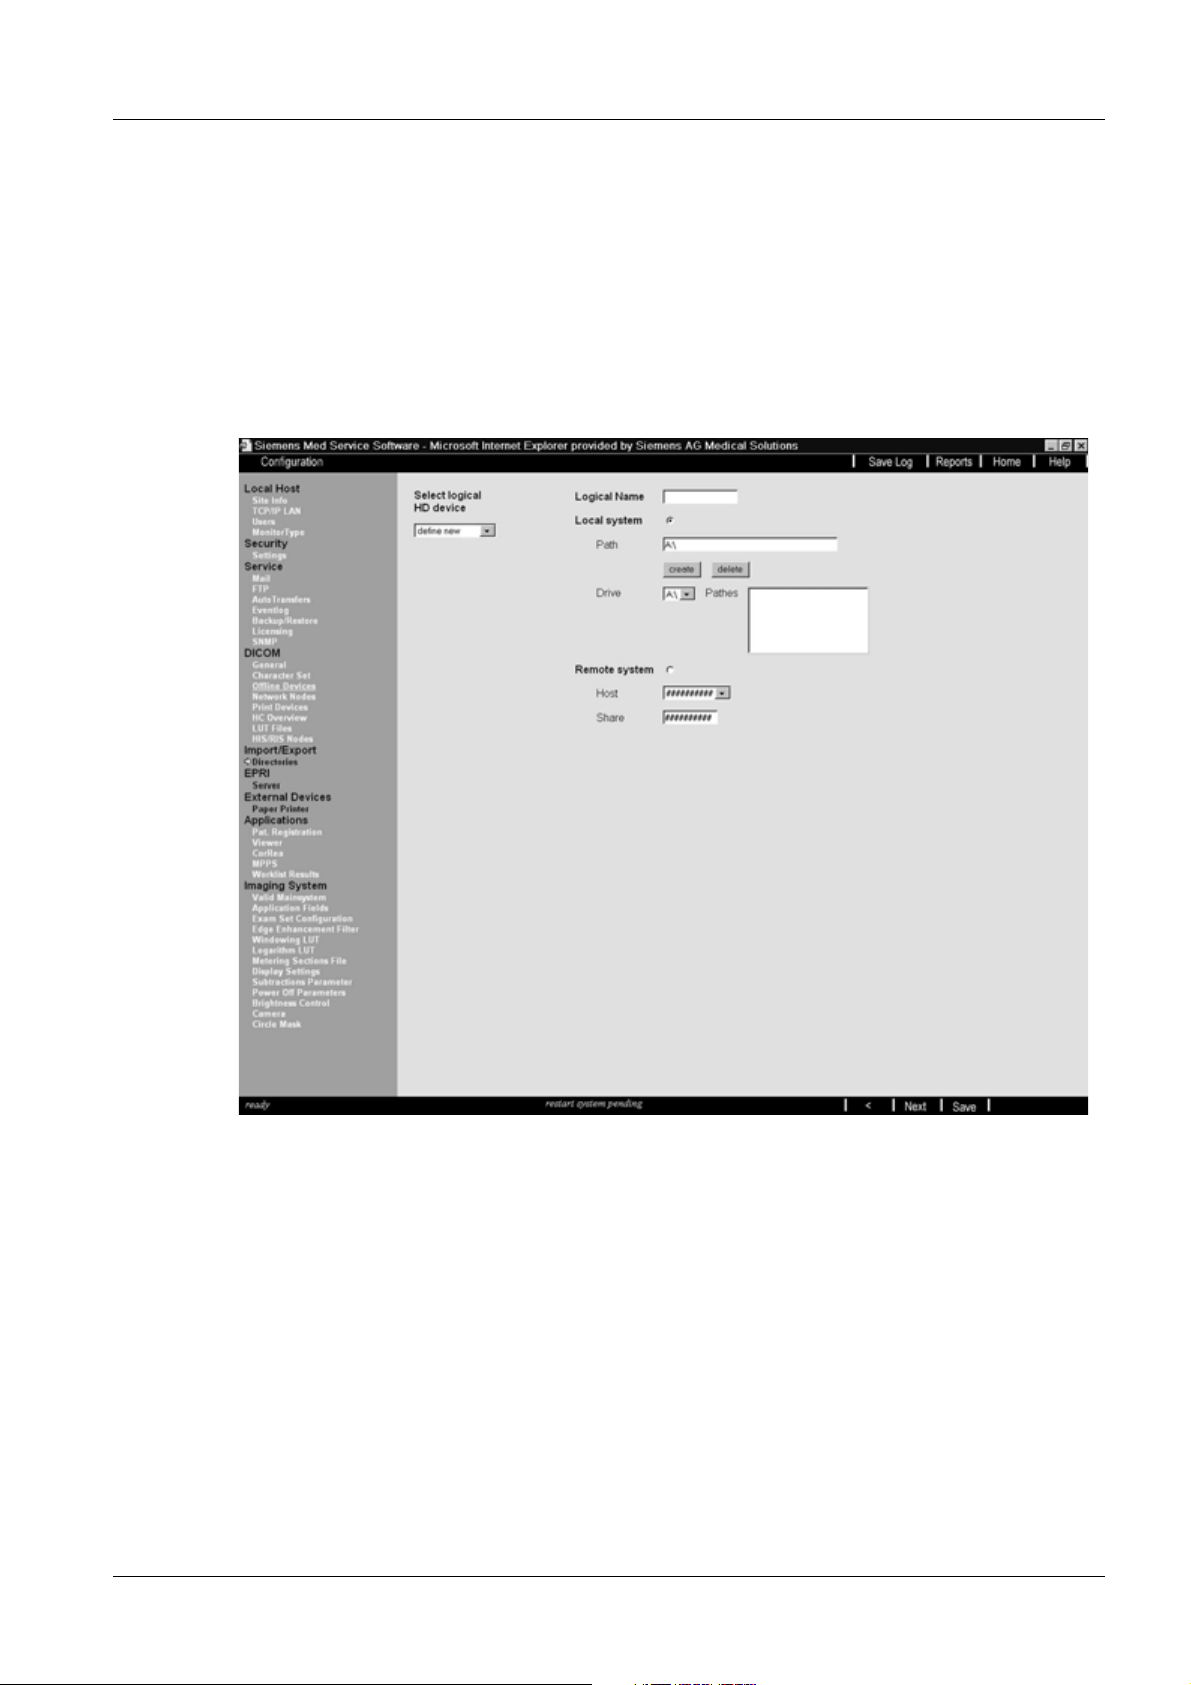
Fig. 38: Import / Export >> Directories 2
Selecting the Logical HC Device
• Select “Define new".
Logical Name
• Select "DICOM Tools" under Logical name.
- The logical name will be displayed in the customer user interface under ’Transfer -
Off-line - Export / Import’ .
Local System
• Select "Local System".
Siemens AG SPR2-310.843.01.03.02 ARCADIS Varic
Medical Solutions
08.04 CS SD 24
Page 59 of 120
Page 60

60 Imaging System Syngo Configuration
• Enter the path "C:\\\\\\\\Syngo\\\\\\\\Service\\\\\\\\dst\\\\\\\\img"
• Select the drive name C:\ under Drive.
• Select "Create".
• Select "Save".
Remote System
• Do not select “Remote system”.
Host
• Do not make any entries.
Share
• Do not make any entries.
• Click "Next".
ARCADIS Varic SPR2-310.843.01.03.02 Siemens AG
08.04 CS SD 24
Page 60 of 120
Medical Solutions
Page 61

Imaging System Syngo Configuration 61
EPRI 0
The EPRI (Electronic Patient Record Interface) is a web interface (Internet Explorer
browser) to a server which provides additional data about the selected patient.
Server 0
The customer user interface provides a button to open a web browser with a link to an
EPR server. The URL and the type of EPR server need to be specified in this menu.
• Select Server.
Fig. 39: EPRI >> Server
EPR Interface
Location of EPR Server
• Do not make any changes under Location of EPR Server.
Type of EPR server
• Do not make any changes under Type of EPR Server.
- Currently, only the WebEPR server from Siemens HS is released (as the default
server).
Siemens AG SPR2-310.843.01.03.02 ARCADIS Varic
Medical Solutions
08.04 CS SD 24
Page 61 of 120
Page 62

62 Imaging System Syngo Configuration
External Devices 0
Paper Printer 0
NOTE
NOTE
Only the media format can be defined in this menu.
The driver for the paper printer must be installed per the instructions in "Troubleshooting, Software, Service Information" with
Print No. SPR2-310.840.01.xx.xx.
Even locally networked screen printers (e.g., from Condronics) are
labeled paper printers in Syngo.
• Select “Paper Printer”.
Fig. 40: Configuration >> ExternalDevices >> PaperPrinter
Available Paper Printer Media Formats
• Verify that all formats are selected.
- For example, A4 is used for Sony printers, 8x10 for Condronics printers.
• Click "Finish".
ARCADIS Varic SPR2-310.843.01.03.02 Siemens AG
08.04 CS SD 24
Page 62 of 120
Medical Solutions
Page 63

Imaging System Syngo Configuration 63
• Select “PS LUT Files”.
0
Fig. 41: Configuration >> ExternalDevices >> PSLUTFiles
• Under "Drive", select drive “C”,
• Under "Source Path”, select “ASPIA”.
• Under "Source Path”, select “config”.
• Under "Source Path”, select “HC”.
• Under "Source Path”, select “LUT”.
• Under "Source Path”, select “XAImage”.
• Under "Source Path”, select “Printer LUT_A2”.
• Click "Import".
• Click "Select".
• Verify that “Use LUT for Postscript printers” is selected.
• Verify that “Use floating Zoom factors” is not selected.
• Click "Save".
Siemens AG SPR2-310.843.01.03.02 ARCADIS Varic
Medical Solutions
08.04 CS SD 24
Page 63 of 120
Page 64

64 Imaging System Syngo Configuration
System Management 0
At this point, you must configure the IP address of the system management where the
event management agent should send its messages.
NOTE
Additional software must be loaded for this purpose. System Management settings are not included in this configuration.
These settings appear in a separate document.
• Skip "Sytemmgt " and proceed to the next configuration item.
Master 0
Fig. 42: C06_5_44
Agent Controls 0
The System Management Agent can be started or stopped in this screen.
ARCADIS Varic SPR2-310.843.01.03.02 Siemens AG
08.04 CS SD 24
Page 64 of 120
Medical Solutions
Page 65

Imaging System Syngo Configuration 65
Fig. 43: C06_5_45
Installation Status
The status is automatically displayed if System Management was configured in the preceding "Master Mask".
The agent is uninstalled by deselecting "Installed".
By selecting "Installed", the Agent is installed as it was set in the preceding "Master
Mask".
Siemens AG SPR2-310.843.01.03.02 ARCADIS Varic
Medical Solutions
08.04 CS SD 24
Page 65 of 120
Page 66

66 Imaging System Syngo Configuration
Applications 0
Under "Applications", you will find menus for setting the application parameters.
NOTE
As a rule, changes are made by application specialists and not CSEs.
Pat. Registration 0
• Select Pat. Registration.
Fig. 44: Applications >> Pat. Registration 5
Patient
• Do not make any changes.
Institution
• Do not make any changes.
Invoking the Patient Registration Dialog
• Do not make any changes.
ARCADIS Varic SPR2-310.843.01.03.02 Siemens AG
08.04 CS SD 24
Page 66 of 120
Medical Solutions
Page 67

Imaging System Syngo Configuration 67
Study
• Do not make any changes.
Visit
• Do not make any changes.
• Click “Finish”.
Viewer 0
• Select Viewer.
Fig. 45: Applications Viewer
Viewer Configuration Settings
Close all studies when new one is loaded
• Do not select.
Siemens AG SPR2-310.843.01.03.02 ARCADIS Varic
Medical Solutions
08.04 CS SD 24
Page 67 of 120
Page 68

68 Imaging System Syngo Configuration
Close all series when new one is loaded
• Do not select.
• Click “Finish”.
CorRea 0
In this menu, you can set the attributes that can be modified in the CorRea(=Correct &
Rearrange Platform).
• Select CorRea; do not make any changes.
Fig. 46: Applications >> CorRea 5
Displayed CorRea Dialogs Elements
Patient
• Do not make any changes.
Hospital
• Do not make any changes.
Study
• Do not make any changes.
ARCADIS Varic SPR2-310.843.01.03.02 Siemens AG
08.04 CS SD 24
Page 68 of 120
Medical Solutions
Page 69

Imaging System Syngo Configuration 69
Instance
• Do not make any changes.
Series
• Do not make any changes.
• Select "Finish".
MPPS 0
(Modality Performed Procedure Steps)
NOTE
The attributes defined here are displayed in the customer user interface when a MPPS
message is sent to the RIS.
Required settings that go beyond this syngo configuration can be
performed only in cooperation with the responsible hospital network administrator.
• Select “MPPS”.
Siemens AG SPR2-310.843.01.03.02 ARCADIS Varic
Medical Solutions
08.04 CS SD 24
Page 69 of 120
Page 70

70 Imaging System Syngo Configuration
Fig. 47: MPPS Applications
Displayed MPPS Dialog Elements
• Do not make any changes.
• Select "Finish".
Worklist Results 0
The attributes defined here are displayed following a DICOM worklist request in the
Patient Registration form.
• Select "Worklist Results".
ARCADIS Varic SPR2-310.843.01.03.02 Siemens AG
08.04 CS SD 24
Page 70 of 120
Medical Solutions
Page 71

Imaging System Syngo Configuration 71
Fig. 48: Applications Worklist Results
Displayed HISRIS Worklist Result Attributes
• Do not make any changes.
• Select "Finish".
Siemens AG SPR2-310.843.01.03.02 ARCADIS Varic
Medical Solutions
08.04 CS SD 24
Page 71 of 120
Page 72

72 ARCADIS Imaging System Configuration
5ARCADIS Imaging System Configuration
6-
Imaging System 0
NOTE
The Examination Set Editor may not be opened.
Valid Main System 0
• Select "Valid Main System".
Fig. 49: Imaging System valid, main system
Initial Installation 0
• Enter the "Serial Number" of the connected main system.
This can be accepted with "get" only after complete installation of the main system and
the image system.
• Select "Save".
ARCADIS Varic SPR2-310.843.01.03.02 Siemens AG
08.04 CS SD 24
Page 72 of 120
Medical Solutions
Page 73

ARCADIS Imaging System Configuration 73
Not an Initial Installation 0
• Select "get".
When this is done, the Serial Number of the connected main system is accepted.
• Select "Save".
Application Fields 0
NOTE
For “Application Fields: that require a license, you must first load
the license. Then you will be able to activate this “Application
Field" as described below.
• Select "Application Fields".
Fig. 50: Configuration >> ImagingSystem >> ApplicationFields
• The "Default Application Field" requested by the customer must be activated with "Set
Default".
- To select an application field as the "default application field", it must be displayed
under "Activated Application Fields".
• To activate an application field, it must be selected under "Application Fields" and then
activated by pressing the "Activate button".
- There are "Application Fields" that require a license, e.g., Vascular (DSA).
Siemens AG SPR2-310.843.01.03.02 ARCADIS Varic
Medical Solutions
08.04 CS SD 24
Page 73 of 120
Page 74

74 ARCADIS Imaging System Configuration
• Select "Save".
Examination Set Configuration 0
Here the minimum and maximum filters and LUTs for each examination set be defined to
the customer’s request.
• Select "Examination Set Configuration".
Fig. 51: Imaging System >> Exam Set Configuration
• Under "Maximum number of Edge Enhancement Filters per Examination Set", check
whether “4” is selected.
• Under "Maximum number of LUTs per Examination Set", check whether “4” is selected.
• Select "Keep first Examination Set in List of Active Examination sets".
- By selecting "Keep first Examination Set in List of Active Examination Sets", the first
"Examination Set" in the Active Examination Set list becomes the "default".
Edge Enhancement Filters 0
The edge enhancement filters are responsible for edge enhancement.
ARCADIS Varic SPR2-310.843.01.03.02 Siemens AG
08.04 CS SD 24
Page 74 of 120
Medical Solutions
Page 75

ARCADIS Imaging System Configuration 75
• Select "Import Edge Enhancement Filters".
Fig. 52: Imaging System >> Edge Enhancement Filter
• Press the "Next" button for an initial installation.
Importing Edge Enhancement Filters
If an "edge enhancement filter" is imported, proceed as follows:
• Select the required drive under "Drive".
• Select the required file in "Directory and file".
• Click "Import".
¹ The file will be displayed under “Available files".
• Press the "Save" button.
Windowing LUT 0
• Select "Import Windowing LUT".
Siemens AG SPR2-310.843.01.03.02 ARCADIS Varic
Medical Solutions
08.04 CS SD 24
Page 75 of 120
Page 76

76 ARCADIS Imaging System Configuration
Fig. 53: Imaging System >> Windowing LUT
• Press the "Next" button for an initial installation.
Importing Windowing LUT
If a "Windowing LUT" is imported, proceed as follows:
• Select the required drive under "Drive".
• Select the required file in "Directory and file".
• Click "Import".
¹ The file will be displayed under "Available files".
• Press the "Save" button.
Importing and Activating Logarithm LUTs 0
• Select "Import and Activate Logarithm LUTs"
ARCADIS Varic SPR2-310.843.01.03.02 Siemens AG
08.04 CS SD 24
Page 76 of 120
Medical Solutions
Page 77

ARCADIS Imaging System Configuration 77
Fig. 54: Imaging System >> Logarithm LUT
• Press the "Next" button for an initial installation.
If a "Logarithm LUT" is imported, proceed as follows:
• Select the required drive under "Drive".
• Select the required file in "Directory and file".
• Click on "Import".
¹ The file will be displayed under "Available files".
• Press the "Save" button.
If a "Logarithm LUT" is activated, proceed as follows:
• Select the required file under "Available files".
• Click on "Activate".
¹ The file will be displayed under “Activated Logarithm LUT File".
• Press the "Save" button.
Siemens AG SPR2-310.843.01.03.02 ARCADIS Varic
Medical Solutions
08.04 CS SD 24
Page 77 of 120
Page 78

78 ARCADIS Imaging System Configuration
If a "Logarithm LUT" is to be removed, proceed as follows:
• Select the required file under "Available files".
• Click on "Remove".
¹ The file will be removed under “Activated Logarithm LUT File".
• Press the "Save" button.
NOTE
A file must always be entered under “Activated Logarithm LUT
File“.
Metering Sections File 0
• Select “Meterings Sections File”.
Fig. 55: Imaging System >> Metering Sections File
• Press the "Next" button for an initial installation.
For import a “metering section file”, proceed as follows:
ARCADIS Varic SPR2-310.843.01.03.02 Siemens AG
08.04 CS SD 24
Page 78 of 120
Medical Solutions
Page 79

ARCADIS Imaging System Configuration 79
• Select the required drive under "Drive".
• Select the required file in "Directory and file".
• Click on "Import".
¹ The file will be displayed under "Available files".
• Press the "Save" button.
For activating a “metering section file”, proceed as follows:
• Select the required file under "Available files".
• Click on "Activate".
¹ The file will be displayed under “Activated Metering Section File".
• Press the "Save" button.
If a "Metering Section File" is to be removed, proceed as follows:
• Select the required file under "Available files".
• Click on "Remove".
¹ The file will be removed under “Activated Metering Section File".
• Press the "Save" button.
NOTE
A file must always be entered under “Activated Metering Section
File “.
Display Settings 0
• Select "Display Settings".
Siemens AG SPR2-310.843.01.03.02 ARCADIS Varic
Medical Solutions
08.04 CS SD 24
Page 79 of 120
Page 80

80 ARCADIS Imaging System Configuration
Fig. 56: Imaging System >> Display Settings
• Check whether "3" is displayed under "Metering Fade Out Delay".
• Check whether "3" is displayed under "Collimator Fade Out Delay".
• If no changes were made, select "Next".
• If changes were made, select "Save" and "Next".
Subtraction Parameters 0
The minimum and maximum values for noise suppression for the individual phases are
set here.
• Select "Subtraction Parameters".
ARCADIS Varic SPR2-310.843.01.03.02 Siemens AG
08.04 CS SD 24
Page 80 of 120
Medical Solutions
Page 81

ARCADIS Imaging System Configuration 81
Fig. 57: Imaging System >> Subtractions Parameter 1
Operating Mode Subtraction (DSA) 0
With a new installation
Noise Reduction Factor
• Under Phase A, verify that the k factor “GGM 8” is set.
• Under Phase A Low, verify that the k factor “GGM 4” is set.
• Under Phase B, verify that the k factor “GGM 4” is set.
• Under Phase B Low, verify that the k factor “GGM 2” is set.
Duration
• Under Phase A, verify that “75” frames are set.
Peak Opacification Delay
• Under Peak Opacification Delay, verify that “4” frames are set.
• Select "Save".
Siemens AG SPR2-310.843.01.03.02 ARCADIS Varic
Medical Solutions
08.04 CS SD 24
Page 81 of 120
Page 82

82 ARCADIS Imaging System Configuration
Operating Mode Roadmap 0
• Select ">".
Fig. 58: Imaging System >> Subtractions Parameter 2
With a new installation
Noise Reduction Factor
• Under Phase A, verify that the k factor “GGM 8” is set.
• Under Phase A Low, verify that the k factor “GGM 4” is set.
• Under Phase B, verify that the k factor “GGM 4” is set.
• Under Phase B Low, verify that the k factor “GGM 2” is set.
• Under Phase C, verify that the k factor “GGM 4” is set.
• Under Phase C Low, verify that the k factor “GGM 2” is set.
Duration
• Under Phase A, verify that “75” frames are set.
ARCADIS Varic SPR2-310.843.01.03.02 Siemens AG
08.04 CS SD 24
Page 82 of 120
Medical Solutions
Page 83

ARCADIS Imaging System Configuration 83
Peak Opacification Delay
• Under Peak Opacification Delay, verify that “4” frames are set.
• Select "Save".
Power Off Parameters 0
The time after which the image system is switched off by the main system is defined
under "Power Off Delay".
The time at which the main system can be switched on again without also switching on
the image system is defined under "Power Off Grace Period".
• Select "Power Off Parameters".
Fig. 59: Imaging System >> Power Off Parameter
• Power Off Enable, check whether "Power Off Enable" is selected.
For service purposes, "Power Off Enable" can be deselected.
• Power Off Delay, check whether “60” x 10s is set.
- The time set is 600 sec.
The number entered is multiplied by the factor 10.
Siemens AG SPR2-310.843.01.03.02 ARCADIS Varic
Medical Solutions
08.04 CS SD 24
Page 83 of 120
Page 84

84 ARCADIS Imaging System Configuration
• Under Power Off Grace Period, verify that “0” x 10ms is set.
- This function is not currently supported by ARCADIS Varic.
Brightness Control 0
This is where the brightness actual value for brightness control of the image system is set.
• Select "Brightness Control".
Fig. 60: Imaging System >> Brightness Control
• Under Nominal Brightness Value, verify that the value “1000” is set.
• Under Nominal Brightness Value Limitation Min., verify that the value “940” is set.
• Under Nominal Brightness Value Limitation Max., verify that the value “1060” is set.
• Under Nominal Brightness Value (Median, Auto gamma), verify that the value “1750” is
set.
Auto Gamma Disabled 0
• Do not select "Auto gamma disabled".
- "Auto gamma disabled" should be selected only for service purposes.
ARCADIS Varic SPR2-310.843.01.03.02 Siemens AG
08.04 CS SD 24
Page 84 of 120
Medical Solutions
Page 85

ARCADIS Imaging System Configuration 85
"Auto gamma disabled" is reset by closing the service software.
• Click on "Next".
Camera 0
The parameters required for the individual operating modes are set here.
These should be changed only when instructed by the home office.
• Select "Camera".
Fig. 61: Imaging System >> Camera
• "DR single", check whether the value “2” is set.
• "DR single sum", check whether the value “2” is set.
• "DR series", check whether the value “2” is set.
• "DR series sum", check whether the value “2” is set.
• "CFC", check whether the value “2” is set.
• "PFC IDL", check whether the value “2” is set.
• "PFC PDL", check whether the value “2” is set.
Siemens AG SPR2-310.843.01.03.02 ARCADIS Varic
Medical Solutions
08.04 CS SD 24
Page 85 of 120
Page 86

86 ARCADIS Imaging System Configuration
Circle Mask 0
• Select "Circle Mask".
Fig. 62: Imaging System >> Circle Mask
• No action required; click “Finish".
- These settings are required only when replacing the image intensifier.
- A switch to "transparent" can be made for service purposes.
This concludes configuration of the imaging system.
ARCADIS Varic SPR2-310.843.01.03.02 Siemens AG
08.04 CS SD 24
Page 86 of 120
Medical Solutions
Page 87

ARCADIS Main System Configuration 87
6ARCADIS Main System Co nfiguration
7-
NOTE
• Activities to be performed are labeled with a bullet point.
- Indented text under the activity to be performed contains
general information.
¹ Results and events are labeled with an arrow in front of
the indented text.
NOTE
NOTE
NOTE
In the main system service pages, you must press the “Enter” key
after entering a parameter.
When this is done, the “Save” button is displayed.
Once the “Save” button has been selected in the individual
screens, the message “..... successfully saved” appears following
a successful save.
Please click on “o.k.”.
Depending on the progress of the configuration, the “Next” button
can also be displayed as the “Finish” button.
Siemens AG SPR2-310.843.01.03.02 ARCADIS Varic
Medical Solutions
08.04 CS SD 24
Page 87 of 120
Page 88

88 ARCADIS Main System Configuration
Download 0
C-Arm 0
This point is described in the document “Software Installation”.
ARCADIS Varic SPR2-310.843.01.03.02 Siemens AG
08.04 CS SD 24
Page 88 of 120
Medical Solutions
Page 89

ARCADIS Main System Configuration 89
Configuration 0
Main System 0
• Select “Main System”.
Fig. 63: Main System >> Configuration >> Main System
System Type
• Check to make sure that the correct system type is displayed here.
- Depending on the system, “ARCADIS Varic” or “ARCADIS Orbic” can be displayed
here.
- The selection is made after selecting the main system in the service software.
Serial No.
• Enter the Serial Number of the “Main System” here.
Enable Internal Tests
• Check to make sure that “no” is selected.
- “Yes” is required only by the Engineering Department.
Siemens AG SPR2-310.843.01.03.02 ARCADIS Varic
Medical Solutions
08.04 CS SD 24
Page 89 of 120
Page 90

90 ARCADIS Main System Configuration
Log Old Messages
• Check to make sure that “yes” is selected.
Load Counter 0
• Select “Load Counter”.
Fig. 64: Main System >> Configuration >> Load Counter
New SERIAL No., Single Tank
• Enter the Serial Number of the “Single Tank”.
- This can be found on the “Single Tank” housing.
Options 0
• Select “Options”.
ARCADIS Varic SPR2-310.843.01.03.02 Siemens AG
08.04 CS SD 24
Page 90 of 120
Medical Solutions
Page 91

ARCADIS Main System Configuration 91
Fig. 65: Main System >> Configuration >> Options
Laser
• If a laser is configured, select “yes”.
Diamentor
Diamentor Configured
• If a Diamentor is configured, select “yes”.
Constant
• This value must be checked during installation of the new Diamentor and, if needed,
adapted. As a default, “36” is set.
Resolution
• Check to make sure that “1.0 cGy cm*cm/Puls is selected.
- At this time, the value “0.1cGy cm*cm/Puls” is not used.
Current Limitation 0
• Select “Current”.
Siemens AG SPR2-310.843.01.03.02 ARCADIS Varic
Medical Solutions
08.04 CS SD 24
Page 91 of 120
Page 92

92 ARCADIS Main System Configuration
Fig. 66: Main System >> Configuration >> Current Limitation
NOTE
Tube Current Limitation
Max. mA Limit
The “Tube Current Limitation” is required only for Denmark. The
required setting is performed during startup.
• Verify that “40” is displayed.
Lock kV Buttons
• Check to make sure that “no” is selected.
Buzzer 0
• Select “Buzzer”.
ARCADIS Varic SPR2-310.843.01.03.02 Siemens AG
08.04 CS SD 24
Page 92 of 120
Medical Solutions
Page 93

ARCADIS Main System Configuration 93
Fig. 67: Main System >> Configuration >> Buzzer
NOTE
The required setting is country-specific and is therefore made during startup.
Siemens AG SPR2-310.843.01.03.02 ARCADIS Varic
Medical Solutions
08.04 CS SD 24
Page 93 of 120
Page 94

94 ARCADIS Main System Configuration
Adjustment 0
Generator Adjust. 0
This point is performed when working with the document Adjustment
SPR2-310.842.01.xx.xx.
Load Counter 0
This point is performed when working with the document Adjustment
SPR2-310.842.01.xx.xx.
Camera Rotation 0
This point is performed when working with the document Adjustment
SPR2-310.842.01.xx.xx.
Collimator, X-Iris 0
This point is performed when working with the document Adjustment
SPR2-310.842.01.xx.xx.
Display X-Iris 0
This point is performed when working with the document Adjustment
SPR2-310.842.01.xx.xx.
Collimator Slot Diaphr. 0
This point is performed when working with the document Adjustment
SPR2-310.842.01.xx.xx.
Display Slot Diaphr. 0
This point is performed when working with the document Adjustment
SPR2-310.842.01.xx.xx.
Diamentor 0
This point is performed when working with the document Adjustment
SPR2-310.842.01.xx.xx.
ARCADIS Varic SPR2-310.843.01.03.02 Siemens AG
08.04 CS SD 24
Page 94 of 120
Medical Solutions
Page 95

ARCADIS Main System Configuration 95
Dose Rate 0
This point is performed when working with the document Adjustment
SPR2-310.842.01.xx.xx.
Siemens AG SPR2-310.843.01.03.02 ARCADIS Varic
Medical Solutions
08.04 CS SD 24
Page 95 of 120
Page 96

96 ARCADIS Main System Configuration
Monitoring 0
MSY Actual Values 0
MSY Actual Values
• Select “MSY Actual Values"
Fig. 68: Main System >> Monitoring >> MSY Actual Values
No configurations can be made on this page.
Click “Go" to display to actual main system values.
ARCADIS Varic SPR2-310.843.01.03.02 Siemens AG
08.04 CS SD 24
Page 96 of 120
Medical Solutions
Page 97

Backup & Restore 97
7Backup & Restore
8-
Service Software 0
Opening the Service Software 0
Fig. 69: C06_5_01
• Select the item “Service" under Options
Siemens AG SPR2-310.843.01.03.02 ARCADIS Varic
Medical Solutions
08.04 CS SD 24
Page 97 of 120
Page 98

98 Backup & Restore
Fig. 70: C06_5_02
• Select "Local System"
ARCADIS Varic SPR2-310.843.01.03.02 Siemens AG
08.04 CS SD 24
Page 98 of 120
Medical Solutions
Page 99

Backup & Restore 99
Fig. 71: C06_5_03
• Enter the service key under "Please enter password"
• Select "set as default".
• Verify with "OK".
¹ The “Home menu appears.
Siemens AG SPR2-310.843.01.03.02 ARCADIS Varic
Medical Solutions
08.04 CS SD 24
Page 99 of 120
Page 100

100 Backup & Restore
Fig. 72: Home Menu
ARCADIS Varic SPR2-310.843.01.03.02 Siemens AG
08.04 CS SD 24
Page 100 of 120
Medical Solutions
 Loading...