


6210 / 6220 User Manual

Contents
Introduction .......................................................................................... |
1 |
General Features ............................................................................... |
1 |
Models/Options .................................................................................. |
1 |
Controls and Indicators ...................................................................... |
2 |
Operation .............................................................................................. |
5 |
Placing a Call ..................................................................................... |
5 |
Answering a Call ................................................................................ |
7 |
Bridging a Shared Call Appearance................................................... |
8 |
Displaying Call Appearance Information............................................ |
8 |
Holding Calls ...................................................................................... |
8 |
Transferring Calls............................................................................... |
9 |
Conferencing Calls............................................................................. |
9 |
Using Network Features................................................................... |
10 |
Using the Call Log............................................................................ |
11 |
Using the Call Directory ................................................................... |
14 |
Using the Speakerphone.................................................................. |
15 |
Using Voice Announce..................................................................... |
16 |
Using a Headset............................................................................... |
17 |
Adjusting the Receive Volume ......................................................... |
17 |
Adjusting the Ringer Volume............................................................ |
17 |
Installation .......................................................................................... |
18 |
Ordering ISDN Service..................................................................... |
18 |
6210T/6220T Installation.................................................................. |
18 |
6210U/6220U Installation................................................................. |
21 |
Wall Mounting................................................................................... |
23 |
Configure the Set ............................................................................. |
24 |
Customize your Phone..................................................................... |
26 |
Label the Set .................................................................................... |
27 |
Installation Options ........................................................................... |
28 |
Installation Options Menu................................................................. |
28 |
SPID Entry........................................................................................ |
29 |
Parameter Download ....................................................................... |
30 |
Configuring Keys.............................................................................. |
30 |
Tone Commander 6210/6220 User Manual |
i |
Terminal Mode ................................................................................. |
36 |
|
Installation Password ....................................................................... |
37 |
|
Reset to Factory Default Settings .................................................... |
39 |
|
Voice Announce ............................................................................... |
40 |
|
Administration Options..................................................................... |
44 |
|
Administration Options Menu ........................................................... |
44 |
|
Local Inspect |
.................................................................................... |
44 |
Version ............................................................................................. |
|
48 |
Test .................................................................................................. |
|
50 |
Diagnostic Display............................................................................ |
52 |
|
Restart.............................................................................................. |
|
52 |
Viewing the Error and Download Logs............................................. |
53 |
|
User Options ...................................................................................... |
|
54 |
User Options Menu .......................................................................... |
54 |
|
Setting the Time and Date ............................................................... |
55 |
|
Setting Up Speed Dial Keys............................................................. |
55 |
|
Setting Up the Call Directory............................................................ |
57 |
|
Personal Ringing Options ................................................................ |
59 |
|
Call Preference Options ................................................................... |
61 |
|
Handset/Headset Configuration ....................................................... |
62 |
|
Adjusting the Display Contrast ......................................................... |
63 |
|
Setting a Call Log Password ............................................................ |
64 |
|
Troubleshooting................................................................................. |
66 |
|
Inoperable Telephone Recovery Procedures .................................. |
66 |
|
Telephone Configuration Troubleshooting....................................... |
68 |
|
Appendix A Ordering ISDN Service............................................... |
69 |
|
Recommended Button Assignments................................................ |
70 |
|
Appendix B Setup Menu Tree........................................................ |
71 |
|
Appendix C Warranty and Service ................................................. |
75 |
|
Appendix D |
Specifications ............................................................. |
76 |
Factory Default Settings................................................................... |
77 |
|
Appendix E |
UL/FCC Statements ................................................... |
78 |
ii Tone Commander 6210/6220 User Manual

Introduction
General Features ________________________
Tone Commander 6210 and 6220 ISDN Telephones are easy to use multiline terminals with advanced automatic setup capabilities. S/T and U interface models are available with 10 or 20 call appearances. The phones support either National ISDN or Lucent 5ESS Custom ISDN.
Features of the 6210 and 6220 include:
• |
AutoSPID and |
• |
Automatic Switch Type |
• |
Parameter Download |
• |
Detection |
Call Log |
Message Waiting Indication |
||
• |
Call Timer |
• Ringing Control for Shared Lines |
|
• |
Last Number Redial |
• Desktop or Wall Mounting |
|
• |
Speed Dial |
• |
Tilt Display |
• |
Hot Key Dialing |
• |
Integrated Speakerphone |
• |
Direct Station Select |
• |
Voice Announce |
• |
Call Directory |
• Handset or Headset Operation |
|
• |
Flexible Ringing Options |
|
|
Models/Options _________________________
Four 6200 series ISDN telephone models are available. The models differ in the number of multifunction keys provided and type of ISDN connection.
The S/T models require an external NT1 Network Termination, such as Tone Commander’s NT1U-220TC. Two S/T telephones can share a single ISDN line in a multi-point arrangement.
U models include a built-in NT1, allowing direct connection to the ISDN line in point-to-point arrangements. An additional S/T jack allows another terminal device to be connected to the network through the built-in NT1.
Options include the 6030X Expansion Module, which adds 30 multifunction keys to any 6210 or 6220 phone, the 6001TA RS-232 Terminal Adapter for interfacing the phone with any TAPI-compliant Windows application, and the 6002TA Analog Port Terminal Adapter for interfacing with any standard analog telephone device.
Tone Commander 6210/6220 User Manual |
1 |

Model |
Multifunction Keys |
ISDN Connection |
|
6210T |
10 |
(40 with 6030X) |
S/T |
6220T |
20 |
(50 with 6030X) |
S/T |
6210U |
10 |
(40 with 6030X) |
U |
6220U |
20 |
(50 with 6030X) |
U |
Controls and Indicators __________________
2 Tone Commander 6210/6220 User Manual
1)Display – shows the call state, caller ID, dialed digits, network call control messages, and elapsed time during calls. When not on a call, the date, time of day, and softkey options are displayed.
The viewing angle can be adjusted by tilting the display, then changing the contrast setting – see page 63.
2)Softkeys (4) – select the function displayed above the key on the second line of the display.
3)Call Key – selects the Call Directory, Call Log, and Call Identification Display modes.
4)Setup Key – enters Setup Mode.
5)Done Key – exits the current menu, saves any changes made, and returns to the previous menu options.
6)More4Key – cycles through the menu option groups in Setup Mode.
7)Message Indicator – a bright red indicator is lit when messages are waiting; controlled by the network.
8)Multifunction Keys – select call appearances, activate network features, or dial personal speed dial numbers. Red and green indicators on the keys show call appearance and feature status. The optional 6030X Expansion Module provides 30 additional multifunction keys.
Call Appearance State |
Indication |
Idle |
OFF |
Call Ringing |
Green – flashing |
In Use by You |
Green – on steady |
On Hold by You |
Green – winking |
In Use at Another Terminal |
Red – on steady |
On Hold at Another Terminal |
Red – winking |
9)Volume Keys – adjust the receiver/speaker volume when on a call; adjust the ringer volume when on-hook.
10)Mute Key – mutes the microphone when using the speakerphone or handset/headset. A red indicator on the key is lit when mute is active.
Tone Commander 6210/6220 User Manual |
3 |
11)Speaker Key – enables/disables the speakerphone. A green indicator on the key is lit when the speakerphone is in use.
12)Dial Pad – dials telephone numbers, and sends DTMF tones to external equipment such as voice mail systems. The dial pad is used for number entry during setup.
13)Transfer Key – places the current call on hold, and selects an idle call appearance for transferring the call. A second press completes a transfer.
14)Conference Key – adds other parties to a conference call.
15)Drop Key – removes the last party added to a conference call, or disconnects you from a call when not in conference mode.
16)Hold Key – places a call on hold.
17)Microphone – used for hands-free (speakerphone) calling; located in front of the Hold key on the bottom of the telephone.
18)Handset/Headset Jack – a jack on the side of the telephone connects to the handset or a standard headset.
4 Tone Commander 6210/6220 User Manual
Operation
Placing a Call ___________________________
Selecting a Call Appearance
If the Call Preference option (page 61) is set to Idle or Ringing, your telephone will automatically select an idle call appearance when you go off-hook, or activate the speakerphone when you press a Speed Dial, DSS, REDIAL, dial pad, or UNANS-DIAL key while on-hook.
Automatic Call Appearance Selection
Lift the handset, press the Spkr key, or press a dial pad key to select an idle call appearance.
Manual Call Appearance Selection
Press an idle (unlit) call appearance key.
Dialing
Wait for dial tone.
Dial the number with the dial pad.
The dialed number will be displayed briefly, then the network will confirm the dialed digits in the display.
The call duration timer begins when you are connected.
Hot Key Dialing
Begin dialing by pressing a dial pad key while on-hook. An idle call appearance, if available, will be selected automatically.
Tone Commander 6210/6220 User Manual |
5 |

Last Number Redial
The Redial feature dials the last number that was dialed with the dial pad or a Speed Dial key. Digits dialed after a call is connected are not saved.
Select REDIAL to redial the last number.
Using the Call Log – refer to page 11.
Using the Call Directory – refer to page 14.
Using Speed Dial Keys
Speed Dial keys automatically dial a series of up to 24 digits when pressed. If your telephone is on-hook, an idle call appearance will be selected before dialing. If you are already on a call, the digits will be dialed using DTMF tones on that call.
Use Speed Dial keys to dial frequently-called numbers, to activate network features that include a directory number, and to speed up dialing of access numbers for voice mail, auto attendant, and similar systems.
Any unused multifunction key can be programmed as a Speed Dial key
– see page 35.
Press a Speed Dial key to dial a number.
The dialed digits will be shown in the display.
6 Tone Commander 6210/6220 User Manual

Using DSS Keys
DSS keys are a special type of Call Appearance/Directory Number keys that are programmed with speed dial numbers to provide Direct Station Selection. When the call appearance is idle or busy, DSS keys act like Speed Dial keys, to call a station. When ringing, DSS keys act like CA/DN keys, to answer a call.
Press an idle DSS key to dial the selected station number.
If the station associated with the DSS key is ringing, the call appearance will be answered.
Answering a Call ________________________
When a call is ringing, the display will show the calling number (if available) and the called number.
Lift the handset or press the Spkr key to answer the ringing call shown in the display.
To answer a different ringing call, press the ringing Call Appearance key before going off-hook.
Call Preference
If the Call Preference option (page 61) is set to Ringing, your telephone will automatically answer the ringing call shown in the display when you lift the handset or press the Spkr key.
Ringing Control
The Ringing Control option (page 60) determines how calls ring at your telephone. Individual call appearances can be set to always ring, never ring, or ring after a delay.
Tone Commander 6210/6220 User Manual |
7 |
Bridging a Shared Call Appearance ________
You can bridge (connect to) an active call on a call appearance that is shared with other terminals, unless call privacy is enabled at the network.
Press the busy Call Appearance key for the call you want to bridge.
Lift the handset or press the Spkr key.
The call duration timer begins when you are connected to the call.
To disconnect from the call, replace the handset or press the Spkr key. The other parties will remain connected.
Displaying Call Appearance Information ____
Call
Done
Press the Call key.
Select ID (Shortcut – you can skip this step and immediately press Call Appearance keys).
Press Call Appearance keys.
Network call information will be displayed for currently active keys.
"NO CALL INFORMATION" and the assigned directory number, if available, will be displayed for idle keys.
Press the Call or Done key when finished.
Holding Calls ___________________________
Press the Hold key or another Call Appearance key to place the currently connected call on hold.
The held call appearance indicator will wink with a green light.
Press the held Call Appearance key to return to the call.
8 Tone Commander 6210/6220 User Manual

Transferring Calls _______________________
Use this feature to transfer an active call to another party.
Press the Tran key while in an active call.
The current call is placed on hold, and an idle call appearance is automatically selected. The Tran indicator flashes (on some network switch types, the Conf indicator may light instead of the Tran indicator).
Dial the party you want to transfer the call to with the dial pad
or a Speed Dial key.
Wait until the called party answers to announce the call, or transfer it immediately before the called party answers.
Press the Tran key again to transfer the call.
DSS Transfer
While on an active call, press the Tran key.
Press the DSS key for the destination party.
Press the Tran key to transfer the call.
Conferencing Calls ______________________
You can initiate multi-party conference calls. Conferences are limited to 3 or 6 parties, depending on your network configuration.
Conferencing a New Call
Press the Conf key while on an active call.
The current call is placed on hold and an idle call appearance is automatically selected. The Conf indicator lights.
Dial the party you wish to add to the conference.
After the added party answers, press the Conf key to conference all parties together.
Repeat the above steps to add another party.
Tone Commander 6210/6220 User Manual |
9 |

Conferencing a Held Call
Press the Conf key while you are on an active call with another call on hold.
The current call is placed on hold and an idle call appearance is automatically selected. The Conf indicator lights.
Press the Call Appearance key for the held call you wish to add to the conference.
Press the Conf key to conference all parties together.
Repeat the above steps to add another party.
Dropping the Last Party
Press the Drop key to remove the last party added to a conference.
Terminating a Conference
Replace the handset or press the Spkr key to terminate a conference, removing yourself and all other parties.
Depending on your network configuration, other parties in the conference may remain connected or be disconnected.
Using Network Features __________________
Feature Activator keys access features provided by the telephone network. A feature is active when the key’s red indicator is on.
Some commonly available features are listed below. Consult your service provider for more information.
Call Forwarding
Forwards ringing calls to another number. When the Call Forward key indicator is lit, incoming calls will be forwarded.
10 Tone Commander 6210/6220 User Manual
Privacy
Prevents other users from bridging on your active call.
Group Call Pickup
Answers a call ringing at another telephone in your workgroup.
Directed Call Pickup
Answers a call ringing at a specified telephone.
Automatic Callback (Recall)
Calls you when a dialed busy station becomes idle, then redials the station when you answer.
Message Waiting
Lights the Message Indicator on your telephone when you have a voice mail message.
Using the Call Log _______________________
What does the Call Log Do?
The call log maintains a running list of the last 100 incoming or outgoing calls from your telephone. You can view the caller ID number (if available), the date and time of the call, and elapsed time for connected calls.
Types of Calls in the Call Log
Unanswered Incoming Calls – calls that rang at your telephone, and were not answered. Forwarded calls are not logged.
Answered Incoming Calls – calls that were answered at your telephone.
Outgoing Calls – calls originating from your telephone.
Tone Commander 6210/6220 User Manual |
11 |
Viewing the Call Log
Call Press the Call key.
CALL MENU
DIR LOG ID
Select LOG.
A password may be set to prevent unauthorized entry into your call log. When prompted for a password, enter your 4-digit password with the dial pad. Press the Done key after entering the password.
To change or remove the password, please refer to page 64.
SELECT CALL LOG TYPE
UNANS ANSWD OUT
Select the type of call you want to view – UNANS (unanswered), ANSWD (answered), or OUT (outgoing).
A key indicator will alternately flash red and green to identify the call appearance that was used for the logged call.
To view a previous (older) call in the log, select ÅBACK.
To return to the last displayed (newer) call in the log, press the
More4key.
To delete a call from the log, select DELETE.
9:42a 4/15 425-349-1234 DELETE DIAL TIME |BACK
To view the elapsed call time for answered calls, select TIME.
00:25:12 425-349-1234 DELETE DIAL DATE |BACK
To return to the time and date display, select DATE.
12 Tone Commander 6210/6220 User Manual
Shortcut to the Unanswered Call Log
If any calls ringing at your telephone were unanswered, UNANS will appear in the display. You can select UNANS to enter directly into the Unanswered call log. After you have viewed the unanswered call log, the UNANS display indication will clear until new calls are received.
Dialing a Call Log Entry
With the call you want to dial showing in the call log display, select DIAL.
An idle call appearance will be automatically selected. The directory number from the log will be shown in the second line of the display. For outgoing calls, all digits that were dialed to complete the original call are shown.
3=Dial:
4253491234
Add any required prefixes, then press the softkey under the directory number to dial the digits displayed.
3=91
4253491234
Tone Commander 6210/6220 User Manual |
13 |
Using the Call Directory __________________
What is the Call Directory?
The Call Directory is a softkey-based speed dialing system that can store up to 36 entries. A name display identifies each entry. Use the directory to store frequently-dialed numbers when additional Speed Dial keys are not available.
Directory entries are displayed on nine screen pages, with four entries per page. The current directory page number (1-9) will be shown at the upper right of the display.
Dialing from the Call Directory
Call Press the Call key.
CALL MENU
DIR LOG ID
Select DIR (Shortcut – you can skip this step and press a dial pad key to select a directory page).
DIRECTORY |
PAGE1\ |
Jim G Home |
|
More 
Call
To see a different directory page, select a page by pressing a dial pad key (1-9), or press the More4key to cycle through the nine pages until the desired page is displayed.
Press the softkey that is under the number you want to dial.
To exit the Call Directory, press the Call key again.
To add or change directory entries, see page 57.
14 Tone Commander 6210/6220 User Manual

Using the Speakerphone _________________
The speakerphone feature allows two-way hands-free conversation and on-hook dialing.
Placing and Answering Calls
The Call Preference option (page 61) determines the behavior of your telephone when the Spkr key is pressed. If this option is set to Idle or Ringing, your telephone will automatically select an idle call appearance when you press the Spkr key, or activate the speakerphone when you press a Speed Dial or DSS key while onhook.
With the Ringing option selected, you can answer a ringing call appearance by pressing the Spkr key.
Muting the Microphone
You can mute the microphone for privacy. The other party will not be able to hear you, but you can still hear the other party.
Press the Mute key to disable or enable the microphone.
The indicator light on the Mute key will be on when the microphone is muted.
Muting is turned off when you change from speakerphone to handset use.
The microphone is located in front of the rubber pad on the bottom of the telephone, in front of the Hold key.
For proper speakerphone operation, make sure that the telephone is placed directly on a hard surface, and the microphone is unobstructed.
Tone Commander 6210/6220 User Manual |
15 |

Using Voice Announce ___________________
The Voice Announce feature may be used to provide hands-free call announcing of screened calls or station-level paging when your phone is on-hook. Incoming calls that meet specific predefined criteria (see page 40) can be answered automatically by the speakerphone. The microphone can be automatically disabled for announcing only, or enabled to allow two-way conversations. You can enable or disable Voice Announce at any time.
Enabling/Disabling
When the phone is idle, the display will show the current Voice Announce state.
The Voice Announce state is shown only if Voice Announce keys have been set up as explained on page 40.
Press the softkey beneath the VA display to enable or disable Voice Announce.
UNANS VA ON
Receiving Voice Announce Calls
Calls selected for voice announcing will be answered automatically. You and the caller will hear a double beep if your microphone is muted, or a single beep if your microphone is enabled. The call will disconnect when the caller hangs up. After the call has been answered, you can pick up the handset for a private conversation, turn muting on or off, press the Spkr key to disconnect, and perform other normal call operations. Voice Announce is disabled when you are on an active call with the handset, headset, or speakerphone.
CAUTION – If Call Announce is enabled for a calling directory number, the caller should not transfer calls unscreened (blind) to your telephone, otherwise the transferred call will be answered using Voice Announce.
16 Tone Commander 6210/6220 User Manual

Using a Headset ________________________
Headset Mode Operation
Your telephone can be set for handset or headset use (see page 62). With a headset, the Spkr key is used as the hookswitch, and the speakerphone feature is disabled.
Optimizing the Phone to Match Your Headset
Headset models may vary in their microphone sensitivities and receive levels. Your telephone provides adjustments for transmit and receive levels to accommodate most headsets – see page 62.
Adjusting the Receive Volume _____________
The Vol5 and Vol6 keys adjust the receive volume level for the handset, headset, and speakerphone while you are on a call.
The telephone stores individual preset volume settings for the handset and headset. Volume settings return to the programmed preset levels after a call is completed. See page 62 to change the preset values.
Changes to speakerphone volume levels are retained after a call is completed.
Adjusting the Ringer Volume ______________
The Vol5 and Vol6 keys adjust the ringer volume while you are not on a call.
The telephone will ring once with the new ringer volume setting, and the new setting will be shown briefly in the display.
When the volume is at the lowest setting, the phone will display "RINGER OFF" instead of the date and time when idle. Press the Vol5 key while you are not on a call to enable the ringer.
RINGER OFF
REDIAL
Tone Commander 6210/6220 User Manual |
17 |
Installation
Ordering ISDN Service ___________________
ISDN ordering forms may be supplied by your service provider. You can also print forms using the PC-based Configuration Wizard. Please refer to Appendix A in this manual.
Consult your service provider to plan your service installation. Allow adequate time after cutover for testing of all call appearances and programmed features. Ask your service provider for your SPID numbers, and confirm the installation date.
6210T/6220T Installation __________________
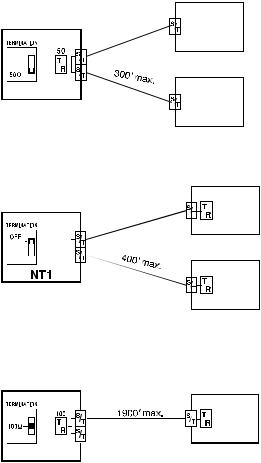
S/T models require an external NT1.
Set the Termination Switches on the Telephone and NT1
Set the termination switches on the bottom of the telephone and on the NT1 to match the termination impedance to your premises wiring configuration. Several typical wiring configurations are shown below, with the appropriate switch setting.
Available switch settings are OFF and 100 ohms.
We recommend the use of Category 3 or better unshielded twisted pair cable with T568A or T568B connector wiring. Distances shown are the maximums for 24-gauge cable, and may vary for other cable types.
18 Tone Commander 6210/6220 User Manual
Basic Multipoint:
(recommended for most applications)
|
NT1U-220TC |
|
|
6210T |
||||||||
|
|
|
or |
|||||||||
|
|
|
|
|
|
|
|
|
|
|
|
|
|
|
|
|
|
|
|
|
|
|
|
|
6220T |
|
|
|
|
|
|
|
|
|
|
|
|
|
|
|
|
|
|
|
|
|
|
|
|
Set phone termination to OFF. |
|
|
|
|
|
|
|
|
|
|
|
|
||
|
|
|
|
|
|
|
|
|
|
|
||
|
|
|
|
|
|
|
|
|
|
|
||
|
|
|
|
|
|
|
|
|
|
|
|
6210T |
|
|
|
|
|
|
|
|
|
|
|
|
|
|
|
NT1 |
||||||||||
|
|
|
||||||||||
Set NT1 termination to 50 ohms. |
|
or |
||||||||||
|
6220T |
|||||||||||
|
||||||||||||
Short Multipoint:
|
NT1U-220TC |
100 |
6210T |
||||||||||
|
|
|
|
|
or |
||||||||
|
|
|
|
|
|
|
|
|
|
|
|
|
|
|
|
|
|
|
|
|
|
|
|
|
|
|
6220T |
|
|
|
|
|
|
|
|
|
|
|
|
|
|
|
|
|
|
|
|
|
|
|
Set phone termination to 100 ohms. |
||||
|
|
|
|
|
|
|
|
|
|||||
|
|
|
|
|
|
|
|
|
|||||
|
|
|
|
|
|
|
|
|
|||||
|
|
|
|
|
|
|
|
|
|||||
|
|
|
|
|
|
|
|
|
100 |
6210T |
|||
|
|
|
|
|
|
|
|
|
|||||
|
|
|
|
|
|
|
|
|
|||||
Set NT1 termination to OFF. |
|
|
|
|
or |
||||||||
|
|
|
|
6220T |
|||||||||
|
|
|
|
||||||||||
Extended Point-to-Point:
NT1U-220TC
100 6210T
or
6220T
 Set phone termination to 100 ohms. Set NT1 termination to 100 ohms.
Line and Power Connections
Power for the telephone may be provided on PS1 (phantom power on the transmit and receive pairs from the NT1) or PS2 (power on pins 7 and 8). Tone Commander NT1U-220TC standalone NT1s and NT1U-223TC rack-mount NT1 cards provide both PS1 and PS2 power without additional connections.
Tone Commander 6210/6220 User Manual |
19 |
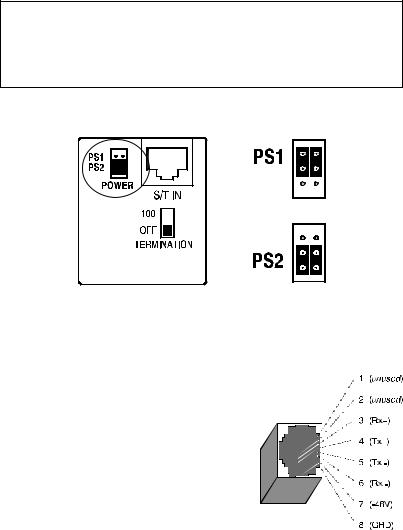
WARNING: If a separate power supply is used to provide PS2 power to the telephone, make sure that the output ground of the NT1 power supply and the PS2 power supply are connected (with the correct polarity) to a common ground reference point or electrical damage to the telephone may occur.
•If your phone is equipped with jumpers next to the S/T IN jack, set both jumpers to PS1 or PS2 as required.
default setting
•Using an 8-conductor line cord, connect the S/T IN jack on the telephone to the TERMINAL jack on the NT1. Route the cord under the guide tabs in the phone base.
Pin # |
Signal |
Wire Color |
|
|
|
T568 A |
T568 B * |
|
|
||
|
|
(AT&T 258A) |
|
|
|
|
|
|
|
|
|
5 |
Tx- |
WHT-BLU |
WHT-BLU |
|
|
|
|
||||
4 |
Tx+ |
BLU |
BLU |
|
|
1 |
unused |
WHT-GRN |
WHT-ORN |
|
|
2 |
unused |
GRN |
ORN |
|
|
3 |
Rx+ |
WHT-ORN |
WHT-GRN |
|
|
6 |
Rx- |
ORN |
GRN |
|
|
7 |
-48V |
WHT-BRN |
WHT-BRN |
|
|
8 |
GRD |
BRN |
BRN |
|
|
Modular Jack Pinout
*T568 B jacks are recommended; they allow conventional station pair ordering when connecting to S/T punchdown blocks on NT1 racks.
Handset/Headset
•Plug the supplied handset or a compatible headset into the jack on the left side of the telephone.
20 Tone Commander 6210/6220 User Manual
6210U/6220U Installation _________________
U models include a built-in NT1. Optional external ISDN S/T Terminal Equipment may share the telephone's ISDN line by connecting to the S/T jack on the telephone.
If you are not using external Terminal Equipment, no termination switch setting is required.
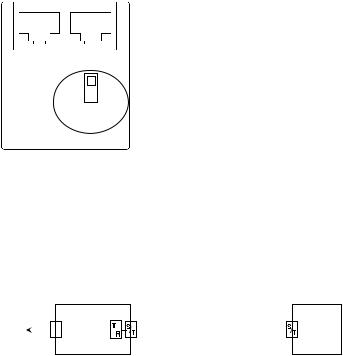
Set the Termination Switch on the Telephone
If external Terminal Equipment (TE) is connected, set the termination switch on the bottom of the telephone to match the termination impedance to your premises wiring configuration. Two typical wiring configurations for connecting external TE are shown below, with the appropriate switch settings.
U IN |
S/T OUT |
||
|
50 |
|
|
|
|
|
|
|
100 |
|
|
|
TERMINATION |
||
Available switch settings are 50 and 100 ohms.
We recommend the use of Category 3 or better unshielded twisted pair cable with T568A or T568B connector wiring. Distances shown are the maximums for 24-gauge cable, and may vary for other cable types.
Basic Multipoint:
(recommended for most applications)
|
|
|
6210U |
50 |
|
|
300' max. |
|
|
|
|
U |
or |
|
|
|
|
TE |
|
|
|
|
|
|
|
|
|||
to Network |
|
|
|
|
|||||
|
6220U |
|
|
|
|
|
|
||
|
|
|
|
|
|
|
|||
|
|
|
|
|
|
||||
|
|
|
|
|
|
|
|
|
|
Set phone termination to 50 ohms.
Set TE termination (internal or external) to OFF.
Tone Commander 6210/6220 User Manual |
21 |
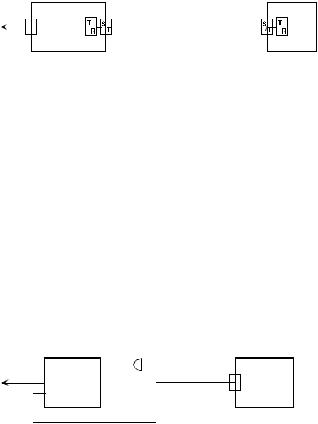
Extended Point-to-Point:
|
|
|
6210U |
100 |
|
|
1900' max. |
|
100 |
|
|
|
|
U |
or |
|
|
|
|
|
|
TE |
|
to Network |
|
|
|
|
|
|
|
||||
|
6220U |
|
|
|
|
|
|
|
|
||
|
|
|
|
|
|
|
|
|
|||
|
|
|
|
|
|
|
|
||||
|
|
|
|
|
|
|
|
|
|
|
|
Set phone termination to 100 ohms.
Set TE termination (internal or external) to 100 ohms.
Line and Power Connections
U models are powered on pin 7 (-) and pin 8 (+) of the U IN jack. PS1 and PS2 output power is supplied on the S/T OUT jack to power an additional terminal.
•Using an 8-conductor line cord, connect the U IN jack on the telephone to the line jack. Route the cord under the guide tabs in the phone base. An additional terminal may be connected to the S/T OUT jack.
•Connect the network line to the power supply (Tone Commander Part No. 901042 or equivalent), and the power supply output to the U IN jack on the phone as shown.
to Network
48 Volt |
|
|
|
|
|
|
6210U |
|
|
|
|
|
|
||
|
|
|
|
|
|
||
|
|
|
|
|
|
||
Power |
|
|
|
|
U |
or |
|
Supply |
|
|
|
|
|
6220U |
|
|
|
|
|
|
|||
|
|
|
|
|
|
|
|
Handset/Headset
•Plug the supplied handset or a compatible headset into the jack on the left side of the telephone.
22 Tone Commander 6210/6220 User Manual

Wall Mounting __________________________
Robust handset retainer clips for wall mount use are available on request from Tone Commander.
Rotating the Base
The phone base must be rotated for wall mounting.
•Disconnect the line cord.
•Remove the retaining screw in the center of the base.
•Press the top of the tall edge of the base to disengage the snap tabs, then lift the base from the telephone body.
Do not touch the expansion connector. If using the 6030X, 6001TA, or 6002TA, leave the expansion cable plugged into the phone.
•Turn the base 180°, insert the tabs on the short edge of the base into the holes near the display end of the telephone, and then snap the tall side of the base onto the telephone.
•Replace the retaining screw (required for UL compliance).
Attaching to a wall mount jack
•Plug an 8”, 8-pin line cord into the S/T IN jack (6210/6220T) or the U IN jack (6210/6220U) on the telephone. Route the cord under the guide tabs on the base. If you do not have one, you can obtain an 8” line cord by calling Tone Commander Technical Support at
(800) 524-0024.
•Hold the telephone next to the wall mount jack. Plug the line cord into the jack.
•Hang the telephone on the wall plate mounting studs. Press down firmly to lock in place.
•Push any excess line cord into the base.
Tone Commander 6210/6220 User Manual |
23 |
 Loading...