

Page 1

ROLMphone 300/600 Series
User Guide
for ROLM 9751 CBX Release 9006i
GU30-1550-03
Page 2

Warning: Hack ers a r e c r im inals who unlawfully gain access to cus tomer telecommunicati ons s ys tems to make long distance telephone calls that are then billed to the
system owner. Currently, we do not know of any telecommunications system that is
immune to this type of criminal activity. Siemens Rolm will not accept liability for any
damages, including lon g di sta n c e charges, which result from unau thorized use. Although
Siemens Rolm has designed security features into its products, it is your sole responsibility
to use the security features and to establish security practices within your company,
including training, security awareness, and call auditing.
Siemens Rolm sales and service perso nne l , as well as Sie m ens Rolm’s business partners,
are available to work with you to help you prevent this type of unauth ori zed use of your
tele-communications system.
Warning: This equipment has been tested and found to comply with the limits for a Class
A digital device, pursuant to Part 15 of the FCC Rules. These limits are designed to provide
reasonable protection against harmful interference when the equipment is operated in a
commercial environment. This equipment generates, uses, and can radiate radio frequency
energy and if not installed and used in accordance with the instruction manual, may cause
harmful interference to radio communication. Operation of this equipment in a residential
area is likely to cause harmful interference, in which case the user will be required to take
whatever measure s ma y be required to correct the i nterference at his own exp ense.
This equipment do es not exc eed Class A limits per radio noise em issions for digital
apparatus, set out in the Ra dio Interference Regula ti on of the Canadian Departmen t of
Communicati ons . Operation in a resi dential area may caus e unacceptable in terference to
radio and TV reception requiring the owner or operator to take whatever steps are necessary
to correct the interference. See instruction manual.
Cet équipement ne dépasse pas les limites de Classe A d’émission de bruits radioélectriques
pour les appareils numériques, telles que prescrit es pa r le Règlement sur le brouillage
radioélectrique établi par le ministère des Communications du Canada. L’exploitation faite
en milieu résidentiel peut entraîner le brouillag e des réceptions radio et télé, c e qui
obligerait le prop riétaire ou l’opérateur à prendre les dispositions nécessaires pour en
éliminer les causes. Voir le Guide d’i ns tructions.
All references to RS-23 2-C in this document are now repla ce d by reference to EIA-TIA232C.
October 1995
Form No. GU30-1550-03 Part No. 51A2305 EC No. A92322
No part of this publication may be reproduced, stored in a retrieval system, or transmitted,
in any form or by any means, mechanical, electronic, photocopying, recording, or
otherwise, without prior written permission of Siemens Rolm Com m unications Inc.
Request Siemens Rolm publications from your Siemens Rolm re pre sentative or the
Siemens Rolm branch servi ng you. Publications are not stocked at the address be low.
Siemens Rolm Communications Inc.
4900 Old Ironsides Drive
P.O. Box 58075
Santa Clara, CA 95052-8075
(408) 492-2000
TWX: 9103387350 ROLM SNTA B
Telex: 278156 ROLM UR
ROLM, ROLMphone, RO L M CBX, and PhoneMail are register ed trademarks and
ROLMfax is a trademark of Siemens Ro lm Com m unications Inc.
Siemens is a registered trademark of Siemens Aktiengesellschaft.
Copyright Siemens Rolm Communications Inc. 1995. All rights reserved.
Page 3

Contents
Chapter 1. Introducti on
The ROLMphone 300 and 600 Series . . . . . . . . . . . . . . . . . . . . . . . . 1-3
ROLMphone 300 Series Telephone . . . . . . . . . . . . . . . . . . . . . . . 1-4
ROLMphone 600 Series Telephone . . . . . . . . . . . . . . . . . . . . . . . 1-5
Options . . . . . . . . . . . . . . . . . . . . . . . . . . . . . . . . . . . . . . . . . . . . . 1-6
ROLMphone Basics . . . . . . . . . . . . . . . . . . . . . . . . . . . . . . . . . . . . . 1-12
Faceplate . . . . . . . . . . . . . . . . . . . . . . . . . . . . . . . . . . . . . . . . . . . . 1-12
Line Keys. . . . . . . . . . . . . . . . . . . . . . . . . . . . . . . . . . . . . . . . . . . . 1-12
Multiple Line Appearance. . . . . . . . . . . . . . . . . . . . . . . . . . . . . . . 1-12
Key Pad . . . . . . . . . . . . . . . . . . . . . . . . . . . . . . . . . . . . . . . . . . . . . 1-13
Display. . . . . . . . . . . . . . . . . . . . . . . . . . . . . . . . . . . . . . . . . . . . . . 1-13
Feature Keys . . . . . . . . . . . . . . . . . . . . . . . . . . . . . . . . . . . . . . . . . 1-14
Status Lights . . . . . . . . . . . . . . . . . . . . . . . . . . . . . . . . . . . . . . . . . 1-18
Speaker . . . . . . . . . . . . . . . . . . . . . . . . . . . . . . . . . . . . . . . . . . . . . 1-18
Speakerphone . . . . . . . . . . . . . . . . . . . . . . . . . . . . . . . . . . . . . . . . 1-18
Voice Volume Keys . . . . . . . . . . . . . . . . . . . . . . . . . . . . . . . . . . . 1-19
Sounds . . . . . . . . . . . . . . . . . . . . . . . . . . . . . . . . . . . . . . . . . . . . . . 1-20
Ring Volume . . . . . . . . . . . . . . . . . . . . . . . . . . . . . . . . . . . . . . . . . 1-22
Ring Tone . . . . . . . . . . . . . . . . . . . . . . . . . . . . . . . . . . . . . . . . . . . 1-22
Where to Go for Assistance . . . . . . . . . . . . . . . . . . . . . . . . . . . . . . . 1-23
Getting Started . . . . . . . . . . . . . . . . . . . . . . . . . . . . . . . . . . . . . . . . . . 1-24
Chapter 2. Using Your Phone
Quick and Easy . . . . . . . . . . . . . . . . . . . . . . . . . . . . . . . . . . . . . . . . . 2-3
Making a Call . . . . . . . . . . . . . . . . . . . . . . . . . . . . . . . . . . . . . . . . . . 2-4
Answering a Call . . . . . . . . . . . . . . . . . . . . . . . . . . . . . . . . . . . . . . . . 2-5
Hanging Up . . . . . . . . . . . . . . . . . . . . . . . . . . . . . . . . . . . . . . . . . . . . 2-6
Internal Calls . . . . . . . . . . . . . . . . . . . . . . . . . . . . . . . . . . . . . . . . . . . 2-7
Calling an Extension in Your Telephone System . . . . . . . . . . . . . 2-7
Features Used with Internal Calls . . . . . . . . . . . . . . . . . . . . . . . . . 2-7
External Calls . . . . . . . . . . . . . . . . . . . . . . . . . . . . . . . . . . . . . . . . . . 2-10
Calling an Outside Number. . . . . . . . . . . . . . . . . . . . . . . . . . . . . . 2-10
Features Used with External Calls . . . . . . . . . . . . . . . . . . . . . . . . 2-11
Using the Speaker . . . . . . . . . . . . . . . . . . . . . . . . . . . . . . . . . . . . . . . 2-13
Using the Speakerphone . . . . . . . . . . . . . . . . . . . . . . . . . . . . . . . . . . 2-14
Voice Transmission. . . . . . . . . . . . . . . . . . . . . . . . . . . . . . . . . . . . 2-15
Muting the Speakerphone . . . . . . . . . . . . . . . . . . . . . . . . . . . . . . . 2-16
Open Listening . . . . . . . . . . . . . . . . . . . . . . . . . . . . . . . . . . . . . . . 2-16
. . . . . . . . . . . . . . . . . . . . . . . . . . . . . . . . .
. . . . . . . . . . . . . . . . . . . . . . . . . . . .
1-1
2-1
Contents iii
Page 4

Hold . . . . . . . . . . . . . . . . . . . . . . . . . . . . . . . . . . . . . . . . . . . . . . . . . . 2-17
Putting a Call on Hold . . . . . . . . . . . . . . . . . . . . . . . . . . . . . . . . . . 2-17
When Your Party Puts You on Hold . . . . . . . . . . . . . . . . . . . . . . . 2-18
Hold on Hold . . . . . . . . . . . . . . . . . . . . . . . . . . . . . . . . . . . . . . . . . 2-18
Private Hold . . . . . . . . . . . . . . . . . . . . . . . . . . . . . . . . . . . . . . . . . . 2-18
Transfer . . . . . . . . . . . . . . . . . . . . . . . . . . . . . . . . . . . . . . . . . . . . . . . 2-20
Connect . . . . . . . . . . . . . . . . . . . . . . . . . . . . . . . . . . . . . . . . . . . . . . . 2-22
Using Your Mailbox . . . . . . . . . . . . . . . . . . . . . . . . . . . . . . . . . . . . . 2-23
Changing Your Telephone’s Ring Tone . . . . . . . . . . . . . . . . . . . . . . 2-26
Chapter 3. Making Calls
. . . . . . . . . . . . . . . . . . . . . . . . . . . . . . . .
3-1
Bridged Call . . . . . . . . . . . . . . . . . . . . . . . . . . . . . . . . . . . . . . . . . . . . 3-3
Busy Override . . . . . . . . . . . . . . . . . . . . . . . . . . . . . . . . . . . . . . . . . . 3-5
Busy Standby Queuing . . . . . . . . . . . . . . . . . . . . . . . . . . . . . . . . . . . . 3-6
Callback Request . . . . . . . . . . . . . . . . . . . . . . . . . . . . . . . . . . . . . . . . 3-7
Conference . . . . . . . . . . . . . . . . . . . . . . . . . . . . . . . . . . . . . . . . . . . . . 3-9
Consultation . . . . . . . . . . . . . . . . . . . . . . . . . . . . . . . . . . . . . . . . . . . . 3-11
Direct Station Select (DSS) . . . . . . . . . . . . . . . . . . . . . . . . . . . . . . . . 3-12
Direct Trunk Select . . . . . . . . . . . . . . . . . . . . . . . . . . . . . . . . . . . . . . 3-16
Intercom Features . . . . . . . . . . . . . . . . . . . . . . . . . . . . . . . . . . . . . . . . 3-17
Buzz . . . . . . . . . . . . . . . . . . . . . . . . . . . . . . . . . . . . . . . . . . . . . . . . 3-17
Community (Com) Group Call . . . . . . . . . . . . . . . . . . . . . . . . . . . 3-18
Community (Com) Group Speaker Call. . . . . . . . . . . . . . . . . . . . . 3-19
Mailbox Reminder Message . . . . . . . . . . . . . . . . . . . . . . . . . . . . . . . 3-21
Paging . . . . . . . . . . . . . . . . . . . . . . . . . . . . . . . . . . . . . . . . . . . . . . . . . 3-22
Repertory Dialing (Repdial) . . . . . . . . . . . . . . . . . . . . . . . . . . . . . . . . 3-23
Saved Number Redial . . . . . . . . . . . . . . . . . . . . . . . . . . . . . . . . . . . . 3-27
Speaker Calls . . . . . . . . . . . . . . . . . . . . . . . . . . . . . . . . . . . . . . . . . . . 3-29
Fixed One-Way Speaker Call. . . . . . . . . . . . . . . . . . . . . . . . . . . . . 3-29
One-Way Speaker Call. . . . . . . . . . . . . . . . . . . . . . . . . . . . . . . . . . 3-30
One-Way Broadcast Speaker Call . . . . . . . . . . . . . . . . . . . . . . . . . 3-31
Two-Way Speaker Call . . . . . . . . . . . . . . . . . . . . . . . . . . . . . . . . . 3-32
Speaker Call Rejection. . . . . . . . . . . . . . . . . . . . . . . . . . . . . . . . . . 3-33
Station Speed Dialing . . . . . . . . . . . . . . . . . . . . . . . . . . . . . . . . . . . . . 3-34
System Speed Dialing . . . . . . . . . . . . . . . . . . . . . . . . . . . . . . . . . . . . 3-39
Trunk Queuing . . . . . . . . . . . . . . . . . . . . . . . . . . . . . . . . . . . . . . . . . . 3-40
Trunk Callback Queuing . . . . . . . . . . . . . . . . . . . . . . . . . . . . . . . . 3-40
Trunk Standby Queuing. . . . . . . . . . . . . . . . . . . . . . . . . . . . . . . . . 3-41
iv ROLMphone 300/600 User Guide
Page 5

Chapter 4. Answering Calls
. . . . . . . . . . . . . . . . . . . . . . . . . . . . . .
4-1
Mailbox Reminder Messages and Notifications . . . . . . . . . . . . . . . . 4-3
Reminder Messages and Notifications on Display Phones. . . . . . 4-3
Displaying Specific Kinds of Messages and Notifications . . . . . . 4-5
Reminder Messages and Notifications on Non-Display Phones. . 4-7
Pickup . . . . . . . . . . . . . . . . . . . . . . . . . . . . . . . . . . . . . . . . . . . . . . . . 4-9
Group Pickup. . . . . . . . . . . . . . . . . . . . . . . . . . . . . . . . . . . . . . . . . 4-9
Station Pickup . . . . . . . . . . . . . . . . . . . . . . . . . . . . . . . . . . . . . . . . 4-10
Universal Night Answer . . . . . . . . . . . . . . . . . . . . . . . . . . . . . . . . 4-10
Chapter 5. Moving Calls
. . . . . . . . . . . . . . . . . . . . . . . . . . . . . . . .
5-1
Forwarding . . . . . . . . . . . . . . . . . . . . . . . . . . . . . . . . . . . . . . . . . . . . 5-3
Fixed Forwarding . . . . . . . . . . . . . . . . . . . . . . . . . . . . . . . . . . . . . 5-3
Variable Forwarding . . . . . . . . . . . . . . . . . . . . . . . . . . . . . . . . . . . 5-4
Other Forwarding Options. . . . . . . . . . . . . . . . . . . . . . . . . . . . . . . 5-10
Park . . . . . . . . . . . . . . . . . . . . . . . . . . . . . . . . . . . . . . . . . . . . . . . . . . 5-12
System Hold . . . . . . . . . . . . . . . . . . . . . . . . . . . . . . . . . . . . . . . . . . . 5-15
Chapter 6. Blocking Calls
. . . . . . . . . . . . . . . . . . . . . . . . . . . . . . .
6-1
Do Not Disturb . . . . . . . . . . . . . . . . . . . . . . . . . . . . . . . . . . . . . . . . . 6-3
Privacy . . . . . . . . . . . . . . . . . . . . . . . . . . . . . . . . . . . . . . . . . . . . . . . . 6-4
Automatic Privacy. . . . . . . . . . . . . . . . . . . . . . . . . . . . . . . . . . . . . 6-6
Chapter 7. Managerial Features
. . . . . . . . . . . . . . . . . . . . . . . . . .
7-1
Account Number . . . . . . . . . . . . . . . . . . . . . . . . . . . . . . . . . . . . . . . . 7-3
Bad Line Reporting . . . . . . . . . . . . . . . . . . . . . . . . . . . . . . . . . . . . . . 7-6
Hunt Groups . . . . . . . . . . . . . . . . . . . . . . . . . . . . . . . . . . . . . . . . . . . 7-7
Pilot Hunt Group . . . . . . . . . . . . . . . . . . . . . . . . . . . . . . . . . . . . . . 7-7
Station Hunt Group . . . . . . . . . . . . . . . . . . . . . . . . . . . . . . . . . . . . 7-8
Hunting Patterns . . . . . . . . . . . . . . . . . . . . . . . . . . . . . . . . . . . . . . 7-8
Removing Yourself from a Hunt Group . . . . . . . . . . . . . . . . . . . . 7-10
Setup . . . . . . . . . . . . . . . . . . . . . . . . . . . . . . . . . . . . . . . . . . . . . . . 7-10
PIN Authorization Features . . . . . . . . . . . . . . . . . . . . . . . . . . . . . . . . 7-14
Class of Service Changeover. . . . . . . . . . . . . . . . . . . . . . . . . . . . . 7-15
Follow-Me Forwarding . . . . . . . . . . . . . . . . . . . . . . . . . . . . . . . . . 7-16
Forced Authorization. . . . . . . . . . . . . . . . . . . . . . . . . . . . . . . . . . . 7-18
Remote Authorization . . . . . . . . . . . . . . . . . . . . . . . . . . . . . . . . . . 7-19
Trace Call . . . . . . . . . . . . . . . . . . . . . . . . . . . . . . . . . . . . . . . . . . . . . 7-21
Contents v
Page 6

Appendix A. Feature Access Codes
. . . . . . . . . . . . . . . . . . . . . . . .
A-1
Feature Access Codes . . . . . . . . . . . . . . . . . . . . . . . . . . . . . . . . . . . . A-3
Appendix B. Help!
. . . . . . . . . . . . . . . . . . . . . . . . . . . . . . . . . . . . . .
B-1
Introduction . . . . . . . . . . . . . . . . . . . . . . . . . . . . . . . . . . . . . . . . . . . . B-3
Self Test . . . . . . . . . . . . . . . . . . . . . . . . . . . . . . . . . . . . . . . . . . . . . . . B-4
Begin the Self Test. . . . . . . . . . . . . . . . . . . . . . . . . . . . . . . . . . . . . B-4
Evaluate the Self Test Results . . . . . . . . . . . . . . . . . . . . . . . . . . . . B-4
Other Problems. . . . . . . . . . . . . . . . . . . . . . . . . . . . . . . . . . . . . . . . B-5
Appendix C. ROLMphone Differences on Release 9006i
. . . . . .
C-1
Introduction . . . . . . . . . . . . . . . . . . . . . . . . . . . . . . . . . . . . . . . . . . . . C-3
Features that Have Been Changed or Replaced on Release 9006i . . C-4
New Features . . . . . . . . . . . . . . . . . . . . . . . . . . . . . . . . . . . . . . . . . . . C-8
Glossary
Index
. . . . . . . . . . . . . . . . . . . . . . . . . . . . . . . . . . . . . . . . . . . . . . .
. . . . . . . . . . . . . . . . . . . . . . . . . . . . . . . . . . . . . . . . . . . . . . . . .
G-1
I-1
vi ROLMphone 300/600 User Guide
Page 7

Tables
Table 1–1. Line Key Status Light Flash Rates . . . . . . . . . . . . . . . . 1-18
Tables vii
Page 8

viii ROLMphone 300/600 User Guide
Page 9

Figures
Figure 1–1. ROLMphone 312L and 624SL Telephones . . . . . . . . . 1-3
Figure 1–2. ROLMphone 312L Telephone . . . . . . . . . . . . . . . . . . . 1-4
Figure 1–3. ROLMphone 624SL Telephone . . . . . . . . . . . . . . . . . 1-5
Figure 1–4. DCO/HRO Module Bays and KEO Connector . . . . . . 1-6
Figure 1–5. Plugging a Headset into the HRO . . . . . . . . . . . . . . . . 1-8
Figure 1–6. Electret Headset Option . . . . . . . . . . . . . . . . . . . . . . . . 1-9
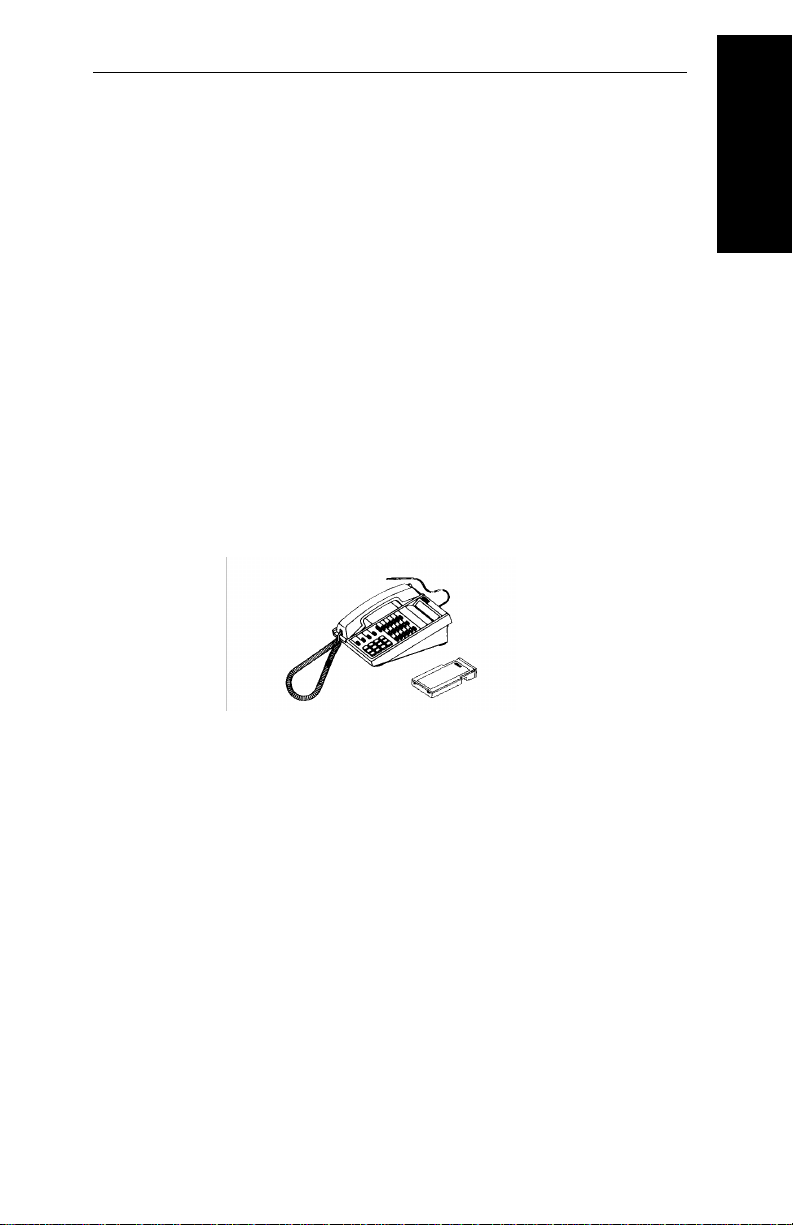
Figure 1–7. Keyboard Expansion Option (KEO) . . . . . . . . . . . . . . 1-10
Figure 1–8. Analog Adapter Option . . . . . . . . . . . . . . . . . . . . . . . . 1-11
Figures ix
Page 10

x ROLMphone 300/600 User Guide
Page 11

How To Use This Guide
This guide explains how to use the many features of
your ROLMphone 300/600 s eri es t el eph one. Be sure
to read Chapter 1, “Introduction” and Chapter 2, “Using Your Phone,” which explain the basic features of
your telephone. Then look through the rest of the
book and read about the additional features you want
to use. You don’t have to know all about your telephone in order to use any given feature.
Chapter 1
Chapter 2 Using Your Telephone
Chapter 3 Making Calls
Chapter 4 Answering Calls
Chapter 5 Moving Calls
Chapter 6 Blocking Calls
The
Introduction
helpful before you begin using your telephone. It explains the telephone models and options available in
the ROLMphone 300/600 s eries, the b asic features of
your telephone, where to go for assistance, and how to
get started using this guide.
answer calls. It also describes the difference between
internal and external calls and briefly explains the
features that can be used with them. Chapter 2 also
describes how to use a speaker, a speakerphone, the
Hold, Transfer, Connect, and Mailbox keys and how
to change a telephone’s ring tone.
use to initiate calls.
receiving calls.
forwarding calls to other extensions and placing calls
on system hold.
prevent calls from reaching your telephone.
presents information that may be
describes the many features you can
describes the features available for
explains the features available for
explains the features you can use to
explains how to make and
Chapter 7 Managerial Features
assign calls to an account, report bad lines, receive
calls through hunt groups, use PIN autho rization, and
trace calls.
describes features that let you
How To Use This Guide xi
Page 12

Appendix A Feature Access Codes
lists the codes that can be
dialed to use system features.
Appendix B Help!
presents some simple procedures you can use
to correct problems with your telephone.
Appendix C ROLMphone Differences on Release 9006i
summarizes the differences in ROLMphone features
on the Release 9006i CBX software compared to
those of previous CBX releases.
briefly
Glossary
Index
The
Glossary
explains some of the technical termi-
nology and concepts used in this guide.
The
is useful for tracking down specific infor-
Index
mation.
xii ROLMphone 300/ 600 User Guide
Page 13

Related Publications
The following list presents the titles and brief descriptions of other useful Siemens Rolm publications.
Please refer to the book’s order nu mber when requesting a publication from your Siemens Rolm representative.
Order No. Title and Description
GU30-1552
GU30-1539
GU30-1533
ROLMphone 300/600 Series Quick Reference Guide
for Release 9006i, 9751 C BX
the different telephone models and quick access to
information on the most used features. This is the
basic guide for all ROLMphone 300/600 series users
(including those who have the Data Communi cations
Option).
Customer Participation Infor m ation Guide
basic guide for the Customer Participation program.
This program allows customers to troubleshoot,
repair, and replace their own telephones. The
Customer Participation Infor m ation Guide
information on maintaining spare parts and shipping
broken telephones back to the factory for repair or
replacement.
Customer Setup Insta llation Instructions
guide for the Customer Setup program for
ROLMphone and analog telephones. The Customer
Setup program allows customers to install their own
telephones. This guide contains detailed installation
instructions for all presently ship ping Siemens Rolm
telephone products and related options.
provides a brief t ou r of
is the
provides
is the basic
GU30-1557
Problem Determination Procedures for ROLMphone
and Analog Teleph ones for Release 9 006i, 9751 CBX
is the troubleshooting guide for the Customer
Participation and Customer Setup programs. This
guide contai ns detailed troubleshooting instru ctions
for all models of ROLMphone and analog telephones.
Related Publications xiii
Page 14

xiv ROLMphone 300/60 0 U ser G uid e
Page 15

Chapter 1 Introduction
The ROLMphone 300 and 600 Series . . . . . . . . . . . . . . . . . . . . . . . . . .1–3
ROLMphone 300 Series Telephone. . . . . . . . . . . . . . . . . . . . . . .1–4
ROLMphone 600 Series Telephone. . . . . . . . . . . . . . . . . . . . . . .1–5
Options . . . . . . . . . . . . . . . . . . . . . . . . . . . . . . . . . . . . . . . . . . . . .1–6
ROLMphone Basics. . . . . . . . . . . . . . . . . . . . . . . . . . . . . . . . . . . . . . .1–12
Faceplate. . . . . . . . . . . . . . . . . . . . . . . . . . . . . . . . . . . . . . . . . . .1–12
Line Keys . . . . . . . . . . . . . . . . . . . . . . . . . . . . . . . . . . . . . . . . . . 1–12
Multiple Line Appearance . . . . . . . . . . . . . . . . . . . . . . . . . . . . .1–12
Key Pad. . . . . . . . . . . . . . . . . . . . . . . . . . . . . . . . . . . . . . . . . . . .1–13
Display . . . . . . . . . . . . . . . . . . . . . . . . . . . . . . . . . . . . . . . . . . . .1–13
Feature Keys. . . . . . . . . . . . . . . . . . . . . . . . . . . . . . . . . . . . . . . .1–14
Status Lights . . . . . . . . . . . . . . . . . . . . . . . . . . . . . . . . . . . . . . . .1–18
Speaker . . . . . . . . . . . . . . . . . . . . . . . . . . . . . . . . . . . . . . . . . . . .1–18
1. Introduction
Speakerphone . . . . . . . . . . . . . . . . . . . . . . . . . . . . . . . . . . . . . . .1–18
Voice Volume Keys . . . . . . . . . . . . . . . . . . . . . . . . . . . . . . . . . .1–19
Sounds. . . . . . . . . . . . . . . . . . . . . . . . . . . . . . . . . . . . . . . . . . . . .1–20
Ring Volume. . . . . . . . . . . . . . . . . . . . . . . . . . . . . . . . . . . . . . . .1–22
Ring Tone . . . . . . . . . . . . . . . . . . . . . . . . . . . . . . . . . . . . . . . . . .1–22
Where to Go for Assistance . . . . . . . . . . . . . . . . . . . . . . . . . . . . . . . . .1–23
Getting Started . . . . . . . . . . . . . . . . . . . . . . . . . . . . . . . . . . . . . . . . . . .1–24
Introduction 1–1
Page 16

1–2 ROLMphone 300/600 User Guide
Page 17

The ROLMphone 300 and 600 Series
Chapter 1 introduces you to the ROLMphone 300
series of telephones (RP300) and the ROLMphone
600 series of telephones (RP600), taking you on a
quick tour of their basic features.
The ROLMphone 300/600 series of telephones are
multi-featured telephones that offer a variety of options enhancing their functio nality. Your ROLMphone model may have a display, a speakerphone,
from 12 to 44 feature keys, and multiple ext e nsions
per telephone.
These digital telephones work your company’s Siemens Rolm Computerized Branch Exchange (CBX)
to give you advanced, easy-to-use telephone features.
The CBX
tions system.
is your facility’s internal telecommunica-
1. Introduction
Figure 1–1. R OLMphone 312L and 624SL Telephones
Introduction 1–3
Page 18
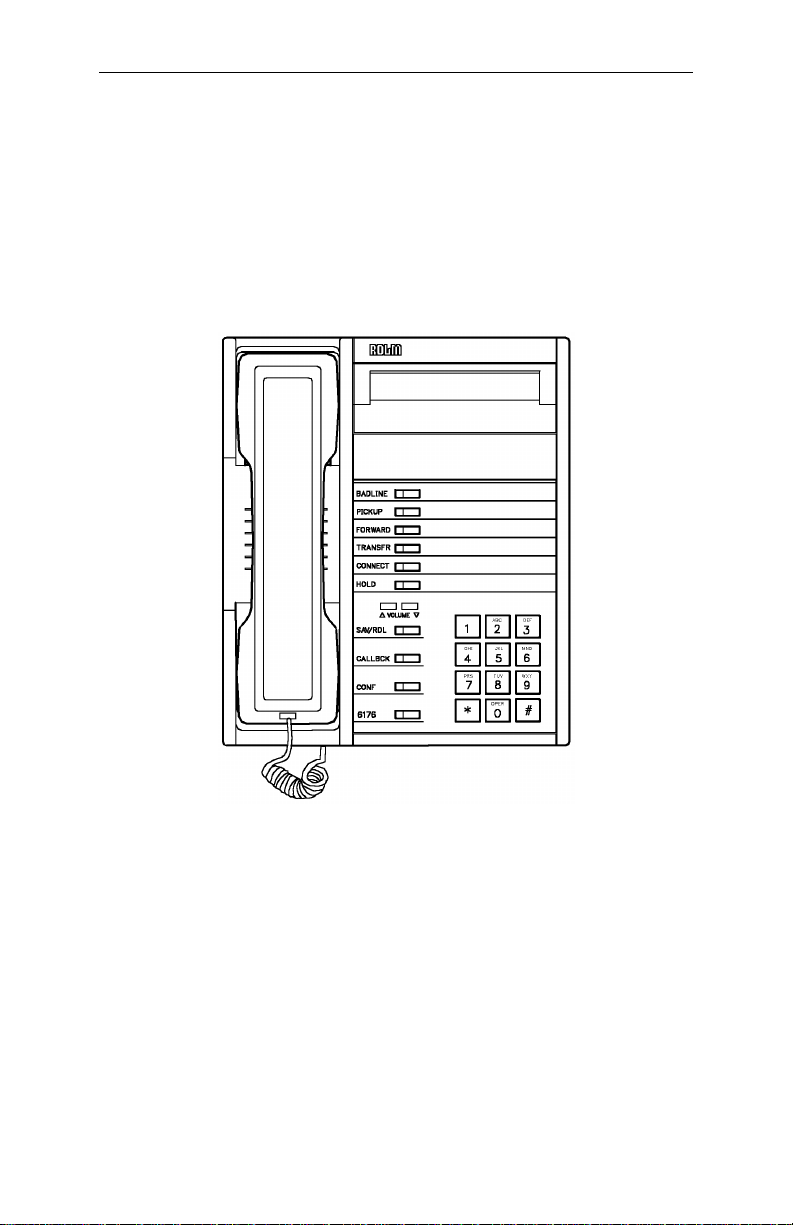
ROLMphone 300 Series Telephone
The ROLMphone 300 series offers two models.
• The RP312 has 12 feature keys and one line
extension.
• The RP312L also has a two-line display with up to
24 characters per line.
Figure 1–2. ROLMphone 312L Telephone
1–4 ROLMphone 300/600 User Guide
Page 19
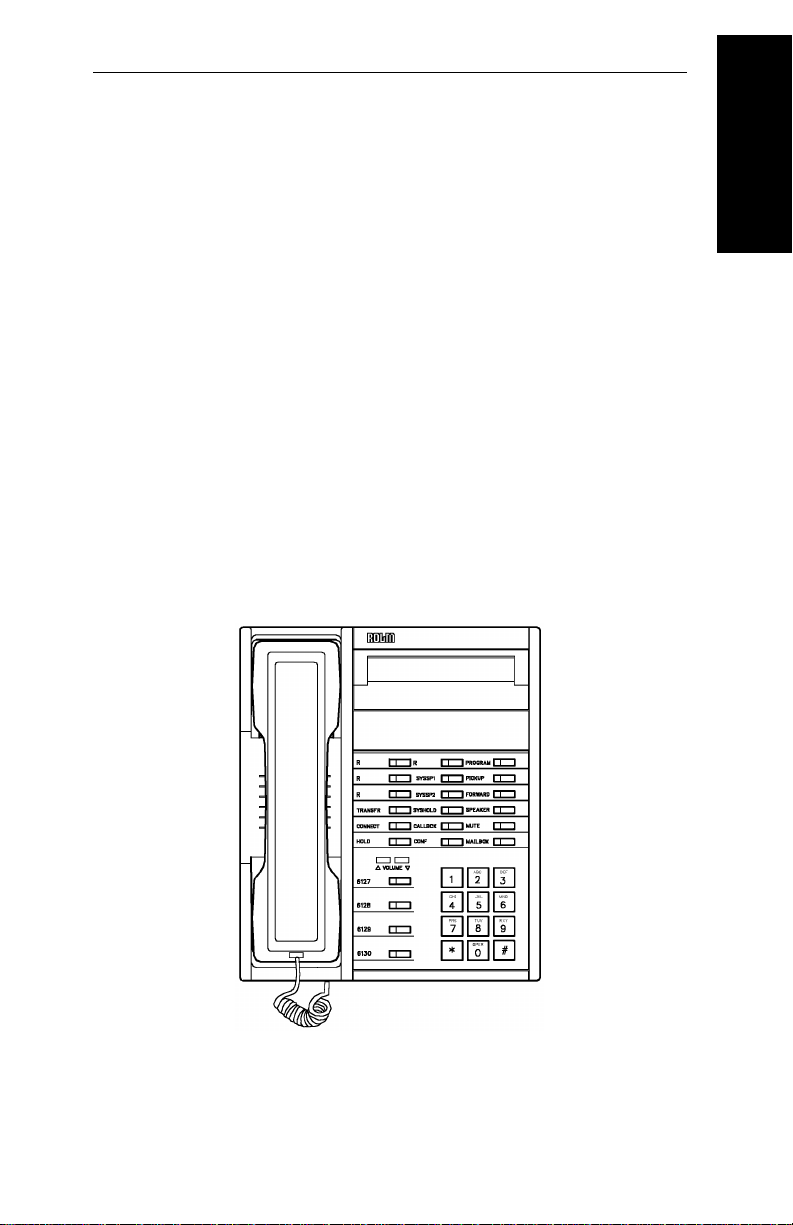
ROLMphone 600 Series Telephone
The ROLMphone 600 series offers eight models.
• The RP612 has 12 feature keys and may have
multiple line extensions.
• The RP612S also has a speakerphone.
• The RP612L has a two-line display with up to 24
characters per line.
• The RP612SL has both a speakerphone and a
display.
• The RP624 has 24 feature keys and may have
multiple line extensions.
• The RP624S also has a speakerphone.
• The RP624L has a two-line display with up to 24
characters per line.
• The RP624SL has both a speakerphone and a
display.
1. Introduction
Figure 1–3. ROLMphone 624SL Telephone
Introduction 1–5
Page 20

Options
The ROLMphone 600 series telephones are modular
and support options for data co mmuni cations , a headset/recorder connection, or additional keys. The Data
Communications Option (DCO), the Headset/Recorder Option (HRO), the Electret Headset Option
(EHO), and the Analog Adapter Option (AAO) fit
into recessed module bays on the bottom of the telephone. The Keyboard Expansion Option (KEO) plugs
into a connector provided in one of the bays. The
DCO, EHO, HRO, and AAO may be installed in either module bay. Once the KEO is installed, any of
the other options may be installed in the
module bay that has the KEO connector.
Figure 1–4. DCO/HRO Module Bays and KEO Connector
1–6 ROLMphone 300/600 User Guide
Page 21

Data Communications Option
Once the Data Communications Option (DCO) is
installed, your ROLMphone 60 0 series telephon e can
be attached to a terminal or a personal computer with
an RS-232C cable. Before the option is in stalled or
removed from your telephone, the telephone mus t be
configured accordingly at the CBX. Only one DCO
may be installed in a given telephone.
The DCO module contains a set of commands that
may be used by a software program in your personal
computer to control the telephone from your
computer keyboard or to provide asynchronous data
communications. For more information concerning
the DCO module, see the
with DCO User Guide for Release 9006i, 9751 CBX
(GU30-1551).
1. Introduction
ROLMphone 600 Series
Introduction 1–7
Page 22
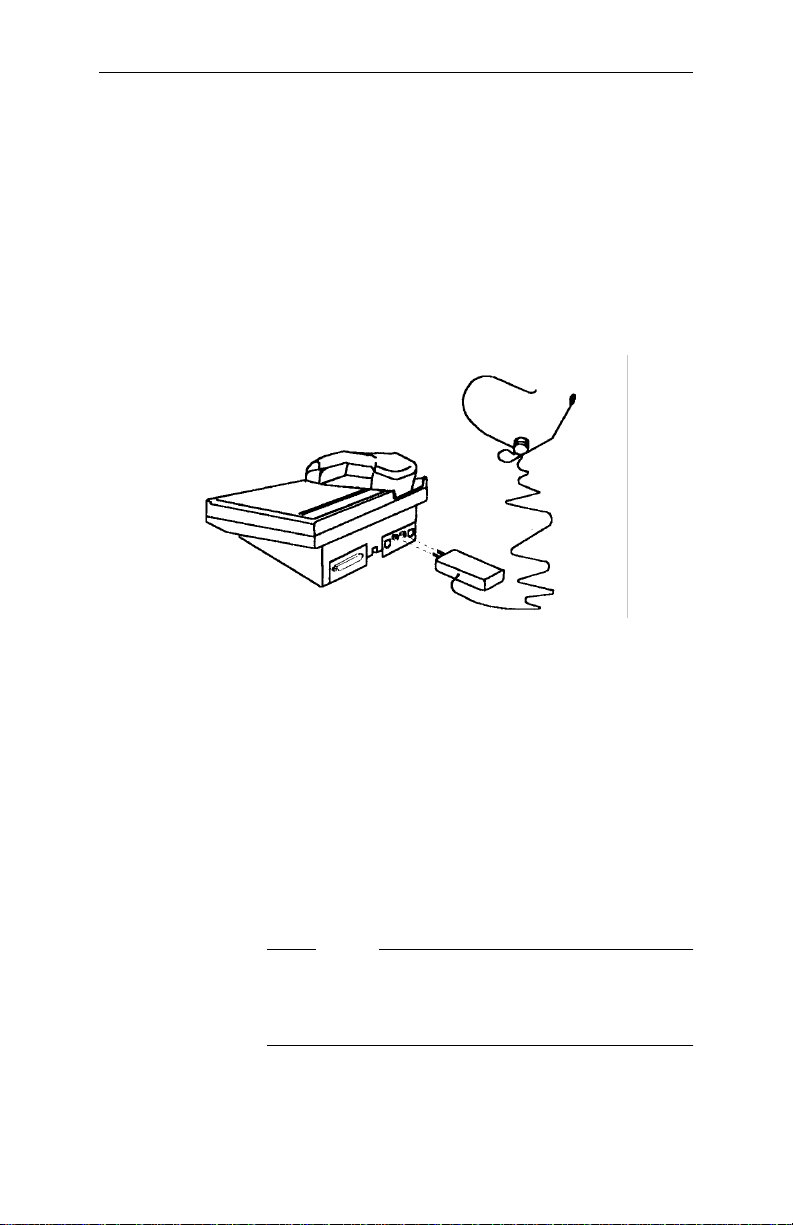
Headset/Recorder Option
The ROLMphone 600 series telephones can also
accept a module that lets you attach a headset and a
recorder: the Headset/Recorder Option (HRO). The
HRO provides for two different types of headset
connectors (the PJ327 type and the RJ8), which can
be plugged into the outlets on the back of the telephone. When a headset is plugged into the option, the
speakerphone does not function.
Figure 1–5. Plugging a Headset into the HRO
The HRO also has an RJ45 connector for plugg ing in
a tape recorder. This connector looks like a bigger
version of the RJ8 headset connector. If either your
headset or recorder is not working the way y ou thi nk
it should, make sure it is plugged into the correct HRO
connector. The HRO connectors are marked with
symbols for either a headset or a recorder.
Before the option is installed, the telephone must be
configured for it at the CBX. For more information,
see your CBX system administrator.
Note
In addition to recording the conversation of a
connected call, the recorder may also record user’s
comments between calls via the handset or headset.
1–8 ROLMphone 300/600 User Guide
Page 23

Electret Headset Option
The Electret Headset Option ( EHO) lets you plug one
or two electret headsets into the installed option and
make and answer calls using a headset instead of the
handset or the phone’s built-in microphone and
speaker. This type of headset does not require require
a headset adapter, or amplifier.
Carbon headsets will not function properl y on the
EHO.
A selection of electret Siemens Rolm headsets is
available. See your Siemens Rolm distribut o r for details.
1. Introduction
Note
Figure 1–6. Electret Headset Op tion
Introduction 1–9
Page 24
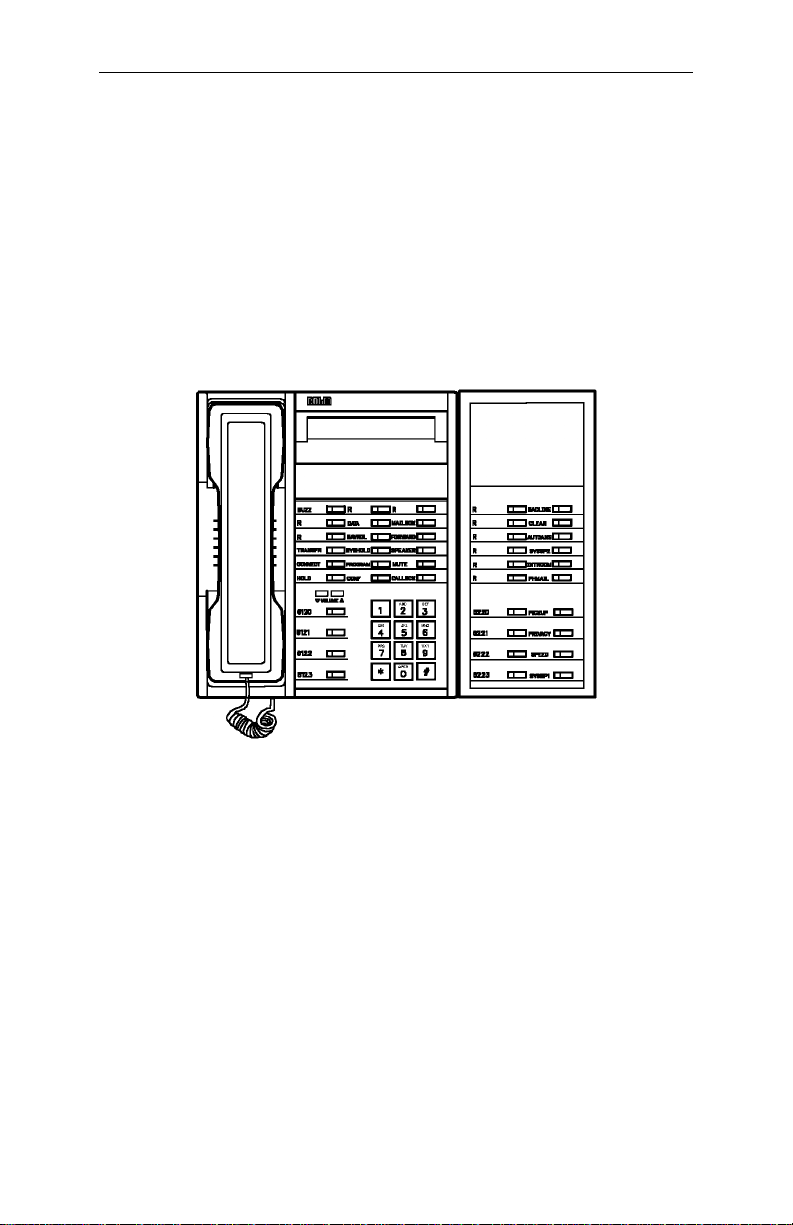
Keyboard Expansion Option
The keyboard of a ROLMphone 600 series t elephone
can be expanded with an option providing 20 additional feature or line keys and status lights. The Keyboard Expansion Option (KEO) attaches to the right
side of the telephone through a special connector and
bracket. Before the option is installed, the telephon e
must be configured for it at the CBX. For more information, see your CBX system administrator.
Figure 1–7. Keyboard Expansion Option (KEO)
1–10 ROLMphone 300 /600 User Guide
Page 25
Analog Adapter Option
The Analog Adapter Option (AAO) allows you to attach an analog device to y our RP600 series telephone.
The AAO supports the following 24-volt analog devices:
• G3 or below fax machine
• PC data communications modem
• P C fax/data modem
• analog conference room speakerphone
• external ringer/alerter
• analog telephone
A ROLMphone
must be attached to your phone for operation of the
AAO.
600 power supply (Model 66938)
1. Introduction
(art: Rios phone
Figure 1–8. Analog Adapter Option
Introduction 1–11
Page 26

ROLMphone Basics
Faceplate
The faceplate is a paper template that identifies
features that you access by pressing specific keys on
your telephone. It shows which system features have
been assigned to your telephone keys.
Line Keys
Your ROLMphone telephone has a separate line key
for every extension that appears on your telephone.
You use the line keys to answer and place calls.
Multiple Line Appearance
Your telephone may have multiple extensions, each
of which is assigned a separate line key. These line
keys can be of different types. You will have at least
one line key, called the primary line key, which
corresponds to your extension. The status light that
turns on when you pick up your handset is next to
your primary line key.
You may also have another type of line, called a
secondary line. You can use your primary line or a
secondary line to make calls.
Your primary and secondary lines may also appear as
lines (called multiple line appearances) on other
people’s phones. Each person with an appearance of
the line on his or her telephone has equal access to the
line. Also, a call can be placed on hold at one telephone, then retrieved at another telephone on which
that same line appears. See “Hold” on page 2–17 for
more information.
If you have a multiple line appearance on your telephone, you will need to know how to tell if that line is
in use. Your telephone tells you about the status of a
line through the line key’s status light. See “Status
Lights” on page 1–18 for more information.
1–12 ROLMphone 300 /600 User Guide
Page 27

Key Pad
Display
1. Introduction
Use the key pad on your telep hone just as you would
any standard telephone key pad for diali ng tele phone
numbers. You can also use your key pad to access system features available to your telephone for which
you do not have feature keys. See “Feature Access
Codes” on page 1–17 for more information.
The display at the top of the RP312L, RP612L,
RP612SL, RP624L, and RP624SL models provides
call information such as the extension calling you and,
if configured to do so, the caller’s name. It also lets
you scroll through messages and notifications waiting
in your mailbox and prov ides informat ion you’ll find
useful as you set up and use Siemens Rolm features.
Some features work differen tly on disp lay telephones
from the way they do on non-display tel ephones. Th e
feature descriptions in Chapters 2 through 7 explain
these differences.
The RP312L, RP612L, RP612SL, RP624L and
RP624SL models all have two-line displays with up
to 24 characters per line. Each extension in your system can have a 16-character name associated with it,
which is shown on the display.
On CBX Release 6.3 and higher, the elapsed time of
an incoming or outgoing external call is displayed.
Introduction 1–13
Page 28

Feature Keys
Class of Service
Feature keys give you access to CBX system features
such as Hold, Transfer, Mailbox, and Program. Press
the key labeled with the feature name to gain access
to the feature. You can also dial feature access codes
to gain access to features. (See “Feature Access
Codes” on page 1–17.)
Note
The labels used in this guide to indicate feature nam es
on keys are the defaults that come with your system.
However, your CBX system administrator can
configure them differently to suit your company’s
requirements.
Each telephone in your CB X system has a class of service (COS) that specifies the features available on that
telephone. Therefore, you may find that some features
included in this guide are not available on your telephone. Consult your CBX system administrator for
information on your telephone’s class of service.
Some of the telephones in you r system may be set up
to use one class of service (the primary) during normal business hours and then automatically change to
a more limited one (the secondary) during non-business hours. If so, the features you can use may vary,
depending on the class of service in effect at the time.
Personal Identification Number (PIN)
A personal identification number (PIN) enables you
to use another telephone within your com pany to gain
access to the features of your own telephone. You
may also need a PIN to be able to dial an outside number.
Ask your CBX system administrator whether you
have been assigned a PIN. Also see “External Calls”
on page 2–10, “PIN Authorization F eatures” on pag e
7–14, and “Forced Authorization” on page 7–18.
1–14 ROLMphone 300 /600 User Guide
Page 29

Frequently Used Keys
1. Introduction
Callback Key:
The Callback key can help you complete calls to extensions that are busy, ringing, or in
Do Not Disturb mode. (See “Callback Request” on
page 3–7 for more information.) I t also lets you return
calls to parties that have left you reminder messages
and to the PhoneMail
system. (See “Using Your
Mailbox” on page 2–23.)
Clear Key:
The Clear key can be used to remove or
cancel information shown on a phone’s display when
it is in program mode. It can also be used to drop the
last party from a conference call and the second party
from a consultation call.
.
Connect Key:
The Connect key lets you:
• reconnect with a call placed on consultation hold
• reconnect with a transferred call before the transfer
is complete
• alternate between two parties, when you have one
of them on consultation hold.
(See “Connect” on page 2–22.)
Hold Key:
The Hold key lets you temporarily hang
up a line without disconnecting the other party. (See
“Hold” on page 2–17.)
Mailbox Key:
The Mailbox key lets you receive
several kinds of messages: reminder messages,
PhoneMail notifications, and ROLM fax
notifica-
tions.
You can display a reminder message, PhoneMail or
ROLMfax notification by pressing the Mailbox key.
The Mailbox key also lets you leave reminder
messages at other extensions. (See “Using Your Mailbox” on page 2–23, for more information.)
Program Key:
The Program key is used to set up
several features, such as Repertory Dialing, Station
Speed Dialing, and Variable Forwarding.
Introduction 1–15
Page 30

Repertory Dialing (R-) Keys:
You can set up keys
for one-touch dialing of an ex t ensi o n, an outside telephone number, or a feature access code, which mak es
the key act like a feature key.
You use the Program key to set up these keys for
dialing. (See“Repertory Dialing (Repdial)” on page
3–23 for further instructions.)
Time Key:
On a display tel ephone, pressing the Time
key displays the current day, date, and time.
Transfer Key:
The Transfer key lets you transfer a
call to another extension or to the company’s operator. (See “Transfer” on page 2–20.)
The Transfer key also places any call you have in
progress on temporar y hold
1
and can be used to dial a
feature access code or a second party. (See “Feature
Access Codes” on page 1–17.)
Finally, you can press the Transfer key to establish a
conference call including yourself, a party you have
placed on consultation hold, and a party you have
dialed subsequently. (See “Consultation” on page
3–11.)
1
This temporary hold lasts only until you hang up or reco nnect to the call, or for a
predetermined length of time. If you press the Transfer key while on a call and
then hang up, the call immediately rings back on your telephone.
1–16 ROLMphone 300 /600 User Guide
Page 31

Feature Access Codes
Since a set of features has already been assigned to
your telephone’s featur e keys, you may find th at your
telephone does not have feature keys for some of the
features described in this guide. However, you can
still use any of these features that are available on
your system and permitted by your class of service by
dialing that feature’s access code, if it has one.
Throughout the remainder of this guide, the steps described for using each of the system features include
the feature key you press to access a feature and the
feature code you can dial if you do not have that feature key. If you need to know a particular feature
access code in a hurry, see “Feature Access Codes” on
page A–1, which lists these codes alphabetically.
You must have a dial tone before entering a feature
access code. If you do not have a dial tone, press the
Transfer key to get one.
1. Introduction
Note
The feature access codes listed in this guide are the
defaults that come with your system. However, your
CBX system administrator can configure them
differently to suit your company’s requirements.
Introduction 1–17
Page 32

Status Lights
Speaker
The red status lights next to the line keys tell you what
is happening on those lines.
A line key status light may turn on steadily, blink, or
flash at different rates to signal the status of that line.
Table 1–1. Line Key Status Light Flash Rates
Flash Rate Line Status
Off Available
On steady In use
Blinking Ringing
Flashing (faster) On hold
Flickering (fastest) Forwarded
Each ROLMphone 300/600 series telephone has a
speaker that you can use for receiving calls or listening to the PhoneMail system. On ROLMphone
models that only have a speaker and not a microphone, you must pick up you r hands et to speak to t he
other party. For more information about using your
speaker, see “Using the Speaker” on page 2–13.
Speakerphone
The RP612S, RP612SL, RP624S, and RP624SL
models each have a two-way speakerphone, consisting of a speaker and a microphone. You can use either
the handset or the speakerphone to make or receive
calls.
1–18 ROLMphone 300 /600 User Guide
Page 33

During a conversation, you can use your speakerphone instead of your handset by pressing the Speaker
key and hanging up the handset. If you want to swi tch
back to using your handset, pick it up. F or more information, see “Using the Speakerphone” on page 2–14.
Voice Volume Keys
Use the Volume Up (▲) and Volume Down (▼) keys
to adjust the voice volume of your telephone. While
on a call, press ▲ to raise the volume of the voice you
are hearing, or press ▼ to lower the volume of the
voice you are hearing. Press either key until you reach
the desired voice level. When you hang up or switch
to another call, the voice volume returns to the defaul t
level.
1. Introduction
Introduction 1–19
Page 34

Sounds
Your phone makes different sounds to let you know
what’s going on. Ring s occur on a line th at you are not
using and indicate that you have an incoming call.
Tones occur while you are us i ng you r phone and provide information about calls and features.
Sound Meaning
Rings Single (repeated) Internal call
Double (repeated) External call
Triple (repeated) Callback
Long (repeated) Intercom call or hunt group call
Single beep Forwarded call; also used in
connection with DSS exten sions
and intercom features.
Triple beep DSS call
Continuous Emergency call
Tones Broken dial tone , inter-
rupted every 1/2 sec.
Broken dial tone , inter-
rupted every 1 1/2 sec.
Busy tone The party you called is on the
Busy tone that changes
to a very fast busy tone
Dial tone You can make a call or invoke a
Fast busy tone Invalid call
1–20 ROLMphone 300 /600 User Guide
Y our phone is in Do Not Disturb
or Forwarding mode.
A reminder message or Phone-
Mail or ROLMfax notification
is waiting.
phone.
You cannot queue for the party
you called.
feature.
Page 35

1. Introduction
Sound
Tones, cont. Intrusion tone followed
by a ringing-beep tone
Long tone, follo wed by
an intrusion tone
repeated every 8 secs.
1-sec. tone after dialing There is a short queue for an
Ringing (ring back)
tone
Short tone ev e ry 20 sec. Internal call waiting
Single (confere nce)
tone
Steady high tone A technician is testing your
3 short tones (confirmation tone)
3 short tones followed
by dial tone
Meaning
The party you called is on the
phone, but has received a call
waiting indication . Sta y on the
phone until the party answers.
Busy override and speaker call
intrusion reminder
outgoing trunk.
The phone you calle d is ringing.
A new party has be en adde d to a
conference.
phone.
A feature has been successfully
activated.
Additional inpu t, suc h as a PIN,
is required.
30-sec. tone after
dialing
2 short tones every 20
secs.
Very short tone after
dialing
Wavering (error) tone Invalid feature request
There is a long queue for an
outgoing trunk.
External call waiting
Y ou have been routed to the next
outgoing trunk or to a more
expensive route.
Introduction 1–21
Page 36

Ring Volume
Ring Tone
Use the slide control to adjust the ringing volume of
your telephone. The slide control is located underneath the front of the ROLMphone 300/600 series
telephones. The volume remains at the level you set it
until you adjust it again.
When first installed, your telephone will have a predetermined ring. You can change your telephone’s
ring tone to any one of eight tones . For information
about how to do this, see “Changing Your Telephone’s Ring Tone” on page 2–26.
1–22 ROLMphone 300 /600 User Guide
Page 37

Where to Go for Assistance
See Appendix B, “Help!” on page B–1 for some procedures that may help y ou correct problems with your
telephone.
Although every company has its own way of handling
support for ROLMphone telephones, most have a
person responsible for making configu ration changes
and answering questions about the CBX telephone
system. This person, the CBX system administrator,
can provide you with informatio n on the featur es you
need to use and can help troubleshoot problems with
your telephone when necessary.
1. Introduction
Introduction 1–23
Page 38

Getting Started
This has been a general introduction to the RO LMphone 300/600 series t elephones. To get started us ing
your telephone, read Chapter 2, “Using Your Phone.”
1–24 ROLMphone 300 /600 User Guide
Page 39

Chapter 2 Using Your Phone
Quick and Easy. . . . . . . . . . . . . . . . . . . . . . . . . . . . . . . . . . . . . . . . . . . .2–3
Making a Call. . . . . . . . . . . . . . . . . . . . . . . . . . . . . . . . . . . . . . . . . . . . .2–4
Answering a Call . . . . . . . . . . . . . . . . . . . . . . . . . . . . . . . . . . . . . . . . . .2–5
Hanging Up . . . . . . . . . . . . . . . . . . . . . . . . . . . . . . . . . . . . . . . . . . . . . .2–6
Internal Calls . . . . . . . . . . . . . . . . . . . . . . . . . . . . . . . . . . . . . . . . . . . . .2–7
Calling an Extension in Your Telephone System. . . . . . . . . . . . .2–7
Features Used with Internal Calls. . . . . . . . . . . . . . . . . . . . . . . . .2–7
External Calls. . . . . . . . . . . . . . . . . . . . . . . . . . . . . . . . . . . . . . . . . . . .2–10
Calling an Outside Number . . . . . . . . . . . . . . . . . . . . . . . . . . . . 2–10
Features Used with External Calls . . . . . . . . . . . . . . . . . . . . . . .2–11
Using the Speaker. . . . . . . . . . . . . . . . . . . . . . . . . . . . . . . . . . . . . . . . .2–13
Using the Speakerphone. . . . . . . . . . . . . . . . . . . . . . . . . . . . . . . . . . . .2–14
Voice Transmission . . . . . . . . . . . . . . . . . . . . . . . . . . . . . . . . . .2–15
Muting the Speakerphone. . . . . . . . . . . . . . . . . . . . . . . . . . . . . .2–16
Open Listening . . . . . . . . . . . . . . . . . . . . . . . . . . . . . . . . . . . . . .2–16
Hold . . . . . . . . . . . . . . . . . . . . . . . . . . . . . . . . . . . . . . . . . . . . . . . . . . .2–17
Putting a Call on Hold . . . . . . . . . . . . . . . . . . . . . . . . . . . . . . . .2–17
When Your Party Puts You on Hold . . . . . . . . . . . . . . . . . . . . .2–18
Hold on Hold . . . . . . . . . . . . . . . . . . . . . . . . . . . . . . . . . . . . . . .2–18
Private Hold . . . . . . . . . . . . . . . . . . . . . . . . . . . . . . . . . . . . . . . .2–18
2. Using Your Phone
Transfer . . . . . . . . . . . . . . . . . . . . . . . . . . . . . . . . . . . . . . . . . . . . . . . .2–20
Connect. . . . . . . . . . . . . . . . . . . . . . . . . . . . . . . . . . . . . . . . . . . . . . . . .2–22
Using Your Mailbox. . . . . . . . . . . . . . . . . . . . . . . . . . . . . . . . . . . . . . .2–23
Changing Your Telephone’s Ring Tone . . . . . . . . . . . . . . . . . . . . . . .2–26
Using Your Phone 2–1
Page 40

2–2 ROLMphone 300/600 User Guide
Page 41

Quick and Easy
You can begin using your ROLMphone 300/600
series telephone as soon as it is pr operly ins talled and
configured at the CBX.
To make a call
from your
primary line
To make a call
from a secondary
line
To answer a call
on your primary
line
To answer a call
on another line
Lift the handset and use the key pad to dial.
➩
Lift the handset.
➩
Press the line key and use the key pad to dial.
➩
Lift the handset.
➩
Press the line key next to the blinking status
➩
light and lift the handset.
2. Using Your Phone
Using Your Phone 2–3
Page 42

Making a Call
Before dialing a number or using a feature access
code you must get a dial tone. The dial tone is an
indication that the system is ready to accept your
request.
You can get a dial tone in one of the following ways:
• by picking up the handset
• by pressing a line key
• by pressing the Speaker key
• by pressing the Transfer key during a call
This guide assumes that your telephone has been set
up at the CBX to get a dial tone in the same ways as
ROLMphone telephones have on previous CBX
releases. If your telephone has been set up differently,
the ways to get a dial tone may be different.
Note
2–4 ROLMphone 300/600 User Guide
Page 43

Answering a Call
You can answer a call in three ways:
• by picking up your handset (for a call ringing on
your primary line)
• by pressing the line key with the blinking status
light
• by pressing the Speaker key
Note
Once you have answered a call, do not press the line
key — doing so disconnects the call.
2. Using Your Phone
Using Your Phone 2–5
Page 44

Hanging Up
You can hang up in three ways:
• by hanging up your handset when you are on a
handset call
• b y pressing the li ne key when you a re on a
speakerphone call
• by pressing the Speaker key when you are on a
speakerphone call
2–6 ROLMphone 300/600 User Guide
Page 45

Internal Calls
Calling an Extension in Your Telephone System
Every telephone in your compan y’s telephone system
has an extension.
Get a dial tone.
To call another
extension
Features Used with Internal Calls
➩
Dial the extension.
➩
If you are a member of a community (com) group, you
can dial a short code instead of an extension to call
another member in your group. (See “Community
(Com) Group Call” on page 3–18.)
The following features can be used with internal calls:
2. Using Your Phone
•
Bridged Call
call on a busy multiple line appearance. (See
“Bridged Call” on page 3–3.)
•
Busy Override
busy extension. (See “Busy Override” on page
3–5.)
•
Busy Standby Queuing
until the busy extension you have dialed becomes
free. The CBX then dials the extension. (See “Busy
Standby Queuing” on page 3–6.)
•
•
- lets you signal the telephone of another
Buzz
person, such as a secretary, with a special tone. (See
“Buzz” on page 3–17.)
Callback Request
calls to busy extensions while you wait. It lets you
hang up and have the CBX call you back when th e
extension becomes free. After you answer, the
CBX dials the number for you. (See “Callback
Request” on page 3–7.)
- lets you join an existing telephon e
- lets you enter a conversation on a
- lets you stay on the line
- directs the CBX to complete
Using Your Phone 2–7
Page 46

•
Community (Com) Group Sp eaker Call
you place a two-way speakerphone call to a
member of your com group (See “Community
(Com) Group Speaker Call” on page 3–19.)
- lets
•
Conference
- lets you have up to eight parties,
including yourself, in a telephone conversation.
(See “Conference” on page 3–9.)
•
Consultation
- lets you talk privately with a second
party while the first party is waiting on consultation
hold. (See “Consultation” on page 3–11.)
•
Direct Station Select
- lets you monitor the status
of, and autodial, an extension that you specify. (See
“Direct Station Select (DSS)” on page 3–12.)
•
Fixed One-Way Speaker Call
- lets you make a
one-way call to the speaker of an extension that is
set up at the CBX as your speaker call target. (See
“Fixed One-Way Speaker Call” on page 3–29.)
•
Paging
- lets you enter an access code so that you
can deliver a message over your company ’s paging
system. (See “Paging” on page 3–22.)
•
Pickup
- lets you pick up calls ringing on other
extensions. Group Pickup le ts you pick up a call to
an extension in your pickup group. Station Pick up
lets you answer any ringing extension. Universal
Night Answer lets you answer a call to the company
operator, when the operator is off duty. (See
“Pickup” on page 4–9.)
•
Repertory Dialing (Repdial)
for one-touch dialing of telephone numbers and
feature access codes. (See “Repertory Dialing
(Repdial)” on page 3–23.)
•
Saved Number Redial
party’s extension during a call and dial it later . (See
“Saved Number Redial” on page 3–27.)
2–8 ROLMphone 300/600 User Guide
- lets you set up keys
- lets you save the called
Page 47

•
Station Speed Dialing
- lets you set up single-d igit
codes for frequently dialed extensions or feature
access codes, so that you can dial the code instead
of the whole extension or feature access code. (See
“Station Speed Dialing” on page 3–34.)
•
Two-Way Speaker Call
- lets you make a two-way
call to the speaker of another telephone. (See “TwoWay Speaker Call” on page 3–32.)
2. Using Your Phone
Using Your Phone 2–9
Page 48

External Calls
Calling an Outside Number
To call outside your CBX system, you must first dial
your trunk (outside line) access code before dialing
the number you want to reach.
If all trunks are busy when you make your call, you
will hear a fast busy tone. If your system has queuing,
you will receive the queuing tone and can then use
Trunk Callback Queuing or Trunk Standby Queuing
to wait for the next available trunk. See “Trunk Callback Queuing” on page 3–40 and “Trunk Standby
Queuing” on page 3–41.
In this guide, 9 is used as the access code for a trunk.
Your CBX system administrator can tell you your
trunk access code.
Your system’s trunk access code _______.
Your system may also pr ompt you t o enter a pers onal
identification number (PIN) to make an external call.
See “Personal Identification Number (PIN)” on page
1–14 and “Forced Authorization” on page 7–18.
Get a dial tone.
To call an
outside number
2–10 ROLMphone 300 /600 User Guide
➩
Dial 9.
➩
Listen for the external dial tone.
➩
Dial the outside number.
➩
If your system prompts you for a PIN, enter
➩
your PIN.
Page 49

Features Used with External Calls
The following features can be used with external
calls:
•
Conference
including yourself, in a telephone conversation.
The other parties can be on trunks (outside lines).
(See “Conference” on page 3–9.)
•
Consultation
while the first party is waiting on consultation hold.
(See “Consultation” on page 3–1 1.)
•
Direct Trunk Select
trunk (outside line) for placing a call. (See “Direct
Trunk Select” on page 3–16.)
•
Pickup
extensions. Group Pickup le ts you pick up a call to
an extension in your pickup group. Station Pick up
lets you answer any ringing extension. Universal
Night Answer lets you answer a call to the
company’s operator, when the o perator is o ff du ty.
(See “Pickup” on page 4–9.)
•
Repertory Dialing (Repdial)
for one-touch dialing of outside numbers and
feature access codes. (See “Repertory Dialing
(Repdial)” on page 3–23.)
•
Saved Number Redial
party’s telephone number dur in g a call and dial it
later. (See “Saved Number Redial” on page 3–27.)
- lets you have up to eight parties,
- lets you talk with a second party
- lets you access a particular
- lets you pick up calls ringing on other
- lets you set up keys
- lets you save the called
2. Using Your Phone
•
Station Speed Dialing
codes for frequently dialed telephone numbers or
feature access codes, so that you can dial the code
instead of the whole number or feature access code.
(See “Station Speed Dialing” on page 3–34.)
•
System Speed Dialing
set up at the CBX, for frequently called outside
numbers. (See “System Speed Dialing” on page
3–39.)
- lets you set up single-d igit
- lets you dial short codes,
Using Your Phone 2–11
Page 50

•
Trunk Queuing
- directs the CBX to help you
complete your call when you are trying to reach an
outside number and all trunks (outside lines) in
your company’s system are busy. Trunk Callback
Queuing lets you hang up and have the CBX call
you back when a trunk becomes free. After you
answer, the CBX dials the number. Trunk Standby
Queuing lets you stay on the line until a trunk
becomes free. The CBX then dials the number. (See
“Trunk Queuing” on page 3–40.)
2–12 ROLMphone 300 /600 User Guide
Page 51

Using the Speaker
Your telephone has a speaker that you can use for
receiving calls or listening to the PhoneMail system.
On ROLMphone models that only have a speaker and
not a microphone (RP312, RP612, and RP624), you
must lift the handset to speak to the other party.
2. Using Your Phone
To answer a call
on your primary
line
To answer a call
on another line
To hang up when
using the handset ➩
To hang up when
listening to the
speaker
➩
➩
➩
➩
When someone puts you on hold, you do not need to
hold the handset while waiting. If you have a Speaker
key, press it and replace the handset. The speaker lets
you hear your party reconne ct to the call. If you do not
have a Speaker key, press the Hold key, replace the
handset, and press the line key.
Pick up the handset. The blinking status light
next to the line key turns on steadil y.
Press the line key next to the blinking status
light.
Pick up the handset.
Hang up the handset.
Press the line key or the SPEAKER key.
Using Your Phone 2–13
Page 52

Using the Speakerphone
The RP612S, RP612SL, RP624S, and RP624SL
models have a two-way speakerphone, con sisting of a
speaker and a microphone. You can use either the
handset or the speakerphone to make or answer calls.
Press the primary line key or the SPEAKER key
To make a call
from your
primary line
To make a call
from another li ne
➩
to get a dial tone.
Use the key pad to dial the number.
➩
Press the line key to get a dial tone.
➩
Use the key pad to dial the number.
➩
To switch from
speakerphone to
handset
To switch from
handset to
speakerphone
To answer a call ➩
To hang up ➩
➩
➩
Lift the handset.
Press the SPEAKER key and hang up the
handset.
Press the line key next to the blinking status
light.
Press the line key or the SPEAKER key.
2–14 ROLMphone 300 /600 User Guide
Page 53

Voice Transmission
A ROLMphone speakerphone only allows voice
transmission in one direction at a time. Therefore, you
and the other party cannot ta lk s i mul ta neo usly. Also,
if you are speaking you may not hear voice interruptions or background noise, but this does not mean
your call has been disconnected.
If the noise level in your room is high, or the other
party is speaking too softly, you can increase the other
party’s voice volume by pressing the Volume Up ▲
key. If the other party’s voice is too loud, you can increase your ability to interrupt by pressing the
Volume Down ▼ key. If the volume adjustment
cannot compensate for the high noise level, you can
use the handset to continue the conversation.
Since the speakerphone’s microphone is located
underneath the right front side of the telephone,
objects need to be kept away from that area to ensure
clear transmission. Also, if your telephone is near a
large object that reflects sound and you are further
away from the telephone than the object is, your voice
volume may be reduced and your voice may sound
hollow to the other party. However, the party should
still be able to understand you.
2. Using Your Phone
Using Your Phone 2–15
Page 54

Muting the Speakerphone
If you have a Mute key, you can press it to turn off the
microphone, so that you can carry on a conversation
in your room that the other party on your line cannot
hear.
Mute is also helpful when someone puts yo u on hold,
since it lets you hear your party reconnect even if
there is a high noise level in your room.
During your conversation, press the MUTE
To mute the
speakerphone
➩
key.
The status light next to the MUTE key blinks to
remind you that Mute is active.
To cancel ➩
Open Listening
If you have a speakerphone, you may use your handset and, at the same time, let someone nearby listen to
the conversation over the speaker. This feature is
called Open Listening. While Open Listening is
active, someone nearby can hear your conversation,
but whatever they say will not be picked up by the
speakerphone.
To use Open
Listening during
a handset call
To use Open
Listening during
a speakerphone
call
To cancel ➩
➩
➩
Press the MUTE key or lift the handset.
During your conversation, press the SPEAKER
key.
During your conversation, lift the handset and
press the SPEAKER key.
Press the SPEAKER key again.
2–16 ROLMphone 300 /600 User Guide
Page 55

Hold
Putting a Call on Hold
The Hold key lets you temporarily hang up a line
without disconnecting the other party. If you do not
retrieve the call after a certain period of time (determined by the CBX), your telephone rings. If it is an
external call and you do not answer, the call is transferred to the operator.
If you want to make another cal l after placing a call on
hold, you must use anot her line. If your te lephone has
only one line, use the consultation feature to place another call. (See “Consultation” on page 3–11.)
Press the HOLD key.
To put a call on
hold
➩
If you were using the handset, you can hang up.
➩
The status light beside the line key flashes to
remind you that the call is on hold, and the CBX
will call you back after a certain period of time.
You can put only one call on hold per line.
2. Using Your Phone
To reconnect to
the call
To pick up a call
on hold at
another
extension
Press the line key next to the flashing status
➩
light, or pick up the handset and press the line
key.
Press the PICKUP key, or get a dial tone and
➩
dial * 3.
Dial the number of the extension at which the
➩
call was placed on hold.
Using Your Phone 2–17
Page 56

When Your Party Puts You on Hold
If you are using your handset and someone puts you
on hold, you may want to switch to your speakerphone to leave your hands free.
If you have a Speaker key, press it and hang up. Your
hands are free, and you can hear when your party reconnects to the call. Note that a high noise level near
your telephone may prevent your speak erphone from
allowing voice transmission from the
other party. (See “Voice Transmission” on page
2–15.)
If you do not have a Speaker key, press the Hold key,
replace the handset, and press the line key. The
speaker lets you hear your party reconnect to the call.
To allow you to hear your party reconnect when ther e
is a high noise level in your room, use the Mute feature. (See “Muting the Speakerphone” on page 2–16.)
Hold on Hold
When a caller has put you on hold, you can use the
Hold key to put that caller on hold, and then answ er or
make a call on another line. This is called a “hold on
hold.”
If you are unable to execut e a hold on hol d, i t may be
that the caller who put you on hold did n ot u se the
Hold key on a ROLMphone telephone.
Private Hold
Private Hold is another way to place a call in a
temporary waiting position. But with Private Hold ,
the call can only be retrieved from your telephone.
Another party cannot pick up the call from his or her
telephone, even if your line appears on their telephone.
2–18 ROLMphone 300 /600 User Guide
Page 57

To put a call on
private hold
To connect to the
call again
Press the Private Hold (HOLDPVT) key. If you
➩
have a PRIVAC Y key, its status lig ht turns on.
OR
Press the PRIVACY key, or press TRANSFR
➩
and dial # 2. The PRIVACY status light turns
on.
Press the HOLD key.
➩
The status light flashes next to the line key that
you have put on hold.
Press the line key next to the flashing status
➩
light, or lift the handset and press the line key.
2. Using Your Phone
Using Your Phone 2–19
Page 58

Transfer
The Transfer feature lets you move a call, for
example, to another party, and then hang up. The
other party can be an extension, the company operator, or an outside number if your CBX is set up to do
this. Your CBX system administrator can tell you how
to dial your company’s operator. In this guide, we
assume you dial 0 to reach your operator.
To reach your company’s operator, dial ______.
If you transfer a call to an extension and the line is
busy, the call is automatically queued for the extension and you can hang up. If the transferred call is then
not answered within a predetermined period, it is
returned to you.
If you transfer a call to an extension that rings but
does not answer within a predetermined period, the
call will also be returned to you.
If the party to which you are transferring the call does
not want to accept the call, use the Connect key to reconnect to the original party.
Ask the other party to hold.
To transfer a call
to another
extension
2–20 ROLMphone 300 /600 User Guide
➩
Press the TRANSFR key.
➩
This makes the status light next to the Connect
key flash.
Dial the extension, or dial 9 and the outside
➩
number.
If you want, announce the call er when the party
➩
you called answers.
Hang up.
➩
Page 59

To reconnect to
the original call
Note
If you have a display telephone, the display notifies
you if the extension to which you are transferring the
call is in Do Not Disturb mode. If you do not have a
display telephone and the extension is in the Do Not
Disturb mode, the CBX calls y ou back after you hang
up. When you answer, you are connected with the
original party.
Before hanging up, press the CONNECT key to
➩
rejoin the original call.
2. Using Your Phone
Using Your Phone 2–21
Page 60

Connect
The Connect key lets you:
• reconnect with a call placed on consultation hold
• reconnect with a transferred call before the transfer
is complete
• alternate between two parties, when you have one
of them on consultation hold
To reconnect
with a call ➩
Press the CONNECT key.
2–22 ROLMphone 300 /600 User Guide
Page 61

Using Your Mailbox
The Mailbox feature lets you receive and answer reminder messages and PhoneMail and ROLMfax notifications. It also lets you leave reminder requests at
other extensions.
Messages and notifications will turn on the status
light beside your Mailbox key and, on display telephones, provide information about the call.
Note
On a non-display telephone, you can receive only one
message or notification at a time.
If you have a non-display telephone with a PhoneMail
(PHMAIL) key, the status light for that key, instead of
the one for the Mailbox key, will turn on when you
have a PhoneMail message.
Press the MAILBOX key or dial # * 1 after re-
To leave a
reminder
message
➩
ceiving a busy signal or getting no answer.
The Mailbox status l ight on the tel ephone of the
party you called turns on steadily. If that
telephone has a display, the system leaves a
reminder message providing your name and the
date and time of your call.
2. Using Your Phone
To display a message or notification on a display
telephone
Press the MAILBOX key.
➩
Press it again to scroll through multiple
➩
messages and notifications until the one you
want is displayed.
Using Your Phone 2–23
Page 62

To answer a
message or
PhoneMail notification on a
display phone
To answer a
ROLMfax notification on a
display phone
Press the Callback (CALLBCK) key.
➩
The CBX automatically dials the extension that
left the message or dials the PhoneMail system.
The message or notification is cancelled when
the called party or the PhoneMail system
answers.
Press the Callback (CALLBCK) key.
➩
The CBX automatically dials the ROLMfax
system. The notification is cancelled when the
ROLMfax system answers.
To delete a displayed message
➩
or notification
To get out of a
display ➩
To answer a
➩
message or
notification on a
non-display
telephone
Press the CLEAR key.
Press the PROGRAM key.
Press the MAILBOX key.
The CBX automatically dials the extension that
left the message, or the ROLMfax system. It
cancels the message or notification when the
called party answers. PhoneMail notifications
are indicated by a separate PhoneMail
(PHMAIL) key on non-display telephones.
2–24 ROLMphone 300 /600 User Guide
Page 63

To turn off the
Mailbox status
light for a
message or
notification on a
non-display
telephone
Get a dial tone.
➩
Dial * 5 2.
➩
Hang up.
➩
Note
Turning off the Mailbox status light does not delete
messages or notifications.
2. Using Your Phone
Using Your Phone 2–25
Page 64

Changing Your Telephone’s Ring Tone
Get a dial tone.
To change your
ring tone
➩
Dial * 5 7 2.
➩
Dial single digits (1 through 8) to hear various
➩
tone pitches. If yo u have a d isp lay te lephone, it
displays the selected tone’s number. The last
tone you hear before you hang up will become
the ring tone of your telephone.
2–26 ROLMphone 300 /600 User Guide
Page 65

Chapter 3 Making Calls
Bridged Call . . . . . . . . . . . . . . . . . . . . . . . . . . . . . . . . . . . . . . . . . . . . . .3–3
Busy Override . . . . . . . . . . . . . . . . . . . . . . . . . . . . . . . . . . . . . . . . . . . .3–5
Busy Standby Queuing. . . . . . . . . . . . . . . . . . . . . . . . . . . . . . . . . . . . . .3–6
Callback Request . . . . . . . . . . . . . . . . . . . . . . . . . . . . . . . . . . . . . . . . . .3–7
Conference . . . . . . . . . . . . . . . . . . . . . . . . . . . . . . . . . . . . . . . . . . . . . . .3–9
Consultation . . . . . . . . . . . . . . . . . . . . . . . . . . . . . . . . . . . . . . . . . . . . .3–11
Direct Station Select (DSS) . . . . . . . . . . . . . . . . . . . . . . . . . . . . . . . . .3–12
Direct Trunk Select . . . . . . . . . . . . . . . . . . . . . . . . . . . . . . . . . . . . . . .3–16
Intercom Features. . . . . . . . . . . . . . . . . . . . . . . . . . . . . . . . . . . . . . . . .3–17
Buzz . . . . . . . . . . . . . . . . . . . . . . . . . . . . . . . . . . . . . . . . . . . . . .3–17
Community (Com) Group Call. . . . . . . . . . . . . . . . . . . . . . . . . .3–18
Community (Com) Group Speaker Call. . . . . . . . . . . . . . . . . . .3–19
Mailbox Reminder Message. . . . . . . . . . . . . . . . . . . . . . . . . . . . . . . . .3–21
Paging . . . . . . . . . . . . . . . . . . . . . . . . . . . . . . . . . . . . . . . . . . . . . . . . . .3–22
Repertory Dialing (Repdial). . . . . . . . . . . . . . . . . . . . . . . . . . . . . . . . .3–23
Saved Number Redial. . . . . . . . . . . . . . . . . . . . . . . . . . . . . . . . . . . . . .3–27
3. Making Calls
Speaker Calls . . . . . . . . . . . . . . . . . . . . . . . . . . . . . . . . . . . . . . . . . . . . 3–29
Fixed One-Way Speaker Call. . . . . . . . . . . . . . . . . . . . . . . . . . .3–29
One-Way Speaker Call. . . . . . . . . . . . . . . . . . . . . . . . . . . . . . . .3–30
One-Way Broadcast Speaker Call . . . . . . . . . . . . . . . . . . . . . . .3–31
Two-Way Speaker Call. . . . . . . . . . . . . . . . . . . . . . . . . . . . . . . .3–32
Speaker Call Rejection . . . . . . . . . . . . . . . . . . . . . . . . . . . . . . . .3–33
Station Speed Dialing. . . . . . . . . . . . . . . . . . . . . . . . . . . . . . . . . . . . . .3–34
System Speed Dialing . . . . . . . . . . . . . . . . . . . . . . . . . . . . . . . . . . . . .3–39
Trunk Queuing . . . . . . . . . . . . . . . . . . . . . . . . . . . . . . . . . . . . . . . . . . .3–40
Trunk Callback Queuing. . . . . . . . . . . . . . . . . . . . . . . . . . . . . . .3–40
Trunk Standby Queuing . . . . . . . . . . . . . . . . . . . . . . . . . . . . . . .3–41
Making Calls 3–1
Page 66

3–2 ROLMphone 300/600 User Guide
Page 67

Bridged Call
To join a
conversation on
a multiple line
appearance
The Bridged Call feature lets you join a call if one of
the other parties’ extensions also appears on your
telephone (a multiple line appearance).
Although the same extension may appear on several
telephones, only one of the parties with the same
multiple line appearance can use the Bridged Call
feature to join a call. Once a call has been bridged,
another party with the same multiple line appear ance
cannot then bridge into the call. Bridging also cannot
take place if either of the other original two parties are
on hold or have turned on the Privacy feature.
During a call that has been bridged, none of the parties
can use their key pads to enter feature access codes.
Press the line key whose status lig ht is on.
➩
Listen for the conference tone. Both parties on
➩
the other end will also hear the tone, and you
will be joined in a three-way conversation. With
display telephones, CONFERENCE is
displayed on your telephone and
CONFERRNG 1-2 is displayed on the bridged
party’s telephone.
3. Making Calls
Begin speaking. If you do not have a speaker-
➩
phone, you must pick up your handset to speak
to the other parties.
Making Calls 3–3
Page 68

Note
If you press the Transfer key during a bridged call,
your telephone will be removed from the call.
You cannot bridge a conversation on an exten sion set
up for Privacy. Also, once you have bridged into a
conversation, the party at that extension can exclude
you by pressing the Privacy key. (See “Privacy” on
page 6–4.)
Bridging overrides Do Not Disturb mode. (See “Do
Not Disturb” on page 6–3.)
3–4 ROLMphone 300/600 User Guide
Page 69

Busy Override
Busy Override lets you join a conversation on a busy
extension. It is intended for high priority and
emergency internal calls and requires a special class
of service. Ask your CBX system administrator
whether your telephone has been assigned this class
of service.
To break through
to a busy
extension
➩
➩
➩
Busy Override does not interrupt a privacy call or a
telephone in Do Not Disturb mode. (See “Do Not
Disturb” on page 6–3 and “Privacy” on page 6–4.)
Listen for the busy tone.
Press the Busy Override (OVERIDE) key, or
dial # # 7.
You will hear the conference tone. Both parties
on the other end will also hear the tone , and you
will be joined in a three-way conversation.
Begin speaking. A single beep will sound
periodically until the overridi ng party hangs up.
Note
3. Making Calls
Making Calls 3–5
Page 70

Busy Standby Queuing
With Busy Standby Queuing, you can stay on a line
until a busy extension th at you are trying to call
becomes free. The busy tone changes to music (or a
ringing-beep tone), indicating that you are q ueued. As
soon as the extension becomes free, your call will be
put through automatically.
Listen for a busy tone.
To standby
queue for an
extension
➩
Stay on the line until you hear music (or a ring-
➩
ing-beep tone). When t he other party hangs up,
the CBX will complete your call.
To cancel busy
standby queuing ➩
Hang up.
3–6 ROLMphone 300/600 User Guide
Page 71

Callback Request
Callback Request can help you complete calls to
extensions that are busy, ringin g, or in Do Not Disturb
mode, once those extensions become available. It lets
you hang up and have the CBX call you back with
triple rings under the following conditions:
• when a busy extension you are trying to reach
becomes free
• when a ringing extension you are trying to reach is
used again and then becomes free
When you then answer, the CBX automatically dials
the number.
While you are queued for a callback, the status light
beside your Callback (CALLBCK) key is on.
To make a callback request
➩
➩
3. Making Calls
Listen for the other party’s t elepho ne to ring or
for the busy signal.
Press the Callback (CALLBCK) key, or dial
# 1.
You will hear the confirmation tone. If you
have a display telephone, WI LL C ALL BAC K
is displayed.
To accept the
callback
Hang up.
➩
Listen for the triple rings.
➩
If you have a display telephone, FREE is
displayed, along with the extension and name of
the party calling you back.
Answer the telephone. The CBX automatically
➩
places your call.
Listen for the extension you called begin to
➩
ring.
Making Calls 3–7
Page 72

To cancel a callback request
from a display
telephone
To cancel a callback request
from a non-display telephone
Press the Callback (CALLBCK) key until the
➩
auto callback message you wish to cancel is
displayed. The status light next to the
PROGRAM key turns on, indicating that your
telephone is in program mode.
Press the CLEAR key. DELETED is displayed
➩
to confirm the cancellation.
Press the PROGRAM key to end the display.
➩
Get a dial tone.
➩
Dial # # 1.
➩
You will hear the confirmation tone.
Hang up.
➩
3–8 ROLMphone 300/600 User Guide
Page 73

Conference
To set up a
conference
The Conference feature lets you have up to eight parties, including yourself, in a telephone convers ation.
The other partie s besides yourself can be on trunks
(outside lines). Any party can leave the conference by
hanging up.
During a conversation, press the TRANSFR
➩
key to put the party on consultation hold.
You will hear the confirmation tone, followed
by the internal dial tone.
Dial the extension y ou want to add, or dial 9 and
➩
the outside number.
After the party answers, press the Conference
➩
(CONF) key to join all the parties. All parties
will hear a conference tone to signal that
another party has joined the call.
Or, if the party does not want to join the
conference, press the CONNECT key, which
will return you to the conference.
3. Making Calls
Note
If you do not have a Conference key on your
telephone, press the TRANSFR key to join all
parties.
To add another party, press the TRANSFR key
➩
and dial the next party, then pr ess CONF to join
all the parties. Everyone in the call will hear a
conference tone to signal that a new party has
joined the call.
Making Calls 3–9
Page 74

To remove the
last party from
the conference
To determine
your position in
the conference
(with a display
telephone)
Press the CLEAR key.
➩
OR
Press the TRANSFR key. The status light
➩
beside the Conference (CONF) key blinks.
Dial * * * 4.
➩
You will hear the confirmation tone.
Press the CONF key to rejoin the conference.
➩
The number of parties and your position in the
conference is displayed.
Press the TRANSFR key. The status light
➩
beside the Conference (CONF) key blinks.
Press the CONF key to rejoin the conference.
➩
You will hear the conference tone. The number
of parties and your position in the conference is
displayed.
Press TRANSFR and dial * * 4. The status light
To remove a
party from the
➩
beside the Conference (CONF) key blinks.
conference
Dial the number for the position in the confer-
➩
ence of the party you want to drop (1-8).
You will hear the confirmation tone.
Press the CONF key to rejoin the conference.
➩
You will hear the conference tone. The number
of parties and your position in the conference is
displayed.
3–10 ROLMphone 300 /600 User Guide
Page 75

Consultation
To consult with a
second party
during a call
To reconnect
with the first
party
Consultation lets you put the other party in a call on
consultation hold, so that you can call and talk
privately with a second party. You can then alternate
between the two parties or join them in a conference
call. (See “Conference” on page 3–9.)
Press the TRANSFR key to put the first party
➩
(or a conference) on consultation hold.
You will hear the confirmation tone fol lowed
by the internal dial tone. The Conn ect key status
light flashes to show that you have a party on
consultation hold.
Dial the extension or 9 and an outside number.
➩
Talk with the second party.
➩
Press the CONNECT key. You can continue to
➩
use the CONNECT key to alternate between the
two parties.
If you want to drop the second party and
reconnect with the first party, press the Clear
key while you are connected with the second
party.
3. Making Calls
If you hang up before recon necti ng to the part y
on consultation hold, the CBX will call you
back with triple rings to remind you that you
have a call waiting. Answer the call to
re-establish the connection.
Note
You cannot dial a feature access code during a
consultation call, since pressing the Transfer
key joins all parties in a conference. Feature
access codes are also not allowed during
conference calls. (See “Conference” on page
3–9.)
Making Calls 3–11
Page 76

Direct Station Select (DSS)
Direct Station Select (DSS) lets you monitor and
automatically dial or answer an extension. The status
light next to the DSS (D-) key on y our telep hone indicates whether that extension is idle, ringing, or busy.
Whenever someone is calling that extension, the
status light next to the DSS key on your telephone
blinks. Your telephone may also alert you to such a
call with a single beep, if it has been set up at the CBX
to do this. When a call is in progress on the DSS
extension, the status light turns on steadily.
When the DSS key status ligh t is off, you can dial the
DSS extension by pressing the DSS key. When the
DSS key status light is blinking, you can ans wer a call
ringing at the DSS extension by pressing the DSS ke y.
When the DSS key status ligh t is on, pressing the DSS
key will place a call to the busy extension. This call
will automatically queue until the station becomes
available. (See “Busy Standby Queuing” on page
3–6.) Before you can use this featur e, you must set up
an extension to be associated with your DSS key.
3–12 ROLMphone 300 /600 User Guide
Page 77

To set up a DSS
key
Press the PROGRAM key. The PROGRAM
➩
status light turns on. If you have a display telephone, PRESS FEATURE KEY OR DIAL
CODE is displayed.
Press the DSS (D-) key you want to set up. If
➩
you have a display telephone, DIRECT
STATION SELECT is displayed, followed by
either the stored extension or NOTHING
STORED. NEW NUMBER? is then displayed.
Enter the extension you wish to assign to this
➩
DSS key. If you make an error while entering
the dialing sequence, press the CLEAR key to
cancel your changes, then enter the extension
again.
If you want to set up another DSS key, press the
➩
STORE key. If you have a display telephone,
STORED is displayed. Rep eat the two previ ous
steps.
To end setup, press the PROGRAM key. The
➩
PROGRAM status light turns off, and
STORED is displayed if you have a display
telephone.
3. Making Calls
On your faceplate, use a pencil to label each
➩
DSS key you changed with the name or extension of the person it dials.
Making Calls 3–13
Page 78

To clear a DSS
key on a display
telephone
Press the PROGRAM key. The PROGRAM
➩
status light turns on, and PRESS FEATURE
KEY OR DIAL CODE is displayed.
Press the DSS (D-) key you want to clear.
➩
DIRECT STATION SELECT is displayed,
followed by the stored extension.
Before NEW NUMBER? is displayed, press the
➩
CLEAR key. DELETED is displayed.
If you want to clear another D-key, repeat the
➩
previous two steps.
To end setup, press the PROGRAM key. The
➩
PROGRAM status light turns off.
On your faceplate, erase the label next to each
➩
D- key you have cleared.
Note
You cannot clear a DSS key on a non-display
telephone or any telephone without a Clear key,
though you can set it up to dial a different extension.
Press the DSS (D-) key for that extension. The
To dial a DSS
extension
➩
other party will hear a triple beep.
If you press a DSS key while you are on a call,
the CBX will place the first party on
consultation hold before dialing the DSS
extension. To reconnect to the first p arty, p ress
the CONNECT key. (See “Consultation” on
page 3–11.)
Note
A DSS call overrides Forwarding and both Station
and Pilot Hunting. (See “Forwarding” on page 5–3
and “Hunt Groups” on page 7–7.)
3–14 ROLMphone 300 /600 User Guide
Page 79

To answer a DSS
extension
To answer a DSS
extension during
a call
Press the DSS (D-) key for that extension.
➩
To answer another extension for which you do
not have a DSS key, you can use the Station
Pickup feature. (See “Station Pickup” on page
4–10.)
Ask the first party to hold.
➩
Press the DSS (D-) key for that extension.
➩
3. Making Calls
Making Calls 3–15
Page 80

Direct Trunk Select
Direct Trunk Select lets you choose a particular trunk
(outside line) for placing a call.
Get a dial tone.
To choose a
trunk
➩
Press the Direct Trunk Select (DTS) key, or dial
➩
# # 8.
Dial the number assigned at the CBX for the
➩
specific trunk you want.
Dial the outside number.
➩
3–16 ROLMphone 300 /600 User Guide
Page 81

Intercom Features
Intercom features let you:
• send signals to another telephone’s speaker
• make calls to members of your community (com)
group by using a short code
• make calls to another telephone’s speaker instead
of ringing that telephone
Buzz
Buzz lets you signal another telephone’s speaker with
a special tone. For example, you might use Buzz to
signal a secretary. You can use this feature only if
your telephone has been assigned a buzz target in the
CBX. A buzz target is another digital telephone.
Press the BUZZ key. If you have a display
To buzz your
target
➩
telephone, the extension and name of your buzz
target are displayed, along with BUZZED. The
telephone that is your buzz target makes a special tone. If your buzz target has a display, your
extension and name are displayed, along with
BUZZING.
3. Making Calls
Get a dial tone.
➩
OR
Dial # * 2.
➩
You will hear the confirmation tone. If you
have a display telephone, the extension and
name of your buzz target are displayed, along
with BUZZED. The telephon e that is your buzz
target makes a special tone. If your buzz target
has a display, your extension and name are
displayed, along with BUZZING.
Hang up.
➩
Making Calls 3–17
Page 82

Note
If you are talking on the telephone, you can press the
Buzz key without interrupting your call.
Buzz overrides Do Not Disturb mode. (See “Do Not
Disturb” on page 6–3.)
Community (Com) Group Call
Community (com) group s can be set up at the CBX so
that the members of a group can call each other by
dialing a short com code instead of an extension. A
call from a com group is signalled by a long ring.
On CBX Release 9006.1, you can only be a member
of one group at a time.
On CBX Release 9006.2 and higher, you can be a
member of more than one group at a time and can be
listed in a group more than once. You can also be assigned access to groups of which you are not a member.
To call a member of your com g roup, you dial the com
group access code followed by the com code for that
member. If your telephone is a member of a com
group, your CBX system administrator can tell you
the com group access code.
Com groups are set up at the CBX. Groups of up to ten
members have one-digit codes. Groups of more than
ten members have two-digit codes. Ask your CBX
system administrator for a list of the com group members to whom you have access.
Get a dial tone.
To call someone
in a com group to
which you have
access
3–18 ROLMphone 300 /600 User Guide
➩
Dial the com group access code.
➩
Dial the member’s com code.
➩
Page 83

Note
A com group call overrides Forwarding and (on CBX
Release 9006.2 and higher) Do Not Disturb mode.
(See “Forwarding” on page 5–3 and “Do Not Disturb ”
on page 6–3.)
Community (Com) Group Speaker Call
Community (Com) Group Speaker Call lets you make
a two-way call to the speaker of another telepho ne in
your community (com) group by dialing a shor t code
instead of an extension. If the party you are calling
does not have a speakerphone, they must pick up the
handset to answer.
This feature is much like the Two-Way Speaker Call
feature, except that the party you are calling must be
a member of your community (com) group. (See
“Two-Way Speaker Call” on page 3–32.)
For more information about com groups, see “Community (Com) Group Call” on page 3–18.
3. Making Calls
To make a com
group speaker
call
Press the Intercom (INTRCOM) key, or get a
➩
dial tone and dial * * 6.
Dial the member’s com code.
➩
You will hear the confirmation tone. The other
➩
party’s telephone will beep twice.
Begin speaking. If the other party does not have
➩
a speakerphone, they must pick up the handset
to answer. You and the other party will hear repeated intrusion tones until they pick up the
handset or you hang up.
Making Calls 3–19
Page 84

If you are a member of a com group and want to make
intercom calls to the same member often, you can set
up an auto intercom repdial key. To do this, set up a
repdial key with the Intercom feature access code
( * * 6) followed by the com code of another member
in your group. (See “Repertory Dialing (Repdial)” o n
page 3–23.)
Note
A com group speaker call will override Forwarding,
Do Not Disturb mode, and both Station and Pilot
Hunting. (See “Forwarding” on page 5–3, “Do Not
Disturb” on page 6–3, and “Hunt Groups” on page
7–7.)
You cannot transfer a com group speaker call or place
it on consultation hold. In addition, you cannot dial an
account number during a com group speaker call.
If the member you are calling is busy on another li ne,
the call is converted to a regular call.
3–20 ROLMphone 300 /600 User Guide
Page 85

Mailbox Reminder Message
When you call an extension that is busy or does not
answer, the Mailbox Reminder Message feature lets
you leave a reminder message, to have the o ther party
call you back. The extension you are calling must
have a mailbox. (See “Using Your Mailbox” on page
2–23.)
For information on how to display and respond to reminder messages, see “Mailbox Reminder Messages
and Notifications” on page 4–3.
After receiving a busy tone or getting no an-
To leave a
reminder
message
➩
swer, press the MAILBOX key or dial # * 1.
You will hear the confirmation tone. If you
have a display telephone, WI LL C ALL BAC K
is displayed.
Hang up. The other party’s MAILBOX status
➩
light turns on. If the other party has a display
telephone, the system will also leave a reminder
message providing your name and the date and
time of your call.
3. Making Calls
To delete a
reminder
message you
have left on
another
telephone
Get a dial tone.
➩
Dial # * 8.
➩
You will hear the confirmation tone, followed
by the internal dial tone.
Dial the extension at which you left the re-
➩
minder message.
You will hear the confirmation tone.
Hang up.
➩
Making Calls 3–21
Page 86

Paging
To make an
announcement
Paging conne cts your teleph one to your comp any’s
loudspeaker or paging system so that you can make an
announcement. If your paging system is divided into
zones, depending upon h ow it has been set up. If your
paging system is di vided i nto zones , you may be abl e
to make an announcement to all zones or to only one
of them. Your CBX system administrator can tell you
your system paging access code or codes.
Your system’s paging access code ____ for all zon es.
Get a dial tone.
➩
Dial the paging access code for all zone s or f or
➩
the one you want.
Listen for a confirmation tone.
➩
State your message.
➩
Press the line key to h ang up. If you hang up th e
➩
handset, the noise of the handset being put
down is heard over the paging system.
3–22 ROLMphone 300 /600 User Guide
Page 87

Repertory Dialing (Repdial)
The Repertory Dialing feature lets you set up each
repdial (R-) key on your faceplate for one-touch dialing of an extension, an outside number, a feature
access code, or a combination of numbers and feature
access codes.
For example, you can set up a repdial key to dial a frequently called telephone number toget her with t he
account number to which you always want to charge
such calls. You might set up another repdial key to
forward incoming calls to the same number every
time.
The dialing sequence saved in a repdial key may include up to 22 characters. You can also pr ess a feature
key, which counts as three characters, as part of the
sequence. For example, you might enter your PhoneMail extension and then press the MUTE key as the
next part of the sequence. This would prevent office
noise from interrupting your PhoneMail messages.
On CBX Releases 9006.2 and higher, you can press
the Hold key once to enter a time delay into a repdial
sequence. For example, a delay may be needed to
process a call placed through a specialized common
carrier. On display phones, a delay appears as a “D.”
The delay is normally configured as two seconds, but
check with your CBX system administrator to determine the length of time it is set for in your system.
You can enter multiple delays in a repdial sequence,
but each delay takes up 3 characters of the 22 allowed.
3. Making Calls
Making Calls 3–23
Page 88

To set up a
repdial key
Note
CBX Releases 9006.2 and hi gher require you to press
the Transfer key (which operates like Flash in
previous releases) as the first element to of some
repdial feature access codes when you are setting
them up. This is necessary with features where you
start out with a call on your line, such as Autom atic
Privacy (to turn it off), Bad Line Repo rting, Park, and
Privacy. It alerts the CBX that a command is to be
issued from the key pad. Earlier releases do not
require this use of Transfer with repdials.
If unsure of what to do, set up your repdial without
Transfer, and if that doesn’t work, redo it with
Transfer. For a list of feature access codes, see
Appendix A, “Feature Access Codes.”
If you press a repdial key while you are on a cal l, CBX
Releases 9006.0 and 9006.1 will place the first party
on consultation hold before dialing. To return to the
first party, press the CONNECT key.
Press the PROGRAM key. The PROGRAM
➩
status light turns on. If you have a display telephone, PRESS FEATURE KEY OR DIAL
CODE is displayed.
Press the repdial (R-) key you want to set up. If
➩
you have a display telephone, REPDIAL is displayed, followed by either the dialing sequence
or NOTHING STORED. NEW NUMBER is
then displayed.
Enter the dialing sequence y ou want to assign to
➩
the R- key. If you make an er ror whi le ente ring
the dialing sequence, press the CLEAR key to
cancel your changes. Then enter the sequence
again.
3–24 ROLMphone 300 /600 User Guide
Page 89

To clear a
repdial key on a
display
telephone
If you want to set up another R- key, press the
➩
STORE key. If you have a display telephone,
STORED is displayed. Rep eat the two previ ous
steps.
To end setup, press the PROGRAM key. The
➩
PROGRAM status light turns off. If you have a
display telephone, STORED is displayed.
On your faceplate, use a pencil to label each
➩
R- key you changed with the name of the
feature or person it dials.
Press the PROGRAM key. The PROGRAM
➩
status light turns on. PRESS FEATURE KEY
OR DIAL CODE is displayed.
Press the repdial (R-) key you want to clear.
➩
REPDIAL is displayed, foll owed by the dialing
sequence.
Before NEW NUMBER? is displayed, press the
➩
CLEAR key. DELETED is then displayed.
3. Making Calls
To clear another R- key, press the STORE key.
➩
STORED is displayed. Rep eat the two previ ous
steps.
To end setup, press the PROGRAM key. The
➩
PROGRAM status light turns off.
On your faceplate, erase the label next to each
➩
R- key you have cleared.
Note
You cannot clear a repdial key on a non-display
telephone or any telephone without a Clear key,
though you can set it up to dial a different sequence.
Making Calls 3–25
Page 90

To dial using a
repdial key
Press the repdial (R-) key.
➩
3–26 ROLMphone 300 /600 User Guide
Page 91

Saved Number Redial
Saved Number Redial lets you save a number that you
have dialed. Later, you can redi al your s aved nu mber
by pressing the Saved Number Redial (SAV/RDL)
key. You can save only one number at a time; each
time you save a number, you erase the number you
had saved previously.
Press the Saved Number Redial (SAV/RDL)
To save a
number you have
dialed
To dial your
saved number
➩
key. If you have a displ ay t elepho ne, STORE D
is displayed.
Press the Saved Number Redial (SAV/RDL)
➩
key.
OR
Get a dial tone.
➩
Dial # 4.
➩
3. Making Calls
Making Calls 3–27
Page 92

To change your
saved number
manually
Press the PROGRAM key. The PROGRAM
➩
status light turns on. If you have a display telephone, PRESS FEATURE KEY OR DIAL
CODE is displayed.
Press the Saved Number Redial (SAV/RDL)
➩
key, or dial # 4. If you hav e a display teleph one,
SAVED NUMBER REDIAL is displayed
followed by either the saved number or
NOTHING STORED. NEW NUMBER is then
displayed.
Enter the number yo u want to save. If y ou make
➩
an error while entering the number, press the
CLEAR key to cancel your changes and then
enter the number again.
Press the PROGRAM key. The PROGRAM
➩
status light turns off. If you have a display telephone, STORED is displayed.
Note
You can also assign a frequently used number to a
repdial key. (See “Repertory Dialing (Repdial)” on
page 3–23.)
3–28 ROLMphone 300 /600 User Guide
Page 93

Speaker Calls
Speaker calls let you make calls to another telephone’s speaker instead of ringing that telephone.
Note
Speaker calls (except Two-Way Speaker Call) will
override Do Not Disturb, Forwarding, and Hunt
Groups. (See “Do Not Disturb” on page 6–3,
“Forwarding” on page 5–3, and “Hunt Groups” on
page 7–7.)
Speaker calls can be blocked with the Speaker Call
Rejection feature. (See “Speaker Call Rejection” on
page 3–33.)
Fixed One-Way Speaker Call
The Fixed One-Way Speaker Call feature lets you
make a one-way call to the speaker of a telephone that
is set up at the CBX (fixed) as your speaker call target.
The other party can hear you but must pick up the
handset to answer. You may want to write the name
of the person who is your speaker call target next to
the Fixed One-Way Speaker Call (SPK1WYF) key on
your telephone’s faceplate.
3. Making Calls
To make a oneway speaker call
to your target
Press the One-Way Speaker Call (SPK1WYF)
➩
key. Or get a dial tone and dial # * 4.
Listen for the confirmation tone. The other
➩
party will hear a double beep.
Begin speaking. The other party must pick up
➩
the handset to answer and will hear single beeps
periodically until they do or until you hang up.
Making Calls 3–29
Page 94

One-Way Speaker Call
The One-Way Speaker Call feature lets you make a
one-way call to the speaker of another phone. If the
other party does not have a speakerphone, they must
pick up the handset to answer.
Note
One-Way Speaker Call is only available on CBX
Release 9006.3 and higher.
Press the One-Way Speaker Call (SPK1WAY)
To make a oneway speaker call
➩
key.
Dial the extension.
➩
You will hear the confirmation tone. The other
party will hear a double beep.
OR
Get a dial tone.
➩
Dial # 8 1.
➩
You will hear the confirmation tone, followed
by a dial tone.
Dial the extension.
➩
You will hear a confirmation tone. The other
party will hear a double beep.
Begin speaking. The other party must pick up
➩
the handset to answer and will hear single beeps
periodically until they do or until you hang up.
3–30 ROLMphone 300 /600 User Guide
Page 95

One-Way Broadcast Speaker Call
The One-Way Broadcast Speaker Call feature lets you
make a one-way call to the speakers of up to 40
phones that are multiple line appearances of the same
extension. To use this feat ure, y ou m us t b e set up for
it on your CBX.
Note
One-Way Broadcast Speaker Call is only available on
CBX Release 9006.3 and higher.
Press the One-Way Broadcast Speaker Call
To make a oneway broadcast
speaker call
➩
(SPKBCST) key.
You will hear the confirmation tone, followed
by a dial tone.
OR
Get a dial tone and dial # 8 0.
You will hear the confirmation tone, followed
by a dial tone.
3. Making Calls
Dial the extension.
➩
You will hear the confirmation tone. The other
parties will hear a special tone.
Begin speaking. The other party must pick up
➩
the handset to answer.
If one of the parties you have called lifts his
handset, a two-way (not speakerphone)
connection will be established with that party.
The other parties will be disconnected.
A party you have called can disconnect by
Making Calls 3–31
Page 96

pressing the line key or the SPEAKER key. If
this party is the last one in the multiple line
appearance, the call is disconnected.
Two-Way Speaker Call
The Two-Way Speaker Call feature lets you make a
two-way call to the speaker of another telephone. If
the other party does not have a speakerphone, they
must pick up the handset to answer.
Press the Two-Way Speaker Call (SPK2WAY)
To make a twoway speaker call
➩
key.
Dial the extension.
➩
You will hear a single beep. The other party will
hear a double beep.
Begin speaking. If the other party does not have
➩
a speakerphone, they must pick up the handset
to answer. You and the other party will hear
single beeps periodically until the other party
picks up the handset.
To make a two-way call to the speaker of a telephone
within your com group, use the Intercom Call feature.
(See “Community (Com) Group Speaker Call” on
page 3–19.)
You can make a two-way speaker call to a DSS extension by pressing the Two-Way Speaker Call
(SPK2WAY) k ey and then pressing the DSS key.
(See “Direct Station Select (DSS)” on page 3–12.)
3–32 ROLMphone 300 /600 User Guide
Page 97

Speaker Call Rejection
Speaker Call Rejection lets you temporarily block
incoming speaker calls. If another party attempts to
make a speaker call to your telephone, they will
receive a busy tone. If they have a di splay telepho ne,
PLEASE TRY LATER is also displayed. For information about the types of calls the Speaker Call
Rejection feature will block, see “Fixed One-Way
Speaker Call” on page 3–29 and “Two-Way Speaker
Call” on page 3–32.
Press the Speaker Call Rejection (SPK-REJ)
To block incoming speaker calls
➩
key. The SPK-REJ status light turns on.
To allow incoming speaker calls
Press the Speaker Call Rejection (SPK-REJ)
➩
key. The SPK-REJ status light turns off.
Note
Whether your telephone initially allo ws or blocks
speaker calls depends on how your telephone has
been set up at the CBX.
3. Making Calls
Making Calls 3–33
Page 98

Station Speed Dialing
The Station Speed Dialing feature lets you assign
frequently used dialing sequences to codes for easy
dialing.
You can assign dialing sequences to each of ten single-digit codes (0 through 9). You can then dial a single-digit code instead of dialing the entire sequence.
On CBX Release 6.3 and higher, you can also be set
up at the CBX for mor e than 30 codes, in groups of 1 0.
If you are set up for more than ten, they follow a double-digit scheme (00 through 29).
A dialing sequence can be an extension, an outside
number, a feature access code (or feature key that you
press as part of the sequence), or a combination of
numbers and feature access codes and can include up
to 22 characters. A feature key entered into a sequence counts as three characters.
Station speed codes are not line dependent; you can
set them up or dial them from any line on your telephone.
3–34 ROLMphone 300 /600 User Guide
Page 99

To set up a
station speed key
on a display
telephone
Press the PROGRAM key. The PROGRAM
➩
status light turns on. PRESS FEATURE KEY
OR DIAL CODE is displayed.
Press the Station Speed (SPEED) key, or dial
➩
# # 3. SPEED DIAL is displayed.
Enter the Station Speed code you want to set up
➩
(0 through 9, or 00 through 29 if you are set up
for more than 10 codes).
Either the dialing sequence or NOTHING
STORED is displayed. (You can view the contents of other codes by entering those codes
now.)
Wait until NEW NUMBER? is displa yed.
➩
Enter the dialing sequence y ou want to assign to
➩
the code. If you make an error while entering
the dialing sequence, press the CLEAR key to
cancel your changes and the enter the sequence
again.
If you want to set up another stat ion speed code,
➩
press the STORE key. STORED is displayed.
Before PRESS FEATURE KEY OR DIAL
CODE is displayed, repeat the three previous
steps.
3. Making Calls
To end setup, press the PROGRAM key. The
➩
PROGRAM status light turns off, and
STORED is displayed.
Making Calls 3–35
Page 100

To set up a
station speed key
on a non-display
telephone
Press the Station Speed (SPEED) key twice.
➩
You will hear the confirmation tone, followed
by the internal dial tone.
Enter the station speed co de y ou want to set up
➩
(0 through 9, or 00 t hro ugh 29 if you are set up
for more than 10 codes).
You will hear the confirmation tone.
Enter the dialing sequence y ou want to assign to
➩
the code.
Hang up.
➩
OR
Get a dial tone.
➩
Dial # # 3.
➩
Enter the station speed co de y ou want to set up
➩
(0 through 9, or 00 t hro ugh 29 if you are set up
for more than 10 codes).
You will hear the confirmation tone.
Enter the dialing sequence y ou want to assign to
➩
the code.
Hang up.
➩
Note
You can also assign a dialing sequence to a repdial
key. (See “Repertory Dialing (Repdial)” on page
3–23.)
3–36 ROLMphone 300 /600 User Guide
 Loading...