

Page 1

MONITOR
.com Betriebsanleitung / Operating Manual
463V FA
Deutsch - English
Page 2

Sie haben ...
... technische Fragen oder Probleme?
Wenden Sie sich bitte an
unseren Help Desk (siehe Garantiehef t ).
Aktuelle Informationen zu unseren Produkten, Tipps, Updat es usw. finden Sie im Internet:
http://www.fujitsu-siemens.com
Are there ...
... any technical problems or other
questions you need clarifi ed?
Please contact
our Help Desk (see Warranty Booklet).
The latest information on our produc t s, tips, updates, et c., can be found on the Internet under:
http://www.fujitsu-siemens.com
Page 3

Page 4

Dieses Handbuch wurde auf Recycling-Papier gedruckt.
636
9
This manual has been printed on recycled paper.
Ce manuel est imprimé sur du papier recyclé.
Este manual ha sido impreso sobre papel reciclado.
Questo manuale è stato stampato su carta da riciclaggio.
Denna handbok är tryckt på recyclingpapper.
Dit handboek werd op recycling-papier gedrukt.
Herausgegeben von/Published by
Fujitsu Siemens Computers GmbH
Bestell-Nr./Order No.:
Printed in Taiwan
AG 0502 05/02
A2
1-K864-Z100-1-5E1
A26361-K864-Z100-1-5E19
Page 5
463V FA
LCD-Bildschirm
LCD monitor
Deutsch
English
Betriebsanleitung
Operating Manual
Ausgabe Mai 2002
May 2002 edition
Page 6

VESA, DDC und DPMS sind eingetragene Warenzeic hen der Video Electronics St andards
Association.
Alle Rechte vorbehalten, i nsbesondere (auch auszugsweise) die der Übersetzung, des
Nachdrucks, der Wiedergabe durch Kopieren oder ähnliche Verfahren.
Zuwiderhandlungen verpflichten zu S chadenersatz.
Alle Rechte vorbehalten, insbesondere für den Fall der Patenterteilung oder GM -Eintragung.
Liefermöglichkeiten und technische Änderungen vorbehalten.
Dieses Handbuch wurde erstellt von
cognitas. Gesellschaft für Technik-Dokumentation mbH
www.cognitas.de
Copyright ã Fujitsu Siem ens Computers GmbH 2002
VESA, DDC and DPMS are registered trademarks of Video Electronics Standards
Association.
All rights, includi ng ri ghts of translation, reproduction by printing, copying or s i m i l ar m ethods,
even of parts are reserved.
Offenders will be liable for damages.
All rights, including rights creat ed by patent grant or registration of a utilit y model or design,
are reserved.
Delivery subject to availability. Right of technical modification reserved.
This manual was produced by
cognitas. Gesellschaft für Technik-Dokumentation mbH
www.cognitas.de
Page 7

Contents
Introduction........................................................................................................................................1
Notational conventions ..............................................................................................................2
Important notes..................................................................................................................................2
Safety........................................................................................................................................2
Cleaning ....................................................................................................................................3
Transport...................................................................................................................................3
Energy Star Guidelines..............................................................................................................4
CE marking................................................................................................................................4
FCC Class B Compliance Statement.........................................................................................4
Declaration of Conformity ..........................................................................................................5
Power cable...............................................................................................................................5
Disposal and recycling...............................................................................................................6
Checking the contents of the consignment ........................................................................................6
Installing an ergonomic video workstation..........................................................................................7
Connecting the monitor......................................................................................................................7
Connecting cables to the monitor...............................................................................................8
Connecting cables to the computer............................................................................................9
Operation of the monitor....................................................................................................................9
Adjusting rake and rotation........................................................................................................9
Switching the monitor on/off.....................................................................................................10
Notes on power management..................................................................................................10
Changing the monitor settings .................................................................................................11
Notes on ergonomic colour adjustment............................................................................................17
Removing the monitor base .............................................................................................................18
Technical data................................................................................................................................. 18
VESA-DDC-compatible VGA interf ace.....................................................................................19
Preset operating modes...........................................................................................................20
Pin assignment D-SUB............................................................................................................20
Monitor port DVI-D...................................................................................................................21
Trouble shooting..............................................................................................................................21
A26361-K864-Z100-1-5E19 English
Page 8

Page 9

Introduction
Your new LCD (Liquid Crystal Display) monitor 463V FA offers numerous features and functions, for
example:
· TFT display (Thin Film Transistor; active matrix)
· minimal space requirements thanks to slim cas i ng
· optimum ergonomic charact eri stics (totally di stortion-free, excellent pi cture definition and colour
purity right into the corners)
· high degree of brightness and good contras t
· high resolution (1280x1024) for displaying the information content of a conventional 21-inch
screen with CRT (Cathode Ray Tube)
· presentation of up to 16.7 million colours (i n conjunction with an appropriate graphics card)
· automatic scanning of hori zontal frequencies from 30 to 82 kHz and refresh rates (vertic al
frequencies) from 56 to 76 Hz (abs ol utely flicker-free)
· digital screen controlle r wi t h microprocessor for stori ng 26 di fferent display modes
· freely adjustable colour ali gnm ent for matching the screen c ol ours to the colours of various
input and output devices
· convenient operation via int egrated OSD (On-Screen-Display) menu
· VESA-DDC compatibility
· VESA-FPMPMI compatibility (Flat Panel Monitor Physical Mounting Int erf ace) - mechanical
interface to swivel arm and wall bracket)
· plug&play capability
· power management for reducing power consumption when the computer is not in us e
· compliance with the recom m endations in accordance with TCO ’99
In normal screen mode (dark charac ters against a light background) the monitor satisfies the
ergonomic requirements for the GS symbol.
This Operating Manual contains i mportant information you require to start up and run your LCD
monitor.
A graphics card (screen c ontroller) with VGA interfac e or a di gi tal graphics card with DVI i nterface is
required to control the 463V FA LCD monitor. The monitor processes the data supplied to it by the
screen controller. The sc reen controller/the associated driver software is respons i bl e f or setting the
modes (resolution and refresh rate).
When putting the monitor into operati on for the first time, t he screen display should be optim al l y
adapted to the screen controll er used and adjusted in accordance with your needs (see the
"Changing the monitor settings" section in the"Operation of the monitor" chapter).
Target group
You don't need to be an "expert" to perform the operations described here. Do, however, read the
chapter "Important notes " i n t he Operating Manual of the computer and in thi s Operating Manual.
In the event of any problems occurring, please contact your sales outlet or our Help Desk .
Further information
Details of how you set t he resolution and refresh rate are provided in the documentation on your
screen controller/the as sociated driver software.
A26361-K864-Z100-1-5E19 English - 1
Page 10
Colour monitor 463V FA
Notational conventions
The meanings of the symbols and fonts used in this manual are as follows:
Pay particular attention to text marked with this symbol. Failure to observe this warning
endangers your life, destroy s the device, or may lead to l oss of data.
!
Supplementary information, remarks, and tips foll ow this symbol.
i
Ê Text which follows this symbol describes activiti es that must be performed in the order s hown.
"Quotation marks" indicate names of chapters or term s.
Texts in italics indicate filenames and menu items.
Important notes
In this chapter you will find information regarding s af et y which is essential to take note of
with your monitor.
!
Safety
This device complies wi th the relevant safety regul at i ons for data processing equipment, including
electronic office m achines for use in an office environment. If you have any questions, contact y our
sales outlet or our Help Desk .
· The display surface of t he LCD m oni tor is sensitive to pressure and scratches. Y ou should
therefore be careful with the display surface so as to avoid lasting damage (Newton rings,
scratches).
· If the device is brought into the installation si te from a cold environment, condensation can
form. Before operating the devi ce, wait until it is absolutely dry and has reached approxim ately
the same temperature as the installation site.
· During installation and before operati ng t he device, please observe the i nstructions on
environmental conditions i n the "Technical data" chapt er as well as the instructi ons in the
"Installing an ergonomic video workstation" chapter.
· To ensure sufficient v entilation, the intake and exhaust air openings of the monitor must never
be blocked.
· The power adapter automatically s ets itself to a mains voltage in the range of 100 V to 240 V.
Ensure that the local mai ns voltage lies within these limits.
· Ensure that the power sock et on the power adapter or the grounded mains outlet is freely
accessible.
· The ON/OFF switch does not disc onnect the device from the mains voltage. To completely
disconnect the mains voltage, remove the power plug from the socket.
· Lay all cables so that nobody can stand on them or trip over t hem . When attaching the device,
observe the relevant notes i n the chapter "Connecting the monitor".
2 - English A26361-K864-Z100-1-5E19
Page 11

Colour monitor 463V FA
· If you use a different dat a cable from the one supplied, ensure that it is adequately shielded.
CE conformance and optimum picture quality are guaranteed only if you use the data cable
supplied.
· No data transmission cabl e should be connected or disconnected during a thunderstorm.
· Make sure that no objects (e.g. jewellery chains, paper clips, etc.) or liquids get inside the
device (danger of electric shock, short circui t).
· In emergencies (e.g. damaged casing, elements or cables, penetration of liquids or foreign
matter), switch off the unit, disconnect the power plug and contact your sales outlet or our Help
Desk.
· The screen background lighting contains mercury. You must observe the applicable handling
and disposal safety regulations for fluorescent t ubes.
· Only qualified technici ans should repair the device. Unauthori sed opening and incorrect repair
may greatly endanger the user (elec t ri c shock, fire risk).
· Only use the power adapter supplied or a power adapter of the same type: LSE9901B1260 (Li
Shin) or UP06041120A (Potrans).
· The power adapter may only be opened by authorised specialist personnel.
· You may set only thos e resolutions and refresh rates s pecified in the "Technical data" chapter.
Otherwise you may damage your moni tor. If you are in any doubt, c ontact your sales outlet or
our Help Desk.
· Keep this operating manual together wi th your device. If you pass on the device to third parti es,
you should include this m anual .
Cleaning
· Always pull out the power plug bef ore you clean the monitor.
· Do not clean any interior parts yourself, leave this j ob to a service technici an.
· Do not use any cleaning agents t hat contain abrasives or may corrode plastic.
· Ensure that no liquid will run into the system.
· Ensure that the ventilation areas of the monitor are free.
· The display surface of t he LCD m onitor is sensitive to pressure and scratches. Cl ean i t only
using a soft, slightly moistened cloth.
Wipe the monitor casing with a dry cloth. If the monitor is particularly dirty, use a cloth which has
been moistened in mild domest i c detergent and then carefully wrung out.
Transport
· Transport the monitor with care and onl y in its original packaging or anot her corresponding
packaging fit to protect it against knocks and jolts .
· Never drop the LCD monitor (danger of glass breakage).
A26361-K864-Z100-1-5E19 English - 3
Page 12
Colour monitor 463V FA
Energy Star Guidelines
The Fujitsu Siemens LCD colour m oni tor 463V FA is designed to conserv e
electricity by droppi ng to less than 3 W when it goes into standby,
suspend and OFF mode. With this new power managem ent the 463V FA
qualifies for the U.S. Environmental Protection Agency's (EPA) Energy
Star Computers award.
The EPA estimates that computer equipment us es 5 percent of all business electricit y and that this
is growing rapidly. If all desktop computers and peripherals enter a low-power mode when not in
use, the overall savings in elect ric it y could amount to $ 2 thousand million annually. These s av i ngs
could also prevent the emission of 20 million t ons of carbon dioxide into the atmosphere - the
equivalent of 5 million automobiles.
As an Energy Star Partner, Fuj i t su Siemens Computers GmbH has det ermined that this product
meets the Energy Star guidel i nes for energy efficiency .
CE marking
The shipped version of this device complies with t he requi rem ents of the EEC
directives 89/336/EEC "Elect romagnet ic compatibility" and 73/23/EEC "Low voltage
directive".
FCC Class B Compliance Statement
The following statement appli es to the products covered in this manual, unless otherwise specified
herein. The statement for other product s will appear in the accompanying documentation.
NOTE:
This equipment has been tested and found to comply with the lim i t s for a "Class B" digital device,
pursuant to Part 15 of the FCC rules and m eets all requirements of the Canadian InterferenceCausing Equipment Regulations. These limits are designed to provide reasonable protection against
harmful interference in a residential installation. This equi pment generates, uses and can radiat e
radio frequency energy and, if not i nstalled and used in strict accordance with the instruc tions, may
cause harmful interference to radio communications. However, there is no guarantee that
interference will not occur in a particular ins t allation. If this equipment does cause harmful
interference to radio or televi sion reception, which can be determ i ned by turning the equipment off
and on, the user is encouraged to try to correct the interferenc e by one or more of the following
measures:
· Reorient or relocate the receiving antenna.
· Increase the separation between equipment and t he receiver.
· Connect the equipment into an outlet on a circuit different from that to which the receiver is
connected.
· Consult the dealer or an experienced radio/ TV technician for help.
Fujitsu Siemens Computers GmbH is not responsible for any radi o or television interference c aused
by unauthorized modificat i ons of this equipment or the substitution or attachment of connecting
cables and equipment other than thos e specified by Fujitsu S i em ens Computers GmbH The
correction of interferenc e caused by such unauthorized modification, substitution or attachment will
be the responsibility of the user.
The use of shielded I/O cables is required when connecting this equi pm ent to any and all optional
peripheral or host devices. Fai l ure to do so may violate FCC rules.
4 - English A26361-K864-Z100-1-5E19
Page 13
Colour monitor 463V FA
Declaration of Conformity
This device complies wi th Part 15 of the FCC Rules. Operation i s subject to the following two
conditions: (1) this device may not cause harmf ul i nt erference, and (2) this device must accept any
interference received, including interference that may cause undesired operation.
Product Name: LCD Monitor
Trade Name: Fujitsu Siemens Comput ers
Model Number(s): 463V FA
Name of Responsible Party: Fujitsu Siemens Computers Inc.
Contact Person: Reiner Johannis
Phone No.: (408) 571-6051
Fax No.: (408) 571-6196
598 Gibraltar Drive
Milpitas, CA 95035-6315
U.S.A.
Power cable
To guarantee safe operation, use the c abl e supplied. Use the following guideli nes if it is necess ary
to replace the original cable set.
· The female/male receptacles of the cord set must m eet CEE-22 requirements.
· The cable has to be HAR-certified or VDE-c ertified. The mark HAR or VDE will appear on the
outer sheath or on the insulation of one of the inner conductors.
· For devices which are mounted on a des k or table, type SVT or SJT cable sets may be used.
For devices which sit on the floor, only SJT type cable sets may be used.
· The cable set must be selected according to the rated current for your device.
Power cable for devices distributed in the US and Canada
In the United States and Canada the cord set must also be UL-listed and CSA-labelled. The voltage
rating should be min. 250 volts a.c.
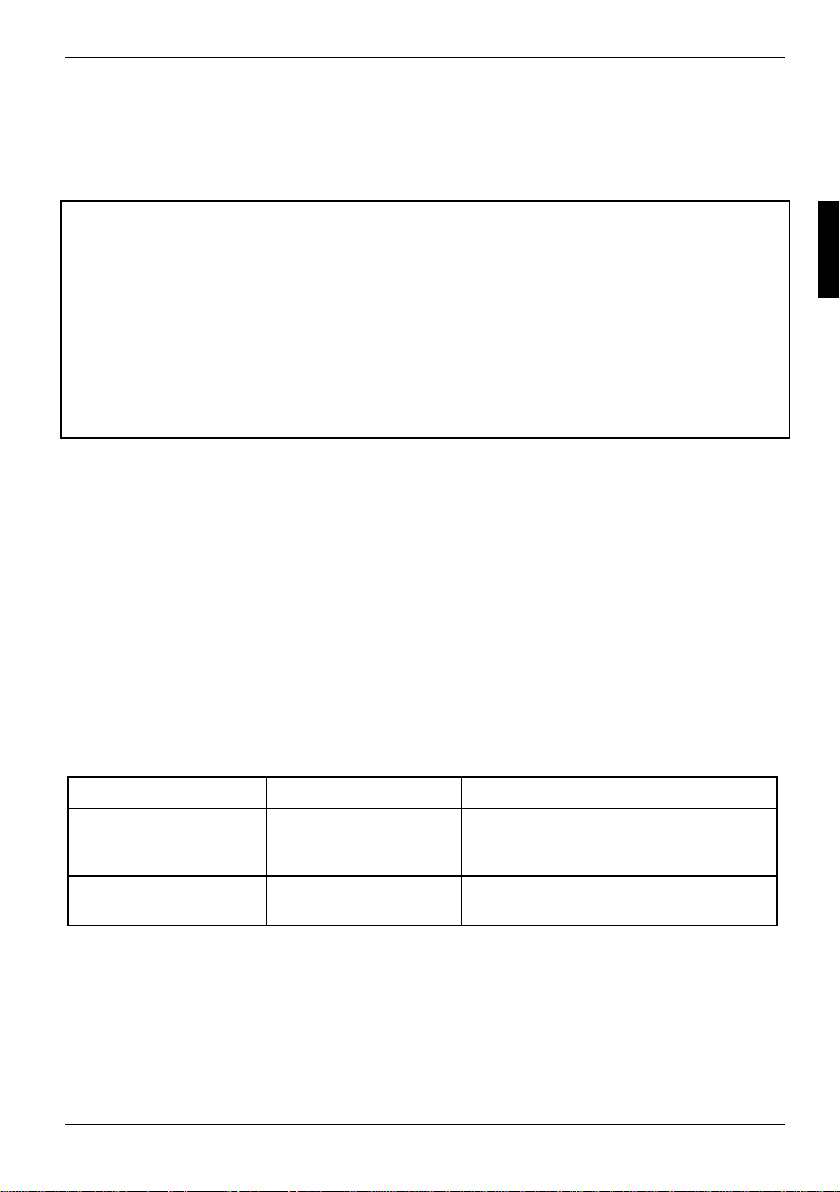
Please consult the f ol l owi ng table for the selection cri t eri a for power cables used in the United
States and Canada.
Cable type Size of conductors i n cable Maximum current rating of t he device
SJT 18 AWG
16 AWG
14 AWG
SVT 18 AWG
17 AWG
A26361-K864-Z100-1-5E19 English - 5
10 Amps
12 Amps
12 Amps
10 Amps
12 Amps
Page 14

Colour monitor 463V FA
Disposal and recycling
This device has been manufac t ured to the highest possible degree from m aterials which can be
recycled or disposed of in a manner that is not environmentally damaging. The devi ce may be taken
back after use to be recycled, provided that it is returned in a condition that is the resul t of normal
use. Any components not recl aimed will be dis posed of in an environmentally acceptable manner.
If you have any questions on disposal, please contact your local office, our Help Desk, or:
Fujitsu Siemens Computers Gm bH
Recyclingcenter
D-33106 Paderborn
Tel.: +49 5251 / 81 80 10, Fax: +49 5251 / 81 80 15
Checking the contents of the consignment
Ê Unpack all the individual parts.
Ê Check the delivery for damage incurred during transportation.
Ê Check whether the delivery agrees with the detail s in the delivery note.
The complete LCD monitor package i ncludes:
- one m oni tor
- one data cable (D-SUB)
- one data cable (DVI-D)
- one power cable
- a power adapter with power adapter cable
- one floppy disk
- one Warranty Booklet
- this Operating Manual
Should you discover that the delivery does not correspond t o t he del ivery note, notify y our l ocal
sales outlet immediat el y.
It is recommended not to throw away the original packaging mat eri al . Keep it for future
transportation.
i
6 - English A26361-K864-Z100-1-5E19
Page 15
Colour monitor 463V FA
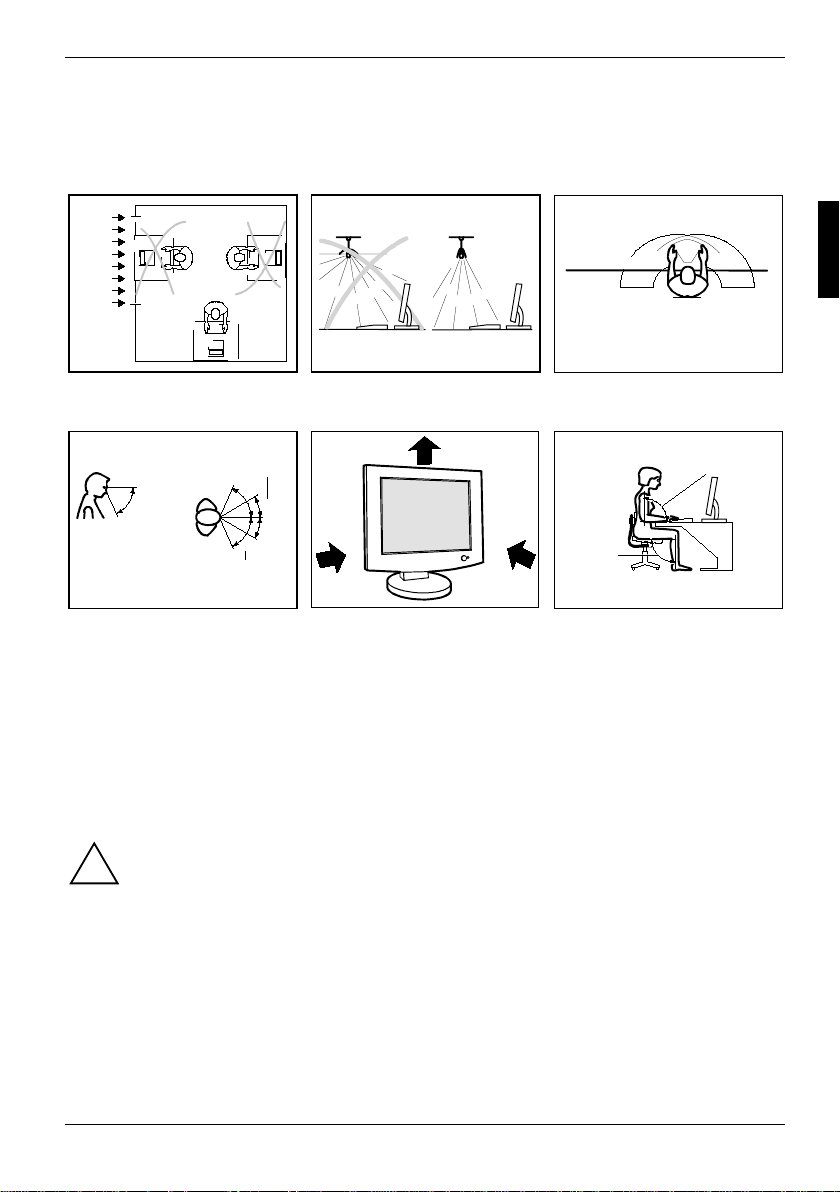
Installing an ergonomic video wor kstati on
Before you set up your equipment , you should select a suit abl e position for working at the monit or.
Please observe the following advice when installing a video workstation.
edge of desk
Window
permissible
reaching sector
600 mm
permissible
reaching sector
600 mm
Avoid direct and reflected glare. Avoid glare from electric
lighting.
preferable viewing sector
0°
0°
60°
permissible
viewing sector
permissible viewing sector
Position the monitor for
65°
65°
30°
30°
Keep ventilated areas clear. Remember to maintain correct
optimum viewing. The viewing
Position the keyboard where it
is easiest to reach.
approx. 90°
approx. 90°
and more
posture.
distance to the monitor should
be approximately 50 cm.
Depending on the situation, the use of a s wivel arm or wall bracket (VESA FPMPMI), are available
from specialised dealers , m ay be advisable. For this purpose the monitor base must be removed
beforehand as described in chapter "Rem oving the monitor base".
Connecting the monitor
Please note the information provided in the "Safety" s ection in the chapter "Import ant
notes" at the beginning of this manual.
!
CE conformance and optimum picture quality are guaranteed only if you use the data
cable supplied.
Do not cover the ventilat i on openi ngs of the monitor.
The computer power plug must be pulled out!
Ê Be sure that the monitor and the computer are swit ched off.
A26361-K864-Z100-1-5E19 English - 7
Page 16
Colour monitor 463V FA
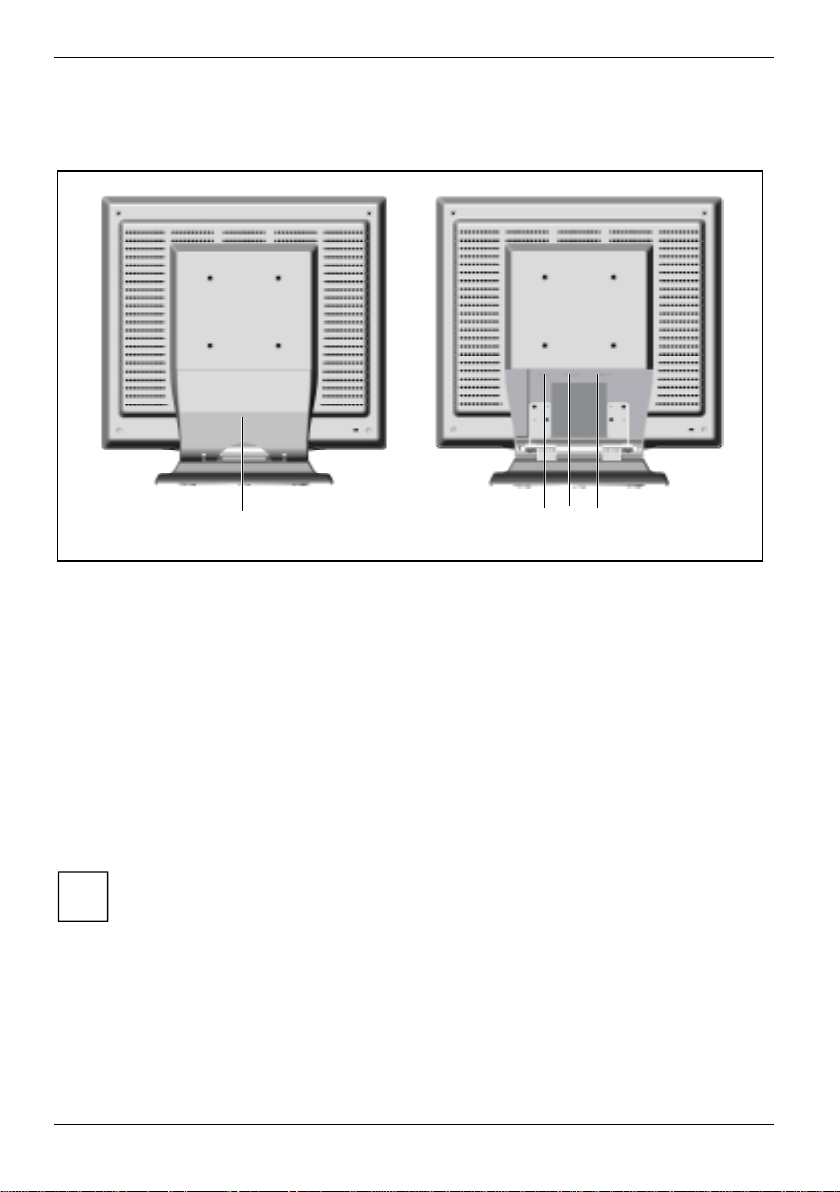
Connecting cables to the monitor
The monitor ports are protected by a cover.
1
1 = Cover
2 = Connector for the power supply
3 = D-SUB connector (ANALOG)
4 = DVI-D connector (DIGITAL)
2 3 4
Ê Remove the cover (1).
The data cables provided have plugs for the D-SUB connector or the DVI-D connector on the
monitor.
Ê Select the suitable data cable for your c omputer.
Digital graphics card wit h DV I interface: DVI connector
Graphics card with VGA in t erface: D-SUB connector
Information on the computer connections and interfaces i s contained in the operating manual for
your computer.
Ê Connect one of the D-SUB connectors of the data cable to the D-SUB connector on the
monitor (3) and secure the plug-in connection by tightening the saf ety screws.
If you want to use the data cable with DVI-D connector or if you want to connect the
monitor to a second comput er, proceed as follows:
i
Ê Connect the DVI-D connector of the data cable to the DVI-D connector on the
monitor (4) and secure the plug-in connection by tightening the saf ety screws.
After switching on the m oni tor you must select t he desired input with the OSD menu (Input
Select function, see "Changing the m oni tor settings" chapter).
Ê Plug the power adapter cable into the power connector (2) of the m oni tor.
Ê Firmly insert the socket with t he power cable supplied into the power cable connection of the
power adapter and check whether the soc ket is securely seated.
8 - English A26361-K864-Z100-1-5E19
Page 17
Colour monitor 463V FA
Ê Mount the cover over the connections again.
Connecting cables to the computer
Information on the computer connections and interfaces i s contained in the operating manual for
your computer.
If your computer has two m oni tor ports ("onboard" screen controll er and separate
graphics card), the monitor port for the separate graphics card i s usually active.
i
Ê Connect the data cable to the (active) monit or port on the computer and secure the plug-in
connection by tightening the safety screws.
Ê Connect the male receptacle of the power cable suppl i ed to the monitor socket of the computer
and ensure a secure connection.
Ê Plug the power connector of the computer into a properly grounded mains outlet.
When you start working with y our monitor for the first ti m e you should install the
appropriate graphics drivers f or your application software. Det ai l s of how to do this are
i
provided in the documentation on y our screen controller/the ass ociated driver software.
Operation of the monitor
The monitor offers the following possibilities t hat enable it to be optimally adjusted for the respective
user and the respective si tuation.
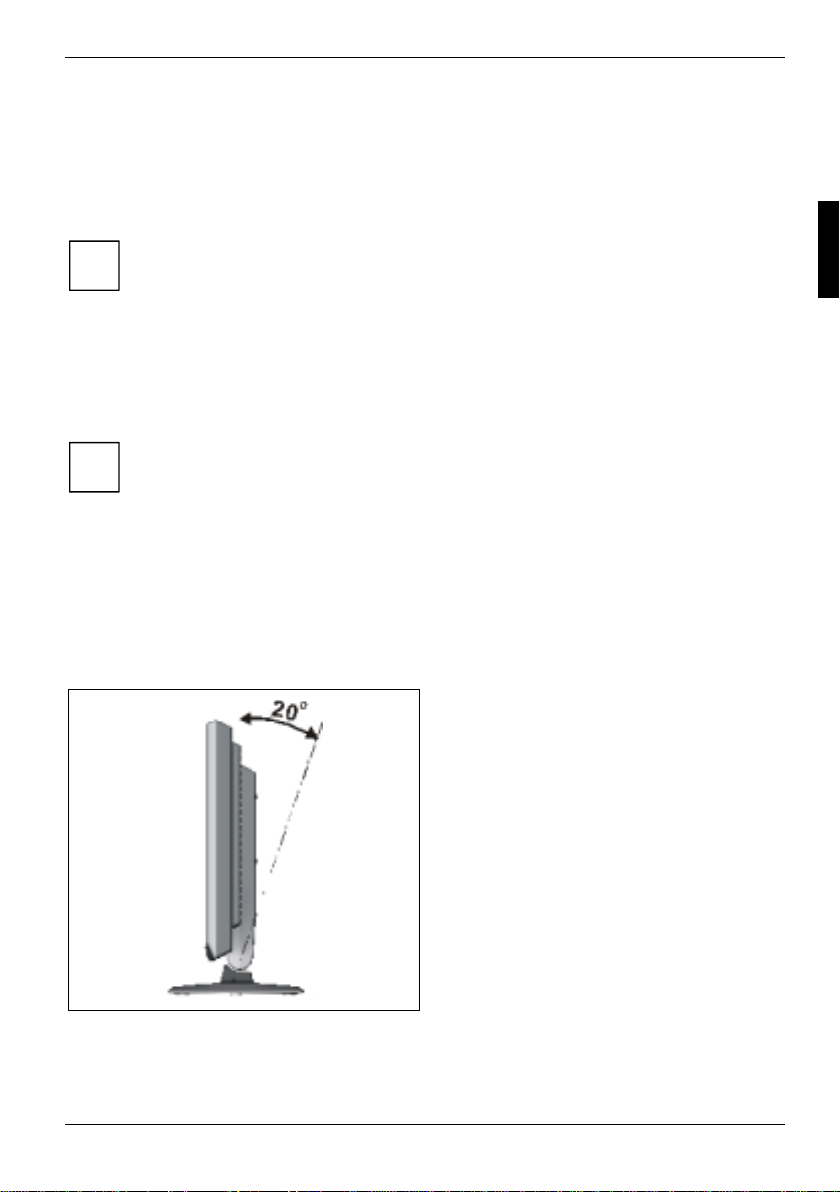
Adjusting rake and rotation
The rake of the monitor can be adjust ed by –5°
(forward) and +20° (back) from its vertical
position.
Ê Grasp the monitor with both hands on the
right and left edge of the casi ng and adj ust
it to the desired rake.
The monitor can be rotated by ± 45° from i ts
centre position.
Ê Grasp the monitor with both hands on the
right and left edge of the casi ng and rotate it
into the desired position.
A26361-K864-Z100-1-5E19 English - 9
Page 18
Colour monitor 463V FA
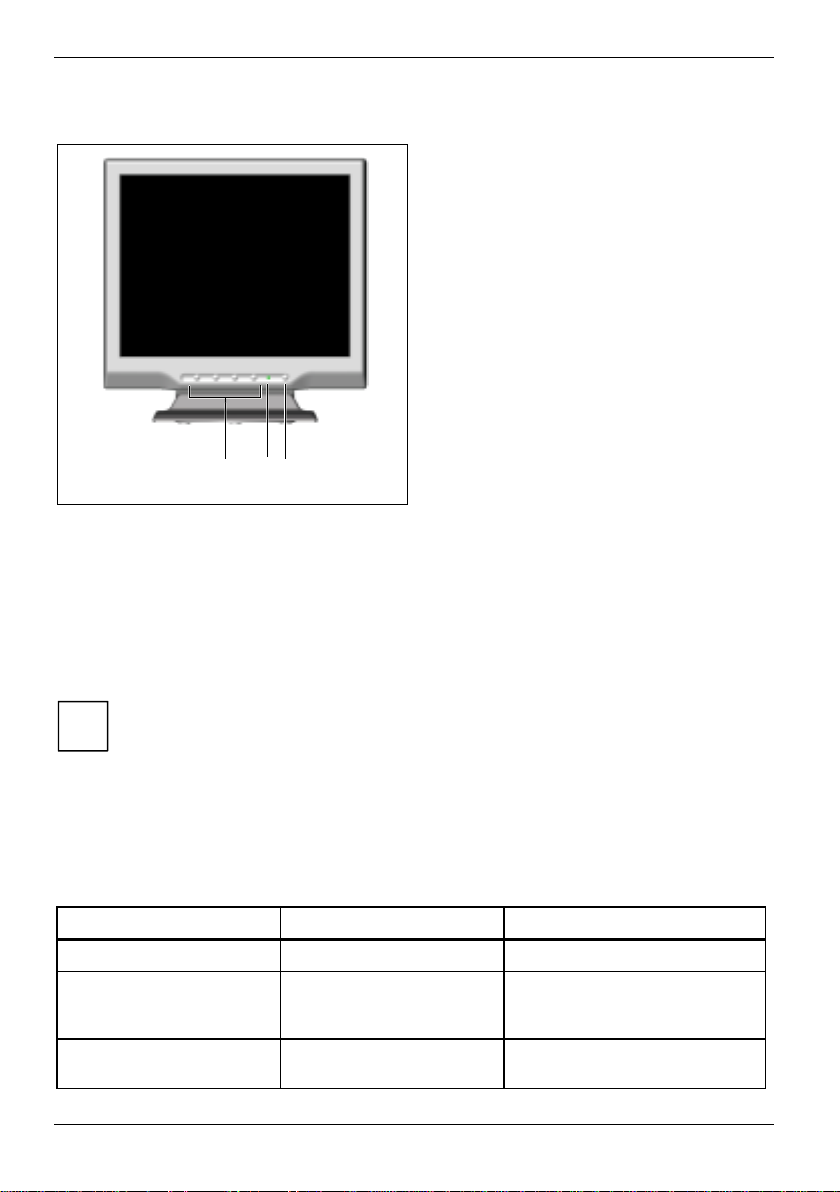
Switching the monitor on/off
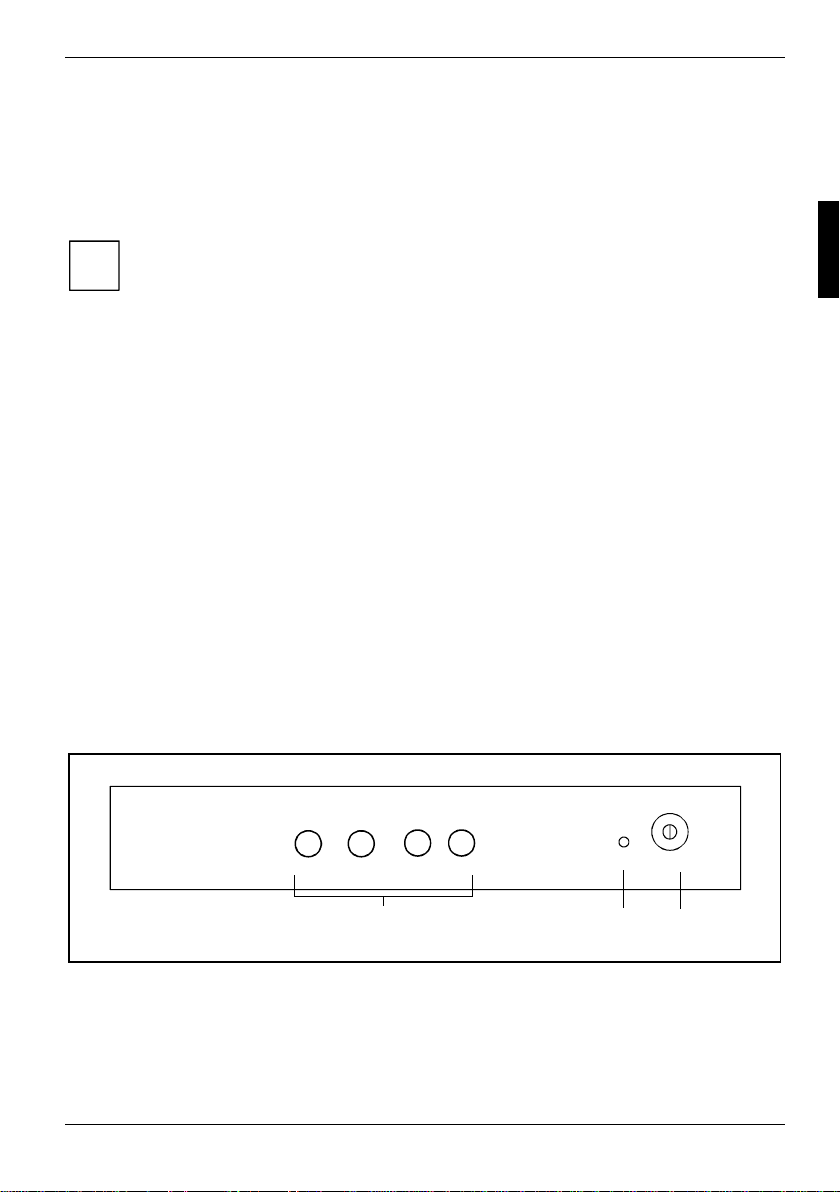
1 = Buttons for the OSD menu
(On-Screen-Display)
2 = Power indicator
3 = Power button
1
The ON/OFF switch (3) is used for switching the monitor on and off.
The power indicator (2) glows green when the monitor and computer are switched on. The power
indicator glows orange when the monitor does not receive a video signal or i s in the energy-saving
mode. The power indicator goes off when the monitor is switched off.
When you switch the comput er system on, you must proceed in the following order:
3
2
Ê First switch the LCD monitor on with the ON/OFF s witch (3).
Ê Then switch on the computer.
If your computer has a power management function (energy-saving m ode), you should
read the "Notes on power management" section in this chapter.
i
Notes on power management
If your computer is equipped wi th power management, the monitor can s upport this function full y.
Here the monitor does not disti ngui sh between the individual energy-sav i ng m odes of the computer
(standby mode, suspend mode and OFF mode), as it is capable of imm ediately switching into the
mode with the highest energy-saving effect.
Stage ON En ergy-savi ng m ode
Power indicator lights green glows orange
Function Monitor
operating
normally
Power consumption normal
< 60 W
Monitor
is dark
reduced to < 3 W
10 - English A26361-K864-Z100-1-5E19
Page 19
Colour monitor 463V FA
If your computer detect s inactivity (no input ) i t sends an appropriate signal to the m oni tor to reduce
the power consumption (energy-sav ing mode). The power indicator of the monit or changes colour to
indicate the status change.
Once an input is made at the com puter the screen contents are redrawn and ful l power is restored.
For detailed information on how energy-saving mode operates refer to the Operating M anual or
Technical Manual of the computer.
When the monitor is switc hed to the energy-saving mode by the power managem ent
system a power consumption of up to 3 W is maintained to feed the circuit for redrawing
i
the screen contents.
To completely switc h off the power consumption, swi tch off the computer or pull t he pl ug
of the monitor power cable out of t he monitor socket of the c omputer.
Changing the monitor settings
When putting the monitor into operati on for the first time, t he screen display should be optim al l y
adapted to the screen controll er used and adjusted in accordance with your needs.
Basic monitor settings with the floppy disk supplied
If one of the operating systems Windows 95/98, Windows NT, Windows Me, Windows 2000,
Windows XP or OS/2 (with Windows em ul ation installed) is used, the basic monitor setti ngs can be
set with the floppy disk supplied.
Ê Insert the supplied floppy disk int o the floppy disk drive.
Ê Open the Readme file on the floppy disk and follow the instructions in the file.
Your monitor should now already be properly adj usted. If none of the above operati ng systems is
used or minor corrections are t o be m ade t o the screen display, then c hange the monitor settings
with the OSD menu.
Monitor settings with the buttons of the control panel
AUTOMENU \
-
1
1 = Buttons for the OSD menu
(On-Screen-Display)
Use the buttons of the control panel to make the following m oni t o r settings directly whi l e t he OSD
menu is switched off.
A26361-K864-Z100-1-5E19 English - 11
INPUT
+
2 = Power indicator
3 = Power button
2
3
Page 20

Colour monitor 463V FA
Performing auto-adjustment of the monitor
Ê Press the MENU \ AUTO button for approx. 1 s econd while the OSD menu is switc hed off.
The Auto Processing message is di splayed.
Picture quality and posi tion are set to optimum values for your system.
Adjusting contrast/background lighting
Ê Press the + or – button to call the Contrast / Backlight setting window.
This setting window can als o be called, when the OSD menu is locked.
Selecting input signal
The monitor can be operated with analogue or digit al signals. You can switc h between the analogue
and the digital mode (depending on the graphics card you use).
Ê Press the INPUT button to change the mode of the input signal.
Locking the OSD menu
The OSD menu can be locked to prevent accidental or unauthorised changes to the monitor
settings.
Ê Press the MENU \ AUTO button and the + button si m ul taneously and hold them until the s tatus
indicator on the screen is completely filled.
A message is displayed that the action has been performed.
Please proceed in the same manner t o rel ease the locked OSD menu again.
Locking the ON/OFF button
The ON/OFF switch can be locked to prevent the monitor from being swi t ched off inadvertently or by
an unauthorised person.
Ê Press the MENU \ AUTO button and the + button si m ul taneously and hold them until the s tatus
indicator on the screen is completely filled.
A message is displayed that the action has been performed.
Please proceed in the same manner to rel ease the locked ON/OFF switch agai n.
Monitor settings using the OSD menu
With the buttons on the cont rol panel , call up and use the integrated OSD (On-S creen Display)
menu.
The OSD menu is available in different languages. The English menu names are used in
the following description (default setting). With t he OS D function Language Select in the
i
Setup Menu you can select another language.
12 - English A26361-K864-Z100-1-5E19
Page 21
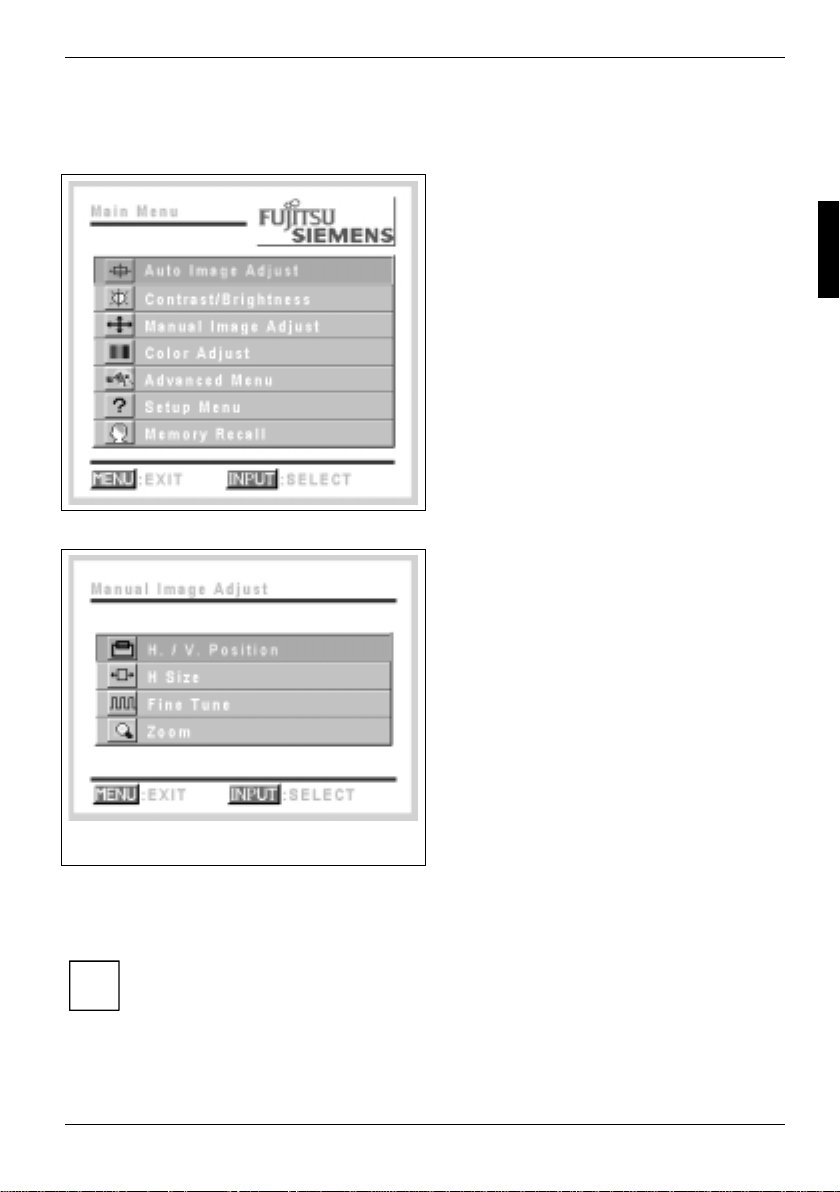
To set the OSD menu, perform the following steps:
Ê Briefly press the MENU \ AUTO button to activate the OSD menu.
The main menu appears on the screen with icons for the setting func tions.
The first symbol (Auto Image Adju st) is
highlighted. At the bottom of the OSD menu
each button's functi on i s displayed.
Ê Press the - or + button to highlight another
icon if necessary (e.g. Manual Image Adjust).
Ê Press the INPUT button to select the
highlighted icon.
The corresponding setting window (here: Manual Image Adjust) is dis pl ayed.
The first symbol (H. / V. Position) is highl i ghted.
Ê If necessary, press the - or + button to mark
the next icon.
Ê Press the INPUT button to select the
highlighted icon.
The icon's colour changes.
Ê Press the - or + button to adjust the
selected function.
Ê Press the MENU \ AUTO button to save the
settings.
The icon's colour changes.
Ê Press the - or + button to mark another
symbol or press the MENU \ AUTO button
to return to the main menu.
Colour monitor 463V FA
All changes are stored automatically.
If you want to change other settings, select t he corresponding function from the OS D m ai n m enu. All
possible adjustments of the main menu are described in the f ol l owi ng.
The OSD menu for analogue monitor operation is described in the following. During digi t a l
operation some functions are not available, as they are not requi red due t o the digital
i
transmission technol ogy used.
A26361-K864-Z100-1-5E19 English - 13
Page 22
Colour monitor 463V FA
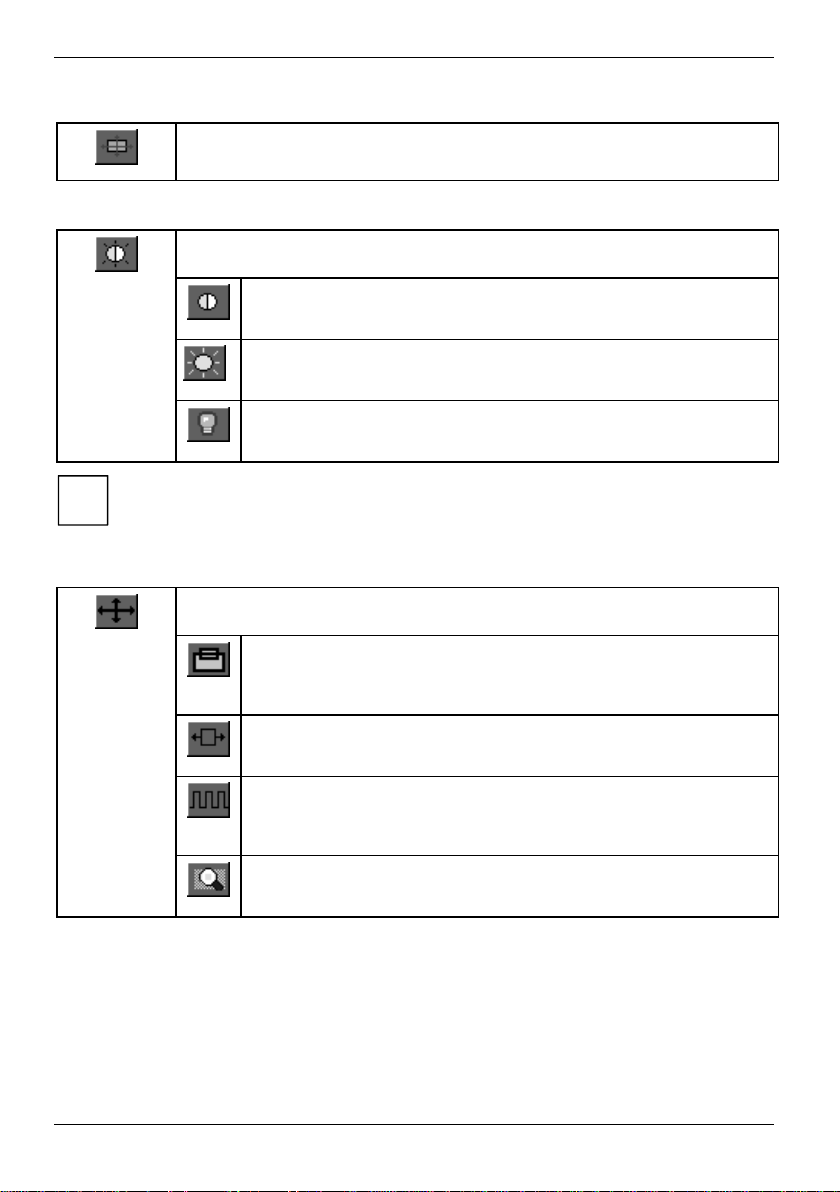
Performing auto-adjustment
Performing auto-adjustment (Au to Image Adju st )
The Auto Processing message is di splayed.
Adjusting the brightness and contrast
Calling the Contrast / Brightness / Backlight setting window.
Setting the contrast of the display (Contrast)
This function allows y ou to modify the contrast of bright colour tones.
Setting the brightness of the display (Brightness)
This function allows y ou to modify the contrast of dark colour tones.
Setting the brightness of the background lighting (Backlight)
This function allows y ou to change the brightness of the ent i re di splay.
If the contrast is set too high, bright surfac es can no longer be distinguished from very
bright surfaces. If the contrast is set too low, the maximum brightness will not be
i
achieved.
Adjusting size and position
Calling the Manual Image Adjust setting window
Adjusting picture posi tion (H./V.Position)
The INPUT button allows you to s witch between the H.Position and the
V.Position.
Adjusting the horizontal size (H.Size)
There is an optimum setting for every resolution.
Eliminating picture interference (Fine Tune)
This function enables the fine tuning of your monitor in cas e of picture
interferences.
Adjusting the Zoom
This function allows y ou to enlarge a section of the displ ay.
14 - English A26361-K864-Z100-1-5E19
Page 23
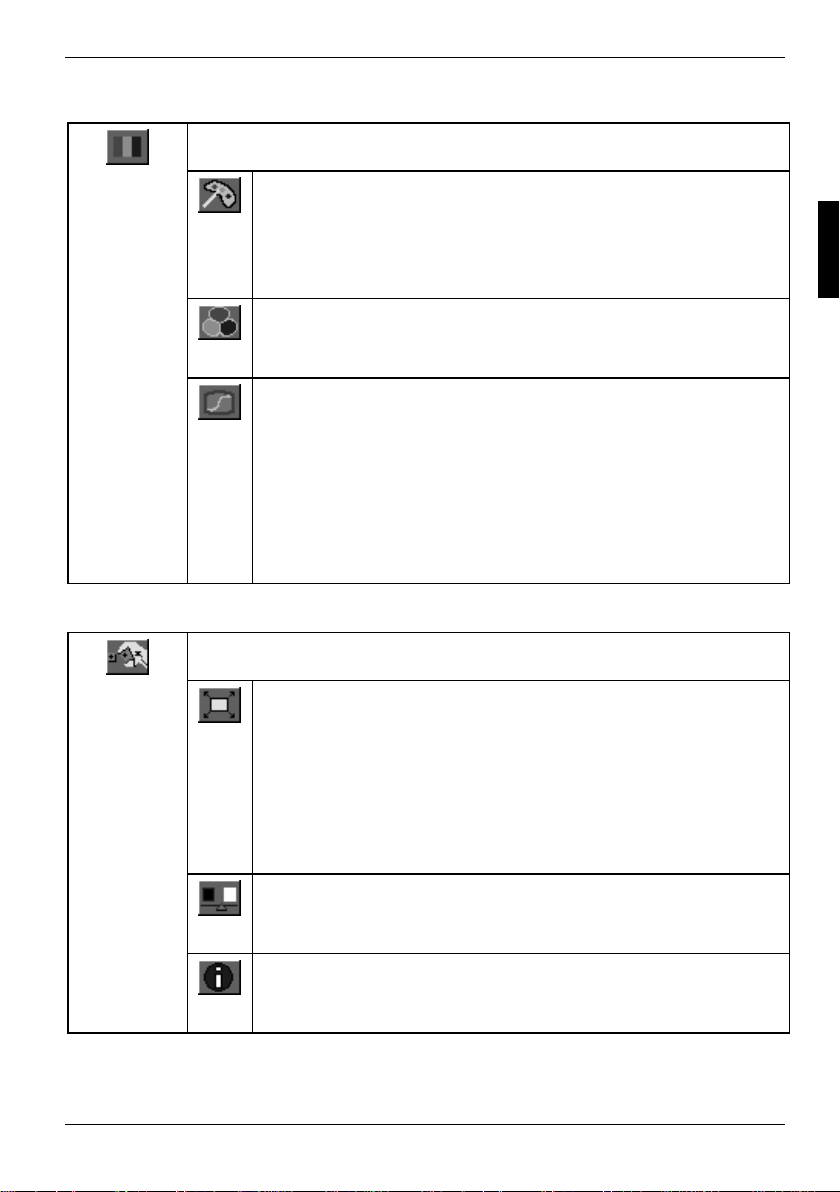
Setting colour temperature and colours
Calling the Color Adjust setting window
Selecting colour temperat ure (Color Temperature)
The "warmth" of the screen col ours is set using the colour temperature.
The colour temperature is measured i n K (= Kelvin). You can select from
9300 K, 6500 K, 5400 K, 5000 K and Native.
Native = original colour of the LCD display
Setting user-defined colours (User Color)
In the user-defined setting you can change the colour ratios of the basic
colours (red, green, blue) as required.
Adjusting the intensi t y of the grey levels (Gamma correction) (Gamma)
This function allows y ou to optimise the display of multimedia
applications.
Linear = default setting
Emphasize Brighter Level = Bright areas remain bright, dark areas become
darker
Emphasize Darker Level = Dark areas remain dark, bright areas become
brighter
Setting functions in the "Advanced Menu" menu
Calling the Advanced Menu setting window
Colour monitor 463V FA
Setting scaling (Scaling)
1:1 = full picture size (depending on the resolution)
Fill All = switch on the full-sc reen m ode. The di splay area is stretched t o
the full picture siz e (1,280 pixels, side ratio 5: 4). As a result, the display
may appear distorted.
Fill Aspect Ratio = Switch on the proportional full-screen mode: The
display area is expanded to the maximum picture size while maintaining
the side ratio (either full pi cture width or full picture height ).
Adjusting the picture qual i t y in case of interpolation (Sharpness)
This function allows y ou to set the sharpness of the i nterpolation filter.
Thus the display can be optim i sed for pictures or texts.
Displaying the monitor information (Information)
This function allows y ou to display e.g. the current resolution and refresh
rate.
A26361-K864-Z100-1-5E19 English - 15
Page 24
Colour monitor 463V FA
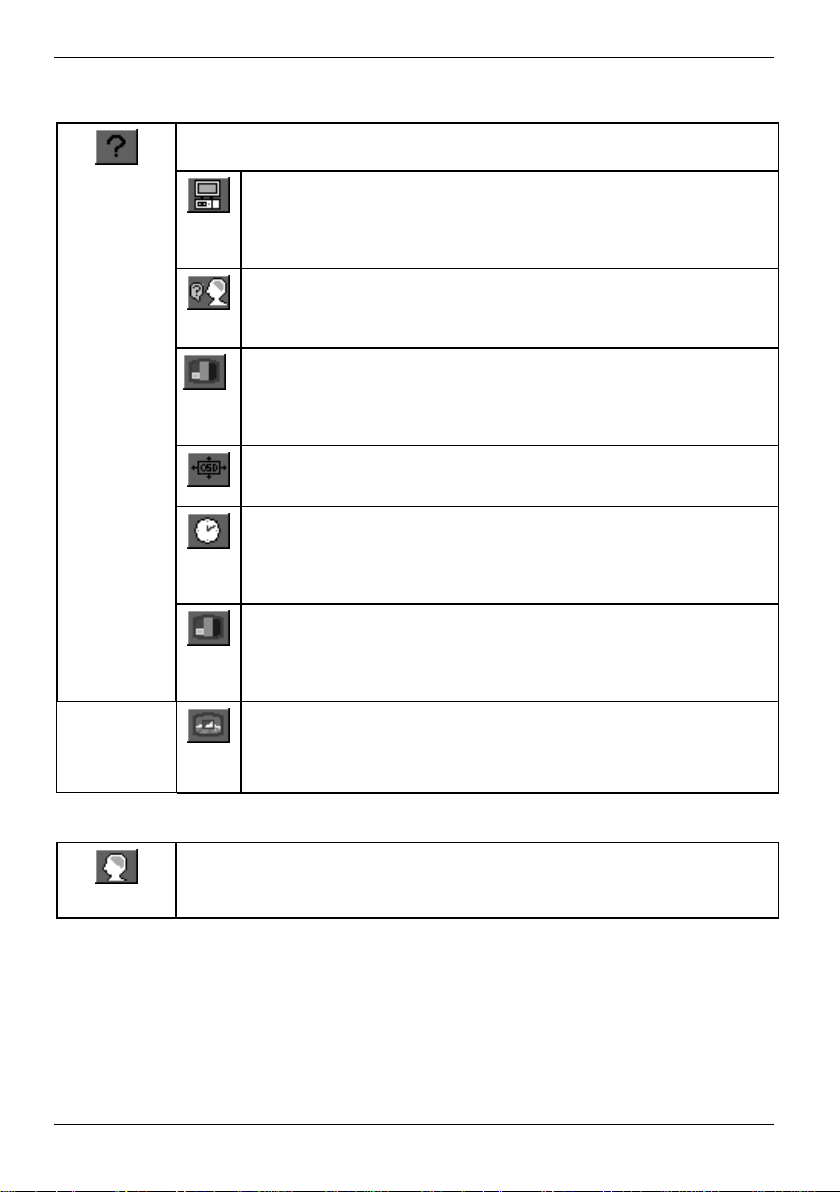
Setting functions in the "Setup Menu" menu
Calling the Setup Menu setting window
Selecting input signal (Input Select)
The monitor can be operated with analogue or digit al signals. With this
function you can (depending on the graphics card you use) switch over
between the analogue and the digital mode.
Setting the language for the OSD m enu (Language Select)
You can choose from Englis h (default setting), German, Frenc h, Italian
and Spanish.
Displaying note on resoluti on (Resolution Notice)
The optimum resolution for thi s monitor is 1280 x 1024. With the function
activated (ON), a mes sage appears on the screen after approx.
30 seconds if a different resolution has been selected.
Setting position for t he OS D menu (OSD Position)
You can shift the OSD menu up, down, to the left or to the right .
Setting display ti m e f or the OSD menu (OSD Time Out)
You can select a value f rom 5 t o 60 seconds. If the adjust ed time has run
out without the settings being saved, the OSD menu is automatically
closed.
Mode Message ON/OFF
If this function i s enabled (ON) a message will be displayed on the sc reen
after approx. 3 seconds when ant her m ode or another input has been
selected.
Setting background for the OS D m enu (OSD Background)
ON = normal setting
OFF = transparent
Activating the factory settings
Activating the factory settings (Memory Recall)
The Auto Processing message is displayed. A ll settings will be reset without
questioning.
16 - English A26361-K864-Z100-1-5E19
Page 25
Colour monitor 463V FA
Notes on ergonomic colour adjustment
If you select col ours for the display in your application programmes, take note of the information
below.
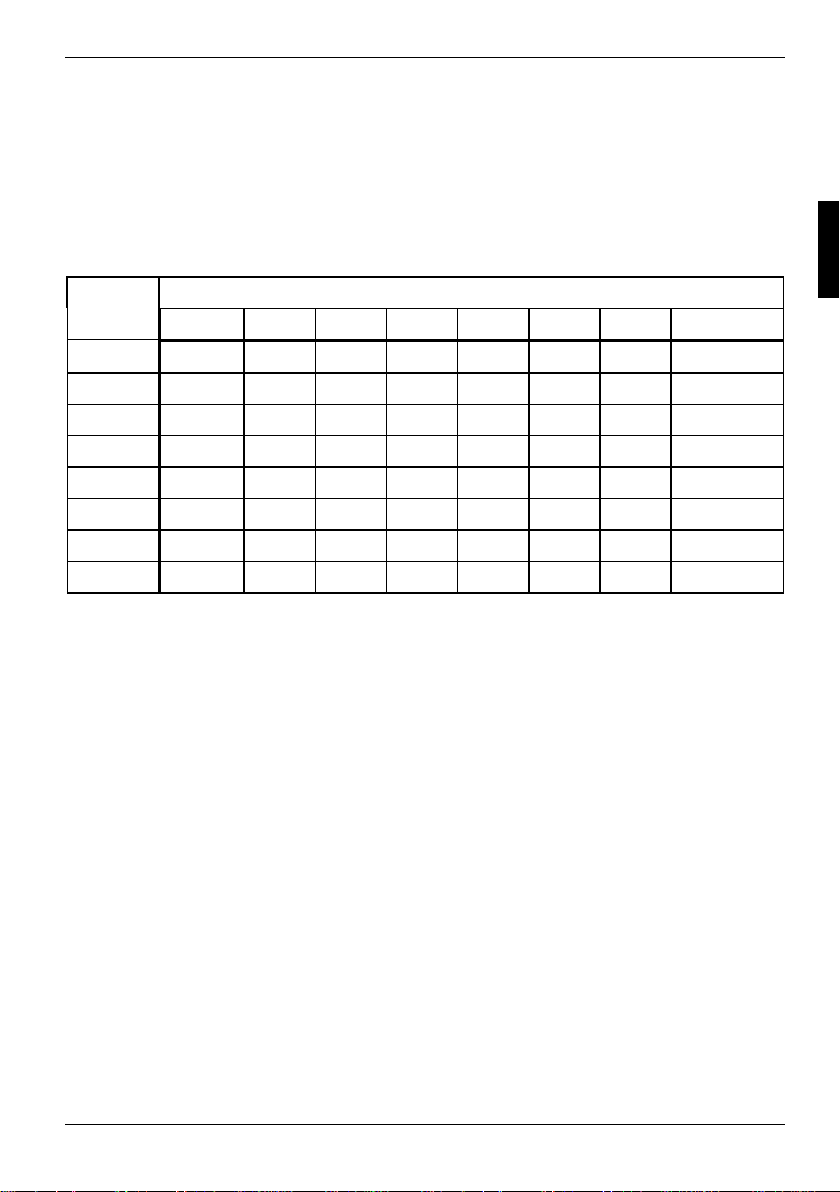
The primary colours blue and red on a dark background do not produce the minimum required
contrast of 3:1 and are therefore not suitable for continuous t ext and data entry.
When using several colours f or characters and background and giving t he pri mary colours full
modulation, you can obtain v ery suitable colour combinat i ons (see the following table):
Background Characters
black white purple blue cyan green yellow red
black + + - + + + -
white + + + - - - +
purple + + - - - - -
blue - + - + - + -
cyan + - - + - - -
green + - - + - - -
yellow + - + + - - +
red - +----+
+ Colour combination very suitable
- Colour combi nation not suitable because col our l ocations are too close toget her, thin
characters are not identif i abl e or ri gorous focusing is demanded of the hum an eye.
A26361-K864-Z100-1-5E19 English - 17
Page 26
Colour monitor 463V FA
Removing the monitor base
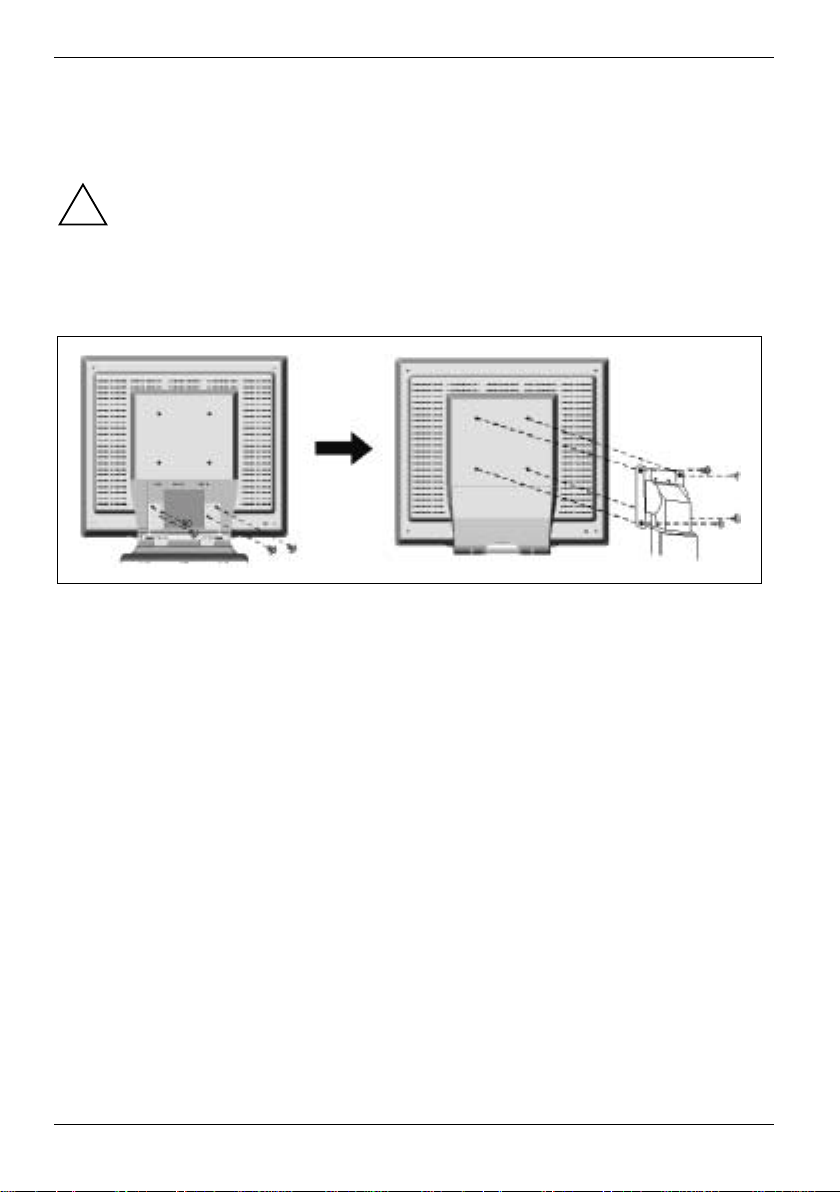
Before you can use a swivel arm or a wal l bracket, you must remove the monitor base:
The monitor surface is susceptible to scratchi ng!
!
Ê Switch off the monitor and pull the power plug out of t he power socket.
Ê Lay the monitor on its face on a soft s urf ace.
Ê Remove the cover and disconnect all cables.
Ê Remove the four screws on the rear of the monitor.
You can now mount a swivel arm or a wall bracket as per VESA FPMPMI with 100 mm hole
spacing.
For instructions on how to mount the swivel arm or wall bracket, please see the documentat i on f or
the swivel arm or wall brack et.
Technical data
Dimensions and weight (LCD monitor)
Visible diagonals: 46 cm
Dot pitch: 0.28 mm
Screen size: 359 mm x 287 mm
Maximal resolution: 1280 x 1024 pix el s
Dimensions (W x H x D) inc l.
monitor base:
Dimensions cardboard box (W x H x
D):
Weight: 7.3 kg
18 - English A26361-K864-Z100-1-5E19
416.3 mm x 425 mm x 203.7 mm
540 mm x 531 mm x 280 mm
Page 27

Colour monitor 463V FA
Accessories: Power adapter with power adapter cable
Storable display modes: 26
Electrical data
Video: analogue, positive, 0.7 V
Synchronisation: Separate Sync. TTL, positive or negative
Horizontal frequency: 30 kHz .... 82 kHz (multi-scanning)
Refresh rate: 56 Hz .... 76 Hz
Maximum pixel rate: 135 MHz
Power supply: switches automatically
Total power consumption: < 60 W (ON, Normal mode)
Environmental conditions
Environment class 3K 2, IEC 721
Rated range of operation:
Humidity:
Limit range of operation:
Humidity:
Condensation must be avoided.
Power cable (1.8 m)
D-SUB data cable (1.8 m)
DVI-D data cable (1.8 m)
, 75 W
digital: DVI-D
Composite Sync. TTL, positive or negative
Sync. On Green
100 V - 120 V, 50 Hz - 60 Hz
220 V - 240 V, 50 Hz - 60 Hz
< 3 W in the energy-saving mode (standby mode, suspend
mode and OFF mode)
15 °C .... 35 °C
20 % .... 85 %
5 °C .... 35 °C
20 % .... 85 %
pp
± 2 Hz, 0.6 A
± 2 Hz, 0.3 A
VESA-DDC-compatible VGA interface
Your monitor is equipped with a VESA-DDC-compatible VGA interface. VESA-DDC (Video
Electronics Standard Association, Displ ay Data Channel) is used as the com m uni cations interface
between the monitor and the computer. If your computer is equipped with a VESA-DDC-compatible
VGA interface, it can automatically read the dat a f or ensuring optimum operation from your m oni tor
and select the appropriate set t i ngs.
If the monitor 463V FA is not yet displayed in the lis t of monitors, you can sel ect the
following monitor instead:
i
Fujitsu Siemens 462V FA, 461V FA , Fujitsu Siemens 4612 FA
A26361-K864-Z100-1-5E19 English - 19
Page 28
Colour monitor 463V FA
Preset operating modes
The picture position and siz e have been set to optimum values at the factory for the
operating modes listed above. Dependi ng on the screen controller used, it may be
i
necessary to adjust the display position and size. In this case, you can change and save
the settings (see "Operat ion of the monitor").
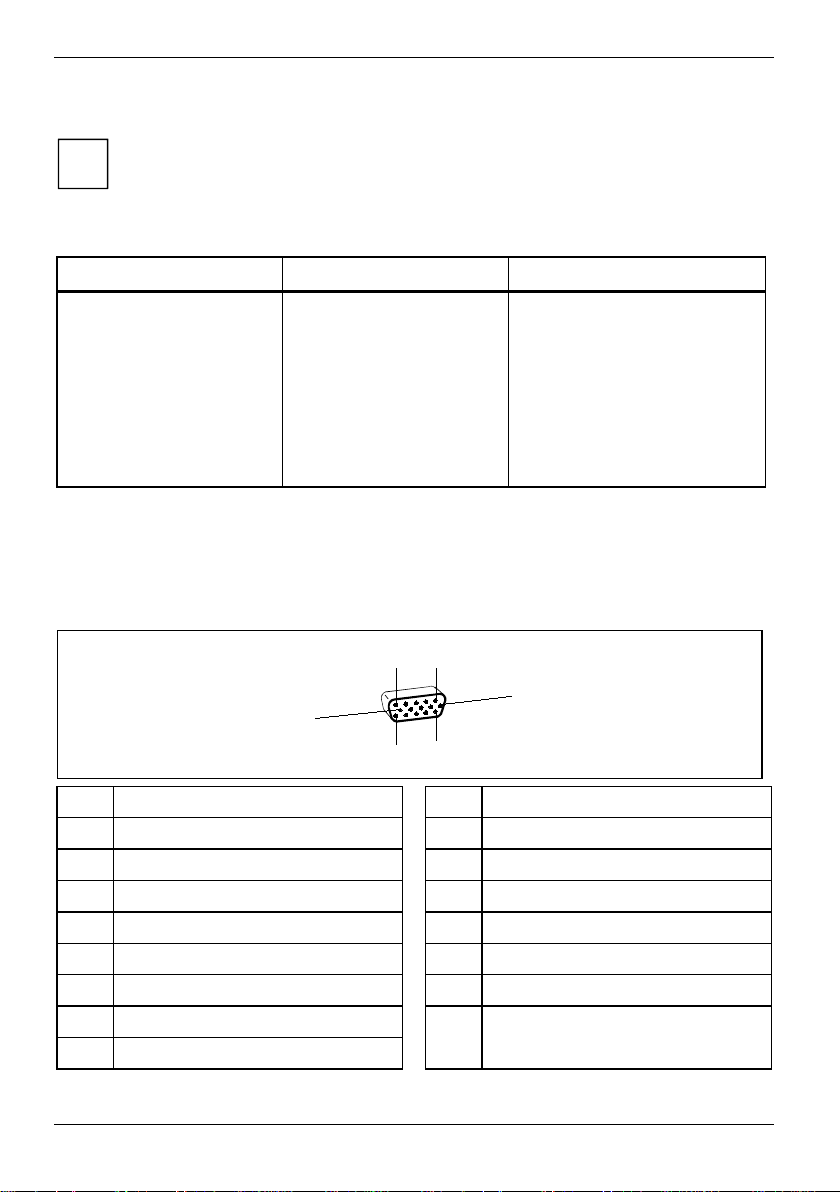
The following are the most frequentl y used of the preset operating modes :
Horizontal frequency Refresh rate S creen resolution
31.5 kHz
31.5 kHz
37.5 kHz
37.9 kHz
46.9 kHz
48.4 kHz
60.0 kHz
64.0 kHz
80.0 kHz
For ergonomic reasons, a screen resolution of 1280 x 1024 pixels is recommended. Because of the
technology used (active matrix) an LCD monitor provides a t otally flicker-free pi cture even with a
refresh rate of 60 Hz.
70 Hz
60 Hz
75 Hz
60 Hz
75 Hz
60 Hz
75 Hz
60 Hz
75 Hz
720 x 400
640 x 480
640 x 480
800 x 600
800 x 600
1024 x 768
1024 x 768
1280 x 1024
1280 x 1024
Pin assignment D-SUB
1
5
6
10
11
15
Stylus Meaning Stylus Meaning
1 Video input red 9 +5 V (DDC)
2 Video input green 10 Sync. ground
3 Video input blue 11 Ground
4 Ground 12 DDC-Data
5 Ground 13 H. sync
6 Red video ground 14 V. sync
7 Green video ground 15 DDC Clock
8 Blue video ground
20 - English A26361-K864-Z100-1-5E19
Page 29
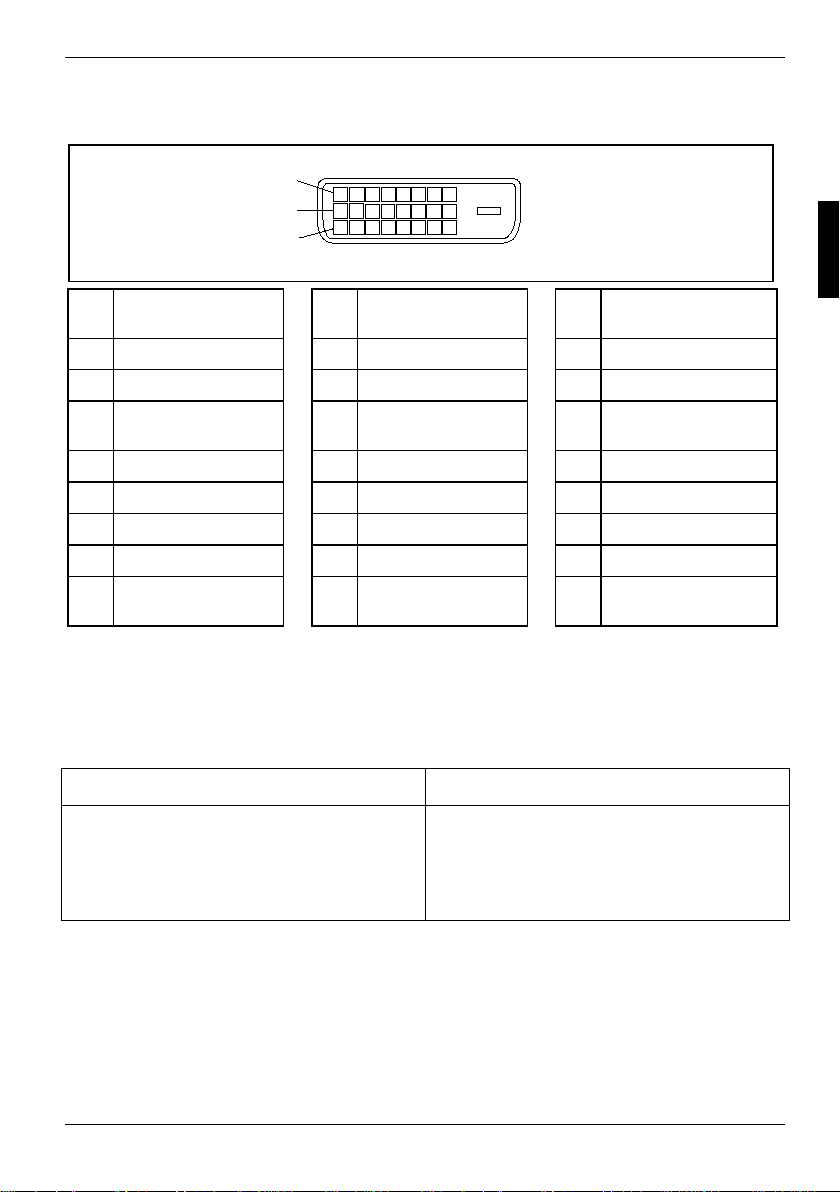
Monitor port DVI-D
Colour monitor 463V FA
1
9
17
Styl
us
1 TMDS Data2- 9 TMDS Data1- 17 TMDS Data02 TMDS Data2+ 10 TMDS Data1+ 18 TMDS Data0+
3 TMDS Data 2/4
4 not connected 12 not connected 20 not connected
5 not connected 13 not connected 21 not connected
6 DDC Clock 14 +5V Power 22 TMDS Clock Shield
7 DDC Data 15 Ground 23 TMDS Clock8 Anal ogue V ertical
Meaning Styl
Shield
Sync
us
11 TMDS Data 1/3
16 Hot Plug Detec t 24 TMDS Clock+
Meaning Styl
us
19 TMDS Data 0/5 Shiel d
Shield
Meaning
Trouble shooting
Should an error occur, first check the following points. If t he dis tortion is still not eliminated, the
monitor should, if poss i bl e, be checked on another computer and/or wi th another data cable.
If you are unable to solve t he probl em , please inform our Help Desk.
Having this problem? Check the following points:
No display (power indicator does not light) Ê Check whether the monitor is switched on.
Ê Check whether the power cable on the
monitor is connected c orrectly.
Ê Check whether the computer is switched
on.
A26361-K864-Z100-1-5E19 English - 21
Page 30
Colour monitor 463V FA
Having this problem? Check the following points:
No display (power indicator li ght s) Ê Check whether the computer is switched
on.
Ê Check whether the data cable for the
monitor is correctly attached to the monitor
port on the computer.
Ê Press any key on the computer keyboard –
the computer may be in energy s aving
mode.
Ê Alter the brightness and/or contrast unt i l
you get a picture.
Ê Check whether the data cable for the
monitor is correctly attached to the monitor
port on the computer.
Ê Check whether the computer is switched
on.
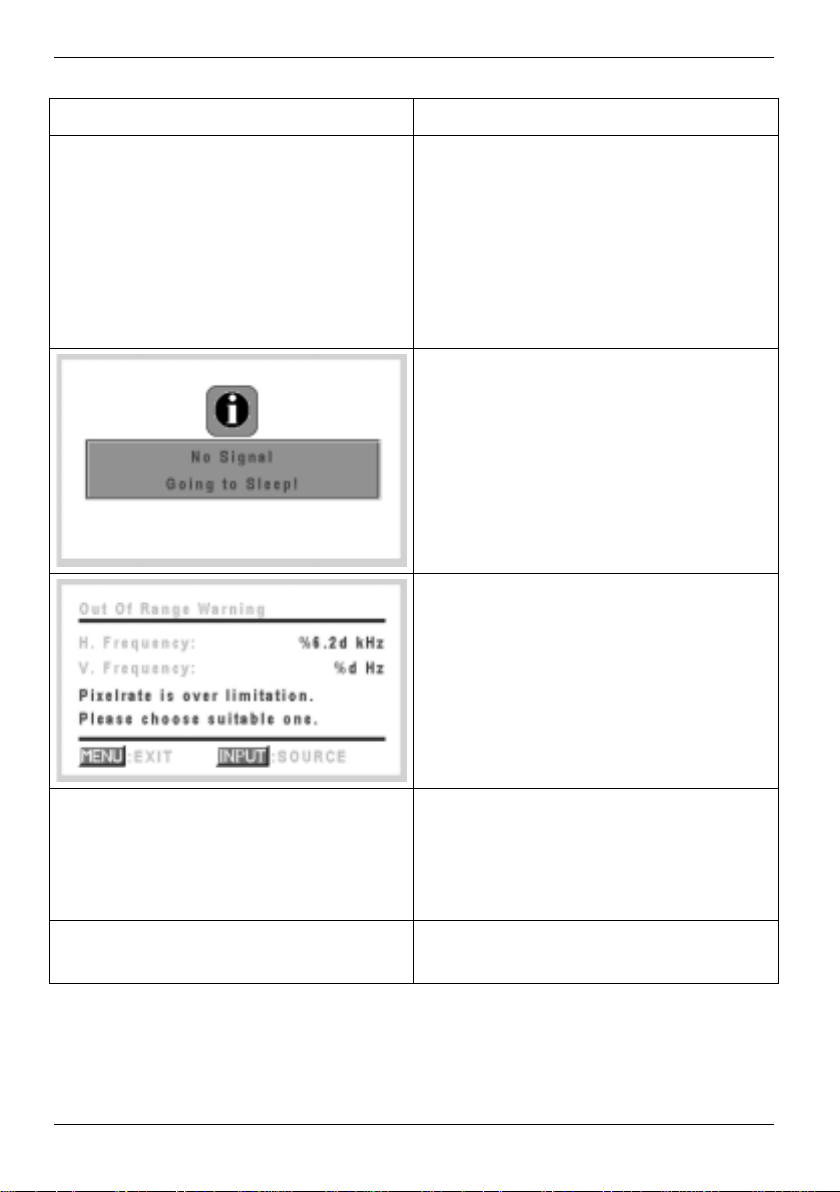
The input signal (horizontal frequency and
refresh rate) at the display ed i nput does not
correspond to the technical m oni tor data.
Ê Adjust the video frequency range using the
computer software (see docum entation for
your computer or your graphics card).
Picture position is not correct The m oni tor recognises an undefined mode (see
"Technical data").
Ê Press the AUTO \ AUTO button to perform
the auto-adjustment of the screen.
Ê Set the picture position with the OSD menu
(see "Operation of the monitor" ).
Picture is shaking Ê Check whether the data cable for the
22 - English A26361-K864-Z100-1-5E19
monitor is correctly attached to the monitor
port on the computer.
Page 31
Colour monitor 463V FA
Having this problem? Check the following points:
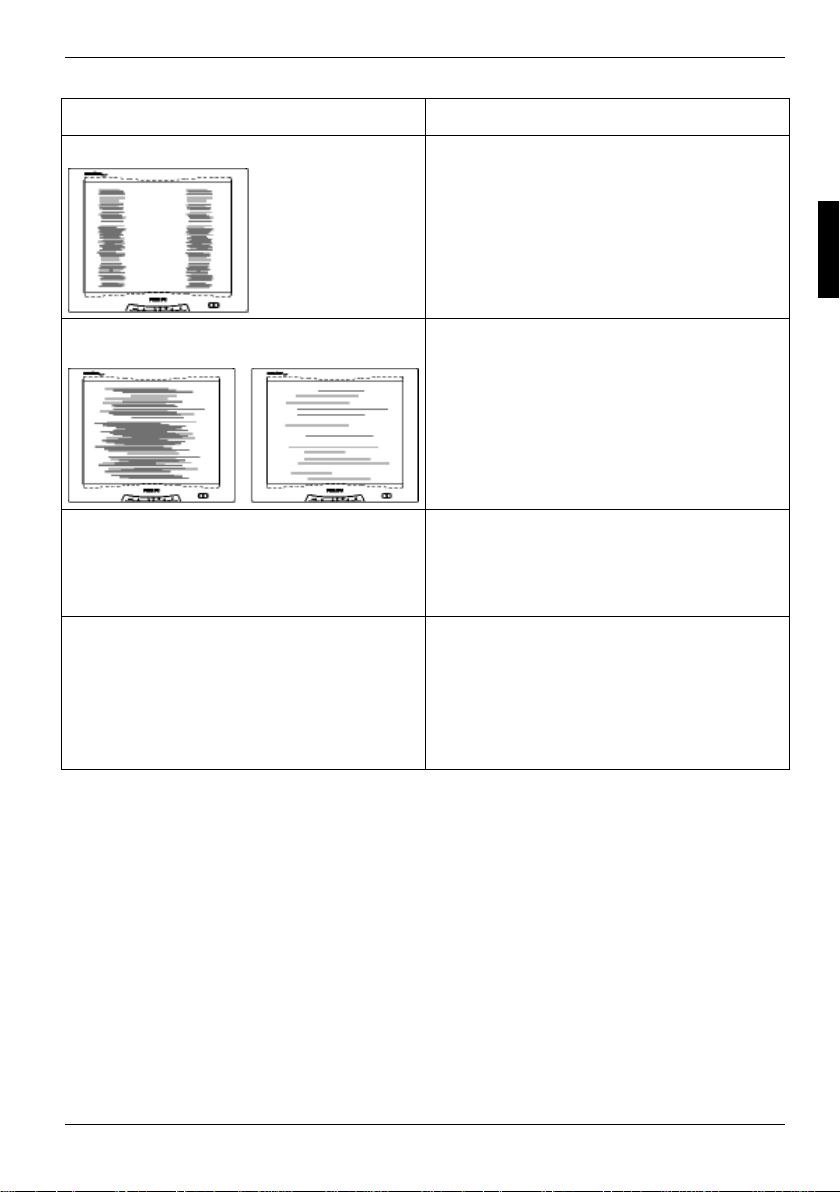
Picture disturbances (vertical lines) Ê Press the AUTO \ AUTO button t o perform
the auto-adjustment of the screen.
Picture disturbances (hori zontal lines, picture
noise)
The screen becomes darker
Ê Press the AUTO \ AUTO button to perform
the auto-adjustment of the screen.
The background lighting has a limited lifetime. If
your monitor display shoul d become too dark,
the background lighting will have to be
exchanged.
Ê Please contact our Help Desk.
Image of last screen display st ill visible If you switch from a high-contrast display (f or
example black lines/ characters on a white
background) to a picture of medium bri ghtness,
you may be able to see a faint i m age of the
previous display for a ti m e. This phenomenon is
not due to a monitor defect but to the technology
used (IPS display with large viewing angle, IPS =
In Plane Switching).
A26361-K864-Z100-1-5E19 English - 23
Page 32
Colour monitor 463V FA
Permanently unlit or lit pi xels The standard of production techniques today
cannot guarantee an absolutely fault-free screen
display. A few isol ated constant lit or unlit pi xels
may be present. The maximum permitted
number of pixels faults i s stipulated in the
stringent international s t andard ISO 13406-2
(Class II).
Example: a 17" or 18" flat-screen monitor with a
resolution of 1280 x 1024 has 1280 x 1024 =
1310720 pixels. Each pixel consists of three
subpixels (red, green and blue), s o t here are
almost 4 million dots in total.
According to ISO 13406-2 (Class II), a maximum
of 6 pixels and 7 subpixels may be defective, i.
e. a total of 25 faulted dots . This corresponds to
approx. 0.0006 % of the entire s creen surface!
24 - English A26361-K864-Z100-1-5E19
 Loading...