

Page 1

Page 2

Page 3

Contents
Contents
Safety precautions . . . . . . . . . . . . . . . . . . . . . . . . . . . 4
Introduction . . . . . . . . . . . . . . . . . . . . . . . . . . . . . . . . 5
Possible uses . . . . . . . . . . . . . . . . . . . . . . . . . . . . . . . . . . . . . . . . . . . . . . . . . . . . . . . . . 5
First Steps . . . . . . . . . . . . . . . . . . . . . . . . . . . . . . . . . . 9
Contents . . . . . . . . . . . . . . . . . . . . . . . . . . . . . . . . . . . . . . . . . . . . . . . . . . . . . . . . . . . . .9
System requirements . . . . . . . . . . . . . . . . . . . . . . . . . . . . . . . . . . . . . . . . . . . . . . . . . . . 9
Operating displays and connections . . . . . . . . . . . . . . . . . . . . . . . . . . . . . . . . . . . . . . 10
Front panel . . . . . . . . . . . . . . . . . . . . . . . . . . . . . . . . . . . . . . . . . . . . . . . . . . . . . . . 10
Back panel . . . . . . . . . . . . . . . . . . . . . . . . . . . . . . . . . . . . . . . . . . . . . . . . . . . . . . . 11
Setting up the Gigaset WLAN Repeater 108 . . . . . . . . . . . . . . . . . . . . . . . . . . . . . . . . 12
Connecting the Gigaset WLAN Repeater 108 . . . . . . . . . . . . . . . . . . . . . . . . . . . . . . . 13
To a wired network (LAN), a PC, a games console or a modem . . . . . . . . . . . . . . 13
Wirelessly to a PC . . . . . . . . . . . . . . . . . . . . . . . . . . . . . . . . . . . . . . . . . . . . . . . . . . 13
To the mains power supply . . . . . . . . . . . . . . . . . . . . . . . . . . . . . . . . . . . . . . . . . . 14
The user interface . . . . . . . . . . . . . . . . . . . . . . . . . . 15
Launching the user interface . . . . . . . . . . . . . . . . . . . . . . . . . . . . . . . . . . . . . . . . . . . . 16
The start screen . . . . . . . . . . . . . . . . . . . . . . . . . . . . . . . . . . . . . . . . . . . . . . . . . . . . . . 17
Selecting a language . . . . . . . . . . . . . . . . . . . . . . . . . . . . . . . . . . . . . . . . . . . . . . . . . . 19
Elements on the user interface . . . . . . . . . . . . . . . . . . . . . . . . . . . . . . . . . . . . . . . . . . 20
Basic Setup Wizard . . . . . . . . . . . . . . . . . . . . . . . . . . 21
Regional Options . . . . . . . . . . . . . . . . . . . . . . . . . . . . . . . . . . . . . . . . . . . . . . . . . . . . . 22
Operating Mode selection . . . . . . . . . . . . . . . . . . . . . . . . . . . . . . . . . . . . . . . . . . . 23
Basic settings for the Repeater and
Access point Operating Mode . . . . . . . . . . . . . . . . . . . . . . . . . . . . . . . . . . . . . . . . . . . 24
Settings for the wireless network . . . . . . . . . . . . . . . . . . . . . . . . . . . . . . . . . . . . . 24
Local network settings . . . . . . . . . . . . . . . . . . . . . . . . . . . . . . . . . . . . . . . . . . . . . . 26
Basic settings in Ethernet adapter Operating Mode . . . . . . . . . . . . . . . . . . . . . . . . . . 30
Local network settings . . . . . . . . . . . . . . . . . . . . . . . . . . . . . . . . . . . . . . . . . . . . . . 32
Security Setup Wizard . . . . . . . . . . . . . . . . . . . . . . . 35
Changing the system password . . . . . . . . . . . . . . . . . . . . . . . . . . . . . . . . . . . . . . . . . . 36
SSID . . . . . . . . . . . . . . . . . . . . . . . . . . . . . . . . . . . . . . . . . . . . . . . . . . . . . . . . . . . . . . . 37
Setting data encryption . . . . . . . . . . . . . . . . . . . . . . . . . . . . . . . . . . . . . . . . . . . . . . . . 38
WPA2/WPA with pre-shared key (PSK) . . . . . . . . . . . . . . . . . . . . . . . . . . . . . . . . . . 39
WEP encryption . . . . . . . . . . . . . . . . . . . . . . . . . . . . . . . . . . . . . . . . . . . . . . . . . . . 40
Access control within the wireless network . . . . . . . . . . . . . . . . . . . . . . . . . . . . . . . . 42
Saving settings . . . . . . . . . . . . . . . . . . . . . . . . . . . . . . . . . . . . . . . . . . . . . . . . . . . . . . . 44
1
Page 4

Contents
Configuring the Advanced Settings . . . . . . . . . . . . 45
Operating Mode . . . . . . . . . . . . . . . . . . . . . . . . . . . . . . . . . . . . . . . . . . . . . . . . . . . . . . 46
Local Network . . . . . . . . . . . . . . . . . . . . . . . . . . . . . . . . . . . . . . . . . . . . . . . . . . . . . . . 47
Repeater/Access Point . . . . . . . . . . . . . . . . . . . . . . . . . . . . . . . . . . . . . . . . . . . . . . 47
Ethernet adapter Operating Mode . . . . . . . . . . . . . . . . . . . . . . . . . . . . . . . . . . . . . 50
Wireless Network . . . . . . . . . . . . . . . . . . . . . . . . . . . . . . . . . . . . . . . . . . . . . . . . . . . . . 51
Setting wireless security . . . . . . . . . . . . . . . . . . . . . . . . . . . . . . . . . . . . . . . . . . . . 55
WPA2-PSK and WPA2-PSK / WPA-PSK . . . . . . . . . . . . . . . . . . . . . . . . . . . . . . . . . . . 56
WEP encryption . . . . . . . . . . . . . . . . . . . . . . . . . . . . . . . . . . . . . . . . . . . . . . . . . . . 58
Permitted clients . . . . . . . . . . . . . . . . . . . . . . . . . . . . . . . . . . . . . . . . . . . . . . . . . . 61
Repeater function (WDS) . . . . . . . . . . . . . . . . . . . . . . . . . . . . . . . . . . . . . . . . . . . . 63
Administration . . . . . . . . . . . . . . . . . . . . . . . . . . . . . 64
Regional Options . . . . . . . . . . . . . . . . . . . . . . . . . . . . . . . . . . . . . . . . . . . . . . . . . . . . . 64
Internet Time . . . . . . . . . . . . . . . . . . . . . . . . . . . . . . . . . . . . . . . . . . . . . . . . . . . . . 65
System Password . . . . . . . . . . . . . . . . . . . . . . . . . . . . . . . . . . . . . . . . . . . . . . . . . . . . . 66
Saving and restoring a configuration . . . . . . . . . . . . . . . . . . . . . . . . . . . . . . . . . . . . . 67
Saving configuration data . . . . . . . . . . . . . . . . . . . . . . . . . . . . . . . . . . . . . . . . . . . 67
Restoring the back-up . . . . . . . . . . . . . . . . . . . . . . . . . . . . . . . . . . . . . . . . . . . . . . 68
Resetting to the factory settings . . . . . . . . . . . . . . . . . . . . . . . . . . . . . . . . . . . . . . 68
Reboot . . . . . . . . . . . . . . . . . . . . . . . . . . . . . . . . . . . . . . . . . . . . . . . . . . . . . . . . . . . . .68
Updating firmware . . . . . . . . . . . . . . . . . . . . . . . . . . . . . . . . . . . . . . . . . . . . . . . . . . . . 69
System Log . . . . . . . . . . . . . . . . . . . . . . . . . . . . . . . . . . . . . . . . . . . . . . . . . . . . . . . . . . 71
Status information . . . . . . . . . . . . . . . . . . . . . . . . . . 72
Overview . . . . . . . . . . . . . . . . . . . . . . . . . . . . . . . . . . . . . . . . . . . . . . . . . . . . . . . . . . . 72
Security . . . . . . . . . . . . . . . . . . . . . . . . . . . . . . . . . . . . . . . . . . . . . . . . . . . . . . . . . . . .74
Local Network . . . . . . . . . . . . . . . . . . . . . . . . . . . . . . . . . . . . . . . . . . . . . . . . . . . . . . . 75
Wireless Network . . . . . . . . . . . . . . . . . . . . . . . . . . . . . . . . . . . . . . . . . . . . . . . . . . . . . 76
Device . . . . . . . . . . . . . . . . . . . . . . . . . . . . . . . . . . . . . . . . . . . . . . . . . . . . . . . . . . . . . .78
Appendix . . . . . . . . . . . . . . . . . . . . . . . . . . . . . . . . . . 80
Settings for wireless connection for games consoles
and set-top boxes . . . . . . . . . . . . . . . . . . . . . . . . . . . . . . . . . . . . . . . . . . . . . . . . . . . . . 80
Integration in the network . . . . . . . . . . . . . . . . . . . . . . . . . . . . . . . . . . . . . . . . . . . . . . 82
Windows XP . . . . . . . . . . . . . . . . . . . . . . . . . . . . . . . . . . . . . . . . . . . . . . . . . . . . . . 83
Windows 2000 . . . . . . . . . . . . . . . . . . . . . . . . . . . . . . . . . . . . . . . . . . . . . . . . . . . . 85
Windows 98 SE/ME . . . . . . . . . . . . . . . . . . . . . . . . . . . . . . . . . . . . . . . . . . . . . . . . 88
Assigning IP addresses automatically . . . . . . . . . . . . . . . . . . . . . . . . . . . . . . . . . . . . . 93
Windows XP . . . . . . . . . . . . . . . . . . . . . . . . . . . . . . . . . . . . . . . . . . . . . . . . . . . . . . 93
Windows 2000 . . . . . . . . . . . . . . . . . . . . . . . . . . . . . . . . . . . . . . . . . . . . . . . . . . . . 95
Windows 98 SE/ME . . . . . . . . . . . . . . . . . . . . . . . . . . . . . . . . . . . . . . . . . . . . . . . . 97
Assigning static IP addresses . . . . . . . . . . . . . . . . . . . . . . . . . . . . . . . . . . . . . . . . . . . 100
Private IP addresses . . . . . . . . . . . . . . . . . . . . . . . . . . . . . . . . . . . . . . . . . . . . . . . 100
Windows XP . . . . . . . . . . . . . . . . . . . . . . . . . . . . . . . . . . . . . . . . . . . . . . . . . . . . . 101
Windows 2000 . . . . . . . . . . . . . . . . . . . . . . . . . . . . . . . . . . . . . . . . . . . . . . . . . . . 102
Windows 98 SE/ME . . . . . . . . . . . . . . . . . . . . . . . . . . . . . . . . . . . . . . . . . . . . . . . 104
2
Page 5

Contents
Restarting the network . . . . . . . . . . . . . . . . . . . . . . . . . . . . . . . . . . . . . . . . . . . . . . . 106
Updating IP addresses . . . . . . . . . . . . . . . . . . . . . . . . . . . . . . . . . . . . . . . . . . . . . . . . 107
Trouble shooting . . . . . . . . . . . . . . . . . . . . . . . . . . . . . . . . . . . . . . . . . . . . . . . . . . . . 111
Specifications . . . . . . . . . . . . . . . . . . . . . . . . . . . . . . . . . . . . . . . . . . . . . . . . . . . . . . . 116
Approval . . . . . . . . . . . . . . . . . . . . . . . . . . . . . . . . . . . . . . . . . . . . . . . . . . . . . . . . . . . 117
Disposal . . . . . . . . . . . . . . . . . . . . . . . . . . . . . . . . . . . . . . . . . . . . . . . . . . . . . . . . . . . 117
Customer service (Customer Care) . . . . . . . . . . . . . . . . . . . . . . . . . . . . . . . . . . . . . . 119
Guarantee Certificate United Kingdom . . . . . . . . . . . . . . . . . . . . . . . . . . . . . . . . . . . 120
Guarantee Certificate Ireland . . . . . . . . . . . . . . . . . . . . . . . . . . . . . . . . . . . . . . . . . . 121
Tillverkarens garanti Sverige . . . . . . . . . . . . . . . . . . . . . . . . . . . . . . . . . . . . . . . . . . . 123
Takuuehdot Suomi . . . . . . . . . . . . . . . . . . . . . . . . . . . . . . . . . . . . . . . . . . . . . . . . . . . 124
Tillverkarens garanti Finland . . . . . . . . . . . . . . . . . . . . . . . . . . . . . . . . . . . . . . . . . . . 125
Garanti Norge . . . . . . . . . . . . . . . . . . . . . . . . . . . . . . . . . . . . . . . . . . . . . . . . . . . . . . 126
Gyldighet . . . . . . . . . . . . . . . . . . . . . . . . . . . . . . . . . . . . . . . . . . . . . . . . . . . . . . . 126
Garantiperiode . . . . . . . . . . . . . . . . . . . . . . . . . . . . . . . . . . . . . . . . . . . . . . . . . . . 127
Producentens Garanti Danmark . . . . . . . . . . . . . . . . . . . . . . . . . . . . . . . . . . . . . . . . 128
Glossary . . . . . . . . . . . . . . . . . . . . . . . . . . . . . . . . . 129
Index . . . . . . . . . . . . . . . . . . . . . . . . . . . . . . . . . . . . 137
3
Page 6

Safety precautions
Safety precautions
u Only use the mains adapter (5V DC 1A) that is supplied with the Gigaset WLAN
Repeater 108. Comply with the connection values and ratings when connecting the
device to the mains power supply.
u Protect the device from damp.
u Never open the device. For reasons of electrical safety it may only be opened by
authorised service technicians.
u The device may affect medical equipment. Take account of the technical conditions
in the relevant environment.
Trademarks
Microsoft, Windows 98 SE, Windows ME, Windows 2000, Windows XP and Internet
Explorer are registered trademarks of the Microsoft Corporation.
Mozilla Firefox is a registered trademark of the Mozilla Organisation.
Super G is a registered trademark of Atheros Communications, Inc.
4
Page 7
Introduction
Introduction
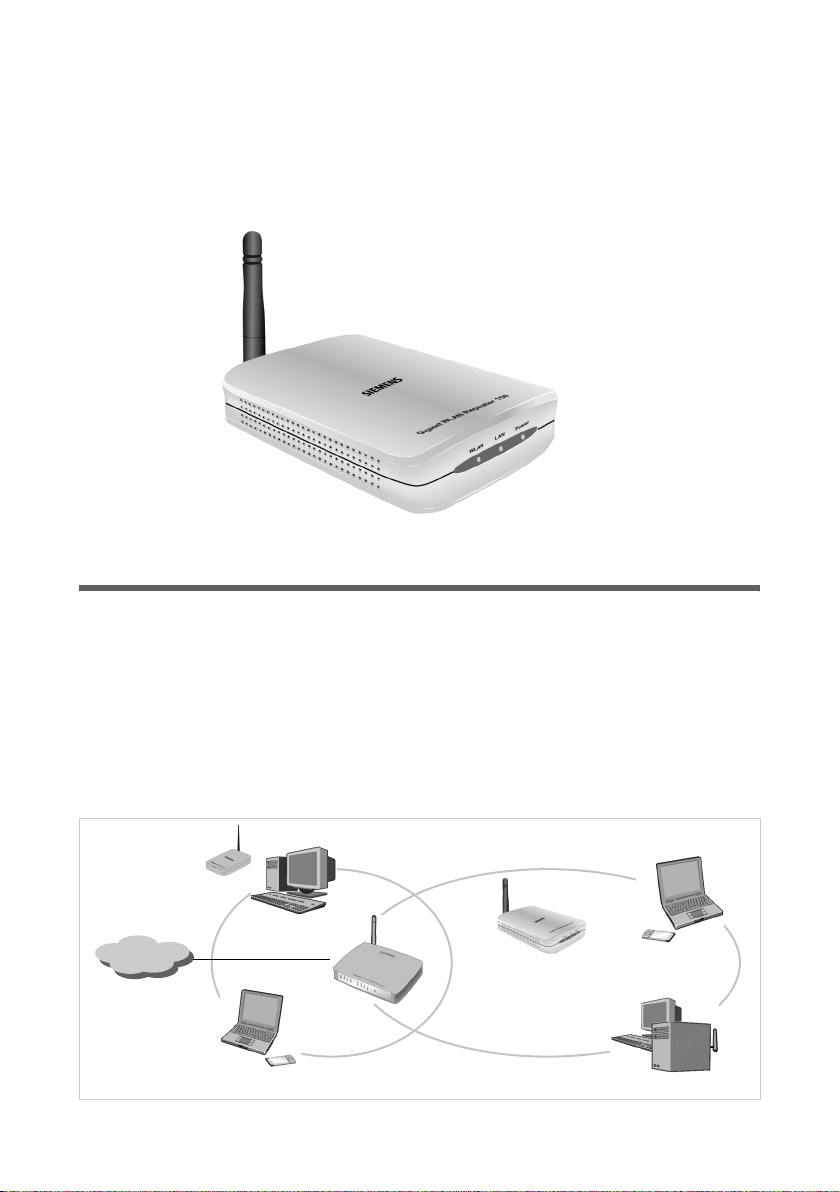
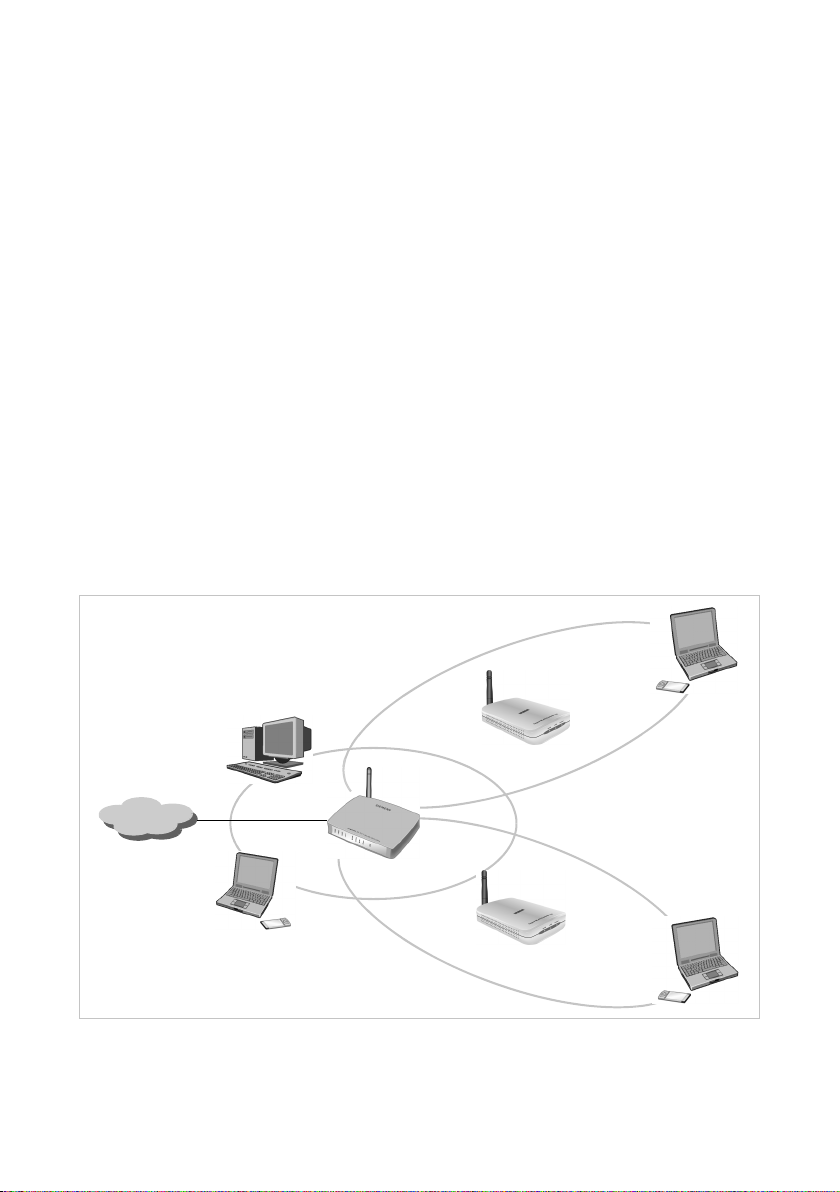
The Gigaset WLAN Repeater 108 offers various possibilities for use in wired and wireless
networks. It enables very simple wireless integration of remote PCs into a network. You
can also provide wireless access to a wired network.
Possible uses
You can use your Gigaset WLAN Repeater 108 in various functions in your network. The
device provides three operating modes that you can choose to suit your requirements.
Use as Repeater
The Gigaset WLAN Repeater 108 can be used to increase the coverage of your wireless
network. Set it up within the range of your network. The Gigaset WLAN Repeater 108
will now transmit data traffic into its own wireless area. This allows you to set up
wireless networks that cover a much larger area than would be possible with just
one wireless router (e.g. Gigaset SE551 WLAN dsl/cable).
)))
)))
Internet
)))
Gigaset WLAN Repeater 108
)))
(((
)))
5
Page 8
Introduction
In this case you need to operate your Gigaset WLAN Repeater 108 in Repeater
Operating Mode.
PCs that you wish to connect to a wireless local network via a Gigaset WLAN Repeater
108 must have a wireless network adapter, such as a Gigaset USB Adapter 108.
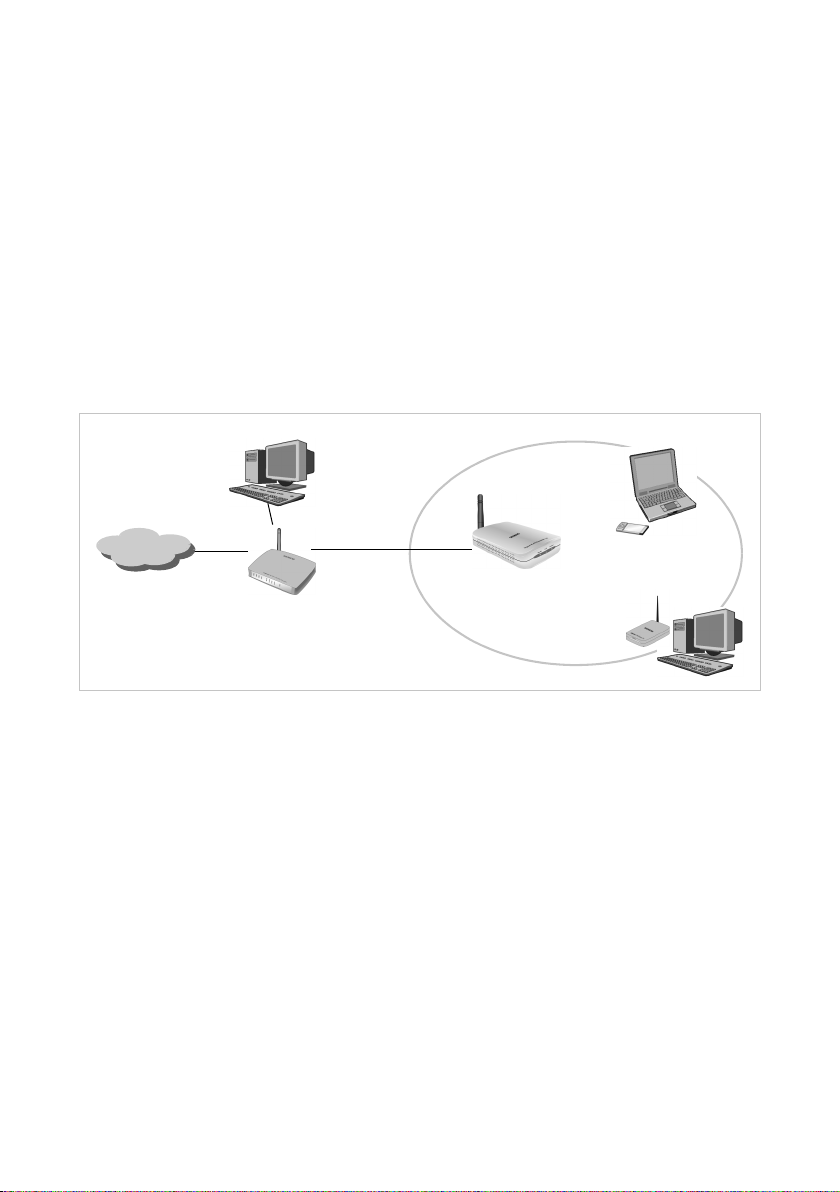
Use as access point in conjunction with a Router
The Gigaset WLAN Repeater 108 permits wireless connection of PCs to a wired local
network. For example, the Gigaset WLAN Repeater 108 can be connected via an
Ethernet cable to an Ethernet router, thus providing further PCs with wireless access to
this network. It is also possible to connect the Gigaset WLAN Repeater 108 away from
(e.g. on the first floor) the Ethernet router (which is in the cellar for example) using
cable.
In this case you need to operate your Gigaset WLAN Repeater 108 in Access point
Operating Mode.
)))
(((
Internet
Ethernet
Gigaset WLAN Repeater 108
Gigaset Router
)))
6
Page 9

Introduction
Use as wireless network adapter
The Gigaset WLAN Repeater 108 can be connected directly to the Ethernet port of a PC
or other device (e.g. a games console, set-top box). It then functions as a wireless
network adapter, but uses the device's wired Ethernet port. You do not need to install
any additional driver software on the device. This ensures that access to the wireless
network is independent of the operating system.
When you set up a connection from a computer or other device to an access point using
the Gigaset WLAN Repeater 108, you operate the Gigaset WLAN Repeater 108 in
Ethernet adapter Operating Mode.
)))
Internet
If you want to set up a wireless connection between two PCs or other devices using
the Gigaset WLAN Repeater 108, you have to use one Gigaset WLAN Repeater 108 in
Access point Operating Mode, and all others in Ethernet adapter Operating Mode.
An example of this configuration, a wireless connection between two games consoles,
can be found on page 80.
(((
Gigaset WLAN Repeater 108
)))
)))
Gigaset WLAN Repeater 108
7
Page 10
Introduction
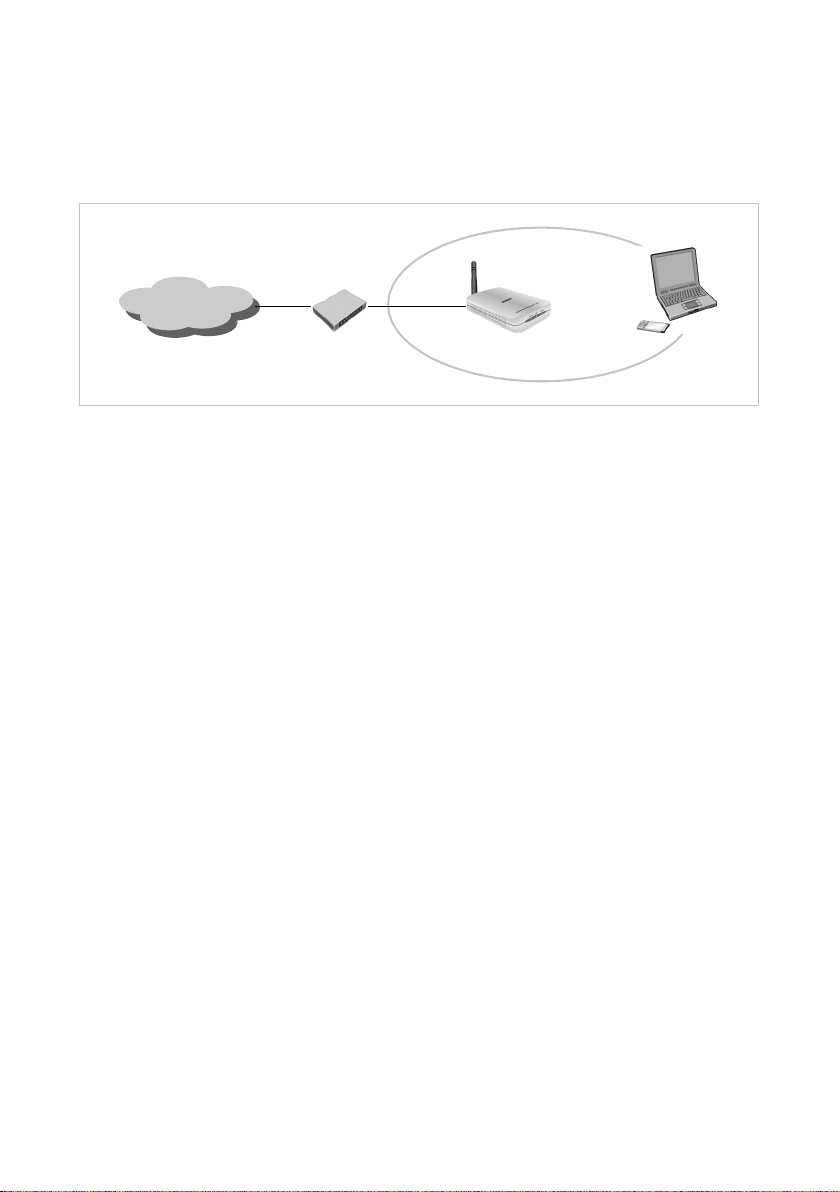
Use for accessing the Internet with a PC
The Gigaset WLAN Repeater 108 permits wireless Internet access for a PC. Here it is
operated in Access point Operating Mode, connected directly to a DSL or cable modem.
However, simultaneous Internet access for several PCs is not possible. This requires a
wireless router (e.g. a Gigaset SE551WLAN dsl/cable).
)))
Internet
(((
DSL modem
To access the Internet, a DSL or cable modem is required. You also need an Internet
Service Provider for Internet access. The Internet access is configured using the software
from your Internet Service Provider. The Gigaset WLAN Repeater 108 does not require
any further configuration.
Security functions
You can use various encryption methods and authentication methods (WEP, WPA/WPA2PSK,WPA/WPA2, MAC access control) to prevent unauthorised access to your wireless
LAN or make data illegible to unauthorised parties. The security settings available to you
depend on the Operating Mode you select and the components used in your local
network.
Gigaset WLAN Repeater 108
8
Page 11

First Steps
First Steps
Contents
The package contains the following components:
u one Gigaset WLAN Repeater 108
u one mains adapter (5V DC, 1A)
u one Ethernet cable (CAT5)
u one power supply cable for the Gigaset WLAN Repeater 108 fed by a USB interface
(e.g. on the PC)
u one CD containing this user guide and the "Gigaset WLAN practical tips" document
u one Quick Start Guide
System requirements
To operate your Gigaset WLAN Repeater 108 you need
u a PC with
– a Gigaset PC Card 108, a Gigaset USB Adapter 108 or a different 802.11g or
802.11b compatible wireless network adaptor
and/or
– an Ethernet card,
u a Web browser, e.g. Microsoft Internet Explorer 6.0 or higher, Mozilla Firefox 1.0 or
higher, to configure your repeater.
9
Page 12
First Steps
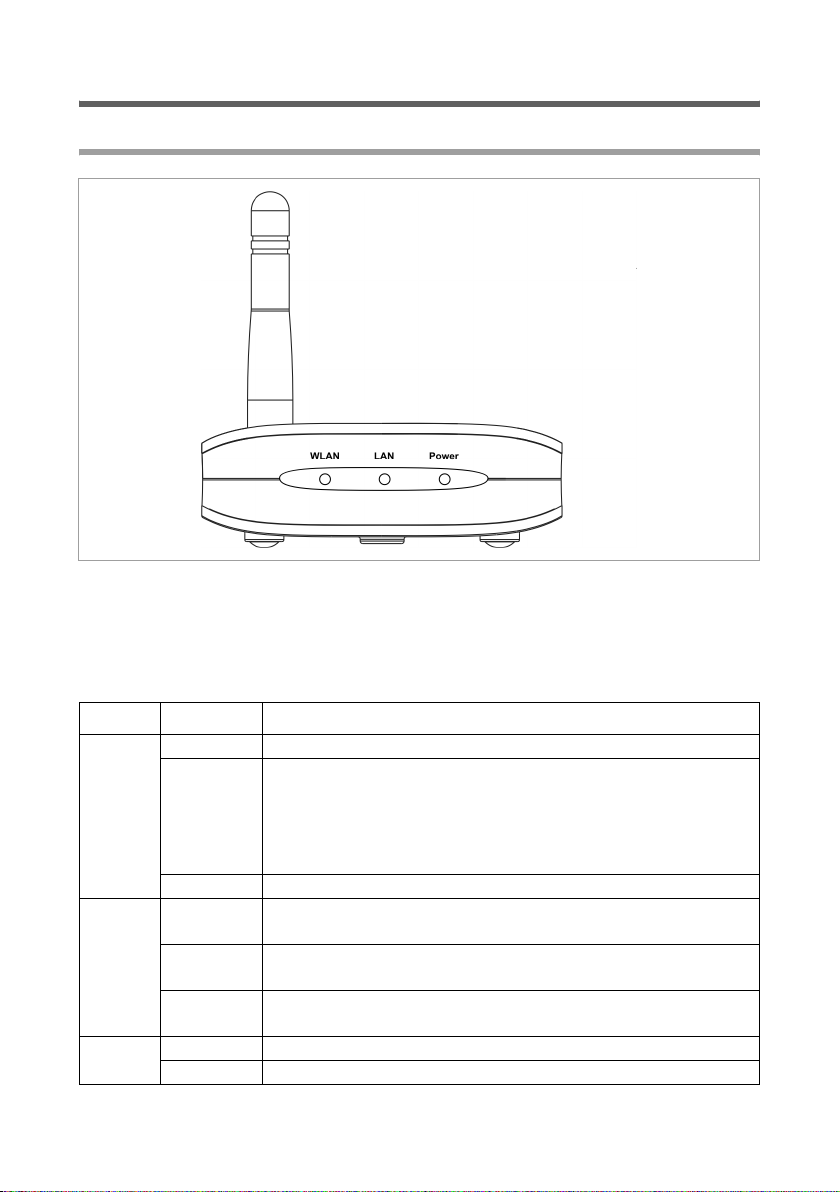
Operating displays and connections
Front panel
LED displays
The front panel of the Gigaset WLAN Repeater 108 contains LED displays that show the
operating state and simplify installation and fault finding in the network.
The LED's show the following:
LED State Status
On There is a wireless connection to the local network.
u The Gigaset WLAN Repeater 108 is sending or receiving
WLAN
LAN
Power
Flashing
Off The WLAN interface is not active.
On
Flashing
Off
On The Gigaset WLAN Repeater 108 has been powered up.
Off The Gigaset WLAN Repeater 108 has been powered down.
u New firmware is being loaded on the Gigaset WLAN
There is a connection to the local network via the Ethernet
cable.
The Gigaset WLAN Repeater 108 is sending or receiving data
via the Ethernet cable.
There is no connection to the local network via the Ethernet
cable.
10
data on its WLAN interface.
Repeater 108 or the Gigaset WLAN Repeater 108 is
rebooting.
Page 13
First Steps
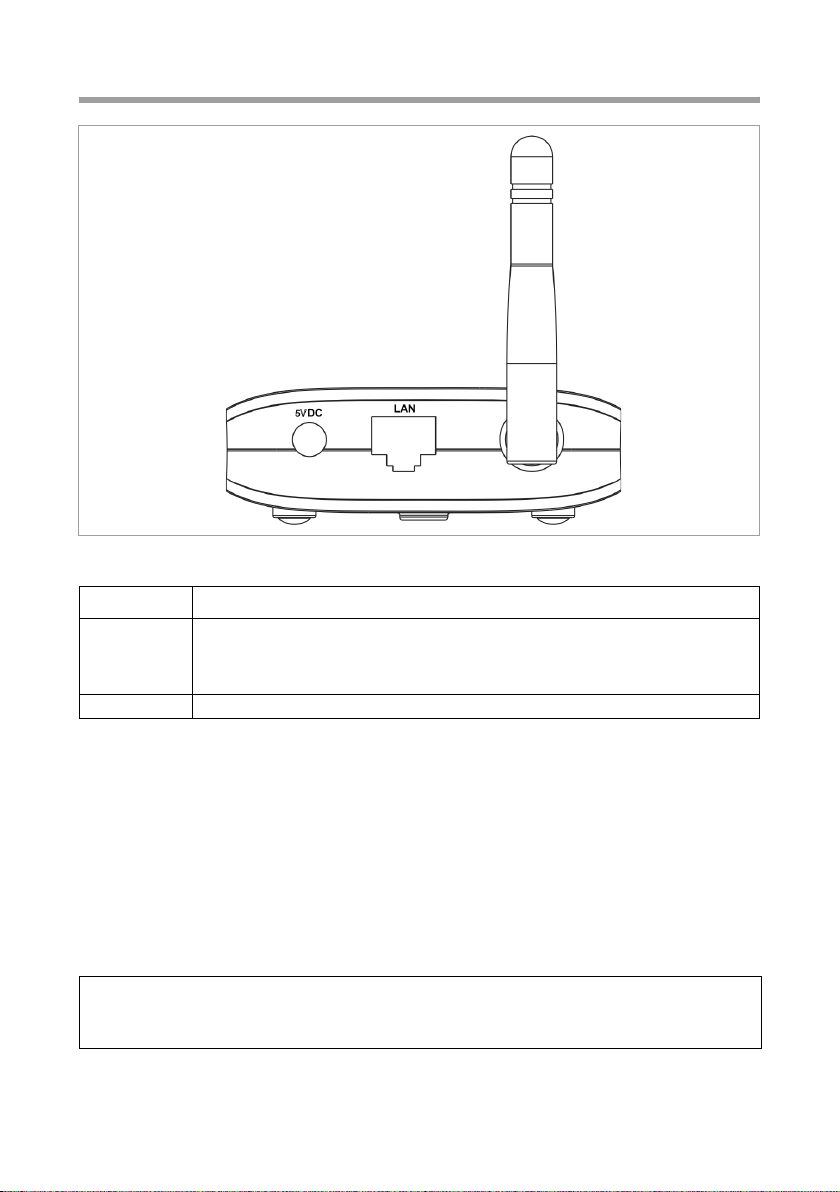
Back panel
The back panel of the Gigaset WLAN Repeater 108 houses the following sockets.
Element Description
5VDC Socket for the mains adapter supplied
Please note:
Using the wrong power supply unit may damage the repeater.
LAN Socket for an Ethernet cable
Reset
The reset button is located behind the small opening on the underside of the device.
u Restart function: Press the reset button for longer than 1 second but less than
5 seconds to reboot the device. This does not affect the configuration settings.
The WLAN LED flashes while the device restarts. This may take several minutes.
u Reset function: Press the button behind the small opening on the underside of the
device for at least 5 seconds to return all settings to the factory settings.
Warning: This will clear all the configuration settings you have made.
Updated firmware will not be affected.
Please note:
While the device is rebooting the reset button does not function. To trigger the restart
or reset function, please wait until the WLAN LED has stopped flashing.
11
Page 14

First Steps
Setting up the Gigaset WLAN Repeater 108
The Gigaset WLAN Repeater 108 can be set up in any suitable location in the home or
office. You do not need any special wiring. However, you should comply with the following guidelines:
u Operate the Gigaset WLAN Repeater 108 only indoors within a temperature range
of +5 to +40 °C. Do not position the Gigaset WLAN Repeater 108 near sources of
heat. Do not cover the ventilation slots. High temperatures will reduce the transmit-
ter range.
u A suitable mains socket and a connection to the Ethernet socket of a PC or a wired
network must be available where you set up the Gigaset WLAN Repeater 108.
u Do not position the device in the immediate vicinity of stereo equipment, TV sets or
microwave ovens. This may cause interference.
u Position the Gigaset WLAN Repeater 108 on a non-slip surface.
The router feet do not normally leave any traces on the surface they are on. How-
ever, some furniture surfaces may contain substances that attack and soften the
router's plastic feet. This may cause the feet to mark the furniture surface.
u Position the Gigaset WLAN Repeater 108 in such a way that it cannot fall down and
damage the antenna.
u Do not place the Gigaset WLAN Repeater 108 on a heat sensitive surface.
u Lay the cables so that nobody can trip over them. You should not cover the cables
with anything.
u Protect the Gigaset WLAN Repeater 108 from dampness.
12
Page 15
First Steps
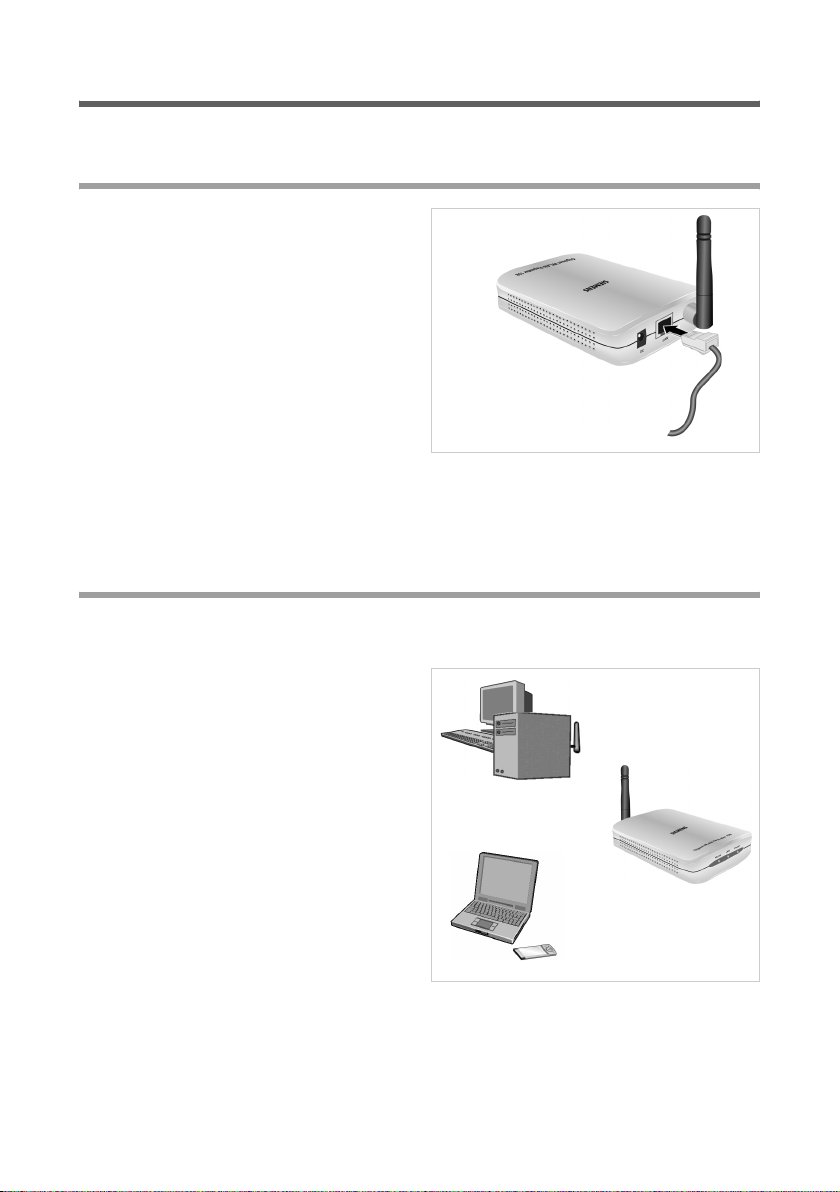
Connecting the Gigaset WLAN Repeater 108
Set up the Gigaset WLAN Repeater 108 at the required location.
To a wired network (LAN), a PC, a games console or a modem
ì Plug one end of the Ethernet cable
into the socket marked LAN on the
Gigaset WLAN Repeater 108.
ì Plug the other end of the Ethernet cable
into the device to which you wish to
connect the Gigaset WLAN Repeater
108.
Depending on the particular applica-
tion, this could be a router, a PC, a
games console or a DSL/cable modem.
Please note:
Depending on the use, you will first have to make some settings via the browser-based
configuration program of your Gigaset WLAN Repeater 108. We therefore recommend
that you first connect the device to a PC using an Ethernet cable.
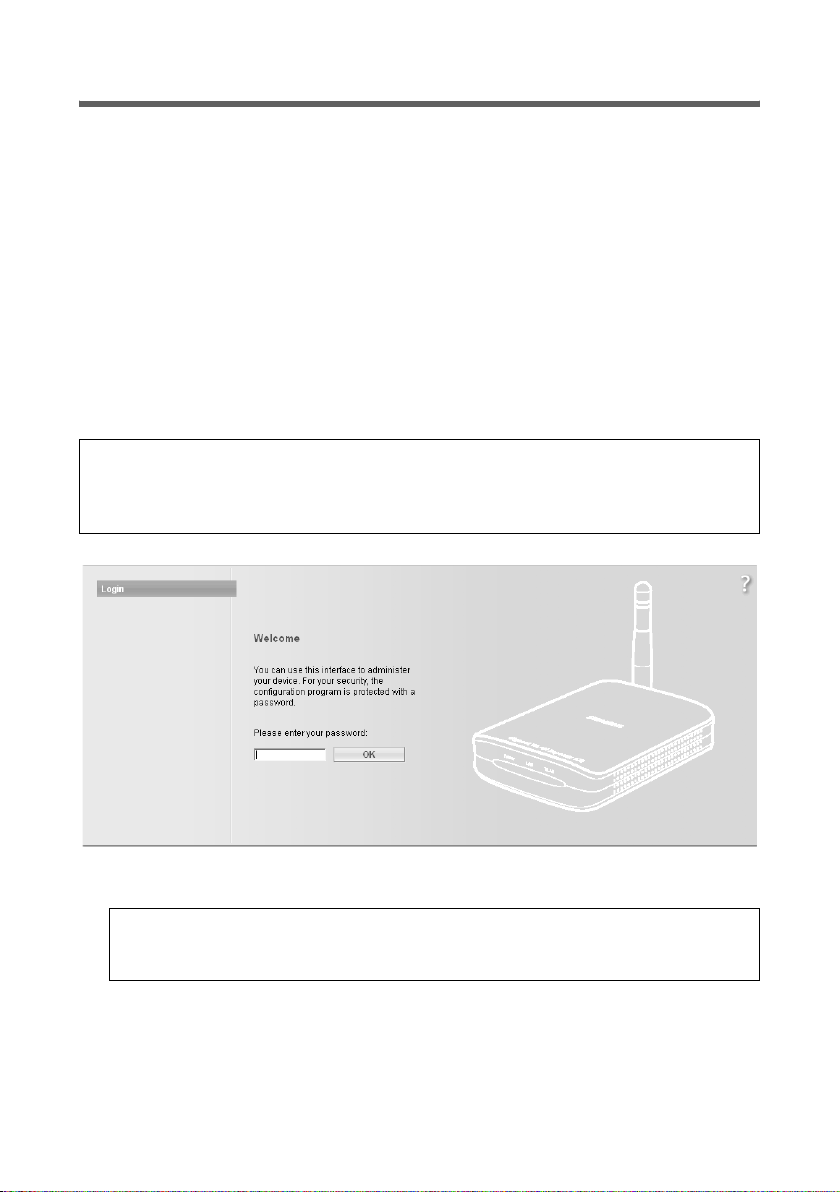
Wirelessly to a PC
A wireless connection is made using a wireless network adapter that must be installed
in your PC.
A wireless network is defined by assigning
an identical SSID to all the devices. The
default SSID of the Gigaset WLAN Repeater
108 is ConnectionPoint.
ì Therefore, enter ConnectionPoint as
the SSID on the wireless network
adapter in your PC, and deactivate
encryption if necessary. The user guide
belonging to the device will tell you
how to do this.
If the correct SSID has been entered in your
PC's wireless network adapter, the wireless
link will be established automatically
once you connect your Gigaset WLAN
Repeater 108 to the mains power supply.
)))
(((
)))
13
Page 16

First Steps
Aligning the antenna
ì Align the antenna.
The antenna should be at right-angles to the communicating partner. The aerial can be
turned sideways and backwards (away from the device).
The configuration and monitoring program provides information about the quality of
the connection. Try out the antenna positions to see which gives the best results for
your location.
Please remember:
Before your PC can communicate via the Gigaset WLAN Repeater 108, you must run network configuration on the PC (see page 82).
To the mains power supply
ì Insert the round plug into the connec-
tion socket marked 5VDC on the
Gigaset WLAN Repeater 108.
ì Plug the mains adapter into a socket to
which no other devices are connected.
Please remember:
Never plug the mains adapter into a mains
power socket if you are not sure that it complies with the values on the nameplate. The
mains adapter and device could be
destroyed and you might be injured.
Your Gigaset WLAN Repeater 108 is now ready for use.
u The power LED on the front lights up.
u The WLAN-LED flashes during startup and is on continuously when a wireless con-
nection to the local network is established.
u The LAN LED lights up if you connect the Gigaset WLAN Repeater 108 using an
Ethernet cable with a router or PC from your network.
14
Page 17

The user interface
The user interface
Your Gigaset WLAN Repeater 108 comes supplied with factory settings that normally
allow it to be used as a repeater without comprehensive adjustments being necessary.
However, you still have to set up the connection to the access point, for which you wish
to extend the range with the Gigaset WLAN Repeater 108. If you wish to use your
Gigaset WLAN Repeater 108 in a different Operating Mode (see page 5), you need to
configure it.
If you use encryption in your wireless network, you must also use encryption and set
the keys on the repeater.
You can use a browser-based configuration program that can be opened from a PC to
carry out the configuration steps and to monitor operations. Detailed information is
provided about the steps required. Necessary configuration steps are carried out automatically.
Please note:
u For initial configuration we suggest that you connect the Gigaset WLAN Repeater
108 with an Ethernet cable to the Ethernet port of the PC on which you wish to
make the configuration. The Ethernet card should also be set to "Obtain an IP
address automatically" (see Section
"Assigning IP addresses automatically" on page 93).
u To start the configuration environment, you may need to deactivate the HTTP
proxy for your browser (see page 83 for Windows XP, page 87 for Windows 2000
and page 91 for Windows 98 SE/ME).
u If you use the Mozilla Firefox browser or if you use Internet Explorer together with
Windows XP Service Pack 2, you need to configure the popup blocker (see page 84
for Windows XP, page 87 for Windows 2000 and page 92 for Windows 98 SE/ME).
15
Page 18
The user interface
Launching the user interface
As described in the "First Steps" on page 9 chapter, you have connected your
Gigaset WLAN Repeater 108 and made any changes necessary to the Ethernet card's
network configuration (see the chapter "Integration in the network" on page 82).
Your Gigaset WLAN Repeater 108 is connected to the mains power supply, the
Power LED lights up, as does the WLAN LED. The LED for the local network lights up
if you have connected a device directly using an Ethernet cable.
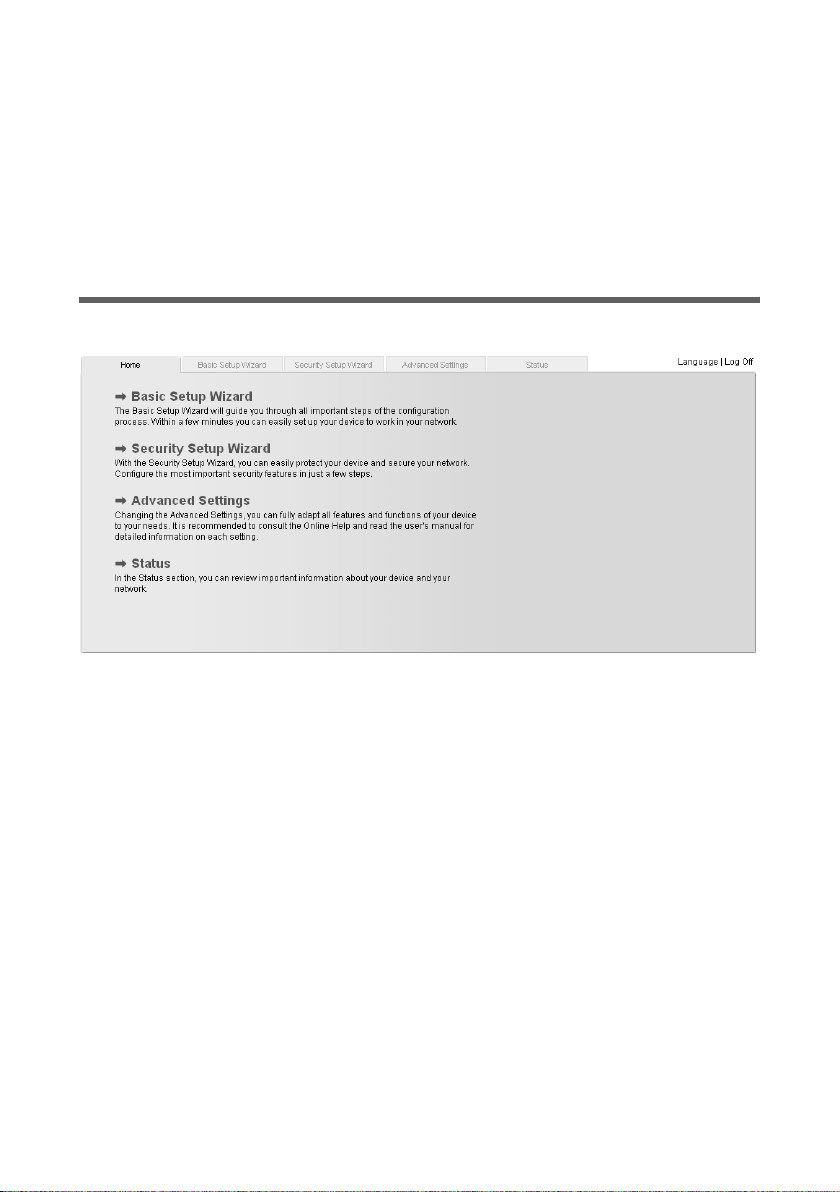
To access the Gigaset WLAN Repeater 108's user interface:
ì Launch your Web browser.
ì Enter the IP address of the Gigaset WLAN Repeater 108 in the browser's address
field.
http://192.168.2.254
The login screen appears.
Please note:
If the DHCP server in your Gigaset WLAN Repeater 108 has been activated (factory setting), it may take a while after connecting to your PC until your PC is automatically
assigned an IP address and you can access the configuration program.
ì The factory settings password is admin. Enter the password and click OK.
Please note:
For security reasons you should change the password at a later stage (see
page 36).
16
Page 19
The user interface
A screen with security information is displayed.
For the initial configuration you can skip this information. If you carry out all the basic
and security settings using the wizard as described below, then your device and network
are fully protected. If not, the next time you log on you will be informed of security gaps
in the configuration program.
ì Click on OK.
You will now see the start screen.
The start screen
The start screen is the starting point for all configuration and administration activities.
Start screen functions
On the start screen you can
u select the language for the user interface (see page 19),
u call up the Basic Setup Wizard (see page 21),
u call up the Security Setup Wizard (see page 35),
u open the Advanced Settings menu for additional configuration options
(see page 45),
u open the Status menu to obtain status information about the Gigaset WLAN
Repeater 108 (see page 72).
You can call up the wizards, the Advanced Settings menu, and status information from
any other configuration program screen at any time via the tabs on the upper edge of
the user interface.
17
Page 20

The user interface
The configuration program offers you the following functions:
Basic Setup Wizard These wizards allow you to set the date for your region, select
the Operating Mode and configure – depending on the Operating Mode selected – your wireless and wired local network.
This is described from page 21.
Security Setup Wizard These wizards allow you to take precautions against unau-
thorised access to your Gigaset WLAN Repeater 108 and the
local network. For example, you can change the password
and set up encryption for wireless traffic. This is described
from page 35. For the protection of your network we recommend that you carry out this setup.
Advanced Settings Additional settings for changing the configuration of your
wireless and wired network can be found in the Advanced Settings menu. You can also, for example, secure and restore
your configuration data or restart the device. These configuration steps are optional and can be carried out at a later
stage. This is described from page 45.
18
Page 21
The user interface
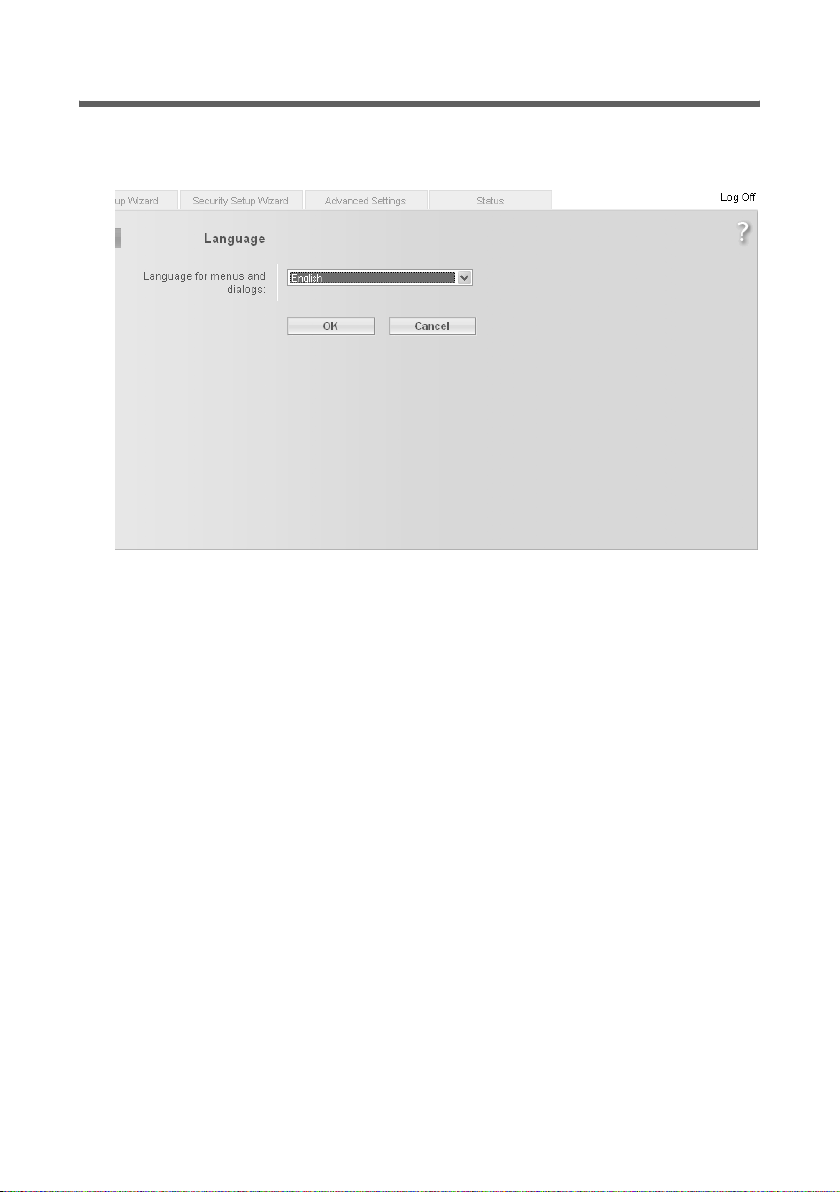
Selecting a language
The user interface can be presented in various languages.
ì Click on Language, top right above the start screen.
ì If you wish to change the preset language, select the required language from the
list.
ì Click OK to apply the setting.
The device will be restarted to activate the change. Confirm the reboot in the dialogue
field shown.
Once the procedure has been concluded the start screen is shown again.
19
Page 22

The user interface
Elements on the user interface
The user interface pages contain the following elements:
Log Off Button
The Log Off button is always present on the right above the user interface. If you click
on Log Off the session is terminated and the login screen appears again.
Help
Click on the question mark to display explanations about the current
user interface screen.
Buttons and symbols used by the wizards
The wizards use graphic symbols to show which steps you have
already carried out.
As soon as you have changed the configuration in a screen, click on Next > at the
bottom of the screen. The < Back button returns you to the previous configuration step,
and Cancel returns you to the start screen. In this case all changes will be lost. The
entered data is not stored until you click on Finish when closing the wizard.
Buttons in the Advanced Settings menu
OK Transfers the settings you have made to the
Gigaset WLAN Repeater 108 configuration.
Cancel Deletes all the entries in a screen since the last time you clicked
on OK.
Other buttons may be visible depending on the function in question. These are
described in the relevant sections.
20
Page 23
Basic Setup Wizard
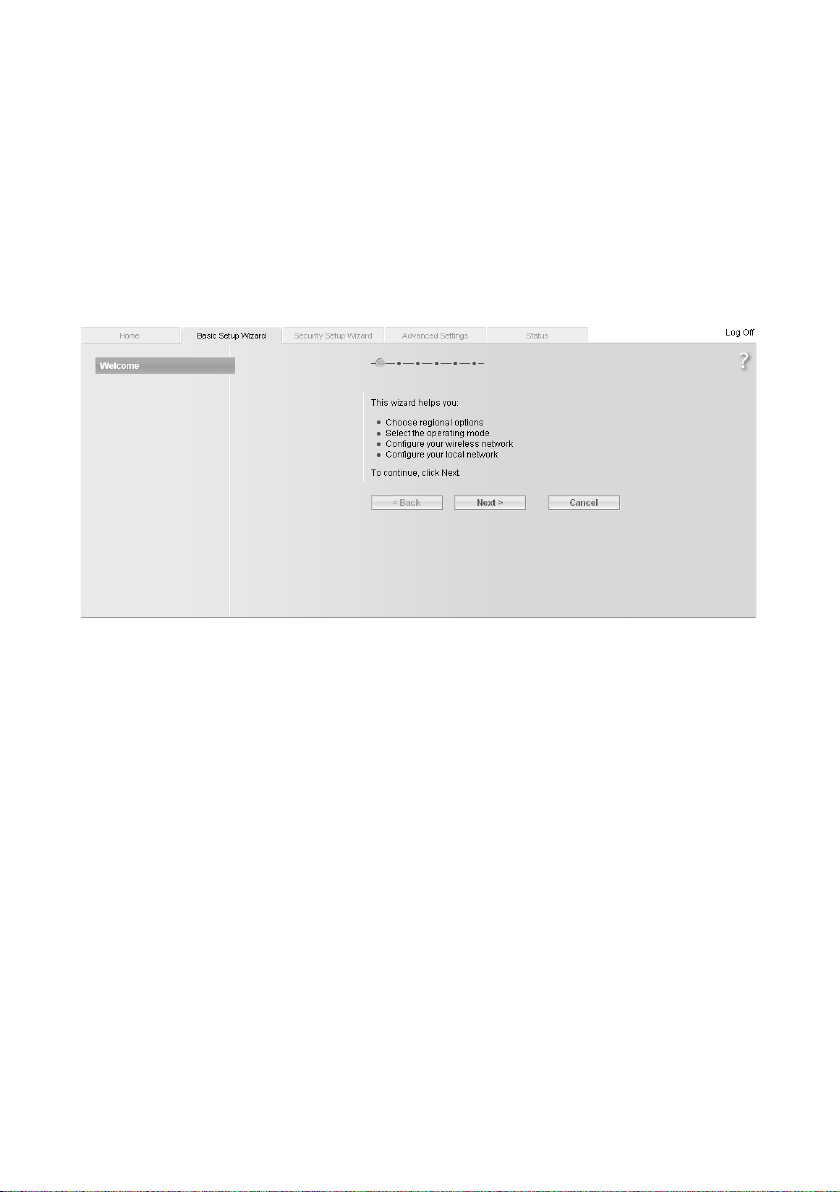
Basic Setup Wizard
The Basic Setup Wizard guides you step by step through the general configuration of
your Gigaset WLAN Repeater 108. This includes the following settings:
u regional settings
u Operating Mode selection
u wireless network (WLAN)settings
u local network (LAN)settings
ì Select Basic Setup Wizard on the start screen to start the configuration.
ì Click the Next > button.
21
Page 24
Basic Setup Wizard
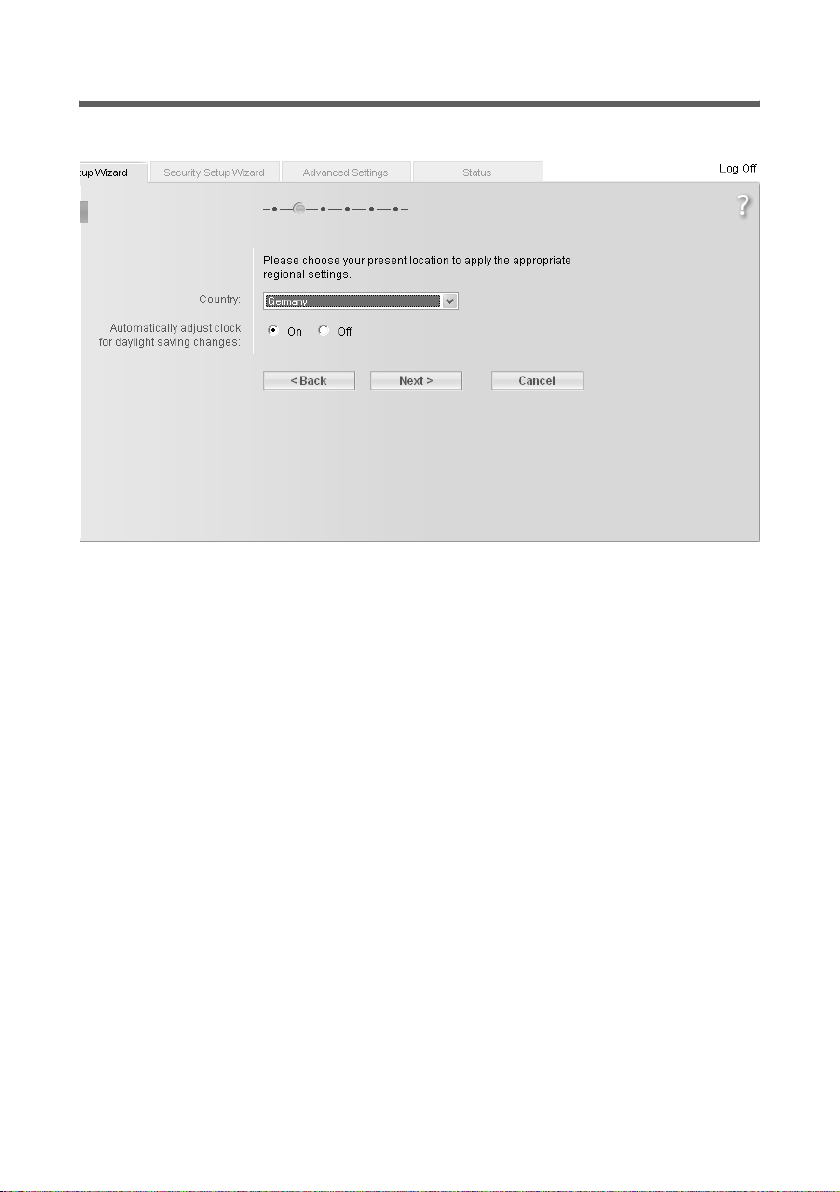
Regional Options
On this screen you can select your present location for the regional settings.
ì Select the country where you are currently located from the list. You can set for the
clock to change automatically to summer time and/or to the time zone as you wish.
ì Select the required option and/or select the time zone for your location.
ì Click the Next > button.
22
Page 25
Basic Setup Wizard
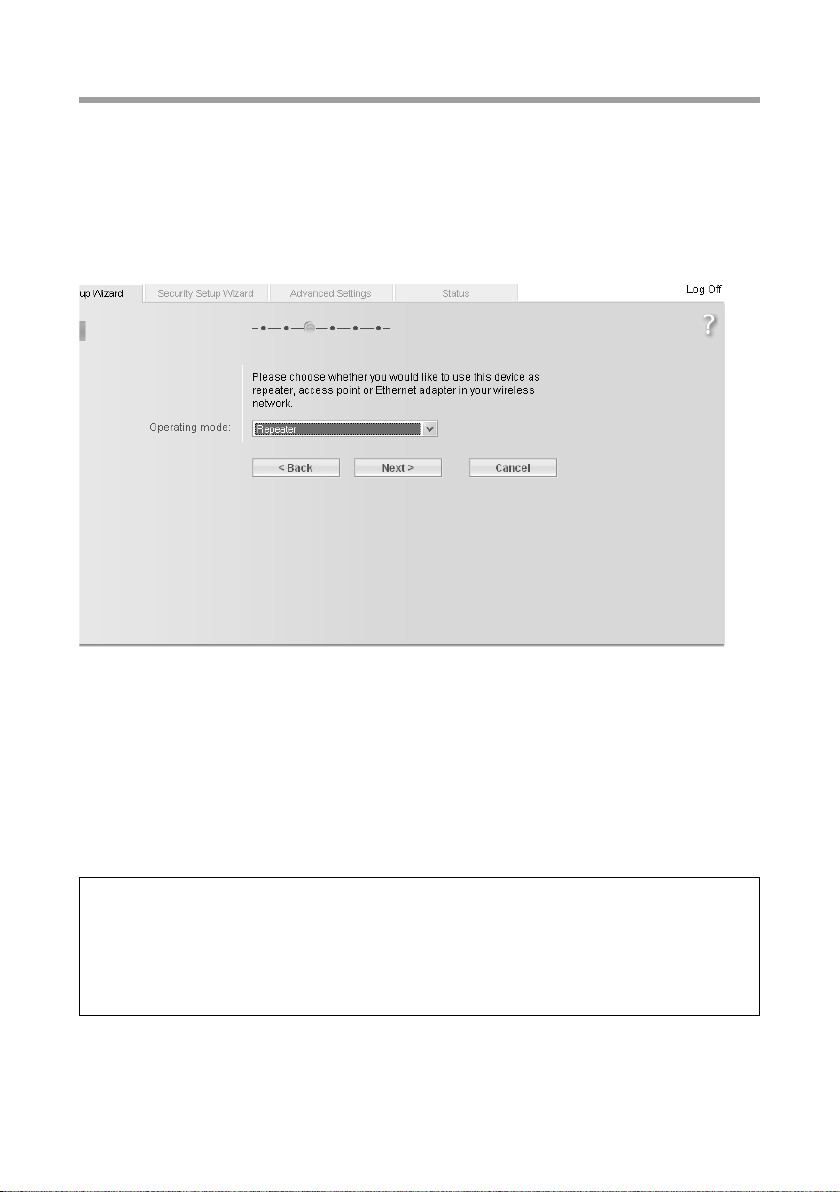
Operating Mode selection
You can operate the Gigaset WLAN Repeater 108 in the following modes:
u Repeater or access point (see page 24)
u Ethernet Adapter (see page 30)
In the factory setting, the Gigaset WLAN Repeater 108 is configured as a repeater.
You can find more information about the operating modes in the chapter "Possible uses"
on page 5.
ì If you wish to change the default settings, select the desired Operating Mode from
the selection menu.
ì Click on Next >.
The basic settings for the Repeater and access point operating modes are described in
the next section, the basic settings for the Ethernet adapter Operating Mode can be
found on page 30.
If you change the Operating Mode, you will be prompted to restart the device after completing the basic settings.
Please note:
The Gigaset WLAN Repeater 108 can be used as an access point. However, if it is
configured as a repeater or Ethernet adapter and the term access point is used in this
context in this user guide, a different device, such as a Router Gigaset SE551WLAN
dsl/cable or another Gigaset WLAN Repeater 108 configured as an access point is
intended.
23
Page 26
Basic Setup Wizard
Basic settings for the Repeater and
Access point Operating Mode
Settings for the wireless network
Your Gigaset WLAN Repeater 108 allows you to roam your network. Roaming provides
optimum connection quality and uninterrupted data traffic while you move around
within the range of your network. Your PC automatically sets up a connection to the
access point with the strongest signal without interrupting data traffic. The precondition for roaming is setting the same radio channel, the same SSID and the same
IP subnet on all the network components.
Please note:
The network adapter of the PC you want to use to configure your Gigaset WLAN
Repeater 108 should be set to obtain its IP address automatically (see also page 93).
If you use static IP addresses in your network, the IP address of your PCs must be in
the same subnet as the IP address of your Gigaset WLAN Repeater 108 (see
page 100).
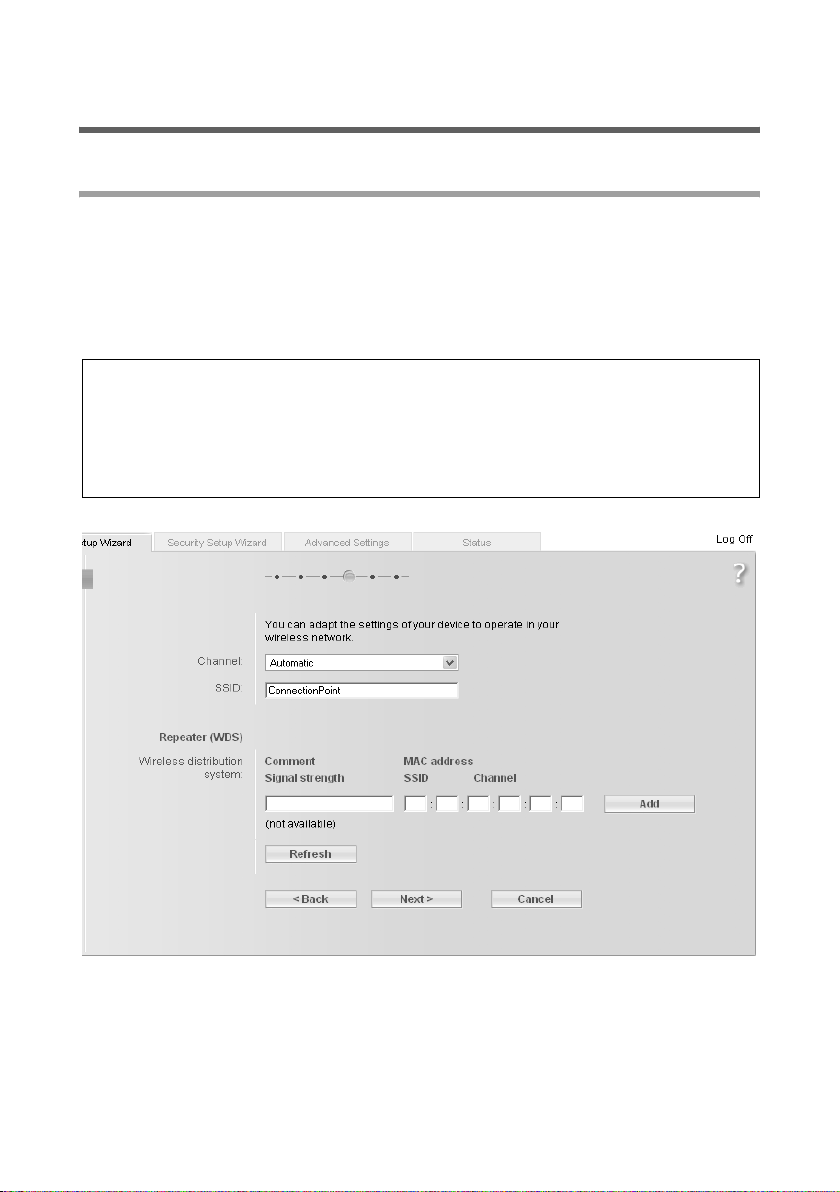
The screenshot shows the setting options for Repeater operating mode; in access point
operating mode, only Channel and SSID are displayed.
24
Page 27

Basic Setup Wizard
Channel
ì In Repeater Operating Mode you must set the channel of the access point for which
you wish to increase the range with the repeater.
ì In Access point Operating Mode select the Automatic option.
Note:
If the basic settings for the channel are not displayed on this screen, Super G is preset
as the transmission mode for the device (see chapter "Settings for the wireless network" on page 24). In this case, the channel is set automatically.
SSID
The SSID (Service Set Identifier) defines your wireless network.
Please remember that using the same SSID for several access points and repeaters
means that you cannot influence which access point your PC will use to set up a connection. This may cause problems if you wish to connect to a particular device for configuration, and it has not been properly integrated into the rest of the network. You may not
be able to reach it as your PC automatically sets up a connection with the strongest
access point. In this case, move to the immediate vicinity of the device you want to connect to, or connect your PC directly to the device in question by means of an Ethernet
cable.
ì If you want to use roaming, enter the same SSID as the one used by the access point
you select.
In Access point operating mode, enter the SSID that you wish to use for your wireless
network.
Make a note of this SSID, you also need to enter it into the network adaptors of the
PCs of your wireless network.
Repeater (WDS) (is only displayed in repeater Operating Mode)
You can enter access points for which you wish to extend the range of the wireless network. If a connection to the access point exists, the Signal strength, the SSID and the
Channel are displayed. If you wish to use the repeater, the WDS function must be activated on the access point. To do this, please refer to your access point's user guide.
ì Enter the MAC address of the access point or select an access point from the list of
available access points by clicking on Add.
The MAC address of an access point in the Gigaset product range is shown on the
nameplate on the underside of the unit.
ì Enter a name for the access point in the Description field. This name will assist you
to identify the various devices more easily. The SSID is the default setting.
ì Click on Refresh to update the display.
ì Click on Next >.
25
Page 28
Basic Setup Wizard
Note:
If carrying out the first configuration and if you have encrypted the data with one of
the WPA standards, you can only select one access point. More than one access point
is only possible with WEP encryption (page 38).
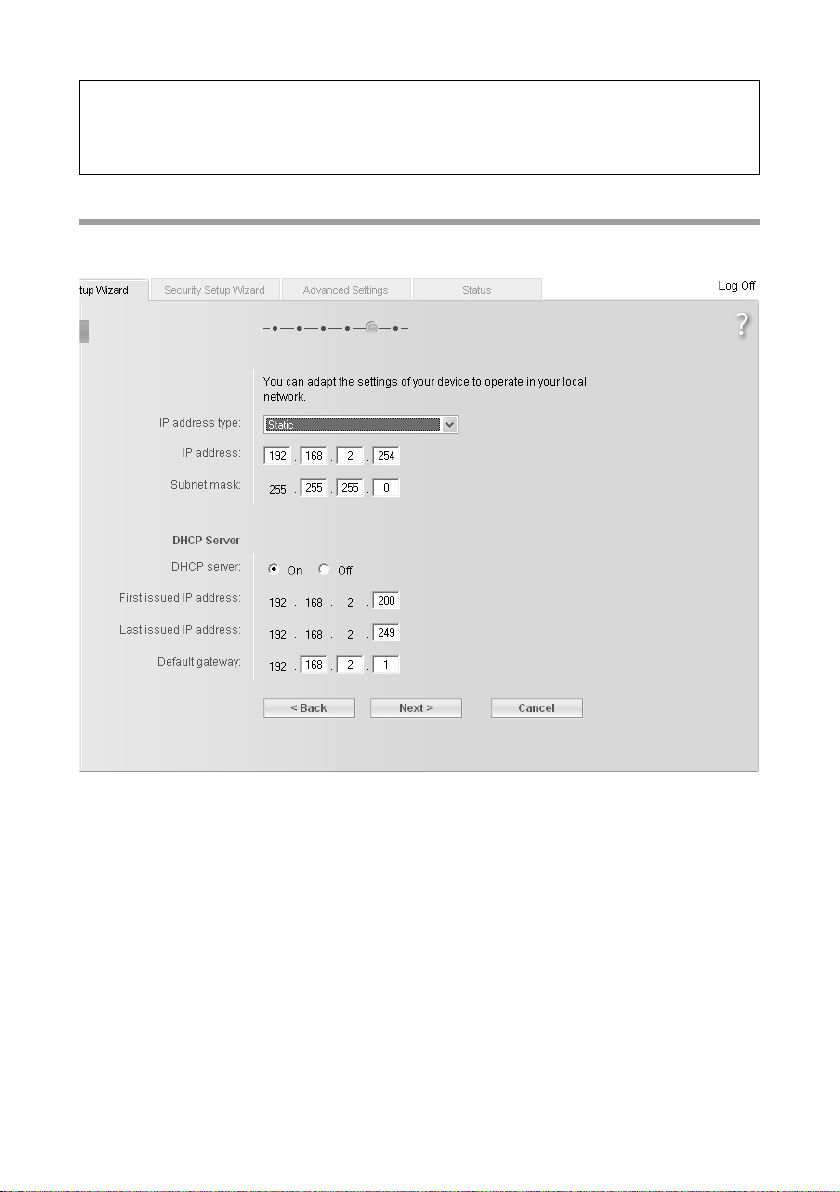
Local network settings
In the next step, you will see the screen for the basic settings of your local network.
ì In IP address type, specify whether the Gigaset WLAN Repeater 108 should obtain
its IP address automatically from an external DHCP server in the network or not.
– If you want to use a static IP address for your Gigaset WLAN Repeater 108 (factory
setting for the IP address is 192.168.2.254), select the Static option and enter the
IP address and subnet mask in the fields underneath. Make sure that the IP
address you assign complies with the conventions for private IP addresses
described on page 100.
– Normally you do not have to change the option for the IP address type. However,
if your Gigaset WLAN Repeater 108 shall obtain its IP address automatically from
a DHCP server in your network, please select the Obtained automatically
option.
26
Page 29

Basic Setup Wizard
Please note:
u If you choose the Obtained automatically option for your Gigaset WLAN
Repeater 108, you may no longer be able to reach your configuration program
as usual. The IP address you need to call up the program via your browser is
assigned dynamically and can therefore change at any time. Therefore we
advise you to assign a static IP address to the Gigaset WLAN Repeater 108.
The Obtained automatically option should only be used in exceptional circumstances.
u You may be able to obtain information about the currently assigned IP address
from the logbook of the DHCP server from which your Gigaset WLAN Repeater 108
obtains its IP address. To do this, you may need the MAC address of your
Gigaset WLAN Repeater 108, which you can find on the label on the underside of
the device. Then enter the IP address shown in the logbook in the browser's
address line to launch the configuration program. If you still cannot open the
configuration program using this method, you will have to reset your
Gigaset WLAN Repeater 108 to the factory settings by using the reset button
(see page 11). Your device will now have the old IP address 192.168.2.254 again
and the DHCP server is activated.
If you have assigned a static IP address for your Gigaset WLAN Repeater 108, you can
decide whether to use the Gigaset WLAN Repeater 108's integrated DHCP server.
Depending on the configuration of your network, it may be better to deactivate the
Gigaset WLAN Repeater 108's integrated DHCP server.
ì To do this, select the Off option for the DHCP server.
However, this is only necessary, if
– another DHCP server is already being used in your network.
– you are using more than one Gigaset WLAN Repeater 108 in the same network.
In this case, please switch off the DHCP server on all other repeaters. Make sure
you change the IP addresses of the other Gigaset WLAN Repeater 108 (follow the
example on page 28).
– the IP addresses in your network are static, i.e. you have manually assigned a
static IP address to every network component.
Note:
If you opt for automatic address assignment for the connected PCs, make sure that the
DHCP server of your existing access point has been activated. The devices connected
via the Gigaset WLAN Repeater 108 will then use it automatically.
27
Page 30
Basic Setup Wizard
If your network does not have a DHCP server yet, then you can use the DHCP server integrated in your Gigaset WLAN Repeater 108 to assign the IP addresses of the connected
devices automatically.
ì In this case, select the On option for the DHCP server.
ì If you have activated the DHCP server integrated in your Gigaset WLAN Repeater
108, you should also check the following settings and make any changes that are
necessary.
–The First issued IP address and Last issued IP address entries define the range
of IP addresses that your Gigaset WLAN Repeater 108 should use to automatically
assign IP addresses to PCs.
–In the Default gateway field, enter the IP address of your router that is to be used
to connect your PCs to the Internet (e.g. 192.168.2.1).
Example of LAN settings with two repeaters
If you want to use several Gigaset WLAN Repeater 108 in the same network, make sure
you assign different IP addresses to each of them. Use an address block that is within the
selected subnet but not in the address block of the addresses automatically assigned by
the DHCP server in your network. Switch off both associated DHCP servers.
For two repeaters in the same network, you could, for example, assign
u the IP address 192.168.2.210 for Gigaset WLAN Repeater 108 A,
u the IP address 192.168.2.240 for Gigaset WLAN Repeater 108 B.
Gigaset WLAN Repeater 108 A
)))
(((
(((
)))
Internet
)))
(((
)))
Gigaset WLAN Repeater 108 B
(((
ì Once you have completed the settings for your local network, click on Next >.
28
Page 31

Basic Setup Wizard
This opens the screen for completing the basic settings.
You should now make the settings for network security.
ì Click on Finish. The basic settings you have made are saved.
ì You are taken to the Security Setup Wizard, which is described from page 35
onwards.
ì If you want to make the security settings later, you can deactivate the relevant
option and then click on Finish.
If you have changed the default settings, the device is restarted.
29
Page 32

Basic Setup Wizard
Basic settings in Ethernet adapter Operating Mode
In Ethernet adapter Operating Mode the Gigaset WLAN Repeater 108 works as a wireless network adaptor. It is connected directly to the Ethernet port of a computer, games
console, a set-top box, or other network-enabled device.
ì Before you make the basic and security settings for operating the Gigaset WLAN
Repeater 108 as a network adapter, you should first cancel the configuration pro-
gram and connect the device directly with the PC via an Ethernet cable.
ì Restart the browser, log back into the configuration program (see page 16) and in
the Basic Setup Wizard go to the Operating Mode window.
ì Click on the selection menu and select Ethernet adapter.
ì Click on Next >.
30
Page 33

Basic Setup Wizard
Settings for the wireless network
The SSID (Service Set Identifier) defines your wireless network. All wireless devices
(router, PC etc.) in the same network must use the same SSID.
ì Enter the same name for the SSID that you assigned to the network or the access
point that you wish to connect to.
ì Click on Next >.
31
Page 34

Basic Setup Wizard
Local network settings
In the next step, you will see the screen for the basic settings of your local network.
ì In IP address type, specify whether the Gigaset WLAN Repeater 108 should obtain
its IP address automatically from an external DHCP server in the network or not.
– If you want to use a static IP address for your Gigaset WLAN Repeater 108 (factory
setting for the IP address is 192.168.2.254), select the Static option and enter the
IP address and subnet mask in the fields underneath. Make sure that the IP
address you assign complies with the conventions for private IP addresses
described on page 100.
– Normally you do not have to change the option for the IP address type. If your
Gigaset WLAN Repeater 108 shall obtain its IP address automatically from a DHCP
server in your network, please select the Obtained automatically option.
32
Page 35

Basic Setup Wizard
Please note:
u We recommend using only one DHCP server in the network. If you are already
using a DHCP server in your network, you should switch off the DCHP server on
your Gigaset WLAN Repeater 108.
u You may be able to obtain information about the currently assigned IP address
from the logbook of the DHCP server from which your Gigaset WLAN Repeater 108
obtains its IP address. To do this, you may need the MAC address of your
Gigaset WLAN Repeater 108, which you can find on the label on the underside
of the device. Then enter the IP address shown in the logbook in the browser's
address line to launch the configuration program. If you still cannot open the
configuration program using this method, you will have to reset your
Gigaset WLAN Repeater 108 to the factory settings by using the reset button
(see page 11). Your device will now have the old IP address 192.168.2.254
again and the DHCP server is activated.
u Ma ke s ure that yo u adj ust the IP conf igurati on of y our Gi gaset WL AN Re peate r 108
as well as that of the connected devices (PC, games console etc.) to the configuration of the other participants in your networks or of your communication partner, for example a valid IP address (that differs from the already assigned
addresses) and the appropriate subnet mask.
ì Click on Next >.
This opens the screen for completing the basic settings.
33
Page 36

Basic Setup Wizard
You should now make the settings for network security.
ì Click on Finish. The basic settings you have made are saved.
ì This takes you to the Security Setup Wizard, which is described from page 35
onwards.
ì If you want to make the security settings later, you can deactivate the relevant
option and then click on Finish.
If you have changed the default settings the device is restarted.
Please note:
u If you wish to connect to an access point, on which the encryption of data is acti-
vated, after running the Basic Setup Wizard go straight to the Security Setup Wizard and enter the same data for encryption.
u If you do not immediately run the Security Setup Wizard for an access point with
encryption, or if the keys or the type of encryption do not match, the PC cannot
establish a connection to your Gigaset WLAN Repeater 108. This is because
there is no accessible DHCP server, or the PC and repeater do not have static IP
addresses. In this case, you must reset the Gigaset WLAN Repeater 108 to the
factory settings (see section "Reset" on page 11) and run the Basic Setup Wizard
again.
u The access point with which the Gigaset WLAN Repeater 108 is to communicate
must be ready for use before the PC, games console or the set-top box to which
the Gigaset WLAN Repeater 108 is to be connected is booted up.
u The appendix contains an example of basic settings for wireless connection of
games consoles and set-top boxes (see page 80).
34
Page 37

Security Setup Wizard
Security Setup Wizard
You can provide comprehensive protection for your Gigaset WLAN Repeater 108 and the
connected PCs against unauthorised access within your local network and from outside
from the Internet. The Security Setup Wizard offers the following functions:
u Changing the SSID of your wireless network (only for Repeater and access point
operating modes, see page 37)
u Setting the encryption of your wireless network (see page 38)
u Restricting the access certain PCs have to your wireless network (only for Repeater
and access point operating modes, see page 42)
When you configure the Gigaset WLAN Repeater 108 for the first time, you should fol-
low the Security Setup Wizard user interface step by step. You will find further options
in the Advanced Settings menu (see page 47).
Now click on Next >.
35
Page 38

Security Setup Wizard
Changing the system password
The configuration of your Gigaset WLAN Repeater 108 is secured with the default password admin. To prevent unauthorised changes to the configuration, you should change
the password.
ì Enter the current password in the Current password field. The default password is
admin.
Enter a new password in the New password field and repeat it in the field underneath.
The password may contain up to 20 characters. The password is case sensitive. Avoid
proper names and words that are too obvious. Use a combination of letters, numbers
and special characters.
Please remember:
If you ever forget the password, you will have to reset your Gigaset WLAN Repeater
108 to the factory settings using the reset button (see page 11). Please bear in mind
that this will restore all the settings to the factory configuration. The password is reset
to the default setting admin.
ì Click on Next >.
36
Page 39

Security Setup Wizard
SSID
This screen only appears in Repeater or access point Operating Mode. In Ethernet
adapter operating mode, the screen is displayed after the data encryption is set (see
page 38).
Before the wireless network components can communicate with each other, you must
use the same SSID (Service Set Identifier).
The default SSID for the Gigaset WLAN Repeater 108 is ConnectionPoint. For security
reasons you should change this SSID and deactivate SSID broadcast.
SSID
ì In Access point Operating Mode : enter a character string of your choice. The SSID is
case sensitive. It can be up to 32 alphanumerical characters long.
ì In Repeater and Ethernet adapter operating modes: enter the SSID of the network or
access point to which you wish to connect the Gigaset WLAN Repeater 108.
Please note:
The connection to wireless Ethernet adapters that do not have valid SSIDs will be
interrupted until the new SSID has been entered in them as well.
If the On option is activated for SSID broadcast, the Gigaset WLAN Repeater 108 will
send the SSID in all data transmissions, and the SSID will be displayed on PCs that have
a wireless network adapter. In this case, unauthorised persons could use the SSID to gain
access to your local network.
ì Activate the Off option to enhance the security of your wireless network.
ì Click on Next > to proceed to the next step.
37
Page 40

Security Setup Wizard
Setting data encryption
In the next step you can set the encryption and authentication methods for your wireless network.
Wireless networks are even more strongly exposed to the risk of eavesdropping than
wired networks.
The Gigaset WLAN Repeater 108 makes use of effective encryption methods to prevent
unauthorised eavesdropping as far as possible.
You can use the following security mechanisms:
u WPA2-PSK or WPA2-PSK / WPA-PSK (see page 39)
u WEP encryption (Wired Equivalent Privacy, see page 40)
We recommend using WPA2-PSK if it is supported by all components in your wireless
network.
You will find further options for setting data encryption and authentication in the
Advanced Settings menu (see page 45).
u Repeater Operating Mode and Ethernet adapter
The encryption selection depends on the settings of your access point.
ì Check what type of encryption and what keys are set at the access point and make
the same settings in the Gigaset WLAN Repeater 108.
Note:
If you have selected several access points in repeater mode (page 25) when making
the basic settings, only WEP is available for encryption.
u Access point Operating Mode
The encryption selection depends on which method is supported by all the components
of your wireless network.
ì Set the appropriate encryption of your data in the Gigaset WLAN Repeater 108, and
then in the other components of your wireless network.
38
Page 41

Security Setup Wizard
WPA2/WPA with pre-shared key (PSK)
WPA is a more advanced procedure than WEP for protecting wireless networks.
Dynamic keys based on TKIP (Temporal Key Integration Protocol) offer increased
security. The new standard WPA2 uses AES (Advanced Encryption Standard) for encryption.
WPA-PSK is a special WPA mode for users at home and in small companies without a
company authentication server. Encryption keys are automatically generated with the
pre-shared key, automatically changed ("rekeying") and authenticated between the
devices after a certain period of time (Rekey Interval).
Please remember:
Every PC (network adapter) that requires access to a wireless network protected by
WPA must also support WPA. To find out whether and how you can use WPA on your
PC, read your network adapter's user guide.
ì Select the option WPA2-PSK if it is suppo rted by all com ponen ts in your wireless net-
work.
or
ì Select the option WPA2-PSK / WPA-PSK if some or all components in your wireless
network support WPA with the TKIP protocol.
ì Enter a key of your choice in the Pre-shared key field (min. 8 to max. 63 characters)
and confirm it by repeating the entry.
You must also set the same pre-shared key for all wirelessly connected PCs.
ì To go to the next step, click on Next >.
39
Page 42

Security Setup Wizard
WEP encryption
WEP (Wired Equivalent Privacy) is an encryption procedure for radio signals in wireless
networks and meets the standard IEEE 802.11.
If you transmit data wirelessly and not all components in your wireless network support
the higher security standard WPA (see page 39), we recommend that you activate
WEP Encryption on these network components.
You can choose either the standard 64 bit key or the more robust 128 bit key for encryption. The keys are generated in hexadecimal or in ASCII format. You must use the same
keys for encryption and decryption for the Gigaset WLAN Repeater 108 and all your
wireless network adapters.
Please note:
If you have already set WEP encryption in your wireless network, you must set the
same encryption data here.
ì Select the Key length: 64 bit or 128 bit.
ì Select the Input type, i.e. whether you wish to enter the key manually or have it
generated automatically by means of a Passphrase.
40
Page 43

Security Setup Wizard
u Manual key entry
ì Select the Key type, Hex or ASCII.
If you select Hex you can use the characters 0 to 9 and A to F.
– With a 64 bit encryption depth the key is exactly 10 characters long.
An example of a valid key: 1234567ABC
– With a 128 bit encryption depth the key is exactly 26 characters long.
An example of a valid key: 234567ABC8912345DEF1234567
If you select ASCII you can use the characters 0 to 9, A to Z and a to z plus the special
characters in the ASCII character set.
– With a 64 bit encryption depth the key is exactly 5 characters long.
An example of a valid key: GIGA1
– With a 128 bit encryption depth the key is exactly 13 characters long.
An example of a valid key: GIGASET_SE551
ì Confirm the key by entering it again in the
Confirm key field.
u Generating the key by means of a Passphrase
ì Enter a Passphrase (up to 32 characters) and confirm it by entering it again. The key
is generated automatically.
41
Page 44

Security Setup Wizard
Please note:
u If you have reset the encryption, it is very important that you make a note of
the key or the passphrases. You will need this information to configure the
wireless network adapters properly.
u When you have completed the Security Setup Wizard, you must also set the
WEP encryption in other components of your wireless network.
ì To go to the next step in the Security Setup Wizard, click on Next >.
Access control within the wireless network
This screen only appears in Repeater or access point Operating Mode.
This step allows you to determine which PCs should have wireless access to the
Gigaset WLAN Repeater 108. The access control is based on the MAC address of the PCs'
network adapters. You can enter the MAC addresses for the PCs manually or select them
from the list of PCs that are currently logged in.
Note:
The access control setting is only valid for wireless access of PCs to the repeater or
access point. If you use a router in your wireless network and have configured access
control there for PCs, you must also set this access control on the repeater.
The default setting for access control is disabled. This means that all PCs using the
correct SSID and the correct encryption can log in.
ì Next to MAC address filter select the option On to activate the MAC filtering.
42
Page 45

Security Setup Wizard
Entering MAC addresses manually
ì Enter the MAC address of the network adapter. You will find this address on the bot-
tom of the device.
ì Enter the name of the PC.
ì Click on the Add button to add the entry to the list.
Selecting from the list of logged-in PCs
ì Select the required PC from the Known wireless clients list. All PCs are displayed
that are currently logged in to the router.
ì Click on the Add button to add the selected PC to the list.
Please remember:
If you activate MAC access control, you must at least enter the PC from which you
are configuring the Gigaset WLAN Repeater 108. Otherwise you will no longer be
able to access the user interface and a corresponding error message will be
shown.
If, by mistake, you have denied all PCs access to the Gigaset WLAN Repeater 108
you have two choices:
u You can completely reset the Gigaset WLAN Repeater 108 (see page 11).
u You can connect a PC to the Gigaset WLAN Repeater 108 using one of the LAN
connections (by cable). As MAC access control only applies to PCs that are connected "wirelessly", you can use this PC to change the configuration.
ì To go to the next step, click on Next >.
43
Page 46

Security Setup Wizard
Saving settings
On the next screen you conclude the wizard and save the settings. You will be informed
of any security risks that still exist.
ì Click on Finish to close the wizard and to save the settings.
If you have changed the default settings, the device is restarted.
Please remember:
u If you have activated encryption, the wireless connection will be blocked until you
enter the appropriate key in the other devices on the network. Please consult the
operating instructions for the network adapter.
u If you use the Gigaset WLAN Repeater 108 in Repeater or Ethernet adapter
Operating Mode, the set keys must match those in the access point. If an error is
made, you no longer have access to the wireless network. If you do not immediately run the Security Setup Wizard settings for an access point with encryption
or the keys or the encryption type do not match, the PC cannot connect to the
Gigaset WLAN Repeater 108. This is because there is then no accessible DHCP
server or PC and repeater have no static IP addresses. In this case, you must return
the Gigaset WLAN Repeater 108 to the factory settings (see section "Reset" on
page 11) and run the Basic Setup Wizard again.
44
Page 47

Configuring the Advanced Settings
Configuring the Advanced Settings
In the Advanced Settings menu, you can configure all the options for the Gigaset
WLAN Repeater 108. If you wish, you can also make changes to the settings you made
using the wizards. The following table shows the menu options.
Menu Description
Operating Mode
Local Network You can configure the settings for your local network (page 47).
Wireless Network
Administration
Here you can change the Operating Mode of your device
(page 46).
You can configure the wireless network and protect your device
and network against eavesdropping (see page 51).
In this menu, you can make or edit various system settings,
e.g. change the password (see page 66) or set the region and
time (see page 64).
You can restart the device (see page 68) and update the
firmware (see page 69).
45
Page 48

Configuring the Advanced Settings
Operating Mode
You can operate the Gigaset WLAN Repeater 108 in the following operating modes:
u Repeater
u Access point
u Ethernet adapter
In the factory setting, the Gigaset WLAN Repeater 108 is configured as a repeater. You
can find more information about the operating modes in the section on "Possible uses"
on page 5.
ì On the Advanced Settings page, select Operating Mode.
ì From the selection menu, choose the Operating Mode you want to use.
ì Click on OK.
You are now prompted to confirm the restarting of the device. Restarting can take up to
two minutes.
46
Page 49

Configuring the Advanced Settings
Local Network
In the Local Network menu, you can determine the settings for assigning IP addresses.
ì Select Advanced Settings – Local Network.
The configuration options for Repeater and Access point operating modes (see below)
differ from those for the Ethernet adapter operating mode (see page 50).
Repeater/Access Point
47
Page 50

Configuring the Advanced Settings
ì In IP address type, specify whether the Gigaset WLAN Repeater 108 should obtain
its IP address automatically from an external DHCP server in the network or not.
– If you want to use a static IP address for your Gigaset WLAN Repeater 108 (factory
setting for the IP address is 192.168.2.254), select the Static option and enter the
IP address and subnet mask in the fields underneath. Make sure that the IP
address you assign complies with the conventions for private IP addresses
described on page 100.
If you w ant to use s eve ral Giga set WL AN Rep eater 108 in the sa me net wor k, make
sure you assign different IP addresses to each of them. Use an address block that
is within the selected subnet but not in the address block of the addresses automatically assigned by the DHCP server in your network. See also "Example of LAN
settings with two repeaters" on page 28.
– Normally you do not have to change the option for the IP address type. However,
if your Gigaset WLAN Repeater 108 should obtain its IP address automatically
from a DHCP server in your network, please select the Obtained automatically
option.
Please note:
You may be able to obtain information about the currently assigned IP address from
the logbook of the DHCP server from which your Gigaset WLAN Repeater 108 obtains
its IP address. To do this, you may need the MAC address of your Gigaset WLAN
Repeater 108, which you can find on the label on the underside of the device. Then
enter the IP address shown in the logbook in the browser's address line to launch the
configuration program. If you still cannot open the configuration program using this
met ho d, yo u w il l hav e t o re se t you r G ig aset WL AN Re peater 108 to the fact or y s ettings
by using the reset button (see page 11). Your device will now have the old IP address
192.168.2.254 again and the DHCP server is activated.
If you have assigned a static IP address for your Gigaset WLAN Repeater 108, you can
decide whether to use the Gigaset WLAN Repeater 108's integrated DHCP server.
Depending on the configuration of your network, it may be better to deactivate the
Gigaset WLAN Repeater 108's integrated DHCP server.
ì To do this, select Off for the DHCP Server.
However, this is only necessary, if
– another DHCP server is already being used in your network,
– you are using more than one Gigaset WLAN Repeater 108 in the same network.
In this case, please switch off the DHCP server on all other repeaters. Make sure
you change the IP addresses of the other Gigaset WLAN Repeater 108 (follow the
example on page 28),
– the IP addresses in your network are static, i.e. you have manually assigned a
static IP address to every network component.
48
Page 51

Configuring the Advanced Settings
ì To do this, select Off for the DHCP Server.
Please note:
u If you use your Gigaset WLAN Repeater 108 in Repeater Operating Mode and opt
for automatic address assignment for the connected PCs, make sure that the DHCP
server of your access point has been activated. The devices connected via the
Gigaset WLAN Repeater 108 will then use it automatically.
u If you use your Gigaset WLAN Repeater 108 in Access point Operating Mode, it
also depends on your existing network whether or not you should use the
integrated DHCP server of the Gigaset WLAN Repeater 108. If there is already a
DHCP server, in your network, this one should be used.
If your network does not have a DHCP server yet, then you can use the DHCP server integrated in your Gigaset WLAN Repeater 108 to assign the IP addresses of the connected
devices automatically.
ì In this case, select On for the DHCP Server.
If you have activated the DHCP server integrated in your Gigaset WLAN Repeater 108,
you should also check the following settings and make any changes that are necessary.
ì In the Lease time field, specify how long the PCs should retain their assigned
IP addresses before they are changed.
ì The First issued IP address and Last issued IP address values define the range of
IP addresses that your Gigaset WLAN Repeater 108 should use to automatically
assign IP addresses to PCs.
Please note:
The address block you enter must not overlap with those of other DHCP servers
in your network or the static IP addresses of devices connected to your network. This
could otherwise cause IP addresses to conflict. This can impair or block the accessibility of some or all of the devices in your network.
ì In the Default gateway, Preferred DNS server and Alternate DNS server fields,
enter the data required for connecting to the Internet. As a rule, you can enter the
IP address of the router in your network for Default gateway and Preferred DNS
server, which sets up the connection to the Internet for all the PCs in the network.
Entries in the Alternate DNS server field are generally optional. For additional infor-
mation, please turn to the appropriate chapter in the operating instructions for your
router.
ì In the Domain name field, you can specify a domain name in the local network.
49
Page 52

Configuring the Advanced Settings
Please note:
If you use the Gigaset WLAN Repeater 108 in Access point Operating Mode and the
integrated DHCP server has been activated, configure the network settings for the
connected PCs so that the Obtain an IP address automatically option is activated.
For more information about this please turn to "Assigning IP addresses automatically"
on page 93. If you deactivate the Gigaset WLAN Repeater 108's DHCP server, you will
have to assign a static IP address for the PCs via the network settings unless there is
another DHCP server on the network. This is described on page 100.
You can specify static IP addresses for individual PCs which are then assigned by the
DHCP server.
ì Enter the MAC address of the PC and the required IP address in the relevant fields.
ì Click on Add.
ì Click on OK to apply the settings.
ì You should restart all the devices once all the configuration settings have been
made.
Ethernet adapter Operating Mode
ì In IP address type, specify whether the Gigaset WLAN Repeater 108 should obtain
its IP address automatically from an external DHCP server in the network or not.
– If you want to use a static IP address for your Gigaset WLAN Repeater 108 (factory
setting for the IP address is 192.168.2.254), select the Static option and enter the
IP address and subnet mask in the fields underneath. Make sure that the IP
address you assign complies with the conventions for private IP addresses
described on page 100.
50
Page 53

Configuring the Advanced Settings
– Normally you do not have to change the option for the IP address type. If your
Gigaset WLAN Repeater 108 should obtain its IP address automatically from a
DHCP server in your existing network, please select Obtained automatically.
ì Click OK to apply the settings.
Please note:
u We recommend using only one DHCP server in the network. If you are already
using a DHCP server in your network, you should switch off the DCHP server on
your Gigaset WLAN Repeater 108.
u You may be able to obtain information about the currently assigned IP address
from the logbook of the DHCP server from which your Gigaset WLAN Repeater 108
obtains its IP address. To do this, you may need the MAC address of your
Gigaset WLAN Repeater 108, which you can find on the label on the underside
of the device. Then enter the IP address shown in the logbook in the browser's
address line to launch the configuration program. If you still cannot open
the configuration program using this method, you will have to reset your
Gigaset WLAN Repeater 108 to the factory settings by using the reset button
(see page 11). Your device will now have the old IP address 192.168.2.254
again and the DHCP server is activated.
u Ma ke s ure that yo u adj ust the IP conf igurati on of y our Gi gaset WL AN Re peate r 108
as well as that of the connected devices (PC, games console etc.) to the configuration of the other participants in your network or of your communication partner,
for example a valid IP address (that differs from the addresses already assigned)
and the appropriate subnet mask.
Wireless Network
If PCs are communicating wirelessly via the Gigaset WLAN Repeater 108, you should
also take steps to enhance the security of your wireless network.
ì In the Advanced Settings menu, select Wireless Network.
The Gigaset WLAN Repeater 108 wireless network is preset as active. Your device can
only communicate with your wireless network if this default setting is left as it is. If you
do not want to use this function, you can deactivate the Wireless Network option.
In this menu you can
u set the channel and SSID (see page 52),
u set the transmission mode and transmission power (see page 53),
u set the Encryption for wireless traffic (see page 55),
In Repeater or Access point Operating Mode you can also
u limit access to the wireless network (see page 61),
In Repeater Operating Mode you can also
u configure the repeater function (see page 63).
51
Page 54

Configuring the Advanced Settings
Channel
This function is only shown in the window if the Super G transmission mode is deactivated (see page 54).
The set radio channel is used by all clients in your network for wireless data transfer. You
can choose between various channels, depending on your current location.
ì In the Repeater operating mode, set the channel that uses the access point for which
you wish to increase the range.
ì Select Automatic in the Access point operating mode so that the best channel for
transmitting the data is used automatically.
SSID
Before the wireless network components can communicate with each other, you must
use the same SSID (Service Set Identifier).
The Gigaset WLAN Repeater 108 SSID factory setting is ConnectionPoint. For the
repeater, you must enter the SSID of the access point for which the range should be
increased. For security reasons you should deactivate SSID broadcast (see below).
ì Enter the required SSID. The SSID is case sensitive. It can be up to 32 alphanumerical
characters long.
Please note:
The connection to the wireless network adapters will be interrupted until you
enter the new SSID on them as well.
52
Page 55

Configuring the Advanced Settings
SSID broadcast (only Repeater and Access Point Operating Mode)
If this option is enabled (default setting), the Gigaset WLAN Repeater 108 will send the
SSID in all data transmissions, and your Gigaset WLAN Repeater 108's SSID will be displayed on PCs that have a wireless network adapter. In this case eavesdroppers could use
the SSID to gain access to your network.
If you deactivate SSID broadcast, your Gigaset WLAN Repeater 108's SSID will not be
displayed. This increases the protection against unauthorised access to your wireless
network. However, you must make a note of the SSID. You will need this to log on to
your PC.
ì Select the Off option to deactivate SSID broadcast.
Tra nsmission mo de
This function is only shown in the window if the Super G transmission mode is deactivated (see page 54).
The standard IEEE 802.11g permits data transfer up to 54 Mbit/s, IEEE 802.11b up to
11 Mbit/s. For the best possible data transfer rates in your network select IEEE 802.11g
only. To operate clients with older wireless network adapters in your network, select
IEEE 802.11b/g (mixed).
ì Select the required transmission mode for your wireless network.
Sending power
ì Select the required sending power for your device.
We recommend that you select a transmission power with a range to suit the spatial
environment of your local network. A much greater range makes it easier to eaves-
drop on your wireless data transmission.
53
Page 56

Configuring the Advanced Settings
Super G (only Repeater and Access Point Operating Mode)
With the aid of channel bundling, the Super G transmission mode enables wireless data
transfer up to 108 Mbps. The channel for wireless data transfer is statically set. You can
only use Super G if this function is supported by at least one client in your wireless network. For the best possible data transfer rates, all clients in your LAN should support
Super G.
Please note:
If you activate Super G as the transmission mode but it is not supported by all components in your wireless network, for technical reasons, the transmission rate in the network may be significantly lower than the possible maximum of 108 Mbit/s.
ì Select the mode for using Super G (108 Mbit/s) for your wireless network to
increase the speed of data transfer. You can choose between two modes.
– Static: Wireless transmission is at a rate of just 108 Mbps. Clients that do not
support this speed cannot connect to the access point.
– Dynamic (default setting): if you select this transmission mode, the router
accepts participants who communicate at different transfer rates and adjusts to
the slowest client in the network.
ì If you do not wish to use Super G (108 Mbit/s), please select Disabled from the
selection menu.
XR (extended range, only Repeater and Access Point Operating Mode)
Activating XR enables wireless data transfer even in the peripheral areas of your wireless
network, albeit at very low data transfer rates. Conversion to XR mode occurs automatically when the signal is weak enough and if the partner station is also XR capable.
ì Activate or deactivate XR for your wireless network.
ì Click on OK to apply the settings.
54
Page 57

Configuring the Advanced Settings
Setting wireless security
To protect your wireless local network against eavesdropping and unauthorised access
to your data, you should set the data encryption.
u Repeater and Ethernet adapter Operating Mode
The encryption selection that is available will depend on your access point.
ì Check what type of encryption and which keys are set at the access point, and make
the corresponding settings in the Gigaset WLAN Repeater 108.
Note:
If you have selected several access points in repeater mode (see page 25 and
see page 63), only WEP is available for encryption.
u Operating Mode Access point
The encryption selection depends on which methods are supported by all your wireless
network components.
ì Set the corresponding encryption of your data on the Gigaset WLAN Repeater 108
and then on the other components of your wireless network.
You can use the following security mechanisms:
u WPA2-PSK and WPA2-PSK / WPA-PSK (see page 56)
u WAP2 and WPA2 / WPA with authentication server (only in Access point mode,
see page 57)
u WEP encryption (Wired Equivalent Privacy), (see page 58)
We recommend using WPA2-PSK if it is supported by all components in your wireless
network.
55
Page 58

Configuring the Advanced Settings
WPA2-PSK and WPA2-PSK / WPA-PSK
WPA / WPA2 with Pre-shared Key (WPA-PSK, WPA2-PSK)
WPA-PSK is a special WPA mode that provides encryption protection for users at home
and in small companies without a company authentication server. Encryption keys are
automatically generated with the Pre-shared Key, and automatically changed (rekeying)
and authenticated between the devices after a certain period of time (Rekey Interval).
Which standard of encryption you can choose depends on the components in your wireless network. Every PC (network adapter) that requires access to a wireless network protected by WPA must also support WPA. To find out whether and how you can use WPA
on your PC, read your network adapter's user guide. If all components support WPA2,
select option WPA2-PSK. If you are using network adapters that only support WPA,
select the option WPA2-PSK / WPA-PSK. The entries described below are the same for
both options.
ì Select the required option in the Security field.
ì Enter a key in the Pre-shared key field (min. 8 to max. 63 characters) and confirm
it by entering it again.
ì Apply the settings by clicking OK.
56
Page 59

Configuring the Advanced Settings
WPA and WPA2 with authentication server (Access point Operating mode only)
In large networks (e.g. in companies) WPA enables the use of an additional authentication service. In this case, user access is controlled by user accounts and passwords, in
addition to WPA encryption. A RADIUS server acts as an authentication server. You can
select the new standard WPA2, if this is supported by all components in your wireless
network, or select WPA2 / WPA, if you are using devices that only support WPA.
ì Select the required option in the Security field.
ì Enter the IP address of the RADIUS server in the RADIUS server IP address field.
ì Enter the port of the RADIUS server in the RADIUS server port field.
ì In the RADIUS ser ver secret key field, enter a key conforming to the conventions of
the RADIUS server, which is to be used by the server for authentication.
ì Click on OK to apply the settings.
57
Page 60

Configuring the Advanced Settings
WEP encryption
If WPA is not supported by all components in your wireless network, we advise you to
activate WEP Encryption on your wireless network components.
ì In the Security field, select the option WEP.
ì Select the Authentication type:
–Select Shared to require that each client registers on the network with a specified
key.
–Select Open to permit data transfer within your wireless network without the
need for a key.
You can choose either the standard 64 bit key or the more robust 128 bit key for encryption. The keys are generated in hexadecimal or in ASCII format. You must use the same
keys for encryption and decryption for both the Gigaset WLAN Repeater 108 and all your
wireless network adapters.
ì Select the Key length: 64 bit or 128 bit.
ì Select the Input type, i.e. whether you wish to enter the key manually or have it
generated automatically by means of a Passphrase.
Generating the key by means of a Passphrase
ì Enter a Passphrase (up to 32 characters) and confirm it by entering it again. Four
keys are generated.
ì Select one of the four keys as Default key.
58
Page 61

Manual key entry
ì Select the Key type, Hex or ASCII.
.
Configuring the Advanced Settings
If you select Hex you can use the characters 0 to 9 and A to F.
– With a 64 bit encryption depth the key is exactly 10 characters long.
An example of a valid key: 1234567ABC
– With a 128 bit encryption depth the key is exactly 26 characters long.
An example of a valid key: 234567ABC8912345DEF1234567
If you select ASCII you can use the characters 0 to 9, A to Z and a to z plus the special
characters in the ASCII character set.
– With a 64 bit encryption depth the key is exactly 5 characters long.
An example of a valid key: GIGA1
– With a 128 bit encryption depth the key is exactly 13 characters long.
An example of a valid key: GIGASET_SE551
ì Enter up to four keys in fields Key 1 to Key 4 and confirm these keys by entering
them again in fields Confirm key 1 to Confirm key 4.
ì Select one of the four keys as Default key.
59
Page 62

Configuring the Advanced Settings
Please note:
u It is very important that you make a note of the entered or generated key(s).
You will need this information to configure the wireless network adapters
properly.
u When you have concluded the configuration, you must change the
WEP encryption on the wireless network adapters for the connected PCs
in the same way as they will not otherwise be given access to the
Gigaset WLAN Repeater 108's wireless network.
u It is very important, that you enter the keys that are currently valid in your
wireless network. Otherwise, your Gigaset WLAN Repeater 108 cannot be
used to extend your network.
ì Click on OK to apply the settings.
60
Page 63

Configuring the Advanced Settings
Permitted clients
Only Access Point and Repeater operating mode
In this screen you can specify which PCs will have wireless access to the Gigaset WLAN
Repeater 108 and hence to your LAN.
Note:
The access control setting is only valid for wireless access from the PC to the repeater
or access point. If you use a router in your wireless network and have configured
access control there for PCs, this must also be set on the repeater.
ì In the Wireless Network menu, select Allowed Clients.
The default setting for access control is disabled. This means that all PCs that use the
correct SSID can register.
The access control is based on the MAC addresss of the PCs' network adapters.
ì Activate access control via the On option in the MAC address filter field.
Entering PCs manually:
ì Enter the required PCs with MAC address and Device name in the appropriate
fields.
ì Click on the Add button to add the entry to the list.
ì Click on the Delete button to delete the entry from the list.
ì Apply the settings by clicking OK.
61
Page 64

Configuring the Advanced Settings
Selecting from the list of logged-in PCs
ì From the Known wireless clients list (all PCs that currently have access to the
Gigaset WLAN Repeater 108), select the PC you want to add to the access control.
ì Click on the Add button to add the entry to the list.
ì Apply the settings by clicking OK.
Please note:
If you activate MAC access control, you must at least enter the PC from which you
are configuring the Gigaset WLAN Repeater 108. Otherwise you will no longer be
able to access the user interface and a corresponding error message will be
shown.
If, by mistake, you have denied all PCs access to the Gigaset WLAN Repeater 108
you have two choices:
u You can completely reset the Gigaset WLAN Repeater 108 (see page 11).
u You can connect a PC to the Gigaset WLAN Repeater 108 using one of the LAN
connections. As MAC access control only applies to PCs that are connected
wirelessly, you can use this PC to change the configuration.
62
Page 65

Configuring the Advanced Settings
Repeater function (WDS)
Only Repeater Operating Mode
If you use the device in Repeater Operating Mode and want to increase the range in your
wireless network, you must configure the Wireless Distribution System (WDS) function.
ì In the Wireless Network menu, select Repeater (WDS).
The name of the access point is shown in the Comment field.
If there is a connection, the MAC address of the access point is shown in the MAC
address field.
If there is a connection to the access point, the SSID is shown in the SSID field
The radio channel used for data transfer is shown in the Channel field.
If there is a connection to the access point, the Signal strength shows the strength of
the connection to the repeater in percentage terms.
ì Click on Refresh to update the display.
ì Click on Add to add an entry.
ì Click on Delete to delete an entry.
ì Apply the settings by clicking OK.
Note:
If you have encrypted the data with one of the WPA standards, you can only select
one access point. More than one access point is only possible with WEP encryption
(page 58).
63
Page 66

Administration
Administration
The Gigaset WLAN Repeater 108 user interface includes several helpful functions for
administration. You can
u make regional settings (see page 64),
u change the system password (see page 66),
u save, and if necessary restore, configuration data (see page 67),
u reset the Gigaset WLAN Repeater 108 to the factory settings (see page 68),
u restart the device (see page 68),
u update the firmware (see page 69),
u make the settings for the system log (see page 71),
u view information about the configuration and status of the Gigaset WLAN Repeater
108 (see page 72).
Regional Options
To operate your Gigaset WLAN Repeater 108, you can select the location, time zone and
format for entering the date and time, and you can also configure a time server for the
Internet time.
ì In the Advanced Settings – Administration menu, select the entry
Regional Options.
64
Page 67

Administration
ì Select the country where you are currently located from the list. You can set the
clock to change automatically to summer time and/or to the Time zone as you wish.
ì Select the required option and/or select the Time zone for your location.
ì Select the required format for entering the date and time from the Date format and
Time format lists respectively.
Internet Time
The System time for your device is automatically synchronised with the time server on
the Internet. The time of the Last synchronization with time server is displayed for
your information.
ì If you wi sh to use yo ur own time se rv er, sel ect t he On opt ion nex t to t he Use custom
time servers field.
ì Enter the Internet address for the time server in the Preferred time server and
Alternate time server fields respectively.
ì Click on OK to apply the settings.
Please note:
If the Gigaset WLAN Repeater 108 does not have direct access to the Internet, it may
not access the time server.
65
Page 68

Administration
System Password
You can assign a System Password for the configuration environment of your Gigaset
WLAN Repeater 108, and specify the period after which a session is to end automatically
if no further entry is made.
Note:
Only one connection to the configuration environment can be started at any one
time.
ì In the Administration menu, select System Password.
After installation, the Gigaset WLAN Repeater 108 configuration is protected by the
System Password admin. To prevent unauthorised changes to the configuration, you
should change the System Password. You may have already set a System Password when
setting up the Security Setup Wizard. If so, you can change it here.
ì Enter the current System Password in the Current password field.
ì Enter a new password in the New password field, and repeat it in the
Confirm new password field.
The password may contain up to 20 characters. The password is case sensitive. Avoid
proper names and words that are too obvious. Use a combination of letters, numbers
and special characters.
Please note:
If you ever forget your System Password, you will have to reset your Gigaset WLAN
Repeater 108 (see page 11). Please bear in mind that this will restore all the settings
to the factory configuration. The password is reset to the default setting admin.
66
Page 69

Administration
Setting Idle time before log off:
ì Enter the period in minutes after which the configuration program is to be aborted
if no entry is made. The default setting is 10 minutes. If you enter the value 0, the
program will never be aborted automatically.
ì Click on OK to apply the settings.
Saving and restoring a configuration
Once you have configured your Gigaset WLAN Repeater 108, it is advisable to back up
the settings. Then you can restore them at any time, should they be accidentally deleted
or overwritten.
You can also reset the configuration to the factory settings. You should always do this
before passing your device on to any other person.
u In the Administration menu, select Save & Restore.
Saving configuration data
ì For Task, select the option Save configuration.
This opens a file selection window where you can specify the file you wish to store
in the backup file.
ì On your local PC select a directory where you wish to store the configuration file,
and enter a name for the file.
ì Click on Save.
Once the procedure has been completed, the current configuration data will have been
backed up in the specified file. As your file contains all your configuration data, you
should protect it from unauthorised access.
67
Page 70

Administration
Restoring the back-up
ì For Task, select the option Restore configuration.
ì In your file system, select the backup file with which you wish to restore the config-
uration.
A window will appear prompting you to confirm the procedure.
ì Click on OK. The configuration will now be updated.
Resetting to the factory settings
You can reset the Gigaset WLAN Repeater 108 to the factory settings. You should do
this before making the device available to others or exchanging it through the dealer.
ì Select the option Reset configuration to factory default settings and click on OK.
A window will appear prompting you to confirm the procedure.
.
Please note:
You can restart your Gigaset WLAN Repeater 108 if it is not working properly. It should
then be ready for use again (see page 11).
Please bear in mind that when the device is fully reset, all configuration settings will
return to the fa ctor y setti ngs. This m eans t hat you wi ll have to co mpletel y reconfigure
the Gigaset WLAN Repeater 108. This does not affect firmware loaded at an earlier
stage.
Reboot
You can restart your Gigaset WLAN Repeater 108 if it is not working properly. It should
then be ready for use again.
In the Administration menu, select Reboot.
Click on OK to restart the device.
68
Page 71

Administration
Updating firmware
Siemens continuously updates the device softwa re fo r yo ur Gig aset WL AN Repe ate r 108
in order to always offer you the latest standards. For this reason you should find out
regularly whether new firmware is available for your device. You will find more information about the firmware and your Gigaset WLAN Repeater 108 on the Internet at:
www.siemens.com/gigasetcustomercare
If a new version of the firmware is made available on the Internet, you can update this
on your device. First download the new firmware on your PC, and then update the
Gigaset WLAN Repeater 108.
Carry out the following steps:
ì Close down all network activities on your local network.
ì In the Administration menu, select Firmware Update.
.
The version of the firmware currently running on your device is displayed in the line Cur-
rent firmware version.
ì In the Firmware update file field, enter the file with the new firmware you have
downloaded from the Internet.
ì Click on OK.
The firmware will now be updated.
69
Page 72

Administration
Please note:
Do not switch off your Gigaset WLAN Repeater 108, your PC or the local network
during the updating procedure.
After successful updating, the device is automatically restarted. All the LEDs will go out.
The WLAN LED flashes when the device is restarting (see page 10). When the procedure
is complete, the browser shows the configuration program login screen.
This may take a few minutes.
Please note:
You can check whether the upgrade process was in fact successful in the Status menu
on the start screen (see page 72). Here you should see the latest firmware version for
the Gigaset WLAN Repeater 108.
70
Page 73

Administration
System Log
The System Log is displayed in the Status – Device menu. It can give you important
information about the functioning of your device and possible problems. You can also
have this information transmitted automatically on a system log server.
ì In the Administration menu, select System Log to make the settings for the log.
ì Log level: Select how much information is to be contained in the system log. You
can choose between four levels:
– Critical: logs the most important information concerning possible problems in
the functioning of your device
– Debugging: complete and detailed information about all your device's functions
– Warning and Informational are intermediate levels.
ì System log server
– Activate this function if you require automatic transmission of your device's sys-
tem log to a system log server in your local network.
– Server address:
Enter the IP address for the system log server.
– Server port:
Enter the port of the system log server that is to be used to transmit the system
log.
ì Click on OK to save and apply the changes. If you have activated the System log
server function, the data will be transmitted to the specified server.
71
Page 74

Status information
Status information
You can view information about the configuration and status of the Gigaset WLAN
Repeater 108 in the Status menu of the Gigaset WLAN Repeater 108. On the first screen
you will see an overview of the status of the local and wireless network, and of the
device.
For detailed information you can view the following status screens:
u Security
u Local Network
u Wireless Network
u Device
To display a status screen, proceed as follows:
ì Select Status on the start screen.
ì Select the entry with the information you require.
Overview
On the first screen you are given an overview of the current operating status and most
important data for your device.
72
Page 75

Status information
Local network
u IP address
The local IP address of your device.
u DHCP Server
Is not displayed in the Ethernet adapter Operating Mode.
The status of the DHCP server for your device and, if activated, the number of clients
in your network to which an IP address has been assigned.
Wireless network
u Status
The status of the wireless network connection for your device and, if activated, the
number of clients in your wireless network connected to your device.
u SSID
The identification of your wireless network.
Device
u System time
Your device's system time.
u Firmware version
The version of the firmware currently installed in your device.
ì Click on Refresh to refresh this screen and update the displayed data.
73
Page 76

Status information
Security
On the Security screen in the Status menu you will see information about possible
security risks for your device and your network. You will achieve maximum security for
the Gigaset WLAN Repeater 108 by eliminating all the listed security risks.
u System password not changed
Your device's configuration program is not effectively protected against unauthorised access, as you have either not changed the password since setting the device
up or you have not assigned any password at all. The section entitled "System Password" on page 66 describes how to avoid this security risk.
u Identification of your wireless network visible or not changed
Your wireless network will also be easy for unauthorised users to find as you have
not changed the ID of your wireless network (SSID) since setup, and you have not
deactivated the SSID broadcast. The section entitled "Setting wireless security" on
page 55 describes how to avoid this security risk.
u Encryption for your wireless network not activated
None of the data in your wireless network is encrypted when transmitted and can
therefore easily be intercepted. Unauthorised users can also easily access your network, your PCs and your Internet connection by this means. The section entitled
"Setting wireless security" on page 55 describes how to avoid this security risk.
u Access to your wireless network not restricted to allowed clients
This is only displayed in access point and repeater operating modes.
Users can access your wireless network from any PC. The section entitled "Permitted
clients" on page 61 describes how to avoid this security risk.
ì Click on Refresh to refresh this screen and update the displayed data.
74
Page 77

Status information
Local Network
On the Local Network screen in the Status menu you will find information about the
settings for your local network.
u IP address
Shows the local IP address of your device.
u Subnet mask
Shows the subnet mask used in the local network.
u MAC address
Shows the local MAC address of your device for wired data transmission.
u DHCP Server
Is not displayed in the Ethernet adapter Operating Mode.
– Status
Shows the status of the DHCP server for your device for automatic assignment of
IP addresses to clients in your local network.
– DHCP clients
Shows all clients in your network who have been assigned an IP address. The Host
name and the MAC address of each client are listed for identification. You are
also given information on the IP address assigned to each client and the remain-
ing Lease time for the IP address, before the client is assigned a new address by
the DHCP server.
ì Click on Refresh to refresh this screen and update the displayed data.
75
Page 78

Status information
Wireless Network
On the Wireless Network screen in the Status menu you will find information about
the settings for your wireless network.
u Status
Shows the status of the connection between your device and the wireless network.
u SSID
Shows the identification of your wireless network.
u Channel
Shows the radio channel currently used for transmitting data within your wireless
network.
u MAC address
Shows the local MAC address of your device for wireless data transmission.
u Wireless clients
Is not displayed in the Ethernet adapter Operating Mode.
Shows all clients in your wireless network currently connected to your device. The
Host name, the MAC address and the IP address of each client are listed for identification. You will also see information about the Uptime to date of the current connection for each client in your wireless network.
76
Page 79

Status information
u Repeater (WDS)
Only displayed in Repeater Operating Mode.
– Status
Shows the status of the WDS (Wireless Distribution System) in your wireless net-
work for increasing the range.
– WDS links
Shows the current number of connections to other access point or repeaters in
your wireless network.
ì Click on Refresh to refresh this screen and update the displayed data.
77
Page 80

Status information
Device
On the Device screen in the Status menu you will find information about the most
important data for your device.
u System uptime
Shows your device's operating time since the last time the system was started.
u System time
Shows the system time for your device.
u Firmware version
Shows the version of the firmware currently installed in your device.
u Bootcode version
Shows the version of the boot code currently installed in your device.
u Wireless driver version
Shows the version of the WLAN driver currently installed in your device.
u Hardware version
Shows the version of your device's hardware.
u Serial number
Shows your device's serial number.
78
Page 81

Status information
u System Log
The system log can give you important information about the functioning of your
device and possible problems. You can adjust the scope of the system log to suit your
needs (see the section entitled "System Log" on page 71).
ì Click on Refresh to refresh this screen and update the displayed data.
79
Page 82

Appendix
Appendix
This appendix contains information about:
u Basic settings for wireless connection of two games consoles (see below)
u Configuring the network (see page 82)
u Updating IP addresses (see page 107)
u Troubleshooting (see page 111)
u Specifications (see page 116)
u Approval (see page 117)
u Customer Care (see page 119)
Settings for wireless connection for games consoles
and set-top boxes
The following example describes what settings you need to make if you want to wirelessly connect two games consoles using two Gigaset WLAN Repeater 108 devices.
The configuration description always refers to the factory settings of the
Gigaset WLAN Repeater 108.
Configuring the first Gigaset WLAN Repeater 108 (as an access point)
ì Start up the user interface of the Gigaset WLAN Repeater 108 from the PC
(see page 16) and select Basic Setup Wizard.
ì Select Access point as Operating Mode.
ì On the wireless network settings screen, select the Channel and enter the required
SSID.
In Super G mode (see page 54), however, the channel is set automatically.
ì On the local network settings screen, select the following options:
– IP address type: Static
– DHCP Server: On
ì On the Security Setup Wizard close-down screen, deactivate the option to start the
Basic Setup Wizard and click Finish.
80
Page 83

Appendix
Configuring the second (and further) Gigaset WLAN Repeater 108
(as an Ethernet adapter)
ì Start up the user interface of the Gigaset WLAN Repeater 108 from the PC
(see page 16) and select Basic Setup Wizard.
ì Select Ethernet adapter as Operating Mode.
ì On the wireless network settings screen, enter the same SSID that you used in the
first device (access point).
ì On the local network settings screen, select the Obtained automatically option for
the IP address type.
ì On the Security Setup Wizard close-down screen, deactivate the option to start the
Basic Setup Wizard and click Finish.
Connecting and getting started
ì Connect the first device (access point) to games console 1. To do this, connect
the LAN ports of the Gigaset WLAN Repeater 108 and the games consoles with an
Ethernet cable.
ì Switch on the Gigaset WLAN Repeater 108 and wait until it is ready for use
(WLAN LED lights up).
ì Switch on games console 1 and configure the console's network settings as directed
in its user guide.
ì Connect the second device (Ethernet adapter) to games console 2. To do this,
connect the LAN ports of the Gigaset WLAN Repeater 108 and the games consoles
with an Ethernet cable.
ì Switch on the Gigaset WLAN Repeater 108 and wait until it is ready for use
(WLAN LED lights up).
ì Switch on games console 2 and configure the console's network settings as directed
in its user guide.
Please note:
1. If your games console has a USB port, you can also use the supplied USB cable to
supply power to the Gigaset WLAN Repeater 108 – providing the games console
can emit sufficient power.
2. A Gigaset WLAN Repeater 108 can also be configured to interact with a
Gigaset M740 AV.
81
Page 84

Appendix
Integration in the network
If you wish to use your Gigaset WLAN Repeater 108 in Ethernet adapter Operating
Mode, i.e. if you wish to connect a PC or a games console wirelessly to a local network,
you may have to carry out a network configuration. PC settings are, however, often
already correct, in which case the step described in this chapter need not be carried out.
You can do this using the tools provided by the Windows operating system on your PC.
The following steps are required:
u First install the TCP/IP protocol as the network protocol on your system. This step is
not necessary if your system has already been configured for TCP/IP connections.
As a rule, Windows XP automatically integrates network cards to the local network
via TCP/IP.
For Windows 2000 and Windows 98 SE/ME, TCP/IP is not normally installed. Informa-
tion is given on how to install the TCP/IP protocol for the network adaptor for these
systems (for Windows 2000 on page 85, for Windows 98 SE/ME on page 88).
If application of the network protocols was not envisaged during installation of
the operating system, you will be prompted to insert your CD-ROM containing the
operating system.
u You define the addressing for your network card. If you want to use your
Gigaset WLAN Repeater 108 as a Repeater or an Access point, select automatic
address allocation (see page 93). If you want to use your device as a network
adapter, assign a static IP address (see page 100).
First configure the network settings for a PC. Then you can use this PC to configure the
Gigaset WLAN Repeater 108. After that you can connect further PCs.
To start the configuration program, you may need to deactivate your browser's HTTP
proxy. If you use Windows XP Service Pack 2, you will need to configure the popup
blocker. Both procedures are described on the subsequent pages.
82
Page 85

Appendix
Windows XP
Note:
The name of the menu items may differ slightly from one version of Windows XP to
another. However, the configuration settings described below apply generally.
ì Click on Start – Control Panel.
ì Click on Network connections.
ì Double-click on the LAN connection, via which you are connected to the Gigaset
WLAN Repeater 108.
ì On the General tab, click on Properties.
ì From the list, select the entry Internet Protocol (TCP/IP) and click on Properties.
ì If the Obtain an IP address automatically and Obtain DNS server address auto-
matically options have already been activated, your PC is already configured for
DHCP. Click on Cancel and close the following windows with OK to save your network configuration.
Otherwise, in the General tab, activate the Obtain an IP address automatically
and Obtain DNS server address automatically options.
ì Click on OK or Close to close each window.
Deactivating the HTTP proxy
Make sure that the HTTP Proxy in your Web browser is deactivated. This function must
be deactivated so that your Web browser can access your Gigaset WLAN Repeater 108's
configuration pages.
The following section describes the procedure for Internet Explorer and Mozilla Firefox.
First decide which browser you are using and then follow the appropriate steps.
u Internet Explorer
ì Open Internet Explorer and click on End. Click on Tools and then on Internet
Options.
ì In the Internet Options window click on the Connections tab.
ì Click on Settings.
ì Deactivate all options in the Settings for local network (LAN) window.
ì Click on OK and then OK again to close the Internet Options window.
83
Page 86

Appendix
u Mozilla Firefox
ì Open Mozilla Firefox. Click on Tools and then on Settings.
ì In the Settings window, click on Connection Settings...
ì In the Connection Settings window, select the option Direct connection to the
Internet.
ì Click on OK to finish.
Configuring the popup blocker
You must allow popups for the configuration program in order to start it.
u Internet Explorer
If working with Windows XP Service Pack 2, popups are blocked by default. Carry out the
following steps:
ì Right-click on the browser information bar.
ì Select Allow popups from this screen.
ì Confirm the dialogue window by clicking on OK.
The configuration screens for the Gigaset WLAN Repeater 108 are now allowed as popups.
You can make additional settings for popups within Internet Explorer via the Tools –
Popup Manager menu item or via Tools – Internet Options in the Privacy tab.
u Mozilla Firefox
Popups are blocked by default. Carry out the following steps:
ì Open Mozilla Firefox. Click on Tools and then on Settings.
ì In the Settings window, click on the Web features tab.
ì In the Web Features window, deactivate the Block Popup window.
ì Click on OK to finish.
Please note:
Should you use a different popup blocker, you must configure this accordingly.
84
Page 87

Windows 2000
Install the TCP/IP protocol
ì Select Start – Settings – Control Panel.
ì Double-click on the Network and Dial-up Connections icon.
Appendix
ì In the Network and Dial-up Connections window, double-click on the icon of the
LAN Connection you use for connecting to the Gigaset WLAN Repeater 108.
ì Click on Properties.
ì In the next window click on Properties again.
85
Page 88

Appendix
ì Check whether the displayed list on the General tab contains an entry for Internet
protocol (TCP/IP) and whether this has been activated. If so, you can terminate the
procedure here. Otherwise, click on Install to install the protocol.
ì Select Protocol and click on Add.
86
Page 89

Appendix
ì In the Network protocol list, select Internet protocol (TCP/IP).
ì Click on OK.
You will now see the TCP/IP protocol in the LAN connection properties window.
ì Click on OK.
You will see a message telling you that the setting will not take effect until you
restart your PC.
ì Confirm this screen with OK.
This restarts your PC.
Deactivating the HTTP proxy
Make sure that the HTTP Proxy in your Web browser is deactivated. This function must
be deactivated so that your Web browser can read your Gigaset WLAN Repeater 108's
configuration pages.
The following section describes the procedure for Internet Explorer and Mozilla Firefox.
First decide which browser you are using and then follow the appropriate steps.
u Internet Explorer
ì Open Internet Explorer. Click on Tools – Internet Options.
ì In the Internet Options window click on the Connections tab.
ì Click on LAN settings.
ì Deactivate all options in the Settings for local network (LAN) window.
ì Click on OK and then OK again to close the Internet Options window.
u Mozilla Firefox
ì Open Mozilla Firefox. Click on Tools and then on Settings.
ì In the Settings window, click on Connection Settings...
ì In the Connection Settings window, select the option Direct connection to the
Internet.
ì Click on OK to finish.
Configuring the popup blocker
Popups are blocked by default for Mozilla Firefox. If you use the Mozilla Firefox browser,
you must allow popups for the configuration program in order to start it. Carry out the
following steps:
ì Open Mozilla Firefox. Click on Tools and then on Settings.
ì In the Settings window, click on the Web features tab.
ì In the Web Features window, deactivate the Block Popup window.
ì Click on OK to finish.
Please note:
Should you use a different popup blocker, you must configure this accordingly.
87
Page 90

Appendix
Windows 98 SE/ME
Installing the TCP/IP protocol
ì Select Start – Settings – Control Panel.
This opens the Windows control panel.
ì Double-click on the Network icon.
ì In the next window, select the name of the network adapter you use to set up the
connection between your PC and the Gigaset WLAN Repeater 108.
88
Page 91

Appendix
ì Check whether there are any other entries for the card starting with TCP/IP ->.
If so, then the TCP/IP protocol has already been installed. You can terminate the procedure at this point.
ì If there is no TCP/IP entry, click on the Add button.
ì In the next window, click on Protocol and then on Add, or double-click on Protocol.
89
Page 92

Appendix
ì In the Manufacturer field, select Microsoft. Then in the Network protocols field,
select TCP/IP.
ì Then click on OK.
You will now see the Network window again. The TCP/IP entry for the network
adapter has now been added.
90
Page 93

ì Click on OK.
You will see a message telling you that the setting will not take effect until you
restart your PC.
ì Confirm this screen with OK.
This restarts your PC.
Appendix
Deactivating the HTTP proxy
Make sure that the HTTP Proxy in your Web browser is deactivated. This function must
be deactivated so that your Web browser can access your Gigaset WLAN Repeater 108's
configuration pages.
The following section describes the procedure for Internet Explorer and Mozilla Firefox.
First decide which browser you are using and then follow the appropriate steps.
u Internet Explorer
ì Open Internet Explorer. Click on Tools – Internet Options.
ì In the Internet Options window click on the Connections tab.
ì Click on LAN settings.
ì Deactivate all options in the Settings for local network (LAN) window and click on
OK.
ì Click on OK again to close the Internet Options window.
91
Page 94

Appendix
u Mozilla Firefox
ì Open Mozilla Firefox. Click on Tools and then on Settings.
ì In the Settings window, click on Connection Settings...
ì In the Connection Settings window, select the option Direct connection to the
Internet.
ì Click on OK to finish.
Configuring the popup blocker
Popups are blocked by default for Mozilla Firefox. If you use the Mozilla Firefox browser,
you must allow popups for the configuration program in order to start it. Carry out the
following steps:
ì Open Mozilla Firefox. Click on Tools and then on Settings.
ì In the Settings window, click on the Web features tab.
ì In the Web Features window, deactivate the Block Popup window.
ì Click on OK to finish.
Please note:
Should you use a different popup blocker, you must configure this accordingly.
92
Page 95

Appendix
Assigning IP addresses automatically
Your Gigaset WLAN Repeater 108 has a DHCP server that automatically assigns
addresses in the network. As a rule, you do not have to do anything, as the Obtain an
IP address automatically function field is set during the installation of TCP/IP. If, however, you integrate your Gigaset WLAN Repeater 108 in an existing network with static
address blocks, domain names or subnets or if you cannot launch the configuration program straight away, you should check the TCP/IP properties and make any necessary
changes. This is described below.
Windows XP
ì Click on Start and select Control panel.
ì Select Network and Internet Connections, then click on the Network Connec-
tions icon.
ì Double-click on the LAN connection with which you are connected to the Gigaset
WLAN Repeater 108.
ì Click on Properties.
ì Select Internet protocol (TCP/IP) and once again click on Properties.
93
Page 96

Appendix
ì If the Obtain an IP address automatically and Obtain DNS server address auto-
matically options have already been activated, your PC is already configured for
DHCP. Click on Cancel and close the following windows with OK to save your network configuration.
ì If the Obtain an IP address automatically and Obtain DNS server address auto-
matically have not been activated, select them and click on OK. Close the following
screens.
ì Restart your network (see page 106).
94
Page 97

Appendix
Windows 2000
ì Click on Start – Settings – Control Panel.
ì Double-click on the Network and Dial-up Connections icon and then on the icon
of the network connection with which you are connected to the Gigaset WLAN
Repeater 108.
ì On the General tab, click on Properties.
ì Select Internet protocol (TCP/IP) and click on Properties.
95
Page 98

Appendix
ì If the Obtain an IP address automatically and Obtain DNS server address auto-
matically options have already been activated, your PC is already configured for
DHCP. Click on Cancel and close the following windows with OK to save your network configuration.
ì If the Obtain an IP address automatically and Obtain DNS server address auto-
matically options have not been activated, select them and click on OK. Close the
following screens.
ì Restart your network (see page 106).
96
Page 99

Windows 98 SE/ME
ì Click on Start – Settings – Control Panel.
ì Double-click on the Network icon.
Appendix
97
Page 100

Appendix
ì In the next window, click on the TCP/IP entry for the network adapter you want to
use to connect your Gigaset WLAN Repeater 108 with the network.
ì Click on the Properties button. You can also double-click on the TCP/IP entry, as this
automatically opens the Properties window.
98
 Loading...