

Page 1

3D GYRO PEN MOUSE
USER'S MANUAL
<< CONTENTS >>
1. What's 3D GYRO PEN MOUSE?
2. Components
3. Specifications
4. Installation
5. RF Tranceiver(ID Setting)
6. ID Resetting
7. How to use
1) Functions
2) Mouse Grip
3) LEDs
8. Warnings.
9. Troubleshooting
10. Warranty
11. Inquiry
12. Tips for easy use
Page 2
1. WHAT'S 3D GYRO PEN MOUSE ?
3D GYRO PEN MOUSE adopted 3 dimension space identification sensor for user's convenient
use in free space by any pose, which completely differentiates it from either ball or optical
mouses.
Z3 mouse enables the user to control his or her PC internet or presentation in extended area as
wide as 10m with no restriction in space and direction by free simple movement of wrist.
Furthermore it is a completely new innovative mouse. By adopting human engineered design
this most updated mouse incur least burden on the user's shoulder and wrist.
This operational manual will make it simple to install and use it.
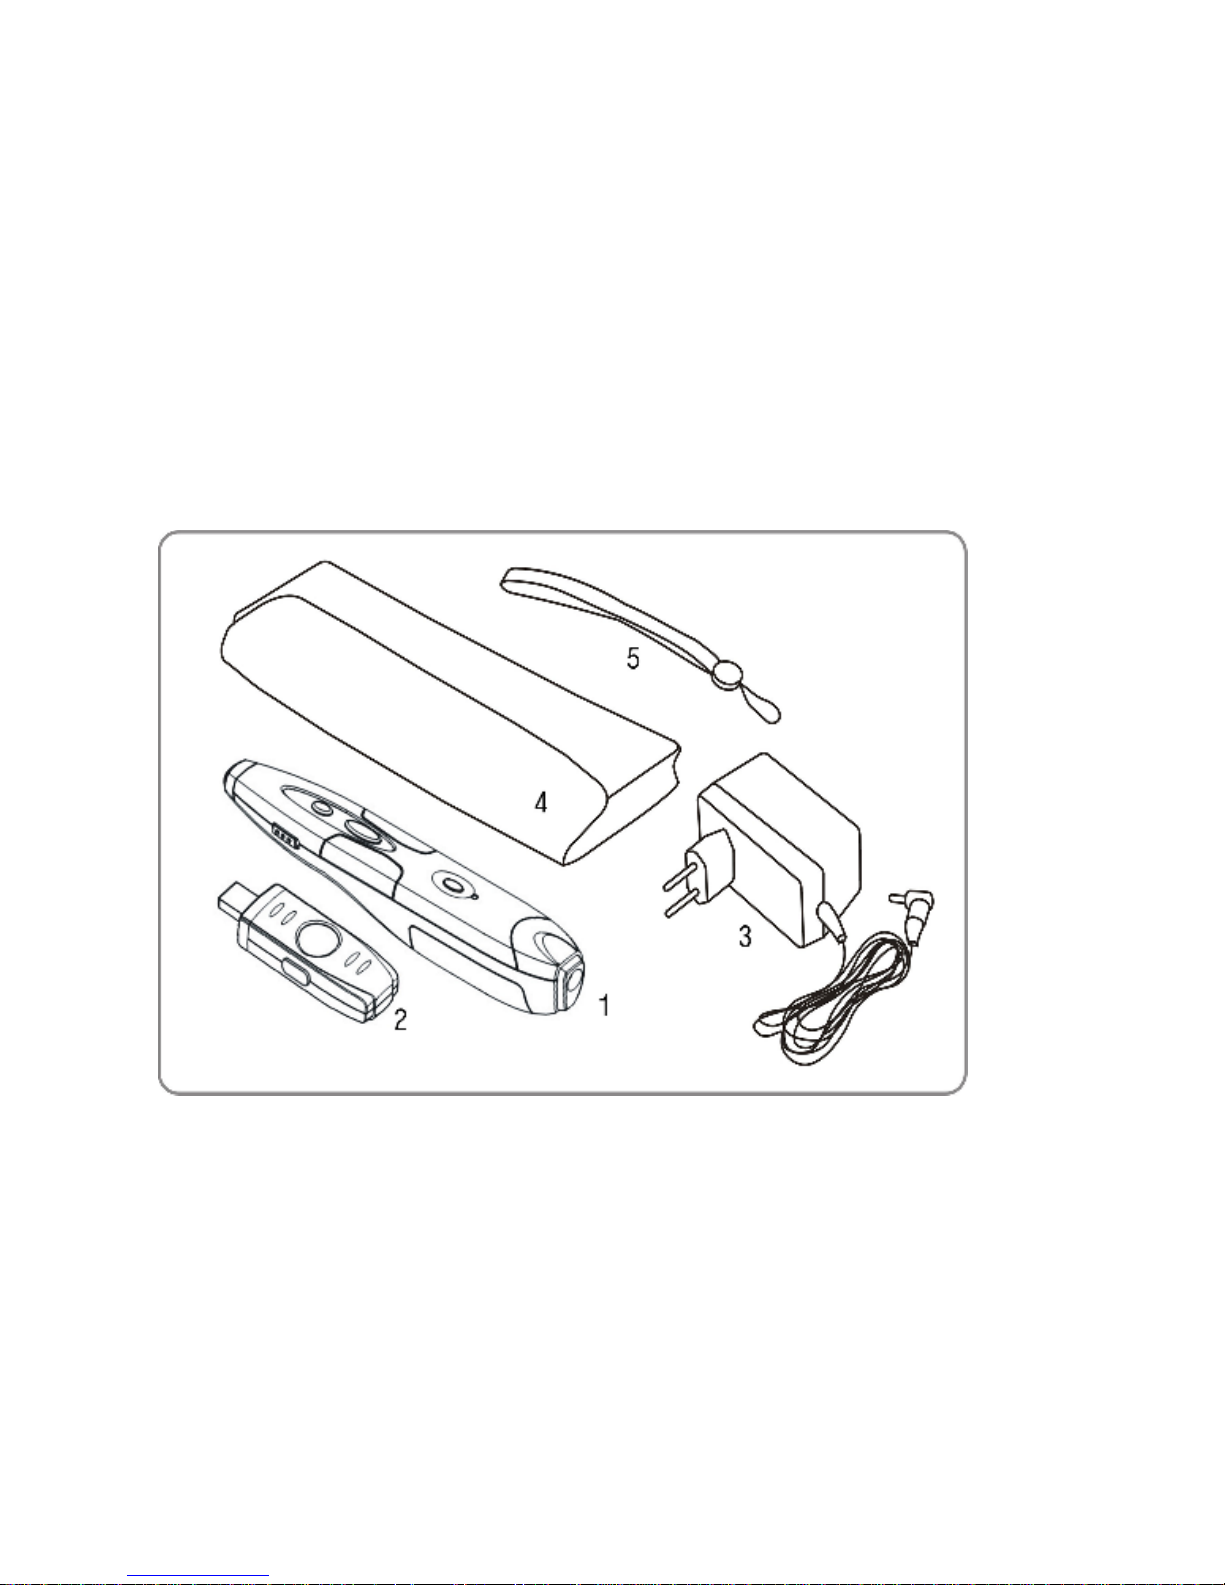
2. Components
1) 3D GYRO PEN MOUSE MAIN BODY
2) R F Receiver : USB PORT installed
3) Adaptor : DC 9V
4) Portable case
5) Wrist holder
1
Page 3

3. SPECIFICATIONS
ㆍ Hardware : IBM-PC convertible
ㆍ Software : Windows 98, Windows NT, Windows 2000, Windows XP.
ㆍ USB port installed
ㆍ Driver : Microsoft Compatible (No additional drivers to install)
ㆍ Operating Environment : 0℃ ~ 40℃
ㆍ Storage Environment : -5℃ ~ 70℃
Property
Z3 PEN MOUSE
RF Receiver
Operable Distance 10 M 10 M
Battery - 3.6 _ 0.6 v
- AAA battery 3pcs
- NiMH Battery
5 V (USB Power)
Recharging time 3 Hours
Using time 8 Hours
Elec. currency 54 mA 70 mA
Band width 35 Mhz - 20 dB 35 Mhz - 20 dB
Frequency 2440 Mhz 2440 Mhz
Peak output 2 dBM 2 dBM
Max.Bit rate 1 Mbps 1 Mbps
RF
Min.Bit rate 10 Kbps 10 Kbps
4. INSTALLATION
USB users
Just connect RF receiver to USB port and use the mouse
Users who do not use USB port
① Connect RF receiver to USB port. Then LED light signal will be on and off.
② Windows NT, WIN-2000, Windows XP users
-. Connect RF receiver to USB port, then the driver is automatically installed.
③ Windows 98
-. Windows 98_ original CD
: Connect RF receiver to USB port, then PC will show a message of new device and
searching for driver. Insert Window 98 original CD and press "Enter".
-. Windows 98_ unoriginal CD
: Access to “http://www.sico.co.kr” and download "3d_Install.zip” at a certain directory.
Connect RF receiver to USB port, then the PC will show a message of new device
and searching for driver. Select the downloaded directory and press "Enter".
2
Page 4

5. ID SETTING
-. Preset ID when manufactured, therefore no need to set ID. When the mouse do not operate even
after USB port installation, please set ID as below.
① Connect RF receiver to USB port.
② Power switch "1" on.
③ Press "B" ( ID set button ) of RF receiver and
simultaneously press "6" (ID set button) of Z3 mouse until LED(green) of Z3 mouse lights on .
④ When ID setting is complete, LED( green ) of Z3 mouse lights on.
⑤ Release '6' ( ID Set Button) first and release 'B' ( ID Set Button ) of RF receiver later. Then
LED lights on and ID setting is complete.
⑥ Power switch '1' of Z3 mouse off and on. If LED of Z3 mouse lights on green, ID setting is
complete
⑦ If failed ID setting, press power switch off and retry the steps from ① to ⑥.
6. ID RESETTING
① Press ID Set Button_ longer than 5 seconds, then ID will be cancelled and LED green light
will on and off with interval of 0.5 second.
② If want to reset ID, press power switch of Z3 mouse off and on, then reset ID.
3
Page 5

7. HOW TO USE
1) Buttons / Functions
1. Power switch ON / OFF
2. Left button of ball mouse
3. Right button of ball mouse
4. Laser beam button for presentation
5. Auto scroll
6. ID set button ( Setting frequency to RF receiver)
7. Active Button
8. DC power
9. Laser beam outlet
A. USB connector
B. ID set button ( Frequency setting button )
2) Mouse Grip
This 3D mouse is using Gyroscope sensor and adjusting accuracy by moving in space.
Therefore Z3 mouse grip is very important.
① Put Z3 mouse in mid of palm
4
Page 6

② Finger-grip the bottom of mouse and control the mouse by the thumb only
③ When using it for presentation, use the laser beam - the upfront button
※ Tips for accurate operation : Keep the mouse as even as possible and use the wrist to control.
Grip the mouse so as the active button touch the life-line on the palm.
3) LEDs
① Front LED : Shows operation status
▶ Standard Operation : When power switch on, green light on and off. And when grip the
mouse in hand, the active button is automatically pressed and the green light on-and-off
by a short interval. It means the mouse is under standard operation.
▶ When ID is not set : When power switch on, green light on-and-off with interval of
0.5 second.
▶ When ID is set : When press the ID set button, the green light will off and after 3 seconds
the green light will on if the RF transmission is successful. If failed ID
setting, the green light will on and off after 5 seconds. In this case reset
ID by the "5. ID Setting" process.
▶ Battery recharge : If red light is on, the battery is used up. So it should be recharged by
the recharger.
② Rear LED : Shows battery (charge) status
▶ When connect the DC adaptor to the power consent, the battery will be recharged fast
and the red light will on. Fast recharging will take 2~4 hours and the red light will off
when completely recharged. Once the fast recharging is completed it will automatically
convert to standard recharging mode and will continuously recharge until fully
recharged.
5
Page 7

③ RF Receive LED : Shows the frequency receiving status between mouse and
RF Receiver
▶ When setting ID : When press the ID set button, LED light will on-and-off in short interval.
Standard operation: When the power switch of mouse is on, the receive LED light will on.
( If receiving is not through or the power switch is off, the LED light
will off.)
▶ When press the active button of Z3 mouse, the receiver LED light will on-and-off. It
means the mouse is operating in good condition.
8. WARNINGS
When power switch on, put the mouse on a plain surface for 10 seconds or more
▶ This is an important process to obtain the location information by the earth's magnetic
property. If neglect this process, the mouse may loose pointing accuracy.
If the mouse's pointing accuracy falls down while operation, please put the mouse
again on a plain surface for 5~10 seconds to refresh the location information.
This is never a trouble of the mouse. Don't worry about this.
Cursor of Z3 mouse moves only when the active button is pressed.
① Gripping the mouse even is the clue to use it more conveniently for a long time.
Therefore need to get used to gripping the mouse as described in 7-2).
② When using this mouse for the first time, the user may feel difficulties in operation due
to his or her habitual sense accustomed with scrolling the ball mouses on pad. One or
two hours practice by Z3 mouse will be enough to acknowledge the most developed
functions of Z3 mouse as more free-moving and convenient.
③ When moved the cursor to the desired location, the user can select it by releasing the
active button pressed. Once selected the cursor point, the user can operate the right or
left or rear button regardless the mouse move.
④ More than two Z3 mouses can be used for one PC by setting ID of all the mouses at the
same time
9. TROUBLESHOOTING
1) Difficult to fix the cursor at the selected point..
Can fix the cursor at the selected point by smoothly releasing the pressed active button.
2) Cursor moves up or down unintendedly
When used Z3 mouse for a long time, the cursor can be trembling by the inconsistency
of the earth magnetic moment. In this case the sensor should be refreshed bu putting it
on a plain surface for 5~10 seconds.
6
Page 8

3) The cursor does not move I the intended direction.
▶ Z3 mouse identify the location in space by Gyro sensor and the mouse must be kept even.
However even if the mouse was in slide, it can be automatically refreshed by keeping it
even again for a while
▶ When the wrist direction is not in parallel to the cursor direction, release the pressed
active button and keep the mouse in even position for a while, then press the active
button to restart mouse operation.
4) Want to use Z3 mouse together with optical or ball mouse.
▶ Z3 mouse can be used combined with optical or ball mouses for one PC. However if both
mouses are operated simultaneously only one of them will be activated..
10. WARRANTY
Z3 mouse is warranted for 1 year..
The battery is rechargeable. Approximately 400 times recharging will be available.
Battery life can be extended by using up the battery and recharging it up to its full capacity.
New battery can be obtained in one of our dealers' shop by the same specifications.
11. INQUIRY
In case any quality issues with Z3 mouses or any inquiry, please contact our main office.
Homepage : http://www.sico.co.kr
12. TIPS FOR EASY USE
Z3 mouse is operable in a 3 dimension space freely without fixed pad. Therefore it can be
rather difficult for the beginner to operate. Hereunder are tips for easy use of Z3 mouse.
(1) After power switch on, put the mouse on a plain surface for 10 seconds to memory the
start location.
(2) Press the active button and move the cursor the desired point..
(3) When moved to the desired point, release the pressed active button softly and
smoothly..
(4) Once the active button is released, the cursor does not move. Then press right or left
button to input data.
If the active button and the right or left buttons are pressed at the same time, it can raise
trembling trouble, making it difficult to input data as intended.
7
Page 9

[ APPLICATION ]
(1) Mouse operation speed can be adjusted in motion, speed, shadow etc to the user's
convenience, including right or left hand conversion.
(2) When accustomed with Z3 mouse operation, the user can take even the advantage of
inertia.
8
FCC COMPLIANCE STATEMENT
THIS DEVICE COMPLIES WITH PART 15 OF THE FCC RULES.
OPERATION IS SUBJECT TO THE FOLLOWING TWO CONDITION;
(1) THIS DEVICE MAY NOT CAUSE HARMFUL INTERFERENCE, AND
(2) THIS DEVICE MUST ACCEPT ANY INTERFERENCE RECEIVED,
INCLUDING INTERFERENCE THAT MAY CAUSE UNDESIRED
OPERATION.
CAUTION: Changes or modifications not expressly approved by the party
responsible for compliance could void the user’s authority to
operate the equipment.
 Loading...