

Page 1

FS400 – 4 Port Ethernet Switch
CLI User Guide
1.0
Proprietary Information
The information contained herein is proprietary to Shyam
Networks Limited. Use or disclosure of this document or the
information contained herein, for any purpose other than that
for which it was furnished is not permitted or it shall not be
disclosed or divulged to any third party without the prior
written consent of Shyam Networks Limited.
Page 2
FS400 S WITCH CLI U SER G UIDE
Copyright Notice
This document is copyright © 2011 Shyam Networks Limited. All
Rights Reserved. No part of this document, in whole or in part,
may be used, reproduced, stored in a retrieval system or
transmitted, in any form or by any means, electronic or
otherwise, including photocopying, reprinting, or recording, for
any purpose, without the express written permission of Shyam
Networks Limited.
Legal Disclaimer
The content of this document is provided for informational
purpose only. The content is subject to change without notice.
Shyam Networks Limited specifically disclaims all warranties,
express or limited, including, but not limited to the implied
warranties of merchantability and fitness for a particular
purpose, except as provided for in a separate software license
agreement.
© 2011 SHYAM | Company Confidential Page 2/57
Page 3
FS400 S WITCH CLI U SER G UIDE
Contents
1. About This Document ............................................................... 9
1.1 Purpose ............................................................................................................ 9
1.2 Intended Audience ...................................................................................... 9
1.3 Document Conventions ............................................................................ 9
1.4 Terms and Abbreviations ....................................................................... 10
1.5 References .................................................................................................... 11
2. Remotely Managing FS400 .................................................... 12
2.1 Using the CLI ............................................................................................... 12
2.1.1 Accessing CLI using Serial Port ..................................................... 12
2.1.2 Accessing CLI using Telnet ............................................................. 15
2.2 CLI Command Syntax .............................................................................. 17
2.3 Command Conventions .......................................................................... 17
3. Basic Commands ..................................................................... 18
3.1 help (?) ........................................................................................................... 18
3.2 show info ...................................................................................................... 19
3.2.1 show ip .................................................................................................. 20
3.2.2 Changing the IP Address ................................................................ 21
3.3 Enabling DHCP ........................................................................................... 22
3.4 Disabling DHCP .......................................................................................... 23
3.5 Changing Password ................................................................................. 24
4. Configuration Commands ...................................................... 25
4.1 Port Configuration .................................................................................... 25
4.1.1 show port status................................................................................. 25
4.1.2 show port statistics ........................................................................... 26
© 2011 SHYAM | Company Confidential Page 3/57
Page 4
FS400 S WITCH CLI U SER G UIDE
4.2 VLAN Configuration ................................................................................. 27
4.2.1 vlan pass-all .......................................................................................... 28
4.2.2 vlan mode ............................................................................................. 29
4.2.3 vlan create ............................................................................................ 30
4.2.4 vlan add ................................................................................................. 31
4.2.5 vlan insert ............................................................................................. 32
4.2.6 vlan pvid ................................................................................................ 33
4.2.7 vlan leaky .............................................................................................. 34
4.2.8 vlan delete ............................................................................................ 35
4.2.9 vlan ingress-filter ............................................................................... 36
4.2.10 no vlan ................................................................................................. 37
4.3 vlan management-vlan ........................................................................... 38
4.4 mac-address-table .................................................................................... 39
4.4.1 no mac-address-table ...................................................................... 40
4.4.2 learning ................................................................................................. 41
4.5 bandwidth-control ................................................................................... 42
4.6 storm-control .............................................................................................. 43
4.7 Port Mirroring Configuration ................................................................ 44
4.7.1 mirror ...................................................................................................... 45
4.7.2 no mirror ............................................................................................... 46
4.8 Igmp Snooping .......................................................................................... 46
4.9 QoS ................................................................................................................. 47
4.9.1 Port based QoS ................................................................................... 47
4.9.2 ip based qos ......................................................................................... 48
4.10 Link Fault Pass (LFP) ............................................................................... 49
4.11 Firmware Upgradation ......................................................................... 50
© 2011 SHYAM | Company Confidential Page 4/57
Page 5
FS400 S WITCH CLI U SER G UIDE
4.11.1 fw-upgrade tftp ............................................................................... 50
4.11.2 fw-upgrade serial ............................................................................ 52
4.12 Saving the Configurations ................................................................... 54
4.13 Enable PoE ................................................................................................. 55
4.14 exit ................................................................................................................ 55
4.15 Rebooting FS400 ..................................................................................... 56
4.15.1 boot ...................................................................................................... 56
4.16 reset ............................................................................................................. 57
© 2011 SHYAM | Company Confidential Page 5/57
Page 6
FS400 S WITCH CLI U SER G UIDE
Figures
Figure 2: Connect To Dialog Box ..................................................................... 13
Figure 3: Properties Dialog Box ....................................................................... 14
Figure 4: Logon to HyperTerminal ................................................................. 15
Figure 5: Login Details ........................................................................................ 16
Figure 6: Login to FS400 ..................................................................................... 16
Figure 7: Full Help Arguments Window ....................................................... 18
Figure 8: Show Info .............................................................................................. 20
Figure 9: Show IP ................................................................................................... 21
Figure 10: Changed IP Address and Gateway ............................................ 22
Figure 11: Displaying the Last Saved Static IP ........................................... 23
Figure 12: Change Password ............................................................................ 24
Figure 13: Show Port Status .............................................................................. 26
Figure 14: Show Port Statistics ........................................................................ 27
Figure 15: vlan pass-all ........................................................................................ 29
Figure 16: Vlan Mode ........................................................................................... 30
Figure 17: Create Vlan ......................................................................................... 31
Figure 18: Add Vlan .............................................................................................. 32
Figure 19: VLAN insert ......................................................................................... 33
Figure 20: Vlan Pvid ............................................................................................. 34
Figure 21: Leaky Vlan ........................................................................................... 35
Figure 22: Delete Vlan ......................................................................................... 36
Figure 23: Vlan Ingress Filter ............................................................................ 37
Figure 24: Delete Vlan ......................................................................................... 38
© 2011 SHYAM | Company Confidential Page 6/57
Page 7
FS400 S WITCH CLI U SER G UIDE
Figure 25: Vlan Management ........................................................................... 39
Figure 26: MAC Address Table ......................................................................... 40
Figure 27: Delete MAC Address Table ........................................................... 41
Figure 28: Learning .............................................................................................. 42
Figure 29: Bandwidth Control .......................................................................... 43
Figure 30: Storm Control .................................................................................... 44
Figure 31: Mirroring ............................................................................................. 45
Figure 32: Delete Mirroring ............................................................................... 46
Figure 33: Igmp Snooping ................................................................................. 47
Figure 34: QoS ........................................................................................................ 48
Figure 35: IP based QoS ...................................................................................... 49
Figure 36: Command to Upgrade Firmware using TFTP ....................... 51
Figure 37: File Transfer using TFTP ................................................................. 51
Figure 38: Command to Upgrade Firmware Using Serial Port ............ 53
Figure 39: File Transfer using Serial Port ...................................................... 53
Figure 40: Sending File ....................................................................................... 54
Figure 41: Saving the Configuration ............................................................. 55
© 2011 SHYAM | Company Confidential Page 7/57
Page 8
FS400 S WITCH CLI U SER G UIDE
Tables
Table 1: Document Conventions ....................................................................... 9
Table 2: Terms and Abbreviations Used in the Document ................... 10
Table 3: Command Conventions .................................................................... 17
Table 4: Configuring the Terminal Emulation Console .......................... 52
© 2011 SHYAM | Company Confidential Page 8/57
Page 9
FS400 S WITCH CLI U SER G UIDE
1. About This Document
1.1 Purpose
This guide familiarizes you with the command line interface (CLI)
commands to configure the FS400 switch. You can configure
FS400 from a remote location through a serial port or Telnet.
1.2 Intended Audience
The intended target groups for this document are:
• System Administrators
• Field Engineers
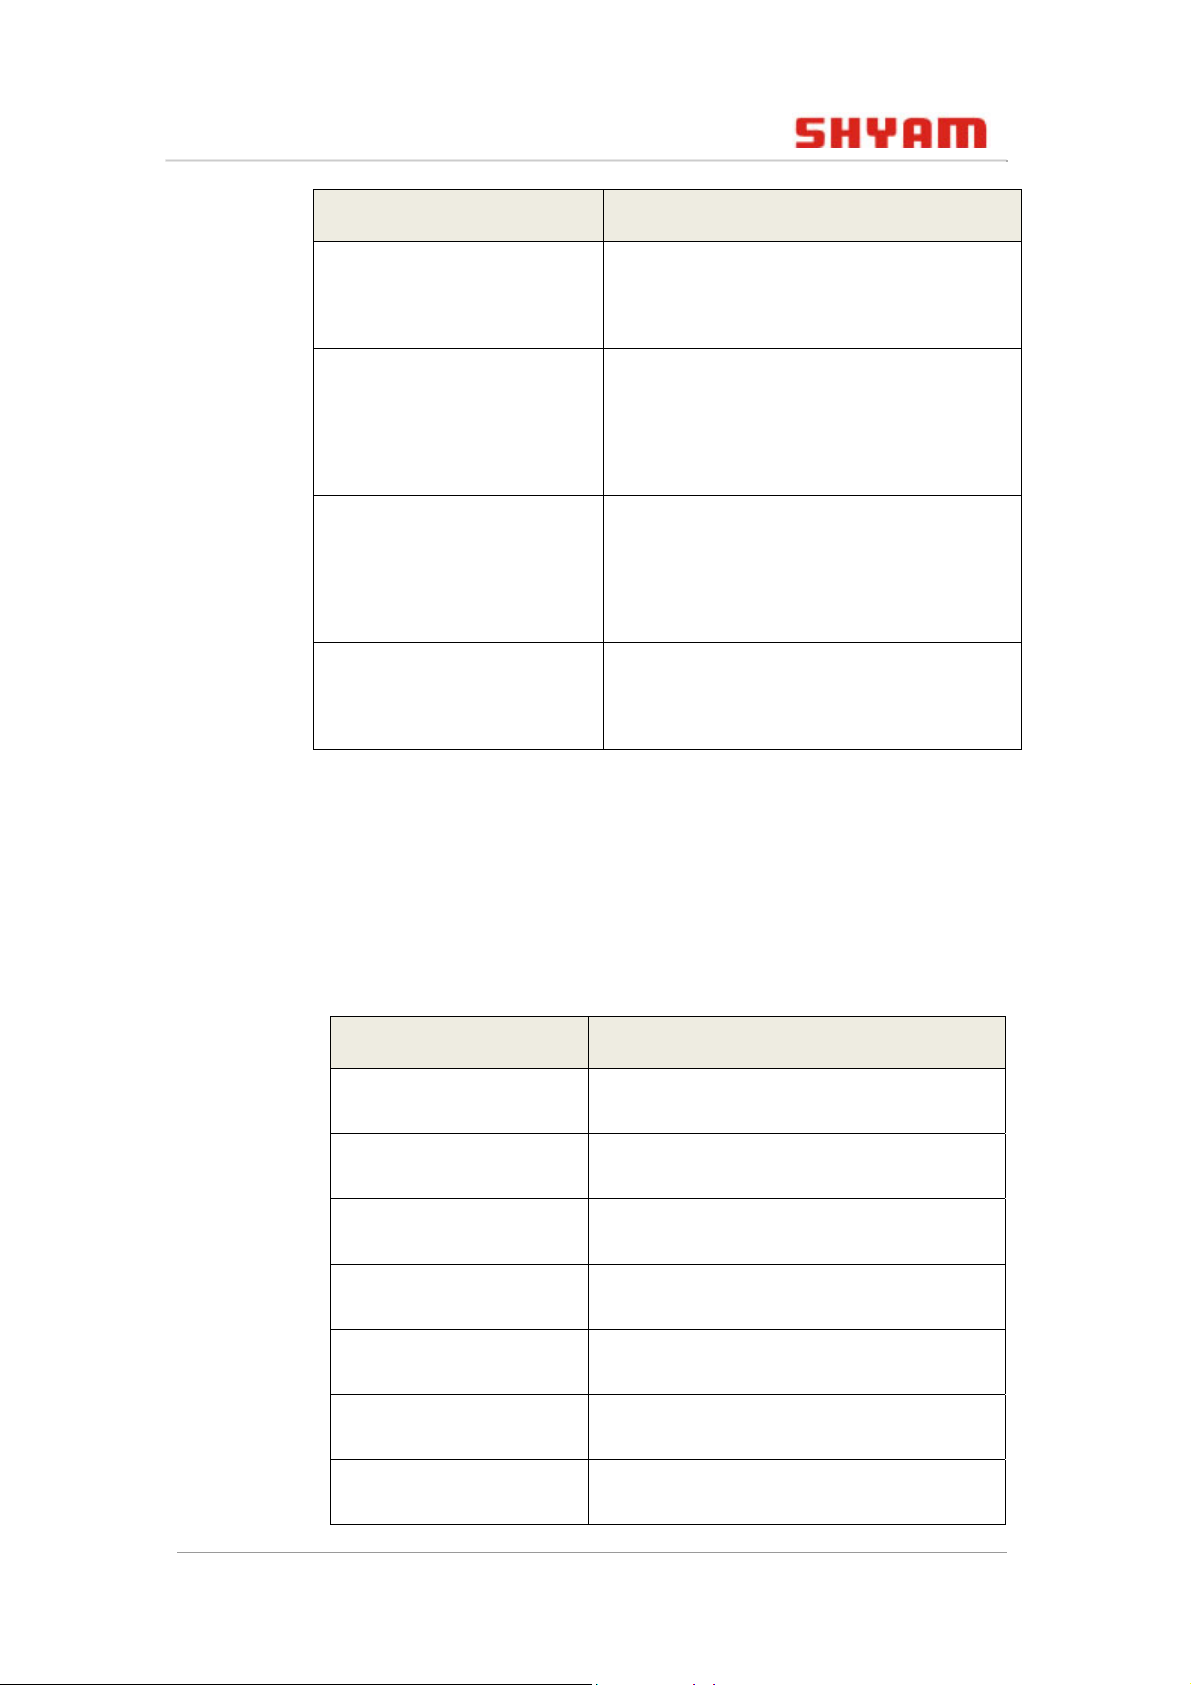
1.3 Document Conventions
The different conventions used in this document are explained
in the following table:
Table 1: Document Conventions
Conventions Description
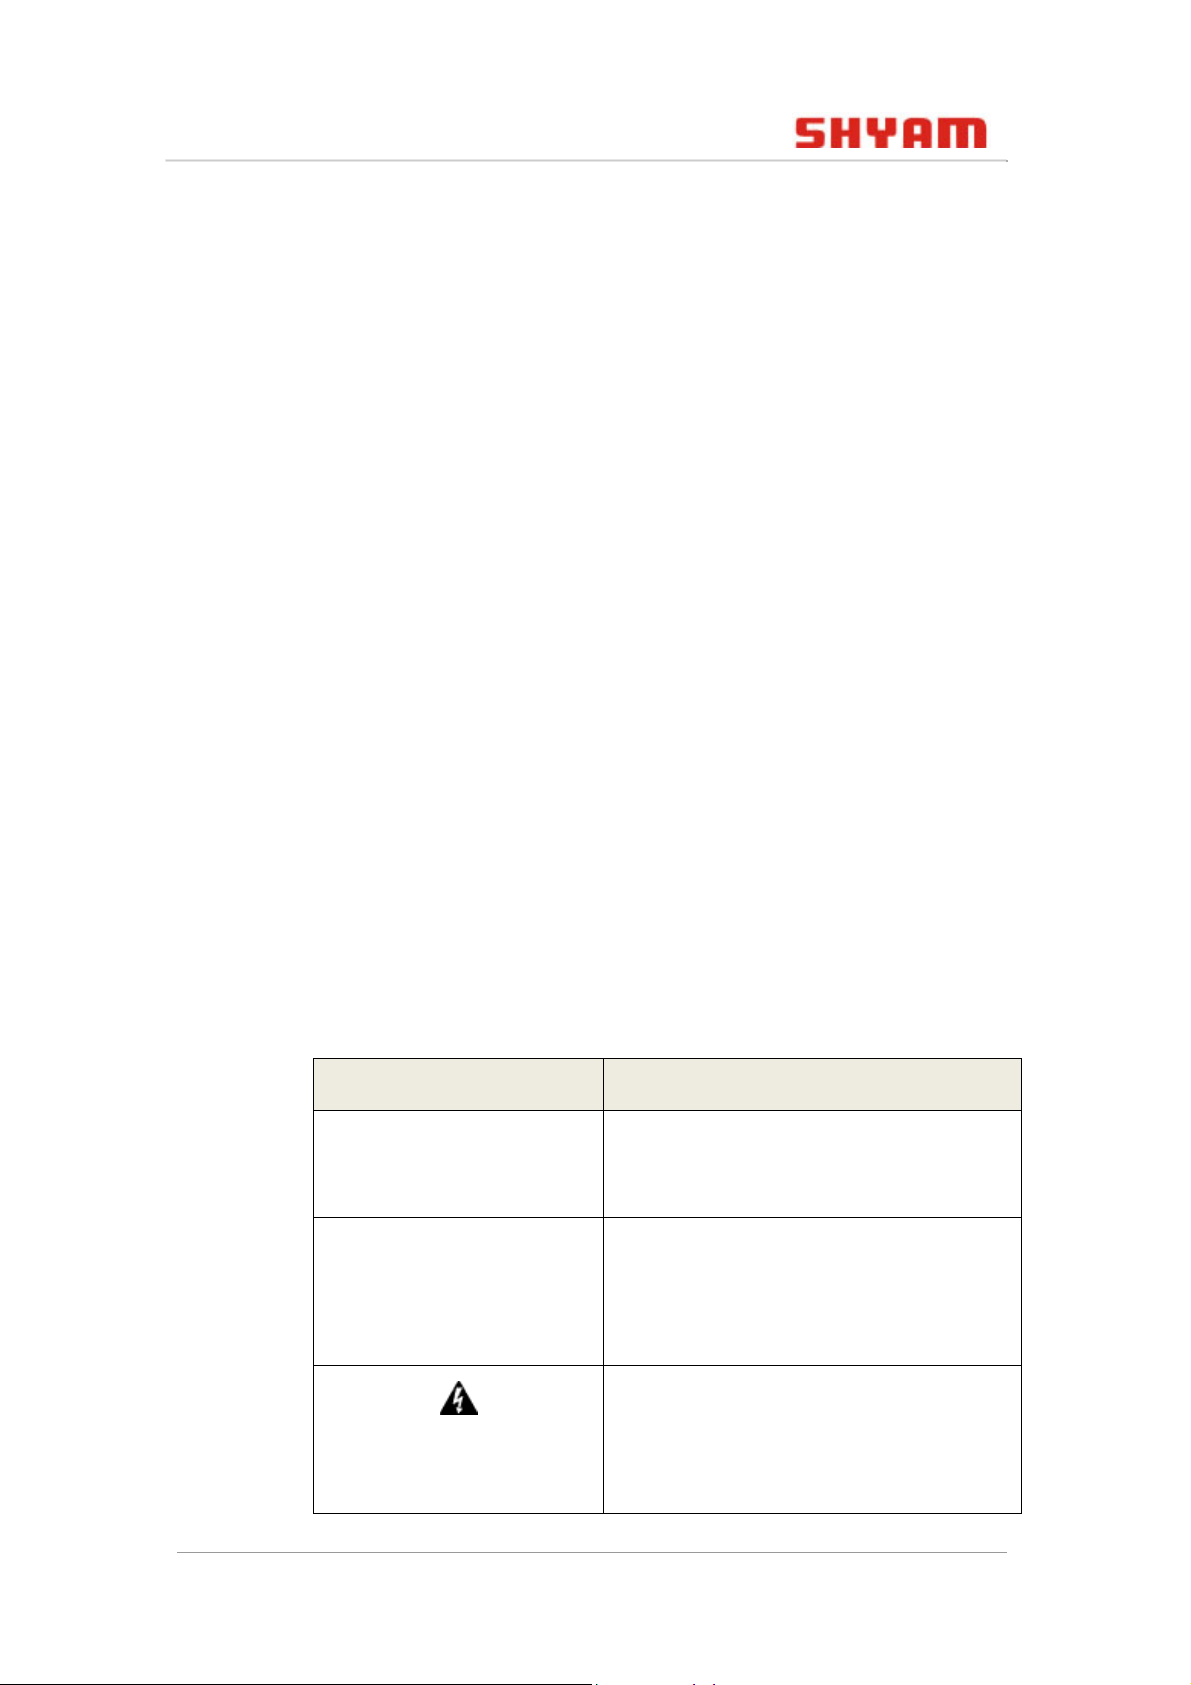
Note: Provides information about
important features or instructions.
Caution: Alerts you to potential
damage to a program, device, or
system.
© 2011 SHYAM | Company Confidential Page 9/57
Warning: Alerts you to potential injury
or fatality. May also alert you to
potential electrical hazards.
Page 10
FS400 S WITCH CLI U SER G UIDE
Conventions Description
file/directory
names
Bold font
cd $HOME
<home_directory>
1.4 Terms and Abbreviations
All courier new.
Any option that needs to be selected or
typed in the user interface is
represented using bold font.
A command that you must enter in a
Command Line Interface (CLI) exactly
as written.
Command variables, the values of
which you must supply.
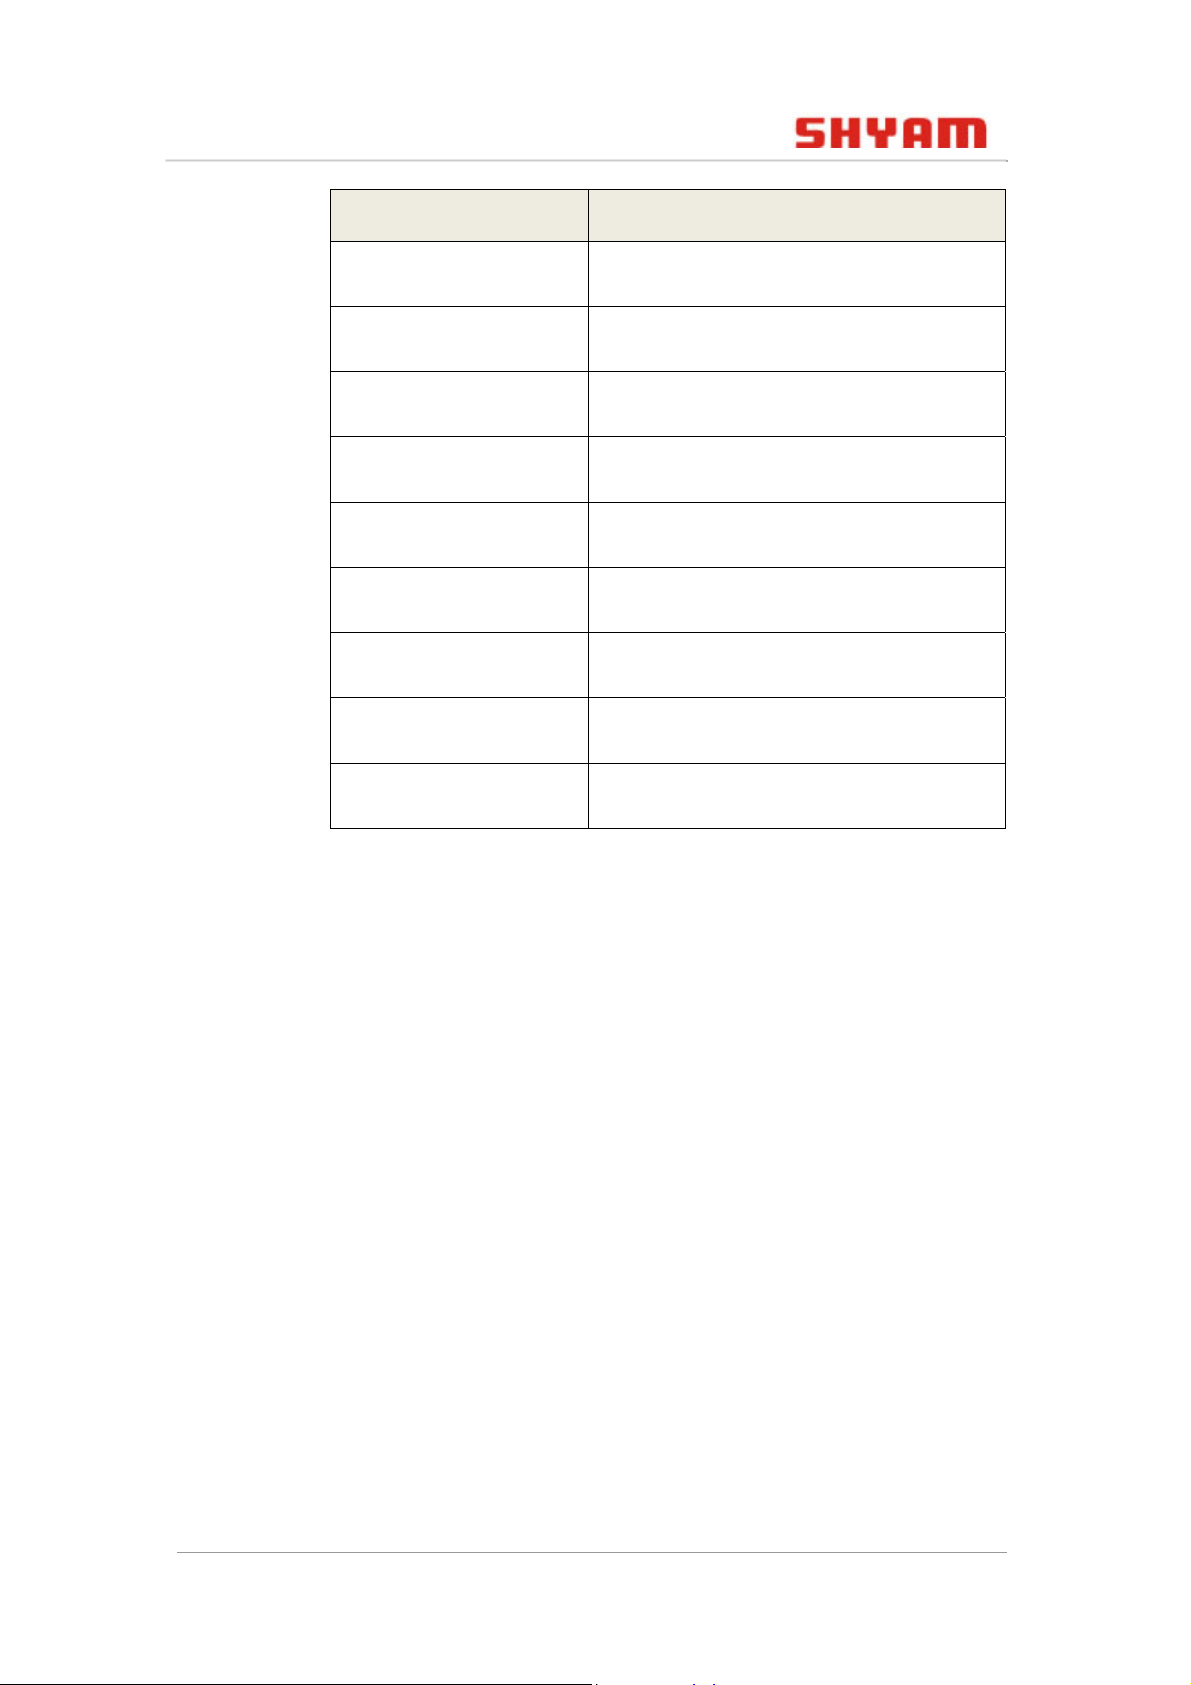
The different terms and abbreviations used in this document are
explained in the following table:
Table 2: Terms and Abbreviations Used in the Document
Terms / Abbreviations Description / Expansion
CLI Command Line Interface
CRC Cyclic Redundancy Check
DHCP Dynamic Host Configuration Protocol
IGMP Internet Group Management Protocol
IP Internet Protocol
Kbps Kilo Bits Per Second
MAC Media Access Control
© 2011 SHYAM | Company Confidential Page 10/57
Page 11
FS400 S WITCH CLI U SER G UIDE
Terms / Abbreviations Description / Expansion
NE Network Element
PoE Power over Ethernet
PVID Port VLAN ID
QoS Quality of Service
SNMP Simple Network Management Protocol
TCP Transmission Control Protocol
TFTP Trivial File Transfer Protocol
Tx/Rx Transmit/Receive
VLAN Virtual Local Area Network
1.5 References
• FS 400 Configuration and User Guide
Note: Please refer to the above mentioned guide for a
detailed description of the commands.
© 2011 SHYAM | Company Confidential Page 11/57
Page 12
FS400 S WITCH CLI U SER G UIDE
2. Remotely Managing FS400
FS400 supports a management interface that you can use to set
up and control the device over the network using the TCP/IP
Telnet protocol. You can use this facility to perform many basic
network management functions.
This section describes how to use command line interface (CLI)
to change FS400 settings and monitor its operation.
2.1 Using the CLI
CLI is a mechanism of interacting and managing any
system/device by typing commands in a single line. After every
typed command, you have to press Enter to execute it.
There are two ways to access the CLI:
• Using direct serial port
• Using remote logical connection with Telnet
Note: You need to ensure that IP address of the system and
FS400 are in the same subnet. The default IP address of FS400 is
192.168.1.2 and your system must also have the IP address in
the same domain as 192.168.1.x (where x is between 1 and 254
except 2). If you encounter any problem while setting up the
system IP in the same subnet, please contact your network
administrator.
2.1.1 Accessing CLI using Serial Port
The CLI can be accessed by first connecting the console port of
FS400 to the serial port on your PC or workstation and then
accessing it through a Telnet session.
© 2011 SHYAM | Company Confidential Page 12/57
Page 13
FS400 S WITCH CLI U SER G UIDE
Perform the following steps to access the CLI through the serial
port:
1. Connect one end of the console cable to FS400 console port.
2. Connect the other end of the cable to the serial port of the
computer.
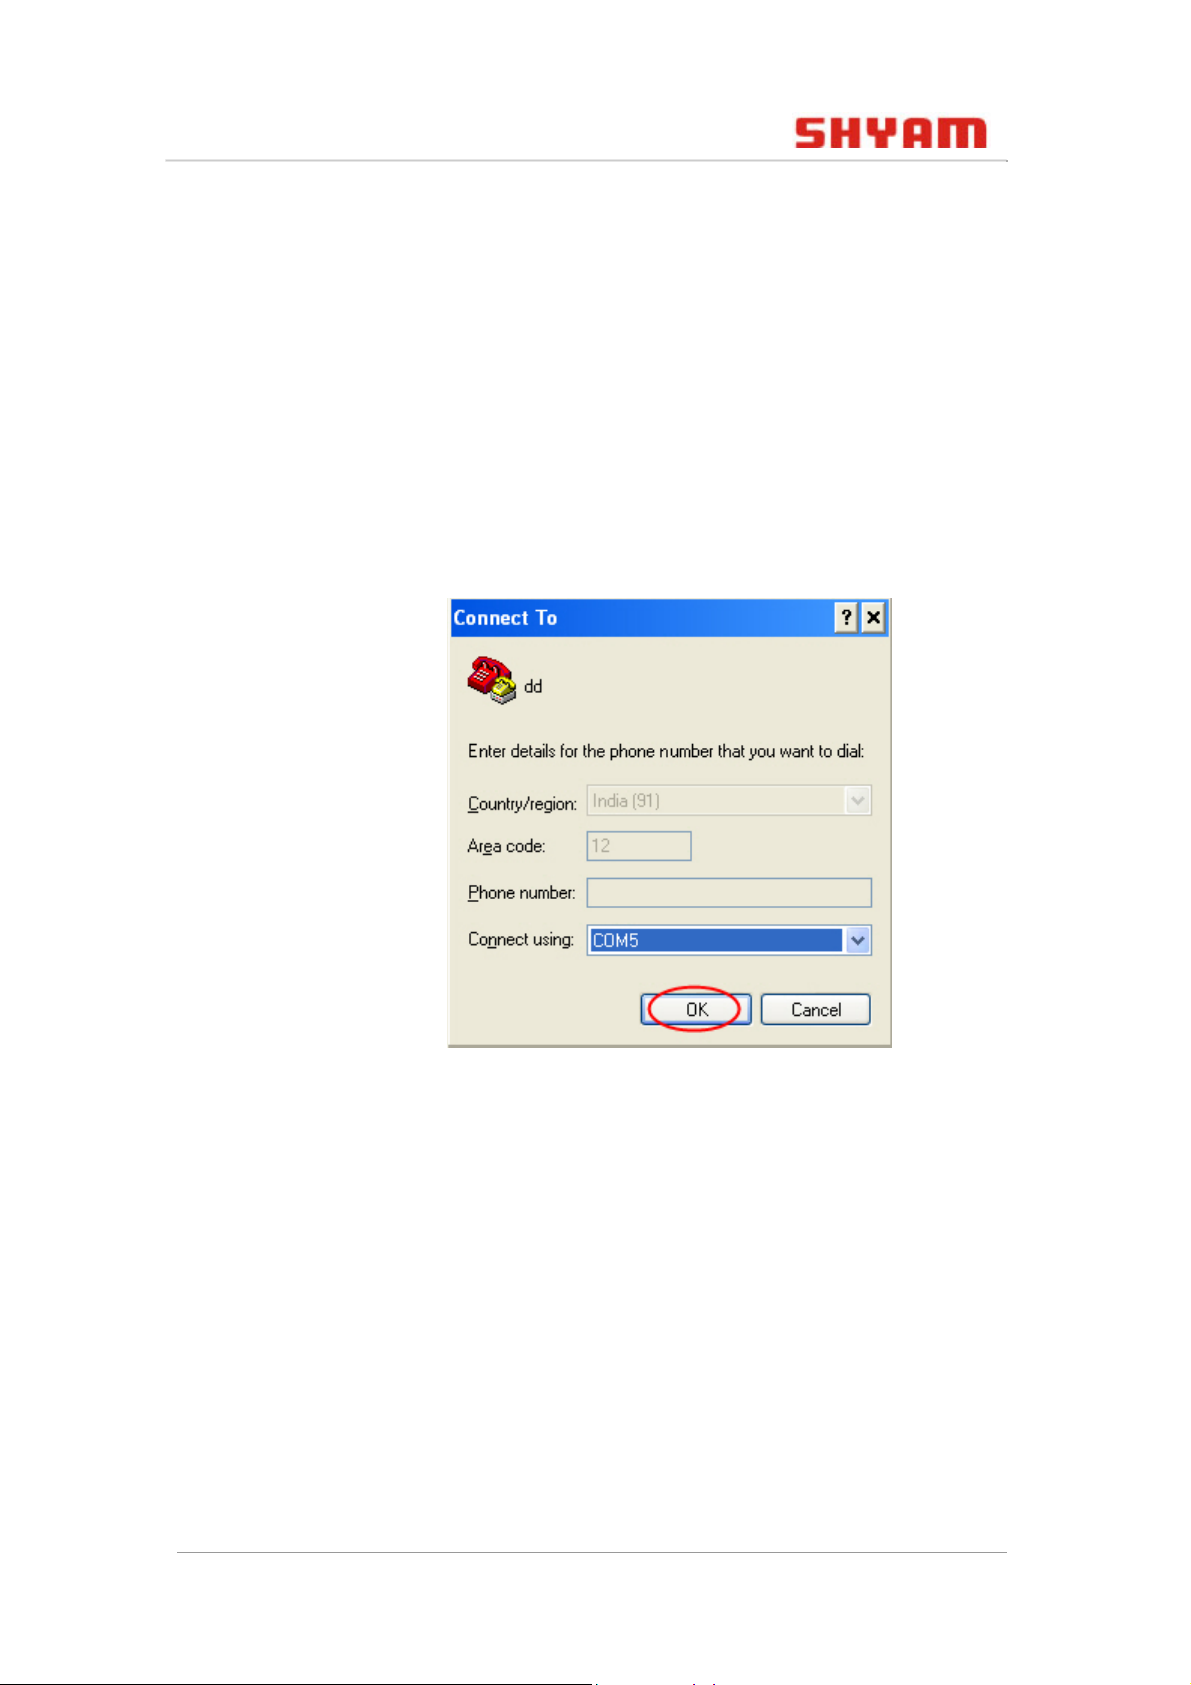
3. Run a terminal emulation program such as HyperTerminal.
The Connect To dialog box appears.
Figure 1: Connect To Dialog Box
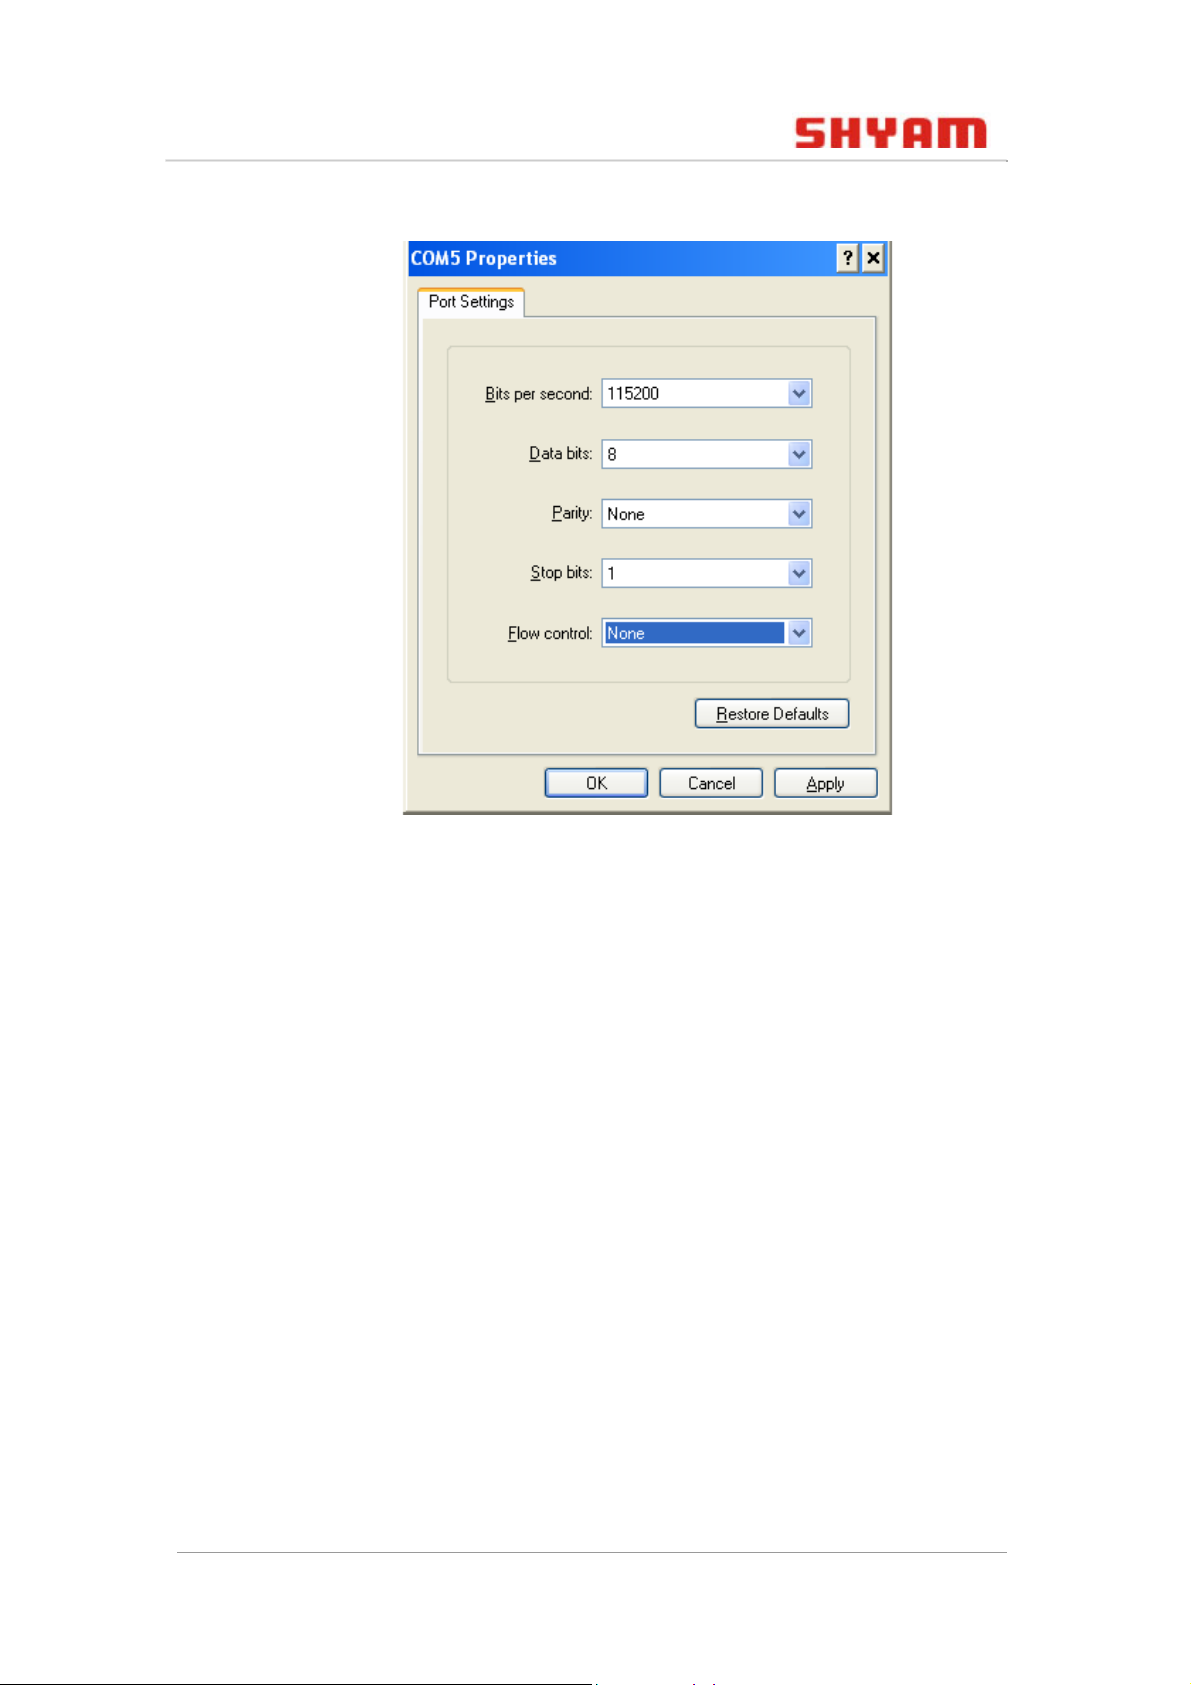
4. Select the desired COM port from the Connect using drop-
down list and click OK.
The <port name>Properties dialog box appears.
© 2011 SHYAM | Company Confidential Page 13/57
Page 14
FS400 S WITCH CLI U SER G UIDE
Figure 2: Properties Dialog Box
Make sure that following values are set:
• Baud rate: 115200
• Data bits: 8
• Parity: None
• Stop bits: 1 bit
• Flow control: None
5. Click OK.
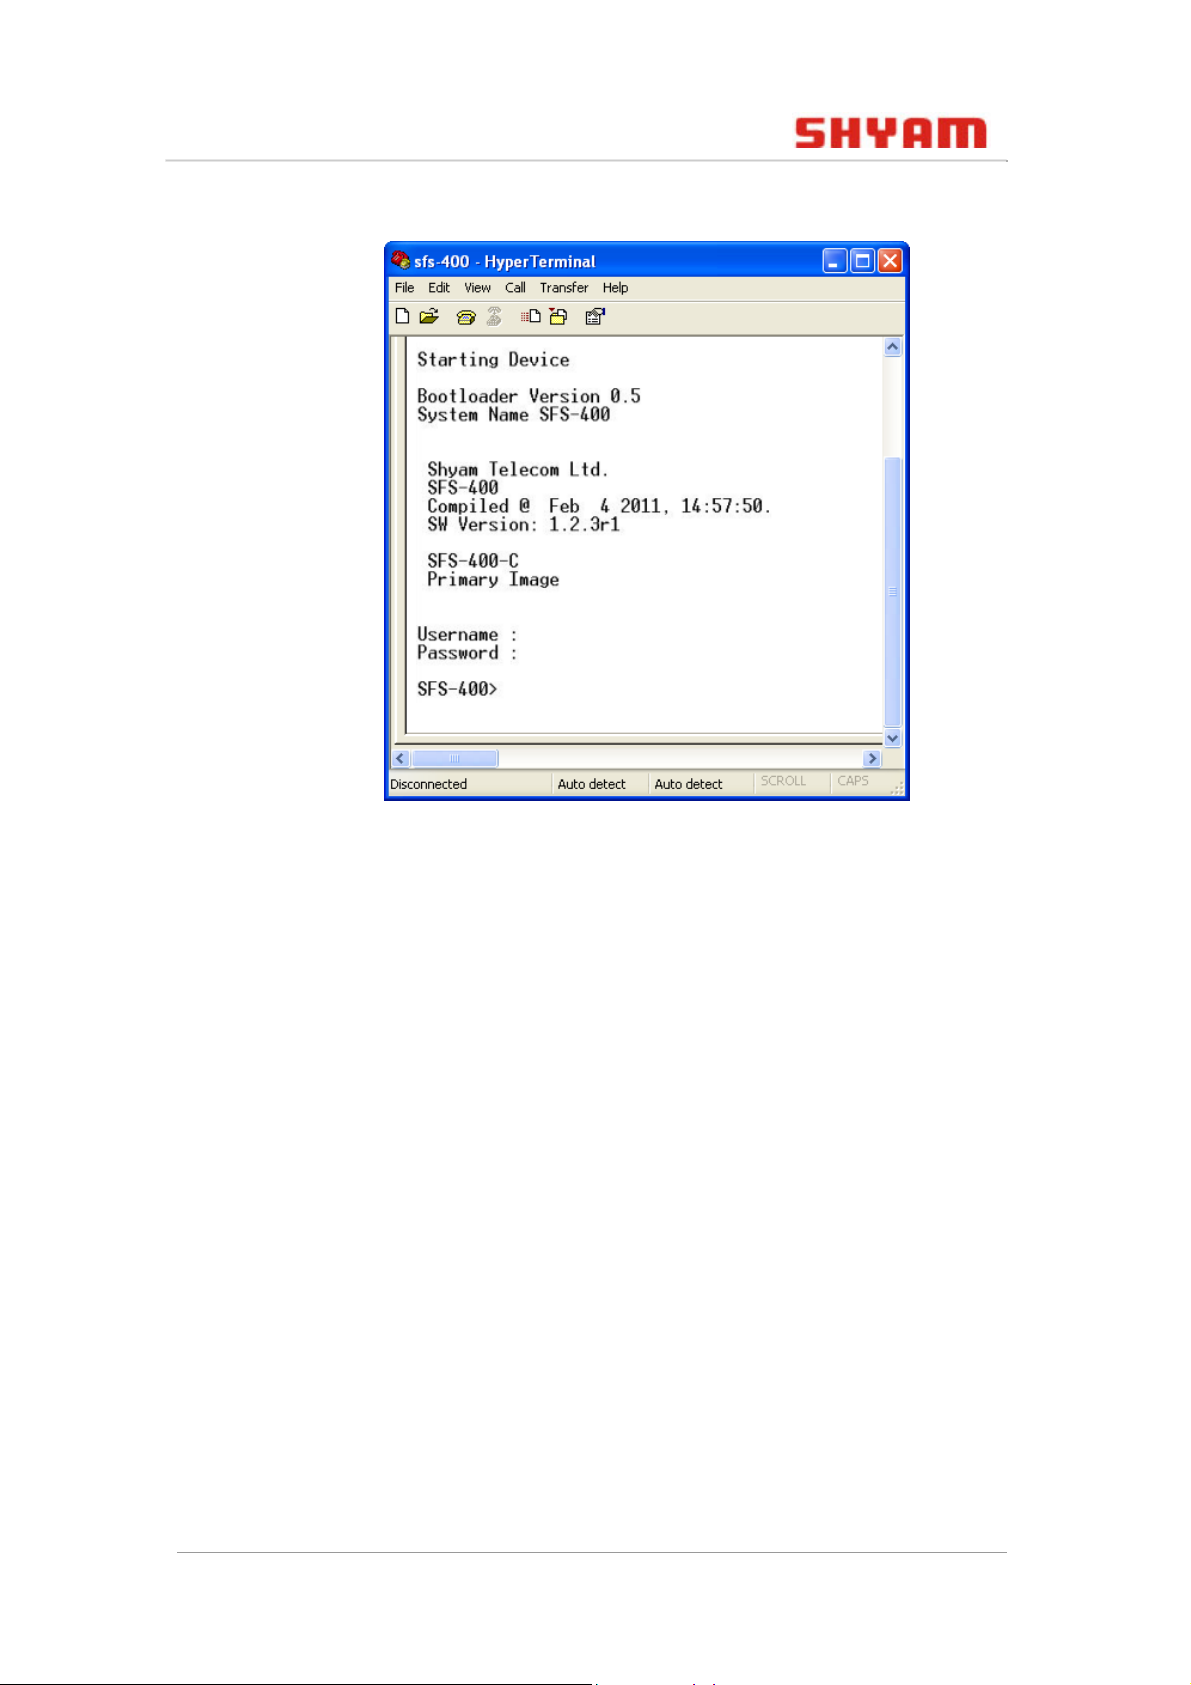
The following prompt appears:
© 2011 SHYAM | Company Confidential Page 14/57
Page 15
FS400 S WITCH CLI U SER G UIDE
Figure 3: Logon to HyperTerminal
6. Type the username as admin, password as password and
press Enter.
You have successfully logged into CLI using serial port.
2.1.2 Accessing CLI using Telnet
You can access the CLI of FS400 using Telnet. But before that
you must set the IP address for FS400. Once you are connected
to the remote system, provide login and password to keep
access restricted to authorized individuals only. The commands
that can be run in a Telnet session are defined by the network
administrator.
Perform the following steps to access the CLI using Telnet:
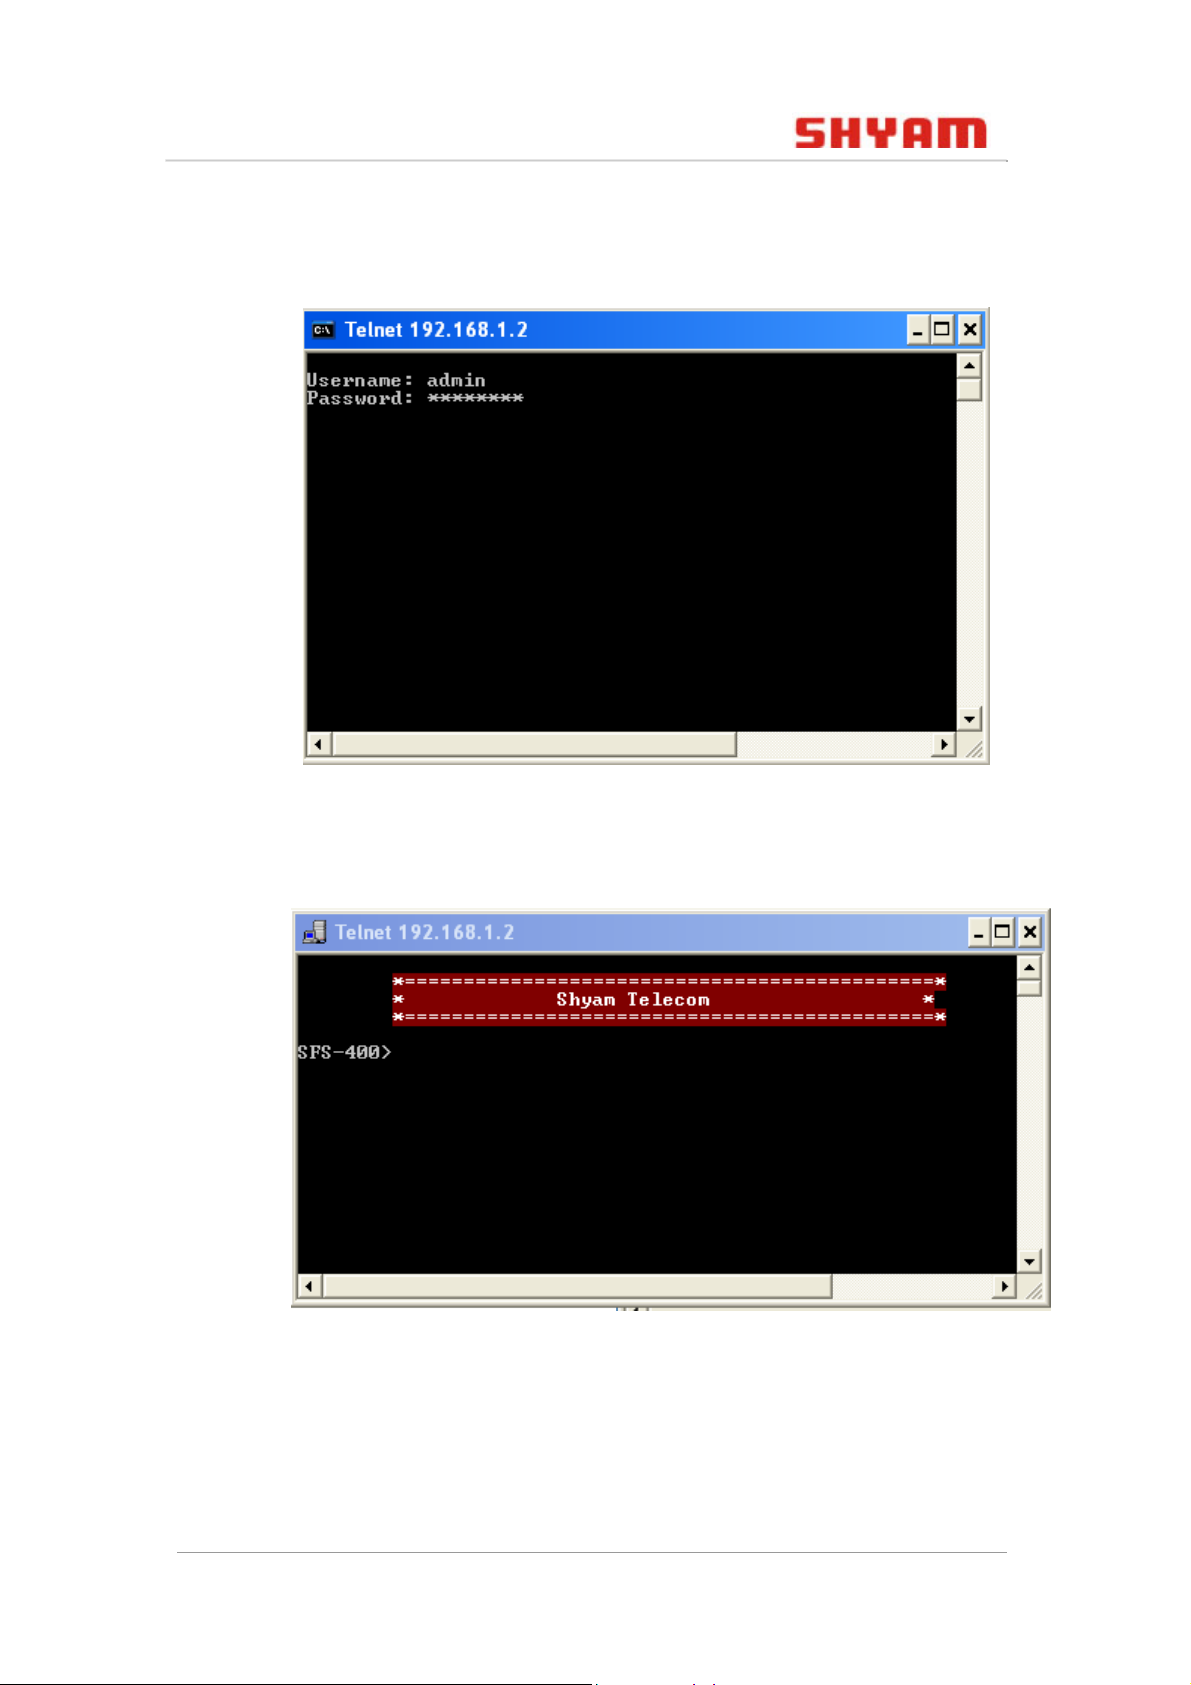
1. Open the command prompt and enter telnet 192.168.1.2.
2. Type the username as admin, password as password and
press Enter.
© 2011 SHYAM | Company Confidential Page 15/57
Page 16
FS400 S WITCH CLI U SER G UIDE
Note: Both username and password are case-sensitive.
Figure 4: Login Details
The following prompt appears:
Figure 5: Login to FS400
You have successfully logged into CLI using Telnet.
© 2011 SHYAM | Company Confidential Page 16/57
Page 17
FS400 S WITCH CLI U SER G UIDE
2.2 CLI Command Syntax
CLI commands are case-sensitive and they should be entered in
a certain format. The CLI commands include the name of the
command, keywords, and parameters/arguments.
Keywords are alphanumeric strings that are used literally.
Parameters/arguments are placeholders for values that a user
must provide. They may or may not be required for a particular
command. For example, some commands such as show vlan
or no vlan do not require parameters. Other commands such
as vlan add and static mac address table require
that you provide a value after the command.
2.3 Command Conventions
The parameters for a command might include mandatory
values, optional values, or keyword choices.
The below table describes the conventions this document uses
to distinguish between value types:
Table 3: Command Conventions
Symbol Example Description
< > angle
bracket
[ ] square
bracket
<value> Indicates that you must enter a
[value] Indicates an optional parameter
value in place of the brackets and
text inside them.
that you can enter in place of the
brackets and text inside them.
| vertical bar <choice1>
|<choice 2>
© 2011 SHYAM | Company Confidential Page 17/57
Separates the mutually exclusive
choices.
Page 18
FS400 S WITCH CLI U SER G UIDE
3. Basic Commands
This section familiarizes you with the basic commands of FS400.
3.1 help (?)
This command displays a partial list of available commands. To
list more available commands, execute? repeatedly.
Syntax
?
Example
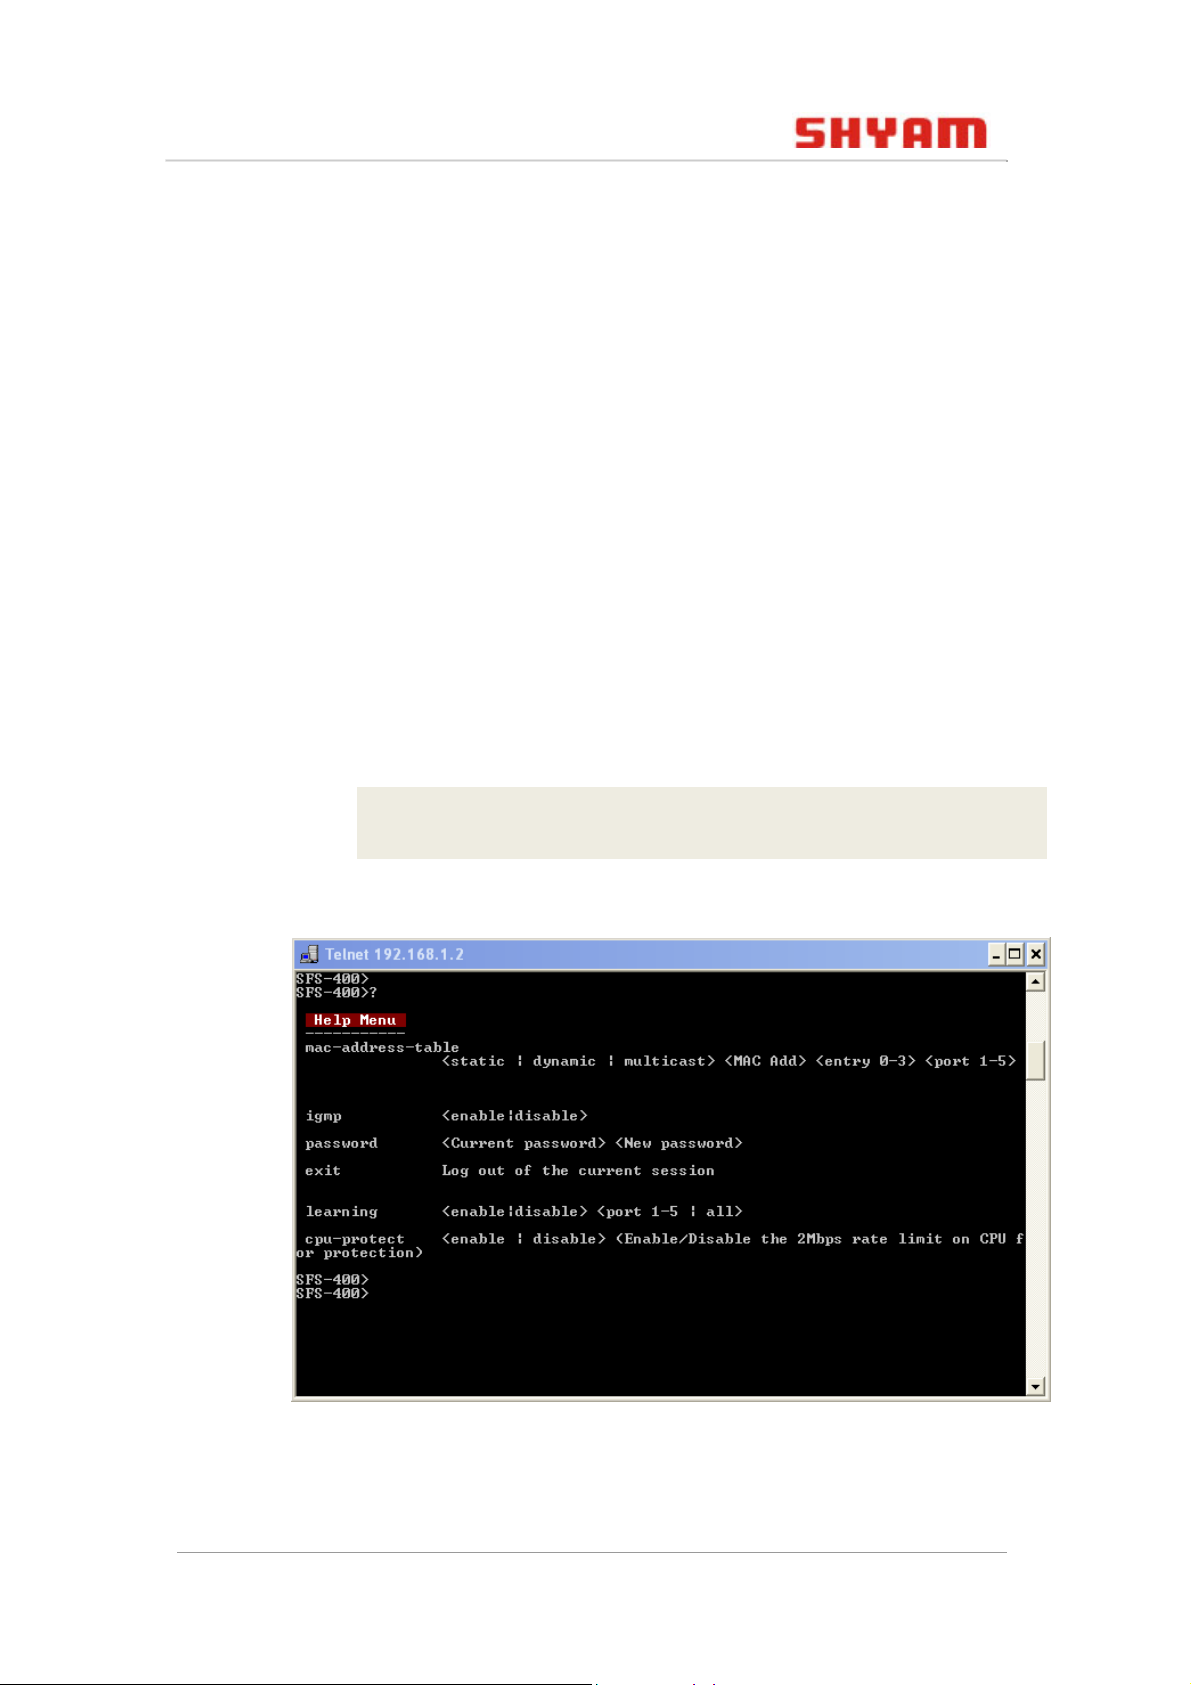
FS-400>?
Figure 6: Full Help Arguments Window
As shown in the above figure, if the help output shows a
parameter in angle brackets, you must replace the parameter
© 2011 SHYAM | Company Confidential Page 18/57
Page 19
FS400 S WITCH CLI U SER G UIDE
with a value. For example, in <port 1-5> you must provide the
port number from 1 to 5.
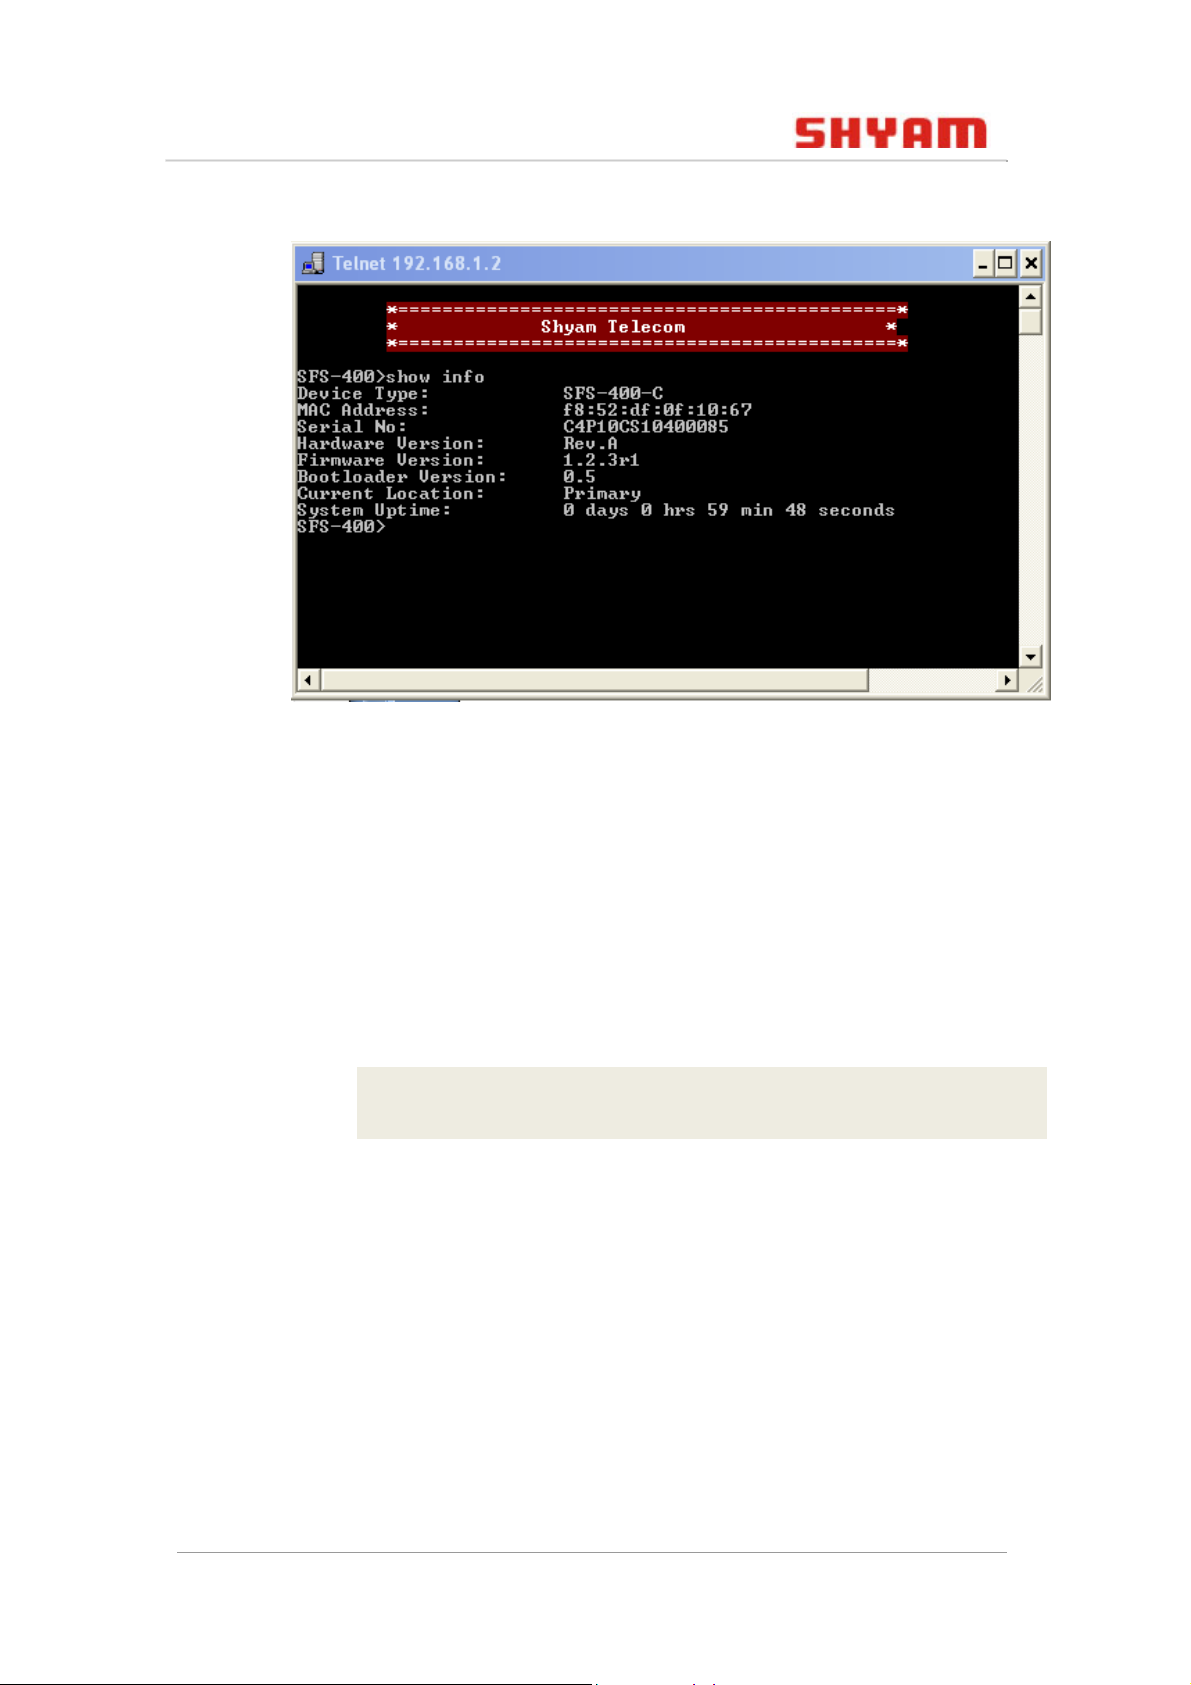
3.2 show info
This command displays the following information of FS400:
• Type: Displays the name of the FS400 model with PoE and
non PoE.
• MAC Address: Displays the media access control (MAC)
address of FS400.
• Serial number: Displays the serial number of the board.
• Hardware Version: Displays the hardware version of FS400.
• Software Version: Displays the software version of FS400.
• Bootloader Version: Displays the bootloader version of
FS400.
• Current Location: Displays the current location of the image.
• System Uptime: Displays the time since FS400 has been up
without any downtime.
Syntax
show info
Example
FS-400> show info
© 2011 SHYAM | Company Confidential Page 19/57
Page 20
FS400 S WITCH CLI U SER G UIDE
Figure 7: Show Info
3.2.1 show ip
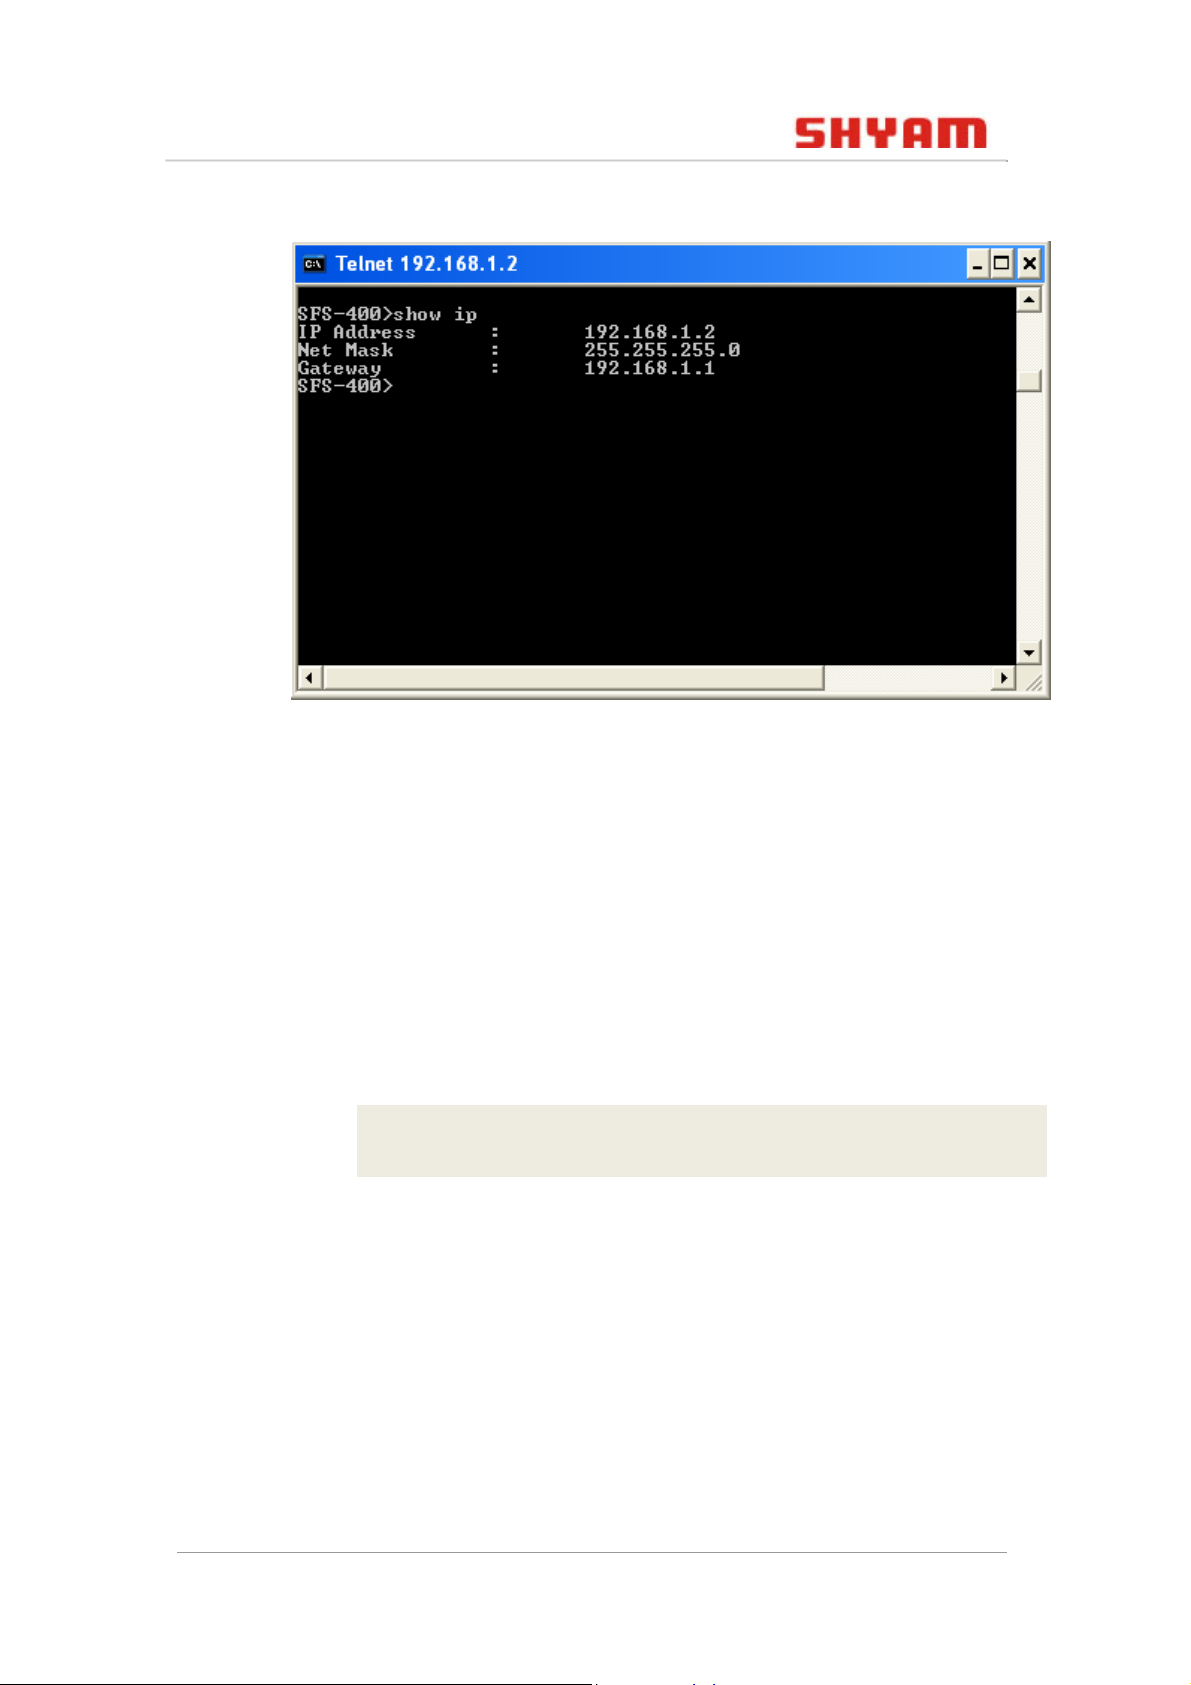
You can use this command to view the IP settings of FS400.
Syntax
show ip
Example
FS-400> show ip
© 2011 SHYAM | Company Confidential Page 20/57
Page 21
FS400 S WITCH CLI U SER G UIDE
Figure 8: Show IP
3.2.2 Changing the IP Address
You can also change or configure the IP address of FS400 by
using the following command:
Syntax
ip address <ip address><subnet mask>
Example
FS-400> ip address 192.168.10.98 255.255.255.0
You can change the default gateway by using the following
command:
Syntax
ip default-gateway <gateway>
© 2011 SHYAM | Company Confidential Page 21/57
Page 22
FS400 S WITCH CLI U SER G UIDE
Example
FS-400> ip default-gateway 192.168.10.1
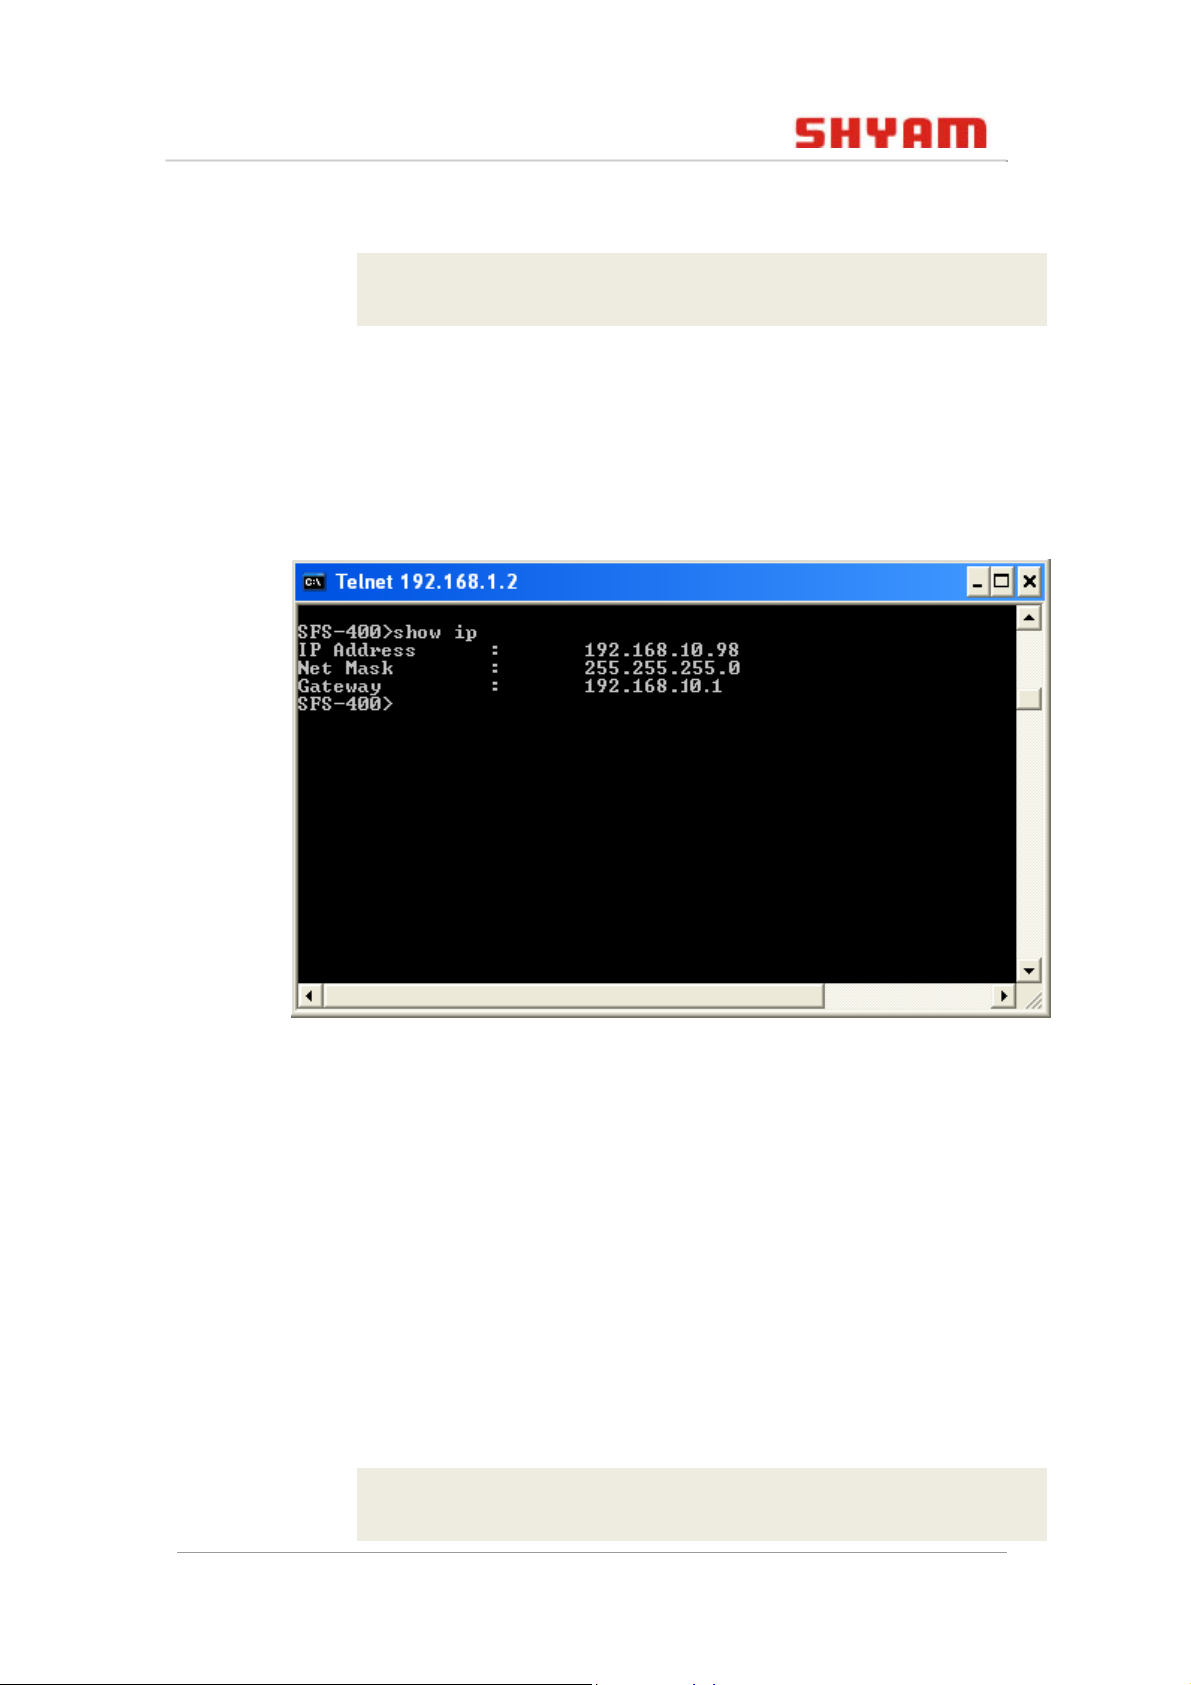
The following figure depicts the changed IP address (from
192.168.1.2 to 192.168.10.98) and gateway (from 192.168.1.1 to
192.168.10.1):
Figure 9: Changed IP Address and Gateway
3.3 Enabling DHCP
You can use the dhcp command to enable FS400 to take IP
automatically from the dynamic host configuration protocol
(DHCP) server.
Syntax
dhcp
Example
FS-400> dhcp
© 2011 SHYAM | Company Confidential Page 22/57
Page 23
FS400 S WITCH CLI U SER G UIDE
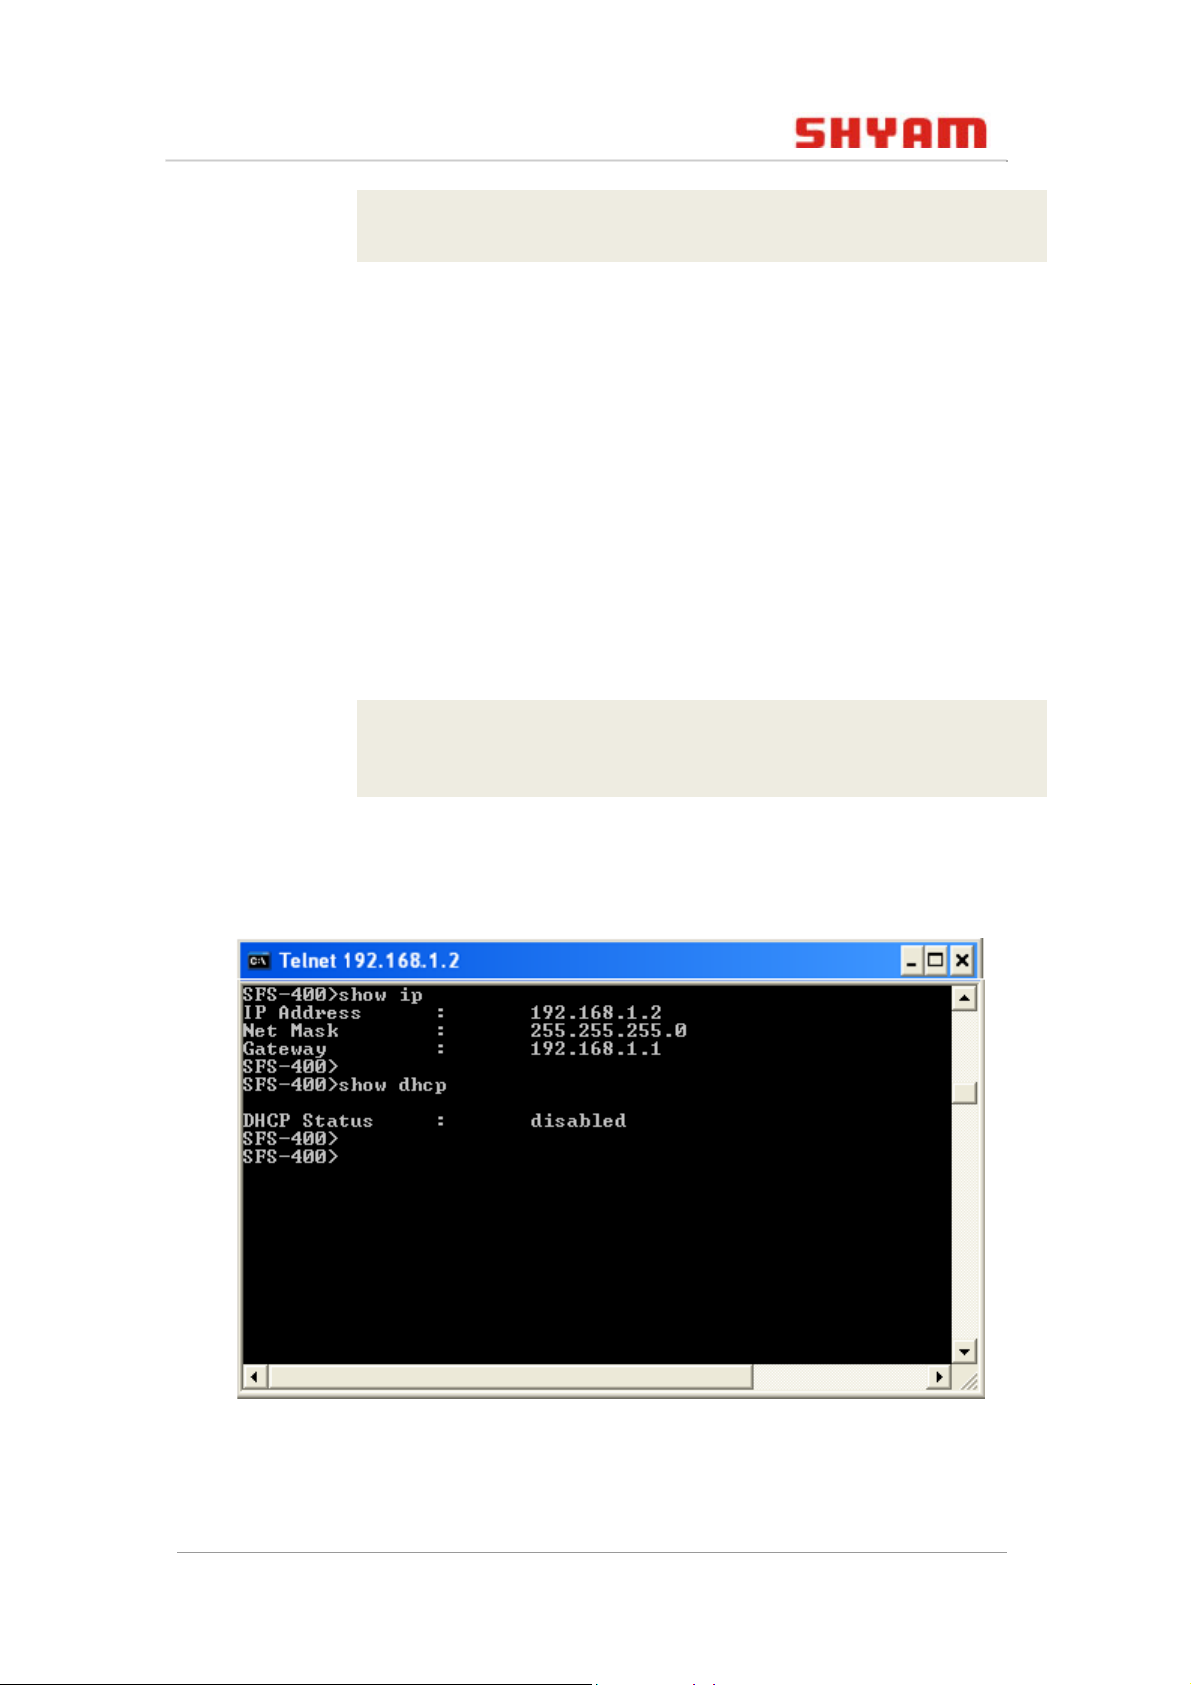
FS-400>show dhcp
3.4 Disabling DHCP
You can use the no dhcp command to disable the DHCP
services. FS400 takes the last saved static IP address after
disabling DHCP.
Syntax
no dhcp
Example
FS-400> no dhcp
FS-400>show dhcp
The figure shown below displays the last saved static IP:
Figure 10: Displaying the Last Saved Static IP
© 2011 SHYAM | Company Confidential Page 23/57
Page 24
FS400 S WITCH CLI U SER G UIDE
3.5 Changing Password
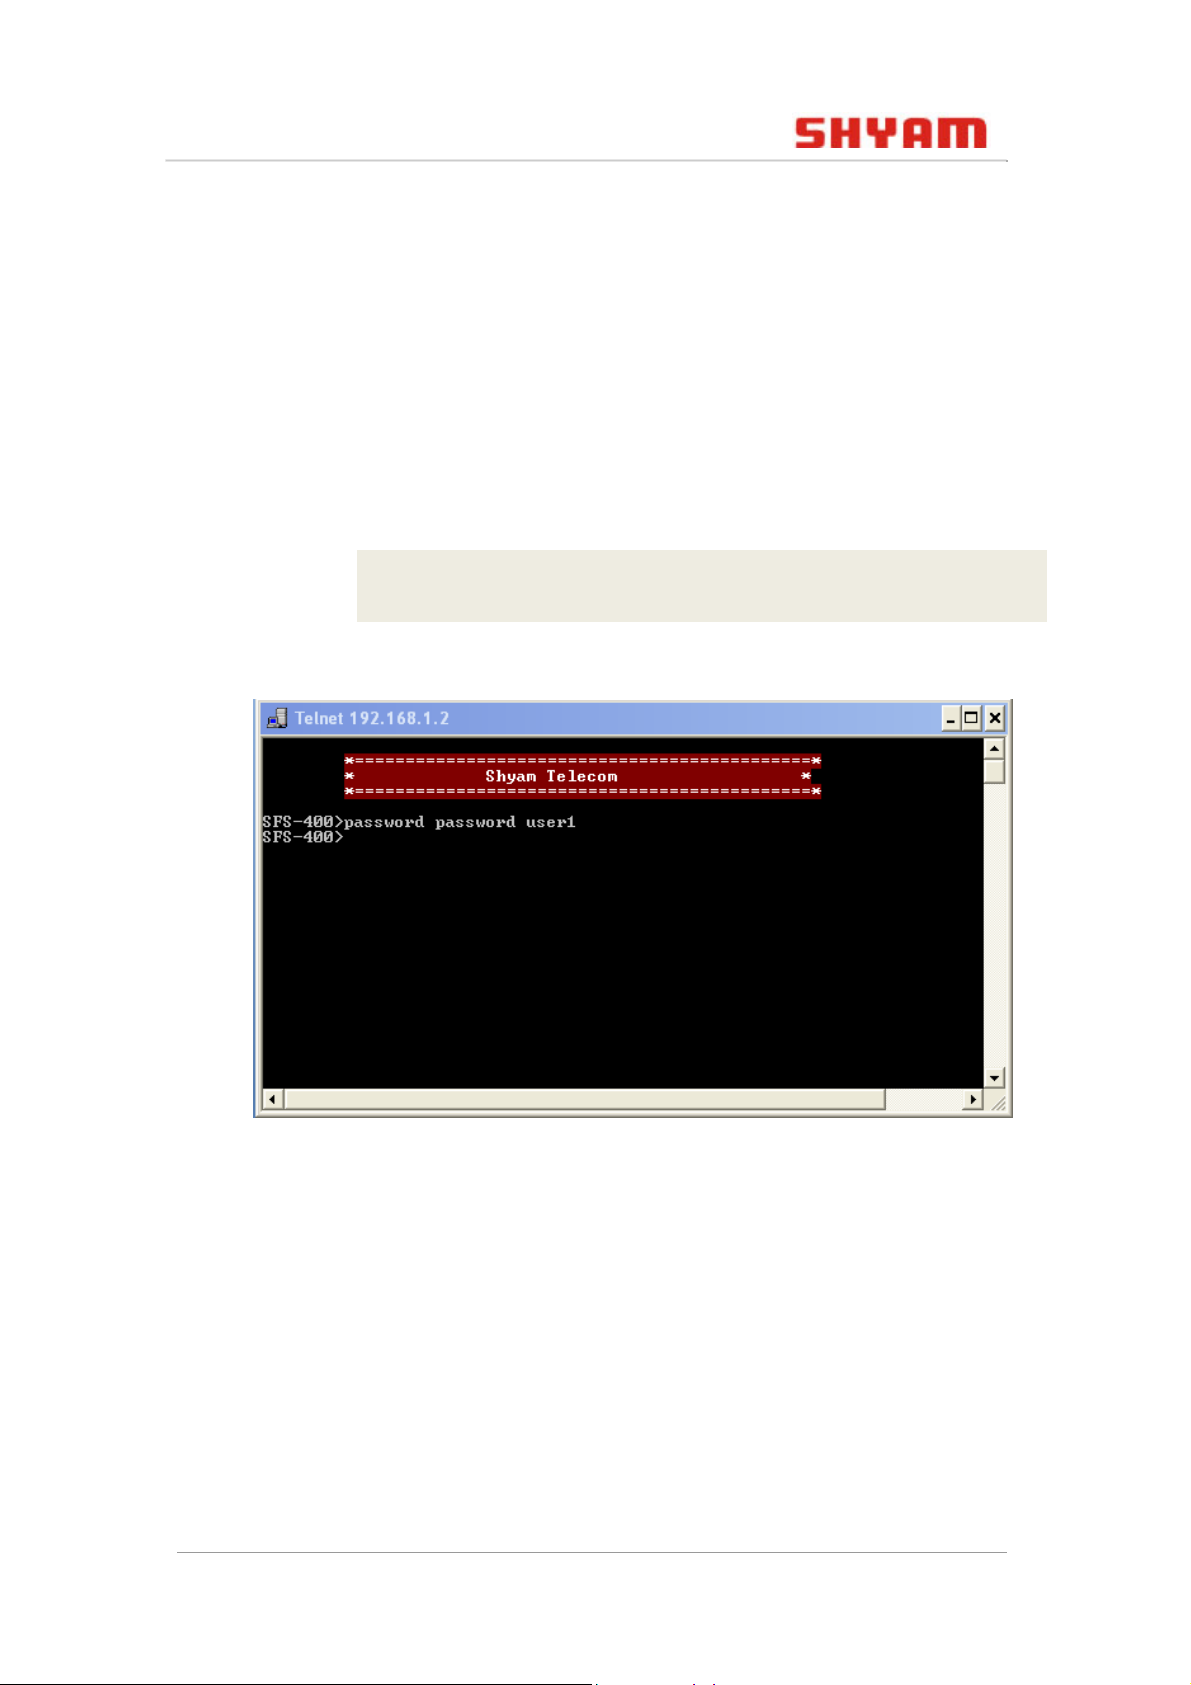
You can use the password command to change the existing
password.
Syntax
password <current password> <new password>
Example
FS-400> password password user1
Figure 11: Change Password
© 2011 SHYAM | Company Confidential Page 24/57
Page 25

FS400 S WITCH CLI U SER G UIDE
4. Configuration Commands
This chapter explains various commands that you can use to
configure FS400.
4.1 Port Configuration
This section describes the various commands that you can use
to configure the port settings of FS400.
4.1.1 show port status
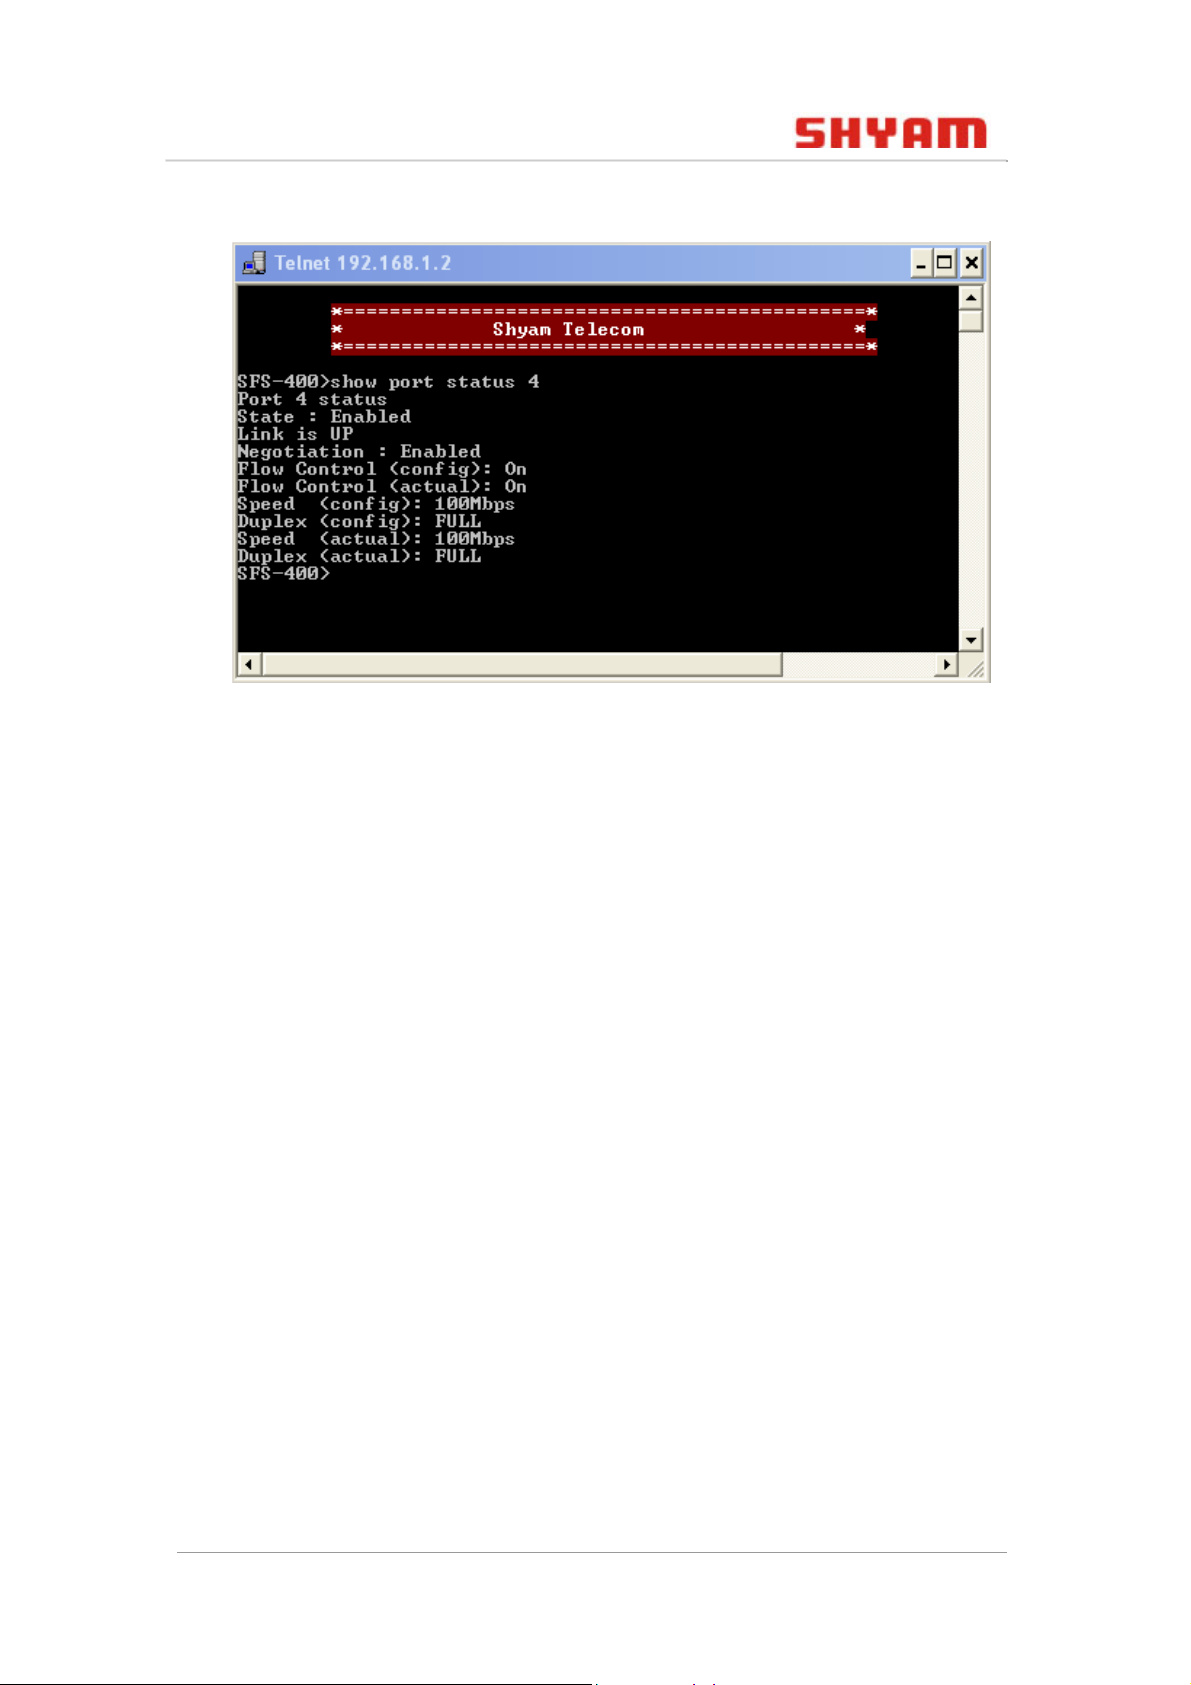
This command displays the following information of the port:
• State: Displays the status of the port as enabled or disabled.
• Link status: Displays the link status as up or down.
• Negotiation: Displays whether the automatic negotiation is
enabled or disabled.
• Flow control: Displays whether hardware flow-control is
enabled or disabled.
• Speed: Displays the speed of the interface such as 100 Mbps.
• Duplex status: Displays the duplex mode as full or half.
Syntax
show port status <port 1-5>
Example
FS-400> show port status 3
© 2011 SHYAM | Company Confidential Page 25/57
Page 26
FS400 S WITCH CLI U SER G UIDE
Figure 12: Show Port Status
4.1.2 show port statistics
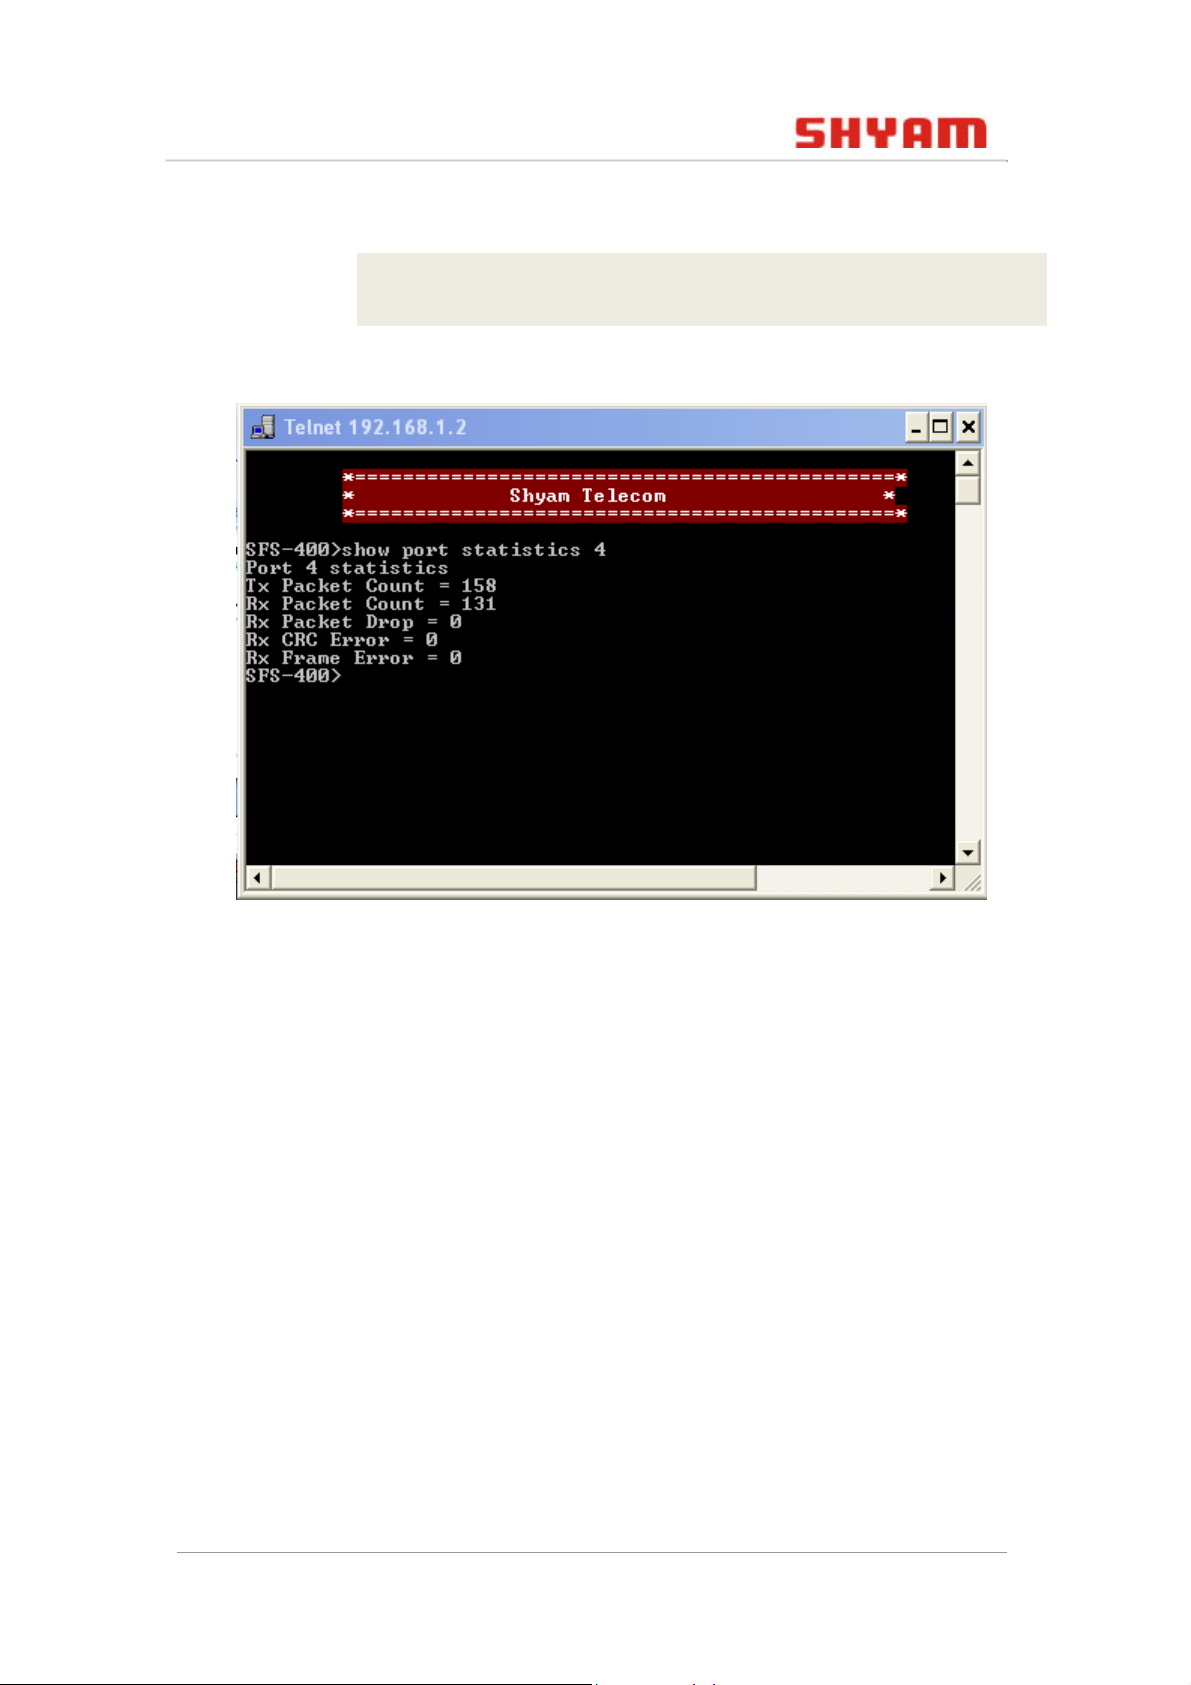
This command displays the following statistics for a specific
port:
• Tx Packet Count: Displays the total number of packets
transmitted.
• Rx Packet Count: Displays the total number of packets
received.
• Rx Packet Drop: Displays the total number of aged packets.
• Rx CRC Error: Displays the total number of cyclic redundancy
check (CRC) or code errors at the time of receiving the
packets.
• Rx frame Error: Displays the total number of error frames
received.
Syntax
show port statistics <port 1-5>
© 2011 SHYAM | Company Confidential Page 26/57
Page 27
FS400 S WITCH CLI U SER G UIDE
Example
FS-400> show port statistics 3
Figure 13: Show Port Statistics
4.2 VLAN Configuration
An Ethernet switch can be configured to enable a wide variety
of virtual local area network (VLAN) configurations among the
various external ports.
The canonical format indicator (CFI) is a single-bit flag, always
set to zero for Ethernet switches. If a frame received at an
Ethernet port has a CFI set to 1, then that frame should not be
forwarded as it is to an untagged port. The remaining twelve
bits define the VLAN ID. Note that user priority and VLAN ID are
independent of each other. A frame with VLAN Identifier (VID) of
null (0) is called a priority frame, meaning that only the priority
level is significant and the default VID of the ingress port is given
© 2011 SHYAM | Company Confidential Page 27/57
Page 28
FS400 S WITCH CLI U SER G UIDE
as the VID of the frame. Maximum VLAN possible in FS400 is 16
only (include default).
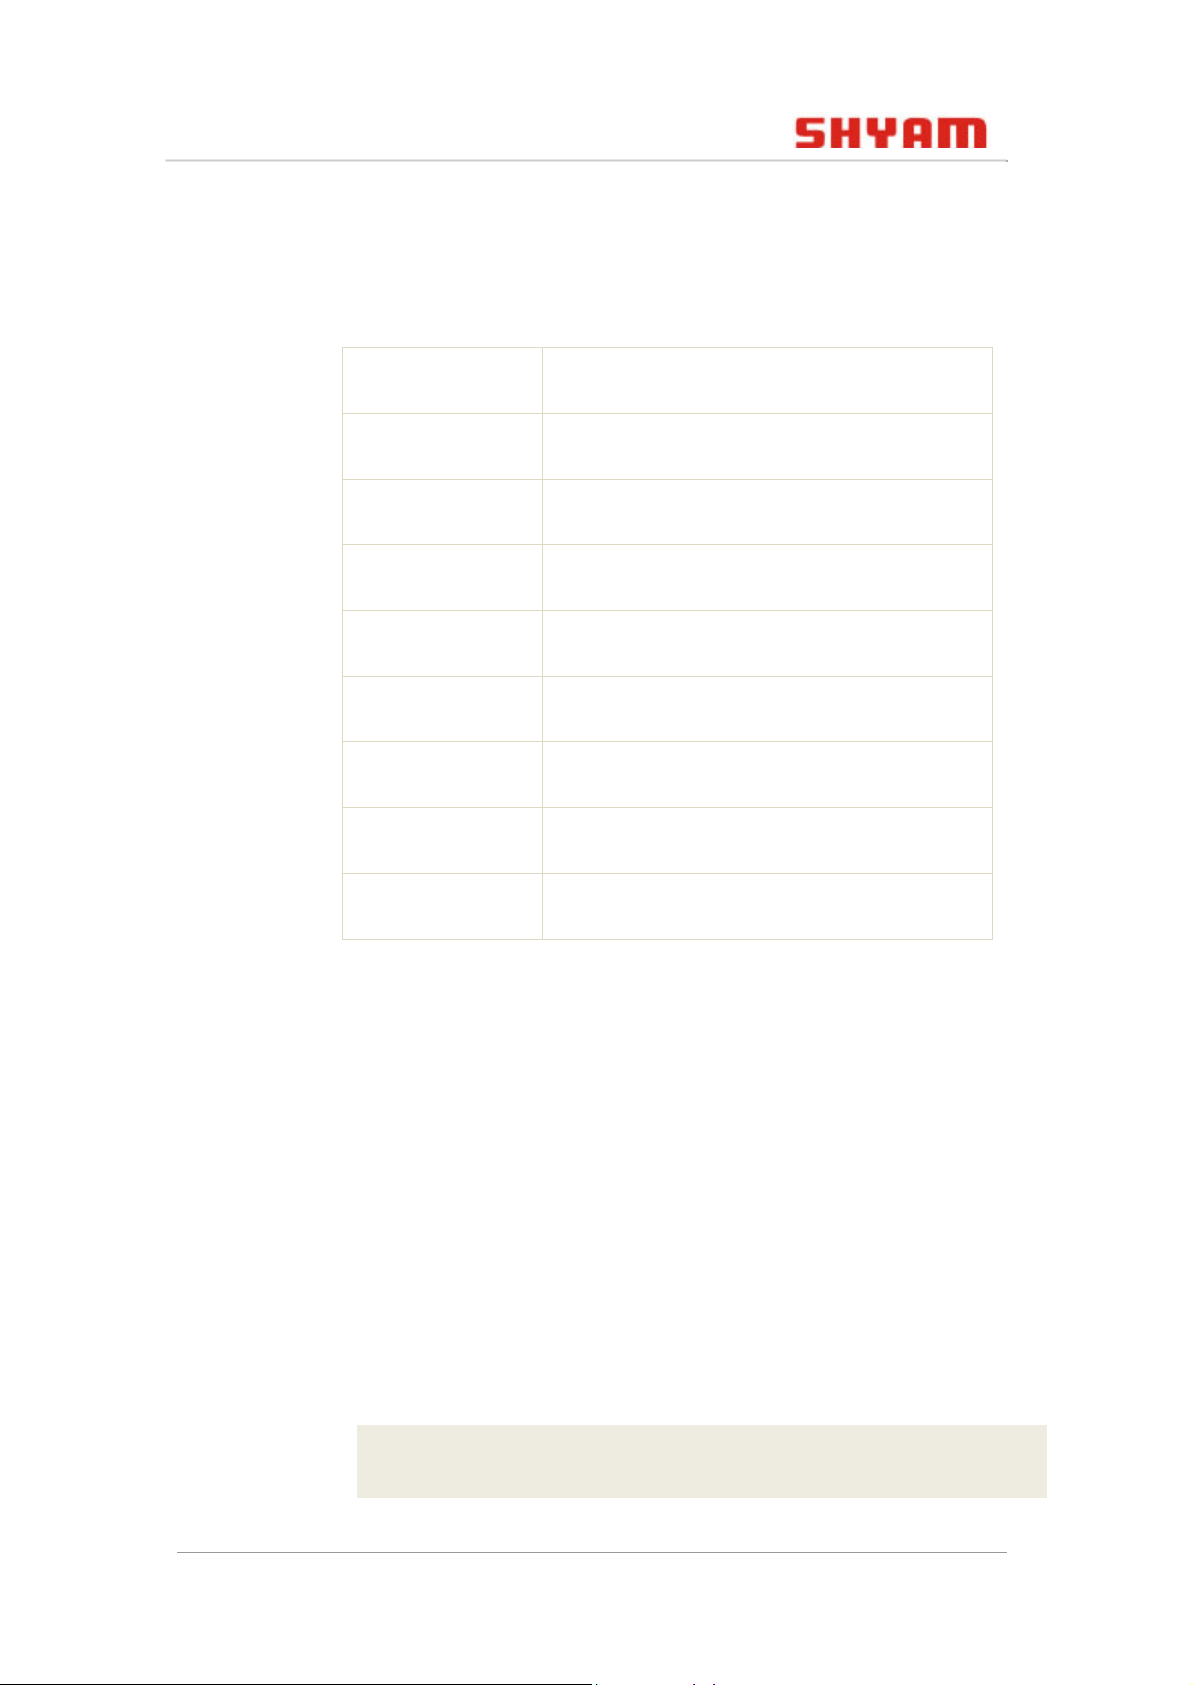
Options
Pass-all Pass-all the VLAN’s
create Create an entity or entry
Show Display the current VLAN
Add Add VLAN member ports
Pvid Port configured VLAN ID
Delete Delete VLAN member ports
Mode Set VLAN mode
Leaky VLAN leaky configuration
ingress-filter Ingress filtering configuration
This section describes the commands you can use to view and
configure VLAN settings.
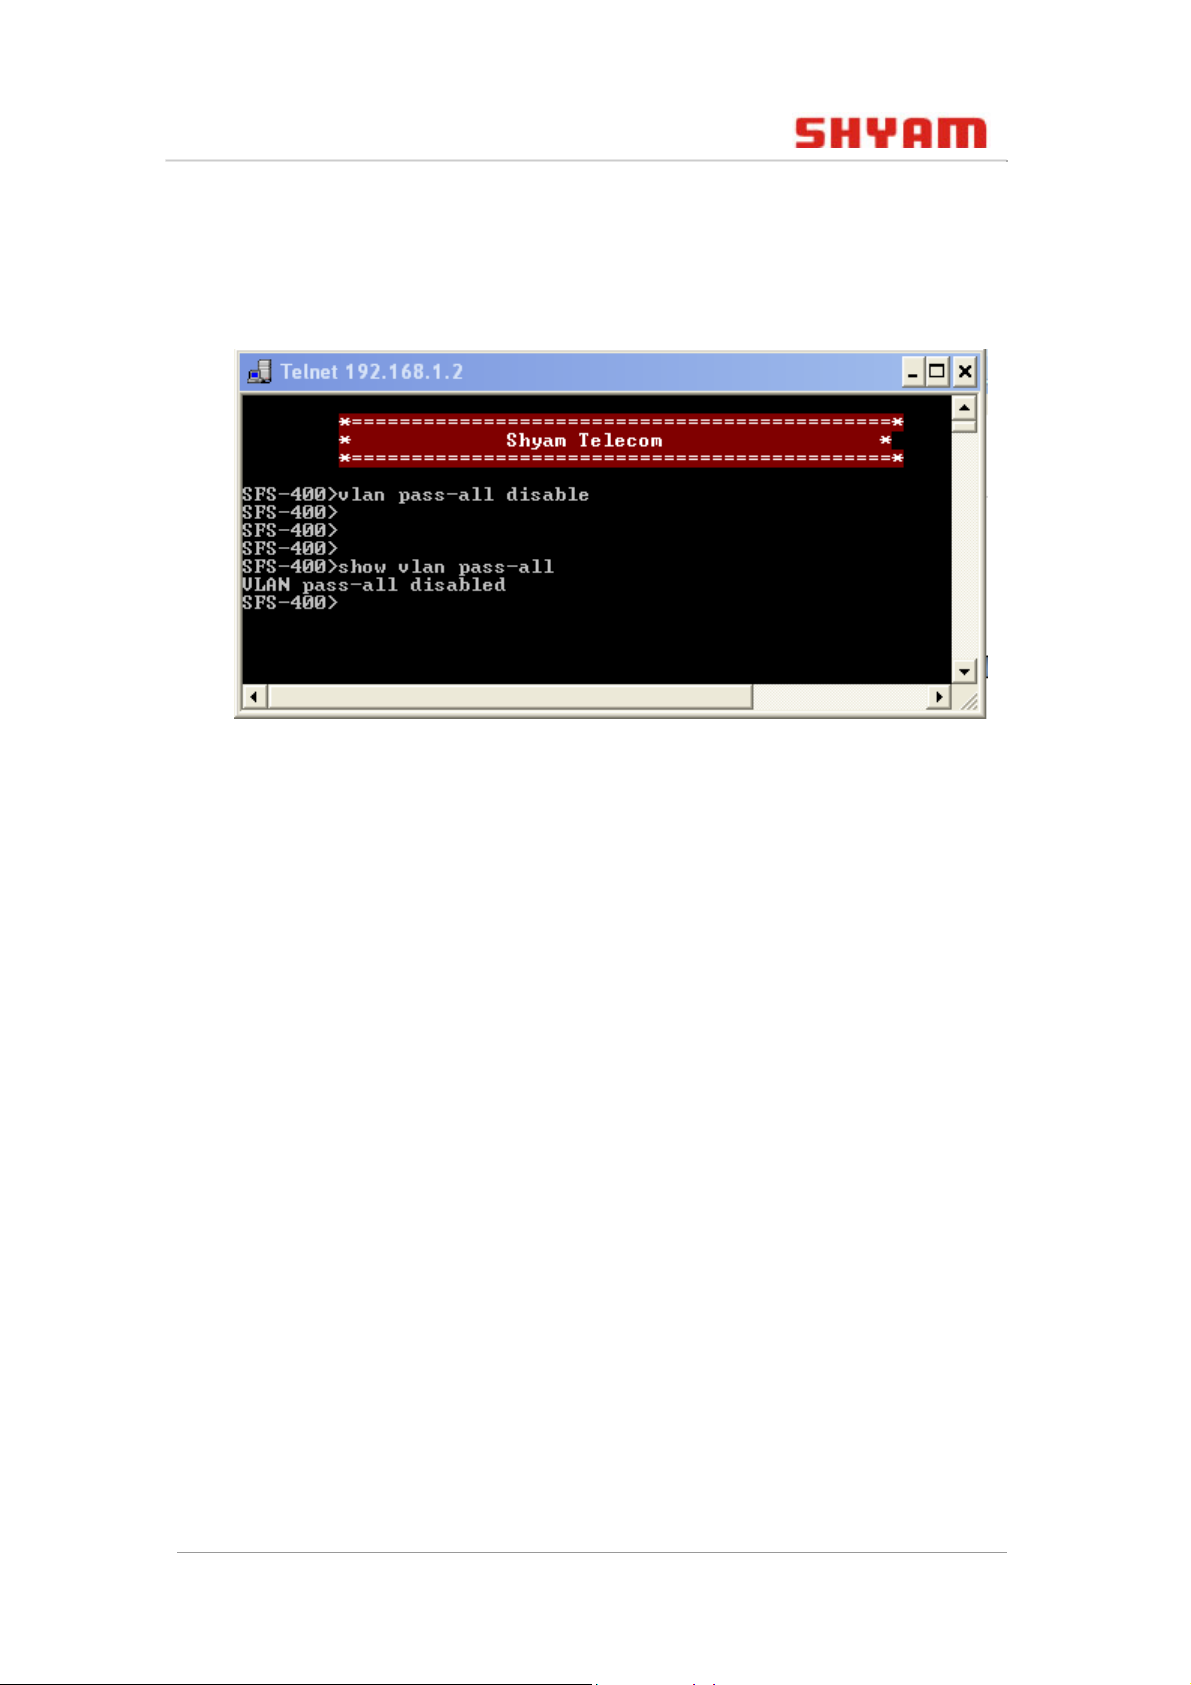
4.2.1 vlan pass-all
This command is used to enable or disable the VLAN pass
through feature.
Syntax
vlan pass-all [enable | disable]
Example
FS-400> vlan pass-all disable
© 2011 SHYAM | Company Confidential Page 28/57
Page 29
FS400 S WITCH CLI U SER G UIDE
You can view the status of vlan pass-all command by
using show vlan pass-all.
Figure 14: vlan pass-all
4.2.2 vlan mode
Note: By default vlan pass-all is enabled. Enabling it
makes a switch unmanaged, which means any VLAN traffic can
pass through it.
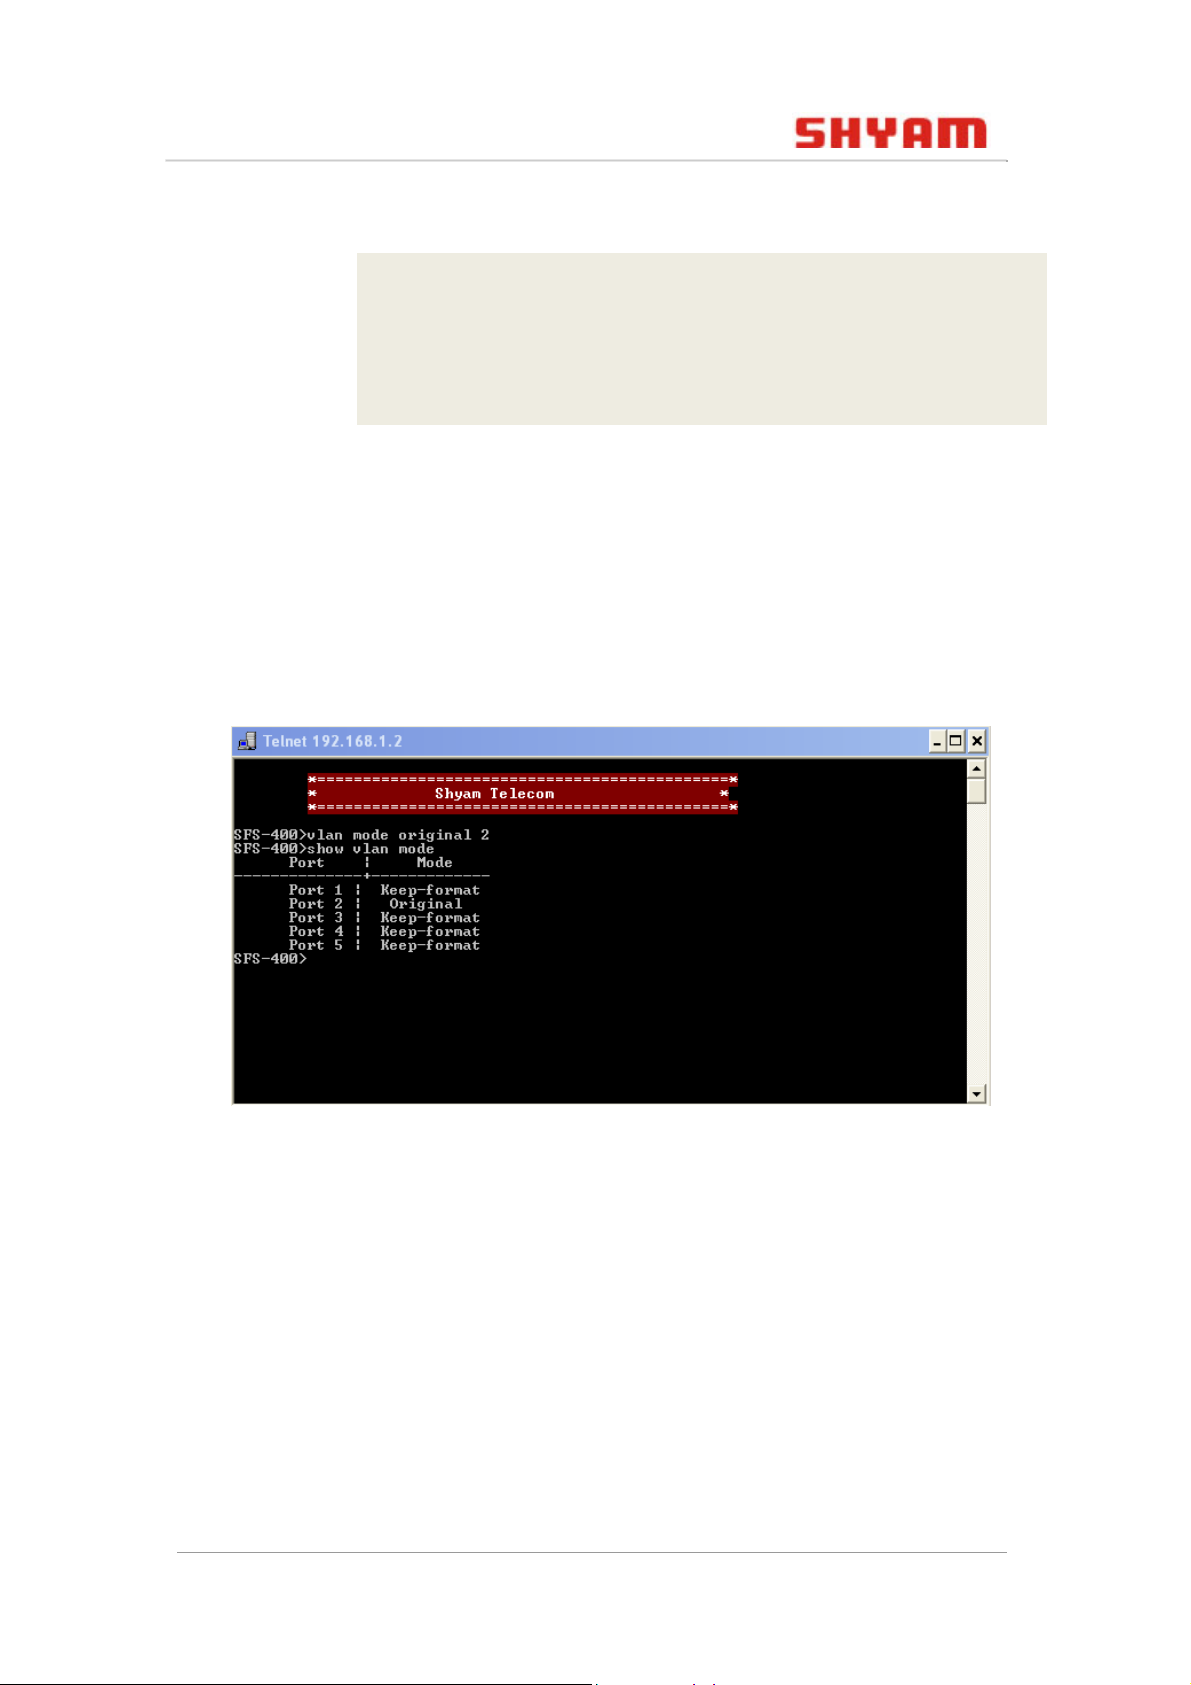
This command is used to set the VLAN mode. The VLAN modes
are of two types:
• Original: Uses the configured setting on FS400. In this mode
if port is untagged then the output is untagged and vice
versa.
• Keep-format: Preserves the original VLAN format. If port is
tagged then output is also tagged, and vice-versa.
Note: The default VLAN mode is keep-format.
Syntax
vlan mode [original | keep-format] <port 15>
© 2011 SHYAM | Company Confidential Page 29/57
Page 30
FS400 S WITCH CLI U SER G UIDE
Example
FS-400> vlan mode original 2
OR
FS-400> vlan mode keep-format 1
You can view the VLAN mode of all the ports by using show
vlan mode command.
Syntax
show vlan mode
Figure 15: Vlan Mode
4.2.3 vlan create
This command is used to create a VLAN by specifying an ID and
a name.
Syntax
vlan create <vlan id> <vlan name>
© 2011 SHYAM | Company Confidential Page 30/57
Page 31
FS400 S WITCH CLI U SER G UIDE
Example
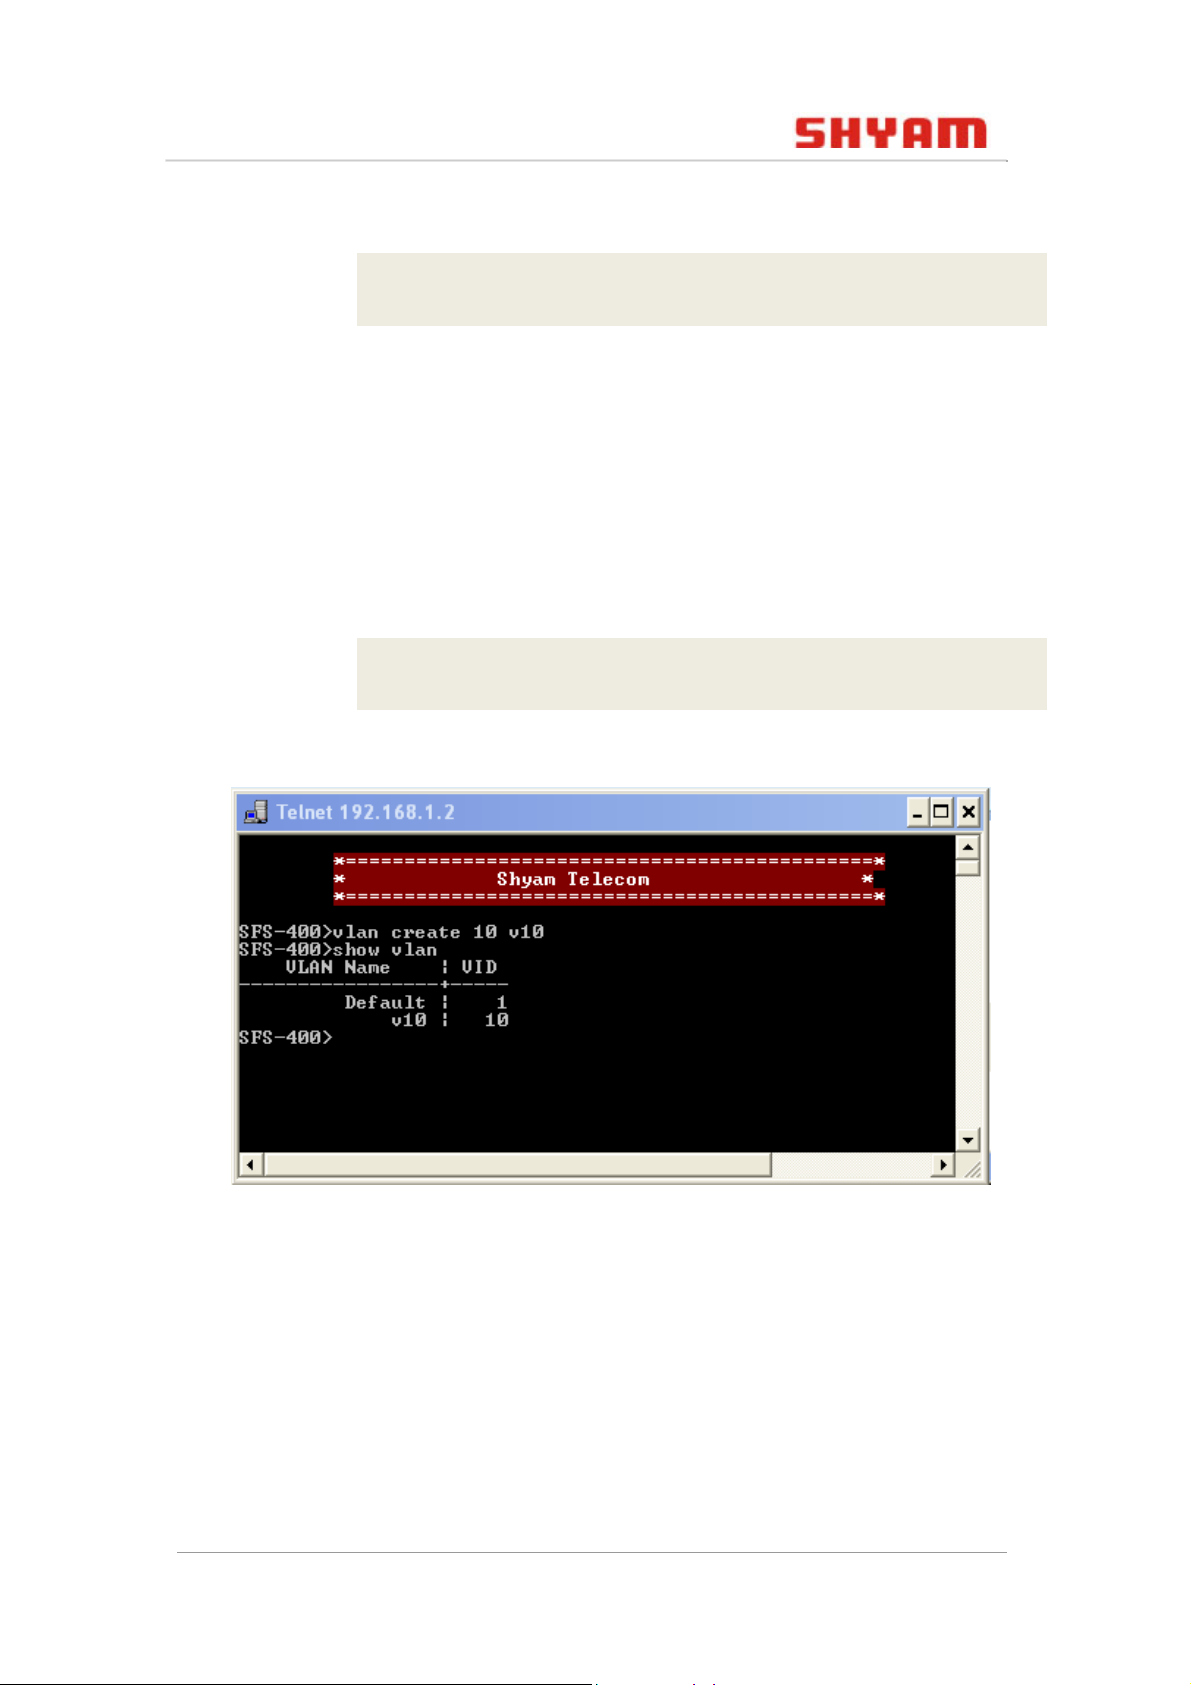
FS-400> vlan create 10 v10
You can view the created VLAN by using show vlan
command.
Syntax
show vlan <vlan id>
Example
show vlan 10
Figure 16: Create Vlan
Note: By default vlan pass-all is enabled to use specific
VLANs. You are required to disable the vlan pass-all and
change the vlan mode to original.
4.2.4 vlan add
This command is used to add a VLAN.
© 2011 SHYAM | Company Confidential Page 31/57
Page 32
FS400 S WITCH CLI U SER G UIDE
Syntax
vlan add <vlan id> <port number>
Example
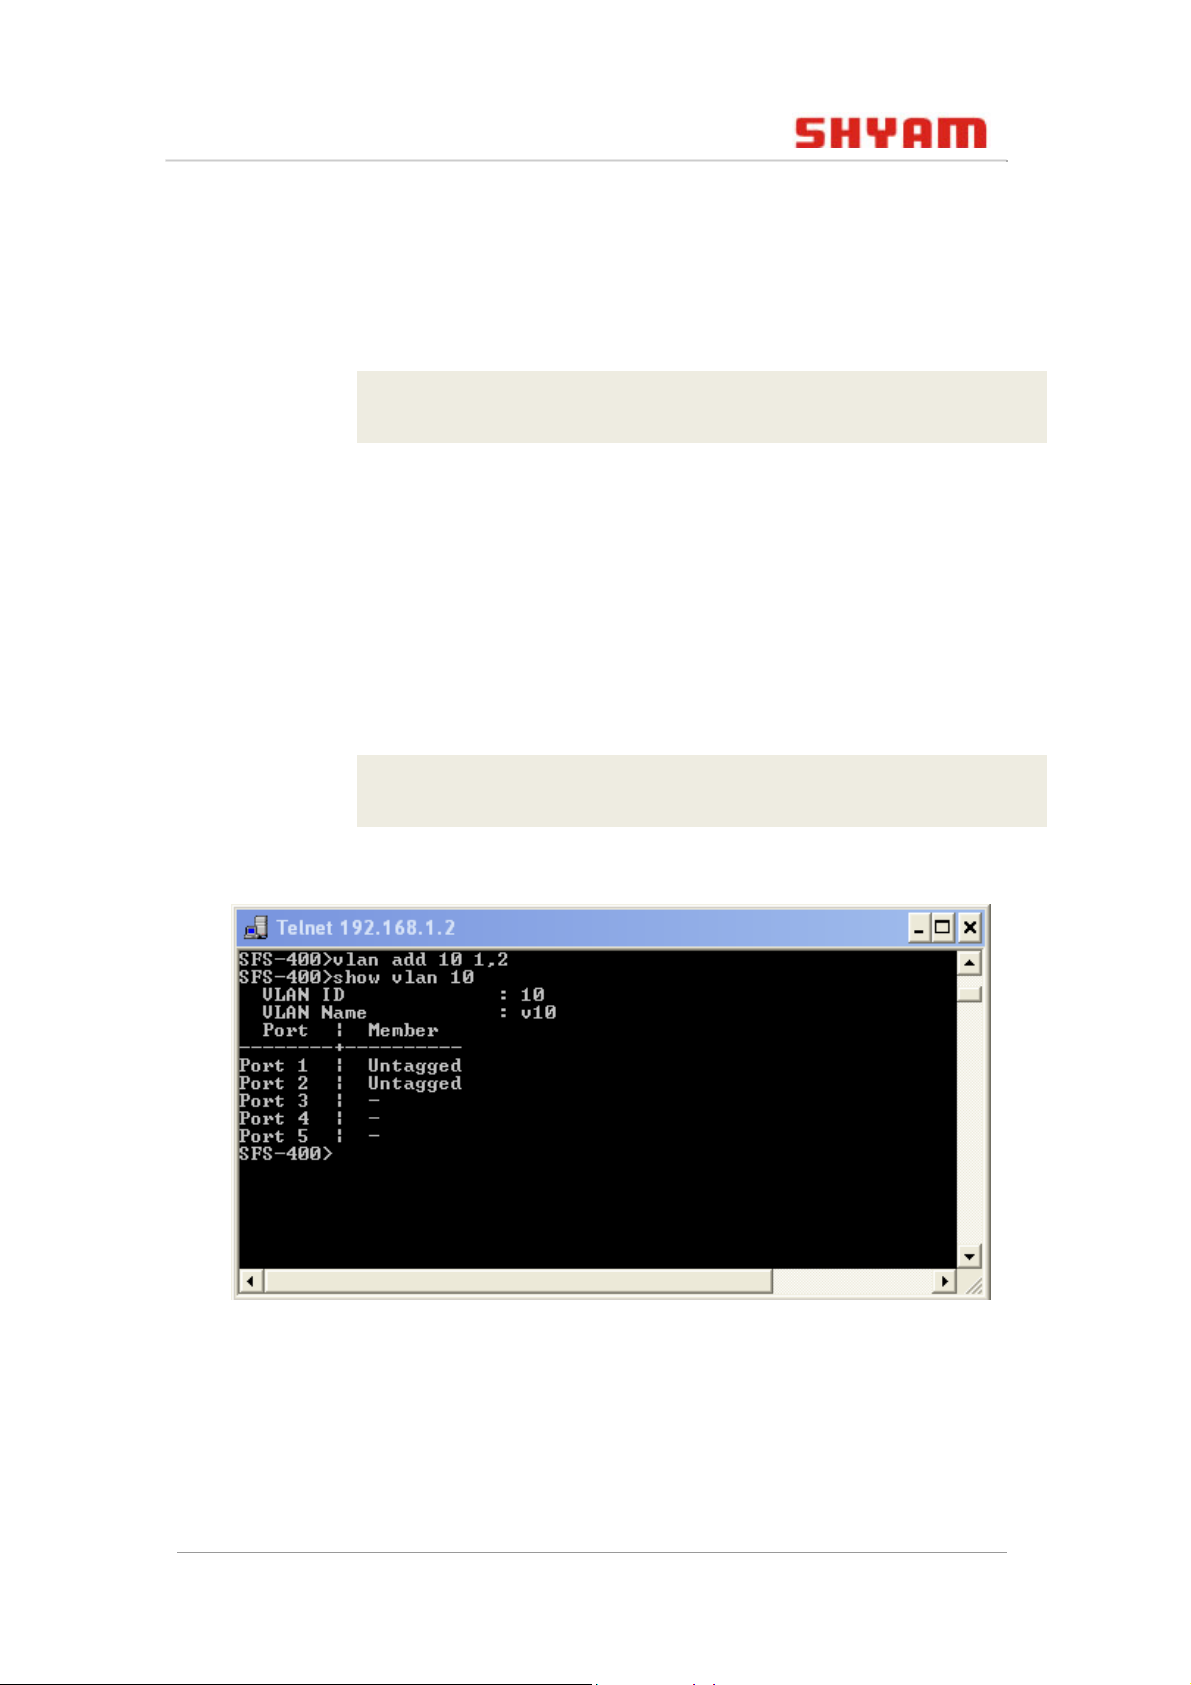
FS-400> vlan add 10 1,2
Note: The specified VLAN ID should exist otherwise an error
message ‘specified VLAN does not exist’ appears.
Syntax
show vlan <vlan id>
Example
Figure 17: Add Vlan
4.2.5 vlan insert
show vlan 10
There are two types of ports tagged and untagged. You can add
any port type as desired by using the vlan insert
command.
© 2011 SHYAM | Company Confidential Page 32/57
Page 33
FS400 S WITCH CLI U SER G UIDE
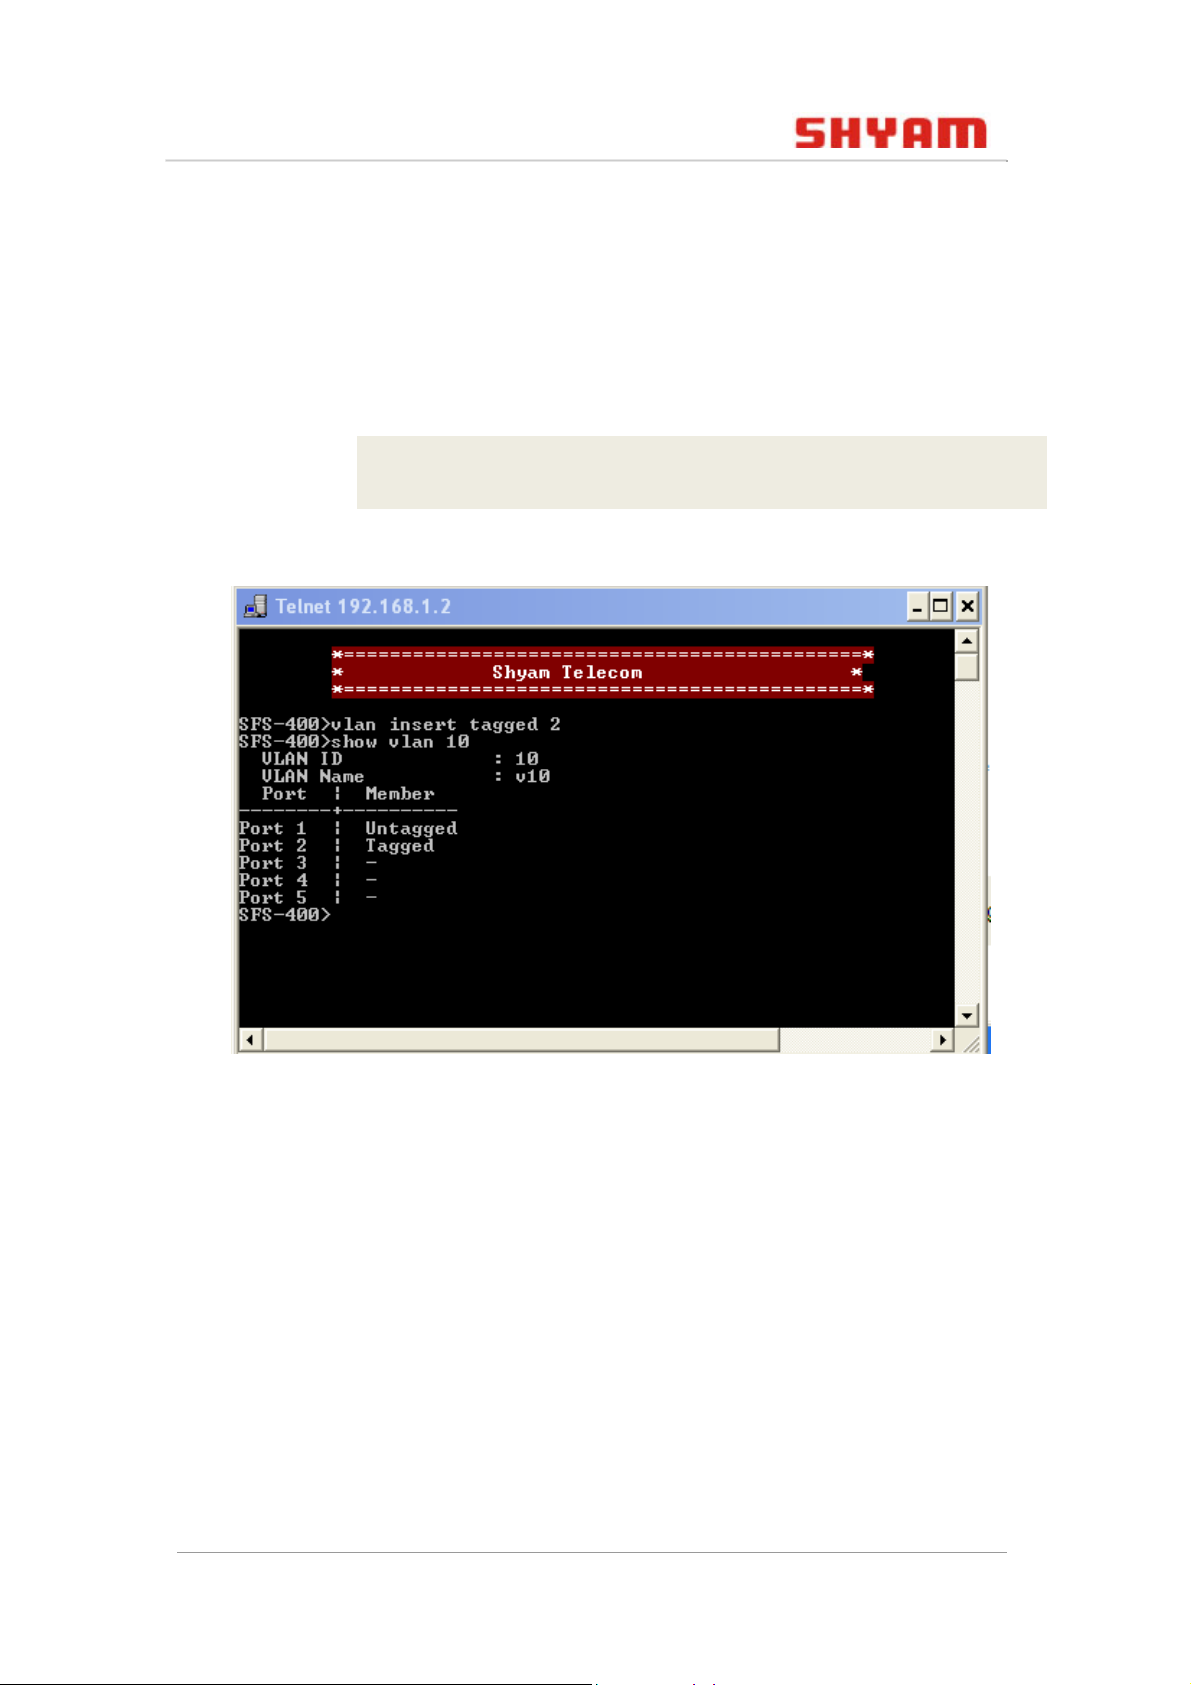
Note: By default, all member ports of any VLAN are untagged.
Syntax
vlan insert <type> <port 1-5>
Example
FS-400> vlan insert tagged 2
Figure 18: VLAN insert
4.2.6 vlan pvid
This command is used to assign the port VLAN ID (PVID) to a
specific port.
Note: By default PVID of all the ports is 1.
Syntax
vlan pvid <port 1-5> <vid>
© 2011 SHYAM | Company Confidential Page 33/57
Page 34
FS400 S WITCH CLI U SER G UIDE
Example
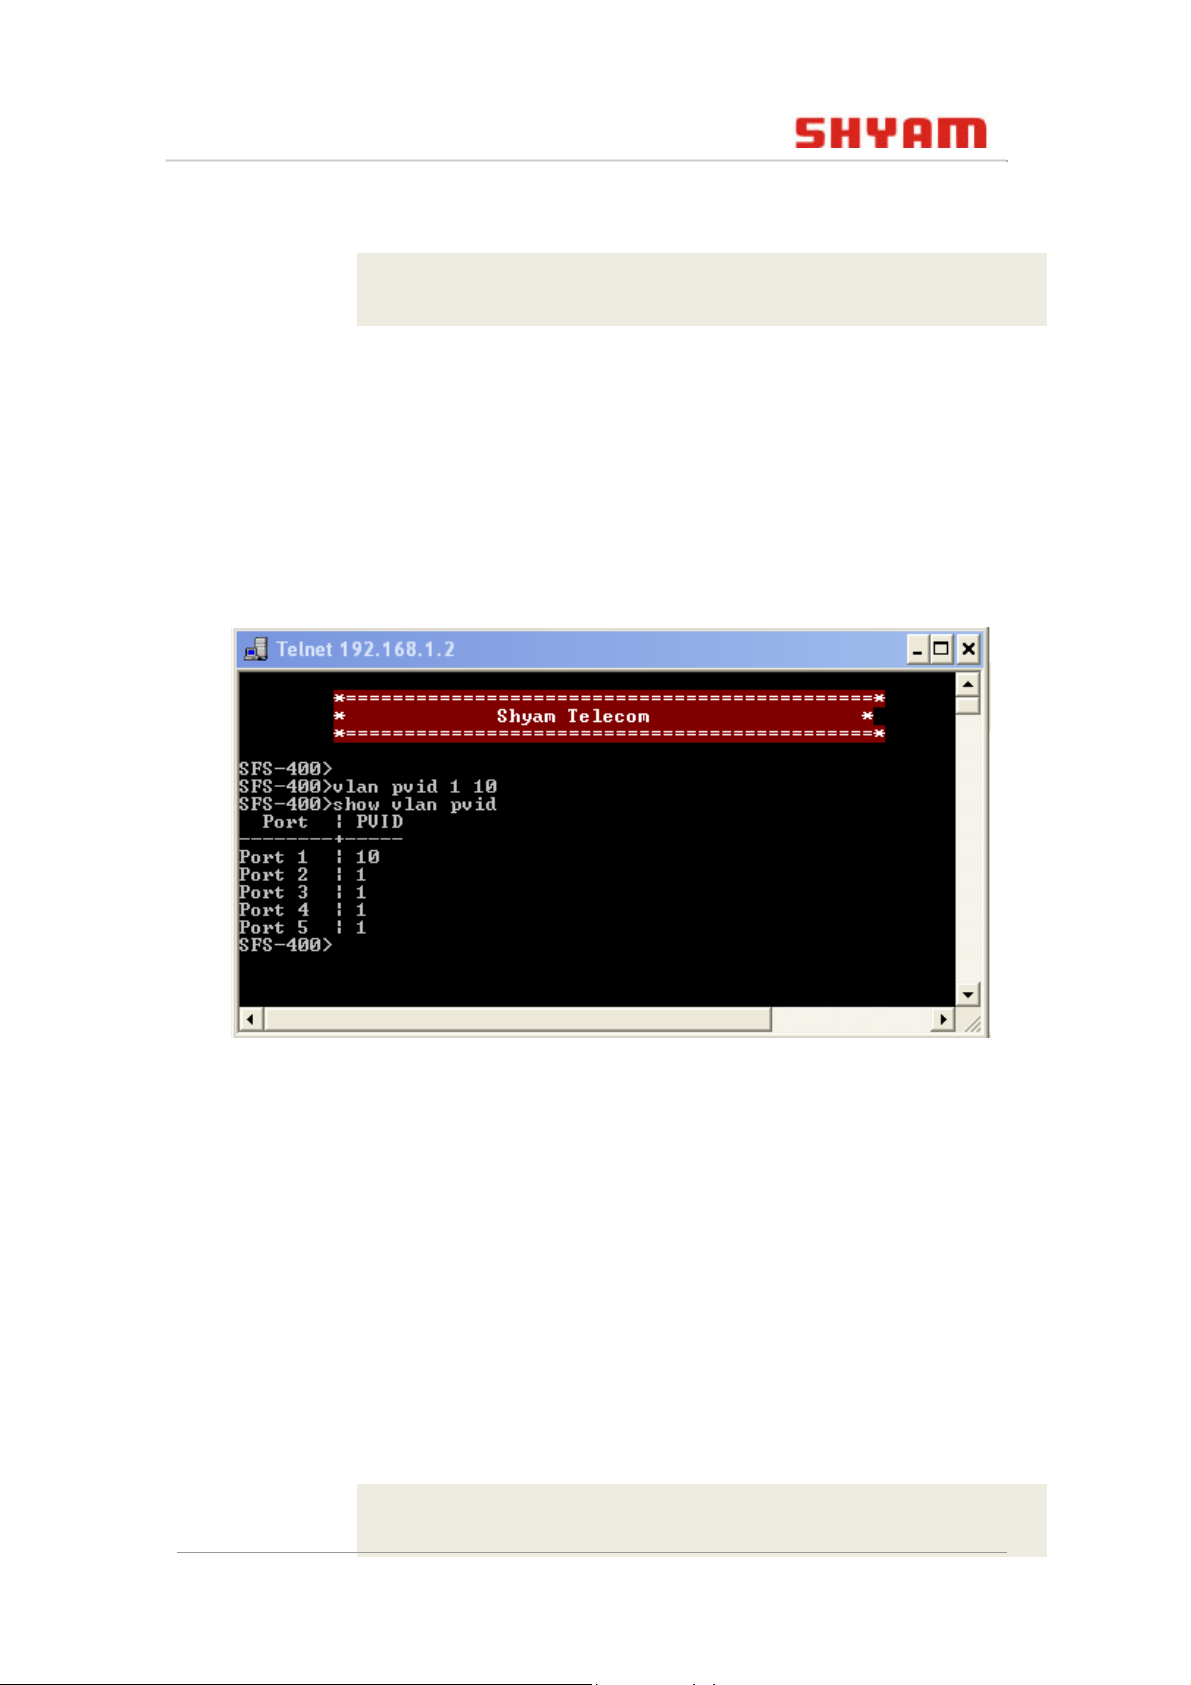
FS-400> vlan pvid 1 10
You can view the PVID of all the ports by using show vlan
pvid command:
Syntax
show vlan pvid
Figure 19: Vlan Pvid
4.2.7 vlan leaky
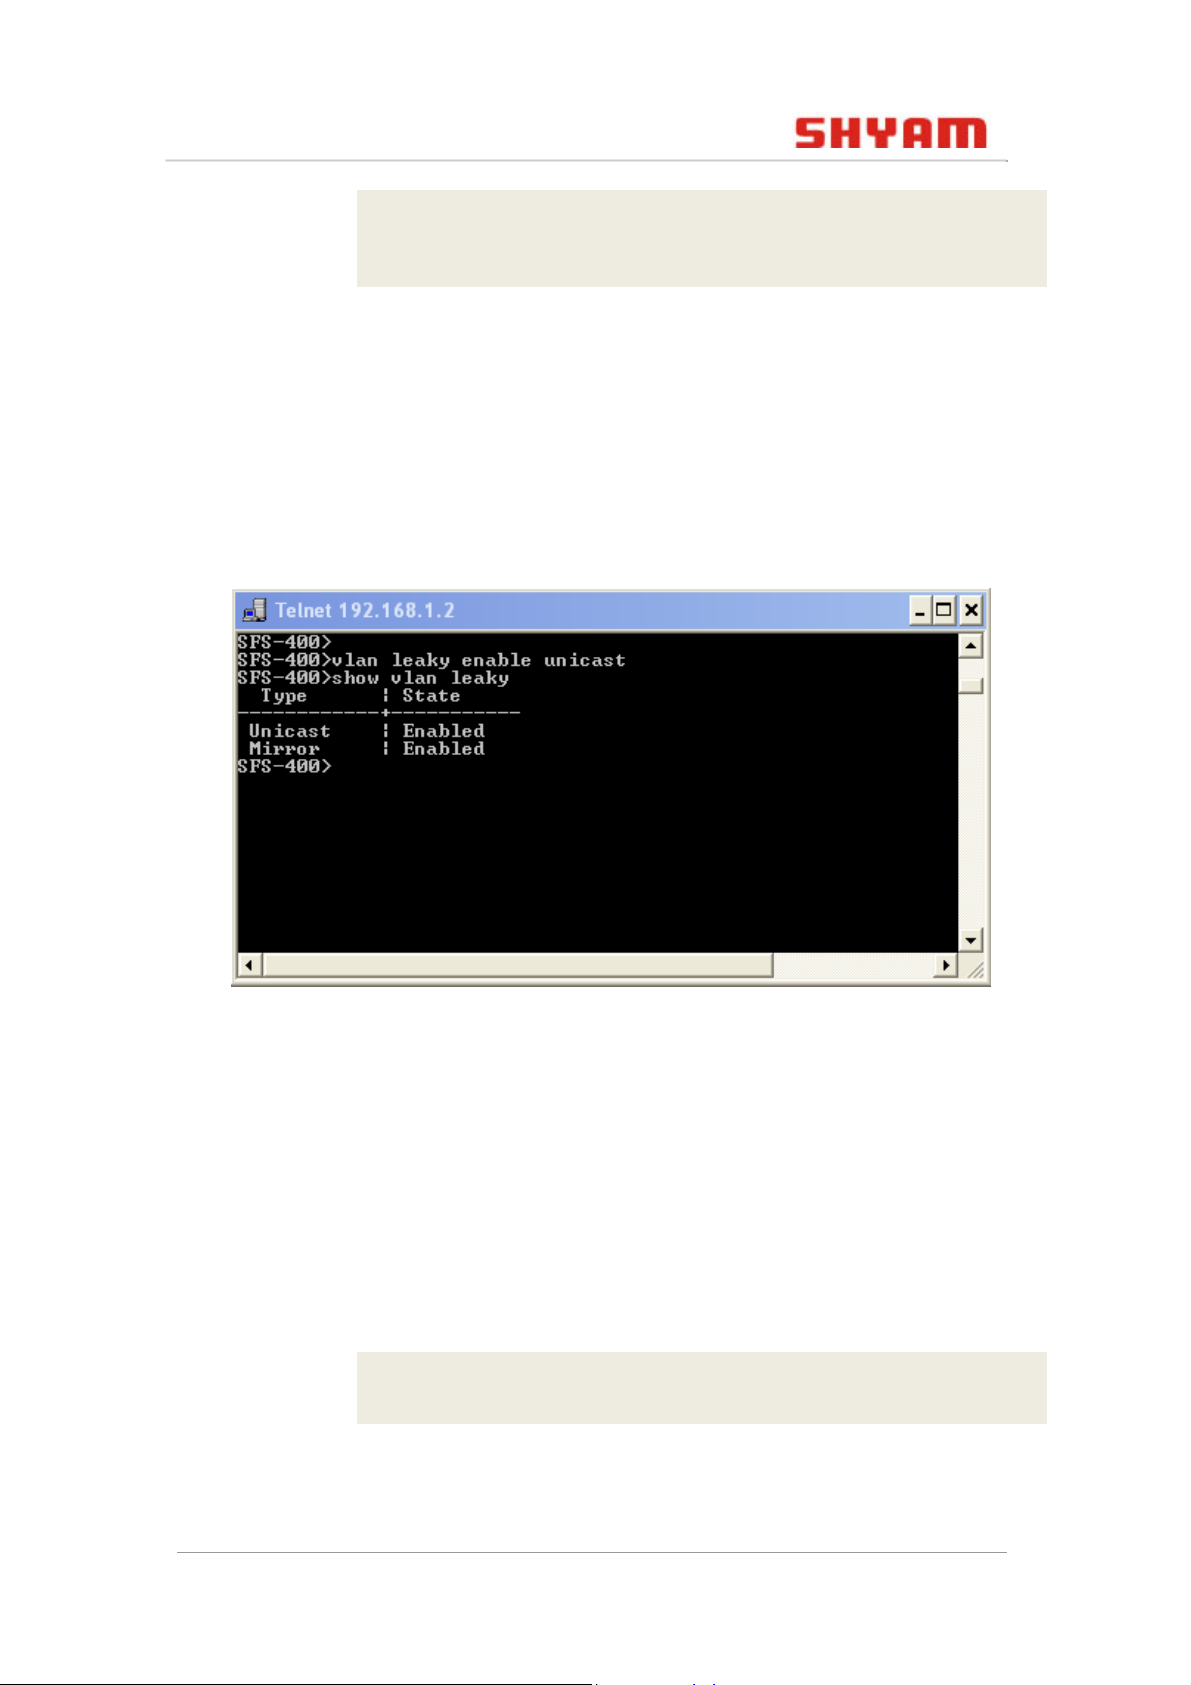
This command is used to enable or disable the leaky VLAN for
unicast and mirror.
Syntax
vlan leaky [enable | disable][unicast
|mirror]
Example
FS-400> vlan leaky enable unicast
© 2011 SHYAM | Company Confidential Page 34/57
Page 35
FS400 S WITCH CLI U SER G UIDE
OR
FS-400> vlan leaky enable mirror
You can view the status of vlan leaky by using show vlan
leaky command.
Syntax
show vlan leaky
Figure 20: Leaky Vlan
4.2.8 vlan delete
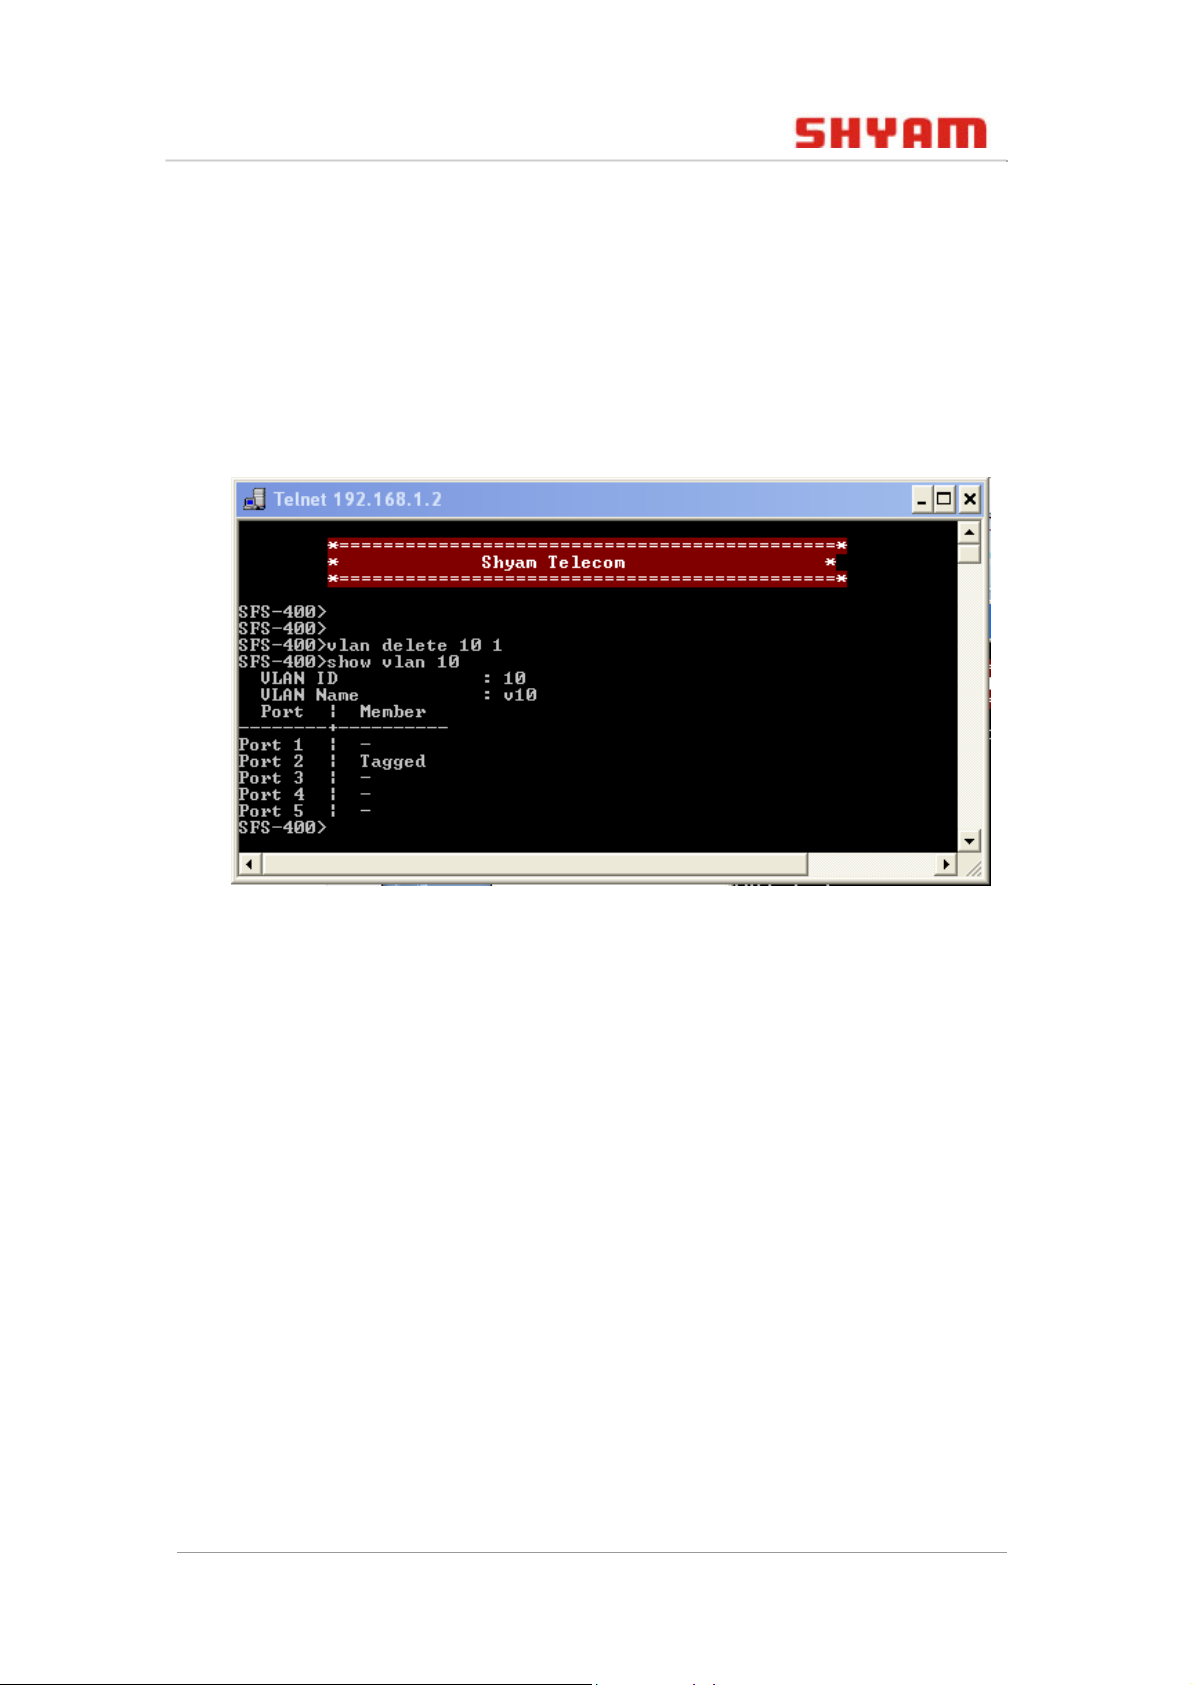
This command is used to delete a desired port from VLAN.
Syntax
vlan delete <vid> <port 1-5>
Example
FS-400> vlan delete 10 1
You can view the VLAN status after deletion by using the
following command:
© 2011 SHYAM | Company Confidential Page 35/57
Page 36
FS400 S WITCH CLI U SER G UIDE
Syntax
show vlan <pvid>
Example
FS-400> show vlan 10
Figure 21: Delete Vlan
4.2.9 vlan ingress-filter
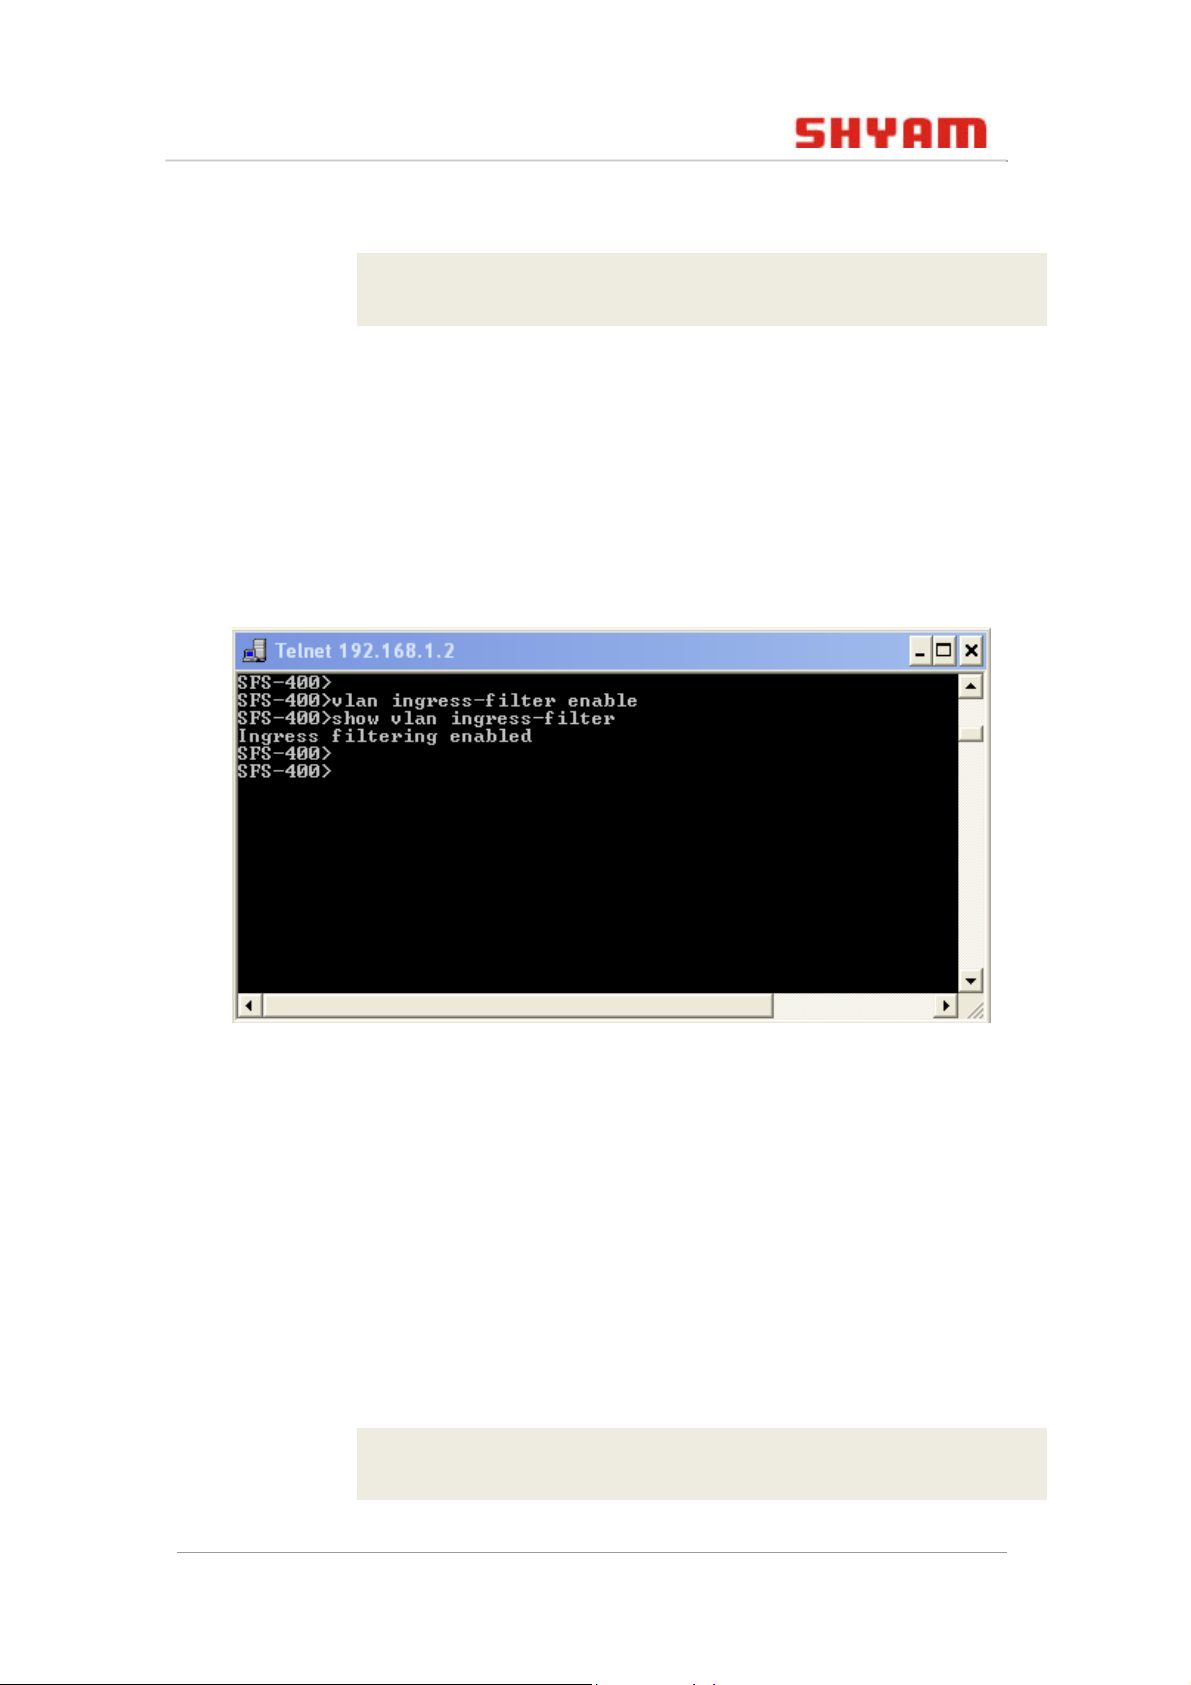
This command enables/disables ingress filtering. If ingress
filtering is disabled, frames received with VLAN IDs, which do
not match the VLAN membership of the receiving interface, are
admitted and forwarded to ports that are members of that
VLAN.
Note: By default ingress filtering is disabled.
Syntax
vlan ingress-filter [enable | disable]
© 2011 SHYAM | Company Confidential Page 36/57
Page 37
FS400 S WITCH CLI U SER G UIDE
Example
FS-400> vlan ingress-filter enable
You can view the status of ingress filter by using show vlan
ingress-filter command.
Syntax
show vlan ingress-filter
Figure 22: Vlan Ingress Filter
4.2.10 no vlan
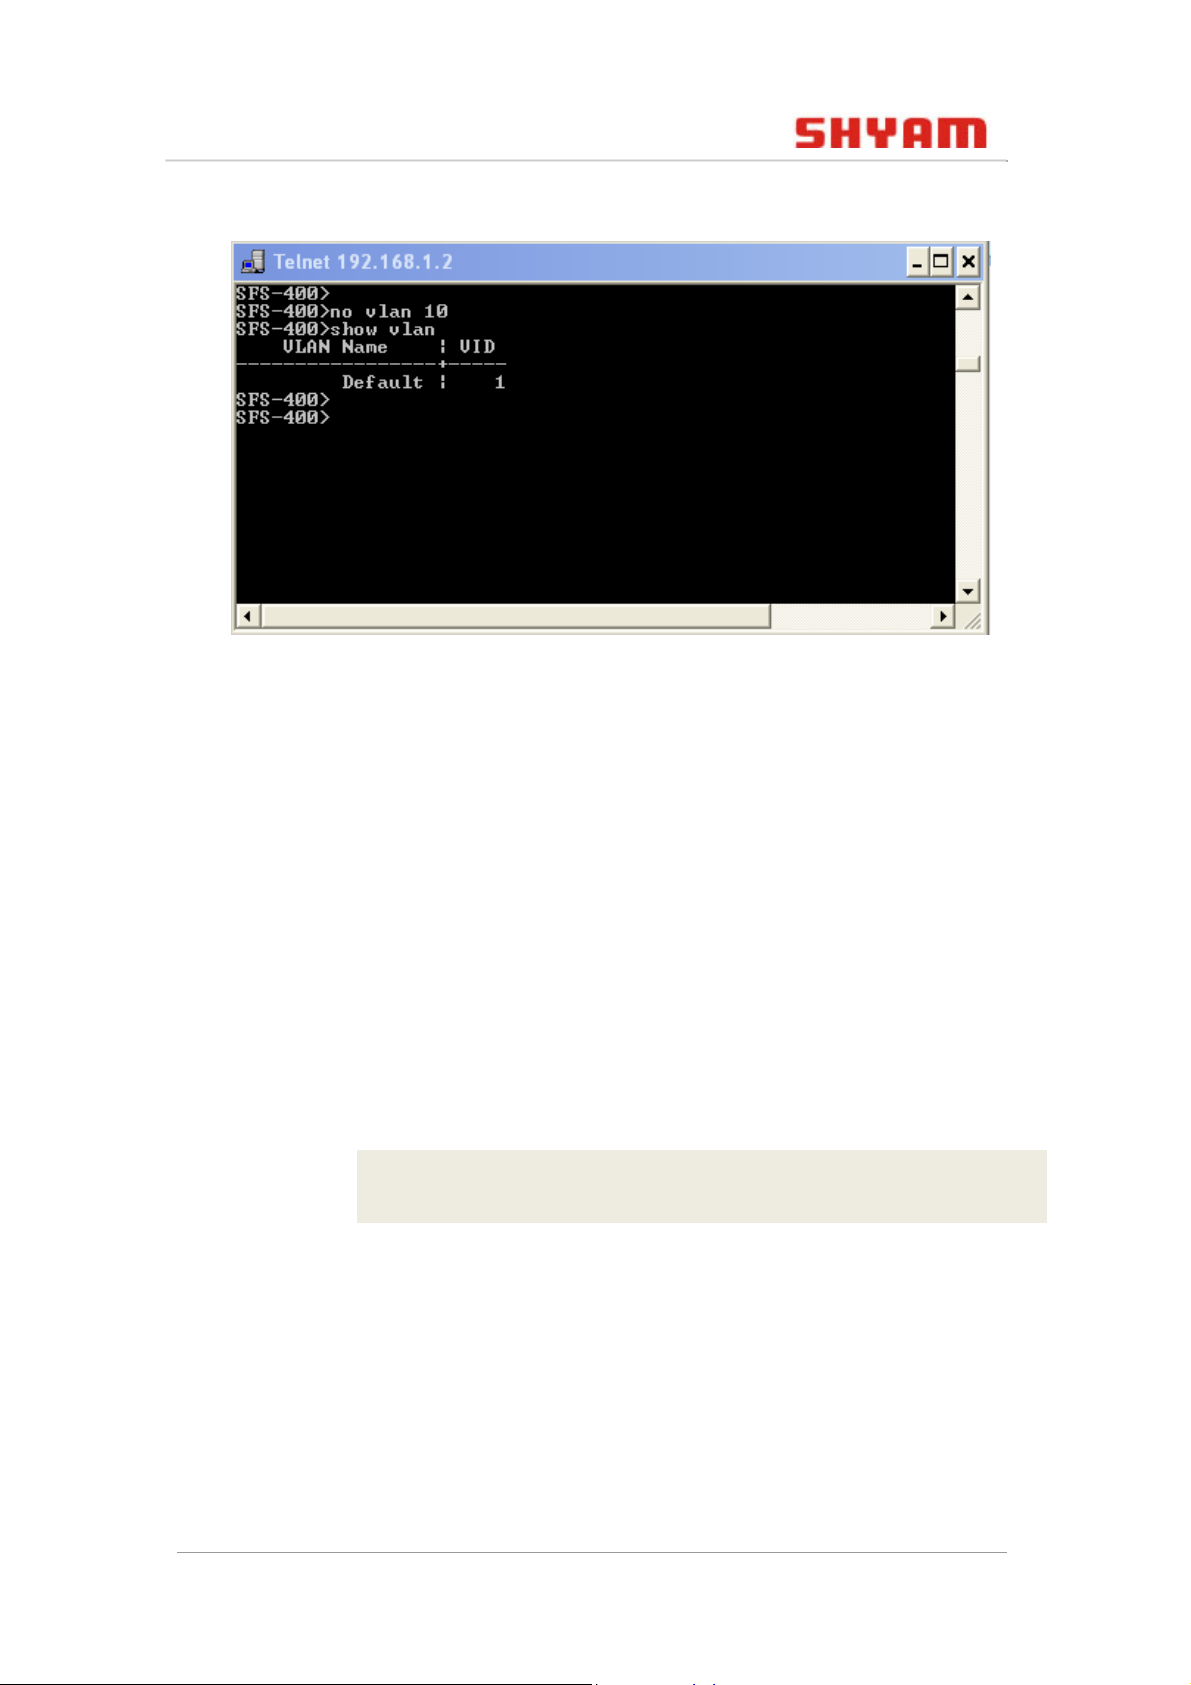
This command deletes an existing VLAN having a valid ID. (ID1 is
reserved for the default VLAN).
Syntax
no vlan <vid>
Example
FS-400> no vlan 2
© 2011 SHYAM | Company Confidential Page 37/57
Page 38
FS400 S WITCH CLI U SER G UIDE
Figure 23: Delete Vlan
Note: Before deleting the VLAN you should change the PVID
of ports from vlan to 1.
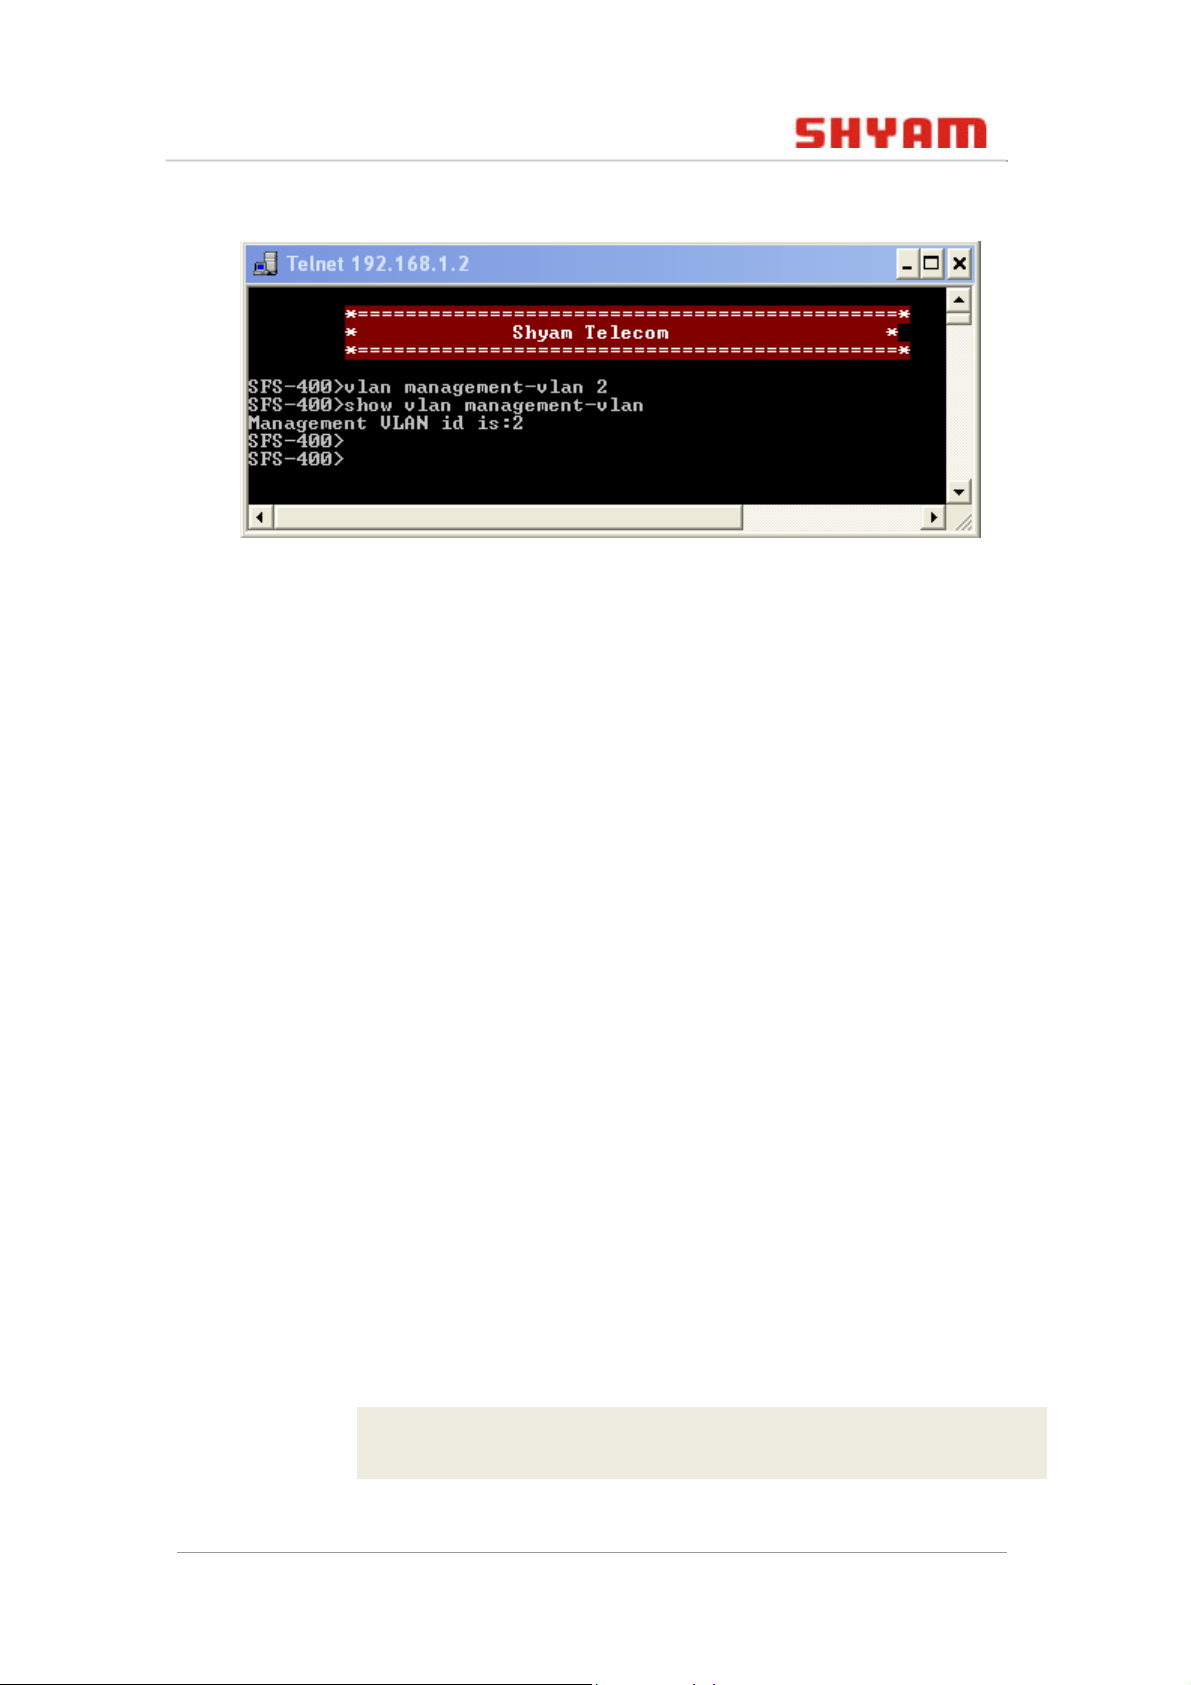
4.3 vlan management-vlan
This command configures the management VLAN ID.
Note: By default the value of management VLAN is 1.
Syntax
vlan management-vlan <vid>
Example
FS-400> vlan management-vlan 2
You can view the management VLAN by using show vlan
management-vlan command.
Syntax
show vlan management-vlan
© 2011 SHYAM | Company Confidential Page 38/57
Page 39
FS400 S WITCH CLI U SER G UIDE
Figure 24: Vlan Management
Note: You should first create a management VLAN.
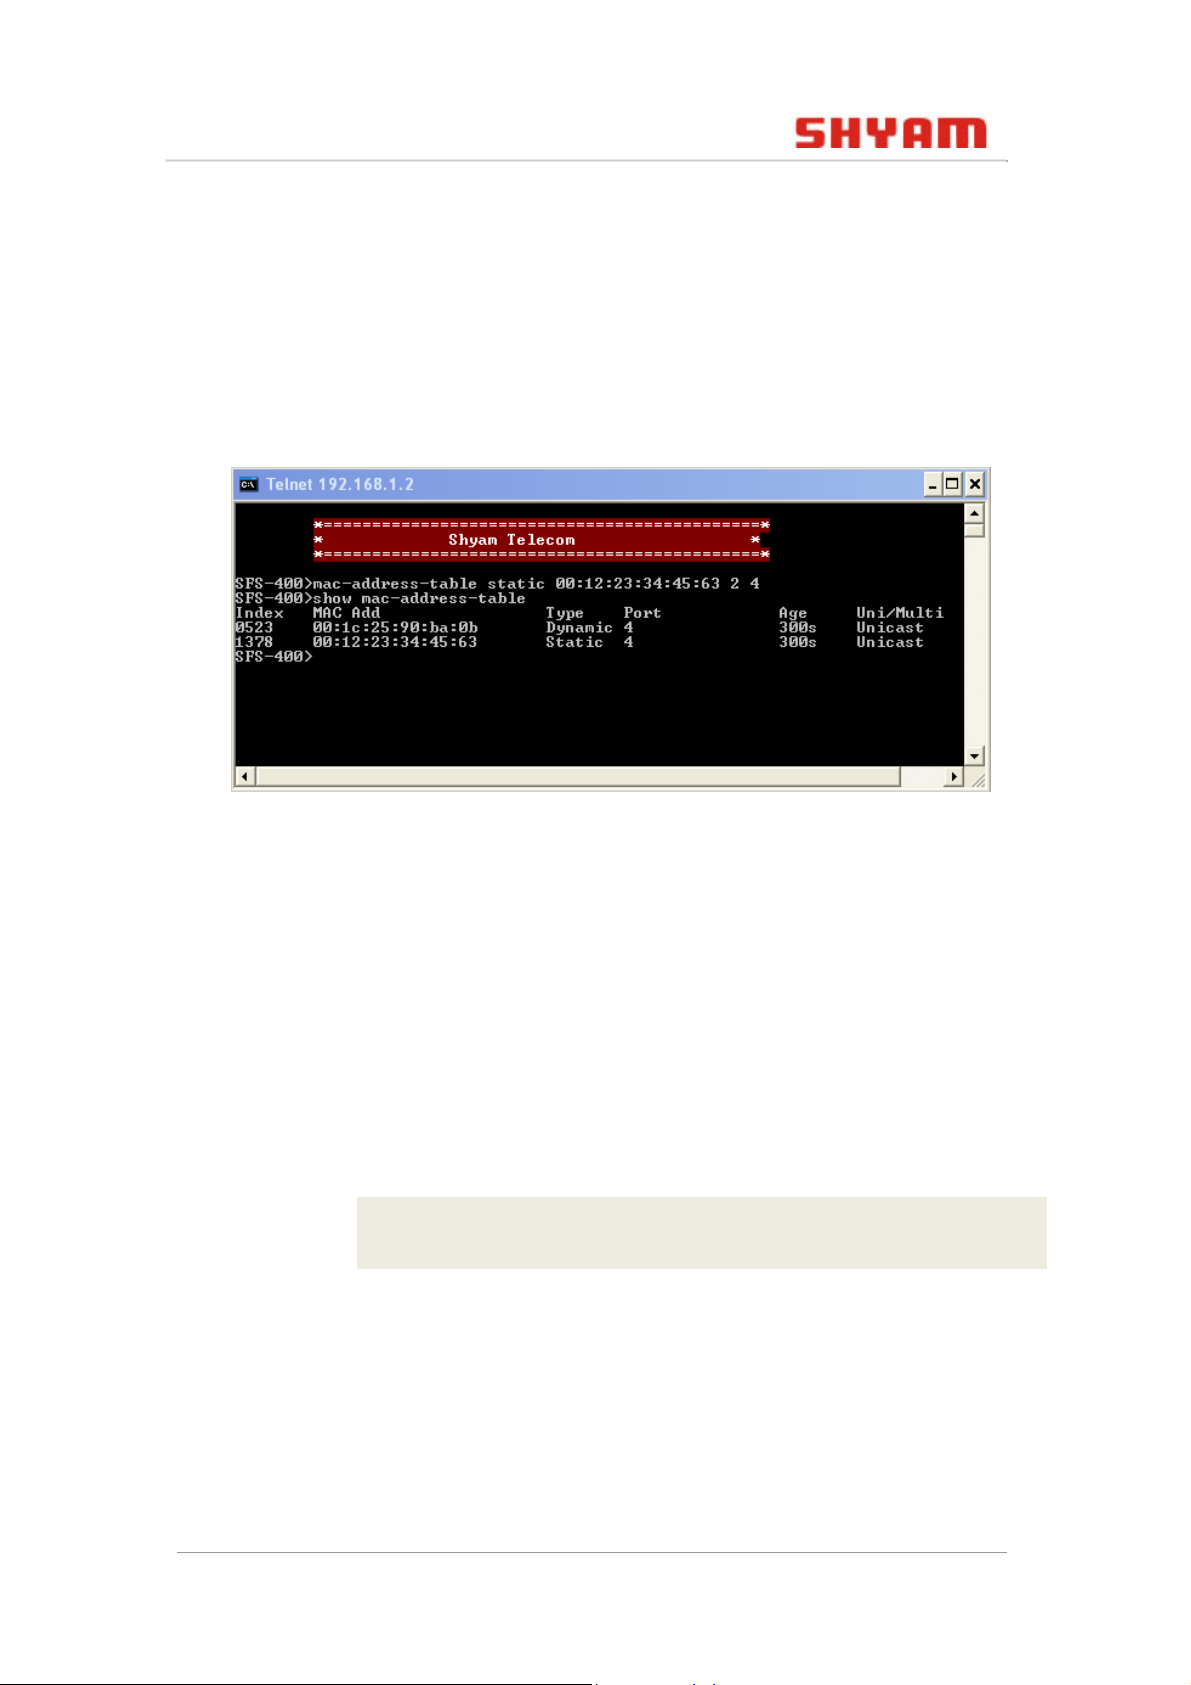
4.4 mac-address-table
This command is used to provide static as well as dynamic MAC
entry in the MAC address table.
Syntax
mac-address-table [static | dynamic |
multicast] <MAC Add> <entry 0-3> <port 1-5>
Here,
• [static | dynamic | multicast] is the type of
MAC.
• <MAC Add> is the MAC address to be entered in the table.
• <entry 0-3> is the order of the MAC address entry in the
table.
• <port 1-5> is the port number to which MAC address is
assigned.
Example
FS-400> mac-address-table static 00:12: 23:34:45:63 2 4
© 2011 SHYAM | Company Confidential Page 39/57
Page 40
FS400 S WITCH CLI U SER G UIDE
You can view all the MAC address in the table by using show
mac-address-table command.
Syntax
show mac-address-table
Figure 25: MAC Address Table
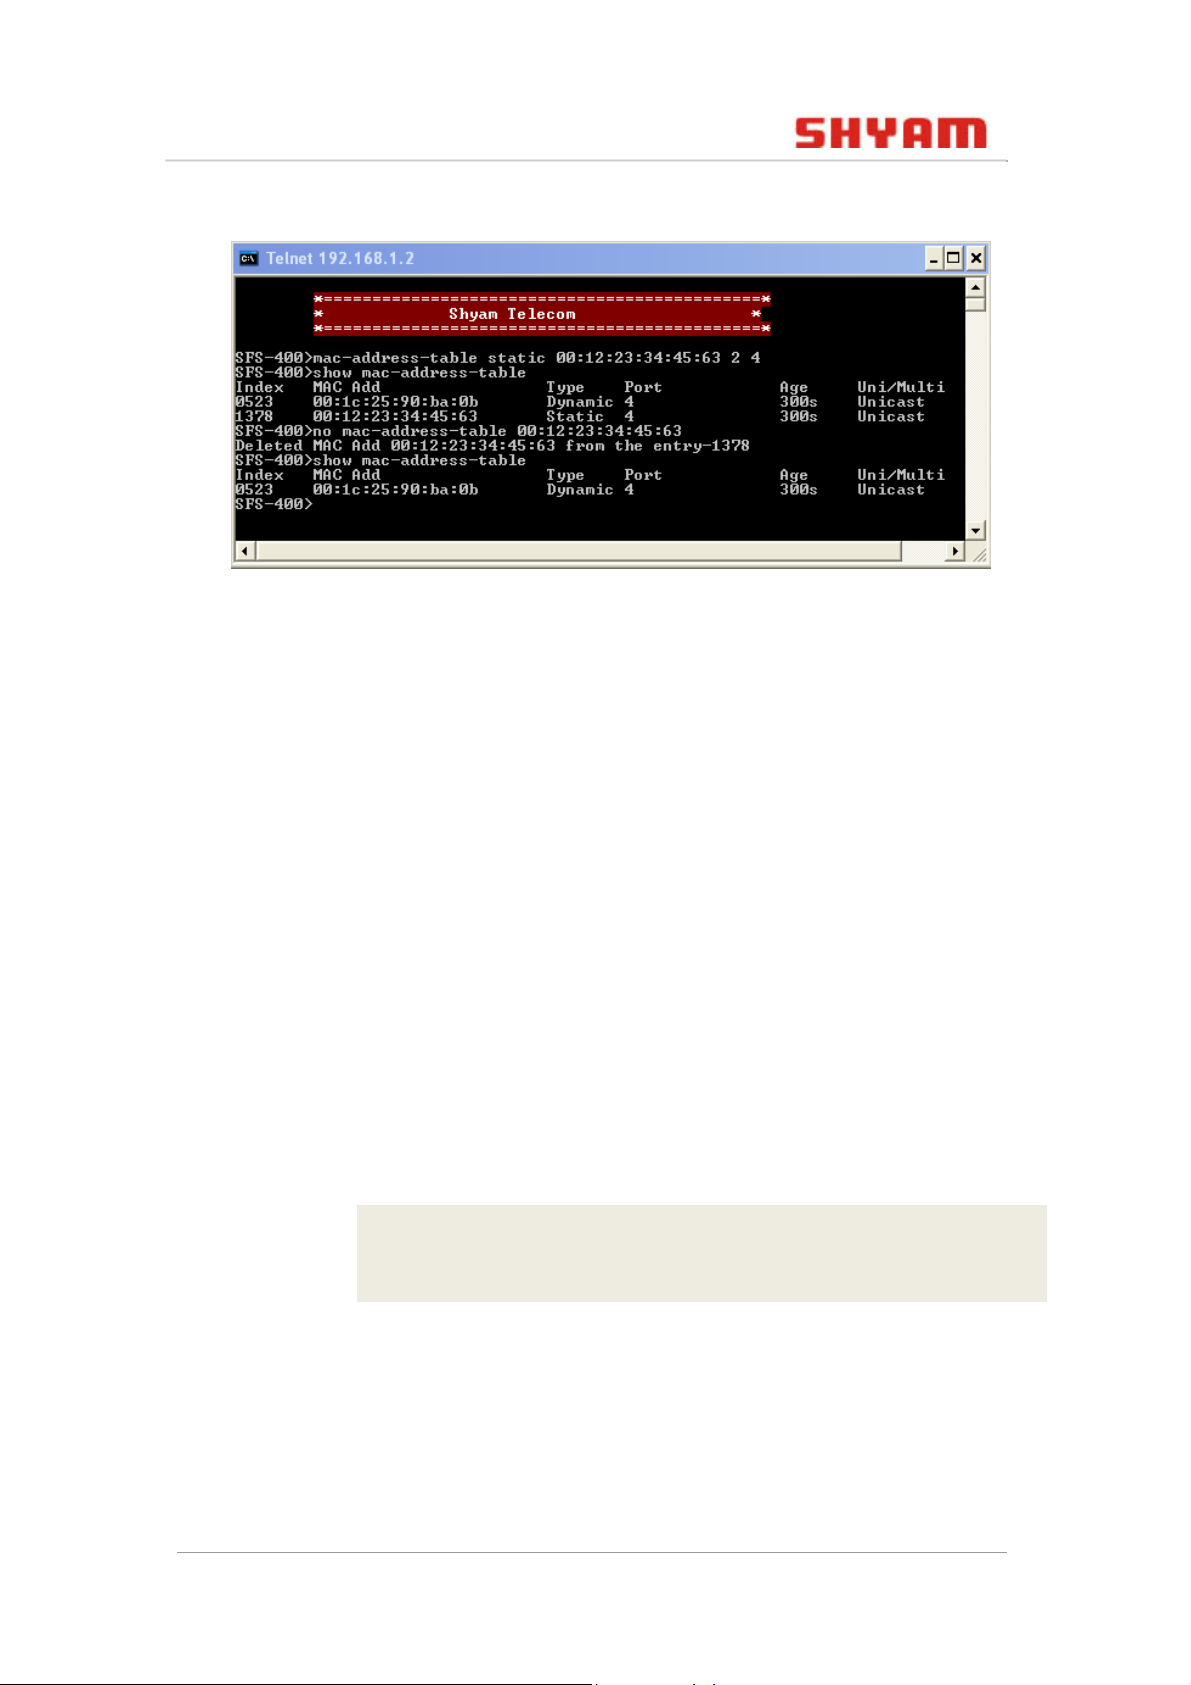
4.4.1 no mac-address-table
This command is used to delete a MAC address entry from the
MAC address table.
Syntax
no mac-address-table <MAC address>
Example
FS-400> no mac-address-table 00:12: 23:34: 45:63
© 2011 SHYAM | Company Confidential Page 40/57
Page 41
FS400 S WITCH CLI U SER G UIDE
Figure 26: Delete MAC Address Table
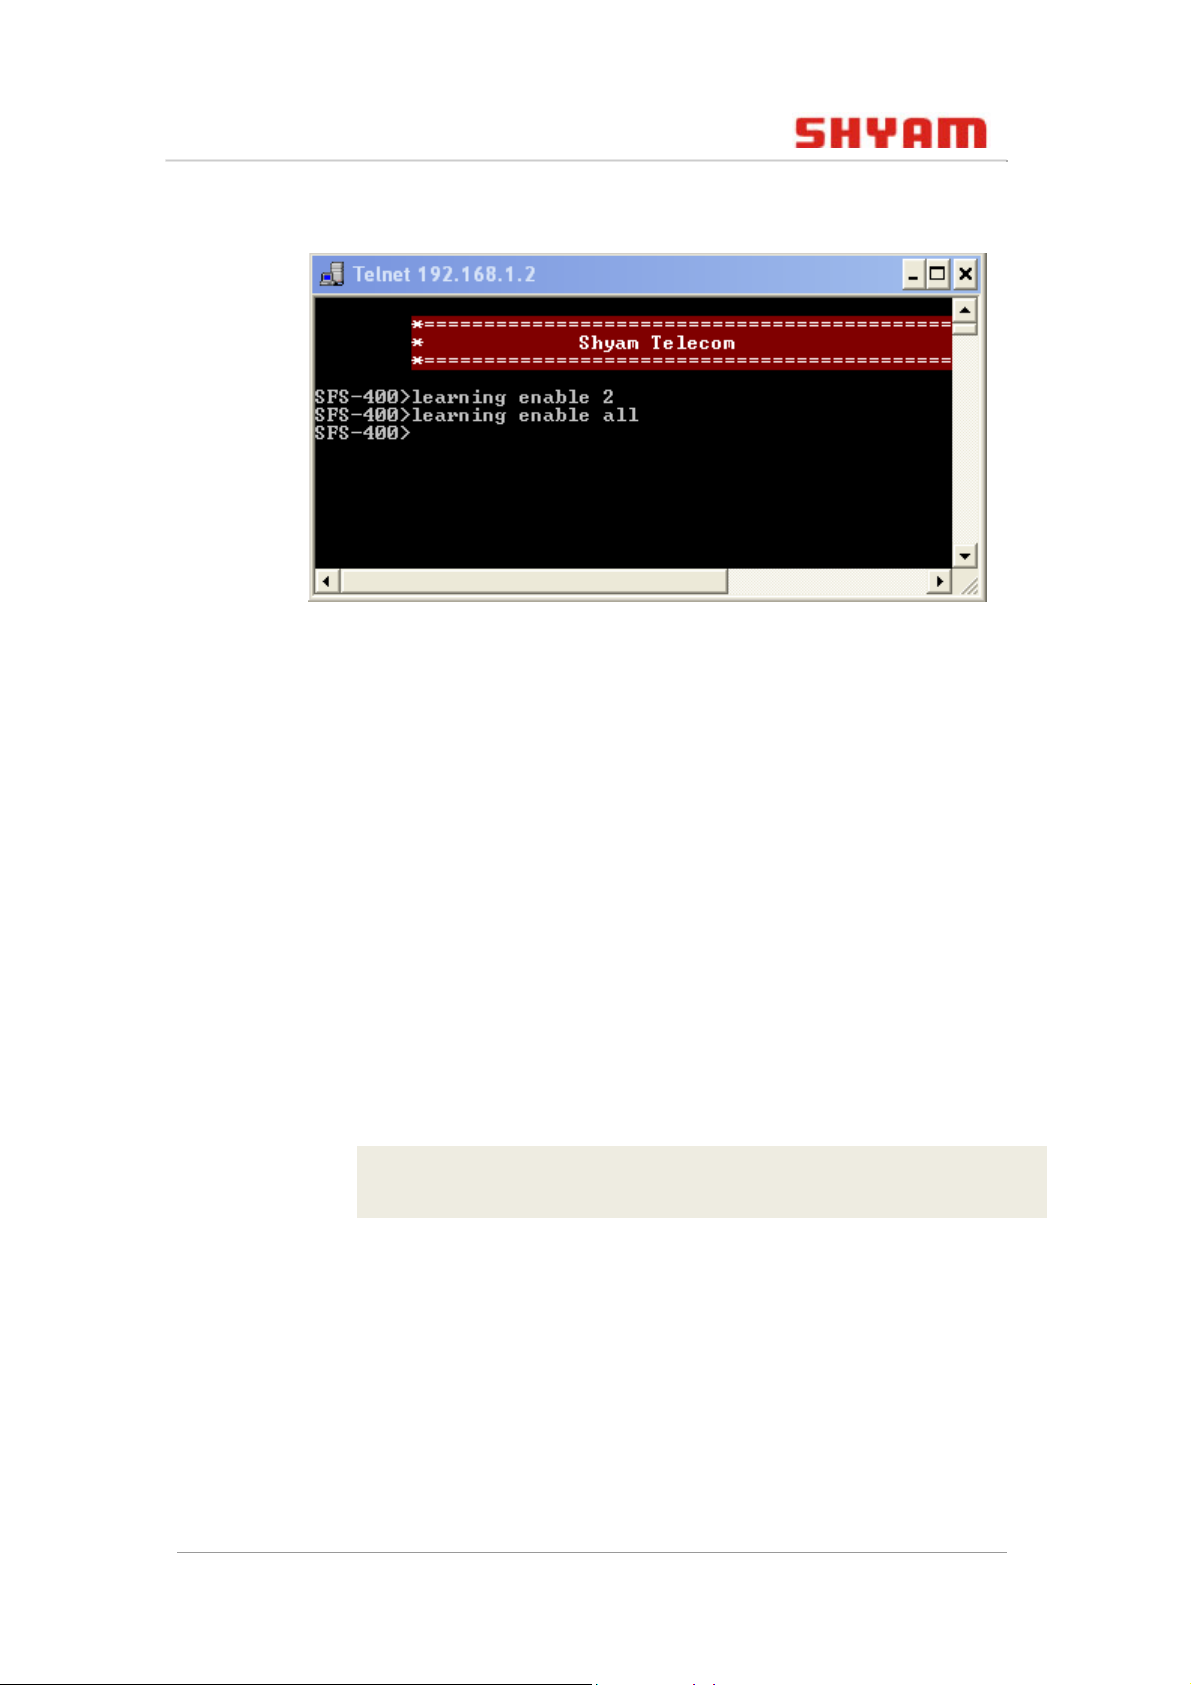
4.4.2 learning
A port learns a station’s location information from the source
address of packets when it is in a learning state. The port then
adds this location information to its forwarding database.
You can enable or disable the learning of MAC address by using
the no mac-address-table command.
Note: By default learning is enabled.
Syntax
learning [enable|disable]> [<port 1-5> |
all]
Example
FS-400> learning enable 2
FS-400> learning enable all
© 2011 SHYAM | Company Confidential Page 41/57
Page 42
FS400 S WITCH CLI U SER G UIDE
Figure 27: Learning
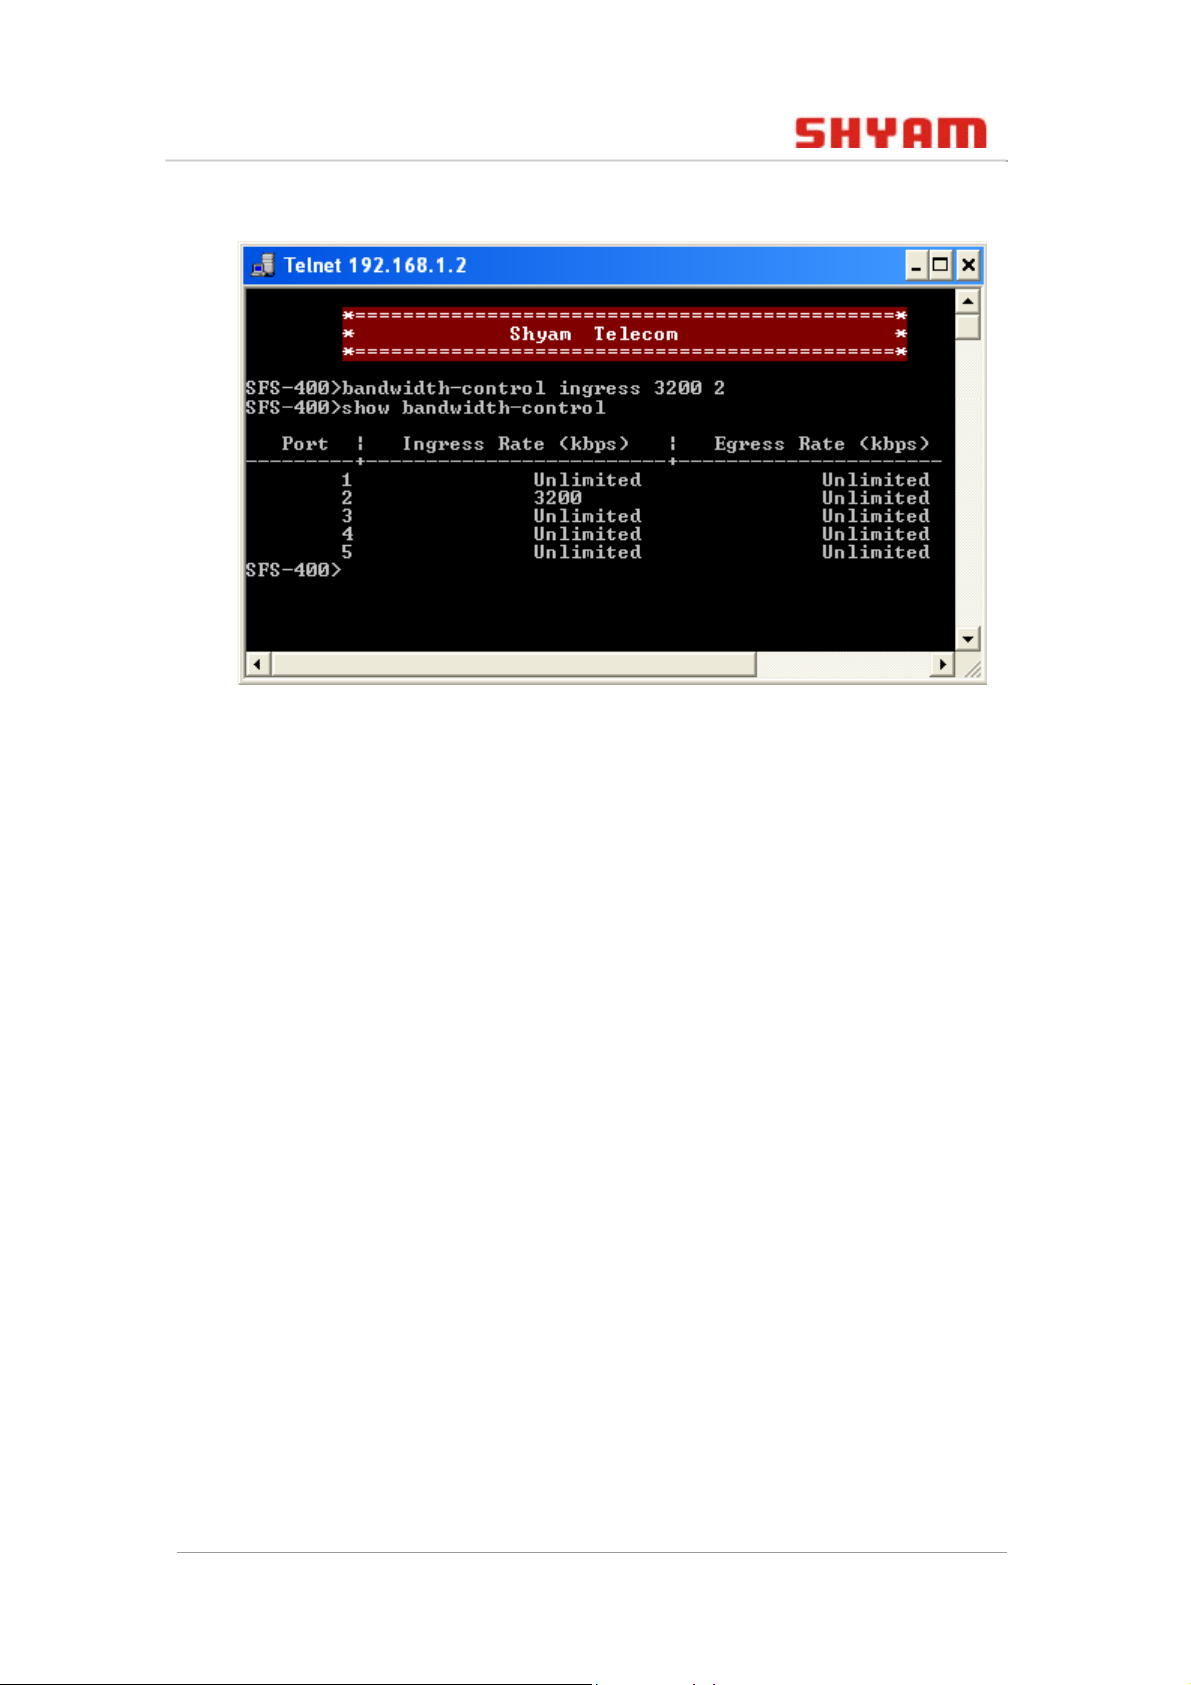
4.5 bandwidth-control
This command is used to control the ingress or egress
bandwidth for any port.
Note: It is necessary to select the bandwidth that is a multiple
of 64 (64 Kbps to 97664 Kbps).
Syntax
bandwidth-control [ingress|egress] <rate[6497664]> <port number>
Example
FS-400> bandwidth-control ingress 3200 2
You can view the bandwidth control of all the ports by using
show bandwidth-control command.
Syntax
show bandwidth-control
© 2011 SHYAM | Company Confidential Page 42/57
Page 43
FS400 S WITCH CLI U SER G UIDE
Figure 28: Bandwidth Control
4.6 storm-control
This command is used to limit the rate of specific types of
packets through a switch. This helps in maintaining network
performance.
This limitation is possible for:
• Unknown destination address (UDA)
• Multicast
• Broadcast
Limitation is also possible for the following ranges in packets
per second (pps) 10, 20, 40, 80, 160, 320, and 640 pps.
You can enable or disable the storm control using the following
commands:
• storm-control
• storm-control rate
© 2011 SHYAM | Company Confidential Page 43/57
Page 44
FS400 S WITCH CLI U SER G UIDE
Syntax
storm-control [enable | disable]
[broadcast/multicast/uda]
Example
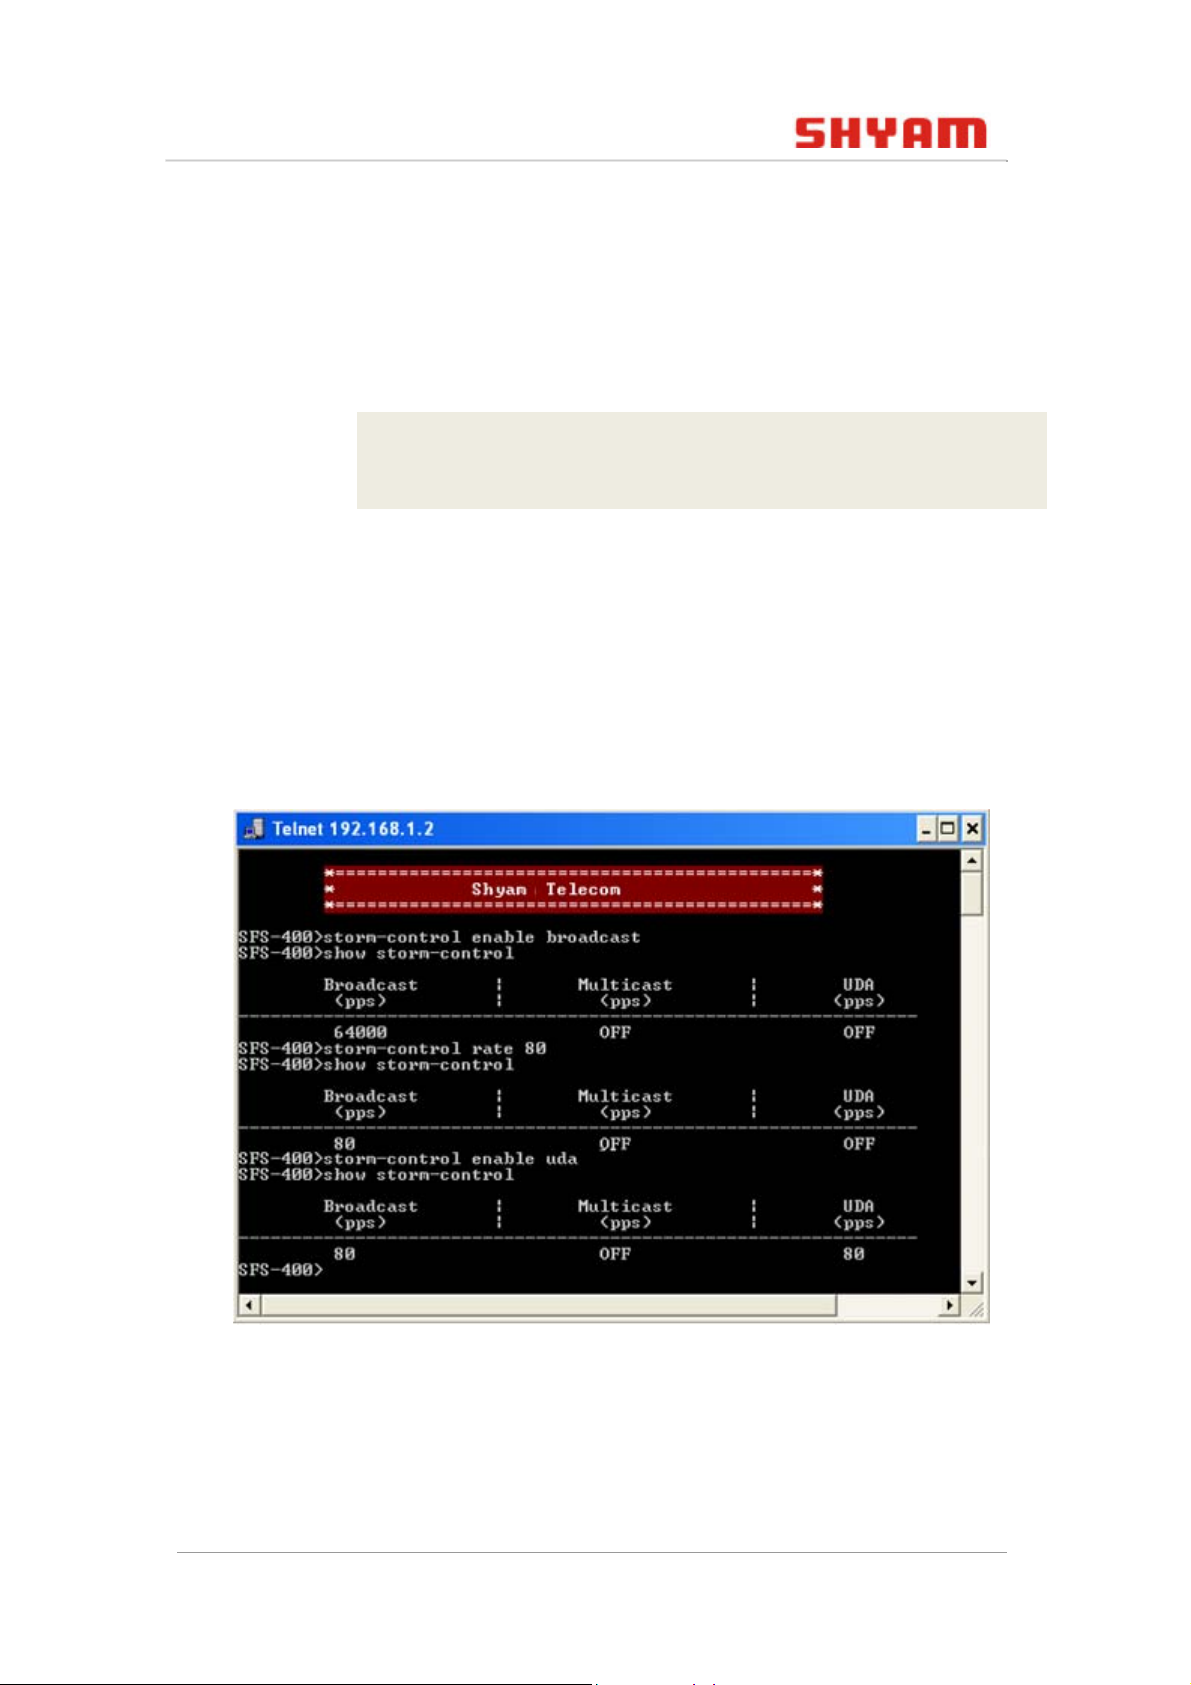
FS-400> storm-control enable broadcast
FS-400> storm-control rate 80
You can view the information of the storm control by using
show storm-control command.
Syntax
show storm-control
Figure 29: Storm Control
4.7 Port Mirroring Configuration
This section describes the various commands that you can use
to configure port mirroring in FS400.
© 2011 SHYAM | Company Confidential Page 44/57
Page 45
FS400 S WITCH CLI U SER G UIDE
4.7.1 mirror
This command is used to mirror the packets
received/transmitted on a port (mirrored port) to any other port
(mirroring port). One mirroring port can be set as either rx/tx or
both.
Syntax
mirror <mirroring port> [rx|tx] <mirrored
port>
Example
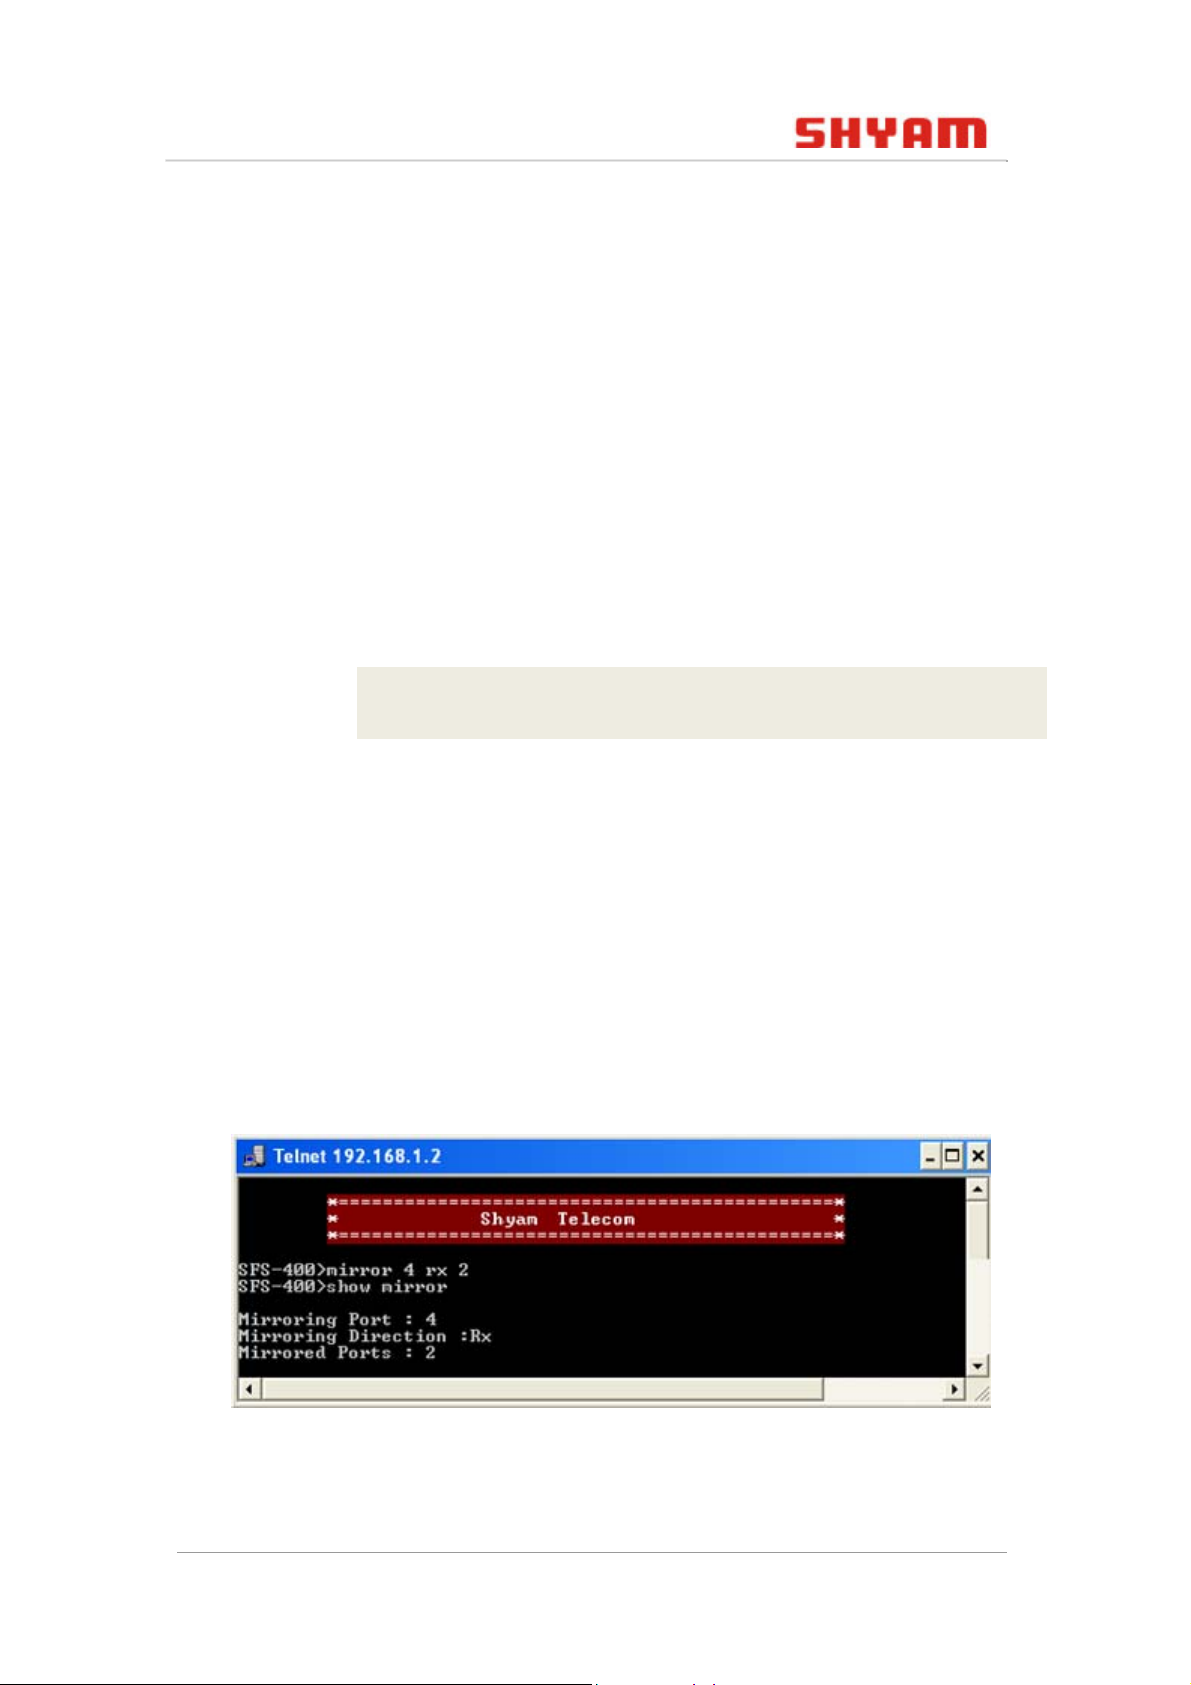
FS-400> mirror 4 rx 2
Note: The above example shows packets received on port 2
are to be mirrored on port 4.
You can view the formed mirror by using show mirror
command.
Syntax
show mirror
Figure 30: Mirroring
© 2011 SHYAM | Company Confidential Page 45/57
Page 46
FS400 S WITCH CLI U SER G UIDE
4.7.2 no mirror
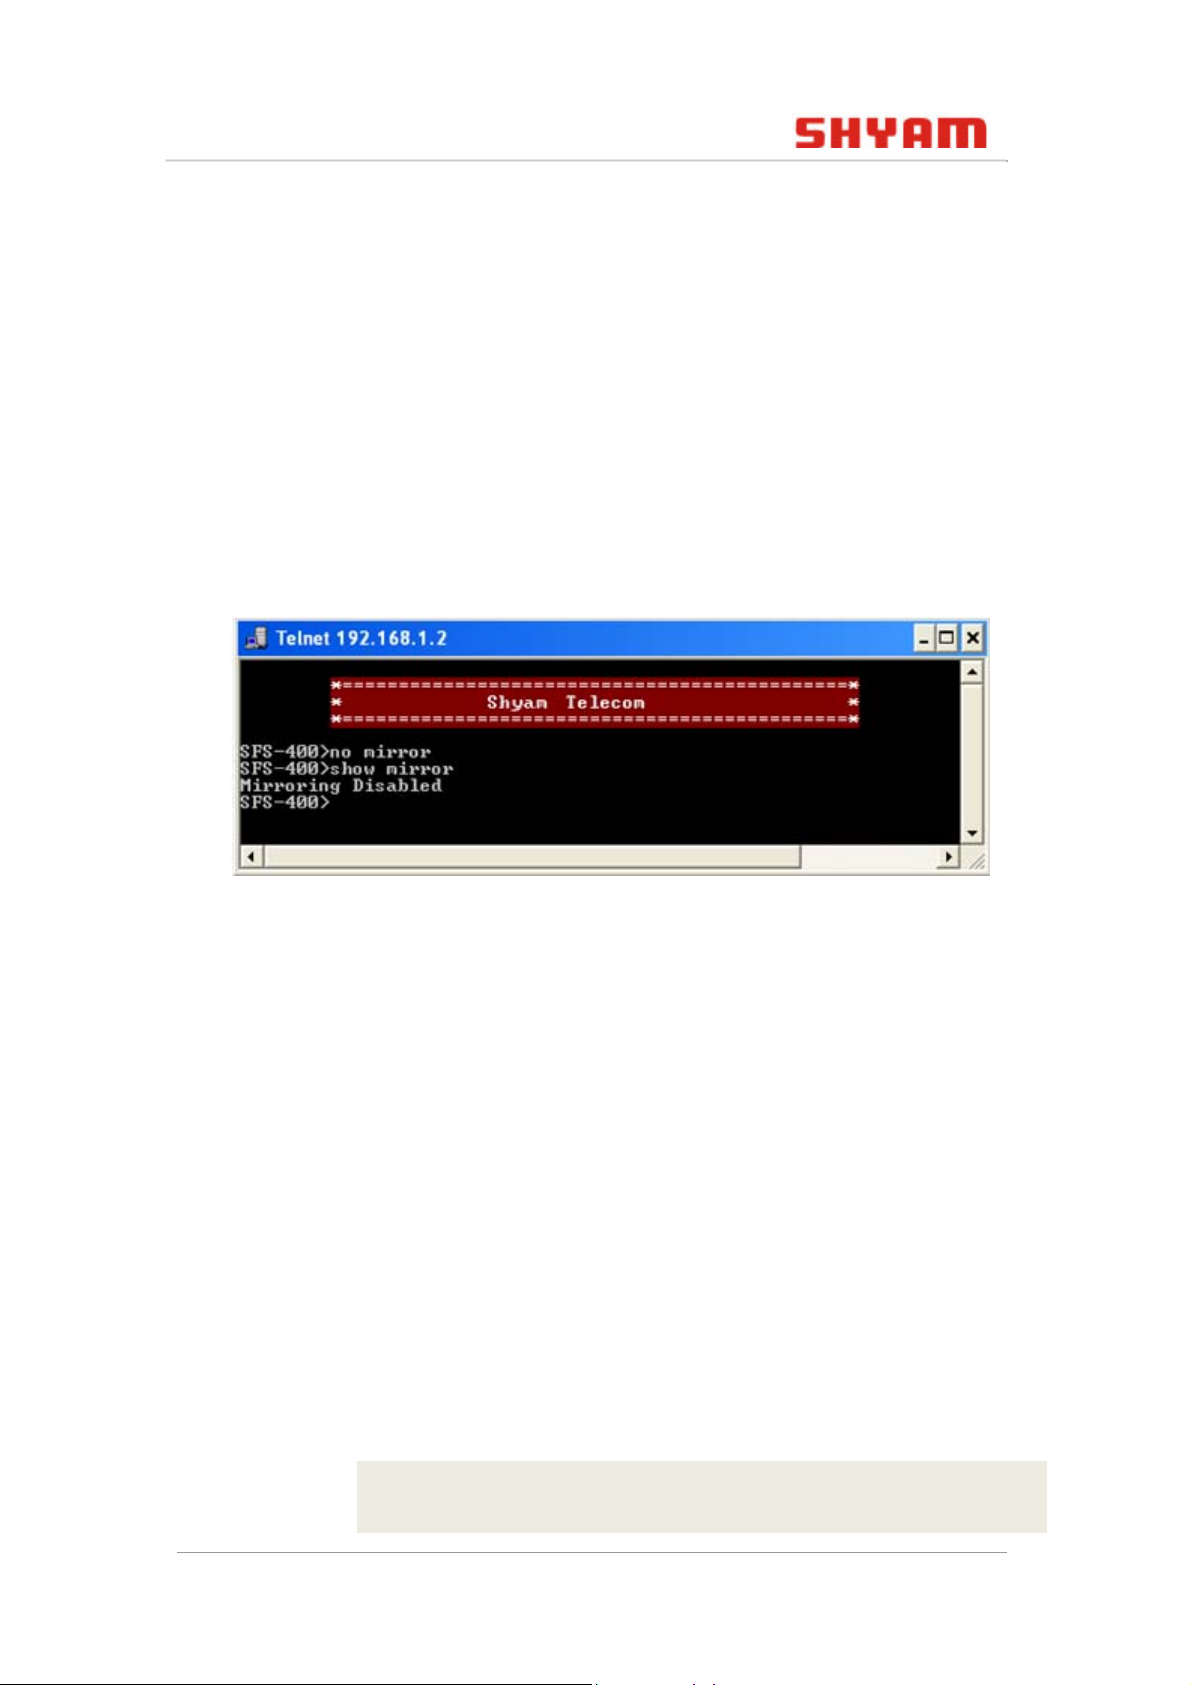
This command is used to remove/disable all the mirroring and
mirrored port(s) and restore the default value for mirroring
session. You can view mirror status of the ports by using show
mirror command.
Syntax
no mirror
Figure 31: Delete Mirroring
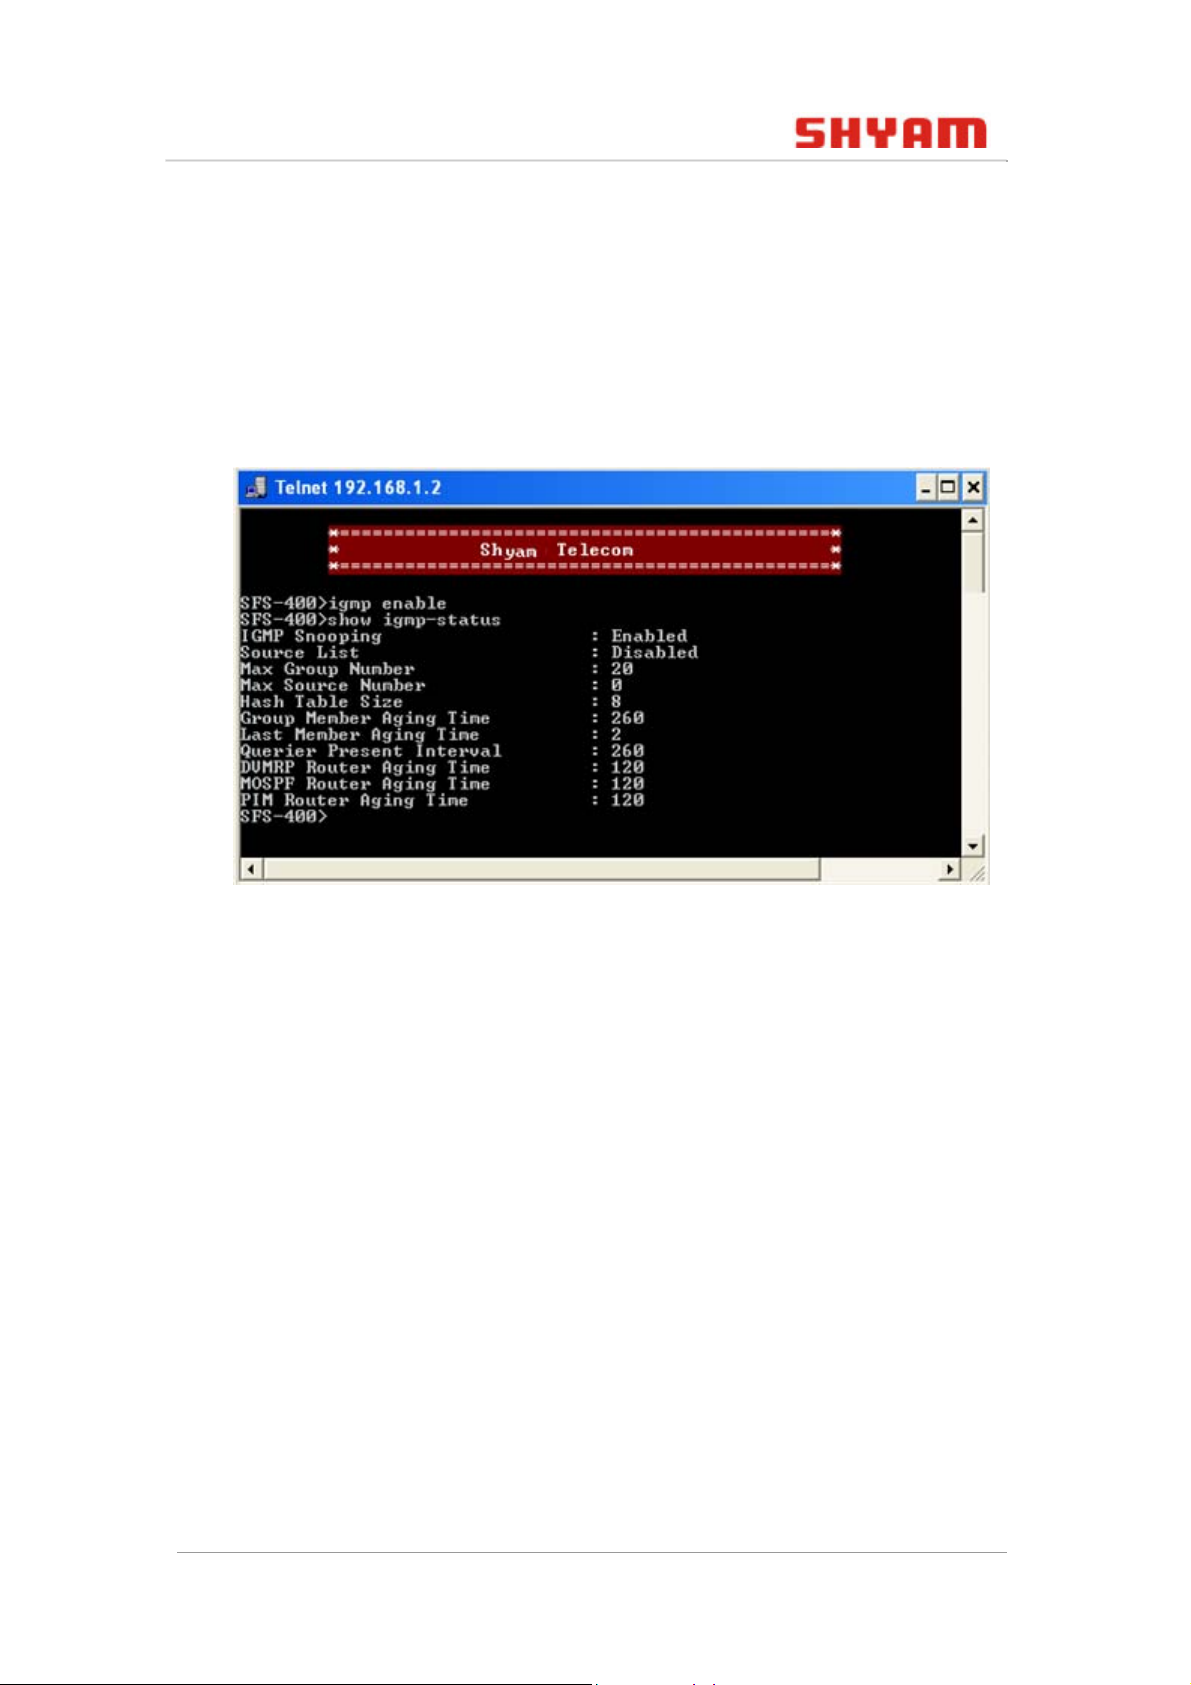
4.8 Igmp Snooping
The Internet group management protocol (IGMP) snooping
feature helps to preserve bandwidth by allowing FS400 to
forward IP multicast traffic only to connected hosts that request
multicast traffic. You can enable/disable the IGMP snooping
feature.
Note: By default the status of igmp is disabled.
Syntax
igmp[enable/disable]
Example
FS-400> igmp enable
© 2011 SHYAM | Company Confidential Page 46/57
Page 47
FS400 S WITCH CLI U SER G UIDE
You can view the status of IGMP snooping by using show
igmp-status command.
Syntax
show igmp-status
Figure 32: Igmp Snooping
4.9 QoS
Quality of service (QoS) is used to solve performance
degradation when there is network congestion.
Note: This section covers only port based and IP based QoS.
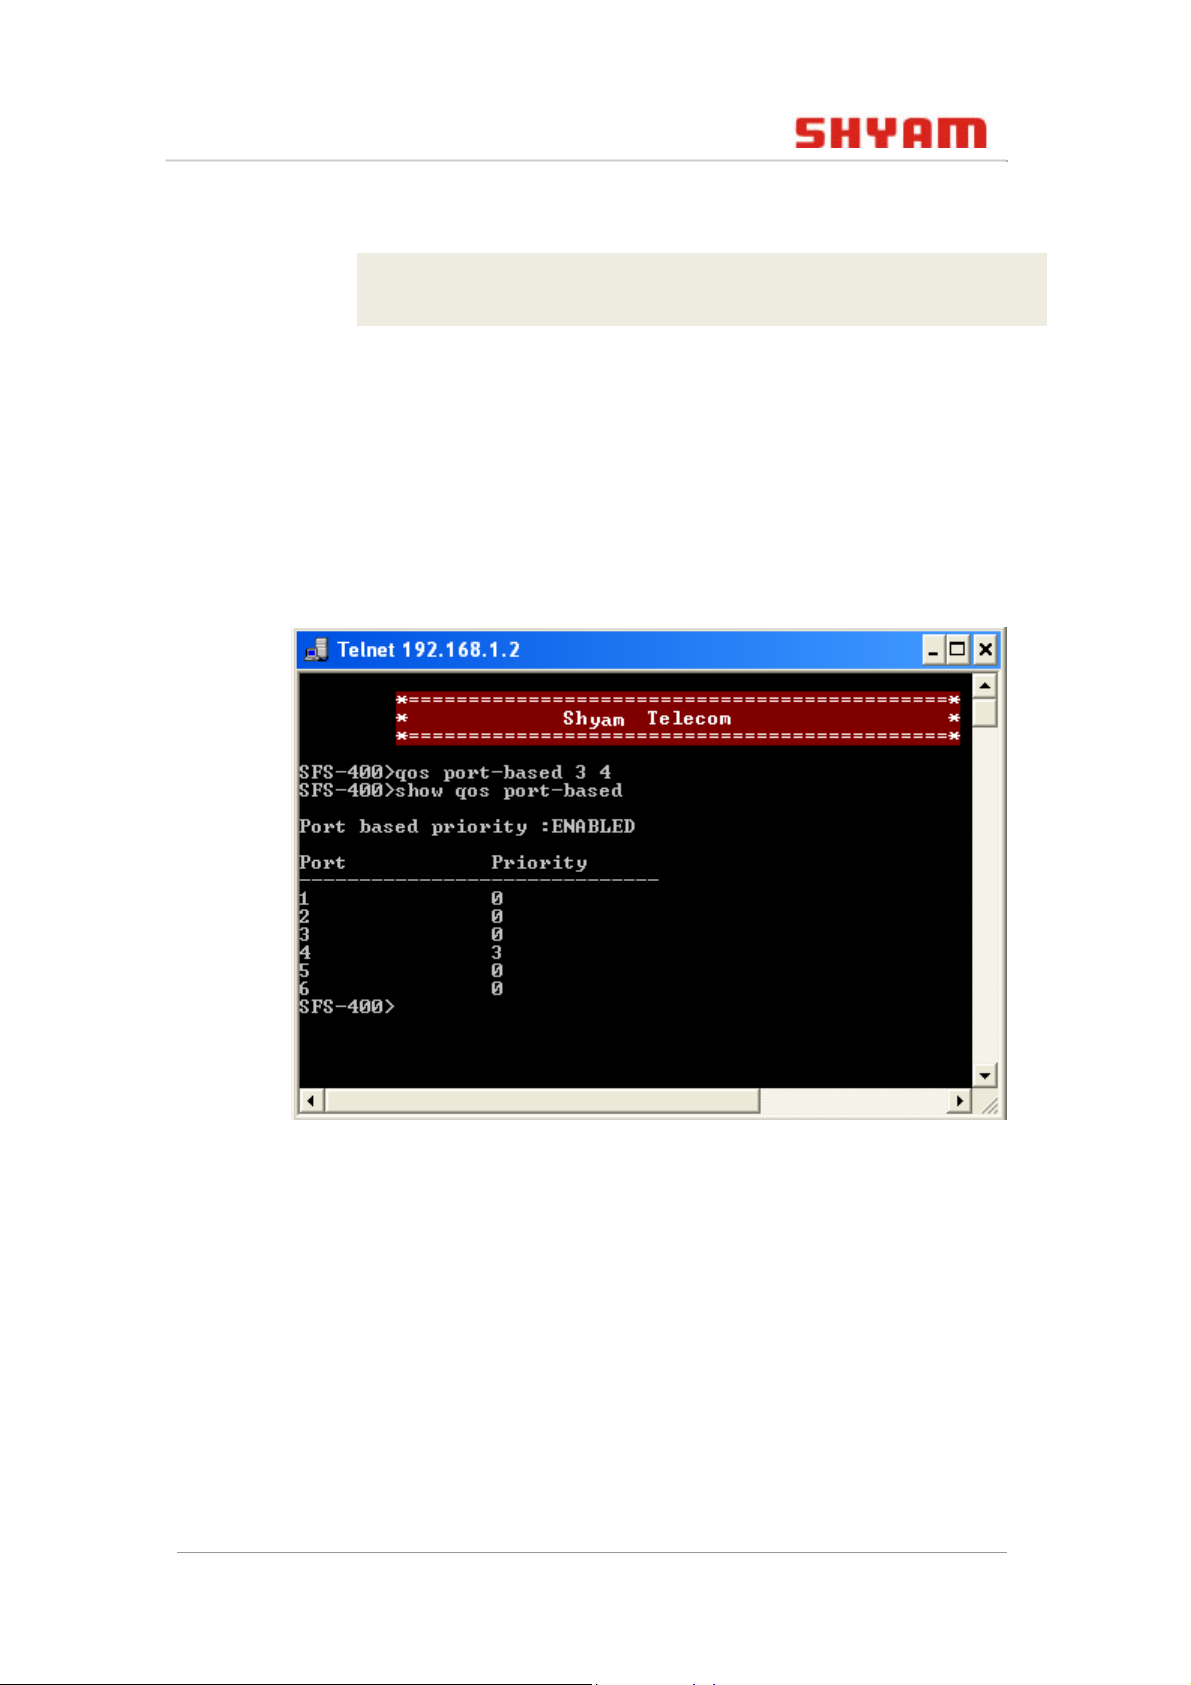
4.9.1 Port based QoS
Port-based QoS allows you to prioritize performance of the LAN
ports 1-5. For each of these ports, select high or low priority.
Syntax
qos port-based <priority 0-3> <port 1-5>
© 2011 SHYAM | Company Confidential Page 47/57
Page 48
FS400 S WITCH CLI U SER G UIDE
Example
FS-400> qos port-based 3 4
You can view the status of port based QoS by using show qos
port-based command.
Syntax
show qos port-based
Figure 33: QoS
Note: By default all the ports have 0 priority.
4.9.2 ip based qos
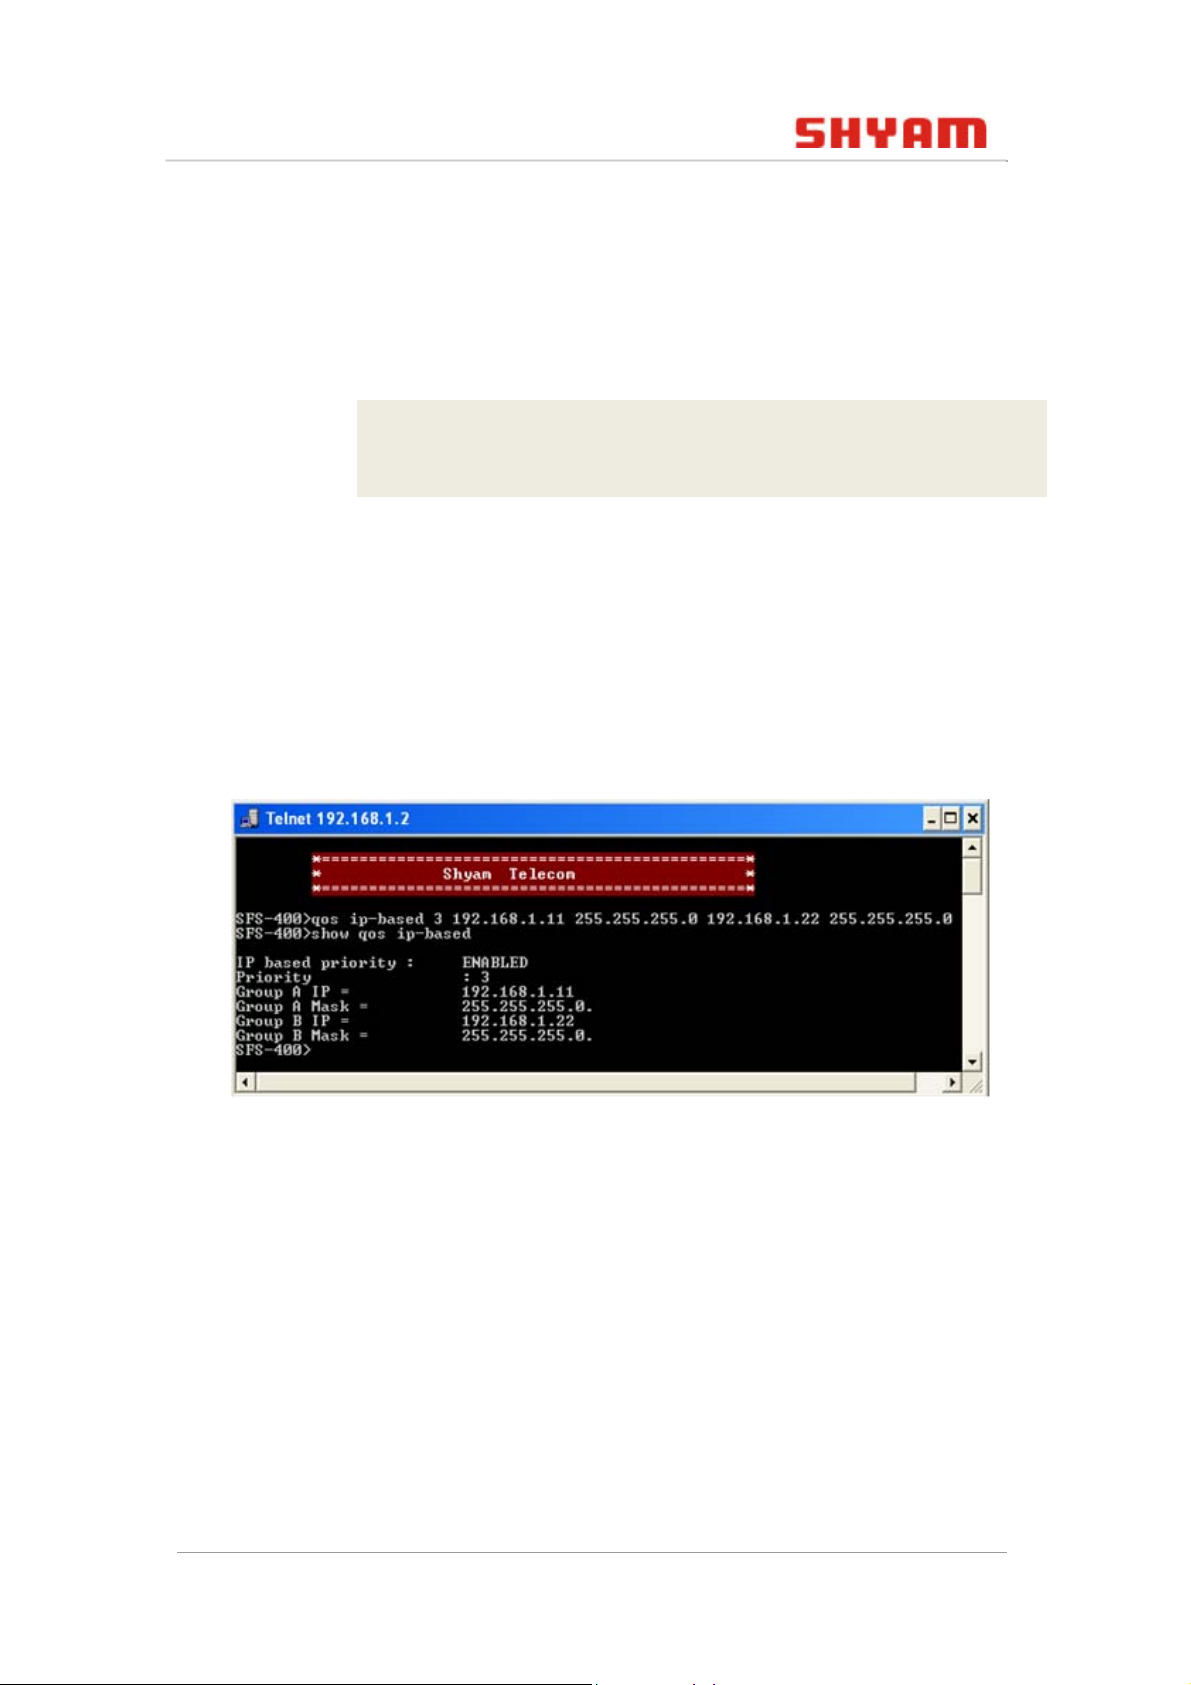
This command is used to enable the IP based QoS.
Syntax
qos ip-based <priority 0-3> <ip-A> <mask-A>
<ip-B> <mask-B>
© 2011 SHYAM | Company Confidential Page 48/57
Page 49
FS400 S WITCH CLI U SER G UIDE
Note: As shown in the above command 3 is the highest
priority. It is necessary to give two IP addresses with
corresponding masks such as <IP-A> and <IP-B>.
Example
FS-400> qos ip-based 3 192.168.1.11 255.255.255.0 192.168.1.22
255.255.255.0
You can view the status of IP based QoS by using show qos
ip-based command.
Syntax
show qos ip-based
Figure 34: IP based QoS
4.10 Link Fault Pass (LFP)
This command is used to enable or disable the link fault pass.
When lfp is enabled the link status on TX port informs the FX
port of FS400 and vice versa. If link fail occurs on TX port, the FX
port then forces its TX port to fail.
Syntax
lfp <enable/disable>
© 2011 SHYAM | Company Confidential Page 49/57
Page 50
FS400 S WITCH CLI U SER G UIDE
Example
FS-400> lfp disable
FS-400> show lfp
Link Fault Pass through: Disabled
4.11 Firmware Upgradation
You can upgrade the firmware image by using either of the
below:
• Trivial file transfer protocol (TFTP)
• Serial
The commands used to upgrade a firmware are described in the
subsequent sections.
Note: You can upgrade the two images in primary and
secondary location. Currently, if you are in primary location then
image is upgraded in secondary location and vice versa. Also,
you have to boot from the new upgraded image location.
4.11.1 fw-upgrade tftp
TFTP support allows FS400 firmware to be upgraded by
downloading a new firmware to the switch. Firmware images to
be uploaded in the switch should be available in the TFTP client
machine.
Before you start the upgrade, make sure you have a TFTP client
on your operating system and the new firmware image copied
onto it. For example, with TFTP server IP address at 192.168.1.2
and new firmware image and located at the TFTP client’s C:
drive.
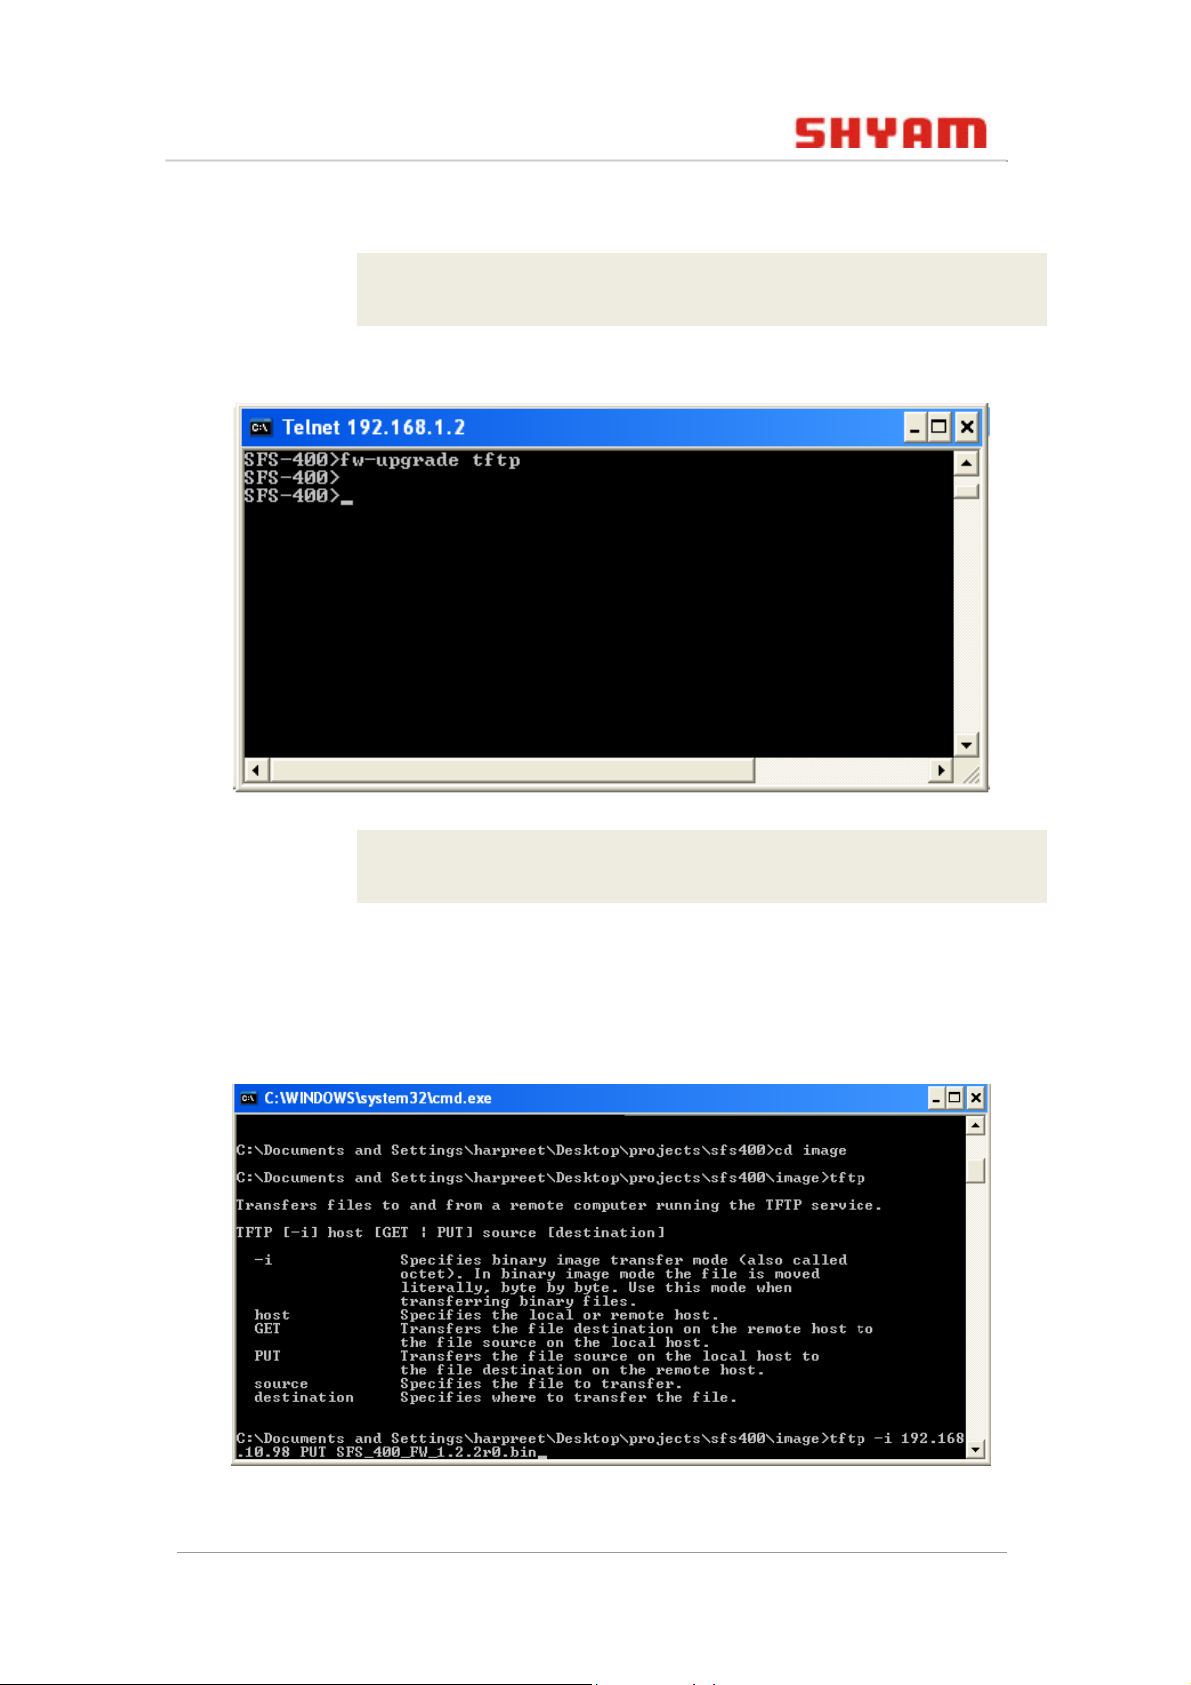
At the Telnet program, enter the following command:
© 2011 SHYAM | Company Confidential Page 50/57
Page 51
FS400 S WITCH CLI U SER G UIDE
Syntax
FS-400>fw-upgrade tftp
Figure 35: Command to Upgrade Firmware using TFTP
C:> tftp –i <switch ip> PUT <image path>
Note: It is recommended that you enter the drive:\path\
before the file name as shown in the figure below:
Figure 36: File Transfer using TFTP
© 2011 SHYAM | Company Confidential Page 51/57
Page 52
FS400 S WITCH CLI U SER G UIDE
Note: You have to type the above mentioned command in
the CLI of the host machine and not in the CLI of FS400.
4.11.2 fw-upgrade serial
This command is used to upgrade the firmware image using
serial port.
Syntax
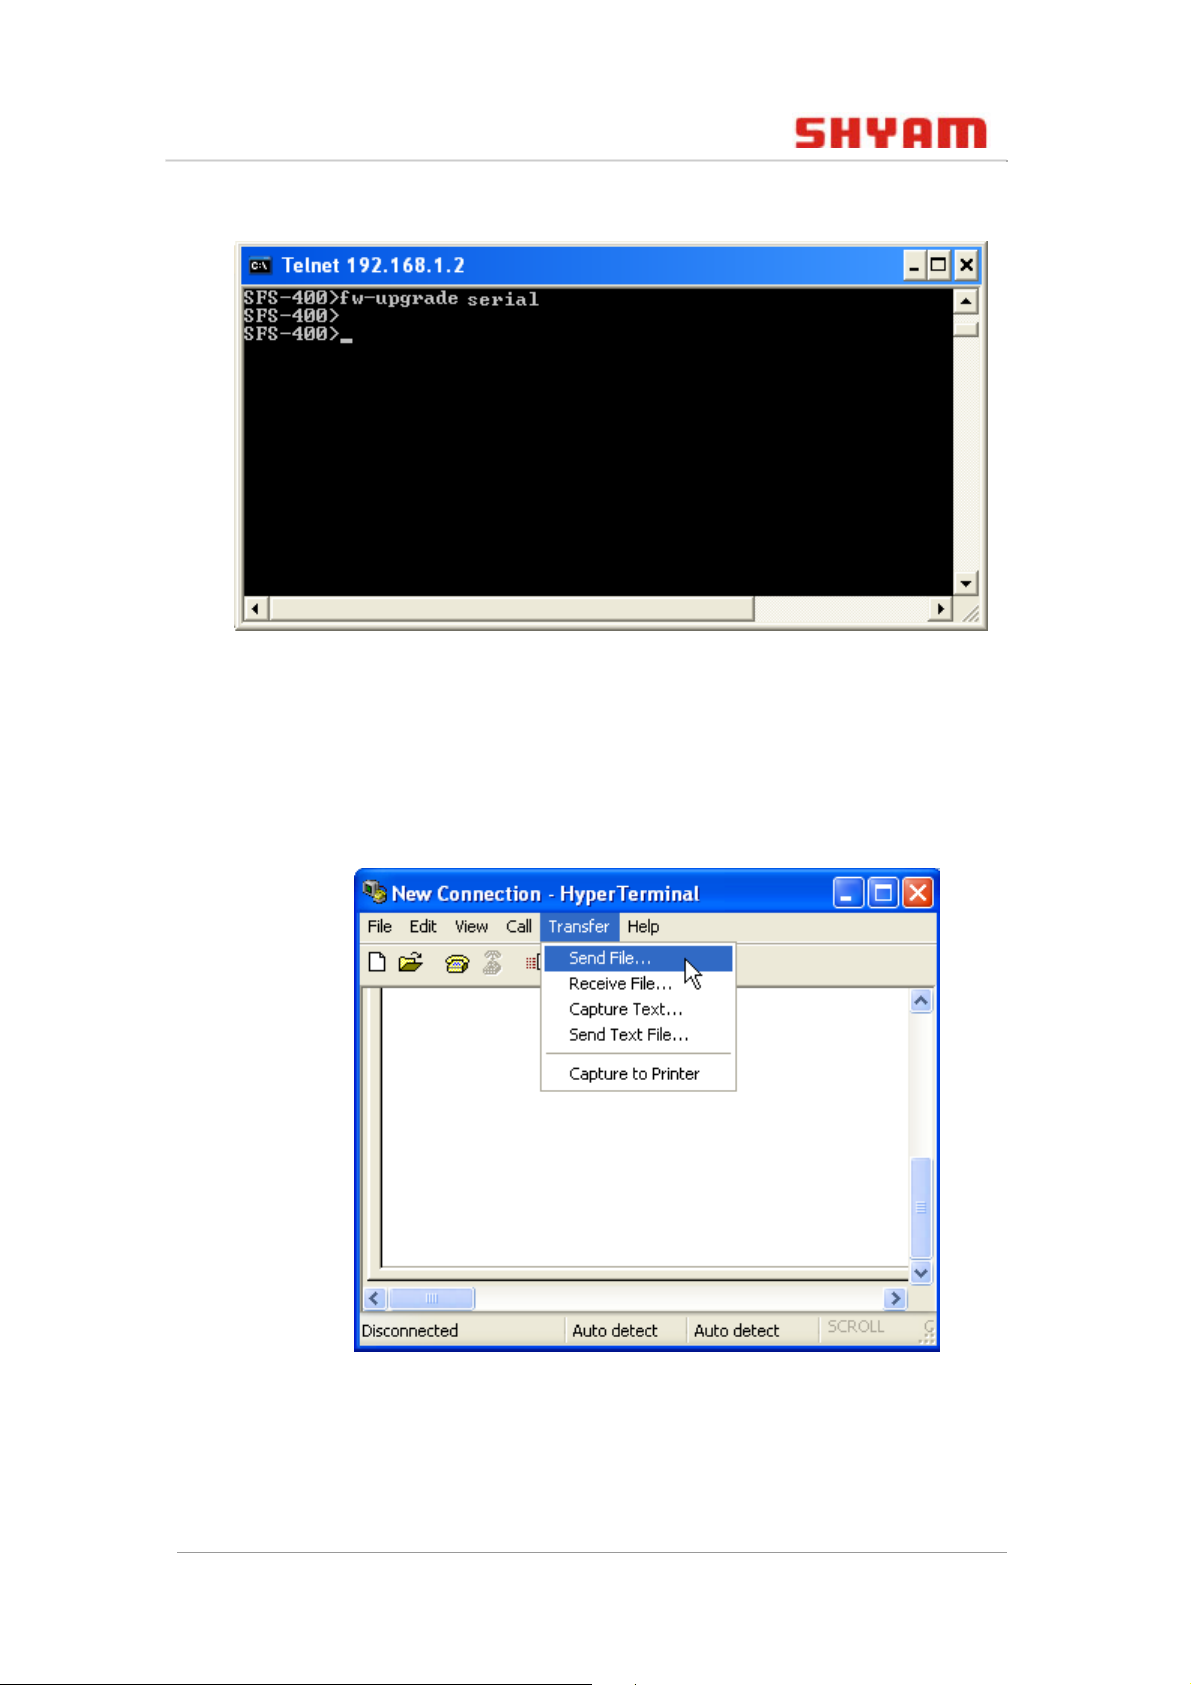
fw-upgrade serial
To perform the serial upgrade of the firmware image, follow
these steps:
1. Connect the console port of FS400 to the serial port of a
computer.
2. Start HyperTerminal or TeraTerm terminal emulation
application.
3. To perform serial download at 115200 baud rate, configure
the terminal emulation console using these parameters:
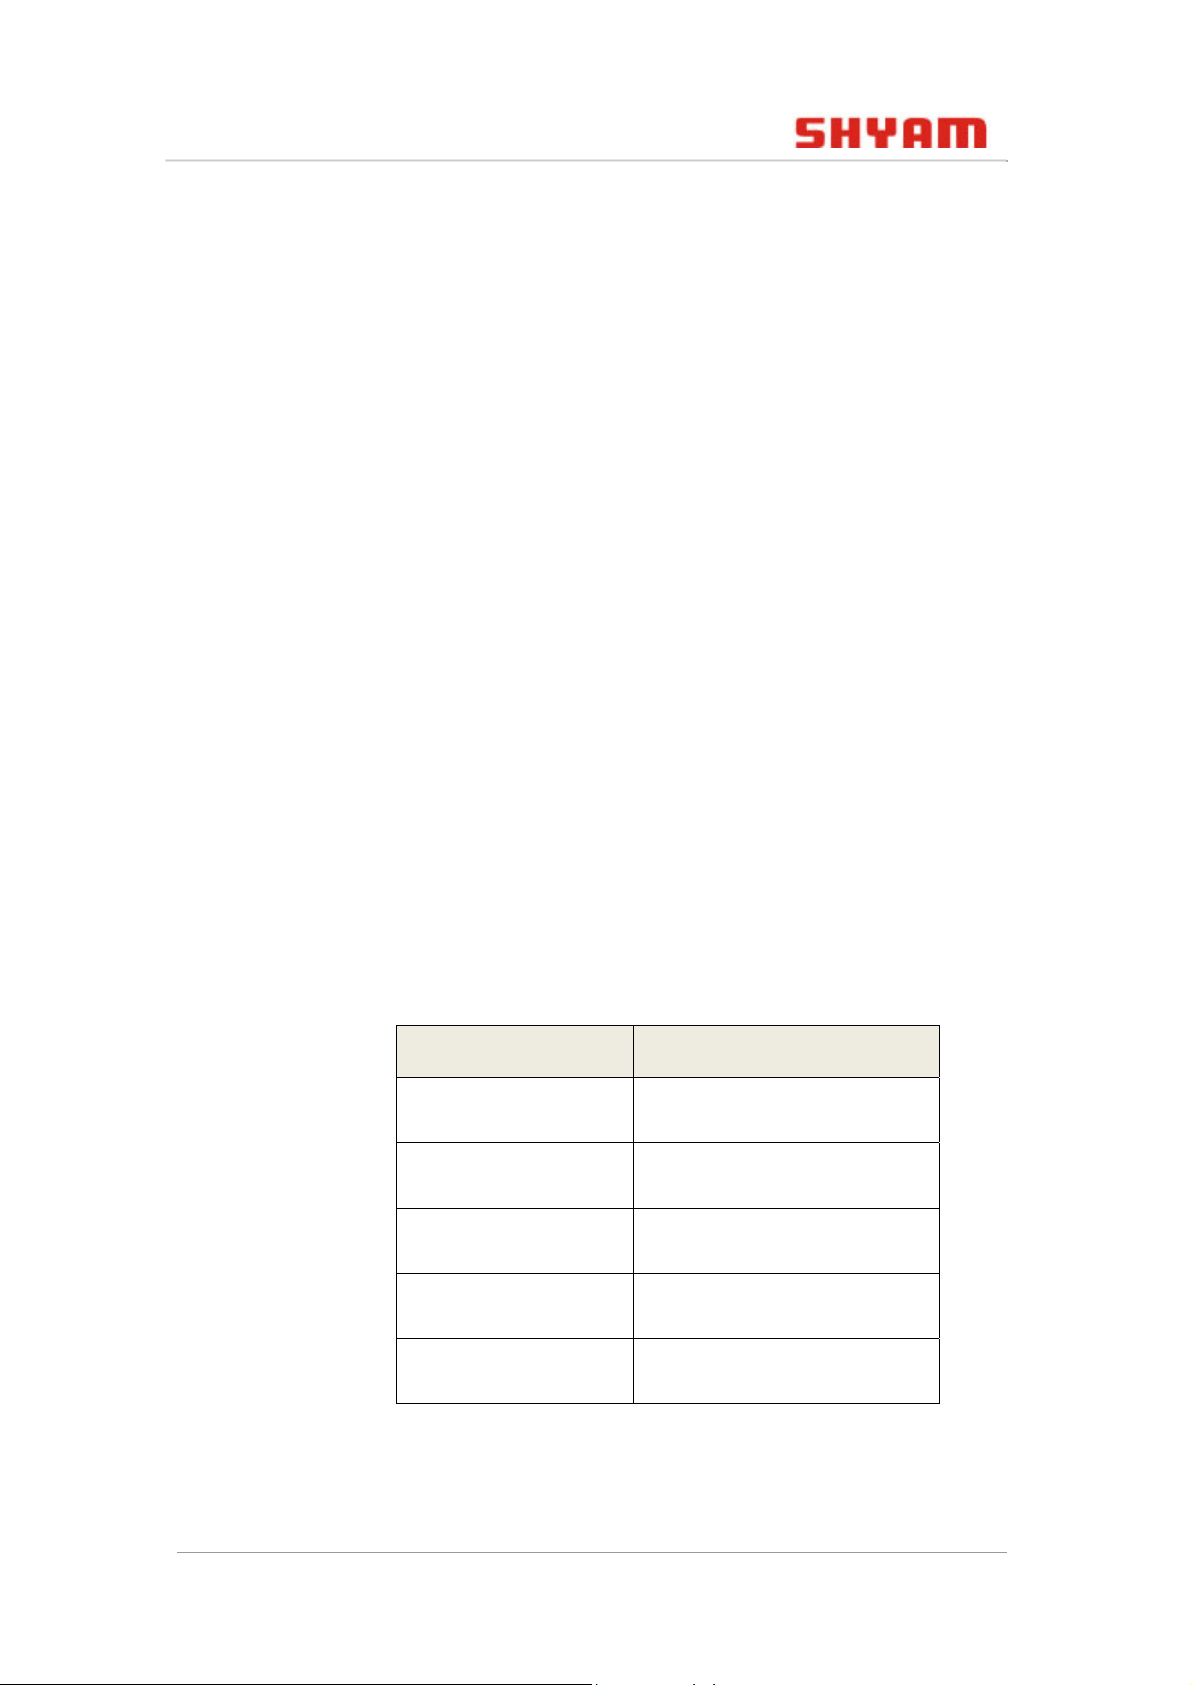
Table 4: Configuring the Terminal Emulation Console
Parameter Value
Baud rate 115200
Data bits 8
Parity None
Stop bits 1 bit
Flow control None
4. Press the Enter key several times on the computer that is
connected to the console port of FS400.
© 2011 SHYAM | Company Confidential Page 52/57
Page 53
FS400 S WITCH CLI U SER G UIDE
Figure 37: Command to Upgrade Firmware Using Serial Port
Note: Ensure that the new switch boot code firmware file is
available on the computer.
5. Select Transfer from menu bar and click Send File.
Figure 38: File Transfer using Serial Port
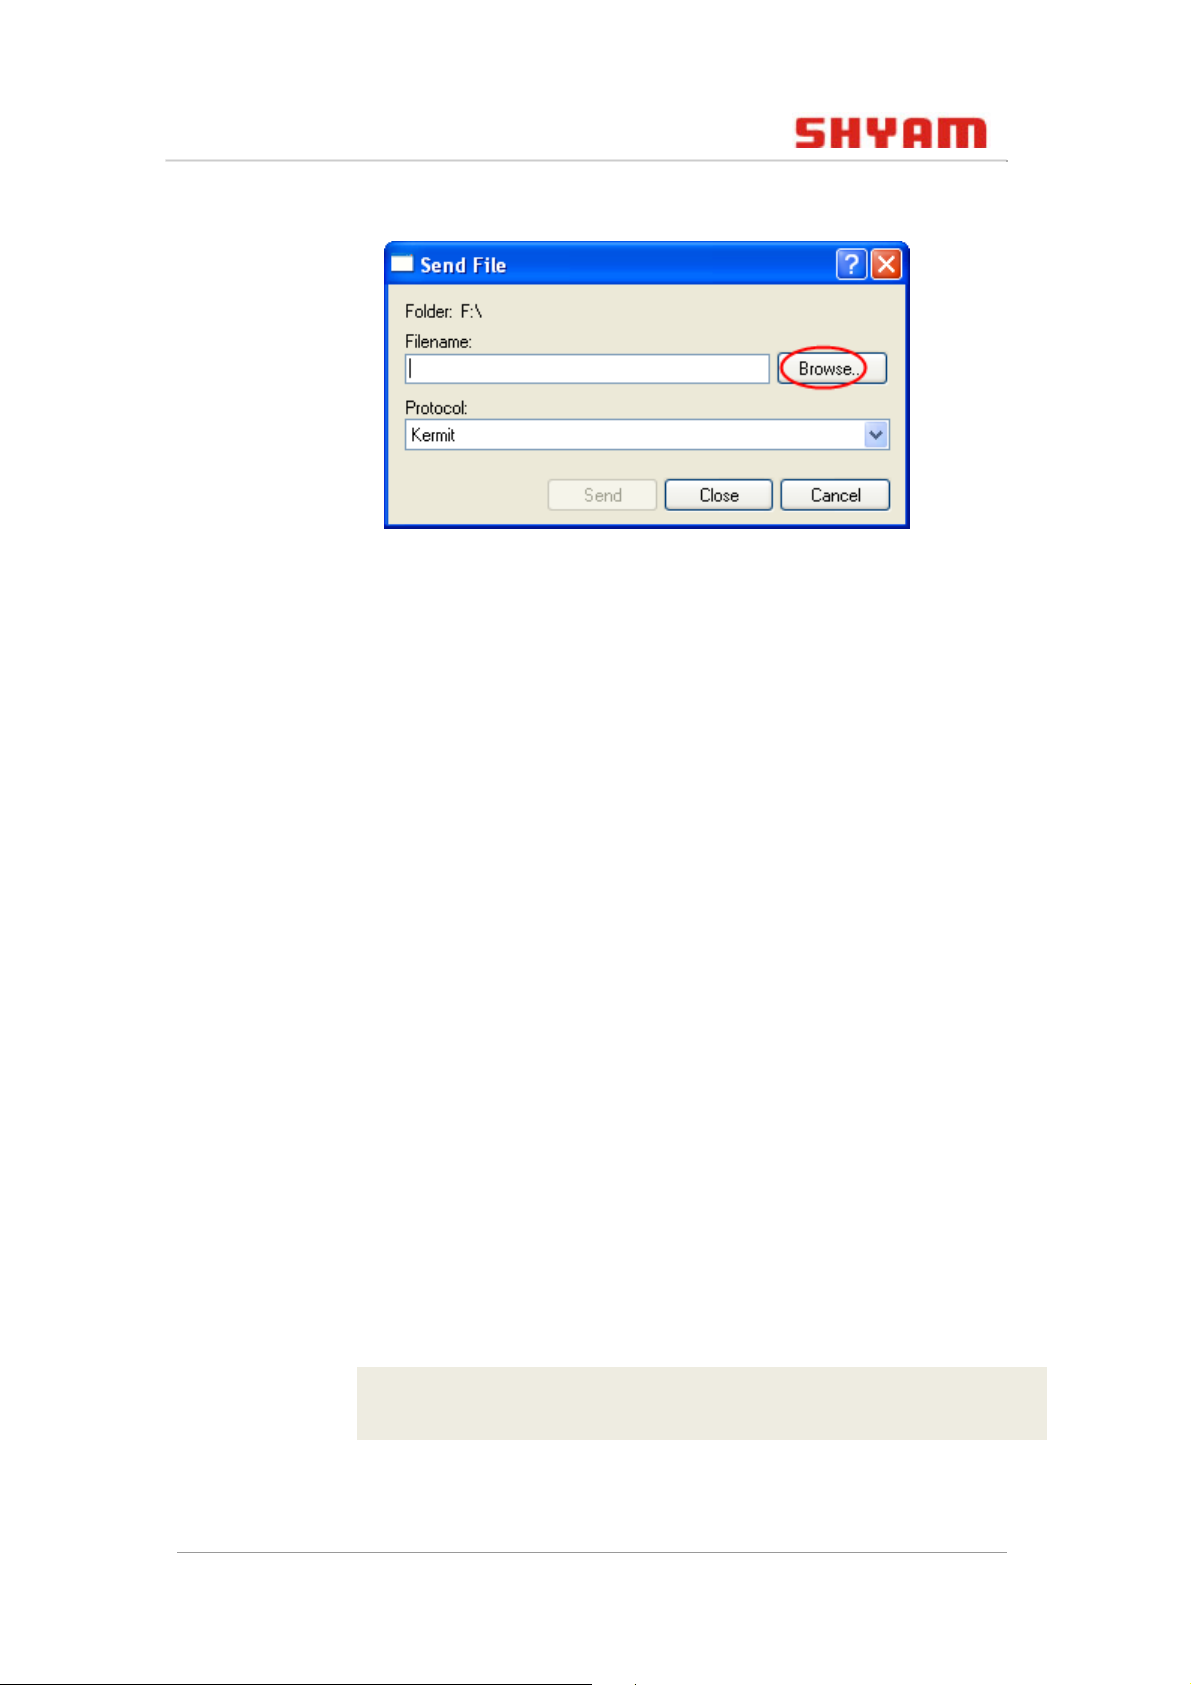
The Send File dialog box appears.
© 2011 SHYAM | Company Confidential Page 53/57
Page 54
FS400 S WITCH CLI U SER G UIDE
Figure 39: Sending File
6. Click Browse to select the path of the firmware.
7. Select Kermit from the Protocol drop-down list.
8. Click Send to transfer the file.
After completing the transfer, a message appears displaying
how many bytes are transferred, followed by another displaying
the status of image extraction.
Note: Do not power cycle/reset FS400 during this process.
After extracting the image, it is updated to flash and a message
with a progress indicator appears.
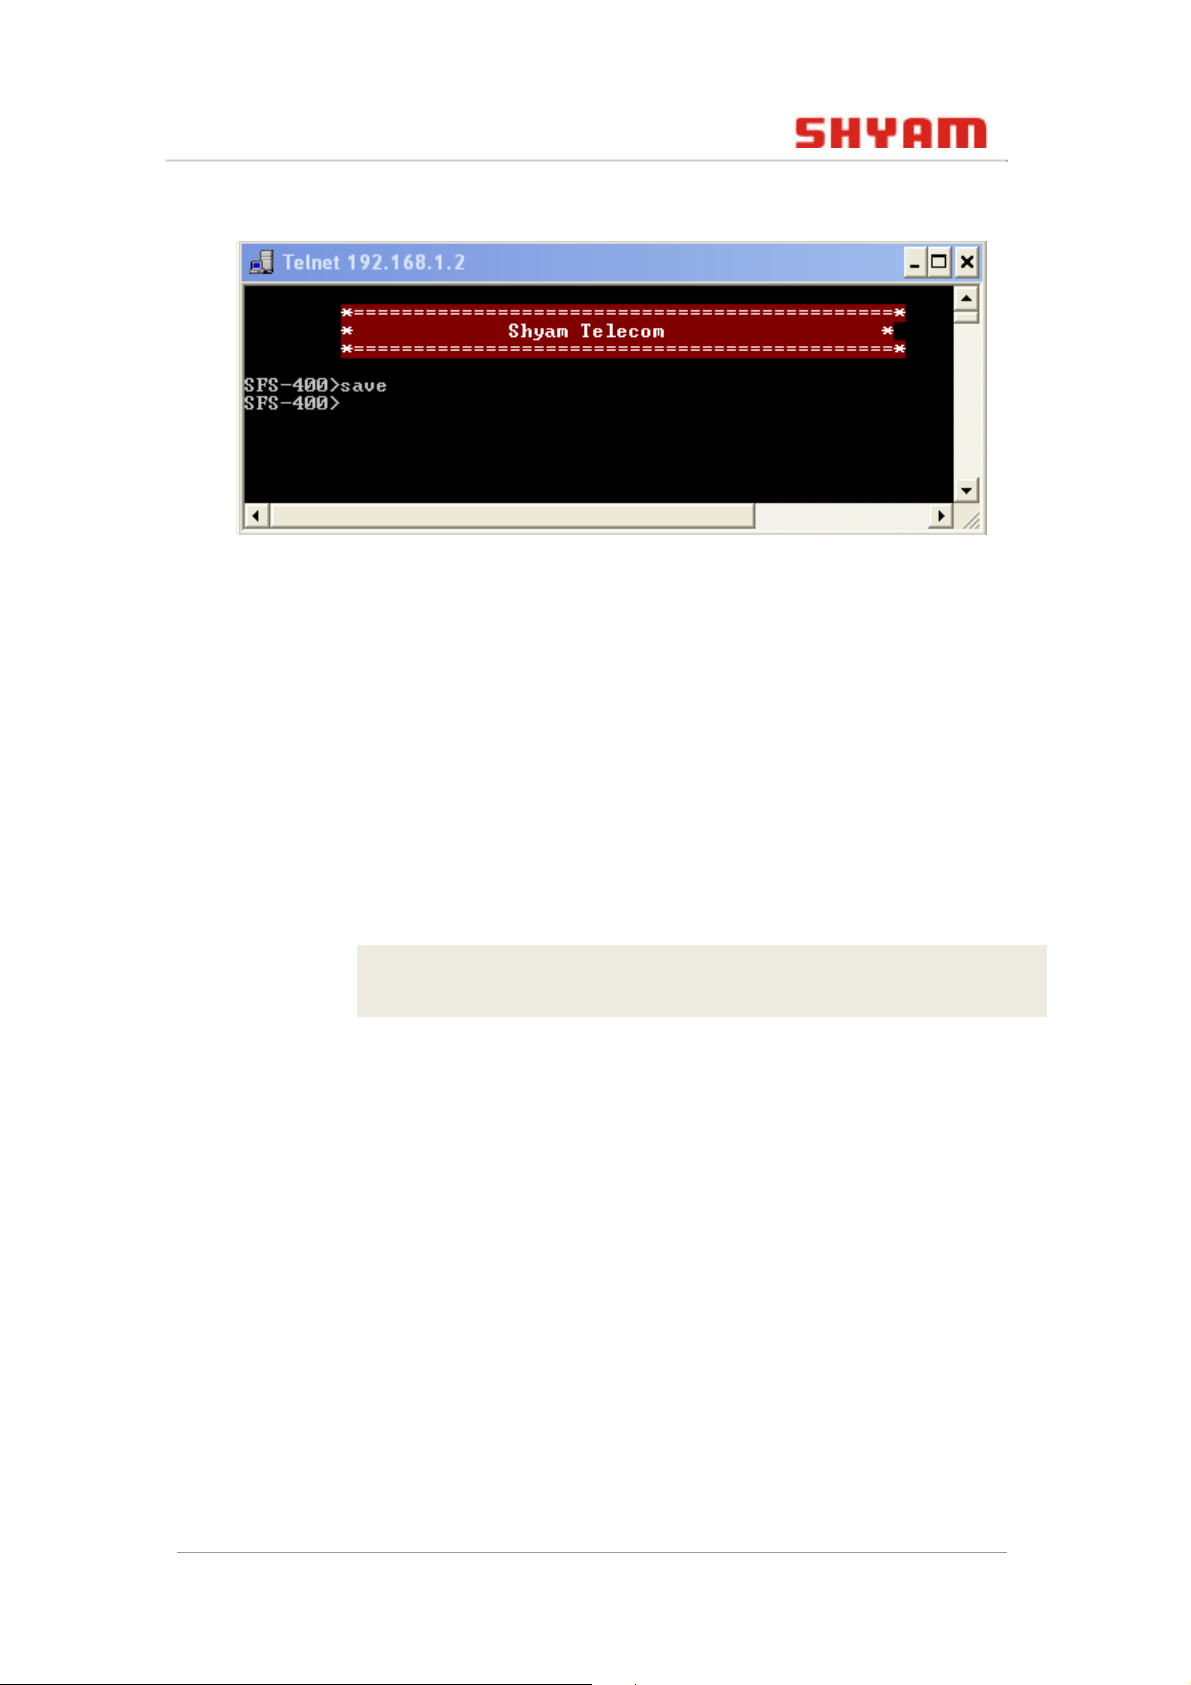
4.12 Saving the Configurations
You can save the configuration of FS400 by using the save
command.
Syntax
save
Example
FS-400> save
© 2011 SHYAM | Company Confidential Page 54/57
Page 55
FS400 S WITCH CLI U SER G UIDE
Figure 40: Saving the Configuration
4.13 Enable PoE
You can enable the power over Ethernet (PoE) on a desired port
of FS400 by using poe on command.
4.14 exit
Syntax
poe on <port number>
Example
FS-400> poe on 2
You can view the status of PoE by show poe command.
Syntax
show poe
This command is used to log off from the current session.
Syntax
exit
© 2011 SHYAM | Company Confidential Page 55/57
Page 56
FS400 S WITCH CLI U SER G UIDE
4.15 Rebooting FS400
Rebooting causes FS400 to restart without changing the
configuration settings. After rebooting, the unsaved
configurations are lost.
4.15.1 boot
This command is used to boot the switch type.
Syntax
boot
You can store the image at the following locations:
• Primary
• Secondary
Therefore, you can boot either from primary or from secondary
location by using the following commands:
4.15.1.1 boot primary
This command is used to boot from the primary image type.
Syntax
boot primary
4.15.1.2 boot secondary
This command is used to boot from the secondary image type.
Syntax
boot secondary
© 2011 SHYAM | Company Confidential Page 56/57
Page 57
FS400 S WITCH CLI U SER G UIDE
4.16 reset
This command resets the configuration to the factory defaults
without turning off FS400.
Syntax
reset
© 2011 SHYAM | Company Confidential Page 57/57
 Loading...