

Page 1
Wired Microphones
VP83F
User Guide
Le Guide de l’Utilisateur
Bedienungsanleitung
Manuale d’uso
Guia del Usuario
Guida dell’Utente
Gebruikershandleiding
© 2013 Shure Incorporated
Printed in China
27A20681 (Rev. 2)
*27A20681*
Руководство пользователя
Pengguna Panduan
取扱説明書
사용자 안내서
用户指南
N108
Page 2

Page 3
VP83F
General Description
The Shure VP83F is a professional-quality condenser microphone designed for use with DSLR and video cameras. The VP83F features built-in flash
recording and captures crystal-clear, high definition audio, completely independent from other hardware. The intuitive menu makes configuration fast
and simple for use in almost any sonic environment.
Features
Exceptional Audio Quality
• High-resolution recording (24 Bit/48khz sampling, WAV
format)
• Supercardioid/lobar pickup pattern rejects unwanted
sounds
• Interference tube for increased directionality
• RF Immunity
Built-in Flash Recording
• Records directly to microSD card (32 GB maximum)
• Intuitive menu for easy microphone configuration and
track management
• Separate outputs for headphone monitoring and camera
input with independent volume adjustment
Rugged and Reliable
• Durable, all-metal housing
• Rycote® integrated shockmount
• Shoemount adapter for easy installation
Accessories
• Rycote® foam windscreen
• 3.5 mm coiled audio cable
• (2) AA batteries (except in Argentina)
• Rycote® Windjammer™ (optional)
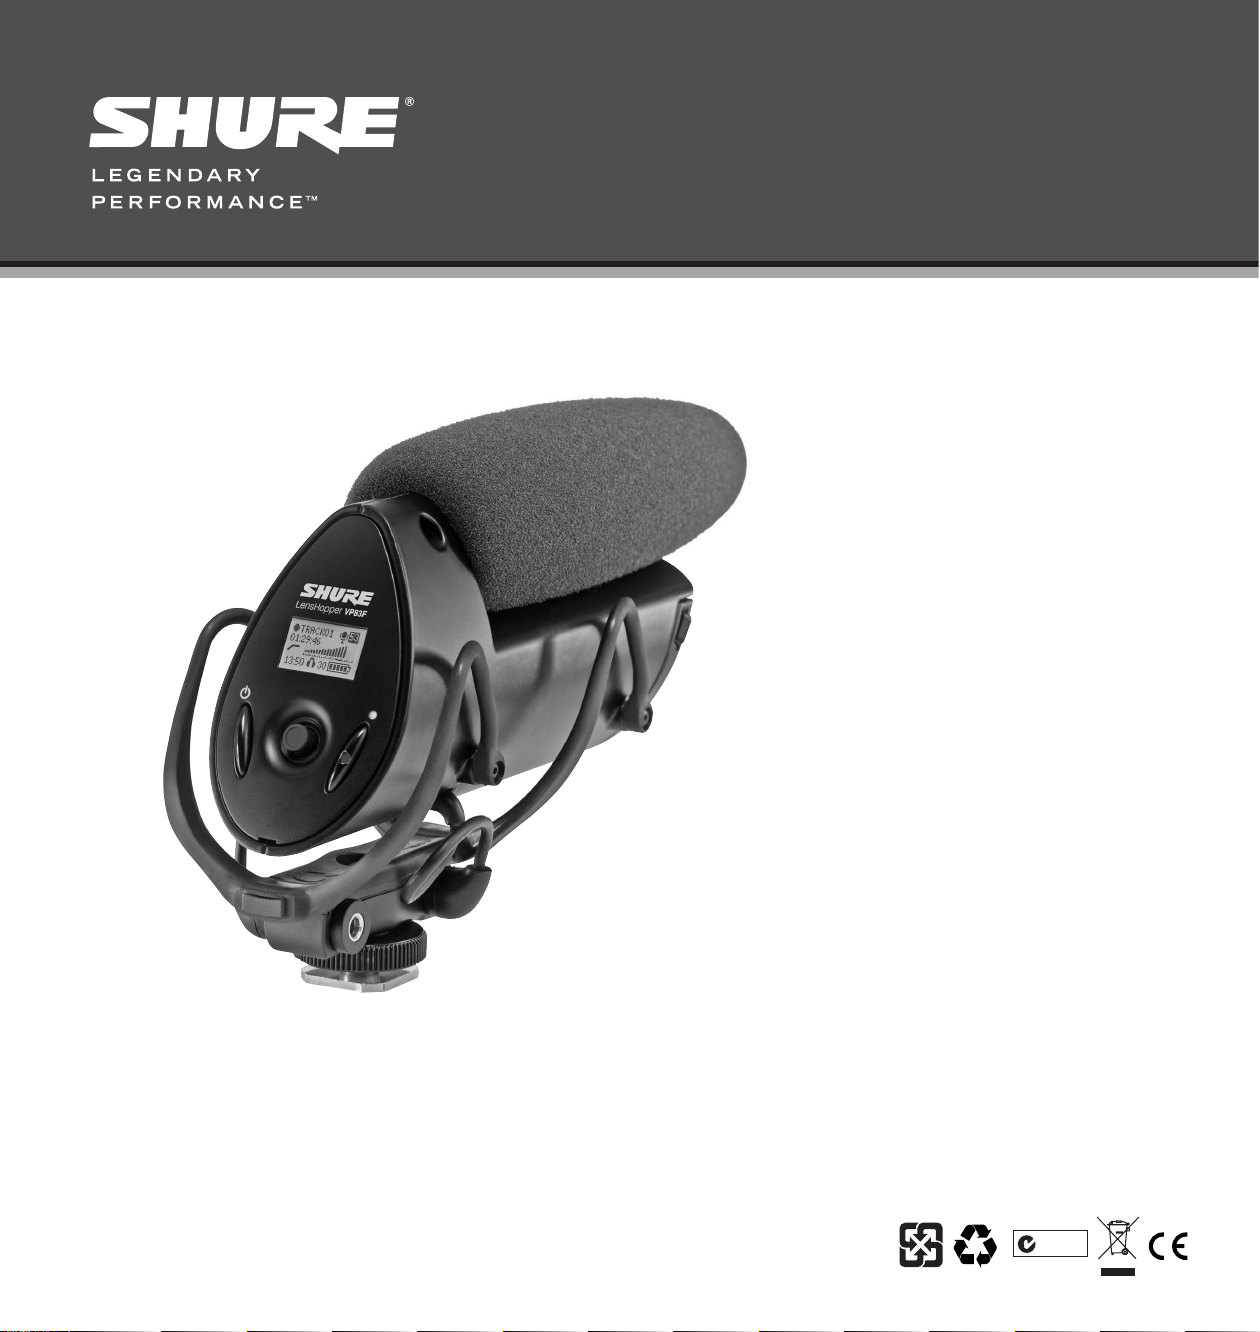
①
④
②
⑤
③
⑥
⑦
① Windscreen
② Camera audio output
③ Camera shoe mount
④ Battery and memory card compartment
⑤ Rycote® integrated shockmount
⑥ Control panel
⑦ Headphone audio output
3
Page 4
Installing the Memory Card and Batteries
The VP83F requires two AA batteries to operate (compatible with Alkaline,
NiMH, or Lithium). Installing a MicroSD memory card enables recording
functionality.
Audio is still passed through to the camera and headphone outputs if there is no memory
card installed.
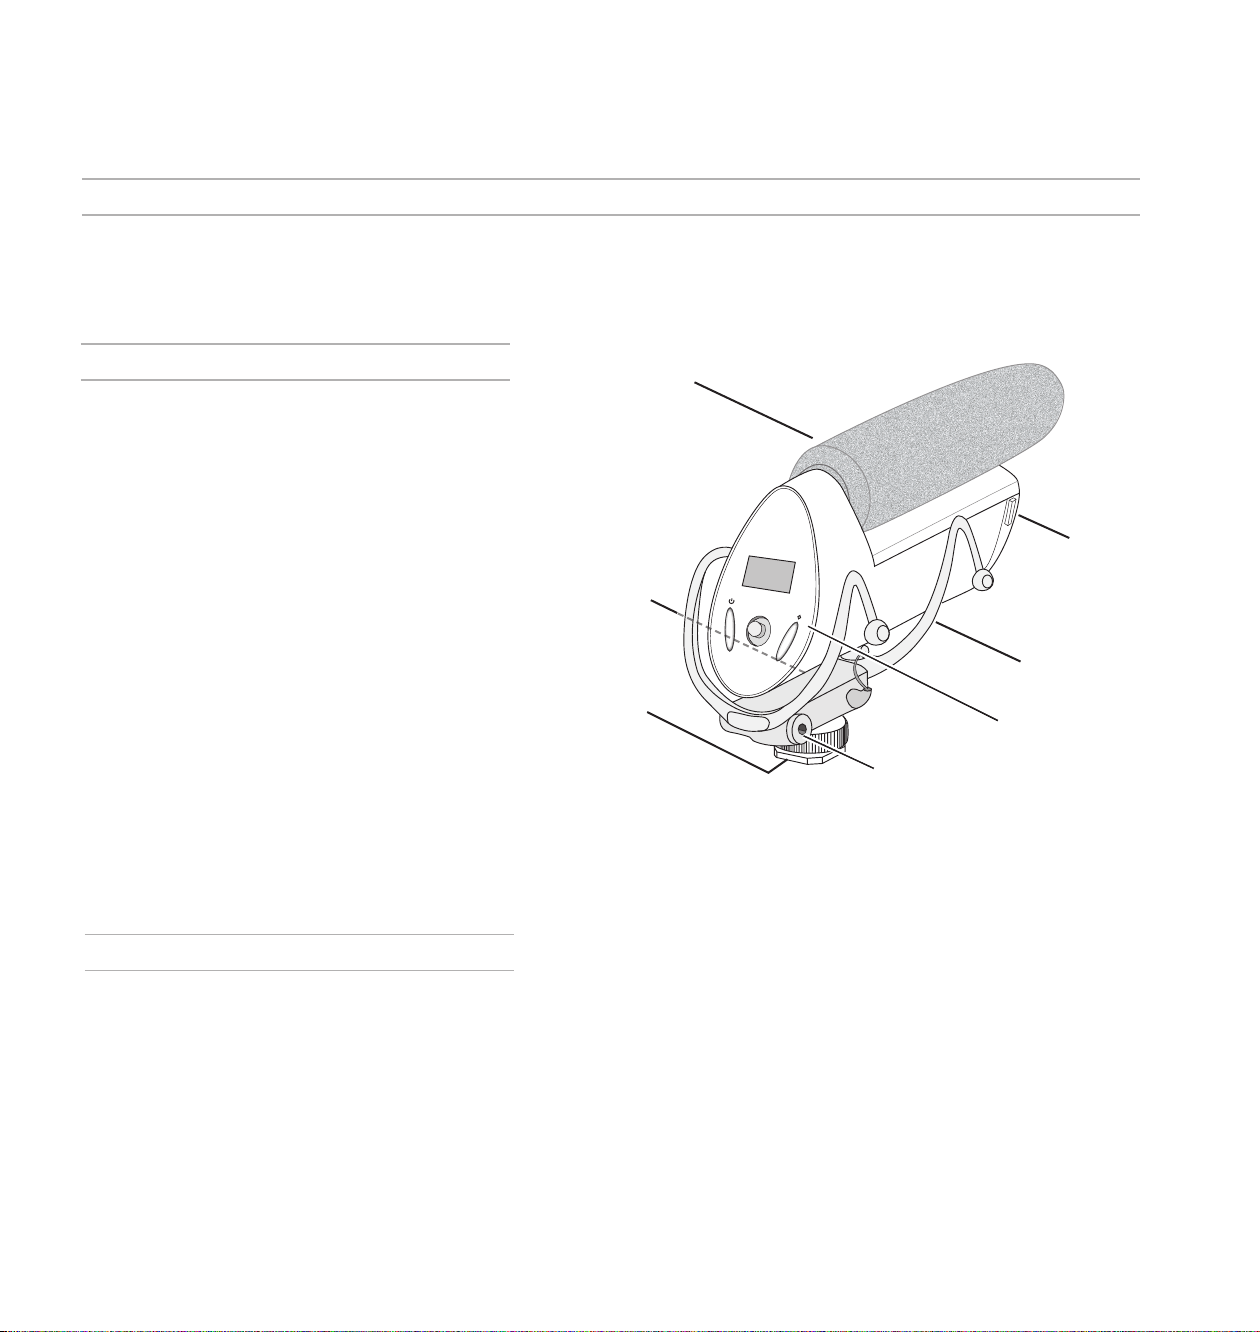
① Opening the front panel
Squeeze the latches on each side and open the front panel to access the
memory card and battery compartment.
② Installing the memory card
Always turn the power off before removing or installing a memory card.
To Install: Insert the card into the slot located above the battery door,
with the contacts facing up. When fully inserted, the card locks into place.
To Remove: Press the card to unlock it, then pull it from the device.
Note: Format the memory card in the device prior to first use. Refer to the memory
card requirements section in the user guide for additional information.
③ Installing and replacing batteries
Open the battery door located inside the front panel by pressing the
fastener down. Insert the batteries according to the polarity indicators.
Note: The battery door must be closed and latched before closing the front panel.
①
②
③
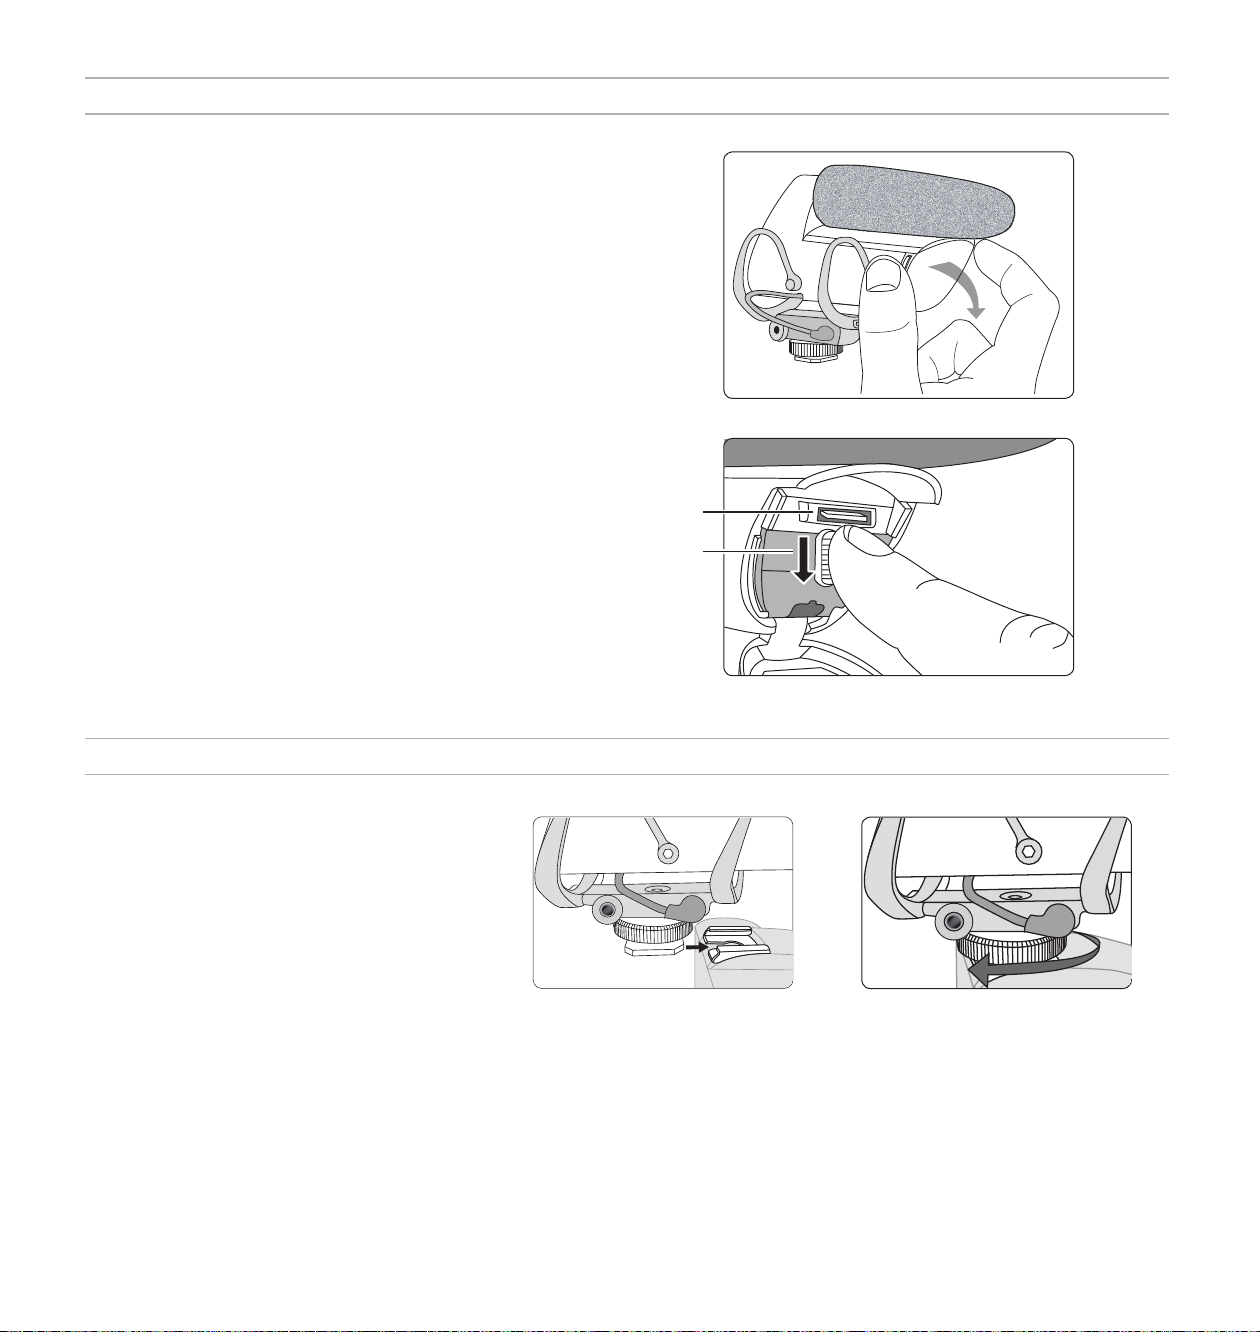
Mounting the Microphone
On a Camera:
1. Slide the microphone onto the camera shoe.
2. Tighten the knurled ring to secure.
Tip: In addition to the vibration isolation provided by the
shock mount, the low-cut filter can be used to further
eliminate handling noise and low frequency rumble.
①
On a Tripod:
The 1/4 inch screw hole at the base of the shoe mount is compatible with tripods that have a 1/4 inch center column. Carefully rotate the microphone
clockwise to tighten onto a tripod. For other mounting solutions, such as microphone stands or boom poles, an adapter may be required.
4
②
Page 5

Audio Connections
Camera Output (Red)
The camera output passes the
audio signal for recording a
backup track on the camera.
Use the 3.5 mm coiled cable to
connect the VP83F camera output
to the camera's audio input.
Control Panel
① Menu Display
Displays menu information and settings.
② Power Button
Turns the unit on and off.
③ Five-Position Joystick
Navigates through the menu. Push
the center of the joystick to make a
selection.
④ Record Button
• Press to begin and pause recording
• Press and hold to stop recording
• When in the menu, press to return
home
⑤ LED Record Indicator
• Solid red = recording
• Flashing red = paused
①
②
③
④
⑤
Headphone Output (Black)
Connect a pair of headphones to
the headphone output for monitoring
recordings and listening during playback.
Important: Never use the microphone gain to
adjust the headphone volume, as this may result
in poor signal quality or distortion.
Menu Navigation
Open menu: Press the joystick to the right
to open the main menu and to proceed into
submenu screens.
Return to previous screen / select
homescreen icons: Press the joystick
to the left to back out of the menu. In the
homescreen, pushing left will highlight the gain,
headphone volume, or low-cut filter and allow
them to be adjusted.
Enter: Press the joystick center button.
Scroll / adjust parameters: Press the joystick
up or down to scroll through menu items, or to
change parameters when selected.
Home Screen Indicators
① Track information
Displays track title and duration
② Low-cut filter icons
On:
Off:
③ Remaining recording time
Displays time remaining on the memory
card
④ Headphone volume
⑤ Battery meter
①
②
③ ④ ⑤
⑥ Audio meter (Gain)
Displays microphone signal level, with
range indicator for suggested peak levels
⑦ Microphone gain value
5
⑦
⑥
Quick adjustments from the home
screen
The following settings are adjustable when
highlighted in the homescreen:
• Headphone volume
• Microphone gain
• Low-cut filter
Press the joystick left or right to highlight
an icon for adjustment, and use up/down
to change the value.
Page 6

Audio Path
Gain
Low-cut Filter
Recording to Memory Card
Camera Out Level
Camera
Output
Headphone Volume
Headphone
Output
Headphone and Camera Output Volume
The following diagram shows how audio flows through the device:
Important: Follow the directions on setting the gain for the best signal-to-noise
performance. Since it is first in the signal path, the gain affects everything following
it. The gain should never be used to boost or attenuate the headphone signal; use
the headphone volume to adjust monitoring levels. The headphone and camera
output level adjustments occur after the signal has reached the recording section of
the device, and should not be used to compensate if the gain setting is too low or is
clipping.
Format The Memory Card Before Use
Format the memory card in the device prior to first use for best
recording performance. Formatting the card after tracks have been
exported is recommended.
To format the card, enter the menu and select UTILITIES > SD CARD >
FORMAT CARD.
Adjusting Microphone Gain
In order to capture the highest quality audio signal, the microphone gain must
be set at the appropriate level. Press the joystick up or down to adjust levels in
the MIC GAIN screen in the menu, or from the home screen when the mic gain
icon is highlighted. Use the following guidelines to achieve the best results:
Headphone Volume: Accessible in the menu by selecting
HEADPHONE, or in the playback, recording, and home screens by
selecting the headphone icon and pressing the joystick up or down.
Camera Output Volume: Accessible in the menu by selecting
UTILITIES > CAMERA OUT. Level is selectable (LOW, MEDIUM, or HIGH)
to accommodate different camera preamp sensitivities.
Note: Always set the gain to the appropriate level prior to adjusting the
headphone or camera output volume.
Low-Cut Filter
Rolls off low frequencies 170 Hz and below (12 dB per octave) in
order to reduce low frequency rumble caused by camera handling
and other environmental factors. A custom Rycote® Windjammer
(A83-FUR) can be used to further reduce wind noise.
Recording Audio
Record: Press the record
button to begin recording. The
LED indicator illuminates while
recording. Pressing record
always creates a new track,
unless resuming a paused
recording.
Pause: Press the record button
to pause the recording. The
LED flashes while recording is
paused. Press record again to
resume.
Stop: Press and hold the record
button (2 seconds).
• Adjust the gain to correspond to the
highest anticipated sound level. The
loudest sounds should peak between
-12 dB and -6 dB.
• Setting the gain too low will result in
more noise in the recording. If set too
high, the signal will clip and become
distorted. The audio meter will indicate
that the signal is clipping when the
level reaches the highest bar.
Tip: For higher resolution metering, adjust the gain in the MIC GAIN screen to see
more precisely where the signal is peaking.
Adjusting Settings While Recording
If necessary, audio settings (Microphone gain, Headphone
volume, and Low-cut filter) can be adjusted while recording to
compensate for unexpected changes, such as a volume increase
that results in clipping. Press the joystick to the left to highlight an
item, and then press the joystick up or down to change the value.
For best results, configure all settings prior to recording.
Note: The menu is not accessible during recording.
6
Page 7

Managing Tracks
VP83F HOME
FILE LIST
HEADPHONE
LOW-CUT
MIC GAIN
UTILITIES
FILE_001
PLAY
RENAME
DELETE
DETAILS
BACKLIGHT
TIME/DATE
SD CARD
BATTERY TYPE
CAMERA OUT
CONTRAST
RESET DEFAULTS
DEVICE DATA
FIRMWARE
FORMAT CARD
SET FILE NAME
MAX FILE TIME
SET TIME
SET DATE
Track Playback
To listen to recorded tracks, select FILE LIST from the menu
screen. Highlight a track and select PLAYBACK to open it.
Playback Controls
Function Joystick action
Utilities
Previous / next track Press left / right
Rewind / fast forward Hold left / right
Play / pause Center push
Return to track list Press left while paused
Return to home screen Press record button
Deleting Tracks
To delete audio tracks, select FILE LIST from the menu screen and open
the track you would like to delete, and select DELETE.
Note: Once tracks have been deleted, they cannot be recovered.
Exporting Tracks
To export .WAV audio files, turn the device off and remove the MicroSD
memory card. Transfer files to a computer using an SD card adapter or
USB adapter. All imported tracks include a title and timestamp.
Tip: For best performance, format the memory card in the device every time after
exporting tracks.
SD CARD
Remaining recording time is displayed and the
following settings can be accessed:
FORMAT CARD: Formatting the microSD card will erase
all data and should be done before first use.
MAX FILE TIME: Adjusting the maximum file size
determines the partitioning of longer tracks. If the
maximum file size is set to 1GB (2 hours), a 6 hour
recording will be divided into three separate WAV
files.
SET FILE NAME: The file name is set to TRACK by
default, but can be changed by selecting a character
and scrolling up or down to change it. This feature is
useful for identifying different sessions or projects.
BACKLIGHT
Adjusts the duration that the LED screen
backlight will remain on.
TIME/DATE
Set the time and date so that tracks include a
timestamp when exported.
BATTERY TYPE
Select the appropriate battery type for the meter
to read accurately.
7
CAMERA OUT
Adjusts the volume of the audio signal that is
sent to the camera.
HIGH (0 dB): For cameras with a low-gain preamp.
MEDIUM (-20 dB): Appropriate for most cameras.
LOW (-40 dB): For cameras with a sensitive
preamp.
CONTRAST
Adjust the contrast value to change the ratio of
light to dark on the display screen.
RESTORE DEFAULTS
Restores all default factory settings except for
the time and date.
DEVICE DATA
Displays technical device information.
UPDATE FW
Enables firmware updates from the memory
card. Having the latest firmware installed on
the unit is recommended. Please visit www.
shure.com for details.
Page 8

Battery Life
Tip
Ring
Sleeve
Use the following information for reference when considering which battery type to use with
the device. Actual runtime may vary depending on the brand of memory card and batteries,
output volume levels, and the type of headphones used.
Battery Type (AA) Battery Runtime (Hours)
When Recording Passing Audio Only
Alkaline 9.5 10.5
NiMH 12 15
Lithium 17.5 22.5
Note: The battery icon will begin flashing when the battery has approximately 15 minutes of run time
remaining.
Memory Card Requirements
The VP83F requires a MicroSD card rated class 6 or higher. Always format new memory
cards in the device prior to recording. Shure recommends using name brand memory cards,
as lower quality or slower memory cards may have a negative effect on performance.
Note: If using a UHS-1 microSDHC memory card, format the card from a computer to FAT32 file system,
and the allocation size to DEFAULT.
Memory Card Recording Capacity
Memory Approximate Recording Time
4 GB 8 Hours
8 GB 16 Hours
16 GB 32 Hours
32 GB (maximum card size) 64 Hours
Accessories and Replacement Parts
Rycote® replacement foam windscreen A83W
Rycote® Windjammer™ A83-FUR
Camera and Headphone Output Pin
Configuration
The camera and headphone outputs send identical,
mono audio signals on the tip and ring portions of
the connector. Headphones and stereo inputs, which
typically use the tip as the left channel and the ring
as the right channel, receive the same audio on both
channels.
Tip Ring Sleeve
Audio (mono 1) Audio (mono 2) Ground
Troubleshooting
Issue Resolution
Unit does not turn on Replace batteries and make sure that the batteries are installed correctly.
Sound is distorted • Microphone gain may be set too high, resulting in clipping. Try lowering the gain.
No sound • If the audio meter doesn’t register a signal, try increasing the microphone gain.
Sound is not being recorded • Ensure the MicroSD memory card is installed correctly.
Wind noise Use A83-FUR windscreen and engage low-cut filter
Audio dropouts Use a memory card with a higher speed class rating or a different brand
Notification screen: SD CARD ERROR
Notification screen: SET TIME/DATE?
Notification screen:
• BATTERY LOW CANNOT FORMAT
• BATTERY LOW CANNOT UPDATE
Notification screen: WAV FILE ERROR The .wav file may be corrupted, or the file format is not supported. Files ripped from a CD that include metadata or files with a sampling rate greater than 48 KHz
• If gain appears to be adjusted properly, try lowering the headphone output volume or using a different pair of headphones.
• Make sure headphone and/or camera outputs are plugged in all the way.
• If the audio meter indicates a signal, check the headphone output level and the headphone connection.
• If gain is adjusted correctly with the headphone output turned up and there is still no sound, try a different pair of headphones.
• Try formatting the card in the device and ensure the memory card meets listed requirements. Use a new memory card if problem persists.
Format the memory card or try a new card that meets the requirements. Be sure to export any tracks before formatting the card.
Set the time and date and keep the device on for 30 minutes upon initial power-up to charge the internal clock (RTC) battery.
Note: The RTC battery may lose the ability to hold a charge after approximately ten years, in which case the time and date settings will not be saved. This does
not affect any other functionality of the device.
Formatting the memory card and updating the firmware cannot be done when the battery is low. To perform these functions, install a new battery.
will not play in the VP83F. Export .wav files to a computer if they are not backed up and remove them from the memory card.
8
Page 9

Specifications
6,300 Hz
10,000 Hz
2,500 Hz
Cartridge Type
Electret Condenser
Polar Pattern
Supercardioid/Lobar
Recording Format
WAV, 24-bit, 48 kHz Sampling Rate
Frequency Response
50 to 20,000 Hz
Sensitivity
open circuit voltage, @ 1 kHz, typical
0 dB Gain
+30 dB Gain
-35.8 dBV/Pa
-5.8 dBV/Pa
[1]
(16.2 mV)
[1]
(512.9 mV)
Maximum SPL
0 dB Gain Setting, 1 kHz at 1% THD
129.2 dB SPL
Signal-to-Noise Ratio
+30 dB Gain Setting
78.4 dB
Self Noise
equivalent SPL, A-weighted, typical, +30 dB Gain
Setting
15.6 dB SPL-A
Operating Temperature Range
-18°C (0°F) to 60°C (145°F)
Storage Temperature Range
-29°C (-20°F) to 74°C (165°F)
Operating Relative Humidity
0 to 95%
Housing
Cast aluminum
Power Requirements
2 AA batteries (Alkaline, NiMH, Rechargeable Li-Ion)
Net Weight
215 g (7.6 oz.)
[3]
[2]
, 1000 Ω load
Camera Output
Connector Type
3.5 mm (1/8") dual mono, Unbalanced
Output Impedance
47 Ω
Headphone Output
Connector Type
3.5 mm (1/8") dual mono
Output Impedance
5 Ω
[1]
1 Pa=94 dB SPL
[2]
THD of microphone preamplifier when applied input
signal level is equivalent to cartridge output at specified
SPL
[3]
S/N ratio is the difference between 94 dB SPL and
equivalent SPL of self noise, A-weighted
250 Hz
500 Hz
1,000 Hz
20
15
0.6 m (2 ft.) from sound source
10
5
0
-5
dB
-10
-15
-20
-25
-30
20 100 1k 10k 20k
2,500 Hz
6,300 Hz
10,000 Hz
Hz
3.8 in
(9.7 cm)
6.6 in (16.8 cm)
9
2.3 in (5.8 cm)
Page 10

Certifications
Information to the user
This equipment has been tested and found to comply with the limits for
a Class B digital device, pursuant to Part 15 of the FCC Rules. These
limits are designed to provide reasonable protection against harmful
interference in a residential installation. This equipment generates uses
and can radiate radio frequency energy and, if not installed and used in
accordance with the instructions, may cause harmful interference to radio
communications. However, there is no guarantee that interference will
not occur in a particular installation. If this equipment does cause harmful
interference to radio or television reception, which can be determined by
turning the equipment off and on, the user is encouraged to try to correct
the interference by one or more of the following measures:
• Reorient or relocate the receiving antenna.
• Increase the separation between the equipment and the receiver.
• Connect the equipment to an outlet on a circuit different from that to
which the receiver is connected.
• Consult the dealer or an experienced radio/TV technician for help.
This Class B digital apparatus complies with Canadian ICES-003. Cet
appareil numérique de la classe B est conforme à la norme NMB-003 du
Canada.
Note: Testing is based on the use of supplied and recommended cable types. The
use of other than shielded (screened) cable types may degrade EMC performance.
This product meets the Essential Requirements of all relevant European
directives and is eligible for CE marking.
The CE Declaration of Conformity can be obtained from Shure
Incorporated or any of its European representatives. For contact
information please visit www.shure.com
The CE Declaration of Conformity can be obtained from: www.shure.com/
europe/compliance
Authorized European representative:
Shure Europe GmbH
Headquarters Europe, Middle East & Africa
Department: EMEA Approval
Jakob-Dieffenbacher-Str. 12
75031 Eppingen, Germany
Phone: 49-7262-92 49 0
Fax: 49-7262-92 49 11 4
Email: EMEAsupport@shure.de
10
Page 11

Europe, Middle East, Africa:
Shure Europe GmbH
Jakob-Dieffenbacher-Str. 12,
75031 Eppingen, Germany
Phone: 49-7262-92490
Fax: 49-7262-9249114
Email: info@shure.de
PT. GOSHEN SWARA INDONESIA
Kompleks Harco Mangga Dua Blok L No. 35 Jakarta Pusat
I.16.GSI31.00501.0211
 Loading...