

Page 1
Wired Microphones
VP83
User Guide
Le Guide de l’Utilisateur
Bedienungsanleitung
Manuale d’uso
Guia del Usuario
Guida dell’Utente
Gebruikershandleiding
© 2013 Shure Incorporated
Printed in China
27A20676 (Rev. 2)
Руководство пользователя
Pengguna Panduan
取扱説明書
사용자 안내서
用户指南
N108
Page 2

Page 3
VP83
General Description
Designed for use with DSLR and video cameras, the Shure VP83
condenser microphone enables videographers to capture professional
quality audio. Adjustable gain, superior off-axis rejection, and a selectable
low-cut filter provide exceptional definition and clarity. Consistent with
Shure's commitment to quality and durability, the VP83 features a
lightweight, all-metal housing and a built-in Rycote® shock mount for
reliable use in the field.
Features
• Supercardioid/lobar pattern rejects unwanted off-axis sounds
• Low-cut and gain switches for maximum adaptability
• Rycote® integrated shock mount
• 130 hours of battery life
• Built-in 3.5 mm audio output cable
• Superior RF immunity
• Durable, all-metal housing
• Shoe mount adapter for easy installation
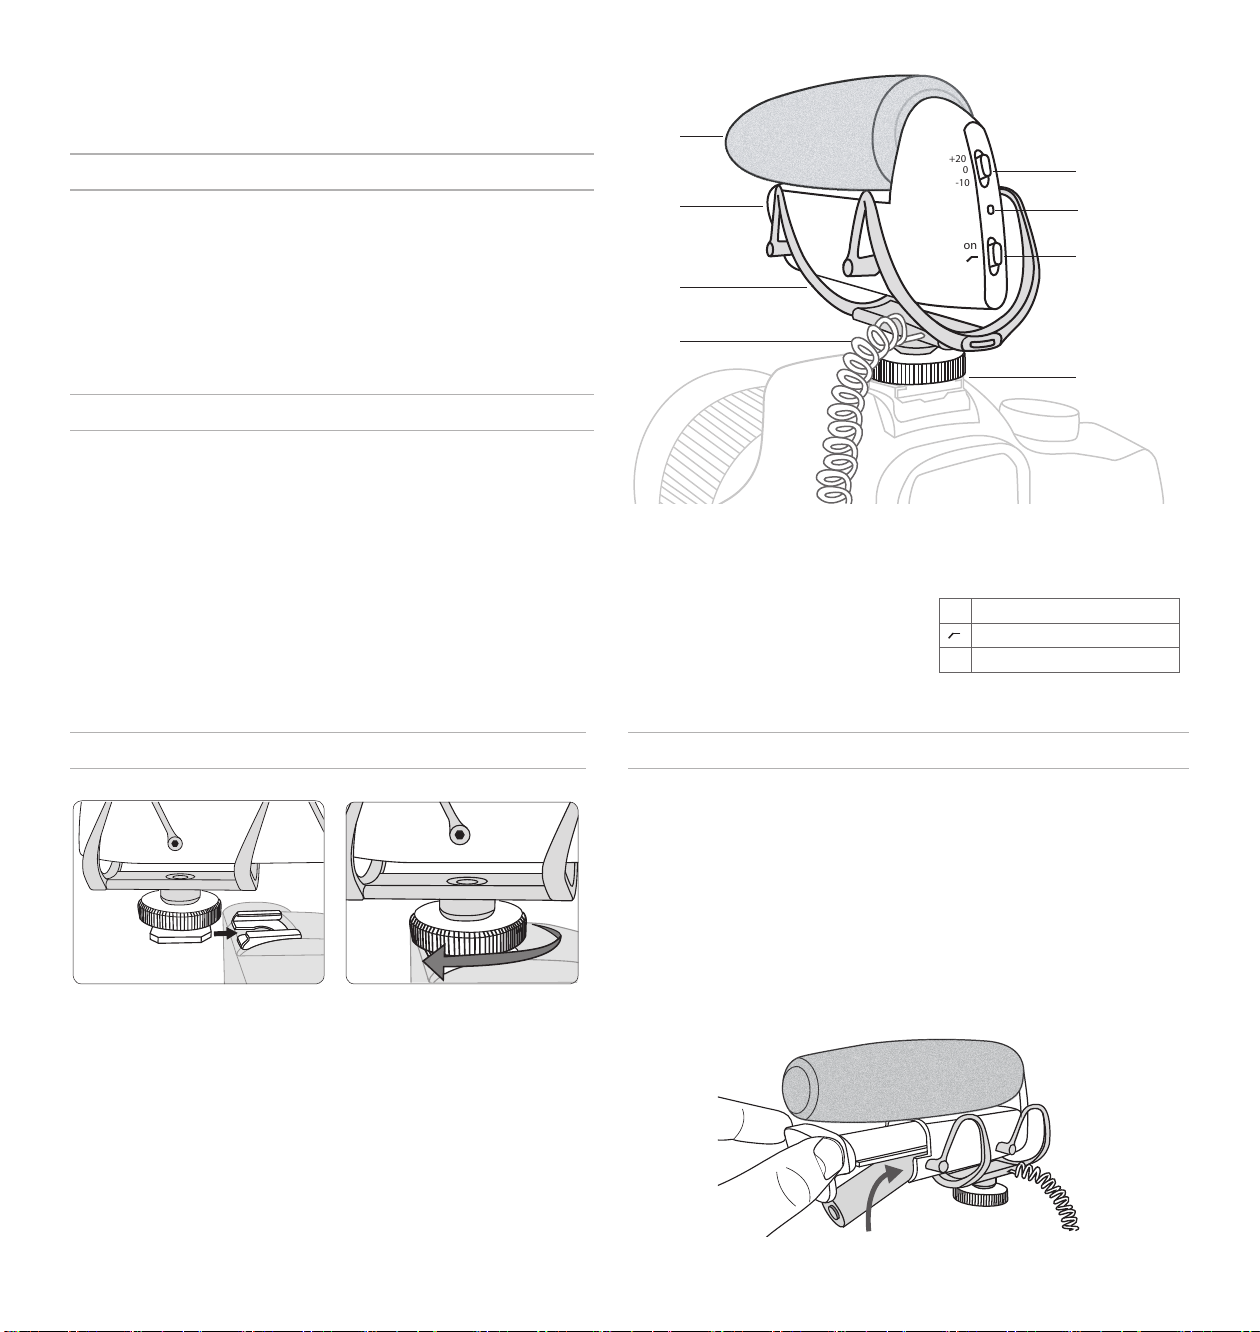
①
②
③
④
① Rycote® Foam Windscreen
② Battery Compartment
③ Rycote® Integrated Shock
Mount
④ Audio Output Cable
⑤ Gain Adjustment Switch
+20
0
-10
on
o
⑥ Power / Low Battery LED
⑦ Power / Low-Cut Filter Switch
on power on
power on with low-cut filter engaged
off power off
⑧ Camera Shoe Mount Adapter
⑤
⑥
⑦
⑧
Mounting the Microphone Installing Batteries
This microphone requires one AA battery to operate (Alkaline, NiMH, or
Lithium). To install:
1. Squeeze the door latches and pull the battery compartment open.
2. Insert the battery into the holder according to the polarity indicator and
secure it into place.
3. Close the compartment by pushing the holder back in until it latches.
Low Battery LED: When the battery is running low, the LED turns red and the
battery should be replaced as soon as possible. See the battery life table in the
user guide to determine remaining runtime after the LED turns red.
1. Slide the microphone onto the
camera shoe.
Tip: In addition to the vibration isolation provided by the shock mount,
the low-cut filter can be used to further eliminate handling noise and
low frequency rumble.
2. Tighten the knurled ring to
secure.
3
Page 4

Audio Configuration
+20
-10
① Connect to the camera or recording device
Plug the attached coiled cable into the camera's audio input.
Alternatively, the microphone can be plugged into a field
recorder or other external device. It may be connected to both
a camera and a recorder by using a Y-splitter cable.
Why Gain Settings are Important
Proper gain adjustment is necessary to
achieve the best signal-to-noise ratio. When
recording audio, the camera's preamp circuitry
may introduce a small amount of noise that
increases as the camera's preamp gain is
raised, or when volume levels are raised
during post production.
How the VP83 improves performance:
The VP83 microphone has very low noise
characteristics, which means that using more
② Lower the camera's gain (input volume) to the minimum
setting
gain from the microphone and less from the
camera will improve the signal-to-noise ratio
and result in a cleaner audio signal.
Using the least amount of gain from the camera or recording
device and more gain from the VP83 will result in a better
0
signal-to-noise ratio.
Note: If automatic gain control on the camera (when applicable) introduces
unwanted audio artifacts, consider bypassing the feature.
Low-cut Filter
The low-cut filter reduces low frequency
rumble caused by camera handling and other
environmental factors by rolling off low frequencies
170 Hz and below (12 dB per octave). To engage,
③ Perform a sound check and adjust the gain switch
The dB gain switch adjusts the level of the audio signal sent to
+20
-10
0
the camera's audio input. Begin with the gain switch set to +20
0
dB. Monitor the camera's audio meter and adjust the switch
on
o
so that the loudest sounds do not exceed -6 dB.
+20 dB: Appropriate level for many cameras when recording typical
0 dB: Use when capturing sounds that are slightly louder than typical
-10 dB: Use when the signal is too loud and distorts the camera's
sound levels (speech, for example) and for quiet sources.
speech levels.
preamp, or in loud environments, such as a concert or sporting
event.
slide the power switch to the low-cut filter ( )
position.
Monitoring the Audio Signal
To listen to the audio while recording, connect a
pair of headphones to the camera's headphone
output. Use the camera's headphone volume
control to adjust the monitoring level. Do not
use the gain switch on the VP83 to adjust the
monitoring level.
Note: Camera input sensitivity varies between manufacturers. Use this
information for general reference.
④ If necessary, increase the camera's input gain
The audio signal should peak between -12 and -6 dB on the
camera's audio meter. Follow the camera manufacturer's
instructions to fine tune the gain to reach the appropriate level.
4
Page 5

Specifications
Cartridge Type
Electret Condenser
Polar Pattern
Supercardioid/Lobar
Frequency Response
50 to 20,000 Hz
Output Impedance
171Ω
Sensitivity
open circuit voltage, @ 1 kHz, typical
-36.5 dBV/Pa
Maximum SPL
1 kHz at 1% THD
129 dB SPL
Signal-to-Noise Ratio
76.6 dB
Dynamic Range
@ 1 kHz, 1000 Ω load
111.6 dB
Clipping Level
@ 1 kHz, 1% THD, 1000 Ω load
-2.7 dBV
Self Noise
equivalent SPL, A-weighted, typical
17.4 dB SPL-A
Operating Temperature Range
-18°C (0°F) to 57°C (135°F)
Storage Temperature Range
-29°C (-20°F) to 74°C (165°F)
Operating Relative Humidity
0 to 95%
Housing
Cast aluminum
Power Requirements
1 AA battery (Alkaline, NiMH, Lithium)
Net Weight
133 g (4.7 oz.)
[1]
1 Pa=94 dB SPL
[2]
THD of microphone preamplifier when
applied input signal level is equivalent to
cartridge output at specified SPL
[3]
S/N ratio is the difference between 94
dB SPL and equivalent SPL of self noise,
A-weighted
[1]
(14.9 mV)
[2]
, 1000 Ω load
[3]
20
15
0.6 m (2 ft.) from sound source
10
5
0
-5
dB
-10
-15
-20
-25
-30
20 100 1k 10k 20k
Hz
250 Hz
500 Hz
1,000 Hz
2,500 Hz
6,300 Hz
10,000 Hz
Battery Life
AA Battery Type Typical Remaining Runtime (Hours)
New Battery After power LED turns red
Alkaline 130 13
NiMH 108 2
Lithium 187
½
5
Page 6

Troubleshooting
Issue Solution
Unit does not turn on Replace batteries and make sure that the batteries are installed
Sound is distorted • Check that the audio cable is completely inserted into the camera.
No sound • Make sure the microphone is on and that the audio cable is
correctly.
• Camera input gain may be set too high, resulting in clipping. Try
lowering the gain. If the camera's gain appears to be adjusted
properly, try setting the gain switch set to 0 or -10 dB.
• If listening through headphones, check the connection or try using
a different pair.
connected to the correct audio input jack on the camera.
• If the camera doesn’t register a signal, try increasing the camera
gain or setting the gain switch to +20.
Accessories and Replacement Parts
Rycote® replacement foam windscreen A83W
Rycote® Windjammer™ A83-FUR
Certifications
Note: Testing is based on the use of supplied and recommended
cable types. The use of other than shielded (screened) cable types
may degrade EMC performance.
The CE Declaration of Conformity can be obtained from: www.shure.
com/europe/compliance
Authorized European representative:
Shure Europe GmbH
Headquarters Europe, Middle East & Africa
Department: EMEA Approval
Jakob-Dieffenbacher-Str. 12
75031 Eppingen, Germany
Phone: 49-7262-92 49 0
Fax: 49-7262-92 49 11 4
Email: EMEAsupport@shure.de
5.9 in
(150 mm)
+20
0
-10
3.3 in
on
o
(84 mm)
1.7 in
(43 mm)
6
Page 7

Europe, Middle East, Africa:
Shure Europe GmbH
Jakob-Dieffenbacher-Str. 12,
75031 Eppingen, Germany
Phone: 49-7262-92490
Fax: 49-7262-9249114
Email: info@shure.de
PT. GOSHEN SWARA INDONESIA
Kompleks Harco Mangga Dua Blok L No. 35 Jakarta Pusat
I.16.GSI31.00501.0211
 Loading...