

Shure Unf-R, UHF-R, UR4S+, UR4D+, SM58 User Manual
...


English
Contents
Important Safety Instructions ............................................................................................................................................................... 3
Feature Overview
System Components
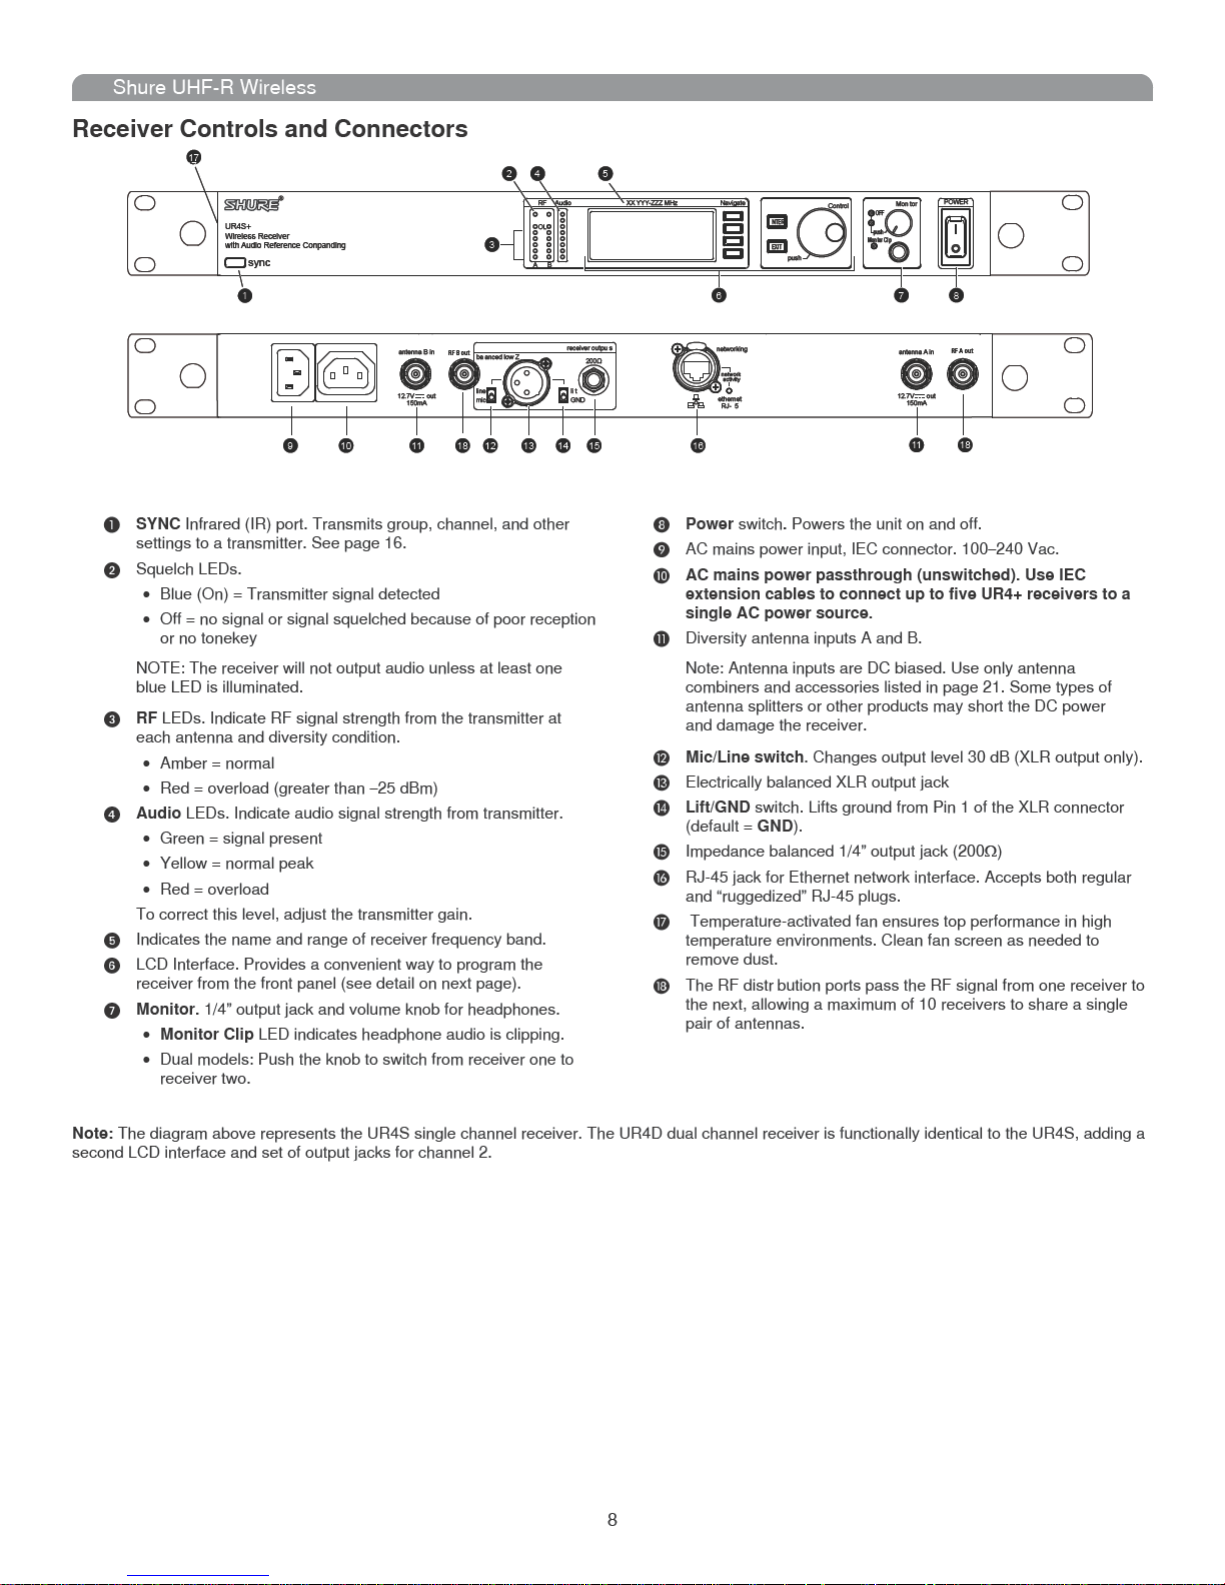
Receiver Controls and Connectors ...................................................................................................................................................... 8
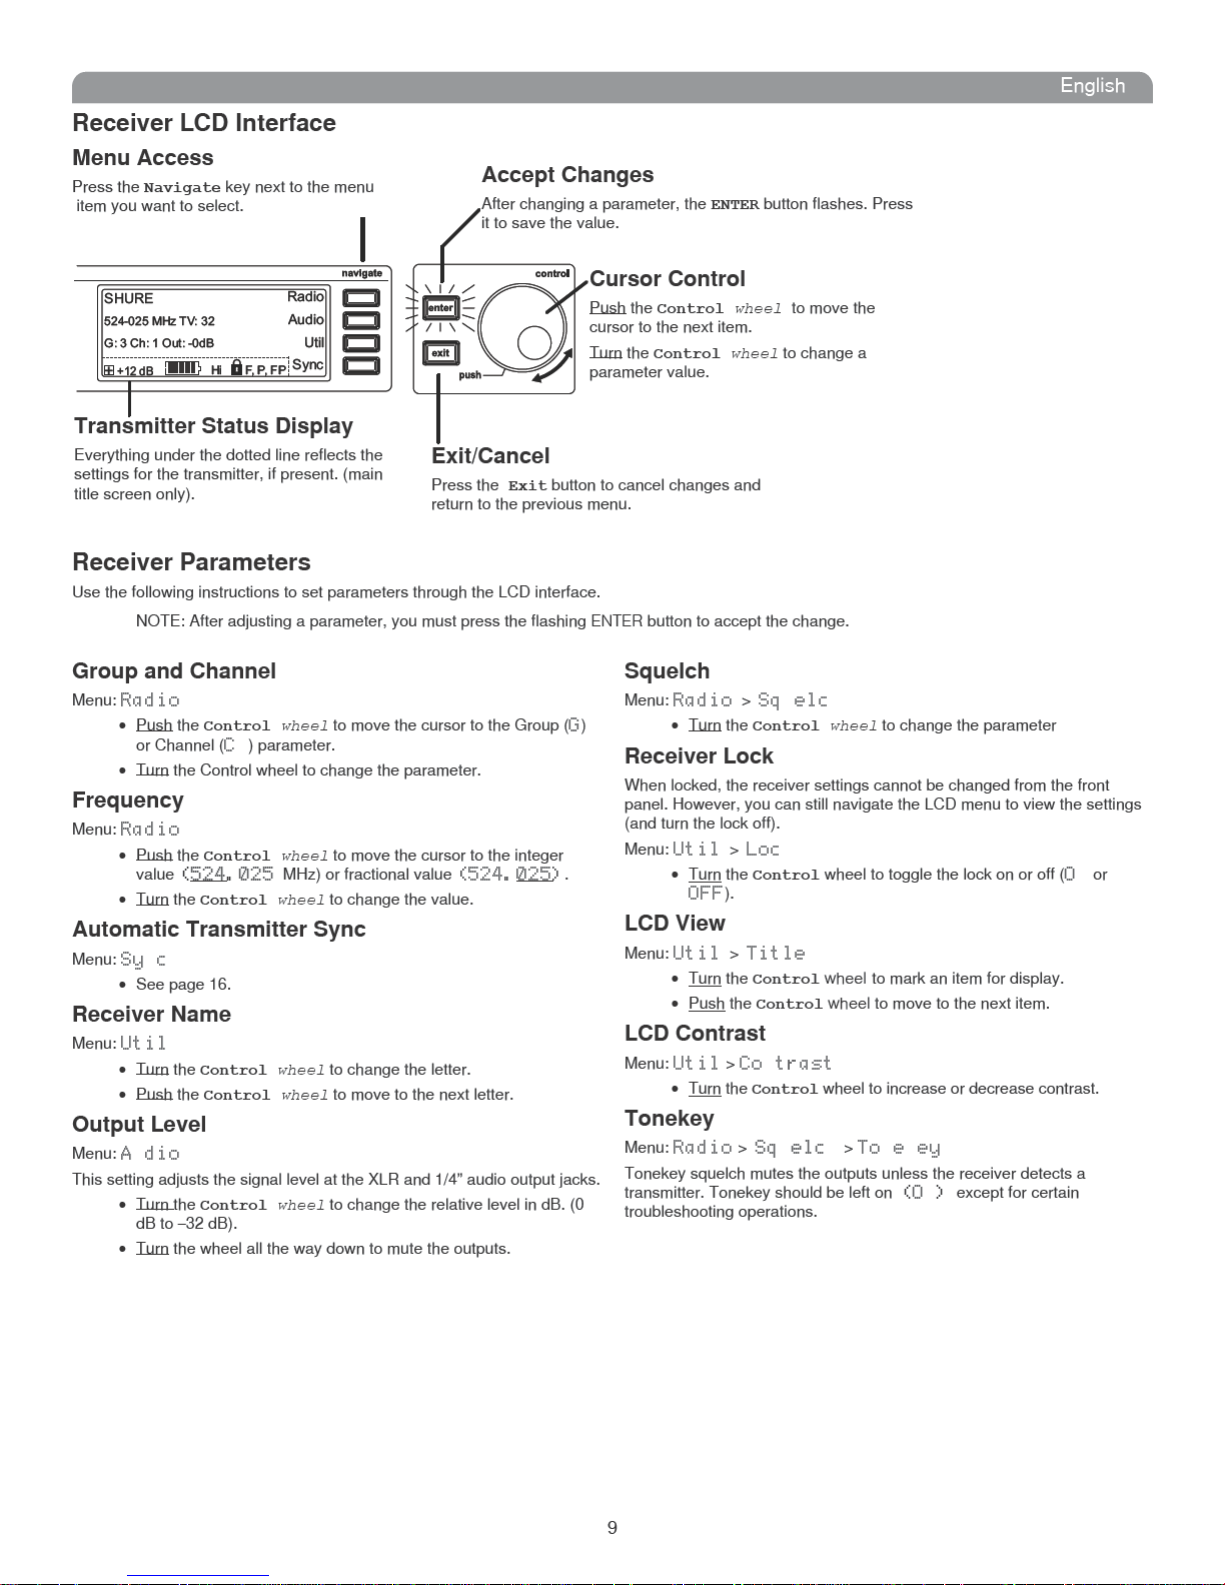
Receiver LCD Interface
Receiver Parameters
Connecting Multiple Receivers to the RF Distribution Ports
Automatic Frequency Selection
Networking Receivers ........................................................................................................................................................................ 12
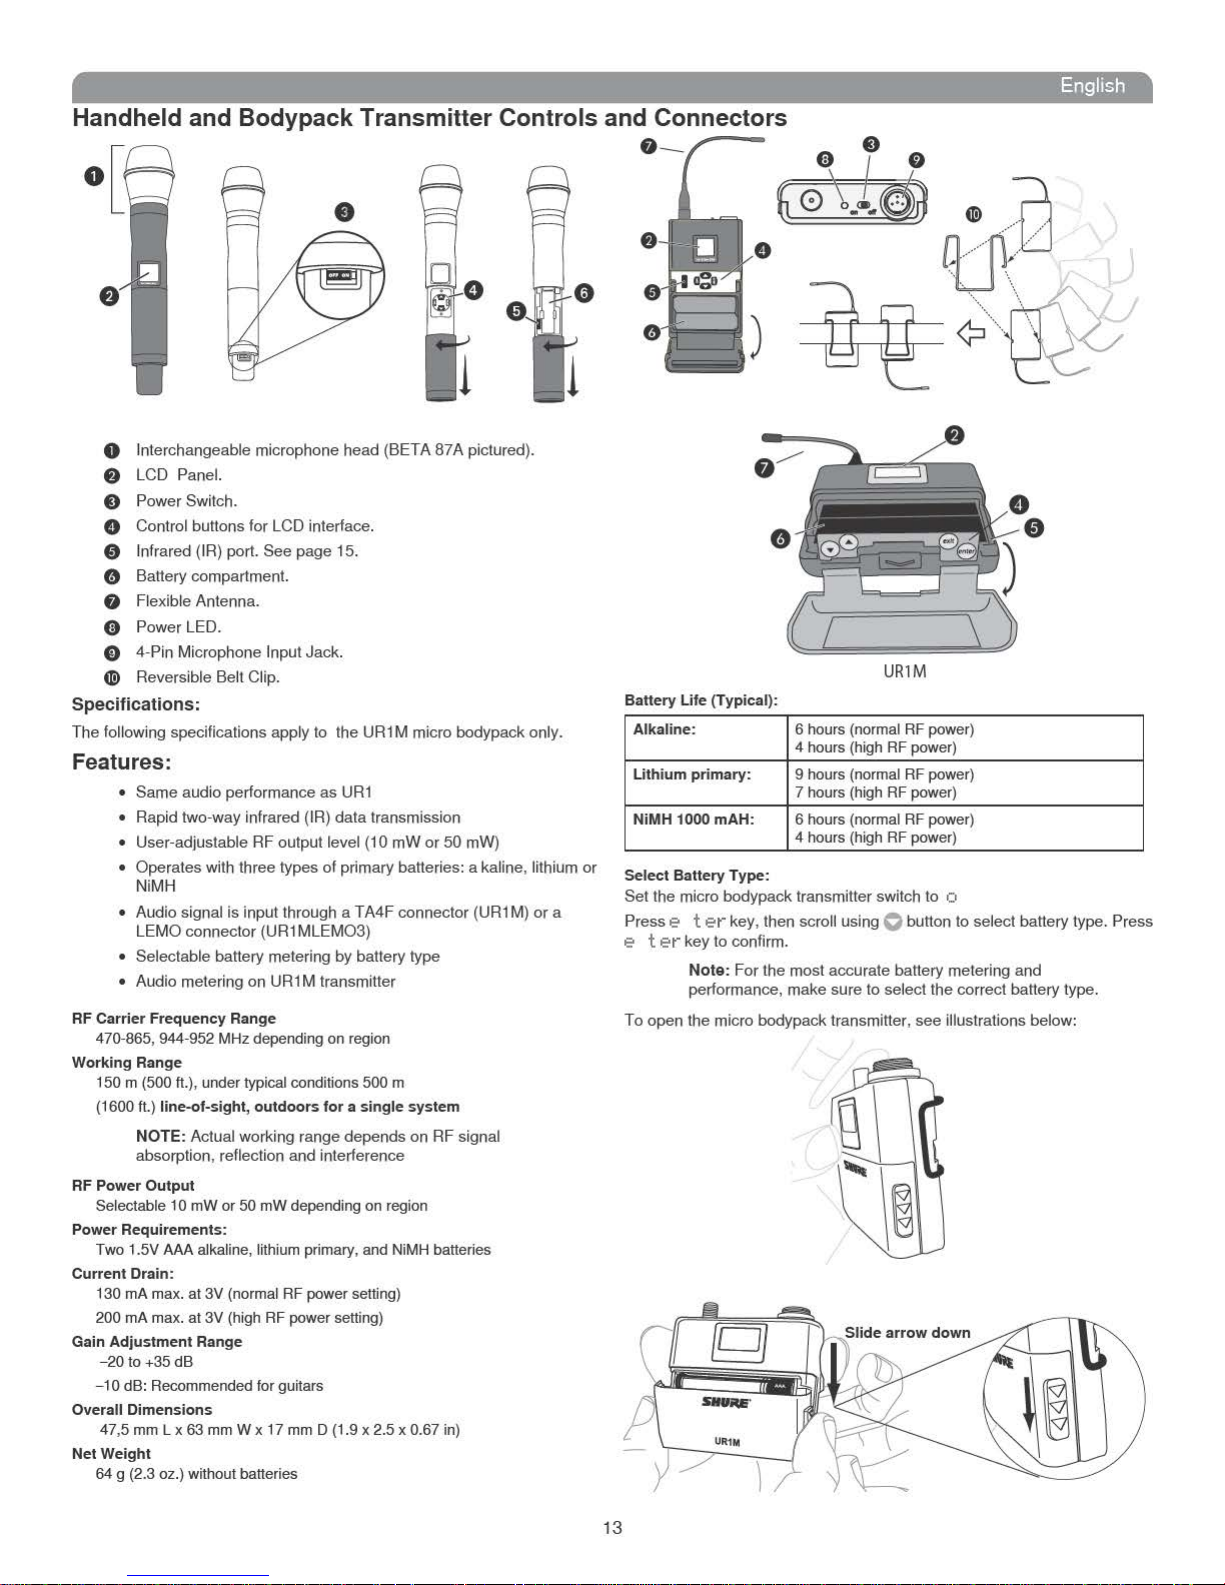
Handheld and Bodypack Transmitter Controls and Connectors
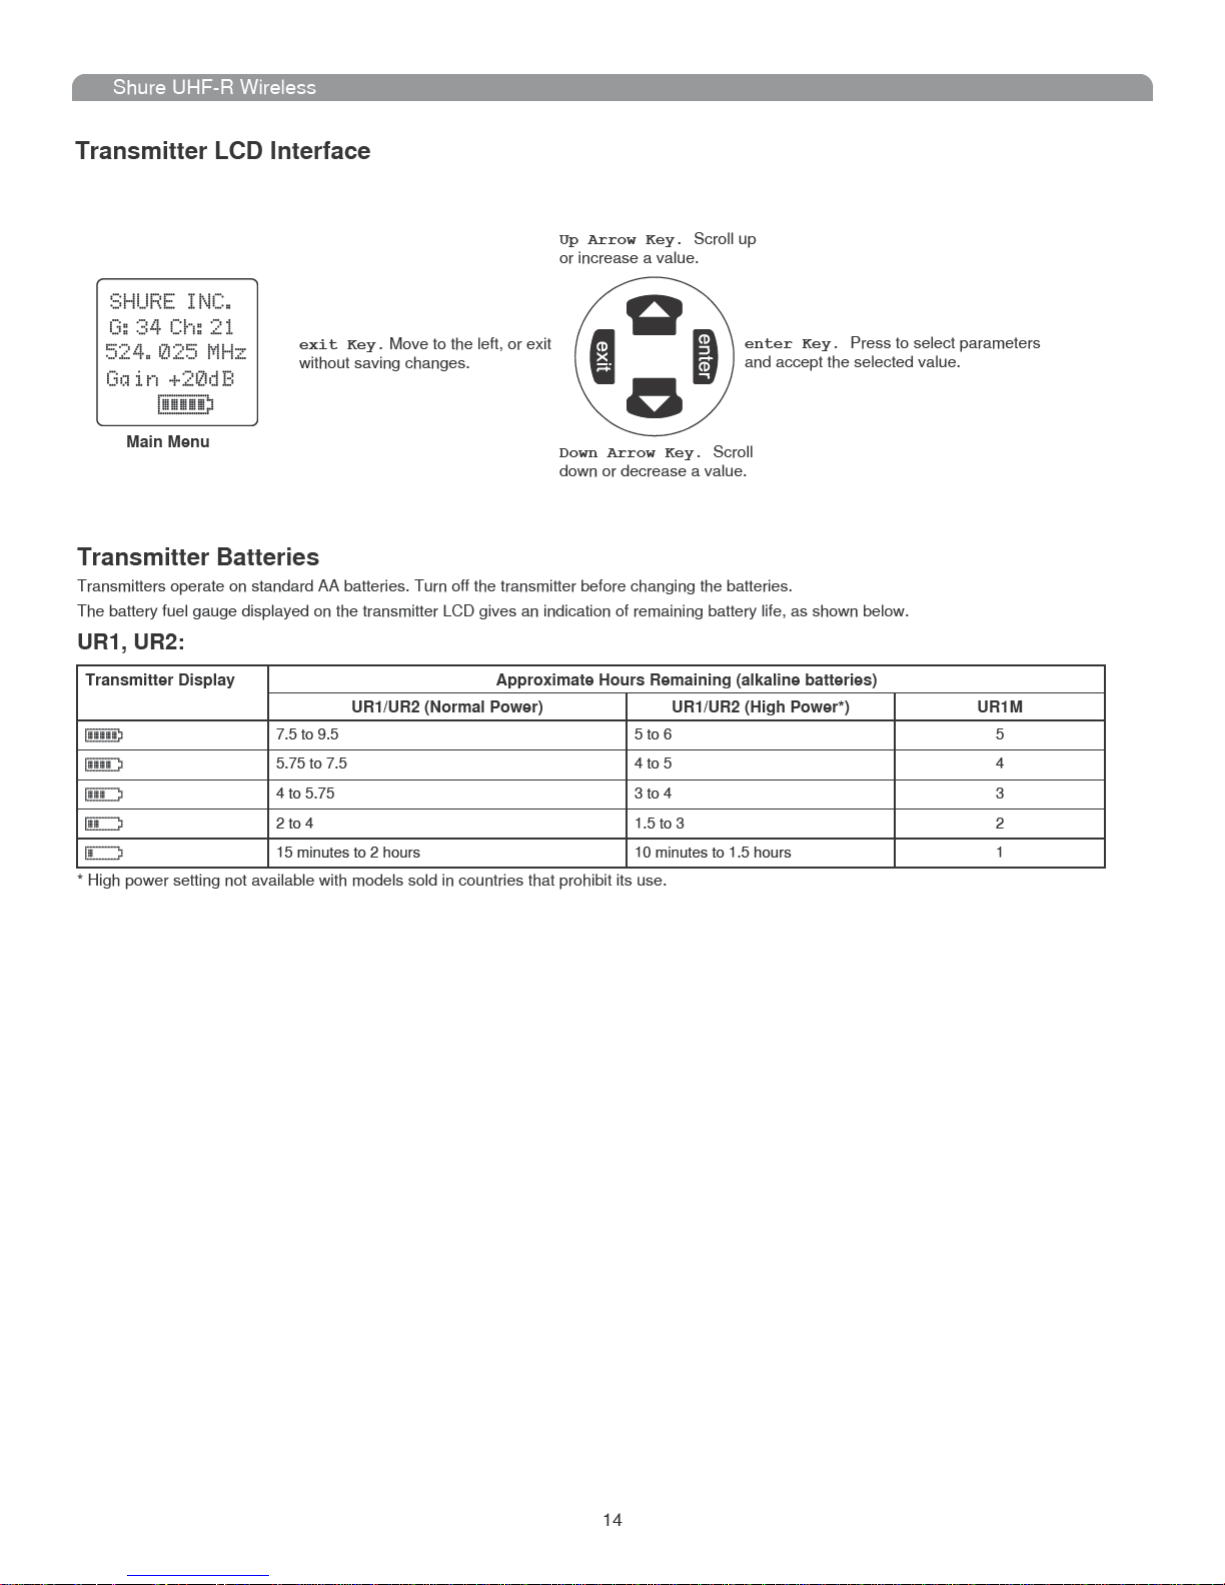
Transmitter LCD Interface
Transmitter Batteries
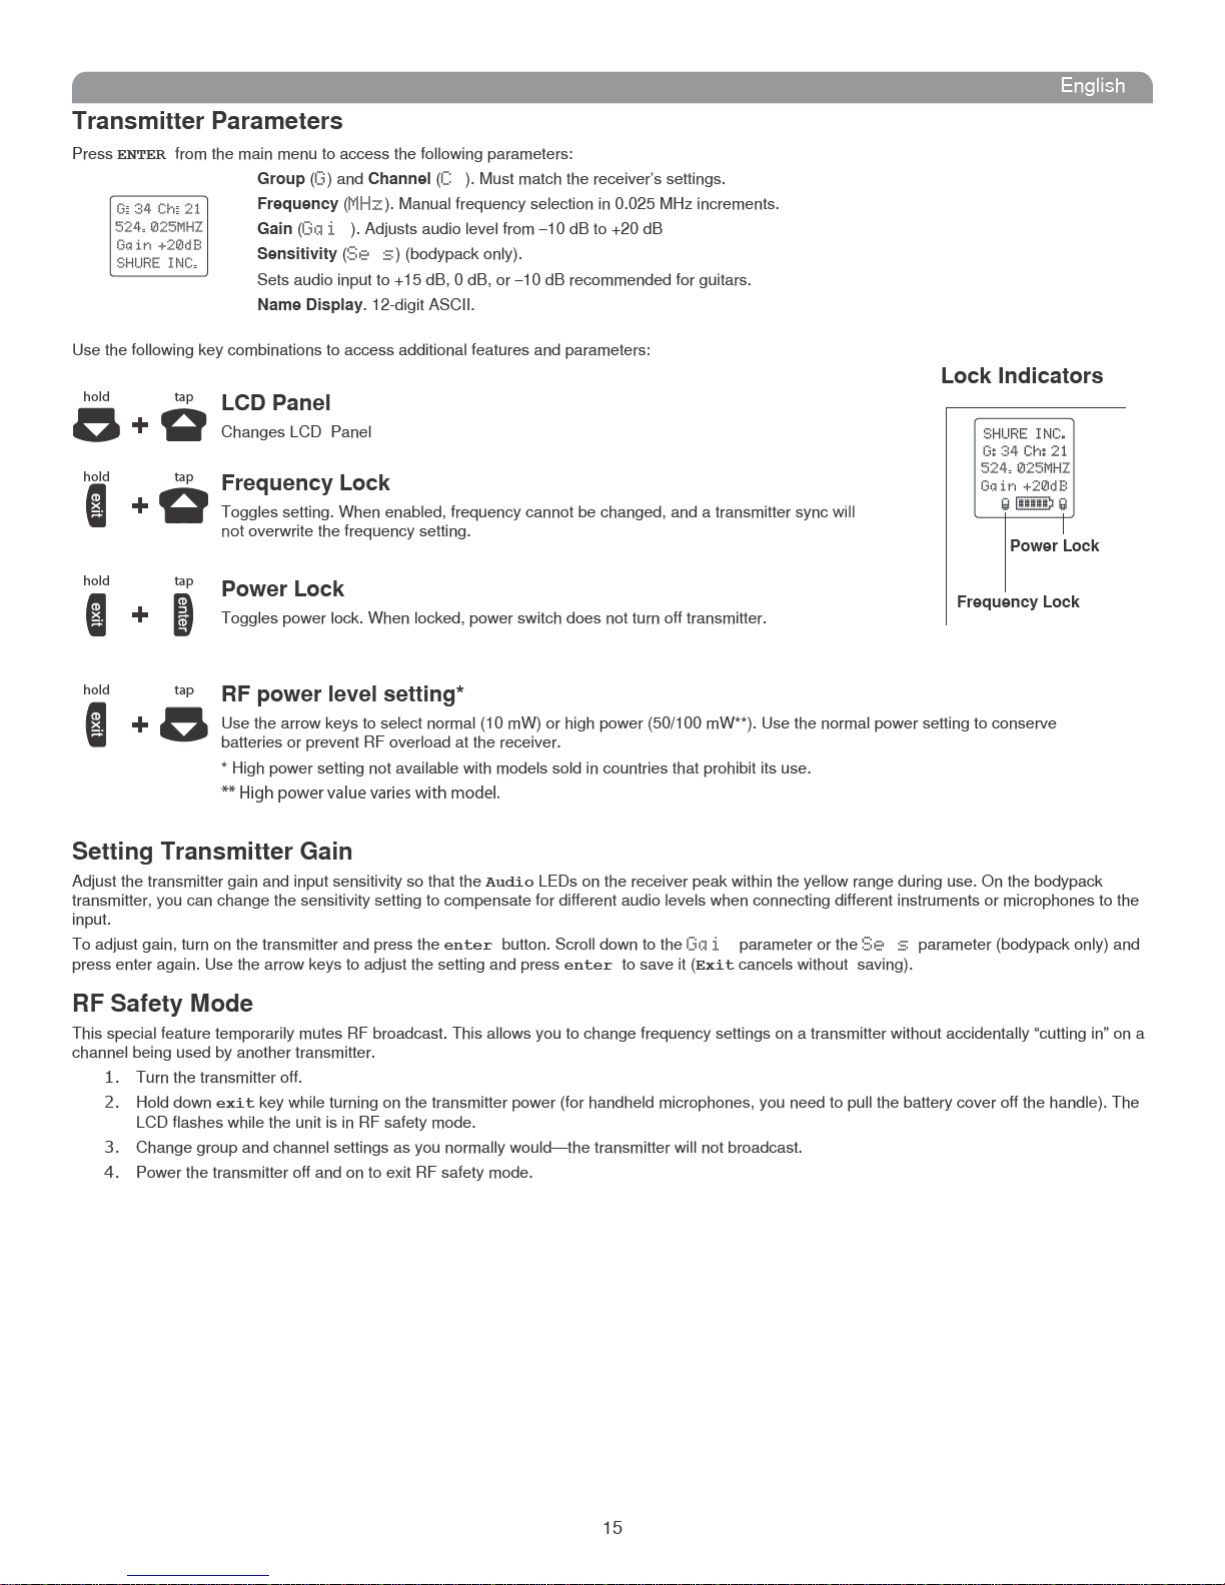
Transmitter Parameters
Setting Transmitter Gain .................................................................................................................................................................... 15
RF Safety Mode ................................................................................................................................................................................. 15
Automatic Transmitter Sync
Troubleshooting
Specifications
Replacement Parts and Accessories ................................................................................................................................................. 21
UHF-R Wireless System Compatibility Guide
................................................................................................................................................................................ 6
........................................................................................................................................................................... 7
...................................................................................................................................................................... 9
........................................................................................................................................................................... 9
.............................................................................................................. 10
......................................................................................................................................................... 11
....................................................................................................... 13
................................................................................................................................................................. 14
......................................................................................................................................................................... 14
..................................................................................................................................................................... 15
.............................................................................................................................................................. 16
................................................................................................................................................................................. 17
.................................................................................................................................................................................... 18
................................................................................................................................... 77
5

Shure UHF-R Wireless
Feature Overview
The UHF-R
set up and operate with advanced features for professional installations requiring multiple wireless microphone systems.
Frequency Band Selection
Shure offers wireless systems in a selection of bands that conform to the different government regulations of specific nations or geographic
regions. These regulations help limit radio frequency (RF) interference among different wireless devices and prevent interference with local public
communications channels, such as television and emergency broadcasts.
The system’s band and frequency range are identified on the face of the receiver and transmitter. For example, “H4 518–578 MHz.”
For information on bands available in your area, consult your local dealer or phone Shure. More information is also available at
Shure’s website (www.shure.com).
Groups and Channels
To transmit audio through a wireless system, the transmitter and receiver must be set to the same radio frequency, or channel. A wide selection of channels
allows more microphones to be used at the same time, since each microphone must operate on a different channel. It also provides a greater choice of
open channels—those that are free from interference from television broadcasts, electronic devices, or other wireless systems.
A group is a selection of compatible channels. Wireless microphones work better together when set to channels in the same group.
Automatic Frequency Selection
The following features scan the RF environment to find the best group and channel settings for a particular installation.
Follow the steps on page 11 for instructions on using these features.
Automatic Transmitter Sync
This feature automatically transfers the group and channel settings from a receiver to a transmitter. You can also program other transmitter settings on a
receiver and transfer those settings too. See page 16.
Interface Lock
This feature locks the receiver and transmitters so that users cannot change settings. The transmitter power switch can also be disabled so that the
transmitter remains on if the power switch is accidentally toggled during a performance.
Audio Gain Structure
The following settings allow you to adjust audio gain throughout the system:
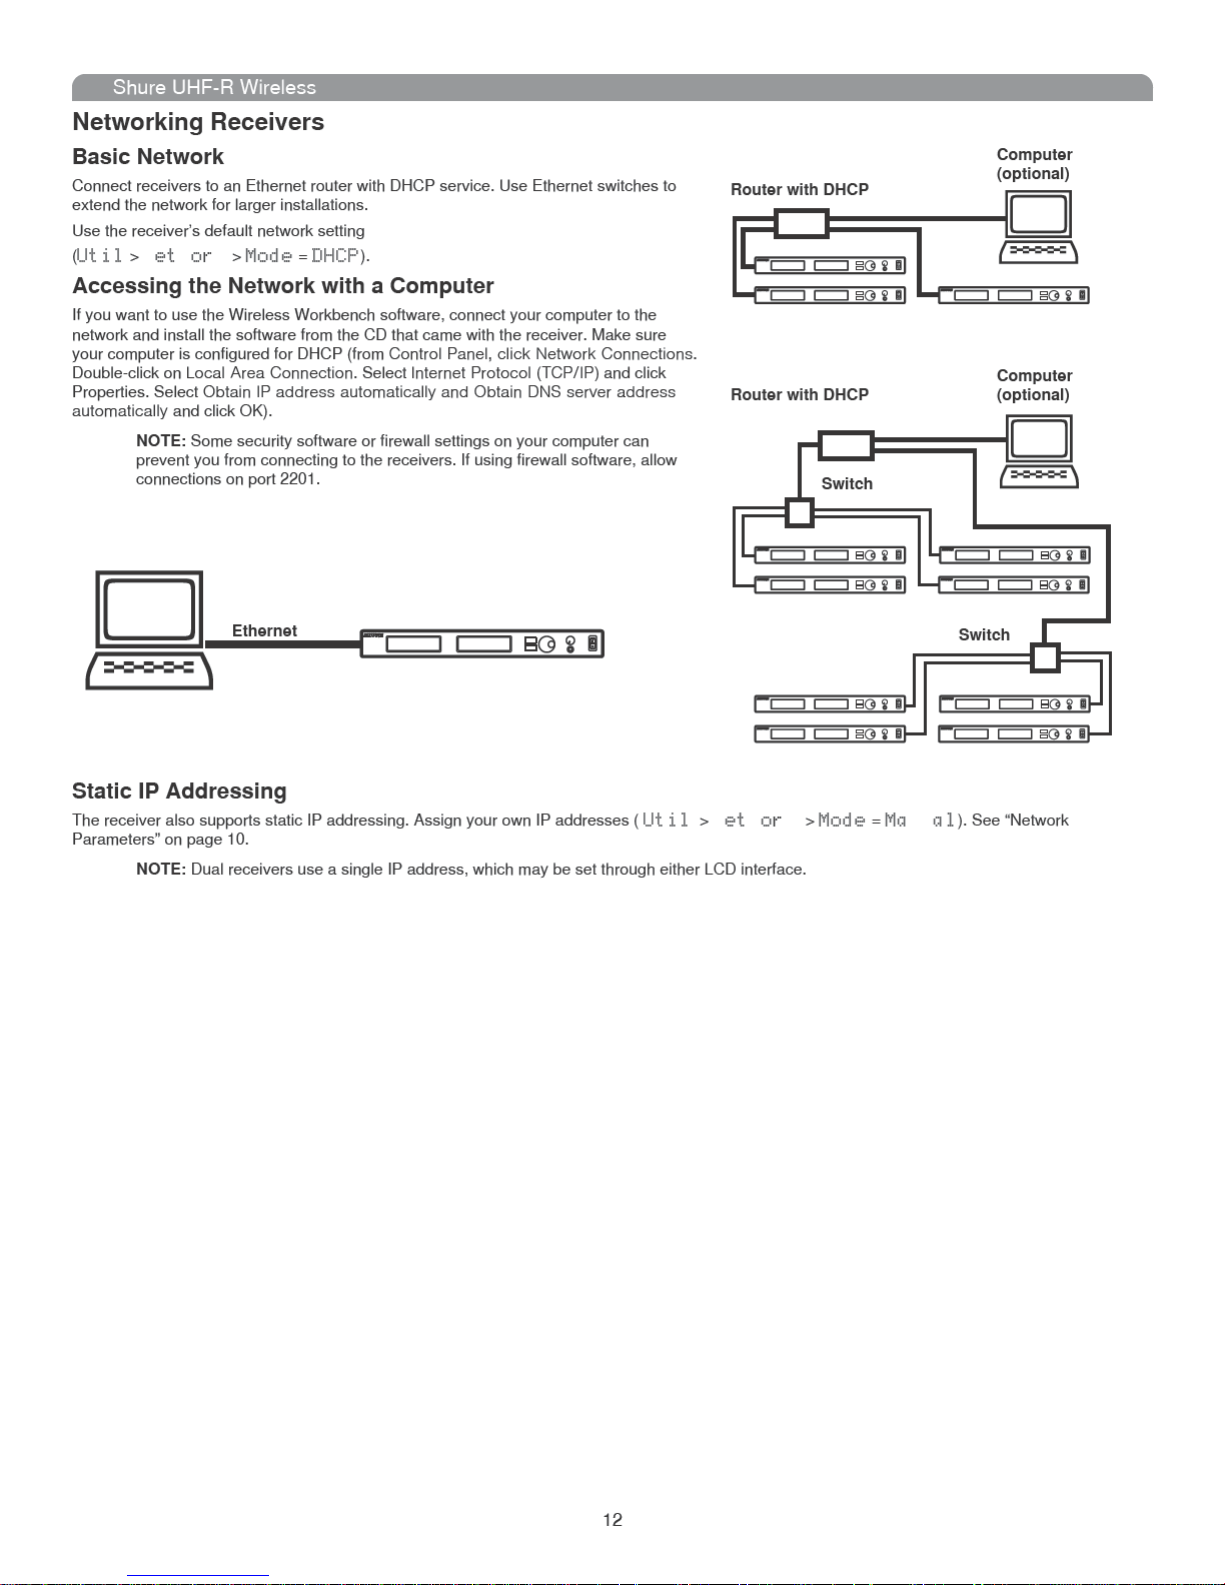
Networking
Each receiver has an RJ-45 port on the back for connecting to other receivers over an Ethernet network. Networking receivers allows you to automatically set channels for all the receivers with a single group scan command. You can also control and monitor all networked receivers through the Shure
Wireless Workbench PC software.
RF Distribution Ports
Use the RF distribution ports to share the signal from a single pair of antennas with up to 10 single or dual receivers within the same frequency band.
The RF ports eliminate the need for antenna splitters or distribution amplifiers. Active circuitry minimizes insertion losses, preserving signal quality.
Input filtering keeps the signal free from out-of-band interference. Distr bution circuitry is active only when additional receivers are connected to the RF
distribution ports. When not used, the port circuitry is bypassed, allowing the receiver to be used as a stand-alone component.
Shure Wireless Workbench Software
The Shure Wireless Workbench software on the supplied CD includes a variety of useful tools for installing and managing multiple wireless systems.
Simply install the software on your computer and connect it to a network of receivers to monitor and control receivers and transmitters throughout the
network. (See page 12 for more information on networking).
Instructions on using the Wireless Workbench software are available in the online help files after you install the software.
®
Wireless Microphone System uses the latest wireless technology, delivers outstanding audio clarity, and is rugged and reliable. It is easy to
• Group Scan—finds the group with the most open channels, then sets all networked receivers to channels in that group.
• Channel Scan—finds the first open channel in the currently selected group and sets the receiver to that channel.
• Sensitivity (bodypack only). A 25 dB range of gain adjustment at the bodypack transmitter input.
• Transmitter Gain. A 30dB range of audio gain adjustment within the transmitter (affects audio level at the receiver, as indicated by the Audio
LEDS.)
• Output Level. 32 dB of attenuation at the receiver output, plus a mute setting.
• Mic/Line switch. –30 dB pad for matching audio levels at the receiver XLR output.
6

Shure UHF-R Wireless
Network Parameters
NOTE:
• The receiver reboots after you press ENTER to accept network
parameter changes
• In dual models (UR4D+), these settings affect both receivers
(the dual receiver is treated as a single network device).
Set the Receiver Network Mode
Menu: Util > et or
1. Push the Control wheel to move the cursor to the Mode
parameter.
2. Turn the Control wheel to set the receiver to one of the
following values:
• DHCP: use this setting when connecting the receiver to a DHCP
server.
• Ma al: allows you to set the receiver to a specific IP address
or subnet.
IP Address and Subnet
Menu: Util > et or
NOTE: To change these settings, the network mode
must be set to Manual.
1. Push the Control wheel to move the cursor to any of the
following parameters:
• IP (IP address)
• S b (Subnet mask)
2. Turn the Control wheel to change the value.
Device ID
Assists in identifying receivers through the Wireless Workbench Software
(has no effect on network identification).
Menu: Util > et or
1. Push the Control wheel to move the cursor to the De ID
parameter.
2. Turn the Control wheel to set the receiver to change the value.
Custom Groups This feature allows you to create your own groups of
frequencies.
Creating new groups...
Menu: Radio > C stom
3. Turn the Control wheel to select a custom group number (U1,
U2, U3, etc.)
4. Push the Control wheel to move to the C a el parameter
and turn it to select a channel (01, 02, 03, etc.)
5. Push the Control wheel to move to the Freq parameter and
select a frequency for that channel.
6. Push the E T menu key to select a frequency for the next
channel in that group.
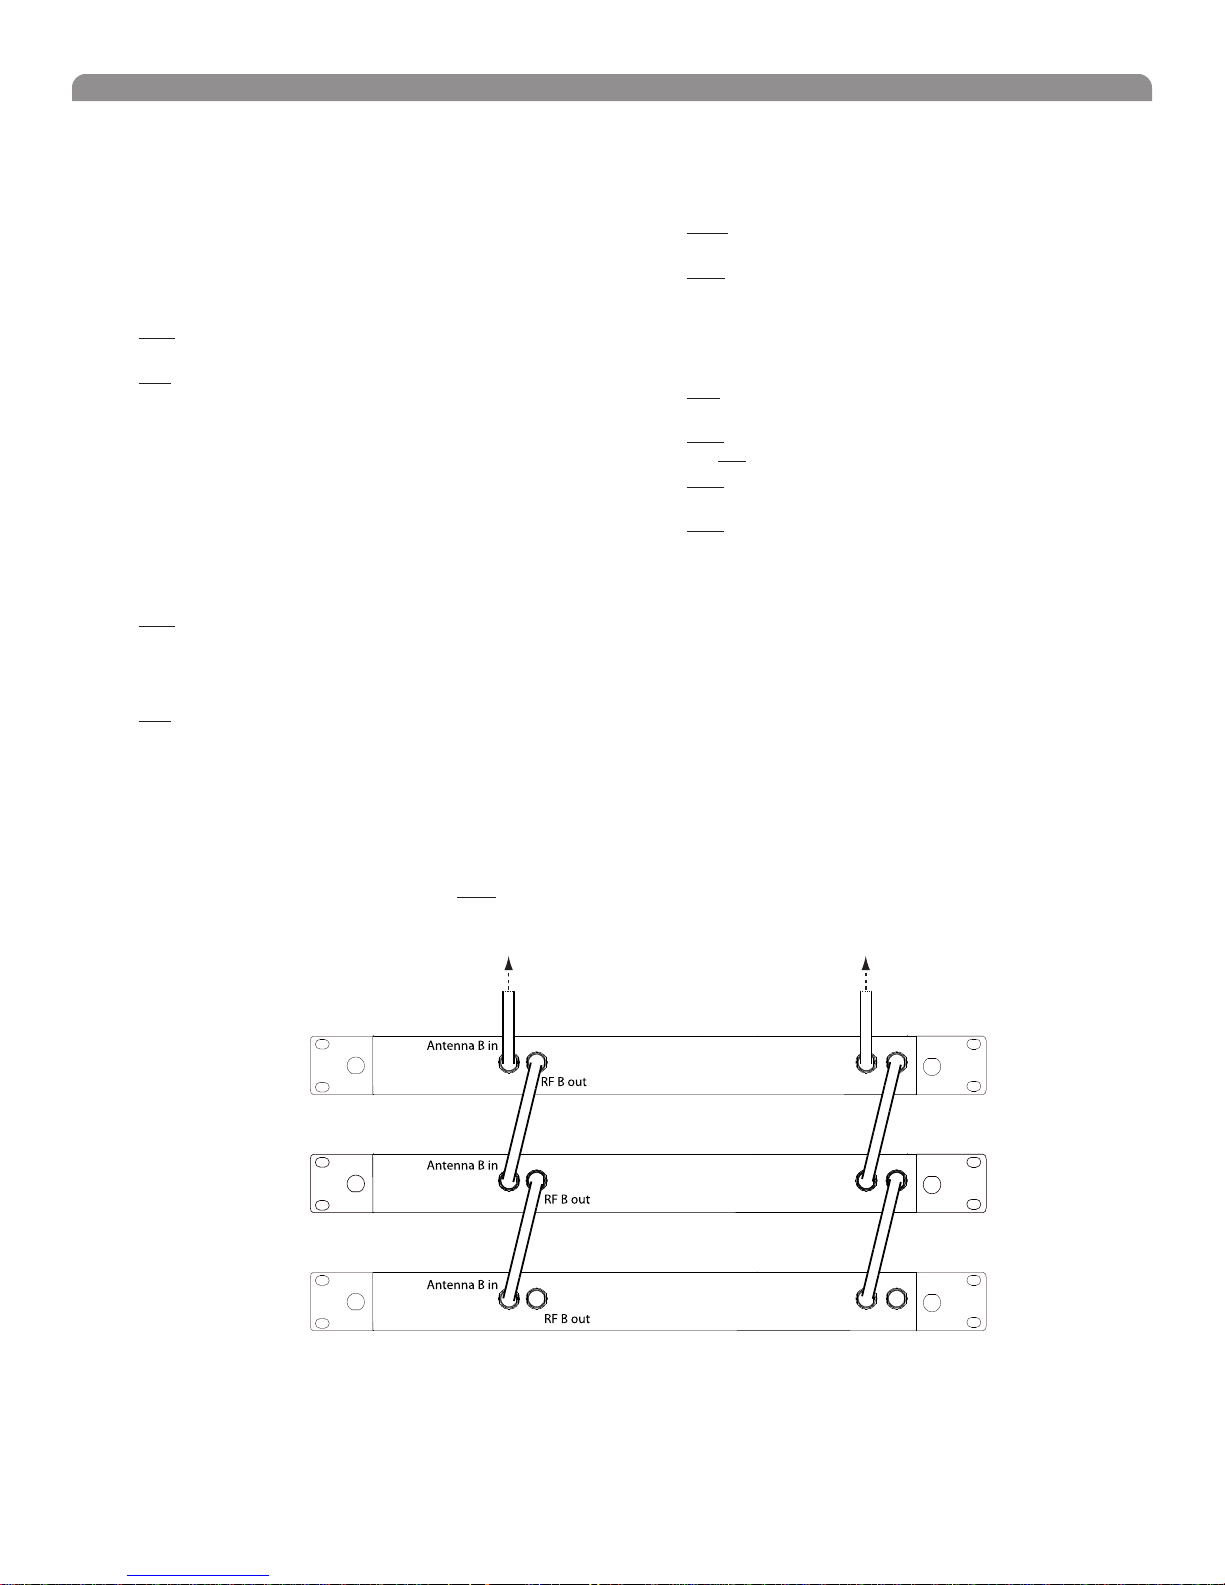
Connecting Multiple Receivers to the RF Distribution Ports
The RF distribution ports pass the RF signal from one receiver to the next, allowing a maximum of 10 single or dual receivers to share a single pair of
antennas.
Use the supplied RF distribution cables to connect the ports of each receiver as shown.
NOTE: All receivers must be operating in the same frequency band.
To Antenna ATo Antenna B
Antenna A in
First Receiver
Antenna A in
Additional Receivers
Antenna A in
Last Receiver
RF A out
RF A out
RF A out
10

English
Automatic Frequency Selection
Follow these steps to use the channel scan and group scan features.
Before you begin...
• Install the receivers in the location where they will be used and power them on.
• Mute all inputs on mixing devices connected to receivers.
• Turn off all bodypack or handheld transmitters for the systems you are setting up.
• Turn on potential sources of interference such as other wireless systems or devices, computers, CD players, effects processors, and digital
rack equipment so they are operating as they would be during the presentation or performance.
Single Receiver
1. Select Radio > Sca > C a Sca using the Navigate keys on the receiver LCD interface.
2. Turn the Control wheel to select a group.
3. Press C a Sca . The display indicates that the receiver is searching. Once it has finished, it displays the selected channel.
4. Press the flashing ENTER button to accept the suggested channel.
5. Sync the transmitter (see page 16).
Networked or Dual Receivers
With networked or dual receivers, you can take advantage of the group scan feature to set group and channel settings for all the receivers at the same
time. (See page 12 for instructions on networking.)
Perform a group scan from any receiver...
1. Select Radio > Sca > Gro p Sca using the Navigate keys on the receiver LCD interface. The display indicates that the receiver is
searching (Scan In Progress). Once it has finished, it displays the group with the most open channels.
2. If you wish, turn the Control wheel to change groups. The number of open channels for each group is displayed.
3. Press the flashing ENTER button to set all receivers to open channels in that group.
NOTE: The group scan feature only works for receivers in the same frequency band. For example, if you did a group scan on a “H4” band
receiver, all “H4” band receivers would be set up, but not “J5” band receivers.
Multiple Receivers—Not Networked
If your receivers are not networked (or in different bands), the group scan cannot automatically set their group and channel settings. However, you can
still take advantage of the group scan feature to find the group with the most open channels and the channel scan feature to find open channels in that
group.
Find the group with the most open channels...
Perform a group scan using the steps for a networked receiver (above). However, make a note of the selected group before pressing the flashing ENTER
button to accept it.
Set the receivers to open channels in that group...
Perform a channel scan on the remaining receivers using the steps for a single receiver (above). Make sure to select the same group for each receiver
before performing the channel scan.
IMPORTANT: After setting the channel for the first receiver, immediately sync the transmitter for that receiver and leave it on so that the
next receiver detects that channel during its channel scan. Otherwise, all the receivers will be set to the same open channel.
NOTE: Receivers in different bands (H4, J5, L3, etc.) do not need to be set to the same group.
11
 Loading...