

Shure Microphone Techniques For Studio Recording Schematic
Microphone
Techniques
for
Studio
Recording
A Shure Educational Publication
Mic
Techniques
Studio
Recording

Mic
Techniques
Studio Recording
for
3
INTRODUCTION . . . . . . . . . . . . . . . . . . . . . . . . . . . . . . . . . . . . . . . . . 4
MICROPHONE TECHNIQUES . . . . . . . . . . . . . . . . . . . . . . . . . . . . . . . 4
MICROPHONE PLACEMENT . . . . . . . . . . . . . . . . . . . . . . . . . . . . . . . . 8
MICROPHONE CHARACTERISTICS . . . . . . . . . . . . . . . . . . . . . . . . . 20
INSTRUMENT CHARACTERISTICS . . . . . . . . . . . . . . . . . . . . . . . . . . 23
ACOUSTIC CHARACTERISTICS . . . . . . . . . . . . . . . . . . . . . . . . . . . . 24
MICROPHONE SELECTION GUIDE . . . . . . . . . . . . . . . . . . . . . . . . . 28
GLOSSARY . . . . . . . . . . . . . . . . . . . . . . . . . . . . . . . . . . . . . . . . . . . . 29
APPENDIX . . . . . . . . . . . . . . . . . . . . . . . . . . . . . . . . . . . . . . . . . . . . 33
Index

4
Introduction
The selection and placement of microphones can
have a major influence on the sound of an acoustic
recor ding . It is a common vie w in the recording
industry that the music played by a skilled musician with a quality instrument properly miked can
be sent directly to the r ecorder with little or no
modification. This simple approach can often
sound better than an instrument that has been
reshaped by a multitude of signal processing gear.
In this guide, Shure Application Engineers
describe particular microphone techniques and
placement: techniques to pick up a natural tonal
balance, techniques to help reject unwanted
sounds, and even techniques to cr eate special
effects.
Following this, some fundamentals of microphones, instruments, and acoustics are presented.
SECTION ONE
Microphone Techniques
Here is a very basic, general procedure to keep
in mind when miking something that makes
sound:
1) Use a microphone with a frequency
response that is suited to the frequency
range of the sound, if possible, or filter out
frequencies above and/or below the highest
and lowest frequencies of the sound.
2) Place the microphone at various distances
and positions until you find a spot where
you hear from the studio monitors the
desired tonal balance and the desired
amount of room acoustics. If you don’t
like it, try another position, try another
microphone, try isolating the instrument
further, or change the sound of the instrument itself. For example, replacing worn
out strings will change the sound of a guitar.
3) Often you will encounter poor room
acoustics, or pickup of unwanted sounds.
In these cases, place the microphone very
close to the loudest part of the instrument
or isolate the instrument. Again, experiment with microphone choice, placement
and isolation, to minimize the undesirable
and accentuate the desirable direct and
ambient acoustics.
Microphone technique is largely a matter of
personal taste. Whatever method sounds right
for the particular sound, instrument, musician,
and song is right. There is no one ideal way to
place a microphone. There is also no one ideal
microphone to use on any particular instrument. Choose and place the microphone to get
the sound you want. We recommend experimenting with all sorts of microphones and
positions until you create your desired sound.
However, the desired sound can often be
achieved more quickly by understanding basic
microphone characteristics, sound-radiation
properties of musical instruments, and basic
room acoustics.
Studio
Recording
Mic
Techniques
Studio Recording
for

Studio
Recording
Mic
Techniques
Studio Recording
for
5
Vocal Microphone Techniques
Individual Vocals
Microphones with various polar patterns can be
used in vocal recording techniques. Consider
recording a choral group or vocal ensemble.
Having the vocalists circle around an omnidirectional mic allows well trained singers to
perform as they would live: creating a blend
of voices by changing their individual singing
levels and timbres. Two cardioid mics, positioned back to back could be used for this same
application.
An omnidirectional mic may be used for a
single vocalist as well. If the singer is in a room
with ambience and reverb that add to the desired
effect, the omnidirectional mic will capture the
room sound as well as the singer’s direct voice.
By changing the distance of the vocalist to the
microphone, you can adjust the balance of the
direct voice to the ambience. The closer the
vocalist is to the mic, the more direct sound is
picked up relative to the ambience.
The standard vocal recording environment usually
captures the voice only. This typically requires isolation and the use of a unidirectional mic. Isolation
can be achieved with baf fles surrounding the
vocalist like a “shell” or some other method
of reducing reflected sound from the room.
Remember even a music stand can cause reflections back to the mic.
The axis of the microphone should usually be
pointed somewhere between the nose and
mouth to pick up the complete sound of the
voice. Though the mic is usually directly in
front of the singer’s mouth, a slightly off-axis
placement may help to avoid explosive sounds
from breath blast or certain consonant sounds
such as “p”, “b”, “d”, or “t”. Placing the mic
even further off-axis, or the use of an accessory
pop filter, may be necessary to fully eliminate
this problem.
While many vocals are recorded professionally
in an isolation booth with a cardioid condenser
microphone, other methods of vocal recording
are practiced. For instance, a rock band’s singers
may be uncomfortable in the isolated environment described earlier. They may be used to
singing in a loud environment with a monitor
loudspeaker as the reference. This is a typical
performance situation and forces them to sing
louder and push their voices in order to hear
themselves. This is a difficult situation to recreate
with headphones.
A technique that has been used successfully in
this situation is to bring the singers into the
control room to perform. This would be especially convenient for project studios that exist in
only one room. Once in that environment, a
supercardioid dynamic microphone could be
used in conjunction with the studio monitors.
The singer faces the monitors to hear a mix of
music and voice together. The supercardioid
mic rejects a large amount of the sound projected from the speakers if the rear axis of the
microphone is aimed between the speakers and
the speakers are aimed at the null angle of the
mic (about 65 degrees on either side of its rear
axis). Just as in live sound, you are using the
polar pattern of the mic to improve gain-beforefeedback and create an environment that is
familiar and encouraging to the vocalists. Now
the vocalist can scream into the late hours of
the night until that vocal track is right.
Ensemble V ocals
A condenser is the type of microphone most
often used for choir applications. They are generally more capable of flat, wide-range frequency
response. The most appropriate directional type
is a unidirectional, usually a cardioid. A supercardioid or a hypercardioid microphone may be
used for a slightly greater reach or for more
ambient sound rejection. Balanced
low-impedance output is used exclusi vely, and
the sensitivity of a condenser microphone is
desirable because of the greater distance between
the sound source and the microphone.
Studio
Recording
Mic
Techniques
Studio Recording
for
6
Application of choir microphones falls into the
category known as “area” coverage. Rather
than one microphone per sound source, the
object is to pick up multiple sound sources (or
a “large” sound source) with one (or more)
microphone(s). Obviously, this introduces the
possibility of interference effects unless certain
basic principles (such as the “3-to-1 rule”) are
followed, as discussed below.
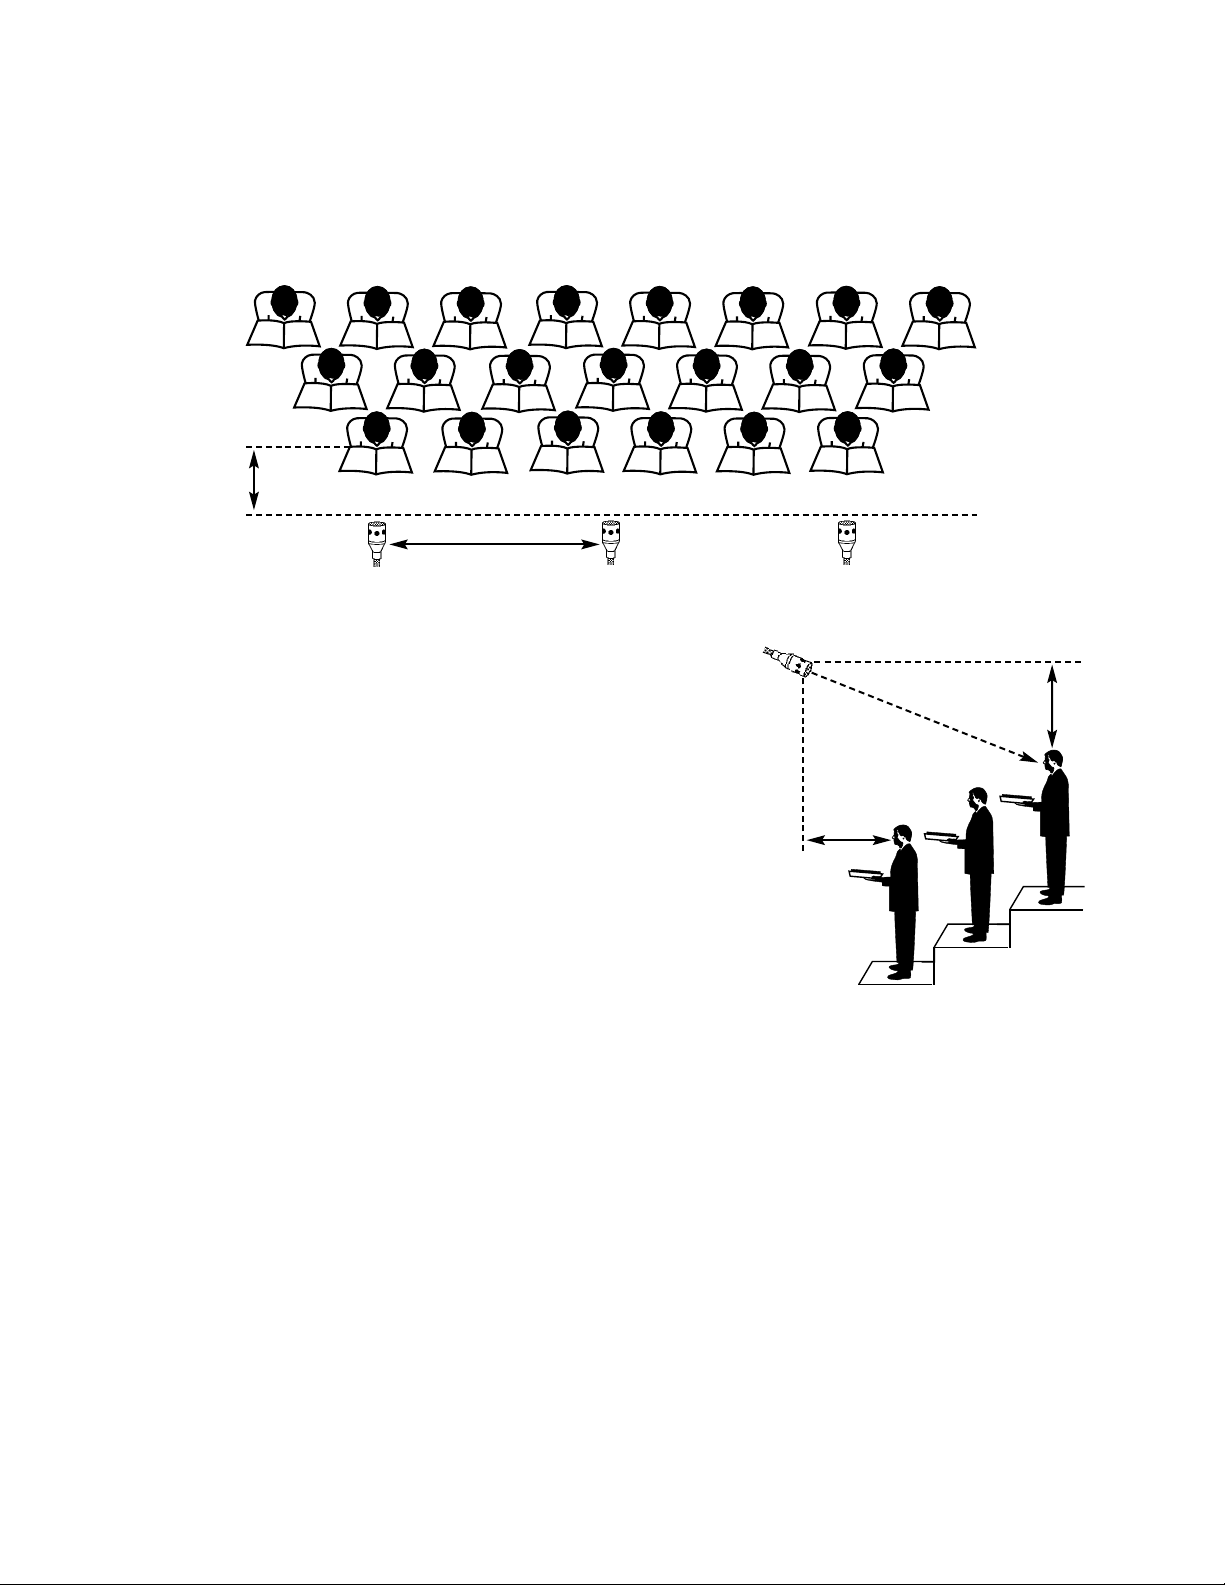
For one microphone picking up a typical choir,
the suggested placement is a few feet in front
of, and a few feet above, the heads of the first
row. It should be centered in front of the choir
and aimed at the last row. In this configuration,
a cardioid microphone can “cover” up to 15-20
voices, arranged in a rectangular or wedgeshaped section.
For larger or unusually shaped choirs, it may be
necessary to use more than one microphone.
Since the pickup angle of a microphone is a
function of its directionality (approximately 130
degrees for a cardioid), broader coverage
requires more distant placement.
In order to determine the placement of multiple
microphones for choir pickup, remember the
following rules: observe the 3-to-1 rule (see glos-
sary); avoid picking up the same sound source
with more than one microphone; and finally,
use the minimum number of microphones.
For multiple
microphones, the
objective is
to divide the
choir into
sections that
can each be
covered by a
single microphone. If the
choir has any
existing
physical
divisions
(aisles or
boxes), use
these to define basic sections.
If the choir is grouped according to vocal range
(soprano, alto, tenor, bass), these may serve as
sections.
If the choir is a single, large entity, and it becomes
necessary to choose sections based solely on the
coverage of the individual microphones,use the
following spacing: one microphone for each lateral
section of approximately 6 to 9 feet. If the choir is
unusually deep (more than 6 or 8 rows), it may be
divided into two vertical sections of se v eral ro ws
each, with aiming angles adjusted accordingly.
In any case, it is better to use too few micro-
phones than too many .
0.6 - 1m
(2 - 3 ft)
1.8 - 3m
(6 - 9 ft)
Choir microphone positions - top view
Microphone positions - side view
0.6 - 1m
(2 - 3 ft)
0.6 - 1m
(2 - 3 ft)
Acoustic String and Fretted
Instruments
Experimentation with mic placement provides
the ability to achieve accurate and pleasing
sound reproduction on these complex sound
sources. It is also an opportunity for exploring
sound manipulation, giving the studio engineer
many paths to the final mix. Whether you are
involved in a music studio, a commercial studio, or a project studio, you should continue to
explore different methods of achieving the
desired results. The possibilities are limited
only by time and curiosity.
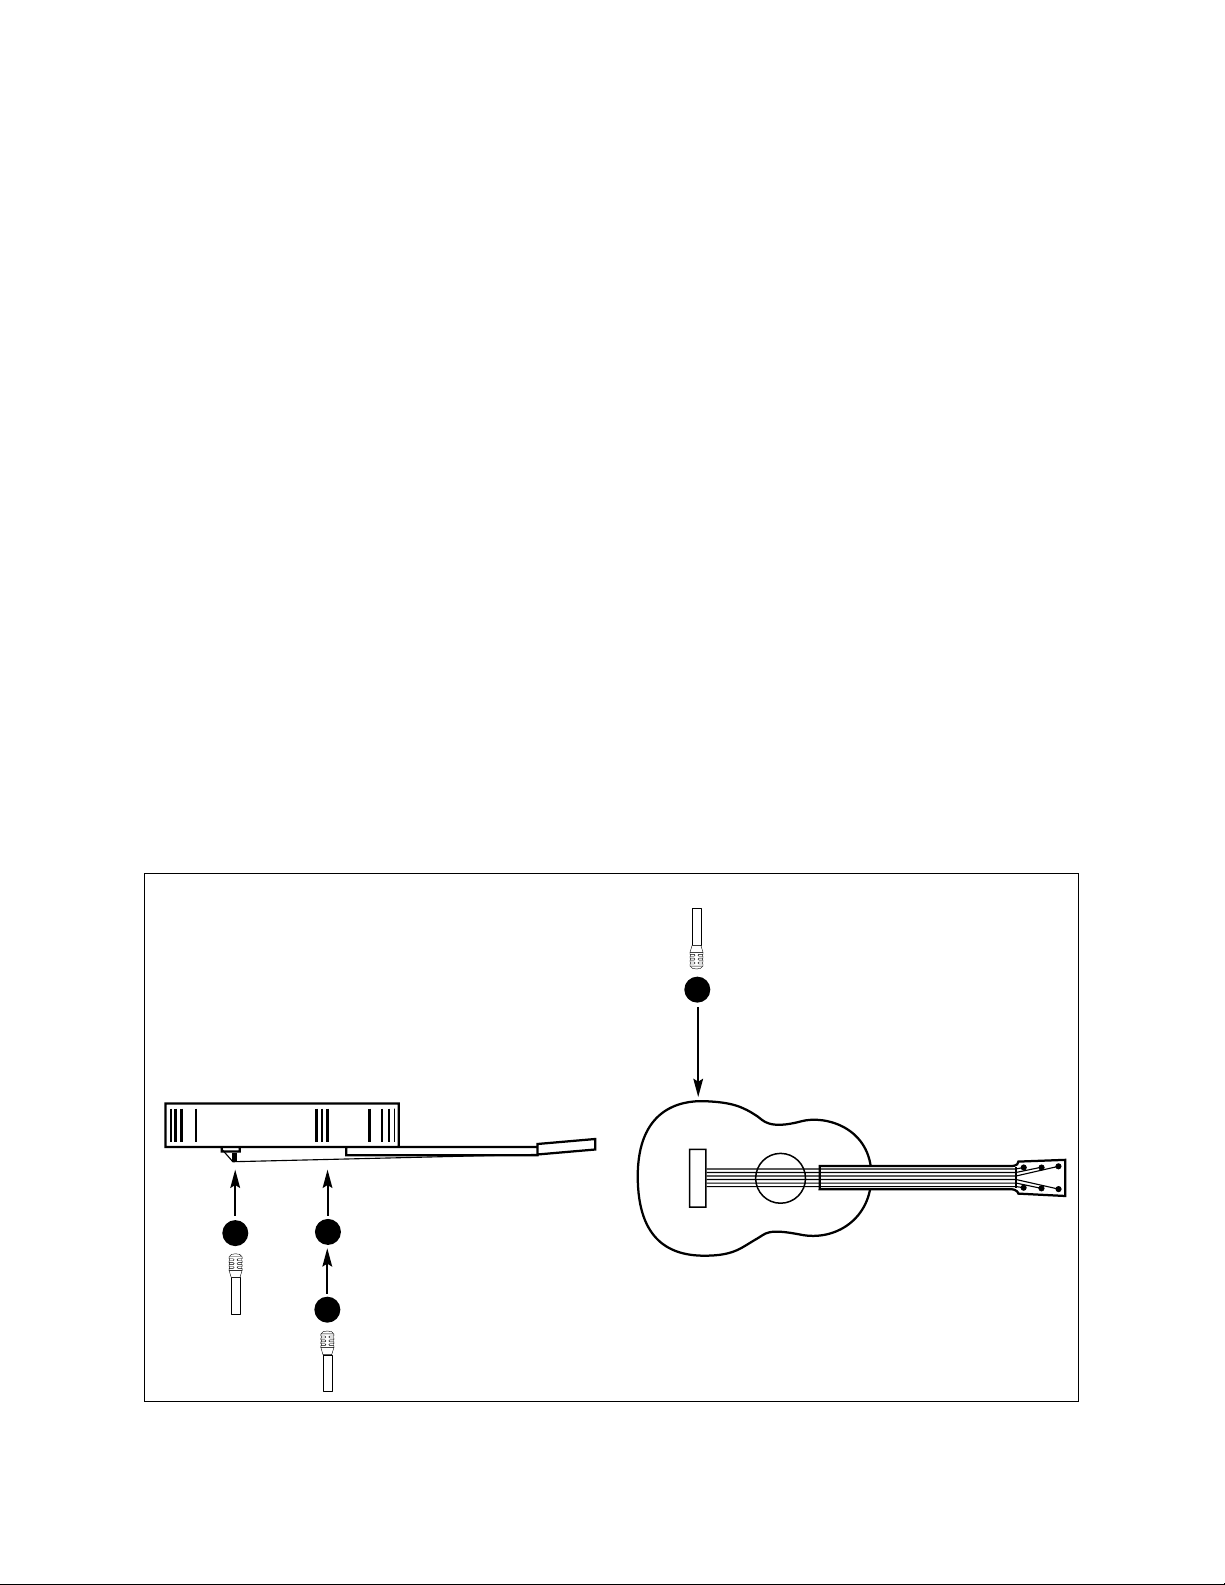
Acoustic Guitar (Also Dobro, Dulcimer,
Mandolin, Ukelele)
When recording an acoustic guitar, try placing
one mic three to six inches away, directly in
front of the sound hole. Then put another
microphone, of the same type, four feet away.
This will allow you to hear the instrument and
an element of room ambience. Record both
mics dry and flat (no effects or EQ), each to its
own track. These two tracks will sound vastly
different. Combining them may provide an
open sound with the addition of the distant
mic. Giving the effect of two completely different instruments or one in a stereo hallway
may be achieved by enhancing each signal
with EQ and effects unique to the sound you
want to hear.
Try the previously mentioned mic technique on
any acoustic instrument. Attempt to position the
mic in different areas over the instruments, listening for changes in timbre. You will find different
areas offer different tonal characteristics. Soon
you should develop “an ear” for finding instruments’sweet spots. In addition, the artist and
style of music should blend with your experiences
and knowledge to generate the desired effect.
7
Studio
Recording
Mic
Techniques
Studio Recording
for
Above
Front
3
2
1
4
Various microphone positions for acoustic guitar
6”

Studio
Recording
Mic
Techniques
Studio Recording
for
8
Bassy
Very bassy, boomy,
muddy , full
W oody, warm,
mellow. Midbassy, lacks detail
Natural,
well-balanced,
slightly bright
Natural,
well-balanced
Bassy , less
string noise
Bassy , thumpy
Bright
Natural
Natural
W ell-def ined
Bright
Good starting placement when leakage is a
problem. Roll off bass for a more natural
sound (more for a uni than an omni).
Very good isolation. Bass roll-off needed
for a natural sound.
Reduces pick and string noise.
Less pickup of ambiance and leakage than 3
feet from sound hole.
Good isolation. Allows freedom of
movement.
Reduces leakage. Test positions to find each
guitar’s sweet spot.
Limits leakage. Roll off bass for natural
sound.
Limits leakage.
Limits leakage. Allows freedom of
movement.
Well-balanced sound.
Well-balanced sound, but little isolation.
Minimizes feedback and leakage. Allows
freedom of movement.
8 inches from sound hole
3 inches from sound hole
4 to 8 inches from bridge
6 inches above the side, over
the bridge, and even with the
front soundboard
Miniature microphone clipped
outside of sound hole
Miniature microphone clipped
inside sound hole
Banjo:
3 inches from center of head
3 inches from edge of head
Miniature microphone clipped to
tailpiece aiming at bridge
Violin (Fiddle):
A few inches from side
Cello:
1 foot from bridge
All String Instruments:
Miniature microphone attached to
strings between bridge and tailpiece
Acoustic Guitar:
1
2
3
4
Microphone Placement Tonal Balance Comments
Studio
Recording
Mic
Techniques
Studio Recording
for
W ell-def ined
Full
Full, “tight”
Natural
Somewhat
constricted
Natural sound.
Roll off bass if sound is too boomy.
Minimizes feedback and leakage.
See “Stereo Microphone Techniques”
section for other possibilities.
Minimizes feedback and leakage.
Acoustic Bass: (Upright Bass, String Bass, Bass Violin)
6 inches to 1 foot out front, just above
bridge
A few inches from f-hole
Wrap microphone in foam padding
(except for grille) and put behind bridge
or between tailpiece and body
Harp:
Aiming toward player at part of
soundboard, about 2 feet away
Tape miniature microphone to
soundboard
Microphone Placement Tonal Balance Comments
9
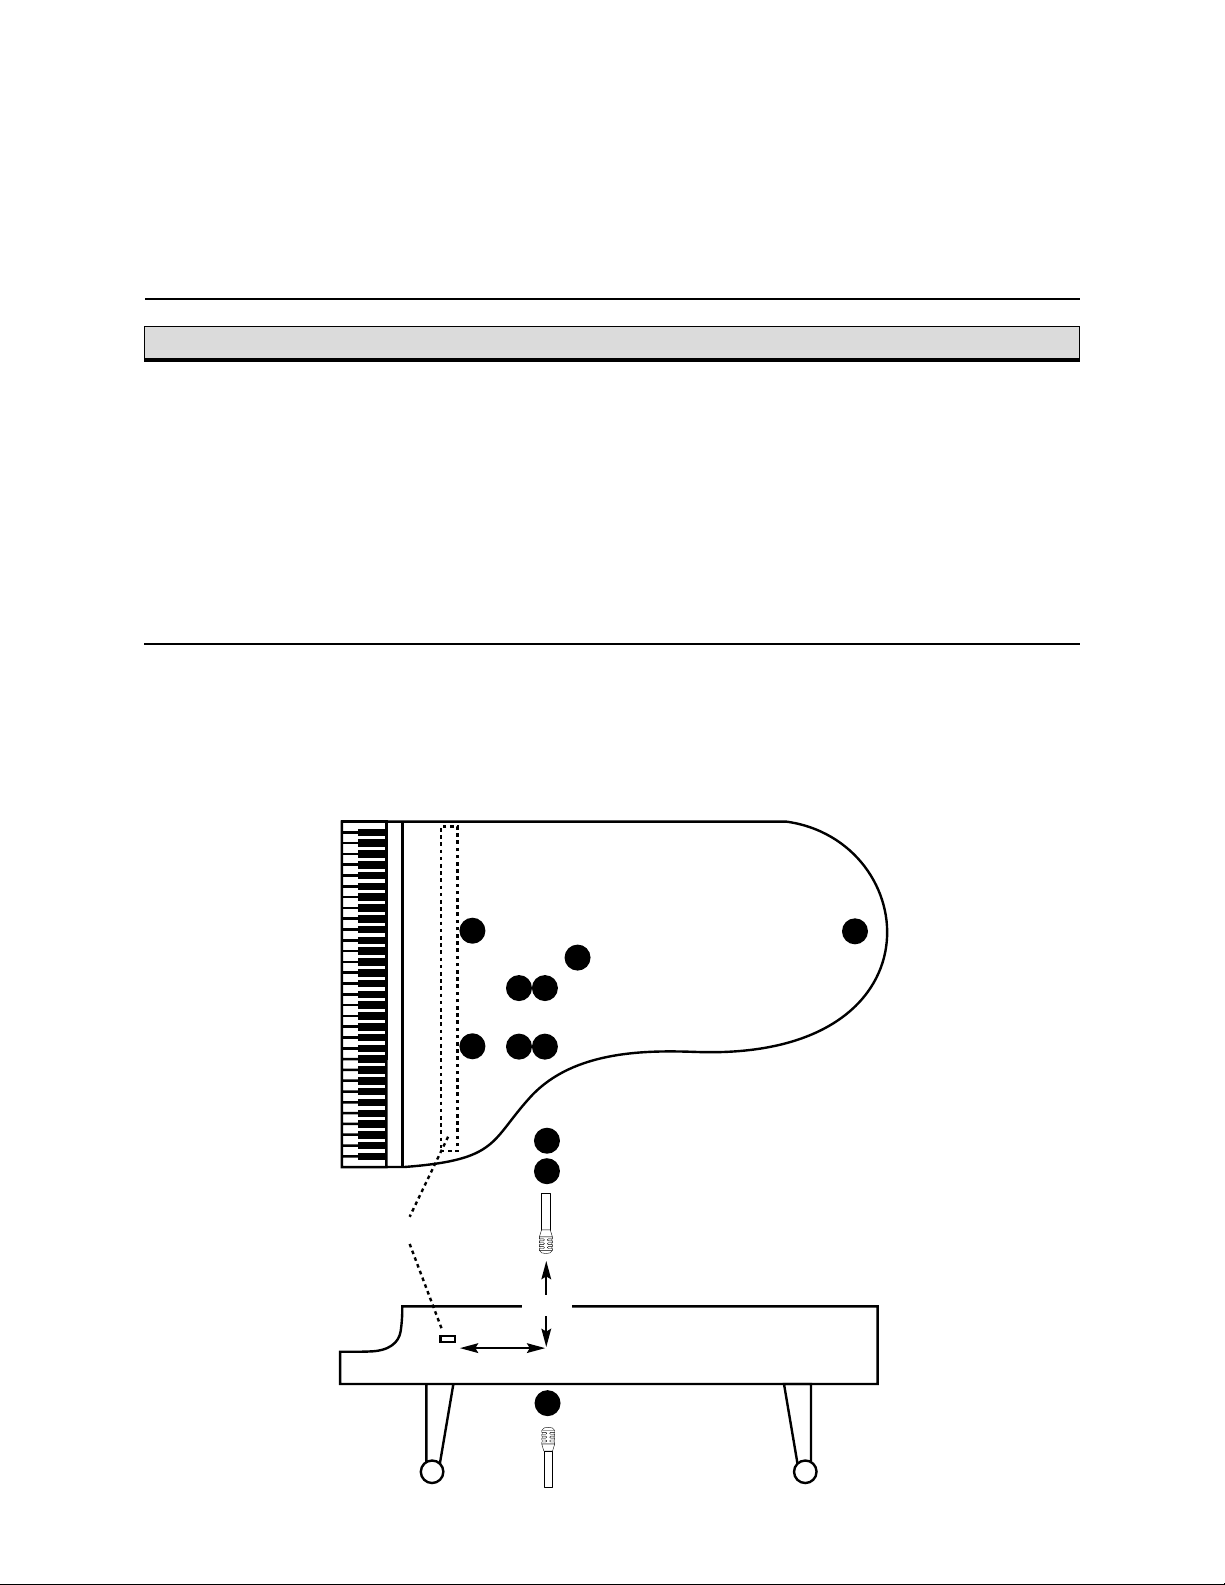
Acoustic
Pianos
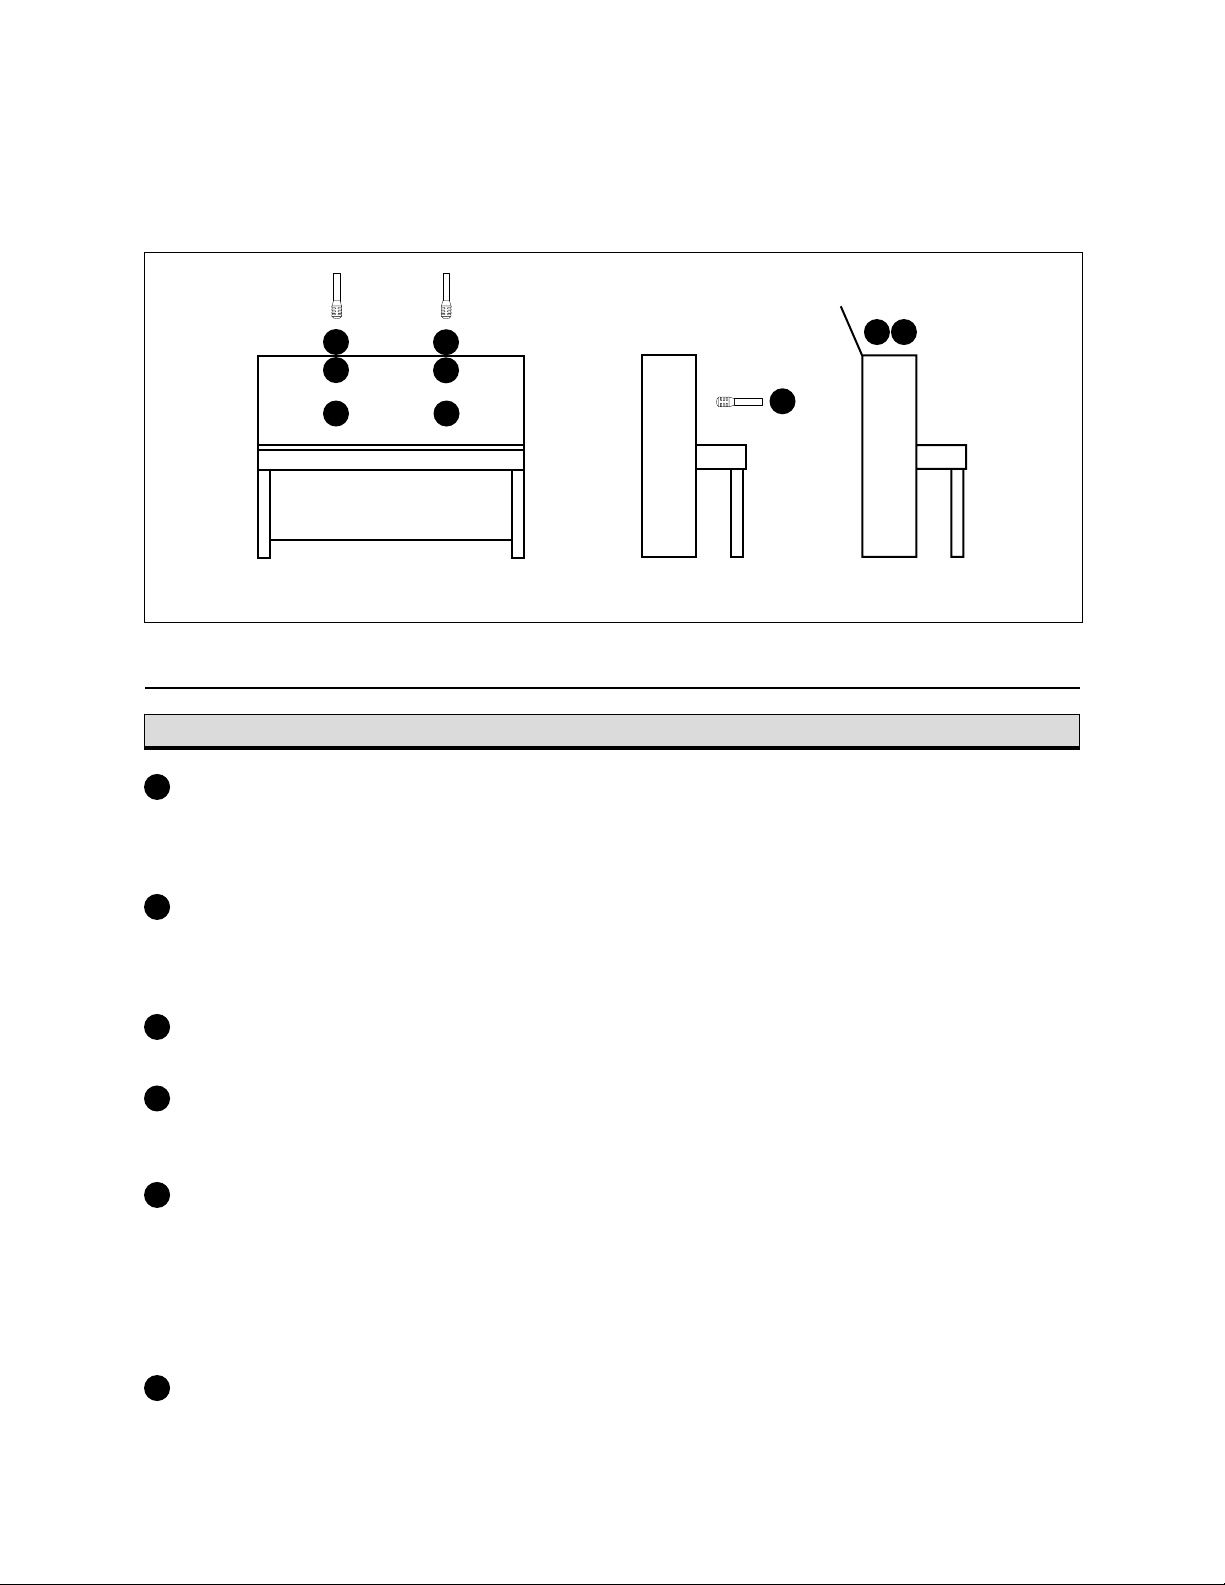
Hammers
6”-12”
8
8
1 4
7 2
5
9
4
1
8”
6

Studio
Recording
Mic
Techniques
Studio Recording
for
10
Natural,
well-balanced
Natural,
well-balanced,
slightly bright
Thin, dull, hard,
constricted
Muddy , boomy,
dull, lacks attack
Bassy , full
Bassy , dull, full
Less pickup of ambience and leakage
than 3 feet out front. Move microphone(s) farther from hammers to
reduce attack and mechanical noises.
Good coincident-stereo placement. See
“Stereo Microphone Techniques” section.
Place one microphone over bass strings
and one over treble strings for stereo.
Phase cancellations may occur if the
recording is heard in mono.
Very good isolation. Sometimes sounds
good for rock music. Boost mid-bass
and treble for more natural sound.
Improves isolation. Bass roll-off and
some treble boost required for more
natural sound.
Unobtrusive placement.
Unobtrusive placement.
12 inches above middle strings, 8
inches horizontally from hammers
with lid off or at full stick
8 inches above treble strings, as
above
Aiming into sound holes
6 inches over middle strings,
8 inches from hammers, with
lid on short stick
Next to the underside of raised lid,
centered on lid
Underneath the piano, aiming up
at the soundboard
Bright, wellbalanced
Bright, wellbalanced, strong
attack
Full, natural
Excellent isolation. Experiment with
lid height and microphone placement
on piano lid for desired sounds.
Excellent isolation. Moving “low”
mic away from keyboard six inches
provides truer reproduction of the bass
strings while reducing damper noise.
By splaying these two mics outward
slightly, the overlap in the middle
registers can be minimized.
Excellent isolation. Minimizes
hammer and damper noise. Best
if used in conjunction with two
surface-mount microphones mounted
to closed lid, as above.
Surface-mount microphone mounted
on underside of lid over lower treble
strings, horizontally , close to hammers for brighter sound, further from
hammers for more mellow sound
Two surface-mount microphones
positioned on the closed lid, under
the edge at its keyboard edge,
approximately 2/3 of the distance
from middle A to each end of the
keyboard
Surface-mount microphone placed
vertically on the inside of the frame,
or rim, of the piano, at or near the
apex of the piano’s curved wall
1
2
3
4
5
6
Grand Piano:
Microphone Placement Tonal Balance Comments
7
8
9
Studio
Recording
Mic
Techniques
Studio Recording
for
11
Natural (but lacks
deep bass), picks
up hammer attack
Slightly full or
tubby, picks up
hammer attack
Natural, picks up
hammer attack
Full, slightly
tubby , no
hammer attack
Thin, constricted,
no hammer attack
Natural, good
presence
Bright, picks up
hammer attack
Good placement when only one
microphone is used.
Mike bass and treble strings for stereo.
Minimizes feedback and leakage.
Use two microphones for stereo.
Use this placement with the following
placement for stereo.
Use this placement with the preceding
placement for stereo.
Minimize pickup of floor vibrations by
mounting microphone in low-profile
shock-mounted microphone stand.
Mike bass and treble strings for stereo.
Just over open top, above treble
strings
Just over open top, above bass
strings
Inside top near the bass and treble
stings
8 inches from bass side of soundboard
8 inches from treble side of soundboard
1 foot from center of soundboard on
hard floor or one-foot-square plate
on carpeted floor, aiming at piano
(soundboard should face into room)
Aiming at hammers from front, sev-
eral inches away (remove front panel)
1
2
3
4
5
6
Upright Piano:
Microphone Placement Tonal Balance Comments
Open
4 5
3
2
Mic
3
1
Mic
Mics
6
1 2
Open
Open

Studio
Recording
Mic
Techniques
Studio Recording
for
12
Flute:
The sound energy from a flute is projected both by the embouchure and by the first open fingerhole.
For good pickup, place the mic as close as possible to the instrument. However, if the mic is too close
to the mouth, breath noise will be apparent. Use a windscreen on the mic to overcome this difficulty.
With the saxophone, the sound is fairly well distributed between the finger holes and the bell. Miking
close to the finger holes will result in key noise. The soprano sax must be considered separately because
its bell does not curve upward. This means that, unlike all other saxophones, placing a microphone
toward the middle of the instrument will not pick-up the sound from the key holes and the bell simultaneously . The saxophone has sound characteristics similar to the human voice. Thus, a shaped response
microphone designed for voice works well.
Woodwinds
Bright
W arm, full
Natural
Bright, punchy
Minimizes feedback and leakage.
Picks up fingering noise.
Good recording technique.
Maximum isolation, up-front sound.
A few inches from and aiming into bell
A few inches from sound holes
A few inches above bell and aiming at
sound holes
Miniature microphone mounted on bell
Natural, breathy
Natural
Pop filter or windscreen may
be required on microphone.
Reduces breath noise.
A few inches from area between
mouthpiece and first set of finger holes
A few inches behind player’s head,
aiming at finger holes
Natural
Bright
Provides well-balanced sound.
Minimizes feedback and leakage.
Oboe, Bassoon, Etc.:
About 1 foot from sound holes
A few inches from bell
Saxophone:
Microphone Placement Tonal Balance Comments
 Loading...