

Page 1
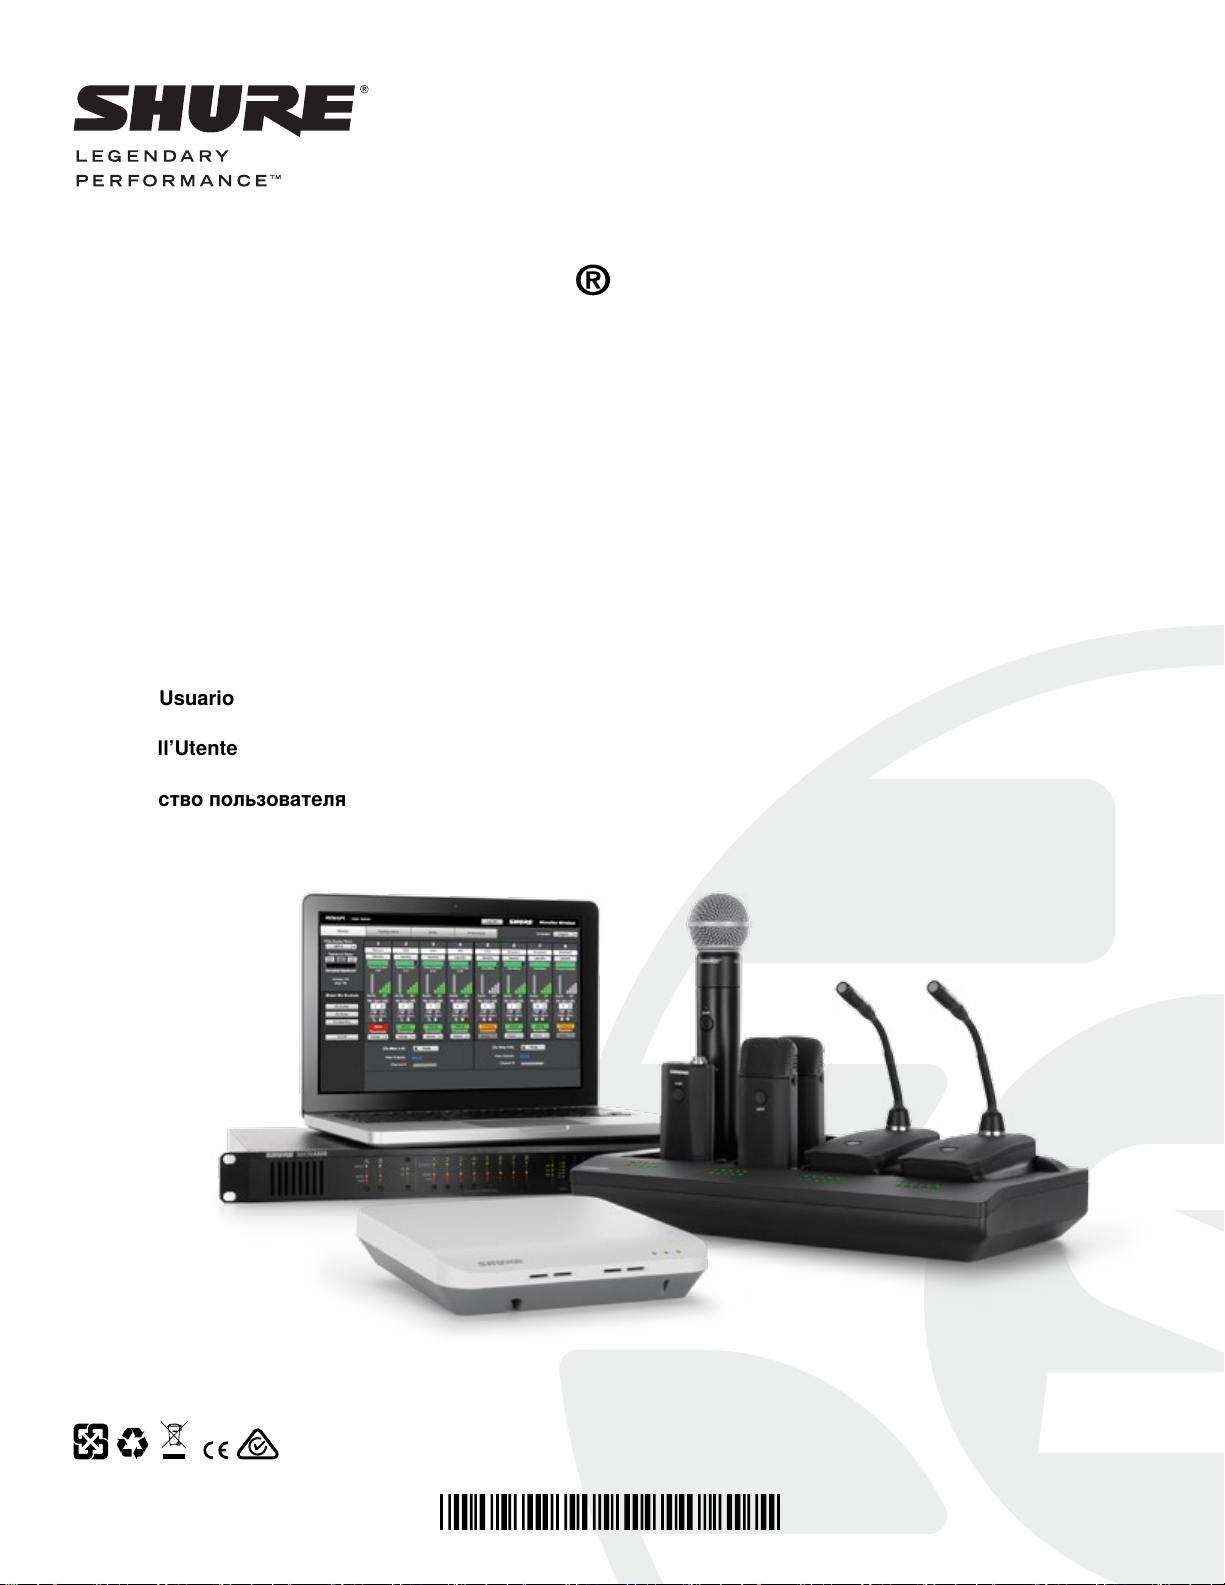
WIRELESS SYSTEM
MICROFLEX
WIRELESS
QUICK START GUIDE
Le Guide de l’Utilisateur
Bedienungsanleitung
Manuale d’uso
Guia del Usuario
Guida dell’Utente
Руководство пользователя
日本語
繁體中文
© 2014 Shure Incorporated
27A20830 (Rev. 4)
Page 2
IMPORTANT SAFETY INSTRUCTIONS
1. READ these instructions.
2. KEEP these instructions.
3. HEED all warnings.
4. FOLLOW all instructions.
5. DO NOT use this apparatus near water.
6. CLEAN ONLY with dry cloth.
7. DO NOT block any ventilation openings. Allow sufficient distances for adequate ventilation and install in accordance with the manufacturer’s instructions.
8. DO NOT install near any heat sources such as open flames, radiators, heat registers,
stoves, or other apparatus (including amplifiers) that produce heat. Do not place any open
flame sources on the product.
9. DO NOT defeat the safety purpose of the polarized or groundingtype plug. A polarized
plug has two blades with one wider than the other. A grounding type plug has two blades
and a third grounding prong. The wider blade or the third prong are provided for your
safety. If the provided plug does not fit into your outlet, consult an electrician for replacement of the obsolete outlet.
10. PROTECT the power cord from being walked on or pinched, particularly at plugs, convenience receptacles, and the point where they exit from the apparatus.
11. ONLY USE attachments/accessories specified by the manufacturer.
12. USE only with a cart, stand, tripod, bracket, or table specified by the manufacturer, or sold with the apparatus. When a cart is used, use caution when
moving the cart/apparatus combination to avoid injury from tip-over.
13. UNPLUG this apparatus during lightning storms or when unused for long
periods of time.
14. REFER all servicing to qualified service personnel. Servicing is required when the apparatus has been damaged in any way, such as power supply cord or plug is damaged,
liquid has been spilled or objects have fallen into the apparatus, the apparatus has been
exposed to rain or moisture, does not operate normally, or has been dropped.
15. DO NOT expose the apparatus to dripping and splashing. DO NOT put objects filled with
liquids, such as vases, on the apparatus.
16. The MAINS plug or an appliance coupler shall remain readily operable.
17. The airborne noise of the Apparatus does not exceed 70dB (A).
18. Apparatus with CLASS I construction shall be connected to a MAINS socket outlet with a
protective earthing connection.
19. To reduce the risk of fire or electric shock, do not expose this apparatus to rain or
moisture.
20. Do not attempt to modify this product. Doing so could result in personal injury and/or
product failure.
21. Operate this product within its specified operating temperature range.
This symbol indicates that dangerous voltage constituting a risk of
electric shock is present within this unit.
This symbol indicates that there are important operating and maintenance instructions in the literature accompanying this unit.
WARNING: This product contains a chemical known to the State of California to cause cancer and birth
defects or other reproductive harm.
CONSIGNES DE SÉCURITÉ IMPORTANTES
1. LIRE ces consignes.
2. CONSERVER ces consignes.
3. OBSERVER tous les avertissements.
4. SUIVRE toutes les consignes.
5. NE PAS utiliser cet appareil à proximité de l'eau.
6. NETTOYER UNIQUEMENT avec un chiffon sec.
7. NE PAS obstruer les ouvertures de ventilation. Laisser des distances suffisantes pour
permettre une ventilation adéquate et effectuer l'installation en respectant les instructions
du fabricant.
8. NE PAS installer à proximité d'une source de chaleur telle qu'une flamme nue, un
radiateur, une bouche de chaleur, un poêle ou d'autres appareils (dont les amplificateurs)
produisant de la chaleur. Ne placer aucune source à flamme nue sur le produit.
9. NE PAS détériorer la sécurité de la fiche polarisée ou de la fiche de terre. Une fiche
polarisée comporte deux lames dont l'une est plus large que l'autre. Une fiche de terre
comporte deux lames et une troisième broche de mise à la terre. La lame la plus large ou
la troisième broche assure la sécurité de l'utilisateur. Si la fiche fournie ne s'adapte pas à
la prise électrique, demander à un électricien de remplacer la prise hors normes.
10. PROTÉGER le cordon d'alimentation afin que personne ne marche dessus et que rien ne
le pince, en particulier au niveau des fiches, des prises de courant et du point de sortie
de l'appareil.
11. UTILISER UNIQUEMENT les accessoires spécifiés par le fabricant.
12. UTILISER uniquement avec un chariot, un pied, un trépied, un support ou
une table spécifié par le fabricant ou vendu avec l'appareil. Si un chariot
est utilisé, déplacer l'ensemble chariot-appareil avec précaution afin de ne
pas le renverser, ce qui pourrait entraîner des blessures.
WICHTIGE SICHERHEITSHINWEISE
1. Diese Hinweise LESEN.
2. Diese Hinweise AUFBEWAHREN.
3. Alle Warnungen BEACHTEN.
4. Alle Hinweise BEFOLGEN.
5. Dieses Gerät NICHT in Wassernähe VERWENDEN.
6. NUR mit einem sauberen Tuch REINIGEN.
7. KEINE Lüftungsöffnungen verdecken. Hinreichende Abstände für ausreichende Belüftung
vorsehen und gemäß den Anweisungen des Herstellers installieren.
8. NICHT in der Nähe von Wärmequellen wie zum Beispiel offenen Flammen, Heizkörpern,
Wärmespeichern, Öfen oder anderen Hitze erzeugenden Geräten (einschließlich
Verstärkern) installieren. Keine Quellen von offenen Flammen auf dem Produkt platzieren.
9. Die Schutzfunktion des Schukosteckers NICHT umgehen. Ein Schukostecker verfügt
über zwei Steckerzinken sowie Schutzleiter. Bei dieser Steckerausführung dienen die
Schutzleiter Ihrer Sicherheit. Wenn der mitgelieferte Stecker nicht in die Steckdose passt,
einen Elektriker mit dem Austauschen der veralteten Steckdose beauftragen.
10. VERHINDERN, dass das Netzkabel gequetscht oder darauf getreten wird, insbesondere
im Bereich der Stecker, Netzsteckdosen und an der Austrittsstelle vom Gerät.
11. NUR das vom Hersteller angegebene Zubehör und entsprechende Zusatzgeräte
verwenden.
12. NUR in Verbindung mit einem vom Hersteller angegebenen oder mit dem Gerät
verkauften Transportwagen, Stand, Stativ, Träger oder Tisch verwenden. Wenn ein
Transportwagen verwendet wird, beim Verschieben der Transportwagen/Geräte-Einheit
vorsichtig vorgehen, um Verletzungen durch Umkippen zu verhüten.
13. Bei Gewitter oder wenn das Gerät lange Zeit nicht benutzt wird, das Netzkabel
HERAUSZIEHEN.
13. DÉBRANCHER l'appareil pendant les orages ou quand il ne sera pas utilisé pendant
longtemps.
14. CONFIER toute réparation à du personnel qualifié. Des réparations sont nécessaires
si l'appareil est endommagé d'une façon quelconque, par exemple : cordon ou prise
d'alimentation endommagé, liquide renversé ou objet tombé à l'intérieur de l'appareil,
exposition de l'appareil à la pluie ou à l'humidité, appareil qui ne marche pas normalement ou que l'on a fait tomber.
15. NE PAS exposer cet appareil aux égouttures et aux éclaboussements. NE PAS poser
des objets contenant de l'eau, comme des vases, sur l'appareil.
16. La prise SECTEUR ou un coupleur d’appareil électrique doit rester facilement utilisable.
17. Le bruit aérien de l'appareil ne dépasse pas 70 dB (A).
18. L'appareil de construction de CLASSE I doit être raccordé à une prise SECTEUR dotée
d'une protection par mise à la terre.
19. Pour réduire les risques d'incendie ou de choc électrique, ne pas exposer cet appareil à
la pluie ou à l'humidité.
20. Ne pas essayer de modifier ce produit. Cela risque de causer des blessures et/ou la
défaillance du produit.
21. Utiliser ce produit dans sa plage de températures de fonctionnement spécifiée.
Ce symbole indique la présence d'une tension dangereuse dans
l'appareil constituant un risque de choc électrique.
Ce symbole indique que la documentation fournie avec l'appareil contient des instructions d'utilisation et d'entretien importantes.
14. ALLE Reparatur- und Wartungsarbeiten von qualifiziertem Kundendienstpersonal
durchführen lassen. Kundendienst ist erforderlich, wenn das Gerät auf irgendwelche
Weise beschädigt wurde, z. B. wenn das Netzkabel oder der Netzstecker beschädigt
wurden, wenn Flüssigkeiten in das Gerät verschüttet wurden oder Fremdkörper
hineinfielen, wenn das Gerät Regen oder Feuchtigkeit ausgesetzt war, nicht normal
funktioniert oder fallen gelassen wurde.
15. Dieses Gerät vor Tropf- und Spritzwasser SCHÜTZEN. KEINE mit Wasser gefüllten
Gegenstände wie zum Beispiel Vasen auf das Gerät STELLEN.
16. Der Netzstecker oder eine Gerätesteckverbindung muss leicht zu betätigen sein.
17. Der Luftschall des Geräts überschreitet 70 dB (A) nicht.
18. Das Gerät mit Bauweise der KLASSE I muss mit einem Schukostecker mit Schutzleiter in
eine Netzsteckdose mit Schutzleiter eingesteckt werden.
19. Dieses Gerät darf nicht Regen oder Feuchtigkeit ausgesetzt werden, um das Risiko von
Bränden oder Stromschlägen zu verringern.
20. Nicht versuchen, dieses Produkt zu modifizieren. Ansonsten könnte es zu Verletzungen
und/oder zum Produktausfall kommen.
21. Dieses Produkt muss innerhalb des vorgeschriebenen Temperaturbereichs betrieben
werden.
Dieses Symbol zeigt an, dass gefährliche Spannungswerte, die ein
Stromschlagrisiko darstellen, innerhalb dieses Geräts auftreten.
Dieses Symbol zeigt an, dass das diesem Gerät beiliegende Handbuch
wichtige Betriebs- und Wartungsanweisungen enthält.
Page 3
INSTRUCCIONES IMPORTANTES DE SEGURIDAD
1. LEA estas instrucciones.
2. CONSERVE estas instrucciones.
3. PRESTE ATENCION a todas las advertencias.
4. SIGA todas las instrucciones.
5. NO utilice este aparato cerca del agua.
6. LIMPIE UNICAMENTE con un trapo seco.
7. NO obstruya ninguna de las aberturas de ventilación. Deje espacio suficiente para
proporcionar ventilación adecuada e instale los equipos según las instrucciones del
fabricante.
8. NO instale el aparato cerca de fuentes de calor tales como llamas descubiertas, radiadores, registros de calefacción, estufas u otros aparatos (incluyendo amplificadores) que
produzcan calor. No coloque artículos con llamas descubiertas en el producto.
9. NO anule la función de seguridad del enchufe polarizado o con clavija de puesta a tierra.
Un enchufe polarizado tiene dos patas, una más ancha que la otra. Un enchufe con puesta a tierra tiene dos patas y una tercera clavija con puesta a tierra. La pata más ancha
o la tercera clavija se proporciona para su seguridad. Si el tomacorriente no es del tipo
apropiado para el enchufe, consulte a un electricista para que sustituya el tomacorriente
de estilo anticuado.
10. PROTEJA el cable eléctrico para evitar que personas lo pisen o estrujen, particularmente
en sus enchufes, en los tomacorrientes y en el punto en el cual sale del aparato.
11. UTILICE únicamente los accesorios especificados por el fabricante.
12. UTILICE únicamente con un carro, pedestal, trípode, escuadra o mesa del
tipo especificado por el fabricante o vendido con el aparato. Si se usa un
carro, el mismo debe moverse con sumo cuidado para evitar que se vuelque
con el aparato.
13. DESENCHUFE el aparato durante las tormentas eléctricas, o si no va a ser utilizado por
un lapso prolongado.
14. TODA reparación debe ser llevada a cabo por técnicos calificados. El aparato requiere
reparación si ha sufrido cualquier tipo de daño, incluyendo los daños al cordón o enchufe
eléctrico, si se derrama líquido sobre el aparato o si caen objetos en su interior, si ha sido
expuesto a la lluvia o la humedad, si no funciona de modo normal, o si se ha caído.
15. NO exponga este aparato a chorros o salpicaduras de líquidos. NO coloque objetos
llenos con líquido, tales como floreros, sobre el aparato.
16. El enchufe de alimentación o un acoplador para otros aparatos deberá permanecer en
buenas condiciones de funcionamiento.
17. El nivel de ruido transmitido por el aire del aparato no excede de 70 dB(A).
18. Los aparatos de fabricación CLASE I deberán conectarse a un tomacorriente de ALIMENTACION con clavija de puesta a tierra protectora.
19. Para reducir el riesgo de causar un incendio o sacudidas eléctricas, no exponga este
aparato a la lluvia ni a humedad.
20. No intente modificar este producto. Hacerlo podría causar lesiones personales y/o la falla
del producto.
21. Utilice este producto únicamente dentro de la gama de temperaturas de funcionamiento
especificadas.
Este símbolo indica que la unidad contiene niveles de voltaje peligrosos
que representan un riesgo de choques eléctricos.
Este símbolo indica que la literatura que acompaña a esta unidad contiene instrucciones importantes de funcionamiento y mantenimiento.
ISTRUZIONI IMPORTANTI PER LA SICUREZZA
1. LEGGETE queste istruzioni.
2. CONSERVATELE.
3. OSSERVATE tutte le avvertenze.
4. SEGUITE tutte le istruzioni.
5. NON usate questo apparecchio vicino all'acqua.
6. PULITE l'apparecchio SOLO con un panno asciutto.
7. NON ostruite alcuna apertura per l'aria di raffreddamento. Consentite distanze sufficienti
per un'adeguata ventilazione e installate l'apparecchio seguendo le istruzioni del costruttore.
8. NON installate l'apparecchio accanto a fonti di calore, quali fiamme libere, radiatori, aperture per l'efflusso di aria calda, forni o altri apparecchi (amplificatori inclusi) che generano
calore. Non esponete il prodotto a fonti di calore non controllate.
9. NON modificate la spina polarizzata o con spinotto di protezione per non alterarne
la funzione di sicurezza. Una spina polarizzata è dotata di due lame, una più ampia
dell'altra. Una spina con spinotto è dotata di due lame e di un terzo polo di messa a terra.
La lama più ampia ed il terzo polo hanno lo scopo di tutelare la vostra incolumità. Se la
spina in dotazione non si adatta alla presa di corrente, rivolgetevi ad un elettricista per far
eseguire le modifiche necessarie.
10. EVITATE di calpestare il cavo di alimentazione o di comprimerlo, specie in corrispondenza di spine, prese di corrente e punto di uscita dall'apparecchio.
11. USATE ESCLUSIVAMENTE i dispositivi di collegamento e gli accessori
specificati dal costruttore.
12. USATE l'apparecchio solo con carrelli, sostegni, treppiedi, staffe o tavoli
specificati dal produttore o venduti unitamente all'apparecchio stesso. Se usate un carrello, fate attenzione quando lo spostate con l'apparecchio collocato
su di esso, per evitare infortuni causati da un eventuale ribaltamento del carrello stesso.
IMPORTANTES INSTRUÇÕES DE SEGURANÇA
1. LEIA estas instruções.
2. GUARDE estas instruções.
3. PRESTE ATENÇÃO a todas as instruções.
4. SIGA todas as instruções.
5. NÃO use este aparelho perto de água.
6. LIMPE SOMENTE com um pano seco.
7. NÃO bloqueie nenhuma das aberturas de ventilação. Deixe distâncias suficientes para
ventilação adequada e instale de acordo com as instruções do fabricante.
8. NÃO instale próximo de nenhuma fonte de calor, tais como fogo aceso, radiadores,
bocais de aquecimento, fornos ou outros aparelhos que produzam calor (inclusive amplificadores). Não coloque fontes de chamas sobre o produto.
9. NÃO inutilize as características de segurança do conector polarizado ou com pino de
aterramento. Um conector polarizado possui duas lâminas com uma mais larga do que a
outra. Um conector com pino de aterramento possui duas lâminas e um terceiro pino de
aterramento. É fornecida uma lâmina mais larga ou o terceiro pino para a sua segurança.
Se por acaso o conector não se encaixar na tomada, chame um eletricista para substituir
a tomada obsoleta.
10. PROTEJA o cabo de alimentação, evitando que seja pisado ou que enrosque, especialmente nos conectores, nas tomadas elétricas de emprego geral e no ponto onde elas
saem do aparelho.
11. USE SOMENTE acessórios/apetrechos especificados pelo fabricante.
12. USE somente com um carrinho, pedestal, tripé, suporte ou mesa especificados pelo fabricante ou vendidos com o aparelho. Quando utilizar um
carrinho, tenha cuidado ao movimentar o conjunto aparelho/carrinho para
evitar danos com a queda do mesmo.
13. Durante i temporali o in caso di inutilizzo prolungato dell'apparecchio, SCOLLEGATELO
dalla presa di corrente.
14. Per qualsiasi intervento, RIVOLGETEVI a personale di assistenza qualificato. È necessario intervenire sull'apparecchio ogniqualvolta è stato danneggiato, in qualsiasi modo;
ad esempio la spina o il cavo di alimentazione sono danneggiati, si è versato liquido
sull'apparecchio o sono caduti oggetti su di esso, l'apparecchio è stato esposto alla pioggia o all'umidità, non funziona normalmente o è caduto.
15. NON esponete l'apparecchio a sgocciolamenti o spruzzi. NON appoggiate
sull'apparecchio oggetti pieni di liquidi, ad esempio vasi da fiori.
16. La spina ELETTRICA o l'accoppiatore per elettrodomestici deve restare prontamente
utilizzabile.
17. Il rumore aereo dell'apparecchio non supera i 70 dB (A).
18. L'apparecchio appartenente alla CLASSE I deve essere collegato ad una presa elettrica
dotata di messa a terra di protezione.
19. Per ridurre il rischio di incendio o folgorazione, non esponete questo apparecchio alla
pioggia o all'umidità.
20. Non tentate di modificare il prodotto. Tale operazione può causare infortuni e/o il guasto
del prodotto stesso.
21. Utilizzate questo prodotto entro la gamma di temperatura operativa specificata.
Questo simbolo indica la presenza di alta tensione all'interno
dell'apparecchio, che comporta il rischio di folgorazione.
Questo simbolo indica la presenza di istruzioni importanti per l'uso e la
manutenzione nella documentazione in dotazione all'apparecchio.
13. DESLIGUE este aparelho da tomada elétrica durante tempestades com relâmpagos ou
quando não seja utilizado por longo período.
14. DEIXE toda a manutenção sob a responsabilidade de uma equipe de manutenção
qualificada. É necessário realizar a manutenção quando por algum motivo o aparelho
tiver sido danificado de alguma forma, como por exemplo por dano do cabo de alimentação elétrica ou do seu conector, por derramamento de líquido ou queda de objetos no
aparelho, se o aparelho tiver sido exposto à chuva ou à umidade, não esteja operando
normalmente ou tenha sofrido queda.
15. NÃO exponha o aparelho a respingos ou goteiras. NÃO coloque objetos cheios de
líquidos, tais como vasos, sobre o aparelho.
16. O plugue MAINS (rede elétrica) ou um acoplador de aparelho deve estar sempre pronto
para operação.
17. O ruído aéreo do Aparelho não ultrapassa 70 dB (A).
18. O aparelho com construção CLASSE I deve estar conectado à tomada da rede elétrica
com ligação à terra.
19. Para reduzir o risco de incêndio ou choque elétrico, não exponha este aparelho à chuva
ou umidade.
20. Não tente alterar este produto. Isso poderá resultar em lesão pessoal e/ou falha do
produto.
21. Opere este produto dentro da faixa de temperatura de operação especificada.
Este símbolo indica que existe nesta unidade tensão perigosa que
apresenta risco de choque elétrico.
Este símbolo indica que existem instruções operação e manutenção
importantes na literatura que acompanha esta unidade.
Page 4
ВАЖНЫЕ ИНСТРУКЦИИ ПО ТЕХНИКЕ БЕЗОПАСНОСТИ
MAINSプラグまたはアプライアンスカップラーが使用できる状態にしておいてください。
1. ПРОЧИТАЙТЕ эти инструкции.
2. СОХРАНИТЕ эти инструкции.
3. ОБРАЩАЙТЕ ВНИМАНИЕ на все предупреждения.
4. СЛЕДУЙТЕ всем инструкциям.
5. НЕ пользуйтесь этим прибором вблизи воды.
6. ЧИСТИТЕ ТОЛЬКО сухой тканью.
7. НЕ закрывайте никакие вентиляционные отверстия. Оставляйте расстояния, нужные
для достаточной вентиляции, и выполняйте установку в соответствии с инструкциями
изготовителя.
8. НЕ устанавливайте вблизи каких бы то ни было источников тепла — открытого
пламени, радиаторов, обогревателей, печей или других приборов (включая усилители),
выделяющих тепло. Не помещайте на изделие источники открытого пламени.
9. НЕ пренебрегайте защитными свойствами поляризованной или заземляющей вилки.
Поляризованная вилка имеет два ножевых контакта, из которых один шире другого.
Заземляющая вилка имеет два ножевых контакта и третий, заземляющий, штырь.
Более широкий контакт или третий штырь предусматриваются для безопасности. Если
вилка прибора не подходит к вашей розетке, обратитесь к электрику для замены
розетки устаревшей конструкции.
10. ЗАЩИТИТЕ силовой шнур, чтобы на него не наступали и чтобы он не был пережат,
особенно в местах подсоединения к вилкам, розеткам и в месте выхода из прибора.
11. ИСПОЛЬЗУЙТЕ ТОЛЬКО те принадлежности и приспособления, которые
предусмотрены изготовителем.
12. ИСПОЛЬЗУЙТЕ только с тележкой, стендом, штативом, кронштейном или
столом, которые предусмотрены изготовителем или наглухо прикреплены к
прибору. При использовании тележки будьте осторожны, когда передвигаете
тележку вместе с прибором — переворачивание может привести к травме.
13. ОТСОЕДИНЯЙТЕ прибор ОТ СЕТИ во время грозы или если он не используется
длительное время.
14. ПОРУЧИТЕ все обслуживание квалифицированному техническому персоналу.
Обслуживание требуется при каком-либо повреждении прибора, например, при
повреждении шнура питания или вилки, если на прибор была пролита жидкость или
на него упал какой-либо предмет, если прибор подвергся воздействию дождя или
сырости, не функционирует нормально или если он падал.
15. НЕ допускайте попадания на прибор капель или брызг. НЕ ставьте на прибор сосуды
с жидкостью, например, вазы.
16. Вилка электропитания или штепсель прибора должны быть легко доступны.
17. Уровень воздушного шума этого аппарата не превышает 70 дБ (A).
18. Аппараты конструкции КЛАССА I необходимо подсоединять к СЕТЕВОЙ розетке с
защитным соединением для заземления.
19. Чтобы уменьшить риск возгорания или поражения электрическим током, не
допускайте попадания на этот аппарат дождя или влаги.
20. Не пытайтесь вносить изменения в это изделие. Это может привести к травме и (или)
выходу изделия из строя.
21. Эксплуатируйте это изделие в указанном диапазоне рабочих температур.
Этот знак показывает, что внутри прибора имеется опасное
напряжение, создающее риск электрического удара.
Этот знак показывает, что в сопроводительной документации
к прибору есть важные указания по его эксплуатации и
обслуживанию.
安全のための重要注意事項
1. この説明書をお読みください。
2. この説明書を保管しておいてください。
3. 警告事項すべてに留意してください。
4. す べ て の 指 示 に 従 っ て く だ さ い 。
5. この製品 は水 の近 くで使用しな いでください。
6. 掃 除 は 、乾 い た 布 で か ら 拭 き す る だ け に し て く だ さ い 。
7. 通風口を塞がないようにしてください。十分な換気ができるよう余裕を持たせ、メーカー
の指示に従って設置してください。
8. 炎、ラジエーターや暖房送風口、ストーブ、その他、熱を発生する機器 (アンプなど) の
近くには設 置しないでください。炎 が出る物 を製品 の上に置 かないでください 。
9. 有極プラグやアース付きプラグは安全のために用いられています。無効にしないように
してください。有極プラグは、2本のブレードのうち一方が幅広になっています。アース付
きプラグは、2本のブレードの他に、3本目のアースの棒がついています。幅広のブレード
や3本目の棒は、安全のためのものです。これらのプラグがコンセントの差し込み口に合
わない場合は、電気工事業者に相談し、コンセントを交換してもらってください。
10. 電源コードは、特にプラグ差し込み部分、延長コード、機器から出ている部分において、
引っかか って 抜けたり挟ま れ たりしな いように 保 護し てくだ さい 。
11. アタッチメントや付属品は、必ずメーカー指定のものをご利用ください。
12. カートやスタンド、三脚、ブラケット、テーブル等は、メーカー指定のものか、こ
の装置用に販売されているものを必ずご利用ください。カートに装置を載せ
て動かす際は、つっかけて怪我をしないよう注意してください。
重要安全事項!
1. 必須閱讀這些注意事項。
2. 必須保留這些注意事項。
3. 必須注意所有警告內容。
4. 必須遵循所有注意事項。
5. 不要在靠近水的地方使用本設備。
6. 只能用幹布擦拭設備。
7. 不要堵塞任何通風口。留出足夠的距離,確保充分通風,並安裝在符合製造
商要求的位置。
8. 不要將本設備安裝在任何熱源(如明火、散熱器、調溫器、火爐或包括功率
放大器在可的其它可能產生熱量的裝置附近。不要將任何明火火源放置在產
品上。
9. 不要破壞帶極性或接地類型插頭的安全功能。極性插頭帶有兩個插片,其中一
個比另一個寬。接地類型插頭帶有兩個插片和第三個接地插腳。較寬的插片或
第三個插腳是為安全目的設定的。如果提供的插頭無法插入您的插座,請向電
工咨詢如何更換合適的插座。
10. 保護電源線防止被腳踩踏或被夾緊,尤其是在插頭、方便插座和機身電源線
的引出處。
11. 只能使用製造商指定的連接部件/附件。
12. 只能使用製造商指定的或隨設備售出的手推車、支座、三角架、托
架或支撐台。如果使用手推車,在移動裝有設備的手推車時應注意
安全,避免設備翻落。
13. 雷を伴う嵐の際、または長期間使用しない場合は、プラグをコンセントから抜いてくだ
さ い 。
14. 整備の際は、資格のある整備担当者に必ずご相談ください。電源コードやプラグの損
傷、液体や異物が装置内に入り込んだ場合、装置が雨や湿気に曝された場合、正常に
作動しない場合、装置を落とした場合など、装置が何らかの状態で損傷した場合は、
整備が必要です。
15. 水滴や水しぶきに曝さないでください。液体の入った花瓶などを装置の上に置かない
で く だ さ い 。
16.
17. 装置の空気伝播音は70 dB(A)を超えません。
18. クラスI構造の装置は保護接地接続のある主電源の壁コンセントに接続してください。
19. 火災や感電の危険を避けるため、本機器は雨や湿気のある場所にさらさないでくださ
い 。
20. 本製品の改造は試みないでください。改造した場合、怪我や製品故障の原因となるこ
とがあります 。
21. 本製品は指定された動作温度範囲内で使用してください。
警告。この表示内容を無視して誤った取り扱いをすると、死亡または重
傷を負う可能性が想定される内容です。
注意。この表示内容を無視して誤った取り扱いをすると、傷害を負う可
能性または物的損害が発生する可能性が想定される内容です。
13. 在雷電天氣或長時間不使用時,應拔下設備的插頭。
14. 所有維修均應由合格的維修人員執行。在設備因以下情況被損壞時,應進行維
修:電源線或插頭損壞、液體潑濺到設備上或異物進入設備,設備暴露在雨水
或潮濕環境中而無法正常工作,或摔落到地上。
15. 不要將本設備暴露在可能滴水和濺水的地方。不要將裝有液體的容器(如花瓶
等)放在本設備頂部。
16. 電源插頭或電器轉接頭應保持在隨時可用的狀態。
17. 本裝置的空氣噪聲不超過 70dB (A)。
18. 應將符合 I 類標準的設備連接到帶有接地保護裝置的主電源插座。
19. 為降低起火或電擊危險,不要將本設備暴露在雨中或潮濕環境下。
20. 不要嘗試改裝本產品。否則可能會導致人身傷害和/或產品故障。
21. 應在技術規格指定的溫度範圍內操作此產品。
這個符號表示本設備中存在可能導致觸電的危險電壓。
此符號表示本部件附帶的說明書中具有重要的操作和安全說
明。
Page 5
General Description
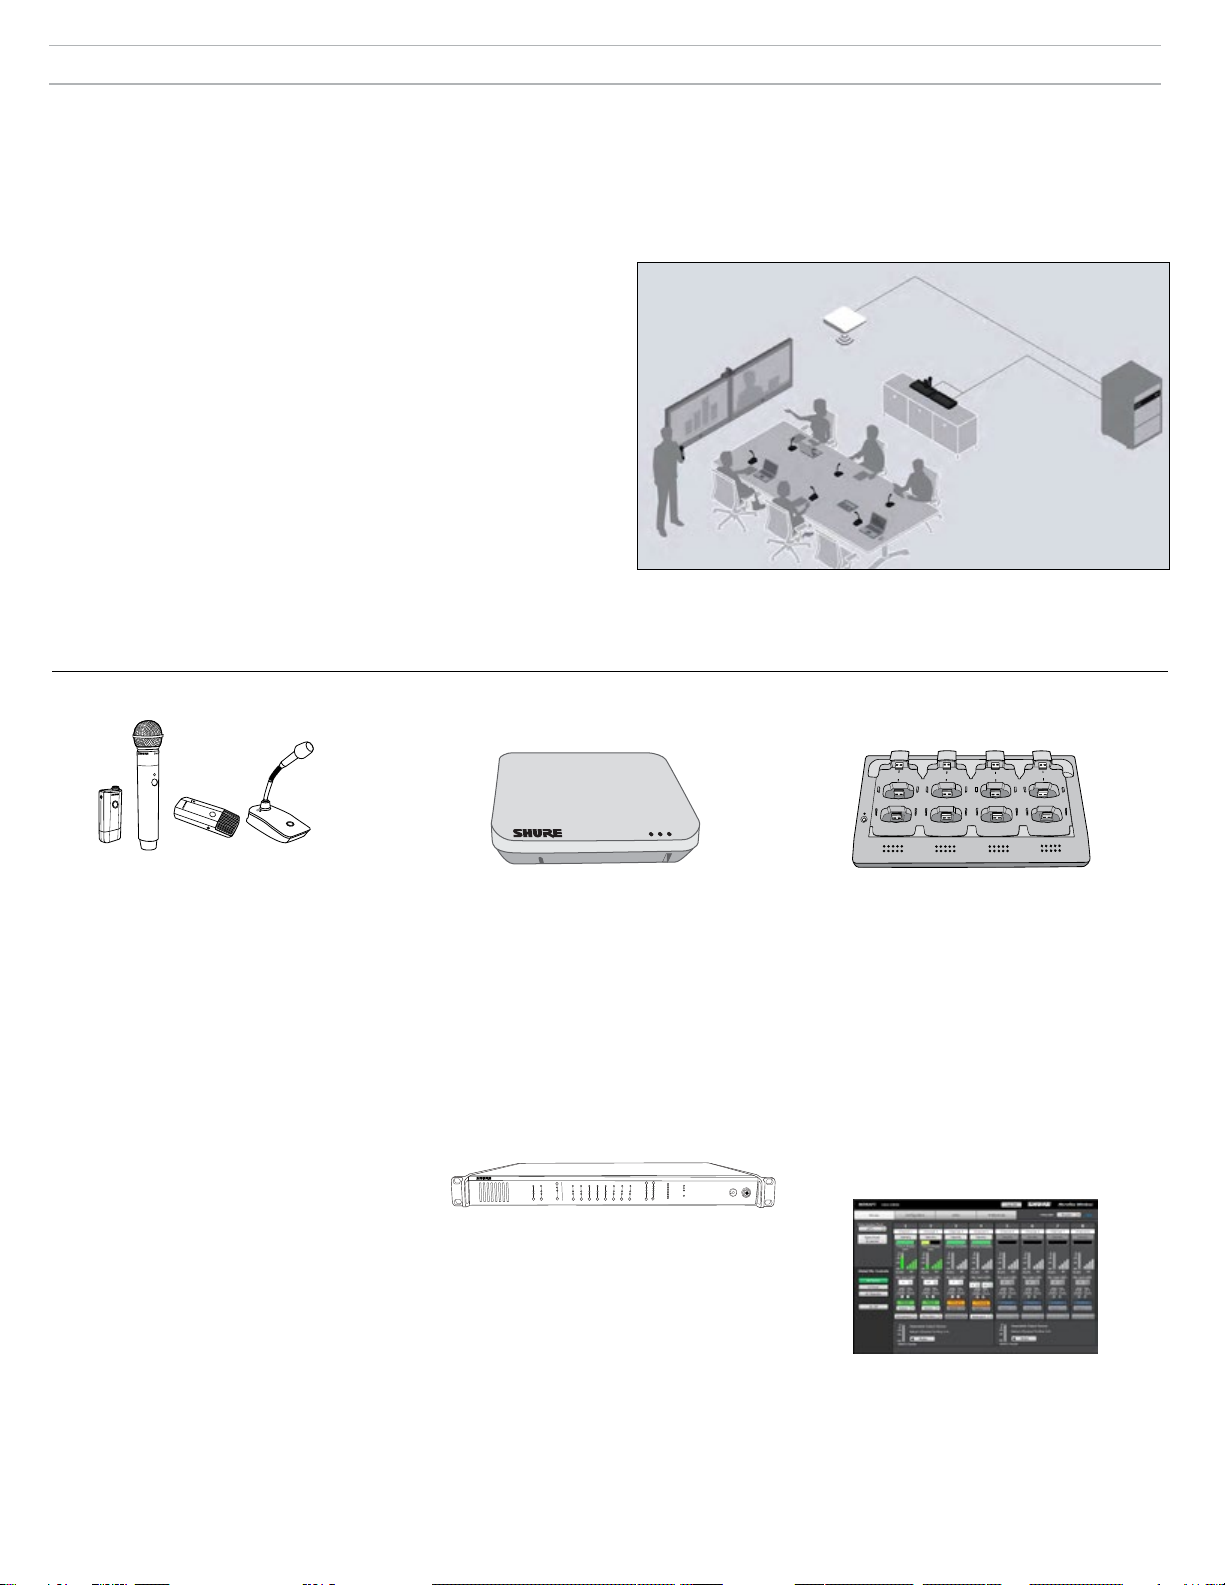
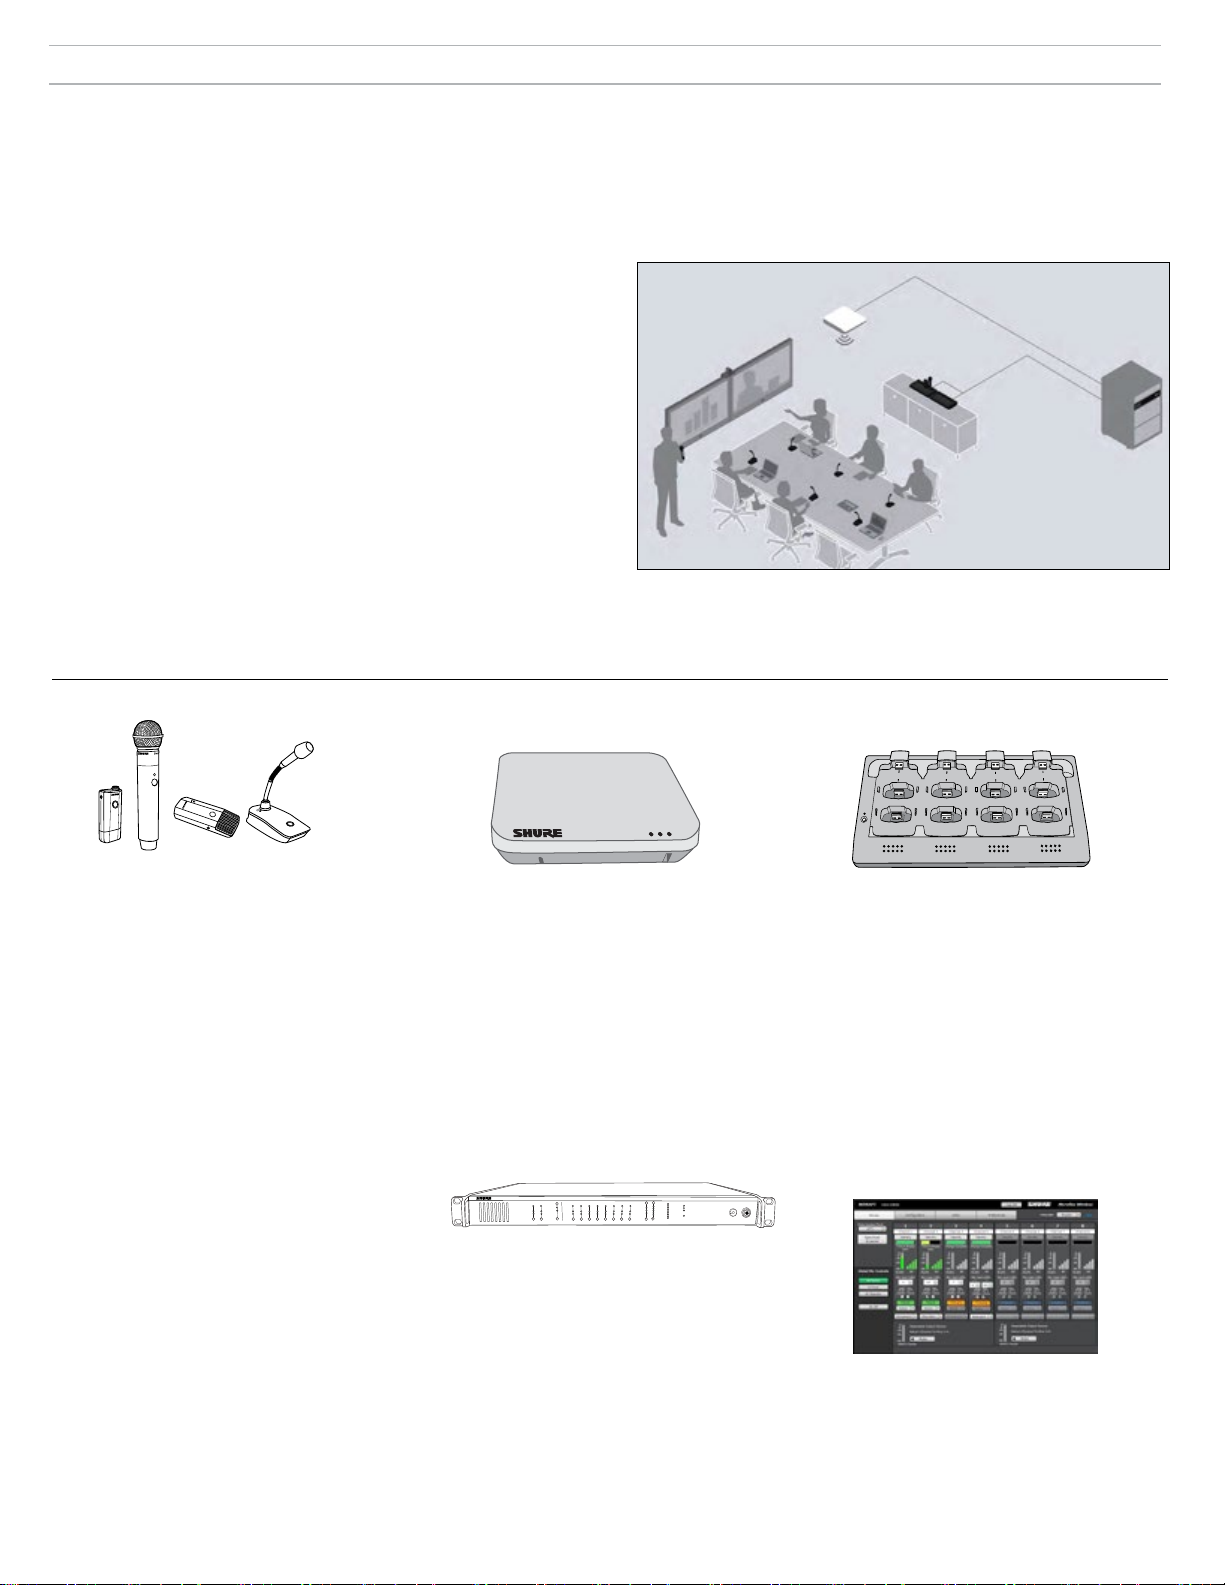
The Shure Microflextm Wireless Series (MXW) is a complete microphone solution for flexible meeting rooms and boardrooms. It features automatic
RF channel management, rechargeable encrypted (AES256) wireless microphones, and digital audio networking (Dante
tm
). The networked charging
station charges boundary and gooseneck microphones for tabletop applications, as well as handheld and bodypack solutions for corporate training and
presentations. The MXW Access Point mounts to a ceiling or wall for discreet communication between the wireless microphones and the digital audio
network. Multiple access points can be used for installations that require simultaneous operation of up to 40* microphones in the same area (*region
dependant). Web-browser based control software is used for remote monitoring and control from any computer connected to the network.
Additional Resources
This Quickstart guide contains the essential information to set up a basic, eightchannel MXW system. The following is a list of additional resources for the
MXW Series:
Full MXW Manual: The full manual provides comprehensive MXW System
information, such as detailed component descriptions, network topologies, RF
management best-practices and control software navigation. It can be found on
www.shure.com and the USB drive supplied with the Access Point Transceiver.
Shure Support: For Troubleshooting assistance or consultation on complex
installations, contact Shure to speak with a support representative. In the
Americas region, call the Systems Support group at 847-600-8541. For users in
other locations, go to www.shure.com to find support contact for your region.
Audinate: For digital audio networking help, advanced networking guidelines,
and Dante
com.
tm
software troubleshooting, visit Audinate's website at www.audinate.
Component Overview
MXW6MXW1 MXW8
MXW2
Microphone Transmitters
MXW microphones transmit an encrypted,
wireless audio signal to the access point. Four
form factors are available:
Hybrid Bodypack (MXW1)
The bodypack secures to a belt or strap
for hands-free, mobile communication. It
features a TQG input for lavalier connection
and an integrated omnidirectional
microphone.
Handheld (MXW2)
The handheld enables presenters to
communicate using legendary Shure SM58,
SM86, BETA58 and VP68 microphone
cartridges.
Boundary (MXW6/C, MXW6/O)
The boundary transmitter sits on a table
or desk to transmit speech while discreetly
blending into any conference environment.
Desktop Gooseneck Base (MXW8)
The gooseneck base is compatible with
5, 10, and 15” Microflex gooseneck
microphones.
The MXW1, MXW6, and MXW8 microphones
include a headphone output for monitoring audio,
such as a translation channel.
Access Point Transceiver
(MXWAPT4, MXWAPT8)
The Access Point Transceiver (4 and 8 channel
units) mounts to a wall or ceiling to manage
encrypted, wireless audio connections with
microphones. As a system hub, it transports
digital audio between the wireless microphones
and other Dante devices on the same network.
The APT includes a webserver that hosts
the MXW System control software, used for
monitoring, configuration, and remote control of
the system.
MICROFLEX WIRELESS
B
OUTPUT
INPUT
line
aux
sig/clip
sig/clip
mute
mute
push to solo | hold to mute
-9
0
line
-18
-9
-12
aux
-24
-18
-36
mic
-24
-48
-60
adjust
0
8
7
6
5
4
3
2
1
A
Audio Network Interface
power
ethernet
network audio
HEADPHONE
lockout
Audio Network Interface
(MXWANI4, MXWANI8)
The Audio Network Interface (4 and 8 channel)
is a Dante network device that provides analog
audio input and outputs for the MXW system.
It has a 4-port Gigabit Ethernet switch that
enables the connection of an MXW access
point, a computer and up to two MXW networked
charging stations.
2
1
5
6
4
3
7
8
Networked Charging Station
(MXWNCS4, MXWNCS8)
The Networked Charging Station (4 and 8 slot
varieties) is capable of simultaneous charging
up to 4 (or 8) MXW microphones. It also
Links microphones to access point channels
and networks battery statistics to the control
software.
Important: Desktop Gooseneck Base
Microphones (MXW8) occupy two charging
slots. For example, eight MXW8 microphones
require two MXWNCS8 charging stations (16
charging slots total).
MXW Control Software
The MXW control software offers comprehensive
remote control of key setup, monitoring and
management functions. The software is
accessible from any PC or Mac on the network,
and opens in a web-browser using Adobe®
Flash®.
5
Page 6
Equipment Inventory
Included Accessories
Component Accessory
Shure USB Flash Drive (contains Shure Web Device
Discovery application, Shure Firmware Update
APT
Manager application and user guides)
Mounting Plate
Paintable Cover
Hardware Kit (rackmount screws, cable connector
ANI
assemblies)
IEC Power Cable
NCS DC Power Adapter
Connect the Components
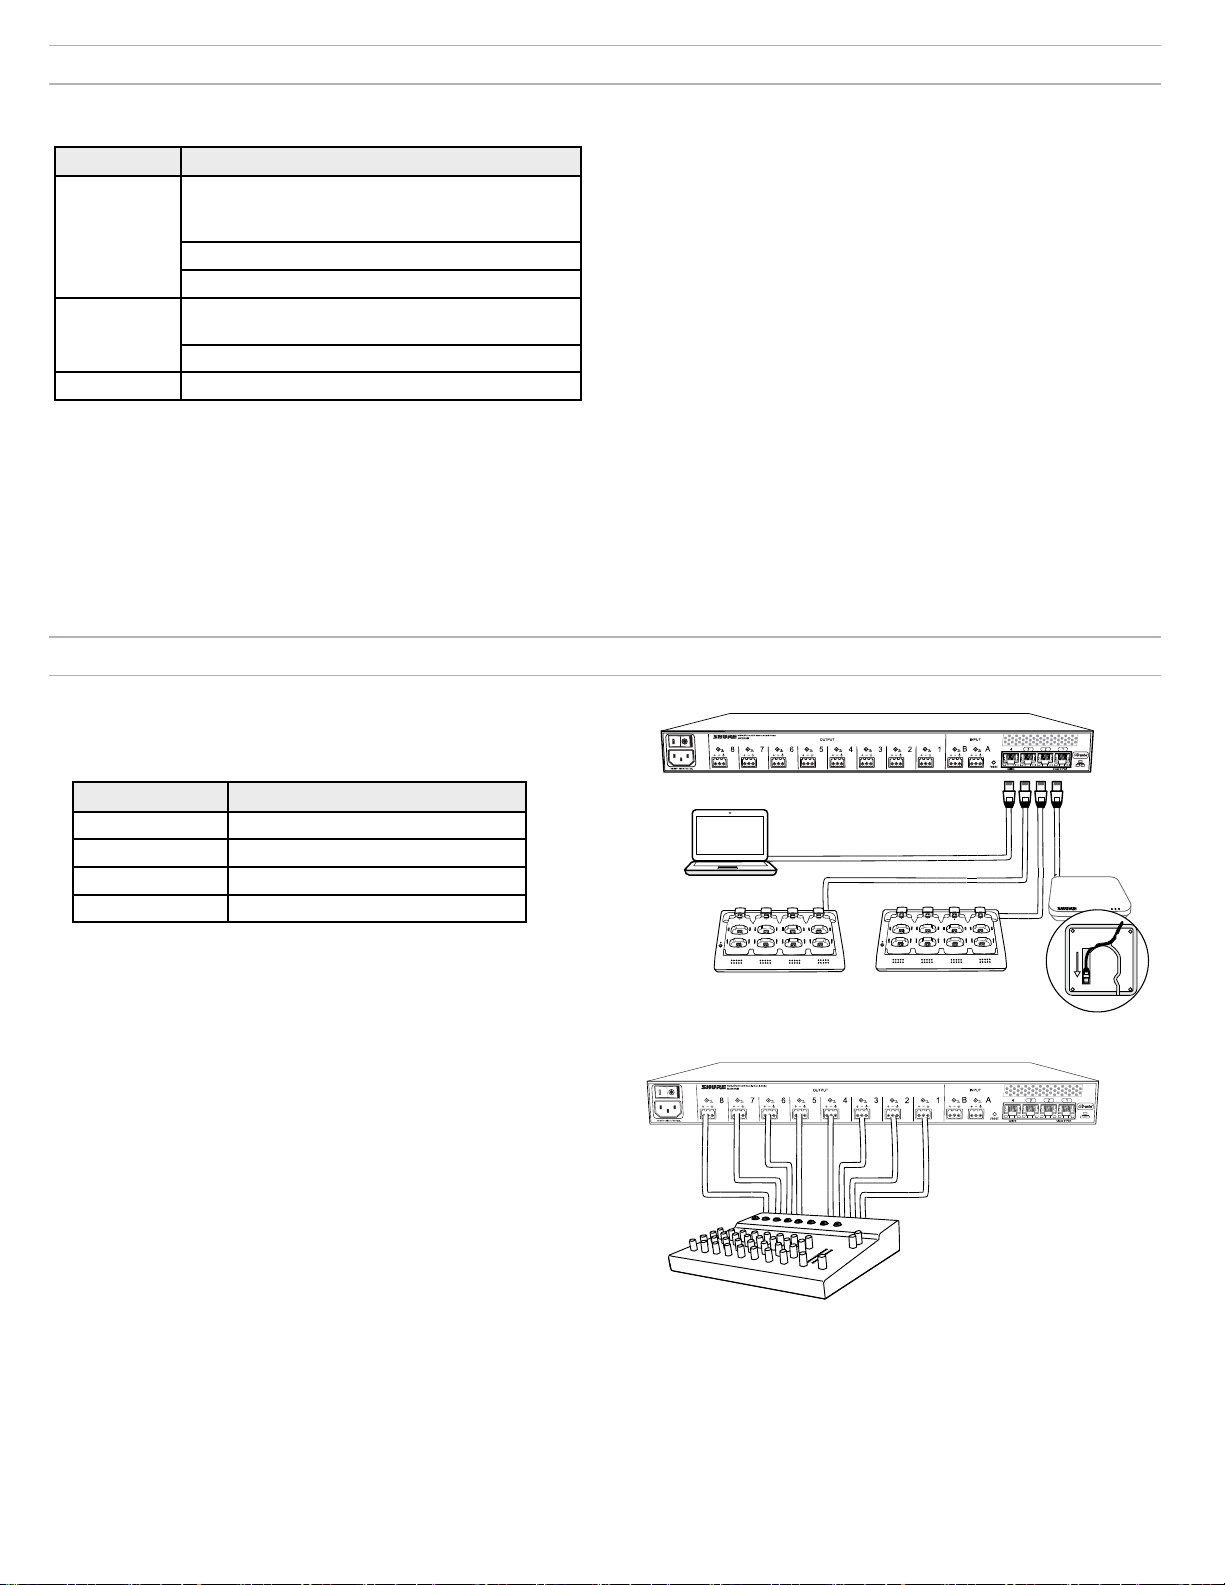
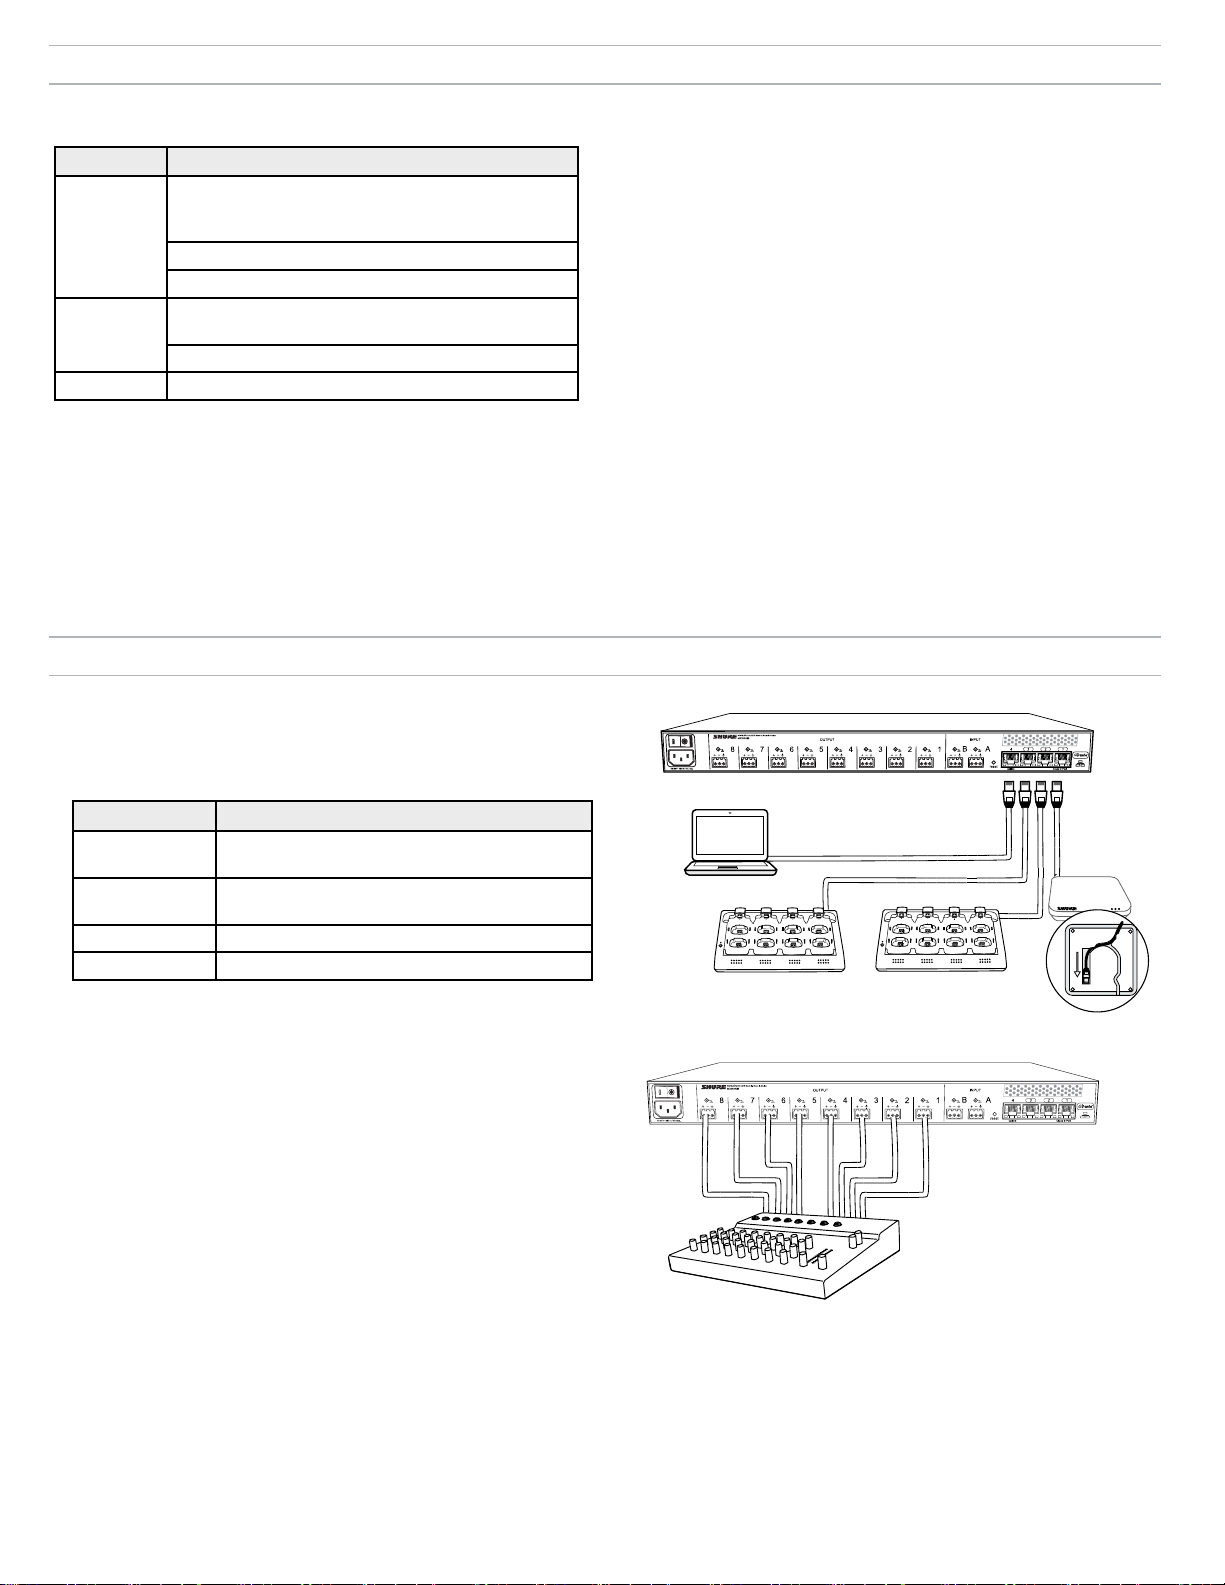
1. Connect MXW components
Use shielded Ethernet cables to connect MXW components together.
Use the 4-port switch on the Audio Network Interface (ANI) or connect
all components to a separate gigabit switch.
Additional Equipment
Audio cables
Use shielded audio cables for connecting the ANI to a mixer, DSP, or
teleconferencing device.
Ethernet cables
Use shielded Cat5e (or higher) cables to network MXW components.
Computer
Use a PC or Mac to access the MXW System interface from a
web-browser.
ANI Network Port To Component
① Port 1 (PoE) Access Point Transceiver (APT)
② Port 2 Networked Charging Station (NCS)
③ Port 3 (Optional) Additional NCS
④ Port 4 Computer
In default settings, MXW devices are set to Automatic (DHCP) mode to
Note:
automatically configure to compatible IP settings. In the absence of a DHCP server,
the devices will use a Link Local (169.254.x.x) address format.
2. Connect ANI analog outputs
Use shielded audio cables to connect the outputs of the ANI to a mixer,
DSP, or teleconferencing device. (Reference the Hardware kit supplied
with the ANI to properly wire the cables to the block connectors.)
④
①
③
1
4
2
1
3
5
7
6
8
2
5
6
②
4
3
7
8
6
Page 7

Power
②
④
①
7
8
6
5
1
2
3
4
7
8
6
5
1
2
3
4
③
MXWANI8 mxwani8-ffeee5.local
192.168.200.22
Dante
Dante
ROOM 5
MXWAPT8
mxwapt8-ffaaa2.local
192.168.200.23
CONFERENCE
mxwani-aa1.local
192-168-200-22
mxwapt8-ffe761.local
192-168-200-23
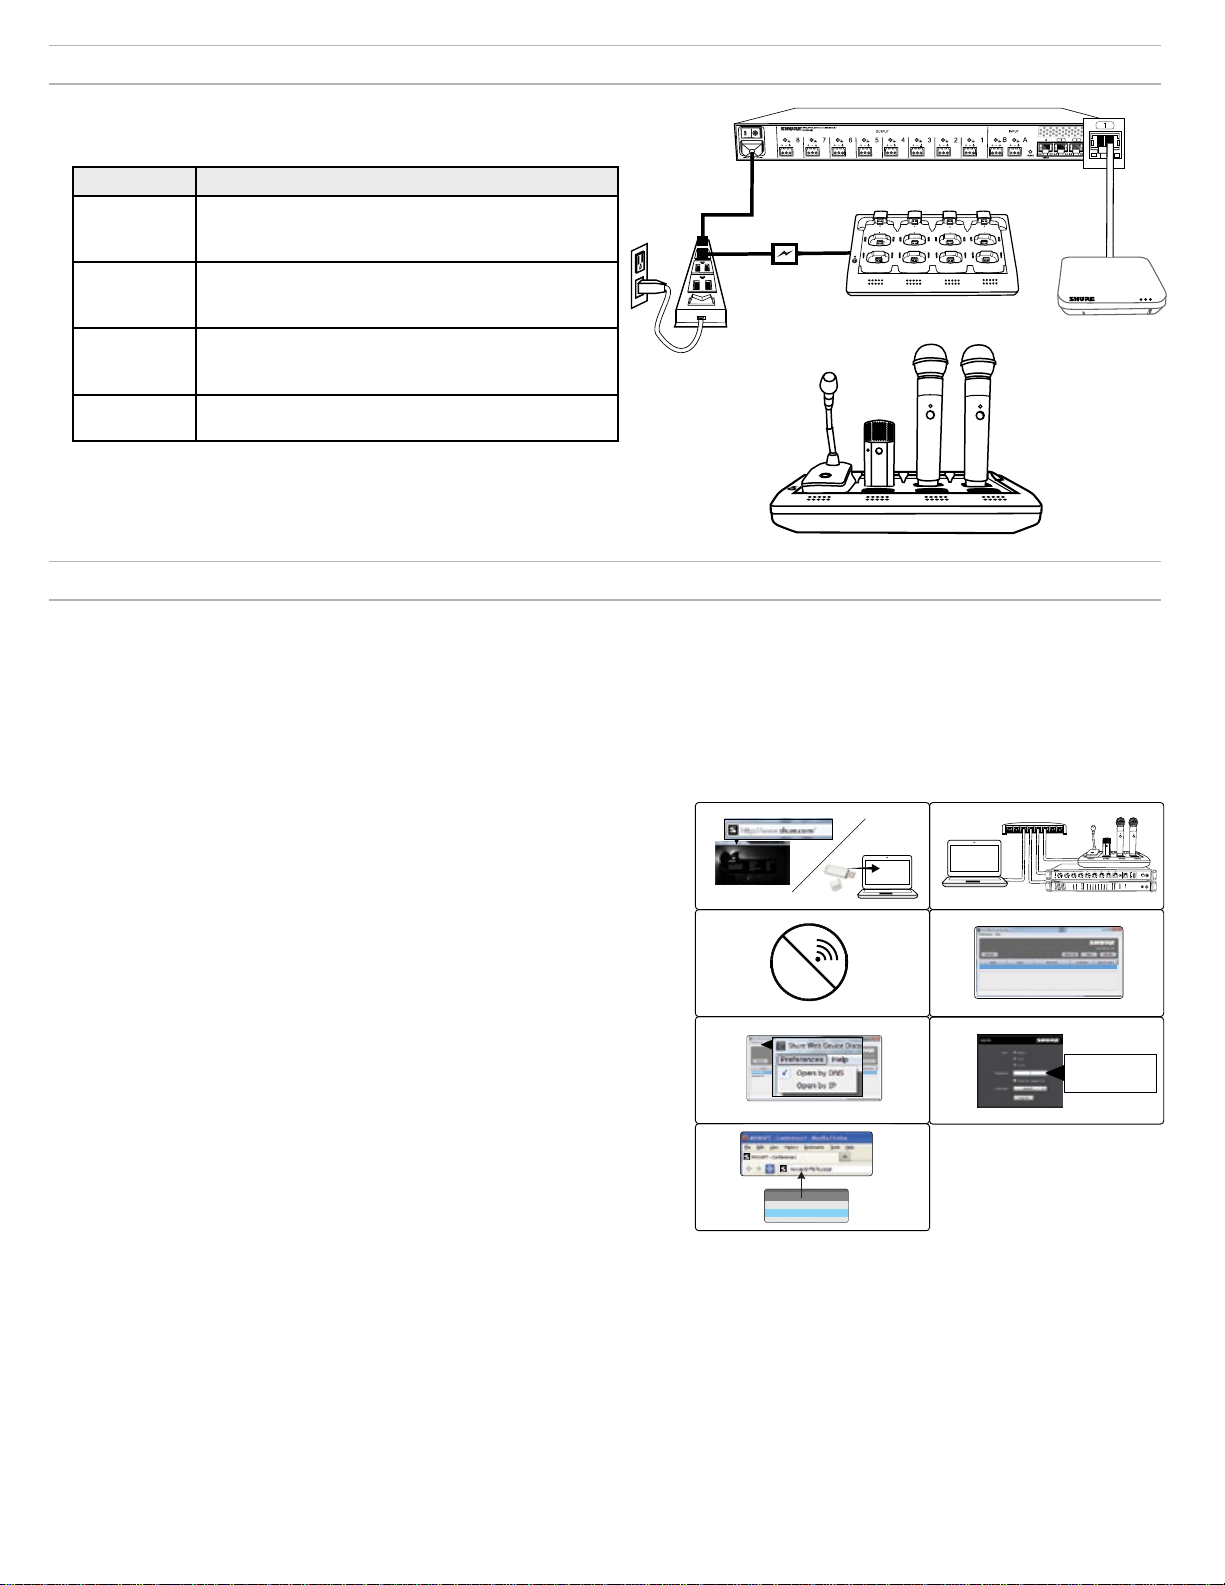
Provide power and turn on components.
The LEDs illuminate on each component when power is on.
①
Class 0 PoE
Component Power Source
① ANI
② APT
Connect the IEC cable to an AC power
supply and turn on the power switch.
Connect to Port 1 of the ANI for Power
over Ethernet (PoE). There is no power
③
1
2
5
6
4
3
7
8
②
switch.
③ NCS
Connect the PS45 to an AC power supply
and turn on the power switch.
④ Transmitters Charge the transmitters to full before use.
④
Accessing the MXW Control Software
The MXW system uses a device-hosted control software that enables comprehensive remote control of key setup, monitoring and management functions.
The software is accessible from any PC or Mac on the network, and opens in a web-browser using Adobe® Flash®.
There are two different control interfaces for the MXW system:
• MXW System control software: Accessed from the Access Point Transceiver and used for managing the MXW system.
• Audio Network Interface control software: Accessed from the Audio Network Interface and used for managing that device only.
Follow these steps for accessing MXW control software:
1. Install the Shure Web Device Discovery application.
Download the Shure Web Device Discovery Application from www.shure.com
or from the USB stick supplied with the MXW Access Point Transceiver. (The
required Bonjour device discovery tool is bundled with the application and will install
automatically.)
2. Ensure the computer is on the MXW network.
The computer accesses the control software from an embedded web server on the
device. All networked devices must be connected to the same network (set to the
same subnet).
3. Turn off WiFi
Turn off the PC's WiFi to force the wired network interface.
4. Launch the Shure Web Device Discovery application.
Open the application to view all Shure devices on the network that feature an
embedded server for control software (MXWAPT, MXWANI and SCM820). Use the
Identify button to flash a device's LEDs for easy identification.
5. Open the MXW Control Software
Double-click on any Access Point Transceiver to open the MXW System control
software. Double click on an Audio Network Interface to open that device's software
interface. The application can open the Control Software by IP address or DNS
name (selectable from the Preferences drop-down).
6. Enter Default Password
Enter the default password 'admin' to access the control software.
7. Bookmark the Webpage (recommended)
Bookmark the IP address of the device when it is set to a Static IP address.
Bookmark the device's DNS name when the IP mode is set to Automatic (DHCP).
①
③
⑤
⑦
Wi-Fi
②
④
⑥
MXWANI8 mxwani8-ffeee5.local
ROOM 5
CONFERENCE
MXWAPT8
mxwapt8-ffaaa2.local
SCM820
1 2 3 4 5 6 7 8
gain
low cut
hi shelf
meter
push to solo | hold to mute
8
7
5
4
6
2
1
3
A
B
OUTPUT
INPUT
line
line
aux
aux
sig/clip
sig/clip
mic
mute
mute
push to solo | hold to mute
192.168.200.22
Dante
Dante
192.168.200.23
admin
®
IntelliMix
LIM
MASTER
AB
power
B
A
AUX IN
HEADPHONE
0
ethernet
-9
network audio
-18
automix link
-24
gain
dual mixer
-36
limiter
-48
L+R SUM
-60
lockout
MICROFLEX WIRELESS
Audio Network Interface
0
power
-9
0
ethernet
-18
-9
network audio
-12
-24
HEADPHONE
-18
-36
-24
-48
lockout
-60
adjust
7
Page 8
Associating Components to a Group
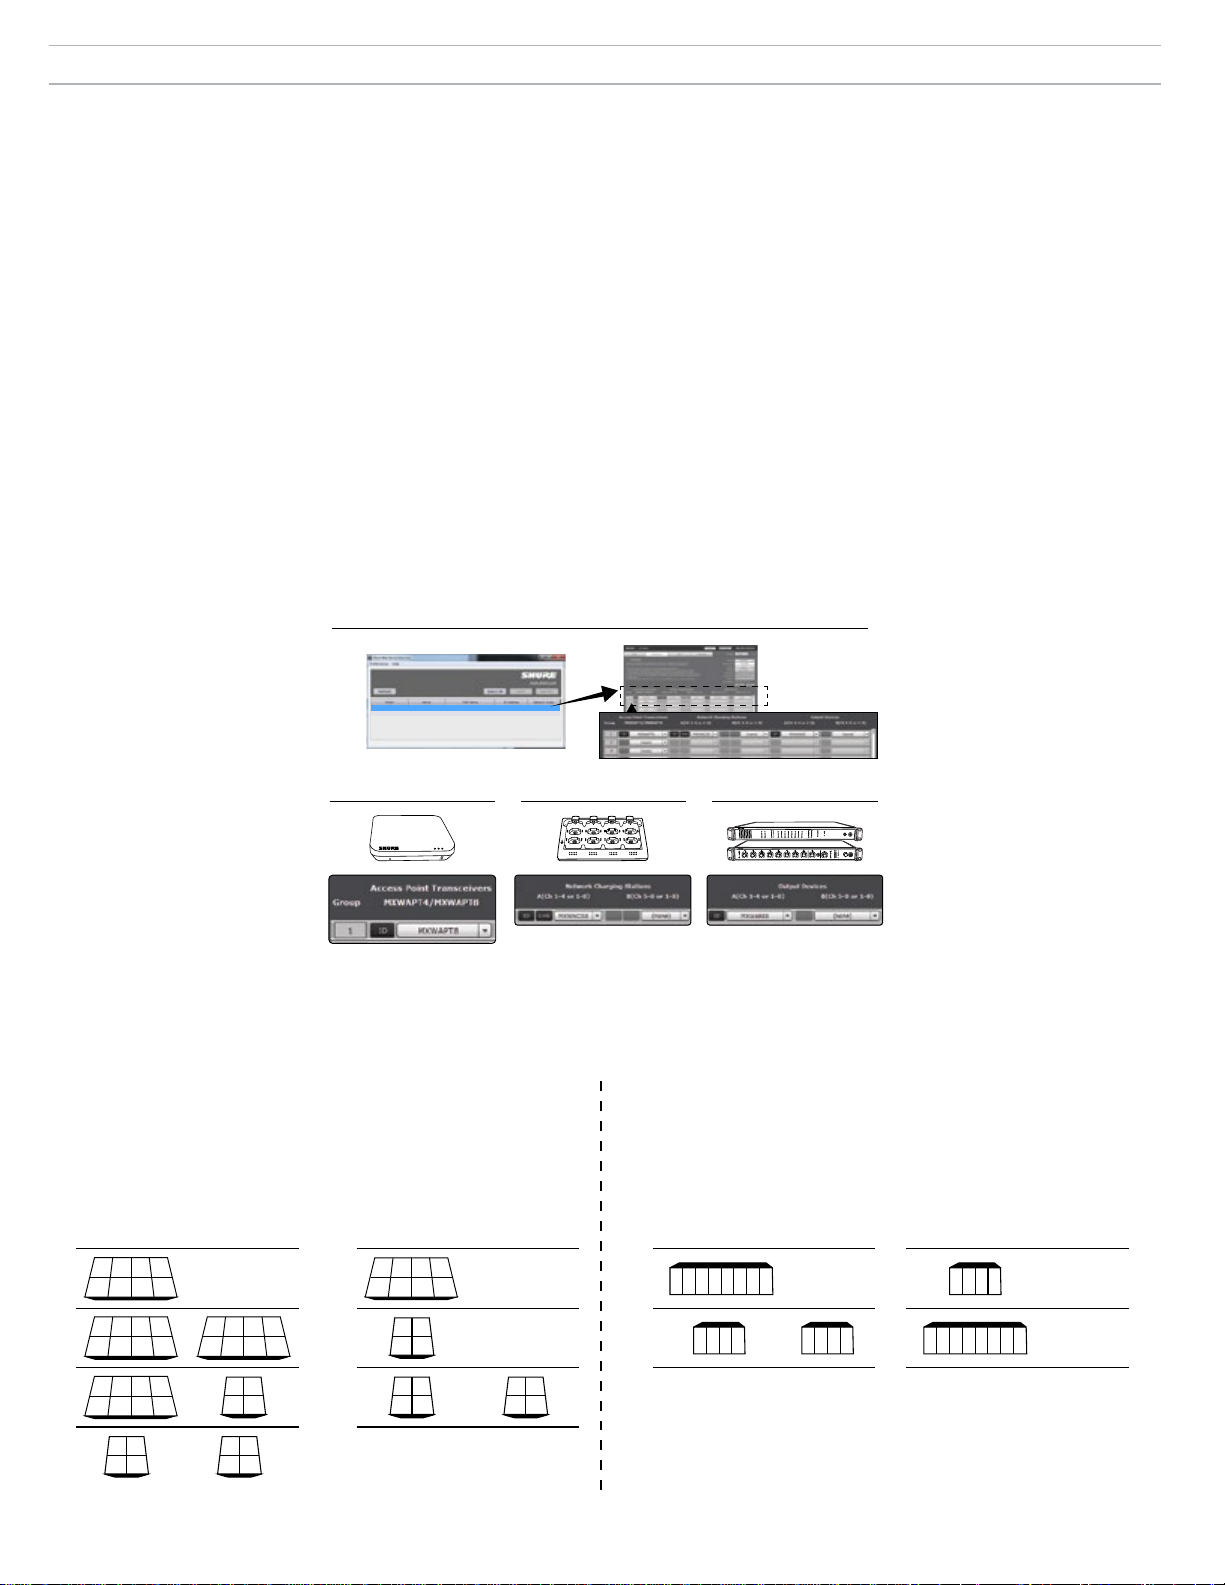
The following instructions are for forming an MXW Group. If a device is not available from drop-down window, make sure it is "open" and on the network.
Tip: Use the
ID button to identify a device. This sends a signal to the device to flash its LEDs for easy identification.
1. Open a Configuration
Use the Shure Web Discovery application to view all MXW Access Point
Transceivers (APTs) on the network. Double-click on an APT to open the
software, and go to the Configuration tab.
2. Select an Access Point Transceiver (APT) for Group 1
Select an open APT from the drop-down display. This selection
determines whether the Group has four or eight channels (APT4 or
APT8).
Note: Group 1 must include the APT that was used to open the control software.
Other networked (and open) APTs are then available for additional groups.
3. Select the Network Charging Station(s)
Associate one or two Network Charging Station (NCS) to the access
point. There are two reasons for associating more than one charger:
- When using two four-channel chargers for an eight-channel access point.
- When using gooseneck microphones. Gooseneck mics cover the front and back
①
MXWANI8 mxwani8-ffeee5.local 192.168.200.22
MXWAPT8
ROOM 5
CONFERENCE
mxwapt8-ffaaa2.local
192.168.200.23
Dante
Dante
slots of a charger, halving the number of slots available. For example, two eightchannel chargers are required to fill an eight-channel access point with gooseneck
microphones.
4. Select the Audio Output Device(s)
Select one or two audio output devices (MXWANI or SCM820) to
automatically route the digital audio channels from the access point.
Select from the following devices:
- Audio Network Interface (MXWANI) four- or eight-channel variation. Two fourchannel units or one eight-channel unit can be assigned to an eight-channel APT.
- Shure SCM820 IntelliMix® Mixer. Dante-enabled SCM820s can be selected as
the audio output for the Group. This automatically routes the SCM820's aux input
to the microphones for personal monitoring (SCM820 aux left channel to MXW
channels 1 - 4; aux right channel to MXW channels 5 - 8).
Note: Device associations and microphone Link data are persistently stored
in the device. If the MXW system is shut off and then restarted without a
computer, the devices will remain associated to the access point.
②
③
4
2
1
3
7
5
6
8
④
A
B
INPUT
OUTPUT
line
aux
sig/clip
mute
SCM820
gain
1 2 3 4 5 6 7 8
low cut
hi shelf
meter
push to solo | hold to mute
sig/clip
mute
HEADPHONE
-18
mic
-36
-24
-48
lockout
-60
adjust
push to solo | hold to mute
®
IntelliMix
LIM
MASTER
AB
power
B
A
HEADPHONE
AUX IN
0
ethernet
-9
network audio
-18
automix link
-24
gain
-36
dual mixer
limiter
-48
-60
L+R SUM
lockout
MICROFLEX WIRELESS
Audio Network Interface
0
5
8
4
7
2
3
6
1
power
-9
0
line
ethernet
-18
-9
aux
network audio
-12
-24
Channel Mapping for Devices in a Group
Audio is routed from the microphones to the analog outputs according to the Group setup in the Configuration tab. The following diagram displays channel
mapping for devices in eight- and four-channel Groups.
Networked Charging Station
An additional charging station is required when filling a Group with
Outputs are assigned to an MXW Audio Network Interface or
gooseneck microphones
8-Channel Group
4-Channel Group
8-Channel Group 4-Channel Group
A B A B A B A B
2 3 4
1
1) 1) 1) 1)
5 6 7 8
2 3 41
2) 2) 2) 2)
x x x x
2 3 41
3) 3)
x x x x
(none) (none) (none)(none)
5 6 7 8
x x x
x
5 6
7 8
2 3 41
x x x x
1
2
4
3
21
x x
1 2 3 4
3 4
x x
Audio Output Device
SCM820 Automatic Mixer
81 2 3 4 5 6 7
85 6 7
1 2 3 4
1 2 3 4 x x x x
(none)(none)
2
1
4)
3 4
5 6
7 8
8
Page 9
7
8
6
5
1
2
3
4
1
2
3
7
8
6
5
1
2
3
4
7
8
6
5
1
2
3
4
link
6
5
1
2
link
push to solo | hold to mute
2
3
4
5
6
7
8
lockout
power
ethernet
network audio
-9
-18
-24
-36
-48
-60
0
-9
-12
-18
-24
0
aux
mic
adjust
line
HEADPHONE
MICROFLEX WIRELESS
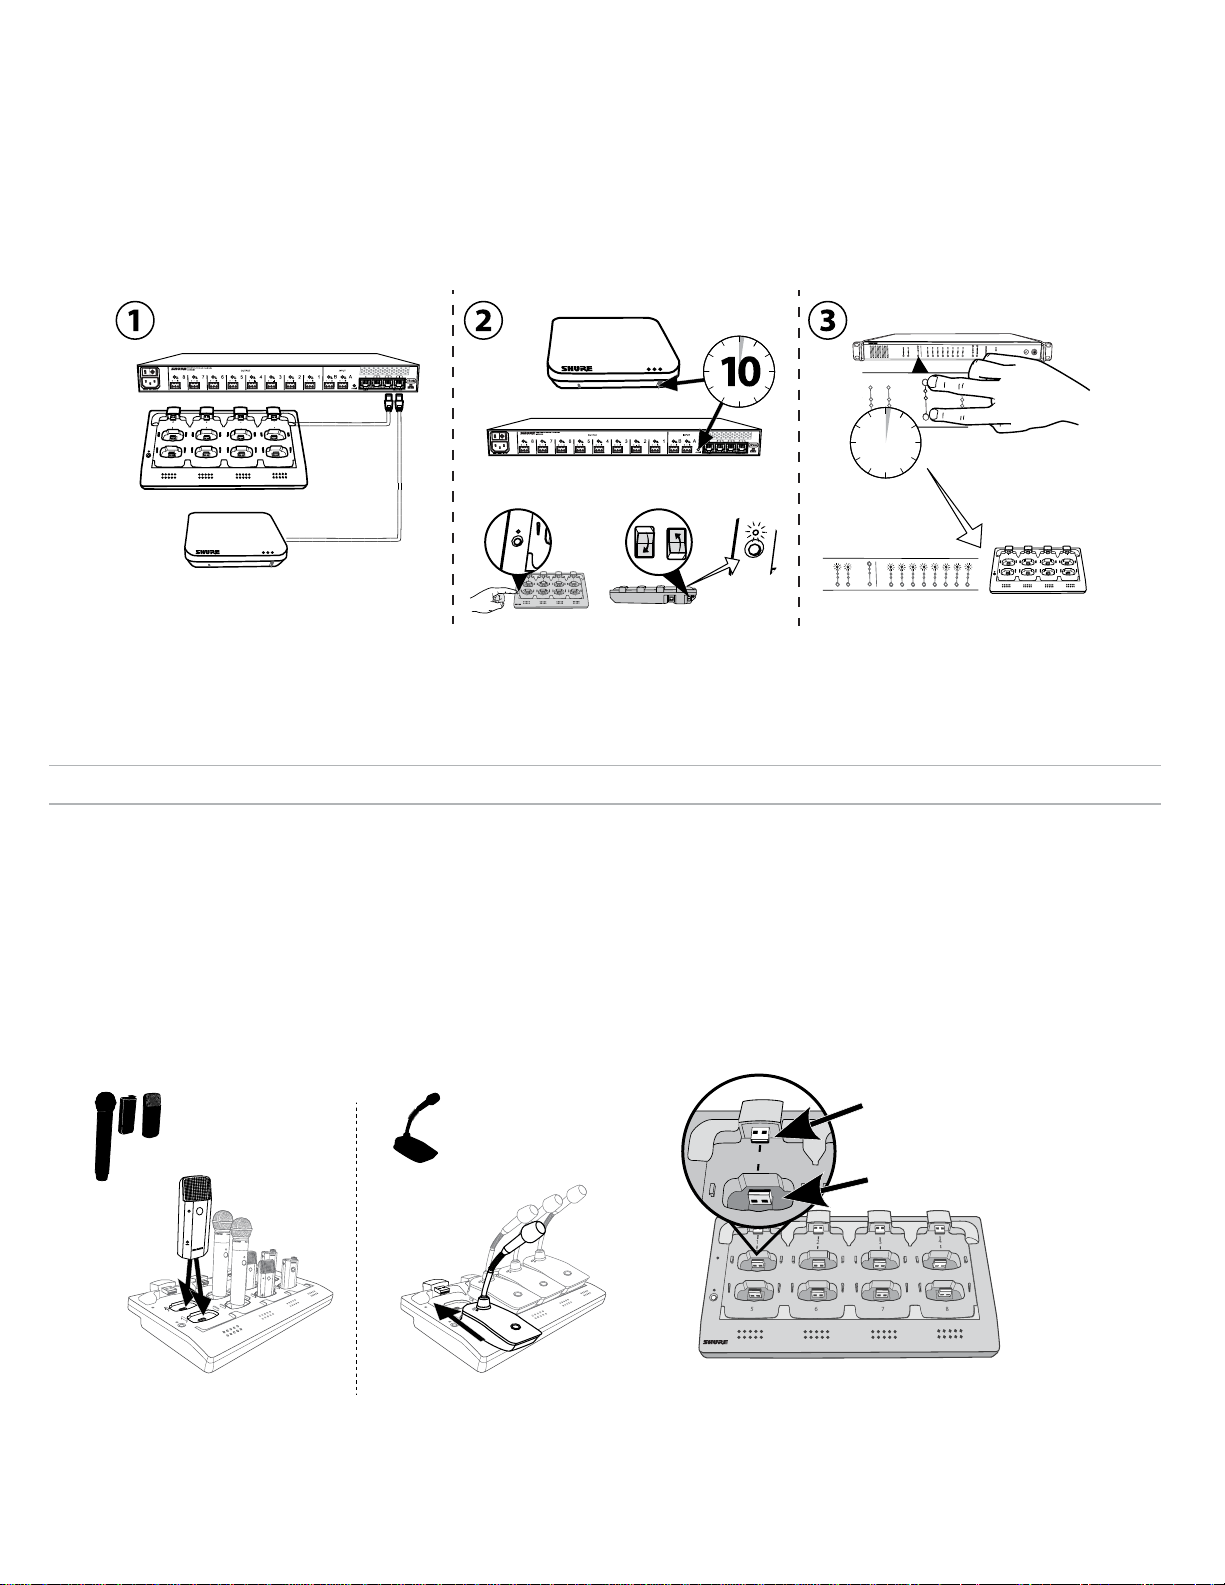
Automatic Group Setup
An MXW Group can be associated without use of the control software when a network is comprised of only one Access Point Transceiver (APT), one
Networked Charging Station (NCS) and one Audio Network Interface (ANI). For best results, perform a factory default on the devices to clear any previous
Group associations.
1. Connect one APT, one NCS and one ANI to the network. The network must only contain one of each device.
2. Perform a factory reset on the devices (see the Factory Default section).
3. On the front panel of the ANI, press both input level selection buttons at the same time and hold for five seconds. The Channel Select LEDs will illuminate
green and the audio meter will flash to indicate that the association is successful.
MICROFLEX WIRELESS
Audio Network Interface
0
2
1
5
3
7
6
4
A
8
12
11
1
10
2
9
3
8
4
5
7
6
2
1
5
6
4
3
7
8
+
Power
Link
A
B
INPUT
sig/clip
mute
B
OUTPUT
INPUT
line
aux
sig/clip
sig/clip
mute
mute
A
B
line
aux
12
11
1
10
2
9
3
5
8
4
5
7
6
3
2
5
4
1
OUTPUT
line
aux
sig/clip
mute
push to solo | hold to mute
push to solo | hold to mute
OUTPUT
power
-9
0
line
ethernet
-18
-9
network audio
aux
-12
-24
HEADPHONE
-18
mic
-36
-24
-48
lockout
-60
adjust
1
sig/clip
mute
4
2
1
8
7
6
3
7
6
5
i i
i
i
i
i
i
i
i i
8
i i
i i
i i
i
i
i
i
i
i
i
i
i
i
i
i
i
i
i
i
i
i
i
i
i
i
i
i
i
i
i
i
i
i
i
i
i
i
i
i
i
i
i i
i i
i i
Linking Microphones
Use the Networked Charging Station (NCS) to Link microphones to Access Point channels. Slots in the charger are mapped to the APT according to the
Group setup from the Configuration tab. Once the Link procedure is complete, audio will route to the corresponding channel in the Group.
Linking will map any microphone placed in the charging station to the APT channels. This replaces any prior microphone Link for that channel. If a slot is
empty during the Link procedure, there will be no impact on that channel.
1. Arrange microphones in the charger.
Microphones are Linked to access point channels according to the
arrangement in the charger.
For gooseneck mics
For bodypacks, handhelds and
boundary mics.
Power
Link
Connecting the Microphone
to the Charger Slot
9
Page 10
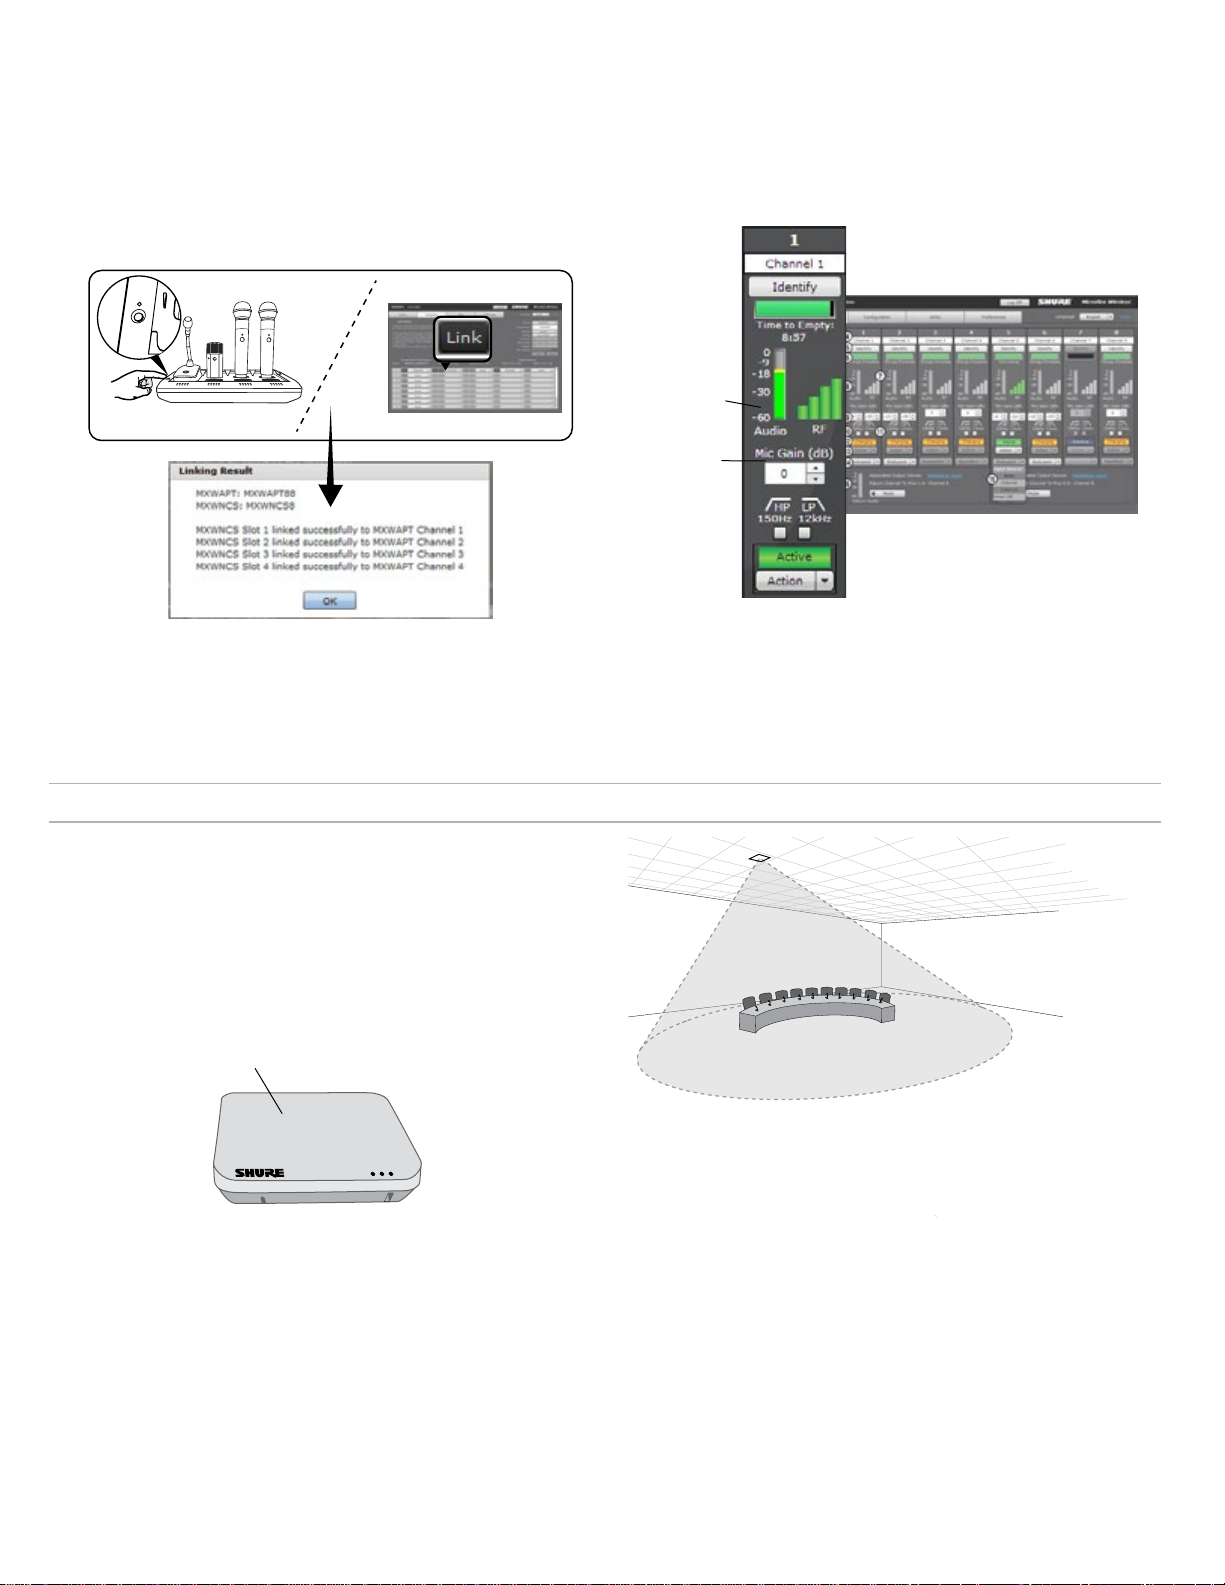
2. Link the microphones to channels.
7
8
6
5
link
Use the control software or the charging station to Link the microphones
to APT channels. If desired, this feature can be disabled on the charging
station so that Linking can only be performed from the control software:
- Control Software: From the Configuration page, press the Link button for
each charger in the Group.
-
Charging Station: Press and hold the Link button for 6 seconds. The LEDs
flash during the process and turn solid green once the Link is successful.
3. Remove Mics and Test the Audio
Test the audio for each microphone and adjust mic gain if necessary
from the Monitor tab of the control software. The gain should be set at a
level where the audio is registering (green/yellow) on the signal indicator
but not clipping (red).
Signal indicator
Gain adjustment
Monitor Tab
Mount the Access Point Transceiver (APT)
The APT radiates RF in a cardioid pattern that is strongest from the face of
the device. Aim the APT face towards the intended coverage areas. Do not
block the line-of-sight and keep away from large metal objects.
Important: Always perform a "walk around" test to verify coverage before
using a wireless system during a speech or performance. Experiment with
antenna placement to find the optimum location. If necessary, mark "trouble
spots" and ask presenters or performers to avoid those areas.
APT Face
Aim toward microphone area
10
Page 11
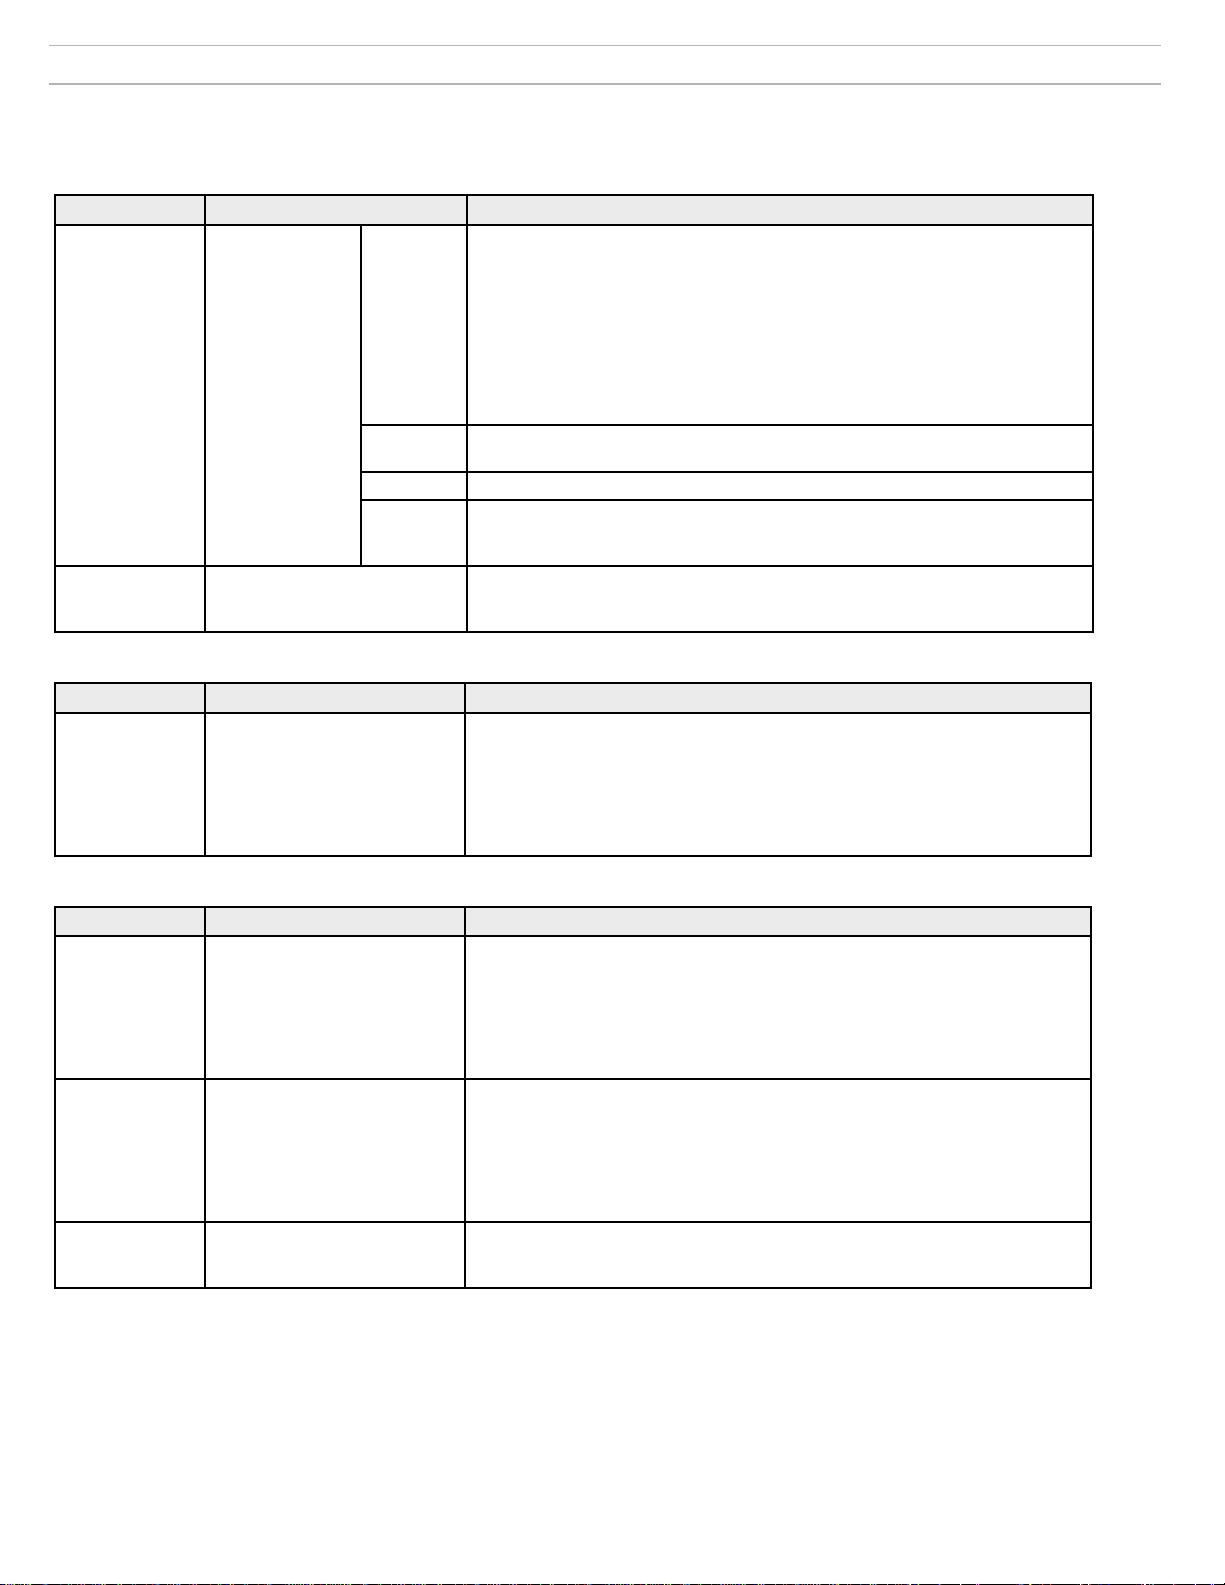
Troubleshooting
The following table offers typical solutions when troubleshooting the Microflex Wireless System. For more information on each topic, reference the full MXW
User Guide found on www.shure.com and bundled with the USB Flash Drive.
Audio
Problem Indicator Solution
• Check cables
• Check that transmitters are on and channels are un-muted
• Check that the input meters are OK on the Monitor tab of the MXW control
software. Attenuate if the channel is clipping.
• Check the output meters on the Audio Network Interface (ANI) front panel and
in the ANI control software. Use headphones to listen to the audio from the ANI.
Attenuate if the channel is clipping.
• Check that the output level of the ANI matches the input of the connecting
equipment.
• Verify APT is not performing a spectrum scan.
• Ensure all devices are on and have a stable network connection
• Use Dante Controller software (DC) to verify channel subscriptions
• Place the device in a Group to automatically route the audio
• Ensure the subnet of the Access Point Transceiver's network audio settings match
the subnet of the Audio Network Interface
• Perform a Spectrum Scan to monitor RF interference
• Decrease channel count to verify if system is overloading the RF spectrum
No/ Distorted
audio
RF Interference
is causing audio
drop-outs
Network Audio
LED on the Audio
Network Interface
or SCM820
Audio is intermittent
Green
Flashing
Green
Red • Check master clock in DC (an MXWAPT must be master clock)
Off
System Setup and MXW Groups
Problem Indicator Solution
• Check that devices are powered and connected to the same network and subnet)
Can't associate
component to a
Group
Device drop-down not displaying
the desired component in the
Group row on the Configuration
tab
• Open the Utility tab of the MXW Control Software and un-check the Configuration
Filter to display all MXW devices on the network. If the device shows up as
"OTHER", then it is part of another Configuration.
• Un-associate the component by selecting 'none' from the Group row in the other
Configuration.
• Perform a factory reset on the device to clear any association.
Network
Problem Indicator Solution
• Ensure the devices are powered
Can't Connect
to the Control
Software from a
PC
Device not appearing in Shure
Web Device Discovery application
• Ensure PC and equipment are on the same network and set to the same subnet
• Turn off other network interfaces not used to connect to the device (including WiFi)
• Check that DHCP server is functioning (if applicable)
• Ensure Bonjour is running on the PC
• If connected via Port 4 of the Audio Network Interface (ANI), ensure it is set to
Switched Mode.
• Download latest version of Adobe
• Ensure PC and device are on the same network and subnet
Control Software
is taking a long
time to load
Web browser cannot connect to
the control interface
• Check that Windows firewall settings are not blocking Shure software
• Set the router to not send default gateway as a part of DHCP
• Set the Shure Web Device Discovery application to open by IP address
• Manually set the computer to a static IP address on the same network as the
device
Control Software
is performing
poorly
Indicators are moving slowly or
not displaying in real time.
• Reduce the number of windows or tabs that are open to the same Configuration
• See Network section for properly setting up the network
®
Flash
®
11
Page 12
7
8
6
5
1
2
3
4
Link
Power
7
8
6
5
1
2
3
4
link
6
5
1
2
link
+
lockout
power
ethernet
network audio
push to solo | hold to mute
-9
-18
-24
-36
-48
-60
0
-9
-12
-18
-24
0
aux
mic
adjust
line
sig/clip
mute
INPUT
A
sig/clip
mute
OUTPUT
HEADPHONE
Audio Network Interface
MICROFLEX WIRELESS
B
1
2
3
4
5
6
7
8
line
aux
push to solo | hold to mute
A
sig/clip
mute
OUTPUT
B
1
2
3
4
5
6
7
8
line
aux
6
7
8
9
10
11
12
1
2
3
4
5
6
7
8
9
10
11
12
1
2
3
4
5
5
7
8
6
5
1
2
3
4
i
i
i i
i
i
i
i
i
i i
i
i
i
i
i
i
i i
i
i
i
i
i
i i
i
i
i
i
i
i
i i
i
i
i
i
i
i i
i
i
i
i
i
i
i i
i
i
i
i
i
i i
i
i
i
i
INPUT
A
OUTPUT
B
1
2
3
4
5
6
7
8
lockout
power
ethernet
network audio
push to solo | hold to mute
-9
-18
-24
-36
-48
-60
0
-9
-12
-18
-24
0
aux
mic
adjust
line
sig/clip
mute
sig/clip
mute
HEADPHONE
MICROFLEX WIRELESS
line
aux
Additional Resources
For additional Troubleshooting assistance or further information on complex installations, contact Shure to speak with a support representative. In the
Americas region, call Systems Support group at 847-600-8541. For users in other locations, go to www.shure.com to find support contact for your region.
For digital audio networking help, advanced networking guidelines and Dante software troubleshooting, visit Audinate's website at www.audinate.com.
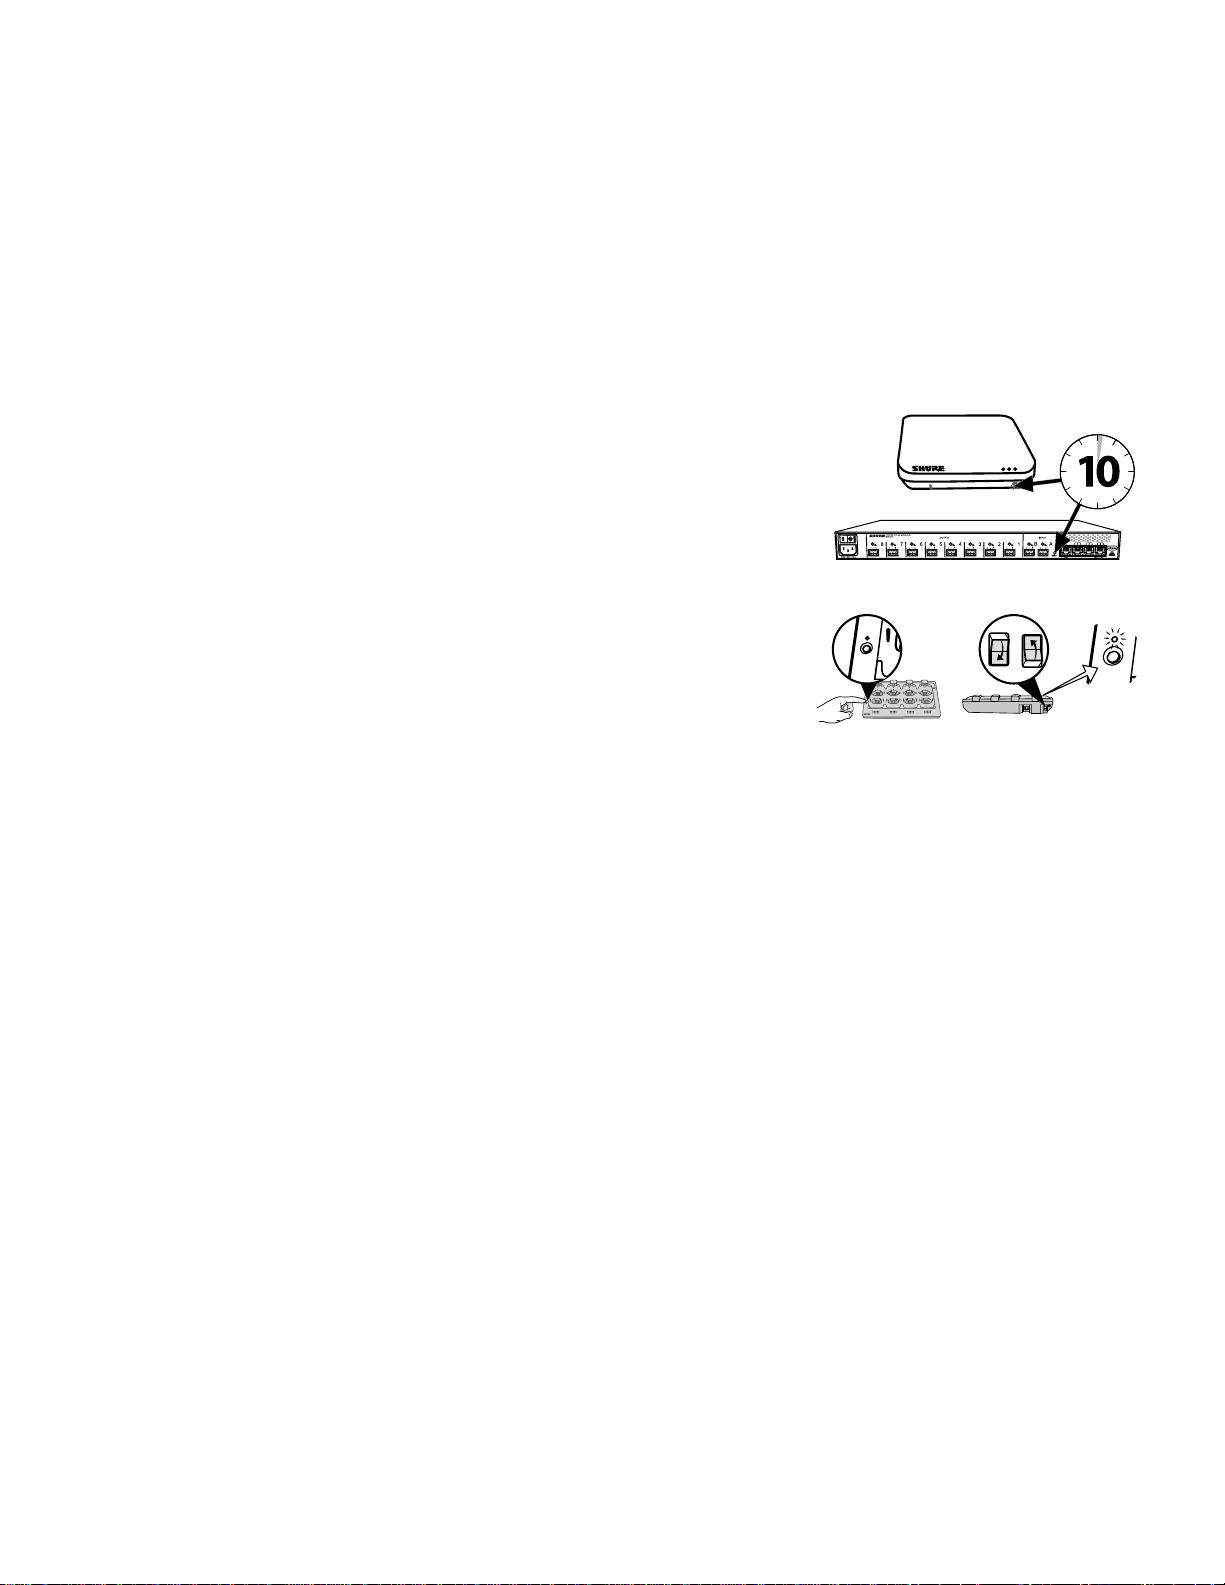
Factory Reset
If a device isn't appearing on the network after trying troubleshooting methods, perform a reset on the specific hardware to return the device to default
settings. Factory default settings are designed for automatic compatibility with other Shure networked devices.
Note: A factory reset will clear any MXW Group and Link associations. The password to access the software will reset to
From the Hardware
Access Point Transceiver
Press and hold the recessed reset button for 10 seconds. The network audio status LED will
briefly turn off to indicate the unit is rebooting.
CAUTION:
Audio Network Interface
Press and hold the reset button for 10 seconds. The front panel LEDs will flash to indicate the
unit is rebooting.
Networked Charging Station
a. Turn off the power switch.
b. Press and hold the Link button.
c. While holding the Link button, turn on the power switch.
d. Continue to hold the Link button for 12 seconds until the LED illuminates amber.
A factory reset deletes all Group associations and microphone Links saved in the device.
admin.
From the Control Software
1. Open the Utility Tab of the MXW control software.
2. Select the Edit Properties button for the device.
3. Select the factory reset check-box.
4. Select Add Updates to save the setting to the edits queue.
5. Repeat for any additional devices.
6. Press the Apply All to make changes to all devices with edited properties.
12
Page 13
Safety Information
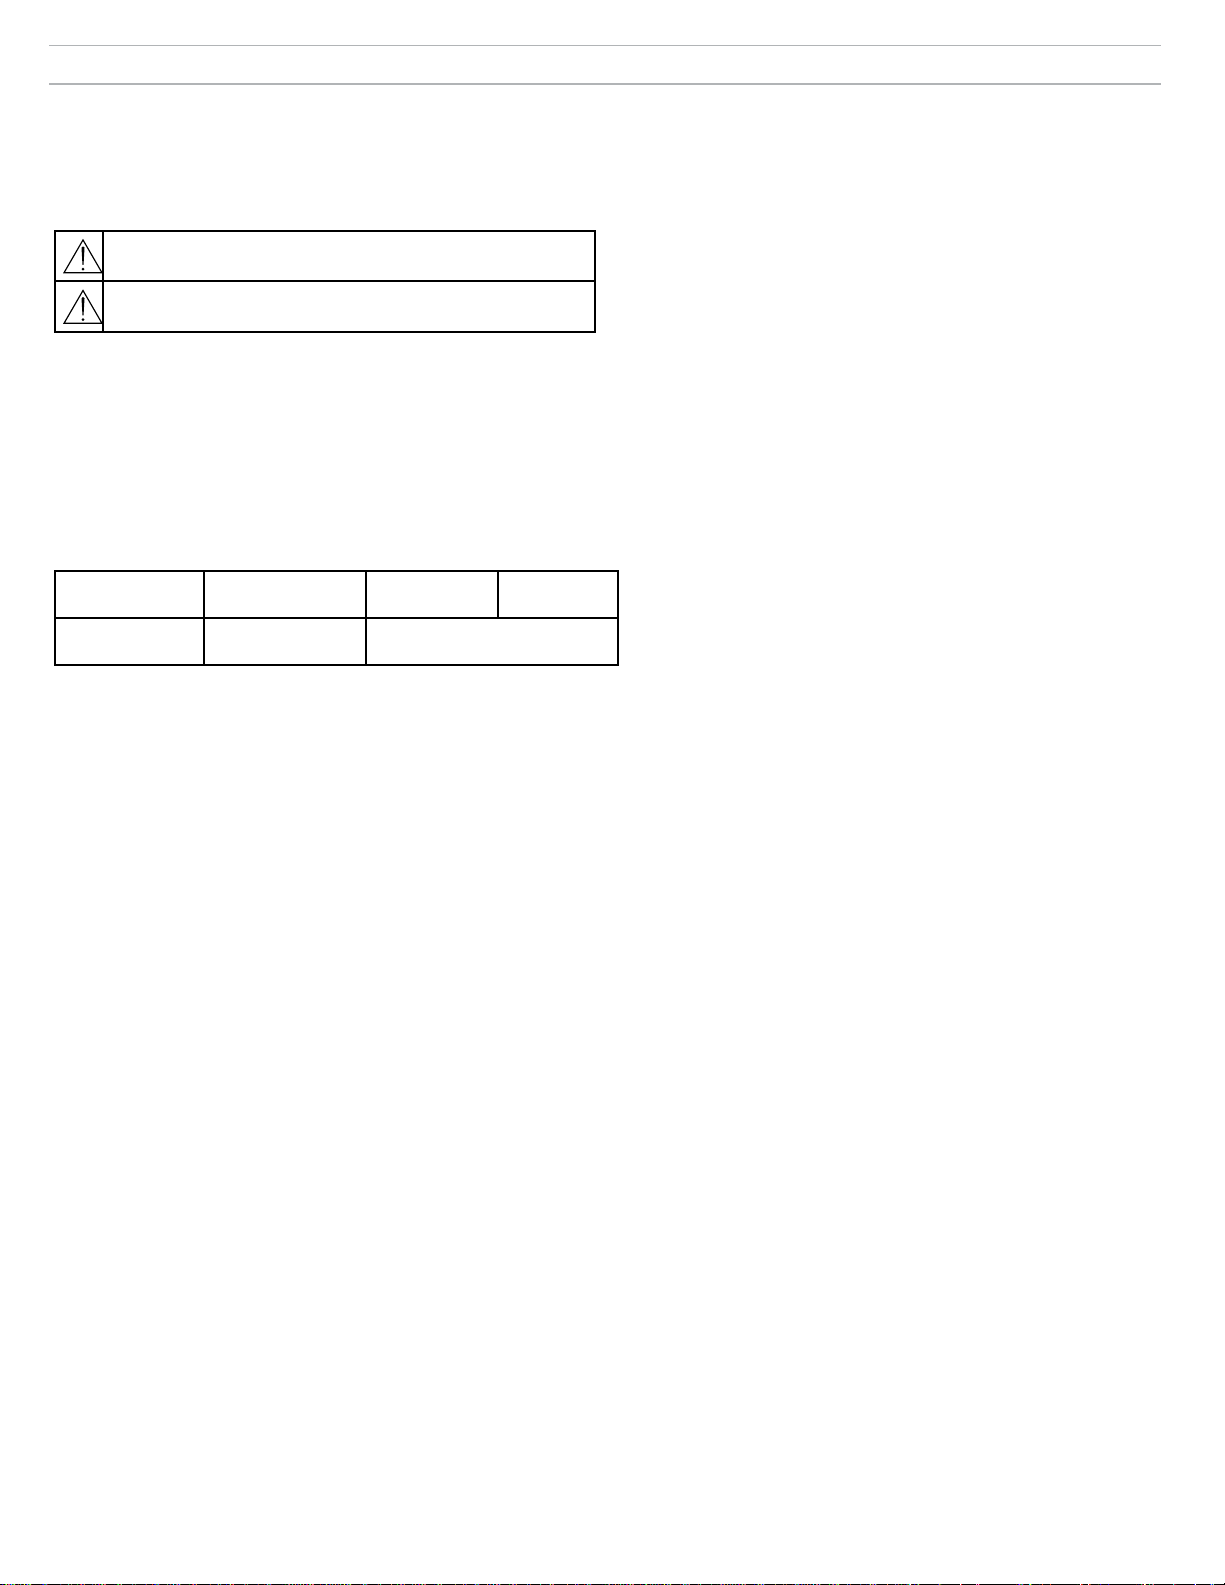
SAFETY PRECAUTIONS
The possible results of incorrect use are marked by one of the two
symbols—"WARNING" and "CAUTION"—depending on the imminence of
the danger and the severity of the damage.
WARNING: Ignoring these warnings may cause severe injury or
death as a result of incorrect operation.
CAUTION: Ignoring these cautions may cause moderate injury or
property damage as a result of incorrect operation.
WARNING
LISTENING TO AUDIO AT EXCESSIVE VOLUMES CAN CAUSE PERMANENT
HEARING DAMAGE. USE AS LOW A VOLUME AS POSSIBLE. Over exposure
to excessive sound levels can damage your ears resulting in permanent noiseinduced hearing loss (NIHL). Please use the following guidelines established by the
Occupational Safety Health Administration (OSHA) on maximum time exposure to
sound pressure levels before hearing damage occurs.
90 dB SPL
at 8 hours
110 dB SPL
at ½ hour
WARNING
• Battery packs may explode or release toxic materials. Risk of fire or burns. Do not
open, crush, modify, disassemble, heat above 140°F (60°C), or incinerate.
• Follow instructions from manufacturer
• Only use Shure charger to recharge Shure rechargeable batteries
• WARNING: Danger of explosion if battery incorrectly replaced. Replace only with
same or equivalent type.
• Never put batteries in mouth. If swallowed, contact your physician or local poison
control center
• Do not short circuit; may cause burns or catch fire
• Do not charge or use battery packs other than Shure rechargeable batteries
• Dispose of battery packs properly. Check with local vendor for proper disposal of
used battery packs.
• Batteries (battery pack or batteries installed) shall not be exposed to excessive
heat such as sunshine, fire or the like
WARNING: Danger of explosion if battery incorrectly replaced. Operate only with
Shure compatible batteries.
Note: Use only with the included power supply or a Shure-approved equivalent.
1. 經審驗合格之射頻電信終端設備,非經許可,公司、商號或使用者均不得擅自變更
頻率、加大功率或變更原設計之特性及功能。
2. 射頻電信終端設備之使用不得影響飛航安全及干擾合法通信;經發現有干擾現象
時,應立即停用,並改善至無干擾時方得繼續使用。所謂合法通信,係指依電信法
規定作業之無線電信。
3. 輸入、製造射頻電信終端設備之公司、商號或其使用者違反本辦法規定,擅自使用
或變更無線電頻率、電功率者,除依電信法規定處罰外,國家通訊傳播委員會並得
撤銷其審驗合格證明。
4. 減少電磁波影響,請妥適使用
95 dB SPL
at 4 hours
115 dB SPL
at 15 minutes
100 dB SPL
at 2 hours
120 dB SPL
Avoid or damage may occur
105 dB SPL
at 1 hour
MXW1
Bodypack Microphone Transmitters:
These transmitters have been tested and found to comply with
international radiation exposure limits set forth for an uncontrolled
environment. This equipment is in direct contact with the body of the
user under normal operating conditions. These transmitters must not
be co-located or operating in conjunction with any other antenna or
transmitter.
MXW2, MXW6, MXW8, MXWAPT4, MXWAPT8
Handheld Microphone Transmitters, Tabletop Boundary Microphone
Transmitters, Tabletop Gooseneck Microphone Transmitters, Wireless
Access Point Transmitters:
These mobile transmitters are intended for use at distances greater
than 20 centimeters from the human body. These mobile transmitters
are exempt from the testing requirements of international radiation
exposure standards due to their proximity to the body of the user in
their intended use case and their low power output. These mobile
transmitters shall be placed or installed at least 20 cm from any
person and must not be co-located or operating in conjunction with
any other antenna or transmitter.
Important Product Information
The equipment is intended to be used in professional audio
applications.
EMC conformance testing is based on the use of supplied and
recommended cable types. The use of other cable types may degrade
EMC performance.
Changes or modifications not expressly approved by Shure
Incorporated could void your authority to operate this equipment.
Please follow your regional recycling scheme for batteries, packaging,
and electronic waste.
Note: This device is not intended to be connected directly to a public
internet network.
Information to the user
This equipment has been tested and found to comply with the limits
for a Class B digital device, pursuant to Part 15 of the FCC Rules.
These limits are designed to provide reasonable protection against
harmful interference in a residential installation. This equipment
generates uses and can radiate radio frequency energy and, if not
installed and used in accordance with the instructions, may cause
harmful interference to radio communications. However, there is no
guarantee that interference will not occur in a particular installation. If
this equipment does cause harmful interference to radio or television
reception, which can be determined by turning the equipment off and
on, the user is encouraged to try to correct the interference by one or
more of the following measures:
• Reorient or relocate the receiving antenna.
• Increase the separation between the equipment and the receiver.
• Connect the equipment to an outlet on a circuit different from that to
which the receiver is connected.
• Consult the dealer or an experienced radio/TV technician for help.
13
Page 14

Certifications
This device complies with FCC Part 15.
This device complies with Industry Canada licence-exempt RSS standard(s).
Operation of this device is subject to the following two conditions: (1) this
device may not cause interference, and (2) this device must accept any
interference, including interference that may cause undesired operation of
the device.
Le présent appareil est conforme aux CNR d'Industrie Canada applicables
aux appareils radio exempts de licence. L'exploitation est autorisée aux
deux conditions suivantes : (1) l'appareil ne doit pas produire de brouillage,
et (2) l'utilisateur de l'appareil doit accepter tout brouillage radioélectrique
subi, même si le brouillage est susceptible d'en compromettre le
fonctionnement.
Japanese Radio Law and Japanese Telecommunications Business Law
Compliance. This device is granted pursuant to the Japanese Radio Law (電
波法) and the Japanese Telecommunications Business Law (電気通信事業
法). This device should not be modified (otherwise the granted designation
number will become invalid).
Conforms to electrical safety requirements based on IEC 60065.
This product meets the Essential Requirements of all relevant European
directives and is eligible for CE marking.
The CE Declaration of Conformity can be obtained from Shure Incorporated
or any of its European representatives. For contact information please visit
www.shure.com
The CE Declaration of Conformity can be obtained from: www.shure.com/
europe/compliance
Authorized European representative:
Shure Europe GmbH
Headquarters Europe, Middle East & Africa
Department: EMEA Approval
Jakob-Dieffenbacher-Str. 12
75031 Eppingen, Germany
Phone: 49-7262-92 49 0
Fax: 49-7262-92 49 11 4
Email: [email protected]
MXWNCS4, MXWNCS8
Authorized under the FCC verification provision per Part 15b.
Industry Canada ICES-003 Compliance Label:
CAN ICES-3 (B)/NMB-3(B)
Note: See the label located on the bottom side of the charger
enclosure for the FCC marking, the CE marking, the C-Tick marking,
and the electrical ratings.
MXW1, MXW2, MXW6, MXW8, MXWAPT4, MXWAPT8
Certified under FCC Part 15.
FCC: DD4MXW1, DD4MXW2, DD4MXW6, DD4MXW8,
DD4MXWAPT4, DD4MXWAPT8.
Meets applicable requirements of RSS-213.
IC: 616A-MXW1, 616A-MXW2, 616A-MXW6, 616A-MXW8,
616A-MXWAPT4, 616A-MXWAPT8.
Trademarks
Audinate®, the Audinate logo and Dante are trademarks of Audinate
Pty Ltd.
Page 15
Description générale
La série Microflextm Wireless (MXW) de Shure est une solution de microphone complète qui offre une grande souplesse d'utilisation aux salles de réunion.
Elle comporte la gestion automatique des canaux HF, des microphones sans fil rechargeables avec cryptage (AES256) et la possibilité de mise en réseau de
l'audio numérique (Dantetm). La station de chargement en réseau permet de recharger des microphones périphériques et des microphones col de cygne pour
les applications de bureau, mais aussi des systèmes à main et de ceinture pour les formations et les présentations d'entreprise. Le point d'accès au MXW se
monte au plafond ou au mur, pour assurer une communication discrète entre les microphones sans fil et le réseau audio numérique. Il est possible d'utiliser
plusieurs points d'accès pour les installations qui nécessitent le fonctionnement simultané de jusqu'à 40* microphones dans la même zone (*nombre variable
d'une région à une autre). Un logiciel de contrôle sur navigateur Web est utilisé pour la surveillance à distance et le contrôle depuis n'importe quel ordinateur
connecté au réseau.
Autres ressources
Ce guide de démarrage contient les informations essentielles permettant de
configurer un système MXW de base à huit canaux. Voici une liste des autres
ressources disponibles pour la série MXW :
Manuel complet du MXW : Le manuel complet comporte des informations
complètes sur le système MXW, notamment des descriptions détaillées des
différents composants, les topologies du réseau, les pratiques d'excellence
à respecter pour la gestion des fréquences radio et des instructions pour la
navigation dans le logiciel de contrôle. On peut le trouver sur le site www.shure.
com ainsi que sur la clé USB fournie avec l'émetteur-récepteur point d'accès.
Assistance Shure : Pour toute assistance concernant le dépannage ou pour
obtenir des conseils sur les installations complexes, contacter Shure pour
parler à un conseiller du service clientèle. Dans la région Amériques, appeler
le groupe Systems Support au 847-600-8541. Les utilisateurs d'autres régions
peuvent consulter le site www.shure.com pour trouver les coordonnées du
service d'assistance approprié.
Audinate : Pour obtenir de l'aide sur la mise en réseau de l'audio numérique,
des lignes directrices sur la mise en réseau avancée et le dépannage du logiciel
tm
Dante
, visiter le site Internet d'Audinate à l'adresse www.audinate.com.
Présentation des composants
MXW6MXW1 MXW8
MXW2
Émetteurs des microphones
Les microphones MXW émettent un signal audio
sans fil crypté qu'ils envoient au point d'accès. Les
émetteurs existent sous quatre formes différentes :
Émetteur de ceinture hybride (MXW1)
L'émetteur de ceinture se fixe à une
ceinture ou une sangle pour permettre une
communication mobile sans fil. Il présente une
entrée TQG pour le branchement d'un microcravate et un microphone omnidirectionnel
intégré.
Émetteur à main (MXW2)
L'émetteur à main permet aux présentateurs
de communiquer en utilisant les légendaires
capsules de micro Shure SM58, SM86,
BETA58 et VP68.
Émetteur périphérique (MXW6/C, MXW6/O)
L'émetteur périphérique se pose sur une table
ou un bureau pour transmettre la parole en
se fondant discrètement dans n'importe quel
environnement de conférence.
Base col de cygne de bureau (MXW8)
La base col de cygne est compatible avec les
microphones cols de cygne Microflex de 5, 10
et 15”.
Les micros MXW1, MXW6 et MXW8 comprennent
une sortie casque permettant de surveiller le son,
notamment celui d'un canal de traduction.
Émetteur-récepteur point d'accès
(MXWAPT4, MXWAPT8)
L'émetteur-récepteur point d'accès (unités à 4
et 8 canaux) se monte sur un mur ou au plafond
pour gérer les connexions audio sans fil cryptées
avec les microphones. Il fait office de carrefour
du système et transporte l'audio numérique
entre les microphones sans fil et les autres
appareils Dante situés sur le même réseau.
L'APT (émetteur-récepteur point d'accès) inclut
un serveur Web qui abrite le logiciel de contrôle
du système MXW, utilisé pour la surveillance,
la configuration et le contrôle à distance du
système.
MICROFLEX WIRELESS
B
OUTPUT
INPUT
line
aux
sig/clip
sig/clip
mute
mute
push to solo | hold to mute
-9
0
line
-18
-9
-12
aux
-24
-18
-36
mic
-24
-48
-60
adjust
0
8
7
6
5
4
3
2
1
A
Audio Network Interface
power
ethernet
network audio
HEADPHONE
lockout
Interface réseau audio
(MXWANI4, MXWANI8)
L'interface réseau audio (4 et 8 canaux) est un
équipement réseau Dante qui fournit des entrées
et sorties audio analogiques au système MXW.
Elle présente un commutateur Ethernet Gigabit
à 4 ports qui permet la connexion d'un point
d'accès MXW, d'un ordinateur et d'un maximum
de deux stations de chargement en réseau
MXW.
2
1
5
6
4
3
7
8
Station de chargement réseau
(MXWNCS4, MXWNCS8)
La station de chargement en réseau (disponible
en version à 4 et 8 encoches) est en mesure
de charger simultanément jusqu'à 4 (ou 8)
microphones MXW. Elle relie également les
microphones aux canaux du point d'accès et
envoie en réseau les statistiques des accus au
logiciel de contrôle.
Important : Les microphones à base en col
de cygne pour table (MXW8) occupent deux
encoches de chargement. Par exemple, huit
microphones MXW8 nécessitent deux stations
de chargement MXWNCS8 (16 encoches de
chargement en tout).
Logiciel de contrôle MXW
Le logiciel de contrôle MXW permet le contrôle
à distance complet des principales fonctions de
configuration, surveillance et gestion. Le logiciel
est accessible depuis n'importe quel ordinateur
PC ou Mac du réseau et s'ouvre dans un
navigateur Internet en utilisant Adobe® Flash®.
15
Page 16
Inventaire de l'équipement
Accessoires fournis
Composant Accessoire
Clé USB Flash Shure (contient l'application Web
Device Discovery de Shure, l'application Firmware
APT
Update Manager de Shure et les guides d'utilisation)
Plaque de montage
Couvercle à peindre
Kit de visserie (vis de montage sur rack, kits de
ANI
connecteurs de câbles)
Câble d'alimentation CEI
NCS Adaptateur secteur c.c.
Connexion des composants
1. Connecter les composants
Utiliser des câbles Ethernet blindés pour connecter les composants du
système MXW les uns aux autres. Utiliser le commutateur à 4 ports sur
l'interface réseau audio (ANI) ou connecter tous les composants à un
commutateur Gigabit séparé.
Équipement supplémentaire
Câbles audio
Utiliser des câbles audio blindés pour connecter l'ANI à un mélangeur,
un processeur de signal numérique (DSP) ou un appareil de
téléconférence.
Câbles Ethernet
Utiliser des câbles blindés de catégorie 5e (ou supérieure) pour mettre
en réseau les composants du système MXW.
Ordinateur
Utiliser un ordinateur PC ou Mac pour accéder à l'interface du système
MXW depuis un navigateur Web.
Port réseau ANI Vers composant
① Port 1 (PoE)
② Port 2
Émetteur-récepteur point d'accès (Access Point
Transceiver, APT)
Station de chargement en réseau (Networked
Charging Station, NCS)
③ Port 3 (En option) NCS supplémentaire
④ Port 4 Ordinateur
Remarque :
mode automatique (DHCP) pour se configurer automatiquement avec les réglages
IP compatibles. En l'absence de serveur DHCP, les appareils utiliseront un format
d'adresse locale de liaison (169.254.x.x).
Dans les paramètres par défaut, les appareils MXW sont réglés sur le
2. Connecter les sorties analogiques de l'ANI
Utiliser des câbles audio blindés pour connecter les sorties de l'ANI à un
mélangeur, un DSP ou un appareil de téléconférence. (Consulter le kit
de visserie fourni avec l'ANI pour voir comment connecter correctement
les câbles aux connecteurs de bloc.)
④
①
③
1
4
2
1
3
5
7
6
8
2
5
6
②
4
3
7
8
16
Page 17
Alimentation
②
④
①
7
8
6
5
1
2
3
4
7
8
6
5
1
2
3
4
③
MXWANI8 mxwani8-ffeee5.local
192.168.200.22
Dante
Dante
ROOM 5
MXWAPT8
mxwapt8-ffaaa2.local
192.168.200.23
CONFERENCE
mxwani-aa1.local
192-168-200-22
mxwapt8-ffe761.local
192-168-200-23
Alimentation et mise sous tension des composants.
Les LED s'allument sur chaque composant lorsqu'il est sous tension.
①
Class 0 PoE
Composant Source d'alimentation
① ANI
② APT
Connecter le câble CEI à une prise d'alimentation c.a. et
mettre le composant en marche à l'aide de l'interrupteur
d'alimentation.
Connecter au Port 1 de l'ANI pour profiter de
l'alimentation via Ethernet (Power over Ethernet, PoE). Il
③
1
2
5
6
4
3
7
8
②
n’y a pas d’interrupteur d’alimentation.
Connecter le PS45 à une prise d'alimentation c.a. et
③ NCS
mettre le composant en marche à l'aide de l'interrupteur
d'alimentation.
④ Émetteurs
Charger complètement les émetteurs avant toute
utilisation.
④
Accès au logiciel de contrôle MXW
Le système MXW utilise un logiciel de contrôle intégré dans l'appareil qui permet le contrôle à distance complet des principales fonctions de configuration,
surveillance et gestion. Le logiciel est accessible depuis n'importe quel ordinateur PC ou Mac du réseau et s'ouvre dans un navigateur Internet en utilisant
Adobe® Flash®.
Il existe deux interfaces de contrôle différentes pour le système MXW :
• Logiciel de contrôle MXW : On y accède depuis l'émetteur-récepteur point d'accès et on l'utilise pour gérer le système MXW.
• Logiciel de contrôle de l'interface réseau audio : On y accède depuis l'interface réseau audio et on l'utilise pour gérer uniquement cet appareil.
Respecter les étapes suivantes pour accéder au logiciel de contrôle MXW :
1. Installer l'application Shure Web Device Discovery.
Télécharger l'application Shure Web Device Discovery sur le site www.shure.
com ou depuis la clé USB fournie avec l'émetteur-récepteur point d'accès MXW.
(L'outil de détection d'appareils Bonjour nécessaire est fourni avec l'application et
s'installera automatiquement.)
2. S'assurer que l'ordinateur est sur le réseau du MXW.
L'ordinateur accède au logiciel de contrôle depuis un serveur Web intégré sur
l'appareil. Tous les appareils mis en réseau doivent être connectés au même
réseau (réglés sur le même sous-réseau).
3. Désactiver le WiFi
Désactiver le WiFi de l'ordinateur pour forcer l'interface réseau câblée.
4. Lancer l'application Shure Web Device Discovery.
Ouvrir l'application pour voir tous les appareils Shure sur le réseau qui présentent
un serveur intégré pour logiciel de contrôle (MXWAPT, MXWANI et SCM820).
Utiliser le bouton Identifier pour faire clignoter les LED d'un appareil afin de
l'identifier facilement.
5. Ouvrir le logiciel de contrôle MXW
Double-cliquer sur n'importe quel émetteur-récepteur point d'accès pour ouvrir le
logiciel de contrôle du système MXW. Double-cliquer sur une interface Network
Audio pour ouvrir l'interface logicielle de cet appareil. L'application peut ouvrir le
logiciel de contrôle par adresse IP ou nom DNS (sélection dans la liste déroulante
des Préférences).
6. Renseigner le mot de passe par défaut
Renseigner le mot de passe « admin » pour accéder au logiciel de contrôle.
①
③
⑤
⑦
Wi-Fi
②
④
⑥
MXWANI8 mxwani8-ffeee5.local
ROOM 5
CONFERENCE
MXWAPT8
mxwapt8-ffaaa2.local
SCM820
1 2 3 4 5 6 7 8
gain
low cut
hi shelf
meter
push to solo | hold to mute
8
7
5
4
6
2
1
3
A
B
OUTPUT
INPUT
line
aux
sig/clip
sig/clip
mute
mute
push to solo | hold to mute
192.168.200.22
Dante
Dante
192.168.200.23
admin
®
IntelliMix
LIM
MASTER
AB
power
B
A
AUX IN
HEADPHONE
0
ethernet
-9
network audio
-18
automix link
-24
gain
dual mixer
-36
limiter
-48
L+R SUM
-60
lockout
MICROFLEX WIRELESS
Audio Network Interface
0
power
-9
0
line
ethernet
-18
-9
network audio
aux
-12
-24
HEADPHONE
-18
mic
-36
-24
-48
lockout
-60
adjust
7. Marquer la page Web (recommandé)
Marquer l'adresse IP de l'appareil s'il est réglé sur une adresse IP statique. Marquer
le nom DNS de l'appareil si le mode IP est réglé sur Automatique (DHCP).
17
Page 18
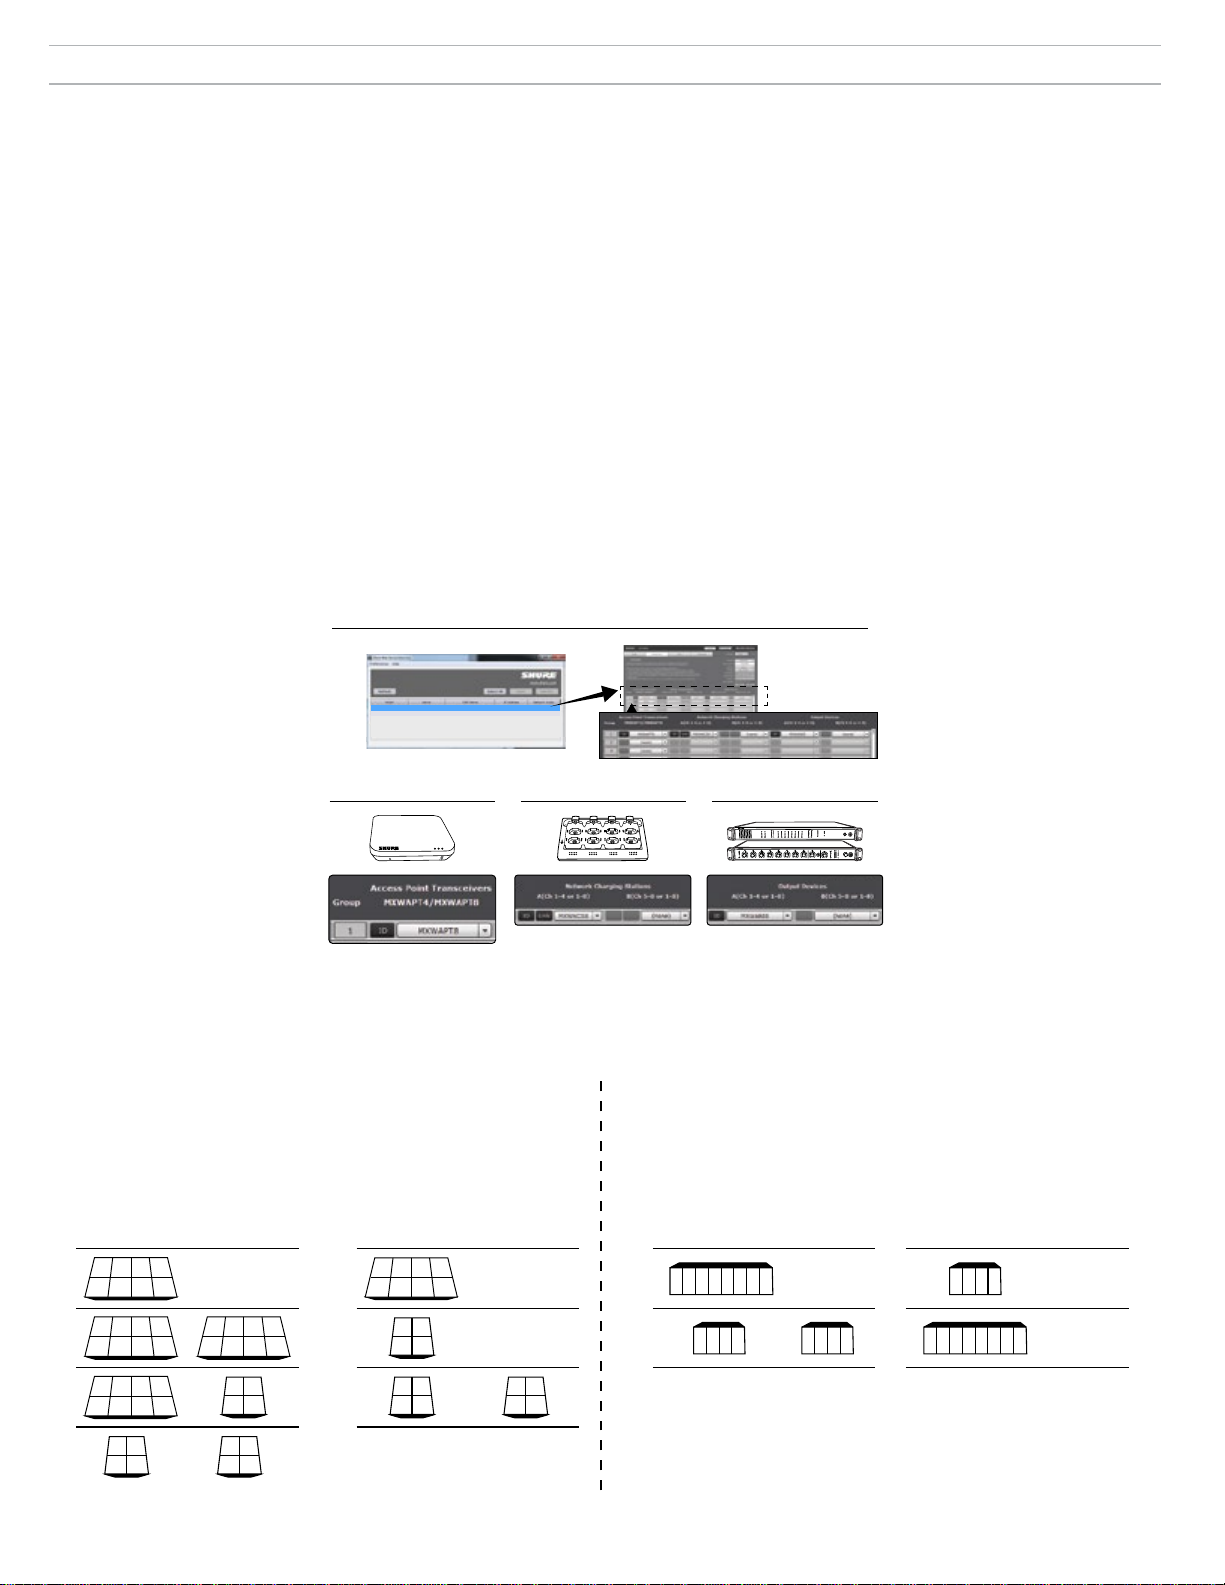
Association de composants à un groupe
Suivre les instructions ci-dessous pour former un groupe MXW. Si un appareil n'est pas disponible dans la liste déroulante, s'assurer qu'il est « ouvert » et sur
le réseau.
Conseil : Utiliser le bouton ID pour identifier un appareil. Cela envoie un signal à l'appareil pour faire clignoter ses LED afin de faciliter son identification.
1. Ouvrir une configuration
Utiliser l'application Shure Web Discovery pour visualiser tous les
émetteurs-récepteurs point d'accès (APT) présents sur le réseau.
Cliquer deux fois sur un APT pour ouvrir le logiciel, et aller à l'onglet
Configuration.
2. Sélectionner un émetteur-récepteur point d'accès (APT) pour le
Groupe 1
Sélectionner un APT ouvert dans la liste déroulante. Cette sélection
détermine si le Groupe possède quatre ou huit canaux (APT4 ou APT8).
Remarque : Le groupe 1 doit contenir l'APT qui a été utilisé pour ouvrir le logiciel de
contrôle. D'autres APT en réseau (et ouverts) sont alors disponibles pour d'autres
groupes.
3. Sélectionner la ou les stations de chargement réseau
Associer une ou deux stations de chargement réseau (NCS) au point
d'accès. Il y a deux raisons pour associer plus d'un chargeur :
- Lors de l'utilisation de deux chargeurs à quatre canaux pour un point d'accès à
huit canaux.
- Lors de l'utilisation de microphones col de cygne. Les micros col de cygne
occupent les encoches avant et arrière d'un chargeur, divisant ainsi par deux le
①
MXWANI8 mxwani8-ffeee5.local 192.168.200.22
MXWAPT8
ROOM 5
CONFERENCE
mxwapt8-ffaaa2.local
192.168.200.23
Dante
Dante
nombre d'encoches disponibles. Par exemple, deux chargeurs de huit canaux
sont nécessaires pour affecter des microphones col de cygne à un point d'accès
à huit canaux.
4. Sélectionner le ou les appareils de sortie audio
Sélectionner un ou deux appareils de sortie audio (MXWANI ou
SCM820) pour acheminer automatiquement les canaux audio
numériques depuis le point d'accès. Faire la sélection parmi les appareils
suivants :
- Interface réseau audio (MXWANI) en version quatre ou huit canaux. Deux unités
à quatre canaux ou une unité à huit canaux peuvent être affectées à un APT à
huit canaux.
- Mélangeur Shure SCM820 IntelliMix®. Des mélangeurs SCM820 compatibles
Dante peuvent être sélectionnés en guise de sortie audio pour le Groupe. Dans
ce cas, l'entrée aux du SMC820 est automatiquement acheminée vers les
microphones pour le contrôle personnel (canal gauche aux du SCM820 vers les
canaux 1 à 4 du MXW ; canal droit aux vers les canaux 5 à 8 du MXW).
Remarque : les associations d'appareils et les données de liaison des
microphones sont stockées en permanence dans l'appareil. Si le système
MXW est éteint puis redémarré sans ordinateur, les appareils demeureront
associés au point d'accès.
②
③
4
2
1
3
7
5
6
8
④
A
B
INPUT
OUTPUT
line
aux
sig/clip
mute
SCM820
gain
1 2 3 4 5 6 7 8
low cut
hi shelf
meter
push to solo | hold to mute
sig/clip
mute
HEADPHONE
-18
mic
-36
-24
-48
lockout
-60
adjust
push to solo | hold to mute
®
IntelliMix
LIM
MASTER
AB
power
B
A
HEADPHONE
AUX IN
0
ethernet
-9
network audio
-18
automix link
-24
gain
-36
dual mixer
limiter
-48
-60
L+R SUM
lockout
MICROFLEX WIRELESS
Audio Network Interface
0
5
8
4
7
2
3
6
1
power
-9
0
line
ethernet
-18
-9
aux
network audio
-12
-24
Mappage de canaux pour les équipements d'un groupe
Le son est acheminé des microphones vers les sorties analogiques selon la configuration du groupe dans l'onglet Configuration. Le diagramme suivant
affiche le mappage de canaux pour les appareils de groupes à huit et quatre canaux.
Station de chargement réseau
Une station de chargement supplémentaire est requise lors du remplissage
Les sorties sont attribuées à une interface réseau audio MXW
d'un groupe avec des microphones col de cygne
Groupe à 8 canaux
Groupe à 4 canaux
Groupe à 8 canaux Groupe à 4 canaux
A B A B A B A B
2 3 4
1
1) 1) 1) 1)
5 6 7 8
2 3 41
2) 2) 2) 2)
x x x x
2 3 41
3) 3)
x x x x
(none) (none) (none)(none)
5 6 7 8
x x x
x
5 6
7 8
2 3 41
x x x x
1
2
4
3
21
x x
1 2 3 4
3 4
x x
Appareil de sortie audio
ou à un mélangeur automatique SCM820
81 2 3 4 5 6 7
85 6 7
1 2 3 4
1 2 3 4 x x x x
(none)(none)
18
2
1
4)
3 4
5 6
7 8
Page 19
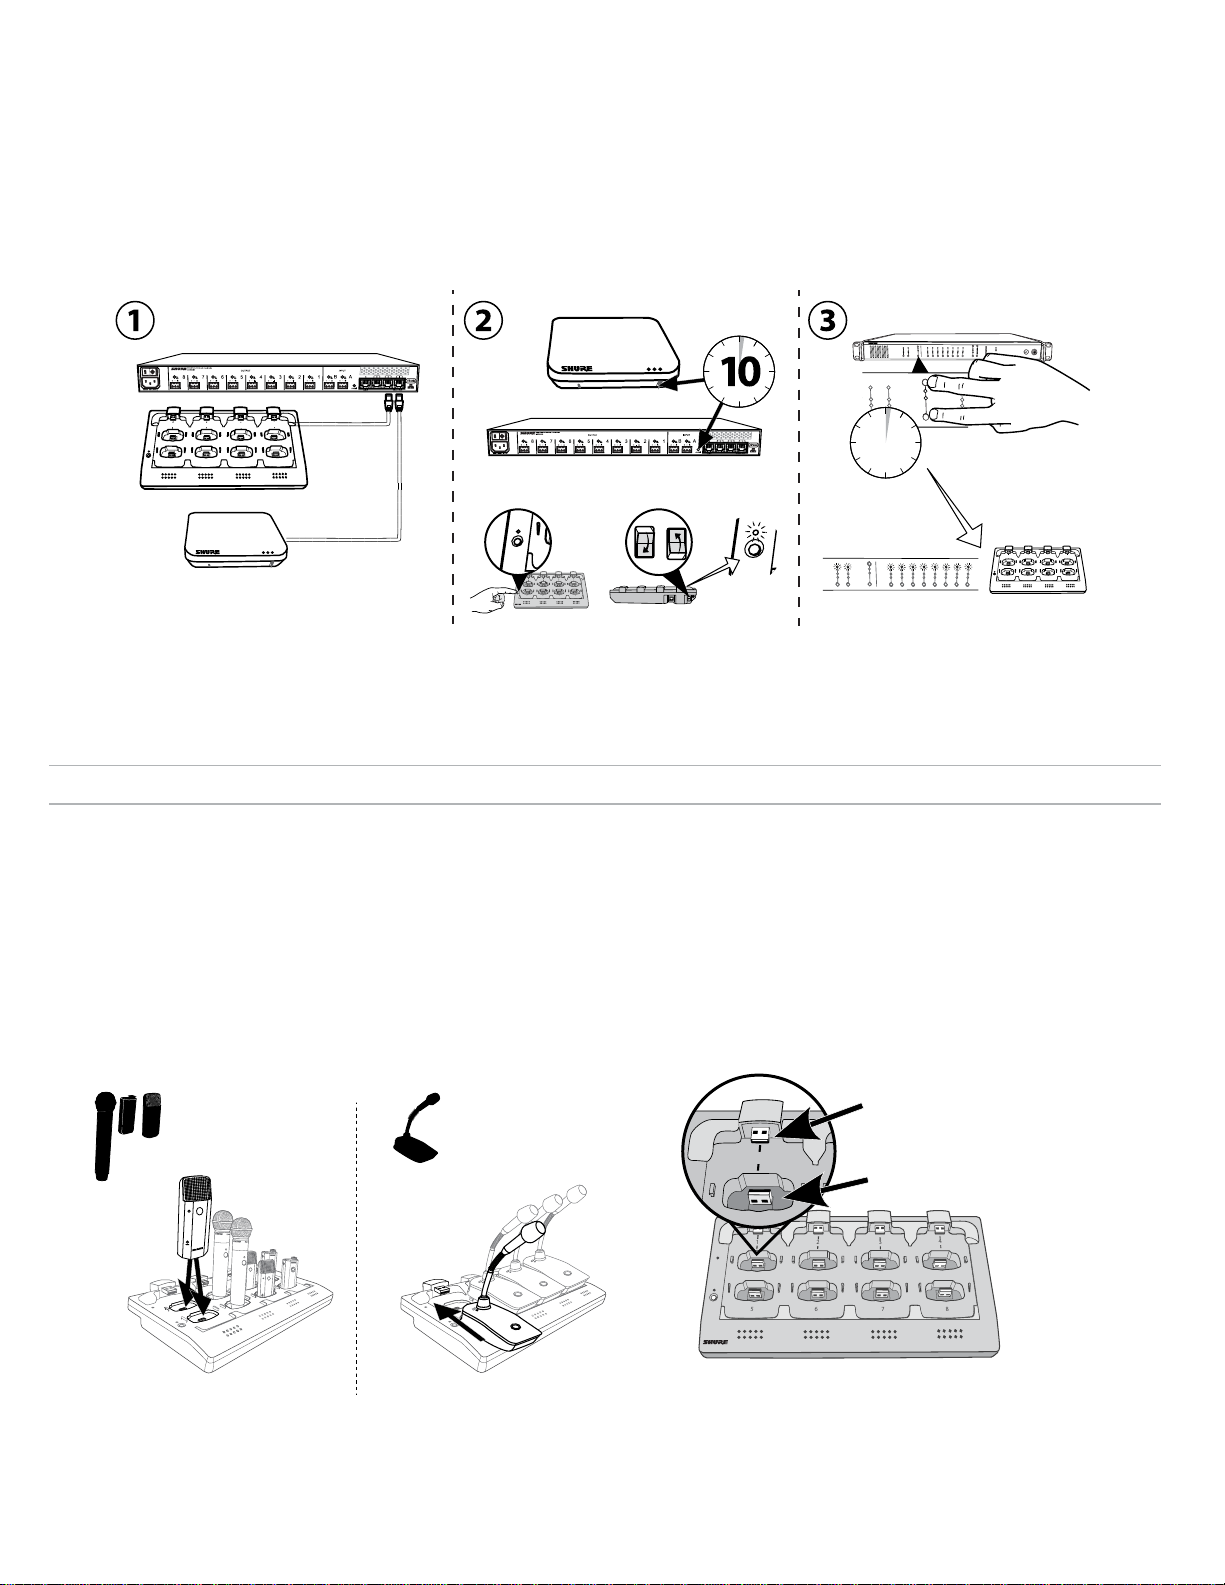
7
8
6
5
1
2
3
4
1
2
3
7
8
6
5
1
2
3
4
7
8
6
5
1
2
3
4
link
6
5
1
2
link
push to solo | hold to mute
2
3
4
5
6
7
8
lockout
power
ethernet
network audio
-9
-18
-24
-36
-48
-60
0
-9
-12
-18
-24
0
aux
mic
adjust
line
HEADPHONE
MICROFLEX WIRELESS
Configuration automatique d'un groupe
Un groupe MXW peut être associé sans utiliser le logiciel de contrôle lorsqu'un réseau est composé d'un seul émetteur-récepteur point d'accès (APT), d'une
seule station de chargement en réseau (NCS) et d'une seule interface réseau audio (ANI). Pour obtenir les meilleurs résultats, rétablir les paramètres d'usine
par défaut sur les appareils pour effacer toute association de groupe précédente.
1. Connecter un APT, une NCS et une ANI au réseau. Le réseau doit contenir un seul exemplaire de chaque appareil.
2. Effectuer une réinitialisation des paramètres d'usine sur les appareils (voir la section Paramètres d'usine par défaut).
3. Sur le panneau avant de l'ANI, appuyer simultanément sur les deux boutons de sélection de niveau d'entrée sans les relâcher pendant cinq secondes. Les
LED de sélection de canal s'allument en vert et le vumètre audio clignote pour indiquer que l'association a réussi.
MICROFLEX WIRELESS
Audio Network Interface
0
2
1
5
3
7
6
4
A
8
12
11
1
10
2
9
3
8
4
5
7
6
2
1
5
6
4
3
7
8
+
Power
Link
A
B
INPUT
sig/clip
mute
B
OUTPUT
INPUT
line
aux
sig/clip
sig/clip
mute
mute
A
B
line
aux
12
11
1
10
2
9
3
5
8
4
5
7
6
3
2
5
4
1
OUTPUT
line
aux
sig/clip
mute
push to solo | hold to mute
push to solo | hold to mute
OUTPUT
power
-9
0
line
ethernet
-18
-9
network audio
aux
-12
-24
HEADPHONE
-18
mic
-36
-24
-48
lockout
-60
adjust
1
sig/clip
mute
4
2
1
8
7
6
3
7
6
5
i i
i
i
i
i
i
i
i i
8
i i
i i
i i
i
i
i
i
i
i
i
i
i
i
i
i
i
i
i
i
i
i
i
i
i
i
i
i
i
i
i
i
i
i
i
i
i
i
i
i
i
i
i i
i i
i i
Liaison de microphones
Utiliser la station de chargement en réseau (NCS) pour relier des microphones aux canaux de point d'accès. Les encoches du chargeur sont mappées à
l'APT selon la configuration du groupe de l'onglet Configuration. Une fois la procédure de liaison terminée, le son est acheminé vers le canal correspondant
dans le groupe.
La liaison mappe tout microphone placé dans la station de chargement aux canaux de l'APT. Cela remplace toute liaison de microphone précédente pour ce
canal. Si une encoche est vide lors de la procédure de liaison, cela n'aura aucun impact sur ce canal.
1. Placer les microphones dans le chargeur.
Les microphones sont reliés à des canaux de point d'accès en fonction
de leur agencement dans le chargeur.
Pour micros col de cygne.
Pour micros de ceinture, à main et
Power
Link
périphériques.
Connexion du microphone à
l'encoche du chargeur
19
Page 20
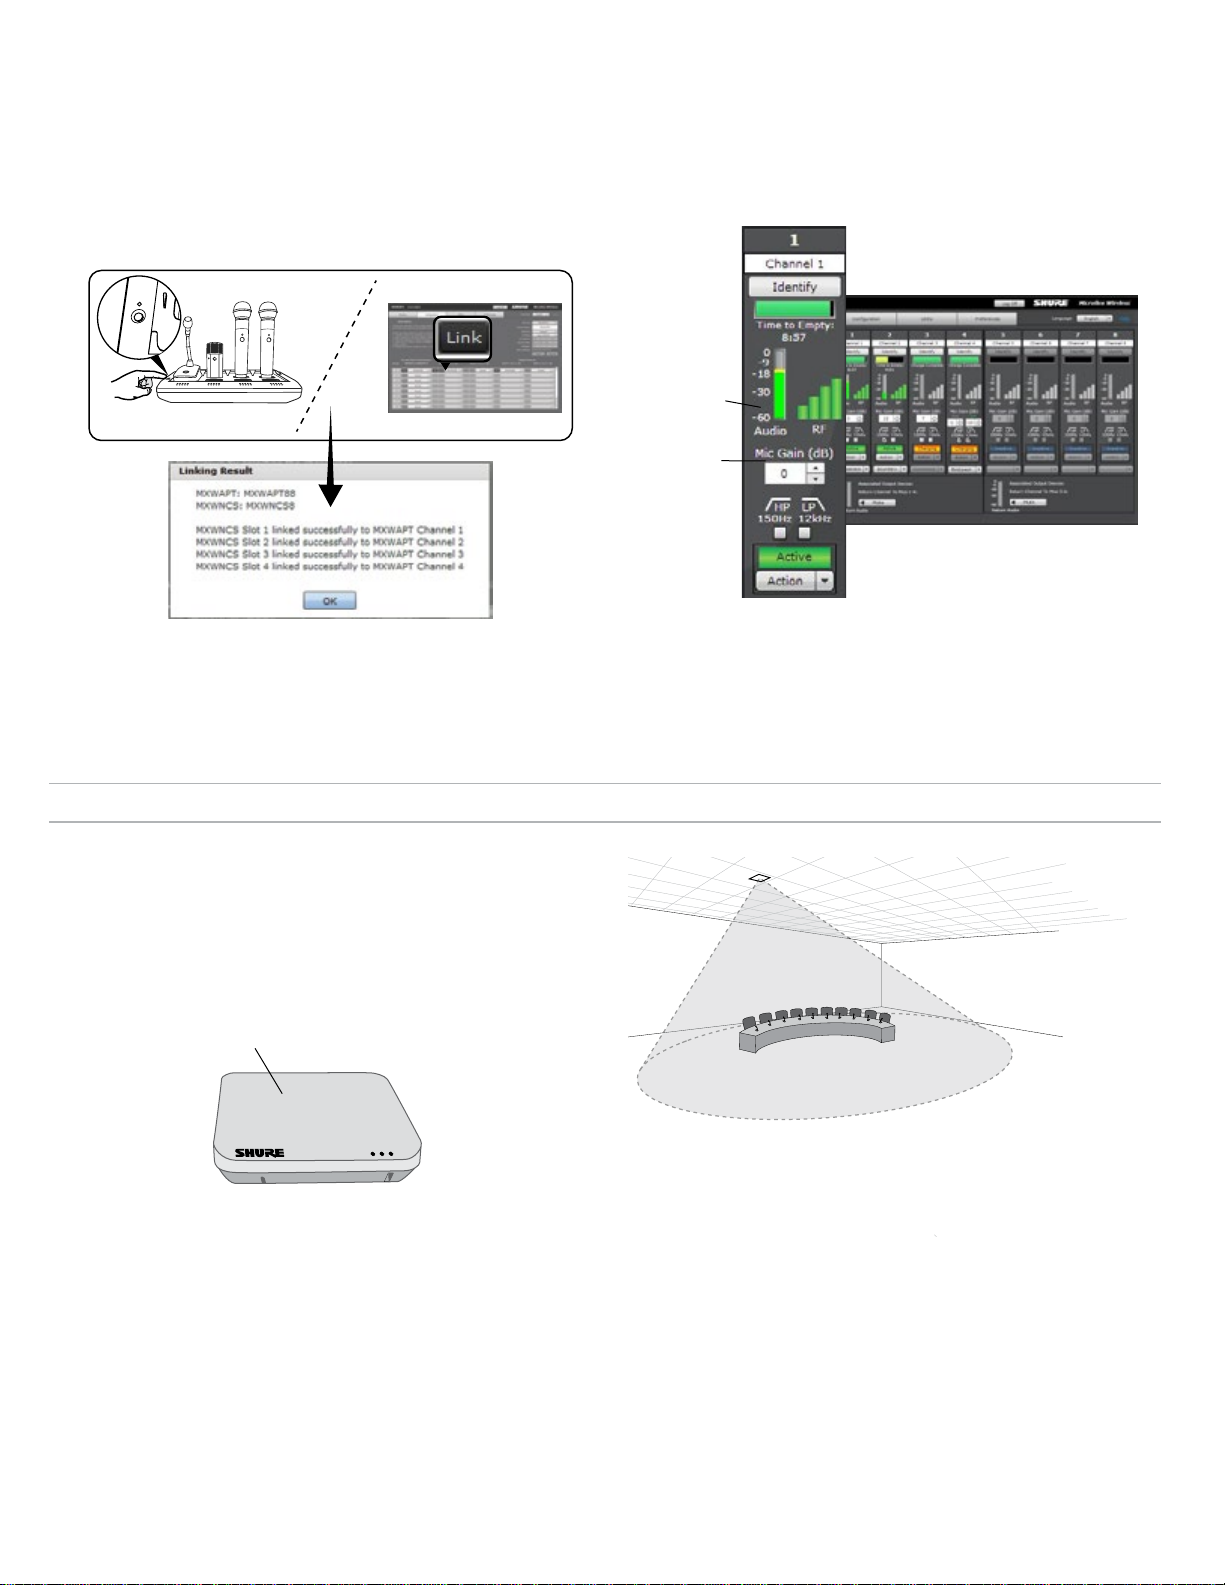
2. Relier les microphones à des canaux.
7
8
6
5
link
Utiliser le logiciel de contrôle ou la station de chargement pour relier les
microphones aux canaux de l'APT. Si on le souhaite, cette fonction peut
être désactivée sur la station de chargement de sorte que la liaison ne
puisse être effectuée que depuis le logiciel de contrôle :
- Logiciel de contrôle : Depuis la page Configuration, appuyer sur le bouton
Liaison pour chaque chargeur du groupe.
-
Station de chargement : Appuyer sur le bouton Liaison sans le relâcher
pendant 6 secondes. Les LED clignotent pendant le processus et deviennent
vertes et fixes une fois que la Liaison a réussi.
3. Retirer les micros et tester l'audio
Tester l'audio pour chaque microphone et, si nécessaire, ajuster le
gain des micros depuis l'onglet Contrôle du logiciel de contrôle. Le gain
devrait être réglé à un niveau auquel l'audio est enregistré (vert/jaune)
sur le témoin de signal mais où il n'y a pas d'écrêtage (rouge).
Témoin de signal
Réglage de gain
Onglet Contrôle
Montage de l'émetteur-récepteur point d'accès (APT)
L'APT fait rayonner des fréquences radio selon un motif cardioïde qui est le
plus puissant au niveau de l'avant de l'appareil. Orienter l'avant de l'APT en
direction des zones de couverture désirées. Ne pas bloquer la visibilité et
tenir éloigné tout objet métallique de grandes dimensions.
Important : Avant d'utiliser un système sans fil pendant un discours ou un
spectacle, toujours effectuer un essai sur le lieu d'utilisation afin de vérifier
la portée. Faire des essais de placement de l'antenne afin de trouver
l'emplacement optimal. Si nécessaire, repérer les « zones à problème » et
demander aux présentateurs ou aux artistes d'éviter ces zones.
Avant de l'APT
Orienter vers la zone du microphone
20
Page 21
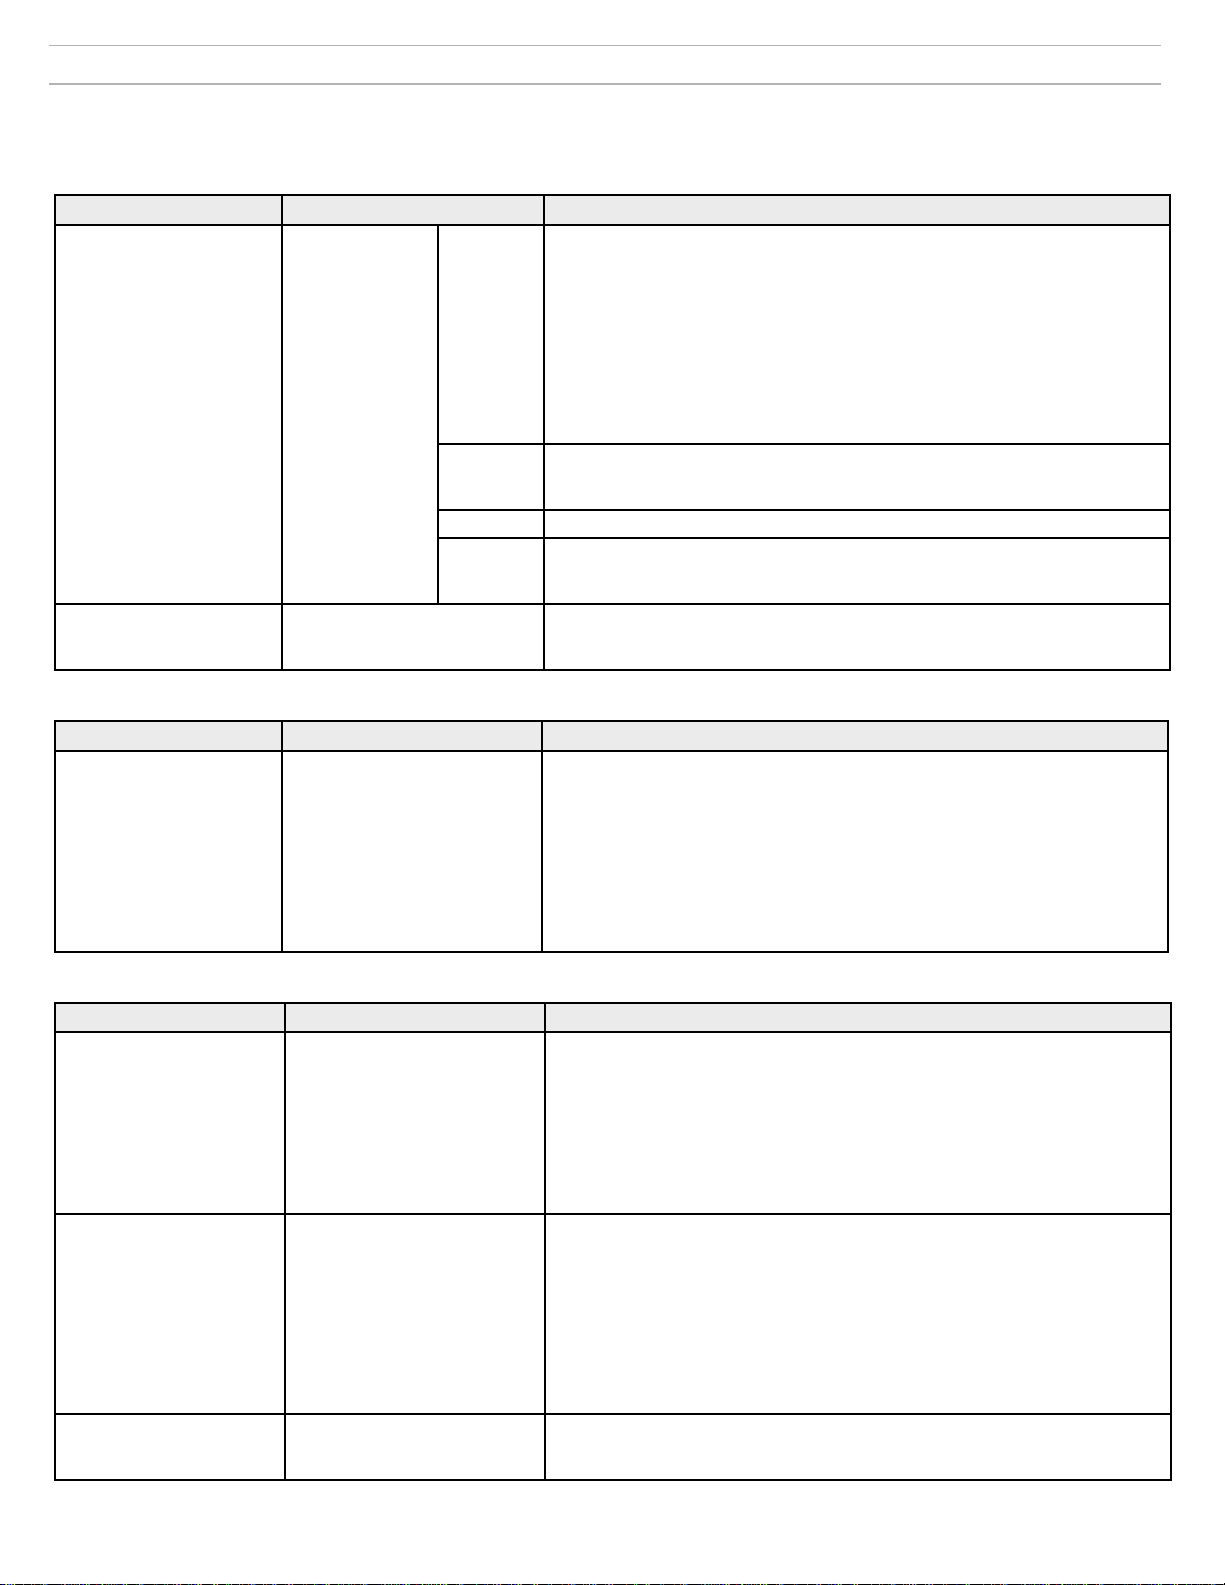
Dépannage
Le tableau suivant offre des solutions typiques de dépannage du système sans fil Microflex. Pour de plus amples renseignements sur chaque sujet, consulter
le guide complet de l'utilisateur MXW se trouvant sur www.shure.com et associé à la clé USB.
Audio
Problème Témoin Solution
• Vérifier les câbles
• Vérifier que les émetteurs sont allumés et que le son n'est pas coupé sur les
canaux
• Vérifier que les vumètres des entrées sont OK dans l'onglet Contrôle du logiciel de
contrôle MXW. Atténuer si le canal présente un écrêtage.
• Vérifier les vumètres des sorties sur le panneau avant de l'interface audio réseau
(ANI) et dans le logiciel de contrôle de l'ANI. Se munir d'un casque pour écouter le
son venant de l'ANI. Atténuer si le canal présente un écrêtage.
• Vérifier que le niveau de sortie de l'ANI correspond à l'entrée de l'équipement
connecté.
• Vérifier que l'APT n'est pas en train d'effectuer un scan du spectre.
• S'assurer que tous les appareils sont allumés et présentent une connexion au
réseau stable
• Utiliser le logiciel Dante Controller (DC) pour vérifier les abonnements aux canaux
• Placer l'appareil dans un groupe pour acheminer automatiquement l'audio
• S'assurer que le sous-réseau des paramètres audio réseau de l'émetteur-récepteur
point d'accès correspond au sous-réseau de l'interface audio réseau
• Réaliser un scan du spectre pour surveiller les perturbations radioélectriques
• Réduire le nombre de canaux pour vérifier si le système surcharge le spectre HF
Pas de son / son déformé
Des perturbations
radioélectriques causes des
décrochements du son
Vert
LED Network Audio
sur l'interface
réseau audio ou le
SCM820
Vert
clignotant
Rouge • Vérifier l'horloge maître dans DC (c'est un MXWAPT qui doit être l'horloge maître)
Éteinte
Le son est intermittent
Configuration du système et groupes MXW
Problème Témoin Solution
• Vérifier que les appareils sont sous tension et connectés au même réseau et au
même sous-réseau
• Ouvrir l'onglet Utilitaire du logiciel de contrôle MXW et décocher la case Filtre
Impossible d'associer un
composant à un groupe
Liste déroulante Appareil
n'affichant pas le composant
désiré dans la rangée Groupe sur
l'onglet Configuration
de configuration pour afficher tous les appareils MXW présents sur le réseau.
Si l'appareil apparaît en tant que « AUTRE », alors il fait partie d'une autre
configuration.
• Désassocier le composant en sélectionnant « aucun » à partir de la rangée Groupe
dans l'autre configuration.
• Exécuter une réinitialisation des paramètres d'usine sur l'appareil pour effacer toute
association.
Réseau
Problème Témoin Solution
• S'assurer que les appareils sont sous tension
• S'assurer que l'ordinateur et l'équipement sont sur le même réseau et réglés sur le
même sous-réseau
Impossible de se connecter
au logiciel de contrôle depuis
un ordinateur
L'appareil n'apparaît pas dans
l'application Shure Web Device
Discovery
• Désactiver les autres interfaces réseau qui ne sont pas utilisées pour se connecter
à l'appareil (y compris le WiFi)
• Vérifier que le serveur DHCP fonctionne (le cas échéant)
• S'assurer que Bonjour est exécuté sur l'ordinateur
• En cas de connexion via le Port 4 de l'interface réseau audio (ANI), s'assurer que
le réglage correspond au mode commuté.
• Télécharger la toute dernière version d'Adobe
• S'assurer que l'ordinateur et l'appareil sont sur le même réseau et sur le même
sous-réseau
• Vérifier que les paramètres de pare-feu de Windows ne bloquent pas le logiciel
Le logiciel de contrôle est
long à charger
Le navigateur Web ne peut pas se
connecter à l'interface de contrôle
Shure.
• Régler le routeur pour qu'il n'envoie pas la passerelle par défaut avec le DHCP
• Configurer l'application Shure Web Device Discovery pour qu'elle s'ouvre par
adresse IP
• Régler manuellement l'ordinateur sur une adresse IP statique sur le même réseau
que l'appareil
Le logiciel de contrôle
fonctionne mal
Les témoins se déplacent
lentement ou ne s'affichent pas en
temps réel.
• Réduire le nombre de fenêtres ou d'onglets ouverts sur la même configuration
• Consulter la section Réseau pour savoir comment configurer correctement le
réseau
®
Flash
®
21
Page 22
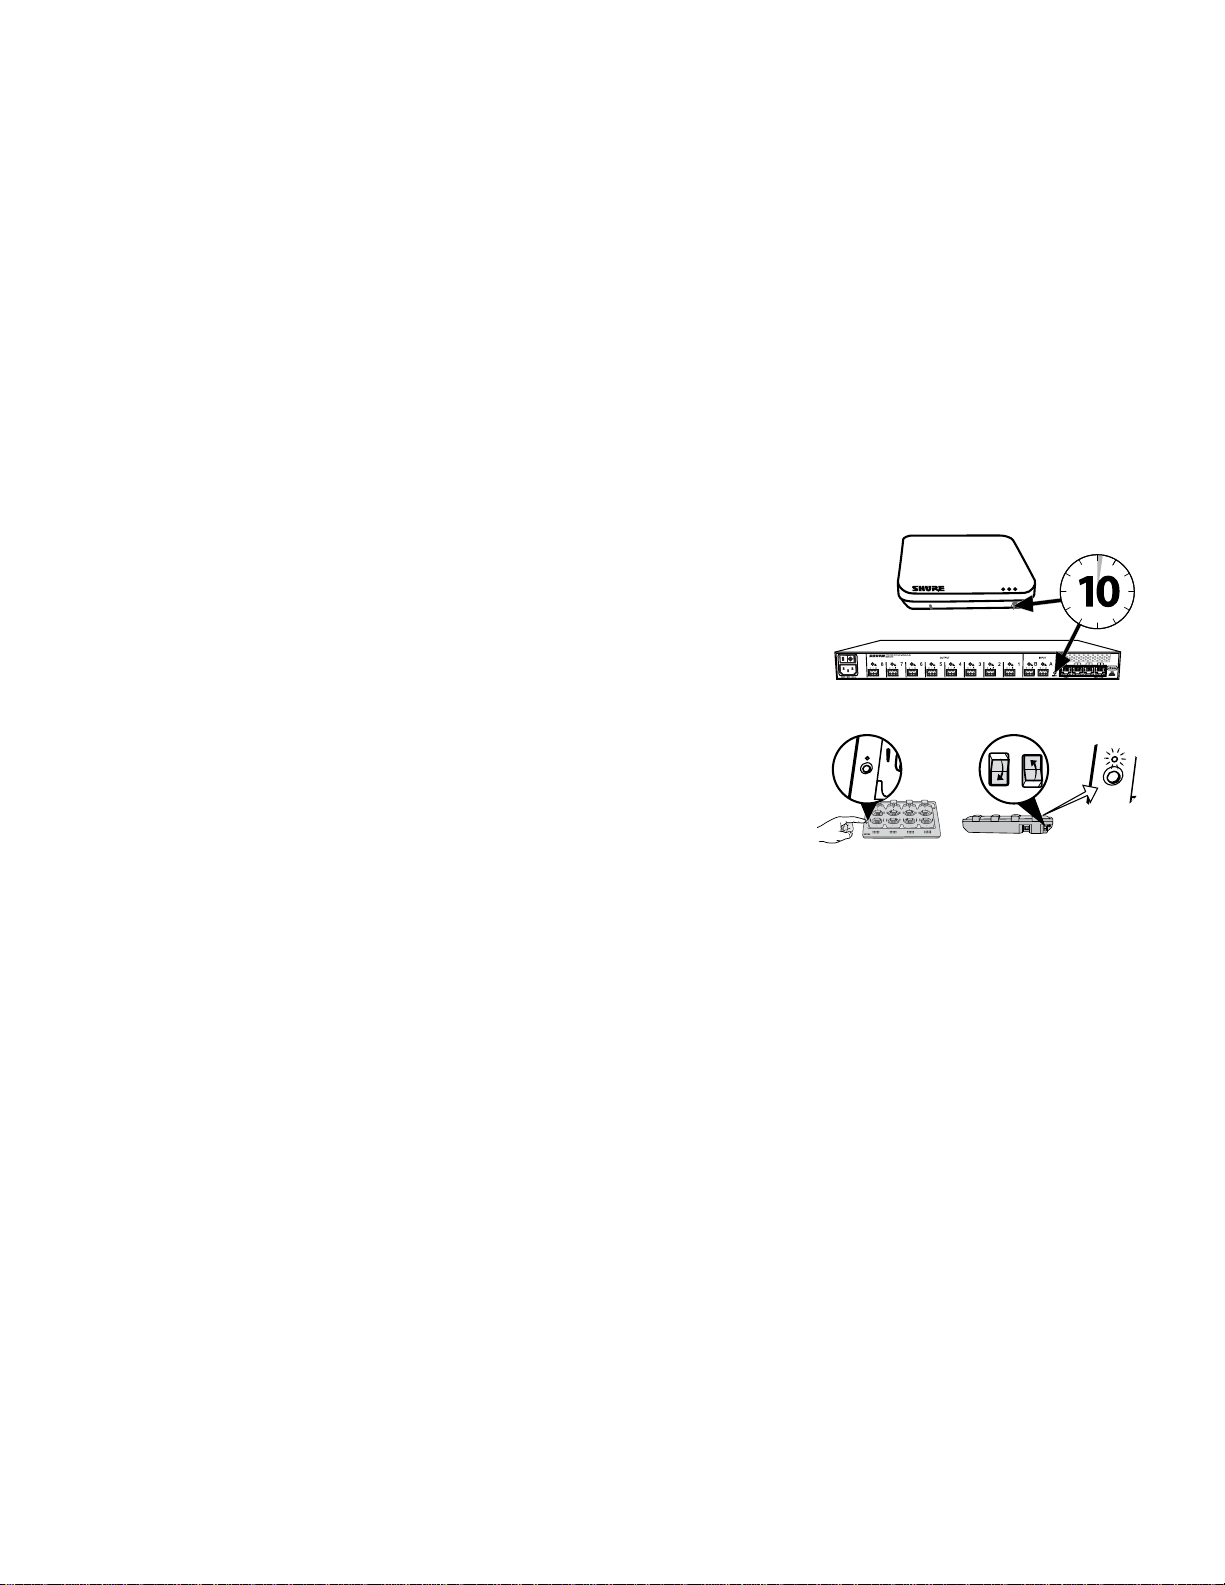
7
8
6
5
1
2
3
4
Link
Power
7
8
6
5
1
2
3
4
link
6
5
1
2
link
+
lockout
power
ethernet
network audio
push to solo | hold to mute
-9
-18
-24
-36
-48
-60
0
-9
-12
-18
-24
0
aux
mic
adjust
line
sig/clip
mute
INPUT
A
sig/clip
mute
OUTPUT
HEADPHONE
Audio Network Interface
MICROFLEX WIRELESS
B
1
2
3
4
5
6
7
8
line
aux
push to solo | hold to mute
A
sig/clip
mute
OUTPUT
B
1
2
3
4
5
6
7
8
line
aux
6
7
8
9
10
11
12
1
2
3
4
5
6
7
8
9
10
11
12
1
2
3
4
5
5
7
8
6
5
1
2
3
4
i
i
i i
i
i
i
i
i
i i
i
i
i
i
i
i
i i
i
i
i
i
i
i i
i
i
i
i
i
i
i i
i
i
i
i
i
i i
i
i
i
i
i
i
i i
i
i
i
i
i
i i
i
i
i
i
INPUT
A
OUTPUT
B
1
2
3
4
5
6
7
8
lockout
power
ethernet
network audio
push to solo | hold to mute
-9
-18
-24
-36
-48
-60
0
-9
-12
-18
-24
0
aux
mic
adjust
line
sig/clip
mute
sig/clip
mute
HEADPHONE
MICROFLEX WIRELESS
line
aux
Autres ressources
Pour toute assistance supplémentaire concernant le dépannage ou tout complément d'information sur les installations complexes, contacter Shure pour
parler à un conseiller du service clientèle. Dans la région Amériques, appeler le service d’assistance systèmes au 847-600-8541. Les utilisateurs d'autres
régions peuvent consulter le site www.shure.com pour trouver les coordonnées du service d'assistance approprié.
Pour toute aide concernant la mise en réseau audio numérique, des consignes de mise en réseau avancée et le dépannage du logiciel Dante, visiter le site
Web d'Audinate, www.audinate.com.
Réinitialisation usine
Si un appareil n'apparaît pas sur le réseau après avoir essayé les différentes méthodes de dépannage, réaliser une réinitialisation du matériel en question
afin de rétablir ses paramètres par défaut. Les paramètres d'usine par défaut sont conçus pour garantir une compatibilité automatique avec les autres
appareils Shure mis en réseau.
Remarque : Une réinitialisation des paramètres d'usine effacera toutes les associations de groupe et les liaisons du système MXW. Le mot de passe
permettant d'accéder au logiciel sera réinitialisé à
Depuis le matériel
Émetteur-récepteur point d'accès
Appuyer sur le bouton en retrait de réinitialisation pendant 10 secondes. La LED d'état de l'audio
réseau s'éteindra brièvement pour indiquer que l'unité est en train de redémarrer.
ATTENTION :
liaisons de microphones enregistrées dans l'appareil.
Interface réseau audio
Appuyer sur le bouton de réinitialisation pendant 10 secondes. Les LED du panneau avant
clignoteront pour indiquer que l'unité est en train de redémarrer.
Une réinitialisation des paramètres d'usine efface toutes les associations de groupe et les
admin.
Station de chargement réseau
a. Couper l'interrupteur d'alimentation.
b. Appuyer sur le bouton Lier sans le relâcher.
c. Tout en maintenant le bouton Lier enfoncé, activer l'interrupteur d'alimentation.
d. Maintenir encore le bouton Lier enfoncé pendant 12 secondes jusqu'à ce que la LED s'allume en jaune.
Depuis le logiciel de contrôle
1. Ouvrir l'onglet Utilitaire du logiciel de contrôle MXW.
2. Sélectionner le bouton Modifier les propriétés de l'appareil.
3. Cocher la case Réinitialisation usine.
4. Sélectionner Ajouter les mises à jour pour enregistrer le paramètre dans la file d'attente des
changements.
5. Faire de même pour tous les autres appareils.
6. Appuyer sur Appliquer tout pour appliquer les changements à tous les appareils dont les
propriétés ont été modifiées.
22
Page 23
Informations de sécurité
PRÉCAUTIONS DE SÉCURITÉ
Les résultats possibles d'une utilisation incorrecte sont marqués par l'un des
deux symboles—AVERTISSEMENT et ATTENTION—selon l'imminence du
danger et la sévérité des dommages.
AVERTISSEMENT : L'ignorance de ces avertissements peut causer
des blessures graves ou la mort suite à une utilisation incorrecte.
ATTENTION : L'ignorance de ces mises en garde peut causer des
blessures modérées ou des dégâts matériels suite à une utilisation
incorrecte.
AVERTISSEMENT
L’ÉCOUTE AUDIO À UN VOLUME SONORE EXCESSIF PEUT CAUSER DES
LÉSIONS AUDITIVES PERMANENTES. RÉGLER LE VOLUME LE PLUS BAS
POSSIBLE. Une surexposition à des volumes sonores excessifs peut causer des
lésions aux oreilles entraînant une perte auditive permanente due au bruit (NIHL).
Se conformer aux directives ci-dessous, établies par l'Occupational Safety Health
Administration (OSHA), pour les limites de durée d'exposition aux pressions
acoustiques avant de risquer des lésions auditives.
SPL de 90 dB
pendant 8 heures
SPL de 110 dB
pendant ½ heure
SPL de 95 dB
pendant 4 heures
SPL de 115 dB
pendant 15 minutes
SPL de
100 dB
pendant 2
heures
SPL de 120 dB
À éviter au risque de
lésions auditives
AVERTISSEMENT
• Les accus risquent d'exploser ou d'émettre des matières toxiques. Risque
d'incendie ou de brûlures. Ne pas ouvrir, écraser, altérer, démonter, chauffer audessus de 60 °C (140 °F) ou incinérer.
• Suivre les instructions du fabricant
• Utiliser uniquement un chargeur Shure pour recharger les accus rechargeables
Shure
• AVERTISSEMENT : Danger d'explosion si l'accu est mal placé. Remplacer
uniquement avec le même type ou un type équivalent.
• Ne jamais mettre les accus dans la bouche. En cas d'ingestion, contacter un
médecin ou le centre anti-poison local
• Ne pas court-circuiter ; cela risque de causer des brûlures ou un incendie
• Ne pas charger ou utiliser des accus autres que les accus rechargeables Shure
• Mettre les accus au rebut de manière appropriée. Vérifier auprès du fournisseur
local la manière appropriée de mettre au rebut les accus usagés.
• Les accus (bloc accu ou accus installés) ne doivent pas être exposés à une
chaleur excessive, p. ex. lumière du soleil, feu ou similaire
AVERTISSEMENT : Danger d'explosion si l'accu est mal placé. N'utiliser qu'avec
des accus compatibles Shure.
Remarque : Utiliser exclusivement avec le bloc d'alimentation inclus ou un produit
équivalent approuvé par Shure.
1. 經審驗合格之射頻電信終端設備,非經許可,公司、商號或使用者均不得擅自變更
頻率、加大功率或變更原設計之特性及功能。
2. 射頻電信終端設備之使用不得影響飛航安全及干擾合法通信;經發現有干擾現象
時,應立即停用,並改善至無干擾時方得繼續使用。所謂合法通信,係指依電信法
規定作業之無線電信。
3. 輸入、製造射頻電信終端設備之公司、商號或其使用者違反本辦法規定,擅自使用
或變更無線電頻率、電功率者,除依電信法規定處罰外,國家通訊傳播委員會並得
撤銷其審驗合格證明。
4. 減少電磁波影響,請妥適使用
SPL de
105 dB
pendant 1
heure
MXW1
Émetteurs de microphones de ceinture:
Ces émetteurs ont été testés et certifiés conformes aux limites
internationales d'exposition aux radiations définies pour un
environnement non contrôlé. Dans des conditions normales de
fonctionnement, cet équipement est en contact direct avec le corps
de l’utilisateur. Ces émetteurs ne doivent pas être situés à côté ou
utilisés en conjonction avec d’autres antennes ou émetteurs.
MXW2, MXW6, MXW8, MXWAPT4, MXWAPT8
Émetteurs de microphones à main, Émetteurs de microphones
périphériques de table, Émetteurs de microphones col de cygne de
table, Émetteurs de point d'accès sans fil:
Ces émetteurs mobiles sont conçus pour être utilisés à des distances
supérieures à 20 centimètres du corps humain. Ces émetteurs
mobiles sont exemptés des exigences de test de conformité aux
normes internationales d'exposition aux radiations étant donné leur
proximité avec le corps de l'utilisateur dans le cadre de leur utilisation
prévue et leur faible sortie de puissance. Ces émetteurs mobiles
doivent être placés ou installés à au moins 20 cm de toute personne
et ne doivent pas être situés à côté ou utilisés en conjonction avec
d'autres antennes ou émetteurs.
Informations importantes sur le produit
L'équipement est prévu pour être utilisé dans des applications audio
professionnelles.
Essais de conformité CEM basés sur l'utilisation des types de câbles
fournis et recommandés. L’utilisation d'autres types de câble peut
dégrader la performance CEM.
Tout changement ou modification n'ayant pas fait l'objet d'une
autorisation expresse de Shure Incorporated peut entraîner la nullité
du droit d'utilisation de cet équipement.
Suivre le plan de recyclage régional en vigueur pour les accus,
l'emballage et les déchets électroniques.
Remarque : Ce dispositif n'est pas conçu pour être connecté
directement à un réseau Internet public.
Information à l'utilisateur
Cet équipement a été testé et déclaré conforme aux limites pour
les appareils numériques de classe B, selon la section 15 des
règlements de la FCC. Ces limites sont destinées à assurer une
protection raisonnable contre les interférences nuisibles dans une
installation résidentielle. Cet équipement produit, utilise et peut
émettre de l'énergie radio électrique et, s'il n'est pas installé et
utilisé conformément aux présentes instructions, peut causer des
interférences nuisibles aux communications radio. Il n'existe toutefois
aucune garantie que de telles interférences ne se produiront pas
dans une installation particulière. Si cet équipement produit des
interférences nuisibles à la réception d'émissions de radio ou de
télévision, ce qui peut être établi en mettant l'appareil sous, puis hors
tension, il est recommandé à l'utilisateur d'essayer de corriger le
problème en prenant l'une ou plusieurs des mesures suivantes :
• Réorienter ou déplacer l'antenne réceptrice.
• Augmenter la distance séparant l'équipement du récepteur.
• Brancher l'équipement sur un circuit électrique différent de celui du
récepteur.
• Consulter le distributeur ou un technicien radio et télévision.
23
Page 24

Homologations
Cet appareil est conforme à l'article 15 de la FCC (organisme fédéral
réglementant les communications aux U.S.A.).
Cet appareil est conforme à la ou aux normes RSS d'exemption de licence
d'Industrie Canada. L'utilisation de ce dispositif est assujettie aux deux
conditions suivantes : (1) ce dispositif ne doit pas causer d’interférences et
(2) ce dispositif doit accepter toutes les interférences, y compris celles qui
pourraient provoquer un fonctionnement non souhaitable de l’appareil.
Le présent appareil est conforme aux CNR d'Industrie Canada applicables
aux appareils radio exempts de licence. L'exploitation est autorisée aux
deux conditions suivantes : (1) l'appareil ne doit pas produire de brouillage,
et (2) l'utilisateur de l'appareil doit accepter tout brouillage radioélectrique
subi, même si le brouillage est susceptible d'en compromettre le
fonctionnement.
Conformité à la législation japonaise sur les ondes radio et sur les
télécommunications. Cet appareil est garanti conforme à la législation
japonaise sur les ondes radio (電波法) et à la législation japonaise sur les
télécommunications (電気通信事業法). Cet appareil ne doit pas être modifié
(cela annulerait la garantie sur le numéro d’identification accordé).
Conforme aux exigences de sécurité électrique basées sur CEI 60065.
Ce produit est conforme aux exigences essentielles de toutes les directives
européennes applicables et est autorisé à porter la marque CE.
La déclaration de conformité CE peut être obtenue auprès de Shure
Incorporated ou de ses représentants européens. Pour les coordonnées,
visiter www.shure.com
La déclaration de conformité CE peut être obtenue auprès de : www.shure.
com/europe/compliance
Représentant agréé européen :
Shure Europe GmbH
Siège Europe, Moyen-Orient et Afrique
Service : Homologation EMA
Jakob-Dieffenbacher-Str. 12
75031 Eppingen, Allemagne
Téléphone : 49-7262-92 49 0
Télécopie : 49-7262-92 49 11 4
Courriel : [email protected]
MXWNCS4, MXWNCS8
Autorisé selon la disposition de vérification de la partie 15b des
réglementations FCC.
Étiquette de conformité à la norme ICES-003 d’Industrie Canada :
CAN ICES-3 (B) / NMB-3 (B)
Remarque : Voir l'étiquette située sur le côté inférieur du boîtier du
chargeur pour trouver les marquages FCC, CE, C-Tick ainsi que les
caractéristiques électriques.
MXW1, MXW2, MXW6, MXW8, MXWAPT4, MXWAPT8
Homologué selon la partie 15 des réglementations FCC.
FCC : DD4MXW1, DD4MXW2, DD4MXW6, DD4MXW8,
DD4MXWAPT4, DD4MXWAPT8.
Conforme aux exigences applicables de RSS-213.
IC : 616A-MXW1, 616A-MXW2, 616A-MXW6, 616A-MXW8,
616A-MXWAPT4, 616A-MXWAPT8.
Marques commerciales
Audinate®, le logo Audinate et Dante sont des marques commerciales
de la société Audinate Pty Ltd.
Page 25
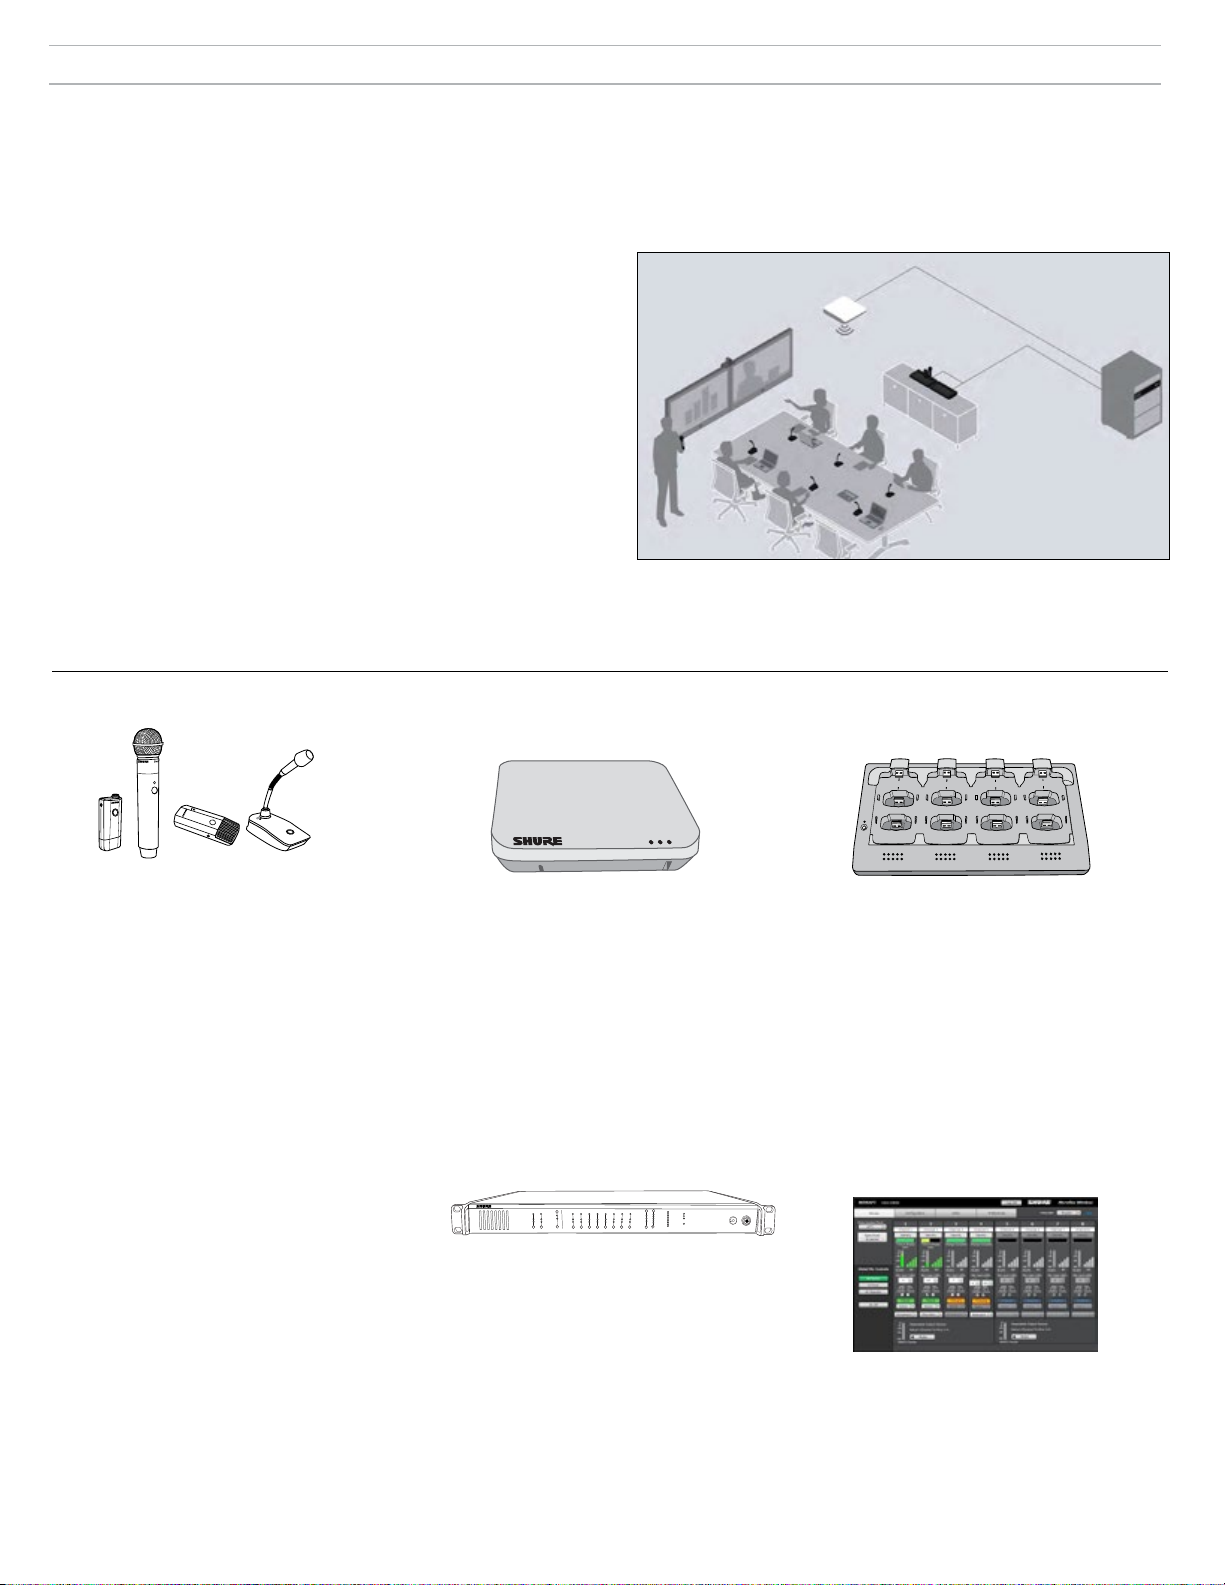
Allgemeine Beschreibung
Die Shure Microflextm Wireless-Serie (MXW) ist eine komplette Mikrofonlösung für flexible Versammlungs- und Konferenzräume. Sie verfügt über
automatische HF-Kanalverwaltung, wiederaufladbare verschlüsselte (AES256) drahtlose Mikrofone und Digital-Audio-Vernetzung (Dante
tm
). Die vernetzte
Ladestation lädt Grenzflächen- und Schwanenhalsmikrofone für Tischanwendungen sowie Hand- und Taschensenderlösungen für betriebliche Schulungen
und Präsentationen auf. Der MXW-Access Point wird zur diskreten Kommunikation zwischen den drahtlosen Mikrofonen und dem Digital-Audio-Netzwerk
an einer Decke oder Wand montiert Bei Installationen, die den simultanen Betrieb von bis zu 40* Mikrofonen im gleichen Bereich erfordern, können mehrere
Access Points verwendet werden (*von Region abhängig). Webbrowser-basierte Steuersoftware wird zum Fernmonitoring und zur Fernsteuerung von einem
beliebigen mit dem Netzwerk verbundenen Computer verwendet.
Weitere Ressourcen
Diese Kurzanleitung enthält wichtige Informationen zur Einrichtung eines
MXW-Systems mit acht Kanälen in Grundausführung. Die folgende Liste
enthält weitere Ressourcen für die MXW-Baureihe:
Komplette MXW-Bedienungsanleitung: Die komplette
Bedienungsanleitung enthält umfassende Informationen zum MXWSystem, z. B. detallierte Beschreibungen der Komponenten, NetzwerkTopologien, optimale Verfahren zum HF-Management und Navigation der
Steuersoftware. Sie ist unter www.shure.com sowie auf dem USB-Stick,
der im Lieferumfang des Access Point Transceiver enthalten ist, zu finden.
Shure-Kundendienst: Für Unterstützung bei der Störungssuche sowie
Beratung bei komplizierten Installationen Kontakt mit Shure aufnehmen,
um mit einem Kundendienstberater zu sprechen. In Nord- und Südamerika
die Abteilung Systems Support unter der Rufnummer +1 847 6008541
kontaktieren. Benutzer in anderen Regionen können unter www. shure.
com die jeweiligen Kontaktinformationen abrufen.
Audinate: Unterstützung bei digitaler Audio-Vernetzung, Richtlinien
bei erweiterten Netzwerkfunktionen und Störungssuche in der Dante
Software sind auf der Audinate-Website www.audinate.com zu finden.
tm
Komponentenübersicht
MXW6MXW1 MXW8
MXW2
Mikrofonsender
MXW-Mikrofone senden ein verschlüsseltes
Audio-Funksignal zum Access Point. Vier
Formfaktoren sind erhältlich:
Hybrid-Taschensender (MXW1)
Der Taschensender wird an einem
Gürtel oder Gurt befestigt und ermöglicht
freihändige, mobile Kommunikation. Er
verfügt über einen TQG-Eingang für den
Anschluss eines Lavaliermikrofons und ein
integriertes Kugelmikrofon.
Handsender (MXW2)
Der Handsender ermöglicht dem
Vortragenden die Kommunikation mit den
legendären Shure Mikrofonkapseln SM58,
SM86, BETA58 und VP68.
Grenzflächensender (MXW6/C, MXW6/O)
Der Grenzflächensender sitzt zur
Übertragung von Sprache auf einem
Tisch und lässt sich diskret in die
Konferenzumgebung integrieren.
Schwanenhals-Tischfußsender (MXW8)
Der Schwanenhals-Tischfußsender
ist mit 5-, 10- und 15”-MicroflexSchwanenhalsmikrofonen kompatibel.
Die Mikrofone MXW1, MXW6 und MXW8
umfassen einen Kopfhörerausgang für
Audiomonitoring, z. B. als Dolmetscherkanal.
Access Point Transceiver (APT)
(MXWAPT4, MXWAPT8)
Der Access Point Transceiver (Einheiten mit
4 und 8 Kanälen) wird an einer Wand oder
Decke montiert, um die verschlüsselten,
drahtlose Audioverbindung zu den Mikrofonen
zu verwalten. Als System-Hub überträgt er
das Digital-Audio zwischen den drahtlosen
Mikrofonen und anderen Dante-Geräten im
gleichen Netzwerk. Der APT umfasst einen
Webserver, der die Steuersoftware des
MXW-Systems bereitstellt, die für Monitoring,
Konfiguration und Fernsteuerung des Systems
verwendet wird.
MICROFLEX WIRELESS
B
OUTPUT
INPUT
line
aux
sig/clip
sig/clip
mute
mute
push to solo | hold to mute
-9
0
line
-18
-9
-12
aux
-24
-18
-36
mic
-24
-48
-60
adjust
0
8
7
6
5
4
3
2
1
A
Audio Network Interface
power
ethernet
network audio
HEADPHONE
lockout
Audio-Netzwerk-Schnittstelle
(MXWANI4, MXWANI8)
Bei der Audio-Netzwerk-Schnittstelle (4 und
8 Kanäle) handelt es sich um ein DanteNetzwerkgerät, das einen analogen AudioEingang und analoge Audio-Ausgänge für das
MXW-System bereitstellt. Sie verfügt über einen
Gigabit-Ethernet-Switch mit vier Anschlüssen,
um einen MXW-Access Point, einen Computer
und bis zu zwei vernetzte MXW-Ladestationen
anzuschließen.
2
1
5
6
4
3
7
8
Vernetzte Ladestation
(MXWNCS4, MXWNCS8)
Die vernetzte Ladestation (Ausführungen mit
4 und 8 Steckplätzen) kann bis zu 4 (oder 8)
MXW-Mikrofone gleichzeitig aufladen. Sie
verbindet die Mikrofone außerdem mit den
Kanälen des Access Point und überträgt die
Akkudaten zur Steuersoftware.
Wichtig: Die TischfußSchwanenhalsmikrofone (MXW8) belegen
zwei Ladestation-Steckplätze. Beispielsweise
erfordern acht MXW8 Mikrofone zwei
MXWNCS8 Ladestationen (insgesamt 16
Steckplätze).
MXW-Steuersoftware
Die MXW-Steuersoftware ermöglicht
umfassende Fernsteuerung wichtiger
Einrichtungs-, Monitoring- und
Verwaltungsfunktionen. Die Software kann
über einen mit dem Netzwerk verbundenen PC
oder Mac aufgerufen werden und wird in einem
Webbrowser mit Adobe® Flash®geöffnet.
25
Page 26
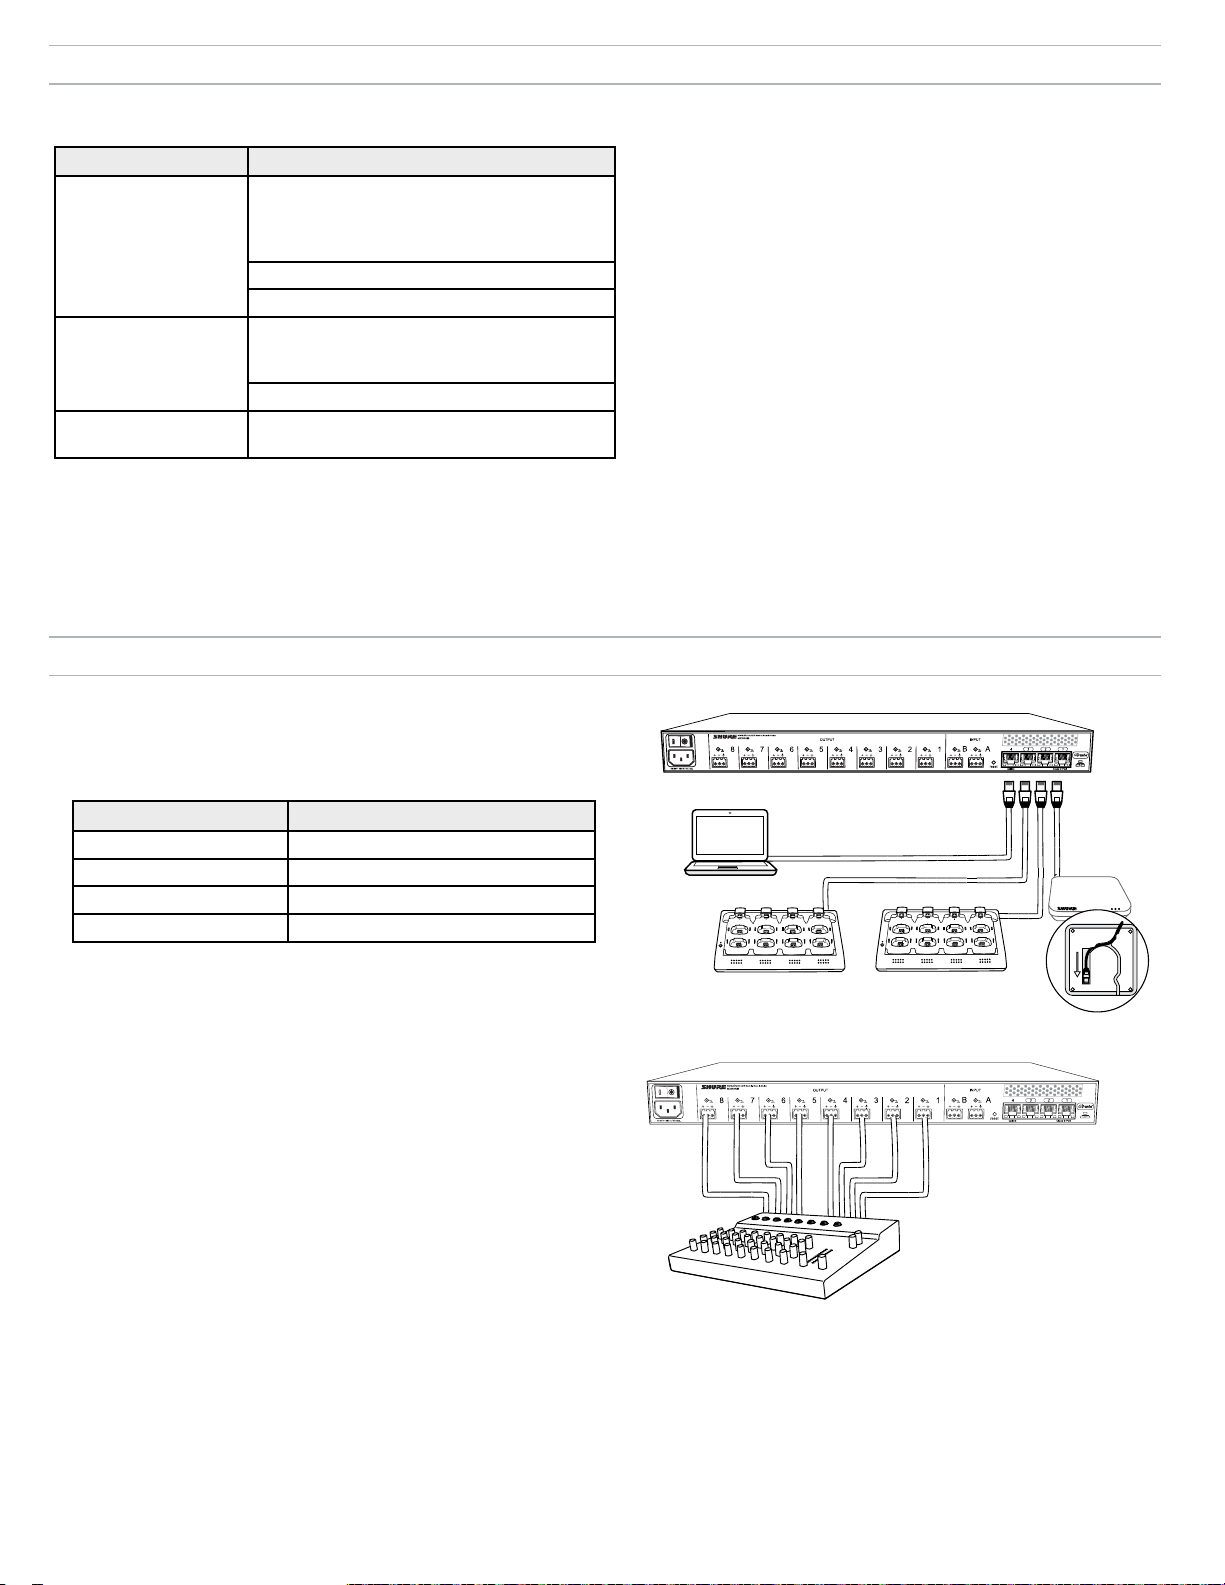
Geräteinventar
Im Lieferumfang enthaltenes Zubehör
Komponente Zubehör
Shure USB-Stick (enthält die Anwendung
Shure Web Device Discovery, die Anwendung
Access Point
Transceiver (APT)
Shure Firmware Update Manager und
Bedienungsanleitungen)
Befestigungsplatte
Lackierbare Abdeckung
Befestigungsteilesatz (Rack-
Audio-NetzwerkSchnittstelle (ANI)
Befestigungsschrauben,
Kabelanschluss-Baugruppen)
IEC-Netzkabel
Vernetzte Ladestation
(NCS)
Gleichstromadapter
Anschließen der Komponenten
1. Anschließen der MXW-Komponenten
Abgeschirmte Ethernet-Kabel verwenden, um die MXW-Komponenten
miteinander zu verbinden. Den 4-Port-Switch an der Audio-NetzwerkSchnittstelle (ANI) verwenden oder alle Komponenten an einen
separaten Gigabit-Switch anschließen.
Zusätzliche Geräte
Audiokabel
Abgeschirmte Audiokabel zum Anschließen der ANI an einen Mischer,
einen digitalen Signalprozessor oder ein Telekonferenzgerät verwenden.
Ethernet-Kabel
Abgeschirmte Cat5e (oder höhere) Kabel zur Vernetzung der MXWKomponenten verwenden.
Computer
Einen PC oder Mac verwenden, um die Benutzeroberfläche des MXWSystems über einen Webbrowser aufzurufen.
ANI-Netzwerkanschluss Zu Komponente
① Anschluss 1 (PoE) Access Point Transceiver (APT)
② Anschluss 2 Vernetzte Ladestation (NCS)
③ Anschluss 3 (Optional) Zusätzliche NCS
④ Anschluss 4 Computer
Hinweis:
eingestellt, um die kompatiblen IP-Einstellungen automatisch zu konfigurieren.
Wenn kein DHCP-Server vorhanden ist, verwenden die Geräte ein Link Local
(169.254.x.x) Adressenformat.
Die MXW-Geräte sind standardmäßig auf automatischen (DHCP) Modus
2. Anschließen der ANI-Analogausgänge
Abgeschirmte Audiokabel verwenden, um die Ausgänge der ANI mit
einem Mischer, digitalen Signalprozessor oder Telekonferenzgerät
zu verbinden. (Den im Lieferumfang der ANI enthaltenen
Befestigungsteilesatz verwenden, um die Kabel vorschriftsmäßig an die
Blockstecker anzuschließen.)
④
①
③
1
4
2
1
3
5
7
6
8
2
5
6
②
4
3
7
8
26
Page 27
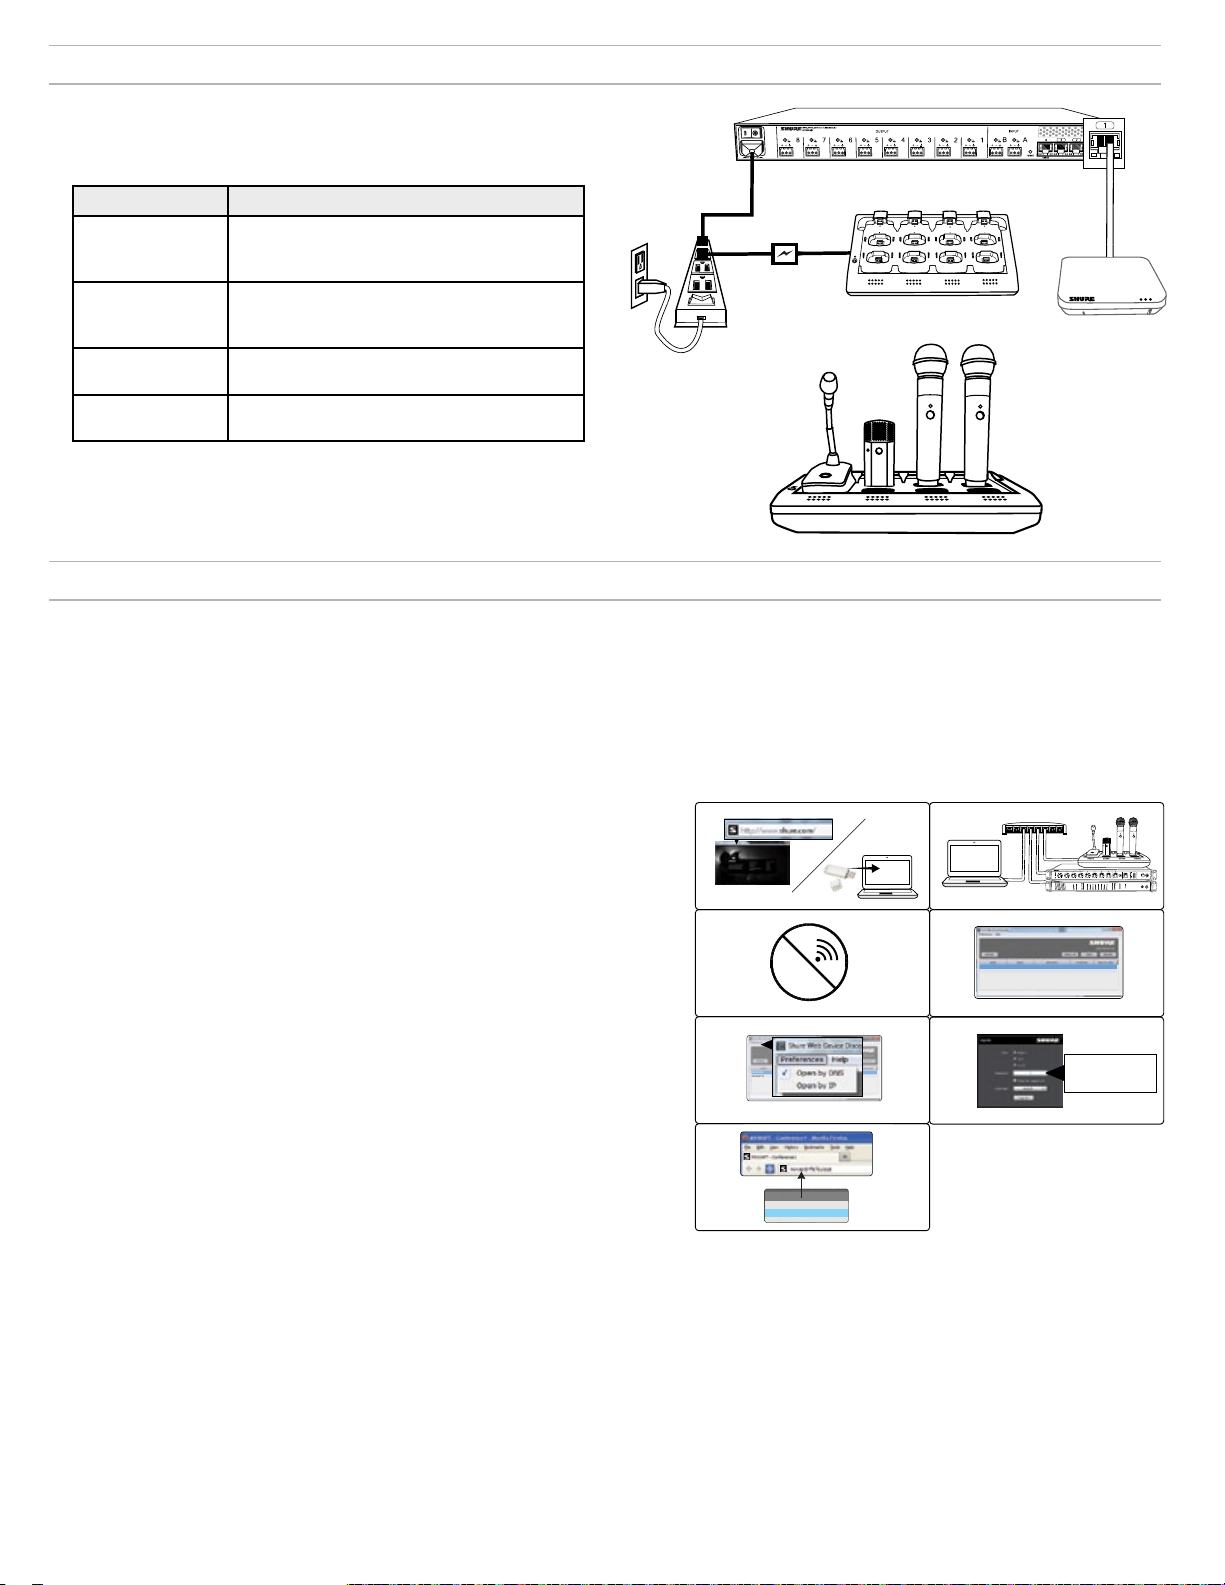
Spannungsversorgung
②
④
①
7
8
6
5
1
2
3
4
7
8
6
5
1
2
3
4
③
MXWANI8 mxwani8-ffeee5.local
192.168.200.22
Dante
Dante
ROOM 5
MXWAPT8
mxwapt8-ffaaa2.local
192.168.200.23
CONFERENCE
mxwani-aa1.local
192-168-200-22
mxwapt8-ffe761.local
192-168-200-23
Versorgt die Komponenten mit Strom und schaltet sie ein.
Bei eingeschalteter Stromversorgung leuchten die LEDs an jeder
Komponente auf
①
Class 0 PoE
Komponente Stromquelle
4
3
7
8
②
① ANI
Das IEC-Kabel an eine Netzsteckdose
anschließen und den AN/AUS-Schalter
einschalten.
③
1
2
5
6
Für Power over Ethernet (PoE) an Anschluss
② APT
1 der ANI anschließen. Es ist kein An/AusSchalter vorhanden.
③ NCS
④ Sender
Das PS45 an eine Netzsteckdose anschließen
und den AN/AUS-Schalter einschalten.
Die Sender vor dem Gebrauch vollständig
aufladen.
④
Aufrufen der MXW-Steuersoftware
Das MXW-System verwendet gerätebasierte Steuersoftware, die umfassende Fernsteuerung wichtiger Einrichtungs-, Monitoring- und Verwaltungsfunktionen
ermöglicht. Die Software kann über einen mit dem Netzwerk verbundenen PC oder Mac aufgerufen werden und wird in einem Webbrowser mit Adobe®
Flash®geöffnet.
Es gibt zwei verschiedene Benutzeroberflächen für das MXW-System:
• Steuersoftware des MXW-Systems: Wird über den Access Point Transceiver aufgerufen und zur Verwaltung des MXW-Systems verwendet.
• Steuersoftware der Audio-Netzwerk-Schnittstelle: Wird über die Audio-Netzwerk-Schnittstelle aufgerufen und nur zur Verwaltung dieses Geräts verwendet.
Die folgenden Schritte durchführen, um die MXW-Steuersoftware aufzurufen:
1. Die Anwendung Shure Web Discovery installieren.
Die Anwendung Shure Web Device Discovery von www.shure.com oder vom
im Lieferumfang des MXW-Access Point Transceiver enthaltenen USB-Stick
herunterladen. (Das erforderliche Device Discovery-Programm Bonjour ist mit der
Anwendung gebündelt und wird automatisch installiert.)
2. Sicherstellen, dass sich der Computer im MXW-Netzwerk befindet.
Der Computer ruft die Steuersoftware von einem in das Gerät integrierten
Webserver auf. Alle vernetzten Geräte müssen mit dem gleichen Netzwerk
verbunden sein (auf das gleiche Subnetz eingestellt sein).
3. WiFi ausschalten.
Das WiFi des PC ausschalten, um die verkabelte Netzwerkverbindung zu
erzwingen.
4. Die Anwendung Shure Web Device Discovery ausführen.
Die Anwendung öffnen, um alle Shure-Geräte im Netzwerk, die über einen
integrierten Server für Steuersoftware verfügen (MXWAPT, MXWANI und
SCM820), anzuzeigen. Die Identifizieren-Schaltfläche verwenden, damit die LEDs
eines Geräts zur mühelosen Identifizierung blinken.
5. Die MXW-Steuersoftware öffnen.
Auf einen beliebigen Access Point Transceiver doppelklicken, um die
Steuersoftware des MXW-Systems zu öffnen. Auf eine Audio-NetzwerkSchnittstelle doppelklicken, um die Software-Oberfläche dieses Geräts zu öffnen.
Die Anwendung kann die Steuersoftware nach IP-Adresse oder DNS-Name öffnen
(im Dropdown-Menü „Voreinstellungen“ auswählbar).
①
③
⑤
⑦
Wi-Fi
②
④
⑥
MXWANI8 mxwani8-ffeee5.local
ROOM 5
CONFERENCE
MXWAPT8
mxwapt8-ffaaa2.local
SCM820
1 2 3 4 5 6 7 8
gain
low cut
hi shelf
meter
push to solo | hold to mute
8
7
5
4
6
2
1
3
A
B
OUTPUT
INPUT
line
aux
sig/clip
sig/clip
mute
mute
push to solo | hold to mute
192.168.200.22
Dante
Dante
192.168.200.23
admin
®
IntelliMix
LIM
MASTER
AB
power
B
A
AUX IN
HEADPHONE
0
ethernet
-9
network audio
-18
automix link
-24
gain
dual mixer
-36
limiter
-48
L+R SUM
-60
lockout
MICROFLEX WIRELESS
Audio Network Interface
0
power
-9
0
line
ethernet
-18
-9
network audio
aux
-12
-24
HEADPHONE
-18
mic
-36
-24
-48
lockout
-60
adjust
6. Das Standard-Kennwort eingeben.
Das Standard-Kennwort „admin“ eingeben, um die Steuersoftware aufzurufen.
7. Ein Lesezeichen für die Webseite anlegen (empfohlen).
Ein Lesezeichen für die IP-Adresse des Geräts anlegen, wenn es auf eine statische
IP-Adresse eingestellt ist. Ein Lesezeichen für den DNS-Namen des Geräts
anlegen, wenn der IP-Modus auf Automatisch (DHCP) eingestellt ist.
27
Page 28
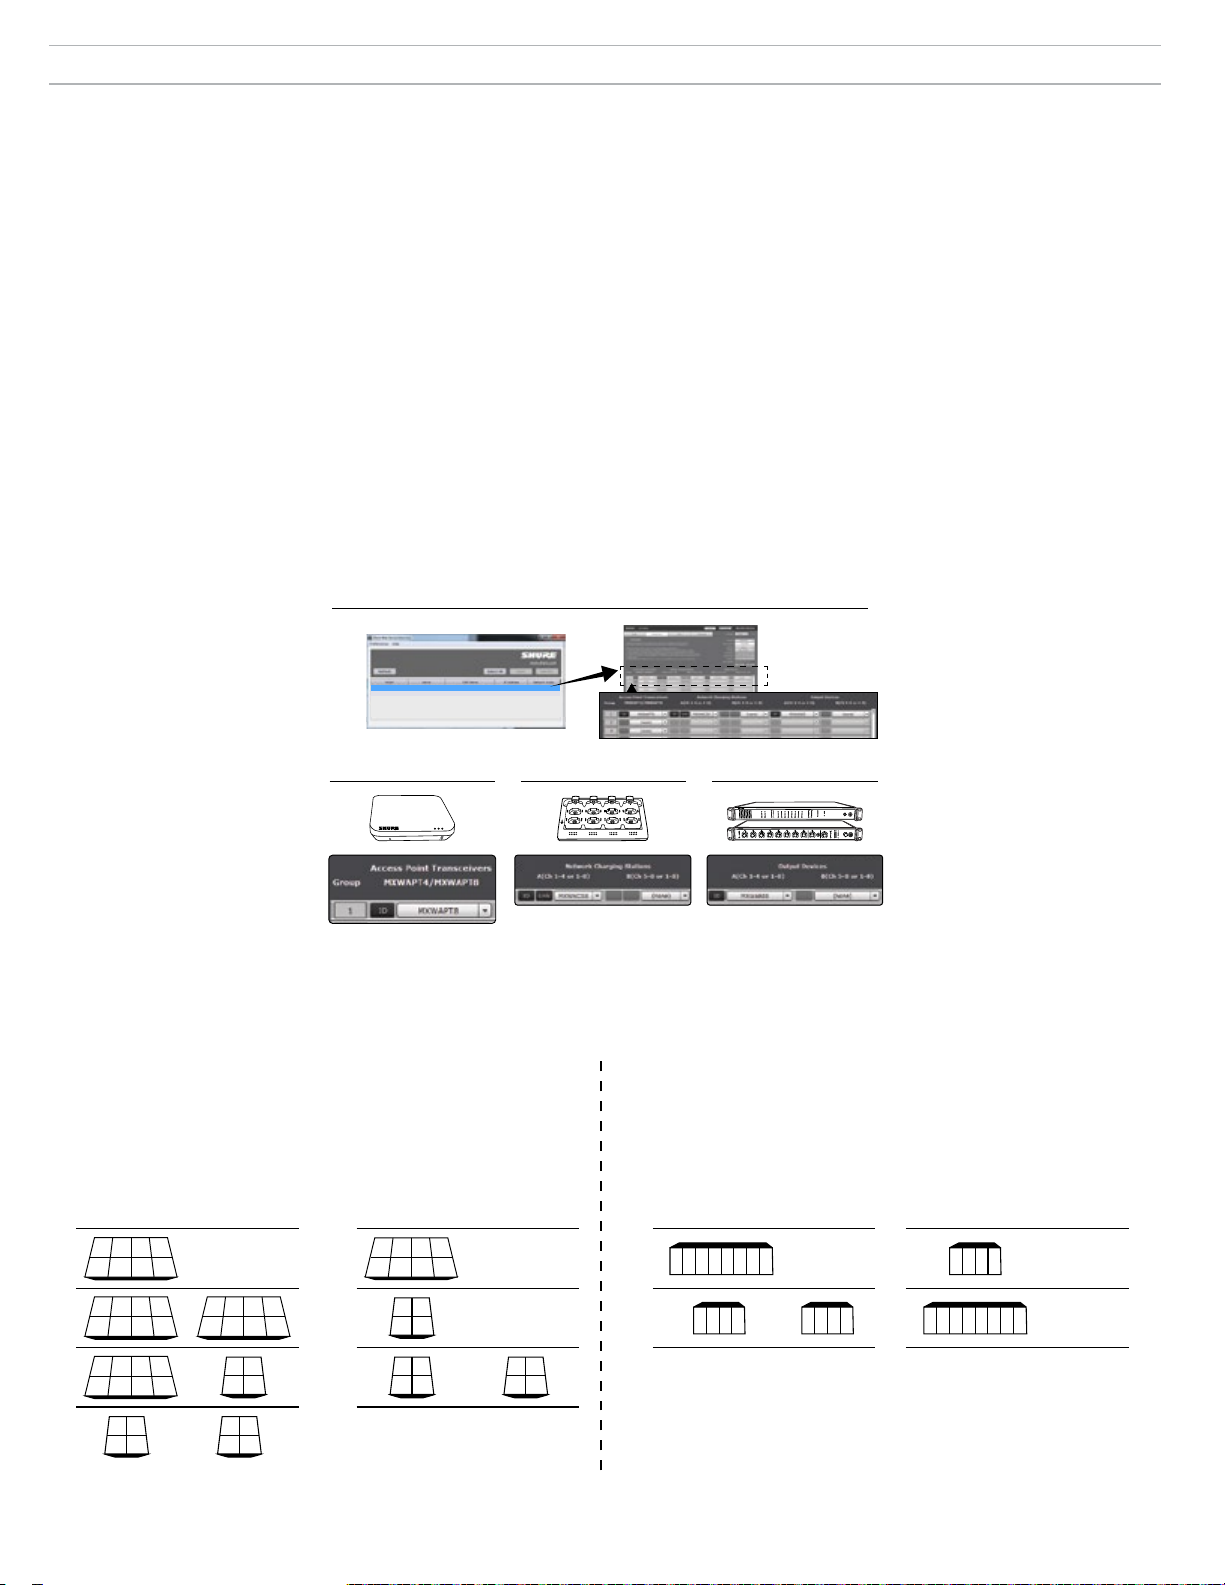
Zuordnen von Komponenten zu einer Gruppe
Die folgenden Anweisungen dienen zur Bildung einer MXW-Gruppe. Wenn ein Gerät nicht im Dropdown-Fenster verfügbar ist, sicherstellen, dass es „frei“ ist
und sich im Netzwerk befindet.
Tipp: Die Schaltfläche ID verwenden, um ein Gerät zu identifizieren.
Dadurch wird ein Signal zum Gerät gesendet, damit die LEDs dieses Geräts
zur leichten Identifizierung blinken.
1. Eine Konfiguration öffnen.
Die Anwendung Shure Web Discovery verwenden, um alle MXWAccess Point-Transceivers (APTs) im Netzwerk anzuzeigen. Auf einen
APT doppelklicken, um die Software zu öffnen, und zur Registerkarte
Konfiguration navigieren.
2. Einen Access Point-Transceiver (APT) für Gruppe 1 auswählen.
Einen freien APT aus dem Dropdown-Fenster auswählen. Diese Auswahl
bestimmt, ob ein Gruppe vier bzw. acht Kanäle aufweist (APT4 oder
APT8).
Hinweis: Gruppe 1 muss den APT enthalten, der zum Öffnen der Steuersoftware
verwendet wurde. Weitere vernetzte (und freie) APTs sind dann für zusätzliche
Gruppen verfügbar.
3. Die Netzwerk-Ladestation(en) auswählen.
Dem Access Point eine bzw. zwei Netzwerk-Ladestation(en) (NCS)
zuordnen. Es gibt zwei Gründe für die Zuordnung von mehr als einer
Ladestation:
①
- Bei Verwendung von zwei Ladestationen mit vier Kanälen für einen Access Point
mit acht Kanälen.
- Bei Verwendung von Schwanenhalsmikrofonen. Schwanenhalsmikrofone
bedecken die vorderen und hinteren Steckplätze der Ladestation, wodurch sich
die Anzahl der verfügbaren Steckplätze halbiert. Zwei Ladestationen mit acht
Kanälen sind bspw. erforderlich, um einen Access Point mit acht Kanälen mit
Schwanenhalsmikrofonen zu füllen.
4. Das/die Audio-Ausgabegerät(e) auswählen.
Ein bzw. zwei Audio-Ausgabegerät(e) (MXWANI oder SCM820)
auswählen, um die Digital-Audio-Kanäle automatisch vom Access Point
zu übertragen. Folgende Geräte können ausgewählt werden:
- Audio-Netzwerkschnittstelle (MXWANI) mit vier oder acht Kanälen. Einem APT
mit acht Kanälen können zwei Geräte mit vier Kanälen bzw. ein Gerät mit acht
Kanälen zugewiesen werden.
- Shure SCM820 IntelliMix®-Mischpult. Dante-fähige SCM820 können als
Audioausgang für die Gruppe ausgewählt werden. Dadurch wird der Aux-Eingang
des SCM820 zum In-Ear-Monitoring automatisch zu den Mikrofonen übertragen
(linker Aux-Kanal des SCM820 zu den MXW-Kanälen 1-4; rechter Aux-Kanal zu
den MXW-Kanälen 5-8).
Hinweis: Gerätezuordnungen und Mikrofonverbindungsdaten werden
ständig im Gerät gespeichert. Wenn das MXW-System ausgeschaltet und
dann ohne einen Computer wieder eingeschaltet wird, sind die Geräte
weiterhin dem Access Point zugeordnet.
MXWANI8 mxwani8-ffeee5.local 192.168.200.22
②
MXWAPT8
ROOM 5
CONFERENCE
mxwapt8-ffaaa2.local
192.168.200.23
③
Dante
Dante
4
2
1
3
7
5
6
8
④
A
B
INPUT
OUTPUT
line
aux
sig/clip
mute
SCM820
gain
1 2 3 4 5 6 7 8
low cut
hi shelf
meter
push to solo | hold to mute
sig/clip
mute
HEADPHONE
-18
mic
-36
-24
-48
lockout
-60
adjust
push to solo | hold to mute
®
IntelliMix
LIM
MASTER
AB
power
B
A
HEADPHONE
AUX IN
0
ethernet
-9
network audio
-18
automix link
-24
gain
-36
dual mixer
limiter
-48
-60
L+R SUM
lockout
MICROFLEX WIRELESS
Audio Network Interface
0
5
8
4
7
2
3
6
1
power
-9
0
line
ethernet
-18
-9
aux
network audio
-12
-24
Kanalzuordnung für Geräte in einer Gruppe
Das Audiosignal wird gemäß der Gruppeneinrichtung auf der Registerkarte Konfiguration von den Mikrofonen zu den Analogausgängen geführt. Das
folgende Diagramm stellt die Kanalzuordnung für Geräte in Acht- bzw. Vier-Kanalgruppen dar.
Vernetzte Ladestation
Eine zusätzliche Ladestation ist erforderlich, wenn eine Gruppe mit
Schwanenhalsmikrofonen belegt wird.
8-Kanalgruppe
4-Kanalgruppe
Ausgänge werden einer MXW-Audio-Netzwerkschnittstelle
oder der automatischen Mischstufe SCM820 zugewiesen
8-Kanalgruppe 4-Kanalgruppe
A B A B A B A B
2 3 4
1
1) 1) 1) 1)
5 6 7 8
(none) (none) (none)(none)
2 3 41
x x x x
Audio-Ausgangsgerät
81 2 3 4 5 6 7
1 2 3 4
2 3 41
2) 2) 2) 2)
x x x x
2 3 41
3) 3)
x x x x
2
1
4)
3 4
5 6 7 8
x x x
x
5 6
7 8
5 6
7 8
1
3
x x
2
4
21
3 4
1 2 3 4
85 6 7
x x
28
1 2 3 4 x x x x
(none)(none)
Page 29
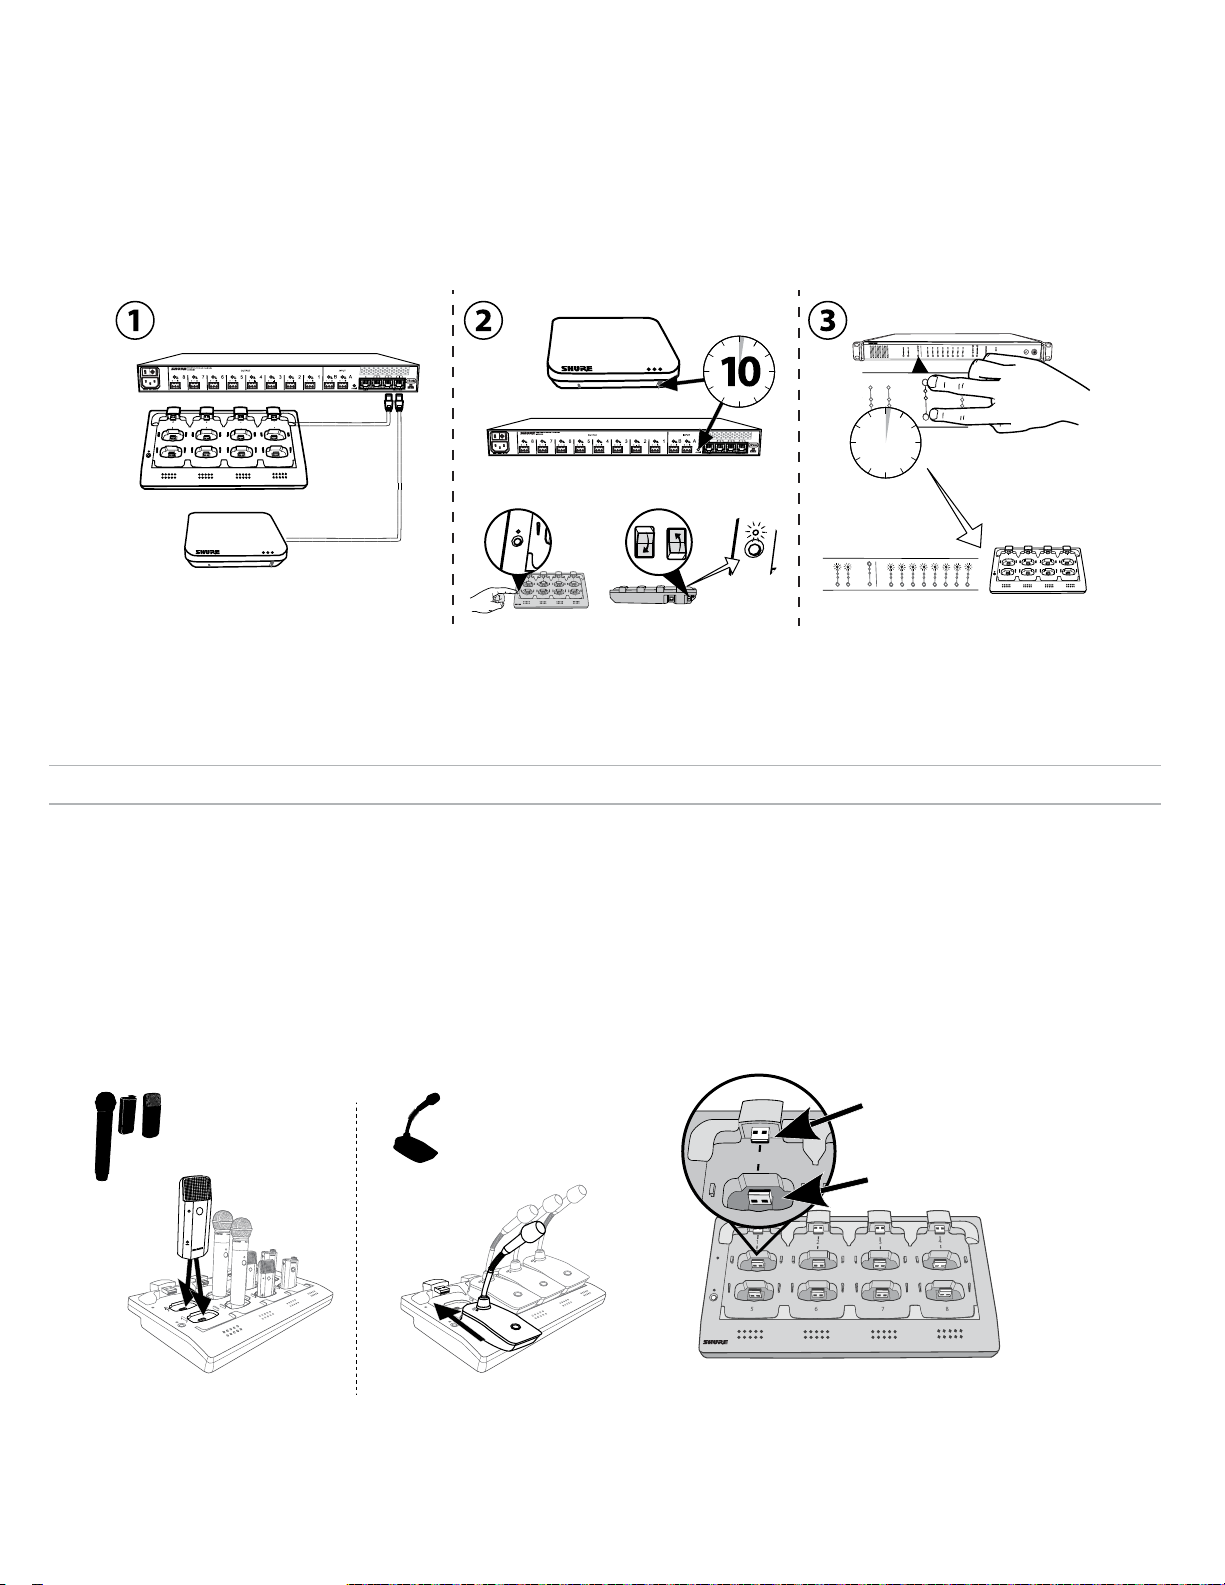
7
8
6
5
1
2
3
4
1
2
3
7
8
6
5
1
2
3
4
7
8
6
5
1
2
3
4
link
6
5
1
2
link
push to solo | hold to mute
2
3
4
5
6
7
8
lockout
power
ethernet
network audio
-9
-18
-24
-36
-48
-60
0
-9
-12
-18
-24
0
aux
mic
adjust
line
HEADPHONE
MICROFLEX WIRELESS
Automatische Gruppeneinrichtung
Eine MXW-Gruppe kann ohne Verwendung der Steuersoftware zugeordnet werden, wenn ein Netzwerk nur aus einem Access Point Transceiver
(APT), einer vernetzten Ladestation (NCS) und einer Audio-Netzwerkschnittstelle (ANI) besteht. Zur Erzielung optimaler Ergebnisse die Geräte auf die
Werksvoreinstellungen zurücksetzen, um etwaige vorherige Gruppenzuordnungen zu löschen.
1. Einen APT, eine NCS und eine ANI mit dem Netzwerk verbinden. Das Netzwerk darf nur jeweils eines dieser Geräte enthalten.
2. Die Geräte auf die Werksvoreinstellungen zurücksetzen (siehe den Abschnitt Werksvoreinstellung).
3. An der Vorderseite der ANI beide Eingangspegel-Auswahltasten gleichzeitig und fünf Sekunden lang gedrückt halten. Die Kanalauswahl-LEDs leuchten
grün auf und die Audio-Pegelanzeige blinkt, um anzuzeigen, dass die Zuordnung erfolgreich war.
MICROFLEX WIRELESS
Audio Network Interface
0
2
1
5
3
7
6
4
A
8
12
11
1
10
2
9
3
8
4
5
7
6
2
1
5
6
4
3
7
8
+
Power
Link
A
B
INPUT
sig/clip
mute
B
OUTPUT
INPUT
line
aux
sig/clip
sig/clip
mute
mute
A
B
line
aux
12
11
1
10
2
9
3
5
8
4
5
7
6
3
2
5
4
1
OUTPUT
line
aux
sig/clip
mute
push to solo | hold to mute
push to solo | hold to mute
OUTPUT
power
-9
0
line
ethernet
-18
-9
network audio
aux
-12
-24
HEADPHONE
-18
mic
-36
-24
-48
lockout
-60
adjust
1
sig/clip
mute
4
2
1
8
7
6
3
7
6
5
i i
i
i
i
i
i
i
i i
8
i i
i i
i i
i
i
i
i
i
i
i
i
i
i
i
i
i
i
i
i
i
i
i
i
i
i
i
i
i
i
i
i
i
i
i
i
i
i
i
i
i
i
i i
i i
i i
Verbinden der Mikrofone
Mikrofone mittels der vernetzten Ladestation (NCS) mit Access Point-Kanälen verbinden. Steckplätze im Ladegerät sind dem APT gemäß der
Gruppeneinrichtung auf der Registerkarte Konfiguration zugeordnet. Nach Abschluss des Verbindungsverfahrens wird das Audiosignal zu dem
entsprechenden Kanal in der Gruppe geführt.
Durch die Verbindung wird jedes Mikrofon, das in der Ladestation platziert wird, den APT-Kanälen zugeordnet. Hierdurch wird jegliche vorherige
Mikrofonverbindung für diesen Kanal ersetzt. Wenn ein Steckplatz während des Verbindungsverfahrens leer ist, hat dies keine Auswirkungen auf den Kanal.
1. Die Mikrofone in der Ladestation anordnen.
Die Mikrofone werden gemäß ihrer Anordnung in der Ladestation mit
den Kanälen des Access Point verbunden.
Für Schwanenhalsmikrofone
Für Taschen-, Hand- und
Grenzflächenmikrofone.
Power
Link
Einsetzen des Mikrofons
in den Steckplatz der
Ladestation
29
Page 30
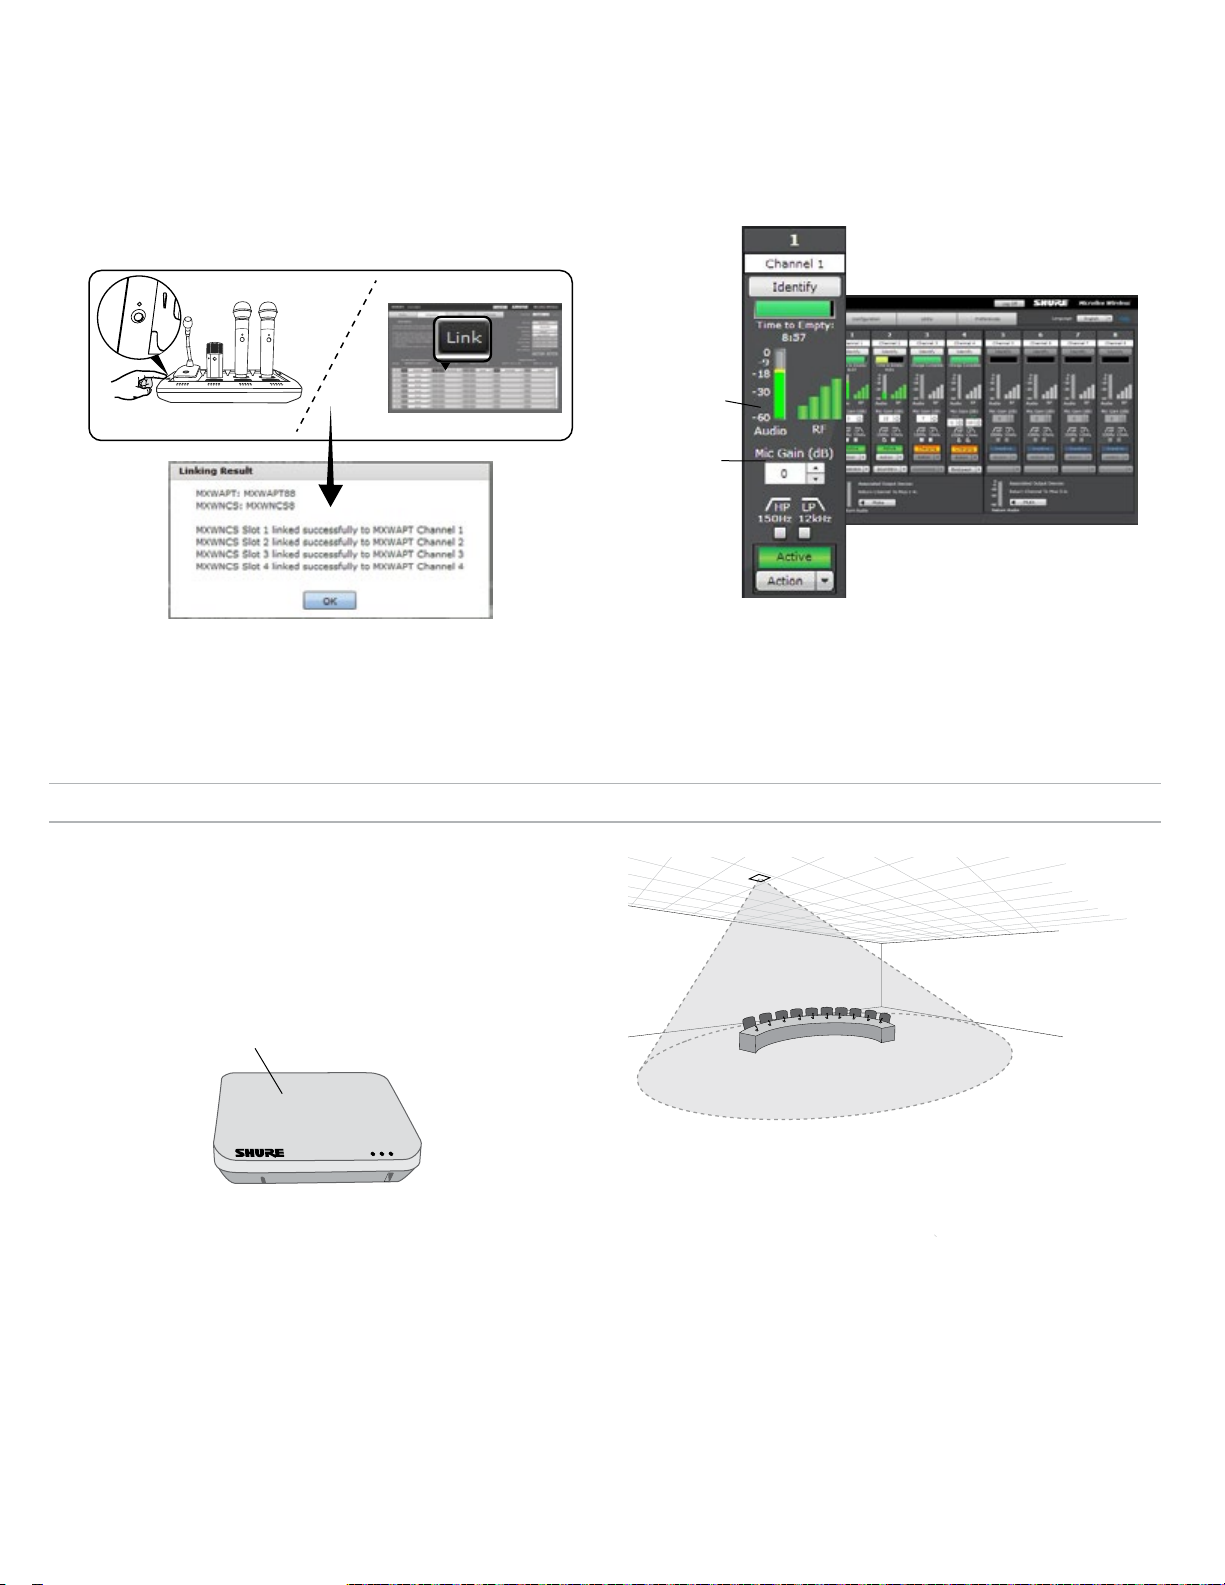
2. Die Mikrofone mit den Kanälen verbinden.
7
8
6
5
link
Die Mikrofone mittels der Steuersoftware oder der Ladestation mit
den APT-Kanälen verbinden. Auf Wunsch kann diese Funktion an der
Ladestation deaktiviert werden, damit die Verbindung nur über die
Steuersoftware erfolgen kann:
- Steuersoftware: Auf der Seite ‚Konfiguration‘ die Schaltfläche ‚Verbinden‘ für
jede Ladestation in der Gruppe drücken.
-
Ladestation: Die Link-Taste 6 Sekunden lang gedrückt halten. Die LEDs
blinken während des Vorgangs und leuchten ständig grün auf, wenn die
Verbindung erfolgreich ist.
3. Entfernen von Mikrofonen und Prüfen des Audios
Das Audio aller Mikrofone prüfen und bei Bedarf die
Mikrofonverstärkung auf der Registerkarte ‚Monitor‘ der Steuersoftware
einstellen. Die Verstärkung sollte auf einen Pegel eingestellt werden,
bei dem das Audio auf der Signalanzeige angezeigt (grün/gelb), jedoch
nicht übersteuert (rot) wird.
Signalanzeige
Verstärkungseinstellung
Registerkarte ‚Monitor‘
Montage des Access Point Transceiver (APT)
Der APT sendet Hochfrequenzsignale in nierenförmiger Richtcharakteristik,
die an der Vorderseite des Geräts am stärksten ist. Die Vorderseite des
APT auf die vorgesehenen Abdeckungsbereiche richten. Nicht die Sichtlinie
blockieren und von großen Metallgegenständen fernhalten.
Wichtig: Stets eine Prüfbegehung zum Prüfen der Abdeckung durchführen,
bevor ein drahtloses System bei einer Rede oder Vorstellung verwendet
wird. Mit der Antennenplatzierung experimentieren, um den optimalen
Aufstellungsort zu ermitteln. Gegebenenfalls „Problemstellen“ markieren und
die Vortragenden oder Sänger bitten, diese Bereiche zu meiden.
Vorderseite des APT
Auf Mikrofonbereich richten
30
Page 31
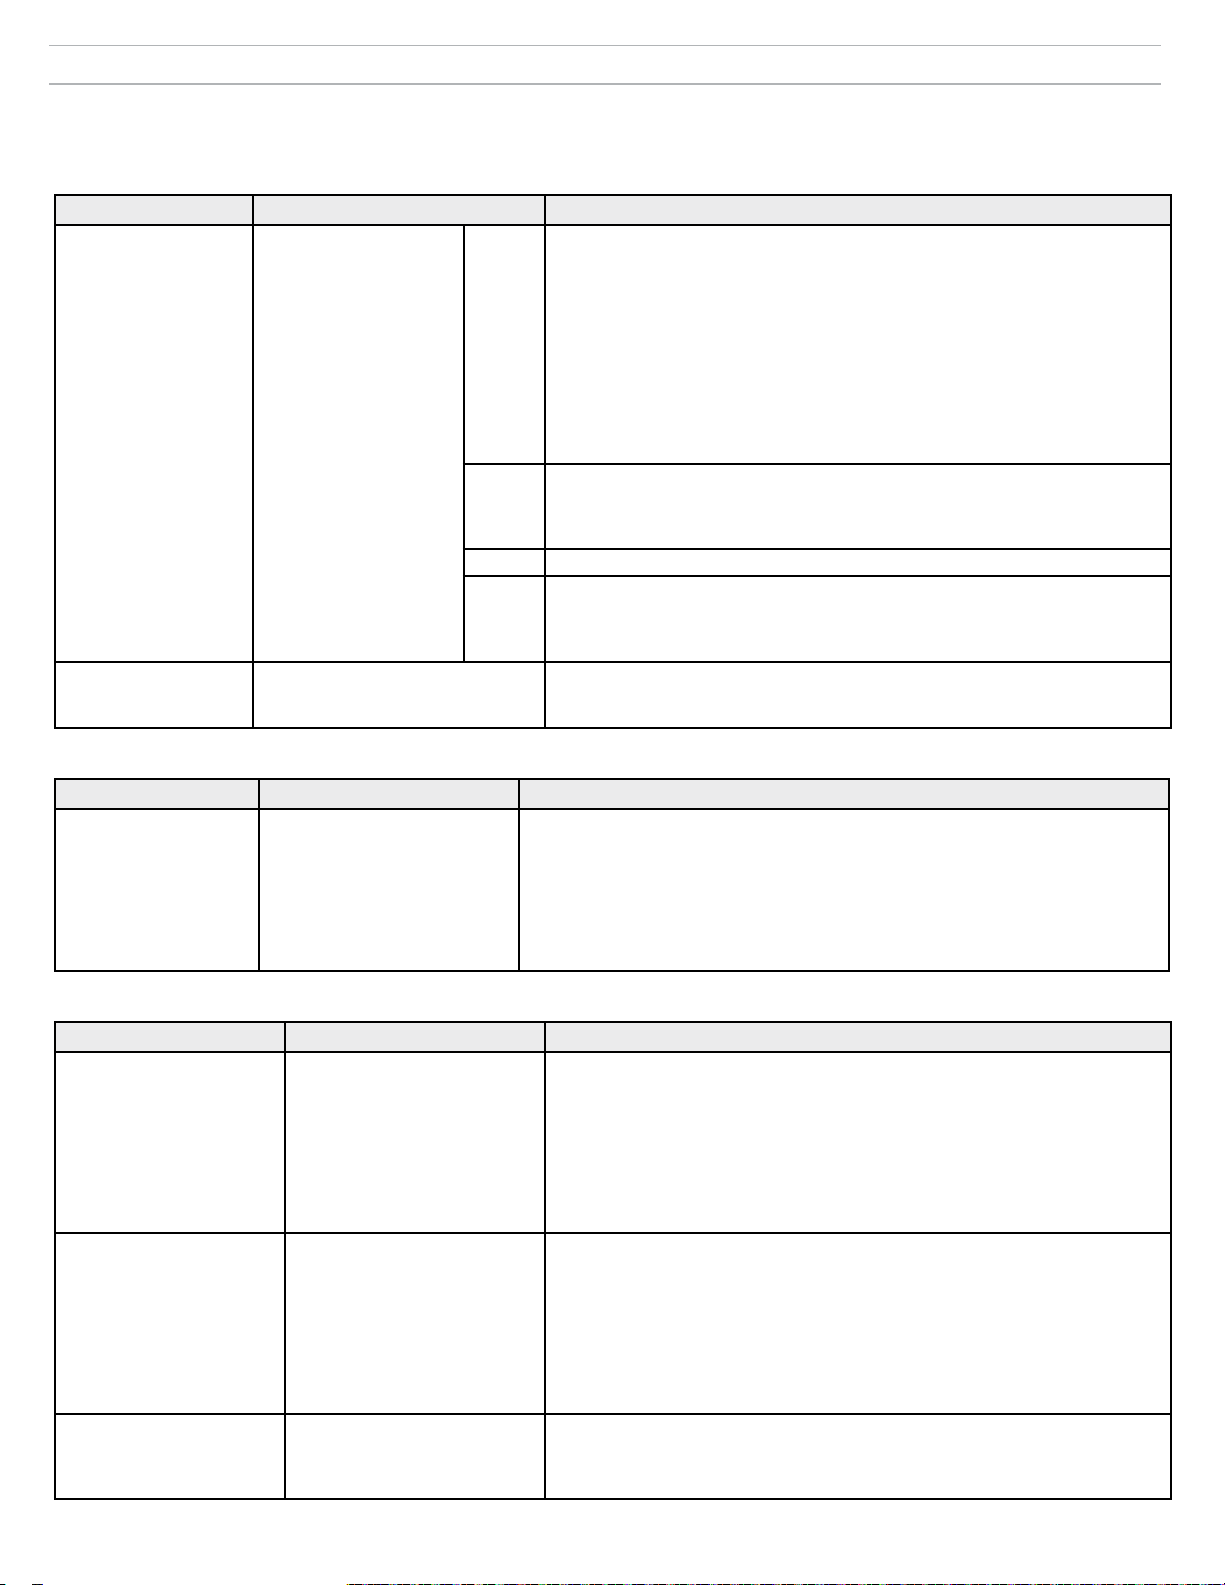
Störungssuche
Die folgende Tabelle bietet übliche Lösungen bei der Störungssuche des Microflex-Funksystems. Siehe die vollständige MXW-Bedienungsanleitung, die im
Internet unter www.shure.com zu finden ist und mit dem USB-Stick gebündelt ist, um weitere Infos über jedes Thema zu erhalten.
Audio
Problem Anzeige Abhilfe
• Kabel prüfen.
• Nachprüfen, ob die Sender eingeschaltet und die Kanäle nicht stummgeschaltet
sind.
• Nachprüfen, ob die Eingangspegelanzeigen auf der Registerkarte ‚Monitor‘ der
MXW-Steuersoftware in Ordnung sind. Bedämpfen, wenn der Kanal übersteuert
wird.
• Die Ausgangspegelanzeigen an der Vorderseite der Audio-Netzwerkschnittstelle
(ANI) und in der ANI-Steuersoftware prüfen. Das Audiosignal vom ANI mittels
Kopfhörern abhören. Bedämpfen, wenn der Kanal übersteuert wird.
• Nachprüfen, ob der Ausgangspegel der ANI mit dem Eingang der angeschlossenen
Geräte übereinstimmt.
• Nachprüfen, ob der APT nicht gerade einen Spektrum-Scan durchführt.
• Sicherstellen, dass alle Geräte eingeschaltet sind und über eine stabile
Netzwerkverbindung verfügen.
• Die Software Dante Controller (DC) verwenden, um die Kanal-Signalwege zu
überprüfen.
• Das Gerät einer Gruppe zuordnen, um automatische Audioführung zu ermöglichen.
• Sicherstellen, dass das Subnetz für die Netzwerk-Audio-Einstellungen des
Access Point-Transceivers mit dem Subnetz der Audio-Netzwerkschnittstelle
übereinstimmt.
• Einen Spektrum-Scan durchführen, um Funkstörungen zu überwachen.
• Die Kanalanzahl verringern, um nachzuprüfen, ob das System das HF-Spektrum
überlastet.
Kein/verzerrtes Audio
Funkstörungen
verursachen Aussetzer in
der Audio-Übertragung.
Grün
Netzwerk-AudioLED an AudioNetzwerkschnittstelle oder
SCM820
Grün
blinkend
Rot • Den Takt-Master in DC prüfen (ein MXWAPT muss Takt-Master sein).
Aus
Audio wird unterbrochen.
Systemeinrichtung und MXW-Gruppen
Problem Anzeige Abhilfe
• Nachprüfen, ob die Geräte eingeschaltet und mit dem gleichen Netzwerk und Subnetz
Komponente kann einer
Gruppe nicht zugeordnet
werden
Netzwerk
Problem Anzeige Abhilfe
Verbindung zur
Steuersoftware kann von
einem PC nicht hergestellt
werden
Laden der Steuersoftware
dauert sehr lange.
Steuersoftware funktioniert
mangelhaft
Geräte-Dropdownmenü zeigt
die gewünschte Komponente
nicht in der Gruppenreihe auf der
Registerkarte Konfiguration an.
Gerät wird nicht in der
Anwendung ‚Shure Web Device
Discovery‘ angezeigt
Webbrowser kann
keine Verbindung zur
Steuerelementoberfläche
herstellen.
Anzeigen bewegen sich langsam
oder werden nicht in Echtzeit
angezeigt.
verbunden sind.
• Die Registerkarte ‚Utility‘ der MXW-Steuersoftware öffnen und das Kontrollkästchen
‚Konfigurationsfilter‘ deaktivieren, um alle MXW-Geräte im Netzwerk anzuzeigen.
Wenn das Gerät als ‚ANDERE‘ angezeigt wird, ist es Teil einer anderen Konfiguration.
• Die Zuordnung der Komponente aufheben, indem ‚keine‘ aus der Gruppenreihe in der
anderen Konfiguration ausgewählt wird.
• Eine Werksrücksetzung am Gerät durchführen, um etwaige Zuordnungen zu löschen.
• Sicherstellen, dass die Geräte eingeschaltet sind.
• Sicherstellen, dass sich der PC und die Geräte im gleichen Netzwerk befinden und
• Andere Netzwerkschnittstellen deaktivieren, die nicht zum Anschließen an das
• Nachprüfen, ob der DHCP-Server funktioniert (falls vorhanden).
• Sicherstellen, dass Bonjour auf dem PC ausgeführt ist.
• Falls die Verbindung über Anschluss 4 der Audio-Netzwerkschnittstelle (ANI)
• Neueste Version von Adobe
• Sicherstellen, dass PC und Gerät sich im selben Netzwerk und Subnetz befinden.
• Sicherstellen, dass die Shure-Software nicht durch die Firewall-Einstellungen
• Router so einstellen, dass er Standard-Gateway nicht als Teil von DHCP sendet.
• Die Anwendung ‚Shure Web Device Discovery‘ so einstellen, dass sie nach IP-
• Den Computer im gleichen Netzwerk wie das Gerät manuell auf eine statische IP-
• Die Anzahl an Fenstern oder Registerkarten, die für dieselbe Konfiguration offen
• Informationen zur richtigen Einrichtung des Netzwerks sind im Abschnitt ‚Netzwerk‘
auf das gleiche Subnetz eingestellt sind.
Gerät verwendet werden (einschließlich WiFi).
erfolgt, sicherstellen, dass er auf den geschalteten Modus eingestellt ist.
®
Flash® herunterladen.
blockiert wird.
Adresse geöffnet wird.
Adresse einstellen.
sind, verringern.
zu finden.
31
Page 32
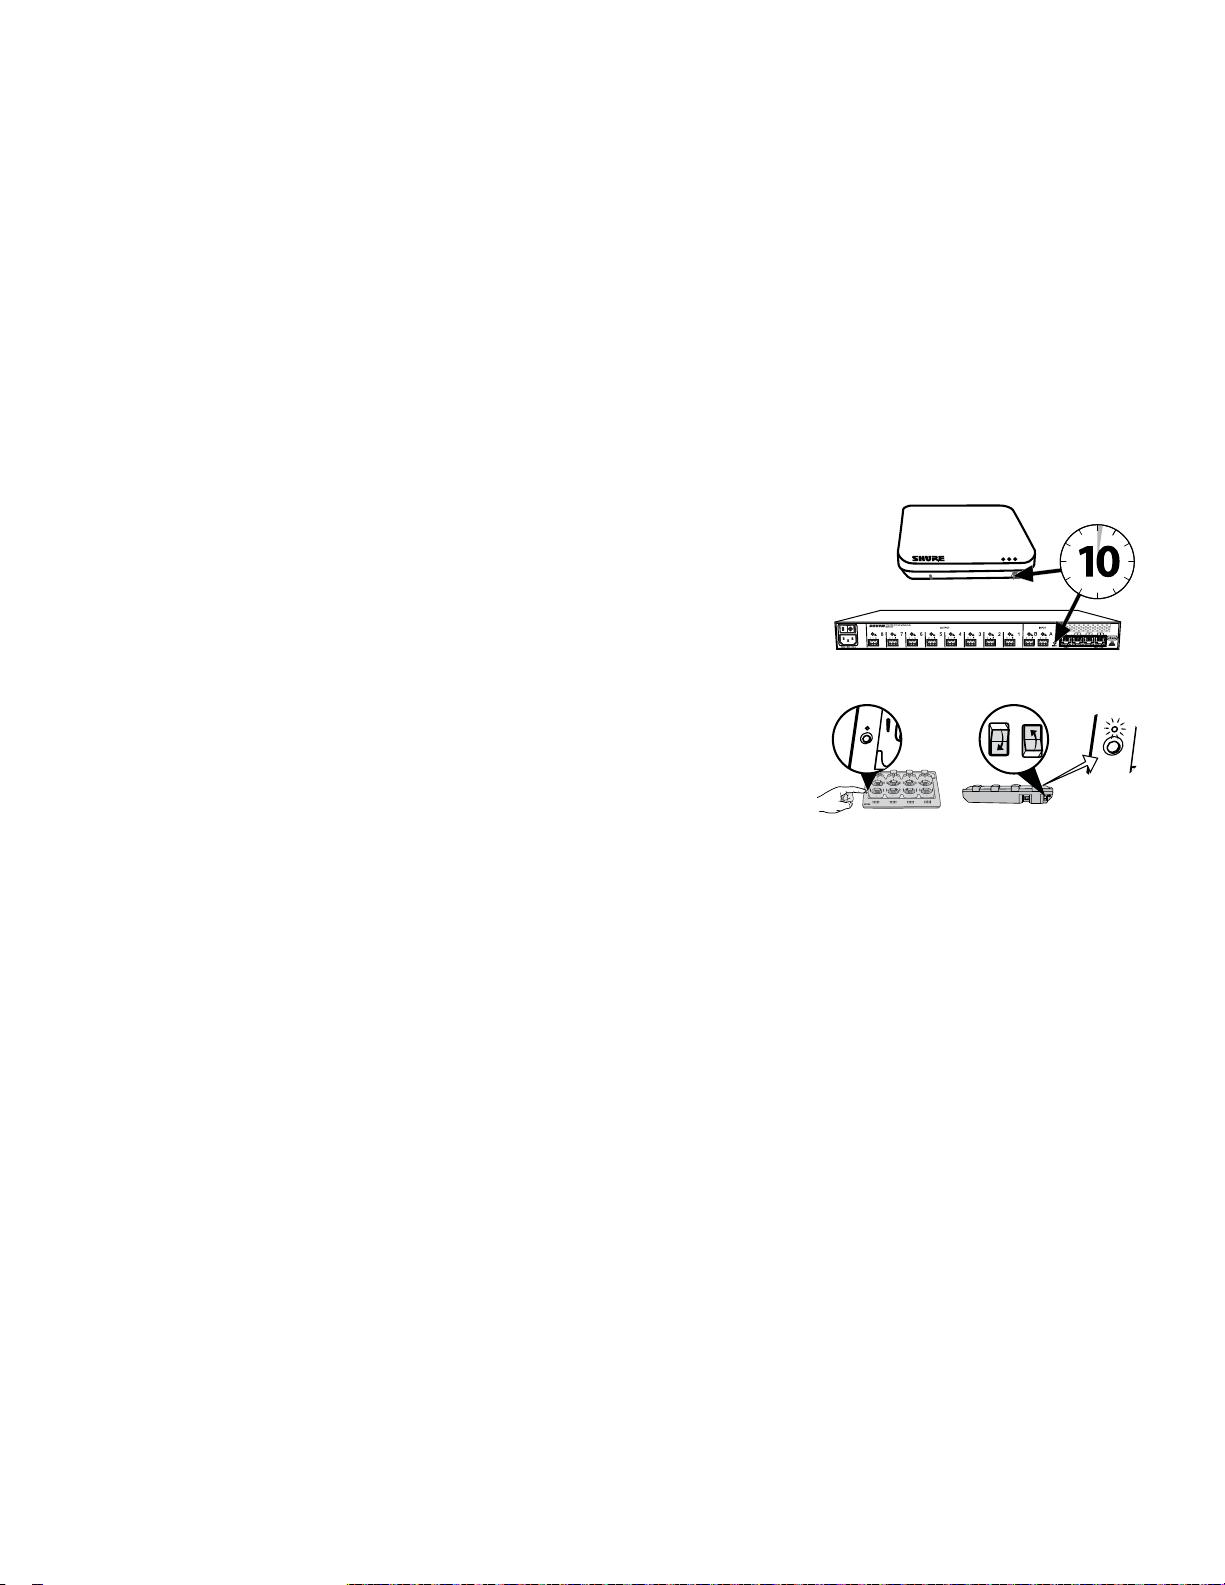
7
8
6
5
1
2
3
4
Link
Power
7
8
6
5
1
2
3
4
link
6
5
1
2
link
+
lockout
power
ethernet
network audio
push to solo | hold to mute
-9
-18
-24
-36
-48
-60
0
-9
-12
-18
-24
0
aux
mic
adjust
line
sig/clip
mute
INPUT
A
sig/clip
mute
OUTPUT
HEADPHONE
Audio Network Interface
MICROFLEX WIRELESS
B
1
2
3
4
5
6
7
8
line
aux
push to solo | hold to mute
A
sig/clip
mute
OUTPUT
B
1
2
3
4
5
6
7
8
line
aux
6
7
8
9
10
11
12
1
2
3
4
5
6
7
8
9
10
11
12
1
2
3
4
5
5
7
8
6
5
1
2
3
4
i
i
i i
i
i
i
i
i
i i
i
i
i
i
i
i
i i
i
i
i
i
i
i i
i
i
i
i
i
i
i i
i
i
i
i
i
i i
i
i
i
i
i
i
i i
i
i
i
i
i
i i
i
i
i
i
INPUT
A
OUTPUT
B
1
2
3
4
5
6
7
8
lockout
power
ethernet
network audio
push to solo | hold to mute
-9
-18
-24
-36
-48
-60
0
-9
-12
-18
-24
0
aux
mic
adjust
line
sig/clip
mute
sig/clip
mute
HEADPHONE
MICROFLEX WIRELESS
line
aux
Weitere Ressourcen
Für weitere Unterstützung bei der Störungssuche sowie zusätzliche Informationen für komplizierte Installationen Kontakt mit Shure aufnehmen, um mit einem
Kundendienstberater zu sprechen. In Nord- und Südamerika die Abteilung Systems Support unter der Rufnummer +1 847 6008541 kontaktieren. Benutzer in
anderen Regionen können unter www.shure.com die jeweiligen Kontaktinformationen abrufen.
Unterstützung bei digitaler Audio-Vernetzung, Richtlinien bei erweiterten Netzwerkfunktionen und Störungssuche in der Dante Software sind auf der
Audinate-Website www.audinate.com zu finden.
Rücksetzung auf Werkseinstellungen
Wenn ein Gerät nach der Störungssuche nicht im Netzwerk erscheint, das jeweilige Gerät auf die Werkseinstellungen zurücksetzen. Die Werkseinstellungen
sind für automatische Kompatibilität mit anderen Shure-Netzwerkgeräten ausgelegt.
Hinweis: Eine Werksrücksetzung löscht alle MXW-Gruppen- und Verbindungszuordnungen. Das Kennwort für das Aufrufen der Software wird auf
zurückgesetzt.
Von der Hardware aus
Access Point Transceiver (APT)
Die vertieft angebrachte Rücksetztaste 10 Sekunden lang gedrückt halten. Die LED für den
Netzwerk-Audio-Status wird kurz ausgeschaltet, um anzuzeigen, dass das Gerät neu gestartet
wird.
VORSICHT:
Mikrofonverbindungen.
Audio-Netzwerkschnittstelle
Die Rücksetztaste 10 Sekunden lang gedrückt halten. Die LEDs auf der Vorderseite blinken, um
anzuzeigen, dass das Gerät neu gestartet wird.
Eine Werksrücksetzung löscht alle im Gerät gespeicherten Gruppenzuordnungen und
admin
Vernetzte Ladestation
a. Den AN/AUS-Schalter (Power) ausschalten.
b. Die Link-Taste gedrückt halten.
c. Während die Link-Taste gedrückt gehalten wird, den AN/AUS-Schalter (Power) einschalten.
d. Die Link-Taste weitere 12 Sekunden lang gedrückt halten, bis die LED gelb aufleuchtet.
Von der Steuersoftware aus
1. Die Registerkarte ‚Utility‘ der MXW-Steuersoftware öffnen.
2. Die Schaltfläche ‚Eigenschaften bearbeiten‘ für das Gerät auswählen.
3. Das Kontrollkästchen ‚Werksrücksetzung‘ markieren.
4. ‚Aktualisierungen hinzufügen‘ auswählen, um die Einstellung zu Bearbeitungswarteschlange zu
speichern.
5. Den Vorgang für etwaige zusätzliche Geräte wiederholen.
6. Auf ‚Alle übernehmen‘ drücken, um Änderungen an allen Geräten mit bearbeiteten Eigenschaften
vorzunehmen.
32
Page 33
Sicherheitsinformationen
SICHERHEITSVORKEHRUNGEN
Die möglichen Folgen des fehlerhaften Gebrauchs, die durch eines der
beiden Symbole - „ACHTUNG“ und „VORSICHT“ - markiert sind, hängen
von der Unmittelbarkeit der bevorstehenden Gefahr und des Schweregrads
der Beschädigung ab.
ACHTUNG: Die Nichtbeachtung dieser Achtung-Hinweise kann
schwere oder tödliche Verletzungen infolge des fehlerhaften Gebrauchs
verursachen.
VORSICHT: Die Nichtbeachtung dieser Vorsichtshinweise kann
mittelschwere Verletzungen oder Sachschäden infolge des fehlerhaften
Gebrauchs verursachen.
ACHTUNG
DAS HÖREN BEI ÜBERMÄSSIGEN LAUTSTÄRKEN KANN DAUERHAFTE
HÖRSCHÄDEN VERURSACHEN. MÖGLICHST GERINGE LAUTSTÄRKEPEGEL
VERWENDEN. Längerfristiges Hören bei übermäßigen Schallpegeln kann zu
Hörschäden und zu permanentem, durch Lärm verursachten Gehörverlust führen.
Bitte orientieren Sie sich an den folgenden, von der Occupational Safety Health
Administration (OSHA; US-Arbeitsschutzbehörde) erstellten, Richtlinien für die
maximale zeitliche Belastung durch Schalldruckpegel, bevor es zu Hörschäden
kommt.
90 dB
Schalldruckpegel
nach 8 Stunden
110 dB
Schalldruckpegel
nach ½ Stunde
ACHTUNG
• Akkusätze können explodieren oder giftiges Material freisetzen. Es besteht
Feuer- und Verbrennungsgefahr. Nicht öffnen, zusammenpressen, modifizieren,
auseinander bauen, über 60 °C erhitzen oder verbrennen.
• Die Anweisungen des Herstellers befolgen.
• Nur Shure-Ladegerät zum Aufladen von wiederaufladbaren Shure-Akkus
verwenden.
• ACHTUNG: Es besteht Explosionsgefahr, wenn die Batterie nicht richtig ersetzt
wird. Nur mit dem gleichen bzw. einem gleichwertigen Typ ersetzen.
• Akkus niemals in den Mund nehmen. Bei Verschlucken ärztlichen Rat einholen
oder die Giftnotrufzentrale anrufen.
• Nicht kurzschließen; kann Verbrennungen verursachen oder in Brand geraten.
• Keine anderen Akkusätze als die wiederaufladbaren Shure-Akkus aufladen bzw.
verwenden.
• Akkusätze vorschriftsmäßig entsorgen. Beim örtlichen Verkäufer die
vorschriftsmäßige Entsorgung gebrauchter Akkusätze erfragen.
• Akkus (Akkusätze oder eingesetzte Akkus) dürfen keiner starken Hitze wie
Sonnenstrahlung, Feuer oder dergleichen ausgesetzt werden.
ACHTUNG: Es besteht Explosionsgefahr, wenn die Batterie nicht richtig ersetzt wird.
Nur mit kompatiblen Shure-Batterien betreiben.
Hinweis: Das Gerät darf nur mit dem im Lieferumfang enthaltenen Netzteil oder
einem gleichwertigen, von Shure zugelassenen Gerät verwendet werden.
1. 經審驗合格之射頻電信終端設備,非經許可,公司、商號或使用者均不得擅自變更
頻率、加大功率或變更原設計之特性及功能。
2. 射頻電信終端設備之使用不得影響飛航安全及干擾合法通信;經發現有干擾現象
時,應立即停用,並改善至無干擾時方得繼續使用。所謂合法通信,係指依電信法
規定作業之無線電信。
3. 輸入、製造射頻電信終端設備之公司、商號或其使用者違反本辦法規定,擅自使用
或變更無線電頻率、電功率者,除依電信法規定處罰外,國家通訊傳播委員會並得
撤銷其審驗合格證明。
4. 減少電磁波影響,請妥適使用
95 dB
Schalldruckpegel
nach 4 Stunden
115 dB
Schalldruckpegel
nach 15 Minuten
100 dB
Schalldruckpegel
nach 2 Stunden
120 dB Schalldruckpegel
Vermeiden, da sonst Schäden
entstehen können.
105 dB
Schalldruckpegel
nach 1 Stunde
MXW1
Taschenmikrofonsender:
Diese Sender wurden getestet und erfüllen die internationalen
Strahlenbelastungsgrenzen für eine nicht kontrollierte Umgebung.
Dieses Gerät steht unter normalen Betriebsbedingungen in direktem
Kontakt mit dem Körper des Benutzers. Diese Sender dürfen nicht
am gleichen Standort wie andere Antennen oder andere Sender
angeordnet oder in Verbindung damit betrieben werden.
MXW2, MXW6, MXW8, MXWAPT4, MXWAPT8
Handmikrofonsender, Grenzflächenmikrofonsender für
Tischanwendungen, Schwanenhalsmikrofonsender für
Tischanwendungen, Drahtlose Access Point-Sender:
Diese mobilen Sender sind zur Verwendung bei Abständen von mehr
als 20 Zentimetern zum menschlichen Körper ausgelegt. Aufgrund
ihrer Nähe zum Körper des Benutzers bei bestimmungsgemäßer
Verwendung und ihrer niedrigen Ausgangsleistung müssen diese
mobilen Sender nicht die Prüfanforderungen der internationalen
Strahlungsbelastungsnormen erfüllen. Diese mobilen Sender müssen
mindestens 20 cm von Personen entfernt platziert bzw. angebracht
werden und dürfen nicht zusammen mit anderen Antennen oder
Sendern angeordnet bzw. betrieben werden.
Wichtige Produktinformationen
Das Gerät ist für den Gebrauch bei Profi-Audioanwendungen
vorgesehen.
Die Prüfung der normgerechten elektromagnetischen Verträglichkeit
beruht auf der Verwendung der mitgelieferten und empfohlenen
Kabeltypen. Bei Verwendung anderer Kabeltypen kann die
elektromagnetische Verträglichkeit beeinträchtigt werden.
Nicht ausdrücklich von Shure Incorporated genehmigte Änderungen
oder Modifikationen können den Entzug der Betriebsgenehmigung für
das Gerät zur Folge haben.
Bitte befolgen Sie die regionalen Recyclingverfahren für Akkus,
Verpackungsmaterial und Elektronikschrott.
Hinweis: Dieses Gerät darf nicht direkt an ein öffentliches InternetNetzwerk angeschlossen werden.
Informationen für den Benutzer
Dieses Gerät wurde geprüft und entspricht demnach den Grenzwerten
für ein digitales Gerät der Klasse B gemäß Teil 15 der Richtlinien
der US-Fernmeldebehörde (FCC Rules). Diese Grenzwerte sollen
einen angemessenen Schutz gegen störende Interferenzen in
Wohngebieten bieten. Dieses Gerät erzeugt und arbeitet mit HFEnergie und kann diese ausstrahlen; wenn es nicht gemäß den
Anweisungen installiert und verwendet wird, kann es störende
Interferenzen mit dem Funkverkehr verursachen. Allerdings wird
nicht gewährleistet, dass es bei einer bestimmten Installation keine
Interferenzen geben wird. Wenn dieses Gerät störende Interferenzen
beim Radio- und Fernsehempfang verursacht (was durch Aus- und
Anschalten des Geräts festgestellt werden kann), wird dem Benutzer
nahe gelegt, die Interferenz durch eines oder mehrere der folgenden
Verfahren zu beheben:
• Die Empfangsantenne anders ausrichten oder anderswo platzieren.
• Den Abstand zwischen dem Gerät und dem Empfänger vergrößern.
• Das Gerät an eine Steckdose eines Netzkreises anschließen, der
nicht mit dem des Empfängers identisch ist.
• Den Händler oder einen erfahrenen Radio- und Fernsehtechniker
zu Rate ziehen.
33
Page 34

Zulassungen
Dieses Gerät entspricht Teil 15 der FCC-Richtlinien.
Dieses Gerät entspricht der/den lizenzbefreiten RSS-Norm(en) von Industry
Canada. Der Betrieb dieses Geräts unterliegt den beiden folgenden
Bedingungen: (1) Dieses Gerät darf keine Interferenzen verursachen und (2)
dieses Gerät muss jegliche Interferenzen aufnehmen können, einschließlich
Interferenzen, die einen unerwünschten Betrieb des Geräts verursachen
können.
Le présent appareil est conforme aux CNR d'Industrie Canada applicables
aux appareils radio exempts de licence. L'exploitation est autorisée aux
deux conditions suivantes: (1) l'appareil ne doit pas produire de brouillage,
et (2) l'utilisateur de l'appareil doit accepter tout brouillage radioélectrique
subi, même si le brouillage est susceptible d'en compromettre le
fonctionnement.
Konformität mit dem japanischen Rundfunkgesetz und dem japanischen
Telekommunikationsgewerbegesetz. Dieses Gerät ist gemäß
dem japanischen Rundfunkgesetz (電波法) und dem japanischen
Telekommunikationsgewerbegesetz (電気通信事業法) zugelassen.
Dieses Gerät sollte nicht modifiziert werden (andernfalls wird die
Zulassungsbezugsnummer ungültig).
Entspricht den auf IEC 60065 beruhenden Anforderungen an die elektrische
Sicherheit.
Dieses Produkt entspricht den Grundanforderungen aller relevanten
Richtlinien der Europäischen Union und ist zur CE-Kennzeichnung
berechtigt.
Die CE-Konformitätserklärung kann von Shure Incorporated oder einem
der europäischen Vertreter bezogen werden. Kontaktinformationen sind im
Internet unter www.shure.com zu finden.
Die CE-Übereinstimmungserklärung ist erhältlich bei: www.shure.com/
europe/compliance
Bevollmächtigter Vertreter in Europa:
Shure Europe GmbH
Zentrale für Europa, Nahost und Afrika
Abteilung: EMEA-Approval
Jakob-Dieffenbacher-Str. 12
75031 Eppingen, Deutschland
Telefon: +49 (0) 7262 9249 0
Telefax: +49 (0) 7262 9249 114
E-Mail: [email protected]
MXWNCS4, MXWNCS8
Zugelassen gemäß der Prüfvorschrift der US-Fernmeldebehörde FCC,
Teil 15b.
Konformitätskennzeichnung Industry Canada ICES-003:
CAN ICES-3 (B)/NMB-3(B)
Hinweis: Das FCC-Zeichen, das CE-Zeichen, das C-Tick-Zeichen
und die elektrischen Nennwerte befinden sich an der Unterseite des
Ladestationsgehäuses.
MXW1, MXW2, MXW6, MXW8, MXWAPT4, MXWAPT8
Zertifizierung unter FCC Teil 15.
FCC: DD4MXW1, DD4MXW2, DD4MXW6, DD4MXW8,
DD4MXWAPT4, DD4MXWAPT8.
Erfüllt die entsprechenden Anforderungen von RSS-213.
IC: 616A-MXW1, 616A-MXW2, 616A-MXW6, 616A-MXW8,
616A-MXWAPT4, 616A-MXWAPT8.
Marken
Audinate®, das Audinate-Logo und Dante sind Marken von Audinate
Pty Ltd.
Page 35
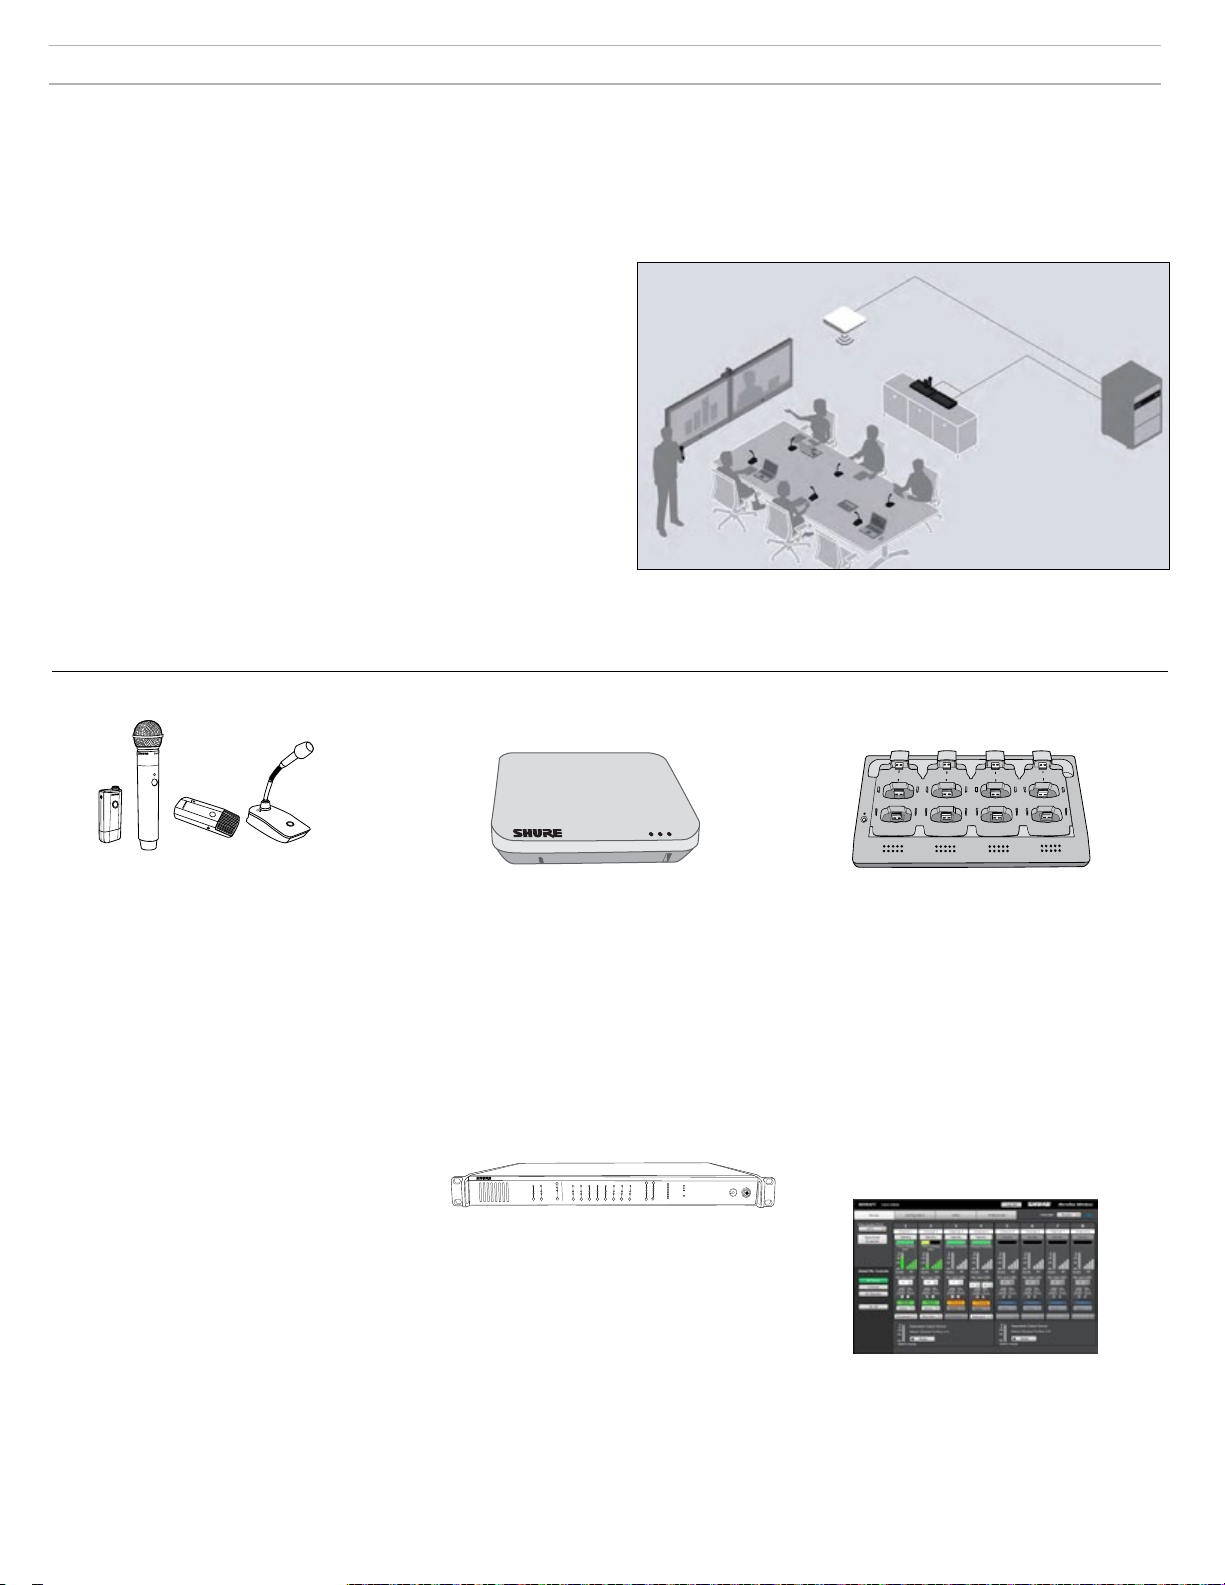
Descripción general
La serie inalámbrica Microflex tm (MXW) de Shure es una solución completa para salas de reuniones y salas de juntas directivas flexibles. Dispone de
administración automática de canales de RF, micrófonos inalámbricos cifrados recargables (AES256), y conexión en red de audio digital (Dante
tm
). La
estación de carga en red carga los micrófonos de frontera y cuello de ganso para aplicaciones de sobremesa, y también soluciones de unidades portátiles
y de cuerpo para capacitación y presentaciones corporativas. El punto de acceso MXW se instala en un cielo raso o pared proporcionando comunicación
discreta entre los micrófonos inalámbricos y la red de audio digital. Se pueden utilizar varios puntos de acceso en instalaciones donde es necesario usar
simultáneamente hasta 40* micrófonos en la misma zona (*dependiendo de la región). El programa de control basado en navegador de Internet se usa para
el monitoreo y control remoto desde cualquier computadora conectada a la red.
Recursos adicionales
Esta guía de inicio rápido contiene información esencial para configurar un
sistema MXW básico de ocho canales. A continuación se da una lista de
recursos adicionales para la serie MXW:
Manual MXW completo: El manual completo proporciona información amplia
del sistema MXW, como descripciones detalladas de los componentes,
topologías de redes, prácticas recomendadas de gestión de RF y navegación
del software de control. Se puede encontrar en www.shure.com y en la unidad
USB suministrada con el transceptor de punto de acceso.
Asistencia al cliente de Shure: Para recibir asistencia sobre localización de
averías o asesoría sobre instalaciones complejas, comuníquese con Shure
para hablar con un representante de asistencia al cliente. En el continente
americano, llame al grupo de apoyo de sistemas al 847-600.8541. Para
usuarios en otros lugares, visite www.shure.com para buscar el contacto de
asistencia para su región.
Audinate: Para recibir asistencia sobre conexión en red de audio digital, pautas
para conexión en red avanzada y localización de averías del software Dante
visite el sitio Web de Audinate en www.audinate.com.
tm
Descripción general de los componentes
MXW6MXW1 MXW8
MXW2
Transmisores de micrófono
Los micrófonos MXW transmiten una señal de
audio cifrada, inalámbrica al punto de acceso.
Hay cuatro factores de forma disponibles:
Unidad de cuerpo híbrida (MXW1)
La unidad de cuerpo se asegura a un
cinturón o correa ofreciendo comunicación
móvil sin usar las manos. Tiene una
entrada TQG para conexión de corbata y un
micrófono omnidireccional integrado.
Unidad de mano (MXW2)
La unidad de mano permite que los
presentadores se comuniquen usando los
legendarios cartuchos de micrófono SM58,
SM86, BETA58 y VP68 de Shure.
Límite (MXW6/C, MXW6/O)
El transmisor de límite se pone en una mesa
o escritorio para transmitir la voz mientras
que se combina discretamente en cualquier
entorno de conferencias.
Base de cuello de ganso para escritorio
(MXW8)
La base de cuello de ganso es compatible
con los micrófonos con cuello de ganso
Microflex de 5, 10 y 15 pulgadas.
Los micrófonos MXW1, MXW6 y MXW8 incluyen
una salida de auriculares para monitoreo de
audio, tal como un canal de traducción.
Transceptor de punto de acceso
(MXWAPT4, MXWAPT8)
El transceptor de punto de acceso (unidades
de 4 y 8 canales) se instala en una pared o
cielo raso para administrar conexiones de audio
inalámbricas cifradas con micrófonos. Como
centro del sistema, transmite audio digital entre
los micrófonos inalámbricos y otros dispositivos
Dante en la misma red. El APT incluye un
servidor de Web que aloja el programa de
control del sistema MXW, usado para monitoreo,
configuración y control remoto del sistema.
Interfaz de red de audio
(MXWANI4, MXWANI8)
La interfaz de red de audio (4 y 8 canales) es
un dispositivo de red Dante que proporciona
entrada y salidas de audio analógico para el
sistema MXW. Tiene un conmutador Ethernet
Gigabit de 4 puertos que permite conectar un
punto de acceso MXW, una computadora y
hasta dos estaciones de carga en red MXW.
2
1
5
6
4
3
7
8
Estación de carga en red
(MXWNCS4, MXWNCS8)
La estación de carga en red (variedades de 4
y 8 ranuras) puede cargar simultáneamente
hasta 4 (u 8) micrófonos MXW. También enlaza
micrófonos a canales de puntos de acceso
y conecta las estadísticas de la batería al
programa de control.
Importante: Los micrófonos con cuello de
cisne para escritorio (MXW8) ocupan dos
posiciones en el cargador. Por ejemplo, para
ocho micrófonos MXW8 se requieren dos
cargadores MXCWNCS8 (16 posiciones de
MICROFLEX WIRELESS
B
OUTPUT
INPUT
line
aux
sig/clip
sig/clip
mute
mute
push to solo | hold to mute
-9
0
line
-18
-9
-12
aux
-24
-18
-36
mic
-24
-48
-60
adjust
0
8
7
6
5
4
3
2
1
A
Audio Network Interface
power
ethernet
network audio
HEADPHONE
lockout
carga en total).
Programa de control MXW
El programa de control del MXW ofrece control
remoto amplio de funciones importantes de
configuración, monitoreo y administración. Se
puede acceder al programa desde cualquier
computadora o Mac en la red, y se abre en un
navegador de Internet usando Adobe.® Flash®.
35
Page 36
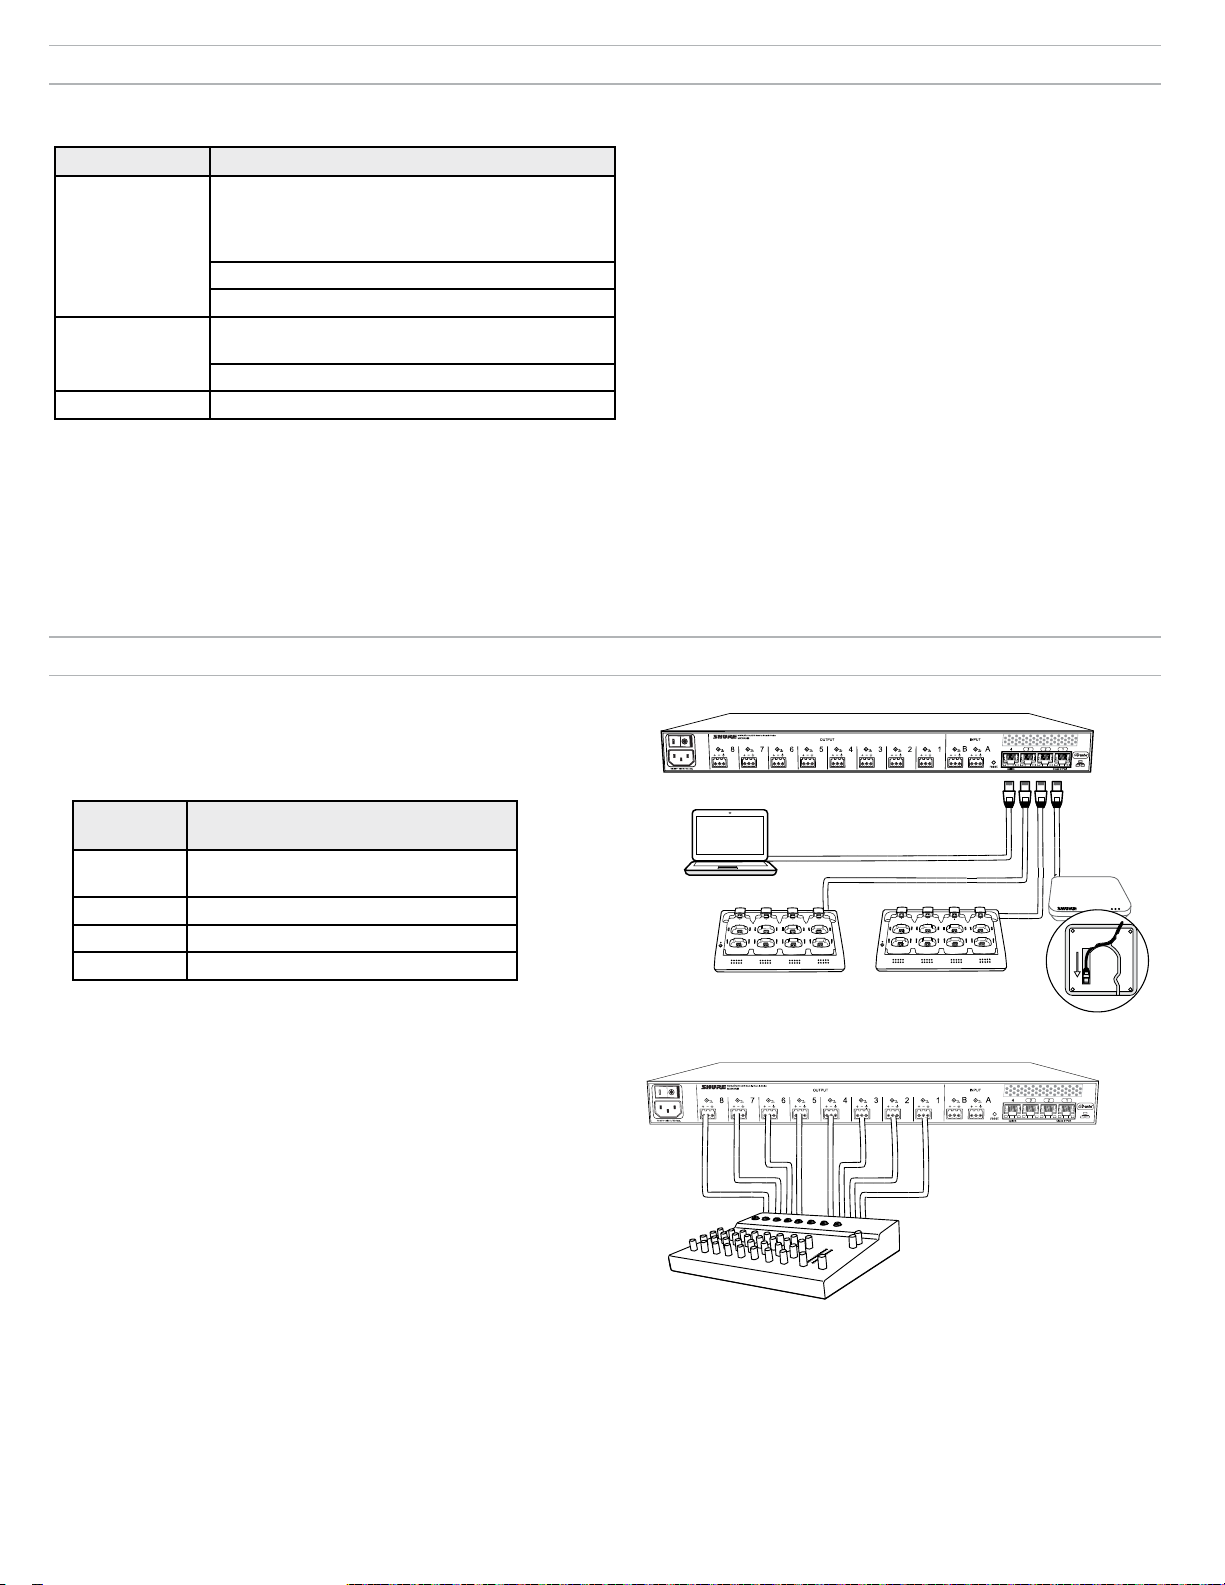
Inventario de equipos
Accesorios incluidos
Componente Accesorio
Unidad flash USB de Shure (contiene el programa
Web Device Discovery de Shure, el programa
Firmware Update Manager de Shure y las guías del
APT
usuario)
Placa de montaje
Tapa para pintar
Juego de tornillería (tornillos para montaje en rack,
ANI
conjuntos de conectores de cables)
Cable de alimentación IEC
NCS Adaptador de alimentación de CC
Conexión de los componentes
1. Conexión de los componentes del MXW
Use cables Ethernet blindados para conectar los componentes del
MXW. Use el conmutador de 4 puertos en la interfaz de red de audio
(ANI) o conecte todos los componentes a un conmutador Gigabit
separado.
Equipo adicional
Cables de audio
Use cables de audio blindados para conectar la ANI a una mezcladora,
DSP o dispositivo de teleconferencias.
Cables Ethernet
Use cables Cat5e blindados (o superior) para conectar los componentes
en red.
Computadora
Use una PC o MAC para acceder a la interfaz del sistema MXW desde
un navegador de Internet.
Puerto de
red ANI
① Puerto 1
(PoE)
Al componente
Transceptor de punto de acceso (APT)
② Puerto 2 Estación de carga en red (NCS)
③ Puerto 3 (Opcional) NCS adicional
④ Puerto 4 Computadora
En la configuración predeterminada, los dispositivos MXW están fijados en
Nota:
el modo automático (DHCP) para configurarse automáticamente a parámetros IP
compatibles. En ausencia de un servidor DHCP, los dispositivos usarán un formato
de dirección de enlace local (169.254.x.x).
2. Conexión de las salidas analógicas de la ANI
Use cables de audio blindados para conectar las salidas de la ANI a una
mezcladora, DSP o dispositivo de teleconferencias. (Haga referencia al
juego de tornillería suministrado con la ANI para conectar correctamente
los cables a los bloques de conexión.)
④
①
③
1
4
2
1
3
5
7
6
8
2
5
6
②
4
3
7
8
36
Page 37
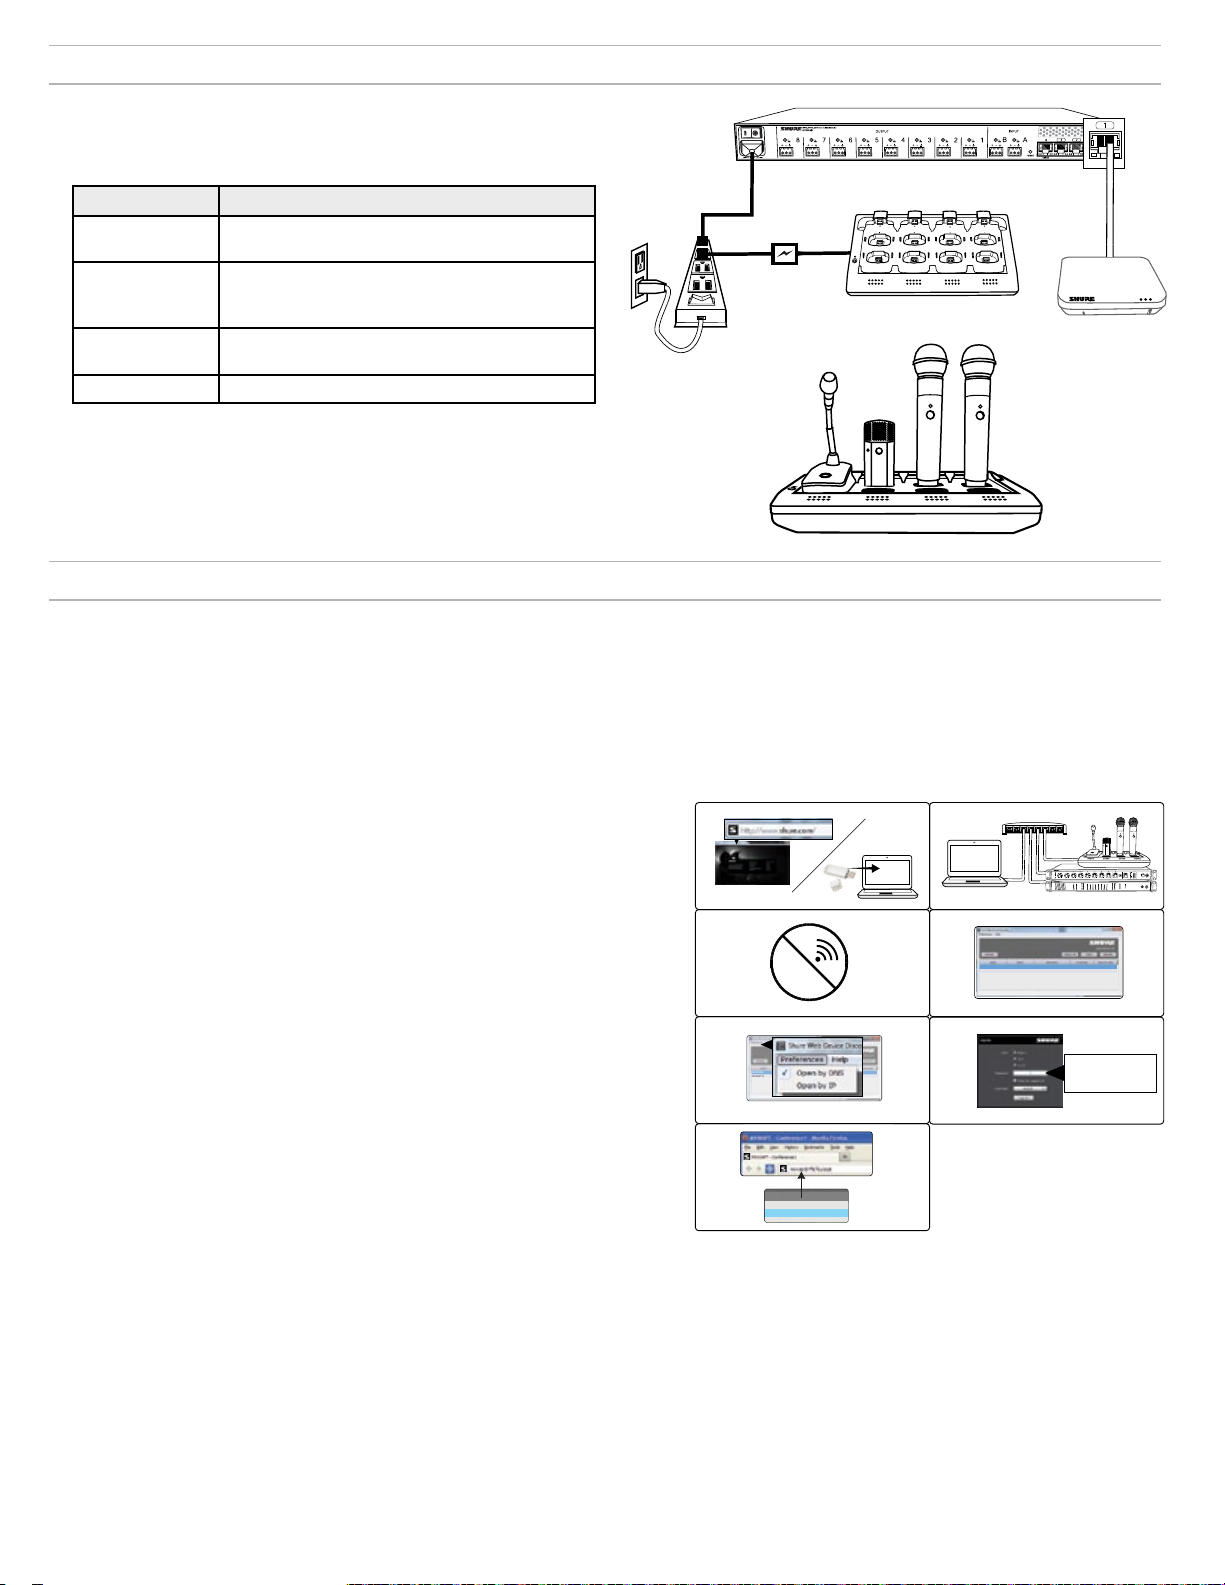
Alimentación
②
④
①
7
8
6
5
1
2
3
4
7
8
6
5
1
2
3
4
③
MXWANI8 mxwani8-ffeee5.local
192.168.200.22
Dante
Dante
ROOM 5
MXWAPT8
mxwapt8-ffaaa2.local
192.168.200.23
CONFERENCE
mxwani-aa1.local
192-168-200-22
mxwapt8-ffe761.local
192-168-200-23
Conecte el suministro eléctrico y encienda los componentes.
Los LED se iluminan en cada componente cuando la alimentación está
conectada.
①
Class 0 PoE
Componente Fuente de alimentación
① ANI
② APT
Conecte el cable IEC a un suministro de CA y
encienda el interruptor de alimentación.
Conecte al puerto 1 de la ANI para alimentación
por Ethernet (PoE). No hay interruptor de
③
1
2
5
6
4
3
7
8
②
encendido.
③ NCS
Conecte el PS45 a un suministro de CA y
encienda el interruptor de encendido.
④ Transmisores Cargue bien los transmisores antes de usarlos.
④
Acceso al programa de control MXW
El sistema MXW utiliza un programa de control alojado en dispositivo que ofrece control remoto completo de funciones importantes de configuración,
monitoreo y administración. Se puede acceder al programa desde cualquier computadora o Mac en la red, y se abre en un navegador de Internet usando
Adobe.® Flash®.
Hay dos interfaces de control diferentes para el sistema MXW:
• Programa de control del sistema MXW: Se accede desde el transceptor de punto de acceso y se utiliza para administrar el sistema MXW.
• Programa de control de la interfaz de red de audio: Se accede desde la interfaz de red de audio y se utiliza para administrar sólo ese dispositivo.
Siga estos pasos para acceder al programa de control MXW:
1. Instale la aplicación Web Device Discovery de Shure.
Descargue la aplicación Web Device Discovery de Shure desde www.shure.com
o de la memoria USB entregada con el transceptor de punto de acceso MXW. (La
herramienta de descubrimiento de dispositivo Bonjour requerida viene integrada en
la aplicación y se instalará automáticamente.)
2. Asegure que la computadora esté en la red MXW.
La computadora accede el programa de control desde un servidor de Web
incorporado en el dispositivo. Todos los dispositivos conectados en red deben
conectarse a la misma red (fijados en la misma subred).
3. Desactive la señal WiFi
Desactive la señal WiFi de la computadora para forzar la interfaz de red de
alambrado directo.
4. Ejecute la aplicación Web Device Discovery de Shure.
Abra la aplicación para ver todos los dispositivos Shure en la red que contienen un
servidor incorporado para el programa de control (MXWAPT, MXWANI y SCM820).
Use el botón Identificar para que los LED del dispositivo destellen para facilitar la
identificación.
5. Abra al programa de control MXW
Haga doble clic en cualquier transceptor de punto de acceso par abrir el programa
de control del sistema MXW. Haga doble clic en una interfaz de red de audio
para abrir la interfaz de software de ese dispositivo. La aplicación puede abrir el
programa de control según dirección IP o nombre DNS (que se puede seleccionar
en la lista desplegable de Preferencias).
①
③
⑤
⑦
Wi-Fi
②
④
⑥
MXWANI8 mxwani8-ffeee5.local
ROOM 5
CONFERENCE
MXWAPT8
mxwapt8-ffaaa2.local
SCM820
1 2 3 4 5 6 7 8
gain
low cut
hi shelf
meter
push to solo | hold to mute
8
7
5
4
6
2
1
3
A
B
OUTPUT
INPUT
line
aux
sig/clip
sig/clip
mute
mute
push to solo | hold to mute
192.168.200.22
Dante
Dante
192.168.200.23
admin
®
IntelliMix
LIM
MASTER
AB
power
B
A
AUX IN
HEADPHONE
0
ethernet
-9
network audio
-18
automix link
-24
gain
dual mixer
-36
limiter
-48
L+R SUM
-60
lockout
MICROFLEX WIRELESS
Audio Network Interface
0
power
-9
0
line
ethernet
-18
-9
network audio
aux
-12
-24
HEADPHONE
-18
mic
-36
-24
-48
lockout
-60
adjust
6. Introduzca la contraseña predeterminada
Introduzca la contraseña predeterminada 'admin' para acceder al programa de
control.
7. Agregue un marcador a la página Web (recomendado)
Agregue un marcador a la dirección IP del dispositivo si tiene una dirección IP
estática. Agregue un marcador al nombre DNS del dispositivo si el modo IP es
Automático (DHCP).
37
Page 38
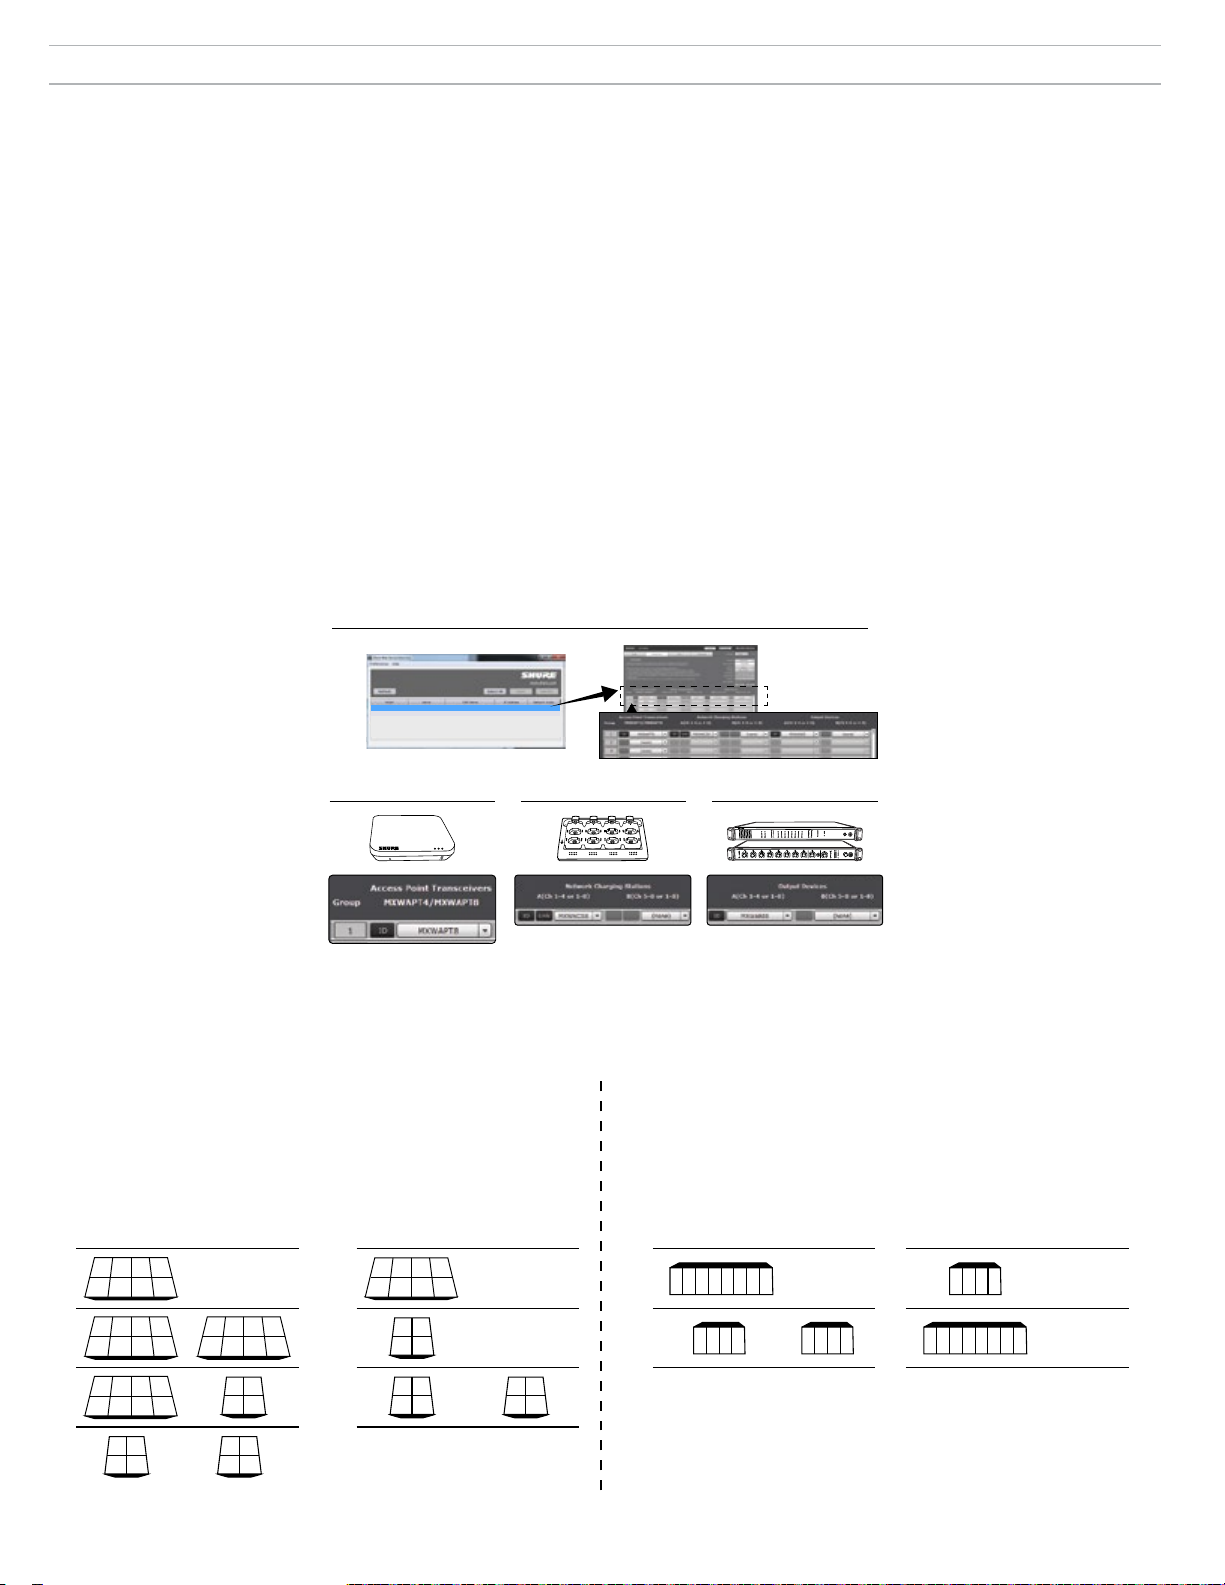
Asociación de componentes a un grupo
Las siguientes instrucciones sirven para formar un grupo MXW. Si un dispositivo no se encuentra en la ventana desplegable, compruebe que esté "activo" y
en la red.
Sugerencia: Use el botón ID para identificar un dispositivo. Esto envía una señal al dispositivo para que destellen los LED y faciliten su identificación.
1. Abra una configuración
Use el programa Web Discovery de Shure para ver todos los
transceptores de punto de acceso MXW (APT) en la red. Haga doble clic
en un APT para abrir el programa y acceda a la ficha Configuración.
2. Seleccione un transceptor de punto de acceso (APT) para el Grupo 1
Seleccione un APT abierto en la ventana desplegable. Esta selección
determina si el grupo tiene cuatro u ocho canales (APT4 o APT8).
Nota: El Grupo 1 deberá incluir el APT empleado para abrir el programa de control.
Otros APT conectados a la red (y abiertos) estarán disponibles para grupos
adicionales.
3. Seleccione las estaciones de carga en red
Asocie una o dos estaciones de carga en red (NCS) al punto de acceso.
Hay dos razones para asociar más de un cargador:
- Cuando se utilizan dos cargadores de cuatro canales para un punto de acceso de
ocho canales.
- Cuando se utilizan micrófonos con cuello de ganso. Los micrófonos con cuellos
de ganso ocupan las ranuras delantera y trasera de un cargador, reduciendo
el número de ranuras disponibles a la mitad. Por ejemplo, se requiere dos
①
MXWANI8 mxwani8-ffeee5.local 192.168.200.22
MXWAPT8
ROOM 5
CONFERENCE
mxwapt8-ffaaa2.local
192.168.200.23
Dante
Dante
cargadores de ocho canales para llenar un punto de acceso de ocho canales con
micrófonos con cuello de ganso.
4. Seleccione los dispositivos de salida de audio
Seleccione uno o dos dispositivos de salida de audio (MXWANI o
SCM820) para encaminar automáticamente los canales de audio digital
desde el punto de acceso. Seleccione de entre los dispositivos indicados
a continuación:
- Variante de cuatro u ocho canales de interfaz de red de audio (MXWANI). Se
puede asignar dos unidades de cuatro canales o una de ocho canales a un APT
de ocho canales.
- Consola mezcladora SCM820 IntelliMix® de Shure. Las SCM820 compatibles
con Dante pueden seleccionarse como la salida de audio para el grupo. Esto
encamina automáticamente la entrada auxiliar de la SCM820 a los micrófonos
para monitoreo personal (canal izquierdo auxiliar de la SCM820 a los canales 1 4 MXW; canal derecho auxiliar a los canales 5 - 8 MXW).
Nota: Las asociaciones de dispositivo y los datos del enlace del micrófono
se almacenan permanentemente en el dispositivo. Si apaga y vuelve
a encender el sistema MXW sin una computadora, los dispositivos
mantendrán la asociación al punto de acceso.
②
③
4
2
1
3
7
5
6
8
④
A
B
INPUT
OUTPUT
line
aux
sig/clip
mute
SCM820
gain
1 2 3 4 5 6 7 8
low cut
hi shelf
meter
push to solo | hold to mute
sig/clip
mute
HEADPHONE
-18
mic
-36
-24
-48
lockout
-60
adjust
push to solo | hold to mute
®
IntelliMix
LIM
MASTER
AB
power
B
A
HEADPHONE
AUX IN
0
ethernet
-9
network audio
-18
automix link
-24
gain
-36
dual mixer
limiter
-48
-60
L+R SUM
lockout
MICROFLEX WIRELESS
Audio Network Interface
0
5
8
4
7
2
3
6
1
power
-9
0
line
ethernet
-18
-9
aux
network audio
-12
-24
Distribución de canales para dispositivos en un grupo
La señal de audio se encamina de los micrófonos a las salidas analógicas según la configuración de grupos establecida en la ficha Configuración. El
diagrama siguiente muestra la asignación de canales a dispositivos en grupos de ocho y de cuatro canales.
Estación de carga en red
Se necesita una estación de carga adicional cuando se llena un grupo con
Las salidas se asignan a una interfaz de red de audio MXW o
micrófonos tipo cuello de cisne
Grupo de 8 canales
Grupo de 4 canales
Grupo de 8 canales Grupo de 4 canales
A B A B A B A B
2 3 4
1
1) 1) 1) 1)
5 6 7 8
2 3 41
2) 2) 2) 2)
x x x x
2 3 41
3) 3)
x x x x
(none) (none) (none)(none)
5 6 7 8
x x x
x
5 6
7 8
2 3 41
x x x x
1
2
4
3
21
x x
1 2 3 4
3 4
x x
Dispositivo de salida de audio
a una consola mezcladora automática SCM820
81 2 3 4 5 6 7
85 6 7
1 2 3 4
1 2 3 4 x x x x
(none)(none)
38
2
1
4)
3 4
5 6
7 8
Page 39
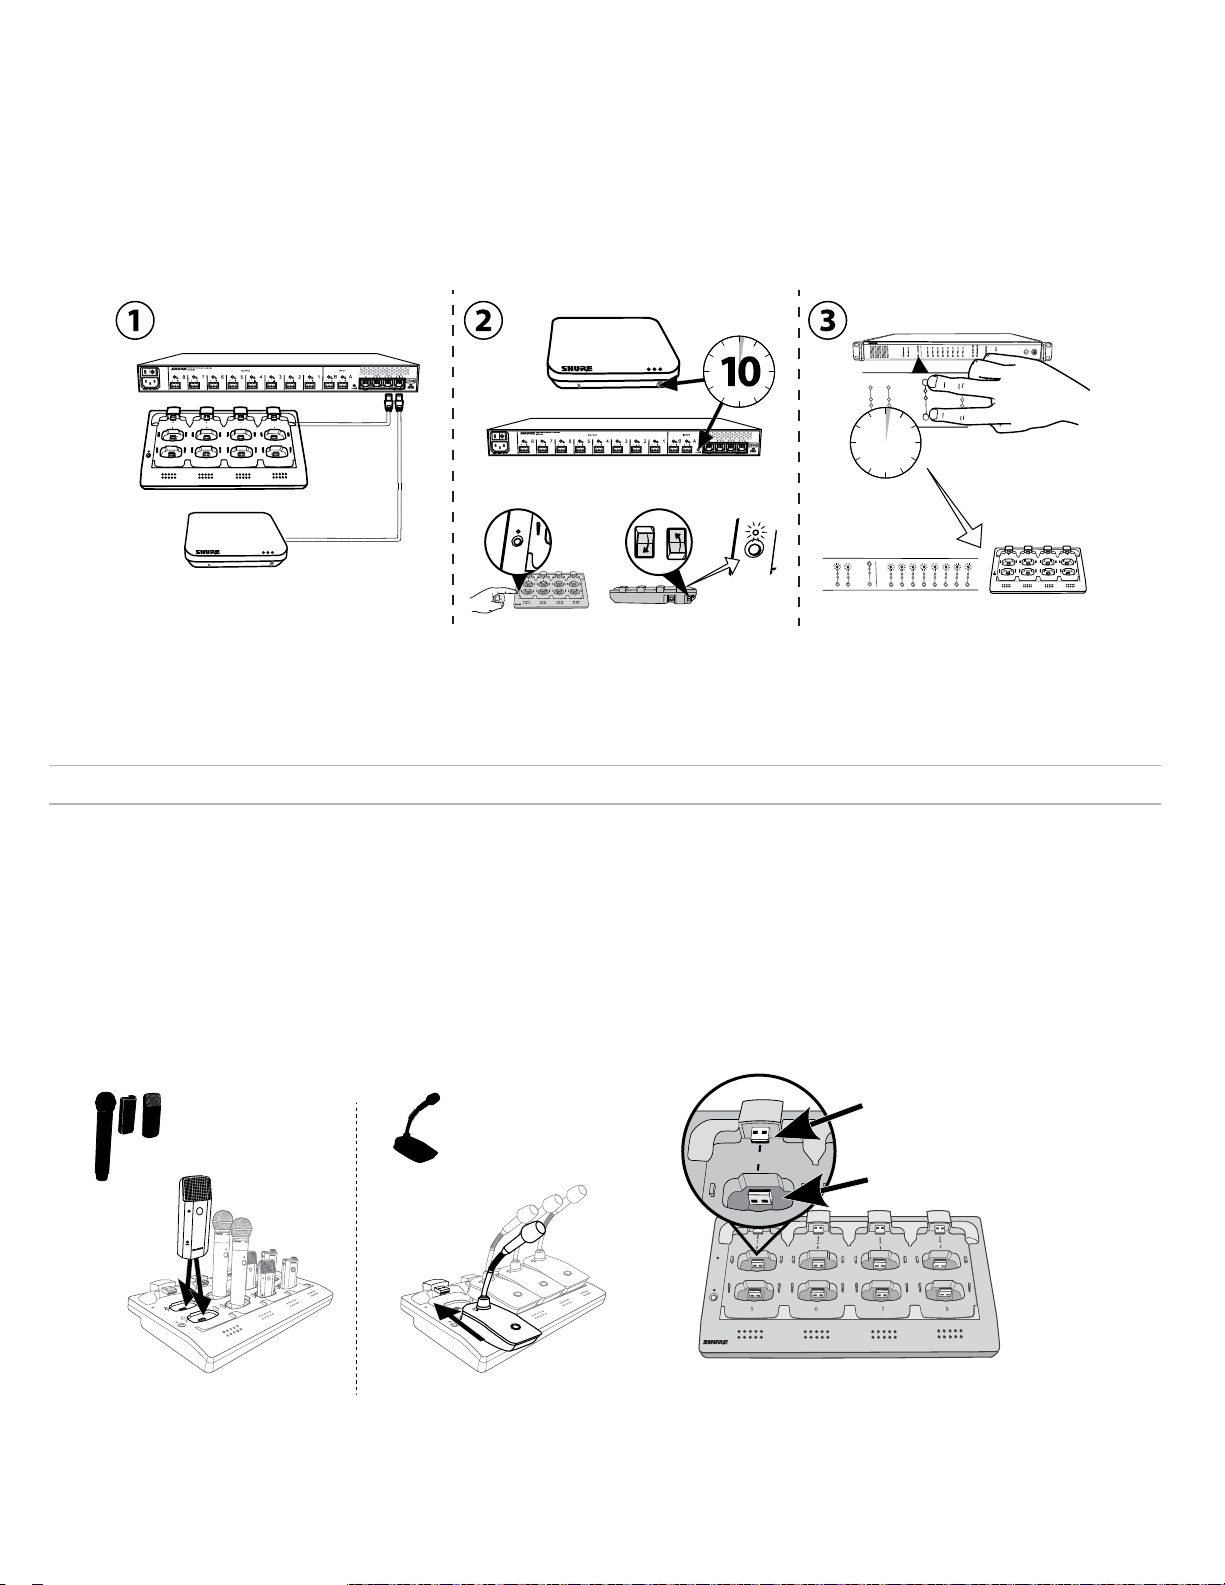
7
8
6
5
1
2
3
4
1
2
3
7
8
6
5
1
2
3
4
7
8
6
5
1
2
3
4
link
6
5
1
2
link
push to solo | hold to mute
2
3
4
5
6
7
8
lockout
power
ethernet
network audio
-9
-18
-24
-36
-48
-60
0
-9
-12
-18
-24
0
aux
mic
adjust
line
HEADPHONE
MICROFLEX WIRELESS
Configuración de grupos automáticos
Se puede asociar un grupo de MXW sin usar el programa de control cuando una red está compuesta de sólo un transceptor de punto de acceso (APT), una
estación de carga en red (NCS) y una interfaz de red de audio (ANI). Para los mejores resultados, lleve a cabo una reposición a valores predeterminados en
fábrica para eliminar las asociaciones a grupos existentes.
1. Conecte un APT, una NCS y una ANI a la red. La red debe contener sólo uno de cada dispositivo.
2. Efectúe una reposición a valores de fábrica en los dispositivos (consulte la sección Configuración de fábrica).
3. En el panel delantero de la ANI, presione simultáneamente ambos botones de selección de nivel de entrada y manténgalos oprimidos por dos segundos.
Los LED de selección de canal se iluminarán en verde y el medidor de audio destellará para indicar que la asociación se realizó sin problemas.
MICROFLEX WIRELESS
Audio Network Interface
0
2
1
5
3
7
6
4
A
8
12
11
1
10
2
9
3
8
4
5
7
6
2
1
5
6
4
3
7
8
+
Power
Link
A
B
INPUT
sig/clip
mute
B
OUTPUT
INPUT
line
aux
sig/clip
sig/clip
mute
mute
A
B
line
aux
12
11
1
10
2
9
3
5
8
4
5
7
6
3
2
5
4
1
OUTPUT
line
aux
sig/clip
mute
push to solo | hold to mute
push to solo | hold to mute
OUTPUT
power
-9
0
line
ethernet
-18
-9
network audio
aux
-12
-24
HEADPHONE
-18
mic
-36
-24
-48
lockout
-60
adjust
1
sig/clip
mute
4
2
1
8
7
6
3
7
6
5
i i
i
i
i
i
i
i
i i
8
i i
i i
i i
i
i
i
i
i
i
i
i
i
i
i
i
i
i
i
i
i
i
i
i
i
i
i
i
i
i
i
i
i
i
i
i
i
i
i
i
i
i
i i
i i
i i
Enlace de micrófonos
Utilice la estación de carga en red (NCS) para enlazar micrófonos con canales del punto de acceso. Las posiciones del cargador están conectadas con los
APT según la configuración de grupos establecida en la ficha Configuración. Una vez terminado el procedimiento de enlace, la señal de audio se encamina
al canal correspondiente del grupo.
La función de enlace conecta los micrófonos conectados a la estación de carga con los canales de los APT. Esto sustituye a cualquier enlace previamente
existente de un micrófono con dicho canal. Si durante el enlace hay una ranura vacía, no se producirá ningún efecto en ese canal.
1. Organice los micrófonos en el cargador.
Los micrófonos se enlazan a los canales de punto de acceso según la
configuración en el cargador.
Para micrófonos con cuello de cisne
Para micrófonos de cuerpo, de mano
Power
Link
y de frontera.
Conexión del micrófono a la
ranura del cargador
39
Page 40
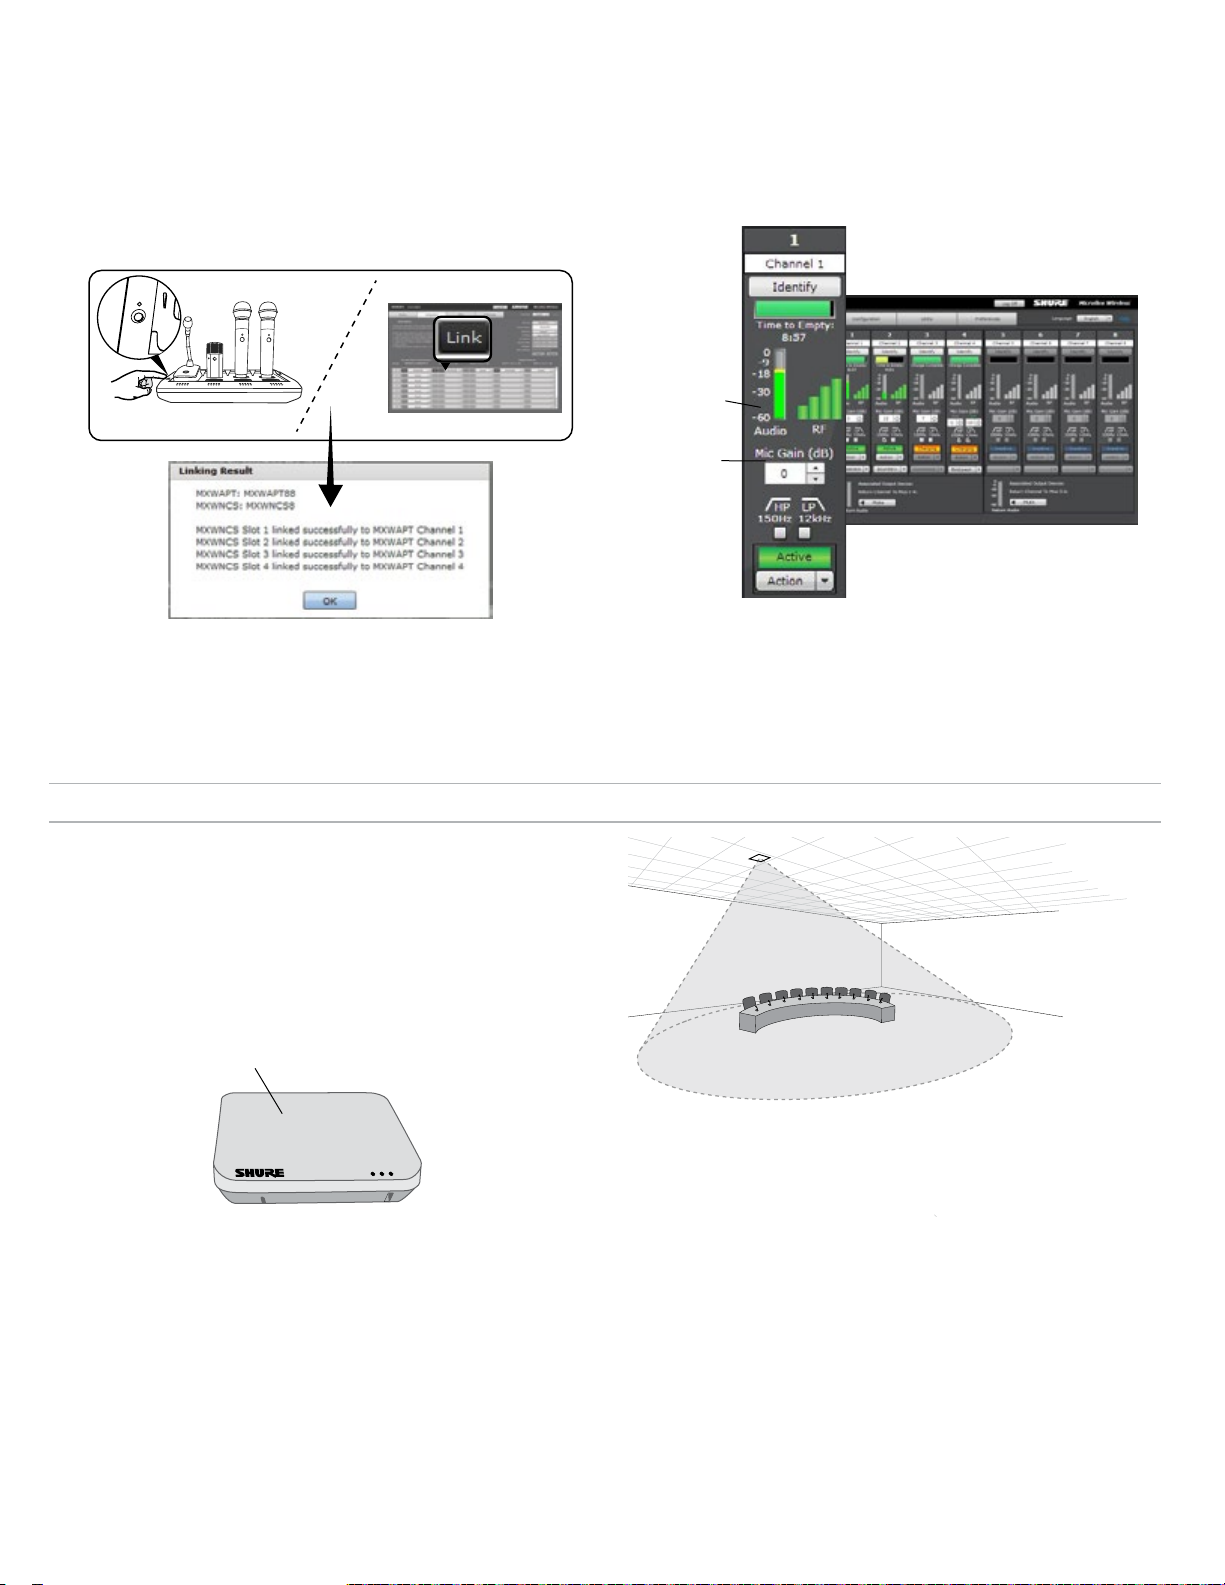
2. Enlace los micrófonos a los canales.
7
8
6
5
link
Use el programa de control o la estación de carga para enlazar los
micrófonos con canales de APT. Si se desea, es posible desactivar esta
función en la estación de carga para que el enlace se pueda realizar
solamente desde el programa de control:
- Programa de control: En la página Configuración, pulse el botón Enlazar
para cada cargador en el grupo.
-
Estación de carga: Oprima sin soltar botón Enlazar por 6 segundos. Los LED
destellan durante el proceso y se vuelven verde continuo cuando se completa el
enlace.
3. Retire los micrófonos y pruebe el audio
Pruebe el audio de cada micrófono y ajuste su ganancia si es necesario
en la ficha Monitor del programa de control. Se debe fijar la ganancia
en un nivel en que se esté registrando audio (verde/amarillo) en el
indicador de señal pero no se esté limitando (rojo).
Indicador de señal
Ajuste de ganancia
Ficha Monitor
Montaje del transceptor de punto de acceso (APT)
El APT irradia RF en un patrón de cardioide que es más intenso saliendo de
la cara del dispositivo. Oriente el APT hacia las zonas de cobertura prevista.
No bloquee la línea visual y manténgase alejado de los objetos metálicos
grandes.
Importante: Siempre efectúe una prueba de recorrido completa para
comprobar la cobertura antes de utilizar el sistema inalámbrico en una
conferencia o presentación. Ensaye colocando la antena en diferentes
posiciones hasta encontrar la ubicación óptima. De ser necesario, marque
los "puntos problemáticos" y pida a los presentadores o artistas que eviten
dichas áreas.
Cara del APT
Oriente hacia la zona del micrófono
40
Page 41
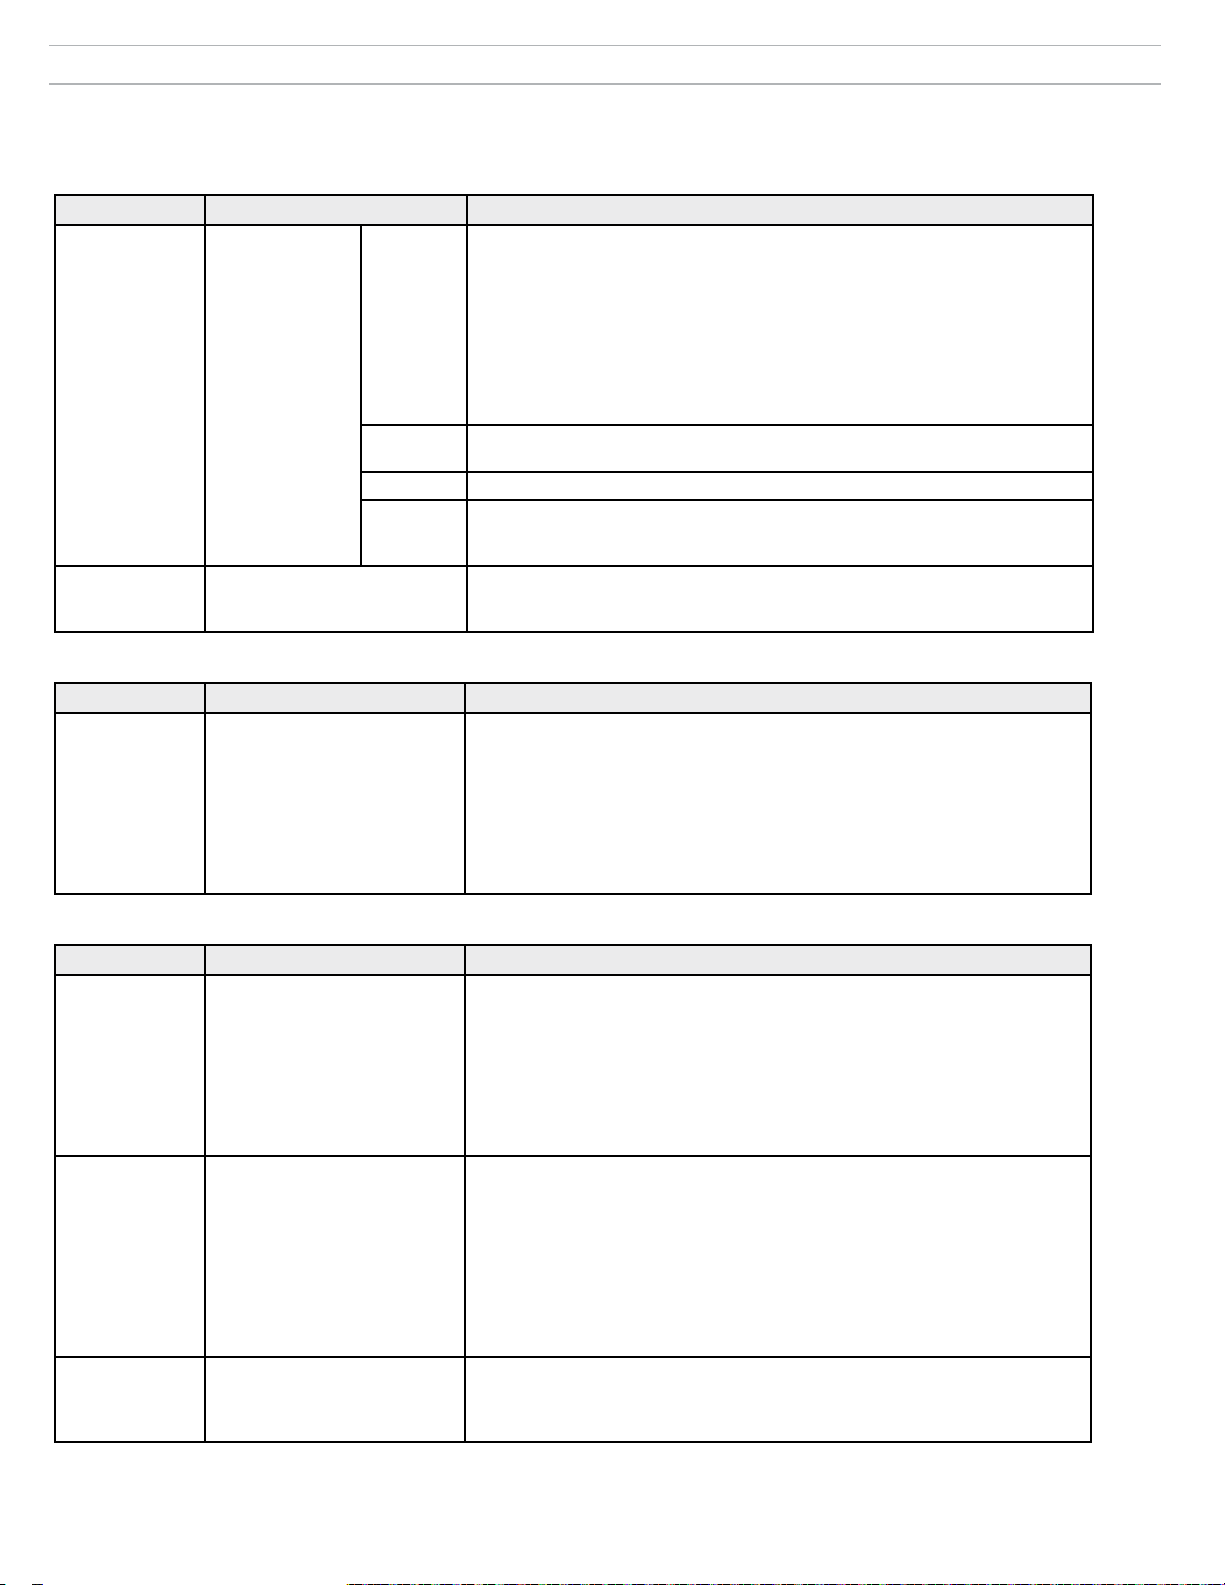
Localización de averías
La tabla siguiente ofrece soluciones típicas para la localización de averías en un sistema inalámbrico Microflex. Para más información sobre cada tema,
consulte la Guía del usuario de MXW hallada en www.shure.com y que también se incluye con el dispositivo Flash USB.
Audio
Problema Indicador Solución
• Revise los cables
• Revise que los transmisores estén encendidos y los canales no estén silenciados
• Revise que los medidores de entrada estén en buena condición en la ficha Monitor
del programa de control MXW. Atenúe si el canal está limitando.
• Revise los medidores de salida en el panel delantero de la interfaz de red de audio
(ANI) y en el programa de control de la ANI. Utilice auriculares para escuchar la
señal de audio de la ANI. Atenúe si el canal está limitando.
• Revise que el nivel de salida de la ANI coincida con la entrada del equipo al que se
conecta.
• Verifique que el APT no se encuentre efectuando un escaneo de espectro.
• Compruebe que todos los dispositivos tienen una conexión de red estable
• Use el programa Dante Controller (DC) para verificar las suscripciones de canal
• Coloque el dispositivo en un grupo para encaminar el audio automáticamente
• Verifique que la subred de los parámetros de audio de red del Transceptor de
punto de acceso coincida con la subred de la interfaz de red de audio
• Realice un escaneo de espectro para monitorear la interferencia de RF
• Disminuya el número de canales para verificar si el sistema está sobrecargando el
espectro de RF
No hay audio
o audio
distorsionado
La interferencia de
RF está causando
pérdidas de señal
LED de audio de
red en la interfaz
de red de audio o
SCM820
El audio es intermitente
Verde
Verde
destellante
Rojo • Revise el reloj maestro en el DC (un MXWAPT debe ser el reloj maestro)
Apagado
Configuración de sistema y grupos de MXW
Problema Indicador Solución
• Compruebe que todos los dispositivos estén encendidos y conectados a la misma
red y a la misma subred
No se puede
asociar un
componente a un
grupo
El cuadro desplegable de
dispositivos no muestra el
componente deseado en la fila de
grupos en la ficha Configuración
• Abra la ficha Utilidad del programa de control MXW y deseleccione el filtro de
configuración para mostrar todos los dispositivos MXW en la red. Si el dispositivo
aparece como "OTROS", entonces es parte de otra configuración.
• Elimine la asociación del componente por medio de seleccionar 'ninguno' en la fila
de grupo de la otra configuración.
• Realice una reposición a valores de fábrica en ese dispositivo para eliminar la
asociación.
Red
Problema Indicador Solución
• Compruebe que los dispositivos estén encendidos
• Cerciórese de que la computadora y los equipos están en la misma red y
No es posible
conectarse con
el programa de
control desde una
computadora
El dispositivo no aparece en el
programa Web Device Discovery
de Shure
configurados con la misma subred.
• Desactive otras interfaces de red no utilizadas para conectar al dispositivo
(incluyendo WiFi)
• Revise que el servidor DHCP esté funcionando (si corresponde)
• Asegure que Bonjour esté funcionando en la computadora
• Si se conecta mediante el puerto 4 de la interfaz de red de audio (ANI), cerciórese
de que esté fijado en el modo conmutado.
• Descargue la versión más reciente de Adobe
• Verifique que la computadora y el dispositivo estén en la misma red y la misma
subred
El programa de
control tarda
mucho para cargar
El navegador de Internet no se
puede conectar a la interfaz de
control
• Verifique que las configuraciones del servidor de seguridad de Windows no
bloquean el programa de Shure.
• Fije el encaminador para que no envíe la puerta de enlace por omisión como parte
de DHCP
• Defina el programa Web Device Discovery de Shure para que abra por dirección IP
• Fije manualmente la computadora a una dirección IP estática en la misma red que
el dispositivo
El programa de
control tiene
un rendimiento
deficiente
Los indicadores se mueven
lentamente o no se visualizan en
tiempo real.
• Reduzca el número de cuadros o fichas que están abiertos en una misma
configuración
• Consulte la sección Red para configurar correctamente la red
®
Flash
®
41
Page 42
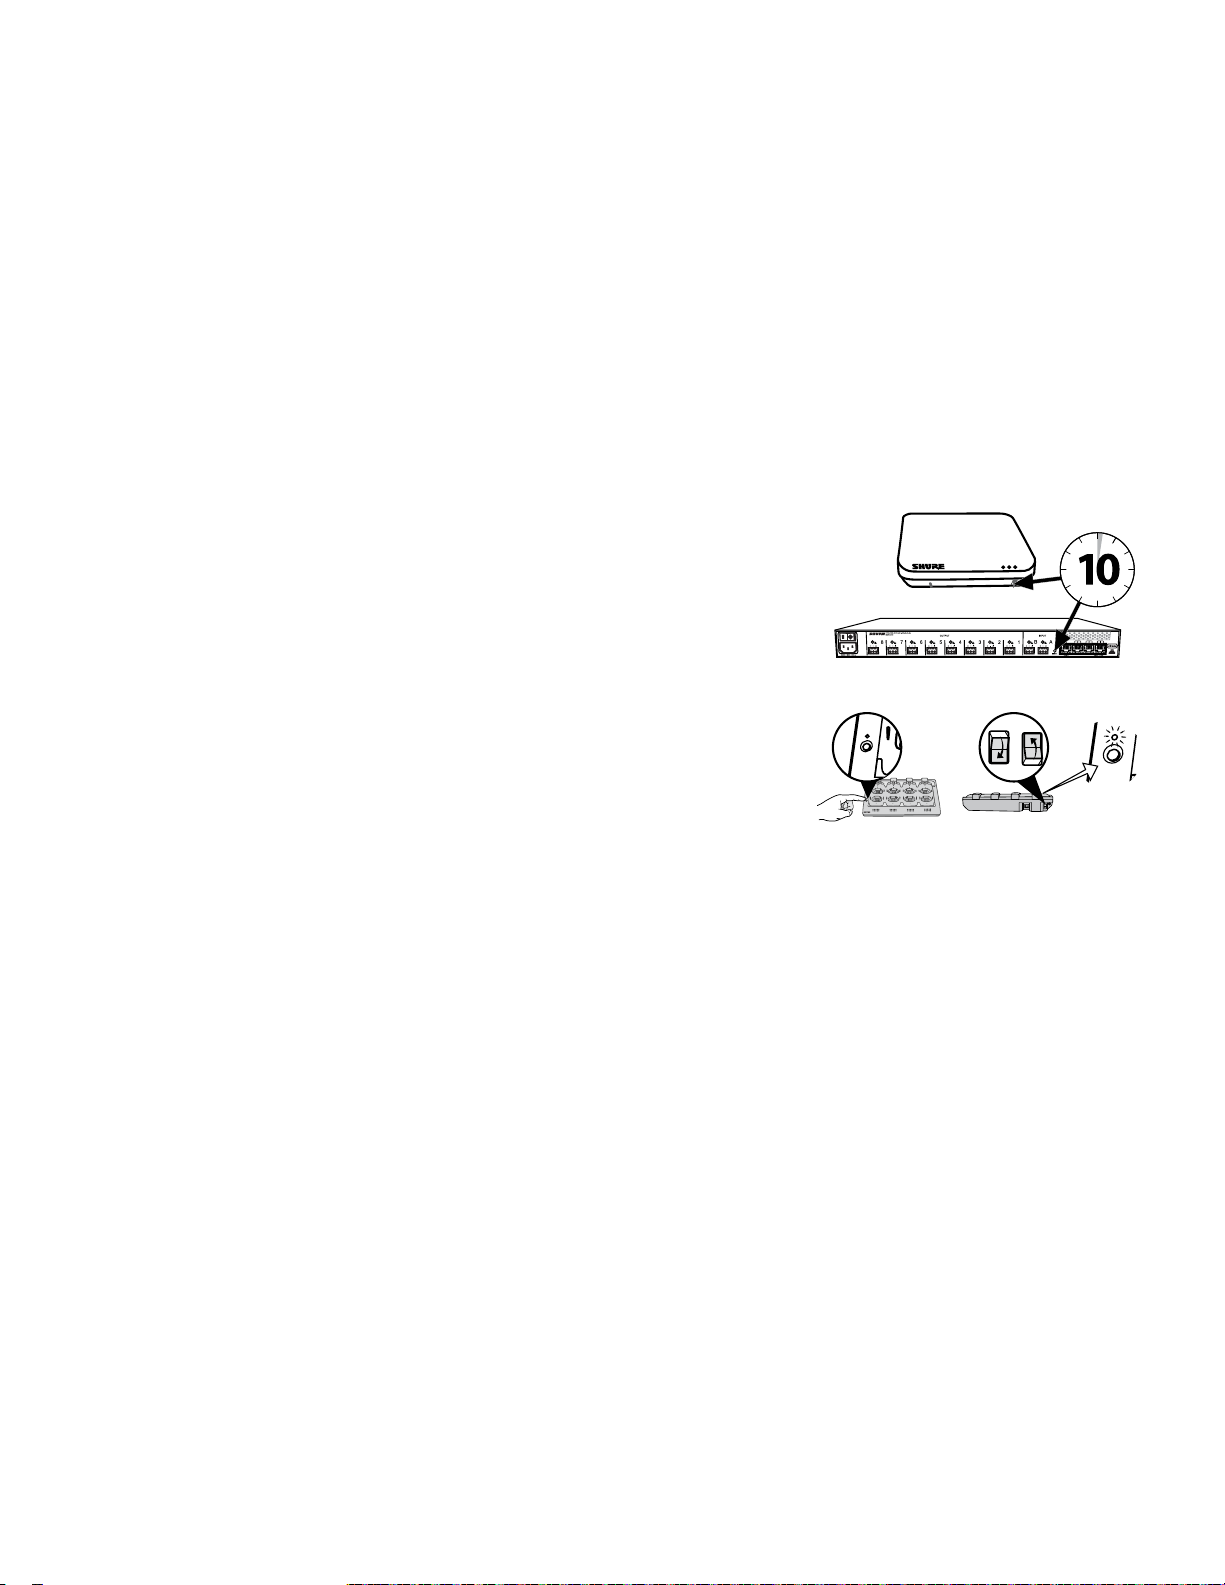
7
8
6
5
1
2
3
4
Link
Power
7
8
6
5
1
2
3
4
link
6
5
1
2
link
+
lockout
power
ethernet
network audio
push to solo | hold to mute
-9
-18
-24
-36
-48
-60
0
-9
-12
-18
-24
0
aux
mic
adjust
line
sig/clip
mute
INPUT
A
sig/clip
mute
OUTPUT
HEADPHONE
Audio Network Interface
MICROFLEX WIRELESS
B
1
2
3
4
5
6
7
8
line
aux
push to solo | hold to mute
A
sig/clip
mute
OUTPUT
B
1
2
3
4
5
6
7
8
line
aux
6
7
8
9
10
11
12
1
2
3
4
5
6
7
8
9
10
11
12
1
2
3
4
5
5
7
8
6
5
1
2
3
4
i
i
i i
i
i
i
i
i
i i
i
i
i
i
i
i
i i
i
i
i
i
i
i i
i
i
i
i
i
i
i i
i
i
i
i
i
i i
i
i
i
i
i
i
i i
i
i
i
i
i
i i
i
i
i
i
INPUT
A
OUTPUT
B
1
2
3
4
5
6
7
8
lockout
power
ethernet
network audio
push to solo | hold to mute
-9
-18
-24
-36
-48
-60
0
-9
-12
-18
-24
0
aux
mic
adjust
line
sig/clip
mute
sig/clip
mute
HEADPHONE
MICROFLEX WIRELESS
line
aux
Recursos adicionales
Para recibir asistencia adicional sobre localización de averías o más información sobre instalaciones complejas, comuníquese con Shure para hablar con un
representante de asistencia al cliente. En el continente americano, llame al grupo de apoyo de sistemas al 847-600.8541. Para usuarios en otros lugares,
visite www.shure.com para buscar el contacto de asistencia para su región.
Para recibir asistencia sobre red de audio digital, pautas para conexión en red avanzada y localización de averías del software Dante, visite el sitio Web de
Audinate en www.audinate.com.
Ajustes de fábrica
Si un dispositivo no aparece en la red después de utilizar los métodos de localización de averías, realice una reposición en el equipo específico para volver a
la configuración predeterminada. La configuración predeterminada de fábrica está diseñada para compatibilidad automática con otros dispositivos de Shure
conectados en red.
Nota: La ejecución de una reposición a valores de fábrica eliminará los grupos MXW y las asociaciones de enlace. La contraseña para acceder el programa
revertirá a
Desde el equipo
Transceptor de punto de acceso
Interfaz de red de audio
admin.
Oprima sin soltar el botón de reposición por 10 segundos. El LED de estado de audio de la red
se apagará brevemente para indicar que se está reiniciando la unidad.
PRECAUCION:
micrófono guardadas en el dispositivo.
La reposición a valores de fábrica elimina todas las asociaciones de grupo y enlaces de
Oprima sin soltar el botón de reposición por 10 segundos. Los LED del panel delantero
destellarán para indicar que se está reiniciando la unidad.
Estación de carga en red
a. Desactive el interruptor de encendido.
b. Oprima el botón Enlazar.
c. Mientras oprime el botón Enlazar, active el interruptor de encendido.
d. Continúe oprimiendo el botón Enlazar por 12 segundos hasta que se ilumine el LED en ámbar.
Desde el programa de control
1. Abra la ficha Utilidad del programa de control MXW.
2. Seleccione el botón Editar propiedades del dispositivo.
3. Marque la casilla de Ajustes de fábrica.
4. Seleccione Añadir actualizaciones para guardar el ajuste en la cola de cambios.
5. Repita para los dispositivos adicionales.
6. Pulse Aplicar Todos para aplicar los cambios a todos los dispositivos cuyas propiedades han sido
modificadas.
42
Page 43
Información de seguridad
PRECAUCIONES DE SEGURIDAD
Los posibles resultados del uso incorrecto de este producto se denotan
por medio de uno de dos símbolos - "ADVERTENCIA" y "PRECAUCION" según la inminencia del peligro y el grado de severidad de los daños.
ADVERTENCIA: Si se pasan por alto estas advertencias se
podrían causar lesiones graves o mortales como resultado del uso
incorrecto.
PRECAUCION: Si se pasan por alto estas precauciones se podría
causar lesiones moderadas y daños a la propiedad como resultado
del uso incorrecto.
ADVERTENCIA
EL ESCUCHAR REPRODUCCIONES DE AUDIO A NIVELES EXCESIVOS
DE VOLUMEN PUEDE CAUSAR DAÑOS PERMANENTES AL OIDO. USE EL
VOLUMEN MAS BAJO POSIBLE. La exposición prolongada a niveles sonoros
excesivamente intensos puede dañar los oídos y causar una pérdida permanente del
oído causada por ruidos (NIHL). Respete los lineamientos dados a continuación, los
cuales fueron establecidos por la Administración de Salud y Seguridad Ocupacional
(OSHA) de los EE.UU. e indican el tiempo máximo que puede escucharse un nivel
determinado de presión sonora antes de producirse daños al oído.
90 dB SPL
por 8 horas
110 dB SPL
por ½ hora
ADVERTENCIA
• Los conjuntos de baterías pueden estallar o soltar materiales tóxicos. Riesgo de
incendio o quemaduras. No abra, triture, modifique, desarme, caliente a más de
60°C (140°F) ni incinere
• Siga las instrucciones del fabricante
• Utilice únicamente el cargador Shure para cargar las baterías recargables Shure.
• ADVERTENCIA: Si se sustituye la batería incorrectamente, se crea el riesgo de
causar una explosión. Sustitúyala únicamente por otra igual o de tipo equivalente.
• Nunca ponga baterías en la boca. Si se tragan, acuda al médico o a un centro
local de control de envenenamiento
• No ponga en cortocircuito; esto puede causar quemaduras o incendios
• No cargue ni utilice baterías diferentes de las baterías recargables Shure.
• Deseche los conjuntos de baterías de forma apropiada. Consulte al vendedor
local para el desecho adecuado de conjuntos de baterías usados.
• Las baterías (conjuntos de baterías o baterías instaladas) no deben exponerse al
calor excesivo causado por la luz del sol, las llamas o condiciones similares.
ADVERTENCIA: Si se sustituye la batería incorrectamente, se crea el riesgo de
causar una explosión. Funciona sólo con baterías compatibles con dispositivos
Shure.
Nota: Use sólo con la fuente de alimentación incluida o una equivalente aprobada
por Shure.
1. 經審驗合格之射頻電信終端設備,非經許可,公司、商號或使用者均不得擅自變更
頻率、加大功率或變更原設計之特性及功能。
2. 射頻電信終端設備之使用不得影響飛航安全及干擾合法通信;經發現有干擾現象
時,應立即停用,並改善至無干擾時方得繼續使用。所謂合法通信,係指依電信法
規定作業之無線電信。
3. 輸入、製造射頻電信終端設備之公司、商號或其使用者違反本辦法規定,擅自使用
或變更無線電頻率、電功率者,除依電信法規定處罰外,國家通訊傳播委員會並得
撤銷其審驗合格證明。
4. 減少電磁波影響,請妥適使用
95 dB SPL
por 4 horas
115 dB SPL
por 15 minutos
100 dB SPL
por 2 horas
120 dB SPL
Evítese o se podrían causar
daños
105 dB SPL
por 1 hora
MXW1
Transmisores de micrófono de cuerpo:
Estos transmisores han sido probados y hallados en cumplimiento
con los límites internacionales de exposición a la radiación
establecidos para un ambiente no controlado. Este equipo está
en contacto directo con el cuerpo del usuario en condiciones de
funcionamiento normales. Estos transmisores no deben ser colocados
ni ponerse en funcionamiento en el mismo lugar ni en conjunto con
ninguna otra antena o transmisor.
MXW2, MXW6, MXW8, MXWAPT4, MXWAPT8
Transmisores de micrófono de mano, Transmisores de micrófono
de frontera para sobremesa, Transmisores de micrófono con cuello
de ganso para sobremesa, Transmisores de punto de acceso
inalámbricos:
Estos transmisores móviles son para uso a distancias mayores de 20
centímetros del cuerpo humano. Estos transmisores móviles no están
sujetos a los requisitos de prueba de las normas internacionales de
exposición a la radiación debido a su proximidad al cuerpo del usuario
en el caso de su uso previsto y su salida de baja potencia. Estos
transmisores móviles se deben colocar o instalar a una distancia
mínima de 20 cm de cualquier persona y no deben ser colocados
ni ponerse en funcionamiento en el mismo lugar ni en conjunto con
ninguna otra antena o transmisor.
Información importante sobre el producto
El equipo está previsto para usarse en aplicaciones de audio
profesional.
Las pruebas de cumplimiento de las normas EMC suponen el uso de
tipos de cables suministrados y recomendados. El uso de otros tipos
de cables puede degradar el rendimiento EMC.
Los cambios o modificaciones que no tengan la aprobación expresa
de Shure Incorporated podrían anular su autoridad para usar este
equipo.
Se recomienda respetar las normas de reciclado de la región relativas
a desechos electrónicos, empaquetado y baterías.
Nota: Este dispositivo no está diseñado para conectarse directamente
a una red pública de internet.
Información para el usuario
Este equipo ha sido probado y hallado en cumplimiento con los
límites establecidos para un dispositivo digital categoría B, según la
Parte 15 de las normas de la FCC. Estos límites han sido diseñados
para proporcionar una protección razonable contra las interferencias
perjudiciales en instalaciones residenciales. Este equipo genera,
utiliza y puede irradiar energía de radiofrecuencia y, si no se instala y
utiliza de acuerdo con las instrucciones, puede causar interferencias
perjudiciales a las comunicaciones de radio. Sin embargo, no se
garantiza que no ocurrirán interferencias en una instalación particular.
Si este equipo causara interferencias perjudiciales a la recepción de
radio o televisión, que se puede determinar apagando y encendiendo
el equipo, se recomienda tratar de corregir la interferencia realizando
una de las siguientes acciones:
• Cambie la orientación o la ubicación de la antena receptora.
• Aumente la distancia entre el equipo y el receptor.
• Conecte el equipo a un tomacorriente de un circuito diferente al
que está conectado el receptor.
• Consulte al concesionario o a un técnico de radio/TV con
experiencia para recibir ayuda.
43
Page 44

Certificaciones
Este dispositivo satisface las normas de la Parte 15 del reglamento de FCC.
Este dispositivo cumple las normas RSS de excepción de licencia
de Industry Canada. El uso de este dispositivo está sujeto a las dos
condiciones siguientes: (1) no se permite que este dispositivo cause
interferencias, y (2) este dispositivo deberá aceptar cualquier interferencia,
incluso la que pudiera causar su mal funcionamiento.
Le présent appareil est conforme aux CNR d'Industrie Canada applicables
aux appareils radio exempts de licence. L'exploitation est autorisée aux
deux conditions suivantes : (1) l'appareil ne doit pas produire de brouillage,
et (2) l'utilisateur de l'appareil doit accepter tout brouillage radioélectrique
subi, même si le brouillage est susceptible d'en compromettre le
fonctionnement.
Cumplimiento con la Ley de la Radio y la Ley Comercial de
Telecomunicaciones de Japón Este dispositivo ha sido autorizado de
conformidad con la Ley sobre la Radio en Japón (電波法) y la Ley Comercial
de Telecomunicaciones de Japón (電気通信事業法). Este dispositivo
no deberá ser modificado (de lo contrario el número de designación de
autorización quedaría invalidado).
Cumple los requisitos de seguridad eléctrica según IEC 60065.
Este producto cumple los requisitos esenciales de las directrices europeas
pertinentes y califica para llevar el distintivo CE.
La declaración de homologación de CE puede obtenerse de Shure
Incorporated o de cualquiera de sus representantes europeos. Para
información de contacto, por favor visite www.shure.com
La declaración de homologación de CE se puede obtener en: www.shure.
com/europe/compliance
Representante europeo autorizado:
Shure Europe GmbH
Casa matriz en Europa, Medio Oriente y Africa
Departamento: Aprobación para región de EMEA
Jakob-Dieffenbacher-Str. 12
75031 Eppingen, Alemania
Teléfono: 49-7262-92 49 0
Fax: 49-7262-92 49 11 4
Correo electrónico: [email protected]
MXWNCS4, MXWNCS8
Autorizado bajo la provisión de verificación de las normas de la FCC
Parte 15B.
Etiqueta de cumplimiento con ICES-003 de Industry Canada:
CAN ICES-3 (B)/NMB-3(B)
Nota: Vea la etiqueta ubicada en la parte inferior del compartimiento
del cargador para ver los distintivos FCC, CE, C-Tick, y las categorías
eléctricas.
MXW1, MXW2, MXW6, MXW8, MXWAPT4, MXWAPT8
Homologado según las normas de la FCC, Parte 15.
FCC: DD4MXW1, DD4MXW2, DD4MXW6, DD4MXW8,
DD4MXWAPT4, DD4MXWAPT8.
Satisface los requisitos aplicables de la norma RSS-213.
IC: 616A-MXW1, 616A-MXW2, 616A-MXW6, 616A-MXW8,
616A-MXWAPT4, 616A-MXWAPT8.
Marcas comerciales
Audinate®, el logotipo de Audinate y Dante son marcas comerciales de
Audinate Pty Ltd.
Page 45
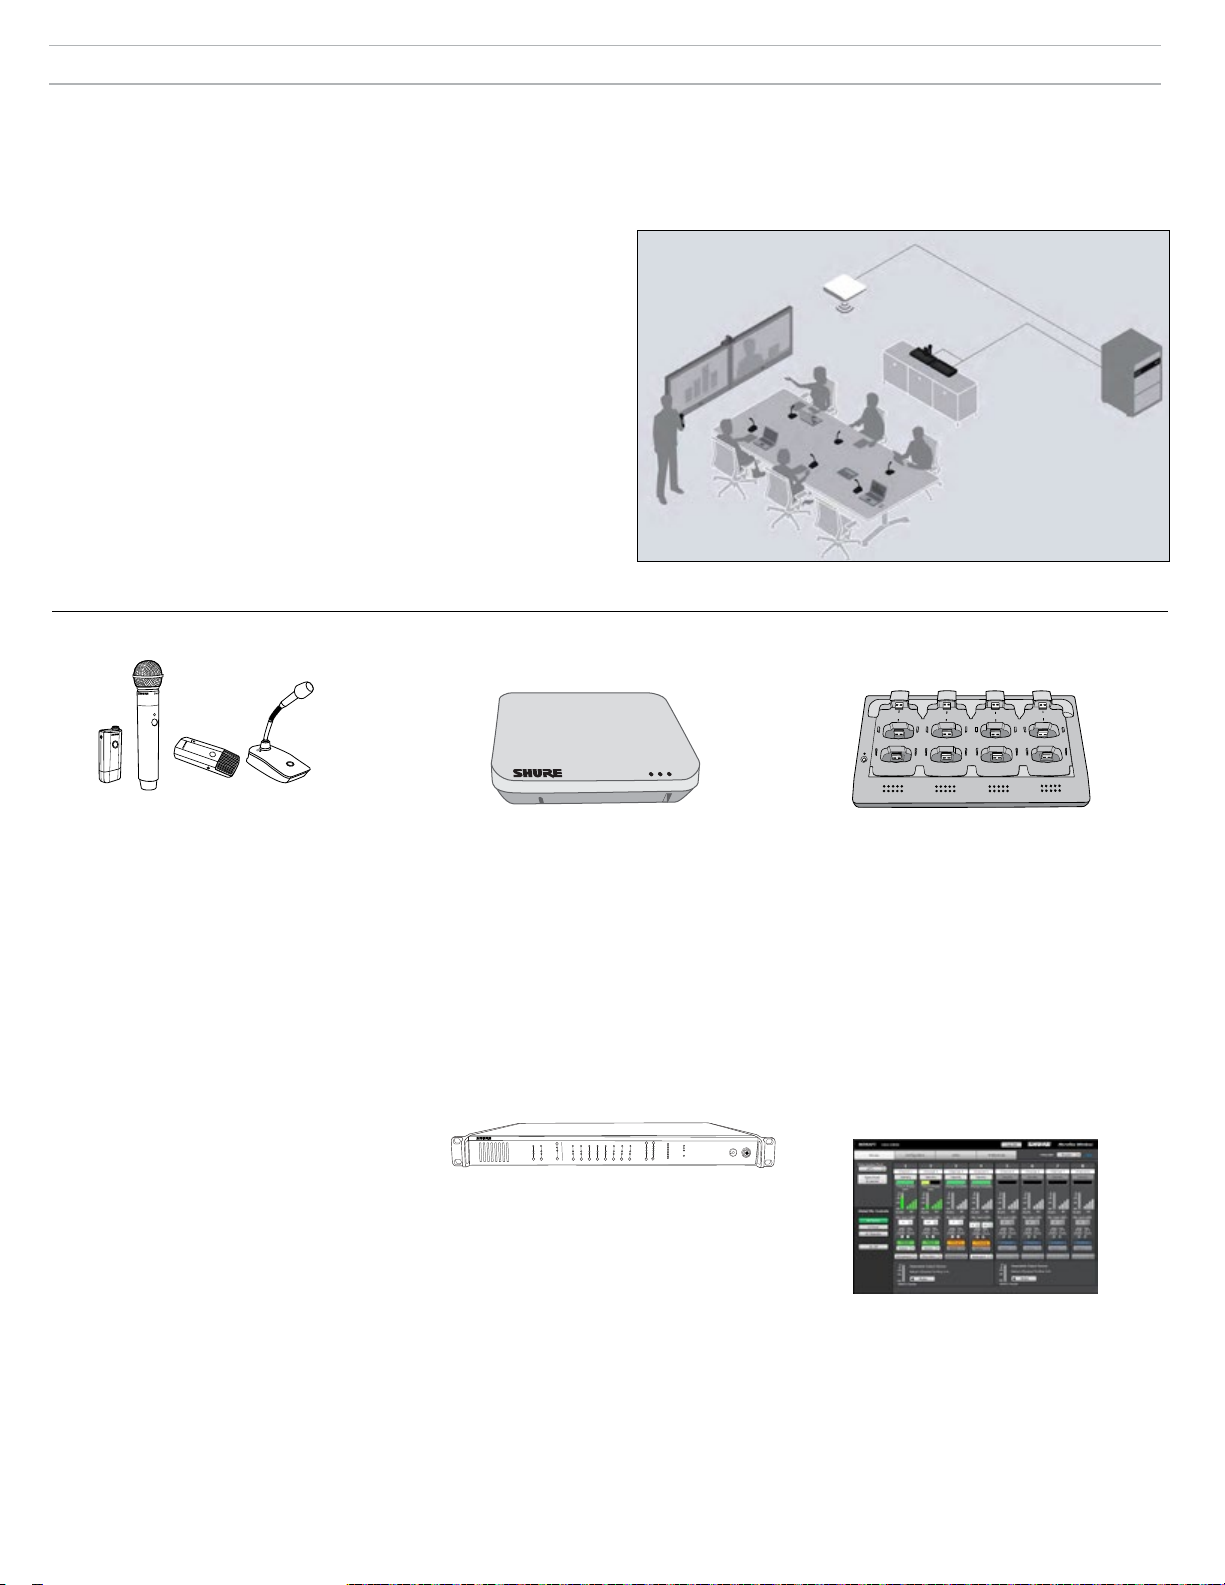
Descrizione generale
Il microfono Shure serie wireless Microflextm (MXW) è una soluzione completa per sale riunioni e sale assemblee flessibili. È provvisto di sistema di gestione
automatica dei canali RF, microfoni wireless ricaricabili con crittografia AES256 e rete audio digitale (Dante
tm
). La stazione di carica in rete permette
di ricaricare microfoni a effetto di contorno e a collo d'oca per applicazioni da tavolo, così come modelli da mano e body-pack destinati a formazioni e
presentazioni aziendali. L'access point MXW, installato a soffitto o a parete, consente una comunicazione discreta tra i microfoni wireless e la rete audio
digitale. Negli impianti in cui occorre utilizzare simultaneamente fino a 40* microfoni nella stessa area, è possibile prevedere access point multipli (*a seconda
della regione). Un software basato su browser Web permette di eseguire il monitoraggio e il controllo in remoto da qualsiasi computer connesso alla rete.
Risorse supplementari
La presente guida rapida contiene le informazioni essenziali per creare un
sistema MXW di base a otto canali. Di seguito è riportato un elenco di risorse
supplementari per la serie MXW.
Manuale MXW completo: Il manuale completo contiene informazioni esaustive
sul sistema MXW, quali descrizioni dettagliate dei componenti, topologie di
rete, migliori prassi di gestione RF e istruzioni per la navigazione all'interno del
software di controllo. Il manuale è disponibile sul sito www.shure.com e sulla
penna USB in dotazione con il ricetrasmettitore per access point.
Assistenza Shure: Per ricevere assistenza nella risoluzione dei problemi
o consulenza relativa a impianti complessi, rivolgetevi a un rappresentante
dell'assistenza Shure. In America potete contattare il servizio di assistenza al
numero 847-600-8541. Gli utenti in altre parti del mondo possono consultare il
sito www.shure.com per trovare i contatti regionali.
Audinate: Per assistenza sulla rete audio digitale, per istruzioni avanzate sul
collegamento in rete e la risoluzione dei problemi nel software Dante
tm
, visitate
il sito Web Audinate all'indirizzo www.audinate.com.
Panoramica dei componenti
MXW6MXW1 MXW8
MXW2
Trasmettitori per microfoni
I microfoni MXW trasmettono all'access point un
segnale audio wireless criptato. Sono disponibili
quattro tipologie.
Body-pack ibrido (MXW1)
Il body-pack è fissato tramite cintura o
cinghia per consentire la comunicazione
mobile lasciando le mani libere. È provvisto
di un ingresso TQG per il collegamento
lavalier e di un microfono omnidirezionale
integrato.
Modello da mano (MXW2)
Il modello da mano permette agli utenti di
comunicare utilizzando le rinomate capsule
microfoniche SM58, SM86, BETA58 e VP68
di Shure.
Modello a effetto di contorno (MXW6/C,
MXW6/O)
Installato su scrivania o tavolo, il
trasmettitore a effetto di contorno permette
di trasmettere l'audio integrandosi
discretamente in qualsiasi contesto di
teleconferenza.
Base da scrivania per modelli a collo d'oca
(MXW8)
La base da scrivania è compatibile con i
microfoni a collo d'oca Microflex da 5, 10 e
15 pollici.
I microfoni MXW1, MXW6 e MXW8 sono muniti
di uscita per cuffie per il monitoraggio dell'audio,
ad esempio un canale per l'interpretazione
simultanea.
Ricetrasmettitore per access point
(APT) (MXWAPT4, MXWAPT8)
Il ricetrasmettitore per access point (unità a
4 e 8 canali), installabile a parete o a soffitto,
consente la gestione di connessioni audio
wireless criptate con i microfoni. Fungendo da
hub di sistema, trasporta il segnale audio digitale
ai vari microfoni wireless e ad altri dispositivi
Dante sulla stessa rete. L'APT include un server
Web contenente il software MXW, impiegato per
il monitoraggio, la configurazione e il controllo in
remoto del sistema.
MICROFLEX WIRELESS
B
OUTPUT
INPUT
line
aux
sig/clip
sig/clip
mute
mute
push to solo | hold to mute
-9
0
line
-18
-9
-12
aux
-24
-18
-36
mic
-24
-48
-60
adjust
0
8
7
6
5
4
3
2
1
A
Audio Network Interface
power
ethernet
network audio
HEADPHONE
lockout
Interfaccia di rete audio
(MXWANI4, MXWANI8)
L'interfaccia di rete audio (4 e 8 canali) è un
dispositivo di rete Dante che fornisce uscite e
ingressi audio analogici per il sistema MXW.
È provvisto di uno switch Gigabit Ethernet a 4
porte che consente il collegamento di un access
point MXW, un computer e fino a due stazioni di
carica MXW in rete.
2
1
5
6
4
3
7
8
Stazione di carica in rete
(MXWNCS4, MXWNCS8)
La stazione di carica in rete (modelli con 4 e 8
slot) permette di caricare simultaneamente fino a
4 (o 8) microfoni MXW. Rende inoltre possibile il
collegamento dei microfoni ai canali dell'access
point e trasmette in rete i dati relativi alla batteria
al software di controllo.
Importante: i microfoni a collo d'oca con base
da tavolo (MXW8) occupano due slot di carica.
Ad esempio, per otto microfoni MXW8 sono
necessarie due stazioni di carica MXWNCS8
(16 slot di carica in totale).
Software di controllo MXW
Il software MXW permette di controllare
in remoto tutte le principali funzioni di
configurazione, monitoraggio e gestione. Il
software è accessibile da qualsiasi PC o Mac
connesso alla rete e si apre in un browser Web
tramite Adobe® Flash®.
45
Page 46
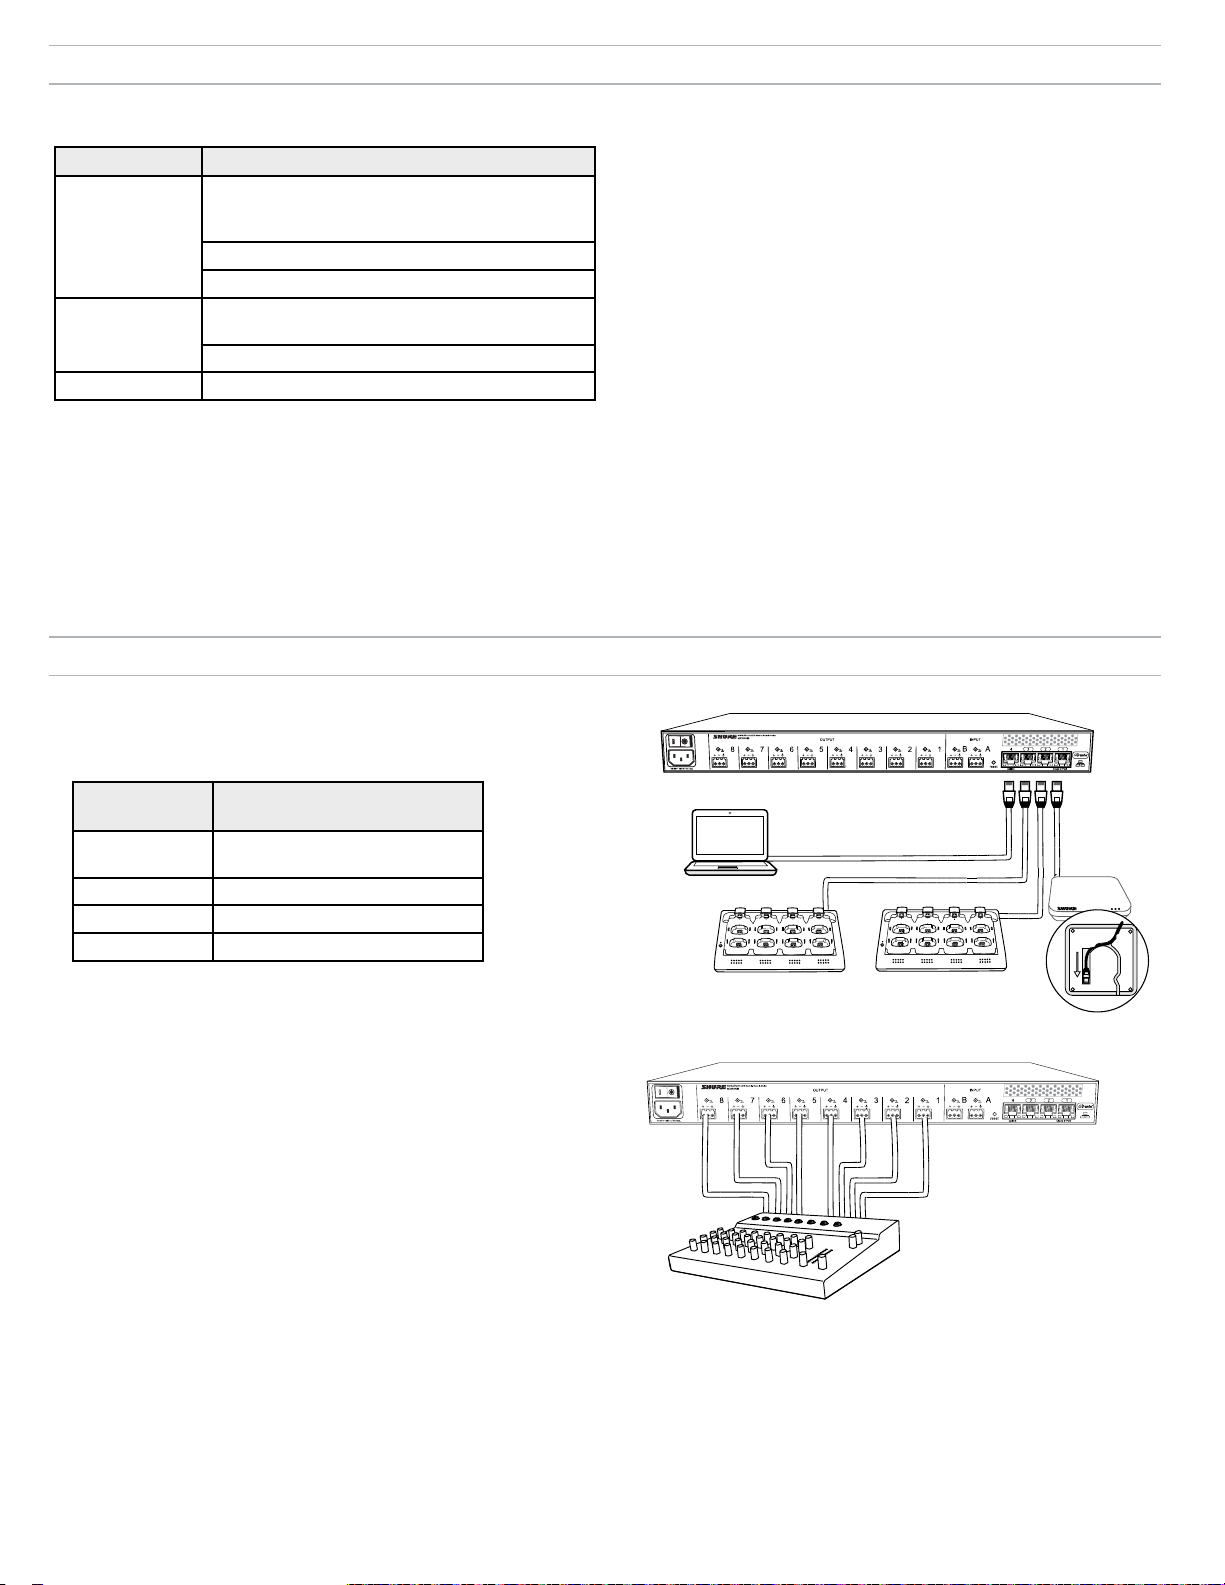
Inventario delle apparecchiature
Accessori inclusi
Componente Accessorio
Unità flash USB Shure (contiene le applicazioni
Shure Web Device Discovery, Shure Firmware
APT
Update Manager e i manuali utente)
Piastra di montaggio
Rivestimento verniciabile
Kit componenti di fissaggio (viti per installazione su
ANI
rack, connettori per cavi)
Cavo di alimentazione IEC
NCS Adattatore di alimentazione c.c.
Collegamento dei componenti
1. Collegamento dei componenti MXW
Realizzate l'interconnessione dei componenti MXW usando i cavi
Ethernet schermati. Usate lo switch a 4 porte sull'interfaccia di rete audio
(ANI) o collegate tutti i componenti a uno switch Gigabit separato.
Componenti aggiuntivi
Cavi audio
I cavi audio schermati permettono di collegare l'ANI a un mixer, DSP o
un dispositivo per teleconferenza.
Cavi Ethernet
I cavi schermati Cat5e (o di categoria superiore) permettono di collegare
alla rete i componenti MXW.
Computer
Utilizzate un PC o Mac per accedere all'interfaccia del sistema MXW da
un browser Web.
Porta di rete
ANI
① Porta 1 (PoE)
A componente
Ricetrasmettitore per access point
(APT)
② Porta 2 Stazione di carica in rete (NCS)
③ Porta 3 NCS aggiuntiva (opzionale)
④ Porta 4 Computer
come impostazione predefinita, i dispositivi MXW sono impostati sulla
Nota:
modalità automatica (DHCP) in modo da essere automaticamente configurati sulla
base delle impostazioni IP compatibili. In assenza di un server DHCP, i dispositivi
utilizzeranno un formato di indirizzo Link Local (169.254.x.x).
2. Connessione delle uscite analogiche dell'ANI
Usate i cavi audio schermati per collegare le uscite dell'ANI a un
mixer, DSP o dispositivo per teleconferenza (fate riferimento al kit di
componenti di fissaggio in dotazione con l'ANI per garantire il corretto
collegamento dei cavi sui connettori).
④
①
③
1
4
2
1
3
5
7
6
8
2
5
6
②
4
3
7
8
46
Page 47
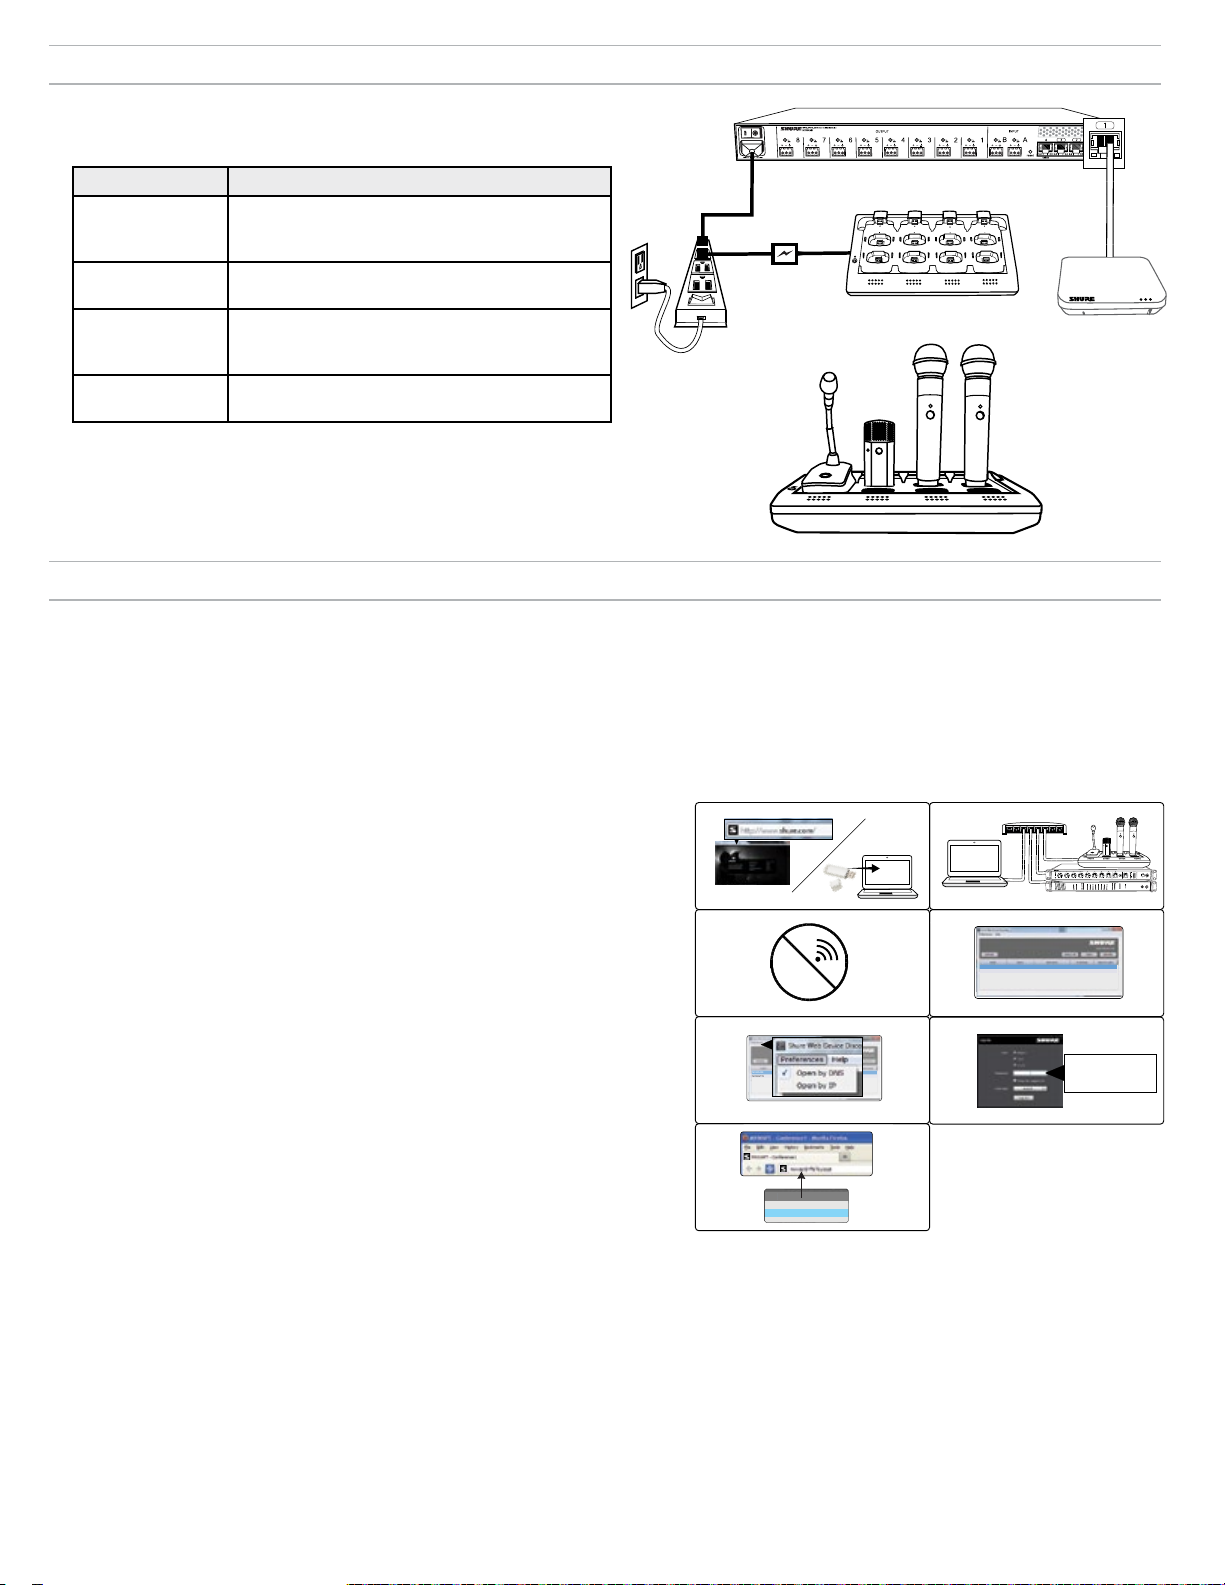
Alimentazione
②
④
①
7
8
6
5
1
2
3
4
7
8
6
5
1
2
3
4
③
MXWANI8 mxwani8-ffeee5.local
192.168.200.22
Dante
Dante
ROOM 5
MXWAPT8
mxwapt8-ffaaa2.local
192.168.200.23
CONFERENCE
mxwani-aa1.local
192-168-200-22
mxwapt8-ffe761.local
192-168-200-23
Collegate a una sorgente di alimentazione e accendete i componenti.
I LED su ciascun componente si illuminano.
①
Class 0 PoE
Componente Sorgente di alimentazione
① ANI
② APT
Collegate il cavo IEC a una sorgente di
alimentazione CA e accendete il sistema tramite
l'interruttore generale.
Collegate alla porta 1 dell'ANI per l'alimentazione
PoE. Non vi è alcun interruttore generale.
③
1
2
5
6
4
3
7
8
②
Collegate il PS45 a una sorgente di alimentazione
③ NCS
CA e accendete il sistema tramite l'interruttore
generale.
④ Trasmettitori
Caricate i trasmettitori al massimo della capacità
prima dell'uso.
④
Accesso al software di controllo MXW
Il sistema MXW utilizza un software di controllo integrato nel dispositivo che permette di controllare in remoto tutte le principali funzioni di configurazione,
monitoraggio e gestione. Il software è accessibile da qualsiasi PC o Mac connesso alla rete e si apre in un browser Web tramite Adobe® Flash®.
Esistono due diverse interfacce di controllo per il sistema MXW:
• software di controllo MXW, accessibile dal ricetrasmettitore per access point e utilizzabile per la gestione del sistema MXW;
• software di controllo dell'interfaccia di rete audio, accessibile dall'interfaccia di rete audio e utilizzabile per la gestione esclusiva del dispositivo.
I seguenti passaggi descrivono la procedura per accedere al software di controllo MXW.
1. Installate l'applicazione Shure Web Device Discovery.
Scaricate l'applicazione Shure Web Device Discovery da www.shure.com o
dalla penna USB in dotazione con il ricetrasmettitore per access point MXW (lo
strumento Bonjour, necessario per l'esplorazione del dispositivo, è fornito insieme
all'applicazione e verrà installato automaticamente).
2. Verificate che il computer sia connesso alla rete MXW.
Il computer accede al software di controllo da un server Web incorporato sul
dispositivo. Tutti i dispositivi in rete devono essere connessi alla stessa rete (e
impostati sulla stessa sottorete).
3. Disattivate il WiFi.
Disattivate il WiFi sul PC per forzare l'accesso all'interfaccia di rete cablata.
4. Lanciate l'applicazione Shure Web Device Discovery.
Aprite l'applicazione per visualizzare tutti i dispositivi Shure sulla rete provvisti di
server incorporato per il software di controllo (MXWAPT, MXWANI e SCM820).
Usate il pulsante Identifica per provocare l'accensione del LED di un dispositivo e
5. Aprite il software di controllo MXW.
semplificarne l'identificazione.
Fate doppio clic su un ricetrasmettitore per access point qualsiasi per aprire il
software di controllo del sistema MXW. Fate doppio clic su un'interfaccia di rete
audio per aprire l'interfaccia software del dispositivo specifico. L'applicazione può
aprire il software di controllo tramite indirizzo IP o nome DNS (selezionabile dal
menu a discesa Preferenze).
6. Inserite la password predefinita.
Inserite la password predefinita 'admin' per accedere al software di controllo.
①
③
⑤
⑦
Wi-Fi
②
④
⑥
MXWANI8 mxwani8-ffeee5.local
ROOM 5
CONFERENCE
MXWAPT8
mxwapt8-ffaaa2.local
SCM820
1 2 3 4 5 6 7 8
gain
low cut
hi shelf
meter
push to solo | hold to mute
8
7
5
4
6
2
1
3
A
B
OUTPUT
INPUT
line
aux
sig/clip
sig/clip
mute
mute
push to solo | hold to mute
192.168.200.22
Dante
Dante
192.168.200.23
admin
®
IntelliMix
LIM
MASTER
AB
power
B
A
AUX IN
HEADPHONE
0
ethernet
-9
network audio
-18
automix link
-24
gain
dual mixer
-36
limiter
-48
L+R SUM
-60
lockout
MICROFLEX WIRELESS
Audio Network Interface
0
power
-9
0
line
ethernet
-18
-9
network audio
aux
-12
-24
HEADPHONE
-18
mic
-36
-24
-48
lockout
-60
adjust
7. Create un segnalibro per la pagina Web (raccomandato)
Create un segnalibro per l'indirizzo IP del dispositivo, se impostato su indirizzo
IP statico. Create un segnalibro del nome DNS del dispositivo se la modalità IP è
impostata su automatica (DHCP).
47
Page 48
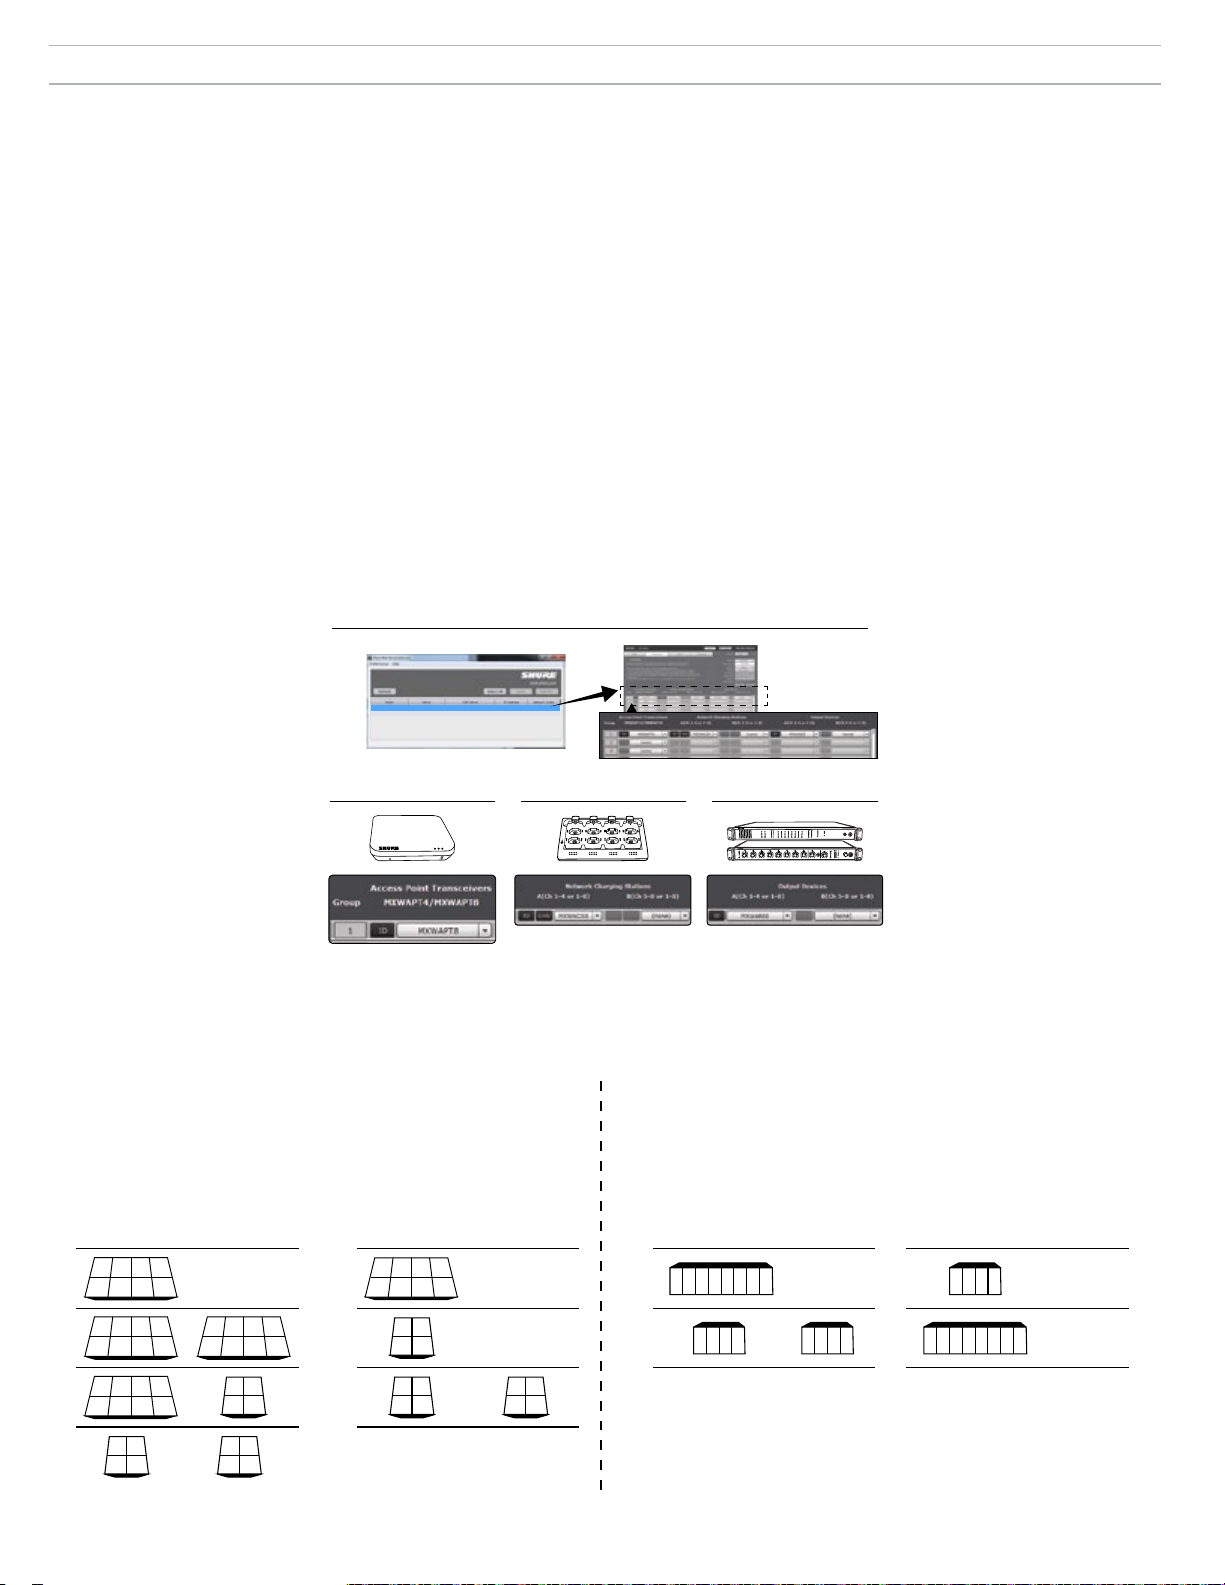
Associare componenti a un gruppo
Le seguenti istruzioni si riferiscono alla formazione di un gruppo MXW. Se un dispositivo non è disponibile nel menu a discesa, verificate che sia "aperto" e
presente sulla rete.
Suggerimento: utilizzate il pulsante ID per identificare un dispositivo. In questo modo si invia un comando al dispositivo che fa lampeggiare i LED
semplificandone l'identificazione.
1. Apertura di una configurazione
Utilizzate l'applicazione Shure Web Discovery per visualizzare tutti i
ricetrasmettitori per access point MXW (APT) sulla rete. Fate doppio
clic su un APT per aprire il software; quindi, accedete alla scheda
Configurazione.
2. Selezione di un ricetrasmettitore per access point (APT) per il
gruppo 1
Selezionate un APT aperto dal menu a discesa. Questa selezione
determina il numero di canali del gruppo (APT4 o APT8).
Nota: è necessario che l'APT usato per aprire il software di controllo sia incluso nel
gruppo 1. Gli altri APT collegati in rete (e aperti) sono quindi disponibili per eventuali
gruppi ulteriori.
3. Selezione delle stazioni di carica in rete
Associate una o due stazioni di carica in rete (NCS) all'access point. Vi
sono due motivi per associare più di un caricabatterie:
- utilizzo di due caricabatterie a quattro canali per un access point a otto canali;
- utilizzo di microfoni a collo d'oca, in quanto coprono lo slot anteriore e quello
posteriore del caricabatterie, dimezzando il numero di slot disponibili. Ad esempio
①
sono necessari due caricabatterie a otto canali per coprire un access point a otto
canali con microfoni a collo d'oca.
4. Selezione dei dispositivi di uscita audio
Selezionate uno o due dispositivi di uscita audio (MXWANI o SCM820)
per instradare automaticamente i canali audio digitali dall'access point.
Selezionate uno dei dispositivi indicati di seguito.
- Interfaccia di rete audio (MXWANI) con variazione a quattro o otto canali. È
possibile assegnare due unità a quattro canali o un'unità a otto canali a un APT a
otto canali.
- Mixer IntelliMix® Shure SCM820. È possibile selezionare unità SCM820 Dante
come dispositivi di uscita audio per il gruppo. In questo modo gli ingressi aux delle
unità SCM820 vengono instradati automaticamente ai microfoni per monitoraggio
personale (canale aux sinistro dell'unità SCM820 ai canali MXW 1 - 4; canale aux
destro ai canali MXW 5 - 8).
Nota: le associazioni di dispositivi e i dati di collegamento dei microfoni
vengono memorizzati continuamente sul dispositivo. Se il sistema MXW
viene spento e riavviato senza computer, i dispositivi rimarranno associati
all'access point.
MXWANI8 mxwani8-ffeee5.local 192.168.200.22
②
MXWAPT8
ROOM 5
CONFERENCE
mxwapt8-ffaaa2.local
192.168.200.23
③
Dante
Dante
4
2
1
3
7
5
6
8
④
A
B
INPUT
OUTPUT
line
aux
sig/clip
mute
SCM820
gain
1 2 3 4 5 6 7 8
low cut
hi shelf
meter
push to solo | hold to mute
sig/clip
mute
HEADPHONE
-18
mic
-36
-24
-48
lockout
-60
adjust
push to solo | hold to mute
®
IntelliMix
LIM
MASTER
AB
power
B
A
HEADPHONE
AUX IN
0
ethernet
-9
network audio
-18
automix link
-24
gain
-36
dual mixer
limiter
-48
-60
L+R SUM
lockout
MICROFLEX WIRELESS
Audio Network Interface
0
5
8
4
7
2
3
6
1
power
-9
0
line
ethernet
-18
-9
aux
network audio
-12
-24
Mappatura dei canali per i dispositivi inseriti in un gruppo
L'audio viene instradato dai microfoni alle uscite analogiche in base alle modalità di impostazione del gruppo nella scheda Configurazione. Lo schema
seguente illustra la mappatura dei canali per dispositivi inseriti in gruppi a otto e a quattro canali.
Stazione di carica in rete
Per coprire un gruppo comprendente dei microfoni a collo d'oca deve essere
Le uscite vengono assegnate a un'interfaccia di rete audio
impiegata una stazione di carica supplementare
Gruppo a 8 canali
Gruppo a 4 canali
Gruppo a 8 canali Gruppo a 4 canali
A B A B A B A B
2 3 4
1
1) 1) 1) 1)
5 6 7 8
(none) (none) (none)(none)
2 3 41
x x x x
Dispositivo di uscita audio
MXW o ad un mixer automatico SCM820
81 2 3 4 5 6 7
1 2 3 4
2 3 41
2) 2) 2) 2)
x x x x
2 3 41
3) 3)
x x x x
2
1
4)
3 4
5 6 7 8
x x x
x
5 6
7 8
5 6
7 8
1
3
x x
2
4
21
3 4
1 2 3 4
85 6 7
x x
48
1 2 3 4 x x x x
(none)(none)
Page 49
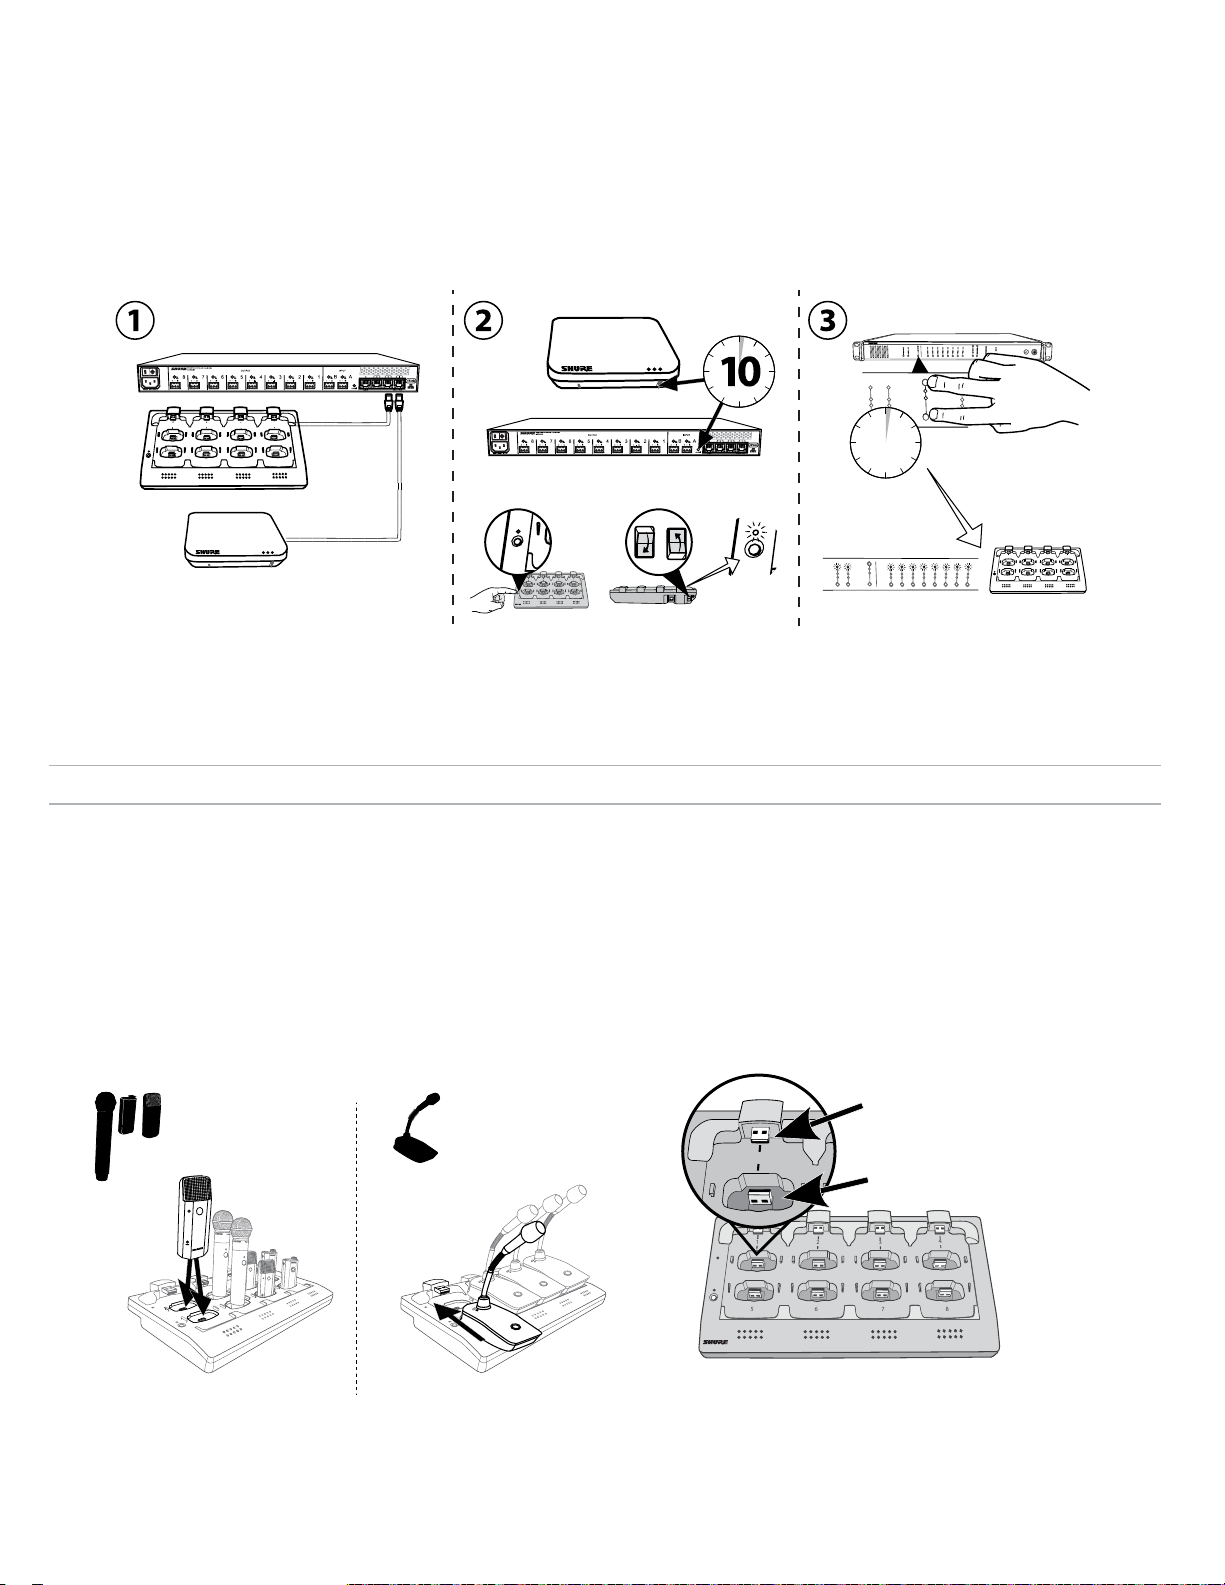
7
8
6
5
1
2
3
4
1
2
3
7
8
6
5
1
2
3
4
7
8
6
5
1
2
3
4
link
6
5
1
2
link
push to solo | hold to mute
2
3
4
5
6
7
8
lockout
power
ethernet
network audio
-9
-18
-24
-36
-48
-60
0
-9
-12
-18
-24
0
aux
mic
adjust
line
HEADPHONE
MICROFLEX WIRELESS
Impostazione automatica di un gruppo
Un gruppo MXW può essere associato senza utilizzare il software di controllo qualora la rete sia composta unicamente da un ricetrasmettitore per access
point (APT), da una stazione di carica in rete (NCS) e da un'interfaccia di rete audio (ANI). Per ottenere risultati ottimali, eseguite un ripristino delle
impostazioni di fabbrica sui dispositivi in modo da eliminare eventuali associazioni a gruppi preesistenti.
1. Collegate un APT, una NCS e un'ANI alla rete. La rete deve contenere solo un'unità per ciascun dispositivo.
2. Eseguite un ripristino delle impostazioni di fabbrica sui dispositivi (consultate la sezione dedicata al ripristino delle impostazioni di fabbrica).
3. Sul pannello anteriore dell'ANI, premete contemporaneamente entrambi i pulsanti di selezione del livello di ingresso e teneteli premuti per cinque secondi. I
LED di selezione del canale si accendono (colore verde) e l'indicatore audio lampeggia per indicare la corretta esecuzione dell'associazione.
MICROFLEX WIRELESS
Audio Network Interface
0
2
1
5
3
7
6
4
A
8
12
11
1
10
2
9
3
8
4
5
7
6
2
1
5
6
4
3
7
8
+
Power
Link
A
B
INPUT
sig/clip
mute
B
OUTPUT
INPUT
line
aux
sig/clip
sig/clip
mute
mute
A
B
line
aux
12
11
1
10
2
9
3
5
8
4
5
7
6
3
2
5
4
1
OUTPUT
line
aux
sig/clip
mute
push to solo | hold to mute
push to solo | hold to mute
OUTPUT
power
-9
0
line
ethernet
-18
-9
network audio
aux
-12
-24
HEADPHONE
-18
mic
-36
-24
-48
lockout
-60
adjust
1
sig/clip
mute
4
2
1
8
7
6
3
7
6
5
i i
i
i
i
i
i
i
i i
8
i i
i i
i i
i
i
i
i
i
i
i
i
i
i
i
i
i
i
i
i
i
i
i
i
i
i
i
i
i
i
i
i
i
i
i
i
i
i
i
i
i
i
i i
i i
i i
Collegamento dei microfoni
Usate la stazione di carica in rete (NCS) per collegare i microfoni ai canali degli access point. Gli slot del caricabatteria sono assegnati all'APT in base alle
modalità di impostazione del gruppo nella scheda Configurazione. Dopo aver completato la procedura di collegamento, l'audio verrà instradato al canale
corrispondente nell'ambito del gruppo.
Durante la procedura di collegamento i microfoni eventualmente presenti nella stazione di carica vengono associati ai canali APT. In tal modo vengono
eliminati eventuali collegamenti preesistenti dei microfoni agli specifici canali. In caso di slot vuoti durante la procedura di collegamento, non vi sarà alcun
impatto sui canali associati.
1. Posizionamento dei microfoni nella stazione di carica
I microfoni sono collegati verso i canali degli access point secondo la
disposizione nella stazione di carica.
Per microfoni a collo d'oca
Per microfoni Body-Pack, da mano e
a effetto di contorno
Power
Link
Collegamento del microfono
allo slot di carica
49
Page 50
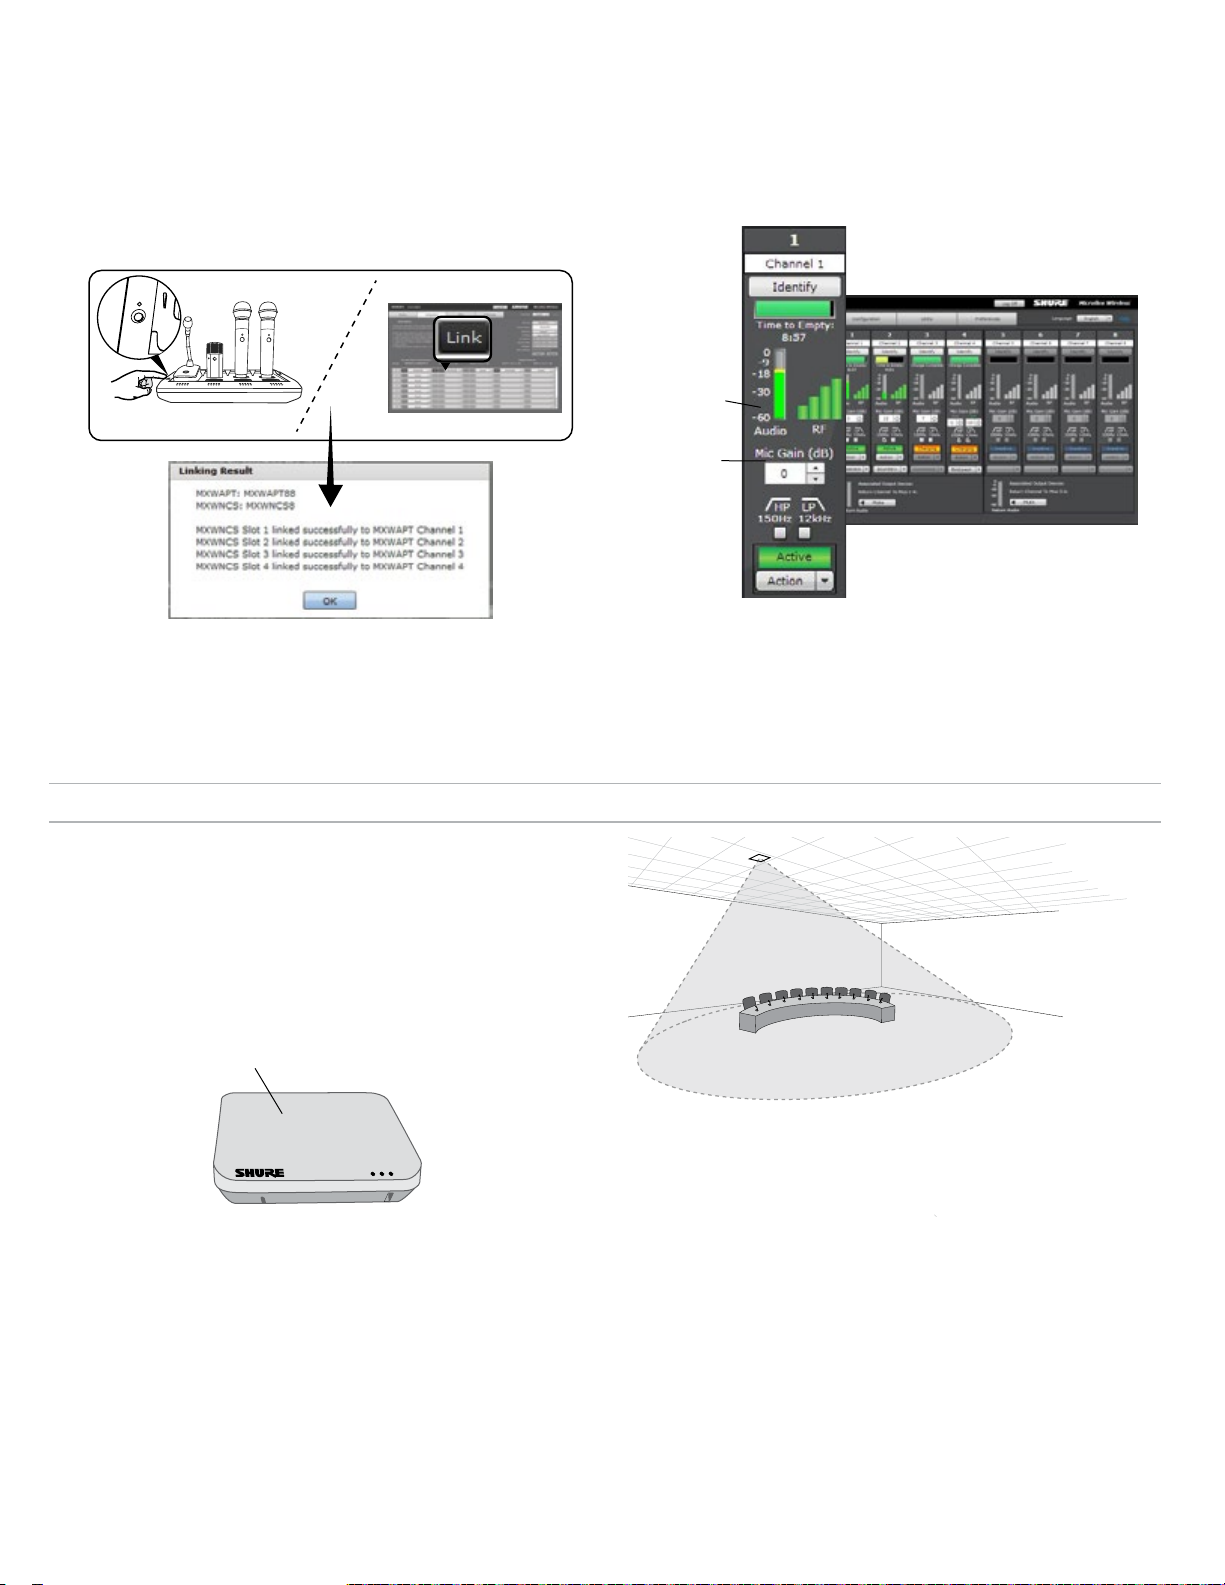
2. Collegamento dei microfoni ai canali
7
8
6
5
link
Usate il software di controllo o la stazione di carica per collegare i
microfoni ai canali APT. Se desiderato, questa funzione può essere
disattivata sulla stazione di carica in modo tale che il collegamento
possa essere eseguito unicamente tramite il software di controllo.
- Software di controllo: dalla pagina di configurazione, premete il pulsante
Link per ciascun caricabatterie nel gruppo.
-
Stazione di carica: tenete premuto il pulsante Link per 6 secondi. I LED
lampeggiano durante il processo per poi rimanere fissi (colore verde) una volta
completato il collegamento.
3. Rimozione dei microfoni e prova audio
Testate l'audio per ciascun microfono e regolate il guadagno a seconda
delle esigenze dalla scheda Monitoraggio del software di controllo. Il
guadagno dovrebbe essere impostato su un livello in corrispondenza del
quale l'audio viene registrato (verde/giallo) sull'indicatore di segnale (non
rosso lampeggiante).
Indicatore di
segnale
Regolazione del guadagno
Scheda Monitoraggio
Montaggio del ricetrasmettitore per access point (APT)
L'APT emette la RF secondo un diagramma cardioide in cui il segnale risulta
più forte in corrispondenza del lato anteriore del dispositivo. Puntate l'APT
verso le aree di copertura previste. Evitate di ostruire la linea di visuale e
tenetevi lontano da oggetti metallici di grandi dimensioni.
Importante: prima di usare un sistema senza fili durante un discorso o uno
spettacolo, fate sempre una prova nell'area di azione. Effettuate le prove
variando la posizione dell'antenna per trovare l'ubicazione ottimale. Se
necessario, segnate i "punti critici" e chiedete ai presentatori o agli artisti di
evitare tali aree.
Lato anteriore APT
Puntate verso l'area del microfono
50
Page 51
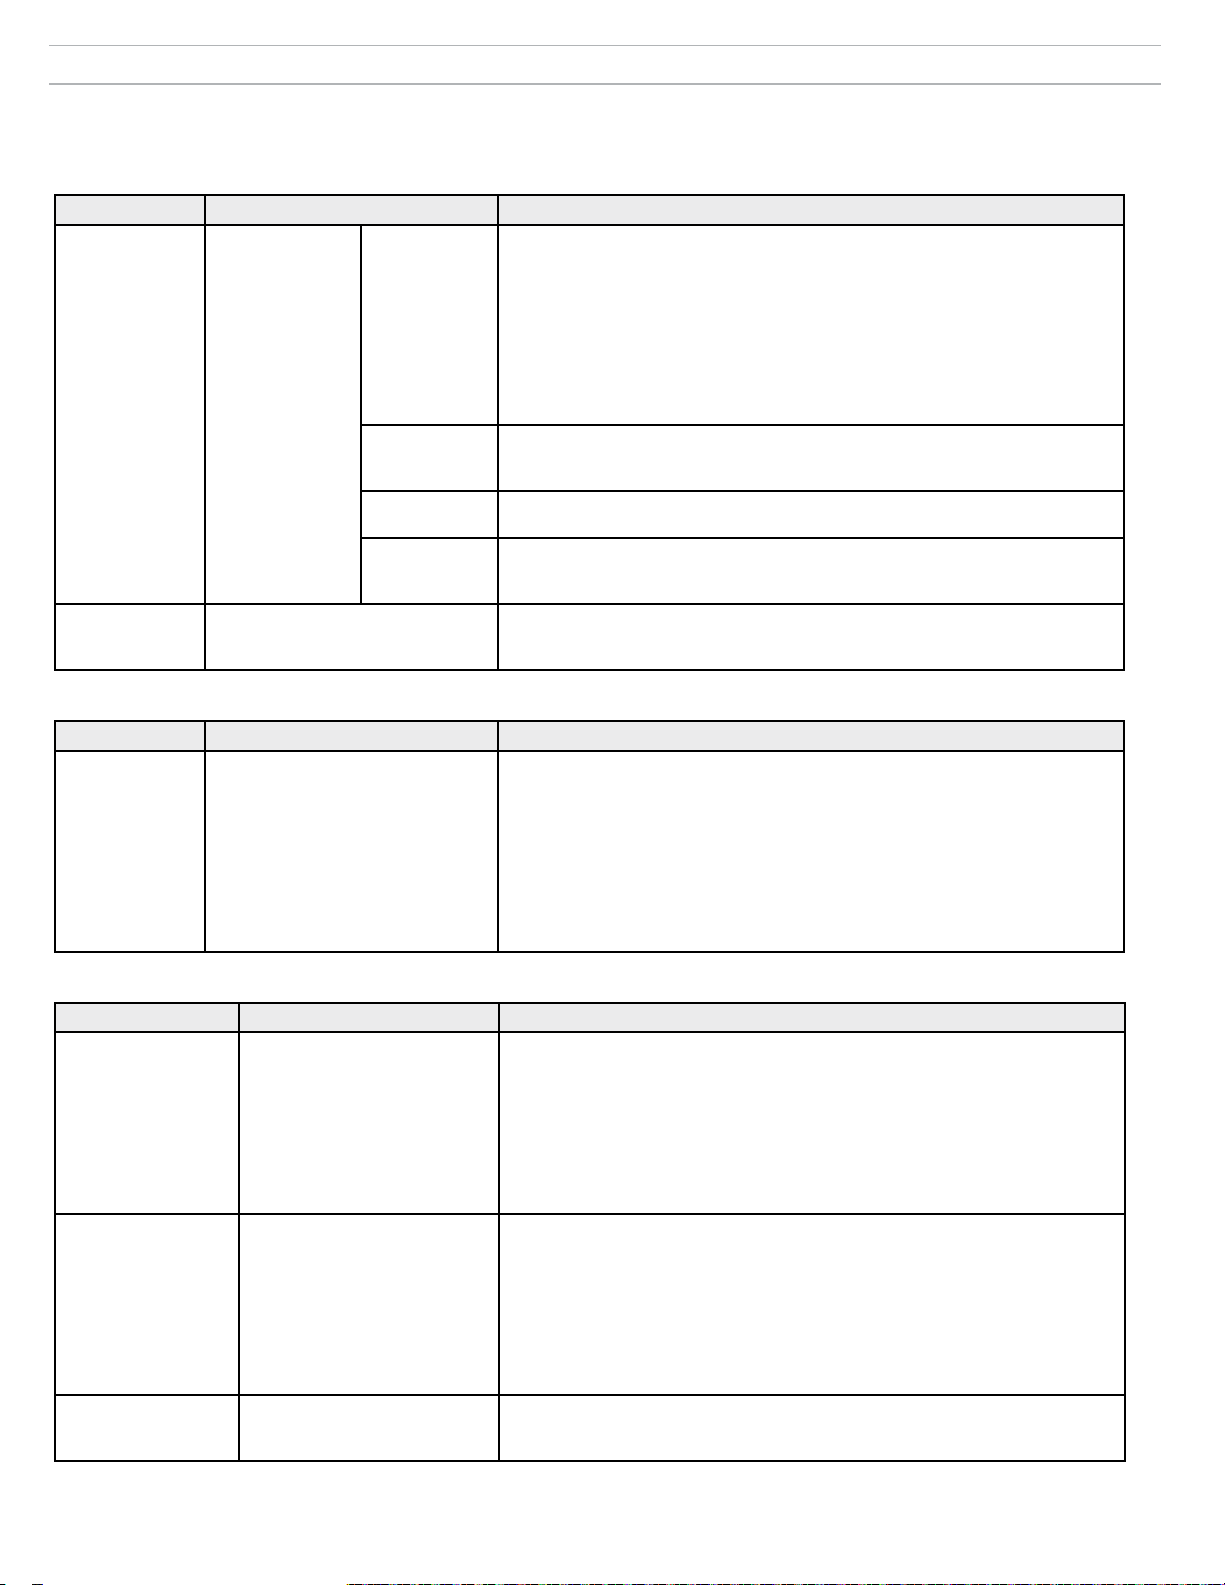
Risoluzione dei problemi
Nella seguente tabella sono descritte le procedure da seguirsi comunemente per la risoluzione dei problemi del sistema wireless Microflex. Per ulteriori
informazioni su punti specifici, consultate la guida all'uso del sistema MXW, reperibile all'indirizzo www.shure.com e fornita con la chiave USB.
Audio
Problema Spia Soluzione
• Controllate i cavi
• Verificate che i trasmettitori siano accesi e che i canali non siano silenziati
• Verificate che gli indicatori di ingresso siano OK sulla scheda Monitoraggio del
software di controllo MXW. Attenuate se il canale è limitato.
• Verificate gli indicatori di uscita sul pannello anteriore dell'interfaccia di rete audio
e nel software di controllo dell'ANI. Ascoltate l'audio dall'ANI mediante una cuffia.
Attenuate se il canale è limitato.
• Verificate che il livello di uscita dell'ANI corrisponda all'ingresso delle
apparecchiature di connessione.
• Verificate che l'APT non stia eseguendo una scansione dello spettro.
• Verificate che tutti i dispositivi siano accesi e presentino una connessione alla rete
stabile
• Usate il software Dante Controller (DC) per verificare le sottoscrizioni dei canali
• Verificate l'orologio principale nel software DC (l'orologio principale deve essere un
MXWAPT)
• Inserite il dispositivo in un gruppo per instradare automaticamente l'audio
• Verificate che la sottorete delle impostazioni audio di rete del ricetrasmettitore per
access point corrisponda alla sottorete dell'interfaccia di rete audio
• Eseguite una scansione dello spettro per monitorare l'interferenza RF
• Diminuite il numero di canali per verificare se il sistema sta sovraccaricando lo
spettro RF
Audio assente/
distorto
Un'interferenza RF
provoca perdite
del segnale audio
LED audio di rete
su interfaccia
di rete audio o
SCM820
L'audio è intermittente
Verde
Verde
lampeggiante
Rosso
Spento
Impostazione del sistema e gruppi MXW
Problema Spia Soluzione
• Verificate che tutti i dispositivi siano accesi, connessi alla stessa rete e impostati
sulla stessa sottorete
• Aprite la scheda Utility del software di controllo MXW e deselezionate la casella
Impossibile
associare un
componente a un
gruppo
Nella scheda Configurazione, nel
relativo menu a discesa, il componente
desiderato non è visualizzato nella riga
del gruppo
Filtro di configurazione per visualizzare tutti i dispositivi MXW collegati in rete. Se
il dispositivo è visualizzato come "OTHER", significa che è compreso in un'altra
configurazione.
• Rimuovete l'associazione del dispositivo selezionando 'nessuno' nella riga del
gruppo dell'altra configurazione.
• Eseguite un ripristino delle impostazioni di fabbrica sul dispositivo, così da
eliminarne l'eventuale associazione preesistente.
Rete
Problema Spia Soluzione
• Verificate che i dispositivi siano accesi
• Verificate che il computer e le apparecchiature siano connessi sulla stessa rete e
impostati sulla stessa sottorete
Impossibile connettersi
al software di controllo
dal computer
Il dispositivo non compare
nell'applicazione Shure Web
Device Discovery
• Disattivate le altre interfacce di rete non utilizzate per il collegamento al dispositivo
(WiFi incluso)
• Verificate il corretto funzionamento del server DHCP (se applicabile)
• Verificate che Bonjour sia in esecuzione sul PC
• In caso di connessione tramite la porta 4 dell'interfaccia di rete audio (ANI),
verificate che questa sia impostata sulla modalità Commutata.
• Scaricate la versione più recente di Adobe
• Assicuratevi che PC e dispositivo siano connessi sulla stessa rete e impostati sulla
stessa sottorete
Il caricamento del
software di controllo
richiede molto tempo
Il browser Web non riesce a
connettersi all'interfaccia di
controllo
• Verificate che le impostazioni di firewall di Windows non blocchino il software Shure
• Impostate il router in modo che non invii il gateway predefinito come parte del
DHCP
• Impostate l'applicazione Shure Web Device Discovery in modo da essere aperta
tramite indirizzo IP
• Impostate il computer su un indirizzo IP statico sulla stessa rete del dispositivo
Le prestazioni del
software di controllo
sono insoddisfacenti
Gli indicatori si muovono
lentamente oppure non mostrano i
dati in tempo reale.
• Riducete il numero di finestre o di schede aperte per la stessa configurazione
• Consultate la sezione dedicata alla rete per le impostazioni di configurazione
adeguate
®
Flash
®
51
Page 52
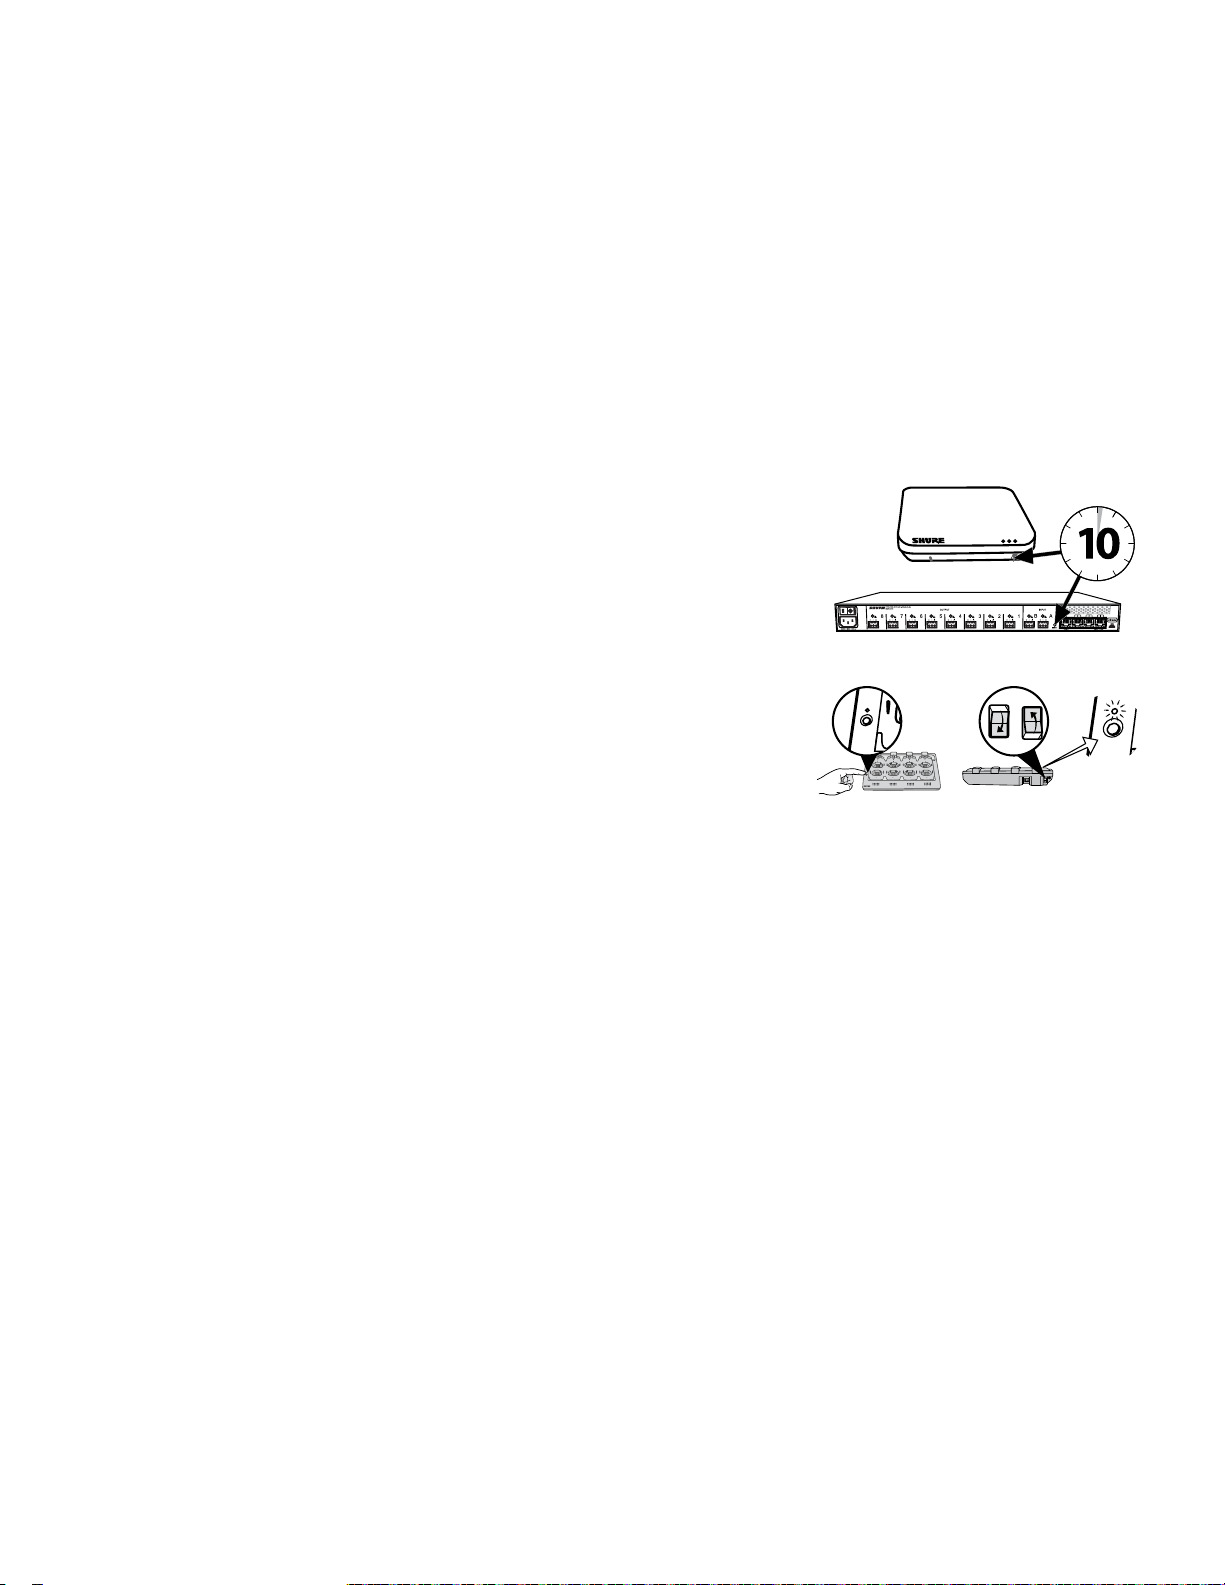
7
8
6
5
1
2
3
4
Link
Power
7
8
6
5
1
2
3
4
link
6
5
1
2
link
+
lockout
power
ethernet
network audio
push to solo | hold to mute
-9
-18
-24
-36
-48
-60
0
-9
-12
-18
-24
0
aux
mic
adjust
line
sig/clip
mute
INPUT
A
sig/clip
mute
OUTPUT
HEADPHONE
Audio Network Interface
MICROFLEX WIRELESS
B
1
2
3
4
5
6
7
8
line
aux
push to solo | hold to mute
A
sig/clip
mute
OUTPUT
B
1
2
3
4
5
6
7
8
line
aux
6
7
8
9
10
11
12
1
2
3
4
5
6
7
8
9
10
11
12
1
2
3
4
5
5
7
8
6
5
1
2
3
4
i
i
i i
i
i
i
i
i
i i
i
i
i
i
i
i
i i
i
i
i
i
i
i i
i
i
i
i
i
i
i i
i
i
i
i
i
i i
i
i
i
i
i
i
i i
i
i
i
i
i
i i
i
i
i
i
INPUT
A
OUTPUT
B
1
2
3
4
5
6
7
8
lockout
power
ethernet
network audio
push to solo | hold to mute
-9
-18
-24
-36
-48
-60
0
-9
-12
-18
-24
0
aux
mic
adjust
line
sig/clip
mute
sig/clip
mute
HEADPHONE
MICROFLEX WIRELESS
line
aux
Risorse aggiuntive
Per ricevere ulteriore assistenza nella risoluzione dei problemi o per maggiori informazioni su impianti complessi, rivolgetevi a un rappresentante
dell'assistenza Shure. In America potete contattare il servizio di assistenza al numero 847-600-8541. Gli utenti in altre parti del mondo possono consultare il
sito www.shure.com per trovare i contatti regionali.
Per assistenza sulla rete audio digitale, per istruzioni avanzate sul collegamento in rete e la risoluzione dei problemi nel software Dante, visitate il sito Web di
Audinate www.audinate.com.
Ripristino delle impostazioni di fabbrica
Se un dispositivo continua a non comparire sulla rete dopo aver provato i metodi di risoluzione dei problemi, eseguite il ripristino delle impostazioni di fabbrica
sull'hardware specifico. Le impostazioni di fabbrica sono pensate per garantire la compatibilità automatica con gli altri dispositivi Shure collegati in rete.
Nota: l ripristino delle impostazioni di fabbrica eliminerà tutti i gruppi MXW e le associazioni. La password di accesso al software verrà reimpostata su
Operazioni da eseguirsi dall'hardware
Ricetrasmettitore per access point
Tenete premuto il pulsante incassato di ripristino per 10 secondi. Il LED di stato dell'audio in rete
si spegnerà brevemente per indicare il riavvio dell'unità.
ATTENZIONE:
di microfoni salvati nel dispositivo.
Interfaccia di rete audio
Tenete premuto il pulsante di ripristino per 10 secondi. I LED sul pannello anteriore
lampeggeranno per indicare il riavvio dell'unità.
il ripristino delle impostazioni di fabbrica elimina tutte le associazioni in gruppi e i collegamenti
admin.
Stazione di carica in rete
a. Spegnete l'apparecchio.
b. Tenete premuto il pulsante Link.
c. Tenendo premuto il pulsante Link, accendete il dispositivo.
d. Continuate a tenere premuto il pulsante Link per 12 secondi fino a quando il LED si illumina (ambra).
Operazioni da eseguirsi dal software
1. Aprite la scheda Utility del software di controllo MXW.
2. Selezionate il pulsante Modifica proprietà del dispositivo.
3. Selezionate la casella di controllo di ripristino delle impostazioni di fabbrica.
4. Selezionate Aggiungi aggiornamenti per salvare l'impostazione nella coda delle modifiche.
5. Ripetete la procedura per ciascun dispositivo aggiuntivo.
6. Premete Applica tutte per eseguire le modifiche su tutti i dispositivi con le proprietà modificate.
52
Page 53
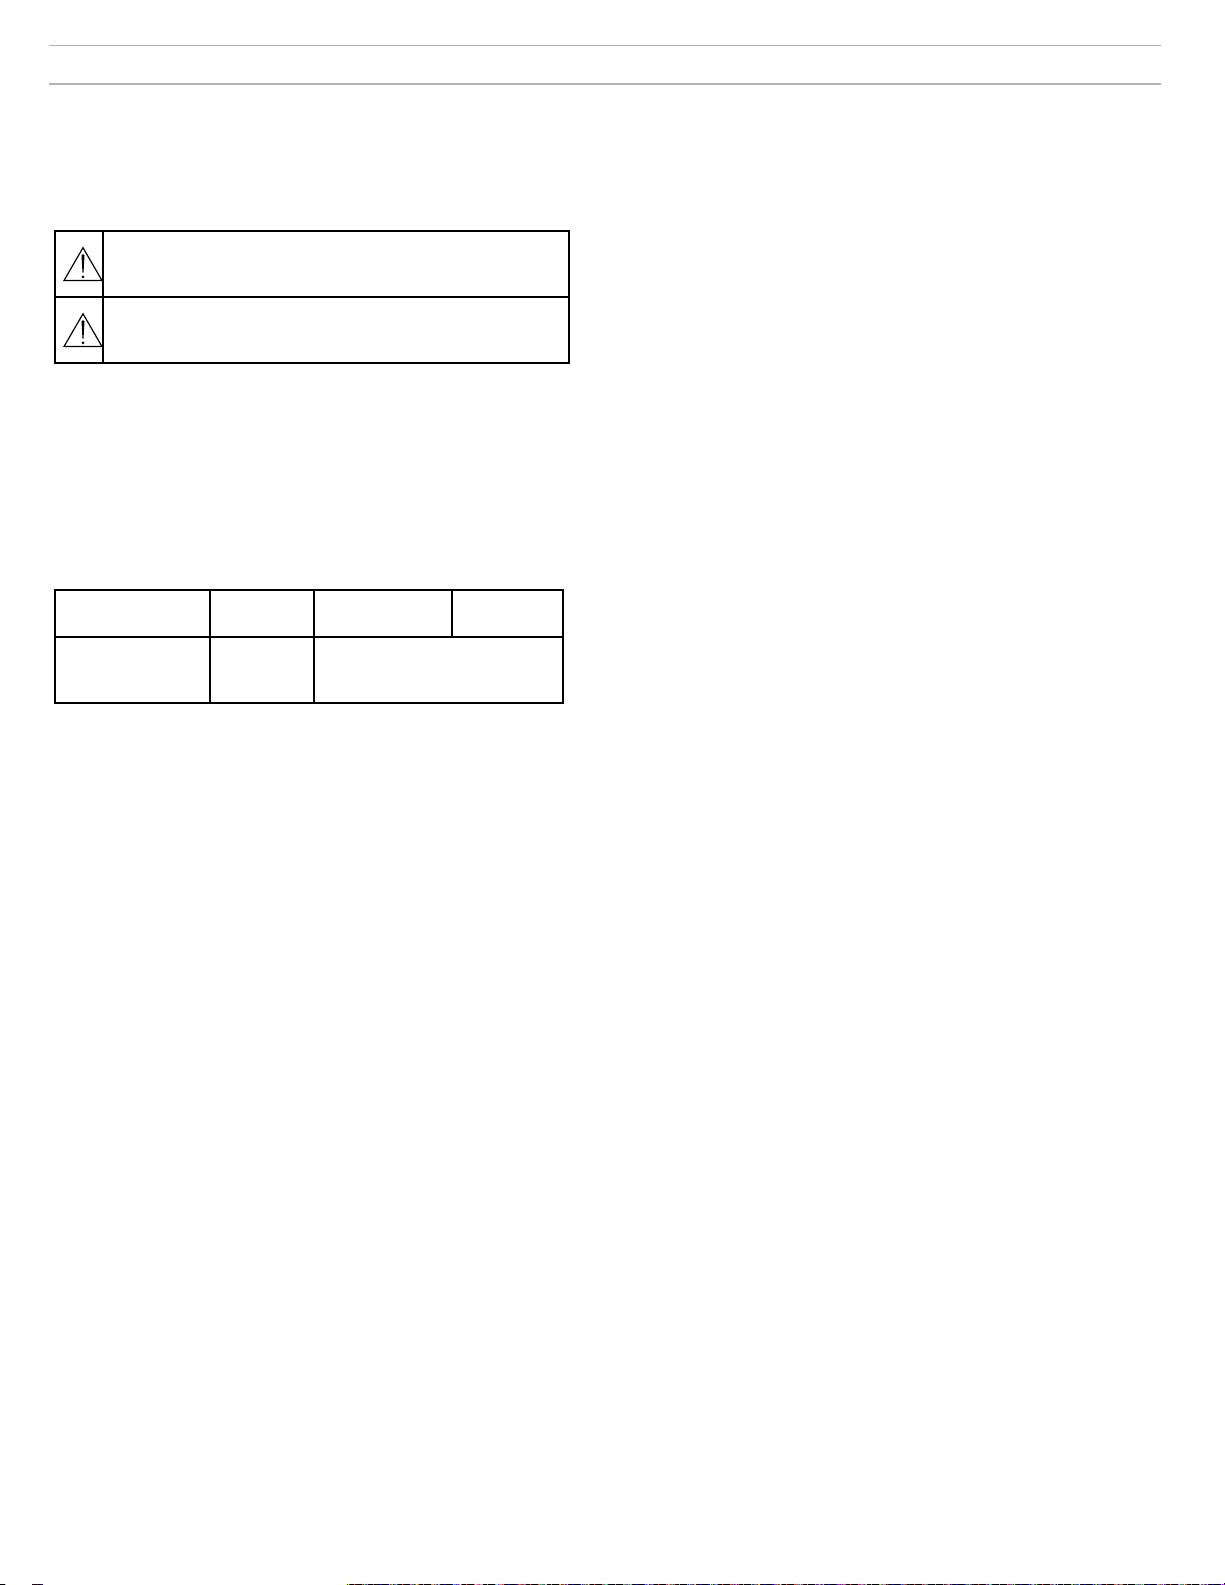
Informazioni di sicurezza
PRECAUZIONI DI SICUREZZA
I possibili effetti di un uso errato sono contrassegnati da uno dei due simboli
- "AVVERTENZA" e "ATTENZIONE" - sulla base dell'imminenza del pericolo
e della gravità del danno.
AVVERTENZA: ignorare questi messaggi può comportare
lesioni personali gravi o mortali in conseguenza di un
funzionamento errato.
ATTENZIONE: ignorare questi messaggi può comportare
lesioni personali di media gravità o danni materiali in
conseguenza di un funzionamento errato.
AVVERTENZA
L'ASCOLTO AD UN VOLUME ECCESSIVAMENTE ELEVATO PUÒ CAUSARE
LESIONI PERMANENTI ALL'APPARATO UDITIVO. USARE IL VOLUME PIÙ
BASSO POSSIBILE. La sovraesposizione a livelli sonori eccessivi può danneggiare
le vostre orecchie provocando una perdita permanente di udito causata dal rumore.
Si consiglia di attenersi alle seguenti direttive stabilite dalla OSHA (Occupational
Safety Health Administration) sul tempo massimo di esposizione a vari livelli di
pressione sonora (SPL), oltre il quale si rischia di causare lesioni all'apparato uditivo.
90 dB SPL
per 8 ore
110 dB SPL
per ½ ora
AVVERTENZA
• Le pile possono esplodere o rilasciare sostanze tossiche. Rischio di incendio o
ustioni. Non aprite, schiacciate, modificate, smontate, scaldate oltre i 60 °C né
bruciate.
• Seguite le istruzioni del produttore
• Per la ricarica delle pile ricaricabili utilizzate esclusivamente un caricabatteria
Shure
• AVVERTENZA: pericolo di esplosione in caso di errato posizionamento della pila.
Sostituite la pila esclusivamente con pile di tipo identico o equivalente.
• Non mettete le pile in bocca. Se ingerite, rivolgetevi al medico o al centro
antiveleni locale.
• Non causate cortocircuiti, per evitare ustioni o incendi.
• Caricate e usate esclusivamente pile ricaricabili Shure.
• Smaltite le pile in modo appropriato. Per lo smaltimento appropriato delle pile
usate, rivolgetevi al fornitore locale.
• Le pile (pile ricaricabili o installate) non devono essere esposte a calore eccessivo
(luce del sole diretta, fuoco o simili).
AVVERTENZA: pericolo di esplosione in caso di errato posizionamento della pila.
Da utilizzare esclusivamente con pile compatibili Shure.
Nota: utilizzate unicamente con l'alimentatore in dotazione o con uno equivalente
autorizzato da Shure.
1. 經審驗合格之射頻電信終端設備,非經許可,公司、商號或使用者均不得擅自變更
頻率、加大功率或變更原設計之特性及功能。
2. 射頻電信終端設備之使用不得影響飛航安全及干擾合法通信;經發現有干擾現象
時,應立即停用,並改善至無干擾時方得繼續使用。所謂合法通信,係指依電信法
規定作業之無線電信。
3. 輸入、製造射頻電信終端設備之公司、商號或其使用者違反本辦法規定,擅自使用
或變更無線電頻率、電功率者,除依電信法規定處罰外,國家通訊傳播委員會並得
撤銷其審驗合格證明。
4. 減少電磁波影響,請妥適使用
95 dB SPL
per 4 ore
115 dB SPL
per 15
minuti
100 dB SPL
per 2 ore
120 dB SPL
Da evitare, rischio di lesioni
105 dB SPL
per 1 ora
MXW1
Trasmettitori per microfoni body-pack:
Questi trasmettitori sono stati testati e valutati conformi con i
limiti internazionali di esposizione alle radiazioni definiti per un
ambiente non controllato. In condizioni operative normali, queste
apparecchiature sono a contatto diretto con il corpo dell'utente. I
trasmettitori non devono essere collocati nella stessa posizione di
altre antenna o altri trasmettitori, né utilizzati insieme a essi.
MXW2, MXW6, MXW8, MXWAPT4, MXWAPT8
Trasmettitori per microfoni da mano, Trasmettitori per microfoni a
effetto di contorno da tavolo, Trasmettitori per microfoni a collo d'oca
da tavolo, Trasmettitori per access point wireless:
Questi trasmettitori mobili sono pensati per essere utilizzati a distanze
superiori a 20 cm dal corpo umano. Sono esenti da requisiti di test
rispetto agli standard internazionali di esposizione alle radiazioni in
ragione della vicinanza al corpo dell'utente nelle condizioni di uso
previste e in ragione della potenza erogata ridotta. Questi trasmettitori
mobili vanno posti ad almeno 20 cm dal corpo umano e non devono
essere posizionati o utilizzati insieme ad altri trasmettitori o ad
antenne.
Informazioni importanti sul prodotto
Questo apparecchio è destinato all'uso nelle applicazioni audio
professionali.
la prova di conformità ai requisiti relativi alla compatibilità
elettromagnetica è basata sull'uso dei cavi in dotazione e
raccomandati. Utilizzando altri tipi di cavi si possono compromettere le
prestazioni relative alla compatibilità elettromagnetica.
Modifiche di qualsiasi tipo non espressamente autorizzate dalla
Shure Incorporated potrebbero annullare il permesso di usare questo
apparecchio.
Per lo smaltimento di pile, imballaggi ed apparecchiature elettroniche,
seguite il programma di riciclo dell'area di appartenenza.
Nota: questo apparecchio non è destinato al collegamento diretto ad
una rete Internet pubblica.
Avviso per gli utenti
in base alle prove su di esso eseguite, si è determinata la conformità
ai limiti relativi ai dispositivi digitali di Classe B, secondo la Parte
15 delle norme FCC. Tali limiti sono stati concepiti per fornire
una protezione adeguata da interferenze pericolose in ambiente
domestico. Questo apparecchio genera, utilizza e può irradiare
energia a radiofrequenza e, se non installato ed utilizzato secondo
le istruzioni, può causare interferenze dannose per le comunicazioni
radio. Tuttavia, non esiste alcuna garanzia che, in una specifica
installazione, non si verificheranno interferenze. Se questo
apparecchio causasse interferenze dannose per la ricezione dei
segnali radio o televisivi, determinabili spegnendolo e riaccendendolo,
si consiglia di tentare di rimediare all'interferenza tramite uno o più dei
seguenti metodi:
• cambiate l'orientamento dell'antenna ricevente o spostatela;
• aumentate la distanza tra l'apparecchio ed il ricevitore;
• collegate l'apparecchio ad una presa inserita in un circuito diverso
da quello a cui è collegato il ricevitore;
• rivolgetevi al rivenditore o ad un tecnico radio/TV qualificato.
53
Page 54

Omologazioni
Questo dispositivo è conforme alla normativa FCC (Federal
Communications Commission, Commissione federale per le comunicazioni
statunitense) Parte 15.
Questo dispositivo è conforme alla norma RSS esonerata dal pagamento
di imposte della IC in Canada. Il funzionamento di questa apparecchiatura
dipende dalle seguenti due condizioni: (1) questo apparecchio non deve
causare interferenza; (2) questo apparecchio deve accettare qualsiasi
interferenza, comprese eventuali interferenze che possano causare un
funzionamento indesiderato.
Le présent appareil est conforme aux CNR d'Industrie Canada applicables
aux appareils radio exempts de licence. L'exploitation est autorisée aux
deux conditions suivantes: (1) l'appareil ne doit pas produire de brouillage,
et (2) l'utilisateur de l'appareil doit accepter tout brouillage radioélectrique
subi, même si le brouillage est susceptible d'en compromettre le
fonctionnement.
Conformità alla legge giapponese sulla radio e alla legge giapponese sul
settore delle telecomunicazioni. Questo dispositivo è omologato ai sensi
della legge giapponese sulla radio (電波法) e della legge giapponese sul
settore delle telecomunicazioni (電気通信事業法). Il dispositivo non deve
essere modificato (l'eventuale modifica comporta l'invalidità del numero di
omologazione).
Conforme ai requisiti di sicurezza elettrica secondo la IEC 60065.
Questo prodotto è conforme ai requisiti essenziali specificati nelle direttive
pertinenti dell'Unione europea ed è contrassegnabile con la marcatura CE.
La Dichiarazione di conformità CE può essere ottenuta da Shure
Incorporated o da uno qualsiasi dei suoi rappresentanti europei. Per
informazioni sui contatti, visitate il sito www.shure.com
La Dichiarazione di conformità CE può essere ottenuta da: www.shure.com/
europe/compliance
Rappresentante europeo autorizzato:
Shure Europe GmbH
Sede per Europa, Medio Oriente e Africa
Department: EMEA Approval
Jakob-Dieffenbacher-Str. 12
75031 Eppingen, Germania
Telefono: 49-7262-92 49 0
Fax: 49-7262-92 49 11 4
E-mail: [email protected]
MXWNCS4, MXWNCS8
Autorizzazione a norma delle disposizioni relative alla verifica previste
dalla FCC, Parte 15b.
Etichetta di conformità alla norma ICES-003 della IC in Canada:
CAN ICES-3 (B)/NMB-3(B)
Nota: il marchio FCC, il marchio CE, il marchio C-Tick e i valori
elettrici sono riportati sull'etichetta posta sul lato inferiore dell'unità del
caricabatteria.
MXW1, MXW2, MXW6, MXW8, MXWAPT4, MXWAPT8
Omologazione a norma FCC Parte 15.
FCC (Commissione Federale delle Telecomunicazioni - USA):
DD4MXW1, DD4MXW2, DD4MXW6, DD4MXW8, DD4MXWAPT4,
DD4MXWAPT8.
Conforme ai requisiti applicabili dello standard RSS-213.
IC: 616A-MXW1, 616A-MXW2, 616A-MXW6, 616A-MXW8,
616A-MXWAPT4, 616A-MXWAPT8.
Marchi
Audinate®, il logo Audinate e Dante sono marchi commerciali di
Audinate Pty Ltd.
Page 55
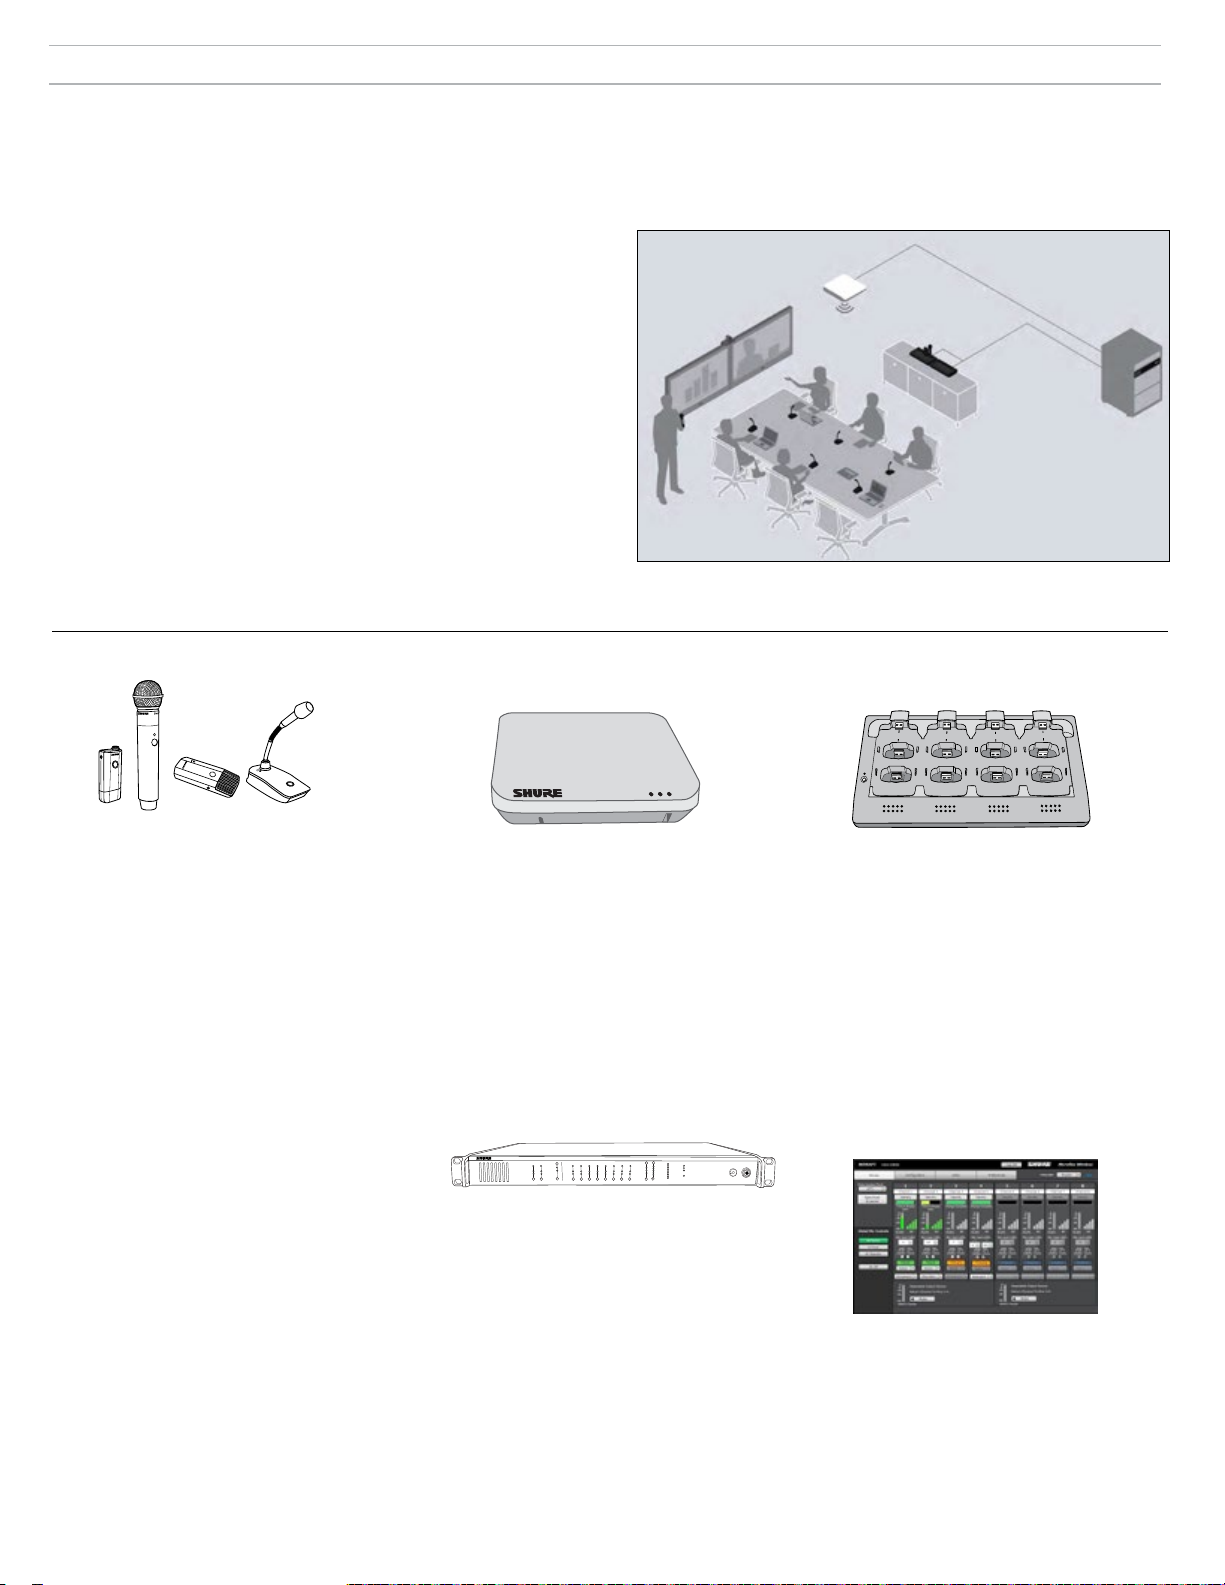
Descrição Geral
A Série Sem Fio Shure Microflextm (MXW) é uma solução de microfone completa para salas de reunião flexíveis. Possui gerenciamento automático de canais
de RF, microfones sem fio criptografados (AES256) recarregáveis e redes de áudio digital (Dante
tm
). A estação de carga em rede carrega microfones de
perfil baixo e tipo gooseneck para aplicações de mesa, bem como soluções de mão e bodypack treinamento e apresentações corporativos. O Ponto de
Acesso MXW é montado em um teto ou uma parede para comunicação discreta entre microfones sem fio e a rede de áudio digital. É possível utilizar vários
pontos de acesso para instalações que requeiram operação simultânea de até 40* microfones na mesma área (*depende da região). O software de controle
baseado em navegador da Internet é usado para monitoração e controle remotos de todos os computadores conectados à rede.
Recursos Adicionais
Este guia de Início Rápido contém as informações essenciais para configurar
um sistema MXW de oito canais básico. A seguir, uma lista de recursos
adicionais para a Série MXW:
Manual Completo do MXW: O manual completo fornece informações
abrangentes sobre o Sistema MXW, como descrições detalhadas de
componentes, topologias de rede, melhores práticas de gerenciamento de RF e
navegação no software de controle. É possível encontrá-lo em www.shure.com
e na unidade USB fornecida com o Transceptor de Ponto de Acesso.
Suporte Shure: Para obter assistência com Resolução de Problemas ou
consultoria para instalações complexas, entre em contato com a Shure para
conversar com um representante de suporte. Na região das Américas, ligue
para o grupo de Suporte a Sistemas pelo número 847-600-8541 (EUA).
Usuários em outros locais devem acessar www.shure.com para encontrar o
contato de suporte de sua região.
Audinate: Para obter ajuda com redes de áudio digital, as diretrizes de redes
avançadas e resolução de problemas do software Dante
tm,
visite o site da
Audinate em www.audinate.com.
Visão Geral dos Componentes
MXW6MXW1 MXW8
MXW2
Transmissores de Microfone
Os microfones MXW transmitem um sinal de
áudio sem fio criptografado ao ponto de acesso.
Estão disponíveis quatro fatores de forma:
Bodypack Híbrido (MXW1)
O microfone bodypack é fixado em um
cinto ou correia para comunicação móvel
com mãos livres. Possui uma entrada TQG
para a conexão de lapela e um microfone
omnidirecional integrado.
De Mão (MXW2)
O microfone de mão permite que
apresentadores se comuniquem usando
as lendárias cápsulas de microfone SM58,
SM86, BETA58 e VP68 da Shure.
Perfil Baixo (MXW6/C, MXW6/O)
O transmissor de perfil baixo é posicionado
em uma mesa ou escrivaninha para
transmitir discursos, enquanto se adapta
discretamente a qualquer ambiente de
conferência.
Base de Mesa para Microfone Gooseneck
(MXW8)
A base para microfone gooseneck é
compatível com microfones Microflex de 5,
10 e 15".
Os microfones MXW1, MXW6, e MXW8 incluem
uma saída de fone de ouvido para monitoração
de áudio, como um canal de tradução.
Transceptor de Ponto de Acesso
(MXWAPT4, MXWAPT8)
O Transceptor de Ponto de Acesso (unidades
de 4 e 8 canais) é montado em uma parede ou
um teto para gerenciar conexões de áudio sem
fio criptografadas com microfones. Como um
concentrador do sistema, transporta o áudio
digital entre os microfones sem fio e outros
dispositivos Dante na mesma rede. O APT inclui
um servidor de Internet que hospeda o software
de controle do Sistema MXW, usado para
monitoração, configuração e controle remoto do
sistema.
MICROFLEX WIRELESS
B
OUTPUT
INPUT
line
aux
sig/clip
sig/clip
mute
mute
push to solo | hold to mute
-9
0
line
-18
-9
-12
aux
-24
-18
-36
mic
-24
-48
-60
adjust
0
8
7
6
5
4
3
2
1
A
Audio Network Interface
power
ethernet
network audio
HEADPHONE
lockout
Interface de Rede de Áudio
(MXWANI4, MXWANI8)
A Interface de Rede de Áudio (canais 4 e 8)
é um dispositivo da rede Dante que fornece
entrada e saídas de áudio analógico para
o sistema MXW. Possui um switch Gigabit
Ethernet de 4 portas que permite a conexão de
um ponto de acesso MXW, um computador e até
duas estações de carga em rede MXW.
2
1
5
6
4
3
7
8
Estação de Carga em Rede
(MXWNCS4, MXWNCS8)
A Estação de Carga em Rede (slots 4 e 8) é
capaz de carregar simultaneamente até 4 (ou 8)
microfones MXW. Também Conecta microfones
aos canais de pontos de acesso e estatísticas
da bateria da rede ao software de controle.
Importante: Os Microfones da Base de
Mesa para Microfone Gooseneck (MXW8)
ocupam dois slots de carga. Por exemplo, oito
microfones MXW8 exigem duas estações de
carga MXWNCS8 (total de 16 slots de carga).
Software de Controle MXW
O software de controle MXW oferece controle
remoto abrangente de funções de configuração
de teclas, monitoração e gerenciamento. O
software pode ser acessado em qualquer
computador PC ou Mac na rede é aberto em um
navegador da Internet usando o Adobe® Flash®.
55
Page 56
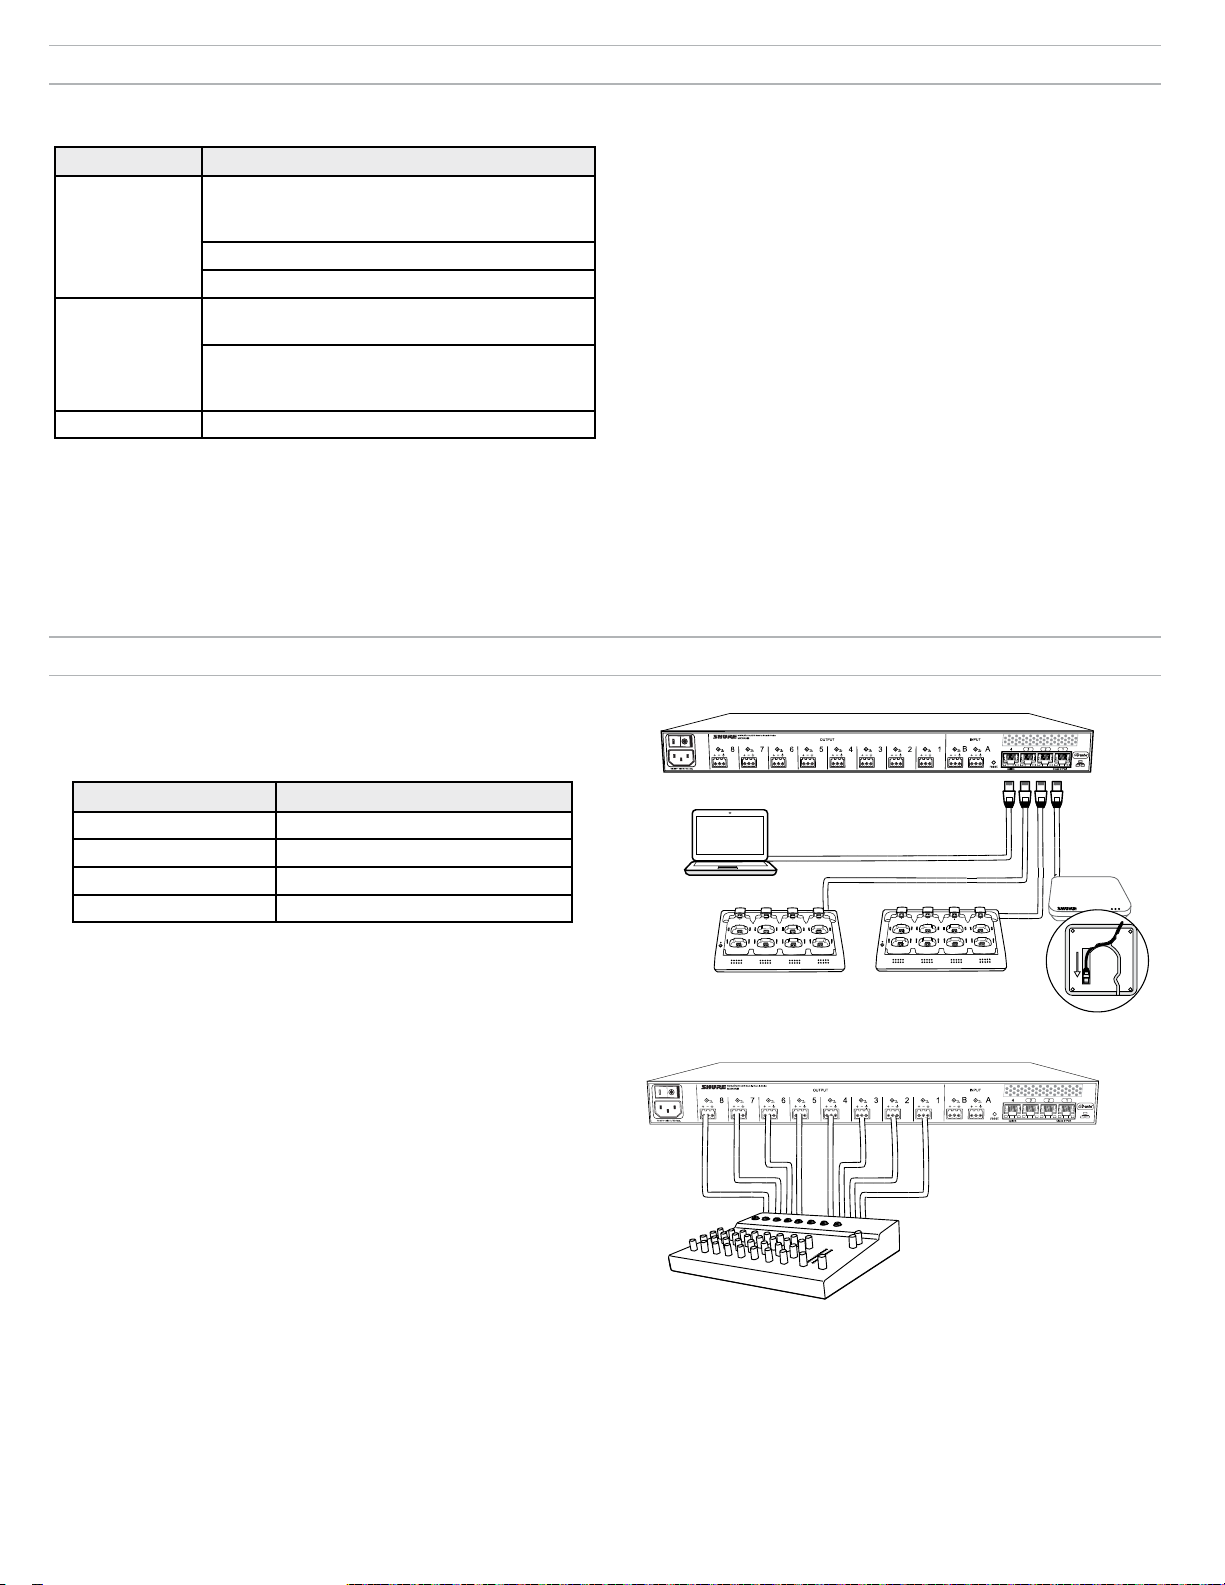
Inventário de Equipamentos
Acessórios Incluídos
Componente Acessório
Unidade Flash USB Shure (contém o aplicativo
Shure Web Device Discovery, o aplicativo Shure
APT
Firmware Update Manager e guias de usuário)
Placa de Montagem
Tampa para Pintar
Kit de Peças De Fixação (parafusos de montagem
em bastidor, conjuntos do conectores de cabo)
ANI
Cabo de Força Padrão IEC (International
Electrotechnical Commission - Comissão
Eletrotécnica Internacional)
NCS Adaptador de Alimentação DC
Conexão dos Componentes
1. Conexão de componentes MXW
Use cabos Ethernet blindados para conectar componentes MXW. Use
o switch de 4 portas na ANI (Interface de Rede de Áudio) ou conecte
todos os componentes a um switch gigabit separado.
Equipamentos Adicionais
Cabos de áudio
Use cabos de áudio blindados para conectar a ANI a um mixer, DSP ou
dispositivo de teleconferência.
Cabos Ethernet
Use cabos blindados Cat5e (ou superior) para conectar componentes
MXW à rede.
Computador
Use um PC ou Mac para acessar a interface do Sistema MXW a partir
de um navegador da Internet.
Porta de Rede da ANI Para Componente
① Porta 1 (PoE) APT (Transceptor de Ponto de Acesso)
② Porta 2 NCS (Estação de Carga em Rede)
③ Porta 3 NCS Adicional (Opcional)
④ Porta 4 Computador
Observação:
modo Automático (DHCP) para ajustar automaticamente com as configurações IP
compatíveis. Na ausência de um servidor DHCP, os dispositivos usarão um formato
de endereço de Conexão Local (169.254.x.x).
Nas configurações padrão, os dispositivos MXW são definidos no
2. Conexão das saídas analógicas da ANI
Use cabos de áudio blindados para conectar as saídas da ANI a um
mixer, DSP ou dispositivo de teleconferência. (Consulte o Kit de Peças
de Fixação fornecido com a ANI para conectar corretamente os cabos
aos conectores de bloco).
④
①
③
1
4
2
1
3
5
7
6
8
2
5
6
②
4
3
7
8
56
Page 57
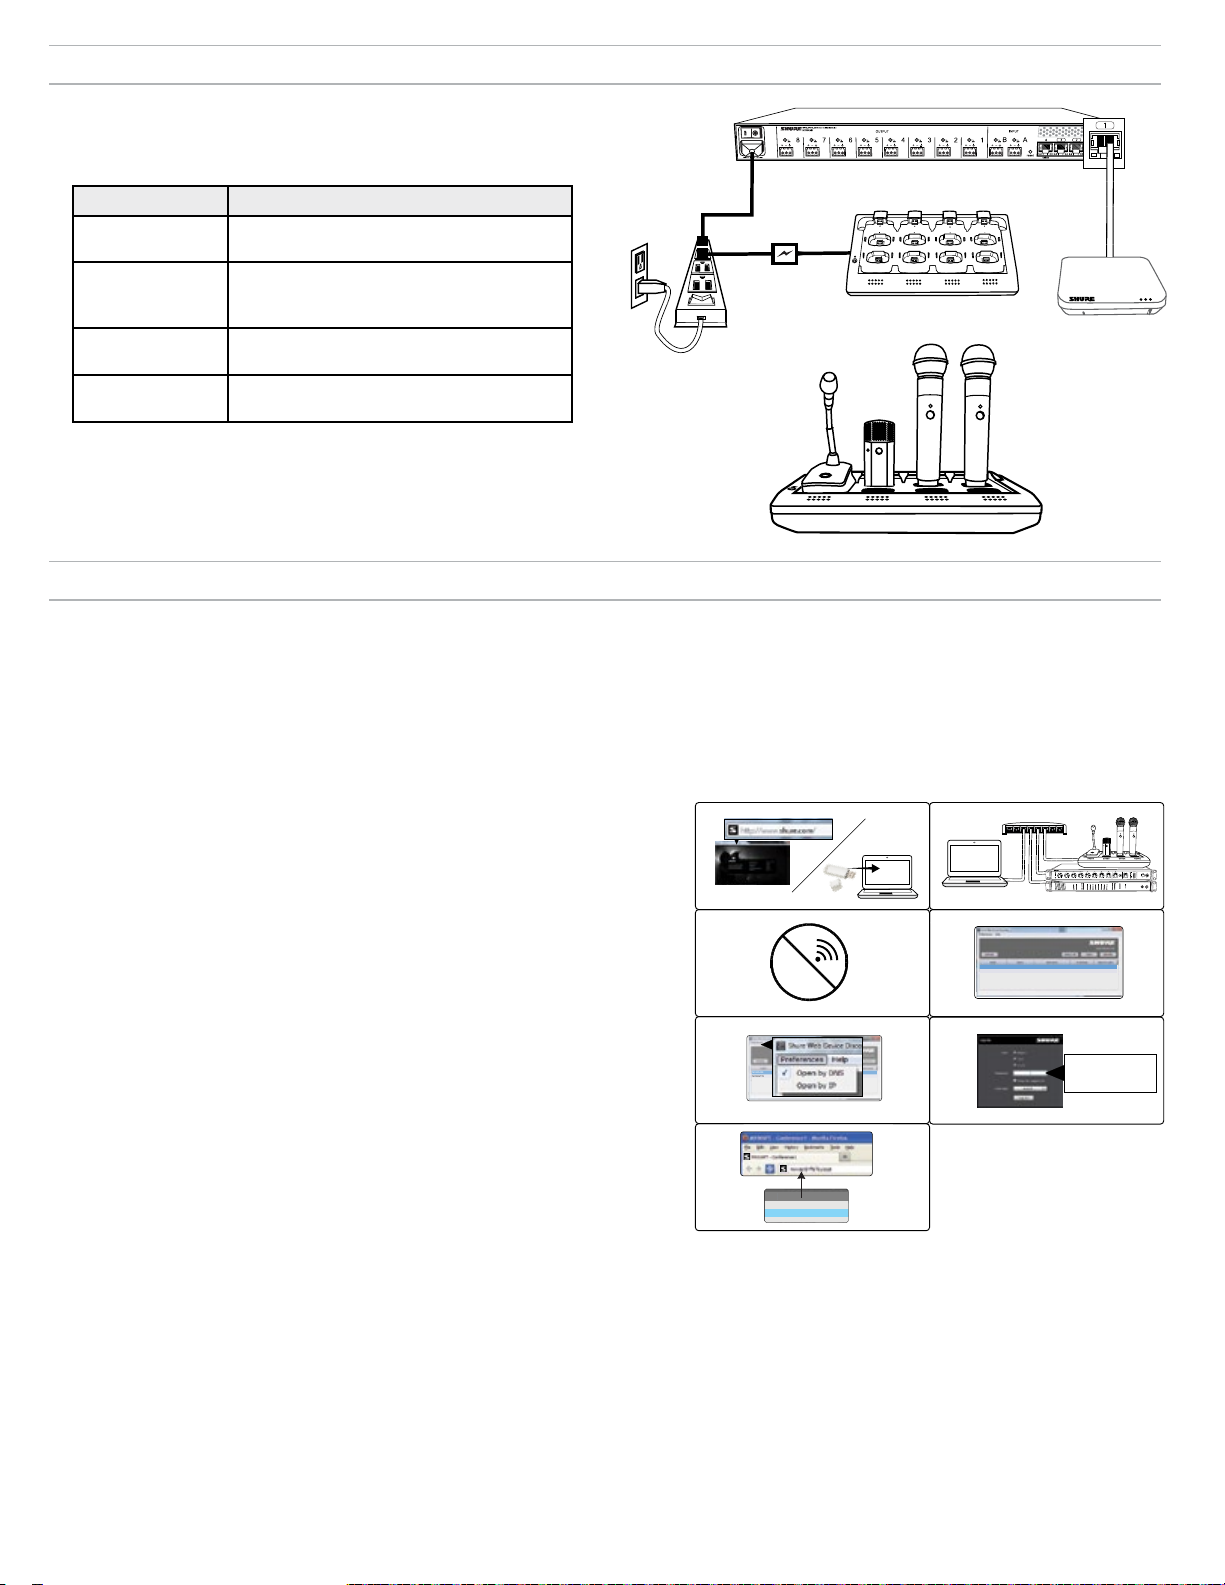
Alimentação Elétrica
②
④
①
7
8
6
5
1
2
3
4
7
8
6
5
1
2
3
4
③
MXWANI8 mxwani8-ffeee5.local
192.168.200.22
Dante
Dante
ROOM 5
MXWAPT8
mxwapt8-ffaaa2.local
192.168.200.23
CONFERENCE
mxwani-aa1.local
192-168-200-22
mxwapt8-ffe761.local
192-168-200-23
Forneça alimentação e ligue os componentes.
Os LEDs acendem em cada componente quando a alimentação estiver
ligada.
①
Class 0 PoE
Componente Fonte de Alimentação
① ANI
② APT
Conecte o cabo IEC a uma fonte de
alimentação AC e ligue o botão Liga/Desliga.
Conecte à Porta 1 da ANI para PoE (Power
over Ethernet). Não existe uma chave
③
1
2
5
6
4
3
7
8
②
liga-desliga.
③ NCS
④ Transmissores
Conecte o PS45 a uma fonte de alimentação
AC e ligue o botão Liga/Desliga.
Carregue completamente os transmissores
antes de usá-los.
④
Acesso ao Software de Controle MXW
O sistema MXW usa um software de controle hospedado no dispositivo que permite controle remoto abrangente de funções de configuração de teclas,
monitoração e gerenciamento. O software pode ser acessado em qualquer computador PC ou Mac na rede é aberto em um navegador da Internet usando o
Adobe® Flash®.
Há duas interfaces de controle diferentes para o sistema MXW:
• Software de controle do Sistema MXW: Acessado a partir do Transceptor de Ponto de Acesso e usado para gerenciar o sistema MXW.
• Software de controle da Interface de Rede de Áudio: Acessado a partir da Interface de Rede de Áudio e usado para gerenciar apenas esse dispositivo.
Siga estas etapas para acessar o software de controle MXW:
1. Instale o aplicativo Shure Web Device Discovery.
Faça o download do Aplicativo Shure Web Device Discovery em www.shure.com
ou do pen drive USB fornecido com o Transceptor de Ponto de Acesso MXW. (A
necessária ferramenta de descoberta de dispositivos Bonjour é fornecida com o
aplicativo e é instalada automaticamente).
2. Verifique se o computador está na rede do MXW.
O computador acessa o software de controle de um servidor de Internet integrado
no dispositivo. Todos os dispositivos em rede devem estar conectados à mesma
rede (configurados na mesma sub-rede).
3. Desligue o WiFi
Desligue o WiFi do PC para forçar a interface de rede com fio.
4. Inicie o aplicativo Shure Web Device Discovery.
Abra o aplicativo para exibir todos os dispositivos Shure na rede que possuem
um servidor integrado para o software de controle (MXWAPT, MXWANI e
SCM820). Use o botão Identify para piscar os LED de um dispositivo para facilitar
a identificação.
5. Abra o Software de Controle do MXW
Clique duas vezes em algum Transceptor de Ponto de Acesso para abrir o
software de controle do Sistema MXW. Clique duas vezes em uma Interface de
Rede de Áudio para abrir a interface do software desse dispositivo. O aplicativo
pode abrir o Software de Controle pelo endereço IP ou nome DNS (selecionável do
menu suspenso Preferences).
6. Insira a Senha Padrão
Insira a senha padrão “admin” para acessar o software de controle.
①
③
⑤
⑦
Wi-Fi
②
④
⑥
MXWANI8 mxwani8-ffeee5.local
ROOM 5
CONFERENCE
MXWAPT8
mxwapt8-ffaaa2.local
SCM820
1 2 3 4 5 6 7 8
gain
low cut
hi shelf
meter
push to solo | hold to mute
8
7
5
4
6
2
1
3
A
B
OUTPUT
INPUT
line
aux
sig/clip
sig/clip
mute
mute
push to solo | hold to mute
192.168.200.22
Dante
Dante
192.168.200.23
admin
®
IntelliMix
LIM
MASTER
AB
power
B
A
AUX IN
HEADPHONE
0
ethernet
-9
network audio
-18
automix link
-24
gain
dual mixer
-36
limiter
-48
L+R SUM
-60
lockout
MICROFLEX WIRELESS
Audio Network Interface
0
power
-9
0
line
ethernet
-18
-9
network audio
aux
-12
-24
HEADPHONE
-18
mic
-36
-24
-48
lockout
-60
adjust
7. Marque a Página da Web como um Favorito (recomendado)
Marque o endereço IP do dispositivo como um Favorito se estiver configurado
como um Endereço IP estático. Marque o nome DNS do dispositivo como um
Favorito se o modo IP estiver configurado como Automático (DHCP).
57
Page 58
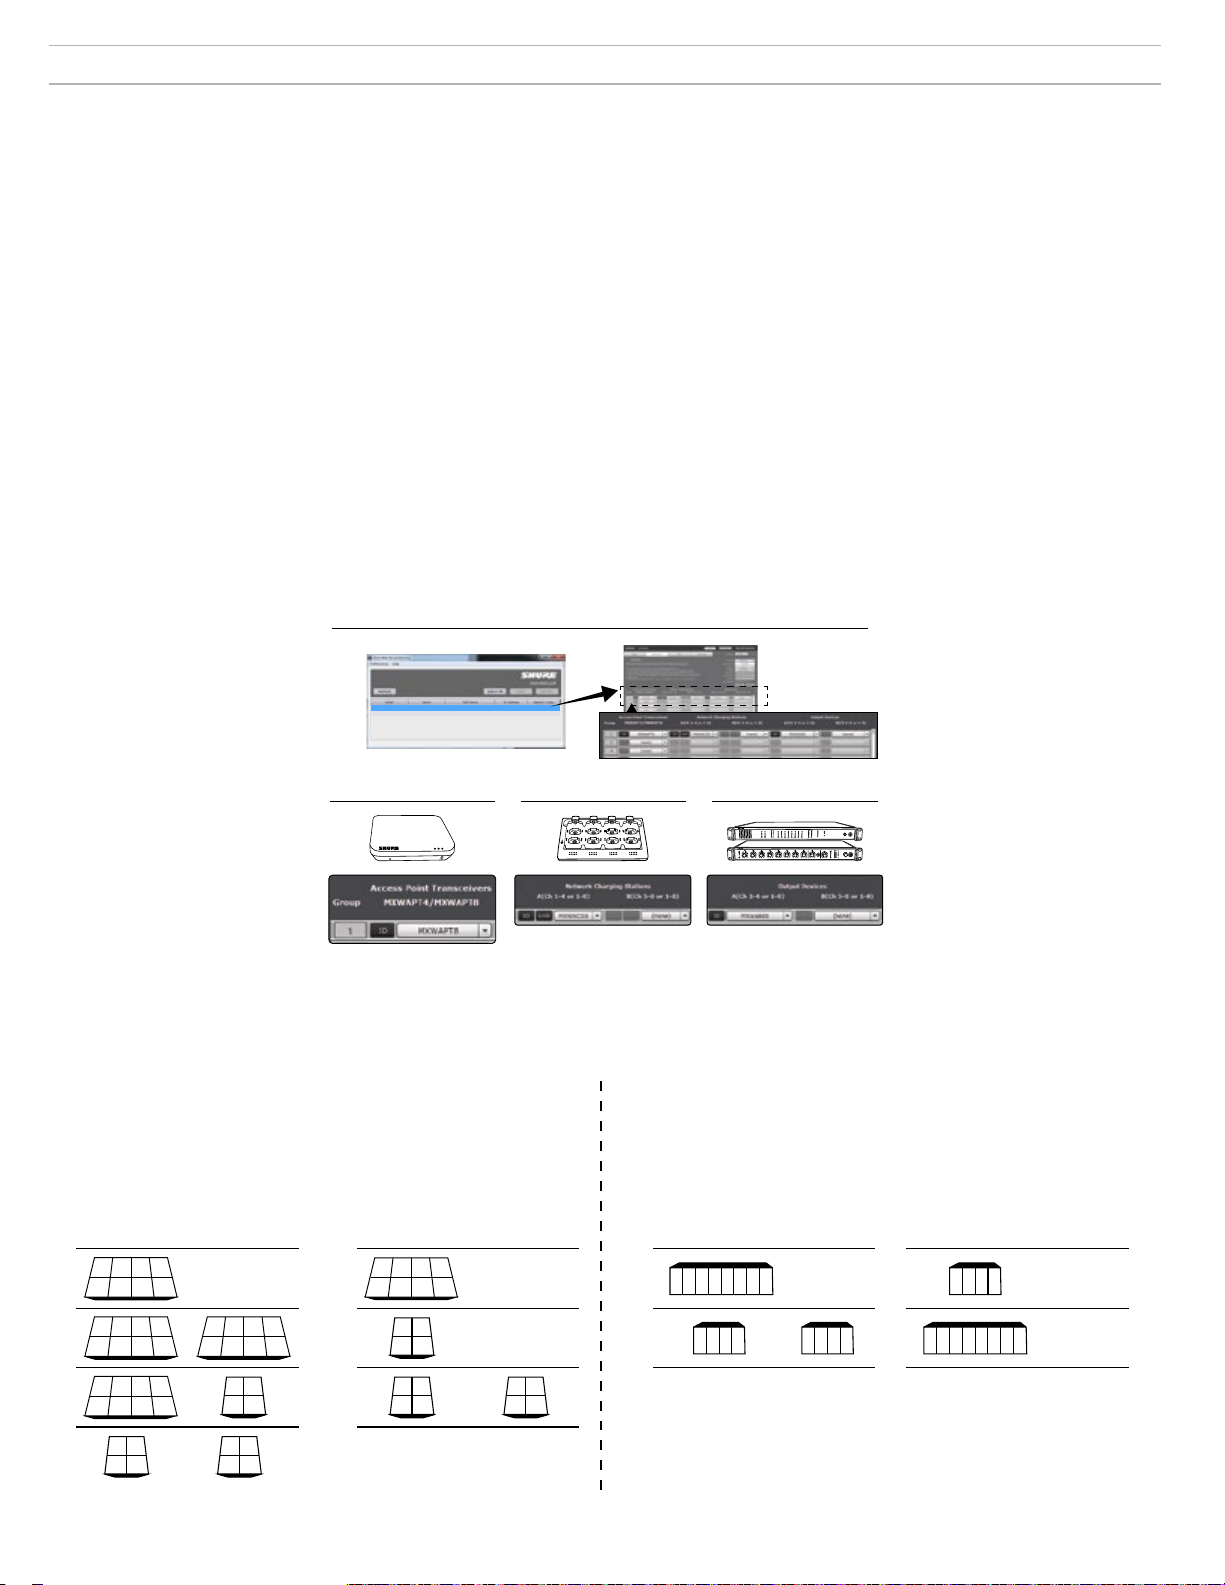
Associação de Componentes a um Grupo
As instruções a seguir são para formar um Grupo MXW. Se um dispositivo não estiver disponível na janela suspensa, verifique se ele está “aberto” e na
rede.
Dica: Use o botão ID para identificar um dispositivo. Isso envia um sinal ao dispositivo para piscar os LEDs para facilitar a identificação.
1. Abra uma Configuração
Use o aplicativo Shure Web Discovery para exibir todos os APTs
(Transceptores de Ponto de Acesso) MXW na rede. Clique duas vezes
em um APT para abrir o software, e vá para a guia Configuration.
2. Selecione um APT (Transceptor de Ponto de Acesso) para o Grupo 1
Selecione um APT aberto no menu suspenso. Esta seleção determina
se o Grupo tem quatro ou oito canais (APT4 ou APT8).
Observação: O Grupo 1 deve incluir o APT que foi usado para abrir o software de
controle. Em seguida, outros APTs conectados (e abertos) estão disponíveis para
grupos adicionais.
3. Selecione a(s) Estação(ões) de Carga da Rede
Associe uma ou duas NCSs (Estações de Carga da Rede) ao ponto de
acesso. Há duas razões para associar mais de um carregador:
- Ao usar dois carregadores de quatro canais para um ponto de acesso de oito
canais.
- Ao usar microfones gooseneck. Os microfones gooseneck cobrem os slots
dianteiros e traseiros de um carregador, reduzindo à metade o número de slots
①
MXWANI8 mxwani8-ffeee5.local 192.168.200.22
MXWAPT8
ROOM 5
CONFERENCE
mxwapt8-ffaaa2.local
192.168.200.23
Dante
Dante
disponíveis. Por exemplo, dois carregadores de oito canais são necessários para
preencher um ponto de acesso de oito canais com microfones gooseneck.
4. Selecione o(s) Dispositivo(s) de Saída de Áudio
Selecione um ou dois dispositivos de saída de áudio (MXWANI ou
SCM820) para rotear automaticamente os canais de áudio digital a partir
do ponto de acesso. Selecione um dos seguintes dispositivos:
- Interface de Rede de Áudio (MXWANI) em variação de quatro ou oito canais.
Duas unidades de quatro canais ou uma unidade de oito canais podem ser
atribuídas a um APT de oito canais.
- Mixer Shure SCM820 IntelliMix®. SCM820s habilitados para Dante podem ser
selecionados como a saída de áudio do Grupo. Isso roteia automaticamente a
entrada auxiliar do SCM820 para os microfones de monitoração pessoal (canal
esquerdo auxiliar do SCM820 para canais MXW 1-4; canal auxiliar direito para
canais MXW 5-8).
Observação: Os dados das associações do dispositivo e de Conexão do
microfone são armazenados persistentemente no dispositivo. Se o sistema
MXW for desligado e, em seguida reiniciado sem um computador, os
dispositivos permanecerão associados ao ponto de acesso.
②
③
4
2
1
3
7
5
6
8
④
A
B
INPUT
OUTPUT
line
aux
sig/clip
mute
SCM820
gain
1 2 3 4 5 6 7 8
low cut
hi shelf
meter
push to solo | hold to mute
sig/clip
mute
HEADPHONE
-18
mic
-36
-24
-48
lockout
-60
adjust
push to solo | hold to mute
®
IntelliMix
LIM
MASTER
AB
power
B
A
HEADPHONE
AUX IN
0
ethernet
-9
network audio
-18
automix link
-24
gain
-36
dual mixer
limiter
-48
-60
L+R SUM
lockout
MICROFLEX WIRELESS
Audio Network Interface
0
5
8
4
7
2
3
6
1
power
-9
0
line
ethernet
-18
-9
aux
network audio
-12
-24
Mapeamento de Canais para Dispositivos em um Grupo
O áudio é distribuído dos microfones para as saídas analógicas de acordo com a configuração do Grupo na guia Configuration. O diagrama a seguir indica o
mapeamento de canais para dispositivos em Grupos de oito e quatro canais.
Estação de Carga em Rede
Uma estação de carga adicional é necessária ao preencher um Grupo com
As saídas são atribuídas a uma Interface de Rede de Áudio do
microfones gooseneck
Grupo com 8 Canais
Grupo com 4 Canais
Grupo com 8 Canais Grupo com 4 Canais
A B A B A B A B
2 3 4
1
1) 1) 1) 1)
5 6 7 8
2 3 41
2) 2) 2) 2)
x x x x
2 3 41
3) 3)
x x x x
(none) (none) (none)(none)
5 6 7 8
x x x
x
5 6
7 8
2 3 41
x x x x
1
2
4
3
21
x x
1 2 3 4
3 4
x x
Dispositivo de Saída de Áudio
MXW ou a um Mixer Automático SCM820
81 2 3 4 5 6 7
85 6 7
1 2 3 4
1 2 3 4 x x x x
(none)(none)
58
2
1
4)
3 4
5 6
7 8
Page 59
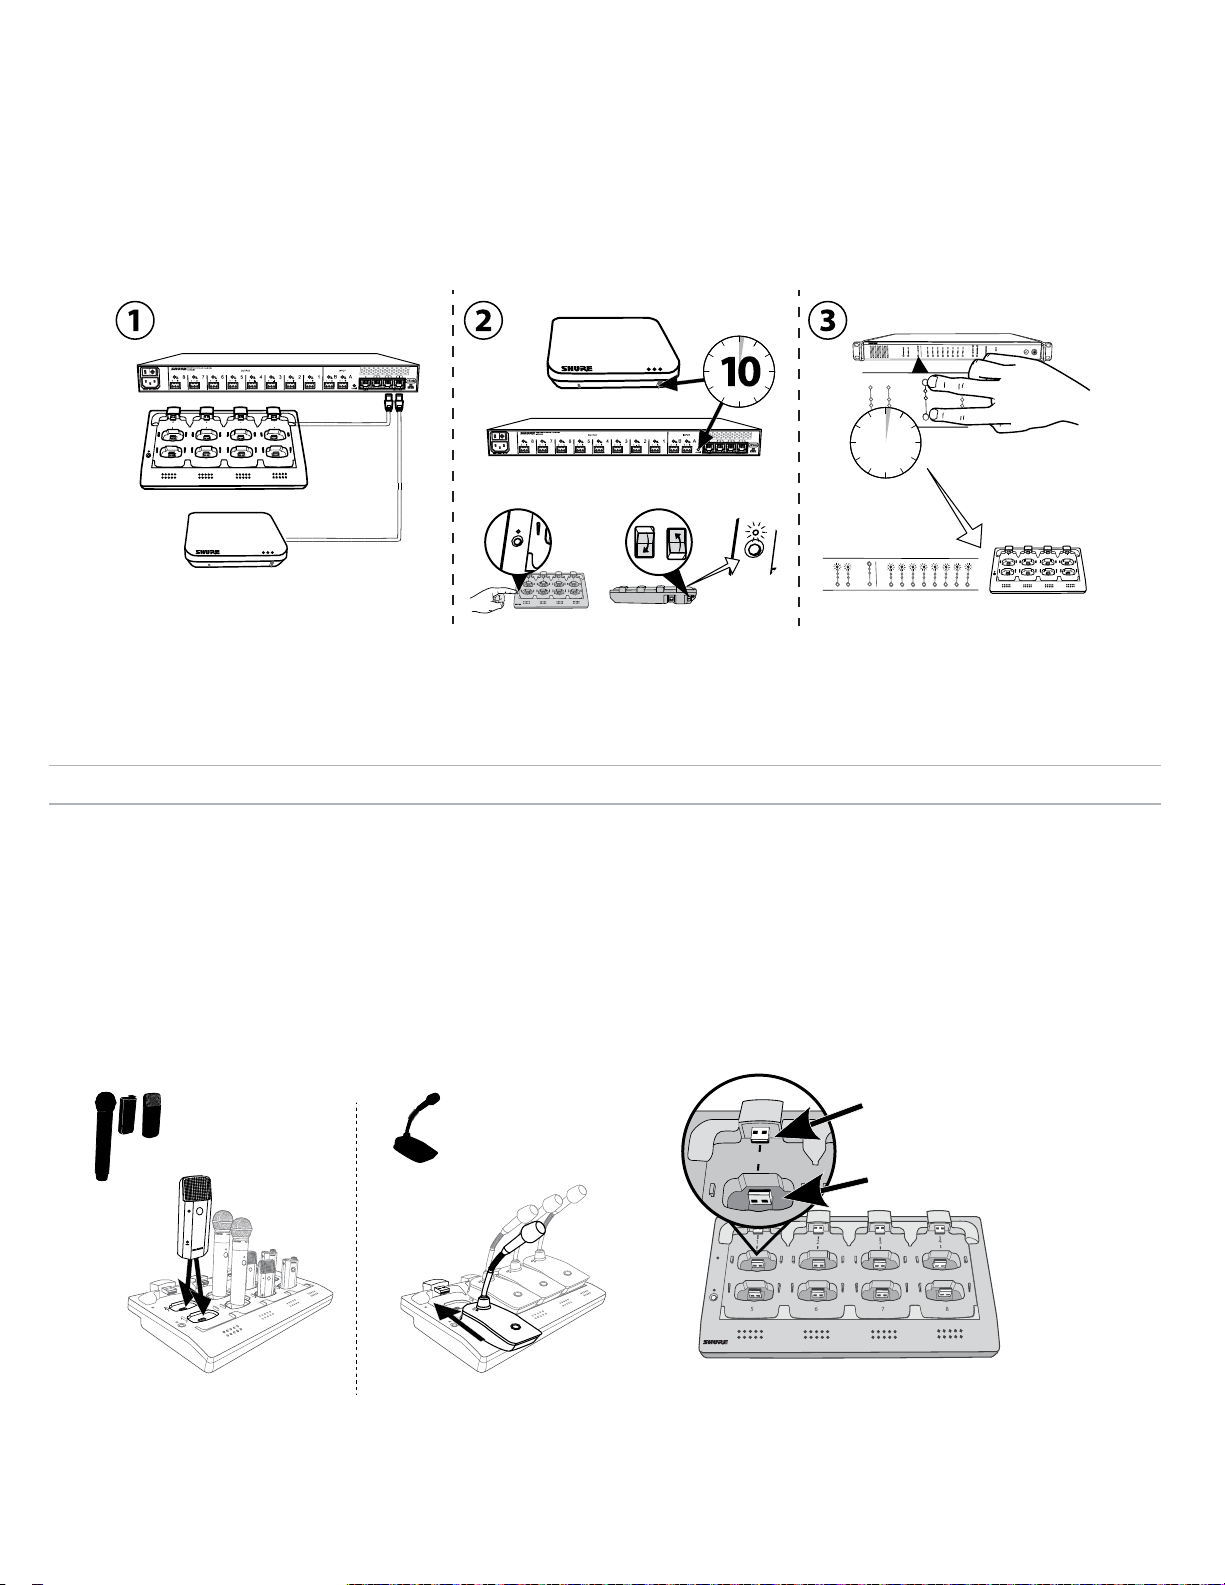
7
8
6
5
1
2
3
4
1
2
3
7
8
6
5
1
2
3
4
7
8
6
5
1
2
3
4
link
6
5
1
2
link
push to solo | hold to mute
2
3
4
5
6
7
8
lockout
power
ethernet
network audio
-9
-18
-24
-36
-48
-60
0
-9
-12
-18
-24
0
aux
mic
adjust
line
HEADPHONE
MICROFLEX WIRELESS
Configuração Automática do Grupo
Um Grupo MXW pode ser associado sem uso do software de controle quando uma rede formada por somente um APT (Transceptor de Ponto de Acesso),
uma NCS (Estação de Carga em Rede) e uma ANI (Interface de Rede de Áudio). Para obter melhores resultados, execute um padrão de fábrica nos
dispositivos para limpar quaisquer associações anteriores ao Grupo.
1. Conecte um APT, uma NCS e uma ANI à rede. A rede somente deve conter um de cada tipo de dispositivo.
2. Execute uma redefinição de fábrica nos dispositivos (consulte a seção Padrão de Fábrica).
3. No painel frontal da ANI, pressione ambos os botões de seleção de nível de entrada ao mesmo tempo e mantenha-os pressionados por cinco segundos.
Os LEDs de Seleção de Canal acendem em verde e o medidor de áudio pisca para indicar que a associação foi bem-sucedida.
MICROFLEX WIRELESS
Audio Network Interface
0
2
1
5
3
7
6
4
A
8
12
11
1
10
2
9
3
8
4
5
7
6
2
1
5
6
4
3
7
8
+
Power
Link
A
B
INPUT
sig/clip
mute
B
OUTPUT
INPUT
line
aux
sig/clip
sig/clip
mute
mute
A
B
line
aux
12
11
1
10
2
9
3
5
8
4
5
7
6
3
2
5
4
1
OUTPUT
line
aux
sig/clip
mute
push to solo | hold to mute
push to solo | hold to mute
OUTPUT
power
-9
0
line
ethernet
-18
-9
network audio
aux
-12
-24
HEADPHONE
-18
mic
-36
-24
-48
lockout
-60
adjust
1
sig/clip
mute
4
2
1
8
7
6
3
7
6
5
i i
i
i
i
i
i
i
i i
8
i i
i i
i i
i
i
i
i
i
i
i
i
i
i
i
i
i
i
i
i
i
i
i
i
i
i
i
i
i
i
i
i
i
i
i
i
i
i
i
i
i
i
i i
i i
i i
Conexão de Microfones
Use a Estação de Carga em Rede (NCS) para Conectar os microfones aos canais do Ponto de Acesso. Os slots do carregador são mapeados para o
APT de acordo com a configuração do Grupo a partir da guia Configuration. Após o procedimento de Conexão ser concluído, o áudio roteará ao canal
correspondente no Grupo.
A Conexão mapeará qualquer microfone colocado na estação de carga para os canais do APT. Isso substitui qualquer Conexão anterior do microfone para
esse canal. Se um slot estiver vazio durante o procedimento de Conexão, não haverá impacto nesse canal.
1. Disponha os microfones no carregador.
Os microfones são Conectados aos canais do ponto de acesso de
acordo com a disposição no carregador.
Para microfones Gooseneck
Para microfones bodypack, de mão e
Power
Link
de perfil baixo.
Conexão do Microfone ao
Slot do Carregador
59
Page 60
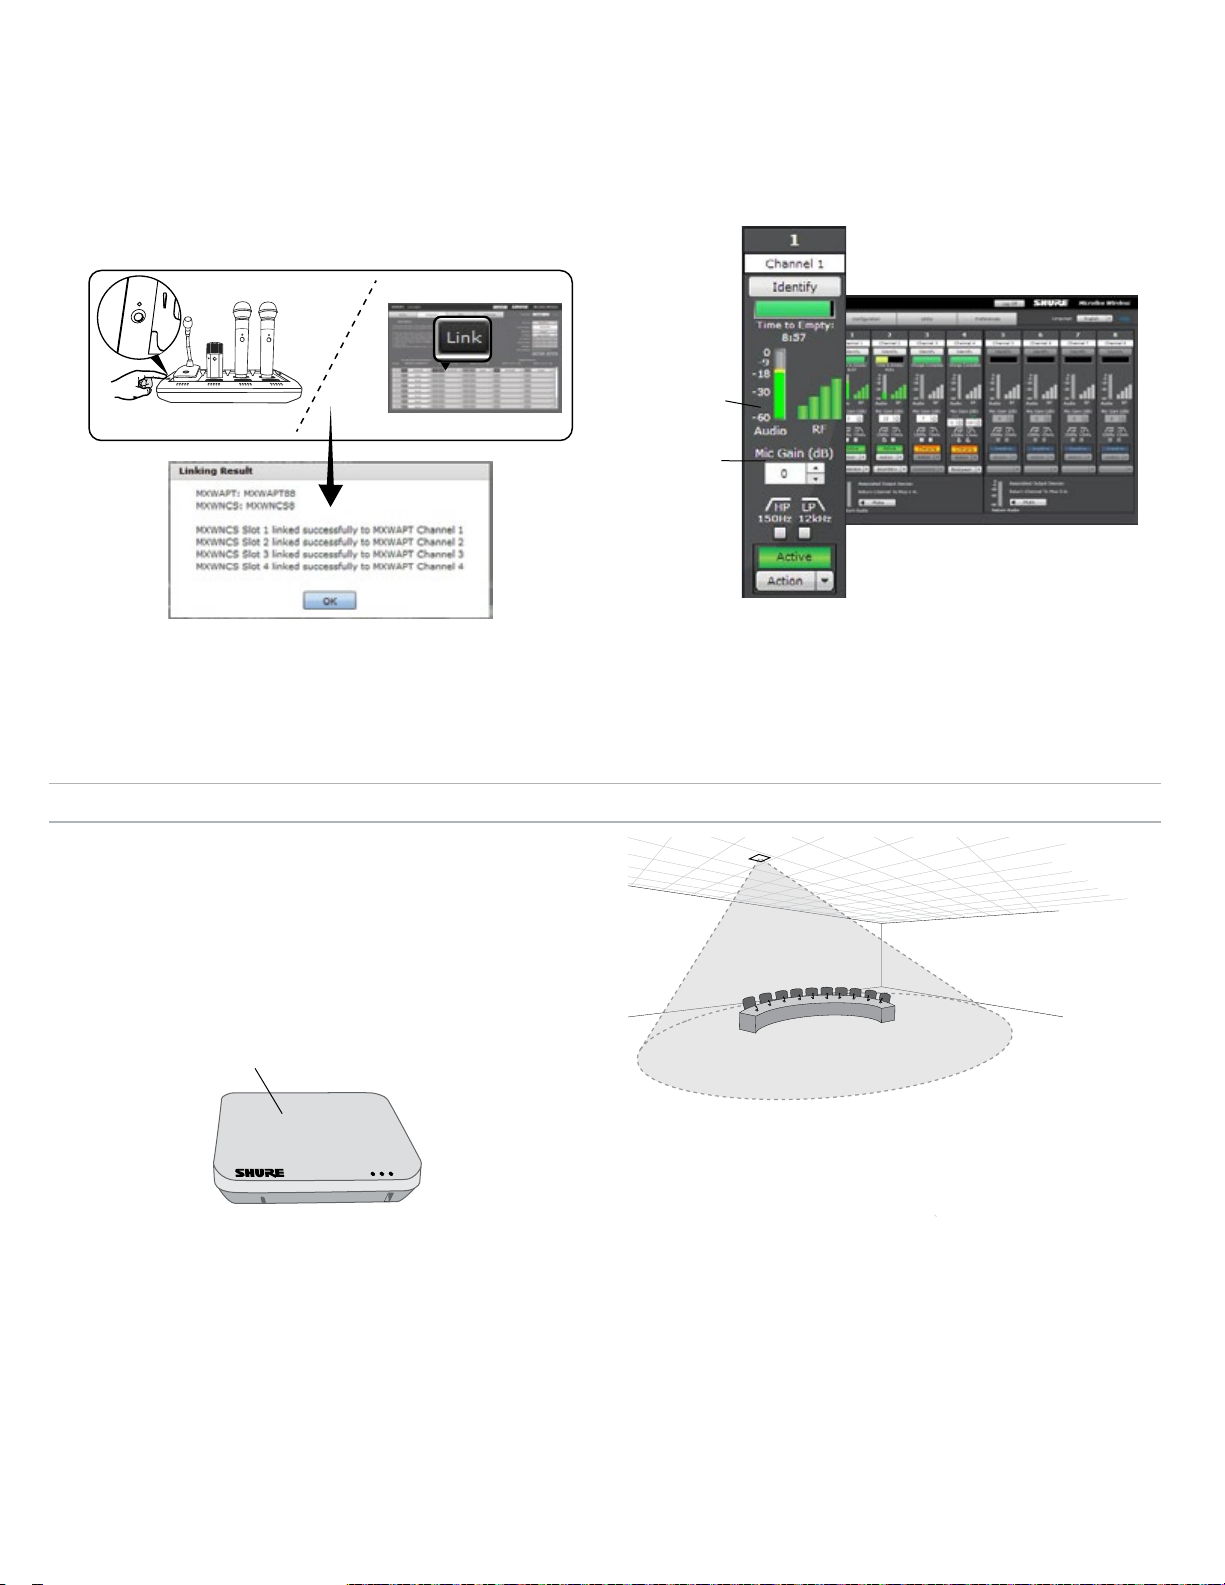
2. Conecte os microfones aos canais.
7
8
6
5
link
Use o software de controle ou a estação de carga para Conectar os
microfones aos canais do APT. Se desejar, esse recurso pode ser
desativado na estação de carga para que a Conexão só possa ser
executada a partir do software de controle:
- Software de Controle: Na página Configuration, pressione o botão Link para
cada carregador no Grupo.
-
Estação de Carga: Mantenha pressionado o botão Reset por 6 segundos. Os
LED piscam durante o processo e ficam verde sólido assim que a Conexão for
bem-sucedida.
3. Remova os Microfones e Teste o Áudio
Teste o áudio de cada microfone e ajuste o ganho do microfone, se
necessário, na guia Monitor do software de controle. O ganho deve ser
configurado num nível em que o áudio esteja sendo registrado (verde/
amarelo) no indicador de sinal, mas não está cortando (vermelho).
Indicador de sinal
Ajuste de ganho
Guia Monitor
Montagem do APT (Transceptor de Ponto de Acesso)
O APT irradia RF em um padrão cardioide que seja mais intensa na face do
dispositivo. Aponte a face do APT para as áreas de cobertura pretendidas.
Não bloqueie a linha de vista e mantenha-se afastado de grandes objetos
de metal.
Importante: Sempre execute uma "inspeção visual" para verificar a
cobertura antes de usar um sistema sem fio durante um discurso ou
apresentação. Experimente com o posicionamento da antena para
encontrar o local ideal. Se necessário, marque os "pontos cegos" e peça
que os apresentadores ou artistas evitem tais áreas.
Face do APT
Mire a área do microfone
60
Page 61
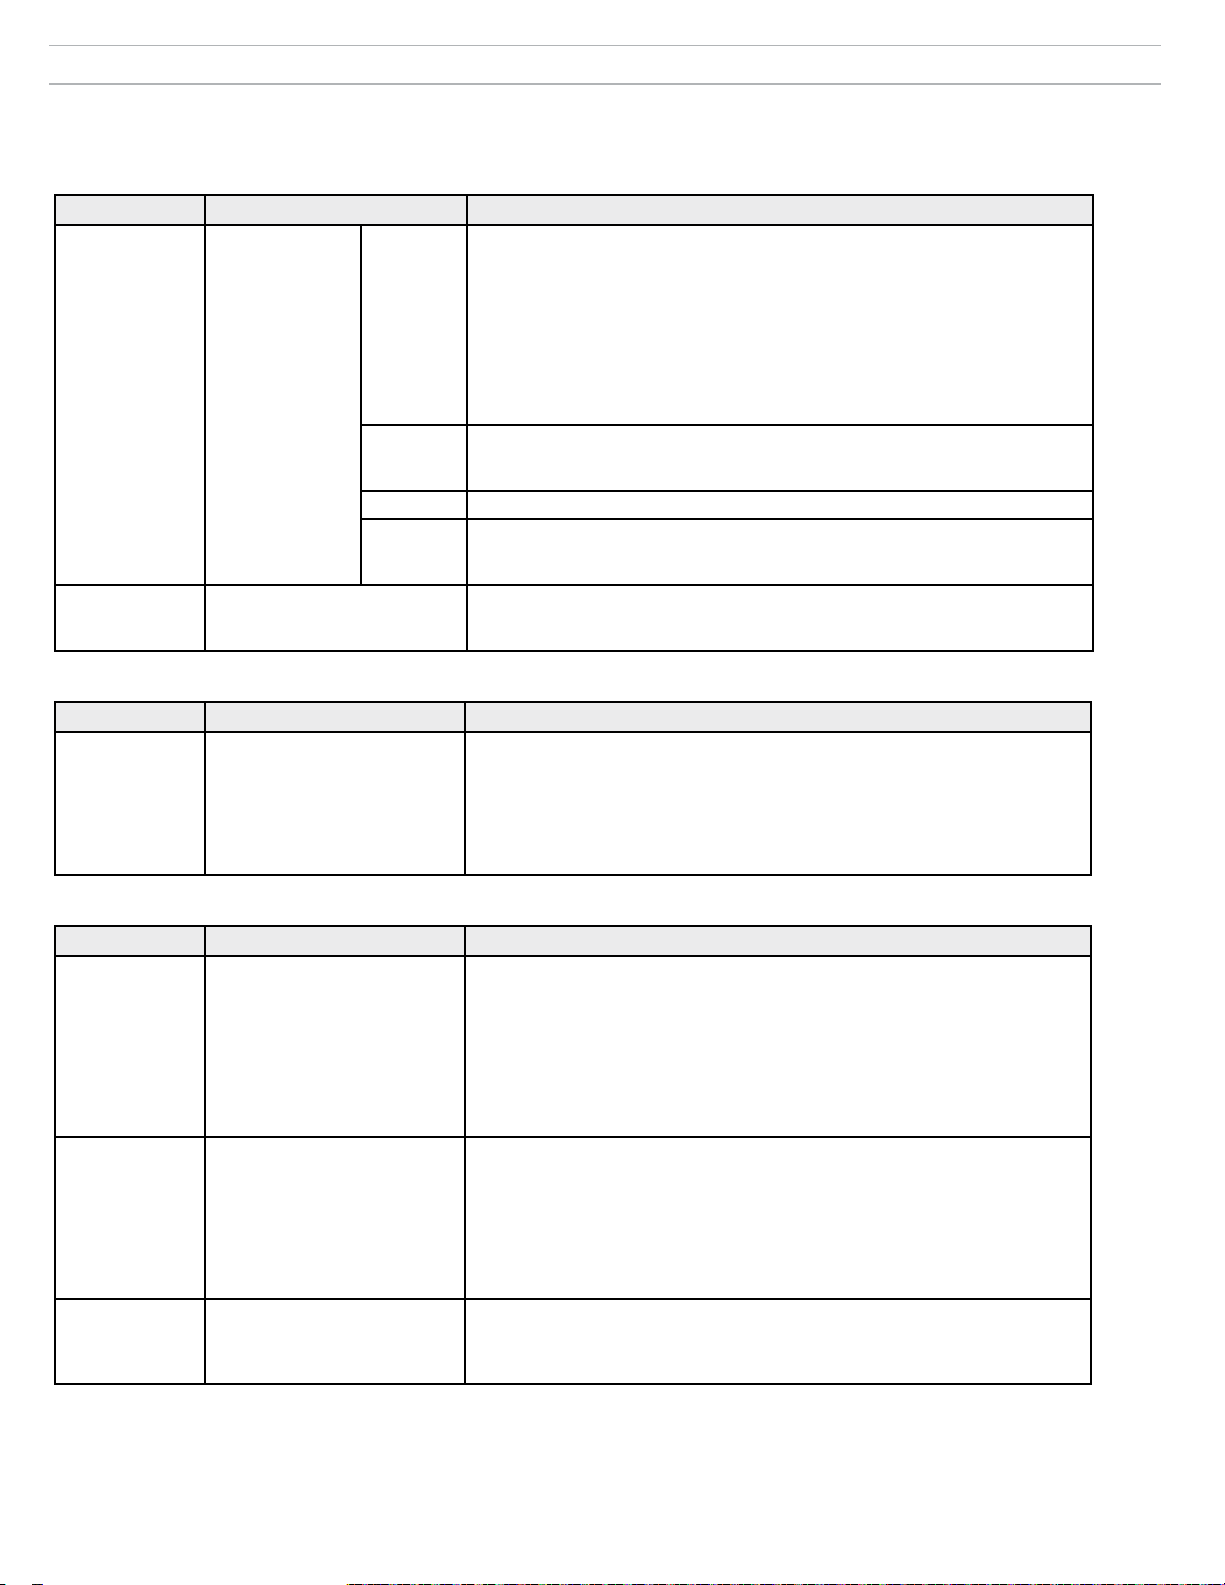
Resolução de Problemas
A tabela a seguir oferece soluções típicas para solucionar problemas do Sistema sem Fio Microflex. Para obter mais informações sobre cada assunto,
consulte o Guia do Usuário completo do MXW encontrado no site www.shure.com acompanhado da sua Unidade Flash USB.
Áudio
Problema Indicador Solução
• Verifique os cabos
• Verifique se os transmissores estão ligados e os canais com mudo desativado.
• Verifique se os medidores de entrada estão OK na guia Monitor do software de
controle MXW. Atenue se o canal estiver cortando.
• Verifique os medidores de saída no painel frontal da ANI (Interface de Rede de
Áudio) e no software de controle da ANI. Use fones de ouvido para escutar o
áudio do ANI. Atenue se o canal estiver cortando.
• Verifique se o nível de saída da ANI corresponde à entrada dos equipamentos de
conexão.
• Verifique se o APT não está executando uma procura espectral.
• Verifique se todos os dispositivos estão ligados e possuem uma conexão de rede
estável
• Use o software do Dante Controller (DC) para verificar assinaturas de canais
• Coloque o dispositivo em um Grupo para rotear automaticamente o áudio
• Verifique se a sub-rede das configurações de áudio da rede do Transceptor de
Ponto de Acesso corresponde à sub-rede da Interface de Rede de Áudio
• Execute uma Procura Espectral para monitorar interferências de RF
• Diminua a contagem de canais para verificar se o sistema está sobrecarregando o
espectro de RF
Se áudio / Áudio
distorcido
Interferência de
RF está causando
falhas de áudio
LED de Áudio da
Rede na Interface
de Rede de Áudio
ou SCM820
Áudio está intermitente
Verde
Piscando
em Verde
Vermelho • Verifique o relógio mestre no DC (um MXWAPT deve ser o relógio mestre)
Deslig.
Configuração do Sistema e Grupos do MXW
Problema Indicador Solução
• Verifique se os dispositivos estão ligados e conectados à mesma rede e sub-rede)
Não é possível
associar o
componente a um
Grupo
O menu suspenso do dispositivo
não exibe o componente
desejado na linha do Grupo na
guia Configuration
• Abra a guia Utility do Software de Controle MXW e desmarque o Filtro
Configuration para exibir todos os dispositivos MXW na rede. Se o dispositivo
aparecer como “OTHER”, ele faz parte de outra Configuração.
• Desassocie o componente selecionando 'nenhum' da linha do Grupo na outra
Configuração.
• Execute uma redefinição de fábrica no dispositivo para limpar qualquer associação.
Rede
Problema Indicador Solução
• Verifique se os dispositivos estão ligados
• Verifique se o PC e os equipamentos estão na mesma rede e configure-os na
Não é Possível
Conectar ao
Software de
Controle a partir
de um PC
Dispositivo não aparece no
aplicativo Shure Web Device
Discovery
mesma sub-rede
• Desligue as outras interfaces de rede não usadas para conectar ao dispositivo
(inclusive WiFi)
• Verifique se servidor DHCP está funcionando (se aplicável)
• Verifique se o Bonjour está em execução no PC
• Se conectado pela Porta 4 da ANI (Interface de Rede de Áudio), verifique se está
configurado para o Modo Comutado.
• Faça o download da versão mais recente do Adobe
• Verifique se o PC e o dispositivo estão na mesma rede e sub-rede
Software de
Controle está
demorando muito
para carregar
Navegador da Internet não
consegue se conectar à interface
de controle.
• Verifique se as configurações do firewall do Windows não estão bloqueando o
software da Shure.
• Configure o roteador para não enviar o gateway padrão como parte do DHCP
• Configure o aplicativo Shure Web Device Discovery abrir por endereço IP
• Configure manualmente o computador com um endereço IP estático na mesma
rede do dispositivo
O Software de
Controle não está
executando de
forma adequada
Indicadores estão se movendo
lentamente ou não estão sendo
exibidos em tempo real.
• Reduza o número de janelas ou de guias que estão abertas para a mesma
Configuração
• Consulte a seção Rede para configurar corretamente a rede
®
Flash
®
61
Page 62
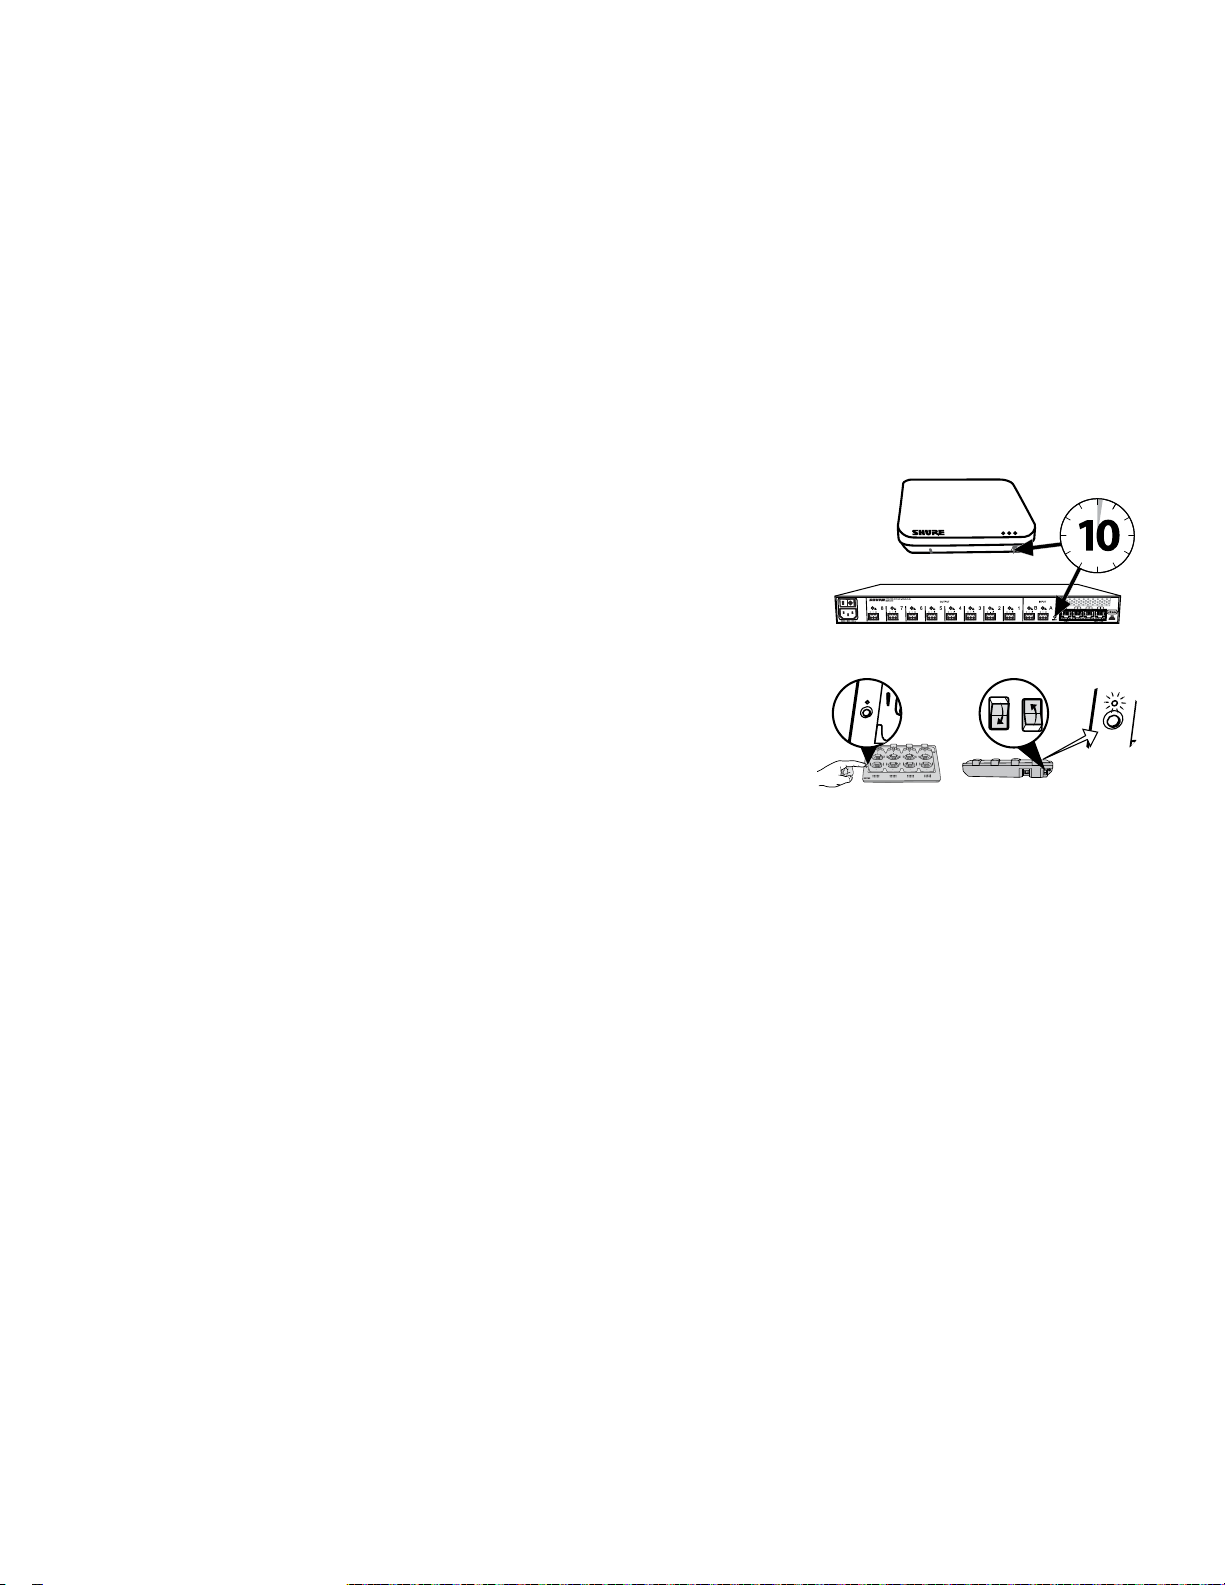
7
8
6
5
1
2
3
4
Link
Power
7
8
6
5
1
2
3
4
link
6
5
1
2
link
+
lockout
power
ethernet
network audio
push to solo | hold to mute
-9
-18
-24
-36
-48
-60
0
-9
-12
-18
-24
0
aux
mic
adjust
line
sig/clip
mute
INPUT
A
sig/clip
mute
OUTPUT
HEADPHONE
Audio Network Interface
MICROFLEX WIRELESS
B
1
2
3
4
5
6
7
8
line
aux
push to solo | hold to mute
A
sig/clip
mute
OUTPUT
B
1
2
3
4
5
6
7
8
line
aux
6
7
8
9
10
11
12
1
2
3
4
5
6
7
8
9
10
11
12
1
2
3
4
5
5
7
8
6
5
1
2
3
4
i
i
i i
i
i
i
i
i
i i
i
i
i
i
i
i
i i
i
i
i
i
i
i i
i
i
i
i
i
i
i i
i
i
i
i
i
i i
i
i
i
i
i
i
i i
i
i
i
i
i
i i
i
i
i
i
INPUT
A
OUTPUT
B
1
2
3
4
5
6
7
8
lockout
power
ethernet
network audio
push to solo | hold to mute
-9
-18
-24
-36
-48
-60
0
-9
-12
-18
-24
0
aux
mic
adjust
line
sig/clip
mute
sig/clip
mute
HEADPHONE
MICROFLEX WIRELESS
line
aux
Recursos Adicionais
Para obter ajuda ou informações adicionais para Solução de Problemas em instalações complexas, entre em contato com a Shure para falar com um
representante de suporte. Na região das Américas, ligue para o grupo de Suporte a Sistemas pelo número 847-600-8541 (EUA). Usuários em outros locais
devem acessar www.shure.com para encontrar o contato de suporte de sua região.
Para obter ajuda para redes de áudio digital, diretrizes para sistemas avançados de rede e solução de problemas do software Dante, visite o site de Audinate
em www.audinate.com.
Redefinição de Fábrica
Se um dispositivo não aparecer na rede após a tentativa de resolução de problemas, execute uma redefinição no hardware específico para retornar o
dispositivo às configurações padrão. As configurações padrão de fábrica são projetadas para compatibilidade automática com outros dispositivos em rede da
Shure.
Observação: Uma redefinição de fábrica limpará todas as associações de Grupos e Conexões do MXW. A senha para acessar o software será redefinida
para
admin.
Do Hardware
Transceptor de Ponto de Acesso
Mantenha pressionado o botão embutido de redefinição por 10 segundos. O LED de status de
áudio da rede se apaga brevemente para indicar que a unidade está reiniciando.
CUIDADO:
salvas no dispositivo.
Interface de Rede de Áudio
Mantenha pressionado o botão Reset por 10 segundos. LED do painel frontal pisca para indicar
que a unidade está reiniciando.
Uma redefinição de fábrica exclui todas as associações de Grupos e Conexões de microfones
Estação de Carga em Rede
a. Desligue o botão Liga/Desliga.
b. Mantenha o botão Link pressionado.
c. Enquanto mantém o botão Link pressionado, desligue o botão Liga/Desliga.
d. Continue a manter o botão Link pressionado por 12 segundos até os LEDs acenderem em âmbar.
Do Software de Controle
1. Abra a Guia Utility do software de controle do MXW.
2. Selecione o botão Edit Properties para o dispositivo.
3. Selecione a caixa de seleção de redefinição de fábrica.
4. Selecione Add Updates para salvar as configurações na fila de edições.
5. Repita para quaisquer dispositivos adicionais.
6. Pressione Apply All para realizar alterações em todos os dispositivos com propriedades alteradas.
62
Page 63
Informações sobre Segurança
MEDIDAS DE SEGURANÇA
Os possíveis resultados do uso incorreto são marcados por um de dois
símbolos — "ATENÇÃO" e "CUIDADO" — dependendo da iminência do
perigo e da severidade do dano.
ATENÇÃO: Não seguir esses avisos de atenção pode causar lesão
grave ou morte devido à operação incorreta.
CUIDADO: Não seguir esses avisos de cuidado pode causar lesão
moderada ou danos à propriedade em consequência da operação
incorreta.
ATENÇÃO
OUVIR O SOM COM VOLUME MUITO ALTO PODE CAUSAR DANOS
PERMANENTES À AUDIÇÃO. USE O VOLUME O MAIS BAIXO POSSÍVEL. A
exposição prolongada a sons excessivamente altos pode danificar os ouvidos e
resultar em perda permanente da audição devido ao ruído (NIHL - Noise-Induced
Hearing Loss). Siga as recomendações estipuladas pela Administração de Saúde e
Segurança do Trabalho dos E.U.A. (U.S. Occupational Safety Health AdministrationOSHA) sobre o máximo tempo de exposição a determinados níveis de pressão
sonora, a fim de evitar danos à audição.
90 dB SPL
por 8 horas
110 dB SPL
por 0,5 hora
ATENÇÃO
• Baterias podem explodir ou liberar materiais tóxicos. Risco de incêndio ou
queimaduras. Não abra, esmague, modifique, desmonte, aqueça acima de 60 °C
(140 °F) ou incinere.
• Siga as instruções do fabricante
• Use somente carregador Shure para recarregar baterias Shure recarregáveis
• ATENÇÃO: Perigo de explosão se a bateria for substituída incorretamente.
Substitua somente pelo mesmo tipo ou por um equivalente.
• Nunca ponha baterias na boca. Se engolida, procure um médico ou centro local
de controle de veneno
• Não provoque curto-circuito; isto pode causar queimaduras ou incêndios
• Não carregue nem use baterias que não sejam baterias recarregáveis Shure
• Descarte as baterias apropriadamente. Verifique com o fornecedor local a forma
correta de descarte de baterias usadas.
• Baterias (a embalagem ou as baterias instaladas) não devem ser expostas a calor
excessivo como luz do sol, fogo etc.
ATENÇÃO: Existe perigo de explosão caso a bateria seja substituída
incorretamente. Utilize apenas com baterias Shure compatíveis.
Observação: Use somente com a fonte de alimentação inclusa ou uma equivalente
aprovada pela Shure.
1. 經審驗合格之射頻電信終端設備,非經許可,公司、商號或使用者均不得擅自變更
頻率、加大功率或變更原設計之特性及功能。
2. 射頻電信終端設備之使用不得影響飛航安全及干擾合法通信;經發現有干擾現象
時,應立即停用,並改善至無干擾時方得繼續使用。所謂合法通信,係指依電信法
規定作業之無線電信。
3. 輸入、製造射頻電信終端設備之公司、商號或其使用者違反本辦法規定,擅自使用
或變更無線電頻率、電功率者,除依電信法規定處罰外,國家通訊傳播委員會並得
撤銷其審驗合格證明。
4. 減少電磁波影響,請妥適使用
95 dB SPL
por 4 horas
115 dB SPL
por 15 minutos
100 dB SPL
por 2 horas
120 dB SPL
Evite, para que não
ocorram danos
105 dB SPL
por 1 hora
MXW1
Transmissores de Microfone Bodypack:
Estes transmissores foram testados e cumprem com os limites
internacionais de exposição à radiação estipulados para um ambiente
descontrolado. Este equipamento fica em contato direto com o corpo
do usuário sob condições normais de operação. Estes transmissores
não devem ser posicionados ou operar em conjunto com nenhum
outro transmissor ou antena.
MXW2, MXW6, MXW8, MXWAPT4, MXWAPT8
Transmissores de Microfone de Mão, Transmissores de Mesa para
Microfone de Perfil Baixo, Transmissores de Mesa para Microfone
Gooseneck, Transmissores de Ponto de Acesso Sem Fio:
Estes transmissores móveis se destinam a uso em distâncias
superiores a 20 centímetros do corpo humano. Estes transmissores
móveis são isentos de requisitos de testes de normas internacionais
de exposição à radiação devido à sua proximidade ao corpo do
usuário em seu uso pretendido e sua saída de baixa potência. Estes
transmissores móveis devem ser posicionados ou instalados a pelo
menos 20 cm de qualquer pessoa e não devem ser posicionados ou
operarem em conjunto com nenhum outro transmissor ou antena.
Informações importantes do produto
Este equipamento destina-se a aplicações de áudio profissionais.
O teste de compatibilidade eletromagnética é baseado no uso dos
tipos de cabos recomendados e fornecidos com o equipamento.
O uso de outros tipos de cabos pode degradar o desempenho da
compatibilidade eletromagnética.
Alterações ou modificações não expressamente aprovadas pela
Shure Incorporated podem anular a autorização do usuário para a
operação deste equipamento.
Siga o esquema de reciclagem de sua região para baterias,
embalagem e resíduos eletrônicos.
Observação: Este aparelho não deve ser conectado diretamente a
uma rede pública de internet.
Informações para o usuário
Este equipamento foi testado e está de acordo com os limites para
um dispositivo digital Classe B, segundo a Parte 15 das Normas do
FCC. Estes limites foram projetados para fornecer razoável proteção
contra interferência prejudicial em uma instalação residencial. Este
equipamento gera, usa e pode irradiar energia de radiofrequência e,
se não for instalado e usado conforme as instruções, pode causar
interferência prejudicial às comunicações de rádio. Entretanto, não há
garantias de que não ocorrerão interferências em uma determinada
instalação. Se este equipamento causar interferência prejudicial
à recepção de rádio ou televisão, o que pode ser determinado
ao desligar e ligar o equipamento, o usuário deve tentar corrigir a
interferência tomando uma das seguintes medidas:
• Reoriente ou mude de lugar a antena receptora.
• Aumente a distância entre o equipamento e o receptor.
• Conecte o equipamento a uma tomada de um circuito diferente do
circuito da tomada onde o receptor está conectado.
• Consulte o fabricante do equipamento ou um técnico de rádio/
televisão experiente.
63
Page 64

Certificações
Esses dispositivos atendem à FCC Parte 15.
Este dispositivo está em conformidade com a(s) normas(s) RSS de
isenção de licença da Indústria Canadense. A operação deste dispositivo
está sujeita às seguintes condições: (1) este dispositivo não pode causar
interferência; e (2) este dispositivo deve aceitar quaisquer interferências,
incluindo algumas que possam causar operação não desejada do
dispositivo.
Le présent appareil est conforme aux CNR d'Industrie Canada applicables
aux appareils radio exempts de licence. L'exploitation est autorisée aux
deux conditions suivantes : (1) l'appareil ne doit pas produire de brouillage,
et (2) l'utilisateur de l'appareil doit accepter tout brouillage radioélectrique
subi, même si le brouillage est susceptible d'en compromettre le
fonctionnement.
Legislação Japonesa de Rádio e Conformidade com a Lei Japonesa de
Negócios de Telecomunicações. Este dispositivo é fornecido de acordo com
a Legislação Japonesa de Rádio (電波法) e a Lei Japonesa de Negócios
de Telecomunicações (電気通信事業法). Este dispositivo não deve ser
modificado (caso contrário, o número de designação fornecido será
invalidado).
Em conformidade com os requisitos de segurança elétrica baseados na IEC
60065.
Atende a todos os requisitos essenciais das Diretivas Europeias relevantes
e pode exibir a marca CE.
A Declaração de Conformidade da CE pode ser obtida da Shure
Incorporated ou de qualquer um dos seus representantes europeus. Para
informações de contato, visite www.shure.com
A Declaração de Conformidade da CE pode ser obtida em: www.shure.com/
europe/compliance
Representante Autorizado Europeu:
Shure Europe GmbH
Headquarters Europe, Middle East & Africa
Department: EMEA Approval
Jakob-Dieffenbacher-Str. 12
75031 Impingem, Alemanha
Telefone: 49-7262-92 49 0
Fax: 49-7262-92 49 11 4
E-mail: [email protected]
MXWNCS4, MXWNCS8
Autorizado pela disposição de verificação da FCC nos termos da Parte
15b.
Selo de Conformidade ICES-003 da Indústria Canadense
CAN ICES-3 (B)/NMB-3(B)
Observação: Consulte a etiqueta localizada no lado inferior da
carcaça do carregador para a marca FCC, marca CE, marca C-Tick e
classificações elétricas.
MXW1, MXW2, MXW6, MXW8, MXWAPT4, MXWAPT8
Certificado de acordo com a Parte 15 da FCC.
FCC: DD4MXW1, DD4MXW2, DD4MXW6, DD4MXW8,
DD4MXWAPT4, DD4MXWAPT8.
Cumpre os requisitos aplicáveis de RSS-213.
IC: 616A-MXW1, 616A-MXW2, 616A-MXW6, 616A-MXW8,
616A-MXWAPT4, 616A-MXWAPT8.
Marcas Comerciais
Audinate®, o logotipo da Audinate e Dante são marcas comerciais da
Audinate Pty Ltd.
Page 65
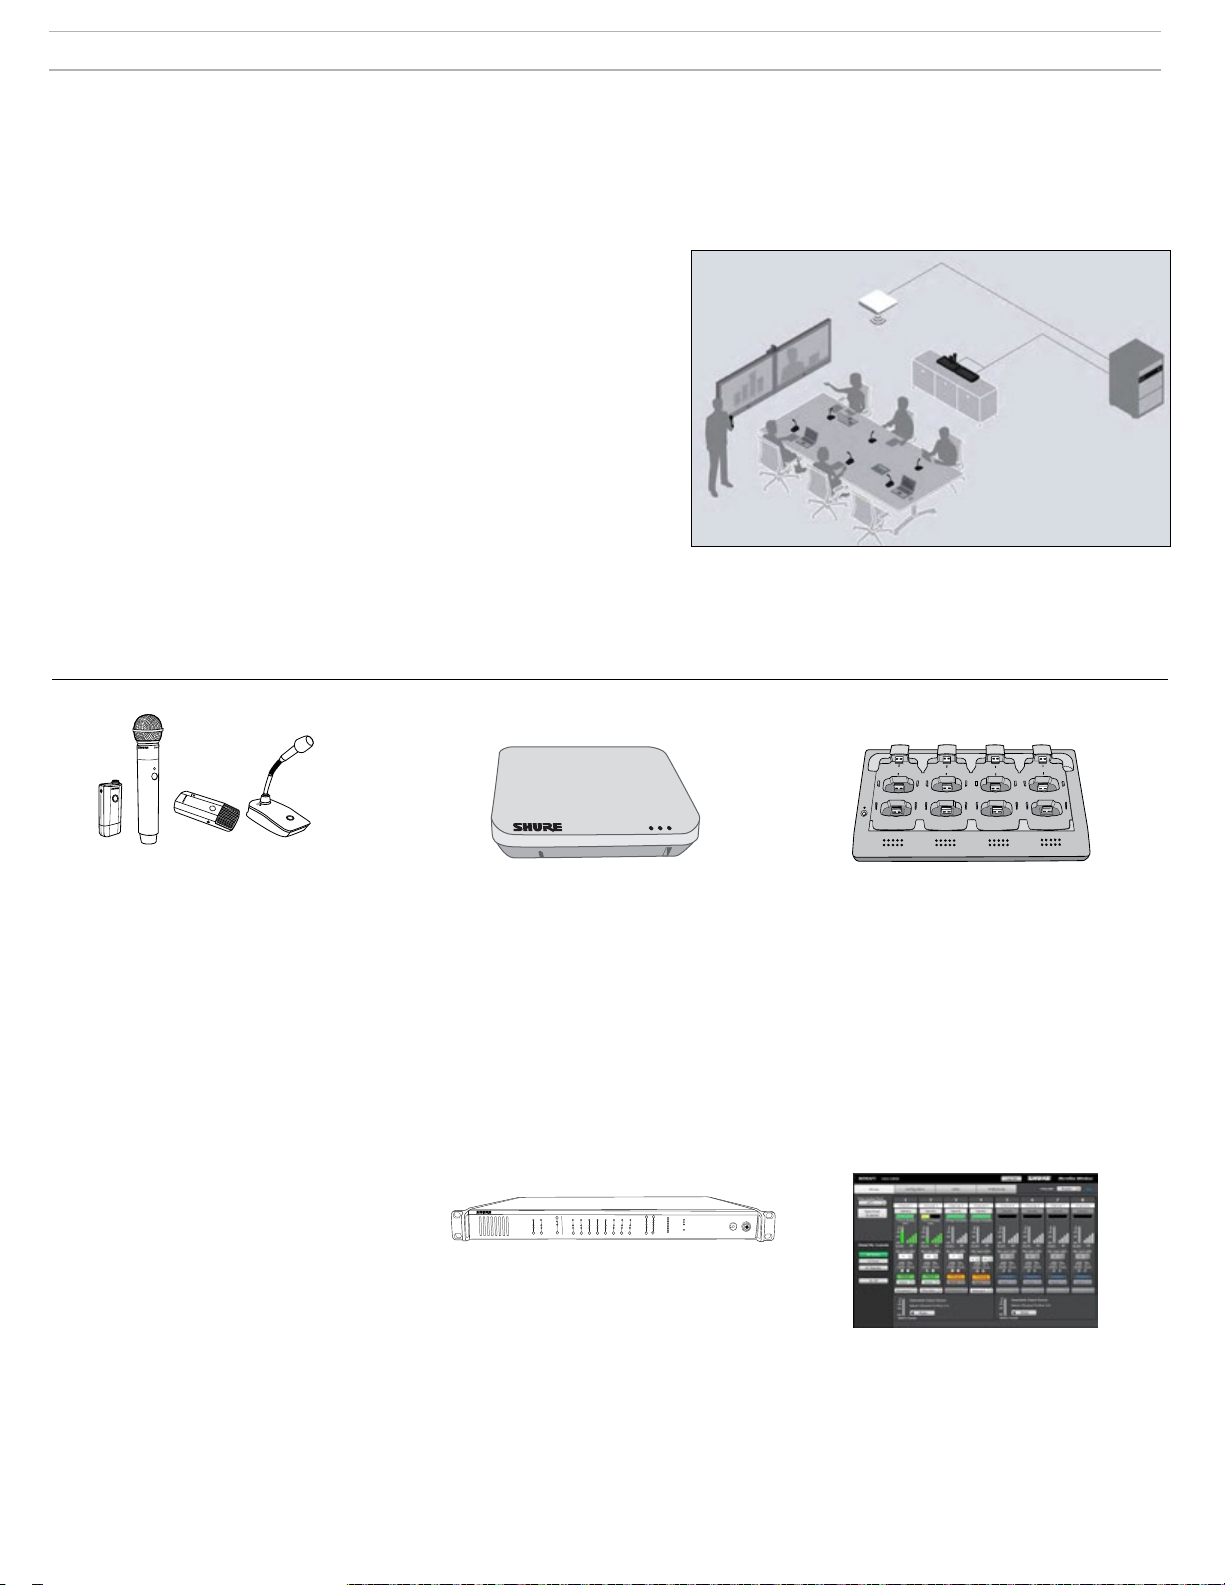
Общее описание
Shure Microflextm Wireless Series (MXW) представляет собой полную микрофонную систему для самых различных комнат переговоров и залов
заседаний. Ее основные особенности — автоматическое управление РЧ каналами, подзаряжаемые кодируемые (AES256) беспроводные
микрофоны и цифровая аудиосеть (Dantetm). Сетевая зарядная станция служит для подзарядки микрофонов граничного слоя и микрофонов на
гибкой стойке, а также ручных и переносных микрофонов для корпоративных учебных курсов и презентаций. Незаметный узел доступа MXW
устанавливается на потолке или на стене и служит для связи между беспроводными микрофонами и цифровой аудиосетью. Для установок,
требующих одновременной работы до 40* микрофонов в одном и том же помещении (*это число зависит от региона) может использоваться
несколько узлов доступа. Дистанционный мониторинг и управление могут осуществляться через веб-браузер с любого компьютера,
подсоединенного к сети.
Дополнительные ресурсы
Настоящее краткое руководство по эксплуатации содержит основную
информацию по установке базовой 8-канальной системы MXW. Ниже приводится
список дополнительных источников сведений, относящихся к серии MXW:
Полное руководство по эксплуатации MXW: Полное руководство содержит
исчерпывающие сведения о системе MXW, в частности, подробные описания
компонентов и сетевой топологии, рекомендации по управлению радиочастотами
и работе с управляющим программным обеспечением. Его можно найти на сайте
www.shure.com и на USB-накопителе, входящем в комплект приемопередатчика
узла доступа.
Помощь со стороны Shure: Если вам понадобится помощь при поиске
неисправностей или консультация по сложной установке, обратитесь в Shure,
чтобы побеседовать с техническим специалистом. Если вы находитесь в
американском регионе, позвоните в группу технической помощи по тел. 847600-8541. Пользователи из других регионов могут найти список контактов для
обращения за технической помощью на сайте www.shure.com.
Audinate: Если потребуется помощь по цифровым аудиосетям, рекомендации
по современным сетевым технологиям или возникнут трудности с работой
программного обеспечения Dante
com.
tm,
посетите веб-сайт Audinate, www.audinate.
Компоненты
MXW6MXW1 MXW8
MXW2
Передатчики микрофонов
Микрофоны MXW передают кодированный
беспроводной аудиосигнал узлу доступа.
Предусмотрены передатчики четырех типов:
Гибридный переносной (MXW1)
Переносной передатчик крепится к поясу
или ленте и обеспечивает мобильную связь,
оставляя руки свободными. Он оборудован
разъемом TQG для петличного микрофона и
встроенным всенаправленным микрофоном.
Ручной (MXW2)
Ручной передатчик позволяет выступающему
использовать легендарные микрофонные
головки Shure SM58, SM86, BETA58 и VP68.
Передатчики микрофонов граничного слоя
(MXW6/C, MXW6/O)
Такой передатчик устанавливается на столе
и естественным образом вписывается в
обстановку любой конференции.
Настольное основание для микрофонов на
гибкой стойке (MXW8)
Такое основание пригодно для микрофонов
Microflex с гибкой стойкой длиной 127, 254 и
381 мм.
Микрофоны MXW1, MXW6 и MXW8 оборудованы
выходом на наушники для мониторинга
аудиосигнала, например, для канала
трансляции.
Приемопередатчик узла доступа
(APT) (MXWAPT4, MXWAPT8)
Приемопередатчик узла доступа (4- или
8-канальный) устанавливается на потолке
или на стене и поддерживает кодированное
беспроводное соединение с микрофонами.
Он представляет собой системный
концентратор и транспортирует цифровой
аудиосигнал между микрофон и другими
устройствами Dante по одной и той же сети.
В состав APT входит веб-сервер, на котором
находится управляющее программное
обеспечение системы MXW, которое служит
для мониторинга, настройки и дистанционного
управления системой.
MICROFLEX WIRELESS
B
OUTPUT
INPUT
line
aux
sig/clip
sig/clip
mute
mute
push to solo | hold to mute
-9
0
line
-18
-9
-12
aux
-24
-18
-36
mic
-24
-48
-60
adjust
0
8
7
6
5
4
3
2
1
A
Audio Network Interface
power
ethernet
network audio
HEADPHONE
lockout
Сетевой аудиоинтерфейс (ANI)
(MXWANI4, MXWANI8)
Cетевой аудиоинтерфейс (4- или 8-канальный)
— это сетевое устройство Dante,
поддерживающее аналоговый аудиовход и
выходы системы MXW В нем предусмотрен
4-портовый гигабитный коммутатор Ethernet,
позволяющий подключить узел доступа MXW,
компьютер и до двух сетевых зарядных
станций.
2
1
5
6
4
3
7
8
Сетевая зарядная станция
(MXWNCS4, MXWNCS8)
Сетевая зарядная станция (с 4 или 8
гнездами) позволяет одновременно заряжать
до 4 (или до 8) микрофонов MXW. Кроме того,
она связывает микрофоны с каналами узла
доступа и передает управляющей программе
статистические данные батареек.
Внимание! Настольные микрофоны на
гибкой стойке (MXW8) занимают два
зарядных гнезда. Например, для восьми
микрофонов MXW8 нужны две зарядные
станции MXWNCS8 (всего 16 зарядных
гнезд).
Управляющее программное
обеспечение MXW
Управляющее ПО системы MXW
поддерживает всестороннее дистанционное
управление основными функциями настройки,
мониторинга и администрирования.
Доступ к ПО осуществляется с любого ПК
или Macintosh, подключенного к сети, и
открывается в веб-браузере при помощи
Adobe® Flash®.
65
Page 66
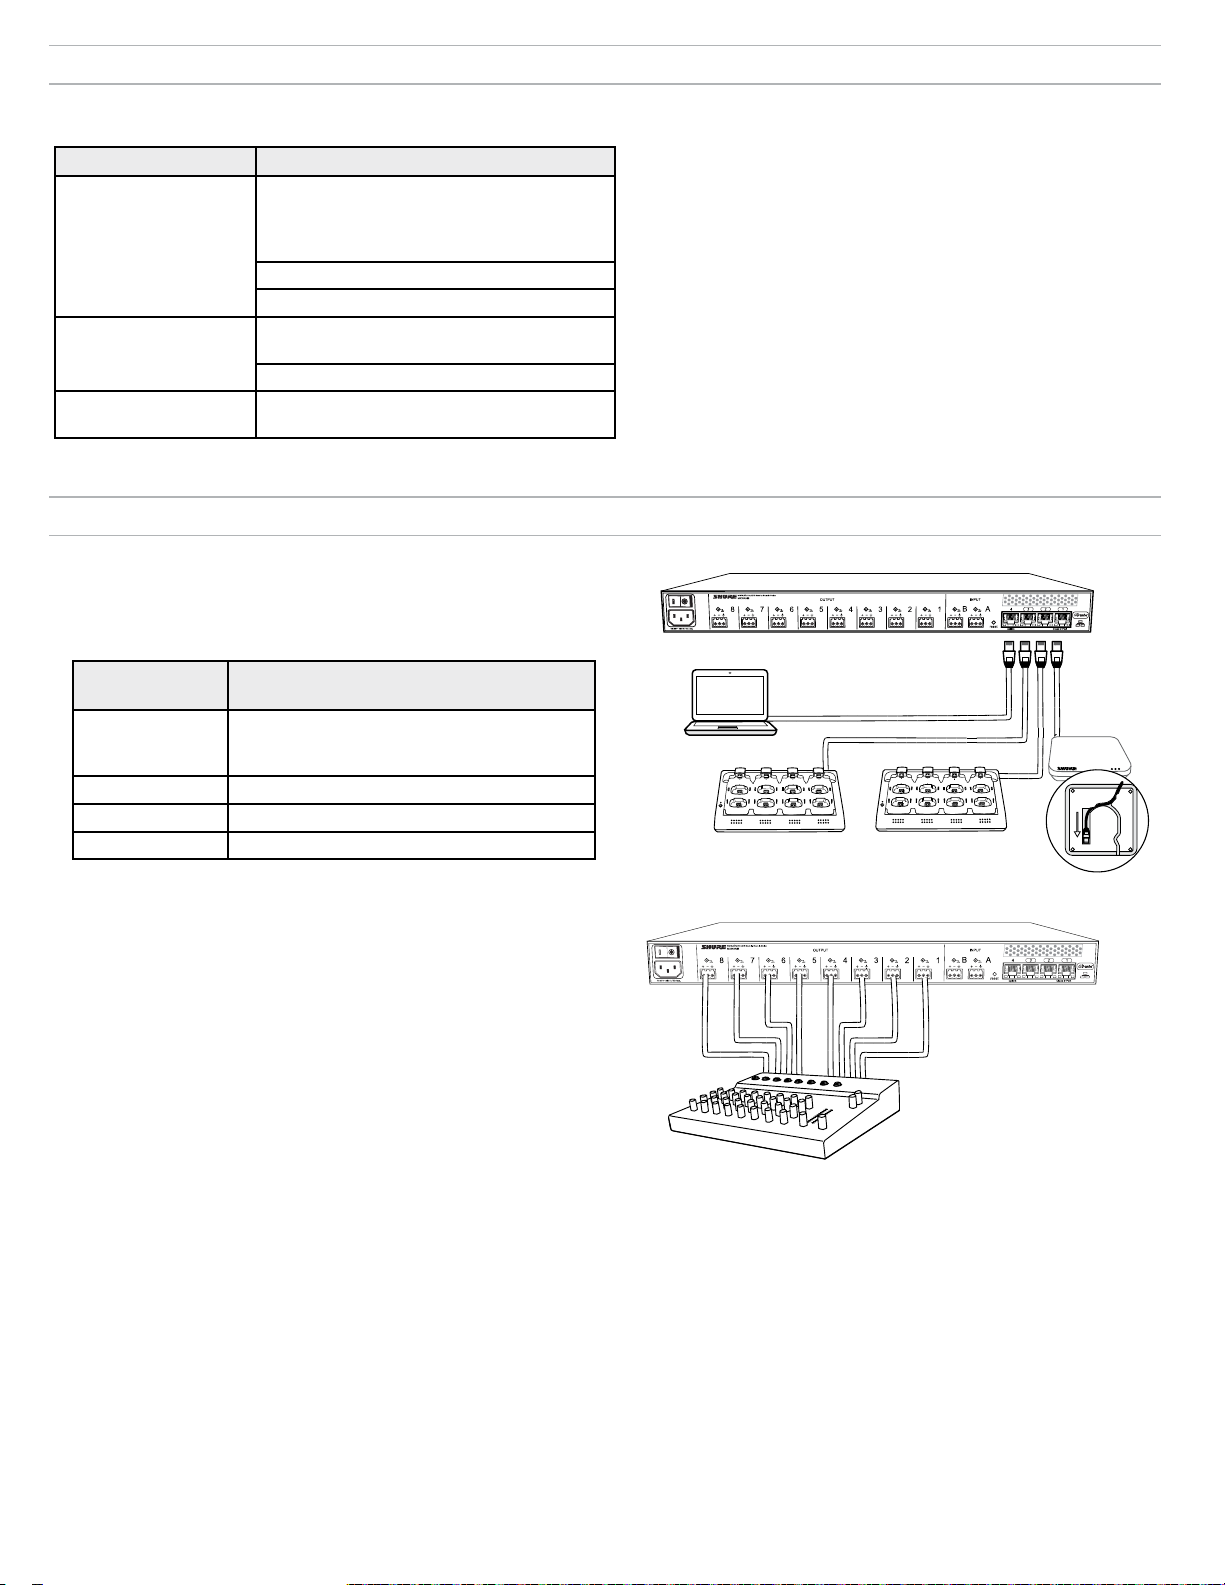
Список оборудования
Принадлежности, входящие в комплект
Компонент Принадлежности
USB флэш-накопитель Shure (содержит
приложение Shure Web Device Discovery,
APT (приемопередатчик
узла доступа)
приложение Shure Firmware Update Manager
и руководства по эксплуатации)
Установочная плата
Окрашиваемая настенная крышка
ANI (сетевой
аудиоинтерфейс)
NCS (сетевое зарядное
устройство)
Комплект крепежа (винты для крепления в
стойку, кабельные разъемы)
Кабель питания IEC
Силовой адаптер постоянного тока
Соедините компоненты
1. Соедините компоненты MXW
используйте для соединения компонентов MXW экранированные
Ethernet-кабели. Используйте 4-портовый коммутатор сетевого
аудиоинтерфейса (ANI) или подключите все компоненты к
отдельному гигабитному коммутатору.
Сетевой порт
ANI
① Порт 1 (PoE) Приемопередатчик узла доступа (APT)
② Порт 2 Сетевая зарядная станция (NCS)
③ Порт 3 (Дополнительно) Вторая NCS
④ Порт 4 Компьютер
Примечание.
автоматический (DHCP) режим, чтобы автоматически получать совместимые
IP-настройки. В отсутствие DHCP-сервера устройства будут использовать
формат адреса Link Local (169.254.x.x).
К компоненту
При стандартной установке устройства MXW настраиваются на
Дополнительное оборудование
Аудиокабели
Для подключения ANI к микшеру, цифровому процессору
сигналов (DSP) или устройству телеконференцсвязи используйте
экранированные аудиокабели.
Ethernet-кабели
Для соединения в сеть компонентов MXW используйте
экранированные кабели категории 5e (или выше).
Компьютер
Для доступа к системе MXW из веб-браузера используйте ПК или
Macintosh.
④
①
③
1
4
2
1
3
5
7
6
8
2
5
6
②
4
3
7
8
2. Подсоедините аналоговые выходы ANI
Для подключения ANI к микшеру, DSP или устройству
телеконференцсвязи используйте экранированные аудиокабели.
(Для правильного подсоединения кабелей к блочным соединителям
воспользуйтесь комплектом крепежа, поставляемого с ANI.)
66
Page 67
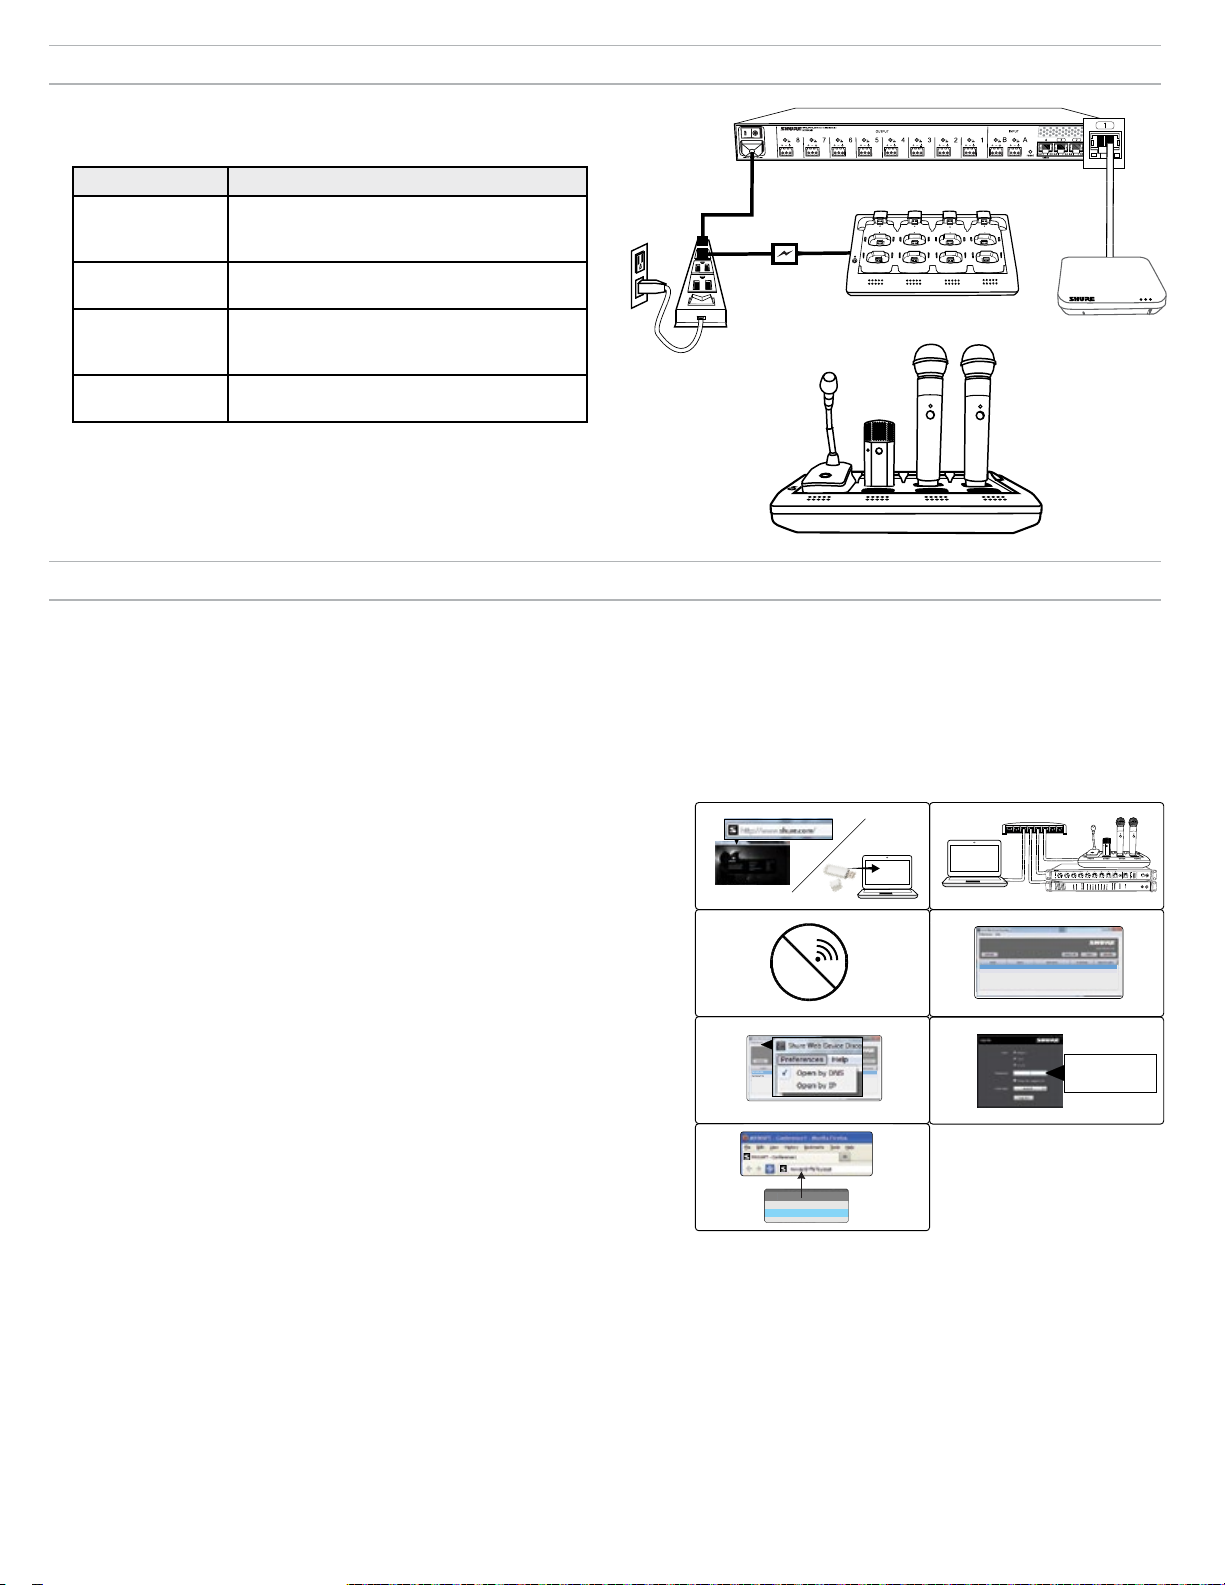
Питание
②
④
①
7
8
6
5
1
2
3
4
7
8
6
5
1
2
3
4
③
MXWANI8 mxwani8-ffeee5.local
192.168.200.22
Dante
Dante
ROOM 5
MXWAPT8
mxwapt8-ffaaa2.local
192.168.200.23
CONFERENCE
mxwani-aa1.local
192-168-200-22
mxwapt8-ffe761.local
192-168-200-23
Подключите питание и включите компоненты.
При включении питания загорится светодиод каждого компонента.
①
Class 0 PoE
Компонент Источник питания
① ANI
② APT
Подсоедините кабель IEC к источнику
питания переменного тока и включите
выключатель питания.
Подключите к порту 1 ANI для питания через
Ethernet (PoE). Выключателя питания нет.
③
1
2
5
6
4
3
7
8
②
Подсоедините PS45 к источнику питания
③ NCS
переменного тока и включите выключатель
питания.
④ Передатчики
Перед работой полностью зарядите
передатчики.
④
Доступ к управляющему ПО MXW
Управляющее ПО системы MXW использует установленное в устройстве ПО, которое осуществляет всестороннее дистанционное управление
основными функциями настройки, мониторинга и администрирования. Доступ к ПО осуществляется с любого ПК или Macintosh, подключенного к
сети, и открывается в веб-браузере при помощи Adobe® Flash®.
Для системы MXW существуют два различных интерфейса управления:
• Управляющее ПО системы MXW: используется для управления системой MXW, доступ — через приемопередатчик узла доступа.
• Управляющее ПО сетевого аудиоинтерфейса: используется для управления только этим устройством, доступ — через сетевой аудиоинтерфейс.
Для доступа к управляющему ПО системы MXW действуйте следующим образом:
1. Установите приложение Shure Web Device Discovery.
Загрузите приложение Shure Web Device Discovery с www.shure.com или с
USB-накопителя, полученного в комплекте приемопередатчика узла доступа
MXW (Программа Bonjour, инструмент для обнаружения устройств, сцеплена
с приложением и устанавливается автоматически.)
2. Проследите, чтобы компьютер находился в сети MXW.
Доступ компьютера к управляющему ПО осуществляется с веб-сервера,
встроенного в устройство. Все сетевые устройства должны быть подключены
к одной сети (и входить в одну и ту же подсеть).
3. Выключите WiFi
Выключите WiFi компьютера, чтобы ввести в действие интерфейс проводной
сети.
4. Запустите приложение Shure Web Device Discovery.
Откройте приложение, чтобы увидеть все присутствующие в сети устройства
Shure, оборудованные встроенным сервером для управляющего ПО
(MXWAPT, MXWANI и SCM820). Нажмите кнопку Identify, чтобы определить
эти устройства по вспыхнувшим светодиодам.
5. Откройте управляющее ПО MXW
Откройте управляющее ПО системы MXW двойным щелчком на любом
приемопередатчике узла доступа. Двойным щелчком на сетевом
аудиоинтерфейсе откройте интерфейс ПО этого устройства. Приложение
может открыть управляющую программу по IP-адресу или DNS-имени (это
выбирается из раскрывающегося списка предпочтений).
①
③
⑤
⑦
Wi-Fi
②
④
⑥
MXWANI8 mxwani8-ffeee5.local
ROOM 5
CONFERENCE
MXWAPT8
mxwapt8-ffaaa2.local
SCM820
1 2 3 4 5 6 7 8
gain
low cut
hi shelf
meter
push to solo | hold to mute
8
7
5
4
6
2
1
3
A
B
OUTPUT
INPUT
line
aux
sig/clip
sig/clip
mute
mute
push to solo | hold to mute
192.168.200.22
Dante
Dante
192.168.200.23
admin
®
IntelliMix
LIM
MASTER
AB
power
B
A
AUX IN
HEADPHONE
0
ethernet
-9
network audio
-18
automix link
-24
gain
dual mixer
-36
limiter
-48
L+R SUM
-60
lockout
MICROFLEX WIRELESS
Audio Network Interface
0
power
-9
0
line
ethernet
-18
-9
network audio
aux
-12
-24
HEADPHONE
-18
mic
-36
-24
-48
lockout
-60
adjust
6. Введите стандартный пароль
Для доступа к управляющему ПО введите стандартный пароль
администратора.
7. Отметьте веб-страницу закладкой (рекомендуется).
Отметьте закладкой IP-адрес, если устройство настроено на статический IPадрес. Отметьте закладкой DNS-имя, если выбран автоматический режим
IP-адресации (DHCP).
67
Page 68
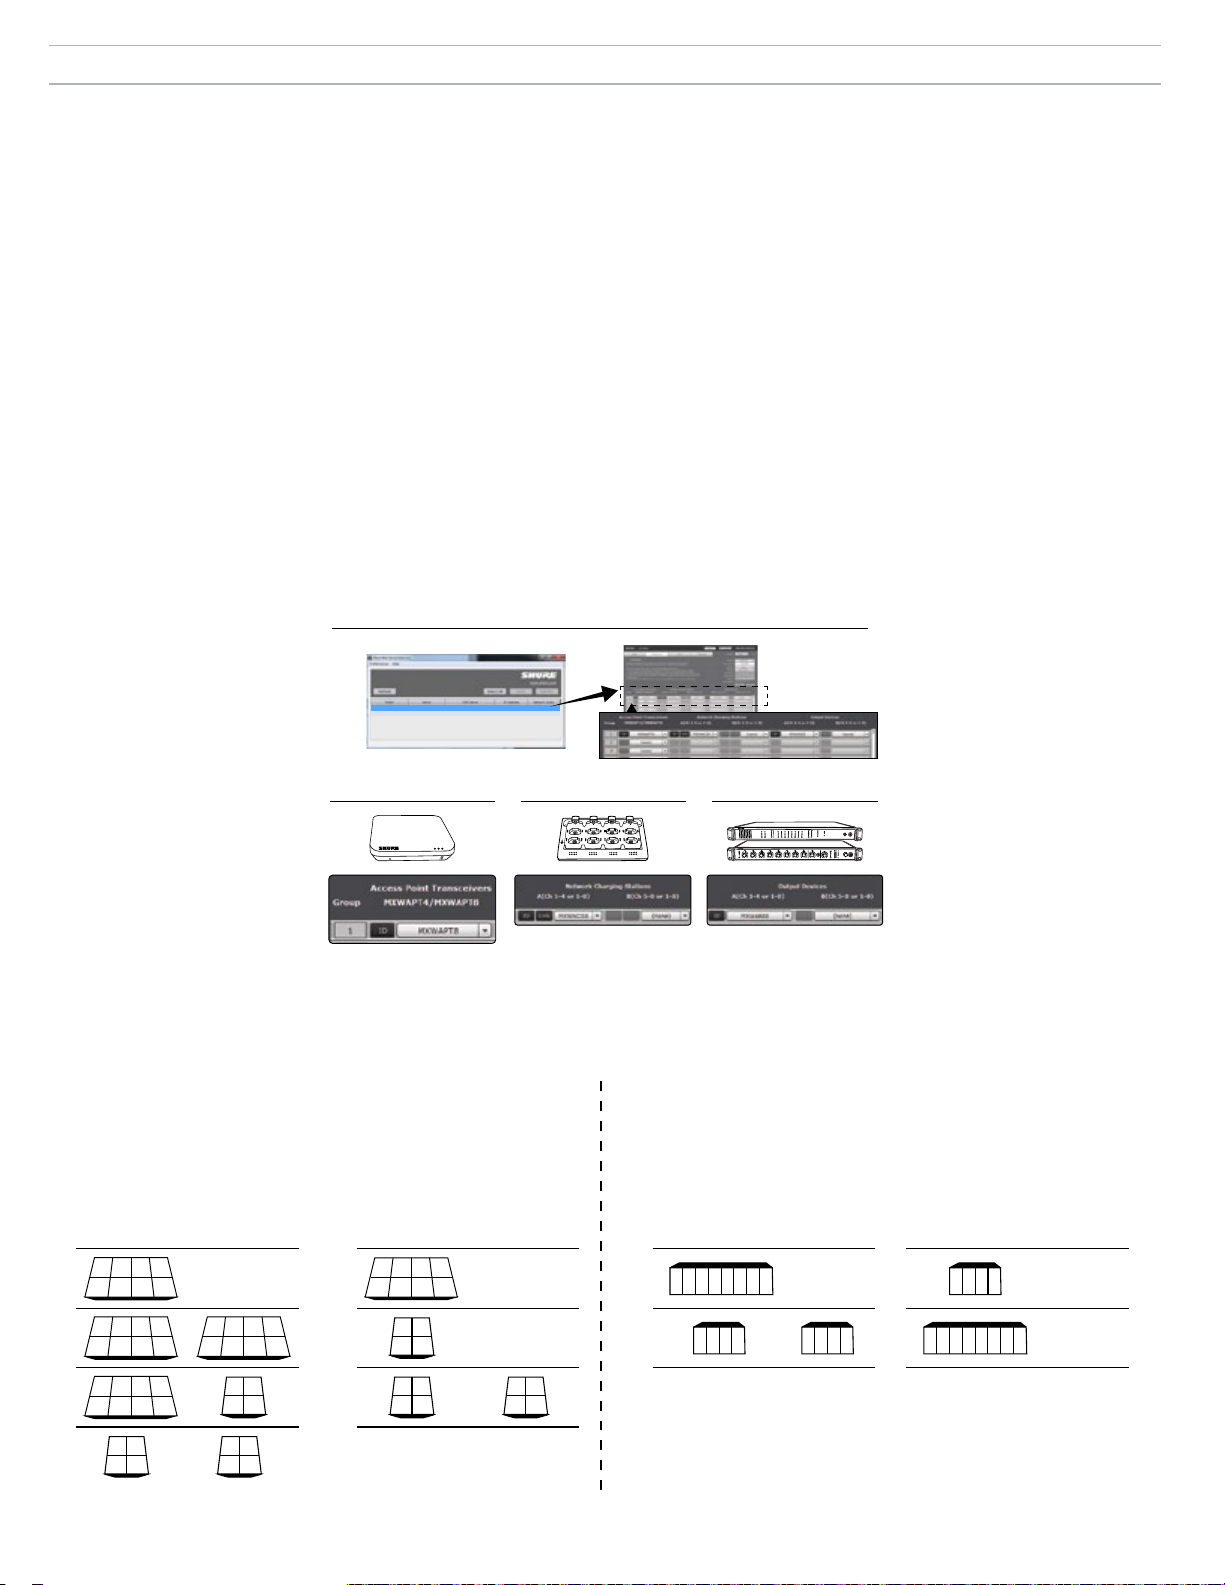
Объединение компонентов в группы
Следующие инструкции относятся к формированию группы MXW. Если устройство недоступно из раскрывающегося окна, убедитесь, что оно
«открыто» и находится в сети.
Совет: Воспользуйтесь кнопкой ID для идентификации устройства. Эта кнопка посылает устройству сигнал, по которому вспыхивает его светодиод,
облегчая идентификацию.
1. Откройте вкладку Configuration
Воспользуйтесь приложением Shure Web Discovery, чтобы
увидеть все приемопередатчики узла доступа (APT) MXW в сети.
Двойным щелчком на откройте программу и перейдите к вкладке
Configuration.
2. Выберите приемопередатчик узла доступа (APT) для группы 1.
Выберите APT из раскрывающегося списка. Этот выбор определит
число каналов группы (APT4 или APT8)
Примечание. APT, через который была открыта управляющая программа,
должен быть включен в группу 1 После этого остальные входящие в сеть (и
открытые) APT можно использовать для дополнительных групп.
3. Выберите сетевую зарядную станцию (станции)
Свяжите одну или две cетевые зарядные станции (NCS) с узлом
доступа. Две зарядные станции могут потребоваться в двух случаях:
- При использовании двух 4-канальных зарядных станций для 8-канального
узла доступа.
- При использовании микрофонов на гибкой стойке. Микрофоны на гибкой
①
стойке перекрывают передние и задние гнезда зарядного устройства,
уменьшая число доступных гнезд вдвое. Так, для заполнения 8-канального
узла доступа микрофонами на гибкой стойке нужны две 8-канальные
зарядные станции.
4. Выберите выходное аудиоустройство (устройства)
Выберите одно или два выходных аудиоустройства (MXWANI или
SCM820), на которые будут автоматически направляться цифровые
аудиоканалы узла доступа. Выбирайте из следующих устройств:
- Сетевой аудиоинтерфейс (MXWANI), 4- или 8-канальный вариант К
8-канальному APT могут быть присоединены два 4-канальных или одно
8-канальное устройство.
- Микшер Shure SCM820 IntelliMix®. В качестве аудиовыхода группы может
быть выбран SCM820, поддерживающий систему Dante. Это автоматически
направит вспомогательный (aux) вход SCM820 на микрофоны для
индивидуального мониторинга (левый канал aux SCM820 на каналы 1 – 4
MXW и правый — на каналы 5 – 8).
Примечание. Данные объединения (ассоциирования) устройств и и
связывания микрофонов постоянно сохраняются в устройстве. Если
система MXW выключается, а заткем запускается без компьютера,
устройства остаются ассоциироваными с узлом доступа.
MXWANI8 mxwani8-ffeee5.local 192.168.200.22
②
MXWAPT8
ROOM 5
CONFERENCE
mxwapt8-ffaaa2.local
192.168.200.23
③
Dante
Dante
4
2
1
3
7
5
6
8
④
A
B
INPUT
OUTPUT
line
aux
sig/clip
mute
SCM820
gain
1 2 3 4 5 6 7 8
low cut
hi shelf
meter
push to solo | hold to mute
sig/clip
mute
HEADPHONE
-18
mic
-36
-24
-48
lockout
-60
adjust
push to solo | hold to mute
®
IntelliMix
LIM
MASTER
AB
power
B
A
HEADPHONE
AUX IN
0
ethernet
-9
network audio
-18
automix link
-24
gain
-36
dual mixer
limiter
-48
-60
L+R SUM
lockout
MICROFLEX WIRELESS
Audio Network Interface
0
5
8
4
7
2
3
6
1
power
-9
0
line
ethernet
-18
-9
aux
network audio
-12
-24
Отображение каналов на устройства группы
Аудиосигнал направляется от микрофонов на аналоговые выходы в соответствии с настройкой группы на вкладке Configuration. Следующая схема
показывает распределение каналов между устройствами в 8- и 4-канальных группах.
Сетевая зарядная станция
Если группа заполнена микрофонами на гибкой стойке, требуется
Выходы назначаются интерфейсу аудиосети MXW или
дополнительная зарядная станция.
8-канальная группа
4-канальная группа
8-канальная группа 4-канальная группа
A B A B A B A B
2 3 4
1
1) 1) 1) 1)
5 6 7 8
(none) (none) (none)(none)
2 3 41
x x x x
Устройство аудиовыхода
автоматическому микшеру SCM820
81 2 3 4 5 6 7
1 2 3 4
2 3 41
2) 2) 2) 2)
x x x x
2 3 41
3) 3)
x x x x
2
1
4)
3 4
5 6 7 8
x x x
x
5 6
7 8
5 6
7 8
1
3
x x
2
4
21
3 4
1 2 3 4
85 6 7
x x
68
1 2 3 4 x x x x
(none)(none)
Page 69
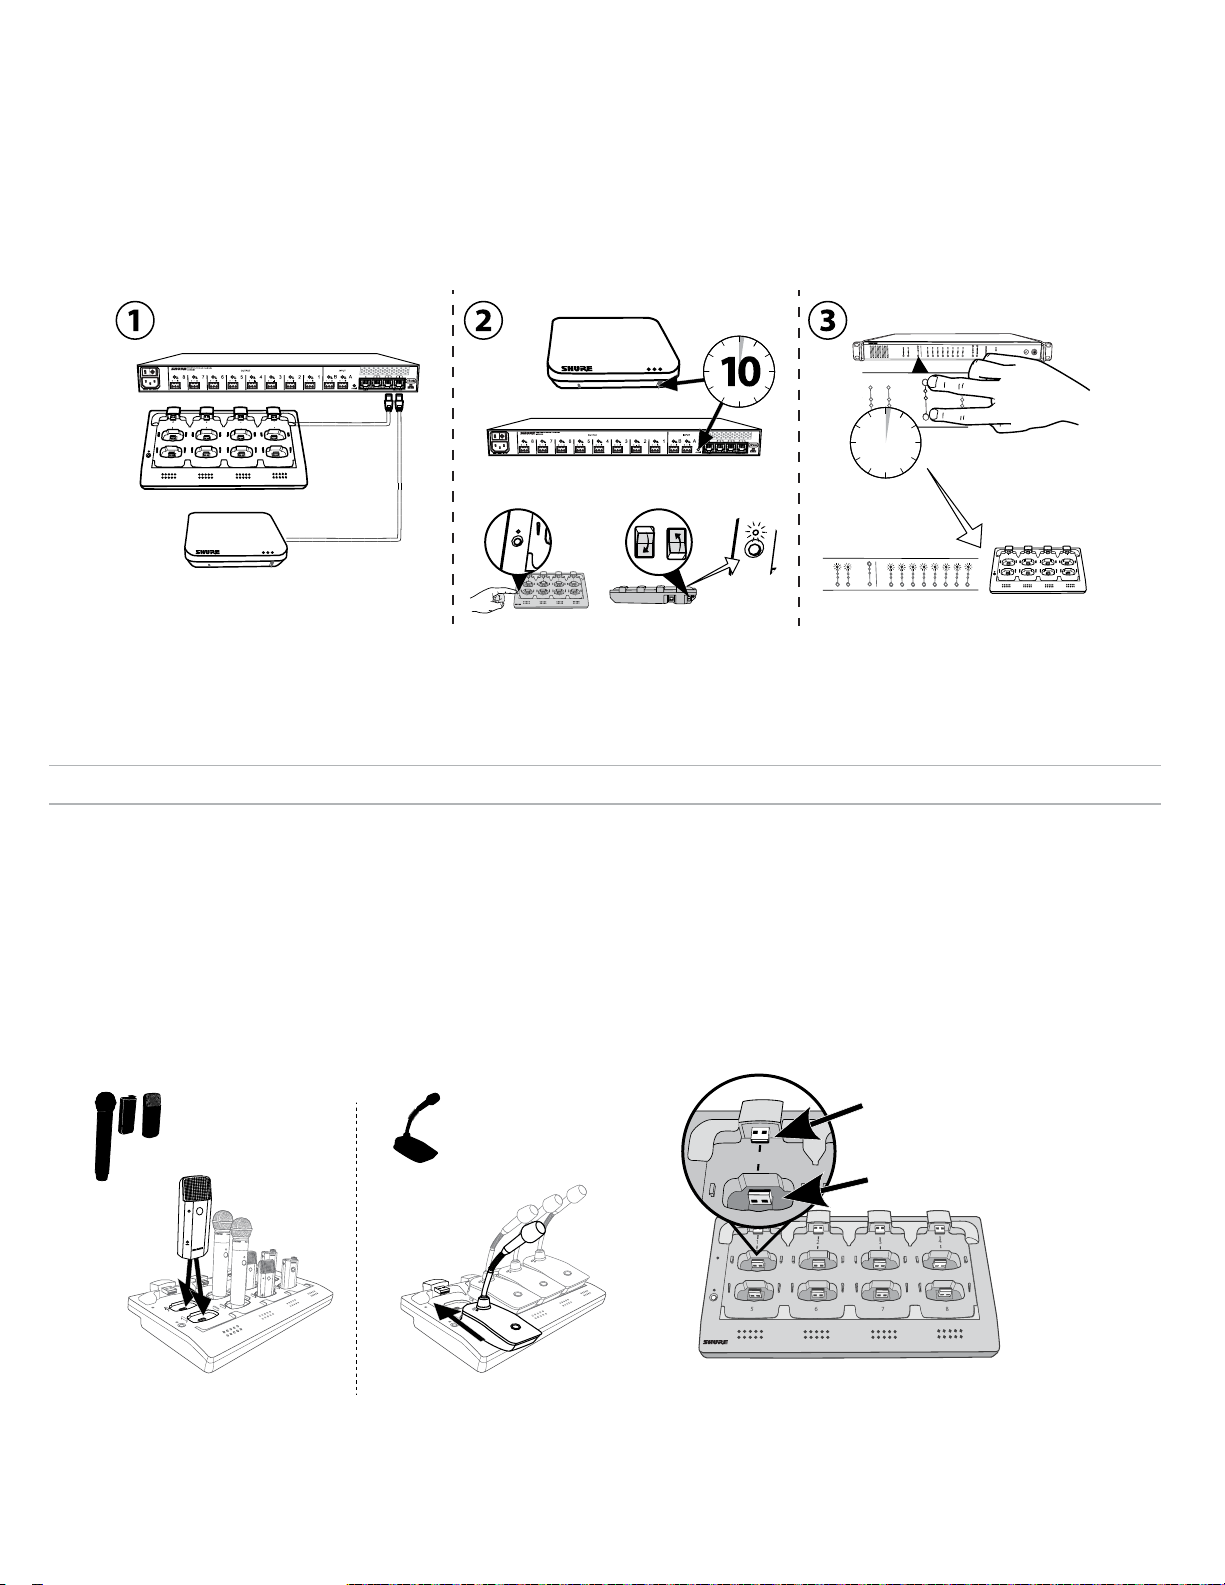
7
8
6
5
1
2
3
4
1
2
3
7
8
6
5
1
2
3
4
7
8
6
5
1
2
3
4
link
6
5
1
2
link
push to solo | hold to mute
2
3
4
5
6
7
8
lockout
power
ethernet
network audio
-9
-18
-24
-36
-48
-60
0
-9
-12
-18
-24
0
aux
mic
adjust
line
HEADPHONE
MICROFLEX WIRELESS
Автоматическая настройка группы
Группа MXW может быть сформирована без использования управляющего ПО, если сеть содержит только один приемопередатчик узла доступа
(APT), одну сетевую зарядную станцию (NCS) и один сетевой аудиоинтерфейс (ANI). Наилучшие результаты получаются, если для сброса всех
предыдущих объединений в группы восстановить стандартные заводские настройки устройств.
1. Подсоедините к сети один APT, одну NCS и один ANI. Сеть должна содержать только по одному каждому такому устройству.
2. Восстановите заводские настройки устройств (см. раздел «Заводские настройки»).
3. На передней панели ANI одновременно нажмите обе кнопки входного уровня и удерживайте пять секунд. Светодиоды выбора канала засветятся
зеленым, и начнет мигать измеритель уровня аудиосигнала, показывая, что ассоциирование прошло успешно.
MICROFLEX WIRELESS
Audio Network Interface
0
2
1
5
3
7
6
4
A
8
12
11
1
10
2
9
3
8
4
5
7
6
2
1
5
6
4
3
7
8
+
Power
Link
A
B
INPUT
sig/clip
mute
B
OUTPUT
INPUT
line
aux
sig/clip
sig/clip
mute
mute
A
B
line
aux
12
11
1
10
2
9
3
5
8
4
5
7
6
3
2
5
4
1
OUTPUT
line
aux
sig/clip
mute
push to solo | hold to mute
push to solo | hold to mute
OUTPUT
power
-9
0
line
ethernet
-18
-9
network audio
aux
-12
-24
HEADPHONE
-18
mic
-36
-24
-48
lockout
-60
adjust
1
sig/clip
mute
4
2
1
8
7
6
3
7
6
5
i i
i
i
i
i
i
i
i i
8
i i
i i
i i
i
i
i
i
i
i
i
i
i
i
i
i
i
i
i
i
i
i
i
i
i
i
i
i
i
i
i
i
i
i
i
i
i
i
i
i
i
i
i i
i i
i i
Связывание микрофонов
Используйте сетевую зарядную станцию (NCS) для связывания микрофонов с каналами узла доступа. Гнезда зарядного устройства отображаются
на каналы APT в соответствии с настройкой группы на вкладке Configuration. После выполнения процедуры связывания аудиосигнал будет
направляться в соответствующий канал группы.
Связывание отображает любой микрофон, установленный в зарядную станцию, на каналы APT. Этим заменяется любой другой микрофон, который
был ранее связан с этим каналом. Если во время процедуры связывания какое-либо гнездо пусто, соответствующий канал не затрагивается.
1. Установите микрофоны в зарядное устройство.
Микрофоны связываются с каналами узла доступа в соответствии с
их размещением в зарядном устройстве.
Для микрофона на гибкой стойке
Для ручных, переносных и
микрофонов граничного слоя
Power
Link
Подключение микрофона
к гнезду зарядного
устройства
69
Page 70
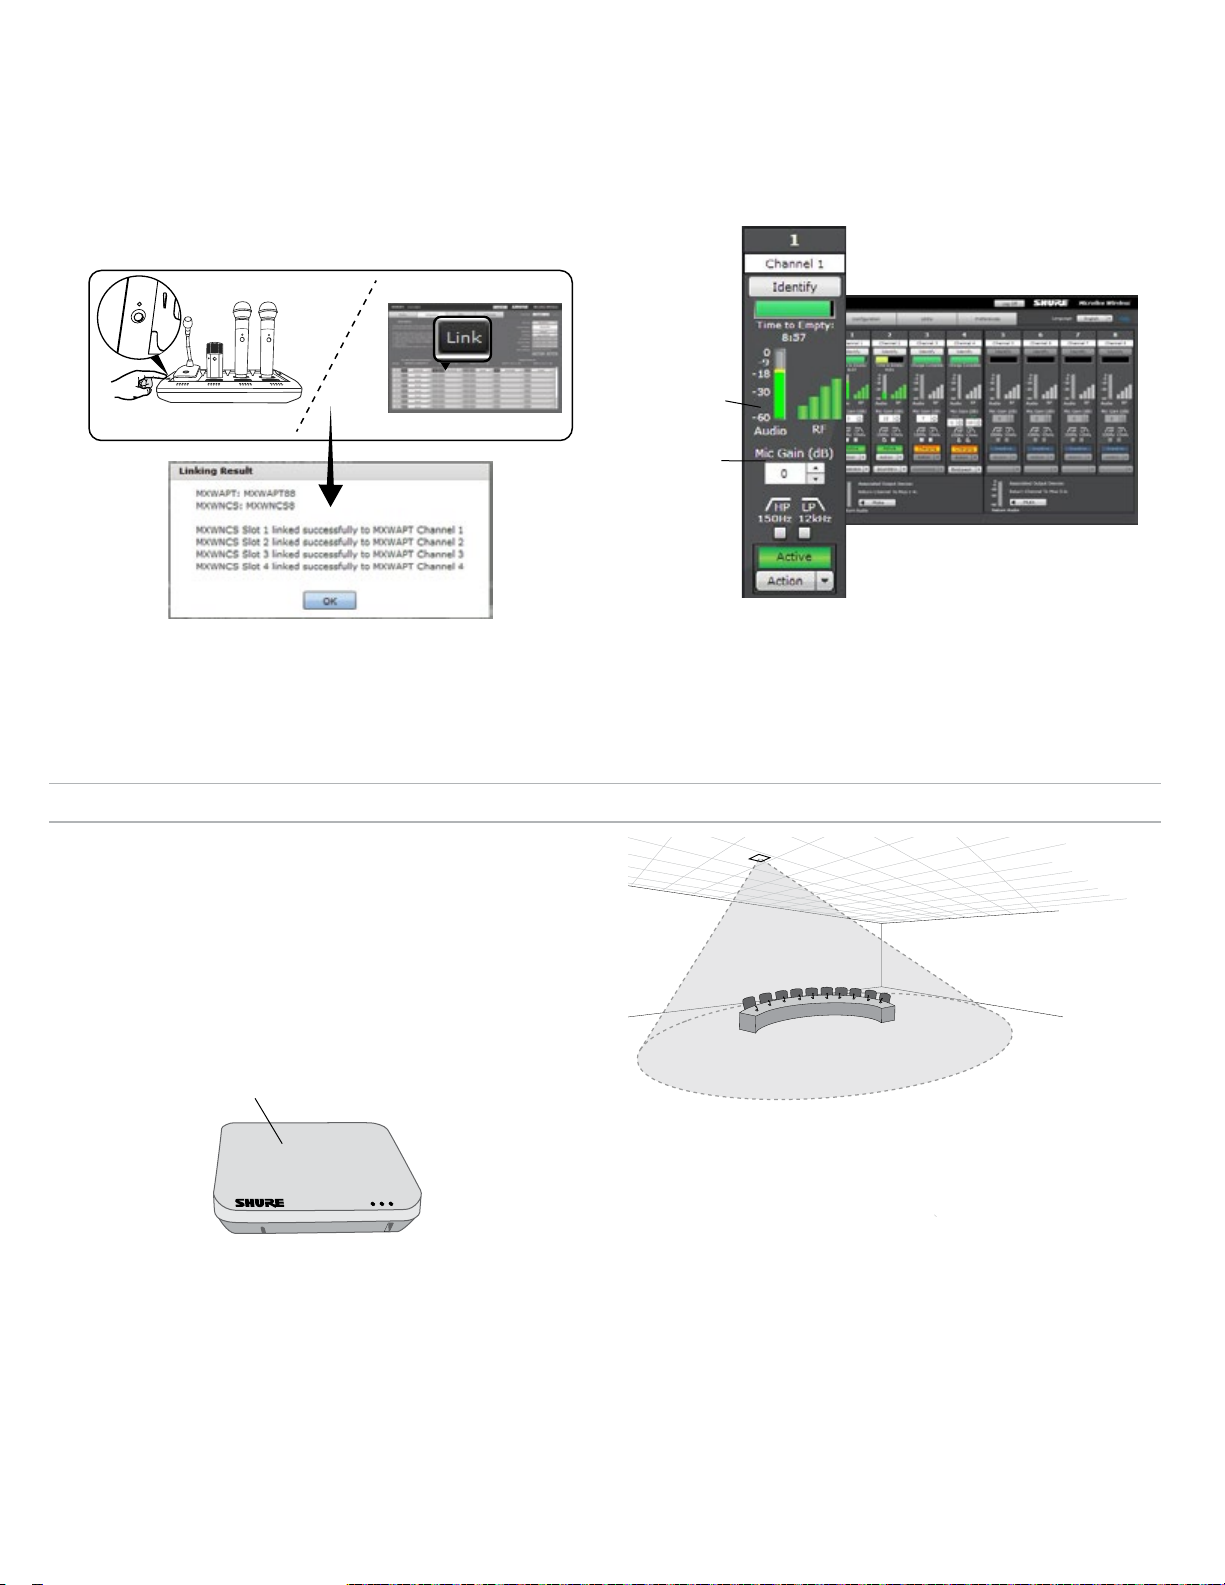
2. Свяжите микрофоны с каналами
7
8
6
5
link
Для связывания микрофонов с каналами APT воспользуйтесь
управляющим ПО или зарядной станцией. Если хотите, можно
блокировать эту функцию зарядной станции, чтобы операция
связывания выполнялась только через управляющее ПО.
- Управляющее ПО: на вкладке Configuration нажмите кнопку Link для
каждого зарядного устройства группы
-
Зарядная станция: Нажмите и в течение 6 секунд удерживайте кнопку
Link. В процессе связывания светодиоды будут мигать, после успешного
связывания будут постоянно зелеными.
3. Извлеките микрофоны и проверьте аудиосвязь
Проверьте аудиосвязь каждого микрофона и, если нужно,
отрегулируйте усиление микрофона на вкладке Monitor
управляющей программы. Усиление должно быть настроено таким
образом, чтобы звук регистрировался индикатором уровня (зеленый
/ желтый), но не клиппировался (красный).
Индикатор уровня
сигнала
Настройка усиления
Вкладка Monitor
Установите приемопередатчик узла доступа (APT)
APT излучает радиочастоты по кардиоидной диаграмме, т.е.
наибольшая интенсивность достигается в направлении от лицевой
поверхности устройства. Направьте лицевую поверхность APT в
сторону нужных зон охвата. Не перекрывайте линию прямой видимости
и старайтесь, чтобы она находилась как можно дальше от крупных
металлических предметов.
Внимание! Перед использованием беспроводной системы для речевых
или концертных выступлений всегда выполняйте проверку «обходом».
Попробуйте различные варианты размещения антенн, чтобы найти
оптимальное положение. При необходимости пометьте проблемные
участки и попросите выступающих или артистов избегать их.
Лицевая сторона APT
Направьте в сторону микрофонов
70
Page 71
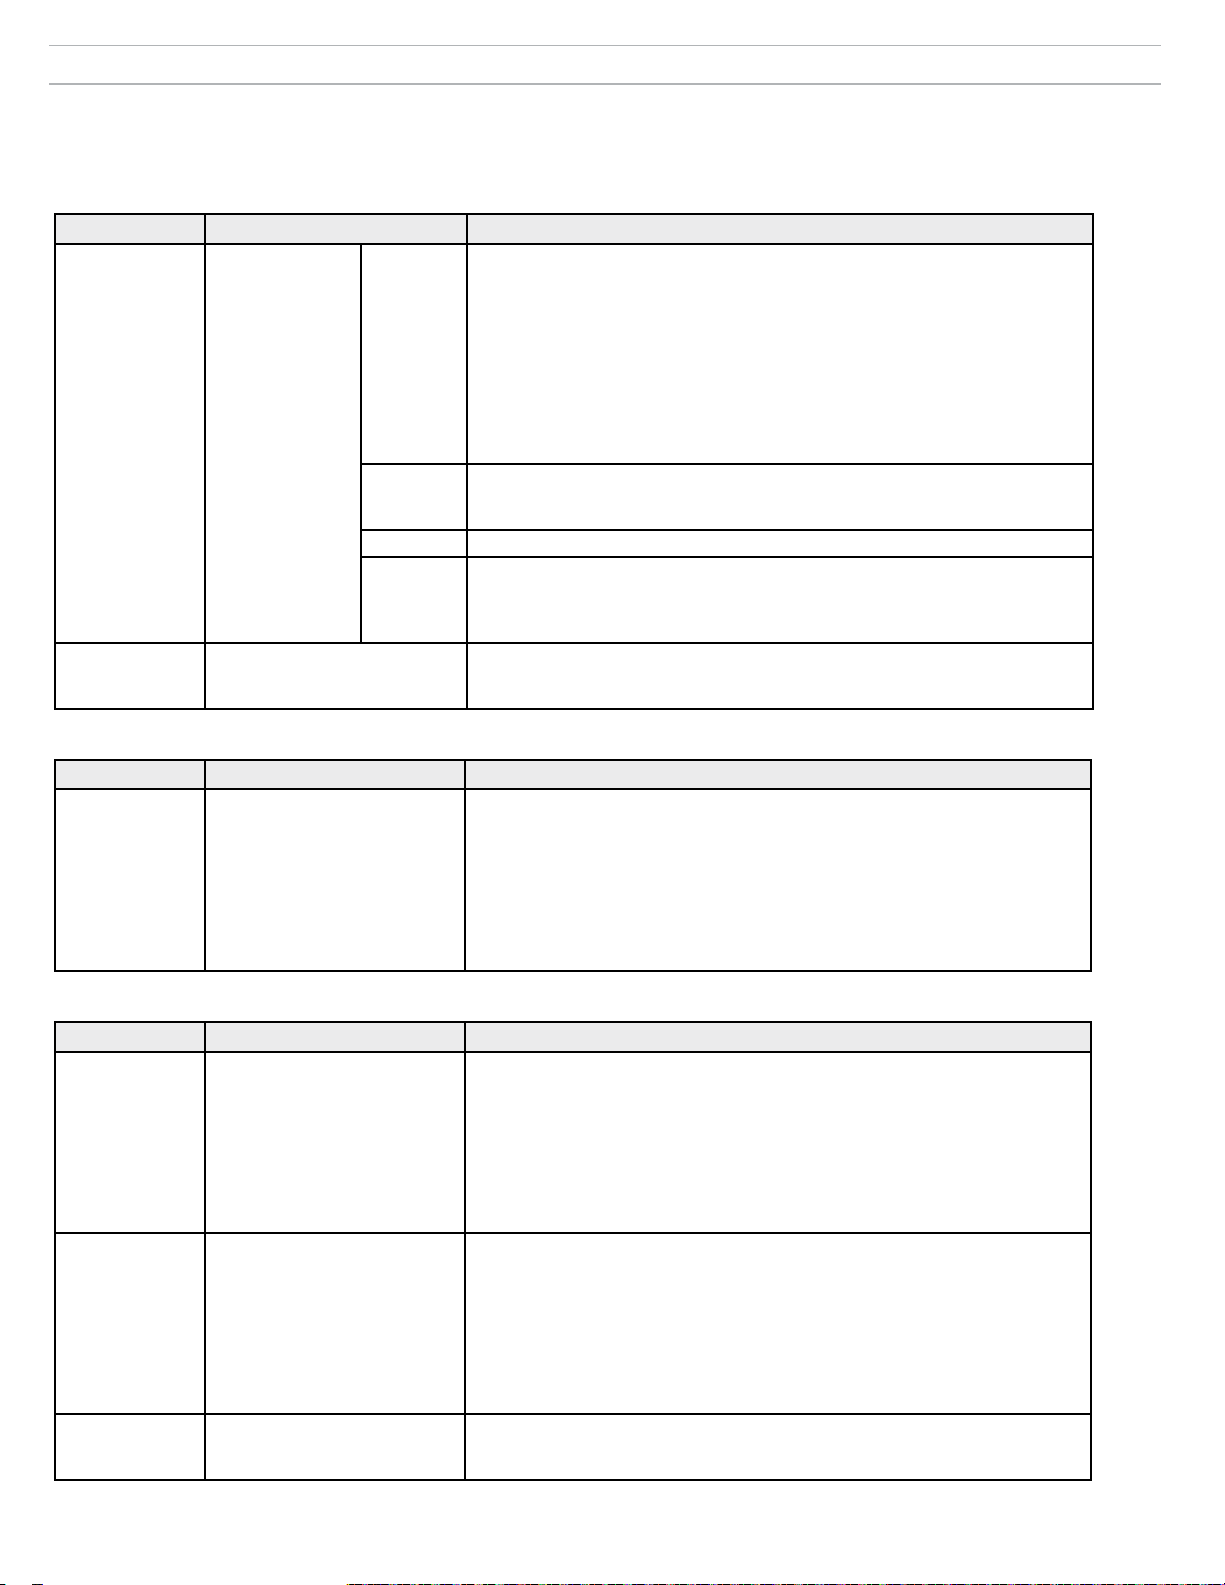
Поиск и устранение неисправностей
Следующая таблица содержит типичные решения, рекомендуемые для поиска и устранения неисправностей беспроводной системы Microflex
(MXW). Дополнительную информацию по каждому вопросу вы найдете в полном руководстве по эксплуатации MXW на сайте www.shure.com и на
USB флэш-накопителю
Аудио
Проблема Признак Решение
• Проверьте кабели
• Убедитесь, что передатчики включены, и каналы не заглушены.
• На вкладке Monitor управляющего ПО MXW проверьте, что все измерители
входного уровня работают нормально. Если канал клиппируется, введите
ослабление.
• Проверьте измерители выходного уровня на передней панели ANI и в
управляющем ПО ANI. Используйте наушники для прослушивания звука от
ANI. Если канал клиппируется, введите ослабление.
• Убедитесь, что выходной уровень ANI согласован с входом подключенного
оборудования.
• Убедитесь, что APT в данный момент не сканирует спектр.
• Убедитесь, что все устройства включены, и их сетевые соединения стабильны
и надежны.
• Проверьте абонирование каналов при помощи ПО Dante Controller (DC).
• Поместите устройство в группу, чтобы маршрутизация аудиосигнала
происходила автоматически.
• Проследите, чтобы сетевые аудионастройки подсети приемопередатчика узла
доступа согласовались с подсетью сетевого аудиоинтерфейса
• Выполните сканирование спектра, чтобы проверить РЧ помехи
• Уменьшите число каналов, чтобы проверить, не перегружает ли система РЧ
спектр
Звук отсутствует
или искажен
РЧ помехи
вызывают
пропадание звука
Светодиод
аудиосети
на сетевом
аудиоинтерфейсе
или SCM820
Звук прерывается
Зеленый
Мигающий
зеленый
Красный • Проверьте в DC задающий генератор (им должен быть MXWAPT)
Выключен
Настройка системы и группы MXW
Проблема Признак Решение
• Убедитесь, что устройства включены и подсоединены к одной сети и подсети.
• Чтобы вывести в список все устройства MXW в сети, откройте вкладку
Не удается
ассоциировать
компонент с
группой
На вкладке Configuration в
строке группы раскрывающийся
список устройств не содержит
нужного компонента.
Utility управляющего ПО MXW и снимите флажок Configuration Filter. Если
устройство фигурирует как «OTHER» (Другая), значит, оно относится к другой
конфигурации.
• Отсоедините компонент, выбрав «none» в строке группы в другой
конфигурации.
• Чтобы отменить любую связь, восстановите в устройстве заводские
настройки.
Сеть
Проблема Признак Решение
• Убедитесь, что устройства включены.
• Убедитесь, что ПК и оборудование находятся в одной сети и настроены на
Не удается
подключиться
на ПК к
управляющей
программе
Устройство не появляется в
приложении Shure Web Device
Discovery
одну и ту же подсеть.
• Выключите другие сетевые интерфейсы, не используемые для подключения к
устройству (в том числе WiFi)
• Проверьте, что DHCP-сервер работает (если это имеет отношение к делу)
• Убедитесь, что на ПК выполняется Bonjour.
• Если соединение выполнено через порт 4 интерфейса аудиосети (ANI),
убедитесь, что порт настроен на сетевой режим Switched Mode.
• Загрузите последнюю версию Adobe
• Убедитесь, что ПК и устройство находятся в одних и тех же сети и подсети.
• Проверьте, что настройки межсетевого экрана Windows не блокируют ПО
Управляющее
ПО долго
загружается
Веб-браузер не может
подключиться к интерфейсу
управления
Shure
• Блокируйте посылку маршрутизатором стандартного шлюза как части DHCP
• Настройте приложение Shure Web Device Discovery на открывание по
IP-адресу
• Вручную задайте компьютеру статический IP-адрес в той же сети, в которой
находится устройство
Управляющее ПО
плохо работает
Индикаторы действуют
медленно или не в реальном
времени.
• Уменьшите число окон или вкладок, открытых в одной конфигурации
• Правильную настройку сети см. раздел «Сеть».
®
Flash
®
71
Page 72
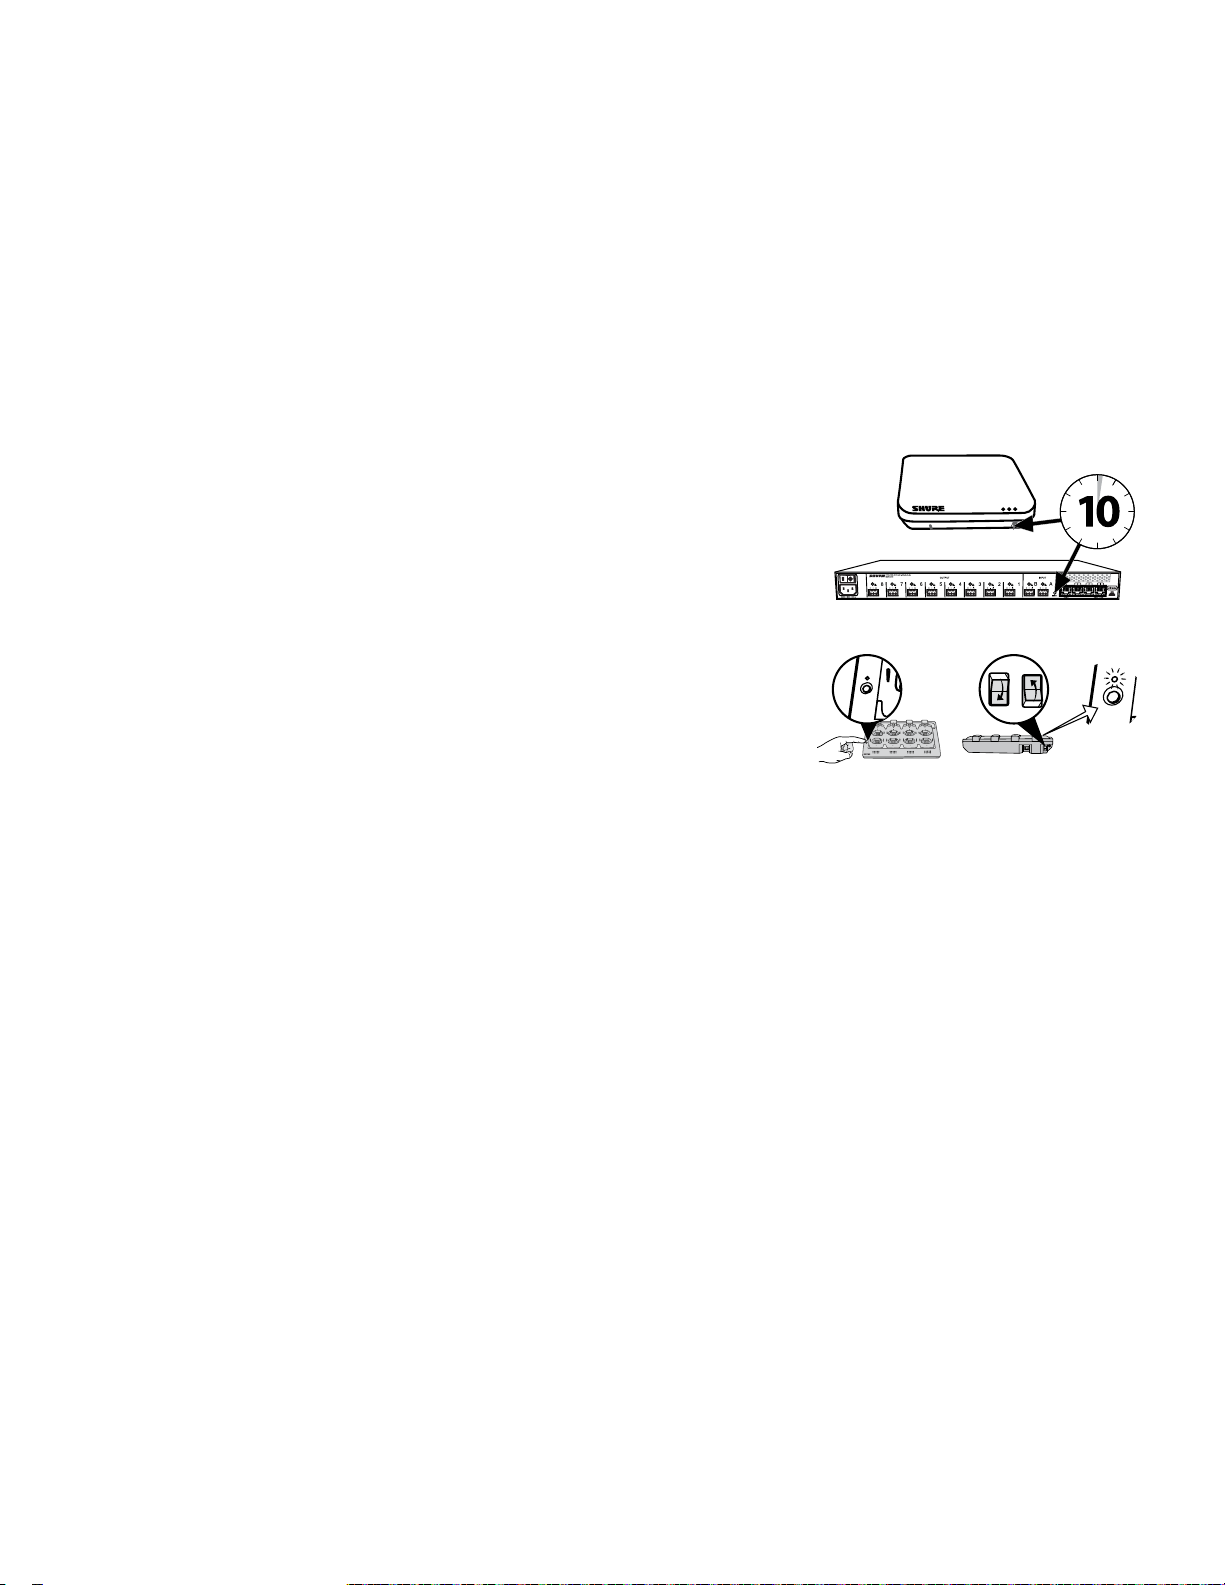
7
8
6
5
1
2
3
4
Link
Power
7
8
6
5
1
2
3
4
link
6
5
1
2
link
+
lockout
power
ethernet
network audio
push to solo | hold to mute
-9
-18
-24
-36
-48
-60
0
-9
-12
-18
-24
0
aux
mic
adjust
line
sig/clip
mute
INPUT
A
sig/clip
mute
OUTPUT
HEADPHONE
Audio Network Interface
MICROFLEX WIRELESS
B
1
2
3
4
5
6
7
8
line
aux
push to solo | hold to mute
A
sig/clip
mute
OUTPUT
B
1
2
3
4
5
6
7
8
line
aux
6
7
8
9
10
11
12
1
2
3
4
5
6
7
8
9
10
11
12
1
2
3
4
5
5
7
8
6
5
1
2
3
4
i
i
i i
i
i
i
i
i
i i
i
i
i
i
i
i
i i
i
i
i
i
i
i i
i
i
i
i
i
i
i i
i
i
i
i
i
i i
i
i
i
i
i
i
i i
i
i
i
i
i
i i
i
i
i
i
INPUT
A
OUTPUT
B
1
2
3
4
5
6
7
8
lockout
power
ethernet
network audio
push to solo | hold to mute
-9
-18
-24
-36
-48
-60
0
-9
-12
-18
-24
0
aux
mic
adjust
line
sig/clip
mute
sig/clip
mute
HEADPHONE
MICROFLEX WIRELESS
line
aux
Дополнительные ресурсы
Для получения дополнительной помощи при поиске неисправностей или дополнительной информации о сложных установках обратитесь в Shure.
Вас свяжут с представителем по оказанию помощи. В американском регионе позвоните в группу технической помощи по тел. 847-600-8541.
Пользователи из других регионов могут найти список контактов для обращения за технической помощью на сайте www.shure.com.
Помощь в отношении цифровых аудиосетей, расширенные указания по организации сетей и сведения по поиску и устранению сбоев ПО Dante
можно найти на веб-сайте Audinate www.audinate.com.
Сброс на заводские настройки
Если после попыток поиска неисправностей устройство не появляется в сети, выполните сброс устройства, чтобы вернуть его стандартные
настройки. Заводские стандартные настройки рассчитаны на автоматическую совместимость с другими сетевыми устройствами Shure.
Примечание: Примечание. Восстановление заводских настроек автоматически отменяет все объединения в группы MXW и связывание устройств.
Для доступа к ПО восстанавливается пароль
От аппаратуры
Приемопередатчик узла доступа
Нажмите и в течение 10 секунд удерживайте утопленную кнопку Reset. Светодиод
состояния аудиосети на короткое время погаснет, показывая, что устройство
перезагружается.
ОСТОРОЖНО:
микрофонов, которые сохранялись в устройстве.
Сетевой аудиоинтерфейс
Нажмите и в течение 10 секунд удерживайте кнопку Reset. Светодиоды передней панели
вспыхнут, показывая, что устройство перезагружается.
Сетевая зарядная станция
a. Выключите питание.
b. Нажмите и удерживайте кнопку Link.
c. Удерживая кнопку Link, включите питание.
d. Продолжайте удерживать кнопку Link еще 12 секунд, пока светодиод не станет желтым.
Восстановление заводских настроек удаляет все ассоциации с группами и связи
admin.
От управляющего ПО
1. Откройте вкладку Utility управляющего ПО MXW.
2. Выберите кнопку Edit Properties (Править свойства) для устройства.
3. Отметьте флажок сброса на заводские настройки.
4. Выберите Add Updates, чтобы сохранить настройки в очереди правки.
5. Повторите для любых дополнительных устройств.
6. Нажмите на Apply All, чтобы внести изменения в настройка всех устройств. для которых
выполнялась правка.
72
Page 73
Информация по технике безопасности
УКАЗАНИЯ ПО ТЕХНИКЕ БЕЗОПАСНОСТИ
В зависимости от степени опасности и серьезности повреждений,
возможные результаты неправильного использования отмечены одним
из двух слов-сигналов — ВНИМАНИЕ или ОСТОРОЖНО.
ВНИМАНИЕ. Игнорирование этих предупреждений может
привести к серьезной травме или смерти в результате
неправильной эксплуатации.
ОСТОРОЖНО. Игнорирование этих предупреждений
может привести к незначительной травме или повреждению
имущества в результате неправильной эксплуатации.
ВНИМАНИЕ
ПРОСЛУШИВАНИЕ ПРИ ЧРЕЗМЕРНО ВЫСОКОЙ ГРОМКОСТИ МОЖЕТ
ПРИВЕСТИ К НЕОБРАТИМОМУ ПОВРЕЖДЕНИЮ СЛУХА. ИСПОЛЬЗУЙТЕ
КАК МОЖНО МЕНЬШУЮ ГРОМКОСТЬ. Длительное воздействие звука
чрезмерно высокого уровня может причинить вам вред, вызвав необратимую
потерю слуха из-за шума (NIHL). Чтобы не повредить слух, руководствуйтесь
следующими нормами Управления охраны труда США (OSHA),
определяющими максимально допустимое время воздействия в зависимости
от уровня звукового давления (SPL).
SPL 90 дБ
8 часов
SPL 110 дБ
30 минут
ВНИМАНИЕ
• Батарейные блоки питания могут взрываться или выделять токсичные
материалы. Остерегайтесь ожогов или возгорания. Ни в коем случае нельзя
вскрывать, разбивать, модифицировать, разбирать, нагревать выше 60 °C
или сжигать батарейки.
• Следуйте инструкциям изготовителя
• Для подзарядки аккумуляторных батареек Shure используйте только
зарядное устройство Shure
• ПРЕДОСТЕРЕЖЕНИЕ. Неправильная замена батарейки может привести к
взрыву. Заменяйте только батарейкой того же или эквивалентного типа.
• Ни в коем случае не берите батарейки в рот. При проглатывании обратитесь
к врачу или в местный токсикологический центр
• Не замыкайте батарейки накоротко; это может привести к ожогам или
возгоранию
• Не заряжайте и не используйте никакие другие батарейки, кроме
аккумуляторных батареек Shure
• Утилизируйте батарейки надлежащим образом. По вопросам надлежащей
утилизации использованных батареек обращайтесь к местному поставщику
• Не подвергайте батарейки (батарейные блоки питания или установленные
батарейки) чрезмерному нагреву от солнца, открытого пламени и т.п.
ВНИМАНИЕ: Неправильная замена батарейки может привести к взрыву.
Используйте только батарейки, совместимые с Shure.
Примечание. Используйте только с блоком питания, входящим в комплект, или
эквивалентным устройством, утвержденным Shure.
1. 經審驗合格之射頻電信終端設備,非經許可,公司、商號或使用者均不得擅自變更
頻率、加大功率或變更原設計之特性及功能。
2. 射頻電信終端設備之使用不得影響飛航安全及干擾合法通信;經發現有干擾現象
時,應立即停用,並改善至無干擾時方得繼續使用。所謂合法通信,係指依電信法
規定作業之無線電信。
3. 輸入、製造射頻電信終端設備之公司、商號或其使用者違反本辦法規定,擅自使用
或變更無線電頻率、電功率者,除依電信法規定處罰外,國家通訊傳播委員會並得
撤銷其審驗合格證明。
4. 減少電磁波影響,請妥適使用
SPL 95 дБ
4 часа
SPL 115 дБ
15 минут
SPL 100 дБ
2 часа
SPL 120 дБ
Недопустимо, можно
повредить слух
SPL 105 дБ
1 час
MXW1
Передатчики переносных микрофонов:
Тестирование этих передатчиков показало, что они соответствуют
международным нормам предельных уровней излучения,
установленным для неконтролируемой среды. При нормальных
рабочих условиях настоящее оборудование находится в прямом
контакте с телом пользователя. Эти передатчики не должны
совмещаться или работать совместно с какими-либо другими
антеннами или передатчиками.
MXW2, MXW6, MXW8, MXWAPT4, MXWAPT8
Передатчики переносных микрофонов, Передатчики настольных
микрофонов граничного слоя, Передатчики настольных
микрофонов на гибкой стойке, Передатчики беспроводных узлов
доступа:
Эти мобильные передатчики предназначены для использования
на расстояниях больше 20 см от тела человека. На эти мобильные
передатчики не распространяются требования международных
стандартов на воздействие излучения ввиду их расстояния от тела
пользователя согласно предполагаемому назначению и ввиду
низкой выходной мощности. Эти мобильные передатчики должны
помещаться или устанавливаться на расстоянии, как минимум,
20 см от любого индивидуума и не должны совмещаться или
работать совместно с какими-либо другими антеннами или
передатчиками.
Важная информация об изделии
Это оборудование предназначено для использования в
профессиональных аудиоприложениях.
Испытания на соответствие требованиям ЭМС проводятся с
использованием входящих в комплект и рекомендуемых типов
кабелей. Использование кабелей других типов может ухудшить
характеристики ЭМС.
Изменения или модификации, не получившие специального
утверждения Shure Incorporated, могут лишить вас права
эксплуатировать это оборудование.
Следуйте местным правилам утилизации батареек, упаковки и
электронных отходов.
Примечание. Это устройство не предназначено для
непосредственного подключения к общественной сети Интернет.
Информация для пользователя
Данное оборудование прошло испытания, и было установлено,
что оно соответствует пределам для цифрового устройства класса
В согласно части 15 Правил FCC. Эти пределы определены
исходя из обеспечения обоснованного уровня защиты от вредных
помех при установке в жилых зданиях. Это оборудование
генерирует, использует и может излучать высокочастотную
энергию; если его установка осуществляется не в соответствии
с инструкциями, оно может создавать вредные помехи для
радиосвязи. Однако нет гарантии, что при конкретной установке
помехи не возникнут. Если оборудование создает вредные
помехи приему радио- или телевизионных передач, в чем можно
убедиться, включая и выключая оборудование, пользователю
рекомендуется устранить помехи одной или несколькими из
следующих мер:
• Измените ориентацию или переместите приемную антенну.
• Увеличьте расстояние между оборудованием и приемником.
• Подключите оборудование к розетке, находящейся не в той
цепи, к которой подсоединен приемник.
• Обратитесь за помощью к дилеру или опытному радио- или
телевизионному технику.
73
Page 74

Сертификация
Данное устройство соответствует требованиям части 15 норм FCC.
Данное устройство соответствует безлицензионным стандартам
RSS Департамента промышленности (IC) Канады. Эксплуатация
этого устройства допускается при следующих двух условиях: (1) это
устройство не должно создавать помех и (2) это устройство должно
принимать любые помехи, включая и те, которые могут привести к
нежелательным явлениям при работе устройства.
Le présent appareil est conforme aux CNR d'Industrie Canada applicables
aux appareils radio exempts de licence. L'exploitation est autorisée aux
deux conditions suivantes : (1) l'appareil ne doit pas produire de brouillage,
et (2) l'utilisateur de l'appareil doit accepter tout brouillage radioélectrique
subi, même si le brouillage est susceptible d'en compromettre le
fonctionnement.
Соответствие закону Японии «О радио» и закону Японии «О
телекоммуникациях в коммерческой сфере». Это устройство
предоставляется в соответствии с законом Японии «О радио» (電波法)
и законом Японии «О телекоммуникациях в коммерческой сфере» (電
気通信事業法). Запрещается модифицировать это устройство (любые
модификации аннулируют выданный индекс стандарта).
Соответствует требованиям по электробезопасности согласно IEC
60065.
Это изделие удовлетворяет существенным требованиям всех
соответствующих директив ЕС и имеет разрешение на маркировку CE.
Декларацию соответствия CE можно получить в компании Shure
Incorporated или в любом из ее европейских представительств.
Контактную информацию см. на вебсайте www.shure.com
Декларацию соответствия CE можно получить по следующему адресу:
www.shure.com/europe/compliance
Уполномоченный европейский представитель:
Shure Europe GmbH
Headquarters Europe, Middle East & Africa
Department: EMEA Approval
Jakob-Dieffenbacher-Str. 12
75031 Eppingen, Germany
Телефон: 49-7262-92 49 0
Факс: 49-7262-92 49 11 4
Эл. почта: [email protected]
MXWNCS4, MXWNCS8
Утверждено согласно условиям проверки FCC Part 15b.
Знак соответствия стандарту Industry Canada ICES-003:
CAN ICES-3 (B)/NMB-3(B)
Примечание. Маркировку FCC, CE и C-Tick, а также
электрические номиналы см. наклейку на нижней стороне корпуса
зарядного устройства.
MXW1, MXW2, MXW6, MXW8, MXWAPT4, MXWAPT8
Сертифицировано согласно требованиям FCC часть 15.
FCC: DD4MXW1, DD4MXW2, DD4MXW6, DD4MXW8,
DD4MXWAPT4, DD4MXWAPT8.
Соответствует применимым требованиям RSS-213.
IC: 616A-MXW1, 616A-MXW2, 616A-MXW6, 616A-MXW8,
616A-MXWAPT4, 616A-MXWAPT8.
Торговые марки
Audinate®, логотипы Audinate и Dante — торговые марки Audinate
Pty Ltd.
Page 75
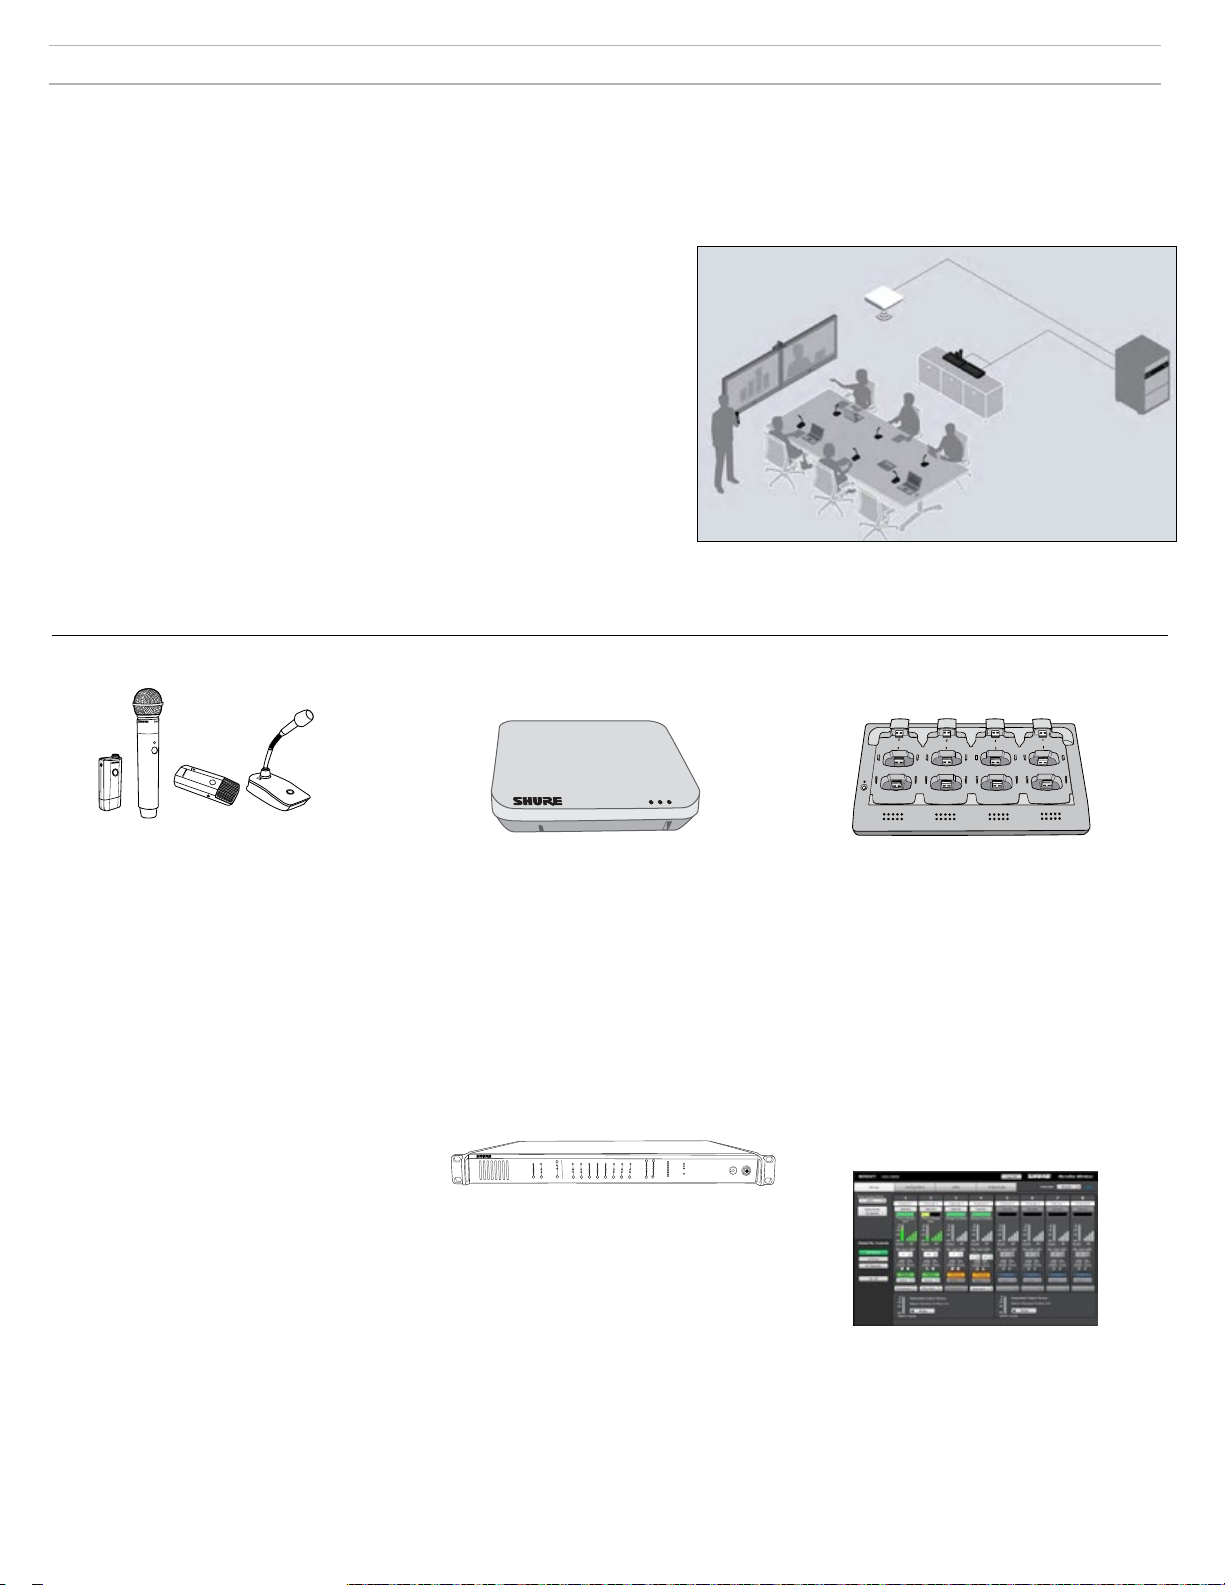
概要
Shure Microflextmワイヤレスシリーズ(MXW)は、会議室や役員会議に柔軟に対応するマイクロホン・ソリューションです。RFチャンネルマネジメント、
リチャージャビリティ、充電対応暗号化(AES256)送信、そしてデジタル音声ネットワーキング(Dante
tm
)を備えています。テーブルトップアプリケー
ションとしてバウンダリーマイクやグースネックマイク、企業のトレーニングやプレゼンテーションでは、ハンドヘルドやボディパックソリューションが
あります。MXWアクセスポイントを天井や壁に取り付けることで、目立ちにくい形での送受信が行えます。複数のアクセスポイントを設置することで同一
空間で最大40*のマイクを同時に使用することが可能です。(*地域によって異なります)。ウェブブラウザベースのコントロールソフトウェアは遠隔モニ
タリングに使用され、ネットワークに接続されたコンピューターからコントロールできます。
追加のリソース
このクイックスタートガイドには基本的な8チャンネルのMXWシステムをセットアッ
プするために欠かせない情報が記載されています。以下は、MXWシリーズ用の追加
のリソースの一覧です。
MXWの完全マニュアル: この完全マニュアルにはコンポーネントの詳しい説明、ネッ
トワーク・トポロジー、RFの管理に関するベストプラクティス、そして制御ソフト
ウェアのナビゲーションなど、MXWシステムに関する包括的な情報が記載されてい
ます。このマニュアルにはwww.shure.comとアクセスポイントトランシーバーに付属
のUSBドライブからアクセスすることができます。
Shureのサポート: トラブルシューティングサポートまたは複雑な取り付けの詳細な
情報については、Shureのサポート担当者までお問い合わせください。北米地域で
は、システムサポートグループ (847-600-8541) までお電話でお問い合わせくださ
い。他の地域では、www.shure.comでお近くのサポート連絡先をご覧ください。
Audinate: デジタルオーディオネットワークのヘルプ、詳細なネットワークガイドラ
イン、Dante
tm
ソフトウェアのトラブルシューティングについては、Audinateのウェ
ブサイト(www.audinate.com)にアクセスしてください。
コンポーネントの概要
MXW6MXW1 MXW8
MXW2
マイクロホン送信機
MXWマイクロホンは、暗号化されたワイヤレス音
声をアクセスポイントへ送信します。4つのフォー
ムファクターがあります:
ハイブリッドボディパック(MXW1)
ボディパックはハンズフリーのモバイル通信用
にベルトやストラップに固定します。小型マイ
クロホン接続用のTQG入力、およびビルトイン
無指向性マイクロホンを備えています。
ハンドヘルド(MXW2)
ハンドヘルドでは、プレゼンターがSM58
、SM86、BETA58およびVP68を使用すること
ができます。
バウンダリー(MXW6/C、MXW6/O)
目立ちにくいデザインのバウンダリー送信機は
会議の環境に自然に馴染みます。
デスクトップグースネックベース(MXW8)
グースネックベースは、5、10、15”のMicroflex
グースネックマイクと互換性があります。
MXW1、MXW6、およびMXW8マイクロホンには、
通訳チャンネルなどの音声をモニタリングするヘッ
ドホン出力が備わっています。
アクセスポイントトランシーバー
(MXWAPT4, MXWAPT8)
アクセスポイントトランシーバー(4および8チ
ャンネルユニット)は壁や天井に取り付けて、
ワイヤレスマイクとの通信を管理します。シス
テムハブとして、ワイヤレスマイクと同一ネッ
トワークにあるその他のDanteデバイス間での
音声伝送を管理します。APTには、MXWシステ
ムコントロールソフトウェアのホストとなるウ
ェブサーバーが含まれており、モニタリング、
設定、システムのリモートコントロールに使用
します。
MICROFLEX WIRELESS
B
OUTPUT
INPUT
line
aux
sig/clip
sig/clip
mute
mute
push to solo | hold to mute
-9
0
line
-18
-9
-12
aux
-24
-18
-36
mic
-24
-48
-60
adjust
0
8
7
6
5
4
3
2
1
A
Audio Network Interface
power
ethernet
network audio
HEADPHONE
lockout
音声ネットワークインターフェース
(MXWANI4, MXWANI8)
オーディオネットワークインターフェース(4お
よび8チャンネル)は、MXWシステムのアナロ
グ音声入力と出力を提供するDante対応のネット
ワークデバイスです。MXWアクセスポイント、
コンピューター、最大2つのMXWネットワーク
充電ステーションの接続を可能にする、4ポート
のギガビットイーサネットスイッチが備わって
います。
2
1
5
6
4
3
7
8
ネットワーク充電ステーション
(MXWNCS4, MXWNCS8)
ネットワーク充電ステーション(4および8スロ
ット)は、最大4(または8)個のMXWマイクロ
ホンを同時に充電することができます。マイク
ロホンとアクセスポイントチャンネルの同期、
ネットワークバッテリー情報をコントロールソ
フトウェアへ転送します。
重要:デスクトップグースネックベースマイ
クロホン(MXW8)は充電スロットを2つ使用
します。例えば、8本のMXW8マイクロホンに
は 2つの MXWNCS8充電ステーション(合計
16個の充電スロット)が必要です。
MXWコントロールソフトウェア
MXWコントロールソフトウェアはキーセットア
ップ、モニタリング、管理機能の総合的なリモ
ートコントロールを提供します。ソフトウェア
は、ネットワーク上のすべてのPCやMacからア
クセスでき、Adobe® Flash®を使用してウェブブ
ラウザで開きます。
75
Page 76
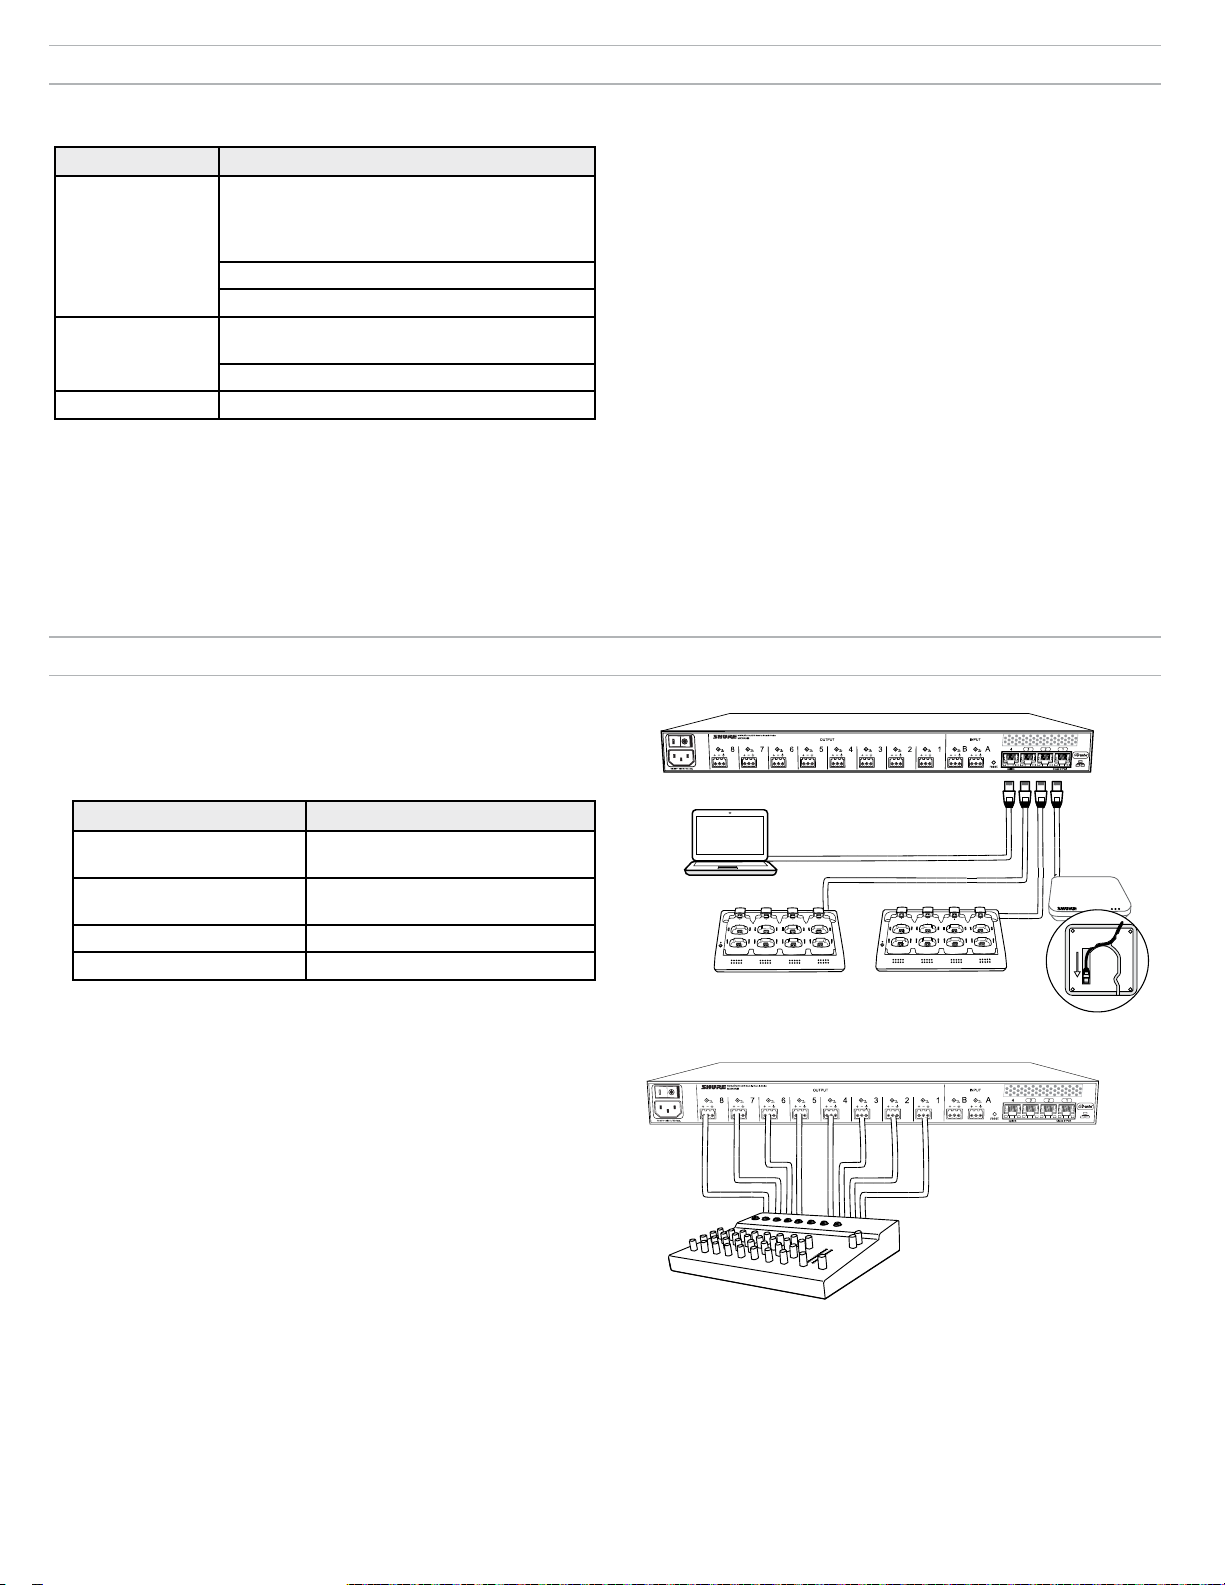
装置の在庫
同梱付属品
コンポーネント アクセサリー
Shure USBフラッシュドライブ(Shureウェブデ
バイス ディスカバリー アプリケーション、Shure
ファームウェア アップデートマネージャー アプ
APT
リケーション、そしてユーザーガイド付き)
取り付けプレート
塗装可能カバー
ハードウェアキット(ラックマウント用ネジ、ケ
ANI
ーブルコネクタの付属品)
IEC 電源ケーブル
NCS DC 電源アダプタ
コンポーネントの接続
1.MXWコンポーネントを接続する
シールドタイプのイーサネットケーブルを使用して、MXWコンポーネ
ントを共に接続します。音声ネットワークインターフェース(ANI)上
の4ポートスイッチを使用するか、またはすべてのコンポーネントを個
別のギガビットスイッチに接続します。
追加装置
音声ケーブル
シールドタイプの音声ケーブルを使用して、ANIをミキサー、DSPまた
は電話会議用デバイスに接続します。
イーサネットケーブル
シールドタイプのCat5e (またはそれ以降)のケーブルを使用し
て、MXWコンポーネントをネットワーク接続します。
コンピューター
パソコンまたはMacを使用して、ウェブブラウザからMXWシステムイ
ンターフェースにアクセスします。
ANIネットワークポート コンポーネント
① ポート1(PoE)
② ポート2
アクセスポイントトランシーバー
(APT)
ネットワーク充電ステーション
(NCS)
③ ポート3 (オプション)追加のNCS
④ ポート4 コンピューター
デフォルト設定では、MXWデバイスは自動的に対応するIP設定に構成される
注:
よう、自動(DHCP)モードに設定されています。DHCPサーバーが不在の場合に
は、デバイスはリンクローカル(169.254.x.x)アドレスのフォーマットを使用し
ます。
2.ANIアナログ出力を接続する
シールドタイプの音声ケーブルを使用して、ANIの出力をミキサ
ー、DSP、または電話会議用デバイスに接続します。(ケーブルをブロ
ックコネクタに適切に配線するには、ANIに付属のハードウェアキット
を参照します。)
④
①
③
1
4
2
1
3
5
7
6
8
2
5
6
②
4
3
7
8
76
Page 77
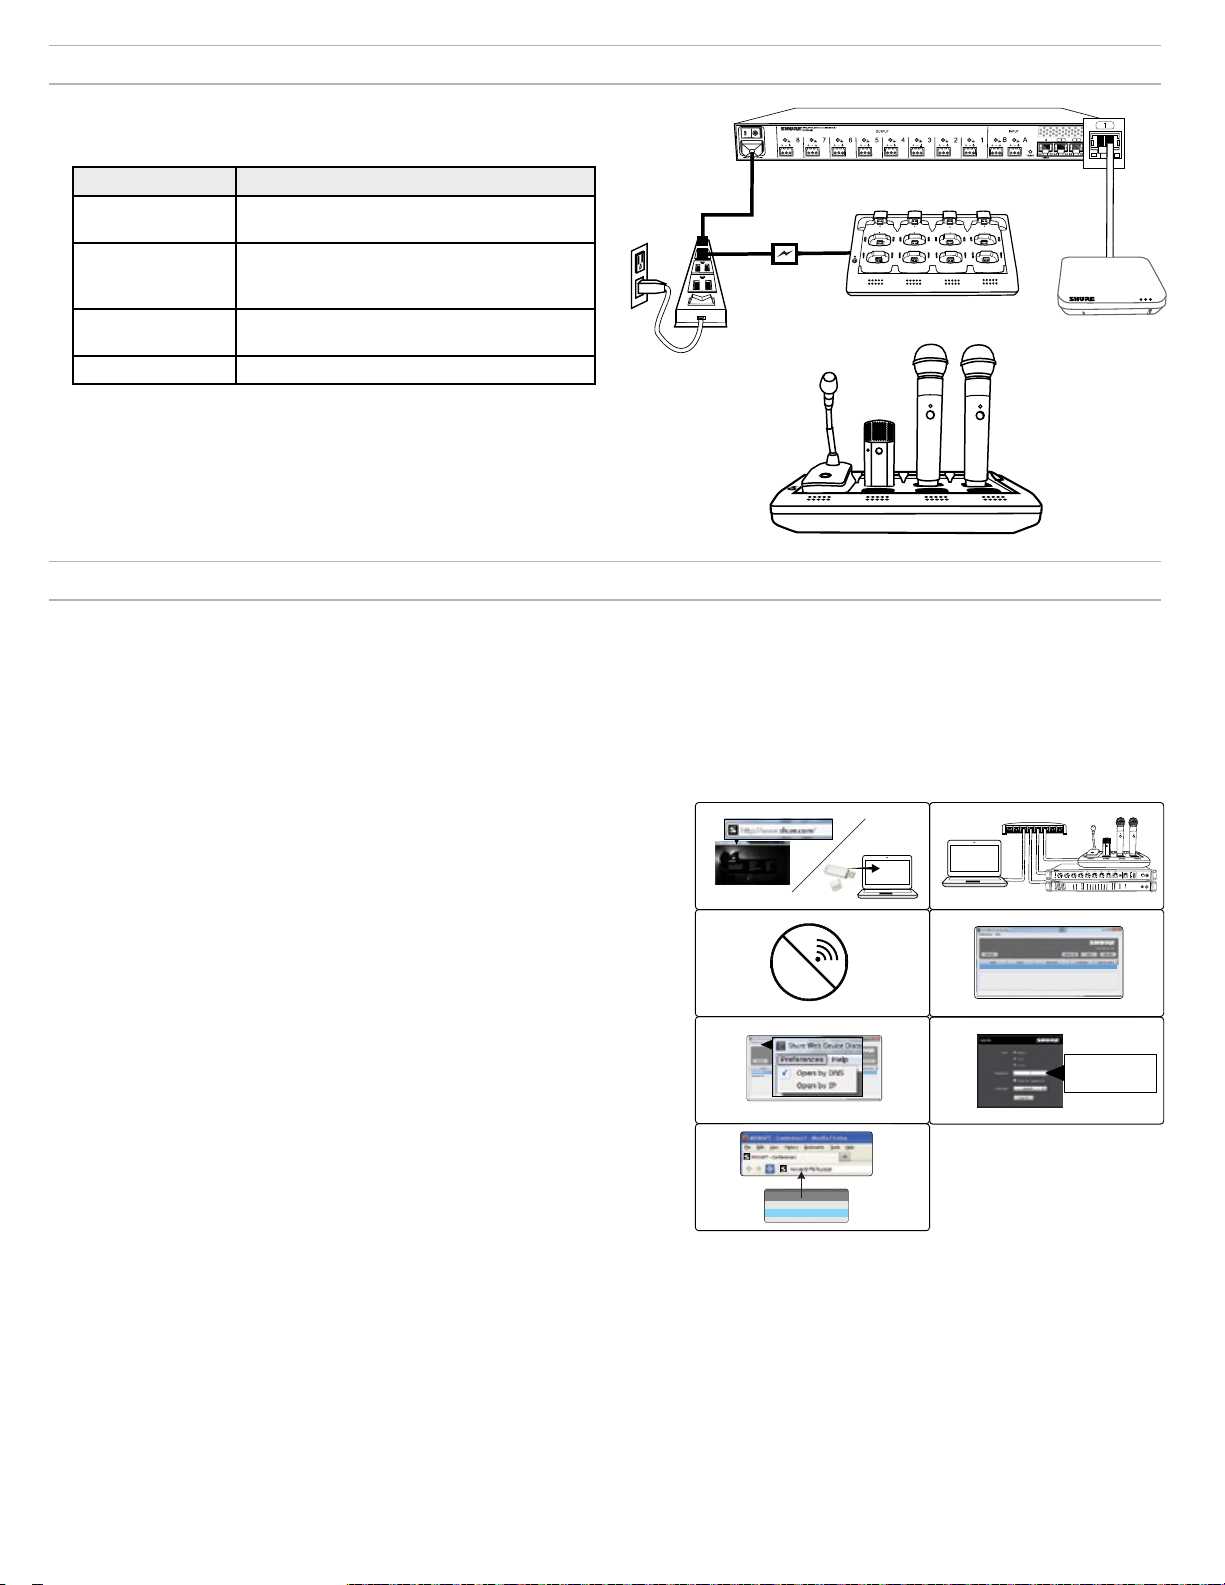
電源
②
④
①
7
8
6
5
1
2
3
4
7
8
6
5
1
2
3
4
③
MXWANI8 mxwani8-ffeee5.local
192.168.200.22
Dante
Dante
ROOM 5
MXWAPT8
mxwapt8-ffaaa2.local
192.168.200.23
CONFERENCE
mxwani-aa1.local
192-168-200-22
mxwapt8-ffe761.local
192-168-200-23
電力を供給し、コンポーネントの電源をオンにします。
電源がオンになると、各コンポーネントのLEDが点灯します。
①
Class 0 PoE
コンポーネント 電源
① ANI
② APT
IECケーブルをAC電源に接続し、電源スイッチ
を入れます。
ANIのポート1に接続し、Power over Ethernet
(PoE) を実現します。電源スイッチはありませ
③
1
2
5
6
4
3
7
8
②
ん。
③ NCS
PS45をAC電源に接続し、電源スイッチを入れ
ます。
④ 送信機 使用前に送信機をフル充電します。
④
MXWコントロールソフトウェアのアクセス
MXWシステムは、キーセットアップ、モニタリング、管理機能の総合的な遠隔コントロールを可能にするデバイスホスト型コントロールソフトウェアを使
用します。ソフトウェアは、ネットワーク上のすべてのPCやMacからアクセスでき、Adobe® Flash®を使用してウェブブラウザで開きます。
MXWシステムには2つの異なるコントロールインターフェースがあります。
• MXWシステムコントロールソフトウェア:アクセスポイントトランシーバーからアクセスし、MXWシステムの管理に使用します。
• オーディオネットワークインターフェースコントロールソフトウェア:オーディオネットワークインターフェースからアクセスし、デバイスの管理だけ
に使用します。
MXWコントロールソフトウェアへのアクセスは、次ののステップに従ってください:
1.Shureウェブデバイスディスカバリーアプリケーションをインストールします。
www.shure.comまたはMXWアクセスポイントトランシーバーと同梱のUSBスティ
ックからShureウェブデバイスディスカバリーアプリケーションをダウンロードし
ます。(必要なBonjourデバイスディスカバリーツールはアプリケーションとセッ
トになっており、自動的にインストールされます。)
2.コンピューターがMXWネットワーク上にあることを確認してください。
コンピューターは、デバイスの埋め込みウェブサーバーからコントロールソフトウ
ェアにアクセスします。すべてのネットワークデバイスは、同じネットワークに接
続していなければなりません(同じサブネットに設定)。
3.WiFiの電源を切る
PCのWiFiの電源を切り、有線ネットワークインターフェースにします。
4.Shureウェブデバイスディスカバリーアプリケーションを起動します。
アプリケーションを開き、コントロールソフトウェアの埋め込みサーバーを備えた
ネットワーク上のすべてのShureデバイスを表示します(MXWAPT、MXWANIお
よびSCM820)。識別ボタンを使用し、識別しやすいようにデバイスのLEDを点滅
させます。
5.MXWコントロールソフトウェアを開く
いずれかのアクセスポイントトランシーバーをダブルクリックし、MXWシステム
コントロールソフトウェアを開きます。オーディオネットワークインターフェース
をダブルクリックし、デバイスのソフトウェアインターフェースを開きます。IPア
ドレスまたはDNS名により(プリファレンスドロップダウンから選択可能)、ア
プリケーションでコントロールソフトウェアを開くことができます。
6.初期設定のパスワードを入力
初期設定のパスワード「admin」を入力してコントロールソフトウェアにアクセス
します。
①
③
⑤
⑦
Wi-Fi
②
④
⑥
MXWANI8 mxwani8-ffeee5.local
ROOM 5
CONFERENCE
MXWAPT8
mxwapt8-ffaaa2.local
SCM820
1 2 3 4 5 6 7 8
gain
low cut
hi shelf
meter
push to solo | hold to mute
8
7
5
4
6
2
1
3
A
B
OUTPUT
INPUT
line
aux
sig/clip
sig/clip
mute
mute
push to solo | hold to mute
192.168.200.22
Dante
Dante
192.168.200.23
admin
®
IntelliMix
LIM
MASTER
AB
power
B
A
AUX IN
HEADPHONE
0
ethernet
-9
network audio
-18
automix link
-24
gain
dual mixer
-36
limiter
-48
L+R SUM
-60
lockout
MICROFLEX WIRELESS
Audio Network Interface
0
power
-9
0
line
ethernet
-18
-9
network audio
aux
-12
-24
HEADPHONE
-18
mic
-36
-24
-48
lockout
-60
adjust
7.ウェブページをブックマーク(推奨)
静的IPアドレスに設定した場合は、デバイスのIPアドレスをブックマーク登録しま
す。IPモードを自動に設定した場合は、デバイスのDNS名をブックマーク登録しま
す(DHCP)。
77
Page 78
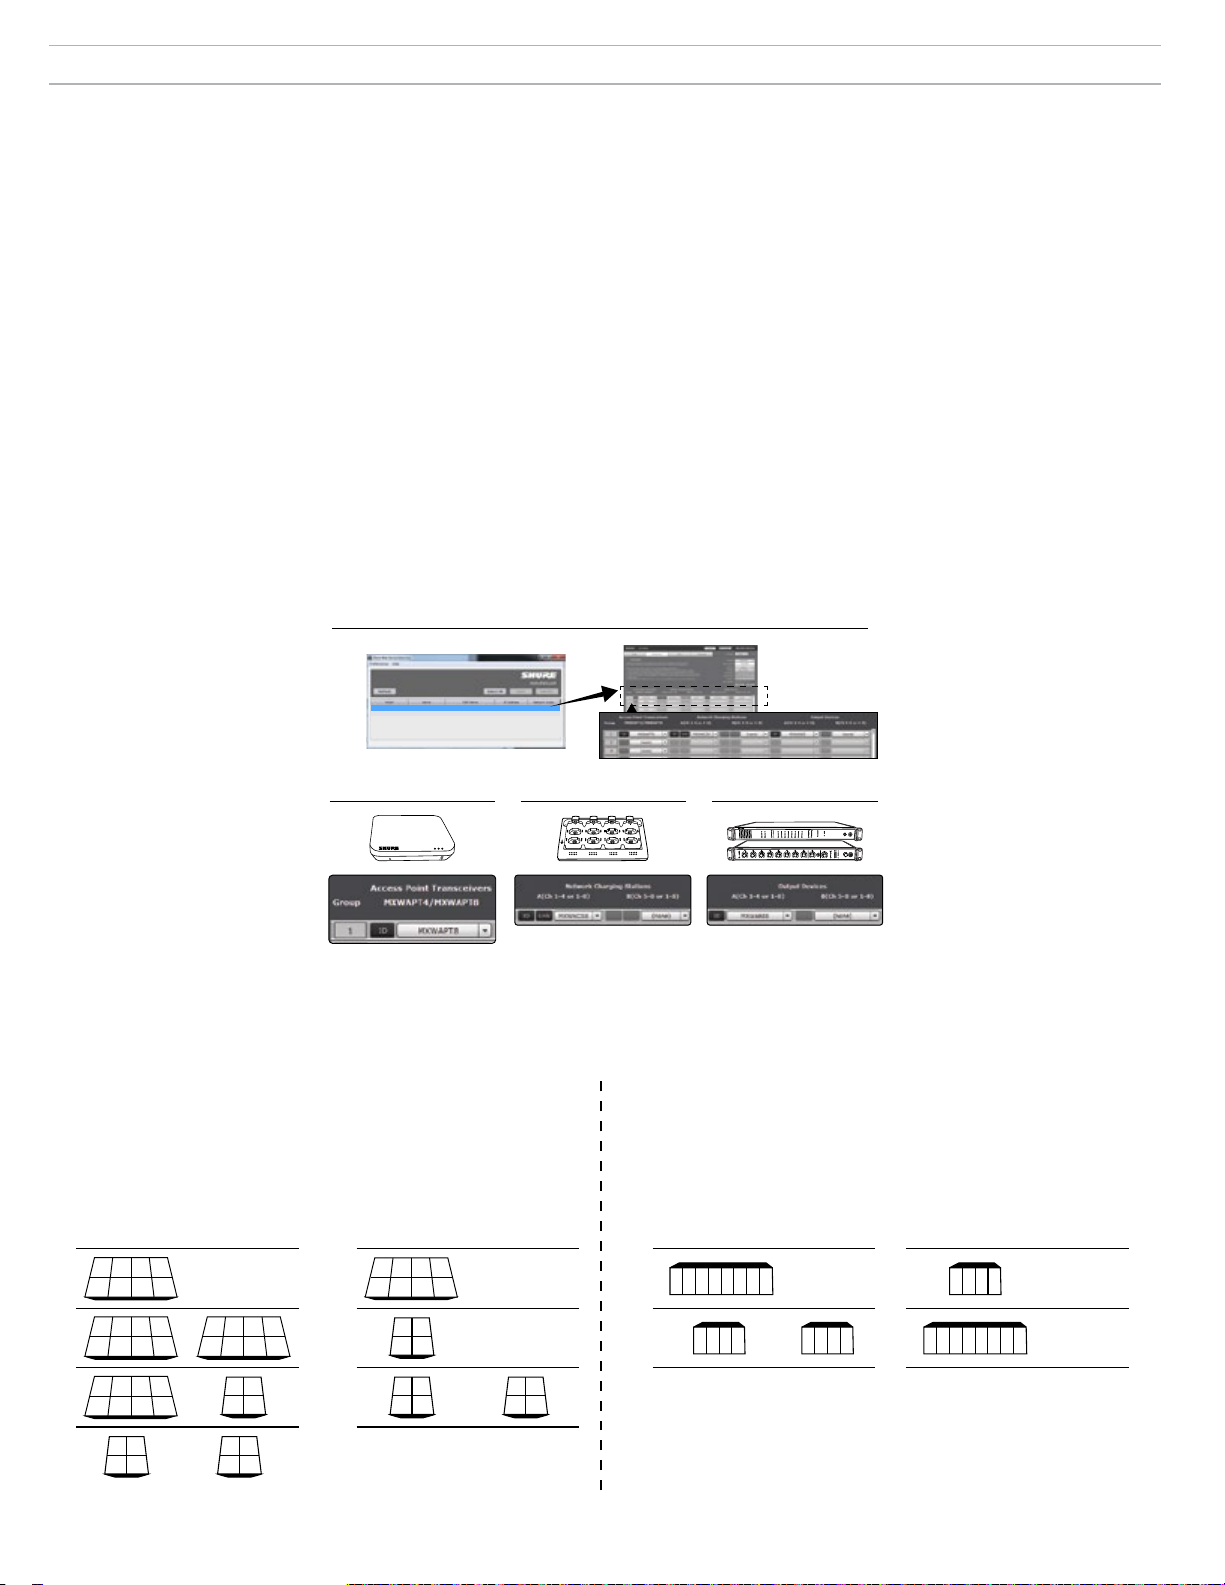
コンポーネントをグループに関連付ける
次の説明は、MXWグループの作成方法です。デバイスがドロップダウンウィンドウから利用できない場合、「オープン」でありネットワーク上にあること
を確認してください。
ヒント:ボタンを使用して、デバイスを識別します。これによりデバイスへ信号を送り、識別しやすいようにLEDを点滅させます。
1.設定を開く
Shureウェブディスカバリーアプリケーションを使用し、ネットワーク
上のすべてのMXWアクセスポイントトランシーバー(APT)を表示しま
す。APTをダブルクリックしてソフトウェアを開き、[Configuration]
タブへ進みます。
2.グループ1でアクセスポイントトランシーバー(APT)を選択
ドロップダウン表示からオープンAPTを選択します。この選択により、
グループが4チャンネル、または8チャンネルであるかを決定します
(APT4またはAPT8)。
注:グループ1には、コントロールソフトウェアを開くために使用されたAPTが含ま
れていなければなりません。その他のネットワーク(またはオープン)APTは、追
加グループで利用できます。
3.ネットワーク充電ステーションを選択
1~2つのネットワーク充電ステーション(NCS)をアクセスポイントに
関連付けます。1つ以上の充電器に関連付ける理由は2つあります:
- 8チャンネルアクセスポイントに2つの4チャンネル充電器を使用する場合。
- グースネックマイクを使用する場合。グースネックマイクは、充電器の前後のス
①
MXWANI8 mxwani8-ffeee5.local 192.168.200.22
MXWAPT8
ROOM 5
CONFERENCE
mxwapt8-ffaaa2.local
192.168.200.23
Dante
Dante
ロットをカバーし、利用できるスロット数を半分にします。例えば、2つの8チャ
ンネル充電器は、グースネックマイクで8チャンネルアクセスポイントを満たさ
なければなりません。
4.音声出力デバイスを選択
1~2つの音声出力デバイス(MXWANIまたはSCM820)を選択し、アク
セスポイントから自動的にデジタル音声チャンネルをルーティングしま
す。次のデバイスから選択します:
- オーディオネットワークインターフェース(MXWANI)4または8チャンネルの
バリエーション。2つの4チャンネルユニットまたは1つの8チャンネルユニット
は、8チャンネルAPTに割り当てることができます。
- Shure SCM820 IntelliMix®ミキサー。Dante有効SCM820は、グループの音声出
力として選択することができます。これにより、SCM820のaux入力は個人モニ
ター用のマイクに自動的にルーティングされます(SCM820左auxチャンネルは
MXWチャンネル1~4、右auxチャンネルはMXWチャンネル5~8)。
注:デバイスの関連付けおよびマイクのリンクデータは、引き続きデバイ
スに保存されます。MXWシステムの電源を切り、コンピューターなしで再
起動する場合、デバイスはアクセスポイントに関連付けられたままになり
ます。
②
③
4
2
1
3
7
5
6
8
④
A
B
INPUT
OUTPUT
line
aux
sig/clip
mute
SCM820
gain
1 2 3 4 5 6 7 8
low cut
hi shelf
meter
push to solo | hold to mute
sig/clip
mute
HEADPHONE
-18
mic
-36
-24
-48
lockout
-60
adjust
push to solo | hold to mute
®
IntelliMix
LIM
MASTER
AB
power
B
A
HEADPHONE
AUX IN
0
ethernet
-9
network audio
-18
automix link
-24
gain
-36
dual mixer
limiter
-48
-60
L+R SUM
lockout
MICROFLEX WIRELESS
Audio Network Interface
0
5
8
4
7
2
3
6
1
power
-9
0
line
ethernet
-18
-9
aux
network audio
-12
-24
1 つのグループ内にデバイス向けにチャネル マッピング
音声は、[Configuration]タブのグループセットアップに従い、マイクからアナログ出力へルーティングされます。次の略図は、8または4チャンネルグル
ープのデバイスを位置付けるチャンネルを表します。
ネットワーク充電ステーション
グースネックマイクだけのグループを作る場合は、追加の充電ステーショ
ンが必要です。
8 チャネル グループ
4 チャネル グループ
出力は、MXWオーディオネットワークインターフェース、ま
たはSCM820自動ミキサーに割り当てられます。
8 チャネル グループ 4 チャネル グループ
A B A B A B A B
2 3 4
1
1) 1) 1) 1)
5 6 7 8
2 3 41
2) 2) 2) 2)
x x x x
2 3 41
3) 3)
x x x x
(none) (none) (none)(none)
5 6 7 8
x x x
x
5 6
7 8
2 3 41
x x x x
1
2
4
3
21
x x
81 2 3 4 5 6 7
1 2 3 4
3 4
x x
音声出力デバイス
85 6 7
1 2 3 4 x x x x
1 2 3 4
(none)(none)
78
2
1
4)
3 4
5 6
7 8
Page 79
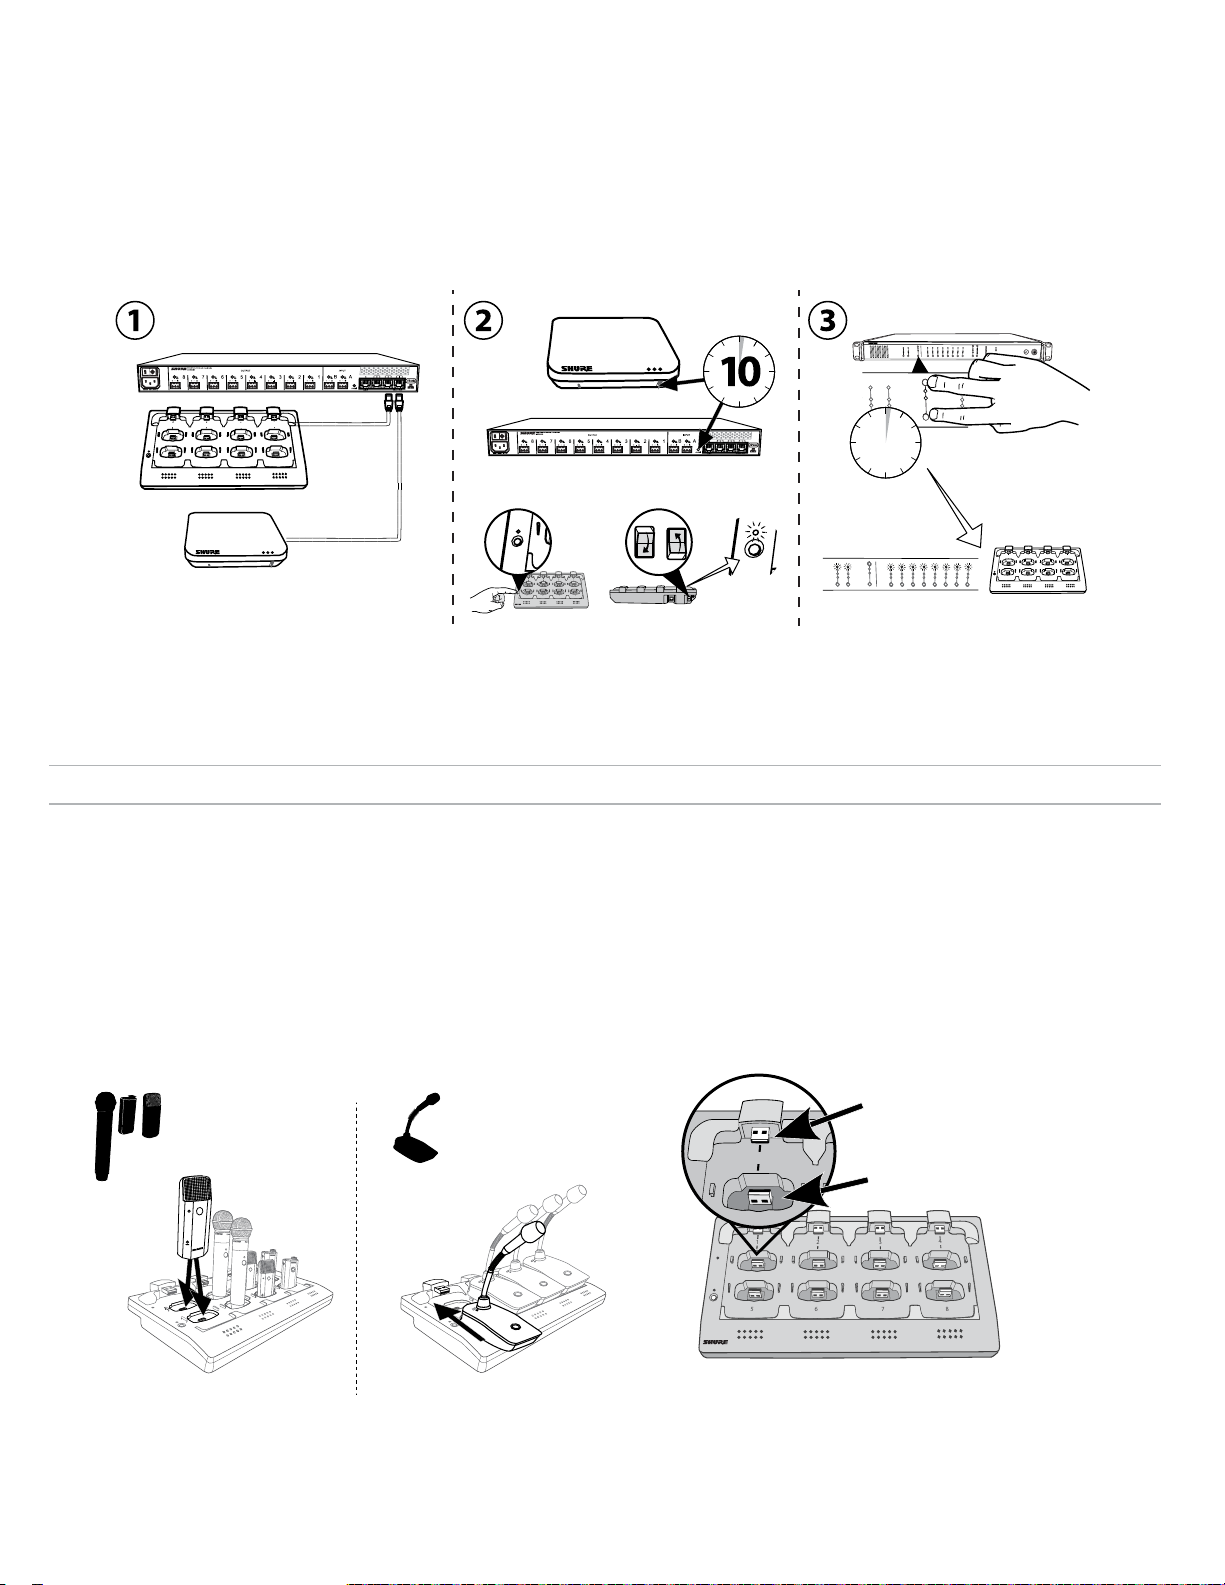
7
8
6
5
1
2
3
4
1
2
3
7
8
6
5
1
2
3
4
7
8
6
5
1
2
3
4
link
6
5
1
2
link
push to solo | hold to mute
2
3
4
5
6
7
8
lockout
power
ethernet
network audio
-9
-18
-24
-36
-48
-60
0
-9
-12
-18
-24
0
aux
mic
adjust
line
HEADPHONE
MICROFLEX WIRELESS
音声グループセットアップ
MXWグループは、ネットワークが1つのアクセスポイントトランシーバー(APT)、1つのネットワーク充電ステーション(NCS)、および1つのオーディ
オネットワークインターフェース(ANI)から構成される場合、コントロールソフトウェアを使用せずに関連付けることができます。最良の結果を得るため
に、デバイスを工場出荷時の初期設定に戻し、以前のグループの関連性をすべて削除します。
1. 1つのAPT、1つのNCS、および1つのANIをネットワークに接続します。各デバイスの1つだけがネットワークに含まれるようにします。
2. デバイスを工場出荷時の設定にリセットします(「工場出荷時の初期設定」セクションを参照)。
3. ANIの前面パネルで、両方の入力レベル選択ボタンを同時に押し、5秒間そのままにします。チャンネル選択LEDが緑色に点灯し、音声メーターが点滅し
て関連付けられたことを示します。
MICROFLEX WIRELESS
Audio Network Interface
0
2
1
5
3
7
6
4
A
8
12
11
1
10
2
9
3
8
4
5
7
6
2
1
5
6
4
3
7
8
+
Power
Link
A
B
INPUT
sig/clip
mute
B
OUTPUT
INPUT
line
aux
sig/clip
sig/clip
mute
mute
A
B
line
aux
12
11
1
10
2
9
3
5
8
4
5
7
6
3
2
5
4
1
OUTPUT
line
aux
sig/clip
mute
push to solo | hold to mute
push to solo | hold to mute
OUTPUT
power
-9
0
line
ethernet
-18
-9
network audio
aux
-12
-24
HEADPHONE
-18
mic
-36
-24
-48
lockout
-60
adjust
1
sig/clip
mute
4
2
1
8
7
6
3
7
6
5
i i
i
i
i
i
i
i
i i
8
i i
i i
i i
i
i
i
i
i
i
i
i
i
i
i
i
i
i
i
i
i
i
i
i
i
i
i
i
i
i
i
i
i
i
i
i
i
i
i
i
i
i
i i
i i
i i
マイクのリンク
ネットワーク充電ステーション(NCS)を使用して、マイクをアクセスポイントチャンネルにリンクします。[Configuration]タブからグループのセット
アップに従い、充電器のスロットをAPTに位置付けます。リンク処理を完了すると、音声はグループ内の対応するチャンネルにルーティングされます。
リンク付けにより、充電ステーションにあるマイクをAPTチャンネルに位置付けします。これにより、以前のマイクのリンクは新しいチャンネルに置き換
えられます。リンク処理中にスロットが空の場合、そのチャンネルに影響はありません。
1.マイクを充電器に配置します。
充電器の配置に従い、マイクをアクセスポイントチャンネルにリンク
します。
グースネックマイク用
ボディパック、ハンドヘルド、およ
びバウンダリーマイク用。
Power
Link
マイクを充電スロットに接続
79
Page 80
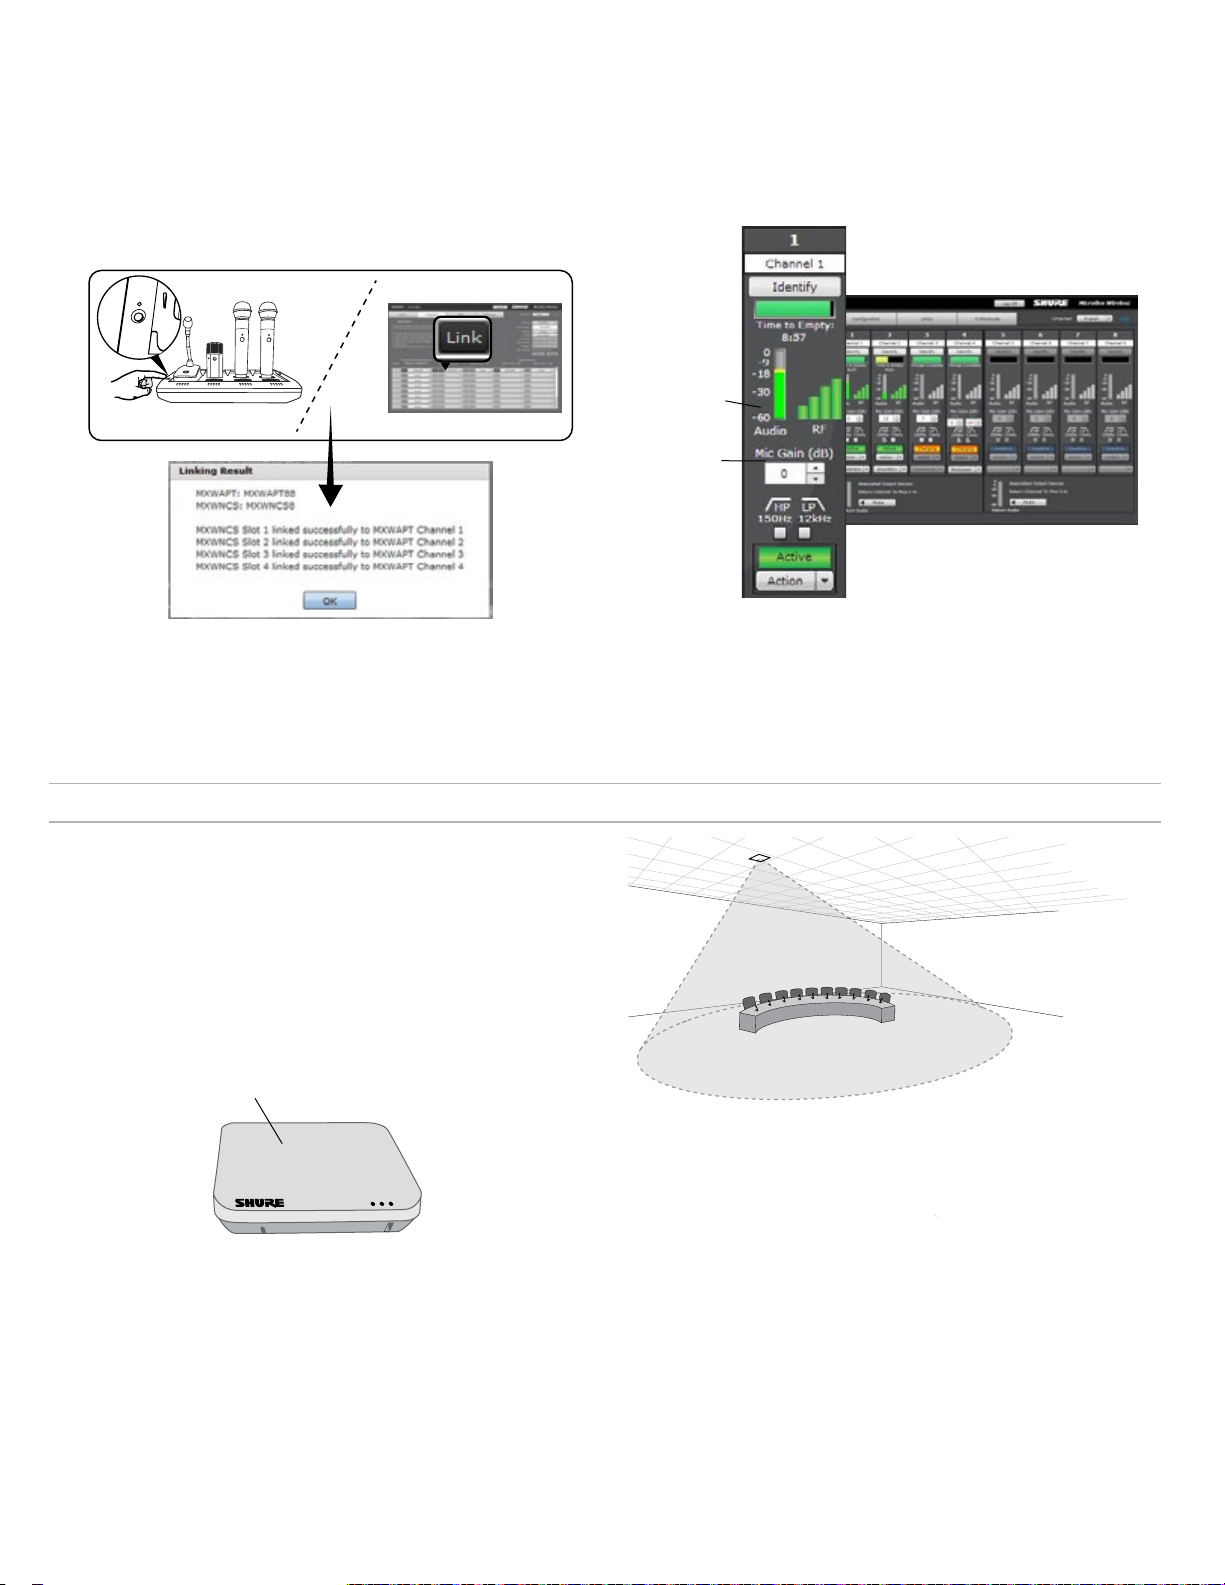
2.マイクをチャンネルにリンクします。
7
8
6
5
link
コントロールソフトウェアまたは充電ステーションを使用し、マイクを
APTチャンネルにリンクします。希望に応じて、充電ステーションでこ
の機能を無効化することができ、コントロールソフトウェアからのみリ
ンクさせることができます:
- コントロールソフトウェア:設定ページから、グループの各充電器のリンク
ボタンを押します。
-
充電ステーション:リンクボタンを6秒間押したままにします。処理中にLED
が点滅し、リンクされると緑色に点灯します。
3.マイクを外して音声をテスト
各マイクの音声をテストし、必要に応じてコントロールソフトウェアの
[Monitor]タブからマイクゲインを調整します。ゲインは、クリッピ
ング(赤)のレベルではなく、信号インジーケーターで音声が登録され
たレベル(緑/黄色)で設定する必要があります。
信号インジケー
ター
ゲイン調整
[Monitor]タブ
アクセスポイントトランシーバー(APT)の取り付け
APTは、カーディオイドパターンでRFを発します。その際、RFはデバイス
の前面が最も強力となります。対象となるカバー範囲にAPTの前面を向け
ます。見通し線は妨害されないように、その近くに大きな金属の物体が置
かれないようにします。
重要:常に「歩きながら」テストを行い、スピーチやパフォーマンスでワ
イヤレスシステムを使用する前に、カバー範囲を確認してください。アン
テナ設置位置を試行することで、最適な場所を見つけます。必要に応じ
て、「トラブルスポット」にマークを付け、プレゼンターまたはパフォー
マーにその場所を避けるよう伝えます。
APTの前面
マイクロホンのエリアに向けます
80
Page 81
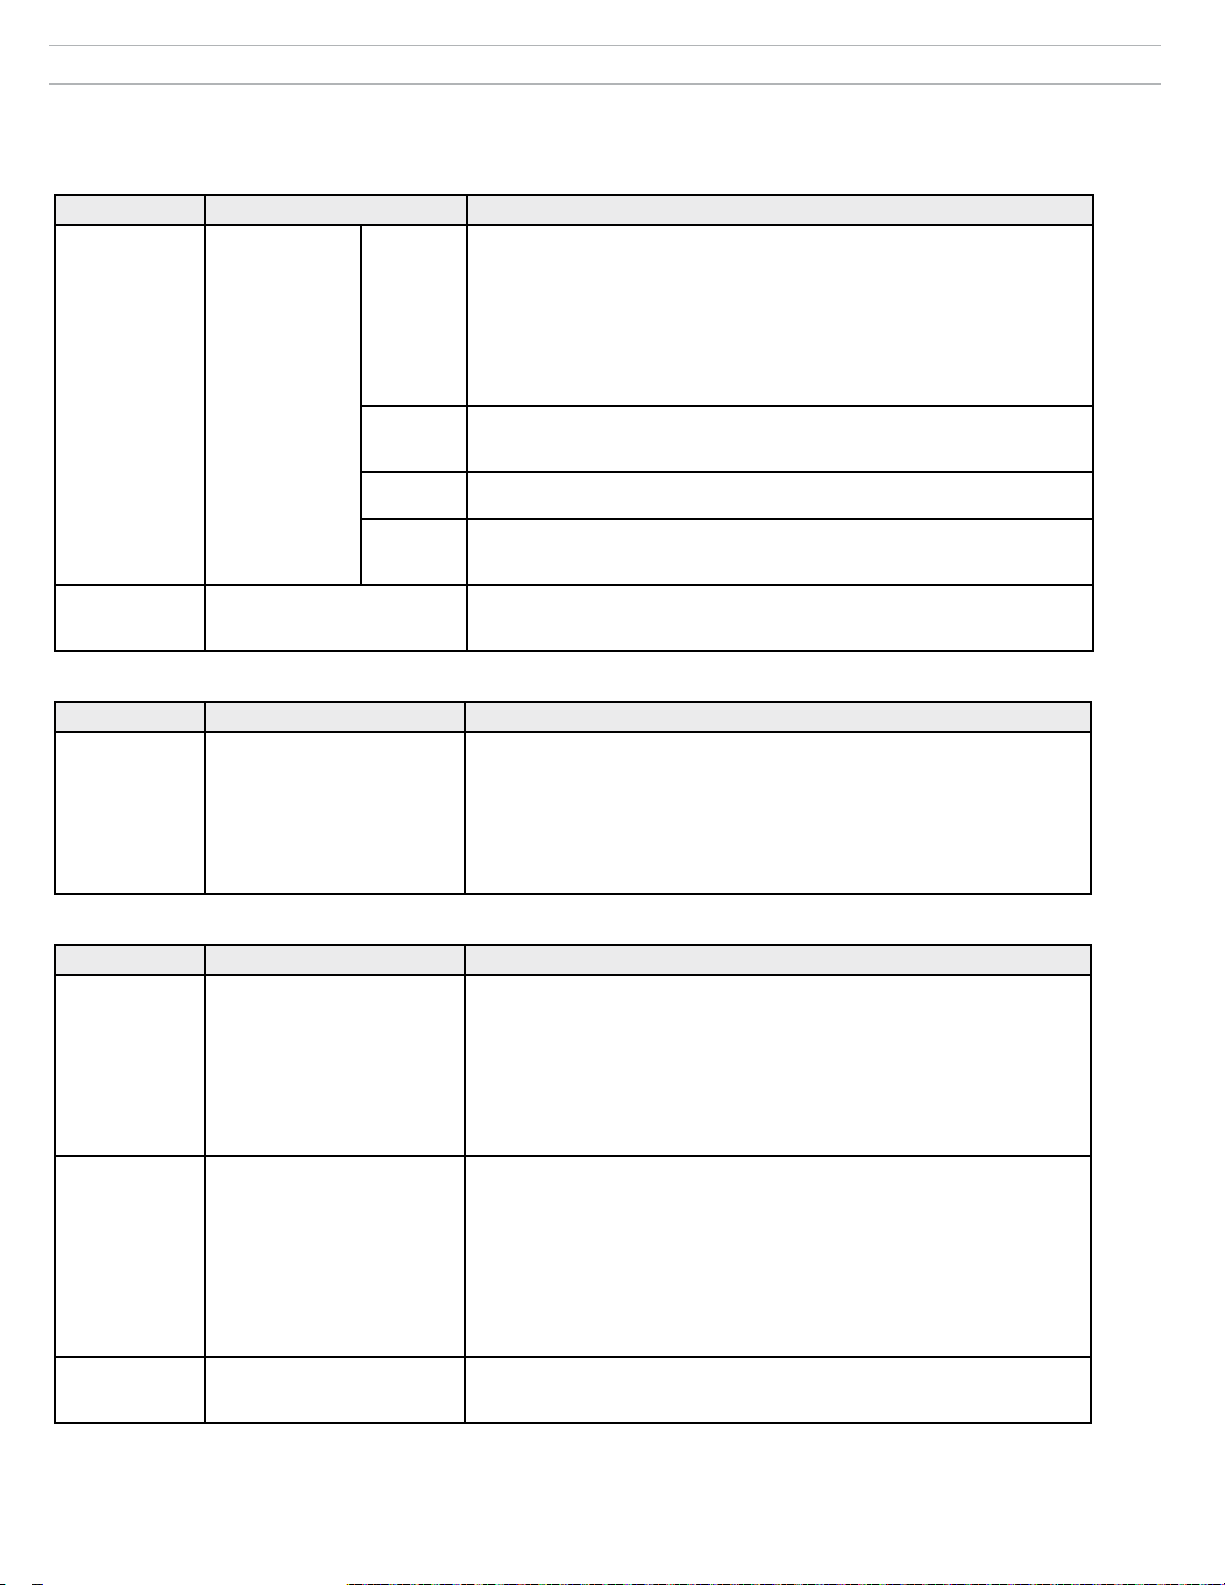
トラブルシューティング
次の表は、Microflexワイヤレスシステムのトラブルシューティングにおける典型的な解決策です。各トピックの詳細については、www.shure.comからご覧
いただける、またはUSBフラッシュドライブに付属の、MXWユーザーガイド完全版をご参照ください。
音声
問題 インジケーター 解決策
• ケーブルのチェック
• 送信機がオンであり、チャンネルがミュートでないことを確認する。
• MXWコントロールソフトウェアの[Monitor]タブで、入力メーターがOKである
ことを確認する。チャンネルがクリッピングしている場合は弱める。
• オーディオネットワークインターフェース(AIN)のフロントパネルおよびANI
コントロールソフトウェアの出力メーターを確認する。ヘッドフォンを使用し
て、AINからの音声を聞く。チャンネルがクリッピングしている場合は弱める。
• AINの出力レベルと接続している装置の入力が一致しているか確認する。
• APTがスペクトラムスキャンを実行していないことを検証する。
• 確実にすべてのデバイスがオンであり、ネットワーク接続が安定するようにする
• Danteコントローラーソフトウェア(DC)を使用してチャンネルサブスクリプシ
ョンを検証する
• DCのマスタークロックを確認(MXWAPTがマスタークロックでなければなりま
せん)
• デバイスをグループに配置して自動的に音声をルーティングする
• アクセスポイントトランシーバーのネットワーク音声設定のサブネットがオーディ
オネットワークインターフェースのサブネットと一致するようにする
• スペクトラムスキャンを実施してRF障害を監視する
• チャンネル数を減らし、システムがRFスペクトラムに負担をかけているか検証す
る
音声がない/歪む
RFインターフェー
スが音声脱落を引
き起こす
オーディオネット
ワークインター
フェースまたは
SCM820のネット
ワーク音声LED
音声が途切れる
緑色
緑色で点滅
赤色
オフ
システムのセットアップおよびMXWグループ
問題 インジケーター 解決策
• デバイスの電源が入っていて、同じネットワークとサブネットに接続されている
コンポーネントを
グループに関連付
けできない
ネットワーク
問題 インジケーター 解決策
PCからコントロ
ールソフトウェア
に接続できない
コントロールソフ
トウェアの読み込
みに時間がかかる
コントロールソフ
トウェアがうまく
機能しない
デバイスのドロップダウンが
[Configuration]タブのグループ
行に望ましいコンポーネントを表
示しない
デバイスがShureウェブデバイス
ディスカバリーアプリケーション
に表示されない
ウェブブラウザがコントロールイ
ンターフェースに接続できない
インジケーターの動きが遅い、ま
たはリアルタイムで表示されない
• MXWコントロールソフトウェアの[Utility]タブを開き、設定フィルターのチェ
• その他の構成のグループ行から「none」を選択して、コンポーネントの関連付け
• デバイスの工場出荷時設定へのリセットを実行し、すべての関連付けを消去する。
• 確実にデバイスに電源が入っていることを確認する
• 確実にPCと装置が同じネットワークにあり、同じサブネットに設定されているこ
• デバイスに接続していない他のネットワークインターフェースをオフにします
• DHCPサーバーが作動しているかチェックしてください (該当する場合)
• PCでBonjourが作動していることを確認する
• オーディオネットワークインターフェース(ANI)のポート4を介して接続してい
• Adobe
• 確実にPCとデバイスが同じネットワークおよびサブネットに存在するようにする
• Windowsのファイアフォール設定がShureのソフトウェアを妨げていないことを確
• デフォルトゲートウェイをDHCPの一部として送信しないようルーターを設定し
• Shureウェブデバイスディスカバリーアプリケーションを設定し、IPアドレスで開
• コンピューターを、デバイスとして同じネットワーク上のスタティックIPアドレス
• 同じ設定で開いているウィンドウやタブの数を減らす
• ネットワークの正しい設定方法については「ネットワーク」セクションを参照し
ことを確認)
ックを外してネットワーク上のすべてのMXWデバイスを表示する。デバイスが
「OTHER」と表示された場合は、別の構成の一部です。
を外す。
とを確かめる
(WiFiを含む)
る場合、必ず切り替えモードにセットする。
®
Flash®の最新バージョンをダウンロード
認する
ます
く
に手動で設定します
てください。
81
Page 82
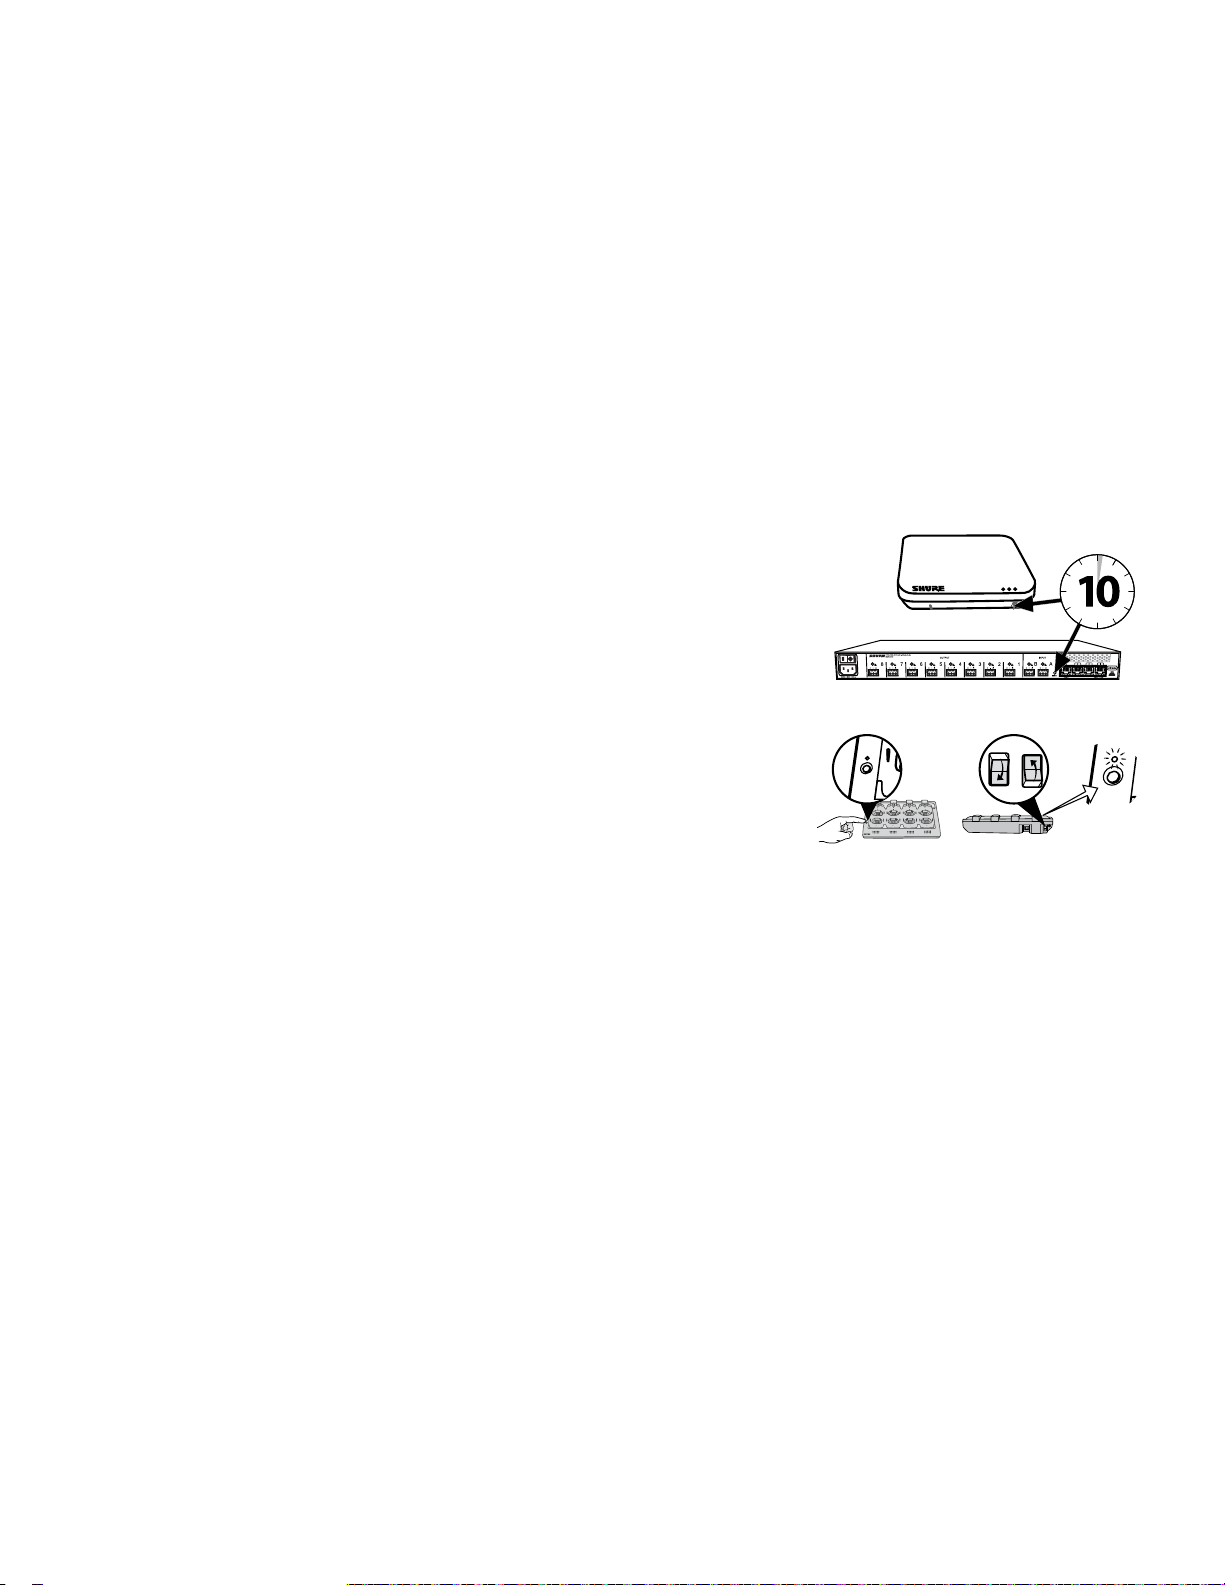
7
8
6
5
1
2
3
4
Link
Power
7
8
6
5
1
2
3
4
link
6
5
1
2
link
+
lockout
power
ethernet
network audio
push to solo | hold to mute
-9
-18
-24
-36
-48
-60
0
-9
-12
-18
-24
0
aux
mic
adjust
line
sig/clip
mute
INPUT
A
sig/clip
mute
OUTPUT
HEADPHONE
Audio Network Interface
MICROFLEX WIRELESS
B
1
2
3
4
5
6
7
8
line
aux
push to solo | hold to mute
A
sig/clip
mute
OUTPUT
B
1
2
3
4
5
6
7
8
line
aux
6
7
8
9
10
11
12
1
2
3
4
5
6
7
8
9
10
11
12
1
2
3
4
5
5
7
8
6
5
1
2
3
4
i
i
i i
i
i
i
i
i
i i
i
i
i
i
i
i
i i
i
i
i
i
i
i i
i
i
i
i
i
i
i i
i
i
i
i
i
i i
i
i
i
i
i
i
i i
i
i
i
i
i
i i
i
i
i
i
INPUT
A
OUTPUT
B
1
2
3
4
5
6
7
8
lockout
power
ethernet
network audio
push to solo | hold to mute
-9
-18
-24
-36
-48
-60
0
-9
-12
-18
-24
0
aux
mic
adjust
line
sig/clip
mute
sig/clip
mute
HEADPHONE
MICROFLEX WIRELESS
line
aux
追加のリソース
追加のトラブルシューティングサポートまたは複雑な取り付けの詳細な情報については、Shureのサポート担当者までお問い合わせください。北米地域で
は、システムサポートグループ (847-600-8541) までお電話でお問い合わせください。他の地域では、www.shure.comでお近くのサポート連絡先をご覧くだ
さい。
デジタルオーディオネットワークのヘルプ、詳細なネットワークガイドライン、Danteソフトウェアのトラブルシューティングについては、Audinateのウェ
ブサイト(www.audinate.com)にアクセスしてください。
出荷時設定にリセット
トラブルシューティングの方法を試してもネットワーク上にデバイスが表示されない場合は、個別のハードウェアでリセットを行い、デバイスを初期設定
に戻します。工場出荷時の初期設定は、その他のShureネットワークデバイスと自動的に互換性を持つように設計されています。
注:工場出荷時の設定へのリセットは、すべてのMXWグループとリンクの関連性を取り消します。ソフトウェアにアクセスするパスワードはにリセットし
ます。
ハードウェアから
アクセスポイントトランシーバー
埋め込まれたリセットボタンを10秒間押したままにします。ネットワーク音声ステータスLED
が一時的にオフになり、ユニットが再起動していることを示します。
注意:
出荷時設定リセットでは、グループの関連付けとデバイスに保存されたマイクのリンクがすべて取り消
されます。
音声ネットワークインターフェース
リセットボタンを10秒間押したままにします。フロントパネルのLEDが点滅し、ユニットが再
起動していることを示します。
ネットワーク充電ステーション
a. 電源スイッチを切ります。
b. リンクボタンを押したままにします。
c. リンクボタンを押しながら、電源スイッチを入れます。
d. LEDが黄色く点灯するまで、リンクボタンを12秒間押し続けます。
コントロールソフトウェアから
1. MXWコントロールソフトウェアの[Utility]タブを開きます。
2. デバイスの[Edit Properties]ボタンを選択します。
3. 出荷時設定リセットのチェックボックスを選択します。
4. アップデートの追加を選択し、編集キューに設定を保存します。
5. 追加のデバイスについて、繰り返します。
6. [Apply All]を押して、プロパティを編集したすべてのデバイスに変更を加えます。
82
Page 83
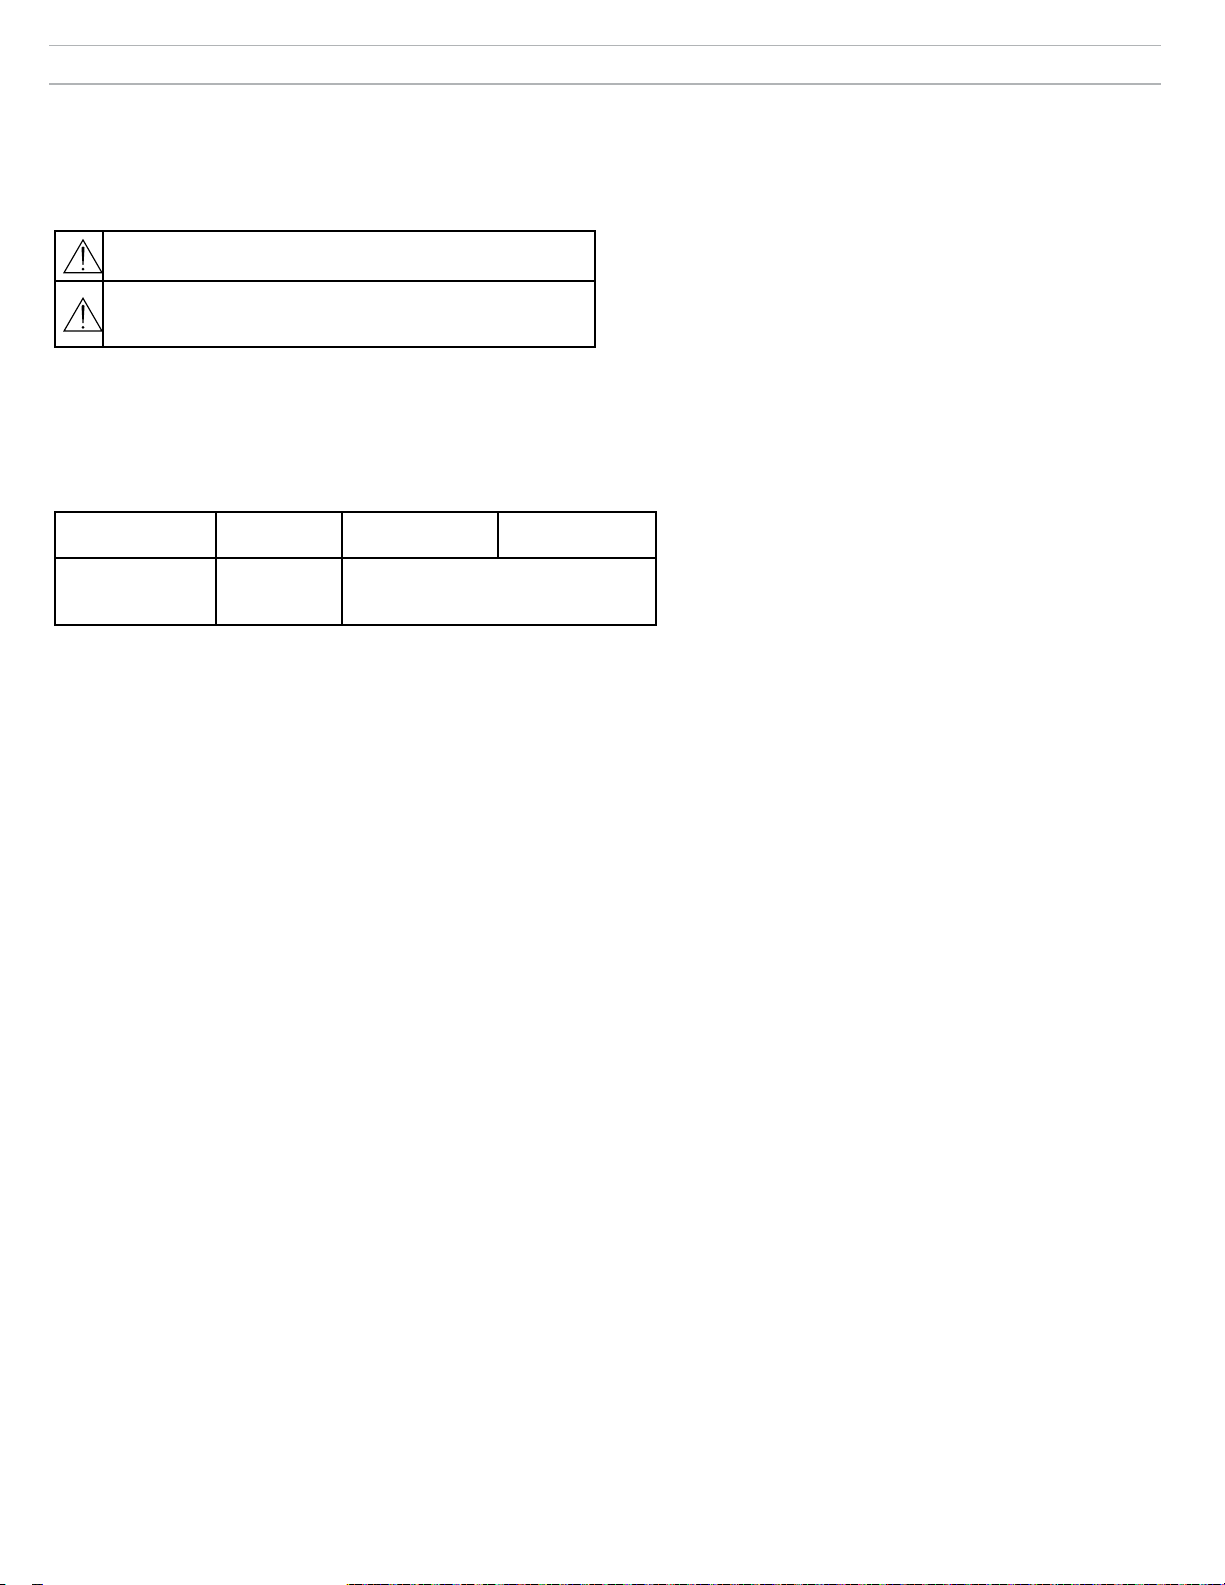
安全使用情報
安全にお使いいただくために
危険や損害の大きさと切迫の程度を明示するために、誤った扱いをすると
生じることが想定される内容を次の定義のように「警告」「注意」の二つ
に区分しています。
警告: この表示内容を無視して誤った取り扱いをすると、死亡ま
たは重傷を負う可能性が想定される内容です。
注意: この表示内容を無視して誤った取り扱いをすると、傷害を
負う可能性または物的損害が発生する可能性が想定される内容で
す。
警告
極度の大音量で音声を聴くと、聴覚を恒久的に損なうことがあります。できるだ
け小さな音量で使用してください。極度に高い音圧レベルに過度に曝されると耳
を傷め、恒久的な騒音性難聴(NIHL)になることがあります。聴覚を損なわない
ようにするため、各音圧レベルに耐えられる最長限度時間の米国労働安全衛生局
(OSHA)ガイドラインを下記に記載しますのでご参照ください。
90 dB SPL
8時間
110 dB SPL
30分
警告
• バッテリーパックは爆発、または有毒な物質を放出する場合があります。火災ま
たは火傷の恐れがあります。開けたり、押し潰したり、改造したり、分解した
り、60℃以上の熱に曝したり、焼却したりしないでください。
• メーカーの指示に従ってください。
• Shure充電器はShure再充電性電池の再充電にのみ使用してください
• 警告:電池が間違って交換された場合、爆発する恐れがあります。同じ種類また
は同等の種類の電池と交換してください。
• 決して口の中に電池を入れないでください。飲み込んだ場合は医師または最寄り
の中毒事故管理センターまで連絡してください。
• ショートさせないでください。火傷または火災の原因となります。
• Shure充電式バッテリー以外のバッテリーパックを充電、または使用しないでく
ださい。
• バッテリーパックは正しく処分してください。使用済みバッテリーパックの適切
な廃棄方法については、各地域の販売店にお問い合わせください。
• 電池(電池パックまたは取り付け電池)は直射日光、火などの高熱に曝さないで
ください。
警告:不適切な電池を使用すると爆発の危険があります。Shure対応電池のみを使用
してください。
注: 付属電源、またはShure認可の電源でのみ使用してください。
1. 經審驗合格之射頻電信終端設備,非經許可,公司、商號或使用者均不得擅自變更
頻率、加大功率或變更原設計之特性及功能。
2. 射頻電信終端設備之使用不得影響飛航安全及干擾合法通信;經發現有干擾現象
時,應立即停用,並改善至無干擾時方得繼續使用。所謂合法通信,係指依電信法
規定作業之無線電信。
3. 輸入、製造射頻電信終端設備之公司、商號或其使用者違反本辦法規定,擅自使用
或變更無線電頻率、電功率者,除依電信法規定處罰外,國家通訊傳播委員會並得
撤銷其審驗合格證明。
4. 減少電磁波影響,請妥適使用
95 dB SPL
4
115 dB SPL
15分
100 dB SPL
2時間
120 dB SPL
障害が発生する恐れがあるため、避け
ること
105 dB SPL
1時間
MXW1
ボディパックマイクロホン送信機:
これらの送信機はテストされ、無制御環境に対して明記した国際放射
線暴露限度に適合していることが確認されています。本機器は、通常
の使用条件においてユーザーの体に直接接触します。これらの送信機
は、他のアンテナや送信機と同じ場所に配置したり、連動して操作す
ることはできません。
MXW2, MXW6, MXW8, MXWAPT4, MXWAPT8
ハンドヘルドマイクロホン送信機, 卓上バウンダリーマイクロホン送
信機, 卓上グースネックマイクロホン送信機, ワイヤレスアクセスポイ
ント送信機:
これらのモバイル送信機は、人体から 20 センチ以上離して使用する
ように作られています。これらのモバイル送信機は、その意図された
用途の場合、使用者の身体に近接していることと低出力を理由に、国
際的な放射線暴露限度のテスト要件を免除されています。これらのモ
バイル送信機は、すべての人から少なくとも 20 cm 離して置く必要
があり、他のアンテナや送信機と同じ場所に配置したり、または連動
して操作することはできません。
重要な製品情報
本機器はプロのオーディオ用途用です。
EMC適合性試験は同梱および推奨のケーブル使用に基づきます。別
種のケーブルを使用した場合はEMC性能が低下します。
本機器の変更・改造は、Shure Incorporated によって書面で認可され
たものを除き、装置の使用の権限を無効にする場合があります。
電池、パッケージ、電子廃棄物については地域のリサイクル方法に従
ってください。
注: 本装置は公共インターネットネットワークに直接接続するための
ものではありません。
ユーザーの方へのお知らせ
本機器はテストされFCC規定パート15に従いクラスBデジタル機器に
適合しますが、制限があります。これらの制限は、住宅地域において
設置する際、有害な電波干渉から機器を適度に保護するためのもので
す。本機器は電磁波を発生・使用し、放射する場合があります。取扱
説明書に従って設置しないと無線通信に電波干渉が起こります。ま
た、設置状況に関わらず妨害を引き起こす可能性もあります。本機器
によりラジオやテレビの受信に電波干渉が起こるようであれば(これ
は、機器の電源を一度切ってから入れるとわかります)、次の手段を
1つまたは複数用いて電波干渉を防いでください。
• 受信アンテナを別の方向に向けるか、別の場所に移す。
• 機器と受信機の設置間隔を広げる。
• 受信機を接続しているコンセントとは別の回路にあるコンセントに
機器を接続する。
• 販売店または熟練したラジオ/テレビ技術者に相談する。
83
Page 84

認証
このデバイスは、FCC パート 15 に準拠しています。
このデバイスは、カナダ産業省ライセンス免除RSS基準に適合していま
す。本装置の操作は次の2つの条件の対象となります:(1) 装置は干渉を起
こしてはならない、(2) 装置は、望まない操作を起こす干渉を含め、あらゆ
る干渉を受け入れなければならない。
Le présent appareil est conforme aux CNR d'Industrie Canada applicables
aux appareils radio exempts de licence.L'exploitation est autorisée aux deux
conditions suivantes :(1) l'appareil ne doit pas produire de brouillage, et (2)
l'utilisateur de l'appareil doit accepter tout brouillage radioélectrique subi,
même si le brouillage est susceptible d'en compromettre le fonctionnement.
日本の電波法および電気通信事業法に準拠。本デバイスは、日本の電波法
および電気通信事業法にしたがって許可されています。本デバイスを改変
しないでください(改変すると許可された指定番号は無効になります)。
IEC 60065に基づく電気安全要件に適合しています。
本製品は、関連するすべての欧州指令の基本的要件を満たし、CEマークに
適合しています。
CE適合宣言書はShure社またはShure社の欧州担当部より入手することがで
きます。問い合わせ先についてはvisit www.shure.comを参照してください
CE適合宣言書は以下より入手可能です:www.shure.com/europe/compliance
ヨーロッパ認可代理店:
Shure Europe GmbH
ヨーロッパ、中東、アフリカ地区本部:
部門:EMEA承認
Jakob-Dieffenbacher-Str. 12
75031 Eppingen, Germany
Tel: 49-7262-92 49 0
Fax: 49-7262-92 49 11 4
Eメール: [email protected]
MXWNCS4, MXWNCS8
パート 15b の FCC 検証規定の下で承認されています。
産業のカナダICES-003コンプライアンスレベル:
CAN ICES-3 (B)/NMB-3(B)
注:FCC マーキング、CE マーキング、C-Tick マーキング、および電
気定格については、充電器の筐体底面にあるラベルをご覧ください。
MXW1, MXW2, MXW6, MXW8, MXWAPT4, MXWAPT8
FCCパート15認証。
FCC:DD4MXW1、DD4MXW2、DD4MXW6、DD4MXW8
、DD4MXWAPT4、DD4MXWAPT8。
RSS-213 の該当する要件を満たしています。
IC:616A-MXW1、616A-MXW2、616A-MXW6、616A-MXW8
、616A-MXWAPT4、616A-MXWAPT8。
商標
Audinate®、Audinate ロゴおよび Dante はAudinate Pty Ltd の商標で
す。
Page 85
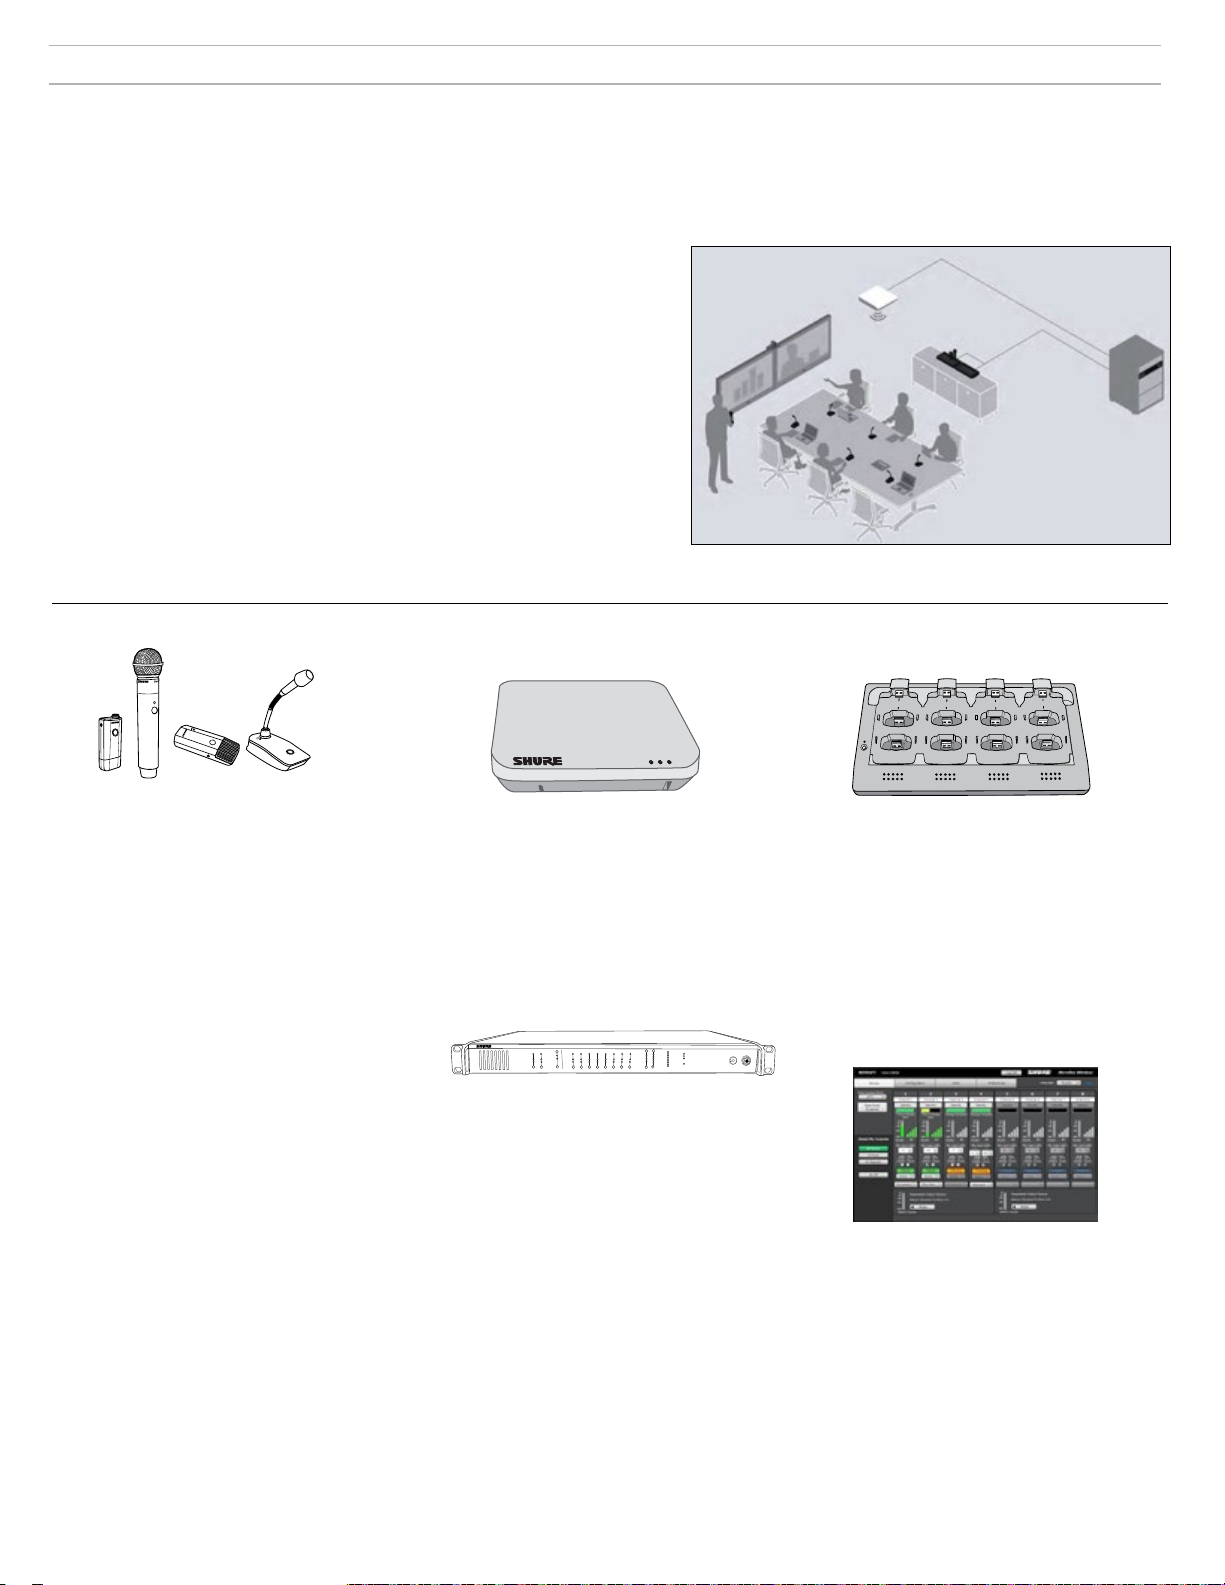
一般說明
Shure Microflextmtm 無線系列 (MXW) 是用於多功能會議室和董事會議室的一整套話筒解決方案。它具有自動射頻通道管理、充電式加密 (AES256) 無線話筒和
數位音訊網路功能 (Dante
tm
)。網路充電站給桌面應用的介面式和鵝頸話筒,以及公司培訓和演講的手持和腰包式解決方案充電。MXW 接入點嵌入天花板或牆
壁中,可實現無線話筒和數位音訊網路的離散通信。如果在安裝時需要在相同區域(*相關區域)使多達 40* 個話筒同時工作,則可以採用多個接入點。利用基
於網路瀏覽器的控制軟體對聯網的任何電腦進行遠端監控和控制。
附加資源
此快速入門指南包含設定基礎的八通道 MXW 系統所需的資訊。以下為 MXW 系列的
附加資源清單:
完整 MXW 手冊: 完整手冊可提供全面的 MXW 系統資訊,如詳細的元件描述、網路拓
撲、射頻管理最佳實例和控制軟體導覽。可在 www.shure.com 和存取點收發器隨附的
USB 磁碟機中查看。
舒爾支援: 如需疑難排解幫助或咨詢複雜安裝問題,請聯絡舒爾以與支援代表對話。
在美國地區,請撥號 847-600-8541 以呼叫系統支援團隊。其他地區的使用者請前往
www.shure.com 以查看您所在地區的支援聯絡方式。
Audinate: 如需數位音訊網路說明、進階網路指南和 Dante
tm
軟體疑難排解,請造訪
Audinate 的網站,地址為 www.audinate.com。
元件概述
MXW6MXW1 MXW8
MXW2
話筒發射機
MXW 話筒將加密的無線音訊信號傳輸至接入點。
四種類型可供選擇:
混合腰包式 (MXW1)
腰包式固定在腰帶或背帶上,實現無需手持的
移動通信。其特點是可以作為頸掛式連接的
TQG 輸入,這是一種集成式全向話筒。
手持型 (MXW2)
手持型可以時發言者利用傳統的 Shure SM58
、SM86、BETA58 和 VP68 話筒拾音器進行
通信。
介面式 (MXW6/C, MXW6/O)
介面發射機放在台桌或書桌上傳輸語音,同時
又低調地融入會議環境中。
桌面鵝頸座式 (MXW8)
鵝頸座式相容 5、10 和 15” 的 Microflex 鵝
頸話筒。
MXW1、MXW6 和 MXW8 話筒含有一個用於監
控語音的耳機輸出,比如翻譯通道。
接入點收發器 (MXWAPT4, MXWAPT8)
接入點收發器(4 和 8 通道裝置)安裝在牆壁或
天花板上,管理加密的無線話筒語音連接。收發
器作為一個系統樞紐,可以傳輸無線話筒和同網
路其他 Dante 設備之間的數位音訊資訊。APT 含
有一個管理 MXW 系統控制軟體的網路服務器,
用於監控、配置和遠端控制系統。
MICROFLEX WIRELESS
B
OUTPUT
INPUT
line
aux
sig/clip
sig/clip
mute
mute
push to solo | hold to mute
-9
0
line
-18
-9
-12
aux
-24
-18
-36
mic
-24
-48
-60
adjust
0
8
7
6
5
4
3
2
1
A
Audio Network Interface
power
ethernet
network audio
HEADPHONE
lockout
音訊網路介面 (MXWANI4, MXWANI8)
音訊網路介面(4 和 8 通道)是一種向 MXW 系
統提供類比音訊輸入和輸出的 Dante 網路設備。
它設有一個 4 埠的千兆乙太網開關,可以連接一
個 MXW 接入點、一台電腦和最多兩個 MXW 網
路充電站。
2
1
5
6
4
3
7
8
網路充電站 (MXWNCS4, MXWNCS8)
網路充電站(4 和 8 插槽品種)最多可以同時給
4(或 8)個 MXW 話筒充電。此外還可以連結話
筒和接入點通道,並將電池統計與控制軟體聯繫
在一起。
重要提示:桌面鵝頸座式話筒 (MXW8) 佔據
兩個充電插槽。例如,八個 MXW8 話筒需要
兩個 MXWNCS8 充電站(一共 16 個充電插
槽)。
MXW 控制軟體
MXW 控制軟體提供綜合的遠端控制,包括按鍵設
定、監控和管理功能。該軟體可以從網路上的 PC
或 Mac 中獲取,並用 Adobe® Flash® 程式在網路
瀏覽器中開啟。
85
Page 86
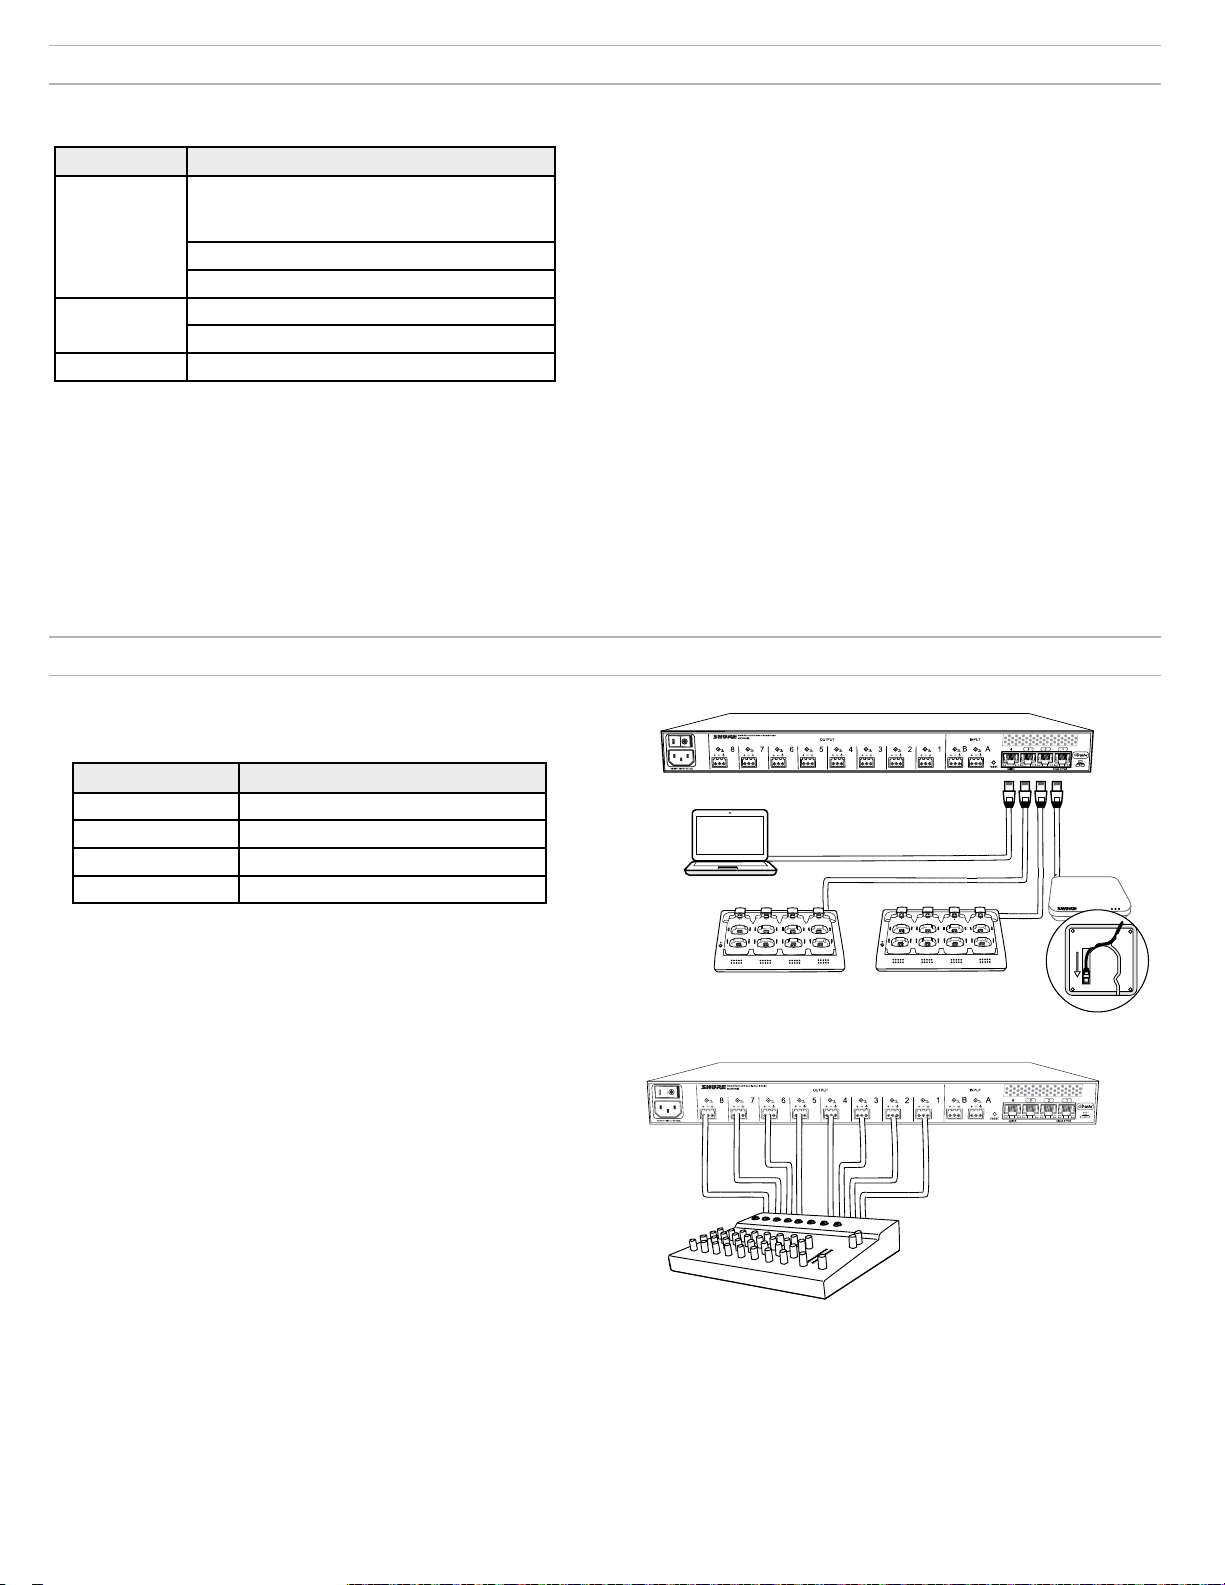
設備清單
包括的附件
元件 附件
Shure USB 快閃磁碟機(包括 Shure Web Device
Discovery 應用程式和 Shure Firmware Update
APT
Manager 應用程式及使用者指南)
安裝板
可繪畫封面
ANI
硬體套件(機架安裝螺釘、纜線連接器組件)
IEC 電源線
NCS 直流電源適配器
連接元件
1.連接 MXW 元件
使用遮罩乙太網纜線將 MXW 元件連接到一起。使用音訊網路介面 (ANI)
上的 4 連接埠交換器,或將所有元件連接至單獨的 gigabit 交換器。
附加設備
音訊纜線
使用遮罩音訊纜線以將 ANI 連接至混音器、DSP 或電話會議設備。
乙太網纜線
使用遮罩 Cat5e(或更高)纜線以連接 MXW 元件。
電腦
使用 PC 或 Mac 以從網路瀏覽器存取 MXW 系統介面。
ANI 網路連接埠 至元件
① 連接埠 1 (PoE) 存取點收發器 (APT)
② 連接埠 2 網路充電站 (NCS)
③ 連接埠 3 (可選)附加 NCS
④ 連接埠 4 電腦
在預設設定中,MXW 設備設定為自動 (DHCP) 模式以自動進行配置從而與 IP
注意:
設定相容。如果沒有 DHCP 伺服器,設備將使用本機連線 (169.254.x.x) 地址格式。
2.連接 ANI 類比輸出
使用遮罩音訊纜線以將 ANI 輸出連接至混音器、DSP 或電話會議設備。
(參考隨 ANI 提供的硬體套件以正確將纜線連接至塊連接器)。
④
①
③
1
4
2
1
3
5
7
6
8
2
5
6
②
4
3
7
8
86
Page 87
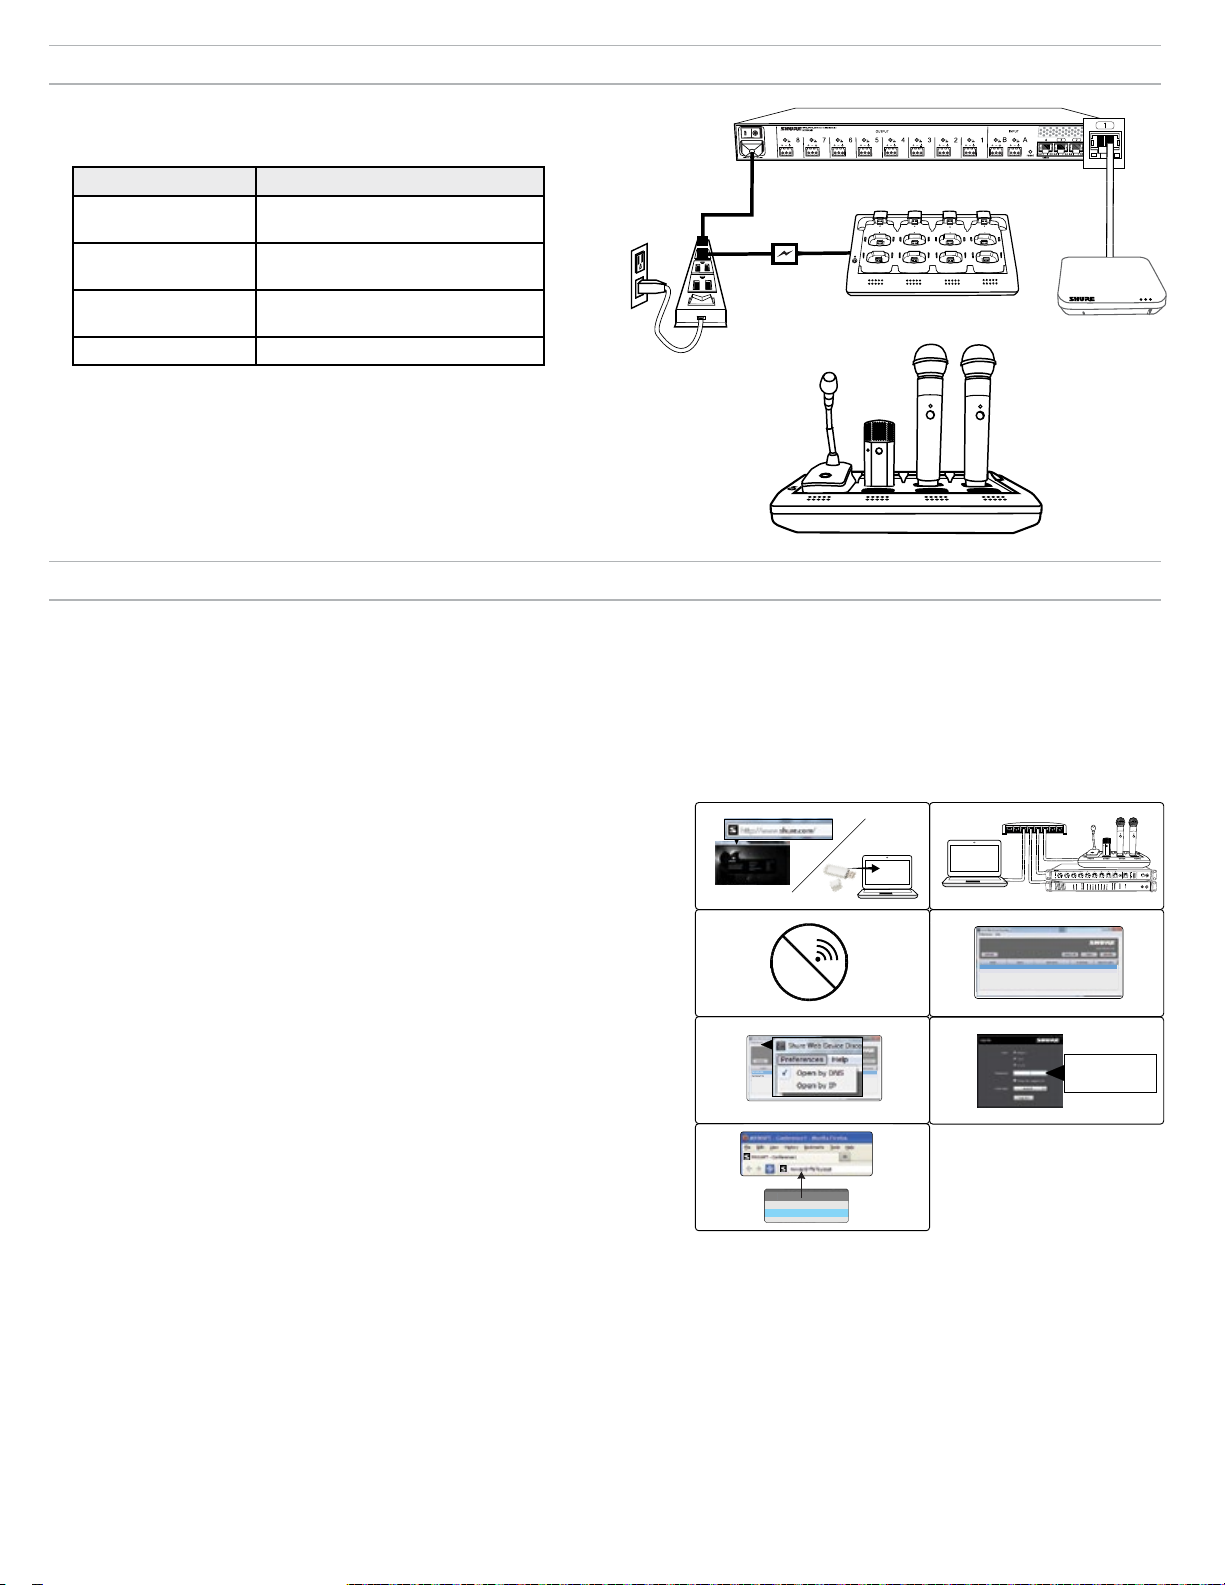
電源
②
④
①
7
8
6
5
1
2
3
4
7
8
6
5
1
2
3
4
③
MXWANI8 mxwani8-ffeee5.local
192.168.200.22
Dante
Dante
ROOM 5
MXWAPT8
mxwapt8-ffaaa2.local
192.168.200.23
CONFERENCE
mxwani-aa1.local
192-168-200-22
mxwapt8-ffe761.local
192-168-200-23
提供電源並開啟元件。
電源開啟時,各個元件的 LED 將會亮起。
①
Class 0 PoE
元件 電源
① ANI
② APT
③ NCS
將 IEC 纜線連接至交流電源並打開電
源開關。
連接至 ANI 的連接埠 1 以通過乙太網
供電 (PoE)。本設備沒有電源開關。
將 PS45 連接至交流電源並打開電源
開關。
③
1
2
5
6
4
3
7
8
②
④ 發射機 在使用前將發射機充滿電。
④
存取 MXW 控制軟體
MXW 系統採用設備宿主控制軟體,啟用綜合遠端控制,包括按鍵設定、監控和管理功能。該軟體可以從網路上的 PC 或 Mac 中獲取,並用 Adobe® Flash® 程
式在網路瀏覽器中開啟。
MXW 系統一共有兩種不同的控制介面。
• MXW 系統控制軟體:利用接入點收發器進行存取,用於管理 MXW 系統。
• 音訊網路介面控制軟體:利用音訊網路介面進行存取,專門用於管理該設備。
請按照以下步驟存取 MXW 控制軟體:
1.安裝 Shure Web Device Discovery 應用程式。
從網站 www.shure.com 或 MXW 接入點收發器隨附的 USB 記憶棒中下載 Shure
Web Device Discovery 應用程式。(所需的 Bonjour 設備發現工具與應用程式綁
定,可以自動安裝。)
2.確保電腦在 MXW 網路中。
電腦利用設備內嵌的網路服務器存取控制軟體。所有網路設備必須連接至相同網路中
(設為相同子網)。
3.關閉 WiFi
關閉 PC 的 WiFi,強制採用有線網路介面。
4.啟動 Shure Web Device Discovery 應用程式。
開啟應用程式,查看網路上的所有舒爾設備,它們內嵌有控制軟體伺服器
(MXWAPT、MXWANI 和 SCM820)。利用 Identify(辨識)按鈕使設備 LED 閃
爍,以便於辨識。
5.開啟 MXW 控制軟體
在接入點收發器上按兩下,開啟 MXW 系統控制軟體。在音訊網路介面上按兩下,開
啟設備的軟體介面。應用程式可以透過 IP 地址或 DNS 名稱(可以從 Preferences(
喜好)下拉功能表中選取)開啟控制軟體。
6.輸入預設密碼
輸入預設密碼「admin」,存取控制軟體。
7.標記網頁(推薦)
當設為靜態 IP 地址時,收藏設備 IP 地址。當 IP 模式設為自動時 (DHCP),收藏設
備的 DNS 名稱。
①
③
⑤
⑦
Wi-Fi
②
④
⑥
MXWANI8 mxwani8-ffeee5.local
ROOM 5
CONFERENCE
MXWAPT8
mxwapt8-ffaaa2.local
SCM820
1 2 3 4 5 6 7 8
gain
low cut
hi shelf
meter
push to solo | hold to mute
8
7
5
4
6
2
1
3
A
B
OUTPUT
INPUT
line
aux
sig/clip
sig/clip
mute
mute
push to solo | hold to mute
192.168.200.22
Dante
Dante
192.168.200.23
admin
®
IntelliMix
LIM
MASTER
AB
power
B
A
AUX IN
HEADPHONE
0
ethernet
-9
network audio
-18
automix link
-24
gain
dual mixer
-36
limiter
-48
L+R SUM
-60
lockout
MICROFLEX WIRELESS
Audio Network Interface
0
power
-9
0
line
ethernet
-18
-9
network audio
aux
-12
-24
HEADPHONE
-18
mic
-36
-24
-48
lockout
-60
adjust
87
Page 88
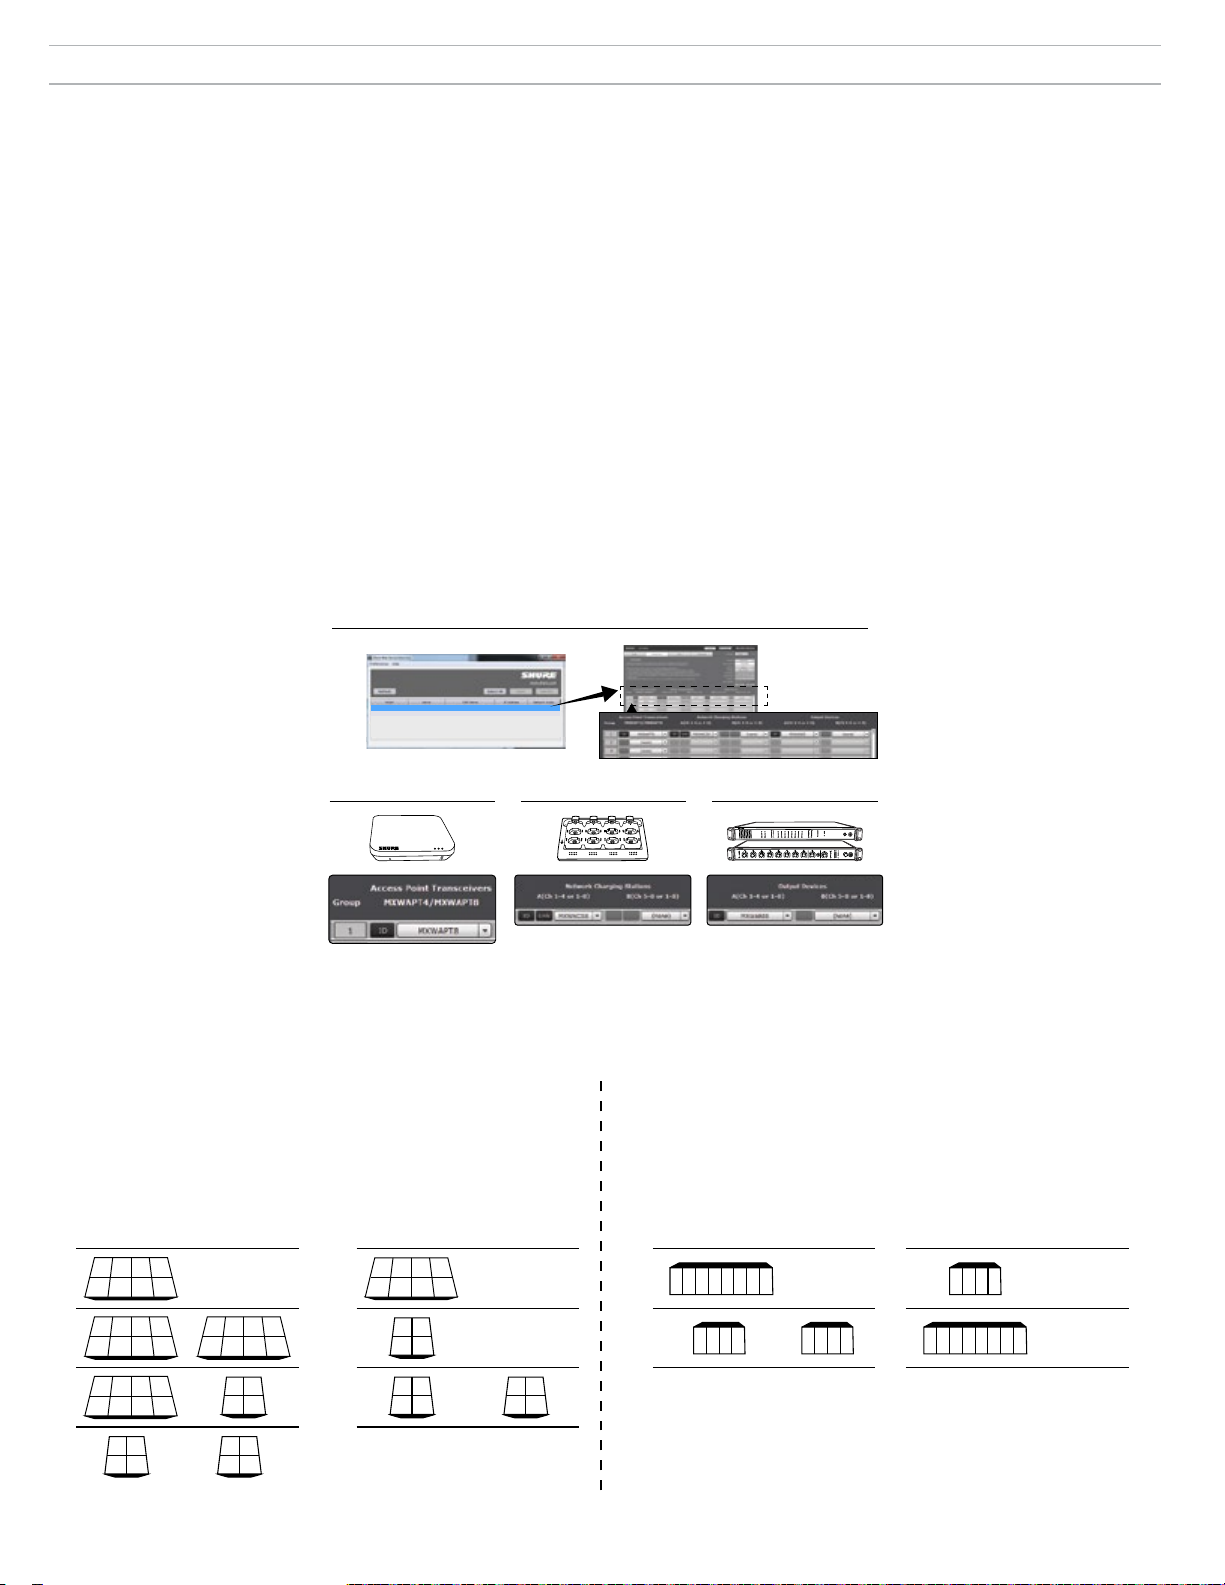
關聯元件和組
以下操作說明用於構成一個 MXW 組。如果設備在下拉視窗中不可用,則確保設備處於「開放」狀態而且在網路中。
提示:利用
ID 按鈕辨識設備。這會向設備發出信號,使其 LED 閃爍,以便於辨識。
1.開啟配置
利用 Shure Web Discovery 應用程式查看網路中的所有 MXW 接入點收發
器 (APT)。按兩下 APT 開啟軟體,前往 Configuration(配置)標籤。
2.選擇一個接入點收發器 (APT) 用於第 1 組。
從下拉顯示中選擇一個開啟的 APT。該選擇將決定該組含四個或八個通道
(APT4 或 APT8)。
注意:第 1 組必須包括用於開啟控制軟體的 APT。其他聯網(和開啟的)APT 可用
於其他組。
3.選擇網路充電站
將一個或兩個網路充電站 (NCS) 關聯至該接入點。關聯多個充電站的原
因有兩個:
- 八通道接入點使用兩個四通道充電站。
①
MXWANI8 mxwani8-ffeee5.local 192.168.200.22
MXWAPT8
ROOM 5
CONFERENCE
mxwapt8-ffaaa2.local
192.168.200.23
Dante
Dante
- 採用鵝頸式話筒。鵝頸式話筒覆蓋充電站的前後插槽,導致只有一半的插槽可用。
例如,需要用兩個八通道充電站滿足一個採用鵝頸式話筒的八通道接入點。
4.選擇音訊輸出設備
選擇一個或兩個音訊輸出設備(MXWANI 或 SCM820),自動路由接入
點的數位音訊通道。從以下設備中選擇:
- 音訊網路介面 (MXWANI) 四通道或八通道變化形式。可以將兩個四通道單元或一個
八通道單元指派給一個八通道 APT。
- Shure SCM820 IntelliMix® 混音器。可以選擇啟用 Dante 的 SCM820 作為該組
的音訊輸出。這可以自動將 SCM820 的輔助輸入路由至話筒,以實現個人監控
(SCM820 左輔助通道路由至 MXW 通道 1-4;右輔助通道路由至 MXW 通道 5-8
)。
注意:設備關聯和話筒連結資料永久儲存在設備中。如果 MXW 系統關閉後重
新啟動(不含電腦),設備仍會保持與接入點關聯。
②
③
4
2
1
3
7
5
6
8
④
A
B
INPUT
OUTPUT
line
aux
sig/clip
mute
SCM820
gain
1 2 3 4 5 6 7 8
low cut
hi shelf
meter
push to solo | hold to mute
sig/clip
mute
HEADPHONE
-18
mic
-36
-24
-48
lockout
-60
adjust
push to solo | hold to mute
®
IntelliMix
LIM
MASTER
AB
power
B
A
HEADPHONE
AUX IN
0
ethernet
-9
network audio
-18
automix link
-24
gain
-36
dual mixer
limiter
-48
-60
L+R SUM
lockout
MICROFLEX WIRELESS
Audio Network Interface
0
5
8
4
7
2
3
6
1
power
-9
0
line
ethernet
-18
-9
aux
network audio
-12
-24
組中設備的通道映射
根據 Configuration(配置)標籤中的組設定,音訊從話筒被路由至模擬輸出端。下圖說明瞭八通道和四通道組設備的通道映射。
網路充電站
當利用鵝頸式話筒構成一個組時,需要另外一個充電站。
8 通道組
4 通道組
輸出被指派至 MXW 音訊網路介面或 SCM820 自動調音台。
8 通道組 4 通道組
A B A B A B A B
2 3 4
1
1) 1) 1) 1)
5 6 7 8
2 3 41
2) 2) 2) 2)
x x x x
2 3 41
3) 3)
x x x x
(none) (none) (none)(none)
5 6 7 8
x x x
x
5 6
7 8
2 3 41
x x x x
1
2
4
3
21
x x
81 2 3 4 5 6 7
1 2 3 4
3 4
x x
音訊輸出設備
85 6 7
1 2 3 4 x x x x
1 2 3 4
(none)(none)
88
2
1
4)
3 4
5 6
7 8
Page 89
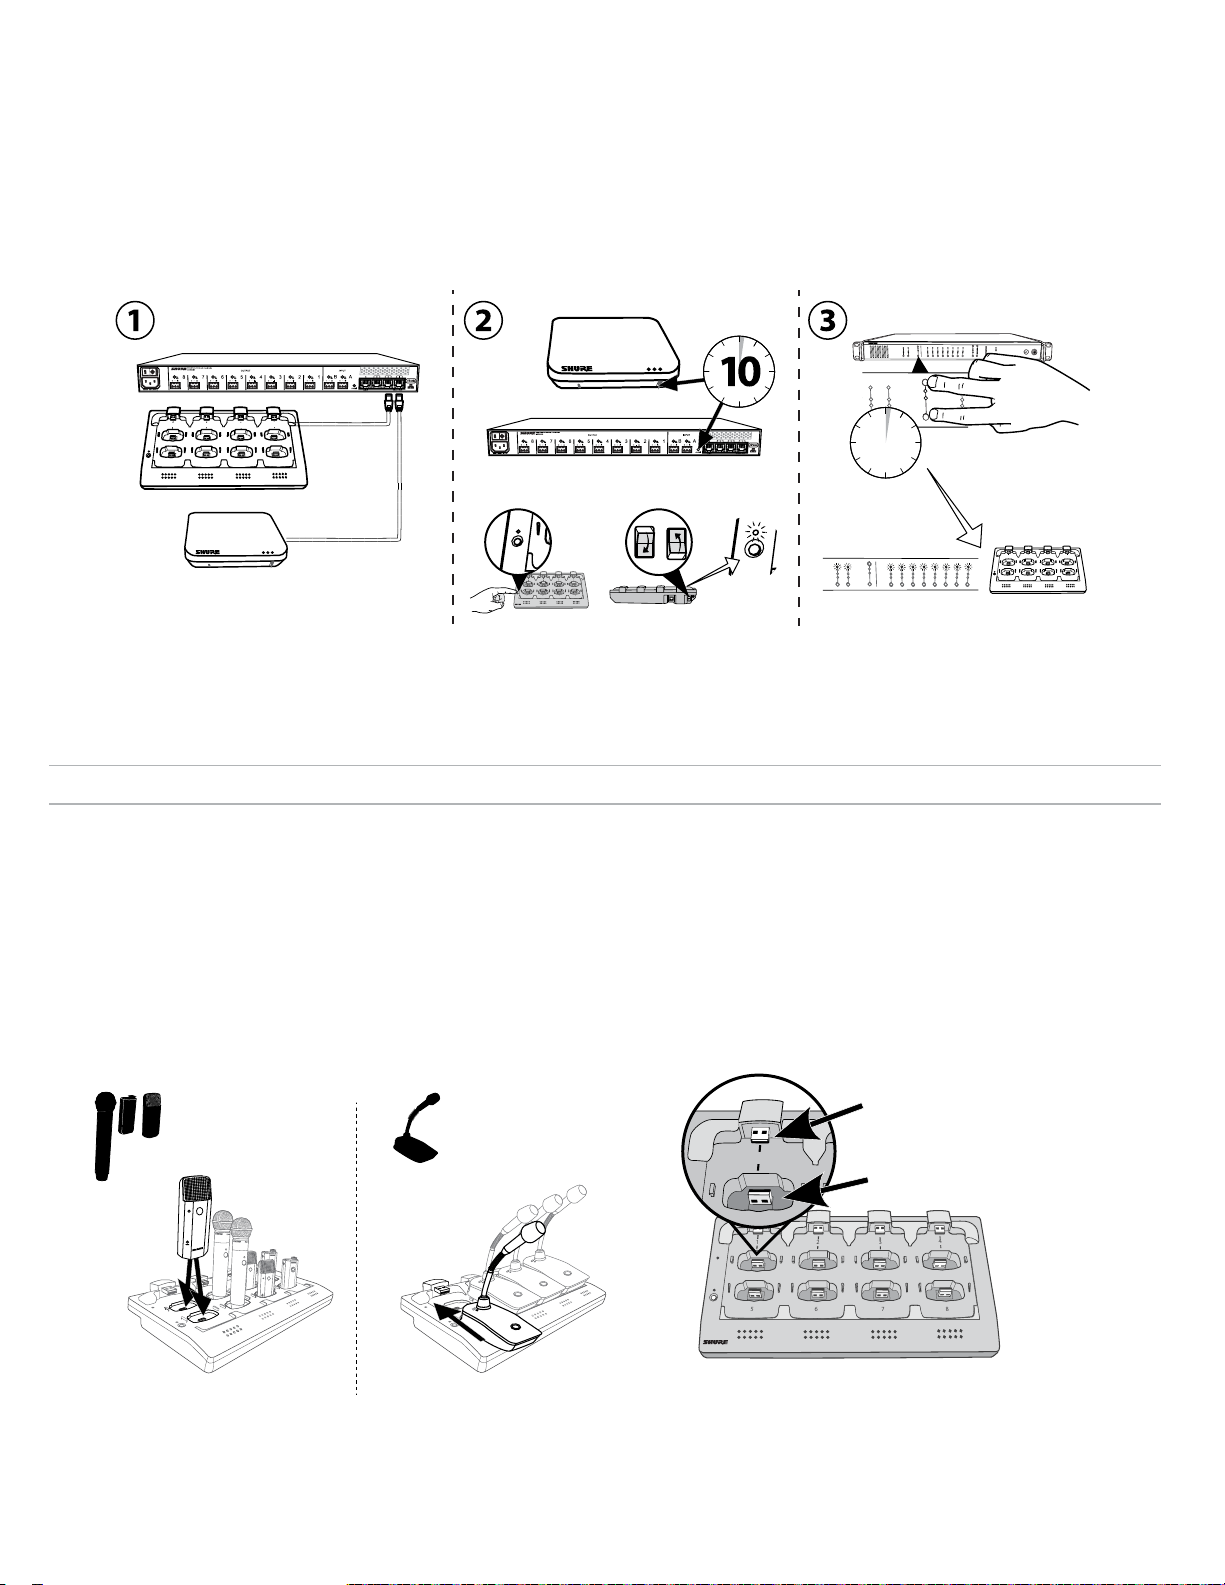
7
8
6
5
1
2
3
4
1
2
3
7
8
6
5
1
2
3
4
7
8
6
5
1
2
3
4
link
6
5
1
2
link
push to solo | hold to mute
2
3
4
5
6
7
8
lockout
power
ethernet
network audio
-9
-18
-24
-36
-48
-60
0
-9
-12
-18
-24
0
aux
mic
adjust
line
HEADPHONE
MICROFLEX WIRELESS
自動組設定
如果網路只有一個接入點收發器 (APT)、一個網路充電站 (NCS) 和一個音訊網路介面 (ANI),則無需使用控制軟體就可以對 MXW 組進行關聯。為了獲得最佳
結果,應恢復設備工廠預設值,清除之前的任何組關聯資訊。
1. 將一個 APT、一個 NCS 和一個 ANI 接入網路。在網路中,每種設備只能含有一個。
2. 恢復設備工廠預設值(見「恢復工廠預設值」章節)。
3. 在 ANI 前面板上,同時按下兩個輸入電平選擇按鈕,並保持五秒鐘。通道選擇 LED 顯示綠光;音訊電平表閃爍,表示關聯成功。
MICROFLEX WIRELESS
Audio Network Interface
0
2
1
5
3
7
6
4
A
8
12
11
1
10
2
9
3
8
4
5
7
6
2
1
5
6
4
3
7
8
+
Power
Link
A
B
INPUT
sig/clip
mute
B
OUTPUT
INPUT
line
aux
sig/clip
sig/clip
mute
mute
A
B
line
aux
12
11
1
10
2
9
3
5
8
4
5
7
6
3
2
5
4
1
OUTPUT
line
aux
sig/clip
mute
push to solo | hold to mute
push to solo | hold to mute
OUTPUT
power
-9
0
line
ethernet
-18
-9
network audio
aux
-12
-24
HEADPHONE
-18
mic
-36
-24
-48
lockout
-60
adjust
1
sig/clip
mute
4
2
1
8
7
6
3
7
6
5
i i
i
i
i
i
i
i
i i
8
i i
i i
i i
i
i
i
i
i
i
i
i
i
i
i
i
i
i
i
i
i
i
i
i
i
i
i
i
i
i
i
i
i
i
i
i
i
i
i
i
i
i
i i
i i
i i
連結話筒
用網路充電站 (NCS) 連結話筒和接入點通道。根據 Configuration(配置)標籤中的組設定,將充電站的插槽映射至 APT。一旦連結程序完成之後,音訊將路
由至該組的相應通道。
連結會將充電站中的任何話筒映射至相應的 APT 通道。這會替換該通道之前的話筒連結。即使在連結程序期間有空置插槽,也不會對通道造成影響。
1.將話筒置於充電站中。
根據在充電站中的佈置,將話筒連結至接入點通道。
適用於鵝頸式話筒
適用於腰包、手持和介面式話筒。
Power
Link
連接話筒和充電插槽
89
Page 90
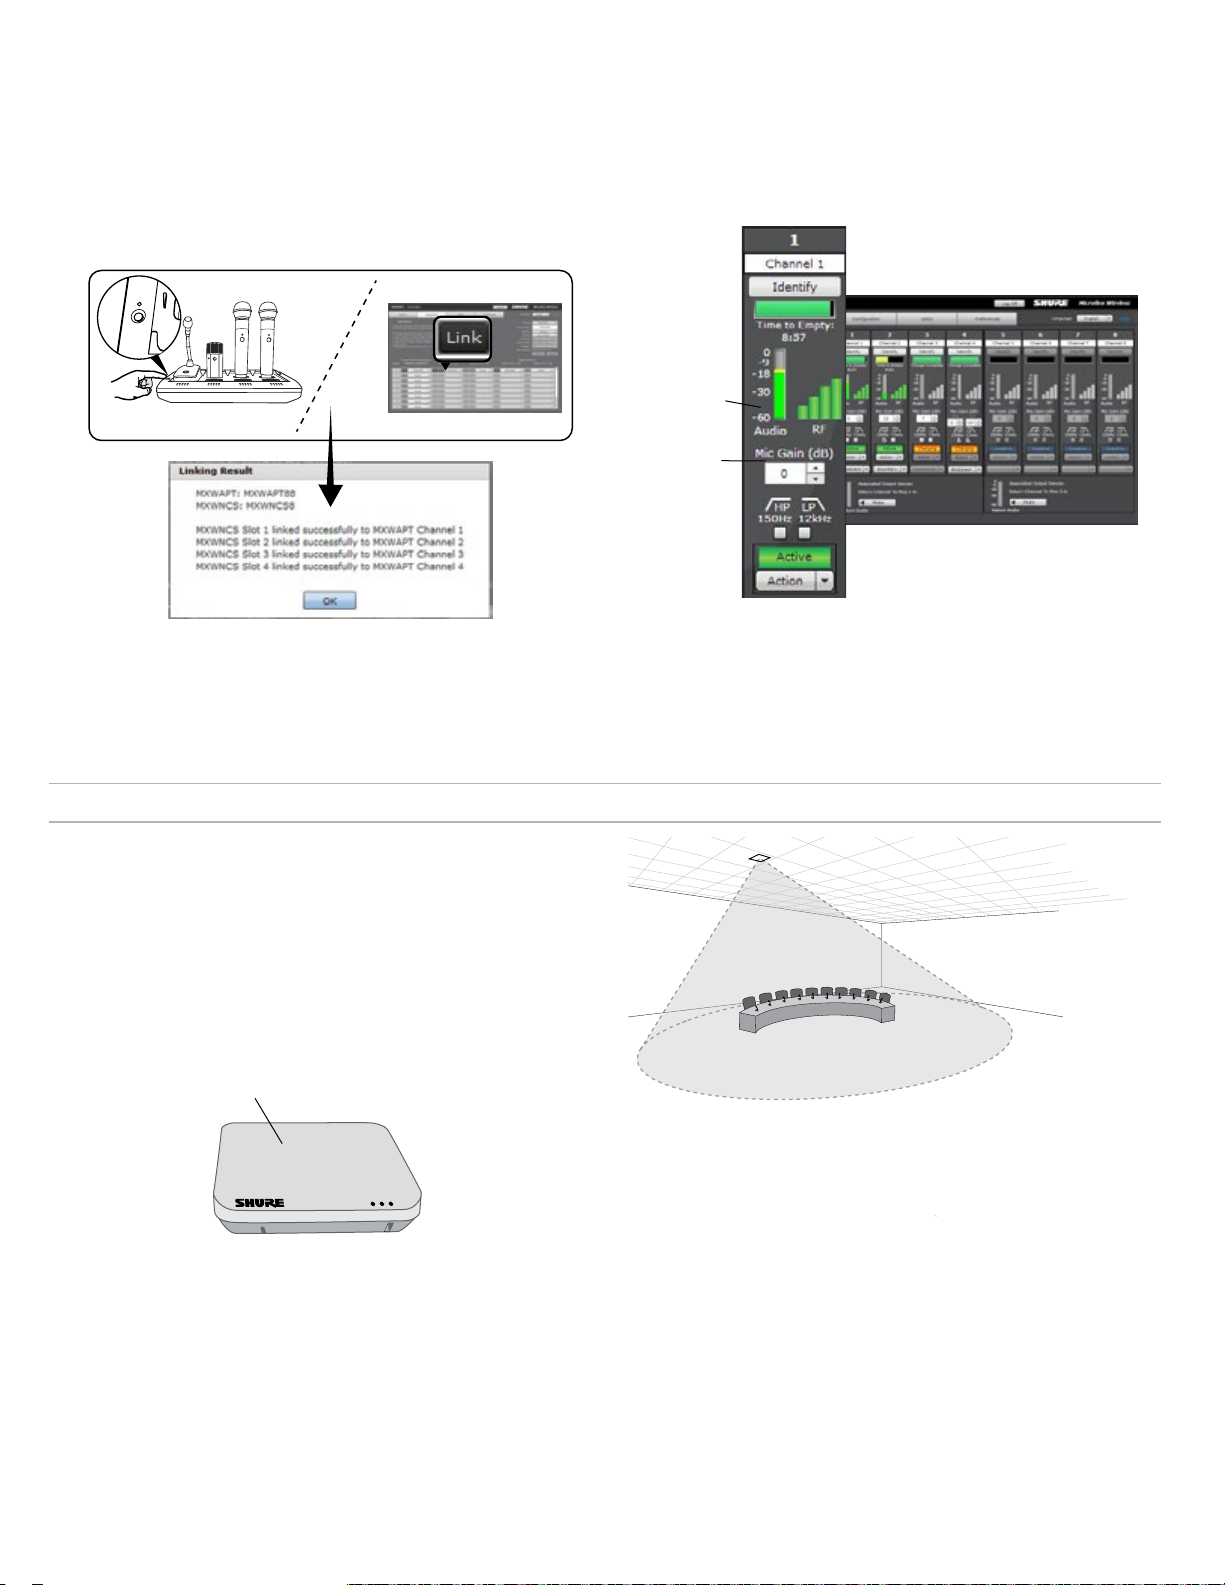
2.連結話筒和通道。
7
8
6
5
link
利用控制軟體或充電站連結話筒和 APT 通道。如有需要,可以在充電站
中停用該功能,以便只能在控制軟體中實施連結:
- 控制軟體:從 Configuration(配置)頁面中,按下該組各個充電站的 Link(連
結)按鈕。
-
充電站:按住 Link(連結)按鈕 6 秒鐘。LED 在該過程期間閃爍,一旦連結成功
之後,將變為穩定的綠色。
3.移除話筒並測試音訊
測試每個話筒的音訊,必要時利用控制軟體的 Monitor(監控)標籤調整
話筒增益。增益應設為音訊正錄入信號指示燈(綠色/黃色)但還沒有削
波(紅色)的水平。
信號指示燈
增益調整
監控標籤
安裝存取點收發器 (APT)
APT 發射心形射頻,設備正面強度最大。將 APT 正面對準所需的覆蓋區域。
不要阻擋視線並遠離大型金屬物件。
重要資訊:應在將無線系統用於講演或演出之前,進行巡場測試,檢查訊號
覆蓋效果。試驗天線的各種放置效果,找到最佳放置位置。應根據實際情況
標記「盲點」,並提示講演者或演出者避開這些區域。
APT 正面
對準話筒區域
90
Page 91
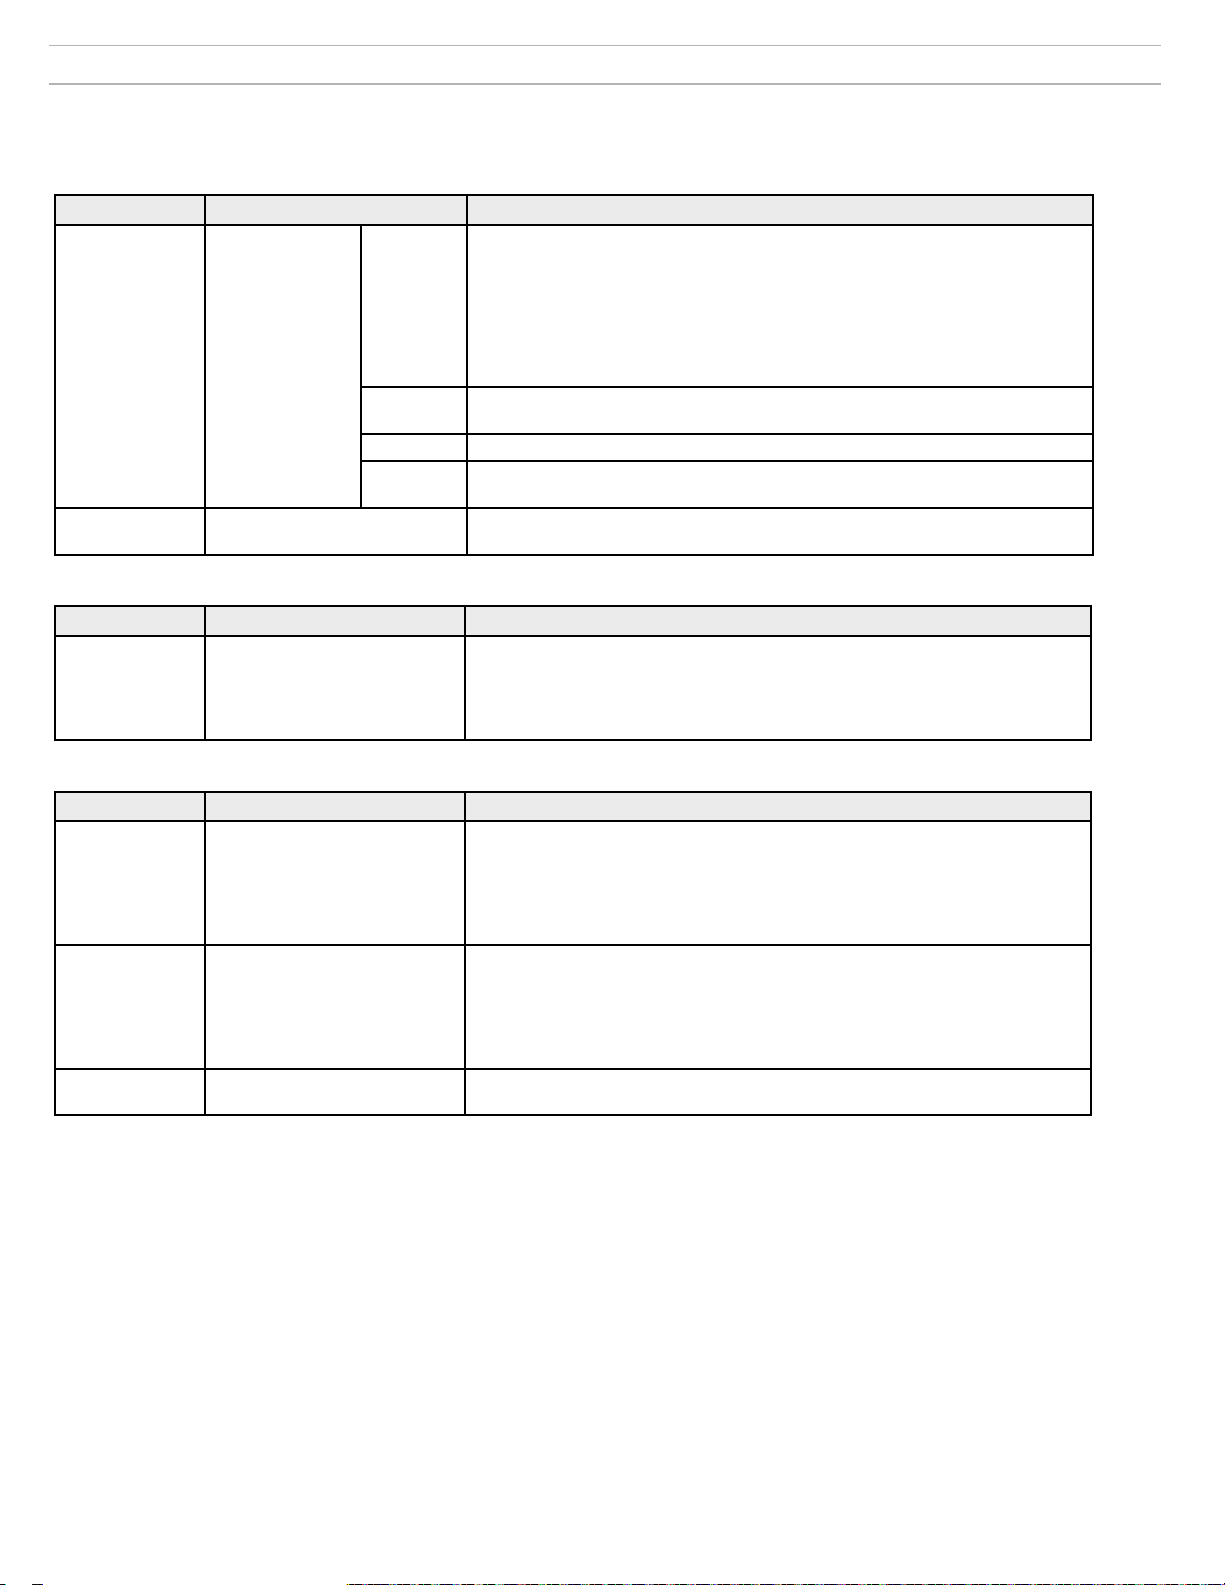
故障排除
下表提供了Microflex 無線系統排障的常用解決方法。關於每個主題的更多資訊,請參考網址 www.shure.com 中的完整《MXW 使用者手冊》(隨附在 USB 隨
身碟中)。
Audio(音訊)
故障 指示燈 解決方法
• 檢查纜線
• 檢查發射機是否接通,通道是否取消靜音
• 檢查 MXW 控制軟體 Monitor(監控)標籤中的輸入電平表是否正常。如果通道產生
綠色
音訊網路介面或
無音訊/失真的音訊
SCM820 上的網路
音訊 LED
綠色閃爍
紅色 • 檢查 DC 的主時鐘(MXWAPT 必須作為主時鐘)
關閉
射頻干擾會導致音
訊掉頻
音訊是間歇性的
系統設定和 MXW 組
故障 指示燈 解決方法
設備下拉清單未在 Configuration(
元件無法關聯至組
配置)標籤的組行中顯示所需元
件。
削波,則信號會衰減。
• 檢查音訊網路介面 (ANI) 前面板或 ANI 控制軟體中的輸出電平表。用耳機聆聽 ANI
的音訊。如果通道產生削波,則信號會衰減。
• 檢查 ANI 輸出電平是否和連接設備的輸入相配。
• 檢驗 APT 是否沒有執行頻譜掃描。
• 確保所有設備接通並具有穩定的網路連接
• 使用 Dante 控制器軟體 (DC) 驗證通道預訂
• 將設備放在一個組中,以自動路由音訊。
• 確保接入點收發器網路音訊設定的子網與音訊網路介面子網相配。
• 執行頻譜掃描,監控射頻干擾情況
• 減少通道數,檢驗系統的射頻頻譜是否超載。
• 檢查設備是否加電和接入相同網路及子網。
• 開啟 MXW 控制軟體的 Utility(公用程式)標籤,取消選中配置篩選器,顯示網路中
的所有 MXW 設備。如果設備顯示「其他」,則說明設備屬於其他配置。
• 在其他配置的組行中選擇「無」,取消元件關聯。
• 恢復設備的工廠預設值,清除任何關聯資訊。
網路
故障 指示燈 解決方法
• 確保設備通電
• 確保 PC 和設備在相同網路,並設為相同子網
無法連接至 PC 的
控制軟體
設備未顯示在 Shure Web Device
Discovery 應用程式上
• 關閉其他連接到設備的未使用網路介面(其中包括 WiFi)
• 檢查 DHCP 伺服器是否正在執行(如適用)
• 確保 Bonjour 正在 PC 上執行
• 如果透過音訊網路介面 (ANI) 的連接埠 4 進行連接,則確保將其設為「開關模式」。
• 下載最新版本的 Adobe
• 確保 PC 和設備在相同網路和子網
控制軟體需要花費
很長的時間載入
網路瀏覽器無法連接控制介面
• 檢查 Windows 防火牆設定是否攔截舒爾軟體
• 設定路由器,不將預設閘道作為 DHCP 一部分發送
• 設定 Shure Web Device Discovery 應用程式,以透過 IP 地址開啟。
• 手動在設備所在的同一網路上將電腦設定為靜態 IP 地址
控制軟體工作效
能欠佳
指示燈移動緩慢或未即時顯示。
• 減少同一配置打開的視窗或標籤數。
• 有關正確網路設定,請參見「網路」部分。
®
Flash
®
91
Page 92
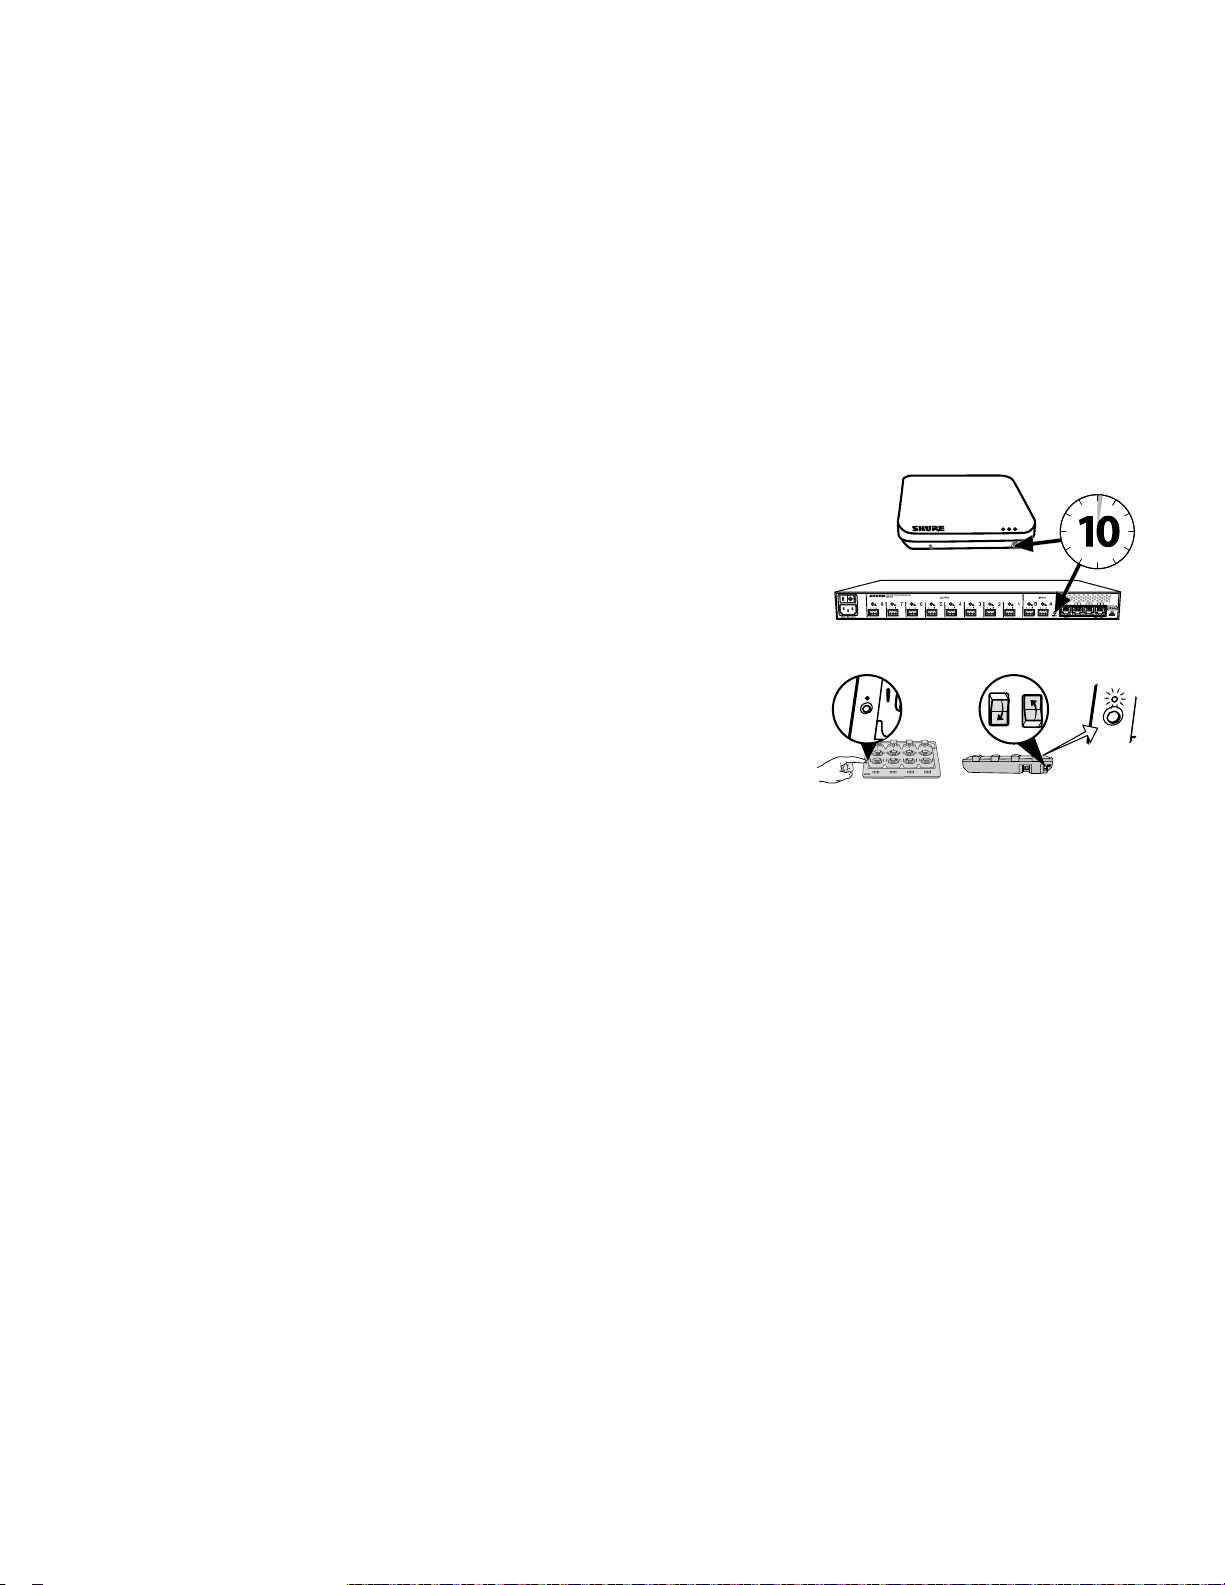
7
8
6
5
1
2
3
4
Link
Power
7
8
6
5
1
2
3
4
link
6
5
1
2
link
+
lockout
power
ethernet
network audio
push to solo | hold to mute
-9
-18
-24
-36
-48
-60
0
-9
-12
-18
-24
0
aux
mic
adjust
line
sig/clip
mute
INPUT
A
sig/clip
mute
OUTPUT
HEADPHONE
Audio Network Interface
MICROFLEX WIRELESS
B
1
2
3
4
5
6
7
8
line
aux
push to solo | hold to mute
A
sig/clip
mute
OUTPUT
B
1
2
3
4
5
6
7
8
line
aux
6
7
8
9
10
11
12
1
2
3
4
5
6
7
8
9
10
11
12
1
2
3
4
5
5
7
8
6
5
1
2
3
4
i
i
i i
i
i
i
i
i
i i
i
i
i
i
i
i
i i
i
i
i
i
i
i i
i
i
i
i
i
i
i i
i
i
i
i
i
i i
i
i
i
i
i
i
i i
i
i
i
i
i
i i
i
i
i
i
INPUT
A
OUTPUT
B
1
2
3
4
5
6
7
8
lockout
power
ethernet
network audio
push to solo | hold to mute
-9
-18
-24
-36
-48
-60
0
-9
-12
-18
-24
0
aux
mic
adjust
line
sig/clip
mute
sig/clip
mute
HEADPHONE
MICROFLEX WIRELESS
line
aux
其他資源
若要獲得故障排除方面的幫助,或複雜安裝環境的詳細資訊,請與舒爾支援代表聯繫。美國地區的系統支援團隊電話為 847-600-8541。對於其他地區的使用
者,請造訪 www.shure.com 以獲取當地支援人員的聯繫資訊。
有關數位音訊網路說明、進階網路指導和 Dante 軟體故障排除方面的相關資訊,請造訪 www.audinate.com 網站。
工廠重設
如果在嘗試排障方法治後,網路中仍沒有出現設備,則對特定韌體進行重設,使設備恢復預設設定。工廠預設設定設計成自動和其他舒爾網路設備相容。
注意:恢復工廠預設值會清除 MXW 組和連接相關性。軟體存取密碼重設為
自硬體
接入點收發器
按住凹入的重設按鈕 10 秒鐘。網路音訊狀態 LED 短暫熄滅,表示設備正在重啟。
小心:
恢復工廠預設值會刪除設備儲存的所有組關聯和話筒連接。
音訊網路介面
按住重設按鈕 10 秒鐘。前面板 LED 閃爍,表示設備正在重啟。
網路充電站
a. 切斷電源開關。
b. 按住「連結」按鈕。
c. 在按住「連結」按鈕的同時,開啟電源開關。
d. 繼續按住「連結」按鈕 12 秒鐘,直到 LED 發出琥珀色光。
admin。
自控制軟體
1. 開啟 MXW 控制軟體的 Utility(公用程式)標籤。
2. 選擇設備的 Edit Properties(編輯屬性)按鈕。
3. 選擇恢復工廠預設值核取方塊。
4. 選擇 Add Updates(新增更新)將設定儲存到編輯佇列中。
5. 針對任何附加設備重複執行上述操作。
6. 按下 Apply All(全部套用),透過所編輯的屬性對所有設備進行變更。
92
Page 93
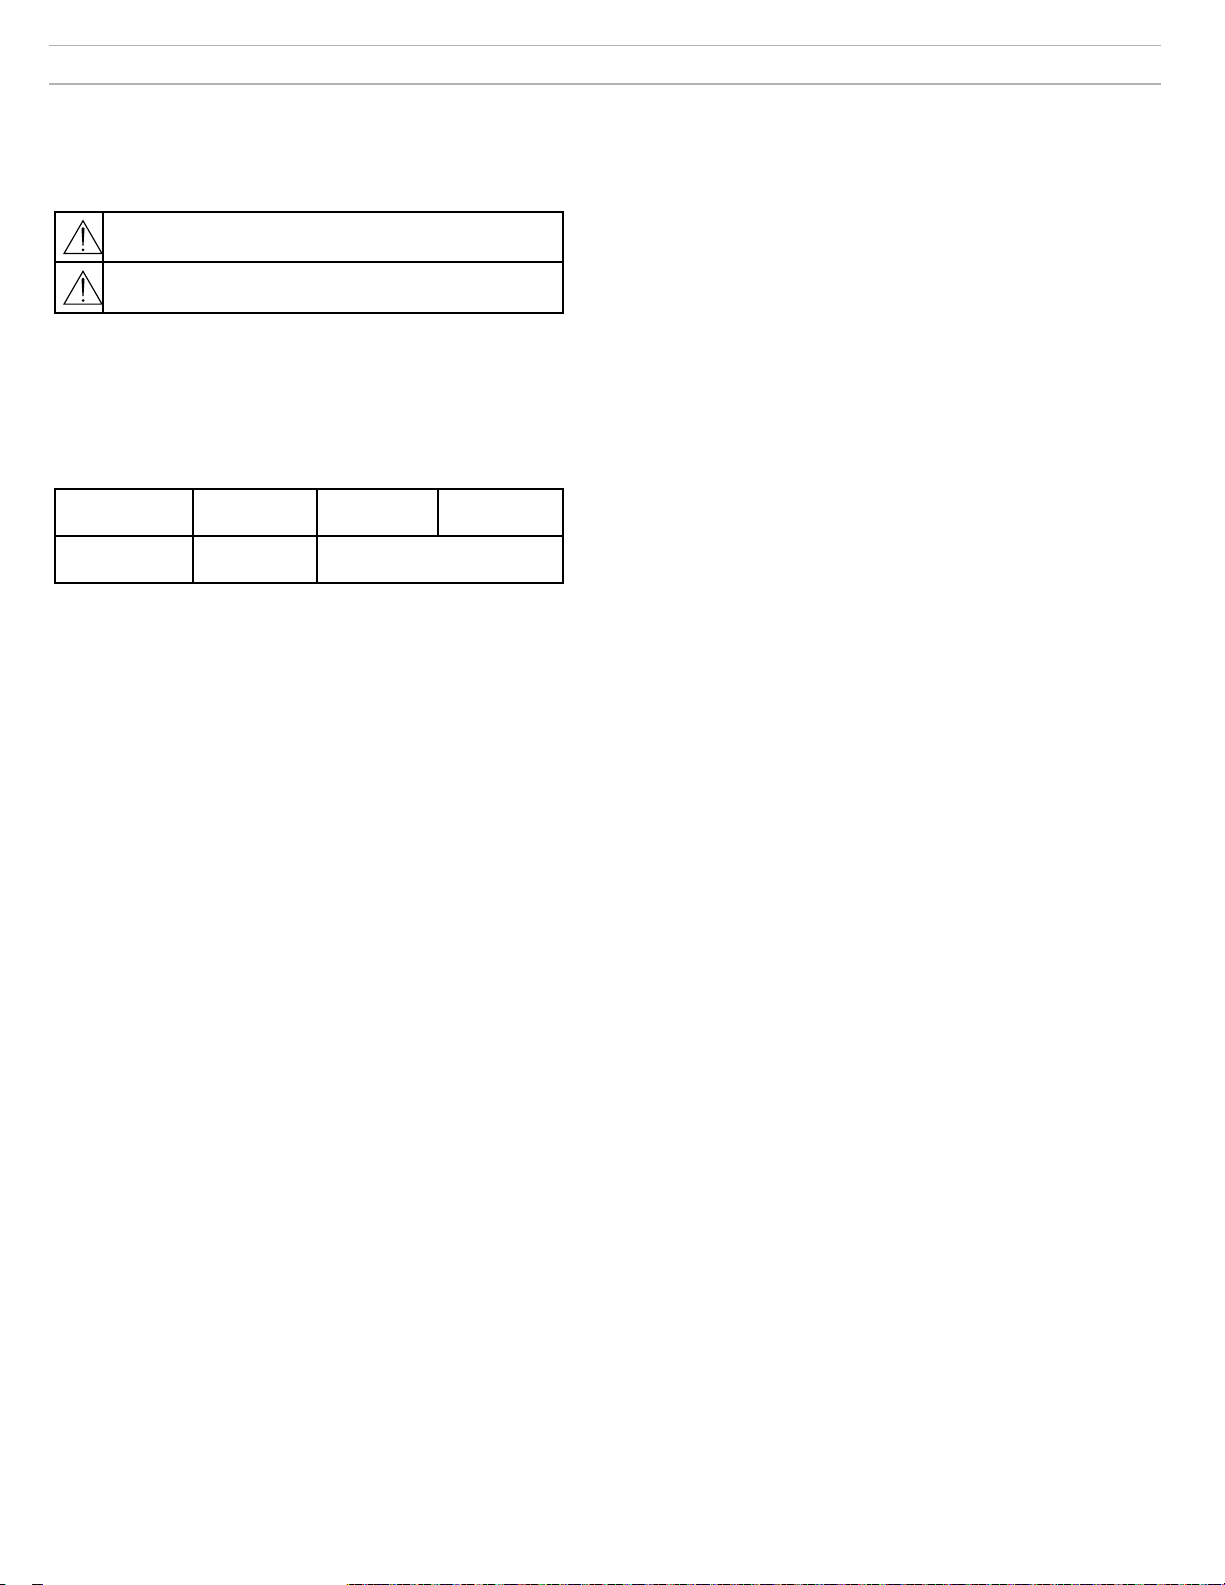
安全資訊
安全事項
根據危險程度和損壞嚴重性的不同,使用“警告”和“小心”文字對未正確使用可
能導致的後果做出標識。
警告:如果沒有遵循這些警告事項,在操作不正確的情況下可
能會導致嚴重的人身傷亡事故。
小心:如果沒有遵循這些警告事項,在操作不正確的情況下可
能會導致常見的人身傷害或財產損失。
警告
使用過大音量收聽音訊可能會使聽力永久喪失。應使用盡可能低的音量。長期暴露在
過高音量下,可能會導致噪音引起的聽力受損。如果長時間暴露在高聲壓級別下,應
遵循美國職業安全與健康部 (OSHA) 制定的指導原則,以避免聽力受損。
90 dB SPL
八小時
110 dB SPL
半小時
警告
• 電池組可能爆炸或釋放有毒物質具有火災或燒傷風險不要拆開、擠壓、修改、拆
卸、加熱到 140°F (60°C) 以上或焚燒。
• 遵循製造廠商的說明
• 只能使用舒爾充電器為舒爾可充電電池充電
• 警告:換用不正確的電池可能出現爆炸危險。只能更換相同的,或型號相當的電
池。
• 禁止將電池放入口中如果吞入,請與外科醫生或當地的毒物控制中心聯繫
• 不要將電池短接,否則可能會導致燒傷或起火
• 請勿使用或給舒爾充電電池以外的電池組充電
• 應使用正確方法丟棄電池向您所在地的供應商瞭解廢舊電池組的正確丟棄方法。
• 電池(已安裝的電池組或電池)不得暴露於過熱環境(陽光、明火或類似熱源)下
警告:電池更換不當,可能會有爆炸危險。只能使用與 Shure 設備相容的電池。
注意:只能使用附帶的電源部件或經過舒爾批准的對等部件。
1. 經審驗合格之射頻電信終端設備,非經許可,公司、商號或使用者均不得擅自變更
頻率、加大功率或變更原設計之特性及功能。
2. 射頻電信終端設備之使用不得影響飛航安全及干擾合法通信;經發現有干擾現象
時,應立即停用,並改善至無干擾時方得繼續使用。所謂合法通信,係指依電信法
規定作業之無線電信。
3. 輸入、製造射頻電信終端設備之公司、商號或其使用者違反本辦法規定,擅自使用
或變更無線電頻率、電功率者,除依電信法規定處罰外,國家通訊傳播委員會並得
撤銷其審驗合格證明。
4. 減少電磁波影響,請妥適使用
95 dB SPL
四小時
115 dB SPL
十五分鐘
100 dB SPL
兩小時
120 dB SPL
儘量避免,否則可能會造成損傷
105 dB SPL
一小時
MXW1
腰包式話筒發射機:
這些發射機已經過測試,證明符合為非受控環境規定的國際輻射曝露限
制。本設備在一般工作條件下與使用者的身體直接接觸。禁止將這些發
射機與任何其他天線或發射機一同使用或配合使用。
MXW2, MXW6, MXW8, MXWAPT4, MXWAPT8
掌上型話筒發射機, 桌面邊界式話筒發射機, 桌面鵝頸式話筒發射機, 無
線存取點發射機:
這些移動發射機在距離人體大於 20 釐米的位置進行使用。這些移動發
射機由於與使用者身體的距離符合其預期使用情況且功率輸入低,所以
免於根據國際輻射曝露標準的要求進行測試。這些移動發射機應放置或
安裝在距離人體至少 20 公釐的位置,並且不得與任何其他天線或發射
機一同使用或配合使用。
重要产品信息
此設備用於專業音響場合。
EMC 符合性測試是使用附帶的和推薦的纜線類型完成的。使用其它纜
線類型可能會降低 EMC 效能。
未經舒爾公司明確許可的修改或改裝會使您操作本設備的授權失效。
請遵循您所在地的電池、包裝和電子廢棄物回收標準。
注意:不能將本設備直接連接到公眾互聯網。
用戶資訊
本設備已經過測試,符合 FCC 法規第 15 章有關 B 類數位設備的限
制。這些限制專適用於在住宅內安裝此設備,能夠為用戶提供免受有害
幹擾影響的足夠保護。本設備產生、使用並可能發射無線電頻率能量,
如果沒有按照要求安裝和使用設備,可能會對無線電通訊產生有害幹
擾。但是,並不保證本設備在特定的安裝情況下不產生幹擾。如果本設
備確實對收音機或電視機的接收產生有害幹擾,可以通過關閉本設備然
後再打開的方法來確定幹擾,建議用戶通過以下一種或多種方法自行排
除此幹擾。
• 調整接收天線的方向或位置。
• 增大設備和接收機之間的距離。
• 將設備連接到與接收機不同的電路插座。
• 可以向經銷商或有經驗的無線電/電視工程師咨詢以尋求幫助。
93
Page 94

認證
此設備符合 FCC 第 15 章的要求。
本設備除 RSS 標準以外,符合加拿大工業部許可證的要求。必須滿足以下兩
個條件才能夠操作本設備:(1) 本設備不產生干擾,並且 (2) 本設備必須能夠
接受包括可能導致設備意外操作的任何干擾。
Le présent appareil est conforme aux CNR d'Industrie Canada applicables
aux appareils radio exempts de licence. L'exploitation est autorisée aux
deux conditions suivantes : (1) l'appareil ne doit pas produire de brouillage,
et (2) l'utilisateur de l'appareil doit accepter tout brouillage radioélectrique
subi, même si le brouillage est susceptible d'en compromettre le
fonctionnement.
遵守《日本電波法》和《日本電信商業法》。此設備依照 Japanese Radio
Law (電波法) 和 Japanese Telecommunications Business Law (電気通信事
業法) 獲得許可。不得對此設備進行修改(否則,許可的指定編號將失效)。
符合基於 IEC 60065 的電氣安全要求。
可從舒爾公司或其任何歐洲代表處獲得“歐盟符合性聲明”。 有關聯繫資訊,
請存取 www.shure.com
可從以下地址獲得“CE 符合性聲明”:www.shure.com/europe/compliance
歐盟授權代表:
Shure Europe GmbH
歐洲、中東、非洲總部
部門:歐洲、中東、非洲批准部
Jakob-Dieffenbacher-Str.12
75031 Eppingen, Germany
電話:49-7262-92 49 0
傳真:49-7262-92 49 11 4
電子郵件:[email protected]
MXWNCS4, MXWNCS8
根據 FCC 第 15b 章的驗證條款獲得授權。
加拿大工業部 ICES-003 合規標籤:
CAN ICES-3 (B)/NMB-3(B)
注意:參見充電器外殼底部標籤上的 FCC 標誌、CE 標誌、C-Tick 標誌
和電氣額定值。
MXW1, MXW2, MXW6, MXW8, MXWAPT4, MXWAPT8
已通過 FCC 第 15 章認證。
FCC:DD4MXW1、DD4MXW2、DD4MXW6、DD4MXW8
、DD4MXWAPT4 和 DD4MXWAPT8。
符合 RSS-213 的適用要求。
IC:616A-MXW1、616A-MXW2、616A-MXW6、616A-MXW8
、616A-MXWAPT4、616A-MXWAPT8。
商標
Audinate®、Audinate 徽標和 Dante 是 Audinate Pty Ltd 的註冊商標。
Page 95

Page 96

 Loading...