

Page 1
ADX2FD
Handheld Transmitter
User guide for the Shure ADX2FD Frequency Diversity handheld transmitter
Version: 11.0 (2020-K)
Page 2

Table of Contents
ADX2FD Handheld Transmitter 3
WARNING 3
ADX2FD Handheld Transmitter 3
Features 3
Performance 3
Design 4
Power 4
Included Components 4
Choice of (1) of the following Shure microphone car
tridges: 4
Optional Accessories 4
Optional Shure microphone cartridges: 5
ADX2FD Transmitter Overview 5
Transmitter Controls 6
Home Screen Display 7
Locking the Interface 7
Shure Rechargeable Batteries 7
Checking Battery Info 8
Important Tips for Care and Storage of Shure Recharge
able Batteries 8
Battery Installation 9
ADX2FD SB920 Battery Runtime 9
Installing the Battery Contact Cover 9
Menu Parameters 9
Tips for Editing Menu Parameters 10
Menu Map 10
Shure Incorporated
Menu Parameter Descriptions 10
Radio Menu 10
Audio Menu 11
Utilities Menu 11
IR Sync 12
Setting the Frequency Manually 13
RF Mute 13
Safe Start 14
Operating in Frequency Diversity Mode 14
Turning Off Frequency 2 (Freq 2) 15
Input Overload 15
Tone Generator 15
Matching Audio Levels with Mic Offset 15
ShowLink Test 16
Updating Firmware 16
Firmware Versioning 16
Updating the Transmitter 17
Specifications 17
Frequency Range and Transmitter Output Power 18
Australia Warning for Wireless 21
LICENSING INFORMATION 21
Certifications 21
Information to the user 22
Contact Customer Support 23
2/23
Page 3
Shure Incorporated
ADX2FD Handheld Transmitter
WARNING
•
Battery packs may explode or release toxic materials. Risk of fire or burns. Do not open, crush, modify, disassemble, heat
above 140°F (60°C), or incinerate.
•
Follow instructions from manufacturer
•
Only use Shure charger to recharge Shure rechargeable batteries
•
WARNING: Danger of explosion if battery incorrectly replaced. Replace only with same or equivalent type.
•
Never put batteries in mouth. If swallowed, contact your physician or local poison control center
•
Do not short circuit; may cause burns or catch fire
•
Do not charge or use battery packs other than Shure rechargeable batteries
•
Dispose of battery packs properly. Check with local vendor for proper disposal of used battery packs.
•
Batteries (battery pack or batteries installed) shall not be exposed to excessive heat such as sunshine, fire or the like
•
Do not immerse the battery in liquid such as water, beverages, or other fluids.
•
Do not attach or insert battery with polarity reversed.
•
Keep away from small children.
•
Do not use abnormal batteries.
•
Pack the battery securely for transport.
Note: Use only with the included power supply or a Shure-approved equivalent.
ADX2FD Handheld Transmitter
ADX series transmitters deliver impeccable audio quality and RF performance, and are equipped with ShowLink remote con
trol for real-time parameter adjustments and interference avoidance. This transmitter additionally features Frequency Diversity
for seamless audio in even the most challenging environments. Lightweight aluminum construction, SB920 rechargeable pow
er options (with dockable charging).
®
Features
Performance
•
184 MHz tuning range
•
Frequency Diversity enables simultaneous transmission on two independent frequencies to ensure seamless, uninterrupt
ed audio for mission-critical applications. Single carrier mode is available if Frequency Diversity is not required.
•
20 Hz to 20 kHz range with flat frequency response
•
Automatic input staging optimizes gain setting
•
Diversity ShowLink-enabled for remote transmitter control and automatic interference avoidance
•
AES 256-bit encryption-enabled for secure transmission
•
>120 dB, A-weighted, System Gain @ +10
•
Digital output: >125dB, A-weighted (Dante, AES3, AES67)
3/23
Page 4
•
100 meter (300 feet) line-of-sight operating range
•
Selectable modulation modes optimize performance for spectral efficiency or audio quality:
◦
Standard – optimal coverage, low latency
◦
High density – dramatic increase in max system channel count
•
Switchable Power Levels (region dependent):
◦
2/10/50 mW (single carrier mode)
◦
2 x 20 mW (Frequency Diversity mode)
•
Built-in tone generator and RF markers to facilitate range-testing
Design
•
Interchangeable Shure microphone cartridges
•
Backlit LCD with easy to navigate menu and controls
•
Rugged metal construction
•
Menu and power lockout
Power
•
Shure SB920 rechargeable batteries offer precision metering and zero memory effect
•
External charging contacts for docked charging
•
Battery Runtime with Shure SB920:
◦
Up to 9 hours in single carrier mode @ 10 mW
◦
Up to 6.5 hours in Frequency Diversity mode @ 10 mW x 10 mW
◦
Up to 5 hours in single carrier, high-power mode @ 50 mW
Shure Incorporated
Included Components
SB920 Shure Rechargeable Battery 95A25763
Zipper Bag 95B2313
Threaded Adapter 31B1856
Swivel Adapter, black 90F4046
Choice of (1) of the following Shure microphone cartridges:
SM58 (RPW112) KSM9 Nickel (RPW188)
BETA 87C (RPW122) BETA 87A (RPW120)
BETA 58A (RPW 118) KSM9 Black (RPW184)
KSM8 Black (RPW174) KSM8 Nickel (RPW170)
KSM9HS Black (RPW186) KSM9HS Nickel (RPW190)
4/23
Page 5
Optional Accessories
SB920 Shure Rechargeable Battery 95A25763
Shure Incorporated
Battery Contact Cover (part number varies by frequency range)
AD651B Talk Switch Button (black) 90A37347B
Microphone stand adapter WA371
Shure Networked Docking Charger 2-Up SBC240
WA619-A (470-636 MHz), WA619-B
(606-810 MHz), WA619-C (750-960 MHz)
Optional Shure microphone cartridges:
SM58 (RPW112)
SM86 (RPW114)
SM87A (RPW116)
BETA 58A (RPW118)
BETA 87A (RPW120)
BETA 87C (RPW122)
VP68 (RPW124)
KSM9 Nickel (RPW188)
KSM9HS Nickel (RPW190)
KSM9 Black (RPW184)
KSM9HS Black (RPW186)
ADX2FD Transmitter Overview
① Microphone Cartridge
See Optional Accessories for a list of compatible cartridges.
② Display
View menu screens and settings. Press any control button to activate the backlight.
③ Infrared (IR) Port
Align with the receiver IR port during an IR Sync for automated transmitter programming.
④ Control Buttons
Use to navigate through parameter menus and change values.
⑤ Battery Compartment
Requires Shure rechargeable battery.
⑥ On/Off Switch
Powers the unit on or off.
5/23
Page 6
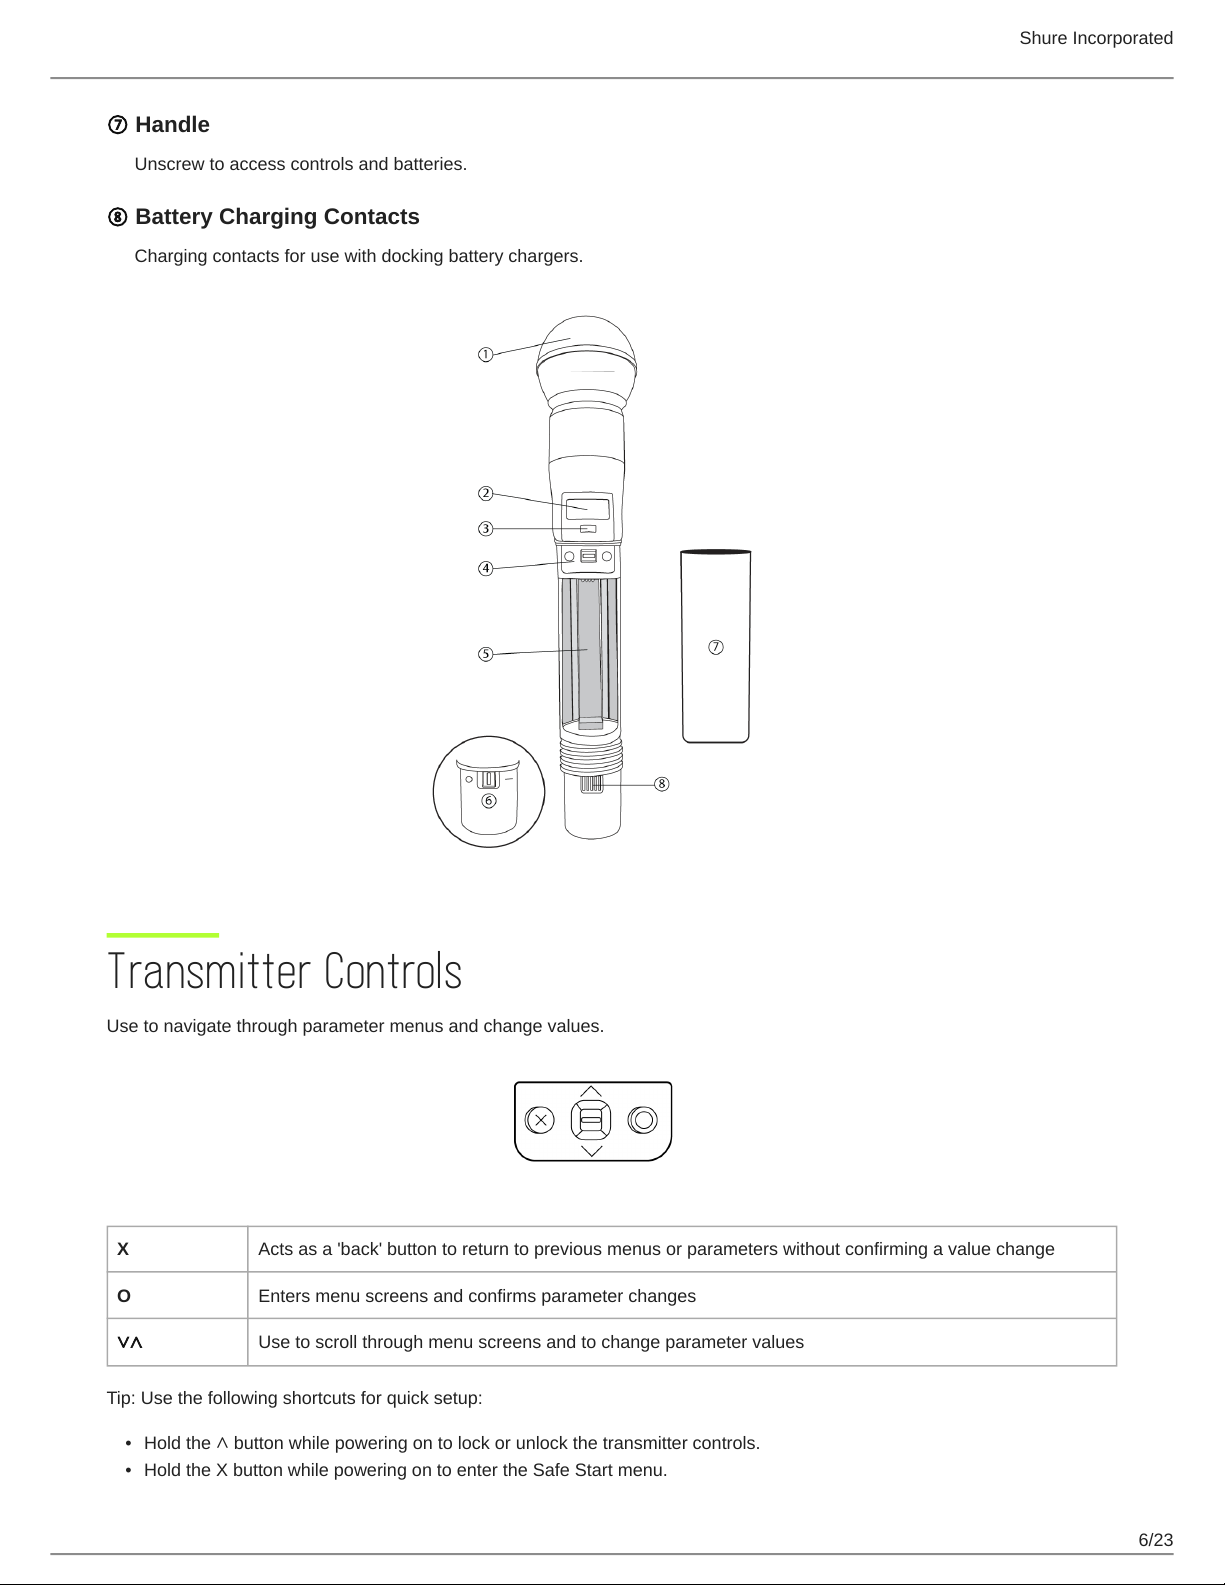
⑦ Handle
Unscrew to access controls and batteries.
⑧ Battery Charging Contacts
Charging contacts for use with docking battery chargers.
Shure Incorporated
Transmitter Controls
Use to navigate through parameter menus and change values.
X Acts as a 'back' button to return to previous menus or parameters without confirming a value change
O Enters menu screens and confirms parameter changes
∨∧ Use to scroll through menu screens and to change parameter values
Tip: Use the following shortcuts for quick setup:
•
Hold the ∧ button while powering on to lock or unlock the transmitter controls.
•
Hold the X button while powering on to enter the Safe Start menu.
6/23
Page 7
Shure Incorporated
Home Screen Display
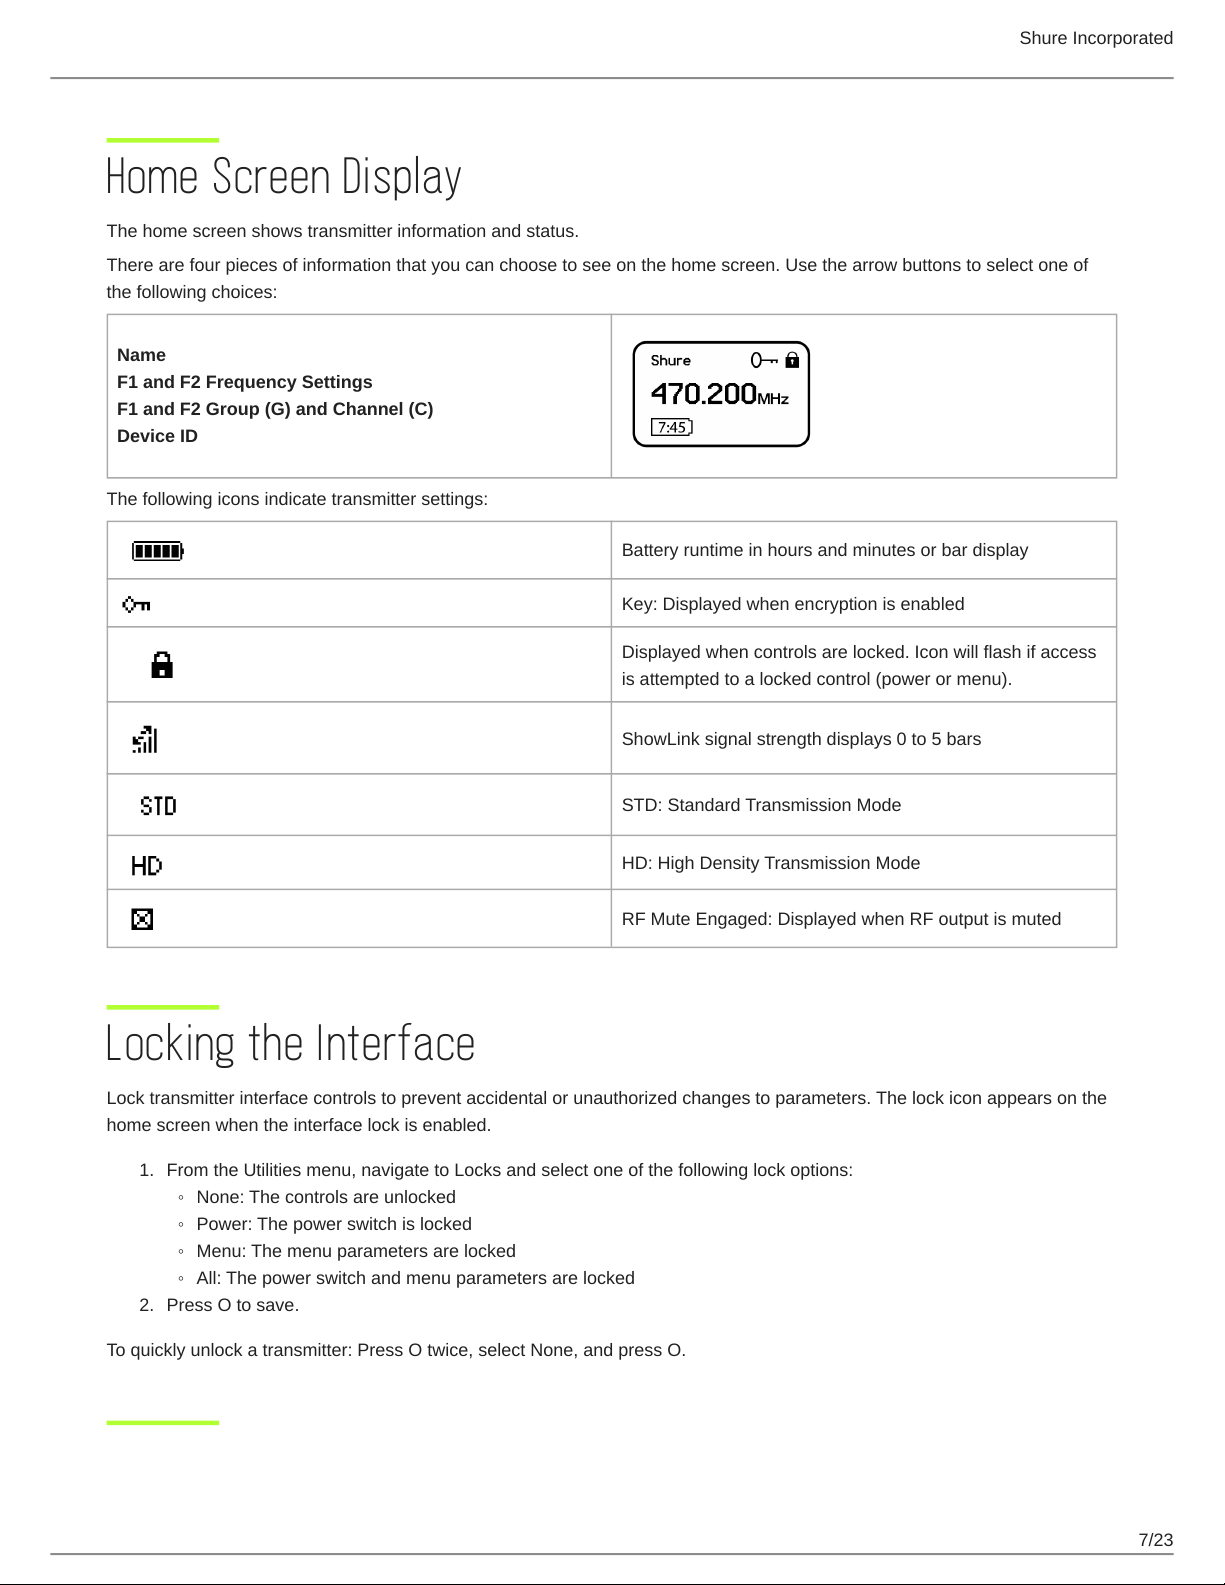
The home screen shows transmitter information and status.
There are four pieces of information that you can choose to see on the home screen. Use the arrow buttons to select one of
the following choices:
Name
F1 and F2 Frequency Settings
F1 and F2 Group (G) and Channel (C)
Device ID
The following icons indicate transmitter settings:
Battery runtime in hours and minutes or bar display
Key: Displayed when encryption is enabled
Displayed when controls are locked. Icon will flash if access
is attempted to a locked control (power or menu).
ShowLink signal strength displays 0 to 5 bars
STD: Standard Transmission Mode
HD: High Density Transmission Mode
RF Mute Engaged: Displayed when RF output is muted
Locking the Interface
Lock transmitter interface controls to prevent accidental or unauthorized changes to parameters. The lock icon appears on the
home screen when the interface lock is enabled.
1.
From the Utilities menu, navigate to Locks and select one of the following lock options:
◦
None: The controls are unlocked
◦
Power: The power switch is locked
◦
Menu: The menu parameters are locked
◦
All: The power switch and menu parameters are locked
2.
Press O to save.
To quickly unlock a transmitter: Press O twice, select None, and press O.
7/23
Page 8
Shure Incorporated
Shure Rechargeable Batteries
Shure lithium-ion batteries offer a rechargeable option for powering the transmitters. Batteries quickly charge to 50% capacity
in one hour and reach full charge within three hours.
Single chargers and multiple bay chargers are available to recharge the Shure batteries.
Caution: Only charge Shure rechargeable batteries with a Shure battery charger.
Checking Battery Info
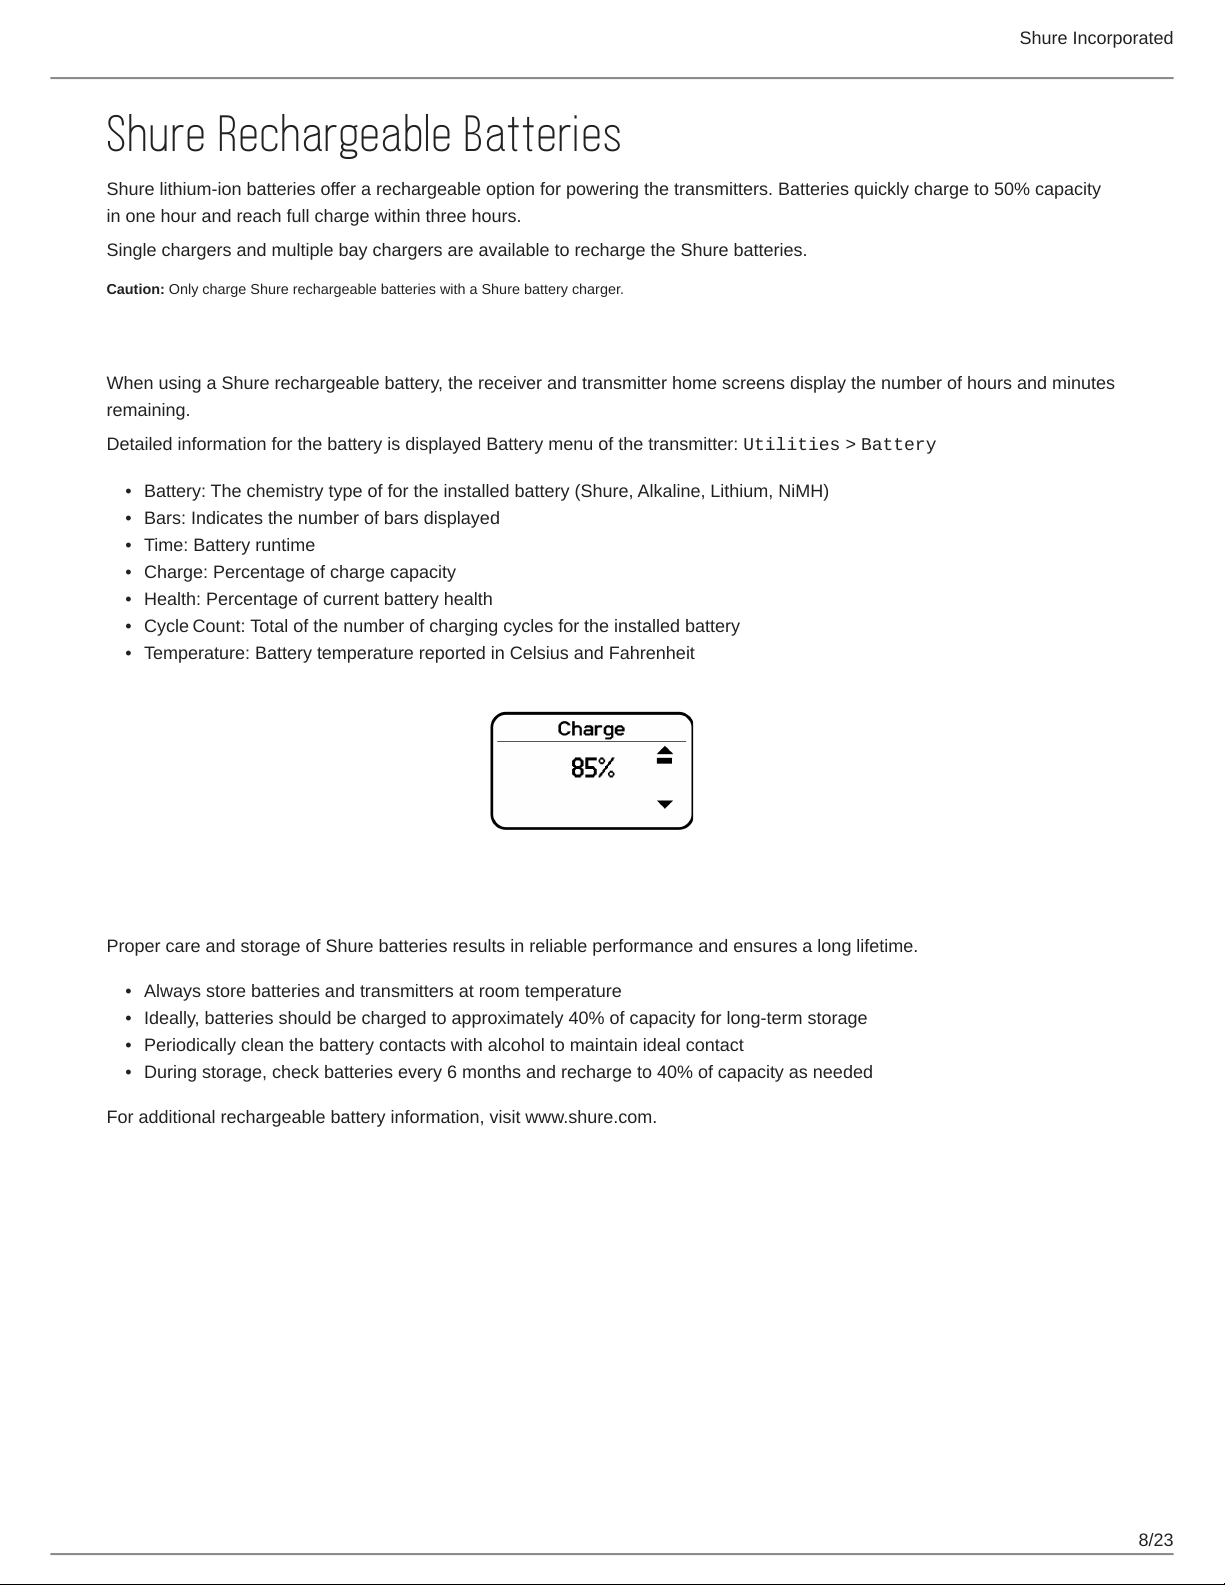
When using a Shure rechargeable battery, the receiver and transmitter home screens display the number of hours and minutes
remaining.
Detailed information for the battery is displayed Battery menu of the transmitter: Utilities > Battery
•
Battery: The chemistry type of for the installed battery (Shure, Alkaline, Lithium, NiMH)
•
Bars: Indicates the number of bars displayed
•
Time: Battery runtime
•
Charge: Percentage of charge capacity
•
Health: Percentage of current battery health
•
Cycle Count: Total of the number of charging cycles for the installed battery
•
Temperature: Battery temperature reported in Celsius and Fahrenheit
Important Tips for Care and Storage of Shure Rechargeable Batteries
Proper care and storage of Shure batteries results in reliable performance and ensures a long lifetime.
•
Always store batteries and transmitters at room temperature
•
Ideally, batteries should be charged to approximately 40% of capacity for long-term storage
•
Periodically clean the battery contacts with alcohol to maintain ideal contact
•
During storage, check batteries every 6 months and recharge to 40% of capacity as needed
For additional rechargeable battery information, visit www.shure.com.
8/23
Page 9
Battery Installation
Shure Incorporated
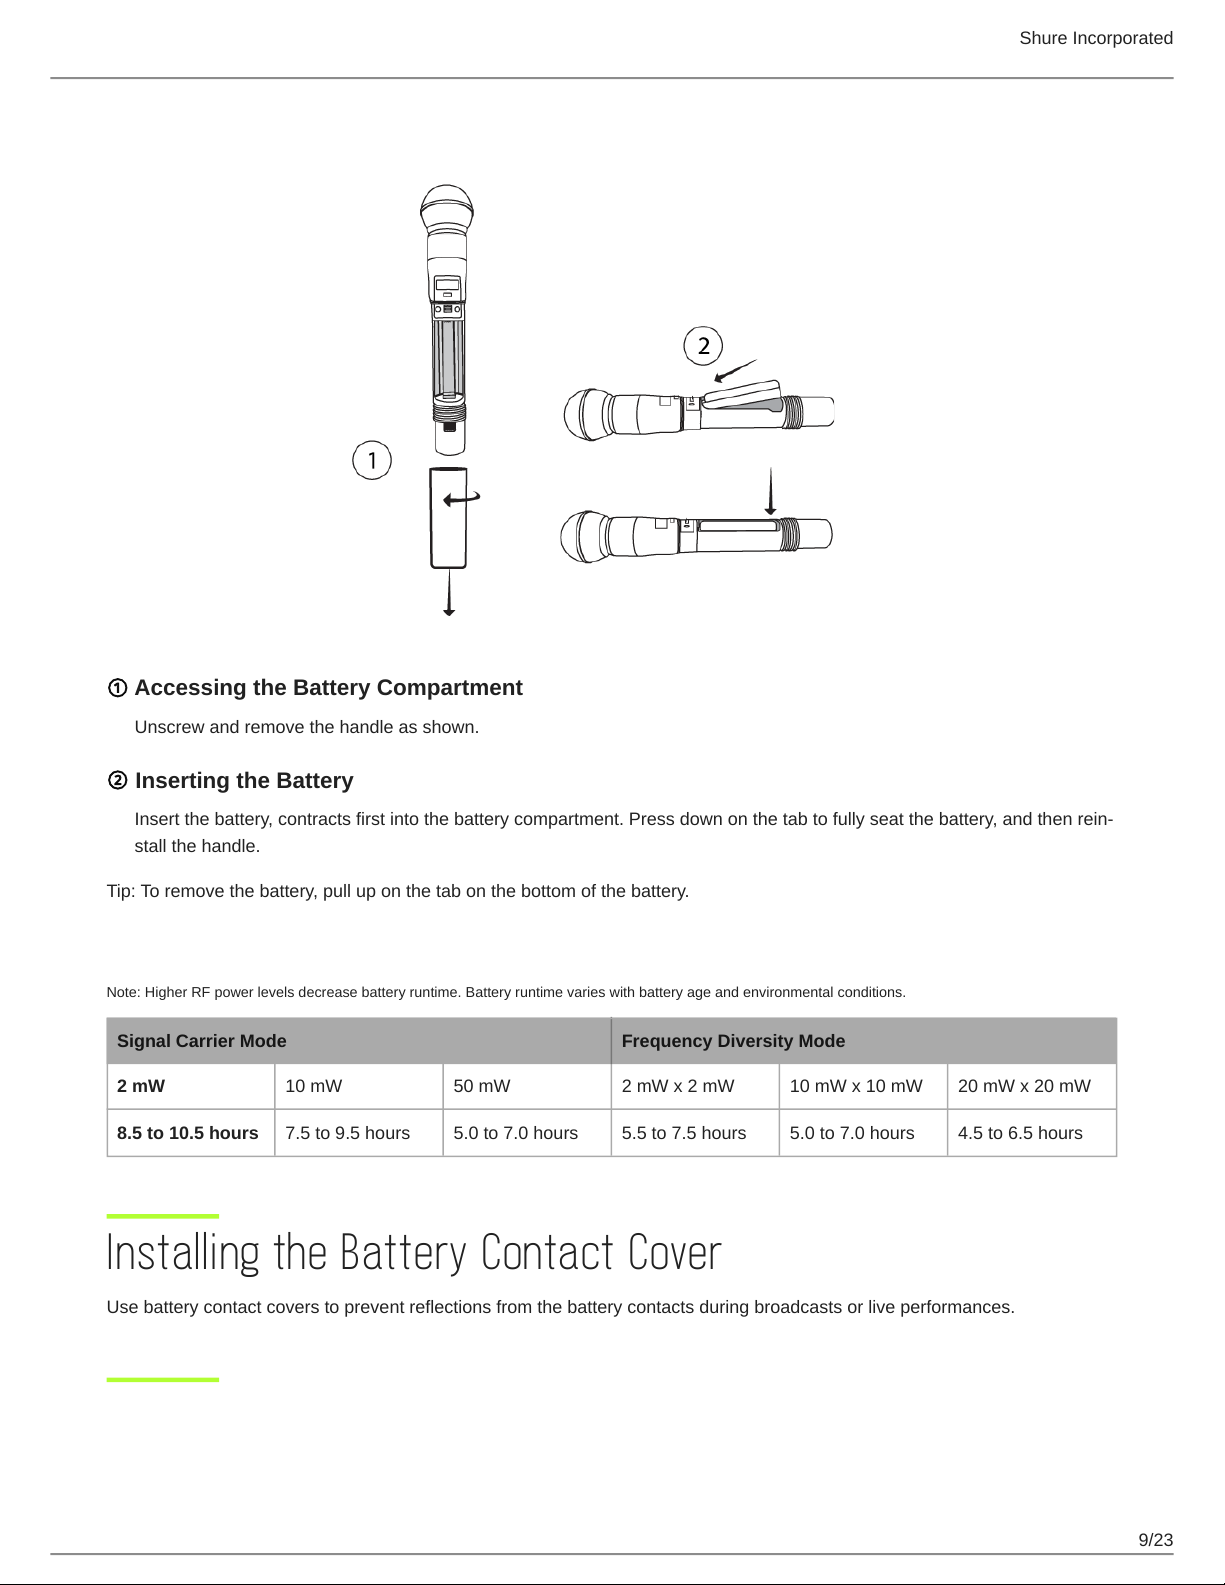
① Accessing the Battery Compartment
Unscrew and remove the handle as shown.
② Inserting the Battery
Insert the battery, contracts first into the battery compartment. Press down on the tab to fully seat the battery, and then rein
stall the handle.
Tip: To remove the battery, pull up on the tab on the bottom of the battery.
ADX2FD SB920 Battery Runtime
Note: Higher RF power levels decrease battery runtime. Battery runtime varies with battery age and environmental conditions.
Signal Carrier Mode Frequency Diversity Mode
2 mW 10 mW 50 mW 2 mW x 2 mW 10 mW x 10 mW 20 mW x 20 mW
8.5 to 10.5 hours 7.5 to 9.5 hours 5.0 to 7.0 hours 5.5 to 7.5 hours 5.0 to 7.0 hours 4.5 to 6.5 hours
Installing the Battery Contact Cover
Use battery contact covers to prevent reflections from the battery contacts during broadcasts or live performances.
9/23
Page 10
Shure Incorporated
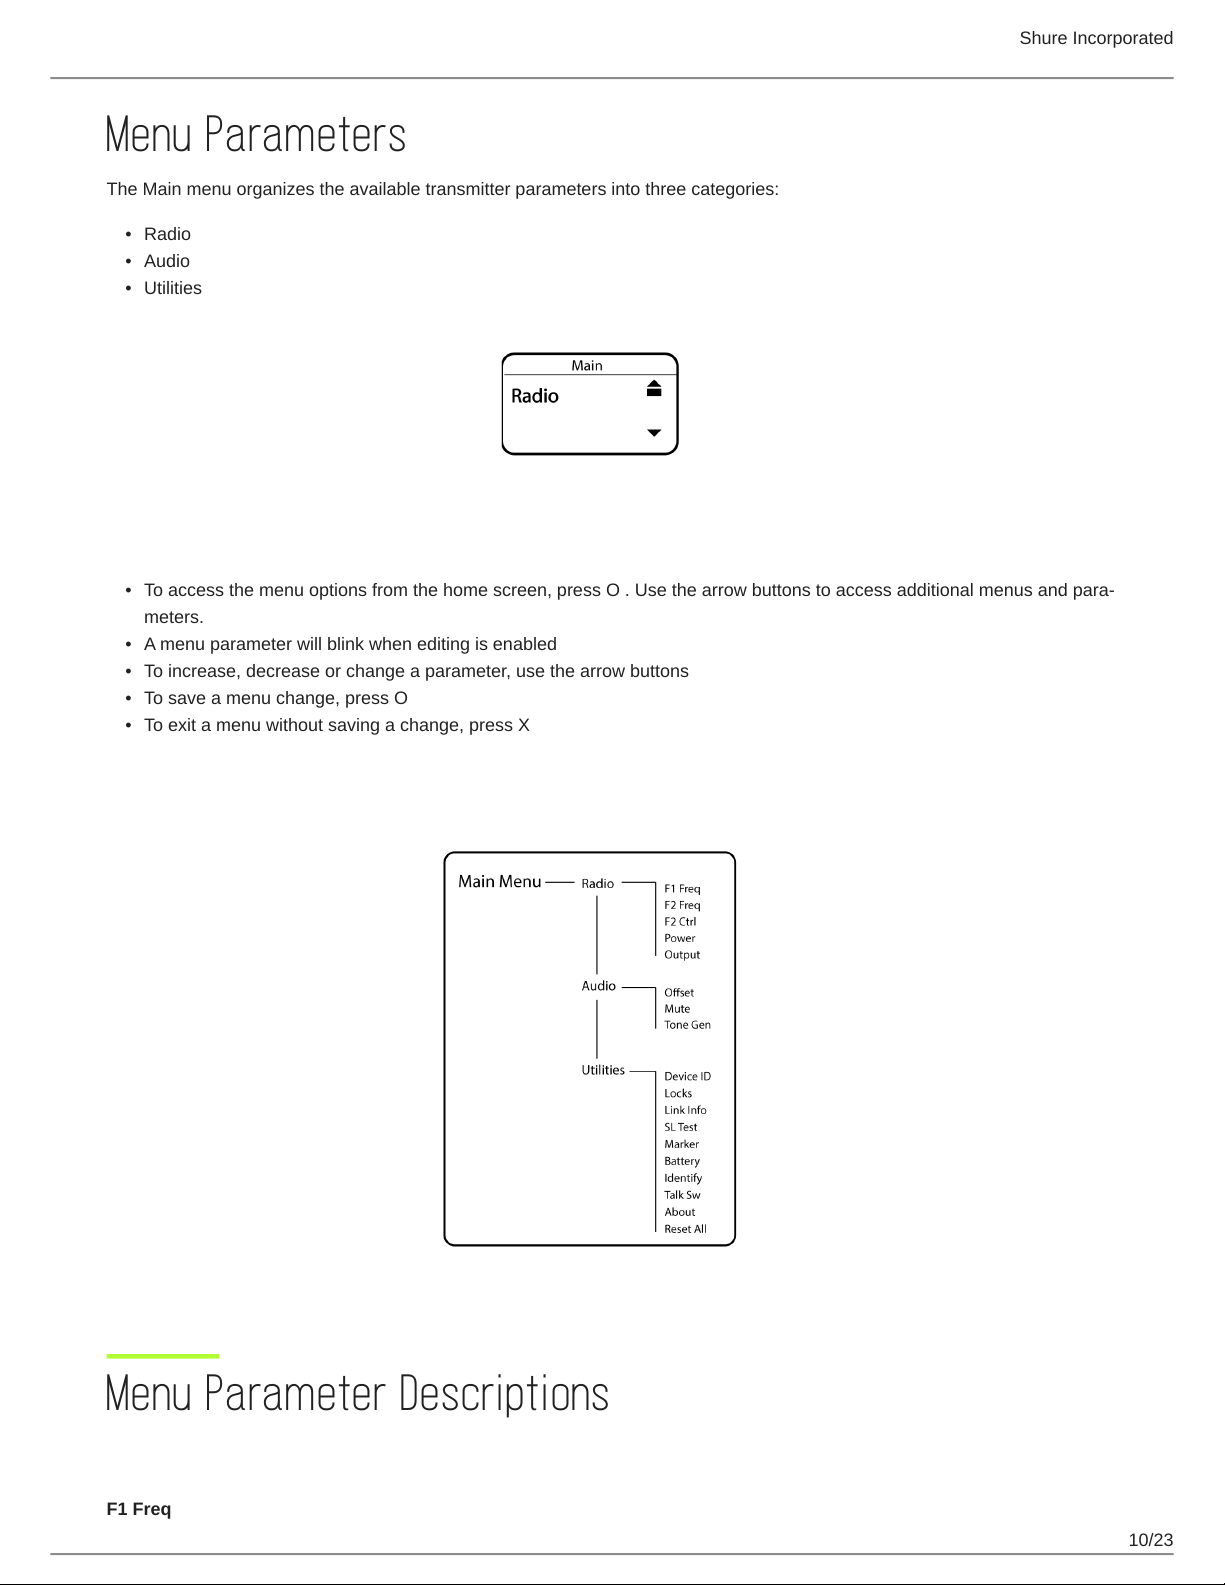
Menu Parameters
The Main menu organizes the available transmitter parameters into three categories:
•
Radio
•
Audio
•
Utilities
Tips for Editing Menu Parameters
•
To access the menu options from the home screen, press O . Use the arrow buttons to access additional menus and para
meters.
•
A menu parameter will blink when editing is enabled
•
To increase, decrease or change a parameter, use the arrow buttons
•
To save a menu change, press O
•
To exit a menu without saving a change, press X
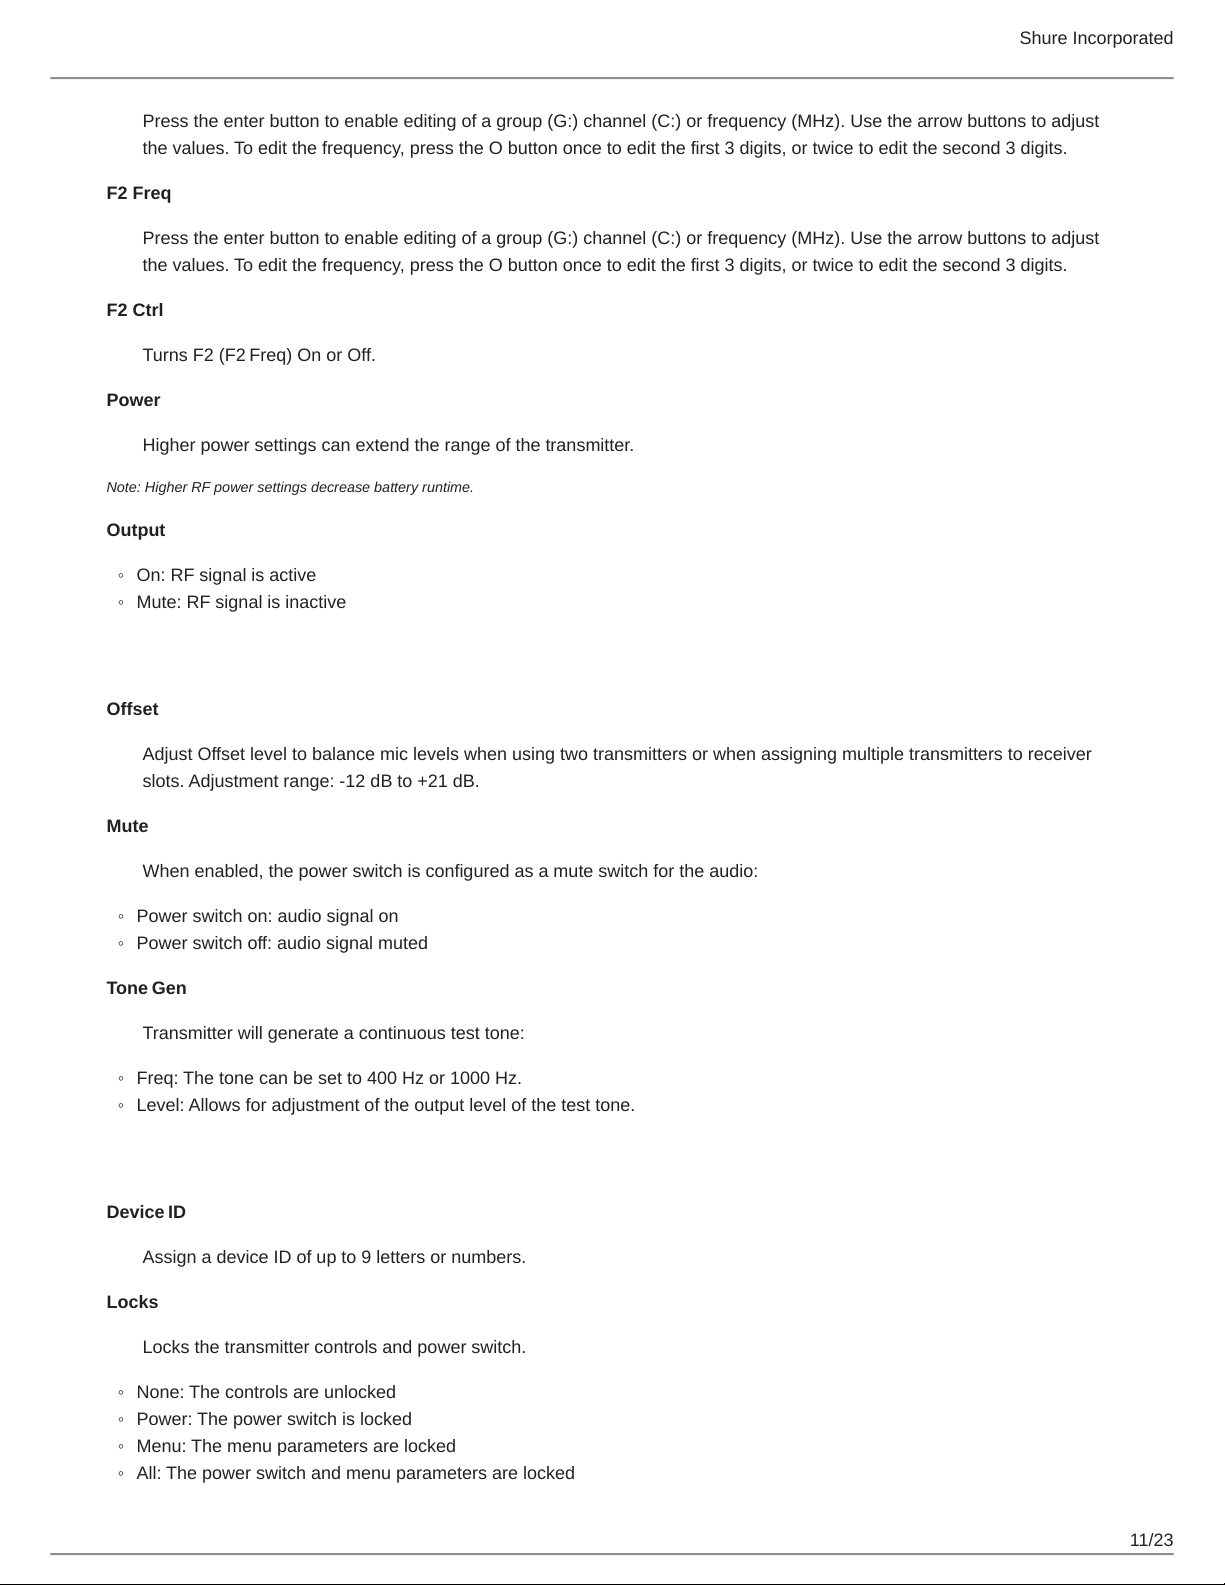
Menu Map
Menu Parameter Descriptions
Radio Menu
F1 Freq
10/23
Page 11
Press the enter button to enable editing of a group (G:) channel (C:) or frequency (MHz). Use the arrow buttons to adjust
the values. To edit the frequency, press the O button once to edit the first 3 digits, or twice to edit the second 3 digits.
F2 Freq
Press the enter button to enable editing of a group (G:) channel (C:) or frequency (MHz). Use the arrow buttons to adjust
the values. To edit the frequency, press the O button once to edit the first 3 digits, or twice to edit the second 3 digits.
F2 Ctrl
Turns F2 (F2 Freq) On or Off.
Power
Higher power settings can extend the range of the transmitter.
Note: Higher RF power settings decrease battery runtime.
Output
◦
On: RF signal is active
◦
Mute: RF signal is inactive
Shure Incorporated
Audio Menu
Offset
Adjust Offset level to balance mic levels when using two transmitters or when assigning multiple transmitters to receiver
slots. Adjustment range: -12 dB to +21 dB.
Mute
When enabled, the power switch is configured as a mute switch for the audio:
◦
Power switch on: audio signal on
◦
Power switch off: audio signal muted
Tone Gen
Transmitter will generate a continuous test tone:
◦
Freq: The tone can be set to 400 Hz or 1000 Hz.
◦
Level: Allows for adjustment of the output level of the test tone.
Utilities Menu
Device ID
Assign a device ID of up to 9 letters or numbers.
Locks
Locks the transmitter controls and power switch.
◦
None: The controls are unlocked
◦
Power: The power switch is locked
◦
Menu: The menu parameters are locked
◦
All: The power switch and menu parameters are locked
11/23
Page 12
Link Info
Displays the following information about the link between a transmitter and receiver:
◦
Not Linked: The transmitter is not linked to a receiver
◦
Linked: The transmitter is linked to a receiver. Select Unlink? to free the transmitter from the receiver link.
◦
Unlinked: The transmitter is not linked to a receiver
SL Test
ShowLink test tool to measure the boundaries of ShowLink coverage.
Marker
When enabled, press the enter button to drop a marker in Wireless Workbench.
Battery
Displays battery information:
◦
Battery Life: Runtime reported in bar display and time (hours:minutes)
◦
Charge: Percentage of charge capacity
◦
Health: Percentage of current battery health
◦
Cycle Count: Total of the number of charging cycles for the installed battery
◦
Temperature: Battery temperature reported in Celsius and Fahrenheit
Shure Incorporated
Talk Sw
Press ENTER to add control from a talk switch. Press the button on the talk switch twice to complete the link.
Identify
When enabled, Identify flashes the transmitter icon in Wireless Workbench Inventory or Monitor tabs.
About
Displays the following transmitter information:
◦
Model: Displays the model number
◦
Band: Displays the tuning band of the transmitter
◦
FW Version: Installed firmware
◦
HW Version: Hardware version
◦
Serial Num: Serial number
Reset All
Restores all transmitter parameters to factory settings.
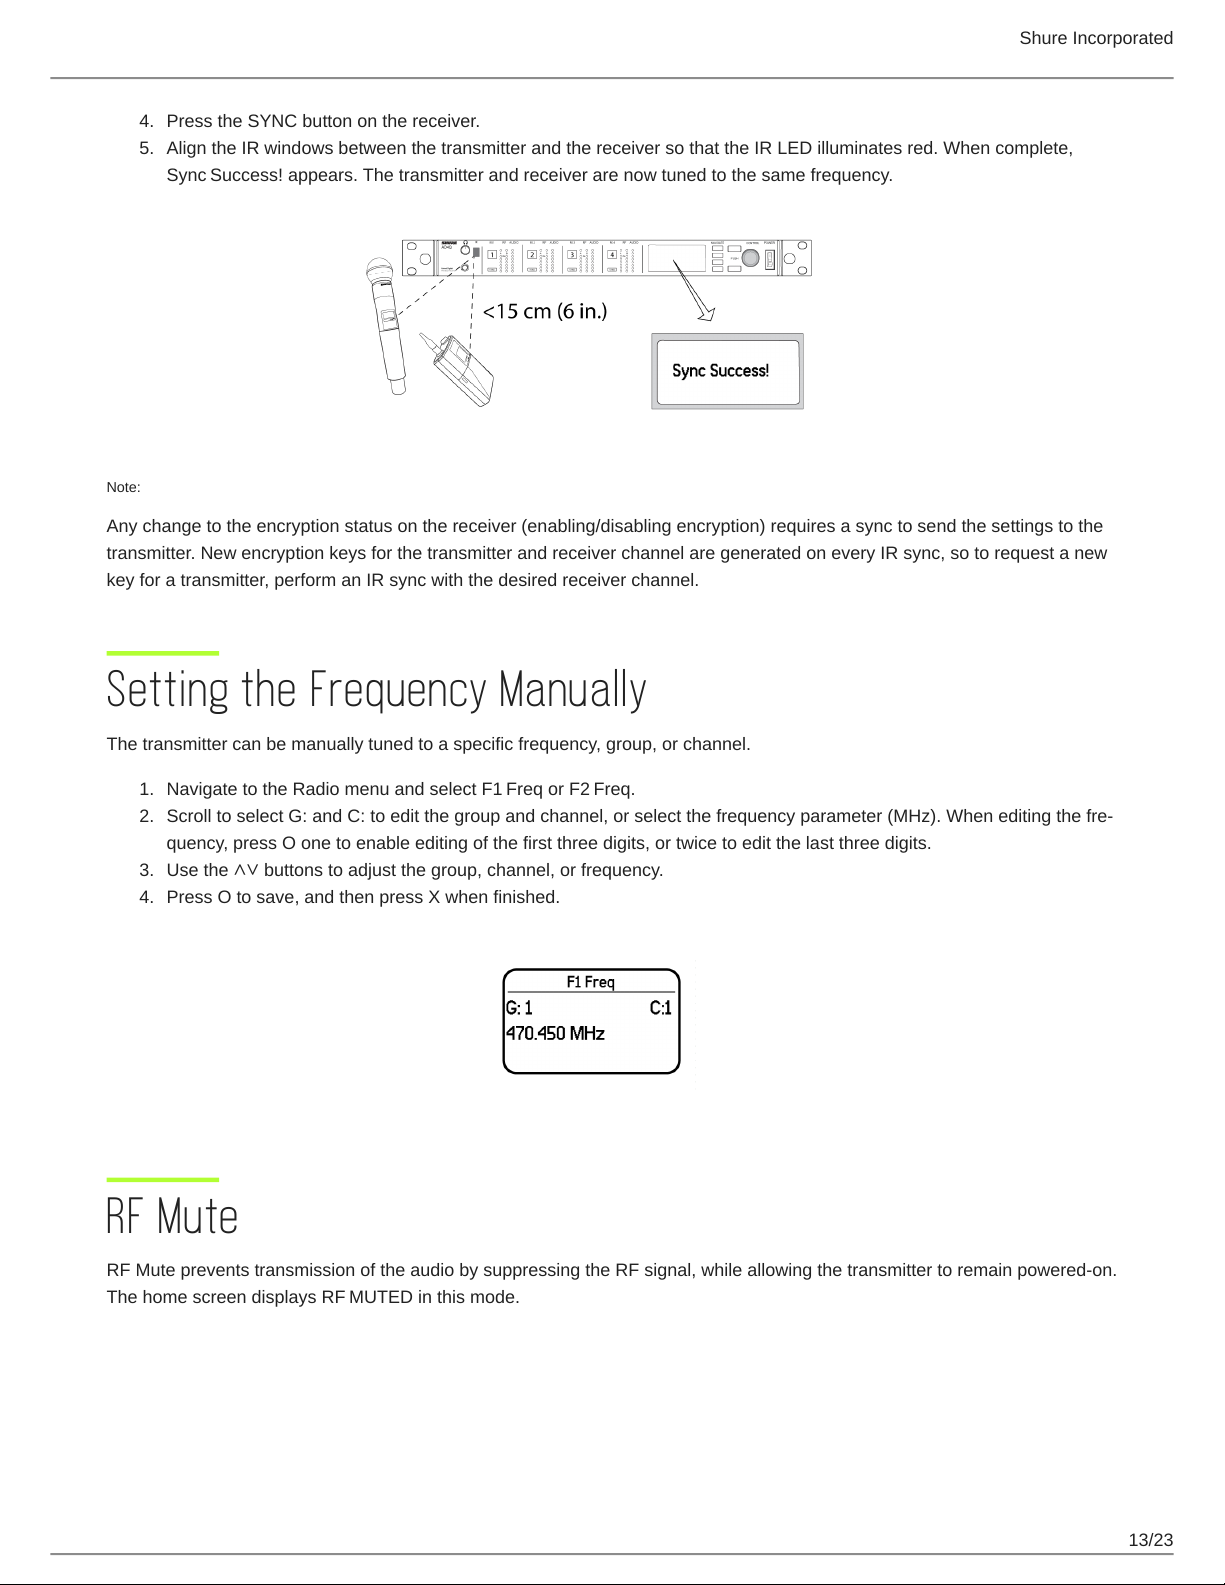
IR Sync
Use IR Sync to form an audio channel between the transmitter and receiver.
Note: The receiver band must match the band of the transmitter.
1.
Select a receiver channel.
2.
Tune the channel to an available frequency using group scan or manually turn to an open frequency.
3.
Power on the transmitter.
12/23
Page 13
Shure Incorporated
4.
Press the SYNC button on the receiver.
5.
Align the IR windows between the transmitter and the receiver so that the IR LED illuminates red. When complete,
Sync Success! appears. The transmitter and receiver are now tuned to the same frequency.
Note:
Any change to the encryption status on the receiver (enabling/disabling encryption) requires a sync to send the settings to the
transmitter. New encryption keys for the transmitter and receiver channel are generated on every IR sync, so to request a new
key for a transmitter, perform an IR sync with the desired receiver channel.
Setting the Frequency Manually
The transmitter can be manually tuned to a specific frequency, group, or channel.
1.
Navigate to the Radio menu and select F1 Freq or F2 Freq.
2.
Scroll to select G: and C: to edit the group and channel, or select the frequency parameter (MHz). When editing the fre
quency, press O one to enable editing of the first three digits, or twice to edit the last three digits.
3.
Use the ∧∨ buttons to adjust the group, channel, or frequency.
4.
Press O to save, and then press X when finished.
RF Mute
RF Mute prevents transmission of the audio by suppressing the RF signal, while allowing the transmitter to remain powered-on.
The home screen displays RF MUTED in this mode.
13/23
Page 14
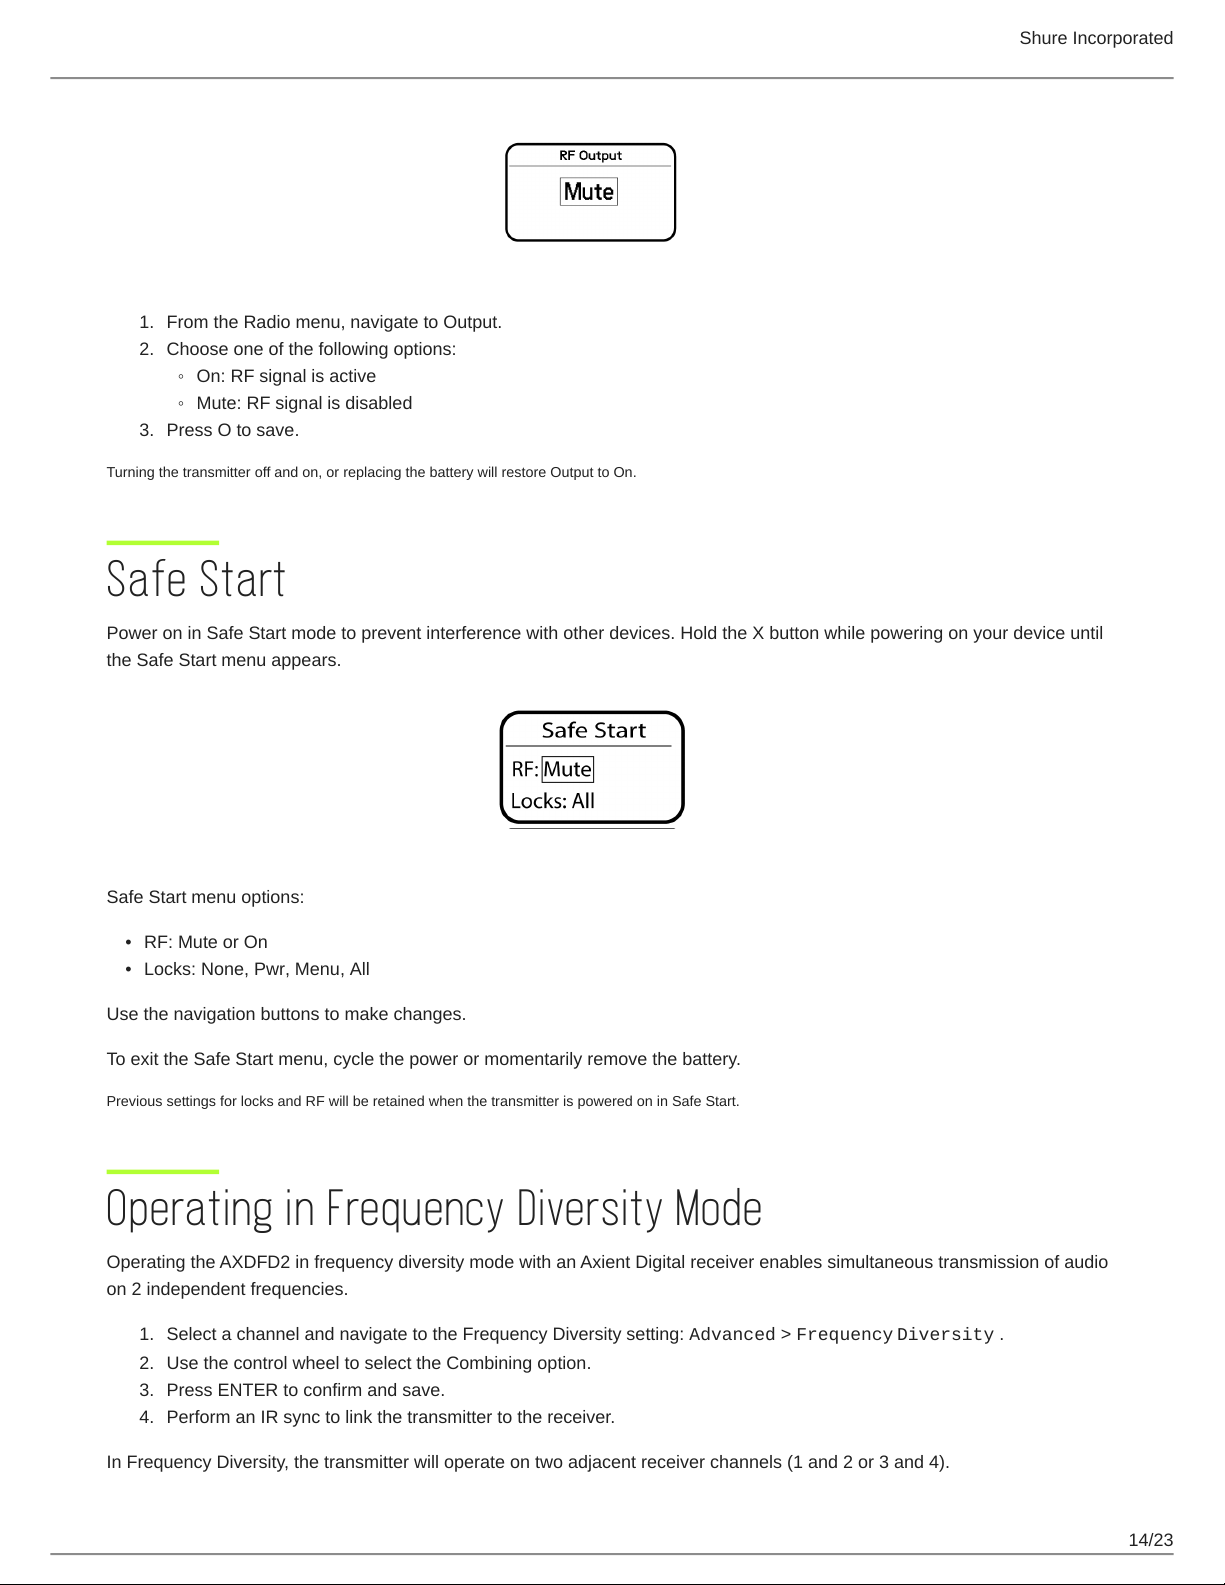
1.
From the Radio menu, navigate to Output.
2.
Choose one of the following options:
◦
On: RF signal is active
◦
Mute: RF signal is disabled
3.
Press O to save.
Turning the transmitter off and on, or replacing the battery will restore Output to On.
Safe Start
Shure Incorporated
Power on in Safe Start mode to prevent interference with other devices. Hold the X button while powering on your device until
the Safe Start menu appears.
Safe Start menu options:
•
RF: Mute or On
•
Locks: None, Pwr, Menu, All
Use the navigation buttons to make changes.
To exit the Safe Start menu, cycle the power or momentarily remove the battery.
Previous settings for locks and RF will be retained when the transmitter is powered on in Safe Start.
Operating in Frequency Diversity Mode
Operating the AXDFD2 in frequency diversity mode with an Axient Digital receiver enables simultaneous transmission of audio
on 2 independent frequencies.
1.
Select a channel and navigate to the Frequency Diversity setting: Advanced > Frequency Diversity .
2.
Use the control wheel to select the Combining option.
3.
Press ENTER to confirm and save.
4.
Perform an IR sync to link the transmitter to the receiver.
In Frequency Diversity, the transmitter will operate on two adjacent receiver channels (1 and 2 or 3 and 4).
14/23
Page 15
Shure Incorporated
Turning Off Frequency 2 (Freq 2)
If a problem develops with one of the frequencies being used by the transmitter, you can lock on to a single frequency by turn
ing off frequency 2. Turning off one frequency allows the transmitter to continue passing audio while a clear frequency can be
found for the second channel.
1.
From the Radio menu navigate to F2 Ctrl.
2.
Use the controls to set F2 to On or Off. When set to On, the transmitter will pass audio using Freq 2.
Input Overload
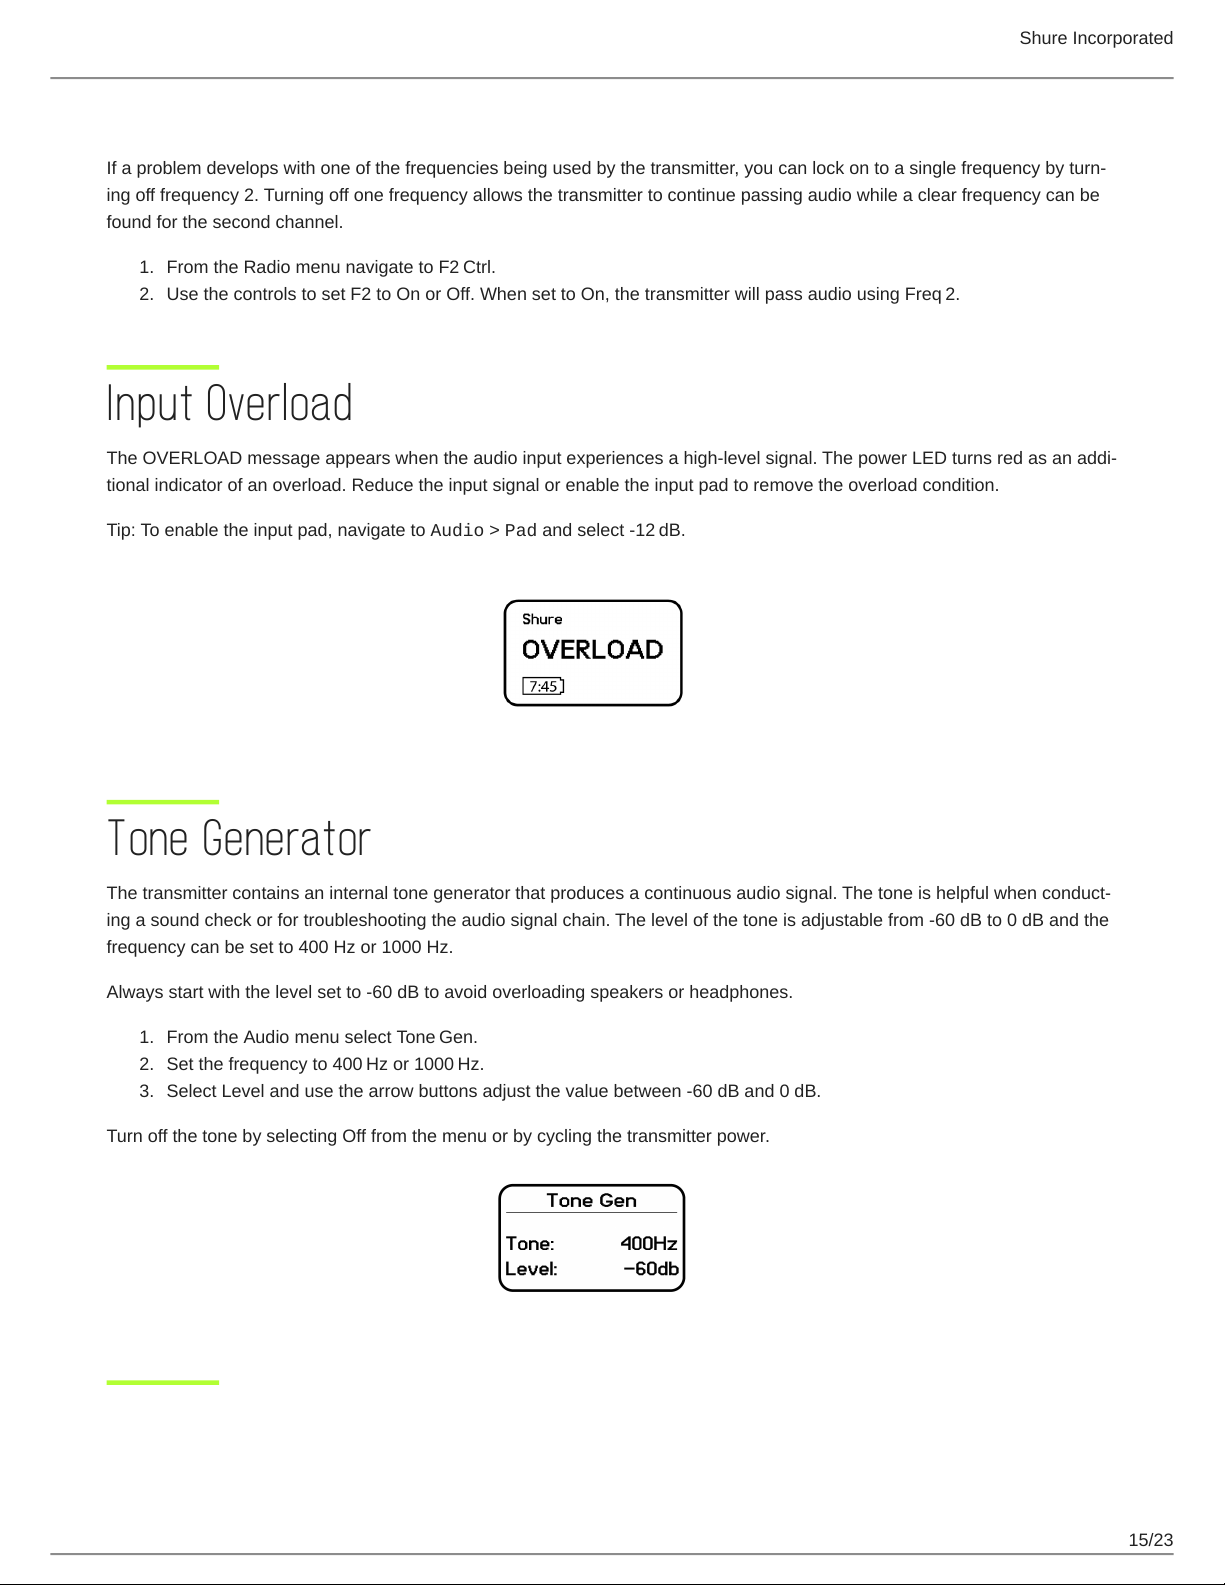
The OVERLOAD message appears when the audio input experiences a highlevel signal. The power LED turns red as an addi
tional indicator of an overload. Reduce the input signal or enable the input pad to remove the overload condition.
Tip: To enable the input pad, navigate to Audio > Pad and select 12 dB.
Tone Generator
The transmitter contains an internal tone generator that produces a continuous audio signal. The tone is helpful when conduct
ing a sound check or for troubleshooting the audio signal chain. The level of the tone is adjustable from -60 dB to 0 dB and the
frequency can be set to 400 Hz or 1000 Hz.
Always start with the level set to -60 dB to avoid overloading speakers or headphones.
1.
From the Audio menu select Tone Gen.
2.
Set the frequency to 400 Hz or 1000 Hz.
3.
Select Level and use the arrow buttons adjust the value between -60 dB and 0 dB.
Turn off the tone by selecting Off from the menu or by cycling the transmitter power.
15/23
Page 16
Shure Incorporated
Matching Audio Levels with Mic Offset
When linking two or more transmitters to a receiver, there may be a difference in volume levels between microphones or instru
ments. If this occurs, use the Offset function to match the audio levels and eliminate audible volume differences between trans
mitters. If using a single transmitter, set Offset to 0 dB.
1.
Turn on the first transmitter and perform a sound check to test the audio level. Turn off the transmitter when finished.
2.
Turn on the second transmitter and perform a sound check to test the audio level. Repeat for any additional transmit
ters.
3.
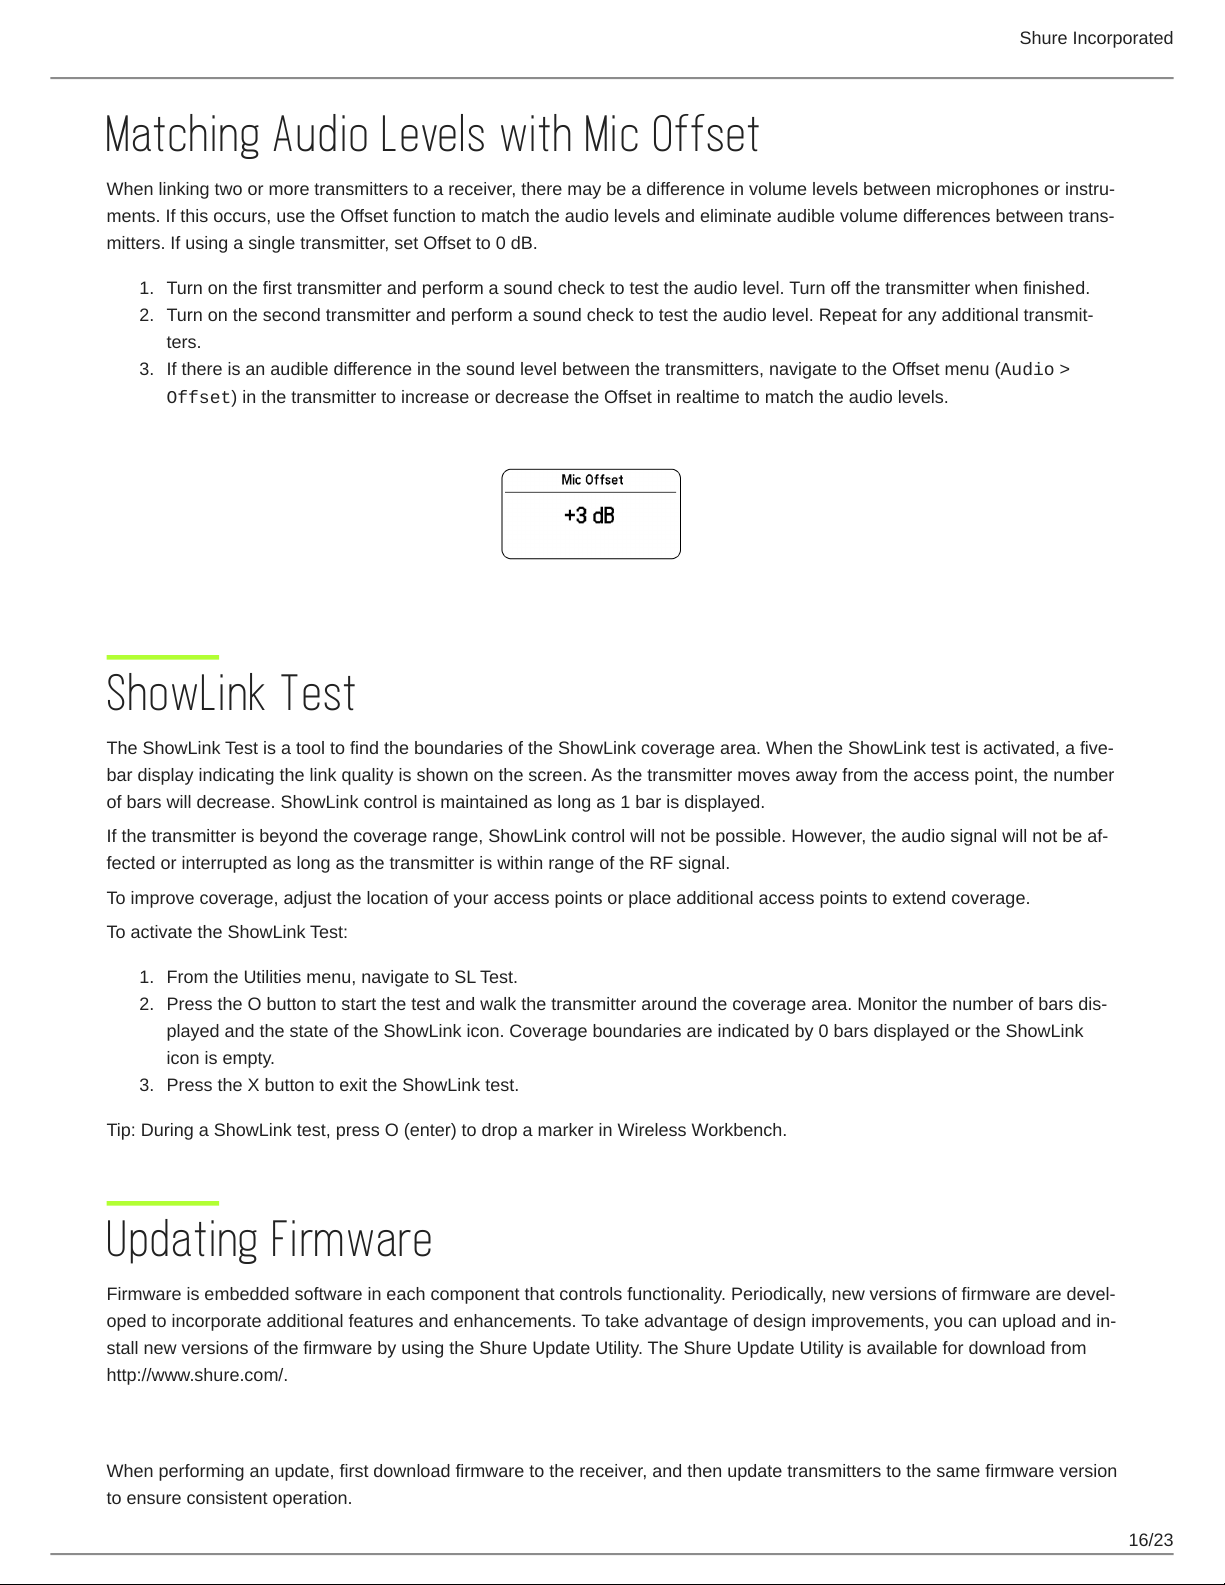
If there is an audible difference in the sound level between the transmitters, navigate to the Offset menu (Audio >
Offset) in the transmitter to increase or decrease the Offset in realtime to match the audio levels.
ShowLink Test
The ShowLink Test is a tool to find the boundaries of the ShowLink coverage area. When the ShowLink test is activated, a five-
bar display indicating the link quality is shown on the screen. As the transmitter moves away from the access point, the number
of bars will decrease. ShowLink control is maintained as long as 1 bar is displayed.
If the transmitter is beyond the coverage range, ShowLink control will not be possible. However, the audio signal will not be af
fected or interrupted as long as the transmitter is within range of the RF signal.
To improve coverage, adjust the location of your access points or place additional access points to extend coverage.
To activate the ShowLink Test:
1.
From the Utilities menu, navigate to SL Test.
2.
Press the O button to start the test and walk the transmitter around the coverage area. Monitor the number of bars dis
played and the state of the ShowLink icon. Coverage boundaries are indicated by 0 bars displayed or the ShowLink
icon is empty.
3.
Press the X button to exit the ShowLink test.
Tip: During a ShowLink test, press O (enter) to drop a marker in Wireless Workbench.
Updating Firmware
Firmware is embedded software in each component that controls functionality. Periodically, new versions of firmware are devel
oped to incorporate additional features and enhancements. To take advantage of design improvements, you can upload and in
stall new versions of the firmware by using the Shure Update Utility. The Shure Update Utility is available for download from
http://www.shure.com/.
Firmware Versioning
When performing an update, first download firmware to the receiver, and then update transmitters to the same firmware version
to ensure consistent operation.
16/23
Page 17
Shure Incorporated
The firmware numbering for Shure devices uses the following format: MAJOR.MINOR.PATCH (e.g., 1.2.14). At a minimum, all
devices on the network (including transmitters), must have the same MAJOR and MINOR firmware version numbers (e.g.,
1.2.x).
Updating the Transmitter
1.
Download the firmware to the receiver.
2.
Access the following menu from the receiver: Device Configuration > Tx Firmware Update.
3.
Align the IR ports between the transmitter and the receiver. IR ports must be aligned for the entire download, which can
take 50 seconds or longer.
The red alignment LED will turn on when the alignment is correct.
4.
Press ENTER on the receiver to begin the download to the transmitter. The receiver will display the progress of the up
date as a percentage.
Specifications
Mic Offset Range
-12 to 21 dB (In 1 dB steps)
Battery Type
Shure SB920 Rechargeable Li-Ion
Battery Runtime
Shure SB920 @ 10 mW
Single Carrier Mode Up to 9 hours
Frequency Diversity Up to 6.5 hours
Dimensions
254 mm x 51 mm (10.0 in. x 2.0 in.) L x Dia.
Weight
338 g (11.9 oz.), Without Battery
Housing
Cast Aluminum
Operating Temperature Range
-18°C (0°F) to 45°C (113°F)
Storage Temperature Range
-29°C (-20°F) to 74°C (165°F)
Audio Input
Configuration
Unbalanced
17/23
Page 18
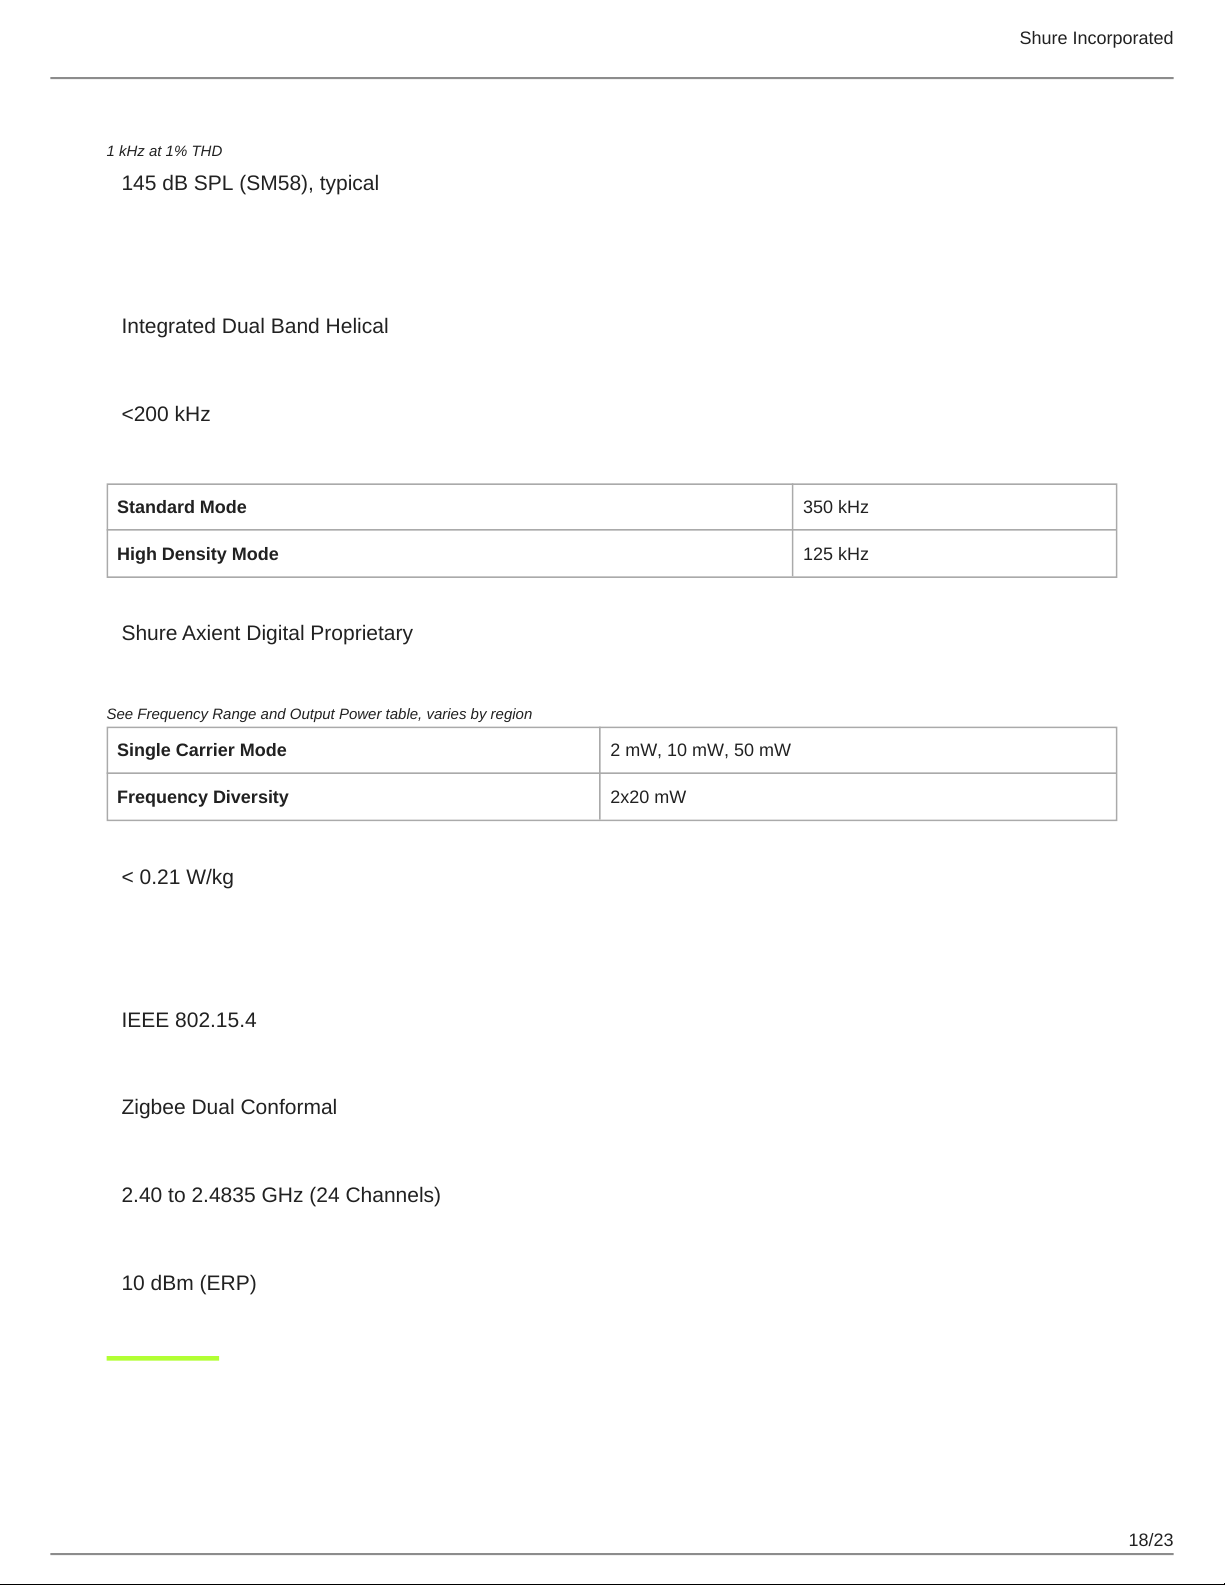
Maximum Input Level
1 kHz at 1% THD
145 dB SPL (SM58), typical
RF Output
Antenna Type
Integrated Dual Band Helical
Occupied Bandwidth
<200 kHz
Channel-to-Channel Spacing
Standard Mode 350 kHz
High Density Mode 125 kHz
Modulation Type
Shure Axient Digital Proprietary
Shure Incorporated
Power
See Frequency Range and Output Power table, varies by region
Single Carrier Mode 2 mW, 10 mW, 50 mW
Frequency Diversity 2x20 mW
Specific Absorption Rate (SAR)
< 0.21 W/kg
ShowLink
Network Type
IEEE 802.15.4
Antenna Type
Zigbee Dual Conformal
Frequency Range
2.40 to 2.4835 GHz (24 Channels)
RF Output Power
10 dBm (ERP)
18/23
Page 19
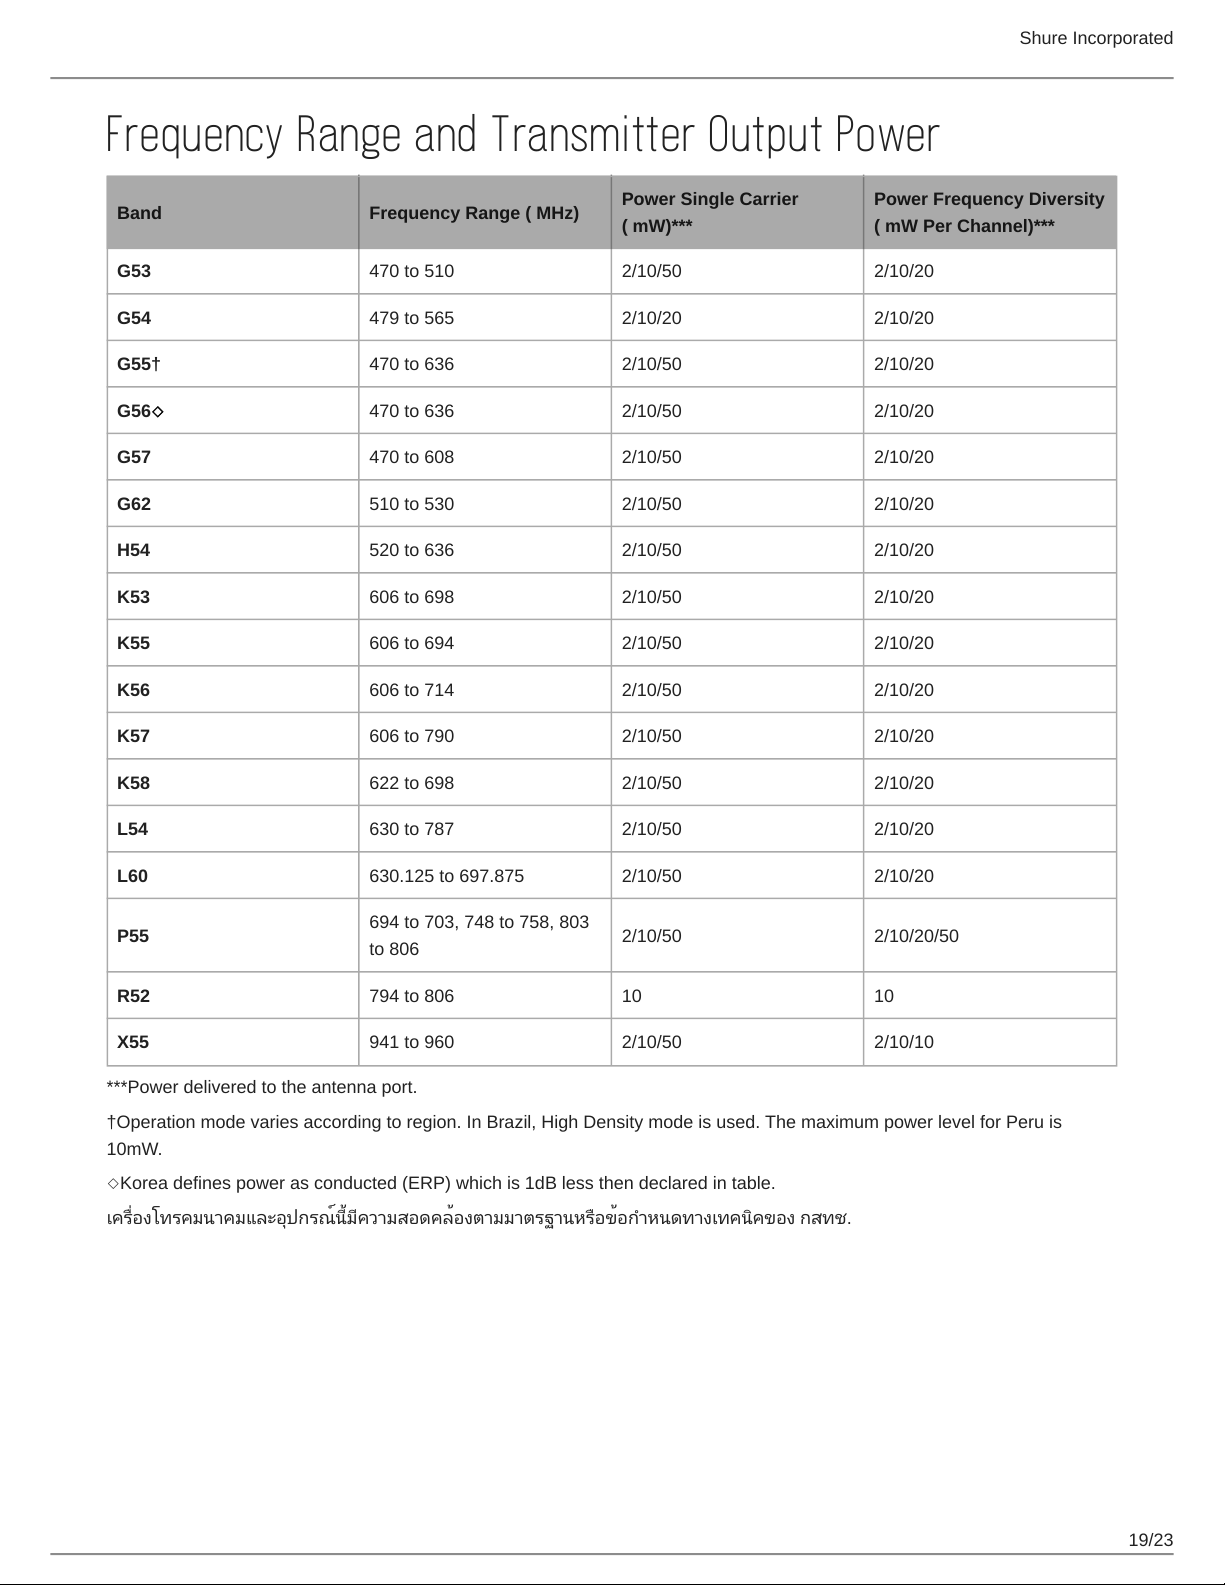
Frequency Range and Transmitter Output Power
Shure Incorporated
Band Frequency Range ( MHz)
G53 470 to 510 2/10/50 2/10/20
G54 479 to 565 2/10/20 2/10/20
G55† 470 to 636 2/10/50 2/10/20
G56◇ 470 to 636 2/10/50 2/10/20
G57 470 to 608 2/10/50 2/10/20
G62 510 to 530 2/10/50 2/10/20
H54 520 to 636 2/10/50 2/10/20
K53 606 to 698 2/10/50 2/10/20
K55 606 to 694 2/10/50 2/10/20
K56 606 to 714 2/10/50 2/10/20
K57 606 to 790 2/10/50 2/10/20
Power Single Carrier
( mW)***
Power Frequency Diversity
( mW Per Channel)***
K58 622 to 698 2/10/50 2/10/20
L54 630 to 787 2/10/50 2/10/20
L60 630.125 to 697.875 2/10/50 2/10/20
P55
R52 794 to 806 10 10
X55 941 to 960 2/10/50 2/10/10
***Power delivered to the antenna port.
†Operation mode varies according to region. In Brazil, High Density mode is used. The maximum power level for Peru is
10mW.
◇Korea defines power as conducted (ERP) which is 1dB less then declared in table.
เครื่องโทรคมนาคมและอุปกรณ์นี้มีความสอดคล้องตามมาตรฐานหรือข้อกำหนดทางเทคนิคของ กสทช.
694 to 703, 748 to 758, 803
to 806
2/10/50 2/10/20/50
19/23
Page 20
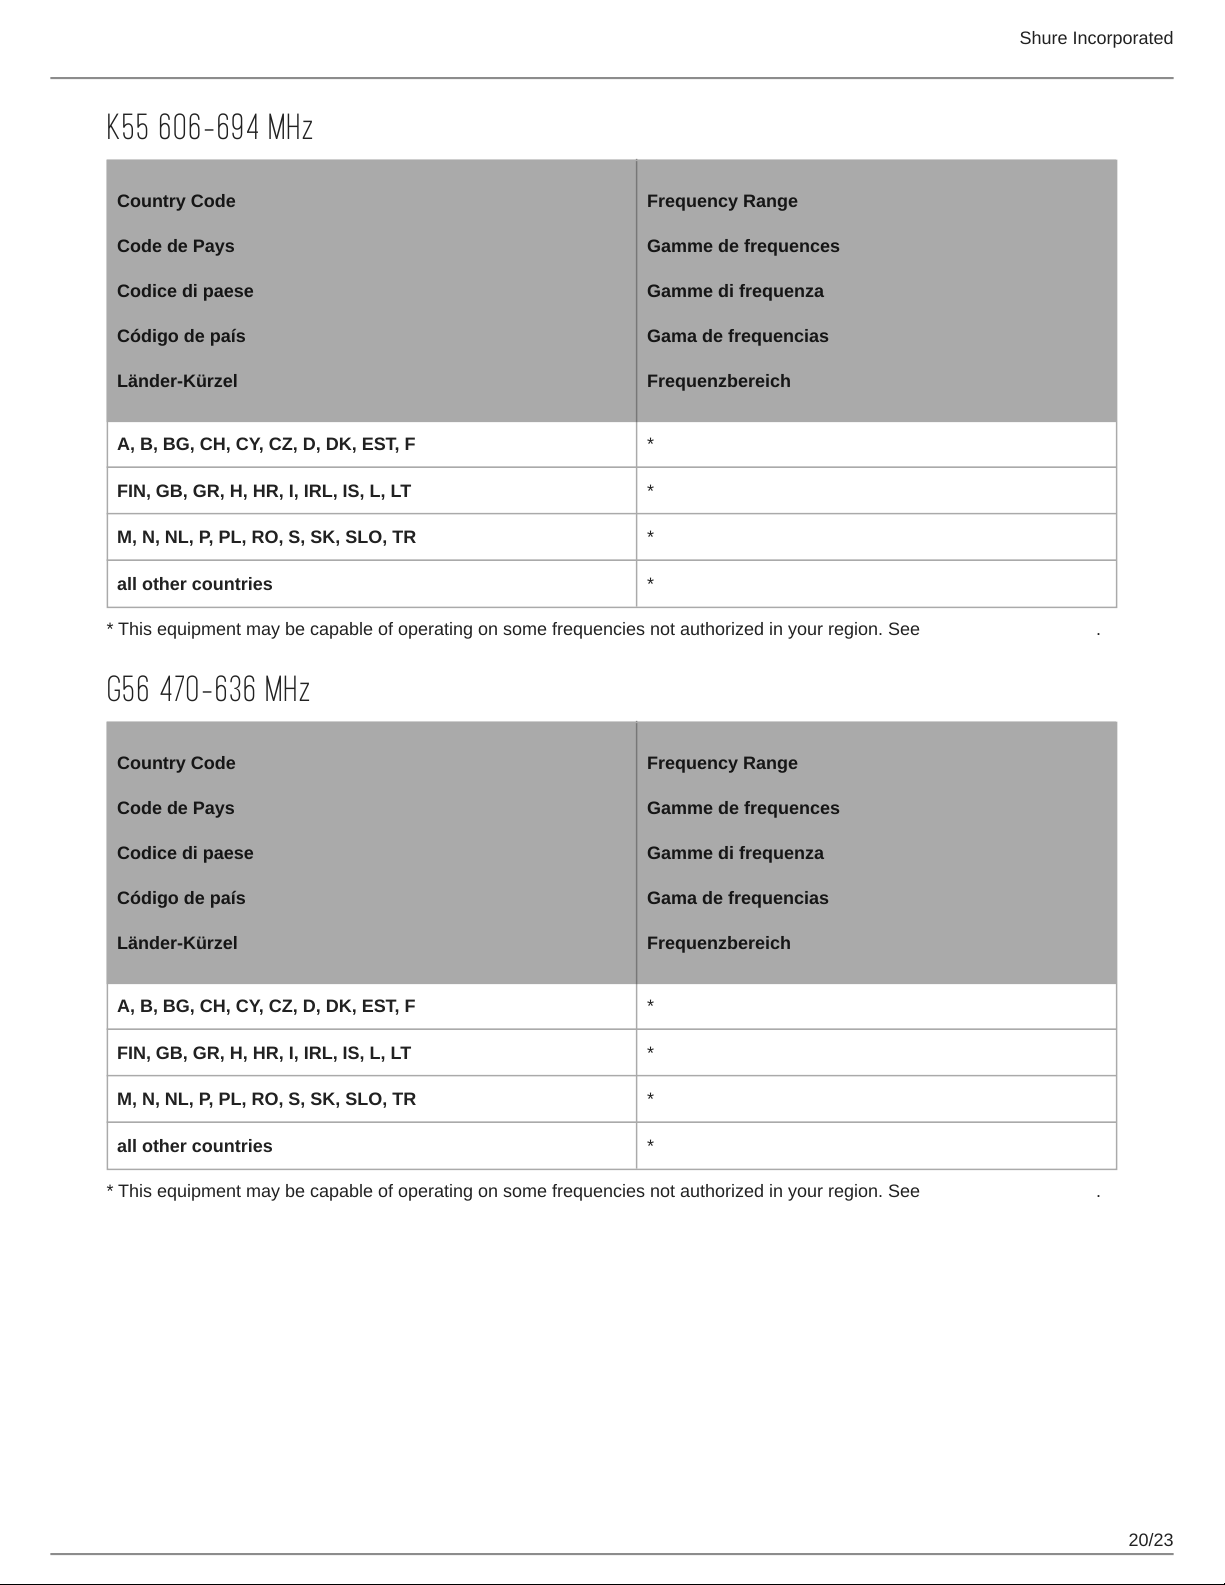
K55 606-694 MHz
Shure Incorporated
Country Code
Code de Pays
Codice di paese
Código de país
Länder-Kürzel
A, B, BG, CH, CY, CZ, D, DK, EST, F *
FIN, GB, GR, H, HR, I, IRL, IS, L, LT *
M, N, NL, P, PL, RO, S, SK, SLO, TR *
all other countries *
* This equipment may be capable of operating on some frequencies not authorized in your region. See Licensing Information.
Frequency Range
Gamme de frequences
Gamme di frequenza
Gama de frequencias
Frequenzbereich
G56 470-636 MHz
Country Code
Frequency Range
Code de Pays
Codice di paese
Código de país
Länder-Kürzel
A, B, BG, CH, CY, CZ, D, DK, EST, F *
FIN, GB, GR, H, HR, I, IRL, IS, L, LT *
M, N, NL, P, PL, RO, S, SK, SLO, TR *
all other countries *
* This equipment may be capable of operating on some frequencies not authorized in your region. See Licensing Information.
Gamme de frequences
Gamme di frequenza
Gama de frequencias
Frequenzbereich
20/23
Page 21
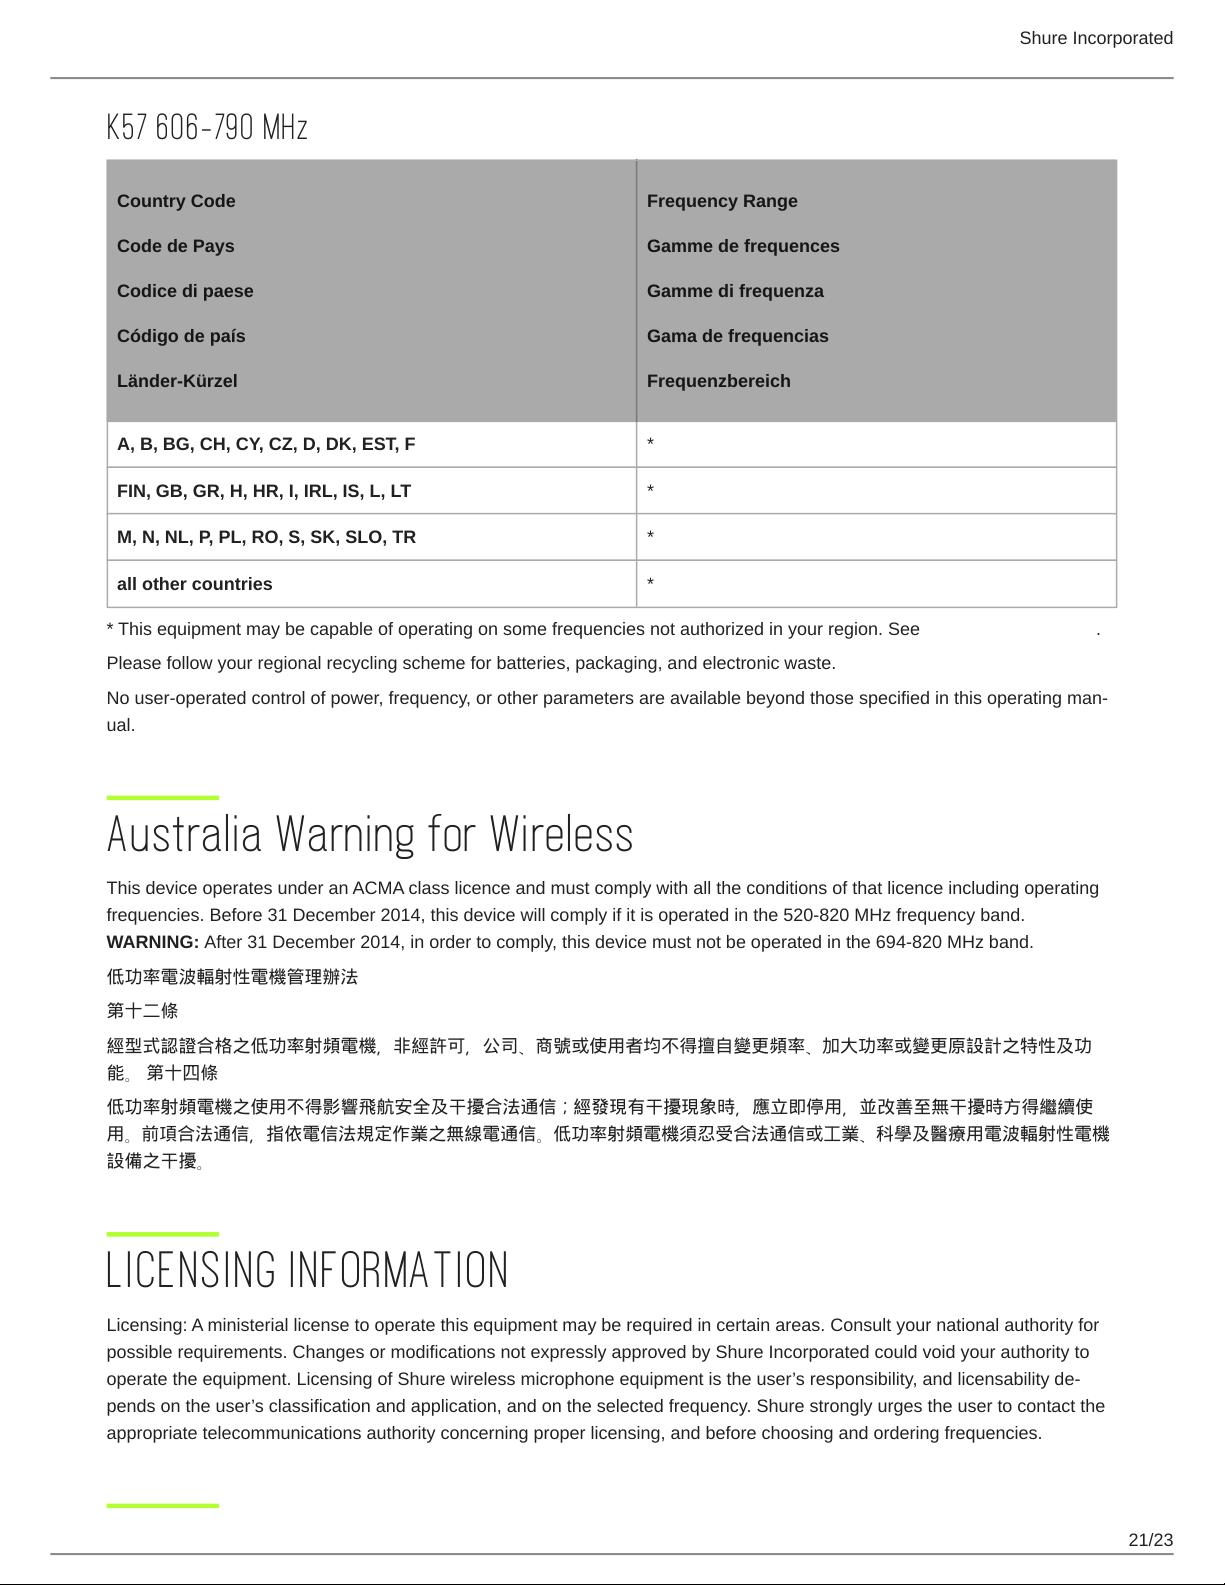
K57 606-790 MHz
Shure Incorporated
Country Code
Code de Pays
Codice di paese
Código de país
Länder-Kürzel
A, B, BG, CH, CY, CZ, D, DK, EST, F *
FIN, GB, GR, H, HR, I, IRL, IS, L, LT *
M, N, NL, P, PL, RO, S, SK, SLO, TR *
all other countries *
* This equipment may be capable of operating on some frequencies not authorized in your region. See Licensing Information.
Please follow your regional recycling scheme for batteries, packaging, and electronic waste.
No useroperated control of power, frequency, or other parameters are available beyond those specified in this operating man
ual.
Frequency Range
Gamme de frequences
Gamme di frequenza
Gama de frequencias
Frequenzbereich
Australia Warning for Wireless
This device operates under an ACMA class licence and must comply with all the conditions of that licence including operating
frequencies. Before 31 December 2014, this device will comply if it is operated in the 520-820 MHz frequency band.
WARNING: After 31 December 2014, in order to comply, this device must not be operated in the 694-820 MHz band.
低功率電波輻射性電機管理辦法
第十二條
經型式認證合格之低功率射頻電機,非經許可,公司、商號或使用者均不得擅自變更頻率、加大功率或變更原設計之特性及功
能。 第十四條
低功率射頻電機之使用不得影響飛航安全及干擾合法通信;經發現有干擾現象時,應立即停用,並改善至無干擾時方得繼續使
用。前項合法通信,指依電信法規定作業之無線電通信。低功率射頻電機須忍受合法通信或工業、科學及醫療用電波輻射性電機
設備之干擾。
LICENSING INFORMATION
Licensing: A ministerial license to operate this equipment may be required in certain areas. Consult your national authority for
possible requirements. Changes or modifications not expressly approved by Shure Incorporated could void your authority to
operate the equipment. Licensing of Shure wireless microphone equipment is the user’s responsibility, and licensability de
pends on the user’s classification and application, and on the selected frequency. Shure strongly urges the user to contact the
appropriate telecommunications authority concerning proper licensing, and before choosing and ordering frequencies.
21/23
Page 22
Shure Incorporated
Certifications
Certified under FCC Part 15 and FCC Part 74.
Certified by ISED in Canada under RSS-210.
FCC ID: DD4ADX2FDG57, DD4ADX2FDK54, DD4ADX2FDX55. IC: 616A-ADX2FDG57, 616A-ADX2FDK54.
Meets essential requirements of the following European Directives:
•
WEEE Directive 2012/19/EU, as amended by 2008/34/EC
•
RoHS Directive EU 2015/863
Note: Please follow your regional recycling scheme for batteries and electronic waste
This product meets the Essential Requirements of all relevant European directives and is eligible for CE marking.
Hereby, Shure Incorporated declares that the radio equipment is in compliance with Directive 2014/53/EU. The full text of the
EU declaration of conformity is available at the following internet address: http://www.shure.com/europe/compliance
Authorized European representative:
Shure Europe GmbH
Headquarters Europe, Middle East & Africa
Department: EMEA Approval
Jakob-Dieffenbacher-Str. 12
75031 Eppingen, Germany
Phone: +49-7262-92 49 0
Fax: +49-7262-92 49 11 4
Email: [email protected]
Information to the user
This device complies with part 15 of the FCC Rules. Operation is subject to the following two conditions:
1.
This device may not cause harmful interference.
2.
This device must accept any interference received, including interference that may cause undesired operation.
Note: This equipment has been tested and found to comply with the limits for a Class B digital device, pursuant to part 15 of
the FCC Rules. These limits are designed to provide reasonable protection against harmful interference in a residential installa
tion. This equipment generates uses and can radiate radio frequency energy and, if not installed and used in accordance with
the instructions, may cause harmful interference to radio communications. However, there is no guarantee that interference will
not occur in a particular installation. If this equipment does cause harmful interference to radio or television reception, which
can be determined by turning the equipment off and on, the user is encouraged to try to correct the interference by one or more
of the following measures:
•
Reorient or relocate the receiving antenna.
•
Increase the separation between the equipment and the receiver.
•
Connect the equipment to an outlet on a circuit different from that to which the receiver is connected.
•
Consult the dealer or an experienced radio/TV technician for help.
This device operates on frequencies shared with other devices. Consult the Federal Communications Commission White
Space Database Administration website to determine available channels in your area prior to operation.
Canada Warning for Wireless
This device operates on a noprotection, nointerference basis. Should the user seek to obtain protection from other radio ser
vices operating in the same TV bands, a radio licence is required. For further details, consult Innovation, Science and Econom
22/23
Page 23
Shure Incorporated
ic Development Canada’s document Client Procedures Circular CPC2128, Voluntary Licensing of LicenceExempt LowPow
er Radio Apparatus in the TV Bands.
Ce dispositif fonctionne selon un régime de non‑brouillage et de non‑protection. Si l’utilisateur devait chercher à obtenir une
certaine protection contre d’autres services radio fonctionnant dans les mêmes bandes de télévision, une licence radio serait
requise. Pour en savoir plus, veuillez consulter la Circulaire des procédures concernant les clients CPC‑2‑1‑28, Délivrance de
licences sur une base volontaire pour les appareils radio de faible puissance exempts de licence et exploités dans les bandes
de télévision d’Innovation, Sciences et Développement économique Canada.
This device contains licenceexempt transmitter(s)/receiver(s) that comply with Innovation, Science and Economic Develop
ment Canada’s licenceexempt RSS(s). Operation is subject to the following two conditions:
1.
This device may not cause interference.
2.
This device must accept any interference, including interference that may cause undesired operation of the device.
L’émetteur/récepteur exempt de licence contenu dans le présent appareil est conforme aux CNR d’Innovation, Sciences et
Développement économique Canada applicables aux appareils radio exempts de licence. L’exploitation est autorisée aux deux
conditions suivantes :
1.
L’appareil ne doit pas produire de brouillage;
2.
L’appareil doit accepter tout brouillage radioélectrique subi, même si le brouillage est susceptible d’en compromettre le
fonctionnement.
Contact Customer Support
Didn't find what you need? Contact our customer support to get help.
23/23
 Loading...