


Integrating communication, digital multi-media entertainment and
cost-efficient wideband access together, this slim-designed, portable and
intricate Notebook offers multi-media entertainment and high-speed
wideband internet access. In order to make customer experience
astonishing, it is also furnished with various business and application
functions. Through online help, you can obtain almost any kind of assistance
regarding operation while using our Notebook.
The latest information is referred to while preparing this user’s manual.
In this manual, screen shots and pictures are employed to present this
device in a more direct and specific manner. However, owing to
modifications of technical development & research as well as being
produced in different batches, pictures and descriptions about products
presented in this manual could be different from real ones. In that case,
functions of real products should prevail.
1. Outer Appearance Description
Front View
This Notebook is designed to details. For more information involving
outer appearance features, please refer to the figure below.
1
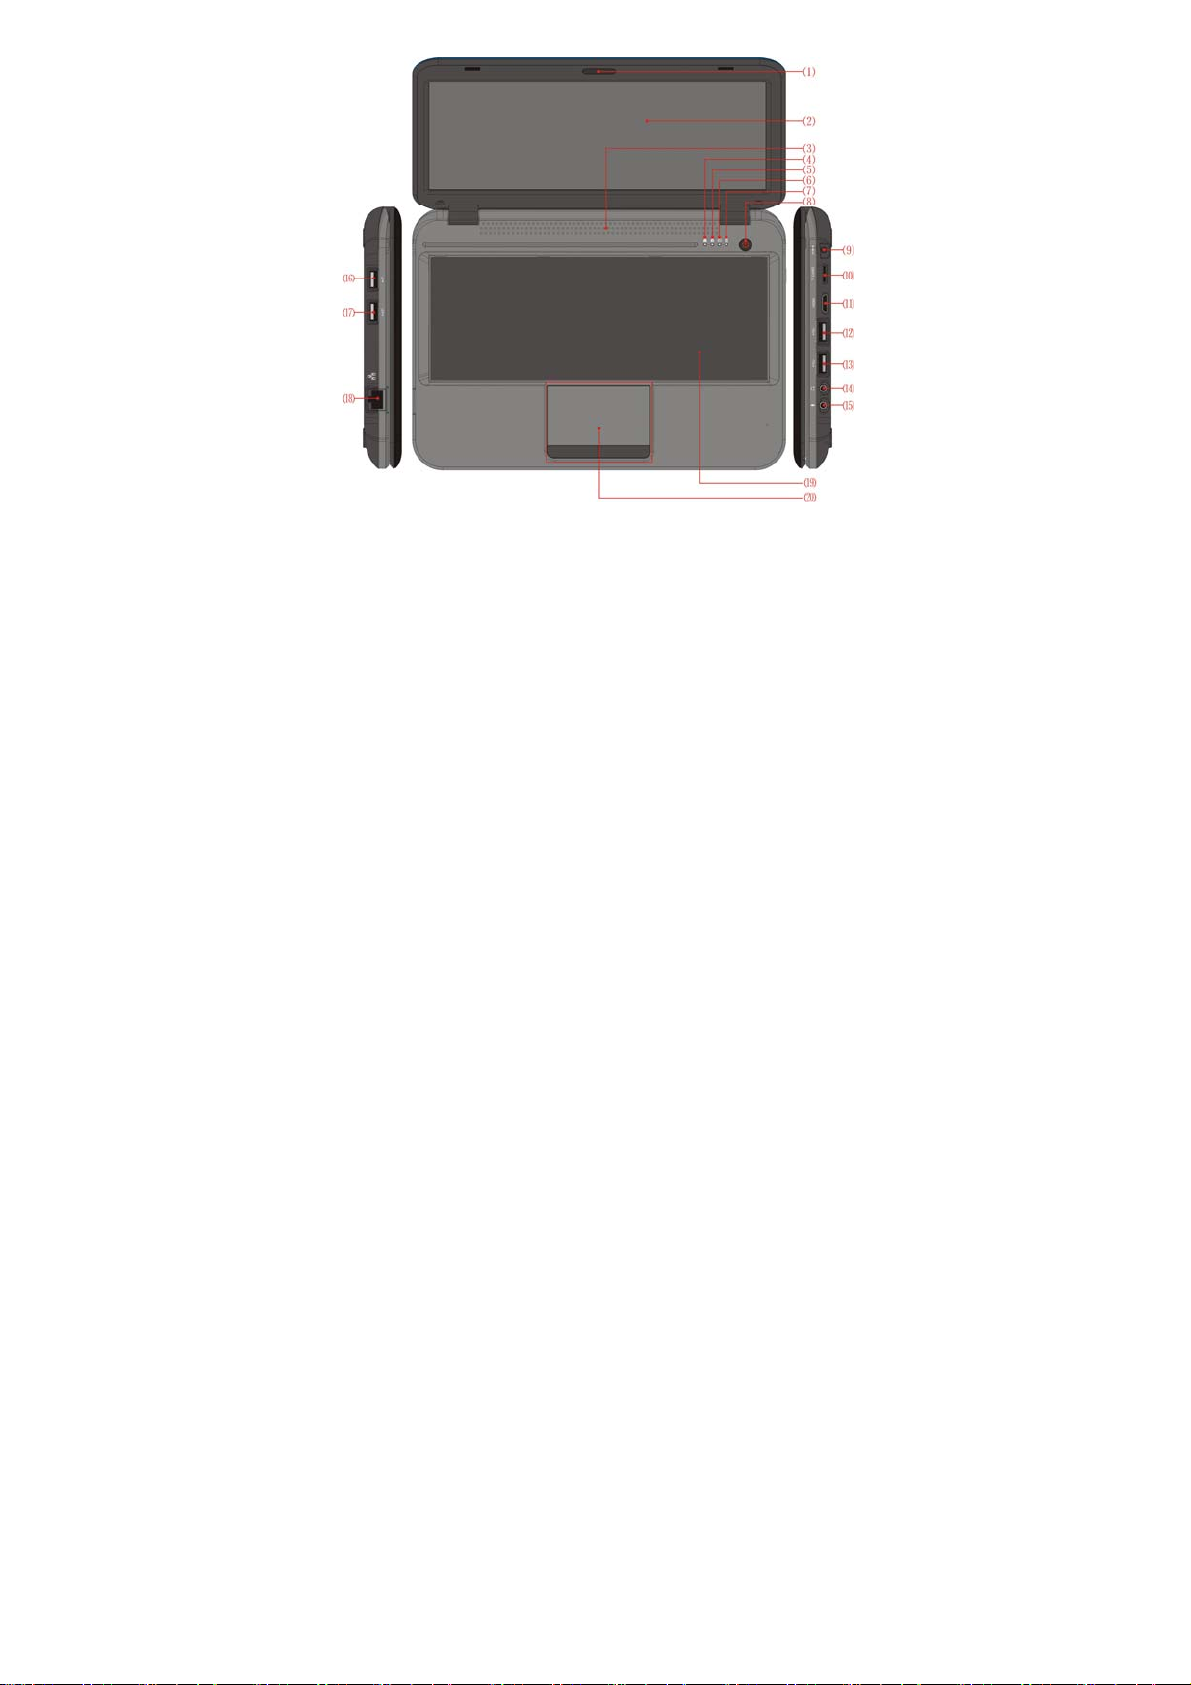
⑴ Camera ⑵ Liquid crystal display screen ⑶ Speaker ⑷ Num Lock
Indicator ⑸Caps Lock Indicator ⑹Power Indicator ⑺Charge Indicator
⑻Power Button ⑼Charge Connector ⑽TF Card Slot ⑾HDMI Interface
⑿USB Connector ⒀USB Connector ⒁Earphone Jack ⒂Microphone Jack
⒃USB Connector ⒄USB Connector ⒅Network port ⒆Keyboard
⒇Touch pad and button
2

Power Button:
When it is off: Press and hold the Power Button about 3 seconds to turn it
on;
When it is on: Press the Power Button to send it to dormant status in which
press the same button again to prompt users to unlock the screen. Press
and hold such button for approx. 5 seconds, a turn-off image appears on the
screen. To reset and turn it off, press and hold the Power Button for around
7 seconds.
Camera:
Click the camera icon to activate the camera mode from which you can take
photos or shoot videos.
Num Lock Indicator:
Enable or disable the number keypad.
Caps Lock Indicator:
Shift between uppercase and lowercase.
Power Indicator:
The Power Indicator remains lit when the Notebook is on and turns
extinguished when off.
Charge Indicator:
The Charge Indicator lights up while charging the Notebook with the adaptor
that is delivered together with the Notebook and dies out once the integral
battery is fully charged.
Charge Connector:
Charge the Notebook with the original adaptor via this connector.
3

Watch out if using the Notebook or doing something else at the
Notebook while it is being charged as the bottom could become
very hot. It is normal to feel temperature rising at the bottom of
the Notebook while being charged or in use. Do not place the Notebook on
any soft surface such as bed or couch etc. as heat radiation could be
impaired. To avoid being scalded, do not put the Notebook on your lap or
other body parts.
Earphone Jack:
Via the earphone jack, you can enjoy high quality music/videos with stereo
earphones. Using earphone disables the speaker automatically.
Notes: It is highly recommended to turn down volume before inserting the
earphones plug into the earphone jack for the sake of hearing protection.
Microphone Jack:
Insert the plug of the microphone and then run a voice-recording application
to start recording.
HDMI Interface:
Via the HDMI Interface, you can output audio/video signals to a HD TV set
from the Notebook via a HDMI cable.
USB Connector:
The USB Connectors of the Notebook are Plug-and-Play USB connectors to
which peripheral devices, memory stick and USB mouse for example, can
be connected for data access or other purposes. Before unplugging an USB
device (e.g. memory stick) from the Notebook’s USB Connector, mind to
remove it in compliance with normal removal procedures and then unplug it.
4

Otherwise, the system will report a fault. In that case, if plugged such USB
device back in next time, it may not be correctly recognized and accessed by
the system.
The normal removal procedures are as follows: Select Setup and Storage
Setup, click the relevant USB device and then Remove. When the system
prompts that the memory card has been removed successfully, immediately
unplug the USB device from the corresponding USB Connector.
TF Card Slot:
A TF card will be recognized automatically by the Notebook once being
inserted. Before inserting, make sure it is positioned correctly. Do not pop
out the TF card in the data access process. Before unplugging the TF card,
mind to remove it in compliance with normal removal procedures and then
unplug it. Otherwise, the system will report a fault. In that case, if inserted
such TF card back in next time, it may not be correctly recognized and
accessed by the system.
As for normal removal procedures, please refer to the USB device removal
procedures.
Speaker:
When music is on, do not block the speaker in order to ensure perfect sound
effects.
2. Get started
2.1 Charge the battery
As the Notebook contains a battery, the system will prompt users to charge it
when the battery electricity falls low.
5

Instructions:
a. Plug in the power adaptor and the Charge Indicator lights up, indicating
that the battery is being charged. As soon as the battery is fully charged, the
Charge Indicators goes off.
b. The Notebook is still available in the charge process.
c. It is strongly suggested to use the original power adaptor to avoid causing
any damage to the device.
2.2 Turn the Notebook on and off
Turn-on: When the battery is powerful enough, press the Power Button
directly to turn it on;
Turn-off: When it is on, press and hold the Power Button for 5 seconds to
make the turn-off image appear on the screen. Slide a key to unlock and
then turn it off.
2.3 Browse documents:
Open the OI document manager to enter the document browse interface.
Press and hold the left mouse button on documents to implement operations
like rename and delete and so on.
2.4 Play music:
Click the music player icon to launch the Music Player. After the player
loading tracks automatically, select a track to start playing.
Alternatively, double-click the document manager and select target tracks,
and then launch the Music Player to start playing.
2.5 Configure network:
a. Wireless Network Configuration:
6

Click the wireless network icon to enter the Wireless Network Interface.
Following completed relevant settings, a Wifi connection icon will show up in
the upper part of the screen, indicating that the network is connected and
ready for internet access.
Notes and Techniques Concerning Internet Access through Wifi: Before
accessing the internet, check whether the Wifi router is normally operational
and the Notebook is correctly connected to such router. Settings of options
like Encryption Method, ID Verification and Network Password etc. must
match those of the target Wifi router.
b. Wired Network Configuration:
When the network cable is correctly wired, click the wired network icon to
enter the Wired Network Interface. Following completed relevant settings, a
wired network connection icon will show up in the upper part of the screen,
indicating that the network is connected and ready for internet access.
IPs fall into 2 categories such as dynamic IP and static IP. For details,
please consult your network provider. Configuring IP correctly constitutes a
prerequisite for successful internet access.
Dynamic IP:
Dynamic IP is usually adopted by LAN routers and allocated automatically.
Therefore, there is no need for configuration.
Static IP:
If LAN routers adopt static IP, it is required to set up IP address and gateway
as well as other options.
7

3. Notes:
3.1 Forced Turn-off
Press and hold the Power Button for 7 seconds more or less to turn off the
Notebook imperatively.
3.2 Default Settings Recovery
Follow Menu Key – Setup – Privacy – Recover to Factory Settings to reset
the Notebook to the factory settings. Warning: Recovering to factory settings
will erase applications downloaded and installed by users as well as related
application data and setup and accordingly, use this option with discretion.
3.3 LCD Screen Protection
Do not directly touch the LCD screen with sharp-pointed objects so as to
protect the screen.
3.4 Use of Original Power Adaptor
It is highly recommended to use and charge the Notebook with the original
power adaptor so as to avoid any damage to the Notebook.
4 Desktop
4.1 Status bar
On the upper part of the screen is a status bar. There’s one software button on
the left and five on the right of it, and they are desktop button, screen capturing
button, volume button, menu button and return button; system information such as
strength of WI-FI signal, Ethernet status, battery status and time is also shown on
the status bar.
8
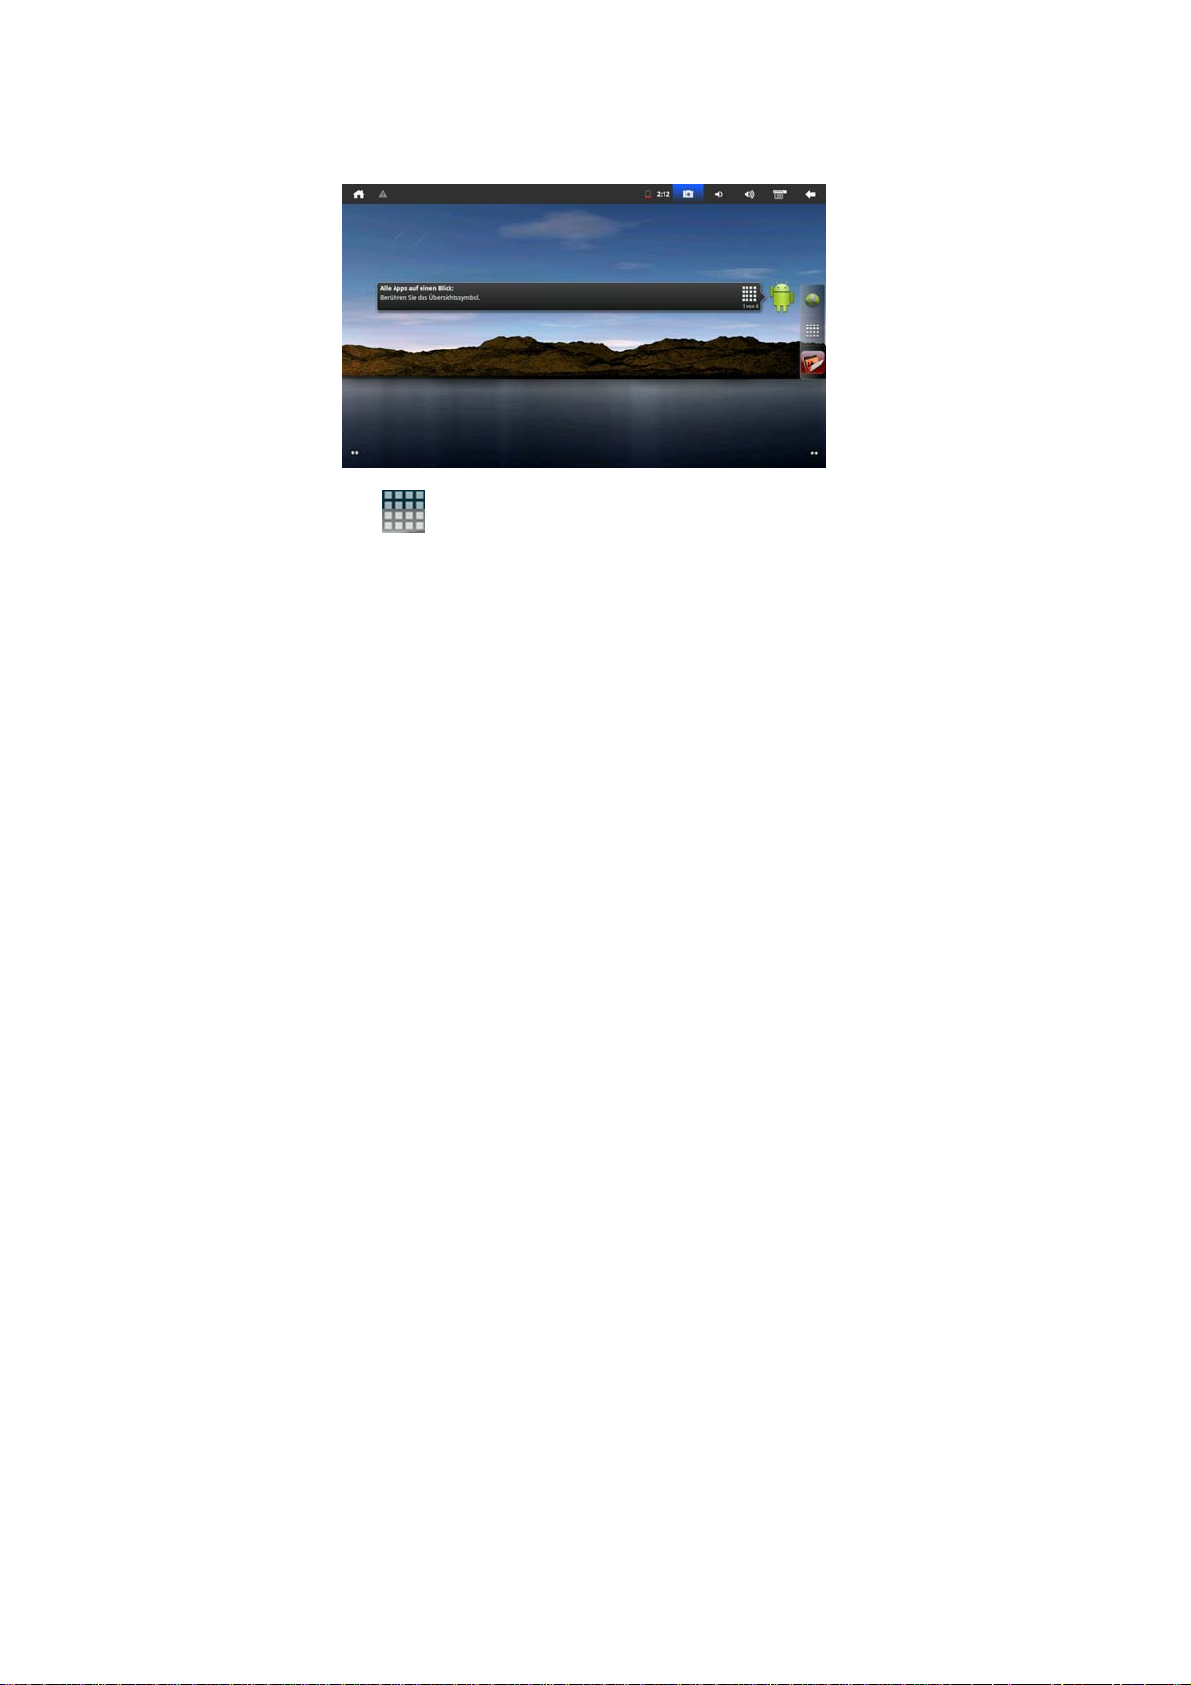
4.2 Main screen
Main screen page of panel palm computer contains two modes: Desktop widget
mode and application program icon mode and they can be shifted with the shortcut
button on the right middle. Screen of desktop widget mode is shown as follows:
Click button on the shortcut bar to enter the application program icon
screen and the screen is shown as follows:
9

Click button to enter the screen of desktop widget mode
4.3 Shortcuts
On the screen of desktop widget mode, press menu key or click the menu icon
on the status bar on the top and a shortcut menu will be popped up under
the screen. Menu items include Add, Wallpaper, Search, Notification, Desktop
Setting and System setting shown as follows:
10

4.4 Add shortcut of widget
1. Shortcut
To add a shortcut onto the main screen, press Menu-Add-Shortcut on the screen of
desktop widget mode. After it is selected, it will be added onto the main screen.
After that, click the shortcut icon on the main screen for corresponding shortcut
operations.
11

2. Window widget
To add a window widget onto the main screen, press Menu-Add-Window widget on
the screen of desktop widget mode. After it is selected, it will be added onto the
main screen. After that, click the shortcut icon on the main screen to carry out
corresponding shortcut operations.
12

4.5 Use of desktop widget
The user can add, delete and install desktop widgets, add and delete
application program icons, move and adjust their positions and drag icons between
working areas and between working area and shortcut bar, and add or delete icons
and so on.
On the screen of desktop widget mode, hold widget icon to pop up a small
check, and pop up a dustbin mark in the middle of the shortcut. Drag the icon to
move it anywhere on the desktop, or drag it direc tly into the dustbin and delete it.
5.Web browse r
The user can access to the internet through the browser
Click the browser icon on the desktop to launch internet browser and
13

open a webpage shown as follows:
6 Introduction to typical applic ations
6.1 Email
Click email icon
1. Set an email account
2. Establish a new email
3. Send and receive emails
4. Download or open an attachment
Note: Press menu key to pup up a shortcut menu
to enter the mailbox for the following operations:
14

6.2 File browser
Click icon of file browser to enter the screen of file browser:
On the upper right corner is an operation list for operations of files, including Move,
Copy, Rename and Delete.
Installation of files
To install software on the file browser, just click an installation file with file
extension name of .APK to pop up an installation prompt window. Select
“Installation” to install the software into the equipment
15

6.4 Camera
Click the icon to enter photo shot mode by default, you can select
photo shot, video shot and make corresponding photo shots or video shots
operation.
7 Tips and skills
7.1Some convenient operation methods
Click to return to homepage
Click to adjust volume
7.2 Internet access setting
7.2.1 Access to wireless internet
Click the icon
wireless internet access screen shown as follows:
for connecting to wireless internet and enter
16

7.3 Prompt for use of battery
The equipment has a wide screen, which uses a large quantity of power. To
extend use time of the battery, you can reduce the frequency for use of its functions
1. See movies, listen to music or take phot os
2. Display brightness: Press Menu key- setting-Sound and display
(display setting ) -Brightness (lower brightness)
3. Network search: Press Menu key-Setting-Wireless internet-
Connecting to wireless-WIFI setting -Network n otification
8. Personal settings
Click desktop setting icon on the shortcut menu for personal settings
17

8.1 Wireless and internet
WIFI
To enable or disable WIFI, set WIFI in the setting menu as “Enabled or Disabled”
after WIFI is set
8.2 Sound and display
Set ring, notification and brightness of screen
18

Mute mode
To set all sound as Mute except for media and ring clock, press Menu-system
setting-Sound and display (sound settin g), Mute mode
Media volume
To set volume of music and video, press Menu key-System setting-Sound and
display (sound setting) –Media volume
Ring of notification
To set default ring of notification, press Menu key-System setting-Sound and
display (sound setting) –Ring of notification
Select operation sound
To make sound when using the screen for selection, press Menu key-System
setting-Sound and display (sound setti ng) – Tactile feedback
To use soft keys and conduct some UI interacting vibrations, press Menu
key-System setting-Sound and displa y (sound setting)- Tactile feedback
19

Brightness
To adjust brightness of the screen, press Menu key-System setting-Sound display
(display setting )-Brightness
Screen timeout
To adjust delay before automatic locking of the screen, press Menu key-System
setting-Sound and display (display setting)-Screen timeout
8.3 Application programs
Unknown source
After it is selected, application programs provided by any non-electronic market are
allowed for installation
Manage application programs
To manage and delete installed application programs, press Menu key-System
setting-Application programs-Manage application programs
Service in operation
To view and control services in operation, press Menu key-System
setting-Application program-Service in operation
Development
To set development option in application programs, press Menu key-System
setting-Application program-Development
8.4 SD card and memory of equipm ent
View usable storage space
20

Storage equipment (SD card and flash disk)
To check and operate the storage unit, such as uninstall, enter Menu-System
setting-SD card and Memory of the unit and select corresponding unit in the storage
equipment catalogue, such as storage card. After entering the screen of the storage
unit, its total capacity and av ailable space can be checked, or un install it, and the
screen is shown as follows:
21

Memory of equipment
To check memory of equipment, enter Menu-system setting-SD card and Memory
of equipment and check in the catalogue of memory of equipment
8.5 Language and keyboard
Set language and region, input langua ge and modify items automatically
22

Select language and region
To select language and region, press Menu key-System setting-Language and
keyboard-Select language region
User dictionary
To add words in user dictionary and delete words from user dictionary, press
Menu key-System setting-Language a nd keyboard-User dictionary
Android keyboard
To set Android keyboard, press Menu key-System setting-Language and
keyboard-Android keyboard
8.6 Date and time
To set date, time, time zone, hour format and date format, press Menu key-System
setting-Date and time
23

9. Use of HDMI
The video playing on the panel computer can be shifted to HDMI display
equipment for playing through HDMI, the maximum output resolution supported
by the panel computer is 720P, and the directions are as follows:
1. Start the panel computer
2. Connect the panel computer to HDMI display equipment with an HDMI
connecting cable and launch the display equipment, and HDMI connection
message will be popped up on the status bar
3. Play video files on the panel com puter
4. Press MENU key, and the panel computer will get dark, and the video will be
shifted to HDMI display equipment for playing. Just wait patiently, and the
process will take about 5 seconds.
24

10. Troubleshooting
10.1 Close application program
Opened programs occupy memory in the equipment and influence running its
speed. Therefore, the programs that won’t be used should be closed in time to
reduce use of memory so that the equipment can run at normal speed.
To close an application program, click the icon on the desktop shortcut bar
and enter system setting screen, select Application program-Service in operation,
the screen is shown as follows:
Click the application program to close and pop up a window to stop service,
shown as follows:
25

Click Stop to close the application program and the program will disappear from
the window in use
10.2 Forced power off
1. Hold power key of the equipment for about 7 seconds and the equipment will be
off.
10.3 Resume to the default setting
To resume the equipment to default setting and clear all information, press
Menu key-System setting-Right of privacy-Resume to default settings
Warning: After the equipment is reset, Google account, system data and setting of
application programs and downloaded application programs will be deleted, Be
cautious in using the function.
Caution :
Changes or modifications not expressly approved by the party responsible for
compliance could void the user's authority to operate the equipment.
26

This device complies with part 15 of the FCC Rules. Operation is subject to the
following two conditions: (1) This device may not cause harmful interference, and (2)
this device must accept any interference received, including interference that may cause
undesired operation.
Any Changes or modifications not expressly approved by the party responsible for
compliance could void the user's authority to operate the equipment.
Note: This equipment has been tested and found to comply with the limits for a Class B
digital device, pursuant to part 15 of the FCC Rules. These limits are designed to
provide reasonable protection against harmful interference in a residential installation.
This equipment generates uses and can radiate radio frequency energy and, if not
installed and used in accordance with the instructions, may cause harmful interference
to radio communications. However, there is no guarantee that interference will not
occur in a particular installation. If this equipment does cause harmful interference to
radio or television reception, which can be determined by turning the equipment off and
on, the user is encouraged to try to correct the interference by one or more of the
following measures:
-Reorient or relocate the receiving antenna.
-Increase the separation between the equipment and receiver.
-Connect the equipment into an outlet on a circuit different from that to which the
receiver is connected.
-Consult the dealer or an experienced radio/TV technician for help.
The device has been evaluated to meet general RF exposure requirement. The device
can be used in portable exposure condition without restriction.
 Loading...