

Page 1
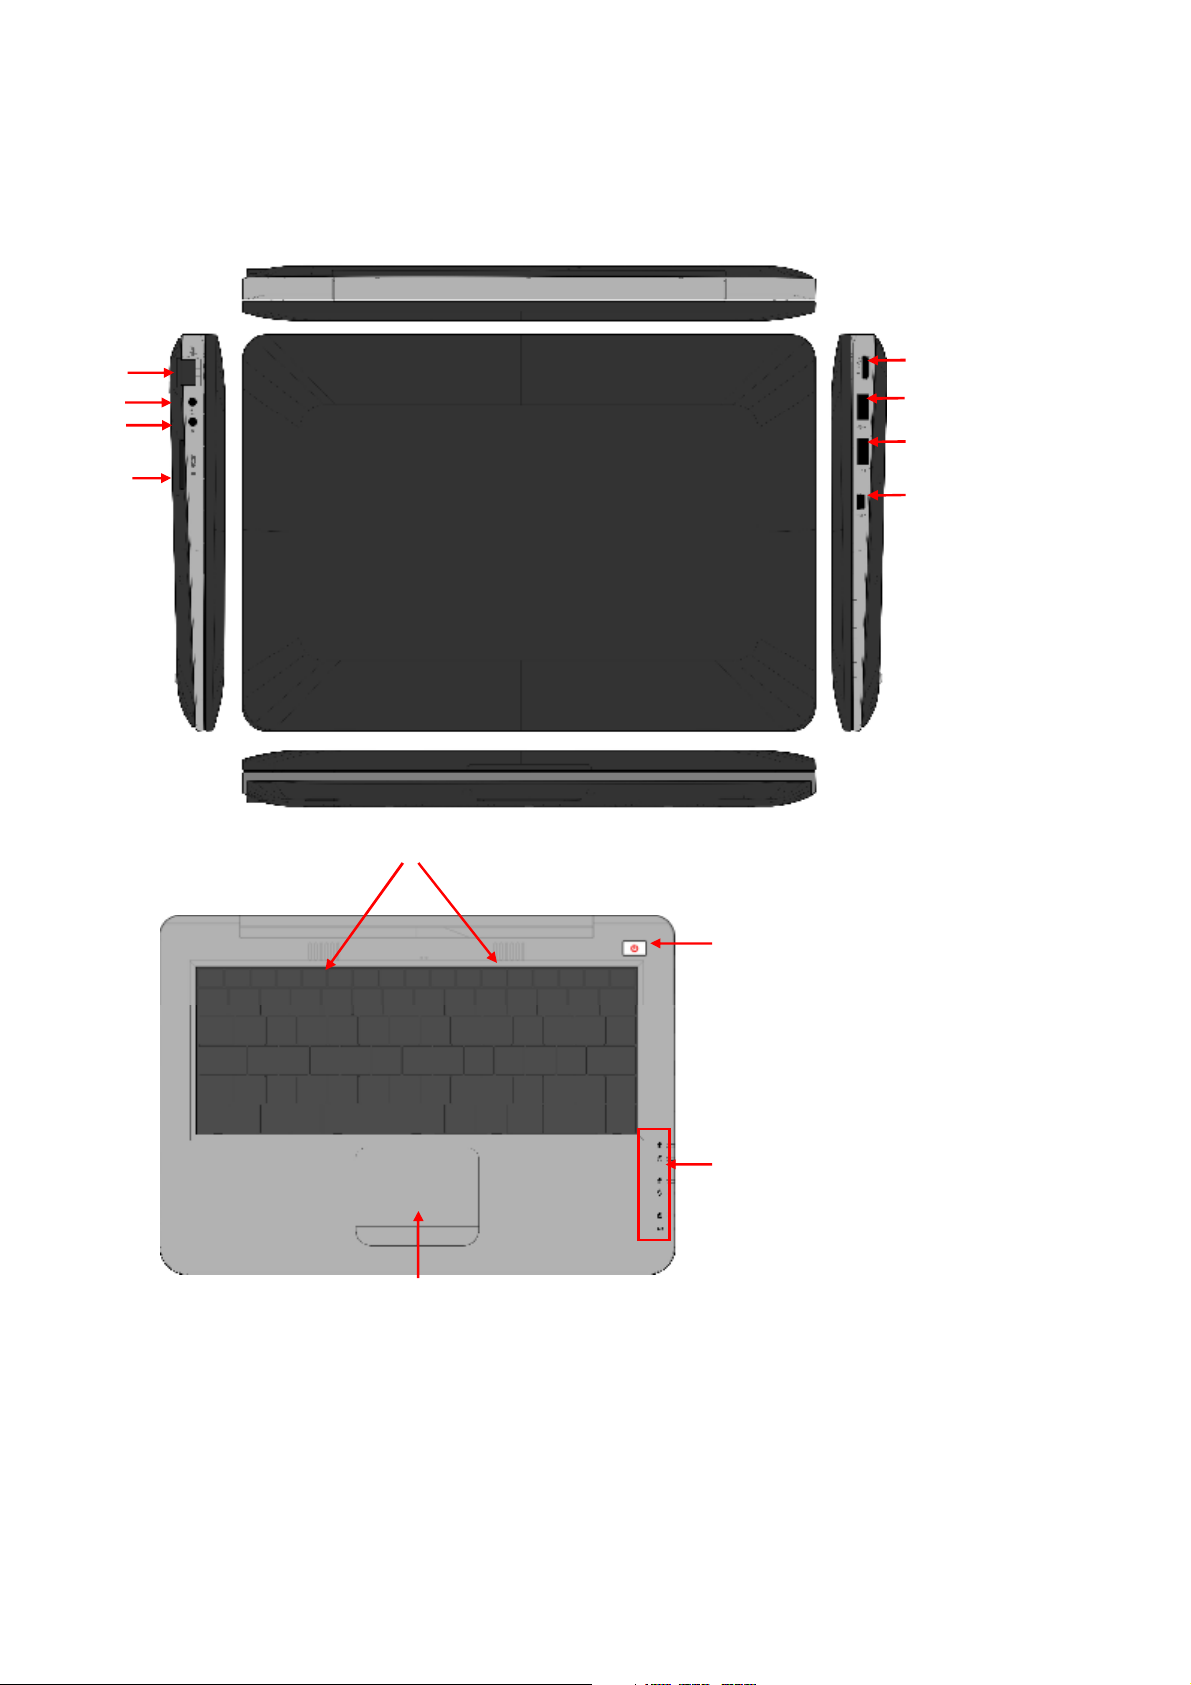
1. Description of appearance
Product structure:
hernet port
Earphone
DC in
SD card slot
HDMI port
USB port
USB port
OTG port
Speaker
Power key
Touch pan el
1
Page 2
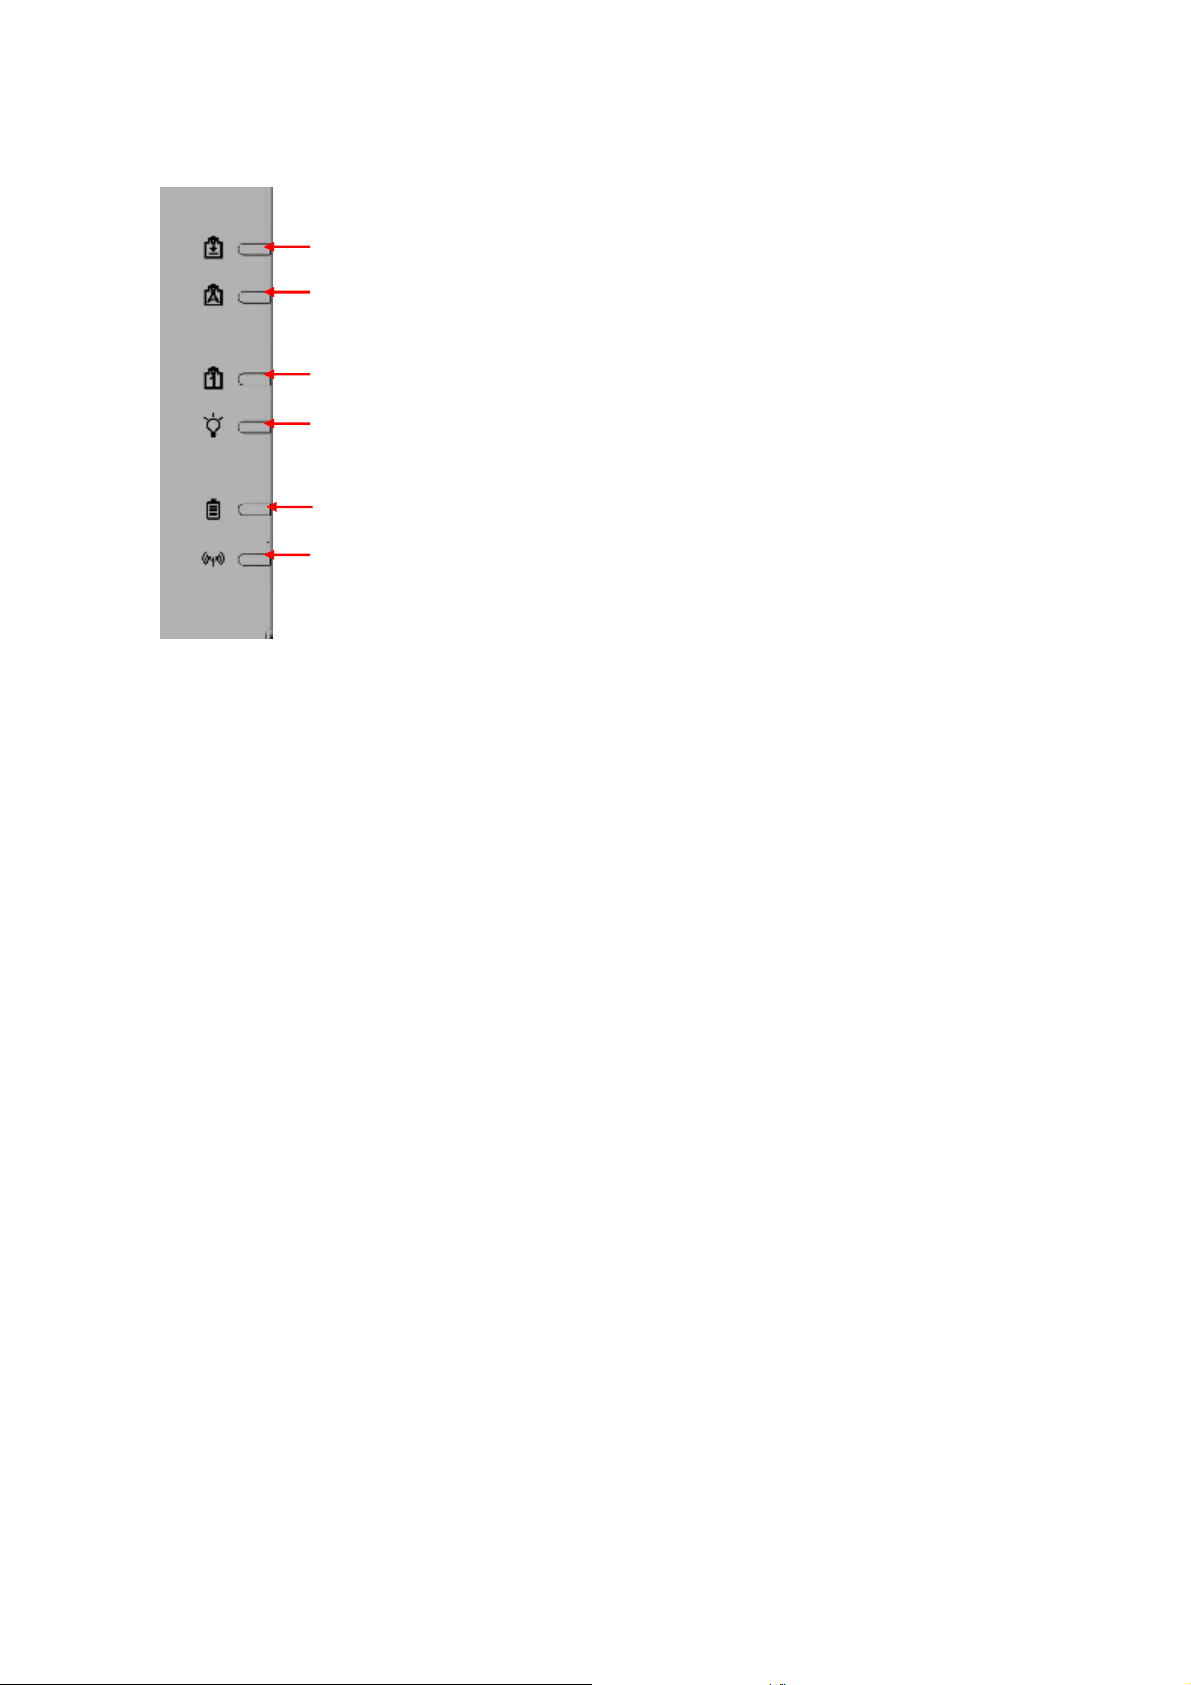
Indicator for direction key
Caps indicator
Indicator for numeric key
Working indicator
Charging indicator
WIFI indicator
Get ready
Statement: This Company is committed to continuous improvement of product quality, and
the software version will be updated from time to time. In case of any functional
inconsistency of finally delivered products with the description in this manual, please refer to
the finally delivered products. Thank you for your understanding!
2.1 Battery charging
The pad has a built-in battery. Charging will be recommended by the system when the battery
level is low.
Power adapter
One end of the adapter is connected to an outlet, and the other end to the pad’spowerjack,to
charge the device. (It is strongly recommended to use the power adapter supplied to avoid
damage.)
Charging method:
1. Plug in power adapter, and the battery charging indicator turns red, indicating the battery is
being charged. When the battery is fully charged, the indicator shows green. Plug out the adapter
and the indicator will extinguish.
2. During charging, the user may still use the pad.
2.2 Use of storage card
Insert storage c ard:
2
Page 3

Insert the storage card into the slot, and press the card into it with a finger until a click is heard.
The top left of the screen will read: Preparing storage card.
Browse the files on the storage card:
Start “My pad” procedure to show all files under the root directory. Select “Storage ca rd 1” and
open it to browse the contents of the card.
Draw the storage card:
Close all files opened on the card. Click menu to select “Setting – Internal storage of the storage
device – Storage ca rd 1 – Unload the storage card”, and the system will pop up a prompt: “The
storage card removed successfully”. Press it lightly to bounce a portion of the card, and then take
it out of the slot. The top left of the screen will read “T he storage ca rd removed successfully”.
Precautions:
1. The card shall be inserted into right position, or it may be damaged;
2. Please do not forcedly draw the storage card from slot without “unloading the storage card”,
to avoid any damages to the card;
3. It is recommended to use the storage cards of main brands, to avoid incompatibility of cards.
2.3 Hot plugging of the storage card and external USB disk
Please do not hot plug the storage card or external USB disk while using or browsing the files on
them. Directly plugging out of the storage card or external USB disk whose files are being
browsed or used in such software as My video, My music and My photos may damage the card
and disk, and may also automatically exit the procedure for the purpose of self-protection. For the
plugging of the storage card, please refer to “2.2 Use of storage card”. Close all files being used
before plugging out of the external USB disk.
2.4 Storage space
The device has three storage spaces: internal memory, USB disk and storage card. The device’s
internal storage will not be displayed; the file name of the storage card displayed is “SD card 1”;
and the file names of the external USB disk are “USB 1” and “USB 2”. The storage space for t he
system is used for storing system files only; the total internal storage space is 4B; and the space of
USB disk and storage card depends on their capacity, with 32GB at most.
For specific information about memory, please refer to 8.7 Stora ge card and device storage.
2.5 Start-up and shutdown
1. Start- up : When the battery power is sufficient, press and hold the power key for 2 seconds to
start up the device. After start-up, enter main interface directly;
2. Shutdown: Press and hold the power key (for 4 seconds) and a shutdown confirmation int erface
will pop up.
3
Page 4
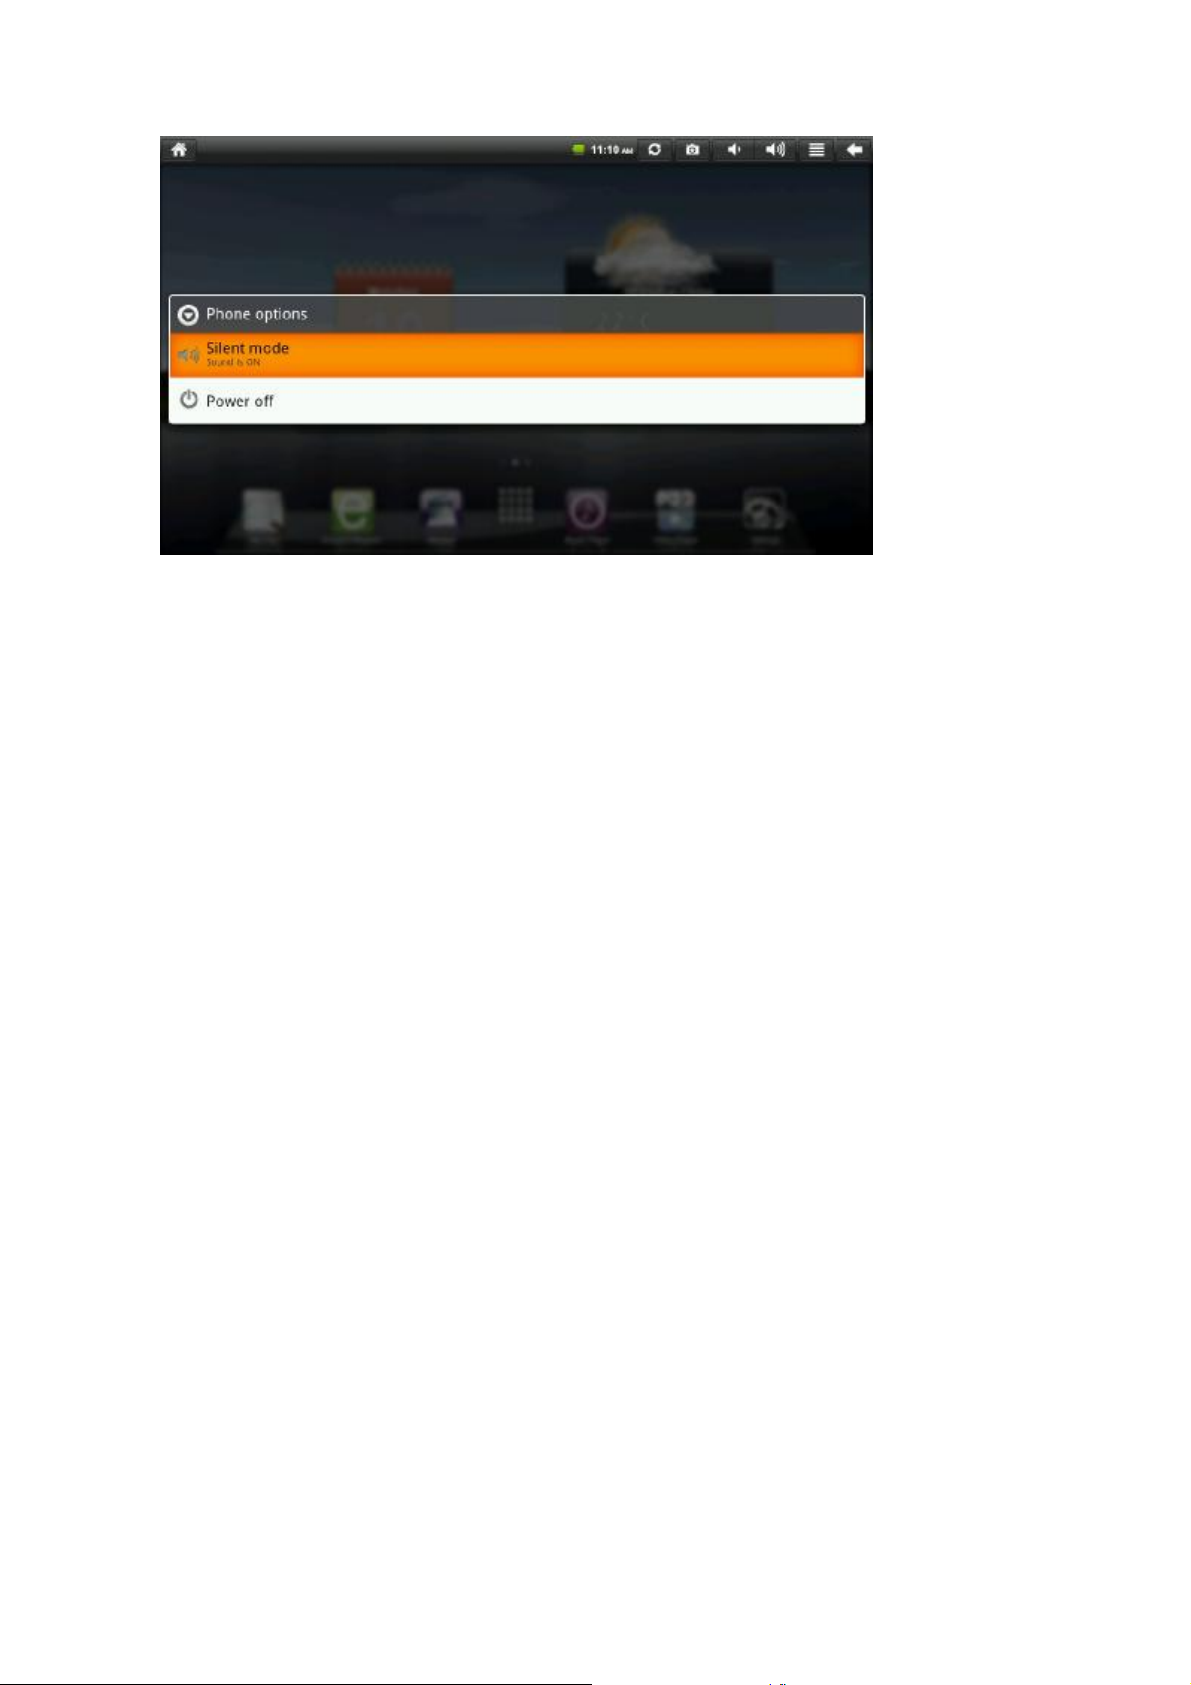
Click “Power off” toshutdownthedevice.PressESCkeytoreturntooperationinterfacefor
further use.
Click “Silent mode” to enter silent mode or close silent mode.
3. Sleep: Press and hold the power key (for 2 seconds) to enter sleep status, where the LCD will
dim out. Under sleep status, press the power key to wake it up. If the battery level i s very low
under sleep status, the device will shutdown automatically after start-up for saving energy.
3. Input operation
3.1 Keyboard
While using procedures or files that require input text and numbers, you may use the keyboard to
input them.
Note: The device supports external USB keyboard, but some keys may fail to work when you use
such external USB keyboard.
3.2 Touch panel
The touch panel can sense the moves of your finge rs. Following operations are a vailable:
Note: Please do not place any object on the surface of the touch panel, for it may scrape or press
the panel.
Click: Select an icon, and click the left mouse key to choose a desired icon or item.
Press and hold: Select an icon, and press and hold the left mouse key to choose the icon. You may
also drag it down to the shortcut bar on the bottom of the desktop for display.
Drag: You may drag an icon on the desktop t o move among different pages within target interface.
You may also drag the application procedure icon to the shortcut bar.
3.3 Mouse
The device supports external USB mouse. When the USB mouse was inserted, you may click,
select, drag, slide and right click to pop up the function menu.
4. Desktop
4
Page 5
4.1 Status bar
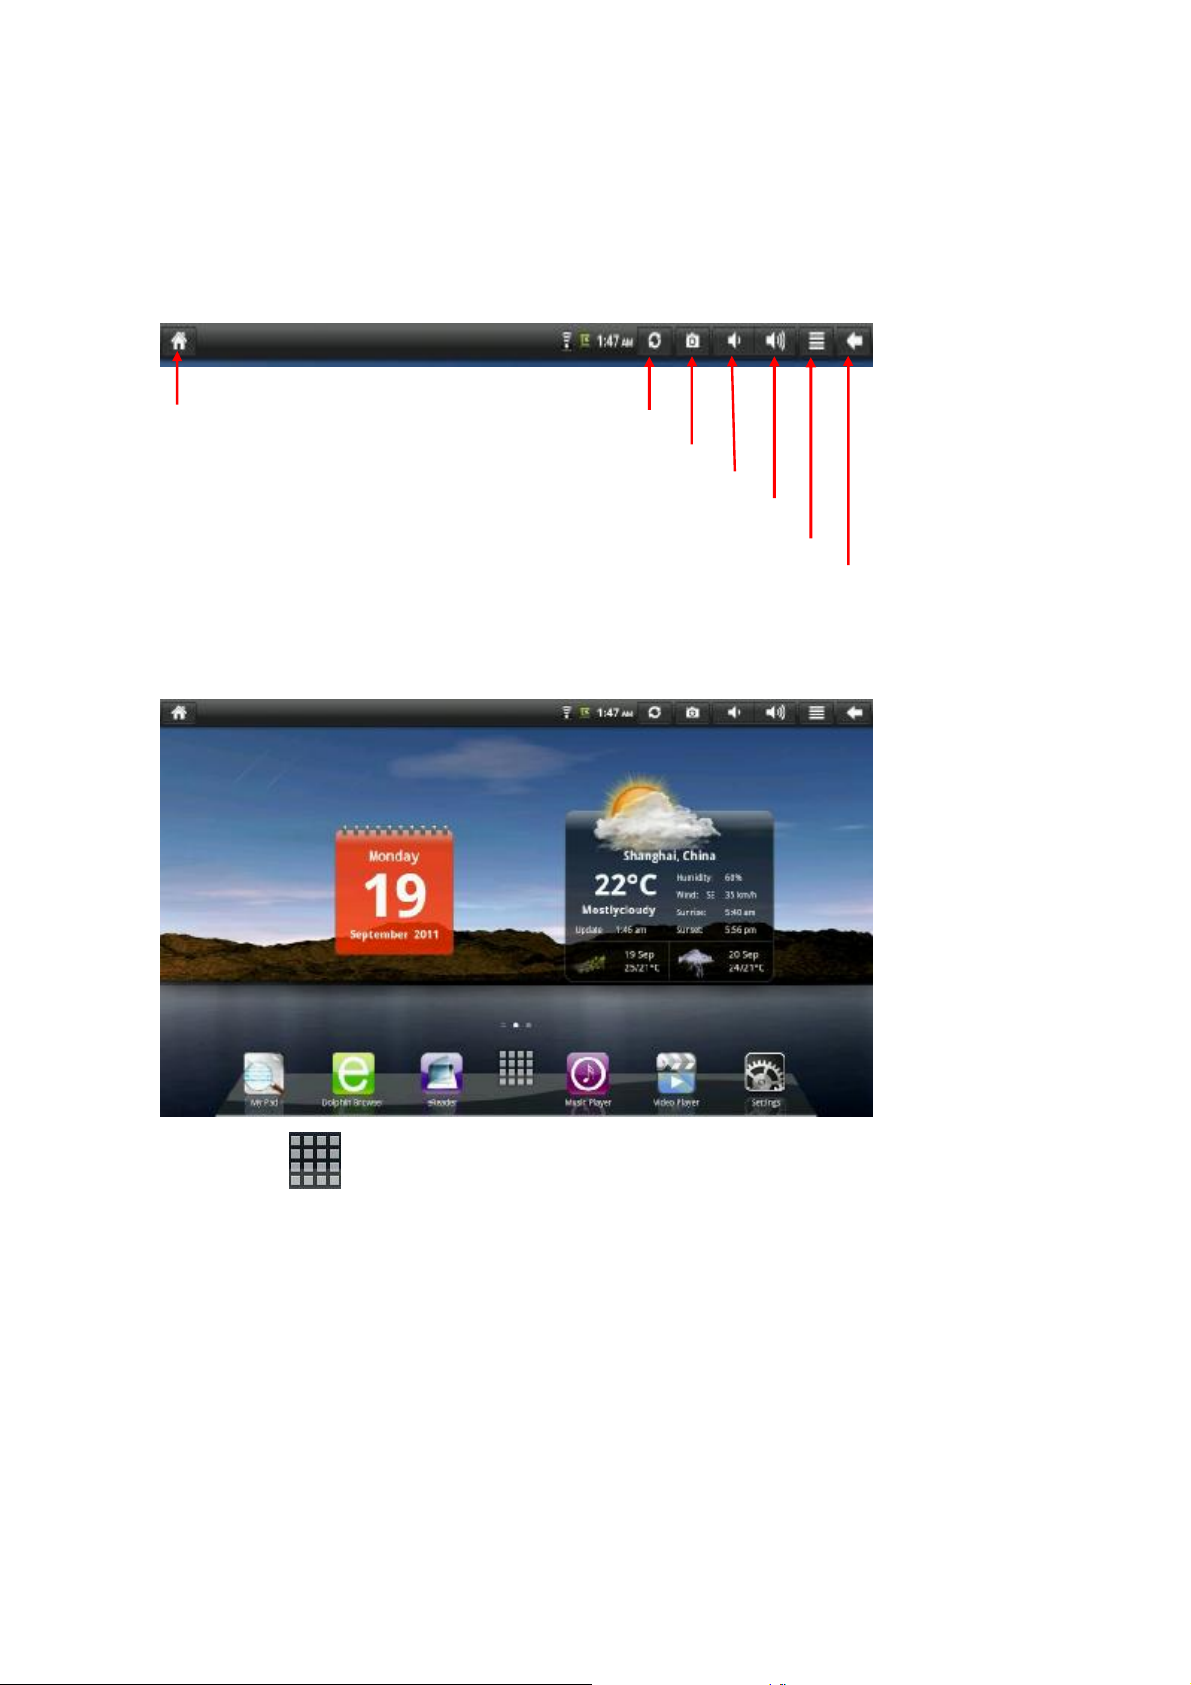
The top of the screen is status bar. There is a software button on the left of the status bar, and
another 6 on the right. They a re Homepage button, Manual refresh button, Screen capture button,
Volume +/- button, Menu button, and Return button. The status bar also displays system
information including 3G signal intensity, WI-FI signal intensity, Ethernet status, battery status,
and time.
Click to
return to
Homepage
Refresh multi-media
Screen capture
Vo l u m e -
Vo l um e +
Menu
Return
4.2 Main i nter face
The main interface procedure of the pad includes two m odes: desktop widget mode and
application procedure icon mode, which may be switched through the button of the shortcut center.
The main interface of the desktop widget mode is shown as below:
Click the button on the shortcut bar to enter the interface of application procedure icon
mode. T he main interface of the application procedure icon mode is shown as below:
5
Page 6
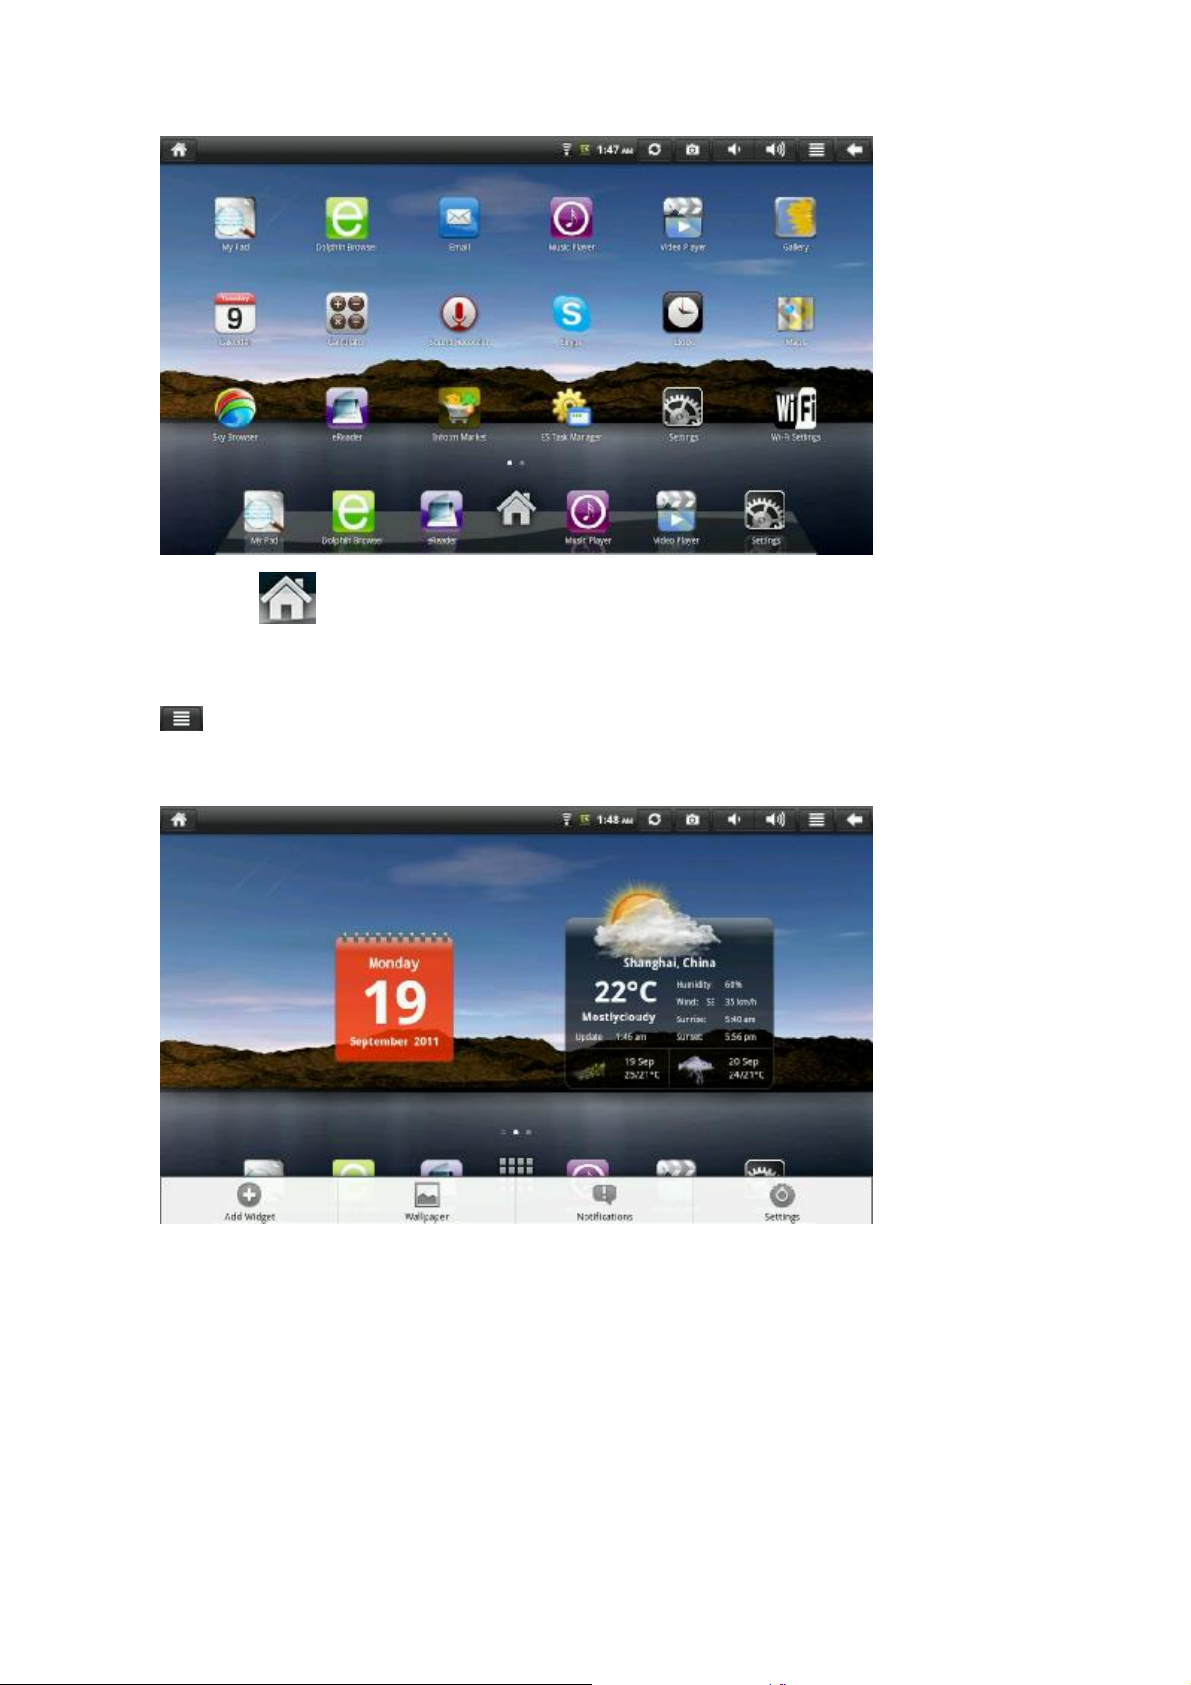
Click button to return to the interface of the desktop widget mode.
4.3 Shortcut
On the main interface of the desktop widget mode, press Menu key or click the menu button
on the status bar, and a menu shortcut will pop up on the lower part of the screen. The
menu includes Add widget, Wallpaper, Notifications, and Settings as shown in the following
picture:
4.4 Shortcut to add widget
1. Add window widget
To add window widget to the main screen, please press “Menu – Add – Window widget”. Choose
6
Page 7
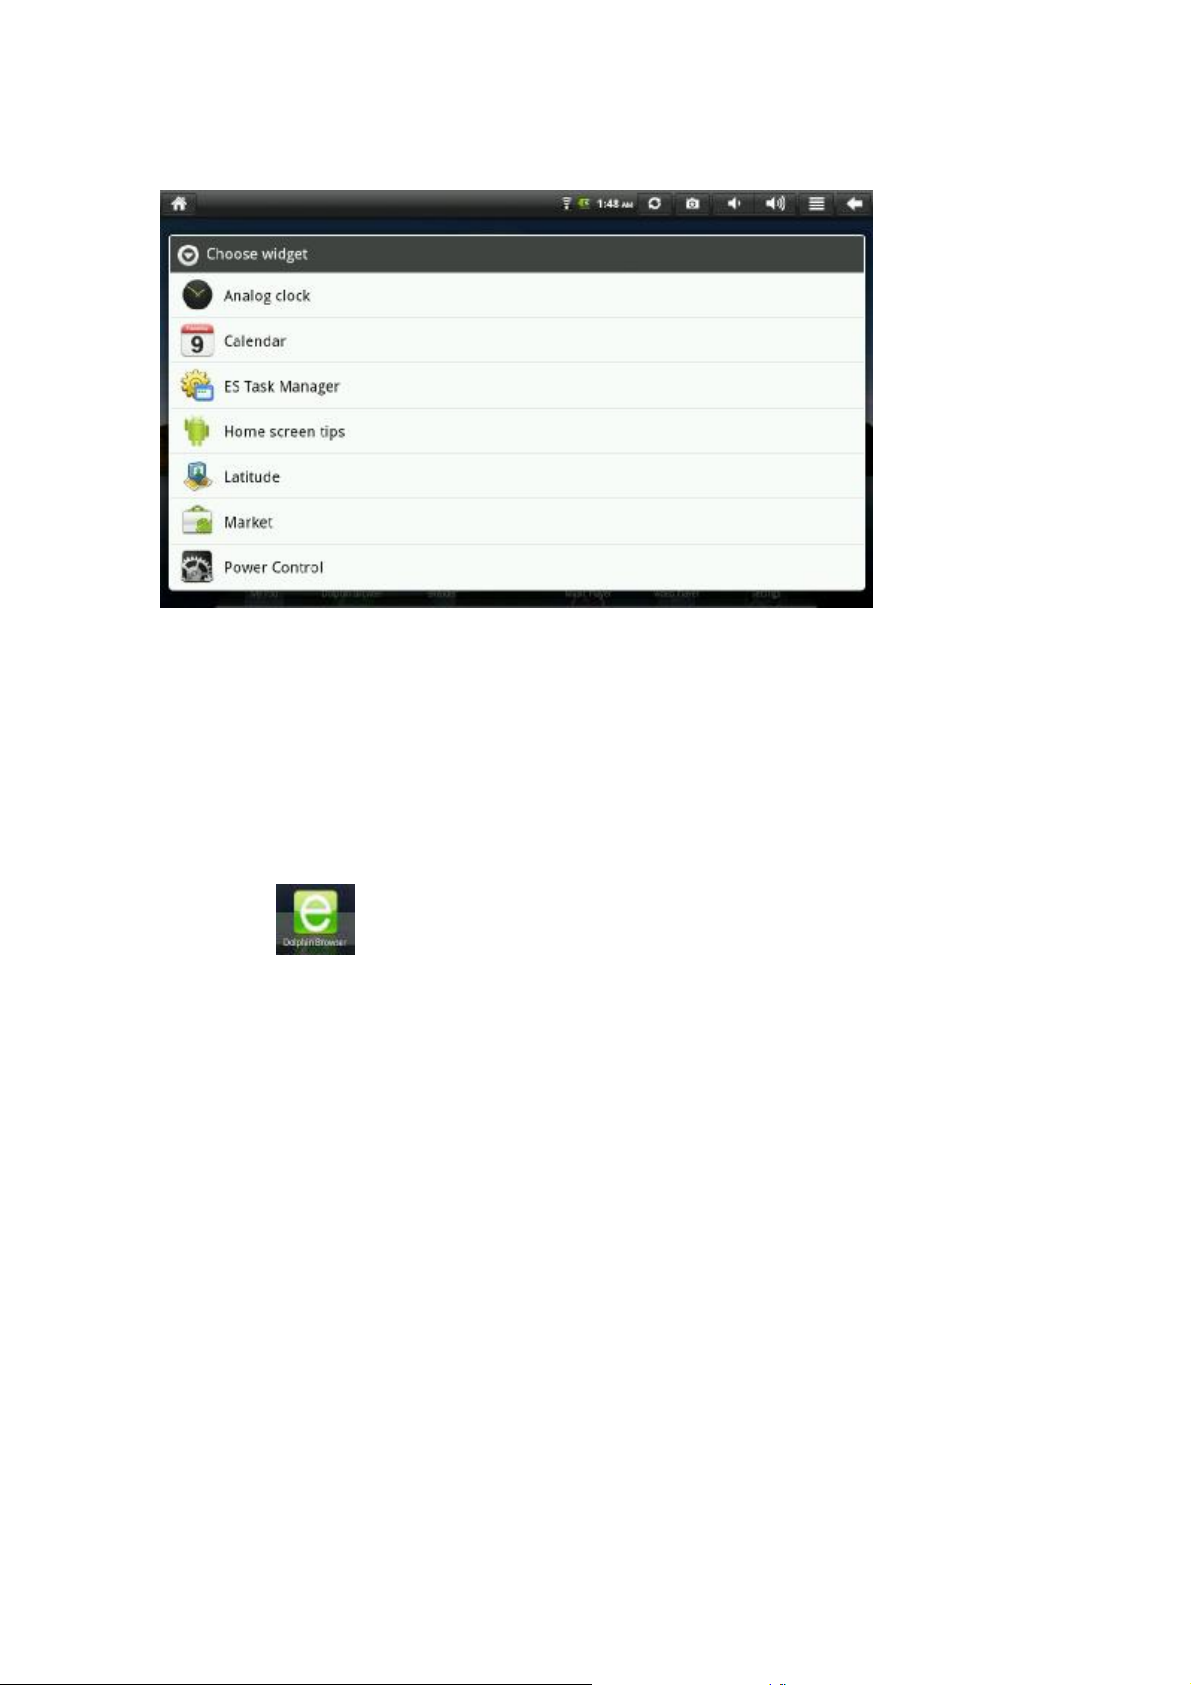
a window widget to add it to the main screen. After that, click the shortcut icon to execute
corresponding shortcut operations.
4.5 Use of desktop widget
The user may add, delete or install desktop widget, may add or delete application procedure icons,
may also remove and adjust the position of icons, and may also dra g icons within working area or
between working area and shortcut bar, add or delete icons as well.
On the main interface of the desktop widget mode, press and hold the widget icon, and a bin mark
will pop up in the right center. At this moment, you may drag this icon to any position on the
desktop, or directly drag it into the bin to delete it.
5. Web browsing
The device may be connected to the Internet via a browser.
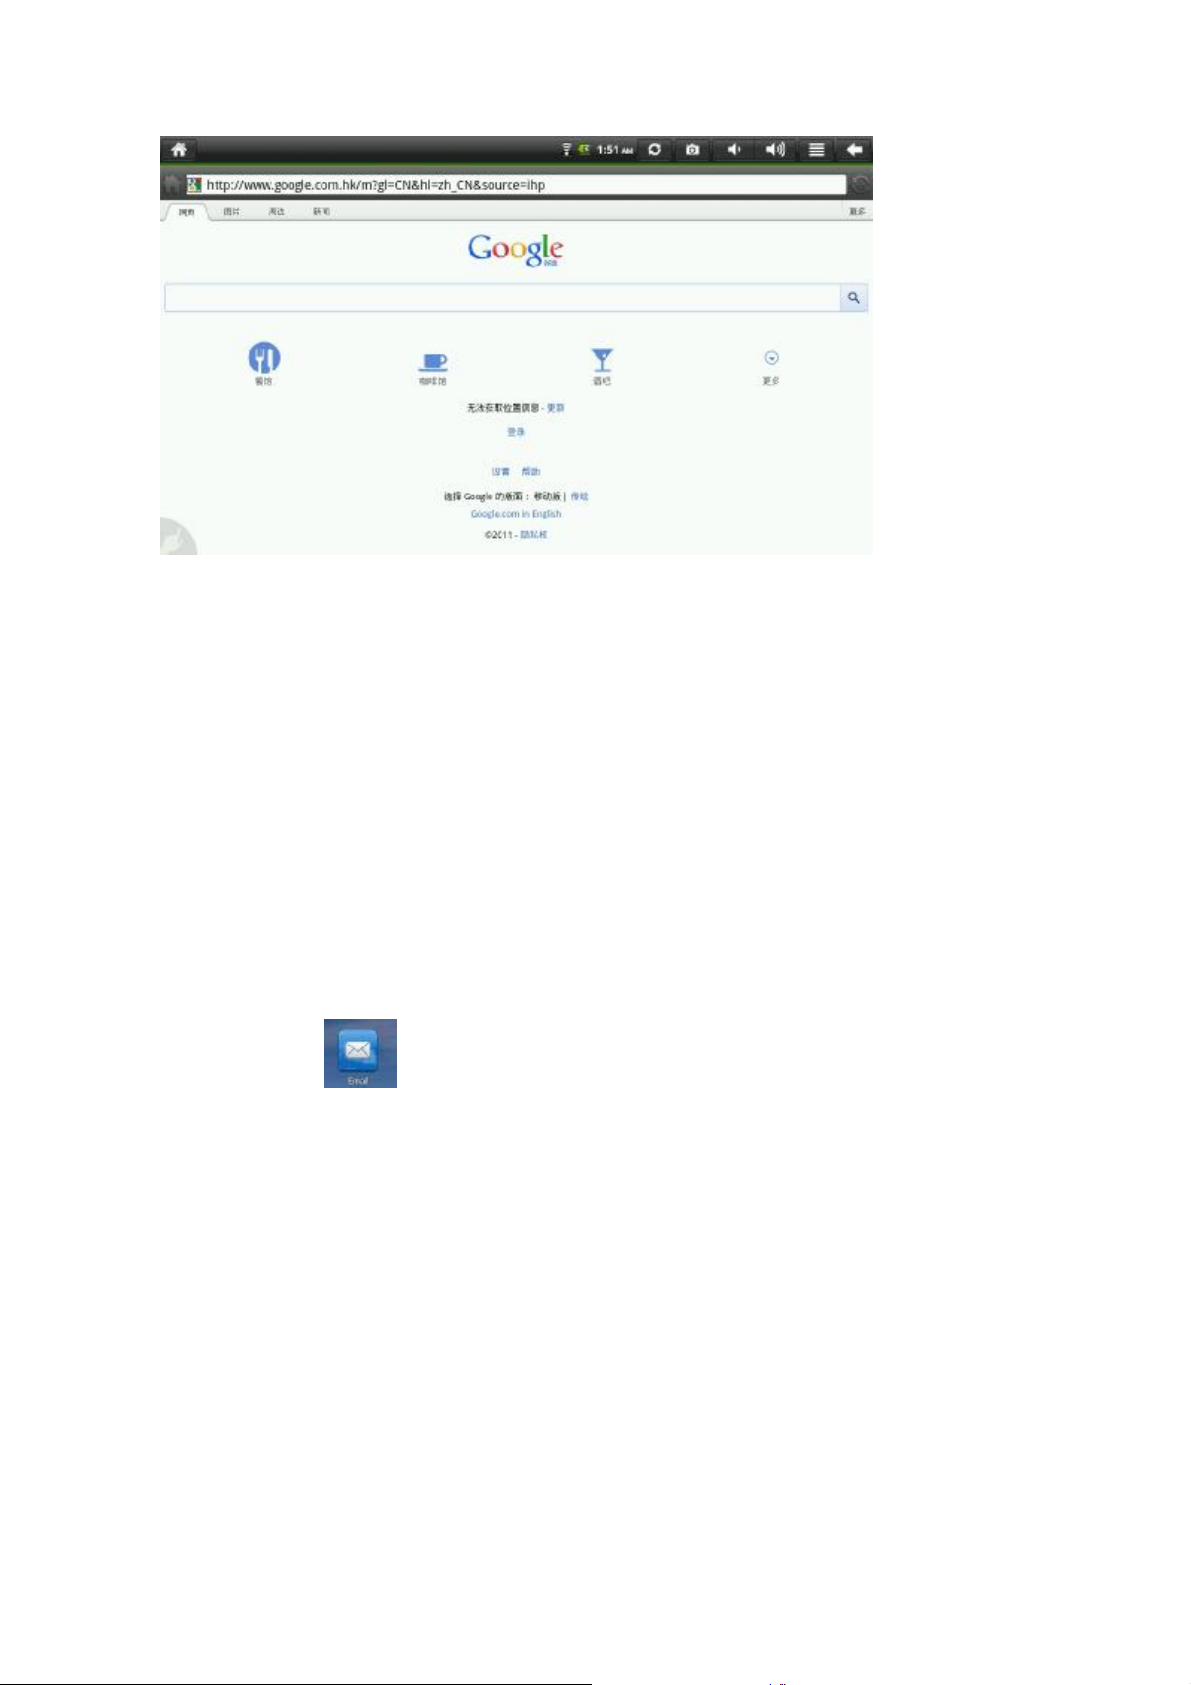
Click the icon
on the desktop to open web browsing function. When the web was
opened, an interface pops up as below:
7
Page 8
We b
Photo
Periphery
News
More
Restaurant
Cafe
Bar
More
Failed to get location information update
Log-in
Setting Help
Select Google impression Mobile/Traditi onal
Privacy right
6. Introduction to typical application
6.1 E-mail
Click the E-mail icon
to enter E-mail mode. Set your E-mail account number, and then
operate as below:
1. Create a new E-mail;
2. Receive and send E-mails; and
3. Download or open attachments.
Tip: Press Menu key to pop up shortcut menu as shown below:
8
Page 9
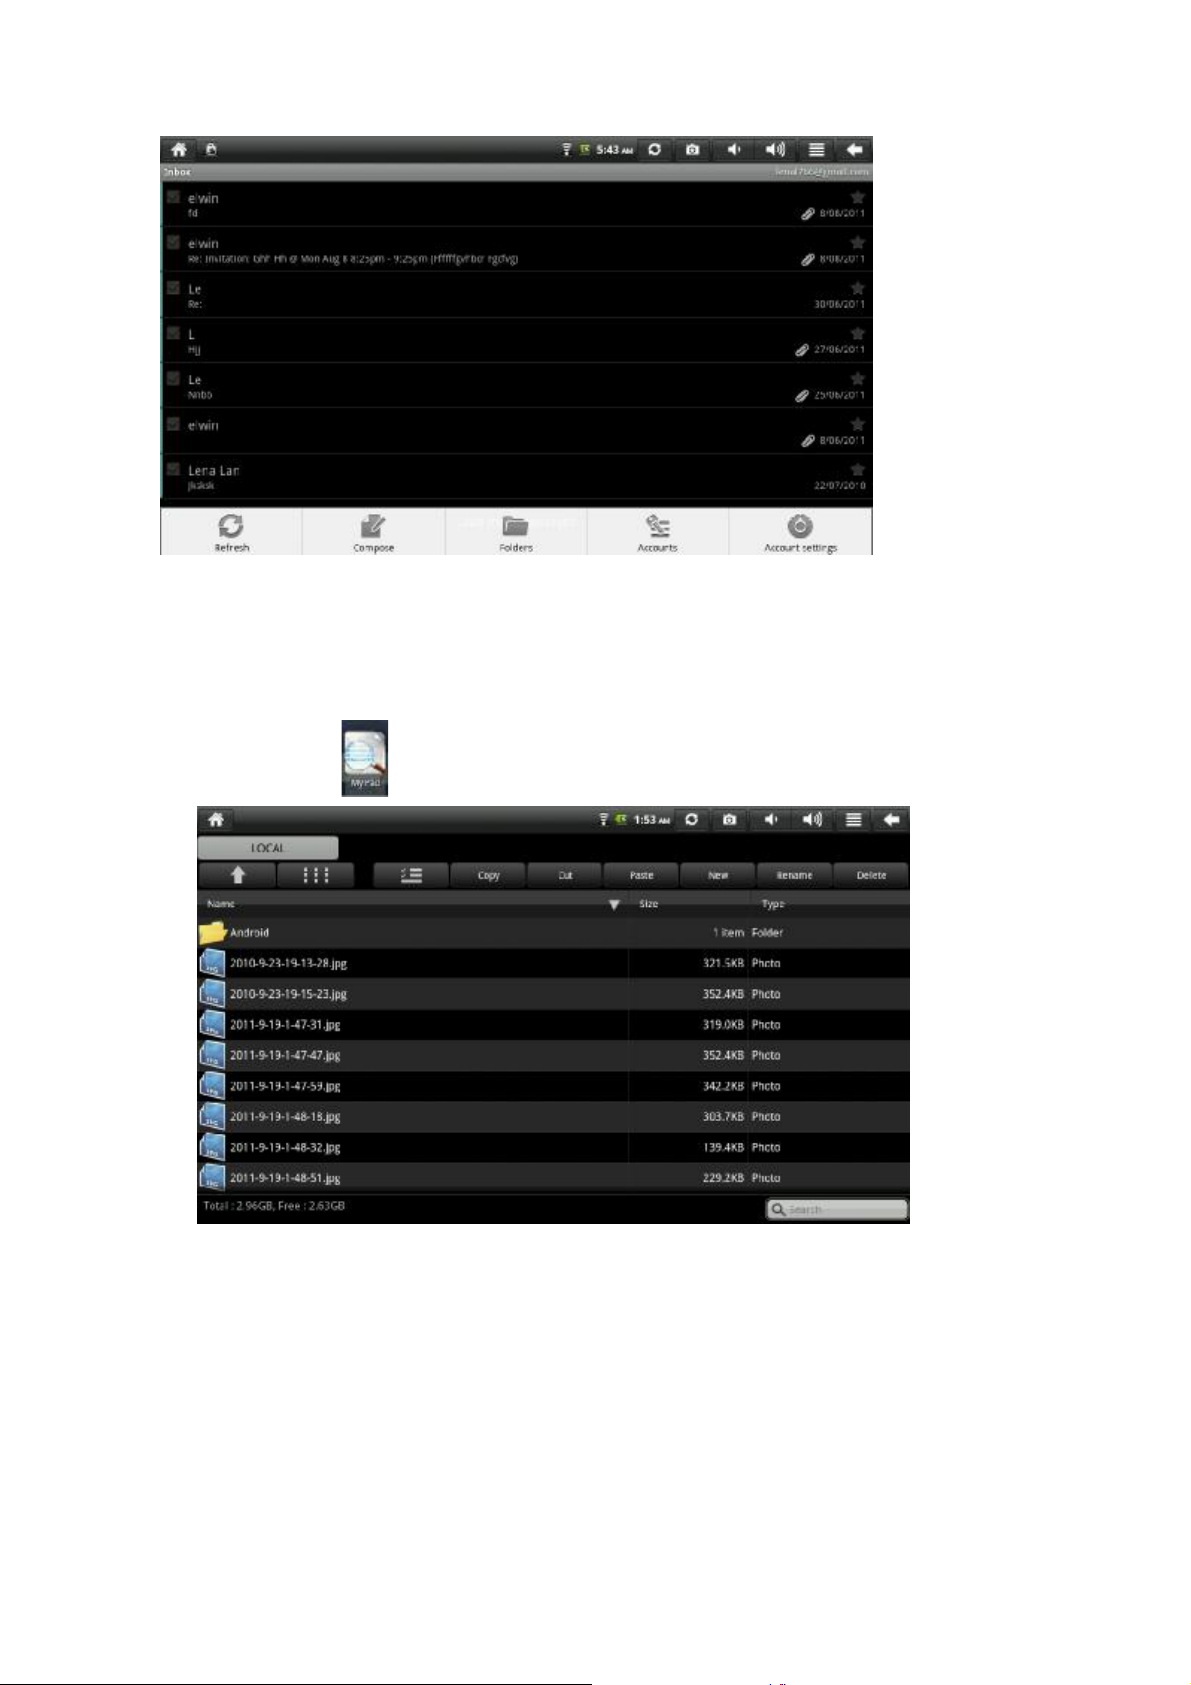
1. Refresh the current folder: Re-scan this folder
2. Compose a new E-mail: Send a new E-mail
3. Folder: Switch among different folders
4. Accounts: When more than one account is added, the user may select one from them
5. Account settings: The regular settings of accounts
6.2 File browsing
Click My pad icon
to enter file browsing interface.
After entering browsing i nterface, you may choose from ma ny browsing manners, and copy, cut,
paste, create, rename or delete files on LOCAL, SD 1, and USB disk.
9
Page 10
Procedure installing
To install software in the file browser, you just need to click the installation file whose file
extension is .APK. An installation prompt box will pop up. Select installation to install the
procedure onto the device.
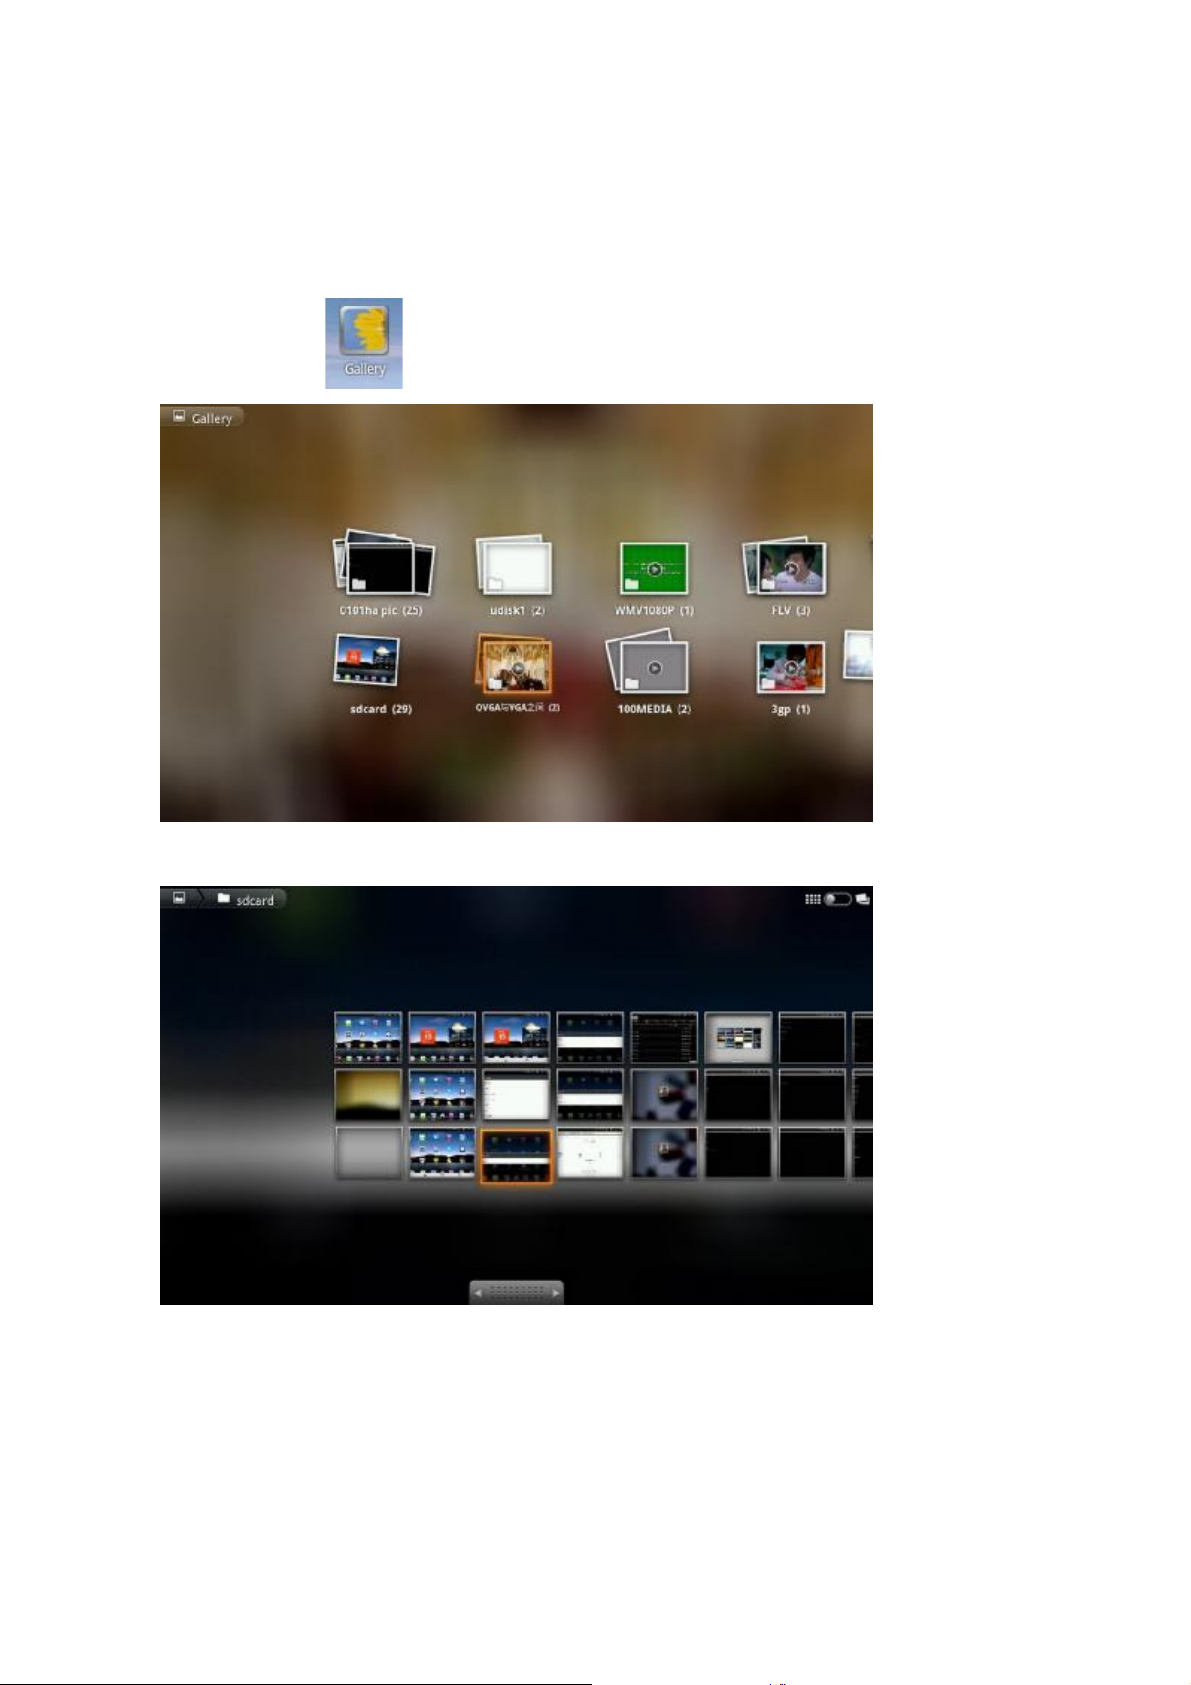
6.3 Gallery
Click the gallery icon
to enter gallery interface, as shown below:
1. After entering the gallery, press the right mouse key to pop up shortcut menu, to select all,
cancel “Select all”, share, delete, or check photo information.
10
Page 11
2. To enter full screen mode, click the thumbnails of pictures on the gallery interface.
Click the screen, a nd Photographic Transparencies will pop up. There are two options on the menu:
zoom in or zoom out, which can be achieved by clicking the icon. Click the above “Menu” or
directly press the right mouse key, and the following three options will pop up:
1) Share: Select G-mail or E-mail to share pictures
2) Delete: Directly delete pictures
3) Check more: Click it, and five options will pop up: Detail, Set, Cut, Rotate anticlockwise and
Rotate clockwise. The pictures may be set as wallpaper or contact icon. To check detailed
information about picture, click “Detail”.
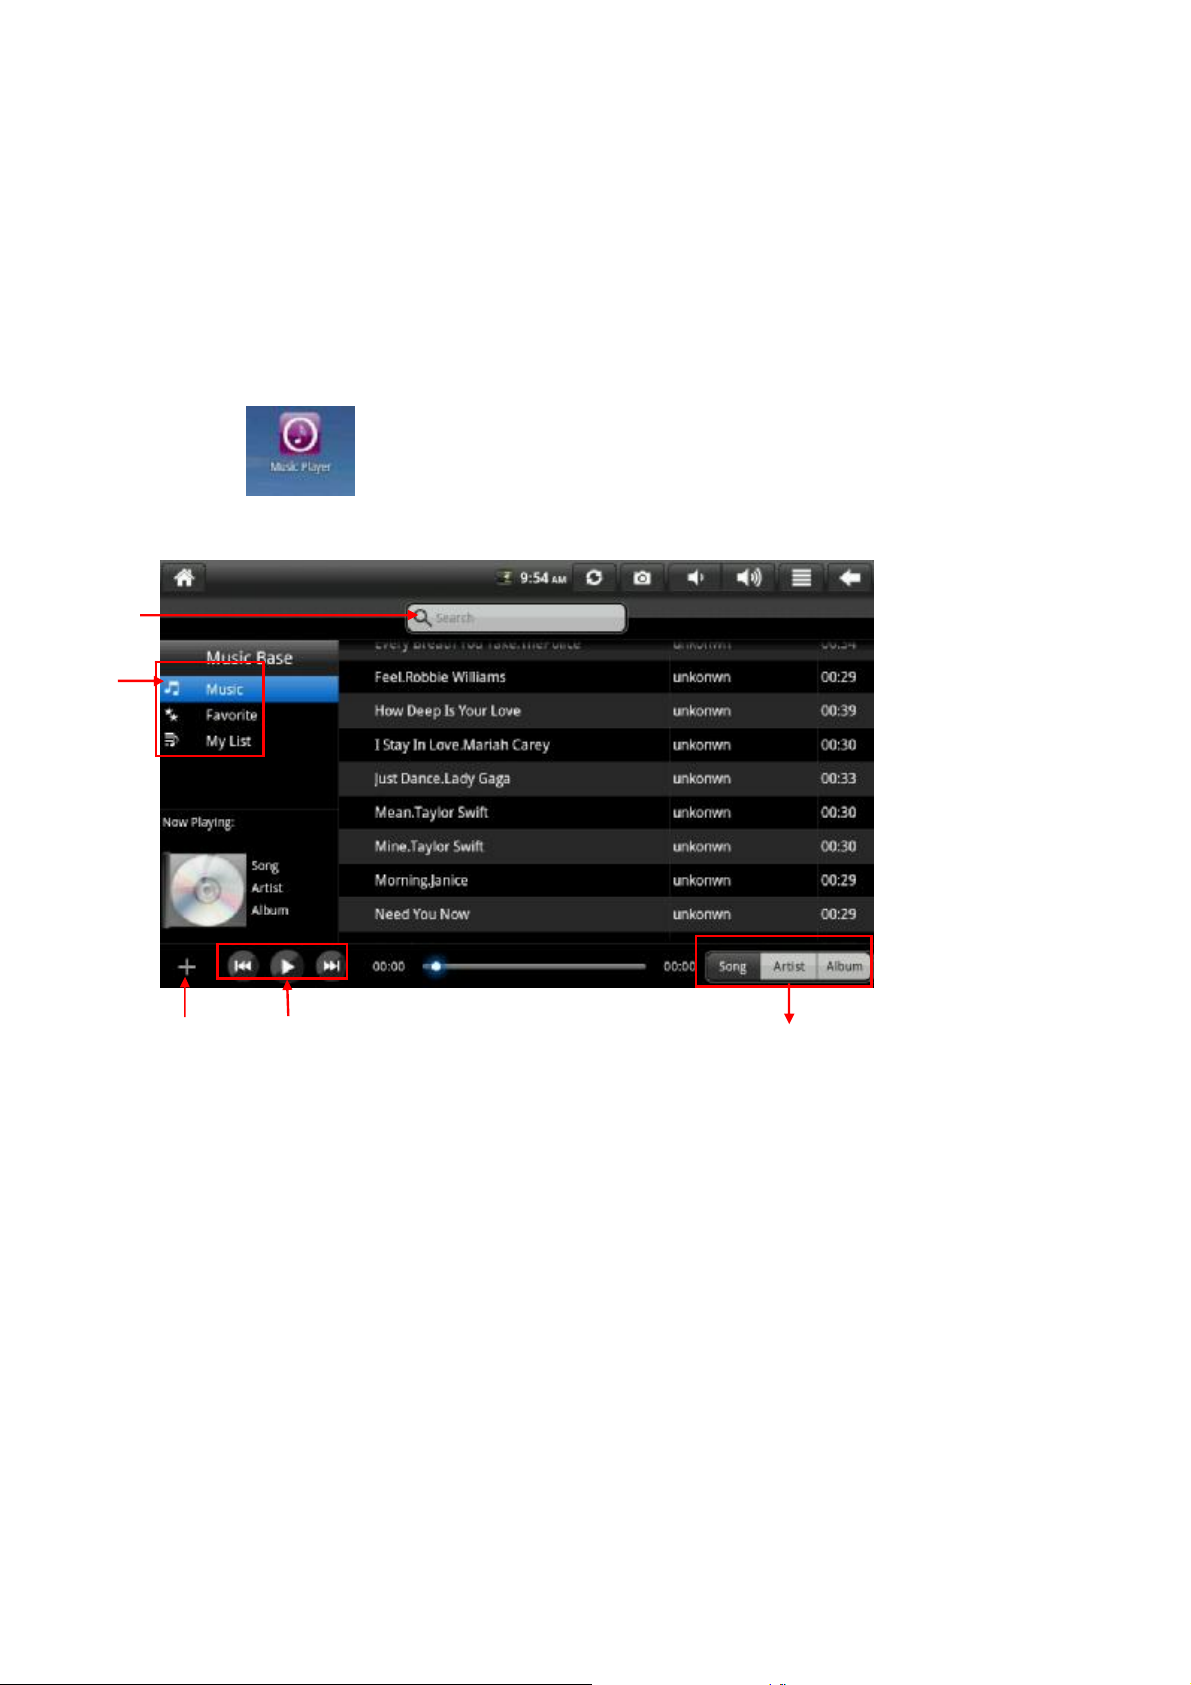
6.4 Music
Click icon
to enter music interface. You may choose from Music, Favorite and
My list in the Music Base.
1
2
3
4
5
Click a song to enter playing interface.
11
Page 12
6
7
109
6.4.1 Search: Click it to search songs
6.4.2 List: Include Music, Favorite and My List.
6.4.3 Add: Click it to add new list
6.4.4 Button: Click to choose Play/Pause, Previous/Next son g.
6.4.5 Display mode: Include Song, Artist and Album
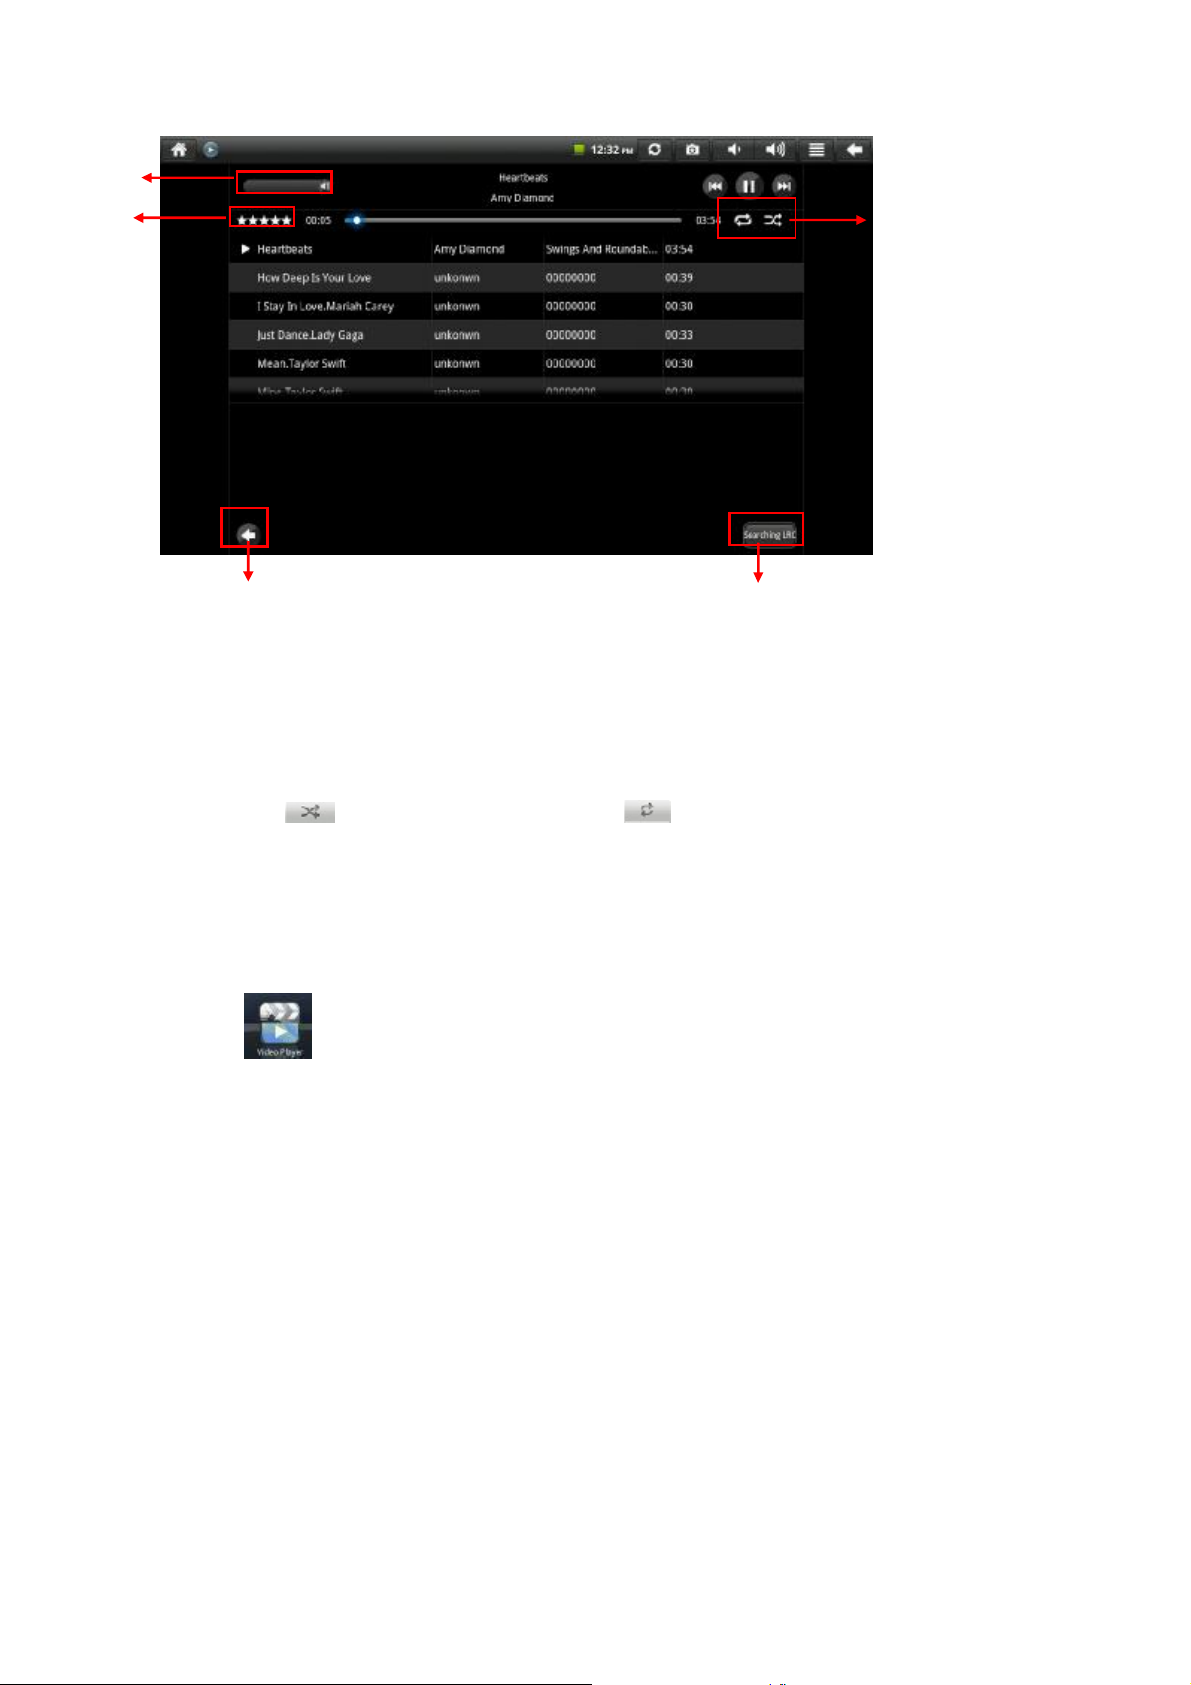
6.4.6 Volume progress bar: Use it to adjust volume
6.4.7 Star index: Songs over three stars will be classified into “My List”
6.4.8 Click icon
to enter shuffle play mode; click icon to switch between “Repeat
all” and “Repeat one” modes.
6.4.9 Return: Click it to return to music interface
6.4.10 Searching LRC: Click it to connect web and search for desired lyrics (WIFI or cabled
network i s required)
8
6.5 Video player
Click icon
to enter the interface of video player.
12
Page 13
1
2
3
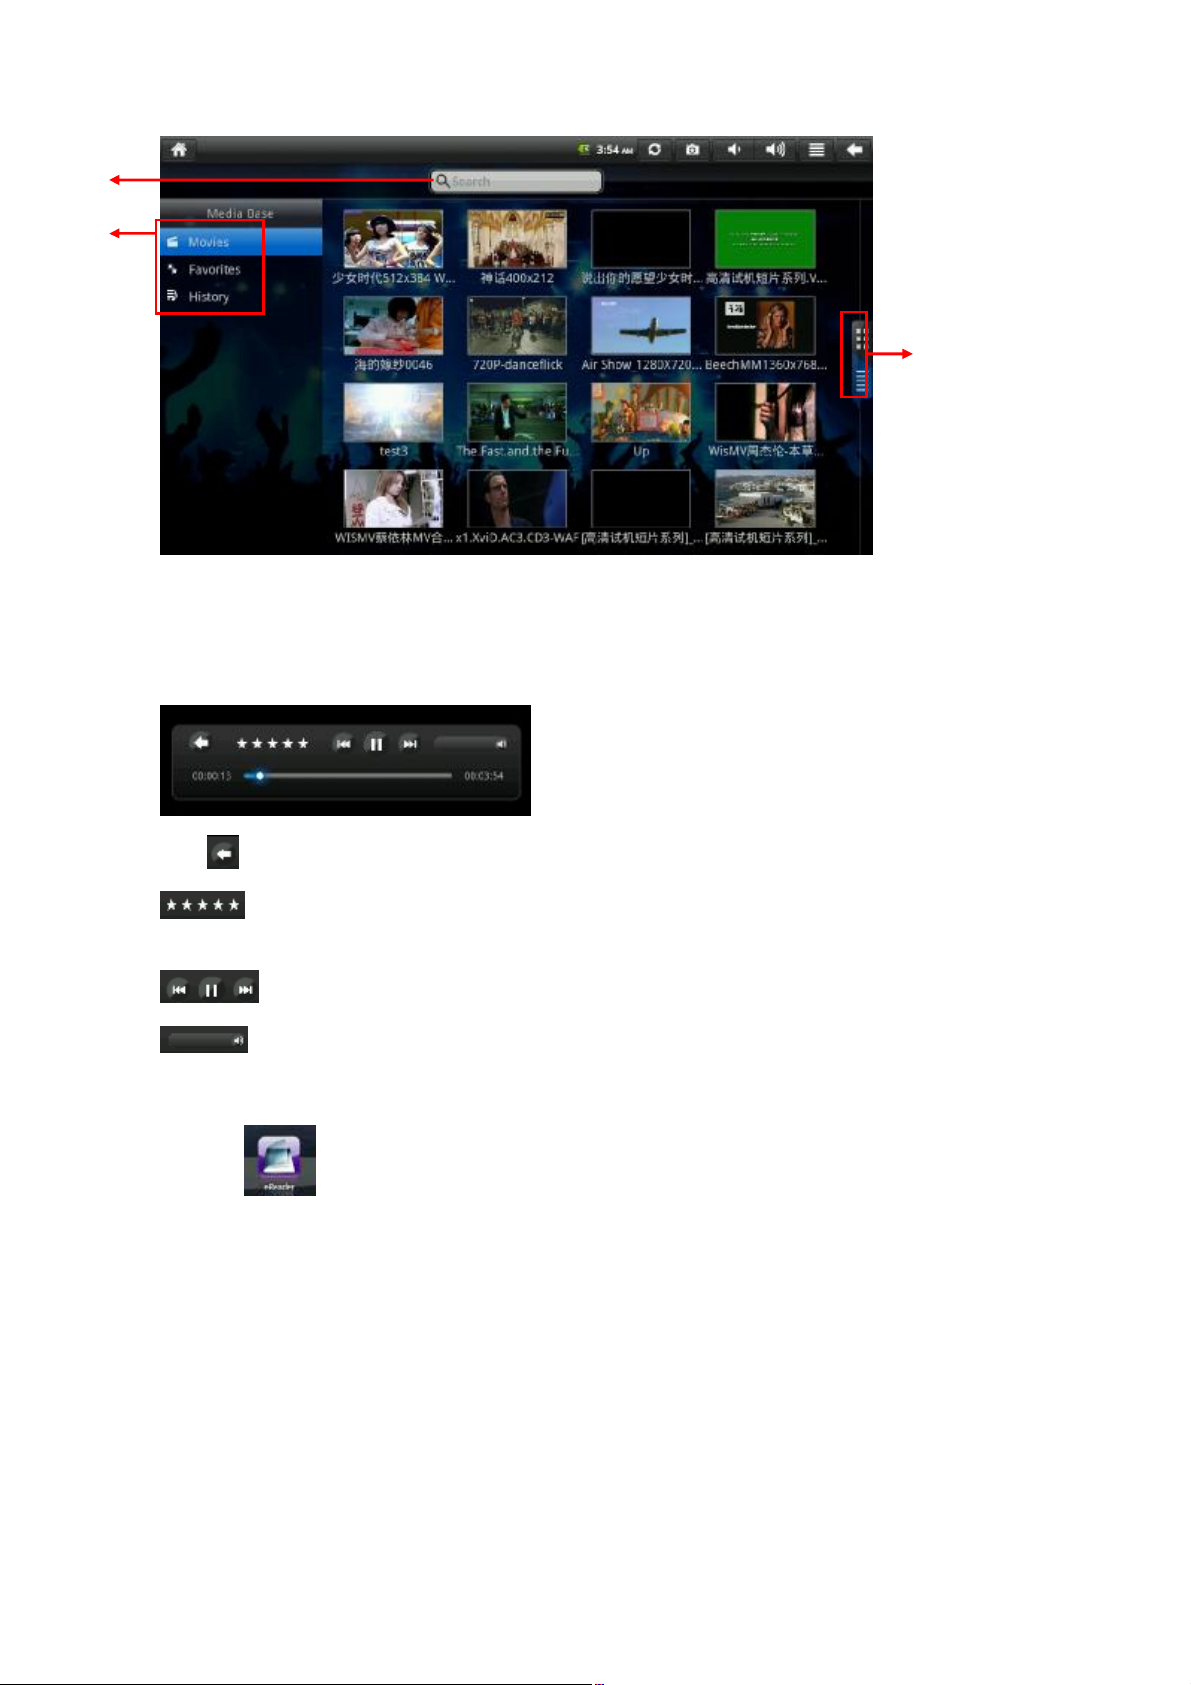
6.5.1 Search: Click it to search for video
6.5.2 List: Include Movies, Favorites and History
6.5.3 Check mode: Click it to shift to movie check mode
Click video directly to play. Click the image while playing, and a play menu will pop up, as
shown below:
Press to stop.
Star index: Songs over four stars will automatically be classified intoMy
Favorites
.
Play/Pause, Previous/Next section
Volume progress bar
6.6 eReader
Click icon
to eReader.
13
Page 14
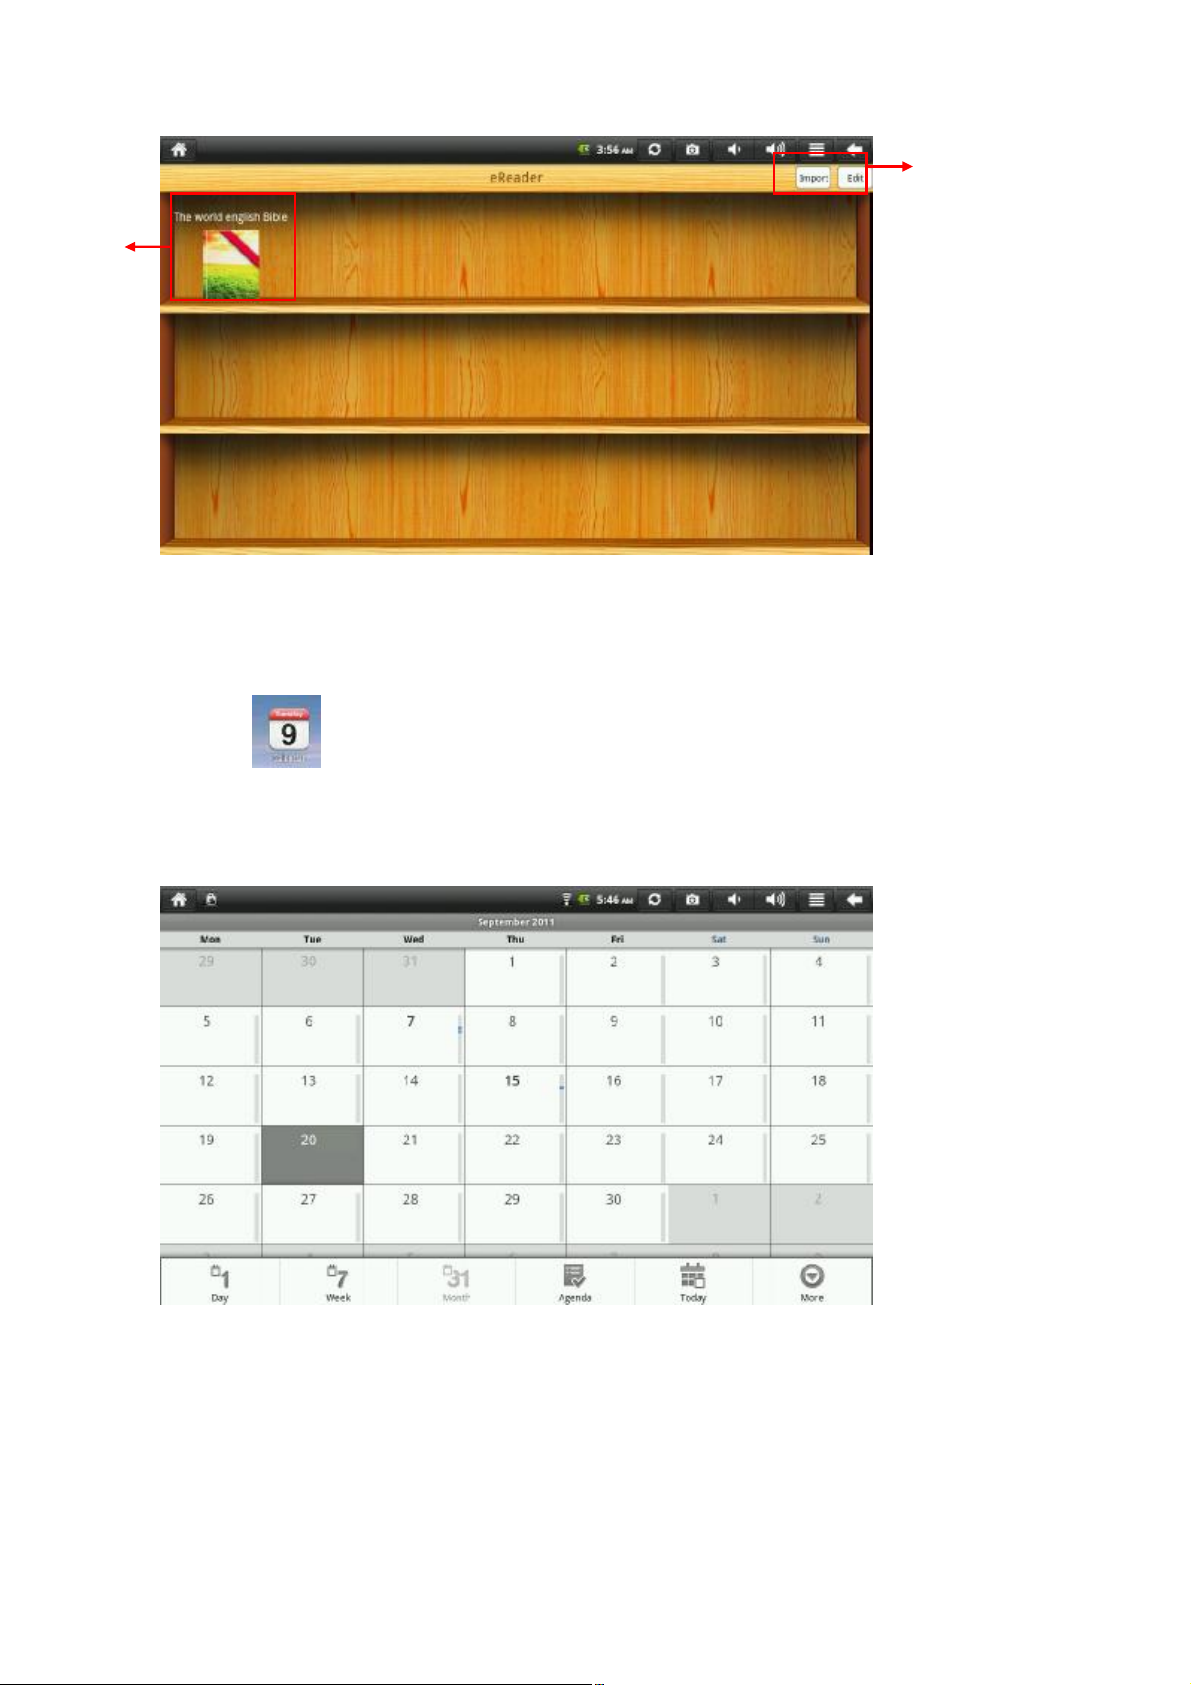
1
6.6.1 eReader icon: Click it to read e-books
6.6.2 Import & Edit: Click “Import” to add the files on disk into the list; click “ Eidt” to delete
books from the list
6.7 Calender
2
Click icon
to enter cal ender interface, only available for device s that excha nge
accounts.
After entering the interface, you may manage the agenda. Press the right mouse key, and a menu
willpopup. Andthenoperateasbelow:
14
Page 15
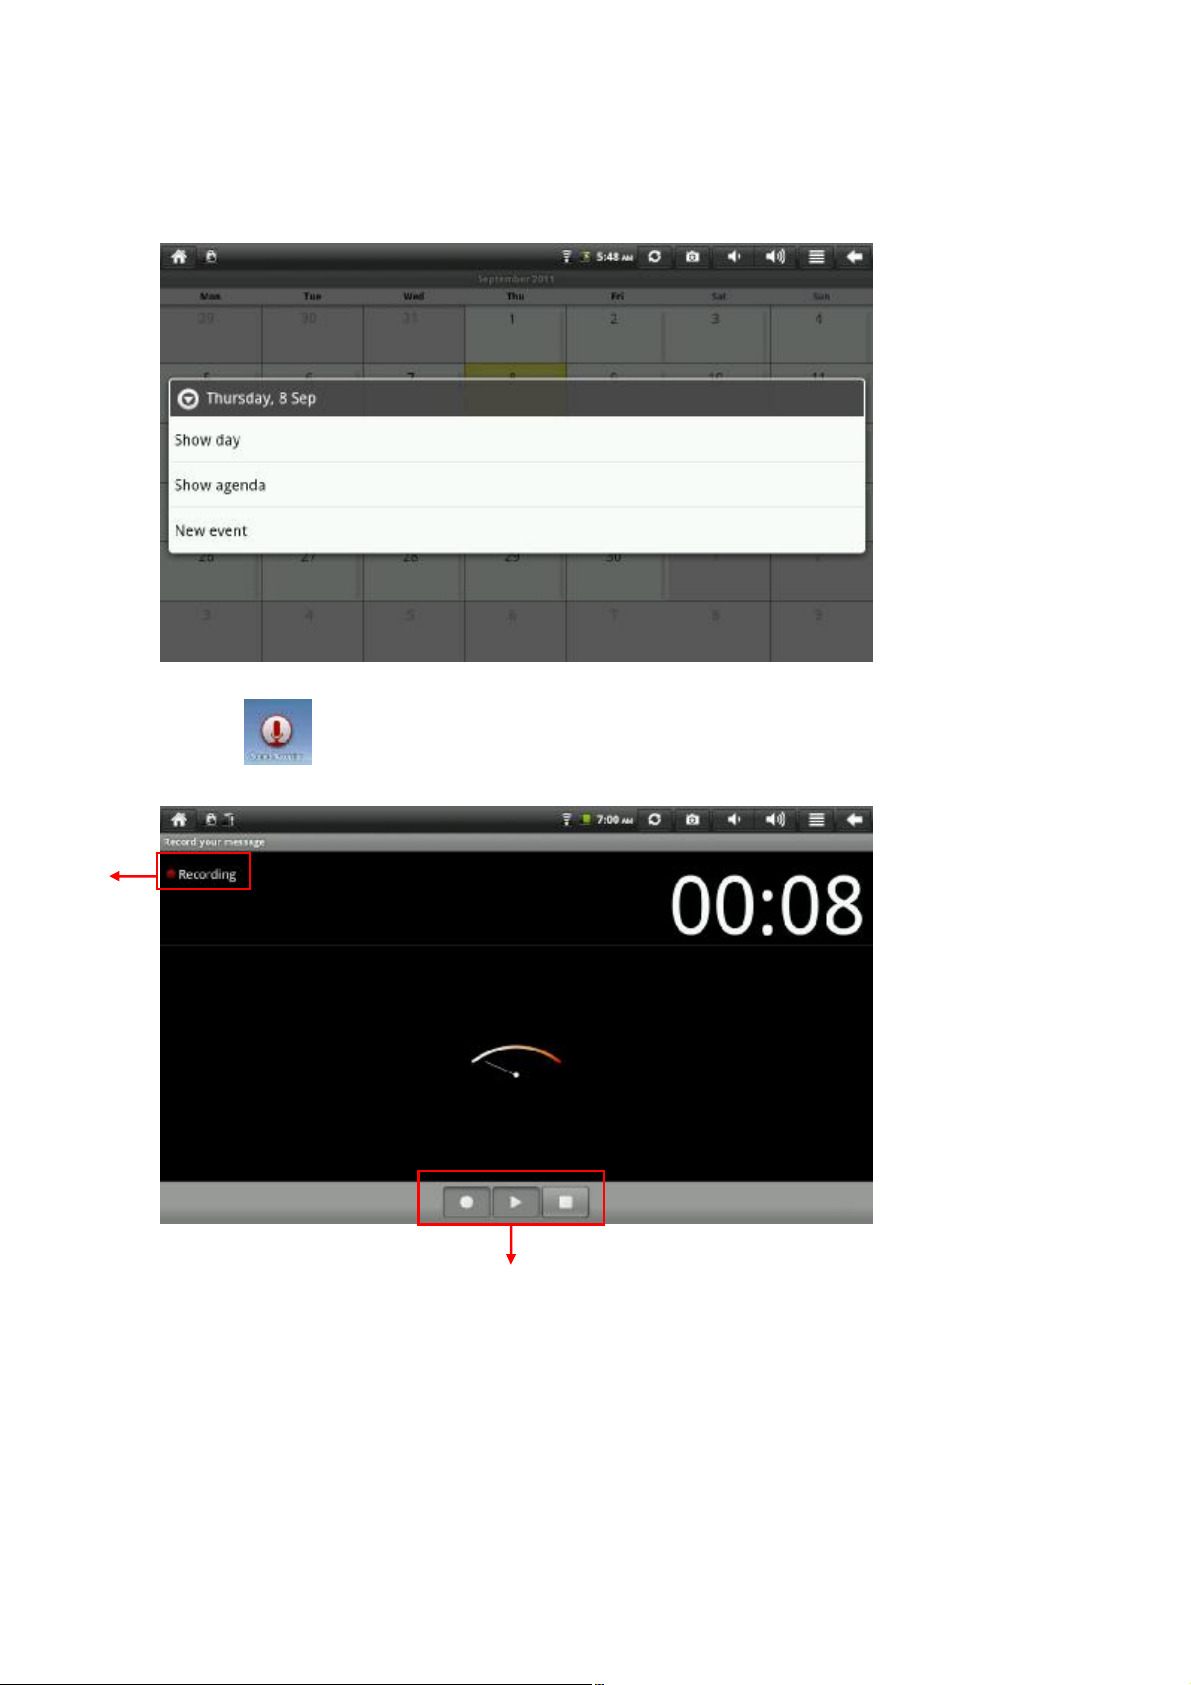
1. Check modes available: Day, Week, Month, Agenda, Today (today’s agenda), and More (Click
it to create a new calender, check calender and set calender)
2. Press and hold the date with left mouse key, and a menu will pop up; you may check agenda or
add new one to it
6.8 Sound recorder
Click icon
to enter sound recorder interface.
1
2
15
Page 16
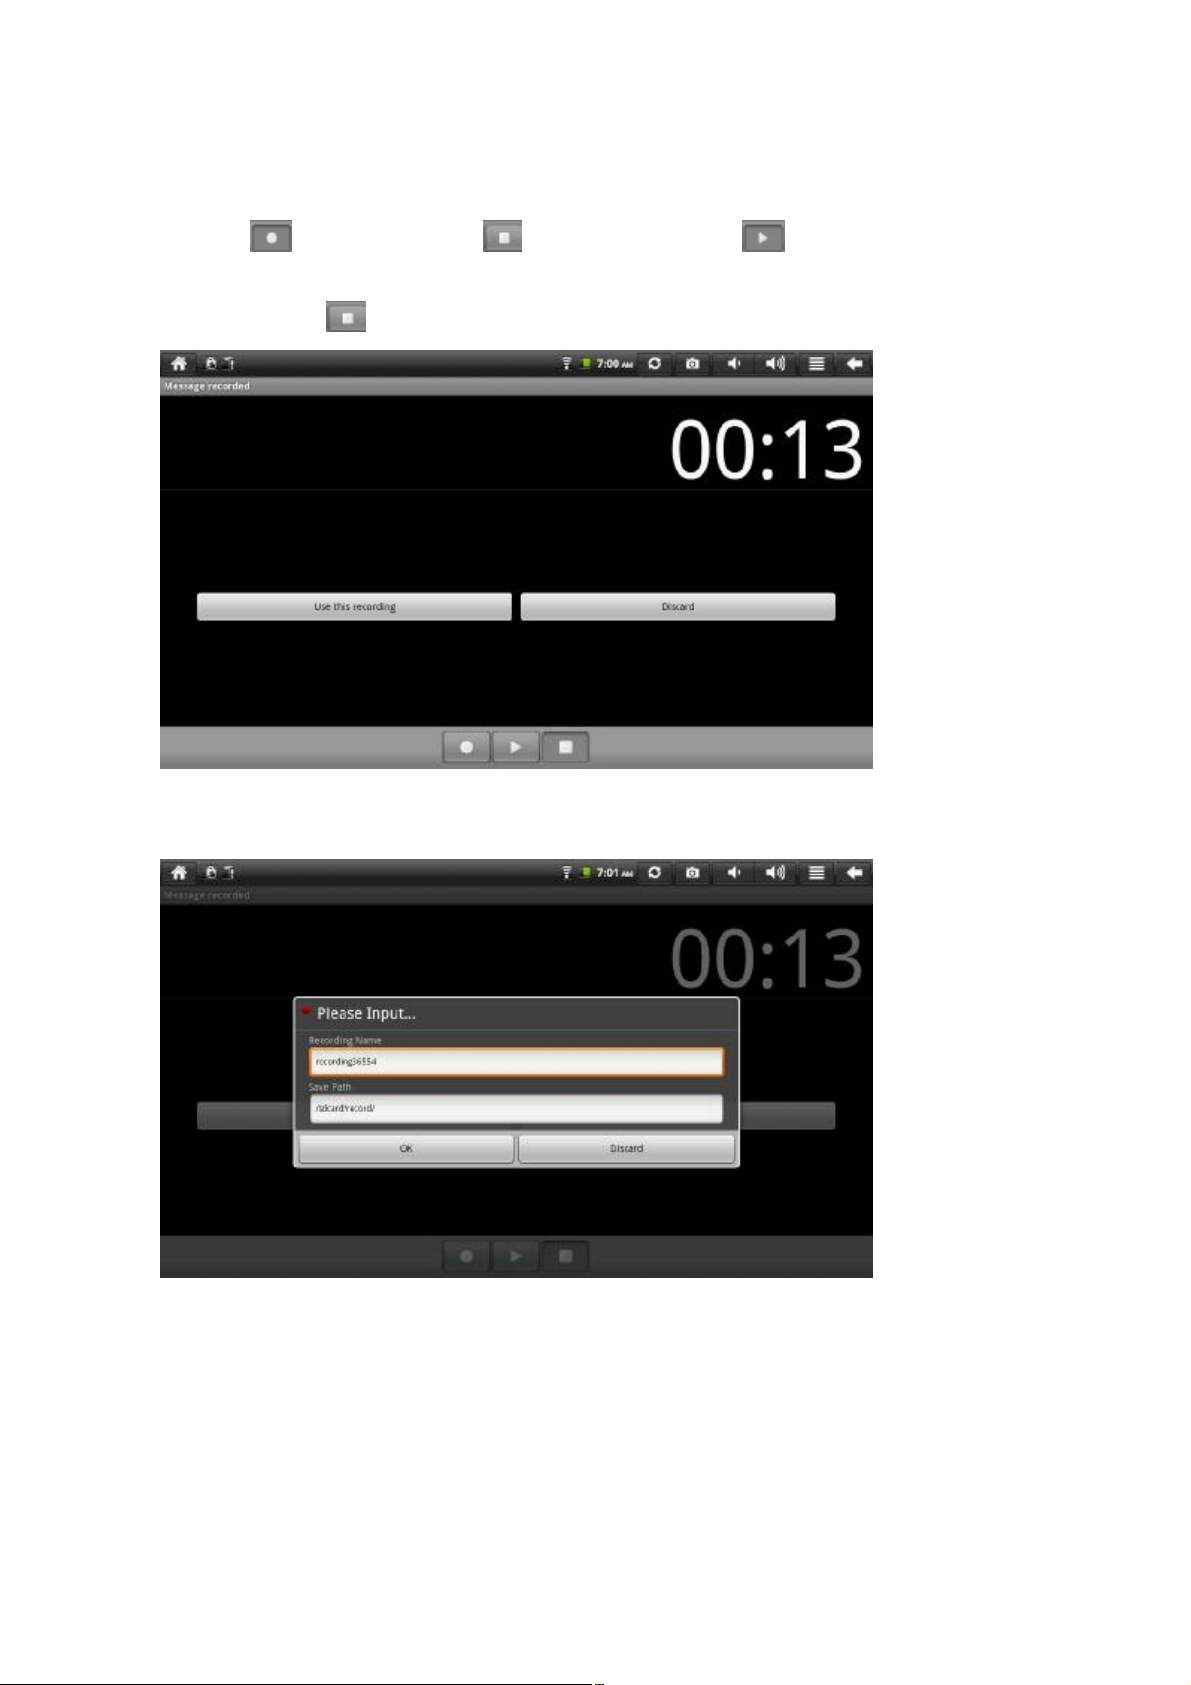
6.8.1 Status: While recording, the light will turn red
6.8.2 Click
to start recording; click to stop recording, and click to listen to
the sound recorded.
After recording, press
to pop up a dialog box as shown below:
Click “Use thi s recording” to save the message recorded (as shown below); and click “Discard” to
discard the message recorded
While saving message, you may choose the recording name and path
7 Tips and skills
16
Page 17
7.1 Convenient settings
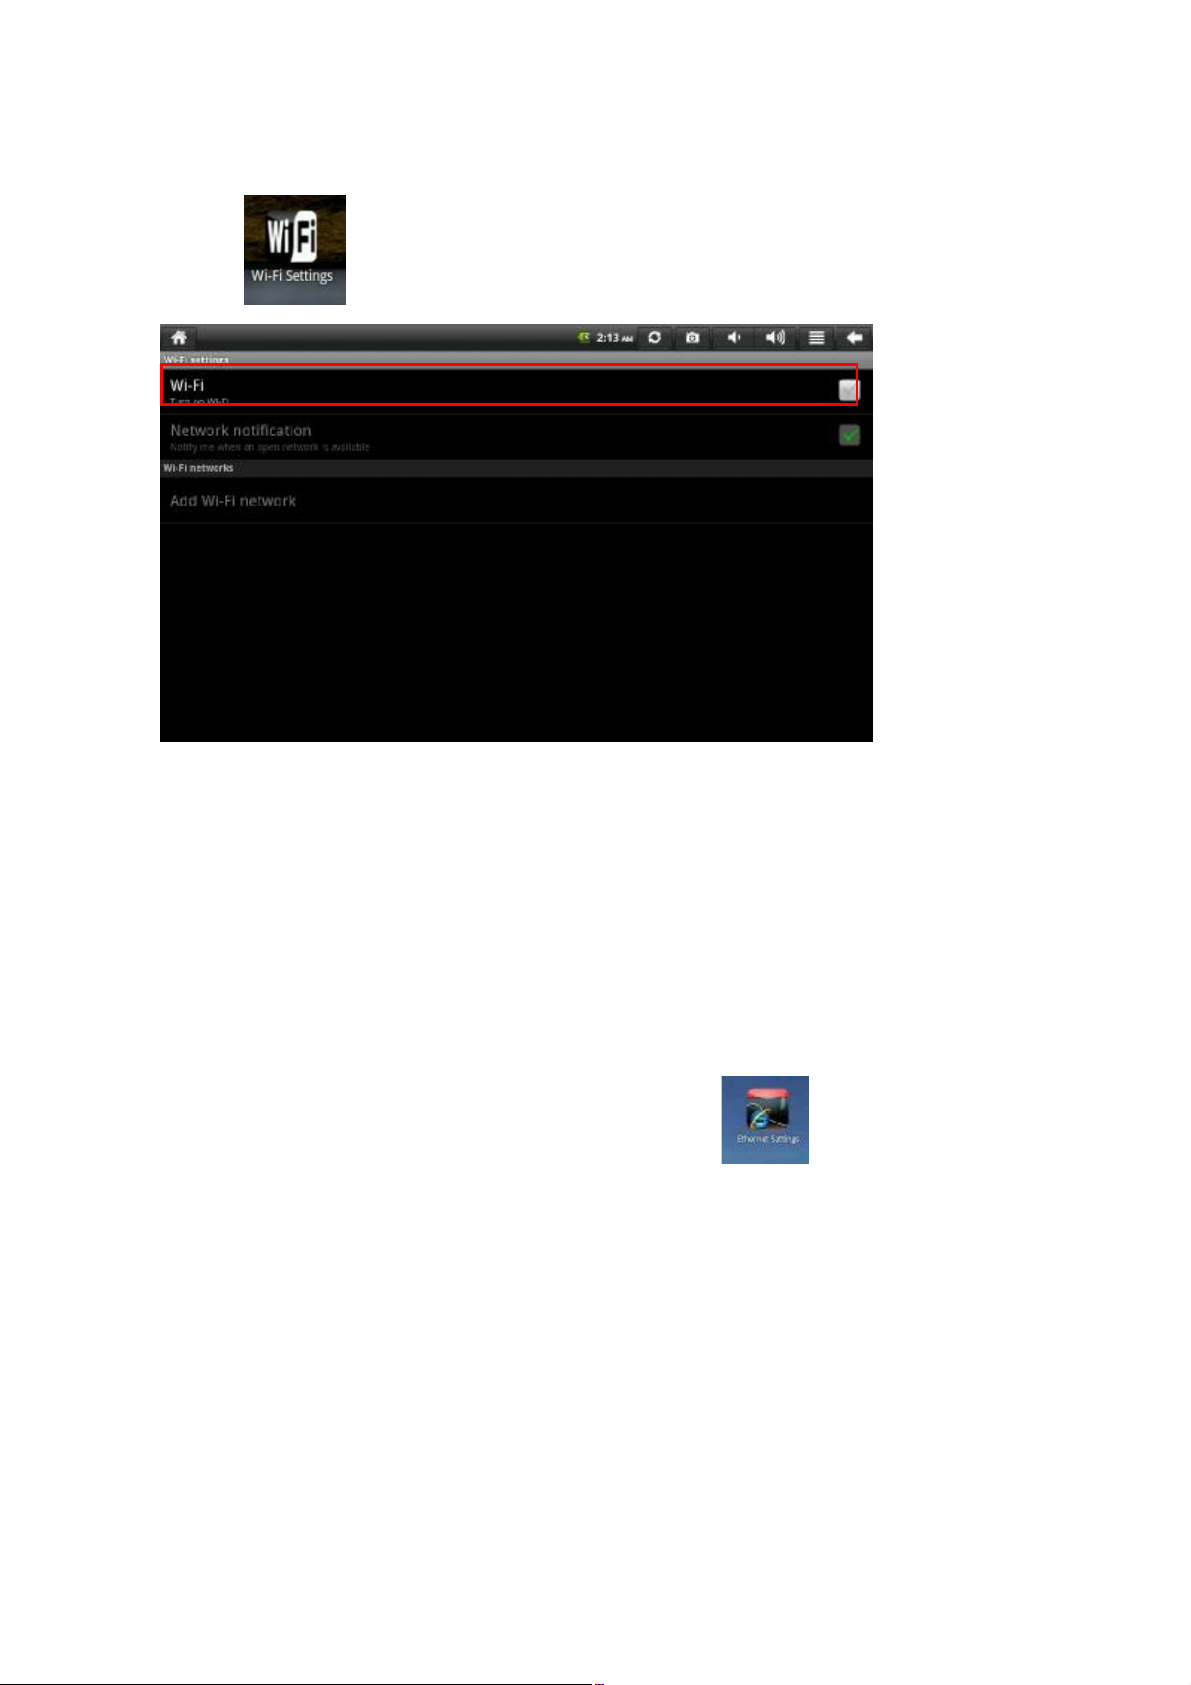
7.1.1 Wi-Fi connection
Click icon
to enter Wi-Fi settings interface, as shown below:
Tick the WIFI check box, and the computer will automatically search for wireless network.
1. All APs searched will be listed. Click the AP name to be connected to.
2. If such AP was connected before, the AP information will be saved. Select
“Connecting” to start connecting; select “Forget” to delete AP information.
3. If such AP is not encoded, click “Connecting” in the window to start conne cting.
4. If such AP is encoded, input password in the window and click “Connecting” to
start connecting.
5. After the WI-FI was connected, the status bar on top of the desktop will appear a
WIFI icon.
Note: Please select appropriate wireless network in accordance with actual sit uation.
7.1.2 Ethernet connection
After the device was connected to Ethernet via the Ethernet port, click icon
Ethernet settings interface, as shown below:
17
to enter
Page 18
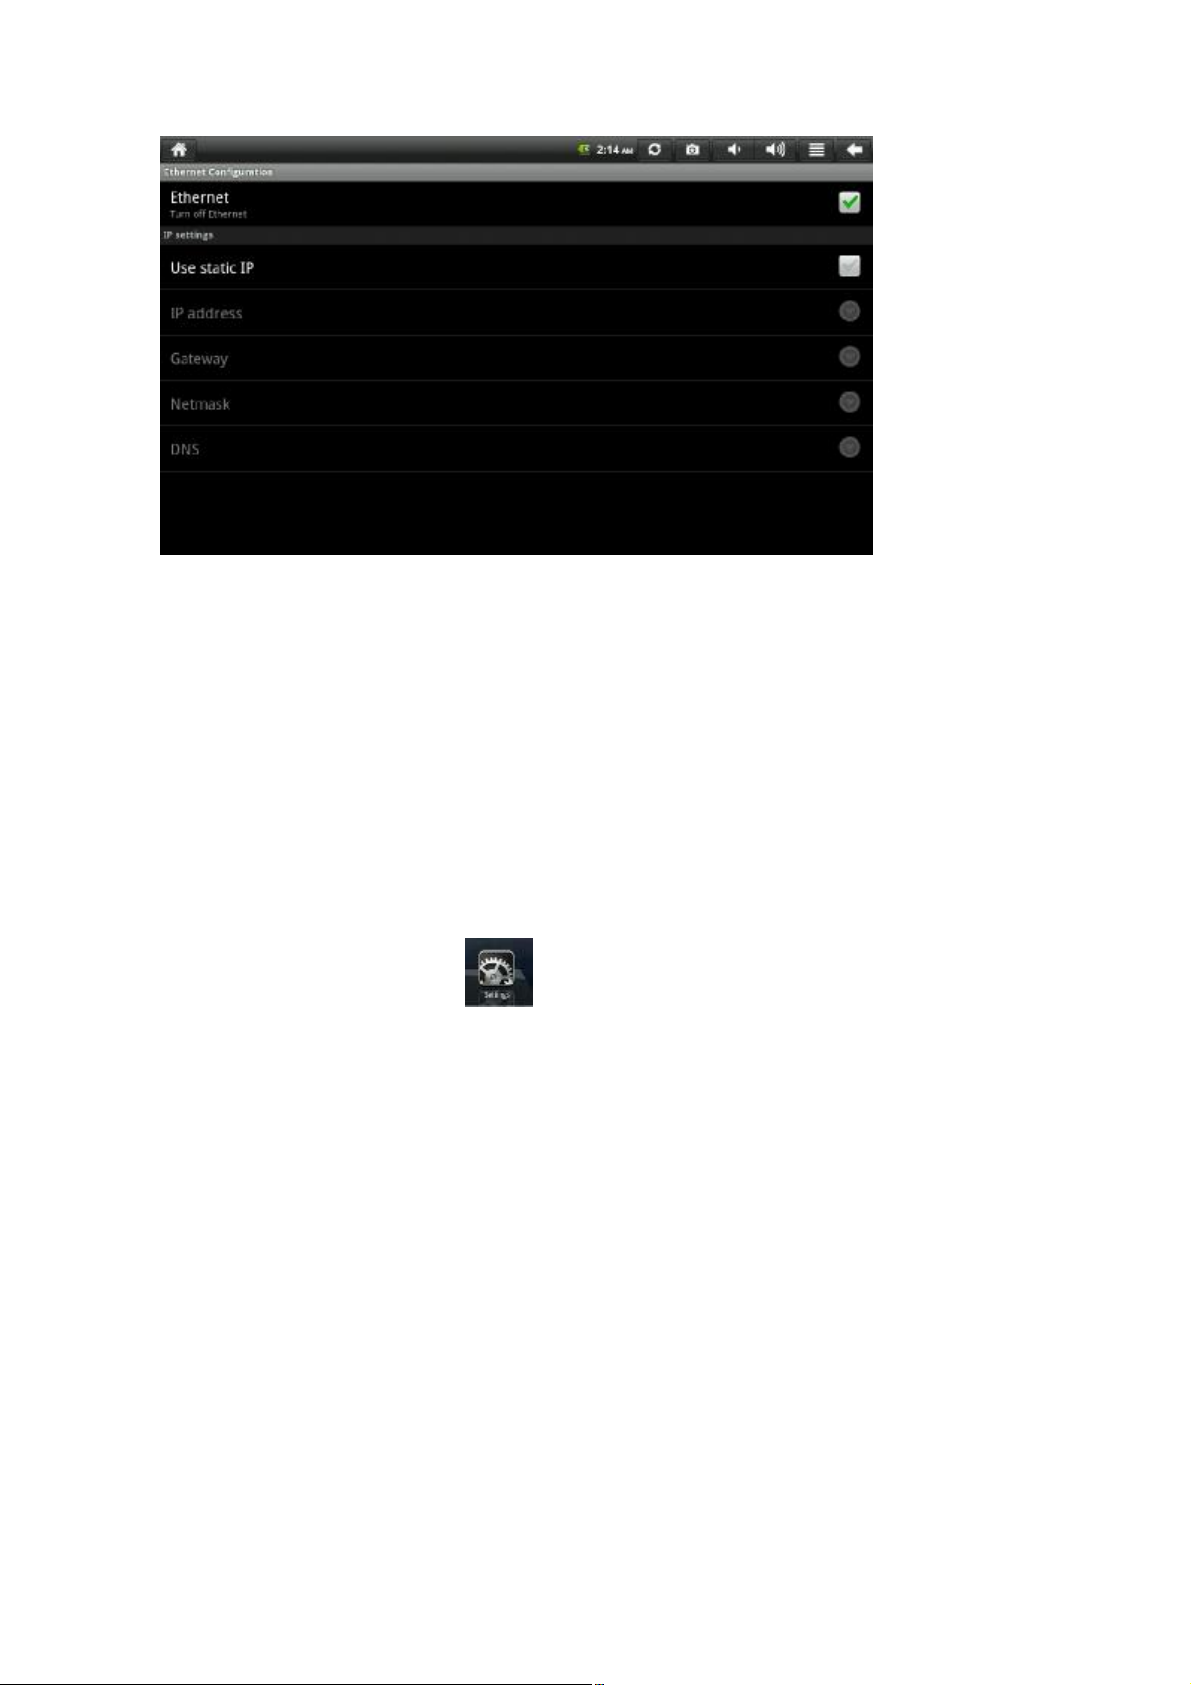
Tick Ethernet check box, and the computer will automatically search for IP to connect it to the
network.
You may also use static IP. Tick “Use static IP” check box and set all parameters to connect.
7.2Tipsforbatteryuse
The device will consume a lot of power due to its broad screen. To extend the use life of the
battery, you may reduce the frequency of using following functions:
1. Watch movies and listen to music
2. Brightness: Please press “Menu key – Settings – Sound and Display (Display settings) –
Bri ghtness” to reduce the brightness.
3. Network searching: Plea se press “Menu key – Settings – WIFI network – WIFI connection –
WIFI settings – Network notification”.
8. Personalized settings
To enter personalized settings, click icon
on shortcut menu.
8.1 Wireless network
WIFI
Connect WIFI network
To set and manage WIFI port, please press “Menu key – System settings – Wire less net work –
WIFI sett ings”.
For more details, plea se refer to 7.1.1 WIFI connection under Convenient settings.
8.2 Cabled network
Connect the device to wideband network or Ethernet.
For more details, please refer to 7.1.2 Cabled network under Convenient settings.
8.3 Sound
18
Page 19
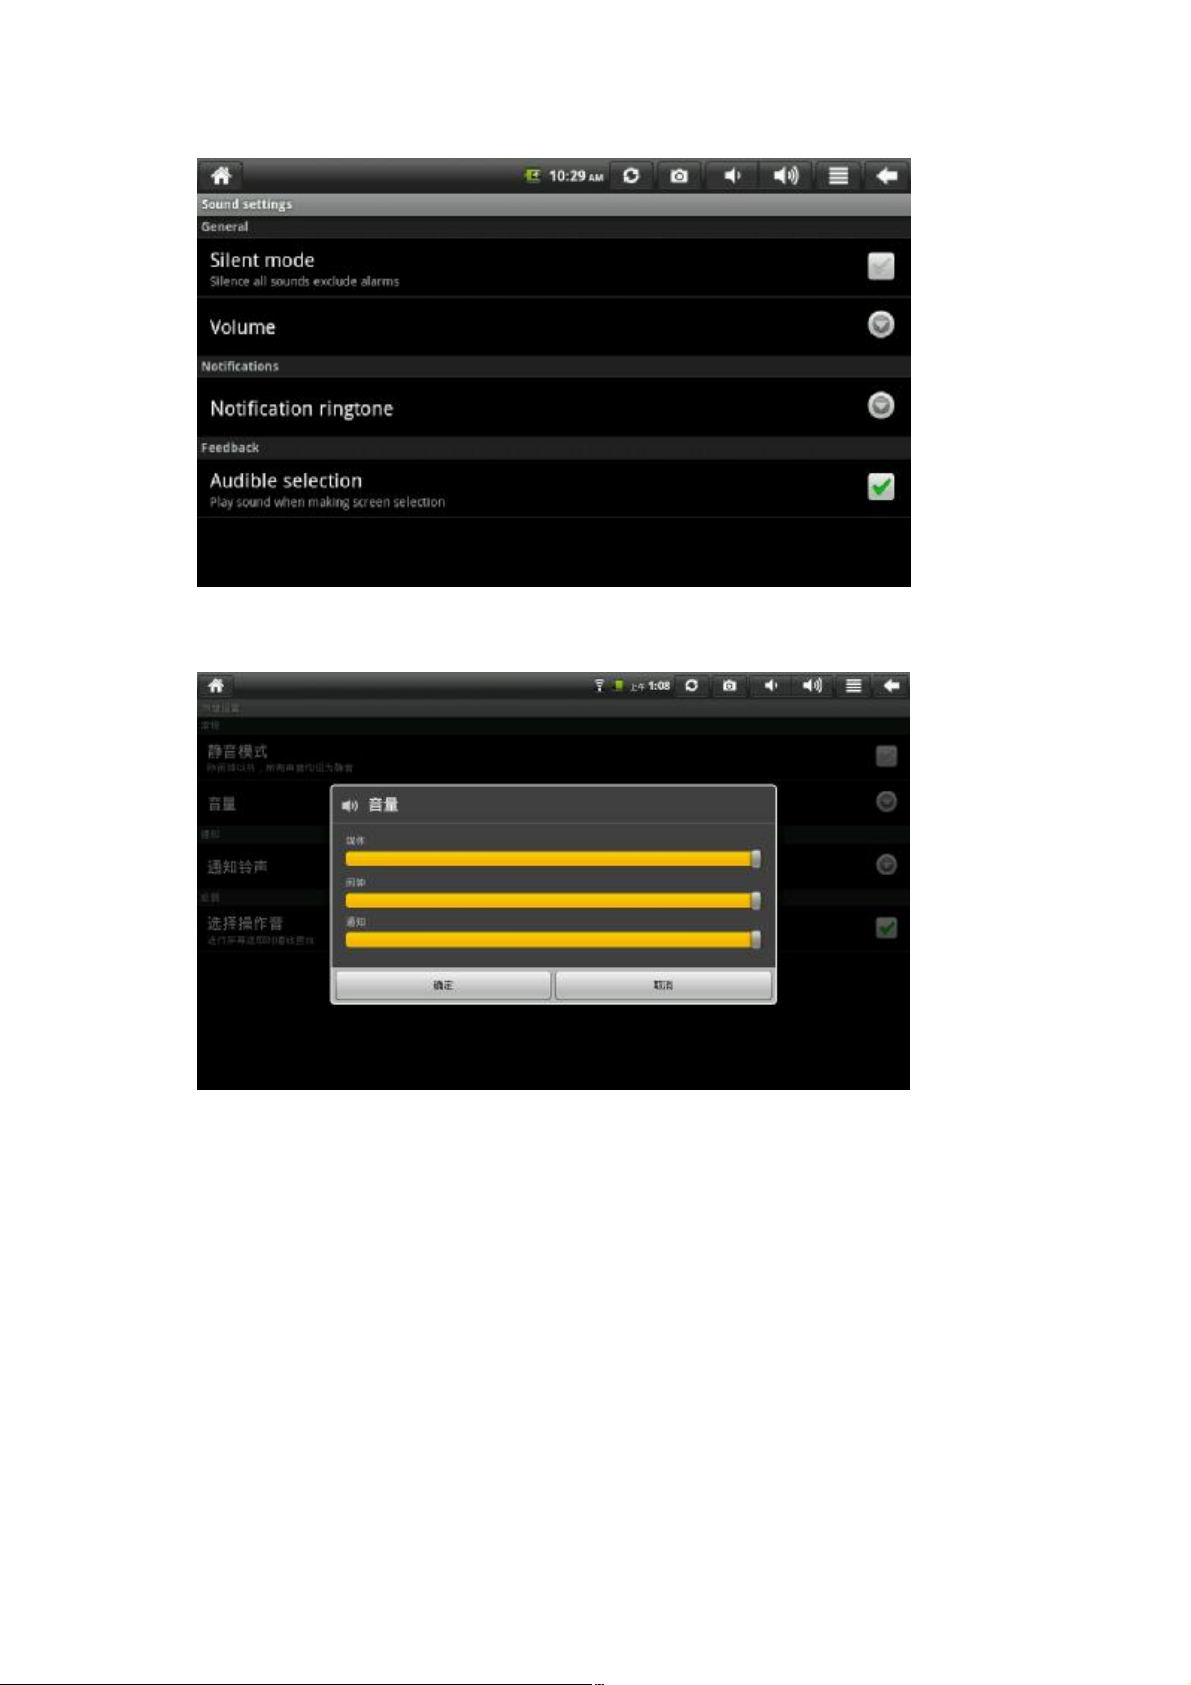
Set ringtone, not ification and vol ume
Silent mode
To set all sounds except alarm clock in silent mode, please press “Menu – System settings –
Sound – Silent mode”.
A.M.
Sound settings
Silent mode
Silence all sounds exclude alarms
Vo l um e
Notifications
Notification ringtone
19
Page 20
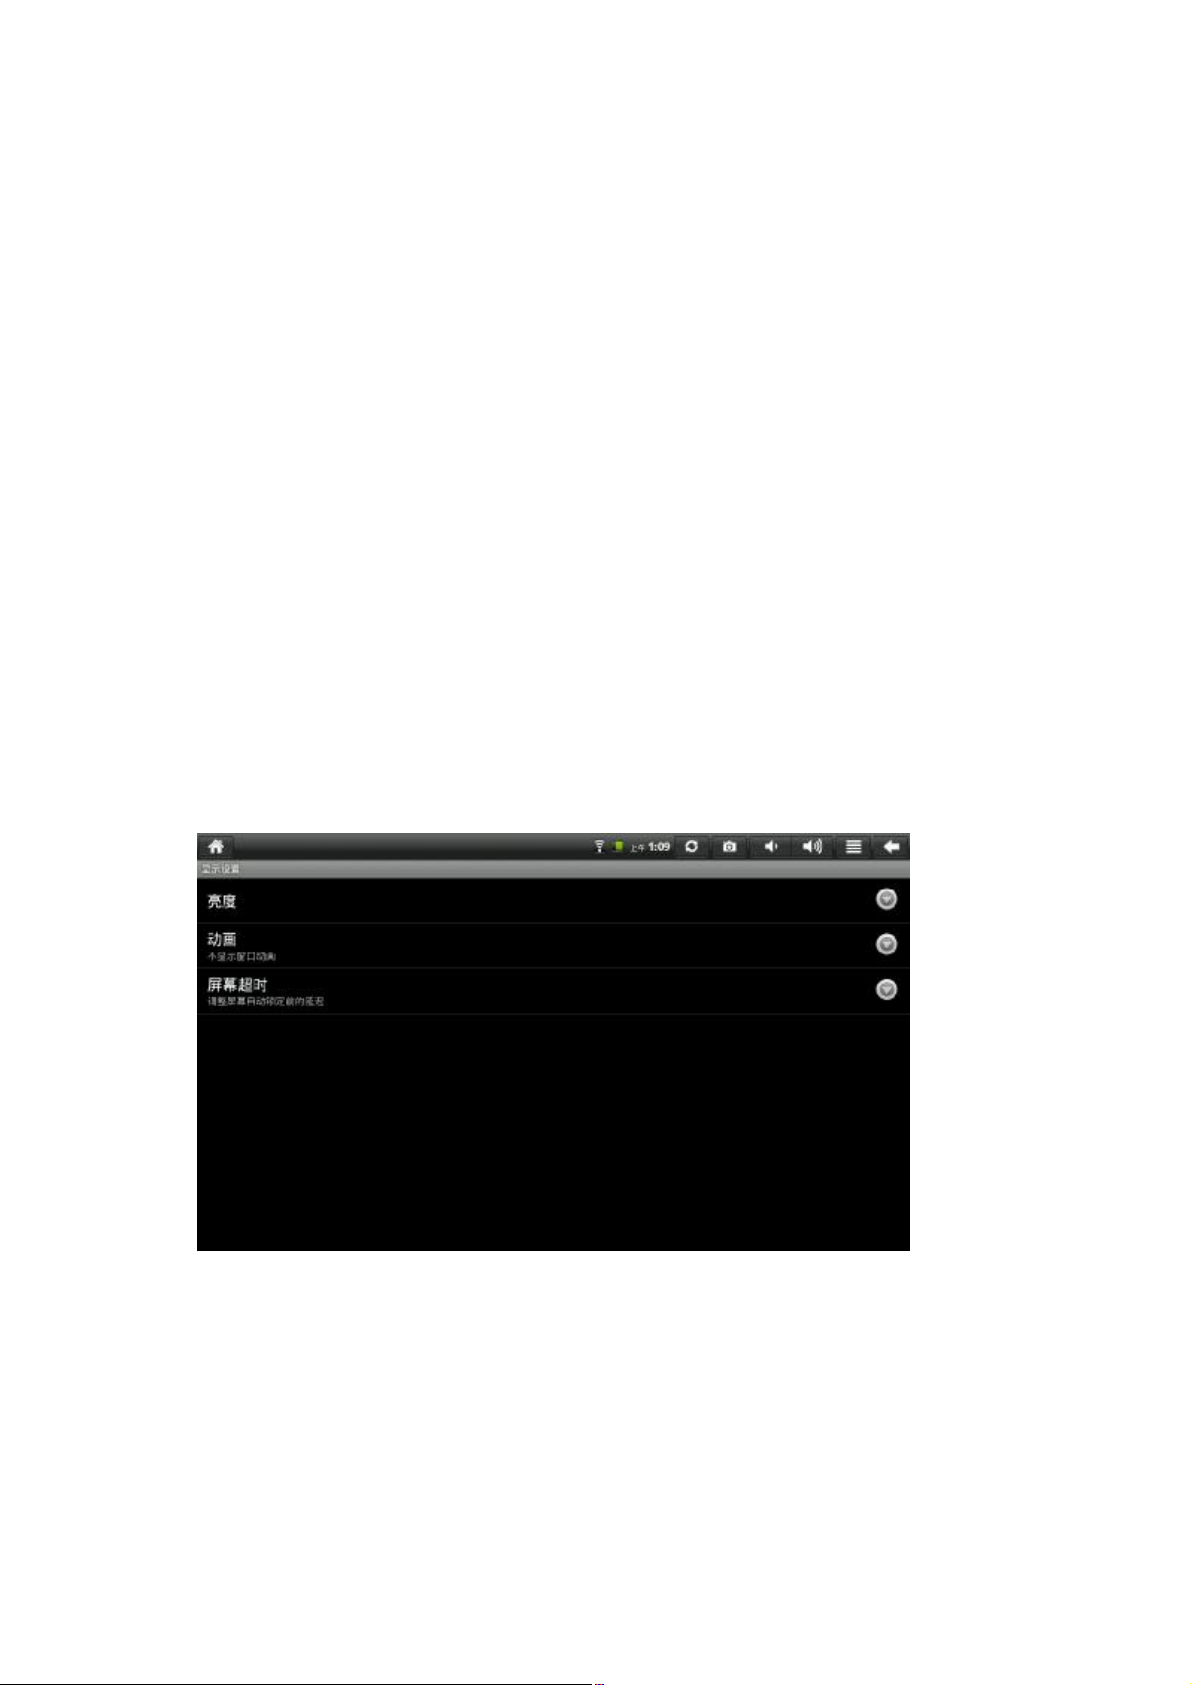
Feedback
Audible selection
Play sound when making screen selection
Vo l um e
Media
Alarm
Notification
OK Cancel
Media volume
To set music and video volume, please press “Menu key– System settings – Sound – Vo l u m e
– Media volume”.
Alarm clock volume
To set music and video volume, please press “Menu key– System settings – Sound – Vo l u m e
–Alarm clock volume”.
Notification ringtone
To set default notification ringtone, please press “Menu key– System settings – Sound –
Vo l u m e – Notification ringtone”.
Select operating sound
To play sound when making screen selection, please press “Menu key– System settings –
Sound – Audible selection”.
8.4 Display
A.M.
Display setting
20
Page 21
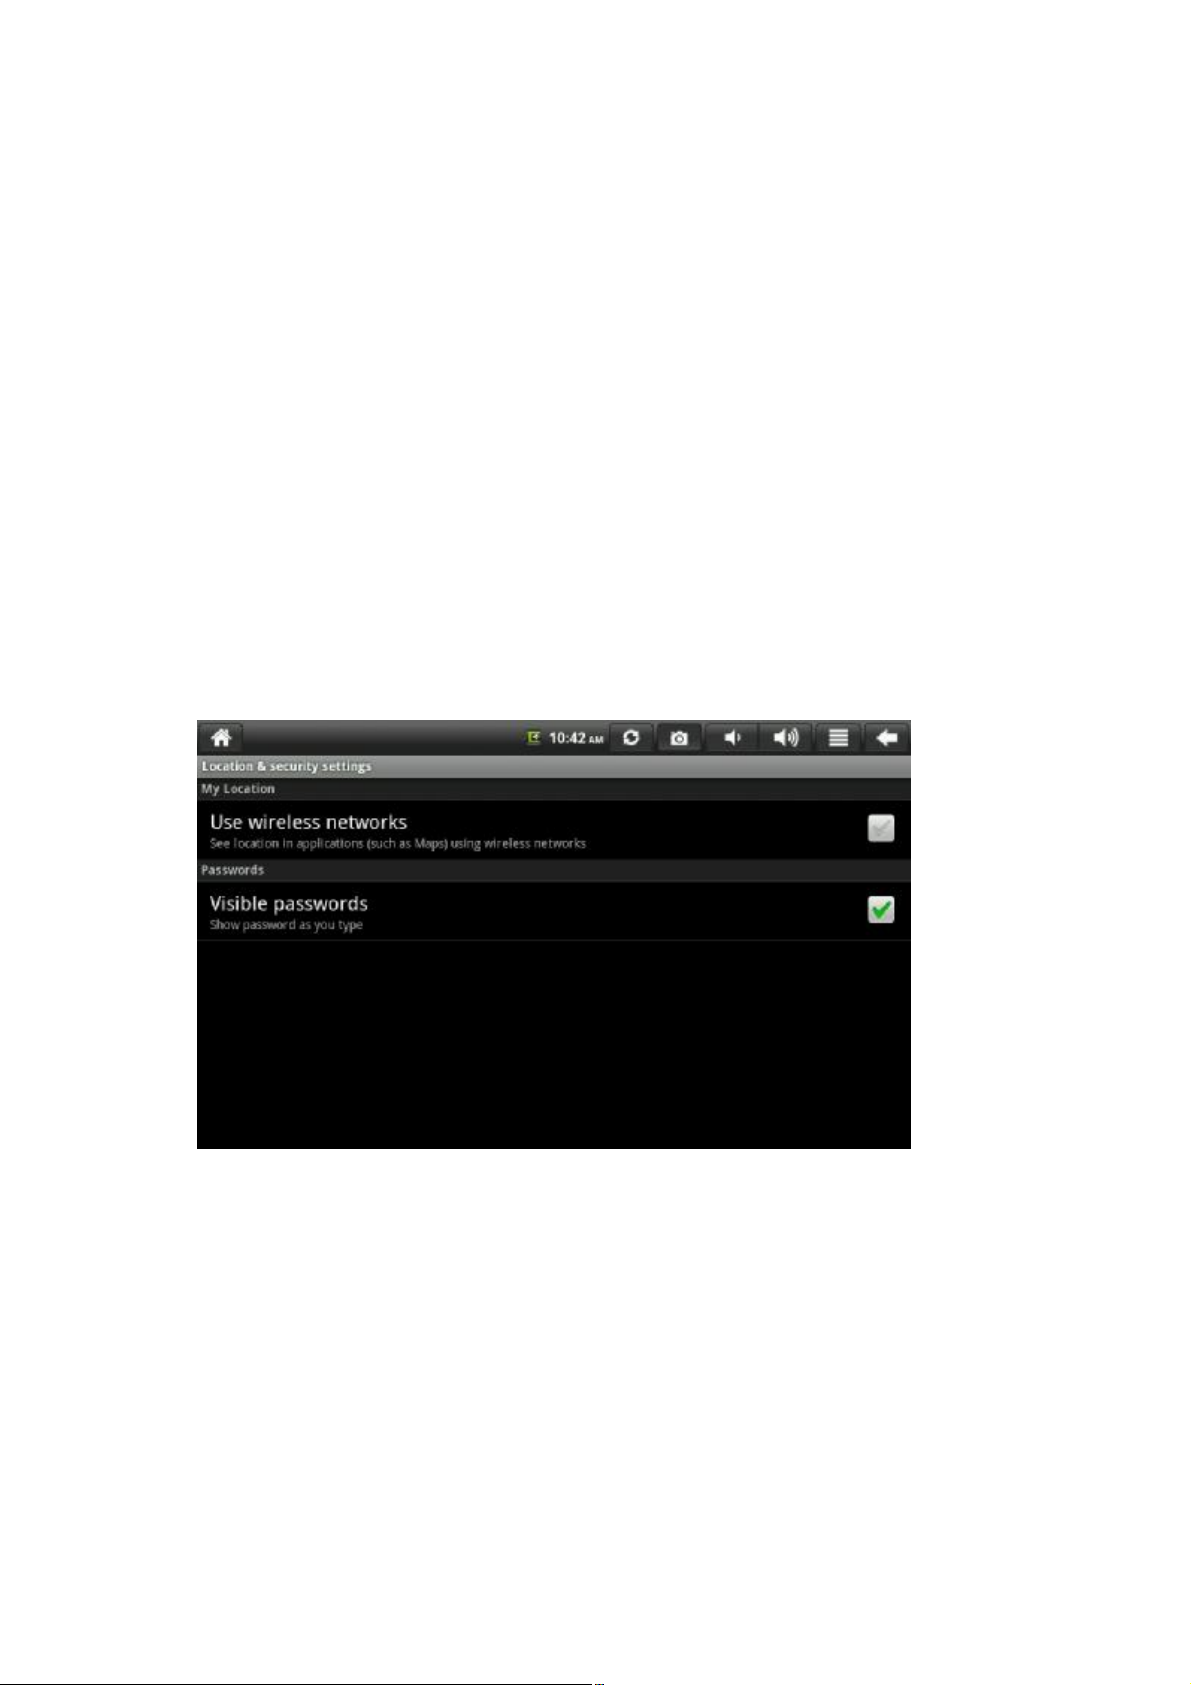
Brightness
Animation
Not display window animation
Screen overtime
Adjust the delay time before the screen automatic locking
Brightness
To adjust the brightness of the screen, please press “Menu key– System settings – Displa y–
Brightness”.
Animation
To display the animation effect of all or partial windows, please pre ss “Menu key– System
settings – Display -- Animation”.
Screen stand-by
To adjust the delay time before the screen automatic locking, please press “Menu key–
System settings – Sound – Vo l u m e – Media volume”.
8.5 Location and security
Use wireless networks
To check location using wireless network in application procedure, please press “Menu key –
System settings – Location & security – Use wireless networks”.
Visible passwords
To make the passwords visible while inputting, please press “Menu key – System settings –
Location & security – Visible passwords”; when the setting is completed, the passwords will be
visible upon inputting.
8.5 Application procedures
21
Page 22
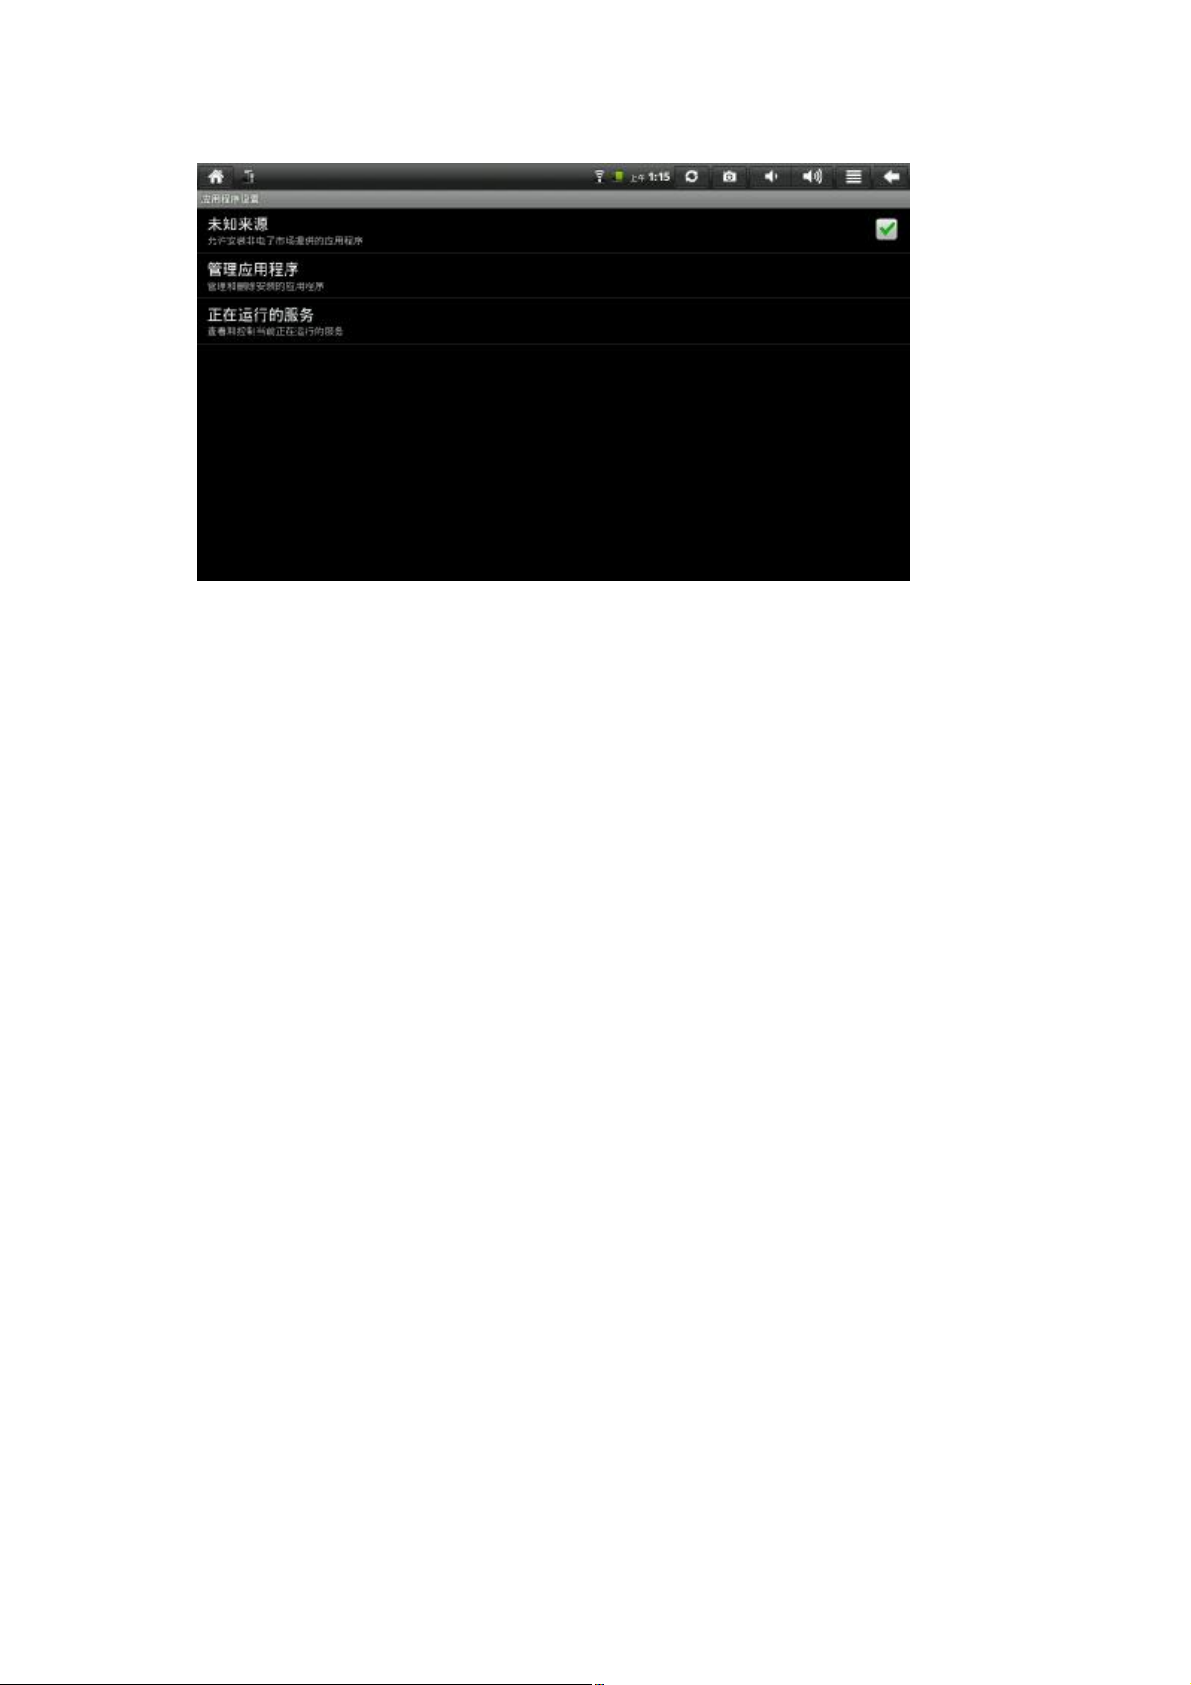
Click it to the interface of application procedures
A.M.
Application procedure setting
Unknown source
Allow installing application procedures not supplied by economic market
Manage application procedures
Manage and delete the application procedures installed
Running services
Check and control the currentl y running servi ce
Unknown source
Tick the check box to allow installing application procedures not supplied by economic
market.
Manage application procedures
To manage and delete the application procedures installed, please “Menu key – System
settings – Application procedures – Manage application proce dures”.
Running services
To check and control the currently running service, please press “Menu key – System settings
– Application procedures – Running service”.
8.6 Account and synchronizing
Click the icon to enter account and synchronizing setting interface
22
Page 23
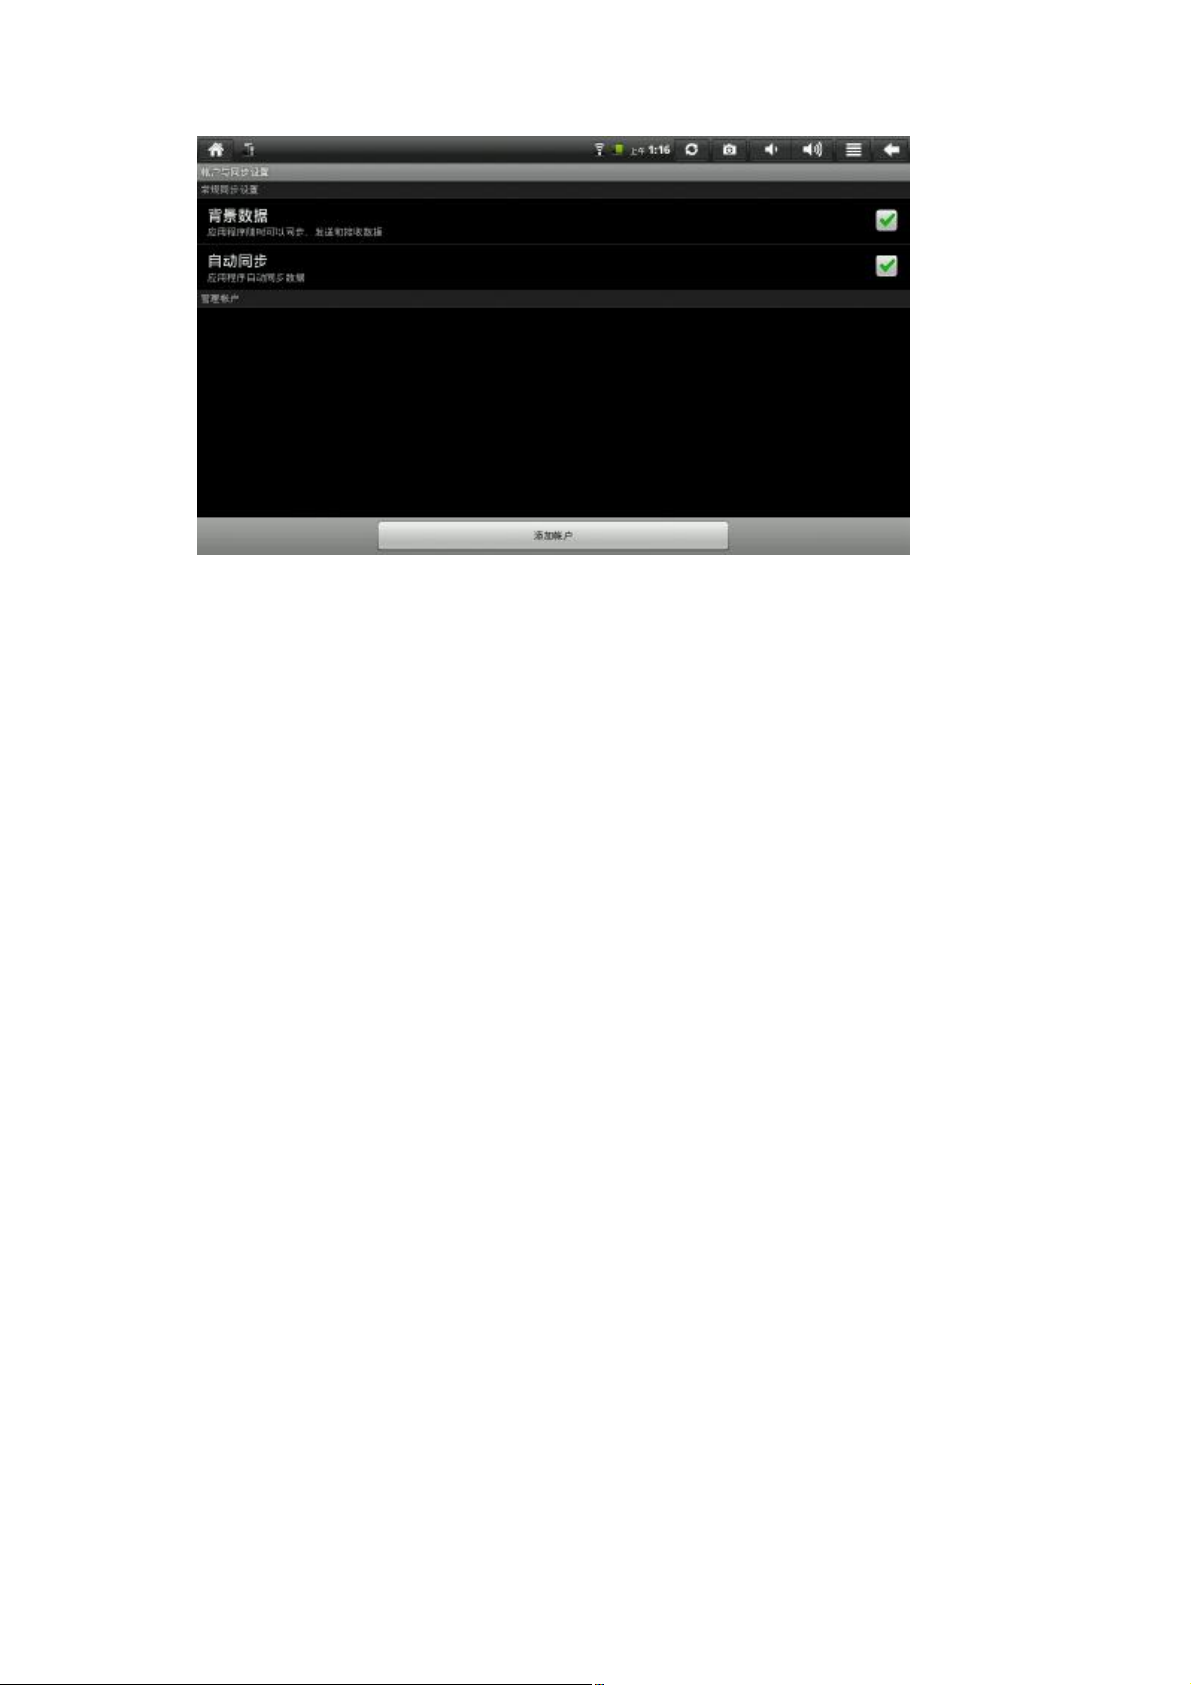
A.M.
Account and synchronizing setting
Regular synchronizing setting
Background data
The application procedures may allow synchronizing, sending and receiving data.
Self synchronizing
The application procedures may automatically synchronize data.
Manage account
Add account
Background data
The application procedures may allow synchronizing, sending and receiving data.
Self synchronizing
The application procedures may automatically synchronize data.
Add account
Click it to add Google, Skype, and company account.
8.7 SD card and internal device storage
Check available space
23
Page 24
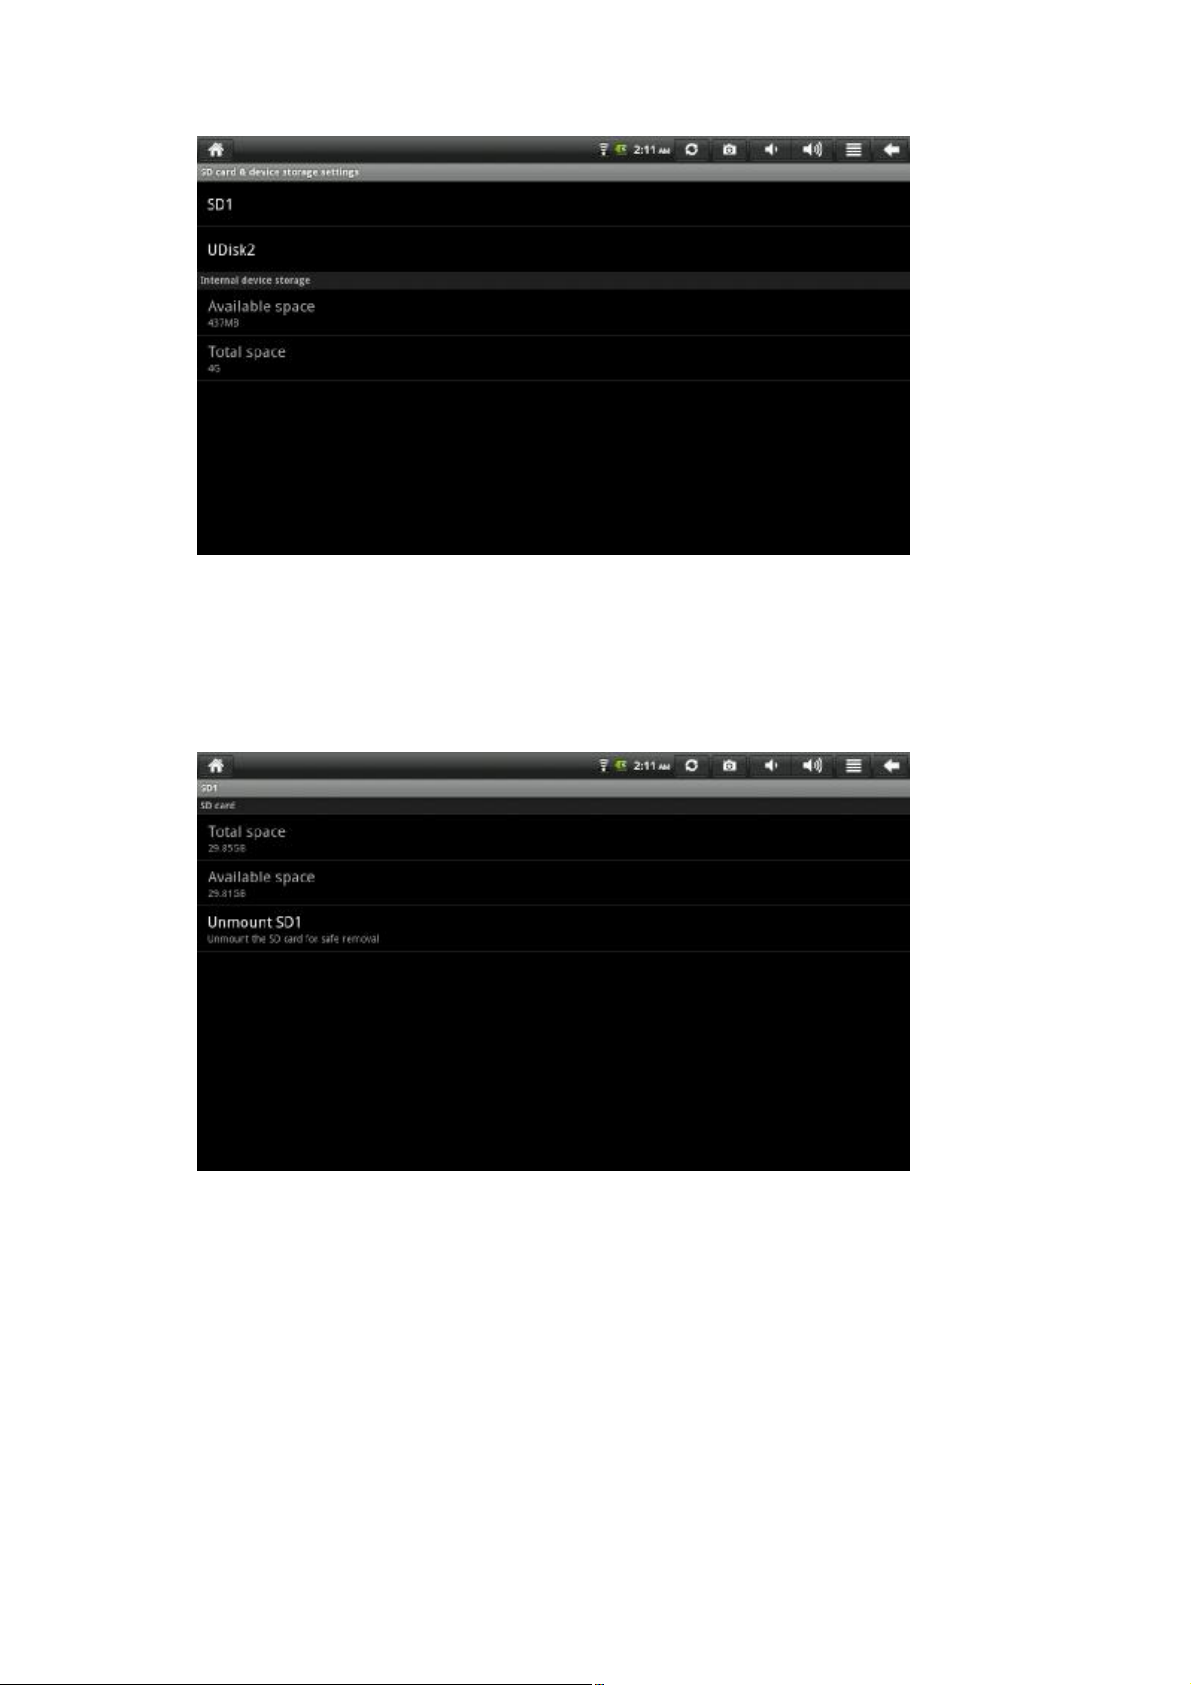
Storage device (SD card and USB disk)
To check and operate the storage device, e.g. unmount, please follow “Menu key–Settings–
SD card and device internal storage" to select desired storage device under the directory of storage
devices, e.g. storage card 1. Enter the storage device interface to check its total space and available
space, or unmount the device. The interface is shown as below:
Internal device storage
To check the internal device storage , please follow “Menu key–Settings– SD card and device
internal storage", and check it under the directory of storage devices.
8.8 Language and keyboard
24
Page 25
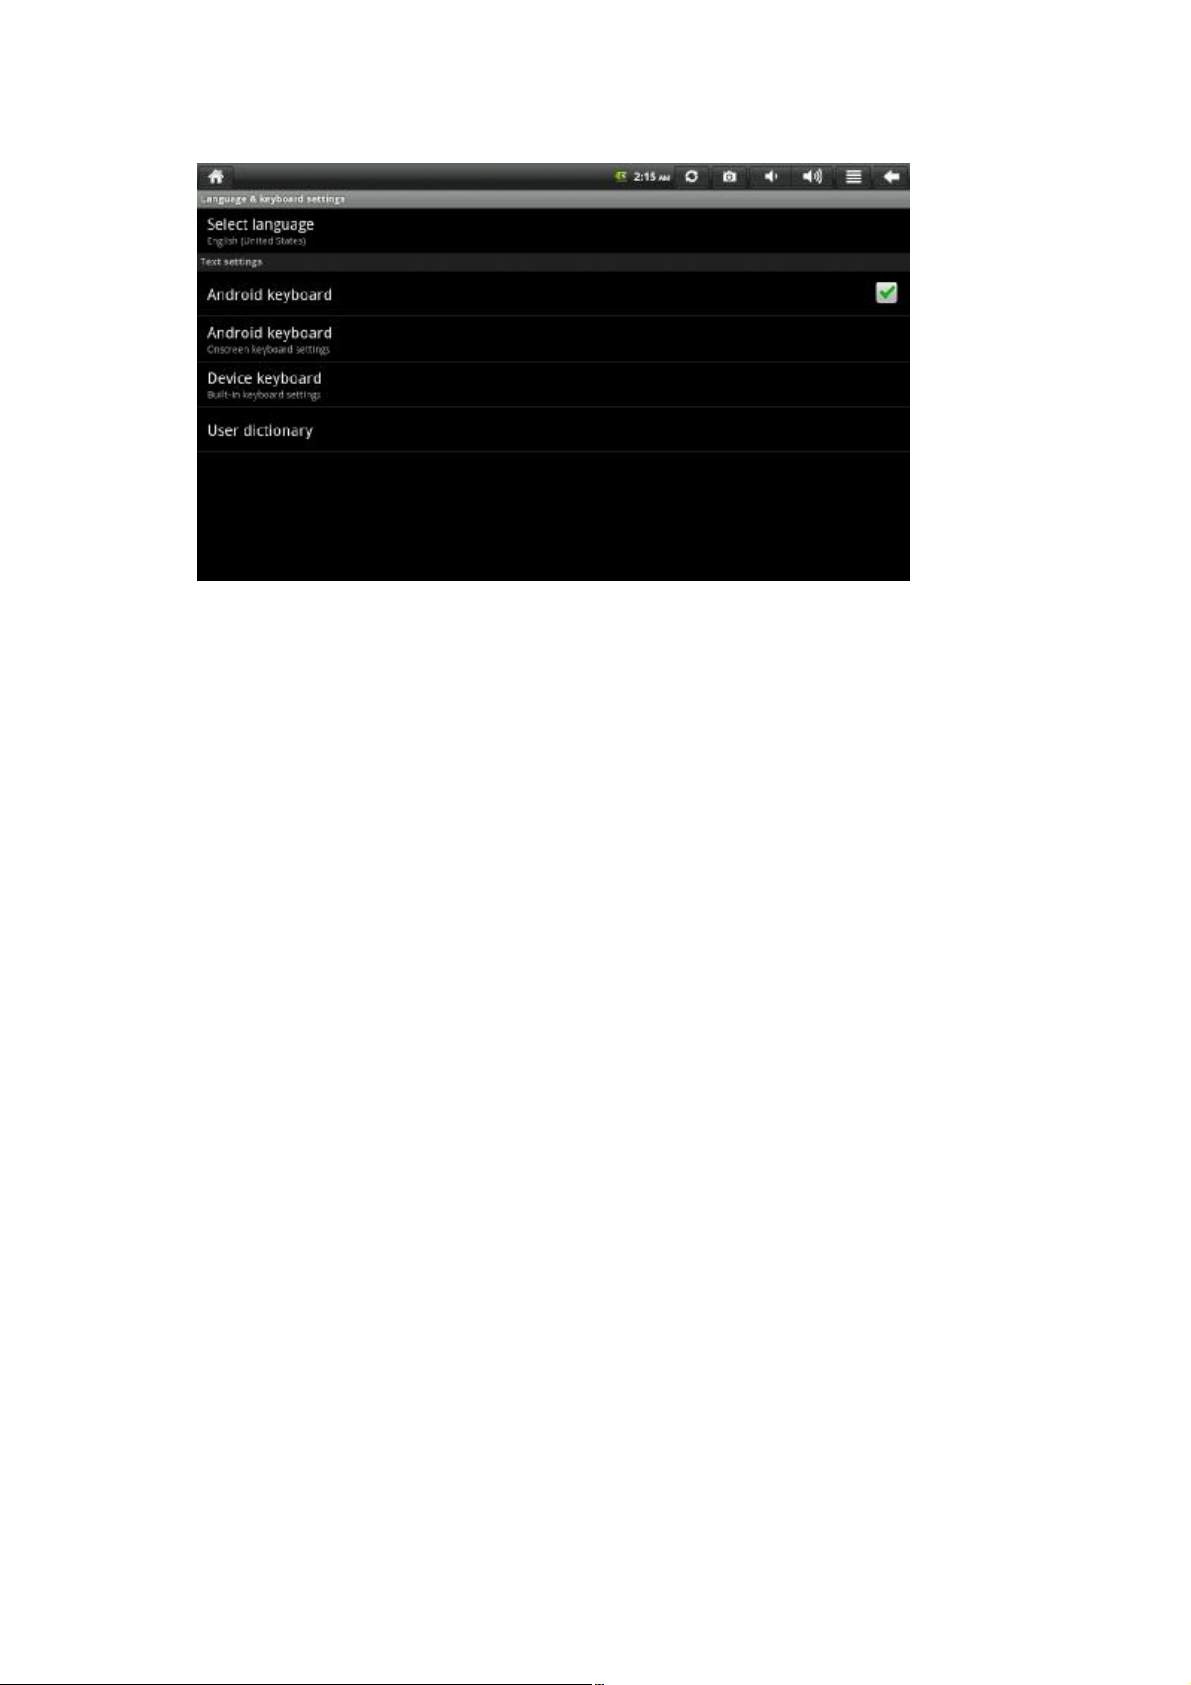
Set langua ge and region (language and region), word input and automatic correction items.
Sele ct language region
To select language and region, please press “Menu key – Settings– Language & keyboard –
Select language region”.
Android keyboard
To set Android keyboard, please press “Menu key – Settings– Langua ge & keyboard –
Android keyboard”.
User dictionary
To add into or delete words from the user dictionary, please press “Menu key– Settings–
Language & keyboard – User dictionary”.
8.9 Date and time
To set date, time, time zone, time system and format, please press “Menu key – Settings– Date &
time settings”.
25
Page 26
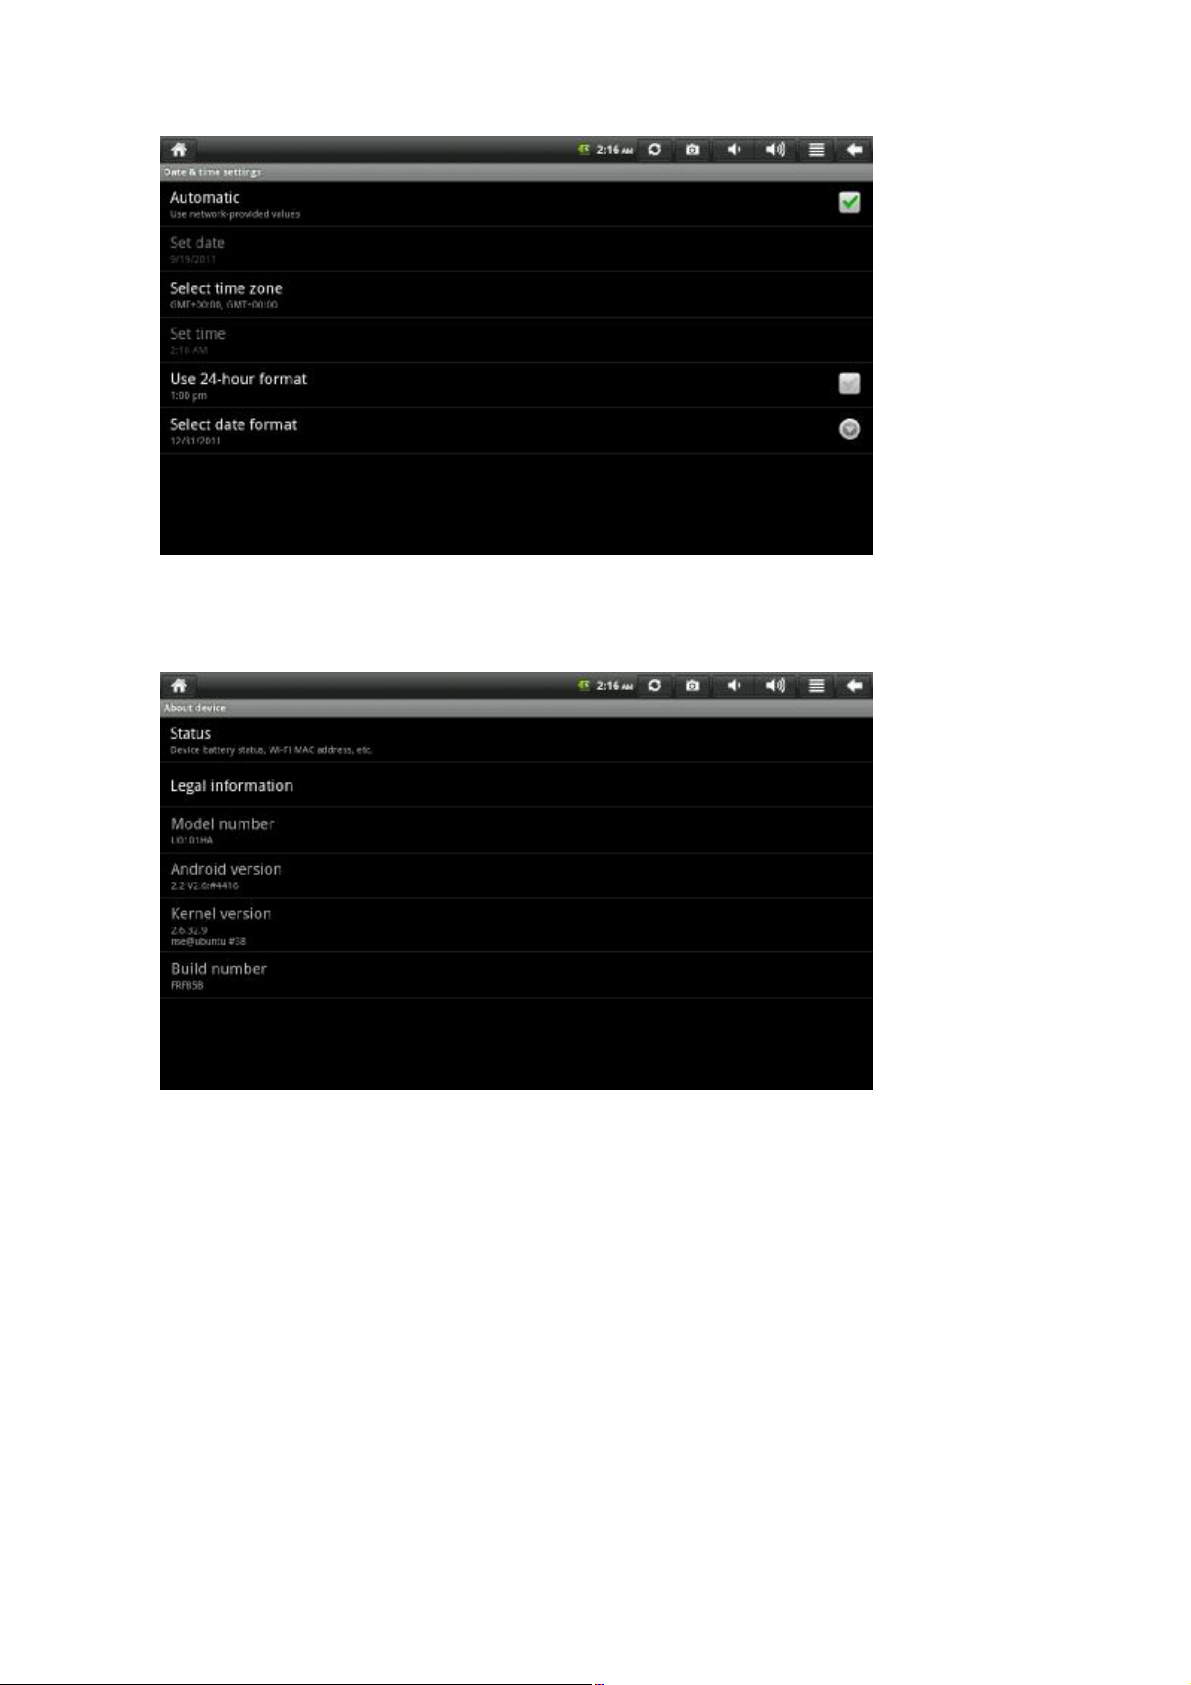
8.10 About device
Check legal information, device status
and software version
Sta tus
To check the battery status, battery level, start-up time and WIFI address, plea se press “Menu
key – Settings– About device – Stat us”.
Legal information
To check related legal information, please press “Menu key – Settings– Ab out de vice – Legal
information”.
26
Page 27

Model number
To check device model number, please press “Menu key – Settings– About device – Model
number”.
Firmware version
To check firmware version, please press “Menu key – Settings– About device – Firmware
version”.
Version number
To check version number, please press “Menu key – Settings– About device – Ve r s i on
number”.
9. Use of HDMI
Via HDMI, the video played on the pad will be switched to a HDMI display device
(e.g. TV with a HDMI port) for playing. The max output resolution supported by a tablet
PC is 720P. The use method is shown as below:
1. Turn on the pad.
2. Connect the computer to a HDMI display device with a HDMI cable. Turn on the
display device and the HDMI connecting information will pop up on the status bar.
3. Play videos on the computer.
4. The videos will automatically be switched to the HDMI display device and continue
to be played. Please wait. It will take about 5 seconds.
5. The videos can be switched back to the pad by the following 3 ways:
1) After the video was played, it will automatically switched to display on the
pad;
2) You may also press ESC key during playing to switch the video to the pad; or
3) You may directly plug out of the HDMI cable during playing to switch the
vide o to the pad.
10. Troubleshooting
10.1 Close application procedures
Any procedures that were opened will occupy the internal storage space in the device. Too many
such procedures may affect the running speed of this device. Therefore, the procedures not used
shall be closed promptly to reduce their occupation of internal storage space so that the device
may run at normal speed.
To cl ose procedures, please click icon
on the shortcut bar to enter setting interface.
Select “Application procedure – Running service s”, as shown below:
27
Page 28
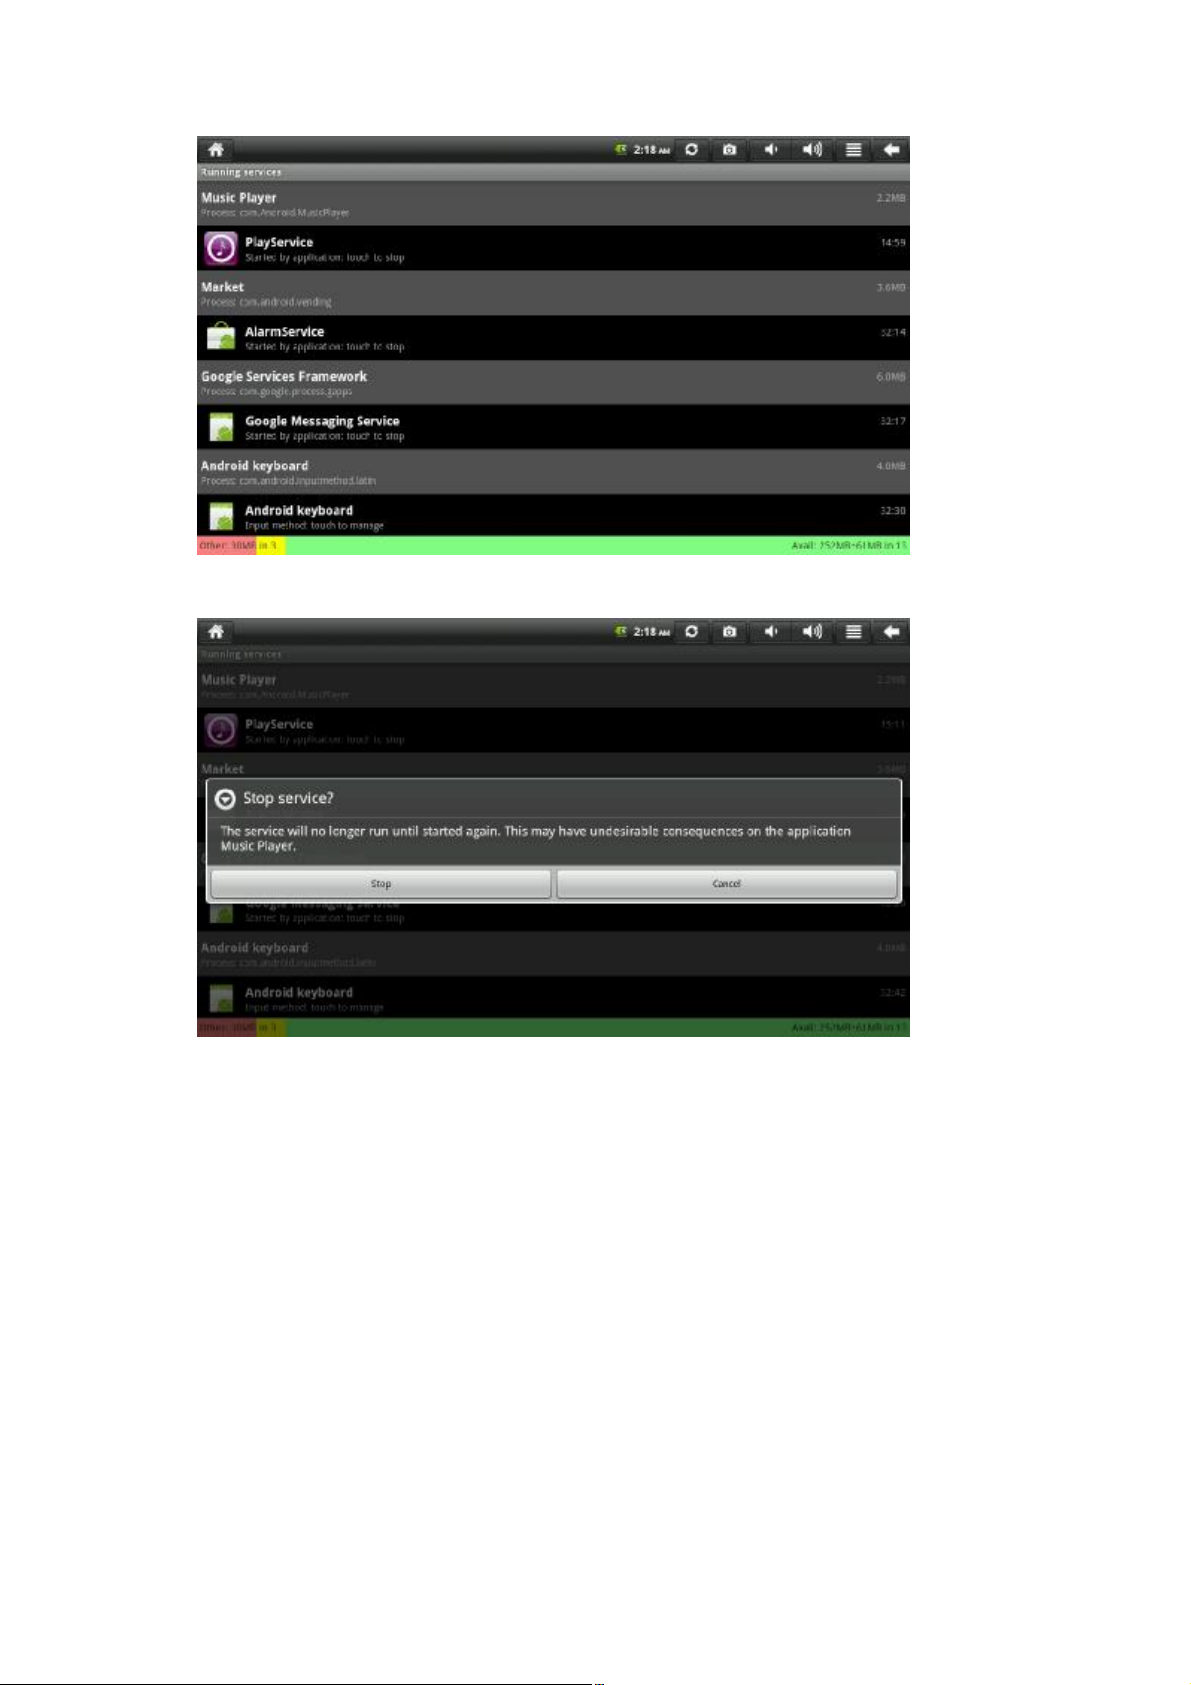
Click the application procedure to be closed, and a window of “Stop service?” will pop up, as
shown below:
Click “Stop”, the selected application procedure will be closed and disappear from the
current window.
10.2 Forced shutdown
Press and hol d the power switch of this device for a bout 7 seconds to shut it down.
10.3 Reset default setting
To reset the device factory setting and delete all information, please press “Menu key –
System settings – Privacy – Factory data reset”.
28
Page 29
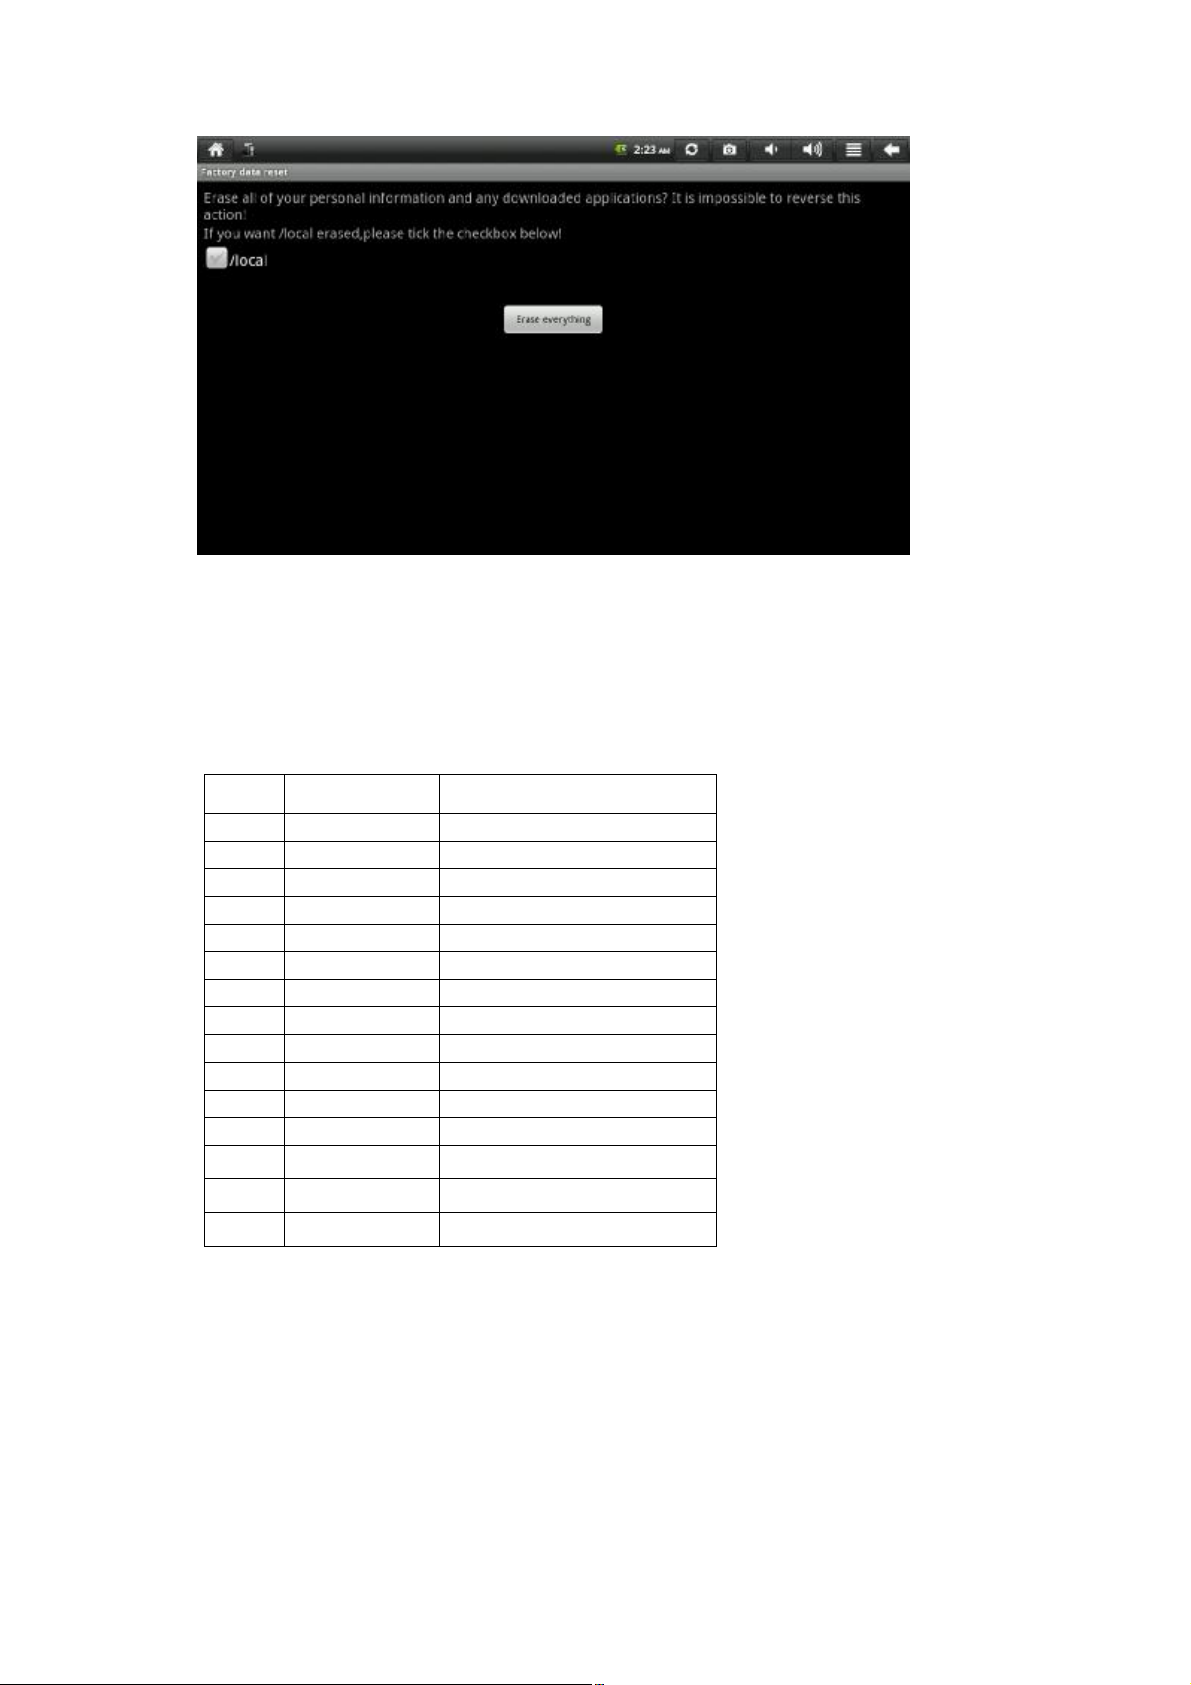
LOCAL-----Select to reset LOCAL, and the files on the local disks will be all deleted; not
select LOCAL, and the files on the local disks will not be deleted.
Warning: To reset the device will delete Google account, the data and setting of the system
and application procedures, and the application procedures downloaded. Please use this function
with prudence.
11. Shortcuts
No. Shortcut Function
1 F1 Setting
2F2 Browser
3 F3 Sending E-mail
4 F4 Calendar
5 F6 APK manager
6 F7 Sound recorder
7F8 Video
8 F9 Music player
9 F10 Gallery
10 F11 WI-FI settings
11 F12 Cabled network settings
12 Fn+F8 Volume -
13 Fn+F9 Volume +
14 Fn+UnmLk Open numeric keyboard
15 Fn+ScrLk Open direction key
29
Page 30

FCC Warning:
This device complies with Part 15 of the FCC Rules. Operation is subject to the
following two conditions: (1) this device may not cause harmful interference, and
(2) this device must accept
any interference received, including interference that may cause undesired
operation.
NOTE: changes or modifications not expressly approved by the party responsible for
compliance could void the user's authority to operate the equipment.
This equipment has been tested and found to comply with the limits for a
Class B digital device, pursuant to Part 15 of the FCC Rules. These limits are
designed to provide reasonable protection against harmful interference in a
residential installation. This equipment generates, uses and can radiate radio
frequency energy and, if not installed and used in accordance with the
instructions, may cause harmful interference to radio communications. However,
there is no guarantee that interference will not occur in a particular installation.
If this equipment does cause harmful interference to radio or television reception,
which can be determined by turning the equipment off and on, the user is
encouraged to try to correct the interference by one or more of the following
measures:
-- Reorient or relocate the receiving antenna.
-- Increase the separation between the equipment and receiver.
-- Connect the equipment into an outlet on a circuit different
from that to which the receiver is connected.
-- Consult the deal er or an experienced radio/TV technician for help.
FCC RF warning statement: The device has been evaluated to meet general RF exposure
requirement. The device can be used in portable exposure condition without
restriction.
:
30
 Loading...