


PA0952 User Guide
User Guide
Thanks for purchasing PA0952 MID. This is a powerful and convenient device, which uses
concise and highly universal platform to enable fast network access and mobile office. PA0952
MID is built on Google Android operating system and integrated with thousands of interesting
applications, enabling incomparable user experience.
Through integrated wireless access and reactive touch screen, you can
read books and newspapers at any time and any where; comprehend the latest
news, sports and weather; manage data and business files; browse map and
company location on the Internet, etc.
Notice
• Before operating, please read the safety precautions and user guide carefully to ensure safe and
proper usage.
• The description in this user guide bases on the default settings.
• The pictures and screenshots in this user guide may be different from the actual product.
• The content in this user guide may be different from the product and software provided by the
service provider. It is subject to change without prior notice.
• Available functions and additional service vary according to the device, software or service
provider.
• The format and information of this user guide base on Google Android operating system, which
may be different from the user operating system.
• The applications and their functions vary according to the country, region or hardware
specifications. Our company won’t be responsible for the problems in performance caused by
third party applications.
• Our company won’t be responsible for the problems in performance or compatibility due to user
edit of registry.
• The audio, wallpapers and pictures provided in this device are only provided for Shuoying and
respective owners. It will violate the copyright law if these data are referenced and used for
commercial or other purposes. Our company won’t be responsible for such copyright
infringement.
• Please keep this user guide properly for future reference.
1

Contents
Introduction of device and accessories...........................................................3
Accessories.............................................................3
Battery charging.............................................................3
Appearance.............................................4
Turning on/off
.......................................................4
Touch screen usage............................................5
Operation interface.........................................................5
Connecting to PC through USB........................................7
Application introduction.........................................................8
Basic settings.............................................................10
Settings.............................................................10
Wireless & networks...........................................................10
Sound.................................................................10
Display.................................................................11
Storage.................................................................11
Battery.................................................................11
Apps.............................................................12
Accounts & sync...........................................................12
Location services.............................................................13
Security.................................................................13
Language & input.........................................................13
Backup & reset...........................................................14
Date & time...........................................................14
About tablet.............................................................14
Troubleshooting....................................................15
Safety precautions...................................................16
Store and use the device properly......................................17
2

Introduction of device and accessories
Accessories
After unpacking, check whether the following items are provided:
• Main unit
• User Guide
• USB cable
• Adapter
• According to the device model and region, the provided items may be different, which depend
on local available software and accessories or service providers.
• You can purchase our accessories from our company, which can provide better compatibility.
Our company won’t be responsible for any incompatibility or damage caused by third party
accessories.
Battery charging
The device is equipped with built-in battery. Charge the battery before using the device for the
first time. It is recommended to charge at least ten hours for the first time, and charge normally
thereafter.
Only use approved charger (input: AC110~240V 50/60Hz; output: DC5V/2.5A). Our company
won’t be responsible for any battery explosion or device damage caused by unapproved charger.
• The user can’t replace the built-in battery. Please contact the service provider for the
information on battery replacement.
• You can charge the battery with the charger or USB cable.
• When the battery charge is lower than 15%, the device will send alert tone and display the
low battery message. The battery icon
the device switches off automatically. Charge the battery before using.
• If the battery electricity is completely run out, the device can’t be turned on even when
connecting the power adapter. Charge for a while and then turn on the device.
• You can use the device while charging, but the charging time will be extended.
• While charging, the battery icon will scroll, the LED changes to blue, and the touch screen
may be invalid because the voltage isn’t stable. In this case, please disconnect the power
adapter.
• It is normal that the device becomes hot while charging, and the device life or performance
won’t be affected.
• If the device can’t be charged normally, please send the device and charger back to our
company for maintenance.
• When the battery is fully charged
disconnect the power adapter.
also will be blank. If the battery voltage is too low,
(battery icon stops scrolling and LED turns off), please
The charging requires about 7 hours. Since the battery is consumable and gradually wastes, the
charging time will be shortened. The initial capacity of the battery is 5200mAh.
The battery will be consumed faster if browser or WLAN is running in background. To save
3
battery electricity, turn off useless applications. You can also reduce the time of backlight and
decrease the brightness of display, or press [
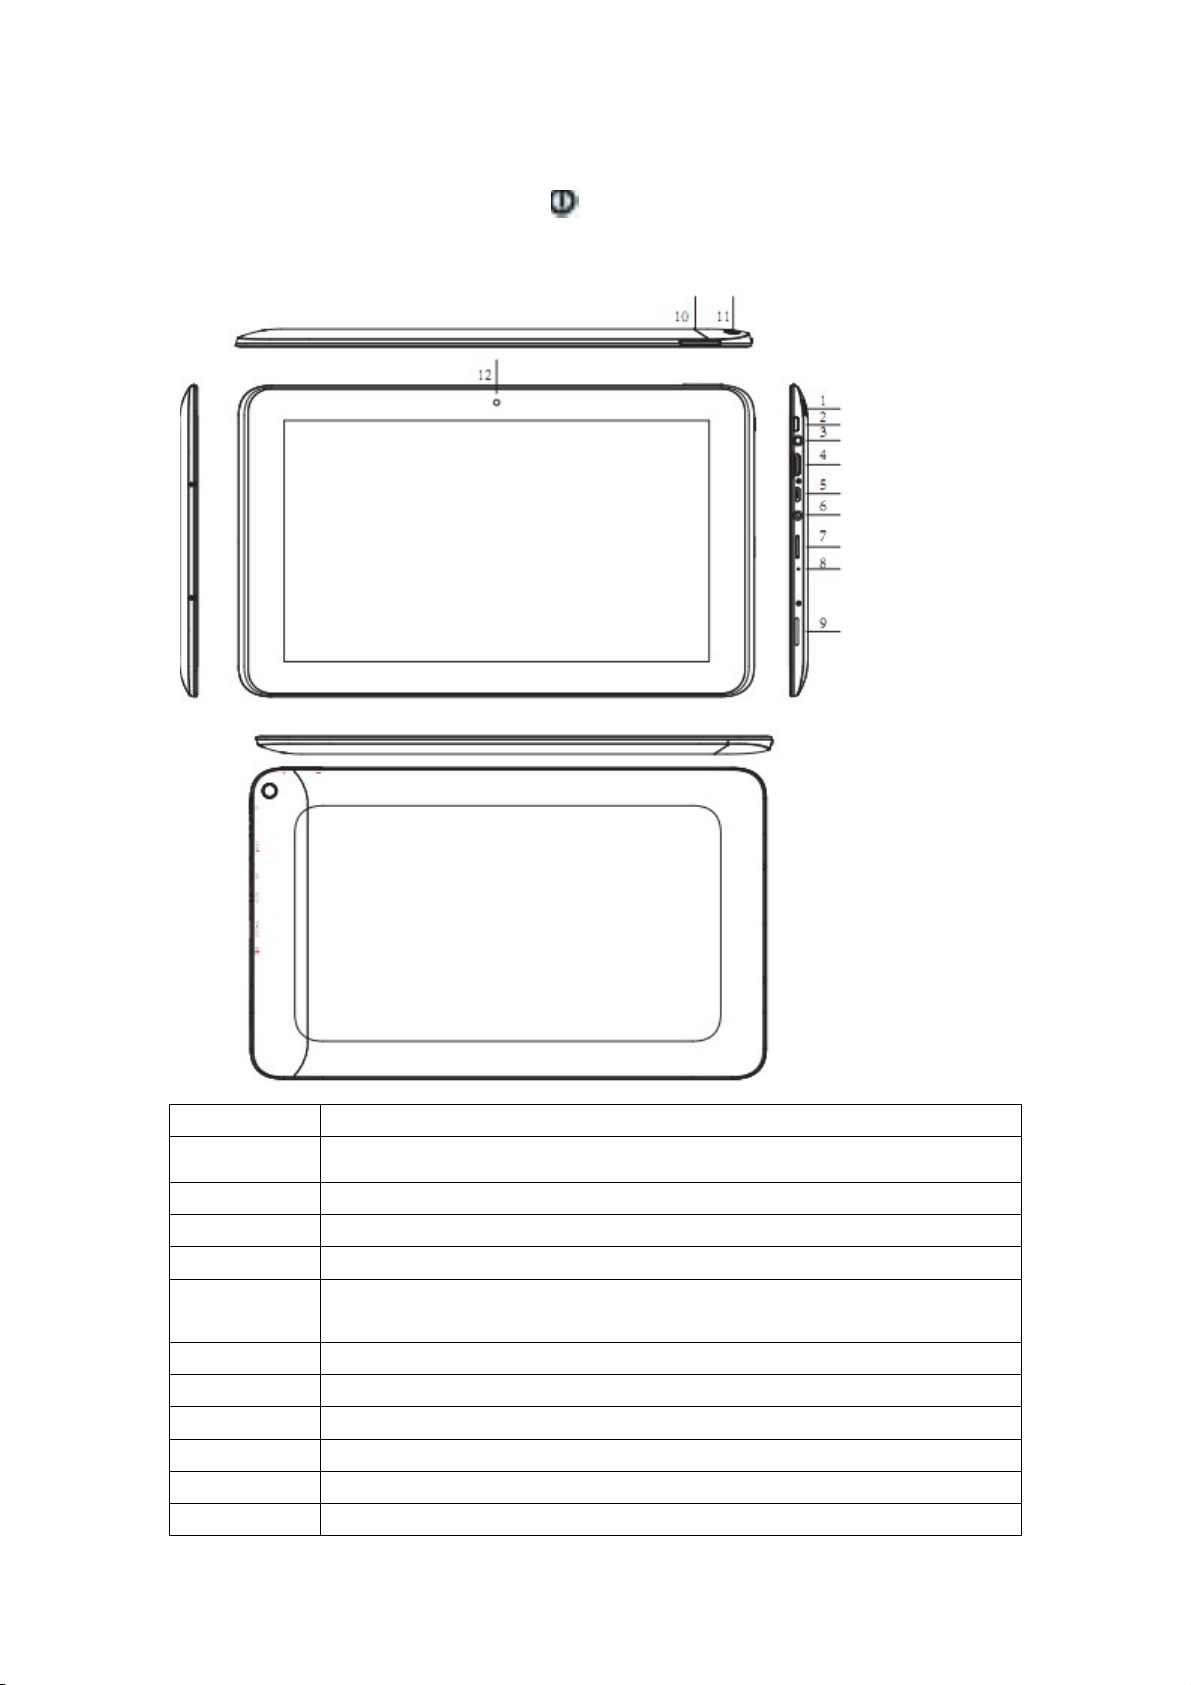
Appearance:
] to switch to sleep mode.
Number#
Description
1(11) Camera,Postposition 2M camera
2 Power jack,Power on/off
3 Earphone jack,3.5mm standard earphone jack
4
HDMI jack,Used to connect to external HDMI displays
5 microUSB jack,Used to connect to PC for data transmission, charging and
connecting to external USB flash drive
6 Charging jack,supper DC5V/2.5A adapter
7 TF-card slot,External T-FLASH card, support 2G~32G
8 MIC jack,built - in MIC
9 Speaker
10 VOL,VOL+ / VOL12 Camera,Prepose 0.3 M cameras
4

Turning on/off
To turn on the device, press and hold [
To turn off the device, press and hold [
]
] for 5S, and then select Power off
Lock screen: press the Power key to lock or unlock the screen.
Touch screen usage
PA0952 has 9” capacitive touch screen, with which you can select items or execute functions
easily. Before using, please comprehend the notice and basic operation of touch screen.
• Do not use sharp object to avoid scratching the touch screen.
• Do not contact other electronic devices with the touch screen, or else ESD may cause failure of
the touch screen.
• Do not contact water with the touch screen, which may have failure in wet environment or
water.
• The touch screen has a detection layer, which can detect the weak charge sent out by human
body. To achieve the best results, please touch the screen with fingertip. Do not operate with
stylus, pen or any sharp object.
The following operations are available to control the touch screen:
• Tap: tap once to select or start a function, option or application
• Tap and hold: tap and hold an item for at least two seconds
• Drag and drop: tap and drag an item and drop at desired position
• Double tap: quickly tap an item twice
• Slide: slide up, down, left or right to browse list or screen
• If there is no operation in specified time, the screen turns off automatically. Press [
] to wake
up the screen
Operation interface
When the screen wakes up, you can view the device status and access applications. Scroll left or
right to select a main screen panel
Unlocking:
After turned on, the device enters unlocking interface; tap and hold
, and drag to to unlock
and enter the main interface:
5
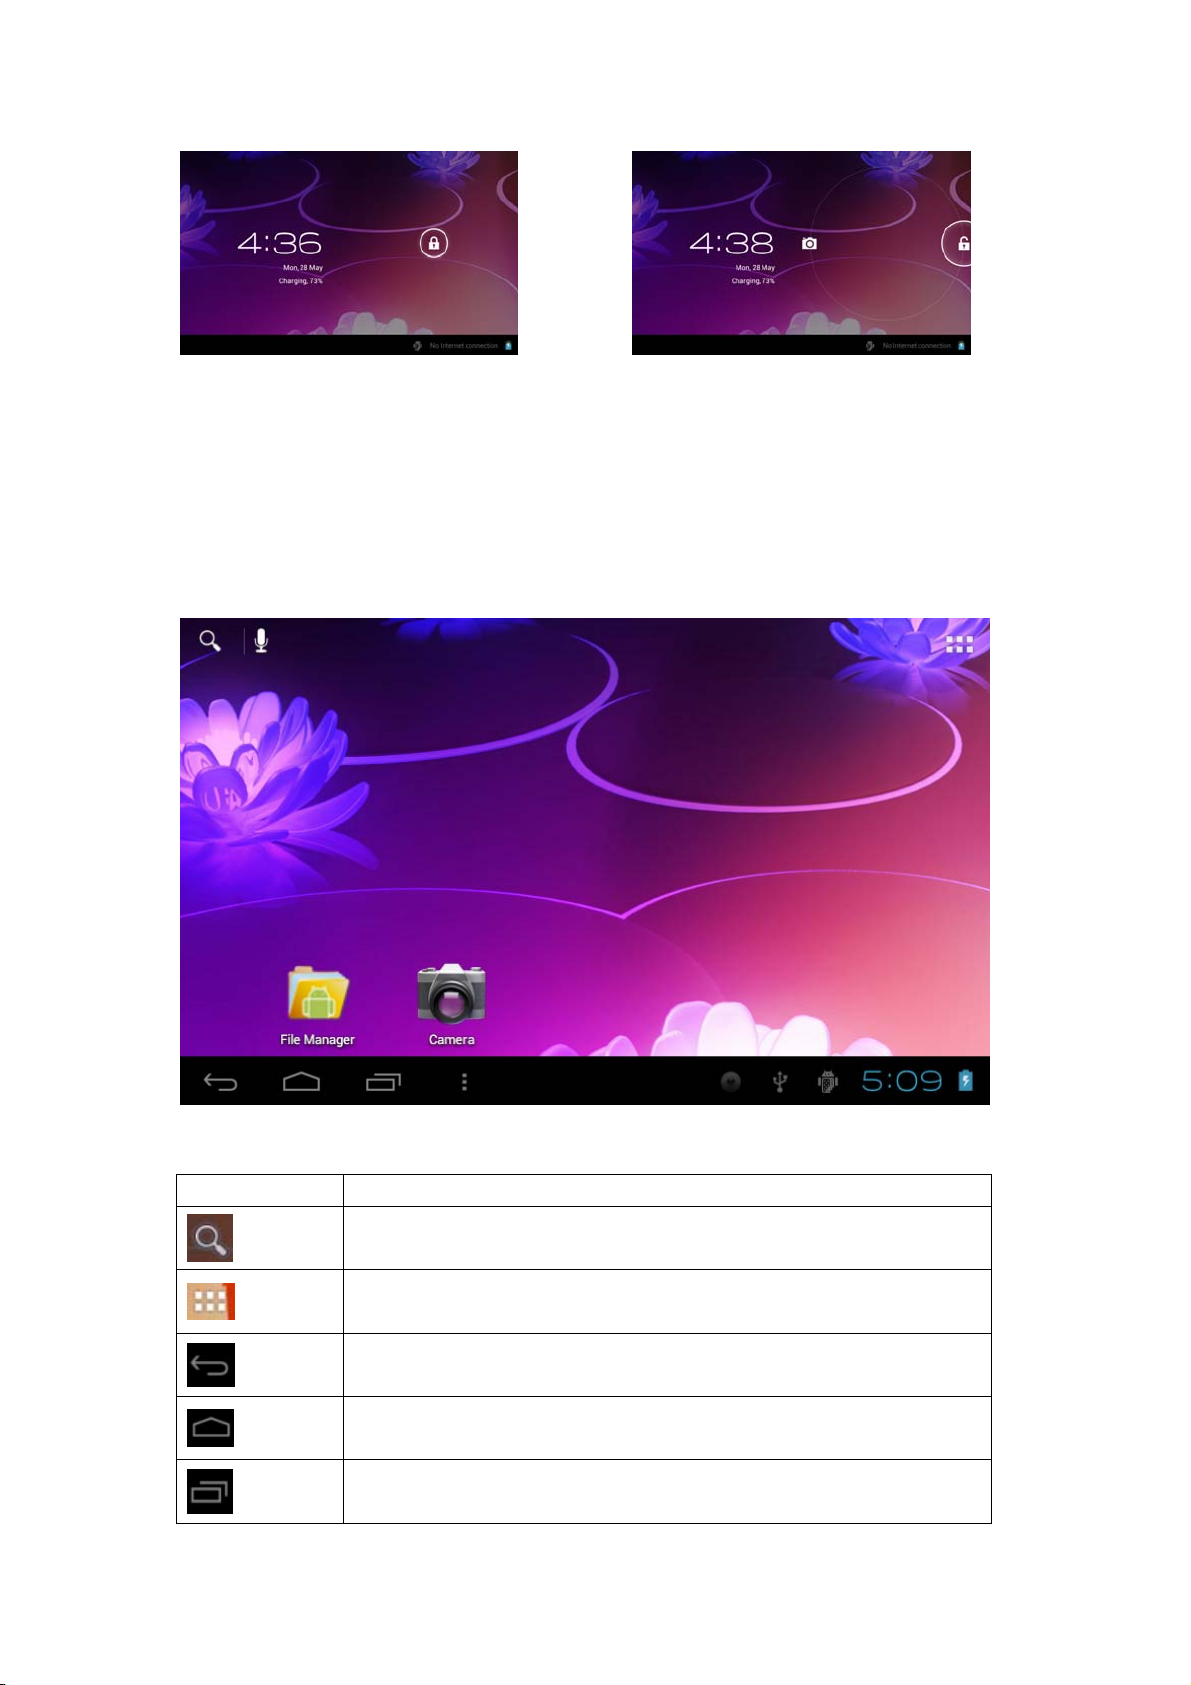
Main interface description:
Icon Function
Scan the network with search widget
Tap to enter APP interface, and access the applications list
Tap to return to previous interface, which has the same function as “Back“
Return to the main interface
Open the list of recent applications
6

USB connected icon, which indicates that the device has been connected
to PC through USB cable
USB debugging icon; tap to enter development interface
Display the time
Display battery status
Tap to enter “Wallpaper”, “Manage applications”, “System settings”
Adding and deleting shortcuts on main screen
• Add shortcuts to applications: tap and hold an application icon in the list, drag and drop to
desired position on the main screen. The shortcut icon of this application will be added to the main
screen.
• Add shortcuts to widgets: tap and hold a widget in the list, drag and drop to desired position on
the main screen. The shortcut icon of this application will be added to the main screen.
• Delete items from the main screen: 1. tap and hold an item to be removed, and the Recycle Bin
appears in the top of the main screen. 2. Drag and drop the icon in the Recycle Bin. 3. Release
when the item and Recycle Bin turn into red
Wallpaper setting: on the main screen, tap and hold for a while, and the “Choose wallpaper from”
dialog box appears to set the background image.
Connecting to PC through USB:
Connect to PC through USB cable, the “USB connected” icon
appears in the lower right; tap
to pop up USB Mass Storage window, select “USB connected” option to pop up USB
connected interface, tap “Turn on USB storage” to connect to PC.
7
 Loading...