

Page 1
Creator 1024 PRO V2
Highlite International B.V. – Vestastraat 2 – 6468 EX – Kerkrade – the Netherlands
Ordercode: 50731
Firmware: 2.3.10
MANUAL
ENGLISH
Page 2

Ordercode: 50731
Creator 1024 PRO
Table of contents
Warning ............................................................................................................................................................................... 3
Safety Instructions ......................................................................................................................................................... 3
Operating Determinations .......................................................................................................................................... 5
Connection with the mains......................................................................................................................................... 5
Return Procedure .......................................................................................................................................................... 6
Claims .............................................................................................................................................................................. 6
Description of the device ................................................................................................................................................. 7
Overview ........................................................................................................................................................................ 8
Glossary .........................................................................................................................................................................10
Backside .......................................................................................................................................................................10
Installation .........................................................................................................................................................................10
Set Up and Operation .....................................................................................................................................................11
Patching .......................................................................................................................................................................11
1. Patching Dimmers ...............................................................................................................................................11
2. Patching Moving Light Fixtures..........................................................................................................................11
3. View the Patching ...............................................................................................................................................12
4. Changing the DMX Address of a Fixture .........................................................................................................12
5. Deleting a Patched Fixture ................................................................................................................................12
6. Patch Utilities .........................................................................................................................................................13
Controlling Dimmers and Fixtures ............................................................................................................................14
1. Selecting Fixtures and Dimmers for Control ....................................................................................................14
2. Changing Attributes of the Selected Fixtures ................................................................................................14
3. Grouping ...............................................................................................................................................................15
4. Stepping Through Selected Fixture (One at a Time) ....................................................................................15
5. Move Lighting Menu ...........................................................................................................................................15
6. The Align Function ...............................................................................................................................................16
7. Flip Fixtures.............................................................................................................................................................16
8. Fan Mode ..............................................................................................................................................................16
9. Advanced Options .............................................................................................................................................17
Palette ...........................................................................................................................................................................18
1. Customize Palette ...............................................................................................................................................18
2. Palette Page .........................................................................................................................................................18
3. Shared and individual Palette ..........................................................................................................................18
4. Which Attributes Are Stored in Palettes ...........................................................................................................18
5. Storing a Palette ..................................................................................................................................................19
6. Recalling a Palette Value ..................................................................................................................................19
7. Palettes in Playback ............................................................................................................................................19
8. Delete a Palette ...................................................................................................................................................19
Shapes...........................................................................................................................................................................20
1. Selecting a Shape ...............................................................................................................................................20
2. Blocking a Shape .................................................................................................................................................20
3. Shape Parameters ...............................................................................................................................................21
4. Edit a Shape .........................................................................................................................................................22
5. Remove a Shape from Fixtures .........................................................................................................................22
6. Delete a Shape ....................................................................................................................................................22
7. Relative Shapes and Absolute Shapes ...........................................................................................................22
8. Playback Parameters .........................................................................................................................................22
Scenes ...........................................................................................................................................................................23
1. How the Creator 1024 PRO works when programming ...............................................................................23
2. Creating a Scene ................................................................................................................................................23
3. Using Shapes in Scenes ......................................................................................................................................24
4. Running Playbacks with a Scene (Autoload) ................................................................................................24
5. HTP and LTP Channels .........................................................................................................................................24
6. Playing Back a Scene .........................................................................................................................................25
7. Turning Playback Pages .....................................................................................................................................25
8. Editing a Scene ....................................................................................................................................................25
9. The Include Function ...........................................................................................................................................26
1
Page 3

Ordercode: 50731
Creator 1024 PRO
10. The “Off” Button .................................................................................................................................................26
11. Copy a Scene ....................................................................................................................................................26
12. Delete a Scene ..................................................................................................................................................26
13. Time ......................................................................................................................................................................27
14. Overlap Function ...............................................................................................................................................28
15. Priority ...................................................................................................................................................................28
Chase ............................................................................................................................................................................29
1. Programming a Chase .......................................................................................................................................29
2. Running Playbacks with a Step (Autoload) ...................................................................................................29
3. Running a Chase .................................................................................................................................................30
4. Connecting a Chase to the Wheels A/B ........................................................................................................30
5. Setting Speed, Crossfade and Direction ........................................................................................................30
6. Manually Controlling the Chase Step .............................................................................................................31
7. Add a Step ............................................................................................................................................................31
8. Unfold a Chase for Editing .................................................................................................................................31
9. Include the Data of a Chase Step ...................................................................................................................31
10. Delete a Chase ..................................................................................................................................................31
11. Delete a Chase Step ........................................................................................................................................31
12. Adjust Speed and Fade Time with Wheels ...................................................................................................31
13. The Global Time of a Chase. ...........................................................................................................................31
14. Set Separate Time for a Step ...........................................................................................................................32
15. Overlap Function ...............................................................................................................................................33
16. Priority ...................................................................................................................................................................33
15. Advanced Options ...........................................................................................................................................33
Show Recording ..........................................................................................................................................................34
1. Record a Show .....................................................................................................................................................34
2. Run a Show ...........................................................................................................................................................34
3. Delete a Show ......................................................................................................................................................34
4. Save/Load a Show ..............................................................................................................................................35
Save Show List ...........................................................................................................................................................35
Load Show List ..........................................................................................................................................................35
Save a Single Show .................................................................................................................................................35
Load a Single Show .................................................................................................................................................35
Setup .............................................................................................................................................................................35
1. Save & Load .........................................................................................................................................................35
2. Wipe Data .............................................................................................................................................................35
3. Select Language .................................................................................................................................................35
4. Personality Management ..................................................................................................................................36
Delete Personality ....................................................................................................................................................36
Delete All Personality ...............................................................................................................................................36
Update Personality ..................................................................................................................................................36
Edit Personality ..........................................................................................................................................................36
5. Show Record ........................................................................................................................................................36
6. User Settings ..........................................................................................................................................................36
Console Lock ...............................................................................................................................................................37
Updating .......................................................................................................................................................................37
Personality Builder .......................................................................................................................................................38
1. Interface of the Personality Builder ..................................................................................................................38
2. How to create a new Personality (Library) .....................................................................................................38
2. Creating Pallettes ................................................................................................................................................39
Maintenance ....................................................................................................................................................................40
Troubleshooting ...............................................................................................................................................................40
No Light .........................................................................................................................................................................40
Incorrect Language ...................................................................................................................................................40
No Response to DMX..................................................................................................................................................41
Playback Buttons Do Not Respond to Commands ..............................................................................................41
Product Specifications ....................................................................................................................................................41
Dimensions ........................................................................................................................................................................42
2
Page 4
Ordercode: 50731
Creator 1024 PRO
Warning
Unpacking Instructions
Immediately upon receiving this product, carefully unpack the carton and check the contents to ensure
that all parts are present, and have been received in good condition. Notify the dealer immediately and
retain packing material for inspection if any parts appear damaged from shipping or the carton itself
shows signs of mishandling. Save the carton and all packing materials. In the event that a fixture must be
returned to the factory, it is important that the fixture be returned in the original factory box and packing.
Your shipment includes:
Creator 1024 PRO
Power cable
User manual
Dust cover
Flight case
Optional Accessories
Goose-neck lamp (ordercode: 60722)
Safety Instructions
Every person involved with the installation, operation and maintenance of this device has to:
be qualified
follow the instructions of this manual
Before your initial start-up, please make sure that there is no damage caused by transportation. Should
there be any, consult your dealer and do not use the device.
To maintain perfect condition and to ensure a safe operation, it is absolutely necessary for the user to
follow the safety instructions and warning notes written in this manual.
Please consider that damages caused by manual modifications to the device are not subject to
warranty.
This device contains no user-serviceable parts. Refer servicing to qualified technicians only.
3
Page 5

Ordercode: 50731
Creator 1024 PRO
IMPORTANT:
The manufacturer will not accept liability for any resulting damages caused by the non-observance of
this manual or any unauthorized modification to the device.
Never let the power cord come into contact with other cables! Handle the power cord and all
connections with the mains with particular caution!
Never remove warning or informative labels from the unit.
Do not open the device and do not modify the device.
Never use anything to cover the ground contact.
Never leave any cables lying around.
Do not insert objects into air vents.
Do not connect this device to a dimmerpack.
Do not switch the device on and off in short intervals, as this would reduce the device’s life.
Do not shake the device. Avoid brute force when installing or operating the device.
Never use the device during thunderstorms, unplug the device immediately.
Only use device indoors, avoid contact with water or other liquids.
Do not touch the device’s housing bare-handed during its operation (housing becomes hot).
Only operate the device after having familiarized with its functions.
Avoid flames and do not put close to flammable liquids or gases.
Always keep case closed while operating.
Always allow free air space of at least 50 cm around the unit for ventilation.
Always disconnect power from the mains, when device is not used or before cleaning! Only handle
the power cord by the plug. Never pull out the plug by tugging the power cord.
Make sure that the device is not exposed to extreme heat, moisture or dust.
Make sure that the available voltage is not higher than stated on the rear panel.
Make sure that the power cord is never crimped or damaged. Check the device and the power
cord from time to time.
If the external cable is damaged, it has to be replaced by a qualified technician.
If the glass is obviously damaged, it has to be replaced, so that its functions are not impaired, due to
cracks or deep scratches.
If device is dropped or struck, disconnect mains power supply immediately. Have a qualified
engineer inspect for safety before operating.
If the device has been exposed to drastic temperature fluctuation (e.g. after transportation), do not
switch it on immediately. The arising condensation water might damage your device. Leave the
device switched off until it has reached room temperature.
If your Showtec device fails to work properly, discontinue use immediately. Pack the unit securely
(preferably in the original packing material), and return it to your Showtec dealer for service.
For adult use only. Light effect must be installed out of the reach of children. Never leave the unit
running unattended.
For replacement use fuses of same type and rating only.
Allow time to cool down, before replacing lamp.
The user is responsible for correct positioning and operating of the Creator 1024 PRO. The
manufacturer will not accept liability for damages caused by the misuse or incorrect installation of
this device.
This device falls under protection class I. Therefore it is essential to connect the yellow/green
conductor to earth.
Repairs, servicing and electric connection must be carried out by a qualified technician.
WARRANTY: Till one year after date of purchase.
4
Page 6
Ordercode: 50731
Creator 1024 PRO
International
EU Cable
UK Cable
US Cable
Pin
L
BROWN
RED
YELLOW/COPPER
FASE
N
BLUE
BLACK
SILVER
NUL
YELLOW/GREEN
GREEN
GREEN
EARTH
Operating Determinations
This device is not designed for permanent operation. Consistent operation breaks will ensure that the
device will serve you for a long time without defects.
The maximum ambient temperature ta = 40°C must never be exceeded.
The relative humidity must not exceed 50 % with an ambient temperature of 40°C.
If this device is operated in any other way, than the one described in this manual, the product may
suffer damages and the warranty becomes void.
Any other operation may lead to dangers like short-circuit, burns, electric shock, crash etc.
You endanger your own safety and the safety of others!
Improper installation can cause serious damage to people and property!
Connection with the mains
Connect the device to the mains with the power-plug.
Always pay attention, that the right color cable is connected to the right place.
Make sure that the device is always connected properly to the earth!
Improper installation can cause serious damage to people and property!
5
Page 7
Ordercode: 50731
Creator 1024 PRO
Return Procedure
Returned merchandise must be sent prepaid and in the original packing, call tags will not be issued.
Package must be clearly labeled with a Return Authorization Number (RMA number). Products returned
without an RMA number will be refused. Highlite will not accept the returned goods or any responsibility.
Call Highlite 0031-455667723 or mail aftersales@highlite.nl and request an RMA prior to shipping the fixture.
Be prepared to provide the model number, serial number and a brief description of the cause for the
return. Be sure to properly pack fixture, any shipping damage resulting from inadequate packaging is the
customer’s responsibility. Highlite reserves the right to use its own discretion to repair or replace
product(s). As a suggestion, proper UPS packing or double-boxing is always a safe method to use.
Note: If you are given an RMA number, please include the following information on a piece of paper
inside the box:
01) Your name
02) Your address
03) Your phone number
04) A brief description of the symptoms
Claims
The client has the obligation to check the delivered goods immediately upon delivery for any shortcomings and/or visible defects, or perform this check after our announcement that the goods are at their
disposal. Damage incurred in shipping is the responsibility of the shipper; therefore the damage must be
reported to the carrier upon receipt of merchandise.
It is the customer's responsibility to notify and submit claims with the shipper in the event that a fixture is
damaged due to shipping. Transportation damage has to be reported to us within one day after receipt
of the delivery.
Any return shipment has to be made post-paid at all times. Return shipments must be accompanied with
a letter defining the reason for return shipment. Non-prepaid return shipments will be refused, unless
otherwise agreed in writing.
Complaints against us must be made known in writing or by fax within 10 working days after receipt of the
invoice. After this period complaints will not be handled anymore.
Complaints will only then be considered if the client has so far complied with all parts of the agreement,
regardless of the agreement of which the obligation is resulting.
6
Page 8
Ordercode: 50731
Creator 1024 PRO
DMX channel
1024
Fixture
80
Re-patched fixture address
Yes
Swop Pan/Tilt
Yes
Reversed channel output
Yes
Channel slope modification
Yes
Channels for each fixture
40 primary + 40 fine tune
Library
Avolite Pearl R20 library supported
Scene
600
Scenes to run simultaneously
20
Total scene steps
600
Time control of scenes
Fade in/out, LTP slope
Shapes for each scene
5
Scene and dimmer by slider
Yes
Swop scene
Yes
Flash scene
Yes
Shape generator
Shapes of Dimmer, Pan/Tilt, RGB, CMY,
Color, Gobo, Iris and Focus
Shapes to run simultaneously
10
Master slider
Global, playback, fixture
Real time blackout
Yes
Channel value by wheel
Yes
Channel value by slider
Yes
Dimmer by slider
Yes
USB memory
FAT32 supported
Fuse:
F1L/250V
Dimensions:
655 x 550 x 135 mm (LxWxH)
Weight:
12,6 kg
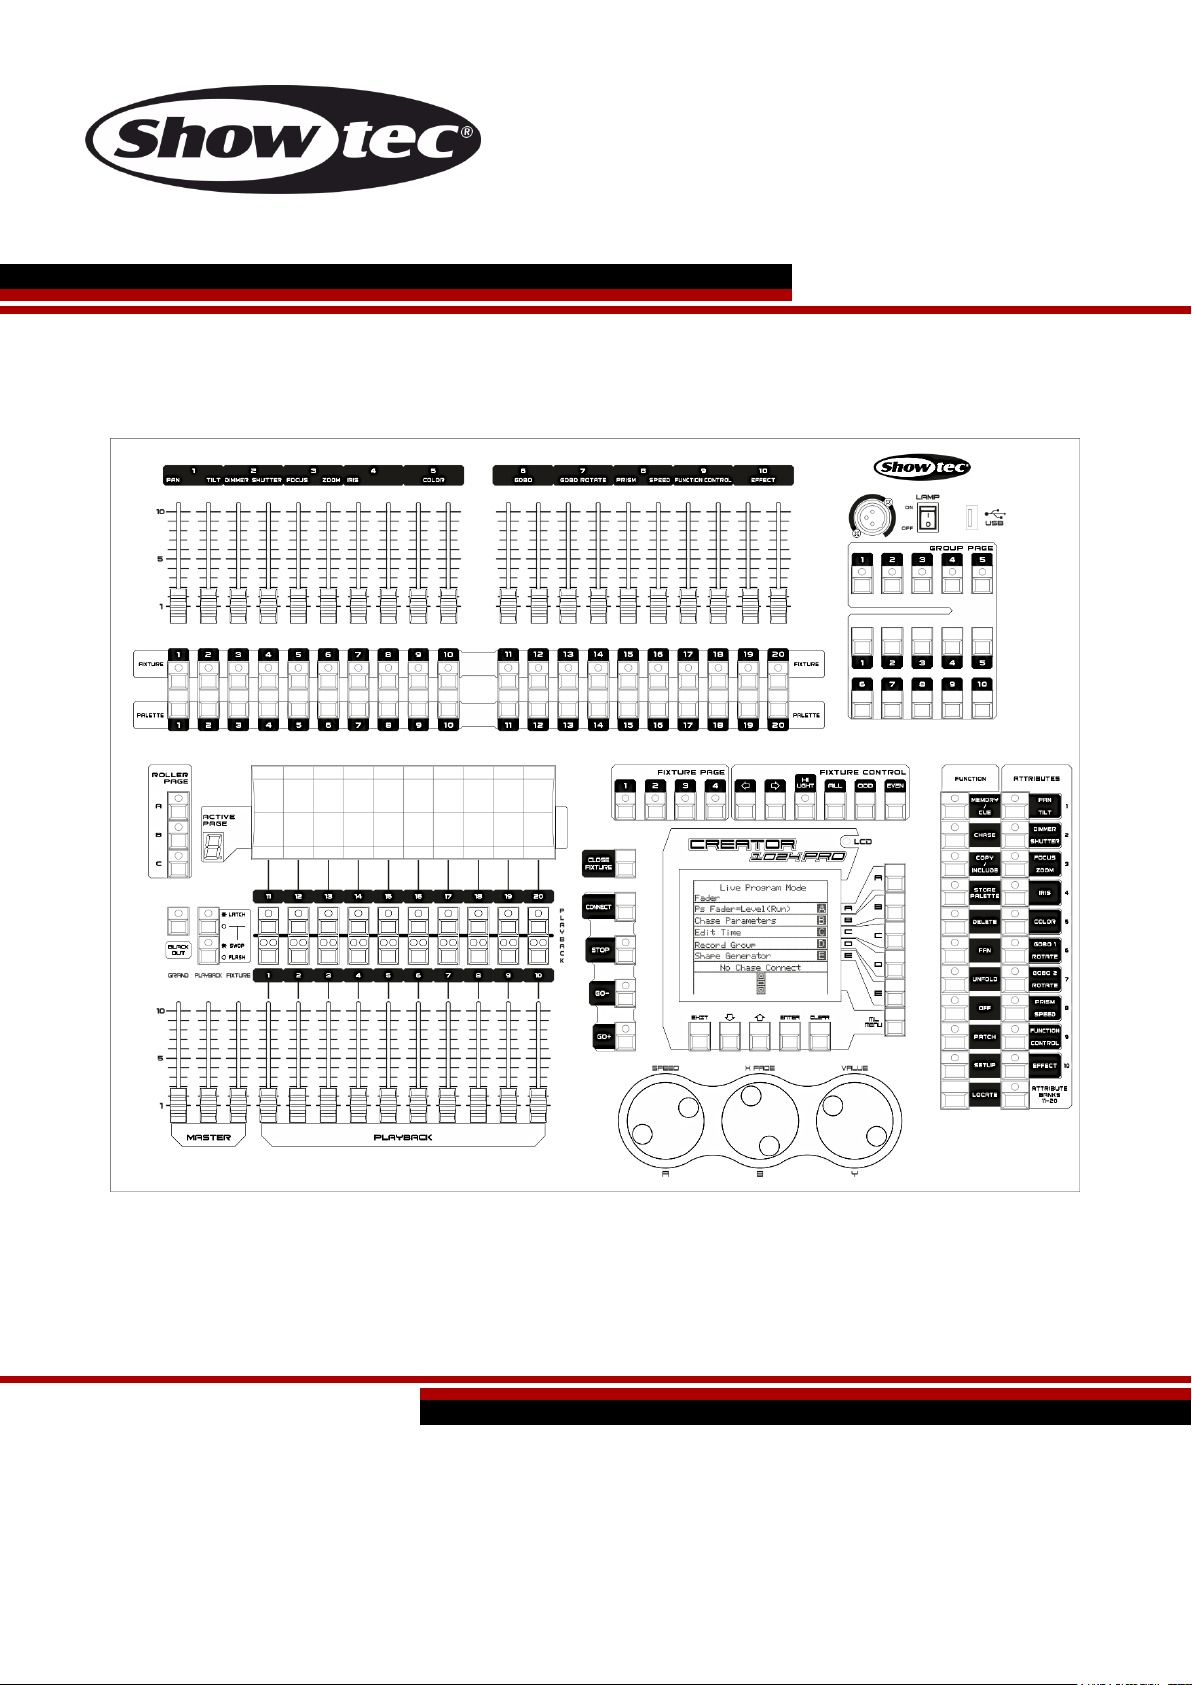
Description of the device
Features
7
Page 9
Ordercode: 50731
Creator 1024 PRO
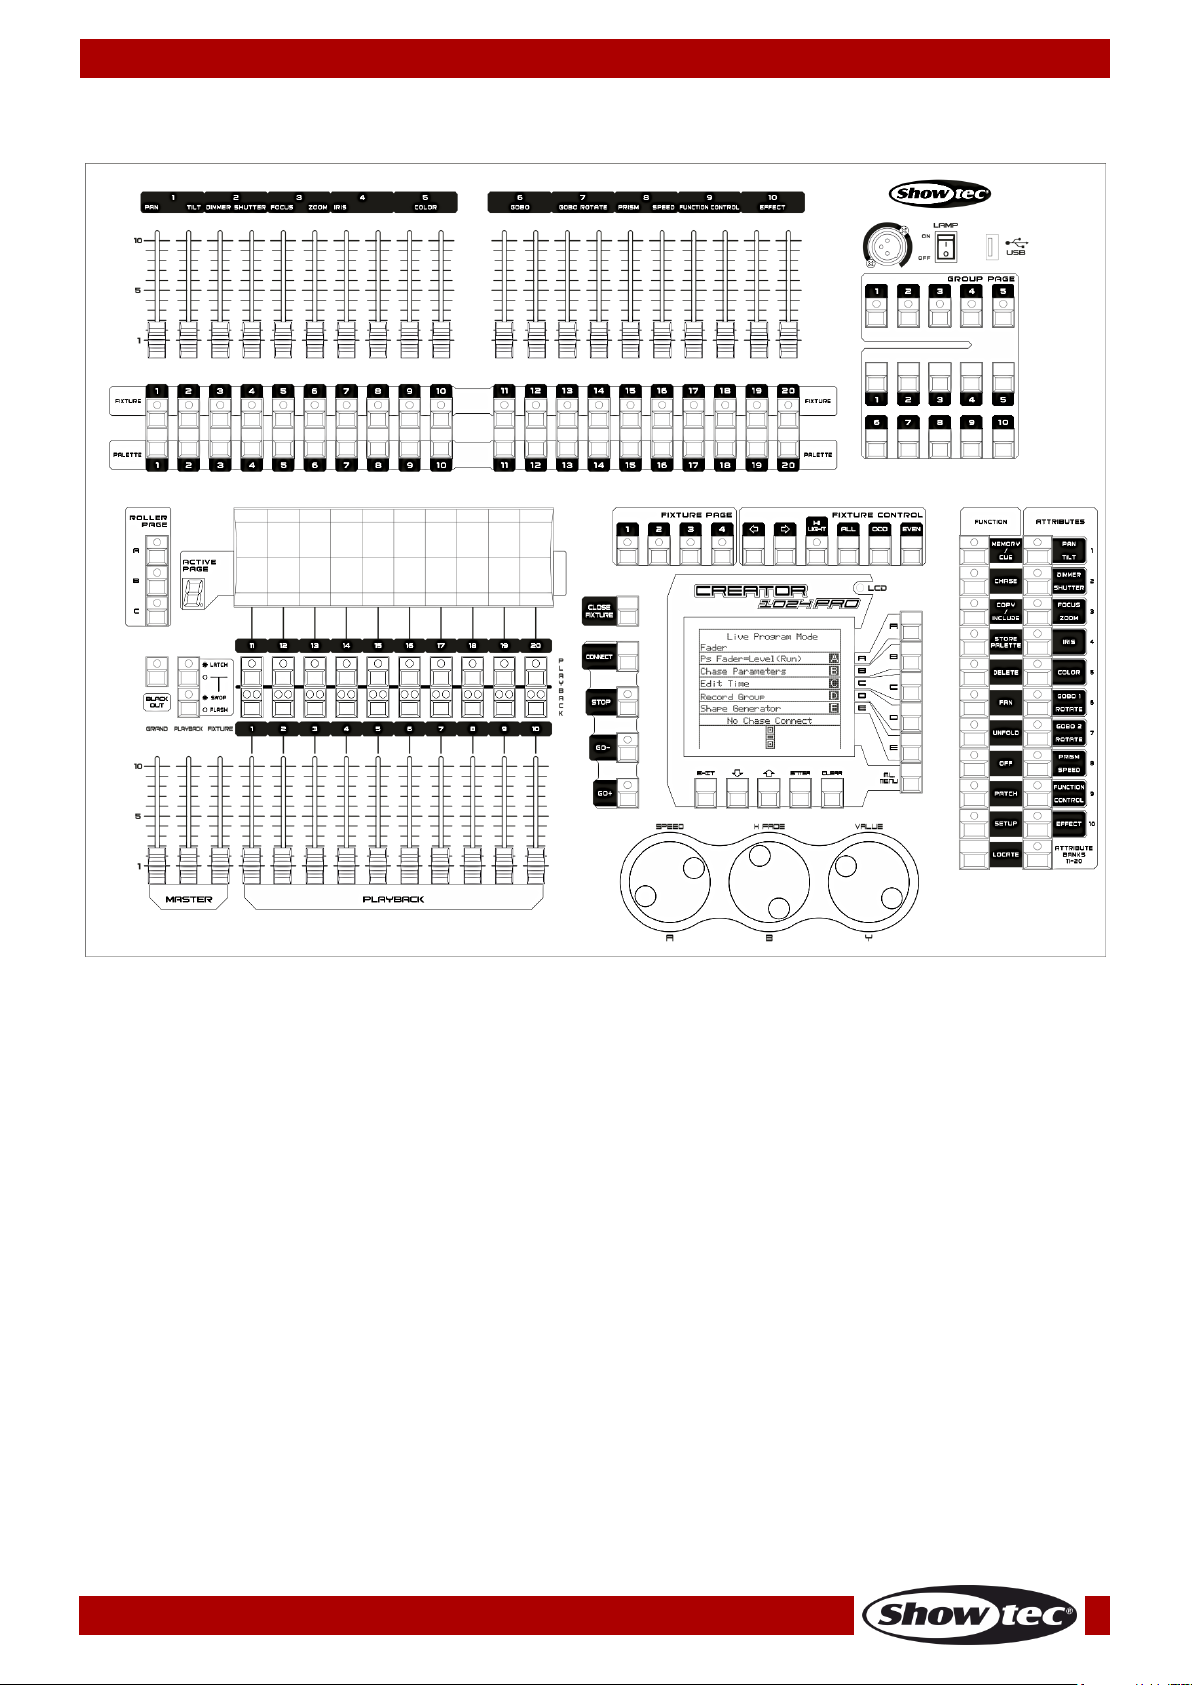
Fig. 01
Overview
8
Page 10
Ordercode: 50731
Creator 1024 PRO
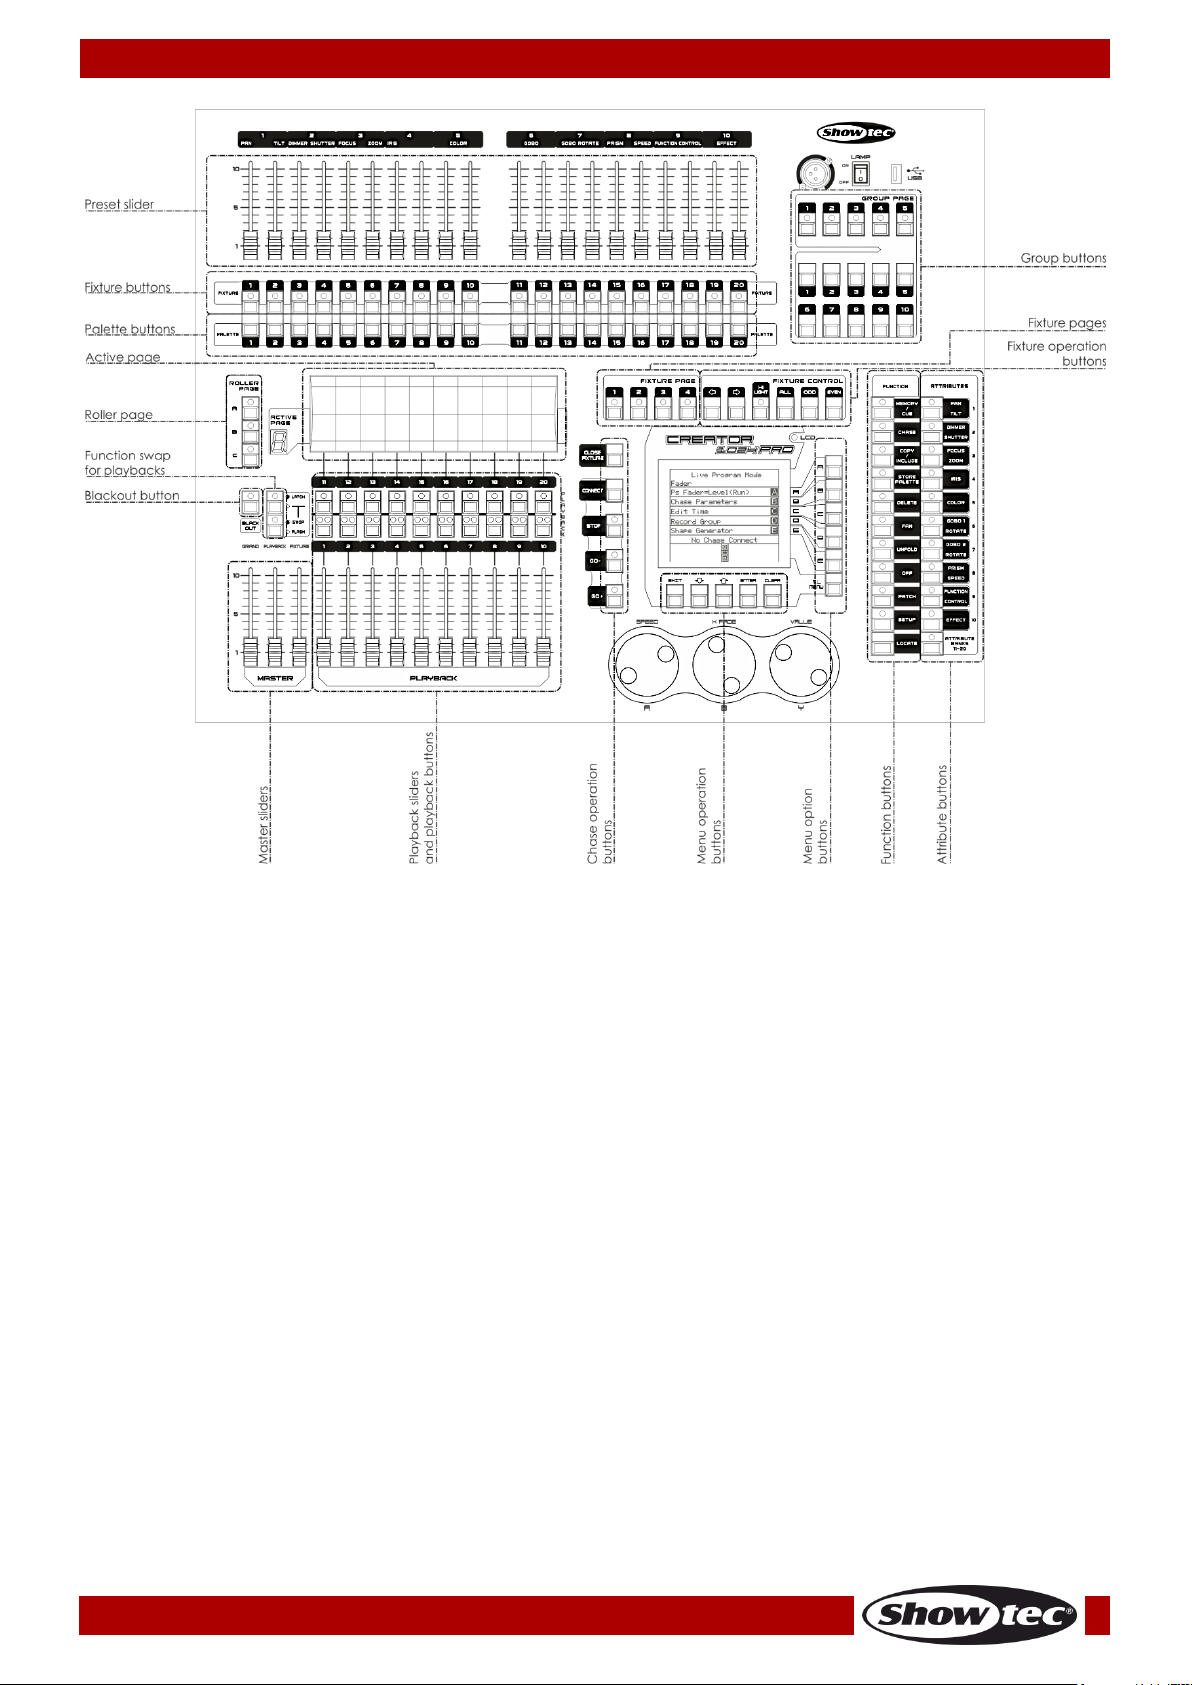
Fig. 02
The Preset Sliders are used for controlling individual dimmer channels and fixture intensities or control
fixture attributes.
The Fixture buttons are used for patching and selecting fixtures.
The Palette buttons allow you to quickly apply many effects (e.g. color, gobo, position) on you
fixtures.
The Fixture Page buttons select 4 pages for the fixtures and palettes.
The Fixture Controls buttons control the fixture selection in different ways.
The Active Pages and Roller Pages allow you to select different pages of playbacks and to write the
playback names on the roller, so that you know what’s in them.
The Function Swap for Playbacks swap the Latch, swop and flash functions of the playback buttons.
The Master sliders control the overall output of the various parts of the console. You will normally
have these set to full. Otherwise, the indicator of the Blackout button will keep flashing.
The Blackout button allows you to black the whole console out.
The Playback sliders and playback buttons are used for playing back scenes you have
programmed, when running a show.
The Menu Operation buttons is used for cancelling, select or page up/down in menu operation.
The Menu Option buttons are used for selecting control options. The display next to the buttons shows
what each one will do. The options for each key change depending on what the console is doing.
The Function buttons are used for functions such as storing cues, copying, saving to disk, etc. These
buttons are equipped with light indicators, to indicate whether they are active or not.
The Attribute buttons are used for selecting which attributes of a fixture (e.g. color, gobo, pan, focus)
are going to be controlled with the control wheels. The buttons have light indicators, to show you
which attributes are active. Repeatedly press the buttons to switch between their functions – you do
not have to press the Page button anymore.
The Fixture Group buttons allow you to group the selected fixtures so that all the fixtures in the group
can be activated with one single button.
9
Page 11
Ordercode: 50731
Creator 1024 PRO
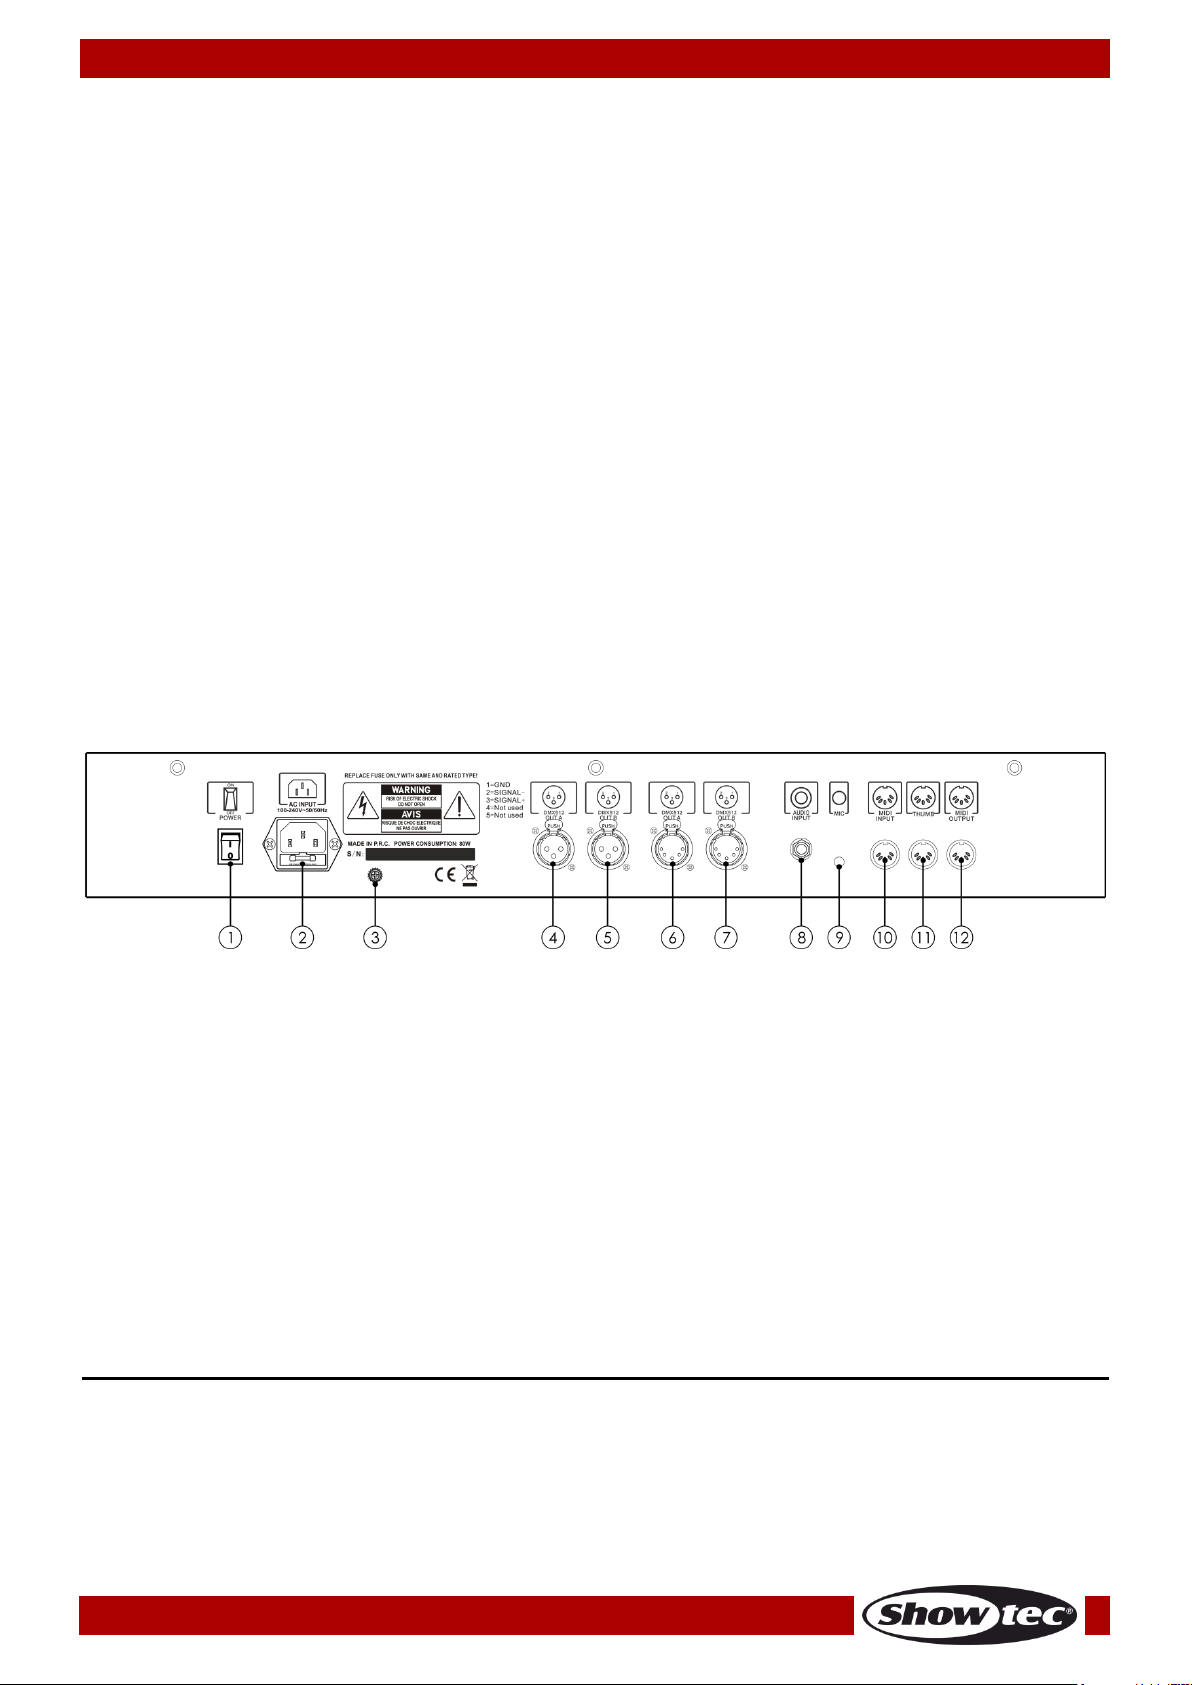
Fig. 03
Glossary
Scene: The data of a stage scene that is saved in a playback.
Chase: The data of a series of fixture performances that is saved in a playback.
HTP: The type of the channels with the highest output (highest takes precedence), normally for
dimmer channels.
LTP: The type of the channels with the latest output (latest takes precedence), for non-dimmer
channels.
Fade in: The intensity of the light changes from dark to bright.
Fade out: The intensity of the light changes from bright to dark.
Record by fixture: This is the normal mode of the Creator 1024 PRO. It means that, when you record a
cue, all attributes of every fixture that you have changed are recorded in the cue. So if you change
only the position of a fixture, the color, gobo, intensity and all other attributes of that fixture are
recorded as well. This is useful because you know that, when you recall a cue, it will look exactly as it
did when you saved it. However, it can be slightly inflexible if you want to combine cues.
Record by channel: This means that only attributes you have changed are recorded in the cue. If
you change the position of a fixture, only the position is recorded. When you recall the cue, the
color, gobo etc will remain as they were last set. This means that you can use a cue to change the
position of some fixtures while leaving the color set for a previous cue, allowing more variety when
you are running a show. It is a powerful feature but you can easily get yourself into trouble with it, so
you need to be sure which attributes you need to record and which you want to “show through”.
When you’re learning, it’s best to have some cues “recorded by fixture” which turn on the fixtures in
a known state, then have some color cues to modify just the color, or some gobo cues to set the
gobo, or other attributes.
Backside
01) ON/OFF
02) IEC Power connector 100-240V AC + Fuse F1L/250V
03) Ground/earth connection
04) 3-pin DMX Output A
05) 3-pin DMX Output B
06) 5-pin DMX Output A
07) 5-pin DMX Output B
08) Audio Input
09) Microphone
10) MIDI Input
11) MIDI Thru
12) MIDI Output
Installation
Remove all packing materials from the Creator 1024 PRO. Check if all foam and plastic padding is
removed. Connect all cables.
Do not supply power before the whole system is set up and connected properly.
Always disconnect from electric mains power supply before cleaning or servicing.
Damages caused by non-observance are not subject to warranty.
10
Page 12

Ordercode: 50731
Creator 1024 PRO
Set Up and Operation
Follow the directions below, as they pertain to your preferred operation mode.
Before plugging the unit in, always make sure that the power supply matches the product specification
voltage. Do not attempt to operate a 120V specification product on 230V power, or vice versa.
Connect the device to the main power supply.
This user manual is based on the software version 2.3.10.
Patching
Patching is the process during which you tell the Creator 1024 PRO:
What type of lighting units you have connected to it
What DMX addresses they are operating at
Which DMX output line each unit is connected to
Which fixture button you want to use in order to access them
You can either patch the DMX channels on your console, to match your lighting rig, or set up the console
first and then set the lighting rig to match.
1. Patching Dimmers
Each dimmer channel is assigned to one fixture button. If you want to link dimmers together, you can
assign several dimmers to the same fixture button.
01) In the initial menu, press <Patch>, then <A> [Dimmer].
02) In the second line, the display shows the DMX address which is going to be used. You can change
this by turning the Wheel V. Press <A> to patch onto the other DMX output line.
03) To patch a single dimmer, press one of the fixture buttons. To patch a range of dimmers, hold down
the fixture button for the first dimmer in the range, then press the last fixture button in the range. The
range of dimmers will be patched to sequential DMX addresses.
04) To patch another dimmer to the same fixture button, enter the new DMX channel and press the
fixture button again.
05) Repeat from step 2 for other dimmers.
You can patch multiple dimmers to the same fixture button by inserting the DMX address of the next
dimmer to be patched and subsequently pressing the fixture button again.
2. Patching Moving Light Fixtures
Moving light fixtures are more complicated to patch than dimmers because they have more attributes to
control, such as pan, tilt, color etc., whereas a dimmer channel just has intensity. When you patch a
fixture, you will see on the display that it occupies a block of DMX channels rather than just one.
01) In the initial menu, press <Patch>.
02) If the desired fixture library is not available in the console, you can copy it (in R20 format) to the root
directory of a USB memory stick (do not save more than 40, FAT32 files on a USB memory stick).
03) Press <B> [Select a Fixture]. It will access the fixture library in the USB memory stick; if the USB is not
inserted, then, it will access the library in the console.
04) Press <Up> or <Down> to browse through the library; Press the soft key to select. When a library from
the USB memory is selected, the library will be added or updated into the console.
05) In the second line, the display shows the DMX address which is going to be used. You can change
this by turning the Wheel V. Press <A> to patch onto the other DMX output line.
06) Press an unused fixture button to patch the fixture. If you want to use a different fixture page, select
the new page first.
07) Press <Exit> to return to the upper menu; then, you can select fixtures of other types.
You can patch a range of fixtures by holding down the first and last fixture buttons of the range,
the same as for dimmers.
Unlike dimmers, you cannot patch more than one fixture to a fixture button. If the fixture button is
already used, then the patch will fail. Use a different fixture button or delete the already existing
fixture from the fixture button, if you do not want it any more.
11
Page 13

Ordercode: 50731
Creator 1024 PRO
3. View the Patching
Follow the below steps to view the patching:
01) In the initial menu, press <Patch> to enter Patch menu.
02) Press <E> [Patch Information] to view the patching info.
03) The button number, fixture name and address code will be displayed in the menu. Press < Up> or
<Down> to browse. Press the fixture button to go to the fixture directly.
4. Changing the DMX Address of a Fixture
You can re-patch a fixture to a different DMX address or a different DMX output line. All programming is
kept.
01) In the initial menu, press <Patch> to enter Patch menu.
02) Press <C> [Repatch Fixtures].
03) In the second line, the display shows the DMX address which is going to be used. You can change
this by turning the Wheel V. You can also use menu option A to patch onto the other DMX output
line.
04) Press the fixture button for fixture to patch that fixture at the new address.
05) Press <Enter> to confirm the change.
06) Repeat from step 3 if you want to change other fixture
If the new DMX address was already used, the fixture or dimmer on that fixture button will be
“parked”. All programming for the fixture button is preserved, but you need to patch it to a new DMX
address using the above procedure before you can use it again. If you view the fixture patch as
described above, the display will show “park.”
5. Deleting a Patched Fixture
01) In the initial menu, press <Patch> to enter Patch menu.
02) Press <Delete> to enter Delete Patch menu.
03) Press the fixture button, assigned to the fixture which you want to delete.
04) Press <Enter> to delete.
You can delete individual DMX channels from a fixture button by modifying the channel number
instead of pressing a fixture button. This is useful for deleting dimmer channels from fixture buttons
which have multiple channels patched to them. Be careful not to delete individual channels from
the fixtures using this function.
12
Page 14

Ordercode: 50731
Creator 1024 PRO
6. Patch Utilities
The Creator 1024 PRO allows several options to be set for each fixture or dimmer when it is being
patched. Patch options menu can be accessed by pressing <D> [Patch utilities] while you are in patch
mode. Set the options before you start programming, because scenes will play back differently when the
options are on. The options are:
Invert – Allows you to invert an attribute of a fixture, so when you set zero the output will be full. You
cannot invert some attributes.
01) In the initial menu, press <Patch> to enter Patch menu.
02) Press <D>[Patch Utilities].
03) Press <A>[Set Invert].
04) Select the desired fixtures and press the attribute buttons to select the desired attributes. Then, press
<A> or <B> on the right hand side of the screen to modify.
Set/Reset Instant Mode – When the Creator 1024 PRO faders LTP (movement) channels between two
scenes, the LTP values normally change smoothly. You can set Instant mode to make the channel
snap instantly to the new value.
01) In the initial menu, press <Patch> to enter Patch menu.
02) Press <D>[Patch Utilities].
03) Press <B> [Set/Reset Instant Mode].
04) Select the desired fixtures and press the attribute buttons to select the desired attributes. Then, press
<A> or <B> on the right hand side of the screen to modify.
Swap Pan & Tilt - If you have some fixtures mounted sideways, it can be useful to swap the pan and
tilt channels over.
01) In the initial menu, press <Patch> to enter Patch menu.
02) Press <D> [Patch Utilities].
03) Press <C> [Swap Pan & Tilt] to enter Swop Pan and Tilt.
04) Press <Up> or <Down> to browse the swop info of pan and tilt. You can change the setting with the
buttons on the right of the screen.
13
Page 15

Ordercode: 50731
Creator 1024 PRO
Controlling Dimmers and Fixtures
When you are programming a show, and sometimes when you are running a show, you need to
manually control the fixtures and dimmers to set the intensity, position, color, etc. To do this you first select
the fixtures you want to change using the Swop buttons, then you set the attributes of those fixtures using
the wheels and attribute buttons.
1. Selecting Fixtures and Dimmers for Control
To select the fixtures or dimmer channels that you want to control, you use the fixture buttons. You can
select fixtures or dimmers individually, or several at once.
You can control dimmer channels and fixture intensity directly from the fader control of the handle, or
select the channels as described below and use the dimmer attribute.
01) Press the fixture buttons for the fixtures you want. The LED on the fixture button will light up for the
selected fixtures.
02) To select a range of fixtures, hold down the fixture button for the first fixture then press the fixture
button for the last fixture.
Press <Locate> to position the selected fixtures in open white at a central position. These values are
not loaded into the programmer – they will not be saved in a scene unless you modify the fixture.
If you want to light up a fixture without moving its position, press <M.L. MENU> then <A> [Locate
without P/T]
If you select a fixture you do not want, press its fixture button again to deselect it.
You can deselect a fixture by pressing the fixture select button again.
Once you have changed any attribute, pressing a fixture button will deselect all fixtures and start the
selection process again.
You can select fixtures on another page by pressing one of the Pages of Fixtures buttons.
2. Changing Attributes of the Selected Fixtures
“Attributes” are the functions of the fixture, like pan, tilt, color, dimmer, etc. You select which attributes
you want to modify using the buttons on the right edge of the console and set values, by turning the
wheels at the bottom of the Creator 1024 PRO. The attributes available depend on the fixture type.
Dimmer channels only have a dimmer attribute. The Creator 1024 PRO can control up to 40 attributes per
fixture. Each attribute button controls two attributes, one on the left wheel and one on the right wheel.
01) Press the button for the attribute to be changed.
02) Turn the wheels to set the attribute. The display above the wheels shows which attributes are being
controlled.
03) Repeat the steps to change other attributes of the selected fixtures.
The attribute buttons let you select the first 20 attributes. Another 20 attributes are available by
pressing the attribute 11-20 buttons, to cater for the weird and wonderful DMX fixtures of the future.
The light on the button stays on when you are using the top 20 attributes.
If the display above the wheels does not show the attribute when you press the button, that attribute
is not available on the selected fixtures.
There are three operation modes for the sliders above the fixture buttons. In “Live Programming
Mode” menu, press <A> to change the operation modes:
Dimmer (Programming): The faders are to control the dimmer channels of the fixture button.
The data will enter the programming area.
Dimmer (Playback): The faders are to control the dimmer channels of the fixture button. The
data will not enter the programming area.
Attribute: To control the attributes of the selected fixtures. The data will enter the programming
area.
14
Page 16

Ordercode: 50731
Creator 1024 PRO
3. Grouping
You can create groups of fixtures or dimmer channels, to make selecting them faster. You can, for
example, make a group for each type of fixture, or group by left / right stage, etc.
01) Select the desired fixtures for group setting (be aware of the order in which you select the fixtures as
it will have influence upon the performance).
02) In “Live Programming Mode” menu, press <D> [Record Group].
03) Select a fixture group button to save.
04) Repeat steps 1-3 to set another group.
Other useful things to know about groups:
To select all the fixtures of a group, simply press the fixture group button. Other fixtures will not be
selected.
The order in which you select the fixtures takes effect when you use the last fixture – next fixture
functions described in the next section, and when you use Shapes and Fan mode.
4. Stepping Through Selected Fixture (One at a Time)
If you have selected a range of fixtures, or a group, the Creator 1024 PRO has functions to step through
the selected fixtures, one at a time. This can make it easier to program a range of fixtures because you
do not have to select each one manually.
This mode uses the fixture control buttons, which are normally used for controlling chases.
01) Select a range of fixtures or a group.
02) Press <←> (Reverse) and <→> (Forward) will select the fixtures in the range one at time.
03) The <HiLight> button will highlight the output of the selected fixture so that you can see it on sate (the
button LED is lit when in Highlight mode).
04) The <All> button reselects the whole range of fixtures.
Press <Odd> or <Even>, the fixtures at the odd/eve positions will be selected.
You can also use the left and right arrow keys to step through selected fixtures.
The selected fixture from the range will light up, and the other fixtures will black out (if the LED of
<HiLight> is turned on).
5. Move Lighting Menu
In Fixture menu, there are more options for fixture operation. Press <M.L. MENU> to turn the pages.
Locate without P/T: Turns on the selected fixtures but does not move them tot he central position. It is
useful if you do not want to change the positioning of the fixtures.
Align Fixture/Attribute: See The Align Function, page 16.
Flip: See Flip Fixtures, page 16.
Macro: Serves the purpose of lighting up or auto testing a fixture. Alter the personality settings first, for
this function to work.
De-Select fixtures: Deselects all fixtures but does not clear the programmer.
Flip Pan: Pan movement flip.
Flip Tilt: Tilt movement flip.
Remove Shape Temp: Move two fixtures running the same shape to the desired position.
15
Page 17

Ordercode: 50731
Creator 1024 PRO
6. The Align Function
The Align function allows you to copy an attribute from one fixture to others. This can be useful if you want
to set a row of scans to have the same tilt position, or if you want to copy a color from one fixture onto
other fixtures.
01) Press an attribute button of the attribute that you want to align.
02) Select the fixture which is to be used as the reference.
03) Select the other fixtures you want to align to the first one.
04) Press <M.L. MENU>, then, press <C> [Align Attribute].
05) The attributes will be copied to all the selected fixtures.
You can align all attributes of the fixtures using <B> [Align Fixtures] (it does not matter which attribute
is selected).
If you use a group to select the fixtures, the one you selected first when you recorded the group will
be the reference fixture.
7. Flip Fixtures
The Flip function is mainly used for moving heads. This type of fixture has two kinds of movement: pan/tilt.
This function alternates between those two movements. While using this function, you do not have to stop
pan movement all the time.
01) Select the desired fixtures.
02) Press <M.L. MENU>.
03) Press <D> to flip the fixtures.
8. Fan Mode
Fan mode automatically spreads out the values on a selected range of fixtures. If used on pan and tilt,
the result is spreading out “rays” of light beams. The first and last fixtures of the range are affected most,
and the central fixtures are affected least. The amount of fan can be set by turning the wheels.
As with shapes, the order in which you select the fixtures sets how the fan effect works. The fixtures you
select first and last will be the ones which change most. If you use a group to select the fixtures, the order
is the one in which the fixtures in the group were selected when it was created.
The fan effect, while normally used on pan or tilt attributes, can be applied to any attribute.
01) Select the fixtures which you want to fan.
02) Select the attributes to fan (Pan/Tilt, Color, etc).
03) Press <Fan> and set the reference point for the fan effect. You can select 3 modes:
<A> Middle.
<B> First
<C> Symmetric
04) The controllable attributes will be displayed in the bottom two lines in the screen.
05) The display shows which attribute is being controlled by each wheel.
06) Turn off Fan by pressing the <Fan> button again, when you have finished.
Fan mode needs to be used on at least 4 fixtures to give good effects. If you have an odd number of
fixtures, the central fixture will not move in fan mode.
Press the <Fan> button again to leave Fan mode. Any effects which you have set will remain in the
programmer.
<A> Middle: In this mode, the fixtures on the edges will move fully, while the fixture close to the
middle will move partially. If the total number of fixtures is odd, then the fixture located on the right
middle will nove move at all.
<B> First/Last: If set to First, the first fixture will remain static and the remaining fixtures will move in the
way that every fixture will move more than its predecessor. If set to Last, the last fixture will remain
static and the remaining fixtures will move in the way that every fixture will move less than its
predecessor.
<C> Symmetric: The fixtures will be divided into 2 groups. Both groups will run in Middle mode (see
above).
16
Page 18

Ordercode: 50731
Creator 1024 PRO
It is fairly easy to accidentally leave Fan mode turned on and be very confused about why the wheels
are not working properly, so turn it off as soon as you have completed the effect.
9. Advanced Options
Locate positions selected fixtures at central position with light coming out of them. The settings are
not placed in the programmer, so you need to change the values if you want to save them. The
“locate fixture” settings for each type of fixture are defined in the personality file.
De-Select fixtures deselects all fixtures but does not clear the programmer.
Close Fixture: Select a fixture, press <Close Fixture>, then, all the channels except the pan/tilt
channels of the fixture will output 0.
If you use the firmware version 2.3.10., press <Close Fixture> to temporarily and rapidly remove the built-in
shapes from the selected fixtures. Press <Clear> to recover.
17
Page 19

Ordercode: 50731
Creator 1024 PRO
Palette
When in programming, you will find some of the positions or colors will be frequently used. The console
allows you to store the frequently used data, like an artist using his palette. Therefore, you can access
such data quickly by pressing a single button. 20 x 4 pages of palettes are available in the console. Every
time you patch a fixture, the console will reserve 10 preset positions, 10 colors and 10 gobos to the
palette assigned to this fixture. Using those presets, you do not need to turn the wheels to search for a
specific color or gobo. Usually, preset positions should be set in advance and the presets should be
available in the fixture’s personality file.
1. Customize Palette
The Creator allows you to select the way in which the palettes can be used.
01) Press <Setup> and then press <Down> to scroll down.
02) Press <A> [User Setting].
03) There are 2 options in the menu:
Save Pal. Not link A/Save Pal. Link Attr.: When recording a palette entry, you can select to link it to
attributes or not. If yes, then only the data of the selected attributes in the programmer will be
recorded. Otherwise, all the data in the programmer will be recorded.
Use Pal. Not link At/Use Pal. Link Attr.: When loading a palette entry, you can select to link it to
attributes or not. If yes, then only the data of the selected attributes will be loaded. Otherwise, all
the data will be loaded.
2. Palette Page
Palette pages can be locked/unlocked, as fixture pages are turning.
01) Press <Setup> and then press <Down> to scroll down.
02) Press <A> [User Setting].
03) Press <Down> to scroll down.
04) Press <A> [Palette Page ON/OFF].
If set to ON, then the palette pages will turn together with the fixture pages.
If set to OFF, then the palette page will be locked on page 1.
3. Shared and individual Palette
Palette entries can be shared or individual.
Shared: If there is only one fixture in the programmer (you have only changed one fixture) when
recording the palette entry, then you can use that palette entry for all fixtures of the same type. So
you could save a value for “Red” on the first of your moving heads and then use that value for any
of your other moving heads. This is a shared palette, useful for values which are the same for all the
fixtures of one type, such as color, gobo, prism etc. The preprogrammed palettes are all shared.
Individual: If there is more than one fixture in the programmer when recording the palette entry, then
the entry is unique for each fixture. Therefore, when you save an entry with pan/tilt positions for your 4
central moving heads, those positions will only ever apply to those fixtures. You can later add values
for other fixtures; fixtures which have no values saved will not change when the palette is recalled.
This is an individual palette, useful for values which vary for each fixture, like pan, tilt and image
focus.
4. Which Attributes Are Stored in Palettes
A palette entry can store any or all attributes of a fixture, so you could store position, color and gobo in
the same palette entry. However, it is easier to operate the Creator 1024 PRO if you have some palettes
for position, some for color, some for gobo and so on. There are 80 palettes available so you do not need
to mix them up.
Some attributes are linked to each other. When we store or recall the first attribute, the console will store
all the other modified attributes or recall al the other attributes stored with data. The 4th attribute button is
also linked to the 9th and the 10th attribute buttons.
18
Page 20

Ordercode: 50731
Creator 1024 PRO
5. Storing a Palette
This is how you save a palette value:
01) Press <Clear> to clear the programmer.
02) Select the fixtures for which you want to store palette values. Select one fixture only to record a
shared palette entry.
03) Using the attribute buttons and wheels, set the attributes you want in the palette entry. You can store
any or all attributes of a fixture in each palette entry. Only attributes you have changed will be
recorded.
04) Press the attribute button for the attributes you want to store (the dimmer button will store all
attributes). The buttons light up to show you which attributes are going to be recorded. It’s best to
save only one type of attribute (e.g. Tilt/Pan).
05) Press <Store Palette>, then press one of the palette buttons, to save.
6. Recalling a Palette Value
To recall a palette value, this is what you do:
01) Select the fixtures to be changed. Shared palettes can be set to any fixture of the same type.
Individual palettes will set individual values to each fixture.
02) Select the attributes you want to recall from the palette. The <Dimmer> attribute button will recall
everything stored in the palette (the LEDs on the buttons show you which attributes are active)
03) Press one of the palette buttons to recall it.
It is easiest to save only one type of attribute (such as pan/tilt) into each palette, then you can just
leave the <Dimmer> attribute button selected when recalling the palette. If you store a mixture of
attributes, you always have to make sure that the correct attributes are selected when recalling a
palette and this is an extra step which you could do without.
7. Palettes in Playback
In firmware version 2.3.10., once a palette is recalled and stored in a playback, the playback will change
as the palette is changed. For example, if we have a palette or red color and store it in a playback, the
playback will output red. However, if we change the palette color from red to green and run the
playback again, the playback will output green.
Due to the free space limit, we suggest to recall only one palette in each playback. If you recall
more palettes, it may cause a time lag. This issue will be addressed in the future update.
This function can be disabled. While in the main menu, press <C> [Edit Time], press the desired
playback button, then press <Down> twice and, finally, press <E> to toggle between [Relate palette]
and [Not relate palette].
8. Delete a Palette
Press <Delete>, then, press <Palette> to delete.
19
Page 21

Ordercode: 50731
Creator 1024 PRO
Shapes
A shape is a sequence of values which can be applied to any attribute of a fixture. A “circle” shape, for
example, applied to the pan and tilt attributes, would cause the fixture to move its beam around in a
circular pattern. You can set the center point of the circle, the size of the circle and the speed of the
circle movement.
In addition to beam position shapes, there are a large number of other shapes available in this console.
The shapes are defined for a particular attribute such as color, dimmer, focus and so on. Some shapes
will not work with some fixtures; focus shapes, for example, can produce nice “focus pull” effects on
fixtures which have DMX focusing, but will do nothing on fixtures which do not have focusing.
When you use a shape with more than one fixture, you can choose to either apply the shape identically
to all the fixtures, or offset them so that the shape runs along the fixtures creating “wave” or “ballyhoo”
type effects. This is called the spread of the shape.
1. Selecting a Shape
Selecting a shape is very similar to selecting a value from a palette. When you choose a shape, it will be
applied to all selected fixtures.
01) Select the fixtures the shape is to be applied to.
02) In the initial menu, press <E> [Shape Generator].
03) Press <A> [Playback a Shape].
04) Select the shape type: Pan/Tilt shape, dimmer shape, RGB/CMY shape, color wheel shape, gobo
wheel shape, focus shape, iris shape, frost shape, prism shape and strobe shape.
05) Press <Up> or <Down> to browse and confirm with a soft key.
Most shapes are based on the current settings of the fixture, so a circle would move around the
current pan-tilt position of the fixture.
If the shape description says “Even” or “Parallel”, this describes the spread of the shape. You can
always change this later.
You can change the base value of a shape (e.g. the center of a circle) by changing the attributes
using the wheels in the usual way. You can reduce the size to zero (see next section) to help you see
what the base value actually is.
You can run more than one shape at a time by repeating the above procedure. You can run several
shapes on one fixture.
Each shape is designed to work on a particular attribute; the list on the palette display shows you
which attribute. Obviously if the fixtures do not have the attribute, you cannot use that shape on
those fixtures.
5 internal shapes can be run simultaneously; Each fixture can run max. 5 internal shapes.
In Shape menu, press <B>[Edit a Shape] to view the running status of the shapes.
To apply the same shapes to two different groups of fixtures, the shapes will show twice in the list. You
can adjust the “two” shapes individually.
To delete a shape press <E>[Shape Generator], press <Delete>, select the desired shape and then
press <Enter> to delete.
Each shape works on specific attributes. If a certain attribute is not available in a fixture, then, the
related shapes will not applied to the fixture.
2. Blocking a Shape
01) Select your fixtures (or a range of fixtures) by pressing the fixture/group buttons.
02) In the initial menu, press <E> [Shape Generator], press <A> [Playback a Shape], press <Down> and
finally press <E> [Block Shape].
03) Choose the kind of shape which you would like to block (All, Pan/Tilt, Dimmer, RGB or CMY).
04) The shape will now be blocked on the chosen fixtures.
20
Page 22

Ordercode: 50731
Creator 1024 PRO
3. Shape Parameters
It is quite easy to modify the range and the speed after a shape is selected.
01) In the initial menu, press <E> [Shape Generator].
02) Press <C> [Shape Parameters].
03) Highlight the desired shape with a soft key. Then, adjust the value with by turning the Wheel V.
If you have more than one shape running, the controls have effect upon the most recent one. You
can edit the parameters of any shape that is running using the Edit Shape function, see later in the
chapter.
The minimum size is zero. This will “hide” the shape, and the fixture will resume its previous settings. The
shape is, however, still active.
The minimum speed is Stop. This will freeze the shape and will offset the positioning of the fixture.
Size: The amplitude. When set to 0, the shape will be paused.
Speed: The running speed of the shape. When set to 0, the shape will be paused.
Repeat: This introduces a smaller offset into the timing of the shape across each fixture. The period of
a shape (in other words, interval angle between two neighbouring fixtures) is 360°.
Spread: This can vary from all fixtures moving identically, fixtures working in pairs (spread = 1) through
to all fixtures being distributed evenly through the shape, so the first fixture is just starting the shape as
the last one finishes (spread = even). When set to 1, then the 1st and the 3rd fixture will perform the
same. When set to 2, then the 1st and the 4th fixture will perform the same. When set to Even, then all
the fixtures will be distributed evenly in the shape period, to create an even wave.
Direction: You can set one of the 4 shape movement directions.
Loop Playback/Bounce/Stop On First Process: If set to Loop Playback, the Creator will run the current
shape for the unlimited amount of times. If set to Bounce, the Creator will run the current shape from
start to finish and then from finish to start. If set to Stop On First Process, the Creator will run the current
shape only once.
Center: Set one of the 2 options. Absolute (the reference point is the absolute center point of the
fixture) or Relative (the reference point are the manually preset pan/tilt settings).
Width1: Set the percentage of time during which the Creator will perform the desired shape. Width 1
cannot be used together with Width 2.
Width2: Set the percentage of the desired shape size. Width 2 cannot be used together with Width 1.
Quick Group: Shapes can be divided into groups in a fast way. Fixtures which belong to the same
group will act the same.
Advanced Group: Sometimes it is useful to have several fixtures to run a shape as a group. In this
case, you can use the Group function. Press <A> [Advanced Group] to enter. The menu contains the
following options:
Number of groups: The number of groups which we need to define. By setting Spread, you can
select the group quantity, not fixture quantity.
Group number: The fixture buttons of the group number will light up. To add a fixture to the
group number, press the desired fixture button until it lights up. If you press any button by
mistake, you will need to return to the settings of the original fixture group.
Group -> <-: Outward auto grouping
Group <- ->: Inward auto grouping
Reset: Reset the group number to fixture number.
Auto group: The fixtures will automatically be grouped, in a consequent order.
Increase group: The fixtures will be grouped with an add-on number.
Start Process: Define the start position.
Offset Degree: Define the end position. If the run mode is set to “Stop on Final Process,” adjust this
option to set the offset of the fixtures.
Reload: Press the button to restart the current shape.
Remove & Remain Offset: The number of shapes which run simultaneously is limited. However, when
you create a static effect with shapes and want to save it as a scene, use this option to record the
offset on the programmer and remove the shape. Then, save it as a scene or a chase.
21
Page 23

Ordercode: 50731
Creator 1024 PRO
4. Edit a Shape
This option can be used for editing a running shape. Only the selected shape can be edited. The shapes
in a scene cannot be edited here.
01) In the initial menu, Press <E>[Shape Generator].
02) Press B[Edit a Shape].
03) The screen shows the shapes that can be edited.
04) Press a soft key to highlight (select) a shape.
05) Exit and then edit the parameters of the shape.
5. Remove a Shape from Fixtures
01) In the initial menu, Press <E>[Shape Generator].
02) Select the fixtures which you want to remove the shape from, then select the shape in [Edit a
Shape].
03) Press <D> [Remove Shape of fixtures] to delete the shape.
6. Delete a Shape
01) In the initial menu, Press <E>[Shape Generator].
02) Press <Delete>.
03) Press a soft key to highlight (select) a desired shape.
04) Press <Enter> to delete.
7. Relative Shapes and Absolute Shapes
Some shapes will operate on the current settings of the fixture; a circle shape, for example, will be
centered around the current pan and tilt positions of the fixture. This is called a relative shape. If you
change the pan and tilt of the fixture, the whole shape will be moved.
All Position (pan/tilt) shapes, and other shapes with “User” or “Usr” in the name, are Relative shapes.
Other shapes always operate about a fixed value; a rainbow shape, for example, is centered at the
midpoint of the color mix attributes so that a full range of colors is obtained. This is called an absolute
shape. The current settings of the fixture are overridden by the shape.
Non-position shapes (color, gobo, focus, dimmer, iris) are usually absolute shapes, unless they have
“User” or “Usr” in the name. For example, “Magenta Even” is an absolute shape centered on 50%
magenta, but “Magenta Even Usr” is a relative shape which will change around the current
Magenta value of the fixture.
If you run a scene containing a shape, when you turn the scene off, the shape will stop. The final state of
the shape will be left as an offset to the fixture settings. Option E of the Playback Parameters (see below)
allows you to remove this offset when the shape stops and return the fixture to its programmed settings.
8. Playback Parameters
This option lets you set parameters for a shape stored in a playback/scene. When a scene fades in, you
can determine whether the shape should start at full size and speed instantly, (Static) or whether the
shape speed and/or size should fade in as well (Timed).
01) In Shape menu, Press <E> [Playback Parameters].
02) Press the playback button of the playback which you want to set parameters for.
03) <A> set the size to Static or Timed.
04) <B> set the speed to Static or Timed.
05) <C> allows you to remove the offset caused by a shape when it is stopped. When you turn off a
scene with a shape, the fixtures will be offset by the last state of the shape. Setting this option to
“Removed” causes the fixture to return to its programmed settings. Setting this option to “Remains”
leaves the shape offset in place.
22
Page 24

Ordercode: 50731
Creator 1024 PRO
Scenes
There are many functions in the controller to create a complicated lighting effect; and, the most
fundamental part is a scene, in which you can store a “look” you have created using your light.
There are 600 playbacks on 3 x 10 pages, each page with 20, which can be used to store scenes and
chases. In Running mode, the faders and the playback buttons are used for controlling playbacks; In
Programming mode, the buttons in the Playback area are for editing
1. How the Creator 1024 PRO works when programming
This console has a special internal scene called the “Programmer.” Whenever you change an attribute of
a fixture, the changes are stored in the programmer. When you record a scene, the contents of the
programmer are stored in the scene. Nothing else from the console output is stored.
This console has two programming modes, “Record by Fixture” (the normal mode) and “Record by
Channel”. The differences are:
Record by Fixture - When you change any attribute of a fixture, all the other attributes are placed in
the programmer as well. You will get exactly the result you expected when you recall the scene, but
you cannot combine scenes containing the same fixtures, because the new scene will just override
the old one.
Record by Channel - Only the attribute you change is placed in the programmer. This means that
you can save scenes which only contain position information, then recall them with other scenes to
set colors, gobos etc. This is much more flexible but requires more programming initially, because you
need several scenes to get a result. It also lays you open to problems if you do not keep tabs on
what you are doing. (This is known as Tracking mode on other consoles).
When you press <Clear>, all fixtures are cleared from the programmer. You should get into the habit of
pressing <Clear> before you start to program a scene, or you can end up recording fixtures you do not
want. You also need to press <Clear> when you finish programming, because any functions in the
programmer will override playbacks.
Attributes in the programmer are displayed with a white background.
Turning on a scene does not place the values from the scene in the programmer (but the Include
function lets you do this. The Locate Fixture function does not place any values in the programmer
either.)
2. Creating a Scene
01) Press <Clear> to clear the programmer. This ensures that you are starting with a clean slate.
02) Set up the stage effect using the fixtures. You can include shapes in a scene. Remember that only
the fixtures you have changed will be included in the Scene.
03) Press <Memory/Cue>.
04) Empty playbacks will flash.
05) Press the playback button of a flashing playback to record it. (Select a new page first if you want to
use a different page).
06) Press <Clear> to clear the programmer. Repeat from 2 to program more scenes.
Other useful things to know about recording scenes:
You can record the whole output of the console (not just what is in the programmer) by pressing <A>
[Record Stage]. The option will highlight when Record stage mode is active.
The roller has a segment above each playback fader to allow you to write on the name of the scene
using the low-tech but reliable method of marker pen (use a strip of tape on the roller surface). You
can then see at a glance what’s in each scene.
23
Page 25

Ordercode: 50731
Creator 1024 PRO
3. Using Shapes in Scenes
As you would expect, any shapes you have set up will be saved as part of the scene.
If the base value of the shape is not in the programmer (e.g. the central pan/tilt position, for a circle),
and the shape is a “User” type, then the scene will contain a “relative” shape. When you recall the
scene, the shape will start based on the current position of the fixture. This allows you to create lots of
different effects by layering a few different scenes - one for the shape, one for the base position. You can
either use “Record by channel” mode, and not set the position, or use the “Off” function to achieve this
effect.
4. Running Playbacks with a Scene (Autoload)
If you want to run a chases as a part of a scene, or automatically turn on an existing scene, you can
assign autoload to the scene.
01) Play back playbacks which you want to assign as autoload.
02) Press <Memory/Cue>.
03) Empty playbacks will flash.
04) Press <E> [Runing Pb. As AutoLoad], the option will highlight.
05) Press the playback button of a flashing playback to record it. (Select a new page first if you want to
use a different page).
06) Press <Clear> to clear the programmer. Repeat from step 2 to program more scenes.
Let us suppose that you have scenes 1, 2 and 3 and you want to autoload them in scene 4. Make
sure that scene 4 is empty. Press <Memory/Cue>, then [Save Running Pb As AutLo> and save to
scene 4.
The playback will run when the scene runs and will remain turned on until the closing of the scene.
5. HTP and LTP Channels
The Creator 1024 PRO can treat control channels in two ways:
Dimmer or intensity channels work on the principle of “highest takes precedence” (HTP). If an HTP
channel is turned on at different levels in several scenes, the highest level will be output. When you
fade a scene, the HTP channels fade out with it.
Moving light channels work on the principle of “latest takes precedence” (LTP). The latest change
takes over any other values, so that the most recent scene to be turned on is the one which is
output. When you fade a scene, LTP channels do not normally fade (though you can make them do
it, if you want, except for channels set to Instant). They set their full values when the scene starts to
fade in, and stay there until another value is set. (You can set the value this happens at using the
User settings menu).
The fixture personality file tells the console which channels of a fixture are HTP and which are LTP.
Normally, only dimmer attributes are HTP, and everything else is LTP. If a fixture does not have an intensity
control channel, the gobo channel is defined as HTP to make sure the fixture blacks out when a scene is
turned off.
24
Page 26

Ordercode: 50731
Creator 1024 PRO
6. Playing Back a Scene
To playback a scene, just move up the playback fader or press the playback button. (Make sure that
there are no values in the programmer by pressing the <Clear> button, because anything in the
programmer will override the playback).
You can turn on more than one scene at once.
All the HTP (intensity) of the scenes saved on the playback buttons 1-10 fade in/out as the fader is
up/down. The LTP (movement) channels will start immediately once the fader is not set to 0. (The LTP
channels also run like this when the scenes are in Mode 1 or Mode 2, unless the channels are set
without fading function in the fixture library.)
All the HTP and the LTP of the scenes saved on the playback buttons 11-20 will be output
immediately when you press the button. (If time is set in the scene, they will fade in as set.)
There are two playback combination keys: One is to control the latch of playback 11-20; The other is
to toggle between Flash and Swop of the playback buttons.
When the LED indicator of <Latch> is on, pressing one of the playback buttons 11-20 will start
outputting scenes till the playback button is pressed again. If <Latch> is not on, the playbacks
11-20 are in manual control mode; it outputs only when pressed and stops when released. The
output mode will be <Flash/Swop> whichever is on.
When the LED indicator of <Flash/Swop> is on, it functions as Swop mode, in which a playback
will output data when the playback button is pressed and close other scenes. When the LED
indicator of <Flash/Swop> is off, it functions as Flash mode, in which a playback will output data
when the playback button is pressed, while other scenes will keep running.
7. Turning Playback Pages
By rolling the roller, you can change to another 20 scenes. There are 10 columns on the roller and 3 page
buttons for the roller. That means that there is a total of 30 pages on the roller.
To run an opened playback, move its fader down and then move it up again. The scenes on the previous
page will be closed and the scenes on the current page will start running.
8. Editing a Scene
You can edit any part of a saved scene:
01) Press <Clear> to empty the programmer.
02) Turn on the scene you want to edit, so you can see what you are doing. Turn off all other scenes to
avoid confusion.
03) Select the fixtures you want to change, and make the changes.
04) Press <Memory/Cue> button.
05) Press the playback button of the scene you are editing.
06) Our console will tell you a scene already exists on playback.
07) Press <A> [Merge Scene] to edit the existing scene. Unchanged information is not affected.
If you are in “Record by fixture” mode, all attributes of any fixture you have changed will be saved in
the scene with their current settings. If you only want to save certain attributes of a fixture, you need
to use “Record by channel” mode (press <B> after pressing <Memory/Cue>).
You can overwrite the existing scene entirely using <B> [Replace Scene]. This wipes the playback
and saves the current programmer as a new scene.
If the scene contains shapes, and you have selected some new shapes, the original shapes in the
scene will be deleted (after a warning). To get round this you need to use Include on the original
scene (see next section) to load the shapes into the programmer. Ensure that the playback fader for
the scene is at zero (i.e. the shape is not active) when including the scene.
25
Page 27

Ordercode: 50731
Creator 1024 PRO
9. The Include Function
The Include function lets you load selected parts of a scene back into the programmer. (Normally, only
manual changes to fixtures are put in the programmer). You can then use this to make a new scene. This
is useful if you want to make a scene which is similar to one you already have.
01) Press <Copy/Include>.
02) Press the playback button of the desired scene.
03) Press <C> to select “Include selected fixtures only” or not.
04) Press <Enter> to include the data.
10. The “Off” Button
The <Off> button allows you to remove an attribute which has been stored in a scene, as if you never
recorded it.
For example, suppose that you recorded a scene which had scans at a certain position, with the color
set to green. If you later decide that you do not want the recorded color at all in the scene, so that the
previous color setting of the scans will be used, you can use the Off function to turn off the color in the
scene. You can also use the Off function to remove complete fixtures from a scene.
Pressing the <Off> button is not the same as recording an attribute at zero.
01) Turn on the scene which you want to edit, so you can see what you are doing.
02) Select the fixtures you want to change.
03) Press the <Off> button (one of the blue command buttons) to display the Off menu.
04) To switch off all attributes of the selected fixtures, press <A> (this will remove the fixtures from the
scene).
05) To switch off selected attributes, press the appropriate attribute button, then use <B> and <C> to set
each attribute to Off (the screen shows which attribute will be turned off for each button)
06) Repeat from 3 to turn off other attributes, or from 2 to turn off other fixtures.
07) Press <Memory/Cue>.
08) Press one of the playback buttons for the scene you are editing, to save the changes. Unchanged
information is not affected.
Attributes which are Off are shown on the screen. (The stage output will not change as the output
values remain at their last settings).
Attributes or fixtures set to Off can be turned back on again by selecting them in the usual way and
changing them using the wheels.
You can also use this function to turn off fixtures or attributes in a palette entry. Use the procedure
above, but instead of editing and recording a scene, edit and record a palette entry instead.
11. Copy a Scene
01) Press <Copy/Include>.
02) Press the playback button that stores a scene.
03) Press an empty playback button to copy.
12. Delete a Scene
01) Press <Delete>.
02) Press the desired playback button.
03) Press the playback button again, to delete.
26
Page 28

Ordercode: 50731
Creator 1024 PRO
13. Time
You can set a fade in and fade out time independently for every scene. The fades only affect HTP
(intensity) channels. There is a separate LTP timer which allows you to set movement times. LTP channels,
which were set to “instant” during patching, ignore LTP fade times.
01) Press <C> <Edit Time>.
02) Press the playback button of the playback you want to set times for.
03) There are two pages in the menu. Press <Up> or <Down> to browse. Select the desired option and
modify the data by turning the Wheel V.
04) Press <Enter> twice to save and exit or press <Exit> twice to exit without saving.
05) The effect of the times is shown in the chart below.
06) The times you enter are also affected by the scene mode. Press <Up> and <Down> to proceed to
page 2 and press <B> [Mode]. The available options are:
Mode 0 – No timing information is used. The HTP channels faded with the 0-100% position with
playback faders.
Mode 1 – Channels fade as set by the HTP and LTP fade times (except Instant LTP channels). If
you enter times for a Mode 0 Scene, it will automatically change to Mode 1. If HTP times are set
to zero, the HTP levels will fade with the fader
Mode 2 – HTP channels fade as set by the HTP times, or with the fader if times are set to 0. LTP
channels are controlled by the fader position (except Instant channels). The initial data of LTP is
the data before the slider is push up. Set the LTP fade time to 0 to use this mode.
Mode 3 – HTP channels fade as set by the HTP times, or with the fader if times are set to 0. LTP
channels are controlled by the fader position (except Instant channels). The initial data of LTP is
0. Set the LTP fade time to 0 to use this mode.
07) Once you have adjusted all the options, press <Enter> twice to save and exit, or press <Exit> to exit
without saving.
27
Page 29

Ordercode: 50731
Creator 1024 PRO
14. Overlap Function
Overlap is a powerful function which makes the fixtures run the same effect with delay. The Overlap must
be switched on (see page 31, The Global Time of a Chase) and scene mode must be set to Mode 2, for
this function to work. The scene will play the overlap effect, as you move the playback slider up. If the
scene is set to instant time, then the overlap effect will play as the fade time runs. There are the following
options in the menu.
Quick Group: Press <E> to enter. Turn the Wheel V to set the number of quick groups. The adjustment
range is between 0-80. The fixtures in the step can be divided into groups. Fixtures from the same
group will act the same.
Advanced Group: Sometimes it is useful to have several fixtures to run a shape as a group. In this
case, you can use the Group function. Press <A> [Advanced Group] to enter. The menu contains the
following options:
Number of groups: The number of groups which we need to define. By setting Spread, you can
select the group quantity, not fixture quantity.
Group number: The fixture buttons of the group number will light up. To add a fixture to the
group number, press the desired fixture button until it lights up. If you press any button by
mistake, you will need to return to the settings of the original fixture group.
Group -> <-: Outward auto grouping
Group <- ->: Inward auto grouping
Auto group: The fixtures will automatically be grouped, in a consequent order.
Increase group: The fixtures will be grouped with an add-on number.
Reset: Reset the group number to fixture number and group again automatically.
15. Priority
The playback priority levels define how the playbacks run. The priority can be set to different levels:
Lowest/Low/Normal/High/Highest. The default priority for a new playback is set to Normal. When you run
a new playback, which has the same priority as the current playback, then the current playback will be
replaced by the new playback. However, if the new playback is of lower priority than the current
playback, then the current playback will keep on running, instead of the new one. Set the priority in Edit
Time menu.
28
Page 30

Ordercode: 50731
Creator 1024 PRO
Chase
In the console, one chase can be edited with up to 600 steps.
1. Programming a Chase
To program a chase, you have to set up the lighting for each step of the chase, then save it. The
contents of the programmer are recorded as a step.
You can either set all the fixtures and dimmers manually for each step, or you can use the <Include>
button to load in the information from scenes you have already recorded.
You cannot use an existing scene as a chase step just by turning it on. You need to use the Include
button to load the scene into the programmer.
01) Press <Chase>.
02) Press the playback button of the playback where you want store the chase.
03) Set up the lighting for the first step, either manually or by pressing the <Include> button on existing
scenes.
04) Press the playback button of the playback or <Enter> to store the programmer contents as step 1 of
the chase.
05) Press Clear (unless you want to re-use the contents of the programmer), then repeat from step 3.
06) Press Chase to finish when you have stored all the steps you want.
Press <Clear> when you have finished saving the chase, otherwise when you try to play it back the
programmer will override the chase and you will not see the chase properly.
The current step number is displayed in the prompt line.
You can record shapes in a chase. If the same shape is saved in subsequent steps it will continue
from step to step, if not it will stop at the end of the step time. (The Creator considers the shape to be
the same if you did not press <Clear> after the previous step, and did not change the speed, size or
spread of the shape from the previous step; or if you included the shape from the previous step and
have not modified it.)
The current step number will be shown on the screen.
A maximum of 600 steps can be edited in a chase.
You can turn the Wheel V to input step NO., then press <E> [Edit Menu] to edit the step. In “Edit
Menu”, press <Delete> to delete the current step.
2. Running Playbacks with a Step (Autoload)
If you want to run chases s a part of a step, or automatically turn on an existing scenes, you can assign
autoload to the step.
01) Press <Chase>.
02) Press the playback button of the playback where you want to store the chase.
03) Play back playbacks you want to assign as autoload.
04) Press <C> [Runing Pb. As AutoLoad], the option will highlight.
05) Press the playback button of the playback or <Enter> to store the programmer contents as step 1 of
the chase.
06) Press <Clear> (unless you want to re-use the contents of the programmer), then repeat from step 3.
07) Press <Chase> or <Exit> to finish when you have stored all the steps you want.
08) Set the times of the chase to 0, in Edit Time menu (see The Global Time of a Chase, page 31).
The playback will turn on when the step runs and will remain turned on until the step is closed. Press
<Go+> or <Go-> to run the playback.
29
Page 31

Ordercode: 50731
Creator 1024 PRO
3. Running a Chase
Move a playback slider up or press a playback button, it will run a chase.
Two or more chases can be output simultaneously.
All the HTP (brightness) of the chases saved on the playback buttons 1-10 are controlled by the
faders. The LTP (movement) channels will implement the chase as the fade time defines.
The chases saved on the playback buttons 11-20 will be output immediately when you press the
playback buttons.
There are two playback combination buttons, one is to control the Latch of playbacks 11-20; The
other is to toggle between Flash and Swop of the playback buttons.
When the LED indicator of <Latch> is on, pressing the playback buttons 11-20 will start outputting
scenes till the playback button is pressed again. If <Latch> is not on, the playbacks 11-20 are in
manual control mode; it outputs only when pressed and stops when released. The output mode
will be <Flash/Swop> whichever is on.
When the LED indicator of <Flash/Swop> is on, it functions as Swop mode, in which a playback
will output data when the playback button is pressed and close other scenes. When the LED
indicator of <Flash/Swop> is off, it functions as Flash mode, in which a playback will output data
when the playback button is pressed while other scenes will keep on running.
4. Connecting a Chase to the Wheels A/B
When running a chase, the playback control will automatically connect to chases.
Press <Connect> and then press the desired playback buttons of chases to set which chase to
connect and which not to play back.
5. Setting Speed, Crossfade and Direction
Run a chase, then you can turn the wheels to adjust speed and fade time.
Once the chase speed is saved, the playback will run at this speed.
Speed: The interval (global) time between two steps. If some steps are set to special time, then i twill
run according to their own time.
Crossfade: The ratio of Wait Time to Fade Time. The three pieces of data fade in slope ratio, fade out
slope ratio and LTP slope ratio. FF means that it is all slope time during the total time and the Wait
Time is 0. When the value is set to 70, it means that the 70% of the total time is the slope time and the
rest is Wait Time.
Wait Time: For example, there is a fixture which is supposed to move from point A to point B. If
the Wait Time is set to 3 seconds, then the fixture will stop at point A for 3 seconds and then will
start moving.
Fade Time: For example, there is a fixture which is supposed to move from point A to point B. If
the Fade Time is set to 3 seconds, then the whole process of moving from point A to B will last 3
seconds.
Once the chase speed is saved, the playback will run at this speed.
01) Turn the Wheel A to adjust the speed.
02) In the initial menu, press <B>[Chase Parameters].
03) Press <A>[Save Speed].
When a chase is running and you turn the wheels to do something like adjusting the positions of some
fixtures by manual, then, you can press <Connect> + <B> [Speed/Cross] to change the mode of the
wheels.
Set the chase to the speed at time of editing, press <Connect> + <A >[Clear Temp. Time].
Chase direction is controlled by <Go+> and <Go->.
Direction can be saved in chase: Press <B> [Chase Parameters] + <B> [Save Direction>.
30
Page 32

Ordercode: 50731
Creator 1024 PRO
6. Manually Controlling the Chase Step
Press <Stop> to control the chase manually. If the chase is set as “Link = Close”, it will automatically
change to manual control. For more information about “Link,” see below.
Press <Go+> or <Go-> to restart the chase.
7. Add a Step
To add a step is similar to edit a chase step. Press <Chase> and press the playback button of a chase,
then follow the steps for recording a new step. The new step will be recorded as the last step in the
chase.
8. Unfold a Chase for Editing
Press <Unfold> to unfold the steps of a chase to the playback buttons; each step functions like a scene
for separate running and editing.
01) Press <Unfold> and press the desired playback button, for editing.
02) The first 20 steps of the chase will be applied to the playback buttons 1-20.
03) Move a playback fader up or press the playback button to output the step data.
04) The options of the unfolded Chase menu are described below.
05) Press <Unfold> again to exit the mode.
Edit a step: Press <Clear> to clear the programmer. Move up the fader or press the button to modify.
Press <A> [Save a step] then press a playback button 1-20.
Adjust the step time, press <B> [Edit Time] and press a playback button. Then, adjust the time.
To insert a new step, you need to set the effects of the new step first. Press <C> [Insert a Step] and
press the playback button which you want to add it to. The new step will be inserted and the
following steps will be pushed back by one step.
To delete a step, press <Delete>, then and press the desired playback button. Press <Enter> to
confirm.
To copy a step, press <Clear> and press <Copy/Include>, then press the desired step to send its data
to the programmer and save.
If there are more than 20 steps in the chase, press <Up> or <Down> to turn the pages.
Press <E> [Shape Generator], to add a shape in the chase.
9. Include the Data of a Chase Step
01) Press <Copy/Include>.
02) Press the button of a scene/chase that you want to copy from.
03) Press the button of the target chase.
10. Delete a Chase
Deleting a chase works the same as to deleting a scene. Press the blue <Delete>, then press the desired
playback button twice.
11. Delete a Chase Step
Press <Unfold> to unfold a chase and press <Delete>. Then, press the desired playback button to delete.
12. Adjust Speed and Fade Time with Wheels
Wheels A/B control the speed of the fade time of the most recent chase. Press <Connect> to connect to
other chases for control: Press <Connect>, then press the desired playback button of a chase.
13. The Global Time of a Chase.
01) Press <C> [Edit Time] and choose the desired chase by pressing one of the playback buttons.
02) Press <Up> or <Down> to turn the pages. Press <A-E> to select the desired option. Turn the Wheel V to
adjust the value.
03) The time options include (see the chart on the next page):
Wait In: The wait time before an HTP channel fading in
Fade In: The fade in time of an HTP channel
Wait Out: The wait time before an HTP channel fading out
Fade Out: The fade out time of an HTP channel
31
Page 33

Ordercode: 50731
Creator 1024 PRO
LTP Wait: The wait time before an LTP channel fading
LTP Fade: The fading time of an LTP channel
Overlap (ON/OFF): If set to ON, then the overlap effect will be active as the fade time runs.
Priority (Lowest/Low/Normal/High/Highest): Set the priority for your playbacks. Playbacks with
higher priority will always override the playbacks with lower priority.
Quick Group: Press <E> to enter. Turn the Wheel V to set the number of quick groups. The
adjustment range is between 0-80. The fixtures in the step can be divided into groups. Fixtures
from the same group will act the same.
Advanced Group: Sometimes it is useful to have several fixtures to run a shape as a group. In this
case, you can use the Group function. Press <A> [Advanced Group] to enter. The menu
contains the following options:
Number of groups: The number of groups which we need to define. By setting Spread, you
can select the group quantity, not fixture quantity.
Group number: The fixture buttons of the group number will light up. To add a fixture to the
group number, press the desired fixture button until it lights up. If you press any button by
mistake, you will need to return to the settings of the original fixture group.
Group -> <-: Outward auto grouping
Group <- ->: Inward auto grouping
Reset: Reset the group number to fixture number.
Auto group: The fixtures will automatically be grouped, in a consequent order.
Increase group: The fixtures will be grouped with an add-on number.
14. Set Separate Time for a Step
Fade in/out time can be set to each single step separately. A chase step with separate time is called a
complex step; if it is using the global time, then it is a simple step. To set separate time for each step, you
can press <Unfold>.
01) Press <Unfold>, and then press the playback button of the chase.
02) Press <B> [Edit Time], and then press the playback button of the step.
03) On Page 2 of Time menu, the option B is “Link”. If “Link” is set to ON, the chase will automatically run
step by step. If “Link” is set to OFF, then you need to press <Go+> or <Go-> to run the steps one after
another.
04) Press <Enter> twice to save and exit or press <Exit> to exit without saving.
Any modification will turn a simple step into a complex step.
To turn a complex step back to a simple step, press <Fixture menu> in the time editing menu to
change.
32
Page 34

Ordercode: 50731
Creator 1024 PRO
15. Overlap Function
Overlap is a powerful function which makes the fixtures in playbacks run the same effect with delay. The
Overlap must be switched on (see page 31, The Global Time of a Chase). The overlap effect will play as
the fade time runs. There are the following options in the menu.
Quick Group: The fixtures in the step can be divided into groups. Fixtures from the same group will
act the same.
Advanced Group: Sometimes it is useful to have several fixtures to run a shape as a group. In this
case, you can use the Group function. Press <A> [Advanced Group] to enter. The menu contains the
following options:
Number of groups: The number of groups which we need to define. By setting Spread, you can
select the group quantity, not fixture quantity.
Group number: The fixture buttons of the group number will light up. To add a fixture to the
group number, press the desired fixture button until it lights up. If you press any button by
mistake, you will need to return to the settings of the original fixture group.
Group -> <-: Outward auto grouping
Group <- ->: Inward auto grouping
Auto group: The fixtures will automatically be grouped, in a consequent order.
Increase group: The fixtures will be grouped with an add-on number.
Reset: Reset the group number to fixture number and group again automatically.
16. Priority
The playback priority levels define how the playbacks run. The priority can be set to different levels:
Lowest/Low/Normal/High/Highest. The default priority for a new playback is set to Normal. When you run
a new playback, which has the same priority as the current playback, then the current playback will be
replaced by the new playback. However, if the new playback is of lower priority than the current
playback, then the current playback will keep on running, instead of the new one. Set the priority in Edit
Time menu.
15. Advanced Options
Each chase has options which can be set to affect the way it runs. Press <P.b. Par>. You need to have a
“connected” chase, or the button will not function. The options you set are individual for each chase.
The options are:
[Save Speed]: Save the current speed of the chase (set by turning the wheel A).
[Save Direction]: Save the direction of the chase by using <Go+> and <Go->.
[Loop Playback/Bounce/Stop on final step]: Makes the chase stop on the final step. If the final step is
a blackout, the chase will appear to turn itself off, so you can just press Go whenever you want to
make it happen again.
[Skip Time Options]: Allows you to skip the first wait and/or fade of a chase. It is useful if you want that
the chase to start as soon as you move the fader. (Press the button to toggle through options):
Skip first wait time: The wait time is missed when the chase is first turned on.
Skip first wait and fade time: Both, wait and fade times, are missed when the chase is first turned
on.
Wait and Fade for all steps.
33
Page 35

Ordercode: 50731
Creator 1024 PRO
Show Recording
You can record the order of the playbacks and the interval time between the playbacks. The shows can
be played back after recording.
1. Record a Show
01) Press <Setup>.
02) Press <E> [Show Record].
03) Press <A> [Show List] and select the desired show to record.
04) Press <A> [Record Show].
05) Press <B> [Record] to highlight it.
06) Play chases and palettes back.
07) When the playbacks are finished, press <B> [Record] to dehighlight it.
08) Press <Enter> to end the show.
09) Now, adjust the time settings. To set the first playback as the starting time.
10) To keep the original time settings, press <E>.
Duration time of the show will be shown after recording.
It is possible to select the time code of the console or the time code of an external MIDI source. In
[Show Record] press <A> to toggle between those 2 options.
2. Run a Show
01) Press <Setup>.
02) Press <E> [Show Record].
03) Press <A> [Show List] and select the desired show to record.
04) Press <C> [Play Show].
05) Press<B> [Play] to highlight it.
Once a show is running, the timer of its first line will start.
Press >D> and <E> to adjust the rhythm of the show. It works only with the console time code. It does
not respond to MIDI.
While playing, you can choose between the time code of the console or the time code from an
external MIDI source. While in [Show Record], press <A> to toggle between those 2 options.
3. Delete a Show
01) Press <Setup>.
02) Press <E> [Show Record].
03) Press <A> [Show List] and select the desired show to record.
04) Press <B> [Delete Show].
05) Press <Enter> to delete.
To delete all programs, enter [Show Record], select [Clear Show List] and press <Enter>.
34
Page 36

Ordercode: 50731
Creator 1024 PRO
4. Save/Load a Show
Save Show List
01) Press <Setup>.
02) Press <E> [Show Record] and insert a USB memory stick.
03) Press <C> [Save Show List].
04) Turn the Wheel V to modify the characters. Press <Up> and <Down> to move the cursor. Press
<Delete> to delete a character.
05) After naming the file, press <Enter> to save.
Load Show List
01) Press <Setup>.
02) Press <E> [Show Record] and insert a USB memory stick.
03) Press <D> [Load Show List].
04) Select the desired show list and press <Enter> to start loading.
Save a Single Show
01) Press <Setup>.
02) Press <E> [Show Record] and insert a USB memory stick.
03) Press <A> [Show List] and select the show.
04) Press <D> [Save&Load Show] and press <A> [Save Show].
05) Turn the Wheel V to modify the characters. Press <Up> and <Down> to move the cursor. Press
<Delete> to delete a character.
06) After naming the file, press <Enter> to save.
Load a Single Show
01) Press <Setup>.
02) Press <E> [Show Record] and insert a USB memory stick.
03) Press <A> [Show List] and select the show.
04) Press <D> [Save&Load Show] and press <B> [Load Show].
05) Press <Enter> to load.
Setup
Press <Setup> to enter the following options:
1. Save & Load
To save data to and load data from a USB memory stick.
Save data: Enter Save Data menu, turn the Wheel V to set the characters. Press <Up> and <Down>
to move the cursor. Press <Delete> to delete a character. After naming, insert a USB memory stick
and press <Enter> to save the data.
Load data: Insert a correct USB memory stick. Select the desired data from the list that appears on
the screen. Press <Up> and <Down> to browse. Press <A-E> to select the desired option.
2. Wipe Data
Wipe Playback: Only the data in the playback area will be wiped off. Other data will remain.
Wipe Palette: Only the data in the palette area will be wiped off. Other data will remain.
Wipe All: Data of playback, palette and patch will all be wiped off. But, the library data will remain.
3. Select Language
There are two language versions available on the Creator: Chinese and English.
35
Page 37

Ordercode: 50731
Creator 1024 PRO
4. Personality Management
Delete Personality
A maximum of 50 personalities can be saved on the console. To add a new personality when there are
already 50 personalities on it, delete one of the old personalities first.
01) Enter Delete Personality menu.
02) Press <Up> or <Down> to browse.
03) Select the desired personality.
04) Press <Enter> to delete.
Delete All Personality
All personalities will be deleted from the console.
Update Personality
01) Insert a correct USB memory stick.
02) Press <Setup>.
03) Press <D>, to start reading personality libraries.
04) Select the desired personality to add.
05) Once updated, the line will be highlighted.
Edit Personality
01) Press <D> [Edit Personality].
02) Turn the Wheel V to modify the characters. Press <Up and <Down> to move the cursor. Press
<Delete> to delete character.
03) After naming the file, press <Enter> to enter Channels Number menu.
04) Turn the Wheel V to modify the channel naumber or press a fixture button to enter the channel
number. Press <Enter> to enter Channel Edit Menu.
05) Select the desired channel which should be edited. Once selected, the option will be highlighted.
Press an attribute button to assign the desired attribute to the channel. If it is not a fine-tone channel,
press the option button again to enter Advanced Channel Setting Menu.
06) In Advanced Channel Setting Menu, turn the Wheel B to modify the characters. Press <Up> and
<Down> to move the cursor. Press <Delete> to delete a character. Press <B> to change the attribute
type. Press <C> to change the channel type. Turn the Wheel V to change the locating value of the
channel. Press <D> to edit the reverse status of the channel.
07) When finished, press <Exit> to return to the previous menu.
08) Repeat step 5 until you have edited all the channels. Press <Enter> to enter Macro menu.
09) In Macro menu, select the macro which should be edited. Turn the Wheel B or press a fixture button
to enter a channel number. Turn the Wheel V to enter a function value. After editing the macro
command, press <Enter> to save the created/edited personality.
5. Show Record
Please, see page 34.
6. User Settings
01) Press <Up> or <Down> to turn the pages.
02) Choose one of the following options:
MIDI (Disable/Master/Slave): If set to Disable, the Creator will not respond to MIDI signals. If set to
Master, the Creator will send MIDI signals to other devices. If set to Slave, the Creator will only
receive MIDI signals and the playback section will respond only to MIDI signals.
MIDI Channel (1-16): Set the number of MIDI channels.
Palette LTP (Close/Open): Link To Playback. This option is useful if you have assigned any color to
one of the palettes and then used this palette to program a show. If set to Open and you have
reassigned another color to the same palette, the color will automatically be used in the
previously saved show, without the need of adjusting the show itself.
NOTE: In [Edit Time] menu, [Relate palette] option must be selected.
Save Pal.: Choose between Not Link Attribute and Link Attribute. While saving a palette, you can
select to link it to an attribute or not. If you have chosen Link Attribute, only the data in the
36
Page 38

Ordercode: 50731
Creator 1024 PRO
selected attributes will be saved. If you have chosen Not Link Attribute, all the data will be
saved.
Use Pal.: Choose between Not Link Attribute and Link Attribute. While loading a palette, you can
select to link it to an attribute or not. If you have chosen Link Attribute, only the data in the
selected attributes will be loaded. If you have chosen Not Link Attribute, all the data will be
loaded.
Palette Page (ON/OFF): If set to ON, the palettes will be linked to pages. This way, you can save
up to 80 palettes (4 pages x 20 palette buttons). If set to OFF, the palettes will not be linked to
pages. This way, the maximum number of palettes will be limited to 20, as there are 20 palette
buttons.
Wheel accele.: You can set the wheel reaction time. Choose between Fast, Normal and Slow.
Blackout Output (HTP/All): If set to HTP and you press <Blackout>, only the HTP channel values will
be set to 0. If set to All and you press <Blackout>, all the channel values will be set to 0.
Master Fader Enable/Master Fader Disable: It is possible to enable or disable the master faders. If
the master faders are enabled, move them to control the output levels of all the http channels.
Console Lock
01) In order to lock the Creator, to prevent any unwanted adjustments carried out by third parties, press
and hold down <Setup> and <M.L. Menu> for 3 seconds.
02) The Creator will now be locked. To unlock, repeat step 1.
Updating
01) Copy the CR102PUD.bin update file to the root directory of a FAT32 USB memory stick.
02) Power off the Creator.
03) Insert the USB memory stick to the USB slot on the console.
04) Power on. The console will automatically find the update file on the USB memory stick. The display will
show “Found Update File”
05) Press <Enter> to start updating. Do not power the Creator off, while the update is running.
06) Once the Creator has been updated, it will reboot automatically.
07) Press the Setup button to view the current software version.
37
Page 39

Ordercode: 50731
Creator 1024 PRO
Personality Builder
With the Personality Builder you can create and edit the fixture library (Personality). The library file must be
placed in the root directory of a FAT32 USB memory stick.
1. Interface of the Personality Builder
2. How to create a new Personality (Library)
01) Select your language.
02) Press [New] to create a new personality or press [load] to load an existing personality.
03) Enter the name of the personality. The name of the file should not consist of more than 12 characters.
Do not use spaces between words!
04) Select the tags with blue background. Normally, you can keep the default configurations in the tag
but it is possible to change them, too. Please note, that the pan/tilt tags cannot be changed.
05) Enter the channel value in Attribute Setting column and select the channel type. If the desired
channel type is not on the list, you can select “Generic.” Enter the attribute name. The name of the
file should not consist of more than 12 characters. Do not use spaces between words!
06) Normally, you should keep the value of Locate function unchanged. However, in case of LED par
lights, the value to locate the strobe is usually set to 0. Refer to the manual of the LED par fixture in
question.
07) Set up Instant and Invert (under normal circumstances, keep it unchanged).
08) Press <Clear> to reset the HTP channel to 0 or to the value indicated by the playback fader position.
This option is mostly used with the built-in program channel of a LED fixture.
09) Repeat from step 4 to set up another attribute.
10) Some fixtures are equipped with the lamp ON/OFF and reset functions. These can be found in
Macros section. Enter the channel number of every channel in the Channel column. Enter the
functional value in the Value column.
11) Save the personality.
38
Page 40

Ordercode: 50731
Creator 1024 PRO
2. Creating Pallettes
It is possible to save custom palettes, either with the Creator or using the software.
01) Click on “Palette.”
02) Click on “New Palette.” The following window will appear:
03) Go to Palette Table Name field and name your palette table. If you want to delete the palette, click
on “Delete Palette.”
04) Go to DMX List and, one by one, select and export the desired channel functions to Palette Table by
clicking on the “>>” button.
05) Go to “NO.” cell to set the palette button number, then go to “Name” cell to type in the name of
the function. Subsequently, set the DMX channel values. See the picture below.
06) When finished, close the window.
07) Click on <Save As> to save your new R20 fixture file.
08) Repeat steps 1-8 to create more palettes.
39
Page 41

Ordercode: 50731
Creator 1024 PRO
Maintenance
The operator has to make sure that safety-related and machine-technical installations are to be
inspected by an expert after every year in the course of an acceptance test.
The operator has to make sure that safety-related and machine-technical installations are to be
inspected by a skilled person once a year.
The following points have to be considered during the inspection:
01) All screws used for installing the device or parts of the device have to be tightly connected and
must not be corroded.
02) There may not be any deformations on housings, fixations and installation spots.
03) Mechanically moving parts like axles, eyes and others may not show any traces of wearing.
04) The electric power supply cables must not show any damages or material fatigue.
The Showtec Creator 1024 PRO requires almost no maintenance. However, you should keep the unit
clean.
Disconnect the mains power supply, and then wipe the cover with a damp cloth. Do not immerse in
liquid. Do not use alcohol or solvents.
Keep connections clean. Disconnect electric power, and then wipe the DMX and audio connections
with a damp cloth. Make sure connections are thoroughly dry before linking equipment or supplying
electric power.
Troubleshooting
No Light
This troubleshooting guide is meant to help solve simple problems.
If a problem occurs, carry out the steps below in sequence until a solution is found. Once the unit
operates properly, do not carry out following steps.
If the Creator 1024 PRO does not operate properly, refer servicing to a technician.
Suspect two potential problem areas: the power supply, the effects.
01) Power supply. Check that the unit is plugged into an appropriate power supply.
02) The effects. Return your effects to the dealer.
03) An effect does not respond to the Creator 1024 PRO: Check the DMX address of the fixture and the
controller. Make sure that they match. Make sure the connections are correct. Check if blackout is
off.
04) If all of the above appears to be O.K., plug the unit in again.
05) If nothing happens after 30 seconds, unplug the device.
06) If you are unable to determine the cause of the problem, do not open the Creator 1024 PRO, as this
may damage the unit and the warranty will become void.
07) Return the device to your Showtec dealer.
Incorrect Language
If the language is incorrect, follow the steps below.
01) Power the Creator on.
02) Press the <Setup> button.
03) Press the <C> button (next to the display).
04) The language will change and the Creator will return to the main menu.
40
Page 42

Ordercode: 50731
Creator 1024 PRO
DMX channel
1024
Fixture
80
Re-patched fixture address
Yes
Swop Pan/Tilt
Yes
Reversed channel output
Yes
Channel slope modification
Yes
Channels for each fixture
40 primary + 40 fine tune
Library
Avolite Pearl R20 library supported
Scene
600
Scenes to run simultaneously
20
Total scene steps
600
Time control of scenes
Fade IN/OUT, LTP slope
Shapes for each scene
5
Scene and dimmer by slider
Yes
Swop scene
Yes
Flash scene
Yes
Shape generator
Shapes of Dimmer, Pan/Tilt, RGB, CMY,
Color, Gobo, Iris and Focus
Shapes to run simultaneously
10
Master slider
Global, playback, fixture
Real time blackout
Yes
Channel value by wheel
Yes
Channel value by slider
Yes
Dimmer by slider
Yes
USB memory
FAT32 supported
Fuse:
F1L/250V
Dimensions:
655 x 550 x 135 mm (LxWxH)
Weight:
12,6 kg
No Response to DMX
Suspect the DMX cable or connectors, a controller malfunction, a light effect DMX card malfunction.
01) Check the DMX setting. Make sure that DMX addresses are correct.
02) Check the DMX cable: Unplug the unit; change the DMX cable; then reconnect to electrical
power. Try your DMX control again.
03) Determine whether the controller or light effect is at fault. Does the controller operate properly with
other DMX products ? If not, take the controller in for repair. If so, take the DMX cable and the light
effect to a qualified technician.
Playback Buttons Do Not Respond to Commands
Please check MIDI status in Setup menu. MIDI Slave mode will disable the playback buttons and the
device will respond only to MIDI master commands.
Product Specifications
Design and product specifications are subject to change without prior notice.
41
Website: www.Showtec.info
Email: service@highlite.nl
Page 43

Ordercode: 50731
Creator 1024 PRO
Dimensions
42
Page 44

©2016 Showtec
 Loading...