

Page 1

Personal Call Manager
Step-by-Step Guide
Page 2

Document and Software Copyrights
Copyright © 1998-2005 by ShoreTel Inc., Sunnyvale, California, U.S.A.
All rights reserved. Printed in the United States of America. Contents of this publication may not be
reproduced or transmitted in any form or by any means, electronic or mechanical, for any
purpose, without prior written authorization of ShoreTel, Inc. ShoreTel, Inc. reserves the right to make
changes without notice to the specifications and materials contained herein and shall not be responsible
for any damage (including consequential) caused by reliance on the materials presented, including, but
not limited to typographical, arithmetic or listing errors.
Trademarks
ShoreCare, ShoreTel, Shoreline, ShoreWare, ShoreGear, and AnyPhone are registered
trademarks of ShoreTel, Inc. in the United States and/or other countries. Shoreline4 is a trademark of
ShoreTel in the United States and/or other countries. Microsoft, Windows, Windows NT, and ActiveX are
either registered trademarks or trademarks of Microsoft Corporation in the United States and/or other
countries. VxWorks is a trademark of Wind River Systems. All other copyrights and trademarks herein are
the property of their respective owners.
Version Information
Using the ShoreTel Personal Call Manager
April, 2005
Company Information
ShoreTel, Inc.
960 Stewart Drive
Sunnyvale, California 94085
(408) 331-3300
(408) 331-3333 fax
www.shoretel.com
Page 3

Table of Contents
Personal Call Manager............................................................................................................................................................I
To start your Call Manager from the Start menu:................................................................................................................. 3
To auto-start Call Manager at log in:........................................................................................................................................3
To quit Call Manager:.................................................................................................................................................................3
1. Right-click the Call Manager icon in the Windows status area. A shortcut menu appears....................................3
2. Click Exit. The Call Manager application quits............................................................................................................3
Find Me Call Handling:.................................................................................................................................................................17
ShoreTel Personal Call Manager, Step-by-Step Guide I
Page 4

1
ShoreWare Personal Call Manager Overview
The ShoreWare™ Personal Call Manager software allows users to manage every
aspect of their business voice communications with customized call handling features
that eliminate time-consuming tasks and maximize productivity.
This simple, easy-to-use application provides call control integrated with calendars and
direct visual access to both voice and e-mail messages from a familiar Microsoft
Outlook desktop interface.
Key Features
• Visual Voice Messaging
• Personalized Call Handling
• Instant name lookup from system directory and Outlook contacts
This document is used to introduce you to some of the most frequently used productivity
features within the Personal Call Manager, including point-and-click call management,
voice mail integration with Microsoft Outlook, and a broad range of call handling
capabilities.
For more detailed information, use the ShoreWare™ Personal Call Manager Help
System to access documentation and online help.
ShoreWare Personal Call Manager Overview 1
Personal Call Manager, Step-by-Step Guide
Page 5

2
Basic Call Handling
Task Step-by-Step Instructions
Launching Call Manager
There are two ways to start Call
Manager: from the Windows Start menu
or by setting Call Manager to auto-start
each time you log in to your computer. .
To start your Call Manager from the
Start menu:
Quitting Call Manager
1. Click Start, select Programs,
select ShoreTel
Communications, and click
ShoreTel Call Manager. Call
Manager opens.
To auto-start Call Manager at log in:
1. Right-click the ShoreTel icon, a
shortcut menu will appear. Click
Configure ShoreTel System.
The ShoreTel System dialog
box appears.
2. Click the Settings tab. Select
Start Call Manager
automatically when I log into
Windows
To quit Call Manager:
1. Right-click the Call Manager
icon in the Windows status
area. A shortcut menu appears.
2. Click Exit. The Call Manager
application quits.
. Click OK.
Basic Call Handling 3
Personal Call Manager, Step-by-Step Guide
Page 6
Task Step-by-Step Instructions
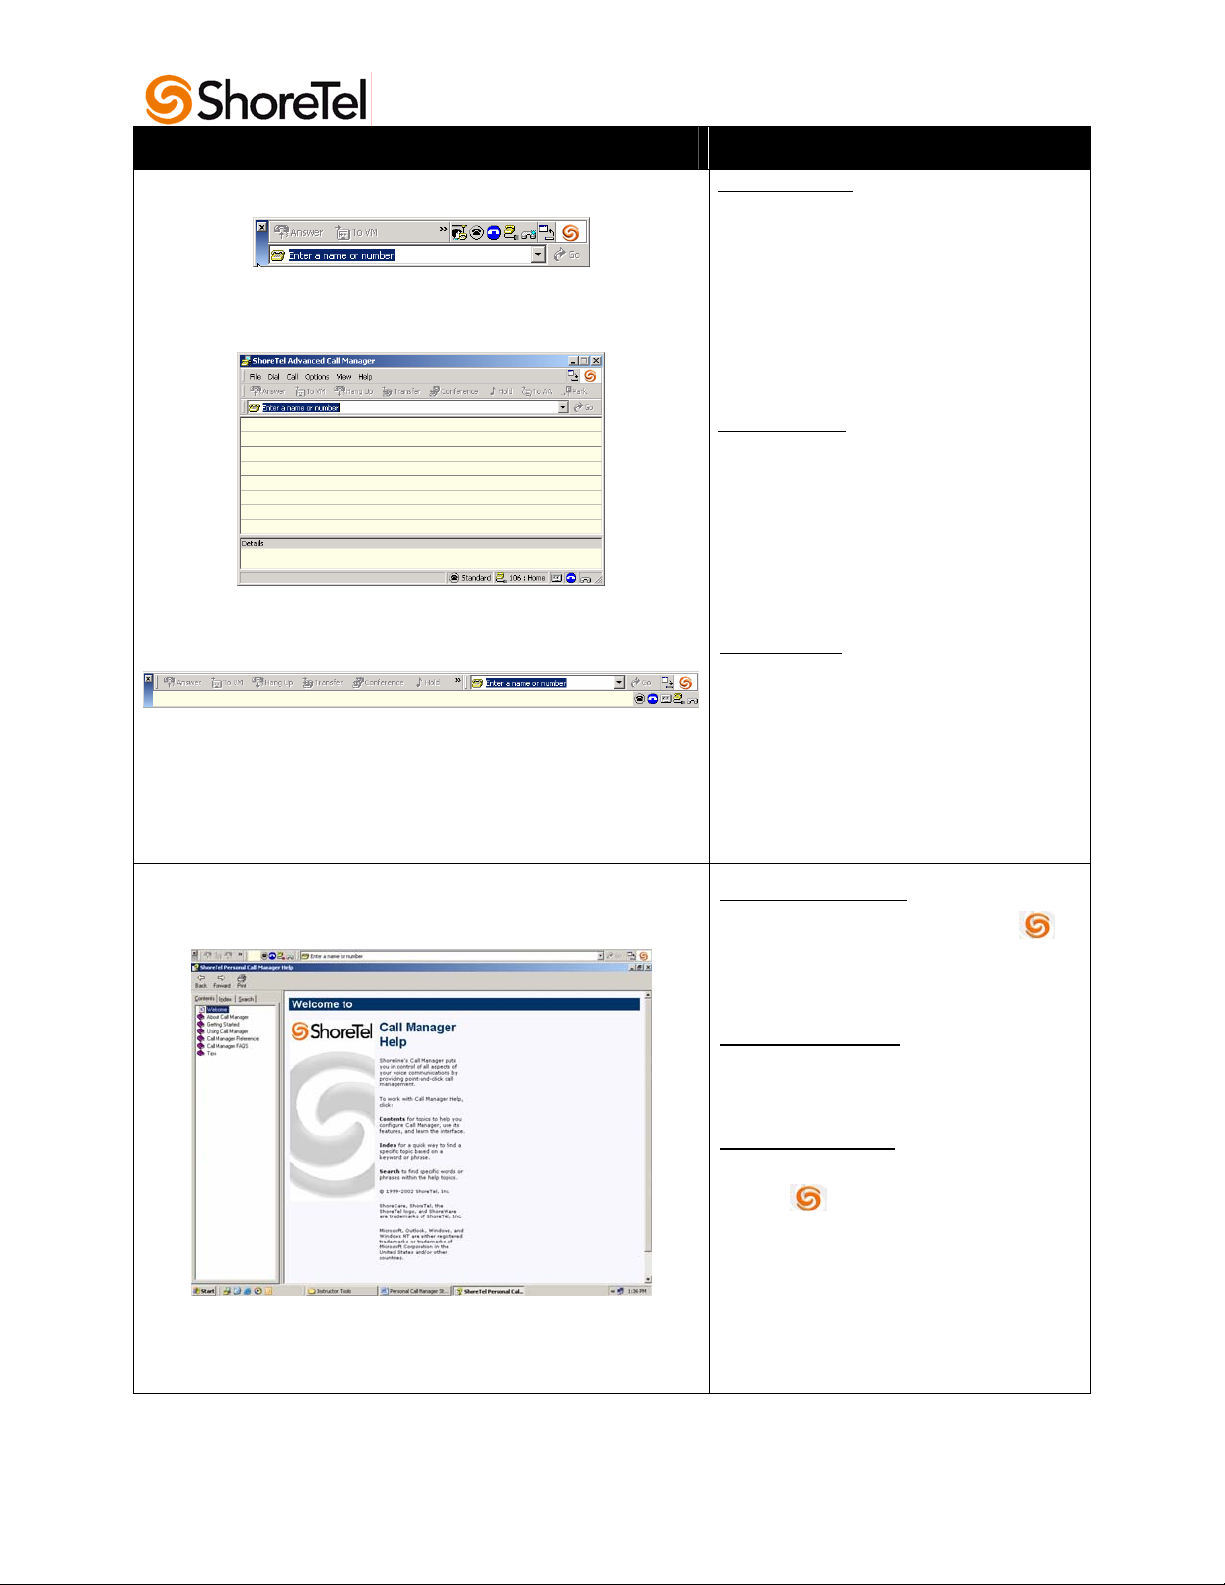
Call Manager Views
Compact View:
This view appears when you first
open the Call Manager
application. This view provides
access to most functions of the
toolbar. Additional features are
available
ShoreTel icon.
if you right-click the
Using the Help System
Detailed View:
This view provides the
QuickDialer, the Active Call list
and the Call Details area at the
same time. In this view, the
menus provide access to all
features.
Docked View:
The Collapse/Expand buttons can be
used to switch between views.
In the Compact view:
Right-click on the ShoreTel icon.
1. Choose Help > Contents and
This view is like a toolbar that
can be docked for quick access
at the bottom or top of the
Windows desktop.
Index from the shortcut menu.
In the Detailed view:
1. Choose Contents and Index
from the drop down menu.
In the Docked view:
1. Right-click on the ShoreTel icon.
2. Choose Help > Contents and
Index from the shortcut menu,
or
3. From the Help Menu, choose
Contents and Index.
Basic Call Handling 4
Personal Call Manager, Step-by-Step Guide
Page 7

Task Step-by-Step Instructions
Making a Call
QuickDialer Tips
1. In the Personal Call Manager
Quick Dialer, select the text
Enter a name or number.
2. Type the name or number of the
person you want to call.
3. Press the Enter key to dial the
number. The Active Call List
displays the status of the call
(Outgoing call).
The fastest way of using the
QuickDialer is to start typing the name
or number of the person you wish to
call.
The QuickDialer looks up contacts by
partial names, whole first or last names,
initials or by company name..
You can use the QuickDialer to redial
recently called numbers.
1. Click the QuickDialer drop
down list arrow.
2. Select the person’s name from
the list.
You can drag a phone number from a
document or a Web site and drop it in
the QuickDialer. If you drag by using
the left mouse button, the number is
pasted into the QuickDialer. When
using the right mouse button to drag the
number, you can dial the number
automatically or paste it into the
QuickDialer.
If you have 50 or less entries in your
redial list, use the down arrow key to
select the person you want to call and
the press the Enter key.
Basic Call Handling 5
Personal Call Manager, Step-by-Step Guide
Page 8
Task Step-by-Step Instructions
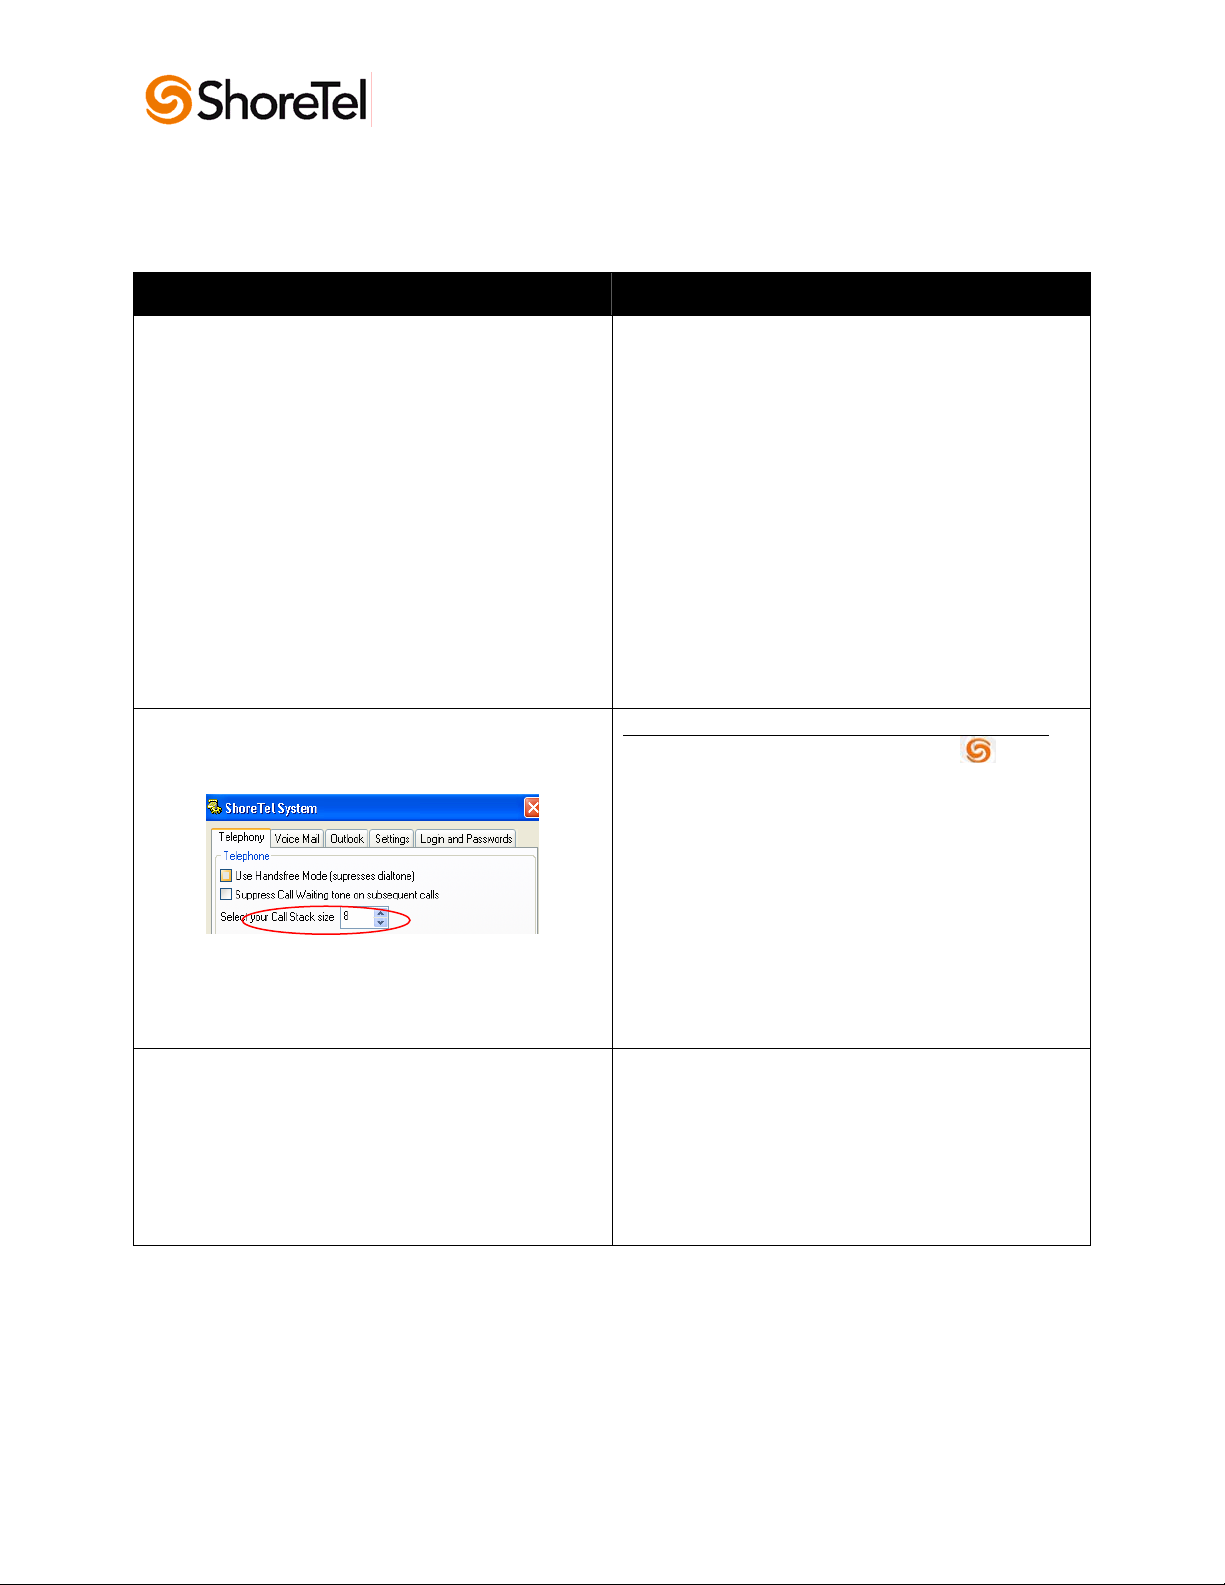
What is a Call Stack?
Configuring the Call Stack Size
What is Handsfree Mode?
The call stack size is the maximum number of
incoming and outgoing calls that you can handle
with Personal Call Manager. The call stack size
determines the number of calls you can receive
before the next call is treated as busy.
Even when your call stack is full, Personal Call
Manager allows you to place one more outgoing
call for performing consultative conferences and
transfers.
Your call stack size cannot exceed the number
configured by your system administrator.
From the Personal Call Manager Compact view:
1. Right-click the ShoreTel icon.
2. Click Configure ShoreTel System from
the shortcut menu. The ShoreTel System
dialog box appears.
3. Click the Telephony tab. The ShoreTel
System Telephony dialog box appears.
4. In the Telephone section, enter the stack
size in the Select your Call Stack Size
box.
5. Click OK to close the dialog box.
Use the Handsfree mode when you want to free
your hands up by using a headset or
speakerphone.
When the Handsfree Mode is activated, ShoreTel
suppresses dial tone to the telephone. .
Basic Call Handling 6
Personal Call Manager, Step-by-Step Guide
Page 9

Task Step-by-Step Instructions
Activating Handsfree Mode
Turning Handsfree Mode off
From the Personal Call Manager
Compact view:
1. Right-click the Not in
Handsfree icon.
Handsfree Mode shortcut menu
appears.
2. Click the Handsfree Mode
menu option to display the
check mark.
3. Personal Call Manager switches
to the handsfree mode the icon
on the toolbar changes to the
Handsfree icon.
From the Personal Call Manager
Compact view:
1. Right-click the Handsfree Mode
The Handsfree Mode
icon.
shortcut menu appears.
2. Click the checkmark in the
Handsfree Mode menu. The
Personal Call Manager turns off
the Handsfree Mode and the
icon in the tool bar changes to
Not in Handsfree Mode.
The
Basic Call Handling 7
Personal Call Manager, Step-by-Step Guide
Page 10

Task Step-by-Step Instructions
Answering a Call
.
Sending a Call to Voice Mail
To answer an incoming call when
not in Handsfree Mode:
1. Pickup the telephone
receiver when it rings and
begin to talk.
2. The call status in the
Active Call List displays
(Connected) and the
Connected icon appears.
To answer an incoming call in
Handsfree Mode:
1. Click the Answer button
on the toolbar.
2. The call status in the
Active Call List displays
(Connected) and the
Connected icon appears.
3. Begin talking
From the Personal Call Manager
Compact view:
1. Highlight the incoming call.
2. Click the To VM button.
.
Placing the Active Call on Hold
Basic Call Handling 8
Personal Call Manager, Step-by-Step Guide
Answer your incoming call:
1. The call appears in the
Active Call List. The call
status displays
(Connected) and the
Connected icon appears.
2. Double-click the call in the
3. The Call Status displays
4. Double-click the call on
Active Call List to be
placed on hold.
(On Hold).
hold to take the call off
hold.
Page 11

Task Step-by-Step Instructions
Transferring a Call
From the Personal Call Manager
Compact view:
1. Click the Transfer button.
The Transfer dialog box
appears.
2. In the Dial box, enter the name
or number where you want to
transfer the call.
3. Select the desired name or
number.
4. Click the Transfer button to
Consultative Transfer
transfer the call
From the Personal Call Manager
Compact view:
1. Click the Transfer button.
The Transfer dialog
box appears.
2. In the Dial box, enter the name
or number where you want to
transfer the call.
3. Select the desired name or
number.
4. Click the Consult button.
are transferring to rings and the
“Complete Transfer” message
appears on your screen.
5. When the party answers, you
can confer with them before
transferring the caller.
6. Click Yes to transfer the call.
The caller is then transferred.
7. Click No to cancel the transfer.
The caller remains on your line.
The phone you
Basic Call Handling 9
Personal Call Manager, Step-by-Step Guide
Page 12

Task Step-by-Step Instructions
Transferring a Call to Another Person’s Voice
Mail
Making a Conference Call
From the Personal Call Manager
Compact view:
1. Click the Transfer button.
The Transfer dialog
box appears.
2. In the Dial box, enter the name
or number of where you want to
transfer the call.
3. Select the desired name or
number.
4. Click the To Mailbox button.
The call is transferred to the
selected number’s voice
mailbox.
To add a third party to an active call
from the Personal Call Manager
Compact view:
1. Click the Conference button.
The Conference
dialog box appears.
2. In the Dial box, enter the name
or number of the third party you
want to add.
3. Select the desired name or
number.
4. Click the Conference button.
The new caller is
now on the line and the active
call lists displays (Conferenced)
beside each caller on the
conference.
Basic Call Handling 10
Personal Call Manager, Step-by-Step Guide
Page 13

Task Step-by-Step Instructions
Making a Consultative Conference Call
Dropping a Party from the Conference Call
To add a third party to an active call
from the Personal Call Manager
Compact view:
1. Click the Conference button.
The Conference
dialog box appears.
2. In the Dial box, enter the name
or number of the third party you
want to add.
3. Click the Consult button.
The “Complete
Conference” message appears.
Phone of the person being
conferenced in rings. When
they answer, you have a chance
to talk to them.
4. Click Yes to connect the new
party to the conference. The
Active Call List displays the
status of the callers.
5. Click No to cancel adding the
person to the conference call.
The original caller(s) remain on
the line.
You can drop a single party from the
conference call in Personal Call
Manager Compact view:
1. Right-click on the party you want
to drop. A pop-up menu
appears.
2. Click Drop Party.
3. The party is dropped from the
conference call.
Basic Call Handling 11
Personal Call Manager, Step-by-Step Guide
Page 14

Task Step-by-Step Instructions
Joining Two Active Calls in a Conference Call
You can create a conference call by
joining two active calls:
1. Place the first call on hold.
2. Answer the second call.
3. Select the call on hold with a
single mouse click from the
Active Call List.
4. Click the Conference button.
The two calls are
joined together, creating a
conference call.
Note: You cannot have both calls on
hold to activate the conference call.
Hanging Up from a Call
To hang up an active call when not in
Handsfree mode:
1. Put the receiver on hook. Your
active call is disconnected.
To hang up an active call in Handsfree
mode:
1. From the Compact view, click
the Toolbar Extender >>. A
pop-up Tool Bar appears.
2. Click the Hang Up button.
Your active call is
disconnected.
Basic Call Handling 12
Personal Call Manager, Step-by-Step Guide
Page 15

Task Step-by-Step Instructions
Viewing Voice Mail Messages in Outlook
From the Personal Call Manager
Compact view:
1. When a new voice message
From the ShoreTel icon:
Note: Depending on your configuration
in the ShoreTel System/Voice Mail
settings, ShoreTel will either ring your
phone or play your voice mail messages
through your PC speakers.
arrives, a cassette tape icon
appears.
2. Click the Cassette icon. A pop-
up menu appears.
3. Click the Voice Mail button.
4. The Outlook Messages screen
appears.
5. Double-click the message you
want to listen to.
1. Right-click the ShoreTel icon.
A shortcut menu appears.
2. Click the Voice Mail option.
The Outlook Messages screen
appears.
3. Double click the message you
want to listen to.
Basic Call Handling 13
Personal Call Manager, Step-by-Step Guide
Page 16

Basic Call Handling 14
Personal Call Manager, Step-by-Step Guide
Page 17

3
Configuring Personal Call Manager
Task Step-by-Step Instructions
What are Call Handling Modes?
Selecting a Call Handling Mode
Call Handling modes provide different
options for handling calls. You can have
different call handling options to manage
incoming calls when you are in a
meeting, working from home or out of
town. Each mode also allows for a
different voice mail greeting.
Available Call Handling Modes are:
Standard
In a Meeting
Out of the Office
From the Personal Call Manger
Compact view:
1. Click the current Call Handling
2. Click the desired Call Handling
Extended Absence
Custom
Mode icon in the Status Bar. A
shortcut menu appears with a list of
the five modes.
Mode. The indicator for the
selected mode appears.
Configuring Personal Call Manager 15
Personal Call Manager, Step-by-Step Guide
Page 18

Task Step-by-Step Instructions
Configuring A Call Handling Mode
From the Personal Call Manager
Compact view:
1. Right-click the ShoreTel icon.
A shortcut menu appears.
2. Click the Configure ShoreTel
System option. The ShoreTel
dialog box appears.
3. Click the Edit Call Handling
Modes button under the
Telephony tab. The Configure
Call Handling dialog box
appears.
4. Click the tab of the Call
Handling Mode you want to
configure.
5. Select the desired options for
the mode you are configuring.
Call Forwarding Condition:
Always – Your calls are forwarded to
the selected Call Handling Mode
destination even if you are available.
When No Answer or Busy
Never – Your calls will never be
forwarded to another Call Handling
Mode.
Call Forwarding Destination:
Box – Displays your current call
forwarding destinations and routing
schemes.
Edit Destination button – Opens
the Call Handling Destination dialog
box and allows you to select the
forwarding number and routing
plans for incoming calls in the
selected Call Handling Mode.
Greeting:
Review/Record Greeting – Opens
the Prompt Recorder dialog box to
record and play the greeting for this
Call Handling Mode.
Configuring Personal Call Manager 16
Personal Call Manager, Step-by-Step Guide
Page 19

Personal Assistant:
0 Forwarded To – Displays your
current selection for a personal
assistant to whom callers are
transferred when they press 0 and do
not want to leave a voice message.
Notification:
Enable Message Notification – A
check in this box means that the
ShoreTel system automatically
notifies you of the arrival of voice mail
messages, as determined by your
message notification settings.
Edit Notification button – Opens the
Configure Message Notification dialog
box where you can configure when
and where you are notified of new
messages.
Find Me Call Handling:
You can use Find Me call handling to
allow callers who reach your voice
mailbox to try and find you at alternate
numbers by pressing “1” during your
outgoing greeting.
Note: There is no prompt instructing the
caller on this option. You must
inform callers of this option in
advance or in your recorded
greeting.
When the callers press 1, they hear a
prompt telling them that the Find Me
destinations are being called. If the call
is not accepted at either of the Find Me
destinations, the call is sent to your
voice mail.
1. Specify up to two alternate
numbers where you want callers
to be able to find you.
2. Set the number of rings (6
second intervals) that Find Me
call
handling will wait for an
answer at each destination.
Configuring Personal Call Manager 17
Personal Call Manager, Step-by-Step Guide
Page 20

Note: You can enable/disable Find Me
call handling for each of the 5 call
handling modes.
When a call is forwarded to a Find Me
destination, the phone at the Find Me
destination displays the caller ID of the
voice mail. When you answer the call,
you hear a prompt announcing who the
call is for and the original caller ID.
You are prompted with the following
options:
- Press 1 to accept the call.
- Press 2 to send the call back to
the original voice mail box.
- Press 3 to repeat the name and
caller ID.
Call Handling Note:
This is the place to enter special
instructions for your personal
assistant when responding to
incoming calls.
6. Click the OK button twice to
complete the configuration and
close the dialog boxes.
Configuring Personal Call Manager 18
Personal Call Manager, Step-by-Step Guide
Page 21

Task Step-by-Step Instructions
Recording a Greeting for a Call Handling
Mode
You can record specific greetings for each of the Call
Handling Modes. If you record a greeting for only one
of the modes, it is only used when call handling mode
is set for that mode. When there is no recorded
greeting for a mode, the ShoreTel system announces
your recorded name and the standard greeting for that
mode.
From the Personal Call Manager Compact view:
1. Right-click the ShoreTel icon.
menu appears.
2. Click the Configure ShoreTel System option.
The ShoreTel System dialog box appears.
3. Click the Edit Call Handling Modes button.
The Configure Call Handling Modes dialog
box appears.
4. Click the tab of the Call Handling Mode you
want to configure.
5. Click the Review/Record Greeting button.
The Prompt Recorder dialog box appears.
6. Click the Record button and record your
message.
7. Click Stop when you complete your message.
8. Click Play to review your message.
9. Click the OK button three times to close each
of the dialog boxes.
A shortcut
Configuring Personal Call Manager 19
Personal Call Manager, Step-by-Step Guide
Page 22

Task Step-by-Step Instructions
Configuring Message Notification
.
From the Personal Call Manager Compact view:
1. Right-click the ShoreTel icon.
menu appears.
2. Click the Configure ShoreTel System option.
The ShoreTel System dialog box appears.
3. Click the Voice Mail tab.
4. In the Voice Mail Notification section, click the
Edit Notification Settings button. The
Configure Message Notification dialog box
appears.
5. Select the desired options for receiving
message notifications.
- What type of messages you want to be
notified about.
- Phone number where you want to be
called.
- How many times and how often voice mail
should try to notify you of new messages.
6. Click OK to save settings.
Note: Your next voice mail or e-mail message will
respond to your new settings.
A shortcut
.
Integrating Outlook with Personal Call
Manager
If you choose to integrate MS Outlook with Personal
Call Manager, all your voice mail messages appear in
your Outlook Inbox, making it easy to retrieve and
respond to messages in any order. With integrated
voice messages, you can also forward voice mail to
any e-mail destination, giving you the power of multimedia messaging.
Before you can take advantage of integrating Personal
Call Manager with Outlook, you must install the
Outlook integration features.
Configuring Personal Call Manager 20
Personal Call Manager, Step-by-Step Guide
Page 23

Task Step-by-Step Instructions
Configuring Outlook for Voice Mail
Including Outlook Contacts in Your
Calling Directory
Personal Call Manager can be configured to integrate
Outlook and voice mail. With this integration, your
voice messages will appear in your Outlook inbox.
From the Personal Call Manager Compact view:
1. Right-click the ShoreTel icon.
menu appears.
2. Click the Configure the ShoreTel System
option. The ShoreTel System dialog box
appears.
3. Click the Outlook tab.
4. Click the Use Outlook as my default Voice
Mail client option.
5. Click OK.
Note: Depending on your configuration in the
ShoreTel System/Voice Mail settings, the
ShoreTel system will either ring your telephone
or play your voice mail messages through your
PC speakers.
You can configure Personal Call Manager to include
Outlook contacts when you make calls, conference
calls, or transfer calls.
Note: Once configured, Personal Call Manager
displays only the contact folders with the word
“Contact” in the folder’s name.
From the Personal Call Manager Compact view;
1. Right-click the ShoreTel icon.
shortcut menu appears.
2. Click the Configure ShoreTel System
option. The ShoreTel System dialog box
appears.
3. Click the Outlook tab.
4. In the Memorize Phone Number
Management section, click Read phone
numbers from Outlook on startup option.
5. Click OK.
A shortcut
A
Configuring Personal Call Manager 21
Personal Call Manager, Step-by-Step Guide
Page 24

Task Step-by-Step Instructions
Displaying Outlook Contact
Information for Incoming Calls
You can display Outlook contact information when you
receive or make calls. Contact Information from
Outlook will be displayed if the caller is in your Outlook
contact list.
From the Personal Call Manager Compact view;
1. Right-click the ShoreTel icon.
shortcut menu appears.
2. Click the Configure ShoreTel System
option. The ShoreTel System dialog box
appears.
3. Click the Outlook tab.
4. In the Memorize Phone Number
Management section, click Pop Outlook
contacts on incoming call option.
5. Click OK.
A
Configuring Personal Call Manager 22
Personal Call Manager, Step-by-Step Guide
Page 25

 Loading...