

SHOEI VFX-WR, VFX-EVO Instructions For Use Manual

Read This First
Confirm the Packed Items
Parts Description
Installing the Visor/ Peak
Removing and Installing
the Nose Cover
Installing the Mud Guard
Removing and Installing
the Neck Outlet
Replacing Interior Parts
Removing Interior Parts
Installing Interior Parts
Important Notice about
Handling Interior Parts
M.E.D.S.
(Motion Energy Distribution System)
E.Q.R.S.
(Emergency Quick Release System)
WARNING
Parts List
English
3
4
5
6
7
8
8
9
10
11-13
14
15
16
17
17
2
I
nstructions for use
Thank you for purchasing your new SHOEI helmet. This manual contains valuable information to help you
understand how to operate and maintain your helmet. Please read this manual carefully before use and keep it
for future reference. Your SHOEI dealer can provide a replacement if this manual is lost.

43
Read This First
English
This product is a motorcycle helmet.
Do not use it for any purposes other than riding a
motorcycle. If you use the helmet for any other
purpose, it may not provide sufficient protection in
case of an accident.
No helmet can protect the wearer against
all foreseeable high speed and low speed
impacts.
For maximum head protection, the helmet must fit
properly and the retention system must be
securely fastened under the chin. The helmet
should allow sufficient peripheral vision when
secure on your head. If your helmet is too large, it
may slip or move on your head while riding. This
could cause your helmet to come off in an
accident or obstruct your vision while riding
resulting in personal injury or death. To learn to
properly wear and secure your helmet, see the
booklet “How to Use Your Helmet Properly” that is
packed with your helmet.
The contents of this manual are subject to change
without notice.
The illustrations in this manual may differ from the
actual product.
The copyrights for this manual belong to SHOEI
CO., LTD. Reproduction or copying of this manual
without written permission is strictly prohibited.
WARNING
5
4
6 7 8 109
2
1. Helmet
2. V-470 Visor/ Peak
3. Visor/ Peak Screws (5)
4.
Anti-reflection Sticker
(except Black plain colored model)
5. Mud Guard
6. Helmet Bag
7. Instruction Manual
8. “How to use your helmet properly“
9. Warning label
(E-3 tag: for ECE R22 products)
10. SHOEI logo stickers (2)
HOW TO USE
YOUR HELMET PROPERLY
3
Confirm the Packed Items
English
After opening the product box, please confirm that
all parts and accessories are included.
1
English
The terms “right” and “left” in
this manual are from the
point of view of a rider who is
wearing the helmet.
Right Left
We recommend that you save the box and
its cushioning material in case you need to
ship the product or its parts for repair. If
you dispose of these materials, please
follow the proper laws and regulations.
5
1. Nose Cover
2. Lower Air Intake
3. Mud Guard
4. Front Air Intake
5. V-470 Visor/Peak
6. Upper Air Intake
7. Shell
8. Top Air Outlet
9. Rear Air Outlet
10. Neck Outlet
11. Side Outlet
6
Nose Cover (Lower Air Intake) / Side Outlet
Front Air Intake
Rear Air Outlet / Neck Outlet
English
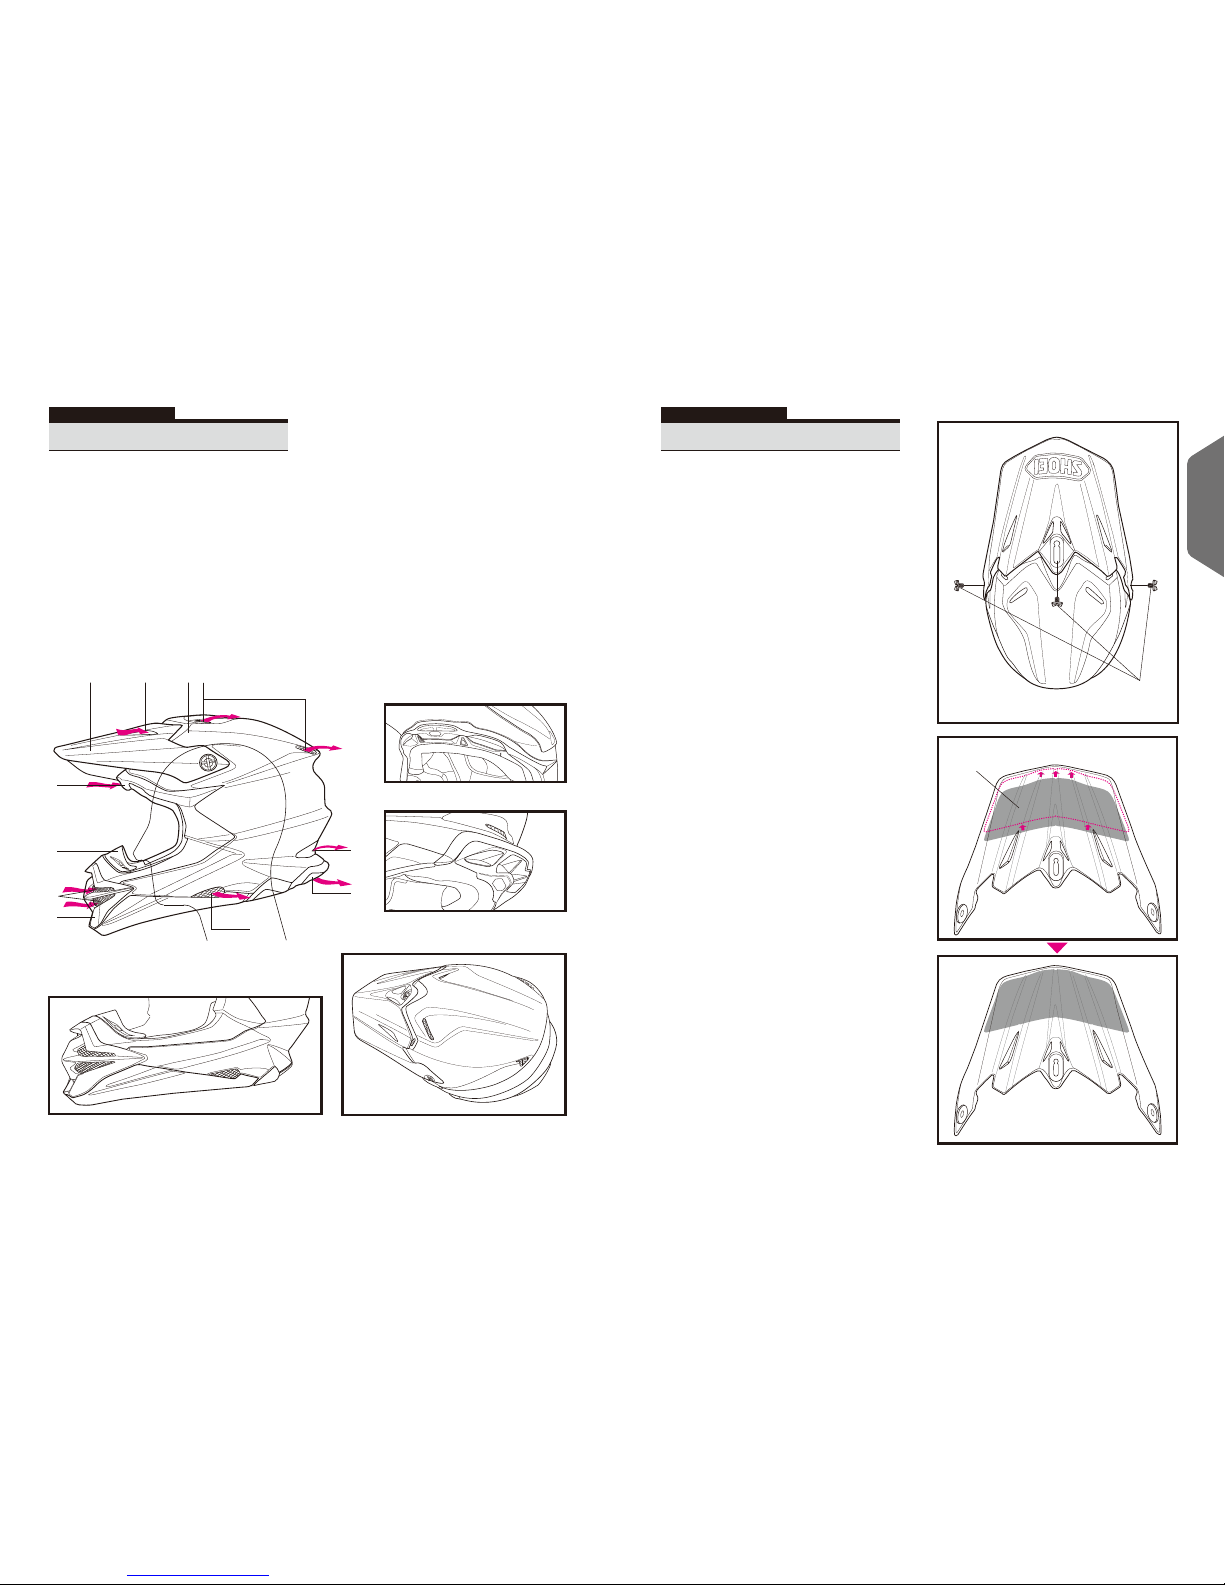
Installing the Visor/Peak
Parts Description
English
Upper Air Intak
e / Top Air Outlet
Visor/ Peak Screw
Anti-reflection Sticker
To install the visor/peak, use the enclosed
visor/peak screws. Tighten the center screw first,
and do right and left screws. The angle of the
visor/peak can be adjusted by loosening the
center screw. But when adjusting the angle lower
from the highest position, remove the center
screw, and after adjusting the angle, fix the center
screw. Make sure to secure your view when
adjusting the angle. Check all screws once more
to ensure they are securely snug. NEVER USE
ANY SCREW EXCEPT FOR ORIGINAL SHOEI
VISOR/PEAK SCREWS TO PREVENT DAMAGE
TO THE THREADED INSERTS.
The visor/peak could shatter under pressure or
due to an impact. Suitable goggles are
recommended for extra eye protection.
Affix the enclosed anti-reflection sticker on the
inner surface of the visor/peak to be positioned
symmetric reffering to the cut positions of the
sticker and the grooves of the visor/peak as per
Drawing.
*Anti-reflection sticker is not enclosed with black
plain colored model.
5
7
4
2
1
3
9
10
11
6
8
English
 Loading...