

Shimano PD-A530 Technical Service Instructions
Sockliner
Waterproof seal
1
2
R
1
2
15
R
R
R
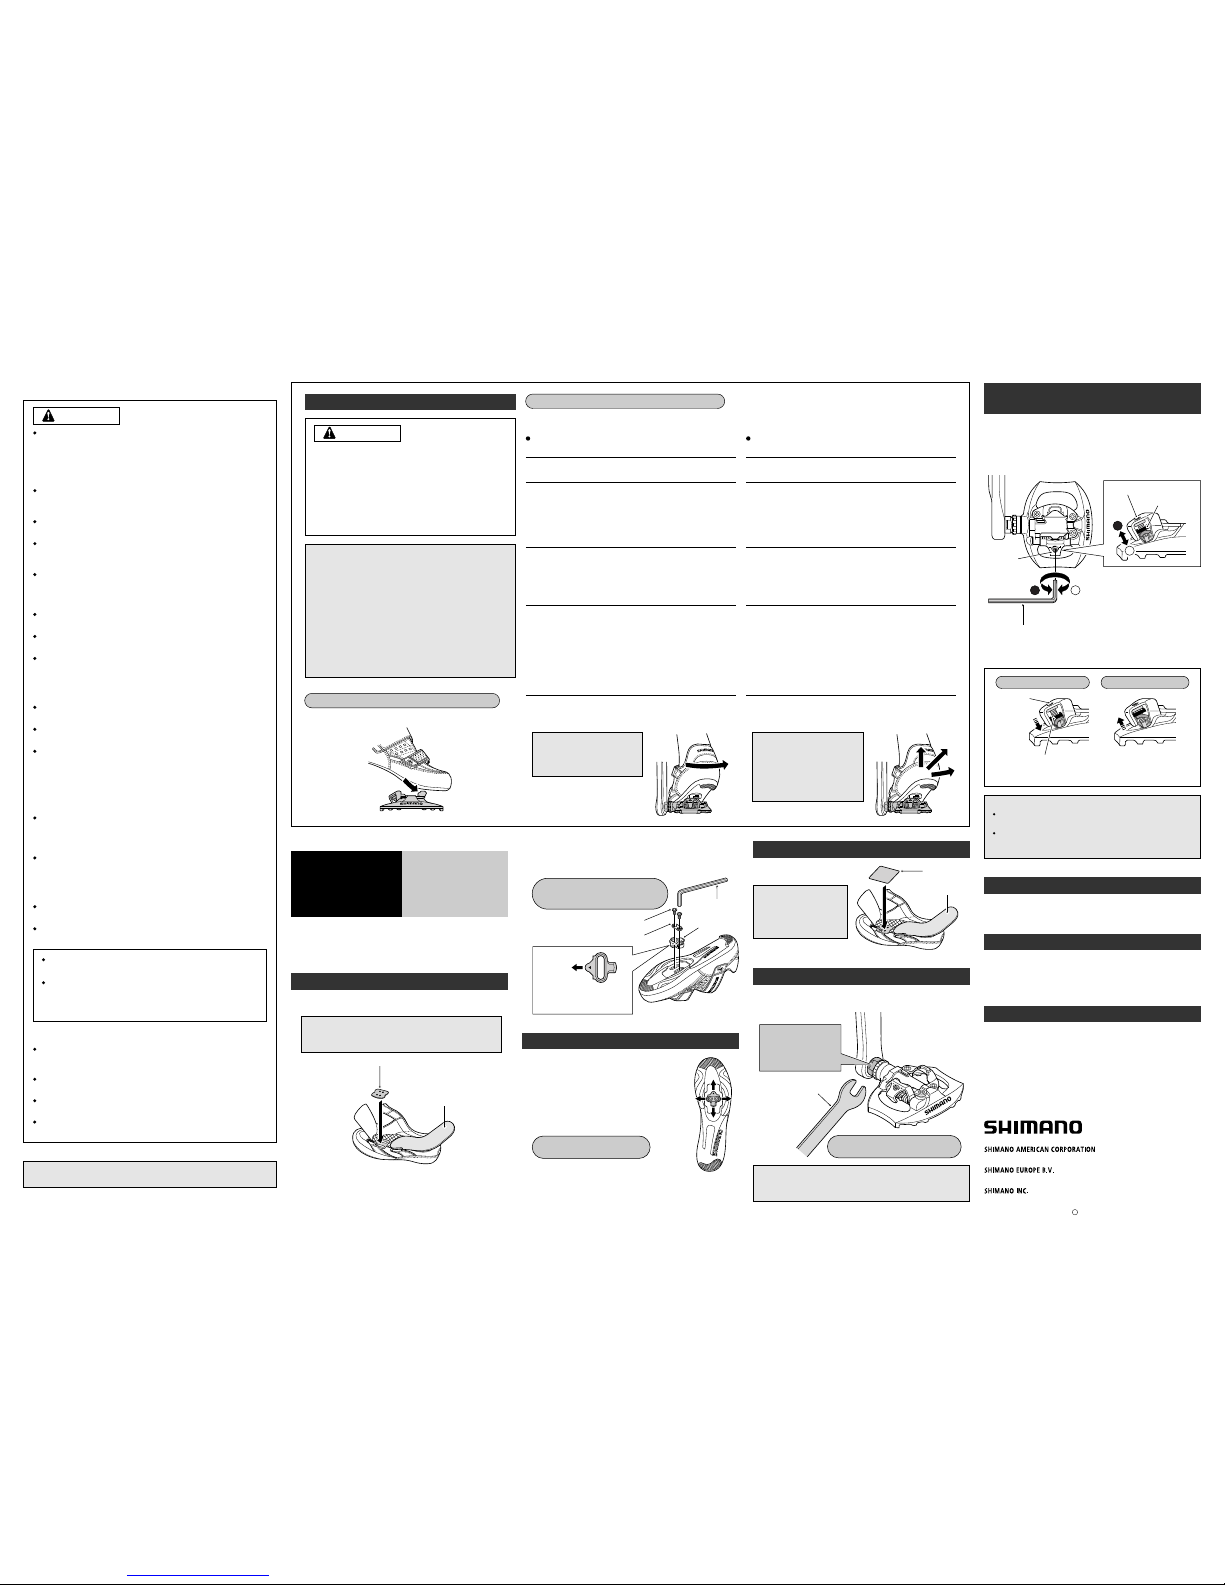
Weakest position
Decrease
Increase
Adjustment
bolt
Adjustment bolt
Adjustment plate
Tightening torque:
5 – 6 N·m {43 – 52 in. lbs.}
WARNING
– To avoid serious injuries:
WARNING
SM-SH51
SM-SH51
4 mm Allen key
Cleat mounting bolts
Cleat adapter
Cleat
Sockliner
Technical Service Instructions
NOTE:
BE SURE TO READ AND FOLLOW THE ABOVE
WARNINGS CAREFULLY.
If the warnings are not followed, your shoes may not
come out of the pedals when you intend or they may
come out unexpectedly or accidentally, and severe injury
may result.
Before riding the bicycle, check that there is no play or
looseness in the connection. Also, be sure to retighten the
crank arms and pedals at periodic intervals.
In addition, if pedaling performance does not feel normal,
check this once more.
Parts are not guaranteed against natural wear or deterioration
resulting from normal use.
For maximum performance we highly recommend Shimano
lubricants and maintenance products.
General Safety Information
SPD pedals are designed so that you release them only when
you intend to release. They are not designed to release
automatically at times such as when falling off the bicycle.
This is a safety measure to prevent you from losing balance
and falling off the bicycle as a result of your feet becoming
accidentally released from the pedals.
Use only SPD shoes with this product. Other types of shoes
may not release from the pedals, or may release
unexpectedly.
Use only Shimano cleats (SM-SH51/ SM-SH56) and tighten the
mounting bolts securely to the shoes.
Before attempting to ride with these pedals and shoes, make
sure you understand the operation of the engagement /
release mechanism for the pedals and cleats (shoes).
Before you attempt to ride with these pedals and shoes, apply
the brakes, then place one foot on the ground and practice
engaging and releasing each shoe from its pedal until you
can do so naturally and with minimal effort.
Ride on level ground first until you become adept at engaging
and releasing your shoes from the pedals.
Before riding, adjust the spring tension of the pedals to your
liking.
When riding at low speed or when there is a possibility that
you might need to stop riding, (for example, when doing a
U-turn, nearing an intersection, riding uphill or turning a blind
curve), release your shoes from the pedal beforehand so that
you can quickly put your feet onto the ground at any time.
Use a lighter spring tension for attaching the pedal cleats
when riding in adverse conditions.
Keep cleats and bindings clear of dirt and debris to ensure
engagement and release.
Remember to check the cleats periodically for wear. When the
cleats are worn, replace them. Always check the spring
tension after replacing the pedal cleats and before ridingIf.
If you do not maintain both your shoes and cleats in good
condition, release and engagement to the pedals could
become unpredictable or difficult, which could result in
severe injury.
Be sure to attach reflectors to the bicycle when riding at
night. Do not continue riding the bicycle if the reflectors are
dirty or damaged, otherwise it becomes more difficult for
oncoming vehicles to see you.
Obtain and read the service instructions carefully prior to
installing the parts. Loose, worn, or damaged parts may
cause serious injury to the rider.
We strongly recommend only using genuine Shimano
replacement parts.
If you have any questions concerning your pedals, contact a
professional dealer.
Read these Technical Service Instructions carefully, and keep
them in a safe place for later reference.
Apr. 2009 by Shimano Inc. PIT. IZM. Printed in Malaysia
C
These service instructions are printed on recycled paper.
Please note: Specifications are subject to change for improvement without notice.
(English)
Engaging the cleats with the pedals
Releasing the cleats from the pedals
The waterproof seal is
supplied with Shimano
shoes which require this
step to be carried out.
Note:
Attaching the cleats
Remove the sockliner and position a cleat nut over the oval
holes.
Waterproof seal
Remove the sockliner and attach
the waterproof seal.
Adjusting the cleat position
The cleat has an adjustment range of 20 mm front
to back and 5 mm right to left.
After provisionally tightening the cleat, practice
engaging and releasing, one shoe at a time.
Readjust to determine the best cleat position.
After you have determined the best cleat position,
firmly tighten the cleat mounting bolts with a 4 mm
Allen key.
From the bottom of the shoe, position a cleat and then a cleat
adapter over the cleat holes. The cleats are compatible with both
left and right pedals. Provisionally tighten the cleat mounting
bolts.
Press the cleats into the pedals with a forward and downward
motion.
Do not use the pedals and cleats in any way other
than as described in these Service Instructions. The
cleats are designed to engage and release from the
pedals when the cleats and pedals are facing
forward.
See below for instructions on how to install the
cleats.
FAILURE TO FOLLOW THESE INSTRUCTIONS MAY
RESULT IN SERIOUS PERSONAL INJURY.
Single release mode cleats (SM-SH51) and multiple
release mode cleats (SM-SH56) are available for use
with these pedals.
Each type of cleat has its own distinctive features,
so be sure to read the Service Instructions carefully
and select whichever type of cleat best suits your
riding style and the terrain and riding conditions
which you will encounter.
Other types of cleats such as single release mode
cleats (SM-SH52) and multiple release mode cleats
(SM-SH55) cannot be used, as they do not provide
stable enough step-out performance or sufficient
holding force.
The method of release varies according to the type of cleats you are using.
(Check the model number and color of your cleats to determine the proper method of release.)
In multiple release mode, it is
necessary to practice
releasing until you become
accustomed to the technique.
Releasing by lifting your heel
requires particular practice.
Note:
It is necessary to practice
releasing until you become
accustomed to the technique.
Note:
Release the cleats from the pedals by twisting
your heels outward.
Release the cleats from the pedals by twisting
your heels in any direction.
The cleats can be released by twisting in any direction.
Because the cleats can also be released by lifting your heel, they
may become accidentally released when applying upward force
on the pedals.
These cleats should not be used for riding style which may involve
pulling up on the pedals or for activities, such as jumping, in which
pulling forces are applied to the pedals causing possible release
from the pedals.
Although the cleats can be released by twisting your heels in any
direction or by lifting, they will not necessarily release if you lose
your balance.
Accordingly, for places and conditions where it looks as though
you may lose balance, make sure that you have sufficient time to
release the cleats beforehand.
If the cleats release by accident, you may fall off the bicycle and
serious injury may result.
If the features of multiple release mode cleats are not sufficiently
understood and if they are not used correctly, then they may
release accidentally with a greater frequency than for single
release mode cleats.
You can help to prevent this by adjusting the amount of force
required to release the cleats in any direction, and you should
practice until you are accustomed to the amount of force and the
angle required to release.
You are able to apply upward force to the pedal, since they will
not release unless the foot is twisted outward.
The cleats will not necessarily release if you lose your balance.
Accordingly, for places and conditions where it looks as though
you may lose balance, make sure that you have sufficient time to
release the cleats beforehand.
When you are pedaling vigorously, your heel may inadvertently
twist outward and this may cause the cleat to release accidentally.
If the cleat releases by accident, you may fall off the bicycle and
serious injury may result.
You can help to prevent this by adjusting the amount of force
required to release the cleats, and you should practice until you
are accustomed to the amount of force and the angle required to
release the cleats.
These cleats only release when the heel is twisted outward.
They will not release if the heel is twisted in any other direction.
SM-SH51 (black)
Single release mode cleats:
SM-SH56 (silver, gold/ Optional accessory)
Multiple release mode cleats:
Single release mode Multiple release mode
Cleat nut
15 mm spanner
Mounting the pedals on the crank arms
Use a 15 mm spanner to mount the pedals on the crank arms. The
right pedal has a right-hand thread; the left pedal has a left-hand
thread.
Pay attention to
the mark
R: right pedal
L: left pedal
The spring force is adjusted by means of adjustment bolts. The
adjustment bolts are located behind each of the bindings, and there
is one adjustment bolt on each pedal. Equalize the spring tensions
by referring to the position of the adjustment plates and by counting
the number of turns of the adjustment bolts. The spring tension can
be adjusted in four steps for each turn of the adjustment bolt.
When the adjustment bolt is turned clockwise, the spring tension
increases, and when it is turned counterclockwise, the spring
tension decreases.
This step may not be necessary depending on the type of
shoes.
Note:
Adjusting the spring tension of the
binding
Cleat types and using the pedals
Note:
In order to prevent accidental release from occurring, make
sure all the spring tensions are properly adjusted.
The spring tensions should be adjusted equally for both right
and left pedals. If they are not adjusted equally, it can cause
the rider difficulty to engage or release from the pedals.
Position the triangular
portion of the cleat toward
the front of the shoe.
Front
SM-SH51
Cleat replacement
Cleats wear out over time and should be replaced periodically.
Cleats should be replaced when it becomes difficult to release, or it
starts to release with much less effort than the when it was in new
condition.
Mounting the reflectors (optional)
An optional reflector set (SM-PD61) is available. Please contact a
professional dealer for details.
Maintenance of the axle units
If you experience any trouble with the rotating parts of the pedal, the
pedal may require adjustment. Obtain advice from a professional
dealer.
Provisional tightening torque
for cleat mounting bolts:
2.5 N·m {22 in. lbs.}
Tightening torque:
35 – 55 N·m {304 – 477 in. lbs.}
Strongest position
Adjustment
bolt
Adjustment plate
If the adjustment plate is at the strongest or the weakest
position, do not turn the adjustment bolt any further.
1.
2.
1.
2.
One Holland, Irvine, California 92618, U.S.A. Phone: +1-949-951-5003
Industrieweg 24, 8071 CT Nunspeet, The Netherlands Phone: +31-341-272222
3-77 Oimatsu-cho, Sakai-ku, Sakai, Osaka 590-8577, Japan
3 mm Allen key
SI-45R0A-002
These pedals have an SPD-type face on one side and a standard
face on the other side.
A 6 mm Allen key cannot provide a sufficient tightening torque.
Always be sure to use a 15 mm spanner.
Note:
PD-A530
SPD Pedals
 Loading...