

Shimano DH-3D71 - TECHNICAL, DH-S500 - TECHNICAL, DH-S500, DH-3D71 Service Instructions Manual
Page 1
DH-S500
DH-3D71
SI-2ZS0C
CLOSE
OPEN
Hub Dynamo
Front fork
Mudguard stay
Quick release lever
Quick release lever
Connection
terminal
Connection terminal
Rotor
Rotor installation ring
Mudguard stay
Front fork
TL-LR15
Installation of the rotor
General Safety Information
Obtain and read the service instructions carefully prior to installing the parts. Loose,
worn, or damaged parts may cause serious injury to the rider.
We strongly recommend only using genuine Shimano replacement parts.
Check that the wheels are fastened securely before riding the bicycle. If the wheels
are loose in any way, they may come off the bicycle and serious injury may result.
Check that the lamp illuminates normally when riding at nighttime.
Read these Technical Service Instructions carefully, and keep them in a safe place
for later reference.
The hub dynamo generates an extremely high voltage. Never touch the connection
terminal of the hub dynamo directly while riding the bicycle or while the wheel is
spinning. Touching the dynamo terminal may cause an electric shock.
Be sure to read these Service Instructions together with the Service Instructions for the
disc brake system.
According to German regulations (StVZO), a hub dynamo in Germany requires
overvoltage protection. This hub dynamo does not have overvoltage protection inside
the hub itself. Use an external overvoltage protector with a symbol to show that it
complies with the German regulations (Shimano SM-DH10 overvoltage protector or
similar product).
Check the degree of parallel of the front fork end. If the front fork end is severely out of
parallel, deformation of the hub axle may cause noise from an obstruction inside the
hub dynamo to be generated.
Install the hub dynamo to the front fork so that the side with the connection terminal is
on the right when facing toward the front of the bicycle. If the side with the connection
terminal is facing toward the left, the hub dynamo may not turn properly while riding.
Check that the hub dynamo connection terminal is securely connected before using the
hub dynamo.
Compatible bulbs
If the bulb of either the front lamp or taillamp blows, excessive voltage will be applied to
the remaining lamp and shorten the operating life of the bulb, so any blown bulbs
should be replaced as soon as possible.
Lamps with electrical circuits such as automatic lamps may become damaged if the
bicycle is ridden at high speeds.
If the lamp is frequently turned on when riding at high speed ranges, it will shorten the
operating life of the bulbs.
Do not disassemble the internal hub mechanism.
Do not apply any lubricant to the inside of the hub, otherwise the grease will come out
and it may cause problems with conductivity.
The hub dynamo will cause the turning of the wheel to become slightly heavier
because of the magnet inside the hub.
Parts are not guaranteed against natural wear or deterioration resulting from normal
use.
WARNING
– To avoid serious injuries:
CAUTION
NOTE:
Front lamp Taillamp
6.0 V/ 2.4 W 6.0 V/ 0.6 W
6.0 V/ 3.0 W
Technical Service Instructions
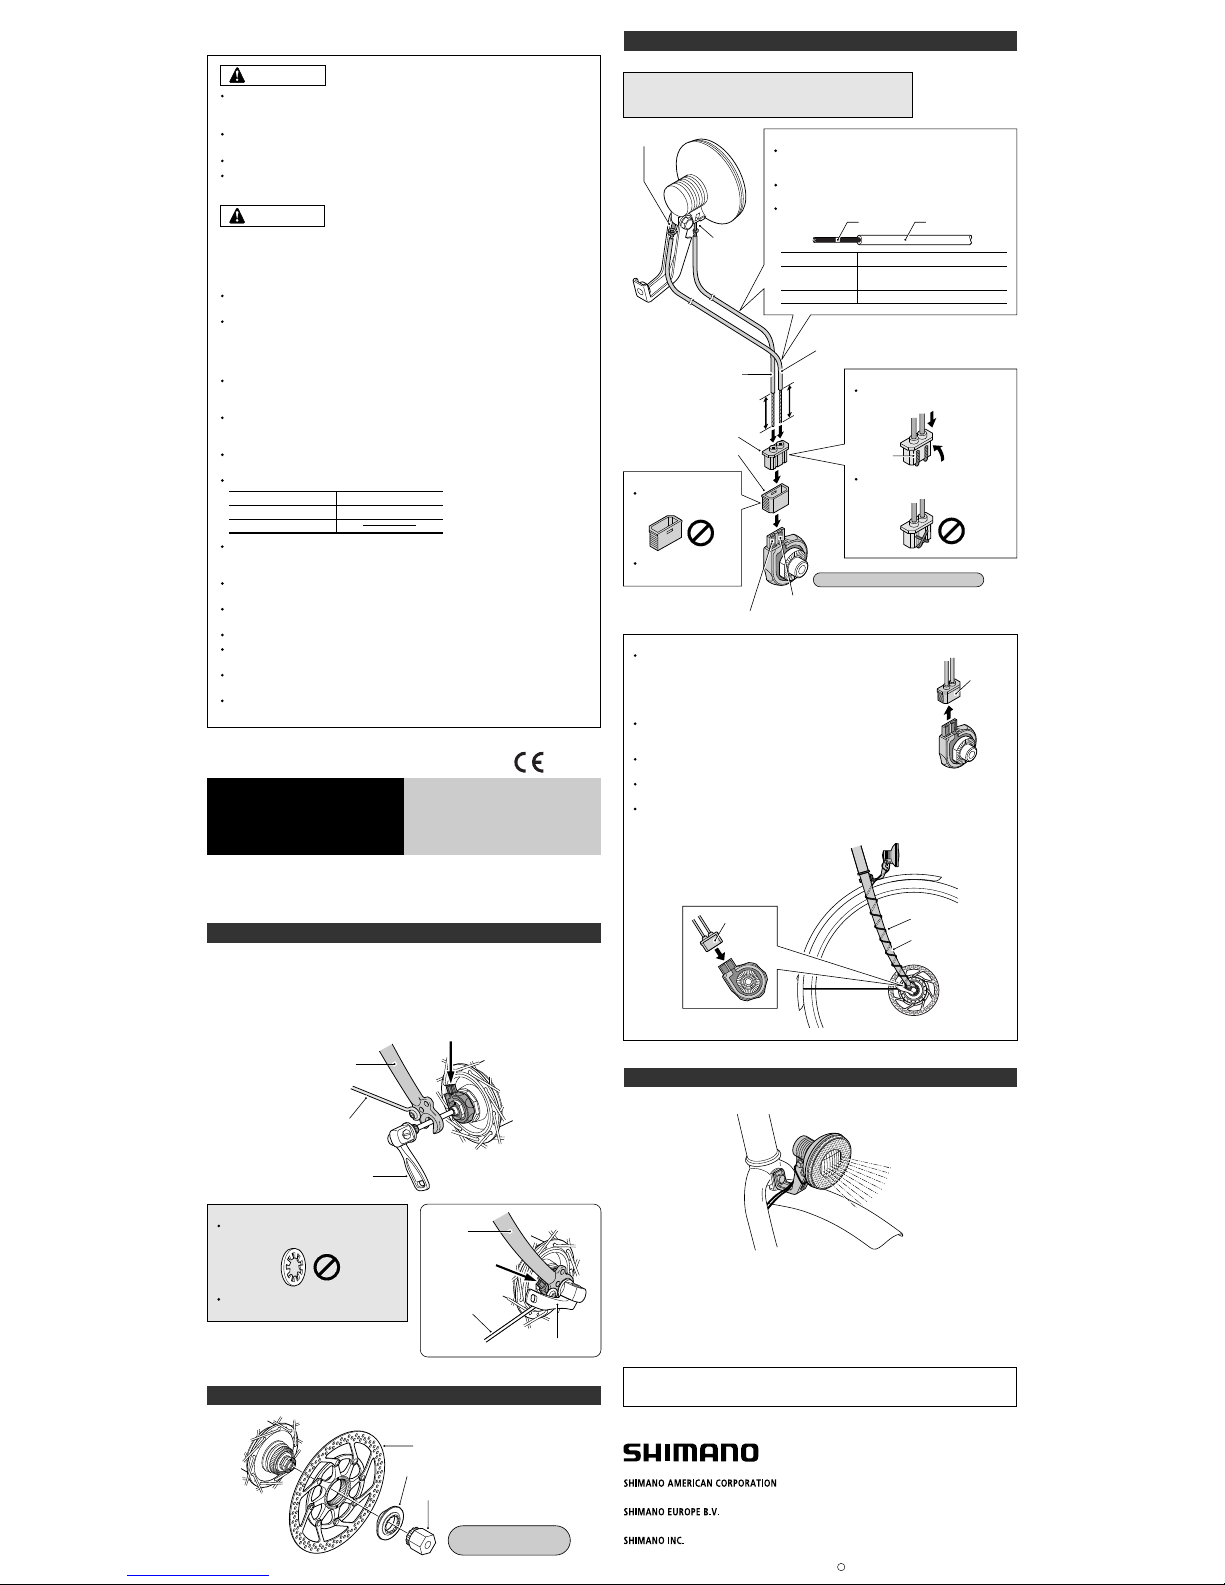
Install the wheel so that the side with the hub dynamo connection terminal is on the
right side when looking toward the front of the bicycle, and so that the hub
connection terminal is aligned with the front fork or with the basket stay.
Then install by following the procedure shown in the illustration below so that the
connection terminal is facing upward. Do not force the connection terminal to turn
after the quick release lever has been secured.
Installation of the front wheel
The toothed axle washer is not necessary
for a quick release type.
Connect the two wires to ensure that the
current flows smoothly.
Note:
Tightening torque:
40 N·m {347 in. lbs.}
Rotate the front wheel and check that the lamp illuminates.
Note:
Scrape away the paint from the lamp's frame connection terminal
and the lamp connection terminal when connecting the cables.
Approx. 16 mm
Approx.
16 mm
Lamp connection
terminal
Wire
Lamp connection terminal
Lamp cable
Connector cap (gray)
Connector cover (black)
Frame connection
terminal
Frame connection terminal
Frame cable
Groove
Bend
Insert
Connect
Remove
Connector cover
Connector
cover
Cable
Front fork
Do not switch over the frame cable and the lamp cable
by mistake. If the cables are connected incorrectly, the
lamp will not illuminate.
Twist the cable wires before connecting them so that
they stay together.
Recommended wire specifications
Note:
Bend the cable wires and run them
along the grooves.
Type
Stranded
Diameter 1.8 – 2 mm
Size (AWG) 22
Diameter approx. 0.8 mm
Wire
Insulation
Note:
Set so that it faces the
right way.
Note:
Secure the cable to the front fork or the basket stay so that it will not
get caught in the spokes or any other parts while riding. If the
position of the hub dynamo may change with respect to the lamp
while riding, for example when using a suspension fork, make sure
that the cable is connected so that it will not be too loose or too tight
at any point within the range of movement.
Connect so that the current from the hub dynamo flows through the
cable from the lamp connection terminal of the hub dynamo to the
frame connection terminal.
To disconnect the lamp from the hub dynamo, remove the connector
cover.
Do not ride the bicycle while the connector cover is removed, otherwise the cable might
get caught in the bicycle wheel.
When removing the bicycle wheel, first remove the connector cover. If the cables are
pulled strongly, it may break the cable wires or cause poor contacts. Furthermore, when
installing the wheel, first secure the wheel to the front forks and then connect the
connector cover.
Note:
Press in until you hear
a click.
Do not allow the cable wires to
touch each other.
Connect the cables as shown in the illustration below.
Connection of the cables
Hub dynamo connection terminal
Insulation
Checking the lamp illumination
These service instructions explain how to use and maintain the Shimano bicycle parts which have
been used on your new bicycle. For any questions regarding your bicycle or other matters which are
not related to Shimano parts‚ please contact the place of purchase or the bicycle manufacturer.
Jul. 2006 by Shimano Inc. PIT. SZK. Printed in Singapore
C
Please note: Specifications are subject to change for improvement without notice. (English)
One Holland, Irvine, California 92618, U.S.A. Phone: +1-949-951-5003
Industrieweg 24, 8071 CT Nunspeet, The Netherlands Phone: +31-341-272222
3-77 Oimatsu-cho, Sakai-ku, Sakai, Osaka 590-8577, Japan
 Loading...