

Page 1

Thank you for purchasing a Shimano DENDOUMARU 1000 PLAYS / 4000 PLAYS.
Before using this reel, please make sure you read the manual thoroughly and keep it in a safe place for future reference.
Safety Precautions ................................................................................................................2
Features ...............................................................................................................................8
Digital Display Component Names .....................................................................................10
Part Names .........................................................................................................................11
Menu Button Operation .....................................................................................................12
Power Supply | Cord ..........................................................................................................14
Learning Methods ..............................................................................................................16
Learning Methods (Flow Diagram) ....................................................................................18
Learning Methods 1. PE Line (Line with markings every meter.) ........................................20
Learning Methods 2. Nylon Line (Line with no markers.) ...................................................22
Learning Methods 3. Backing Line .....................................................................................24
What to do after completing Learning ...............................................................................28
Various Techniques ............................................................................................................. 30
Zero Setting .......................................................................................................................32
Adjusting Smart Line Depth ...............................................................................................34
A-RB (Antirust Bearings) ....................................................................................................35
Automatic Gunwale Stop ................................................................................................... 36
Alarm (Gunwale) ................................................................................................................ 37
Programming Target Depth and Bottom Depth ..................................................................38
Finding the Target Depth ....................................................................................................40
Top-Down Mode Example ..................................................................................................41
Bottom-Up Mode Example .................................................................................................42
Winding In: Rakuraku Mode | Fixed Speed Mode ..............................................................43
Jigging Mode .....................................................................................................................45
Handing Instructions ..........................................................................................................47
Specifications ..................................................................................................................... 50
Troubleshooting .................................................................................................................52
Product Inquiries /After Sales Service Information ..............................................................54
Service network ..................................................................................................................55
INSTRUCTION MANUAL
Page 2
2
Caution:
High Temperature
Warning
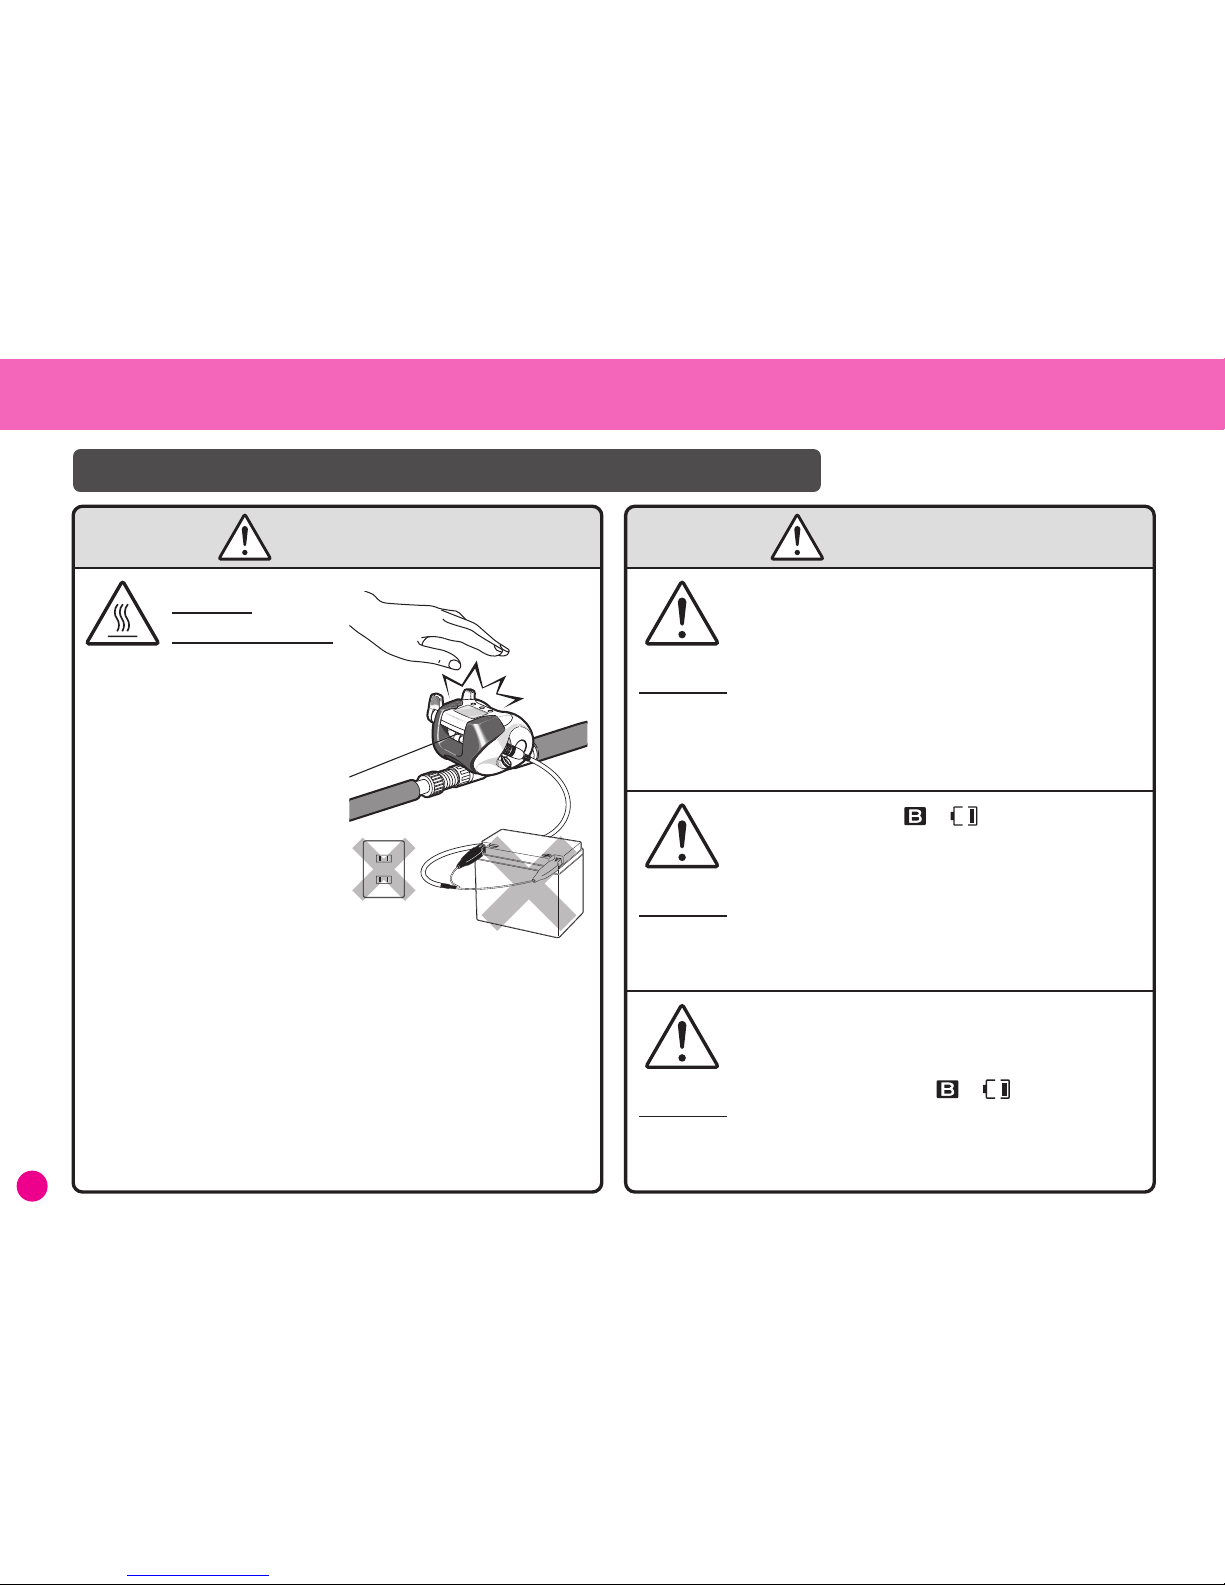
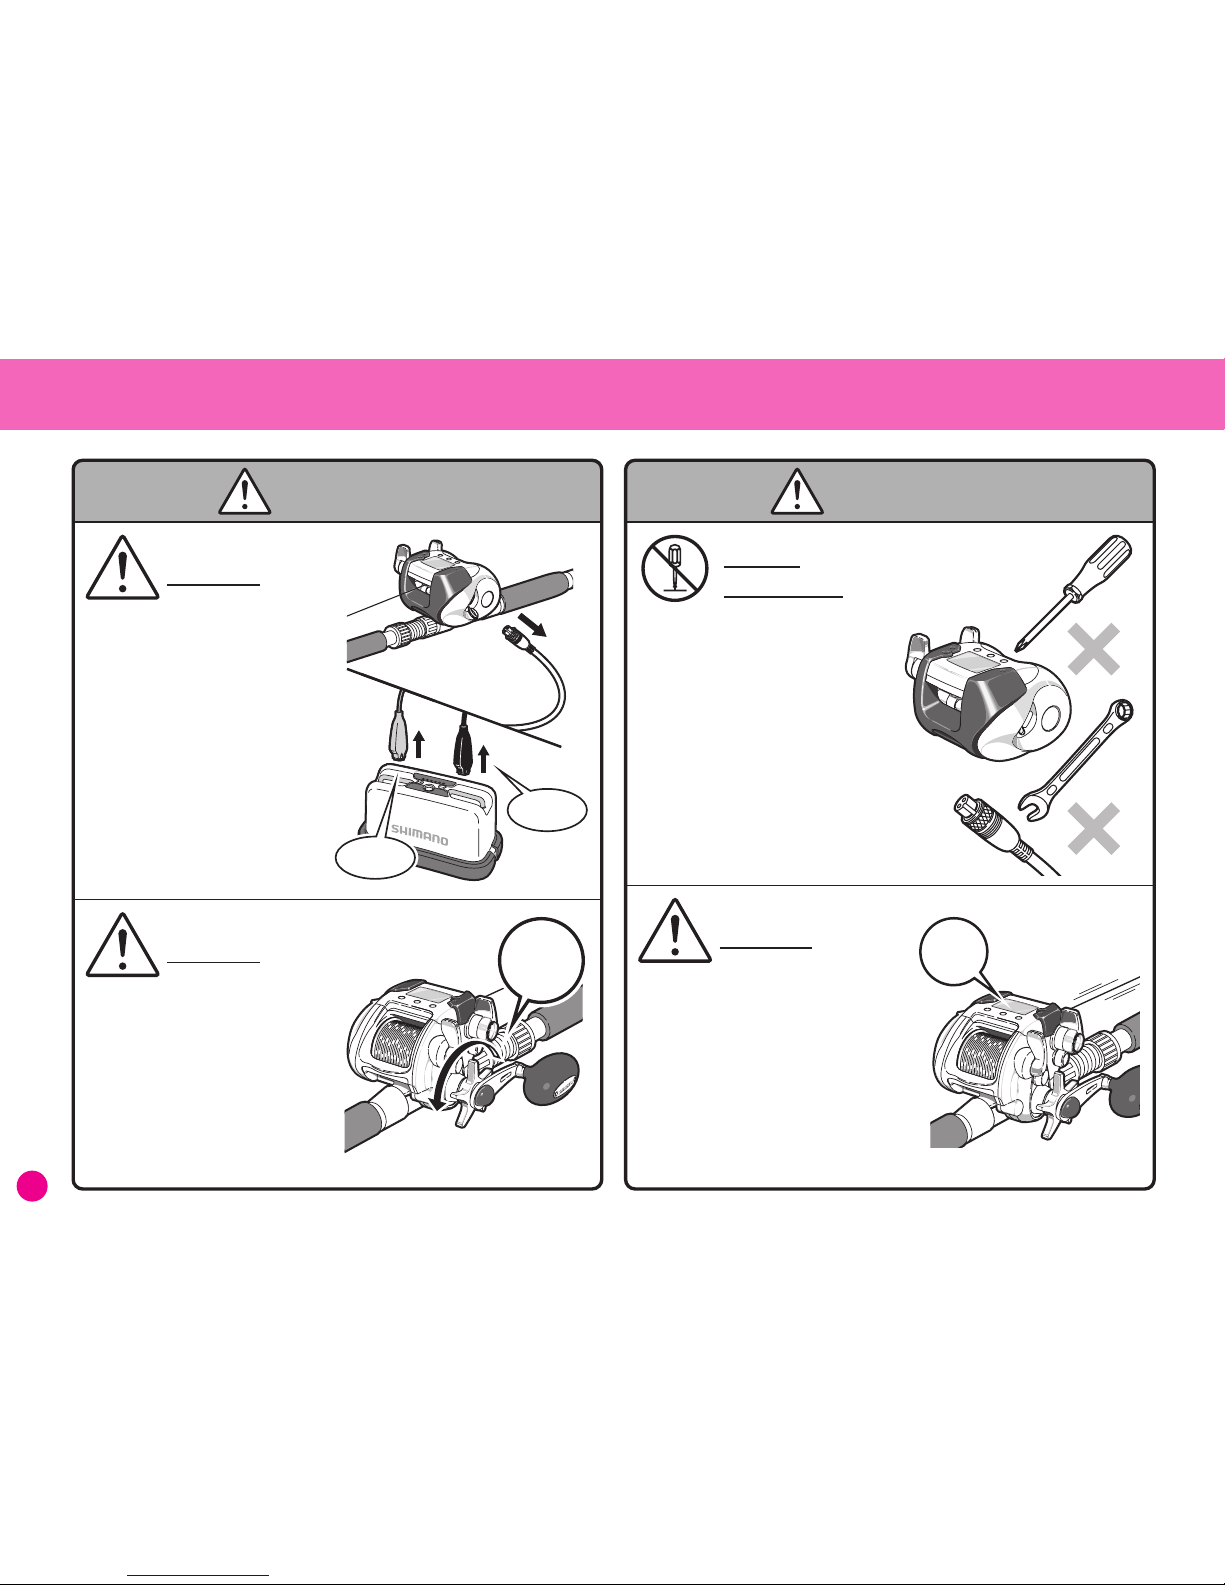
• Use only the specified voltage
(DC12~14.8V) from a battery
or the vessel’s onboard power
supply.
Using voltages other than
those specified may cause the
reel to heat up, damage
electrical components or burn
your hand.
• NEVER connect the reel to a
household power supply or a
battery charger.
Doing so may damage the
circuit boards and cause fire
and smoke.
• Stop using the reel
IMMEDIATELY if the power
supply connector or alligator
clips become abnormally hot.
AC100V
• If the circuit breaker in the reel is tripped repeatedly,
it is possible that the specifications of the reel are
not appropriate for the load from that particular
species of fish or rig.
If you continue to use the reel in such a situation,
the motor or display may overheat and be damaged.
Should that occur, please change to a higher
specification reel.
• Please do NOT use the reel with a vessel’s power
supply or a battery that does not provide the proper
voltage.
When the battery mark ( ---- or ----- ) lights up and
starts flashing, winding in under heavy load (high
current) may damage the electronic components in
the display and cause the lens to pop out.
• If the battery mark ( ---- or ----- ) lights up and starts
flashing, this means that battery voltage is dropping,
which will lead to a decrease in performance. It also
means that excessive load is being placed on the
motor and display, which may cause the reel to
malfunction. Stop using the reel immediately and
connect to a fully charged battery.
Please read these safety precautions before using the reel.
High Voltage
Warning
Warning
Warning
Warning
Safety Precautions
Page 3
3
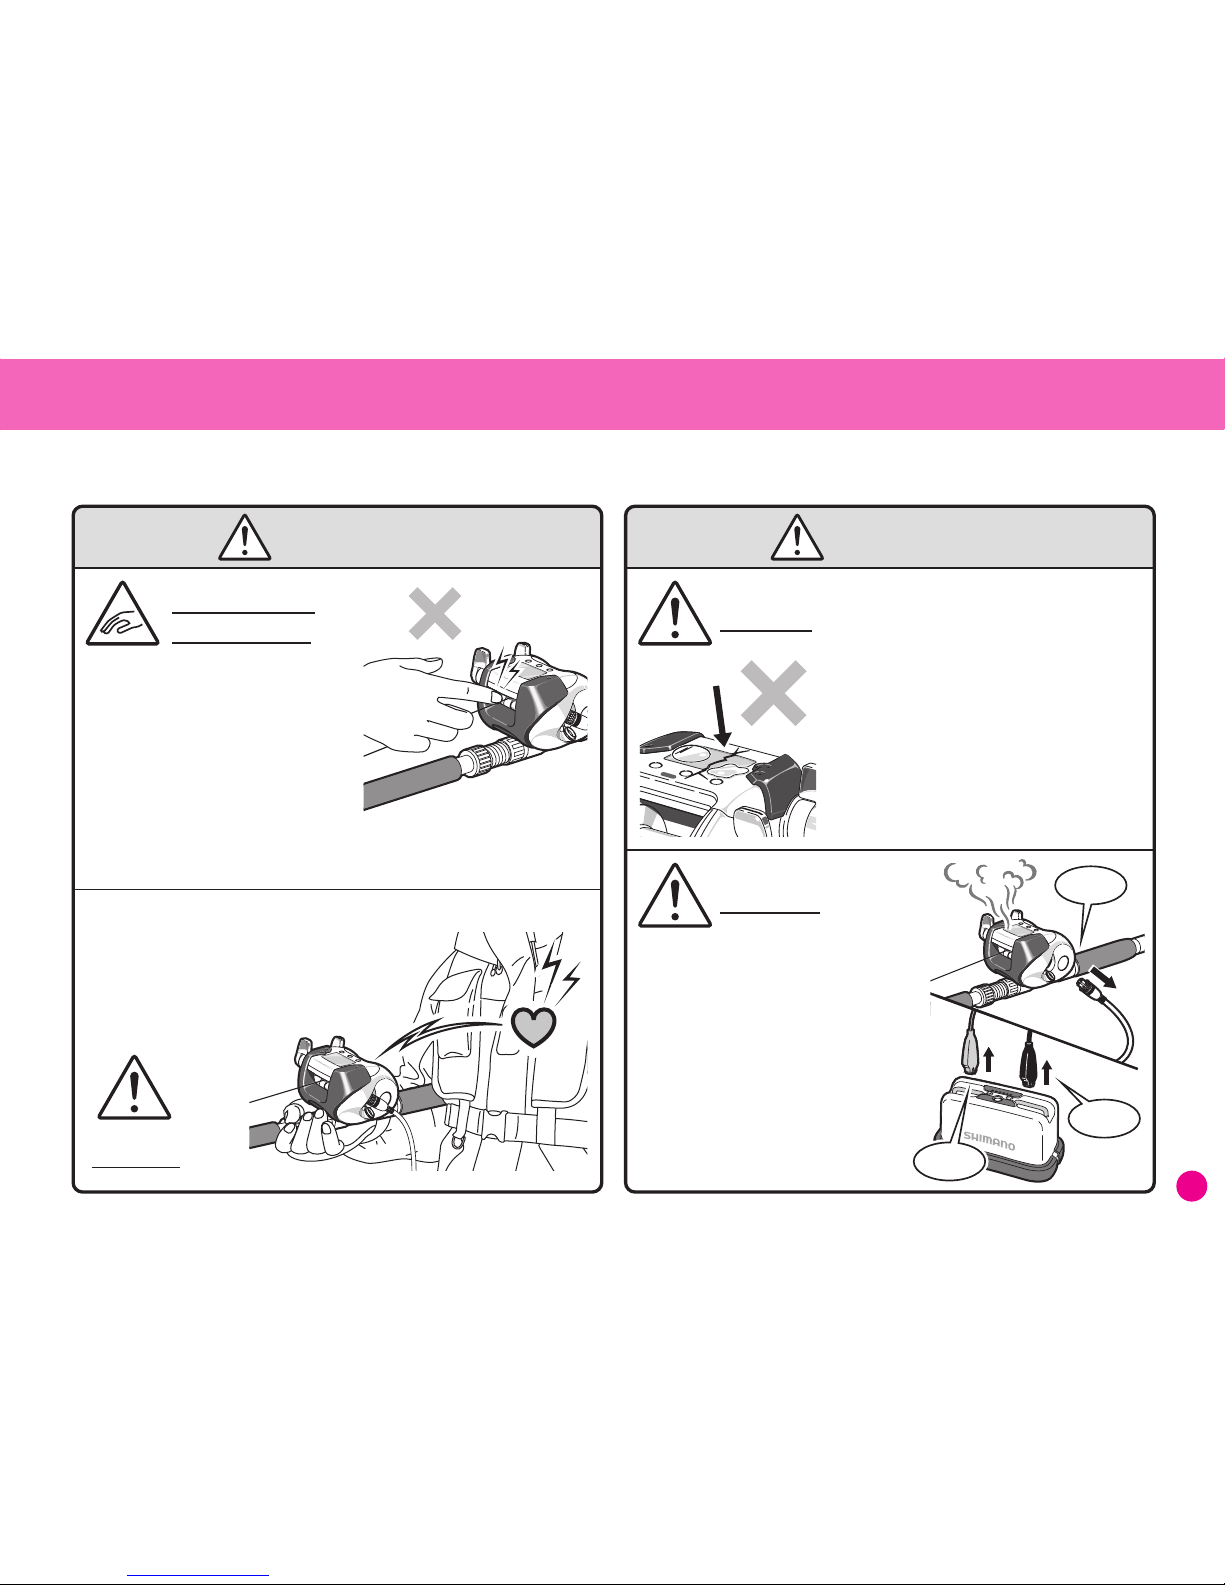
• A very weak electrical signal is produced
when using the reel. This may cause
medical equipment such as hearing aids
and pacemakers to malfunction,
causing the user to have palpitations or
become dizzy.
• Immediately remove the power cable if you
see moisture or water droplets on the inside
of the display. If you continue to use the
reel in such a situation it may malfunction,
break the tip of the rod and cause injury.
• Stop using the reel if you see a crack
develop in the display or the case. If water
penetrates into the case it can cause
shorting to occur, which can damage the
electronics and make it impossible to
control the motor.
• Stop using the reel IMMEDIATELY if a
burning smell or smoke is emitted
from the reel or the display, or if the
reel becomes abnormally hot. If you
continue to use the reel in this
situation then the reel may catch fire.
• Disconnect the power connector or
the alligator clips from the battery
immediately if the motor cannot be
stopped.
• Do NOT put your finger near the
level winding position when fishing
as it may get caught and cause
injury. If your finger does become
caught, turn off the power switch
on the reel immediately and
disassemble the reel.
• Do NOT put your finger in between the handle and the body as it may
get caught and cause injury.
Don’t get your
finger caught!
Warning Warning
Warning
Warning
Warning
Remove
Remove
Remove
Page 4
4
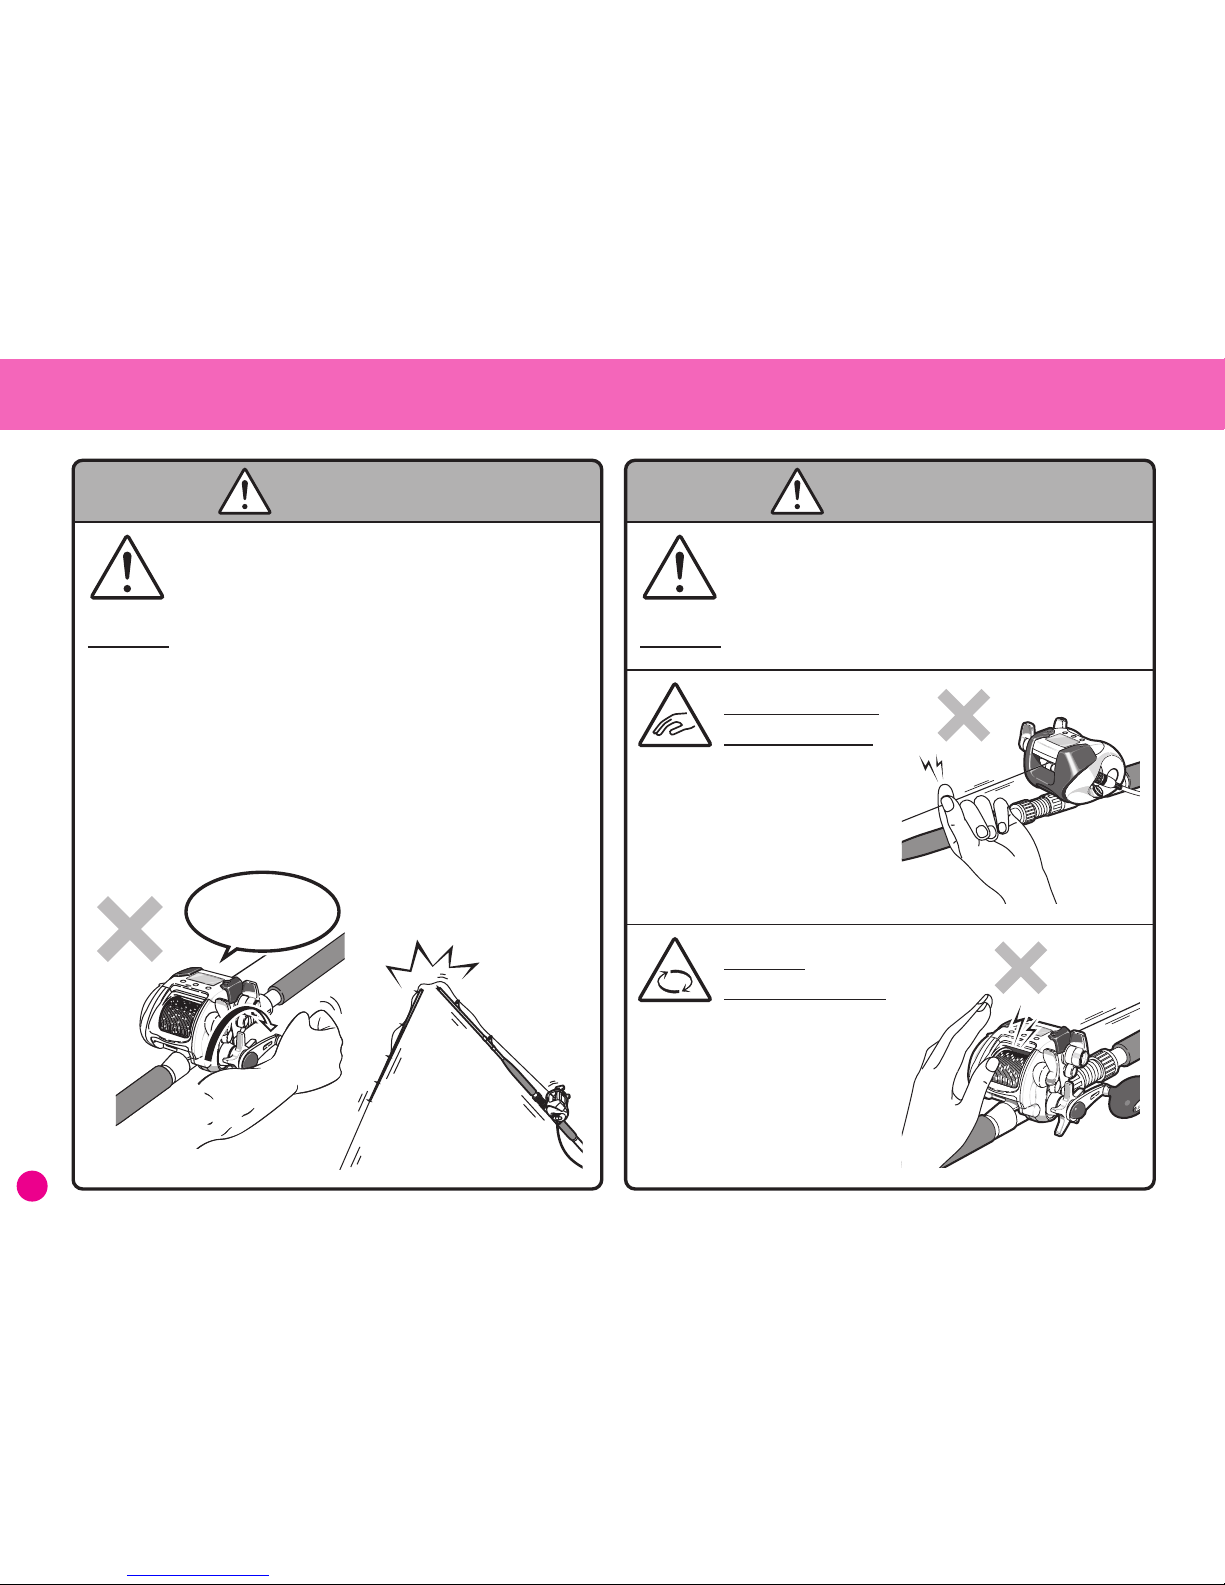
• Do NOT touch the rotating
spool as this can cause injury.
• Do NOT touch the rotating
spool as this can cause injury.
• If the surface of the coating on the reel comes off or
if the surface of the material comes off due to a
strong impact leaving a sharp edge, do NOT touch
that area as it may cause injury.
Caution
Caution:
Rotating Objects
• Do NOT touch the line when it
is being fed out or wound in as
the line can cut or even cut off
your finger.
Do not get your
fingers caught!
CautionCaution
• When using the reel, if the display goes off, do not
wind the line in manually using the handle as this
will mean there will be a difference between the
actual line length and the counter. If you do wind
the line in manually using the handle, after the
display comes back on and you start winding the
line in again using the motor the gunwale stop
position will be incorrect, which can cause the rig to
be wound in too much and even snap off the end of
the rod.
Therefore, it is important to investigate why the
display has gone off and fix the problem and to only
wind in the line after the display comes back on.
The display has
gone off.
Caution
Page 5
5
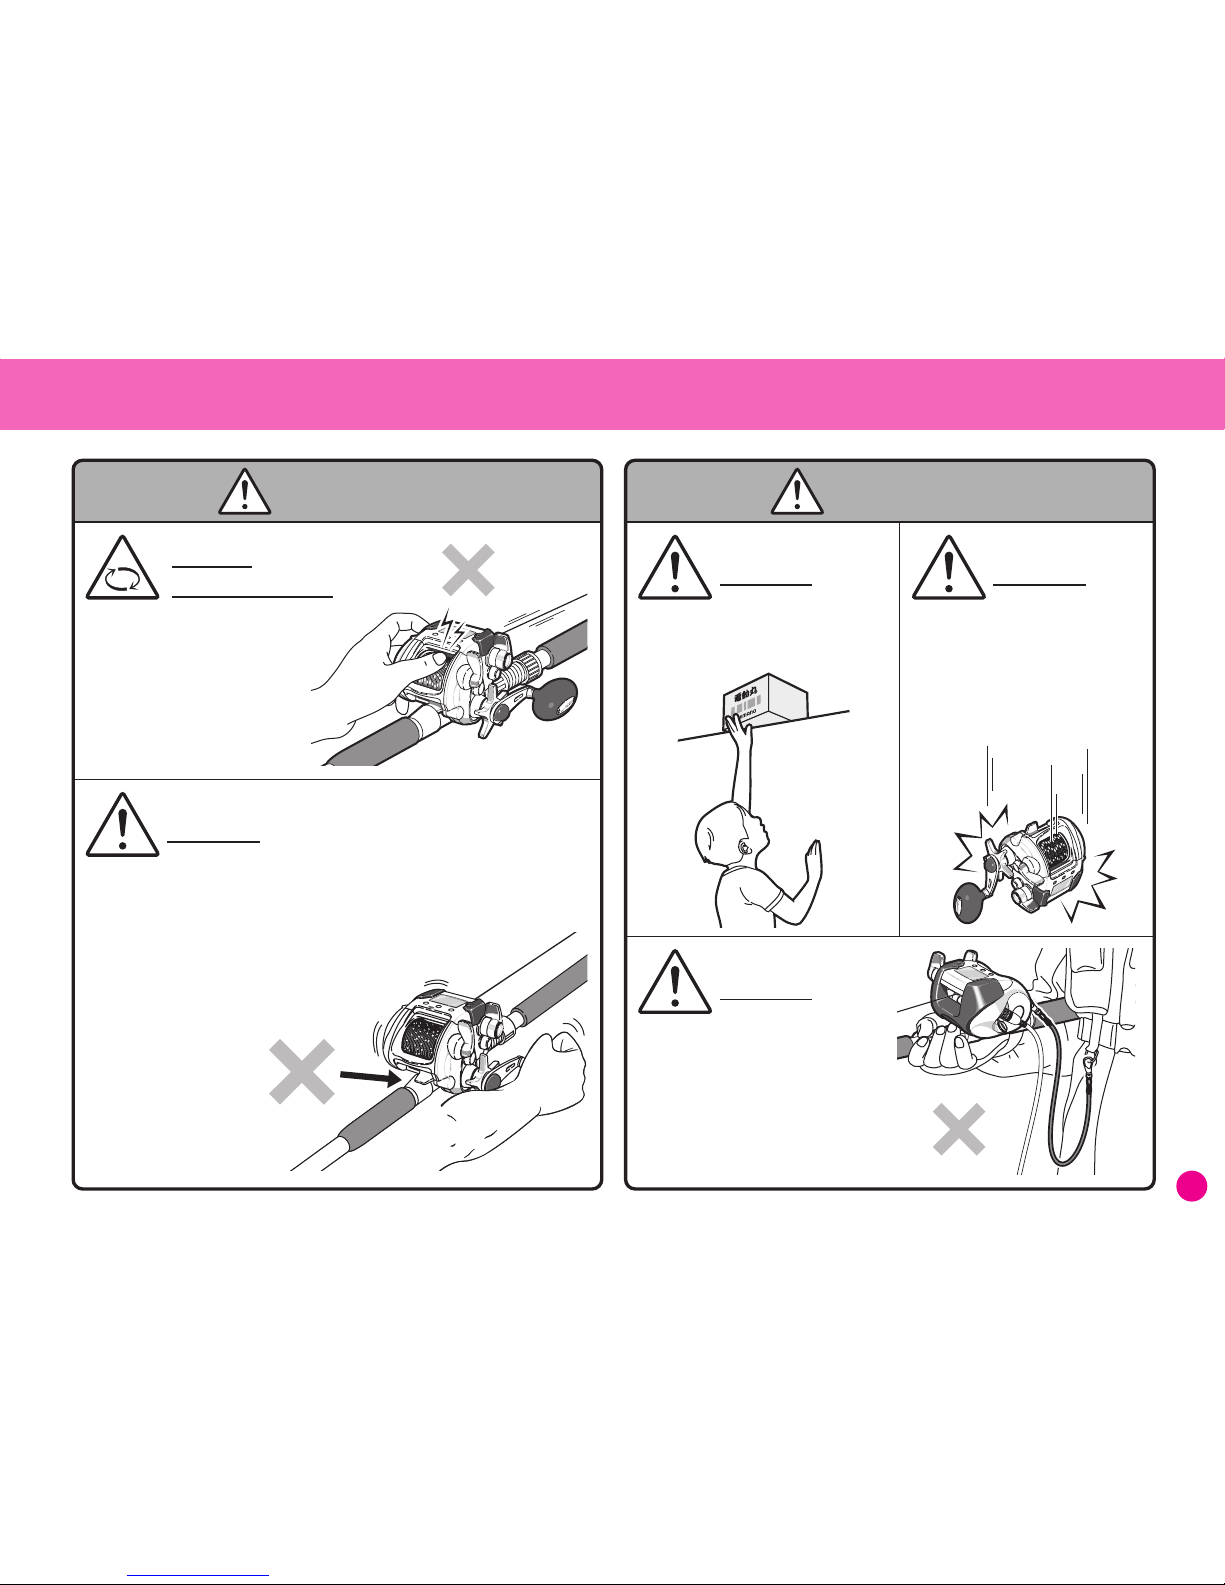
• Please store and use the reel
out of the reach of children.
Caution
• Do NOT wrap the cable
around your body as
depending on how the fish is
pulled in it may cause you to
be thrown into the sea.
Caution
• The reel may malfunction if
it is dropped and the display
damaged due to the impact.
Please take care to avoid
any such impacts.
Caution
• Please secure the reel securely to the rod.
Do NOT use the reel if it is
cross-threaded or not properly secured
as it may come off during fishing and
cause injury.
• Please secure the reel securely to the rod.
Do NOT use the reel if it is
cross-threaded or not properly secured
as it may come off during fishing and
cause injury.
• Do NOT put your finger
near rotating parts such
as the spool as this can
cut or even cut off your
finger.
Caution Caution
Caution:
Rotating Objects
Caution
Page 6
6
• The gunwale stop position may
change according to factors such
as retrieval tension. If the gunwale
stop position changes, please reset
the counter to zero again.
This is just in case the gunwale
stop position changes, which can
break the tip of the rod.
Caution
Reset
• Always decrease drag before
connecting the power supply.
There is the possibility that
the rod may be damaged if
the motor malfunctions,
cannot be stopped and
retrieves the rig.
Caution
Loosen
• ALWAYS remove the cable
from the battery when
carrying out maintenance on
the reel when it is in use as
the spool may move at any
time causing injury to the
user or damage to the reel.
• ALWAYS remove the cable
from the battery when
carrying out maintenance on
the reel when it is in use as
the spool may move at any
time causing injury to the
user or damage to the reel.
Caution
Remove
Remove
Caution Caution
• Please do not modify the reel
as this can cause performance
to deteriorate and safety
features to malfunction.
• Please do not modify the cable
as this may cause performance
to deteriorate, generate heat
or result in a fire.
Do NOT
Disassemble
Page 7
7
Caution: Motor Malfunction
• The display is water-resistant to a depth of 10m.
However, if the reel is dropped or receives an impact of some kind
and the display is damaged or cracked, the motor may
malfunction if water is able to penetrate into the reel.
As injury may occur if the motor malfunctions and suddenly
retrieves the line, etc., if the display is cracked or damaged,
immediately remove the power cord, stop using the reel and
return it to the place of purchase. If there is no licensed Shimano
dealer nearby, please enquire as to the location of your nearest
service center.
• This reel operates on DC12~14.8V. Using a higher voltage or a
household power supply may damage the electronic circuits in
the display and make it impossible to control the motor.
As this could also result in smoke or fire, always check the
specification of the power supply before use.
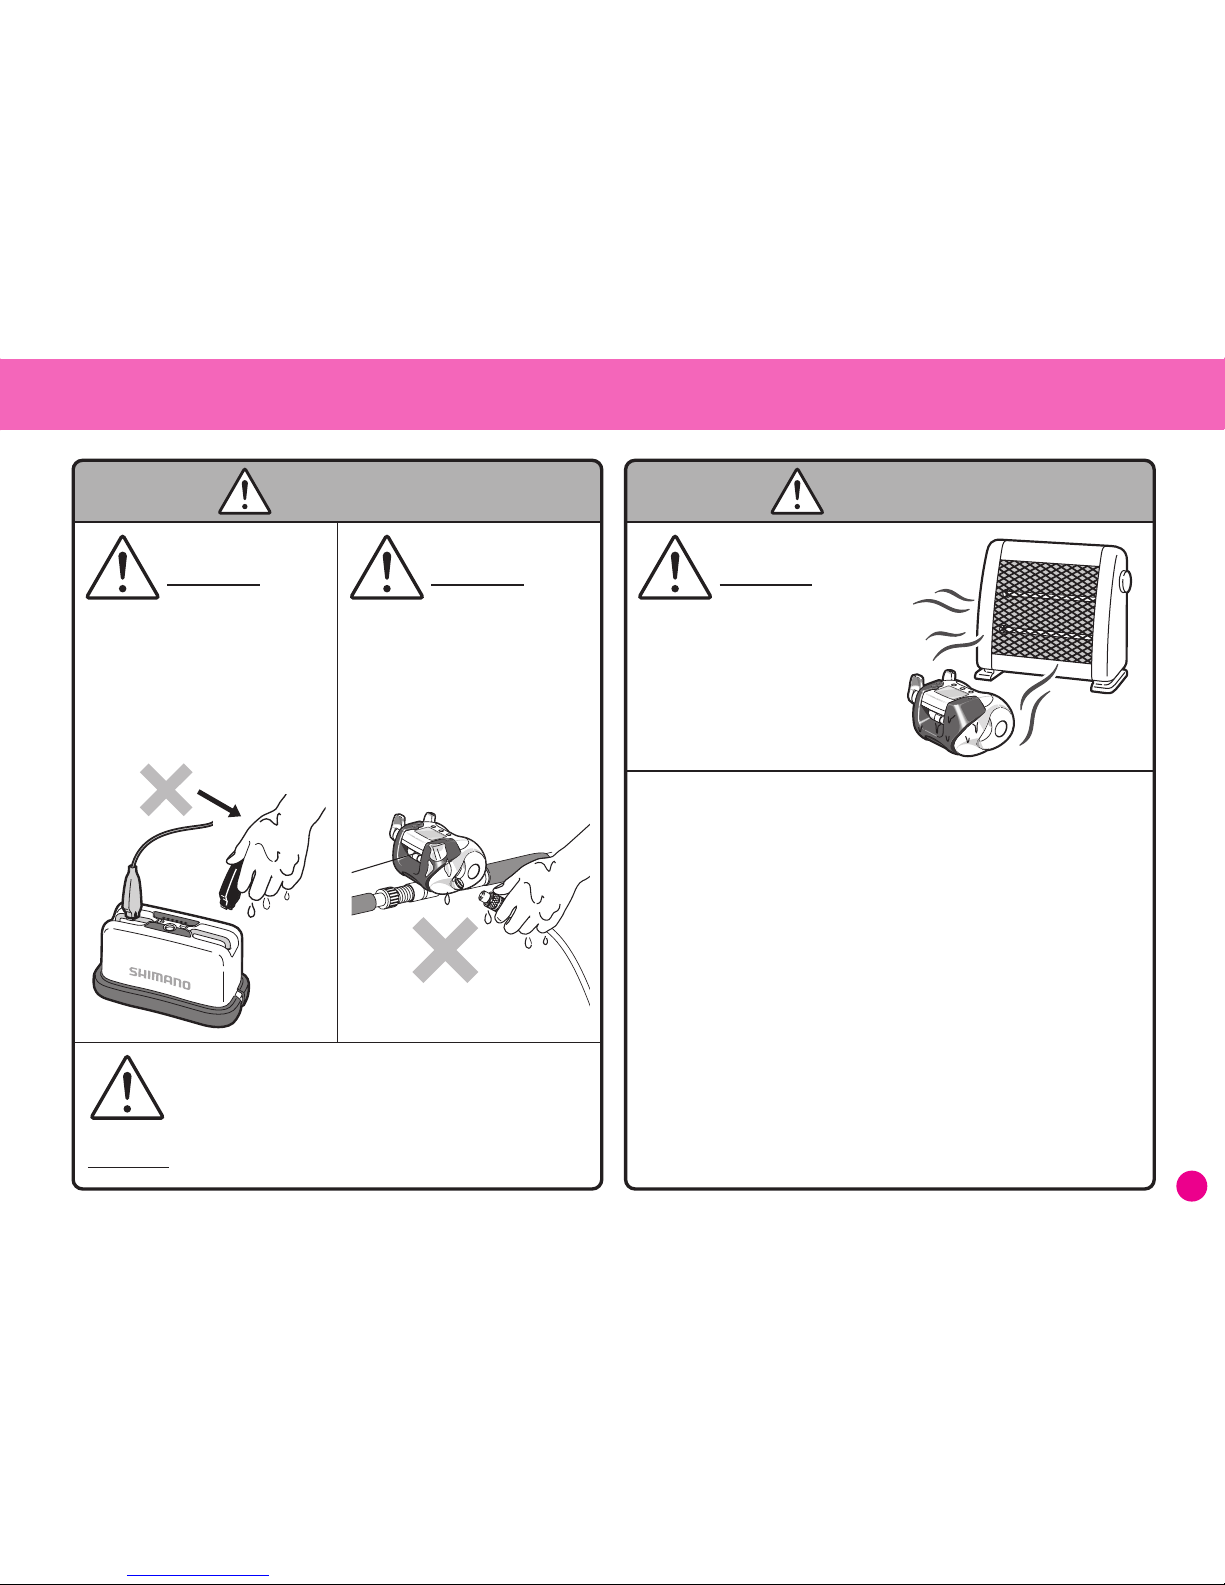
• Check that the terminals are
not wet before attaching the
power cord to the reel.
If the terminals are wet this
can cause a short circuit,
which may result in fire or
smoke that can lead to injury.
• Please do NOT touch the metal
parts of the alligator clips or
the terminals of the battery or
power supply with wet hands
as there is the danger of
electric shock.
Caution Caution
Caution Caution
• If your rig is caught on the bottom, wind the line
around a rod holder or the gunwale and cut it rather
than trying to jerk it free.
Caution
• Do NOT try to dry the reel
using a hair dryer or some
other heating appliance after
carrying out maintenance as
this may deform the resin.
Caution
Page 8

8
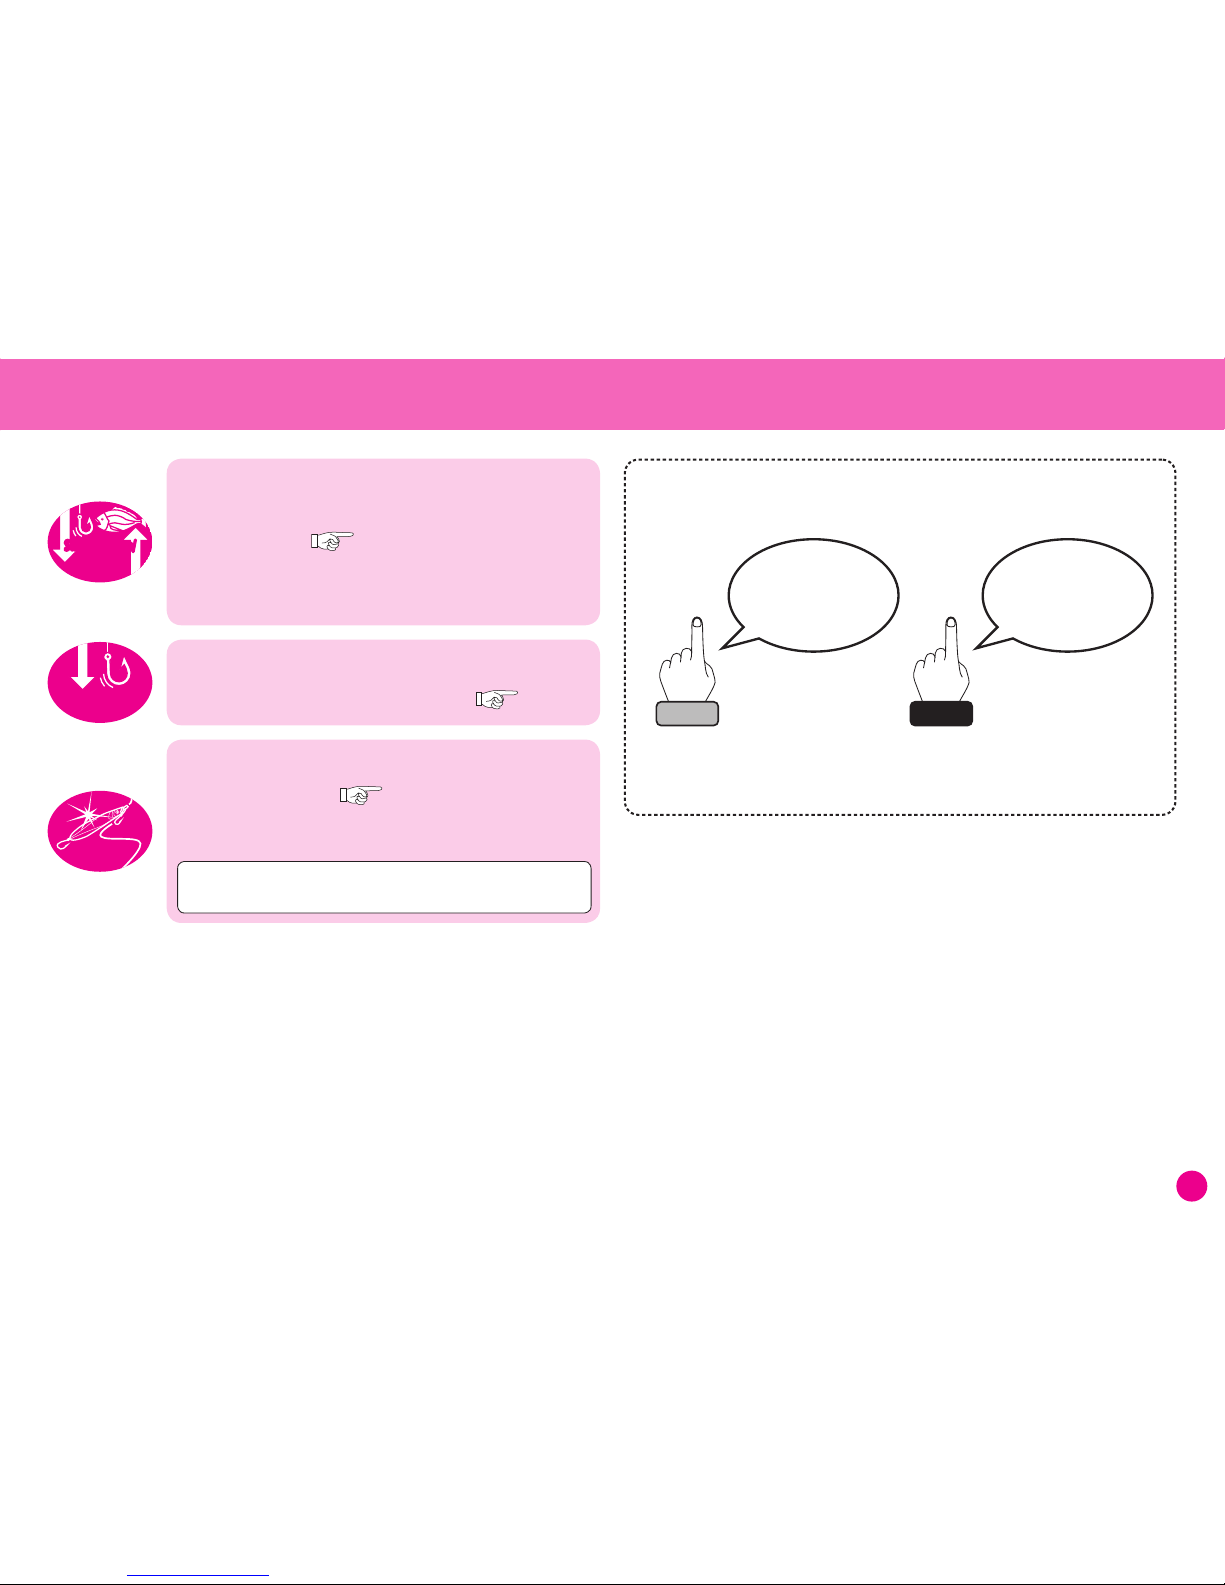
Reset
Consistently position your rig more accurately
at the desired depth.
Zero reset.
Pages 32~33
The counter can be reset to zero with the rig touching the surface
of the water. This allows you to more accurately position the rig at
the desired depth.
Gunwale
Stop
Stops retrieving the line at the point where
you can raise the rod vertical and have the rig
come straight to your hand.
Pages 36~37
The gunwale stop position is set automatically, allowing you to raise
the rod vertical and have the rig come straight to your hand.
Smart Line
Depth
Allows you to easily return your rig to the same depth
after repairing your line if it breaks.
Page 34
If you break your line, after repairing it, lower the rig to the surface
and press 0 Set. The Smart Line Depth function then automatically
returns your rig to the same depth it was at before it broke.
SLS
The new SLSII system requires no programming.
SLSII
(Shimano Line Program System 2)
Pages 16~27
The Technical Lever
is used to adjust retrieval speed and
Rakuraku settings.
Pages 11, 43~44
Technical
Lever
Rakuraku Mode
| Fixed Speed
Mode
Select between two modes when reeling in your fish.
You can select between Rakuraku Mode
and Fixed Speed Mode
Pages 43~44
Select between Rakuraku Mode, which maintains a specific line
tension, and Fixed Speed Mode, which maintains a fixed spool
rotation speed, according to your situation.
High Speed
High Power
Switch between
high speed and high power.
Lightweight and
Compact
Lightweight, compact design
that is among the best in its class.
Bringing you an even smoother spool.
Antirust Bearings
Page 35
A highly corr osion-resistant metal is dense ly p acked onto th e
bearing’s surface, using a process known as surface reforming. This
creates a stable, immoveable layer that ensures total protection.
Anti-Rust Bearings in both ends of the spool make for an even
smoother performance!
Antirust
Bearings
Features
Auto Depth
Alert
An alarm sounds at a predetermined depth.
Pages 38~39
Set the shelf or bottom depth and next time you let down your rig
an alarm will sound when that depth is reached.
Page 9
9
Caution:
The values and settings shown on the reel display in this manual are in some cases
just examples. Actual values may differ.
The following icons appear in the manual
and have the following meanings:
Press the button
indicated.
Press the
button indicated
for more than
3 seconds.
Press Hold
Auto Casting
Function
Let down your line faster with
the Auto Casting function.
Page 31
Surface-Down/
Bottom-Up
Modes
Select between
Surface-Down and Bottom-Up Modes
for the display.
Pages 40~42
Depth can be shown as distance from the surface or distance from
the bottom to best suit factors such as fishing ground, fishing
technique and target species.
Jigging
Mode
* In some cases 0 Set cannot be changed in Jigging Mode. Please
turn Jigging Mode OFF before pressing the 0 Set|Enter Button.
The reel replicates the jigging technique.
Jigging Mode
Pages 45~46
Jigging mode is a new function that enables the reel to replicate the
popular jigging technique.
Page 10
10
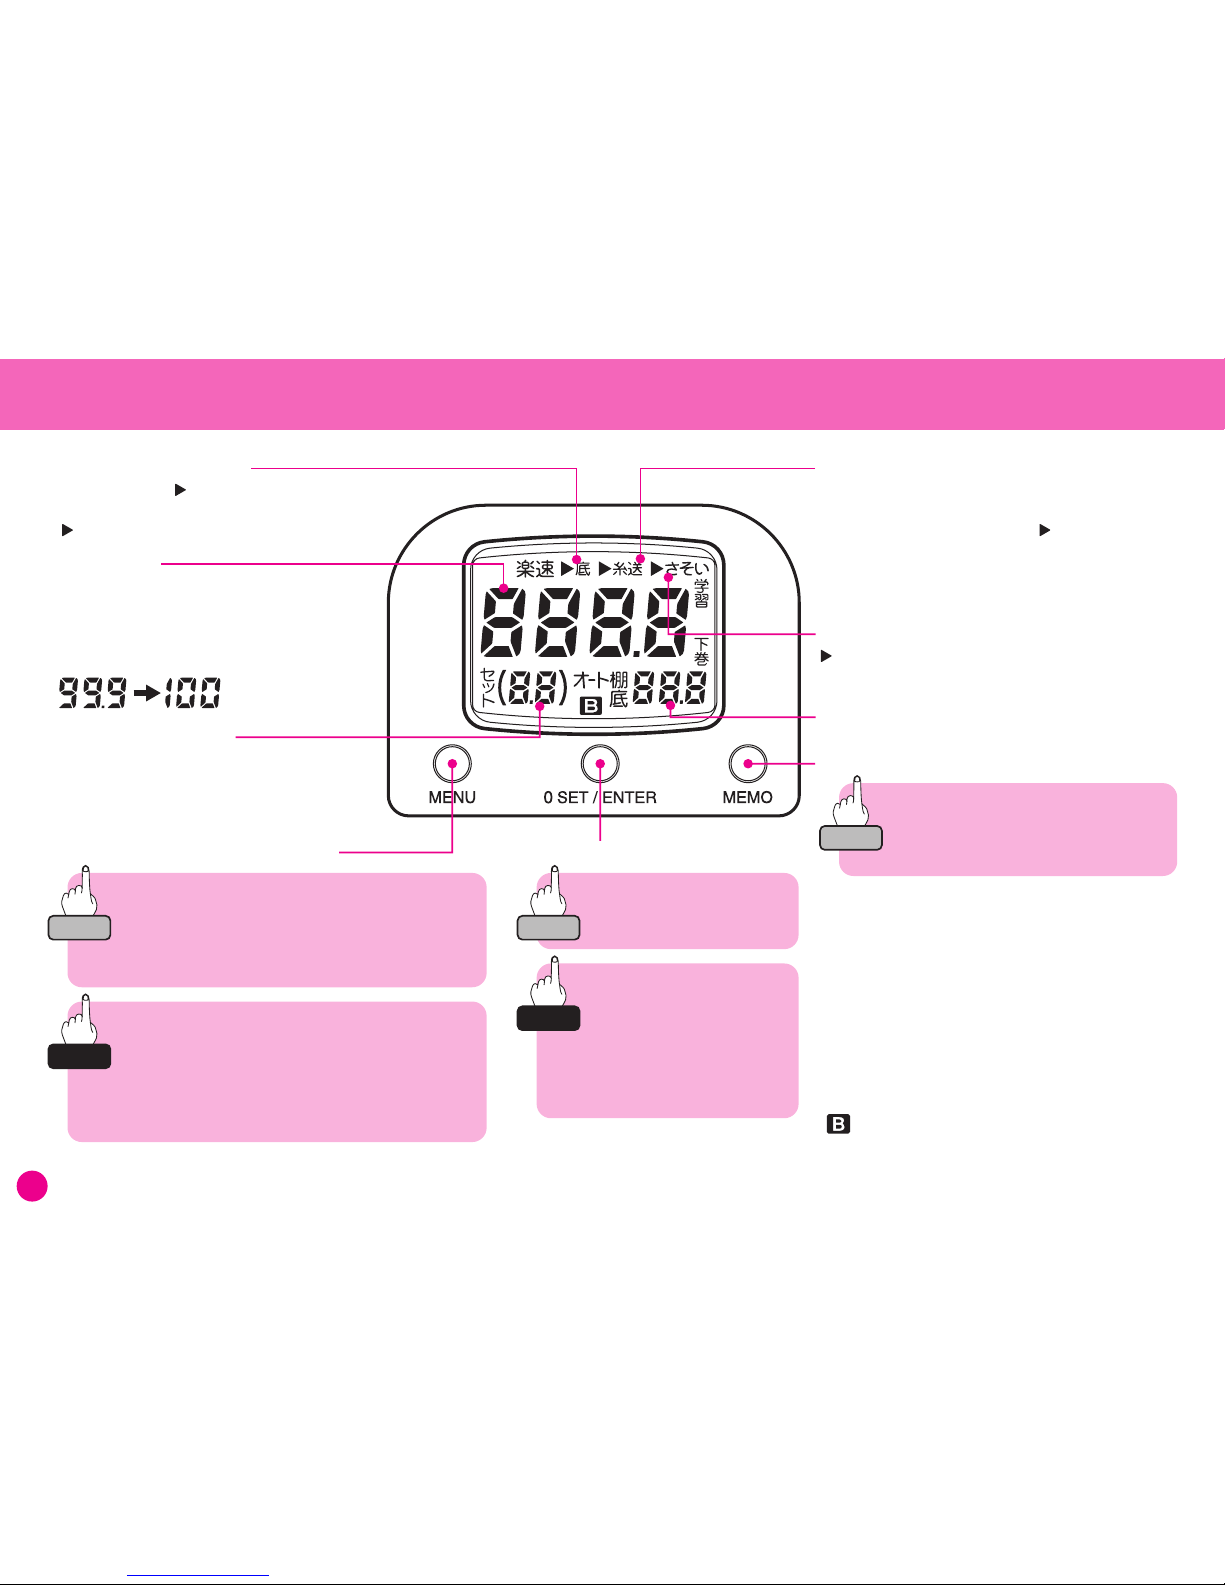
Saved Depth
• All items on the LCD shown here are displayed for instructional purposes only.
Memo Button
Saves the present depth from the surface.
In Bottom-Up mode, the counter shows the
depth from the bottom as the Present Depth,
starting from 0.0m.
Press
Auto Casting Function
When lowering the rig, the motor will start automatically
5m past the gunwale stop position and spool resistance
will be reduced to a minimum. The --- to the left of
糸送
will not be displayed when this function is OFF.
(E.g. If the gunwale stop position is set at 1m then the
motor will start at 6m.)
0 Set/Enter Button
Press Enter to turn ON or OFF
the function selected using the
Menu button.
Press
Zeroing the Counter
Lower the rig to the surface of
the water and zero the counter.
* It may not be possible to zero the
counter if Jigging Mode is ON.
Always turn Jigging Mode OFF
before zeroing the counter.
Hold
Mode Indication
学習
Normal | 下巻 Backing :
These icons are displayed in Learning Mode.
棚
: Displayed in Surface-Down Mode.
底
: Displayed in Bottom-Up Mode.
オート
: Displayed when the Auto Depth Function is ON.
楽
: Displayed in Rakuraku Mode.
速
: Displayed in Fixed Speed Mode.
セット:
Displayed for 2 seconds when Line Learning
or 0 Set is selected.
------ :
Displayed when battery or power supply voltage is
too low.
Bottom-Up Mode (Icon:
底
)
In Bottom-Up Mode --- will be displayed to the left of the
Bottom-Up icon.
If --- is not displayed then the reel is in Top-Down Mode.
Jigging Mode (Icon:
さそい
)
--- is displayed to the left of the Jigging icon
in Jigging Mode.
Technical Lever Settings
Displays Rakuraku mode and Fixed Speed Mode
values.
Present Depth
Displays depth from the surface of the water.
(In Bottom-Up mode it displays the distance from
the bottom.)
* Depth is shown in 10cm graduations. Depths over 100m
are shown in 1m graduations as shown on the right.
Menu | Rakuraku/Fixed Speed Button
Press Menu to toggle through the menu items.
The icon for the appropriate item (
底
bottom-up, 糸送
casting,
さそい
jigging) will flash.
Press Menu again to return to Standard Mode.
Used together with the Enter button.
Press
Rakuraku Mode: Green Backlight (楽 is displayed)
Fixed Speed Mode: Orange Backlight (
速
is displayed)
Hold
Press for more than 3 seconds to switch between
Rakuraku Mode and Fixed Speed Mode. You can press
this button even when reeling in.
The mode selected will be shown on the display.
Digital Display Component Names
Page 11
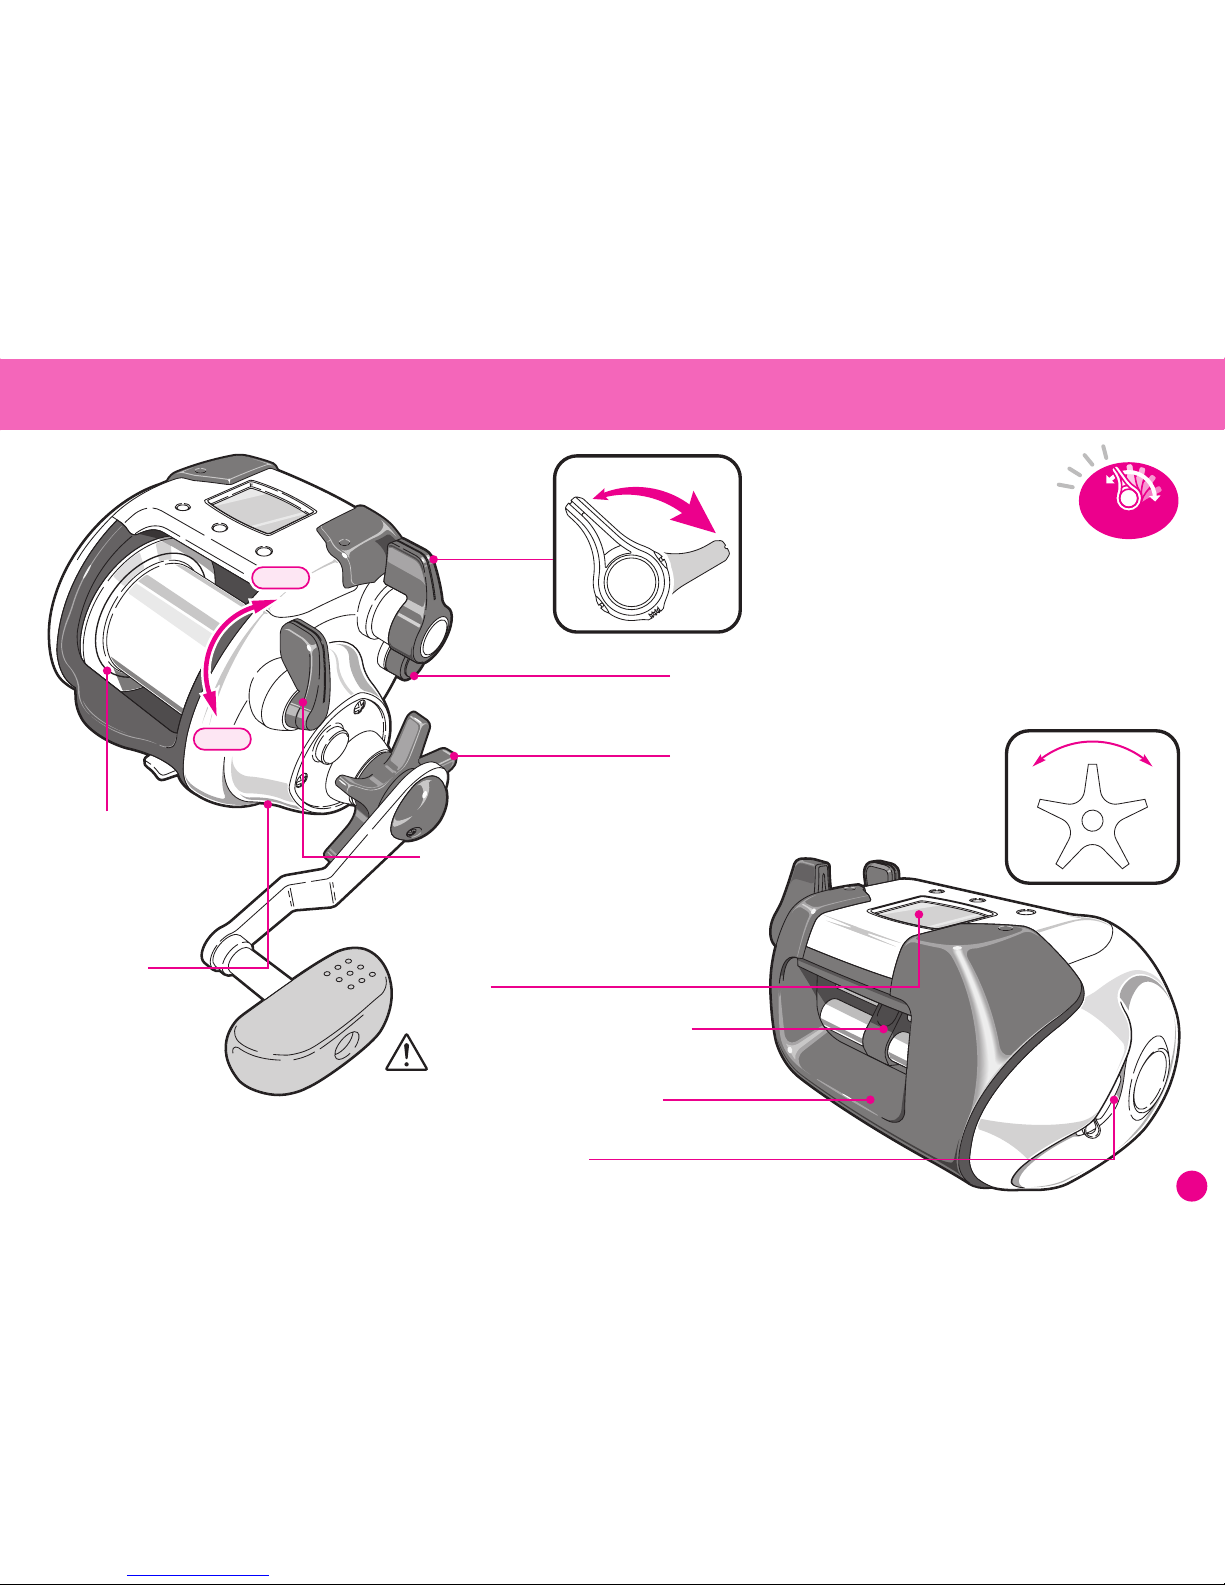
11
Safety Level Wind Protector
(Also protects the display.)
OFF MAX
Display
Line Holder
Holds the line in place.
DDL (Direct Drive Level Winder)
* Be careful not to get your finger caught.
Power Cord Socket
* Always replace the connector cap when not using the reel.
Technical Lever
Allows you to instantly adjust retrieval
speed and Rakuraku Mode tension settings.
After gunwale stop, if you want to restart
the motor, then turn the lever to the OFF position once
before restarting. In the interests of safety, however,
this does not work if the counter displays 1.0m or less
even if the lever is moved to the ON position.
Mechanical Brake Knob
Brakes spool rotation and prevents backlash
when lowering the rig.
Clutch Lever
ON when the handle is turned clockwise or
turned by hand.
ON : Retrieves the rig.
OFF : Frees the spool and allows the rig to drop.
Line Level Guide
#1000 : 0.23mm-265m
#4000 :
0.32mm-520m
ON
OFF
Technical
Lever
Weak Strong
Star Drag
Adjusts line delivery tension to prevent the line
from breaking when a fish is pulling hard.
Part Names
Page 12
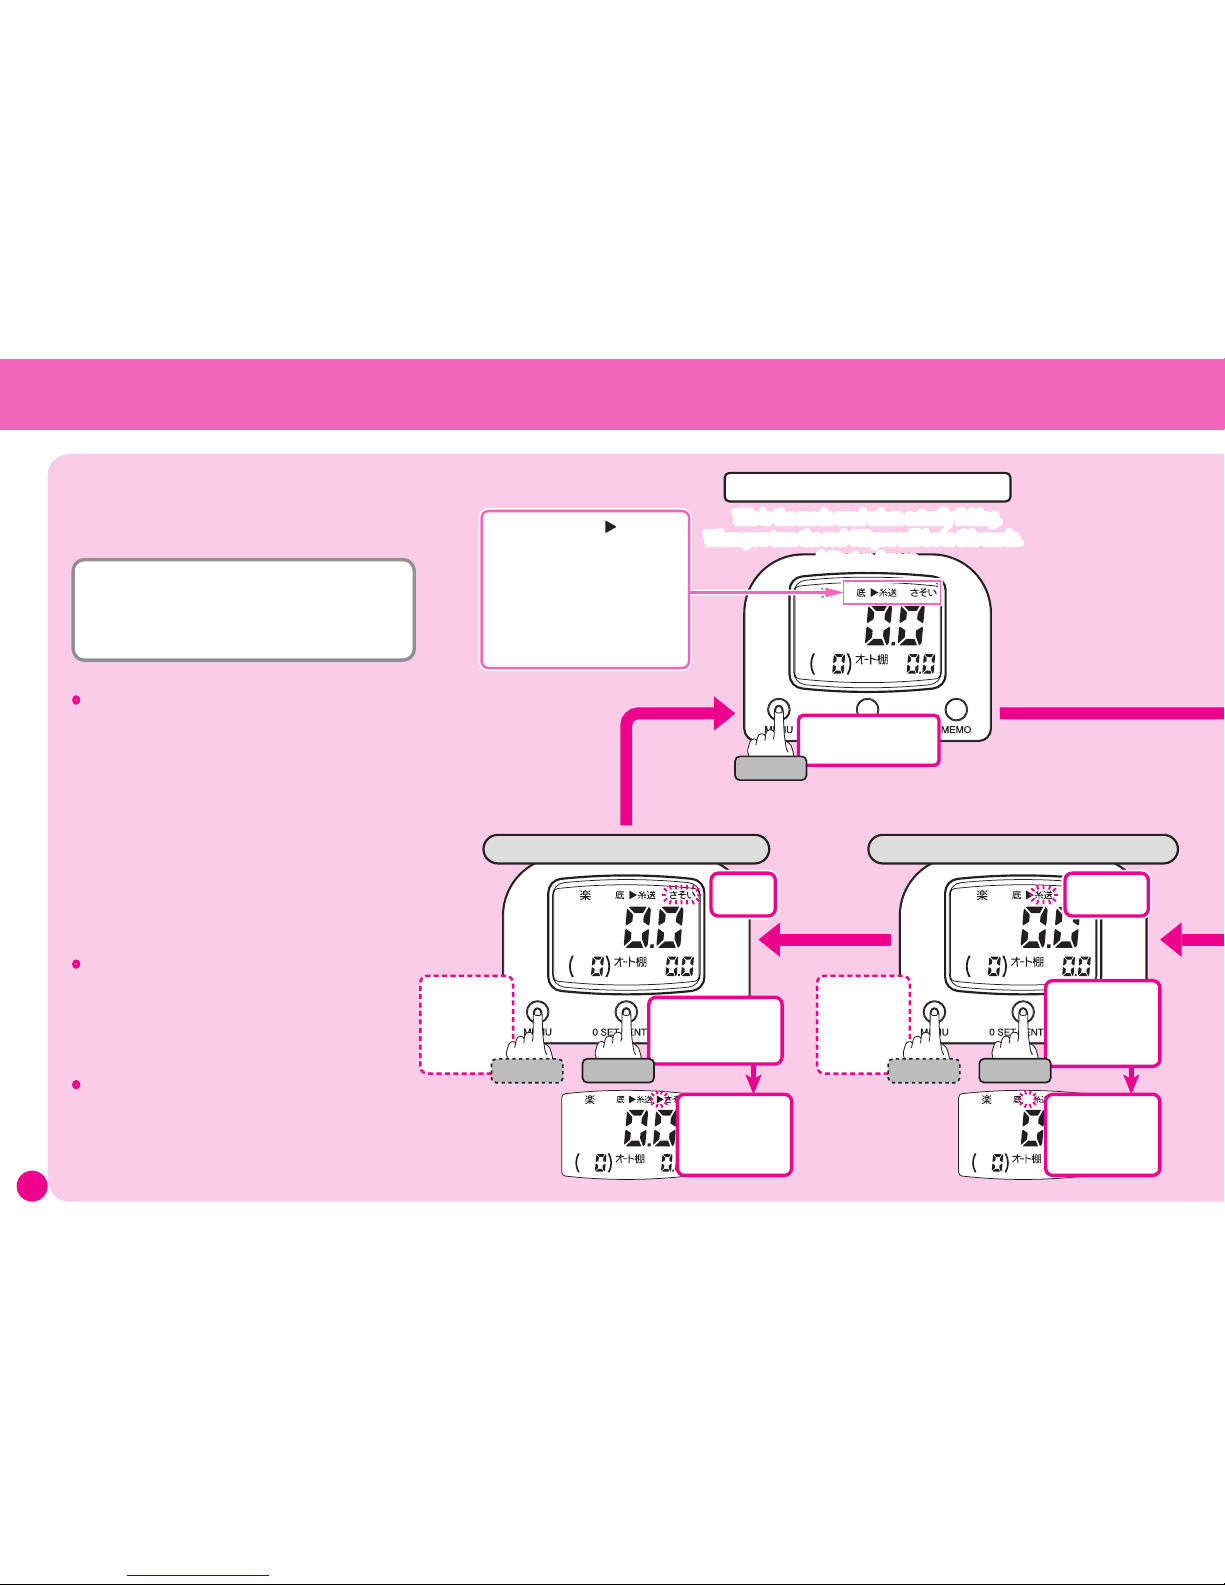
12
Press Menu to go
to the next Menu.
Press Menu to enter
Menu mode.
Icons with a flashing --- on the left
are ON.
The state of the functions in the
example are as follows:
Bottom-Up Mode (
底
) ...........OFF
Auto Casting Function
(糸送) OFF
Jigging Mode (
さそい
)..........OFF
Press Menu to
enter Menu mode.
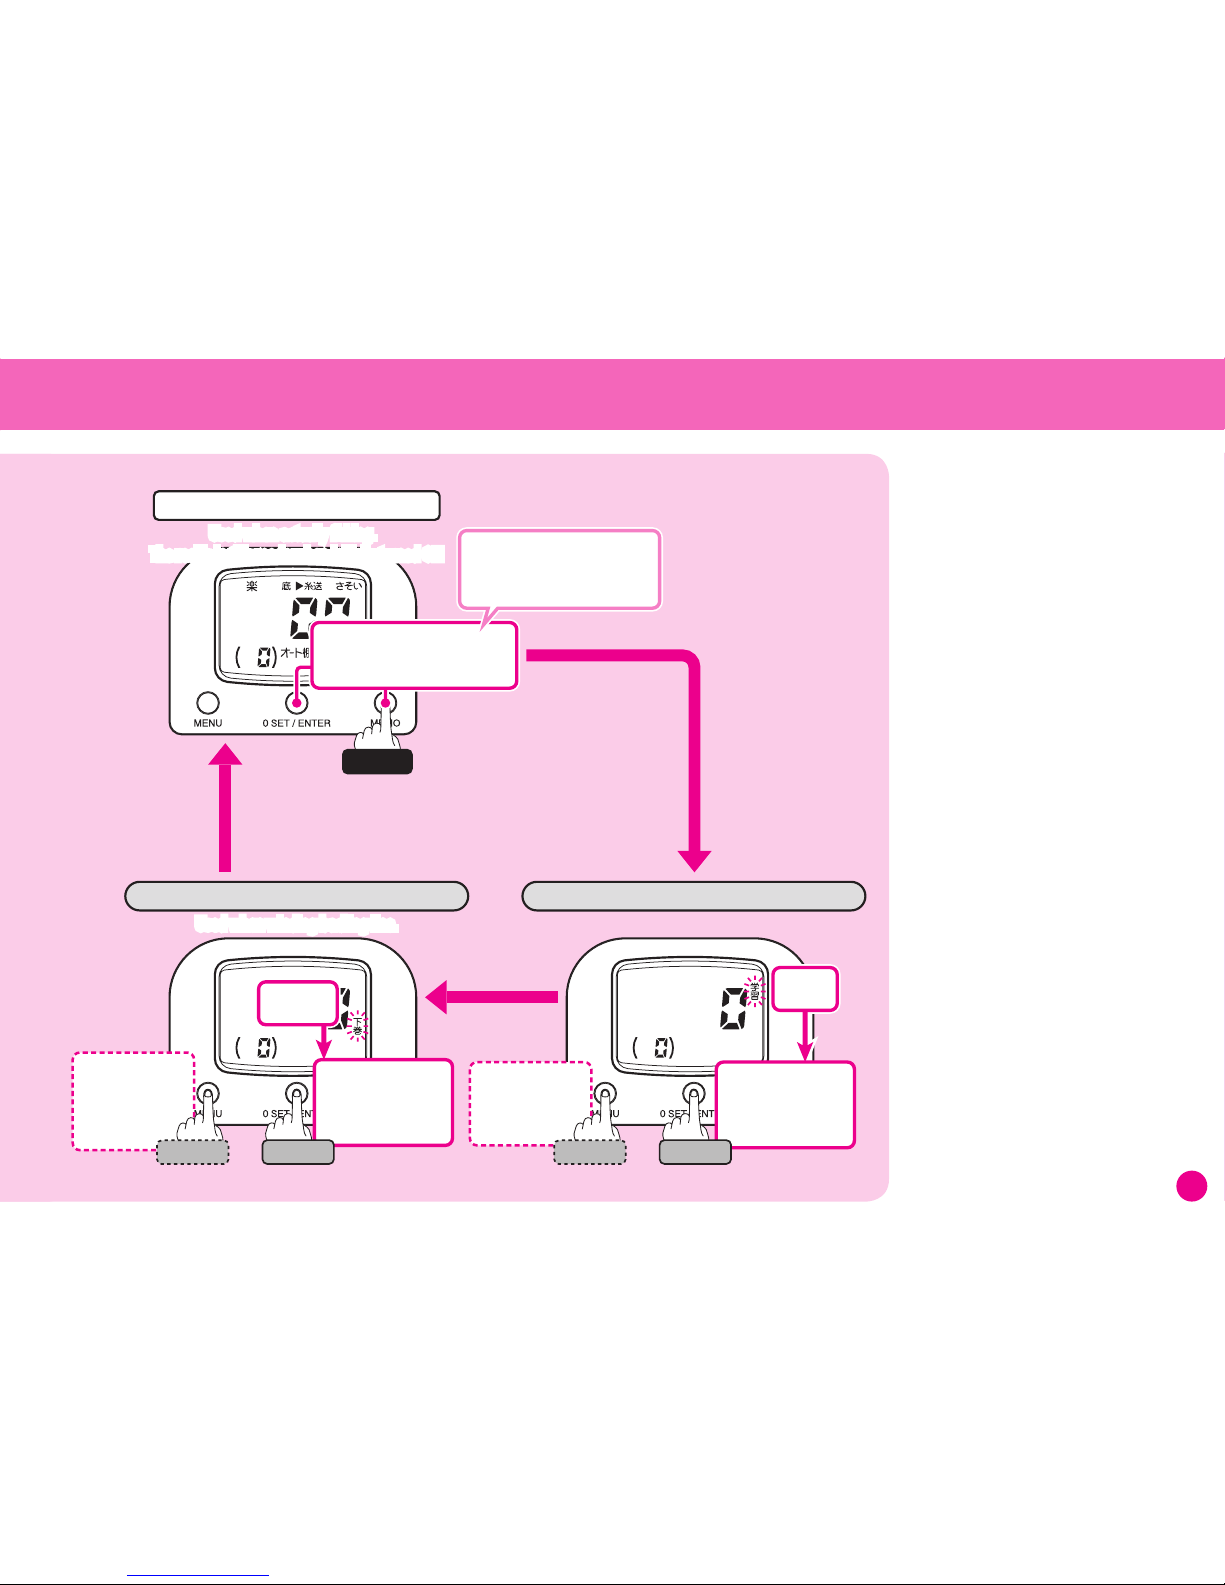
Standard Mode
This is the mode used when actually fishing.
When you turn the reel ON you will be in this mode.
* Startup Screen
Menu 2: Auto Casting Function
Press Menu to
go to the next
Menu without
making any
changes.
Press 0 Set|Enter
to turn
the function
ON or OFF.
Auto Casting
will flash.
Press
The example here
shows how to turn
the Auto Casting
Function OFF. Repeat
the same procedure
to turn it ON.
Press
This will confirm
the change and
return you to
Standard Mode.
Press Menu to
go to the next
Menu without
making any
changes.
Press 0 Set|Enter to
turn the function
ON or OFF.
Jigging
will flash.
Press
The example here shows
how to turn Jigging Mode
ON. Repeat the same
procedure to turn it OFF.
Press
Menu 3: Jigging Mode
This will confirm
the change and
return you to
Standard Mode.
Press
Press Menu to return
to Standard Mode
Menu Button Operation
The Menu Button is used to set
the following functions:
Bottom-Up Mode ON/OFF
Auto Casting Function ON/OFF
Jigging Mode ON/OFF
•When the motor is stopped in Standard
Mode, press Menu repeatedly (for less
than 3 seconds) to toggle through the
menu items.
The icon for the appropriate item (底bottom-
up, 糸送casting,
さそい
jigging) will be
displayed.
Press Menu again to return to Normal
Mode.
•When the desired icon is flashing, press
Enter to turn that function ON or OFF.
The display will then return to Standard
Mode.
•
When you have changed setting in Standard
Mode (Startup Screen), even if you turn the
power OFF the new settings will be saved.
Page 13
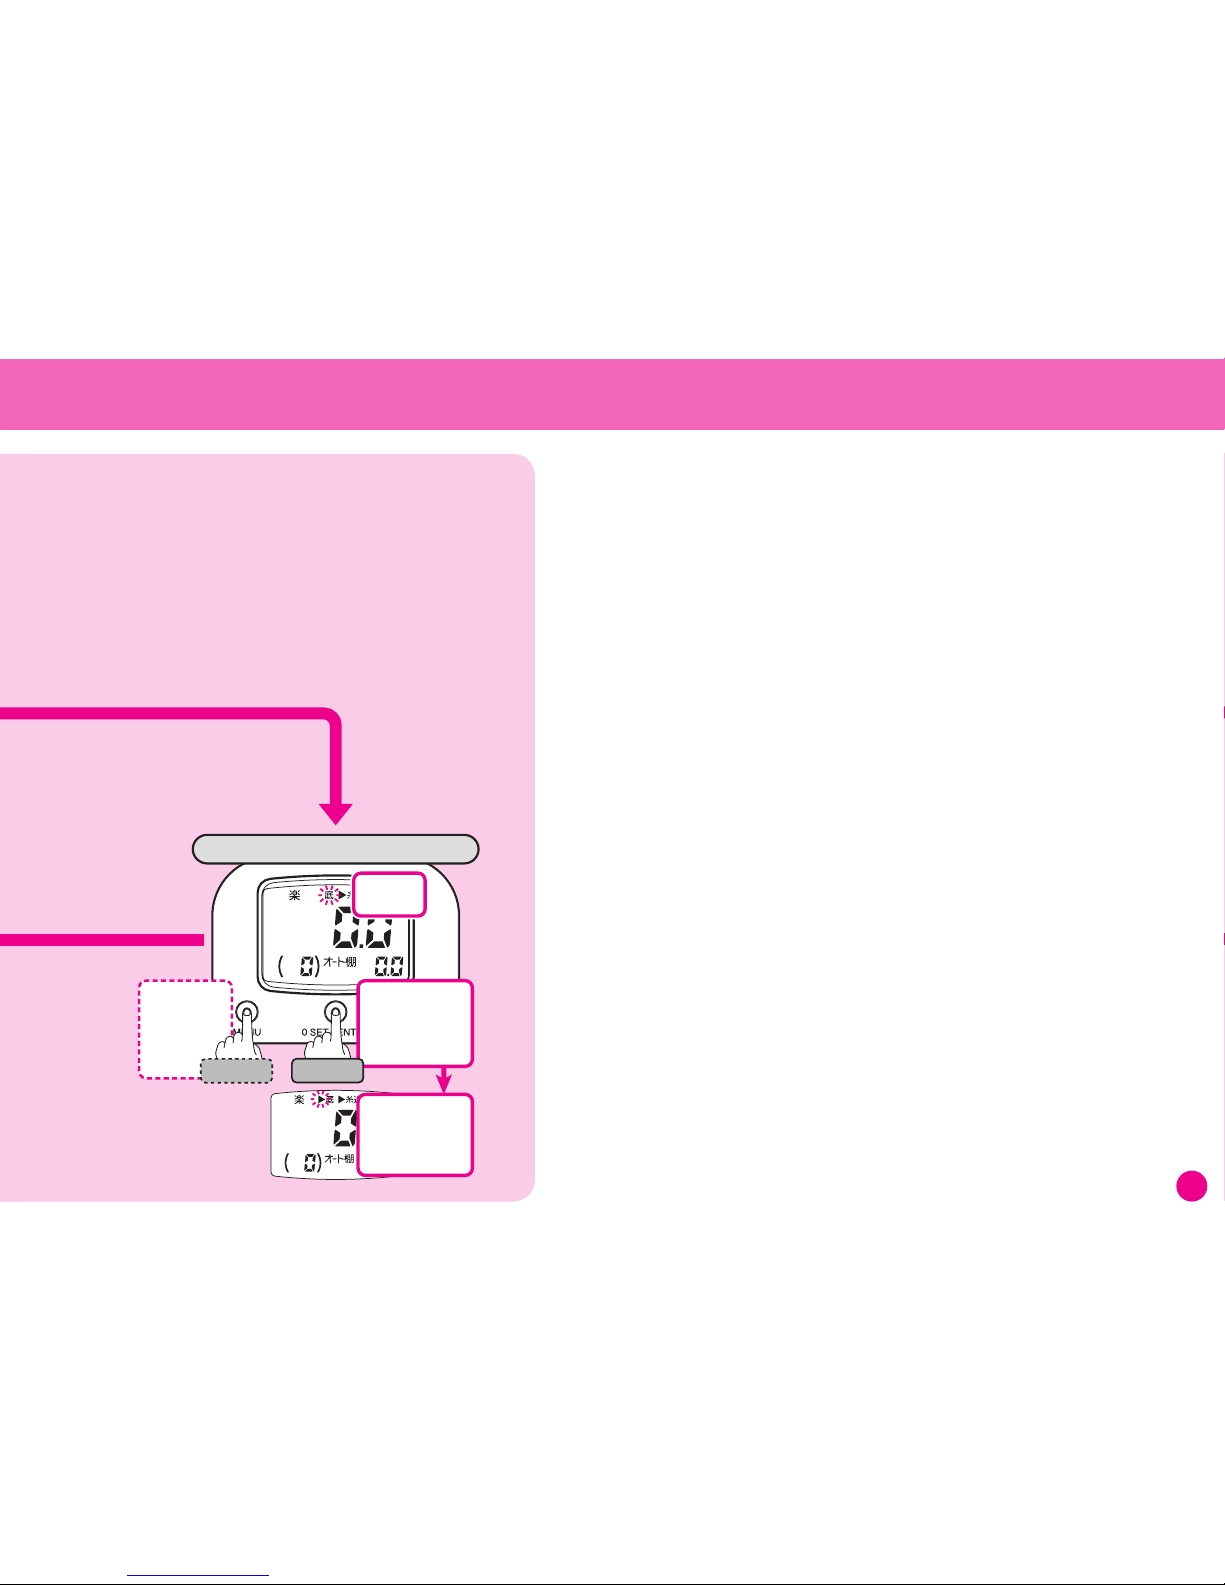
13
Press Menu to go
to the next Menu.
Menu 1: Bottom-Up Mode
Press Menu to
go to the next
Menu without
making any
changes.
Press 0 Set|Enter
to turn
the function
ON or OFF.
Bottom-Up
will flash.
Press
The example here
shows how to turn
Bottom-Up Mode
ON. Repeat the
same procedure to
turn it OFF.
Press
This will confirm
the change and
return you to
Standard Mode.
Page 14

14
Handling Precautions
This reel can use 12V DC power supply with a nominal voltage of 12~14.8V
(lithium-ion batteries, etc.). Do NOT use the reel with any kind of unspecified
power supply (e.g. a vessel’s on-board power supply or a AC100 household power
supply). NEVER use a battery charger.
•When using a vessel’s on-board power supply, always check that the voltage is
DC12V. (Only use a vessel’s battery if it is 12V or if you use a 24V to 12V DC-DC
converter.) If the battery terminals are corroded, the voltage may not be stable,
which can cause the reel to malfunction.
•Only use a fully charged battery.
•If a battery is used for a long period of time it loses charging capacity. If that
occurs get a new battery.
•NEVER use an AC power supply as it will destroy the reel’s electronics.
•It may not be possible to properly attach the alligator clips to the terminals of
other batteries from other manufacturers and in some cases using batteries from
other manufacturers may cause damage to such batteries.
Always use a genuine Shimano power cord to connect your reel to the power
supply.
The power cord is a consumable. Depending on frequency of use, it may need to
be changed every 2~3 years.
Caution
Using a power cord other than a genuine Shimano item may cause the reel to
malfunction. Please do not treat the power cord in a rough manner, stand on it
or fold or bend it as this can cause it to break.
Power Supply Power Cord
Power Supply | Cord
CHARGER
BATTERY
BATTERY
CHARGER
BATTERY
DC12V-14.8V
(5400mAh+)
CHARGER
BATTERY
AC100V
CHARGER
BATTERY
On-Board
Power Supply
Page 15
15
Connecting a Battery
Please use the supplied power cord to connect to the
battery.
Firstly connect the red connector to the positive electrode and the
black connector to the negative electrode.
1
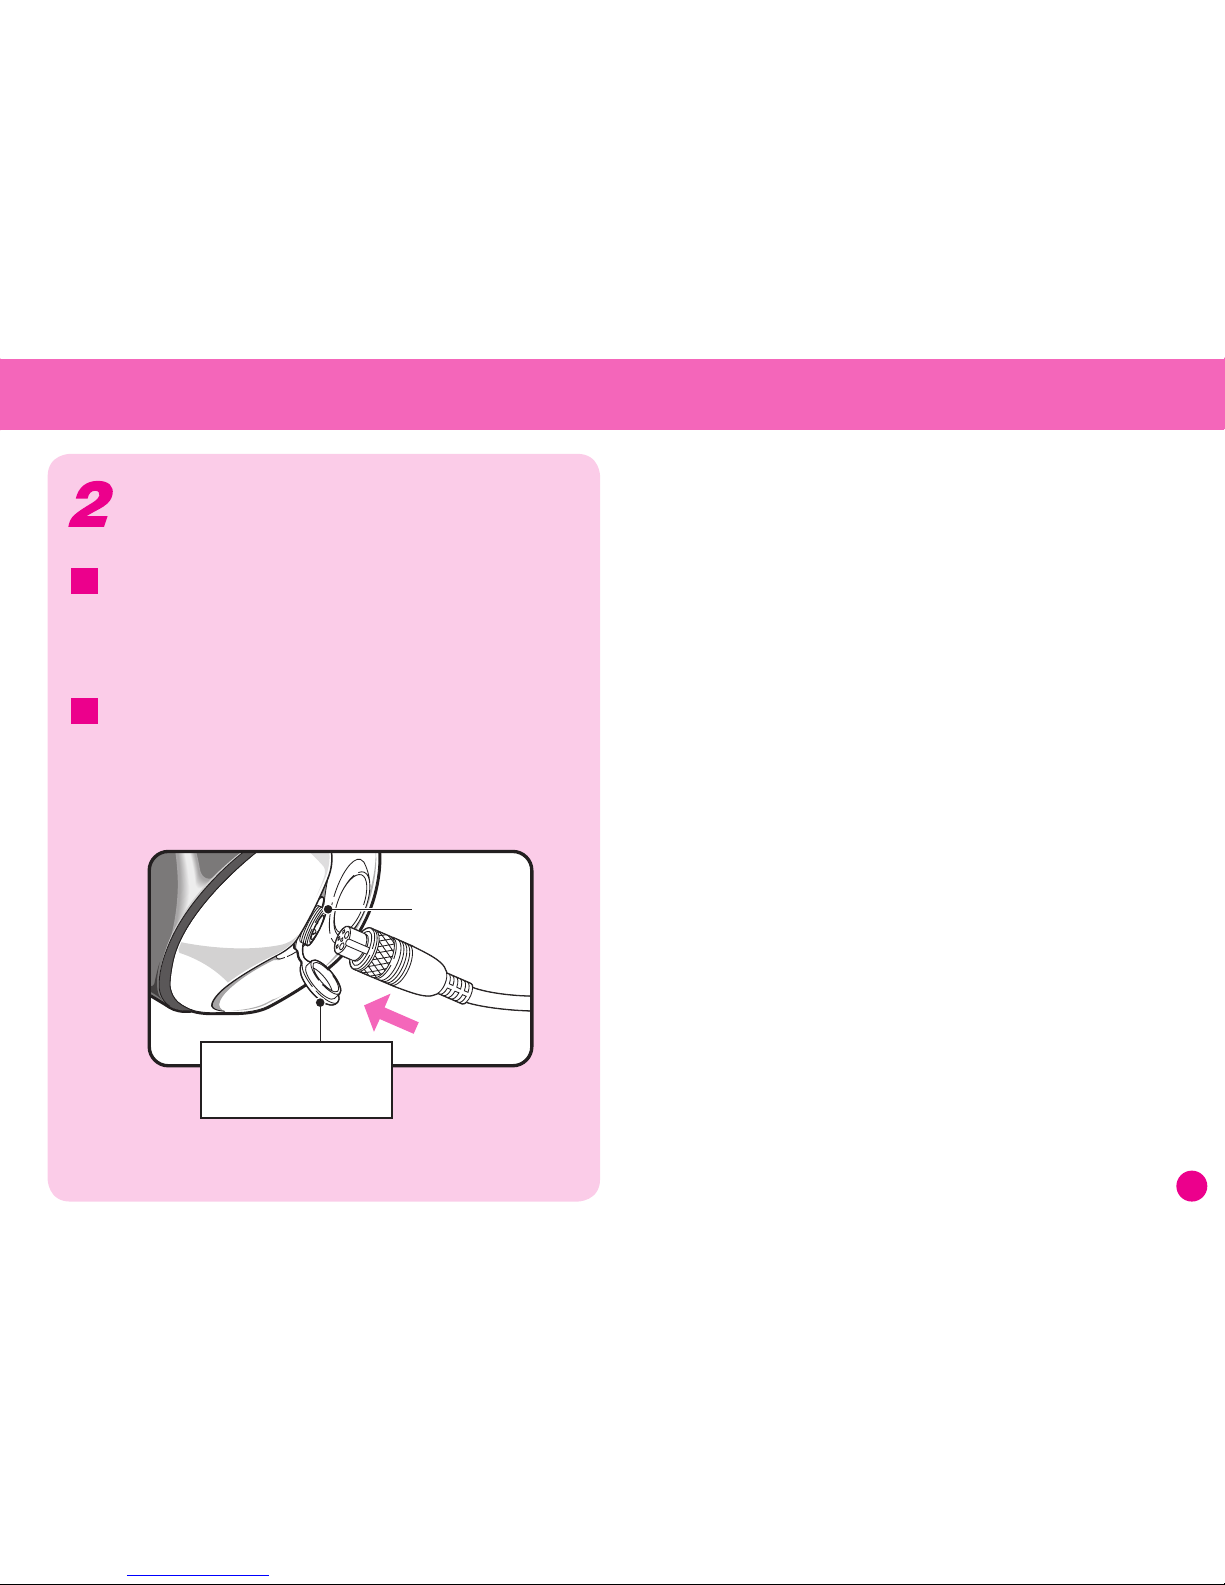
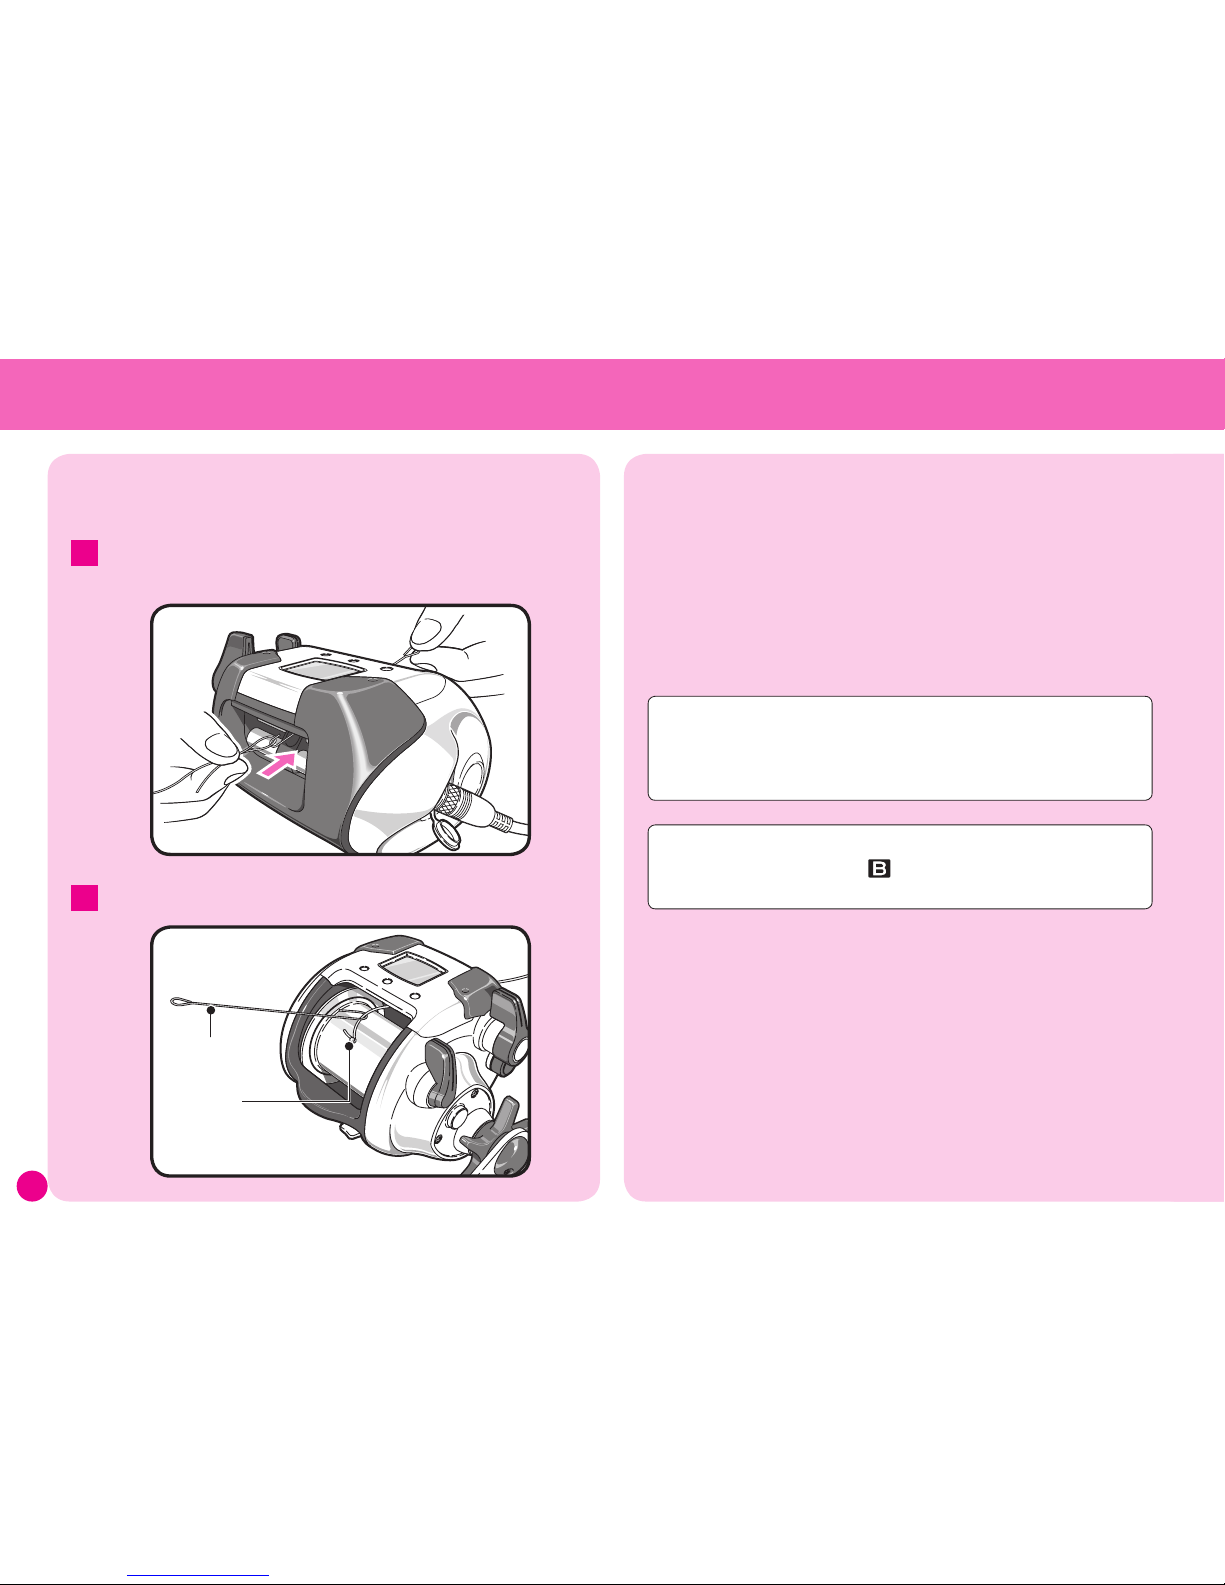
Next connect the power cord to the reel.
Line up the connections and insert the power cord into the socket in
the bottom of the reel, pushing it firmly in and then tightening the
lock screw.
* Please do NOT push any buttons while connecting the power cord.
2
Please do NOT remove the
connector cap from the
screw thread on the reel.
Power Supply
Connector
Page 16
16
(Entering the actual line length into the reel.)
* This operation cannot be carried out unless a power supply is
connected.
* Carry out this operation when the display shows less than 6m.
Please reset the counter if the value displayed is greater than 6.1m.
Caution:
If Learning is carried out when is displayed then the display may go
off. If it does, please start Learning again from the beginning.
Spooling Up the Line
Feed the line through the level winder.
When threading the line, use the threading pin provided.
1
Tie the line to the spool pin.
Threading Pin
Spool Pin
2
Learning Methods
Selecting Learning Methods
Firstly, change from standard mode to learning mode as shown
below. Be sure to select the learning method that best matches
the type of line you will be using.
Please refer to the following page for details regarding each learning
method.
Page 17
17
Hold
Press Menu once to
go to the next menu.
Press Menu once to
go to the next menu.
Press Menu to return
to Standard Mode
Press Menu to return
to Standard Mode
Press Enter and Memo at the same
time for more than 3 seconds to
enter Learning Mode.
Learning Mode (Normal Learning)
Learning Mode
(Wind Down Learning)
Learning
will flash.
Standard Mode
Used when actually fishing.
The reel is in this mode when initially turned ON
Used when winding backing line.
When not selecting
Normal Learning,
press Menu to go to
the next menu.
Press Enter to turn ON
Normal Learning.
The icon will be
displayed.
Press
Press
Press Enter to turn ON
Wind Down Learning.
The icon will be
displayed.
Wind Down
will flash.
When not selecting
Wind Down
Learning, press
Menu to go to the
next menu.
Press
Press
* Carry out this operation when the
display shows less than 6m.
Please reset the counter if the value
displayed is greater than 6.1m.
Page 18

18
Hold Enter.
Line Winding
Start~Finish
Use the Technical Lever
to wind on the line.
Remove 10m of line.
Check the markings
on the line.
Join 10m of other
line and wind
it on manually.
Hold Enter.
When NOT using a backing line.
PE Line (See Pages 20~21.)
1
Line with No Markings (See Pages 22~23.)
2
①
Hold Enter and
Memo at the
same time.
②
Press Enter.
Normal Learning
Finish
Go to .
2
SLS
Before winding line, please look though the following flowchart to gain an understanding of the
overall process.
There are 3 Learning Modes. Please see the following pages for more details.
Learning Methods
(Flow Diagram)
* This operation cannot be carried out unless a power supply is connected.
Page 19

19
3
Use the Line Level Guide on the spool when winding on
0.23mm
-
265m of line (0.32mm
-
520m for the #4000). (See Pages 24~27)
3
When using backing line. When using backing line.
Backing Line
Start~Finish
Use the Technical
Lever to wind
on the line.
Hold Enter.
Hold Enter.
Main Line
Start~Finish
Use the Technical
Lever to wind
on the line.
Hold Enter.
Hold Enter.
Wind the backing line onto the spool.
Finish
①
②
③
①
Hold Enter
and Memo
at the same
time.
②
Press Menu
once.
③
Press Enter.
Backing
Line
Learning
Tie the main
line to the
backing line.
Wind on
10m of line
manually.
Remove
10m of line.
Caution
Take care not to wind on too much line as it can become caught
between the spool and the frame and backlash because it is so thin.
Page 20

20
SLS
PE Line (Line with markings every meter.)
→
Use Normal Learning. (
学習
)
Please ensure that winding
tension is set at 3.
The number of
spool revolutions
is displayed.
Use the Technical Lever
to wind on the line.
Press
②
Hold
①
Hold
①
Press Enter
Press At the Same Time
(Inputting the actual value of the line use into the reel.)
Learning Methods
Please see Pages 22~23 when winding lines such as nylon (line with no markings every meter).
Learning can also be carried out using backing line. Learning Mode (Backing Line Learning) See Pages 24~27.
Do this when the display shows less than 6m.
Reset the counter if the display shows more than
6.1m (see Pages 32~33).
Engage the clutch. Check the power
supply.
The display should be as shown in the diagram.
(This is Standard Mode.)
1
Use the Technical Lever to wind on line.
The number of spool revolutions will be displayed.
Please ensure that winding tension is set at
3 in the brackets.
This value refers to line tension when winding in
line. The value shown is NOT in kg and is different
again from the values displayed in Rakuraku Mode.
Winding speed can be adjusted using the
Technical Lever. To stop winding in, move
the Technical Lever to the OFF position.
3
Press Enter and Memo at the same time
for more than 3 seconds to enter Learning
Mode.
Learning学習 (Normal Learning) will flash.
Press Enter to select Normal Learning.
学習
(Learning) will be displayed.
(Please see Pages 16~17 Selecting Learning
Methods for details regarding how to select
learning methods in Learning Mode.)
2
Page 21

21
Peep-Peep
Hold
Hold
Peep-Peep
After completely finishing winding line,
press Enter for more than 3 seconds.
The alarm will sound (peep-peep) and the display
will appear as shown in the diagram.
Accurately remove 10m of line.
(Check this according to the changes in line
color that occur every 10m or according
to the number of marks on the line that
appear every meter.)
4
The display will return to Standard Mode
and learning will be complete.
(In some cases there may be as much as a ±3%
difference between the value shown on the display
and the actual length of the line.)
* The difference is the difference on the first
attempt after learning has been completed.
6
Wind up the 10m of line that was removed.
7
The number of spool revolutions will be displayed
in the bottom right of the display (the area shown
inside the square).
Press Enter for more than 3 seconds to exit
Learning Mode.
The alarm will sound (peep-peep) and
セット
will
be displayed for 2 seconds.
* If you accidentally press Menu while winding on
line data will be lost and you will have to repeat
the process once more from the beginning.
5
Caution: The values and settings shown on the reel display in this manual are in some cases just examples. Actual values may differ.
Wind on 10m
Remove 10m
Page 22

22
Peep-Peep
Hold
Please ensure that winding
tension is set at 3.
The number of
spool revolutions
is displayed.
Use the Technical Lever
to wind on the line.
Press
②
Hold
①
Hold
①
Press Enter
Press At the Same Time
SLS
Do this when the display shows less than 6m.
Reset the counter if the display shows more than
6.1m (see Pages 32~33).
Engage the clutch. Check the power
supply. Press Enter and Memo at the same
time for more than 3 seconds to enter
Learning Mode.
Learning学習 (Normal Learning) will flash.
Press Enter to select Normal Learning.
学習
Learning will be displayed.
(Please see Pages 16~17 Selecting Learning Methods for details
regarding how to select learning methods in Learning Mode.)
1
After completely finishing winding line,
press Enter for more than 3 seconds.
The alarm will sound (peep-peep) and the display
will appear as shown in the diagram.
3
Use the Technical Lever to wind on line.
The number of spool revolutions will be displayed.
Please ensure that winding tension is set at
3 in the brackets.
This value refers to line tension when winding in
line. The value shown is NOT in kg and is different
again from the values displayed in Rakuraku Mode.
Winding speed can be adjusted using the
Technical Lever. To stop winding in, move
the Technical Lever to the OFF position.
2
Nylon Line (Line with no markers.)
→
Use Normal Learning. (
学習
)
(Inputting the actual value of the line use into the reel.)
Learning Methods
Page 23

23
Hold
Peep-Peep
Tie 10m of different line to the end of the
line you wound on.
4
The display will return to Standard Mode
and learning will be complete.
(In some cases there may be as much as a ±3%
difference between the value shown on the display
and the actual length of the line.)
* The difference is the difference on the first
attempt after learning has been completed.
6
Caution
In some cases a difference of more than 3%
occurs with nylon line because the tension
changes with repeated winding in. Please take
care to watch for tangles at the tip of the rod
when using it.
Pull out the joined line and remove it.
7
Wind on the joined line manually.
The number of spool revolutions will be displayed in the
bottom right of the display (the area shown inside the
square).
Press Enter for more than 3 seconds to exit
Learning Mode.
The alarm will sound (peep-peep) and
セット
will be
displayed for 2 seconds.
* If you accidentally press Menu while winding on line data will be
lost and you will have to repeat the process from the beginning.
5
Caution: The values and settings shown on the reel display in this manual are in some cases just examples. Actual values may differ.
Tie on 10m of line.
Pull it out
and remove it.
Wind on 10m
Page 24

24
Do this when the display shows less than 6m.
Reset the counter if the display shows more than 6.1m (see Pages 32~33).
Press Enter and Memo at the same time for more than 3 seconds to
enter Learning Mode and then press Menu once.
Backing Line Learning (下巻) will flash.
Press Enter to select Backing Line Learning.
Backing Line Learning (下巻) will be displayed.
(Please see Pages 16~17 Selecting Learning Methods for details regarding how to
select learning methods in Learning Mode.)
1
Wind on line using the backing line mark as an estimate.
Use the Technical Lever to wind on the line.
Please ensure that winding tension is set at 3 in the brackets.
Winding speed can be adjusted using the Technical Lever.
To stop winding in, move the Technical Lever to the OFF position.
2
SLS
3
Please use the Line Level Guide and Backing Line Learning (
下巻
)
when winding on 0.23mm
-
265m of line
(0.32mm-520m for the #4000).
(It is also possible to use Learning for backing line.)
Learning Methods
Press
③
Hold
①
Hold
①
Press Enter
Press At the Same Time
Press once
②
Please ensure that winding
tension is set at 3.
The number of
spool revolutions
is displayed.
Wind on backing line until
it reaches the backing line
mark on the spool.
Use the Technical Lever
to wind on the line.
Page 25

25
(Continued on the next page.)
When backing line learning has finished,
press Enter for more than 3 seconds.
3
Accurately wind on 10m of main line.
The number of spool revolutions will be shown on the
display.
5
The alarm will sound (peep-peep) and the display
will appear as shown in the diagram.
Tie the main line to the backing line.
4
Caution: The values and settings shown on the reel display in this manual are in some cases just examples. Actual values may differ.
Hold
Peep-Peep
Wind on 10m
Tie the main line
to the backing line.
Page 26

26
Caution: The values and settings shown on the reel display in this manual are in some cases just examples. Actual values may differ.
Press Enter for more than 3 seconds.
The alarm will sound (peep-peep) and the display
will appear as shown in the diagram.
6
After completely finishing winding line,
press Enter for more than 3 seconds to exit
Learning Mode.
8
Wind on the remainder of the rest of the
main line.
Use the Technical Lever to wind on the line.
Please ensure that winding tension is set at
3 in the brackets.
Winding speed can be adjusted using the
Technical Lever. To stop winding in, move
the Technical Lever to the OFF position.
7
Peep-Peep
Hold
Please ensure that winding
tension is set at 3.
The number of
spool revolutions
is displayed.
Hold
Use the Technical Lever
to wind on the line.
Page 27

27
Caution: The values and settings shown on the reel display in this manual are in some cases just examples. Actual values may differ.
The alarm will sound (peep-peep) and the display
will appear as shown in the diagram.
Accurately remove 10m of line.
(Check this according to the changes in line
color that occur every 10m or according
to the number of marks on the line that
appear every meter.)
9
The display will return to Standard Mode
and learning will be complete.
(In some cases there may be as much as a ±3%
difference between the value shown on the display
and the actual length of the line.)
* The difference is the difference on the first
attempt after learning has been completed.
The number of spool revolutions will be displayed
in the bottom right of the display (the area shown
inside the square).
Press Enter for more than 3 seconds to exit
Learning Mode.
The alarm will sound (peep-peep) and
セット
will
be displayed for 2 seconds.
* If you accidentally press Menu while winding on
line data will be lost and you will have to remove
the line and repeat the process once more from
1
above.
10 11
Wind up the 10m of line that was removed.
12
Peep-Peep
Hold
Peep-Peep
Wind on 10m
Remove 10m
Page 28

28
More advanced features
open up a wide range of
possibilities.
Simple and convenient
features.
All you need to know in
order to use the reel.
Advanced
Convenient
Basic
What to do after completing Learning
Auto Depth
Alert
Record a specific depth and
the next time your let down
your rig an alarm will sounds
at that depth.
Auto Depth
Alert
See Pages 38~39
for details.
底
Use the Technical Lever
to easily wind in your line
when the bait needs to be
changed or when you have
hooked a fish.
Technical
Lever
See Page 11
for details.
Technical
Lever
Stops retrieving the line at
the point where you can
raise the rod vertical and
have the rig come straight to
your hand.
Gunwale
Stop
See Pages 36~37
for details.
Gunwale
Stop
Press one button to Zero your
line at the surface.
Now you can accurately
position your rig at your
target depth.
See Pages 32~33
for details.
Reset
Zero Reset
Page 29

29
The reel replicates the popular
jigging function.
Jigging
Mode
Jigging
Mode
See Pages 45~46
for details.
棚
底
Depth can be shown as
distance from the surface or
distance from the bottom
to best suit factors such
as fishing ground, fishing
technique and target species.
Change between
Top-Down
and
Bottom-
Up modes.
Surface-Down/
Bottom-Up
Modes
See Pages 40~42
for details.
Change between Rakuraku
Mode, which maintains a
constant tension and prevent
line slack, and Fixed Speed
Mode, which maintains spool
rotation at a constant speed.
Change between
Rakuraku
Mode
and
Fixed
Speed Mode.
The spool rotates at
a constant speed in
Fixed Speed Mode.
Line tension in constant in
Rakuraku Mode.
Switch between
Modes
Rakuraku Mode
| Fixed Speed
Mode
See Pages 43~44
for details.
Page 30

30
Drop Your Rig Quickly
This is an especially effective technique when fishing for squid.
Technique
• Normally, the mechanical brake knob is tightened to slightly brake
the free rotation of the spool to prevent backlash due to the up/down
movement of the vessel.
• To drop your rig faster, use your finger rather than tightening the
mechanical brake knob.
You can also use the techniques shown below.
• This reel has an Auto Casting Function. The motor automatically starts
when the rig is 5m or more past the gunwale stop position and spool
resistance is minimized. The motor automatically stops when the clutch
is returned.
* As the motor is in operation during Auto Casting, engaging the clutch will cause
the line to be slightly wound in but this is not abnormal.
• Point the tip of the rod downward to reduce guide resistance as shown
in the diagram on the right.
(You will want to learn these techniques to improve your catch.)
Various Techniques
Page 31

31
When a power source is connected the Auto Casting Function will be in operation.
Use the procedure shown below to turn off this function if guide resistance or backlash
is a problem.
With the motor stopped and the reel in Standard Mode, press Menu twice.
1.
糸送
(Auto Casting Function) will flash.
Press Enter to cancel the Auto Casting Function and
2.
will disappear.
Carry out the same procedure again when you want to restart this function.
Please see Pages 12~13 for details regarding menu button operation.
Cancelling the Auto Casting Function
Flashing Icon
②
disappears.
③
Press twice
①
Press
②
Page 32

32
The counter can be reset to 0m when the rig is on the surface.
If you want to improve your catch you must be able to position your rig accurately at the target depth.
Zero setting resets the counter to zero when the rig is on the surface.
Zero setting enables you to know the depth of the rig and to accurately position it at the target depth.
* Do NOT wind too much line onto the spool as this can cause inaccurate readings when setting zero in one of the Learning Modes.
Accurately reach your target fishing depth.
Reset
(Always do this before you start fishing.)
Zero Setting
Page 33

33
Let’s Try Zero Setting
Do NOT wind too much line onto the spool
as this can cause inaccurate readings when
setting zero in one of the Learning Modes.
Caution
Hold
* It may not be possible to zero the counter if Jigging Mode is ON.
Always turn Jigging Mode OFF before zeroing the counter.
Lower the rig to the surface and press 0
Set for more than 3 seconds.
1
Zero setting is complete.
3
The alarm will sound (peep-peep) and
the display will change as shown above.
2
Peep-Peep
Page 34

34
Do NOT adjust Smart Line Depth with an
excessive amount of line wound onto the spool
as this can cause inaccurate line learning.
Caution
This function allows you to easily return your rig to the same depth
after repairing your line if it breaks.
Smart Line
Depth
Peep-Peep
Hold
If you break your line, after repairing it,
lower your rig to the surface and press
0 Set for more than 3 seconds.
1
The computer will automatically return
your rig to the same depth it was at
before the line broke.
3
The display will change as shown above.
2
Adjusting Smart Line Depth
Always check that Jigging Mode is turned OFF before adjusting
Smart Line Depth. If it is ON and jigging starts, then the line can
be wound in and cause unforeseen injuries.
Caution
Page 35

35
A corrosion-resistant metal is densely packed onto the surface of both ends of the spool using surface
reforming technique. This creates a stable immoveable layer that ensures constant protection.
Due to highly rust-resistant bearings (A-RB) inside the unit, lowering the hook has become even easier.
That’s why even simple float fishing, said to be troublesome with an electronic reel, can be conquered.
We have also achieved the ideal balance between the safety bar and the level wind, to completely avoid
notorious and unwanted line tangles at this crucial point.
A-RB
(Antirust Bearings)
Bringing you even smoother spool movement.
Antirust
Bearings
2 Antirust Bearings
A-RB
(Antrust Bearings)
Page 36

36
Automatic Gunwale Stop
Gunwale
Stop
Helpful Advice
When fishing with a short rod from the bow of a boat, if zero setting is carried out in the normal way, then the Gunwale
Stop Position will be outside of the normal 1~6m range.
In such cases, wind the rig up to the end of the rod and reset zero at that point to ensure that when the motor stops the rig
will come to your hand when you raise the rod vertical.
In this particular situation, as zero setting is not carried out on the surface of the water, the actual distance from the end of
the rod to the surface of the water will be different.
You can set the reel so that when the motor stops retrieving the line you just need to raise your rod
vertical to have the rig come straight to your hand.
* When connecting to a power source for the first time the
Gunwale Stop is set at 6m.
From the second time onwards, the position at which the
reel is stopped for more than 5 seconds will automatically be
remembered by the computer as the Gunwale Stop position.
(This feature works within the 1m~6m range. When the depth
displayed is less than 1m, in the interests of safety it is set at 1m.)
When the motor stops,
just raise your rod vertical and the rig will come straight to your hand.
Page 37

37
Peep-Peep
Peep
Peep
The alarm will sound 4m before the Gunwale Stop Position.
Peep-Peep
Alarm (Gunwale)
4m before the Gunwale Stop Position the alarm will sound
every 2m.
The diagram above shows the display when winding in using the Technical
Lever in HI.
1
At the Gunwale Stop Position (in this case at 6.0m) the alarm
will sound (peep-peep) and the motor will automatically stop.
After the motor has stopped you can raise the rod vertical and have the
rig come straight to your hand as shown in the diagram above.
2
Page 38

38
The Auto Depth Alert can be programmed automatically or manually.
Any depth past 6.1m where the rig stops for
more than 6 seconds is automatically saved as
the target depth and is shown in the bottom
right hand corner of the display when the rig
is stopped at the Gunwale Stop Position (the
figure shown above inside the square).
If the rig stops for more than 6 seconds more than once,
the last depth is saved as the target depth. If the rig
stops for less than 6 seconds then the maximum depth
will be reached and saved in the memory.
The example shown in the diagram above is for TopDown Mode. The figures shown on the display are for
illustration purposes only.
Auto Manual
Lower the rig to the target depth (6.1m or
more) and press Memo.
オート
(Auto) will disappear from the display. In
the diagram above, a depth of 102m has been saved
manually (the figure shown above inside the square).
In Bottom-Up Mode, the current depth is set to
0.0m.
The Auto Depth Alert can be set as many times as
you like.
Auto Depth
Alert
Peep-Peep
Peep
Press
Hold
Programming Target Depth and Bottom Depth
Press Memo for more than 3 seconds
when the rig is at the Gunwale Stop
Position to change back to auto mode.
Changing from Manual to Auto
Page 39

39
The alarm will sound 4m before the saved depth.
When lowering the hook the alarm will sound (peep) every 2m
from 4m before the saved depth.
1
At the saved depth (in this case 100m) the alarm will sound
(peep-peep).
The alarm will only sound only once in each cast.
2
Peep
Peep
Peep-Peep
Page 40

40
Choose between
Top-Down and Bottom-Up Modes
fishing technique and target species, this
position may be given as the distance from
the surface or the distance from the bottom.
This reel is ideally suited to either situation as
it has both a Top-Down Mode and a BottomUp Mode.
Select between modes according the
situation at hand.
The secret to improving your catch is being
able to accurately position your rig at the
depth where the fish are.
With the latest high-performance fish finders
it is possible to see the exact depth that the
fish are at. The skipper of the vessel will
normally give you this information.
Depending on factors such as fishing ground,
Present Depth
Bottom
Target Zone
Bottom
Surface-Down/
Bottom-Up
Modes
Changing Mode
When the power is turned ON the reel will
be in Top-Down Mode. Use the procedure
shown below to change modes.
When the motor is stopped in Standard
1.
Mode, press Menu once.
底
(Bottom-Up Mode) will flash.
Press Enter and
2.
will be displayed
next to
底
to indicate Bottom-Up Mode.
Repeat the procedure to select to TopDown Mode.
Please see Pages 12~13 for details regarding
menu button operation.
Finding the Target Depth
底 flashes.
②
will be
displayed to indicate
Bottom-Up Mode.
③
Press once
①
Press
②
Page 41

41
Target Zone
Bottom
Wind Up
Find the Bottom
Peep-Peep
Peep
Peep
Peep
Wind Up
through the
Target Zone
Target
Zone
Top-Down Mode Example
Allow the rig to drop to the bottom.
1
On subsequent drops the alarm will
sound when the rig reaches the saved
depth.
3
Wind the rig up to the target depth.
Press Menu to save the target depth.
The above procedure is used when you want to
know the depth of the bottom. However, it is also
possible to drop the rig to the target depth and
then press Memo to save that depth.
2
•The skipper indicates that the fish are at a depth of 55m.
Page 42

42
* When dropping
the rig the distance
from the surface
is displayed.
Wind Up
Subsequent
Drops
1
Wind up the rig to
the target depth.
2
Wind up to the
target depth.
Wind up the
specified number
of meters.
Peep-Peep
Peep-Peep
Peep
Peep
Peep
Peep
Peep
Peep
Initial Drop
3
Redrop the rig and
once it hits the bottom
press Memo.
• A depth of 59.7m from
the surface is saved.
• At the same time the
present depth is
displayed as 0.0m.
Target Zone
Bottom
Once the rig reaches a depth of
10m the display will automatically
change to Top-Down Mode to give
an indication of how far it is from
the Gunwale Stop Position.
(Previous Depth)
Explanation
When the skipper says the fish are a certain number of meters from the
bottom, lower the rig to the bottom and the wind it up the required
number of meters.
Explanation
When the skipper says the fish are a certain number of meters from the
bottom, lower the rig to the bottom and the wind it up the required
number of meters. (Normally bait is scattered at this time.)
Bottom-Up Mode Example
•The skipper indicates that the fish are 2m
from the bottom.
Allow the rig to hit the bottom and then press Memo.
• The depth from the surface is saved.
• The present depth is displayed as 0.0m. When you wind up the rig
the depth from the bottom will be shown as a positive number on the
display.
1
Page 43

43
• The reel will start up in Rakuraku Mode.
• Press Menu for more than 3 seconds to change between
Rakuraku Mode and Fixed Speed Mode.
You can change modes when winding in.
• The current mode is shown on the display.
Rakuraku Mode: Green backlight. (
楽
is displayed.)
Fixed Speed Mode: Orange backlight. (速 is displayed.)
Regardless of the size of the fish, or in other words the load
on the reel, Fixed Speed Mode adjusts motor settings to wind
in your fish at a set speed*.
* Speed is the spool rotation speed of the spool.
What is Fixed
Speed Mode?
Changing between Rakuraku Mode
and Fixed Speed Mode
Technical Lever
Used to set Fixed Speed Mode
and Rakuraku Mode.
Rakuraku Mode |
Fixed Speed Mode Button
Used to change between Rakuraku
Mode and Fixed Speed Mode.
Shows the position of
the Technical Lever.
Present Mode
Rakuraku Mode: Green backlight (楽 is displayed).
Fixed Speed Mode: Orange backlight (速 is displayed).
Rakuraku Mode
| Fixed Speed
Mode
Winding In: Rakuraku Mode | Fixed Speed Mode
(Continued on the next page.)
Technical
Lever
Page 44

44
What is Rakuraku Mode?
Rakuraku Mode maintains line tension at the level you set.
In other words, the reel senses the tension (load) on the line
and automatically adjusts motor rotation speed to maintain a
constant tension.
In other words…
• It adjusts motor speed to
compensate for sudden
changes in tension caused by
the movement of the fish and
the vessel.
• The motor takes up any
sudden slack in the line when
tension decreases due to
factors such as when the rod is
lowered during pumping.
• It avoids the tug of war that
occurs between the motor and
the fish.
• This is particularly useful when
fishing in rough water where it
is impossible to maintain a
constant tension on the line
manually by using the rod.
It makes reeling your fish in so easy that
you just need to enjoy your fishing.
It also has the following advantages…
• It can handle any kind of fishing other than live bait fishing.
Rigs with only a light load can be recovered at maximum speed
without having to worry about adjusting motor speed, which
makes life easy and means that you can concentrate on fishing.
• Adjust tension can quickly and easily using the Technical Lever.
• Maximize rig strength by eliminating the tug of war that
occurs between the motor and the fish.
• Settings are adjusted using the Technical Lever (see the
previous page for details).
There are
31
tension settings that can be selected using the
Technical Lever.
These are displayed as shown in the diagram.
• Settings
1~4
are for dead slow.
At some tension setting the weight of the sinker can stop the
rig from being wound in. In such cases increase the tension.
Setting Rakuraku Mode
Technical
Lever
* The factory settings are the same as Rakuraku Mode.
Page 45

45
Always check that Jigging Mode is turned
OFF before adjusting Smart Line Depth. If it
is ON and jigging starts, then the line can be
wound in and cause unforeseen injuries.
Caution
Press
is displayed.
The reel can replicate the popular jigging function.
This is particularly handy when you want to fish all day using this technique.
Jigging Mode
(Continued on the next page.)
Jigging
Mode
With the motor stopped and the reel in
Standard Mode, press Menu repeatedly
until
さそい
flashes on the display.
Caution:
The settings and values shown on the display
are for illustration purposes only. Actual
settings and values may differ.
1
Press Enter and will be displayed to
indicate that Jigging Mode is ON.
Carry out the same procedure again
when you want to turn Jigging Mode
OFF.
Please see Pages 12~13 for details regarding
menu button operation.
2
L1 is displayed.
②
Press
Repeatedly
Press Menu repeatedly
until L1 is displayed.
Press Menu repeatedly
until
さそい
flashes
on the display.
Flash
Page 46

46
Caution: The settings and values shown on the display are for illustration purposes only. Actual settings and values may differ.
Caution
Do NOT press for more than 3 seconds.
If you press Enter for more than 3 seconds then the reel will adjust
the Smart Line Depth and an error will be shown on the display. If
this happens, either carry out Line Learning again or wind the rig in
manually until it gets to the surface and then reset 0m.
(When carrying out this at 65m as shown above, the display will
show -65m when reset.)
3
Press Enter again to repeat jigging in Jigging Mode.
Press Enter again during jigging to stop and start jigging.
さそい
will flash during Jigging.
* If you start to retrieve your rig using the Technical Lever during jigging
then jigging will be cancelled.
* The motor will stop after the Gunwale Stop.
L1 is displayed.
2.8
seconds
0.4
seconds
0.4
seconds
Start Jigging
Select from 27 speeds in
Fixed Speed Mode.
Press
さそい
flashes in
Jigging Mode.
Retrieve at speed 28 in
Fixed Speed Mode.
Page 47

47
This reel consists of precision electrical components. Please read and follow
the instructions below. Proper maintenance after every fishing trip is
recommended to ensure that you will be able to enjoy using the reel for many
years to come.
Cleaning Your Reel
(When you notice a deterioration in spool rotation.)
• If the spool is not rotating as smoothly as usual even after normal
maintenance then this may indicate that there is a build-up of salt
in the bearing near the handle.
* Remove the power cord.
Carefully immerse the reel
1.
in freshwater up to spool as
shown in the diagram.
Do NOT immerse the whole reel.
Rotate the spool to dissolve the
salt and regain performance.
Immerse up to
this point.
way as if the bearings were rusty. It is almost impossible to remove dried salt
from inside the bearings and even though Anti-Rust Bearings are used there is
no alternative other than to completely replace the bearings. Please bear this in
mind when using your reel. We strongly recommend that you have maintenance
carried out on a regular basis.
* Please detach the power cord from the reel when in storage.
Remove the reel from the water and hold it up with the connector
2.
side facing down to ensure that the water completely drains from
inside the reel.
If that does not improve the situation, please contact your
nearest sales office to have the reel overhauled.
Caring for Your Reel
* Remove the power cord and
make sure that the reel has
completely cooled down before
you start any maintenance.
Tighten the drag.
1.
Wash the outside of the
2.
reel with water, using a wet
sponge to remove any dirt.
* Do not immerse the reel in
water.
Disengage the clutch to let out 2~3m of line while washing between
3.
the spool and reel to get rid of the salt as shown in the diagram.
Loosen the drag completely and leave the reel to dry in a shady
4.
place.
* Wash or lightly brush the alligator clips using freshwater to get rid of
any impurities from seawater.
* Salt Build-Up in the Bearings
While Anti-Rust Bearings are especially resistant to salt water, they are not,
however, designed to prevent salt water from penetrating inside the bearings.
If basic maintenance is neglected, seawater may remain inside the bearings and
when it dries it may cause the bearings to run roughly or seize. Although in such
a case the bearings will not rust, the reel will run roughly and noisily in the same
Handing Instructions
(Continued on the next page.)
Page 48

48
Precautions
• One of the characteristics of powered reels is that even though the
motor is ON, sometimes line will not get wound in if a fish is hooked
because the drag is slipping. This is similar to an automobile going
along with the handbrake on. If this goes on for a long time, then the
oil in the drag will be burn off and eventually the drag will burn out.
Take care not to allow this to happen as it could destroy the entire
reel.
• When the line is caught, do NOT exert excessive force on the rod or
reel. Instead, please cut the line after taking care to minimize the
amount of line left in the fishing ground.
• Please take care when handling the reel. Never throw it in your bag or
allow it to bang against other items during transportation.
• NEVER drop or hit the reel. Treat it carefully.
• Take care not to hit the back of the reel or bend the power cord when
putting the reel into a rod stand. Take special care not to trap the
power cord between the reel and the gunwale.
• Some types of polarizing sunglasses make it difficult to properly view
the display.
• After winding in a heavy load, take care when dropping the rig and
winding it in the next time as the rig may get tangled with the tip of
the rod.
• If the resin footing of the reel is secured to a metal reel mount,
this may damage the resin and can ultimately damage the whole
reel. Please make sure the resin protector is properly in place when
attaching the reel to a metal mount.
Maintaining Your Reel
• Regular Maintenance - Please contact your nearest service center.
The condition of the reel is greatly influenced by not only frequency
of use, but also the environment in which it is used, how it is used
and the target species. If any abnormality is detected, please contact
your nearest service center through the nearest retailer immediately.
A regular professional maintenance check once every six months is
highly recommended.
• Always remove the power cord from the reel before storing it.
• Place the protective cap on connectors when the reel is not in use.
• NEVER try to disassemble the reel as this can damage internal
electrical components such as the motor and circuit breaker and may
cause the reel to malfunction.
• NEVER oil the drag mechanism as this may decrease performance.
• Leaving the reel in high temperature, high humidity conditions for a
long period of time may cause deformation or weakness. Always store
in a cool, dry place after carrying out regular maintenance.
• NEVER immerse the entire reel in water,
especially the display. (Although the
display is shower proof it is best to avoid
immersing it in order to prevent any
trouble.
Page 49

49
• Please use Shimano Reel Grease to extend the life of your reel.
Apply the grease at the locations shown in Figure 1 and 2.
Shimano Genuine Reel Grease Spray (SP-023A)
Figure 1. The end of the power cord.
It is more effective to apply grease to the terminals
in the socket of the reel.
Apply grease to the
end of the power cord.
Screw
Apply grease.
(Back of the reel.)
Figure 2. The worm shaft and sides of the worm shaft.
Safety Features
• Automatic Circuit Breaker
The motor will turn ON and OFF at 1 second
intervals if there is excessive load on the reel. This
is normal.
When that happens, the circuit breaker will trip and the display will flash.
Leave it flashing for 5 minutes to protect the motor. Learning data will be
saved even if the line is wound in or fed by hand. The motor will start to
operate again when the flashing stops.
• Battery Status Display
When battery voltage drops below 10.5V (13.5V
for the lithium-ion battery), or when the power
cord is not properly connected, the battery icon
will be displayed. Check the connection first. If there is no problem with
the connection then the battery will need to be charged.
• Technical Lever Breakage
Please refer to the Inquiries | After Sales
Service section to have the unit repaired if this
error message is shown in the display.
* Do NOT wind or unwind the line when this error message
is displayed. Line Learning will be inaccurate.
• If Voltage is Too High
This error message will be displayed if a
voltage of more than DC28V is applied. Please
check the power source and make sure that it
provides between 12V and 14.8V
• Inaccurate Line Learning Operation
This error message indicates inaccurate Line
Learning. Carry out Line Learning again.
Page 50

50
• Standard Accessories
Power Cord, Operating Manual, Component Diagram,
Line Threading Pin, 10m line
• Caution
Take care not to cause backlash or the line may be caught between the
spool and the frame.
Maximum
Winding Speed
Maximum Drag
Actual Winding Speed
136
m/min.
116
m/min.
146
m/min.
Maximum
Winding Strength
25.0
kg
241N
5.0
kg
49.0N
4.2
kg
41.2N
Actual Maintainable
Winding Strength
185
m/min.
2kg (Load) 3kg (Load)1kg (Load)
Retrieval speed when
winding the line in
with no load.
Maximum drag for
Shimano boat reels
is the drag produced
when a person pulls
the reel with one
hand.
Reference
The time required for bringing a rig to the surface from 100m.
Actual winding speed is for example, is the speed at which a specific
load can be reeled in from 100m at maximum speed using a #1000
series reel with 280m of POWER PRO 0.32 diameter line.
Measuring Conditions: A 12.5V power supply at 15~20°C. (Speed will be
higher if a higher voltage lithium battery is used.)
* Measurements may fluctuate according to the environment in which the
reel is used.
The winding strength
that can be maintained
for an extended period
of time.
The actual maintainable
winding strength is
the weight of the load
when the circuit breaker
actually trips under the
gradually increasing
load.
Specifications
• Power Supply (DC Only)
DC12V (Compatible with lithium batteries.)
Model
Number
DENDOUMARU
1000 PLAYS
Spool Dimensions
(diameter/
width (mm))
49/39
Bearing
Number
(balls/roller)
2 A-RB / 1
Weight
(g)
545
Gear
Ratio
3.9
Winding Capacity
(cm/1 handle
rotation)
60
Handle
Length
(mm)
6051RG241000G
Product Code
Line Capacity (diameter-m)
POWER PRO
0.19-465, 0.23-390
0.32-280, 0.36-275
DENDOUMARU 1000 PLAYS specifications:
1
Page 51

51
2
Maximum
Winding Speed
Maximum Drag
Actual Winding Speed
122
m/min.
120
m/min.
131
m/min.
Maximum
Winding Strength
48.0
kg
467N
15.0
kg
147N
10.0
kg
98.0N
Actual Maintainable
Winding Strength
160
m/min.
2kg (Load) 3kg (Load)1kg (Load)
Retrieval speed when
winding the line in
with no load.
Maximum drag for
Shimano boat reels
is the drag produced
when a person pulls
the reel with one
hand.
Reference
The time required for bringing a rig to the surface from 100m.
Actual winding speed is for example, is the speed at which a specific
load can be reeled in from 100m at maximum speed using a #1000
series reel with 280m of POWER PRO 0.32 diameter line.
Measuring Conditions: A 12.5V power supply at 15~20°C. (Speed will be
higher if a higher voltage lithium battery is used.)
* Measurements may fluctuate according to the environment in which the
reel is used.
The winding strength
that can be maintained
for an extended period
of time.
The actual maintainable
winding strength is
the weight of the load
when the circuit breaker
actually trips under the
gradually increasing
load.
• Standard Accessories
Power Cord, Operating Manual, Component Diagram,
Line Threading Pin, 10m line
• Power Supply (DC Only)
DC12V (Compatible with lithium batteries.)
• Caution
Take care not to cause backlash or the line may be caught between the
spool and the frame.
DENDOUMARU 4000 PLAYS specifications:
Model
Number
DENDOUMARU
4000 PLAYS
Spool Dimensions
(diameter/
width (mm))
68/61.5
Bearing
Number
(balls/roller)
2 A-RB / 0
Weight
(g)
1,230
Gear
Ratio
3.2
Winding Capacity
(cm/1 handle
rotation)
68
Handle
Length
(mm)
7551RG244000G
Product Code
Line Capacity (diameter-m)
POWER PRO
0.32-680, 0.36-675
Page 52

52
Situation What to do
P.14
P.11
Reference
P.14〜P.15
P.16〜P.27
P.16〜P.27
P.16〜P.27
P.32〜P.33
P.36
This happens when the unit is left somewhere at high temperature, such as in a car boot. It
will return to normal when the temperature goes down.
Check to see if the (+) and (--) of the power cord are connected properly to the battery.
Check to see if the battery has sufficient charge.
Check the surface of the alligator clips for foreign objects.
When the LCD display is left in extreme cold (below -15°C), the display will not work for a while
even though the power is turned on. Wait until the circuit board inside the unit warms up.
When fishing in extremely cold conditions, it is recommended that the reel be kept in the cabin
or under cover until it is needed.
Please try the Line Learning process again.
Please try the Line Learning process again.
Please try the Line Learning process again.
Depending on the type of line, sometimes the line gets stretched, which can cause
discrepancies on the display.
This is probably due to winding tension or stretched line. Carry out 0 set.
Gunwale set is only possible between 1~6m.
Settings between 0~1m are rounded up to 1m for safety reasons.
Check if the battery has enough charge.
When the battery does not have enough charge, the motor may work at low speed but not at
high speed. Charge the battery and test the reel. If that does not improve the situation, you
may need a new battery.
The motor may not work when the temperature of the reel is below 0°C. When fishing in
extremely cold conditions, keep the reel in the cabin or leave it ON until it is needed.
Furthermore, the motor does not start when the display shows less than 1m for safety reasons.
The display is black or shows
all characters.
Nothing appears on the display.
Nothing appears on the display
(when used in extreme cold).
Line Learning cannot be set.
The numbers on the display do not
change even when line is fed out.
There is too much discrepancy.
The number on the display does not
match the line depth marks.
The Gunwale Stop position is wrong.
The display is working but
the motor is not.
Troubleshooting
Page 53

53
Situation What to do Reference
P.14
Make sure all the screws on the power cord connector are at the connector. If the boat’s
power supply terminal or the reel’s power cord connector is rusty, the current will not flow
properly. Remove any rust and try again. Battery charge should also be checked.
A condenser is installed under the display unit to protect the reel from fluctuating current. The
condenser may vibrate and make some noise when the reel is used with an unstable power
supply. However, this will not affect reel function so it is OK to keep on using it.
There is a strange sound in the reel
even when not winding.
The motor stops while winding.
In order to enjoy fishing, please turn the power on and check the performance of the reel before you go.
(The motor does not come on unless the line is fed more than 1.1m.)
If above checks still do not improve the situation, please contact the retailer you purchased the reel from and explain the problem in detail.
Page 54

54
INSTRUCTION MANUAL
Please include your telephone number when you send us an inquiry by mail.
It is easier to explain some reel mechanisms on the phone rather than in writing.
• When the reel needs repairing, please take it to the retailer you purchased
it from together with the guarantee and the power cord. We need to know
detail regarding the problem. (E.g. The stopper does not work.)
A charge will be made for the necessary replacement parts and labor. We
cannot compensate for damaged or lost tackle arising from a damaged
Shimano product and/or fishing trip expenses.
• If you wish to order a part or replacement spool, please order from the place
of purchase or your nearest retailer, specifying product name, merchandise
code/product code, part name/number as shown in the component diagram.
(We recommend sending in the whole reel for the repair.)
Example/
Product Name: DENDOUMARU 1000 PLAYS
Product Code: 51RG241000G
Part Number: 2
Part Name: Handle
• Shimano retains fundamental parts (i.e. the parts necessary to maintain
the function of the product) for fishing rod for up to 6 years after the
manufacturing of a particular model is stopped. We may not accept a
request for the repair if parts are not available. Some other minor parts may
not be provided even if it is less than 6 years since the manufacturing of the
product has been stopped.
• Product Code
The top five digits of the product code is recorded on the instruction manual,
component diagram, and bottom or side of the package.
Product Inquiries /After Sales Service Information
Page 55

55
www.shimano.com
PRINTED IN JAPAN
IMPRIME AU JAPON
(100521)
11
Service network
Page 56

•LineThreadingPin
(110218)
 Loading...