

Page 1
M055-E017
Shimadzu Electronic Printer
Instruction Manual
EP-90
READ AND UNDERSTAND THIS MANUAL BEFORE
OPERATION. SAVE THIS MANUAL.
Page 2

- I -
Note
This instruction manual uses the following notation conventions to indicate Safety
Precautions and additional information.
Caution
Indicates a potentially hazardous situation that may
result in injury to personnel or equipment damage.
Note
Provides additional information needed to properly use
the balance.
Caution
To ensure safe and proper operation of the Printer, observe the following
precautions.
• Do not use the Printer in hazardous areas.
This includes areas where the balance is expose to dust or flammable gases
and liquids.
• Use the AC adapter specified by Shimadzu.
To prevent electric shock, never disassemble the AC adapter.
The AC adapter is designed for indoor use only. Do not use the AC adapter
in exterior environments or where it may be splashed by water.
Ensure that the power supply voltage meets the indicated range of the AC
adapter.
• Handle the printer carefully.
This printer is a precision instrument.
• Do not disassemble the printer.
Safety Precautions
Page 3

- II -
Shimadzu Corporation declares that the following product:
EP-90 Electronic Printer
conforms to the following directives.
Directives
EMC directive 89/336/EEC amended by 92/31/EEC, 93/68/EEC
EN55022: 1994 / A1: 1995 / A2: 1997 (Class B)
EN55024: 1998
EN61000-3-2: 1995 /A1: 1998 /A2: 1998, EN61000-3-3: 1995
Low Voltage directive 73/23/EEC amended by 93/68/EEC
EN60950: 1992 /A1: 1993 /A2: 1993
Weighing Instruments Department
Analytical & Measuring Instruments Division
SHIMADZU CORPORATION
1, Nishinokyo-Kuwabaracho
Nakagyo-ku, Kyoto-shi
604-8511 JAPAN
Declaration Of Conformity
Page 4

- i -
Safety Precautions
Declaration Of Conformity
1. Introduction ..........................................................................................1
2.
Packing List and Component Names
............................................................2
2.1 Packing list............................................................................................................... 2
2.2 Main unit components.............................................................................................. 2
3. Installation ............................................................................................3
3.1 Installation Site......................................................................................................... 3
3.2 Power ....................................................................................................................... 3
3.3 Installation ................................................................................................................ 5
3.3.1 Connecting to power (when using AC adapter).............................................. 5
3.3.2 Loading batteries (when using batteries)........................................................ 5
3.3.3 Loading printer paper...................................................................................... 6
3.4 Connecting the Balance........................................................................................... 8
4. Functions and Operation..................................................................... 9
4.1 Key Switches and Functions.................................................................................... 9
4.2 Basic Operation.......................................................................................................11
4.3 ID Number.............................................................................................................. 12
4.3.1 Setting ID number......................................................................................... 12
4.3.2 Printing of ID number.................................................................................... 12
4.4 Sample Number ..................................................................................................... 13
4.4.1 Setting sample number................................................................................. 13
4.4.2 Printing of sample number............................................................................ 13
4.5 xK Mode ................................................................................................................. 14
4.5.1 Setting constant K......................................................................................... 14
4.5.2 Printing of the result of constant multiplication ............................................. 14
4.6 Statistic Calculation Mode...................................................................................... 15
4.6.1 Setting statistical calculation mode............................................................... 15
4.7 Comparator Mode (checkweighing)....................................................................... 17
4.7.1 Setting comparator thresholds...................................................................... 17
4.7.2 Turning comparator mode on ....................................................................... 18
4.7.3 Turning comparator mode off........................................................................ 18
4.8 Auto Print Mode ..................................................................................................... 19
4.9 Date Output............................................................................................................ 19
Contents
Page 5

- ii -
Contents
4.10 Combined Use of Functions ................................................................................... 20
4.11 Print-out Examples by Function ............................................................................. 21
5.
Communication and Other Settings
..........................................................25
5.1 DIP Switches .......................................................................................................... 25
5.2 Settings................................................................................................................... 26
5.2.1 Communication Setting 1 (Baud rate)........................................................... 26
5.2.2 Communication Setting 2 (Parity) ................................................................. 26
5.2.3 Communication Setting 3 (Delimiter) ............................................................ 26
5.2.4 English / Japanese........................................................................................ 27
5.2.5 Buzzer ON/OFF ............................................................................................ 27
6. Maintenance........................................................................................28
6.1 Refilling Printer Paper ............................................................................................ 28
6.2 Replacing Ink Ribbon Cartridge ............................................................................. 28
6.3 Replacing Batteries ................................................................................................ 28
7. Troubleshooting .................................................................................29
8. Parts List .............................................................................................30
9. Specifications .....................................................................................31
10. Dimensions .........................................................................................32
Page 6

1
1. Introduction
1. Introduction
Shimadzu Electronic Printer EP-90 is designed to be used with Shimadzu Electronic Balances. It is
easy to operate and useful for a wide range of applications and measurement administration.
Capability of battery operation is convenient for field use and transportation. Printing method is impact
dot on normal paper, which is suitable for long-term storage. Commands for printing, taring, auto print
and other balance functions can be sent to the balance with the EP-90 printer keys. ID number,
sample number, date and time can be input when printing the measurement results. Statistic
calculation function allows up to 1000 samples to be calculated and prints out the results.
Page 7
2
2. Packing List and Component Names
2.
Packing List and Component Names
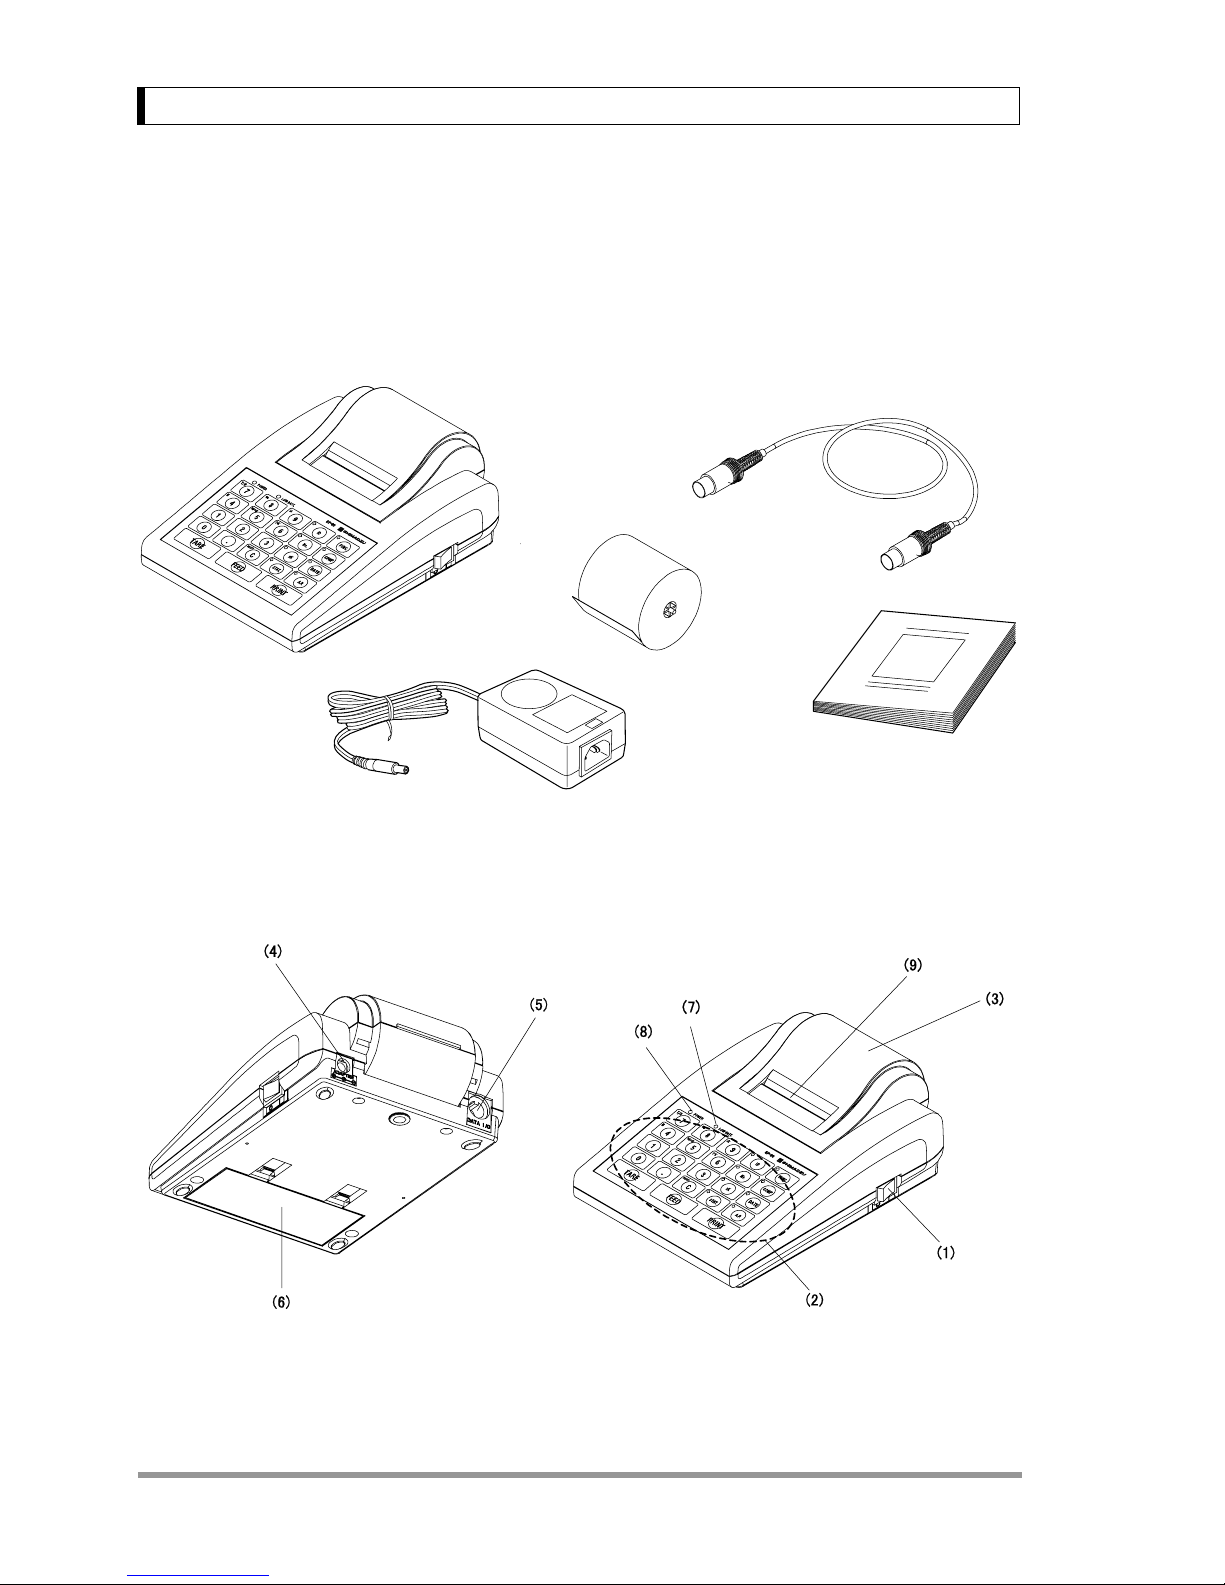
2.1 Packing list
Unpack and verify that the following standard packed items (one each) are present.
The shape of the supplied AC adapter may differ from the figure above.
2.2 Main unit components
(1) Power switch (2) Key switches (Number keys and command keys)* (3) Printer paper cover
(4) Power connector (5) Data I/O connector (6) Battery cover (7) LOW BATT lamp
(8) Power indication lamp (9) Cutter
*Refer to “4.1 Key Switches and Functions” for the names and functions of key switches.
Printer Main Unit
A
C Adapte
r
Connection Cable
Instruction manual
Printer Paper and
Printer Paper Shaft
Page 8
3
3. Installation
3. Installation
3.1 Installation Site
Caution
For safe and proper operation, avoid sites where EP-90 is exposed to the following:
• Corrosive or flammable gasses
• Dust, wind, electromagnetic waves, or magnetic fields
• Direct sunlight
• Extreme temperature, temperature changes or humidity
3.2 Power
EP-90 can be operated either with AC adapter or with batteries.
(When using AC Adapter)
Choose a site where the standard AC adapter can be used.
Make certain the supplied power voltage meets the AC adapter's specification.
Remove batteries when using AC adapter.
(When using batteries)
Use alkaline batteries only.
Disconnect AC adapter when using batteries.
Make certain to turn power switch off after use.
Replace with new batteries promptly when LOW BATT lamp is illuminated.
Page 9
4
3. Installation
Caution
Observe the following instructions about handling batteries.
1. Load batteries observing the polarity.
2. Do not mix new and used batteries.
3. Do not mix batteries of different kinds.
4. Do not use any rechargeable batteries.
5. Remove and dispose of used batteries as soon as LOW BATT lamp is illuminated.
6. Remove batteries when printer is not in use for a long period.
Caution
Use the AC adapter supplied by Shimadzu representative only. (DC 9V-12V, 2A) Using other
adapters may cause failure. When EP-90 is not in use, disconnect AC adapter from power
source.
Page 10
5
3. Installation
3.3 Installation
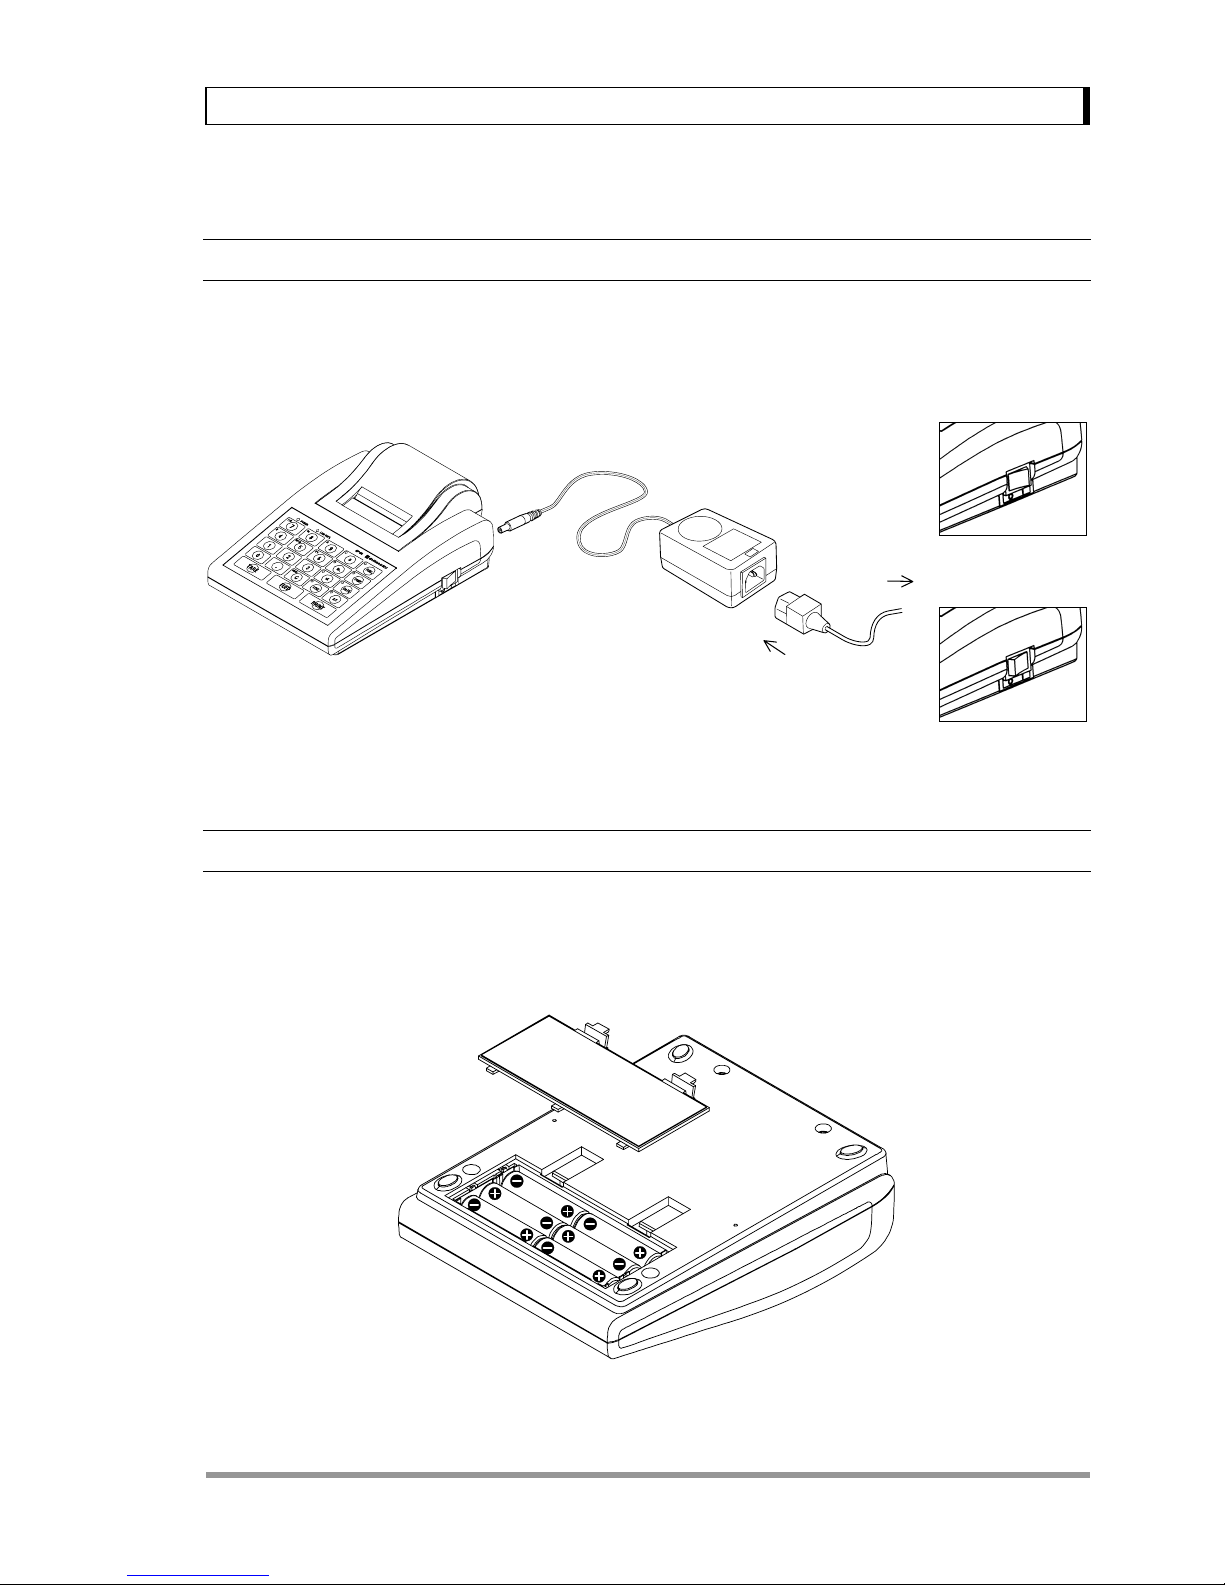
3.3.1 Connecting to power (when using AC adapter)
Verify power switch is off.
Connect AC adapter to EP-90. Connect AC adapter to designated power source.
The shape of the supplied AC adapter may differ from the figure above.
3.3.2 Loading batteries (when using batteries)
Disconnect AC adapter. Turn power switch OFF.
Turn over the printer main unit and remove battery cover. Load batteries as shown in the figure.
Load batteries correctly observing the polarity shown in the figure. Use alkaline batteries only.
Switch OFF
Switch ON
Power Cable
Power
Source
Page 11
6
3. Installation
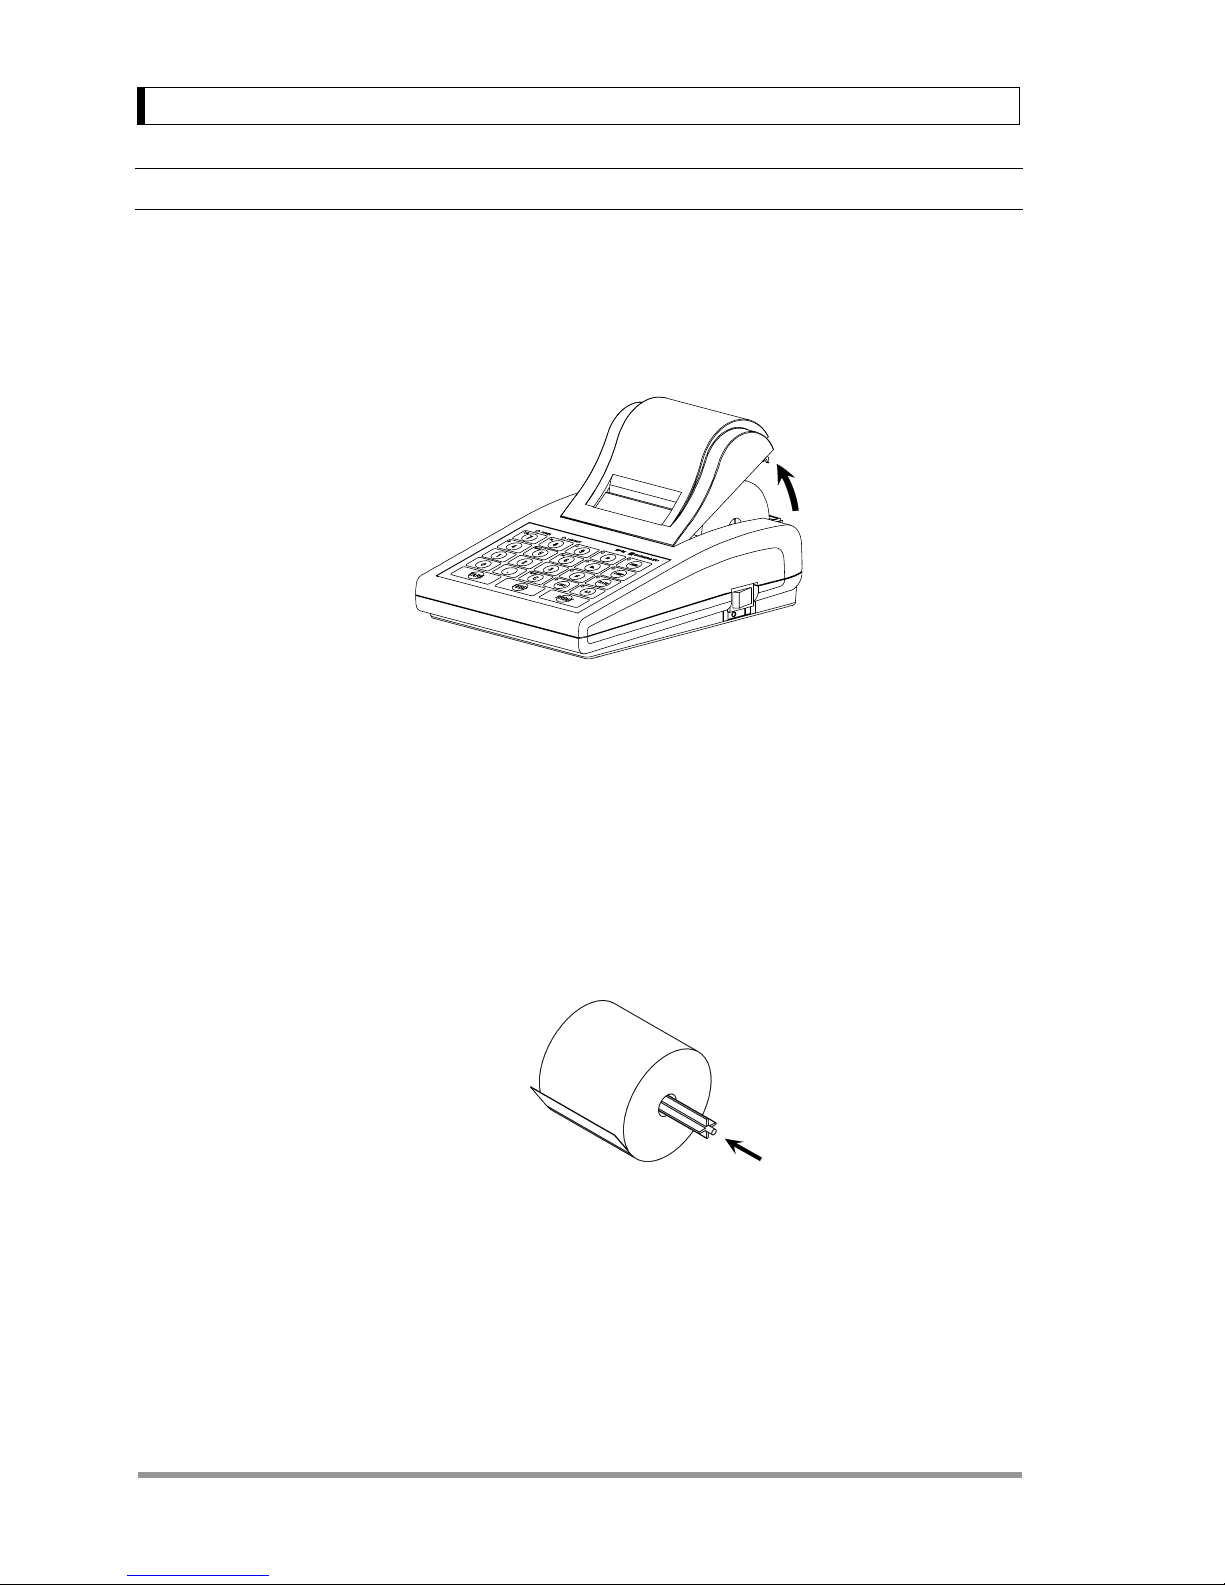
3.3.3 Loading printer paper
Connect AC adapter or load batteries.
Remove printer paper cover.
(How to remove printer paper cover)
Lift rear of printer as shown in the figure.
(When replacing, take out the remaining roll and pull out printer paper shaft.)
Verify there are no bends or folds in the paper end.
Insert printer paper shaft to the center of the paper roll as shown in the figure. (Printer paper shaft is
inserted when EP-90 is delivered)
Turn power switch ON.
Page 12

7
3. Installation
Keep pressing FEED key while inserting the printer paper end into the slot of the printer mechanism as
shown in the figure. Feed the paper until its end comes out.
Place printer paper shaft on the bearings and tension the paper.
Close printer paper cover.
(How to fit printer paper cover
)
Slide printer paper cover forward as shown in the figure, then lower the rear to close it.
Bearing
Page 13

8
3. Installation
3.4 Connecting the Balance
Cable connection
Turn OFF the balance and EP-90.
Firmly attach connection cable to the I/O connectors of the balance and EP-90.
Turning power ON/OFF
Follow the sequence below when turning ON/OFF.
(1) When turning ON
Turn ON the balance first and then EP-90.
(2) When turning OFF
Turn OFF EP-90 first and then the balance.
Page 14

9
4. Functions and Operation
4. Functions and Operation
4.1 Key Switches and Functions
Basic operation requires keys and
functions marked by bold frame only.
Function
Description
Key / Name
Key category
/ Name of
attached
lamp
Main
Function
(when
Function
lamp is OFF)
Sub Function
(When Function lamp is ON)
(*1)
Command
code sent
to the
balance
(*2)
PRINT
(Refer to 4.2)
Command key Command the balance to send data.
(*7)
D05
FEED
(Refer to 4.2)
Command key Feed printer paper. None
TARE
(Refer to 4.2)
Command key Command the balance tare the display.
(*8)
T
0
Number key Numeral 0 None None
1
Number key Numeral 1 None None
2
Number key Numeral 2 None None
3
Number key Numeral 3 None None
4
Number key Numeral 4
Turn ON the balance’s formulation mode.
(Ignored if the balance doesn’t have formulation
mode)
M
(*6)
Page 15

10
4. Functions and Operation
Function
Description
Key / Name
Key category
/ Name of
attached
lamp
Main
Function
(when
Function
lamp is OFF)
Sub Function
(When Function lamp is ON)
(*1)
Command
code sent
to the
balance
(*2)
5
Number key Numeral 5
Unit switching on the balance between % and
gram
G
(*6)
6
Number key Numeral 6
Turn On the balance’s animal weighing mode
(Ignored if the balance doesn’t have animal
weighing mode)
A
(*6)
7
Number key Numeral 7
Turn OFF the balance’s application mode
(formulation, animal weighing, add-on, etc.)
R
(*6)
8
Number key Numeral 8
Setting the balance’s per cent display mode
(Switching the unit to % and setting the current
load as 100 %)
%
(*6)
9
Number key Numeral 9
Turn On the balance’s Add-on mode
(Ignored if the balance doesn’t have Add-on mode)
+
(*6)
.
(decimal point)
Number key
Numeral
decimal
point
None None
C
(Reset)
Number key
Clear
numeral
input
Clears the numerical values set by ID Number,
Sample Number, Comparator, and xK functions of
EP-90. Also clears the above four functions and
date output.
(When in statistic calculation mode, prints the
results.)
None
FUNC
Command key /
Function lamp
Assign sub functions to part of number keys
(*1)
None
ID
(Refer to 4.3)
Command key /
ID lamp
Store the set number as the ID and prints it with the weighed
result. Maximum 10 digits.
None
No.
(Refer to 4.4)
Command key /
No. lamp
Store the set number as the Sample number and print it with the
mass data (weighed result). Sample number is counted up at
each data output. Maximum 10 digits.
(0000000001 to 9999999999)
None
xK
(Refer to 4.5)
Command key /
xK lamp
Store the set number as constant K and print the mass value
multiplied by K. K: up to 8 digits including decimal point.
None
STAT.
(Refer to 4.6)
Command key /
STAT. lamp
Enter statistic calculation mode. None
COMP
(Refer to 4.7)
Command key /
COMP lamp
Enter comparator (checkweighing) mode.
(*5)
None
A.P.
(Refer to 4.8)
Command key /
Auto Print lamp
Turn ON/OFF the balance’s auto print function
(*3)
D06 / D09
DATE
(Refer to 4.9)
Command key /
DATE lamp
Receive date and time from the balance and print them.
(*4)
TIME
(*1) Function lamp is turned ON and OFF every time FUNC key is pressed. Sub function is assigned to number key, only when
Function lamp is ON.
(*2) Pressing the indicated key of EP-90 is equivalent to sending the command code here from a computer to the balance. For
further information on command codes, refer to the balance’s instruction manual. When the connected balance is not
equipped with the concerned function, the command is not recognized.
(*3) This key on EP-90 only turns it ON/OFF. With balance series for which detailed conditions of auto print function can be
selected (UW/UX, BW-K/BX-K etc.), the current settings on the balance remain valid. Refer to the balance’s instruction
manual for the details. Auto print is activated even with the series for which auto print cannot be set on the balance (BL,
EL/ELB etc.). As soon as stability is resumed after sample is loaded at zero display, the mass value is automatically printed out.
(*4) Only with the balances equipped with built-in clock. Refer to the balance’s instruction manual for details of built-in clock.
(*5) Receives the mass data from the balance, then EP-90 processes it and print out the checkweighing result. This function
works separately from the checkweighing functions of UW/UX series, BW-K/BX-K series, etc. Works with any balance
connected to EP-90.
Page 16

11
4. Functions and Operation
(*6) Command code is output only when Function lamp is ON.
(*7) Equivalent to pressing the PRINT key of the balance
(*8) Equivalent to pressing the TARE or O/T key of the balance
Combined use of functions of EP-90 printer
X indicates available combination for simultaneous use.
ID number
X
Sample number
X X
xK Mode
X X X
Comparator
X X X
Auto Print
X X X X X
Statistic calculation
X
Date output ID number Sample
number
xK Mode Comparator Auto Print
Combined use of functions of EP-90 printer and functions of the balance
Date output, ID number, Sample number, xK Mode of EP-90 printer can be simultaneously used with
any function of the balance that involves data output. At every mass data output, these EP-90’s
functions operate the same way as when mass data is output by pressing the print key.
(e.g.) While formulation mode of the balance is used, if ID number and Sample number
functions are ON, lines of ID/Sample numbers are inserted before each component
mass value. Turn off EP-90’s functions if they are not desired for each component.
4.2 Basic Operation
While weighed result is displayed on the balance, if PRINT key of EP-90 or PRINT key of the balance
is pressed, the displayed value will be printed out with an indication of the weighing unit.
Depending on the balance series, additional data apart from weighed results such as calibration report,
application measurement results, date and time may also be output to EP-90 for printing. The PRINT
key of the balance or the balance's function menu should be used to output such items. Refer to the
balance's operation manual for instructions.
Page 17

12
4. Functions and Operation
4.3 ID Number
4.3.1 Setting ID number
The ID number is a 10 digit character string which can consist of both numerals and
decimal points.
When fewer than 10 digits are entered, zeros fill in to the left of the entered numbers to
total 10 digits.
If entering more than 10 digits is attempted, an error message “ERR” is printed out.
[setting procedure]
Verify function lamp
is off. If not, press FUNC key
to turn it off.
Verify ID lamp
is off. If not, press ID key to turn it off.
(example)
(1) Press Reset key
.
(2) Key in ID number. 1 2 ・ 3 4 ・ 5 6
(3) Press ID key . Print-out ID:12.34.56
4.3.2 Printing of ID number
While ID number lamp is on, upon printing mass data, ID number is
automatically printed as a line before mass data.
Toggle ID key
to turn ID number lamp on/off.
(example)
ID:12.34.56
_________________99.94g
In order to print the currently set ID number, press ID key
when ID number lamp
is off.
Page 18

13
4. Functions and Operation
4.4 Sample Number
4.4.1 Setting sample number
Sample number is counted up at each data output.
The sample number is a 10 digit integer that cannot include a decimal point.
When an integer of fewer than 10 digits is entered, zeros fill from the left to total 10
digits.
If entering an integer of more than 10 digits or a decimal point is attempted, an error
message “ERR” is printed out.
[setting procedure]
Verify function lamp
is off. If not, press FUNC key to turn it off.
Verify sample number lamp is off. If not, press No. key to turn it off.
(example)
(1) Press Reset key
.
(2) Key in sample number. 1 2 3 4 5 6 7 8
(3) Press No. key . Print-out NO.0012345678
4.4.2 Printing of sample number
While sample number lamp is on, upon printing mass data, sample number is
automatically printed as a line before mass data.
Sample number is counted up at each data output.
Toggle No. key
to turn sample number lamp on/off.
(example)
NO.0012345678
_________________49.97g
NO.0012345679
_________________49.97g
In order to print the currently set sample number, press No. key
when sample
number lamp is off.
Page 19

14
4. Functions and Operation
4.5 xK Mode
4.5.1 Setting constant K
The constant K is a positive number of 8 or fewer digits including one decimal point.
[setting procedure]
Verify function lamp
is off. If not, press FUNC key to turn it off.
Verify xK lamp
is off. If not, press xK key to turn it off.
(example)
(1) Press Reset key
.
(2) Key in constant K. 0 ・ 5
(3) Press xK key . Print-out K=_________O.5
4.5.2 Printing of the result of multiplication by constant
While xK lamp is on, the mass value from the balance is multiplied by the
constant K and printed.
Toggle xK key
to turn xK lamp on/off.
(example)
K=_________O.5
*K_______24.98
In order to print the currently set constant K value, press xK key
without setting
numeral when xK lamp is off.
Page 20

15
4. Functions and Operation
4.6 Statistic Calculation Mode
While STAT. Lamp is on, EP-90 collects each mass value that is printed from the balance and
performs statistical calculations on these values when each set is complete.
4.6.1 Setting statistical calculation mode
Press STAT key when STAT. lamp is off.
STAT. lamp turns on and statistical calculation mode is entered.
(example)
(1) Press STAT key
.
(2) Place a container on the balance.
(3) Press TARE key
.
(4) Place the sample into the container to weigh it.
(5) Print the weighed result by pressing PRINT key
and unload the balance.
(6) Repeat (2) through (5) for the rest of samples in a set. The samples are
automatically numbered in sequence.
(7) When all the samples have been weighed, press STAT key
to print out the
result of statistical calculations for the set of samples. STAT. lamp goes off.
The results of statistic calculation are printed out in the following order.
Order in print out Statistics Symbol in print out Description
1 Number of samples N
2 Total T
3 Maximum MAX
4 Minimum MIN
5 Range RNG = MAX – MIN
6 Mean MEAN = T / N
7 Standard deviation SD
1N
)MEANXi(
2
−
−
∑
Page 21

16
4. Functions and Operation
• Statistics of up to 1,000 samples can be calculated. When the number of samples reaches 1,000,
statistic calculation will be automatically performed, the results will be printed out, and the printer
will exit statistic calculation mode.
• Once the results of statistic calculation have been printed out and the statistic calculation mode
has been exited, the data that has been obtained up to that point can no longer be recalled.
The number of significant figures is 7 in EP-90. The calculated values may contain errors due to
the smaller number of digits of weighing data depending on the balance model.
(Example of print out)
Page 22

17
4. Functions and Operation
4.7 Comparator Mode (checkweighing)
When COMP lamp is on and mass value from the balance is printed, checkweighing result
“LOW”, “OK” or “HIGH” will be attached to each mass value. Checkweighing is performed according to
the two preset thresholds as below.
HIGH (over)
HIGH threshold
OK (pass)
LOW threshold
LOW (under)
4.7.1 Setting comparator thresholds
[setting procedure]
Verify function lamp
is off. If not, press FUNC key to turn it off.
Verify COMP lamp is off. If not, press COMP key to turn it off.
Set HIGH threshold and LOW threshold in this order as the following.
Note
After HIGH threshold has been set, it is stand-by for the LOW threshold setting.
At this time, key operations except for , , and are invalid.
(example)
(1) Press Reset key
.
(2) Key in HIGH threshold. 1 0 0 ・ 5
(3) Press COMP key . Print-out HIGH=___100.5
(4) Key in LOW threshold. 9 9 ・ 5
(5) Press COMP key . Print-out LOW_=____99.5
Note
A comparator threshold must be a positive value of not more than 10 digits.
Page 23

18
4. Functions and Operation
4.7.2 Turning comparator mode on
Press COMP key when COMP. lamp is off.
COMP. lamp turns on and comparator mode will be entered. The currently set
thresholds are printed out.
4.7.3 Turning comparator mode off
Press COMP key when COMP. lamp is on.
COMP. lamp turns off and comparator mode will be terminated.
(example)
HIGH=___100.5
LOW_=____99.5
C.LOW_____________99.49g
C.HIGH___________100.58g
C.OK_____________100.47g
Page 24

19
4. Functions and Operation
4.8 Auto Print Mode
Auto print function prints out the weighed result automatically as a sample is placed on the balance
pan and the display stabilizes. Productivity is enhanced as the operator doesn't have to press any key.
(1) Press A.P. key
. The auto print function of the balance is activated and Auto Print lamp
of EP-90 will be illuminated.
(2) Press TARE key or O/T key of the balance or EP-90. The balance display will be zeroed.
(3) Place the sample on the balance pan. The weighed result will be automatically printed out
when the display stabilizes.
(4) Press A.P. key
while Auto Print lamp is illuminated to turn off the auto print function.
Notes
Conditions for data output in auto print mode vary depending on the balance series.
Refer to the balance instruction manual for UW/UX series, BW/BX series, BW-K/BX-K
series and AUW-D/AUW/AUX/AUY series. A.P. key of EP-90 only turns it ON/OFF. With
balance series for which detailed conditions of auto print function can be selected
(UW/UX, BW-K/BX-K etc.), the current settings on the balance remain valid. Refer to the
balance’s instruction manual for the details. Auto print is activated even with the balance
series for which auto print cannot be set on the balance (BL, EL/ELB etc.). Upon stability
is resumed after sample is loaded at zero display, the mass value is automatically
printed out.
4.9 Date Output
Press DATE key . Command is sent to the balance to receive date and time from the balance’s
built-in clock. Date and time are then printed out using one line each.
Every time DATE key
is pressed, DATE lamp will be turned on/off. While DATE lamp is
on, date and time are printed for each mass value that is printed.
Note
Date output function of EP-90 is not available with a balance that is not equipped with
built-in clock.
Page 25

20
4. Functions and Operation
4.10 Combined Use of Functions
Combined use of functions of EP-90 printer
X indicates available combination for simultaneous use.
ID number
X
Sample number
X X
xK Mode
X X X
Comparator
X X X
Auto Print
X X X X X
Statistic calculation
X
Date output ID number Sample
number
xK Mode Comparator Auto Print
Order of print-out
Date output, ID number and Sample number are printed out in this order using one line each before
each mass data to be printed. An item set to be off is skipped.
Combined use of functions of EP-90 printer and functions of the balance
Balance that involves data output. At every mass data output, these EP-90’s functions operate the
same way as when mass data is output by pressing the print key.
(e.g.) While formulation mode of the balance is used, if ID number and Sample number
functions are ON, lines of ID/Sample numbers are inserted before each component
mass value. Turn off EP-90’s functions if they are not desired for each component.
Page 26

21
4. Functions and Operation
4.11 Print-out Examples by Function
Printing position
1 2 3 4 5 6 7 8 9 10 11 12 13 14 15 16 17 18 19 20 21 22 23 24
1. Basic Data Print
1 2 3 4 5 6 7 8 9 10 11 12 13 14 15 16 17 18 19 20 21 22 23 24
0.00g
1000.00g
2. Print-out at Setting Date and Time
1 2 3 4 5 6 7 8 9 10 11 12 13 14 15 16 17 18 19 20 21 22 23 24
D A T E 2006- 02- 10
T I M E 15.55 .33
0.00g
3. ID Number Print-out
1 2 3 4 5 6 7 8 9 10 11 12 13 14 15 16 17 18 19 20 21 22 23 24
I D : 1 234567 890
0.00g
4. Sample Number Print-out
1 2 3 4 5 6 7 8 9 10 11 12 13 14 15 16 17 18 19 20 21 22 23 24
N o . 0 000000 001
0.01g
N o . 0 000000 002
0.01g
N o . 0 000000 003
0.01g
N o . 0 000000 004
0.02g
N o . 0 000000 005
0.03g
5. Comparator Print-out
1 2 3 4 5 6 7 8 9 10 11 12 13 14 15 16 17 18 19 20 21 22 23 24
C . H I GH 200.000g
C . O K 100.000g
C . L O W 5.000g
Page 27

22
4. Functions and Operation
6. xK Print-out
1 2 3 4 5 6 7 8 9 10 11 12 13 14 15 16 17 18 19 20 21 22 23 24
K = 1. 56
* K 86. 8 2 804
7. Statistical Calculation Print-out
1 2 3 4 5 6 7 8 9 10 11 12 13 14 15 16 17 18 19 20 21 22 23 24
. . . . . . . .<STAT .>. . . ......
N o . 0 0 0 1 4 9 . 8167g
N o . 0 0 0 2 4 9 . 8167g
N o . 0 0 0 3 4 9 . 8167g
N o . 0 0 0 4 4 9 . 8166g
N o . 0 0 0 5 4 9 . 8167g
. . . . . . . .<RESU LT> . . ......
N= 5
T= 249 . 0 034g
M A X= 49 . 8 167g
M I N= 49 . 8 166g
R N G= 0 . 0 001g
M E A N= 49. 8 1 668g
S D= 0 .00 0 0 447g
. . . . . . . ...... ... . . <END>.
8. Date, Time and ID Number Print-out
1 2 3 4 5 6 7 8 9 10 11 12 13 14 15 16 17 18 19 20 21 22 23 24
D A T E 2 0 06-02- 10
T I M E 15.55. 33
I D : 1 2 3 4 567890
0.00g
9. Date, Time, ID Number and Sample Number Print-out
1 2 3 4 5 6 7 8 9 10 11 12 13 14 15 16 17 18 19 20 21 22 23 24
D A T E 2 0 06-02- 10
T I M E 15.55. 33
I D : 1 2 3 4 567890
N o . 0 0 0 0 000001
0.00g
Page 28

23
4. Functions and Operation
10. Date, Time, ID Number and xK Print-out
1 2 3 4 5 6 7 8 9 10 11 12 13 14 15 16 17 18 19 20 21 22 23 24
D A T E 2006- 02- 10
T I M E 15. 55. 33
I D : 12345 678
K = 1 2 .3
* K 0
11. Date, Time, ID Number and Comparator Print-out
1 2 3 4 5 6 7 8 9 10 11 12 13 14 15 16 17 18 19 20 21 22 23 24
D A T E 2006- 02- 10
T I M E 15. 55. 33
I D : 1 234567 890
C . L O W 0.00g
12. Date, Time and Statistical Calculation Print-out
(Date and time can be printed only prior to entering statistical calculation mode.)
1 2 3 4 5 6 7 8 9 10 11 12 13 14 15 16 17 18 19 20 21 22 23 24
D A T E 2006- 02- 10
T I M E 15. 55. 33
. . . . ....<S TAT .> .........
N o . 0 001 49.8167g
N o . 0 002 49.8167g
N o . 0 003 49.8167g
N o . 0 004 49.8166g
N o . 0 005 49.8167g
. . . . ....<R ESU LT >........
N= 5
T= 24 9.0034g
MAX= 4 9.8167g
MIN= 4 9.8166g
RNG= 0.0001g
MEAN= 49 .81668g
SD= 0 .0 000447g
. . . . ...... ... .. ...<END>.
Page 29

24
4. Functions and Operation
13. Date, Time, ID Number and Statistical Calculation Print-out
(ID number can be printed only prior to entering statistical calculation mode.)
1 2 3 4 5 6 7 8 9 10 11 12 13 14 15 16 17 18 19 20 21 22 23 24
D A T E 2 0 06-02- 10
T I M E 15.55. 33
I D : 1 2 3 4 567890
. . . . . . . .<STAT .>. . . ......
N o . 0 0 0 1 4 9 . 8167g
N o . 0 0 0 2 4 9 . 8167g
N o . 0 0 0 3 4 9 . 8167g
N o . 0 0 0 4 4 9 . 8166g
N o . 0 0 0 5 4 9 . 8167g
. . . . . . . .<RESU LT> . . ......
N= 5
T= 249 . 0 034g
M A X= 49 . 8 167g
M I N= 49 . 8 166g
R N G= 0 . 0 001g
M E A N= 49. 8 1 668g
S D= 0 .00 0 0 447g
. . . . . . . ...... ... . . <END>.
14. Print-out at Setting ID Number
1 2 3 4 5 6 7 8 9 10 11 12 13 14 15 16 17 18 19 20 21 22 23 24
I D : 1 2 3 4 567890
15. Print-out at Setting Sample Number
1 2 3 4 5 6 7 8 9 10 11 12 13 14 15 16 17 18 19 20 21 22 23 24
N o . 1 2 3 4 567890
16. Print-out at Setting Constant K
1 2 3 4 5 6 7 8 9 10 11 12 13 14 15 16 17 18 19 20 21 22 23 24
K = 1. 34
17. Print-out at Setting Comparator Thresholds
1 2 3 4 5 6 7 8 9 10 11 12 13 14 15 16 17 18 19 20 21 22 23 24
H I G H = 200.0 00
L O W = 5 . 0 00
Page 30

25
5. Communication and Other Settings
5.
Communication and Other Settings
In EP-90 electronic printer, five settings including three communication settings can be selected with
the DIP switches. The default setting of the three communication settings are Shimadzu electronic
balance standard settings. Therefore, the communication settings do not have to be changed to
communicate with the balance. If any settings have been altered after the delivery, set them to meet
the balance's communication settings.
When using EP-90 simultaneously with the balance's WindowsDirect function.
• Set the baud rate at 300.
• Command keys of EP-90 are not valid.
• Date output function of EP-90 is not available.
5.1 DIP Switches
DIP Switches are mounted on the floor of the printer paper holder part. (See the figure) Remove the
printer paper. Turn the power OFF before operating DIP switches. The new settings will be made
effective when turning the power ON.
Caution
Turn the power OFF before operating DIP switches.
DIP switches
Page 31

26
5. Communication and Other Settings
5.2 Settings
There are 8 DIP switches numbered from 1 to 8. 5 items including 3 communication settings can be
set by DIP switches. Settings are listed in the following. * indicates the default settings.
5.2.1 Communication Setting 1 (Baud rate)
DIP switch number 1 2 3 Baud rate
OFF OFF OFF 300
ON OFF OFF 600
OFF* ON* OFF* 1200*
ON ON OFF 2400
OFF OFF ON 4800
ON OFF ON 9600
OFF ON ON 19200
Settings
ON ON ON 38400
5.2.2 Communication Setting 2 (Parity)
DIP switch number 4 5 Parity
OFF* OFF* No*
ON OFF No
OFF ON Even
Settings
ON ON Odd
5.2.3 Communication Setting 3 (Delimiter)
DIP switch number 6 Delimiter
OFF* CR*
Setting
ON LF
Page 32

27
5. Communication and Other Settings
5.2.4 English / Japanese
Switches between English and Japanese for statistic calculation print out.
DIP switch number 7 Language
OFF* English*
Setting
ON Japanese
5.2.5 Buzzer ON/OFF
Switches buzzer sounding upon key operations
DIP switch number 8 Buzzer
ON* ON*
Setting
OFF OFF
Page 33

28
6. Maintenance
6. Maintenance
6.1 Refilling Printer Paper
The red lines marked on the printer paper indicate the paper is running short. Replace with a new roll
soon. For replacement, move printer paper shaft to the new roll from the old one. Refer to 3.3.3.
Loading printer paper.
6.2 Replacing Ink Ribbon Cartridge
Replace ink ribbon cartridge when print becomes faint. Open printer paper cover. Take out ink ribbon
cartridge by pressing the right end of it as shown in the figure.
Insert the new cartridge from straight above.
6.3 Replacing Batteries
The illumination of LOW BATT lamp indicates batteries need replacement. Replace with new batteries
soon. For replacement, refer to 3.3.2 Loading batteries.
Page 34

29
7. Troubleshooting
7. Troubleshooting
Check the following points before calling for servicing.
Symptom Cause (→ remedy)
The power lamp does not light up when
the power switch is turned ON.
• AC adapter is not connected.
• AC adapter is not receiving power.
• The batteries are out.
No data can be received from the balance. • The connection cable is disconnected. (→ Switch off
EP-90 and the balance, then connect the cable properly.)
• The balance is not active for sending data, e.g., the
balance is displaying a menu.
• DIP switch settings have not been made effective. (→ Set
DIP switch while power is off, then turn the power on.)
• Sequence of switching power of EP-90 and the balance
was wrong. (→ See 3.4 Connecting the Balance)
The printed characters deviate.
No paper feed occurs.
• Paper jam is occurring. (→ Reload printer paper.)
No key entry can be made. • Printout is in progress.
• Data is being received from the balance.
No key switch on the balance works. • There is a data I/O error. (→ Switch off once, then switch
on again.)
The following data has been printed out. • The test program for servicing is running. If the power
switch is turned on with FEED key held down, the test
program is initiated.
Page 35

30
8. Parts List
8. Parts List
Standard Items
Item Part No. Remarks
AC adapter 321-62688 INPUT:AC 100-240V
Connection cable 321-62686-01 60 cm
Printer paper (1 roll) 321-62685-01 Roll 60mm dia.
Ink ribbon cartridge 321-61111-05 Standard type, black ink
Consumables
Item Part No. Remarks
Printer paper (20 rolls) 321-62685-02
Ink ribbon cartridge (5 pieces) 321-61111-06 Standard type, black ink
Ink ribbon cartridge (5 pieces) 321-61111-08 Long life type, black ink
Maintenance parts
Item Part No. Remarks
Printer paper cover 321-62714
Battery cover 321-62718
Page 36

31
9. Specifications
9. Specifications
Print method Impact dot
Inking Ink ribbon
Print format 24 digits / line (5 × 7 dot matrix)
Printing speed 2.7 lines / sec. (approx.)
Character size 1.7mm (W) × 2.6mm (H)
Printer paper Normal paper 57.5mm width
Printing
Printer mechanism durability 1.5 million lines
Operation temperature range 5-40°C
AC AC adapter (Output : DC 9 - 12V 2A)
Power
source
Battery operation Dry batteries (Alkaline only) R6 (size AA) × 6pcs (not provided)
Battery life: 10 hours approx.
(when prints 1 line / 5 seconds continuously at 20°C)
Interface Serial I/O, TTL level
Physical dimensions 154 (W) × 78.5 (H) × 215 (D) mm approx.
Weight 630g approx.
Functions Statistical calculations, Date and time print-out (with balance’s
built-in clock), ID number, Sample number print-out,
xK data output, Comparator print-out, Auto print, Commands to
set on balance’s application functions (Formulation, Add-on,
Animal weighing, Percentage display)
Page 37

32
10. Dimensions
10. Dimensions
(mm)
 Loading...