

Page 1
DS-801
Stereo Cassette Tape Deck
Stereo Cassetten-Recorder
OPERATING INSTRUCTIONS
BEDIENUNGSANLEITUNG
ON/STANDBY
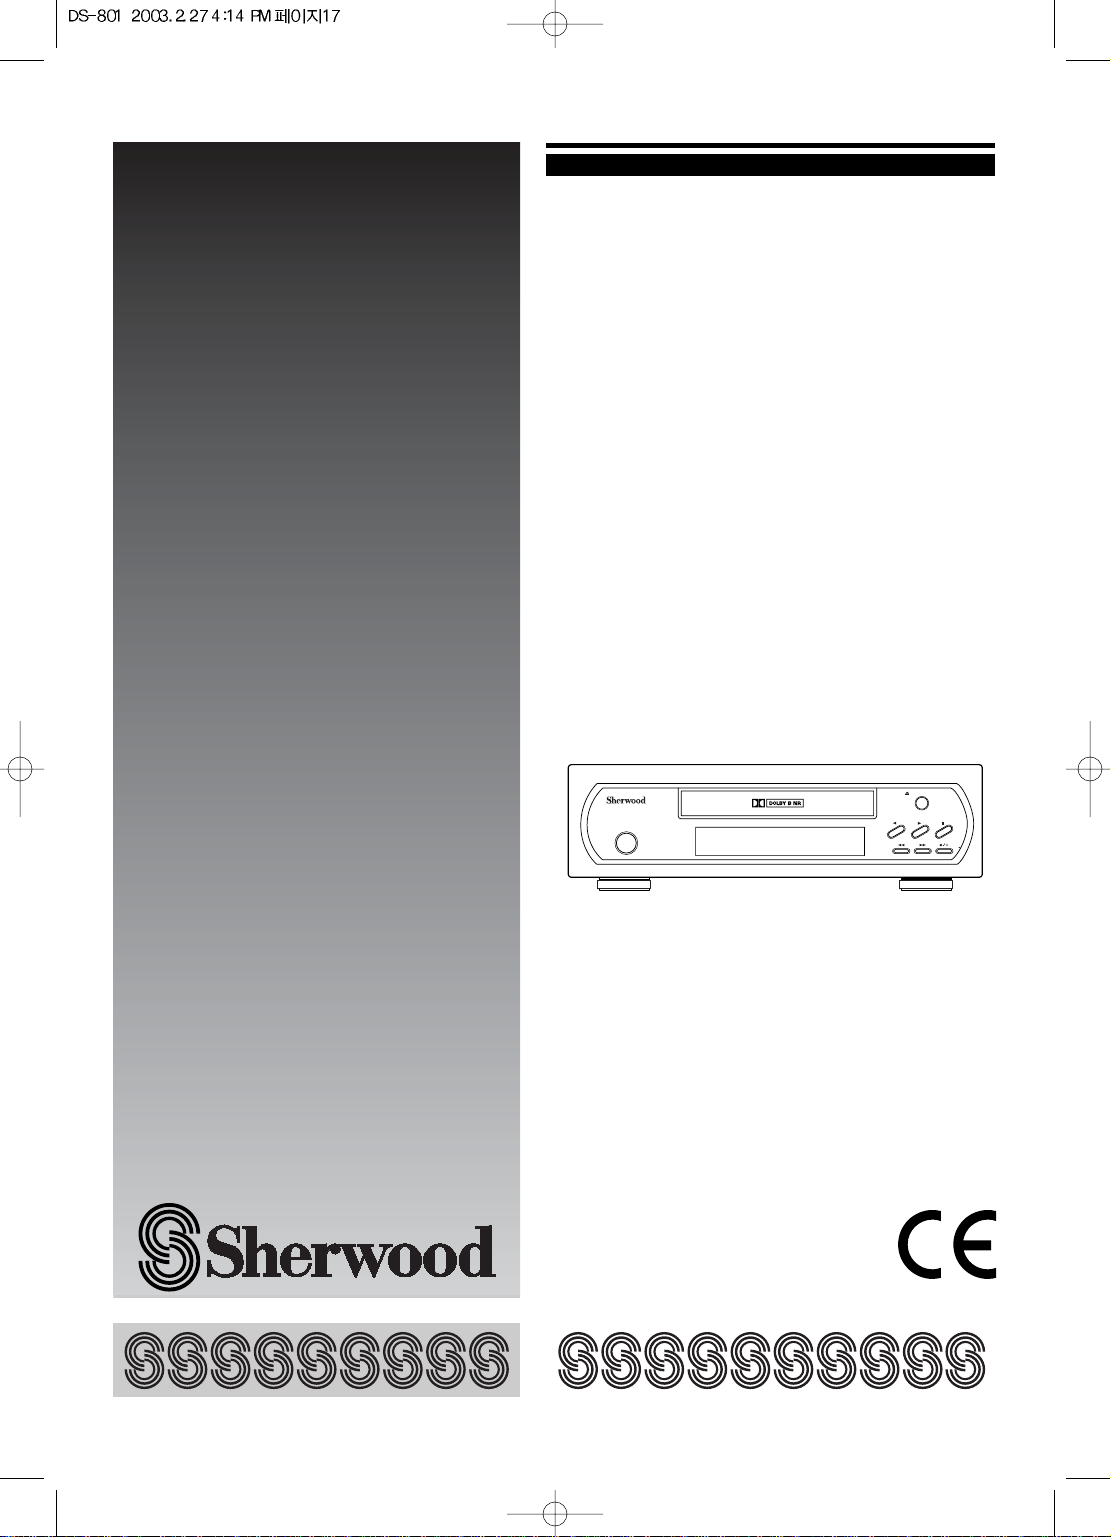
PERSONAL COMPONENT SYSTEM/STEREO CASSETTE TAPE DECK DS-801
OPEN/CLOSE
Page 2
2
ENGLISH
Introduction
Congratulations on Your Purchase!
Your new high fidelity Cassette Tape Deck is designed to
deliver maximum enjoyment and years of trouble free service.
Please take a few moments to read this manual thoroughly. It
will explain the features and operation of your unit and help
ensure a trouble free installation.
Please unpack your Cassette Tape Deck carefully. We
recommend that you save the carton and packing material.
They will be helpful if you ever need to move your unit and
may be required if you ever need to return it for service. Your
Cassette Tape Deck is designed to be placed in a horizontal
position and it is important to allow at least two inches of
space behind your unit for adequate ventilation and cabling
convenience.
To avoid damage, never place the unit near radiators, in front
of heating vents, in direct sunlight, or in excessively humid or
dusty locations. Connect your complementary components as
illustrated in the following section.
CAUTION : TO REDUCE THE RISK OF
ELECTRIC SHOCK, DO NOT
REMOVE COVER (OR BACK).
NO USER-SERVICEABLE PARTS
INSIDE. REFER SERVICING TO
QUALIFIED SERVICE PERSONNEL.
CAUTION
RISK OF ELECTRIC SHOCK
DO NOT OPEN
This symbol is intended to alert the user to
the presence of uninsulated "dangerous
voltage" within the product's enclosure that
may be of sufficient magnitude to
constitute a risk of electric shock to
persons.
This symbol is intended to alert the user to
the presence of important operating and
maintenance (servicing) instructions in the
literature accompanying the appliance.
To reduce the risk of fire or electric shock, do not
expose this appliance to rain or moisture.
FOR U.S.A
FCC INFORMATION
This equipment has been tested and found to comply
with the limits for a Class B digital device, pursuant to
Part 15 of the FCC Rules. These limits are designed to
provide reasonable protection against harmful
interference in a residential installation. This equipment
generates, uses and can radiate radio frequency energy
and, if not installed and used in accordance with the
instructions, may cause harmful interference to radio
communications. However, there is no guarantee that
interference will not occur in a particular installation. If
this equipment does cause harmful interference to radio
or television reception, which can be determined by
turning the equipment off and on, the user is
encouraged to try to correct the interference by one or
more of the following measures:
Reorient or relocate the receiving antenna.
Increase the separation between the equipment and
receiver.
Connect the equipment into an outlet on a circuit
different from that to which the receiver is connected.
Consult the dealer or an experienced radio/TV
technician for help.
CAUTION: Any changes or modifications in
construction of this device which are not
expressly approved by the party responsible
for compliance could void the user's
authority to operate the equipment.
WARNING
UNPACKING AND
Page 3
3
ENGLISH
FOR U.S.A AND CANADA ........................120 V
Units shipped to the U.S.A and Canada are
designed for operation on 120 V AC only.
Observe all safety precautions for use of a polarized
AC plug.
However, some products may be supplied with a
non polarized plug.
CAUTION : To prevent electric shock, match
wide blade of plug to wide slot, insert fully.
FOR YOUR SAFETY
FOR EUROPE AND AUSTRALIA
..........
230V/240V
Units shipped to Australia are designed for
operation on 240 V AC only.
To ensure safe operation, the three-pin plug
supplied must be inserted only into a standard
three-pin power point which is effectively earthed
through the normal household wiring. Extension
cords used with the equipment must be three-core
and be correctly wired to provide connection to
earth. Improper extension cords are a major cause
of fatalities.
The fact that the equipment operates satisfactorily
does not imply that the power point is earthed and
that the installation is completely safe. For your
safety, if in any doubt about the effective earthing of
the power point, consult a qualified electrician.
PAN-EUROPEAN UNIFIED VOLTAGE
All units are suitable for use on supplies 230-240 V
AC.
FOR YOUR SAFETY
READ THIS BEFORE OPERATING
Page 4
4
ENGLISH
CONTENTS
Introduction
UNPACKING AND INSTALLATION ...................................................................................................... 2
READ THIS BEFORE OPERATING YOUR UNIT .................................................................................. 3
Rear Panel Connections ............................................................................................................................... 5
Front Panel & System Remote Controls .................................................................................................. 6
Before Operation
NOTES ON CASSETTE TAPE .................................................................................................................. 8
Operations
PLAYING BACK A TAPE ......................................................................................................................... 9
AMS(Automatic Music Search) PLAY ..................................................................................................... 10
RECORDING ............................................................................................................................................ 11
CD SYNCHRO RECORDING ................................................................................................................. 13
Troubleshooting Guide ............................................................................................................................... 14
Specifications ................................................................................................................................................. 15
Page 5
5
ENGLISH
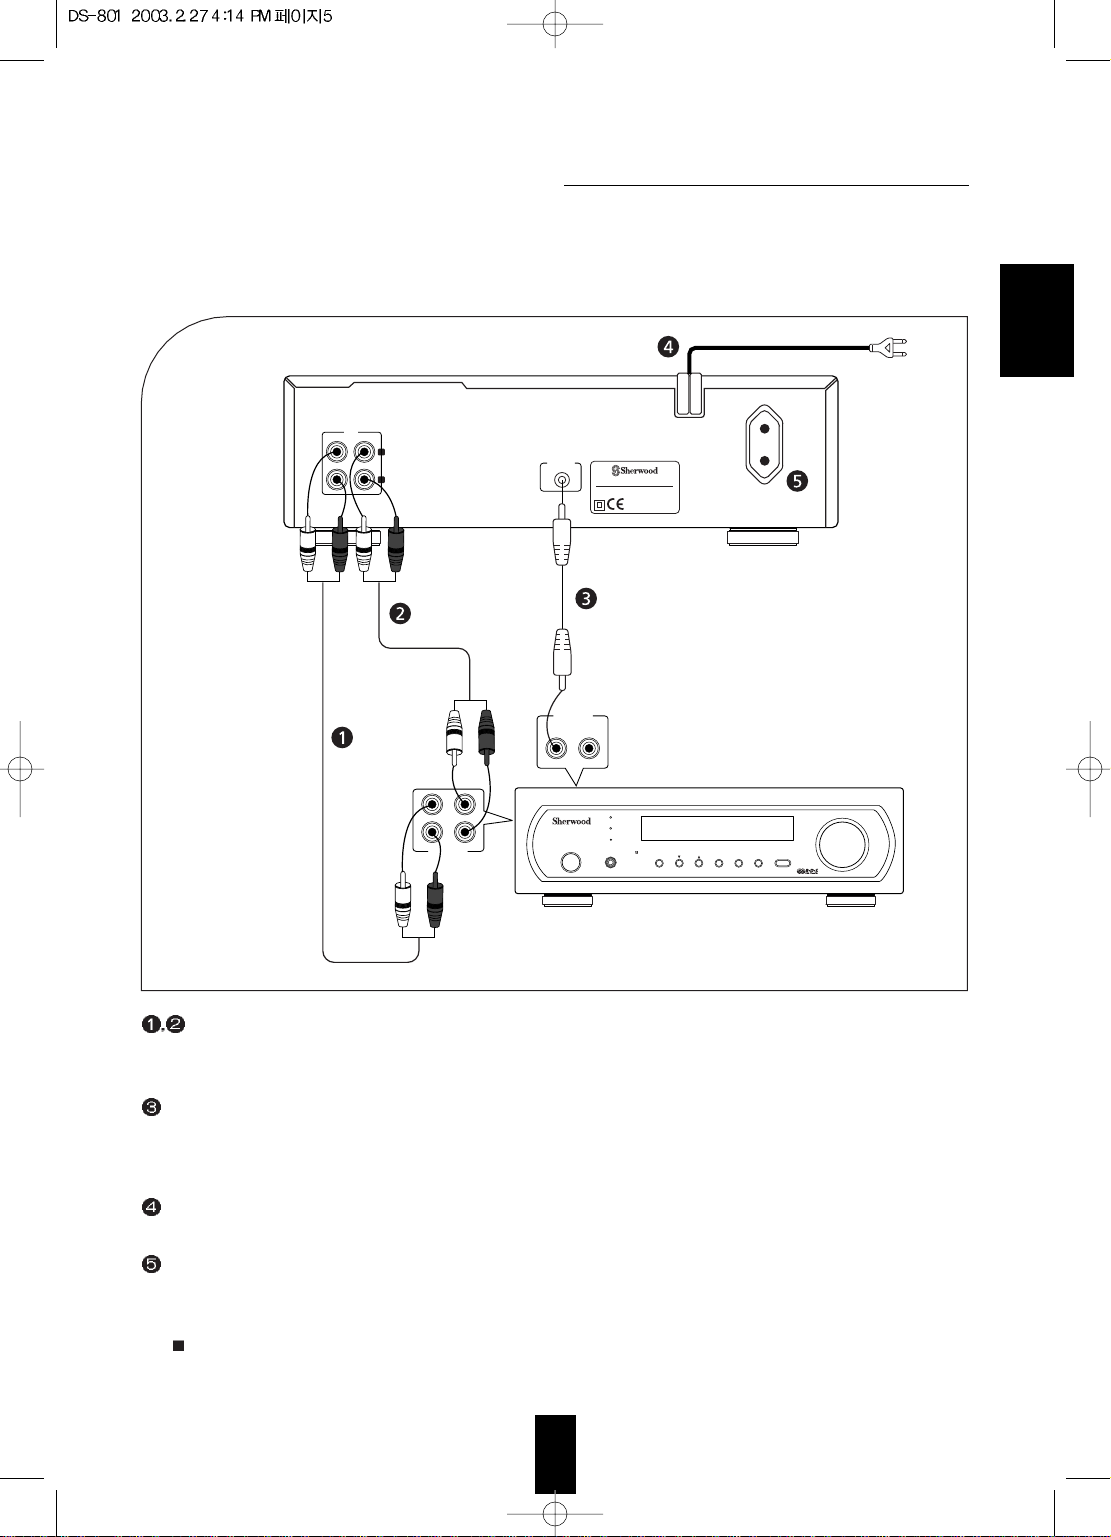
Rear Panel Connections
• Do not plug the AC input cord into the AC outlet when plugging and unplugging connection cords.
• Be sure to connect the white plugs to the L(Left) and the red plugs to the R(Right) jacks when making connections with
the supplied cords.
• Refer to the connecting diagram in the operating instructions of Sherwood system receiver RX-801R.
LINE
PB REC
SYSTEM
CONNECTOR
R
L
PERSONAL COMPONENT SYSTEM/AM-FM STEREO RECEIVER RX-801R
SYSTEM
ON/STANDBY
STANDBY/TIMER
PHONES
SOUND
MULTI CONTROL
TUNING
BAND TIMER MEMORY FUNCTION
VOLUME
EON-TA
EON-NEWS
UNSWITCHED
230V~50Hz
100W MAX
AC INPUT
230V~50Hz
10W
CAUTION
:
TO PREVENT ELECTRIC SHOCK, DO NOT
REMOVE COVER. NO USER-SERVICEABLE PARTS INSIDE.
REFER-SERVICING TO QUALIFIED SERVICE PERSONNEL.
SER. NO
MODEL NO. DS-801
DESIGNED IN USA
ASSEMBLED IN KOREA
CASSETTE DECK
Manufactured under license from Dolby Laboratories.
Dolby and the double-D symbol are trademarks of
Dolby Laboratories.
RECEIVER(RX-801R)
PB-TAPE-REC
SYSTEM
CONNECTOR
12
LINE(REC) IN, (PLAY) OUT JACKS
Connect the LINE(PLAY) OUT jacks of this unit to the TAPE(PLAY) IN jacks of your receiver and the LINE(REC) IN
jacks to the TAPE(REC) OUT jacks respectively.
SYSTEM CONNECTOR JACKS 1, 2
Connect this jack to the SYSTEM CONNECTOR jack of Sherwood system receiver RX-801R to control this unit remotely
with the remote control unit of RX-801R.
(For details, refer to the operating instructions of RX-801R)
AC INPUT CORD
Plug this cord into a wall AC outlet or the switched or unswitched AC outlet of your system component.
UNSWITCHED AC OUTLET
• You can connect audio equipment like CD player.
• Power always flows to this outlet, regardless of whether this unit is switched ON or OFF if power flows through the AC
input cord of this unit.
Note : The equipment whose power consumption exceeds 100 watts should not be connected.
Page 6

6
ENGLISH
Front Panel & System Remote Controls
Front Panel Controls
System Remote Controls
SLEEP
EDIT
AUTO/MONO
TUNING TUNE MODE
PROGRAM
AUX
MD
TUNER
TAPE
CD
POWER
123
456
789
0
MEMO
DOLBY C.RESET
TIME REPEAT
RANDOM
EON RDS
CD SYNC.
REV.MODE
SYSTEM REMOTE CONTROL UNIT
(only for RX-801R)
ON/STANDBY
PERSONAL COMPONENT SYSTEM/STEREO CASSETTE TAPE DECK DS-801
OPEN/CLOSE
Page 7

7
ENGLISH
FLUORESCENT DISPLAY
TAPE COUNTER DISPLAY RECORD INDICATOR
TAPE DETECTION INDICATOR TAPE DIRECTION DISPLAY
DOLBY B NR INDICATOR REVERSE MODE DISPLAY
LEVEL METER DISPLAY CD SYNCHRO RECORDING INDICATOR
WHEN USING THE SYSTEM REMOTE CONTROL UNIT OF RX-801R
This unit can be remotely controlled with Sherwood system receiver RX-801R.
• To listen to a tape by using the system remote control unit of RX-801R, first connect SYSTEM CONNECTOR jack
of this unit to that of Sherwood system receiver RX-801R.
• With the system remote control unit of RX-801R, you can use additional functions.
POWER(ON/STANDBY) BUTTON
• Press this button to turn the power on and press
again to enter the standby mode.
• In standby mode, this unit is not disconnected from
the AC mains and a small amount of current is
retained for operation readiness.
• For system operation, connect this unit to Sherwood
system receiver RX-801R as illustrated in the
connecting diagram in the operating instructions of
RX-801R, then this unit is turned on or off
depending on the power operation on RX-801R.
TAPE TRAY
Load a tape with its exposed tape backwards.
OPEN/CLOSE( ) BUTTON
Press this button to open or close the tape tray.
REVERSE PLAY( ) BUTTON
Press this button to play back the back side of the tape.
FORWARD PLAY( ) BUTTON
Press this button to play back the front side of the tape.
STOP( ) BUTTON
Press this button to stop the tape.
REWIND( ) BUTTON
Press this button to rewind the tape rapidly during
forward playback or to advance during reverse playback.
FAST FORWARD( ) BUTTON
Press this button to advance the tape rapidly during
forward playback or to rewind during reverse playback.
RECORD/RECORD MUTE( ) BUTTON
Press this button to record or to make a 4 second
blank space between the programs for automatic
music search, etc.
DOLBY NR BUTTON
Press this button to select the Dolby B NR system
when playing back or recording.
COUNTER RESET BUTTON
Press this button to reset the counter to “0000”.
CD SYNCHRO RECORDING BUTTON
Press this button to use the CD SYNCHRO
RECORDING function.
REVERSE MODE BUTTON
Press this button to select the desired reverse mode.
HGFECB
A D
Page 8

8
ENGLISH
NOTES ON CASSETTE TAPE
Before Operation
• Before loading a cassette tape, take up the slack in the
tape to prevent it from becoming entangled around the
capstan.
• After the recording has been finished, remove the tab to
prevent the recorded contents from being erased or
recorded on accidently.
• To rerecord after tabs have been removed, cover with
adhesive tape.
• Do not cover the tape detection holes for chrome
(CrO
2) tape.
• Do not store the tapes in direct sunlight or near
equipment that generates heat. Keep the tapes away
from any magnetic fields.
• Do not touch the tape surface and store the tapes in their
cases after use. Dust can cause contamination of the
heads resulting in noise.
PRINCIPLE OF DOLBY B NR SYSTEM
The Dolby NR system functions so that it automatically
increases recording levels of medium and high
frequencies when the recording signal level is lower
than the specified level(encoding), and automatically
reduces the output level to the normal level during
playback(decoding). In this way, the tape hissing noise
is remarkably reduced without affecting the sound
quality. The Dolby B NR system used in your Cassette
Deck improves S/N ratio by about 5 dB at 1 kHz and
about 10 dB at 10 kHz.
Manufactured under lincense from Dolby Laboratories.
“Dolby” and the double-D symbol are trademarks of
Dolby Laboratories.
CLEANING THE HEAD SECTION
Clean the head section about every 10 hours of use
with a commercially available head cleaning tape.
• For better recordings, you should clean the
head section before every recording.
• After cleaning the head section, do not load a
tape until the cleared section is completely dry.
DEMAGNETIZING THE HEAD
When the recording/playback head is magnetized, the
sound quality will be deteriorated.
In this case, demagnetize the head using a
commercially available demagnetizer.
AUTO TAPE SELECTOR
The type of tape loaded is detected automatically by
the auto tape selector and recording bias and
equalization are set automatically according to the
characteristic of that tape such as normal or
chrome(CrO
2) tape.
For side B For side A
Page 9

9
ENGLISH
Operations
• To use the system remote control unit of Sherwood system receiver RX-801R, first connect the SYSTEM
CONNECTOR jack of this unit to that of RX-801R.(Refer to the operating instructions of the RX-801R.)
PLAYING BACK A TAPE
In case of the tape recorded with Dolby
B NR system, select the Dolby B NR
mode.
3
Select the desired reverse mode.
4
• Each time the POWER(ON/STANDBY) button is
pressed, this unit is turned on or off.
• Each time this button is pressed, the Dolby B NR
mode changes as follows:
DOLBY B NR(“B” light up) OFF
• On the commercial tapes, if Dolby NR or “ ”
appears, the tapes are recorded with the Dolby B
NR.
• Each time this button is pressed, the reverse mode is
selected as follows:
Start playback.
5
Turn the power on.
1
ON/STANDBY
SLEEP
EDIT
AUTO/MONO
TUNING TUNE MODE
PROGRAM
MUTE
TIMER
VOL
VOL
AUX
MD
TUNER
TAPE
CD
POWER
123
456
789
0
MEMO ENTER
DOLBY C.RESET
TIME REPEAT
RANDOM
CD SYNC.
REV.MODE
EON
RDS
REMOTE CONTROL UNIT
RM-404
SYSTEM REMOTE
CONTROL UNIT
(only for RX-801R)
DISPLAY
REV.MODE
SLEEP
EDIT
AUTO/MONO
TUNING TUNE MODE
PROGRAM
MUTE
TIMER
VOL
VOL
AUX
MD
TUNER
TAPE
CD
POWER
123
456
789
0
MEMO ENTER
DOLBY C.RESET
TIME REPEAT
RANDOM
CD SYNC.
REV.MODE
EON
RDS
REMOTE CONTROL UNIT
RM-404
SYSTEM REMOTE
CONTROL UNIT
(only for RX-801R)
DISPLAY
DOLBY
SLEEP
EDIT
AUTO/MONO
TUNING TUNE MODE
PROGRAM
MUTE
TIMER
VOL
VOL
AUX
MD
TUNER
TAPE
CD
POWER
123
456
789
0
MEMO ENTER
DOLBY C.RESET
TIME REPEAT
RANDOM
EON
RDS
CD SYNC.
REV.MODE
REMOTE CONTROL UNIT
RM-404
DISPLAY
TAPE
or
Back side Front side
SYSTEM REMOTE
CONTROL UNIT
(only for RX-801R)
: Playback of a single side.
: Repeat playback of both sides.
( Front side Back side )
: Playback of both sides.
(Front side Back side)
Load a tape.
2
• According to the type of the tape loaded, the
corresponding type(normal, chrome) is detected by
the auto tape selector.
Note: Do not open or close the tape tray by force.
Doing so may damage it.
OPEN/CLOSE
• Each time “TAPE ” button pressed, the
corresponding side is played back.
• At the end of the tape, according to the reverse
mode, the playback of the next side starts or the
playback of the current side stops automatically.
Page 10

10
ENGLISH
• In case of forward playback(“ ”).
• At the desired point, press the STOP or
corresponding PLAY button.
The automatic music search function automatically skips other musics, finds and starts playback from the desired music.
Up to 99th music before or after the current music can be searched quickly on the current side.
AMS(Automatic Music
To rapidly advance or rewind the tape,
press the corresponding button in the
stop mode.
7
• “0000” appears in the tape counter.
• When winding or recording the tape, this function is
convenient.
SLEEP
EDIT
AUTO/MONO
TUNING TUNE MODE
PROGRAM
MUTE
TIMER
VOL
VOL
AUX
MD
TUNER
TAPE
CD
POWER
123
456
789
0
MEMO ENTER
DOLBY C.RESET
TIME REPEAT
RANDOM
CD SYNC.
REV.MODE
EON
RDS
REMOTE CONTROL UNIT
RM-404
SYSTEM REMOTE
CONTROL UNIT
(only for RX-801R)
DISPLAY
C.RESET
In the current position, to reset the TAPE COUNTER to “0000”.
8
To stop playback.
6
EON
RDS
REMOTE CONTROL UNIT
RM-404
or
SYSTEM REMOTE
CONTROL UNIT
(only for RX-801R)
SLEEP
EDIT
AUTO/MONO
TUNING TUNE MODE
PROGRAM
MUTE
TIMER
VOL
VOL
AUX
MD
TUNER
TAPE
CD
POWER
123
456
789
0
MEMO ENTER
DOLBY C.RESET
TIME REPEAT
RANDOM
CD SYNC.
REV.MODE
DISPLAY
• During playback, press the desired button.
Example) In case of playback in direction of “
”.
Ex. 1) To playback the program number 4 while playing
back the program number 2.
Press “
” button twice.
Ex 2.) To playback the program number 3 again while
playing back the program number 3.
Press “
” button only once.
Automatic music search function might not
operate as expected if:
• The length of the blank space between two
musics is less than 4 seconds.
• The noise level of the blank space is very high.
• The overall recorded volume level of a music is
very low.
SLEEP
EDIT
AUTO/MONO
TUNING TUNE MODE
PROGRAM
MUTE
DISPLAYTIMER
VOL
VOL
AUX
MD
TUNER
TAPE
CD
POWER
123
456
789
0
MEMO ENTER
DOLBY C.RESET
TIME REPEAT
RANDOM
CD SYNC.
REV.MODE
EON
RDS
REMOTE CONTROL UNIT
RM-404
or
SYSTEM REMOTE
CONTROL UNIT
(only for RX-801R)
For the beginning
of the current music
For the beginning
of the next music
TUNING
To rewind To advance
SLEEP
POWER
AUX
123
MD
456
TUNER
789
TAPE
CD
0
CD SYNC.
DOLBY C.RESET
REV.MODE
RANDOM
TIME REPEAT
EDIT
EON
RDS
AUTO/MONO
TUNING TUNE MODE
PROGRAM
MEMO ENTER
VOL
or
VOL
MUTE
DISPLAY
TIMER
REMOTE CONTROL UNIT
RM-404
TUNING
SYSTEM REMOTE
CONTROL UNIT
(only for RX-801R)
Page 11

11
ENGLISH
• Be sure the erase-protection tabs on the tape are in
place.
• The type of tape(normal or chrome) is automatically
detected.
• The metal tapes are not recorded correctly.
• ”B” lights up.
Load a tape to be recorded.
1
RECORDING
When recording with Dolby B NR
system, select the Dolby B NR mode.
2
SLEEP
EDIT
AUTO/MONO
TUNING TUNE MODE
PROGRAM
MUTE
TIMER
VOL
VOL
AUX
MD
TUNER
TAPE
CD
POWER
123
456
789
0
MEMO ENTER
DOLBY C.RESET
TIME REPEAT
RANDOM
CD SYNC.
REV.MODE
EON
RDS
REMOTE CONTROL UNIT
RM-404
SYSTEM REMOTE
CONTROL UNIT
(only for RX-801R)
DISPLAY
DOLBY
Select the reverse mode.
3
• According to the selected reverse mode, recording
will be performed as follows:
• When selecting the recording of both sides and
recording first on the back side, recording is made
only on that side.
• Be sure the both of erase-protection tabs on the tape
are in place when recording on the both sides.
SLEEP
EDIT
AUTO/MONO
TUNING TUNE MODE
PROGRAM
MUTE
TIMER
VOL
VOL
AUX
MD
TUNER
TAPE
CD
POWER
123
456
789
0
MEMO ENTER
DOLBY C.RESET
TIME REPEAT
RANDOM
CD SYNC.
REV.MODE
EON
RDS
REMOTE CONTROL UNIT
RM-404
SYSTEM REMOTE
CONTROL UNIT
(only for RX-801R)
DISPLAY
REV.MODE
: Recording of a single side.
, : Recording of both sides.
EON
RDS
REMOTE CONTROL UNIT
RM-404
or
SYSTEM REMOTE
CONTROL UNIT
(only for RX-801R)
FUNCTION
SLEEP
EDIT
AUTO/MONO
TUNING TUNE MODE
PROGRAM
MUTE
TIMER
VOL
VOL
AUX
MD
TUNER
TAPE
CD
POWER
123
456
789
0
MEMO ENTER
DOLBY C.RESET
TIME REPEAT
RANDOM
CD SYNC.
REV.MODE
TUNER
DISPLAY
Select the program source to be recorded.
Example) When selecting the tuner.
4
Press the RECORD/RECORD MUTE
button to enter the recording pause mode.
5
• “ ” lights up and this unit enters the recording
pause mode.
• In the recording pause mode, when this button is
pressed, the unit will make a 4 second blank space
and then enter the recording pause mode.
Note
• When there is a erase-protection tab, to record on a
single side, you should load a tape correctly or select
the corresponding tape direction depending on the
tape direction display(
: Playback/recording of the
back side,
:Playback/recoding of the front side).
• For your reference, when loading a tape, the side
facing up is the front side and the erase-protection
tabs of the corresponding sides are as follows:
Front side
Erase-protection tab of the back side
Erase-protection tab of the front side
OPEN/CLOSE
Page 12

12
ENGLISH
To stop recording
8
EON
RDS
REMOTE CONTROL UNIT
RM-404
or
SYSTEM REMOTE
CONTROL UNIT
(only for RX-801R)
SLEEP
EDIT
AUTO/MONO
TUNING TUNE MODE
PROGRAM
MUTE
TIMER
VOL
VOL
AUX
MD
TUNER
TAPE
CD
POWER
123
456
789
0
MEMO ENTER
DOLBY C.RESET
TIME REPEAT
RANDOM
CD SYNC.
REV.MODE
DISPLAY
In the recording pause mode, press the corresponding PLAY button to start recording.
6
To temporarily stop recording
7
• The unit temporarily stops recording and enters the
recording pause mode.
• To restart recording, press the corresponding PLAY
button.
• “PLAY” lights up and recording starts.
• If recording is performed, start play on the desired
recording source.
SLEEP
EDIT
AUTO/MONO
TUNING TUNE MODE
PROGRAM
MUTE
TIMER
VOL
VOL
AUX
MD
TUNER
TAPE
CD
POWER
123
456
789
0
MEMO ENTER
DOLBY C.RESET
TIME REPEAT
RANDOM
CD SYNC.
REV.MODE
EON
RDS
REMOTE CONTROL UNIT
RM-404
or
SYSTEM REMOTE
CONTROL UNIT
(only for RX-801R)
TAPE
DISPLAY
Page 13

13
ENGLISH
• Because CD synchro recording will start from the
front side, be sure the erase-protection tab of the
front side.
• Only when the both of the erase-protection tabs on
the tape are in place, CD synchro recording can be
performed on both sides.
• When the SYSTEM CONNECTOR jack of this unit is connected to that of Sherwood system CD player CD-801, the
CD synchro recording can be performed.
• When CD-801 is in the stop mode, the program
mode(meaning “PROGRAM” lights up in the stop
mode) and the edit mode, the CD synchro recording
will be performed.
• In the random and repeat mode, the CD synchro
recording cannot be performed.
Do the steps 1~3 in “RECORDING”
procedure.
1
Start CD synchro recording.
3
• “CD SRS”, “ ” indicators light up, this unit
rewinds the tape rapidly automatically, makes a 8
seconds blank space from the beginning of the front
side and then starts CD synchro recording.
• According to the selected reverse mode and the
erase-protection tabs, recording is made on the front
side or both sides.
• When selecting the recording of both sides as
reverse mode, if recording on the front side has been
finished, recording on the back side continues
automatically and in this case, the track being
recorded on the end of the front side will be
recorded again on the back side.
Select the CD as recording source.
2
To stop CD synchro recording.
4
CD SYNCHRO RECORDING
FUNCTION
or
SLEEP
123
456
789
0
DOLBY C.RESET
TIME REPEAT
EDIT
AUTO/MONO
PROGRAM
MEMO ENTER
MUTE
REMOTE CONTROL UNIT
RM-404
CD SYNC.
TUNING TUNE MODE
VOL
VOL
POWER
CD
EON
TIMER
DISPLAY
SLEEP
POWER
AUX
123
MD
456
TUNER
789
TAPE
CD
0
DOLBY C.RESET
REV.MODE
CD SYNC.
TIME REPEAT
RANDOM
EDIT
EON
RDS
AUTO/MONO
TUNING TUNE MODE
PROGRAM
MEMO ENTER
VOL
VOL
MUTE
TIMER
DISPLAY
REMOTE CONTROL UNIT
RM-404
AUX
MD
TUNER
CD SYNC.
TAPE
REV.MODE
RANDOM
RDS
SYSTEM REMOTE
CONTROL UNIT
(only for RX-801R)
CD
SYSTEM REMOTE
CONTROL UNIT
(only for RX-801R)
SLEEP
POWER
AUX
123
MD
456
TUNER
789
TAPE
CD
0
DOLBY C.RESET
REV.MODE
CD SYNC.
TIME REPEAT
RANDOM
EDIT
EON
RDS
AUTO/MONO
TUNING TUNE MODE
PROGRAM
MEMO ENTER
VOL
VOL
MUTE
DISPLAY
REMOTE CONTROL UNIT
TIMER
RM-404
SYSTEM REMOTE
CONTROL UNIT
(only for RX-801R)
or
Page 14

14
ENGLISH
Troubleshooting Guide
PROBLEM POSSIBLE CAUSE REMEDY
No power
No sound
Distorted or abnormal
sound
Vibrating sound
Too noisy
No recording
• The AC input cord is disconnected.
• The POWER(ON/STANDBY) button is
not pressed completely.
• Unrecorded tape is loaded.
• Incorrect connections.
• Incorrect operation of the receiver.
• Dirty head.
• Incorrect selection of the Dolby B NR
system.
• The tape is stretched or wrinkled.
• Dirty capstans or pinch rollers.
• The tape is irregularly wound.
• Magnetized head.
• Poor connections.
• The tabs have been removed.
• Dirty head.
• Too low recording level.
• Connect the cord securely.
• Press the POWER(ON/STANDBY)
button to ON.
• Load the recorded tape.
• Make connections correctly.
• Operate the receiver correctly.
• Clean the head.
• Select the Dolby B NR mode or the
Dolby B NR OFF mode.
• Replace the tape.
• Clean the capstans or pinch rollers.
• Wind the tape by advancing or
rewinding rapidly.
• Demagnetize the head.
• Check the connections and connect
all cords securely.
• Cover with the adhesive tape.
• Clean the head.
• Adjust the recording level properly.
If your unit should not perform as expected, consult the table below to see if the problem can be corrected before
seeking help from your dealer or our service organization.
Page 15

15
ENGLISH
Specifications
Type ........................................................................................ Stereo full logic cassette deck with Dolby B NR system
Track system ............................................................................................................................. 4-track, 2-channel stereo
Recording system ........................................................................................ AC bias system (bias frequency : 105 kHz)
Erasing system ................................................................................................................................................ AC system
Tape speed ................................................................................................................................... 4.76 cm/sec.(1-7/8 ips)
Heads ....................................................................................... 1 erasing head and 1 recording/playback head(rotating)
Wow and flutter, WRMS ...................................................................................................................................... 0.08 %
Frequency response, -20 dB recording/playback, Dolby B NR OFF
Normal ......................................................................................................................................... 30~14,500 Hz,
3 dB
Chrome ....................................................................................................................................... 50~15,500 Hz,
3 dB
Signal to noise ratio, weighted CCIR/ARM
Dolby B NR OFF, Normal/Chrome .................................................................................................................. 53/54 dB
Dolby B NR, Normal/Chrome .......................................................................................................................... 63/64 dB
Line input sensitivity/impedance ............................................................................................................. 400 mV/47 kΩ
Line output level/impedance .................................................................................................................... 500 mV/47 kΩ
Channel separation ................................................................................................................................................. 40 dB
GENERAL
Power supply......................................................................................................................................... AC 230 V, 50 Hz
Power consumption.................................................................................................................................................. 10 W
Unswitched AC outlet.......................................................................................................................... Total 100 W max.
Dimensions (W H D) ................................................................................................................... 270 79 255 mm
Weight (Net) ........................................................................................................................................................... 2.9 kg
Note: Design and specifications are subject to change without notice for improvements.
Page 16

5707-21050-008-0
 Loading...