


Pull-Eaze™ Roll-Up Door Kit
Assembly Instructions
Description of Parts: |
Quantity |
“S” Hooks |
2 |
|
|
Plugs for Poles |
2 |
|
|
Butterfly Cleat |
1 |
|
|
Screws for Cleat |
2 |
|
|
Philips Head Screwdriver Bit |
1 |
|
|
Pipe, Plain End |
1 |
|
|
Pipes, Swedged End |
5 |
|
|
100' Rope |
1 |
|
|
NOTE: Review all parts included in the kit.
Description |
Model # |
|
|
Pull-Eaze™ Roll-Up Door Kit |
10077 |
Pull-Eaze™ Roll-Up Door Kit |
00800 |
Recommended Tools
Please read instructions COMPLETELY before assembly.
Before you start: 2+ individual recommended for assembly, approximate time 30 min.
|
1-800-524-9970 |
150 Callender Road |
|
Canada: |
|
Watertown, CT 06795 |
1-800-559-6175 |
www.shelterlogic.com |
|
|
3/01/10 |
Page 1 |
05-10077-00800-OD |
1. Assemble pipes for bottom pocket of door.
A.Measure width of door between the zippers to determine size.
B.Slide pipes into one another to assemble. NOTE: Fill pipe with sand for added weight and insert plugs.
C.Slide pipe into pocket at bottom of door.
Door Panel Exterior
Width |
Between |
Zippers |
Shelter Width |
Door Width |
Number of Poles |
6' |
4' |
1 Swedged Poles + 1 Plain Pole |
|
|
|
8' |
6' |
2 Swedged Poles + 1 Plain Pole |
|
|
|
10' |
8' |
3 Swedged Poles + 1 Plain Pole |
|
|
|
12' |
10' |
4 Swedged Poles + 1 Plain Pole |
|
|
|
14' |
12' |
5 Swedged Poles + 1 Plain Pole |
|
|
|
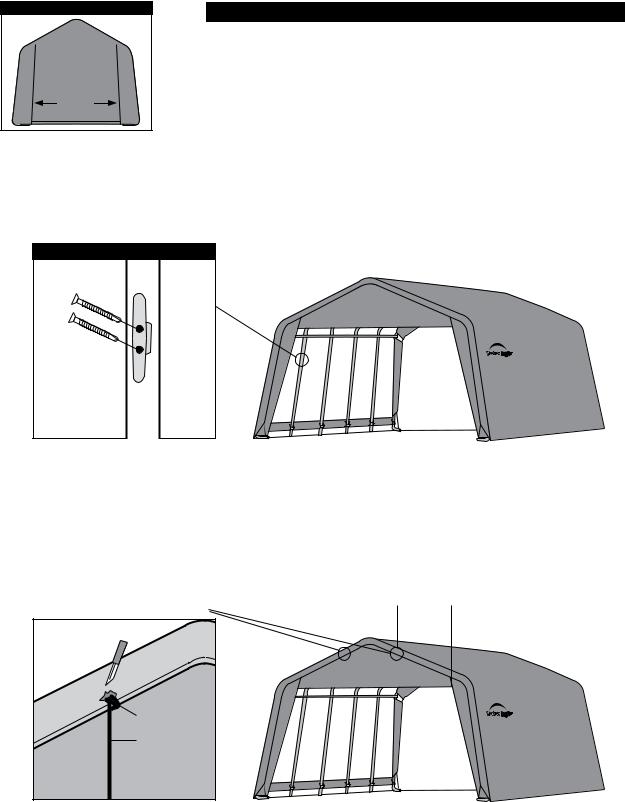
2. Attach butterfly Cleat to inside of shelter Frame
Attach butterfly cleat with screws to second vertical rib, about 8" down from cross rail on either side.
Butterfly Cleat
3. Attach rope ends to outside of shelter Cover
A.Cut a small slit/hole, approximately 18" in from zipper, on the outside of the cover, just above the webbing rope. Do this on both sides.
B.Tie a knot around the cover webbing through the hole in the cover.
|
"Approximately" |
||||
Shelter Cover Exterior |
|
|
18" |
|
|
|
|
||||
|
|
|
|
|
|
Cover |
Tie Knot |
|
|
|
Rope |
Door Panel |
|
Page 2 |
05-10077-00800-OD |

4. Attach "S" Hooks and rope to the INside of the Door Panel
A. Cut 2 more slits inside the shelter on door above the webbing. Hang each pulley here.
Door Panel Interior
B.Pass the rope from the knot down under the door and back up to the first pulley. Hook each rope on each pulley. Do this on both sides.
C.On the opposite side of the cleat, bring one rope across top of the door to the other pulley and pass it through that pulley. You should have 2 pieces of rope hanging on the same side of the shelter as the cleat.
D.Hand start to roll up the door holding the 2 ropes together. The door will start to roll up around the pipe from the bottom as you pull the ropes, similar to a window shade. Secure the ropes to cleat at preferred height.
Inside view of door panel
Page 3 |
05-10077-00800-OD |
 Loading...