

Page 1
Page 2
Page 3
Page 4
Page 5
Page 6
Page 7
Page 8
Page 9

Page 10
Page 11
Page 12
Page 13
Page 14
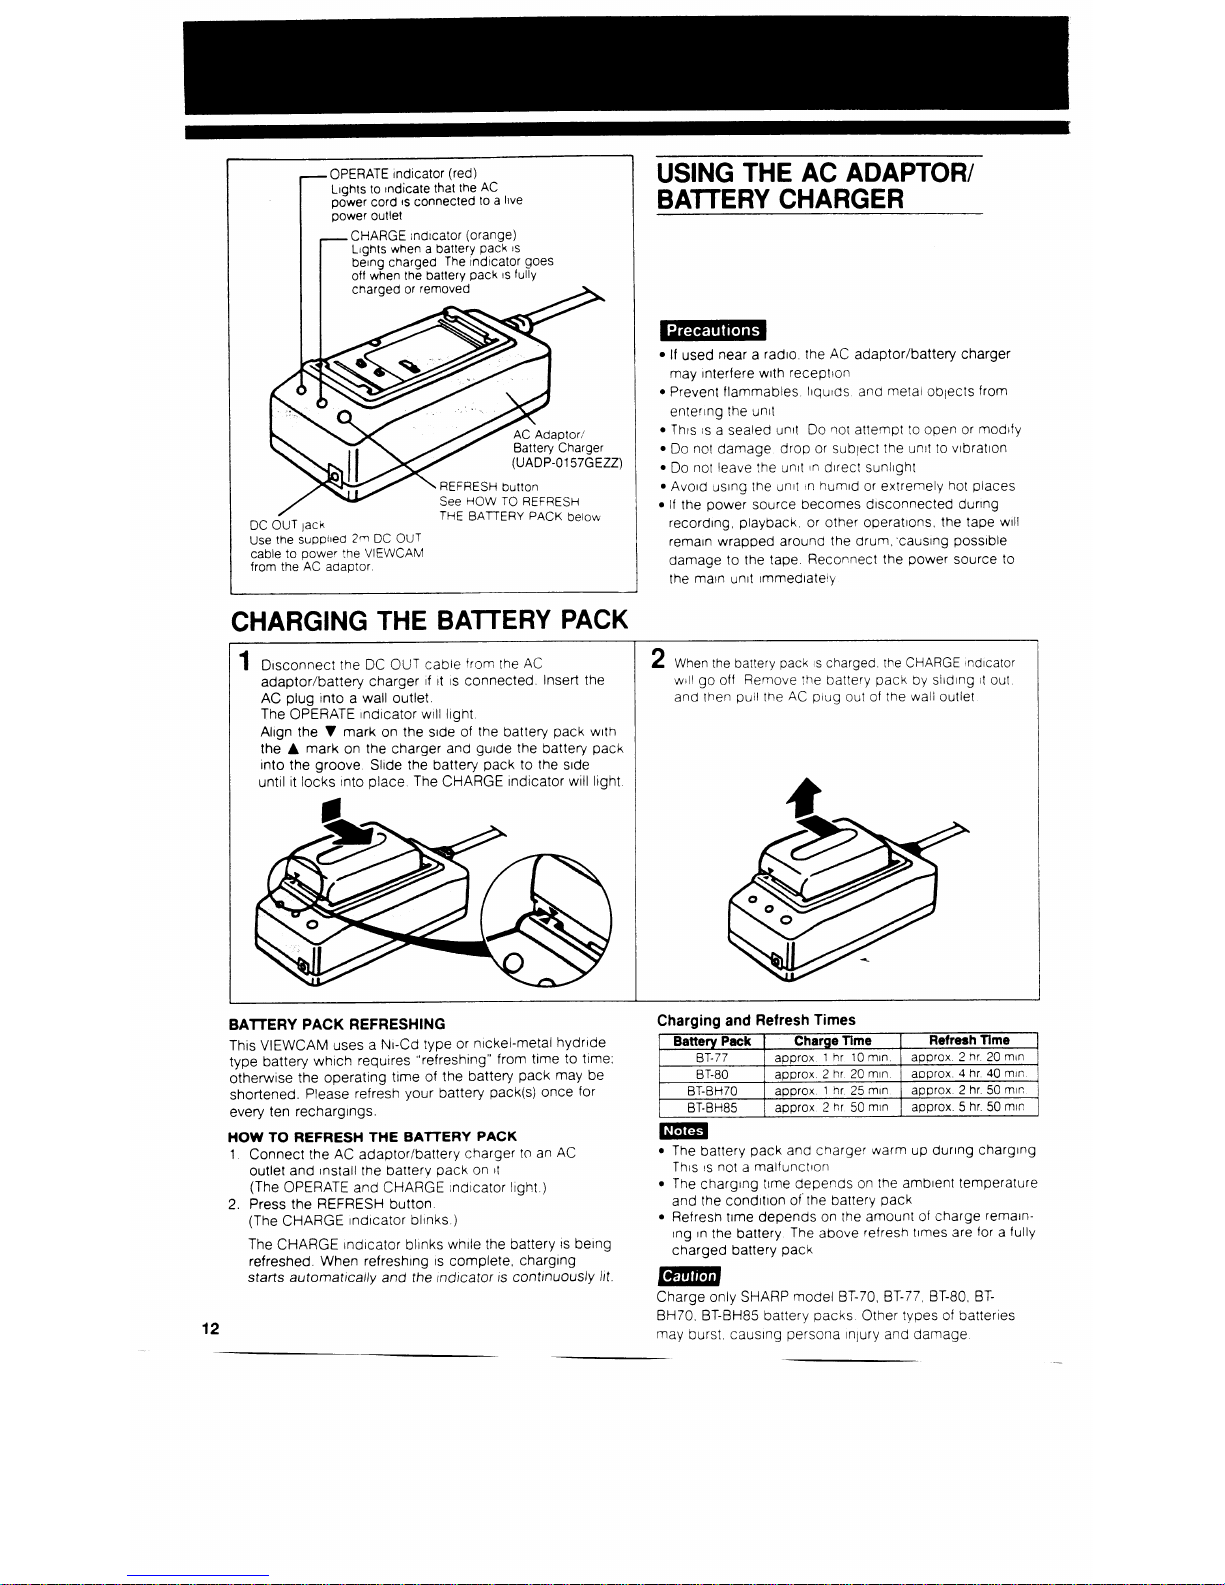
Page 15
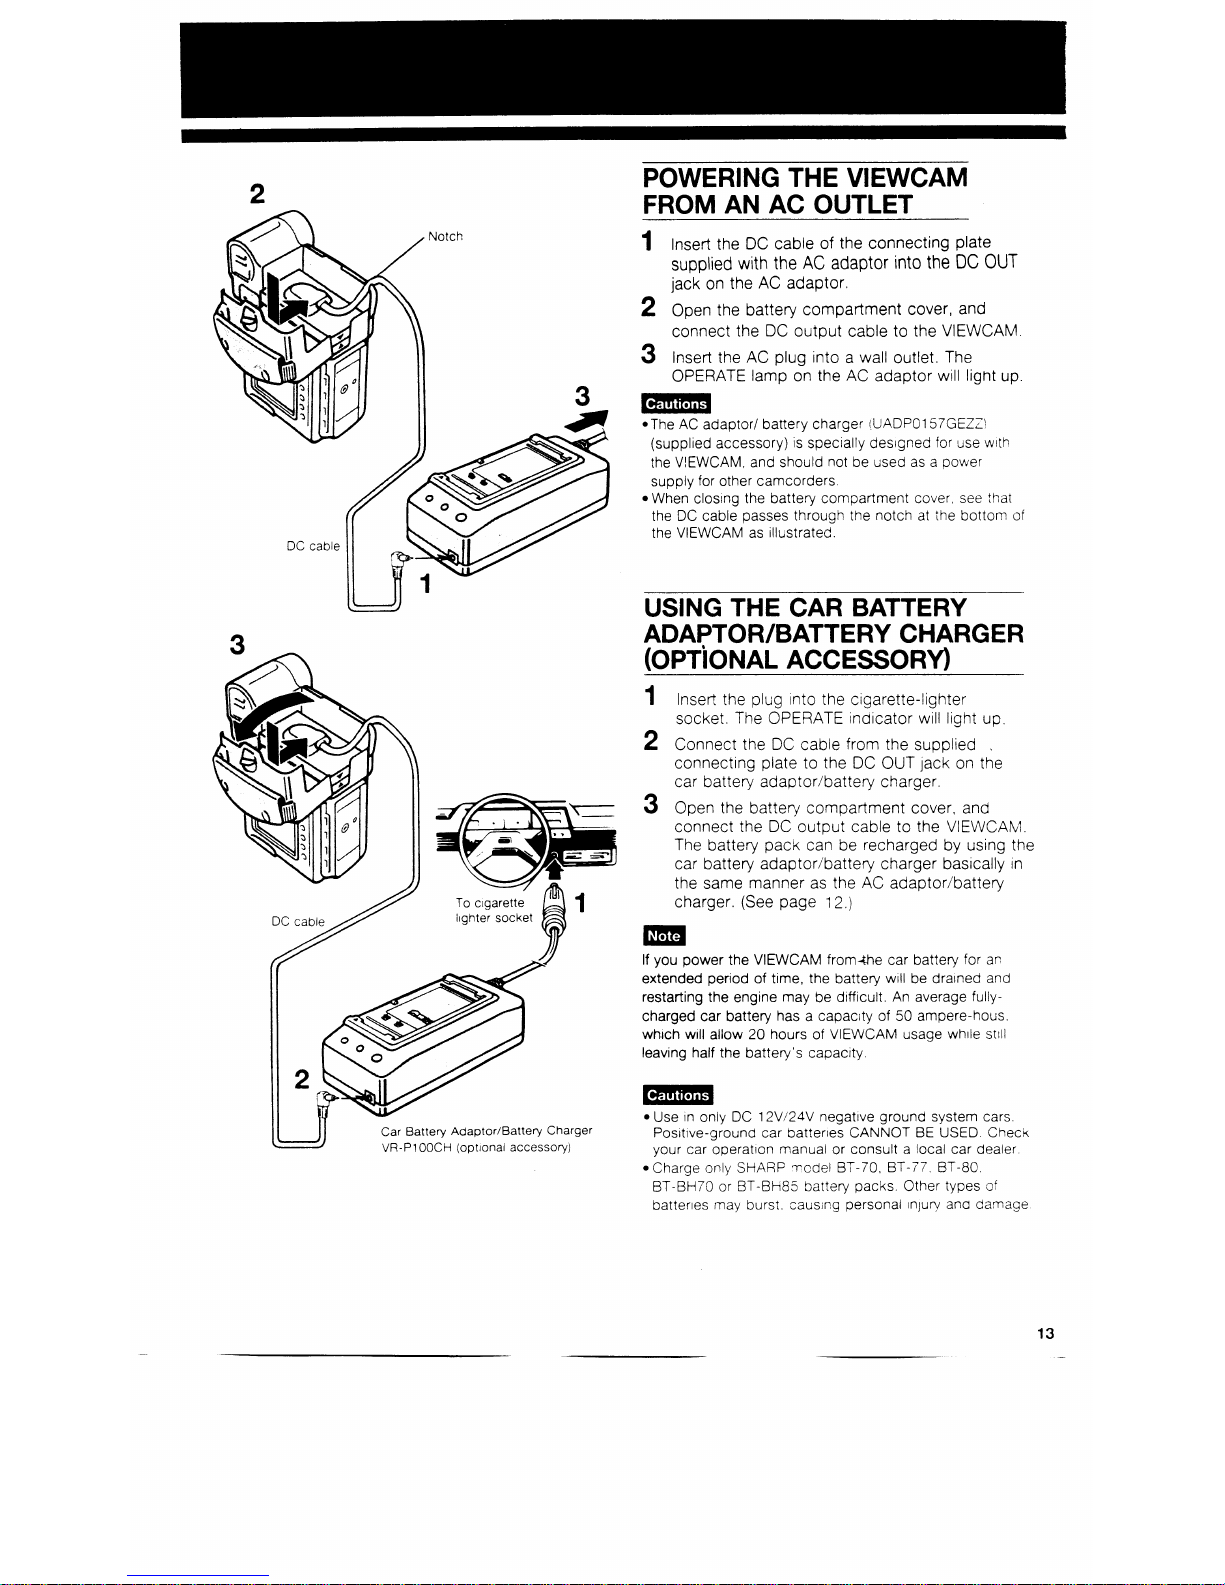
Page 16
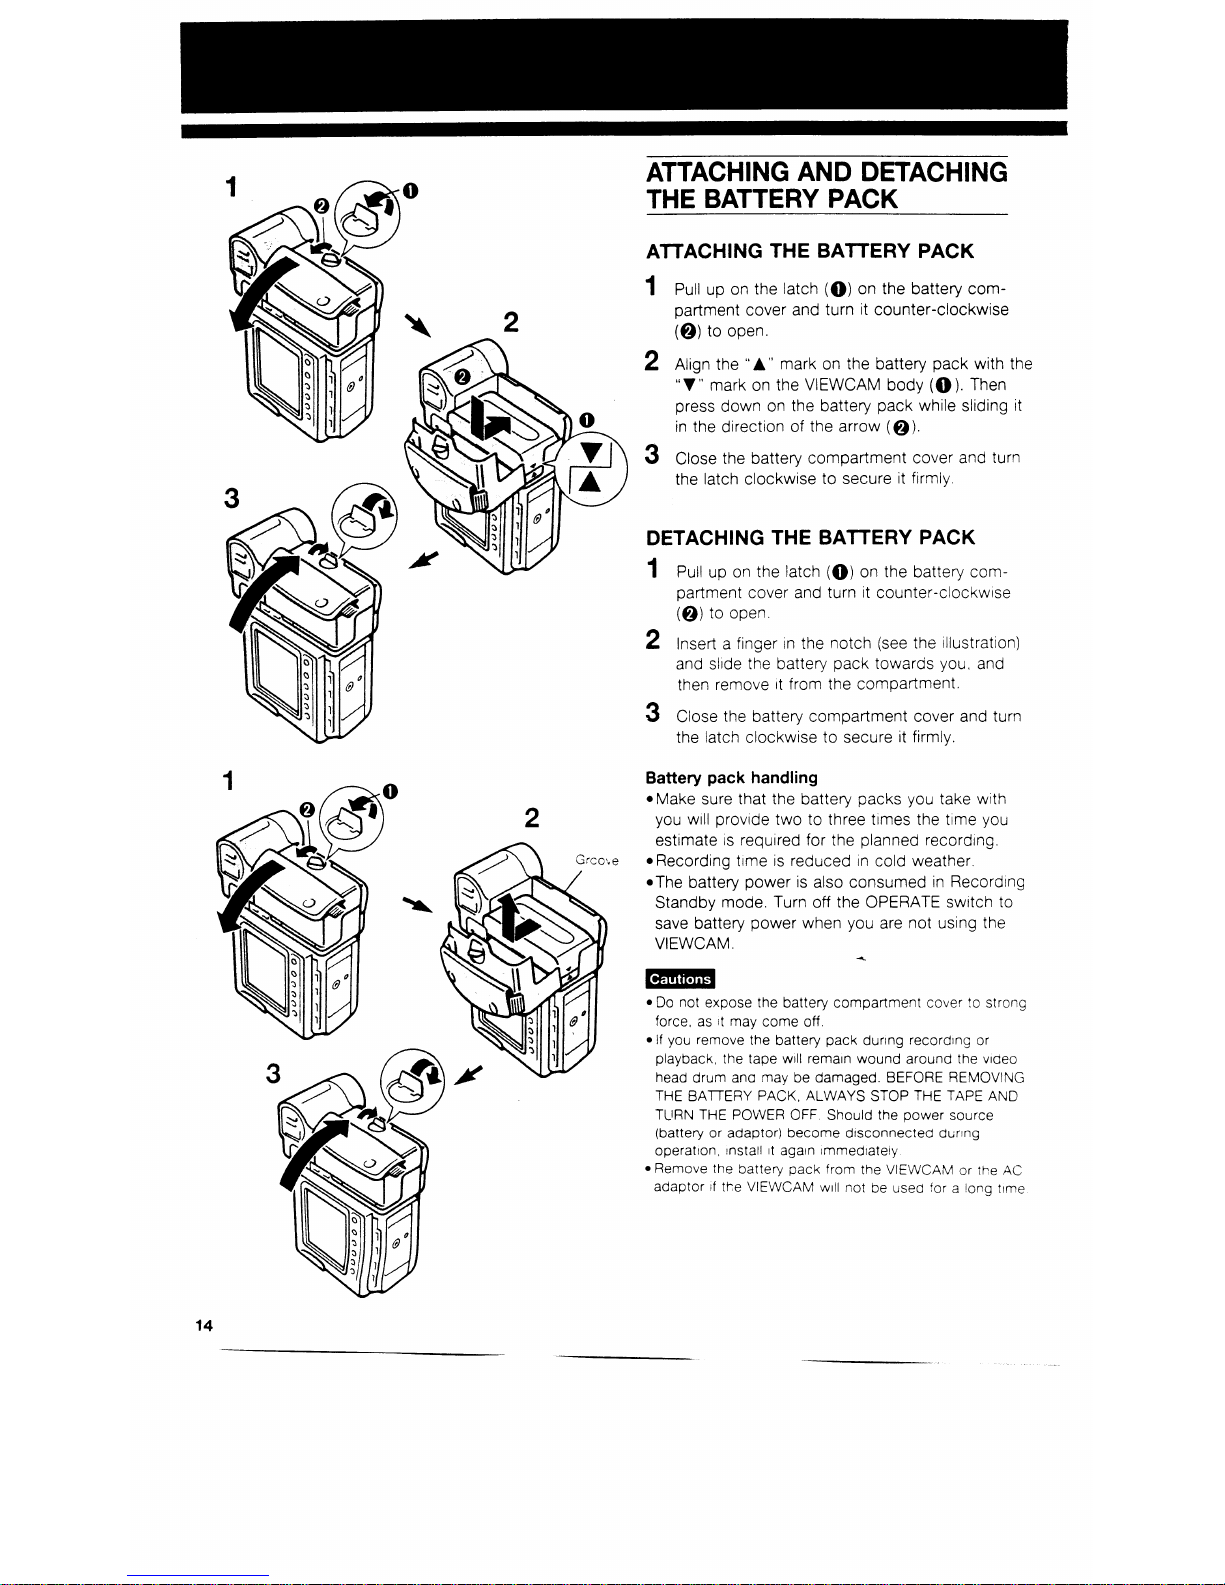
Page 17

Page 18

Page 19

Page 20

Page 21

Page 22

Page 23

Page 24

Page 25

Page 26

Page 27

Page 28

Page 29

Page 30

Page 31

PLAYBACK STANDBY
INDEX SEARCH
INDEX SEARCH
Playback standby function allows you to quickly
find the beginning of a previous recording.
The
is capable of
the
point of up to 10 recordings.
TO OPERATE PLAYBACK STANDBY
1
Set the OPERATE switch to VCR.
2
Press the INDEX SEARCH button. (“INDEX
SEARCH” and
or “CFF” or both are
displayed on the screen.)
Beginning Recording
of tape
1
2
Recording
3
Record
;Last recording)
The
or “FF” on the
the
you are playing back recording 3. “FF” ard
are displayed. If you press the FF button, the
recording 4. If you press the REW button
returns
to the begInnIng of recording 3. If you are
recording 5, only
IS
you
the option of returning to the begInnIng of recording
5. After the
IS found, the VIEWCAM goes
playback standby function ocerares viiren
IS stopped, and during playback.
not
with recordings that are
shorter than
seconcs
l
function aoes not operate tape nas
ejected.
Page 32

VIDEO SEARCH
VIDEO SEARCH
This function makes it possible to quickly search for
desired scenes during playback. All you have to do
is to press the FF (or
button during playback.
To return to normal playback, press the PLAY
button.
This unit has a two-speed video search function.
Press REW
or FF
twice to switch from
slow to high speed.
Sound cannot be heard
these searches
STILL
function makes it posstble to freeze the picture
Press the PAUSE/STILL button durtng playback.
To return to normal playback, press the PAUSE,
STILL button or PLAY button.
SLOW
This function makes it possible ta play back in slow
motion. Press the
SLOW button during
playback. To return to normal playback, press the
PLAY button.
and Slow modes
l The LCD
has a function for reducing picture
noise during still or slow playback. However, when the
IS connected to a TV,
may appear on
the
screen during
slow or search mode
l TO protect the tape the
to
playback mode
s
mode for more than 5 minutes, or
Slow mode for more
than 1 minute.
30
Page 33

COUNTER MEMORY FEATURE
4
SELECT-SET
Counter Display
The counter display shows elapsed recording time
in hours, minutes and seconds. (It continues to
count even while it is not being displayed.) It is also
available during playback and recording search
operations.
Counter Memory Display
The position where a memory reset (O:OO.OO) was
made is stored in memory to make it easier to
return the tape to the beginning of a recording.
USING THE COUNTER
The counter display changes each time you press
the COUNTER MEMORY button as shown below.
TO RESET THE COUNTER TO ZERO
Press the COUNTER RESET button.
31
Page 34

USING THE COUNTER MEMORY
Use the counter memory when you want to return
to the beginning of a desired scene.
The unit will automatically stop at the point where
the counter reads M O:OO.OO during fast forward or
rewind.
1
Press the COUNTER MEMory button to make
the counter memory dtsplay appear on the
1.08. 31
playback (or recording) press the
COUNTER RESET button at the beginning of a
scene that you want to return to.
To return to M
slide the OPERATE
switch to VCR and press the FF or REW button.
To cancel Counter Memory mode
Press the COUNTER MEMORY button to make the
counter display disappear, and then press the
COUNTER MEMORY button once
video searches.
l The counter reading may differ slightly from the actual
is
notlceable when the tape has
been rewound or fast forwarded a number of times,
which case there can be a difference of several seconds
USING THE STAND
Pull out the stand and lock
into position when
you put the VIEWCAM on a table or other flat
surface. To stabilize the VIEWCAM,
sure that
the VIEWCAM’s camera part stands verttcally as
shown to the left.
l Protect the stand ‘ram strong forces
may
break
stand in ihe
2-e
on the left) to fold
32
Page 35

l By using the electronic shutter together
the “snapshot
recording function, you can record a completely still
without any blurring.
l The quality of
recorded
Snapshot
mode
be slightly lower than normal pictures.
USING THE DIGITAL IMAGE
FEATURE
The DIS button lets you stabilize the image by electro-
nically cancelling relatively small VIEWCAM shakes
that are often annoying
closeup shots.
Press the DIS button. The
(DIS) Indicator appears
at the
of the monitor screen.
To return to normal recording mode, press the
button once again. The DIS Indicator
disappear.
l When the
mode
engaged, the screen Image
magnified, and the shutter speed IS
from the standard speed
to
20 sec..
l Image
slightly decreases
DIS mode
l Under the light of fluorescent lamps, the picture may
and dim
l Dunng
Recording mode, the
Ineffective
l Leave the DIS
when you use the VlEWCAhil
on a
l When you wish to save battery
Keep the ZIS
function inactive.
The DIS function
compensate for excessive VIEWCAhl
shake, or
the subjects or
below
(*The
l Subject
or
stripes
l Subject
low contrast
l Subject
a plain background
l Dark or
subject
l There are many moving subjects
a
l A shutter speed other than
IS
of fluorescent lamps
RECORDING A FIVE-SECOND
STILL IMAGE
The SNAP button lets you
a
picture (“snap-
shot”) for about five seconds, together
normal
sound.
Recording a Snapshot While in
Pause Mode
If you press the SNAP button
the
IS
Recording Standby mode, a
of the subject
be recorded for about five seconds.
When “snapshot” recording IS finished, the
returns to Recording Standby mode.
a freeze-frame
IS
recorded. the
monitor screen also displays the freeze-frame Image.
Recording a Snapshot While in Recording Mode
If you press the SNAP button
recording, when
the snapshot has been recorded, the
returns to Recording mode.
Page 36

STILL/STROBE RECORDING
The STILUSTROBE button lets you record still or
strobe (still pictures that capture continuous motion
at
sec. intervals) images of subjects along with
normal sound.
You will find it useful when you want to record a
shot of, say, a tourist information board during
sightseeing (still recording), or produce a special
effect while recording moving subjects such as your
friends waving at you (strobe recording).
Press the STILLSTROBE button while the
Press the button once to select Still mode,
press it twice to select Strobe mode.
Press the REC START/STOP button to start
recording or Strobe mode.
l You can switch between
Recoraing mode and
Strobe Recording mode while the
IS recording
or
Standby mode.
l To cancel Still Recording mode. press
STILL
STROBE button twice. to cancel Strobe
mode. press the button once Each
vou press the
button, the recording mode changes as snown below
Normal
Strobe
l When recording
Still (or Strobe) mode
you engage
the
Recording Standby mode and then
press the REC START/STOP button to restart
without having canceled
(or Strobe) mode. the
conttnue to record
Still (or Strcbe)
mode.
l The quality of pictures recorded
or Strobe
Recording mode
be slightly lower than normal
pictures.
l When you select Strobe
mode, the shutter
speed automatically swatches from the standard speed
sec.) to 1
sec. (The “SHUT. SPEED”
on the monitor will remain unchanged.)
button remains Ineffective while the
IS
Still Recording mode.
l After recording
Recording mode for a iong time.
the monitor may hold an afterlmage
IS not a
problem. The monitor
return to normal
you turn off
the
and wait for a while
Do not keep the
Recording mcce too
long.
Page 37

SELF RECORDING
Indoor
adaptor for
recordtng
VR-FA1 OOP
accessory)
Recording yourself and your fnends together at a
party, using the remote control,
monltorlng
yourselves on the
screen
Outdoor
adaptor for
recordtng
VR- FA1 OOP
(optional
accessory)
The Self Recording function lets you monitor the
recording while you are part of the scene. Set the
“SELF REC” menu item to “AUTO CORRECT” to
turn the on-screen picture right way up. Then rotate
the monitor
to face the same direction as the
camera lens.
MENU
IME
l
D I SPLAY
OFF
*SELECT
*AREA
11 SYDNEY
l SUMR TIME OFF
ä ETTING
25 12 1993
6 25
l
H
AUTO
*SELF REC
AUTO CORRECT
NORMAL
*REMOTE
ON
You
need the VR-FA1 OOP tripod adaptor for 180”
recording (optional accessory) if you want to use an
Recording mode.
If you wish to use a
use the
adaptor bracket, and make sure the lens
section is right side up. If the lens section
IS
Inverted
instead of the screen (which will occur
you mount
the
directly onto a tripod, wtthout the
adaptor bracket), the recorded picture
be
upside down.
l In Self Recording mode. no menus or mode lndtcators
are dtsplayed.
l In Self Recording mode, all standard warning indicators
on the monitor are replaced
by
a flashrng
the centre of the monitor. To check the
of
the warning, rotate the monitor back to the normal
4
Do not rotate the monitor to the Self Recording positton
IS
or playing
Recording yourself and
your family together
on a
the remote control
35
Page 38

MANUAL FOCUS
4
The VIEWCAM’s Auto Focus feature (Full Auto
mode) is designed to focus on most types of
subjects. In Full Auto mode, the VIEWCAM automatically focuses on whatever is in the center of the
scene. Therefore, always keep the subject in the
center of the screen.
When it is difficult to focus in Full Auto mode, set
the VIEWCAM to Manual Focus mode and focus
manually.
1
2
3
4
Press and hold the FULL AUTO button for
more than
seconds to disengage Full Auto
mode. The “FULL AUTO” indicator disappears,
and operation control indicators for Manual
Focus mode appear on the monitor.
Press the Auto/Manual Focus button
to
engage the VIEWCAM in manual Focus mode.
The “MAN’L FOCUS” indicator and the
(far)
and
(near) indicators will appear on the
Press and hold the Power Zoom
(Telephoto)
button to zoom in all the way.
Use the Power Focus F/N buttons to focus
correctly on the subject. Then, use the Power
Zoom buttons to obtain the desired
size.
l To engage the
FULL AUTO mode
press and hold the FULL AUTO
for more than 2
seconds. The “FULL AUTO”
reappear on
the monitor.
l
recording
Manual Focus mode. you may not be
able to focus correctly
the subject IS within approxl-
of the
In such a case,
the zoom control toward wide angle, and then try
focusing again.
l If you focus on a subject
first setting the zoom
when you zoom
on
later.
l If the lens IS dirty or fogged, you may not
able to
36
Page 39

White paper
FULL
AUTO
WHITE BALANCE LOCK
White balance ensures that colours are correctly
reproduced. In the Full Auto mode, white balance is
constantly adjusted automatically.
USING THE WHITE BALANCE
LOCK MODE
Colours may shift when the VIEWCAM IS filled with a
scene that has just one colour, e.g., if you take a
close-up of a solid orange sheet of paper. To
prevent colour shifts with that kind of scene, lock
the correct white balance by followlng the procedure below.
1
Press and hold the FULL AUTO button for
more than 2 seconds to cancel Full Auto
mode. The “FULL AUTO” Indicator disappears.
and the manual operatton control
are
displayed on the monitor.
Set the VIEWCAM to Recording Standby
mode, at a solid
subject such as a
piece of white paper or cloth, and zoom in
it fills the field of view.
Press the
LOCK button to lock the white
balance. The “W/B”
on the monitor
changes to the “W/B LOCK” Indicator.
THE WHITE BALANCE
LOCK MODE
Press the W/B LOCK button, or hold down the
FULL AUTO button for more than 2 seconds
the “FULL AUTO” Indicator appears on the monitor.
The VIEWCAM is now engaged
Auto White
Balance mode.
l
Balance Lock mode
cancelled
power
IS turned off, or when the
set to Playback
mode.
l Reset the white balance lock when the light source has
changed.
l Even after the whtte balance has been locked, white
balance shifts may occur due to slight changes
37
Page 40

Page 41

FADE IN
FADE OUT
MACRO SHOTS
This VIEWCAM lets you shoot closeup images Of
small objects such as flowers and insects, or make
record a magnified image of a subject whrch is
within approximately 1.5 m of the VIEWCAM, do not
zoom in on the subject.
Instead, zoom out all the way by holdtng down the
Power Zoom
button, and then move the
desired image on the monitor.
The VIEWCAM will automatically focus on the
subject when the lens is set for the widest angle.
l When you are recordlcg a macro spot. see that the
subject receives suff lclent lllumlnation.
l It IS recommended that you use a tripod for recorcing a
macro shot to avold camera shakes
FADE IN
FADE OUT
Press the FADER button to smoothly fade in or
fade out a scene.
FADE IN
If the FADER button IS pressed dunng the Recording Pause mode, “FADER” IS displayed on the
monitor and Fade In Standby mode IS engaged.
When the REC START/STOP button IS pressed,
“FADE IN” IS displayed, the monitor screen
becomes whtte, and recording begins
a fade
in of the audio and the visual Image.
FADE OUT
If the FADER button IS pressed dunng recording,
“FADER” is displayed on the monitor and Fade Out
Standby mode is engaged. When the REC START
STOP button is pressed,
“FADE OUT” is displayed,
and recording finishes with a fade out of both the
audio and the visual image.
Press
START/STOP button,
and
IN” or “FADE OUT”
appears on the monitor
3s
Page 42

WIDE SCREEN
Normal mode
Screen mode
The top and the bottom of the picture are masked
with black bands to produce an effective screen
aspect ratio of
which has the wide-screen
feel of a movie shown in a theater.
1
2
3
TIME
*DISPLAY
-SELECT
DATE-TIME
SYDNEY
l SUMR TIME OFF
25
10
00 AM
4
5
l
AUTO
*SELF REC
AUTO CORREC
T
*SCREEN
NORMA:
*REMOTE
ON
-SELF REC
AUTO CORRECT
NORMAL
*REMOTE ON
-SELF REC
AUTO CORRECT
WIDE
*REMOTE
ON
Make sure that the OPERATE switch IS set to
CAMERA and press the REC START/STOP
button, if necessary, to select Recording
Standby mode. (‘II-
is displayed.)
Press the MENU button to display the menu.
Move the
pointer to “SCREEN” by pressing
the SELECT button.
Press the SET button to select “WIDE.”
Press the MENU button to turn off the menu.
The monitor now displays the picture
the
top and bottom portions masked out.
TO RETURN TO NORMAL PICTURE
“NORMAL” for ‘SCREEN
l The
Screen mode cannot be set or
l The
Screen function does not work when the
IS
VCR mode
BACK LIGHT COMPENSATION
adjusts to the scene’s bnghtness. However, if
the subject is backlit or
a shadow, the subject
may be too dark. In this case, BLC (Back Light
Compensation) will prevent the subject from appearing dark.
Press the BLC button. The
q
appears on the monitor screen.
Press the BLC button once again to return to
normal Auto Exposure. (The
Indicator goes
out.) Other-we, the recorded picture
be too
Page 43

1,000
400
10
Blue sky
Clear day at noon
(100,000
Clear day, one hour before sunset
(1.000)
Fluorescent desk lamp (400)
Cigarette lighter at
30cm (15-20)
10,000 (K)
9,000
8,000
7,000
6,500
6,000
5,500
5,000
4,500
3,500
3,200
2,800
2,500
2,000
Clear day
Cloudy day
Daylight fluorescent
Camera flashbulb
Blue photolamp
Off
fluorescent
Tungsten photolamp
Halogen lamp
Tungsten lamp
Acetylene lamp
Kerosene lamp
Candlelight
Blue
U
T
Yellow
Red
LIGHTING
For
clear, good-quality recording, 500 to 100,000
Iux IS needed. Recording IS also possible with less
quality may suffer Adequate
In most outdoor, daytime scenes, natural
IS adequate for home videos. Indoors, the situation
becomes more complicated Arttficlal lighting IS
required. and halogen lamps provide the most
natural artlflclal light while
a constant
colour temperature over a long operating life.
Good
IS difficult to achieve There are many
problems
to catch the unwary Simply
the VIEWCAM will only make your subject look flat
and two-dImensIonal To make a subject more Interesting, use the llghtlng to model your subject and to
add or create emphasis
a scene
Auto White Balance should normally be used
the
colour temperature range shown on the left. However,
operate from 2 500K up to
although the ptcture may take on a red or blue tint
41
Page 44

CONNECTION TO A TV WITH
AUDIO/VIDEO TERMINALS
By connecting the VIEWCAM to a
you can
watch played-back tapes on the
screen.
Yellow: To VIDEO IN terminal
Red: To AUDIO IN (R) terminal
To AUDIO
(L)
cable
Yellow, To VIDEO IN terminal
Red: To
IN (R) terminal
To AUDIO IN (L) terminal
To S-VIDEO
Make sure that the
TV and other
to
be connected have been turned off before you make
any of the
components left turned on may cause
or
VIEWING PLAYED-BACK
VIDEOS ON A TV
Use the menu to set the VIEWCAM to
output mode by selecting “OUT” for “AV IN/OUT”.
Select “AV” (Video Input mode) with the input select
switch on the
(Consult the-operation manual for
your
for details).
If your
set has
one
input terminal (for
monaural source)
connect the white plug to that terminal
When the
s
a TV
piacoack
the TV Image may viPrare f
sound
of
this napoen. lower the
volume
CONNECTION TO A TV
WITH S-VIDEO TERMINAL
To
S-VIDEO
Select
Input mode)
the source
select
on the
42
Page 45

CONNECTION TO TV VIA VCR
Yellow: To VIDEO IN terminal
m Red: To AUDIO IN (R) terminal
To AUDIO IN (L) terminal
Yellow: To VIDEO terminal
Red: To AUDIO (R) terminal
To AUDIO (L) terminal
-VIDEO
To
S-VIDEO
S-Video cable
accessory)
Put your
at the cover edge
and pull the cover
the direction
of the arrow
PHONES
0
0
IN
1 Set the TV to receive picture from the VCR.
Turn on the VCR, and set the source select
to the external source
l If your TV set has only one audio
(for
monaural
the
plug to that
l If your VCR has an S-video
terminal, connect
to
the VIEWCAM’s S-VIDEO socket with the supplied
S-video cable.
S-Video terminal
S-video terminals are used to pass the chroma
(colour) and luminance (brightness) components of
video signals separately. They serve to Improve the
picture quality
both playback and recording.
ABOUT THE MONITOR IN JACK
The MONITOR IN jack is used to check video
pictures from an external source. When you connect
the VIEWCAM to other video’equipment (for example, a video printer for prints of screen images), you
can use the VIEWCAM’s LCD screen to see and
check the video
There is no need to connect
a TV or other external monitor.
l It
IS
not
to record
images from an external
source by using the MONITOR IN lack.
l Unless the MONITOR IN lack IS
used, do not leave
a cable plugged
the
OtherwIse, you cannot
l Do not leave a cable plugged
the MONITOR IN jack
when you watch played-Back tapes on a 7-V of Other
connected to the
Page 46

r-6
CONNECTION TO
WITH RF
CONVERTER
or cable
TO ANTENNA IN
2
If your
antenna input is connected to a VCR
Disconnect the cable between the
and VCR, and
insert the RF converter between them as shown below
Use the RF converter and VHF connecting cable,
available as optional accessories.
1
To view the output from your camcorder on the
you must select an unused channel on
your
and tune
to the output of the RF
converter (factory preset to channel 0).
2
3
4
5
6
7
Set the TV tuner to the same channel.
Remove the antenna cable from your TV and
then connect the RF converter to the camcorder as shown.
Then plug the antenna cable rnto the ANTENNA
IN terminal on the RF converter.
Plug the
coaxial cable
the RF OUT
terminal on the RF converter and the
coaxial antenna terminal on the TV.
Plug the RF converter cable
the AV out
terminals on the VIEWCAM.
Slide the VIEWCAM’s OPERATE
to VCR.
Load a video cassette (cassette
button
The
may require tuning. Refer to the
operation manual.
l Use only the optlonal RF converter VR-X30RF with the
l The RF converter
a sealed
Do not attempt to
open or modify
Do not damage, drop or subject the
l Unplug the RF converter dunng
storms.
resume normal
operation, set the OPERATE
switch to OFF on the
or unplug the RF
converter cable from the
playback sound
monaural
l The picture may be alsturbed during video searcn or
picture playback.
does not
a
the
Page 47

[Playback
EDITING
Set the OPERATE switch to VCR.
Yellow. To VIDEO terminal
To AUDIO (R) terminal
To AUDIO
terminal
(supplied
accessory)
To S-VIDEO
Recording
input terminal
Yellow, To VIDEO IN termtnal
Red: To AUDIO IN (R) terminal
To AUDIO IN (L) terminal
cable
(supplied accessory)
unwanted sequences from your tape, or transposing one
sequence with another. Connect the
to your
home VCR, and use the former as the source (playback)
equipment and the latter as the recording equipment.
lets you monitor the source program on the
to an
external
or video monitor.
Connect the
to a VCR with the supplied
l If your VCR has
S-Lldeo Inout !errr;na:.
to :he
socket with
supcileo S-video cable
l If your
set nas
one
terrrlnai ,ior
source), connect :he white olug :o
!errrinai
CUTTING UNWANTED SEQUENCES
1
2
3
4
5
Play back the ?ape to be edited, and locate the
ning and end of that sequence.
rewind :he tape
to the beginnIng of the portIon that you
to keep
Load a blank cassette tape
the recoralng VCR.
Press the VIEWCAM’s PLAY button and the VCR’s
REC (record) button at the same time.
Press the VCR’s PAUSE:STlLL button to pause
recording wher :he source tape reaches the beginning of the sequence to be cut.
Press the VCR’s PAUSE/STILL (or PLAY) button to
resume recording when the source ?ape reaches the
end of the sequence to be cut.
TO STOP EDITING
Press the STOP button on the
and the VCR
l Some of the
of
sequences
l The images played back on
Forward,
Search or
mode may be sightly disturbed or dimmed.
IS not malfunc!lon
EDIT SWITCH
to a VCR. Use ?he menu to set “EDIT” to “CN”
to mlnlmize the quality
Use this
videos.
l When you dub from the VIEWCAM to a VCR, be sure to
selecting “OUT” for “AV IN/OUT” on the menu display.
l The edlt switch remains Ineffec:ive wnen
IS
recording
45
Page 48

Yellow: To VIDEO
Red: To AUDIO (R)
terminal
To AUDIO (L)
Playback
TV with monitor output
To S-VIDEO
To S-VIDEO
output terminal
Video disc player
Yellow: To VIDEO OUT terminal
Red: To AUDIO OUT (R)
To AUDIO OUT (L) terminal
RECORDING FROM
AN EXTERNAL SOURCE
YOU can record or edit on this VIEWCAM from other
sources such as a VCR, TV, or video disc player.
Connect the
to the source equipment
with the supplied audio/video cable as shown to the
left.
l If the source equipment has an S-video output terminal,
connect it to the VIEWCAM’s S-VIDEO socket with the
supplied S-video cable.
l If the source equipment has only one audio output
terminal, connect the white plug to that terminal, and
leave the red one unplugged.
l While the
cable is plugged
into the
S-VIDEO socket, the VIDEO terminal does not accept
recording signals. (Audio signals can be recorded.)
When you wish to record through the VIDEO terminal,
be sure to leave the S-VIDEO socket unplugged.
TO RECORD FROM AN EXTERNAL
SOURCE
1
Set the OPERATE switch to VCR.
the VIEWCAM’s A/V terminal mode to
by
for
or
the menu display.
Start sending audio/video signals from the
source equipment connected to the VIEWCAM.
Check on the
monitor to see if the
picture
is
properly received.
Press the REC button-on the
to start
recording.
l To pause recording, press the PAUSE/STILL button on
the
Press the PAUSE/STILL button again to
resume recording.
l The AV terminal mode (“AV IN/OUT” on the menu
display) should normally be set to output (“OUT”).
TO STOP RECORDING
STOP button
Press the STOP button on the
Page 49

FLUORESCENT LAMP
BACKLIGHT
Fluorescent lamp
The fluorescent lamp backlight used in this
continue to use the VIEWCAM when the fluorescent
lamp has almost reached the end of its service life,
the “LAMP” indicator will appear in the
of
the monitor screen, and the monitor
go off
approximately one minute later. When this occurs,
purchase a replacement (KLMPV0006TAZZ) from
your dealer and replace the old lamp.
REPLACING THE FLUORESCENT LAMP BACKLIGHT
1
Set the OPERATE switch to OFF
to
turn off
the
and watt about 15 minutes for the
lamp unit to cool down.
CAMERA
Carefully hold the end (white knob) of the fluorescent
lamp unit with tweezers, and pull the lamp
out.
Fluorescent
lamp
Replace the backlight compartment cover
Backlight
compartment
cover
Rotate the monitor halfway forward
the direction
of the arrow, and tnen remove the backlight compartment cover with a flat-head screwdrIver or a
similar Instrument.
4
Insert the replacement fluorescent lamp
the
compartment. See note below
l Be sure to
the replacement fluorescent
the direction of the arrow,
the com-
partment. Do not press diagonally as
may cause
contact failure.
l The fluorescent light may fllcker when first turned on
Should this occur, turn off the
then turn
on again.
l The fluorescent lamp
hot auring and
of
at least 15
after
turning the power off before
lamp, to
for it to
stlii
hot may result
burns or other
47
Page 50

<Basic
Look at the
both eyes
Place your feet
at a 45” angle and
take a firm stance.
<High Angle>
You can record and
see the monltor
screen.
IS
want to record over
Press your
elbows against
your
Angle>
can record using more natural body postures
since you can see the subject on-screen, without
having to hold the VIEWCAM against your eye.
LCD monitor also makes high-angle and
low-angle shots easy.
hand-held recording, the VIEWCAM has to be
steadied to prevent image shake.
l Use a tripod for very stable recording.
BASIC RECORDING POSITIONS
Put the fingers of your right hand through the hand
strap, and place your
thumb
to the
Record Start/Stop and Power Zoom buttons. Place
the thumb of your
hand on the
of the
LCD monitor.
l Take care not to touch the monitor with your fingers, as
perspiration and dirt
smudge
l The supplied shoulder strap and hand strap should also
be used
l Unless you
to create a
effect, keep the
level with the honzontal plane.
When kneeling, putting
one knee on the ground
HANDLING OF THE LCD MONITOR
not let anything press against the monitor
screen, or expose it to shock, as it may bleak.
l Make sure that the shoulder strap fittings do not
touch the screen.
not put the VIEWCAM on a table, or any other
surface, with the monitor screen facing down.
the provided cleaning cloth or other soft cloth
to clean the screen.
image may become blurred when the screen
or areas adjacent to the screen are pressed.
Page 51

Before calling for service, please check the following troubleshooting table.
l Power
l No power
l Recording
l Operating time of
battery is short.
l Power on but no Image
on the monitor.
l Cannot record
I
l Poor colour
l Fuzzy picture
l
picture IS too
dark.
l Playback
l Morxtor picture not
easy to see.
l No image appears.
l Poor colour
l The Infrared remote control does not
function.
l Cassette cannot be Inserted.
l Cassette won’t eject.
l No tape movement
Fast Forward
mode.
l No tape movement
Rewind mode.
l Safety devices are functioning
l The battery pack IS not charged.
The power source
not correctly
connected.
l Depleted battery pack.
l Dew in
l Battery pack needs refreshing.
l Disconnect the AC adaptor cord. then, plug
the wall outlet again
13)
l Charge the battery pack sufflclently.
1
(Page
l Connect the power source correctly
(Page 13. 14)
l Use a ‘ully charged battery
(Page
l
dew dries
1
l Refresh battery pack. (Page :2)
l
IS
VCR mode.
l
the OPERATE
to CAMERA.
l Erasure protection hole IS covered. l
the red projectIon to open the hole
l
not properly adjusted. l Adjust the
(See
operation
l
balance is set improperly
l Poor lighting.
l Reset the white balance or set the
to Full Auto mode (Page
l Apply additIonal lighting or correct
l Dust or other forelan matter on lens.
l Clear the lens
l Not properly focused.
l Adjust the focus or set the
to
l High speed shutter IS set to
speed mode.
l
picture adjustments
Auto mode (Page
l Set the
to
Auto mode
(Page
l Adjust !he plctlire.
l Improperly connected to
l Reconnect properly (Page
l
channel or
switch IS l Tune
to RF converter’s output channel
not properly set.
(VHF channel 0 or 1). (Page 44)
l AV terminal mode IS set to Input.
l Set TV’s
switch to
VIDEO
the
IS used. (Page
. Change the A/Y terminal
to outout.
l
balance not properly adjusted l
sure the white balance IS properly
during recording.
adjusted during recording. (Page
l Dirty video heads l
service
l Worn video heads
l Carl for setvIce.
l Old or worn tape
Use a new tape cassette (Page
. The lithium battery has run down.
l The remote control IS being usea
beyond
operating range.
l Intense dayltght IS
on the
photoreceptor.
l There IS an obstacle between the
remote control and the
photoreceptor.
l Cassette IS not right
up or IS
backwards.
l Replace the llthlum battery
a new one
(Page
1)
l Use the remote control
operattpg
range. (Page 23)
l Avoid letting
daylight fall on the
photoreceptor (Page
l Remove the obstacle or use the remote
control from a different angle (Page
l Check cassette positiontng and
(Page
l Another cassette IS
the
l
is in Camera Recording mode
l Press the EJECT Putton ana remove
(Page
l Press REC START/STOP button to stop tape
and try
(Page 22)
l Tape IS already completely wound.
l Rewind to desired point (Page 28)
l Tape IS already completely rewound.
l Fast
to desired polr;t (Page
l
IS
with a microprocessor. Its performance could be adversely affectea
external noise or Interference
should happen, turn off the power, and disconnect
from any power sources, inciualng
etc Ther
reconnect the power sources (to resume operation).
l If the characters displayed on the monttor screen appear to malfunctron, disconnect the power source and remove the
battery, then reconnect the power source, insert the lithium battery, and turn the power on again. When the characters on the
monitor becomes normal, set the date and time; then resume operatton.
Page 52

Signal system
Recording system
Cassette
Tape speed
(SP)
Recording time Max. (SP)
VIDEO Output
S/N ratio
AUDIO Output
Microphone input
Pickup
Minimum required illumination
Lens
Filter diameter
Monitor
Power source
Power consumption
Colour temperature compensation
Operating temperature
Operating humidity
Storage temperature
Dimensions (approx.)
Weight (approx.)
PAL type colour signals.
4 rotary heads, helical scanning FM system
8 mm video tape, MP type, or Hi8 MP, ME type
Approx. 20.051 mm/second
90 minutes
1 Vp-p, 75 ohms unbalanced, negative sync.; S-video terminal;
Y
signal 1
Vp-p, C signal 286
(burst signal),
unbalanced
48 dB (with Rohde
Schwarz noise meter)
-8 dBs, impedance less than 2.2 kohms
8.5 mm CCD image sensor
(approx. 470,000 pixels, including optical black)
6 Lux*
mm, 8x power zoom, full-range auto focus
with macro function
37 mm
10.2 cm full-colour LCD screen (TFT active matrix)
8.8 W during camera recording in Full Auto mode
with Zoom motor off, backlight in normal mode, and DIS function off)
Auto white balance with white balance lock
0°C to +4O”C
30% to 80%
-20°C to +6O”C
201
155
91 mm (W/H/D)
995 g (without battery pack, lithium battery, and video cassette)
AC power adaptor/Battery charger specifications
Power requirement:
11 O-240 V,
Hz
DC output: 6.0 V
Power Consumption: 23 W
Dimensions (approx.): 70 x 44.3 x 165 mm (W/H/D)
Weight (approx.):
350 g
SUPPLIED ACCESSORIES
Standard battery pack (BT-BH70)
AC power adaptor/battery charger
Infrared remote control unit
Shoulder strap Audio/Video. cable
DC output cable S-video cable
Lithium battery x 2 Cleaning cloth
Some accessories may not be available in Australia/New Zealand.
Call* 0055 36883
Australia only
for details.
*Calls charged at
per 21.4 sec. Charges advised at the start of each call.
OPTIONAL ACCESSORIES
Standard battery pack (BT-70, BT-77, BT-BH70)
Car battery adaptor/charger (VR-Pl OOCH)
Tuner pack
Shoe adaptor
Wide conversion lens
Sun hood
Sports housing
Weather resistant housing
RF converter
Battery pack for extended use (BT-80-BK, BT-BH85)
Video light
Tripod adaptor for 180” recording
Soft
case
Waterproof housing
Cleaning
for LCD
Auto pan head
Design and specifications are subject to change without notice.
*Minimum Illumination: Since there is no widely accepted testing procedure for determining minimum
tion capability,
ratings are comparable only between models from the same
manufacturer.
Page 53

SHARP CORPORATION
Osaka, Japan
Printed in Japan
 Loading...