

Before using the LCD projector, please read this operation manual carefully.
OPERATION MANUAL ENGLISH
ENGLISH
Important
IMPORTANT
Information
For your assistance in reporting the loss or theft of your
Colour LCD Projector, please record the Serial Number
located on the bottom of the projector and retain this
information. Before recycling the packaging, please be
sure that you have checked the contents of the carton
thoroughly against the list of “Supplied Accessories”
on page 10.
WARNING:
Intense light source. Do not look into the beam or view it directly. Be especially careful
that children do not look directly into the beam.
WARNING:
To reduce the risk of fire or electric shock, do not expose this appliance to liquids.
CAUTION:
To reduce the risk of electric shock, do not remove cabinet. No user-serviceable parts
are inside. Refer servicing to qualified service personnel.
Model No.: XV-Z7000E
Serial No.:
1
WARNING:
The cooling fan in this projector continues to run for about 90 seconds after the projector is turned off. During
normal operation, when turning the power off always use the ON/OFF button on the projector or the POWER
button on the remote control. Ensure the cooling fan has stopped before disconnecting the power cord.
DURING NORMAL OPERATION, NEVER TURN THE PROJECTOR OFF BY DISCONNECTING THE POWER
CORD. FAILURE TO OBSERVE THIS WILL RESULT IN PREMATURE LAMP FAILURE.
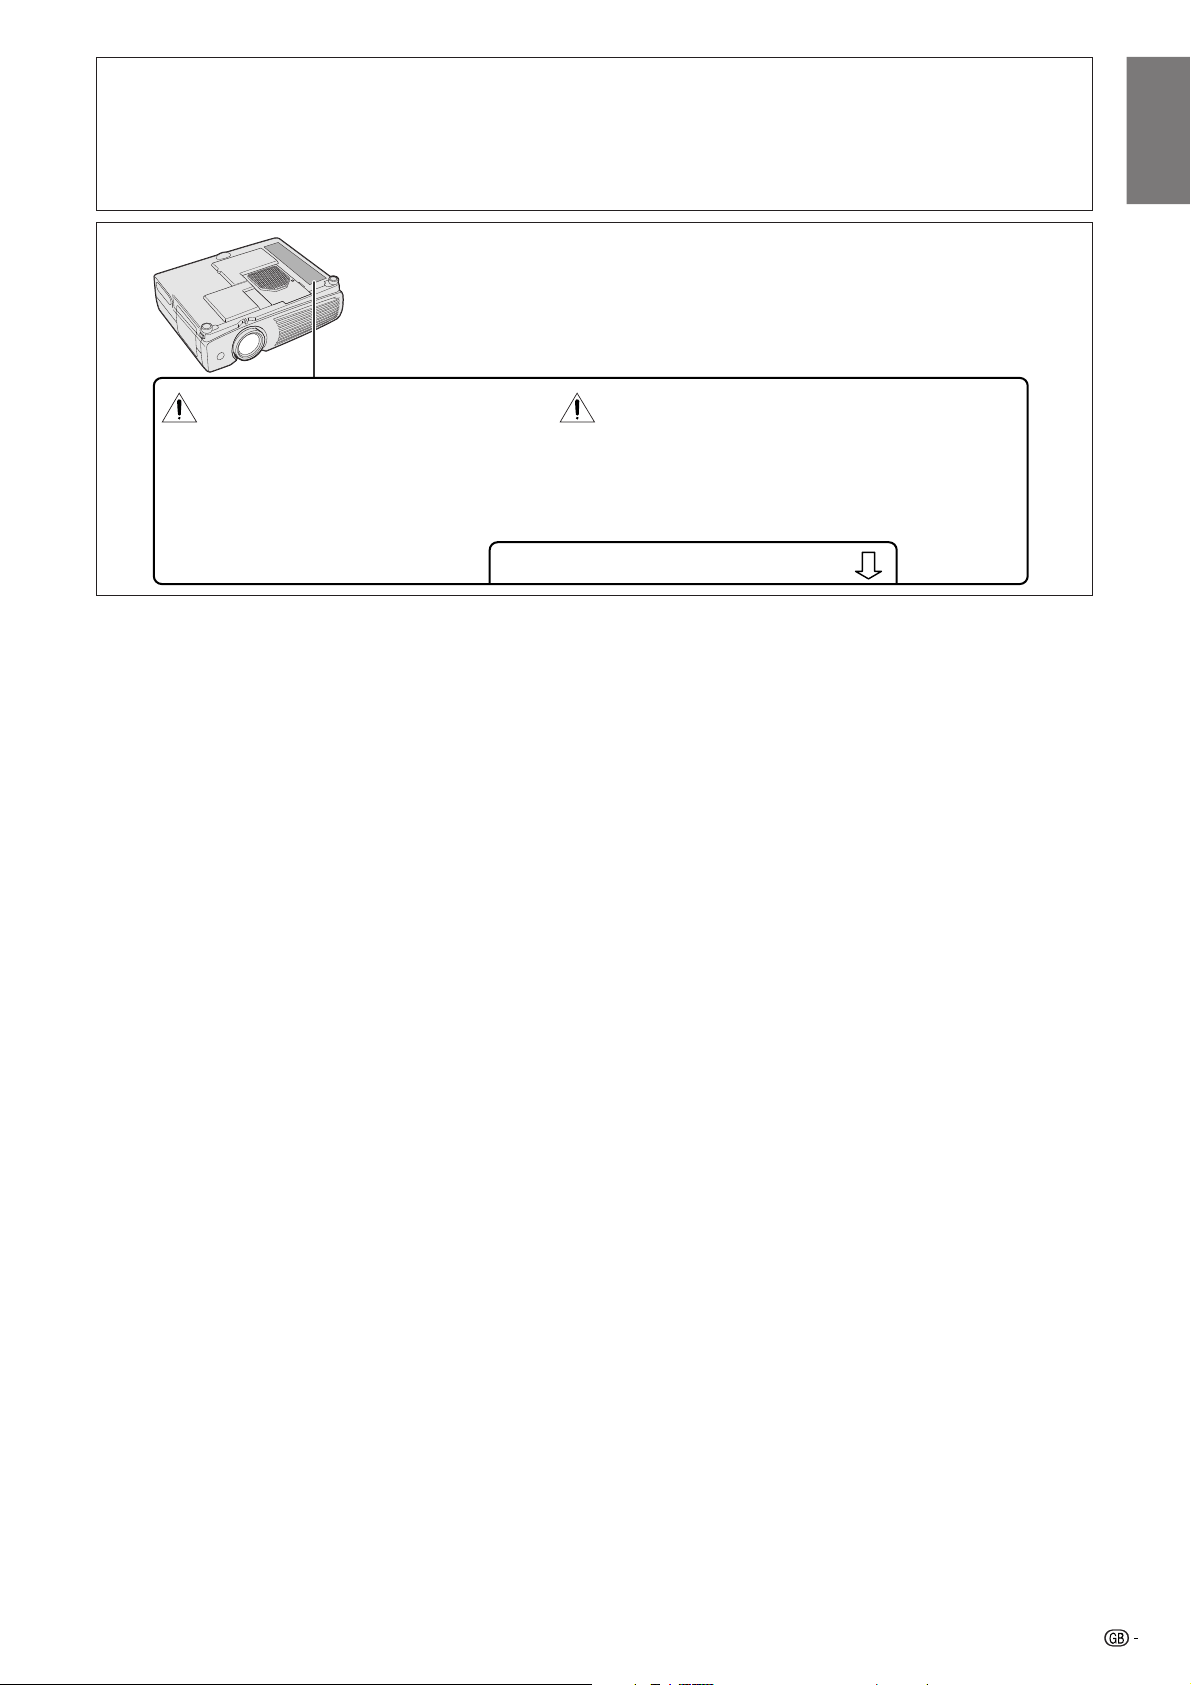
Caution Concerning the Lamp Replacement
See “Replacing the Projection Lamp” on pages 38 and 39.
ENGLISH
Information
Important
LAMP REPLACEMENT CAUTION
BEFORE REMOVING THE SCREW, DISCONNECT POWER CORD.
HOT SURFACE INSIDE. ALLOW 1 HOUR TO COOL BEFORE
REPLACING THE LAMP. REPLACE WITH SAME SHARP LAMP
UNIT TYPE BQC-PGC20X // 1 ONLY. UV RADIATION : CAN CAUSE
EYE DAMAGE. TURN OFF LAMP BEFORE SERVICING.
MEDIUM PRESSURE LAMP : RISK OF EXPLOSION.
POTENTIAL HAZARD OF GLASS PARTICLES IF LAMP HAS
RUPTURED. HANDLE WITH CARE. SEE OPERATION MANUAL.
USER SERVICE SCREW
VIS POUR ENTRETIEN PAR L’UTILISATEUR
PRECAUTIONS A OBSERVER LORS DU
REMPLACEMENT DE LA LAMPE.
DEBRANCHER LE CORDON D’ALIMENTATION AVANT DE RETIRER LES VIS.
L’INTERIEUR DU BOITIER ETANT EXTREMEMENT CHAUD, ATTENDRE 1 HEURE
AVANT DE PROCEDER AU REMPLACEMENT DE LA LAMPE.
NE REMPLACER QUE PAR UNE LAMPE SHARP DE TYPE BQC- PGC20X// 1.
RAYONS ULTRAVIOLETS : PEUVENT ENDOMMAGER LES YEUX.
ETEINDRE LA LAMPE AVANT DE PROCEDER A L’ENTRETIEN.
LAMPE A MOYENNE PRESSION : RISQUE D’EXPLOSION. DANGER POTENTIEL
DE PARTICULES DE VERRE EN CAS D’ECLATEMENT DE LA LAMPE.
A MANIPULER AVEC PRECAUTION, SE REPORTER AU MODE D’EMPLOI.
2
Important Safeguards
ATTENTION: Please read all of these instructions before you operate your LCD Projector
for the first time. Save these instructions for future reference.
Important
Information
For your own protection and prolonged operation of your LCD Projector, be sure to read the following “Important
Safeguards” carefully, before use.
This projector has been engineered and manufactured to ensure your personal safety. But IMPROPER USE CAN
RESULT IN POTENTIAL ELECTRICAL SHOCK OR FIRE HAZARDS. In order not to defeat the safeguards
incorporated into this LCD Projector, observe the following basic rules for its installation, use and servicing.
1. Unplug the LCD Projector from the wall outlet before
cleaning.
2. Do not use liquid cleaners or aerosol cleaners. Use a
damp cloth for cleaning.
3. Do not use attachments not recommended by the LCD
Projector manufacturer, as they may cause hazards.
4. Do not use the LCD Projector near water; for example,
near a bathtub, washbowl, kitchen sink, laundry tub, in a
wet basement, near a swimming pool, etc. Never spill
liquid into the projector.
5. Do not place the LCD Projector on an unstable cart, stand,
or table. The LCD Projector may fall, which may cause
serious injury to a child or an adult, and/or serious damage
to the unit.
6. Wall or Ceiling Mounting—The product should be
mounted to a wall or ceiling only as recommended by
the manufacturer.
7. LCD Projector equipment and cart
combinations should be moved
with care. Quick stops, excessive
force, and uneven surfaces may
cause the equipment and cart
combination to overturn.
8. Slots and openings in the cabinet back and bottom are
provided for ventilation. To ensure reliable operation of
the LCD Projector and to protect it from overheating, these
openings must not be blocked or covered. The openings
should never be covered with cloth or other material.
9. This LCD Projector should never be placed near or over
a radiator or heating vent. The LCD Projector should not
be placed in a built-in installation such as a bookcase
unless proper ventilation is provided.
10. The LCD Projector should be operated only from the type
of power source indicated on the back of the projector or
in the specifications. If you are not sure of the type of
power supplied to your home, consult your LCD Projector
dealer or local power company.
11. Do not place the LCD Projector where the cord will be
abused by persons walking on it.
12. Follow all warnings and instructions marked on the LCD
Projector.
13. To prevent damage to the projector due to lightning and
power-line surges, unplug the projector from the power
outlet, when not in use.
14. Do not overload wall outlets and extension cords with too
many products, because this can result in fire or electric
shock.
15. Never push objects of any kind into the LCD Projector
through the cabinet slots as they may touch high-voltage
points or cause a short circuit. This could result in a fire
or electric shock.
16. Do not attempt to service the LCD Projector yourself.
Opening or removing covers may expose you to dangerous voltage or other hazards. Refer all servicing to
qualified service personnel.
17. Unplug the LCD Projector equipment from the wall outlet
and refer servicing to qualified service personnel under
the following conditions:
a. When the power cord or plug is damaged or frayed.
b. If liquid has been spilled into the LCD Projector.
c. If the LCD Projector has been exposed to rain or
water.
d. If the LCD Projector does not operate normally
when you follow the operating instructions. Adjust
only those controls that are covered by the operating instructions, as improper adjustment of other
controls may cause damage and will often require
extensive work by a qualified technician to restore
the LCD Projector to normal operation.
e. If the LCD Projector has been dropped or the
cabinet has been damaged.
f. When the LCD Projector exhibits a distinct change
in performance—this indicates a need for service.
18. When replacement parts are required, be sure the service technician has used replacement parts specified by
the manufacturer that have the same characteristics as
the original parts. Unauthorised substitutions may result
in fire, electric shock, or other hazards.
19. This LCD Projector is provided with one of the following
types of plugs. If the plug should fail to fit into the power
outlet, please contact your electrician.
Do not defeat the safety purpose of the plug.
a. Two-wire type mains plug.
b. Three-wire grounding type mains plug with a
grounding terminal.
This plug will only fit into a grounding type power
outlet.
3

Outstanding Features
1. WIDESCREEN IMAGES
Allows projection of DVD, DTV and other anamorphic images recorded in widescreen format with a 16:9 aspect ratio. (Page
31)
2. BRIGHTNESS SWITCHOVER FUNCTION
Function with toggle switch to control the quantity of projected light. Select “ON” or “OFF” to decrease or increase brightness,
power consumption and fan noise. (Page 33)
3. FOR USE WITH DTV*
Allows projection of DTV images and 16:9 wide-screen images when connected to a DTV decoder or similar video systems.
(Page 11)
4. ADVANCED VIDEO CIRCUITRY
Provides high quality images with minimal dot crawl and cross colour noise.
5. 3D DIGITAL UNIFORMITY
Equipped with new 3D digital uniformity technology for a clearer, more uniform image.
6. NEW PROGRESSIVE MODE AND FILM MODE
Optimises the image by converting the interlaced signal to the progressive. Useful for displaying slow-moving images or still
images. Four modes are available, and the film mode beautifully reproduces movie film recorded in 24 Hz progressive format.
(Page 25)
7. ANALOG COMPONENT VIDEO INPUT
Utilises a component video input signal (Y, CB, CR). The video signal is input as separate components to provide superior
colour and image quality.
Information
Important
8. ACTIVE DIGITAL KEYSTONE CORRECTION
Corrects keystone distortion caused when the projected image is not perpendicular to the screen. This method provides not
only horizontal correction, but vertical as well, thus maintaining the original 4:3 aspect ratio and eliminating jag lines. (Page 19)
9. EASY-TO-USE GRAPHICAL USER INTERFACE (GUI)
A multi-colour menu system allows for simple image adjustments. (Page 20)
10. COLOUR TEMPERATURE ADJUSTMENT
The function can be used to adjust the colour temperature to suit the type of image input to the projector. (Page 29)
11. GAMMA CORRECTION FUNCTION
The gamma value setting can be adjusted according to the input source for optimal image contrast. (Page 30)
12. DIRECT COMPUTER COMPATIBILITY
A multi-scan RGB input accepts signals from VGA (640 dots ⳯ 480 lines) to SXGA (1,280 dots ⳯ 1,024 lines) and Macintosh
(from 13ⴖ) compatible computers without the need for any additional hardware.
*DTV is the umbrella term used to describe the new digital television system in the united states.
4
Contents
Important Information
Important Safeguards …………………………… 3
Important
Information
Outstanding Features …………………………… 4
Contents …………………………………………… 5
Usage Guidelines ………………………………… 6
Part Names ………………………………………… 7
Setup & Connections
Supplied Accessories …………………………… 10
Connecting the Projector ……………………… 11
Setup & Connections
Operation
Operation
Basic Operations ………………………………… 15
Setting up the Screen …………………………… 17
Using the GUI (Graphical User Interface)
Menu Screens ………………………………… 20
Selecting the On-screen Display Language … 23
Selecting the Video Input System Mode
(S-VIDEO or VIDEO mode only) …………… 23
Picture Adjustments ……………………………… 24
Adjusting the Picture …………………………… 24
Selecting the Signal Type ……………………… 25
Progressive Mode ……………………………… 25
Computer Image Adjustments
(INPUT 2 (RGB) mode only) ………………… 26
Auto Sync Adjustment ………………………… 26
Adjusting the Computer Image ……………… 27
Useful Features
Freeze Function …………………………………… 28
Adjusting the Colour Temperature …………… 29
Gamma Correction ……………………………… 30
Selecting the Picture Display Mode …………… 31
Checking the Input Signal
and the Lamp Usage Time …………………… 32
Automatic Power Shutoff Function …………… 32
Selecting a Background Image ………………… 33
Theatre Mode Function ………………………… 33
Reverse/Invert Image Function ………………… 34
Special Mode Adjustment ……………………… 34
Maintenance & Troubleshooting
Air Filter Maintenance …………………………… 35
Lamp/Maintenance Indicators ………………… 37
Replacing the Projection Lamp ………………… 38
Using the Kensington Lock …………………… 40
Troubleshooting …………………………………… 40
Appendix
Attaching the Lens Cap ………………………… 41
Connection Pin Assignments…………………… 42
RS-232C Port Specifications …………………… 43
Computer Compatibility Chart ………………… 45
Specifications ……………………………………… 46
Dimensions ………………………………………… 47
Glossary …………………………………………… 48
Useful Features
Maintenance &
Troubleshooting
Appendix
5
Usage Guidelines
CAUT I ON
ATTENTI ON
BQC-PGC20X //1
Ⳮ35˚C
Ⳮ5˚C
Caution Concerning the Lamp Unit
Potential hazard of glass particles if lamp ruptures. Please have the nearest Sharp
Authorised LCD Projector Dealer or Service Centre replace lamp if rupture occurs.
See “Replacing the Projection Lamp” on pages 38 and 39.
Cautions Concerning the Setup of the Projector
For minimal servicing and to maintain high image quality, SHARP recommends
that this projector be installed in an area free from humidity, dust and cigarette
smoke. If the projector is used in these environments, the lens and filter will need
to be cleaned (or the filter replaced) more often, and internal cleaning may become
necessary. As long as the projector is regularly cleaned, use in these environments
will not reduce the overall operation life of the unit. Internal cleaning should only
be performed by a Sharp Authorised LCD Projector Dealer or Service Centre.
• Do not expose the projector to extreme heat or cold.
Operating temperature: Ⳮ5°C to Ⳮ35°C
Storage temperature: ⳮ20°C to Ⳮ60°C
Information
Important
Notes on Operation
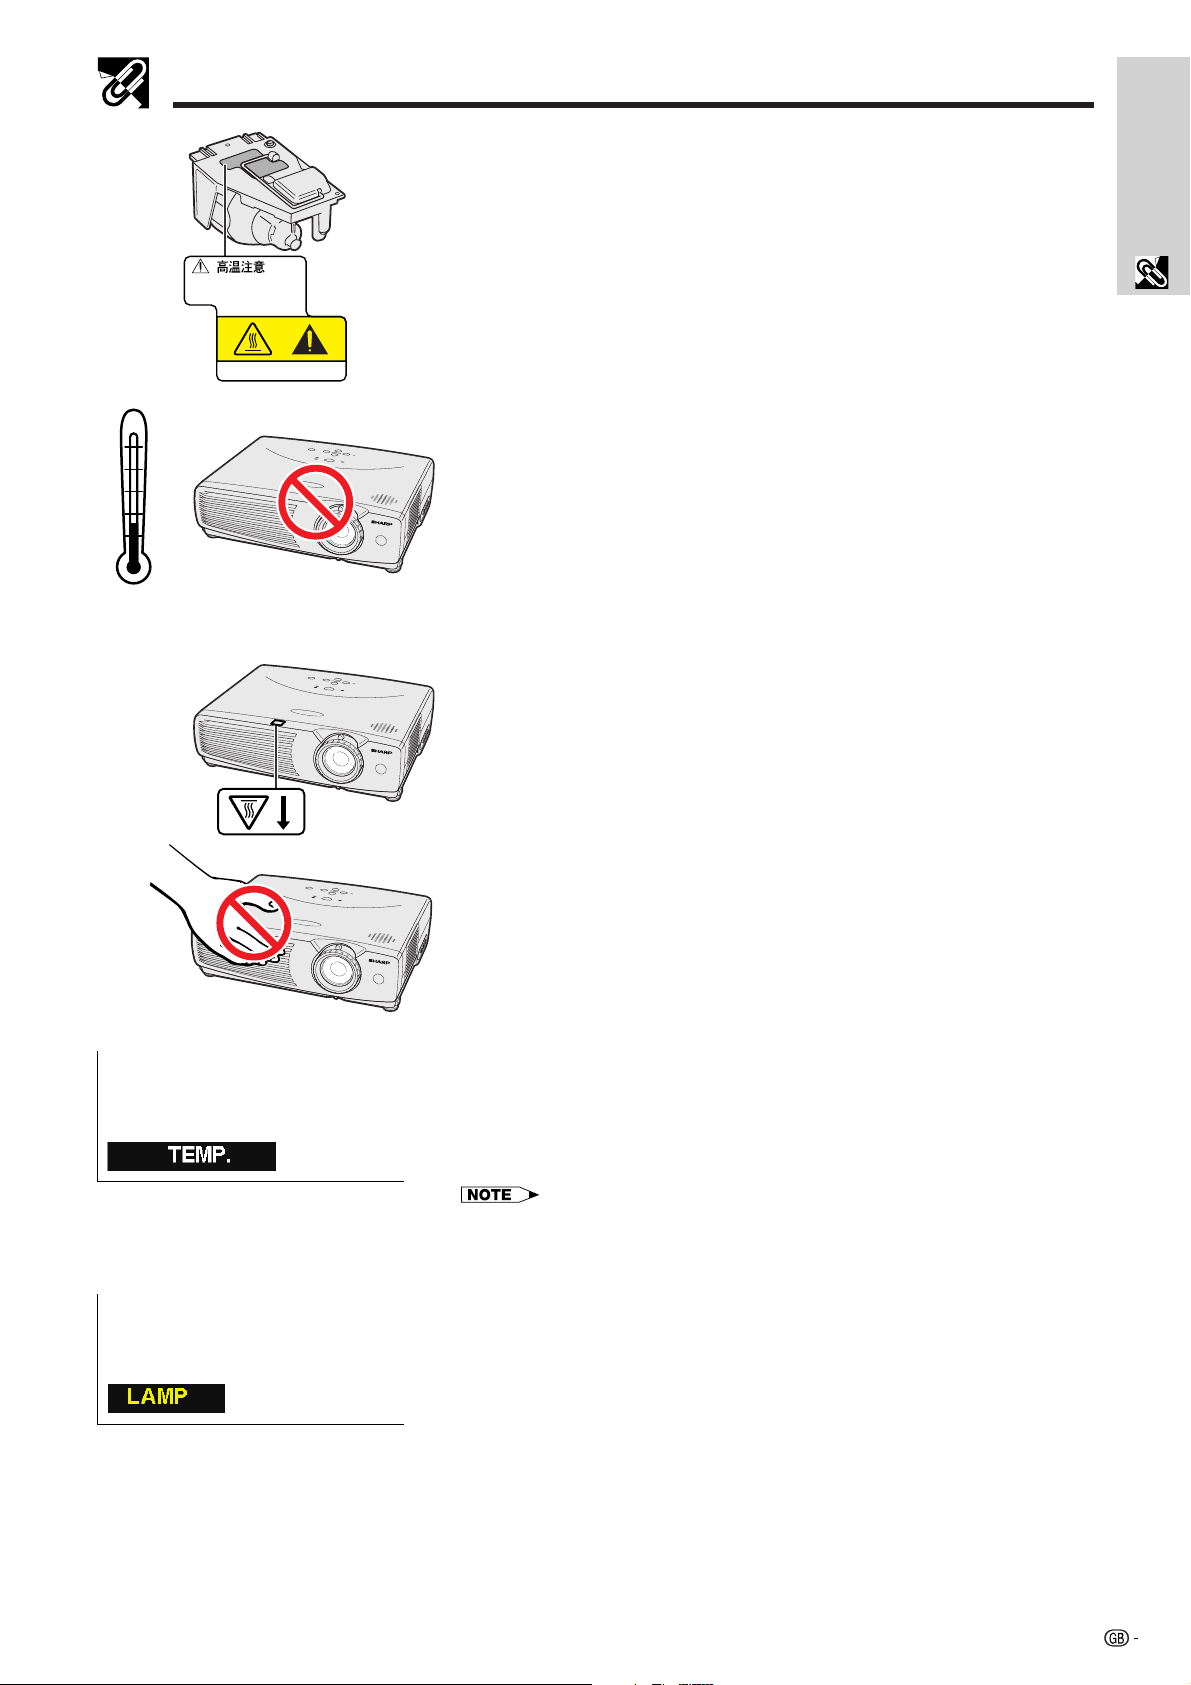
• The mark shown on the left calls the user’s attention to a part of the projector
that emits intense heat during operation.
• The exhaust vent, the lamp cage cover and adjacent areas may be extremely
hot during projector operation. To prevent injury, do not touch these areas until
they have sufficiently cooled.
• Allow at least 10 cm of space between the cooling fan (exhaust vent) and the
nearest wall or obstruction.
• If the cooling fan becomes obstructed, a protection device will automatically
turn off the projector lamp. This does not indicate a malfunction. Remove the
projector power cord from the wall outlet and wait at least 10 minutes. Then
turn on the power by plugging the power cord back in. This will return the
projector to the normal operating condition.
Temperature Monitor Function
If the projector starts to overheat due to setup problems or a dirty air filter, “TEMP.”
will appear in the lower-left corner of the picture. If the temperature continues to
rise, the lamp will turn off, the TEMPERATURE WARNING indicator on the projector
will flash, and after a 90-second cooling-off period the power will shut off. Refer
to “Lamp/Maintenance Indicators” on page 37, for details.
• The cooling fan regulates the internal temperature, and its performance is automatically
controlled. The sound of the fan may change during projector operation due to changes
in the fan speed.
Lamp Monitor Function
When the projector is turned on after the lamp has been used for 900 hours,
“LAMP” will appear in the lower-left corner of the picture to advise you to replace
the lamp. See pages 38 and 39 for lamp replacement. If the lamp has been used
for 1,000 hours, the projector power will automatically turn off and the projector
will enter standby mode. Refer to “Lamp/Maintenance Indicators” on page 37,
for details.
6
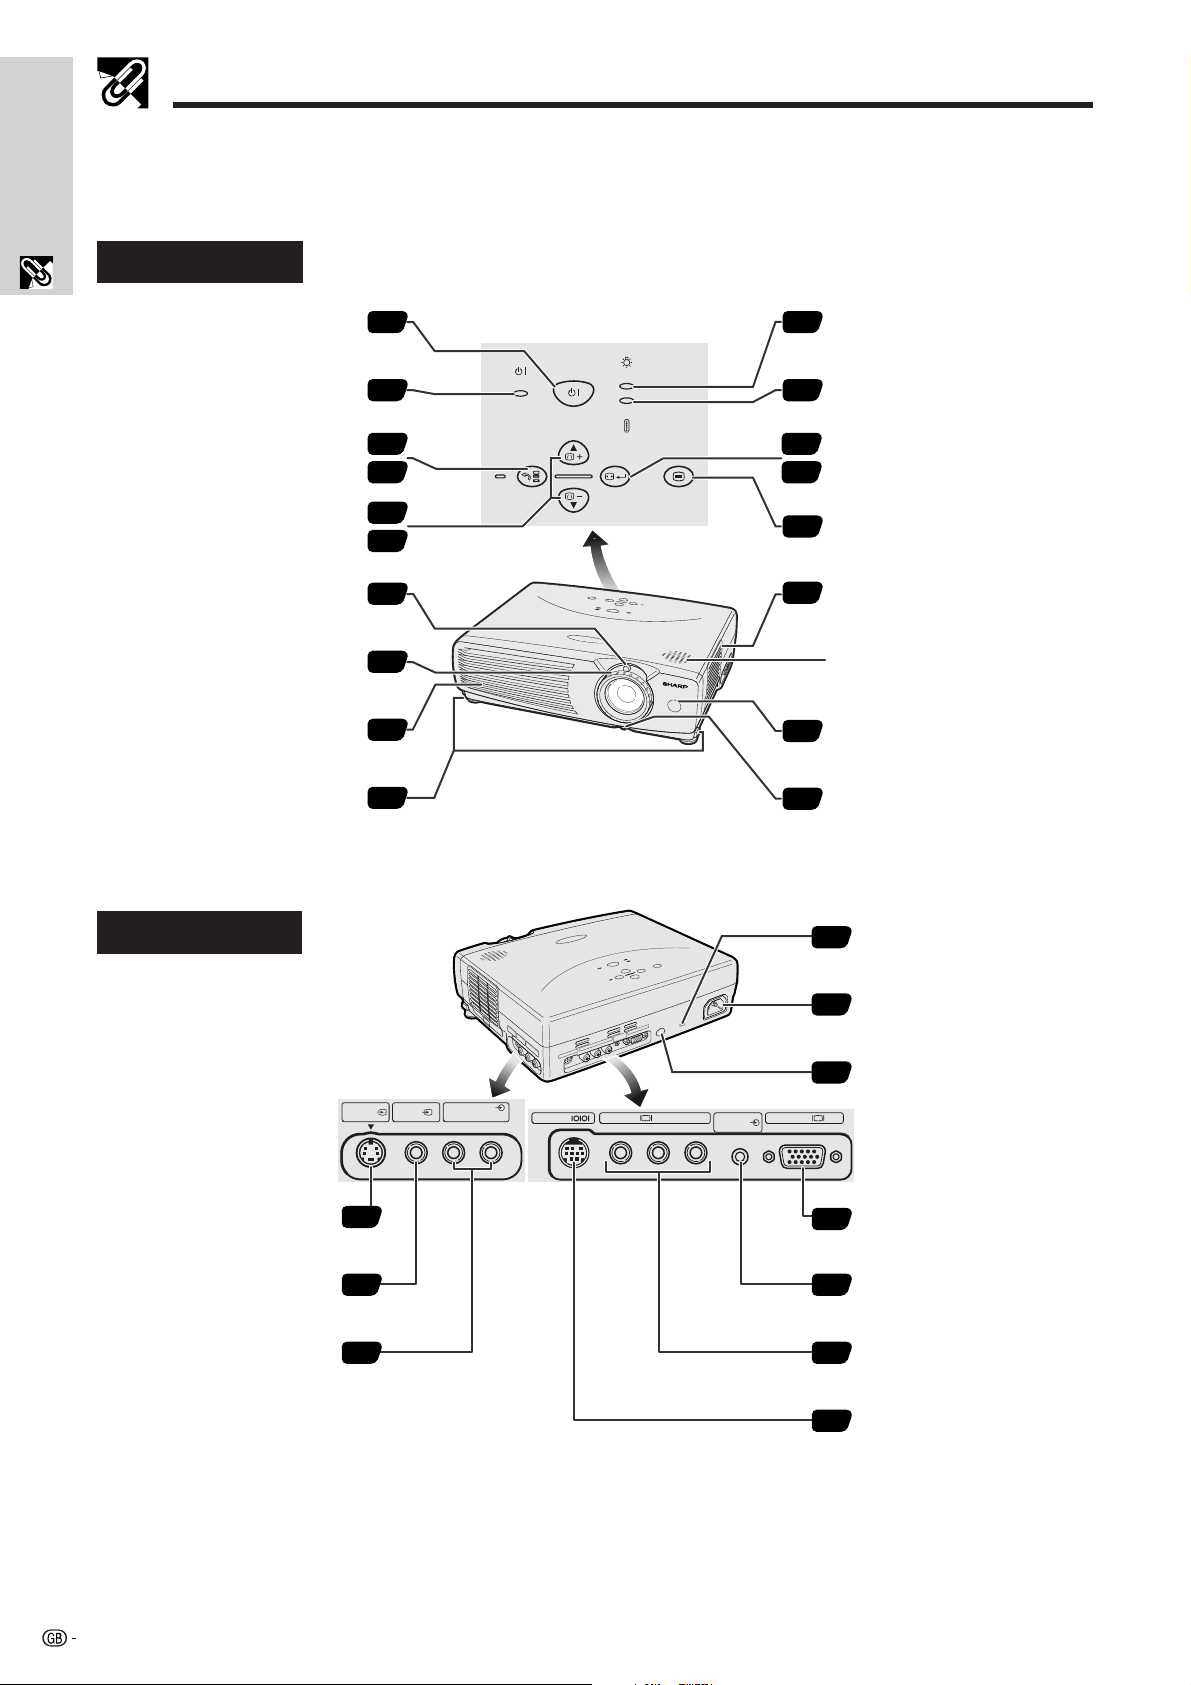
Part Names
Numbers next to the part names refer to the main pages in this manual where the topic is explained.
Important
Projector
Information
Front and Top View
ON/OFF button
POWER indicator
INPUT/BACK button
KEYSTONE/Adjustment
(∂ /ƒ) buttons
ZOOM knob
FOCUS ring
Cooling fan (Exhaust vent)
Foot releases
15
15
16
20
19
20
15
15
6
18
ON/OFF
POWER
KEYSTONE
INPUT
BACK ENTER MENU
LAMP
TEMP.
PICT MODE
LAMP REPLACEMENT
37
indicator
TEMPERATURE WARNING
37
indicator
31
PICT MODE/ENTER button
20
MENU button
20
Air filter/Cooling fan
35
(Intake vent)
Speaker
Remote control sensor
9
Eyelet for
41
lens cap strap
Side and Rear View
S-VIDEO INPUT terminal
(4-pin Mini DIN)
VIDEO INPUT terminal
(RCA)
AUDIO INPUT
(S-VIDEO, VIDEO INPUT )
terminals (RCA)
S-VIDEO
INPUT
11
11
11
VIDEO
INPUT
AUDIO INPUT
(S-VIDEO, VIDEO INPUT)
LR
RS-232C
INPUT 1 INPUT 2/COMPONENT
AUDIO INPUT
(INPUT 1, 2)
Kensington Security
40
Standard connector
AC socket
11
Remote control sensor
9
RGB /COMPONENTCRCBY
INPUT 2
RGB/COMPONENT
12
port (HD 15)
AUDIO INPUT (INPUT 1, 2)
terminal
12
(3.5 mm stereo minijack)
INPUT 1/COMPONENT
12
terminals (RCA: Y, C
RS-232C port
14
(9-pin Mini DIN)
B, CR)
7
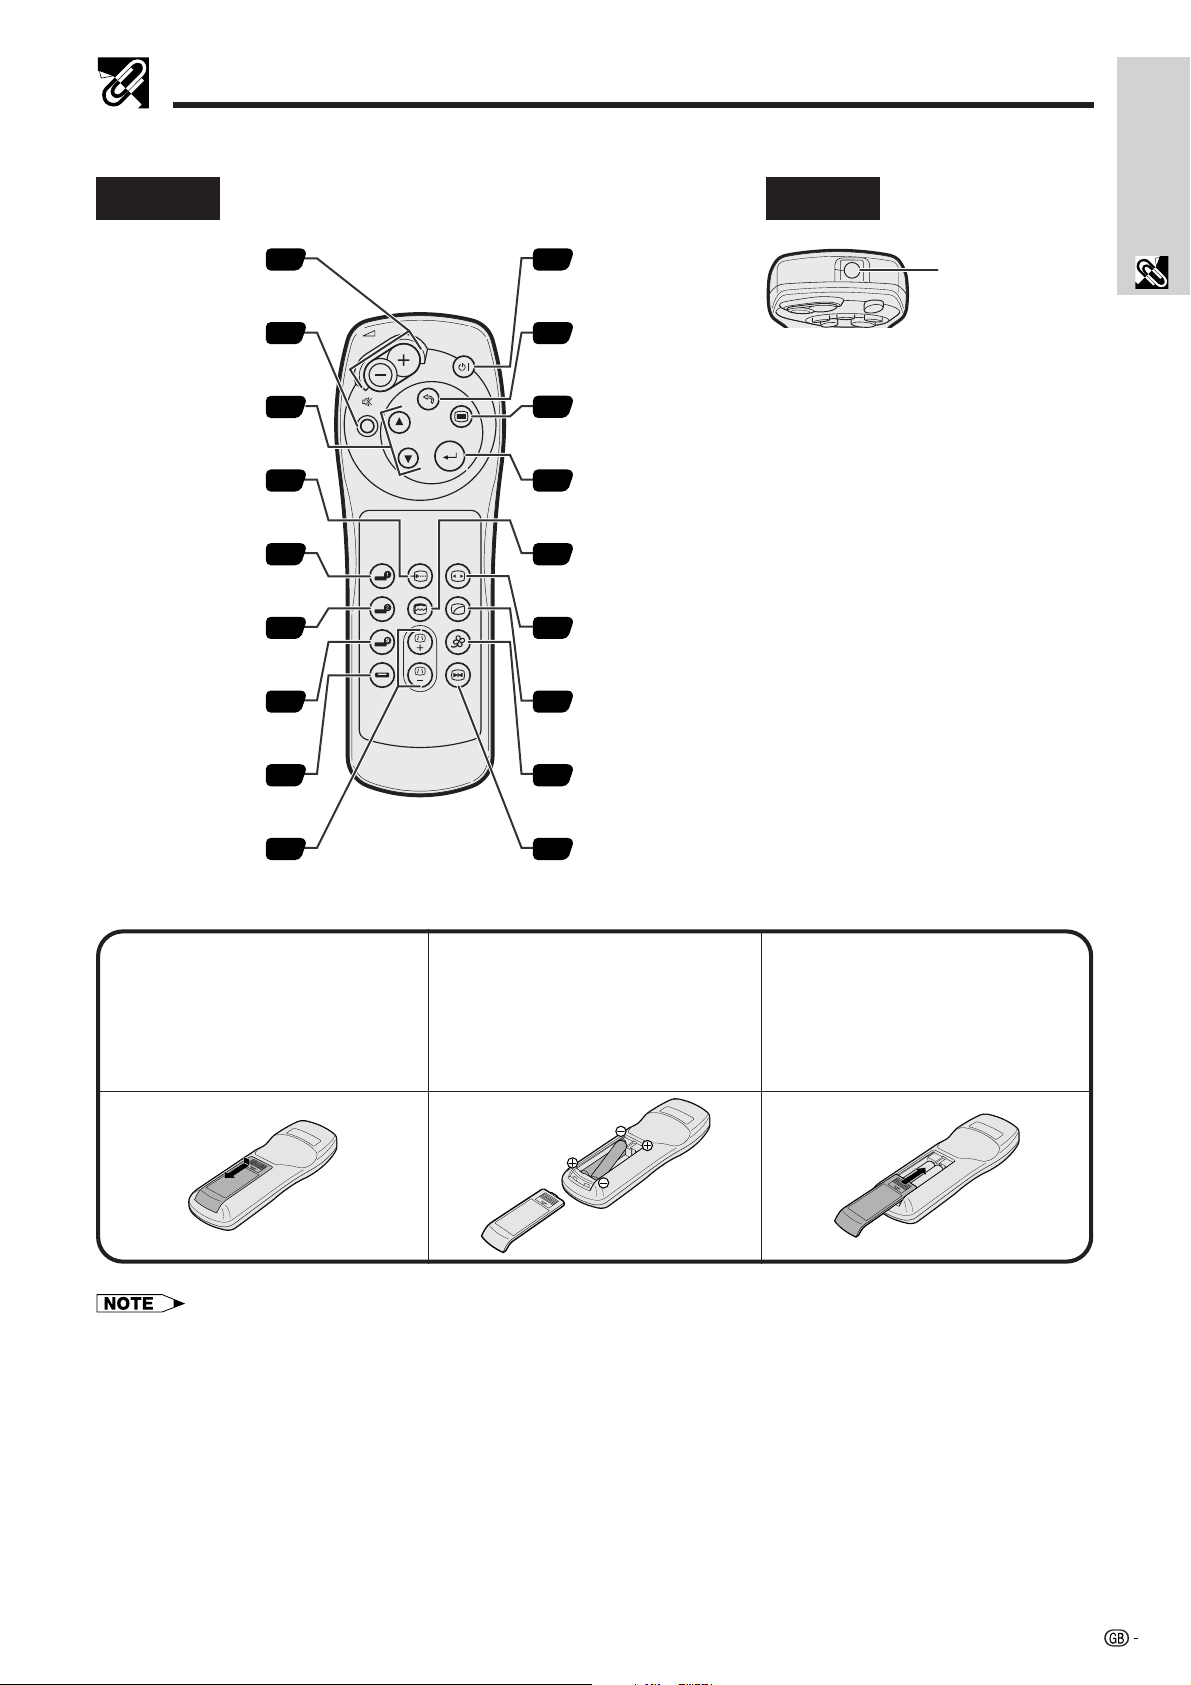
Part Names
Remote Control
Information
Important
Front View
VOLUME buttons
MUTE button
Mouse (∂/ƒ)/
Adjustment (∂/ƒ)
buttons
RGB/COMPONENT
button
INPUT 1 button
INPUT 2 button
S-VIDEO button
VIDEO button
16
16
20
12
16
16
16
16
VOL
MUTE
BACK
ENTER
RGB/
COMPONENT
INPUT 1
AUTO SYNCINPUT 2 GAMMA
S-VIDEO CLR TEMP
KEYSTONE
VIDEO FREEZE
POWER
MENU
PICT MODE
POWER button
15
BACK button
20
MENU button
20
ENTER button
20
AUTO SYNC button
26
PICT MODE button
31
GAMMA button
30
CLR TEMP button
29
Top View
Remote control
signal transmitter
KEYSTONE buttons
19
FREEZE button
28
Inserting the Batteries
Slide in the direction of
13
the arrow to remove the
battery cover.
• If the remote control gets wet, wipe it dry immediately.
• Avoid excessive heat and humidity.
• If you will not be using the remote control for a long time, remove the batteries.
• Do not mix new and old or different types of batteries.
• There are operations that can only be carried out by remote control. Handle the remote control carefully.
Insert two AAA size
2
batteries, making sure
their polarities match the
ⴐ and ⴑ marks inside
the battery compartment.
Insert the side tabs of
the battery cover into
their slots and press the
cover in until it is
properly seated.
8
Part Names
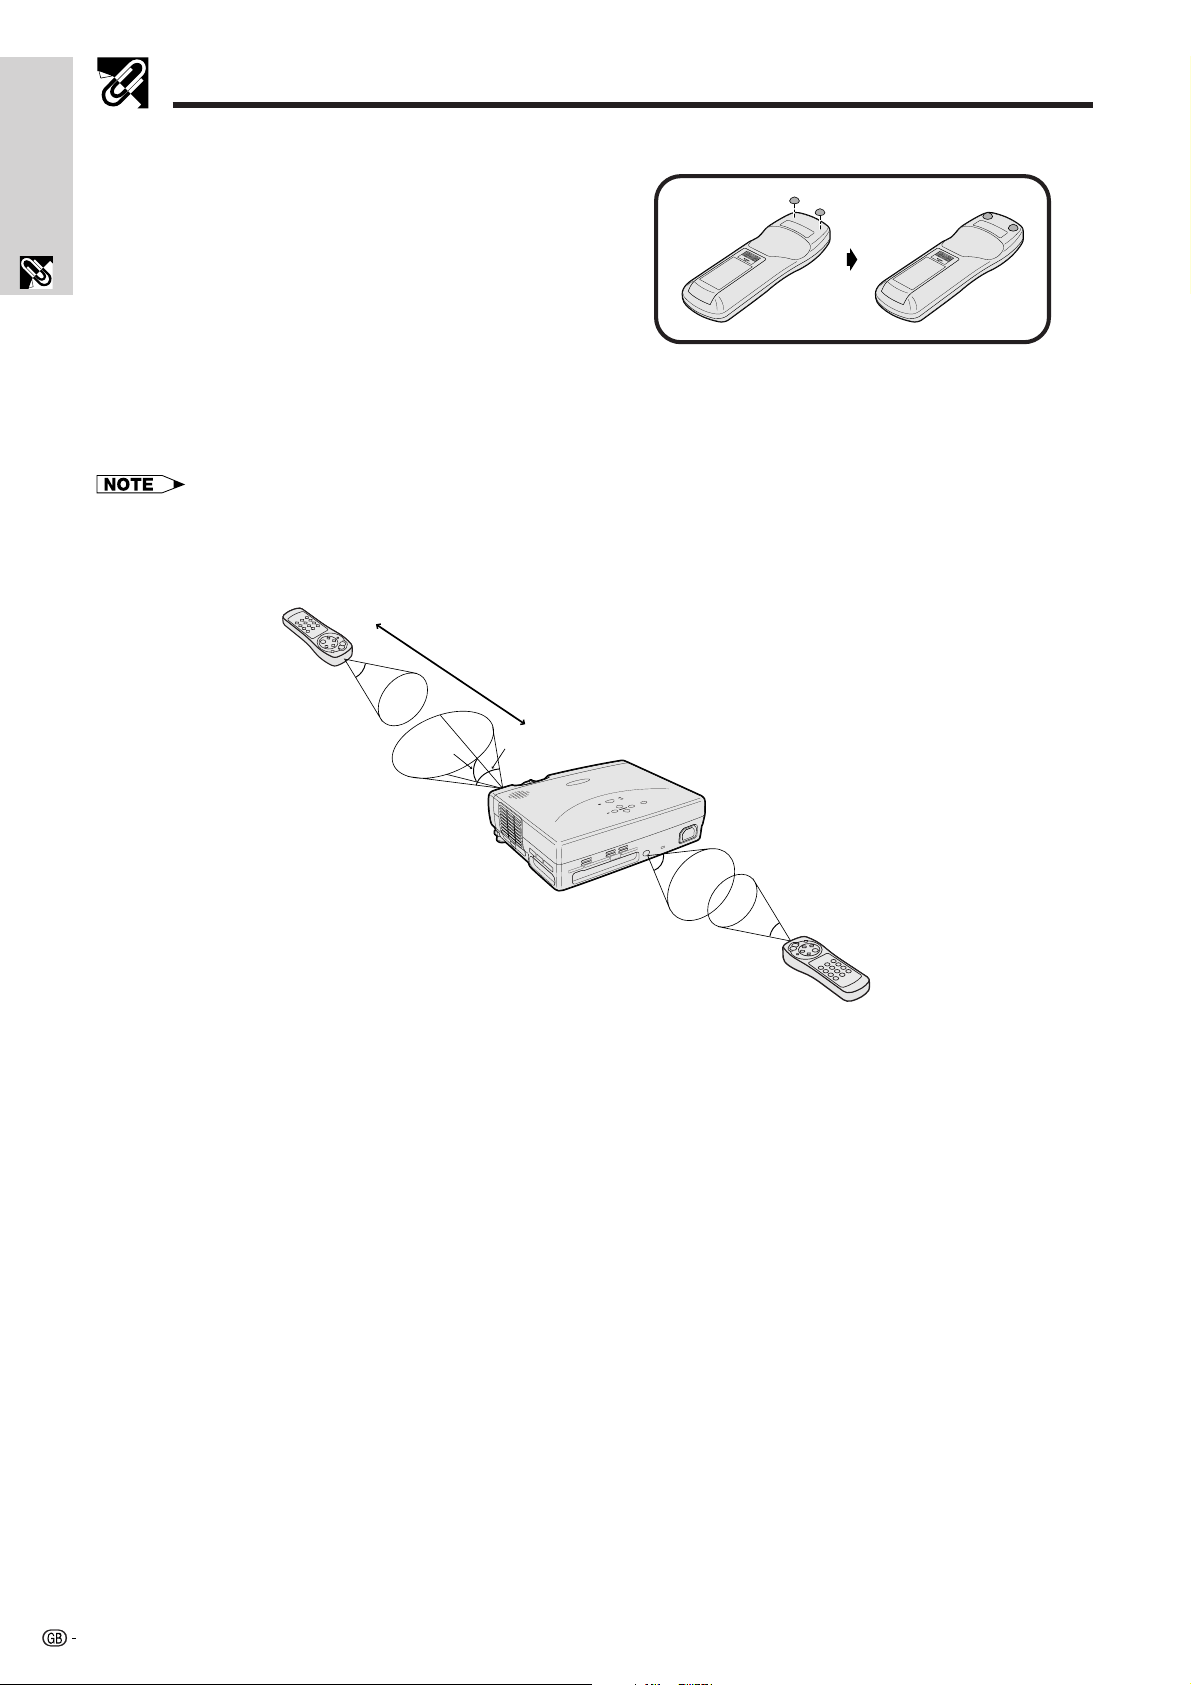
Attaching the Rubber Leg Tips
The rubber leg tips are provided to prevent the remote
Important
Information
control from skidding and shaking over a flat surface.
Positioning the Remote Control
The remote control can be used to control the projector within the ranges shown below.
• The signal from the remote control can be reflected off a screen for easy operation. However, the effective distance of the
signal may differ due to the screen material.
Remote control
7 m
30˚
30˚
45˚
45˚
30˚
Remote control
9

Setup & Connections
Supplied Accessories
Remote control
Two AAA size batteries
Power cord
For Europe, Hong Kong and Singapore
(For Europe, except U.K.) (For U.K., Hong Kong and Singapore)
• The configuration of wall outlets differs from country to country. Use the power cord that corresponds to the wall outlet in your country.
Rubber leg tips
for remote control
For Australia, New Zealand, and Oceania
Setup & Connections
For Europe only
Computer RGB cable
• The RGB cable and 21 pin conversion adaptor are only supplied with European models.
A/V cable
Extra air filter
Lens cap
21 pin RCA conversion adaptor
DIN-D-sub RS-232C cable
Lens cap strap
Two LCD projector operation manuals
10

Connecting the Projector
Connecting the Power Cord
Plug the supplied power cord into the AC socket on the back of the projector.
Power cord
Setup & Connections
CAUTION
• Make sure you connect the power cord firmly into the AC socket.
• The configuration of wall outlets differs from country to country. Use the power cord that corresponds to the wall outlet in your country.
Connecting the Projector to Audiovisual Equipment
You can connect your projector to a VCR, laser disc player, DVD player, DTV decoder* and other audiovisual
equipment.
CAUTION
• Always turn off the projector while connecting to audiovisual equipment, in order to protect both the projector and the
equipment being connected.
Connecting a video source (VCR, laser disc player, DTV decoder or DVD player) using the standard video and audio input
1 Connect one end of the S-video cable to the S-VIDEO
INPUT terminal, or one end of the video cable to the
OR
VIDEO INPUT terminal on the projector and the video
output terminal on the video source.
2 To use the built-in audio system, connect the RCA
connectors to the corresponding AUDIO INPUT (S-
VIDEO, VIDEO INPUT) terminals on the projector and
the audio output terminals on the audiovisual source.
The S-VIDEO INPUT terminal uses a video signal system
in which the picture is separated into a colour and a
luminance signal to realise a higher-quality image.
• For higher quality video, you may use the S-VIDEO INPUT terminal on
the projector. S-video cable is sold separately.
• If your video equipment does not have an S-video output terminal, use
the composite video output terminal.
Projector
VIDEO
S-VIDEO
INPUT
* DTV is the umbrella term used to describe the new digital television system in the united
states.
11
INPUT
AUDIO INPUT
(S-VIDEO, VIDEO INPUT)
LR
2 Audio cable (sold separately)
To audio output terminals
1 Video cable (sold separately)
OR
To video output terminal
1 S-video cable (sold separately)
To S-video output terminal
VCR,
Laser disc player,
DTV decoder or
DVD player

Connecting the Projector
Connecting an audiovisual source (DTV decoder or DVD player) using the RCA input
1 Connect each RCA connector to the corresponding
INPUT 1/COMPONENT terminals on the projector.
2 Connect the other end of the cable to the corresponding
terminals of a DVD player or DTV decoder.
3 To use the built-in audio system, connect one end of an
audio cable to the AUDIO INPUT (INPUT 1, 2) terminal
on the projector.
Connect the other end to the audio output terminal on
the audiovisual equipment.
• A 3.5 mm minijack to RCA audio cable adaptor may be
necessary.
When connecting this projector to a DVD player or a DTV decoder, select “Component” by using RGB/COMPONENT on
the remote control or the GUI menu. (See page 25.)
Setup & Connections
Projector
RS-232C
INPUT 1 INPUT 2/COMPONENT
C
Y
AUDIO INPUT
(INPUT 1, 2)
R
B
RGB /COMPONENTC
Audio cable (sold separately)
To audio output terminals
RCA component cable (sold separately)
To analog component output terminals
Connecting an audiovisual source (DTV decoder or DVD player)
using the 15 pin video and audio input
1 Connect the one end of the D-sub/RCA cable to the
INPUT 2 RGB/COMPONENT port on the projector.
2 Connect the other end of the cable to the corresponding
terminals of a DVD player or DTV decoder.
3 To use the built-in audio system, connect one end of an
audio cable to the AUDIO INPUT (INPUT 1, 2) terminal
on the projector.
Connect the other end to the audio output terminal on
the audiovisual equipment.
• A 3.5 mm minijack to RCA audio cable adaptor may be
necessary.
DTV decoder
or
DVD player
When connecting this projector to a DVD player or a DTV decoder, select “Component” by using RGB/COMPONENT on
the remote control or the GUI menu. (See page 25.)
Projector
AUDIO INPUT
(INPUT 1, 2)
INPUT 2
RGB /COMPONENTP
D-sub/RCA cable (sold separately)
To analog component output terminals
Audio cable (sold separately)
To audio output terminals
DTV decoder
or
DVD player
ENT
R
12

Connecting the Projector
Connecting the Projector to a Computer
You can connect your projector to a computer for projection of full color computer images.
Connecting a computer using the standard 15-pin video and audio input
For Europe only
Computer RGB cable
1 Connect one end of the computer RGB cable to the
INPUT 2 RGB/COMPONENT port on the projector.
Secure the connector by tightening the thumb screws.
2 Connect the other end to the Monitor output port on the
Setup & Connections
computer. Secure the connector by tightening the thumb
screws.
3 To use the built-in audio system, connect one end of
the computer audio cable to the AUDIO INPUT (INPUT
1, 2) terminal on the projector.
4 Connect the other end to the Audio output terminal on
the computer.
CAUTION
• Before connecting, be sure to turn both the projector and the
computer off. After making all connections, turn the projector
on first. The computer should always be turned on last.
• Please read the computer’s operation manual carefully.
• Refer to page 45 “Computer Compatibility Chart” for a list of computer
RS-232C
INPUT 1 INPUT 2/COMPONENT
AUDIO INPUT
(INPUT 1, 2)
RGB /COMPONENTCRCBY
signals compatible with the projector. Use with computer signals other
than those listed may cause some of the functions not to work.
• A Macintosh adaptor may be required for use with some Macintosh
computers. Contact your nearest Sharp Authorised LCD Projector Dealer
or Service Centre.
When connecting this projector to a computer, select “RGB”
by using RGB/COMPONENT on the remote control or the
GUI menu. (See page 25.)
Connecting other compatible computers
When connecting the projector to a compatible computer other than an IBM-PC (VGA/SVGA/XGA/SXGA) or Macintosh (i.e. Workstation), a separate cable may be needed. Please contact your dealer for more information.
When connecting this projector to a computer, select “RGB” by using RGB/COMPONENT on the remote control or the GUI
menu. (See page 25.)
• Connecting computers other than the recommended types may result in damage to the projector, the computer, or both.
“Plug and Play” function
• This projector is compatible with VESA-standard DDC 1/DDC 2B. The projector and a VESA DDC compatible
computer will communicate their setting requirements, allowing for quick and easy setup.
• Before using the “Plug and Play” function, be sure to turn on the projector first and the connected computer last.
• The DDC, Plug and Play function of this projector operates only when used in conjunction with a VESA DDC compatible computer.
13

O
Connecting the Projector
Connecting RS-232C Port
When the RS-232C port on the projector is connected to a computer with an RS-232C cable (null modem, cross
type, sold separately), the computer can be used to control the projector and check the status of the projector.
See pages 43 and 44 for details.
DIN-D-sub RS-232C
cable
1 Connect the supplied DIN-D-sub RS-232C cable to the RS-232C port on the projector.
2 Connect an RS-232C cable (null modem, cross type, sold separately) to the other end of DIN-D-sub RS-232C
cable and to the serial port on the computer.
Setup & Connections
(null modem, cross type, sold separately)
RS-232C cable
DIN-D-sub
RS-232C cable
Projector
RS-232C
INPUT 1 /C
Y
CAUTION
• Do not connect or disconnect an RS-232C cable to or from the computer while it is on. This may damage your computer.
• The RS-232C function may not operate if your computer port is not correctly set up. Please refer to the operation manual of
the computer for details on setting up.
• A Macintosh adaptor may be required for use with some Macintosh computers. Contact your nearest Sharp Authorised LCD
Projector Dealer or Service Centre.
P
B
14

Operation
Basic Operations
Maintenance indicators
POWER
ON/OFF
KEYSTONE
LAMP
TEMP.
1 Make the necessary connections before pro-
ceeding. Connect the power cord to a wall outlet.
The POWER indicator illuminates red and the
projector enters standby mode.
• If the side filter cover is not securely installed, the POWER
indicator flashes.
Operation
Projector
ON/OFF
KEYSTONE
LAMP
TEMP.
PICT MODE
POWER
INPUT
BACK ENTER MENU
Maintenance indicators
POWER
2
Startup image
ON/OFF
KEYSTONE
Remote control 2 Press ON/OFF on the projector for over one
second, or POWER on the remote control.
VOL
MUTE
LAMP
TEMP.
BACK
ENTER
POWER
MENU
• The flashing green LAMP REPLACEMENT indicator shows
that the lamp is warming up. Wait until the indicator stops
flashing before operating the projector.
• If the power is turned off and then immediately turned on
again, it may take a short while before the lamp turns on.
• After the projector is unpacked and turned on for the first
time, a slight odour may be emitted from the exhaust vent.
This odour will soon disappear with use.
• Do not press any buttons before the startup image
disappears. Before “Adjusting The Image” appears, only
ON/OFF or POWER is available.
When the power is on, the LAMP REPLACEMENT indicator
lights indicating the status of the lamp.
Green: Lamp is ready.
Flashing green: Warming up.
Red: Change the lamp.
15
3
4
3 Slide the ZOOM knob. The image can be adjusted
to the desired size within the zoom range.
4 Rotate the FOCUS ring until the image on the
screen becomes clear.

Basic Operations
Projector Remote control
ON/OFF
KEYSTONE
LAMP
TEMP.
PICT MODE
POWER
INPUT
BACK ENTER MENU
8
6
MUTE
7
5
EXAMPLE
INPUT 1 Mode INPUT 2 Mode
5
g
d
VIDEO Mode S-VIDEO Mode
s
6
VOL
BACK
ENTER
RGB/
COMPONENT
INPUT 1
S-VIDEO CLR TEMP
VIDEO FREEZE
PICT MODE
AUTO SYNCINPUT 2 GAMMA
KEYSTONE
f
POWER
MENU
5 Press INPUT on the projector, INPUT 1, INPUT 2,
S-VIDEO or VIDEO on the remote control to select
the desired input mode.
Press INPUT, INPUT 1, INPUT 2, S-VIDEO or
VIDEO again to change the mode.
• When the selected input signal is being received, “Adjusting
The Image” will be displayed.
• When no signal is being received, “NO SIGNAL” will be
displayed. When a signal that the projector is not preset to
receive is being received, “NOT REG.” will be displayed.
6 Press VOLUME on the remote control to adjust
the volume.
7 Press MUTE on the remote control to temporarily
turn off the sound.
Press MUTE again to turn the sound back on.
8 Press ON/OFF on the projector for over one
second, or POWER on the remote control.
Press ON/OFF or POWER again while the
message is displayed.
• If you accidentally pressed ON/OFF or POWER and do not
want to turn off the power, wait until the power off screen
disappears.
• When ON/OFF or POWER is pressed twice, the POWER
indicator will light up red and the cooling fan will run for
about 90 seconds. The projector will then enter standby
mode.
• Wait until the cooling fan stops before disconnecting the
power cord.
• The power can be turned on again by pressing ON/OFF or
POWER. When the power is turned on, the POWER indicator
and the LAMP REPLACEMENT indicator light green.
• The POWER indicator flashes if the right side filter cover is
not securely installed.
Operation
7
8
WARNING:
The cooling fan in this projector continues to run for about
90 seconds after the projector is turned off. During normal
operation, when turning the power off always use the ON/
OFF button on the projector or the POWER button on the
remote control. Ensure the cooling fan has stopped before
disconnecting the power cord.
DURING NORMAL OPERATION, NEVER TURN THE
PROJECTOR OFF BY DISCONNECTING THE POWER
CORD. FAILURE TO OBSERVE THIS WILL RESULT IN
PREMATURE LAMP FAILURE.
16

Setting up the Screen
Position the projector perpendicular to the screen with all feet flat and level to achieve an optimal image.
Move the projector forward or backward if the edges of the image are distorted.
• The projector lens should be centred in the middle of the screen. If the lens centre is not perpendicular to the screen, the image will be
distorted, making viewing difficult.
• Position the screen so that it is not in direct sunlight or room light. Light falling directly onto the screen washes out colours, making viewing
difficult. Close the curtains and dim the lights when setting up the screen in a sunny or bright room.
• A polarizing screen cannot be used with this projector.
Standard Setup (Front Projection)
Place the projector at the required distance from the screen according to the desired picture size. (See the table
below.)
FULL Mode
(4:3)
Operation
WIDE Mode
(16:9)
Picture size (diag.) (x)
635 cm (250⬙)
508 cm (200⬙)
381 cm (150⬙)
254 cm (100⬙)
213 cm (84⬙)
183 cm (72⬙)
152 cm (60⬙)
102 cm (40⬙)
Picture size (diag.) (x)
572 cm (225⬙)
508 cm (200⬙)
381 cm (150⬙)
338 cm (133⬙)
269 cm (106⬙)
254 cm (100⬙)
234 cm (92⬙)
213 cm (84⬙)
183 cm (72⬙)
152 cm (60⬙)
102 cm (40⬙)
Projection distance (L)
Maximum
10.0 m
9.6 m
7.2 m
4.8 m
4.0 m
3.4 m
2.8 m
1.9 m
Projection distance (L)
Maximum
10.0 m
10.0 m
7.8 m
6.9 m
5.5 m
5.2 m
4.8 m
4.4 m
3.7 m
3.1 m
2.0 m
*1
*2
*3
Minimum
9.9 m
7.9 m
5.9 m
3.9 m
3.3 m
2.8 m
2.3 m
1.6 m
Minimum
9.8 m
8.7 m
6.5 m
5.7 m
4.6 m
4.3 m
4.0 m
3.6 m
3.1 m
2.6 m
1.7 m
Distance from the lens centre to the
bottom of the image (H)
38.1 cm
30.5 cm
22.9 cm
15.2 cm
12.8 cm
11.0 cm
9.1 cm
6.1 cm
Distance from the lens centre to the
bottom of the image (H)
ⳮ9.3 cm
ⳮ8.3 cm
ⳮ6.2 cm
ⳮ5.5 cm
ⳮ4.4 cm
ⳮ4.2 cm
ⳮ3.8 cm
ⳮ3.5 cm
ⳮ3.0 cm
ⳮ2.5 cm
ⳮ1.7 cm
NORMAL Mode
(4:3)
Picture size (diag.) (x)
457 cm (180⬙)
381 cm (150⬙)
254 cm (100⬙)
213 cm (84⬙)
183 cm (72⬙)
152 cm (60⬙)
102 cm (40⬙)
• Values with a minus (ⳮ) sign indicate the distance of the lens centre below the bottom of the screen.
• The values do not match up when applying the formula in *1 to *4 above. However, this is not a calculation
error.
• For optimum focus, the recommended projection distance (L) is from 1.15m to 10.0m.
Projection distance (L)
Maximum
10.0 m
9.6 m
6.3 m
5.3 m
4.6 m
3.8 m
2.5 m
*4
Minimum
9.5 m
7.9 m
5.3 m
4.4 m
3.8 m
3.1 m
2.1 m
Distance from the lens centre to the
bottom of the image (H)
ⳮ9.1 cm
ⳮ7.6 cm
ⳮ5.1 cm
ⳮ4.3 cm
ⳮ3.7 cm
ⳮ3.0 cm
ⳮ2.0 cm
17

Setting up the Screen
Using the Adjustment Feet
You can adjust the height of the image by raising the projector with the
foot releases.
1 Press the foot releases and lift the projector to the desired angle.
(Adjustable up to approximately 7° from the standard position.)
2 Remove your hands from the foot releases. Once the adjustment
feet have locked in position, release the projector.
3 If the screen is at an angle, the adjusters can be used to adjust
the angle of the image.
Returning the projector to its original position
While holding the projector, press the foot releases and slowly lower the projector
to its original position.
• When an adjustment is made, the image may become distorted (keystoned), depending
on the relative positions of the projector and the screen.
CAUTION
• Do not press the foot releases when the adjustment feet are extended without firmly holding the projector.
• Do not hold the lens when lifting or lowering the projector.
• When lowering the projector, be careful not to get your fingers caught in the area between the adjustment feet and the
projector.
Operation
Reversed Image Setup
Rear projection
• Place a translucent screen between the projector and
the audience.
• Use the projector’s menu system to reverse the
projected image. (See page 34 for use of this
function.)
• Optimal image quality can be achieved when the projector is positioned perpendicular to the screen with all feet flat and level.
CAUTION
• When using a mirror, be sure to carefully position both the projector and the mirror so the light does not shine into the eyes of
the audience.
Projection using a mirror
• When the distance between the projector and screen
is not sufficient for normal rear projection, you can
use a mirror to reflect the image onto the screen.
• Place a mirror (normal flat type) in front of the lens.
• Project the normal image onto the mirror.
• The image reflected from the mirror is projected onto
the translucent screen.
Ceiling-mount Setup
• It is recommended that you use the optional Sharp ceiling-mount
bracket for this installation.
• Before mounting the projector, contact your nearest Sharp
Authorised LCD Projector Dealer or Service Centre to obtain the
recommended ceiling-mount bracket (sold separately). (AN-TK202
ceiling-mount bracket, AN-TK201 extension tube, AN-Z7T ceiling
adaptors for AN-TK202 or AN-TK201.)
• When the projector is in the inverted position, use the upper edge
of the screen as the base line.
• Use the projector’s menu system to select the appropriate projection
mode. (See page 34 for use of this function.)
18

Setting up the Screen
Digital Keystone Correction
• When the image is distorted due to the projection
angle, the digital keystone correction function allows
you to correct it.
• The digital keystone correction can be made by
pressing KEYSTONE, or by setting “Keystone”
correction in the GUI menu.
Operation
Projector Remote control
COMPONENT
ON/OFF
KEYSTONE
LAMP
TEMP.
PICT MODE
POWER
INPUT
BACK ENTER MENU
Projector
ON/OFF
KEYSTONE
LAMP
TEMP.
PICT MODE
POWER
INPUT
BACK ENTER MENU
1
2, 3, 4
2, 3
INPUT 1
AUTO SYNCINPUT 2 GAMMA
S-VIDEO CLR TEMP
VIDEO FREEZE
Remote control
VOL
MUTE
1, 5
(GUI) On-screen Display
RGB/
KEYSTONE
BACK
ENTER
PICT MODE
POWER
MENU
Using the KEYSTONE buttons
1 Press KEYSTONE to adjust the setting.
Using the GUI menu
1 Press MENU.
2 Press ∂/ƒ to select “Options”, and then press
ENTER.
3 Press ∂/ƒ to select “Keystone”, and then press
ENTER.
4 Press ∂/ƒ to move the mark to the desired
setting.
5 To exit from the GUI, press MENU.
• To reset the keystone setting, press BACK.
• Straight lines and the edges of the displayed image may
appear jagged, when adjusting the keystone setting.
19

Using the GUI (Graphical User Interface) Menu Screens
Projector Remote control This projector has three sets of menu screens (INPUT 1
or 2 (COMPONENT), INPUT 2 (RGB) and S-VIDEO or
VIDEO) that allow you to adjust the image and various
projector settings. These menu screens can be
operated from the projector or the remote control with
the following buttons.
s
ON/OFF
POWER
TEMP.
KEYSTONE
INPUT
BACK ENTER MENU
PICT MODE
EXAMPLE
INPUT 1 or 2 (COMPONENT) mode
LAMP
7
2, 4, 6
3, 5
1, 8
VOL
MUTE
POWER
BACK
MENU
ENTER
(GUI) On-screen Display
Operation
INPUT 2 (RGB) mode
s
S-VIDEO or VIDEO mode
s
1 Press MENU to display the main menu.
2 Press ∂/ƒ to select an adjustment item in the main menu.
3 Press ENTER to display the sub menu.
4 Press ∂/ƒ to select an adjustment item in the sub menu.
5 Press ENTER to activate the selected adjustment item.
6 Press ∂/ƒ to adjust the item.
7 Press BACK to return to the previous screen.
8 Press MENU to exit from the GUI.
• For details on items on the menu screen, see the tree charts on pages 21 and 22.
20

Using the GUI (Graphical User Interface) Menu Screens
Items on the INPUT 1 or 2 (COMPONENT)
Mode Menu Bar
Main menu Main menu
Picture1
Picture2
Options Signal Info
Language English
Operation
Contrast
Bright
Red
Blue
Signal Type *1
Reset
Color
Tint
Sharp
Progressive *2
Reset
Lamp Timer
Keystone
Auto Power Off
Background
Theater Mode
Deutsch
Español
Nederlands
Français
Italiano
Svenska
Português
Ⳮ30ⳮ30
Ⳮ30ⳮ30
Ⳮ30ⳮ30
Ⳮ30ⳮ30
Component
RGB
Ⳮ30ⳮ30
Ⳮ30ⳮ30
70
2D Progressive
3D Progressive
Film Mode 1
Film Mode 2
Ⳮ127ⳮ127
ON
OFF
Blue
None
ON
OFF
Items on the INPUT 2 (RGB) Mode Menu Bar
Sub menuSub menu
Picture
Fine Sync
Options Signal Info
Language English
Contrast
Bright
Red
Blue
Signal Type
Reset
Clock
Phase
H-Pos
V-Pos
Reset
Lamp Timer
Keystone
Auto Power Off
Background
Theater Mode
Deutsch
Español
Nederlands
Français
Italiano
Svenska
Português
Ⳮ30ⳮ30
Ⳮ30ⳮ30
Ⳮ30ⳮ30
Ⳮ30ⳮ30
Component
RGB
Ⳮ127ⳮ127
Ⳮ120ⳮ120
Ⳮ50ⳮ50
Ⳮ50ⳮ50
Ⳮ127ⳮ127
ON
OFF
Blue
None
ON
OFF
PRJ Mode
Special Modes
Front
CeilingⳭFront
Rear
CeilingⳭRear
640⳯480
480P
PRJ Mode
Special Modes
Front
CeilingⳭFront
Rear
CeilingⳭRear
640⳯480
480P
*1 “Signal Type” does not appear when the INPUT 1 (COMPONENT) mode is selected.
*2 “Progressive” only appears when receiving a 480i signal in the INPUT 2 (COMPONENT) mode.
•“Color”, “Tint” and “Sharp” do not appear in the INPUT 2 (RGB) mode.
21

Using the GUI (Graphical User Interface) Menu Screens
Items on the S-VIDEO or VIDEO
Mode Menu Bar
Main menu
Picture1
Picture2
Options Signal Info
Language English
Sub menu
Contrast
Bright
Red
Blue
Reset
Color
Tint *3
Sharp
Progressive
Reset
Lamp Timer
Keystone
Auto Power Off
Background
Theater Mode
Deutsch
Español
Nederlands
Français
Italiano
Svenska
Português
Ⳮ30ⳮ30
Ⳮ30ⳮ30
Ⳮ30ⳮ30
Ⳮ30ⳮ30
Ⳮ30ⳮ30
Ⳮ30ⳮ30
70
2D Progressive
3D Progressive
Film Mode 1
Film Mode 2
Ⳮ127ⳮ127
ON
OFF
Blue
None
ON
OFF
Operation
PRJ Mode
Video System Auto
Front
CeilingⳭFront
Rear
CeilingⳭRear
PAL
NTSC3.58
SECAM
NTSC4.43
PAL M
PAL N
PAL (60Hz)
*3 “Tint” does not appear when receiving “PAL”, “SECAM”, “PAL M”, “PAL N“ or “PAL (60Hz)” in the S-VIDEO or VIDEO mode.
22

Selecting the On-screen Display Language
Operation
Projector
Remote control
English is the preset language for the On-screen
Display. The language can be set to English, German,
ON/OFF
KEYSTONE
LAMP
TEMP.
PICT MODE
POWER
INPUT
BACK ENTER MENU
2, 3
2, 4
1, 5
VOL
MUTE
BACK
ENTER
POWER
MENU
Spanish, Dutch, French, Italian, Swedish, Portuguese,
Chinese, Korean or Japanese.
1 Press MENU.
2 Press ∂/ƒ to select “Language”, and then press
ENTER.
3 Press ∂/ƒ to select the desired language.
(GUI) On-screen Display
4 Press ENTER to save the setting. The On-screen
Display is now programmed to display in the
language selected.
5 To exit from the GUI, press MENU.
Selecting the Video Input System Mode (S-VIDEO or VIDEO mode only)
Projector
ON/OFF
KEYSTONE
LAMP
TEMP.
PICT MODE
POWER
INPUT
BACK ENTER MENU
(GUI) On-screen Display
2, 3
2, 4
1, 5
Remote control
VOL
MUTE
POWER
BACK
MENU
ENTER
The video input system mode is preset to “Auto”;
however, it can be changed to a specific system mode,
if the selected system mode is not compatible with the
connected audiovisual equipment.
1 Press MENU.
2 Press ∂/ƒ to select “Video System”, and then
press ENTER.
3 Press ∂/ƒ to select the desired video system
mode.
4 Press ENTER to save the setting.
5 To exit from the GUI, press MENU.
• When the system mode is set to “Auto”, you may not receive
a clear picture due to signal differences. Should this occur,
switch to the video system of the source signal.
23

Picture Adjustments
Projector
ON/OFF
KEYSTONE
LAMP
TEMP.
PICT MODE
2, 3, 4
2, 3
POWER
INPUT
BACK ENTER MENU
1, 5
(GUI) On-screen Display
INPUT 1 or 2 (COMPONENT) mode
Remote control
VOL
MUTE
POWER
BACK
MENU
ENTER
Adjusting the Picture
You can adjust the projector’s picture to your preferences with the following picture settings.
Description of Adjustment Items
Selected item
Contrast
Bright
Red
Blue
Reset
Color
Tint
Sharp
•“Signal Type” does not appear when the INPUT 1
(COMPONENT) mode is selected.
•“Progressive” only appears when receiving a 480i signal in
the INPUT 2 (COMPONENT) mode.
•“Color”, “Tint” and “Sharp” do not appear in the INPUT 2
(RGB) mode.
•“Tint” does not appear when receiving “PAL”, “SECAM”,
“PAL M”, “PAL N“ or “PAL (60Hz)” in the S-VIDEO or VIDEO
mode.
ƒ button ∂ button
For less contrast
For less brightness
For weaker red
For weaker blue
All image adjustment items are returned to the factory preset
settings.
For less colour intensity
Skin tones become purplish
For less sharpness
For more contrast
For more brightness
For stronger red
For stronger blue
For more colour intensity
Skin tones become greenish
For more sharpness
Operation
INPUT 2 (RGB) mode
S-VIDEO or VIDEO mode
1 Press MENU.
2 Press ∂/ƒ to select “Picture1” or “Picture2” in
INPUT 1 or 2 (COMPONENT), S-VIDEO or VIDEO
mode, or to select “Picture” in INPUT 2 (RGB)
mode, and then press ENTER.
3 Press ∂/ƒ to select a specific adjustment item,
and then press ENTER.
4 Press ∂/ƒ to move the mark of the selected
adjustment item to the desired setting.
5 To exit from the GUI, press MENU.
• To reset all adjustment items, select “Reset”, and then press
ENTER.
• The adjustments can be stored separately in the INPUT 1,
INPUT 2, S-VIDEO and VIDEO modes.
24

Picture Adjustments
Operation
Projector Remote Control
ON/OFF
KEYSTONE
LAMP
TEMP.
PICT MODE
POWER
INPUT
BACK ENTER MENU
2, 3, 4
2, 3, 5
VOL
MUTE
1, 6
(GUI) On-screen Display
Projector Remote Control
BACK
ENTER
POWER
MENU
Selecting the Signal Type
This function allows you to select the input signal type
(RGB or COMPONENT) for INPUT 2 port.
1 Press MENU.
2 Press ∂/ƒ to select “Picture” in INPUT 2 (RGB)
mode, and then press ENTER.
3 Press ∂/ƒ to select “Signal Type”, and then press
ENTER.
4 Press ∂/ƒ to select “Component” or “RGB”.
5 Press ENTER to save the setting.
6 To exit from the GUI, press MENU.
Progressive Mode
This function allows you to select the progressive display
of a video signal. The progressive display projects a
smoother video image. For reducing distortion and
noise, select an item in “Progressive” for optimum image
quality.
ON/OFF
KEYSTONE
LAMP
TEMP.
PICT MODE
POWER
INPUT
BACK ENTER MENU
(GUI) On-screen Display
2, 3, 4
2, 3, 5
1, 6
VOL
MUTE
BACK
ENTER
POWER
MENU
1 Press MENU.
2 Press ∂/ƒ to select “Picture2” in S-VIDEO or
VIDEO mode, and then press ENTER.
3 Press ∂/ƒ to select “Progressive”, and then press
ENTER.
4 Press ∂/ƒ to select the desired progressive
display.
5 Press ENTER to save the setting.
6 To exit from the GUI, press MENU.
Description of Progressive Modes
2D Progressive
Useful for displaying fast-moving images such as sports and action
films. Mode that optimises the image in a displayed frame.
3D Progressive
Useful for displaying relatively slow-moving images such as drama
and documentary more clearly. Mode that optimises the image by
estimating the movement of a number of preceding and succeeding
frames.
Film Mode 1
Effective for displaying action movies or other fast-moving film
sources.
Film Mode 2
Effective for displaying still images or slow-moving film sources as in
a documentary.
25
• The film source is a digital video recording with the original encoded
as is at 24 frames/second. The projector can convert this film source
to progressive video at 60 frames/second to play back a highdefinition image.

Computer Image Adjustments (INPUT 2 (RGB) mode only)
Remote control
Auto Sync Adjustment
• Used to automatically adjust a computer image.
• Auto Sync adjustment can be made manually by
RGB/
COMPONENT
INPUT 1
S-VIDEO CLR TEMP
VIDEO FREEZE
PICT MODE
AUTO SYNCINPUT 2 GAMMA
KEYSTONE
1
pressing AUTO SYNC.
• The sync adjustment is automatically made each time the
projector is turned on while connected to a computer or
the input selection is changed.
1 Press AUTO SYNC on the remote control.
On-screen Display During Auto Sync adjustment, “Adjusting The Image”
is displayed as shown on the left.
• Auto Sync adjustment may take some time to complete,
depending on the image of the computer connected to the
projector.
• When the optimum image cannot be achieved with Auto
Sync adjustment, use manual adjustments. (See page 27.)
Operation
26

Computer Image Adjustments (INPUT 2 (RGB) mode only)
Operation
Projector
ON/OFF
KEYSTONE
LAMP
TEMP.
PICT MODE
POWER
INPUT
BACK ENTER MENU
(GUI) On-screen Display
2, 3, 4
2, 3
1, 5
Remote control
VOL
MUTE
POWER
BACK
MENU
ENTER
Adjusting the Computer Image
When displaying computer patterns which are very
detailed (tiling, vertical stripes, etc.), interference may
occur between the LCD pixels, causing flickering,
vertical stripes, or contrast irregularities in portions of
the screen. Should this occur, adjust “Clock”, “Phase”,
“H-Pos” and “V-Pos” for the optimum computer image.
Description of Adjustment Items
DescriptionSelected item
Clock
Phase
H-Pos
V-Pos
• Computer image adjustments can be made easily by
pressing AUTO SYNC (
(Select the desired computer input mode with INPUT
on the projector or INPUT 2 on the remote control.)
1 Press MENU.
2 Press ∂/ƒ to select “Fine Sync”, and then press
ENTER.
Adjusts vertical noise.
Adjusts horizontal noise (similar to tracking on your VCR).
Centres the on-screen image by moving it to the left or right.
Centres the on-screen image by moving it up or down.
). See page 26 for details.
3 Press ∂/ƒ to select a specific adjustment item,
and then press ENTER.
4 Press ∂/ƒ to move the mark of the selected
adjustment item to the desired setting.
5 To exit from the GUI, press MENU.
• The value range of “Clock” setting is limited by the type of
signal received.
• To reset all adjustment items, select “Reset” on the “Fine
Sync” menu screen and press ENTER.
27
 Loading...