

MIKROWIEŻA
X
X
MIKRO KOMPONENS RENDSZER
MIKROSYSTÉM
MIKROSYSTÉM
МІКРОСИСТЕМА
MIKRO COMPONENT SUSTAV
MIKRO MÜZIK SISTEMI
ΣΥΣΤΗΜΑ ΜΙΚΡΟΣΤΟΙΧΕΙΩΝ
MICRO COMPONENT SYSTEM
L-E2180H
MODEL
MODEL
MODEL
XL-E2180H
MODEL
МОДЕЛЬ
MODEL
MODEL
ΜΟΝΤΕΛΟ
MODEL
L-E2580H
XL-E2580H
INSTRUKCJA OBSŁUGI
HASZNÁLATI ÚTMUTATÓ
NÁVOD K POUŽITÍ
NÁVOD NA POUŽÍVANIE
ІНСТРУКЦІЯ З ЕКСПЛУАТАЦІЇ
Note:
This product is not compatible with MTP and AAC file systems.
UPUTSTVA ZA UPORABU
KULLANIM KILAVUZU
ΕΓΧΕΙΡΙΔΙΟ ΛΕΙΤΟΥΡΓΙΑΣ
OPERATION MANUAL
POLSKI
MAGYAR
ČESKY
SLOVENSKY
УКРАЇНСЬКА
HRVATSKI
TÜRKÇE
ΕΛΛΗΝΙΚΑ
ENGLISH
...
Patrz strony od i do xii oraz od PL-1 do PL-42.
...
Lásd az i - xii és HU-1 - HU-42 oldalakat.
...
Viz strany i až xii a CZ-1 až CZ-42.
...
Prosím, pozrite si strany i až xii a SK-1 až SK-42.
...
Дивіться: сторінки від i до xii, а також від UA-1 до UA-42.
...
Vidi stranicu od i do xii ili od HR-1 do HR-42.
...
Lütfen i’den xii’a kadar ve TR-1’den TR-42’a kadar sayfaları inceleyiniz.
...
Παρακαλούμε παραπεμφθείτε στις σελίδες i με xii και GR-1 με GR-42.
...
Please refer to pages i to xii and E-1 to E-42.

XL-E2180H
XL-E2580H
PL - WAŻNE INFORMACJE HU - SPECIÁLIS MEGJEGYZÉSEK
z Gdy urządzenie znajduje się w trybie czuwania, jego
wewnętrzne elementy są pod napięciem. Jeśli urządzenie znajduje się w trybie czuwania, może zostać
włączone przy pomocy pilota lub automatycznie przy
pomocy zegara.
z Wewnątrz urządzenia nie ma żadnych elementów wy-
magających obsługi użytkownika. Obudowa może być
zdejmowana wyłącznie przez wykwalifikowanych pracowników serwisu. Wewnętrzne elementy urządzenia
znajdują się pod napięciem. Przed zdjęciem odbudowy,
lub gdy urządzenie ma zostać przez dłuższy czas nieużywane, należy wyjąć wtyczkę z gniazdka elektrycznego.
z Nagrań audiowizualnych chronionych prawami autorski-
mi nie można kopiować bez zgody właściciela tych praw.
Prosimy o postępowanie zgodne z obowiązują
cym pra-
wem.
z Produkt jest URZĄDZENIEM LASEROWYM KLASY 1.
z Urządzenie należy chronić przed zalaniem i wilgocią.
OSTRZEŻENIE:
Pod pokrywą znajduje się źródło niewidzialnego promieniowania laserowego. Nie wolno patrzeć w wiązkę lasera
bezpośrednio, ani przy użyciu przyrządów optycznych.
z Amikor az ON/STAND-BY gomb STAND-BY helyzetben
van, a készülék még hálózati feszültség alatt van. Amikor
az ON/STAND-BY gomb STAND-BY helyzetben van,
a készülék a távvezérlő segítségével bekapcsolható.
z A készülék nem tartalmaz a felhasználó által javítható
alkatrészeket. A burkolatokat ne távolítsa el, hacsak nem
rendelkezik megfelelő képesítéssel. A készülék feszültség
alatt van, ezért szervizelés előtt húzza ki a dugaszt a
hálózati aljzatból, illetve amikor hosszabb ideig nem
használja a készüléket.
z Az audio-vizuális anyag törvényvédett tulajdont is
tartalmazhat, melynek rögzítése és másolása esetleg tilos a
védjegy tulajdonosának engedélye nélkül. Az adott
országban érvényes jogszabályok az irányadók.
z A készülék 1. OSZTÁLYBA SOROLT LÉZERTERMÉK.
z A tűzveszély és az áramütés megelőzése érdekében
ügyeljen arra, hogy a készülék ne érintkezzen folyadékokkal. Ne helyezzen semmilyen folyadékkal töltött tárgyat (pl. vázát) a készülékre.
FIGYELMEZTETÉS:
A burkolat megbontásakor láthatatlan lézersugár léphet ki a
készülékből. Ne nézzen a fénysugárba se szabad szemmel,
se optikai eszközön keresztül!
i

CZ - ŮLEŽITÉ INFORMACE
XL-E2180H
XL-E2580H
z Je-li přístroj v pohotovostním režimu, jeho vnitřní části
jsou pod napětím. Přístroj v pohotovostním režimu
můžete zapnout pomocí dálkového ovládání nebo automaticky pomocí časovaného zapnutí.
z Omezte riziko zásahu elektrickým proudem tak, že neb-
udete snímat žádný kryt. Uvnitř zařízení nejsou žádný
části, které by si mohl uživatel opravit sám, proto
ponechte veškerý servis kvalifikovaným technikům.
Chcete-li otevřet kryt nebo nebudete-li přístroj delší
dobu používat, odpojte napájecí kabel z elektrické zásuvky.
z Audiovizuální nahrávky chraněné autorským právem
nesmí být kopírované bez souhlasu majitele. Postupujte
v souladu s právem.
z Je to LASEROVÝ VÝROBEK TŘÍDY 1.
z Zabraňte kontaktu přístroje s vodou a vlhkem.
UPOZORNĚNÍ:
Po otevření a uvolnění zámků se vystavujete neviditelnému laserovému záření. Vyvarujte se přímému pohledu
do paprsku.
PŘÍSTROJ NEVYSTAVUJTE KAPAJÍCÍ NEBO STŘÍKA-
JÍCÍ VODĚ.
PŘED SEJMUTÍM KRYTU NUTNO VYJMOUT VIDLICI
ZE SÍŤOVÉ ZÁSUVKY.
VÝSTRAHA: VÝROBEK JE VYBAVEN LASEREM. PŘI
NESPRÁVNÉ MANIPULACI S PŘÍSTROJEM V ROZPORU S TÍMTO NÁVODEM MŮŽE DOJÍT K NEBEZPEČÉMU OZÁŘENÍ. NEOTVÍREJTE A NESNÍMEJTE
PROTO ŽÁDNÉ KRYTY A PŘÍSTROJ NEOPRAVUJTE.
OPRAVU A SERVIS SVĚŘTE ODBORNÉMU SERVISU.
ii

XL-E2180H
XL-E2580H
SK - DÔLEŽITÉ INFORMÁCIE
z Ak je jednotka v pohotovostnom režime, jej vnútorné
časti sú pod napätím. Jednotku, ktora je v pohotovostnom režime, môžete zapnut´ pomocou diaľkového
ovládača alebo automatický pomocou časovača.
z Vo vnútri zariadenia sa nenachádzajú žiadne časti ktoré
vyžadujú obsluhu použivateľa. Kryt môže demontovat´
vylučne kvalifikovaný pracovník servisu. Vnútorné časti
zariadenia sa nachádzajú pod napätím. Predtým než
demontujete kryt alebo keď zariadenie bude cez dlhší
čas nepouživané, odpojte zástrčku zo zásuvky.
z Audiovizuálne záznamy, ktoré sú chránené autorskými
právami nesmiete kopírovat´ bez súhlasu ich majiteľa.
Prosíme, postupujte v súlade s platnými právnymi predpismi.
z Výrobok je LASEROVÁ JEDNOTKA 1. TRIEDY.
z Zariadenie nevystavujte pôsobeniu vlkosti a dbajte, aby
sa do jednotky nedostala voda.
UPOZORNENIE:
Pod krytom sa nachádza zdroj neviditeľného laserového
žiarenia. Nepozerajte sa na snímač lasera priamo alebo
pomocou optických nástrojov.
PROSTROJ NEVYSTAVUJTE KVAPKAJÚCEJ ALEBO
STRIEKAJÚCEJ VODE.
PRED ZLOŽENÍM KRYTU JE NUTNE ODPOJIŤ
PRÍSTROJ ZO SIETE.
VÝSTRAHA: VÝROBOK JE VYBAVENÝ LASEROM. PRI
NESPRÁVNO MANIPULOVANÍ S PRÍSTROJOM V ROZPORE S TÝMTO NÁVODOM MÔŽE DÔJSŤ K NEBEZPEČNEMU OŽIARENIU. NEODKRÝVAJTE PRETO
ŽIADNE KRYTY A PRÍSTROJ NEOPRAVUJTE. OPRAVU A SERVIS PRENECHAJTE ODBORNÉMU
SERVISU.
iii

UA - ВАЖЛИВА ІНФОРМАЦІЯ HR - POSEBNE NAPOMENE
XL-E2180H
XL-E2580H
z У режимі очікування пристрою його внутрішні
елементи знаходяться під напругою. Тому в режимі
очікування пристрій можна увімнкути за допомогою
пульта або автоматично за допомогою таймера.
z В середині пристрою немає елементів, які б
вимагали обслуговування зі сторони користувача.
Верхню кришку може зняти тільки кваліфікований
працівник сервісного центру. Внутрішні елементи
пристрою знаходяться під напругою. Перед тим, як
зняти кришку, або у випадку, коли Ви довго не
користувалися пристроєм, слід витягнути штепсель з
електричної розетки.
z Аудіовізуальні записи, які захищені відповідними
параграфами авторського права, забороняється
копіювати без дозволу власника авторських прав.
Поступайте згідно із діючим законодавством.
z Даний продукт є ЛАЗЕРНИМ ПРИСТРОЄМ КЛАСУ 1.
z Оберігайте пристрій від від дії води
та вологи.
ПРИМІТКА:
Під кришкою пристрою знаходиться невидиме джерело
лазерного випромінювання. Не дивіться на промінь
лазера безпосередньо, ані за допомогою оптичних
приладів.
z Dok je tipka ON/STAND-BY uključena na STAND-BY
poziciju, uređaj je i dalje pod glavnim naponom. Dok je
tipka ON/STAND-BY uključena na STAND-BY poziciju,
moguće je uključiti uređaj pomoću timer-a ili daljinskog
upravljača.
z Ovaj uređaj ne sadrži dijelove koje bi korisnik mogao sam
popraviti. Nikad ne skidajte sami poklopac uređaja, već to
prepustite kavalificirnoj osobi za servisiranje. Uređaj je pod
naponom koji može biti opasan, zato uvijek isključite glavni
utikač iz zidne utičnice prije bilo kakvih servisnih radova ili u
slučaju da nemate namjeru koristiti uređaj duže vremena.
z Audio-vizualni materijal mogao bi biti zaštićen autorskim
pravima koji ne dozvoljavaju presnimavanje bez dozvole
vlasnika autorskih prava. Molimo vas da se obratite nadležnoj ustanovi u vašoj zemlji.
z Ovaj je proizvod klasificiran kao LASERSKI PROIZVOD 1.
KLASE.
z Ne izlažite uređaj vodi, kapanju i pljuskanju u cilju spreča-
vanja požara ili strujnog udara. Nikavi predmeti puni vode,
kao na primjer vaze, ne bi se smjeli postavljati na uređaj.
OPREZ:
Nevidljivo lasersko zračenje u slučaju otvaranja poklopca. Ne
gledajte direktno u snop zraka i ne promatrajte ih pomoću optičkih instrumenata.
iv

XL-E2180H
XL-E2580H
TR - ÖZEL NOTLAR GR - ΕΙΔΙΚΕΣ ΣΗΜΕΙΩΣΕΙΣ
z ON/STAND-BY (AÇMA/BEKLEME) dügmesi STAND-
BY (BEKLEME) konumu olarak ayarlanmiş durumunda
şebeke voltaji hala ünitenin içerisindedir. ON/STANDBY (AÇMA/BEKLEME) dügmesi STAND-BY (BEKLEME) konumu olarak ayarlanmiş durumunda ünite
zamanlayici modu tarafindan veya uzaktan kumanda
araciligiyla çaliştirilabilir.
z Cihazin içinde kullanicinin servis yapabilecegi hiçbir
parça yoktur. Yetkiniz yokken hiçbir zaman kapaklari açmayiniz. Bu ünitenin tehlikeli voltaji var, herhangi bir
servis işleminden önce ve onun uzun zaman kullanilmayacagi sürede fişini prizden her zaman çekiniz.
z Görsel işitsel materyal telif hakki ile korunan ve telif hakki
sahibinin iznini almadan kaydedilemeyen çalişmalari
içerebilir. Lütfen sizin ülkenizde geçerli olan uygun mevzuatlari inceleyiniz.
z Yangin veya elektrik çarpma tehlikesini önlemek
amaciyla bu cihazi damlama veya serpmeye maruz
birakmayiniz. Aygitin üstüne vazo gibi sivi ile doldurulmuş objeler yerleştirilemez.
z Bu ürün SINIF 1 LAZER ÜRÜNÜ olarak siniflandi-
rilmiştir.
DIKKAT:
Bu ürün düşük güçlü lazer cihazini içermektedir. Devamli
emniyeti saglamak için herhangi bir kapagi açmayiniz veya
ürünün içerisine erişim saglamayi denemeyiniz. Bütün
servis işlemleri için yetkili personele başvurunuz.
z Όταν το κομβίον ΛΕΙΤΟΥΡΓΙΑ/ΣΕ ΑΝΑΜΟΝΗ είναι στη θέση
ΣΕ ΑΝΑΜΟΝΗ, τάση ηλεκτρικού δικτύου υπάρχει ακόμη μέσα
στο συγκρότημα. Όταν το κομβίον ΛΕΙΤΟΥΡΓΙΑ/ΣΕ
ΑΝΑΜΟΝΗ είναι στη θέση ΣΕ ΑΝΑΜΟΝΗ, το συγκρότημα
μπορεί να μπει σε λειτουργία από την κατάσταση
χρονοδιακόπτη ή από το τηλεχειριστήριο.
z Αυτό το συγκρότημα δεν αποτελείται από στοιχεία
μπορούν να συντηρηθούν από το χρήστη. Ποτέ μην αφαιρείτε
σκέπαστρα εκτός αν είστε εξουσιοδοτημένος για αυτό. Αυτό το
συγκρότημα περιέχει επικίνδυνη τάση, απομακρύνετε πάντα το
βύσμα της τάσης ηλεκτρικού δικτύου από το ρευματοδότη πριν
από οποιαδήποτε επιχείρηση συντήρησης καθώς επίσης, όταν
το συγκρότημα δε χρησιμοποιείται για μακρά περίοδο.
z Το οπτικοακουστικό υλικό μπορεί
προστατευόμενα πνευματικά δικαιώματα που απαγορεύεται να
ηχογραφηθούν χωρίς την άδεια του ιδιοκτήτη των πνευματικών
δικαιωμάτων. Παρακαλώ παραπεμφθείτε στην ανάλογη
νομοθεσία της χώρας σας.
z Για την πρόληψη κινδύνου πυρκαγιάς ή ηλεκτροπληξίας, μην
εκθέτετε τη συσκευή σε σημείο που στάζει ή που μπορεί να
πιτσιλιστεί. Μην τοποθετείτε επάνω στη συσκευή αντικείμενα
που
περιέχουν υγρά, όπως για παράδειγμα βάζα.
z Αυτό το προϊόν είναι ταξινομημένο ως 1ης ΤΑΞΕΩΣ ΠΡΟΙΟΝ
ΛΕΙΖΕΡ.
να περιέχει εργασίες με
που
ΠΡΟΣΟΧΗ:
Το προϊόν αυτό περιέχει συσκευή λέιζερ χαμηλής τάσεως.
Για να σιγουρέψετε συνεχόμενη ασφάλεια μην
απομακρύνετε τα σκέπαστρα και μην προσπαθείτε να
επέμβετε στο εσωτερικό του προϊόντος. Παραπέμψτε όλη
τη συντήρηση σε εξουσιοδοτημένο προσωπικό.
v

ENG - SPECIAL NOTES
z When the ON/STAND-BY button is set at STAND-BY posi-
tion, mains voltage is still present inside the unit. When the
ON/STAND-BY button is set at STAND-BY position, the
unit may be brought into operation by the timer mode or
remote control.
z This unit contains no user serviceable parts. Never remove
covers unless qualified to do so. This unit contains dangerous voltages, always remove mains plug from the socket
before any service operation and when not in use for a long
period.
z Audio-visual material may consist of copyrighted works
which must not be recorded without the authority of the
owner of the copyright. Please refer to relevant law in your
country.
z To prevent fire or shock hazard, do not expose this appli-
ance to dripping or splashing. No objects filled with liquids,
such as vases, shall be placed on the apparatus.
z This product is classified as a CLASS 1 LASER PRODUCT.
This product contains a low power laser device. To ensure
continued safety do not remove any cover or attempt to gain
access to the inside of the product. Refer all servicing to qualified personnel.
XL-E2180H
XL-E2580H
vi
XL-E2180H
XL-E2580H
PL - INFORMACJE DOTYCZĄCE USUWANIA ZUŻYTEGO URZĄDZENIA
A. Informacje dla użytkowników (prywatne gospodarstwa domowe) dotyczące usuwania odpadów
1. W krajach Unii Europejskiej
Uwaga: Jeśli chcą Państwo usunąć to urządzenie, prosimy nie używać zwykłych pojemników na śmieci!
Zużyty sprzęt elektryczny i elektroniczny należy usuwać oddzielnie, zgodnie z wymogami prawa dotyczącymi odpowiedniego
przetwarzania, odzysku i recyklingu zużytego sprzętu elektrycznego i elektronicznego.
Po wdrożeniu przepisów unijnych w Państwach Członkowskich prywatne gospodarstwa domowe na terenie krajów UE mogą
bezpłatnie* zwracać zużyty sprzęt elektryczny i elektroniczny do wyznaczonych punktów zbiórki odpadów. W niektórych krajach*
można bezpłatnie zwrócić stary produkt do lokalnych punktów sprzedaży detalicznej pod warunkiem, że zakupią Państwo
podobny nowy produkt.
Uwaga: Państwa produkt
oznaczony jest tym
symbolem. Oznacza to, że
zużytego sprzętu elektrycz-
nego i elektronicznego
nie należy łączyć
z odpadami z gospodarstw
domowych.
Dla tego typu produktów
istnieje odrębny system
zbiórki odpadów.
*) W celu uzyskania dalszych informacji na ten temat należy skontaktować się z lokalnymi władzami.
Jeśli zużyty sprzęt elektryczny i elektroniczny jest wyposażony w baterie lub akumulatory, należy je usunąć oddzielnie, zgodnie
z wymogami lokalnych przepisów.
Jeśli ten produkt zostanie usunięty we właściwy sposób, pomogą Państwo zapewnić, że odpady zostaną poddane przetworzeniu,
odzyskowi i recyklingowi, a tym samym zapobiec potencjalnym negatywnym skutkom dla środowiska naturalnego i zdrowia
ludzkiego, które w przeciwnym razie mogłyby mieć miejsce na skutek niewłaściwej obróbki odpadów.
2. Kraje pozaunijne
Jeśli chcą Państwo pozbyć się produktu, należy skontaktować się z władzami lokalnymi i uzyskać informacje na temat prawidłowej
metody usunięcia produktu.
B. Informacje dla użytkowników biznesowych dotyczące usuwania odpadów
1. W krajach Unii Europejskiej
W przypadku gdy produkt używany jest do celów handlowych i zamierzają go Państwo usunąć:
Należy skontaktować się z dealerem firmy SHARP, który poinformuje o możliwości zwrotu wyrobu. Być może będą Państwo
musieli ponieść koszty zwrotu i recyklingu produktu. Produkty niewielkich rozmiarów (i w małej liczbie) można zwrócić do
lokalnych punktów zbiórki odpadów.
2. Kraje pozaunijne
Jeśli chcą Państwo usunąć ten produkt, należy skontaktować się zwładzami lokalnymi i uzyskać informacje na temat prawidłowej
metody jego usunięcia.
INFORMACJA NA TEMAT USUWANIA BATERII
Bateria dostarczona wraz z produktem może zawierać śladowe ilości ołowiu.
W krajach Unii Europejskiej:
z odpadami domowymi! Dla zużytych baterii istnieją oddzielne systemy zbiórki, które zapewnią prawidłowe przetwarzanie i odzysk
zgodnie z obowiązującym prawem. Szczegóły na temat systemów zbiórki otrzymają Państwo u lokalnych władz.
W Szwajcarii:
Kraje pozaunijne:
o kontakt z władzami lokalnymi.
Zużyte baterie można zwrócić w punkcie sprzedaży.
W celu uzyskania szczegółowych informacji na temat prawidłowej metody pozbycia się zużytych baterii, proszę
Przekreślony pojemnik na odpady oznacza, że zużytych baterii nie należy wyrzucać do pojemników
vii
HU - TÁJÉKOZTATÓ A MEGFELELŐ ÁRTALMATLANÍTÁSRÓL
A. Hulladék-elhelyezési tájékoztató felhasználók részére (magán háztartások)
1. Az Európai Unióban
Figyelem: Ha a készüléket ki akarja selejtezni, kérjük, ne a közönséges szemeteskukát használja!
A használt elektromos és elektronikus berendezéseket külön, és a használt elektromos és elektronikus berendezések
szabályszerű kezeléséről, visszanyeréséről és újrahasznosításáról rendelkező jogszabályokkal összhangban kell kezelni.
A tagállamok általi végrehajtást követően az EU államokon belül a magán háztartások használt elektromos és
elektronikai berendezéseiket díjmentesen juttathatják vissza a kijelölt gyűjtőlétesítményekbe*. Egyes országokban* a helyi
kiskereskedés is díjmentesen visszaveheti Öntől a régi terméket, ha hasonló új terméket vásárol.
*) A további részletekről, kérjük, érdeklődjön az önkormányzatnál.
Figyelem: A terméket ezzel
a jelöléssel láttákel. Ez azt
jelenti, hogy a használt
elektromos és elektronikus
termékeket nem szabad az
általános háztartási
hulladékkal keverni.
Ezekhez a termékekhez
külön hulladékgyűjtő
rendszer üzemel.
Ha használt elektromos vagy elektronikus berendezésében elemek vagy akkumulátorok vannak, kérjük, előzetesen ezeket
selejtezze ki a helyi előírásoknak megfelelően.
A termék szabályszerű kiselejtezésével Ön segít biztosítani azt, hogy a hulladék keresztülmenjen a szükséges kezelésen,
visszanyerési és újrahasznosítási eljáráson, ezáltal közreműködik a lehetséges káros környezeti és humán egészségi hatások
megelőzésében, amelyek ellenkező esetben a helytelen hulladékkezelés következtében előállhatnának.
2. Az EU-n kívüli egyéb országokban
Ha a terméket ki szeretné selejtezni, kérjük, forduljon az önkormányzathoz, és érdeklődjön a helyes hulladékelhelyezési
módszerről.
B. Hulladék-elhelyezési tájékoztató vállalati felhasználók részére
1. Az Európai Unióban
Ha a terméket üzleti célokra használta, és ki kívánja selejtezni:
Kérjük, forduljon a SHARP kereskedéshez, ahol tájékoztatják Önt a termék visszavételéről. Lehetséges, hogy a visszavételből és
újrahasznosításból eredő költségeket felszámítják. Előfordulhat, hogy a helyi hulladékbegyűjtő létesítmény átveszi a kisebb
termékeket (és kis mennyiségeket).
2. Az EU-n kívüli egyéb országokban
Ha a terméket ki szeretné selejtezni, kérjük, forduljon az önkormányzathoz, és érdeklődjön a helyes hulla-dékelhelyezési
módszerről.
TÁJÉKOZTATÓ AZ ELHASZNÁLT ELEMEK ELHELYEZÉSÉRŐL
A termékhez tartozó elem nyomokban ólmot tartalmaz.
Az áthúzott kerekes szemétgyűjtő tartály jelzi, hogy a használt elemeket nem szabad a háztartási szemétbe tenni. A használt
EU:
elemek számára egy elkülönített begyűjtési rendszert hoztak létre, ami lehetővé teszi a jogszabály rendelkezései szerint a
megfelelő kezelést és újrahasznosítást. Kérjük, vegye fel a kapcsolatot a helyi hatósággal a begyűjtés és újrahasznosítás
részleteivel kapcsolatban.
Svájc:
A használt elemeket az értékesítési helyre kell visszavinni.
Más nem uniós országok:
eljárásával kapcsolatban.
Kérjük, vegye fel a kapcsolatot a helyi hatósággal a használt elemek ártalmatlanításának helyes
XL-E2180H
XL-E2580H
viii
XL-E2180H
XL-E2580H
CZ - INFORMACE O LIKVIDACI POUŽITÉHO VYBAVENÍ
A. Informace o likvidaci pro uživatele (domácnosti)
1. V zemích Evropské unie
Upozornění: Toto zařízení nelikvidujte v běžných odpadkových koších!
Použíté elektické a elektronické vybavení je třeba likvidovat samostatně a v souladu s legislativou, která vyžaduje řádnou likvidaci,
obnovení a recyklaci použitého elektického a elektronického vybavení.
Na základě dohody členských států mohou domácnosti v zemích Evropské unie vracet použité elektrické a elektronické vybavení
v určených sběrnách zdarma*. V některých zemích* od vás může místní prodejce odebrat zdarma použitý výrobek, pokud
zakoupíte nový podobný.
*) Další podrobnosti vám sdělí orgány místní správy.
Upozornění: Váš výrobek je
označen tímto symbolem.
Znamená to, že je
zakázáno likvidovat použitý
elektický nebo elektronický
výrobek s běžným
domácímodpadem.
Pro tyto výrobky je
k dispozici samostatný
sběrný systém.
Pokud použité elektrické nebo elektronické vybavení obsahuje baterie nebo akumulátory, zlikvidujte je předem samostatně v
souladu s místními vyhláškami.
Řádnou likvidací toho výrobku pomáháte zajistit, že bude odpad vhodným způsobem zlikvidován, obnoven a recyklován a
zabráníte tak možnému poškození životního prostředí a zdraví obzvatel, ke kterému by mohlo dojít v případě nesprávné likvidace.
2. V ostatních zemích mimo Evropskou unii
Chcete-li tento výrobek zlikvidovat obrat’te se na místní orgány, které vás seznámí s vhodnou metodou likvidace.
B. Informace o likvidaci pro podnikatelské subjekty
1. V zemích Evropské unie
Chcete-li zlikvidovat výrobek, který je používán pro ponikatelské účely:
Obrat’te se na prodejce SHARP, který vás informuje o odebrání výrobku. Odebrání a recyklace mohou být zpoplatněny. Malé
výrobky (a malá množství) mohou odebírat místní sběrny odpadu.
2. V ostatních zemích mimo Evropskou unii
Chcete-li tento výrobek zlikvidovat obrat’te se na místní orgány, které vás seznámí s vhodnou metodou likvidace.
INFORMACE O LIKVIDACI BATERIÍ
Baterie připojená k výrobku může obsahovat stopové množství olova.
V zemích Evropské unie:
Pro vybité baterie existují zvláštní systémy sběru, které umožňují správné opětné použítí a recyklaci v souladu s platnými právními
předpisy.
Pro podrobnosti spojené se systémy sběru kontaktujte lokální úřady.
Ve Švýcarsku:
Země mimo Evropskou unii:
použíté baterie mohou být vráceny do prodejny.
Přeškrtnutá nádoba na odpad znamená, že použíté baterie nesmí být vyhozeny do domácí popelnice!
Pro podrobnosti spojené se správným způsobem zbavení se vybitých baterií kontaktuje lokální úřady.
ix
SK - INFORMÁCIE O LIKVIDÁCII POUŽITÉHO ZARIADENIA
A. Informácie o likvidácii pre používateľov (domácnosti)
1. V Európskej únii
Pozor: Ak chcete zlikvidovat’ toto zariadenie, nepoužívajte bežný kôš na odpadky!
Použité elektrické a elektronické zariadenia musia byt’ spracované oddelene a podľa platných zákonov, ktoré vyžadujú správne
zaobchádzanie, obnovu a recyklovanie použitých elektrických a elektronických zariadení.
Podľa implementácie v jednotlivých členských štátoch môžu domácnosti v štátoch EÚ vrátit’ použité elektrické a elektronické
zariadenia na určené zberné miesta bez poplatkov*. V niektorých štátoch* môžu vaše staré výrobky zdarma odobrat’ tiež miestni
maloobchodní predajcovia, ak si zakúpite podobný nový výrobok.
*) Ďalšie podrobnosti sa dozviete od vašich miestnych orgánov.
Pozor: Výrobok je
označený týmto symbolom.
Znamená to, že použité ele-
ktrické a elektronické
výrobky by sa nemali
miešat’ s bežným do-
movým odpadom. Pre tieto
výrobky existuje sa-
mostatný zberný systém.
Ak sa vo vašich použitých elektrických alebo elektronických zariadeniach nachádzajú batérie, zlikvidujte ich samostatne vopred,
podľa miestnych požiadaviek.
Správnou likvidáciou tohto výrobku pomôžete pri zabezpečení toho, aby odpad prešiel potrebnou úpravou, obnovou a recykláciou
a takto sa predchádzalo možným negatívnym vplyvom na životné prostredie a zdravie osôb, ku ktorým by inak mohlo dochádzat’
v dôsledku nevhodného zaobchádzania s odpadom.
2. V ostatných štátoch mimo EÚ
Ak si želáte znehodnotit’ tento výrobok, obrát’te sa na vaše miestne orgány a informujte sa o správnej metóde likvidácie.
B. Informácie o likvidácii pre komerčných používateľov
1. V Európskej únii
Ak sa výrobok používa na komerčné účely a chcete ho znehodnotit’:
Obrát’te sa na vášho predajcu SHARP, ktorý vás informuje o spätnom odobratí výrobku. Môžu vám byt’ účtované náklady
vyplývajúce zo spätného odobratia a recyklácie. Malé výrobky (a malé množstvá) môžu spätne odobrat’ vaše lokálne zberné
miesta.
2. V ostatných štátoch mimo EÚ
Ak si želáte znehodnotit’ tento výrobok, obrát’te sa na vaše miestne orgány a informujte sa o správnej metóde likvidácie.
INFORMÁCIE O LIKVIDÁCII BATÉRIE
Batéria dodávaná s výrobkom môže obsahovať stopové prvky a toxické kovy olovo.
V Európskej Únii:
Pre použité batérie je určený špeciálny systém separovaného zberu, ktorý zabezpečuje správnu obnovu a recyklovanie podľa
platných zákonov.
Podrobné informácie týkajúce sa systémov separovaného zberu Vám poskytnú miestne orgány.
V Švajčiarsku:
V ostatných štátoch mimo EÚ:
batérií, prosím, obráťte sa na Vaše miestne orgány.
Prečiarknutý odpa`dkový kôš znamená, že použité batérie by sa nemali miešať s bežným domovým odpadom.
Použité batérie môžete zadarmo vrátiť predajcovi.
V záujme získania podrobných informácií týkajúcich sa správnej metódy vyhadzovania použitých
XL-E2180H
XL-E2580H
x

XL-E2180H
XL-E2580H
GR - Πληροφορίες για σωστή απόρριψη
Α. Πληροφορίες απόρριψης για χρήστες (ιδιωτική οικιακή χρήση)
1. Στην Ευρωπαϊκή Ένωση
Προσοχή: Αν θέλετε να απορρίψετε αυτή
O χρησιμοποιημένος ηλεκτρικός και ηλεκτρονικός εξοπλισμός πρέπει να μεταχειρίζεται μεμονωμένα και σύμφωνα με τη νομοθεσία που
απαιτεί κατάλληλη μεταχείριση, αποκατάσταση και ανακύκλωση χρησιμοποιημένου ηλεκτρικού και ηλεκτρονικού εξοπλισμού.
Ακολουθώντας τις εφαρμογές των κρατών μελών, οι ιδιοκτήτες συσκευών ιδιωτικής, οικιακής χρήσης στα κράτη μέλη της
επιστρέφουν τον χρησιμοποιημένο ηλεκτρικό και ηλεκτρονικό εξοπλισμό τους σε ενδεδειγμένες εγκαταστάσεις συλλογής χωρίς
επιβάρυνση*. Σε κάποιες χώρες* ο τοπικός μεταπράτης μπορεί να παραλάβει το παλαιό σας προϊόν χωρίς επιβάρυνση αν αποκτήσετε ένα
παρόμοιο καινούργιο.
*) Παρακαλούμε να επικοινωνήσετε με τις τοπικές αρχές για περεταίρω λεπτομέρειες.
Αν ο χρησιμοποιημένος ηλεκτρικός ή
Προσοχή: Το προϊόν σας
είναι σημαδεμένο με αυτό το
σύμβολο. Αυτό σημαίνει ότι
χρησιμοποιημένα ηλεκτρικά
και ηλεκτρονικά προϊόντα δεν
πρέπει να αναμιχθούν με
κοινά οικιακά απορρίμματα.
Υπάρχει σύστημα ξεχωριστής
περισυλλογής για αυτά τα
προϊόντα.
νωρίτερα σύμφωνα με τις τοπικές απαιτήσεις.
Με τη σωστή απόρριψη αυτού του προϊόντος θα βοηθήσετε στην επιβεβαίωση ότι τα απόβλητα υποβάλλονται την απαραίτητη επεξεργασία,
αποκατάστασης και ανακύκλωσης και ότι έτσι αποφεύγονται εν δυνάμει αρνητικές επιδράσεις στο περιβάλλον και στην ανθρώπινη
μπορούν αλλιώς να προκληθούν εξαιτίας της ανάρμοστης μεταχείρισης αποβλήτων.
2.Σε άλλες χώρες εκτός ΕΕ
Αν θέλετε να απορρίψετε αυτό το προϊόν, παρακαλούμε να επικοινωνήσετε με τις τοπικές αρχές και να ρωτήσετε για τη σωστή μέθοδο
απόρριψης.
Β. Πληροφορίες απόρριψης για χρήστες (επαγγελματική χρήση)
1. Στην Ευρωπαϊκή Ένωση
Αν το προϊόν
Παρακαλούμε να επικοινωνήσετε με τον προμηθευτή σας που θα σας πληροφορήσει για την ανάληψη του προϊόντος. Μπορεί να χρεωθείτε για τα
έξοδα που θα προκύψουν από την ανάληψη και την ανακύκλωση. Μικρά προϊόντα (και μικρά ποσά) μπορούν να αναληφθούν από τοπικές
υπηρεσίες περισυλλογής. Για την Ισπανία: Παρακαλούμε επικοινωνήστε με το καθιερωμένο σύστημα
επιστροφή των χρησιμοποιημένων σας προϊόντων.
2. Σε άλλες χώρες εκτός ΕΕ
Αν επιθυμείτε να απορρίψετε αυτό το προϊόν, παρακαλώ επικοινωνήστε με τις τοπικές αρχές και ρωτήστε για τη σωστή μέθοδο απόρριψης.
χρησιμοποιείται για επαγγελματικούς σκοπούς και θέλετε να το απορρίψετε:
Πληροφορίες για την απόρριψη μπαταριών
Η μπαταρία που προμηθεύεστε με αυτό το προϊόν περιέχει ίχνη Μολύβδου.
Για την Ε.Ε (Ευρωπαϊκή Ένωση).:
μπαταρίες δεν πρέπει να απορριφθούν μαζί με τα υπόλοιπα οικιακά απορρίμματα! Υπάρχει ξεχωριστό σύστημα περισυλλογής για τις
χρησιμοποιημένες μπαταρίες, για να πραγματοποιηθεί η ανάλογη επεξεργασία και ανακύκλωση σύμφωνα με τη νομοθεσία. Παρακαλούμε
επικοινωνήστε με τις τοπικές αρχές για λεπτομέρειες περί του
Για την Ελβετία:
Για άλλες χώρες εκτός Ευρωπαϊκής Ένωσης:
χρησιμοποιημένων μπαταριών.
Η χρησιμοποιημένη μπαταρία πρέπει να επιστραφεί στον τόπο από τον οποίο την προμηθευτήκατε.
τη συσκευή παρακαλώ μη χρησιμοποιείτε κανονικούς κάδους απορριμμάτων.
ΕΕ μπορούν να
ηλεκτρονικός εξοπλισμός σας έχει μπαταρίες ή συσσωρευτές, παρακαλούμε να τα απορρίψετε
υγεία που
περισυλλογής ή τις τοπικές αρχές για την
Το σύμβολο του διαγραμμένου τροχοφόρου κάδου απορριμμάτων υποδεικνύει ότι οι χρησιμοποιημένες
προγράμματος περισυλλογής και ανακύκλωσης.
Παρακαλούμε επικοινωνήστε με τις τοπικές αρχές για τη σωστή μέθοδο απόρριψης των
xi
ENG - INFORMATION ON PROPER DISPOSAL
A. Information on Disposal for Users private households)
1. In the European Union
Attention: If you want to dispose of this equipment, please do not use the ordinary dustbin!
Used electrical and electronic equipment must be treated separately and in accordance with legislation that requires proper
treatment, recovery and recycling of used electrical and electronic equipment.
Following the implementation by member states, private households within the EU states may return their used electrical and
electronic equipment to designated collection facilities free of charge*. In some countries* your local retailer may also take back
your old product free of charge if you purchase a similar new one.
*) Please contact your local authority for further details.
Attention: Your product
is marked with this symbol.
It means that used electri-
cal and electronic products
should not be mixed with
general household waste.
There is a separate collec-
tion system for these
products.
If your used electrical or electronic equipment has batteries or accumulators, please dispose of these separately beforehand
according to local requirements.
By disposing of this product correctly you will help ensure that the waste undergoes the necessary treatment, recovery and
recycling and thus prevent potential negative effects on the environment and human health which could otherwise arise due to
inappropriate waste handling.
2. In other Countries outside the EU
If you wish to discard this product, please contact your local authorities and ask for the correct method of disposal.
B. Information on Disposal for Business Users
1. In the European Union
If the product is used for business purposes and you want to discard it:
Please contact your SHARP dealer who will inform you about the take-back of the product. You might be charged for the costs
arising from take-back and recycling. Small products (and small amounts) might be taken back by your local collection facilities.
2. In other Countries outside the EU
If you wish to discard of this product, please contact your local authorities and ask for the correct method of disposal.
INFORMATION ON BATTERY DISPOSAL
The battery supplied with this product contains traces of Lead.
The crossed-out wheeled bin implies that used batteries should not be put to the general household waste! There is a
For EU:
separate collection system for used batteries, to allow proper treatment and recycling in accordance with legislation. Please
contact your local authority for details on the collection and recycling schemes.
For Switzerland:
For other non-EU countries:
The used battery is to be returned to the selling point.
Please contact your local authority for correct method of disposal of the used battery.
XL-E2180H
XL-E2580H
xii
XL-E2180H
XL-E2580H
ENGLISH
Introduction
ENGLISH
Accessories
Thank you for purchasing this SHARP product. To obtain the best
performance from this product, please read this manual carefully. It
will guide you in operating your SHARP product.
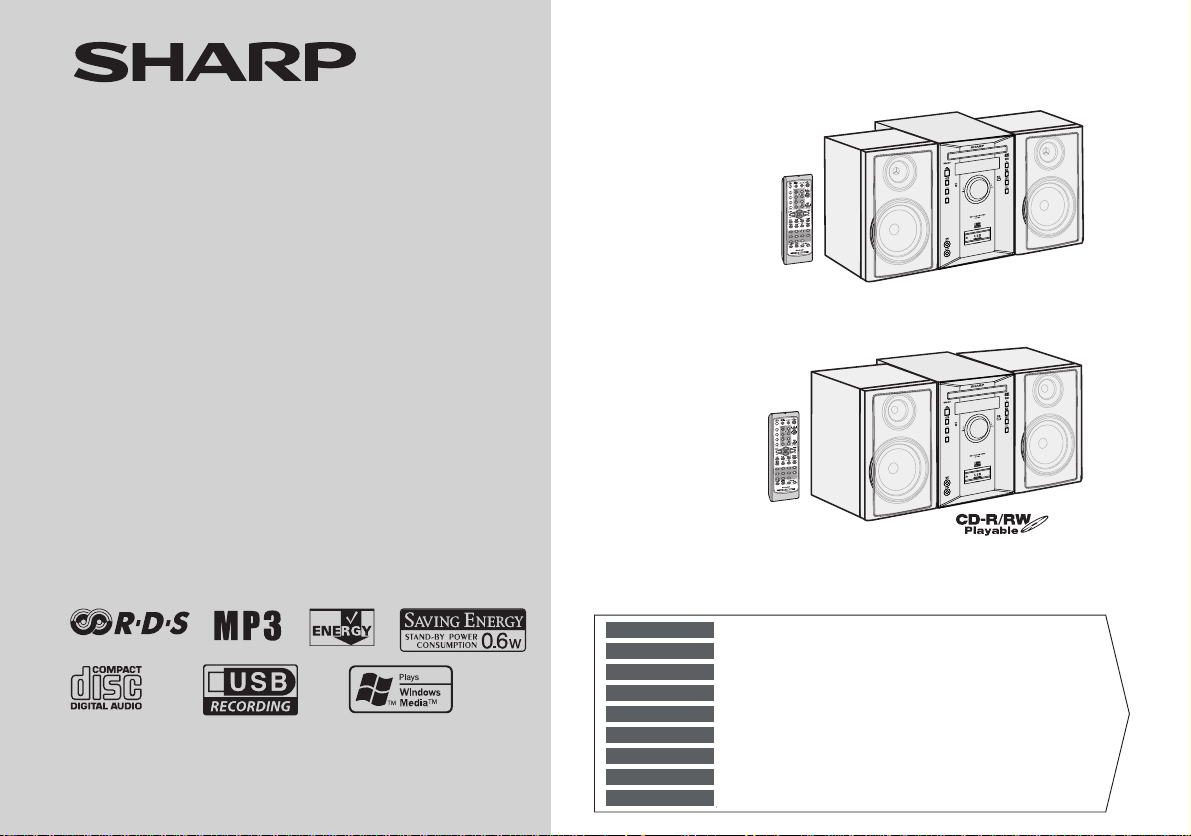
z XL-E2180H Micro Component System consisting of
XL-E2180H (main unit) and CP-UR2180H (speaker system).
z XL-E2580H Micro Component System consisting of
XL-E2580H (main unit) and CP-UR2580H (speaker system).
The illustrations printed in this operation manual are for the model
XL-E2180H.
Special Note
Supply of this product does not convey a license nor imply any right
to distribute content created with this product in revenue-generating
broadcast systems (terrestrial, satellite, cable and/or other
distribution channels), revenue-generating streaming applications
(via Internet, intranets and/or other networks), other revenue-
generating content distribution systems (pay-audio or audio-on-
demand applications and the like) or on revenue-generating physical
media (compact discs, digital versatile discs, semiconductor chips,
hard drives, memory cards and the like). An independent license for
such use is required. For details, please visit http://mp3licensing.com
General Information
MPEG Layer-3 audio coding technology licensed from Fraunhofer
IIS and Thomson.
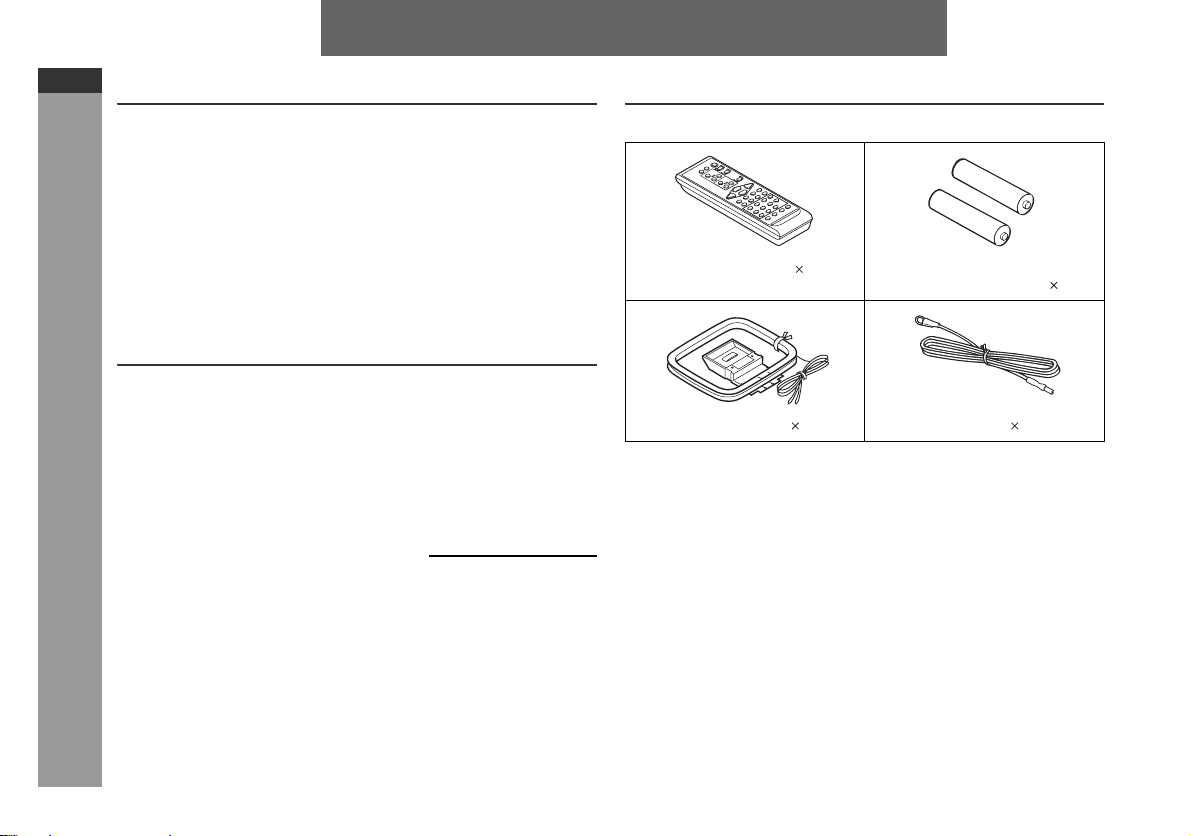
Please confirm that the following accessories are included.
Remote control 1 “AA” size battery (UM/SUM-3,
AM loop aerial 1 FM aerial 1
R6, HP-7 or similar) 2
E-1

Contents
Page
General Information
Precautions . . . . . . . . . . . . . . . . . . . . . . . . . . . . . . . . . . . . . . .2 - 3
Controls and indicators . . . . . . . . . . . . . . . . . . . . . . . . . . . . . .3 - 5
Preparation for Use
System connections . . . . . . . . . . . . . . . . . . . . . . . . . . . . . . . .6 - 8
Remote control . . . . . . . . . . . . . . . . . . . . . . . . . . . . . . . . . . . . . . . 9
Basic Operation
General control . . . . . . . . . . . . . . . . . . . . . . . . . . . . . . . . . . . . . 10
Setting the clock (Remote Control only) . . . . . . . . . . . . . . . . . 11
CD or MP3/WMA disc Playback
Listening to a CD or MP3/WMA disc . . . . . . . . . . . . . . . . .12 - 14
Advanced CD or MP3/WMA disc playback . . . . . . . . . . . .14 - 16
MP3/WMA folder mode (only for MP3/WMA files) . . . . . . .17 - 18
USB Memory Playback
Listening to USB mass storage device / MP3 Player . . . .19 - 20
To remove USB memory device . . . . . . . . . . . . . . . . . . . . . . . . 20
Advanced USB playback . . . . . . . . . . . . . . . . . . . . . . . . . . . . . . 21
Recording on USB Memory device . . . . . . . . . . . . . . . . . 22 - 23
Radio
Listening to the radio . . . . . . . . . . . . . . . . . . . . . . . . . . . . .24 - 25
Advanced Features
Using the Radio Data System (RDS) . . . . . . . . . . . . . . . . .26 - 30
Timer and sleep operation (Remote Control only) . . . . . .31 - 34
Enhancing your system . . . . . . . . . . . . . . . . . . . . . . . . . . .35 - 36
References
Troubleshooting chart . . . . . . . . . . . . . . . . . . . . . . . . . . . . .36 - 38
Maintenance . . . . . . . . . . . . . . . . . . . . . . . . . . . . . . . . . . . . . . . . 38
Specifications . . . . . . . . . . . . . . . . . . . . . . . . . . . . . . . . . . . .39 - 41
Precautions
General
z Please ensure that the equipment is positioned in a well-ventilated
area and ensure that there is at least 10 cm (4") of free space
along the sides, top and back of the equipment.
z Use the unit on a firm, level surface free from
vibration.
z Keep the unit away from direct sunlight,
strong magnetic fields, excessive dust,
humidity and electronic/electrical equipment (home computers, facsimiles, etc.)
which generate electrical noise.
z Do not place anything on top of the unit.
z Do not expose the unit to moisture, to temperatures higher than
60
°C (140°F) or to extremely low temperatures.
z If your system does not work properly, disconnect the AC power
lead from the wall socket. Plug the AC power lead back in, and
then turn on your system.
z In case of an electrical storm, unplug the
unit for safety.
XL-E2180H
XL-E2580H
ENGLISH
General Information
E-2
XL-E2180H
XL-E2580H
ENGLISH
General Information
E-3
Precautions (continued)
z Hold the AC power plug by the head when
removing it from the wall socket, as pulling the
lead can damage internal wires.
z
The AC power plug is used as a disconnect
device and shall always remain readily operable.
z Do not remove the outer cover, as this
may result in electric shock. Refer internal service to your local SHARP service
facility.
z The ventilation should not be impeded by
covering the ventilation openings with
items, such as newspapers, tablecloths,
curtains, etc.
z No naked flame sources, such as lighted candles, should be
placed on the apparatus.
z Attention should be drawn to the environmental aspects of battery
disposal.
z This unit should only be used within the range of 5°C - 35°C
(41°F - 95°F).
z The apparatus is designed for use in moderate climate.
Warning:
The voltage used must be the same as that specified on this unit.
Using this product with a higher voltage other than that which is
specified is dangerous and may result in a fire or other type of
accident causing damage. SHARP will not be held responsible for
any damage resulting from use of this unit with a voltage other than
that which is specified.
Volume control
The sound level at a given volume setting depends on speaker
efficiency, location, and various other factors. It is advisable to avoid
exposure to high volume levels. Do not turn the volume on to full at
switch on and listen to music at moderate levels. Excessive sound
pressure from earphones and headphones can cause hearing loss.
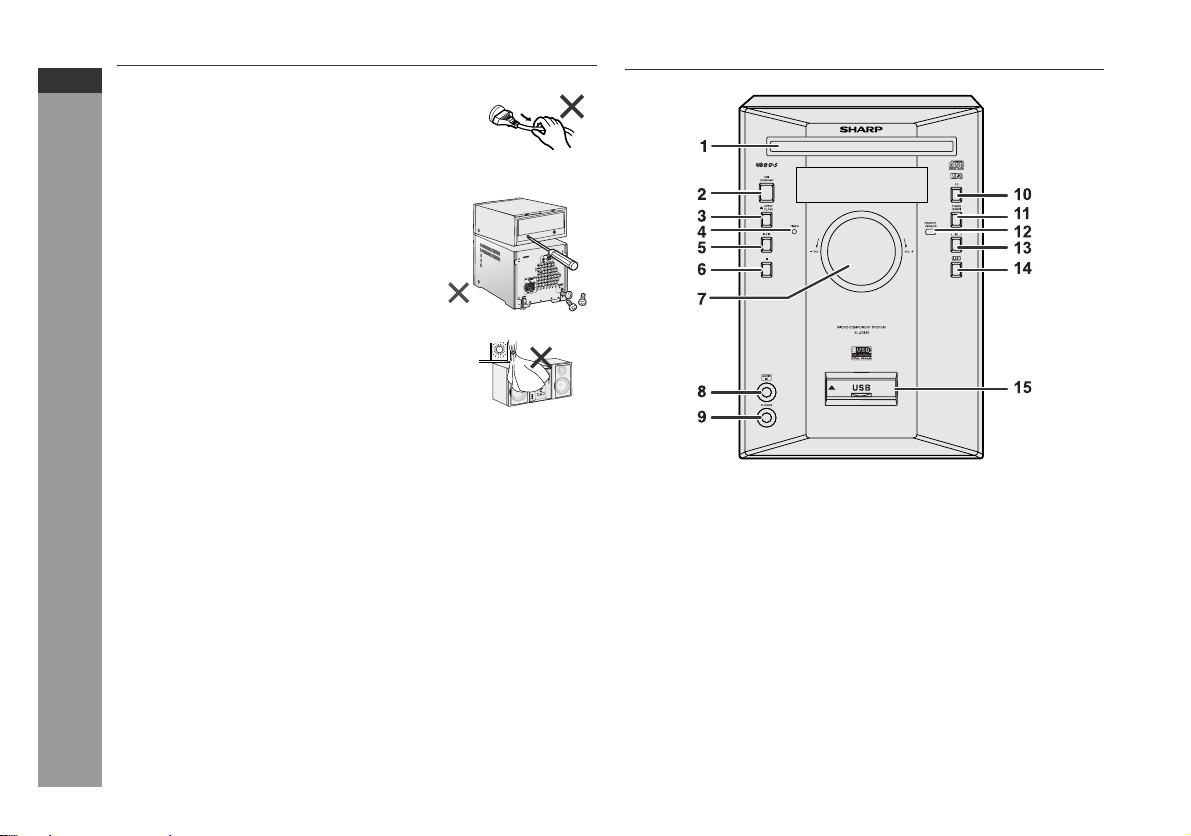
Controls and indicators
Front panel
Reference page
1. Disc Tray . . . . . . . . . . . . . . . . . . . . . . . . . . . . . . . . . . . . . . . . 13
2. ON/STAND-BY Button . . . . . . . . . . . . . . . . . . . . . . . . . . . . . 10
3. Tray Open/Close Button . . . . . . . . . . . . . . . . . . . . . . . . . . . 12
4. Timer Indicator . . . . . . . . . . . . . . . . . . . . . . . . . . . . . . . . . . . 32
5. Disc or USB Play or Pause Button . . . . . . . . . . . . . . . . . . . 14
6. Disc Stop Button . . . . . . . . . . . . . . . . . . . . . . . . . . . . . . 12, 14
7. Volume Control . . . . . . . . . . . . . . . . . . . . . . . . . . . . . . . . . . . 10
8. Audio In Socket . . . . . . . . . . . . . . . . . . . . . . . . . . . . . . . . . . 35
9. Headphone Socket . . . . . . . . . . . . . . . . . . . . . . . . . . . . . . . . 35
10. CD Button . . . . . . . . . . . . . . . . . . . . . . . . . . . . . . . . . . . . . . . 12
11. Tuner (Band) Button . . . . . . . . . . . . . . . . . . . . . . . . . . . 24, 26
12. Remote Sensor . . . . . . . . . . . . . . . . . . . . . . . . . . . . . . . . . . . . 9
13. AUDIO IN Button . . . . . . . . . . . . . . . . . . . . . . . . . . . . . . . . . . 35
14. USB Button . . . . . . . . . . . . . . . . . . . . . . . . . . . . . . . . . . . . . . 19
15. USB Terminal . . . . . . . . . . . . . . . . . . . . . . . . . . . . . . . . . . . . 19

1234 910
5 6 7 8
16 17
12 1314
11
18
19
15
3
4
5
1
6
2
Display
1. MP3/WMA Folder Indicator . . . . . . . . . . . . . . . . . . . . . . . . . 20
2. MP3/WMA Title Indicators . . . . . . . . . . . . . . . . . . . . . . . 18, 20
3. MP3 Indicator . . . . . . . . . . . . . . . . . . . . . . . . . . . . . . . . . 13, 19
4. WMA Indicator . . . . . . . . . . . . . . . . . . . . . . . . . . . . . . . . 13, 19
5. RDS Indicator . . . . . . . . . . . . . . . . . . . . . . . . . . . . . . . . . . . . 26
6. Traffic Announcement Indicator . . . . . . . . . . . . . . . . . . . . . 26
7. Dynamic PTY Indicator . . . . . . . . . . . . . . . . . . . . . . . . . . . . 26
8. Traffic Programme Indicator . . . . . . . . . . . . . . . . . . . . . . . . 26
9. Sleep Indicator . . . . . . . . . . . . . . . . . . . . . . . . . . . . . . . . . . . 34
10. Timer Play Indicator . . . . . . . . . . . . . . . . . . . . . . . . . . . . . . . 33
11. MP3/WMA Total Indicator . . . . . . . . . . . . . . . . . . . . . . . 13, 19
12. Daily Timer Indicator . . . . . . . . . . . . . . . . . . . . . . . . . . . . . . 33
13. FM Stereo Mode Indicator . . . . . . . . . . . . . . . . . . . . . . . . . . 24
14. FM Stereo Receiving Indicator . . . . . . . . . . . . . . . . . . . . . . 24
15. Memory Indicator . . . . . . . . . . . . . . . . . . . . . . . . . . . . . . 16, 25
16. Extra Bass Indicator . . . . . . . . . . . . . . . . . . . . . . . . . . . . . . 10
17. Disc or USB Repeat Play Indicator . . . . . . . . . . . . . . . . 15, 21
18. Disc or USB Pause Indicator . . . . . . . . . . . . . . . . . . . . . . . 14
19. Disc or USB Play Indicator . . . . . . . . . . . . . . . . . . . . . . 13, 20
Reference page
Rear panel
1. Speaker Terminals . . . . . . . . . . . . . . . . . . . . . . . . . . . . . . . . . 7
2. AC Power Lead . . . . . . . . . . . . . . . . . . . . . . . . . . . . . . . . . . . . 8
3. FM 75 Ohms Aerial Socket . . . . . . . . . . . . . . . . . . . . . . . . . . 7
4. AM Aerial Earth Terminal . . . . . . . . . . . . . . . . . . . . . . . . . . . 7
5. AM Loop Aerial Terminal . . . . . . . . . . . . . . . . . . . . . . . . . . . 7
6. Subwoofer Pre-output Socket . . . . . . . . . . . . . . . . . . . . . . 36
Reference page
Speaker system
1. Tweeter
2. Woofer
3. Bass Reflex Duct
4. Speaker Wire
1
3
2
XL-E2180H
XL-E2580H
ENGLISH
General Information
4
E-4

4
2
3
5
6
7
0
1
2
XL-E2180H
XL-E2580H
ENGLISH
General Information
Controls and indicators (continued)
1
8
15
9
10
16
17
11
18
19
23
12
13
14
25
27 28 29
24
26
Remote control
1. Remote Control Transmitter . . . . . . . . . . . . . . . . . . . . . . . . . 9
2. USB Recording Enter Button . . . . . . . . . . . . . . . . . . . . 22, 23
3. USB Recording Mode Button . . . . . . . . . . . . . . . . . . . . 22, 23
4. Clock/Timer Button . . . . . . . . . . . . . . . . . . . . . . . . . 11, 31, 34
5. Direct Search Buttons . . . . . . . . . . . . . . . . . . . . . . . . . . . . . 14
6. Equaliser Mode Select Button . . . . . . . . . . . . . . . . . . . . . . . 10
7. Extra Bass/Demo Button . . . . . . . . . . . . . . . . . . . . . . . . . 8, 10
2
2
2
8. On/Stand-by Button . . . . . . . . . . . . . . . . . . . . . . . . . . . . . . . 10
9. CD Button . . . . . . . . . . . . . . . . . . . . . . . . . . . . . . . . . . . . . . . 12
10. Tuner (Band) Button . . . . . . . . . . . . . . . . . . . . . . . . . . . 24, 26
11. AUDIO IN/USB Button . . . . . . . . . . . . . . . . . . . . . . . . . . 19, 35
12. MP3/WMA Folder Button . . . . . . . . . . . . . . . . . . . . . . . . . . . 17
13. MP3/WMA Display Button. . . . . . . . . . . . . . . . . . . . . . . . . . . 19
14. Volume Up and Down Buttons . . . . . . . . . . . . . . . . . . . . . . 10
15. Clear/Dimmer Button . . . . . . . . . . . . . . . . . . . . . . . . . . . 10, 16
16. Play Mode Button . . . . . . . . . . . . . . . . . . . . . . . . . . . . . . . . . 12
17. Disc Stop Button . . . . . . . . . . . . . . . . . . . . . . . . . . . . . . . . . 14
18. USB Recording Button . . . . . . . . . . . . . . . . . . . . . . . . . 22, 23
19. USB Stop Button . . . . . . . . . . . . . . . . . . . . . . . . . . . . . . . . . 19
20. Memory Button . . . . . . . . . . . . . . . . . . . . . . . 11, 16, 25, 31, 34
21. Disc Play or Pause Button . . . . . . . . . . . . . . . . . . . . . . 14, 15
22. USB Play or Pause Button . . . . . . . . . . . . . . . . . . . . . . . 20, 21
23. Tuning Up Button, Folder Up Buttom . . . . . . . . . . . . . . 19, 24
24. Track Up or Fast Forward,
Tuner Preset Up, Time Up Button . . . . . . . . 11, 14, 19, 25, 31
25. Track Down or Fast Reverse,
Tuner Preset Down, Time Down Button . . . 11, 14, 19, 25, 31
26. Tuning Down Button, Folder Down Button . . . . . . . . . 19, 24
27. RDS ASPM Button . . . . . . . . . . . . . . . . . . . . . . . . . . . . . . . . 26
28. RDS PTY Button . . . . . . . . . . . . . . . . . . . . . . . . . . . . . . . . . . 26
29. RDS Display Button . . . . . . . . . . . . . . . . . . . . . . . . . . . . . . . 26
Reference page
E-5

System connections
Make sure to unplug the AC power lead before making any connections.
Aerial connection (see page 7)
XL-E2180H
XL-E2580H
ENGLISH
Right speaker
Speaker connection
(see page 7)
FM aerial
AM loop aerial
Left speaker
Preparation for Use
Wall socket
(AC 220 - 240 V ~ 50 Hz)
AC power connection (see page 8)
E-6

XL-E2180H
XL-E2580H
ENGLISH
Preparation for Use
System connections (continued)
Aerial connection
Supplied FM aerial:
Connect the FM aerial wire to the FM 75 OHMS socket and position
the FM aerial wire in the direction where the strongest signal can be
received.
Supplied AM loop aerial:
Connect the AM loop aerial to the AM and Earth (GND) terminals.
Position the AM loop aerial for optimum reception. Place the AM loop
aerial on
supplied).
Note:
Placing the aerial on the unit or near the AC power lead may cause
noise pickup. Place the aerial away from the unit for better reception.
Installing the AM loop aerial:
< Assembling > < Attaching to the wall >
a shelf, etc., or attach it to a stand or a wall with screws (not
Speaker connection
Connect the black wire to the minus (-) terminal, and the red wire to
the plus (+) terminal.
SPEAKERS
RATED SPEAKER IMPEDANCE:
4 OHMS MIN.
LEFT
RIGHT
BlackRed
Caution:
z Use speakers with an impedance of 4 ohms or more, as lower
impedance speakers can damage the unit.
z Do not mistake the right and the left
channels. The right speaker is the one on the
right side when you face the unit.
z Do not let the bare speaker wires touch
each other.
z Do not allow any objects to fall into or to be
placed in the bass reflex ducts.
z Do not stand or sit on the speakers. You may
be injured.
SPEAKERS
RATED SPEAKER IMPEDANCE:
4 OHMS MIN.
LEFT
RIGHT
Incorrect
Speaker grilles are removable
Make sure nothing comes into contact
with the speaker diaphragm when you
remove the speaker grilles.
E-7
Wall Screws (not supplied)

AC power connection
After checking all the connections have been made correctly, plug
the AC power lead of this unit into the wall socket. If you plug in the
unit first, the unit will enter the demonstration mode.
Wall socket
(AC 220 - 240 V ~ 50 Hz)
Note:
z Unplug the AC power lead from the wall socket if the unit will not
be in use for a prolonged period of time.
Demonstration mode
The first time the unit is plugged in, the
unit will enter the demonstration mode.
You will see words scroll.
To cancel the demonstration mode:
When the unit is in the power standby mode (demonstration mode),
press the X-BASS/DEMO button on
the remote control. The unit will
enter the low power consumption
mode.
To return to the demonstration mode:
When the unit is in the power stand-by mode, press the X-BASS/
DEMO button on the remote control again.
Note:
When the power is on, the X-BASS/DEMO button can be used to
select the extra bass mode.
External FM aerial
Use an external FM aerial if you require better reception.
Consult your dealer.
External FM aerial
XL-E2180H
XL-E2580H
ENGLISH
Preparation for Use
75 ohms
coaxial cable
Note:
When an external FM aerial is used, disconnect the supplied FM
aerial wire.
E-8

XL-E2180H
XL-E2580H
ENGLISH
Preparation for Use
Remote control
Battery installation
1 Open the battery cover.
2 Insert the supplied batteries according to the direction
indicated in the battery compartment.
When inserting or removing the batteries, push them towards the
battery terminals.
3 Close the cover.
Precautions for battery use:
z Replace all old batteries with new ones at the same time.
z Do not mix old and new batteries.
z Remove the batteries if the unit will not be used for long periods
of time. This will prevent potential damage due to battery leakage.
Caution:
z Do not use rechargeable batteries (nickel-cadmium battery, etc.).
z Installing the batteries incorrectly may cause the unit to
malfunction.
z Batteries (battery pack or batteries installed) shall not be exposed
to excessive heat such as sunshine, fire or the like.
Battery removal:
Open the battery cover and pull up the battery to take out.
Notes concerning use:
z Replace the batteries if the operating distance is reduced or if the
operation becomes erratic. Purchase 2 “AA” size batteries (UM/
SUM-3, R6, HP-7 or similar).
z Periodically clean the transmitter on the remote control and the
sensor on the unit with a soft cloth.
z Exposing the sensor on the unit to strong light may interfere with
operation. Change the lighting or the direction of the unit if this
occurs.
z Keep the remote control away from moisture, heat, shock, and
vibrations.
Test of the remote control
Check the remote control after checking all the connections (see
pages 6 - 8).
Point the remote control directly at the remote sensor on the unit.
The remote control can be used within the range shown below:
Press the ON/STAND-BY button. Does the power turn on? Now, you
can enjoy the music.
E-9

General control
d.
To turn the power on
Press the ON/STAND-BY button to turn the power on.
After use:
Press the ON/STAND-BY button to enter the power stand-by mode.
Illumination light control
When the power is turned on, the ring around the volume control
lights up. To turn on/off the light, hold down the CLEAR/DIMMER
button on the remote control for more than 2 seconds.
Volume auto fade-in
If you turn off and on the main unit with the volume set to 27 or
higher, the volume starts at 16 and fades in to the last set level.
Volume control
Main unit operation:
When the VOLUME control is turned clockwise, the volume will
increase. When it is turned anti-clockwise, the volume will decrease.
Remote control operation:
Press the VOLUME (+ or -) button to increase or decrease the volume.
.....
30 MAXIMUM0
Bass control
When the power is first turned on, the unit will enter the extra bass
mode which emphasises the bass frequencies, and “X-BASS” will
appear. To cancel the extra
button on the remote control
bass mode, press the X-BASS/DEMO
.
Equaliser
When the EQUALIZER MODE button on the remote control is
pressed, the current mode setting will be displayed. To change to a
different mode, press the EQUALIZER MODE button repeatedly
until the desired sound mode appears.
FLAT
ROCK
CLASSIC
POPS
VOCAL
JAZZ
Equalizer off.
For rock music.
For classical music.
For pop music.
Vocals are enhance
For jazz.
XL-E2180H
XL-E2580H
ENGLISH
Basic Operation
E-10

XL-E2180H
XL-E2580H
ENGLISH
Setting the clock (Remote Control only)
5 Press the or button to adjust the hour and then
press the MEMORY button.
Press the or button once to advance the time by 1 hour.
Hold it down to advance continuously.
6 Press the or button to adjust the minutes and then
press the MEMORY button.
E-11
In this example, the clock is set for the 24-hour (0:00) display.
1 Press the ON/STAND-BY button to turn the power on.
2 Press the CLOCK/TIMER button.
3 Within 10 seconds, press the or button to select
“CLOCK”, and then press the MEMORY button.
Basic Operation
4 Press the or button to select 24-hour or 12-hour
display and then press the MEMORY button.
“0:00”
“AM 12:00”
“AM 0:00”
(AM 0:00 - PM 11:59)
The 24-hour display will appear.
(0:00 - 23:59)
The 12-hour display will appear.
(AM 12:00 - PM 11:59)
The 12-hour display will appear.
Press the or button once to advance the time by 1
minute. Hold it down to change the time in 5-minute intervals.
To confirm the time display:
[When the unit is in the stand-by mode]
Press the CLOCK/TIMER button.
The time display will appear for about 10 seconds.
[When the power is on]
Press the CLOCK/TIMER button.
Within 10 seconds, press the or button to display the time.
The time display will appear for about 10 seconds.
Note:
The “CLOCK” will appear or time will flash to confirm the time
display when the AC power supply is restored after a power failure
or unplugging the unit. If incorrect, readjust the clock as follows.
To readjust the clock:
Perform “Setting the clock” from step 1. If the “CLOCK” does not
appear in step 3, step 4 (for selecting the 24-hour or 12-hour
display) will be skipped.
To change the 24-hour or 12-hour display:
1 Clear all the programmed contents. [Refer to “Factory Reset,
Clearing All Memory” on page 37 for details.]
2 Perform “Setting the clock” from step 1 onwards.

Listening to a CD or MP3/WMA disc
This system can play back a standard CD, CD-R/RW in the CD
format and CD-R/RW with MP3 or WMA files, but cannot record on
them.
Some audio CD-R and CD-RW discs may not be playable due
to the state of the disc or the device that was used for recording.
MP3:
MP3 is a form of compression. It is an acronym which stands
for MPEG Audio Layer 3.
MP3 is a type of audio code which is processed by significant
compression from the original audio source with very little loss
in sound quality.
z This system supports MPEG 1 Layer 3, MPEG 2 Layer 3, and
VBR files.
z During VBR file playback, time counter in the display may differ
from its actual playback time.
z Bitrate which is supported by MP3 is 32 ~ 320 kbps.
WMA:
WMA files are Advanced System Format files that include audio
files which are compressed with Windows Media Audio codec.
WMA is developed by Microsoft as an audio format file for Windows Media Player.
z “MP3” and “WMA” indicator will light up after the unit reads
information on an MP3 or WMA disc.
z Bitrate which is supported by WMA is 64 ~ 160 kbps.
Auto power on function:
When you press any of the following buttons, the unit turns on.
z CD button (main unit and remote control): The unit turns on and
the “CD” function is activated.
z CD / button on the remote control: The unit turns on and CD
playback starts (regardless of the last function).
z / button on the main unit: The unit turns on and playback of
the last function starts (CD, TUNER, AUDIO IN, USB).
MICRO COMPONENT SYSTEM
XL-E2180
XL-E2180H
XL-E2580H
ENGLISH
CD or MP3/WMA disc Playback
Auto power off function:
In the stop mode of CD, MP3 or WMA operation, the main unit enters
the stand-by mode after 15 minutes of inactivity.
E-12

XL-E2180H
T
t
or
XL-E2580H
ENGLISH
Listening to a CD or MP3/WMA disc (continued)
1 Press the ON/STAND-BY button to turn the power on.
2 Press the CD button.
3 Press the OPEN/CLOSE button to open the disc tray.
4 Place the disc on the disc tray, label side up.
Be sure to place 8 cm (3" ) disc in the middle of the disc tray.
12 cm (5")
8 cm (3")
5 Press the OPEN/CLOSE button to close the disc tray.
MP3 indicator
[CD]
TOTAL indicator
[MP3/WMA]
WMA indicat
To remove the discs:
In the stop mode, press the OPEN/CLOSE button.
Caution:
z Do not place two discs in one disc tray.
z Do not play discs of special shapes (heart, octagon, etc).
It may cause malfunctions.
z Do not push the disc tray while it is moving.
z If the power fails while the tray is open, wait until the power is
restored.
z If TV or radio interference occurs during CD operation, move the
unit away from the TV or radio.
otal number of
racks on the disc
z Due to the structure of the disc information, it takes longer to
CD or MP3/WMA disc Playback
read an MP3/WMA disc than a normal CD (approximately 20
to 90 seconds).
Total playing
time of the disc
Total number
of files
6 Press the / button to start playback.
Disc play indicator
z After the last track is played, the unit will stop automatically.
E-13

Various disc functions
Function Main unit Remote
Play Press in the stop mode.
Stop Press in the playback
Pause Press in the playback
Track up/
Track down
Fast
forward/
Fast
reverse
Notes for CD or MP3/WMA disc:
z When the end of the last track is reached during fast forward,
“END” will appear on the display and CD operation will be
paused. When the beginning of the first track is reached during
fast reverse, the unit will enter the playback mode.
z Rewritable multi-session discs with unfinished writing, can still be
played.
control
Operation
mode.
mode. Press the /
button to resume playback
from the paused point.
Press in the playback or
stop mode.
If you press the button in
the stop mode, press the
/ button to start the
desired track.
Press and hold down in
the playback mode.
Release the button to
resume playback.
Advanced CD or MP3/WMA disc playback
Direct track search
By using the direct search buttons, the desired tracks on the current
disc can be played.
Use the direct search buttons on
the remote control to select the
desired track while playing the
selected disc.
Selected track number
z The direct search buttons allow you to select up to number 9.
z When selecting number 10 or higher, use the “+10” button.
A. For example, to choose 13
1 Press the “+10” button once.
2 Press the “1” button.
3 Press the “3” button.
B. For example, to choose 130
1 Press the “+10” button twice.
2 Press the “1” button.
3 Press the “3” button.
4 Press the “0” button.
Notes:
z A track number higher than the number of tracks on the disc
cannot be selected.
z During random play, direct search is not possible.
To stop playback:
Press the (CD ) button.
XL-E2180H
XL-E2580H
ENGLISH
CD or MP3/WMA disc Playback
E-14

XL-E2180H
XL-E2580H
ENGLISH
Advanced CD or MP3/WMA disc playback (continued)
Repeat play
Repeat play can play one track, all tracks or a programmed
sequence continuously.
To repeat one track:
Press the PLAY MODE button once.
Press the / button.
To repeat all tracks:
Press the PLAY MODE button twice.
Press the / button.
To repeat desired tracks:
Perform steps 1 - 6 in “Programmed play” section on page 16 and
then press the PLAY MODE button once.
Press the / button.
To cancel repeat play:
Press the PLAY MODE button again until “ ” disappears.
CD or MP3/WMA disc Playback
Random play
The tracks on the disc can be played in random order automatically.
To random play all tracks:
Press and hold down PLAY MODE button on the remote control.
Press the / button.
To cancel random play:
Press the PLAY MODE button.
“R” will disappear.
Notes:
z If you press the button during random play, you can move to
the track selected next by the random operation. On the other
hand, the button does not allow you to move to the previous
track. The beginning of the trackbeing played will be located.
z In random play, the unit will select and play tracks automatically.
(You cannot select the order of the tracks.)
Caution:
After performing repeat or random play, be sure to press the
(CD ) button. Otherwise, the disc will play continuously.
E-15

Programmed play
You can choose up to 32 selections for playback in the order you like.
1 While in the stop mode, press the
MEMORY button on the remote
control to enter the programming
save mode.
2 Press the direct search buttons
on the remote control to select
the desired track.
Selected track number
You can also select a track by pressing the or button.
3 Press the MEMORY button to
save the track number.
4 Repeat steps 2 - 3 for other tracks. Up to 32 tracks can be
programmed.
If you make a mistake, the programmed tracks can be cleared
by pressing the CLEAR/DIMMER button.
5 Press the (CD ) button.
The total number in memory will
appear.
6 Press the / button to start playback.
To clear the programmed selections:
Press the CLEAR/DIMMER button on the
remote control while the “MEMORY” indicator
is flashing.
Each time the button is pressed, one track will
be cleared, beginning with the last track
programmed.
To cancel the programmed play mode:
While in the stop mode and the “MEMORY” indicator is lit, press the
CLEAR/DIMMER button on the remote control. The “MEMORY”
indicator will disappear and all the programmed contents will be
cleared.
Adding tracks to the programme:
If a programme has been previously stored, the “MEMORY” indicator
will be displayed. Then follow steps 1 - 6 to add tracks. The new
tracks will be stored after the last track of the previous program.
To check which tracks are programmed:
While the unit is stopped in the programmed play mode, press the
or button.
MP3/WMA Folder programmed:
Only tracks in the same folder can be select. Select which folder to
be programmed before entering program mode. (refer page 17 to
select folder)
Notes:
z When a disc is ejected, the program is automatically cancelled.
z Even if you press the ON/STAND-BY button to enter the stand-by
mode or change the function from CD to another, the programmed
selections will not be cleared.
z During the program operation, random play is not possible.
XL-E2180H
XL-E2580H
ENGLISH
CD or MP3/WMA disc Playback
E-16

R
(
0
XL-E2180H
XL-E2580H
ENGLISH
MP3/WMA folder mode (only for MP3/WMA files)
To playback MP3/WMA (Windows Media Audio) file
There are many music sites on the internet that you can download
MP3/WMA (Windows Media Audio) music files. Follow the
instructions from the website on how to download the music files.
You can then playback these downloaded music files by burning
them to a CD-R/RW disc or by connecting a USB Memory Player
device.
z Your downloaded song/files are for personal use only. Any other
usage of the song without owner’s permission, is against the law.
About folder playback order
If MP3/WMA files are recorded in several folders, a folder number will
be set to each folder automatically.
These folders can be selected by the FOLDER button on the remote
control. If there is no supported file formats inside the selected folder,
the folder is skipped and the next folder will be selected.
Example: How to set folder number if MP3/WMA format files are
recorded as below figure.
1. ROOT folder is set as folder 1.
2. As for folders inside ROOT folder (Folder A and Folder B), the
folder which is recorded earlier on the disc will be set as folder 2
and folder 3.
3. As for folder inside Folder A (Folder C and Folder D), the folder
which is recorded earlier on the disc will be set as folder 4 and
folder 5.
4. Folder E that is inside Folder D will be set as folder 6.
z The folder and file order information which is recorded on the disc
CD or MP3/WMA disc Playback
depends on the writing software. There maybe possibilities that
this unit will playback the files not according to our expected
playback order.
z For CD MP3/WMA, 512 numbers of folders and files inclusives of
the folders which have non playable files can be read.
Folder mode on/off can be operated by the FOLDER button on the
remote control. Files that are played when folder mode is set to the
on position, may differ from those played back when folder mode is
turned off.
Folder Mode Off case:
All the files starting from the selected file will be played back. If file 3
inside Folder C is selected, all the files starting from file 3 will be
played back until file 10 of Folder E.
Folder Mode On case:
All the files inside the selected folder will be played back.
In case Folder D is selected, file 6, 7 and 8 will be played back. File
9 and 10 in Folder E will not be played back.
OOT
FOLDER 1)
FOLDER A
(FOLDER 2)
FOLDER C
(FOLDER 4)
FOLDER D
(FOLDER 5)
FILE 3
FILE 4
FILE 5
FILE 6
FILE 7
FILE 8
FOLDER E
(FOLDER 6)
FILE 9
FILE 1
E-17
FOLDER B
(FOLDER 3)
FILE 1
FILE 2

Procedure to play back MP3/WMA disc with
s
3
folder mode on
To play back CD-R/RW.
1 Press the CD button, and load an MP3/WMA disc.
z After disc is loaded, disc info will be displayed.
MP3 indicator
WMA indicator
Disc Name
TOTAL indicator
4
Press the
Playback will start and file name will be displayed.
z Title, Artist & Album name are displayed if they are recorded on
the disc.
z Display content can be changed by pressing the DISPLAY
button.
File Name Display Title Display
/ (CD
/
) button.
TITLE-1 Indicator
XL-E2180H
XL-E2580H
ENGLISH
Total number of file
2 Press the FOLDER button, and press the TUNING ( or )
button to select desired playback folder. (Folder mode on)
FOLDER indicator
FOLDER number
Total files in Folder
3 Select desired file to be played back by pressing the or
button.
Function Display Artist Display
( )
Clock Display Album Display
In case of playback with the folder mode on, press the TUNING (
or ) button, and the folder can be selected even though it is in
playback/pause mode.
It will continue playback/pause mode in the 1st track of the selected
folder.
( ) Only appears when clock is already set.
Note:
z If “NO SUPPORT” is displayed, it means “Copyright protected
WMA file” or “Not supported playback file” is selected.
TITLE-2 Indicator
TITLE-3 Indicator
CD or MP3/WMA disc Playback
E-18

XL-E2180H
s
TITLE-1 Indicator
s
XL-E2580H
ENGLISH
Listening to USB mass storage device / MP3 Player
3
AUDIO
IN
Press the
Playback will start and the file name will be displayed.
z Title, Artist & Album name are displayed if they are recorded in
the USB memory device.
z
Display content can be changed by pressing the DISPLAY button.
File Name Display Title Display
/ (USB /
) button.
Note:
This product is not compatible with MTP and AAC file systems.
To play back USB/MP3 Player with Folder mode off
1 Press the USB button, and lift up the USB door. Connect
the USB Memory device that has MP3/WMA format files on
the unit.
USB Memory Playback
When the USB memory is connected to the main unit, the
device information will be displayed.
Volume ID
2 Select desired file to be played back by pressing the or
button.
E-19
MP3 indicator
WMA indicator
TOTAL indicator
Total number of file
Function Display Artist Display
( )
Clock Display Album Display
( ) Only appears when clock is already set.
Note:
To pause playback:
Press the
Auto power off function:
In the stop mode of USB operation, the main unit enters the stand-by
mode after 15 minutes of inactivity.
USB / button.
To play back USB/MP3 Player with Folder mode on
TITLE-2 Indicator
TITLE-3 Indicator
1 Press the USB button, and push up the USB door. Connect
the USB Memory device that has MP3/WMA format files on
the unit.
When the USB memory is connected to the main unit, the
device information will be displayed.
MP3 indicator
Volume ID
WMA indicator
TOTAL indicator
Total number of file

2 Press the FOLDER button, and press the TUNING ( or )
FOLDER indicator
2
TITLE-1 Indicator
z To start playback with folder
z To change the playback folder, press the TUNING ( or )
3 Select desired file to be played back by pressing the or
4
z Title, Artist & Album name are displayed if they are recorded in
z
Note:
To pause playback:
Press the
Auto power off function:
In the stop mode of USB operation, the main unit enters the stand-by
mode after 15 minutes of inactivity.
button to select desired playback folder.
FOLDER number
mode on
button to select another folder.
button.
Press the
Playback will start and the file name will be displayed.
the USB memory device.
Display content can be changed by pressing the DISPLAY button.
File Name Display Title Display
Function Display Artist Display
( )
Clock Display Album Display
( ) Only appears when clock is already set.
/ (USB /
USB / button.
) button.
Total files in Folder
, go to step 4.
(
( TITLE-2 Indicator
( TITLE-3 Indicator
To remove USB memory device
1 Press the USB button to stop playback. Then press the
USB button again and wait until “UNPLUG OK” is
displayed.
Always remove the USB memory device after “UNPLUG OK” appears
on the display. Improper removal of the USB memory device may
cause irregularities such as continuous appearance of “READING
FILES”. Should this happen, turn off the unit and then turn it on again.
2 Disconnect USB memory device from the USB terminal.
Notes:
z
SHARP will not be held liable for the loss of data whilst the USB memory
device is connected to the audio system.
z
Files compressed in MP3 and / or WMA format can be played back
when connected to the USB terminal.
z
This USB memory’s format supports FAT 16 or FAT 32.
z
SHARP cannot guarantee that all USB memory devices will work on
this audio system.
z
USB cable is not recommended for use in this audio system to connect
to USB memory device. Use of the USB cable will affect the
performance of this audio system.
z
This USB memory cannot be operated via USB hub.
z
The USB terminal in this unit is not intended for a PC connection but is
used for music streaming with a USB memory device.
z
External HDD-storage cannot be played back via USB terminal.
z
If the data inside the USB memory is large, it may take longer time for
the data to be read.
z
This product can play WMA and MP3 files. It will automatically detect
the file type being played. If unplayable file is played on this product,
“NO SUPPORT” is indicated and the file will be automatically skipped.
This will take a few seconds. If abnormal indications appear on the display due to the unspecified file, turn off the unit and then turn it on again.
z
This product relates to USB mass storage devices and MP3 players.It may
however face some irregularities due to various unforeseen reasons from
some devices. Should this happen, turn off the unit and then turn it on again.
z
The USB port is only intended for direct connection to a USB memory
device without any cable.
XL-E2180H
XL-E2580H
ENGLISH
USB Memory Playback
E-20

XL-E2180H
XL-E2580H
ENGLISH
Advanced USB playback
Repeat play
Repeat play can play all tracks sequence continuously.
To repeat all tracks:
Press the PLAY MODE button once.
To cancel repeat play:
Press the PLAY MODE button again until “ ” will disappear.
Random play
The tracks can be played in random order automatically.
To random play all tracks:
Press and hold down PLAY MODE button on the remote control.
To cancel random play:
Press the PLAY MODE button. “R” will disappear.
Notes:
z If you press the button during random play, you can move to
the track selected next by the random operation. However, the
button does not allow you to move to the previous track. It will go
to the beginning of the current track instead.
z In random play, the unit will select and play tracks automatically.
USB Memory Playback
(You cannot select the order of the tracks.)
Note:
( ) When folder mode is on, the selected play mode can be used for
the files in the selected folder only.
Notes:
z This unit only supports “MPEG-1 Audio Layer-3” format.
(Sampling Frequency is 32, 44.1, 48kHz)
“MPEG-2 Audio Layer-3” , “MPEG-2.5 Audio Layer-3” and MP1,
MP2 format are not supported.
z Programme playback for USB memory is not available.
z Playback order for MP3 files may differ depending on the writing
software used during file download.
z Bitrate which is supported by MP3 is 32~320 kbps, WMA is
E-21
64~160 kbps.
z For MP3/WMA files, please put “.MP3” “.WMA” extension. Files
cannot be played back if there is no MP3/WMA extension.
z Playlists are not supported on this unit.
z This unit can display Folder Name or File Name up to 32 charac-
ters.
z Maximum total number of MP3/WMA files is 65280. Maximum
total number of folders is 255 inclusive of root directory. Folders
with non playable files are also counted.
z The display playback time may not be displayed correctly when
playing back a variable bitrate file.
z Time display cannot be changed by the DISPLAY button.
z The ID3TAG information supported are TITLE, ARTIST and
ALBUM only.
z Title name, artist name and album name can be displayed by
pressing the DISPLAY button during file playback or pause mode.
z WMA meta tag also supports title, artist and album name which
are recorded in WMA files.
z Copyright protected WMA files cannot be played back.
File Erase
1. At USB STOP condition, press or key to select the desired
MP3 or WMA file to be erased.
2. Press MODE key, and the display will show “ERASE” menu.
3. Within 10 seconds press ENTER key. “ERASE?” will be displayed.
To cancel file erase operation, press USB STOP key.
4. Press ENTER key again to confirm the file erase selection. “FILE
ERASE” will be displayed.
5. “COMPLETE” will be displayed for a few seconds once erasing
process is finished.
Folder Erase
1. At USB STOP condition (Folder mode on), press TUNING ( or
) key to select the desired folder to be erased.
2. Press MODE key, and the display will show “ERASE” menu.
3. Within 10 seconds press ENTER key. “ERASE?” will be displayed.
To cancel folder erase operation, press USB STOP key.
4. Press ENTER key again to confirm the folder erase selection.
“FOL ERASE” will be displayed.
5. “COMPLETE” will be displayed for a few seconds once erasing
process is finished.

Recording on USB Memory device
[
[
This system can record a standard CD, CD-R/RW in the CD format or
CD-R/RW with MP3 files, TUNER function to the USB device.
CD to USB recording
There are four kinds of recording from CD to USB.
1. One File Recording (for CD) or One File Copy (for MP3 disc).
2. One Disc Recording (for CD) or One Disc Copy (for MP3 disc).
3. Programme Recording.
4. One Folder Copy (for MP3 disc only).
Select the bitrate before starting recording.
Press the MODE button and “BIT RATE” will be displayed and then
press ENTER button.
z
This bitrate selection is valid for CD, TUNER and AUDIO IN function only.
Within 10 seconds, press the or button to select the desired
bitrate, and press the ENTER button.
[128 kbps]
5 After the selected song finishes playing, the unit will stop
playback and recording process automatically and
“WRITING USB” will be displayed for a few seconds.
Disc Recording (for CD) or Disc Copy (for MP3 disc)
1 Perform steps 1 - 5 in “Listening to a CD or MP3/WMA disc”
section on page 13.
2 Whilst in the stop mode, press the RECORD button to start
USB recording.
“REC START” will be displayed for a few seconds and
recording will start after the USB device has been initialised.
XL-E2180H
XL-E2580H
ENGLISH
[192 kbps]
[96 kbps]
One File Recording (for CD) or One File Copy (for MP3 disc)
1
Perform steps 1 - 5 in “Listening to a CD or MP3/WMA disc” section
on page 13.
2
Press or button to select the desired file to be recorded.
3
Press the RECORD button to start USB recording at the selected track.
“REC START” will be displayed for a few seconds and recording will start
after the USB device has been initialised.
4
During file recording, the display will show normal CD playback but
during file copy process for MP3 disc, “COPY” will be displayed.
CD]
MP3]
3 During disc recording, the display will show normal CD
playback but during disc copy process for MP3 disc,
“COPY” will be displayed.
4 After the last track of the disc is played, the unit will stop
playback and recording process automatically, and
“WRITING USB” will be displayed for a few seconds.
Programme Recording
1
Perform steps 1 - 6 in “Programmed play” section on page 16.
2
Whilst in the stop mode, press the RECORD button to start USB
recording.
“REC START” will be displayed for a few seconds and recording will start
after the USB device has been initialised.
3
During recording process, the display will show normal CD
programme playback.
4
After the last programme track is played, the unit will stop playback
and recording process automatically, and “WRITING USB” will be
displayed for a few seconds.
USB Memory Playback
E-22

XL-E2180H
XL-E2580H
ENGLISH
Recording on USB Memory device (continued)
One folder copy (for MP3 disc only)
1 Perform steps 1 - 2 in “Procedure to play back MP3/WMA
disc with folder mode on” section on page 18.
2 Whilst in the stop mode, press the RECORD button to start
USB recording.
“REC START” will be displayed for a few seconds and recording
will start after the USB device has been initialised.
3 During folder copy process, “COPY” will be displayed.
4 After the last track of a selected folder finishes playing, the
unit will stop playback and recording process automatically
and “WRITING USB” will be displayed for a few seconds.
Tuner to USB recording
1
To select tuner, press the TUNER (BAND) button and select desired
band station (see “Tuning” on page 24).
2
Press the RECORD button to start recording.
“REC START” will be displayed for a few seconds and recording will start
after the USB device has been initialised.
3
During recording process, the display show as normal TUNER
function.
[TUNER]
USB Memory Playback
To stop recording:
Press the USB STOP button. The unit will stop the recording process
and “WRITING USB” will be displayed for a few seconds.
Notes:
z Recording can be operated in CD stop mode only. During CD play-
back, the RECORD button is invalid.
z
The sound is heard during CD disc recording but not with an MP3 disc.
z
Bitrate selection is valid for CD disc and TUNER recording only. It is
invalid for MP3 disc. The default bitrate recording is 128 kbps.
z It is not possible to display ID3 tag information during MP3 disc
copy process.
z Do not POWER OFF the main unit whilst “WRITING USB” shows
on the display. Wait until “WRITING USB” display disappear before turning it off.
z This system does not support WMA disc recording.
z “USB FULL” message will be displayed if USB device is set in
write-protect mode or if there is insufficient free space in it.
z USB playback order is the same as MP3/WMA playback order
(see page 17) and follow the recording order of the folder.
USB folder structure (of recorded files)
When recording files to USB memory, folders inside it will be created
automatically according to the source selected.
Example:
If recording from CD to USB, the files will be saved in a folder named
CDREC001. For next recording session, the next folder will be
created and named CDREC002 and so on.
If the source is TUNER (FM band), folder FMREC001 will be created.
For TUNER (AM band), folder AMREC001 will be created.
Maximum number of folders that can be created is 128.
E-23

Listening to the radio
Auto power on function:
When you press any of the following buttons, the unit turns on.
z TUNER (BAND) button (main unit and remote control): The unit
turns on and the “TUNER” function is activated.
z / button on the main unit: The unit turns on and playback of
the last function starts (CD, TUNER, AUDIO IN, USB).
Tuning
1 Press the ON/STAND-BY button to turn the power on.
2 Press the TUNER (BAND) button repeatedly to select the
desired frequency band (FM or AM).
3 Press the TUNING ( or ) button on the remote control to
tune in to the desired station.
Manual tuning:
Press the TUNING ( or
the desired station.
Auto tuning:
When the TUNING ( or
seconds, scanning will start automatically and the tuner will
stop at the first receivable broadcast station.
Notes:
z When radio interference occurs, auto scan tuning may stop
automatically at that point.
z Auto scan tuning will skip weak signal stations.
z To stop the auto tuning, press the TUNING ( or
z When an RDS (Radio Data System) station is tuned in, the fre-
quency will be displayed first, and then the RDS indicator will light
up. Finally, the station name will appear.
z Full auto tuning can be achieved for RDS stations “ASPM”, see
page 27.
To receive an FM stereo transmission:
Press the TUNER (BAND) button to select stereo mode and “ST”
indicator will be displayed.
z “ ” will appear when an FM broadcast is in stereo.
z If the FM reception is weak, press the TUNER (BAND) button to
extinguish the “ST” indicator. The reception changes to monaural,
and the sound becomes clearer.
) button repeatedly to the tune in to
) button is pressed for more than 0.5
) button again.
FM stereo mode indicator
FM stereo receiving indicator
XL-E2180H
XL-E2580H
ENGLISH
Radio
E-24

XL-E2180H
XL-E2580H
ENGLISH
Radio
Listening to the radio (continued)
Memorising a station
You can store 40 AM and FM stations in memory and recall them at
the push of a button. (Preset tuning)
1 Perform steps 1 - 3 in “Tuning” on page 24.
2 Press the MEMORY button to enter the preset tuning
saving mode.
3 Within 30 seconds, press the PRESET ( or ) button to
select the preset channel number.
Store the stations in memory, in order, starting with preset
channel 1.
4 Within 30 seconds, press the MEMORY button to store that
station in memory.
To recall a memorised station
Press the PRESET ( or ) button for less than 0.5 seconds to
select the desired station.
To scan the preset stations
The stations saved in the memory can be scanned automatically.
(Preset memory scan)
Press the
1
The preset number will flash and the programmed stations will be
tuned in sequentially, for 5 seconds each.
2 Press the PRESET
station is located.
PRESET ( or )
( or ) button again when the desired
button for more than 0.5 seconds.
E-25
If the “MEMORY” and preset number indicators disappear
before the station is memorised, repeat the operation from step
2.
5 Repeat steps 1 - 4 to set other stations, or to change a
preset station.
When a new station is stored in the memory, the station
previously memorised for that preset channel number will be
erased.
Note:
The backup function protects the memorised stations for a few
hours should there be a power failure or the AC power lead become
disconnected.
To erase entire preset memory
1 Press the ON/STAND-BY button to enter the stand-by mode.
2 Whilst pressing down the button, press the TUNER (BAND)
button until “TUNER CLEAR” appears.

Using the Radio Data System (RDS)
RDS is a broadcasting service which a growing number of FM
stations provide. These FM stations send additional signals
along with their regular programme signals. They send their
station names, and information about the type of programme
such as sport, music, etc.
When tuned to an RDS station, “RDS” and the station name will be
displayed.
“TP” (Traffic Programme) will appear on the display when the
received broadcast carries traffic information, and “TA” (Traffic
Announcement) will appear whilst a traffic information is on air.
“PTYI” (Dynamic PTY Indicator) will appear whilst the Dynamic PTY
station is received.
Information provided by RDS
Each time the RDS DISPLAY button is pressed, the display will
switch as follows:
XL-E2180H
XL-E2580H
ENGLISH
You can control the RDS by using the buttons on the remote
control only.
Station name (PS) Programme type (PTY)
Frequency Radio text (RT)
When tuning in to a station other than an RDS station or to an RDS
station which sends weak signal, the display will change in the
following order:
NO PS NO PTY
FM 98.80 MHz
NO RT
Advanced Features
E-26

XL-E2180H
XL-E2580H
ENGLISH
Advanced Features
Using the Radio Data System (RDS) (continued)
Using the Auto Station Programme Memory
(ASPM)
Whilst in the ASPM operation mode, the tuner will automatically
search for new RDS stations. Up to 40 stations can be stored.
If you have already stored some stations in the memory, the number
of new stations you can store will be less.
1 Press the TUNER (BAND) button to select the FM band.
2 Press and hold down the RDS ASPM button on the remote
control for at least 3 seconds.
1 After “ASPM” has flashed for about 4 seconds, scanning will
start (87.50 - 108.00 MHz).
2 When an RDS station is found, “RDS” will appear for a short
time and the station will be stored in memory.
3 After scanning, the number of stations stored in memory will
be displayed for 4 seconds, and then “END” will appear for
4 seconds.
To stop the ASPM operation before it is completed:
Press the RDS ASPM button whilst it is scanning for stations.
The stations which are already stored in memory will be kept there.
Notes:
z If the same station is broadcasting on different frequencies, the
strongest frequency will be stored in the memory.
z Any station which has the same frequency as the one stored in the
memory will not be stored.
z If 40 stations have already been stored in the memory, scanning
will be aborted. If you want to redo the ASPM operation, erase the
preset memory.
z If no stations have been stored in the memory, “END” will appear
for about 4 seconds.
z If the RDS signals are very weak, station names may not be
stored in the memory.
To erase all of the contents of preset memory:
1 Press the ON/STAND-BY button to enter the power stand-by
mode.
2 Whilst pressing down the button, press the TUNER (BAND) but-
ton until “TUNER CLEAR” appears.
z After performing this operation, all of the preset memory
information will be erased.
To store a station name again if the wrong name was stored in
memory:
It may be impossible to store station names in the memory using the
ASPM function if there is lots of noise or if the signal is too weak. In
this case, perform as follows.
1 Press the PRESET
are correct.
2 If you find a wrong name during receiving the station, wait until the
correct name will be displayed. And then press the MEMORY
button.
3 Within 30 seconds, press the MEMORY button whilst the preset
channel number is flashing.
z The new station name has been stored in memory correctly.
( or ) button to check whether the names
E-27

Notes:
z The same station name can be stored in different channels.
z In a certain area or during certain period, the station names may
temporarily be different.
Notes for RDS operation
If any of the following events occur, it does not mean that the
unit is faulty:
z “PS”, “NO PS” and a station name appear alternately, and the unit
does not operate properly.
z If a particular station is not broadcasting properly or a station is
conducting tests, the RDS reception function may not work
properly.
z When you receive an RDS station whose signal is too weak,
information like the station name may not be displayed.
z “NO PS”, “NO PTY” or “NO RT” will flash for about 5 seconds, and
then the frequency will be displayed.
Notes for radio text:
z The first 10 characters of the radio text will appear for 4 seconds
and then they will scroll across the display.
z If you tune in to an RDS station which is not broadcasting any
radio text, “NO RT” will be displayed when you switch to the radio
text position.
z Whilst radio text data is received or when the text contents
change, “RT” will be displayed.
To recall stations in memory
To specify programmed types and select stations (PTY search):
You can search a station by specifying the programme type (news,
sports, traffic programme, etc. ... see pages 29 - 30) from the stations
in the memory.
1 Press the TUNER (BAND) button to select the FM.
2 Press the RDS PTY button on the remote control.
“SELECT” and “PTY TI” will appear alternately for about
6 seconds.
3 Within 6 seconds, press the PRESET ( or ) button to
select the programme type.
Each time the button is pressed, the programme type will
appear. If the button is held down for more than 0.5 seconds,
the programme type will appear continuously.
4 Whilst the selected programme type is flashing (within
6 seconds), press the RDS PTY button again.
XL-E2180H
XL-E2580H
ENGLISH
Advanced Features
After the selected programme type has been lit for 2 seconds,
“SEARCH” will appear, and the search operation will start.
E-28

XL-E2180H
XL-E2580H
ENGLISH
Advanced Features
Using the Radio Data System (RDS) (continued)
Notes:
z If the display stops flashing, start again from step 2. If the unit finds
the desired programme type, the corresponding channel number
will flash for about 4 seconds, and then the station name will flash
for 7 seconds, which will remain lit.
z If you want to listen to the same programme type of another
station, press the RDS PTY button whilst the channel number or
station name is flashing. The unit will look for the next station.
z If no station can be found, “NOT FOUND” will appear for 4
seconds.
If you select the traffic programme:
If you select the traffic programme (TP) in step 3, “TP” will appear.
(This does not mean that you can listen to the traffic information at
that time.)
When the traffic information is broadcast, “TA” will appear.
To specify station names and select stations manually:
You can select a station by specifying the name (BBC R1, BBC R2,
etc.) from the stations stored in memory.
Before starting this operation, you must store one or more station
names in memory.
1 Press the TUNER (BAND) button to select the FM band.
2 Press the PRESET ( or ) button on the remote control to se-
lect a desired station.
3 The station name will be displayed for 6 seconds. Then the
display will change.
Descriptions of the PTY (Programme Type) codes, TP (Traffic
Programme) and TA (Traffic Announcement).
You can search for and receive the following PTY, TP and TA
signals.
NEWS Short accounts of facts, events and publicly
AFFAIRS Topical programme expanding or enlarging upon
INFO Programmes whose purpose is to impart advice in
SPORT Programme concerned with any aspect of sport.
EDUCATE Programme intended primarily to educate, of which
DRAMA All radio plays and serials.
CULTURE Programmes concerned with any aspect of national
SCIENCE Programmes about the natural sciences and
VARIED Used for mainly speech-based programmes usually
POP M Commercial music, which would generally be
ROCK M Contemporary modern music, usually written and
EASY M Current contemporary music considered to be
expressed views, reportage and actuality.
the news, generally in different presentation style or
concept, including debate, or analysis.
the widest sense.
the formal element is fundamental.
or regional culture, including language, theatre, etc.
technology.
of light-entertainment nature, not covered by other
categories. Examples include: quizzes, panel
games, personality interviews.
considered to be of current popular appeal, often
featuring in current or recent record sales charts.
performed by young musicians.
“easy-listening”, as opposed to Pop, Rock or
Classical, or one of the specialised music styles,
Jazz, Folk or Country. Music in this category is often
but not always, vocal, and usually of short duration.
E-29

LIGHT M Classical music for general, rather than specialist
appreciation. Examples of music in this category
are instrumental music, and vocal or choral works.
CLASSICS Performances of major orchestral works,
symphonies, chamber music, etc., and including
Grand Opera.
OTHER M Musical styles not fitting into any of the other
categories. Particularly used for specialist music of
which Rhythm & Blues and Reggae are examples.
WEATHER Weather reports and forecasts and meteorological
information.
FINANCE Stock Market reports, commerce, trading, etc.
CHILDREN For programmes targeted at a young audience,
primarily for entertainment and interest, rather than
where the objective is to educate.
SOCIAL Programmes about people and things that influence
them individually or in groups. Includes: sociology,
history, geography, psychology and society.
RELIGION Any aspect of beliefs and faiths, involving a God or
Gods, the nature of existence and ethics.
PHONE IN Involving members of the public expressing their
views either by phone or at a public forum.
TRAVEL Features and programmes concerned with travel to
near and far destinations, package tours and travel
ideas and opportunities. Not for use for
announcements about problems, delays, or
roadworks affecting immediate travel where TP/TA
should be used.
LEISURE Programmes concerned with recreational activities
in which the listener might participate. Examples
include, Gardening, Fishing, Antique collecting,
Cooking, Food & Wine, etc.
JAZZ Polyphonic, syncopated music characterised by
improvisation.
COUNTRY Songs which originate from, or continue the musical
tradition of the American Southern States.
Characterised by a straightforward melody and
narrative story line.
NATION M Current Popular Music of the Nation or Region in
that country's language, as opposed to
International “Pop” which is usually US or UK
inspired and in English.
OLDIES Music from the so-called “golden age” of popular
music.
FOLK M Music which has its roots in the musical culture of a
particular nation, usually played on acoustic
instruments. The narrative or story may be based
on historical events or people.
DOCUMENT Programme concerned with factual matters,
presented in an investigative style.
TEST Broadcast when testing emergency broadcast
equipment or receivers.
ALARM ! Emergency announcement made under
exceptional circumstances to give warning of
events causing danger of a general nature.
NONE No programme type (receive only).
TP Broadcasts which carry traffic announcements.
TA Traffic announcements are being broadcast.
XL-E2180H
XL-E2580H
ENGLISH
Advanced Features
E-30

XL-E2180H
XL-E2580H
ENGLISH
Advanced Features
Timer and sleep operation (Remote Control only)
Timer playback:
The unit turns on and plays the desired source (CD, TUNER, USB,
AUDIO IN) at a preset time.
Timer recording:
The unit turns on and starts recording from TUNER at the preset
time.
This unit has 2 types of timer: ONCE TIMER and DAILY TIMER.
Once timer: Once timer play or once timer recording works for
For example, if you are away but want to record a program on a
radio station.
Daily timer: Daily timer play or daily timer recording works at
For example, set the timer as a wake-up call every morning.
Using the once timer and daily timer in combination:
For example, use the once timer to record a radio program, and use
the daily timer to wake up.
1 Set the daily timer (pages 31 - 33).
2 Set the once timer (pages 31 - 33).
Start
one time only at a preset time.
the same preset time every day.
1 minute or more
Daily timer
Stop Start Stop
Once timer
Timer playback or timer recording
Before setting timer:
1 Check that the clock is set to the correct time (refer to page 11).
If it is not set, you cannot use the timer function.
2 For timer playback: Plug in USB or load discs to be played.
For timer recording: Plug in USB for recording in the USB
1 Press the ON/STAND-BY button to turn the power on.
2 Press the CLOCK/TIMER button.
3 Within 10 seconds, press the or button to select
“ONCE” or “DAILY”, and press the MEMORY button.
terminal.
E-31
Note:
When set times for the daily timer and once timer overlap, the once
timer takes priority. Allow an interval of at least 1 minute between
operations.
Set the clock to the correct time if “ONCE” or “DAILY” does not
appear.

4 Within 10 seconds, press the or button to select
“ONCE SET” or “DAILY SET”, and press the MEMORY
button.
5 Press the or button to select “PLAY” or “REC”, and
press the MEMORY button.
The illustrations show the daily timer setting.
6 Press the or button to adjust the hour and then
press the MEMORY button.
The illustrations show the timer playback setting in the daily
timer mode.
7 Press the or button to adjust the minutes and then
press the MEMORY button.
9 Switch input with the or button, and then press the
MEMORY button.
To select the timer playback source: CD, TUNER, USB or
AUDIO IN.
z This operation will be skipped for timer recording.
z When you select the tuner, select a station by pressing the
or button, and then press the MEMORY button.
z If a station has not been programmed, “NO PRESET” will be
displayed and timer setting will be cancelled.
10 Adjust the volume using the VOLUME control, and then
press the MEMORY button.
Do not turn the volume up too high.
11 Press the ON/STAND-BY button to enter the power stand-
by mode.
The “TIMER” indicator lights up and the unit is ready for timer
playback.
XL-E2180H
XL-E2580H
ENGLISH
Advanced Features
8 Set the time to finish as in steps 6 and 7 above.
Continued to the next page.
E-32

XL-E2180H
XL-E2580H
ENGLISH
Advanced Features
Timer and sleep operation (Remote Control only) (continued)
12 When the preset time is reached, playback or recording
will start.
The volume will increase gradually until it reaches the preset
volume.
The “ ” indicator will blink during timer playback/recording.
r
The “DAILY ” indicator will blink during timer playback/
recording.
r
13 When the timer end time is reached, the system will enter
the power stand-by mode automatically.
Once timer:
The timer will be cancelled.
Daily timer:
The timer operates at the same time every day. It will continue
until the daily timer setting is cancelled. Cancel the daily timer
when it is not in use.
Notes:
z When performing timer playback using another unit connected to
the USB terminal or AUDIO IN sockets, select “USB” or “AUDIO
IN” in step 9.
This unit will turn on or enter the power stand-by mode automatically. However, the connected unit will not turn on or off.
z To stop the timer playback/recording, follow step “Cancelling the
timer setting in the timer stand-by mode” on the right hand side
of this page.
Checking the timer setting in the timer stand-by mode:
1 Press the CLOCK/TIMER button.
2 Within 10 seconds, press the or button to select “ONCE”
or “DAILY”, and press the MEMORY button.
3 Within 10 seconds, press the or button to select “ONCE
CALL” or “DAILY CALL”, and press the MEMORY button.
The unit returns to the timer stand-by mode after displaying the
settings in order.
Cancelling the timer setting in the timer stand-by mode:
1 Press the CLOCK/TIMER button.
2 Within 10 seconds, press the or button to select “ONCE”
or “DAILY”, and press the MEMORY button.
3 Within 10 seconds, press the or button to select “ONCE
OFF” or “DAILY OFF”, and press the MEMORY button.
Timer will be cancelled (the setting will not be cancelled).
Reusing the memorised timer setting:
The timer setting will be memorised once it is entered. To reuse the
same setting, perform the following operations.
1 Turn the power on and press the CLOCK/TIMER button.
2 Within 10 seconds, press the or button to select “ONCE”
or “DAILY”, and press the MEMORY button.
3 Within 10 seconds, press the or button to select “ONCE
ON” or “DAILY ON”, and press the MEMORY button.
4 Press the ON/STAND-BY button to enter the power stand-by
mode.
E-33

S
automatically stop.
e
Sleep operation
The radio, compact disc and USB can all be turned off automatically.
1 Play back the desired sound source.
2 Press the CLOCK/TIMER button.
3 Within 10 seconds, press the
or button to select
“SLEEP”, and press the
MEMORY button.
4 Press the or button to select the time.
(Maximum: 3 hours - Minimum: 1 minute)
z 3 hours - 5 minutes 5-minute intervals
z 5 minutes - 1 minute 1-minute intervals
5 Press the MEMORY button.
“SLEEP” will appear.
To cancel the sleep operation:
Press the ON/STAND-BY button whilst “SLEEP” is indicated.
To cancel the sleep operation without setting the unit to the stand-by
mode, proceed as follows.
1 Whilst “SLEEP” is indicated, press the CLOCK/TIMER button.
2 Within 10 seconds, press the or button to select “SLEEP
OFF”, and press the MEMORY button.
To use timer and sleep operation together
Sleep and timer playback:
For example, you can fall asleep listening to the radio and wake up
to CD in the next morning.
1 Set the sleep time (see left, steps 1 - 5).
2 Whilst the sleep timer is set, set the timer playback (steps 2 -
10, pages 31 - 32).
XL-E2180H
XL-E2580H
ENGLISH
6 The unit will enter the power stand-by mode automatically
after the preset time has elapsed.
The volume will be turned down 1 minute before the sleep operation finishes.
To confirm the remaining sleep time:
1 Whilst “SLEEP” is indicated, press the CLOCK/TIMER button.
2 Within 10 seconds, press the or button to select “SLEEP
X : XX”.
“X : XX” is sleep remaining time.
z The remaining sleep time is displayed for about 10 seconds.
z You can change the remaining sleep time whilst it is displayed by
pressing the MEMORY button (steps 4 - 5).
leep timer setting
1 minute - 3 hours Desired time
Sleep operation will
Timer playback setting
Timer playback start time
End tim
Advanced Features
E-34

XL-E2180H
XL-E2580H
ENGLISH
Advanced Features
Enhancing your system
The connection lead is not included. Purchase a commercially
available lead as shown below.
Portable audio player, etc.
Audio cable
(not supplied)
Auto power on function (AUDIO IN):
When you press any of the following buttons, the unit turns on.
z AUDIO IN button (main unit and remote control): The unit turns on
and the “AUDIO IN” function is activated.
z / button on the main unit: The unit turns on and playback of
the last function starts (CD, TUNER, AUDIO IN, USB).
Listening to the playback sounds of Portable
Audio Player, etc.
1 Use a connection lead to connect the Portable Audio
Player etc. to the AUDIO IN socket.
When using video equipment, connect the audio output to this
unit and the video output to a television.
2 Press the ON/STAND-BY button to turn the power on.
3 Press the AUDIO IN button.
4 Play the connected equipment.
If volume level of the connected device is too high, sound
distortion may occur. Should this happen, lower the volume of
the connected device.
If volume level is too low, increase the volume of the connected
device.
Note:
To prevent noise interference, place the unit away from the
television.
Headphones
z Do not turn the volume on to full at switch on and listen to music
at moderate levels. Excessive sound pressure from earphones
and headphones can cause hearing loss.
z Before plugging in or unplugging the headphones, reduce the
volume.
z Be sure your headphones have a 3.5 mm (1/8") diameter plug and
impedance between 16 and 50 ohms. The recommended
impedance is 32 ohms.
z Plugging in the headphones disconnects the speakers
automatically. Adjust the volume using the VOLUME control.
E-35

Subwoofer connection
When a commercially available subwoofer with a built-in amplifier is
connected to this unit, you can enjoy sound with emphasised bass.
Connect an RCA lead from a commercially available speaker with a
built-in amplifier to the SUBWOOFER PRE-OUT socket.
Subwoofer with a
built-in amplifier
Troubleshooting chart
Many potential problems can be resolved by the owner without
calling a service technician.
If something is wrong with this product, check the following before
calling your authorised SHARP dealer or service centre.
General
Symptom Possible cause
z The clock is not set to the
correct time.
z When a button is pressed,
the unit does not respond.
z No sound is heard. z Is the volume level set to “0”?
CD player
Symptom Possible cause
z Playback does not start. z Is the disc loaded upside down?
z Playback stops in the
middle or is not performed
properly.
z Playback sounds are
skipped, or stopped in the
middle of a track.
z Did a power failure occur? Reset
the clock. (Refer page 11)
z Set the unit to the power stand-
by mode and then turn it back on.
z If the unit still malfunctions, reset
it. (Refer page 37)
z Are the headphones connected?
z Are the speaker wires discon-
nected?
z Does the disc satisfy the
standards?
z Is the disc distorted or
scratched?
z Is the unit located near excessive
vibrations?
z Is the disc very dirty?
z Has condensation formed inside
the unit?
XL-E2180H
XL-E2580H
ENGLISH
References
E-36

XL-E2180H
XL-E2580H
ENGLISH
References
Troubleshooting chart (continued)
Remote control
Symptom Possible cause
z The remote
control does not
operate.
Tuner
Symptom Possible cause
z The radio
makes unusual
noises continuously.
USB
Symptom Possible cause
z Device cannot
be detected.
z Playback does
not start.
z Wrong time
display.
z Wrong file name
display.
z Recording
cannot start.
z Is the AC power lead of the unit plugged in?
z Is the battery polarity correct?
z Are the batteries dead?
z Is the distance or angle incorrect?
z Does the remote control sensor receive
strong light?
z Is the unit placed near the TV or computer?
z Is the FM aerial or AM loop aerial placed
properly? Move the aerial away from the
AC power lead if it's located nearby.
z Is there any MP3/WMA file available?
z Is the device properly connected?
z Is it MTP device?
z Does the device contain AAC file only?
z Is it the copyright protected WMA file?
z Is it the false MP3 file?
z Is Variable Bitrate file being played back?
z Is the File Name written in Chinese or
Japanese characters?
z Is the USB device in write protect mode?
z Is it a CD-WMA disc?
z Is the device’s memory already full?
Condensation
Sudden temperature changes, storage or operation in an extremely
humid environment may cause condensation inside the cabinet (CD
pickup, etc.) or on the transmitter on the remote control.
Condensation can cause the unit to malfunction. If this happens,
leave the power on with no disc in the unit until normal playback is
possible (about 1 hour). Wipe off any condensation on the transmitter
with a soft cloth before operating the unit.
If problem occurs
When this product is subjected to strong external interference
(mechanical shock, excessive static electricity, abnormal supply
voltage due to lightning, etc.) or if it is operated incorrectly, it may
malfunction.
If such problem occurs, do the following:
1 Set the unit to the stand-by mode and turn the power on again.
2 If the unit is not restored in the previous operation, unplug and
plug in the unit again, and then turn the power on.
Note:
If neither operation above restores the unit, clear all the memory by
resetting it.
Factory Reset, Clearing All Memory
1 Press the ON/STAND-BY button to enter the power stand-by
mode.
2 Whilst pressing down the button, press the CD button until
“CLEAR ALL” appears.
CD
Caution:
This operation will erase all data stored in memory including clock,
timer settings, tuner preset, and CD programme.
E-37

Before transporting the unit
Remove all CDs from the unit. Make sure there is no CD in the disc
tray. Then, set the unit to the power stand-by mode. Carrying the
unit with discs left inside can damage the unit.
Care of compact discs
Compact discs are fairly resistant to damage, however mistracking
can occur due to an accumulation of dirt on the disc surface. Follow
the guidelines below for maximum enjoyment from your CD
collection and player.
z Do not write on either side of the disc, particularly the non-label
side from which signals are read. Do not mark this surface.
z Keep your discs away from direct sunlight, heat, and excessive
moisture.
z Always hold the CDs by the edges. Fingerprints, dirt, or water on
the CDs can cause noise or mistracking. If a CD is dirty or does
not play properly, clean it with a soft, dry cloth, wiping straight out
from the centre, along the radius.
Maintenance
Cleaning the cabinet
Periodically wipe the cabinet with a soft cloth and a diluted soap
solution, then with a dry cloth.
Caution:
z Do not use chemicals for cleaning (petrol, paint thinner, etc.). It
may damage the cabinet finish.
z Do not apply oil to the inside of the unit. It may cause
malfunctions.
XL-E2180H
XL-E2580H
ENGLISH
NO YES
Correct
References
E-38

XL-E2180H
XL-E2580H
ENGLISH
References
Specifications
As part of our policy of continuous improvement, SHARP reserves
the right to make design and specification changes for product improvement without prior notice. The performance specification figures indicated are nominal values of production units. There may be
some deviations from these values in individual units.
General (XL-E2180H)
Power source AC 220 - 240 V ~ 50 Hz
Power
consumption
Dimensions Width: 180 mm (7-1/6")
Weight 4.0 kg (8.8 lbs.)
General (XL-E2580H)
Power source AC 220 - 240 V ~ 50 Hz
Power
consumption
Dimensions Width: 180 mm (7-1/6")
Weight 4.4 kg (9.7 lbs.)
( * )This power consumption value is obtained when the demonstration
mode is cancelled in the power stand-by mode. Refer to page 8 to
cancel the demonstration mode.
Power on: 40 W
Power stand-by: 0.6 W(*)
Height: 260 mm (10-2/8")
Depth: 273 mm (10-6/8")
Power on: 55 W
Power stand-by: 0.6 W(*)
Height: 260 mm (10-2/8")
Depth: 273 mm (10-6/8")
Amplifier (XL-E2180H)
Output power PMPO: 128 W
Output terminals Speakers: 4 ohms
Input terminals Audio In (audio signal):
MPO: 64 W (32 W + 32 W) (10% T.H.D.)
RMS: 64 W (32 W + 32 W) (10% T.H.D.)
RMS: 40 W (20 W + 20 W) (1% T.H.D.)
Headphones: 16 - 50 ohms
(recommended: 32 ohms)
Subwoofer pre-out (audio signal):
150 mV/10 k ohms at 70 Hz
250 mV/47 k ohms
Amplifier (XL-E2580H)
Output power PMPO: 320 W
Output terminals Speakers: 4 ohms
Input terminals Audio In (audio signal):
MPO: 160 W (80 W + 80 W) (10% T.H.D.)
RMS: 160 W (80 W + 80 W) (10% T.H.D.)
RMS: 100 W (50 W + 50 W) (1% T.H.D.)
Headphones: 16 - 50 ohms
(recommended: 32 ohms)
Subwoofer pre-out (audio signal):
150 mV/10 k ohms at 70 Hz
250 mV/47 k ohms
E-39

CD player
Type Single disc multi-play Compact Disc player
Signal readout
D/A converter D/A Multi-bit converter
Frequency response 20 - 20,000 Hz
Dynamic range 90 dB (1 kHz)
Non-contact, 3-beam semiconductor laser
pickup
Tuner
Frequency range FM: 87.5 - 108 MHz
Support preset
memory
AM: 522 - 1,620 kHz
40 presets (AM and FM).
USB
USB host
interface
Support file z MPEG 1 Layer 3
Bitrate support z MP3 (32 ~ 320 kbps)
Other z Maximum total number of MP3/WMA files
File system
support
z Complies with USB 1.1 (Full Speed)/
2.0 Mass-Storage-Class.
z Supports Bulk only and CBI protocol.
z WMA (Non DRM)
zWMA (64 ~ 160 kbps)
is 65280.
z Maximum total number of folders is 255
INCLUSIVE of root directory. (Folders with
non playable files are also counted.)
z The ID3TAG information supported are
TITLE, ARTIST and ALBUM only.
z Supports ID3TAG version 1 and version 2.
z Maximum number of folders that can be
recorded is 128.
z Maximum number of files in a folder that
can be recorded is 128.
z Supports USB devices with Microsoft
Windows/DOS/FAT 12/ FAT16/ FAT 32.
z 2 kbyte block length for sector.
XL-E2180H
XL-E2580H
ENGLISH
References
E-40

XL-E2180H
XL-E2580H
ENGLISH
References
Specifications (continued)
Speaker (XL-E2180H) Speaker (XL-E2580H)
Type 2-way type speaker system
Maximum input power 64 W
Rated input power 32 W
Impedance 4 ohms
Dimensions Width: 148 mm (5-13/16")
Weight 2.14 kg (4.72 lbs.)/each
2.5 cm (1") tweeter
10 cm (4") woofer
Height: 260 mm (10-1/4")
Depth: 175.5 mm (6-15/16")
Type 2-way type speaker system
Maximum input power 160 W
Rated input power 80 W
Impedance 4 ohms
Dimensions Width: 148 mm (5-13/16")
Weight 2.45 kg (5.40 lbs.)/each
5 cm (2") tweeter
12 cm (4-3/4") woofer
Height: 260 mm (10-1/4")
Depth: 198.5 mm (7-13/16")
E-41

MEMO

T
Z
0
ße
SHARP CORPORATION
INSZA365AWZ
8F R MW 1
 Loading...