SHARP VNEZ1U Operation Manual

0 (0)

Basic Operations

Basic Operations

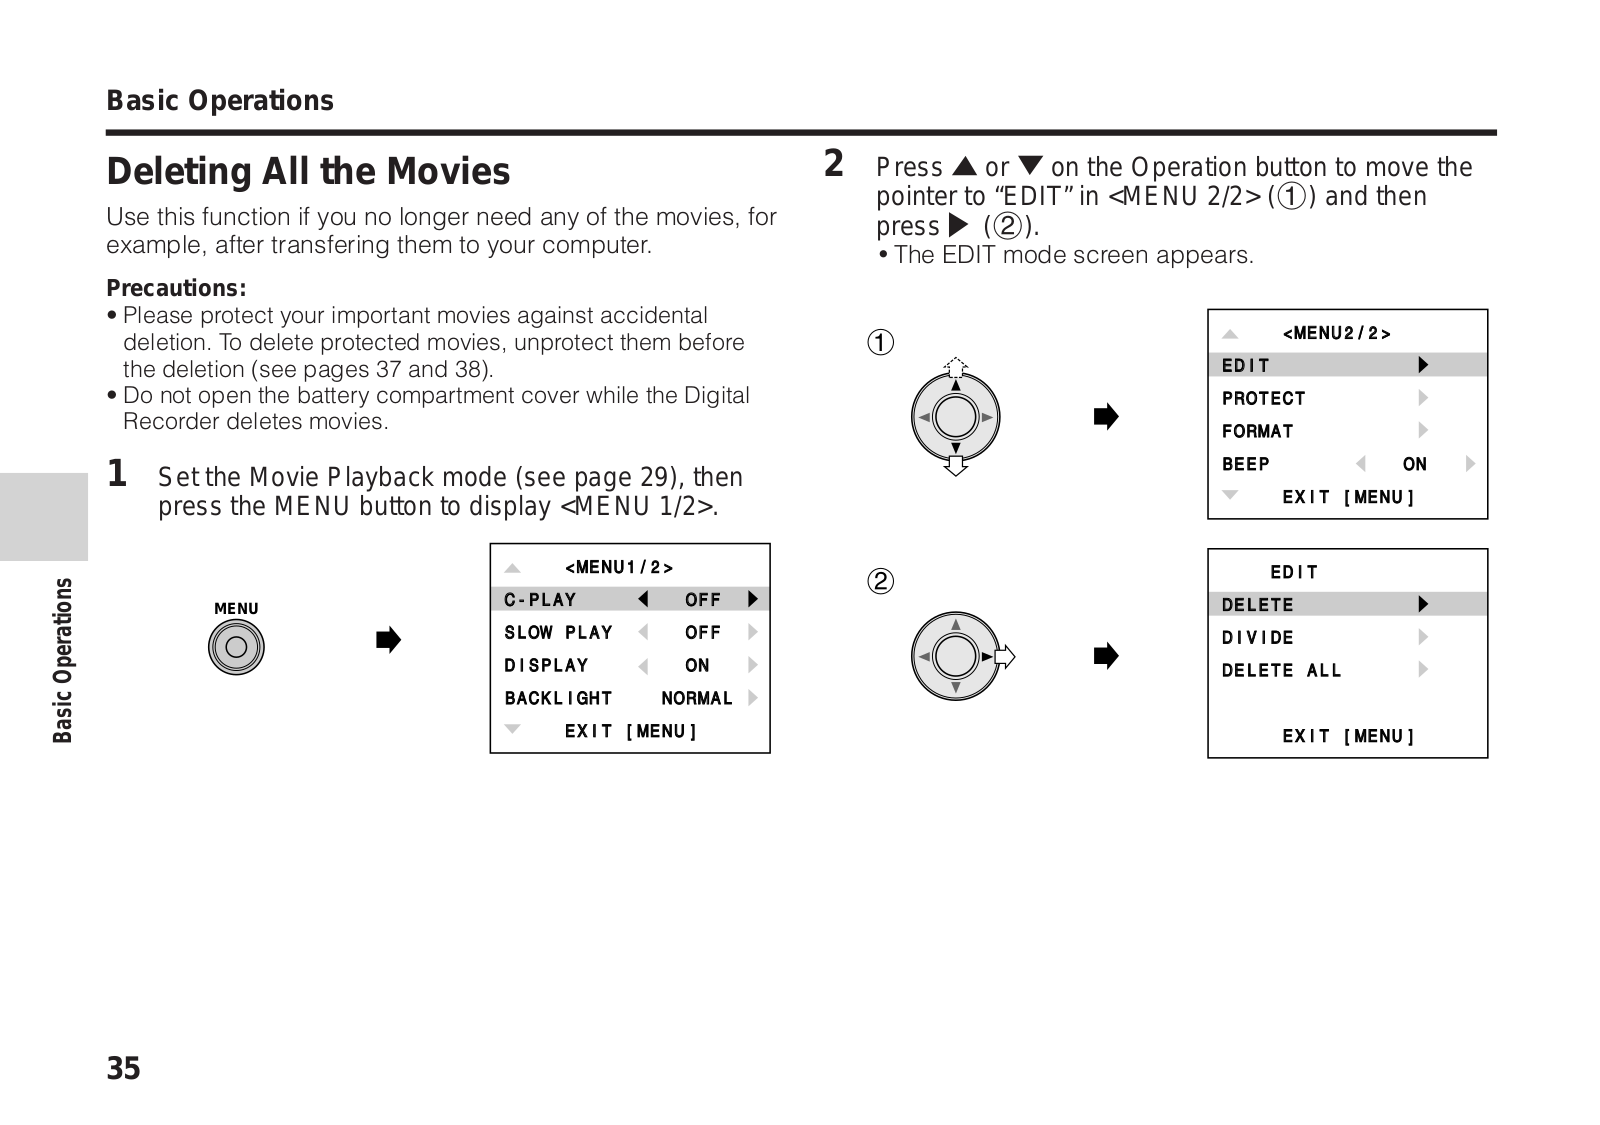
Deleting All the Movies


2 Press 'or "on the Operation button to move the

Use this function if you no longer need any of the movies, for

pointer to “EDIT” in <MENU 2/2> (1) and then

press | (2).


example, after transfering them to your computer.


The EDIT mode screen appears.


Precautions:


• Please protect your important movies against accidental

1


<MENU2/2>


deletion. To delete protected movies, unprotect them before


the deletion (see pages 37 and 38).


EDIT


• Do not open the battery compartment cover while the Digital


PROTECT


Recorder deletes movies.


FORMAT


1 Set the Movie Playback mode (see page 29), then


BEEP

ON


EXIT [MENU]

press the MENU button to display <MENU 1/2>.


<MENU1/2>


2

EDIT


MENU


C-PLAY

OFF


DELETE


SLOW PLAY

OFF


DIVIDE


DISPLAY

ON


DELETE ALL


BACKLIGHT

NORMAL


EXIT [MENU]


EXIT [MENU]


35

Basic Operations

3 Press ' or " to select “DELETE ALL” (1) and press | (2).

1

EDIT


DELETE


DIVIDE


DELETE ALL


EXIT [MENU]


2


DELETE ALL


MOTION PICTURES?


YES [SHUTTER]

NO [ MENU ]

Notes:

Protected movies cannot be deleted. See pages 37 and 38 for the details on protecting and unprotecting images.

To cancel the deletion, press the MENU button in step 3.

4 Press the Shutter button to delete all recorded movies.

The Movie Index Playback mode screen appears.


NO FILE


Operations Basic

36

Basic Operations

Basic Operations

Protecting Important Movie and

3 Press 'or "on the Operation button to move the

Images from Deletion

pointer to “PROTECT” in <MENU 2/2> (1) and then

press | (2).

This function protects your important movies or still images

The Movie Index Playback mode screen appears with

against accidental deletion.

the protect indicator “ ”.

Note:


1

<MENU2/2>


• You can perform this procedure in the Playback mode.


EDIT


Example:


PROTECT


• Protecting an important movie.


FORMAT


1 Slide the POWER switch (1), set the Mode select


BEEP

ON


EXIT [MENU]

switch to MOVIE (2) and then rotate the lens body


to PLAY (3).


3


2


POWER


PLAY


MOVIE

STILL


CAMERA


1


2


OK[SHUTTER]

‰‰2


2 Press the MENU button to display <MENU 1/2>.

Protect indicator


<MENU1/2>


C-PLAY

OFF


MENU

OFF


SLOW PLAY


DISPLAY

ON


BACKLIGHT

NORMAL


EXIT [MENU]


37

Basic Operations

4 Press \or |to move the frame to the desired movie.


OK[SHUTTER]

‰‰1

Note:

If you have recorded more than nine movies or still images,

there are other pages before and after the current page.

To go to the previous page, press '. To go to the next page, press ".

5 Press the Shutter button.

The protect indicator “” is lit on the desired movie.


OK[SHUTTER]

‰‰1


6 Press the MENU button twice to end the protect setting procedure.

The Movie Index Playback mode screen appears.

MENU

Notes:

If you protect a still image, perform steps 2 through 6 in the Still Playback mode.

To protect another movie, repeat the procedure in steps 4 and 5.

Formatting a SmartMedia card (see page 64) deletes all images on it, regardless of whether the images are protected or not.

To Cancel the Protect Setting

Perform steps 2 through 4, and then press the Shutter button. When the “” indicator flashes, press the MENU button.

If you want to cancel another protection, press \or |to select the protected image and press the Shutter button.

Operations Basic

38

SHARP VNEZ1U Operation Manual

Basic Operations

Basic Operations

Still Playback

Using the LCD monitor, you can see the still images as soon as you have finished the shooting.

1 Slide the Power switch (1), set the Mode select switch to STILL (2) and then rotate the lens body to PLAY (3).

The still images will displayed in a thumbnail format (reduced size images) by the Still Index Playback mode.

MENU

OK[SHUTTER] 1‰‰-‰‰‰1

3

PLAY

CAMERA

POWER

MOVIE STILL

1 2

2 Press \ or | on the Operation button to move the

frame to the desired image.

STILL mode indicator


OK[SHUTTER] 1‰‰-‰‰‰2

The number of a still image

Note:

If you have recorded more than nine still images, there are

other pages before and after the current page.

To go to the previous page, press '. To go to the next page, press ".

3 Press the Shutter button to playback the selected still

image in the full size.

The number of a still image

NORMAL 1‰‰-‰‰‰21


OCT.27.2‰‰‰


1‰:31 AM


Notes:

Pressing \ plays the previous image.

Pressing | plays the next image.

39

Basic Operations

To Return to the Still Index Playback Mode

Press the MENU button and hold it until the Still Index

Playback mode screen appears.

MENU

Operations Basic

40

Basic Operations

Basic Operations

Deleting Unwanted Still Image One by One

This function allows you to delete unwanted still image one by one.

Precautions:

Please protect your important still image against accidental deletion. To delete a protected still image, unprotect it before the deletion (see pages 37 and 38).

Do not open the battery compartment cover while the Digital Recorder deletes a still image.

1 Slide the POWER switch (1), set the Mode select switch to STILL (2) and then rotate the lens body to

PLAY (3).

3

POWER

PLAY

MOVIE STILL


CAMERA

1 2

2 Press the MENU button to display <MENU 1/2>.

<MENU1/2>

AUTO PLAY


MENU

DISPLAY ON

BACKLIGHT NORMAL

DELETE

EXIT [MENU]

3 Press 'or "on the Operation button to move the pointer to “DELETE” (1) and then press | (2).

The Still Index Playback mode screen appears with a “DELETE” frame.

1 <MENU1/2>


AUTO PLAY


DISPLAY


ON


BACKLIGHT

NORMAL


DELETE


EXIT [MENU]

2


DELETE


OK[SHUTTER]

1‰‰-‰‰‰2

41


Basic Operations

4 Press \ or | to move the frame to the unwanted still

6 Press the Shutter button again to delete the selected

image.


still image.


The screen returns to the Still Index Playback mode


with a “DELETE” frame. If you want to delete another

DELETE


still image, repeat the procedure from step 4 to 6.


DELETE


OK[SHUTTER] 1‰‰-‰‰‰1


Note:


OK[SHUTTER]

1‰‰-‰‰‰2

• If you have recorded more than nine still images, there are


other pages before and after the current page.


7 Press the MENU button twice to display the Still

To go to the previous page, press '.


To go to the next page, press ".


Index Playback mode screen.


5 Press the Shutter button.


Note:


• To cancel the deletion, press the MENU button in step 4.


DELETE?


YES

[SHUTTER]


NO

[ MENU

]


Operations Basic

42

Basic Operations

Basic Operations

Deleting All the Still Images


2 Press 'or "on the Operation button to select

Use this function if you no longer need any of the still

“DELETE ALL” in <MENU 2/2> (1) and then press

| (2).


images, for example, after transfering them to your


computer.


1

<MENU2/2>


Precautions:


DELETE ALL


• Please protect your important still images against accidental


PROTECT


deletion. To delete protected still images, unprotect them


FORMAT


before the deletion (see pages 37 and 38).


BEEP


ON

• Do not open the battery compartment cover while the Digital


EXIT [MENU]

Recorder deletes still images.


1 Set the Still Playback mode (see page 39), then

2


press the MENU button to display <MENU 1/2>.


DELETE ALL


<MENU1/2>


STILL IMAGES?


AUTO PLAY


MENU

DISPLAY

ON


YES

[SHUTTER]


BACKLIGHT

NORMAL


NO

[ MENU

]


DELETE


EXIT [MENU]


43

3 Press the Shutter button to delete all recorded still images.

The Still Index Playback mode screen appears.


NO FILE


Notes:

Protected still images cannot be deleted. See pages 37 and 38 for the details on protecting and unprotecting images.

To cancel the deletion, press the MENU button in step 2.

Basic Operations

Operations Basic

44

Advanced Features

Resolution Setting

The picture quality and the recording time/the number of shots depend on the resolution mode. Select an appropriate mode for your needs or the shooting conditions.

Precaution:

The figures below are approximations only. The actual recordable time/the number of images stored in a SmartMedia card cannot be specified precisely because the amount of memory required for storage of each image differs according to image contents.

Movie Resolution Mode

NORMAL: Recording with the standard picture quality. LP: Images in this mode is suitable for sending and

receiving across the Internet through analogue telephone circuits. Its picture quality is lower than that of the NORMAL mode.

FINE: Recording with higher quality than that of the NORMAL mode images, while the recordable time is one-third long of that of the NORMAL mode.

S-FINE: Recording with higher quality than that of the FINE mode, while the recordable time is about half of that of the FINE mode.

1/4 VGA: Recording with the best quality of all. The moving of subject in playback is not fluent because the number of images recorded per one second is about one-third of that of the S-FINE mode.

Features


Record time according to SmartMedia card capacity


Computer

Frame rate*

Transfer rate


Resolution mode


output image

(number of

(kbps) image/

Advanced


32 MB

16 MB

8 MB

4 MB


(dot)

images per sec.)

sound


S-FINE

10 min.

5 min.

2 min. 30 sec.

1 min. 15 sec.

320 × 240

5 to 15

384/32


1/4VGA

10 min.

5 min.

2 min. 30 sec.

1 min. 15 sec.

2 to 5

384/32


FINE

20 min.

10 min.

5 min.

2 min. 30 sec.

160 ×120

5 to 12

192/24


NORMAL

60 min.

30 min.

15 min.

7 min. 30 sec.

5 to 10

64/16


LP

2 hr. 17 min.

1 hr. 8 min.

34 min.

17 min.


1 to 2

28.8/16


* “Frame rate” is the number of the frames the Digital Recorder can record per second. It depends on the image of the movie.

45


Advanced Features


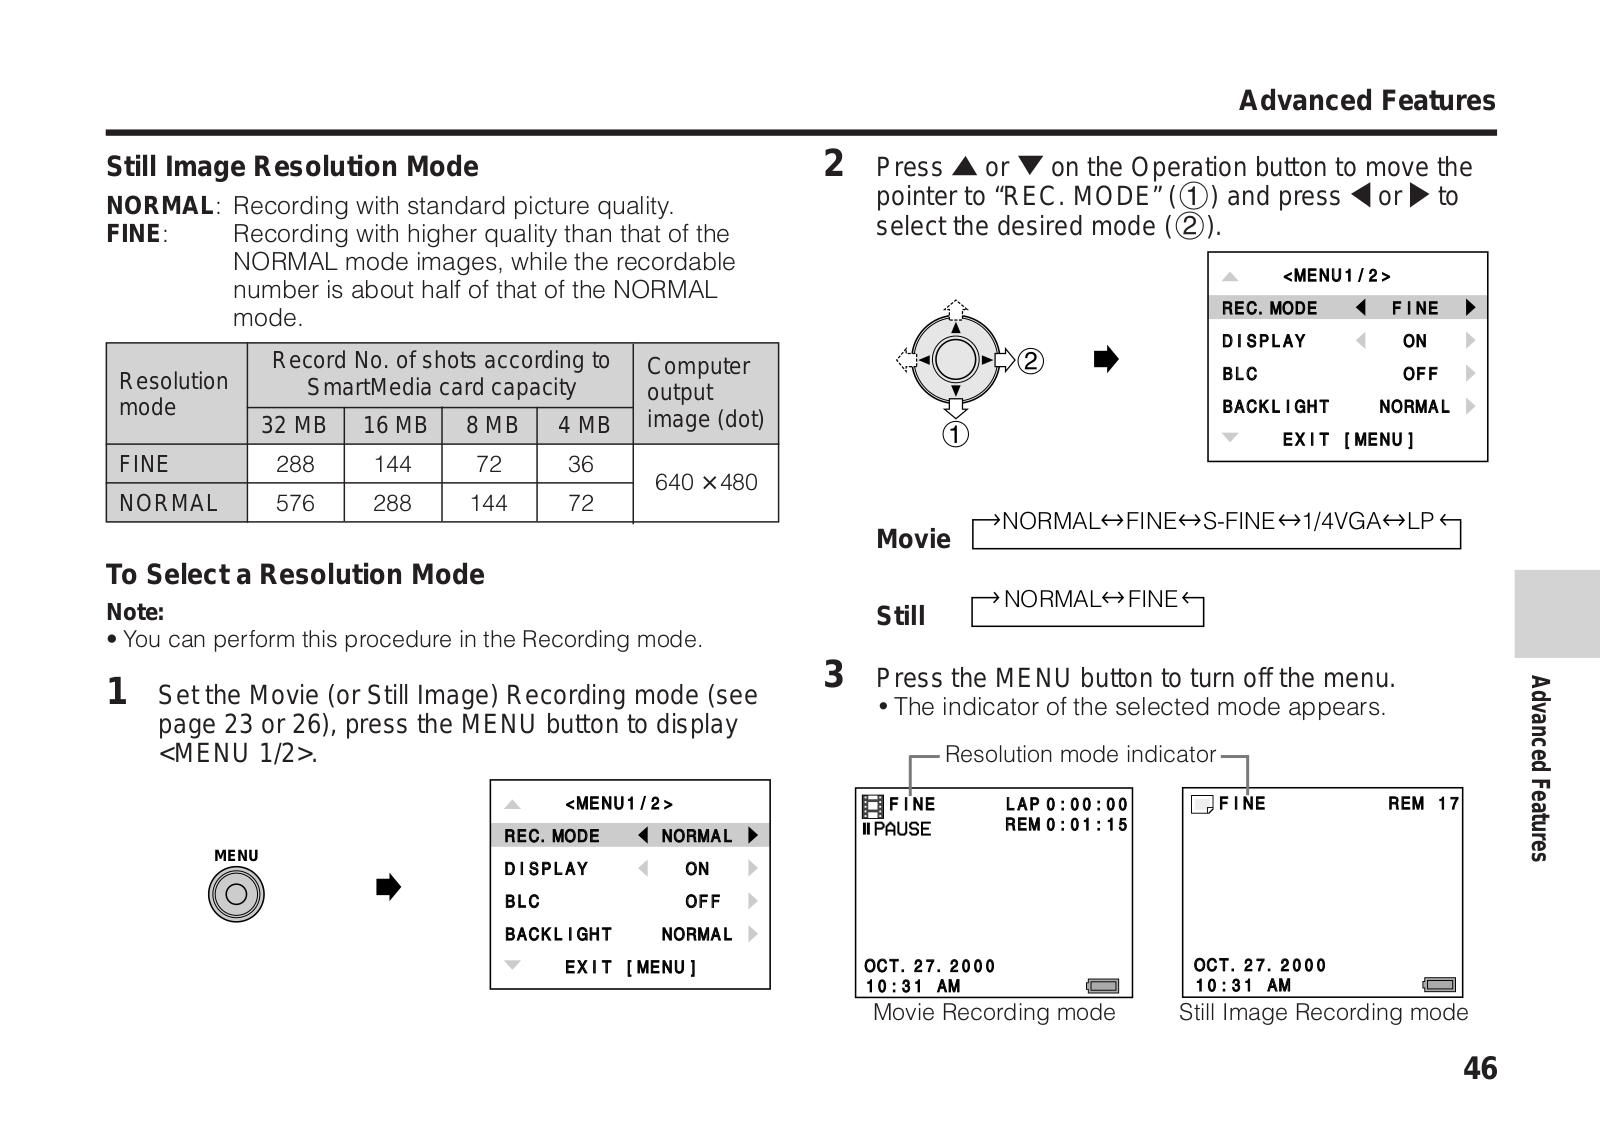
Still Image Resolution Mode


2 Press 'or "on the Operation button to move the

NORMAL: Recording with standard picture quality.

pointer to “REC. MODE” (1) and press \ or | to

select the desired mode (2).


FINE:

Recording with higher quality than that of the


NORMAL mode images, while the recordable


<MENU1/2>


number is about half of that of the NORMAL


REC.MODE

FINE


mode.


2


DISPLAY

ON


Resolution


Record No. of shots according to

Computer


BLC

OFF


SmartMedia card capacity

output


mode


32 MB

16 MB

8 MB

4 MB

image (dot)

1


BACKLIGHT

NORMAL


EXIT [MENU]


FINE


288

144

72

36

640 × 480


NORMAL


576

288

144

72

NORMAL FINE S-FINE 1/4VGA LP


Movie


To Select a Resolution Mode


NORMAL

FINE


Note:


Still


• You can perform this procedure in the Recording mode.

1 Set the Movie (or Still Image) Recording mode (see page 23 or 26), press the MENU button to display <MENU 1/2>.


<MENU1/2>


REC.MODE

NORMAL

MENU

DISPLAY

ON


BLC

OFF


BACKLIGHT

NORMAL


EXIT [MENU]


3 Press the MENU button to turn off the menu.

The indicator of the selected mode appears.

Resolution mode indicator


FINE

REM 17


FINE

LAP ‰:‰‰:‰‰


REM ‰:‰1:15


OCT.27.2‰‰‰

OCT.27.2‰‰‰


1‰:31 AM


1‰:31 AM


Movie Recording mode

Still Image Recording mode

Features Advanced

46

Advanced Features

Advanced Features

Recording Backlit Subjects


2 Press 'or "on the Operation button to move the

When the subject is backlit, the image will be darkened in

pointer to “BLC” (1) and then press | (2).

The BLC (Backlight compensation) setting mode

the regular recording. The following procedure makes it

screen appears.


possible to brighten the subject and suppress the whitening


of the background to improve the image.


1

<MENU1/2>

Example:


REC.MODE

NORMAL

• Setting during a movie recording.


DISPLAY

ON


1 During a movie recording (see page 23), press the


BLC

OFF


BACKLIGHT

NORMAL

MENU button to display <MENU 1/2>.


EXIT [MENU]


<MENU1/2>


MENU

REC.MODE

NORMAL

2


DISPLAY

ON


BLC

OFF


BACKLIGHT

NORMAL


OFF


EXIT [MENU]


EXIT [MENU]


3 Press \ or | to select “ON”.


ON


EXIT [MENU]


47


Advanced Features

4 Press the MENU button to turn off the BLC setting

Macro Shots

mode screen.


Slide the projection of the Focus (Macro/Normal) select

The BLC indicator appears.


switch to the

mark, when a subject is at a short distance


NORMAL

LAP ‰:‰‰:‰‰

(min. 4˝ (10 cm)) from the lens.


REM ‰:‰3:45


MENU


Focus select switch


Normal focus


OCT.27.2‰‰‰


1‰:31 AM


BLC indicator

Macro focus

Notes:


• To cancel the backlight compensation, press “OFF” in step 3.


• The compensation setting returns to “OFF”, whenever the


power is turned off.


Normal focus

:


The focal distance will be about 24˝ (60 cm) to .

Recording outdoors or a bust shot indoors

Macro focus :

The focal distance will be about 4˝ (10 cm).

Recording a close-up shot outdoors or indoors

Note:

• Slide the switch until it stops at the end.

Features Advanced

48

Advanced Features

Advanced Features

Time-Lapse Movie Recording


1 Set the Movie Recording mode (see page 23), then

Use the Time-Lapse Movie mode when you want to record a

press the MENU button to display <MENU 1/2>.


extremely slow-moving subject. When playing back

<MENU1/2>

normally, you can enjoy the movie which appear to be

REC.MODE

NORMAL

moving 10 times, 40 times or 100 times faster than an actual

MENU

ON

subject’s motion.


DISPLAY


BLC

OFF

Precautions:


BACKLIGHT

NORMAL

• We recommend that you use the supplied AC adapter as the

EXIT [MENU]

power source (see page 16) and a tripod for this function.

2 Press 'or "on the Operation button to move the

• This function cannot record sounds.


• Extremely short recording time may not be available for the

pointer to “TIME LAPSE” in <MENU 2/2>.


Time-Lapse Movie mode.


Example:


<MENU2/2>

• Recording a blooming flower in ×100 mode of the time-lapse

W/B

AUTO

movie. The motion for 8-hour is played back in about 5

TIME LAPSE

OFF

minutes.


BEEP

ON


Recording time


CLOCK SET


EXIT [MENU]

1 sec.

100 sec.

8 hr.


Playback time

about 5 min.

49

Loading...
+ 34 hidden pages