

Page 1
ENGLISH
LIQUID CRYSTAL DISPLAY CAMCORDER
VL-Z5E
VL-Z3E
OPERATION MANUAL
Page 2
ENGLISH
OPERATION MANUAL
WARNING
To prevent fire or shock hazard,
do not expose this apparatus to
dripping or splashing. No
objects filled with liquids, such
as vases, should be placed on
the apparatus.
This equipment should be used
with the recommended AC
adapter or battery pack.
CAUTION
To prevent electric shocks and
fire hazards, do NOT use any
other power source.
CAUTION
To prevent shock, do not open the
cabinet. No user serviceable parts
inside. Refer servicing to qualified
dealer or service centre.
Important:
Audio-visual material may consist
of copyrighted works which must
not be recorded without the
authority of the owner of the
copyright. Please refer to relevant
laws in your country.
Power supply:
This unit can be operated by
connecting it to either the AC
adapter or battery pack. The AC
adapter incorporates the AUTO
VOLTAGE (AC 110–240 V,
50/60 Hz) function.
NOTE
The LCD panel of this camcorder is a very high technology product with
more than 215,000 thin-film transistors*, giving you fine picture detail.
Occasionally, a pixel may appear on the screen as a fixed point of blue,
green, red, or black. Please note that this does not affect the
performance of your camcorder.
Trademarks
• Microsoft and Windows are either registered trademarks or trademarks of Microsoft
Corporation in the United States and/or other countries.
• DPOF is a trademark of CANON INC., Eastman Kodak Company, Fuji Photo Film
Co., Ltd. and Matsushita Electric Industrial Co., Ltd.
• All other brand or product names are registered trademarks or trademarks of their
respective holders.
*Specifications are subject to change without notice.
Before using the camcorder, please read this operation manual
carefully, especially page vi.
Page 3
i
WARNING:
This Camcorder must be supplied only with DC 7.4 volts from a BTL226 battery or the AC adapter (UADP-A016WJZZ).
CAUTION:
As there are no user-serviceable parts inside the Camcorder or AC
adapter, do NOT remove their cabinets as touching parts inside could
result in electric shock. Please refer servicing to a qualified dealer or
a Camcorder service centre approved by Sharp.
Information for Australia/New Zealand Only
ENGLISH
NOTE
This Camcorder is a high technology product.
The LCD Panel comprises 215,280 TFT Transistors. Due to the high
density of transistors, it is possible that some pixels may fail.
Important:
Copyright may exist in material you wish to record.
Copying such material without permission of the relevant licensees or
owners of the copyright is prohibited by law.
Sharp is not in a position to authorize the recording of copyright works
and nothing in this operation manual should be read or implied as giving
that authority.
Page 4
ii
Part Names ............................................................. 1
Warning Indicators .................................................. 4
Operation References
Preparation
Basic Operations
Attaching and Removing the Battery Pack .............6
Charging the Battery Pack ...................................... 8
Powering the Camcorder from an AC Outlet .......... 9
Inserting and Removing a Cassette ..................... 10
Inserting and Removing a Card ............................ 11
Installing the Lithium Batteries ..............................12
Setting the Date and Time .................................... 14
Using the Lens Cap .............................................. 15
Adjusting the Hand Strap ..................................... 16
Using the Grip ....................................................... 16
Detaching the Lens Hood .....................................17
Using the Viewfinder .............................................17
Using the LCD Monitor ......................................... 19
Tips on Recording Positions ................................. 20
Camera Recording
Selecting the Camcorder Mode ............................ 21
Easy Camera Recording on Tape in
Full Auto Mode ................................................... 22
Zooming ................................................................23
Power Standby Mode ........................................... 24
Turning on/off the Backlight .................................. 24
Auto Focus ............................................................25
Macro Shots ..........................................................25
Remaining Recording Time Display ..................... 26
Remaining Battery Power Display ........................ 26
Playback
Tape Playback ...................................................... 27
Volume Control...................................................... 28
Still ........................................................................ 28
Video Search......................................................... 28
Using Earphones
(Commercially Available, VL-Z5 only) ................ 29
Adjusting the Phones Volume (VL-Z5 only) .......... 29
Watching Playback on a TV ..................................30
Contents
Supplied Accessories ......................................................................................... v
Optional Accessory ............................................................................................ v
Precautions ........................................................................................................ vi
Page 5
iii
Useful Features
Control Buttons ..................................................... 31
Using the Mode Screens ...................................... 31
Using the Menu Screens....................................... 32
Camera Recording
Setting the Digital Zoom ....................................... 33
Backlight Compensation (BLC) ............................ 34
Gain-up ................................................................. 35
Fade in and Fade out ............................................ 36
Quick Return ......................................................... 37
Edit Search............................................................ 38
Still Recording on Tape ......................................... 38
Digital Image Stabilization (DIS) ........................... 39
Self Recording ...................................................... 40
Wide Screen (16:9) ............................................... 42
Recording in LP (Long Play Recording) Mode .....43
Windbreak ............................................................. 44
Selecting the 16-bit Audio Recording Mode......... 45
Playback
Using the Remote Control
(Only supplied with VL-Z5) ................................. 46
Tape Playback Functions with the Remote
Control (Only supplied with VL-Z5) .................... 47
Selecting the Date and Time of Recording
Display ................................................................ 48
Picture Effect Playback .........................................49
Rotate Playback ....................................................50
Copying an Image from Tape to Card .................. 51
Advanced Features
Camera Recording
Manual Focus ....................................................... 52
Returning to Auto Focus ....................................... 53
Displaying the Manual Setting Screen .................. 53
White Balance Lock .............................................. 54
Manual Iris ............................................................ 55
Manual Gain .......................................................... 56
Setting the Camcorder to Full Auto Mode............. 57
Scene Menu (Program AE) ................................... 58
Page 6
iv
Advanced Features
Playback
Using the Time Code ............................................ 59
Audio Dubbing Feature......................................... 60
Selecting the Audio Playback Mode ..................... 62
Editing ...................................................................63
Recording from an External Source ...................... 64
Editing with the DV Terminal (IEEE1394) .............. 66
Using the Camcorder as a Converter ...................68
Digital Still Camera
Features
Camera Recording
Card Recording .................................................... 70
Selecting the Picture Quality ................................. 71
Recording with the Self-timer ................................ 72
Formatting a Card .................................................73
Setting the File Numbering Method ...................... 74
Playback
Card Playback ...................................................... 75
Playback Zoom with the Remote Control (Only
supplied with VL-Z5) .......................................... 76
Delete Protection................................................... 77
Deleting Stored Images ........................................ 78
Print Order............................................................. 80
Transferring Data on Card to Computer ............... 82
Installing the USB Driver ................................... 82
Slide Show Playback ............................................ 85
Appendix
Picture/Backlight Adjustments ..............................86
Turning off the Confirmation Sound ...................... 88
Setting the Camcorder to Factory Presettings ...... 89
Demonstration Mode ............................................ 90
Useful Information .................................................91
Troubleshooting .................................................... 97
Specifications ..................................................... 101
On-screen Display Index .................................... 102
Note:
• Before requesting service, please read “Troubleshooting” carefully. (See pages 97–
100.)
Contents
Page 7
v
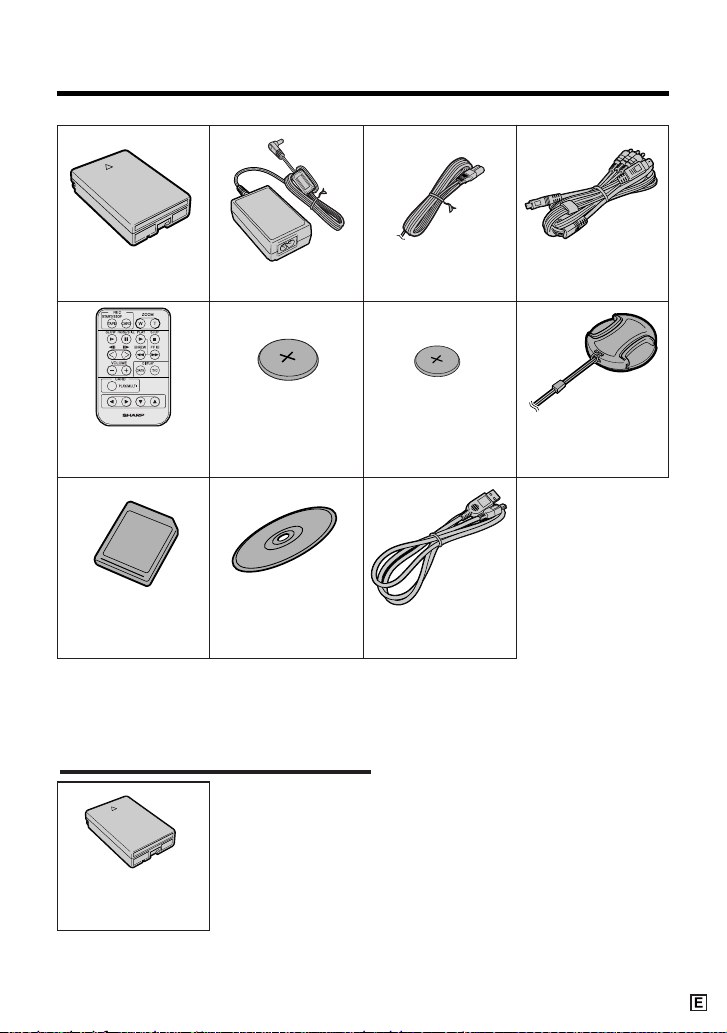
Supplied Accessories
Battery pack
BT-L226
Audio/video/S-video
cable
CR2025 type
lithium battery
for remote control
CR1216 type
lithium battery
for camcorder Lens cap
CD-ROM
8 MB SD Memory Card
Remote control
USB cable
Standard-life
battery pack
BT-L226
*
The accessories with * mark are not supplied with VL-Z3 (only supplied
with VL-Z5).
*
Optional Accessory
AC adapter
Power cord
*
Note:
• The accessory above may not be available in selected areas.
Page 8
vi
Precautions
• Before recording an important scene,
please perform the recording test, then
playback to check if the scene was recorded properly. If noise occurs, use a
commercially available cleaning tape to
clean the video heads (see page viii).
• When the camcorder is not in use, re-
member to remove the cassette tape,
turn off the power, and disconnect the
camcorder from the power source.
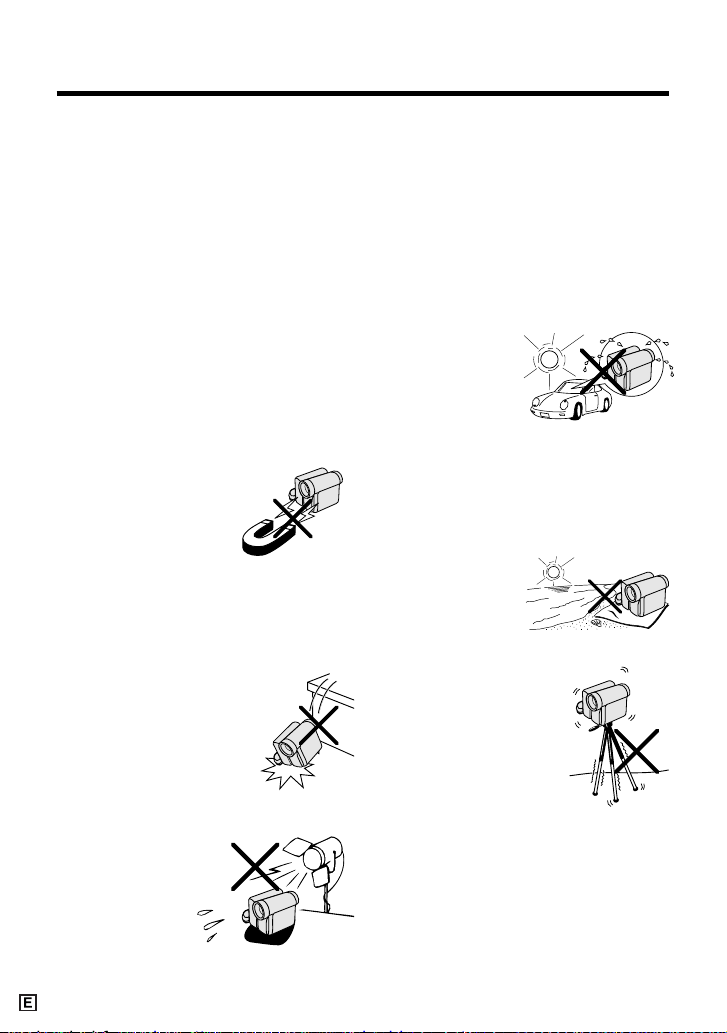
• Do not aim the lens at the sun.
Do not allow direct sunlight to strike the
camcorder lens, whether or not recording
is in progress, as it may damage the CCD
sensor. Be particularly careful when recording outside.
• Avoid magnetic sources.
Using the camcorder near
strong fluorescent lights,
motors, televisions, or
other magnetic sources
may adversely affect recorded images.
• Using the camcorder near a broad-
casting station or other powerful transmission source may cause buzzing or
picture deterioration.
• Avoid shocks and dropping.
Do not drop or otherwise subject the camcorder to hard
shocks or strong vibrations.
Bumping or striking the unit
during recording will generate noise in the recorded
image.
• Avoid placing the
camcorder in close
proximity to lighting
equipment.
The heat from incandescent lights
may deform the
camcorder, or cause
it to malfunction.
• Always respect prohibitions or restric-
tions on the use of electronic equipment
on commercial flights or in other sensitive areas.
• Be aware of the temperature and humid-
ity.
You can use your camcorder at 0°C to
L40°C, and at 30% to 80% relative humidity. Do not store the unit in an
unventilated car in the summer, in direct
sunlight, or near
strong heat
sources; this can
result in severe
damage to the unit
casing and circuitry.
• Avoid situations where water, sand, dust
or other foreign matter could get on or
inside the camcorder, and do not use or
leave your camcorder in areas with excessive smoke, steam or moisture.
Such environments can cause malfunctions or cause mildew to form on the
lenses. Be sure to
keep the unit in a
well-ventilated location.
• Some small, portable tri-
pods may be difficult to
attach and may not be
sturdy enough to support your camcorder. Be
sure to use only a
strong, stable tripod.
• When using your camcorder in a cold
environment, the LCD monitor screen often appears less bright immediately after the power is turned on. This is not a
malfunction. To prevent the camcorder
from becoming too cold, wrap it in a
thick cloth (a blanket, etc.).
Page 9
vii
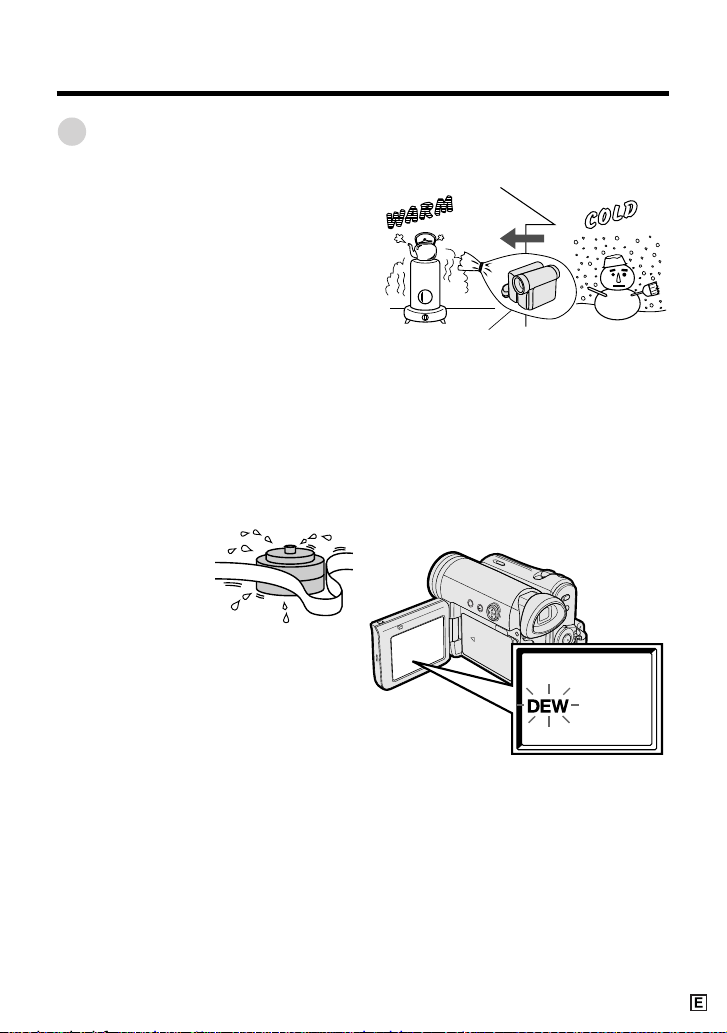
Dew Formation
• What is “dew formation”?
When cold water is poured into a glass,
dew drops form on the glass. This clinging
of water drops is called dew formation.
• When dew forms in your camcorder.
Dew will gradually form on the head drum
of your camcorder and make the video
tape stick to the head. This causes
damage both to the head and the tape.
When dew forms, recording and playback
may not function properly.
Dew is likely to form in the following
circumstances:
— When moving the camcorder from a
cold place to a warm place.
— When placing the camcorder in a cold
room which is then heated rapidly.
— When moving the camcorder outdoors
from an air conditioned room or car.
— When placing the camcorder in the
direct path of air
blowing from an air
conditioner.
— When placing the
camcorder in a
humid room.
• How to prevent trouble.
When using the camcorder in a place
where dew is likely to form, allow the
camcorder and the video tape to
acclimatise to the surroundings for about
one hour.
For example, when bringing the
camcorder indoors after skiing, place it in
a plastic bag.
1 Be sure to tightly seal the plastic bag
containing the camcorder.
2 Remove the bag when the air tem-
perature inside it reaches the temperature of the room.
• “Dew” warning feature
If dew forms, the word “DEW” flashes on
the screen, and the power will automatically turn off in approximately 10 seconds.
Plastic bag
1 If “DEW” flashes, remove the cassette,
leave the cassette compartment open,
and wait for a few hours to allow the
camcorder to acclimatise to the
surrounding temperature.
2 To use the camcorder again, turn on the
power after waiting for a few hours. Be
sure that “DEW” has disappeared.
3 Do not insert a cassette while “DEW” is
flashing; this may result in damage to
the tape.
4 Since dew forms gradually, it may take
10 to 15 minutes before the dew
warning feature engages.
Page 10
viii
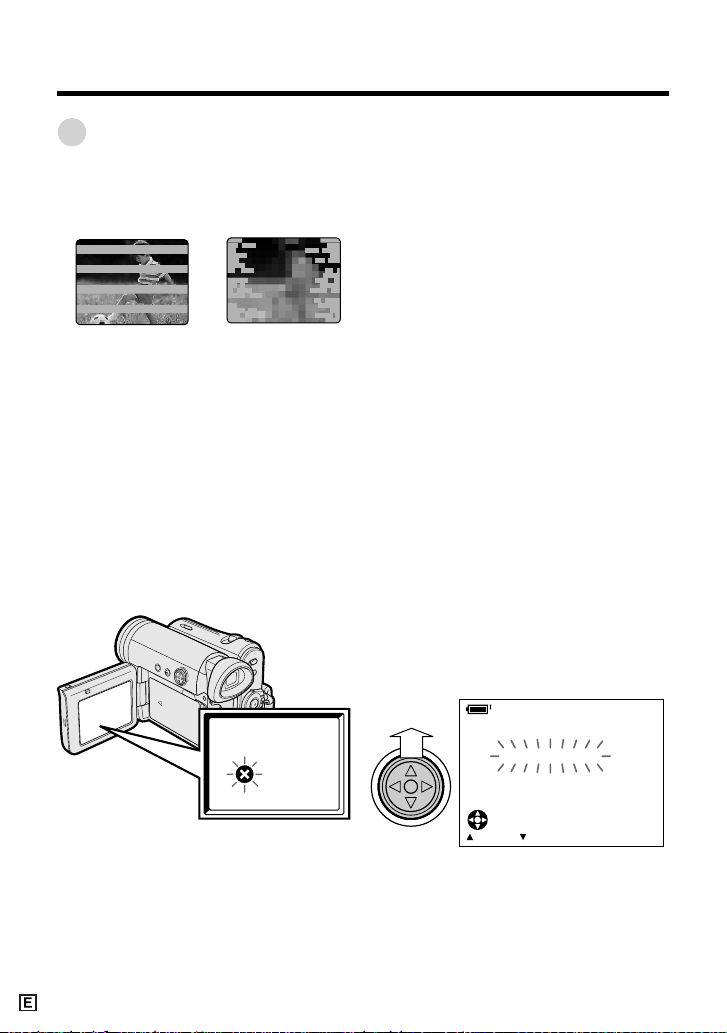
Dirty Video Heads
When the video heads have become
clogged with dirt (dust and tape coating
particles),
• mosaic-like noise appears on the
playback picture. (see illustrations above)
• playback pictures do not move.
• during playback, the whole screen
becomes blue.
Using a Cleaning Tape (Commercially Available)
Available mode:
Tape Playback
You can clean the video head with a
commercially available cleaning tape.
Notes:
• Excessive use of the cleaning tape may
cause damage to the video heads. Please
read the instructions accompanying the
cleaning tape carefully before using it.
• The fast forward and rewind functions cannot
be used when the cleaning tape is in the
camcorder.
• If the video heads again become clogged
with dirt soon after cleaning, this might be
caused by a damaged tape. In this case,
stop using that cassette immediately.
1 Insert a cleaning tape into the
camcorder.
2 Set the camcorder to Tape Playback
mode.
• The video head cleaning screen
appears.
3 Press m on the Operation button to
begin video head cleaning.
• “NOW CLEANING” flashes during
cleaning.
• After about 20 seconds, video head
cleaning automatically finishes, and
“EJECT THE CASSETTE.” displays.
4 Remove the cleaning tape.
To cancel cleaning, press l.
Causes of video head clogging
• High-temperature and high-humidity
environment
• A lot of dust in the air
• Damaged tape
• Worn tape
• Long-time use
• Dew formation
If the video heads become clogged, the
v indicator appears on the screen. Contact
the nearest SHARP service centre or your
dealer for further advice.
Precautions
STOPSTART
CLEAN I NG
CLEANINGNOW
Striped noise
Mosaic noise
Page 11
1
Operation References
Operation References
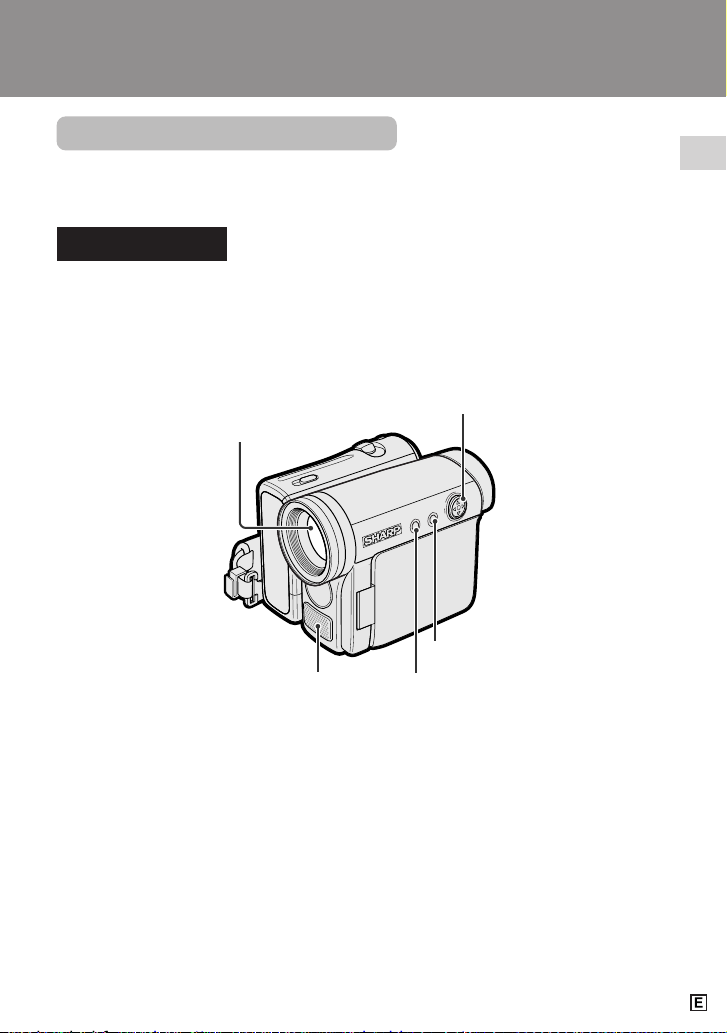
Part Names
For details on the use of each part, refer to the page number indicated in
parentheses.
Front view
Zoom lens
DISPLAY button (p. 31)
Operation button (p. 31)
Stereo microphone
LCD LAMP button (p. 24)
Page 12
Operation References
2
Operation References
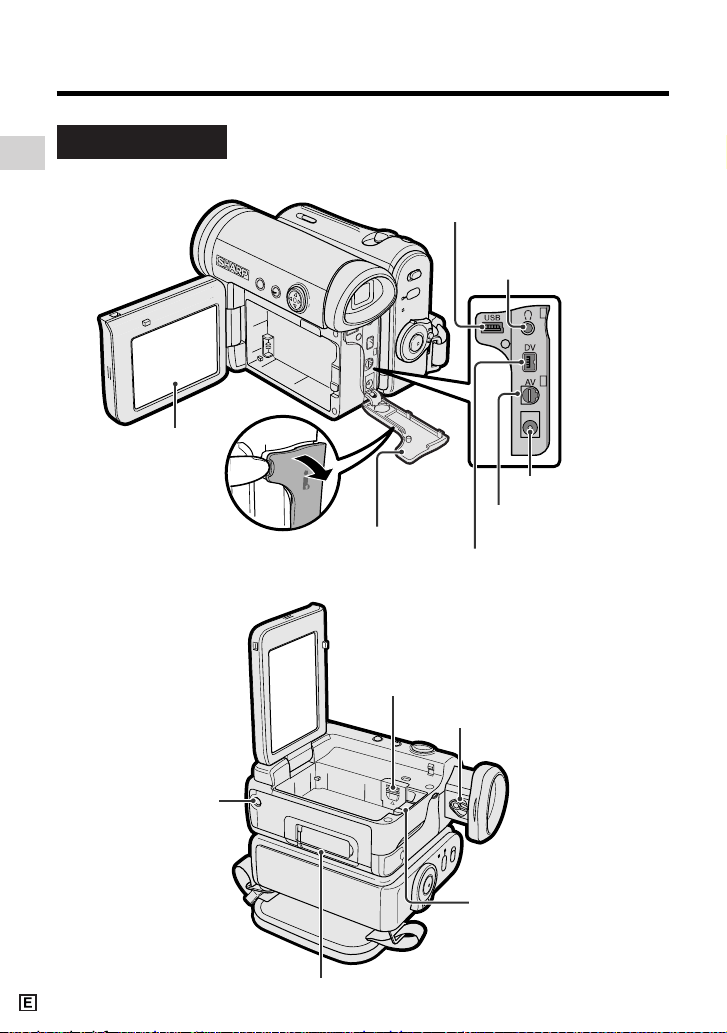
Lithium battery cover (p. 12)
Tripod socket*
Card slot cover (p. 11)
Left view
Dioptre adjustment dial (p. 18)
Battery release (pp. 7, 12)
* When attaching a tripod
with a guide pin, do not
attach the pin to the bottom
of the camcorder.
LCD monitor
(p. 19)
Earphones jack
(VL-Z5 only) (p. 29)
DV terminal (pp. 66, 68)
USB terminal (p. 83)
DC IN jack (pp. 8, 9)
AV terminal
(pp. 30, 63, 64, 68)
Terminal cover
(pp. 29, 30, 63, 64, 66, 68, 83)
Page 13
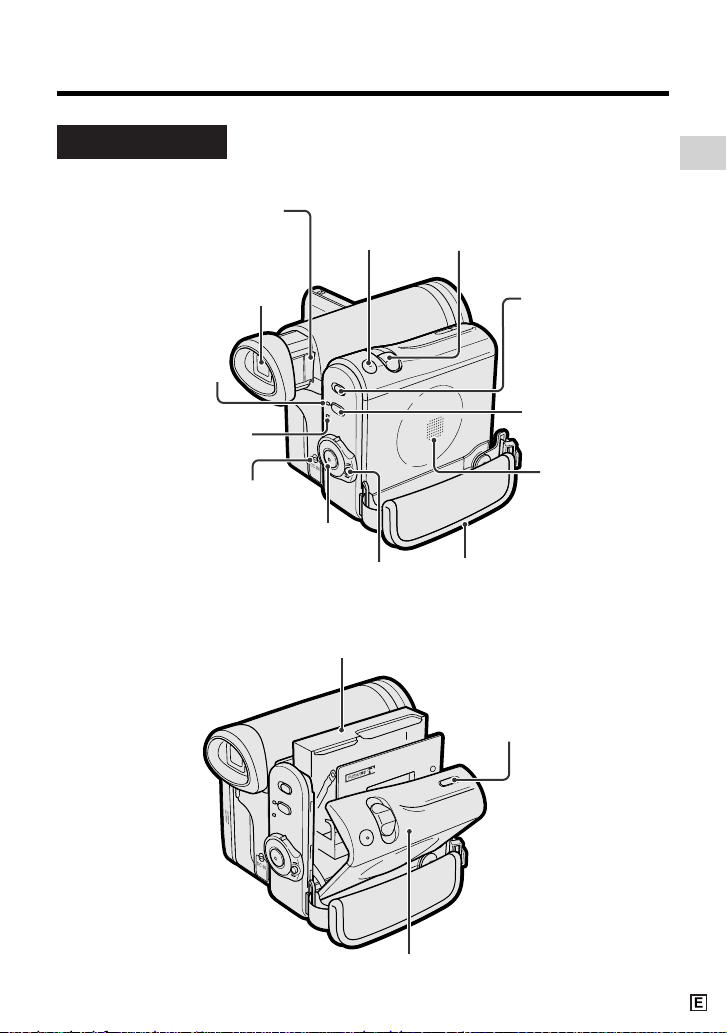
3
Operation References
Viewfinder (pp. 17, 18)
Power Zoom Wide angle/
Telephoto control (p. 23)/
VOLume control (p. 28)
Media Selection
switch (V Tape
mode/u Card
mode selection
switch) (p. 21)
Start/Stop button
(p. 22)
PHOTO button
(pp. 38, 51, 70)
Power switch (v Camera
Recording mode/w Playback
mode select switch) (p. 21)
STANDBY button
(p. 24)
STANDBY indicator
(p. 24)
POWER/CHARGE
(RED) indicator
(pp. 8, 9, 22)
DC IN jack cover
(pp. 8, 9)
Cassette holder (p. 10)
Cassette compartment
door release (p. 10)
Cassette compartment door (p. 10)
Right view
Hand strap (p. 16)
Speaker
Window cleaning cover
(p. 95)
Page 14
Operation References
4
Operation References
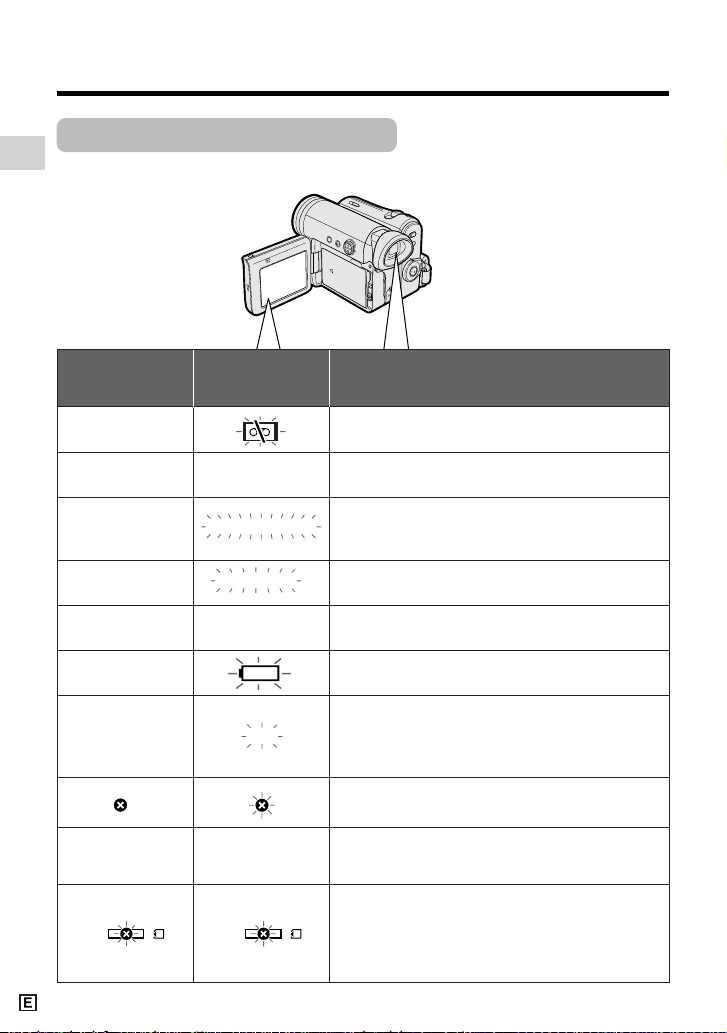
Warning Indicators
If a warning indicator appears on the screen, follow the specified instructions.
Displayed for the
first 3 seconds
Displayed after
3 seconds
Description of warning
There is no video cassette in the camcorder.
Insert a cassette (see page 10).
INSERT
A CASSETTE.
BATTERY IS
TOO LOW.
PROTECT. TAB
CHANGE THE
CASSETTE.
EJECT THE
CASSETTE.
EJECT THE
CASSETTE.
CASSETTE NOT
RECORDABLE.
The video cassette is defective and should be
removed (see page 10).
The erasure protect tab on the video cassette
has been slid to the record-protect position,
preventing recording (see page 92).
The tape is about to end. Prepare a new
cassette.
THE
ENDS SOON.
TAPE
DEW
LAMP
LAMP
DEW
The tape has reached the end. Replace it with a
new cassette (see page 10).
The battery is almost depleted. Replace it with
a fully charged battery pack (see pages 6, 7).
Dew has formed inside the camcorder. Wait a
few hours for the dew to dry away (see page vii).
About 10 seconds after this warning appears,
the camcorder automatically turns off.
The video heads are clogged and should be
cleaned (see page viii).
The fluorescent lamp behind the LCD monitor is
close to the end of its service life. Call your local
authorized Sharp dealer to have it replaced.
TAPE END
TAPE END
The battery is almost depleted when the
camcorder transfers data through the USB
cable. Use the AC adapter or fully charged
battery pack as the power source (see pages
6–9, 84).
USB USB
Page 15
5
Operation References
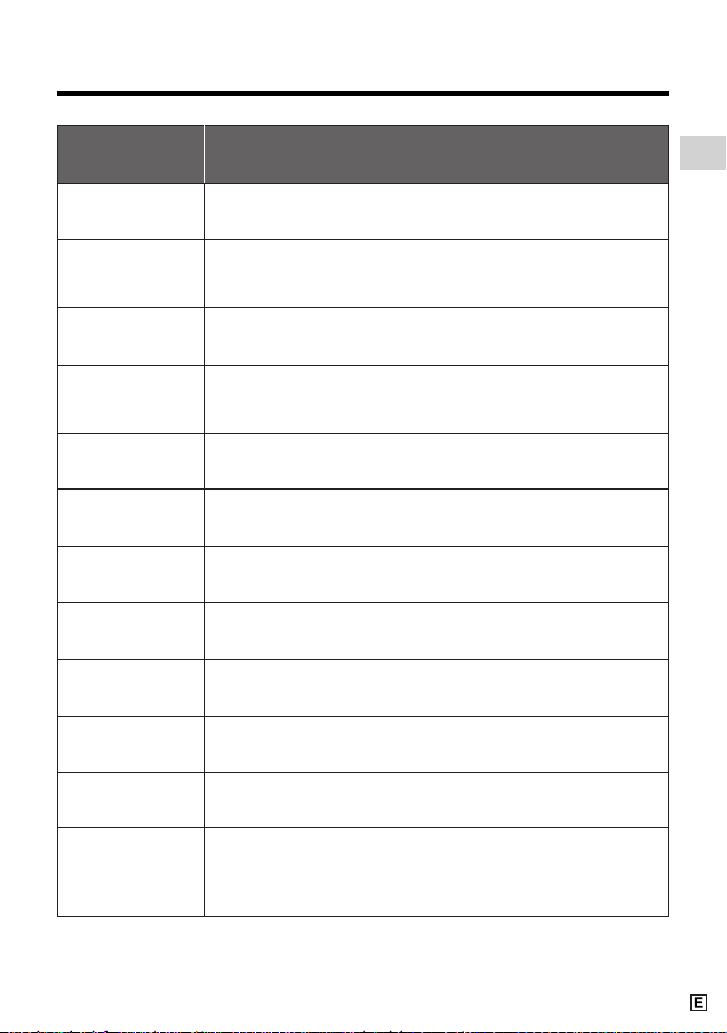
Note:
• N indicates a flashing display.
Displayed for
5 seconds
Description of warning
The card is not inserted or is inserted improperly. Check that it is
properly inserted (see page 11).
The capacity of the card is full and cannot store any more images.
Delete unnecessary images (see page 78) or replace the card with
a new one (see page 11).
The card has no images recorded in the format the camcorder can
recognize.
The images in the card are corrupted or recorded in a format
which is not compatible with this camcorder. Format the card to
use it with this camcorder (see page 73)*.
The card has not been formatted with this camcorder. Format the
card (see page 73)*.
The card is write-protected (see page 11).
You are trying to delete a protected image. Cancel the protection
setting (see page 77).
The selected image cannot be read by this camcorder. Format the
card to use it with this camcorder (see page 73)*.
The card cannot record any data due to a problem with the card or
data on the card. Replace the card (see page 11).
NO
MEMORY CARD
MEMORY
FULL
CARD
NO DA TA ON
MEMORY C ARD
MEMORY C ARD
ERROR
FORMAT
MEMORY C ARD
MEMORY C ARD
PROTECTED
PROTECTED
DATA
MEMORY C ARD
RE AD ERROR
CANNOT
STORE DATA
The camcorder cannot record with the Start/Stop button in Card
Recording mode. Press the PHOTO button (see page 70).
PLEASE USE
PHOT O BUT T ON
The print order cannot be set to more than 999 images.
MA X I MUM
9 99 IMAGE S
You cannot record any image with a file number bigger than 999–
9999. Set FILE NO. menu item to “RESET” (see page 74), then
format the card (see page 73)* or replace the card with a new one
(see page 11).
* Formatting a card erases all stored images, including delete-protected images. Be sure to
backup important data on your computer or other media before formatting the card.
MA X I MUM
F I LE NUMBER
Page 16
Preparation
Preparation
6
Preparation
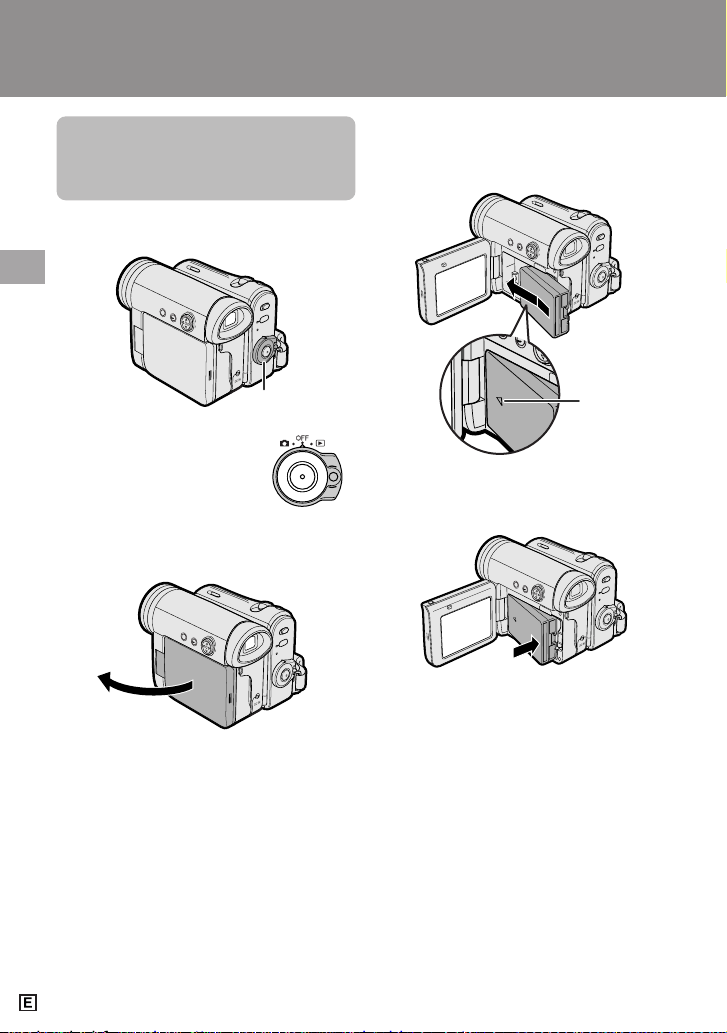
Attaching and
Removing the Battery
Pack
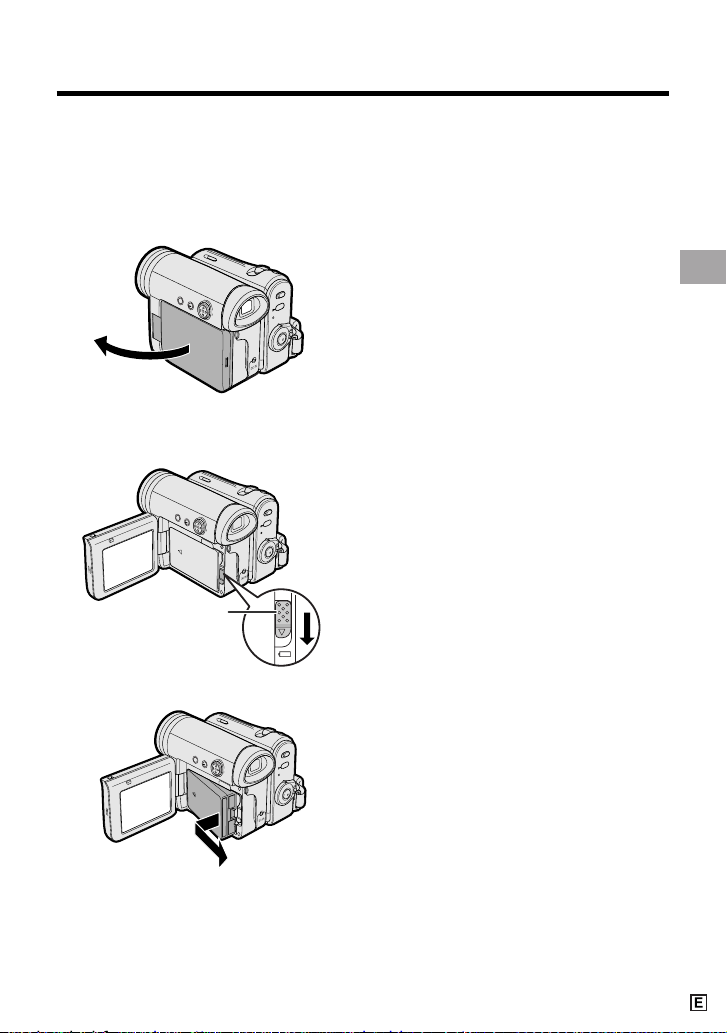
Attaching
1 Make sure that the Power
switch is set to OFF.
2 Open the LCD monitor to a 90° angle
to the camcorder body.
3 Slide the battery pack in the direction
of the arrow with the “m” mark facing
out.
4 Push the battery pack in the direction
of the arrow until it clicks.
90˚
Power switch
“m” mark
Page 17
7
Preparation
Removing
1 Make sure that the Power switch is
set to OFF, then open the LCD
monitor to a 90° angle to the
camcorder body.
90˚
2 Slide the battery release in the
direction of the arrow.
3 Take the battery pack out.
Notes:
• BEFORE REMOVING THE BATTERY PACK,
ALWAYS STOP RECORDING OR PLAYBACK AND TURN THE POWER OFF.
Removing the battery pack while shooting or
during playback may damage the tape by
causing it to wrap around the video head
drum or destroy the card, rendering it
unreadable and unwritable.
• Remove the battery pack from the camcorder
if you will not use the camcorder for a long
period of time.
• Make sure that the battery pack is firmly
attached during operation. If it is not, the
battery pack may come off or camcorder
operation may fail because of the poor
contact pressure.
• To prevent damage to the battery pack when
removing, be sure to firmly hold the battery
pack while pressing the release.
• Use only SHARP model BT-L226 battery
packs with this camcorder. Use of other
batteries may create a risk of fire or
explosion.
• Before closing the LCD monitor, make sure
the battery pack is properly attached to the
camcorder, otherwise the monitor may be
damaged.
Battery release
Page 18
Preparation
Preparation
8
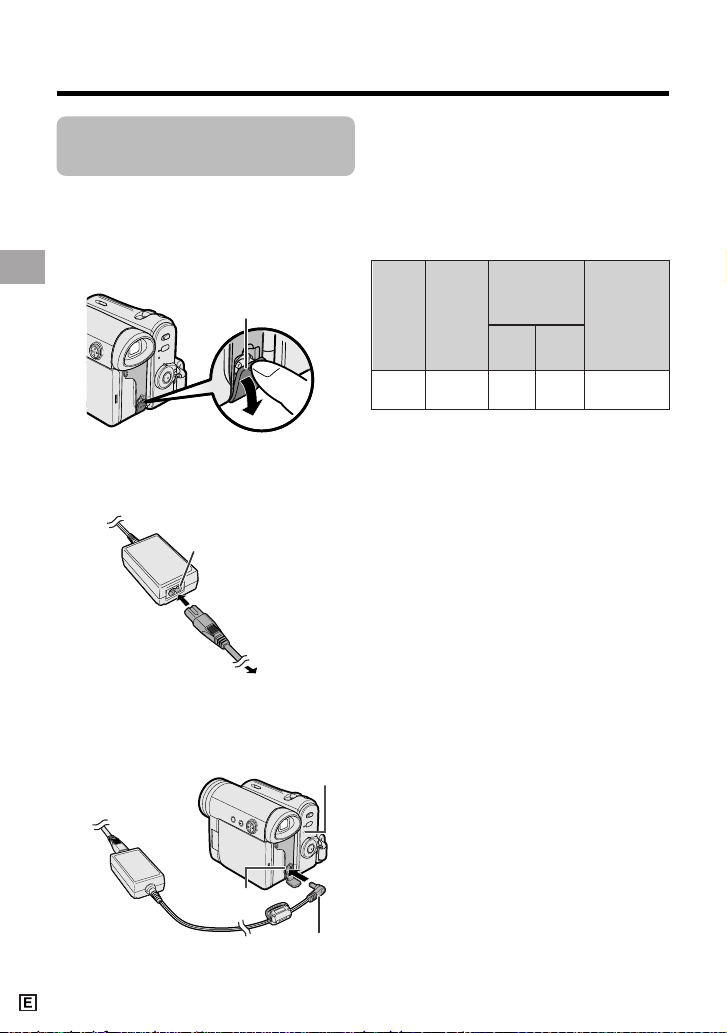
Charging the Battery
Pack
1 Attach the battery pack on the
camcorder, and make sure that the
Power switch is set to OFF.
2 Open the DC IN jack cover.
3 Connect the supplied power cord to
the AC power socket on the AC
adapter, and insert the AC plug into a
power outlet.
4 Insert the DC plug into the DC IN
jack of the camcorder.
• The POWER/CHARGE (RED)
indicator lights up red.
• The POWER/CHARGE (RED)
indicator turns off when the battery is
charged.
4 Remove the DC plug from the DC IN
jack, then remove the AC adapter
from the power outlet.
BT-L226
Charging
time
Battery
pack
Max.
continuous
recording time
Max.
continuous
playback time
on LCD
120
120 105
Charging time and maximum
continuous recording and playback
times in Tape modes
LCD
closed
LCD
open
105
• The chart specifies the approximate times in
minutes.
Notes:
• Charge the battery pack between 10°C and
30°C. The battery pack may not charge
properly at temperatures too low or too
high.
• The battery pack and AC adapter become
warm during charging. This is not a
malfunction.
• Using the zoom (see page 23) and other
functions or turning the power on and off
frequently will increase power consumption. This may result in a decrease in the
actual recording time compared to the
maximum continuous recording time
listed above.
• The charging time and recording time may
vary depending on the ambient temperature and the condition of the battery pack.
• See pages 94 and 95 for more information on
using the battery pack.
• Charge only SHARP model BT-L226 battery
packs. Other types of battery packs may
burst, causing personal injury and damage.
• When attaching the supplied audio/video/Svideo cable or USB cable, remove the DC
plug, open the terminal cover and connect it.
DC IN jack
AC power socket
To power
outlet
DC IN jack cover
POWER/CHARGE (RED)
indicator
DC plug
Page 19
9
Preparation
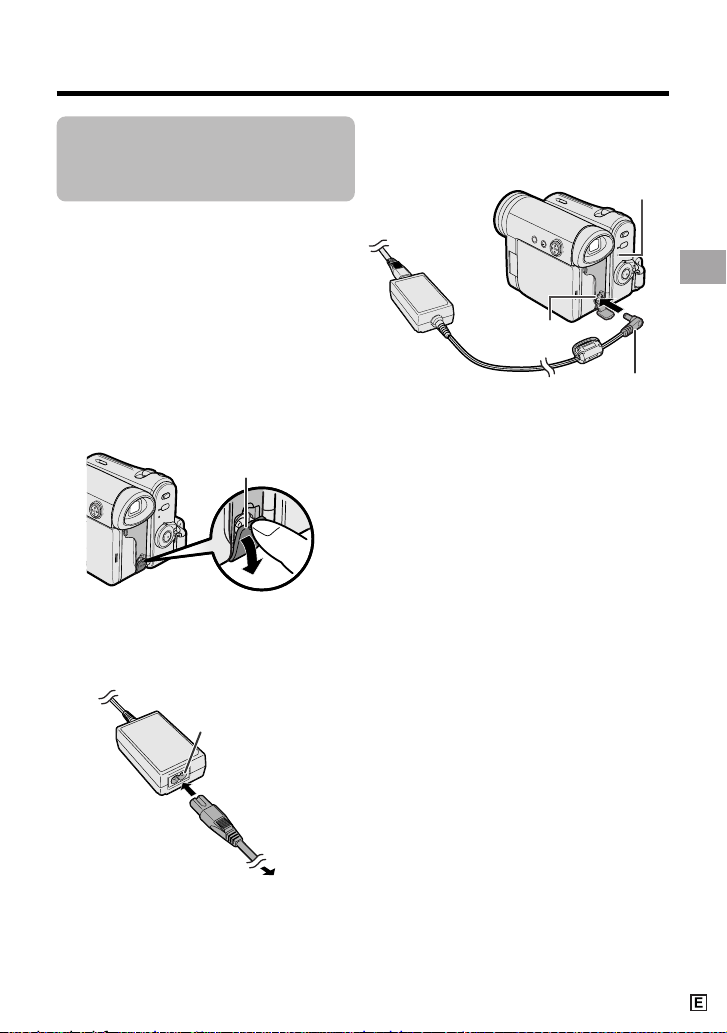
Powering the
Camcorder from an
AC Outlet
You can also power the camcorder from a
power outlet by using the supplied AC
adapter.
Note:
• The supplied AC adapter is specially
designed for use with this camcorder, and
should not be used as a power supply for
other camcorders.
1 Make sure that the Power switch is
set to OFF.
2 Open the DC IN jack cover.
3 Connect the supplied power cord to
the AC power socket on the AC
adapter, and insert the AC plug into a
power outlet.
To power
outlet
AC power socket
4 Insert the DC plug into the DC IN
jack of the camcorder.
5 Hold down the Lock button and set
the Power switch to v or w.
• The POWER/CHARGE (RED)
indicator lights up green.
Notes:
• BEFORE REMOVING THE DC PLUG,
ALWAYS STOP RECORDING OR PLAYBACK AND TURN THE POWER OFF.
Removing the DC plug while shooting or
during playback may damage the tape by
causing it to wrap around the video head
drum or destroy the card, rendering it
unreadable and unwritable.
• Disconnect the AC adapter from the
camcorder if you will not use the camcorder
for a long period of time.
DC IN jack
DC IN jack cover
POWER/CHARGE (RED)
indicator
DC plug
Page 20
Preparation
Preparation
10
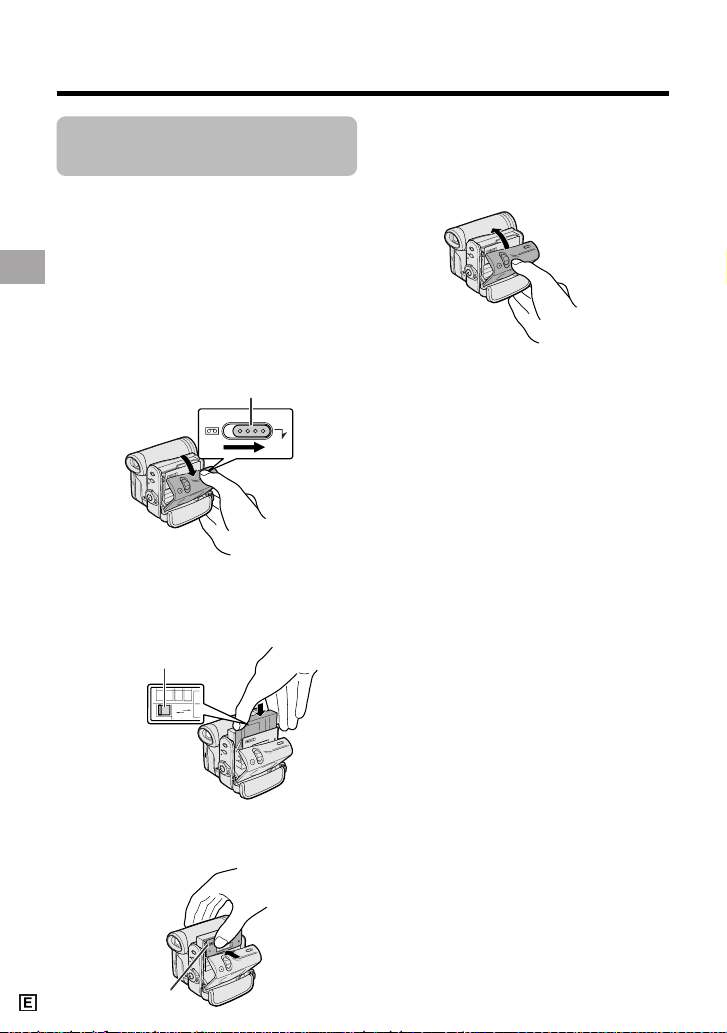
Inserting and
Removing a Cassette
Inserting
1 Attach the power source to the
camcorder, then slide and hold the
cassette compartment door release
as you open the cassette compartment door.
• After confirmation sound, the
cassette holder extends and opens
automatically.
2 Insert a commercially available Mini
DV cassette fully with the window
facing outwards, and with the erasure
protect tab facing upwards.
3 Press the “PUSH” mark gently until
the cassette holder clicks into place.
• The cassette holder retracts
automatically.
4 Wait for the cassette holder to fully
retract. Close the compartment door
by pressing its centre until it clicks
into place.
Removing
Perform step 1 above, then take out the
cassette.
Notes:
• Do not try to close the cassette compartment
door while the cassette holder is extending or
retracting.
• Be careful not to get your fingers caught in
the cassette holder.
• Do not apply force to the cassette holder
except when pressing the “PUSH” mark to
close it.
• Do not tilt the camcorder or hold it upside
down when you are inserting or removing a
cassette. It may damage the tape.
• Remove the cassette if you will not use the
camcorder for a long period of time.
• If you do not correctly close the cassette
holder in step 3, the cassette protection
mechanism of the camcorder might eject the
cassette. If this happens, repeat the insertion
procedure.
• Do not attempt to pick up the camcorder by
the cassette compartment door.
• If the battery power is too low, you may not
be able to eject the cassette. Replace the
battery pack with a fully charged one.
• You can only use Mini DV cassettes. Large
DV cassettes cannot be used. Be sure to use
Mini DV cassettes with the i
mark.
• See page 92 for more information on the
video cassette tapes intended for use with
this camcorder.
SAVE
REC
Cassette compartment door release
“PUSH” mark
Erasure protect tab
Page 21
11
Preparation
Inserting and
Removing a Card
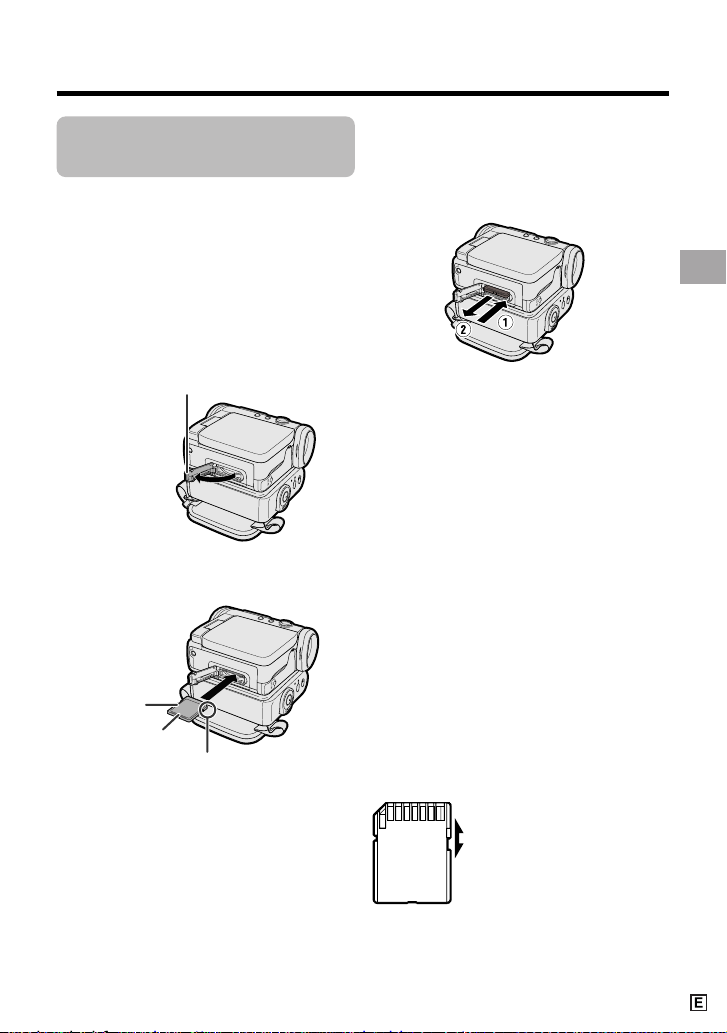
You can use an SD Memory Card (supplied
with VL-Z5) or a MultiMediaCard (commercially available) for storing still images.
Inserting
1 Make sure that the Power switch is
set to OFF.
2 Open the card slot cover.
3 Insert a card into the slot as shown
below, and push it in fully.
4 Close the card slot cover securely.
Back view
Locked position
Unlocked position
Removing
Perform steps 1 and 2 above, push the card
and release slowly (1). Then pull the card
straight out (2) as shown below.
Notes:
• You can use only the SD Memory Card or the
MultiMediaCard (see page 93).
• The card supplied with VL-Z5 is preformatted
for immediate use.
• See page 93 for more information on the
cards intended for use with this camcorder.
• Do not remove the card from the
camcorder while recording data on the
card (S indicator flashes during recording). This may delete the recorded image
or damage the card.
• You cannot insert or remove the card when
using a tripod.
About the write-protect
switch
SD Memory Card has a write-protect switch.
When the switch is set to the locked
position, you cannot record/delete data or
format the card. Set it to the unlocked
position to record/delete data or format the
card.
Card slot cover
Write-protect
switch
Label
Clipped corner
Page 22
Preparation
Preparation
12
Installing the Lithium
Batteries
Installing the Memory Battery
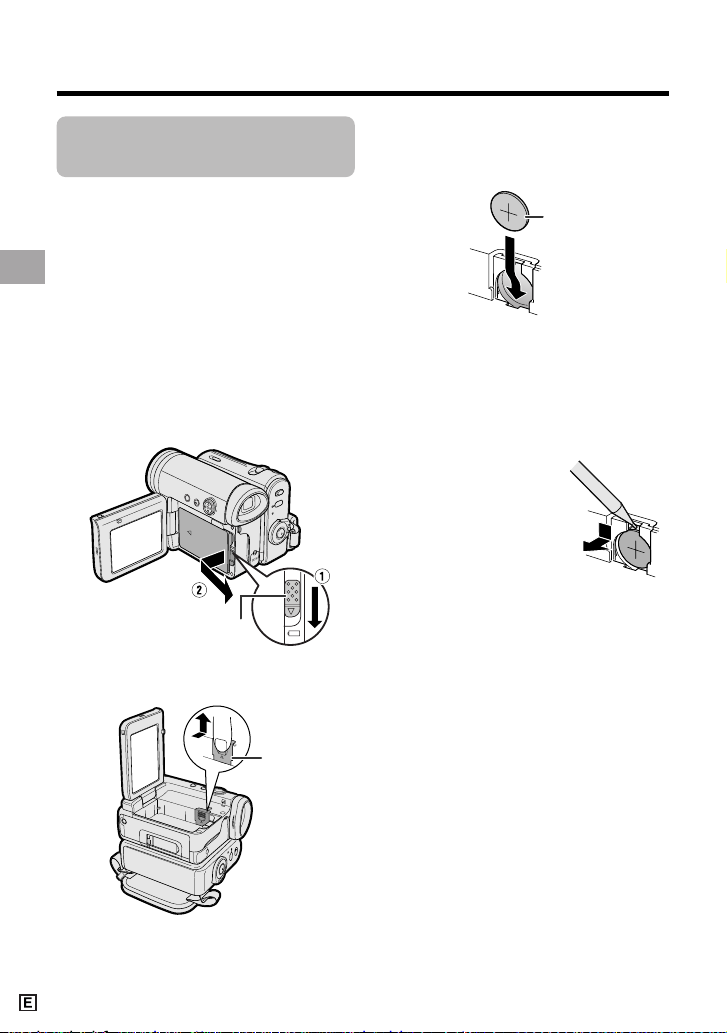
The supplied CR 1216 type lithium battery is
used to store the memory of the date and
time settings.
1 Make sure that the Power switch is
set to OFF.
2 Open the LCD monitor to a 90° angle
to the camcorder body.
3 Slide the battery release in the
direction of the arrow, then take the
battery pack out.
4 Pull out the lithium battery cover in
the direction of the arrow.
5 Insert the smaller lithium battery into
the compartment with the H side of
the battery facing out.
6 Close the lithium battery cover firmly
until it clicks into place.
Removing the Memory
Battery
Perform steps 1 to 4 above,
then lift out the battery by
using a pointed object such
as the tip of a ballpoint pen.
Battery release
Lithium
battery cover
CR 1216 type
lithium battery
Page 23
13
Preparation
Installing the Battery to
Remote Control (VL-Z5
only)
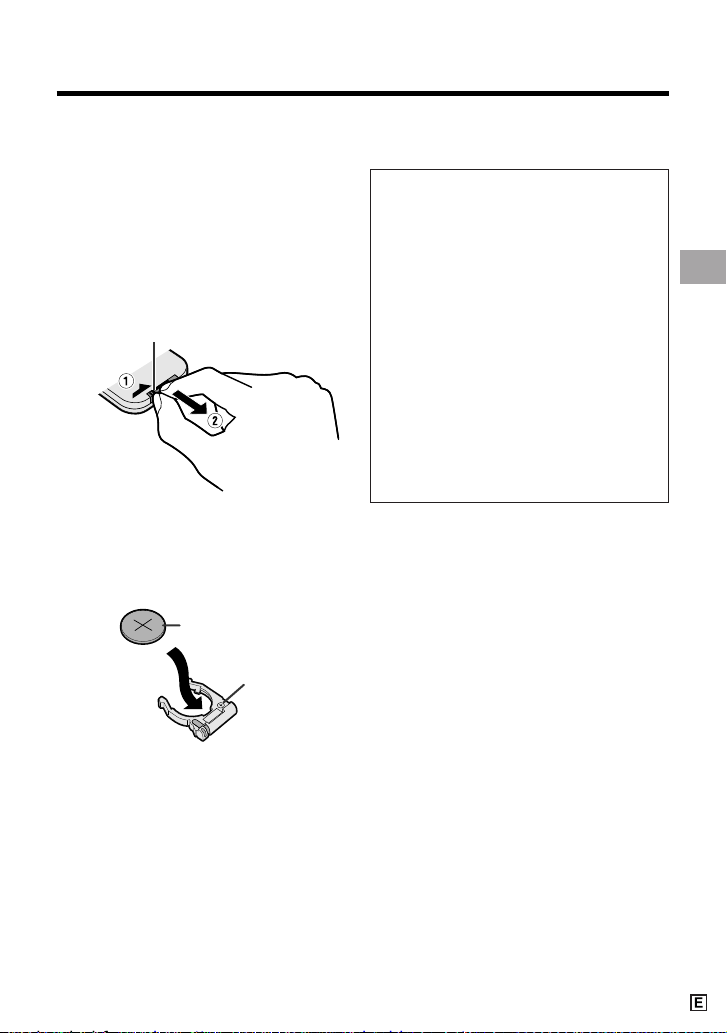
The CR 2025 type lithium battery
supplied with VL-Z5 is used to power the
remote control unit.
1 Hold the remote control facing down,
and pull out the battery holder while
pressing the tab toward the centre.
2 Insert the larger lithium battery into
the battery holder with the H side of
the battery facing the m side of the
holder.
3 Insert the battery holder back into
position.
Notes on the Use of the Lithium
battery
• Do not short-circuit, recharge, disassemble,
or heat the lithium battery.
• Should the lithium battery leak, wipe the
battery compartment clean, and then insert a
new battery.
• The lithium batteries will last about one year
under normal usage.
CAUTION: Danger of explosion if
battery is incorrectly replaced. For
camcorder, replace only with same or
equivalent type CR1216, for remote
control unit, replace only with same or
equivalent type CR2025, both recommended by the equipment manufacturer.
X KEEP THIS BATTERY
AWAY FROM CHILDREN. IF SWALLOWED, CONSULT A PHYSICIAN
IMMEDIATELY FOR EMERGENCY
TREATMENT.
Z BATTERY MAY EXPLODE
IF MISUSED OR INSTALLED WITH
POLARITY REVERSED. DO NOT
RECHARGE, DISASSEMBLE OR
DISPOSE OF IN FIRE.
“m” side
H side, CR 2025 type
lithium battery
Ta b
Page 24
Preparation
Preparation
14
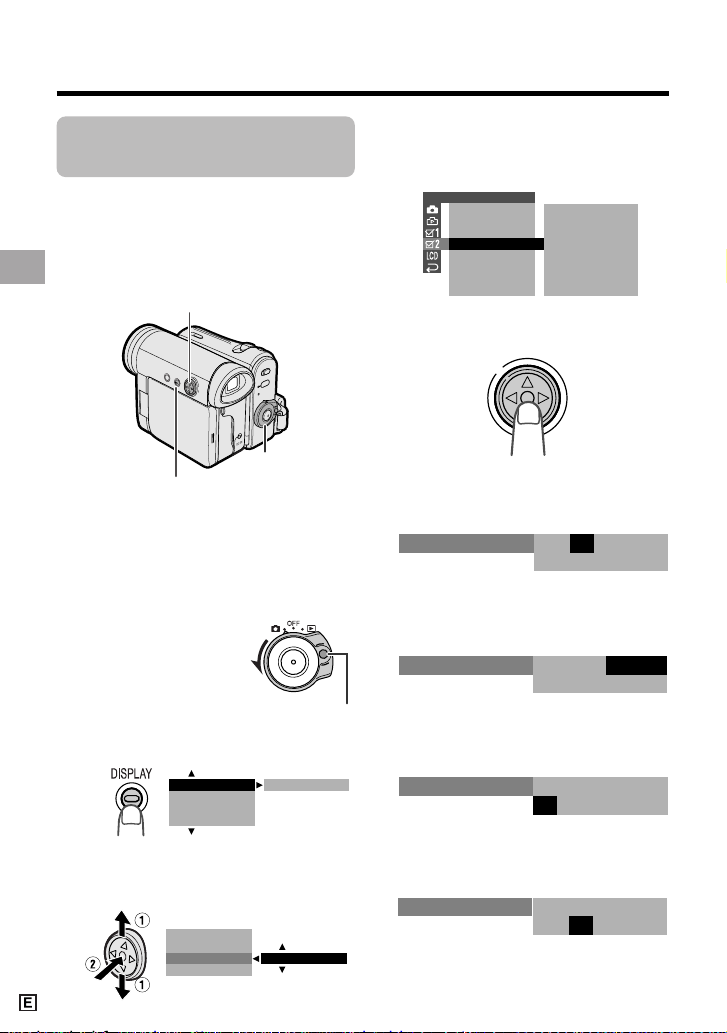
4 Press m or l to select “EXECUTE”,
then press the centre of the Operation
button.
5 Press the centre of the Operation
button.
6 Press m or l to select “2” (day),
then press the centre of the Operation
button.
7 Press m or l to select “6” (month),
then press the centre of the Operation
button.
8 Press m or l to select “2004” (year),
then press the centre of the Operation
button.
9 Press m or l to select “10” (hour),
then press the centre of the Operation
button.
Setting the Date and
Time
Available modes:
Tape Camera, Card Camera
Example: Setting the date to 2 June 2004
(2. 6. 2004) and the time to 10:30 am
(10:30).
Note:
• Before performing the steps below, make
sure that the CR1216 type lithium battery has
been installed (see page 12).
• The example screens shown are for Tape
Camera mode.
1 Hold down the Lock
button and set the
Power switch to v.
2 Press the DISPLAY button until the
mode screen appears.
3 Press l or m on the Operation
button to select “MENU”, then press
the centre of the Operation button.
BLC GAI N/ OFF
FADE
M
ENU
SCENE
M
ENU
EXECUTE
FADE
M
ENU
SCENEMENU
BLC GAI N/
OTHERS 2
RETURN
T IME CODE OFF
OFFTC OUT
SETT ING
12H 24H/
24H
.1120
000:
03.
2.
000
:
1 2003.
SETT ING
SETT ING
2.
000
:
6
2003.
SETT ING
2.
0 00
:
6 2004.
SETT ING
2.
01
00
:
6 2004.
DISPLAY button
Power switch
Operation button
Lock button
Page 25
15
Preparation
Changing to the 12-hour
Time Mode
1 After performing step 10 above, press
l or m to select “12H/24H”, then
press the centre of the Operation
button.
2 Press l or m to select “12H”, then
press the centre of the Operation
button.
3 Press the DISPLAY button to turn off
the menu screen.
Notes:
• The date and time, once set, are internally
recorded even when not displayed on the
screen.
• The menu screen automatically turns off if no
settings are made within 5 minutes.
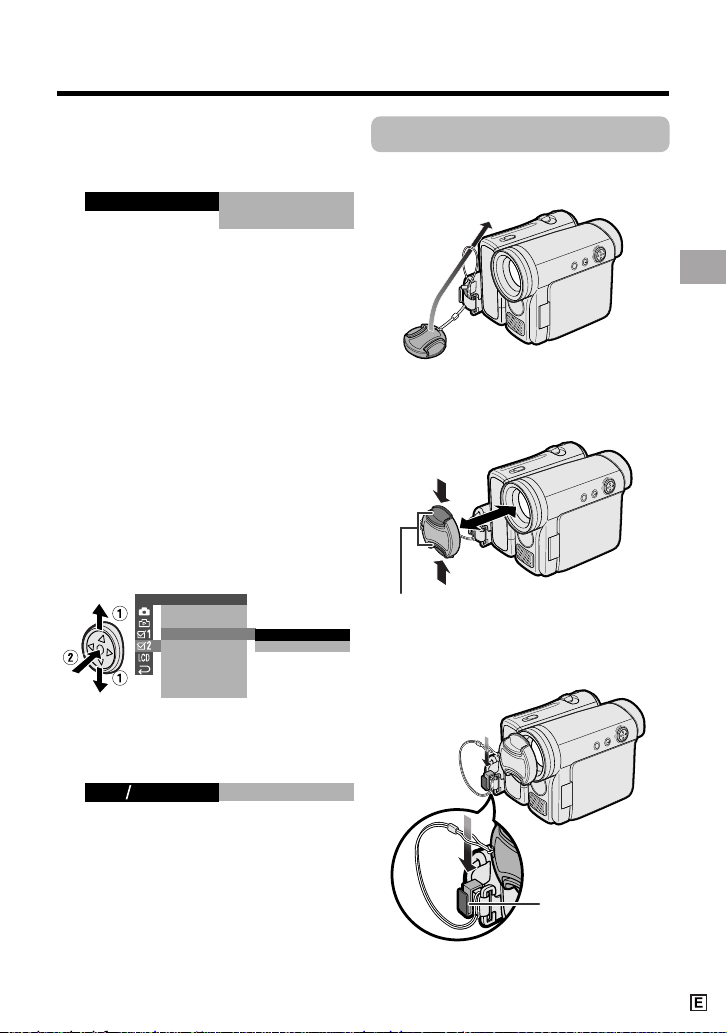
Using the Lens Cap
Attach the strap of the lens cap to the hand
strap as shown below.
When attaching or removing the lens cap,
grasp the indents on both sides of the cap.
When recording, remove the lens cap and
attach the lens cap cord to the fastener so
that the cap will not get in the way.
Note:
• Always attach the lens cap over the lens
when not using the camcorder.
12H
21H24H
10
Press m or l to select “30” (minute),
then press the centre of the Operation
button.
• The internal clock now starts
operating with the seconds display.
11
Press the DISPLAY button to turn off
the menu screen.
Note:
• If the date and time have been set, the
SETTING 1 screen (T) appears in step 4.
Select “SETTING” in the OTHERS 2 screen
(~) using the Operation button.
SETT ING
2.
0130:00
:
6 2004.
OTHERS 2
T IME CODE
TC OUT
24
H12
H
RETURN
SETT ING
12H 24H/
Indents
Fastener
Page 26
Preparation
Preparation
16
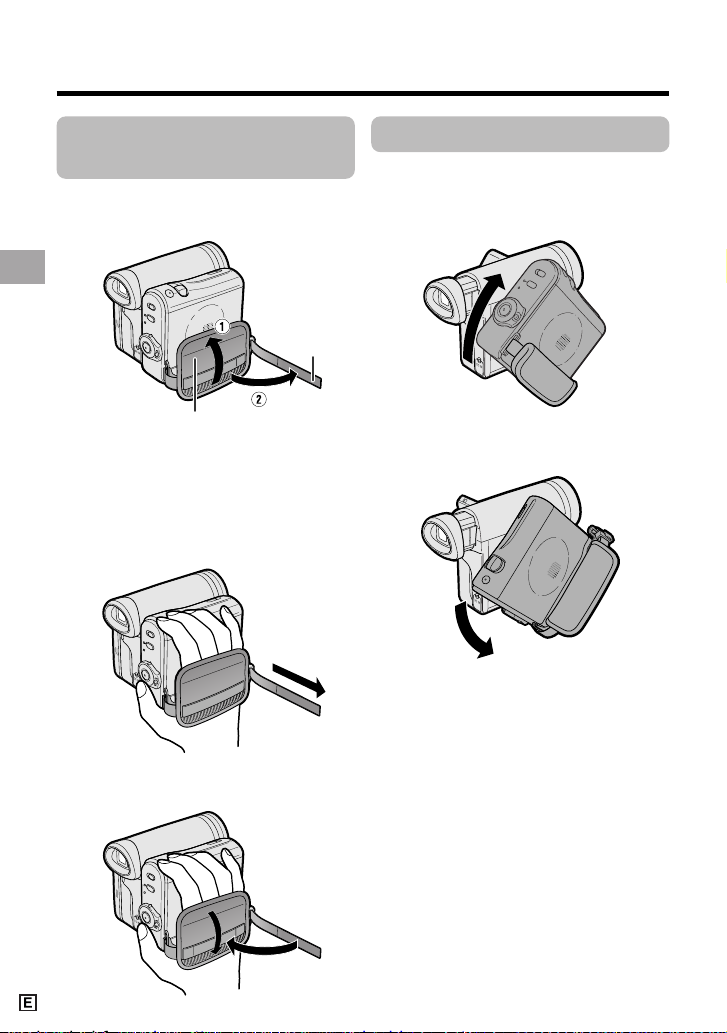
Adjusting the Hand
Strap
1 Open the hand strap flap (1) and grip
strap (2).
2 Loosen the grip strap, pass your right
hand through the hand strap, and put
your thumb close to the Start/Stop
button and your middle finger on the
Power Zoom control. Then, pull the
grip strap tight until it fits snugly.
3 Seal the Velcro
®
fasteners of the grip
strap and the hand strap flap.
Using the Grip
Rotate the grip 135° forward or 90°
downward so that you can record images
easily from high or low angle (see page 20).
Note:
• The grip cannot rotate when a tripod is
attached.
Grip strap
Hand strap flap
135°
90°
Page 27
17
Preparation
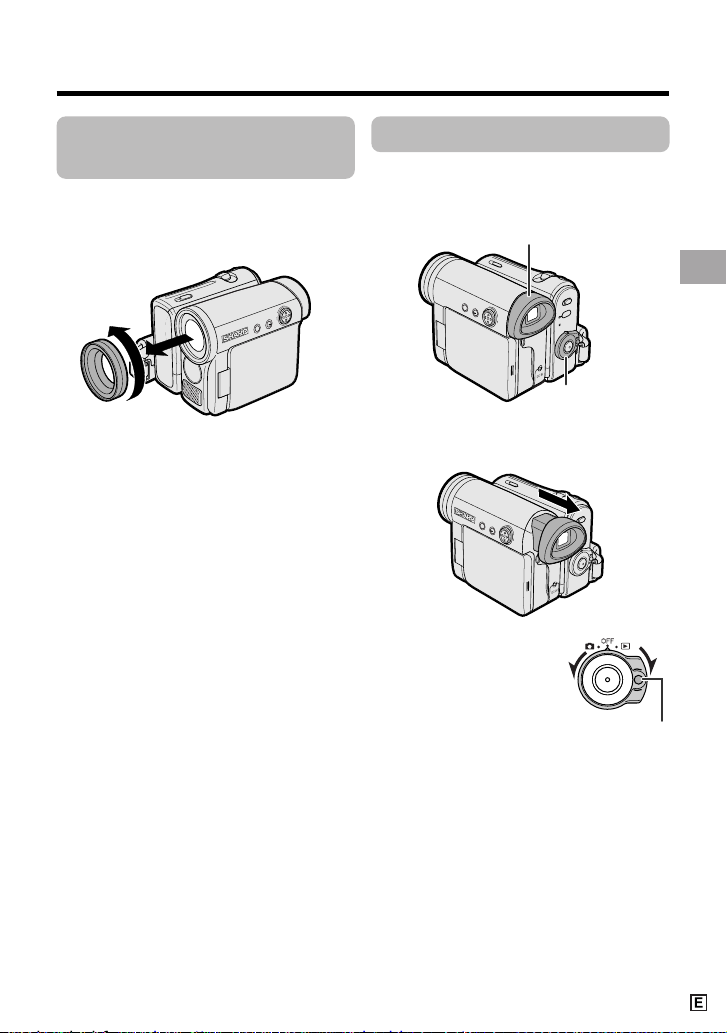
Using the Viewfinder
You can record the subject using the
electronic viewfinder. You can also watch
playback through the viewfinder.
1 Pull out the viewfinder completely.
2 Hold down the Lock
button and set the
Power switch to v or
w.
Detaching the Lens
Hood
Before using a commercially available
conversion lens, detach the lens hood as
shown below.
(Continued on the next page)
Note:
• You cannot attach the supplied lens hood or
lens cap to a conversion lens.
Power switch
Viewfinder
Lock button
Page 28
Preparation
Preparation
18
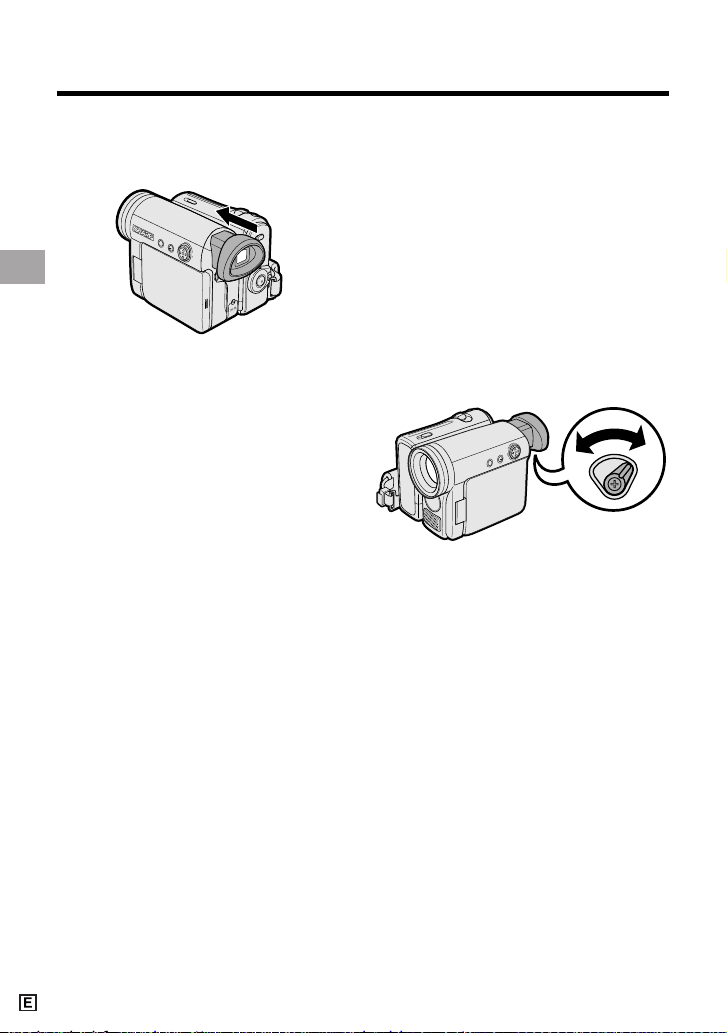
Closing the viewfinder
Push in the viewfinder completely.
Notes:
• Do not use excessive force when moving
the viewfinder.
• Do not pick up the camcorder by the
viewfinder.
• The viewfinder automatically turns off when
the LCD monitor is opened. If the vertical
rotation of the monitor is 180° when in Tape
Camera or Card Camera mode, however, the
viewfinder is on and the subject is displayed
both in the viewfinder and on the monitor
(see page 40).
• You can adjust the settings on the MENU
screen through the viewfinder by using the
Operation button (see page 31 for use of the
Operation button).
• Be sure to close the viewfinder after use.
Adjusting the dioptre
Adjust the dioptre according to your
eyesight when the picture in the viewfinder
or the characters on the on-screen display
is not clear.
1 Pull out the viewfinder completely.
2 Hold down the Lock button and set
the Power switch to v.
3 While looking through the viewfinder,
turn the dioptre adjustment dial until
the indicators in the viewfinder are
clearly visible.
Note:
• For cleaning the viewfinder, see page 95.
Dioptre adjustment dial
Page 29
19
Preparation
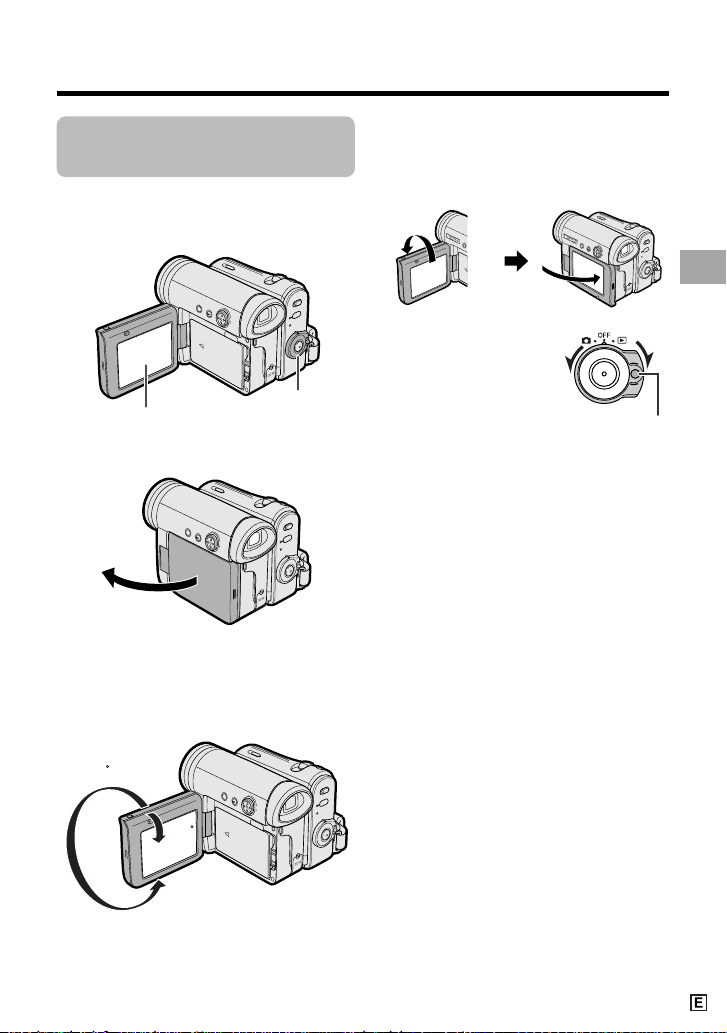
Using the LCD
Monitor
You can use the LCD monitor to play back
recordings that you have made or to watch
the subject during recording.
1 Open the LCD monitor to a 90° angle
to the camcorder body.
2 Adjust the LCD monitor to an angle
that allow easy viewing of the onscreen picture.
• The LCD monitor rotates 270°
vertically.
Note: Do not try to rotate the LCD
monitor vertically until the monitor is
completely opened.
• You can also fold the LCD monitor
into the camcorder with the screen
facing out for watching playback on
the monitor.
3 Hold down the Lock
button and set the
Power switch to v or
w.
• A picture displays on
the LCD monitor.
Note:
• Battery consumption is larger when the LCD
monitor is opened. Use the viewfinder instead
of the LCD monitor when you want to save
the battery power.
Closing the LCD monitor
Return the LCD monitor to the vertical 90°
position with the screen facing in, and fold it
into the camcorder into place.
Notes:
• Do not use excessive force when moving
the LCD monitor.
• When closing the LCD monitor, do not tilt
it; otherwise the monitor may not close
properly and may become damaged.
• Do not pick up the camcorder by the LCD
monitor.
• Do not place the camcorder with the LCD
monitor screen facing down.
• Close the LCD monitor completely with the
screen facing in when not in use.
• Before closing the LCD monitor, make sure
the battery pack is properly attached to the
camcorder, otherwise the monitor may be
damaged.
90˚
180
90
Lock button
LCD monitor
Power switch
Page 30
Preparation
Preparation
20
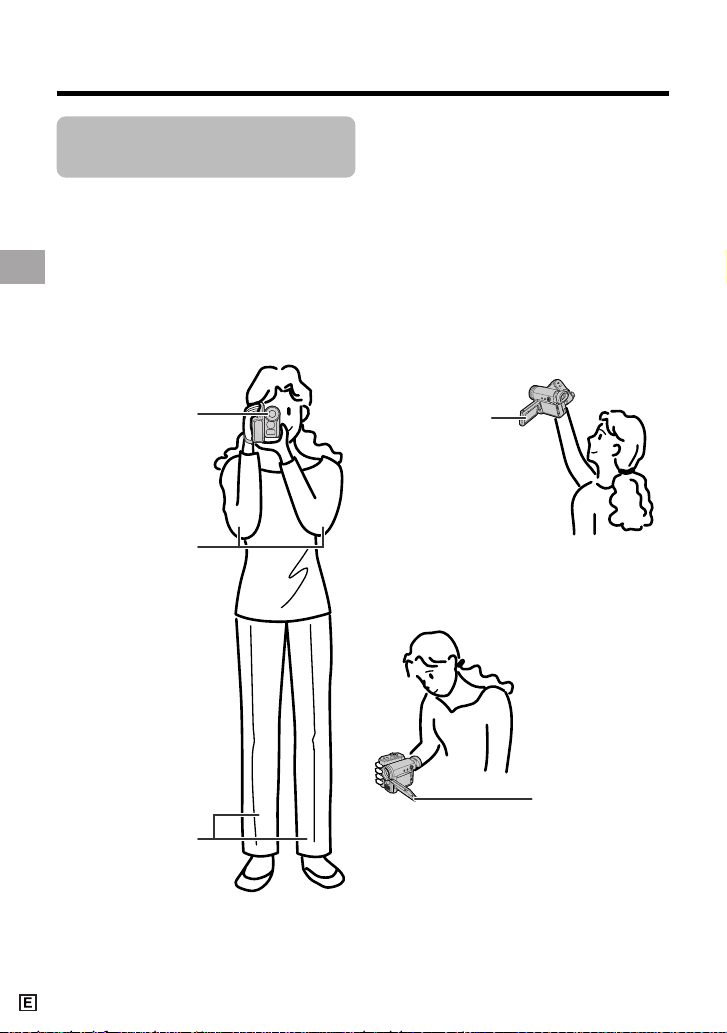
Tips on Recording
Positions
Turn the LCD
monitor so that the
screen faces
upward.
Balance your
weight on both
legs.
Turn the LCD
monitor so that the
screen faces
downward.
Place your elbows
against your sides.
To create images that are easy to watch during playback, try to record with an upright
posture and steady hands to prevent a shaky image.
Holding the camcorder
Put your right hand through the hand strap, and place your left hand under the camcorder
for support.
Basic posture
Place the viewfinder
eyecup firmly against
your eye.
Shooting from a low angle
Shooting from a high angle
Note:
• Take care not to touch the microphone with your fingers during recording. It will cause noise on
the audio track.
Page 31
Basic Operations
21
Basic Operations
Camera Recording
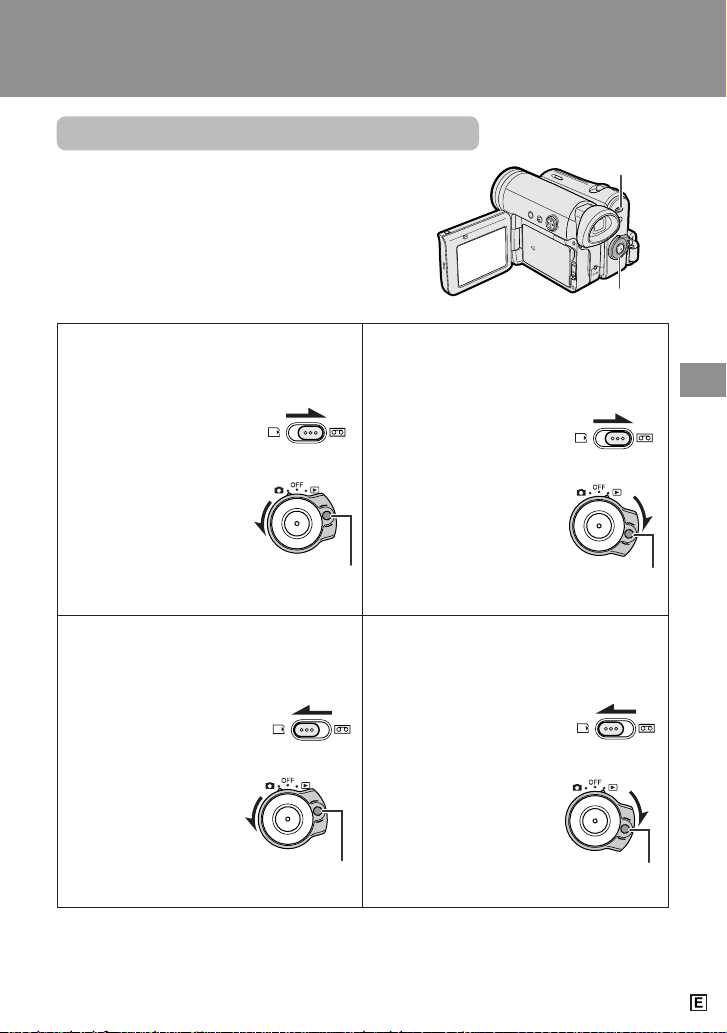
Selecting the Camcorder Mode
This camcorder includes functions for use as both a
video camera for recording and playing back images
on tapes and as a digital still camera for recording and
playing back still images on cards. One of the following
camcorder modes needs to be set before starting any
operation.
Camcorder modes
Tape Playback mode
For playing back or editing motion and still
images recorded on a tape.
1 Set the Media Selection
switch to V.
2 Hold down the Lock
button and set the
Power switch to w.
Card Camera mode
For recording still images on a card.
1 Set the Media Selection
switch to u.
2 Hold down the Lock
button and set the
Power switch to v.
Tape Camera mode
For recording motion and still images on
a tape.
1 Set the Media
Selection switch to V.
2 Hold down the Lock
button and set the
Power switch to v.
Card Playback mode
For playing back still images recorded on
a card.
1 Set the Media Selection
switch to u.
2 Hold down the Lock
button and set the
Power switch to w.
Notes:
• To turn the power off, set the Power switch to OFF without pressing the Lock button.
• Do not change the camcorder mode by operating the Media Selection switch during recording
or playback, as this may cause damage to the tape or card.
Power switch
Media Selection
switch
Lock button
Lock button
Lock button
Lock button
Page 32
Basic Operations
22
Basic Operations
Camera Recording
Easy Camera
Recording on Tape in
Full Auto Mode
Available mode:
Tape Camera
• Before you start recording, perform the
operations described on pages 6 through
20 to prepare your camcorder for
recording.
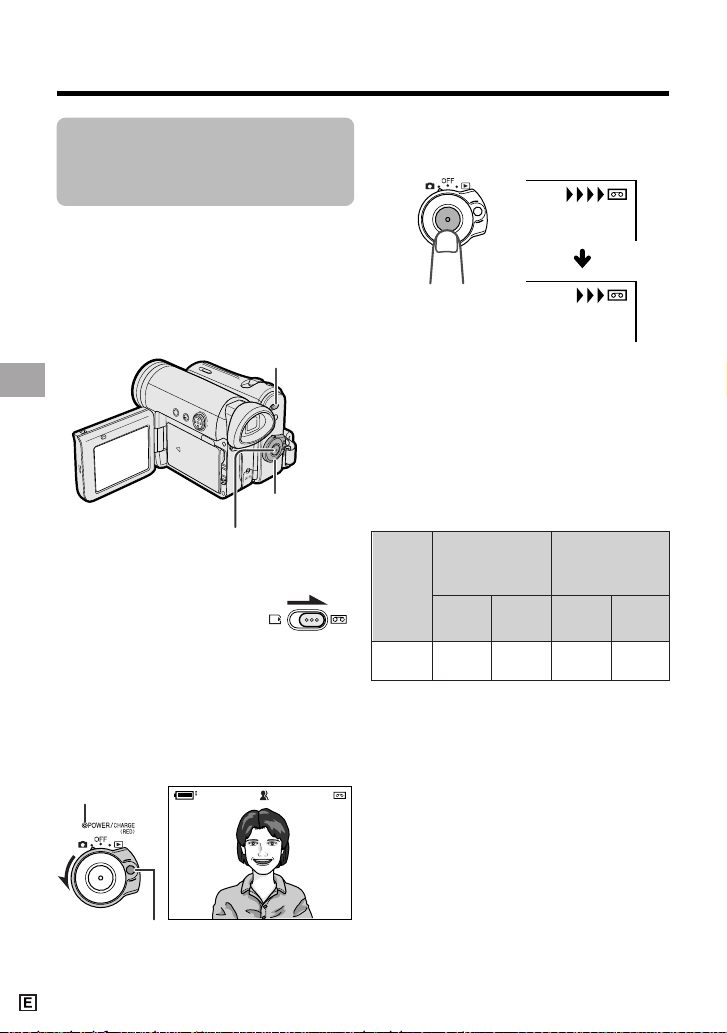
1 Remove the lens cap.
2 Set the Media Selection
switch to V.
3 Hold down the Lock button and set
the Power switch to v.
• The picture from the lens now
displays and the POWER/CHARGE
(RED) indicator lights up green.
• The camcorder is now ready to
record (Recording Standby mode).
Note:
• If “AUTO” is not displayed at this time,
set the camcorder to Full Auto mode
(see page 57).
AU T OAUTO
4 Press the Start/Stop button to begin
recording.
REC
Note:
• Before recording an important scene,
please perform the recording test, then
playback to check if the scene was
recorded properly. If noise occurs, use a
commercially available cleaning tape to
clean the video heads (see page viii).
Maximum continuous recording and
actual recording times in Tape
Camera mode
Note:
• Using the zoom (see page 23) and other
functions or turning the power on and off
frequently will increase power consumption. This may result in a decrease in the
actual recording time compared to the
maximum continuous recording time listed
above.
Media Selection switch
Start/Stop button
Power switch
Lock button
BT-L226
Battery
pack
Max. continuous
recording time
120
LCD
closed
LCD
open
105
POWER/CHARGE
(RED) indicator
Actual
recording time
60
LCD
closed
LCD
open
55
Page 33
Basic Operations
23
PAUSE
To pause recording
Press the Start/Stop button again. Recording pauses, and the camcorder enters
Recording Standby mode.
To turn the power off
Set the Power switch to OFF without
pressing the Lock button.
Note:
• If the camcorder remains in Recording
Standby mode for more than 5 minutes in
Tape Camera mode, the power will automatically turn off to save battery power and to
protect the tape from being damaged. To
resume recording, set the Power switch to
OFF and then back to v. (The camcorder
will make a confirmation sound when it is left
in Recording Standby mode for about 4
minutes.)
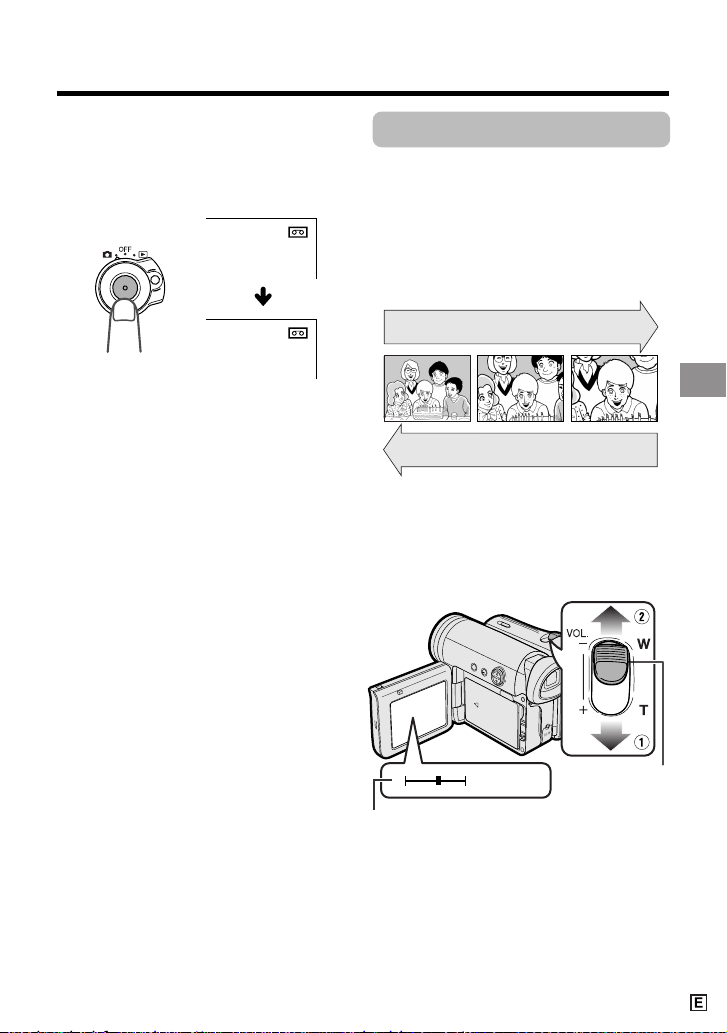
Zooming
Available modes:
Tape Camera, Card Camera
Zooming allows you to move visually closer
to or farther from a subject without physically changing your position.
When using the optical zoom, you can
enlarge the subject up to 10K.
Zooming in
Push the Power Zoom control to the T
(telephoto) side to get a close-up view (1).
Zooming out
Push the Power Zoom control to the W (wide
angle) side to get a wide field of view (2).
• The zoom range indicator shows you the
current zoom setting.
• The zoom speed depends on how far you
push the Power Zoom control.
Notes:
• The camcorder is unable to focus when
zooming in on subjects within 1.5 m.
• See page 33 for how to use the digital zoom.
Zooming in (when you want to centre
attention on the subject)
Zooming out (when you want to include
the surroundings)
WT3ZOOM
Power Zoom
control
Zoom range indicator
Page 34
Basic Operations
24
Basic Operations
Camera Recording
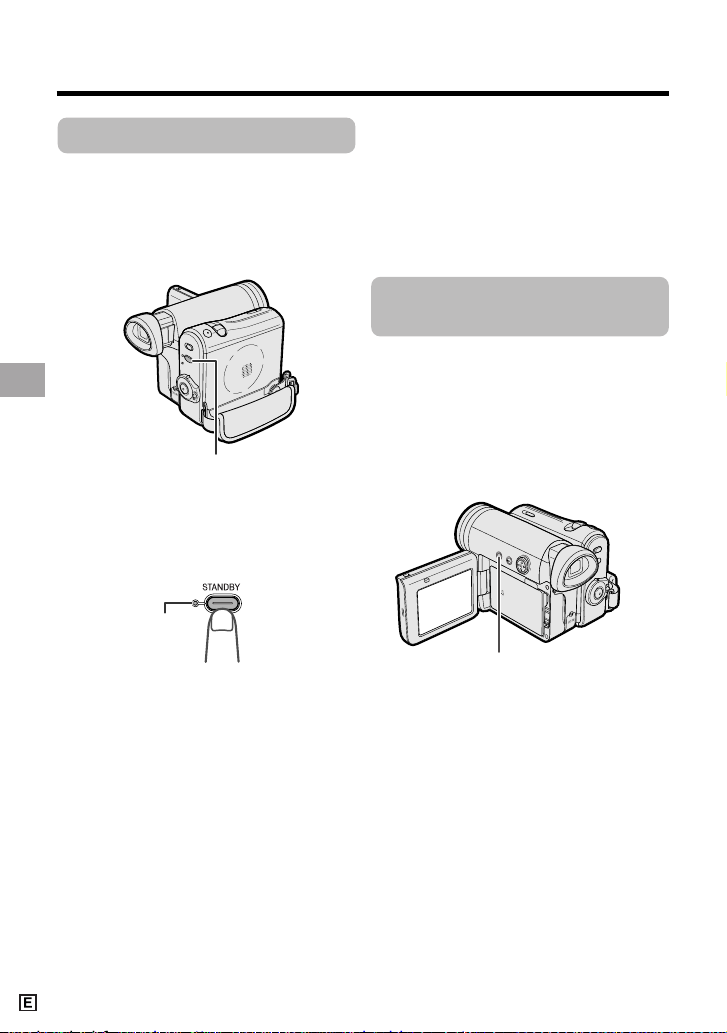
Power Standby Mode
Available mode:
Tape Camera
Power Standby mode allows you to prevent
accidental recording by locking all
operations except cancelling the mode.
Hold down the STANDBY button for more
than 2 seconds when you pause recording in Tape Camera mode.
• The screen turns off and the STANDBY
indicator lights up.
Turning on/off the
Backlight
Available modes:
All modes
You can see the on-screen display outdoors
on a sunny day or in a location with bright
lighting even when the backlight turns off.
Also, this function is useful when watching
playback on a TV.
Hold down the LCD LAMP button for
more than 2 seconds to turn off the
backlight.
• “BACKLIGHT OFF” will flash for two seconds,
then H appears on the LCD screen.
To turn on the backlight
Press the LCD LAMP button.
Note:
• The BACKLIGHT OFF mode will cancel when
you close the LCD monitor.
To resume operation
Press the STANDBY button again to
return to the Recording Standby mode.
• It takes about 2 seconds to be able to start
recording.
Notes:
• Power Standby will cancel and the STANDBY
indicator will turn off in these situations below:
— When the camcorder remains in Power
Standby mode more than 5 minutes
— When the camcorder is set to Card
Camera, Tape Playback or Card Playback
mode
— When removing the battery pack
— When removing a cassette
• The camcorder will turn off automatically in 5
minutes after setting Power Standby mode if
it remains in Recording Standby mode after
canceling Power Standby mode.
— When Power Standby mode, for example,
is cancelled after 3 minutes, the
camcorder will turn off if recording is not
started within 2 minutes.
STANDBY indicator
STANDBY button
LCD LAMP button
Page 35
Basic Operations
25
Auto Focus
Available modes:
Tape Camera, Card Camera
The camcorder is preset to Auto Focus
mode, which is designed to focus on most
types of subjects. In Auto Focus mode, the
camcorder automatically focuses on the
subject in the centre of the scene. Always
keep the subject in the centre of the scene.
Notes:
• If no subject is in the centre of the scene, the
focus area will expand and the subject
nearest the center will be focused on.
• Auto Focus may not work in the situations
described on page 52. In these situations,
use the manual focus function.
• The camcorder may not be able to focus
correctly if the subject is closer than
approximately 1.5 m. Set the zoom control to
wide angle, and try refocusing again.
• If the lens is dirty or fogged, the camcorder
may not be able to focus correctly.
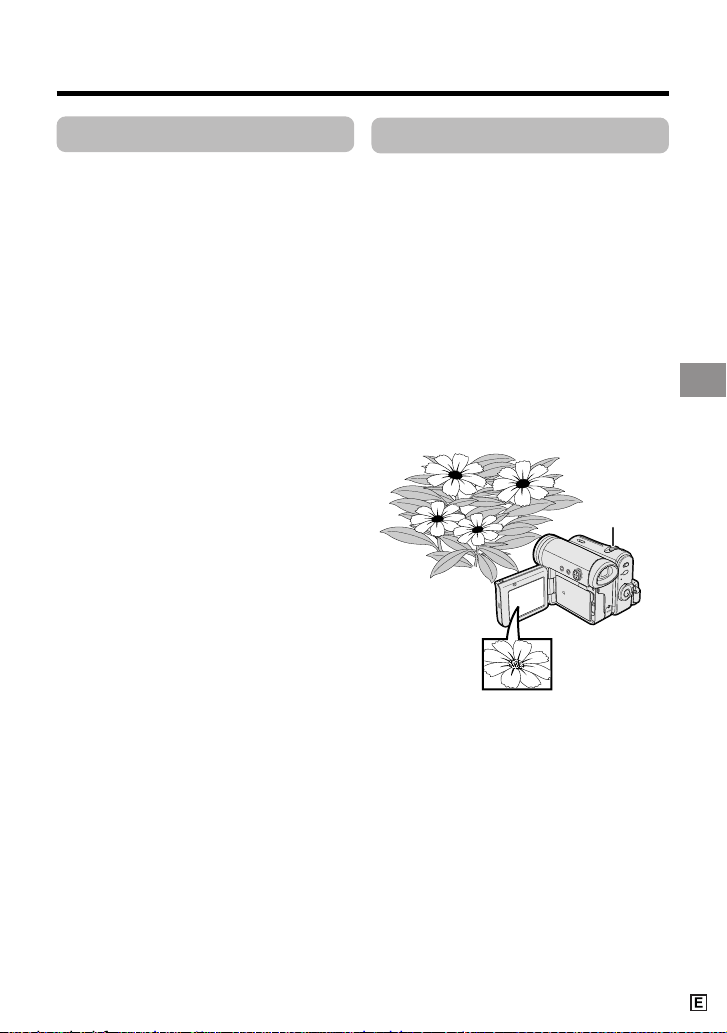
Macro Shots
Available modes:
Tape Camera, Card Camera
This camcorder lets you shoot close-up
images of small objects such as flowers and
insects, or make title frames for your videos.
When you want to record a magnified image
of a subject which is within approximately
1.5 m of the camcorder, do not zoom in on
it. Instead, zoom out all the way by pushing
the Power Zoom control to the W side, and
then move the camcorder closer to the
subject until you obtain the desired angle of
view. The camcorder will automatically
focus on the subject when the lens is set for
the widest angle.
Note:
• When you are recording a macro shot, be
sure that the subject receives sufficient
illumination.
Power Zoom
control
Page 36
Basic Operations
26
Basic Operations
Camera Recording
30
min
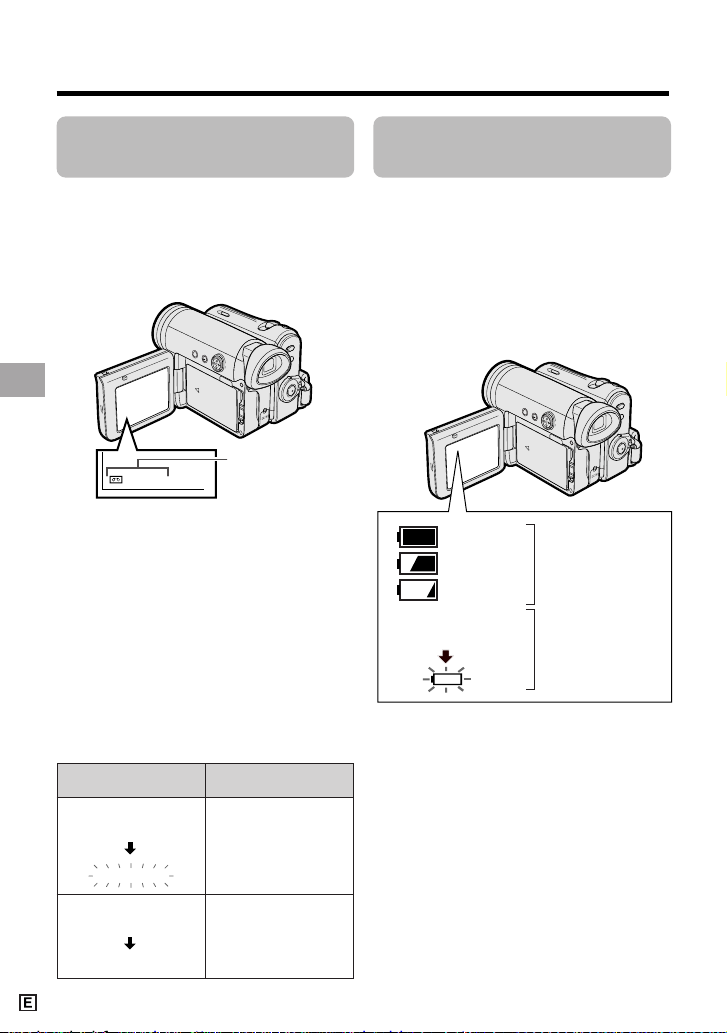
Remaining Battery
Power Display
Available modes:
All modes
When using the camcorder with the battery
pack as the power source, the remaining
battery power indicator is displayed. If the
battery power becomes very low, a warning
indicator appears. Replace the battery
pack.
Notes:
• The remaining battery power indicator
appears when the on-screen indicators are
turned on.
• Use the remaining battery power indicator
only as an approximate indication.
• The remaining battery power indicator may
change to either a higher or lower level if you
set the Power switch to OFF and then back to
v or w.
• In cold environments, the red remaining
battery power indicator may appear sooner.
• Use of the zoom functions when the warning
indicator is displayed may cause the
camcorder to suddenly lose power.
THE
ENDS SOON.
TAPE
TAPE END
Warning indicator
Approx. remaining
time
Less than 1 min.
Remaining Recording
Time Display
Available mode:
Tape Camera
When the camcorder is recording in Tape
Camera mode, an on-screen indicator
displays the approximate remaining tape
time in minutes.
The tape has reached
the end.
CHANGE THE
CASSETTE.
TAPE END
BATTERY IS
TOO LOW.
Remaining
recording time
indicator
Remaining
battery power
indicator
Notes:
• The remaining recording time indicator
appears when the on-screen indicators are
turned on.
• The remaining recording time indicator
appears 10 seconds after pressing the
Start/Stop button to begin recording.
• The remaining recording time indicator only
shows the approximate time left. Also, it
varies slightly depending on the length of the
tape used. (This function is based on the
DVM60 tape standard.)
When the remaining recording time reaches
1 minute, a warning indicator will appear.
Prepare a new cassette.
Warning
indicator
(Green)
(Green)
(Red)
Page 37
Basic Operations
27
Note:
• If you press the Start/Stop button in Tape
Playback mode, the “g” mark appears and
the camcorder enters Recording Standby
mode. If you do not intend to record, press
l to turn the “g” mark off, then press m to
begin playback. This will ensure your
previous recording is not erased (see pages
64–67).
To stop playback
Press l.
To turn the power off
Set the Power switch to OFF without
pressing the Lock button.
Note:
• The tape automatically rewinds when
playback reaches the end of the tape.
Watching the playback in
the viewfinder
You can also watch the playback in the
viewfinder by closing the LCD monitor with
the screen facing in. You cannot monitor the
sound through the speaker when watching
the playback in the viewfinder.
Tape Playback
Available mode:
Tape Playback
The LCD monitor screen functions as a
handy playback monitor. Nothing needs to
be connected, allowing instant on-screen
playback with the sound through the built-in
speaker.
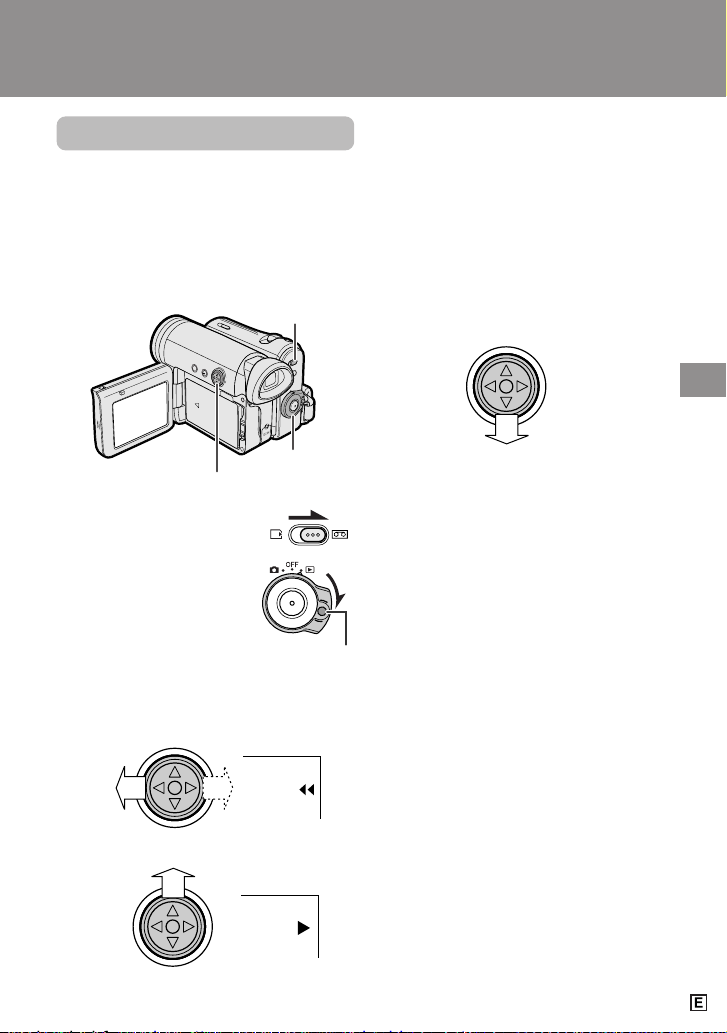
1 Set the Media Selection
switch to V.
2 Hold down the Lock
button and set the
Power switch to w.
3 Press j (or k) on the Operation
button to rewind (or fast forward) the
tape to the desired point.
4 Press m to begin playback.
Basic Operations
Playback
Power switch
Operation button
Lock button
Media Selection
switch
Page 38
Basic Operations
Playback
Basic Operations
28
VOLUME
Video Search
Available mode:
Tape Playback
The video search function makes it easy to
search for a desired scene on the tape.
Searching for a Scene Near
the Current Tape Position
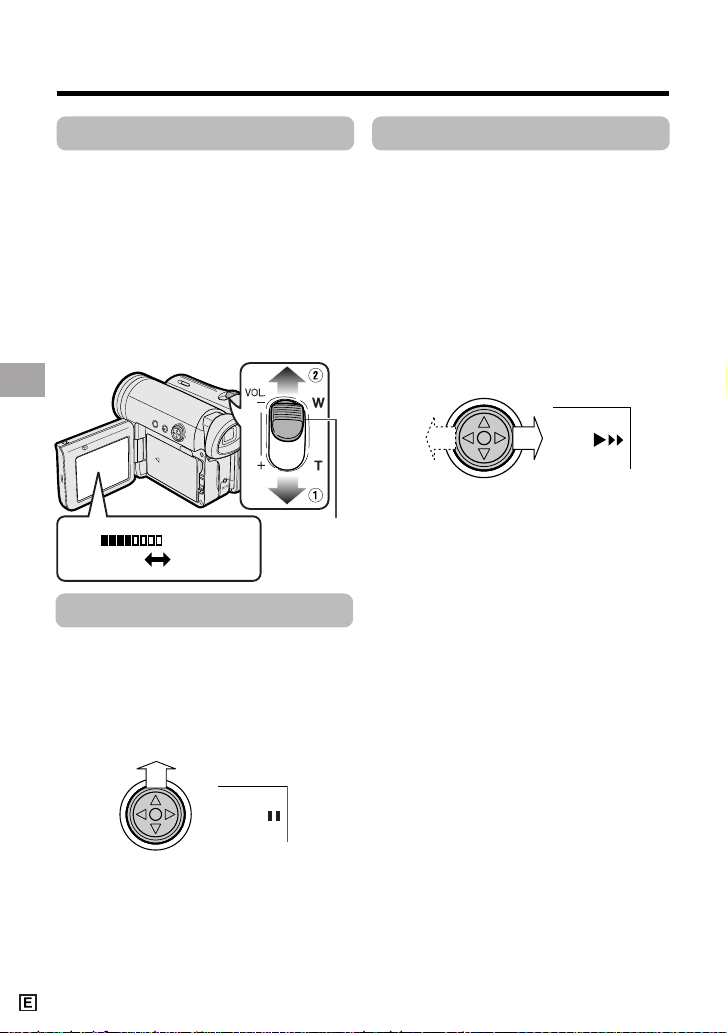
1 During Tape Playback, press k (or
j) on the Operation button.
• The playback picture fast forwards
(or reverses).
2 When you find the scene, press m to
return to normal playback.
Searching for a Scene Far
from the Current Tape Position
1 During fast forward (or rewind) in
Tape Playback mode, press and hold
k (or j) on the Operation button.
• The fast forward (or rewind) picture
displays.
2 If the scene is still rather far from the
current tape position, release the
Operation button to normal fast
forward (or rewind).
3 Repeat steps 1 and 2 above until you
find the scene.
4 Press m to begin normal playback.
Notes:
• The sound is off during search.
• You may experience picture noise during
search. This is not a malfunction.
Still
Available mode:
Tape Playback
The still function allows you to pause in
Tape Playback mode.
During Tape Playback, press m on the
Operation button.
To return to normal playback, press m
again.
Notes:
• The sound is off in Still mode.
• To protect the tape, the camcorder automatically returns to normal playback if it is left in
Still mode for more than 5 minutes.
Volume Control
Available mode:
Tape Playback
When the camcorder is in Tape Playback
mode, push the Volume control to the L or
+ side to increase (1) or decrease (2) the
volume.
The volume level indicator will appear on
the LCD screen during adjustment only.
Once the Volume control is released, the
volume level indicator will disappear shortly
afterwards.
Volume
control
IncreaseDecrease
Page 39
Basic Operations
29
OTHERS 1
EXECUTE
ON
ON
OFF
–+
BEEP
REMOT E
DEF AULT
PHONES VOL
DE MO MOD E
RETURN
– +
PHONES VOL
Using Earphones
(Commercially
Available, VL-Z5 only)
Available modes:
Tape Playback, Tape Camera
You can monitor the sound via stereo
earphones (commercially available) during
playback or recording. Stereo earphones
with a 3.5 mm diameter plug can be used
with this camcorder.
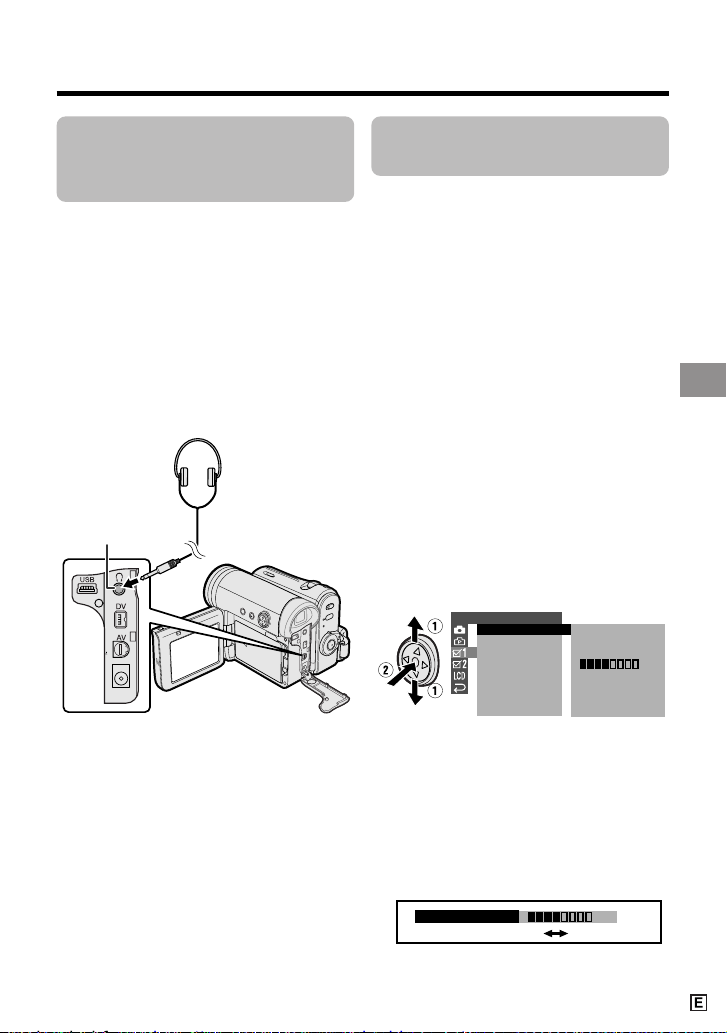
Connect the plug of stereo earphones to the
earphones jack on the camcorder as shown
below.
Notes:
• Before connecting stereo earphones, turn the
camcorder volume down to the lowest
setting.
• The built-in speaker automatically turns off
when stereo earphones are connected to the
earphones jack.
Adjusting the Phones
Volume (VL-Z5 only)
Available mode:
Tape Camera
You can adjust the phones volume if sound
through the earphones is difficult to hear.
1 Set the Media Selection switch to V,
then hold down the Lock button and
set the Power switch to v (see page
21).
2 Press the DISPLAY button until the
mode screen appears (see page 31).
3 Press l or m on the Operation
button to select “MENU”, then press
the centre of the Operation button.
4 Press l or m to select “EXECUTE”,
then press the centre of the Operation button.
5 Press l or m to select Z, then
press the centre of the Operation
button.
Note: “PHONES VOL” does not appear
with VL-Z3.
6 Press l or m to select “PHONES
VOL” , then press the centre of the
Operation button.
7 Press j or k to adjust to the desired
volume level, then press the centre of
the Operation button.
8 Press the DISPLAY button to turn off
the menu screen.
Earphones jack
(VL-Z5 only)
Decrease Increase
Page 40
Basic Operations
Playback
Basic Operations
30
Watching Playback
on a TV
Available modes:
Tape Playback, Card Playback
You can connect the camcorder to a TV to
allow a larger audience to enjoy playback.
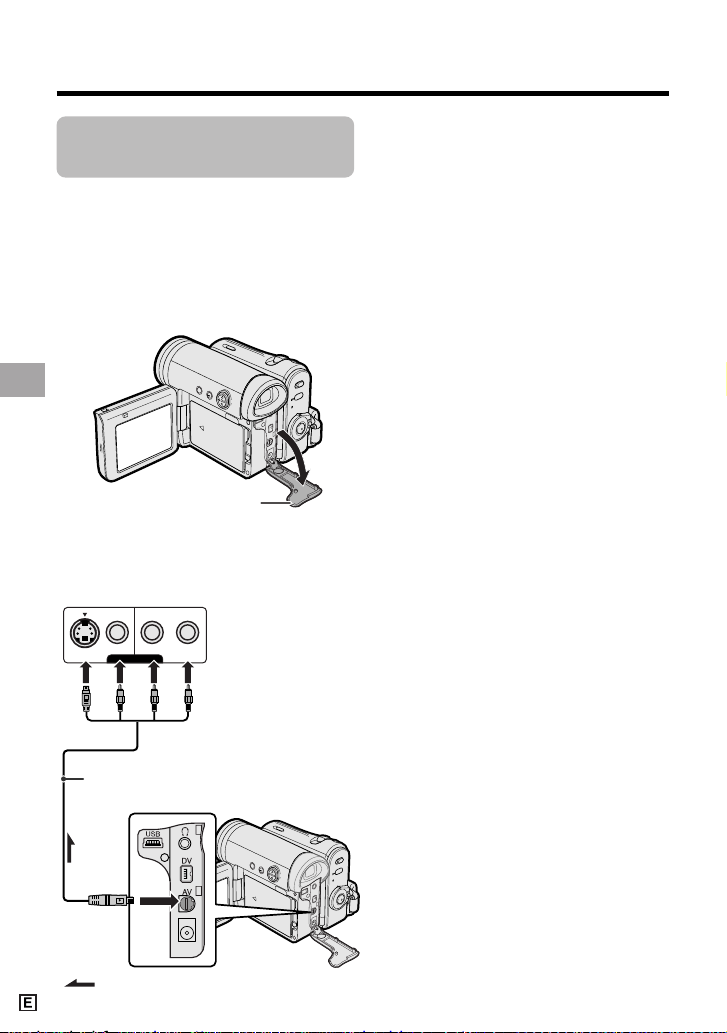
1 Open the terminal cover on the
camcorder (see page 2).
2 Connect the camcorder to your TV (or
VCR) with the supplied audio/video/Svideo cable, as shown.
About the S-video socket
S-video sockets are used to separately pass
the chroma (colour) and luminance
(brightness) components of video signals.
They serve to improve the picture quality in
both recording and playback.
Note:
• Check that the camcorder, TV, VCR and
other equipment to be used are turned
off before making any connections.
Picture noise or malfunction may occur
if any of the above is left on while
making a connection.
3 Turn on the TV and set it to the “AV”
or “VIDEO” channel. (See the
operation manual of your TV.)
• When connecting to a TV via a VCR,
turn on the VCR and set it to the “AV”
or “LINE” input channel. Operate the
TV as you normally do to view the
signal from the VCR. (See the
operation manuals of your TV and
VCR.)
4 Set the Power switch on the
camcorder to w, and begin playback
(see page 27).
Notes:
• If your TV or VCR has only one audio input
jack, use the white plug for the audio
connection on the TV or VCR.
• If your TV or VCR has an S-video input
socket, you do not need to connect the
yellow video plug.
• Close the terminal cover after use.
VIDEO
S-VIDEO
L-AUDIO-R(MONO)
AV-IN
:
Terminal cover
To AV
terminal
Black: To S-video input socket
Yellow: To video input jack
White: To audio input (L) jack
Red: To audio input (R) jack
Audio/video/S-video cable (supplied)
The arrow shows the signal flow.
TV or VCR
Page 41
Useful Features
31
Operation button
Media Selection switch
DISPLAY button
Power switch
Information
display on
Mode screen
Information
display off
Example
Example
Useful Features
Control Buttons
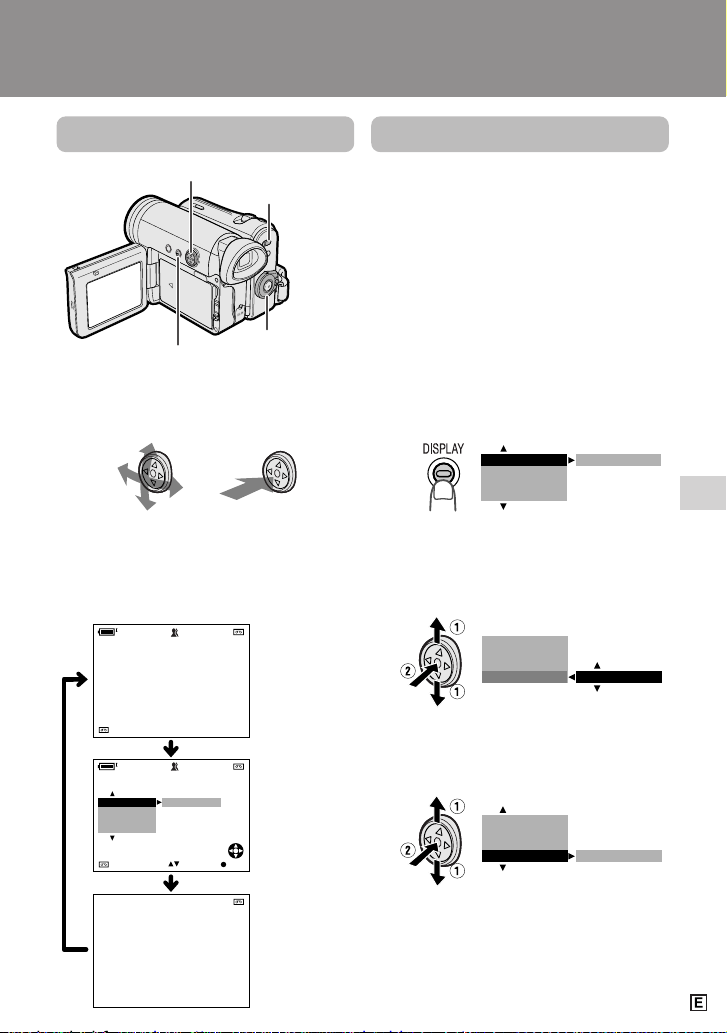
Operation button
Use the Operation button to select and set
the desired setting.
Using the Mode Screens
In the mode screens, you can adjust the
camcorder settings by using the Operation
button.
1 Set to the desired camcorder mode
by using the Media Selection switch
and the Power switch (see page 21).
• See pages 102 to 105 for the mode
items you can select in each
camcorder mode.
• Steps 2 to 4 show how to change the
SCENE MENU setting in Tape
Camera mode.
2 Press the DISPLAY button until the
mode screen appears.
3 Press l or m on the Operation
button to select the desired mode
item (SCENE MENU), then press the
centre of the Operation button.
4 Press l or m to select the desired
mode setting (DUSK), then press the
centre of the Operation button.
To turn off the mode screen
Press the DISPLAY button.
Note:
• Items that are not selectable are greyed out.
3 0min
AUTO
3 0min
AUTO
SELECT SET
OFF
FADE
M
ENU
SCENE
M
ENU
BLC GA IN/
4002.2
03:01
6.
BLC GAI N/ OFF
FADE
M
ENU
SC ENE
M
ENU
FADE
M
ENU
SC ENE
M
ENU OF F
BLC GAI N/
SCENEMENU
FADE
M
ENU
DUS K
BLC GAI N/
DISPLAY button
Each time you press the DISPLAY button,
the screen changes as shown below.
• The example screens shown are for Tape
Camera mode.
Page 42
Useful Features
Useful Features
32
DISPLAY button
Operation button
Media Selection switch
Power switch
Example
Example
Example
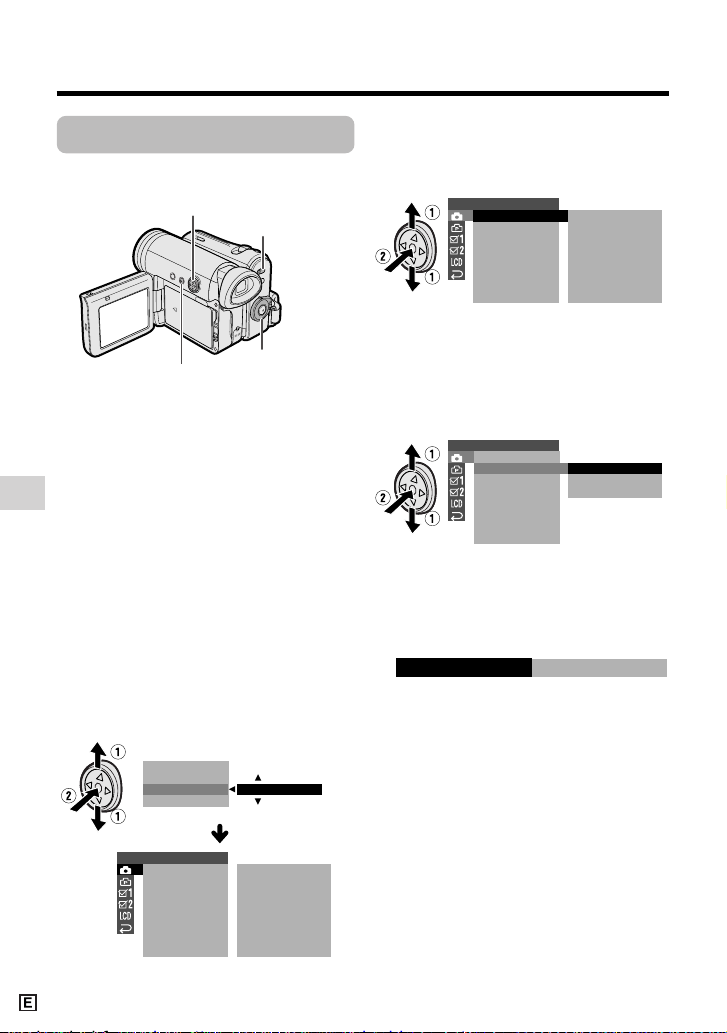
Using the Menu Screens
Use the menu screens to adjust the various
camcorder settings.
1 Set to the desired camcorder mode
by using the Media Selection switch
and the Power switch (see page 21).
• See pages 102 to 105 for the menu
items you can select in each
camcorder mode.
• Steps 2 to 8 show how to change the
DGTL ZOOM menu setting in Tape
Camera mode.
2 Press the DISPLAY button until the
mode screen appears (see page 31).
3 Press l or m on the Operation
button to select “MENU”, then press
the centre of the Operation button.
4 Press l or m to select “EXECUTE”,
then press the centre of the Operation
button.
Note:
• The menu screen does not appear
during recording.
5 Press l or m to select the desired
menu screen (T), then press the
centre of the Operation button.
• You can press k, instead of the
centre of Operation button.
6 Press l or m to select the desired
menu item (DGTL ZOOM), then press
the centre of the Operation button.
• You can press k, instead of the
centre of the Operation button.
7 Press l or m to select the desired
menu setting (40), then press the
centre of the Operation button.
• You can press j, instead of the
centre of the Operation button.
• To adjust another menu item, press
l or m to select “RETURN” and
press the centre of the Operation
button, then perform steps 5 to 7.
8 Press the DISPLAY button to turn off
the menu screen.
Notes:
• Certain menu items are common to all
camcorder modes. If the BEEP menu item, for
example, is set to “OFF” in Tape Camera
mode, it will be automatically set to “OFF” in
other modes.
• The menu screen automatically turns off if no
settings are made within 5 minutes.
• Items that are not selectable are greyed out.
SETT I NG 1
QK.
DGT L
RE TURN
ZOOM
TAPE SPEED
RETURN
START
OFF
SP
SCENE MENU
EXECUTE
M
ENU
FADE
BLC GAI N/
SETT I NG 1
QK.
DGT L
RE TURN
ZOOM
TAPE SPEED
RETURN
START
OFF
SP
SETT I NG 1
QK.
DGT L
RE TURN
ZOOM
TAPE SPEED
RETURN
OF F
40
500
04
DGTL Z OOM
Page 43
Useful Features
33
Power Zoom
control
Digital zoom indicator
Useful Features
Camera Recording
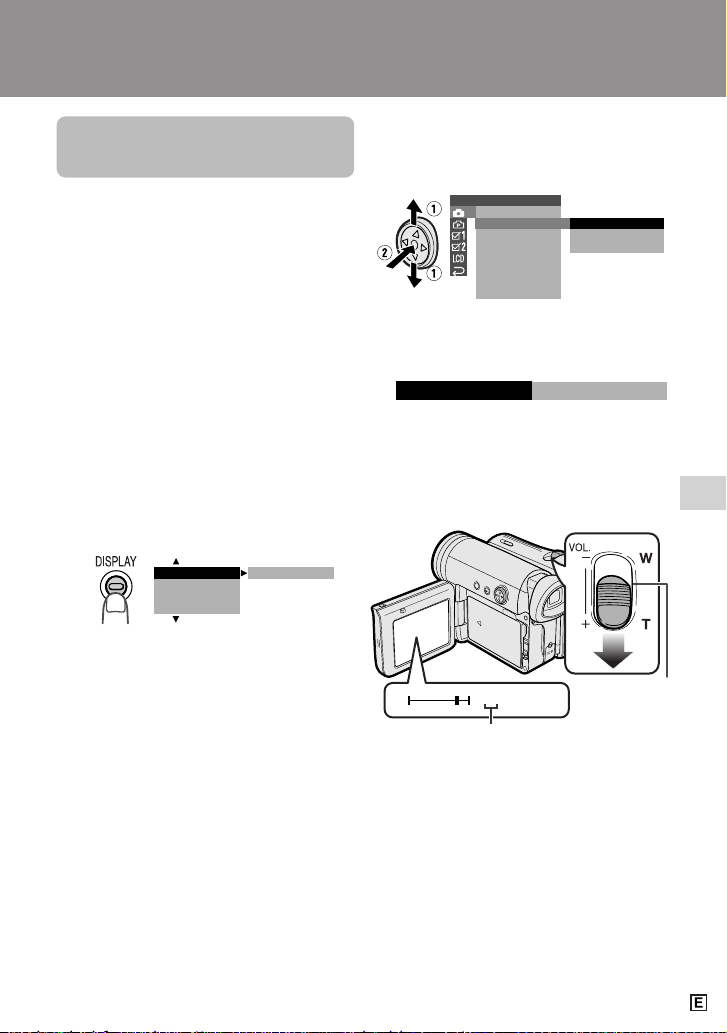
5 Press l or m to select “DGTL
ZOOM”, then press the centre of the
Operation button.
6 Press l or m to select “40” or “500”,
then press the centre of the Operation
button.
7 Press the DISPLAY button to turn off
the menu screen.
The “D” digital zoom indicator is displayed
during digital zooming.
To use optical zoom only
Select “OFF” in step 6 above.
Setting the Digital
Zoom
Available mode:
Tape Camera
You can select three different zoom ranges:
1–10K (optical zoom), 10–40K (digital
zoom) or 10–500K (digital zoom). The
digital zoom allows you to record powerful
close-up pictures with the same operation
as normal zooming.
Notes:
• The digital zoom is in addition to the optical
zoom giving a combined maximum zoom
range of 1–500K.
• As the image is enlarged digitally, the
picture quality decreases when higher
digital zoom settings are used.
1 In Tape Camera mode, press the
DISPLAY button until the mode
screen appears.
2 Press l or m on the Operation
button to select “MENU”, then press
the centre of the Operation button.
3 Press l or m to select “EXECUTE”,
then press the centre of the Operation
button.
4 Press l or m to select T, then
press the centre of the Operation
button.
BLC GAI N/ OFF
FADE
M
ENU
SC ENE
M
ENU
SETT I NG 1
QK.
DGT L
RE TURN
ZOOM
TAPE SPEED
RETURN
OF F
40
500
WT 52D-ZOOM
04
DGTL ZOOM
Page 44
Useful Features
Camera Recording
Useful Features
34
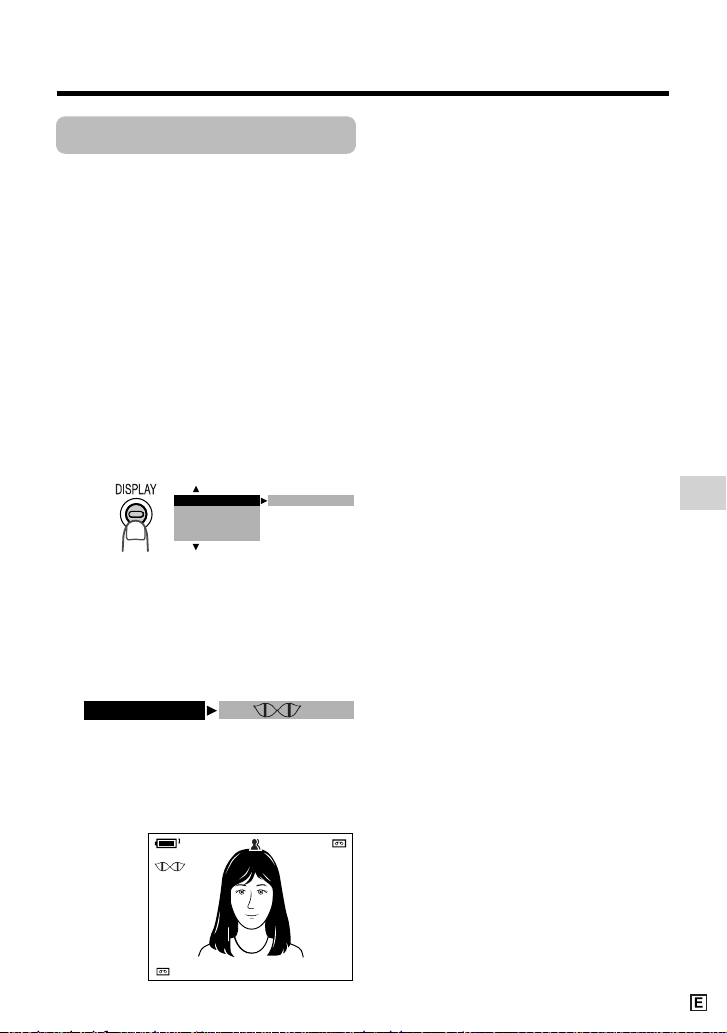
Backlight
Compensation (BLC)
Available modes:
Tape Camera, Card Camera
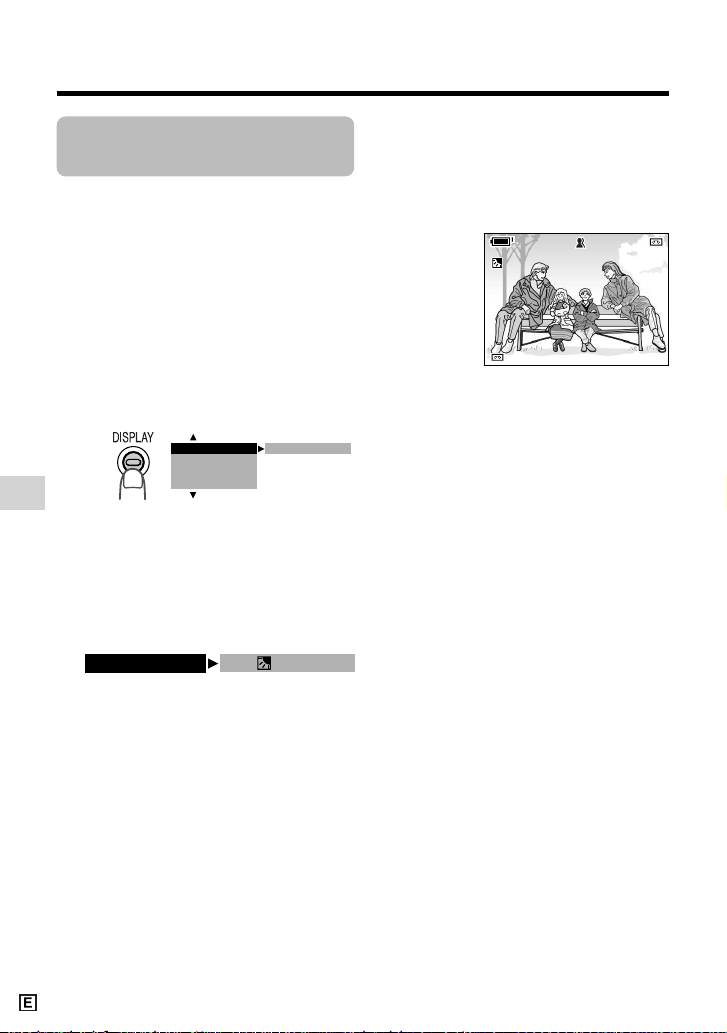
When the subject is backlit, the image will
appear dark if it is recorded normally. Use
the backlight compensation (BLC) function
to improve the picture.
• The example screens shown are for Tape
Camera mode.
1 In Tape Camera or Card Camera
mode, press the DISPLAY button until
the mode screen appears.
2 Press l or m on the Operation
button to select “BLC/GAIN”, then
press the centre of the Operation
button.
3 Press l or m to select “ON x”,
then press the centre of the Operation
button.
BLC GAI N/ OFF
FADE
M
ENU
SC ENE
M
ENU
BLC / GA I N ON
AU T OAUTO
3 0min3 0min
4 Press the DISPLAY button to turn off
the mode screen.
•“x” appears when on-screen
indicators are turned on, indicating that
the backlight compensation is now
working.
To cancel the backlight compensation function
Select “OFF” in step 3 above.
Page 45
Useful Features
35
Gain-up
Available modes:
Tape Camera, Card Camera
When you are recording in a dark or poorly
illuminated location, “LIGHT” is displayed
on the screen. Use the gain-up function to
record a brighter picture.
Note:
• At locations where lighting is adequate,
“LIGHT” will not appear. The gain-up function
cannot be used in this case.
• The example screens shown are for Tape
Camera mode.
1 In Tape Camera or Card Camera
mode, press the DISPLAY button until
the mode screen appears.
AUTO
3 0min3 0min
BLC / GA I N ON
To cancel the gain-up function
Select “OFF” in step 3 above.
Notes:
• You may experience some picture noise in
Gain-up mode, which increases when the
e appears.
• When the e indicator appears, you may
get a shadow image behind a subject that is
moving around a lot.
• Fine brightness adjustments are possible
when using manual iris (see page 55).
• The e indicator will disappear and
Gain-up mode will cancel if you aim the
camcorder in a bright location.
2 Press l or m on the Operation
button to select “BLC/GAIN”, then
press the centre of the Operation
button.
3 Press l or m to select “ON e”,
then press the centre of the Operation
button.
4 Press the DISPLAY button to turn off
the mode screen.
•“e” appears when on-screen
indicators are turned on, indicating that
the gain-up function is now working.
BLC GAI N/ OFF
FADE
M
ENU
SC ENE
M
ENU
Page 46
Useful Features
Camera Recording
Useful Features
36
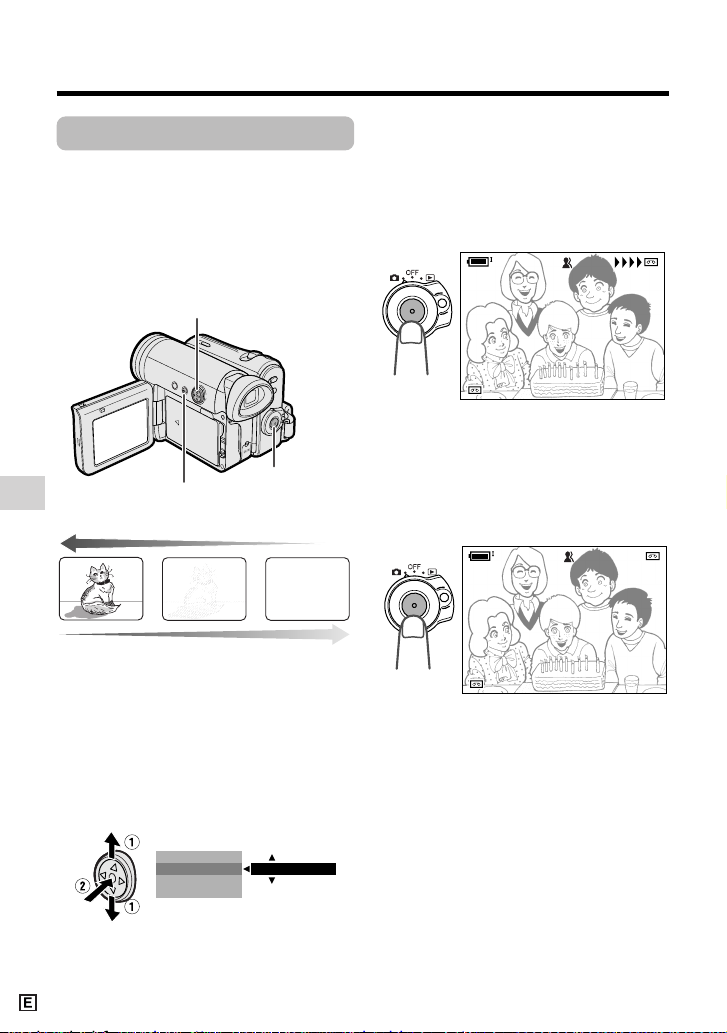
Fade In and Fade Out
Available mode:
Tape Camera
The fade function allows you to gradually
bring the image and sound in or out at the
beginning or end of a scene for creating
scene transitions. This is especially effective
in creating a dramatic change in scenery.
4 Press the DISPLAY button until on-
screen indicators appear.
5 Press the Start/Stop button to begin
recording.
• The picture turns white, and the
image and sound fade in.
6 Press the Start/Stop button at the
point where you wish to stop
recording.
• The image and sound fade out as the
picture gradually turns white. The
camcorder then returns to Recording
Standby mode.
To cancel Fade mode
Select “OFF” in step 3 above.
To use Fade Out only
1 During camera recording in Tape
Camera mode, press the DISPLAY
button until the mode screen appears.
2 Perform steps 2 and 3 in “Using”.
3 Press the Start/Stop button at the
point where you wish to stop
recording.
Note:
• Fade mode automatically cancels after Fade
Out.
Using
1 In Tape Camera mode, press the
DISPLAY button until the mode
screen appears.
2 Press l or m on the Operation
button to select “FADE”, then press
the centre of the Operation button.
3 Press l or m to select “ON”, then
press the centre of the Operation
button.
FADE
M
ENU
SC ENE
M
ENU
OFF
BLC GAI N/
REC
3 0min
A U TO
F AD E I N
REC
3 0min
AUTO
FADE I N
REC
2 727min
A U TO
F AD E OUTOUT
min
AUTO
FADE
Fade in
Fade out
Operation button
DISPLAY button
Start/Stop button
Page 47
Useful Features
37
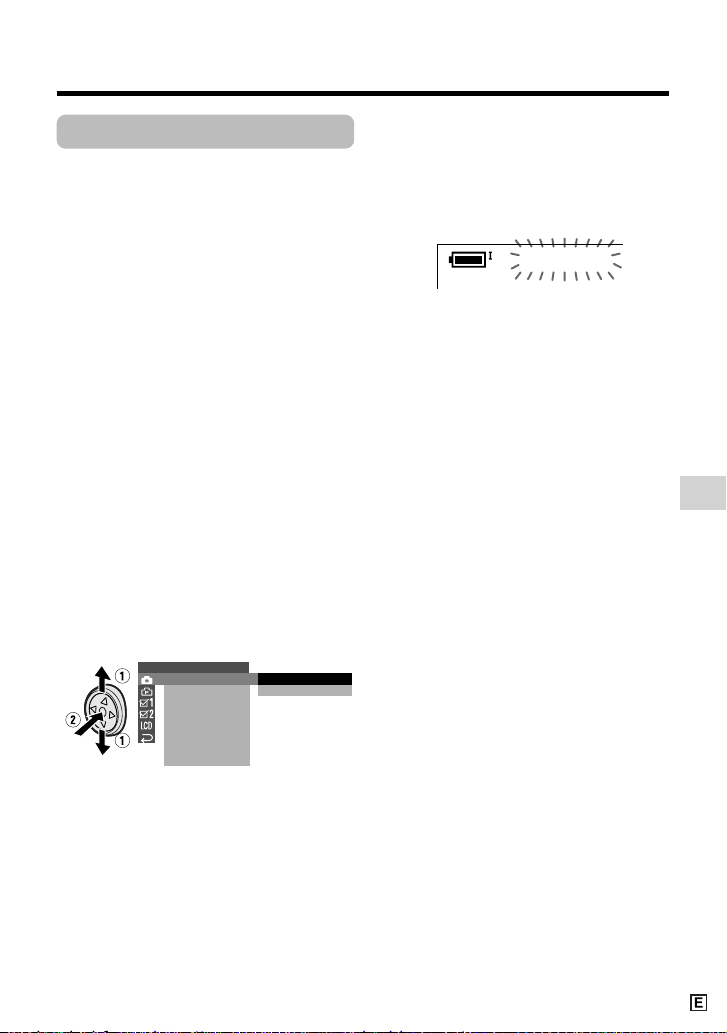
Quick Return
Available mode:
Tape Camera
If while playing back your tape you want to
quickly return to the last recorded scene
and start recording again, use the quick
return function.
1 Set the camcorder to Tape Camera
mode.
2 In Recording Standby mode, press
the DISPLAY button until the mode
screen appears.
3 Press l or m on the Operation
button to select “MENU”, then press
the centre of the Operation button.
4 Press l or m to select “EXECUTE”,
then press the centre of the Operation
button.
5 Press l or m to select T, then
press the centre of the Operation
button.
6 Press l or m to select “QK.
RETURN”, then press the centre of
the Operation button.
7 Press l or m to select “START”,
then press the centre of the Operation
button.
• “SEARCH” flashes, and the tape
begins fast forwarding or rewinding
to the end of the last recorded scene.
• When the tape reaches the end of
the last recorded scene, “FINISHED”
is displayed, and the camcorder
enters Recording Standby mode.
8 Press the DISPLAY button to turn off
the menu screen.
Notes:
• To cancel the quick return function while
“SEARCH” is flashing, press the centre of
Operation button twice.
• Quick return will not work if you remove the
cassette and reload it after recording or if
nothing has been recorded since loading.
SETT I NG 1
QK.
DGT L
RE TURN
ZOOM
TAPE SPEED
RETURN
START
STOP
SEARCH
Page 48
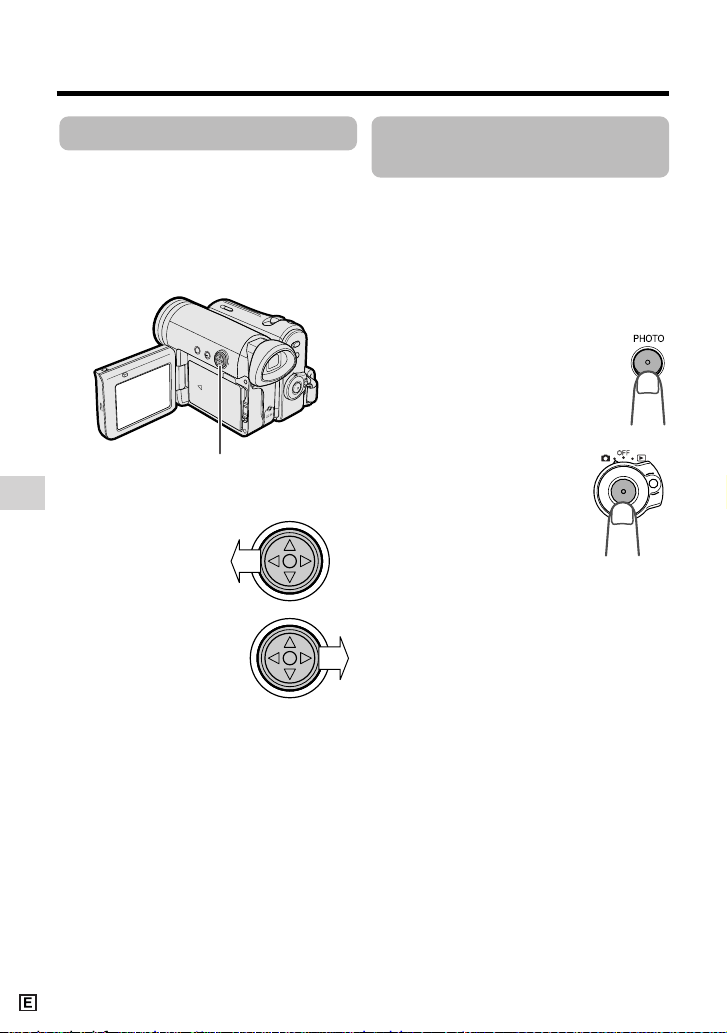
Useful Features
Camera Recording
Useful Features
38
Still Recording on
Tape
Available mode:
Tape Camera
You can record continuous still images of
subjects.
1 Set the camcorder to Tape Camera
mode.
2 In Recording Standby mode,
press the PHOTO button fully.
• A still image of the subject is
displayed.
3 Press the Start/Stop
button.
• The still image of the
subject will be recorded.
To pause recording
Press the Start/Stop button.
To cancel the still image
Press the PHOTO button fully.
Notes:
• Still Recording can also be used during
recording by pressing the PHOTO button
fully.
• The picture quality in Still Recording function
will be slightly lower than normal pictures.
Edit Search
Available mode:
Tape Camera
The edit search function lets you search,
without switching from Tape Camera mode
to Tape Playback mode, for the point on the
tape where you wish to start recording next.
1 Set the camcorder to Tape Camera
mode.
2 In Recording
Standby mode,
press and hold
down j (reverse
edit search) or k
(forward edit
search) on the
Operation button.
3 When you find the point where you
want to begin recording, release the
button.
Notes:
• The sound is off during search.
• Forward edit search is performed at the same
speed as normal playback, and reverse edit
search at 6.5 times the normal playback.
• You may experience picture noise during
reverse edit search.
Operation button
Page 49
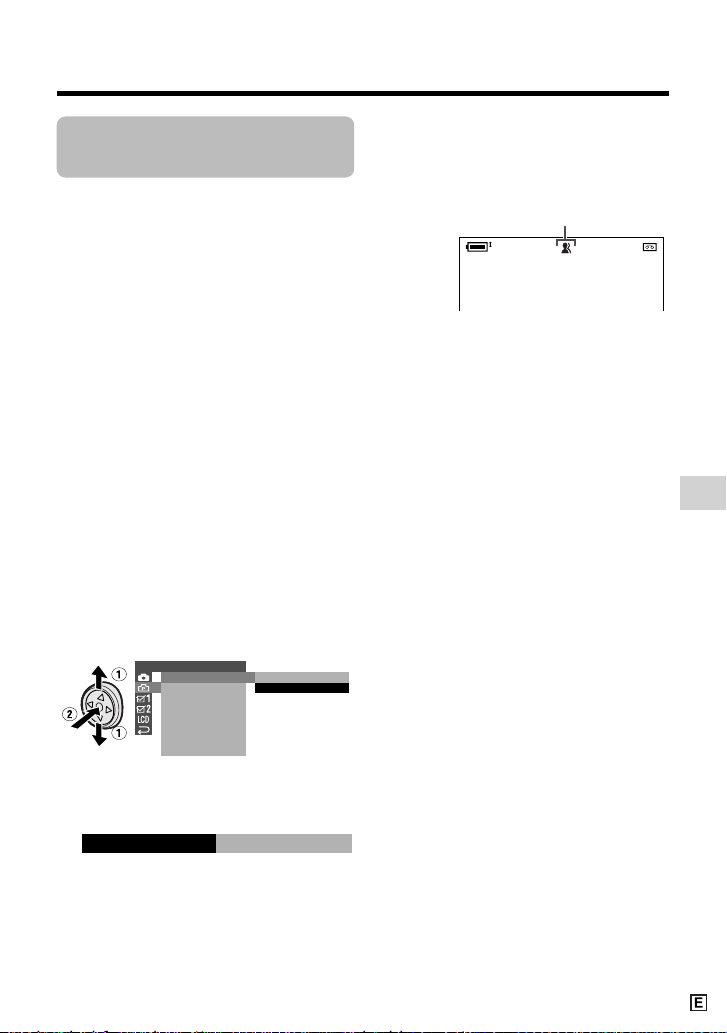
Useful Features
39
Digital Image
Stabilization (DIS)
Available mode:
Tape Camera
The digital image stabilization (DIS) function
allows you to stabilize the image by
electronically compensating for relatively
minor image shaking that is often annoying
in close-up shots.
1 In Tape Camera mode, press the
DISPLAY button until the mode
screen appears.
2 Press l or m on the Operation
button to select “MENU”, then press
the centre of the Operation button.
3 Press l or m to select “EXECUTE”,
then press the centre of the Operation
button.
4 Press l or m to select Y, then
press the centre of the Operation
button.
5 Press l or m to select “DIS”, then
press the centre of the Operation
button.
6 Press l or m to select “ON”, then
press the center of the Operation
button.
7 Press the DISPLAY button to turn off
the menu screen.
• The DIS indicator only appears when
the on-screen indicators are turned
on.
To cancel DIS function
Select “OFF” in step 6 above. The z
indicator will disappear.
Notes:
• The DIS function cannot compensate for
excessive image shaking.
• When image shaking does not occur (e.g.
when using the camcorder on a tripod), turn
off the DIS function. The picture will appear
more natural when the DIS function is off.
SETT I NG 2
DIS
16 9:
AUDI O MODE
RETURN
W
IND
ON
OFF
T AP E
ONDIS
DIS indicator
Page 50
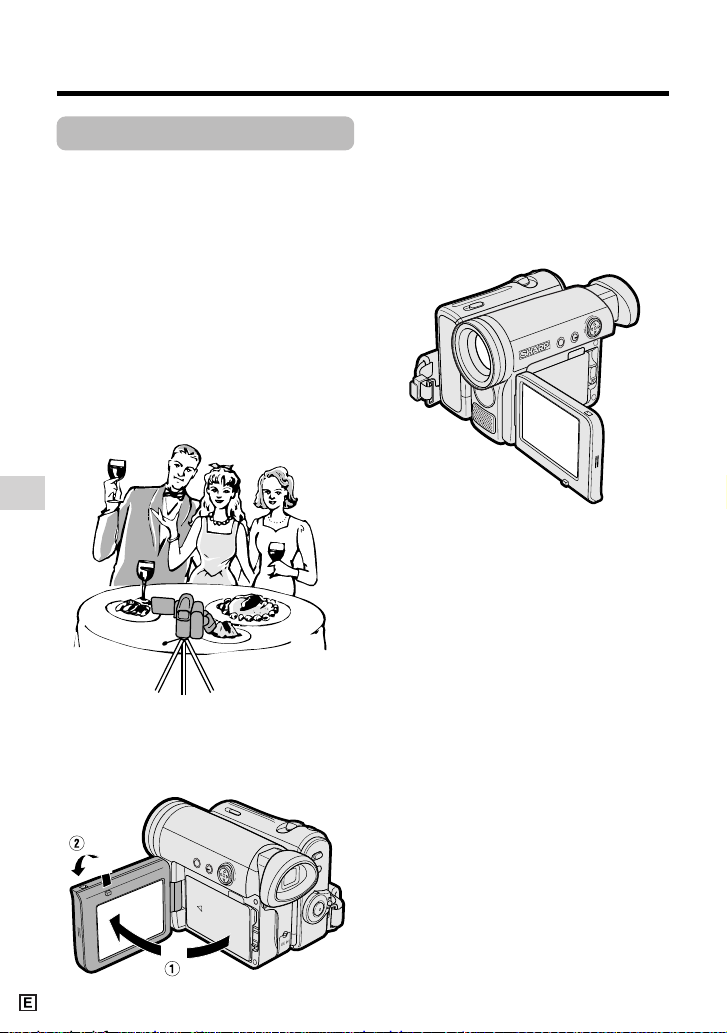
Useful Features
Camera Recording
Useful Features
40
Self Recording
Normal self recording
Available modes:
Tape Camera, Card Camera
Open the LCD monitor and rotate it 180°
vertically so that the screen faces the other
way and the subject can monitor the shot
while you are recording with the viewfinder.
If the camcorder is steadied, you can record
yourself in the scene by watching yourself
on the LCD monitor. The remote control
(only supplied with VL-Z5) is useful for such
occasions.
1 Pull out the viewfinder completely.
Open the LCD monitor to a 90° angle
to the camcorder body (1), and then
rotate it 180° vertically (2).
180˚
90˚
2 Set the Media Selection switch to V
or u.
3 Set the Power switch to v.
• The subject is displayed in the
viewfinder, and a mirror image of the
subject is displayed on the LCD
monitor.
4 Begin recording.
Notes:
• Use the remote control (only supplied with
VL-Z5) to begin/stop recording on tape.
• You can play back images while the monitor
is in the self recording position. Set the
camcorder to Tape Playback or Card
Playback mode.
Page 51
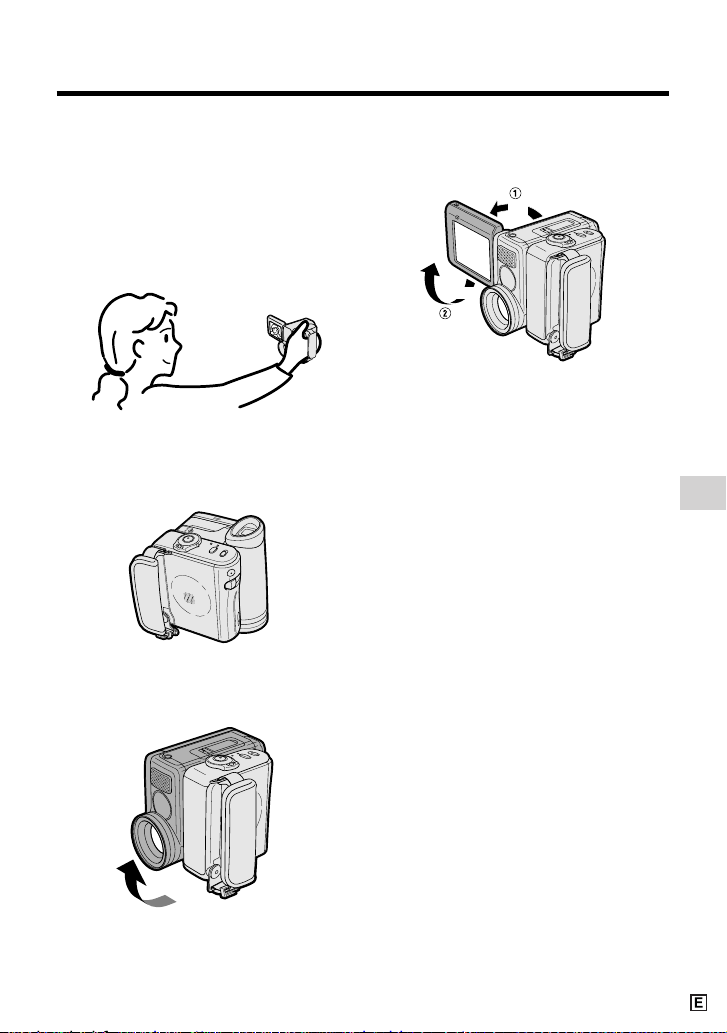
Useful Features
41
Self recording with reversed
grip
Available mode:
Tape Camera
Rotate the grip 90° and the LCD monitor
180° vertically so that you can record
yourself while holding the grip.
3 Open the LCD monitor to a 90° angle
to the camcorder body (1), and then
rotate it 180° vertically (2).
4 Set the Media Selection switch to V.
5 Set the Power switch to v.
6 Begin recording.
Notes:
• Do not rotate the monitor section to the self
recording position during recording or
playback.
• During self recording, the mode or menu
screen cannot be displayed.
• All of the manual settings are set to AUTO
and some other settings will set to OFF in self
recording.
• You may experience image noise when using
self recording.
• To operate self recording with reversed grip
correctly, make sure to turn the grip and the
lens section so that the Start/Stop button and
the tripod socket face upward, and the lens
faces toward you. The I indicator will
appear.
• Be sure that the LCD monitor rotation is
exactly 180°, otherwise the image recorded
will be rotated 180° upside-down.
• In self recording with reversed grip in Card
Camera mode, the still images will be
recorded rotated 180° upside down. The J
indicator will appear in this case.
• The viewfinder does not work in self
recording with reversed grip.
1 Turn the camcorder downward as
shown below.
2 Rotate the lens section 90° vertically
as shown below.
90˚
180˚
90°
Page 52
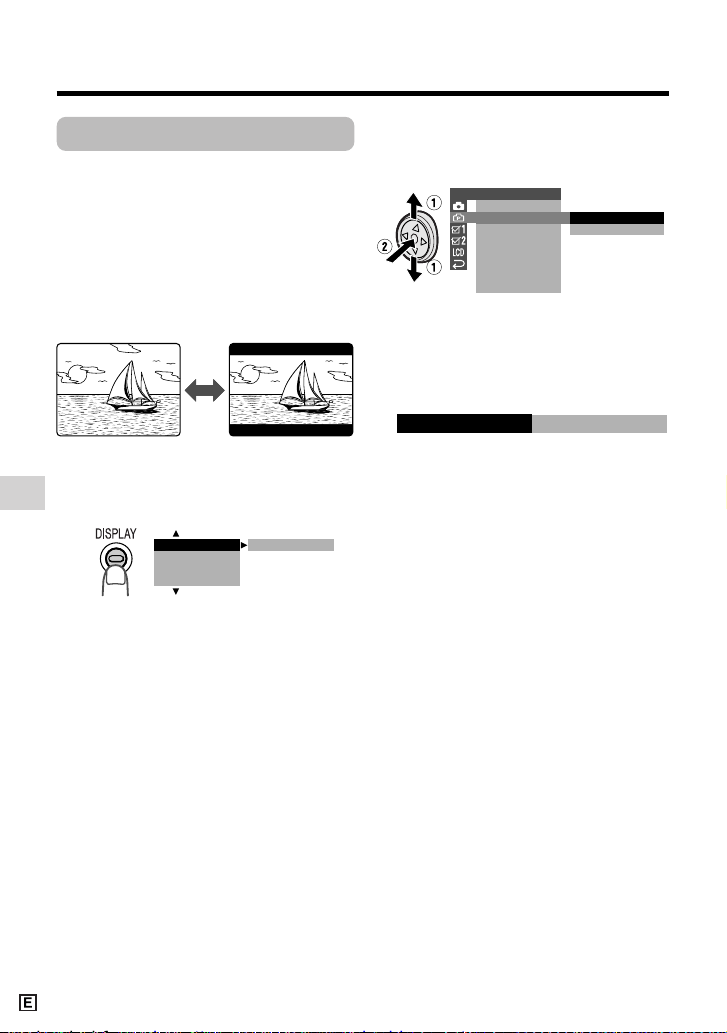
Useful Features
Camera Recording
Useful Features
42
Wide Screen (16:9)
Available mode:
Tape Camera
The wide screen function lets you record
scenes with the wide-screen feel of a movie
shown in a theatre The top and bottom of
the picture are masked with black bands to
produce an effective screen aspect ratio of
16:9.
1 In Tape Camera mode, press the
DISPLAY button until the mode
screen appears.
2 Press l or m on the Operation
button to select “MENU”, then press
the centre of the Operation button.
3 Press l or m to select “EXECUTE”,
then press the centre of the Operation
button.
4 Press l or m to select Y, then
press the centre of the Operation
button.
5 Press l or m to select “16:9”, then
press the centre of the Operation
button.
6 Press l or m to select “ON”, then
press the centre of the Operation
button.
• The picture is displayed with the top
and bottom portions masked.
7 Press the DISPLAY button to turn off
the menu screen.
To return to normal screen
Select “OFF” in step 6 above.
BLC GAI N/ OFF
FADE
M
ENU
SC ENE
M
ENU
SETT I NG 2
DIS
16 9:
AUDI O MODE
RETURN
W
IND
ON
OFF
ON
16 9:
Normal screen Wide screen
Page 53
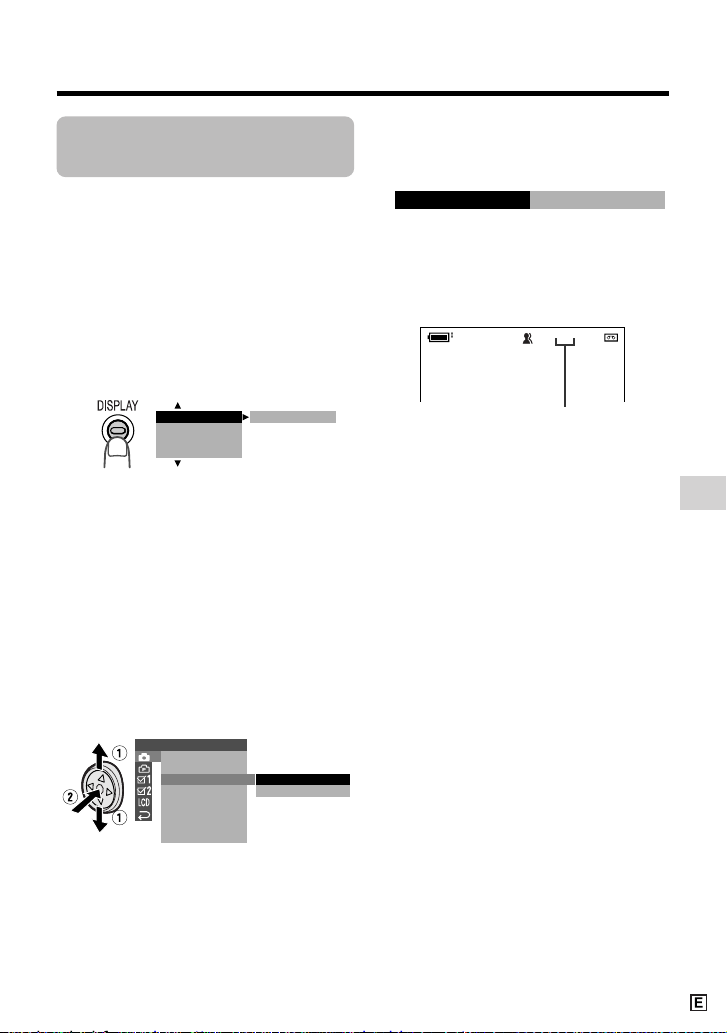
Useful Features
43
Recording in LP (Long
Play Recording) Mode
Available mode:
Tape Camera
This camcorder allows you to record in LP
(Long Play Recording) mode for approximately 50% more recording time with the
same picture quality as that in SP (Standard
Play Recording) mode.
1 In Tape Camera mode, press the
DISPLAY button until the mode
screen appears.
2 Press l or m on the Operation
button to select “MENU”, then press
the centre of the Operation button.
3 Press l or m to select “EXECUTE”,
then press the centre of the Operation
button.
4 Press l or m to select T, then
press the centre of the Operation
button.
5 Press l or m to select “TAPE
SPEED”, then press the centre of the
Operation button.
6 Press l or m to select “LP”, then
press the centre of the Operation
button.
7 Press the DISPLAY button to turn off
the menu screen.
• The long play recording mode
indicator only appears when the onscreen indicators are turned on.
To return to SP mode
Select “SP” in step 6 above.
Notes on the use of LP
mode
• To record in LP mode, be sure to use a
Mini DV cassette labelled for use with LP
mode.
• Frozen images, mosaic-pattern picture
noise, audio interruptions or audio loss
may occur in the following cases:
—When using a tape which is not
designated for use with LP mode.
—When a tape recorded in LP mode
under high temperature conditions is
played back.
—When a tape recorded in LP mode with
the camcorder is played back on a Mini
DV player or camcorder from another
manufacturer.
—When a tape recorded in LP mode is
played back on a Mini DV player or
camcorder without an LP function.
• Audio dubbing is not possible with LP
mode recording.
BLC GAI N/ OFF
FADE
M
ENU
SC ENE
M
ENU
SETT I NG 1
QK.
DGT L
RE TURN
ZOOM
TAPE SPEED
RETURN
SP
LP
T AP E
LP
LP
TAPE SPEED
Long play recording mode indicator
Page 54
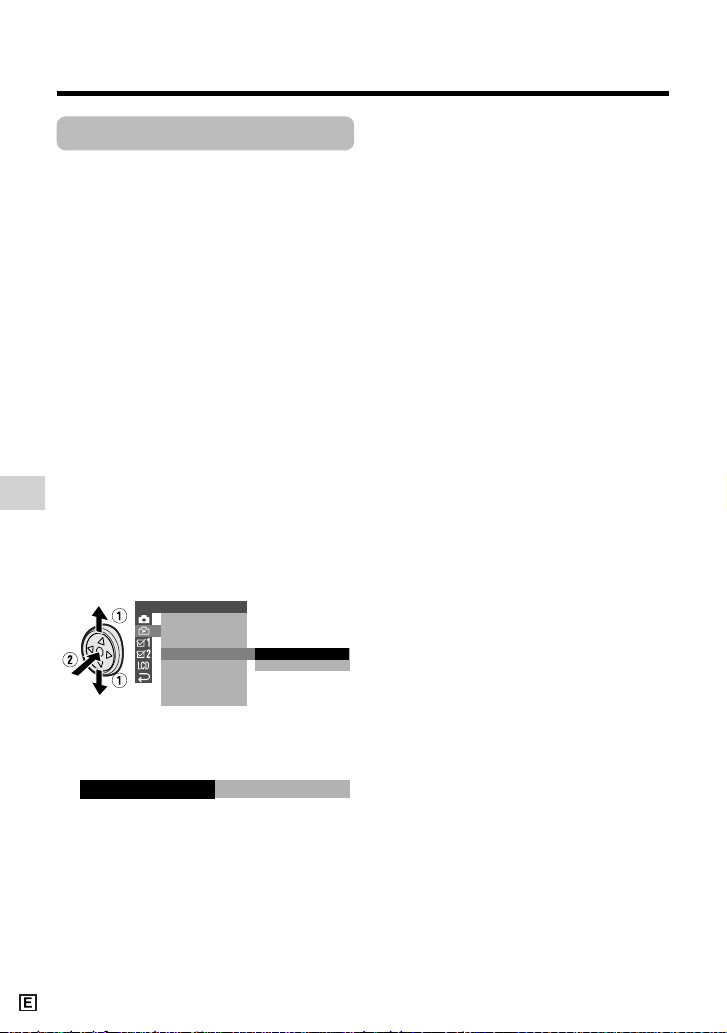
Useful Features
Camera Recording
Useful Features
44
Windbreak
Available mode:
Tape Camera
The windbreak function allows you to
reduce annoying noise from strong winds
when recording.
1 In Tape Camera mode, press the
DISPLAY button until the mode
screen appears (see page 31).
2 Press l or m on the Operation
button to select “MENU”, then press
the centre of the Operation button.
3 Press l or m to select “EXECUTE”,
then press the centre of the Operation
button.
4 Press l or m to select Y, then
press the centre of the Operation
button.
5 Press l or m to select “WIND”, then
press the centre of the Operation
button.
6 Press l or m to select “ON”, then
press the centre of the Operation
button.
7 Press the DISPLAY button to turn off
the menu screen.
SETT I NG 2
DIS
16 9:
AUDI O MODE
RETURN
W
IND
OFF
ON
ON
W
IND
To cancel Windbreak
Select “OFF” in step 6 above.
Note:
• Keep the windbreak function off during
normal recording. If left on, the recorded
audio may sound somewhat muffled when
played back.
Page 55
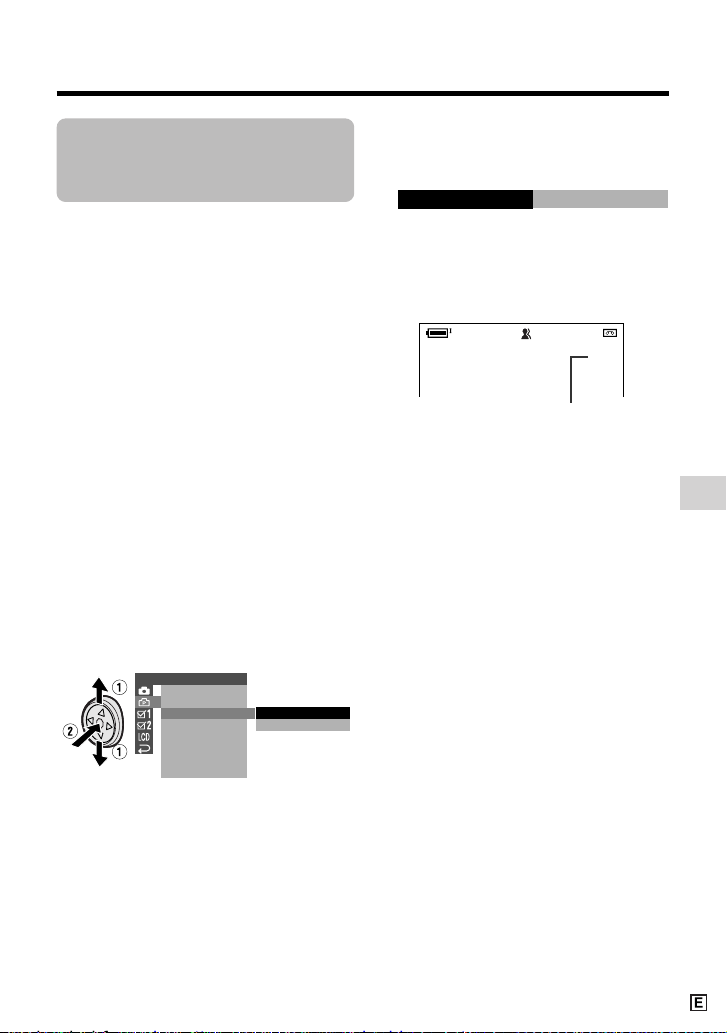
Useful Features
45
Selecting the 16-bit
Audio Recording
Mode
Available mode:
Tape Camera
The camcorder normally records audio in
the 12-bit audio recording mode. For higherquality audio recording, select the 16-bit
audio recording mode.
1 In Tape Camera mode, press the
DISPLAY button until the mode
screen appears (see page 31).
2 Press l or m on the Operation
button to select “MENU”, then press
the centre of the Operation button.
3 Press l or m to select “EXECUTE”,
then press the centre of the Operation
button.
4 Press l or m to select Y, then
press the centre of the Operation
button.
5 Press l or m to select “AUDIO
MODE”, then press the centre of the
Operation button.
6 Press l or m to select “16bit”, then
press the centre of the Operation
button.
7 Press the DISPLAY button to turn off
the menu screen.
• The 16-bit audio recording mode
indicator only appears when the onscreen indicators are turned on.
To return to 12-bit audio recording
mode
Select “12bit” in step 6 above.
Note:
• When using Audio Dubbing with 16-bit audio
recordings, both the dubbed and original
sounds will be recorded in mono (see page
60).
1 6 bit
AUD I O MODE
SETT I NG 2
DIS
16 9:
AUDI O MODE
RETURN
W
IND
112
6
bit
bit
T AP E
16 bit
16-bit audio recording mode indicator
Page 56
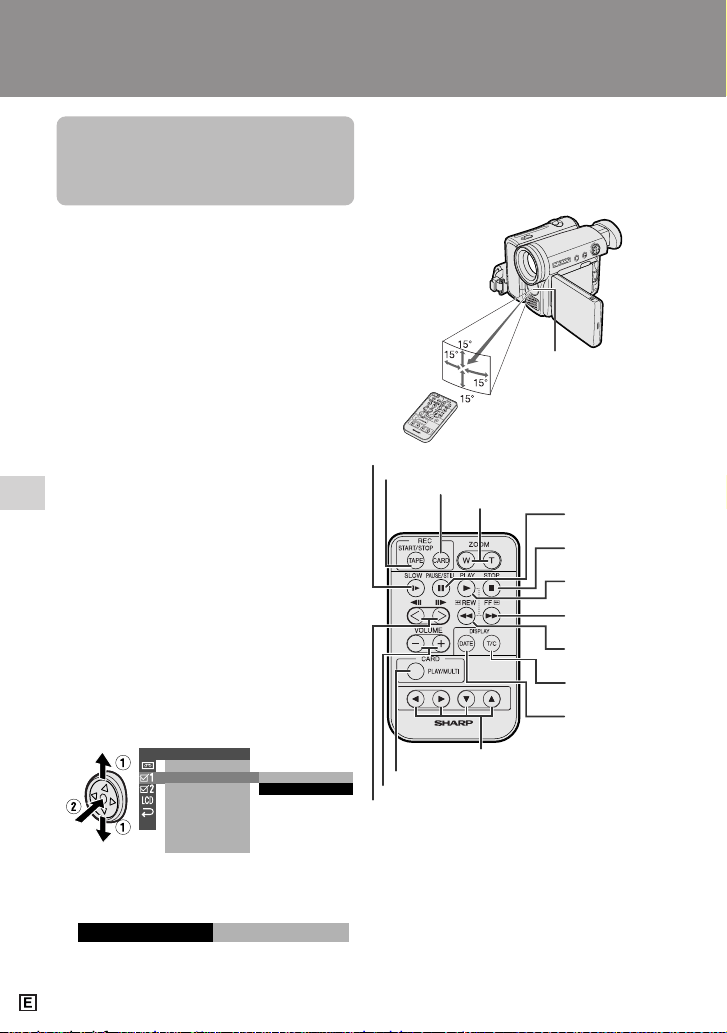
Useful Features
Playback
Useful Features
46
Using the Remote
Control (Only
supplied with VL-Z5)
Available modes:
All modes
Use the remote control to operate the
camcorder from a distance, such as when
you want to record yourself in a scene, or
when the camcorder is connected to a TV
for use as a VCR.
Activating
• The example screens shown are for Tape
Playback mode.
1 Press the DISPLAY button until the
mode screen appears.
2 Press l or m on the Operation
button to select “MENU”, then press
the centre of the Operation button.
3 Press l or m to select “EXECUTE”,
then press the centre of the Operation
button.
4 Press l or m to select Z, then
press the centre of the Operation
button.
5 Press l or m to select “REMOTE”,
then press the centre of the Operation
button.
6 Press l or m to select “ON”, then
press the centre of the Operation
button.
7 Press the DISPLAY button to turn off
the menu screen.
Useful Features
Playback
Operating
Aim the remote control at the remote sensor
of the camcorder, and press the control
buttons to operate.
Notes:
• Be careful not to expose the remote sensor to
direct sunlight or strong interior lighting, as
this may prevent the remote control from
operating properly.
• Be sure that there are no obstacles between
the remote control and the remote sensor.
• The remote control (RRMCGA149WJSA) is
not supplied with VL-Z3. Contact the nearest
SHARP service center or your dealer for
purchasing as specified part.
OTHERS 1
BEEP
REMOT E
DEF AULT
RETURN
ON
OFF
REMOT E
ON
ZOOM (W/T) buttons
SLOW button
Remote sensor
5 m
CARD PLAY/MULTI button
Advance/reverse buttons
Shift buttons
VOLUME +/L buttons
PLAY button
STOP button
PAUSE/STILL
button
REW button
FF button
DATE button
T/C (Time
Code) button
CARD REC button
TAPE REC START/STOP button
Page 57
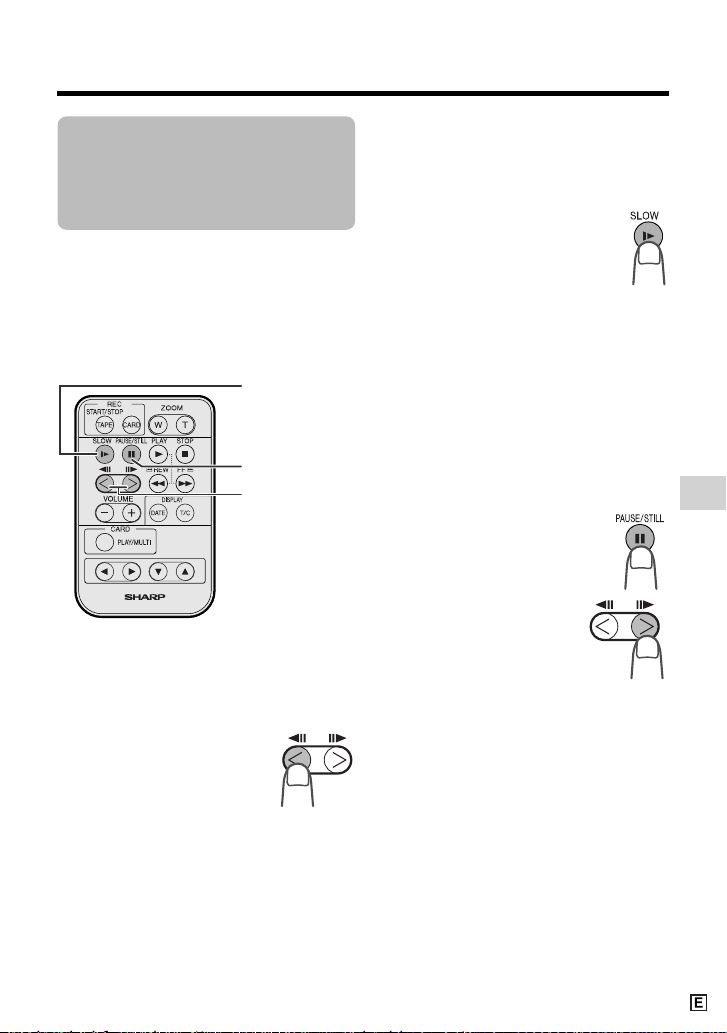
Useful Features
47
Tape Playback
Functions with the
Remote Control (Only
supplied with VL-Z5)
Available mode:
Tape Playback
You can use the following playback
functions with the remote control (only
supplied with VL-Z5). (See page 46 for use
of the remote control.)
The reverse playback function allows you to
play back images in reverse.
During Tape Playback, press the
j button.
Slow
The slow function allows you to play back
images in slow motion.
During Tape Playback, press the
SLOW button (f).
Then, select the tape direction using
the advance/reverse buttons (j or
h).
To return to normal playback, press the
PLAY button (t).
Note:
• To protect the tape, the camcorder automatically returns to normal playback if it is left in
Slow mode for more than 10 minutes.
Frame Advance
The frame advance function allows you to
play back still images frame by frame.
1 During Tape Playback, press
the PAUSE/STILL button (g)
to pause playback.
2 Press the h (or j)
button.
• Each time you press the
button, the picture
advances one frame
forward (or backward).
To return to normal playback, press the
PLAY button (t).
Notes:
• The sound is off during reverse, slow, and
frame advance playback.
• If you use the slow or frame advance function
with the tape recorded in LP mode, the
picture may advance several frames at a
time.
• The reverse frame advance moves about 30
frames.
To return to normal playback, press the
PLAY button (t).
Note:
• The camcorder automatically returns to
normal playback if it is left in reverse
playback for more than 30 minutes.
Reverse Playback
Advance/reverse
buttons
PAUSE/STILL
button
SLOW button
Page 58
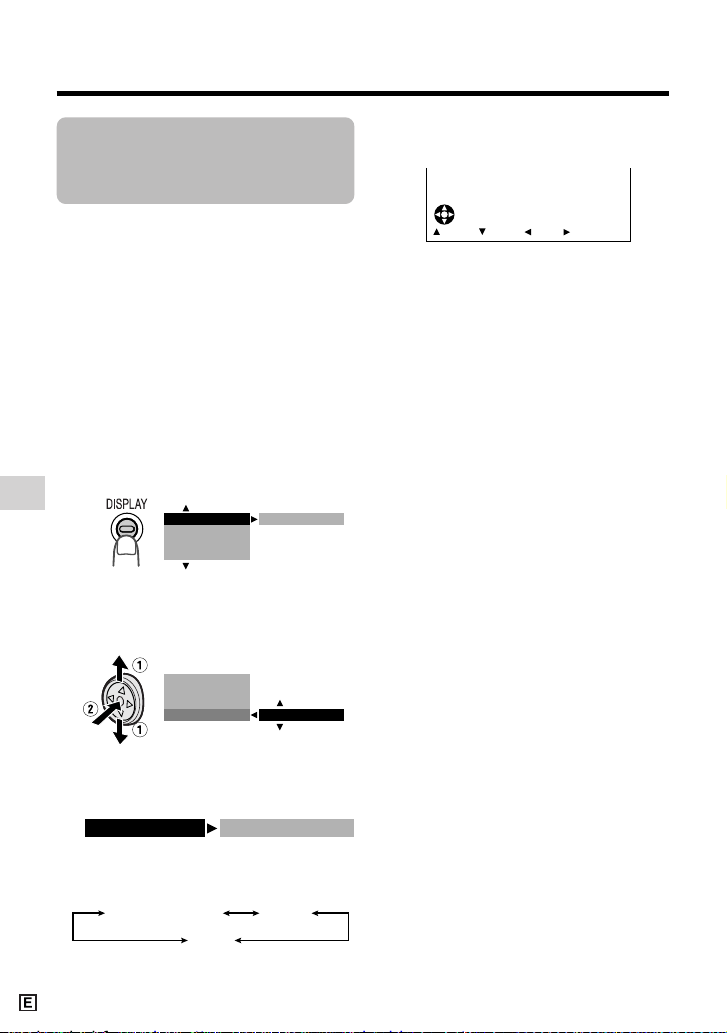
Useful Features
Playback
Useful Features
48
Selecting the Date
and Time of
Recording Display
Available modes:
All modes
Follow the procedure below to select the
date, or both the date and time, of recording
display on the screen. You can display the
date and time during both recording and
playback.
• The example screens shown are for Tape
Playback mode.
1 Hold down the Lock button and set
the Power switch to v or w.
2 Press the DISPLAY button until the
mode screen appears.
3 Press l or m on the Operation
button to select “DATE DISP.”, then
press the centre of the Operation
button.
4 Press l or m to select the desired
setting, then press the centre of the
Operation button.
• Each time you press l or m, the
setting changes as shown below.
5 Press the DISPLAY button until the
date (or date and time) appears.
Notes:
• The date (or date and time) appears when
the on-screen indicators are turned on.
• Before recording, make sure that the date
and time have been correctly set. If they have
not been set, the display will be left blank
when playing back the recording. (The
display will also be left blank for unrecorded
or damaged portions of the tape.)
• In Tape Playback mode, the current date and
time are displayed when the tape is not being
played back.
• You can also press the DATE button on the
remote control (only supplied with VL-Z5) to
display the date (or date and time).
OF F
AUD I O DUB
M
ENU
DATE DI SP.
PI C. EFFECT
DAT E D I S P.
DAT E+TIME
AUD I O DUB
PI C.EFFECT
M
ENU
DATE
OFF
DATE+TIME
4002.26.
FFREWSTOPPLAY
DATE DI SP. DATE
Page 59
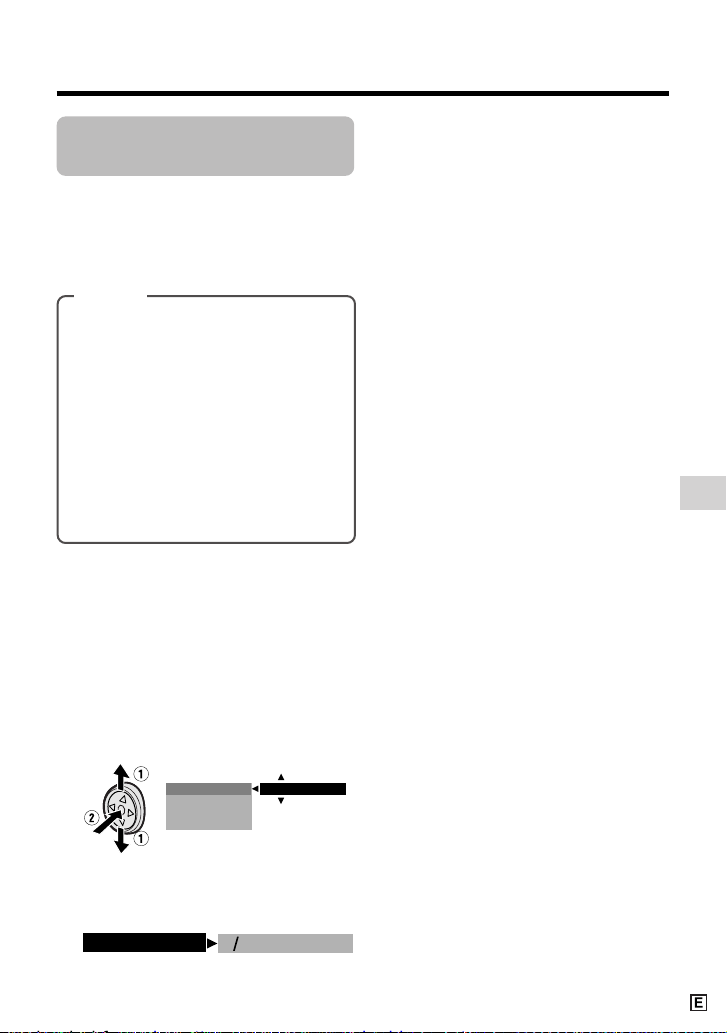
Useful Features
49
Picture Effect
Playback
Available modes:
Tape Playback, Card Playback
These picture effects let you play back
images with a more dramatic effect.
4 Press the DISPLAY button to turn off
the mode screen.
To cancel Picture Effect Playback
Select “OFF” in step 3 above.
Notes:
• Video images in Picture Effect Playback
mode cannot be transferred via DV cable to a
personal computer.
• You cannot use Picture Effect Playback with
Slide Show Playback.
Types
B/W: The picture is displayed in
black-and-white.
SEPIA: The picture is displayed in
sepia colour similar to that of an old
photograph.
SOLARI: The contrast of the subject
is enhanced, creating an unique
artistic image.
NEGA: The blacks and whites of the
image are reversed and colours of
the image are inverted.
• The example screens shown are for Tape
Playback mode.
1 During Tape Playback (or Card
Playback), press the DISPLAY button
until the mode screen appears.
2 Press l or m on the Operation
button to select “PIC. EFFECT”, then
press the centre of the Operation
button.
3 Press l or m to select the desired
picture effect, then press the centre of
the Operation button.
DAT E D I S P.
OFF
AUD I O DUB
PI C.EFFECT
M
ENU
BW
P I C. EFFECT
Page 60
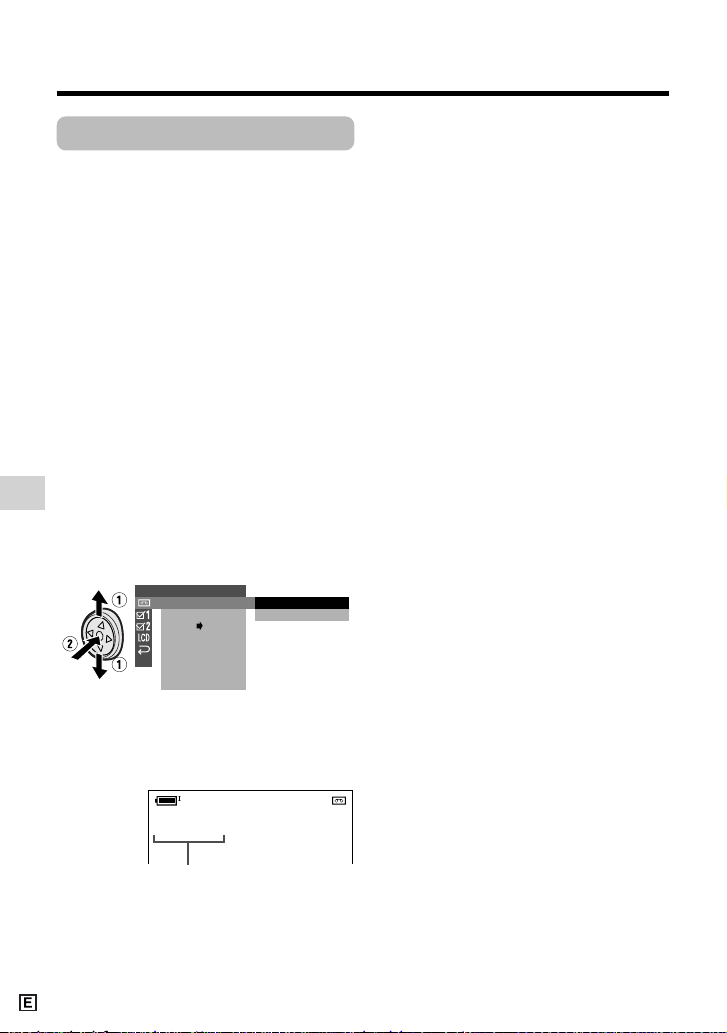
Useful Features
Playback
Useful Features
50
Rotate Playback
Available mode:
Tape Playback
This function allows you to play back
images rotated 180°.
1 In Tape Playback mode, press the
DISPLAY button until the mode
screen appears.
2 Press l or m on the Operation
button to select “MENU”, then press
the centre of the Operation button.
3 Press l or m to select “EXECUTE”,
then press the centre of the Operation
button.
4 Press l or m to select V, then
press the centre of the Operation
button.
5 Press l or m to select “ROTATE
PB”, then press the centre of the
Operation button.
6 Press l or m to select “EXECUTE”,
then press the centre of the Operation
button.
• Rotate Playback indicator appears.
7 Press m to begin Rotate Playback.
• The image is rotated 180° upside
down.
PLAYBACK
AUDI O
ANLG DGTL
RET URN
SET
EXECUTE
RET URN
ROTAT E PB
AUDIO
ROT ATE PB
21
+
To cancel Rotate Playback
Press the centre of the Operation button
in step 7 above.
Notes:
• When executing Rotate Playback during Tape
Playback, playback will stop. Press m to
begin Rotate Playback.
• Even if the camcorder is in Rotate Playback
mode, the image output via a DV connection
will display as normal playback.
• The camcorder will stop and cancel Rotate
Playback when the LCD monitor is closed.
• When you want to display the menu screen
during Rotate Playback, press the centre of
the Operation button.
• In Rotate Playback mode, you cannot
perform frame advance, slow, and picture
effect playback or copying an image from
tape to card.
Rotate Playback indicator
Page 61
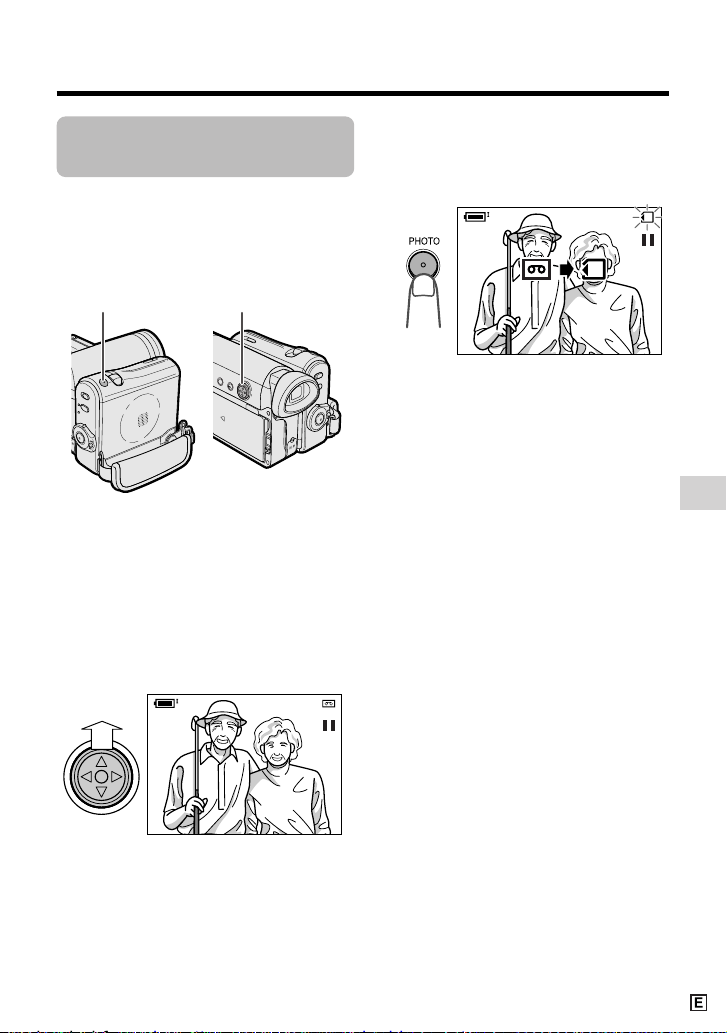
Useful Features
51
Copying an Image
from Tape to Card
Available mode:
Tape Playback
You can capture your favourite image frame
from a video tape recording and save it on
card.
1 Inser t the recorded Mini DV cassette
and a card in the camcorder.
2 Set the camcorder to Tape Playback
mode, then begin tape playback.
3 Press m on the Operation button at
the point where the desired image
appears.
• A still picture of the image appears.
Note:
• To cancel the still picture, press m
again.
4 Press the PHOTO button to copy the
image to the card.
• The S indicator flashes red while the
image is copied.
AUDIO
2+21
+
AUDIO
2+21
+
PHOTO button
Operation button
Page 62
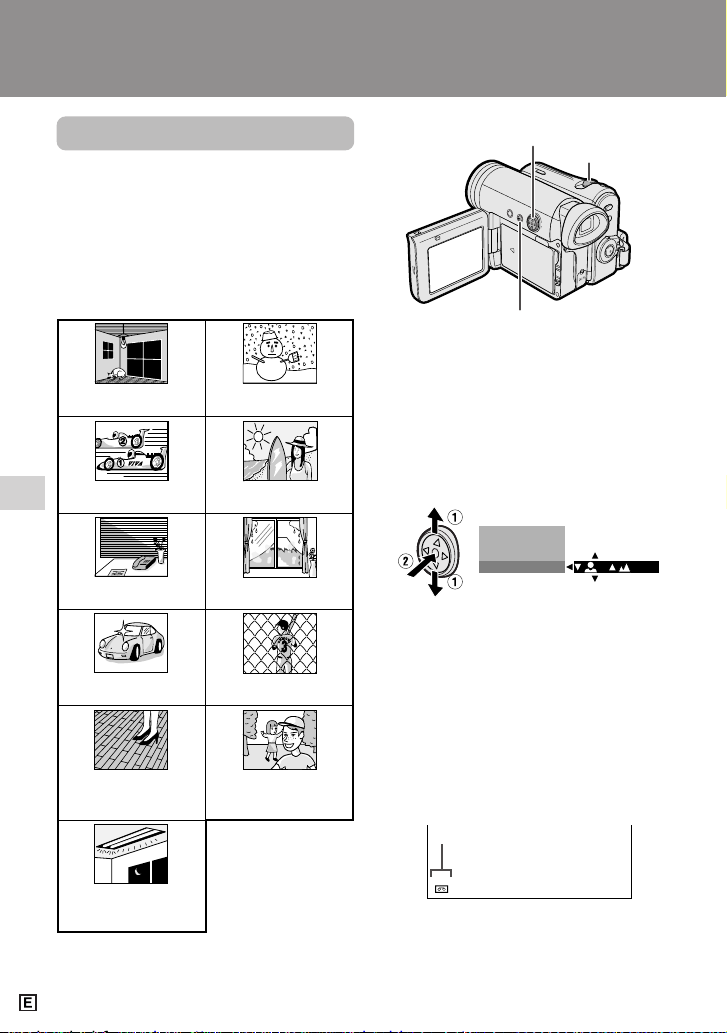
Advanced Features
Camera Recording
Useful Features
52
Power Zoom control
Operation button
DISPLAY button
Manual focus indicator
Manual Focus
Available modes:
Tape Camera, Card Camera
Auto Focus may not be able to focus on the
subject in the situations shown below. In
such situations, set the camcorder to
Manual Focus mode and focus manually.
Fast-speed shutter being
used under fluorescent
lighting.
Subject is too dark.
Lack of contrast, e.g.
snow scene.
Fast-moving subject. Background is too bright.
Subject has horizontal
stripes.
Subject is being shot through a
dirty or wet window.
Light reflects off the
subject.
Two subjects at different distances
overlap in the same scene.
Subject has fine, repeated
patterns.
Subjects at different distances
appear in the centre of the scene
at the same time.
Advanced Features
Camera Recording
• The example screens shown are for Tape
Camera mode.
1 In Tape Camera or Card Camera
mode, press the DISPLAY button until
the mode screen appears.
2 Press l or m on the Operation
button to select “FOCUS”, then press
the centre of the Operation button.
3 Adjust the Power Zoom control to
frame the subject as you desire.
4 Press l or m to focus on the
subject.
p: To focus on a closer subject
o: To focus on a more distant subject
5 Press the DISPLAY button to turn off
the mode screen.
• “MF” appears when the on-screen
indicators are turned on.
Note:
• When “MF” is displayed, you can manually
adjust the focus by pressing l or m, even if
the focus setting screen is not displayed.
SCENE MENU
SET
M
ANUAL
FOCUS
/
M
ENU
3 0min3 0min
MF
Page 63
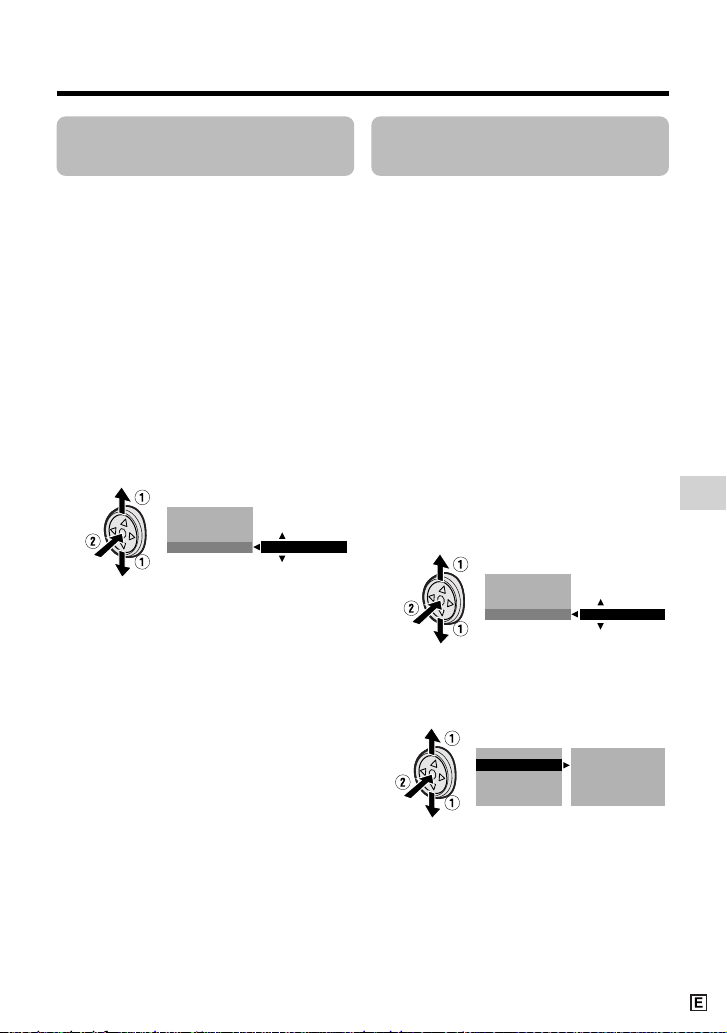
Useful Features
53
Displaying the Manual
Setting Screen
Available modes:
Tape Camera, Card Camera
You can manually adjust these settings as
shown below in the manual setting screen.
• White Balance (see page 54)
• Manual Iris (see page 55)
• Manual Gain (see page 56)
• The example screens shown are for Tape
Camera mode.
1 In Tape Camera or Card Camera
mode, press the DISPLAY button until
the mode screen appears.
2 Press l or m on the Operation
button to select “MANUAL SET”, then
press the centre of the Operation
button.
3 Press l or m to select “EXECUTE”,
then press the centre of the Operation
button.
Notes:
• Tape Camera and Card Camera mode do not
share manual settings.
• Items that are not selectable are greyed out.
Returning to Auto
Focus
Available modes:
Tape Camera, Card Camera
You can set Manual Focus mode to Auto
Focus mode with the operation below.
• The example screens shown are for Tape
Camera mode.
1 In Tape Camera or Card Camera
mode, press the DISPLAY button until
the mode screen appears.
2 Press l or m on the Operation
button to select “AUTO FOCUS”, then
press the centre of the Operation
button.
3 Press l or m to select “EXECUTE”,
then press the centre of the Operation
button.
• The FOCUS setting returns to Auto
Focus mode.
4 Press the DISPLAY button to turn off
the mode screen.
SCENE MENU
SET
M
ANUAL
FOCUS
AUTO F OCUS
EXECUTE
SCENE MENU
EXECUTE
M
ENU
FADE
SET
M
ANUAL
W
HITE BAL.
IRIS
GA I N
FULL AUTO
RETURN
EXECUTE
AUTO
AUTO
AUTO
Page 64
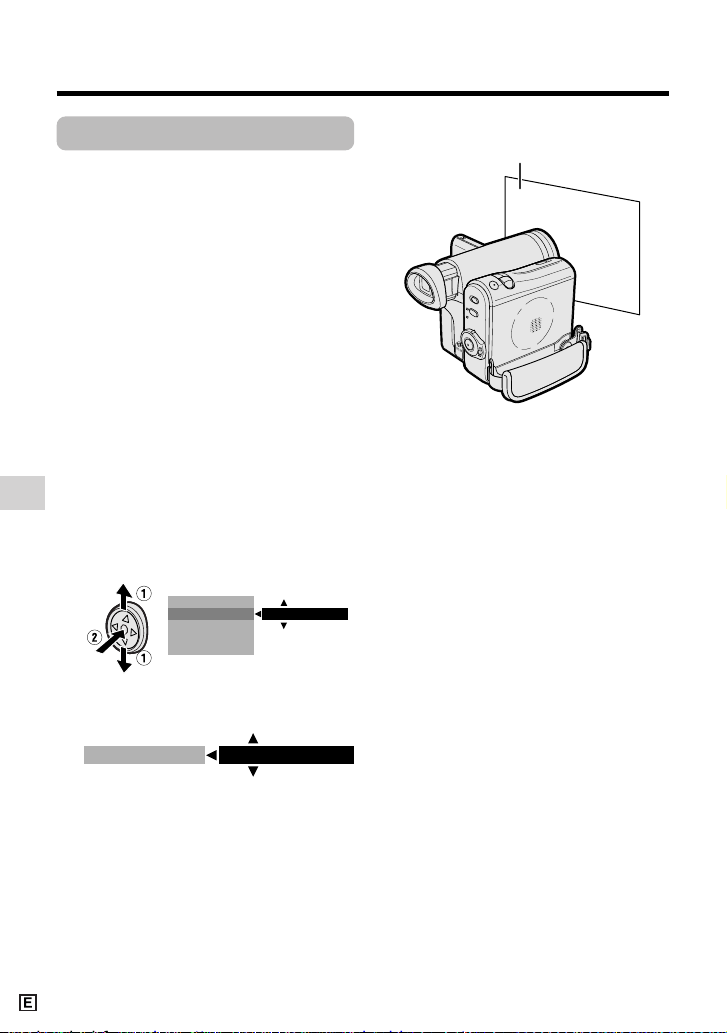
Advanced Features
Camera Recording
Useful Features
54
White paper or white cloth
White Balance Lock
Available modes:
Tape Camera, Card Camera
The colour of the subject on the screen
looks different depending on lighting
conditions. Lock the White Balance if the
Auto White Balance does not work properly.
1 In Tape Camera or Card Camera
mode, press the DISPLAY button until
the mode screen appears.
2 Press l or m on the Operation
button to select “MANUAL SET”, then
press the centre of the Operation
button (see page 53).
3 Press l or m to select “EXECUTE”,
then press the centre of the Operation
button.
4 Press l or m to select “WHITE
BAL.”, then press the centre of the
Operation button.
5 Press l or m to select “LOCK
MODE”.
6 Aim the lens at a white object.
• Adjust the distance of the object so
that the entire screen is white.
7 Press the centre of the Operation
button to set the white balance lock.
• “LOCK MODE” will change to
“LOCK” after pressing the centre of
the Operation button.
• “LOCK” flashes during the locking
procedure, and stops flashing after
locking the white balance.
Note:
• If you move the camcorder while
“LOCK” is flashing, “LOCK” may not
stop flashing. If this occurs, repeat
step 7.
8 Press the DISPLAY button to turn off
the MANUAL SET screen.
To return to Auto White Balance
mode
Press k in step 5 above, then press the
centre of the Operation button.
To return to Full Auto mode
Set the camcorder to Full Auto mode (see
page 57).
Note:
• White Balance setting cannot be used
when a scene setting is selected.
W
HITE BAL.
IRIS
AUTO
GA I N
FULL AUTO
RETURN
LOCK MODE
W
HITE BAL.
Page 65
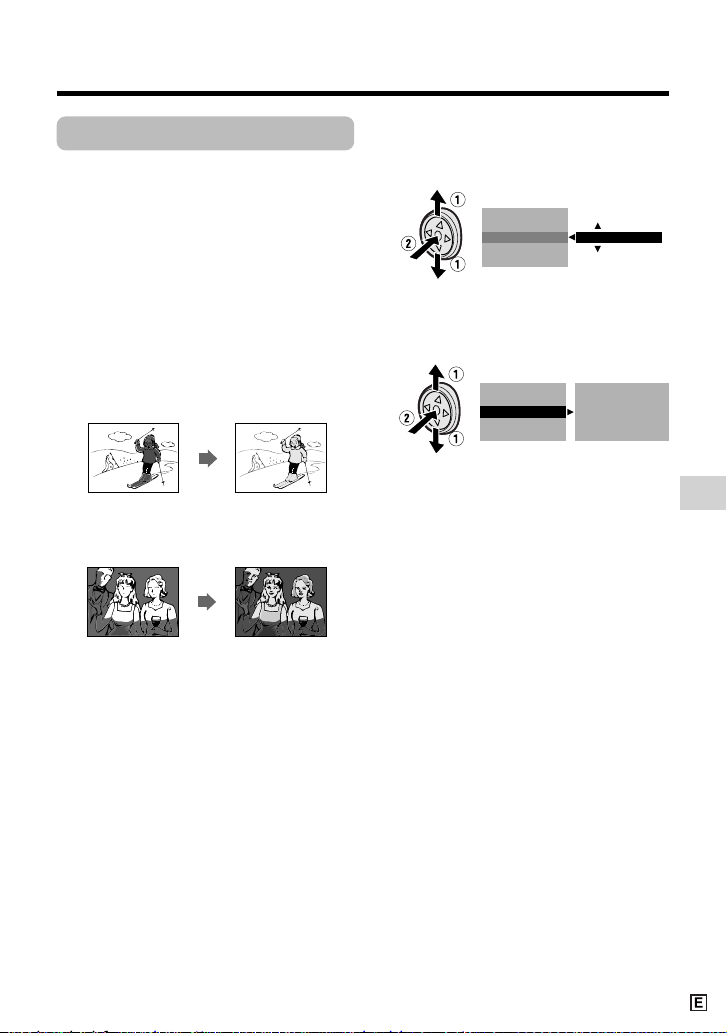
Useful Features
55
Manual Iris
Available modes:
Tape Camera, Card Camera
The camcorder is preset to Auto Iris mode,
which automatically selects the optimal
aperture. However, when there is too much
contrast in brightness between the subject
and background, you may not be able to
record a clear image. In this case, use the
manual iris function to correct the iris value.
Background is too bright and subject too
dark (backlit subject).
• Decrease the iris value to allow more light
through the lens.
Subject is too bright against background.
• Increase the iris value to allow less light
through the lens.
1 In Tape Camera or Card Camera
mode, press the DISPLAY button until
the mode screen appears.
2 Press l or m on the Operation
button to select “MANUAL SET”, then
press the centre of the Operation
button (see page 53).
3 Press l or m to select “EXECUTE”,
then press the centre of the Operation
button.
4 Press l or m to select “IRIS”, then
press the centre of the Operation
button.
5 Press l or m to select the desired
iris value, then press the centre of the
Operation button.
• The number shown is the selected
iris value. The adjustment range is 15
steps from F1.8 (most light) to F19
(least light).
6 Press the DISPLAY button to turn off
the MANUAL SET screen.
To return to Auto Iris mode
Press k in step 5 above, then press the
centre of the Operation button.
To return to Full Auto mode
Set the camcorder to Full Auto mode (see
page 57).
Note:
• Manual Iris mode cannot be used when a
scene setting is selected.
W
HITE BAL.
IRIS
AUTO
GA I N
FULL AUTO
RETURN
W
HITE BAL.
IRIS
GA I N
FULL AUTO
RETURN
F2.0
EXECUTE
AUTO
AUTO
Page 66
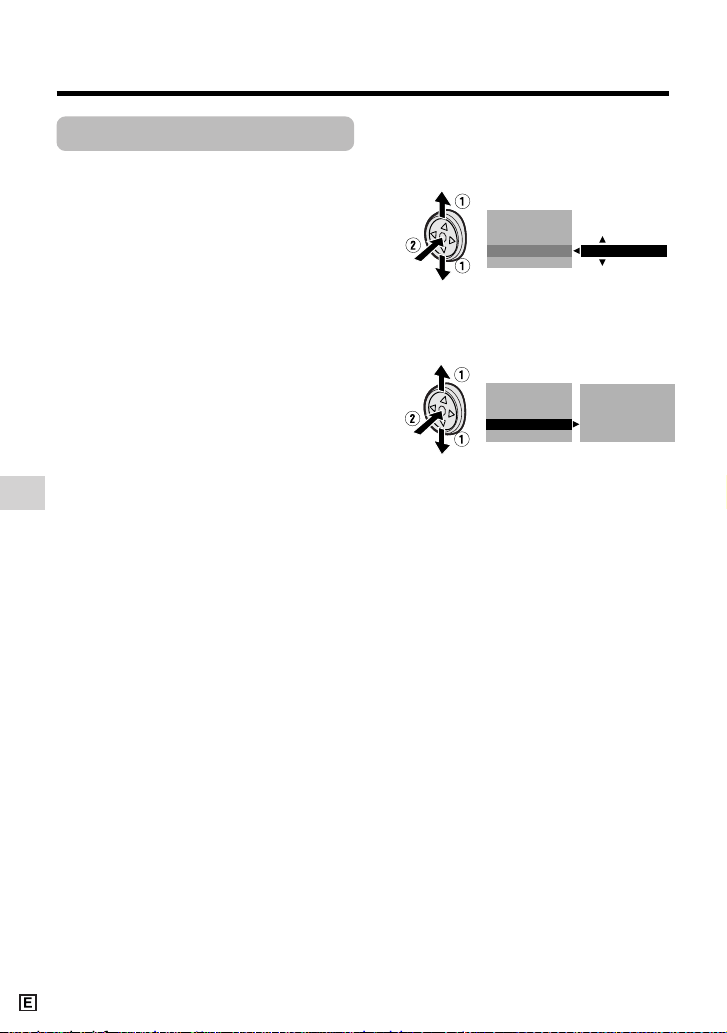
Advanced Features
Camera Recording
Useful Features
56
Manual Gain
Available modes:
Tape Camera, Card Camera
When recording in a dark or poorly
illuminated location with Auto Gain mode,
the light sensitivity of the camcorder (gain)
will be automatically adjusted and the
recorded image may be brighter than the
subject actually is. If you want to faithfully
record a dark scene in this case, use the
manual gain function. You can also adjust
the gain to record a backlit subject brighter.
Example of use
Faithfully recording a dark scene
• Select a smaller gain value (to decrease the
light sensitivity).
Background is too bright and subject is
too dark (backlit subject)
• Select a larger gain value (to increase the
light sensitivity).
1 In Tape Camera or Card Camera
mode, press the DISPLAY button until
the mode screen appears.
2 Press l or m on the Operation
button to select “MANUAL SET”, then
press the centre of the Operation
button (see page 53).
3 Press l or m to select “EXECUTE”,
then press the centre of the Operation
button.
4 Press l or m to select “GAIN”, then
press the centre of the Operation
button.
5 Press l or m to select the desired
gain value, then press the centre of
the Operation button.
• The number shown is the selected
gain value. The adjustment range is 7
steps from 0dB (lowest sensitivity) to
L18dB (highest sensitivity).
Note: If you select a large gain value,
the image may appear grainy.
6 Press the DISPLAY button to turn off
the MANUAL SET screen.
To return to Auto Gain mode
Press k in step 5 above, then press the
centre of the Operation button.
To return to Full Auto mode
Set the camcorder to Full Auto mode (see
page 57).
Note:
• Manual Gain mode cannot be used when a
scene setting is selected.
W
HITE BAL.
IRIS
AUTO
GA I N
FULL AUTO
RETURN
W
HITE BAL.
IRIS
GA I N
FULL AUTO
RETURN
+
3dB
EXECUTE
AUTO
AUTO
Page 67
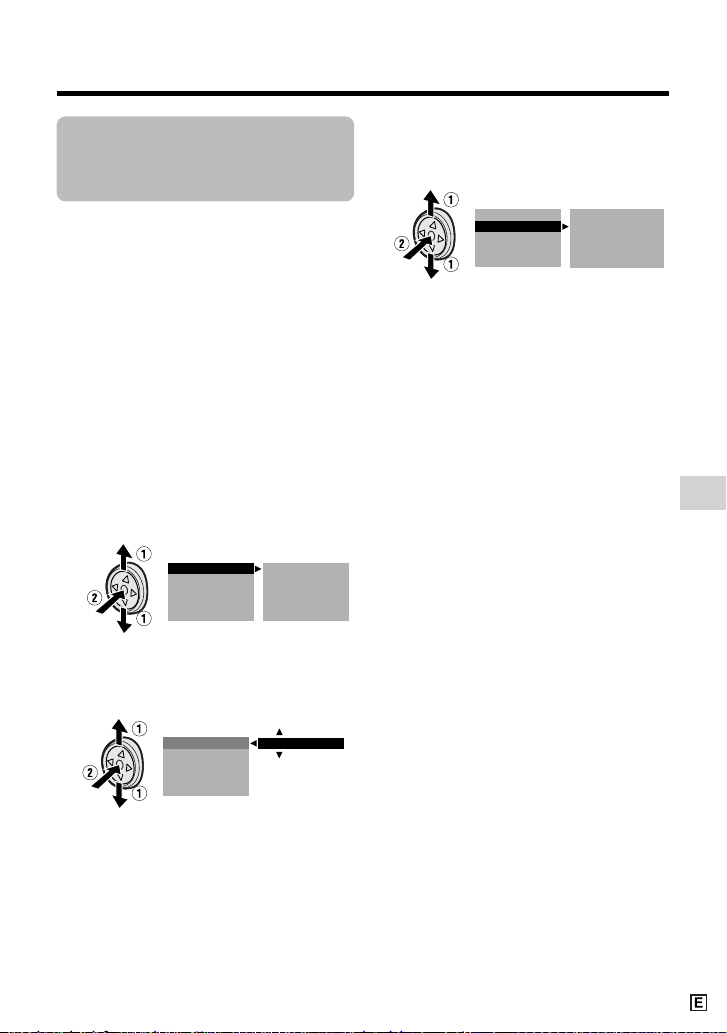
Useful Features
57
Setting the
Camcorder to Full
Auto Mode
Available modes:
Tape Camera, Card Camera
You can set all manual settings, including
white balance, iris, gain, but not focus, to
Full Auto mode in one operation.
1 In Tape Camera or Card Camera
mode, press the DISPLAY button until
the mode screen appears.
2 Press l or m on the Operation
button to select “MANUAL SET”, then
press the centre of the Operation
button (see page 53).
3 Press l or m to select “EXECUTE”,
then press the centre of the Operation
button.
4 Press l or m to select “FULL
AUTO”, then press the centre of the
Operation button.
W
HITE BAL.
IRIS
EXECUTE
LOCK
GA I N
FULL AUTO
RETURN
+
3dB
F4 0.
W
HITE BAL.
IRIS
GA I N
FULL AUTO
RETURN
EXECUTE
AUTO
AUTO
AUTO
5 Press l or m to select “EXECUTE”,
then press the centre of the Operation
button.
6 Press the DISPLAY button to turn off
the MANUAL SET screen.
Note:
• You cannot select “FULL AUTO” when no
manual settings are currently in use.
W
HITE BAL.
IRIS
EXECUTE
GA I N
FULL AUTO
RETURN
Page 68
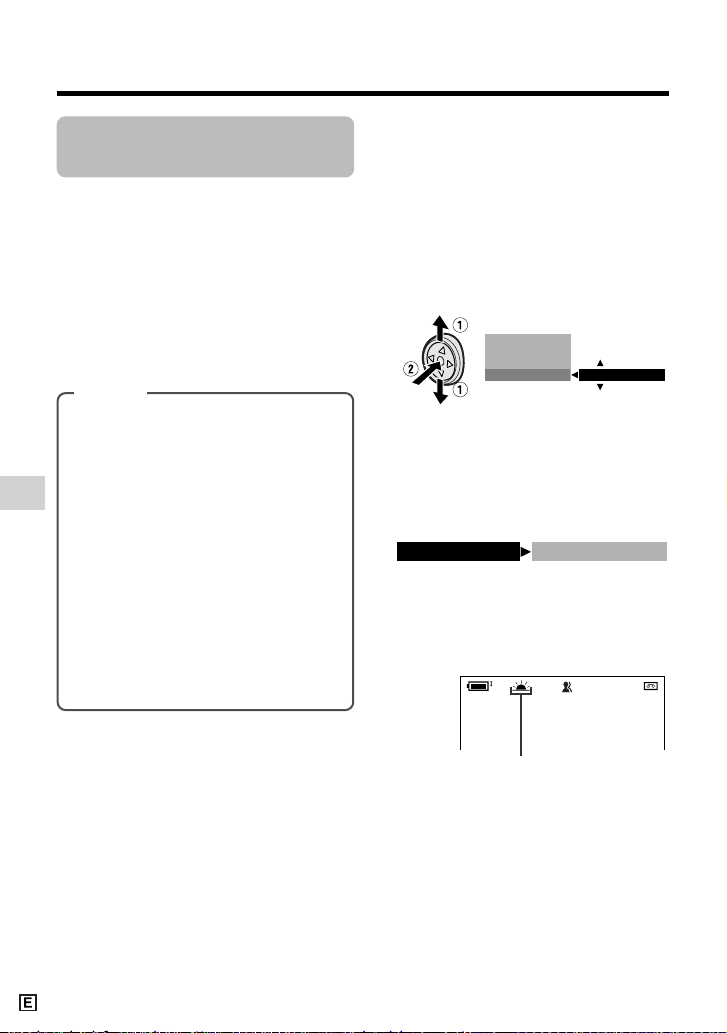
Advanced Features
Camera Recording
Useful Features
58
Scene setting indicator
Scene Menu
(Program AE)
Available modes:
Tape Camera, Card Camera
You can set the camcorder to a shooting
mode that will create the best results for a
specific situation. Just select one of the six
scene settings shown below. The
camcorder will automatically set the
exposure, white balance, and shutter speed
to produce the optimum picture quality for
the selected situation.
• The example screens shown are for Tape
Camera mode.
1 In Tape Camera or Card Camera
mode, press the DISPLAY button until
the mode screen appears.
2 Press l or m on the Operation
button to select “SCENE MENU”,
then press the centre of the Operation
button.
3 Press l or m to select the scene
setting that best fits the recording
situation, then press the centre of the
Operation button.
• The selected scene setting displays
on the mode screen.
4 Press the DISPLAY button to turn off
the mode screen.
• The selected scene setting indicator
displays when the on-screen
indicators are turned on.
To cancel the scene setting
Select “OFF” in step 3 above.
Note:
• Scene settings cannot be used when using
any manual setting except focus. Also not
selectable when e displays.
Types
SPORT (A): When you want to record
a fast-moving subject.
DUSK (B): When you want to
faithfully record the red of the setting
sun, and the surrounding twilight.
SUNLIGHT (F): When background is
very bright.
PARTY (C): When the illumination is
from a spotlight or candle.
NIGHT LUMI (D): When you want to
record fireworks or an illuminated
object in the dark.
SLOW SHUT. (E): When you want to
record an object in a dim place and
make it emerge brightly.
SCENE MENU
OFF
BLC GA I N/
FADE
M
ENU
T AP E
DUSK
SCENE MENU
Page 69
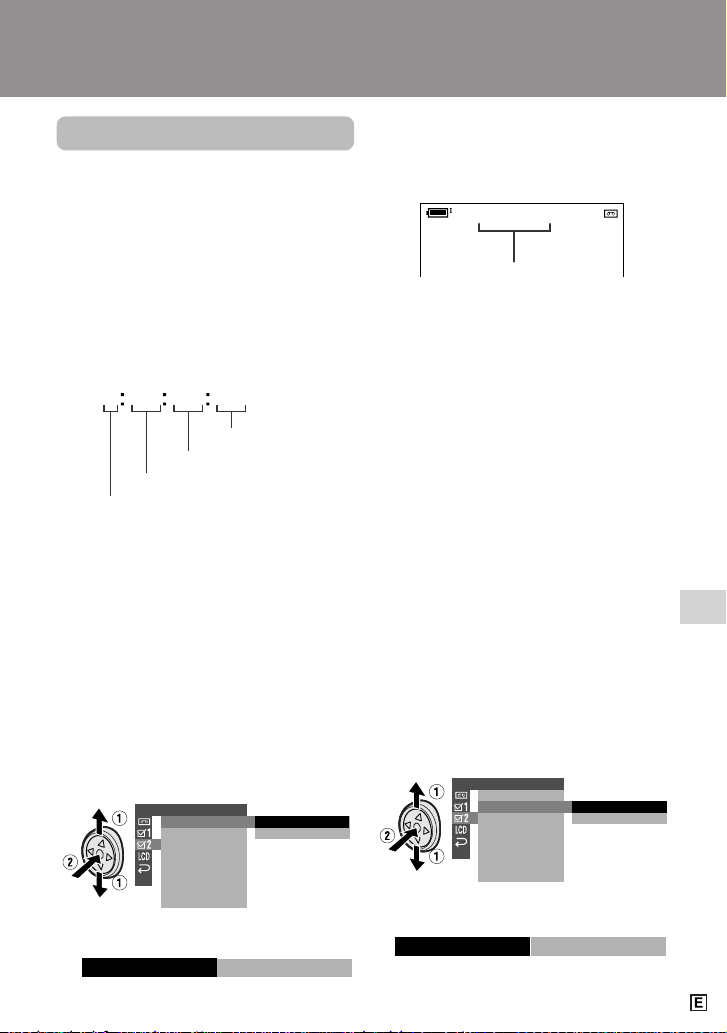
Advanced Features
59
Using the Time Code
Available modes:
Tape Camera, Tape Playback
The time code shows the hour, minute and
second of recording, and the frame number
(1 frame = approx. 1/25 sec.). This is
automatically recorded along with the
subject when you are recording on the tape.
You can display the time code on the screen
as an accurate counter in both Tape
Playback and Tape Camera modes.
Display format
• The example screens shown are for Tape
Playback mode.
1 During playback or camera recording
in Tape mode, press the DISPLAY
button until the mode screen appears.
2 Select “MENU”, then “EXECUTE” by
using the Operation button (see page
32).
3
Press l or m to select ~, then press
the centre of the Operation button.
4 Press l or m to select “TIME
CODE”, then press the
centre
of the
Operation button.
5
Press l or m to select “ON”, then press
the
centre
of the Operation button.
0 00 10 20TC
Advanced Features
Playback
6 Press the DISPLAY button to turn off
the menu screen.
• The time code appears when the onscreen indicators are turned on.
Minute
Hour
ON
TIME CODE
OTHERS 2
T I ME CODE
TC OUT
RETURN
S
-
VIDEO
IN
OFF
ON
01:02:0
TC
AUDIO
21
+
Displaying the time code on
a TV during playback
1 In Tape Playback mode, press the
DISPLAY button until the mode
screen appears.
2 Select “MENU”, then “EXECUTE” by
using the Operation button (see page
32).
3
Press l or m to select ~, then press
the
centre
of the Operation button.
4 Press l or m to select “TC OUT”,
then press the
centre
of the Operation
button.
5
Press l or m to select “ON”, then press
the
centre
of the Operation button.
6 Press the DISPLAY button to turn off
the menu screen.
OTHERS 2
T I ME CODE
TC OUT
RETURN
S
-
VIDEO
IN
OFF
ON
ON
TC OUT
To turn off the time code
Select “OFF” in step 5 above.
Notes:
• When the tape reaches an unrecorded
section, the time code returns to zero
(TC0:00:00). Once recorded, the time code
cannot be changed.
• You can also press the T/C button on the
remote control (only supplied with VL-Z5) to
display the time code.
Second
Frame number*
* Displayed during still or
frame advance playback.
Time code
Page 70
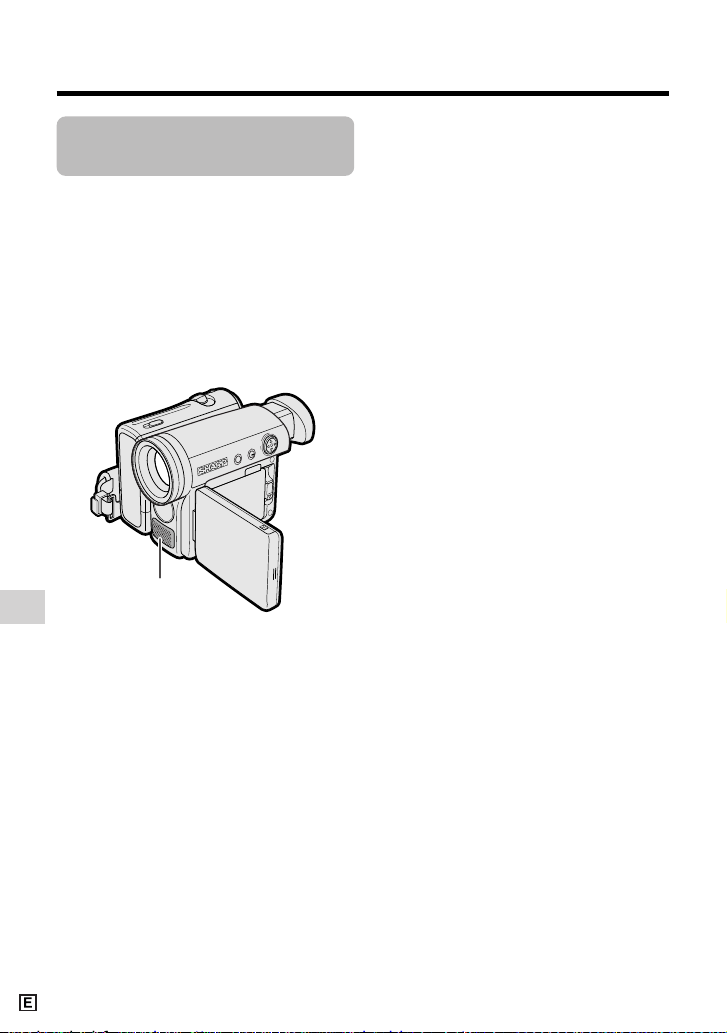
Advanced Features
Playback
Advanced Features
60
Audio Dubbing
Feature
Available mode:
Tape Playback
You can add narration to recordings made
with this camcorder, while preserving the
original audio and video recordings.
Microphone for Audio Dubbing
You can use the built-in stereo microphone
to record narration.
Notes:
• Audio dubbing does not function through the
DV terminal.
• You cannot use audio dubbing with
recordings made in LP mode.
• You cannot use the built-in stereo microphone
for audio dubbing when the audio/video/Svideo cable is connected.
Audio Recording
In normal recording mode
12-bit audio recording
The audio is recorded in stereo on Audio 1.
Audio 1: Stereo (left and right) sound
Audio 2: No audio
16-bit audio recording
The audio is recorded in stereo with the left
and right sound on two separate channels.
Audio 1: Left sound
Audio 2: Right sound
In Audio Dubbing mode
12-bit audio recording
The dubbed audio is recorded on Audio 2.
Audio 1: Original stereo (left and right)
sound
Audio 2: Dubbed stereo (left and right)
sound
16-bit audio recording
The dubbed audio is recorded on Audio 2
over the original right sound. Both dubbed
and original sounds are mono.
Audio 1: Original left sound
Audio 2: Dubbed sound
Note:
• You can select the 12-bit or 16-bit audio
recording mode by performing the procedure
on page 45.
Built-in stereo microphone
Page 71
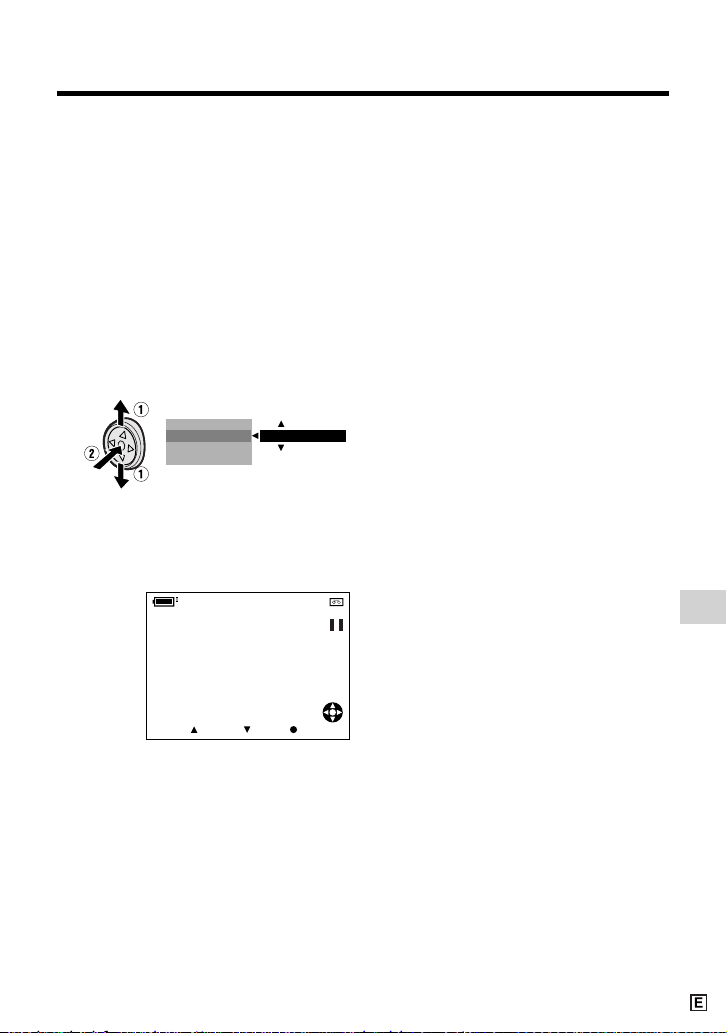
Advanced Features
61
Audio Dubbing
1 Play back the Mini DV cassette
recorded in SP mode and locate the
tape position where you wish to start
audio dubbing.
2 Press m on the Operation button to
pause playback.
3 Press the DISPLAY button until the
mode screen appears.
4 Press l or m to select “AUDIO
DUB”, then press the centre of the
Operation button.
5 Press l or m to select “EXECUTE”,
then press the centre of the Operation
button.
• The audio dubbing screen appears.
6 Press m to begin audio dubbing.
Record your narration.
To pause audio dubbing
Press l. To resume audio dubbing, press
m again.
To cancel audio dubbing
Press the centre of the Operation button in
step 5. The audio dubbing screen disappears.
If you wish to change the
dubbed audio or dub additional scenes
1 Press the DISPLAY button to turn off
the audio dubbing screen.
2 Repeat steps 1 to 6 above.
Notes:
• It is recommended that you use Audio
Dubbing only with recordings made with this
camcorder. Use of recordings made with
other digital video equipment may result in
poor audio quality.
• Audio dubbing will automatically pause if the
original audio changes from 12-bit mode to
16-bit mode or vice versa. Press m to
resume operation.
• Audio dubbing will automatically stop if a
portion recorded in LP mode or an unrecorded portion of the tape is encountered.
• You can play back the dubbed audio and the
original audio together or separately (see
page 62).
• “AUDIO DUB” cannot be selected when the
Mini DV cassette is recorded in LP mode.
DAT E D I S P.
AUD I O DUB
PI C.EFFECT
M
ENU
EX ECUT E
AUDIO
AUDIO DUB
21
+
START STOP CANC E L
00:00:0
TC
Page 72
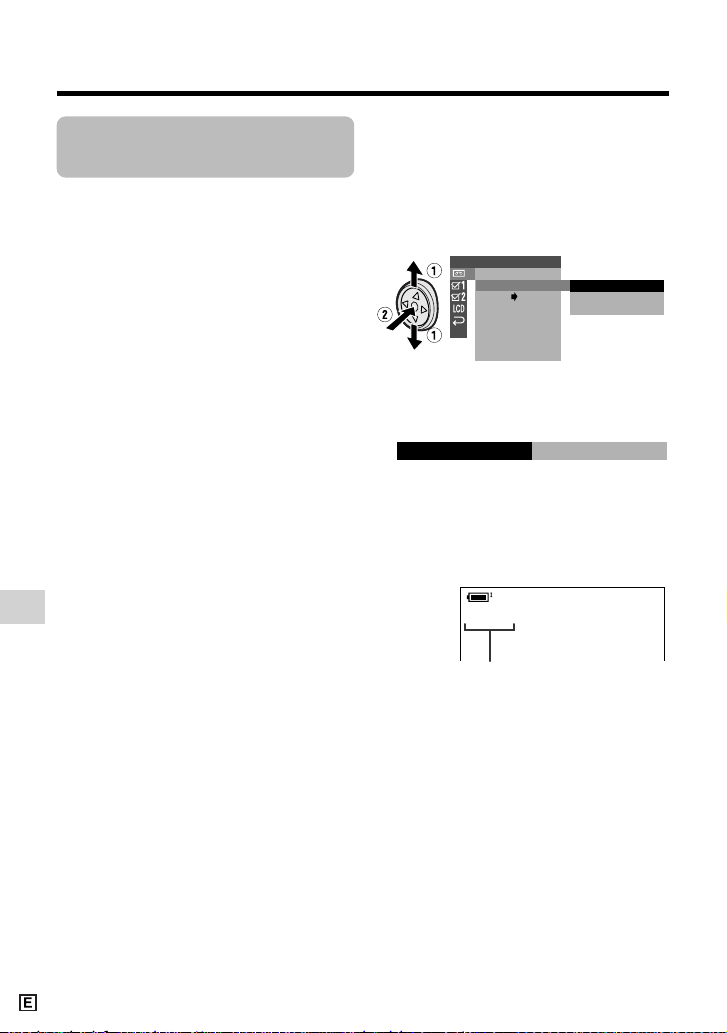
Advanced Features
Playback
Advanced Features
62
Selecting the Audio
Playback Mode
Available mode:
Tape Playback
You can select any of the following audio
playback modes.
Audio 1H2
• 12-bit recording in stereo (Audio 1
and Audio 2 channels)
• 16-bit recording in stereo (left and
right channels)
Audio 1
• 12-bit recording in stereo (Audio 1
channel only)
• 16-bit recording in mono (left channel
only)
Audio 2
• 12-bit recording in stereo (Audio 2
channel only)
• 16-bit recording in mono (right
channel only)
1 Playback a Mini DV cassette with
dubbed audio.
2 Press the DISPLAY button until the
mode screen appears.
3 Select “MENU”, then “EXECUTE” by
using the Operation button (see page
32).
4 Press l or m to select V, then
press the centre of the Operation
button.
5 Press l or m to select “AUDIO”,
then press the centre of the Operation
button.
6 Press l or m to select the desired
audio playback mode, then press the
centre of the Operation button.
PLAYBACK SET
1
1
2
+
2
AUDI O
ROTAT E PB
ANLG DGTL
RET URN
AUDIO
21
+
AUDI O
12
+
7 Press the DISPLAY button to turn off
the menu screen.
• The selected audio playback mode
indicator only appears when the onscreen indicators are turned on.
Note:
• The audio playback mode indicator,
“AUDIO”, displays in different colours
depending on the recording mode (12- or 16bit) used for the recording being played
back. A white display indicates 12-bit
recording mode, while a green indicates 16bit.
Audio playback mode indicator
Page 73
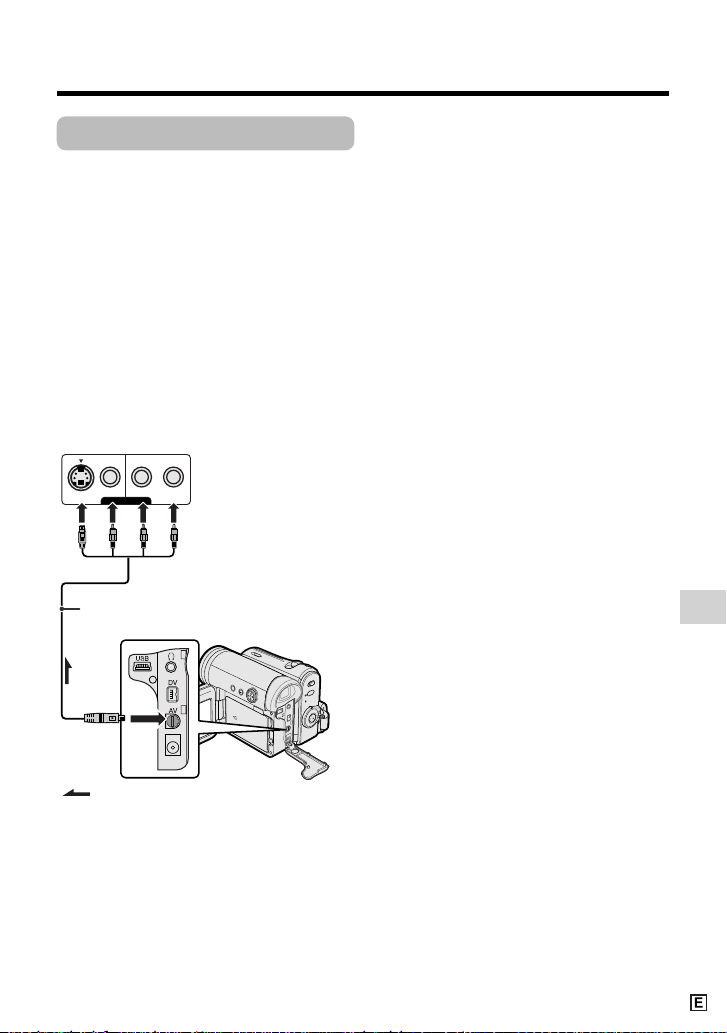
Advanced Features
63
Editing
Available mode:
Tape Playback
Video editing lets you refine your videos by
removing unwanted sequences from your
tape, or transposing one sequence with
another.
This camcorder lets you monitor the source
program on the built-in LCD monitor without
having to connect it to an external TV or
video monitor.
Preparation
Connect the camcorder to a VCR with the
supplied audio/video/S-video cable, as
shown.
Notes:
• See page 2 for how to open the terminal
cover.
• If your VCR has only one audio input jack,
use the white plug for the audio connection
on the VCR.
• If your VCR has an S-video input socket, you
do not need to connect the yellow video plug.
Cutting Unwanted Sequences
1 Play back the tape to be edited on the
camcorder, and locate the beginning
and end of the sequence you wish to
cut. Write down the time code reading
at the beginning and end of that
sequence (see page 59). Then, rewind
the tape to before the beginning of the
portion that you wish to keep.
2 Load a video cassette into the
recording VCR.
3 Press m on the camcorder to begin
playback, then press the Record
button on the VCR to begin recording.
4 Press the Pause/Still button on the
VCR to pause recording when the
source tape reaches the beginning of
the sequence to be cut.
5 Press the Pause/Still (or Record)
button on the VCR to resume
recording when the source tape
reaches the end of the sequence to
be cut.
To stop editing
Press l on the camcorder and press the
Stop button on the VCR.
Notes:
• Some of the transitions between edited
sequences may be slightly off.
• There may be picture noise during video
search or still playback. This does not imply a
defect in the camcorder.
• The time code display will be recorded along
with the edited sequences if the TC OUT
menu item is set to “ON”. Set to “OFF” before
editing (see page 59).
VIDEO
S-VIDEO
L-AUDIO-R
(MONO)
AV-IN
:
To AV
terminal
Recording (VCR)
Audio/video/S-video cable (supplied)
Playback
The arrow shows the signal flow.
Black: To S-video input socket
Yellow: To video input jack
White: To audio input (L) jack
Red: To audio input (R) jack
Page 74
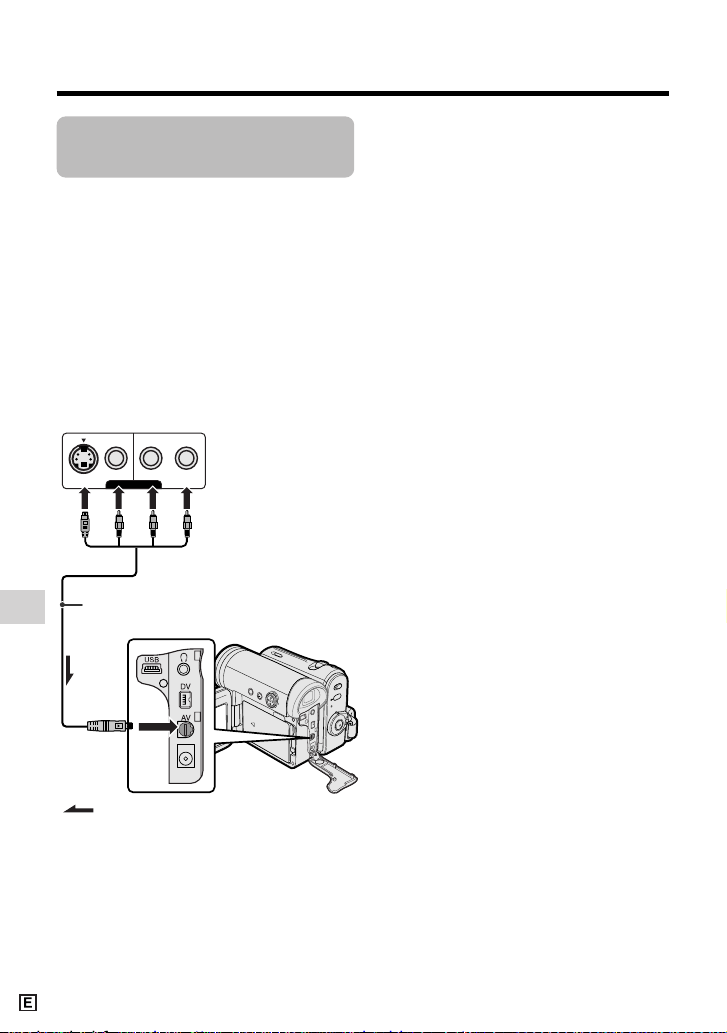
Advanced Features
Playback
Advanced Features
64
Recording from an
External Source
Available mode:
Tape Playback
You can use this camcorder to record or
edit videos from another source, such as a
VCR or TV.
Preparation
Connect the camcorder to the source
equipment with the supplied audio/video/Svideo cable, as shown.
Notes:
• See page 2 for how to open the terminal
cover.
• If the source equipment has only one audio
output jack, use the white plug for the audio
connection on the source equipment. (The
input audio will only be recorded on the left
channel of the tape.)
• Even if the source equipment has an S-video
output socket, connect both the yellow video
plug and S-video plug.
VIDEO
S-VIDEO
L-AUDIO-R(MONO)
AV-OUT
:
Recording
To AV
terminal
Audio/video/S-video cable (supplied)
Black: To S-video output socket
Yellow: To video output jack
White: To audio output (L) jack
Red: To audio output (R) jack
The arrow shows the signal flow.
Playback
(VCR or TV)
Page 75
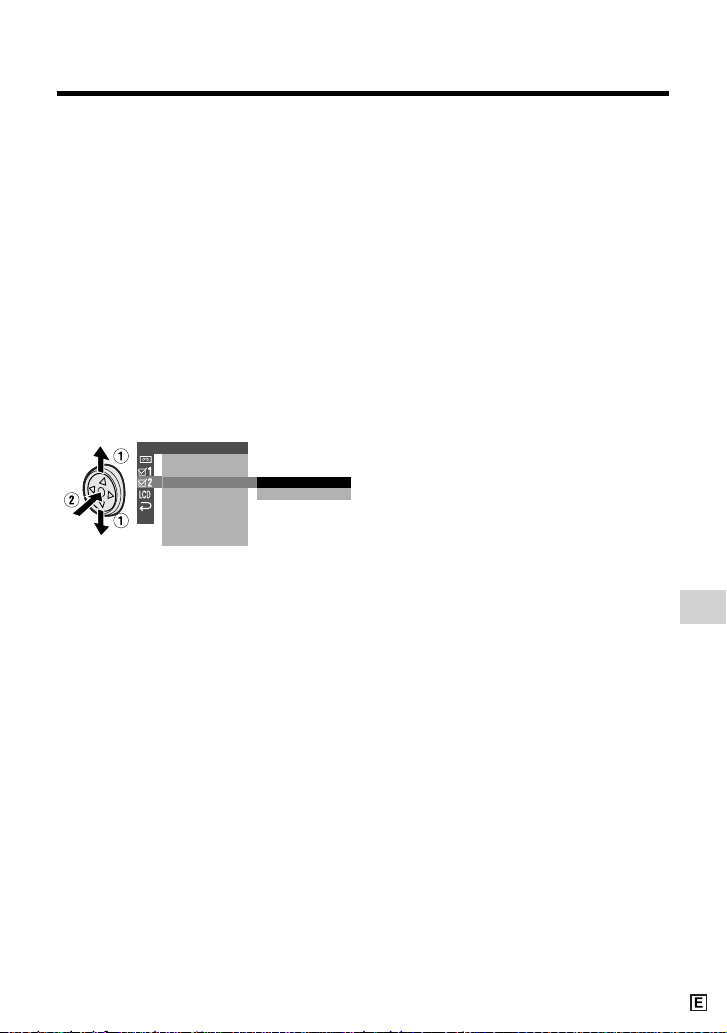
Advanced Features
65
To Record from an External
Source
1 In Tape Playback mode, press the
DISPLAY button until the mode
screen appears.
2 Select “MENU”, then “EXECUTE” by
using the Operation button (see page
32).
3 Press l or m to select ~, then
press the centre of the Operation
button.
4 Press l or m to select “S-VIDEO
IN”, then press the centre of the
Operation button.
5 Press l or m to select “ON” (for S-
video connection) or “OFF” (for video
connection), then press the centre of
the Operation button.
6 Press the DISPLAY button to turn off
the menu screen.
•“S-VIDEO” appears on the screen
during a pause or Recording
Standby mode when you set the SVIDEO IN menu item to “ON” in step
5 above.
7 Begin playback on the source
equipment connected to the
camcorder.
• Check the camcorder screen to see if
the picture is properly received.
8 Press the Start/Stop button on the
camcorder, then press m to begin
recording.
OTHERS 2
T I ME CODE
TC OUT
RETURN
S
-
VIDEO
IN
OFF
ON
Notes:
• To pause recording, press m. Press m again
to resume recording.
• To operate by remote control, perform steps 1
to 7 above, and press the TAPE REC START/
STOP button, then press the PAUSE/STILL
button (g).
• If “NO SIGNAL” is displayed on the
camcorder screen, check that the audio/
video/S-video cable is properly connected.
• If a digital video recording with a copyright
protection signal is used as the playback
source, “COPYRIGHT PROTECTED.”
appears on the camcorder monitor and the
recording function is disabled.
Page 76
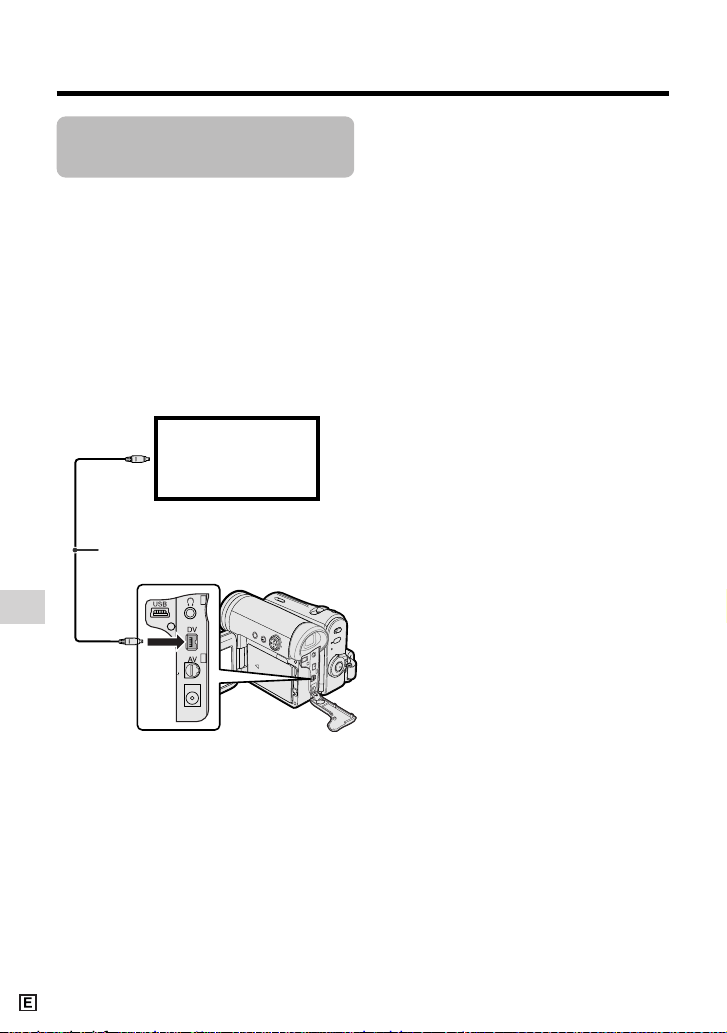
Advanced Features
Playback
Advanced Features
66
Editing with the DV
Terminal (IEEE1394)
Available mode:
Tape Playback
This camcorder can be used as a digital
video editor. A DV cable transfers all
dubbing signals including video and audio
directly to the camcorder.
Preparation
Connect the camcorder to video equipment
with a DV terminal using a commercially
available DV cable.
To Record to Video Equipment
See “Cutting Unwanted Sequences” on
page 63, using the video equipment as the
recording source.
Note:
• Make sure that the video equipment to which
you are recording can input dubbing signals
via the DV terminal.
To D V
terminal
To DV
terminal
DV cable (commercially available)
Video equipment
with DV terminal
(e.g. DV camcorder)
Page 77

Advanced Features
67
To Record from Video Equipment
1 Set the camcorder to Tape Playback
mode, and insert a Mini DV cassette.
2 Begin playback on the video equip-
ment connected to the camcorder.
• Check the camcorder screen to see if
the picture is properly received.
3 Press the Start/Stop button on the
camcorder.
• The camcorder enters Recording
Standby mode.
4 Press m on the Operation button to
begin recording.
To stop recording
Press l on the Operation button.
Cutting Unwanted Sequences
1 Press m to pause recording when the
source tape reaches the beginning of
the sequence to be cut.
2 Press m to resume recording when
the source tape reaches the end of
the sequence to be cut.
Notes:
• Make sure that the video equipment from
which you are recording can output dubbing
signals via the DV terminal.
• If the video equipment is not set to playback
mode or the DV cable is not properly
connected, “NO SIGNAL” is displayed on the
camcorder screen.
• If no picture or sound is input to the
camcorder even if the DV cable is properly
connected and you are playing back the
source media from the video equipment, set
the Power switch on the camcorder to OFF
and then back to w, or disconnect the DV
cable and connect it again.
• If a digital video recording with a copyright
protection signal is used as the playback
source, “COPYRIGHT PROTECTED.”
appears on the camcorder monitor and the
recording function is disabled (see page 92).
• When displaying the playback picture on the
PC, you may find black bands around the
image. This is caused by the differences of
the image display sizes.
•“i.Link” refers to the IEEE1394-1995 industry
specification and extensions thereof. The z
logo is used for products compliant with the
i.Link standard.
Page 78
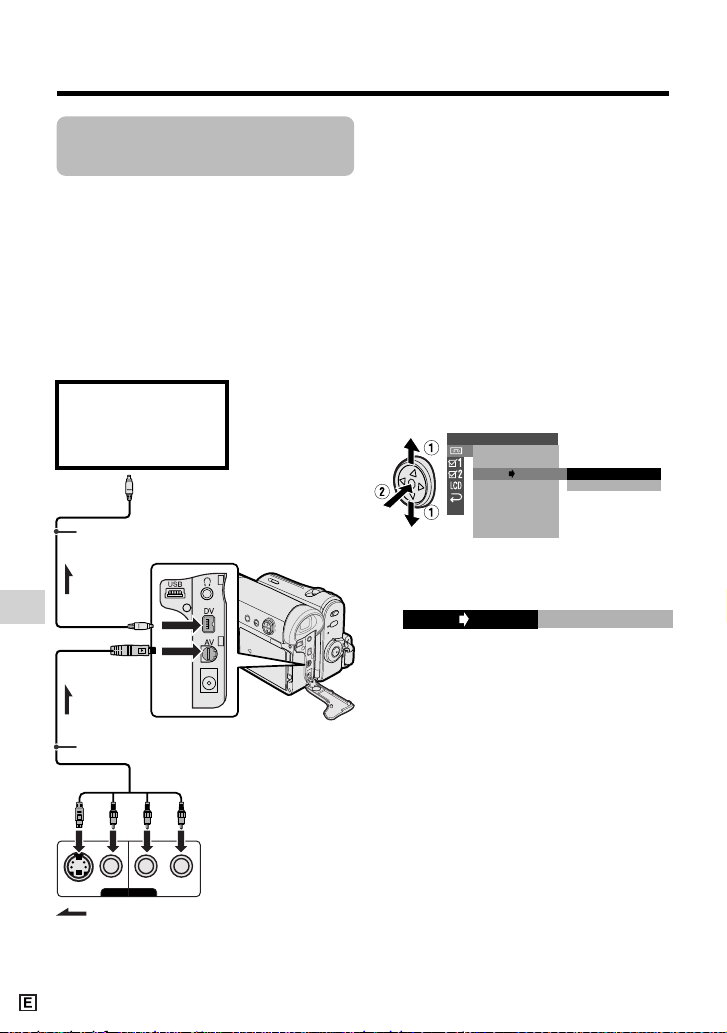
Advanced Features
Playback
Advanced Features
68
AV-OUT
VIDEO
S-VIDEO
L-AUDIO-R
(MONO)
:
Using the Camcorder
as a Converter
Available mode:
Tape Playback
You can use this camcorder to convert from
analog signal (e.g. video recorded on 8 mm
or Hi8 tapes) to digital signal.
Preparation
Connect the audio/video/S-video cable and
DV cable as shown below.
Note:
• See page 2 for how to open the terminal
cover.
PLAYBACK
AUDI O
ANLG DGTL
RET URN
SET
OFF
ON
ROTAT E PB
ONANLG DGTL
1 Set the camcorder to Tape Playback
mode, and make sure that playback is
stopped.
2 Press the DISPLAY button until the
mode screen appears.
3 Select “MENU”, then “EXECUTE” by
using the Operation button (see page
32).
4 Press l or m to select V, then
press the centre of the Operation
button.
5 Press l or m to select
“ANLGyDGTL”, then press the centre
of the Operation button.
6 Press l or m to select “ON”, then
press the centre of the Operation
button.
To DV terminal
To AV terminal
To DV terminal
DV cable (commercially available)
Playback
(analog equipment)
e.g. 8 mm or Hi8
camcorder
Black: To S-video output socket
Yellow: To video output jack
White: To audio output (L) jack
Red: To audio output (R) jack
Analog
signal
Audio/video/S-video cable (supplied)
Digital
signal
Recording
(digital equipment)
e.g. computer
The arrow shows the signal flow.
Page 79

Advanced Features
69
7 Press the DISPLAY button to turn off
the menu screen.
8 Press the Play button on the analog
equipment
• Check the monitor on the digital
equipment to see if the picture is
being properly received.
9 Press the Record button on the digital
equipment.
Notes:
• The camcorder is not guaranteed to work
with all digital/analog equipment. Contact the
manufacturer of your equipment for advice.
• If the camcorder outputs a video recording
with a copyright signal, the digital equipment
cannot record or save it.
• The camcorder may not convert some input
video recordings properly (e.g.
discolouration, picture noise, muted sound),
depending on the input condition.
Page 80
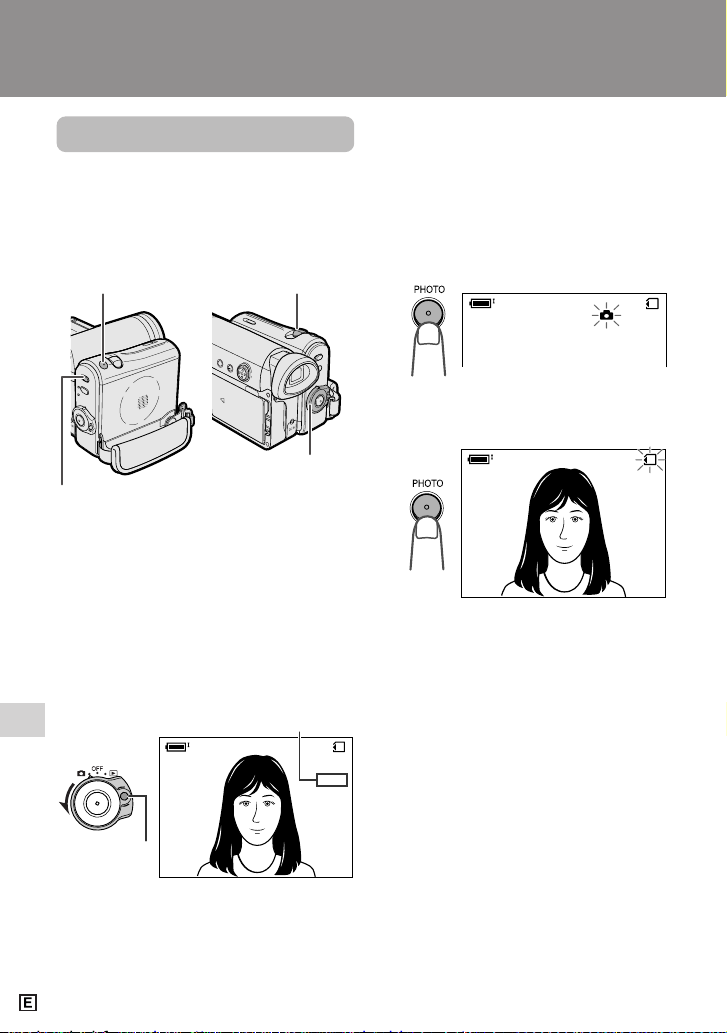
Digital Still Camera Features
Camera Recording
Digital Still Camera Features
70
Number of shots taken/remaining
Power switch
Media Selection switch
PHOTO button
Lock button
Power Zoom control
Digital Still Camera Features
Camera Recording
Card Recording
Available mode:
Card Camera
You can take a still picture in the same way
as you do with a standard camera and
record that image on the card.
1 Inser t a card into the camcorder (see
page 11).
2 Remove the lens cap.
3 Set the Media Selection switch to u.
4 Hold down the Lock button and set
the Power switch to v.
• The picture from the lens now
displays.
5 Adjust the Power Zoom control to
frame the subject as you desire.
6 Press the PHOTO button half-way
down to focus on the subject.
• The camcorder automatically focuses
on the subject. When it is set, you will
hear a sound and see T mark, then
the camcorder locks the focus.
7 Press the PHOTO button fully to
begin recording.
• The S indicator flashes red while
data is being recorded on the card,
and returns to white when recording
completes.
• To record another image, release the
PHOTO button and make sure the
picture is not frozen in the monitor,
then perform steps 6 and 7.
Notes:
• Recording under insufficient lighting may
result in blurred images. It is recommended
that you use a tripod to record insufficiently
illuminated subjects.
• Recording under the light of a fluorescent,
mercury, or sodium lamp may cause
flickering in the image and, depending on the
timing of the shot, may result in changes to
colour hue in the image.
• Set the BEEP menu item to “OFF” to turn off
the focus locking sound.
• Do not turn the power off or remove the
card while the S indicator is flashing in
step 7.
/981
NORMAL
AUTO
/981
NORMA L
/981
NORMAL
AUTO
Page 81
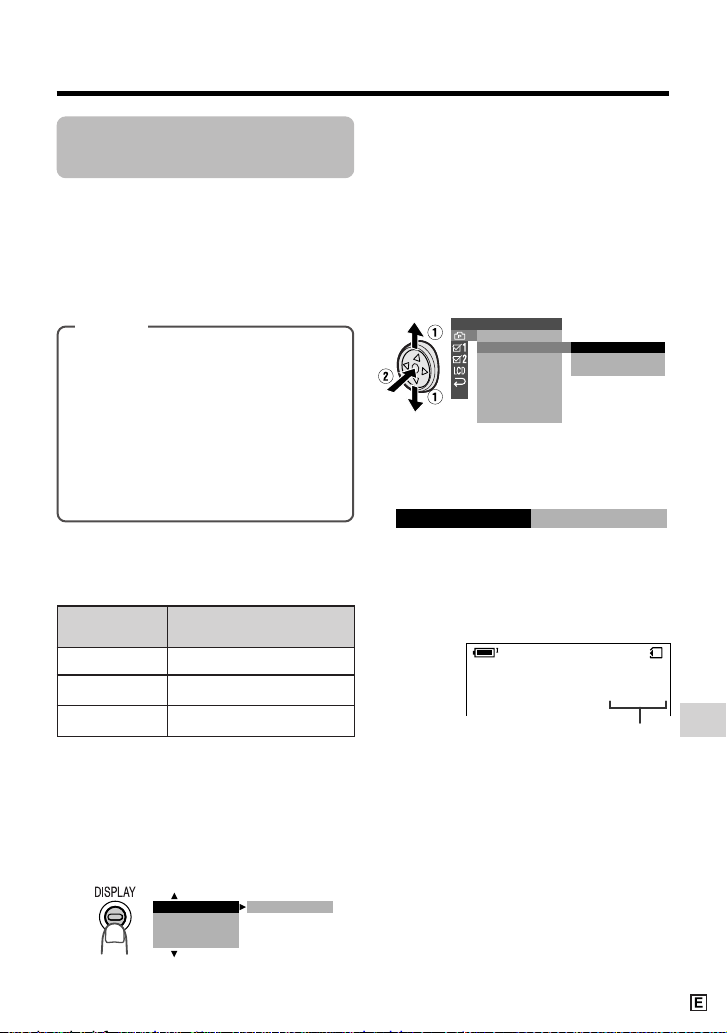
Digital Still Camera Features
71
Picture quality indicator
Approximate number of recordable images with 8 MB SD memory
card
Selecting the Picture
Quality
Available mode:
Card Camera
The picture quality of still images recorded
on the card depends on the picture quality
setting. Select the appropriate setting to
match your recording objectives.
Note:
• The number of recordable images differs
depending on the combination of picture
quality settings used and the images shot.
1 In Card Camera mode, press the
DISPLAY button until the mode
screen appears.
Approx. number of images
NORMAL
ECONOMY
FINE
Types
NORMAL: Records images with
standard picture quality.
ECONOMY: Allows you to take more
shots than in NORMAL mode but with
lower quality.
FINE: Records images with higher
quality than in NORMAL mode but
with lower number of recordable
images.
90
160
50
Picture quality
setting
2 Select “MENU”, then “EXECUTE” by
using the Operation button (see page
32).
3 Press l or m to select Y, then
press the centre of the Operation
button.
4 Press l or m to select “REC
MODE”, then press the centre of the
Operation button.
5 Press l or m to select the desired
setting, then press the centre of the
Operation button.
6 Press the DISPLAY button to turn off
the menu screen.
• The selected picture quality indicator
only appears when the on-screen
indicators are turned on.
Note:
• The picture quality indicator is also displayed
in Card Camera mode. The picture quality
indicator displayed during playback is based
on the amount of data for that recorded
image. Since the amount of data differs
depending on factors such as image detail,
sometimes the picture quality indicator
displayed during playback may not match
the picture quality setting used during
recording.
OF F
SCENE MENU
TIMER
M
ENU
SEL F
BLC GAI N/
SETT I NG 1
RE TURN
REC
F I L E NO.
MOD E
NORMAL
ECONOMY
FINE
REC MODE
ECONOMY
/0160
EC ONOMY
Page 82
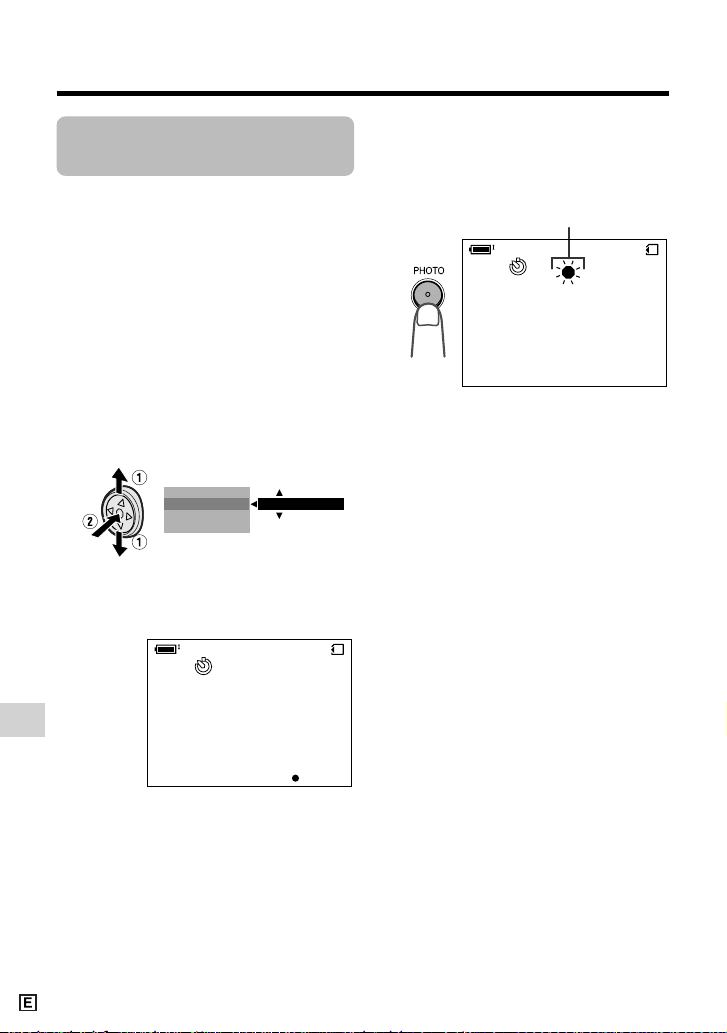
Digital Still Camera Features
Camera Recording
Digital Still Camera Features
72
Self-timer operating indicator
Recording with the
Self-timer
Available mode:
Card Camera
The self-timer function allows you to record
images after a time-lag of 10 seconds. This
is convenient when you want to record an
image of you and your friends together.
1 In Card Camera mode, press the
DISPLAY button until the mode
screen appears.
2 Press l or m on the Operation
button to select “SELF TIMER”, then
press the centre of the Operation
button.
3 Press l or m to select “EXECUTE”,
then press the centre of the Operation
button.
4 Press the PHOTO button to start the
self-timer.
• The self-timer operating indicator
flashes while the timer counts down.
• The shutter automatically releases
after 10 seconds, and a still image of
the subject is recorded.
To cancel the countdown
Press the PHOTO button in step 4.
To cancel the self-timer
Press the centre of the Operation button
again in step 3.
Notes:
• When recording with the self-timer, stabilize
the camcorder in the horizontal plane by
attaching it to a tripod, etc.
• Self-timer mode cancels after recording one
image. Repeat steps 1 to 4 to record another
image with the self-timer.
• Do not turn the power off or remove the card
once the self-timer operating indicator begins
flashing.
M
ENU
SC ENE
M
ENU
EXECUTESEL F T I MER
BLC GAI N/
81/9
NORMAL
AUTO
81/9
NORMAL
AUTO
CANCE L
Page 83
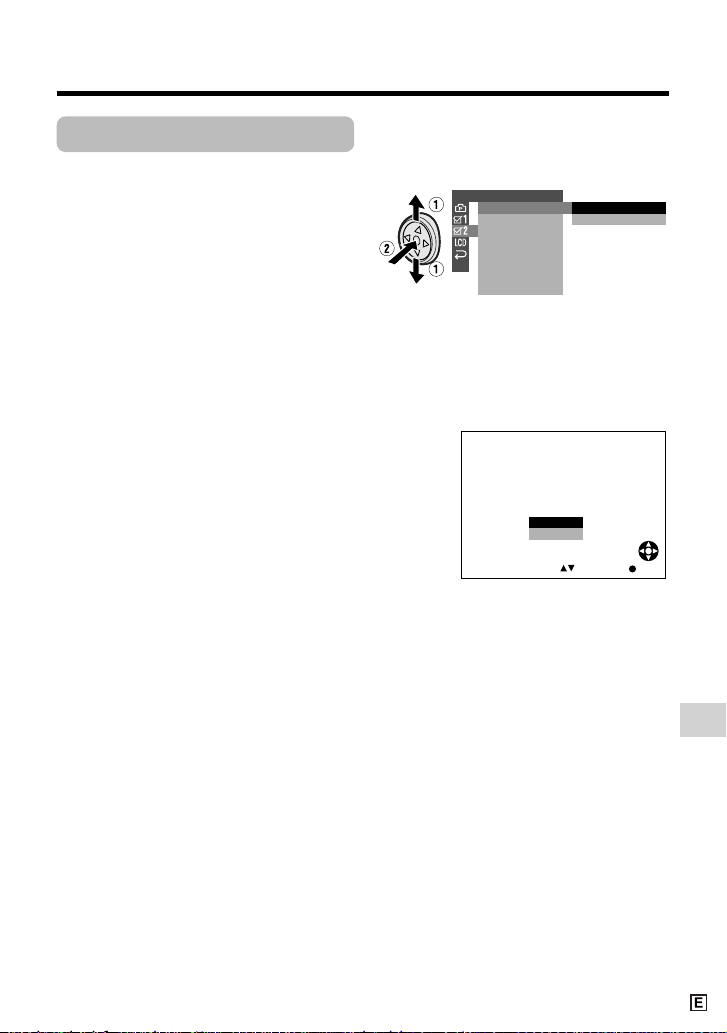
Digital Still Camera Features
73
SELECT
F ORMAT
ALL DATA
BE
NO
YES
ERASED.
WI LL
SET
Formatting a Card
Available mode:
Card Camera
Before using a commercially available card
with this camcorder, you must first have it
formatted. Also, if any of the following
warning indicators displays, you will need to
format your card.
• “FORMAT MEMORY CARD”
• “MEMORY CARD ERROR”
• “MEMORY CARD READ ERROR”
• “CANNOT STORE DATA”
Notes:
• Formatting a card erases all stored images,
including delete-protected images. Be sure
to backup important data on your computer
or other media before formatting the card
(see pages 82–84).
• Do not remove the power source during
formatting, as this may cause damage to the
camcorder or card. It is recommended that
you use the AC outlet for the power supply.
1 In Card Camera mode, press the
DISPLAY button until the mode
screen appears.
2 Select “MENU”, then “EXECUTE” by
using the Operation button (see page
32).
3 Press l or m to select ~, then
press the centre of the Operation
button.
4 Press l or m to select “FORMAT”,
then press the centre of the Operation
button.
5 Press l or m to select “EXECUTE”,
then press the centre of the Operation
button.
• To cancel formatting, press l or m
to select “RETURN”, then press the
centre of the Operation button.
6 Press l or m to select “YES”, then
press the centre of the Operation
button to begin formatting.
• The menu screen displays when
formatting finishes.
7 Press the DISPLAY button to turn off
the menu screen.
Notes:
• The card supplied with VL-Z5 is preformatted
for immediate use.
• Use this camcorder to format a card. The
camcorder may not recognize the images
on a card formatted by a computer or other
equipment.
OTHERS 2
RETURN
EXECUTE
RETURN
FORMAT
SETT ING
12H 24H/
Page 84
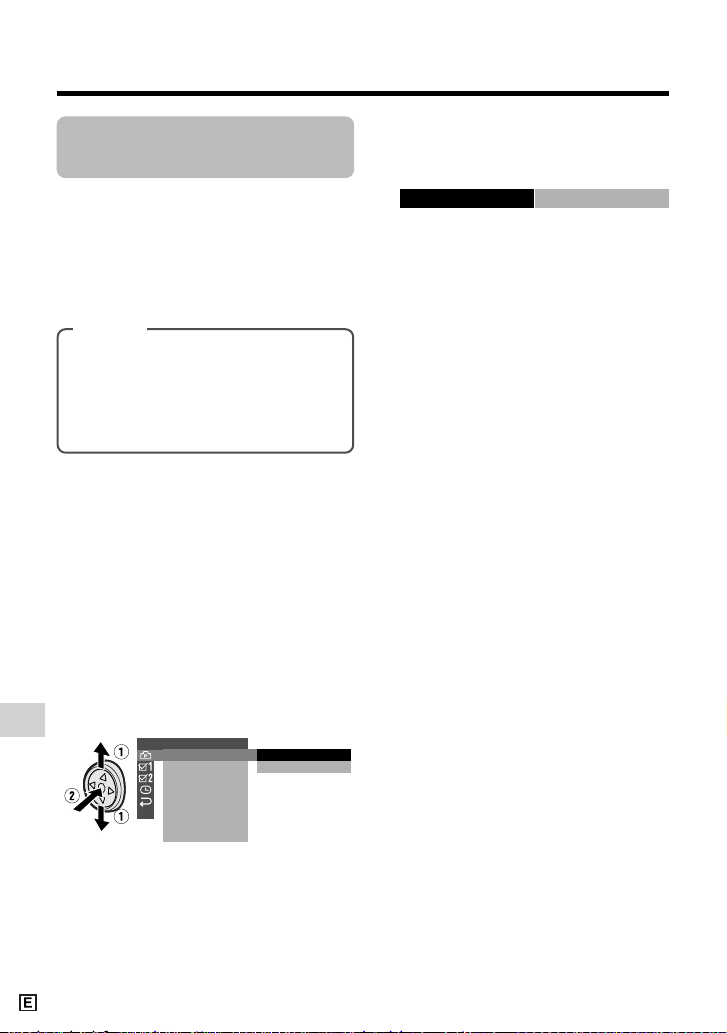
Digital Still Camera Features
Camera Recording
Digital Still Camera Features
74
Setting the File
Numbering Method
Available mode:
Card Camera
The camcorder automatically assigns file
numbers to captured images. You can
select two different methods of file numbering.
1 In Card Camera mode, press the
DISPLAY button until the mode
screen appears.
2 Select “MENU”, then “EXECUTE” by
using the Operation button (see page
32).
3 Press l or m to select Y, then
press the centre of the Operation
button.
4 Press l or m to select “FILE NO.”,
then press the centre of the Operation
button.
Types
SERIAL: Defines file numbers by
incrementing up from the last image
captured when inserting a new card.
RESET: Defines a new set of file
numbers when inserting a new card.
SETTING 1
SERIAL
REC MODE
RETURN
F I LE NO.
RESET
RESETFILE NO.
5 Press l or m to select “SERIAL” or
“RESET”, then press the centre of the
Operation button.
6 Press the DISPLAY button to turn off
the menu screen.
Note:
• When a warning indicator “MAXIMUM FILE
NUMBER” appears on the screen, set FILE
NO. menu item to “RESET”, then format the
card (see page 73) or replace the card with a
new one (see page 11).
Page 85
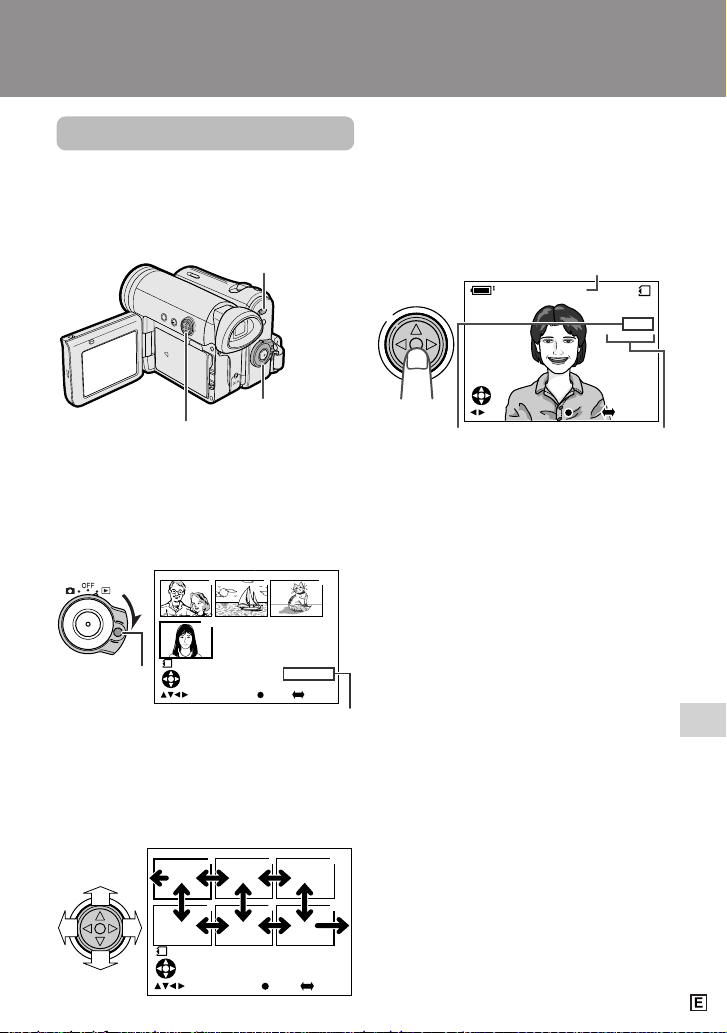
Digital Still Camera Features
75
Playback image number/
number of recordings
Lock button
Page number/total thumbnail pages
Media Selection switch
Operation button
Power switch
Image file name
Picture quality
indicator
Digital Still Camera Features
Playback
Card Playback
Available mode:
Card Playback
You can play back and view still images
recorded on a card on the LCD monitor.
1 Set the Media Selection switch to u.
2 Hold down the Lock button and set
the Power switch to w.
• The images recorded on the card are
displayed in a thumbnail format.
3 Press j, k, l or m on the Opera-
tion button to move the selection
frame to the desired image.
• Each time you press j, k, l or m,
the selection frame moves as shown
below.
Note:
• Holding down j or k increases the
speed of motion of the selection frame.
4 Press the centre of the Operation
button.
• The selected image displays in fullscreen.
Available Operations during
Full-screen Display
• You can display the full-screen picture of
the previous or next image by pressing j
or k.
• When holding down j or k, you can
search through the images on the card.
The search can be very fast, so it is
recommended that the on-screen
indicators turns on to display the image
number.
• To return to a thumbnail of the images,
press the centre of the Operation button
again.
Notes:
• You can also set in the mode screen to display
the images in full screen or thumbnails.
• Depending on the amount of data for the
recorded image, the picture quality indicator
displayed during playback may not match the
picture quality setting used during recording.
• The images bigger than 640K480, e.g. images
recorded on other equipment, display as
thumbnails, not full screen.
• Do not play back any card storing a defective
image (with noise and distortion) created on
other equipment. If you mistakenly play back
data on such a card, set the Power switch to
OFF, remove, and never use it with this
camcorder.
0100-00
2/2PAGE
NORMA L
1
FULLSELECT IMG MULTI
7
01
89
1000-00
2/1PAGE
NORMA L
1
1
4
2
5
3
6
FULLSELECT IMG MULTI
1 0/1
C ARD
NO RMAL
0-0 0 1001
F ULLS E L E CT I MG MULT I
10/1
NORMAL
0-001001
FULLSELECT IMG MUL T I
Page 86
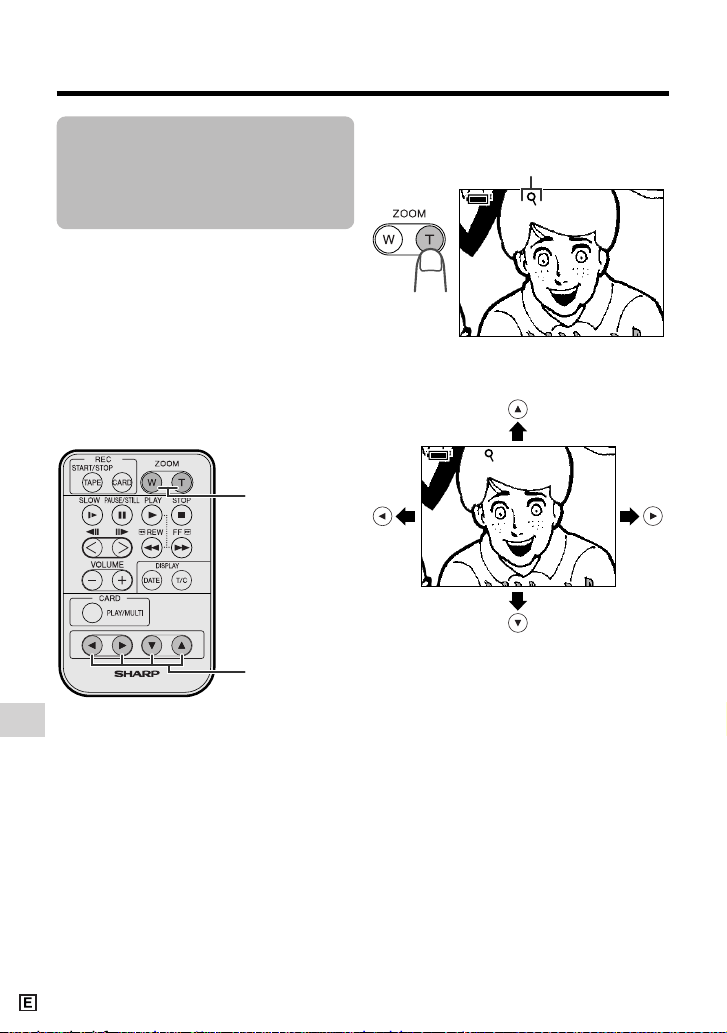
Digital Still Camera Features
Playback
Digital Still Camera Features
76
ZOOM button
Playback zoom indicator
Playback Zoom with
the Remote Control
(Only supplied with
VL-Z5)
Available mode:
Card Playback
The playback zoom function allows you to
magnify the playback picture up to 10 times
its original size and shift the magnified
picture by using the remote control. (See
page 46 for use of the remote control.)
Note:
• Playback Zoom does not work in Tape
Playback mode.
1 During Card Playback, press the
ZOOM T button to zoom in.
2 Press the Shift q, w, a, or s button
to shift the displayed image.
To cancel Playback Zoom
Press the ZOOM W button, which zooms out
to the widest angle.
Note:
• Use of Playback Zoom may cause a
reduction in picture quality for still images.
Shift buttons
Page 87
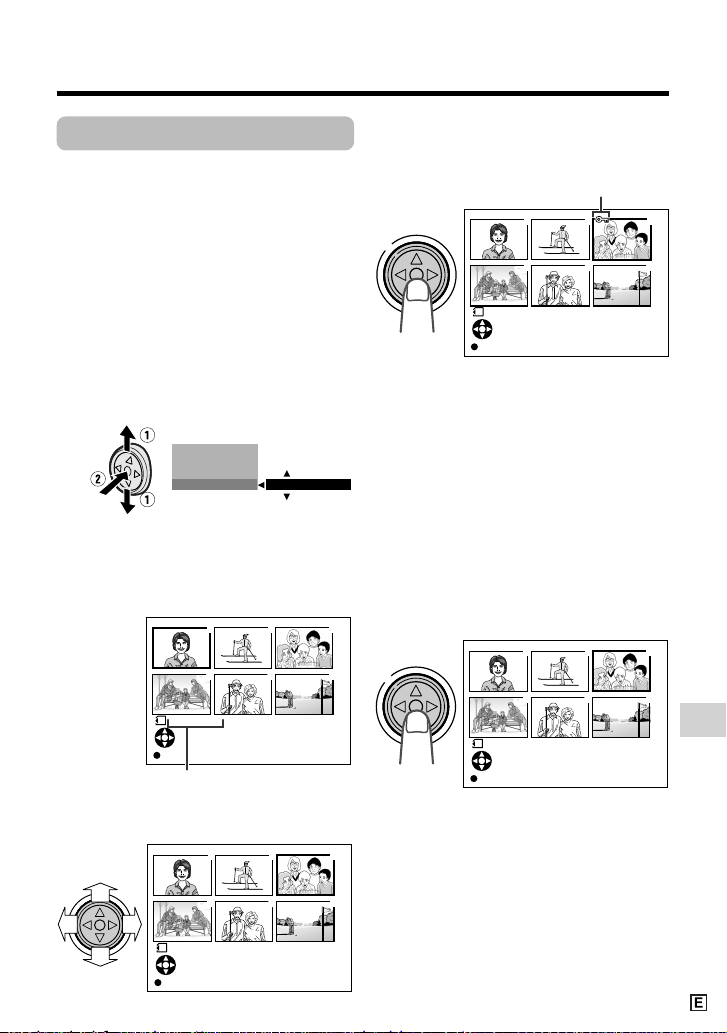
Digital Still Camera Features
77
Delete protection indicator
PROTECT indicator
Delete Protection
Available mode:
Card Playback
You can prevent your important images
recorded on the card from accidental
erasure.
1 In Card Playback mode, press the
DISPLAY button until the mode
screen appears.
2 Press l or m on the Operation
button to select “PROTECT”, then
press the centre of the Operation
button.
3 Press l or m to select “EXECUTE”,
then press the centre of the Operation
button.
• The PROTECT indicator appears.
4 Press j, k,l or m to select the
image for delete protection.
5 Press the centre of the Operation
button to set delete protection.
• The R indicator appears.
• If you want to protect another image,
repeat steps 4 to 5.
6 Press the DISPLAY button to finish
the setting.
To cancel the protection
setting
1 Select the image for delete protection
cancellation in step 4 above.
2 Press the centre of the Operation
button to cancel the protection.
• The R indicator disappears.
3 Press the DISPLAY button to finish
the setting.
Note:
• Formatting a card erases all stored images,
including delete-protected images.
EX ECUT E
M
ENU
PROTE CT
DELETE ALL
DEL ETE ONE
1000-00
2/1PAGE
NORMA L
1
PROTECT
SET DI SPLAY CANCEL:
][
1
4
2
5
3
6
3000-00
2/1PAGE
NORMA L
1
PROTECT
SET DI SPLAY CANCEL:
][
1
4
2
5
3
6
3000-00
2/1PAGE
NORMA L
1
PROTECT
SET DI SPLAY CANCEL:
][
1
4
2
5
3
6
3000-00
2/1PAGE
NORMA L
1
PROTECT
SET DI SPLAY CANCEL:
][
1
4
2
5
3
6
Page 88
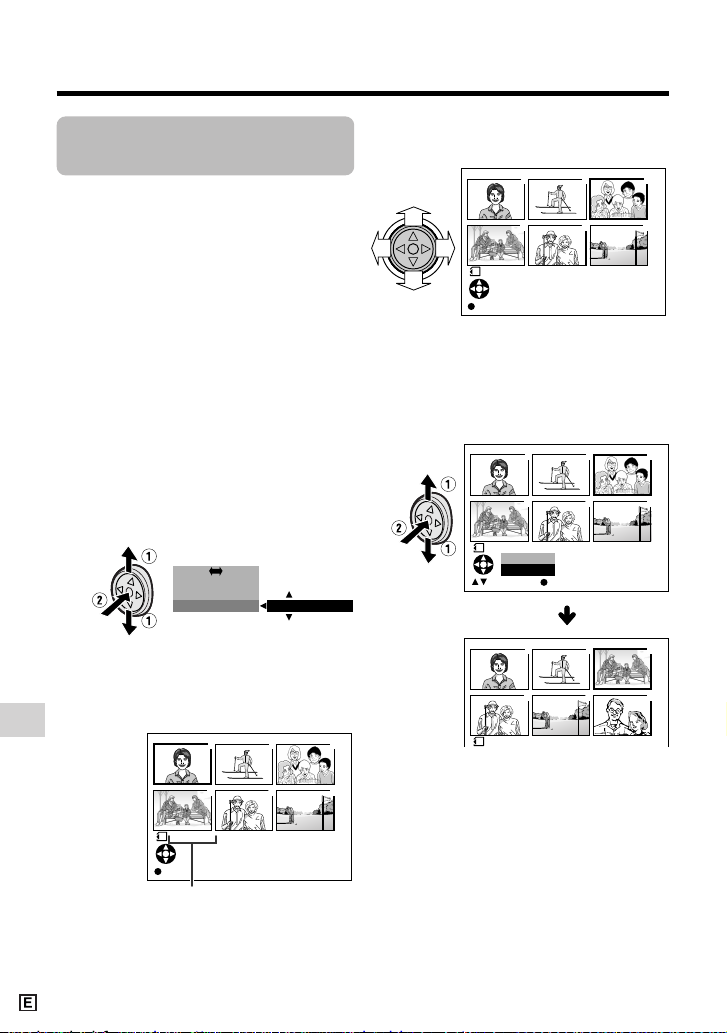
Digital Still Camera Features
Playback
Digital Still Camera Features
78
DELETE indicator
Deleting Stored
Images
Available mode:
Card Playback
Deleting One Stored Image
You can delete unwanted images to free up
memory of a card for new images.
Note:
• Deleted images cannot be restored. Check
whether or not you want the images before
performing the procedure below.
1 In Card Playback mode, press the
DISPLAY button until the mode
screen appears.
2 Press l or m on the Operation
button to select “DELETE ONE”, then
press the centre of the Operation
button.
3 Press l or m to select “EXECUTE”,
then press the centre of the Operation
button.
• The DELETE indicator appears.
4 Press j, k, l or m to select the
image to be deleted.
5 Press the centre of the Operation
button to set the image.
6 Press l or m to select “YES”, then
press the centre of the Operation
button to delete the image.
• To cancel the setting, select “NO”.
• If you want to delete another image,
repeat steps 4 to 6.
7 Press the DISPLAY button to finish
the setting.
Notes:
• The protected images cannot be deleted.
Cancel the protection setting to delete the
image (see page 77).
• Do not turn the power off while deleting an
image.
EXECUTE
FULL MULTI
M
ENU
DEL E TE ONE
PI C.EFFECT
1000-00
1/1PAGE
NORMA L
1
DELE TE
SET DI SPLAY CANCEL:
][
1
4
2
5
3
6
3000-00
2/1PAGE
NORMA L
1
DELE TE
SET DI SPLAY CANCEL:
][
1
4
2
5
3
6
3000-00
NORMA L
1
1
4
2
5
3
6
DELETE?
NO
YES
SETSELECT
4000-001
DELE TE
1
4
2
5
3
6
Page 89
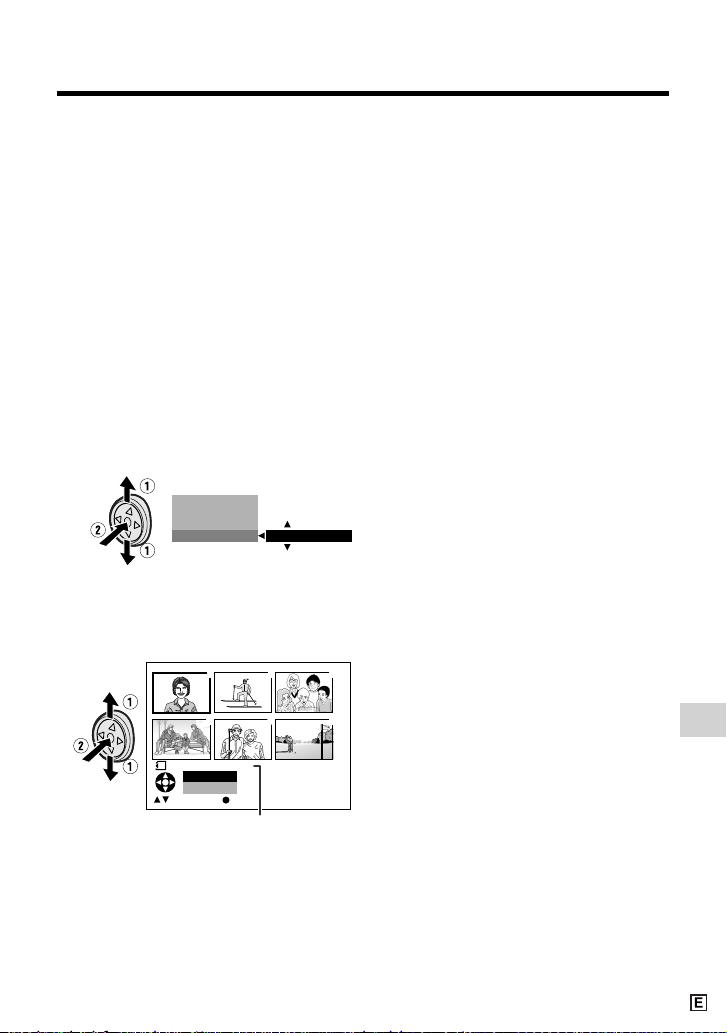
Digital Still Camera Features
79
DELETE ALL? indicator
Deleting All Stored Images
You can delete all stored images on a card
in one operation.
Notes:
• Deleted images cannot be restored. Check
whether or not you want the images before
performing the procedure below.
• If you want to keep some images on the card,
first delete-protect them (see page 77), and
then perform the procedure below.
1 In Card Playback mode, press the
DISPLAY button until the mode
screen appears.
2 Press l or m on the Operation
button to select “DELETE ALL”, then
press the centre of the Operation
button.
3 Press l or m to select “EXECUTE”,
then press the centre of the Operation
button.
• The DELETE ALL? indicator appears.
4 Press l or m to select “YES”, then
press the centre of the Operation
button.
• To cancel the setting, select “NO”.
5 Press the DISPLAY button to finish
the setting.
Notes:
• The protected images cannot be deleted.
Cancel the protection setting to delete the
image (see page 77).
• If a print order is assigned to deleteprotected images and you perform the
procedure above, the print order will cancel
(the protection setting will not cancel).
• It may take several seconds to delete all
images from the card.
• Do not turn the power off while deleting
images.
EXECUTE
M
ENU
DEL E TE ONE
DEL E TE A L L
PI C.EFFECT
1000-00
NORMA L
1
1
4
2
5
3
6
ALL?
NO
YES
SETSELECT
DELETE
Page 90
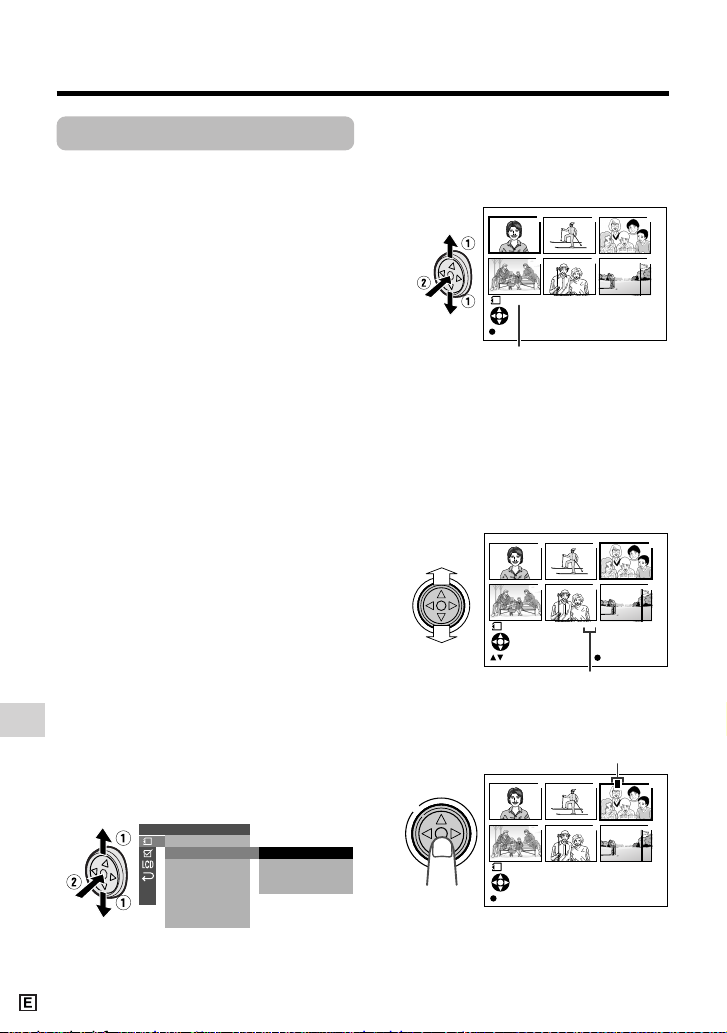
Digital Still Camera Features
Playback
Digital Still Camera Features
80
Number of printouts
PRINT indicator
M indicator
Print Order
Available mode:
Card Playback
The print order function allows you to add
print information called DPOF to still images
recorded on a card.
About DPOF
DPOF (Digital Printing Order Format)
defines the print information for the specific
images and number of each image on
memory cards. In the near future you will be
able to easily make prints on a DPOFcompatible printer or order copies at your
local print shop.
Note:
• You can print an image even if no print order
has been assigned.
Assigning Print Order to an
Image
1 In Card Playback mode, press the
DISPLAY button until the mode
screen appears.
2 Select “MENU”, then “EXECUTE” by
using the Operation button (see page
32).
3 Press l or m to select S, then
press the centre of the Operation
button.
4 Press l or m to select “PRI.
ORDER”, then press the centre of the
Operation button.
5 Press l or m to select “PRI.
SELECT”, then press the centre of
the Operation button.
• The PRINT indicator appears.
6 Press j, k, l or m to select the
image to which you want to assign a
print order.
7 Press the centre of the Operation
button, then press l or m to select
the number of printouts.
• 1 through 99 can be set for the
number of printouts.
8 Press the centre of the Operation
button to set the print order.
• The M indicator appears.
• If you want to assign another print
order, repeat steps 6 to 8.
9 Press the DISPLAY button to finish
the setting.
PLAYBACK SET
PRI.SELECT
PR I. ALL
PR I. NONE
RET URN
SL I DE SHO
W
PR I.
RET URN
ORDER
1000-00
2/1PAGE
NORMA L
1
PRI NT
SET D I SPLAY CANCEL:
][
1
4
2
5
3
6
3000-00
2/1PAGE
NORMA L
11
PRI NT
1
4
2
5
3
6
SETPR I NT NUMBER
P
3000-00
2/1PAGE
NORMA L
1
PRI NT
SET D I SPLAY CANCEL:
][
1
4
2
5
3
6
Page 91
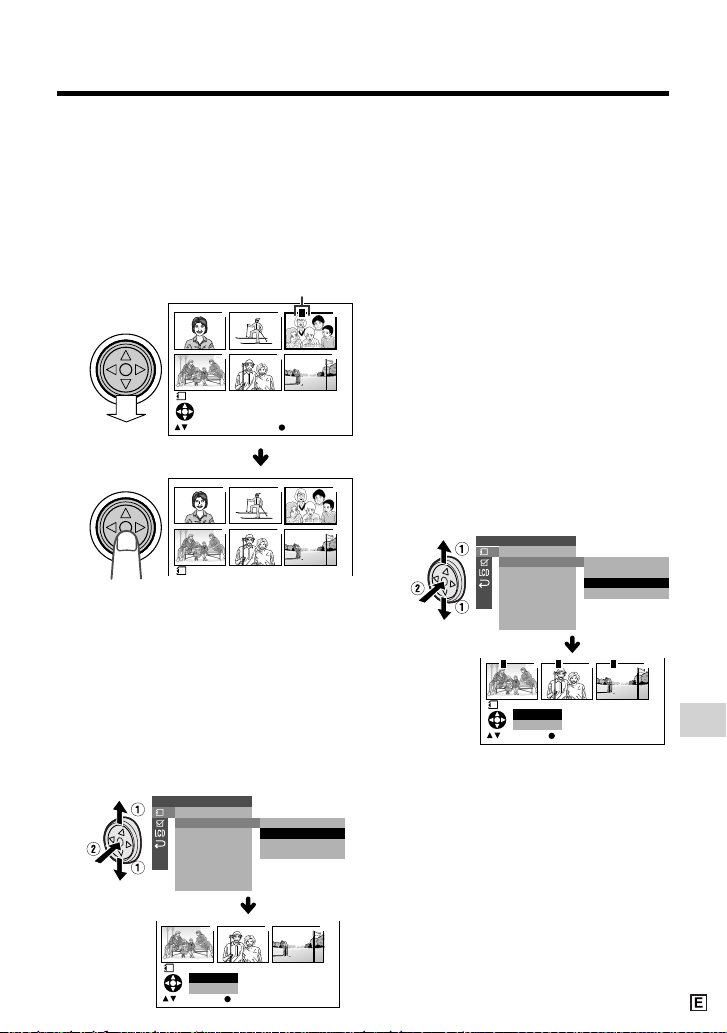
Digital Still Camera Features
81
M indicator
To cancel the print order for an image
1 Select the image for cancelling out of
print order in step 6 above, then press
the centre of the Operation button.
2 Press l to select “0”, then press the
centre of the Operation button.
• The M indicator disappears.
3 Press the DISPLAY button to finish
the setting.
Assigning Print Order to All
Images
1 Perform steps 1 to 4 in “Assigning
Print Order to an Image”.
2 Press l or m to select “PRI. ALL”,
then press the centre of the Operation
button.
Note:
• A warning indicator appears when the
print order is set to more than 999
images. To turn off the warning
indicator, press the Operation button.
3 Press l or m to select “YES”, then
press the centre of the Operation
button.
• The M indicators appear, and each
image is set to 1 print out.
• To cancel the setting, select “NO”.
To cancel the print order for all
images
1 Perform steps 1 to 4 in “Assigning
Print Order to an Image”.
2 Press l or m to select “PRI. NONE”,
then press the centre of the Operation
button to cancel the print order for all
images.
3 Press l or m to select “YES”, then
press the centre of the Operation
button.
• The M indicators are turned off.
• To cancel the setting, select “NO”.
P
3000-00
2/1PAGE
NORMA L
10
PRI NT
1
4
2
5
3
6
SETPR I NT NUMBER
3000-001
PRI NT
1
4
2
5
3
6
PLAYBACK SET
PRI.SELECT
PRI . ALL
PR I. NONE
RETURN
SL I DE SHO
W
PRI .
RETURN
ORDER
1000-00
NORMA L
1
456
ALL?
NO
YES
SETSELECT
PRI NT
PLAYBACK SET
PRI.SELECT
PRI . ALL
PR I. NONE
RETURN
SL I DE SHO
W
PRI .
RETURN
ORDER
1000-00
NORMA L
1
456
NONE ?
NO
YES
SETSELECT
PRI NT
P P P
Page 92
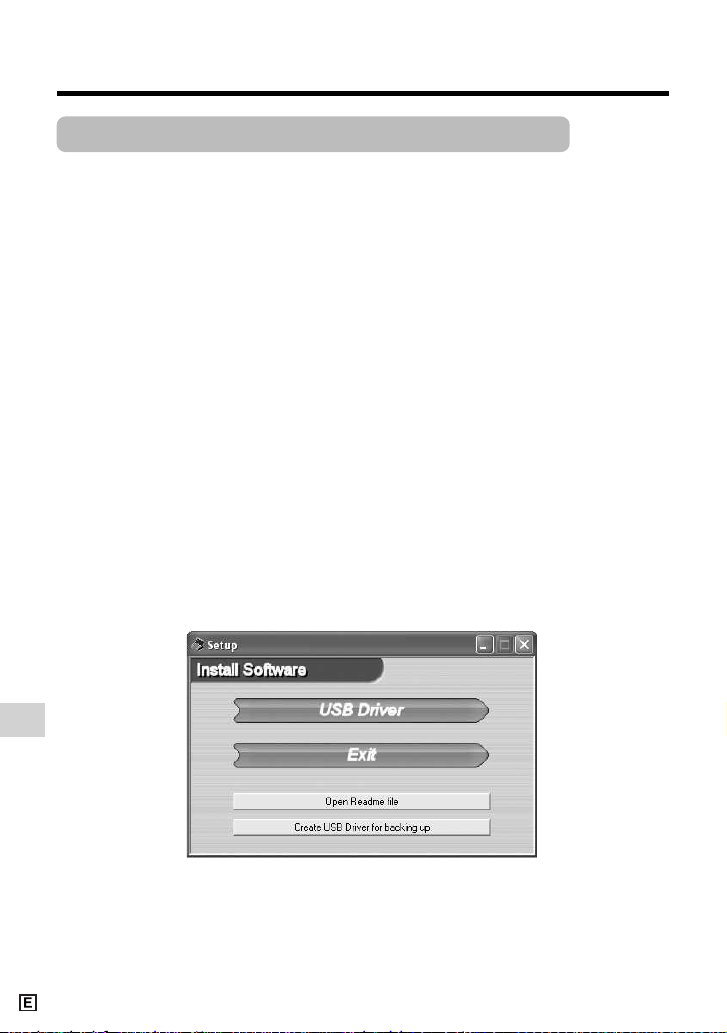
Digital Still Camera Features
Playback
Digital Still Camera Features
82
Transferring Data on Card to Computer
Using the supplied USB cable, you can transfer still images to a computer.
System Requirements
• Operating systems
— Microsoft Windowsb XP Home Edition/Professional
— Microsoft Windowsb 2000 Professional
— Microsoft Windowsb Me
— Microsoft Windowsb 98 Second Edition
— Microsoft Windowsb 98
• USB terminal
• CD-ROM drive (for driver installation)
• Mouse or other pointing device
Note:
• The USB driver is not compatible with Macintosh operating systems.
Installing the USB Driver
For installing the USB driver in Windowsb XP or Windowsb 2000, you need to log in as the
system administrator.
1 Turn on the PC.
• Do not connect the camcorder to the PC with the USB cable at this point.
2 Inser t the supplied CD-ROM containing the USB driver into the CD-ROM drive.
• The Setup screen will display automatically.
• The example screen shown is for Windowsb XP.
Note:
• When the Setup screen does not appear,
1 select “Run...” in Windowsb “Start” menu, then
2 type “R:\SETUP.EXE”, and then click on the “OK” button.
• In the example above the CD-ROM drive letter is taken as “R:”. Select the correct drive
letter according to your operating environment.
Page 93
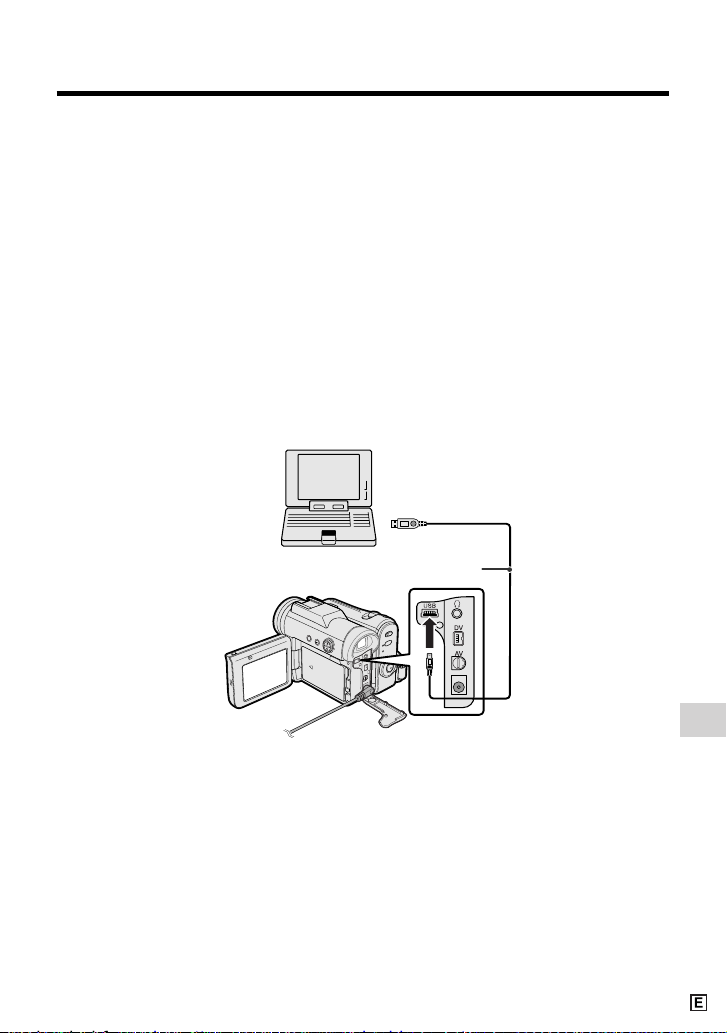
Digital Still Camera Features
83
3 Click the “USB driver” button.
• Welcome screen appears.
4 Click the “Next” button.
• Information screen appears
5 Click the “Next” button.
• Installation begins.
6 Confirm the message on the screen, and then click the “Finish” button to complete
the installation.
Note:
• If your computer gives you the option to restart, you may do so.
7 Inser t a card that contains recorded still images into camcorder.
8 Connect the camcorder to the PC with the supplied USB cable as shown below.
• It is recommended to use the AC adapter as a power source for extended periods of
use.
To USB terminal
To USB terminal
USB cable (supplied)
9 Set the Media Selection switch to u.
10
Hold down the Lock button and set the Power switch to w.
• PC will recognize the camcorder automatically.
Page 94
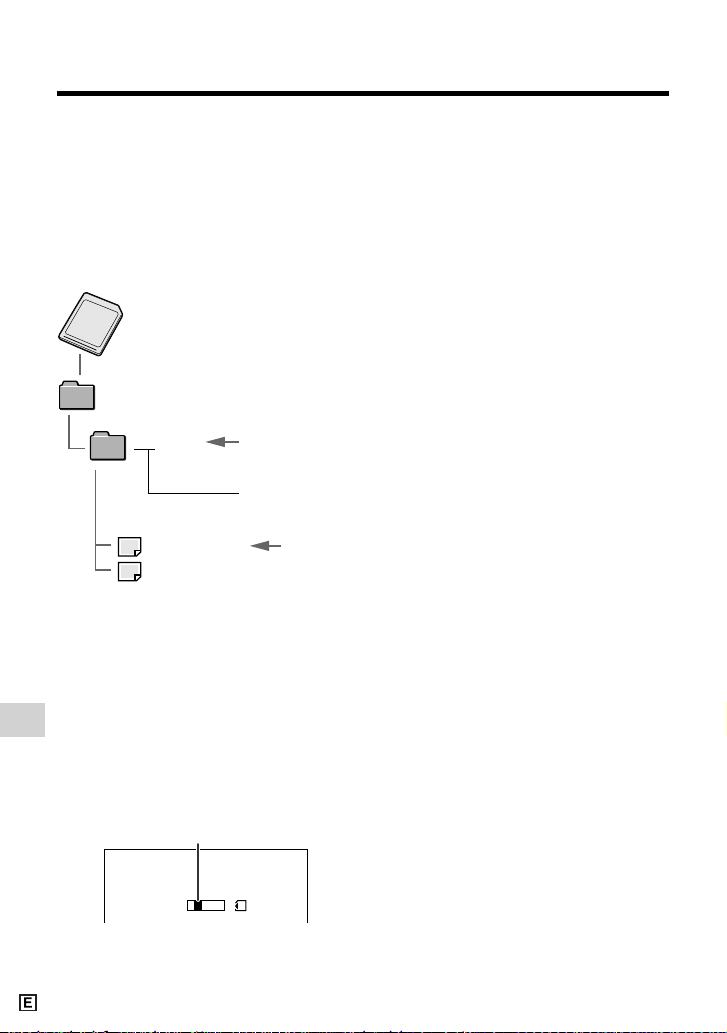
Digital Still Camera Features
Playback
Digital Still Camera Features
84
Serial number
(100 to 999)
Sub-folder of still
images
Folder of still image files
Still
image
Transfer indicator
Image Folders and File
Names
Double-click the My Computer icon on the
PC and find a new drive called “Removable
Disk (F:)” (or other drive letter, depending
on your PC configuration). Still images
recorded using the camcorder are stored in
files and on a card as shown below.
Note:
• If you copy any data incompatible with this
camcorder to the card, the camcorder will not
be able to recognize it.
Caution on transferring data
While transferring data, the transfer
indicator moves. Do not execute the
operations below.
• Disconnecting the USB cable
• Switching the power on/off
• Turning off the PC or setting it to Standby
• Removing the card
Note:
• In case of data transfer error, disconnect the
USB cable, then connect it again, or set the
Power switch to OFF, then set it to w again.
DCIM
100SHARP
DVC00001.JPG
DVC00002.JPG
••••••
Disconnecting the USB
cable
Windows Me/2000/XP
1 Close Explorer or any open applica-
tions.
2 Click the “Safely Remove Hardware”
(or “Unplug or Eject Hardware”) icon
that appears on the task bar, and
choose an applicable hard drive to
stop.
3 After the message “Safe To Remove
Hardware” appears, disconnect the
USB cable.
Note:
• See Windows Help for the procedure
of disconnecting USB cable in detail.
Windows 98
1 Close Explorer or any open applica-
tions.
2 When data is not being transferred
(the indicator on LCD display stays
still), right-click on the disk drive icon,
which appears on explorer window, to
eject the disk. After that, disconnect
the USB cable.
USB
TRANSMI TT I NG
Page 95
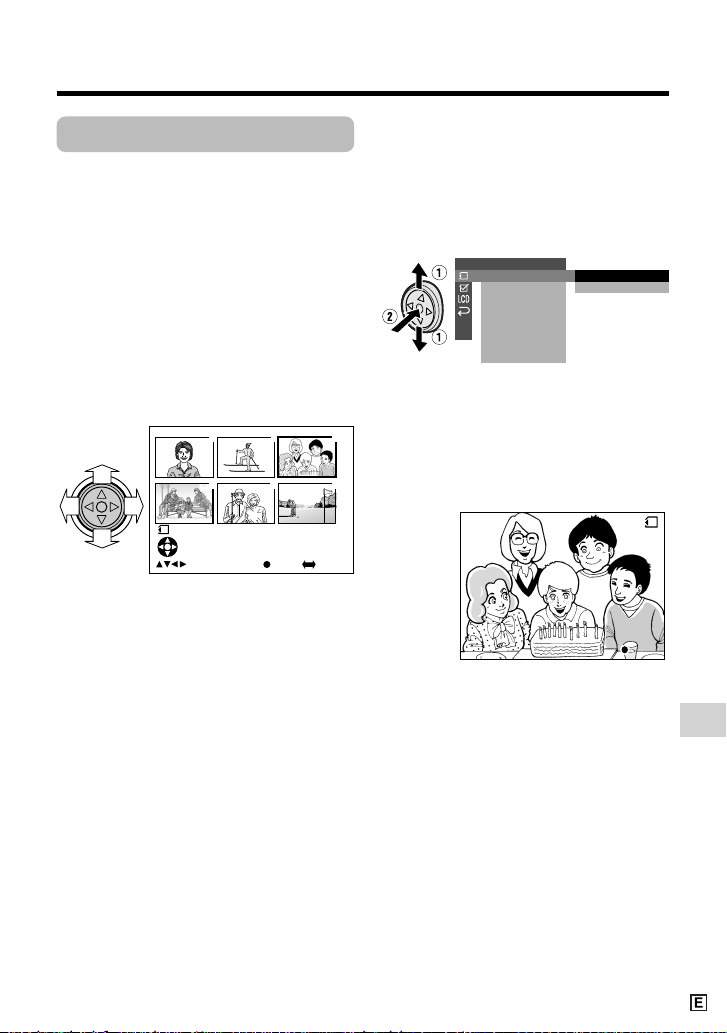
Digital Still Camera Features
85
Slide Show Playback
Available mode:
Card Playback
You can automatically play back consecutive still images recorded on a card at
intervals of 5 seconds. This is useful when
confirming the data recorded on a card.
1 Set the camcorder to Card Playback
mode.
2 Press j, k, l or m on the
Operation button to select the image
from which you want to begin slide
show playback.
3 Press the DISPLAY button until the
mode screen appears.
4 Press l or m to select “MENU”, then
press the centre of the Operation
button.
5 Press l or m to select “EXECUTE”,
then press the centre of the Operation
button.
6 Press l or m to select S, then
press the centre of the Operation
button.
7 Press l or m to select “SLIDE
SHOW”, then press the centre of the
Operation button.
8 Press l or m to select “EXECUTE”,
then press the centre of the Operation
button.
• Beginning from the image selected in
step 2, the recorded images will
display in full-screen one after
another in order of recording.
• After playing back all the images on
the card once, slide show playback
automatically stops.
9 Press the DISPLAY button to turn off
the menu screen.
To stop slide show playback
During slide show playback, press the
centre of the Operation button.
3000-00
2/1PAGE
NORMA L
1
1
4
2
5
3
6
F ULLSE L E C T I MG MULT IFULLSELECT IMG MULTI
PLAYBACK SET
EXE CUTE
RET URN
SL I DE SHO
W
PR I.
RET URN
ORDER
SL I D E S HOWSLI DE SHOW
S TOP
STOP
Page 96
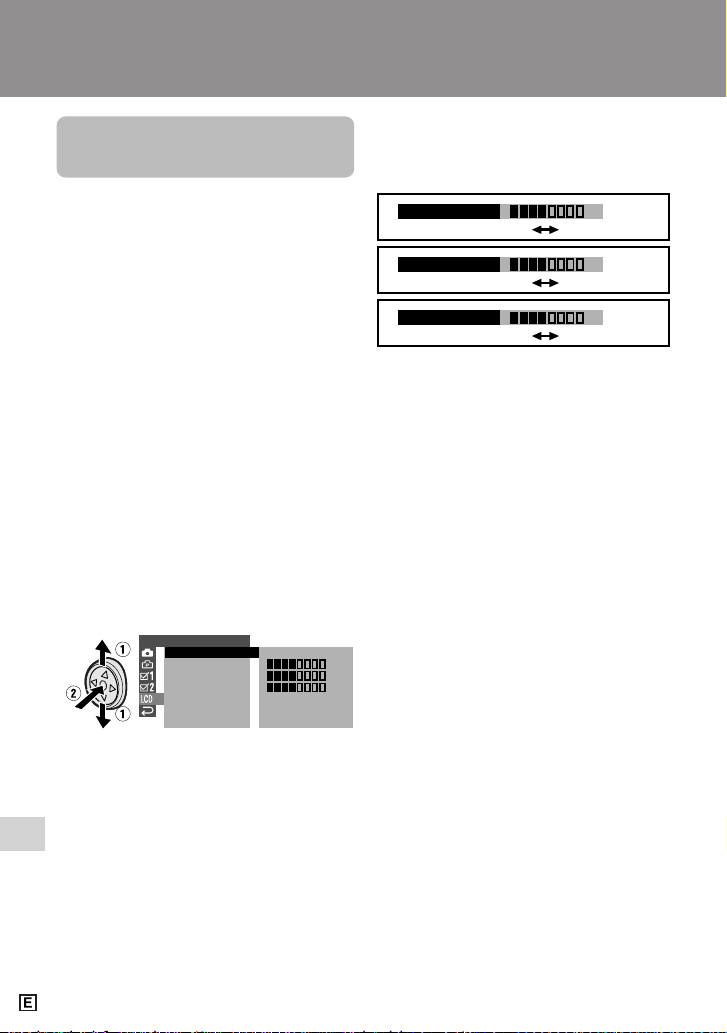
Appendix
Appendix
86
Darker
Brighter
Decrease
Darker
Increase
Brighter
–
+
–
+
–
+
LCD BRI GHT
LCD COLOUR
VF BRIGHT
6 Press j or k to adjust the item to
the desired setting, then press the
centre of the Operation button.
Appendix
Picture/Backlight
Adjustments
Available modes:
All modes
If the picture is difficult to see due to
ambient light or other factors, adjust the
monitor picture settings.
• The example screens shown are for Tape
Camera mode.
Adjusting the Picture
1 Press the DISPLAY button until the
mode screen appears.
2 Press l or m on the Operation
button to select “MENU”, then press
the centre of the Operation button.
3 Press l or m to select “EXECUTE”,
then press the centre of the Operation
button.
4 Press l or m to select O, then
press the centre of the Operation
button.
5 Press l or m to select “LCD
BRIGHT”, “LCD COLOUR” or “VF
BRIGHT”, then press the centre of
the Operation button.
LCD SET
BACKL IGHT
LC D BRI GHT
LCD COLOUR
RET URN
NORMAL
VF BRIGHT
–
+
–
+
–
+
7 Press the DISPLAY button to turn off
the menu screen.
Notes:
• When adjusting the colour, the picture on the
LCD monitor may differ from the picture
actually recorded. Do not change the colour
setting unless necessary. (This adjustment
only affects the monitor picture, not the
recorded image.)
• The viewfinder turns on if you select “VF
BRIGHT”.
Page 97
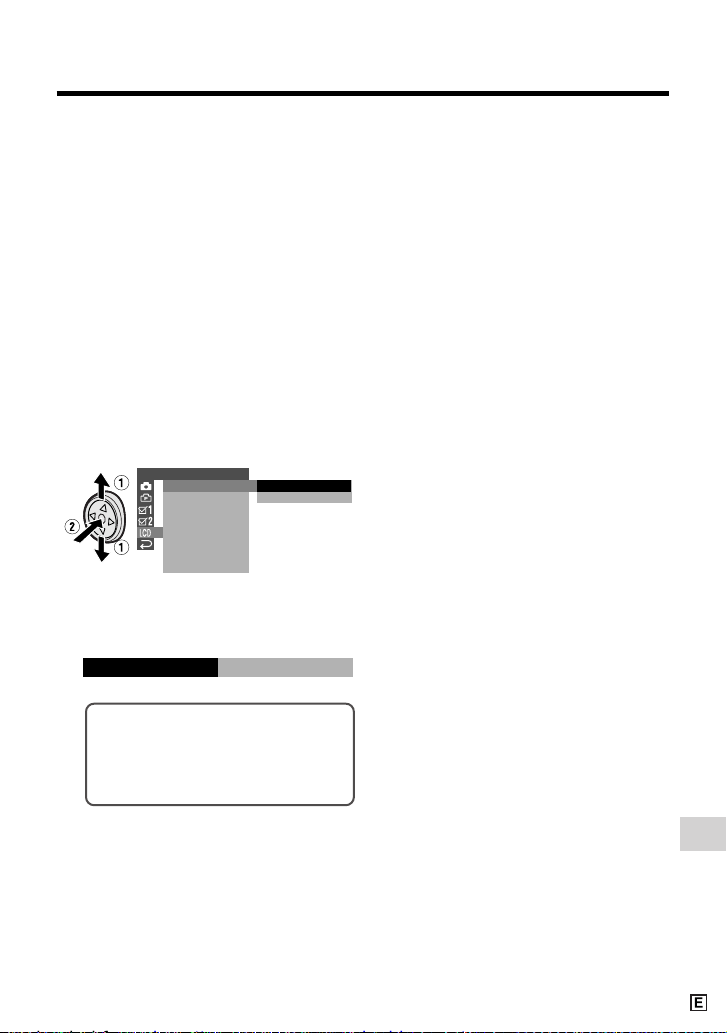
Appendix
87
Adjusting the Backlight
1 Press the DISPLAY button until the
mode screen appears.
2 Press l or m on the Operation
button to select “MENU”, then press
the centre of the Operation button.
3 Press l or m to select “EXECUTE”,
then press the centre of the Operation
button.
4 Press l or m to select O, then
press the centre of the Operation
button.
5 Press l or m to select “BACK-
LIGHT”, then press the centre of the
Operation button.
6 Press l or m to select “NORMAL” or
“BRIGHT”, then press the centre of
the Operation button.
NORMAL: For use indoors or under
moderate lighting conditions.
BRIGHT: For use outdoors under
strong lighting conditions, such
as bright daylight.
7 Press the DISPLAY button to turn off
the menu screen.
LCD SET
BACKL IGHT
LC D BRI GHT
LC D C OL OUR
RET URN
VF BRIGHT
NORMAL
BRI GHT
BACKL I GHT
BRI GHT
Page 98
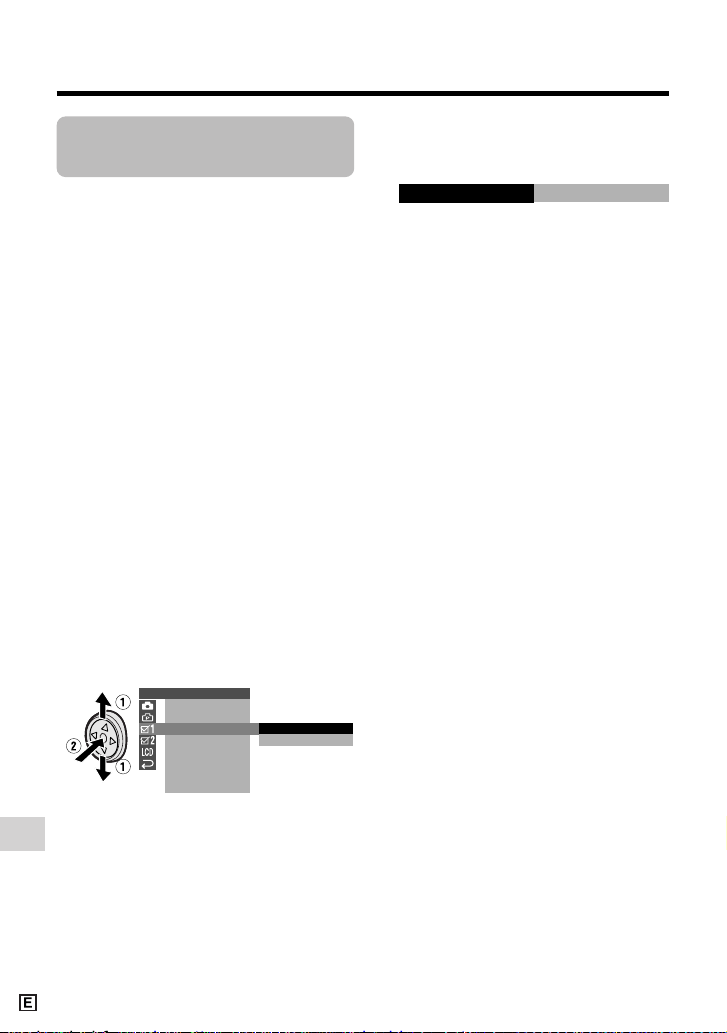
Appendix
Appendix
88
Turning off the
Confirmation Sound
Available modes:
All modes
A confirmation sound is made when you
turn on or off the Power switch, press the
Start/Stop button, or perform other
designated operations. Use the procedure
below to turn off the confirmation sounds.
• The example screens shown are for Tape
Camera mode.
1 Press the DISPLAY button until the
mode screen appears.
2 Press l or m on the Operation
button to select “MENU”, then press
the centre of the Operation button.
3 Press l or m to select “EXECUTE”,
then press the centre of the Operation
button.
4 Press l or m to select Z, then
press the centre of the Operation
button.
5 Press l or m to select “BEEP”, then
press the centre of the Operation
button.
OTHERS 1
BEEP
REMOT E
DEF AULT
RETURN
ON
OFF
PHONES VOL
DE MO MOD E
OFFBEEP
6 Press l or m to select “OFF”, then
press the centre of the Operation
button.
7 Press the DISPLAY button to turn off
the menu screen.
Note:
• If you select “OFF”, the focus confirmation
sound in Card Camera mode will turn off.
Page 99
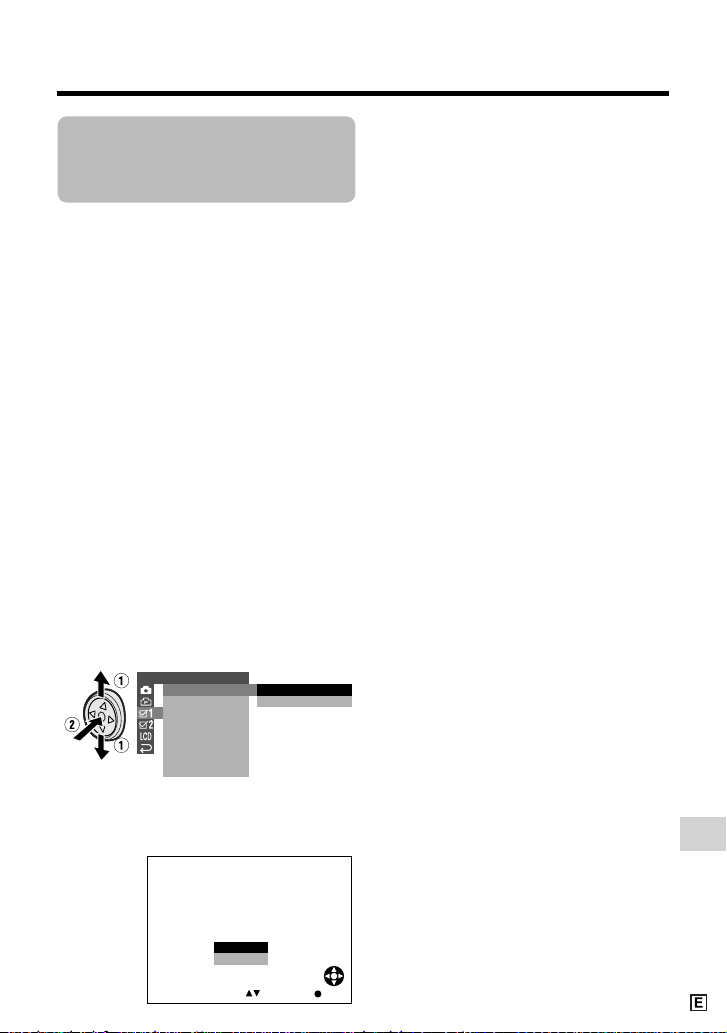
Appendix
89
Setting the
Camcorder to
Factory Presettings
Available modes:
All modes
You can set the camcorder to the factory
presettings in one operation.
• The example screens shown are for Tape
Camera mode.
1 Press the DISPLAY button until the
mode screen appears.
2 Press l or m on the Operation
button to select “MENU”, then press
the centre of the Operation button.
3 Press l or m to select “EXECUTE”,
then press the centre of the Operation
button.
4 Press l or m to select Z, then
press the centre of the Operation
button.
5 Press l or m to select “DEFAULT”,
then press the centre of the Operation
button.
6 Press l or m to select “EXECUTE”,
then press the centre of the Operation
button.
OTHERS 1
BEEP
REMOT E
DEF AULT
RETURN
PHONES VOL
DE MO MOD E
EXE CUTE
RET URN
7 Press l or m to select “YES”, then
press the centre of the Operation
button.
• To cancel the setting, select “NO”.
8 Press the DISPLAY button to turn off
the menu screen.
Note:
• Even when you perform the steps above, the
clock setting maintains the memory.
SELECT
DEFAULT
RE TURN PRE SET T I NGSTO
EXCEPT CERTA I N I TEMS.
NO
YES
SET
Page 100
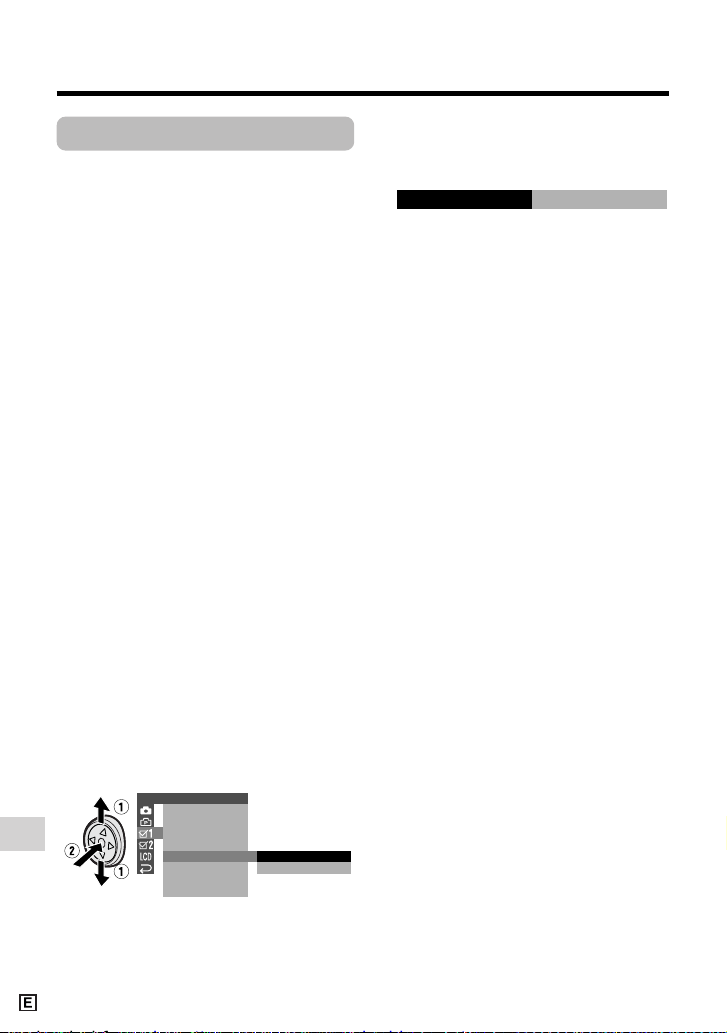
Appendix
Appendix
90
Demonstration Mode
Available modes:
Tape Camera, Card Camera
You can watch a brief demonstration of the
special camcorder features in Demo mode.
If the demonstration appears on the screen
when you turn on the camcorder for the first
time, cancel the Demo mode to use your
camcorder.
Watching
• The example screens shown are for Tape
Camera mode.
1 Remove the Mini DV cassette from
the camcorder (see page 10).
2 In Tape Camera or Card Camera
mode, press the DISPLAY button until
the mode screen appears.
3 Press l or m on the Operation
button to select “MENU”, then press
the centre of the Operation button.
4 Press l or m to select “EXECUTE”,
then press the centre of the Operation
button.
5 Press l or m to select Z, then
press the centre of the Operation
button.
6 Press l or m to select “DEMO
MODE”, then press the centre of the
Operation button.
7 Press l or m to select “ON”, then
press the centre of the Operation
button.
8 Set the Power switch to OFF, then
hold down the Lock button and set
the Power switch to v.
• The demonstration begins.
Cancelling
1 During the demonstration, press the
centre of the Operation button to
pause the demonstration.
2 Perform step 3 to 6 in “Watching”,
then select “OFF” in step 7.
Notes:
• The demonstration will pause if you press the
centre of the Operation button. If you leave it
for 60 seconds, or turn the power off
temporarily and then set the Power switch to
v, the demonstration will begin again.
• Demonstration mode does not work in self
recording with reversed grip.
OTHERS 1
RETURN
D EMO MO DE
OFF
ON
PHONES VOL
BEEP
REMOT E
DEF AULT
ON
D EMO MO DE
 Loading...