

Sharp Viewcam VL-Z1U Operation Manual

LIQUID CRYSTAL DISPLAY CAMCORDER
MODEL
VL-Z1U
OPERATION MANUAL
Please read this operation manual
carefully before using the camcorder.
Important
For assistance in reporting the theft or
this product, record on the line
model number and serial number which
are located on the bottom of the unit.
Please retain this information.
Model No.:
Serial No.:
• See page 64 for use of Demo mode.
below the
loss of
ii
Thank you for purchasing this camcorder from SHARP.
The camcorder will enhance your home video enjoyment and allow you to
capture those special moments. Please read this operation manual to familiarize
yourself with the camcorder’s features, so that you will get the most out of it. The
video techniques section will help you fully enjoy the many features this
camcorder offers, and expand your video world.
CAUTION
RISK OF ELECTRIC SHOCK
DO NOT OPEN
This symbol warns the user of uninsulated voltage
within the unit that can cause dangerous electric
shocks.
This symbol alerts the user that there are important
operating and maintenance instructions in the literature accompanying this unit.
CAUTION:
TO REDUCE THE RISK OF ELECTRIC SHOCK, DO NOT REMOVE
COVER. NO USER-SERVICEABLE
PARTS INSIDE. REFER SERVICING
TO QUALIFIED SERVICE PERSONNEL.
TO REDUCE THE RISK OF FIRE OR ELECTRIC
SHOCK, DO NOT EXPOSE THIS APPLIANCE TO
RAIN OR MOISTURE.
Important Information for Consumers in
the U.S.
WARNING:

iii
PRODUCT DISPOSAL
This Product utilizes tin-lead solder, and a fluorescent lamp containing a
small amount of mercury. Disposal of these materials may be regulated
due to environmental considerations. For disposal or recycling information, please contact your local authorities or the Electronics Industries
Alliance: www.eiae.org.
CAUTION
CAUTION
If the AC adapter is misplaced or
needs to be replaced, obtain the
same type of adapter from a
SHARP service center or your
local dealer.
BATTERY DISPOSAL
THIS PRODUCT CONTAINS LITHIUM-ION BATTERY.
THIS BATTERY MUST BE DISPOSED OF PROPERLY.
CONTACT YOUR LOCAL AGENCIES FOR INFORMATION ON
RECYCLING AND DISPOSAL OPTIONS IN YOUR AREA.
TO PREVENT ELECTRIC
SHOCK, MATCH WIDE BLADE
OF PLUG TO WIDE SLOT, FULLY
INSERT.
(applies to the supplied AC adapter)
CAUTION ON LITHIUM BATTERY
If a battery is reversed (positive end where the negative end belongs
and vice versa), it can overheat and rupture. This has happened when
young children install batteries backwards. Warn children
not
to take out
batteries or install them.
Parents should install the lithium battery in the
camcorder.
COPYRIGHT WARNING: It is the intent of SHARP that this unit be used in full com-
pliance with the copyright laws of the United States and
that prior permission be obtained from copyright owners
whenever necessary.

iv
WARNINGCFCC Regulations state that any unauthorized changes
or modifications to this equipment not expressly approved by the manufacturer could void the user’s authority to operate this equipment.
INFORMATION
This equipment has been tested and found to comply with the limits for a
Class B digital device, pursuant to Part 15 of the FCC Rules. These limits
are designed to provide reasonable protection against harmful interference in a residential installation. This equipment generates, uses, and
can radiate radio frequency energy and, if not installed and used in accordance with the instructions, may cause harmful interference to radio
communications. However, there is no guarantee that interference will
not occur in a particular installation. If this equipment does cause harmful interference to radio or television reception, which can be determined
by turning the equipment off and on, the user is encouraged to try to correct the interference by one or more of the following measures:
CReorient or relocate the receiving antenna.
CIncrease the separation between the equipment and receiver.
CConnect the equipment into an outlet on a circuit different from that to
which the receiver is connected.
CConsult the dealer or an experienced radio/TV technician for help.
DECLARATION OF CONFORMITY
Sharp Camcorder, Model VL-Z1U
This device complies with Part 15 of the FCC Rules. Operation is subject to
the following two conditions: (1) This device may not cause harmful interference, and (2) this device must accept any interference received, including
interference that may cause undesired operation.
RESPONSIBLE PARTY:
SHARP ELECTRONICS CORPORATION
Sharp Plaza, Mahwah, New Jersey 07430
Phone: 1-800-BE-SHARP
NOTE
The LCD panel of this camcorder is a very high technology product with more than
215,000 thin-film transistors*, giving you fine picture detail. Occasionally, a pixel may appear on the screen as a fixed point of blue, green, red, or black. Please note that this
does not affect your camcorder’s performance.
*Specifications are subject to change without notice.
v
9. A product and
cart combination
should be
moved with care.
Quick stops,
excessive force,
and uneven
surfaces may cause the product
and cart combination to overturn.
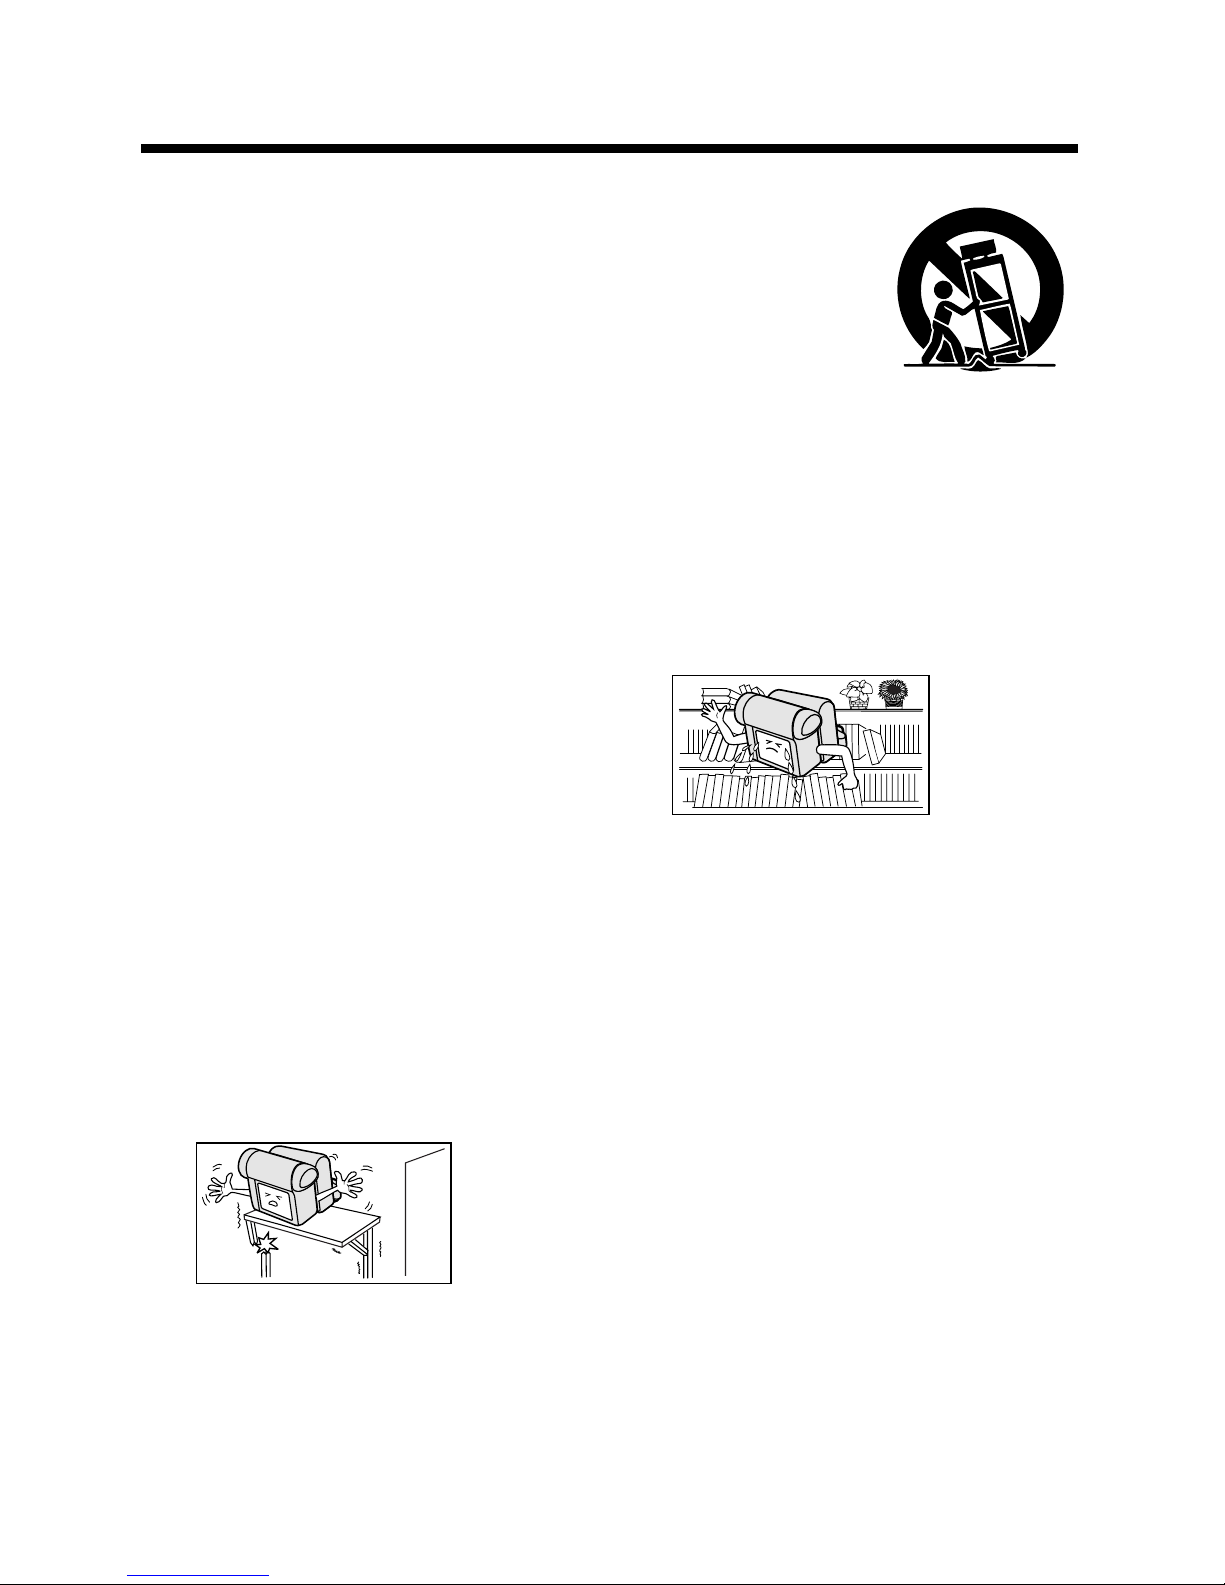
10. VentilationCSlots and openings in
the cabinet are provided for
ventilation and to ensure reliable
operation of the product and to
protect it from overheating, and
these openings must not be
blocked or covered. The openings
should
never be
blocked by
placing the
product on
a bed,
sofa, rug, or other similar surface.
This product should not be placed
in a built-in installation such as a
bookcase or rack unless proper
ventilation is provided or the
manufacturer’s instructions have
been adhered to.
11. Power SourcesCThis product
should be operated only from the
type of power source indicated on
the marking label. If you are not
sure of the type of power supply to
your home, consult your product
dealer or local power company.
For products intended to operate
from battery power, or other
sources, refer to the operating
instructions.
1. Read InstructionsCAll the safety
and operating instructions should
be read before the product is
operated.
2. Retain InstructionsCThe safety
and operating instructions should
be retained for future reference.
3. Heed WarningsCAll warnings on
the product and in the operating
instructions should be adhered to.
4. Follow InstructionsCAll operating
and use instructions should be
followed.
5. CleaningCUnplug this product
from the wall outlet before
cleaning. Do not use liquid
cleaners or aerosol cleaners. Use
a damp cloth for cleaning.
6. AttachmentsCDo not use attach-
ments not recommended by the
product manufacturer as they may
cause hazards.
7. Water and MoistureCDo not use
this product near waterCfor
example, near a bath tub, wash
bowl, kitchen sink, or laundry tub;
in a wet basement; or near a
swimming pool; and the like.
8. AccessoriesCDo not place this
product on an unstable cart,
stand, tripod, bracket, or table.
The product may fall, causing
serious
injury to a
child or
adult, and
serious
damage to
the product. Use only with a cart,
stand, tripod, bracket, or table
recommended by the manufacturer, or sold with the product.
Any mounting of the product
should follow the manufacturer’s
instructions, and should use a
mounting accessory recommended by the manufacturer.
IMPORTANT SAFEGUARDS
vi
12. Grounding or PolarizationCThis
product may be equipped with a
polarized alternating-current line
plug (a plug having one blade
wider than the other). This plug
will fit into the power outlet only
one way. This is a safety feature. If
you are unable to insert the plug
fully into the outlet, try reversing
the plug. If the plug should still fail
to fit, contact your electrician to
replace your obsolete outlet. Do
not defeat the safety purpose of
the polarized plug.
13. Power-Cord ProtectionCPower-
supply cords should be routed so
that they are not likely to be
walked on or pinched by items
placed upon or against them,
paying particular attention to
cords at plugs, convenience
receptacles, and the point where
they exit from the product.
14. LightningCFor added protection
for this product during a lightning
storm, or when it is left unattended
and unused for long periods of
time, unplug it from the wall outlet
and disconnect the antenna or
cable system. This will prevent
damage to the product due to
lightning and power-line surges.
15. Power LinesCAn outside antenna
system should not be located in
the vicinity of overhead power
lines or other electric light or
power circuits, or where it can fall
into such power lines or circuits.
When installing an outside
antenna system, extreme care
should be taken to keep from
touching such power lines or
circuits as contact with them might
be fatal.
16. OverloadingCDo not overload
wall outlets, extension cords, or
integral convenience receptacles
as this can result in a risk of fire or
electric shock.
17. Object and Liquid EntryCNever
push objects of any kind into this
product through openings as they
may touch
dangerous
voltage
points or
short-out
parts that
could result in a fire or electric
shock. Never spill liquid of any
kind on the product.
18. ServicingCDo not attempt to
service this product yourself as
opening or removing covers may
expose you to dangerous voltage
or other hazards. Refer all
servicing to qualified service
personnel.

vii
19. Damage Requiring
ServiceCUnplug this product from
the wall outlet and refer servicing
to qualified service personnel
under the following conditions:
a. When the power-supply cord or
plug is damaged,
b. If liquid has been spilled, or
objects have fallen into the
product,
c. If the product has been
exposed to rain or water,
d. If the product does not operate
normally by following the
operating instructions. Adjust
only those controls that are
covered by the operating
instructions as an improper
adjustment of other controls
may result in damage and will
often require extensive work by
a qualified technician to restore
the product to its normal
operation,
e. If the product has been
dropped or damaged in any
way, and
f. When the product exhibits a
distinct change in
performanceCthis indicates a
need for service.
20. Replacement PartsCWhen
replacement parts are required,
be sure the service technician has
used replacement parts specified
by the manufacturer or have the
same characteristics as the
original part. Unauthorized
substitutions may result in fire,
electric shock, or other hazards.
21. Safety CheckCUpon completion
of any service or repairs to this
product, ask the service technician to perform safety checks to
determine that the product is in
proper operating condition.
22. Wall or Ceiling MountingCThe
product should be mounted to a
wall or ceiling only as recommended by the manufacturer.
23. HeatCThe product should be
situated away from heat sources
such as radiators, heat registers,
stoves, or other products (including amplifiers) that produce heat.

viii
Part Names ............................................................. 1
Warning Indicators ..................................................4
Operation References
Preparation
Basic Operations
Attaching and Removing the Battery Pack ............. 5
Charging the Battery Pack ......................................7
Powering the Camcorder from an AC Outlet ..........8
Inserting and Removing a Cassette .......................9
Installing the Lithium Batteries .............................. 10
Setting the Date and Time .................................... 12
Using the Lens Cap ..............................................13
Adjusting the Hand Strap ..................................... 14
Using the Grip .......................................................14
Detaching the Lens Hood ..................................... 15
Using the Viewfinder ............................................. 15
Using the LCD Monitor .........................................17
Tips on Recording Positions .................................18
Camera Recording
Easy Camera Recording in Full Auto Mode ..........19
Zooming ................................................................20
Power Standby Mode ...........................................21
Turning on/off the Backlight .................................. 21
Auto Focus ............................................................22
Macro Shots ..........................................................22
Remaining Recording Time Display ..................... 23
Remaining Battery Power Display ........................ 23
Playback
Playback ............................................................... 24
Volume Control ......................................................25
Still ........................................................................25
Video Search......................................................... 25
Watching Playback on a TV .................................. 26
Contents
Supplied Accessories ........................................................................................ xi
Optional Accessories ......................................................................................... xi
Precautions ....................................................................................................... xii

ix
Useful Features
Control Buttons ..................................................... 27
Using the Mode Screens ...................................... 27
Using the Menu Screens.......................................28
Camera Recording
Setting the Digital Zoom .......................................29
Backlight Compensation (BLC) ............................ 30
Gain-up .................................................................31
Fade in and Fade out ............................................32
Quick Return .........................................................33
Edit Search............................................................ 34
Still Recording .......................................................34
Digital Image Stabilization (DIS) ...........................35
Self Recording ...................................................... 36
Wide Screen (16:9) ...............................................38
Recording in LP (Long Play Recording) Mode .....39
Windbreak .............................................................40
Selecting the 16-bit Audio Recording Mode......... 41
Playback
Using the Remote Control
(Not supplied).....................................................42
Playback Functions with the Remote Control
(Not supplied).....................................................43
Selecting the Date and Time of Recording
Display................................................................44
Picture Effect Playback .........................................45
Rotate Playback .................................................... 46
Advanced Features
Camera Recording
Manual Focus .......................................................47
Returning to Auto Focus ....................................... 48
Displaying the Manual Setting Screen ..................48
White Balance Lock ..............................................49
Manual Iris ............................................................50
Manual Gain ..........................................................51
Setting the Camcorder to Full Auto Mode............. 52
Scene Menu (Program AE) ...................................53

x
Advanced Features
Playback
Using the Time Code ............................................54
Editing ................................................................... 55
Editing with the DV Terminal (IEEE1394) ..............56
Audio Dubbing Feature.........................................57
Selecting the Audio Playback Mode .....................59
Appendix
Picture/Backlight Adjustments .............................. 60
Turning off the Confirmation Sound ...................... 61
Selecting the Language for the Information
Display................................................................62
Setting the Camcorder to Factory Presettings ......63
Demonstration Mode ............................................ 64
Useful Information .................................................65
Troubleshooting .................................................... 70
Specifications .......................................................73
On-screen Display Index ......................................74
Note:
• Before requesting service, please read “Troubleshooting” carefully. (See pages 70–
72.)
• Guía de operación rápida en español ................................................................... 76
Contents
xi
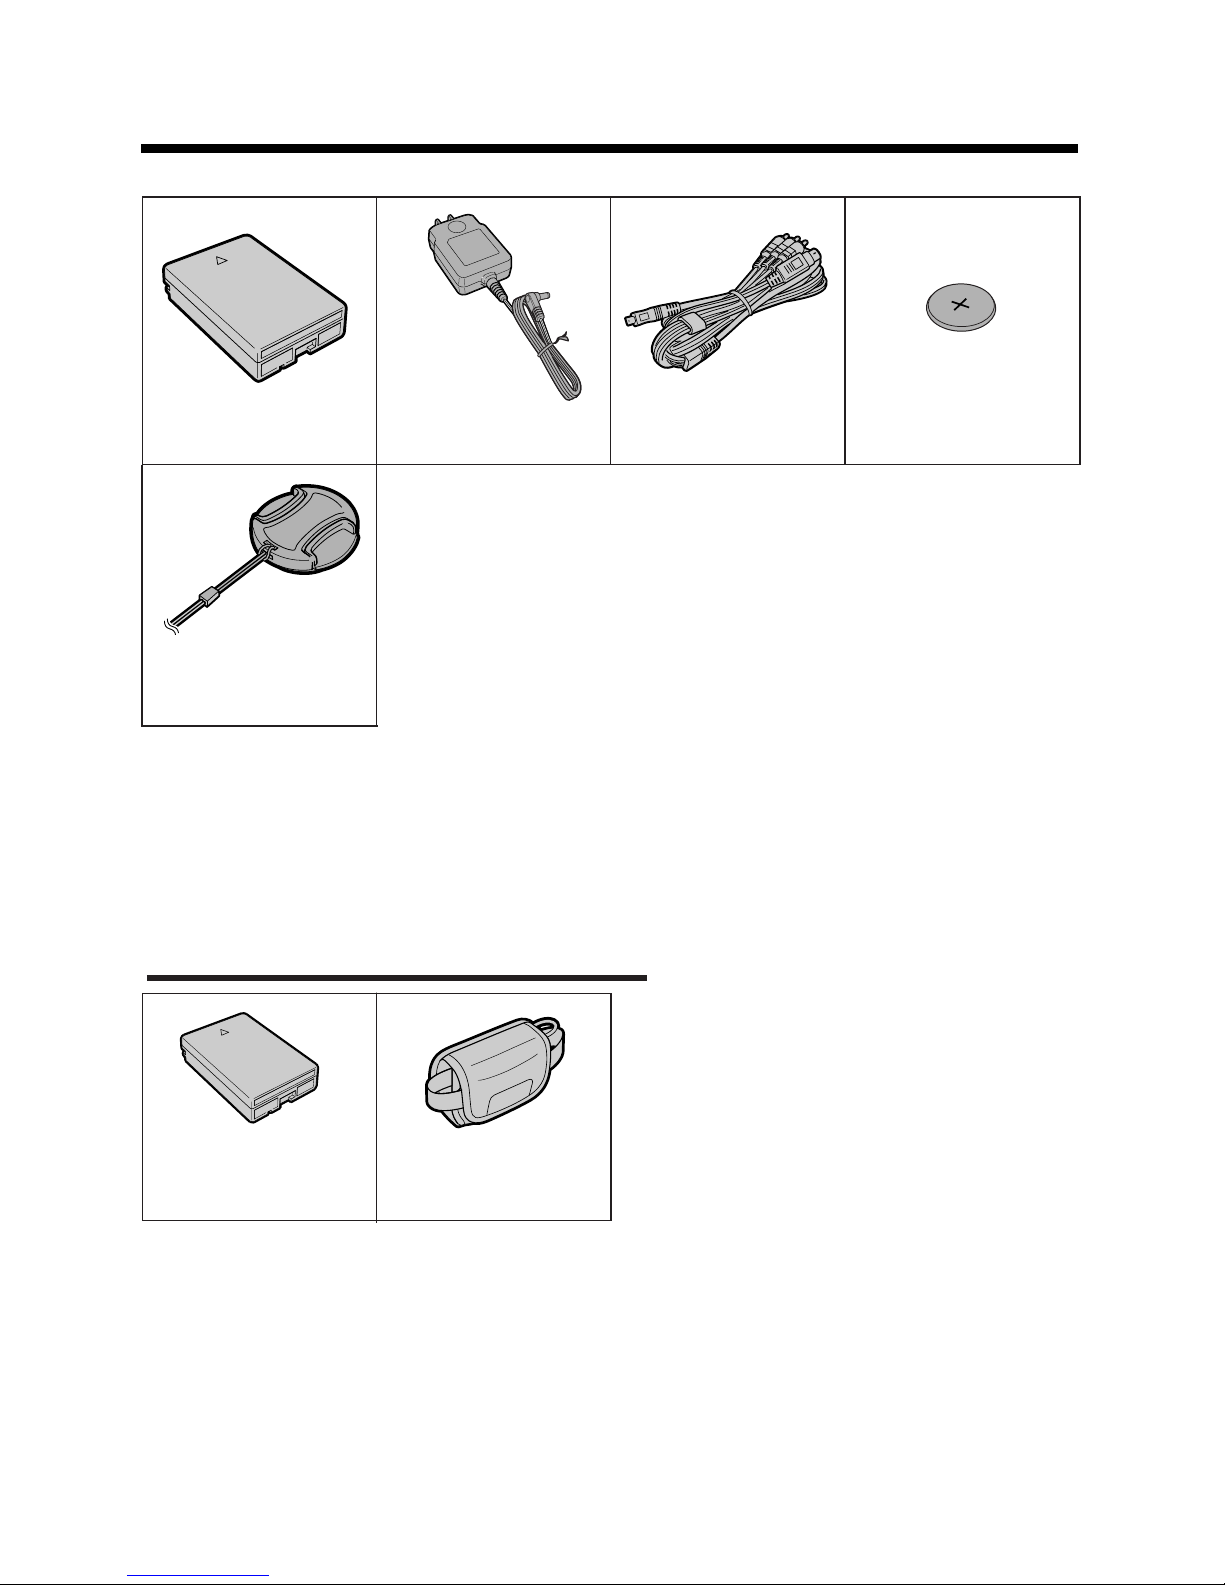
Supplied Accessories
Battery pack
BT-L226U*
AC adapter
UADP-0339TAZZ*
Audio/video/S-video
cable
QCNW-B173WJZZ
CR1216 type
lithium battery
Lens cap
GCOVHA002WJZZ
* The part numbers for the AC adapter and battery pack supplied with this camcorder are valid
only in the U.S. and Latin America. If this camcorder was purchased outside of these areas, the
part numbers may be different. Please refer to the part numbers printed on the labels of the
supplied AC adapter and battery pack.
Note:
• The listed model names are for U.S. accessories.
For optional and additional accessories, contact your local dealer, call the Sharp Accessories
and Supply Center at 1-800-642-2122, or visit SHARP’s website (http://www.sharpusa.com).
Optional Accessories
Standard-life
battery pack
BT-L226U
External battery with
hand strap
BT-LCA1U

xii
Precautions
• Before recording an important scene,
please perform the recording test, then
playback to check if the scene was recorded properly. If noise occurs, use a
commercially available cleaning tape to
clean the video heads (see page xiv).
• When the camcorder is not in use, re-
member to remove the cassette tape,
turn off the power, and disconnect the
camcorder from the power source.
• Do not aim the lens at the sun.
Do not allow direct sunlight to strike the
camcorder lens, whether or not recording
is in progress, as it may damage the CCD
sensor. Be particularly careful when recording outside.
• Avoid magnetic sources.
Using the camcorder near
strong fluorescent lights,
motors, televisions, or
other magnetic sources
may adversely affect recorded images.
• Using the camcorder near a broad-
casting station or other powerful transmission source may cause buzzing or
picture deterioration.
• Avoid shocks and dropping.
Do not drop or otherwise subject the camcorder to hard
shocks or strong vibrations.
Bumping or striking the unit
during recording will generate noise in the recorded image.
• Avoid placing the
camcorder in close
proximity to lighting
equipment.
The heat from incandescent lights
may deform the
camcorder, or
cause it to malfunction.
• Always respect prohibitions or restric-
tions on the use of electronic equipment
on commercial flights or in other sensitive areas.
• Be aware of the temperature and humid-
ity.
You can use your camcorder at 32°F to
104°F (0°C to L40°C), and at 30% to 80%
relative humidity. Do not store the unit in an
unventilated car in the summer, in direct
sunlight, or near
strong heat
sources; this can
result in severe
damage to the unit
casing and circuitry.
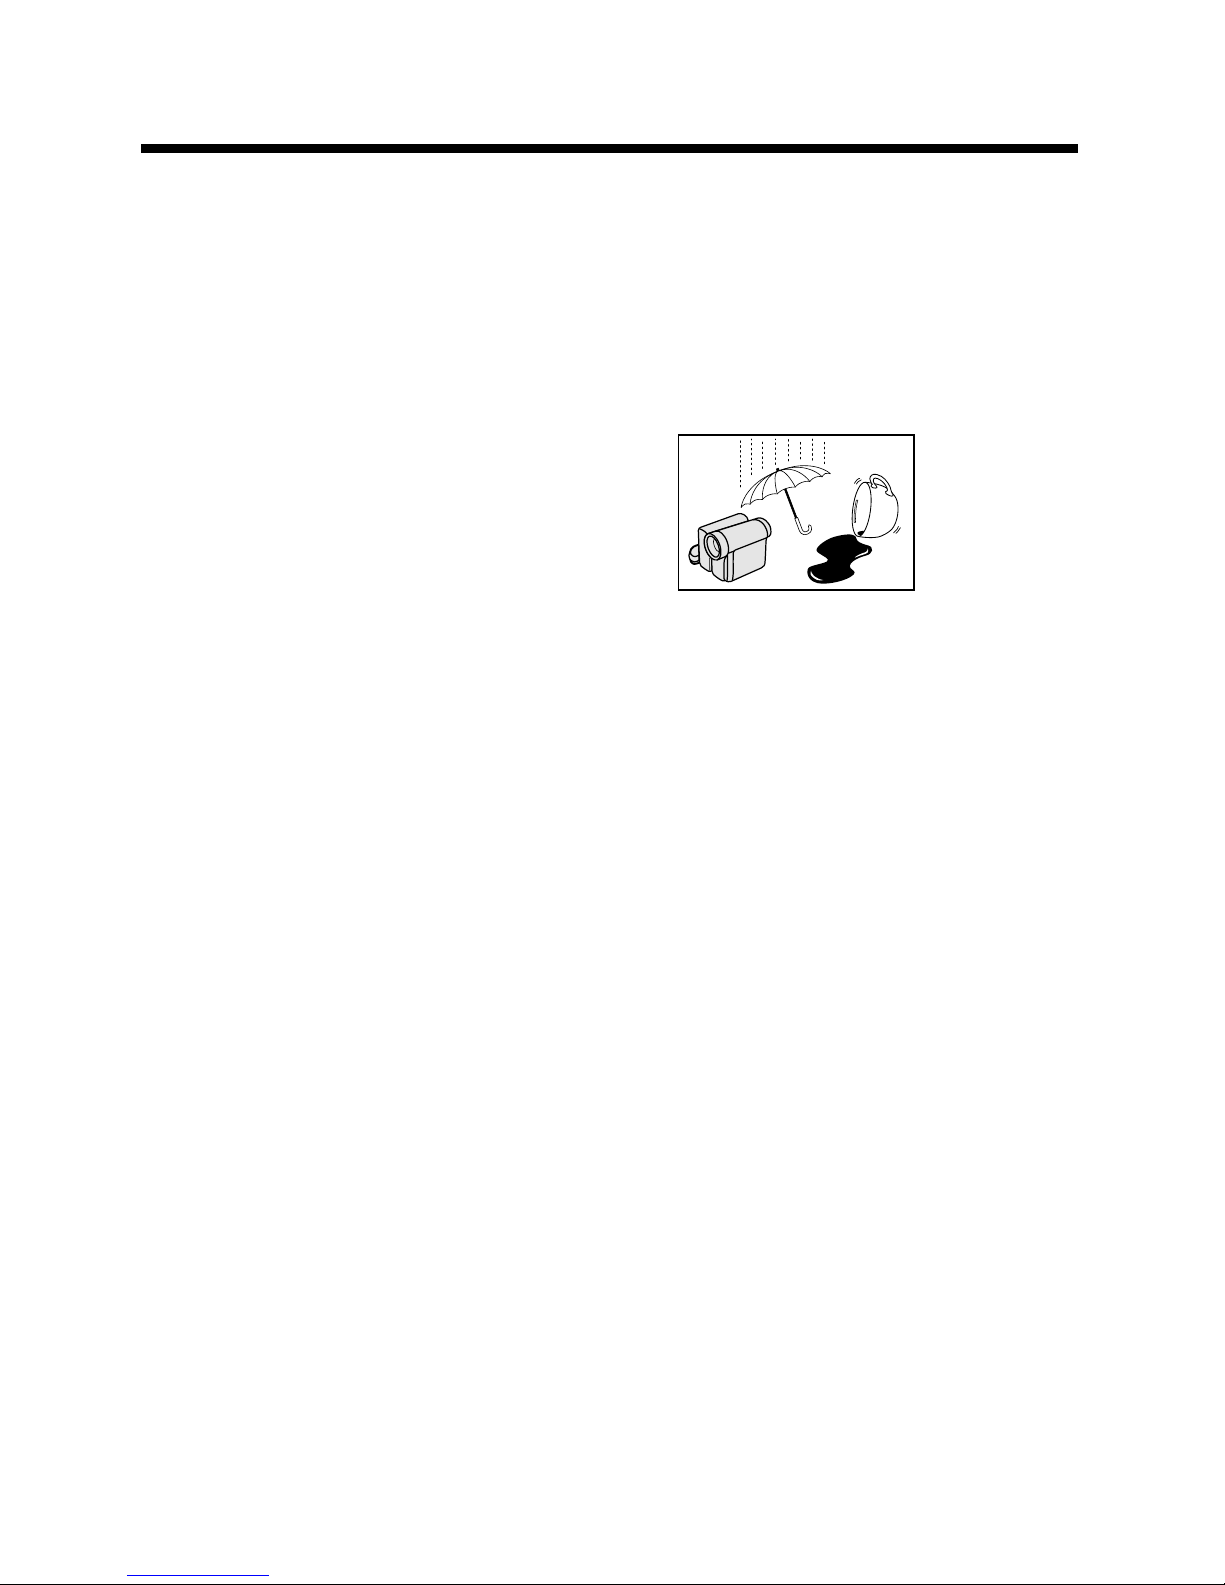
• Avoid situations where water, sand, dust
or other foreign matter could get on or
inside the camcorder, and do not use or
leave your camcorder in areas with excessive smoke, steam or moisture.
Such environments can cause malfunctions or cause mildew to form on the
lenses. Be sure to
keep the unit in a
well-ventilated location.
• Some small, portable tri-
pods may be difficult to
attach and may not be
sturdy enough to support your camcorder. Be
sure to use only a
strong, stable tripod.
• When using your camcorder in a cold
environment, the LCD monitor screen often appears less bright immediately after the power is turned on. This is not a
malfunction. To prevent the camcorder
from becoming too cold, wrap it in a
thick cloth (a blanket, etc.).

xiii
Dew Formation
• What is “dew formation”?
When cold water is poured into a glass,
dew drops form on the glass. This clinging
of water drops is called dew formation.
• When dew forms in your camcorder.
Dew will gradually form on the head drum
of your camcorder and make the video
tape stick to the head. This causes
damage both to the head and the tape.
When dew forms, recording and playback
may not function properly.
Dew is likely to form in the following
circumstances:
—When moving the camcorder from a
cold place to a warm place.
—When placing the camcorder in a cold
room which is then heated rapidly.
—When moving the camcorder outdoors
from an air conditioned room or car.
—When placing the camcorder in the
direct path of air
blowing from an air
conditioner.
—When placing the
camcorder in a
humid room.
• How to prevent trouble.
When using the camcorder in a place
where dew is likely to form, allow the
camcorder and the video tape to
acclimate to the surroundings for about
one hour.
For example, when bringing the
camcorder indoors after skiing, place it in
a plastic bag.
1 Be sure to tightly seal the plastic bag
containing the camcorder.
2 Remove the bag when the air tem-
perature inside it reaches the temperature of the room.
• “Dew” warning feature
If dew forms, the word “DEW” flashes on
the screen, and the power will automatically turn off in approximately 10 seconds.
Plastic bag
1 If “DEW” flashes, remove the cassette,
leave the cassette compartment open,
and wait for a few hours to allow the
camcorder to acclimate to the
surrounding temperature.
2 To use the camcorder again, turn on the
power after waiting for a few hours. Be
sure that “DEW” has disappeared.
3 Do not insert a cassette while “DEW” is
flashing; this may result in damage to
the tape.
4 Since dew forms gradually, it may take
10 to 15 minutes before the dew
warning feature engages.
xiv
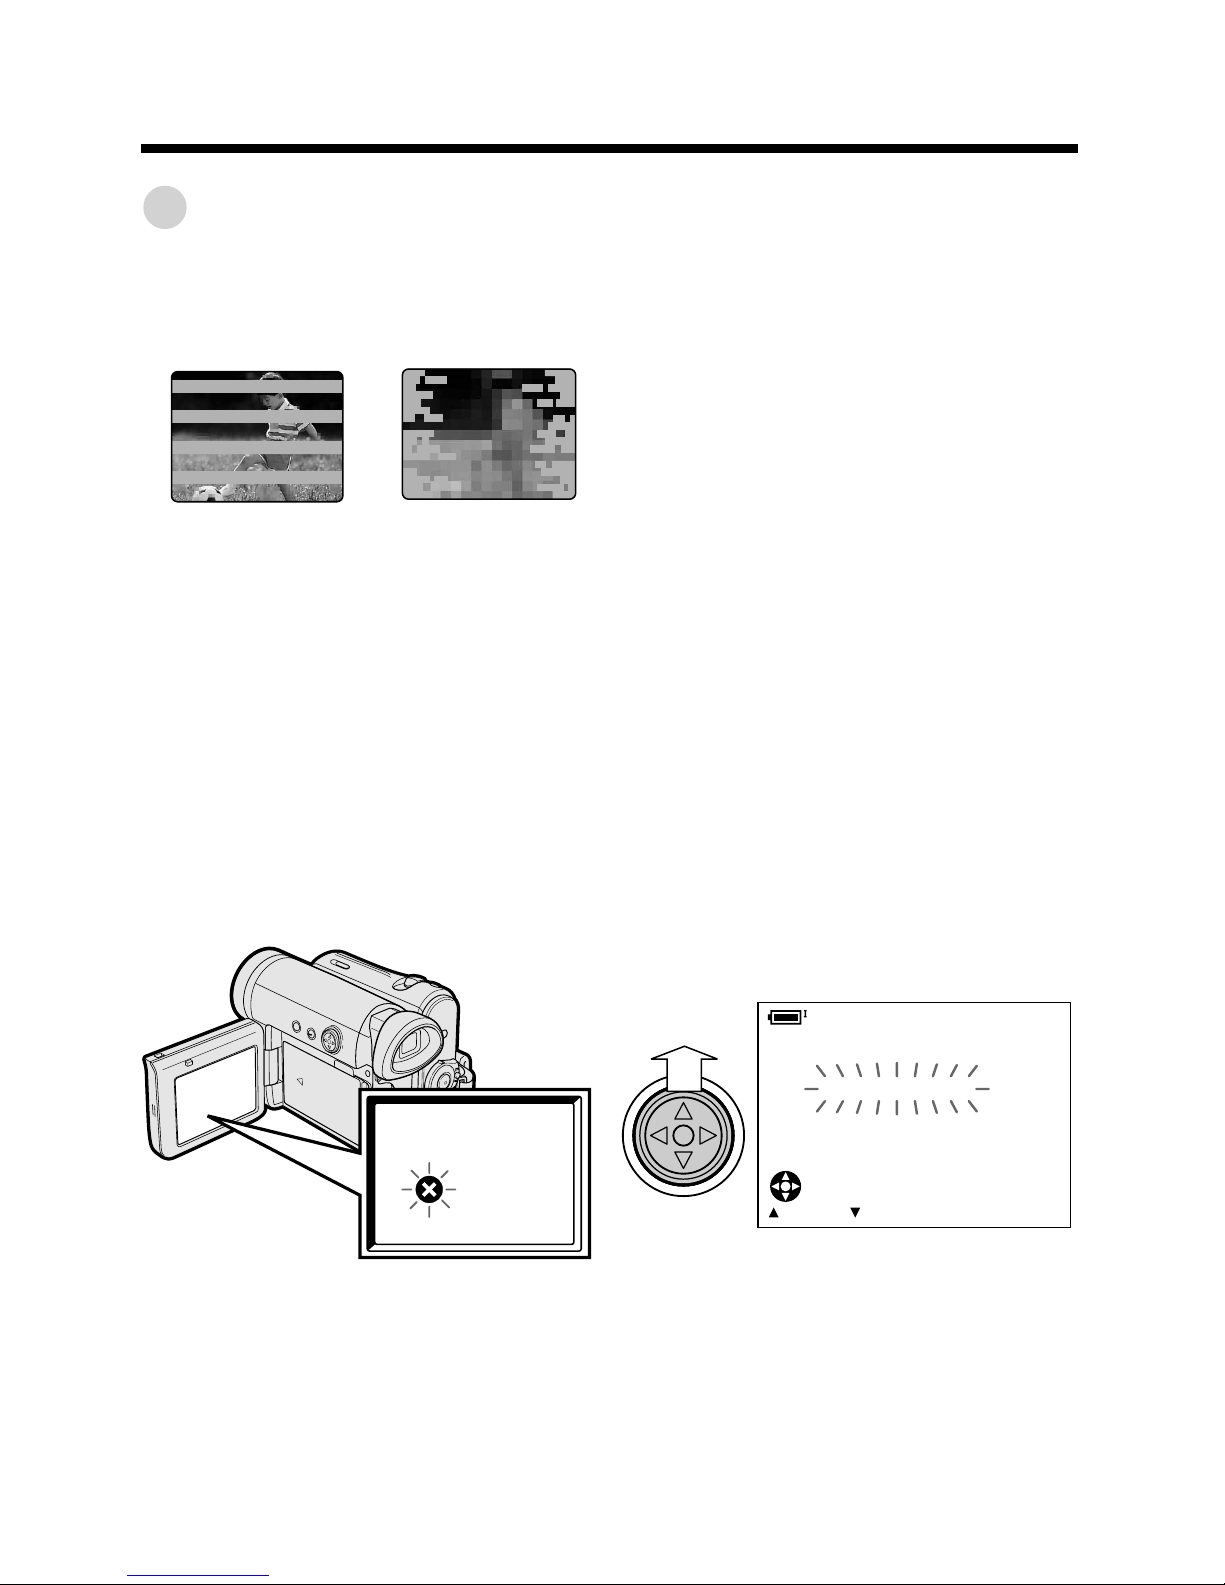
Dirty Video Heads
When the video heads have become
clogged with dirt (dust and tape coating
particles),
• mosaic-like noise appears on the
playback picture. (see illustrations above)
• playback pictures do not move.
• during playback, the whole screen
becomes blue.
Using a Cleaning Tape (Commercially Available)
You can clean the video head with a
commercially available cleaning tape.
Notes:
• Excessive use of the cleaning tape may
cause damage to the video heads. Please
read the instructions accompanying the
cleaning tape carefully before using it.
• The fast forward and rewind functions cannot
be used when the cleaning tape is in the
camcorder.
• If the video heads again become clogged
with dirt soon after cleaning, this might be
caused by a damaged tape. In this case,
stop using that cassette immediately.
1 Insert a cleaning tape into the
camcorder.
2 Hold down the Lock button and set
the Power switch to w.
• The video head cleaning screen
appears.
3 Press m on the Operation button to
begin video head cleaning.
•“NOW CLEANING” flashes during
cleaning.
• After about 20 seconds, video head
cleaning automatically finishes, and
“EJECT THE CASSETTE.” displays.
4 Remove the cleaning tape.
To cancel cleaning, press l.
Causes of video head clogging
• High-temperature and high-humidity
environment
• A lot of dust in the air
• Damaged tape
• Worn tape
• Long-time use
• Dew formation
If the video heads become clogged, the
v indicator appears on the screen. Contact
the nearest SHARP service center or your
dealer for further advice.
Precautions
STOPSTART
CLEANI NG
CLEANINGNOW
Striped noise
Mosaic noise
1
Operation References
Operation References
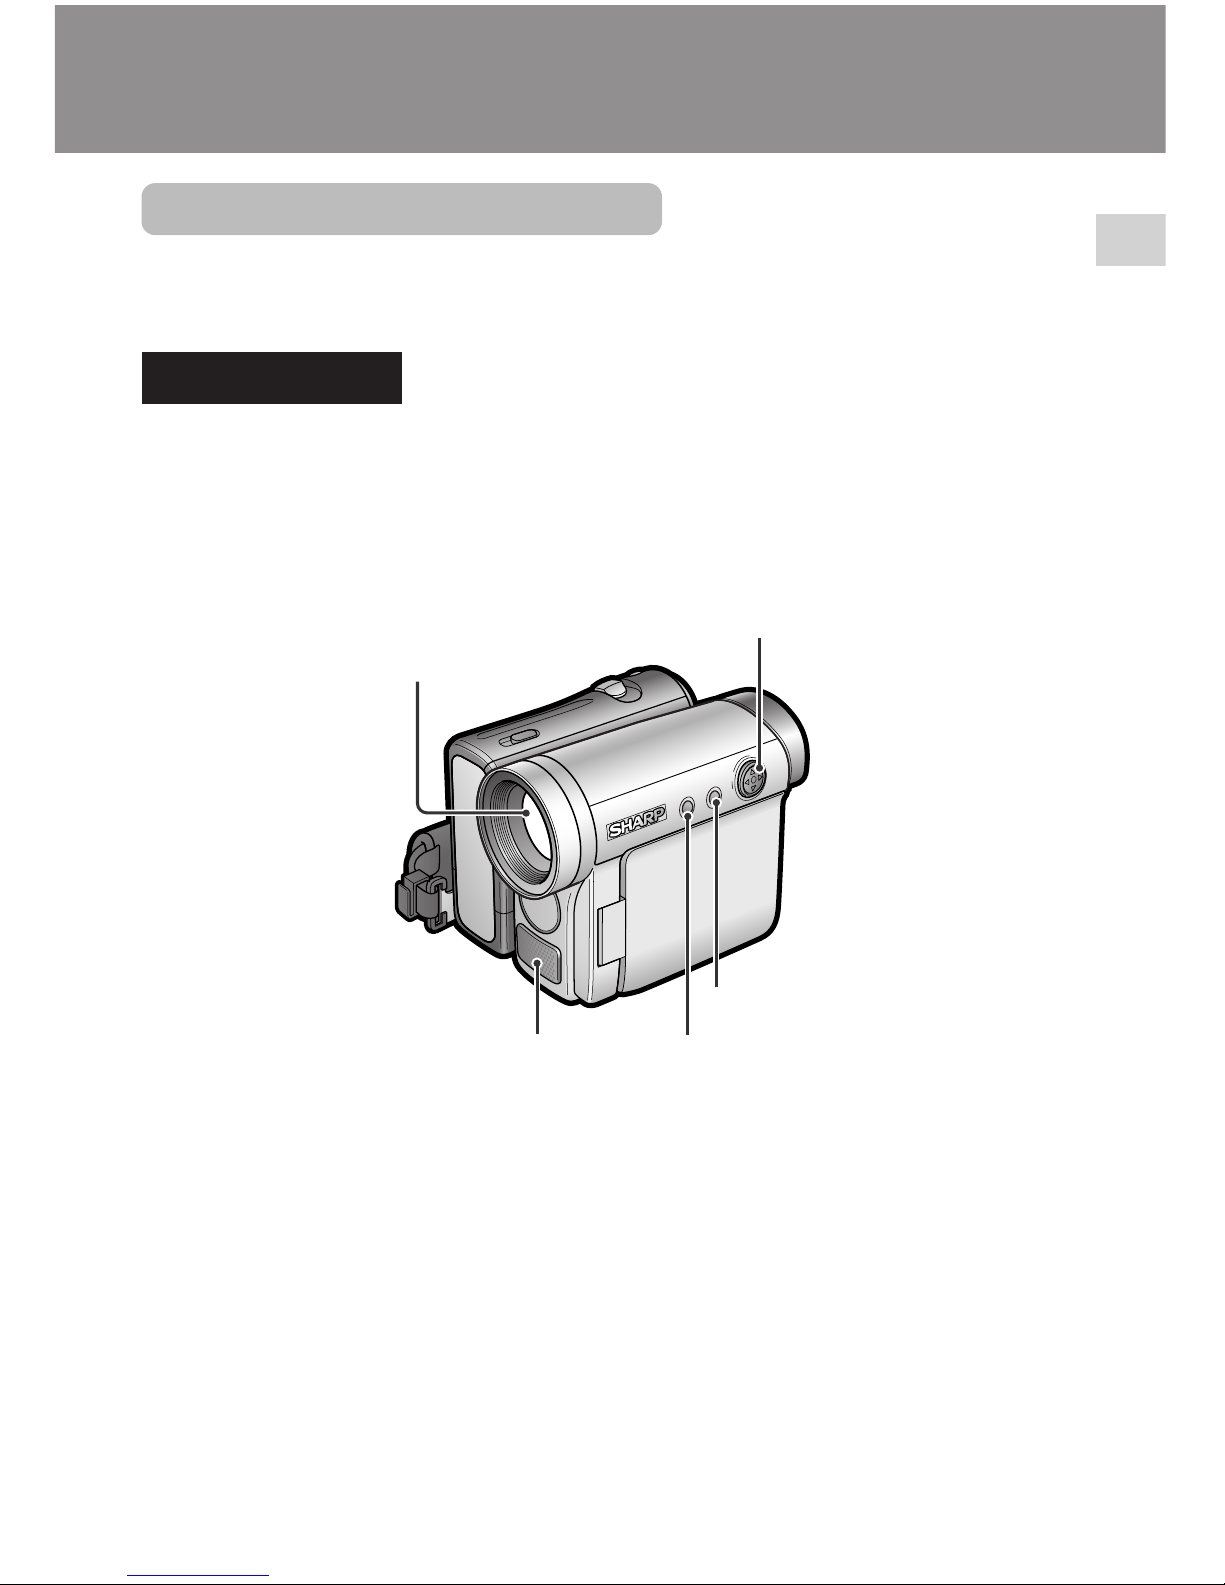
Part Names
For details on the use of each part, refer to the page number indicated in
parentheses.
Front view
Zoom lens
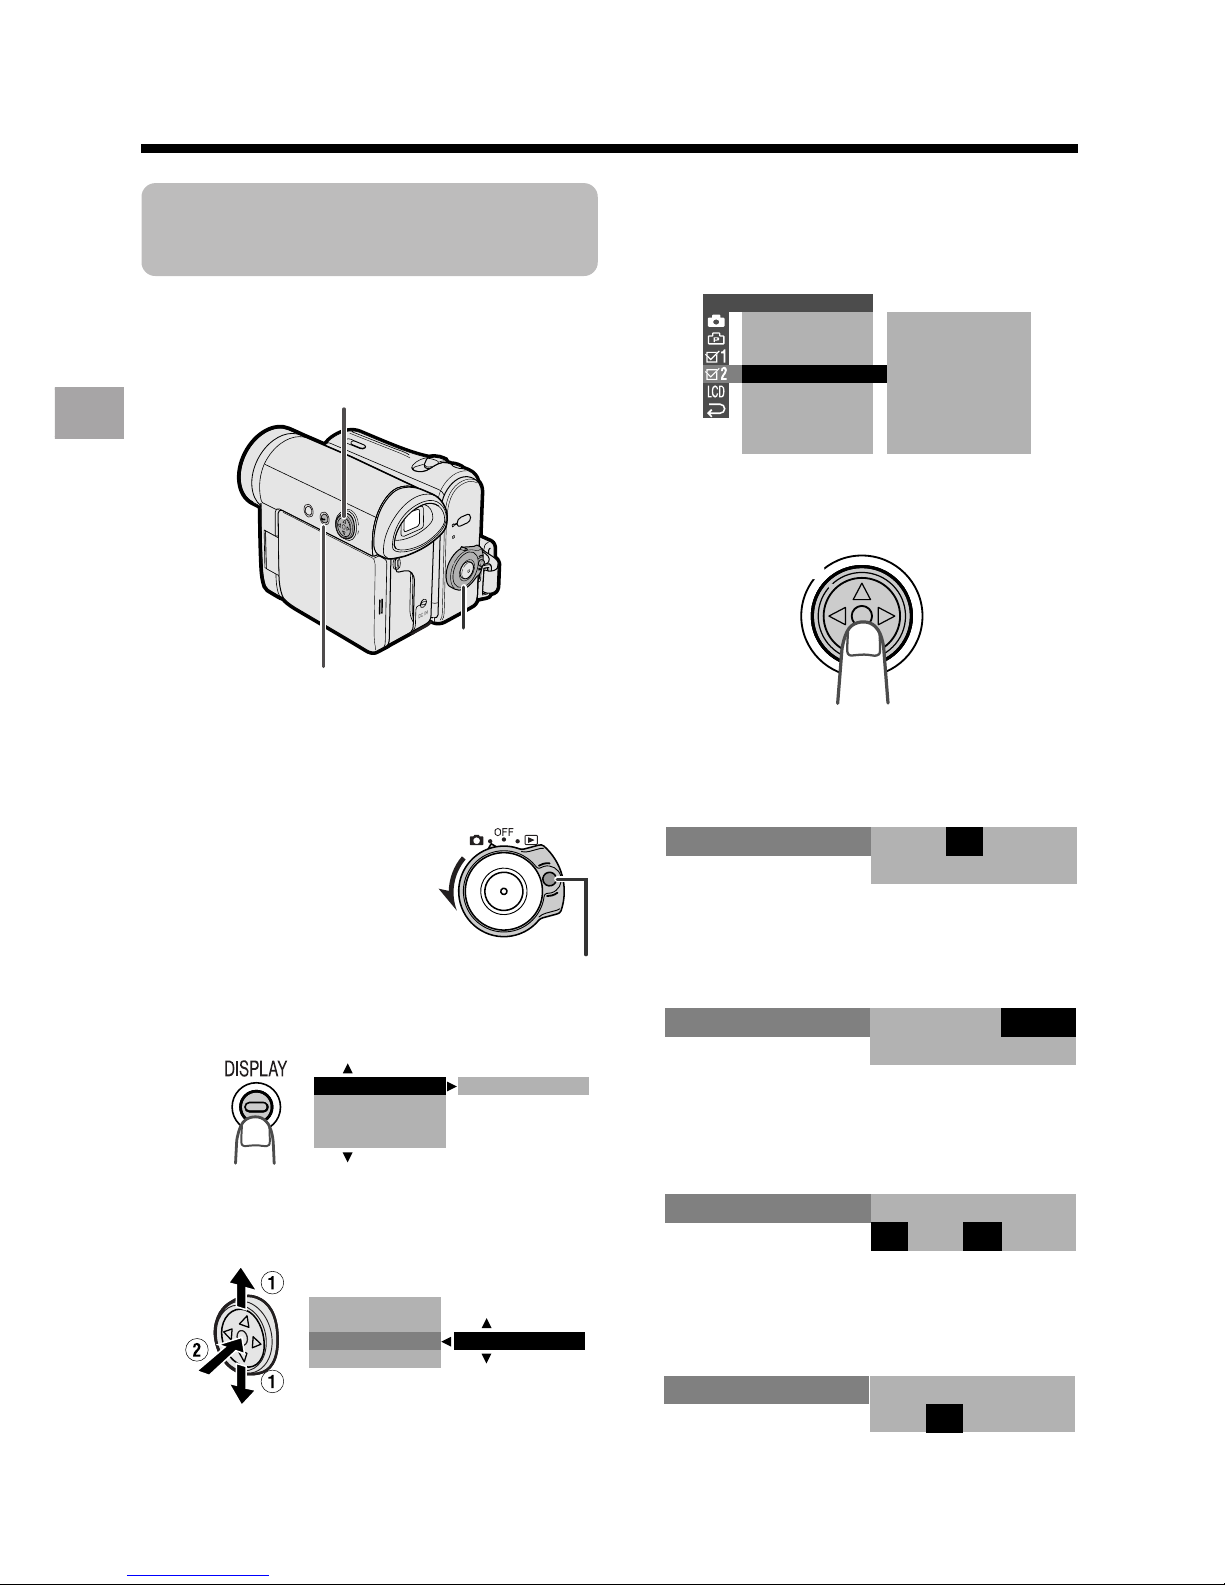
DISPLAY button (p. 27)
Operation button (p. 27)
Monaural microphone
LCD LAMP button (p. 21)
2
Operation References
Operation References
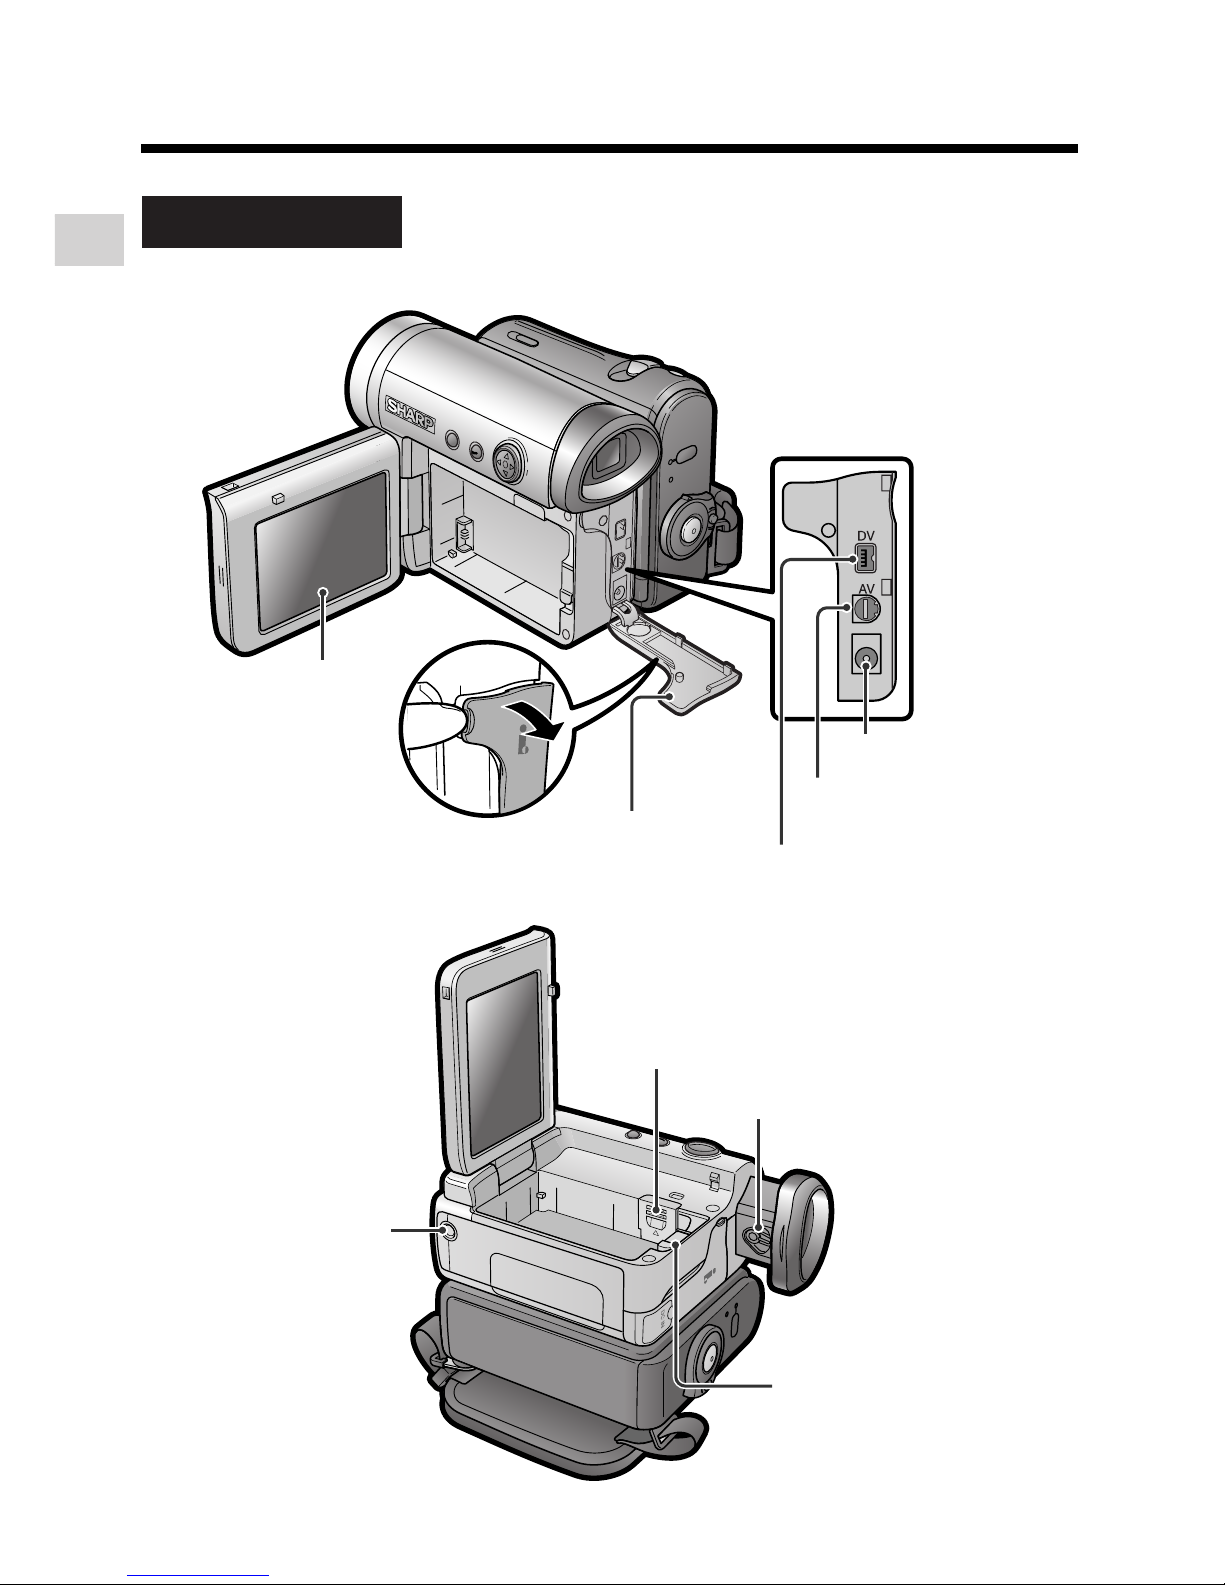
Lithium battery cover (p. 10)
Tripod socket*
Left view
Diopter adjustment dial (p. 16)
Battery release (pp. 6, 10)
* When attaching a tripod
with a guide pin, do not
attach the pin to the bottom
of the camcorder.
LCD monitor
(p. 17)
DV terminal (p. 56)
DC IN jack (pp. 7, 8)
AV terminal
(pp. 26, 55)
Terminal cover
(pp. 26, 55, 56)
3
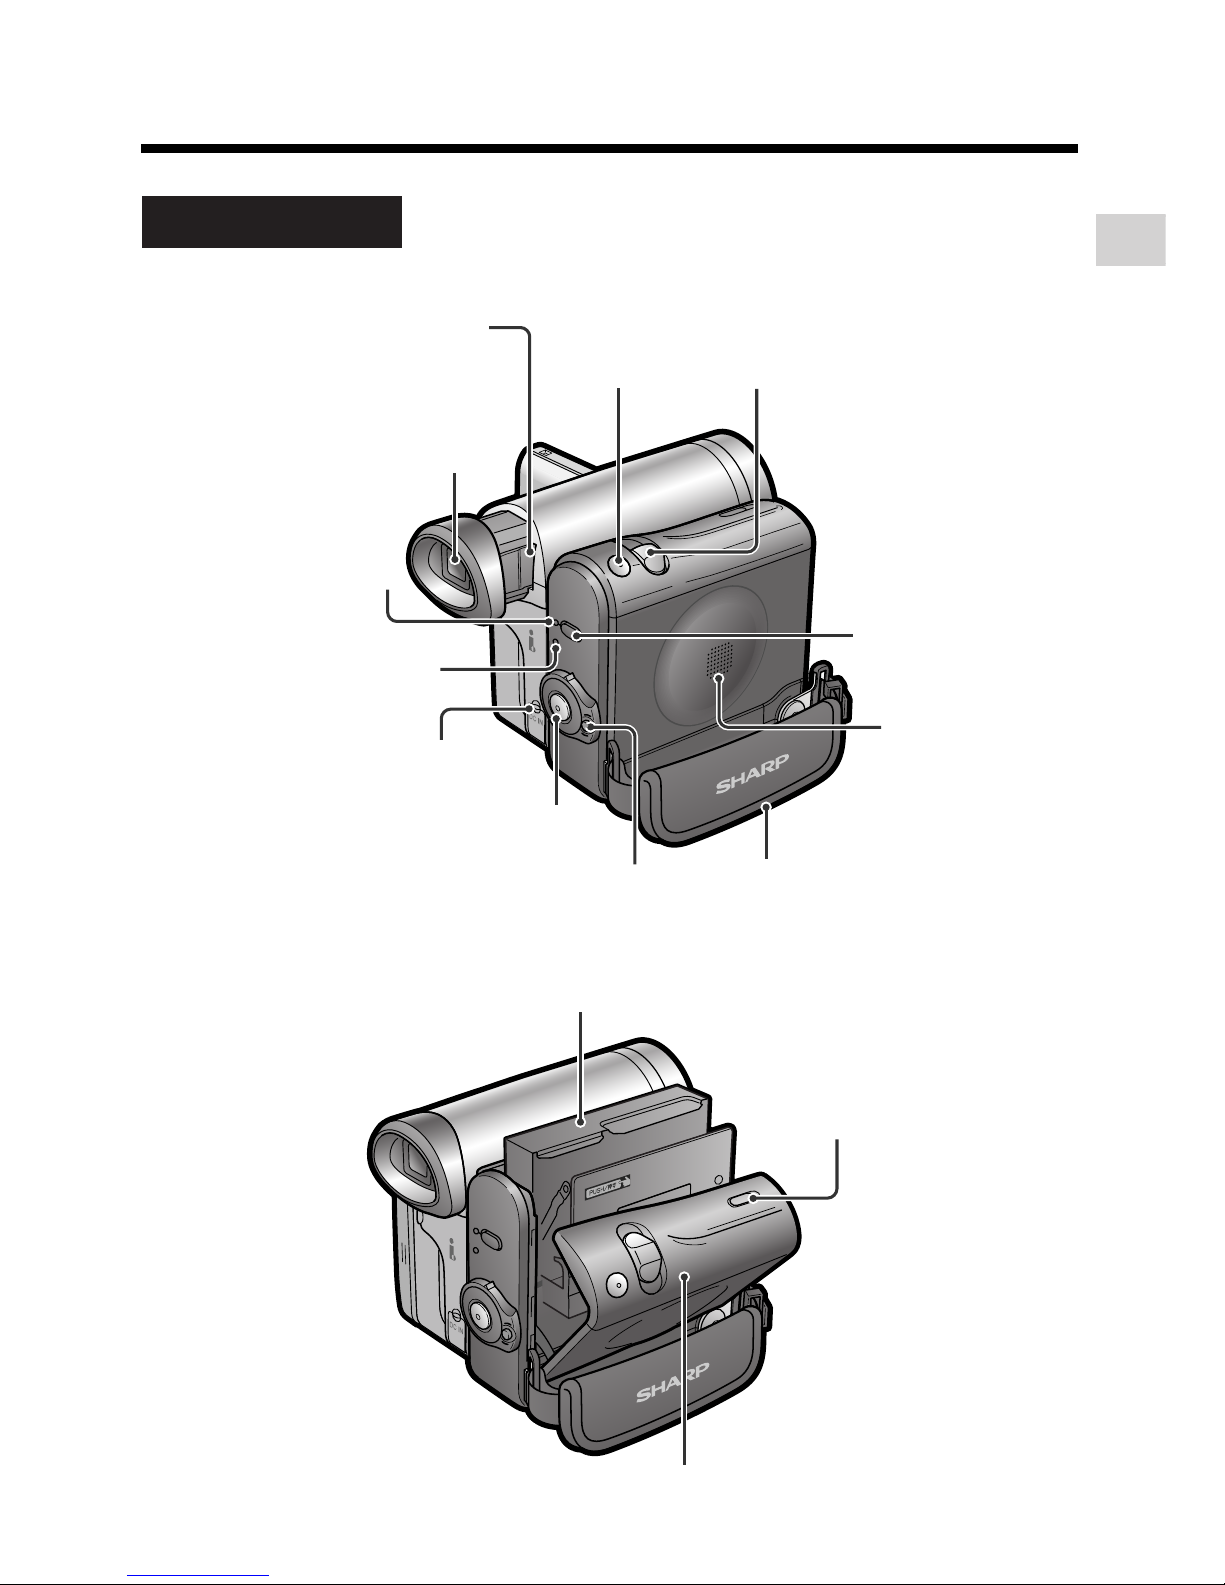
Operation References
Viewfinder (pp. 15, 16)
Power Zoom Wide angle/
Telephoto control (p. 20)/
VOLume control (p. 25)
Start/Stop button
(p. 19)
PHOTO button
(p. 34)
Power switch (v Camera
Recording mode/w Playback
mode select switch) (pp. 19, 24)
STANDBY button
(p. 21)
STANDBY indicator
(p. 21)
POWER/CHARGE
(RED) indicator
(pp. 7, 8, 19)
DC IN jack cover
(pp. 7, 8)
Cassette holder (p. 9)
Cassette compartment
door release (p. 9)
Cassette compartment door (p. 9)
Right view
Hand strap (p. 14)
Speaker
Window cleaning cover
(p. 68)
4
Operation References
Operation References
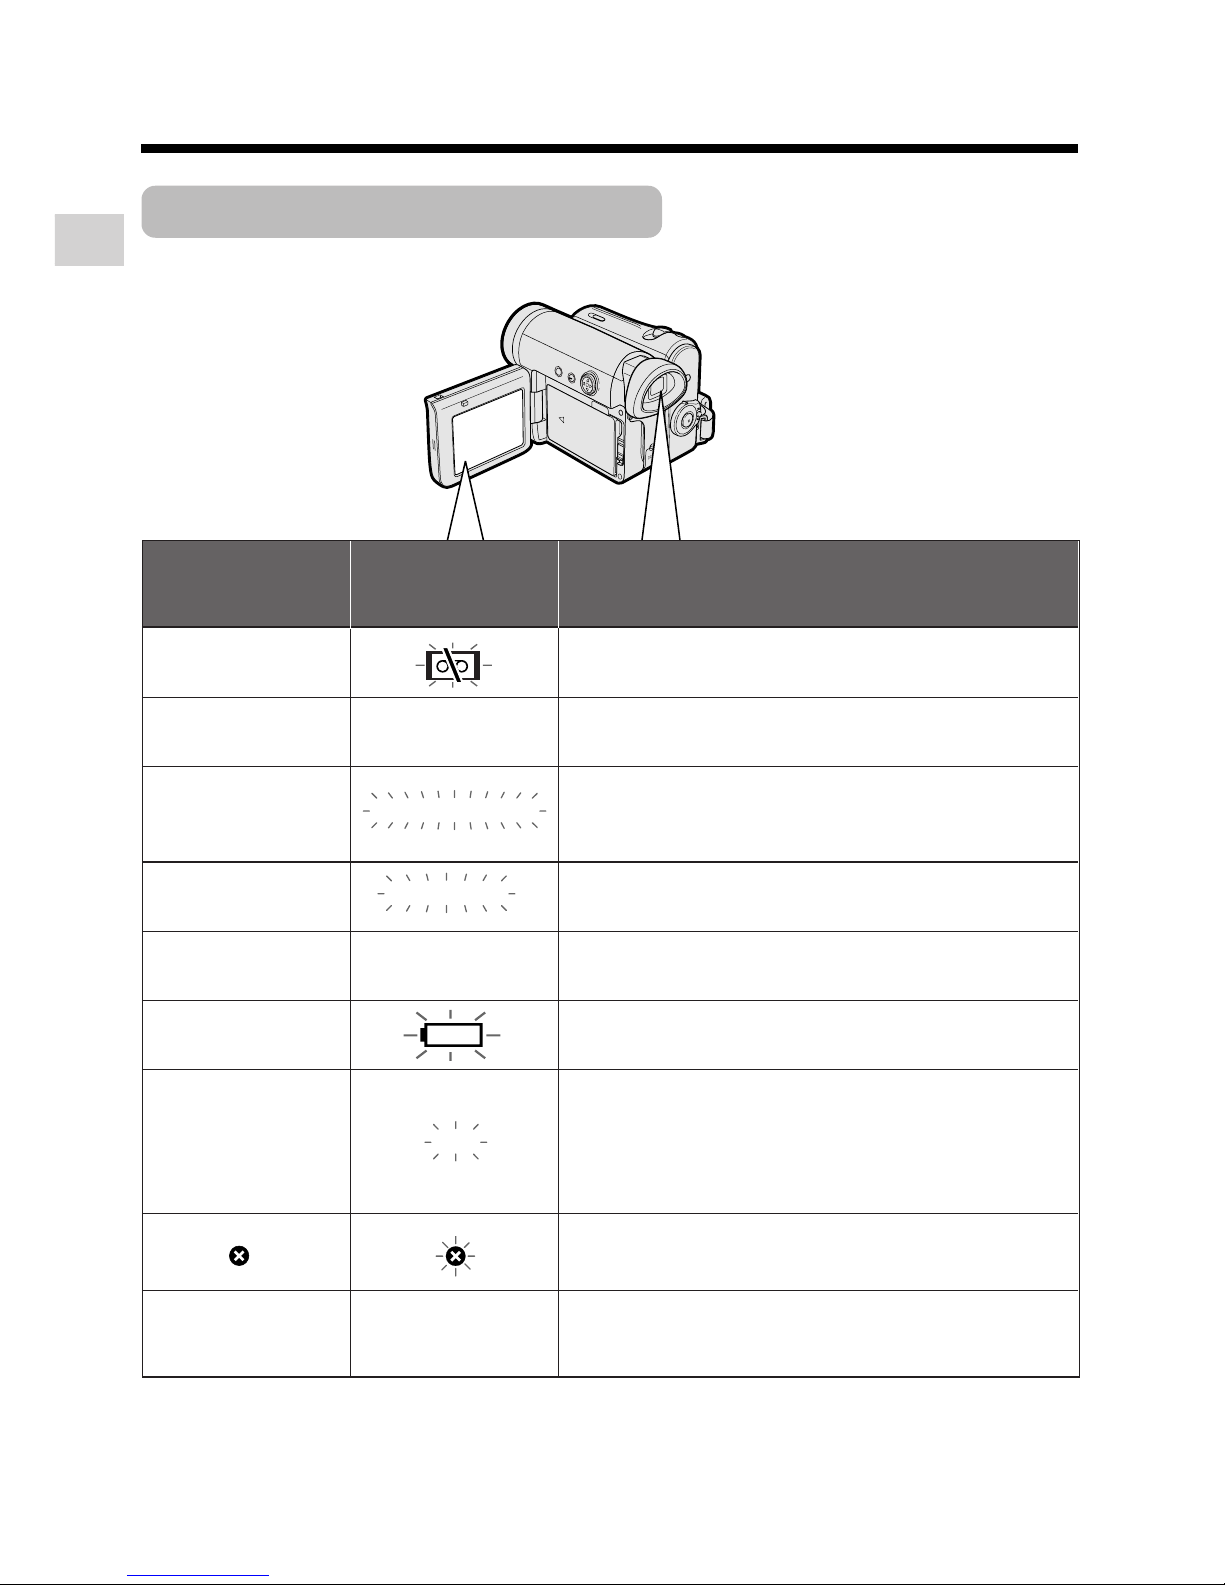
Warning Indicators
If a warning indicator appears on the screen, follow the specified instructions.
Displayed for the
first 3 seconds
Displayed after
3 seconds
Description of warning
There is no video cassette in the camcorder.
Insert a cassette (see page 9).
INSERT
A CASSETTE.
BATTERY I S
TOO LOW.
PROTECT. TAB
CHANGE THE
CASSETTE.
EJECT THE
CASSETTE.
EJECT THE
CASSETTE.
CASSETTE NOT
RECORDABLE.
The video cassette is defective and should be
removed (see page 9).
The erasure protect tab on the video cassette
has been slid to the record-protect position,
preventing recording (see page 66).
The tape is about to end. Prepare a new
cassette.
THE
ENDS SOON.
TAPE
DEW
LAMP
LAMP
DEW
The tape has reached the end. Replace it with a
new cassette (see page 9).
The battery is almost depleted. Replace it with
a fully charged battery pack (see pages 5, 6).
Dew has formed inside the camcorder. Wait a
few hours for the dew to dry away (see page
xiii).
About 10 seconds after this warning appears,
the camcorder automatically turns off.
The video heads are clogged and should be
cleaned (see page xiv).
The fluorescent lamp behind the LCD monitor is
close to the end of its service life. Call your local
authorized Sharp dealer to have it replaced.
TAPE END
TAPE END
Note:
• N indicates a flashing display.
5
Preparation
Preparation
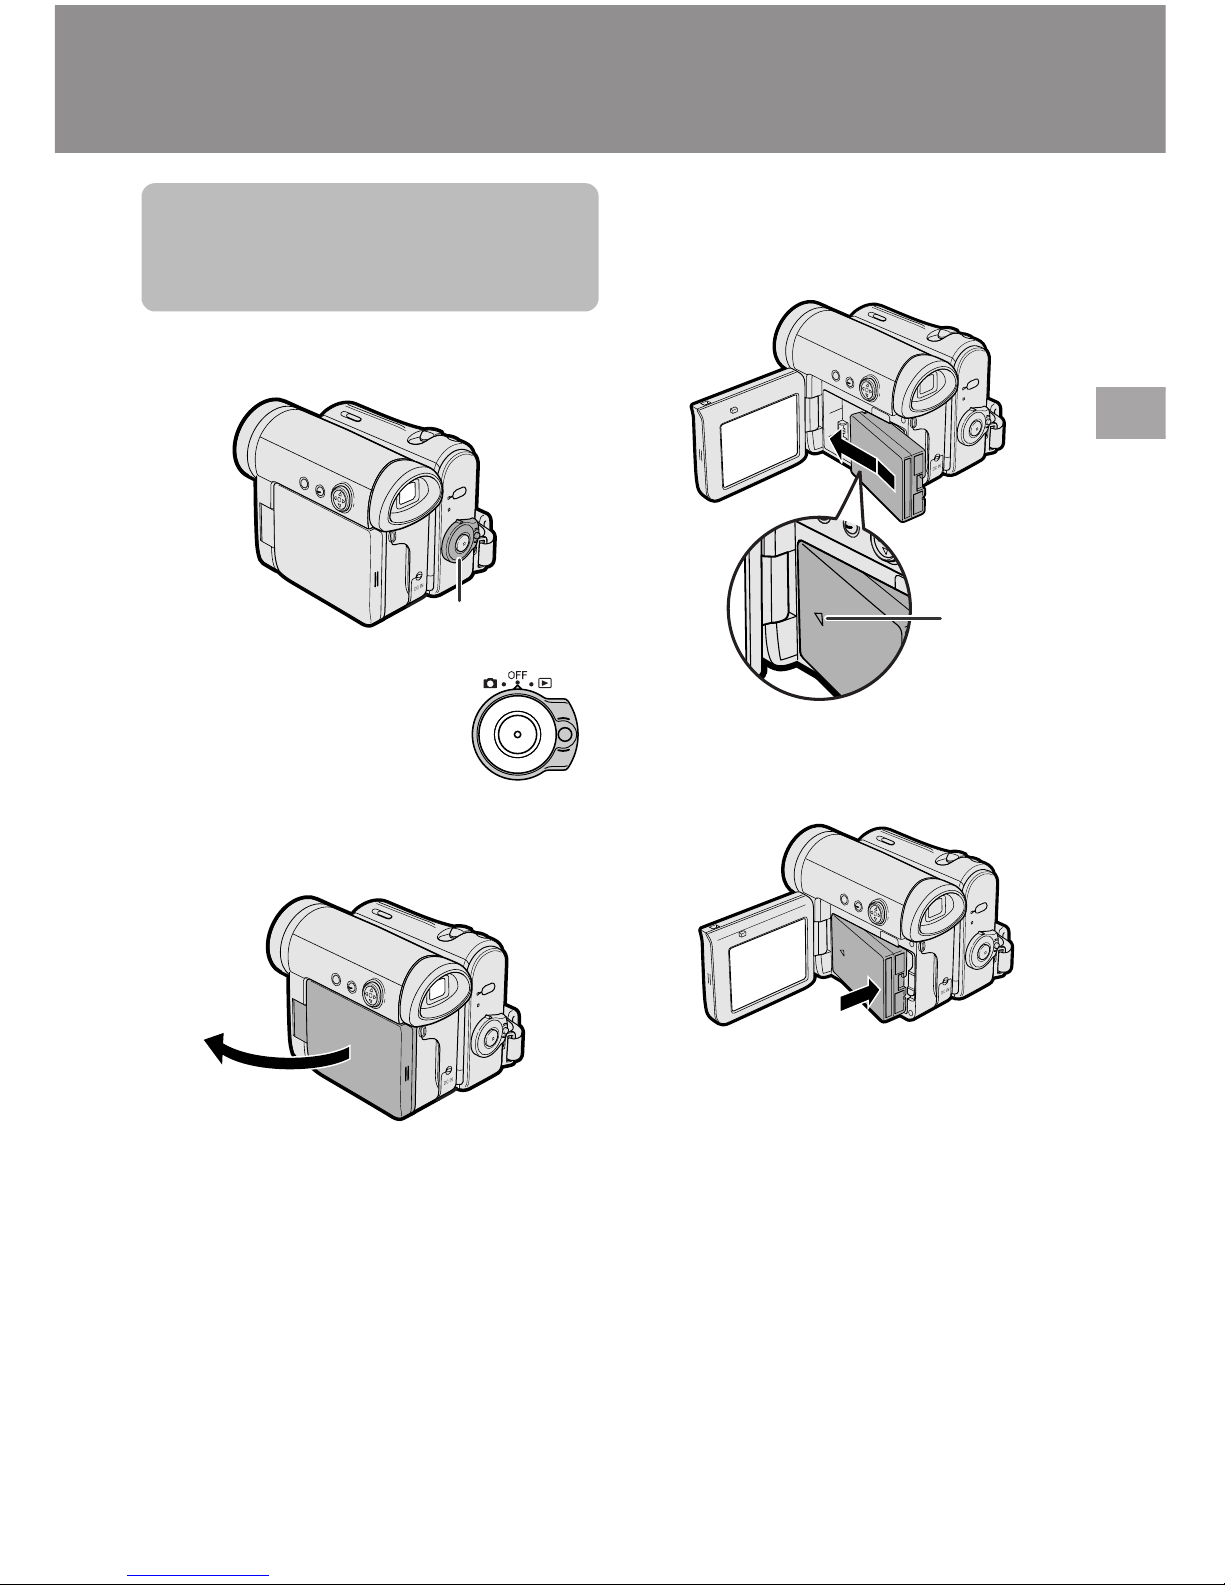
Attaching and
Removing the Battery
Pack
Attaching
1 Make sure that the Power
switch is set to OFF.
2 Open the LCD monitor to a 90° angle
to the camcorder body.
3 Slide the battery pack in the direction
of the arrow with the “m” mark facing
out.
4 Push the battery pack in the direction
of the arrow until it clicks.
90˚
Power switch
“m” mark
6
Preparation
Preparation
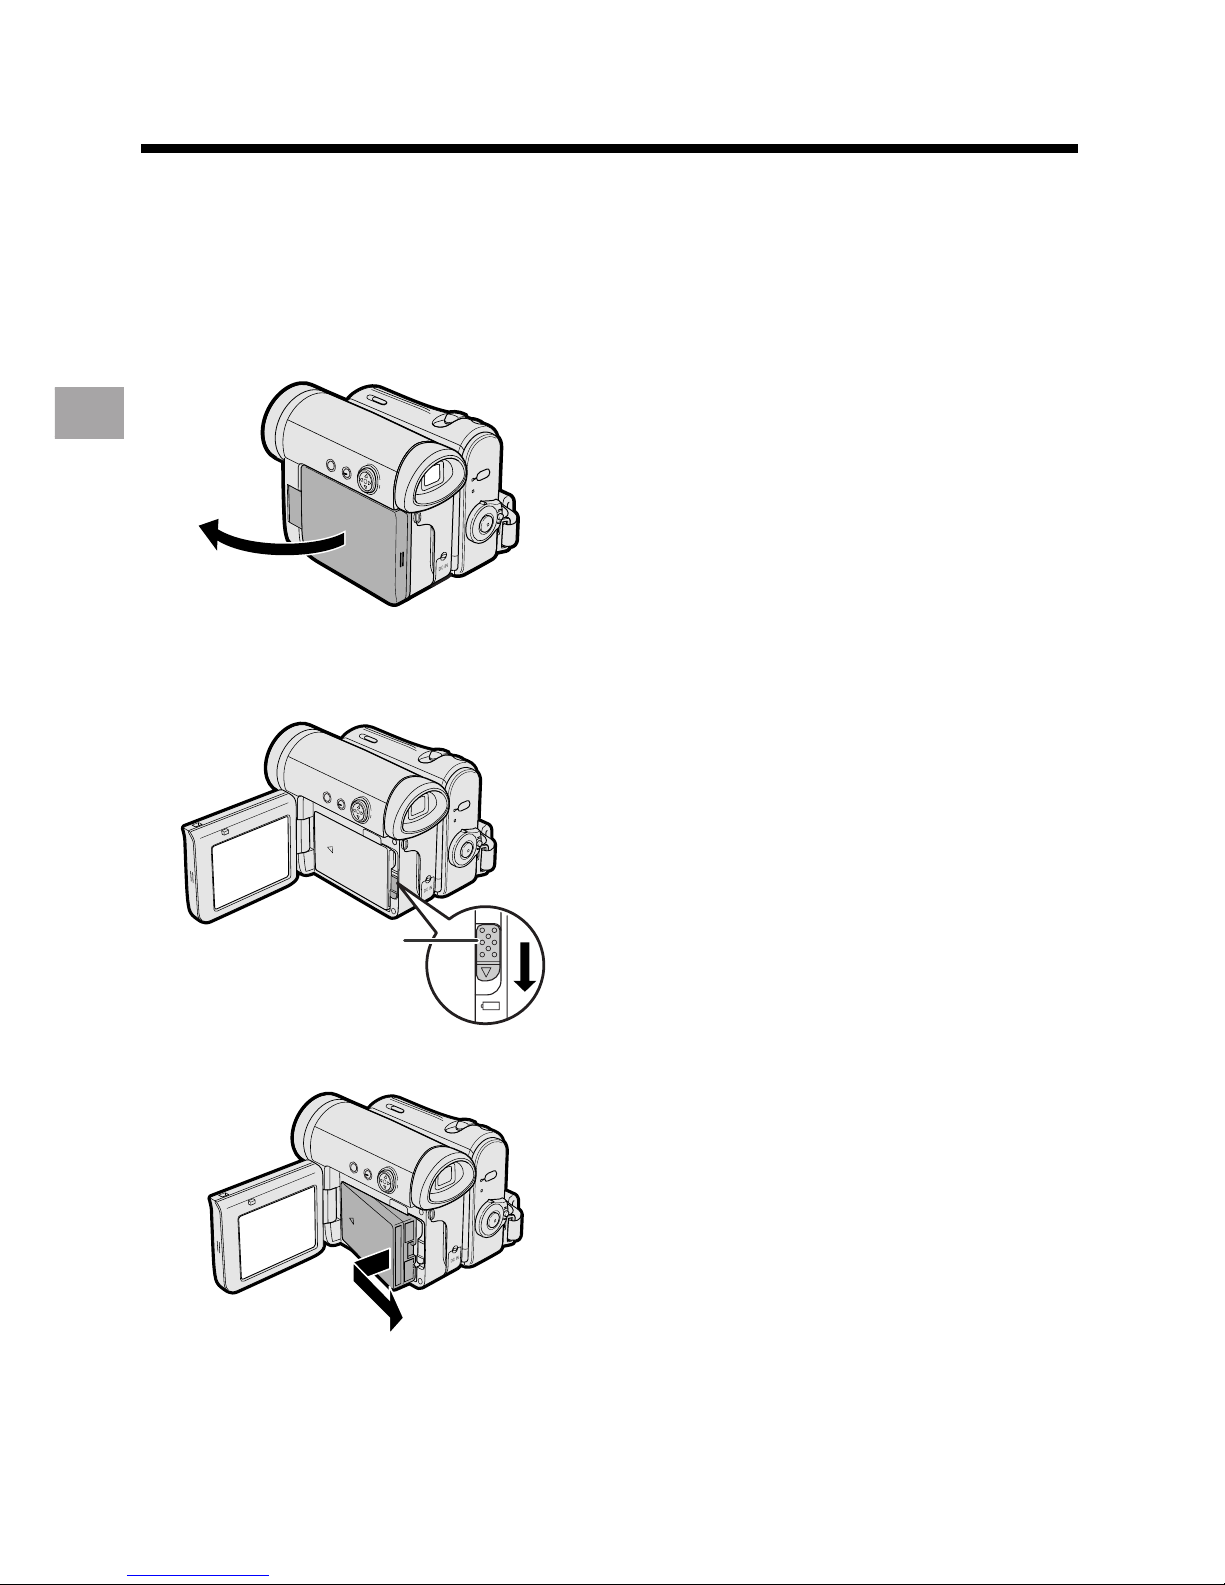
Removing
1 Make sure that the Power switch is
set to OFF, then open the LCD
monitor to a 90° angle to the
camcorder body.
90˚
2 Slide the battery release in the
direction of the arrow.
3 Take the battery pack out.
Notes:
• BEFORE REMOVING THE BATTERY PACK,
ALWAYS STOP RECORDING OR PLAYBACK AND TURN THE POWER OFF.
Removing the battery pack while shooting or
during playback may damage the tape by
causing it to wrap around the video head
drum.
• Remove the battery pack from the camcorder
if you will not use the camcorder for a long
period of time.
• Make sure that the battery pack is firmly
attached during operation. If it is not, the
battery pack may come off or camcorder
operation may fail because of the poor
contact pressure.
• To prevent damage to the battery pack when
removing, be sure to firmly hold the battery
pack while pressing the release.
• Use only SHARP model BT-L226 battery
packs with this camcorder. Use of other
batteries may create a risk of fire or
explosion.
• Before closing the LCD monitor, make sure
the battery pack is properly attached to the
camcorder, otherwise the monitor may be
damaged.
Battery release
7
Preparation
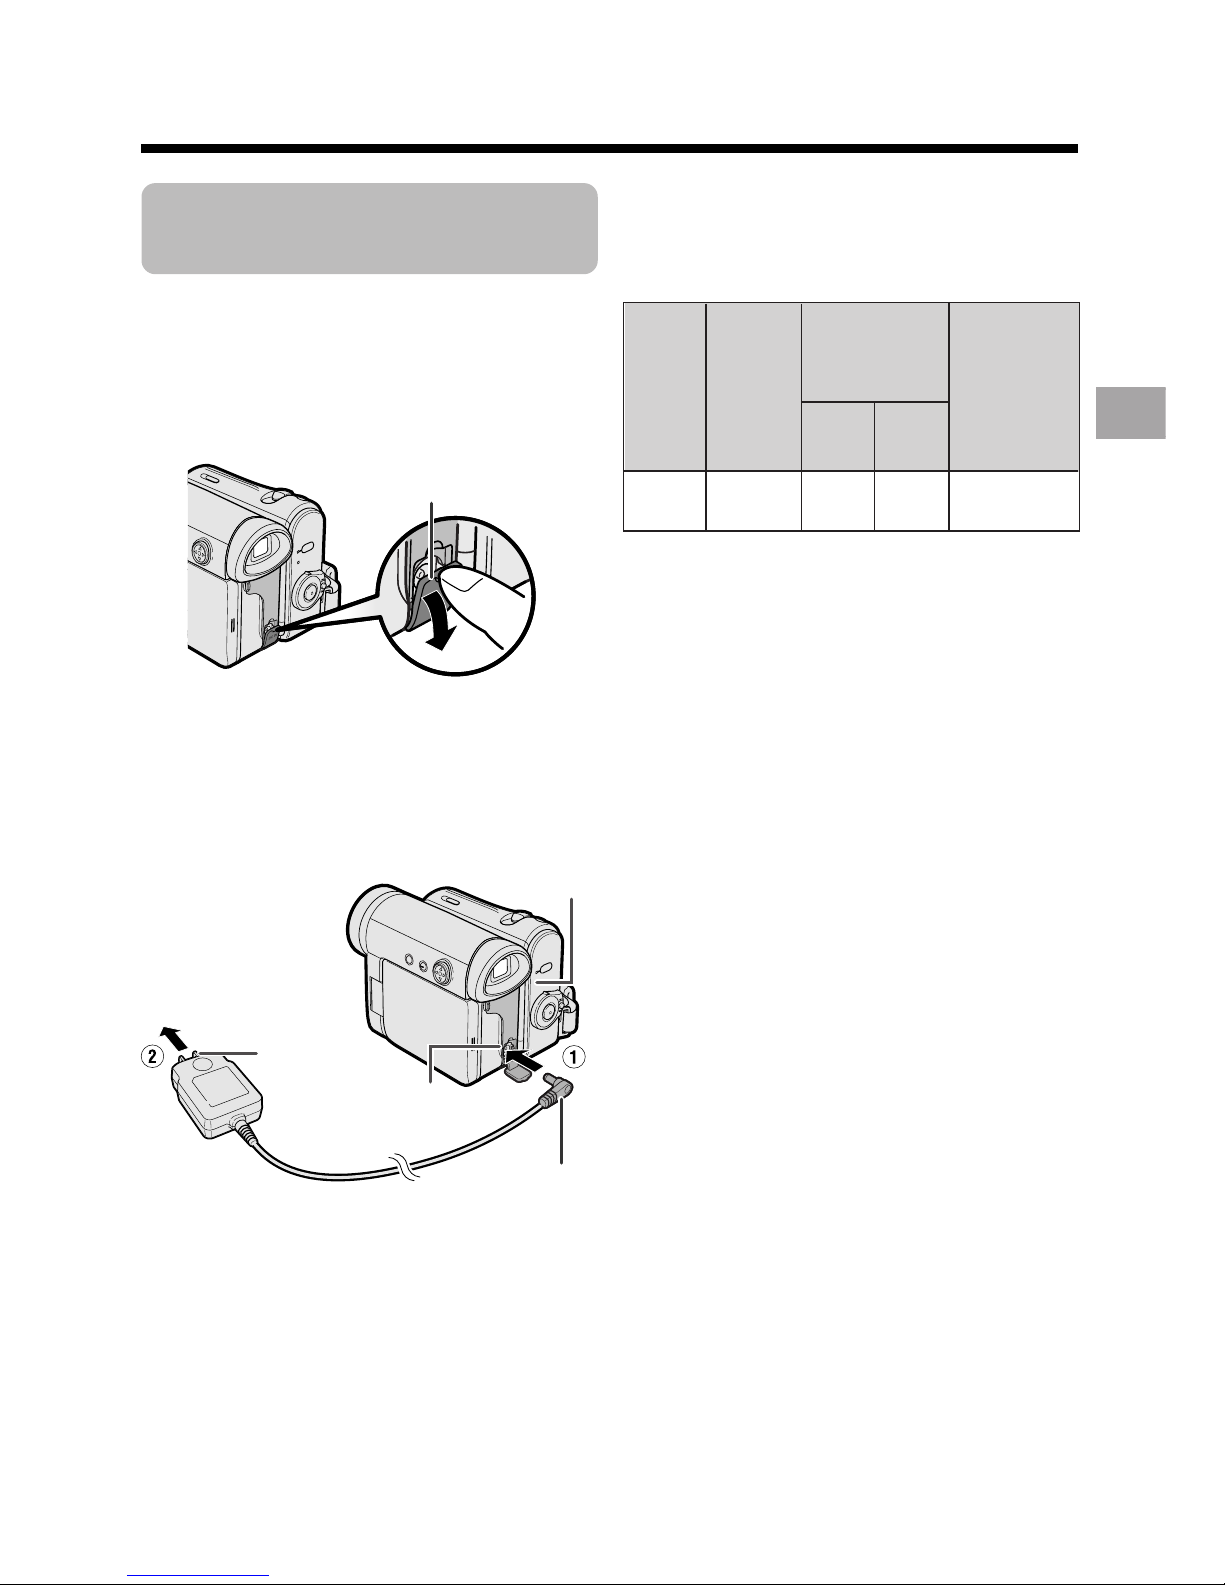
Charging the Battery
Pack
1
Attach the battery pack on the
camcorder, and make sure that the
Power switch is set to OFF.
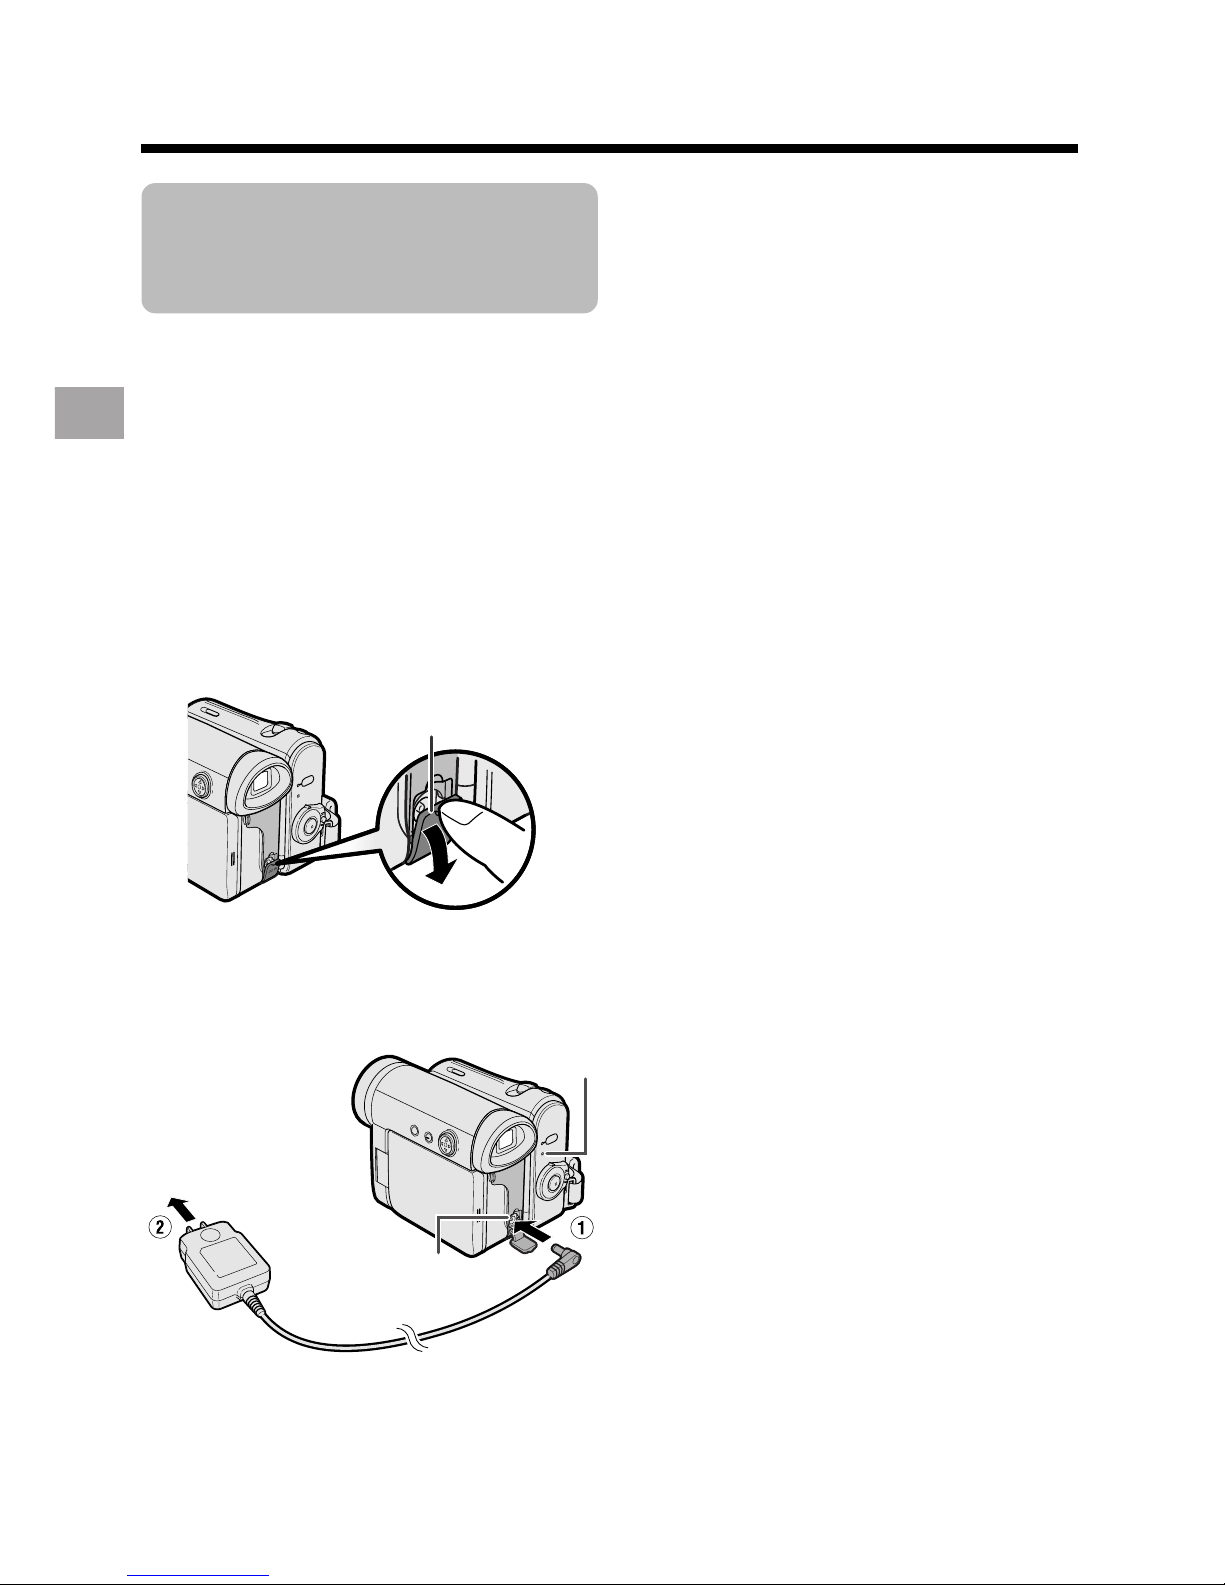
2 Open the DC IN jack cover.
3 Insert the DC plug into the DC IN
jack of the camcorder (1), and plug
the AC plug into a power outlet (2).
• The POWER/CHARGE (RED)
indicator lights up red.
• The POWER/CHARGE (RED)
indicator turns off when the battery is
charged.
4 Remove the DC plug from the DC IN
jack, then remove the AC adapter
from the power outlet.
• The chart specifies the approximate times in
minutes.
Notes:
• Charge the battery pack between 50°F and
86°F (10°C and 30°C). The battery pack
may not charge properly at temperatures
too low or too high.
• The battery pack and AC adapter become
warm during charging. This is not a
malfunction.
• Using the zoom (see page 20) and other
functions or turning the power on and off
frequently will increase power consumption. This may result in a decrease in the
actual recording time compared to the
maximum continuous recording time listed
above.
• The charging time and recording time may
vary depending on the ambient temperature and the condition of the battery pack.
• See pages 67 and 68 for more information on
using the battery pack.
• Charge only SHARP model BT-L226 battery
packs. Other types of battery packs may
burst, causing personal injury and damage.
• When attaching the supplied audio/video/Svideo cable, remove the DC plug, open the
terminal cover and connect it.
BT-L226
Charging
time
Battery
pack
Max.
continuous
recording time
Max.
continuous
playback time
on LCD
120
120 105
Charging time and maximum
continuous recording and playback
times
LCD
closed
LCD
open
105
DC IN jack cover
DC plug
To power outlet
DC IN jack
AC plug
POWER/CHARGE (RED)
indicator
8
Preparation
Preparation
Powering the
Camcorder from an
AC Outlet
You can also power the camcorder from a
power outlet by using the supplied AC
adapter.
Note:
• The supplied AC adapter is specially
designed for use with this camcorder, and
should not be used as a power supply for
other camcorders.
1 Make sure that the Power switch is
set to OFF.
2 Open the DC IN jack cover.
3 Insert the DC plug into the DC IN
jack of the camcorder (1), and plug
the AC plug into a power outlet (2).
4 Hold down the Lock button and set
the Power switch to v or w.
• The POWER/CHARGE (RED)
indicator lights up green.
DC IN jack
Notes:
• BEFORE REMOVING THE DC PLUG,
ALWAYS STOP RECORDING OR PLAYBACK AND TURN THE POWER OFF.
Removing the DC plug while shooting or
during playback may damage the tape by
causing it to wrap around the video head
drum.
• Disconnect the AC adapter from the
camcorder if you will not use the camcorder
for a long period of time.
DC IN jack cover
POWER/CHARGE (RED)
indicator
To power outlet
9
Preparation
Inserting and
Removing a Cassette
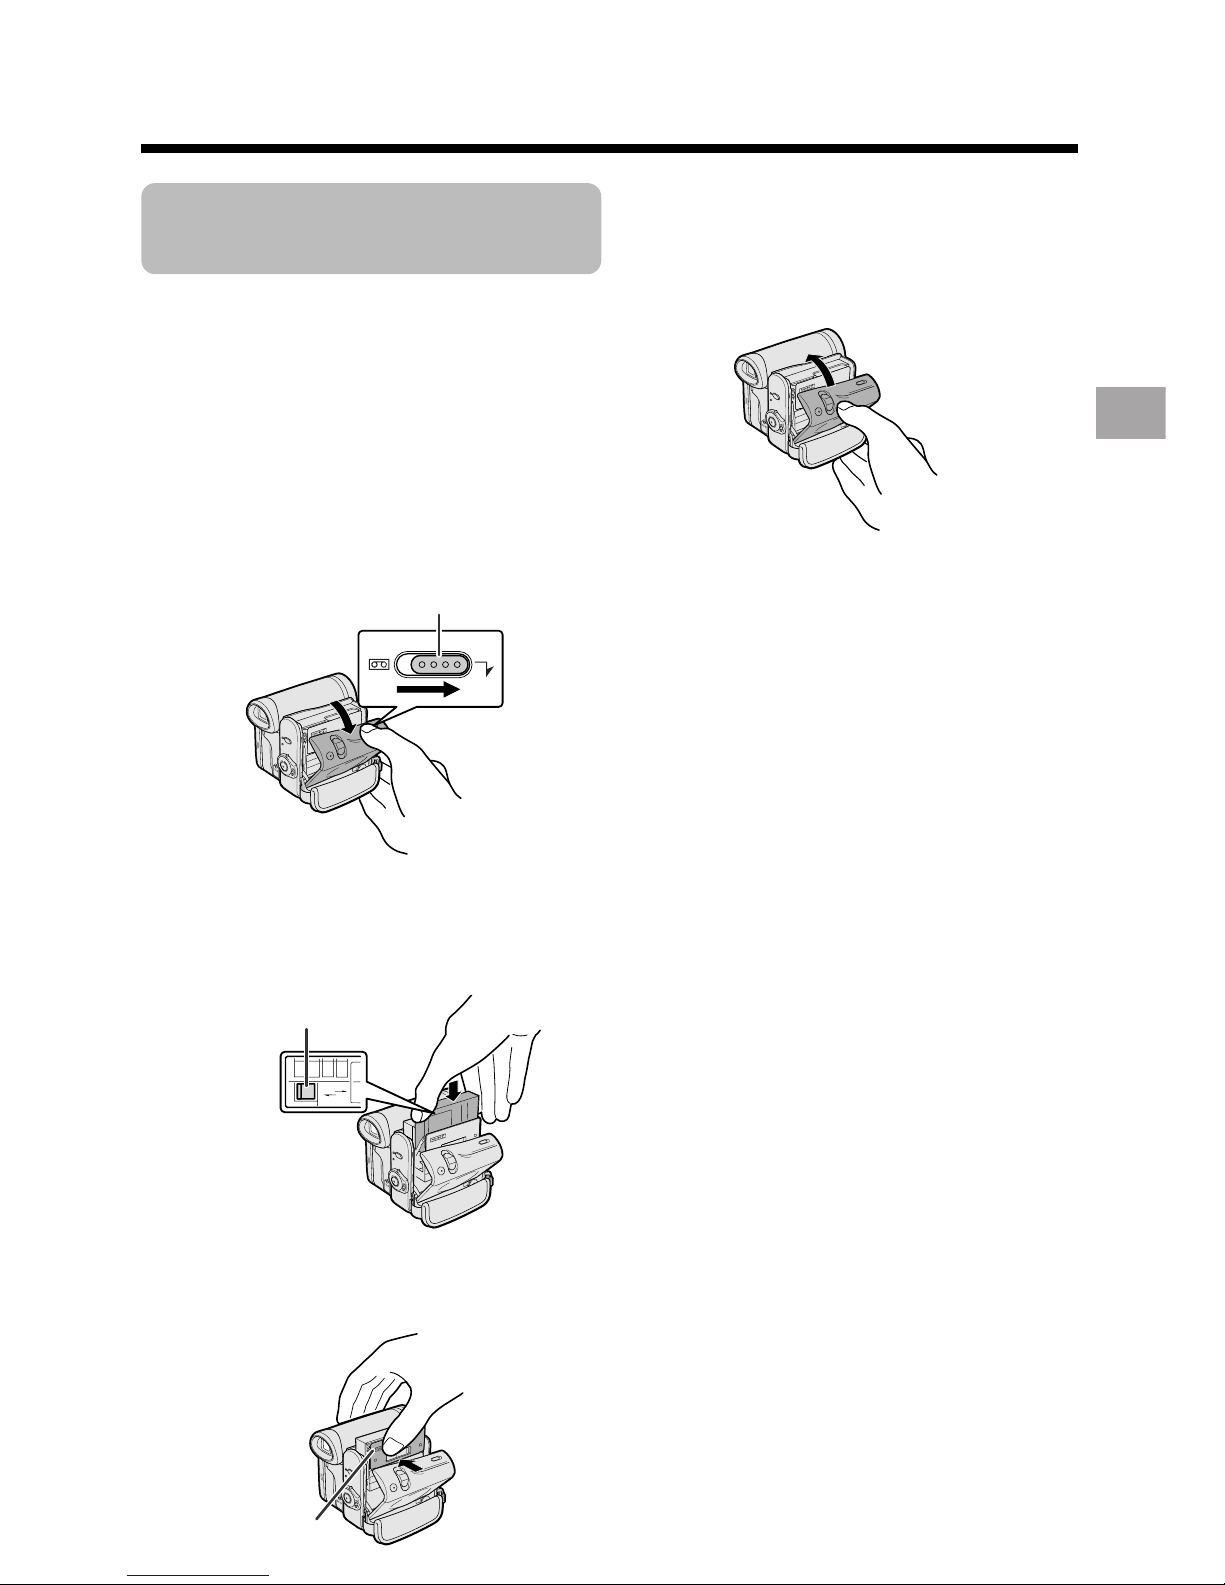
Inserting
1 Attach the power source to the
camcorder, then slide and hold the
cassette compartment door release
as you open the cassette compartment door.
• After confirmation sound, the
cassette holder extends and opens
automatically.
2 Insert a commercially available Mini
DV cassette fully with the window
facing outwards, and with the erasure
protect tab facing upwards.
3 Press the “PUSH” mark gently until
the cassette holder clicks into place.
• The cassette holder retracts
automatically.
4 Wait for the cassette holder to fully
retract. Close the compartment door
by pressing its center until it clicks
into place.
Removing
Perform step 1 above, then take out the
cassette.
Notes:
• Do not try to close the cassette compartment
door while the cassette holder is extending or
retracting.
• Be careful not to get your fingers caught in
the cassette holder.
• Do not apply force to the cassette holder
except when pressing the “PUSH” mark to
close it.
• Do not tilt the camcorder or hold it upside
down when you are inserting or removing a
cassette. It may damage the tape.
• Remove the cassette if you will not use the
camcorder for a long period of time.
• If you do not correctly close the cassette
holder in step 3, the cassette protection
mechanism of the camcorder might eject the
cassette. If this happens, repeat the insertion
procedure.
• Do not attempt to pick up the camcorder by
the cassette compartment door.
• If the battery power is too low, you may not
be able to eject the cassette. Replace the
battery pack with a fully charged one.
• You can only use Mini DV cassettes. Large
DV cassettes cannot be used. Be sure to use
Mini DV cassettes with the i
mark.
• See page 66 for more information on the
video cassette tapes intended for use with
this camcorder.
SAVE
REC
Cassette compartment door release
“PUSH” mark
Erasure protect tab
10
Preparation
Preparation
Installing the Lithium
Batteries
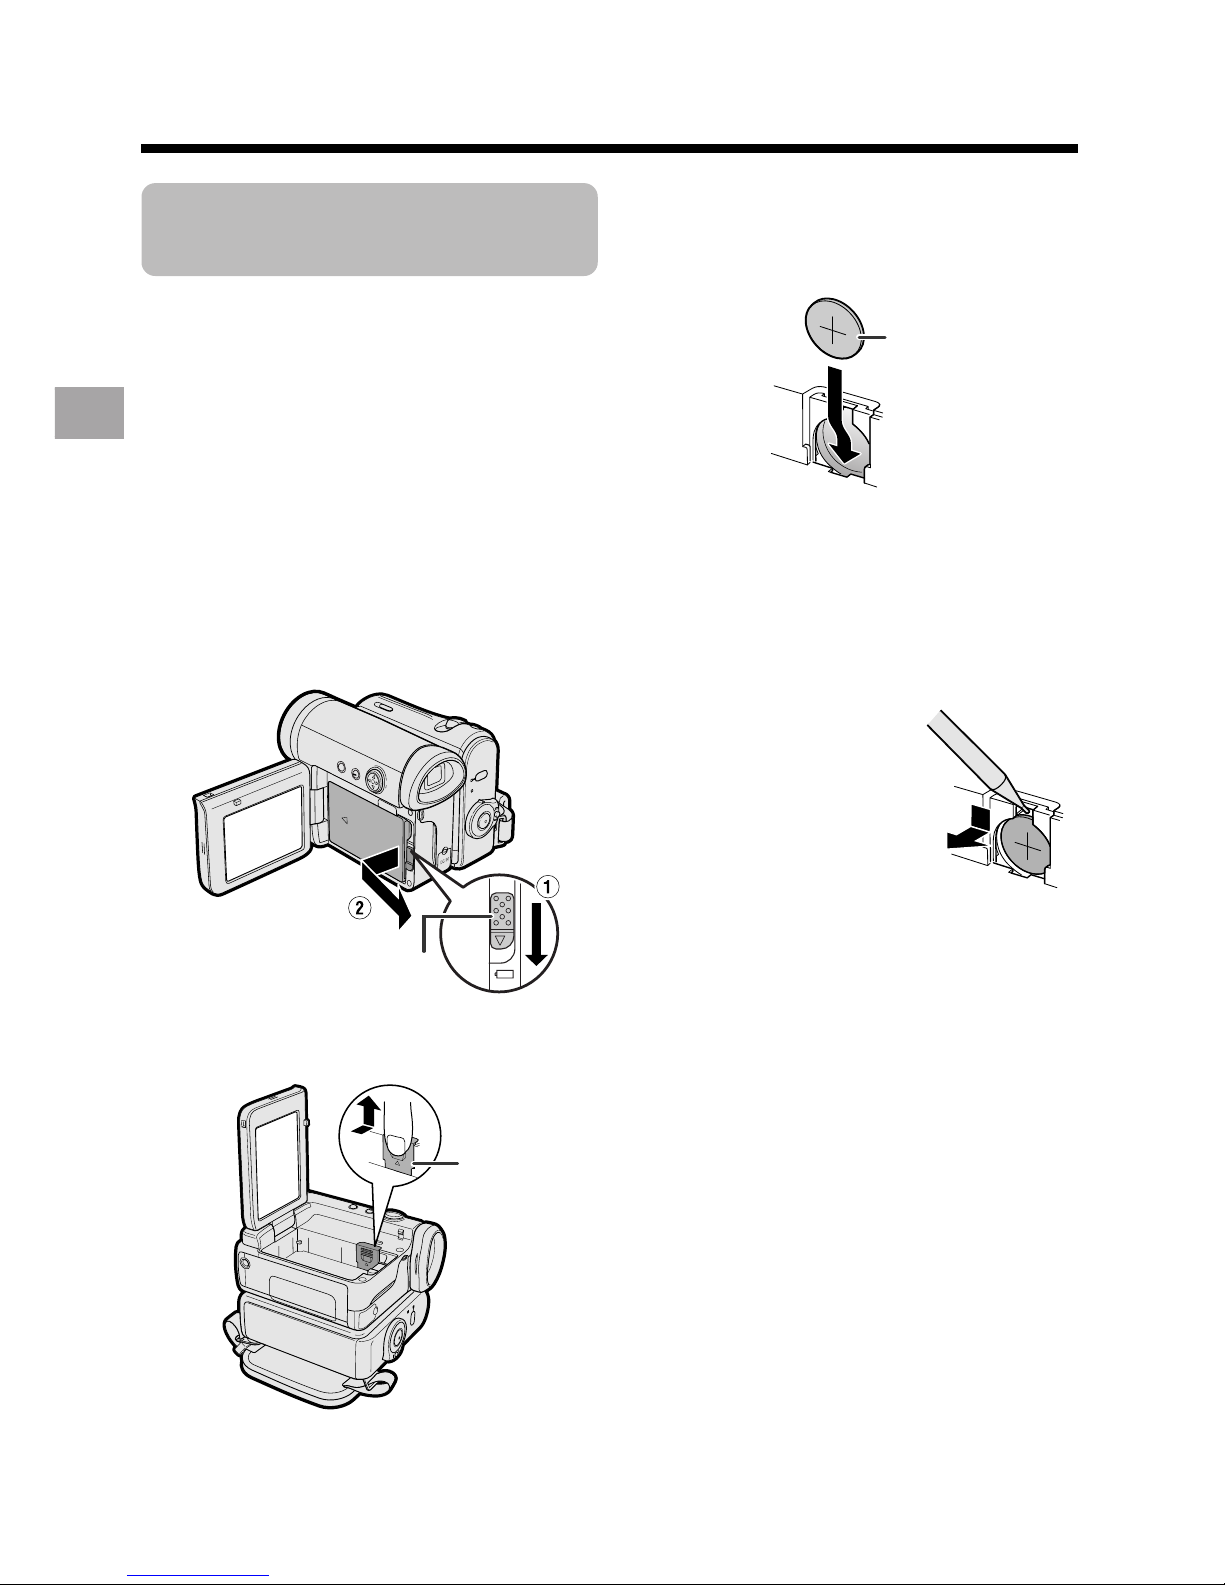
Installing the Memory Battery
The supplied CR 1216 type lithium battery is
used to store the memory of the date and
time settings.
1 Make sure that the Power switch is
set to OFF.
2 Open the LCD monitor to a 90° angle
to the camcorder body.
3 Slide the battery release in the
direction of the arrow, then take the
battery pack out.
4 Pull out the lithium battery cover in
the direction of the arrow.
5 Insert the CR 1216 type lithium
battery into the compartment with the
H side of the battery facing out.
6 Close the lithium battery cover firmly
until it clicks into place.
Removing the Memory
Battery
Perform steps 1 to 4 above,
then lift out the battery by
using a pointed object such
as the tip of a ballpoint pen.
Battery release
Lithium
battery cover
CR 1216 type
lithium battery
11
Preparation
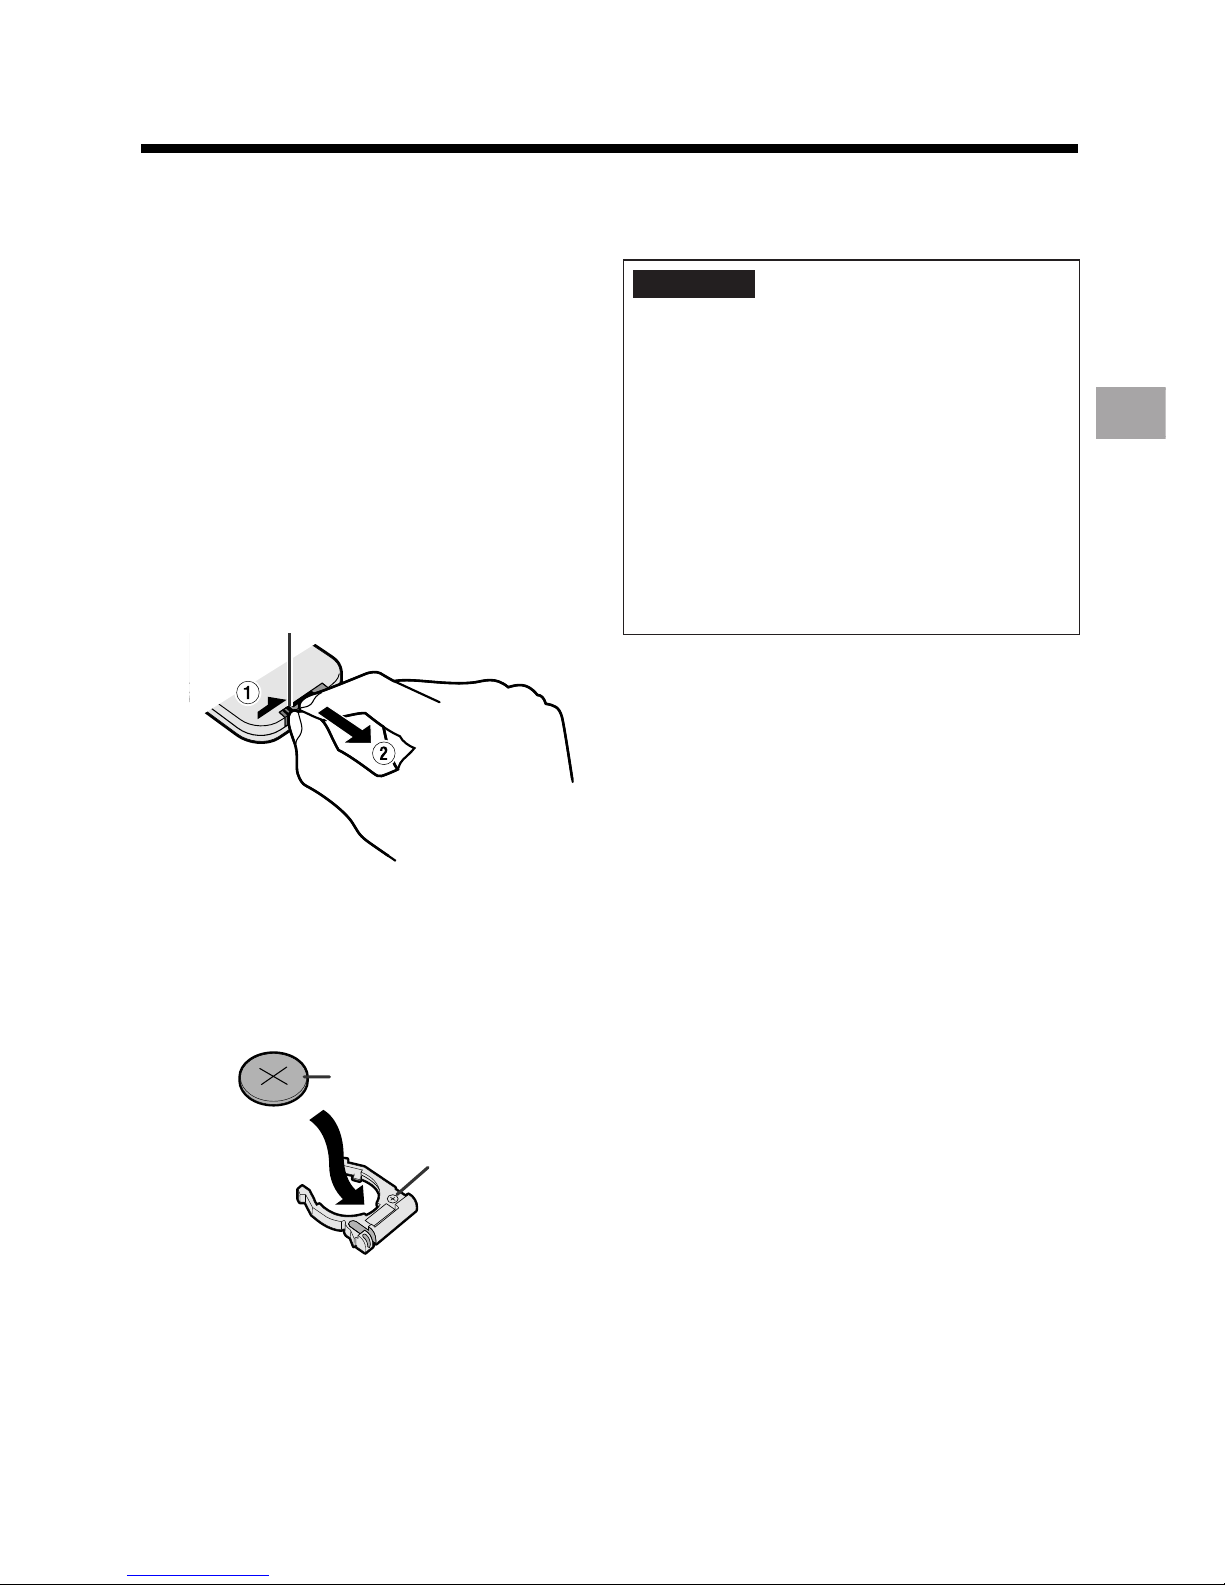
Installing the Battery to
Remote Control (Not supplied)
The remote control (RRMCGA149WJSA)
is not supplied with this camcorder.
Contact the nearest SHARP service
center or your dealer for purchasing as
specified part.
The CR 2025 type lithium battery is used
to power the remote control unit.
1 Hold the remote control facing down,
and pull out the battery holder while
pressing the tab toward the center.
2 Insert the CR 2025 type lithium
battery into the battery holder with
the H side of the battery facing the
m side of the holder.
3 Insert the battery holder back into
position.
Notes on the Use of the Lithium
battery
• Do not short-circuit, recharge, disassemble,
or heat the lithium battery.
• Should the lithium battery leak, wipe the
battery compartment clean, and then insert a
new battery.
• The lithium batteries will last about one year
under normal usage.
CAUTION The battery used in this
device may present a risk of fire of
chemical burn if mistreated. Do not
recharge, disassemble, heat above
212°F (100°C) , or incinerate. Replace
battery with the type CR1216 for the
camcorder and the type CR2025 for the
remote control unit of Toshiba Battery
Co., Ltd. only. Use of another battery
may present a risk of fire or explosion.
Dispose of used battery promptly. Keep
away from children. Do not disassemble
and do not dispose of in fire.
“m” side
H side, CR 2025 type
lithium battery
Ta b
12
Preparation
Preparation
4 Press m or l to select “EXECUTE”,
then press the center of the Operation
button.
5 Press the center of the Operation
button.
6 Press m or l to select “JUN”
(month), then press the center of the
Operation button.
7 Press m or l to select “2” (day),
then press the center of the Operation
button.
8 Press m or l to select “2004” (year),
then press the center of the Operation
button.
9 Press m or l to select “10 AM”
(hour), then press the center of the
Operation button.
Setting the Date and
Time
Example: Setting the date to June 2, 2004
(JUN. 2. 2004) and the time to 10:30 am
(10:30 AM).
Note:
• Before performing the steps below, make
sure that the CR1216 type lithium battery has
been installed (see page 10).
1 Hold down the Lock
button and set the
Power switch to v.
2 Press the DISPLAY button until the
mode screen appears.
3 Press l or m on the Operation
button to select “MENU”, then press
the center of the Operation button.
BLC GA I N/ OFF
FADE
M
ENU
SCENE
M
ENU
EXECUTE
FADE
M
ENU
SCENEMENU
BLC GA I N/
OTHERS 2
RETURN
T IME CODE OFF
OFFTC OUT
SETT ING
12H
12H
24H/
JAN. 1 20
12 00AM:
03.
JUN.
12 00AM
:
1 2003.
SETT I NG
JUN.
12 00AM
:
2 2003.
SETT I NG
JUN.
12 00AM
:
2 2004.
SETT I NG
JUN.
10 00AM
:
2 2004.
SETT I NG
Operation button
Power switch
DISPLAY button
Lock button
13
Preparation
Changing to the 24-hour
Time Mode
1 After performing step 10 above, press
l or m to select “12H/24H”, then
press the center of the Operation
button.
2 Press l or m to select “24H”, then
press the center of the Operation
button.
3 Press the DISPLAY button to turn off
the menu screen.
Notes:
• The date and time, once set, are internally
recorded even when not displayed on the
screen.
• The menu screen automatically turns off if no
settings are made within 5 minutes.
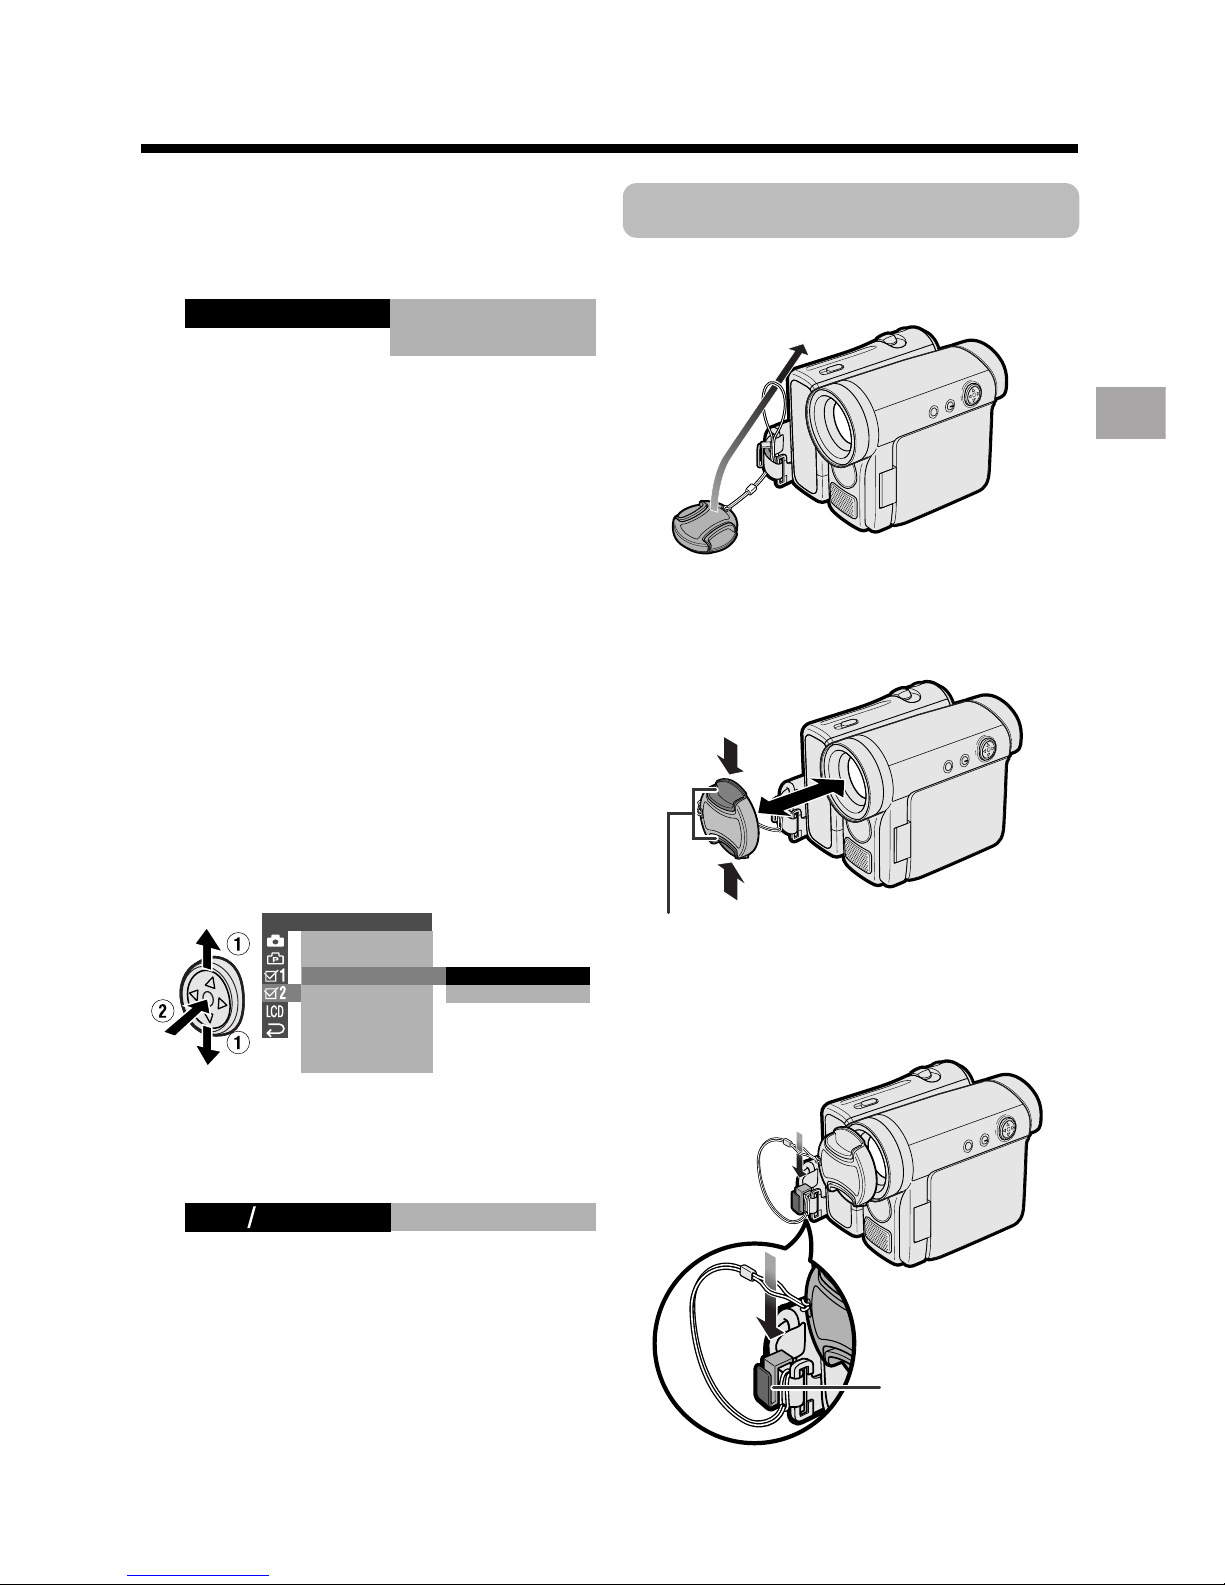
Using the Lens Cap
Attach the strap of the lens cap to the hand
strap as shown below.
When attaching or removing the lens cap,
grasp the indents on both sides of the cap.
When recording, remove the lens cap and
attach the lens cap cord to the fastener so
that the cap will not get in the way.
Note:
• Always attach the lens cap over the lens
when not using the camcorder.
24H
21H24H
10
Press m or l to select “30” (minute),
then press the center of the Operation
button.
• The internal clock now starts
operating with the seconds display.
11
Press the DISPLAY button to turn off
the menu screen.
Note:
• If the date and time have been set, the
SETTING 1 screen (T) appears in step 4.
Select “SETTING” in the OTHERS 2 screen
(~) using the Operation button.
JUN.
100030 AM
::
2 2004.
SETT I NG
OTHERS 2
T IME CODE
TC OUT
24H
12H
RETURN
SETT ING
12H 24H/
Indents
Fastener
14
Preparation
Preparation
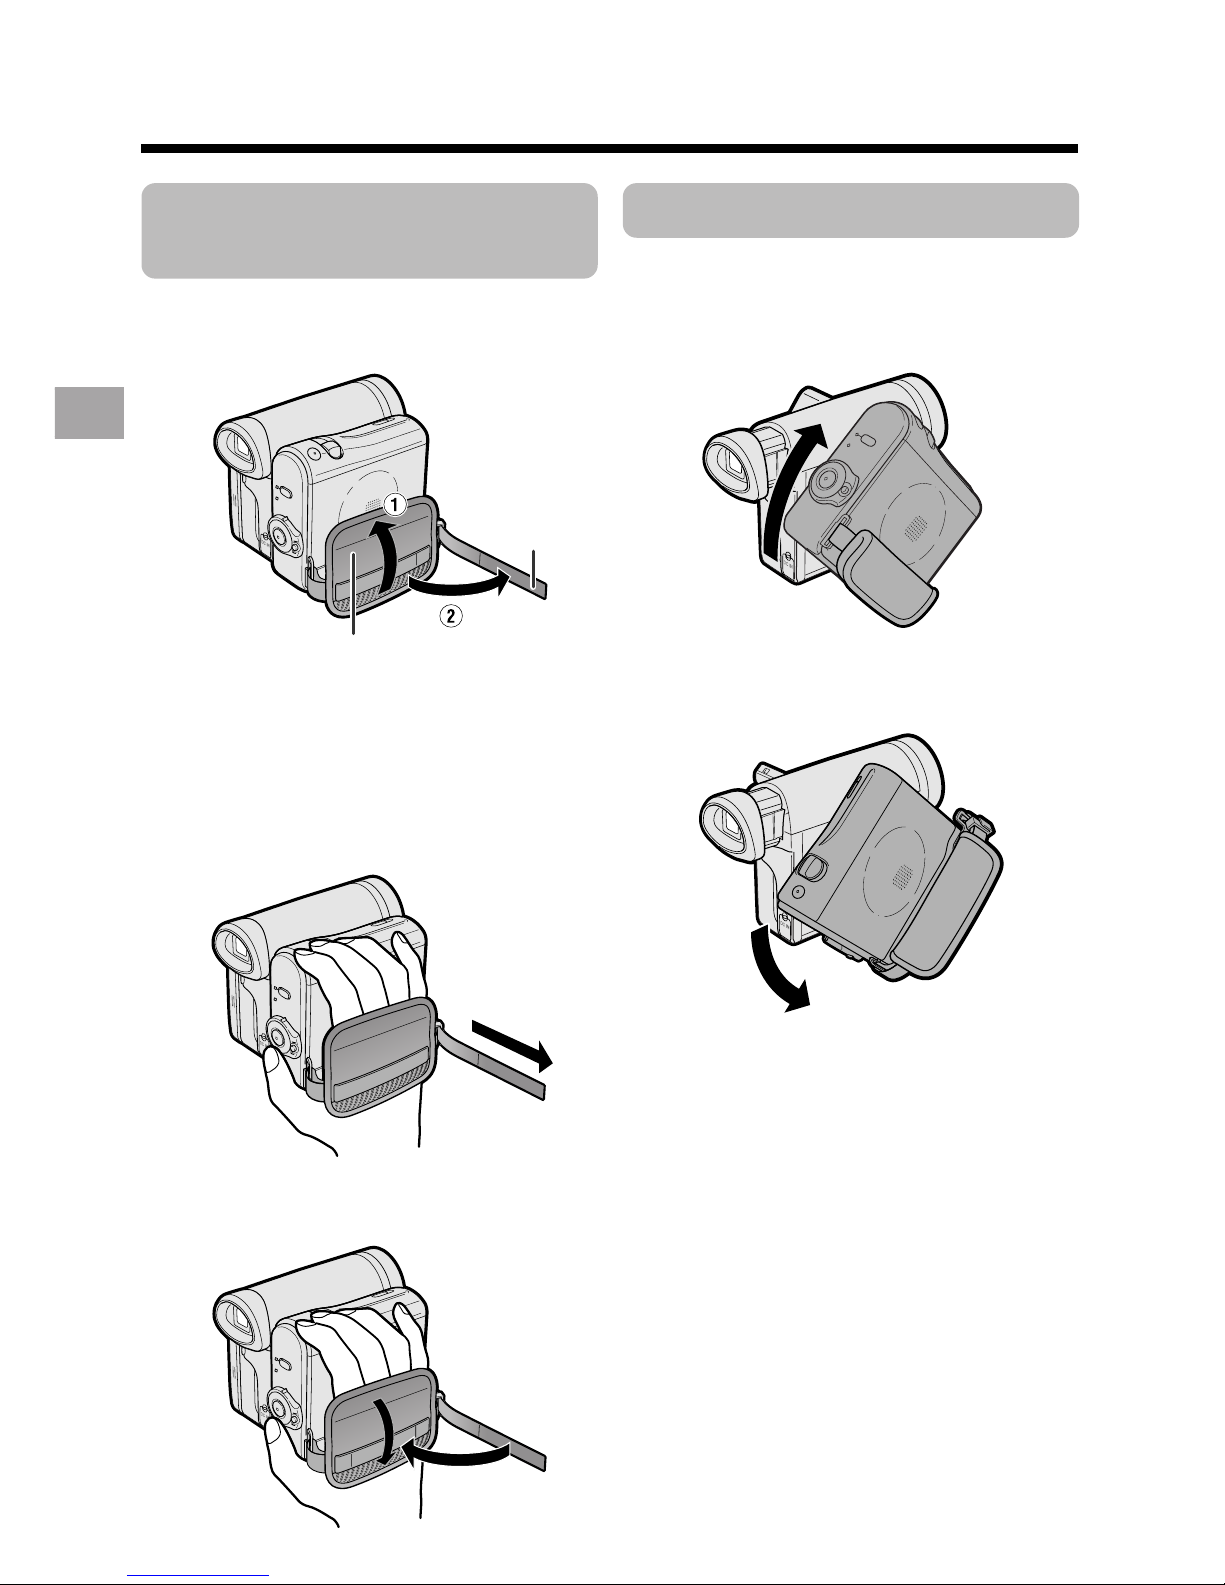
Adjusting the Hand
Strap
1
Open the hand strap flap (1) and grip
strap (2).
2 Loosen the grip strap, pass your right
hand through the hand strap, and put
your thumb close to the Start/Stop
button and your index finger on the
Power Zoom control. Then, pull the
grip strap tight until it fits snugly.
3 Seal the Velcro
®
fasteners of the grip
strap and the hand strap flap.
Using the Grip
Rotate the grip 135° forward or 90°
downward so that you can record images
easily from high or low angle (see page 18).
Note:
• The grip cannot rotate when a tripod is
attached.
Grip strap
Hand strap flap
135°
90°
15
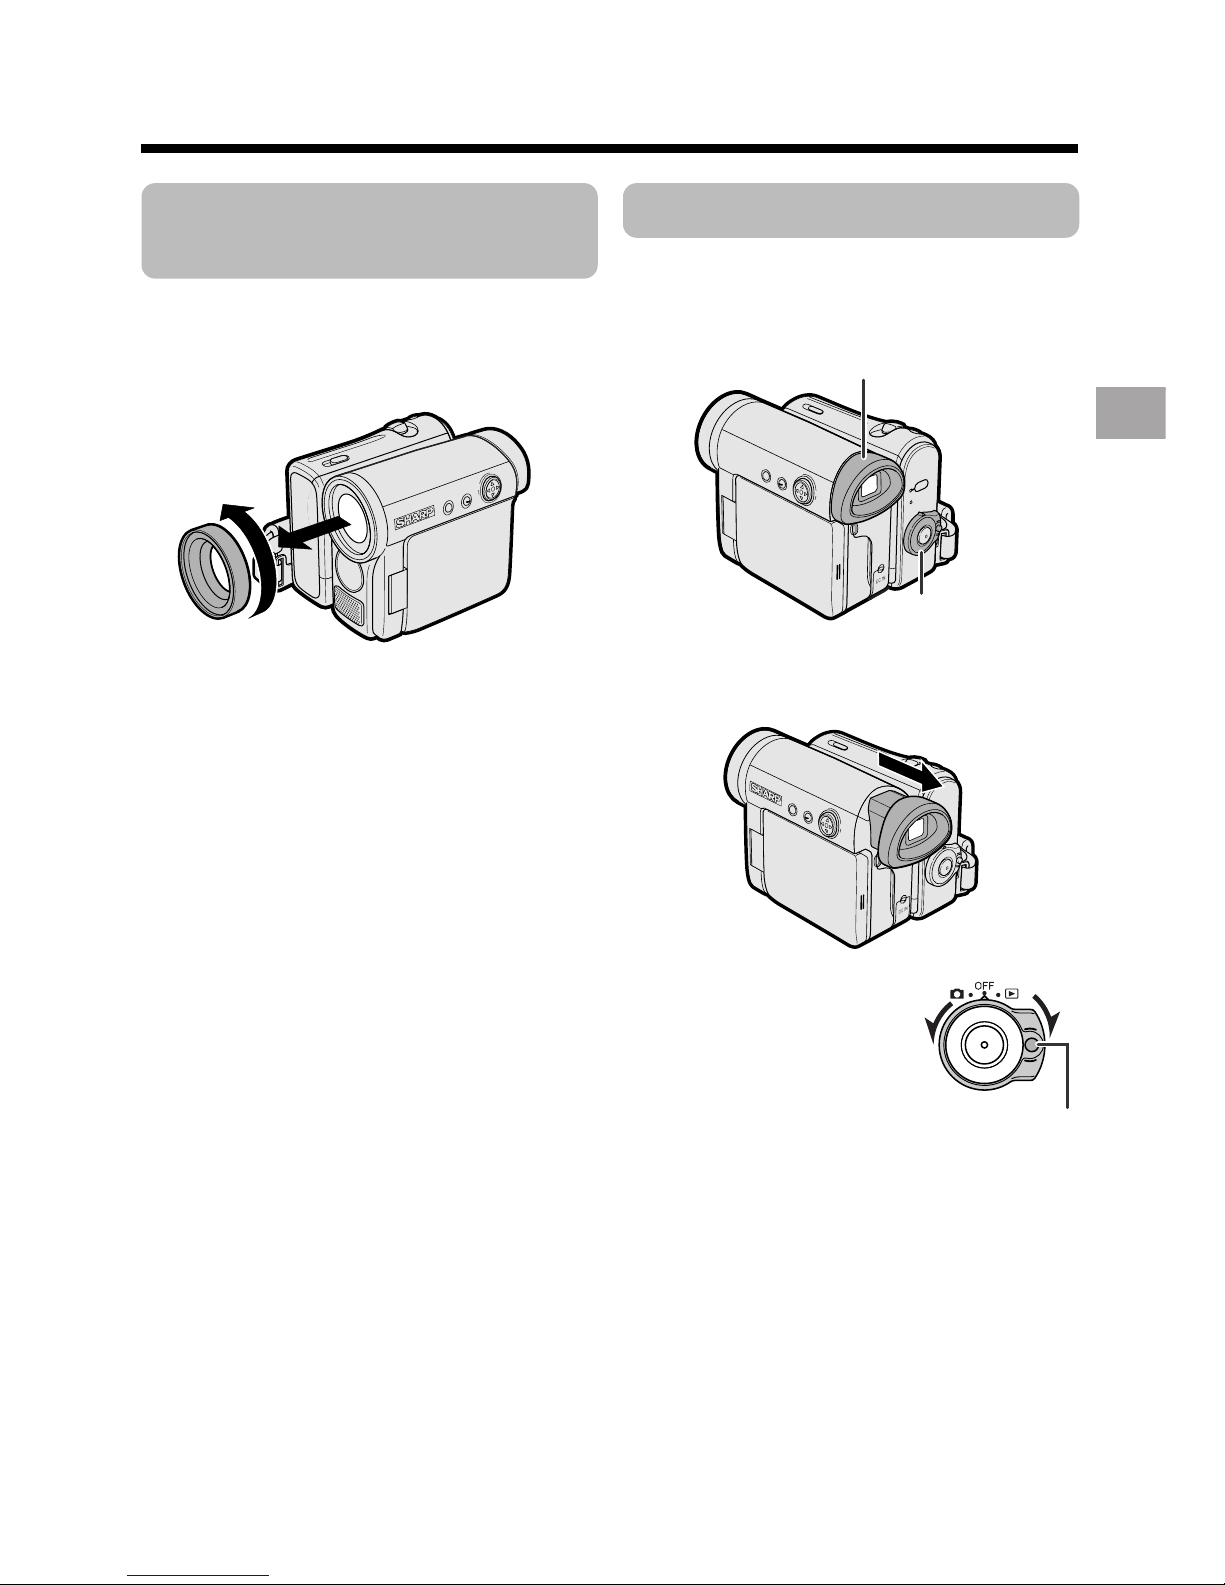
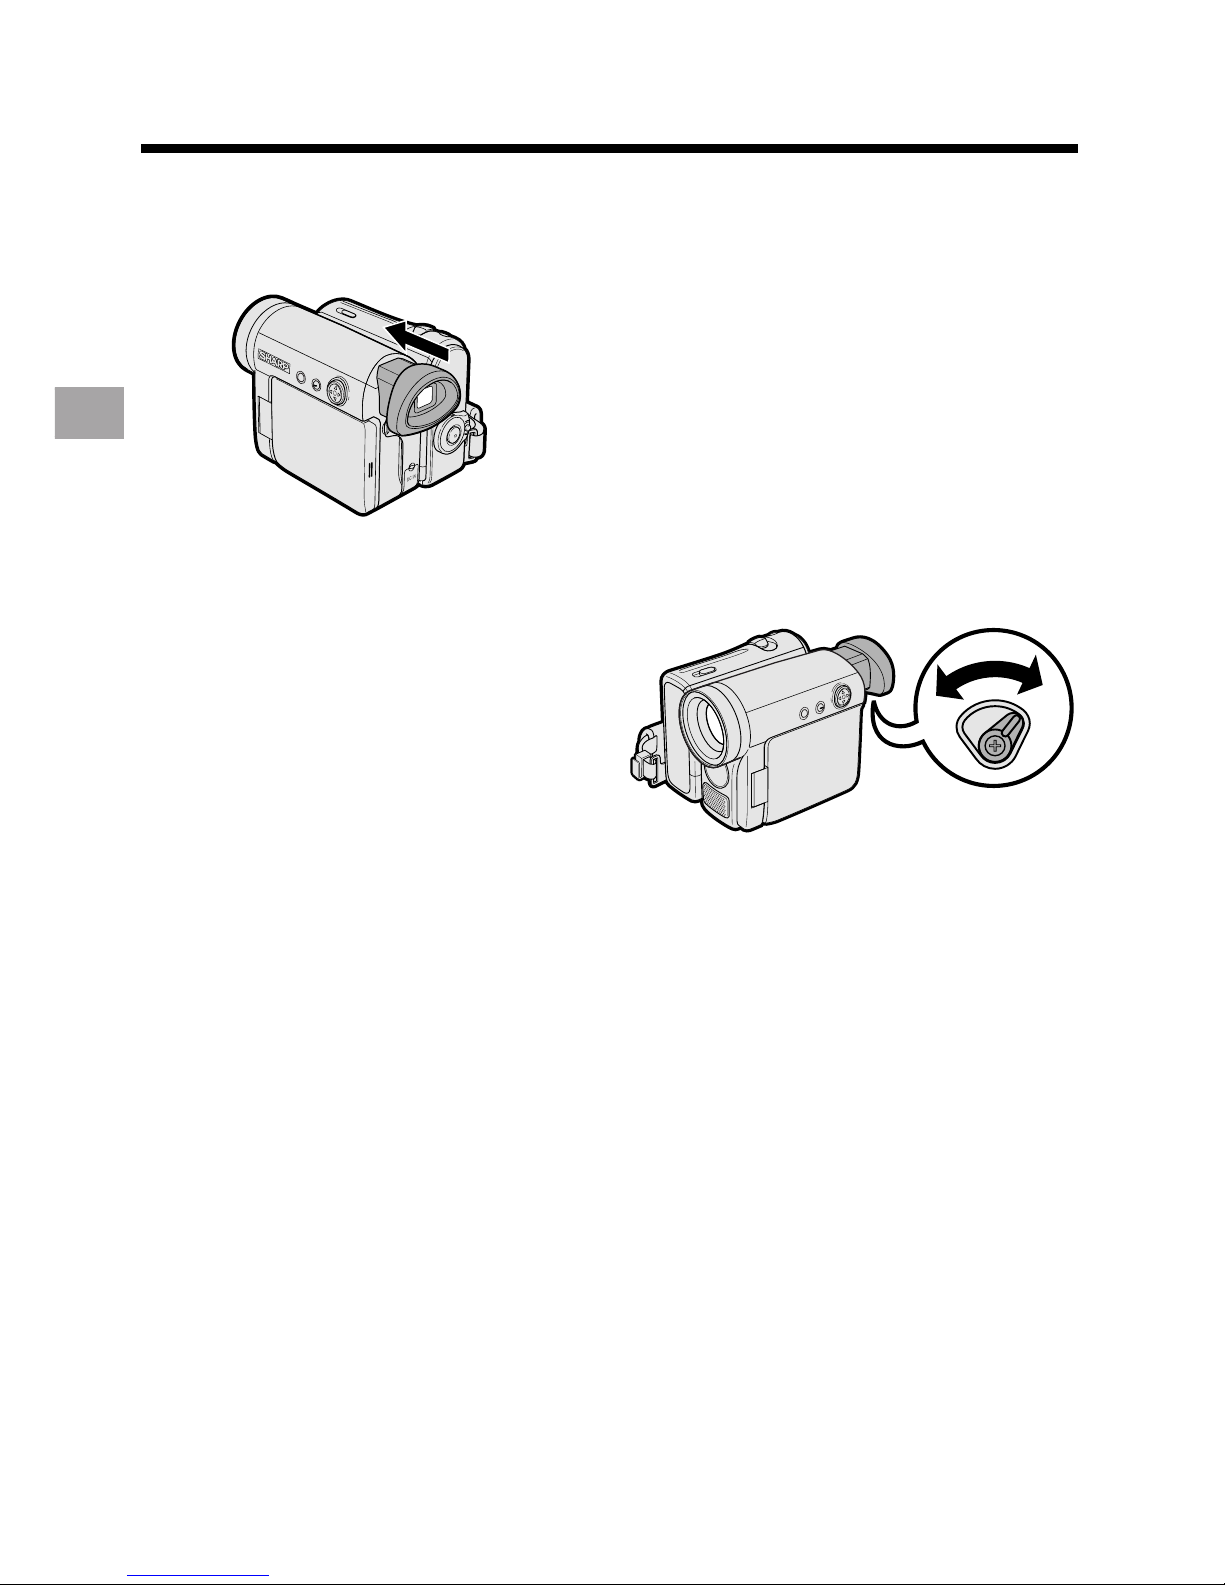
Preparation
Using the Viewfinder
You can record the subject using the
electronic viewfinder. You can also watch
playback through the viewfinder.
1 Pull out the viewfinder completely.
2 Hold down the Lock
button and set the
Power switch to v or
w.
Detaching the Lens
Hood
Before using a commercially available
conversion lens, detach the lens hood as
shown below.
(Continued on the next page)
Note:
• You cannot attach the supplied lens hood or
lens cap to a conversion lens.
Power switch
Viewfinder
Lock button
16
Preparation
Preparation
Closing the viewfinder
Push in the viewfinder completely.
Notes:
• Do not use excessive force when moving
the viewfinder.
• Do not pick up the camcorder by the
viewfinder.
• The viewfinder automatically turns off when
the LCD monitor is opened. If the vertical
rotation of the monitor is 180° when in
Camera mode, however, the viewfinder is on
and the subject is displayed both in the
viewfinder and on the monitor (see page 36).
• You can adjust the settings on the MENU
screen through the viewfinder by using the
Operation button (see page 27 for use of the
Operation button).
• Be sure to close the viewfinder after use.
Adjusting the diopter
Adjust the diopter according to your
eyesight when the picture in the viewfinder
or the characters on the on-screen display
is not clear.
1 Pull out the viewfinder completely.
2 Hold down the Lock button and set
the Power switch to v.
3 While looking through the viewfinder,
turn the diopter adjustment dial until
the indicators in the viewfinder are
clearly visible.
Note:
• For cleaning the viewfinder, see page 68.
Diopter adjustment dial
 Loading...