

Sharp Viewcam VL-WD450U, VIEWCAM VL-WD650U Operation Manual
:. ...... : :. : .......
"_;;:::..":;.:'i,ii...i:..:... ......:..::..,i:.::.:...:".::::::-. i_on.:aa.n;u.ai::.:....
::i::i::;::::ii:::ii: : ::::i:i:] ::i:: :: :carefull_
liltS H A R Pi'i".'.:...
i Important
i.".! i.. i:i. For assistance in reporting the theft or loss of
•::i:,tVIEWOAM ,::::i:this product, record ontheline belowthe
model number and serial number which
.... ;..... : are located on the bottom of the unit.
i.." Please retain this information.
. .. . ,.....:-. ....... ,.: ..... . :::":.". Model No.:
... ...... • . . ........ . :.- . ......... .... ....... . .. __
•:..'. . ..". ._ ,_• Serial No.:
• " ... "._The .l]l_.lOgoiS:_it_adematk, :. . .. .... .:., . ... " .". '..." ': .". -- .......
..:....":.::.:. :...;:..:..."...'.......:..:.:.:;.:;:......"...:.:..:...: ..., ;:..:::.: .:.:.:..:.:;::. ..:.....See:.page:93.fQi.use;0fDemo.niode:....::.:....::..:.:
..... '".. ., •'.". ..".:.. : . . ': :. ..... . . ".:...", :.:..." ." . :' ::". :".. :,Theimages of tiie VIEWCAM.in tliiS.. "... ..... ...... •
•..: :". ."'.. '..: • .: .. " ".."... " " ' .."..." .:". .." '.. ::.'.:.: '::"..::".:":opefat 0i_.maiiua .a[e.basedupon.the..:... :.....".: ....
•.,....:..:.!'......,....:..":.....,.':..........:.::......:.•...:..:":.'"..'.: :::.VE.-WI_50U. ....::.."....:.:.:.'..::..:.."."."::.::.";'.".:.:..:"..";..":...:
Thank you for purchasing this camcorder from SHARP.
The camcorder will enhance your home video enjoyment and allow you to capture those
special moments. Please read this operation manual to familiarize yourself with the
camcorder's features, so that you will get the most out of it. The video techniques section will
help you fully enjoy the many features this camcorder offers, and expand your video world.
Important Information for Consumers in the U.S.
WARNING: TO REDUCETHE RISK OF FIRE OR ELECTRIC SHOCK,
DO NOT EXPOSE THIS APPLIANCE TO RAIN OR
MOISTURE.
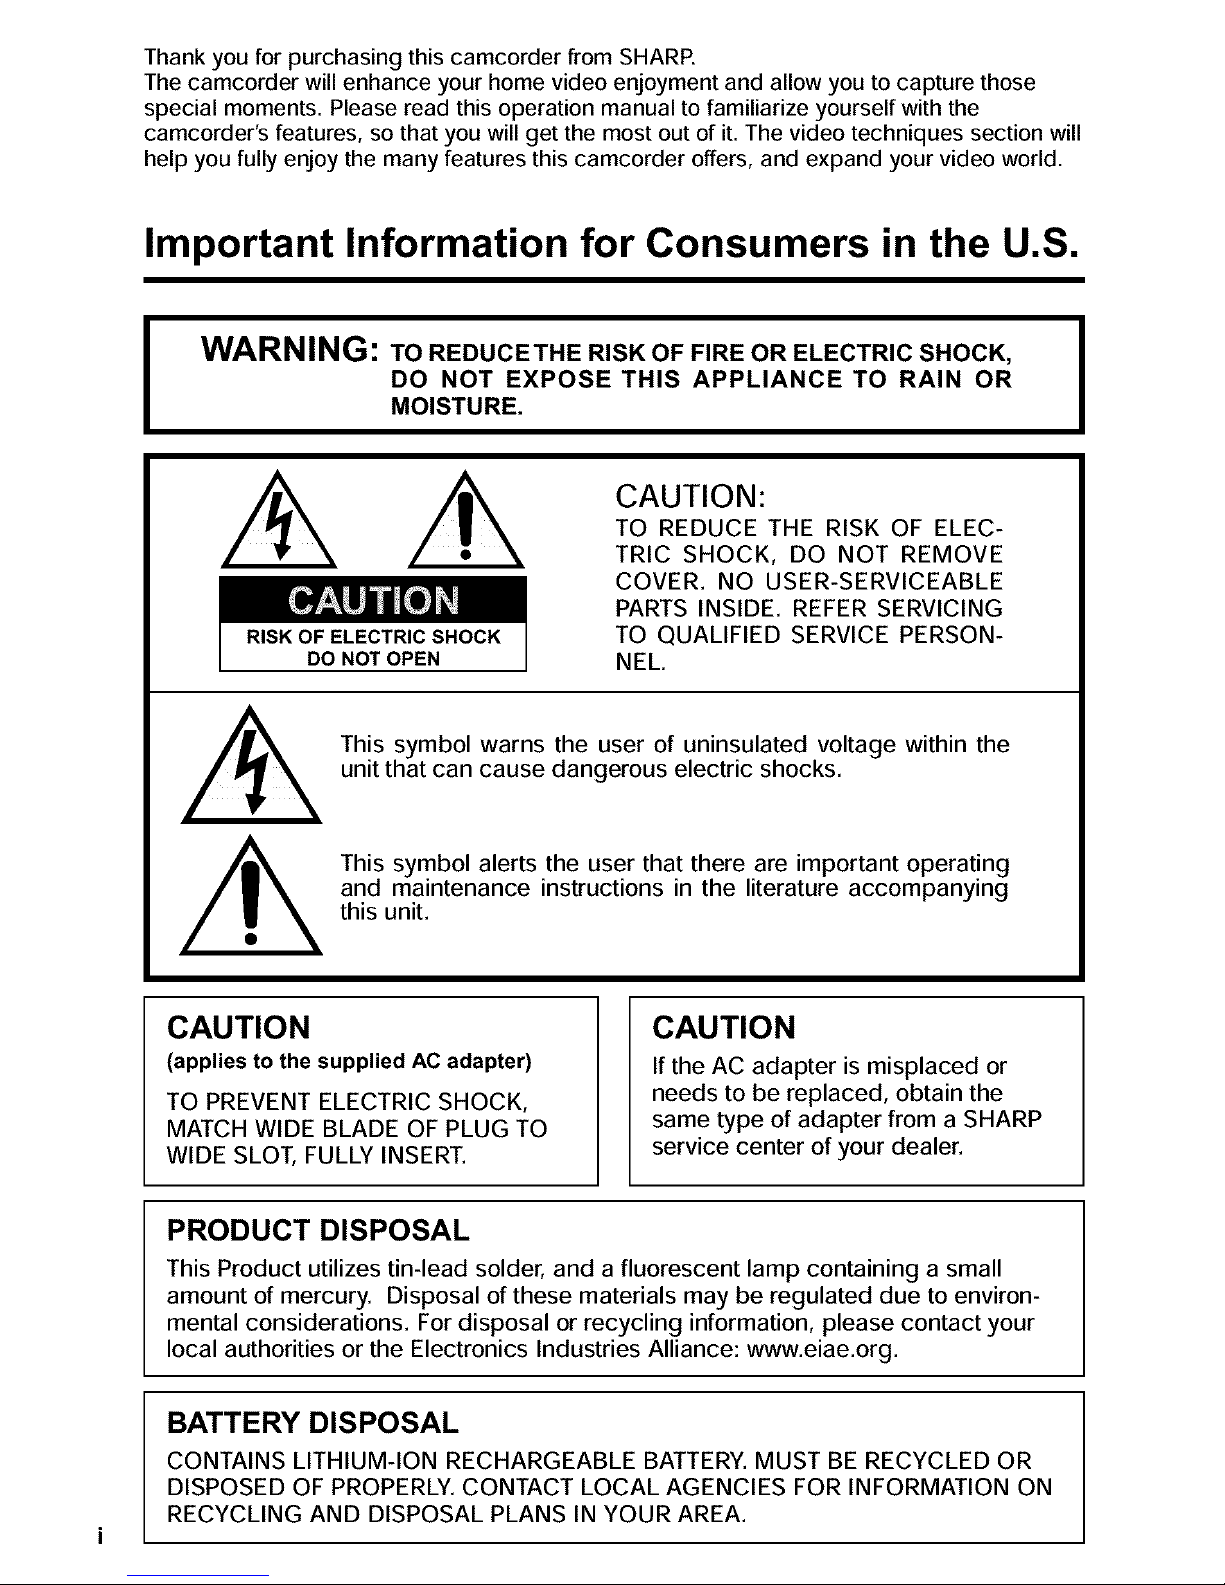
RISK OF ELECTRIC SHOCK
DO NOT OPEN
CAUTION:
TO REDUCE THE RISK OF ELEC-
TRIC SHOCK, DO NOT REMOVE
COVER. NO USER-SERVICEABLE
PARTS INSIDE. REFER SERVICING
TO QUALIFIED SERVICE PERSON-
NEL.
This symbol warns the user of uninsulated voltage within the
unit that can cause dangerous electric shocks.
This symbol alerts the user that there are important operating
and maintenance instructions in the literature accompanying
this unit.
CAUTION
(applies to the supplied AC adapter)
TO PREVENT ELECTRIC SHOCK,
MATCH WIDE BLADE OF PLUG TO
WIDE SLOT, FULLY INSERT.
CAUTION
If the AC adapter is misplaced or
needs to be replaced, obtain the
same type of adapter from a SHARP
service center of your dealer.
PRODUCT DISPOSAL
This Product utilizes tin-lead solder, and a fluorescent lamp containing a small
amount of mercury. Disposal of these materials may be regulated due to environ-
mental considerations. For disposal or recycling information, please contact your
local authorities or the Electronics Industries Alliance: www.eiae.org.
BATTERY DISPOSAL
CONTAINS LITHIUM-ION RECHARGEABLE BATTERY. MUST BE RECYCLED OR
DISPOSED OF PROPERLY. CONTACT LOCAL AGENCIES FOR INFORMATION ON
RECYCLING AND DISPOSAL PLANS IN YOUR AREA.
WARNING--FCC Regulations state that any unauthorized changes or modifica-
tions to this equipment not expressly approved by the manufacturer could void the
user's authority to operate this equipment.
NOTE
This equipment has been tested and found to comply with the limits for a Class B
digital device pursuant to Part 15 of the FCC Rules. These limits are designed to
provide reasonable protection against harmful interference in a residential installation.
This equipment generates, uses, and can radiate radio frequency energy and, if not
installed and used in accordance with the instructions, may cause harmful interference
to radio communications. However, there is no guarantee that interference will not
occur in a particular installation. If this equipment does cause harmful interference to
radio or television reception, which can be determined by turningthe equipment off
and on, the user is encouraged to try to correct the interference by one or more of the
following measures:
• Reorient or relocate the receiving antenna.
• Increase the distance between the equipment and receiver.
• Connect the equipment into an outlet on a circuit different from that to which the
receiver is connected.
• Consult the dealer or an experienced radio/TV technician for help.
A shielded I/F cable is required to insure compliance with FCC regulations for Class B
computing equipment.
DECLARATION OF CONFORMITY
Sharp Camcorder
This device complies with Part 15 of the FCC Rules. Operation is subject to the follow-
ing two conditions: (1) This device may not cause harmful interference, and (2) this
device must accept any interference received, including interference that may cause
undesired operation.
RESPONSIBLE PARTY:
SHARP ELECTRONICS CORPORATION
Sharp Plaza, Mahwah, New Jersey 07430
Phone: 1-800-BE-SHARP
CAUTION ON LITHIUM BATTERY (MEMORY BACKUP BATTERY)
If a battery is reversed (positive end where the negative end belongs and vice
versa), it can overheat and rupture. This has happened when young children install
batteries backwards. Warn children not to take out batteries or install them. Parents
should install the lithium battery in the camcorder,
COPYRIGHTWARNING: It is the intent of SHARP that this unit be used in full
compliance with the copyright laws of the United States and
that prior permission be obtained from copyright owners
whenever necessary.
NOTE
The camcorder's LCD panel is a very high technology product with more than
61,000 (VL-WD450U)/close to 90,000 (VL-WD650U) thin-film transistors*, giving you
fine picture detail. Occasionally, a pixel may appear on the screen as a fixed point of
blue, green, red, or black. Please note that this does not affect your camcorder's
performance.
*Specifications aresubject to change without notice.
Trademarks
• SmartMedia is a trademark of Toshiba Corporation.
• DPOF is a trademark of CANON INC., Eastman Kodak Company, Fuji Photo Film Co., Ltd. and
Matsushita Electric Industrial Co., Ltd.
• All other brand or product names are registered trademarks or trademarks of their respective
holders.
IMPORTANT SAFEGUARDS
iii
1.
2.
3.
4.
5.
6.
7.
8.
9.
10.
Read Instructions--All the safety and
operating instructions should be read
before the product is operated.
Retain Instructions--The safety and
operating instructions should be
retained for future reference.
Heed Warnings--All warnings on the
product and in the operating instruc-
tions should be adhered to.
Follow Instructions--All operating and
use instructions should be followed.
Cleaning--Unplug this product from the 11.
wall outlet before cleaning. Do not use
liquid cleaners or aerosol cleaners. Use
a damp cloth for cleaning.
Attachments--Do not use attachments
not recommended by the product
manufacturer as they may cause
hazards.
Water and Moisture--Do not use this
product near water--for example, near 12.
a bath tub, wash bowl, kitchen sink, or
laundry tub; in a wet basement; or near
a swimming pool; and the like.
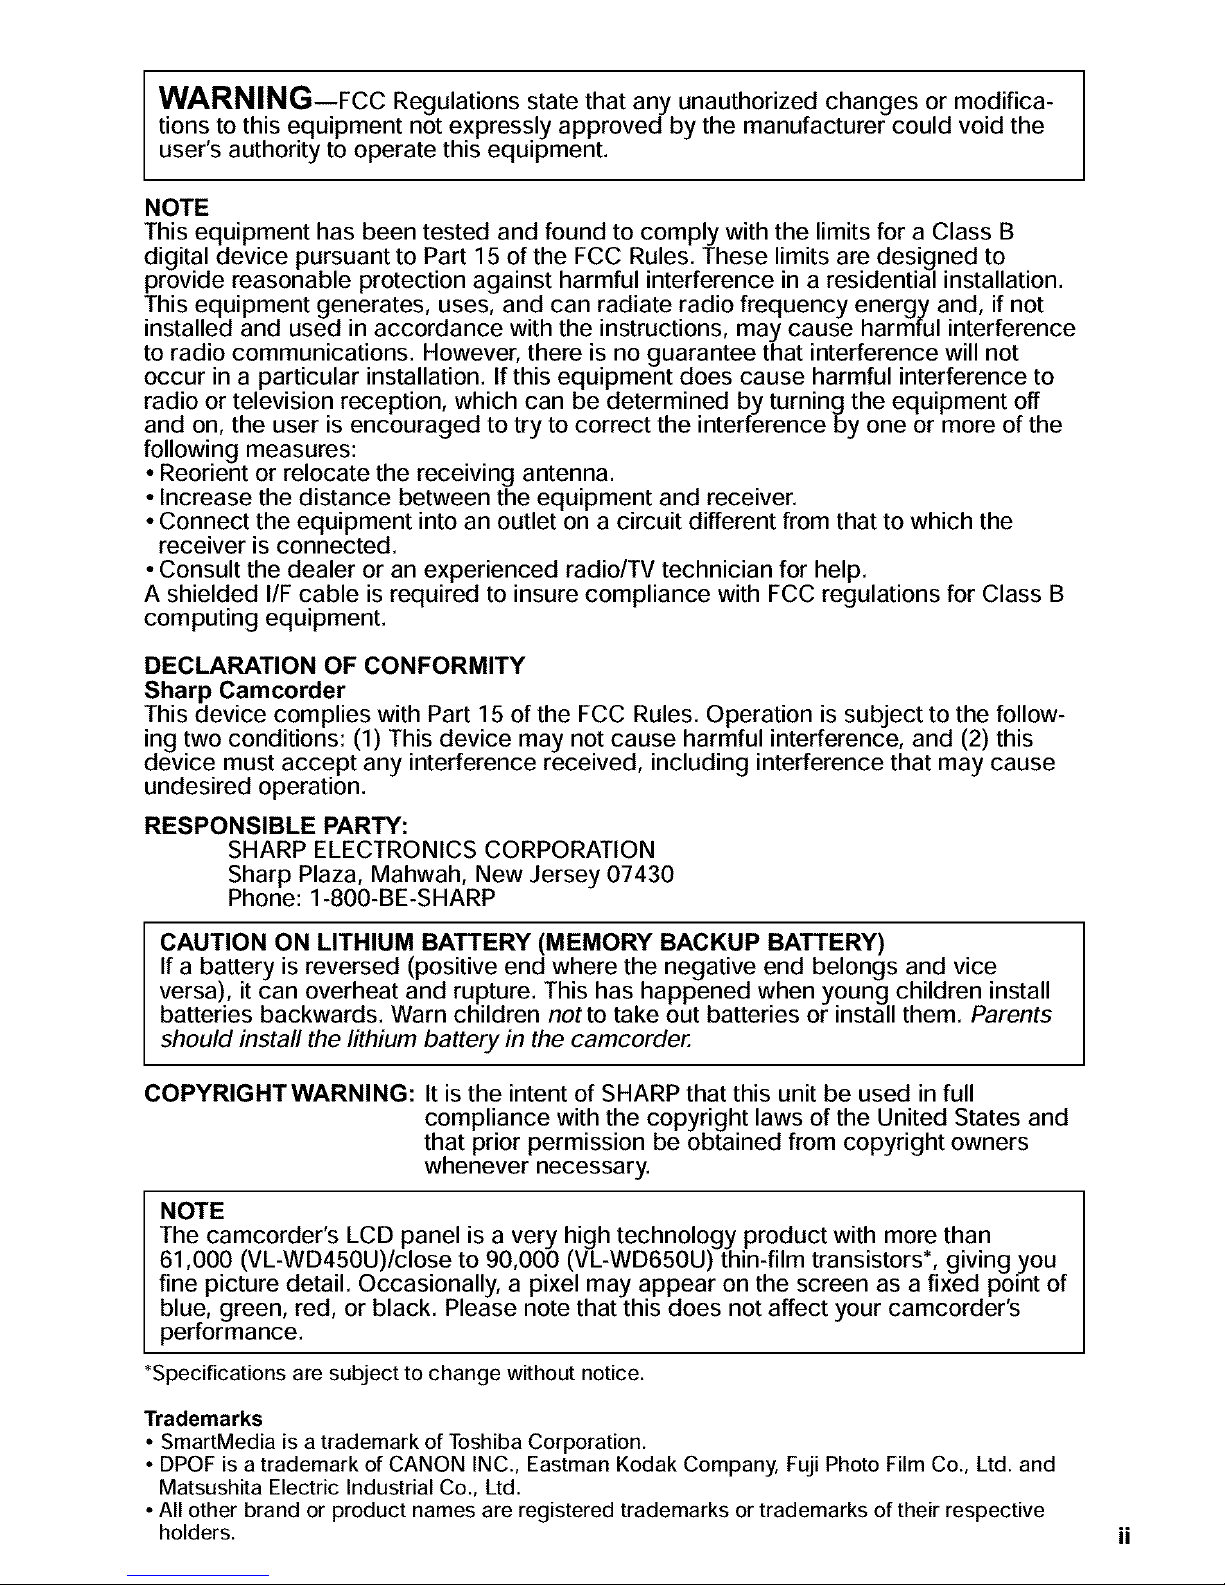
Accessories--Do not place this product
on an unstable cart, stand, tripod,
bracket, or table. The product may fall,
causing serious injury to a child or
adult, and
____ _' -- _ serious damage
___ to the product.
/
Use only with a
cart, stand, 13.
tripod, bracket,
or table recommended by the manu-
facturer, or sold with the product. Any
mounting of the product should follow
the manufacturer's instructions, and
should use a mounting accessory
recommended by the manufacturer.
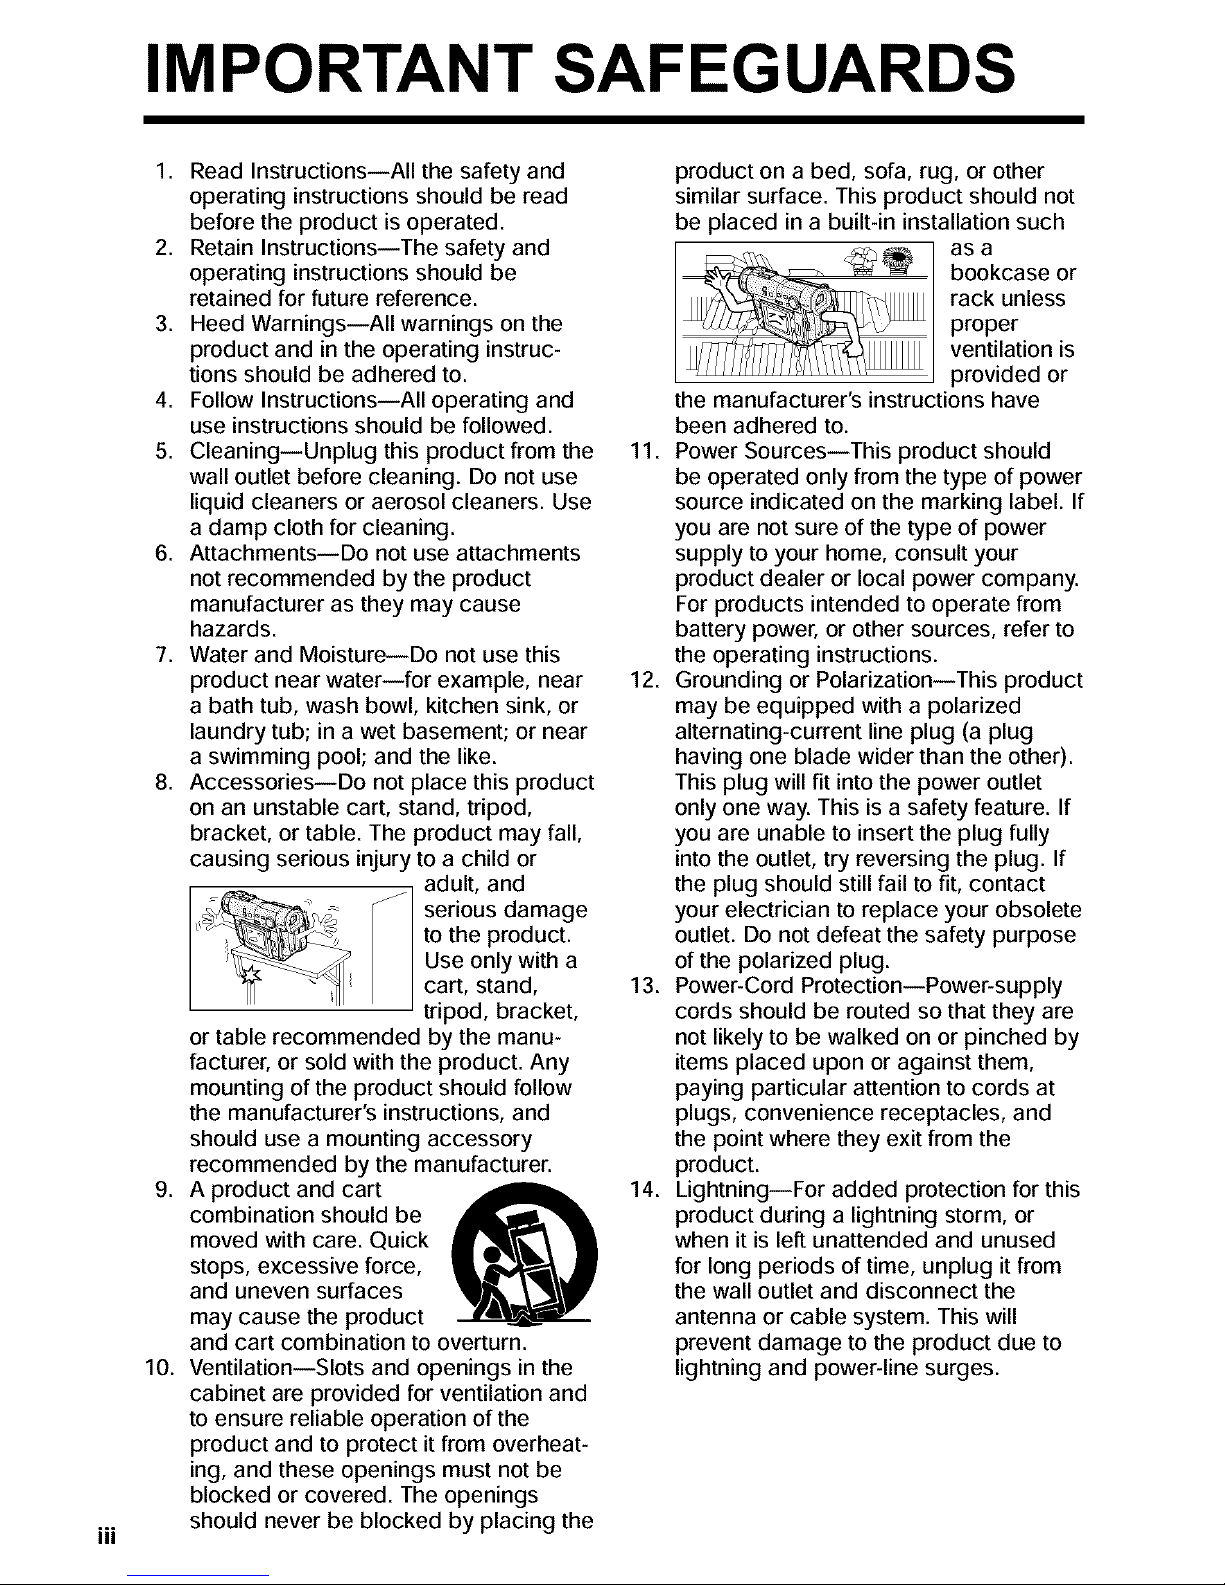
A product and cart _ 14.
combination should be
€9
moved with care. Quick
stops, excessive force,
and uneven surfaces
may cause the product
and cart combination to overturn.
Ventilation--Slots and openings in the
cabinet are provided for ventilation and
to ensure reliable operation of the
product and to protect it from overheat-
ing, and these openings must not be
blocked or covered. The openings
should never be blocked by placing the
product on a bed, sofa, rug, or other
similar surface. This product should not
be placed in a built-in installation such
as a
bookcase or
rack unless
proper
ventilation is
provided or
the manufacturer's instructions have
been adhered to.
Power Sources--This product should
be operated only from the type of power
source indicated on the marking label. If
you are not sure of the type of power
supply to your home, consult your
product dealer or local power company.
For products intended to operate from
battery power, or other sources, refer to
the operating instructions.
Grounding or Polarization--This product
may be equipped with a polarized
alternating-current line plug (a plug
having one blade wider than the other).
This plug will fit into the power outlet
only one way. This is a safety feature. If
you are unable to insert the plug fully
into the outlet, try reversing the plug. If
the plug should still fail to fit, contact
your electrician to replace your obsolete
outlet. Do not defeat the safety purpose
of the polarized plug.
Power-Cord Protection--Power-supply
cords should be routed so that they are
not likely to be walked on or pinched by
items placed upon or against them,
paying particular attention to cords at
plugs, convenience receptacles, and
the point where they exit from the
product.
Lightning--For added protection for this
product during a lightning storm, or
when it is left unattended and unused
for long periods of time, unplug it from
the wall outlet and disconnect the
antenna or cable system. This will
prevent damage to the product due to
lightning and power-line surges.
15.PowerLines--Anoutsideantenna
systemshouldnotbelocatedin the
vicinity of overhead power lines or other
electric light or power circuits, or where
it can fall into such power lines or
circuits. When installing an outside
antenna system, extreme care should
be taken to keep from touching such
power lines or circuits as contact with
them might be fatal.
16. Overloading--Do not overload wall
outlets, extension cords, or integral
convenience receptacles as this can
result in a risk of fire or electric shock.
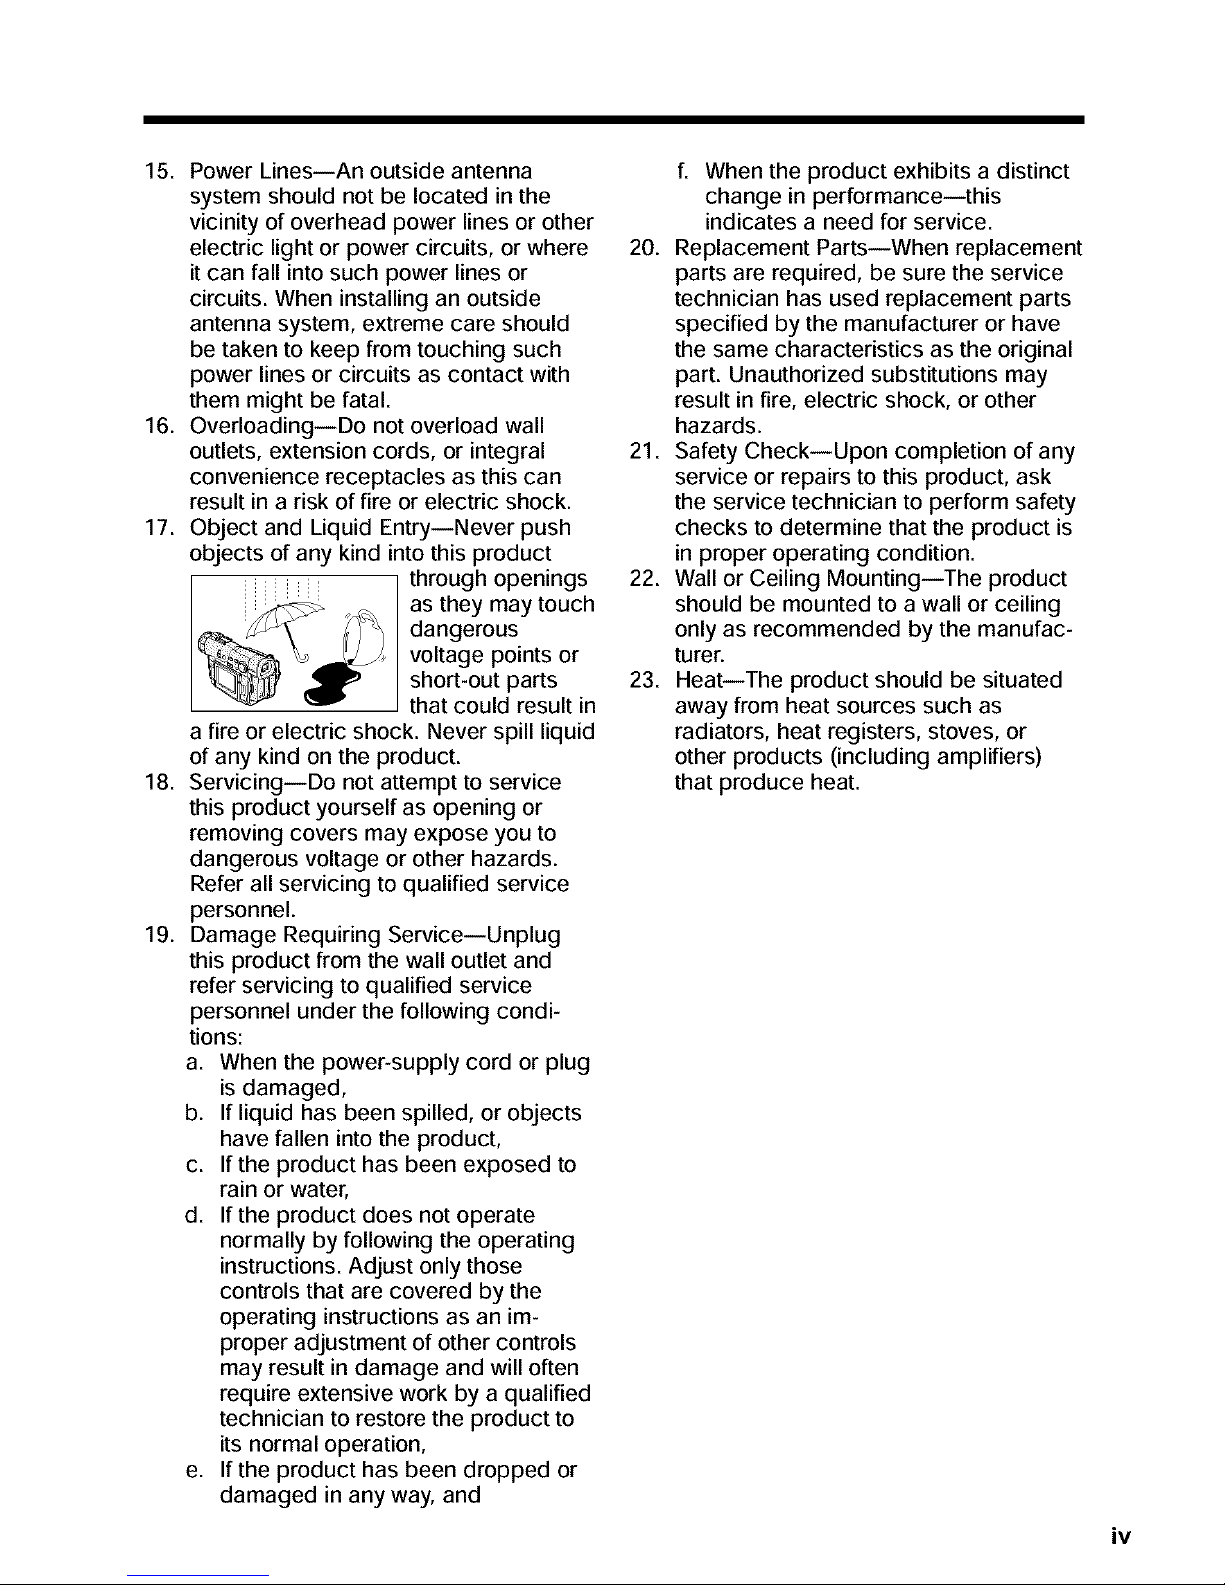
17. Object and Liquid Entry--Never push
objects of any kind into this product
through openings
as they may touch
dangerous
voltage points or
short-out parts
that could result in
a fire or electric shock. Never spill liquid
of any kind on the product.
18. Servicing--Do not attempt to service
this product yourself as opening or
removing covers may expose you to
dangerous voltage or other hazards.
Refer all servicing to qualified service
personnel.
19. Damage Requiring Service--Unplug
this product from the wall outlet and
refer servicing to qualified service
personnel under the following condi-
tions:
a. When the power-supply cord or plug
is damaged,
b. If liquid has been spilled, or objects
have fallen into the product,
c. If the product has been exposed to
rain or water,
d. If the product does not operate
normally by following the operating
instructions. Adjust only those
controls that are covered by the
operating instructions as an im-
proper adjustment of other controls
may result in damage and will often
require extensive work by a qualified
technician to restore the product to
its normal operation,
e. If the product has been dropped or
damaged in any way, and
f. When the product exhibits a distinct
change in performance--this
indicates a need for service.
20. Replacement Parts--When replacement
parts are required, be sure the service
technician has used replacement parts
specified by the manufacturer or have
the same characteristics as the original
part. Unauthorized substitutions may
result in fire, electric shock, or other
hazards.
21. Safety Check--Upon completion of any
service or repairs to this product, ask
the service technician to perform safety
checks to determine that the product is
in proper operating condition.
22. Wall or Ceiling Mounting--The product
should be mounted to a wall or ceiling
only as recommended by the manufac-
turer.
23. Heat--The product should be situated
away from heat sources such as
radiators, heat registers, stoves, or
other products (including amplifiers)
that produce heat.
iv
Quick Operation Guide
Please consult this operation manual
further for details on these and other
functions of your camcorder.
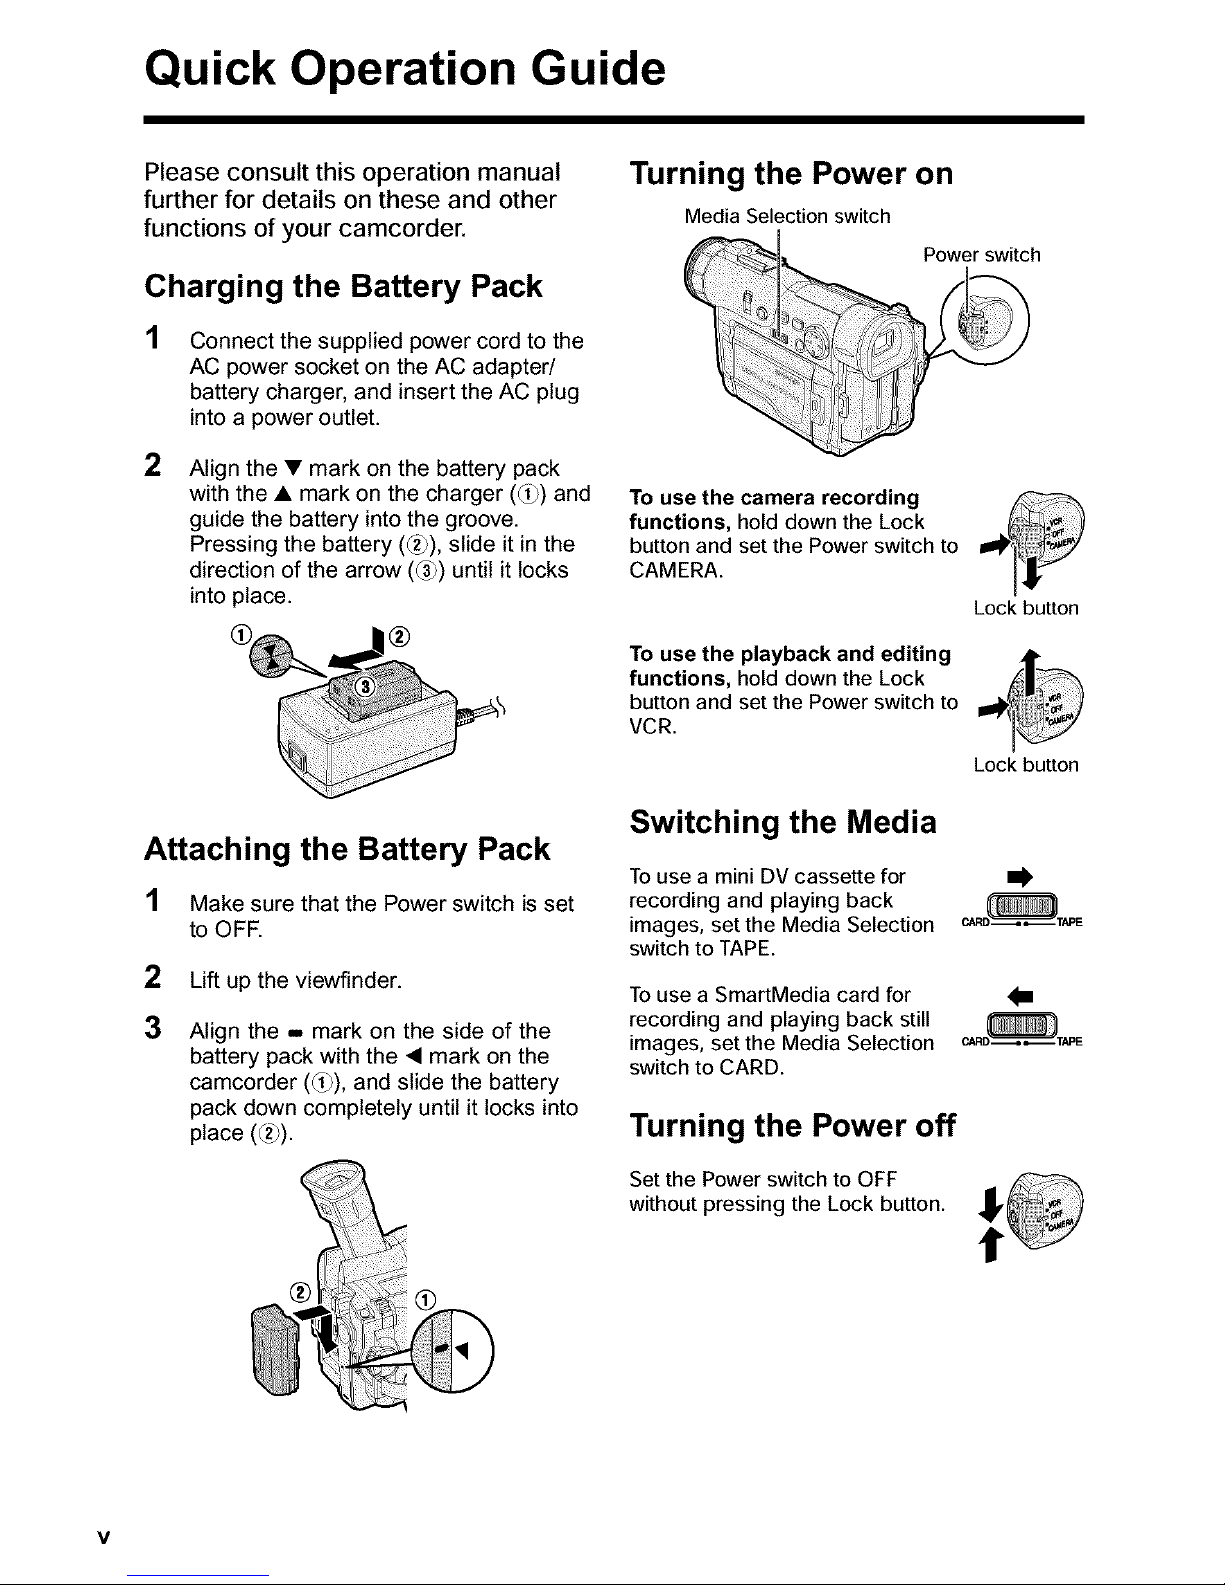
Charging the Battery Pack
Connect the supplied power cord to the
AC power socket on the AC adapter/
battery charger, and insert the AC plug
into a power outlet.
2
Align the • mark on the battery pack
with the • mark on the charger (_) and
guide the battery into the groove.
Pressing the battery (_2_),slide it in the
direction of the arrow (_) until it locks
into place.
Attaching the Battery Pack
1 Make sure that the Power switch is set
to OFF.
2
3
Lift up the viewfinder.
Align the ,.. mark on the side of the
battery pack with the • mark on the
camcorder (_), and slide the battery
pack down completely until it locks into
place (_2_).
Turning the Power on
Media Selection switch
Power switch
To use the camera recording
functions, hold down the Lock
button and set the Power switch to
CAMERA.
Lock button
To use the playback and editing
functions, hold down the Lock
button and set the Power switch to
VCR.
Lock button
Switching the Media
To use a mini DV cassette for
recording and playing back
images, set the Media Selection
switch to TAPE.
To use a SmartMedia card for
recording and playing back still
images, set the Media Selection
switch to CARD.
..I,
I
Turning the Power off
Set the Power switch to OFF
without pressing the Lock button.
v
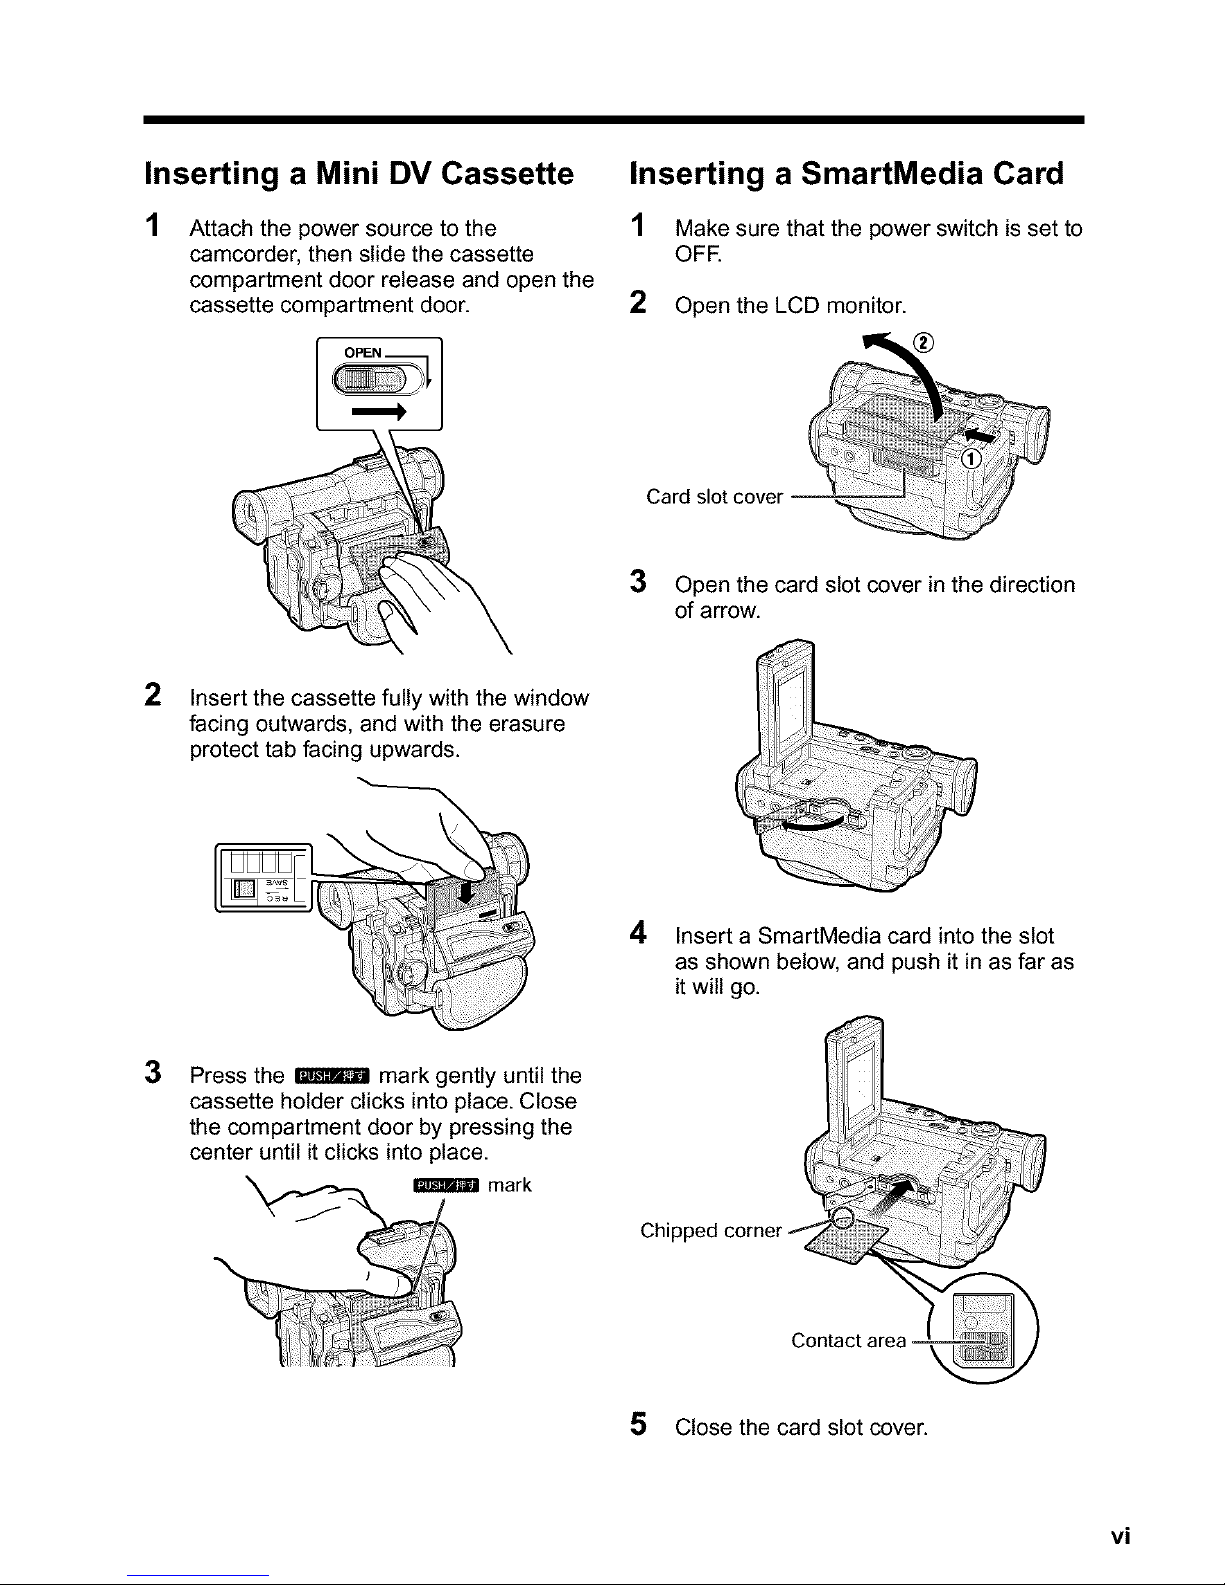
Inserting a Mini DV Cassette
Attach the power source to the
camcorder, then slide the cassette
compartment door release and open the
cassette compartment door.
Inserting a SmartMedia Card
1 Make sure that the power switch is set to
OFF.
2 Open the LCD monitor.
Card slot cover
2
3
Insert the cassette fully with the window
facing outwards, and with the erasure
protect tab facing upwards.
Press the _ mark gently until the
cassette holder clicks into place. Close
the compartment door by pressing the
center until it clicks into place.
mark
3
4
Open the card slot cover in the direction
of arrow.
Insert a SmartMedia card into the slot
as shown below, and push it in as far as
it will go.
5 Close the card slot cover.
vi
Quick Operation Guide
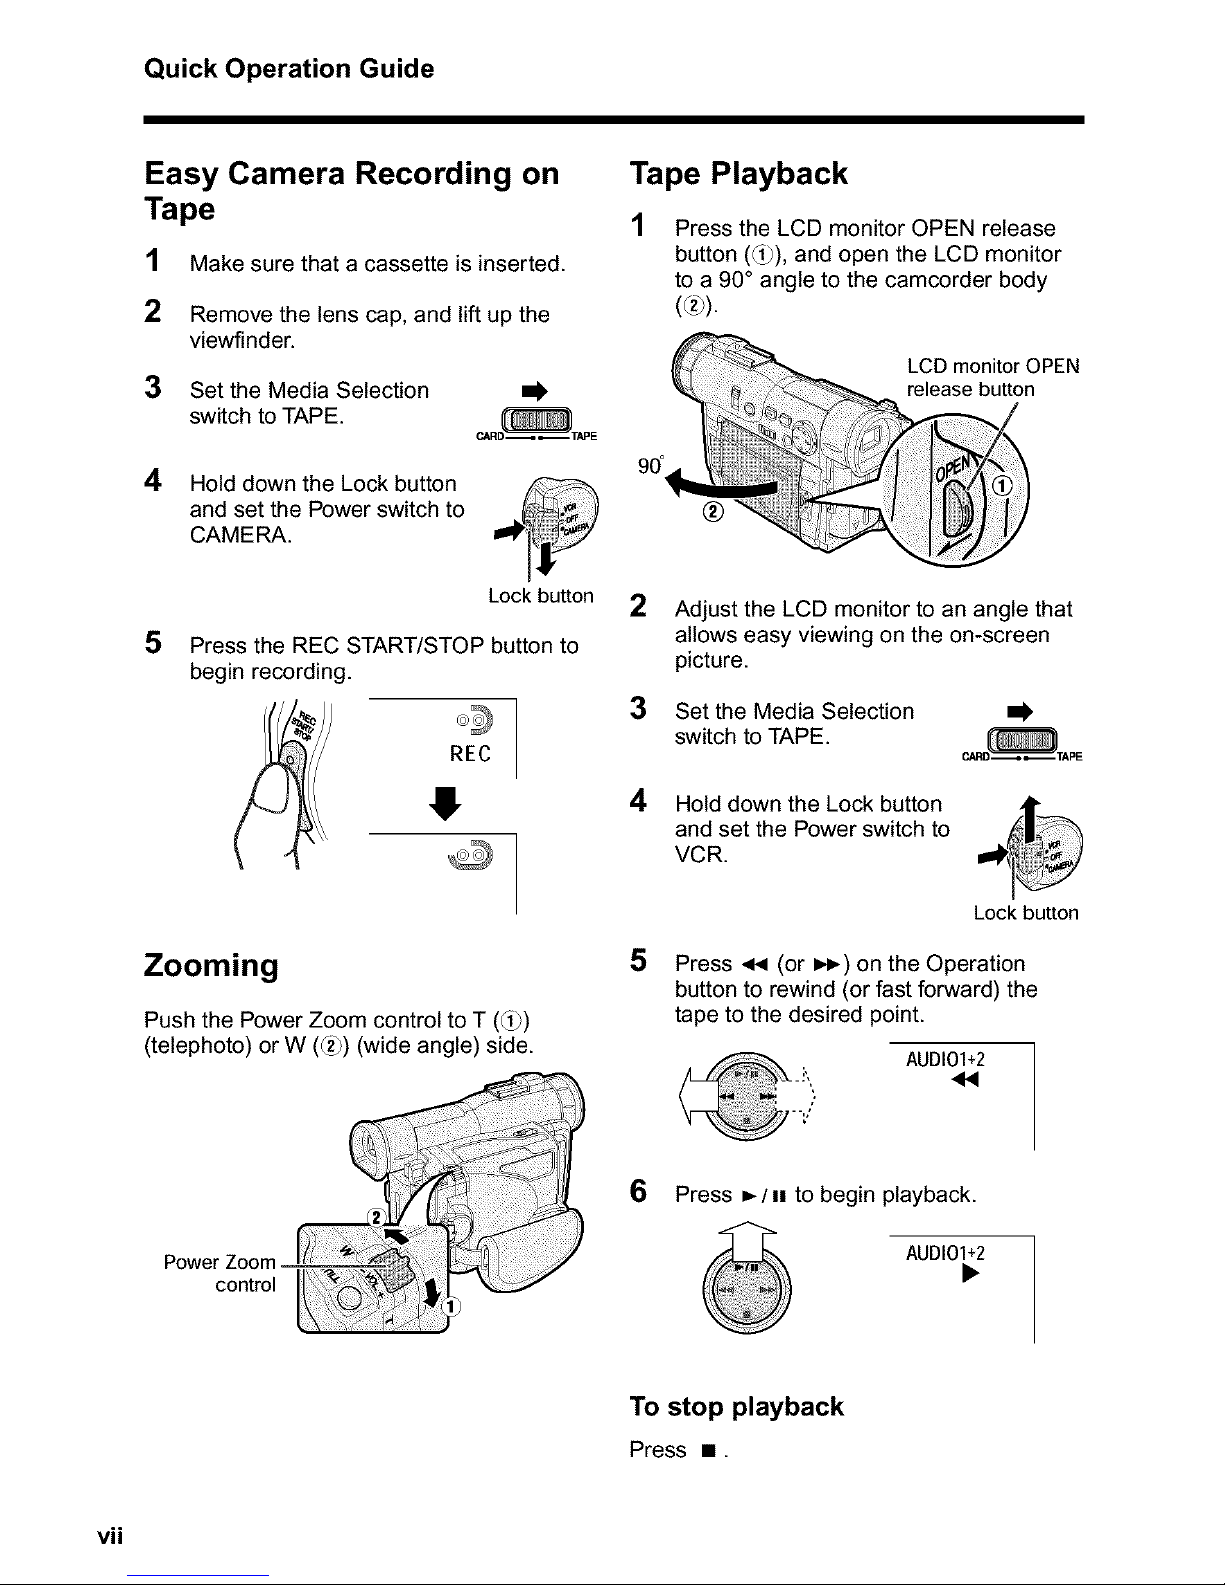
Easy Camera Recording on
Tape
1 Make sure that a cassette is inserted.
2 Remove the lens cap, and lift up the
viewfinder.
3 Set the Media Selection
switch to TAPE.
4 Hold down the Lock button
and set the Power switch to
CAMERA.
Lock button
5 Press the REC START/STOP button to
begin recording.
REC
Tape Playback
2
Press the LCD monitor OPEN release
button (_), and open the LCD monitor
to a 90 ° angle to the camcorder body
(®).
3
Adjust the LCD monitor to an angle that
allows easy viewing on the on-screen
picture.
Set the Media Selection ml_
switch to TAPE.
Hold down the Lock button
and set the Power switch to
VCR.
Zooming 5
Push the Power Zoom control to T (_)
(telephoto) or W (_) (wide angle) side.
Power Zoom _ 6
control
Lock button
Press _ (or _,_) on the Operation
button to rewind (or fast forward) the
tape to the desired point.
AUDI01+2
Press _-/ nl to begin playback.
AUDI01+2
To stop playback
Press =.
vii
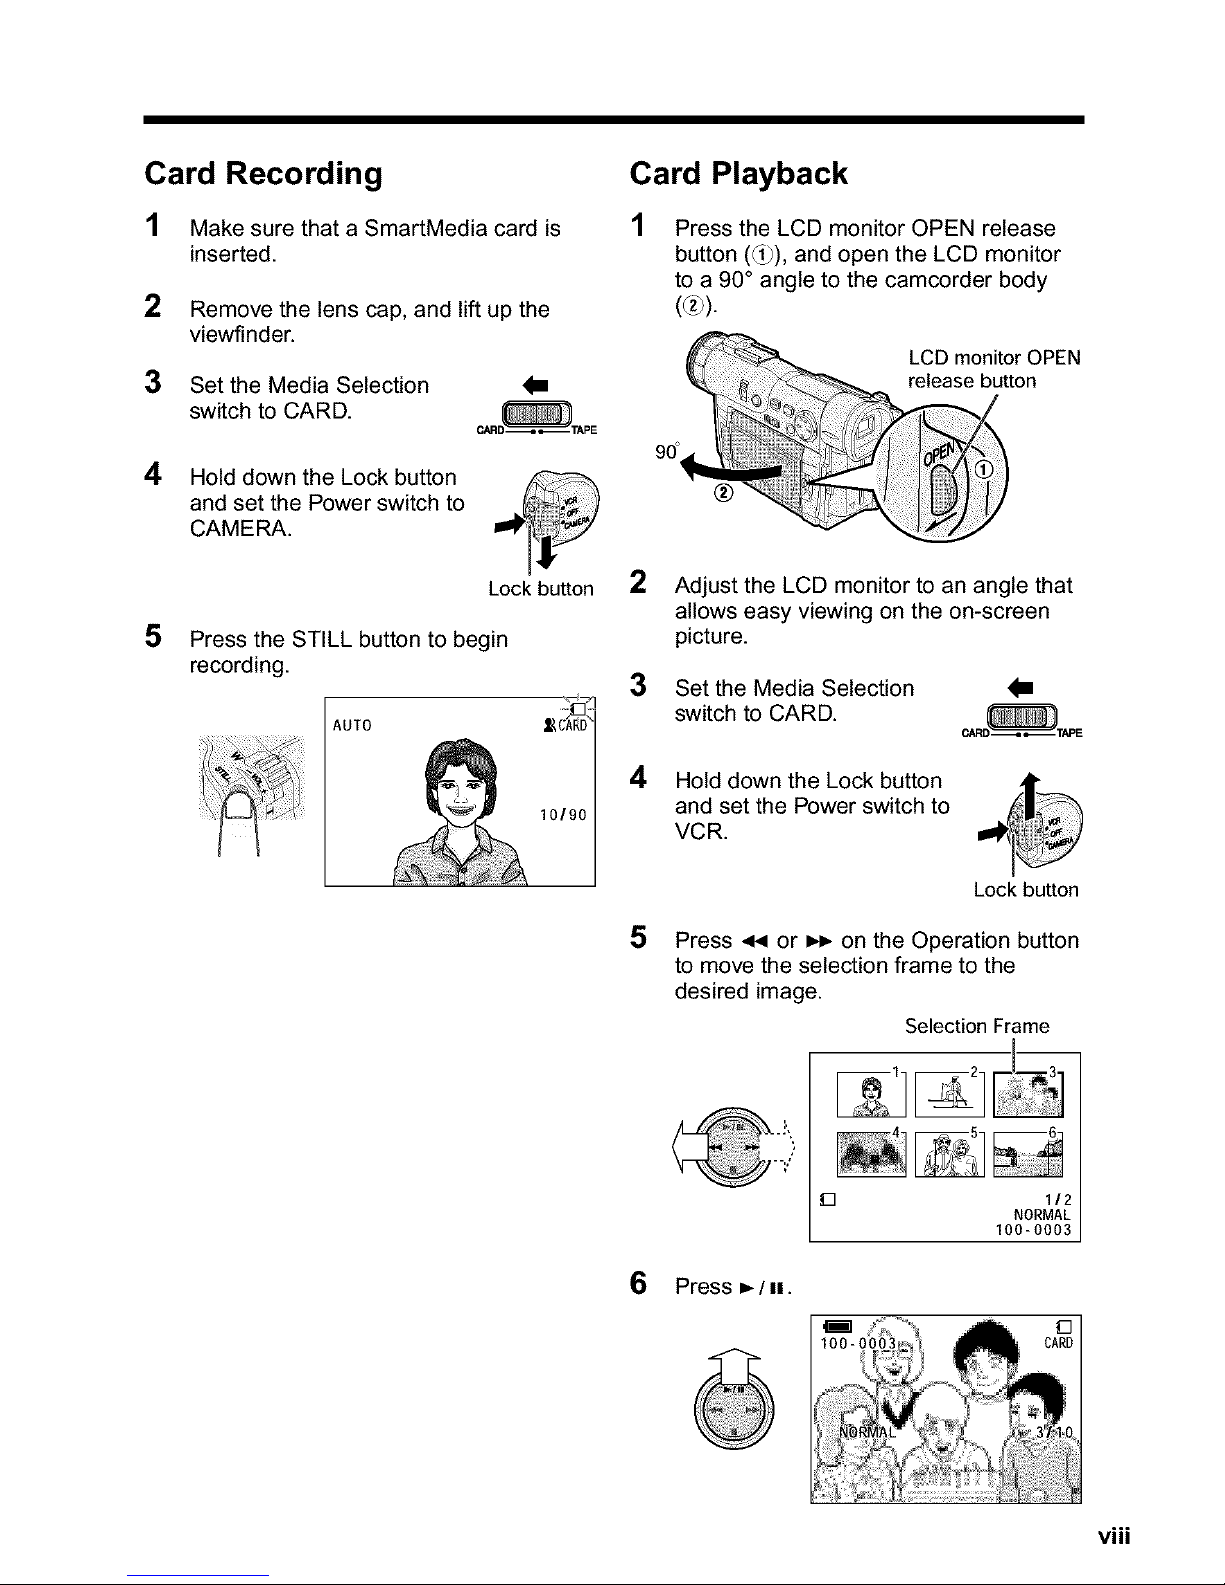
Card Recording
1 Make sure that a SmartMedia card is
inserted.
2
3
Remove the lens cap, and lift up the
viewfinder.
Set the Media Selection
switch to CARD.
4 Hold down the Lock button
and set the Power switch to
CAMERA.
5
Lock button
Press the STILL button to begin
recording.
AUTO 10/90
Card Playback
Press the LCD monitor OPEN release
button (_), and open the LCD monitor
to a 90 ° angle to the camcorder body
(®).
LCD monitor OPEN
release button
90°
2
Adjust the LCD monitor to an angle that
allows easy viewing on the on-screen
picture.
3 Set the Media Selection I
switch to CARD.
4 Hold down the Lock button
and set the Power switch to
VCR.
5
Lock button
Press _ or _,_ on the Operation button
to move the selection frame to the
desired image.
Selection Frame
6 Press I- / II.
viii
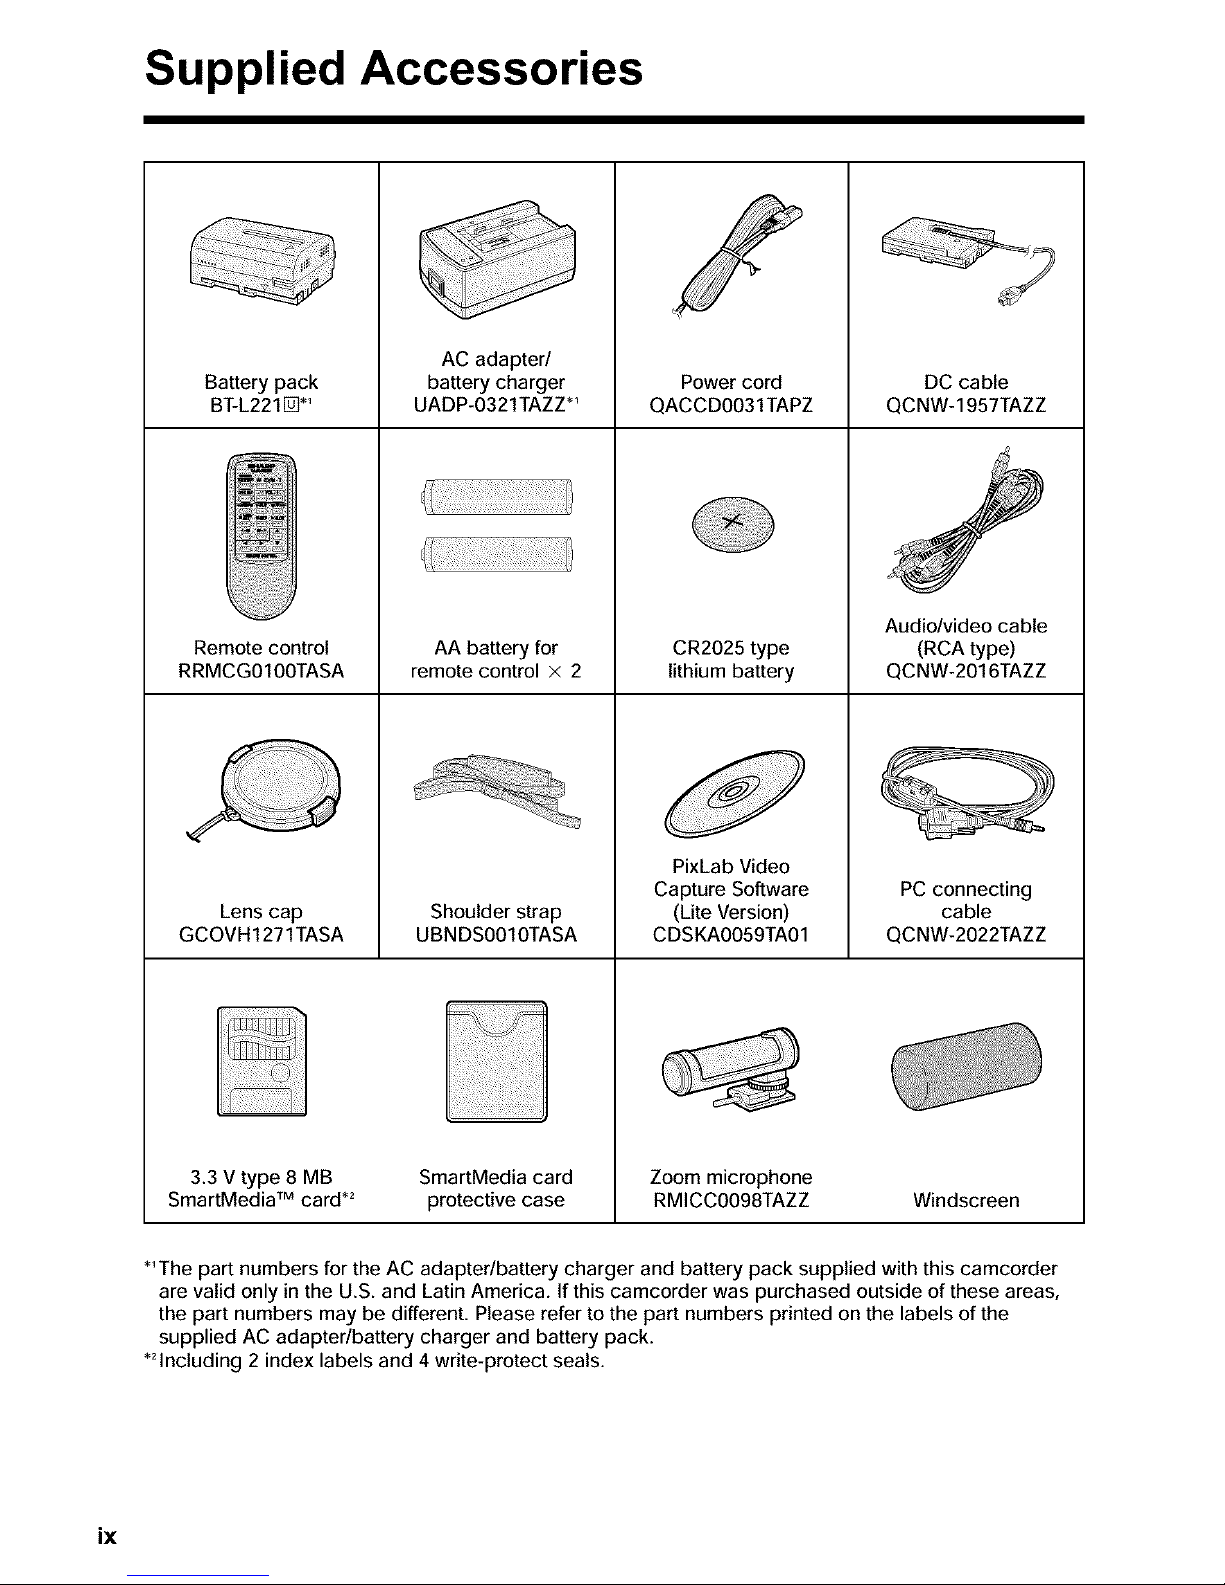
Supplied Accessories
Battery pack
BT-L221[_*_
AC adapter/
battery charger
UADP-O321TAZZ *_
Power cord
QACC DO031 TAPZ
Remote control
AA battery for
RRMCG0100TASA
Lens cap
GCOVH1271TASA
3.3 v type 8 MB
SmartMedia TM card *_
remote control x 2
Shoulder strap
UBNDSOOIOTASA
CR2025 type
lithium battery
PixLab Video
Capture Software
(Lite Version)
CDSKAOO59TA01
DC cable
QCNW-1957TAZZ
Audio/video cable
(RCA type)
QCNW-2016TAZZ
PC connecting
cable
QCNW-2022TAZZ
SmartMedia card
protective case
Zoom microphone
RMICCOO98TAZZ Windscreen
*_The part numbers for the AC adapter/battery charger and battery pack supplied with this camcorder
are valid only in the U.S. and Latin America. If this camcorder was purchased outside of these areas,
the part numbers may be different. Please refer to the part numbers printed on the labels of the
supplied AC adapter/battery charger and battery pack.
*2Including 2 index labels and 4 write-protect seals.
ix
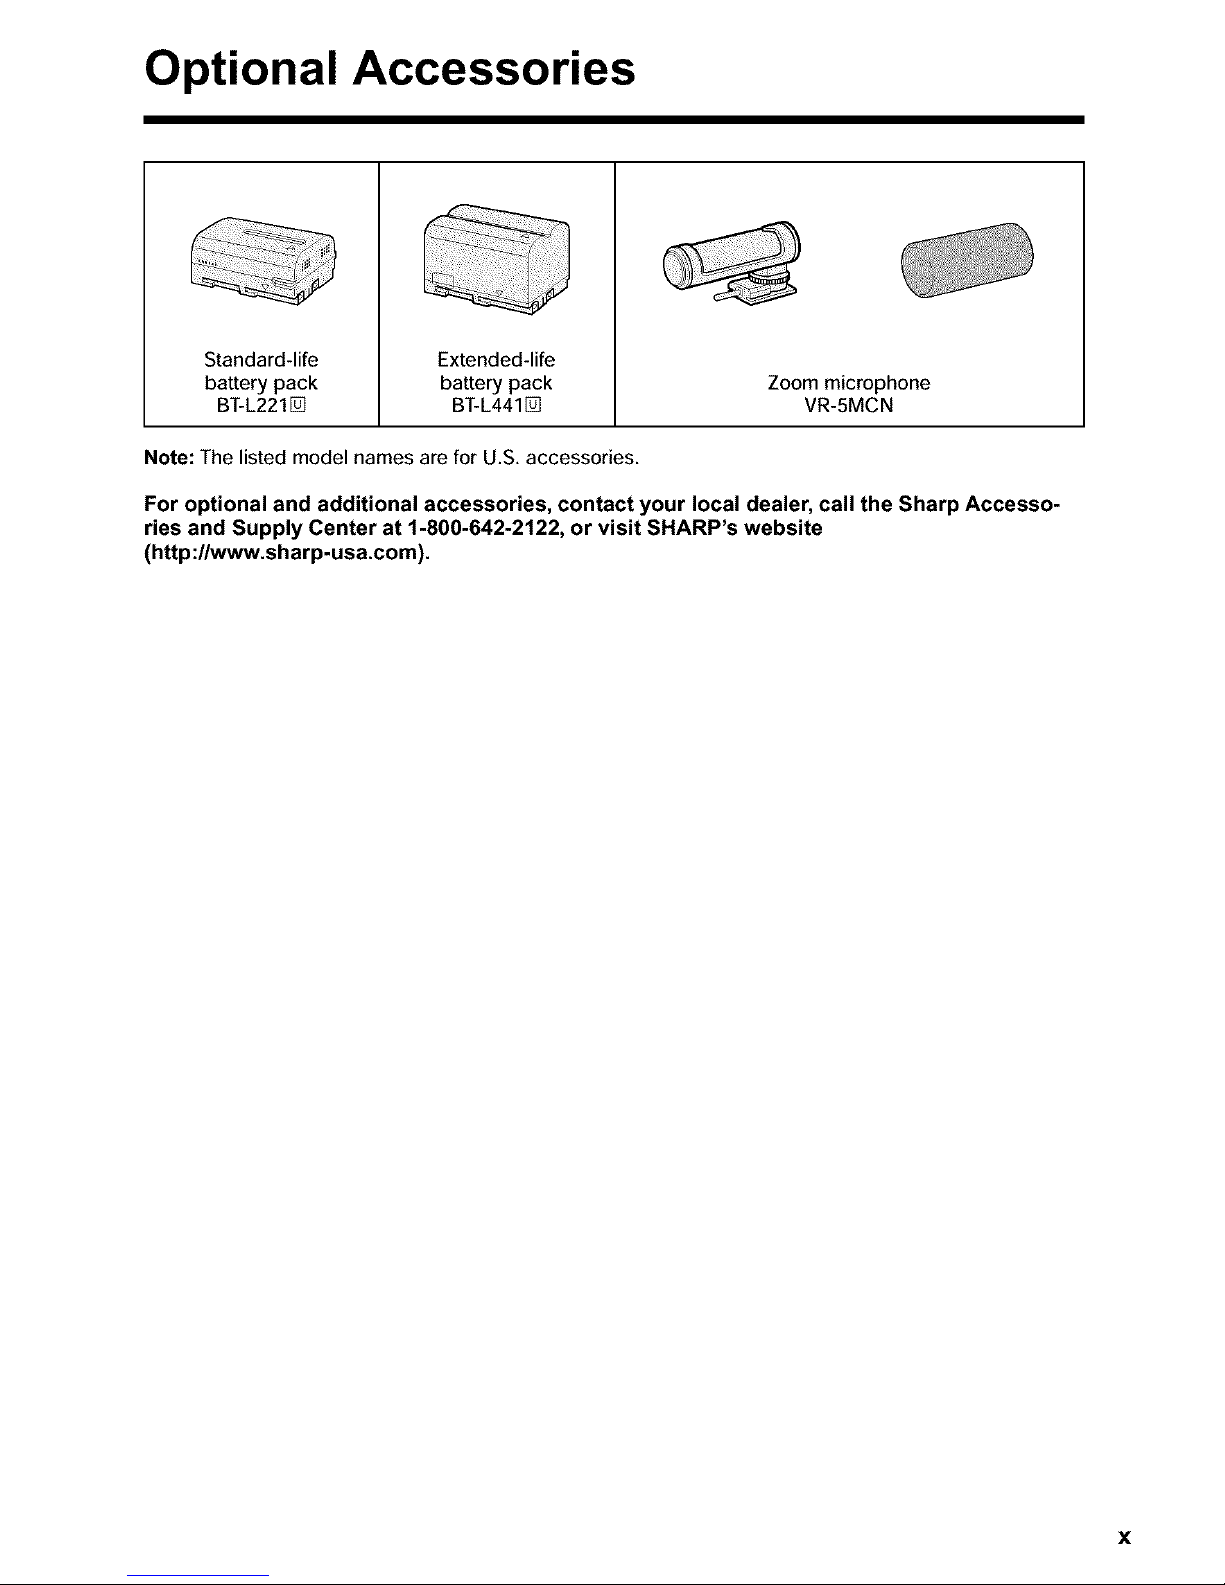
Optional Accessories
Standard-life
battery pack
BT-L221 []
Extended-life
battery pack
BT-L441 []
Zoom microphone
VR-5MCN
Note: The listed model names are for U.S. accessories.
For optional and additional accessories, contact your local dealer, call the Sharp Accesso-
ries and Supply Center at 1-800-642-2122, or visit SHARP's website
(http://www.sharp-usa.com).

Precautions
• When the camcorder is not in use, remem-
ber to remove the cassette tape, turn off
the power, and disconnect the camcorder
from the power source.
• Do not aim the lens at the sun.
Do not allow direct sunlight to strike the
camcorder lens or LCD monitor screen,
whether or not recording is in progress, as it
may damage the CCD sensor or LCD screen
surface. Be particularly careful when
recording outside.
• When shooting in dark places, avoid sudden
brightly lit objects or light sources, such as
the sun. Otherwise, the image may white out.
Should this happen, point the lens in a
different direction until the picture returns to
normal.
• Avoid magnetic sources.
Using the camcorder near
strong fluorescent lights,
motors, televisions, or
other magnetic sources
may adversely affect
recorded images.
• Using the camcorder near a broadcasting
station or other powerful transmission
source may cause buzzing or picture
deterioration.
• Avoid shocks and dropping.
Do not drop or otherwise
subject the camcorder to
hard shocks or strong
vibrations. Bumping or
striking the unit during
recording will generate noise
in the recorded image.
• Avoid placing the
camcorder in close
proximity to lighting
equipment.
The heat from
incandescent lights
may deform the
camcorder, or cause it
to malfunction.
Always respect prohibitions or restrictions
on the use of electronic equipment on
commercial flights or in other sensitive
areas.
Be aware of the temperature and humidity.
You can use your camcorder at 32°F to 104°F
(0°C to +40°C), and at 30% to 80% relative
humidity. Do not store the unit in an
unventilated car in the
summer, in direct
sunlight, or near strong
heat sources; this can
result in severe damage
to the unit casing and
circuitry.
Avoid situations where water, sand, dust or
other foreign matter could get on or inside
the camcorder, and do not use or leave
your camcorder in areas with excessive
smoke, steam or moisture.
Such environments can
cause malfunctions or
cause mildew to form
on the lenses. Be sure
to keep the unit in a
well-ventilated location.
Some small, portable
tripods may be difficult to
attach and may not be
sturdy enough to support
your camcorder. Be sure to
use only a strong, stable
tripod.
When using your camcorder in a cold
environment, the LCD monitor screen often
appears less bright immediately after the
power is turned on.This is not a malfunc-
tion.To prevent the camcorder from
becoming too cold, wrap it in a thick cloth
(a blanket, etc.).
xi
Contents
I Operation References
Part Names ............................................................... |
Quick Reference List .................................................
On-screen Display Index ...........................................
Warning Indicators ....................................................
Preparation Charging the Battery Pack ........................................ 9
Attaching and Removing the Battery Pack .............. 10
Powering the Camcorder from an AC Outlet ........... 11
Inserting and Removing a Mini DV Cassette .......... 12
Installing the Lithium Memory Battery ..................... 13
Selecting the Language for the On-screen
Display .................................................................. 14
Setting the Area, Date and Time ............................. 15
Displaying the Date and Time of Recording ............ 16
Adjusting the Hand Strap ........................................ 17
Using the Lens Cap ................................................ 17
Attaching the Shoulder Strap .................................. 17
Using the Viewfinder ............................................... 18
Using the LCD Monitor ............................................ 19
J
Basic Operations Camera Recording
Easy Camera Recording on Tape
in Full Auto Mode .................................................. 20
Zooming .................................................................. 21
Tips on Recording Positions ................................... 21
Remaining Recording Time Display ........................ 22
Remaining Battery Power Display ........................... 22
r
Useful Features
Playback
TapePlayback ......................................................... 23
VolumeControl ........................................................ 23
Watchingthe Playback ona TV .............................. 24
Video Search .......................................................... 25
Still .......................................................................... 25
Selecting the Camcorder Mode .............................. 26
Using the Controls .................................................. 27
Selecting the User Mode ......................................... 28
Using the Menu Screens ......................................... 29
Camera Recording
Recording in LP (Long Play Recording) Mode ........ 30
Selecting the 16-bit Audio Recording Mode ............ 31
Digital Image Stabilization (DIS) ............................. 31
Setting the Digital Zoom .......................................... 32
Gamma Brightness Compensation ......................... 33
Gain-up ................................................................... 34
Night Recording (Super Cat's Eye) ......................... 35
J
xii
Contents
f
Useful Features Quick Return ........................................................... 36
Edit Search ............................................................. 36
Fade In and Fade Out ............................................. 37
Wide Screen (16:9) ................................................. 38
Still Recording on Tape ........................................... 39
Still Recording Effects ............................................. 40
Letting the Subject Monitor the Shot ....................... 42
Auto Focus .............................................................. 43
Macro Shots ............................................................ 43
Using the Remote Control ....................................... 43
Playback
Playback Functions with the Remote Control ......... 45
Using the Time Code .............................................. 46
f
Advanced Features
Camera Recording
Manual Focus .......................................................... 47
Setting the Shutter Speed ....................................... 49
Manual Exposure .................................................... 51
White Balance Lock ................................................ 52
Digital Picture Effects .............................................. 53
Scene Menu (Program AE) ..................................... 54
Using the Zoom Microphone ................................... 55
Windbreak ............................................................... 56
Setting the Confirmation Sounds ............................ 56
World Clock ............................................................. 57
Selecting Daylight Saving Time ............................... 59
Playback
Playback Zoom ....................................................... 60
Gamma Playback .................................................... 61
Multiple Strobe Playback ......................................... 61
Playback Effects ...................................................... 62
Picture Effect Playback ........................................... 63
Picture/Backlight Adjustments ................................. 64
Editing ..................................................................... 65
Recording from an External Source ........................ 66
Editing with the DV Terminal (IEEE1394) ................ 67
Audio Dubbing Feature ........................................... 68
Selecting the Audio Playback Mode ........................ 70
Configuring Software for PC Connection ................ 71
J
xiii
f
SmartMedia Card
Features
Camera Recording
Inserting and Removing a SmartMedia Card .......... 73
Card Recording ....................................................... 74
Selecting the Picture Resolution ............................. 75
Recording with the Self-timer .................................. 76
Formatting a SmartMedia Card ............................... 77
I Appendix
Playback
Card Playback ......................................................... 78
Slide Show Playback ............................................... 79
Delete-protection ..................................................... 80
Deleting One Stored Image .................................... 81
Deleting All Stored Images ..................................... 82
Print Order .............................................................. 83
Transferring the Data on a SmartMedia Card
to a Computer ....................................................... 85
Useful Information ................................................... 811
Demonstration Mode ............................................... 93
:J
Before Requesting Service ..................................... 94
Specifications .......................................................... 9
• Gufa de operaciSn r&pida en espaSol ................................................................... 97
• Visualizaciones en pantalla en espaSol .............................................................. 101
• Affichages sur 6cran en fran_ais ........................................................................ 103
xiv
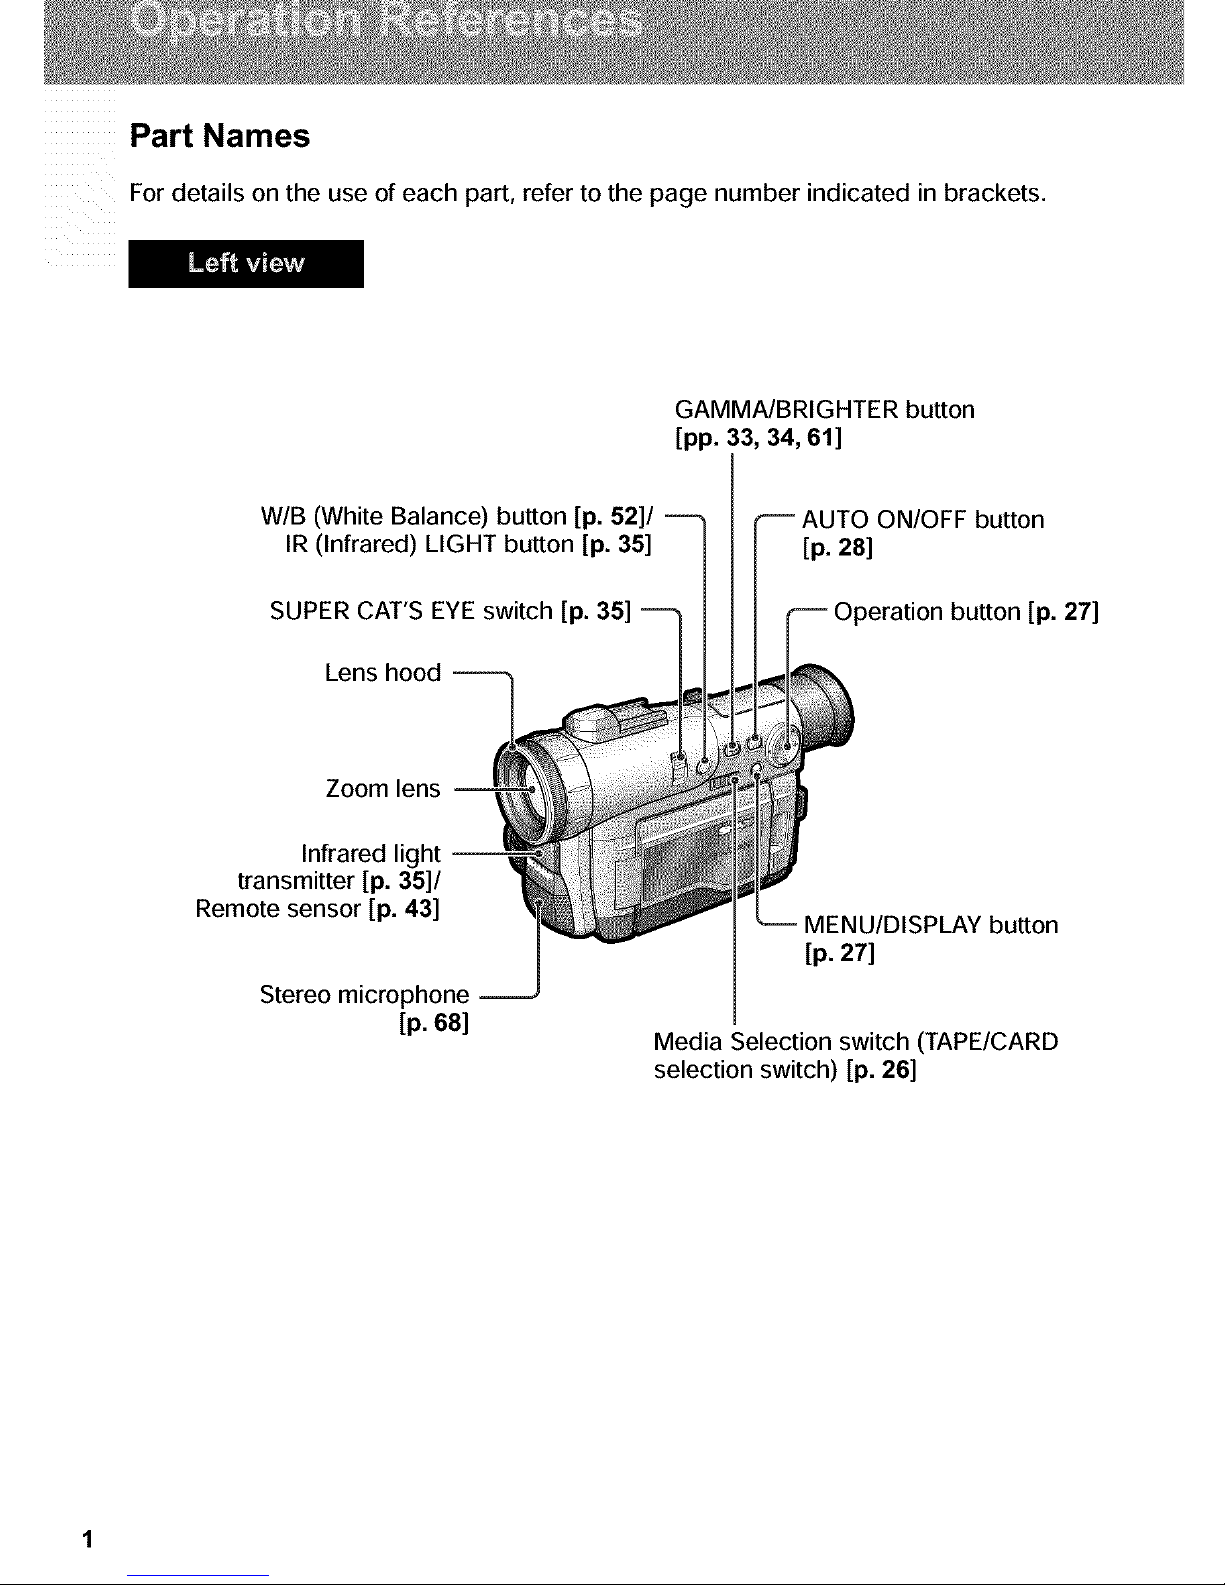
Part Names
For details on the use of each part, refer to the page number indicated in brackets.
GAMMA/BRIGHTER button
[pp. 33, 34, 61]
W/B (White Balance) button [p. 52]/
IR (Infrared) LIGHT button [p. 35]
/
SUPER CAT'S EYE switch [p. 35]
Lens hood
AUTO ON/OFF button
[p. 28]
Operation button [p. 27]
Zoom lens
Infrared light
transmitter [p. 35]/
Remote sensor [p. 43]
Stereo microphone
[p. 68]
MENU/DISPLAY button
[p. 27]
Media Selection switch (TAPE/CARD
selection switch) [p. 26]
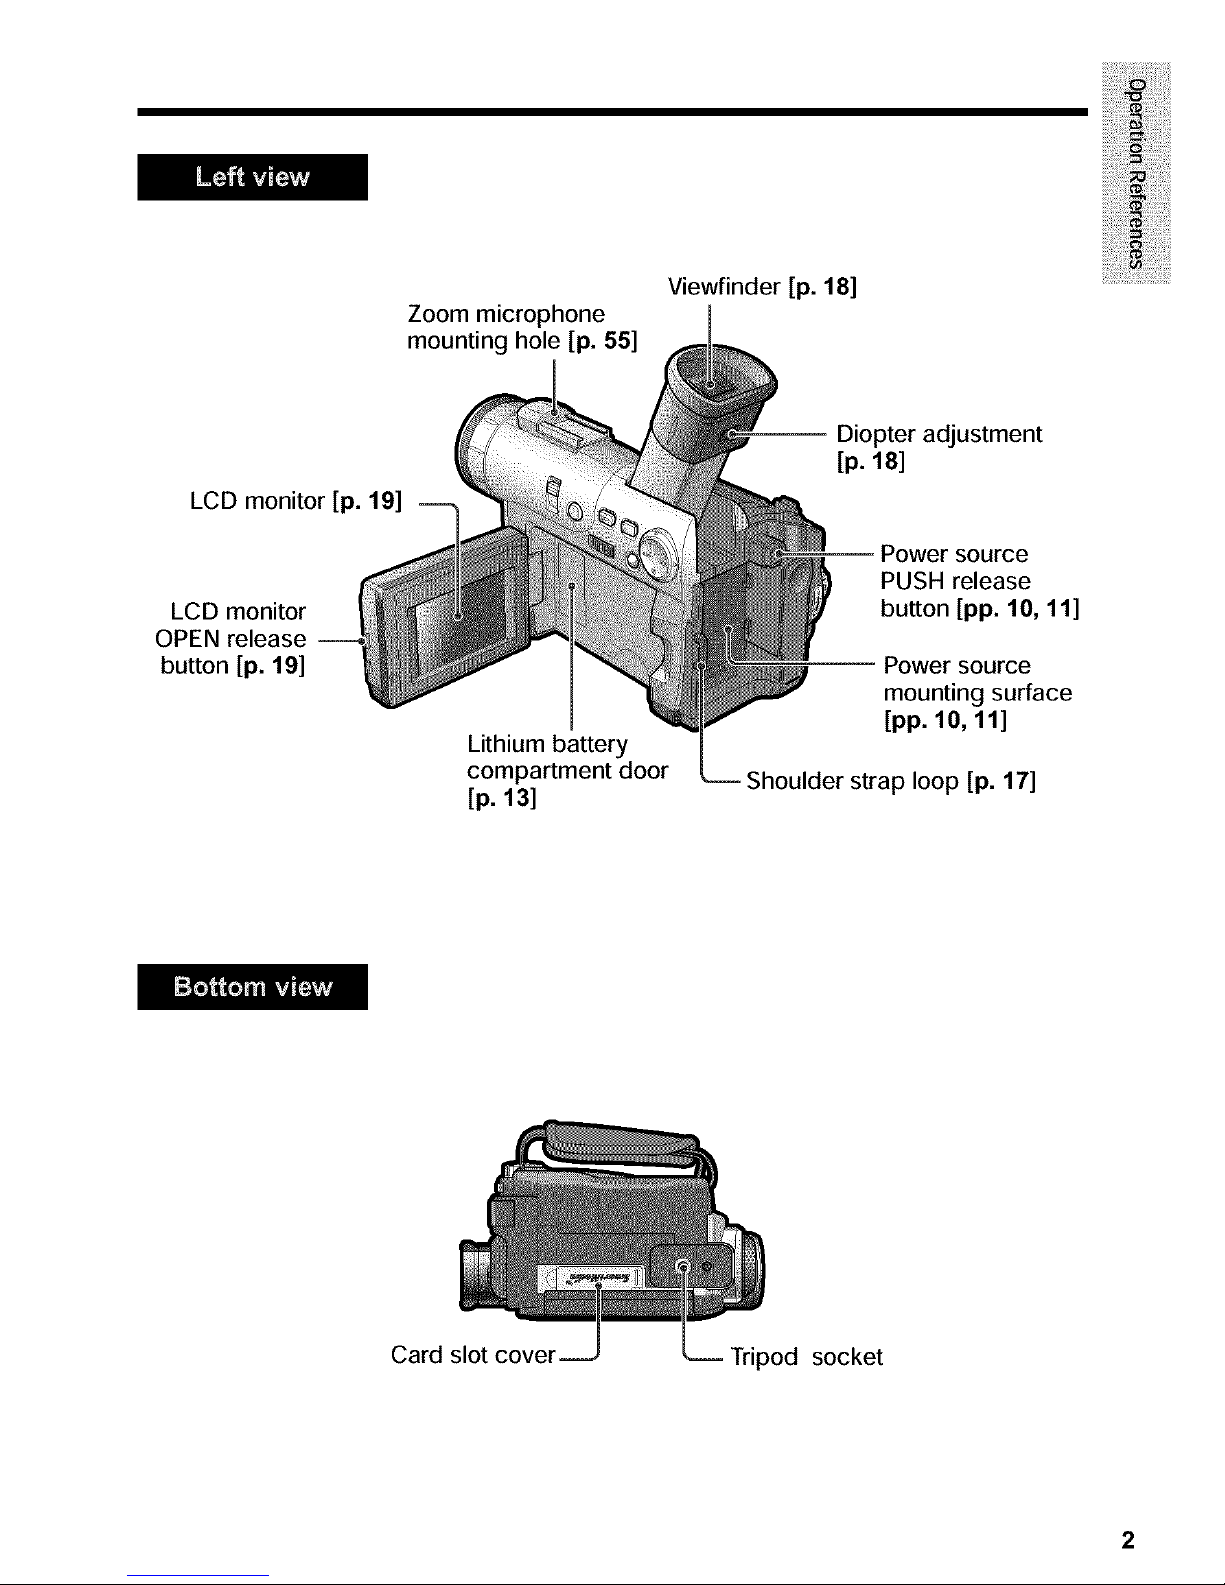
Viewfinder[p.18]
Zoommicrophone I
mountinghole[p.55]
LCDmonitor[p.19]
LCDmonitor
OPENrelease
button[p.19]
Lithiumbattery
compartmentdoor
[p.13]
-- Diopteradjustment
[p.18]
-- Power source
PUSH release
button [pp. 10, 11]
Power source
mounting surface
[pp. 10, 11]
Shoulder strap loop [p. 17]
Card slot cover
Tripod socket
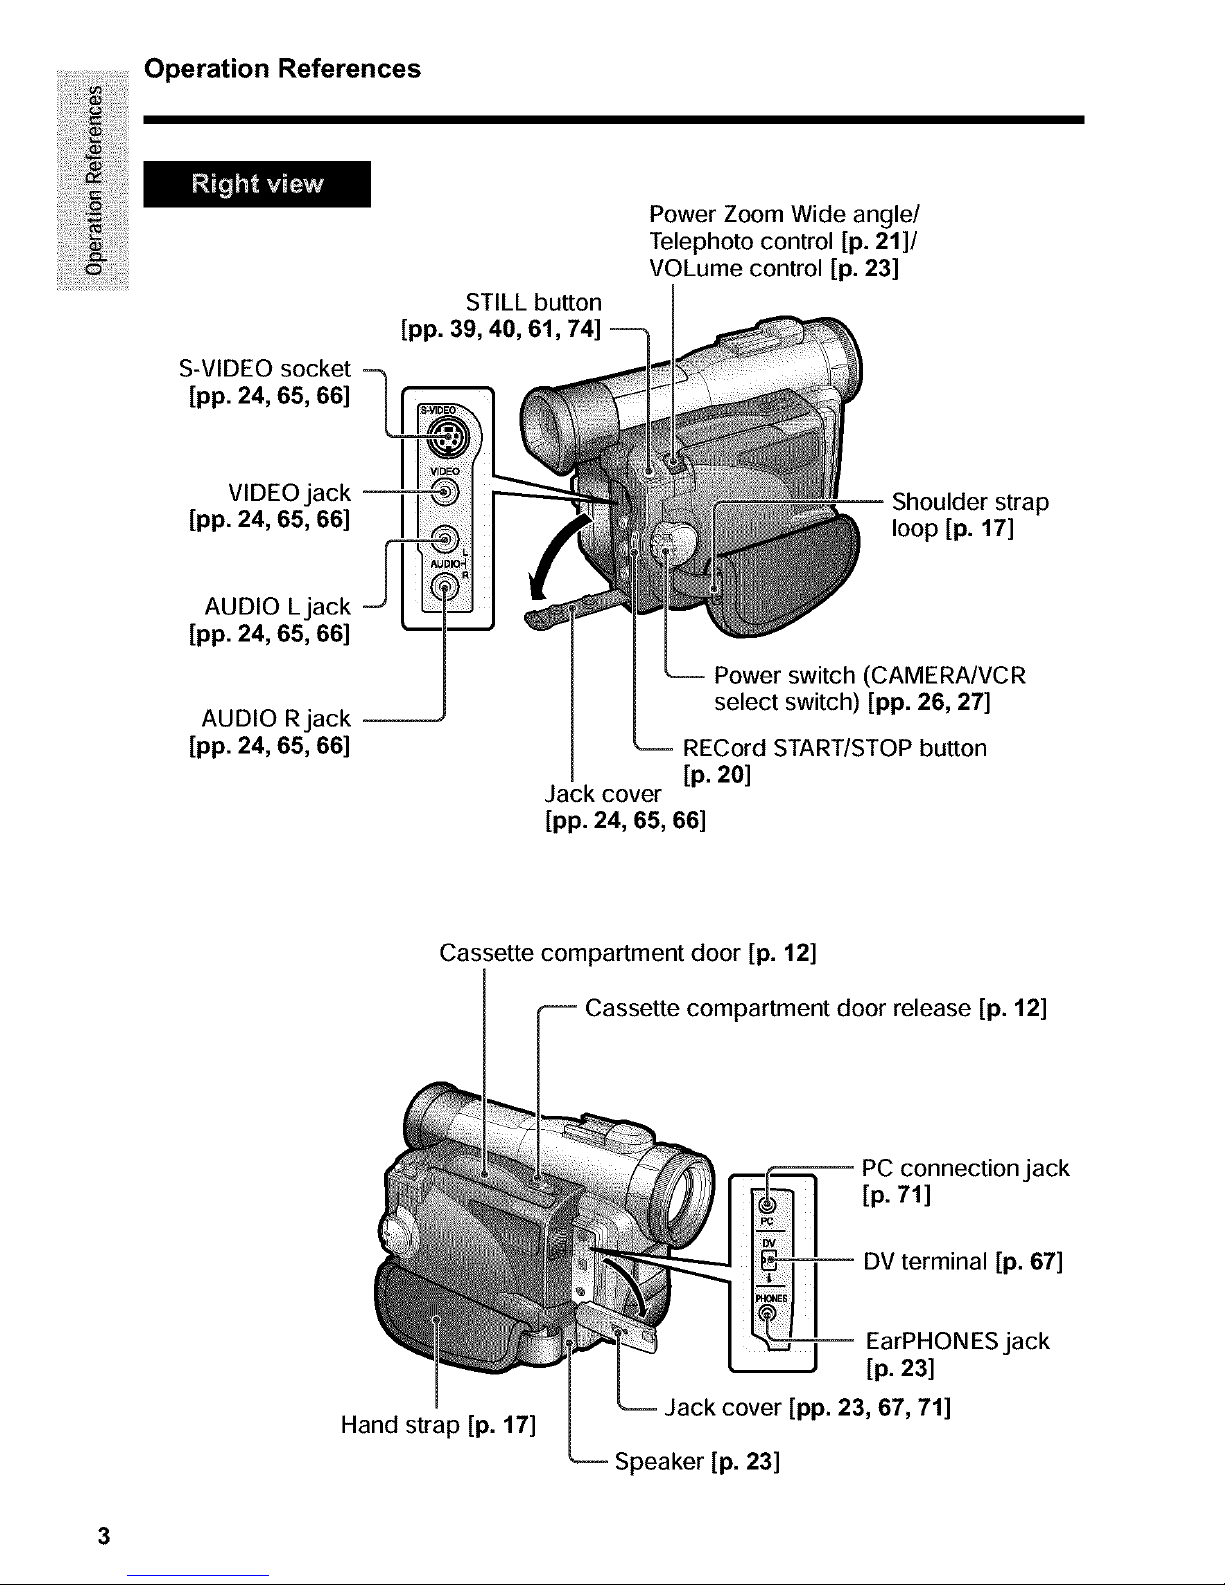
Operation References
S-VIDEO socket
[pp. 24, 65, 66]
STILL button
[pp. 39, 40, 61, 74]
Power Zoom Wide angle/
Telephoto control [p. 21]/
VOLume control [p. 23]
VIDEO jack
[pp. 24, 65, 66]
Shoulder strap
loop [p. 17]
AUDIO Ljack
[pp. 24, 65, 66]
AUDIO Rjack
[pp. 24, 65, 66]
Power switch (CAMERA/VCR
select switch) [pp. 26, 27]
RECord START/STOP button
[p. 20]
Jack cover
[pp. 24, 65, 66]
Cassette compartment door [p. 12]
Cassette compartment door release [p. 12]
connection jack
[p. 71]
DV terminal [p. 67]
Hand strap [p. 17]
EarPHON ESjack
[p. 23]
Jack cover [pp. 23, 67, 71]
_-- Speaker [p. 23]
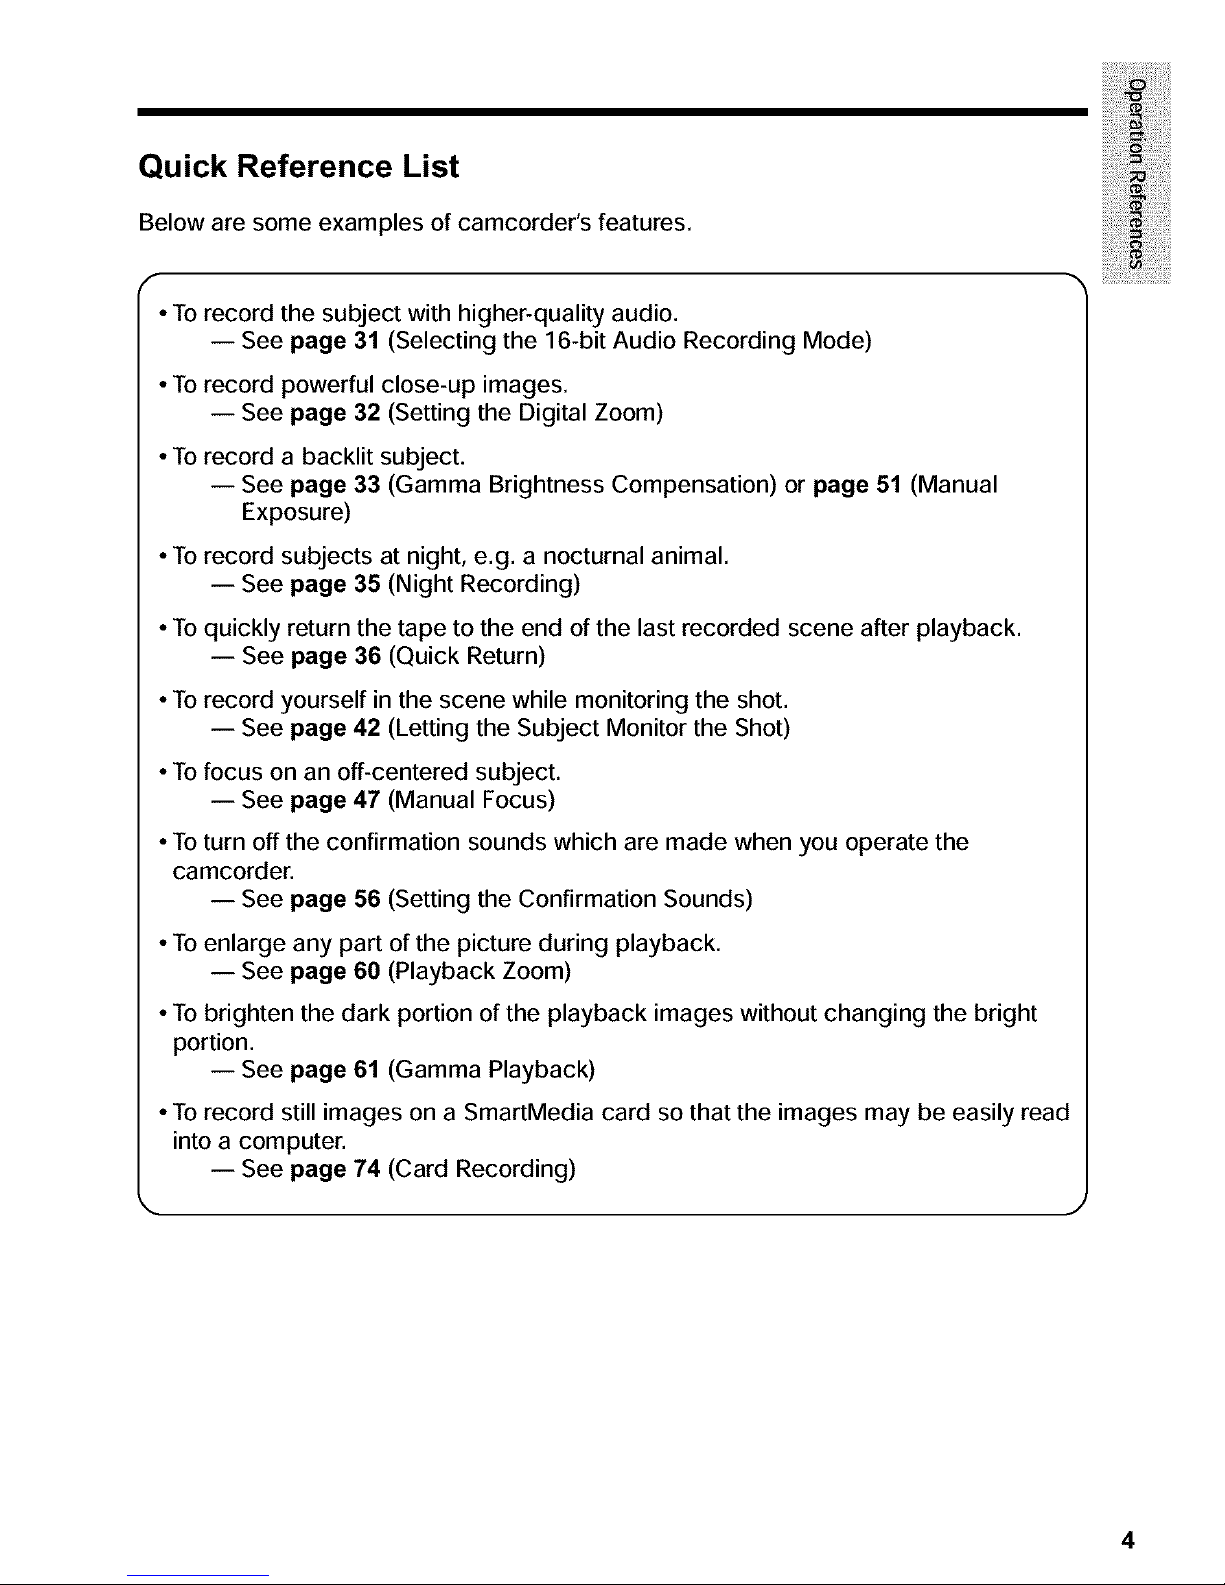
Quick Reference List
Below are some examples of camcorder's features.
• To record the subject with higher-quality audio.
-- See page 31 (Selecting the 16-bit Audio Recording Mode)
• To record powerful close-up images.
-- See page 32 (Setting the Digital Zoom)
• To record a backlit subject.
-- See page 33 (Gamma Brightness Compensation) or page 51 (Manual
Exposure)
• To record subjects at night, e.g. a nocturnal animal.
-- See page 35 (Night Recording)
• To quickly return the tape to the end of the last recorded scene after playback.
-- See page 36 (Quick Return)
• To record yourself in the scene while monitoring the shot.
-- See page 42 (Letting the Subject Monitor the Shot)
• Tofocus on an off-centered subject.
-- See page 47 (Manual Focus)
• Toturn off the confirmation sounds which are made when you operate the
camcorder.
-- See page 56 (Setting the Confirmation Sounds)
• To enlarge any part of the picture during playback.
-- See page 60 (Playback Zoom)
• To brighten the dark portion of the playback images without changing the bright
portion.
-- See page 61 (Gamma Playback)
• To record still images on a SmartMedia card so that the images may be easily read
into a computer.
-- See page 74 (Card Recording)
4
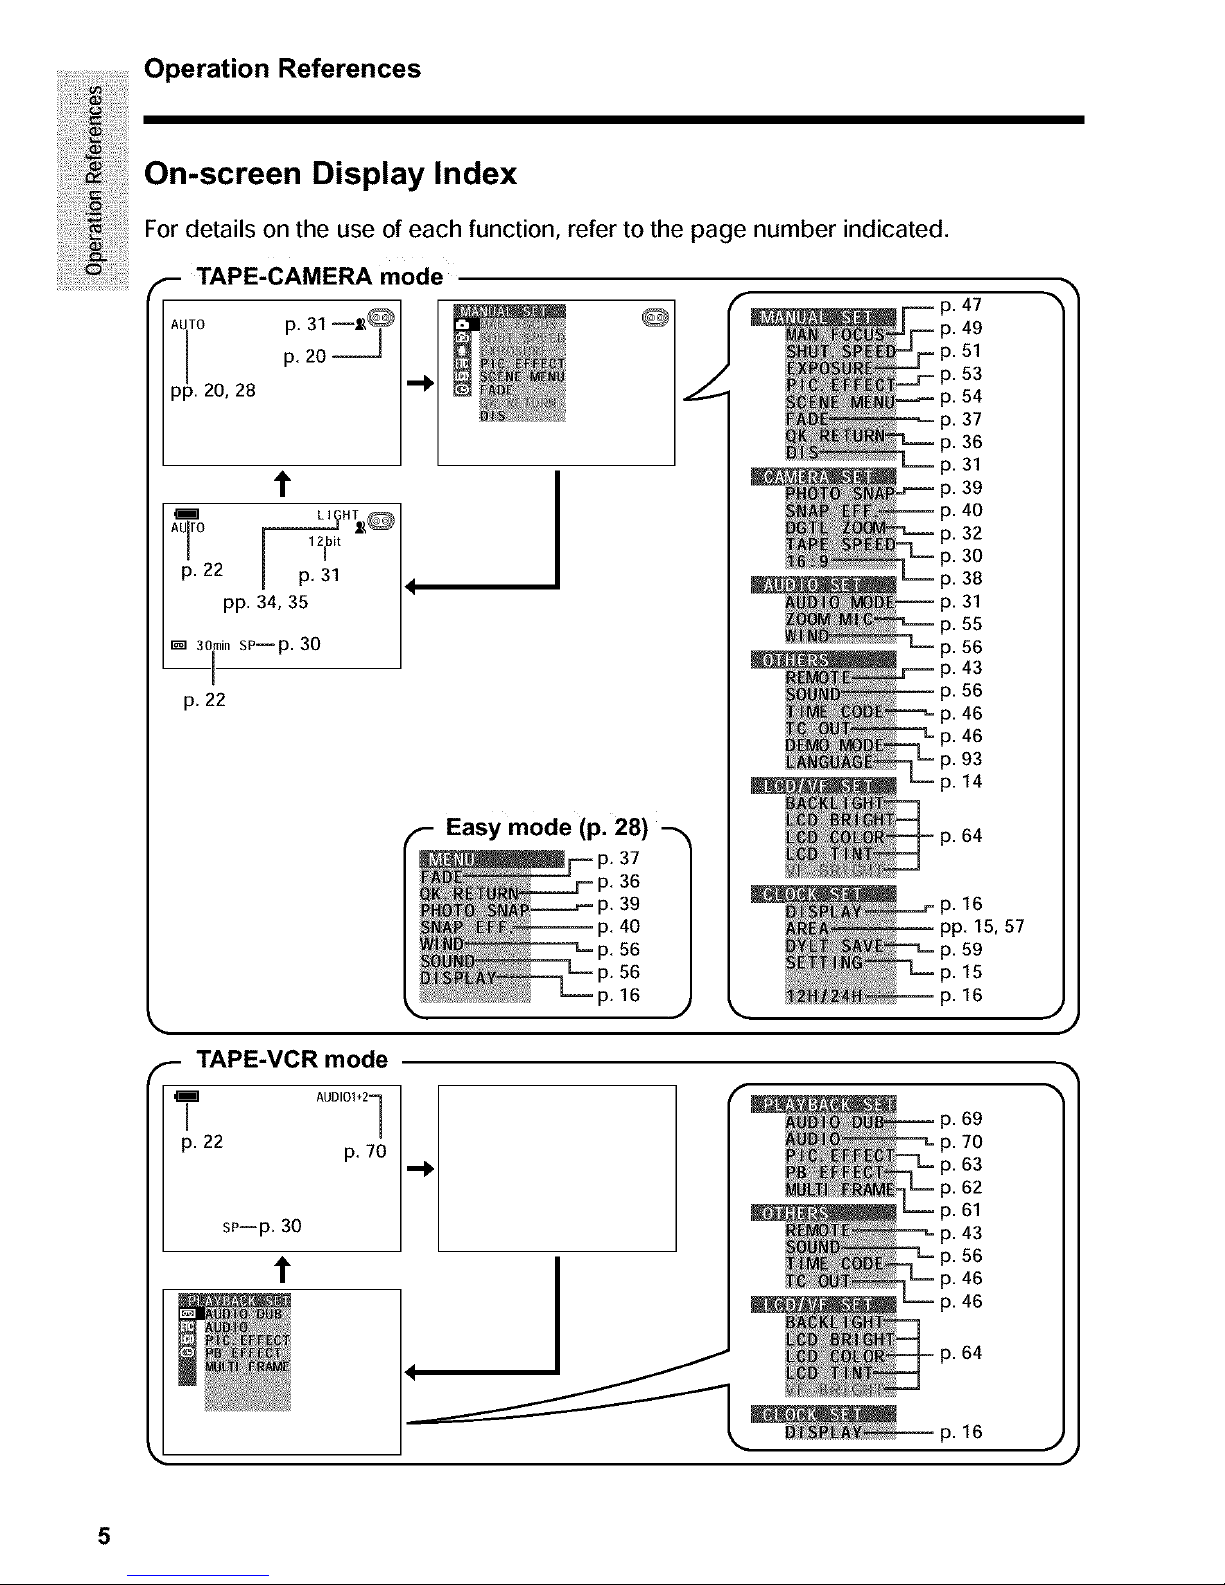
Operation References
On-screen Display Index
For details on the use of each function, refer to the page number indicated.
(.- TAPE-CAMERA mode ,_
AUTO P,P2031=====J--=_ Q
p!.zo,28
t
Jil LIGHT _I
AUro _ _'
[ [ 12[bit
p. 22 [ p. 31 ,
pp. 34, 35
Jl_ 30iin sP--p. 30
p. 22
F- TAPE-VCR mode
3-- -A_
sP--p. 30
t
i Easy mode (p. 28) 1
p. 37
p. 36
p. 39
p. 40
p. 56
p. 56
p. 16
p.
p.
p.
p.
p.
p.
p.
p.
p.
p.
p.
p.
p.
p.
p.
p.
p.
p.
p.
p.
p.
p.
47
49
51
53
54
37
36
31
39
40
32
3O
38
31
55
56
43
56
46
46
93
14
64
p. 16
pp. 15,57
p. 59
p. 15
p. 16
Jj
p. 69
p. 70
p. 63
p. 62
p. 61
p. 43
p. 56
p. 46
p. 46
p. 64
p. 16 ,,'
J
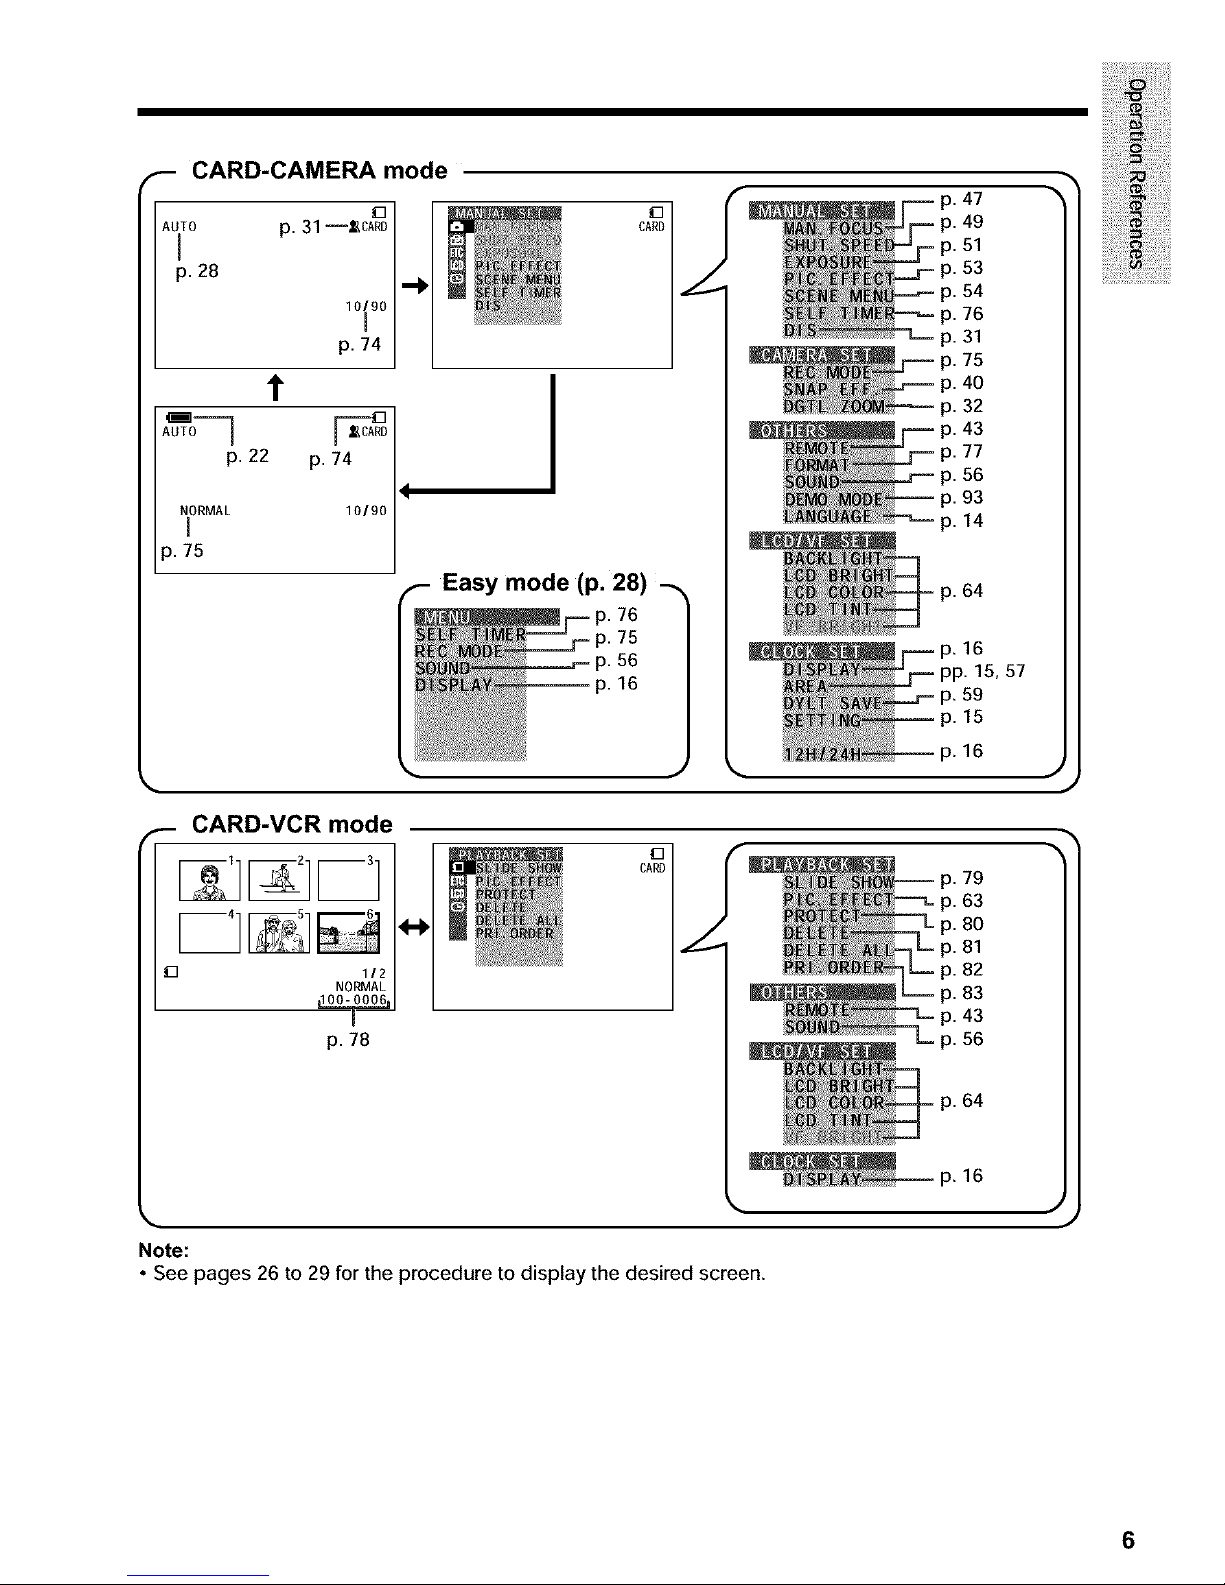
_- CARD-CAMERA mode
AUTO p. 31 --_CARD
p. 28 10190 _
I
p. 74
t
AU_rO_p. 22
ORMAL
p. 75
p. 74
101901
Easy mode (p. 28)
i p. 75
p. 56
p. 16
_- CARD-VCR mode
I
p. 78
p_
Note:
• See pages 26 to 29 for the procedure to display the desired screen.
47
49
51
53
54
76
p. 31
75
40
p. 32
43
77
56
93
p. 14
64
16
15, 57
59
15
16
79
63
8O
81
82
83
43
56
64
16
J
J
6
Operation References
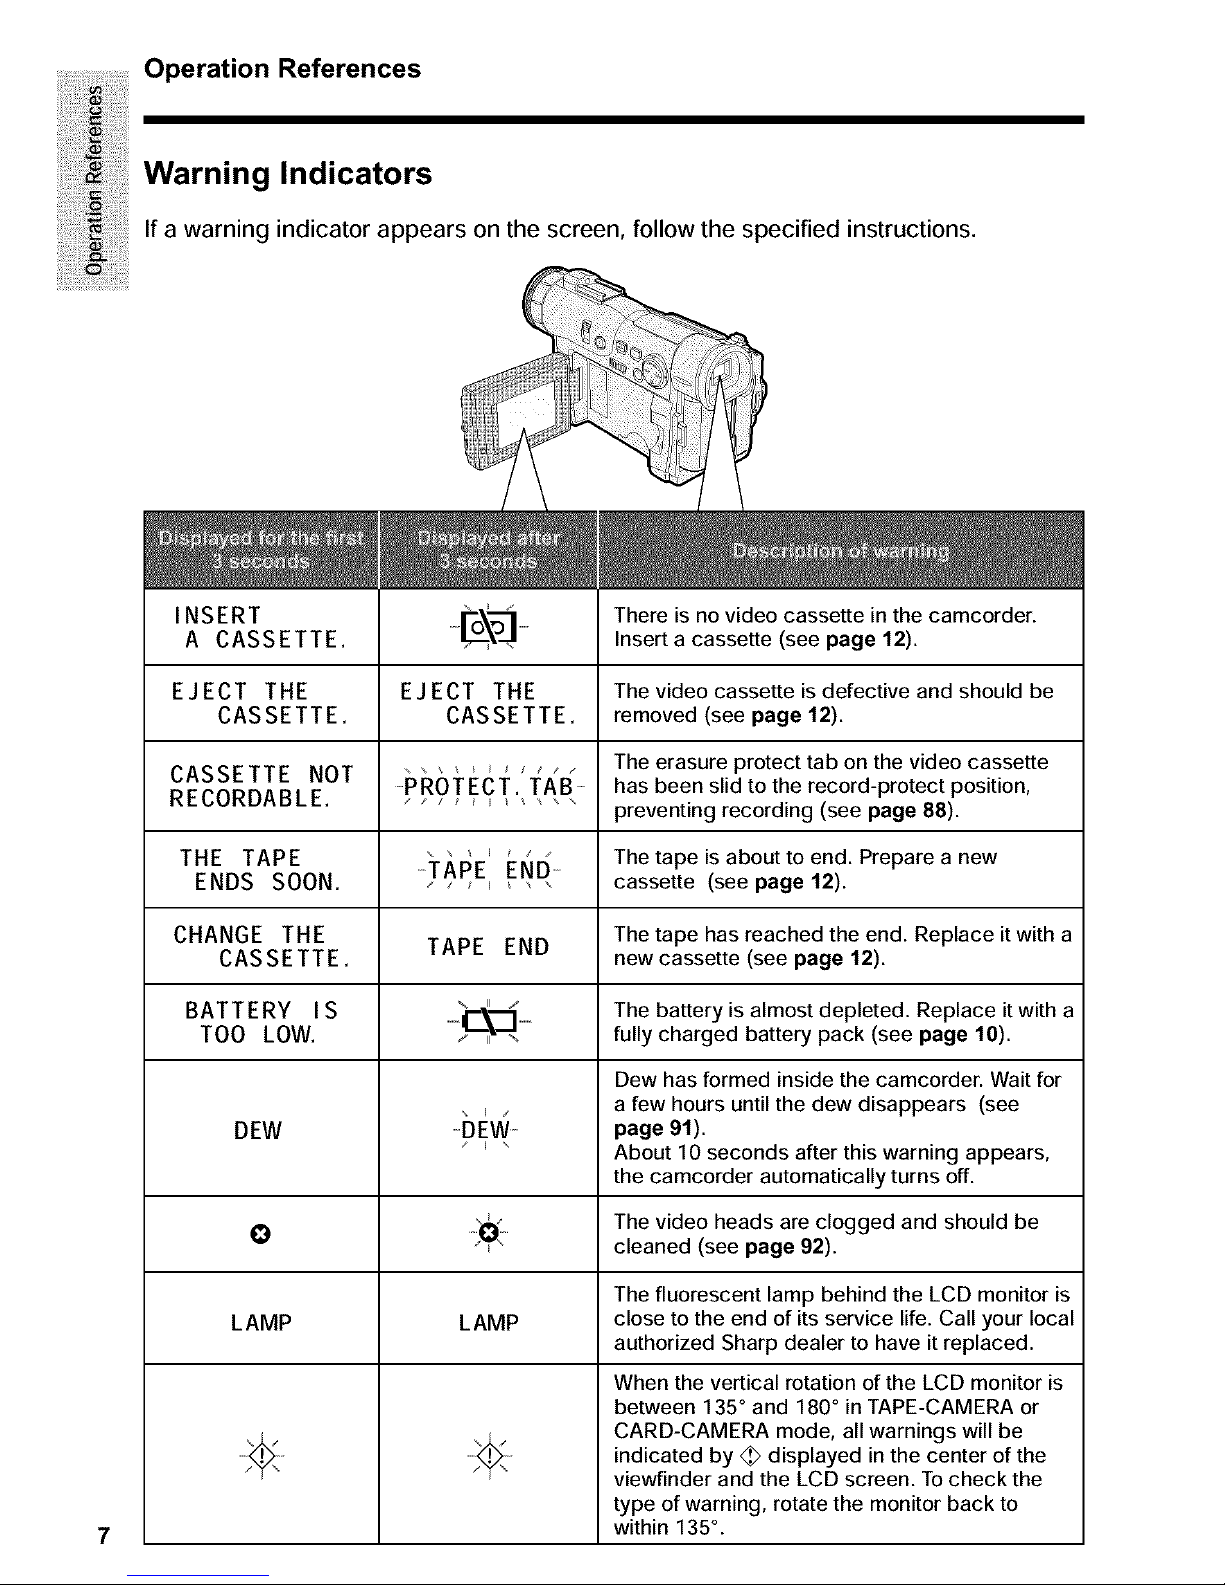
Warning Indicators
If a warning indicator appears on the screen, follow the specified instructions.
7
EJECT THE
CASSETTE.
INSERT There is no video cassette in the camcorder.
A CASSETTE. Insert a cassette (see page 12).
EJ ECT THE The video cassette is defective and should be
CAS SE TT E. removed (see page 12).
CASSETTE NOT _ _ _ _ _ _ _ f _ The erasure protect tab on the video cassette
-PRO T EC T. TA B- has been slid to the record-protect position,
RECORDABLE ..... _ .... preventing recording (see page 88).
THE TAPE -T_.I:JE_ I:NI)- The tape is about to end. Prepare a new
ENDS SOON _ _ ,, _ cassette (see page 12).
CHANGE THE The tape has reached the end. Replace it with a
CASSETTE. TAPE END new cassette (see page 12).
BATT ERY I S The battery is almost depleted. Replace it with a
TOO LOW. fully charged battery pack (see page 10).
Dew has formed inside the camcorder. Wait for
a few hours until the dew disappears (see
DEW -bI_VV- page 91).
_ _" About 10 seconds after this warning appears,
the camcorder automatically turns off.
_4_ The video heads are clogged and should be
cleaned (see page 92).
The fluorescent lamp behind the LCD monitor is
LAMP LAMP close to the end of its service life. Call your local
authorized Sharp dealer to have it replaced.
,÷ ,÷
When the vertical rotation of the LCD monitor is
between 135° and 180° in TAPE-CAMERA or
CARD-CAMERA mode, all warnings will be
indicated by _ displayed in the center of the
viewfinder and the LCD screen. Tocheck the
type of warning, rotate the monitor back to
within 135 °.
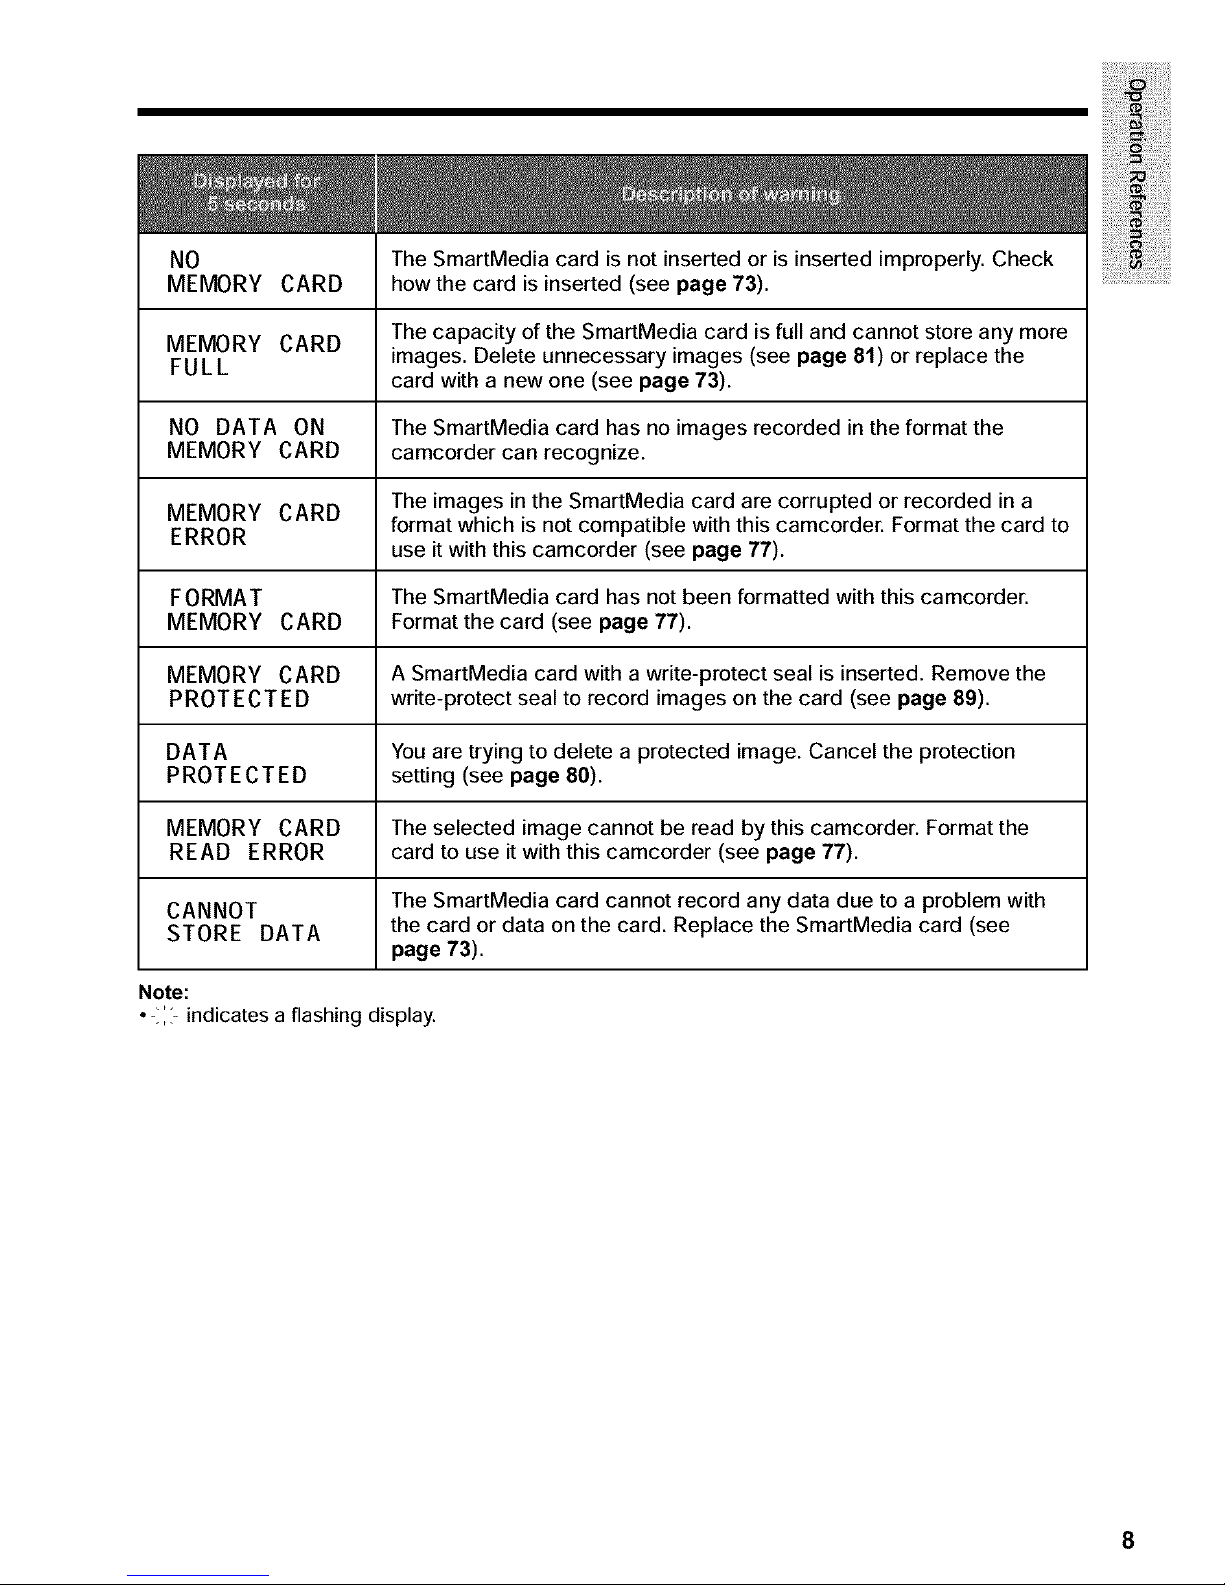
NO
MEMORYCARD
The SmartMedia card is not inserted or is inserted improperly. Check
how the card is inserted (see page 73).
MEMORY CARD The capacity of the SmartMedia card is full and cannot store any more
F UL L images. Delete unnecessary images (see page 81) or replace the
card with a new one (see page 73).
NO DATA ON The SmartMedia card has no images recorded in the format the
MEMORY CARD camcorder can recognize.
MEMORY CARD The images in the SmartMedia card are corrupted or recorded in a
ERROR format which is not compatible with this camcorder. Format the card to
use it with this camcorder (see page 77).
FORMAT The SmartMedia card has not been formatted with this camcorder.
MEMORY CARD Format the card (see page 77).
MEMORY CARD A SmartMedia card with a write-protect seal is inserted. Remove the
PROTECTED write-protect seal to record images on the card (see page 89).
DATA You are trying to delete a protected image. Cancel the protection
PROT ECT E D setting (see page 80).
MEMORY CARD The selected image cannot be read by this camcorder. Format the
READ ERROR card to use it with this camcorder (see page 77).
CANNOT The SmartMedia card cannot record any data due to a problem with
STORE DATA the card or data on the card. Replace the SmartMedia card (see
page 73).
Note:
• -_',? indicates a flashing display.
8
:i!i!i!iiiiii!!i!iiiii !i!!iiiiiii!iii ! !,ii i!ii!i!i!i!iiii i! i!!i
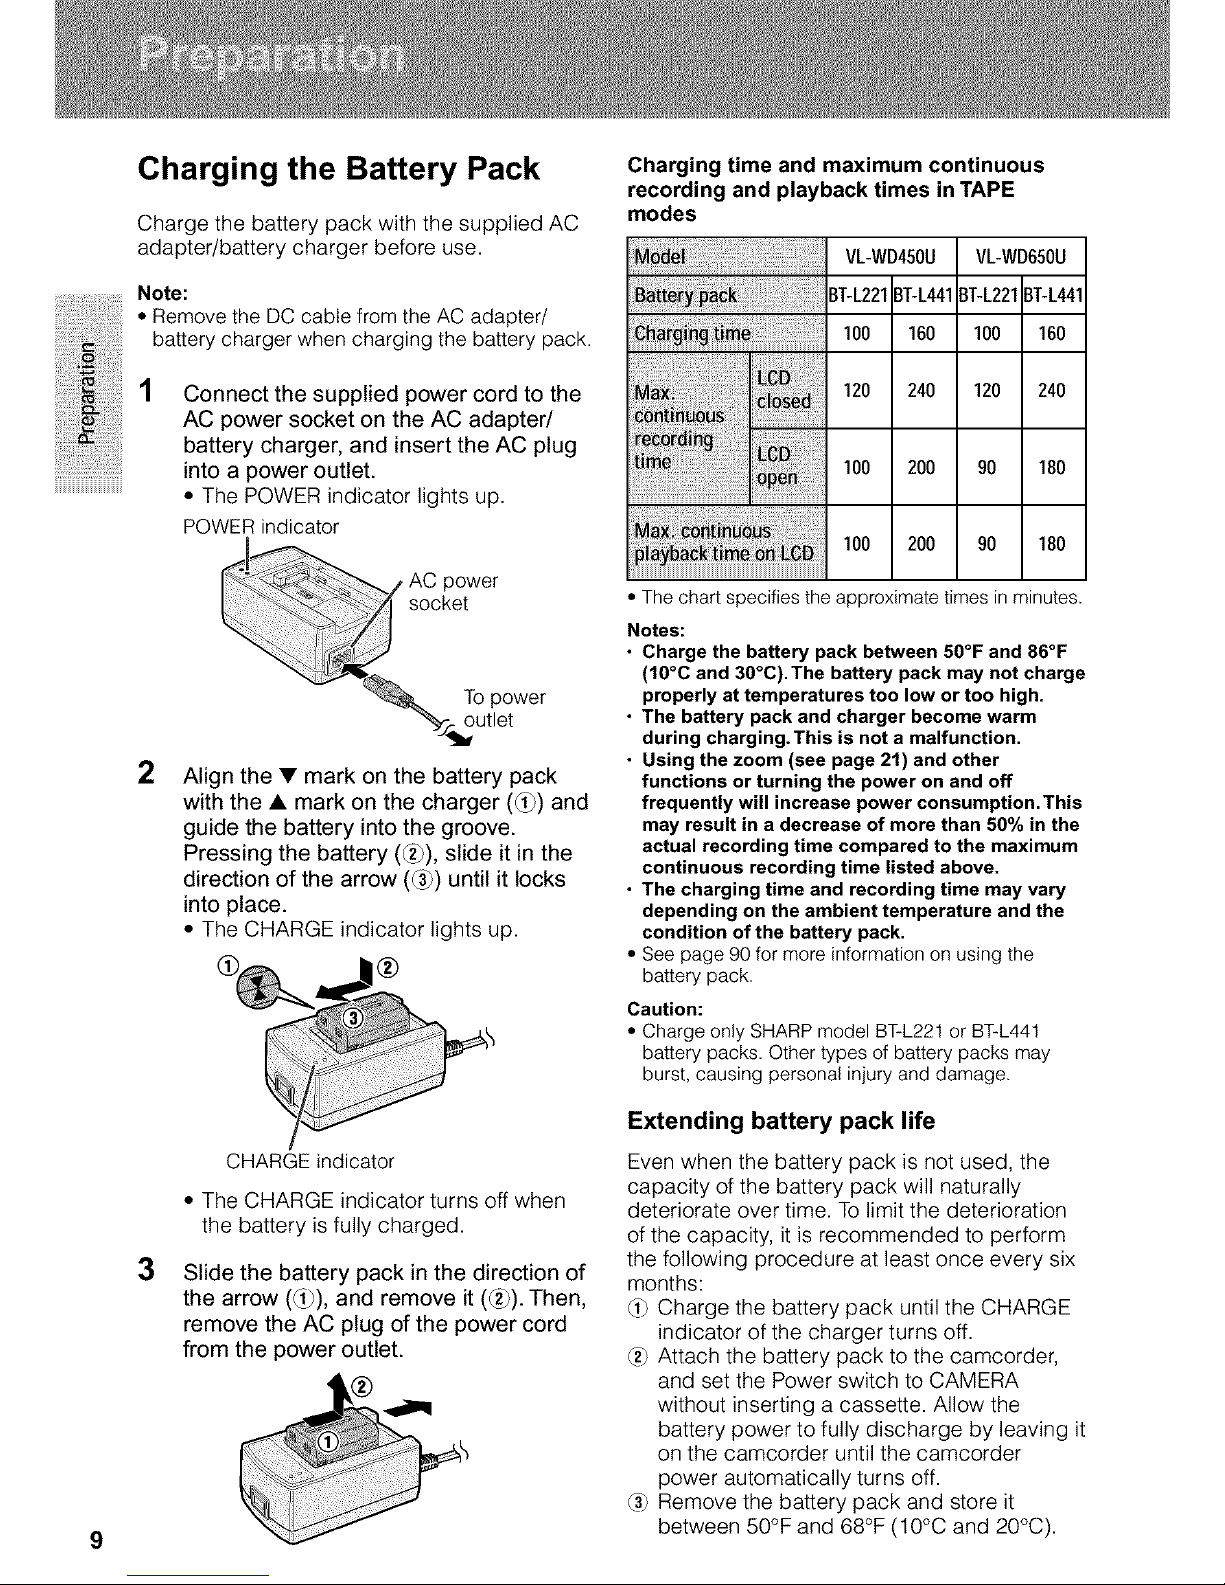
Charging the Battery Pack
Charge the battery pack with the supplied AC
adapter/battery charger before use.
Note:
• Remove the DC cable from the AC adapter/
battery charger when charging the battery pack.
Connect the supplied power cord to the
AC power socket on the AC adapter/
battery charger, and insert the AC plug
into a power outlet.
• The POWER indicator lights up.
POWER indicator
2
3
Align the • mark on the battery pack
with the • mark on the charger (_) and
guide the battery into the groove.
Pressing the battery (_), slide it in the
direction of the arrow (_) until it locks
into place.
• The CHARGE indicator lights up.
CHARGE indicator
• The CHARGE indicator turns off when
the battery is fully charged.
Slide the battery pack in the direction of
the arrow (_), and remove it (_2_).Then,
remove the AC plug of the power cord
from the power outlet.
Charging time and maximum continuous
recording and playback times in TAPE
modes
VL-WD450U VL-WD650U
IT-L221BT-L4413T-L221BT-L441
1001,01001,0
120 240 120 240
100 200 90 180
100 200 90 180
• The chartspecifies theapproximate times in minutes.
Notes:
• Charge the battery pack between 50°F and 86°F
(10°C and 30°C). The battery pack may not charge
properly at temperatures too low or too high.
• The battery pack and charger become warm
during charging.This is not a malfunction.
• Using the zoom (see page 21) and other
functions or turning the power on and off
frequently will increase power consumption.This
may result in a decrease of more than 50% in the
actual recording time compared to the maximum
continuous recording time listed above.
• The charging time and recording time may vary
depending on the ambient temperature and the
condition of the battery pack.
• See page 90 for more information on using the
battery pack.
Caution:
• Charge only SHARP model BT-L221 or BT-L441
battery packs. ©ther types of battery packs may
burst, causing personal injury and damage.
Extending battery pack life
Even when the battery pack is not used, the
capacity of the battery pack will naturally
deteriorate over time. Tolimit the deterioration
of the capacity, it is recommended to perform
the following procedure at least once every six
months:
(1) Charge the battery pack until the CHARGE
indicator of the charger turns off.
_) Attach the battery pack to the camcorder,
and set the Power switch to CAMERA
without inserting a cassette. Allow the
battery power to fully discharge by leaving it
on the camcorder until the camcorder
power automatically turns off.
(3) Remove the battery pack and store it
between 50°F and 68°F (10°C and 20°C).
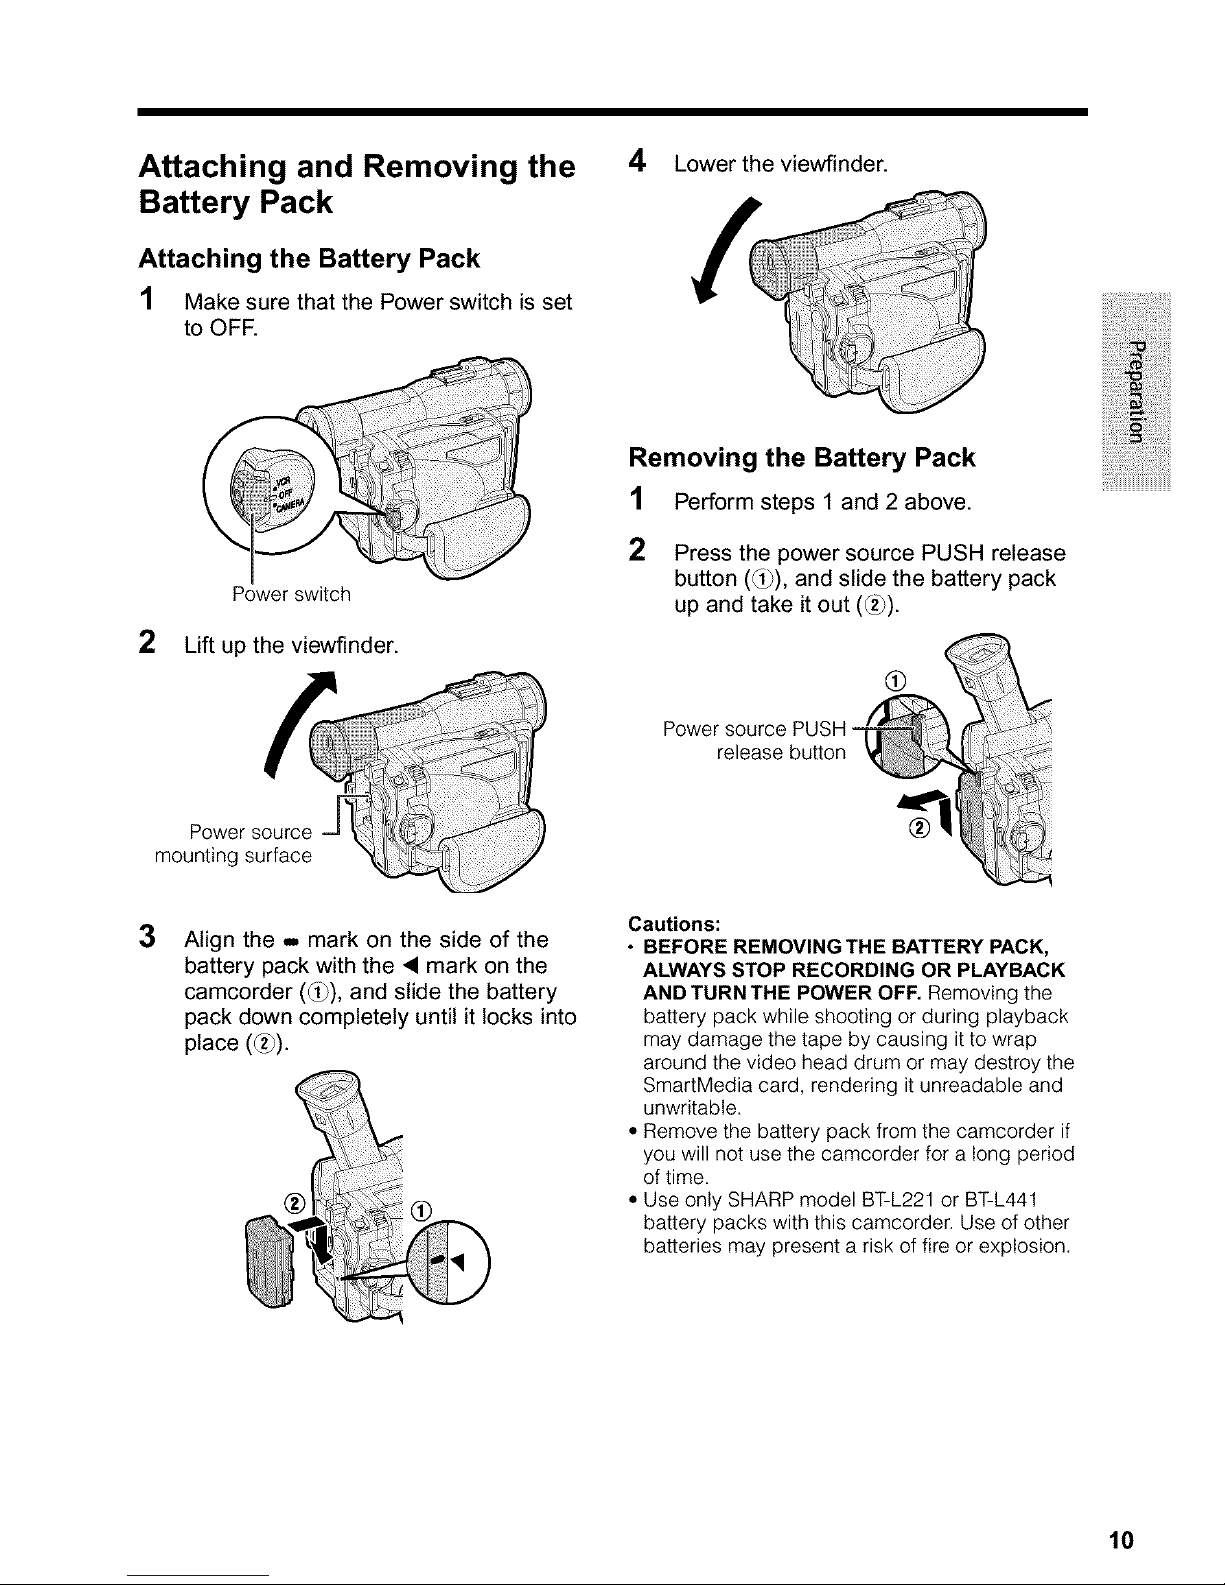
Attaching and Removing the
Battery Pack
4 Lower the viewfinder.
Attaching the Battery Pack
1 Make sure that the Power switch is set
to OFF.
Power switch
2 Lift up the viewfinder.
Removing the Battery Pack
1 Perform steps 1 and 2 above.
2 Press the power source PUSH release
button (_), and slide the battery pack
up and take it out (_).
iiiiii!iiii:i!!ii!i!i!_ii!iii:iiiiiiii_ii!iiil
Power source
mounting surface
3
Align the - mark on the side of the
battery pack with the • mark on the
camcorder (_), and slide the battery
pack down completely until it locks into
place (_).
Cautions:
• BEFORE REMOVINGTHE BATTERY PACK,
ALWAYS STOP RECORDING OR PLAYBACK
AND TURN THE POWER OFF. Removing the
battery pack while shooting or during playback
may damage the tape by causing it to wrap
around the video head drum or may destroy the
SmartMedia card, rendering it unreadable and
unwritable.
• Remove the battery pack from the camcorder if
you will not use the camcorder for a long period
of time.
• Use only SHARP model BT-L221 or BT-L441
battery packs with this camcorder. Use of other
batteries may present a risk of fire or explosion.
10
Preparation
Powering the Camcorder
from an AC Outlet
You can also power the camcorder from a
power outlet by using the supplied AC adapter/
battery charger and DC cable.
Caution:
• The supplied AC adapter/battery charger is
specially designed for use with this camcorder,
and should not be used as a power supply for
other camcorders.
1 Make sure that the Power switch is set
to OFR
2 Lift up the viewfinder.
3
Align the ,,,,,. mark on the side of the
DC cable connecting plate with the •
mark on the camcorder (_), and slide
the connecting plate down completely
until it locks into place (_).
®1
DC cable
connecting
plate
4 Lower the viewfinder.
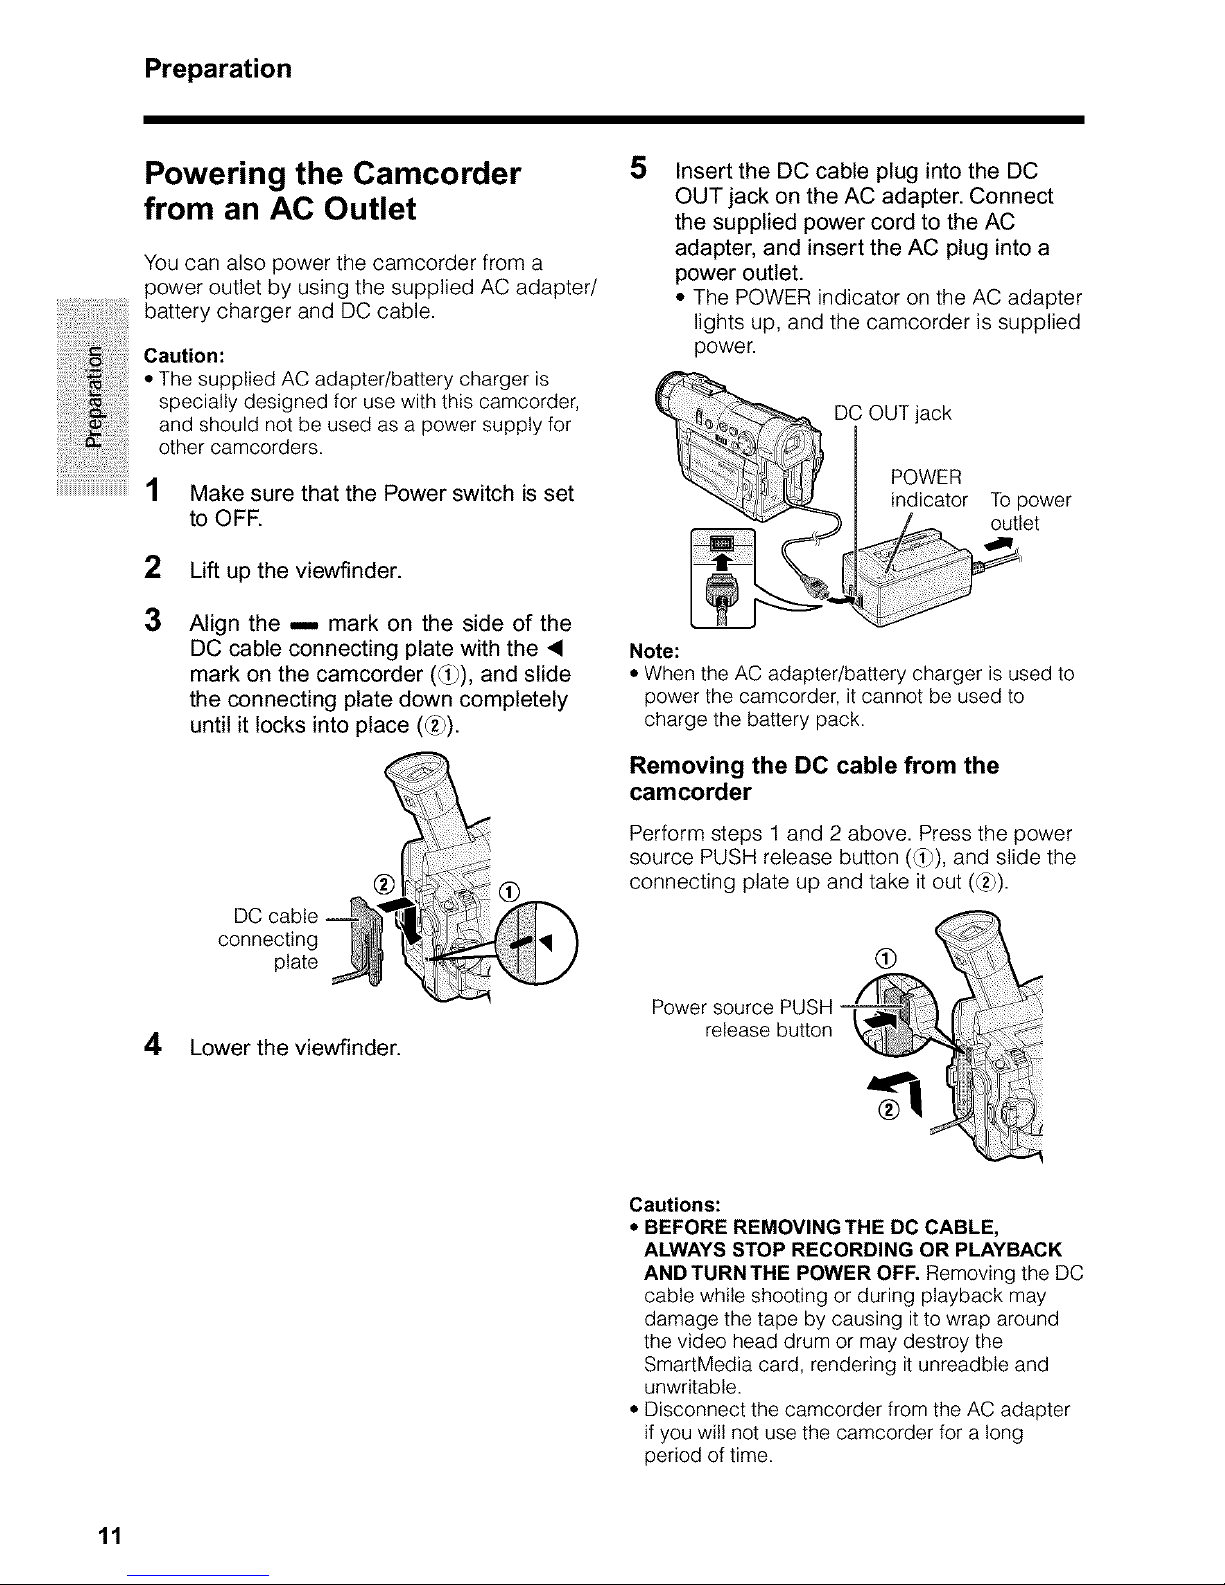
5
Insert the DC cable plug into the DC
OUT jack on the AC adapter. Connect
the supplied power cord to the AC
adapter, and insert the AC plug into a
power outlet.
• The POWER indicator on the AC adapter
lights up, and the camcorder is supplied
power.
DC OUT jack
POWER
indicator To power
outlet
Note:
• When the AC adapter/battery charger is used to
power the camcorder, it cannot be used to
charge the battery pack.
Removing the DC cable from the
camcorder
Perform steps 1 and 2 above. Press the power
source PUSH release button (d_), and slide the
connecting plate up and take it out (_).
(b
Power source PUSH
release button
°L,3 ii
Cautions:
• BEFORE REMOVING THE DC CABLE,
ALWAYS STOP RECORDING OR PLAYBACK
AND TURN THE POWER OFF. Removing the DC
cable while shooting or during playback may
damage the tape by causing it to wrap around
the video head drum or may destroy the
SmartMedia card, rendering it unreadble and
unwritable.
• Disconnect the camcorder from the AC adapter
if you will not use the camcorder for a long
period of time.
11

Inserting and Removing a
Mini DV Cassette
Inserting a Cassette
1 Attach the power source to the
camcorder, then slide the cassette
compartment door release and open the
cassette compartment door.
• A confirmation sound is made, and the
cassette holder extends and opens
automatically.
Cassette compartment ]
door release
3
4
Press the _ mark gently until the
cassette holder clicks into place.
• A confirmation sound is made, and the
cassette holder retracts automatically.
mark
Wait for the cassette holder to fully
retract. Close the compartment door by
pressing the center until it clicks into
place.
iiiiii!iiii:i!!ii!i!i!_ii!iii:iiiiiiii_ii!!iil
2
Note:
• If the hand strap is pulled too tight, it can
obstruct the opening of the cassette
compartment door and the cassette holder
may be unable to extend. Should this occur,
loosen the hand strap and open the
cassette compartment door completely.
Insert the cassette fully with the window
facing outwards, and with the erasure
protect tab facing upwards.
Erasure protect tab
Removing a Cassette
Perform step 1 above, then take out the
cassette.
Cautions:
• Do not try to close the cassette compartment
door while the cassette holder is extending or
retracting.
• Be careful not to get your fingers caught in the
cassette holder.
• Do not apply force to the cassette holder except
when pressing the _ mark to close it.
• Do not tilt the camcorder or hold it upside down
when you are inserting or removing a cassette. It
may damage the tape.
• Remove the cassette if you will not use the
camcorder for a long period of time.
• If you do not correctly close the cassette holder in
step 3, the cassette protection mechanism of the
camcorder might eject the cassette. If this happens,
repeat the insertion procedure.
• Do not attempt to pick up the camcorder by the
cassette compartment door.
Notes:
• If the battery power is too low, you may not be able
to eject the cassette. Replace the battery pack with
a fully charged one.
• See page 88 for more information on the video
cassette tapes intended for use with this camcorder.
12
Preparation
i!;;iii_;iiiiii_iii_;iiiiii_iii_;iiiiii_iii_;iiiiii_iiii
Installing the Lithium Memory
Battery
Installing the Lithium Battery
The supplied lithium battery is used to store the
memory of the date and time settings.
Press the LCD monitor OPEN release
button (_) and open the LCD monitor
(®).
LCD monitor OPEN
_ _releasebutton
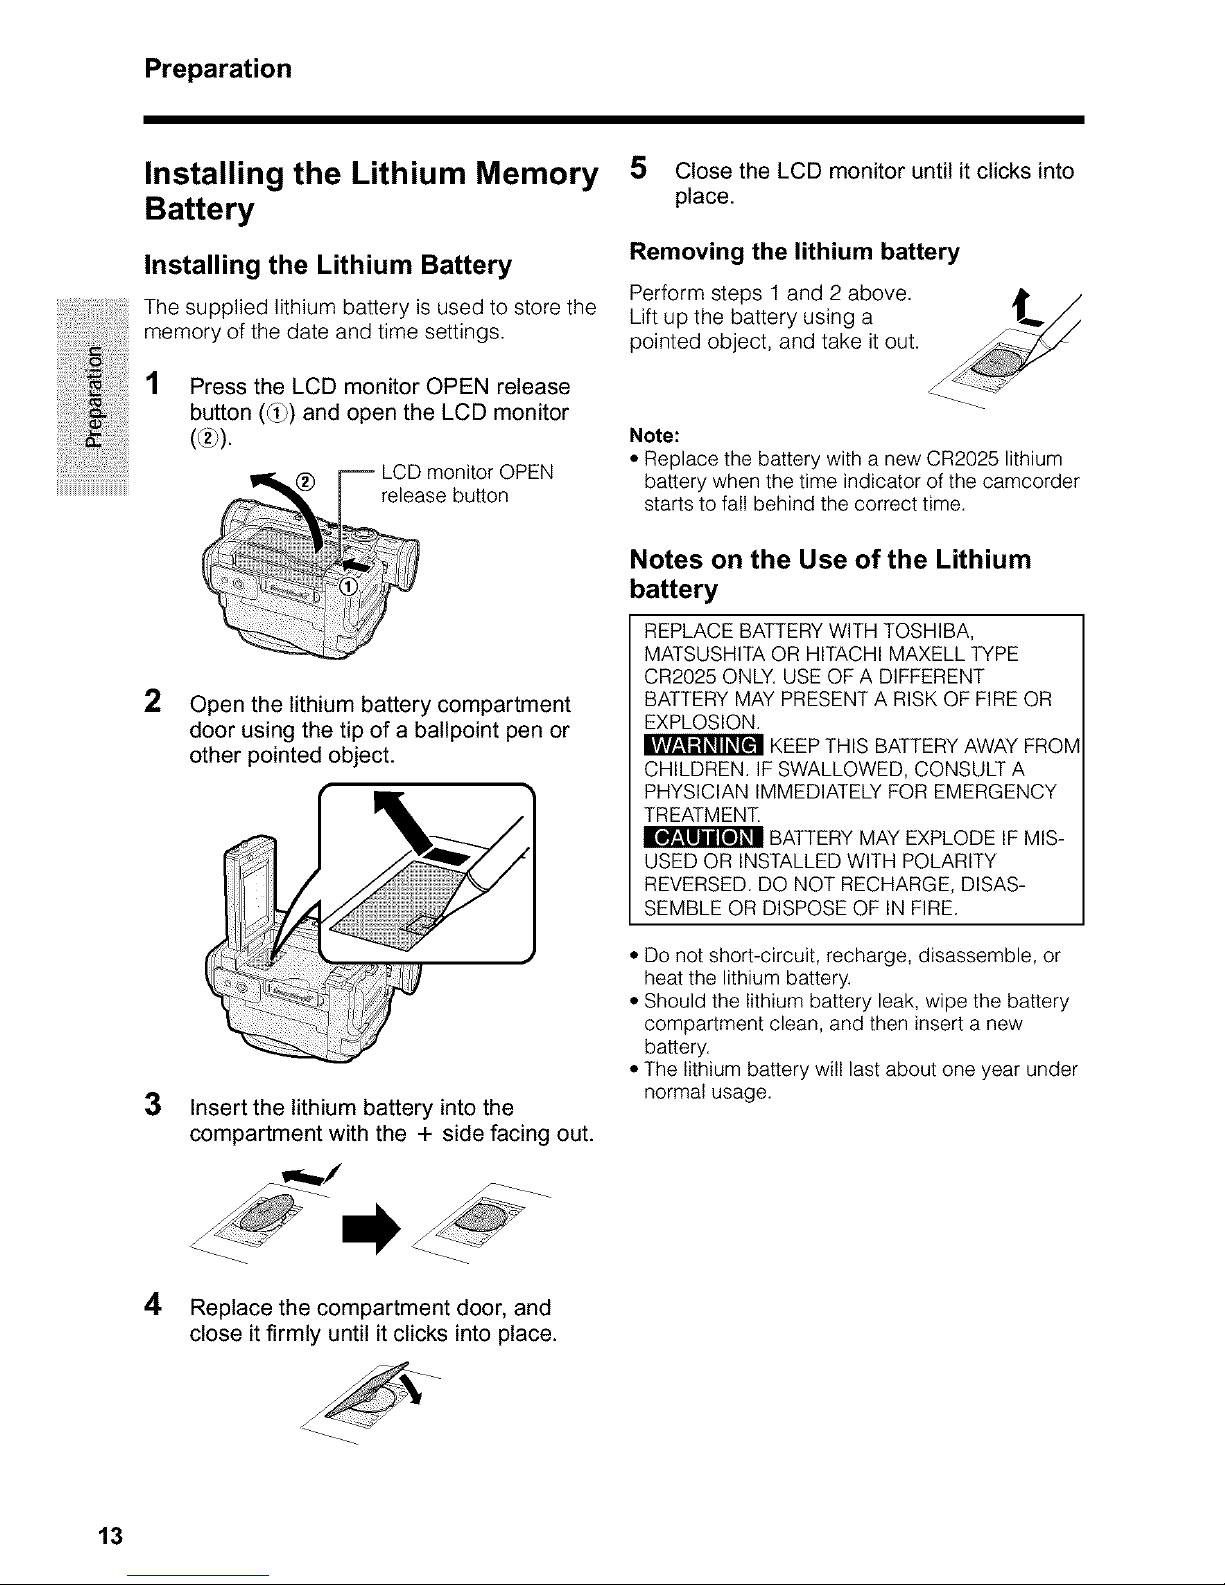
2 Open the lithium battery compartment
door using the tip of a ballpoint pen or
other pointed object.
3
4
Insert the lithium battery into the
compartment with the + side facing out.
Replace the compartment door, and
close it firmly until it clicks into place.
5 Close the LCD monitor until it clicks into
place.
Removing the lithium battery
Perform steps 1 and 2 above.
Lift up the battery using a
pointed object, and take it out.
Note:
• Replace the battery with a new CR2025 lithium
battery when the time indicator of the camcorder
starts to fall behind the correct time.
Notes on the Use of the Lithium
battery
REPLACE BATTERYWITH TOSHIBA,
MATSUSHITA OR HITACHI MAXELL TYPE
CR2025 ONLY. USE OF A DIFFERENT
BATTERY MAY PRESENT A RISK OF FIRE OR
EXPLOSION.
KEEP THIS BATTERYAWAY FROM
CHILDREN. IF SWALLOWED, CONSULT A
PHYSICIAN IMMEDIATELY FOR EMERGENCY
TREATMENT.
BATTERY MAY EXPLODE IF MIS-
USED OR INSTALLED WITH POLARITY
REVERSED. DO NOT RECHARGE, DISAS-
SEMBLE OR DISPOSE OF IN FIRE.
• Do not short-circuit, recharge, disassemble, or
heat the lithium battery.
• Should the lithium battery leak, wipe the battery
compartment clean, and then insert a new
battery.
• The lithium battery will last about one year under
normal usage.
13
Selecting the Language for
the On-screen Display
This camcorder allows you to choose from
among English, French or Spanish for the on-
screen display language.
Note:
• The operation procedures in the following
sections of this operation manual are based
on the use of on-screen displays in English.
MENU/DISPLAY button
Power switch
_ration button
Setting the Language
When using the camcorder for the first time,
select the desired language for the on-screen
display by performing the procedure below.
1 Press the LCD monitor OPEN release
button (_) and open the LCD monitor
(®).
®
LCD monitor
OPEN release
button
2
Hold down the Lock button
and set the Power switch to
CAMERA.
• The language selection screen
appears on the LCD screen.
Lock button
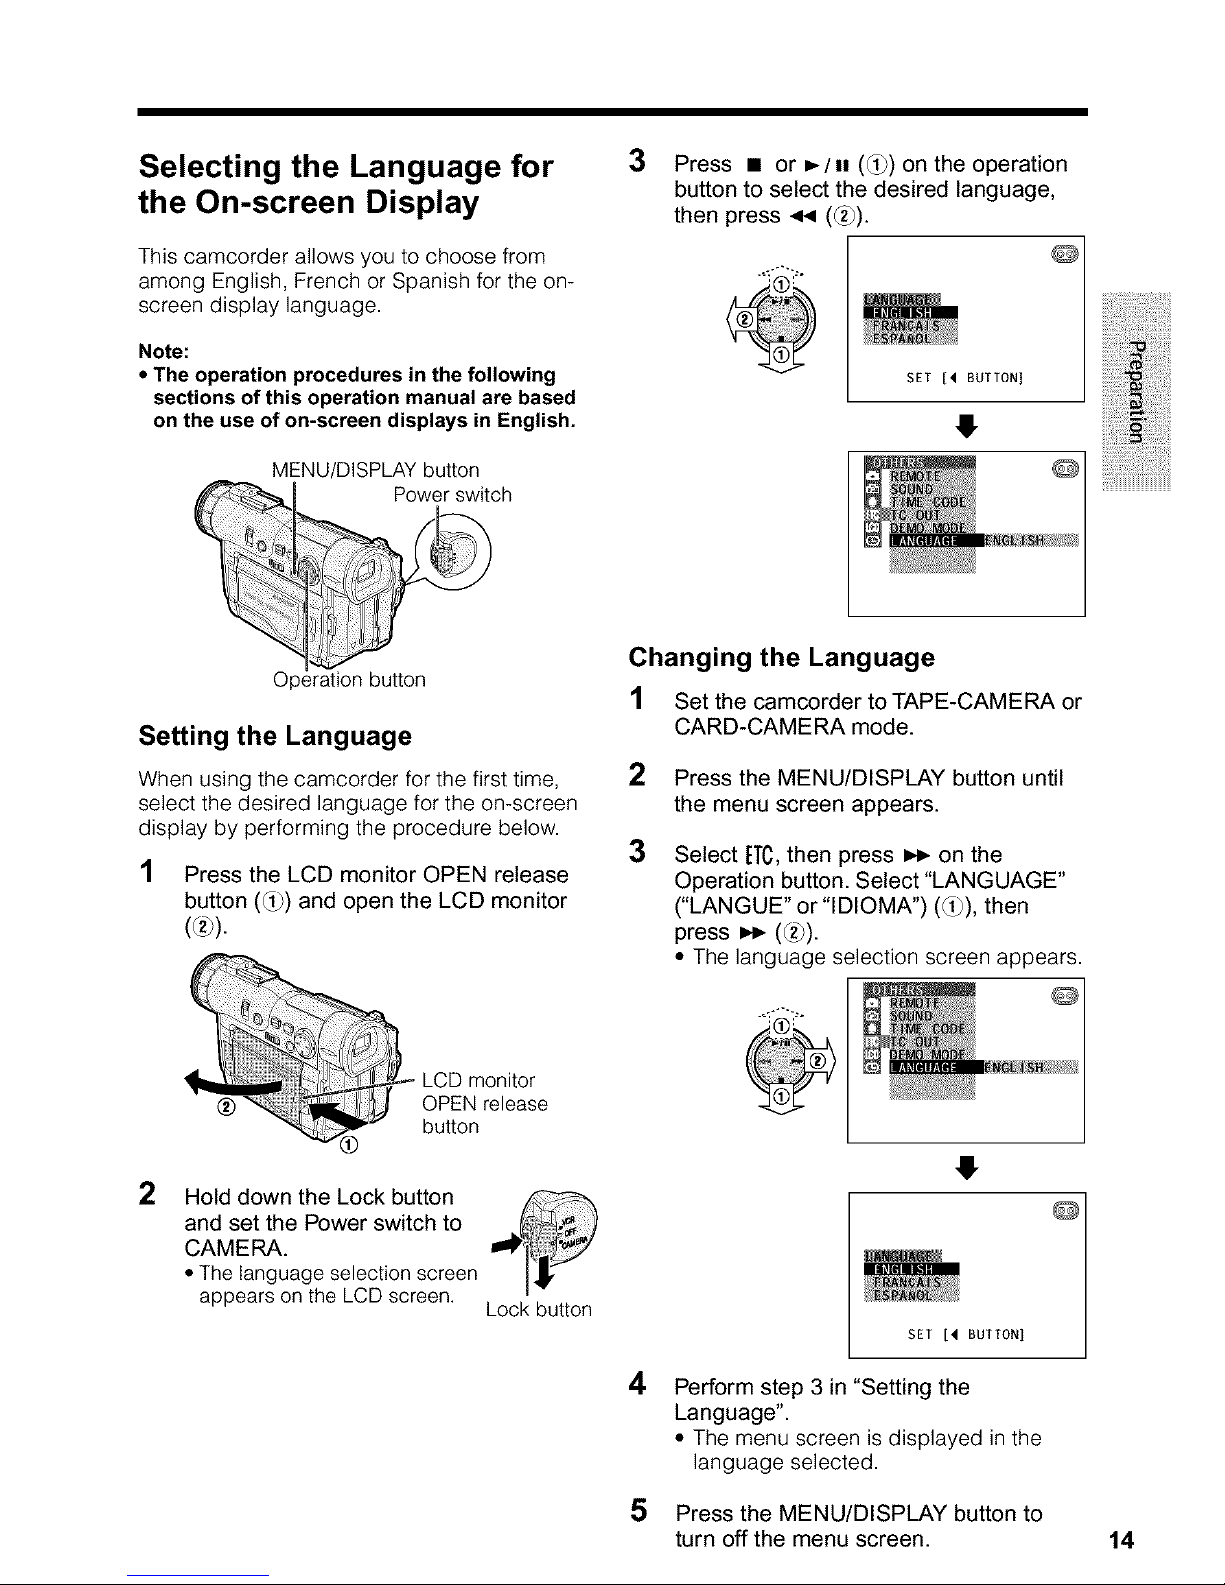
3
Press • or _-/ H (_) on the operation
button to select the desired language,
then press _ (_).
®l
SET[_ BUTTONI
@
Changing the Language
1 Set the camcorder toTAPE-CAMERA or
CARD-CAMERA mode.
2
3
Press the MENU/DISPLAY button until
the menu screen appears.
Select FTC,then press m,_ on the
Operation button. Select "LANGUAGE"
("LANGUE" or "IDIOMA") (_), then
press _ (_).
• The language selection screen appears.
@
4
5
I-
SET [4 BUTTON}
Perform step 3 in "Setting the
Language".
• The menu screen is displayed in the
language selected.
O
Press the MENU/DISPLAY button to
turn off the menu screen. 14
Preparation
iiiii!!i!iiiii !i!!iiiiiii!iii ! !,ii i!ii!i!i!i!iiii i! i!!i
iiiiiiiiiiiiiiiiiiiiiiiiiiiiiiiiiiiiiiiiiiiiiiiiiiii
Setting the Area, Date and
Time
Example: Setting the date to June 2, 2002
(JUN. 2.2002) and the time to 10:30 am
(10:30 AM) in New York.
Notes:
• Before performing the procedure below, make
sure that the lithium battery has been installed
(see page 13).
• If you are in an area that observes daylight
saving time, set the time to the standard time.
You can then correct it for daylight saving time
by performing the procedure on page 59.
MENU/DISPLAY button
Powerswitch
Operation button
1 Press the LCD monitor OPEN release
button (_) and open the LCD monitor
(®).
LCD monitor OPEN
• release button
2 Hold down the Lock button
and set the Power switch to
CAMERA.
Lock button
3 Press the MENU/DISPLAY button until
the menu screen appears.
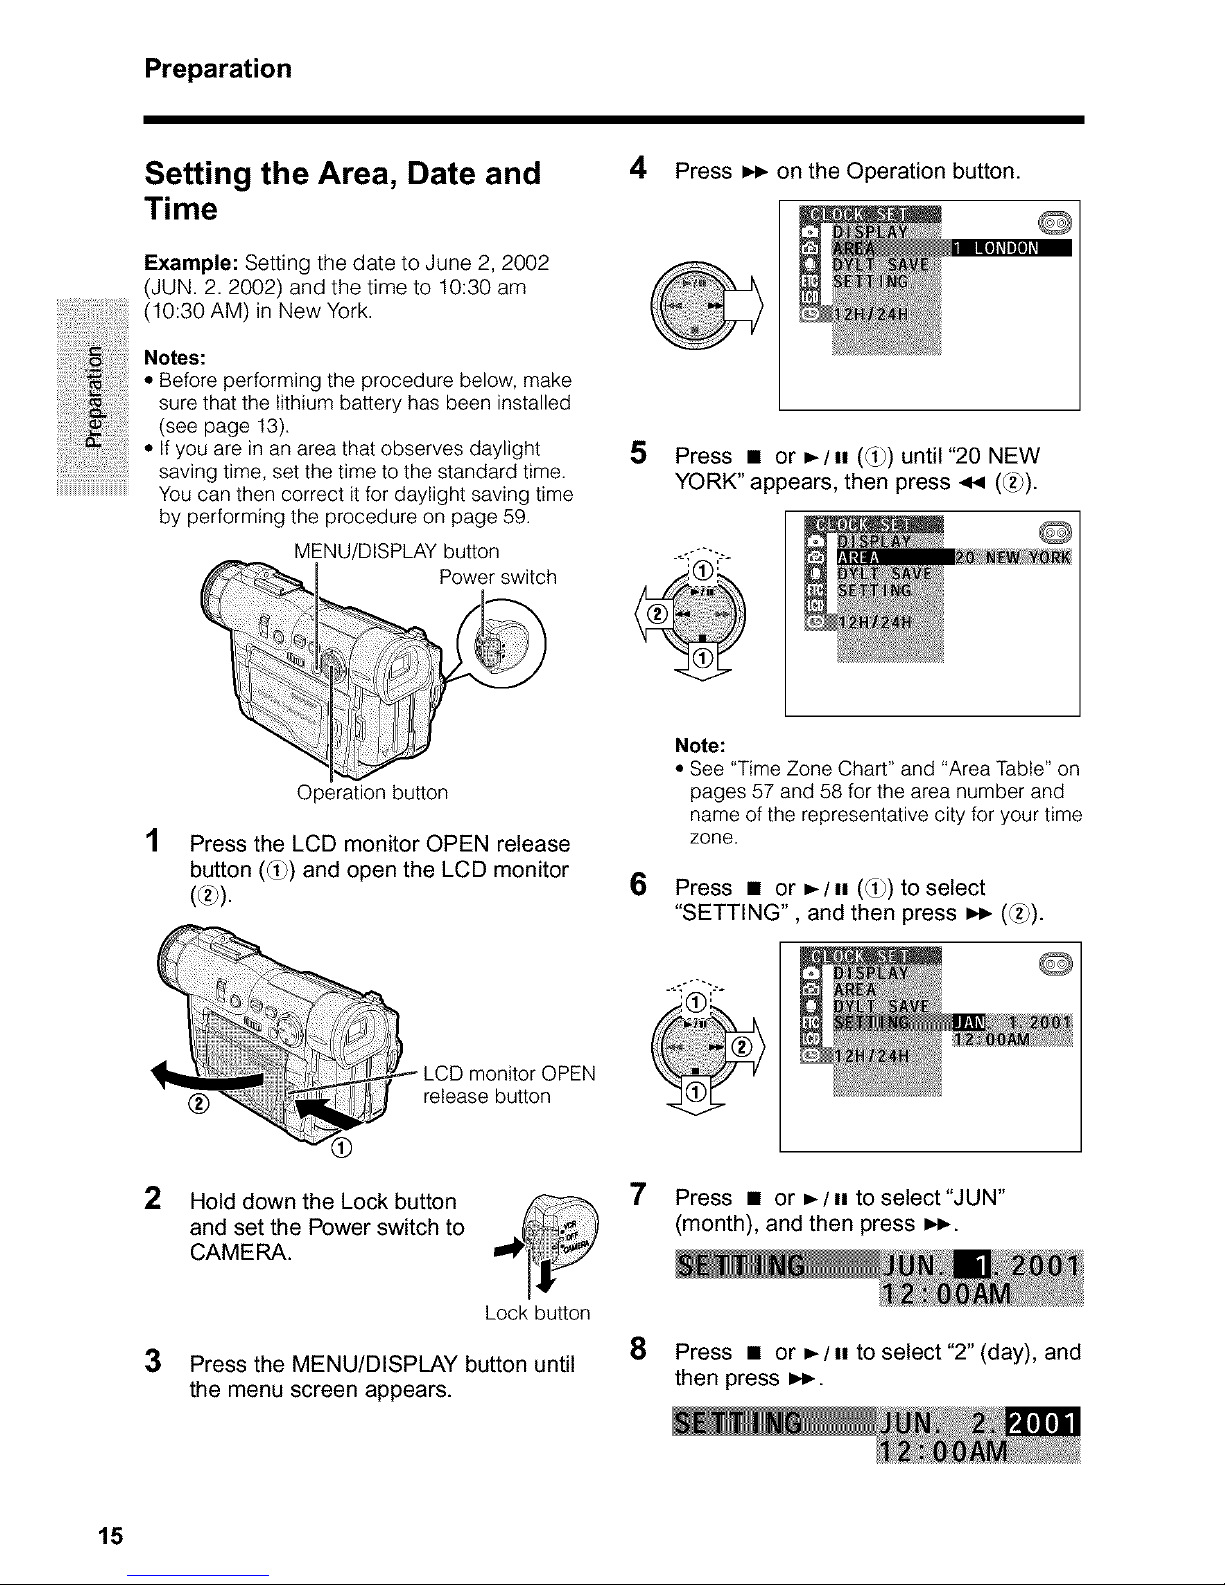
4 Press _,_ on the Operation button.
5
Press • or _-/ii (_) until "20 NEW
YORK" appears, then press _ (_2_).
@
Note:
• See "Time Zone Chart" and "Area Table" on
pages 57 and 58 for the area number and
name of the representative city for your time
zone.
6 Press • or =-/H (_) to select
"SETTING", and then press _ (_2_).
8
Press • or _-/1! to select"JUN"
(month), and then press _,_.
Press • or =-/ H to select "2" (day), and
then press _,_.
w
15
 Loading...