

Sharp ViewCam VL-NZ50S Operation Manual
-
CAMCORDER CON PANTALLA DE CRISTAL LÍQUIDO
VIDEOKAMERA MED FLYTANDE KRISTALLSKÄRM
CAMCORDER COM VISOR DE CRISTAL LÍQUIDO
LIQUID CRYSTAL DISPLAY CAMCORDER
MANUAL DE MANEJO
MANUAL DE OPERAÇÃO
BRUKSANVISNING
OPERATION MANUAL
MANUAL DE MANEJO BRUKSANVISNING
ESPAÑOL
SVENSKA
VL-NZ50S
PORTUGUÊS
ENGLISH

Before using the camcorder, please read this operation manual carefully,
especially page iv.
OPERATION MANUAL
WARNING
TO PREVENT SHOCK
HAZARD, DO NOT EXPOSE
THIS APPLIANCE TO RAIN
OR MOISTURE.
This equipment should be used with
the recommended AC adapter or
battery pack.
CAUTION
To prevent electric shocks and fire
hazards, do NOT use any other power
source.
Important:
Audio-visual material may consist of
copyrighted works which must not be
recorded without the authority of the
owner of the copyright. Please refer to
relevant laws in your country.
CAUTION
To prevent shock, do not open the
cabinet. No user serviceable parts
inside. Refer servicing to qualified
dealer or service centre.
Power supply:
This unit can be operated by
connecting it to either the AC adapter
or battery pack. The AC adapter
incorporates the AUTO VOLTAGE (AC
110–240 V, 50/60 Hz) function.
ENGLISH
NOTE
The LCD panel of this camcorder is a very high technology product with more than
120,000 thin-film transistors*, giving you fine picture detail. Occasionally, a pixel may
appear on the screen as a fixed point of blue, green, red, or black. Please note that
this does not affect the performance of your camcorder.
*Specifications are subject to change without notice.
ENGLISH
Quick Operation Guide
Please consult this operation manual
further for details on these and other
functions of your camcorder.
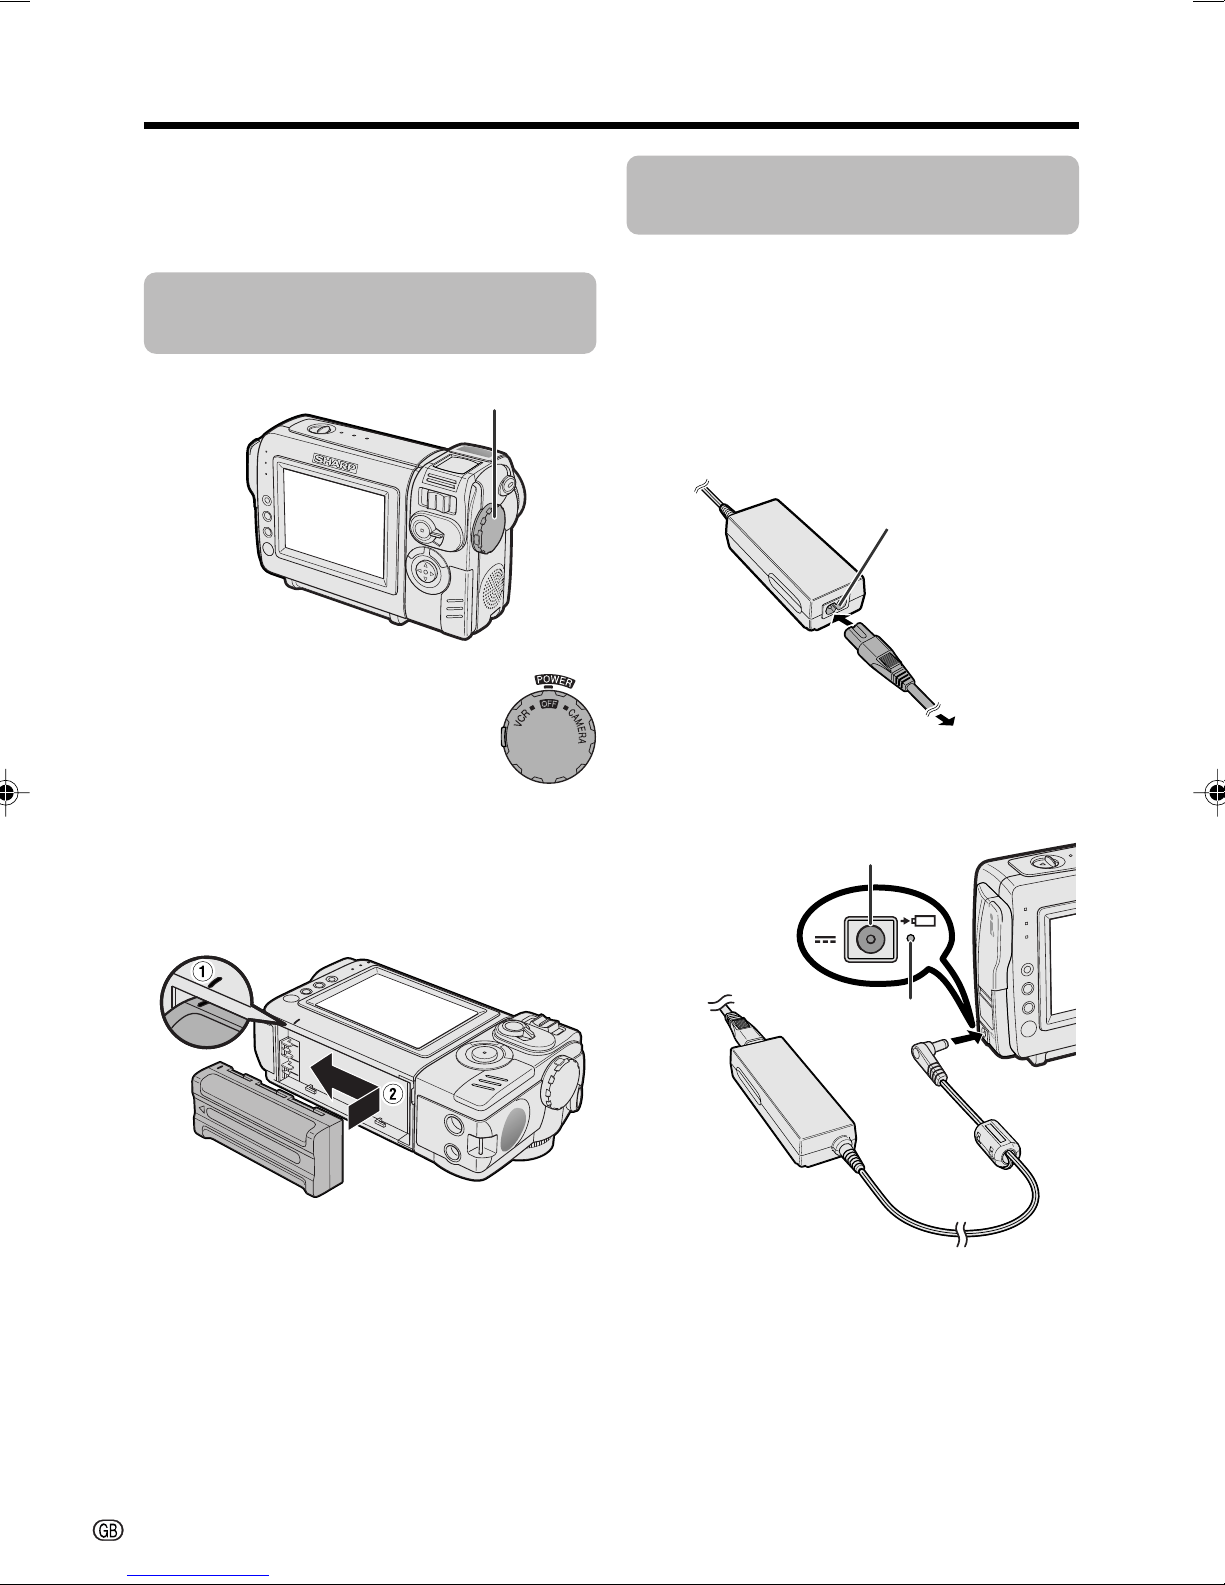
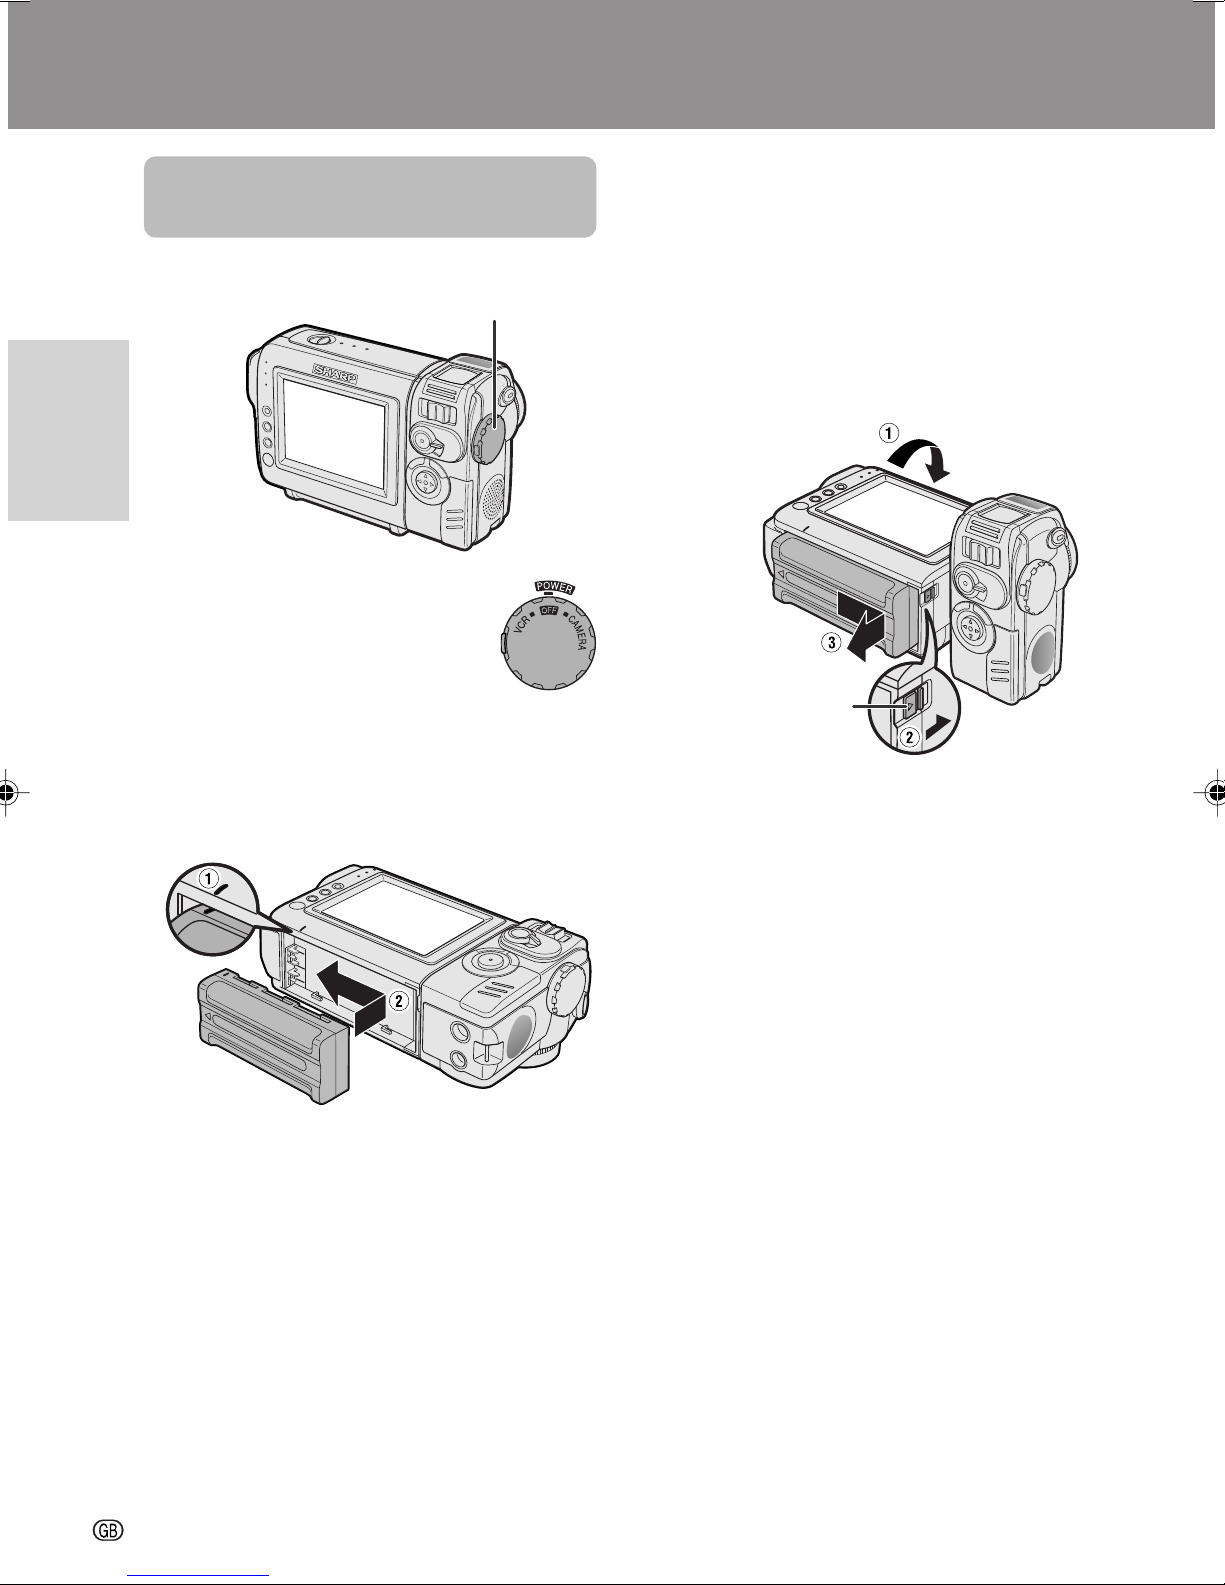
Attaching the Battery
Pack
Power switch
1 Make sure that the Power
switch is set to OFF.
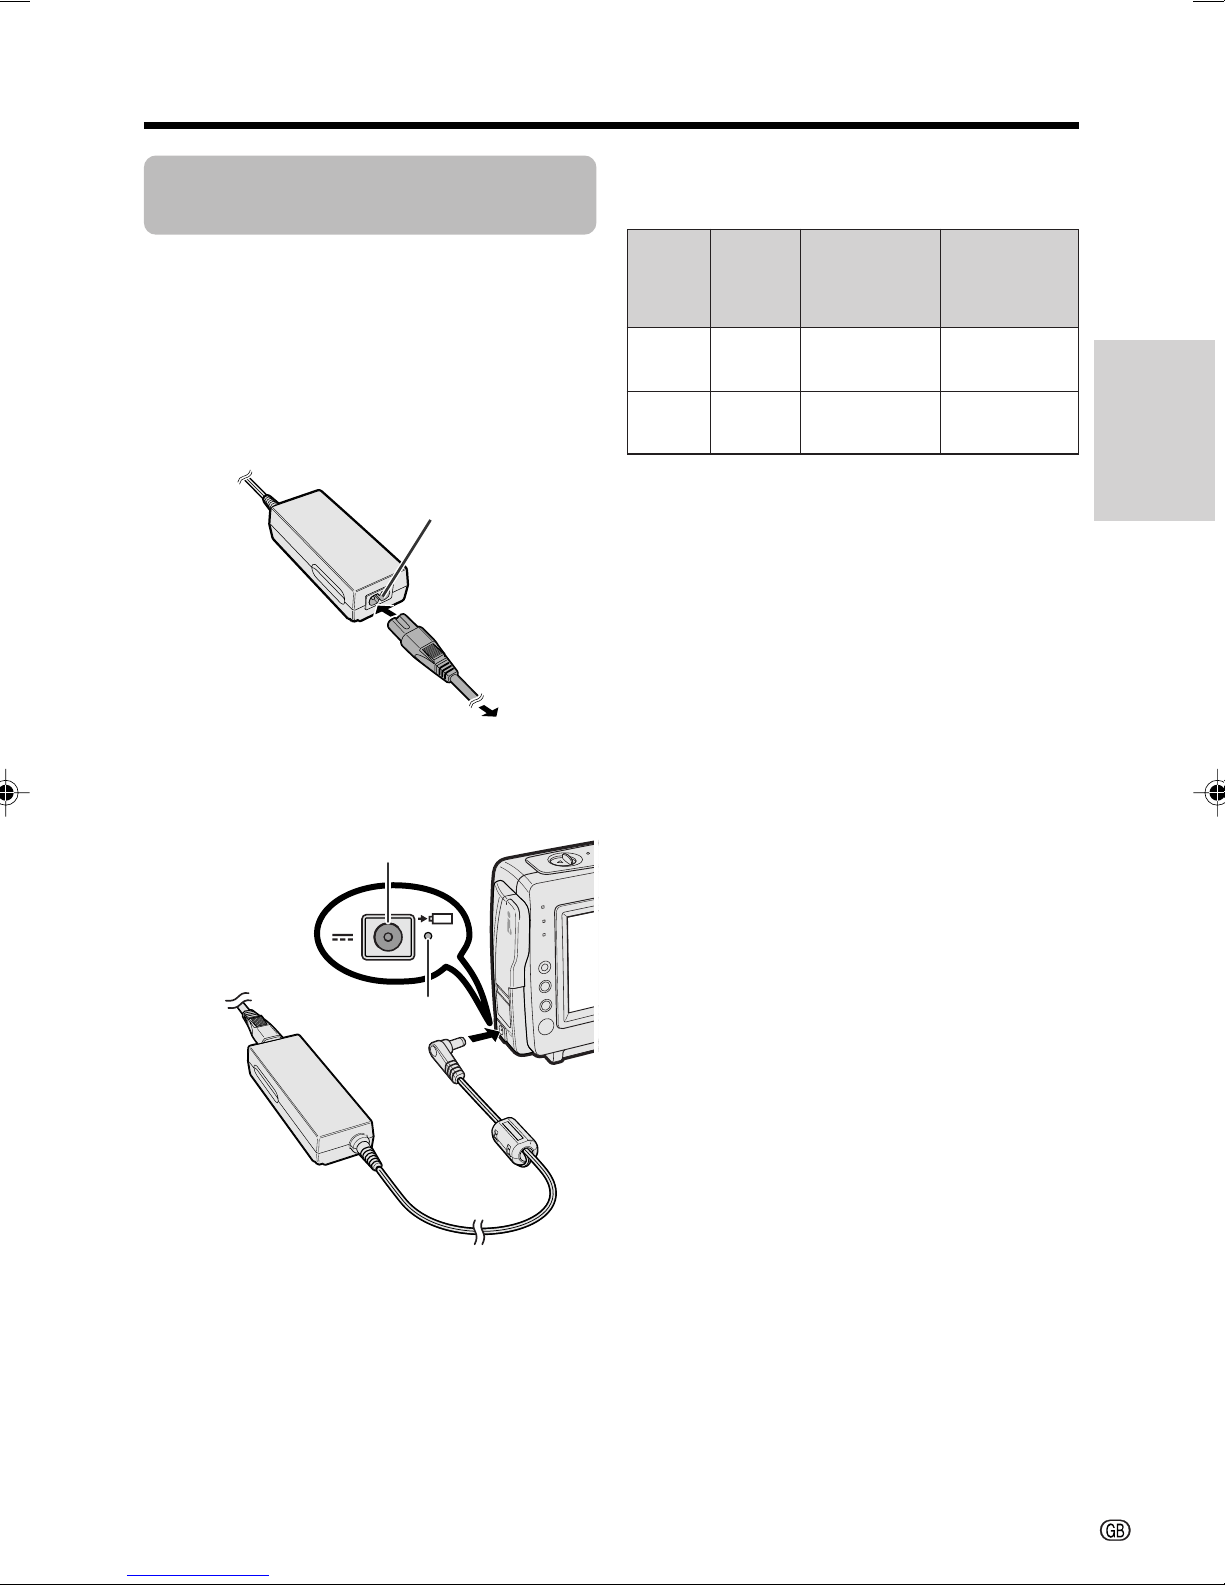
Charging the Battery
Pack
1
Attach the battery pack on the
camcorder, and make sure that the
Power switch is set to OFF.
2 Connect the supplied power cord to the
AC power socket on the AC adapter, and
insert the AC plug into a power outlet.
AC power socket
To power
outlet
2 Align the = mark on the side of the
battery pack with the = mark on the
camcorder (1), and slide the battery
pack in the direction of the arrow
completely until it locks into place (2).
3 Insert the DC plug into the DC input
jack.
• The charge indicator lights up.
DC input jack
Charge indicator
• The charge indicator turns off when the
battery is charged.
4 Remove the DC plug from the DC input
jack, then remove the AC plug from the
power outlet.
i
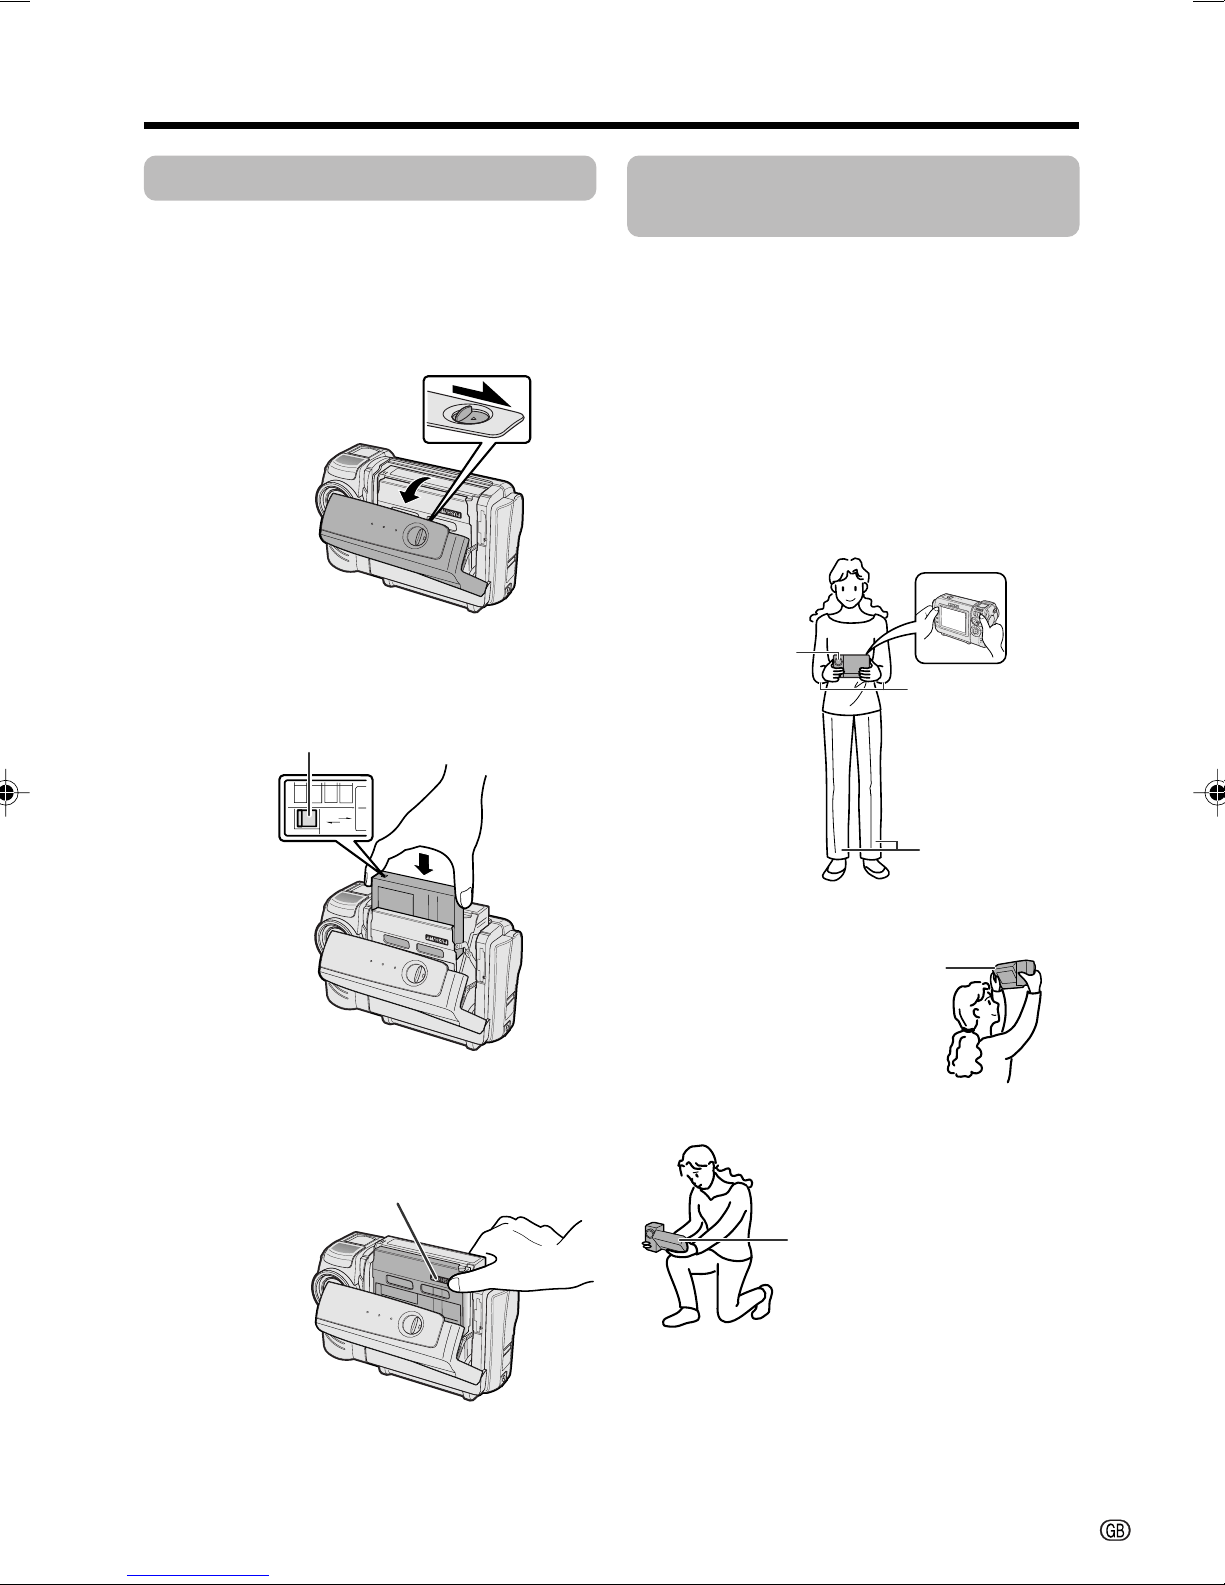
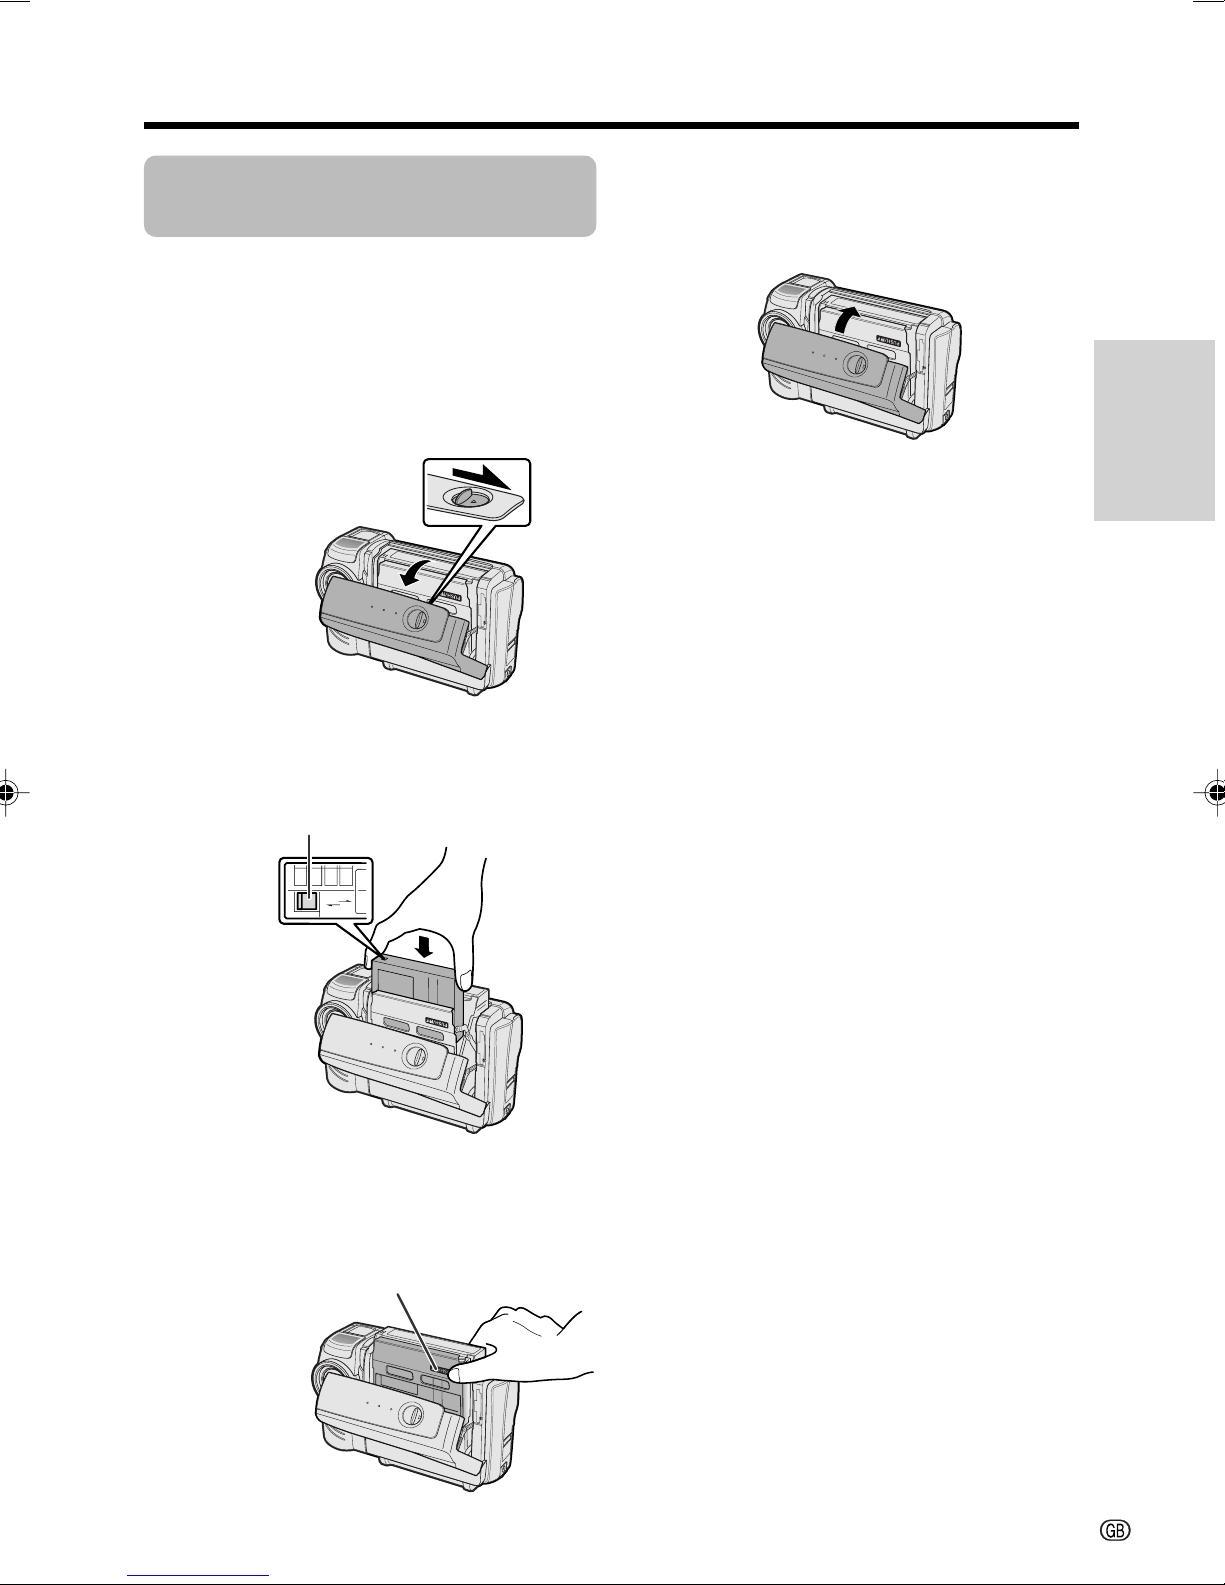
Inserting a Cassette
Tips on Recording
1
Attach the power source to the
camcorder, then slide the cassette
compartment door release and open the
cassette compartment door.
• After confirmation sound, the cassette
holder extends and opens automatically.
Cassette compartment
door release
2 Insert a commercially available cassette
fully with the window facing outwards,
and with the erasure protect tab facing
upwards.
Erasure protect tab
Positions
To create images that are easy to watch during
playback, try to record with an upright posture
and steady hand to prevent a shaky image.
Holding the camcorder
Place your right thumb close to the REC
START/STOP button and Power Zoom control.
Place your left thumb on the thumb rest on the
left side of the screen.
Basic posture
Take care not to
cover the lens or
microphone with
your finger.
Place your elbows
against your sides.
SAVE
REC
3 Press the W mark gently until the
cassette holder clicks into place.
• After confirmation sound, the cassette
holder retracts automatically.
“W” mark
Balance your
weight on both
legs.
Shooting from a high angle
Turn the LCD monitor so that the
screen faces downward.
Shooting from a low angle
Turn the LCD monitor so that
the screen faces upward.
4 Wait for the cassette holder to fully
retract. Close the compartment door by
pressing the centre until it clicks into
place.
ii
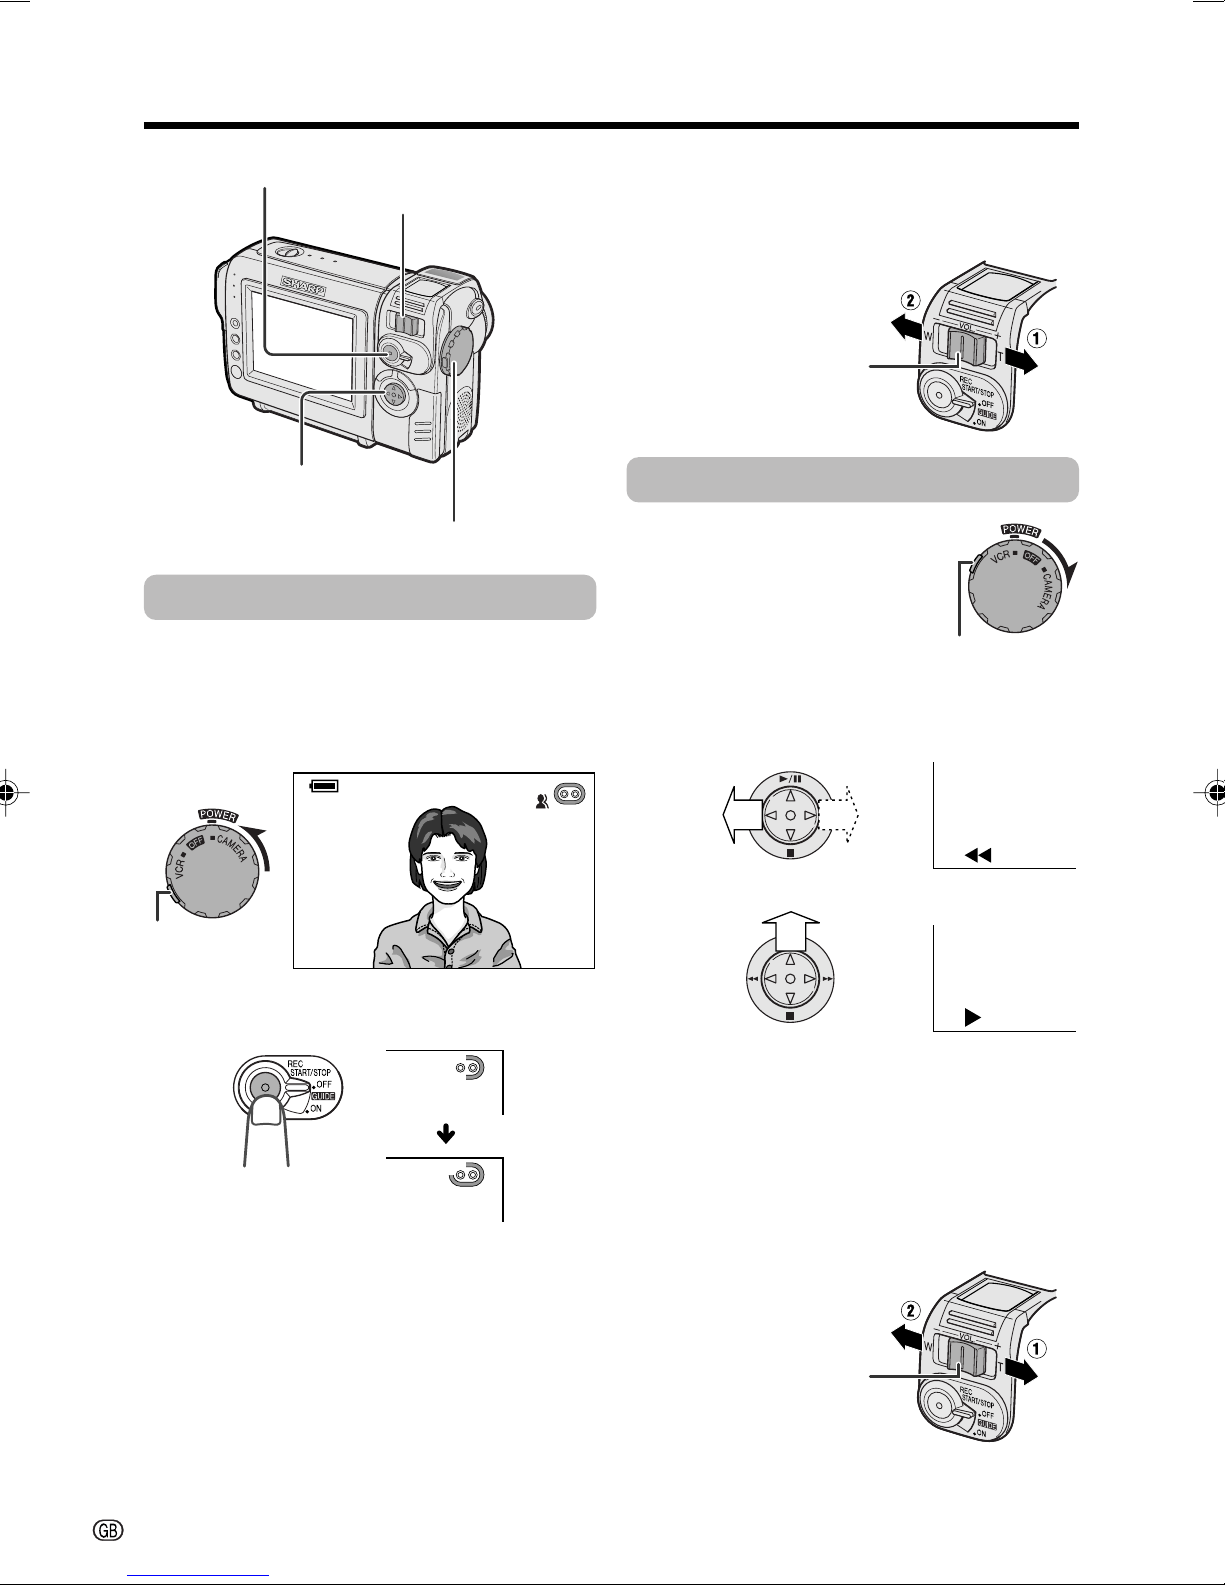
Quick Operation Guide
REC START/STOP button
Power Zoom control/Volume control
Operation button
Power switch
Easy Camera Recording
1 Insert a cassette into the camcorder.
2 Hold down the Lock button and set the
Power switch to CAMERA.
• The picture from the lens now displays.
Zooming
Push the Power Zoom control to T (1) (telephoto) or W (2) (wide angle) side.
Power Zoom control
Playback
1 Hold down the Lock button
and set the Power switch to
VCR.
Lock button
2 Press j (or k) on the Operation button
to rewind (or fast forward) the tape to the
desired point.
Lock button
AUTO
3 Press the REC START/STOP button to
begin recording.
REC
To pause recording
Press the REC START/STOP button again.
3 Press m to begin playback.
To stop playback
Press l.
Volume Control
Push the Volume control to the L or + side to
increase (1) or decrease (2) the volume.
Volume control
iii
Precautions
• When the camcorder is not in use, remem-
ber to remove the cassette tape, turn off
the power, and disconnect the camcorder
from the power source.
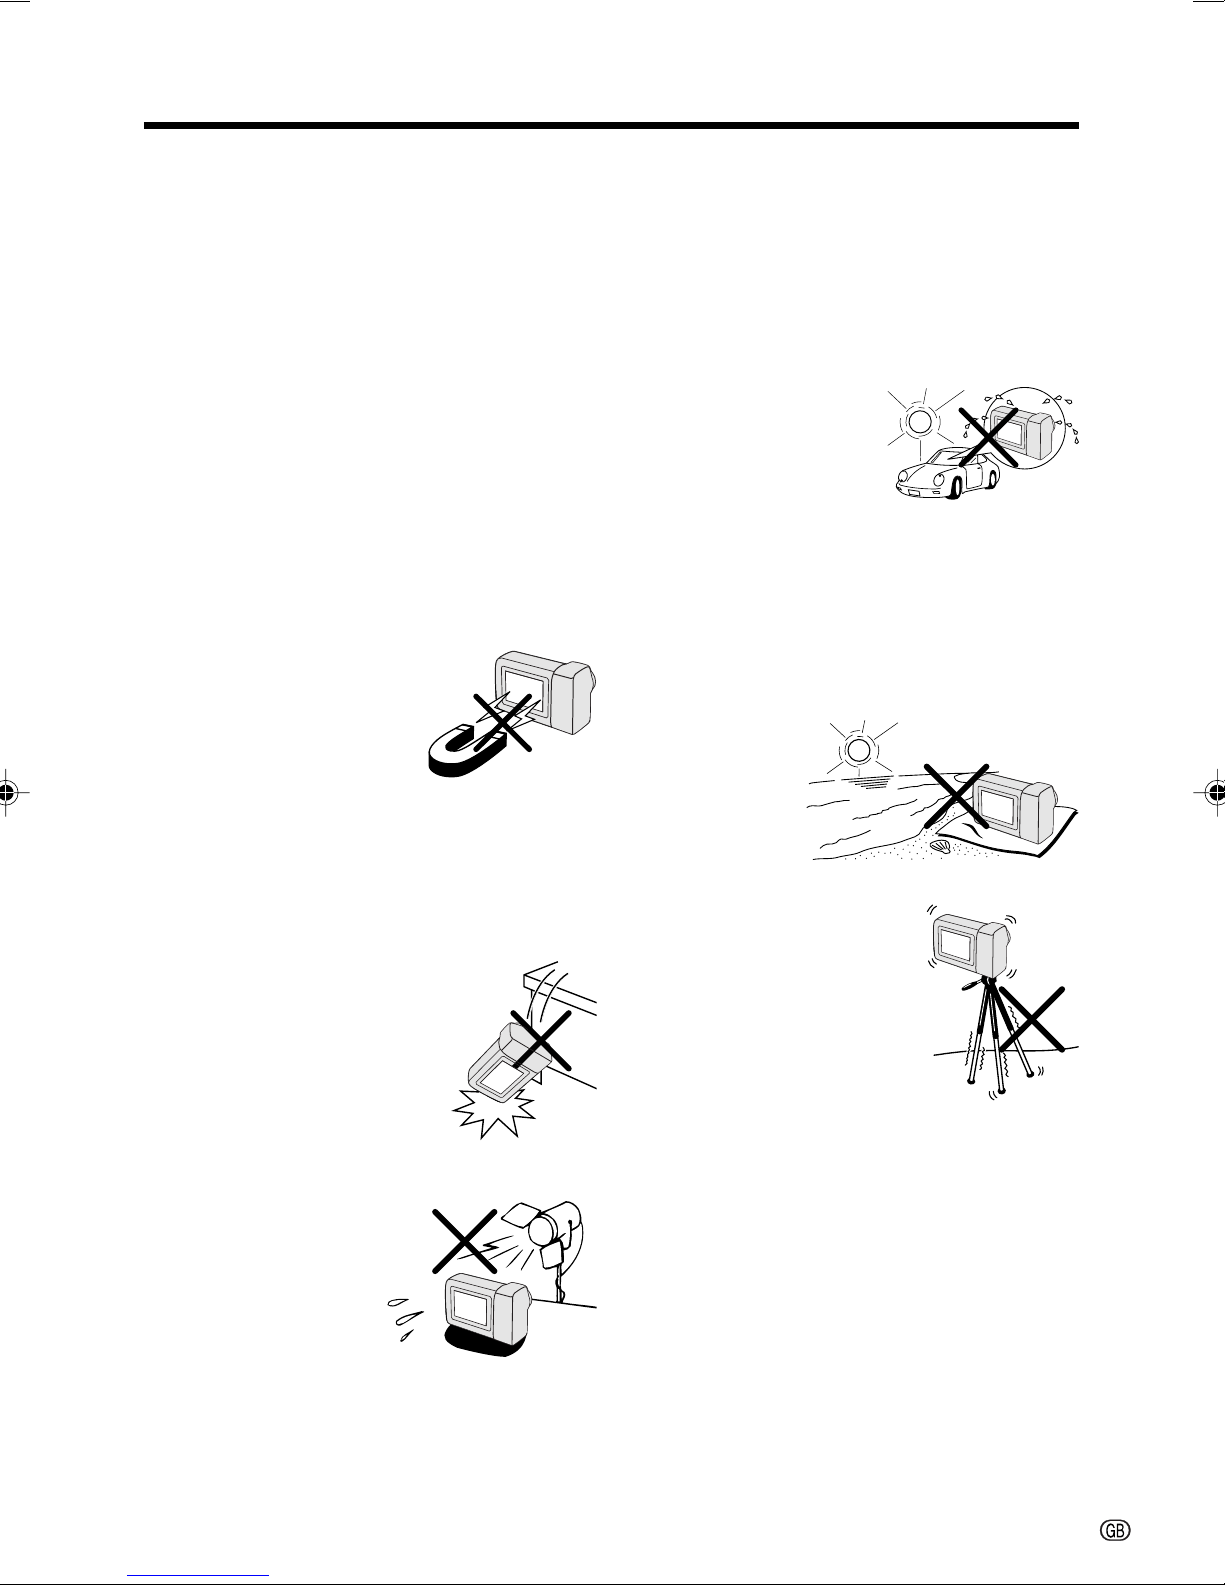
• Do not aim the lens at the sun.
Do not allow direct sunlight to strike the
camcorder lens or LCD monitor screen,
whether or not recording is in progress, as it
may damage the CCD sensor or LCD screen
surface. Be particularly careful when recording outside.
• When shooting in dark places, avoid sudden
brightly lit objects or light sources, such as
the sun. Otherwise, the image may white out.
Should this happen, point the lens in a different direction until the picture returns to normal.
• Avoid magnetic sources.
Using the camcorder near
strong fluorescent lights,
motors, televisions, or other
magnetic sources may adversely affect recorded images.
• Using the camcorder near a broadcasting
station or other powerful transmission
source may cause buzzing or picture deterioration.
• Avoid shocks and dropping.
Do not drop or otherwise
subject the camcorder to
hard shocks or strong vibrations. Bumping or striking the
unit during recording will
generate noise in the recorded image.
• Avoid placing the
camcorder in close
proximity to lighting
equipment.
The heat from incandescent lights may deform the camcorder, or
cause it to malfunction.
• Always respect prohibitions or restrictions
on the use of electronic equipment on
commercial flights or in other sensitive areas.
• Be aware of the temperature and humidity.
You can use your camcorder at 0°C to
L40°C, and at 30% to 80% relative humidity.
Do not store the unit in
an unventilated car in
the summer, in direct
sunlight, or near strong
heat sources; this can
result in severe damage
to the unit casing and
circuitry.
• Avoid situations where water, sand, dust or
other foreign matter could get on or inside
the camcorder, and do not use or leave
your camcorder in areas with excessive
smoke, steam or moisture.
Such environments can cause malfunctions
or cause mildew to form on
the lenses. Be
sure to keep the
unit in a wellventilated location.
• Some small, portable tri-
pods may be difficult to attach and may not be sturdy
enough to support your
camcorder. Be sure to use
only a strong, stable tripod.
• When using your
camcorder in a cold environment, the LCD monitor screen often appears less bright immediately after the
power is turned on. This is not a malfunction. To prevent the camcorder from becoming too cold, wrap it in a thick cloth (a
blanket, etc.).
iv
Precautions
Dew Formation
• What is “dew formation”?
When cold water is poured into a glass, dew
drops form on the glass. This clinging of
water drops is called dew formation.
• When dew forms in your camcorder.
Dew will gradually form on the head drum of
your camcorder and make the video tape
stick to the head. This causes damage both
to the head and the tape. When dew forms,
recording and playback may not function
properly.
Dew is likely to form in the following circumstances:
—When moving the camcorder from a cold
place to a warm place.
—When placing the camcorder in a cold
room which is then heated rapidly.
—When moving the camcorder outdoors from
an air conditioned room or car.
—When placing the
camcorder in the direct
path of air blowing from
an air conditioner.
—When placing the
camcorder in a humid
room.
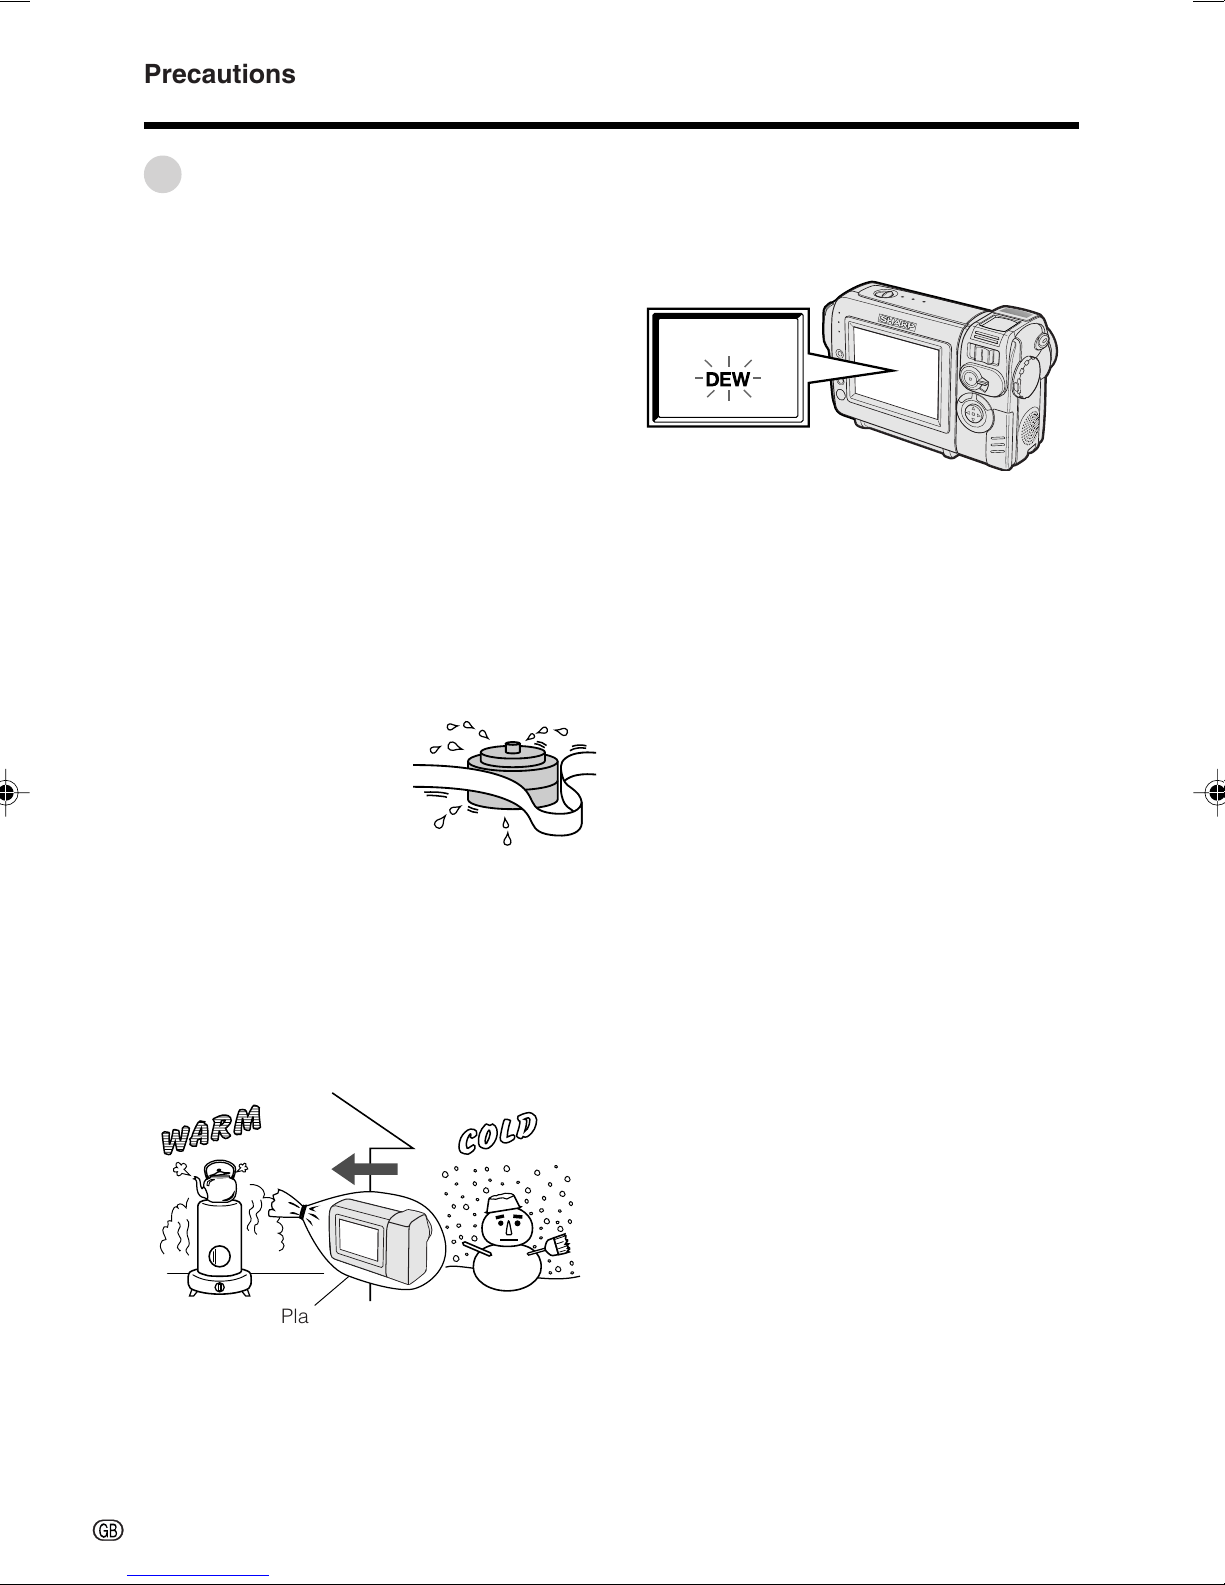
• “Dew” warning feature
If dew forms, the word “DEW” flashes on the
screen, and the power will automatically turn
off in approximately 10 seconds.
1If “DEW” flashes, remove the cassette,
leave the cassette compartment open, and
wait for a few hours to allow the camcorder
to acclimatise to the surrounding temperature.
2To use the camcorder again, turn on the
power after waiting for a few hours. Be sure
that “DEW” has disappeared.
3Do not insert a cassette while “DEW” is
flashing; this may result in damage to the
tape.
4Since dew forms gradually, it may take 10
to 15 minutes before the dew warning
feature engages.
• How to prevent trouble.
When using the camcorder in a place where
dew is likely to form, allow the camcorder and
the video tape to acclimatise to the surroundings for about one hour.
For example, when bringing the camcorder
indoors after skiing, place it in a plastic bag.
Plastic bag
1Be sure to tightly seal the plastic bag
containing the camcorder.
2Remove the bag when the air temperature
inside it reaches the temperature of the
room.
v
Dirty Video Heads
CLEANING
STOP
START
CLEANINGNOW
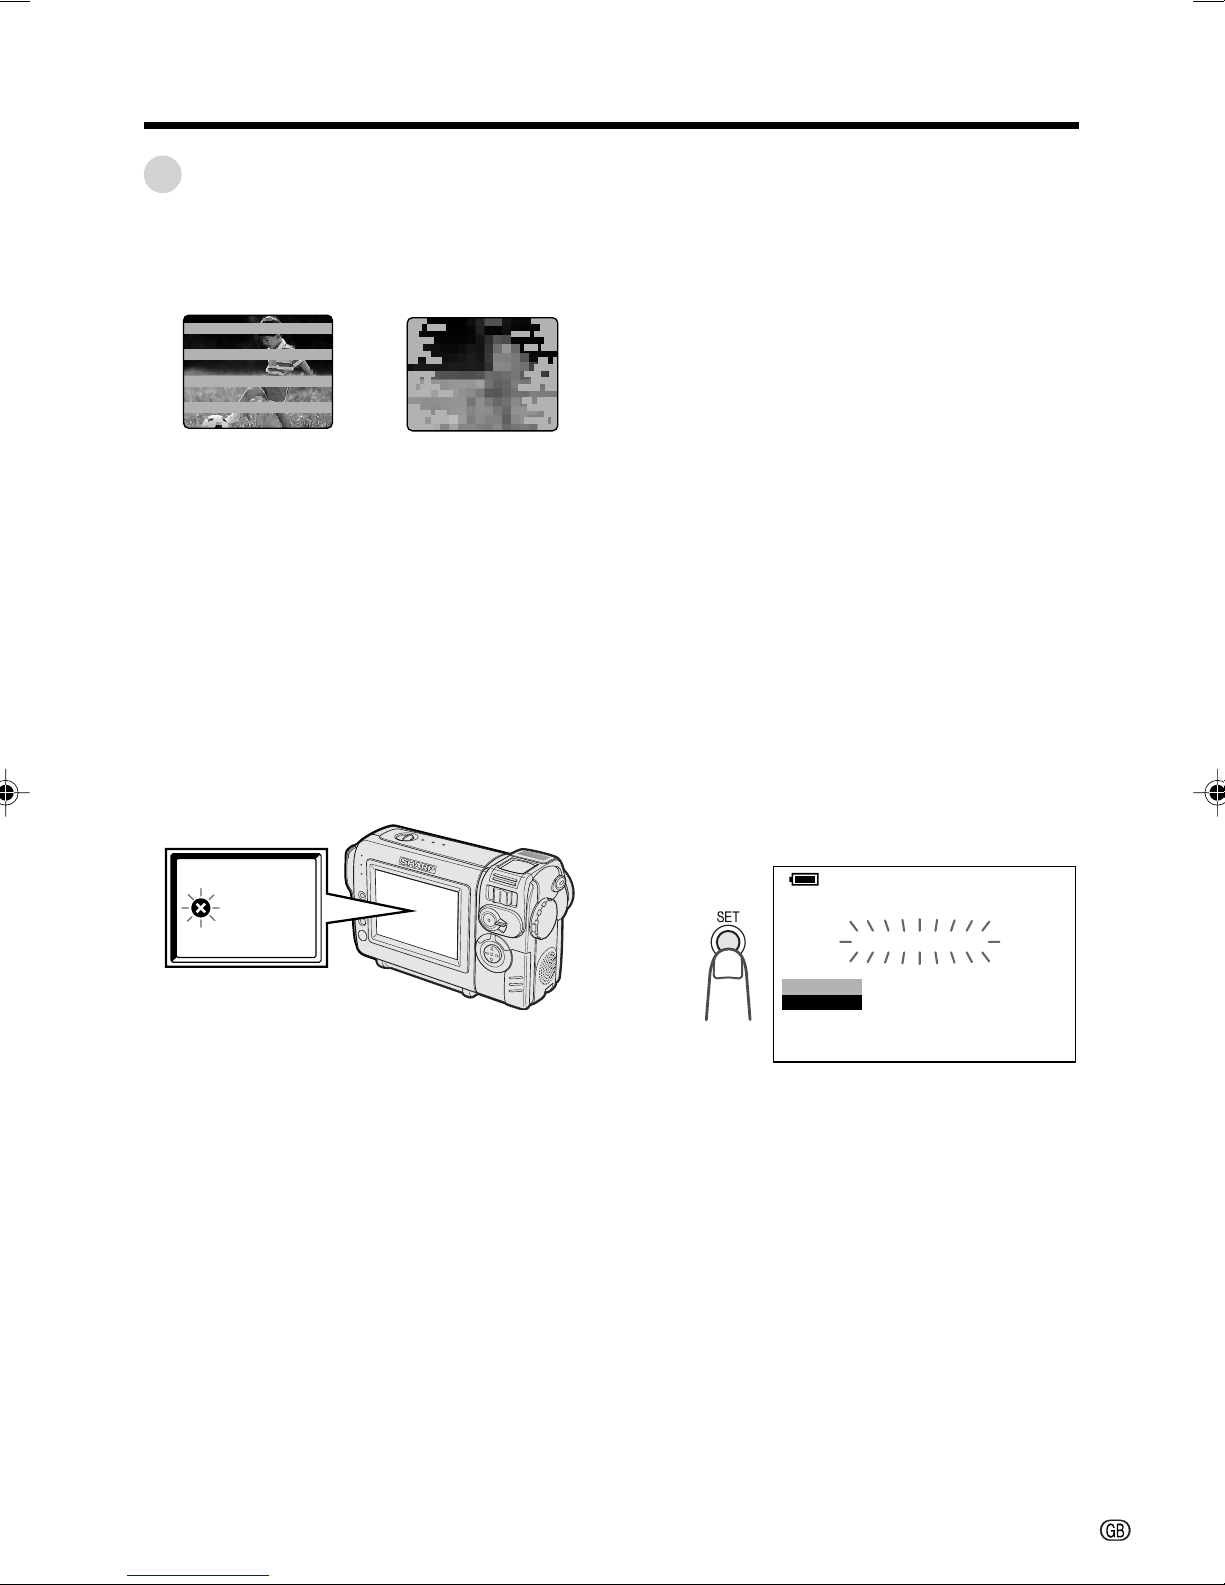
When the video heads have become clogged
with dirt (dust and tape coating particles),
Mosaic noiseStriped noise
• mosaic-like noise appears on the playback
picture. (see above illustration)
• playback pictures do not move.
• during playback, the whole screen becomes
blue.
Causes of video head clogging
• High-temperature and high-humidity environment
• A lot of dust in the air
• Damaged tape
• Worn tape
• Long-time use
• Dew formation
Using a Cleaning Tape (Commercially
Available)
You can clean the video head with a commercially available cleaning tape.
Notes:
• Excessive use of the cleaning tape may cause
damage to the video heads. Please read the
instructions accompanying the cleaning tape
carefully before using it.
• The fast forward and rewind functions cannot be
used when the cleaning tape is in the
camcorder.
• If the video heads again become clogged with
dirt soon after cleaning, this might be caused by
a damaged tape. In this case, stop using that
cassette immediately.
1 Insert a cleaning tape into the
camcorder.
2 Set the camcorder to VCR mode.
• The video head cleaning screen
appears.
3 Press the SET button to begin video
head cleaning.
•“NOW CLEANING” flashes during
cleaning.
If the video heads become clogged, the
v indicator appears on the screen. Contact
the nearest SHARP service centre or your
dealer for further advice.
• After about 20 seconds, video head
cleaning automatically finishes, and
“EJECT THE CASSETTE.” displays.
4 Remove the cleaning tape.
To cancel cleaning, press the SET button.
vi
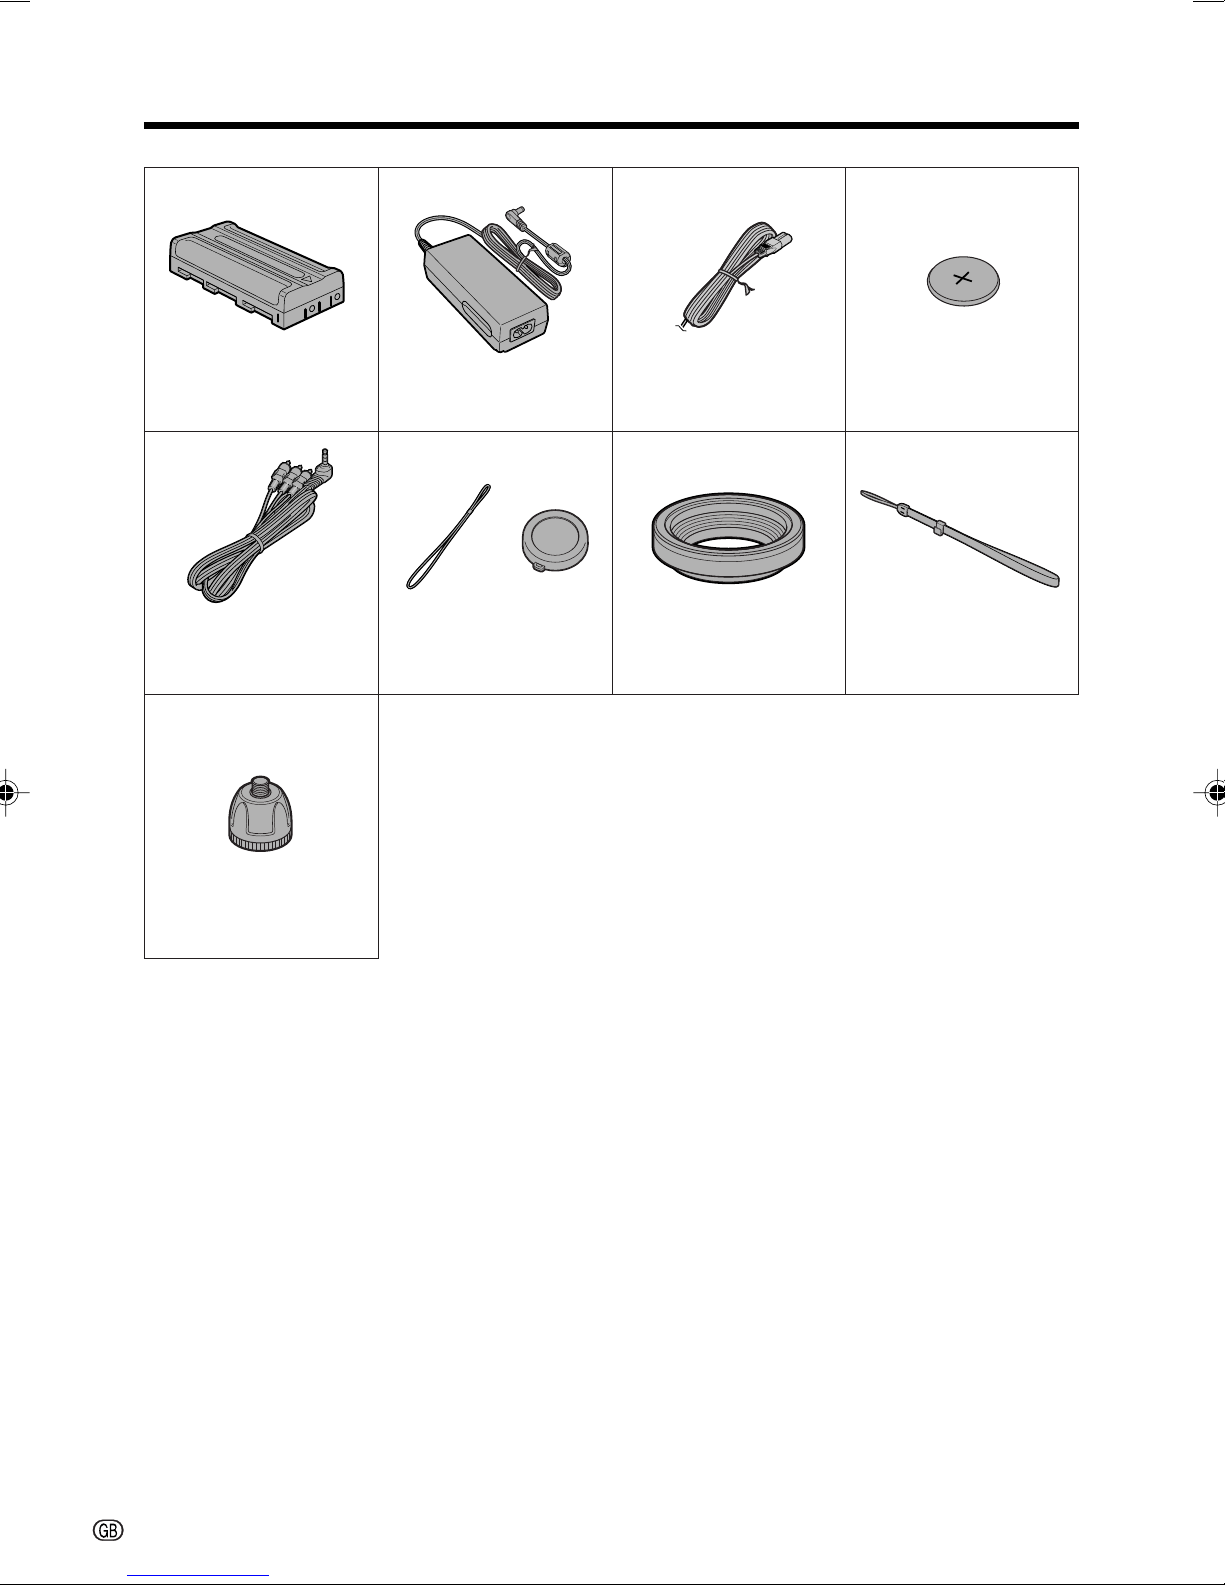
Supplied Accessories
Battery pack
BT-L225 Power cord
Audio/video cable Lens cap
Tripod adapter
CR2025 type
lithium batteryAC adapter
Lens hood Wrist strap
vii
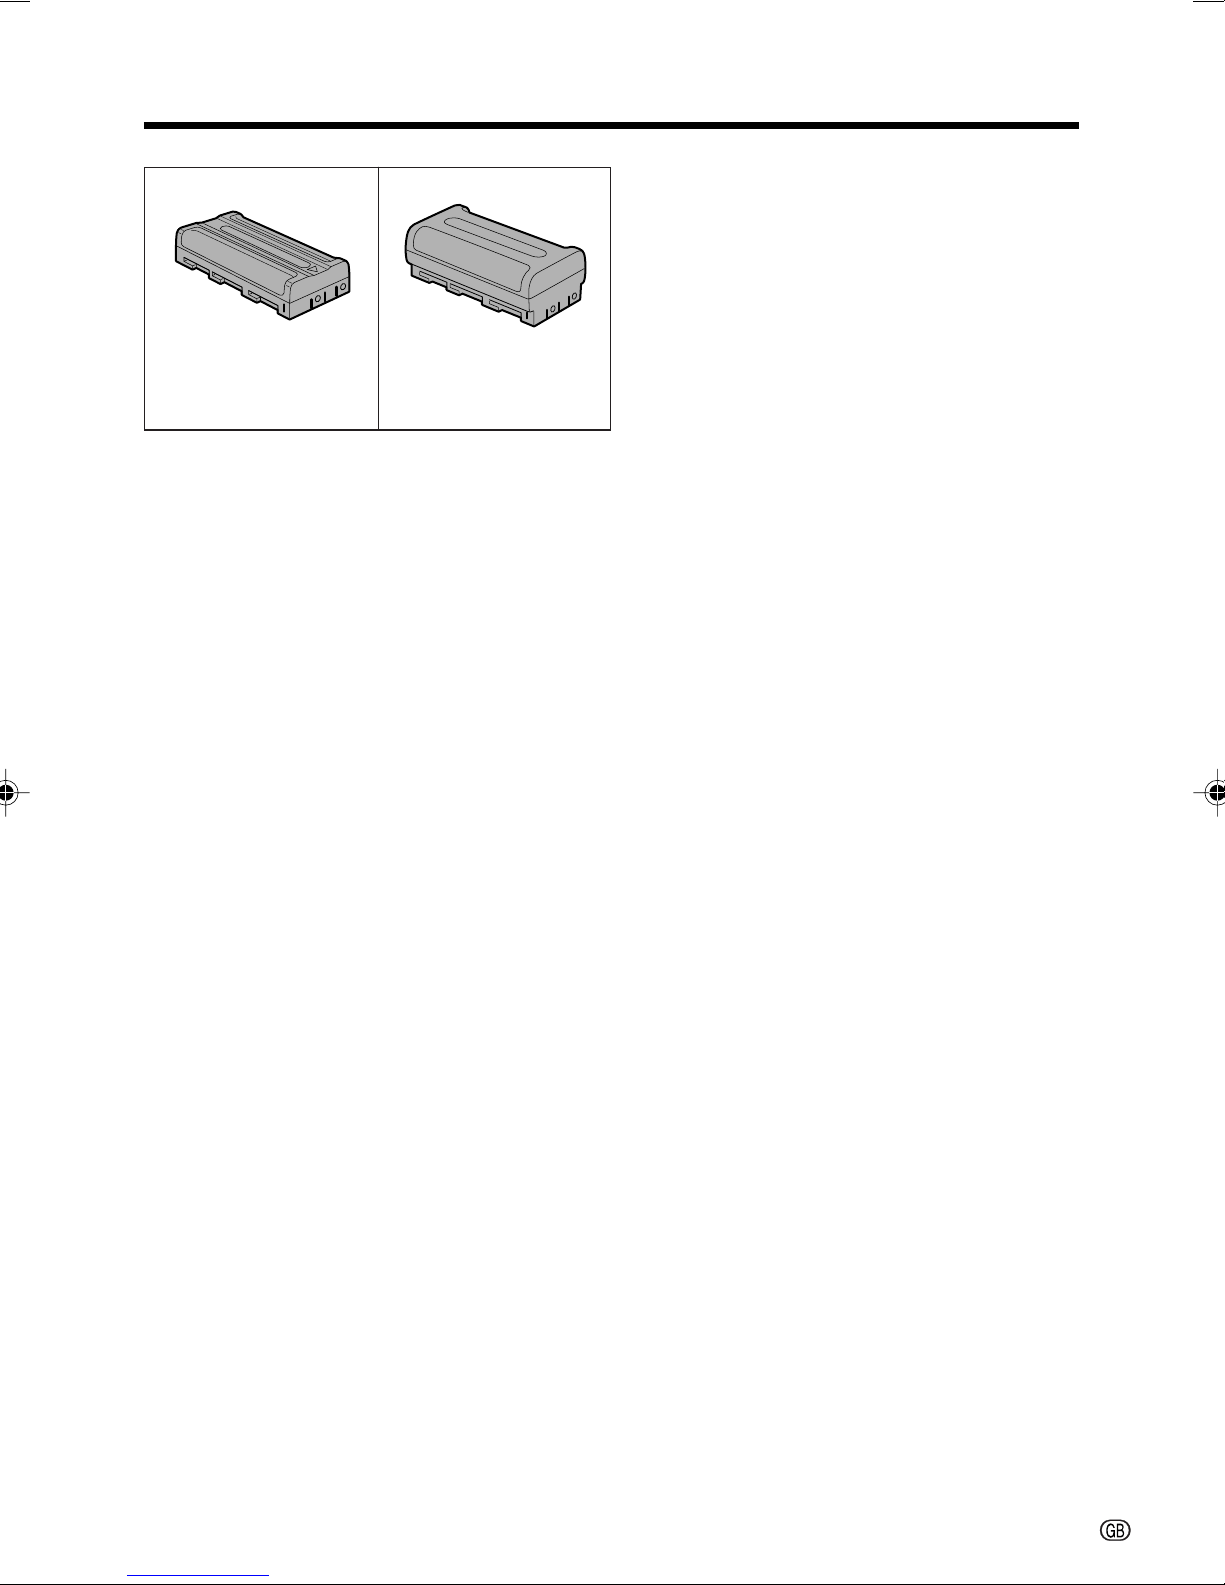
Optional Accessories
Standard-life
battery pack
BT-L225
Extended-life
battery pack
BT-L445
viii

Contents
Operation References
Preparation
Basic Operations
Part Names .................................................................... 1
On-screen Display Index ............................................... 4
Warning Indicators ......................................................... 6
Attaching and Removing the Battery Pack .................... 7
Charging the Battery Pack ............................................. 8
Powering the Camcorder from an AC Outlet ................. 9
Inserting and Removing a Cassette ............................ 10
Installing the Lithium Battery ........................................ 11
Selecting the Language for the On-screen Display..... 12
Setting the Date and Time ........................................... 13
Attaching the Lens Hood ............................................. 14
Attaching the Wrist Strap ............................................. 14
Using the Lens Cap ..................................................... 14
Tips on Recording Positions ........................................ 15
Camera Recording
Easy Camera Recording in Full Auto Mode ................. 16
Zooming ....................................................................... 17
Auto Focus ................................................................... 17
Macro Shots ................................................................. 17
Remaining Recording Time Display ............................ 18
Remaining Battery Power Display ............................... 18
Useful Features
Playback
Playback ...................................................................... 19
Volume Control ............................................................. 19
Video Search................................................................ 20
Still ............................................................................... 20
Watching Playback on a TV ......................................... 21
Using the Menu Screens.............................................. 22
Camera Recording
Displaying the Recording Guide.................................. 23
Setting the Digital Zoom .............................................. 24
Gamma Brightness Compensation .............................. 25
Gain-up ........................................................................ 26
Fade In and Fade Out .................................................. 27
Quick Return ................................................................ 28
Edit Search................................................................... 28
ix

Operation References
Useful Features
Advanced Features
Still Recording .............................................................. 29
Attaching the Supplied Tripod Adapter ....................... 29
Wide Screen (16:9) ...................................................... 30
Digital Image Stabilization (DIS) .................................. 30
Self Recording ............................................................. 31
Recording in LP (Long Play Recording) Mode ............ 32
Selecting the 16-bit Audio Recording Mode................ 33
Playback
Using the Remote Control (Not supplied) .................... 34
Displaying the Date and Time of Recording ................ 35
Gamma Playback ........................................................ 35
Picture Effect Playback ................................................ 36
Camera Recording
Manual Focus .............................................................. 37
Manual Exposure ......................................................... 38
White Balance Lock ..................................................... 39
Setting the Camcorder to Full Auto Mode.................... 39
Digital Picture Effects ................................................... 40
Scene Menu (Program AE) .......................................... 41
Preparation
Basic Operations
Appendix
Playback
Using the Time Code ................................................... 42
Editing .......................................................................... 43
Editing with the DV Terminal (IEEE1394) ..................... 44
Audio Dubbing Feature................................................ 45
Selecting the Audio Playback Mode ............................ 47
Picture/Backlight Adjustments ..................................... 48
Turning off the Confirmation Sound ............................. 49
Useful Information ........................................................ 50
Demonstration Mode ................................................... 55
Before Requesting Service .......................................... 56
Specifications .............................................................. 58
Useful Features
Advanced Features
Appendix
x
Operation References
Operation References
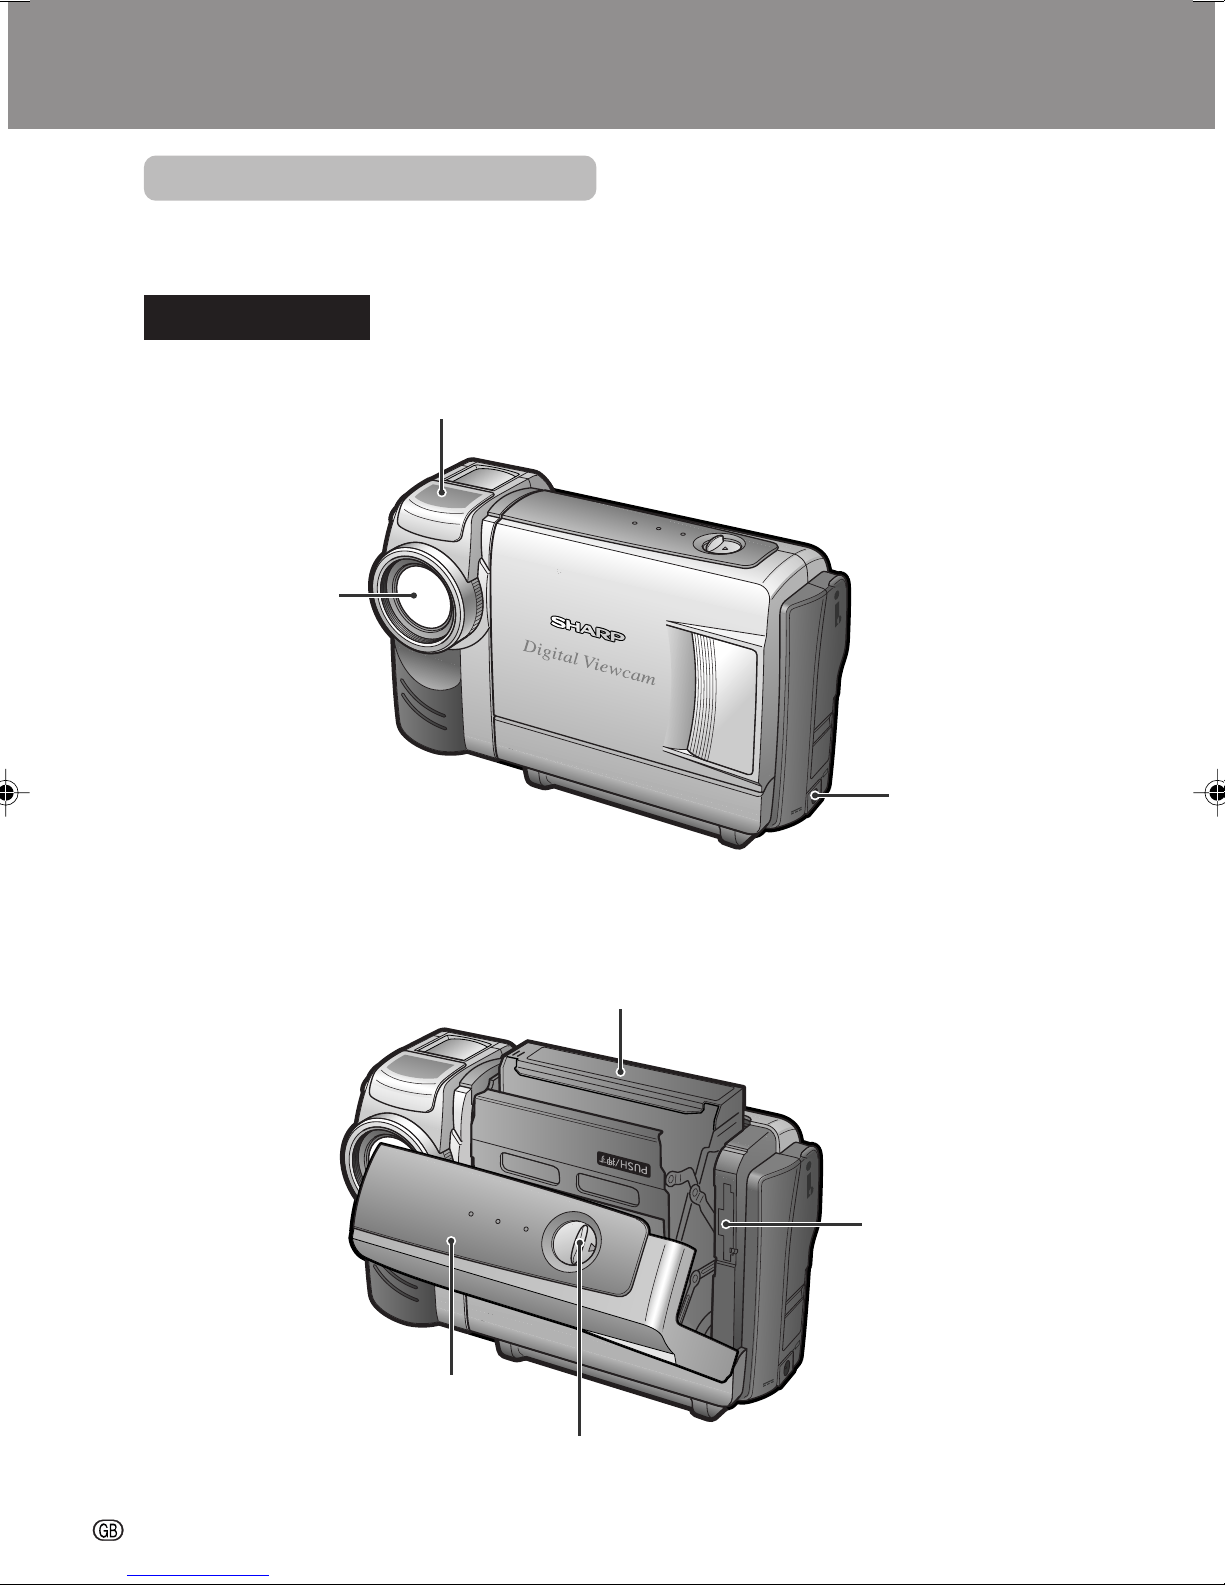
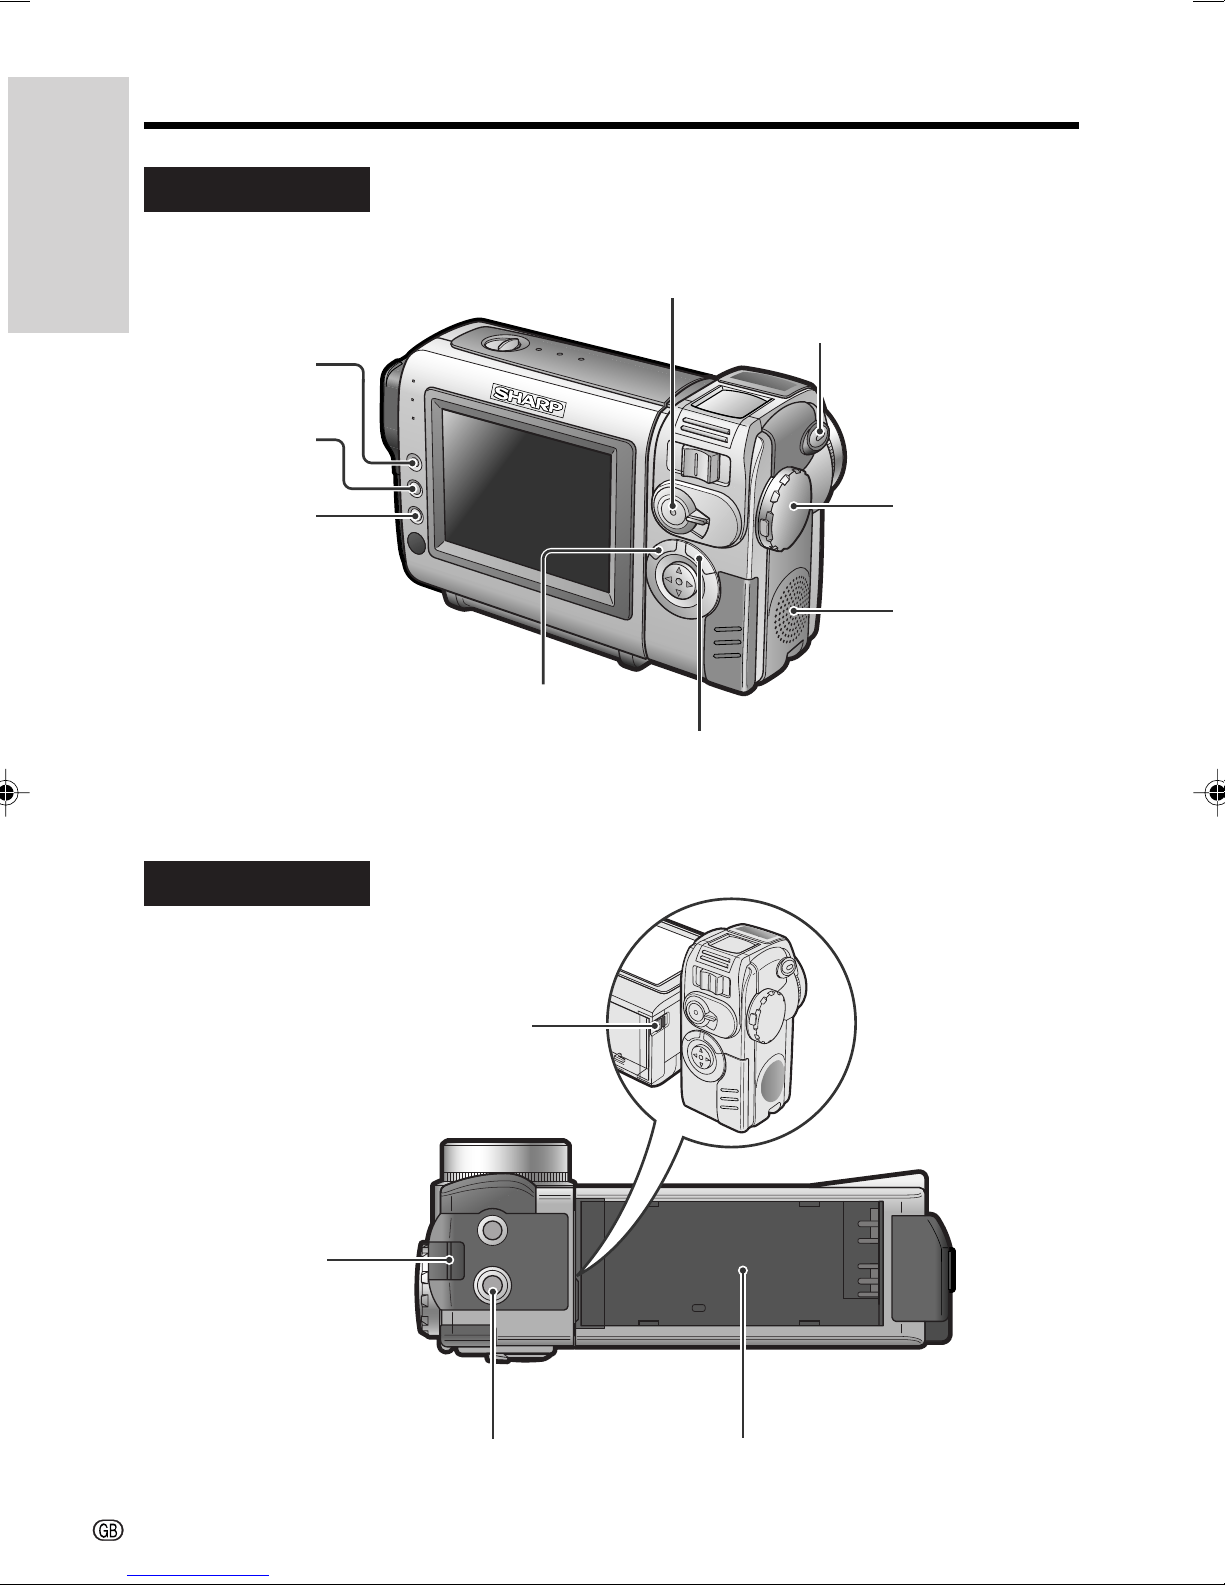
Part Names
For details on the use of each part, refer to the page number indicated in brackets.
Operation References
Front view
Stereo microphone
Zoom lens
Cassette holder [p. 10]
DC input jack
[pp. 8, 9]
Lithium battery
compartment door
[p. 11]
Cassette compartment door [p. 10]
1
Cassette compartment door release [p. 10]
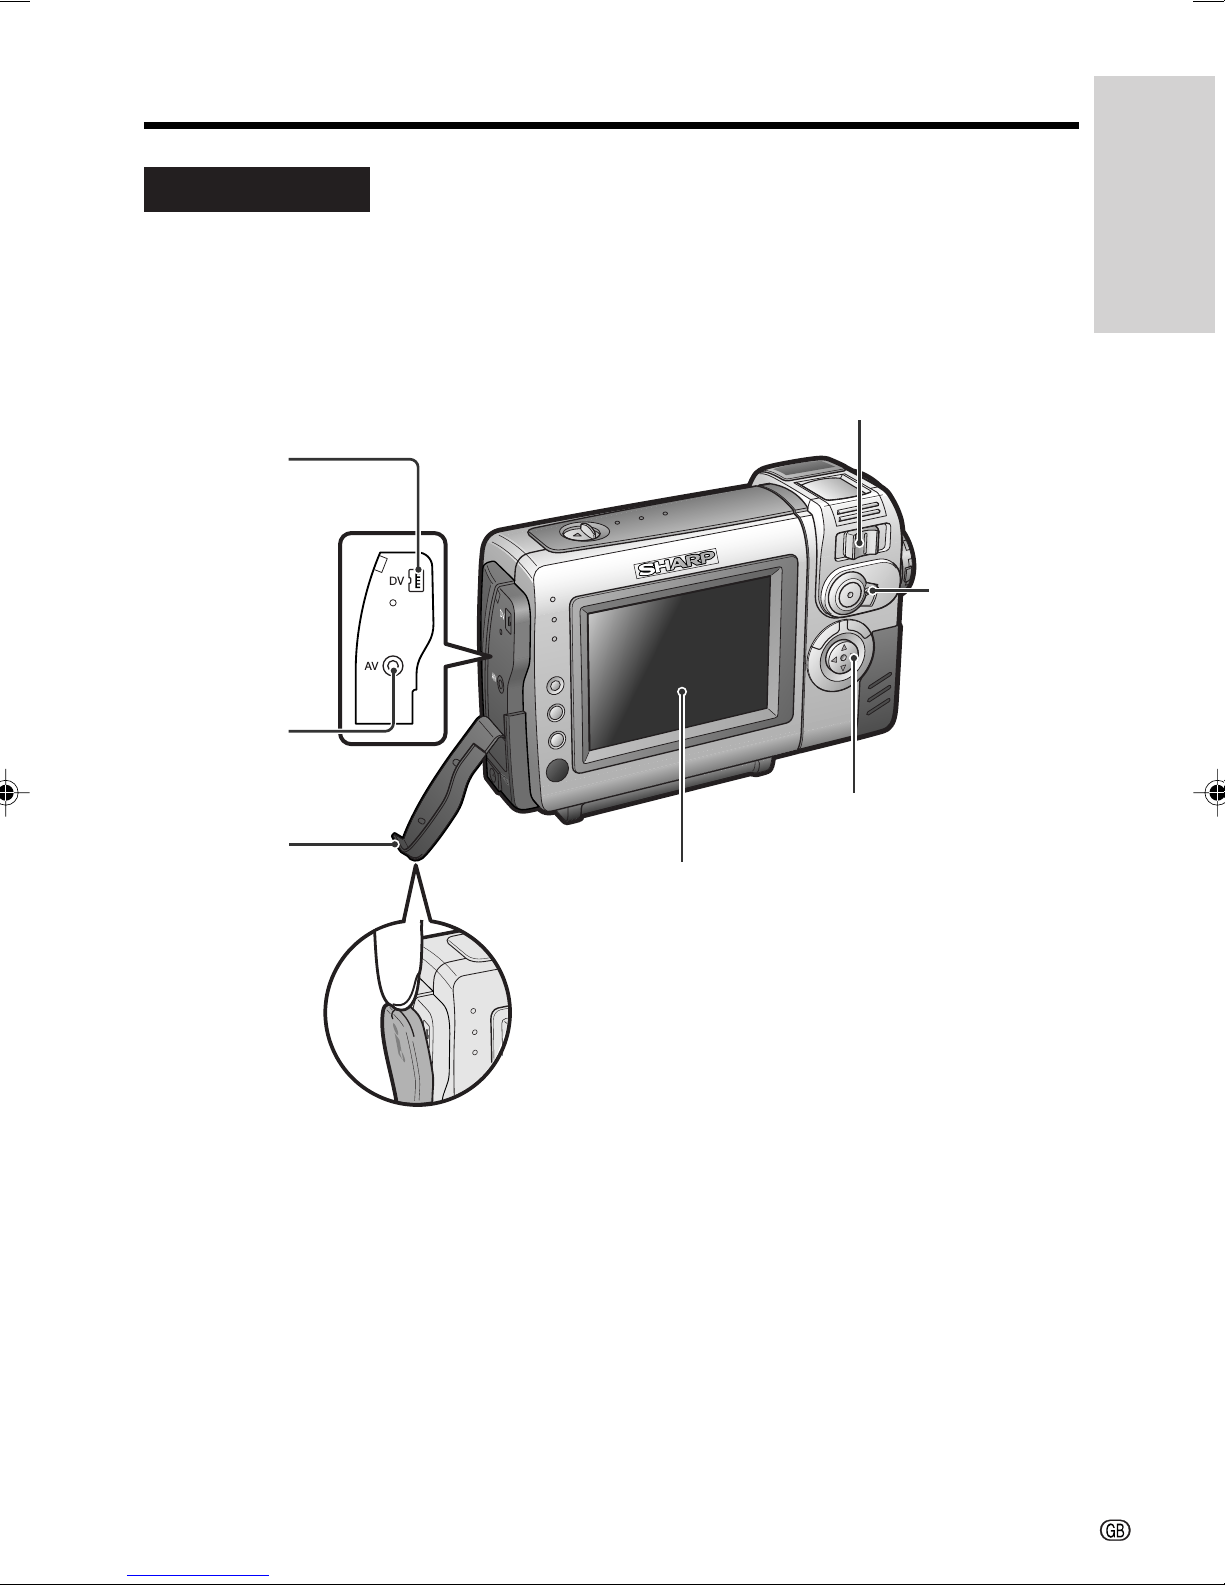
Rear view
DV terminal
[p. 44]
Operation References
Power Zoom Wide angle/
Telephoto control [p. 17]/
VOLume control [p. 19]
GUIDE ON/OFF
switch [p. 23]
AV jack
[pp. 21, 43]
Jack cover
[pp. 21, 43, 44]
Operation button
LCD monitor
2
Operation References
Rear view
Operation References
RECord START/STOP
button [p. 16]
GAMMA/
BRIGHTER button
[pp. 25, 26, 35]
FADE button
[p. 27]
SET button
[p. 22]
Bottom view
STILL button [p. 29]
Power switch
(CAMERA/VCR
select switch)
[pp. 16, 19]
Speaker
MENU button [pp. 5, 22]
MANUAL button
[p. 5]
Battery release [p. 7]
Wrist strap loop
[p. 14]
Tripod adapter socket
3
[p. 29]
Battery mounting surface
[p. 7]
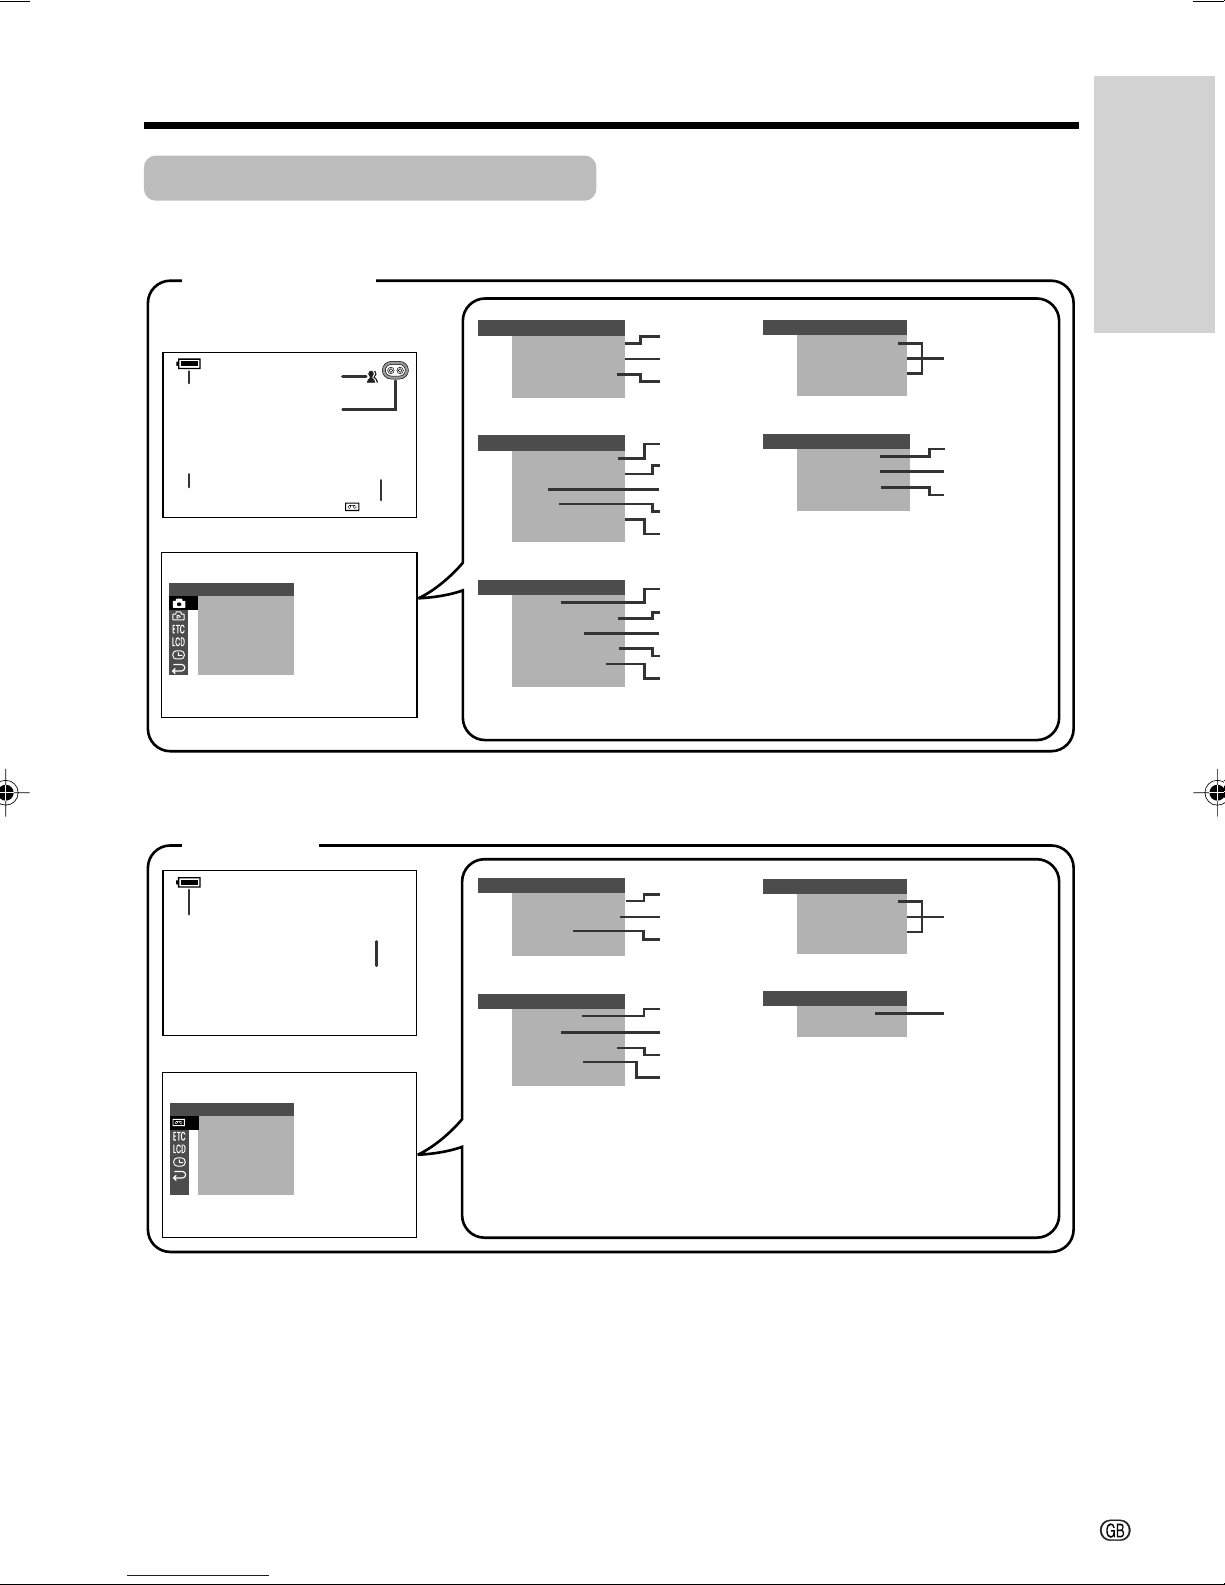
On-screen Display Index
For details on the use of each function, refer to the page number indicated.
CAMERA mode
Operation References
p. 18
pp. 16, 39
AUTO
SETTING 1
EFFECTPIC.
SCENE MENU
QK.
RET URN
RET URN
VCR mode
p. 18
PLAYBACK
PIC.
EFFECT
AUDI O DUB
AUDI O
RET URN
SET
p. 30
p. 16
p. 18
30
A UDIOAUDIO
p. 47
min
SETT I NG 1
SETT I NG 2
OTHERS
PLAYBACK
+
21+21
OTHERS
EFFECTPIC.
SCENE MENU
QK.
RET URN
RET URN
DGTL ZOOM
TAPE
SPEED
DIS
16 9:
AUDI O MODE
RETURN
BEEP
T IME CODE
TC OUT
DEMO
MOD E
LANGUAGE
RETURN
SET
EFFECT
PIC.
AUDI O DUB
AUDI O
RET URN
REMOTE
BEEP
T IME CODE
TC OUT
RETURN
p. 40
p. 41
p. 28
p. 24
p. 32
p. 30
p. 30
p. 33
p. 49
p. 42
p. 42
p. 55
p. 12
p. 36
p. 46
p. 47
p. 34
p. 49
p. 42
p. 42
LCD SET
BACKL I GHT
LCD BRIGHT
LCD COLOUR
RET URN
CLOCK SET
DISPLAY
SETT I NG
12H 24H/
RETURN
LCD SET
BACKL I GHT
LCD BRIGHT
LCD COLOUR
RET URN
CLOCK SET
DISPLAY
RETURN
p. 48
p. 35
p. 13
p. 14
p. 48
p. 35
Note:
• See page 22 for procedures on how to display the desired screen.
4
Operation References
AUT O
30
min
EFFECT
SETT ING
PIC.
SCENE MENU
QK.
RET URN
RET URN
1
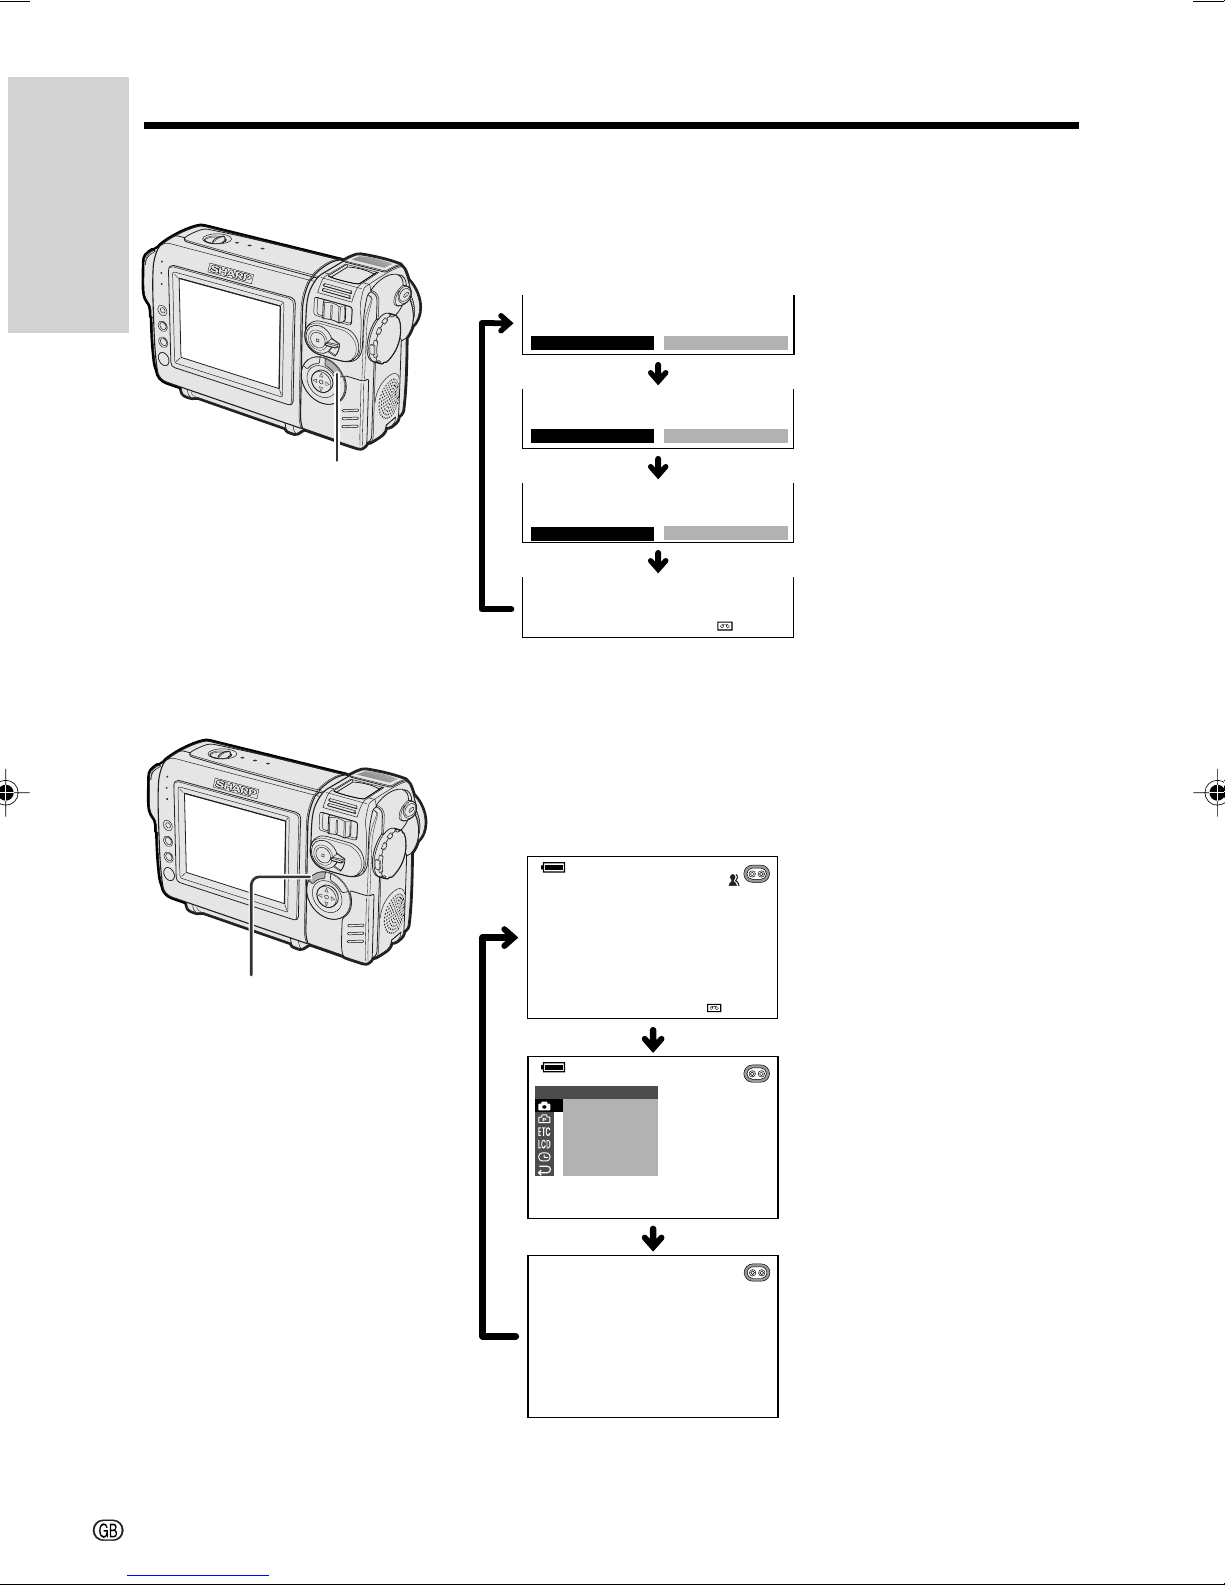
Manual screens
Operation References
Each time you press the MANUAL button, the screen
changes as shown below.
Focus setting screen
AUTO
MAN. FOCUS AUTO
(p. 37)
Exposure setting screen
AUTO
EXPOSURE
AUTO
(p. 38)
MANUAL button
On-screen indicators on/off
Each time you press the MENU button, the screen
changes as shown below.
• The example screens shown are for CAMERA mode.
MENU button
AUTO
W
HITE BAL.
AUTO
AUTO
White balance screen
(p. 39)
Normal screen
30
min
Indicators on
5
Menu screen
Indicators off
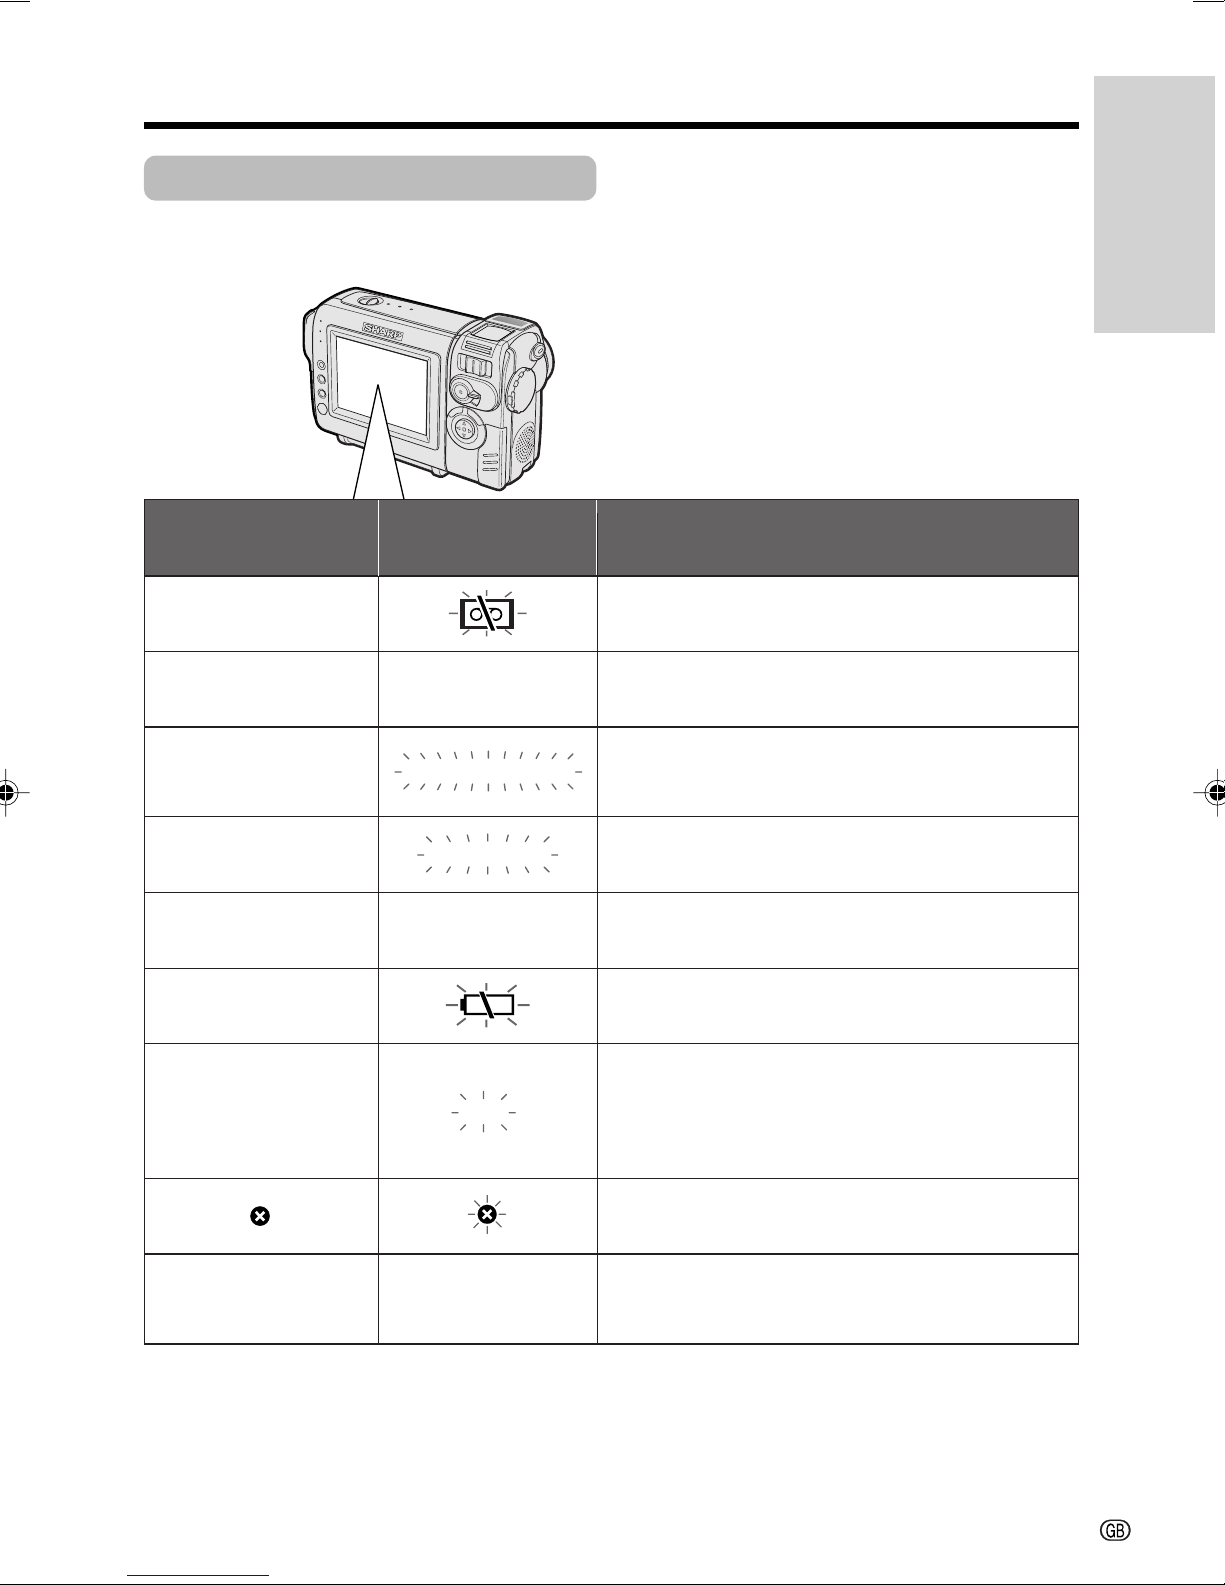
Warning Indicators
If a warning indicator appears on the screen, follow the specified instructions.
Operation References
Displayed for the first
3 seconds
INSERT
A CASSETTE.
EJECT THE
CASSETTE.
CASSETTE NOT
RECORDABLE.
THE
TAPE
ENDS SOON.
CHANGE THE
CASSETTE.
BATTERY I S
TOO LOW.
DEW
Displayed after
3 seconds
EJECT THE
CASSETTE.
PROTECT. TAB
TAPE END
TAPE END
DEW
Description of warning
There is no video cassette in the camcorder.
Insert a cassette (see page 10).
The video cassette is defective and should be
removed (see page 10).
The erasure protect tab on the video cassette
has been slid to the record-protect position,
preventing recording (see page 52).
The tape is about to end. Prepare a new
cassette (see page 10).
The tape has reached the end. Replace it with a
new cassette (see page 10).
The battery is almost depleted. Replace it with a
fully charged battery pack (see page 7).
Dew has formed inside the camcorder. Wait a
few hours for the dew to dry away (see
page v).
About 10 seconds after this warning appears,
the camcorder automatically turns off.
LAMP LAMP
Note:
• N indicates a flashing display.
The video heads are clogged and should be
cleaned (see page vi).
The fluorescent lamp behind the LCD monitor is
close to the end of its service life. Call your local
authorized Sharp dealer to have it replaced.
6
Preparation
Preparation
Attaching and Removing
the Battery Pack
Attaching
Power switch
Preparation
1 Make sure that the Power
switch is set to OFF.
2 Align the = mark on the side of the
battery pack with the = mark on the
camcorder (1), and slide the battery
pack in the direction of the arrow
completely until it locks into place (2).
Removing
1 Make sure that the Power switch is set
to OFF.
2 Rotate the monitor section of the
camcorder (1), then press the battery
release (2). Slide the battery pack in
the direction of the arrow and take it out
(3).
Battery release
Cautions:
• BEFORE REMOVING THE BATTERY PACK,
ALWAYS STOP RECORDING OR PLAYBACK
AND TURN THE POWER OFF. Removing the
battery pack while shooting or during playback
may damage the tape by causing it to wrap
around the video head drum.
• Remove the battery pack from the camcorder if
you will not use the camcorder for a long period
of time.
• Make sure that the battery pack is firmly
attached during operation. If it is not, the battery
pack may come off or camcorder operation may
fall because of the poor contact pressure.
• To prevent damage to the battery pack when
removing, be sure to firmly hold the battery pack
while pressing the release.
• Use only SHARP model BT-L225 or BT-L445
battery packs with this camcorder. Use of other
batteries may create a risk of fire or explosion.
7
Charging the Battery
Pack
Charging time and maximum continuous recording and playback times
1
Attach the battery pack on the
camcorder, and make sure that the
Power switch is set to OFF.
2 Connect the supplied power cord to the
AC power socket on the AC adapter, and
insert the AC plug into a power outlet.
AC power socket
To power
outlet
3 Insert the DC plug into the DC input
jack.
• The charge indicator lights up.
DC input jack
Battery
pack
BT-L225
BT-L445
Notes:
• Charge the battery pack between 10°C and
30°C. The battery pack may not charge
properly at temperatures too low or too high.
• The battery pack and charger become warm
during charging. This is not a malfunction.
• Using the zoom (see page 17) and other
functions or turning the power on and off
frequently will increase power consumption.
This may result in a decrease in the actual
recording time compared to the maximum
continuous recording time listed above.
• The charging time and recording time may
vary depending on the ambient temperature
and the condition of the battery pack.
• See page 53 for more information on using the
battery pack.
Caution:
• Charge only SHARP model BT-L225 or BT-L445
battery packs. Other types of battery packs may
burst, causing personal injury and damage.
Charging
time
approx.
2hr.
approx.
3hr. 30min.
Max. continuous
recording time
approx.
1hr. 30min.
approx.
3hr.
Max. continuous
playback time
approx.
1hr. 30min.
approx.
3hr.
Preparation
Charge indicator
• The charge indicator turns off when the
battery is charged.
4 Remove the DC plug from the DC input
jack, then remove the AC plug from the
power outlet.
Extending battery pack life
Even when the battery pack is not used, the
capacity of the battery pack will naturally
deteriorate over time. To limit the deterioration
of the capacity, it is recommended to perform
the following procedure at least once every six
months:
1Fully charge the battery pack.
2Attach the battery pack to the camcorder,
and set the Power switch to CAMERA
without inserting a cassette. Allow the
battery power to fully discharge by leaving
it on the camcorder until the camcorder
power automatically turns off.
3Remove the battery pack and store it
between 10°C and 20°C.
8

Preparation
Powering the
Camcorder from an AC
Outlet
You can also power the camcorder from a
power outlet by using the supplied AC adapter.
Caution:
• The supplied AC adapter is specially designed
for use with this camcorder, and should not be
used as a power supply for other camcorders.
Preparation
1 Make sure that the Power switch is set
to OFF.
2 Connect the supplied power cord to the
AC power socket on the AC adapter, and
insert the AC plug into a power outlet.
AC power socket
Note:
• When using the AC adapter to power the
camcorder, the battery pack is not charged.
Cautions:
• BEFORE REMOVING THE DC PLUG, ALWAYS
STOP RECORDING OR PLAYBACK AND TURN
THE POWER OFF. Removing the DC plug while
shooting or during playback may damage the
tape by causing it to wrap around the video
head drum.
• Disconnect the camcorder from the AC adapter
if you will not use the camcorder for a long
period of time.
To power
outlet
3 Insert the DC plug into the DC input
jack.
• The camcorder is supplied power.
DC input jack
4 Hold down the Lock button
and set the Power switch to
CAMERA or VCR.
9
Lock button
Inserting and Removing
a Cassette
Inserting
1 Attach the power source to the
camcorder, then slide the cassette
compartment door release and open the
cassette compartment door.
• After confirmation sound, the cassette
holder extends and opens automatically.
4 Wait for the cassette holder to fully
retract. Close the compartment door by
pressing the centre until it clicks into
place.
Preparation
Cassette compartment
door release
2 Insert a commercially available cassette
fully with the window facing outwards,
and with the erasure protect tab facing
upwards.
Erasure protect tab
SAVE
REC
3 Press the W mark gently until the
cassette holder clicks into place.
• After confirmation sound, the cassette
holder retracts automatically.
Removing
Perform step 1 above, then take out the
cassette.
Cautions:
• Do not try to close the cassette compartment
door while the cassette holder is extending or
retracting.
• Be careful not to get your fingers caught in the
cassette holder.
• Do not apply force to the cassette holder except
when pressing the W mark to close it.
• Do not tilt the camcorder or hold it upside down
when you are inserting or removing a cassette. It
may damage the tape.
• Remove the cassette if you will not use the
camcorder for a long period of time.
• If you do not correctly close the cassette holder
in step 3, the cassette protection mechanism of
the camcorder might eject the cassette. If this
happens, repeat the insertion procedure.
• Do not attempt to pick up the camcorder by the
cassette compartment door.
Notes:
• If the battery power is too low, you may not be
able to eject the cassette. Replace the battery
pack with a fully charged one.
• See page 52 for more information on the video
cassette tapes intended for use with this
camcorder.
“W” mark
10
 Loading...