

Page 1
● AUTO HEAD CLEANER
● S-VHS SIMPLE PLAYBACK
● AUTO INSTALLATION
● SHARP SUPER PICTURE
● NICAM Hi-Fi STEREO
● 6 HEAD EXTENDED PLAY
● CHILD LOCK
VC-MH815HM
VC-MH815LM
VIDEO CASSETTE RECORDER
OPERATION MANUAL
®
Page 2

SAFETY WARNINGS
Observe all warnings for your safety and to ensure trouble free use
of your VCR.
INFORMATION
Additional information complements instructions.
Dear SHARP Customer
Thank you for buying this SHARP VCR. Given proper care it will provide years of
entertainment for the whole family. Please read this operation manual carefully before
attempting to operate the VCR.
Copyright
● Audio-visual material may consist of copyrighted works which must not be recorded
without the authority of the owner of the copyright. Please refer to the relevant laws in
your country.
● No part of this publication may be reproduced, stored or transmitted in any form without
prior permission from SHARP Electronics (UK) Ltd.
● VIDEO Plus+ and PlusCode are registered trademarks of Gemstar Development
Corporation.
● The VIDEO Plus+ system is manufactured under license from Gemstar Development
Corporation.
This manual covers a range of models, not all of the features
included will be relevant to your VCR.
If you require any advice or assistance regarding your Sharp
product, please visit our web-site www.sharp.co.uk/support.
Customers without Internet access may telephone
08705 274277 during office hours (or (01)676 0648 if
telephoning from Ireland).
(i)
Page 3
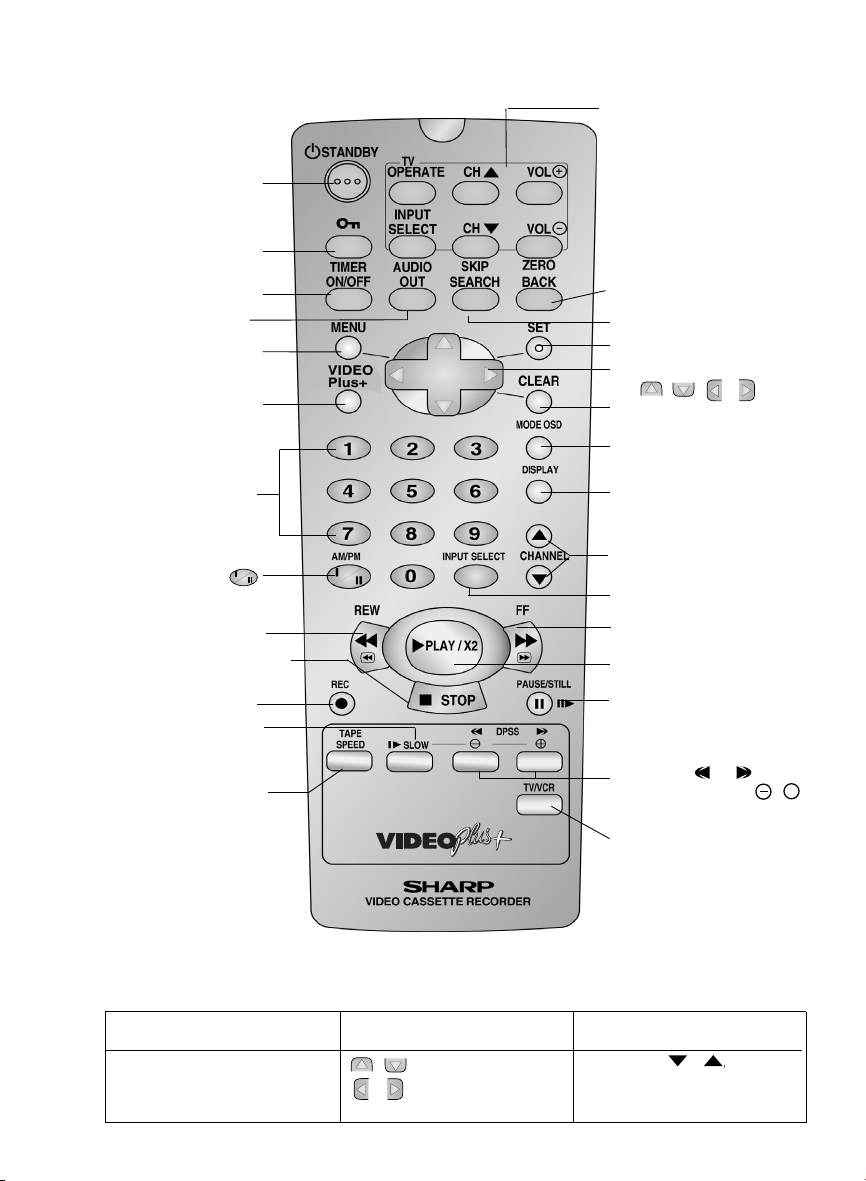
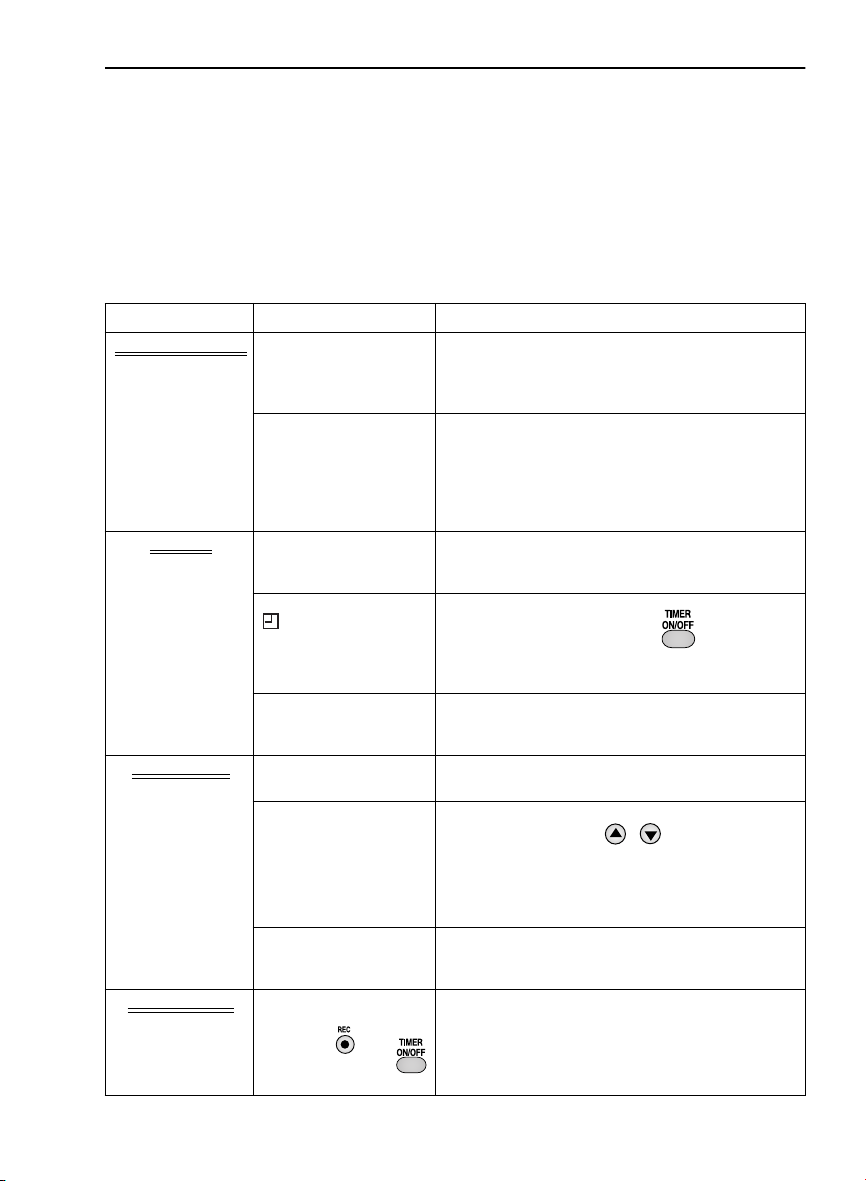
VCR REMOTE CONTROL
VCR FRONT PANEL/REMOTE CONTROL EQUIVALENT FUNCTIONS.
If you prefer, or if remote control batteries fail, you will need to use the VCR front panel controls. The only
differences in function are shown below:
FUNCTION OSD
On-Screen Display
Moving UP/DOWN menu
Moving LEFT/RIGHT menu
OPERATION WITH REMOTE
CONTROL
[ / ] Menu Select buttons
[ / ] Menu Select buttons
OPERATION WITH VCR
FRONT PANEL
CHANNEL / buttons.
Press the FF or REW buttons
on the front of the VCR.
/
(ii)
2. CHILD LOCK
20. MODE ON SCREEN
DISPLAY
18. MENU SELECT
/ / /
26. PAUSE/STILL
8. AM/PM or
25. PLAY/X2
21. DISPLAY
4. AUDIO OUT
9. REWIND
24. FAST FORWARD
12.SLOW
13. TAPE SPEED
27. DPSS
SLOW SPEED
/
+
7. NUMBER
BUTTONS
17. SET
19. CLEAR
10. STOP
(The STOP button is
also used to switch on the VCR.)
16. SKIP SEARCH
1. STANDBY
3. TIMER ON/OFF
6. VIDEO Plus+
23. INPUT SELECT
28. TV/VCR
/
14. BASIC SHARP TV
CONTROLS
11. RECORD
22. CHANNEL UP AND
DOWN
5. MENU
15. ZERO BACK
Page 4
SHARP ELECTRONICS (U.K.) Ltd.
TINS-A080UMN1
Printed in U.K.
This equipment complies with the requirements of Directives 89/336/EEC and 73/23/EEC
as amended by 93/68/EEC.
• Specifications are subject to change without notice as part of our policy of continuous
improvement.
• No liability is accepted for any inaccuracies or omissions in this publication, although
every possible care has been taken to make it complete and as accurate as possible.
CALLING FOR SERVICE
SHARP Customer Helpline: Tel: 08705 274277 during office hours
(or (01) 676 0648 if telephoning from Ireland)
● If you are unable to resolve a problem using the TROUBLESHOOTING guide, do not
remove the cabinet or attempt to service this VCR yourself.
● For service please contact your dealer. If this is not possible, please call our Customer
Information Centre for details of your nearest Sharp Service Centre.
● In the unlikely event of this equipment requiring repair during the guarantee period, you
will need to provide proof of the date of purchase to the repairing company. Please keep
your invoice or receipt which is supplied at the time of purchase.
● Certain replacement parts and accessories may be obtained from our main parts
distributor who can be contacted at: Willow Vale Electronics Limited
Tel. 0121 766 5414. Most credit/debit cards accepted.
Alternatively, please visit our web-site:
www.sharp.co.uk/support
100% of the pulp used
in making this paper comes
from sustainable forests
Page 5

CONTENTS
BEFORE USING YOUR VCR
Important notes on your VCR ....................................................................................................... 2
Unpacking the accessories........................................................................................................... 3
INSTALLING YOUR VCR
Connecting the cables ................................................................................................................. 4
Auto Tuning ..................................................................................................................................... 5
BASIC OPERATION
Scart lead connection (Not supplied)......................................................................................... 9
Important notes on your VCR and video tapes .........................................................................9
How to playback a video tape....................................................................................................9
Immediate recording................................................................................................................... 11
How to use the VIDEO Plus+
How to set a delayed recording ................................................................................................ 15
ADVANCED OPERATION
Audio and your VCR.................................................................................................................... 18
Playback of a video tape ........................................................................................................... 20
LCD Display ................................................................................................................................... 22
Tape counter and zero back......................................................................................................22
Blue mute ...................................................................................................................................... 23
Colour ............................................................................................................................................ 23
Searching the video tape ........................................................................................................... 24
Recording from other equipment .............................................................................................. 25
OTHER FEATURES ON YOUR VCR
Child lock ...................................................................................................................................... 26
Decoder switching operation.....................................................................................................27
CUSTOMISED INSTALLATION
Manually tuning a channel......................................................................................................... 28
Manually sorting channels .......................................................................................................... 29
Manually setting the clock.......................................................................................................... 31
MORE INFORMATION ABOUT YOUR VCR
VCR display................................................................................................................................... 32
Selecting the output from the VCR............................................................................................ 32
On-screen display ........................................................................................................................ 33
Specifications................................................................................................................................ 34
Troubleshooting ............................................................................................................................ 35
VCR reset....................................................................................................................................... 37
RF channel tuning ........................................................................................................................ 37
Guarantee .................................................................................................................................... 38
Connecting to the mains ............................................................................................................ 39
Calling for Service ........................................................................................................Back Cover
Pausing and slow motion...................................................................................... 10
Fast forwarding/rewinding a video tape............................................................ 11
Tape speed selection ........................................................................................... 12
Checking the amount of tape remaining.......................................................... 20
Playing back a video tape repeatedly .............................................................. 20
Playing back an S-VHS tape ................................................................................ 21
Playing back an NTSC tape ................................................................................. 21
Skip searching the video tape............................................................................. 24
Digital programme search system (DPSS) .......................................................... 24
Sorting the channels into your preferred order.................................................. 29
Deleting channels ................................................................................................. 30
®
system to make a recording.................................................... 13
1
Page 6
BEFORE USING YOUR VCR
IMPORTANT NOTES ON YOUR VCR
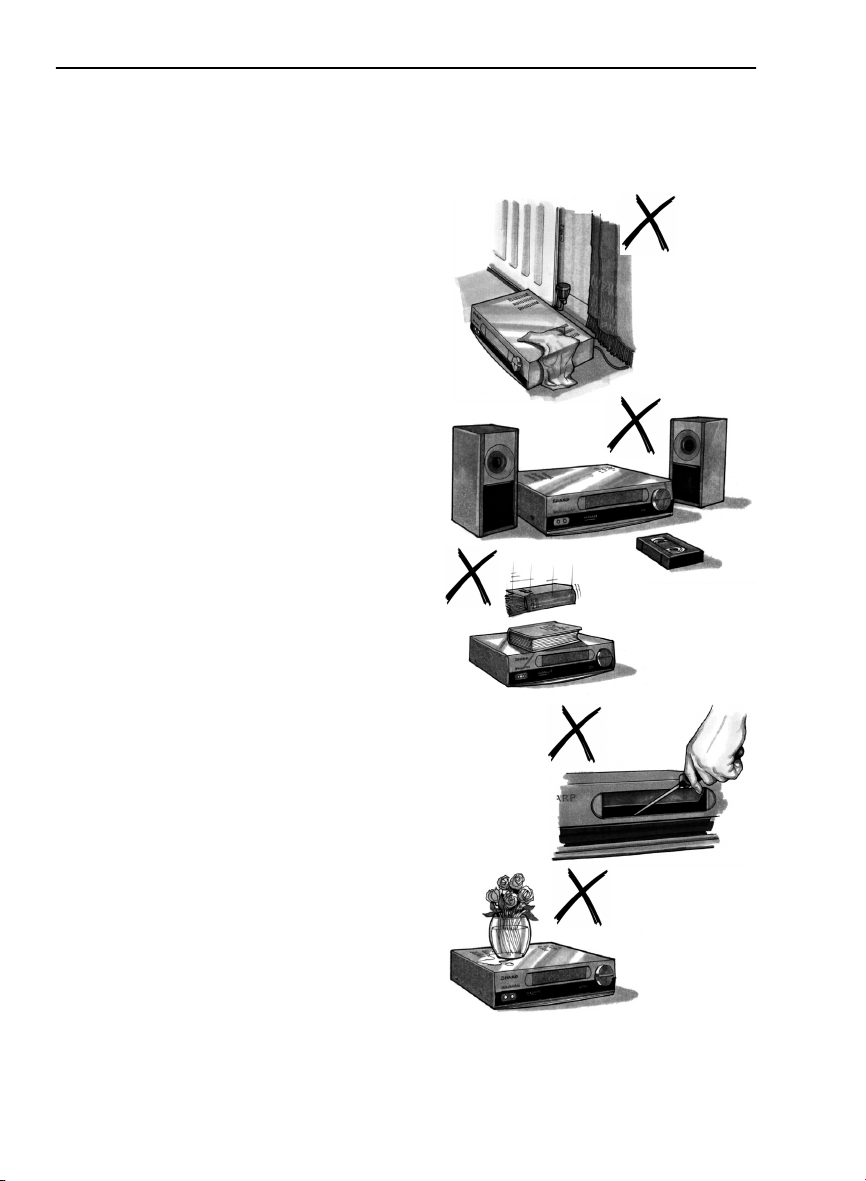
IDEAL VCR LOCATION
PLACE THE VCR..
• ... on a flat level surface away from radiators
or other heat sources and out of direct
sunlight.
• ... and video tapes away from magnetic
sources such as speakers or microwave ovens.
• ... at least 8” (20cm) away from the TV.
• ... away from curtains, carpets or other
materials and allow ventilation space around
the VCR.
DO NOT...
• ... block the air-vent openings.
• ... expose the VCR to excessive dust,
mechanical vibration or shock.
• ... place any heavy object or liquid on top of
the VCR. If liquid drops inside the VCR unplug
immediately and contact your SHARP dealer.
Do not use the VCR.
• ... insert or drop anything into the tape
compartment or through the
air-vents, as this could result in serious
damage, fire or an electric shock.
POWER SOCKETS
• To avoid overheating or even fire, insert the
plug correctly into the socket.
DO NOT...
• ... overload power sockets, this may cause a
fire or electric shock.
• ... pull the power cord to disconnect the plug
from the mains.
• ... bind the power cords together.
• This VCR is not equipped with a mains power
switch. Accordingly, nominal current to drive
the clock is drawn at all times when the AC
power cord is plugged into a wall socket. If
the VCR is not to be used for an extended
period be sure to unplug the cord.
www.sharp.co.uk/support
2
Page 7
BEFORE USING YOUR VCR
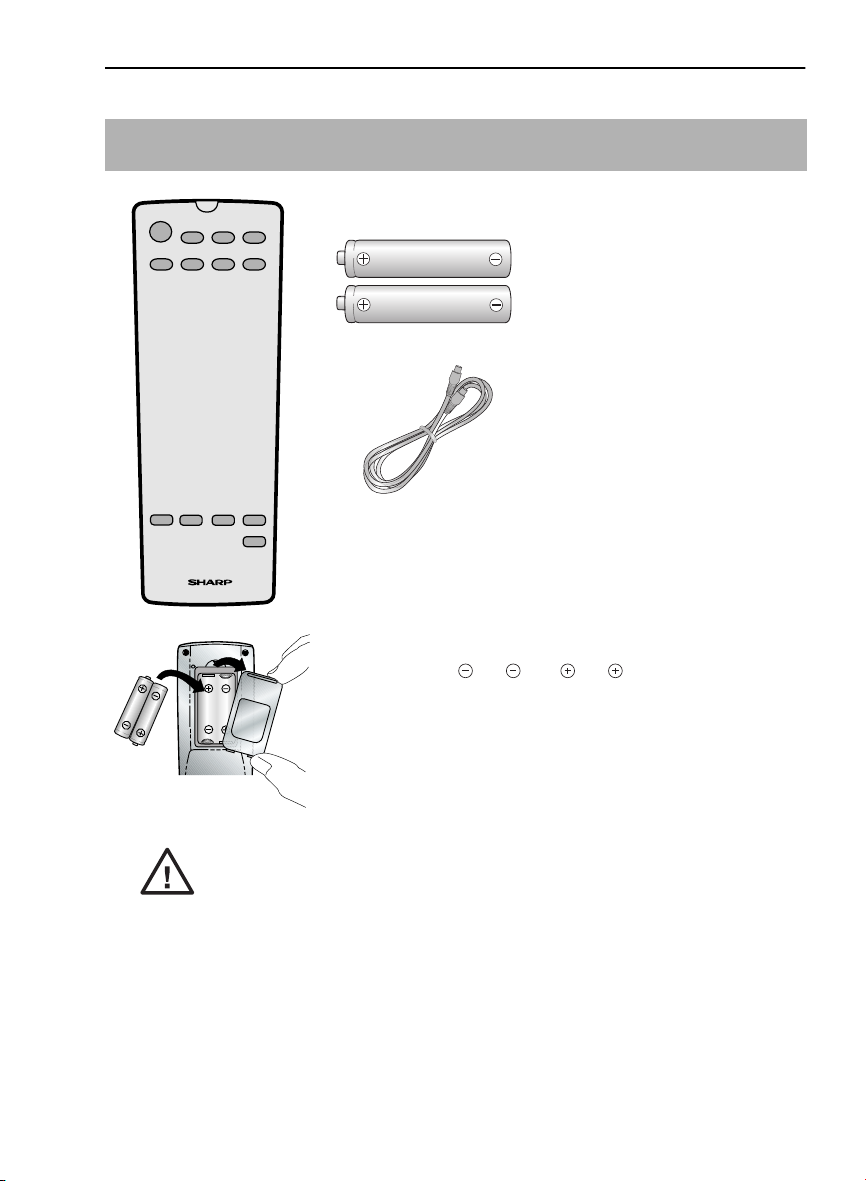
UNPACKING THE ACCESSORIES
CHECK ALL THESE ACCESSORIES ARE SUPPLIED WITH YOUR VCR. CONTACT YOUR DEALER IF
ANY ARE MISSING.
REMOTE
CONTROL
For a more
detailed
picture of
your remote
control refer
to page (ii).
Battery cover
(TYPE AA/R6/UM3)
BATTERIES (X2)
for the remote control unit.
RF CONNECTION CABLE
connects the VCR to the TV.
To fit the batteries into the remote control
Remove the battery cover on the back of the remote control.
Fit the batteries: to and to terminals. Place the
battery cover back into position.
Remote Control
• Remote Control must be pointed towards the VCR to operate.
• Do not expose to liquid or shock.
• May not function if the VCR is in direct sunlight or any other strong light.
• Replace both alkaline batteries (type AA/R6/UM3) if the remote control
fails.
• Remove the batteries and keep in a safe place if you do not plan to use
the VCR for several months.
• Remove and dispose of flat batteries safely and promptly.
• Incorrect use of batteries may cause them to leak or burst.
www.sharp.co.uk/support
3
Page 8
INSTALLING YOUR VCR
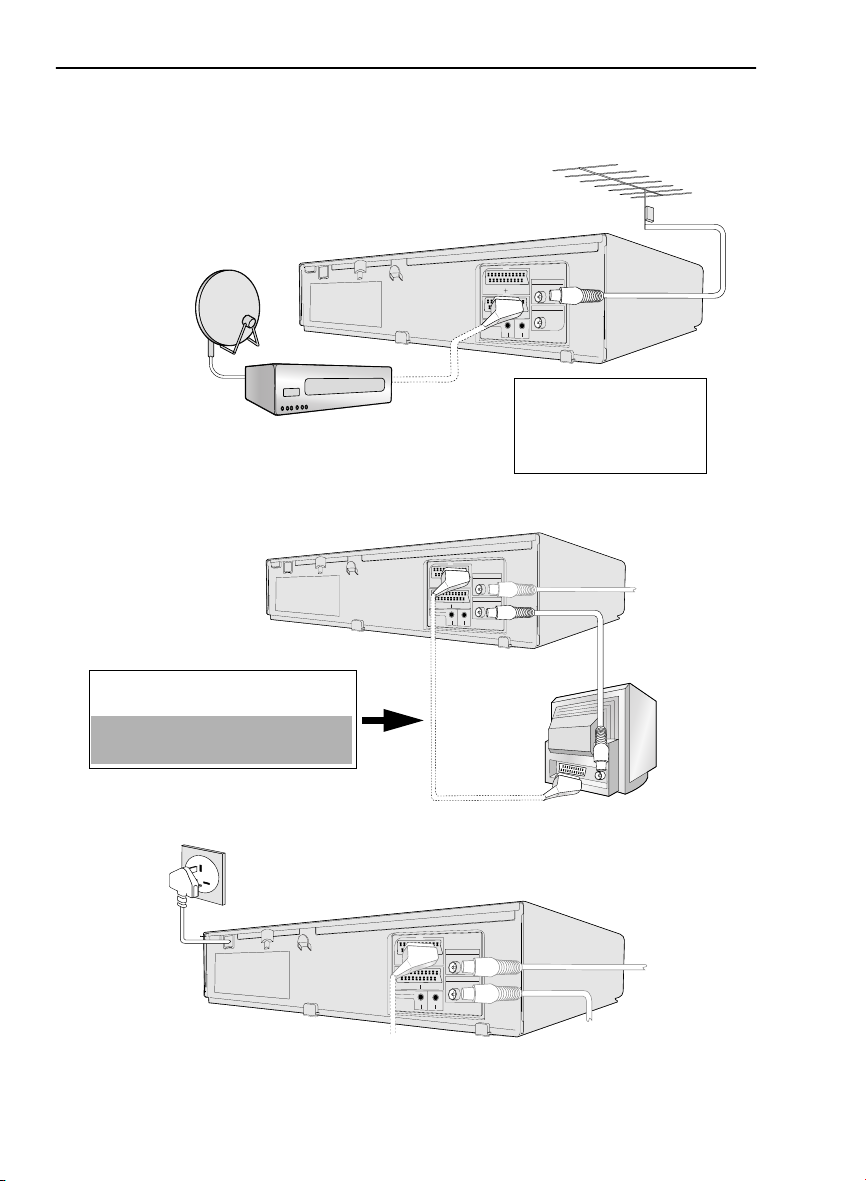
CONNECTING THE CABLES
Connect your existing aerial cable to
1
the
AERIAL IN
socket on your VCR.
AERIAL OR
CATV CABLE
AERIAL IN
ENTREE ANTENNE
SON/VIDEO
LINE1(I)IN
(L1/I)
/OUT
AERIAL OUT
SORTIE ANTENNE
LIN
E2(II)IN
/D
EC
O
D
ER
C
A
NA
L PLUS/L2(II)
AU
DIO OUT
SORTIE SON
A2230
R D
L G
DECODER UNIT
OR SATELLITE SYSTEM
Connect your TV to the VCR using the
2
supplied RF connection cable, i.e. connect
the VCR
AERIAL IN
Optional
have a scart lead connect it to your TV and
LINE 1 IN/OUT
- The advantage of a Scart connection is
improved picture and sound quality during
playback.
Connect the VCR to the mains.
3
AERIAL OUT
socket.
SCART (not supplied). If you
socket on the VCR.
socket to the TV
SCART LEAD
(not supplied)
LINE1(I)IN
/OUT
LIN
E2(II)IN/D
EC
A
U
D
I
O
O
U
T
S
O
R
T
IE
S
O
N
A2230
SON/VIDEO
LINE1(I)IN
(L1/I)
/OUT
L
IN
E
2
(II)IN
/D
E
C
O
D
E
R
C
A
N
A
L
P
L
U
S
/L
2
(II)
AUDIO OUT
SORTIE SON
A2230
R D
L G
SCART LEAD
SON/VIDEO
(L1/I)
O
D
ER
C
A
N
AL
PL
R D
AERIAL IN
ENTREE ANTENNE
AERIAL OUT
SORTIE ANTENNE
Optional:
Satellite receiver or decoder to
the VCR using a scart lead to
LINE 2 IN/DECODER
socket on the VCR.
AERIAL IN
ENTREE ANTENNE
AERIAL OUT
SORTIE ANTENNE
U
S/L2(II)
L G
Connect your
AERIAL IN
AERIAL OUT
RF CONNECTION
CABLE
BACK OF
TELEVISION
AERIAL IN
AERIAL OUT
RF CONNECTION
CABLE
The VCR is correctly connected.
✔
www.sharp.co.uk/support
4
Page 9
INSTALLING YOUR VCR
AUTO TUNING
PROCEDURE
This model automatically tunes the TV channels for your area. If the VCR has not previously
been tuned-in, instructions will be given on screen to guide you through this procedure.
1.
Ensure your VCR is still in the STANDBY mode.
Switch on the TV.
2.
3.
Select the next available or unused channel on your TV, this will become the dedicated
video channel.
Example of
TV channels
1 = BBC1 4 = Channel 4
2 = BBC2 5 = Channel 5
3 = ITV ? = VCR
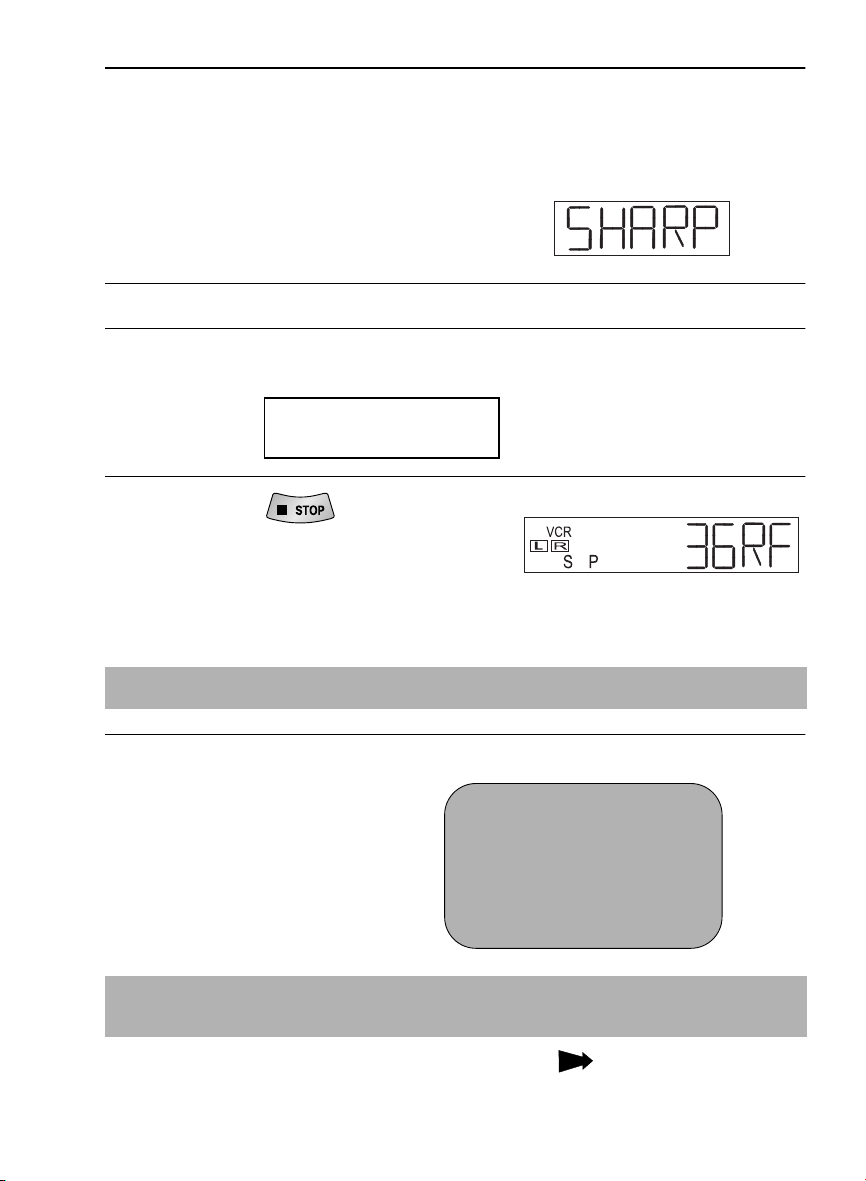
Press the
4.
search and display an ideal RF channel.
Wait for the flashing channel number to appear
on the VCR display, this number will be between
21 and 69.
•
If you are connected via a scart lead, go to step 6.
button. The VCR will
STOP
CAUTION:
If the clear button is pressed at this point it will not allow the TV to be tuned to the VCR. Refer
to RF through ON/OFF on page 37.
5.
Tune the selected channel on your TV.
(Refer to your TV manual for
instructions on how to tune in your TV).
Store this as your VCR channel.
TV SCREEN
AUTO I NS TALLAT I ON
PRESS SET KEY TO START .
SET : ENTER MENU : EX I T
Blue
background
with
White Text
NOTE:
If the AUTO INSTALLATION screen doesn’t appear when you switch on your VCR or you wish
to reset your VCR and start the installation again, refer to
book.
VCR RESET
at the back of the
See next page to continue
www.sharp.co.uk/support
5
Page 10
INSTALLING YOUR VCR
AUTO TUNING CONTINUED
6.
Press the
installation.
7.
Ensure your Aerial/Scart cables are
connected to your VCR and then
press the
Auto install will now search for and tune in
all available channels.
(This may take a few minutes.)
SET
SET
SET
button to store the RF channel setting and continue with the
SET
button to confirm.
7.
PLEASE BE SURE THE
AER I AL / SCART CABLE I S
CONNECT ED TO YOUR VCR .
PRESS SET TO CONT I NUE
SET : ENTER MENU : EX I T
1CH22
AUTOMAT I C TUN I NG .
PLEASE WA I T .
MENU : E X I T
Button positions for your reference.
REMOTE CONTROL
See next page to continue
www.sharp.co.uk/support
6
SET
Page 11

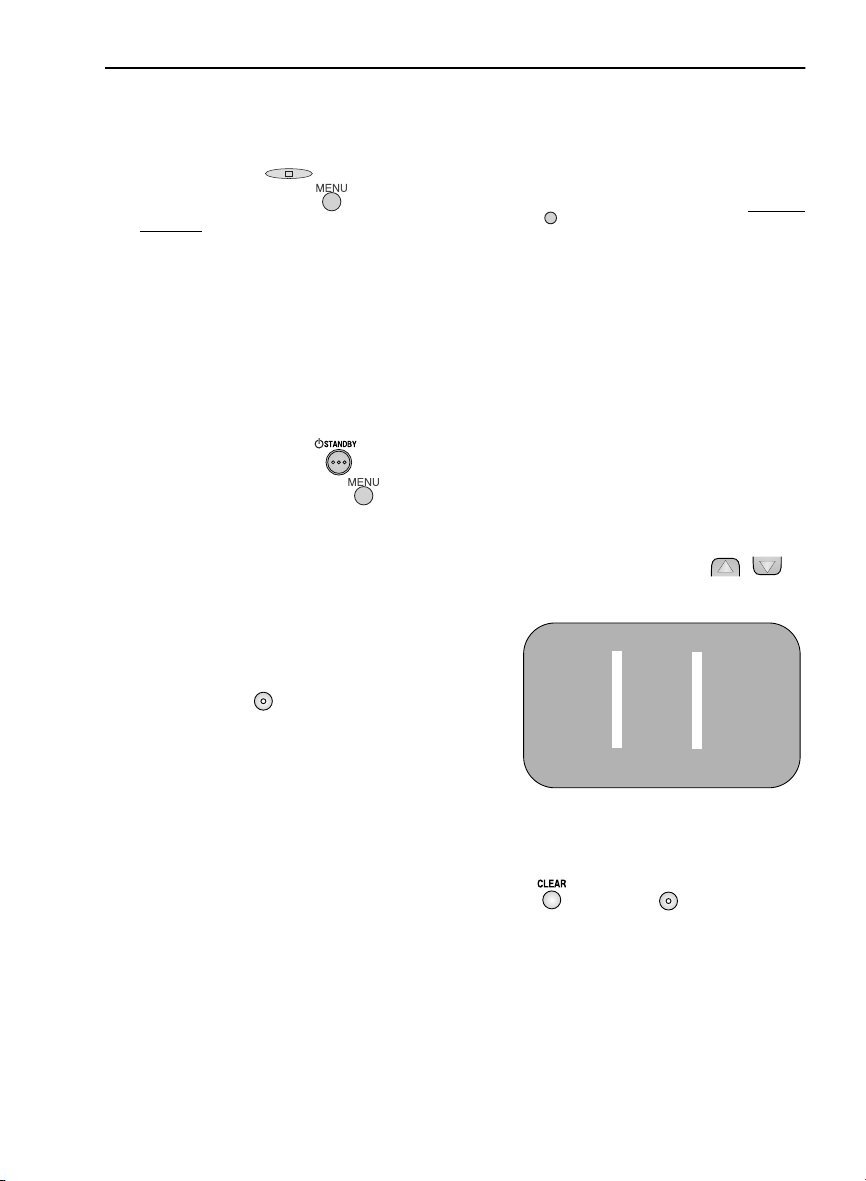
INSTALLING YOUR VCR
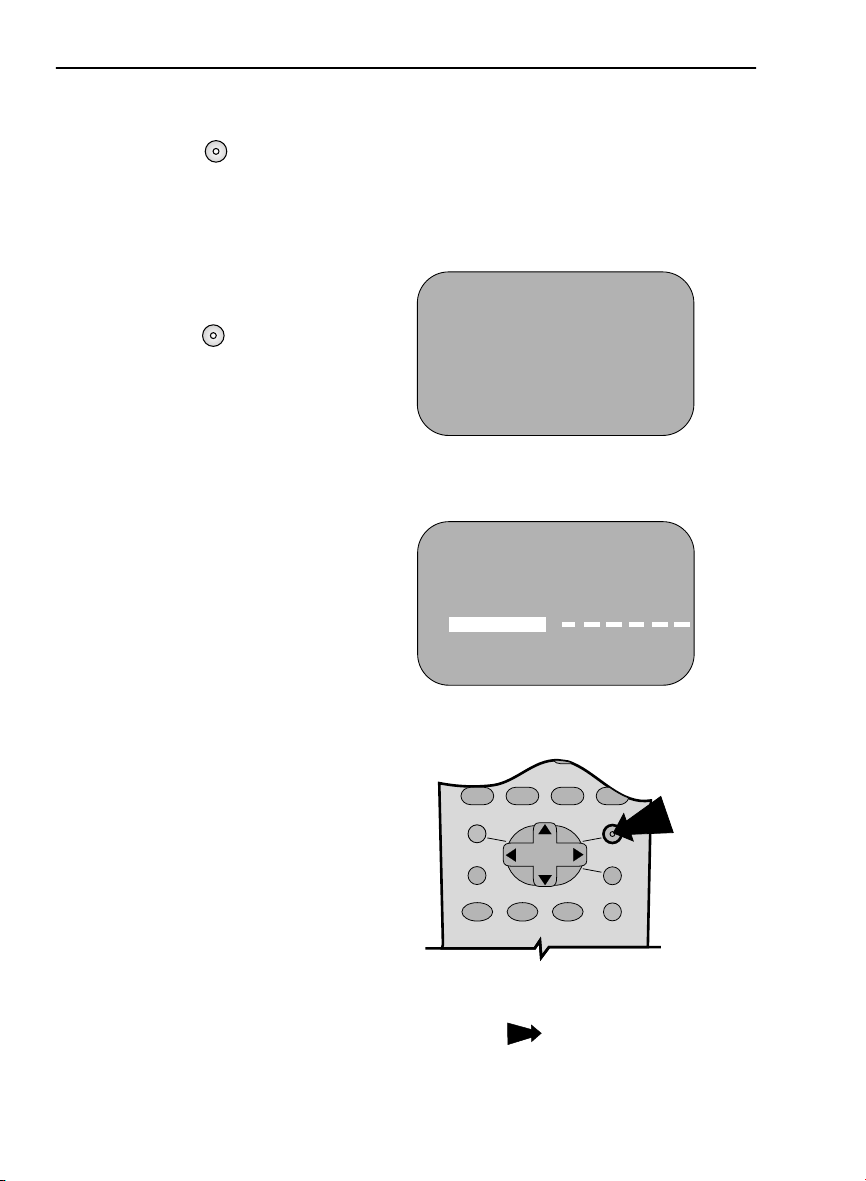
On completion the
tune in. By pressing
help you see which channel your VCR has tuned in. Using the [ / /
buttons scroll through the channels to find BBC1. Some channels may be duplicated but with
more interference than others. Search for the best quality picture and using the procedure
below, move this channel to Preset 1. Repeat this procedure for BBC2 - Preset 2, ITV - Preset 3,
etc.
MOVE MENU
MODE OSD
will appear showing all the channels the VCR was able to
button, the VCR will change to a blue background. This may
] menu select
/
1.
1.
Press [ / /
the channel to be moved.
2.
Press the
3.
Press [ / /
the new position for the channel.
4.
Press the
If any more channels are to be
5.
moved, repeat procedure from
step 3.
6.
Press the button to exit if you are
happy with the channel order.
SET
SET
/
] to highlight
SET
button to confirm.
/
] to highlight
SET
button to confirm.
1CH21 7 13
2CH32 8 14
3CH43 9 15
4CH54 10 16
5 CH 6 5 11 17
61218
CL EAR :CHANNE L SORT
: SELECTED
SET : ENTER MENU : EX I T
3.
1 CH 6 5 713
2CH21 8 14
3CH32 9 15
4CH43 10 16
5CH54 11 17
61218
SELECTED :CH5
: SELECTED
SET : ENTER MENU : EX I T
MOVE 1/5
MOVE 1/5
All the programmes should now
be correctly tuned!
If you wish to delete or change the
channel order at a later date please refer
MANUALLY SORTING
to
CHANNELS
book.
towards the back of this
See next page to continue
www.sharp.co.uk/support
7
MENU
SET
MENU SELECT
BUTTONS
Page 12
INSTALLING YOUR VCR
The clock setting screen will now appear.
To set the time and date follow the steps
below:
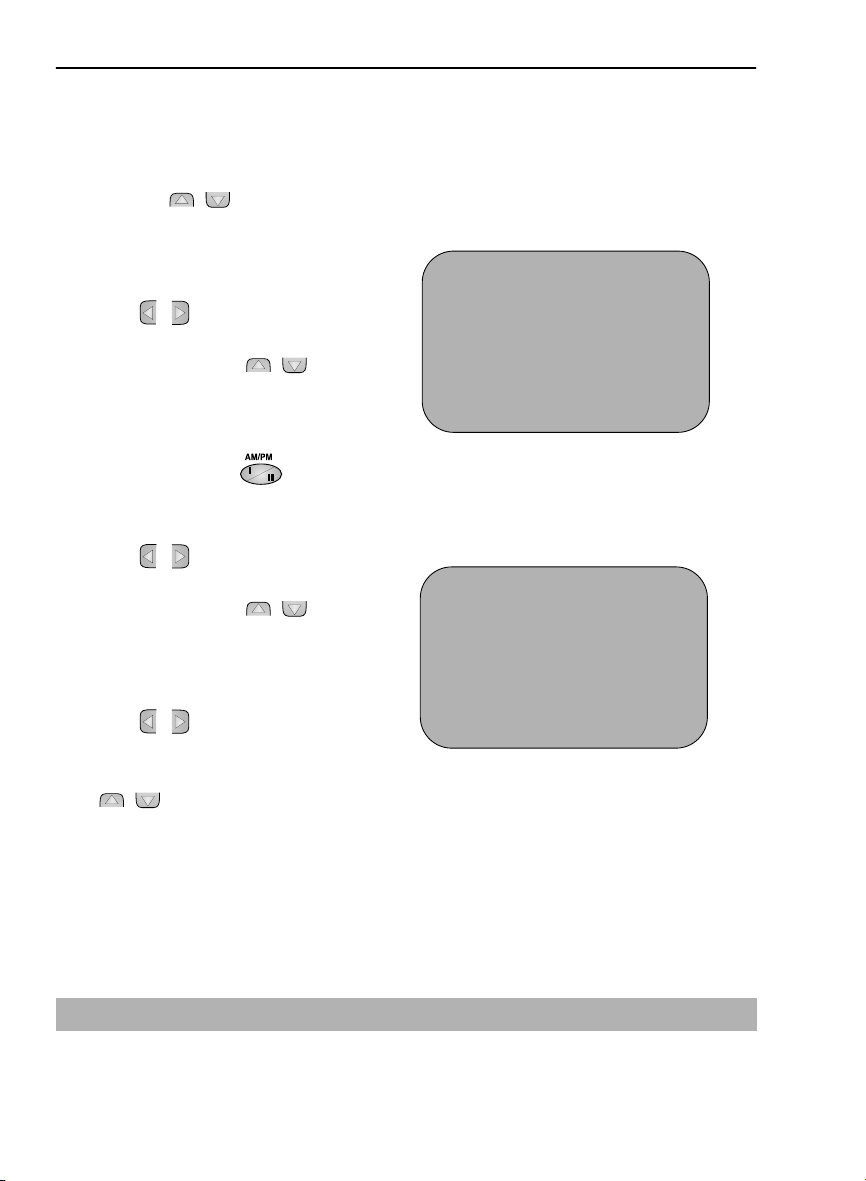
1.
Press the [ / ] menu select
buttons to select either 12 or 24 hour
clock operation.
2.
Press [
the time using the
BUTTONS
buttons. If the minutes or hours are
less than 10, enter the leading 0. If
using the 12 hour clock enter AM or
PM by pressing the
button on the remote control.
3.
Press [
the date using the
BUTTONS
buttons. For example, for 1st April
enter
4.
Press [
the last two digits of the year using
the
[ / ] buttons. For example, for
2002 enter
enter 03.
/
] to select TIME. Enter
NUMBER
or the [ / ]
] to select DATE. Enter
/
NUMBER
or the [ / ]
01 04
.
/
] to select YEAR. Enter
NUMBER BUTTONS
. For the year 2003
02
AM/PM
or the
24 hour example:
MODE T I ME DATE YEAR
24H 15:0501/0402
MODE : 24H / 12H
: SELECT : CHANGE
SET : ENTER MENU : EX I T
12 hour example:
MODE T I ME DAT E Y EAR
12H 03:05PM 01/04 02
MODE : 24H / 12H
: SELECT : CHANGE
SET : ENTER MENU : EX I T
CLOCK
CLOCK
5.
Press the
and date.
SET
button to store the time
NOTE:
• You will need to update the clock for Winter/Summer daylight saving.
✔
All the programmes should now be correctly tuned in and the clock set.
www.sharp.co.uk/support
8
Page 13
BASIC OPERATION
SCART LEAD CONNECTION (NOT SUPPLIED)
A scart lead can be connected at any time. It is recommended to connect your TV and VCR
in this way as it will provide improved picture and sound quality. Please refer to the connection
diagram on page 4.
IMPORTANT NOTES ON YOUR VCR AND VIDEO
TAPES
VIDEO TAPES
• If you use only good quality video tapes, generally it will not be necessary to clean the
video heads.
• If poor quality tapes are used, or if a tape is loaded after changing VCR location, oxide
from the tape may "clog" the video heads. This will cause the playback picture to be
"snowy", or even disappear.
• To remove minor contamination run a video tape in visual search mode. If this fails, you
will need to have the heads cleaned by a SHARP Service Facility. Please note, if cleaning
is necessary it is not covered by the guarantee.
• Use video tapes which carry the mark.
SECAMPAL
HOW TO PLAYBACK A VIDEO TAPE
BEFORE YOU PLAYBACK A VIDEO TAPE
Condensation forms in the VCR when it is moved out of or into a warm place.
If you try to playback or record, the video tape and VCR may be damaged.
Turn the VCR on and wait for about two hours until the VCR reaches room
temperature before operating.
PLAYBACK
Switch on your TV and select the video channel.
1.
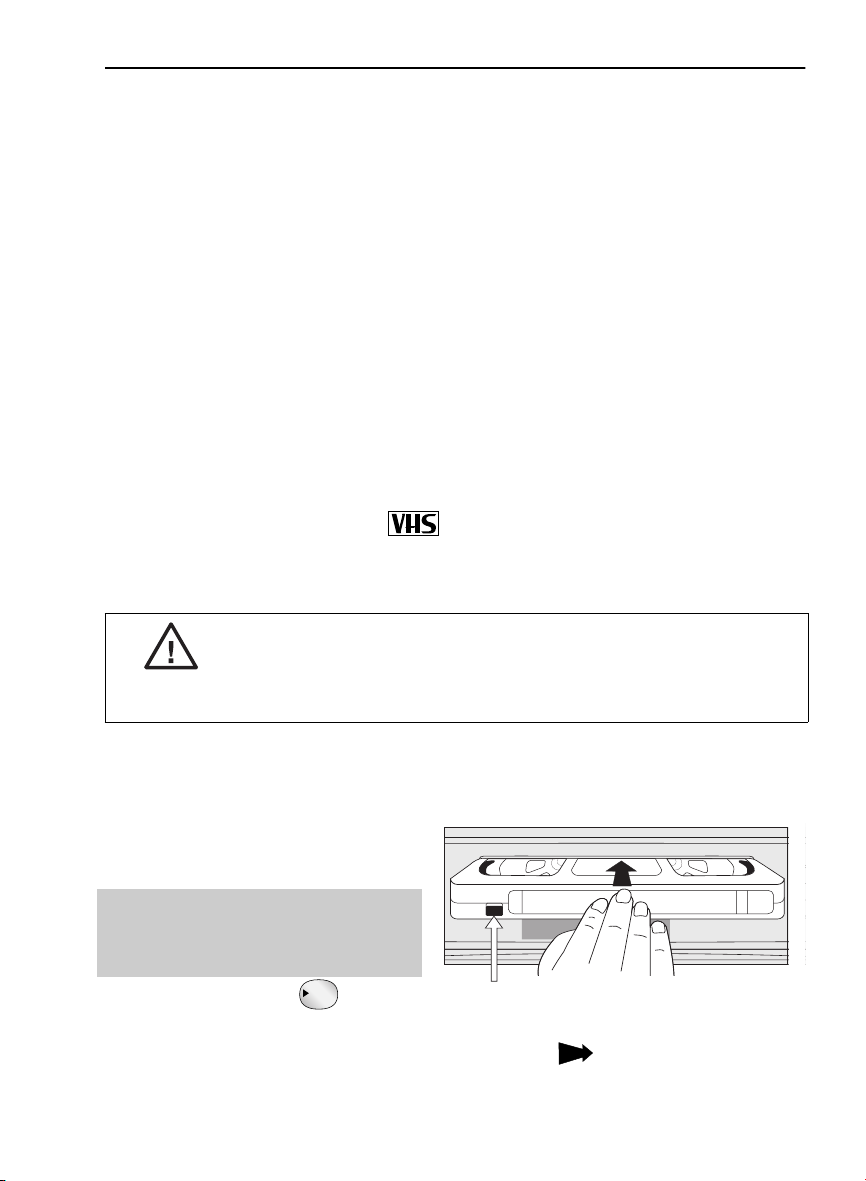
2. Carefully push a pre-recorded video
tape into the tape compartment.
This will switch the VCR on.
• If the record-protection tab has
been removed, the VCR will start
playback as soon as the video tape
has been loaded.
3. Press the PLAY/X2 button to
start playback.
PLAY / X2
See next page to continue
www.sharp.co.uk/support
Record protection tab
9
Page 14

BASIC OPERATION
PLAY / X2
DISPLAY
DPSS
INPUT SELECT
CHANNEL
AM/PM
SLOW
TAPE
SPEED
REC
PAUSE/STILL
REW FF
PLAY / X2
STOP
231
475
8
0
6
9
HOW TO PLAYBACK A VIDEO TAPE
• For double speed playback (without sound), press the PLAY/X2 button again.
• To revert to normal playback, press the
PLAY/X2 button again.
PLAY / X2
• To stop the video tape, press STOP .
• To eject the tape press EJECT on the VCR.
SHARP SUPER PICTURE should enhance the picture quality during playback. It is
normally set to ON. To turn
on the VCR front panel.
SHARP SUPER PICTURE on or off press SUPER P.
SUPER P.
PICTURE DISTURBANCE DURING PLAYBACK
This VCR has an automatic tracking system which reduces picture disturbance when you start
to playback a video tape. When auto-tracking is in operation flashes on the on-screen
display. If the picture still has disturbance you may need to manually track the video tape:
During PLAYBACK of a video tape.
• Press
CHANNEL or to position picture interference off the TV screen.
(Manual Tracking)
• Press
CHANNEL and buttons together to start Auto Tracking.
PAUSING AND SLOW MOTION
Press the PLAY/X2 button to start the video tape
1.
playing.
PLAY / X2
2. To pause the video tape, press PAUSE/STILL .
• To minimise jitter whilst in pause mode press
or .
• Press the
PLAY/X2 button to resume playback.
PLAY / X2
3. To playback in slow motion (without sound) press the
SLOW button on the remote control. Slow motion speed can be adjusted using
the or buttons next to the slow button. Picture disturbance can be improved by
using the
• Press the
CHANNEL or during slow motion playback.
PLAY/X2 button to resume playback.
PLAY / X2
CHANNEL
REMOTE CONTROL
NOTES:
• When using SLOW MOTION function some mechanical noise may be heard.
• There will be picture interference and possibly a change to black and white picture
• PAUSE mode will disengage after about 5 minutes.
using Pause and Slow functions.
www.sharp.co.uk/support
10
Page 15
BASIC OPERATION
REW
REW
HOW TO PLAYBACK A VIDEO TAPE
FAST FORWARDING/REWINDING A VIDEO TAPE
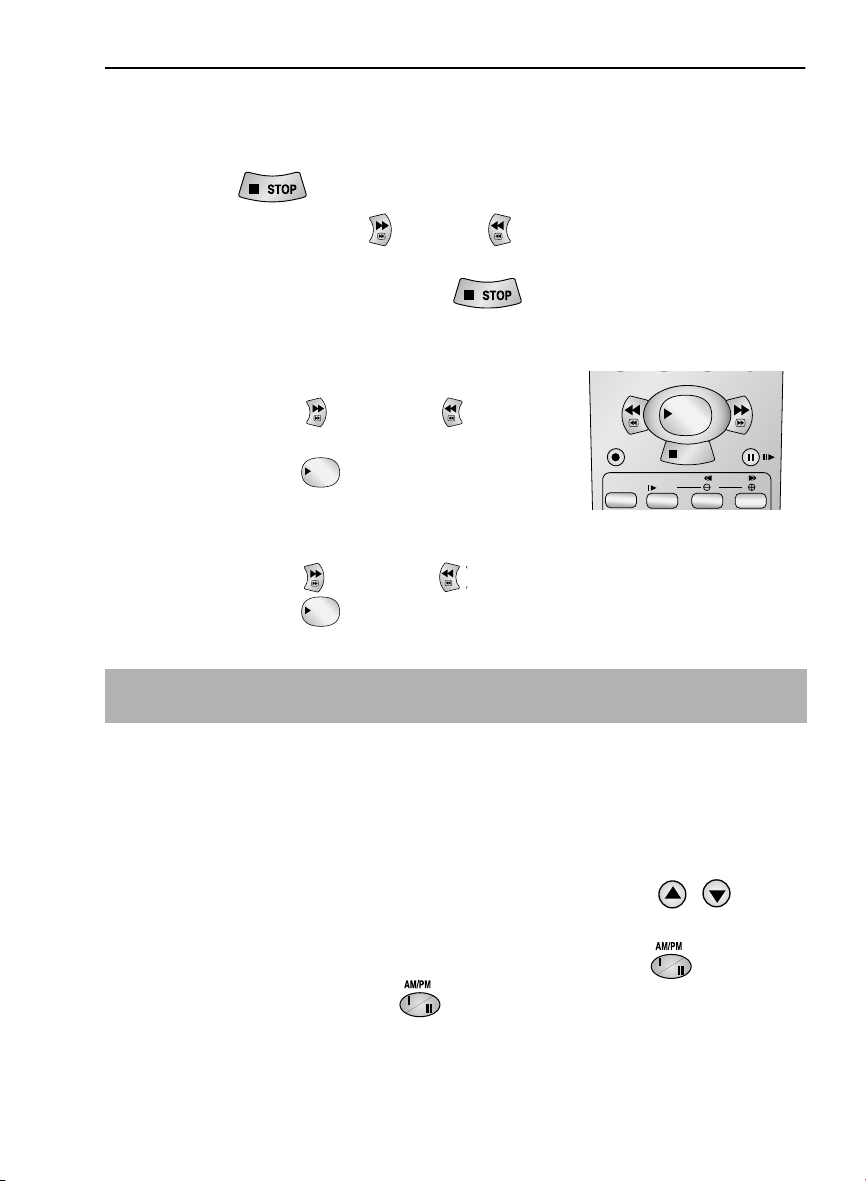
1.
Press STOP to stop the video tape.
2. Press the FAST FORWARD /REWIND buttons on the remote control or on
the VCR front panel.
3. To stop fast forward/rewind, press STOP .
FORWARD/REVERSE VISUAL SEARCH
During playback to select search mode, press the
1.
FAST FORWARD or REWIND buttons on
the remote control, or on the VCR front panel.
2. Press the PLAY/X2 button to resume playback.
OR
3. To decrease the speed, during visual search mode press
FAST FORWARD or REWIND again.
FF
PLAY / X2
FF
FF REW
REW FF
PLAY / X2
REC
TAPE
SPEED
SLOW
STOP
PAUSE/STILL
DPSS
REMOTE CONTROL
4. Press the PLAY/X2 button.
PLAY / X2
NOTE:
• There will be picture interference and possibly a change to black and white picture
using Visual Fast Forward/Rewind functions.
IMMEDIATE RECORDING
SELECTION OF A CHANNEL
Select the channel you wish to record by using the
control, or select the next/previous channel by pressing the
on the remote control or on the VCR front panel.
To change between single digit and 2-digit channel numbers, press the button.
For example, for channel 24, press the button then press
www.sharp.co.uk/support
NUMBER BUTTONS
CHANNEL / buttons
11
on the VCR remote
2 4.
Page 16

BASIC OPERATION
IMMEDIATE RECORDING CONTINUED
TAPE SPEED SELECTION
Your VCR has three tape speeds: SP (Standard Play) , LP
(Long Play) and EP (Extended Play).
Press the
control or on the VCR front panel to select the desired
setting.
It is recommended that EP recordings are only played back on the VCR on which they were
originally recorded.
You can record the channel you are watching or a different channel.
TAPE SPEED button on the remote
1. Insert a video tape into your VCR.
2. Select the channel you wish to record on the VCR as
above.
3. To start recording, press REC .
4. To pause during recording, press PAUSE/STILL .
5. To continue recording, press REC .
Cassette
Length
Recording
Time
E-240 In Minutes
SP 240
LP 480
EP 720
0
REW FF
PLAY / X2
REC
SPEED
TAPE
SLOW
STOP
DPSS
REMOTE CONTROL
PAUSE/STILL
6. To stop recording, press STOP once.
SIMPLE TIMED RECORDING:
1. Press REC .
2. To specify a stop time, each additional press of
REC will delay the stop time by 10
minutes.
STOP 15:30
3. To stop recording at any time, press
STOP once.
NOTES:
• If the tape ends before the recording is complete the VCR will stop recording, rewind,
eject the tape and place the VCR into STANDBY mode, or just eject the tape and place
the VCR in STANDBY timer mode if the VCR is in timer record mode.
• If the VCR ejects the video tape when you press
i.e. record protection tab has been removed.
www.sharp.co.uk/support
12
REC the tape is record protected.
Page 17
BASIC OPERATION
MENU SET
CLEAR
DISPLAY
VIDEO
Plus+
MODE OSD
TIMER
ON/OFF
AUDIO
OUT
SKIP
SEARCH
ZERO
BACK
231
456
MENU
SELECT
BUTTONS
HOW TO USE THE VIDEO Plus+® SYSTEM TO MAKE A
RECORDING
Before you start!
• If the Timer Standby symbol appears on the VCR display,
• Check that the VCR clock is displaying the correct time.
The VIDEO Plus+ system allows you to program the VCR to record up to eight programmes
using the PlusCode numbers published in TV listings (refer to your daily newspaper or TV
magazine).
1. Press the VIDEO Plus+ button on the
2. Enter the PlusCode number from the TV
NOTE:
• An ERROR message will appear if you have entered a number that is not a current
3.
• If you want to make additional recordings at the same
4. Press the SET button to confirm.
NOTE:
• Check that the menu list agrees with the times shown in the TV listing. If it does not press
The first time that you use the VIDEO Plus+ system
to make a recording on each channel Preset, (PR)
may be highlighted on the On-Screen Display.
5. Enter the channel number you wish to record
press the
symbol.
remote control.
listing using the
PlusCode number. If this happens press
and enter the correct PlusCode number.
Press the [ / ] menu select buttons to select
ONCE, WEEKLY, DAILY.
time each day or week, then use
WEEKLY, or DAILY option as appropriate.
CLEAR to return to the VIDEO Plus+ system menu, and re-enter the correct
PlusCode number.
using the
example if you wish to record channel 2 press
0 2. The VCR will remember this for the future.
See next page to continue
TIMER ON/OFF button to remove the
VIDEO
Plus+
NUMBER BUTTONS.
CLEAR to delete the numbers as required
[/]to select the
SET
NUMBER BUTTONS, for
www.sharp.co.uk/support
13
PLU SCOD E NO . -
→
ONCE WE EK L Y D A I L Y
REMOTE CONTROL
DATE PR START STOP
21/06 02 12:00 13:00 SP
--/-- -- -:-- -:-- --
--/-- -- -:-- -:-- --
--/-- -- -:-- -:-- --
PR : CH3 2
: SELECT : CHANGE
SET : ENTER MENU : EX I T
1/2
Page 18
BASIC OPERATION
HOW TO USE THE VIDEO Plus+® SYSTEM TO MAKE A
RECORDING
6. If you wish to change the RECORDING
SPEED, use the [/]to highlight SP. Press
[ / ] to select either standard play (SP),
long play (LP) or extended play (EP) as
required.
7. Press the SET button to confirm the
programme. The VIDEO Plus+ system menu will
reappear. If you wish to enter further VIDEO
Plus+ system recordings repeat this procedure.
SET
8. When you have completed entering the timer
settings, press the
remove the menu from the TV screen.
MENU button to
9. Ensure that the tape on which you
wish to record is inserted into the VCR,
then press the TIMER ON/OFF
button once to place the VCR in TIMER
STANDBY mode. will be shown on
the display.
6.
DATE PR START STOP
21/060212:0013:00SP
--/-- -- -:-- -:-- --
--/-- -- -:-- -:-- --
--/-- -- -:-- -:-- --
EP : T
SP / LP /
: SELECT : CHANGE
SET : ENTER MENU : EX I T
APE SP
EED
7.
PLU SCOD E NO . -
→
ONCE WE E K L Y D A I L Y
1/2
NOTES:
• You may also access the VIDEO Plus+ system menu by the following procedure:
i. Press the MENU button.
ii. The VIDEO Plus+ system option will be highlighted. Press the SET button to
confirm.
Continue from step 2 of this procedure.
• If the symbol flashes a video tape has not been inserted into the VCR.
• If the video tape is ejected when the VCR tries to record the record protection tab has
been removed.
• During recording, press
recordings to be made, the VCR will return to Timer Standby.
STOP to cancel the recording. If there are further
www.sharp.co.uk/support
14
SET
Page 19

BASIC OPERATION
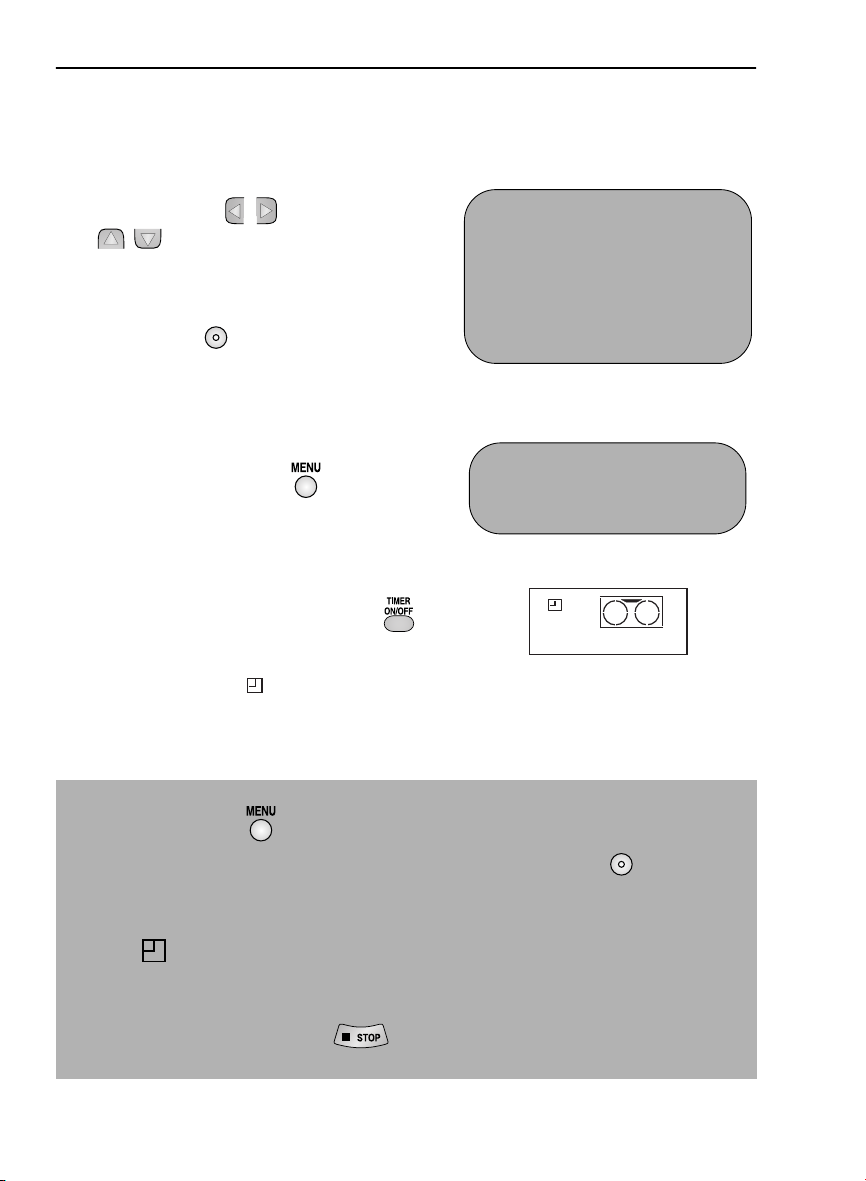
HOW TO SET A DELAYED RECORDING
You can make a maximum of eight delayed recordings up to a year in advance.
The example shown is for 24-hour clock operation. To change to12-hour clock operation refer
to the
MANUALLY SETTING THE CLOCK section of this manual.
12-hour clock am/pm can be selected using the
control.
Before you start!
• If the Timer Standby symbol appears on the VCR display, press the TIMER ON/OFF
button to remove the symbol.
• Check that the VCR clock is displaying the correct time.
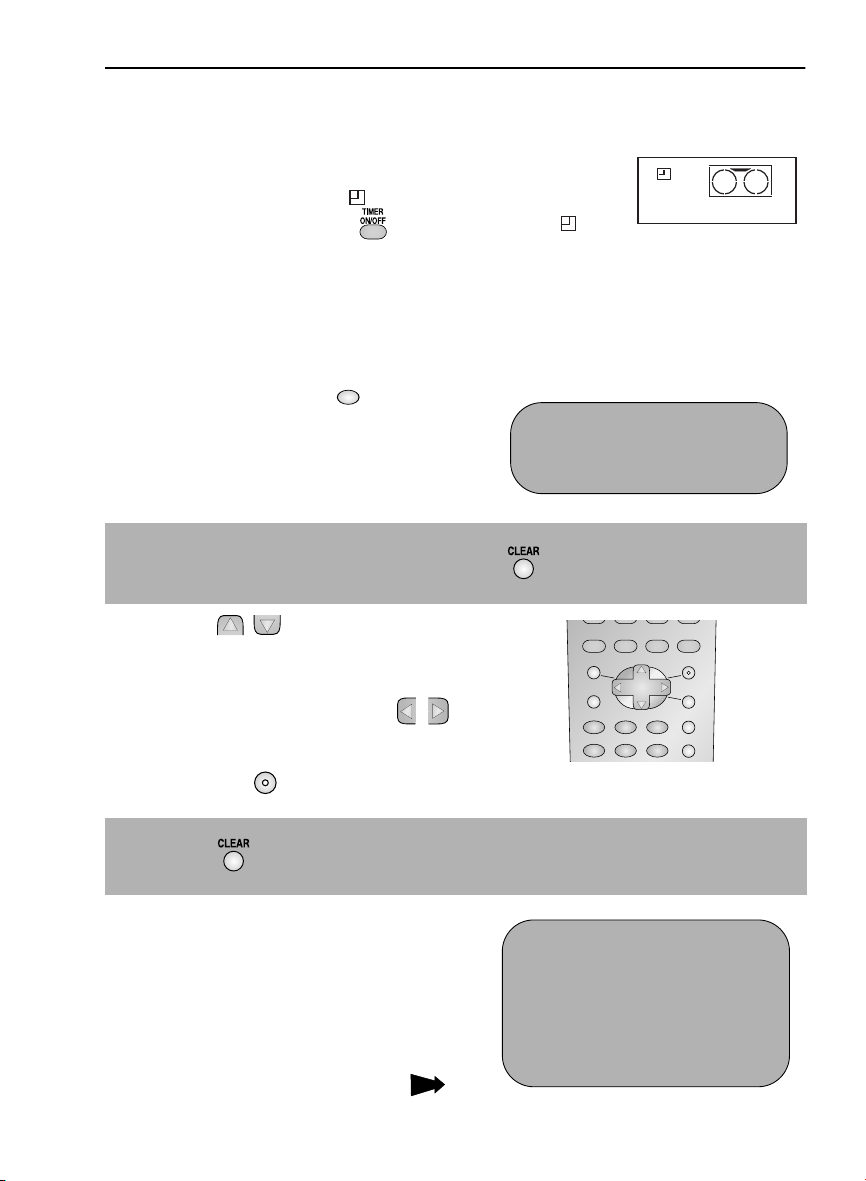
SETTING A RECORDING
For example: Recording a programme on channel 3 from 21:05 to 22:30 on July 9th.
1. Press STOP to ensure that the VCR
is switched on.
2. Press the MENU button .
3. Press the[ / ] menu select buttons to
select
TIMER. Press the SET button to
confirm.
4. Press the SET button again, the on-screen
display will now show today’s date.
If you wish to change the date use the
[ / ]or
use the number buttons, enter two digits for
the day, then two for the month. For example
for July 9th, press
When the correct date for your recording is
shown, press the
move to the next setting.
SET
NUMBER BUTTONS. If you
0 9 (9th), then 0 7 (July).
menu select button to
SET
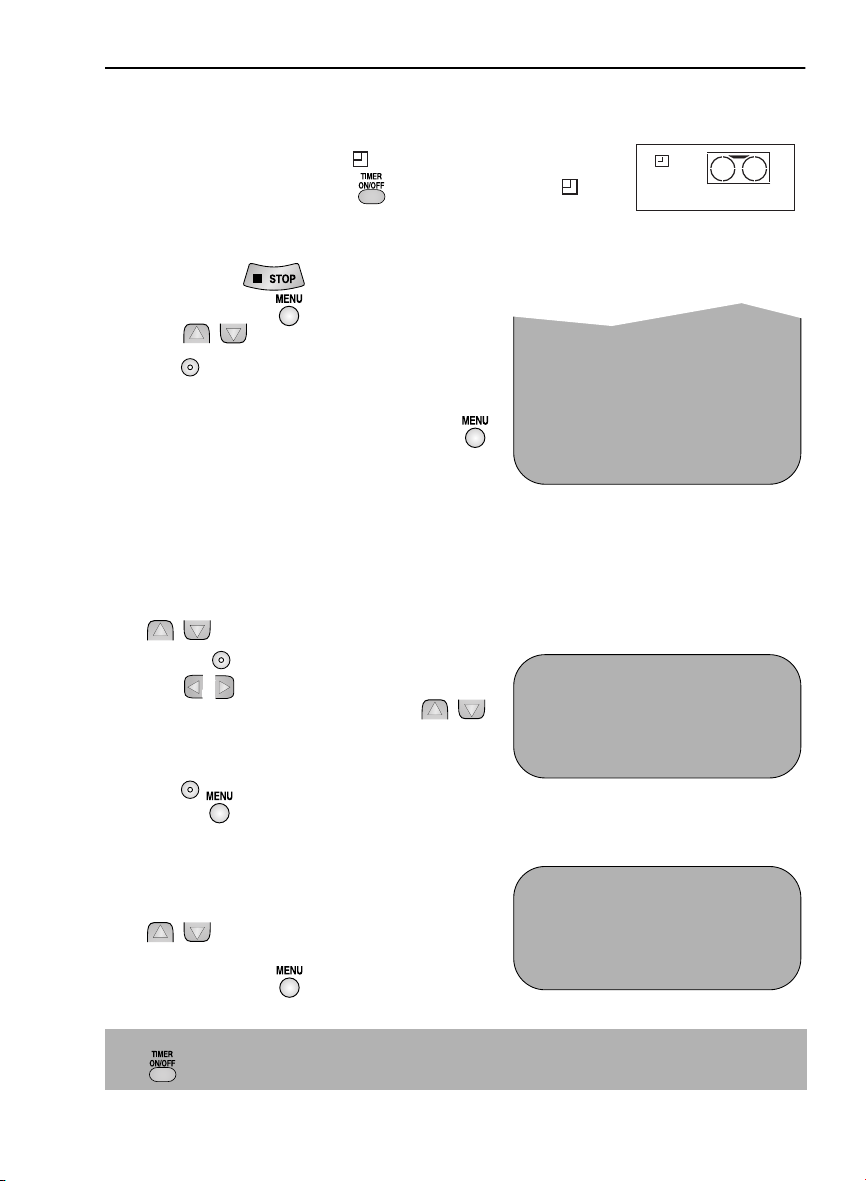
5. If you want to make additional recordings at
the same time each day or week, use the
[ / ] buttons to select D (daily) or W
(weekly). Then press to move to the next
setting.
6. Enter the channel number using the
[ / ]or the
example to record a programme on channel
3, press 0 3. Then press to move to the next
setting.
NUMBER BUTTONS. For
AM/PM button on the remote
ZERO
TIMER
ON/OFF
MENU SET
VIDEO
Plus+
REMOTE CONTROL
3.
V I DEOP LUS +
TIMER
MOD E
SET UP
SKIP
AUDIO
OUT
SEARCH
BACK
CLEAR
231
MODE OSD
DISPLAY
MENU SCREEN
MENU
MENU
SELECT
BUTTONS
4.
DATE PR START STOP
21/060212:0013:00SP
9/07 -- -:-- -:-- --
--/-- -- -:-- -:-- --
--/-- -- -:-- -:-- --
5.
DATE PR START STOP
21/060212:0013:00SP
9/07D -- -:-- -:-- --
--/-- -- -:-- -:-- --
--/-- -- -:-- -:-- --
1/2
1/2
See next page to continue
www.sharp.co.uk/support
15
Page 20

BASIC OPERATION
HOW TO SET A DELAYED RECORDING
7. Enter the start time using the[ / ] or
NUMBER BUTTONS, hours first then
minutes (when entering less than 10 hours or
minutes add a '0' before the number), for
example for 21:05 start, press
Then press to move to the next setting.
2 1 0 5.
8. Enter the stop time, for example for 22:30 stop,
press 2 2 3 0.
9. If you wish to change the RECORDING
SPEED, use the [/]to highlight SP.
Press[ / ]to select either standard play
(SP), long play (LP) or extended play (EP) as
required.
10. Press the SET button to confirm.
• The MENU now shows all the timer settings you
have entered. If you wish to make additional
timer recordings, repeat this procedure.
SET
11. When you have completed entering timer
settings, press the
remove the menu from the TV screen.
MENU button to
12. Ensure that the tape on which you wish
to record is inserted into the VCR, then
press the TIMER ON/OFF button
once to place the VCR in TIMER
STANDBY mode. will be shown on
the display.
7.
DATE PR START STOP
21/060212:0013:00SP
9/07D03 21:05 -:-- SP
--/-- -- -:-- -:-- --
--/-- -- -:-- -:-- --
9.
DATE PR START STOP
21/060212:0013:00SP
9/07D03 21:05 22:30 LP
--/-- -- -:-- -:-- --
--/-- -- -:-- -:-- --
1/2
1/2
NOTES:
• If the symbol flashes a video tape has not been inserted into the VCR.
• If the video tape is ejected when the VCR tries to record the record protection tab has
been removed.
• During recording, press STOP to cancel the recording. If there are further
recordings to be made, the VCR will return to Timer Standby.
www.sharp.co.uk/support
16
Page 21
BASIC OPERATION
HOW TO CHECK, CHANGE AND CANCEL A DELAYED
RECORDING
Before you start!
• If the Timer Standby symbol appears on the VCR display,
press the
symbol.
CHECKING A RECORDING
1. Press STOP to switch on the VCR.
2. Press the MENU button.
3. Press[ / ]to select TIMER. Press the
SET button to confirm.
• All the delayed recordings in the VCR’s memory
will be shown.
4. If the settings are correct press the MENU
button to exit.
• If you wish to change or cancel any settings,
follow the procedures below.
CHANGING A RECORDING
1. Follow steps 1 to 3 of CHECKING A
RECORDING above.
2. To change a delayed recording, press
[ / ] to highlight the recording, then press
the
3. Press[/]to highlight the setting to be
changed and correct it by using the[ / ]
or the NUMBER BUTTONS.
4. When all corrections are complete press the
SET button to confirm, then press the
MENU button to exit.
CANCELLING A RECORDING
1. Follow steps 1 to 3 of CHECKING A
RECORDING above.
2. To cancel a delayed recording, press
[ / ]to highlight the recording to be
cancelled, then press CLEAR.
3. Press the MENU button to exit.
NOTE:
• If there are some programmes to be recorded, do not forget to press TIMER ON/OFF
TIMER ON/OFF button to remove the
SET
SET
SET button to select.
DATE PR START STOP
21/060212:0013:00SP
SET
DATE PR START STOP
21/060212:0013:00SP
--/-- -- -:-- -:-- --
button to return the VCR to Timer Standby mode.
MENU SCREEN
TIMER
MOD E
SET UP
: SELECT
SET : ENTER MENU : EX I T
--/-- -- -:-- -:-- --
--/-- -- -:-- -:-- --
--/-- -- -:-- -:-- --
--/-- -- -:-- -:-- --
--/-- -- -:-- -:-- --
1/2
1/2
www.sharp.co.uk/support
17
Page 22

ADVANCED OPERATION
SETS
AUDIO AND YOUR VCR
HI-FI STEREO SOUND
Stereo sound is possible from this VCR if you have a stereo TV connected to the VCR with a
scart lead, or audio equipment connected with audio phono leads. The VCR is normally set
so that stereo sound is possible. The sound output from the VCR is controlled by the
AUDIO OUT button on the remote control. If you wish to change the sound output you
can use the
AUDIO OUT button as follows:
• Press the
speakers.
• Press the
speakers.
• Press the
speakers.
• Pressing the
heard.
AUDIO OUT button once. The LEFT audio channel will be sent to BOTH
L will appear on the VCR display.
AUDIO OUT button again. The RIGHT audio channel will be sent to BOTH
R will appear on the VCR display.
AUDIO OUT button a third time and the MONO track will be sent to BOTH
L and R will not appear on the VCR display.
AUDIO OUT button a fourth time, normal Hi-Fi stereo sound will be
L and R will appear on the VCR display.
NICAM Hi-Fi STEREO SOUND
Your VCR can receive and record NICAM sound. The VCR is normally set so that NICAM sound
is possible if it is present on the receiving signal, otherwise the VCR will automatically switch to
receive the mono signal. NICAM sound can be turned off. If you wish to do this follow the
procedure below:
1. Press the MENU button to display the
main menu on the screen.
2. Press the [ / ] menu select buttons to
select MODE then press the
confirm.
• The MODE menu will be displayed with NICAM
selected.
3. Press [ / ]to select OFF.
ET
SET button to
➝NICAM AUTO OFF
COLOUR AUTO PAL
4. Press the SET button to confirm and return to the main menu screen.
5. Press the MENU button to exit to normal screen.
NOTES:
• If the tape being played back does not carry sound recorded on Hi-Fi tracks, L and R
will not appear on the display.
• lf the sound contains ‘crackling’ or ‘popping’ noises the sound quality may be
improved by adjusting the tracking using the
• If the poor quality is for a long period the VCR will automatically select the mono track
and the sound will be in mono.
• NICAM sound may not be stereo.
www.sharp.co.uk/support
VCR CHANNEL / buttons.
18
Page 23

ADVANCED OPERATION
AUDIO AND YOUR VCR
CONNECTING TO AUDIO EQUIPMENT
The diagram below shows how to connect your VCR to audio equipment. When connected
in this way stereo sound is possible from the speakers.
EXISTING AERIAL
CABLE
BACK OF
TELEVISION
AUDIO PHONO LEADS
(NOT SUPPLIED)
RF CONNECTION CABLE
SON/VIDEO
LINE1(I)IN
(L1/I)
/OUT
LINE2(II)IN/DECODER CANAL PLUS/L2(II)
AUDIO OUT
SORTIE SON
A2230
R D
L G
AUDIO OUT
L and R
+
AMPLIFIER
AERIAL IN
ENTREE ANTENNE
AERIAL OUT
SORTIE ANTENNE
AERIAL IN
AERIAL OUT
www.sharp.co.uk/support
19
Page 24

ADVANCED OPERATION
PLAYBACK OF A VIDEO TAPE
CHECKING THE AMOUNT OF TAPE REMAINING
When you load a video tape into the VCR it can calculate approximately the amount of
video tape remaining in hours and minutes. This is useful in determining whether or not there is
sufficient tape left to make a recording.
When a video tape is playing, the amount of tape remaining is calculated for you
automatically.
To display the amount of video tape remaining:
1. Load the video tape into the VCR
2. Press DISPLAY on the remote control as many times as necessary until “R” appears on
the VCR display. The tape will wind forward and then return to its original position. The
tape remaining will be shown on the VCR display in hours and minutes.
By pressing the
change between long play and standard play.
For example,
in standard play 1 hour 23 minutes is left on the tape:
in long play 2 hours 46 minutes is left on the tape:
in extended play 4 hours 9 minutes is left on the tape:
NOTES:
• If tape remaining function is interrupted, the remaining time will not be displayed.
• If less than 5 minutes of tape remains the display will flash.
TAPE SPEED button on the remote control the remaining time will
PLAYING BACK A VIDEO TAPE REPEATEDLY
You can set your VCR to automatically rewind at the end of playing a video tape and replay
the entire tape again. REPEAT will appear on the on-screen display when selected.
To use this feature:
1. Press the MENU button to display the
main menu on the screen.
2. Press the[ / ]menu select buttons to
select MODE.
3. Press the SET button.
SET
4. Press [ / ]to select REPEAT.
5. Press [/]to select ON or OFF.
6. Press the SET button to confirm and return
to the main menu screen.
SET
MODE MENU SCREEN
BLUE MUTE AU TO OFF
➝REPEAT ON OF F
: SELECT : CHANGE
S E T : EN T E R ME N U : EX I T
7. Press the MENU button to exit to normal screen.
www.sharp.co.uk/support
20
Page 25

ADVANCED OPERATION
PLAYBACK OF A VIDEO TAPE
PLAYING BACK AN S-VHS TAPE
S-VHS (super VHS) pre-recorded tapes give you a better quality playback picture with
increased detail and depth.
Your VCR will automatically recognise which type of tape is being used, VHS or S-VHS and
playback the appropriate standard accordingly.
NOTES:
• All of the VCR’s playback functions can be used during S-VHS playback, SLOW, PLAY/X2,
VISUAL SEARCH, etc.
• Your VCR is S-VHS playback only, it will not record S-VHS.
• Some picture noise may be observed on the screen in Long Play (LP) mode.
PLAYING BACK AN NTSC TAPE
NTSC (National Television Standards Committee) is a different TV standard to PAL and is used
in some Non-European Countries. Your VCR can playback pre-recorded NTSC tapes onto a
PAL system TV, but cannot record an NTSC signal onto a video tape.
Note that..
• You cannot record NTSC signals or dub NTSC tapes onto other VCR’s from this VCR.
• You cannot use Slow speed, Still frame, Double Speed, Frame Advance or Tape
Remaining with a pre-recorded NTSC tape.
• On some televisions, the picture may appear in black and white or there may be no
picture. This does not indicate a fault with your VCR.
• On some televisions, the picture may shrink vertically causing black bands to appear at
the top and bottom of your screen.
• On some televisions, the played-back picture may roll vertically, this does not indicate a
fault with your VCR.
www.sharp.co.uk/support
21
Page 26

ADVANCED OPERATION
LCD DISPLAY
TIME OF DAY
Shows current time of day, if the clock is set.
Press the
appears. For example, 21:20 appears:
DISPLAY button until the time of day
CHANNEL STATUS
Shows the current VCR channel preset. Press the
DISPLAY button until the channel number
appears, for example:
TAPE COUNTER AND ZERO BACK
Tape counter measures the current position of the video tape in real time. ZERO BACK uses the
tape counter to determine a specific point on a tape you may wish to return to.
1. Press the DISPLAY button until tape
counter appears, for example:
2. To identify the current position on a video tape
press the
counter will appear:
CLEAR button and the tape
When you wish to return to this position on the video tape, press
The tape will rewind/advance to this point.
ZERO BACK button.
NOTE:
• The tape counter will only operate on recorded sections of tape.
DISPLAY BRIGHTNESS
The LCD display brightness can be changed to suit the ambient lighting in the room. Switch
on the VCR (ensure the menu screen is not on) then press and hold the
approximately 2 seconds. This will reduce the brightness of the VCR display. Repeat the
process to change the display back to the previous setting.
www.sharp.co.uk/support
22
DISPLAY button for
Page 27

ADVANCED OPERATION
TIMER
AUDIO
SKIP
BLUE MUTE
The TV screen will be blue if a TV channel with no signal is selected, an unrecorded section of
tape is played or the quality of the recording on the tape is poor. Select OFF in the mode
menu to disable this feature.
1. Press the MENU button to display the
main menu on the screen.
2. Press the[ / ] menu select buttons to
MODE MENU SCREEN
NICAM AUTO OF F
COLOUR AUTO PAL
BLUE MUTE AUTO OF F
REPEAT ON OF F
select MODE.
SET
3. Press the SET button.
4. Press the [ / ] menu select buttons to
select BLUE MUTE.
5. Press [/] menu select buttons to select
AUTO or OFF.
6. Press SET to confirm and then MENU
to return to the normal screen
SET
ON/OFF
OUT
SEARCH BACK
MENU SET
VIDEO
Plus+
231
CLEAR
MODE OSD
REMOTE CONTROL
COLOUR
If the VCR is playing poor quality recording, the picture may turn black and white. Selecting
PAL may improve this (depending on the recording), although coloured speckles may appear
on black and white recordings.
1. Follow steps 1 to 3 from BLUE MUTE above.
2. Press the [ / ] menu select buttons to select COLOUR.
3. Press [/] menu select buttons to select AUTO or PAL.
4. Press SET to confirm and then MENU to return to the normal screen.
SET
www.sharp.co.uk/support
23
Page 28

ADVANCED OPERATION
SEARCHING THE VIDEO TAPE
SKIP SEARCHING THE VIDEO TAPE
You can search the tape in 30 second time intervals. To do this follow the procedure below:
1. Press PLAY/X2 to start the video tape
playing.
2. Press the SKIP SEARCH button on the
remote control.
The number of times you press
determines the forward search time.
• After searching, normal playback
will resume automatically
DIGITAL PROGRAMME SEARCH SYSTEM (DPSS)
Your VCR records a marker signal on the tape at the start of each recording. These signals can
be used later to locate the starting point of a recording.
DPSS / to locate a previous programme or the next programme.
Press
For example,
1. Load the video tape into the VCR.
2. Press DPSS three times. DPSS 3 will appear on the on-screen display, and the VCR
will fast forward to locate the third recording after the current one.
3. Press DPSS once. DPSS -1 will appear on the on-screen display and the VCR will
rewind to locate the beginning of the current recording.
PLAY / X2
1 press = 30 seconds.
2 presses = 1 minute.
3 presses = 1 minute 30 seconds.
4 presses = 2 minutes.
SKIP SEARCH
DPSS Signals
Fast ForwardRewind
DPSS
Number
Current tape position
4. To cancel the search before it has finished, press STOP or PLAY/X2 .
PLAY / X2
NOTES:
• Recordings must be longer than 3 minutes.
• The starting point of playback may vary.
• This feature will only work with video tapes recorded on a VCR with the DPSS feature.
www.sharp.co.uk/support
24
Page 29
ADVANCED OPERATION
LINE1(I)IN
/OUT
SON/VIDEO
(L1/I)
AERIAL IN
ENTREE ANTE
INPUT SELECT
CHANNEL
AM/PM
REW FF
PLAY / X2
7809
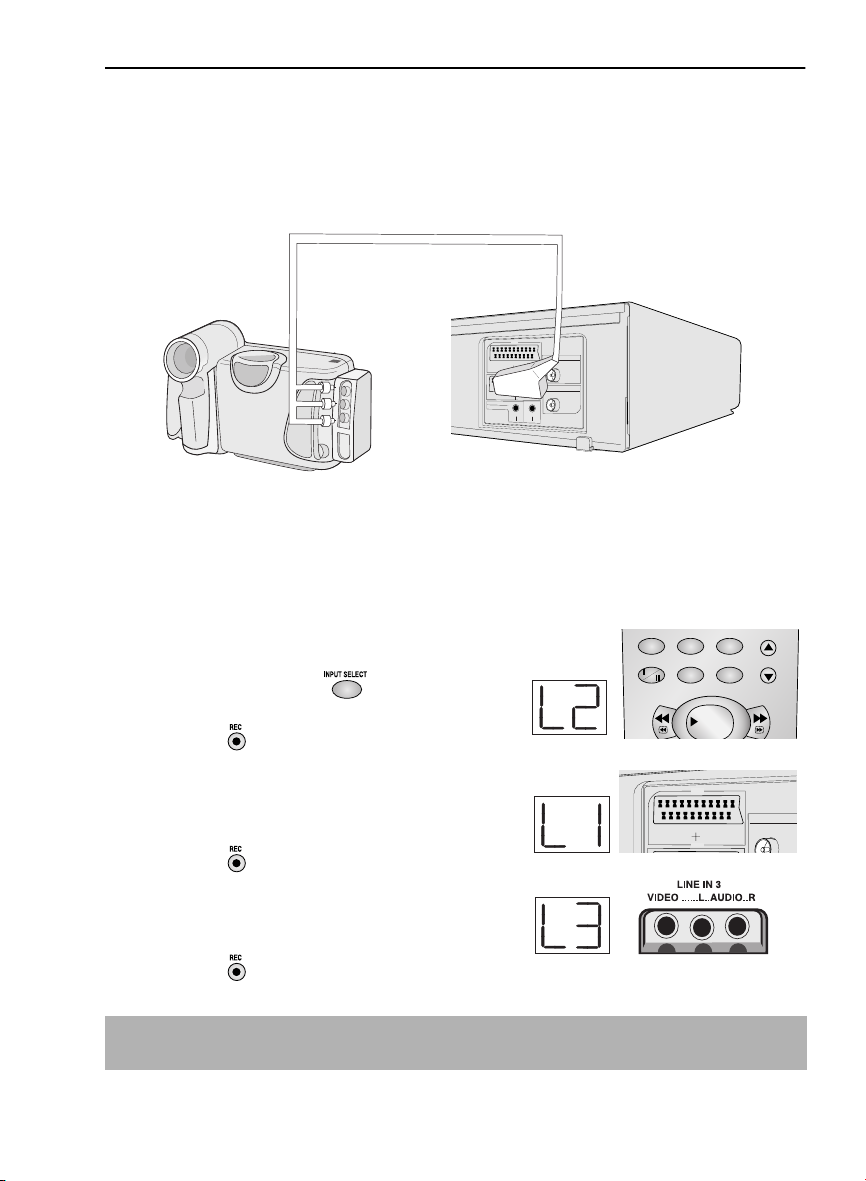
RECORDING FROM OTHER EQUIPMENT
You can record video and audio signals from various external sources, such as a camcorder,
onto a video tape using your VCR.
For example, recording from a camcorder connected to LINE 2 IN/DECODER on your VCR:
Optional Scart connection (not supplied)
AERIAL IN
ENTREE ANTENNE
SON/VIDEO
LINE1(I)IN
(L1/I)
/OUT
AERIAL OUT
SORTIE ANTENNE
L
IN
E
2(II)IN
/D
E
C
O
D
ER
C
A
N
A
L
P
L
U
S
/L
2(II)
A
U
D
IO
O
U
T
S
O
R
T
IE
S
O
N
A2230
R D
L G
Mono/Stereo Camcorder
Connect your signal source (eg. Camcorder,
1.
Digital Camera etc) to the desired scart socket
on the back of the VCR using the manufacturers
recommended cable (not supplied).
Input Select
2.
Ensure that the tape on which you wish to record
is inserted into the VCR.
➘
Press
3.
INPUT SELECT
control until the VCR display shows
4.
Press
to start recording.
REC
on the remote
L2
.
• If you wish to record from a source connected to
• If you wish to record from a source connected
NOTE:
OTHER CONNECTIONS POSSIBLE!
.
LINE 1 IN/OUT, select
Press
to start recording.
REC
with audio phono leads to the sockets on the
front of the VCR (if fitted), select
to start recording.
REC
Press
• There are many different ways of connecting external equipment to your VCR. Please
refer to your equipment operation manuals for further information.
L1
L3
.
www.sharp.co.uk/support
25
Page 30

OTHER FEATURES ON YOUR VCR
CHILD LOCK
You can lock your VCR with this feature. It will work even when the VCR is in STANDBY,
preventing children from operating the VCR.
TO ENGAGE CHILD LOCK
Press and hold the
flashes and then remains lit on the VCR display confirming that CHILD LOCK
has been activated.
Regardless of what other operating buttons are touched, the VCR will continue to operate in
its present mode. If CHILD LOCK is activated during playback, once the tape reaches its end,
the VCR will automatically rewind the tape, eject it, and turn the power off.
CHILD LOCK
button on the remote control for about 2 seconds.
TO DISENGAGE CHILD LOCK
Press and hold the
starts flashing and then disappears. CHILD LOCK is disengaged.
CHILD LOCK
button for about 2 seconds.
NOTES:
• If you attempt to change modes by pressing another button while CHILD LOCK is on,
the indicator will flash on the VCR display.
• If power is interrupted for more than 60 seconds (due to power failure etc), CHILD LOCK
may disengage.
www.sharp.co.uk/support
26
Page 31

OTHER FEATURES ON YOUR VCR
DECODER SWITCHING OPERATION
If you have a separate decoder connected to the VCR’s L2 input as previously shown in the
“Connecting the Cables” section, you will need to set the decoder function to ON in order to
record the descrambled signal and/or watch it on your TV. Now, when the VCR receives a
scrambled signal it is output via LINE 2 terminal to the decoder. The decoder then outputs the
descrambled signal back to LINE 2 terminal and the signal can be recorded. The VCR outputs
the descrambled signal to your TV through the LINE1 terminal and you can watch the
descrambled picture.
When making recordings using a separate decoder connected as shown remember to leave
the decoder function ON.
If you connect a decoder unit to the VCR, the decoder unit provides a switching signal which
will automatically allow your TV to display the descrambled signal routed through the VCR. To
use this feature make sure that the VCR is connected to both TV and decoder unit by SCART
leads. Then:
• Press STANDBY
• Press TV/VCR on the remote control to place the VCR in ‘VCR mode’. ‘VCR’ will
appear on the display.
to place the VCR in STAND-BY mode. OR
www.sharp.co.uk/support
27
Page 32
CUSTOMISED INSTALLATION
MANUALLY TUNING A CHANNEL
• It should not be necessary to tune in a broadcast channel manually except in unusual
circumstances such as poor signal.
To manually tune in a channel follow the procedure below.
Press
MENU
1.
2.
Press the [ / ] menu select buttons
to select SET UP. Press
CHANNEL PRESET
3.
highlighted. Press
4.
Press [ / ] to select
VC-MH815LM only
5.
IMPORTANT NOTE:
Press to select CH or CC. This will
determine whether off air (CH) or cable
(CC) is tuned first. Note that both off air
and cable will be tuned regardless of the
setting.
6.
7.
[/]
Press
direction. Tuning will stop when a
channel is received. If it is not the desired
channel, press
tuning.
Press [ / ] to select
TUNING
the sharpest colour picture is obtained.
IMPORTANT NOTE:
If you connect an independent
8.
decoder, you must press [ / ] to
select DECODER, then select
turn the decoder function ON.
9.
Press [ / ] to select
The SKIP function determines whether the
channel can be selected when using the
CHANNEL
NUMBER BUTTONS.
10. Press [/] to select ON or OFF for
this option.
11. Press SET to confirm.
12. Press MENU to leave this function.
.
to confirm.
SET
will be
.
SET
CHANNEL
to start tuning in either
[/]
to continue
FINE
. Press and hold
[/]
[/]
SKIP
/ instead of the
CHANNEL PRES ET
CHANNEL SORT
CLOCK
.
PRESET 1
➔
CHANNEL CH 2 1
FINE TUNING
DECODER ON OFF
SKIP ON OF F
▲
▲
CABLE RECEPTION
VC-MH815LM only
Station
Signals VHF
until
A
B
C
D
E
F
to
G
H
J
.
MENU SET
VIDEO
Plus+
Real
Channel
Numbers
01
02
03
04
05
06
07
08
09
CLEAR
MODE OSD
231
Remote Control
www.sharp.co.uk/support
28
Page 33

CUSTOMISED INSTALLATION
MANUALLY SORTING CHANNELS
SORTING THE CHANNELS INTO YOUR PREFERRED ORDER
Press the MENU button.
1.
2. Press the [ / ] menu select buttons to
SET
select SET UP. Press the
confirm.
SET button to
2.
MENU SCREEN
V I DEOP LUS
TIMER
MOD E
SET UP
3. Press [ / ] to select CHANNEL SORT. Press
SET
SET button to confirm.
the
4. The MOVE position will be highlighted. Press the
SET
SET button to confirm.
5. Press [ / / / ] to highlight the
SET
channel to be moved. Press the
button to confirm.
SET
6. Press [ / / / ] to highlight the new
SET
position for the channel. Press the
button to confirm.
SET
7. If any more channels are to be moved, repeat
procedure from step 5.
8. When all the channels are in your preferred
order, either press the
return to the CHANNEL SORT menu or press the
MENU button to leave the MENU
function.
CLEAR button to
NOTES:
If when moving channels the picture becomes
unclear and the on-screen display is unreadable,
the
MODE OSD button can be used to toggle
between a blue background and the normal
picture.
The blue background will be shown until either
another channel is selected or the
button is pressed again.
MODE OSD
5.
1CH43 7 1 3
2CH54 8 1 4
3CH65 9 15
4CH21 10 1 6
5CH50 1 1 17
6 CH 3 2 12 18
MOVE 1/5
6.
1 CH 3 2 713
2CH43 8 1 4
3CH54 9 15
4CH65 10 1 6
5CH21 11 1 7
6CH50 1 2 18
MENU
MOVE 1/5
SET
MENU SELECT
BUTTONS
Remote Control
www.sharp.co.uk/support
29
Page 34

CUSTOMISED INSTALLATION
MANUALLY SORTING CHANNELS
DELETING CHANNELS
If there is a channel you wish to delete from the VCR memory, you can follow the procedure
below.
1. Press the MENU button.
2. Press the [ / ] menu select buttons to
select SET UP. Press the SET button to
confirm.
SET
3. Press [ / ] to select CHANNEL SORT. Press
the SET button to confirm.
SET
4. Press [ / ] to select CANCEL. Press the
SET
SET button to confirm.
5. Press [ / / / ] to highlight the
channel to be cancelled.
6. Press the SET button twice to cancel the
channel.
SET
7. When all the channels you wish have been
cancelled, either press the CLEAR button
to return to the CHANNEL SORT menu or press
the MENU button to leave the MENU
function.
2.
MENU SCREEN
V I DEOP LUS
TIMER
MOD E
SET UP
5.
1 CH 5 0 713
2CH32 8 1 4
3CH43 9 1 5
4CH54 10 1 6
5CH65 11 1 7
6CH21 1 2 18
CANCEL 1 / 5
6.
1CH32 7 1 3
2CH43 8 1 4
3CH54 9 15
4CH65 10 1 6
5CH21 1 1 17
61218
MENU
CANCEL 1 / 5
SET
NOTES:
If when deleting channels the picture becomes
unclear and the on-screen display is unreadable,
the
MODE OSD button can be used to toggle
between a blue background and the normal
picture.
The blue background will be shown until either
another channel is selected or the
button is pressed again.
MODE OSD
www.sharp.co.uk/support
30
MENU SELECT
BUTTONS
Remote Control
Page 35

CUSTOMISED INSTALLATION
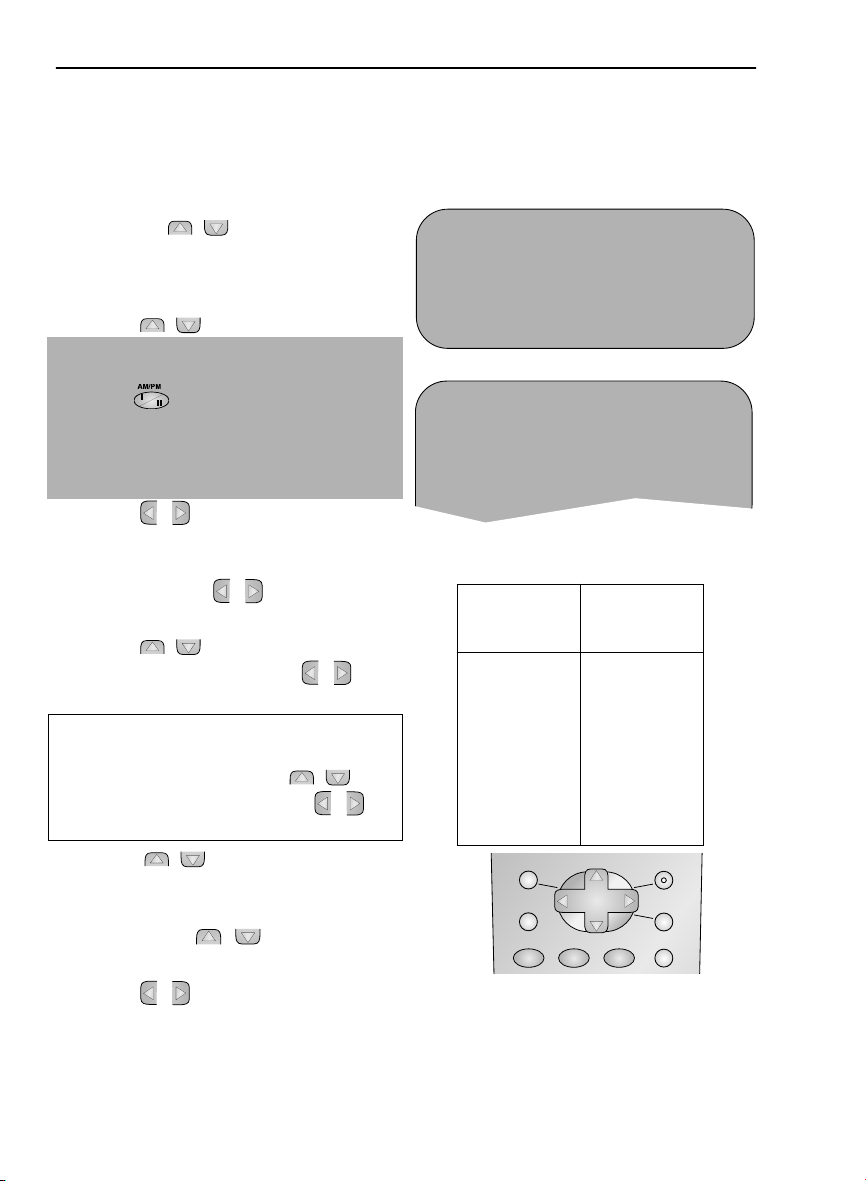
MANUALLY SETTING THE CLOCK
This procedure will allow you to set the clock manually.
1. Press the MENU button.
2. Press the [ / ] menu select buttons to
SET
select SET UP. Press the
confirm.
SET button to
3. Press [ / ] to select CLOCK. Press the
SET
SET button to confirm.
4. Press [ / ] to select either 12 or 24 hour
clock.
5. Press [/] to select TIME. Enter the time
using the
[ / ] buttons. If the minutes or hours are
less than 10, enter the leading 0. If using the 12
hour clock enter AM or PM by pressing the
AM/PM button on the remote control.
NUMBER BUTTONS or the
6. Press [/] to select DATE. Enter the date
using the
[ / ] buttons. For example, for 1st April
enter
NUMBER BUTTONS or the
01 04.
3.
CHANNEL PRESE T
CHANNEL SORT
CLOCK
: SELECT : CHANGE
SET : ENTER MENU : EX I T
4.
MODE T I ME DATE YEAR
24H 0:00 01/ 04 02
MODE : 24H / 12H
: SELECT : CHANGE
SET : ENTER MENU : EX I T
SET UP
CLOCK
Remote Control
7. Press [/] to select YEAR. Enter the last two
digits of the year using the
NUMBER
BUTTONS or [ / ]. For example, for
2002 enter
8. Press the SET button to confirm.
02. For the year 2003 enter 03.
SET
MENU
NOTE:
• You will need to update the clock for Summer/Winter daylight saving.
www.sharp.co.uk/support
31
SET
MENU SELECT
BUTTONS
Page 36

MORE INFORMATION ABOUT YOUR VCR
VCR DISPLAY
1. TIMER RECORD indicator.
2. VCR MODE indicator.
3. TAPE MOTION STATUS
indicator
4. RECORDING indicator.
5. AUDIO OUTPUT indicator.
6. CHILD LOCK indicator.
7. TAPE SPEED indicator.
8. VIDEO PROGRAMMING
SYSTEM/PROGRAMME
DELIVERY CONTROL indicator.
9. DECODER indicator.
10. CLOCK, TAPE COUNTER,
TAPE STATUS AND CHANNEL
PRESET STATUS .
NOTE:
• Some models do not have all the features shown, therefore, they will not appear on the
display.
SELECTING THE OUTPUT FROM THE VCR
If your VCR is connected to your TV with a scart lead, when you start to play a video tape the
VCR will automatically switch its output so that playback picture is shown on the TV.
In this case ‘VCR’ will appear on the VCR display.
You can manually override this by pressing
TV broadcast channel will be seen on the TV screen and ‘VCR’ will disappear from the VCR
display.
• Pressing
TV/VCR again will return the TV picture to the playback picture.
TV/VCR on the remote control. Now the
www.sharp.co.uk/support
32
Page 37

MORE INFORMATION ABOUT YOUR VCR
ON-SCREEN DISPLAY
All the information you need on the VCR status will be summarised on the on-screen display.
If you are recording, playing back a tape or watching a broadcast on the video channel you
can call up three standard on-screen displays. The display can be selected by pressing the
MODE OSD button on the remote control, 1,2,3 or 4 times.
1. AUTO, the current mode and channel
number will be displayed for 3 seconds when an
operation or number button is pressed.
2. FULL., all the active features will also be shown
on screen.
Programme number and channel
Tape Status
NICAM signal
Audio output mode
Tape speed
Tape remaining
Time
Date
Tape counter
3. COUNTER, this display will show the tape
counter and amount of tape remaining.
4. DISPLAY OFF, this will remove the display
from the screen.
1.
■ 1CH59
SP L R
NICAM
STEREO
2.
■ 1CH59
SUPER P . ON N I CAM
SP L R
22:00 REM1:05
9/07 02 0:00.00
STEREO
3.
REM 1:05
0:00.00
NOTES:
• The default time and date will not be displayed if the clock has not been set.
• The VCR will return to display
• If you are recording from this VCR to another, make sure you remove the display from
the screen otherwise it will be recorded.
1. each time it is switched on.
www.sharp.co.uk/support
33
Page 38

MORE INFORMATION ABOUT YOUR VCR
SPECIFICATIONS
Format: VHS PAL standard
Number of heads: Six
Video signal system: PAL colour or monochrome signal: 625 lines
Hi-Fi audio recording
system: Deep layer recording system conforming to
Maximum playing time: 240 min. with E-240 video cassette in Standard
Tape width: 12.7 mm
Tape speed: 23.39 mm/s Standard Play (SP)
Antenna: 75 Ω unbalanced
Reception channels: UHF channel 21-69
RF output signal: UHF channel 21-69
Power requirement: AC 230-240V, 50 Hz
Power consumption:
Operating temperature: 5 ˚C to 40 ˚C
Storage temperature: -20 ˚C to 55 ˚C
Video input: 1.0 Vp-p, 75 Ω
Video output: 1.0 Vp-p, 75 Ω
Audio input: Line1&2: -3.8 dBs, 10 kΩ, Line3: -3.8 dBs, 47 kΩ
Audio output: Line1&2: -3.8 dBs, 1 kΩ, Audio out: -3.8 dBs, 1 kΩ
Hi-Fi audio: Dynamic range: ~90dBs typ. (SP);
Dimensions: 430(W) x 220(D) x 93(H) mm
Weight: 2.8 kg (approx.)
Supplied accessories: 75 Ω RF Connection cable, operation manual,
stereo Hi-Fi VHS standard
Play (SP) mode
480 min. with E-240 video cassette in Long Play
(LP) mode
720 min. with E-240 video cassette in Extended
Play (EP) mode
11.70 mm/s Long Play (LP)
7.8mm/s Extended Play (EP)
(
VHF Channels A-J VC-MH815LM only)
17 W approx. (Standby power consumption < 3W)
Frequency response: 20 Hz - 20 kHz;
Wow and Flutter: <0.005% Wrm (JIS A)
remote control, AA/R6/UM3 battery (x2)
• Specifications are subject to change without notice as part of our policy
of continuous improvement.
• No liability is accepted for any inaccuracies or omissions in this
publication, although every possible care has been taken to make it
complete and as accurate as possible.
www.sharp.co.uk/support
34
Page 39
MORE INFORMATION ABOUT YOUR VCR
TROUBLESHOOTING
BEFORE REQUESTING SERVICE!
The following conditions do not always denote trouble. Therefore, perform the checks
described below before calling for service. If the problem cannot be corrected by the use of
this guide, remove the mains plugs from the wall socket and contact the dealer or supplier
from whom the unit was purchased in order to obtain service. Where this is not possible, please
contact the telephone number listed below, you will then be given details of how to obtain
service.
Tel.
08705 274277
be charged at local rate.
AREA PROBLEM POSSIBLE CAUSE/CURE
INSTALLATION TV will not tune in to
POWER
PLAYBACK
RECORDING
(office hours)
the VCR.
Auto Installation
screen does not
appear when the VCR
is switched on OR Auto
Installation is not
complete.
Display is not working. • Make sure the power cord is plugged in.
VCR will not operate -
display and the red
timer standby
indicator is illuminated.
VCR will not respond to
any commands.
No picture appears. • Make sure the TV is set to the video channel.
Playback picture is
snowy.
Playback/Recording
does not play back in
Stereo
Tape is automatically
ejected when pressing
the
TIMER ON/OFF
buttons.
or (01) 676 0648
appears in VCR
REC or
if telephoning from Ireland
• Check all the cables are correctly
connected.
• Check your TV manual for correct tuning of
your TV.
Reset the VCR and complete AUTO
INSTALLATION again. (Refer to VCR Reset at the
back of the book.)
• Make sure the wall socket has power (check
by plugging another appliance in).
• Press the TIMER ON/OFF button to
disengage timer.
• Check the CHILD LOCK is not engaged.
• Safety device operating: unplug VCR for 2
hours.
• Check all connecting cables.
• Adjust the tracking using the
VCR CHANNEL
• Try another tape.
• The video heads may have been
contaminated - refer to a SHARP Service
Facility.
• Ensure the VCR is connected to a stereo TV
with a SCART lead.
• Programme may not carry stereo.
• The record-protection tab has been
removed from the cassette.
- Please note: All calls will
/
buttons
.
www.sharp.co.uk/support
35
Page 40

MORE INFORMATION ABOUT YOUR VCR
TROUBLESHOOTING
AREA PROBLEM POSSIBLE CAUSE/CURE
RECORDING The VIDEO Plus+
system does not
record desired
programme.
TAPE
TRANSPORT/
MECHANISM
REMOTE
CONTROL
OTHER
PROBLEMS
Tape can not be
loaded.
Rewind is not
possible.
The VCR can not be
operated by remote
control.
Picture does not
change even though
the VCR CHANNEL
/
buttons
pressed.
Desired channel
position can not be
selected.
No colour or poor TV
picture on normal
viewing.
Not possible to view
picture or playback
through AERIAL OUT.
Desired channel has
interference.
No picture appears. • Make sure the TV is on the video channel.
• Ensure date and time are correctly set on the
VCR.
• Make sure there is no other tape in the VCR.
• Make sure you are loading the tape
correctly.
• Make sure the tape is not at the start.
• Remote control is too far away from the main
unit.
• Point the remote control at the VCR.
• Batteries are flat - replace both.
• Batteries have not been inserted correctly.
• VCR is positioned in strong light.
• Make sure the VCR is not in Timer or Menu
mode.
are
• The channel position has been set to be
skipped. Cancel the SKIP mode for that
channel.
• Make sure all the cables are connected
properly.
• Make sure the VCR power cord is properly
plugged in.
• Make sure the RF OUTPUT has not been
switched off. (Refer to page 37, RF CHANNEL
TUNING and RF THROUGH ON/OFF)
• Possible weak signal strength, the same
channel with a better signal strength may
have been tuned in on another VCR preset
channel. Example;
VCR preset 1 = BBC1 and
VCR preset 14 = BBC1
(Refer to Manually Sorting Channels section
to move the channel to your desired
position.)
• TV aerial may need adjusting.
• Check all connecting cables.
www.sharp.co.uk/support
36
Page 41
MORE INFORMATION ABOUT YOUR VCR
VCR RESET
1. Press the STOP button on the front of the VCR.
2. Press and hold MENU and CHANNEL UP buttons together on the front of
the VCR for 10 seconds.
STOP
CHANNEL
K
✔ VCR RESET IS NOW COMPLETE
Please continue with your previous procedure.
RF CHANNEL TUNING
If you have a preferred RF output channel this can be set manually between channels 21 and
69 by following the procedure below.
1. Press the STANDBY button.
2. Press and hold the MENU button for 3 seconds.
3. Wait for a flashing channel number to appear on the VCR display.
4. The channel number can now be changed by using the MENU SELECT /
buttons.
5. Your TV will now require tuning to the new
channel. (The screen opposite should be
displayed on the TV)
6. Press the SET button to store.
SET
VCR RF
(White text
blue background)
SET : ENTER MENU: EX I T
RF THROUGH ON/OFF:
If you wish to connect your VCR to the TV with only a scart lead, the RF Output on your VCR
can be turned OFF and ON. To do this press the
remote control at point 3 from
RF CHANNEL TUNING above, or at point 4 of AUTO
CLEAR then SET buttons on the
TUNING on page 5. This will help minimise interference.
www.sharp.co.uk/support
37
SET
Page 42

MORE INFORMATION ABOUT YOUR VCR
GUARANTEE
SHARP Electronics (UK) Ltd. (hereafter called Sharp) guarantee to provide for
the repair, or at its option the replacement, of this product subject to the
conditions listed below:
1. This guarantee shall only apply to faults which are due to inferior
workmanship or materials. It does not cover faults or damage by
accident, misuse, fair wear and tear, neglect, tampering with the
product, or repair other than by a Service Facility appointed by SHARP.
2. As this product is intended for private domestic use only, the guarantee
will not apply if the product is used in the course of a business, trade or
profession.
3. To benefit from this guarantee, any fault which occurs must be notified
to SHARP, or its appointed Service Facility within one year from the date
this product was purchased. Proof of purchase must be provided.
4. The guarantee does not cover carriage costs, batteries or video tapes.
5. In the unlikely event of this product requiring repair, please contact the
supplier from whom it was purchased. Where this is not possible, please
contact the SHARP Helpline on the telephone number given below.
6. This guarantee is offered as an additional benefit to your statutory rights
and does not affect these rights in any way.
7. No person has any authority to vary the terms or conditions of this
guarantee.
If you have any difficulty operating this product, or would like information on
other SHARP products, please telephone the SHARP Helpline on the number
given below.
SHARP Helpline: Tel: 08705-274277 (office hours)
or (01) 676 0648 if telephoning from Ireland
Please note that all calls are charged at local rate.
In the unlikely event of this equipment requiring repair during the guarantee
period, you will need to provide proof of the date of purchase to the
repairing company. Please keep your invoice or receipt which is supplied at
the time of purchase.
www.sharp.co.uk/support
38
Page 43
MORE INFORMATION ABOUT YOUR VCR
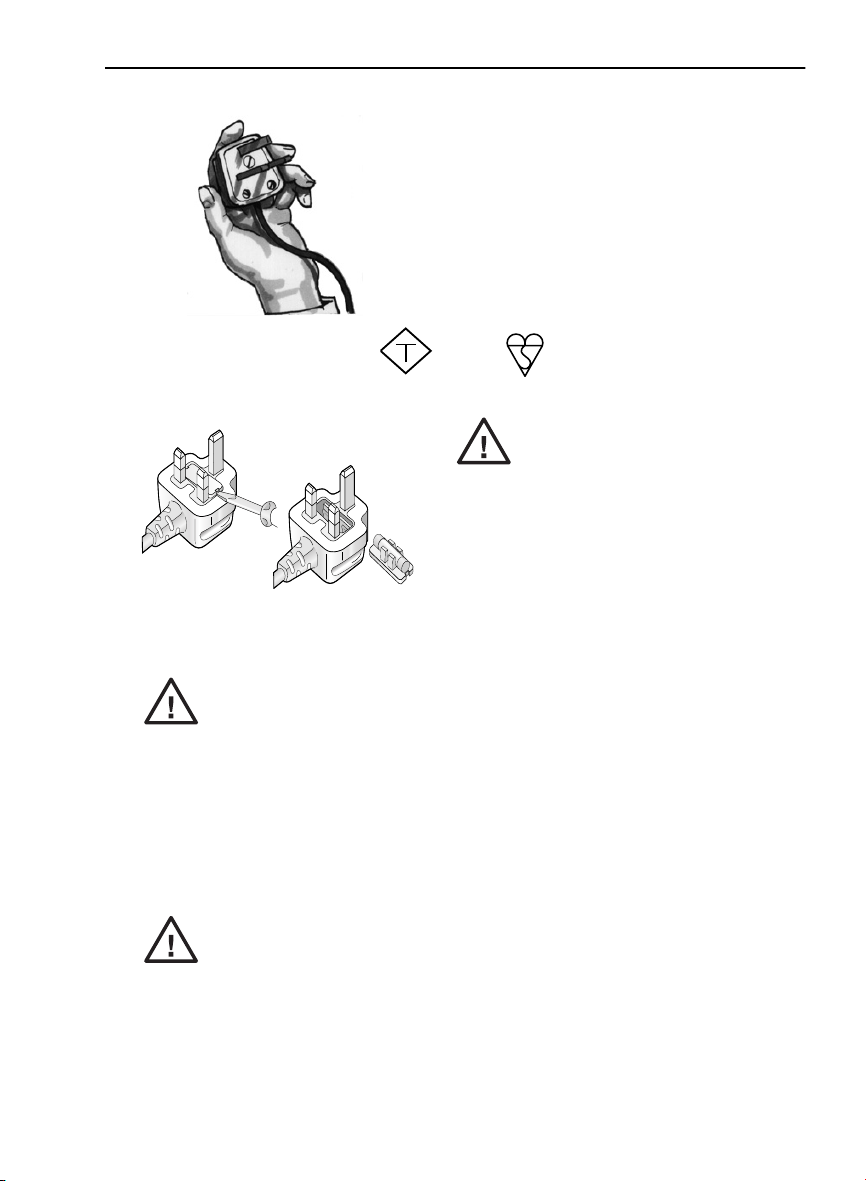
CONNECTING TO THE MAINS
This VCR is suitable only for connection to UK
mains. The unit is fitted with a moulded 3-pin
mains plug with a 3-amp fuse. The VCR does not
have a mains power switch. When connected
to the mains, the unit will draw current at all
times to power the clock. Be sure to unplug the
VCR when it is not to be used for several months.
TO REPLACE THE FUSE:
You must use a 3-amp fuse, marked (ASTA) or (BSI) to BS-1362. Remove the fuse
cover as shown. Replace the fuse and re-fit the fuse cover securely into the plug.
ASA
Never connect the plug to the
mains without the fuse cover
fitted.
TO REPLACE THE MAINS PLUG:
If the plug fitted is unsuitable for the mains socket in your home, cut off the plug, remove the
fuse and dispose of the cut-off plug safely.
Severe electric shock may occur if you connect the cut-off
plug to a mains socket. If a new plug is fitted, observe the
wiring code supplied by the plug manufacturer (and given
below.) If you have any doubt, consult a qualified
electrician.
The wires in the mains cable are colour coded as follows: blue = neutral, brown = live.
As the colours of the wires may not correspond with the terminals in your plug, connect the
wires following plug manufacturer's guide:
• blue wire to the terminal marked N or coloured black or blue.
• brown wire to the terminal marked L or coloured red or brown.
• Ensure neither the brown nor the blue wire is connected
to the earth terminal in your plug.
• Do not allow water to come into contact with the power
supply cord or plug.
• A damaged power supply cord or loose plug may cause
electric shock.
• Contact your SHARP dealer or a qualified electrician. Do
not use the VCR.
www.sharp.co.uk/support
39
 Loading...