

Page 1

Manufactured under license
from Dolby Laboratories.
Dolby and the double-D
symbol are trademarks of
Dolby Laboratories.
HDMI, the HDMI logo and
High-Definition Multimedia
Interface are trademarks or
registered trademarks of
HDMI Licensing LLC.
+
Important: This product can only receive Digital Terrestrial TV
signals, subject to coverage an aerial upgrade may be required.
Text your postcode followed by your house name or number to
83331* or go to www.freeview.co.uk/availability (*Costs no more
than a normal text).
Read this operation manual carefully.1
If you still encounter a problem, please call our service help 2
line on 0845 880 0421 during normal weekday office hours.
TU-T2HR32_GB.indd 1TU-T2HR32_GB.indd 1 29/06/2010 15:10:5829/06/2010 15:10:58
Page 2

OPERATION MANUAL
The illustrations and the OSD in this operation manual are for explanation purposes and may vary slightly from the actual operations.•
The examples used throughout this manual are based on the TU-T2HR32 model.•
ENGLISH
Dear SHARP customer
Thank you for your purchase of the SHARP Digital Terrestrial HD Recorder. To ensure safety and many years of troublefree operation of your product, please read Important safety precautions carefully before using this product.
Contents
Contents ...................................................................... 2
Introduction ................................................................. 3
Important safety precautions ................................. 3
Remote control unit .............................................. 4
Recorder (front view) ............................................. 5
Recorder (rear view) .............................................. 5
Preparation.................................................................. 6
Supplied accessories ............................................ 6
Inserting the batteries............................................ 7
Using the remote control unit ................................ 7
Quick guide ................................................................. 8
Initial installation overview...................................... 8
Before turning on the power ................................. 9
Initial auto installation ............................................ 9
Watching TV .............................................................. 10
Daily operation .................................................... 10
Channel List ........................................................ 11
Selecting a programme using the EPG ................ 12
Digital text ........................................................... 13
Recording TV ............................................................ 14
Recording a programme ..................................... 14
Playing a recorded programme ........................... 14
Library ................................................................ 14
Connecting external devices ................................... 15
Video connections .............................................. 15
Audio connections .............................................. 17
Menu operation......................................................... 18
What is the MAIN MENU? ................................... 18
Basic adjustment ...................................................... 19
AV Settings ......................................................... 19
Languages .......................................................... 21
Parental Control .................................................. 22
Freeview+ ........................................................... 23
General ............................................................... 24
Library ................................................................ 26
Scheduled Recordings ........................................ 26
Appendix ................................................................... 27
Troubleshooting .................................................. 27
Specifications ..................................................... 28
PIN CODE reminder ............................................ 29
Trademarks ......................................................... 29
End of life disposal .............................................. 30
Digital Switchover and Your TV Equipment .......... 31
ENGLISH
2
TU-T2HR32_GB.indd 2TU-T2HR32_GB.indd 2 29/06/2010 15:15:5029/06/2010 15:15:50
Page 3
Introduction
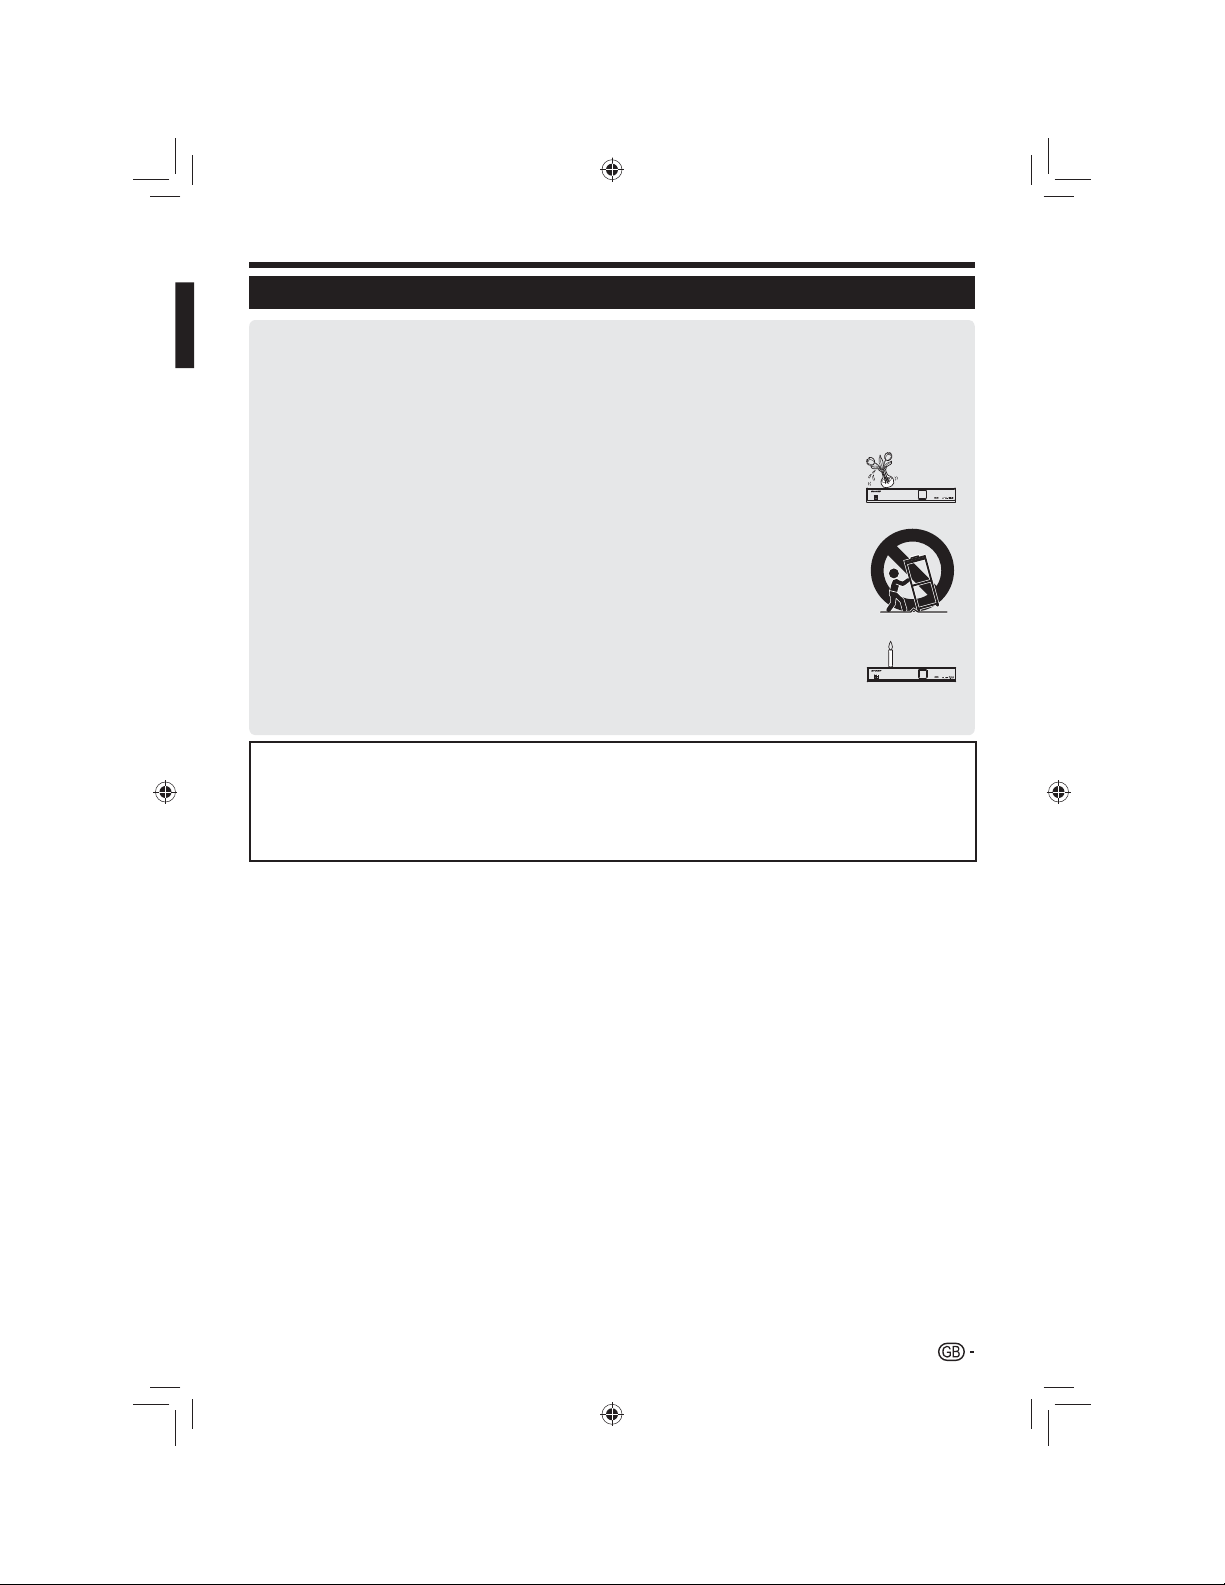
Important safety precautions
Cleaning—Unplug the AC power adapter from the AC outlet before cleaning the product. Use a damp cloth to clean the product. Do •
not use liquid cleaners or aerosol cleaners.
Use a soft damp cloth to gently wipe the product when it is dirty. To protect the product, do not use a chemical cloth to clean it. •
Chemicals may cause damage or cracks in the casing of the product.
Water and moisture—Do not use the product near water, such as bathtub, washbasin, kitchen sink, laundry tub, swimming pool and in •
a wet basement.
Do not place vases or any other water-filled containers on this product. The water may spill onto the product •
causing fire or electric shock.
Stand—Do not place the product on an unstable cart, stand, tripod or table. Doing so can cause the product •
to fall, resulting in serious personal injuries as well as damage to the product. Use only a cart, stand, tripod, or
table recommended by the manufacturer or sold with the product.
When relocating the product placed on a cart, it must be moved with utmost care. Sudden stops, excessive •
force and uneven floor surface can cause the product to fall from the cart.
Ventilation—The vents and other openings in the casing are designed for ventilation. Do not cover or block •
these vents and openings since insufficient ventilation can cause overheating and/or shorten the life of the
product. Do not place the product on a bed, sofa, rug or other similar surface, since they can block ventilation
openings. This product is not designed for built-in installation; do not place the product in an enclosed place
such as a bookcase or rack, unless proper ventilation is provided or the manufacturer’s instructions are
followed.
Heat sources—Keep the product away from heat sources such as radiators, heaters, stoves and other heat-•
generating products (including amplifiers).
To prevent fire, never place any type of candle or naked flames on the top or near the product.•
To prevent fire or shock hazard, do not place the AC power adapter under the product or other heavy items.•
The product uses power even in Standby. Unplug the product from the AC outlet when you are not using it.•
Servicing—Do not attempt to service the product yourself. Removing covers can expose you to high voltage •
and other dangerous conditions. Request a qualified person to perform servicing.
Devices connected to the protective earthing of the building installation through the MAINS connection or through other devices with a
connection to protective earthing and to a television distribution system using coaxial cable, may in some circumstances create a fire
hazard. Connection to a television distribution system therefore has to be provided through a device providing electrical isolation within a
certain frequency range (galvanic isolator, see EN 60728-11).
NOTE
For requirements in Norway and Sweden, the requirements for isolation are also relevant for devices that can be connected to •
television distribution systems.
TU-T2HR32
TU-T2HR32
+
HD
+
HD
3
TU-T2HR32_GB.indd 3TU-T2HR32_GB.indd 3 29/06/2010 15:15:5029/06/2010 15:15:50
Page 4
Introduction
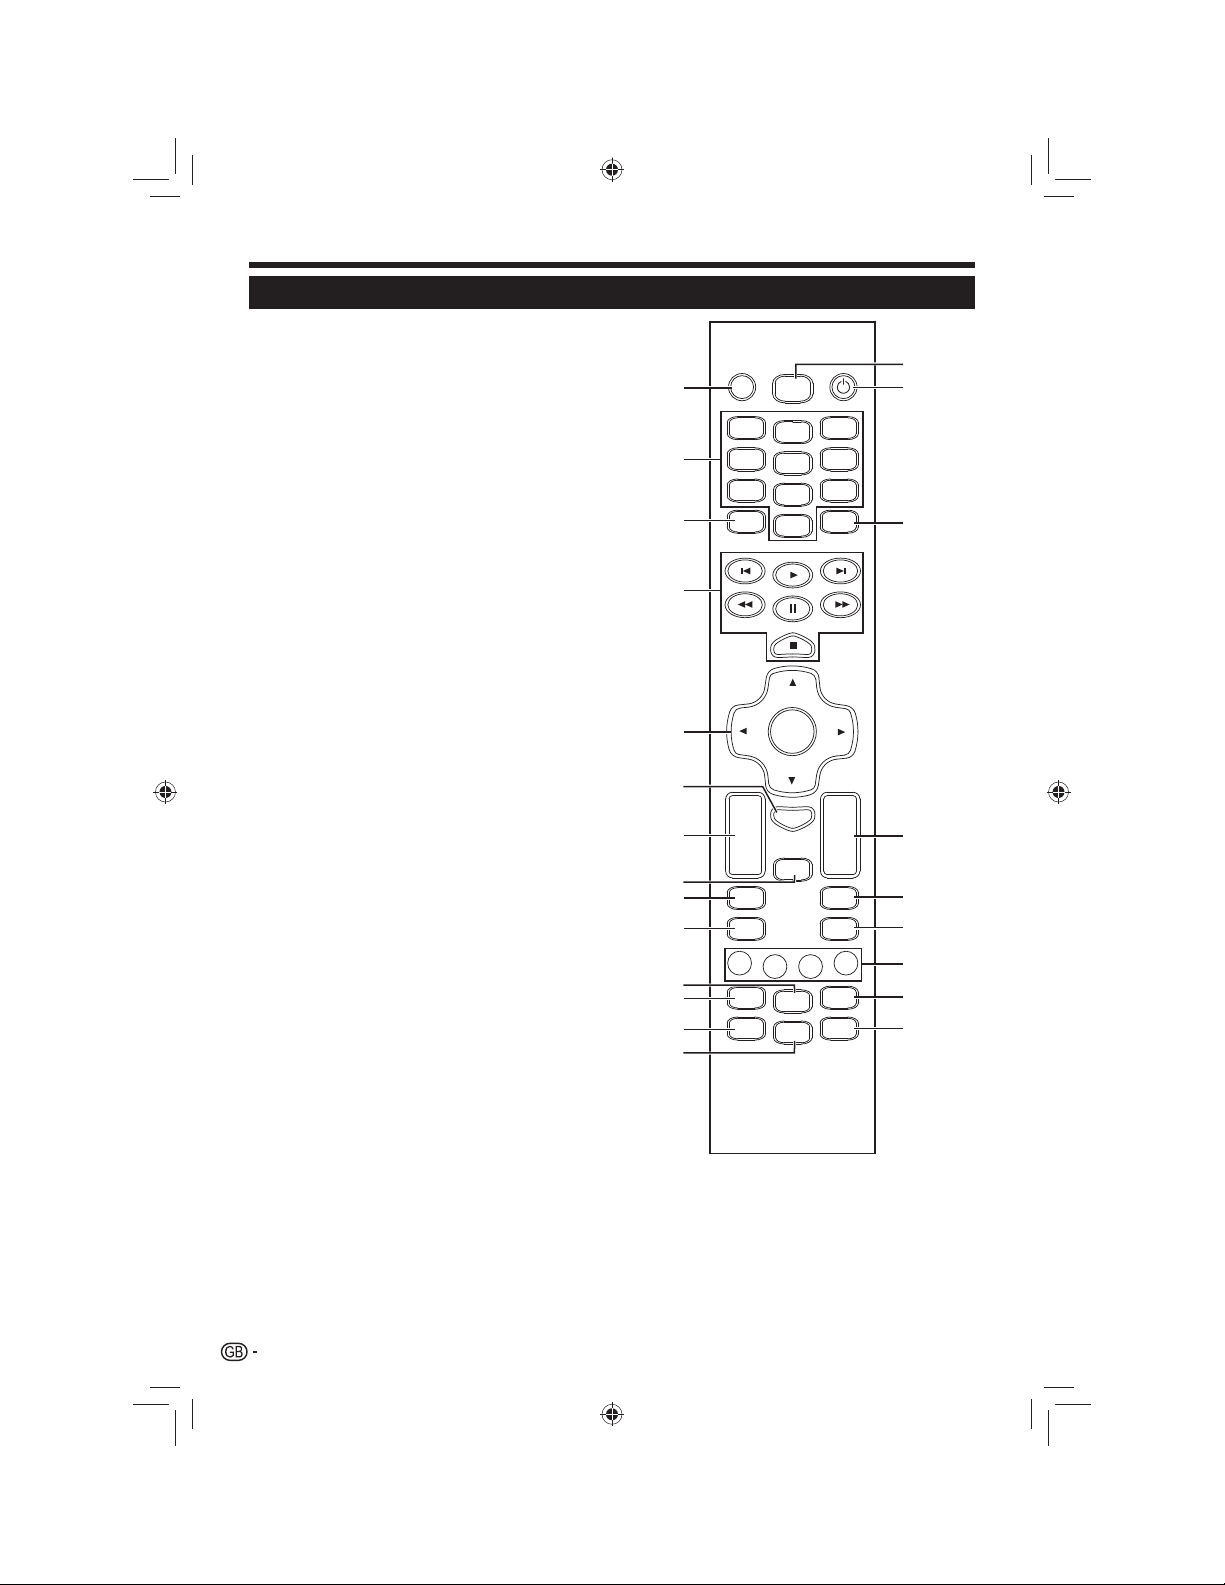
Remote control unit
MUTE 1
Volume on/off.
NUMERIC BUTTONS 2
Set the channel
Enter desired numbers
Set the page in Digital Text Mode.
REC 3
Record selection (Page 14).
PLAYBACK NAVIGATION 4
Play, Pause, Stop, Fast Fwd
Fast Rwd, Skip Fwd, Skip Rwd.
CURSOR 5
Select a desired item on the “MENU” screen (Page 18).
GUIDE 6
Display the EPG.
VOLUME 7
Increase/decrease the volume (Page 10).
MENU 8
“MENU” screen on/off (Page 18).
BACK 9
Return to the previous “MENU” screen.
TEXT 0
Display Digital Text (Page 13).
SUBT Q
Switch subtitles on/off (Page 21).
AD W
Switch Audio Description on/off (Page 21).
A/V E
Switch to HDMI output or SCART output (Page 10).
HDMI R
Hold this button down for 5 seconds to revert the output
to 1080i (Page 19).
LIBRARY T
Display “LIBRARY” information (Page 26).
STANDBY/ON Y
Switch between Standby and On (Page 10).
LAST U
Toggle between the current channel and the previous
channel (Page 10).
PROG I
Select the programme.
INFO O
Display programme information (Page 10).
EXIT P
Exit the “MENU” screen.
COLOUR BUTTONS A
The colour buttons are correspondingly used to select
the coloured item on the screen e.g. Digital Text.
AUDIO S
Select the desired audio language.
WIDE D
Select a wide mode (Page 19).
10
11
12
13
14
15
MUTE
1
2
3
LIBRARY
1
4
7
REC
3
2
6
5
9
8
LAST
0
16
17
4
5
OK
6
+
7
8
9
VOL
–
BACK
TEXT
GUIDE
MENU
PROG
INFO
EXIT
+
18
–
19
20
21
AD
A/V
SUBT
HDMI
AUDIO
WIDE
22
23
4
TU-T2HR32_GB.indd 4TU-T2HR32_GB.indd 4 29/06/2010 15:15:5129/06/2010 15:15:51
Page 5
Introduction
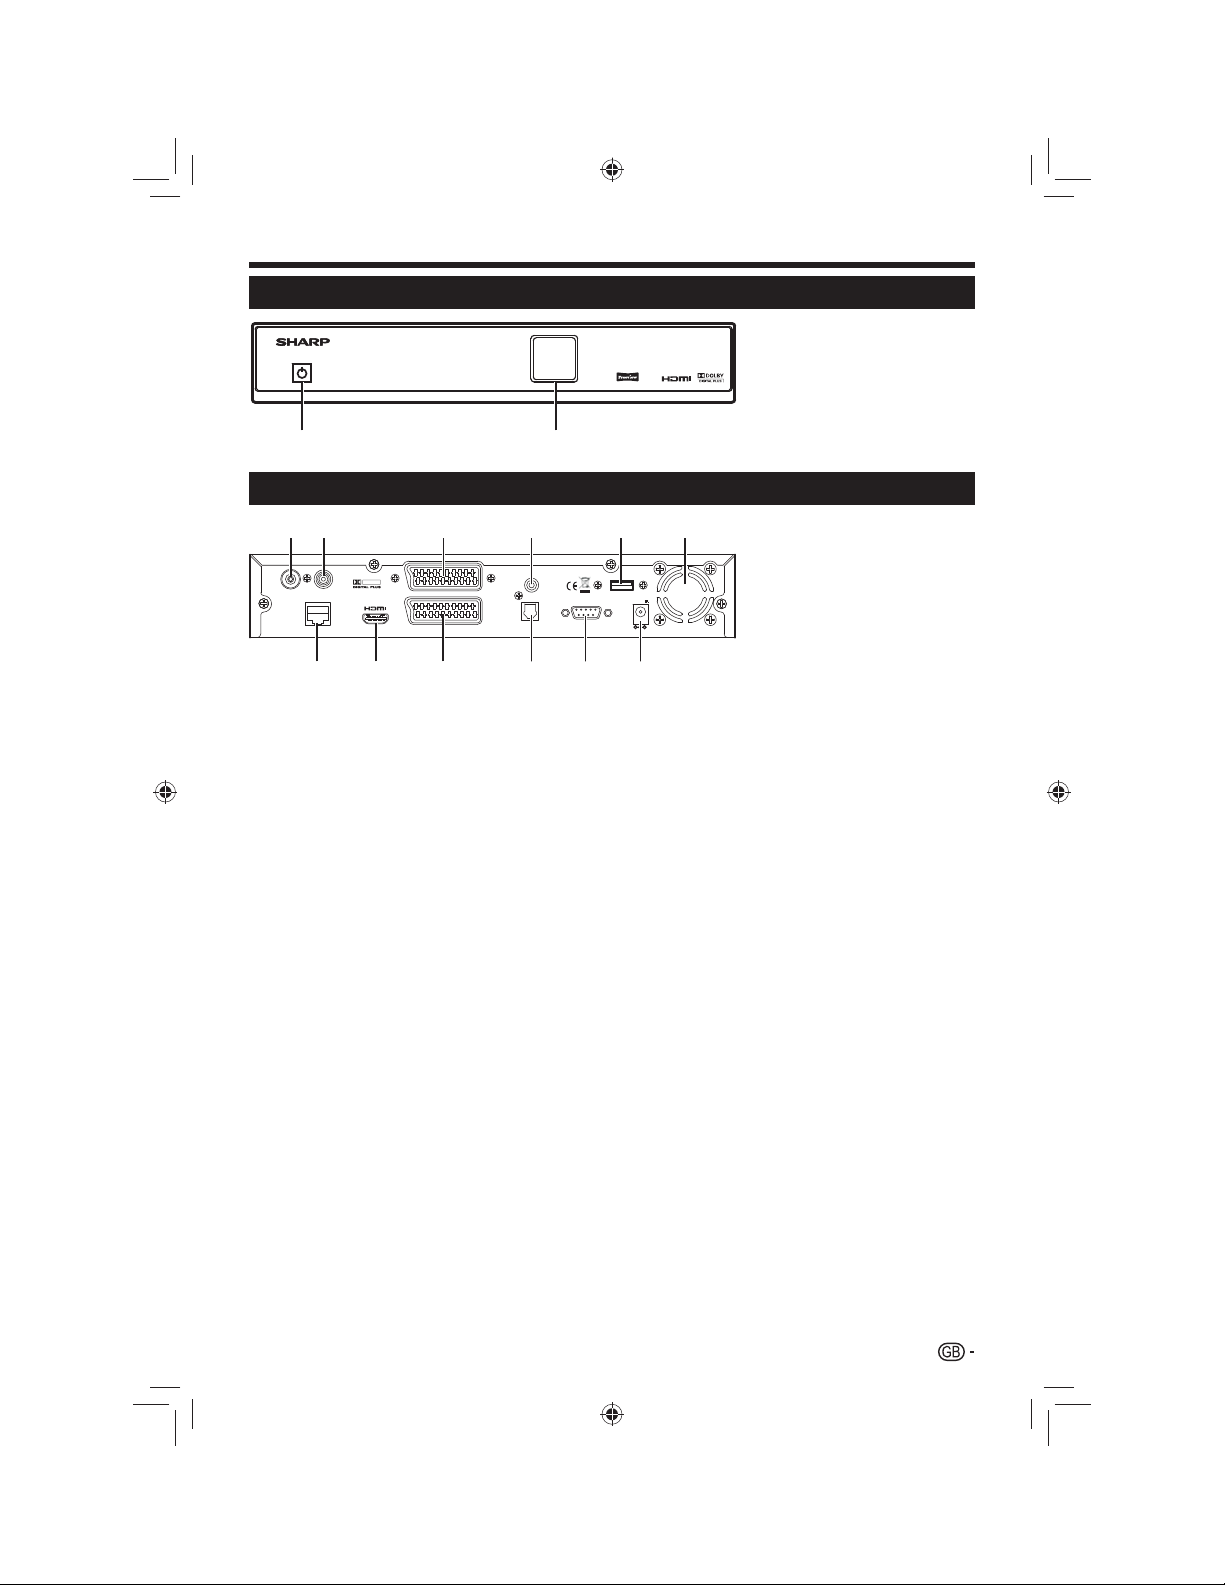
Recorder (front view)
TU-T2HR32
+
HD
12
Recorder (rear view)
a1 (Power button)
Display2
1
23456
RFIN
DOLBY
ETHERNET
RFOUT
HIGHDEFINITIONMULTIMEDIAINTERFACE
TV
HDMI
VCR
SPDIF
USB
RS-232OPTICAL
78 9 1011
DC12V DC
12
IN
+
RF IN (Antenna in) terminal1
RF OUT (Antenna out) 2
terminal
TV (SCART) terminal3
SPDIF (Digital audio 4
output) terminal
USB terminal - (For 5
service only)
Cooling fan outlet6
Ethernet terminal 7
HDMI terminal8
VCR (SCART) terminal9
Optical (infra red) terminal10
RS232 terminal - (For 11
service only)
12V DC terminal12
5
TU-T2HR32_GB.indd 5TU-T2HR32_GB.indd 5 29/06/2010 15:15:5129/06/2010 15:15:51
Page 6
Preparation
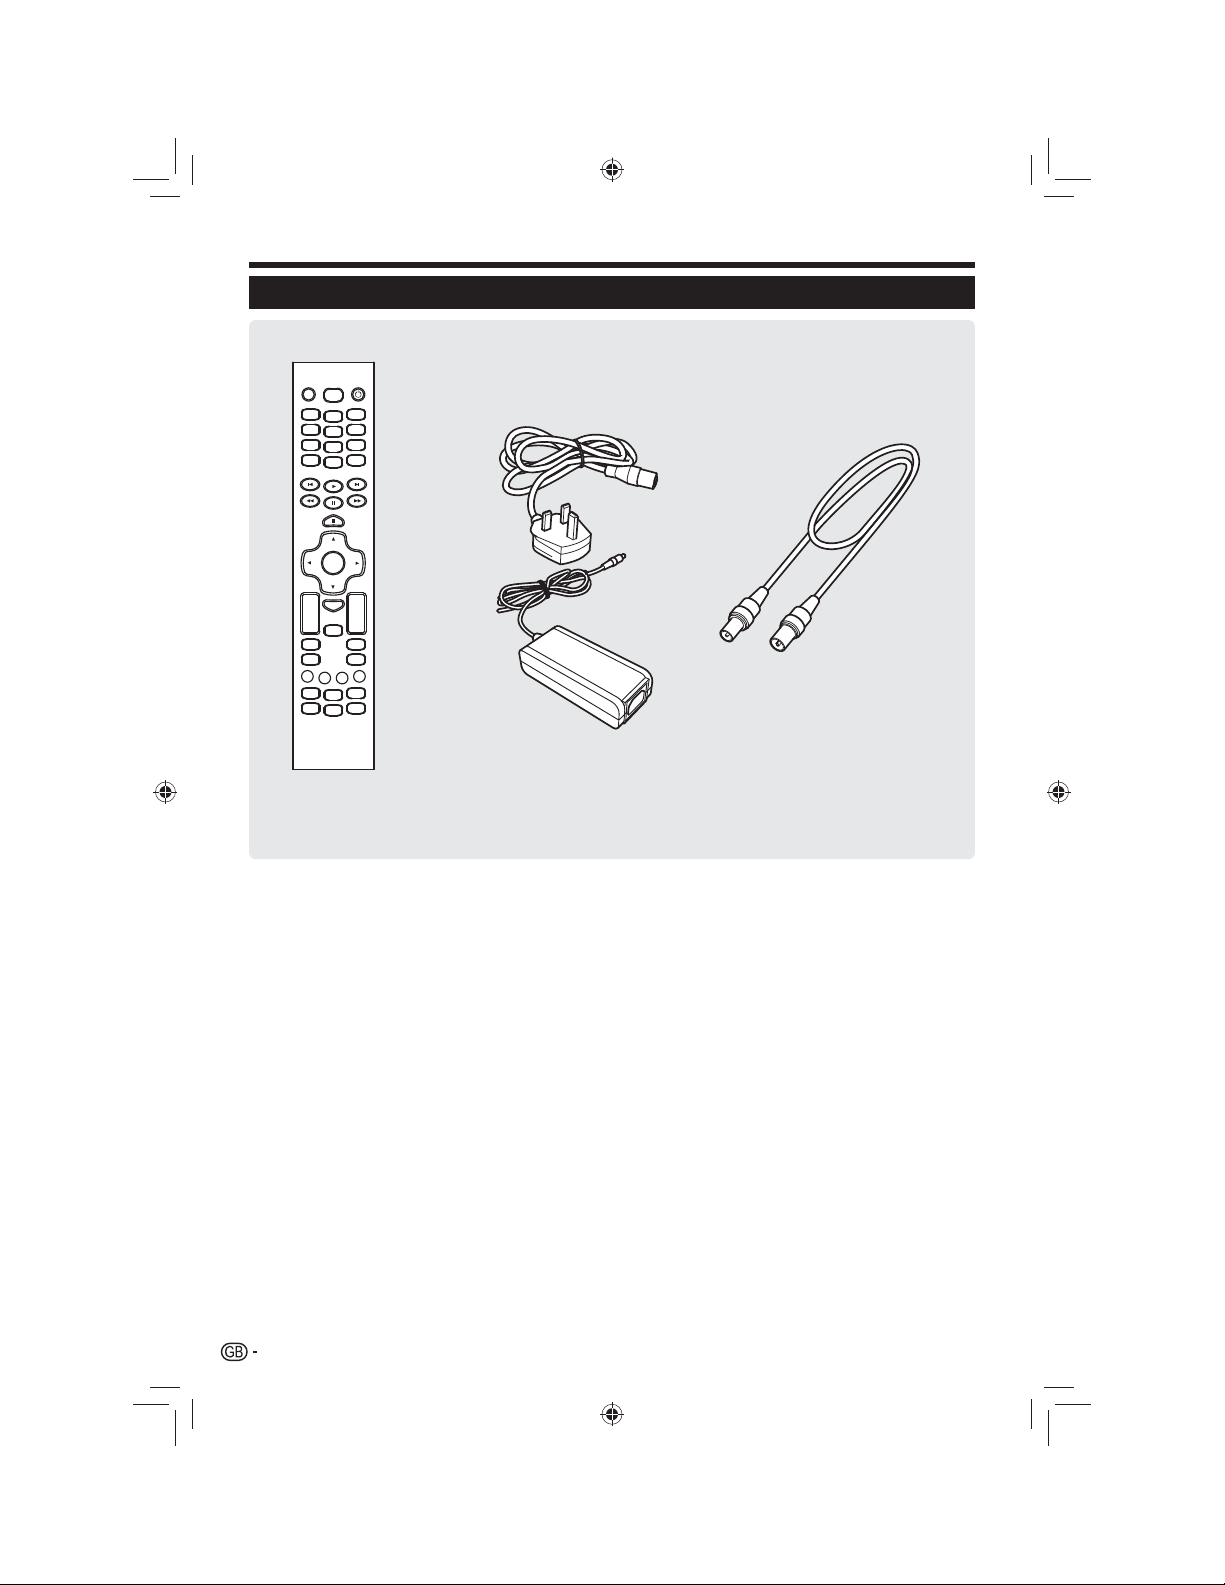
Supplied accessories
Remote Control Unit ( x 1) Power Adaptor ( x 1) RF Cable ( x 1)
MUTE
LIBRARY
1
3
2
4
6
5
7
9
8
REC0LAST
OK
+
+
GUIDE
VOL
PROG
–
–
MENU
BACK
INFO
TEXT
EXIT
AD
AUDIO
SUBT
A/V
WIDE
MENU
Page 4 Page 9 Page 9
Operation manual (this publication)•
“AAA” size zinc-carbon battery (x2) Page 7•
6
TU-T2HR32_GB.indd 6TU-T2HR32_GB.indd 6 29/06/2010 15:15:5229/06/2010 15:15:52
Page 7
Preparation
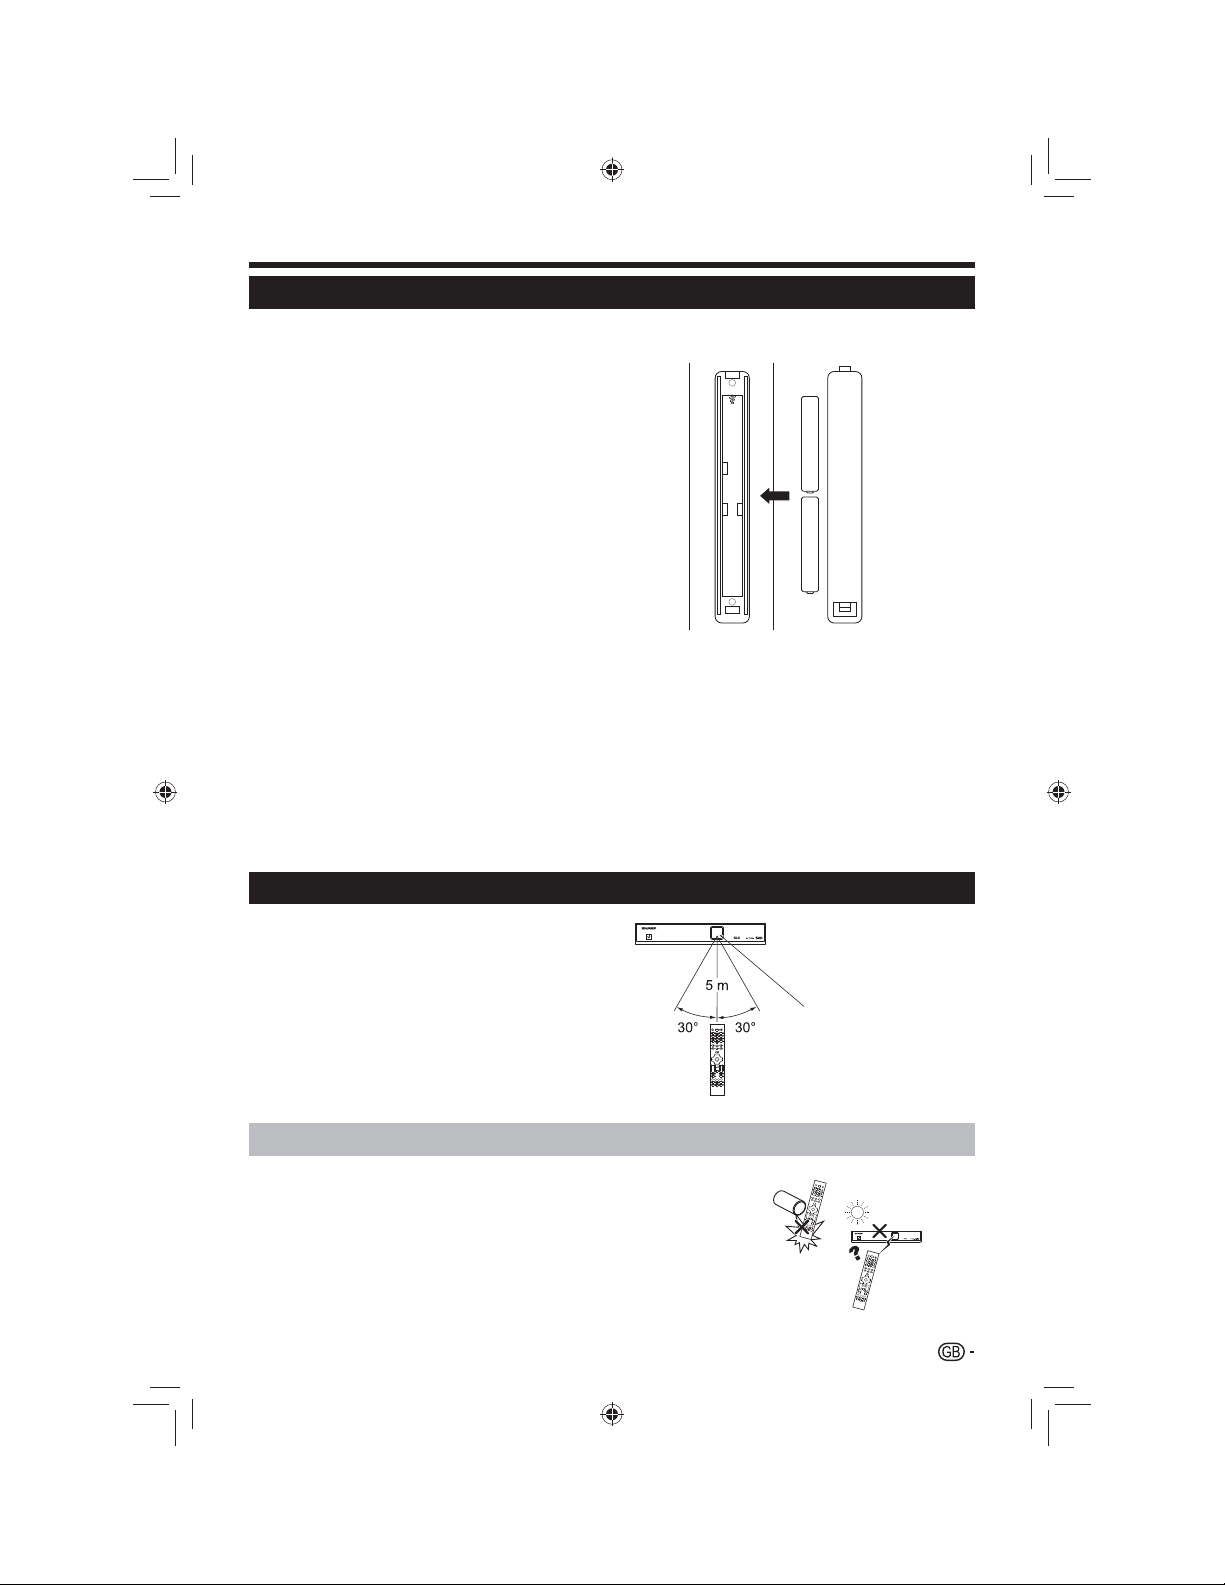
Inserting the batteries
Before using the Recorder for the first time, insert the two supplied “AAA” size zinc-carbon batteries. When the batteries
become depleted and the remote control unit fails to operate, replace the batteries with new “AAA” size batteries.
Open the battery cover. 1
Insert the two supplied “AAA” size zinc- 2
carbon batteries.
Place batteries with their terminals corresponding to the •
(e) and (f) indications in the battery compartment.
Close the battery cover. 3
CAUTION
Improper use of batteries can result in chemical leakage or explosion. Be sure to follow the instructions below.
Do not mix batteries of different types. Different types of batteries have different characteristics.•
Do not mix old and new batteries. Mixing old and new batteries can shorten the life of new batteries or cause chemical leakage in old •
batteries.
Remove batteries as soon as they have worn out. Chemicals that leak from batteries can cause a rash. If you find any chemical leakage, •
wipe thoroughly with a cloth.
The batteries supplied with this product may have a shorter life expectancy due to storage conditions.•
If you will not be using the remote control unit for an extended period of time, remove the batteries from it.•
When replacing the batteries, use zinc-carbon batteries instead of alkaline ones.•
Note on disposing batteries:
The batteries provided contain no harmful materials such as cadmium, lead or mercury.
Regulations concerning used batteries stipulate that batteries may no longer be thrown out with the household rubbish.
Deposit any used batteries free of charge into the designated collection containers set up at commercial businesses.
-
+
-
+
Using the remote control unit
Use the remote control unit by pointing it towards the
front of the Recorder. Objects between the remote
control unit and sensor may prevent proper operation.
TU-T2HR32
+
HD
MUTE
LIBRARY
123
456
789
REC0LAST
OK
+
+
GUIDE
VOL
PROG
–
–
MENU
BACK
INFO
TEXT
EXIT
AD
AUDIO
SUBT
A/V
WIDE
MENU
Remote control sensor
Cautions regarding the remote control unit
Do not expose the remote control unit to shock. In addition, do not expose the remote •
control unit to liquids, and do not place in an area with high humidity.
Do not place the remote control unit under direct sunlight. The heat may cause •
deformation of the unit.
The remote control unit may not work properly if the remote control sensor of the Recorder •
is under direct sunlight or strong lighting. In such cases, change the angle of the lighting or
the Recorder, or operate the remote control unit closer to the remote control sensor.
TU-T2HR32_GB.indd 7TU-T2HR32_GB.indd 7 29/06/2010 15:15:5329/06/2010 15:15:53
TU-T2HR32
+
HD
M
U
T
E
L
I
B
R
A
R
Y
1
2
3
4
5
6
7
8
9
R
E
C
0
LA
S
T
O
K
+
G
U
I
D
E
+
VO
L
–
P
R
O
G
M
E
N
U
–
B
A
C
K
I
N
F
O
T
E
X
T
E
X
I
T
A
D
S
U
B
T
A
U
D
I
O
A
/
V
M
E
N
U
W
I
D
E
7
Page 8
Quick guide
Initial installation overview
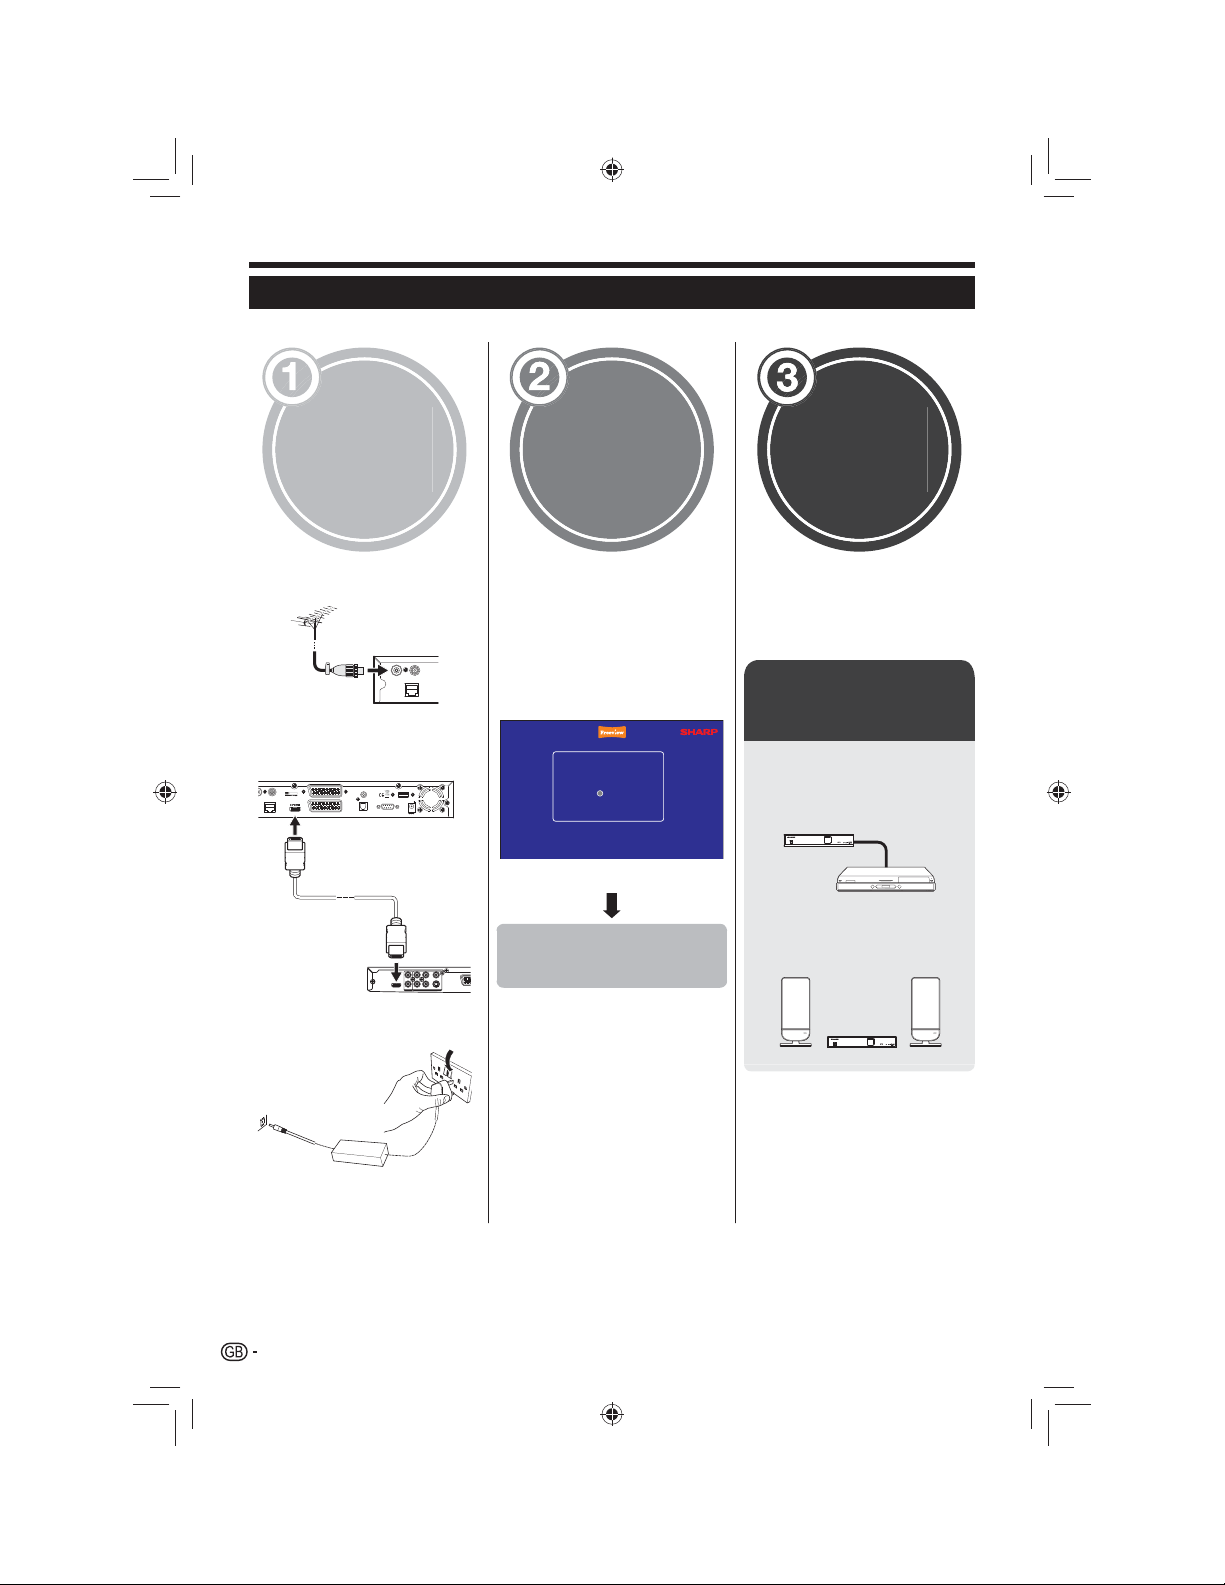
Follow the steps below one by one when using the Recorder for the first time.
Run the
Preparation
initial
settings
Watch TV
Connect the antenna cable to n
the RF IN terminal (Page 9).
RFIN
RFOUT
ETHERNET
Connect the Recorder to your TV o
using the supplied HDMI cable
(Page 9).
DOLBY
IN
RFOUT
TV
HIGHDEFINITIONMULTIMEDIAINTERFACE
HDMI
VCR
ETHERNET
USB
SPDIF
DC12VDC
IN
RS-232OPTICAL
+
LRCB/PB
HDMI
VIDEOOUT/DIGITALAUDIOOUT
2-CHAUDIOOUT
Connect the power adapter to p
the Recorder (Page 9).
Turn on the power using the n a
button on the Recorder
(Page 10).
o
Run the first time installation
(Page 9).
Ensure the antenna is ✔
connected
First TimeInstallation
Pleaseensure that an aerial is connected
OK
Thenpress toscan for services
Congratulations! n
Now you can watch TV.
o
If necessary, adjust the antenna
to attain maximum signal
reception.
Connect external
devices
Connect external devices n
such as a DVD player/
recorder as instructed
(Page 15).
TU-T2HR32
+
HD
Press OK to continue ✔
Connect external audio o
devices such as speakers/
Start searching
CR/PR
VIDEOCOAXIALYS-VIDEO
channels
amplifier as instructed
(Page 17).
TU-T2HR32
+
HD
8
TU-T2HR32_GB.indd 8TU-T2HR32_GB.indd 8 29/06/2010 15:15:5429/06/2010 15:15:54
Page 9
Quick guide
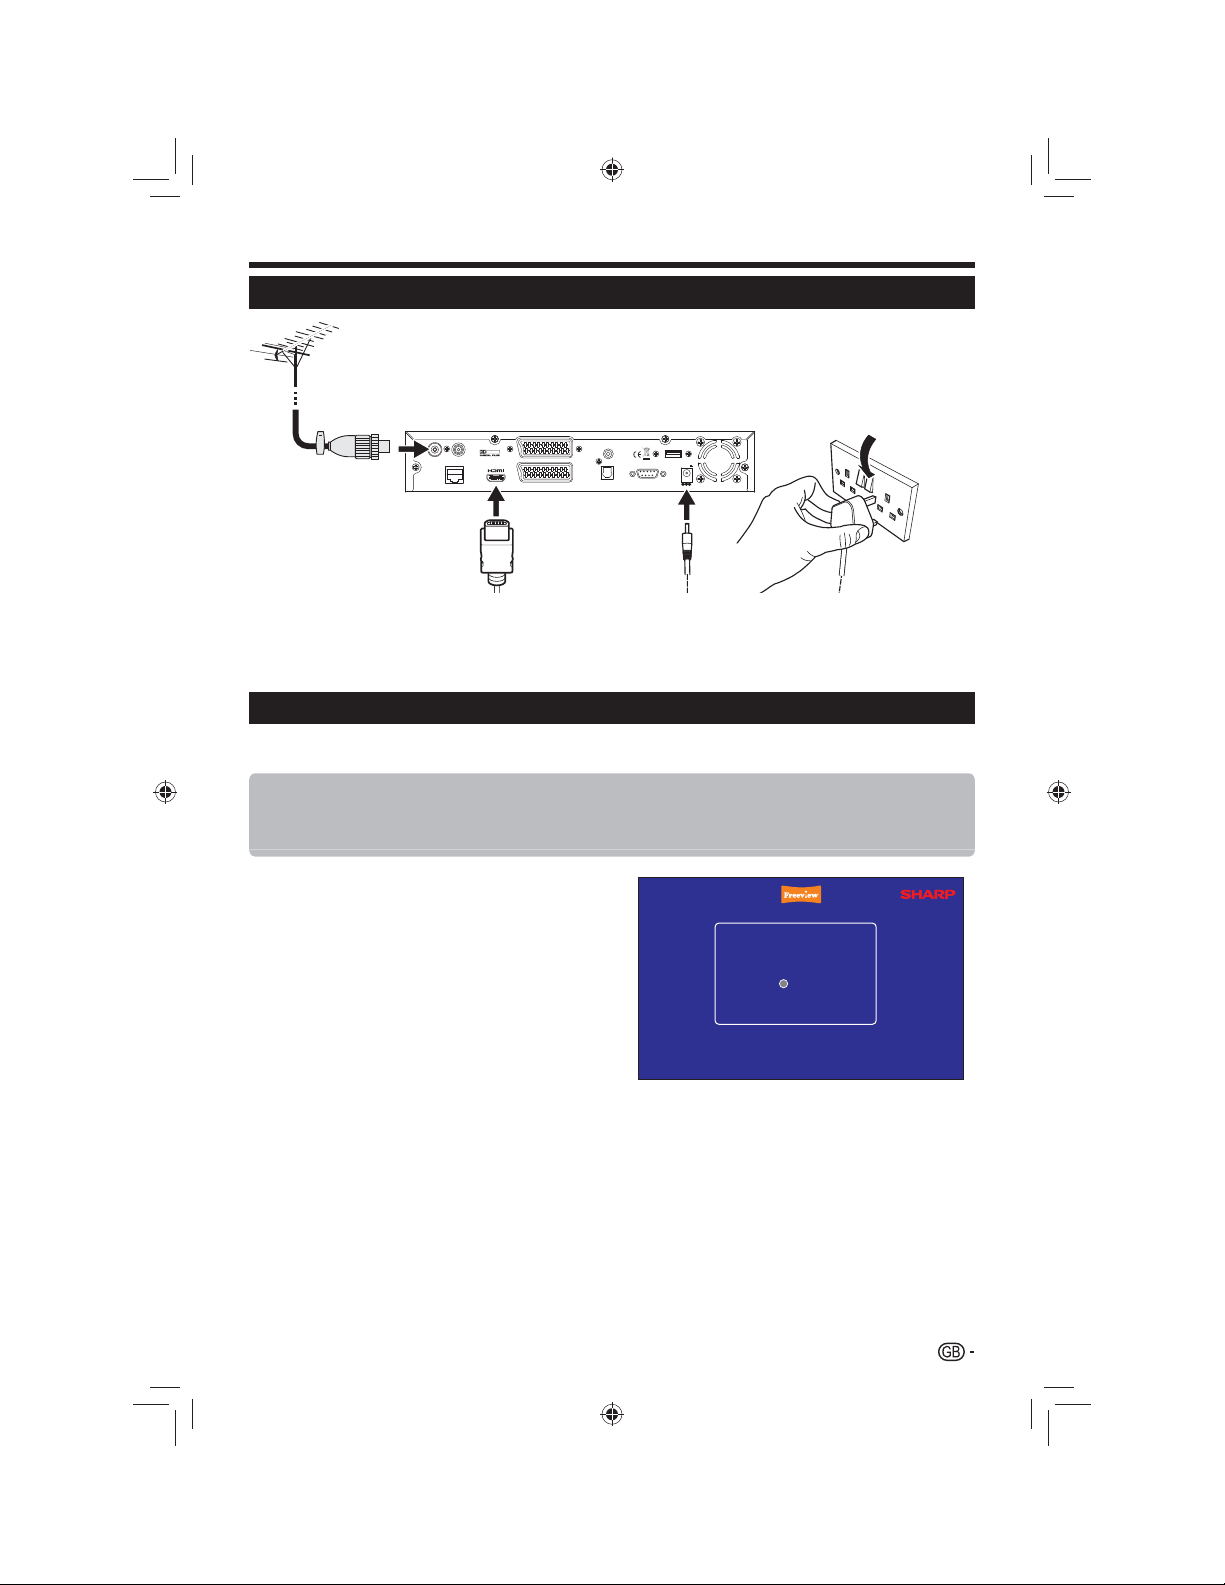
Before turning on the power
n
DOLBY
RFIN
ETHERNET
RFOUT
TV
HIGHDEFINITIONMULTIMEDIAINTERFACE
HDMI
VCR
SPDIF
USB
DC12VDC
IN
RS-232OPTICAL
+
o p
Connect the antenna (standard DIN45325 plug (IEC 169-2) n
75 q coaxial cable)
o
Connect the HDMI cable
Connect the p p ower adapter
Place the TV close to the AC outlet,
and keep the power plug within
reach.
Initial auto installation
When the Recorder is powered on for the first time after purchase, the first time installation screen appears. Follow the
on-screen instructions to search for all available channels.
Confirm the following before turning on the power
Is the antenna cable connected? E
Is the power adapter connected and plugged in? E
Is the HDMI cable connected between the Recorder and your TV? E
Press 1 a on the Recorder.
The first time installation screen is displayed.•
Ensure the antenna cable is connected. 2
Press OK to start the channel search. 3
The Recorder will search for, sort and store all •
receivable channels.
NOTE
The first time installation process will be aborted if the •
Recorder is left unattended for more than 30 minutes before
searching for channels.
After the first time installation has been completed, the •
default PIN is automatically set to ‘0000’. To change the PIN
setting, refer to Page 22.
First Time Installation
Please ensure that an aerial is connected
OK
Then press to scan for services
9
TU-T2HR32_GB.indd 9TU-T2HR32_GB.indd 9 29/06/2010 15:16:1529/06/2010 15:16:15
Page 10
MUTE
LIBRARY
VOL
+
–
PROG
+
–
GUIDE
MENU
1
2
3
4
5
6
7
8
9
REC
0
LAST
VOL
–
PROG
–
MENU
BACK
INFO
TEXT
EXIT
Watching TV
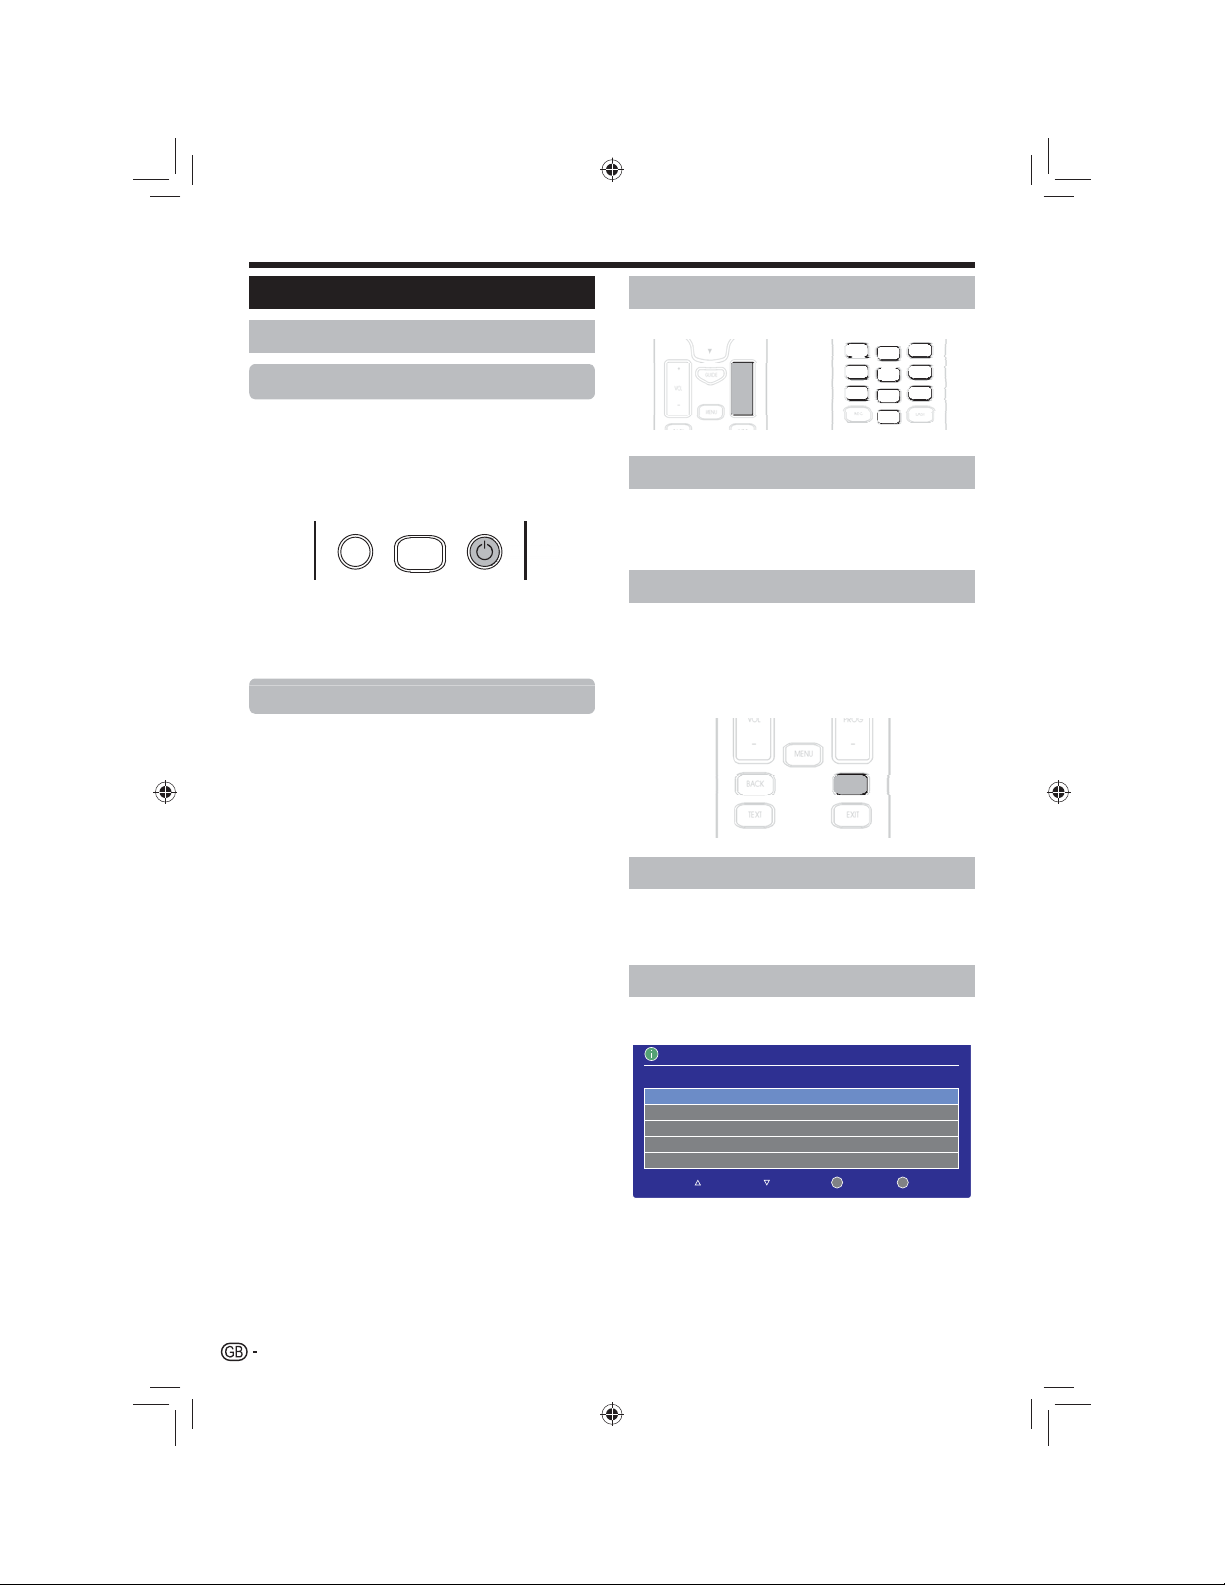
Daily operation
Switching on/off
Standby mode
Select standby mode E
If the Recorder is switched on, you can switch it to
standby by pressing a on the remote control unit.
Switching on from standby E
From standby, press a on the remote control unit.
NOTE
If you are not going to use this Recorder for long periods of •
time, be sure to remove the power adapter from the supply.
(Page 9).
A small amount of electric power is still consumed with the •
Recorder in standby mode.
Adjusting the volume
Press the VOL+ button to increase the volume and the
VOL- button to decrease the volume.
Changing channels
With PROG +/-:
With 0_9:
Switching between channels
Switch between the current channel and the previous
channel by pressing LAST. Each press of the LAST
button will toggle between the current channel and the
previous channel.
Programme information
Press the 1 INFO button once to display times,
channel, programme, start and finish dates.
Press the
2 INFO button again to display
additional information about the current
programme.
Selecting a video output source
Once the Recorder is connected to your TV using either
a HDMI cable or SCART cable, you can select the
appropriate output source by pressing A/V on the remote
control unit.
Selecting an audio language
Some programmes are broadcast with multiple audio
channels. Press AUDIO to display the audio menu.
INFORMATION Audio Channel
Select the audio channel that you want to use.
ENG
ENG
Press 1 a/b to select the desired channel.
Press
2 OK to confirm the audio channel.
10
TU-T2HR32_GB.indd 10TU-T2HR32_GB.indd 10 29/06/2010 15:16:1629/06/2010 15:16:16
Stereo
Stereo
OK
DownUp
Select
Exit
Exit Menu
Page 11

Watching TV
VOL
–
PROG
–
MENU
BACK
INFO
Channel List
Basic operation
Display/close the Channel guide E
Press 1 Menu.
Press
2 a/b to select channels setting.
Press
3 OK.
Channels
All Channels
BBC 1
001
BBC 2
002
ITV1
003
CHANNEL 4
004
FIVE
005
ITV2
006
BBC THREE
007
BBC FOUR
008
ITV3
009
OK
Watch
EXIT
Exit Menu
Add Fav
Lock
Show Favs
Delete Guide
1 2 3 4 5 6
Navigating the Channel guide E
Select a channel 1
Press a/b to select a channel. Press OK to
watch the current programme.
Useful functions
Lock a channel 2
You can lock a channel to prevent children
viewing scenes of a violent or sexual nature.
PIN Required
Press 1 a/b to select the channel you want
to lock.
Press the RED coloured button. A screen is
2
displayed requesting a PIN entry. Enter a
4-digit code, then press .
NOTE
If parental controls are enabled (Page 22), the parental settings •
PIN must be entered before a channel can be locked/unlocked.
To unlock a channel, select the channel using the • a/b buttons
and press the RED coloured button. Enter the PIN, then press
EXIT.
Set a channel as a favourite 3
You can set a channel as a favourite for
quick access. All favourite channels will be
displayed in the favourites list.
Press
1 a/b to select the channel you want to
add to the favourites list.
Press the GREEN coloured button.
2
The favourites list will be shown listing all favourite •
channels and the channel you have just added.
Press 3 c to return to the channel list.
NOTE
To delete a channel from the favourites list, press the YELLOW •
coloured button. You can choose to delete the channel or
cancel.
Deleting a channel 4
GUIDE
Press 1 a/b to select the channel you want to
delete.
Press the YELLOW coloured button.
2
The delete channel screen will be displayed. You can •
choose to delete the channel or cancel.
NOTE
To view a channel once it has been deleted, you will need to •
perform a first time installation (Page 9).
Viewing the Favourites List 5
Press 1 d to view the favourites list
While viewing the favourite list, you can select and watch •
channels in the same way as the Channel List.
Press 2 c to return to the channel list.
View the EPG 6
To view the 1 EPG (Page 12), press the GUIDE
button.
You have chosen to lockunlock a channel
Please enter the PIN
0 9
Enter PIN
EXIT
Exit
----
11
TU-T2HR32_GB.indd 11TU-T2HR32_GB.indd 11 29/06/2010 15:16:1829/06/2010 15:16:18
Page 12

Watching TV
+
+
GUIDE
Selecting a programme using the
EPG
Basic operation
Display/close the EPG screen E
Press GUIDE.
1
Programme Guide
Royal Ascot
2/5. Clare Baldingpresents day two of Royal Ascot.The feature race is The Pronce of Wale’s Stakes at
3:50pm. Willie Carson and Rishi Persad are on hand with news and interviews. [S]
SUB
S
[SPORT]
4:000pm 5:00pm 6:00pm
Wed16Jun
001
MOTD Live : Spain vSwitzerland
BBC ONE
Royal Ascot
002
BBC TWO
Midsummer Murders
003
ITV1
Count
004
Channel 4
Little Girl Lost
005
FIVE
Loose Women
006
ITV2
This is BBC Three
007
BBC THREE
This is BBC Three
009
BBC FOUR
OK
Exit
Exit Menu
Watch
3 2
Deal or No Deal
-2 Hrs
5
+2 Hrs
2
The Chase
The 5 o’clock Show
Five News
The Ricki Lake Show
-24 hrs
2 2
R
The Weakest Link
The Hairy Bikers’ Food Tourof
R LIB
+24 hrs
Record Library
9.00pm - 10.00pm
Neighbours
Judge Judy
Select a programme E
Select the desired programme 1
Press a/b to select the desired programme.
If • a or b are displayed on the left of the services,
continue to Press a / b to display the next or previous
screen.
Useful functions
Navigate the time span 2
Press the RED coloured button to move 1
backwards 2 hours.
Press the GREEN coloured button to move 2
forwards 2 hours.
Press the YELLOW coloured button to move
3
backwards 24 hours.
Press the BLUE coloured button to move
4
forwards 24 hours.
Watch a programme
Watch a programme now 3
Press 1 a/b to select a programme.
2 OK to watch the programme.
Press
Set a reminder
Set a reminder for a programme
Press 1 a / b/ c / d to select a future
programme.
Press
2 OK. A clock icon will be shown next to
the selected programme.
1
NOTE
If you set a reminder, just before the programme start time, •
a message will appear reminding you that the programme is
about to start. You can choose to automatically switch channels
or cancel the reminder.
EPG recommendations
Programme Guide
Springwatch 2010
Chris Packham, Kate Humble and Simon King have the latest on the Springwatch animal dramas. In Dorset,
Simon heads beneath the waves for a live dive. [S]
I
Wed16Jun 10:00pm
001
002
003
004
005
006
007
009
OK
INFORMATION
Yourselected programme recommends the following programme is
recorded.
BBC ONE
Springwatch Unsprung
BBC TWO
Accept this recommendation?
ITV1
Channel 4
FIVE
ITV2
BBC THREE
BBC FOUR
EXIT
Exit Menu
- 2 Hrs
+ 2 Hrs
Recording Recommendation
OK
Accept
- 24 Hrs + 24 HrsReminder
When you press the REC button on the EPG to
record an event, the receiver will check if there is a
recommendation for that event.
If there is a recommendation for the event, the receiver
will ask you if you want to accept the recommendation.
If you accept the recommendation, it will be scheduled
for recording as well as the original event in the EPG on
which REC was pressed.
If you do not accept the recommendation (by pressing
BACK or EXIT), only the original event in the EPG on
which REC was pressed will be scheduled.
Pressing EXIT will exit the menu without booking the
item.
EXIT
Exit Menu
8:00pm - 9:00pm
R
Record
LIB
Library
12
TU-T2HR32_GB.indd 12TU-T2HR32_GB.indd 12 29/06/2010 15:16:1929/06/2010 15:16:19
Page 13

Watching TV
Trailer bookings
When the receiver detects a trailer booking suggestion is
being broadcast, it will raise the following menu:
Book Me
This menu consists of an icon on the screen, indicating
that you can press the GREEN coloured button to invoke
the trailer booking menu. The icon menu will disappear
automatically if you do not press the GREEN coloured
button and the broadcast is no longer signalling the trailer
booking suggestion.
If you do press the GREEN coloured button, the receiver
will show the following menu:
Buttons for digital text operation
Buttons Description
a / b/ c / d
Coloured
buttons
Numeric
buttons 0_9
EXIT / TEXT
Navigate the digital text index page and
menu system
Access digital text shortcuts. These are
often displayed on the bottom of the page.
Directly select a page.
Exit digital text.
Booking
Four Promo event name (eng)
Eight Promo event name (eng)
EXIT
OK
Exit Menu
Book Item
Four Promo event name (eng)
This menu allows you to select the item to book.
Pressing OK will book the item, placing it in the
scheduled recordings list.
Pressing EXIT will exit the menu without booking the
item.
Digital text
What is digital text?
Some channels are broadcast with digital text which
contains pages of information and entertainment. News,
weather, sports information, stock exchange prices and
programme previews are among the many services.
Accessing digital text
Select a channel which broadcasts digital text. 1
Press 2 TEXT or the RED button.
Not all channels broadcast digital text.•
You may not be able to receive digital text if you have a •
poor quality signal.
13
TU-T2HR32_GB.indd 13TU-T2HR32_GB.indd 13 29/06/2010 15:16:2029/06/2010 15:16:20
Page 14

Recording TV
Recording a programme
Record a programme now
Press the REC button on the remote control.
A message will appear briefly to confirm the current
recording operation for the selected programme.
NOTE
The programme being recorded will appear in the Library (see •
Page 26).
Record a future programme
Press 1 GUIDE.
Press
2 a / b/ c / d to select a programme.
Press the
3 REC button on the remote control.
A black record icon will appear next to the
selected programme title.
The scheduled recording will appear in the
4
library where it can be edited/deleted (see
Page 26).
Record multiple/alternative
programmes
It is possible to record or schedule two individual
programmes at the same time. If you select more than
two recordings, you will see an error message:
!
WARNING Recording Clash
Your Freeview+ DTR is already recording two different channels.
What would you like to do?
Playing a recorded programme
Play a recorded programme
From the Library (see Page 26), 1
pressa / b/ c / d on the remote control to
select a programme you want to watch.
If the programme has not yet been watched,
2
it will start playback from the start of the
recording.
If part of the programme has already been
3
watched, the following screen appears:
.
INFORMATION Resume Playback
i
You have already watched part of this programme.
Press Blue to watch from the start, or OK to resume playback.
Restart
OK
Resume
Exit
Exit Menu
Make your selection using the buttons on the 4
remote control.
Stop a recorded programme
To stop playback of a recorded programme, press the
STOP button on the remote control (see Page 4).
Record ‘South Africa Walks’ Ehen on Thur 00:20
Switch Recording of ‘Coronation Street’ to Thur 00:10
Switch Recording of ‘Channel 4 News’ to at 20:00
OK
Select
Exit
Exit Menu
Press 1 a / b/ c / d on the remote control to
highlight one of the three options.
Press
2 OK. The screen returns to normal
viewing.
Library
Library details
The Library shows a list of the programmes previously
recorded and/or currently being recorded (see Page 26).
Library
BBC ONE
001
Breakfast
Deal or No Deal 15/06
The Simpsons 15/06
EastEnders 15/06
Escape to the Country 16/06
Royal Ascot
MOTD Live: Spain v Switzerland
Stop
Wed 16 Jun 2010
2:38pm - 2:39pm
Gary Lineker introduces live coverage from Durban. Spain are favourites
to win a first-ever World Cup. Switzerland are appearing in their ninth
finals. Also in HD. [S]
AD
SUB
Channel 4
Channel 4
BBC ONE
BBC ONE
GUIDE
Protect
Schedule
Guide
Preview Delete Select
BBC ONE
MOTD Live: Spain v Switzerland
68% Remaining
15/06
RecordedBBC ONE
Viewed
Recorded
Failed
Recorded
16/06 RecordedBBC ONE
16/05 RecordedBBC ONE
EXIT
OK
Exit Menu
14
TU-T2HR32_GB.indd 14TU-T2HR32_GB.indd 14 29/06/2010 15:16:2029/06/2010 15:16:20
Page 15

Connecting external devices
Before connecting ... E
Be sure to turn off the Recorder and any external equipment before making connections.•
Firmly connect a cable to a terminal or socket.•
Carefully read the operation manual of each external device for possible connection types. This also helps you get the best audiovisual •
quality to maximise the potential of the Recorder and the connected device.
NOTE
The cables illustrated in Pages 15 to 17 are commercially available items.•
Video connections
HDMI connection
Example of connectable devices
HD Ready TV E
The HDMI connection permits digital video and audio transmission via a connection cable to a TV. The digital picture
and sound data are transmitted without data compression and therefore lose none of their quality. Analogue to digital
conversion is no longer necessary in any connected devices, which would also result in quality losses.
DOLBY
RFIN
RFOUT
ETHERNET
TV
HIGHDEFINITIONMULTIMEDIAINTERFACE
HDMI
VCR
SPDIF
n
USB
DC12VDC
IN
RS-232OPTICAL
+
HDMI-certified cable n
15
TU-T2HR32_GB.indd 15TU-T2HR32_GB.indd 15 29/06/2010 15:16:2129/06/2010 15:16:21
Page 16

Connecting external devices
SCART connection
Example of connectable devices
HD Ready TV E
DVD Recorder E
DOLBY
RFIN
ETHERNET
RFOUT
TV
HIGHDEFINITIONMULTIMEDIAINTERFACE
HDMI
VCR
SPDIF
USB
DC12VDC
IN
RS-232OPTICAL
+
LRCB/PB
CR/PR
VIDEOCOAXIALYS-VIDEO
HDMI
VIDEOOUT/DIGITALAUDIO OUT
2-CHAUDIOOUT
SCARTOUTPUT
16
TU-T2HR32_GB.indd 16TU-T2HR32_GB.indd 16 29/06/2010 15:16:2229/06/2010 15:16:22
Page 17

Connecting external devices
Audio connections
SPDIF connection
Example of connectable devices
Dolby Digital Surround Sound System E
DOLBY
RFIN
ETHERNET
RFOUT
TV
HIGHDEFINITIONMULTIMEDIAINTERFACE
HDMI
VCR
SPDIF
USB
DC12VDC
RS-232OPTICAL
-
IN
+
CD VCR TV
L
R
AUDIOINPUT
COAX1
COAX2
DIGITALINPUT
OPTICAL
+
_
FR FL C RL RR
SPEAKEROUTPUT
FUSE
POWER
T2AL/250V
ON
OFF
AC 230V- 50Hz
After connecting E
Digital audio output setting
After connecting to a surround sound system with a SPDIF cable, you should set an audio output format compatible
with the programme you are watching or the device connected.
17
TU-T2HR32_GB.indd 17TU-T2HR32_GB.indd 17 29/06/2010 15:16:2329/06/2010 15:16:23
Page 18

OK
VOL
+
–
PROG
+
–
GUIDE
MENU
BACK
INFO
TEXT
EXIT
Menu operation
OK
OK
OK
What is the MAIN MENU?
You need to call up the on screen display (OSD) to perform settings for the Recorder. The OSD for the settings is called “MAIN MENU”•
The “MAIN MENU” enables various settings and adjustments.•
Basic operation
Display the MAIN
MENU screen
Press @ and the “MAIN MENU”
screen displays.
Main Menu
Programme Guide
Channels
Library
Scheduled Recordings
OK
Exit
ExitMenu
Watch
Exit the MAIN MENU
screen
Press EXIT to exit the MAIN MENU at
any time. If you have not pressed ;
before exiting, the desired setting will
not be changed.
Selecting a menu or
sub menu
Press a/b to select one of the main
menu options. Press d to display the
option. Press a/b to select one of
the sub menus. Press c/d to display
the sub menu. Press c/d to adjust
the desired setting and then press ;.
Press BACK to return to the previous
menu.
Selecting a sub-menu in the
MAIN MENU
Settings
AVSettings
Languages
Parental Control
Freeview +
General
OK
Exit
Select
Selecting and adjusting options
Settings
AVSettings
Languages
Parental Control
Freeview +
General
OK
Exit
Select
ExitMenu
ExitMenu
HDMIVideo
HDMIAudio
SCARTOutput
ScreenSize
MenuTransparency
ChannelChange Timeout
AudioDesacription Volume
AudioDelay Settings
HDMIVideo
HDMIAudio
SCARTOutput
ScreenSize
MenuTransparency
ChannelChange Timeout
AudioDesacription Volume
AudioDelay Settings
720p
1080p
About the guide display
The guide display at the bottom of the MAIN MENU
screen shows operations with the OSD.
The guide display is an operational guide for the remote control •
unit. The bar will change in accordance with each sub-menu
and menu setting.
•
OK
Exit
Exit Menu
Select
Main Menu Options
The MAIN MENU allows you access to
various menu screens.
Item
Programme Guide
Channels
Library
Scheduled
Recordings
Settings
Information
View the EPG (Page 12).
View the Channel List (Page 11).
View the Library (Page 26).
View the Scheduled Recordings
(Page 26).
Adjust various settings for the Recorder
(Page 19).
View system and software information
for the Recorder.
18
TU-T2HR32_GB.indd 18TU-T2HR32_GB.indd 18 29/06/2010 15:16:2429/06/2010 15:16:24
Page 19

Basic adjustment
AV Settings
Settings
AV Settings
Languages
Parental Control
Freeview +
General
OK
Exit
Exit Menu
Select
Default Recording Mode
Add to Start of Recording
Add to End of Recording
Live Pause Length
Skip Forwards Time
Skip Backwards Time
Auto Disk Management
Show AvailableSpace As
Format Hard Disk Drive
AV Settings
HDMI Video
Adjusts the video resolution when the Recorder is
connected to your TV using a HDMI cable. This allows
you to watch High Definition (HD) TV.
Item
576p
720p
1080i
1080p
NOTE
Consult the documentation supplied with your TV to select the •
correct TV resolution.
If your TV is not HD Ready but has a HDMI socket, select the •
576p video resolution.
Sets the video resolution to 576p.
Sets the video resolution to 720p.
Sets the video resolution to 1080i.
Sets the video resolution to 1080p.
AV Settings
HDMI Audio
Adjusts the audio output type when the Recorder is
connected to surround sound system using a HDMI
cable. This allows you to enjoy realistic live sound.
Item
The Recorder will output Stereo sound
Stereo
Dolby Digital
NOTE
Only select Dolby Digital if you have a compatible surround •
sound system. If you choose this setting with a non-compatible
sound system the audio will not be heard.
Not all channels are broadcast with Dolby Digital sound.•
when connected to a standard surround
sound system using the HDMI cable.
The Recorder will output Dolby Digital
surround sound when connected to
a compatible surround sound system
using the HDMI cable.
AV Settings
SCART Output
Adjusts the video signal type when the Recorder is
connected to your TV using a SCART cable.
Item
This selects an RGB video signal type.
The video signal will be splits the video
RGB
Composite
NOTE
If your TV is not compatible with RGB signals, select the •
Composite video output.
output into separate red, green and
blue signals to provide the best picture
quality.
This selects a composite video signal.
Produces a single composite video
signal which provides poor picture
quality.
AV Settings
Screen Size
Adjusts the screen size (aspect ratio) between 16:9
widescreen and various 4:3 picture sizes.
Item
Displays a 16:9 widescreen picture.
16:9 Widescreen
4:3 Widescreen
(16:9)
4:3 Centre Cut Out
4:3 Letterbox (16:9)
NOTE
If you have connected the Recorder to a Widescreen TV, you •
should select the 16:9 Widescreen setting.
The wide mode feature lets you adjust the screen size using the •
WIDE button on the remote control unit. Press WIDE to cycle
through the available screen sizes while watching TV.
If you have selected 16:9 widescreen in the AV settings menu, •
the wide mode will have no effect.
This ensures the best aspect ratio for
widescreen TVs.
In this mode, the picture is stretched
towards each side of the screen.
This displays a picture similar to 16:9
widescreen on 4:3 TVs.
Displays a 4:3 picture in the centre of
the screen. With some programmes,
bars may appear on the left and right
hand side of the screen.
Displays a 16:9 picture in the centre of
the screen. With some programmes,
bars may appear on the top and bottom
of the screen.
19
TU-T2HR32_GB.indd 19TU-T2HR32_GB.indd 19 29/06/2010 15:16:2629/06/2010 15:16:26
Page 20

Basic adjustment
AV Settings
Menu Transparency
This function allows you to adjust the transparency of the
OSDs.
Item
Off
25%
50%
75%
NOTE
The menu transparency settings will not affect the “MAIN •
MENU”.
The picture will not be visible behind
the OSD.
The picture will be partially visible behind
the OSD.
The picture will be mostly visible behind
the OSD.
The picture is clearly visible behind the
OSD.
AV Settings
Channel Change Timeout
This function allows you to adjust the length of time that
information screen is displayed for if no other buttons are
pressed
Audio Description
Some programmes are broadcast with audio descriptions
(AD) which provides a voice-over describing visual
information such as scenery, body language and facial
expressions.
Press AD on the remote control unit to toggle audio
description on or off.
NOTE
If audio description is available for a programme, the AD symbol •
will be displayed in the Information Screen (Page 10) and the
EPG (Page 12).
When turning the AD function ON or OFF you may notice a brief •
loss in audio. This is not a fault.
AV Settings
Audio Description Volume
Adjusts the volume of the audio description when
available.
AV Settings
Audio Delay Settings
Synchronises the audio and video outputs when the
Recorder is connected to a Dolby Digital Surround Sound
System using the SPDIF (digital audio output) connection.
Digital Audio Delay 60 ms
Press 1 a/b to increase or decrease the audio
delay time.
Press
2 EXIT to complete the setting.
20
TU-T2HR32_GB.indd 20TU-T2HR32_GB.indd 20 29/06/2010 15:16:2829/06/2010 15:16:28
Page 21

Basic adjustment
Languages
Settings
AV Settings
Languages
Parental Control
Freeview +
General
OK
Exit
Exit Menu
Select
Subtitle \Language
Audio Language
Audio Description Language
Languages
Subtitle Language
This function allows you to set the default subtitle
language to English, Welsh, Gaelic or Irish.
NOTE
Some subtitle languages are available with enhanced subtitles. •
These provide additional information about the programme for
the hard of hearing.
Switching on subtitles
Press SUBT on the remote control unit to
toggle subtitles on or off.
NOTE
Not all programmes are broadcast with subtitles. If subtitles are •
available for a programme, the SUBT symbol will be displayed
in the Information Screen (Page 10) and the EPG (Page 12).
If subtitles are available they will be displayed at the bottom of •
the screen in the default subtitle language.
Languages
Audio Language
This function allows you to set the default audio language
to English, Welsh, Gaelic or Irish.
Selecting audio languages
Press AUDIO on the remote control unit to
toggle switch between the available audio
languages.
NOTE
Not all programmes are broadcast with alternative audio •
languages. If the selected audio language is not broadcast,
English will be used.
Languages
Audio Description Language
This function allows you to set the default audio
description (AD) language to English, Welsh, Gaelic or
Irish.
NOTE
Not all programmes are broadcast with alternative audio •
description languages. If the selected audio description
language is not broadcast, English will be used.
21
TU-T2HR32_GB.indd 21TU-T2HR32_GB.indd 21 29/06/2010 15:16:3129/06/2010 15:16:31
Page 22

Basic adjustment
Parental Control
The Parental Control feature allows you to prevent
accidental changes being made to the Recorder. In
addition channels can be locked to prevent children
viewing scenes of a violent or sexual nature.
Parental Settings PIN
Settings
AV Settings
Languages
Parental Control
General
OK
Exit
Exit Menu
Select
Parental Settings PIN
This menu is PIN protected.
Please enter your PIN to view and change
the settings.
OK
Select
0 9
Exit
Enter PIN
Exit
----
The default personal identification number (PIN) must
be entered before the parental control settings can be
adjusted.
Enter the default four digit PIN (0000) using
the 0-9 numeric buttons, then press OK.
NOTE
If you have changed the default PIN, this must be entered •
before the parental control settings can be adjusted.
Parental Control
Guidance PIN for recordings
This function is broadcaster dependant and restricts
playback of Guidance flagged content.
Item
Yes
No
This will allow playback to be performed
with a PIN entry.
This will allow playback to be performed
without a PIN entry.
Parental Control
Allow first time installation
This function allows you to prevent a first time installation
being performed without first entering the parental
settings PIN.
Item
This will allow a first time installation
Enabled
Disabled
to be performed without entering the
parental settings PIN.
This will prevent a first time installation
to be performed unless the parental
settings PIN is entered.
Parental Control
Allow parental changes
This function allows you to prevent changes within the
parental control menu without first entering the parental
settings PIN.
Item
This will allow access to the parental
Enabled
Disabled
control menu without first entering the
parental settings PIN.
This will prevent access to the parental
control menu unless the parental
settings PIN is entered.
Parental Control
Allow Hard Disc Drive format
This function gives the option to allow the hard disc drive
to be formatted or not.
Item
Enabled
Disabled
This will allow the Hard Disc Drive to be
formatted.
This will prevent the Hard Disc Drive
from being formatted.
Parental Control
Change PIN
Settings
AV Settings
Languages
Parental Control
General
OK
Exit
Exit Menu
Select
This function allows you to change the PIN.
Changing the parental settings PIN. E
Enter the default (0000) or current four digit 1
PIN using the 0-9 numeric buttons.
Enter the new four digit PIN using the 2 0-9
numeric buttons.
Confirm the new four digit PIN using the
3 0-9
numeric buttons.
NOTE
As a precautionary measure, make a note of your PIN on the •
back of this operational manual, cut it out and keep it in a safe
place that children cannot reach.
PIN Change
Enter old PIN
Enter new PIN
Copnfirm new PIN
OK
Select
----
----
----
0 9
Exit
Enter PIN
Exit
22
TU-T2HR32_GB.indd 22TU-T2HR32_GB.indd 22 29/06/2010 15:16:3329/06/2010 15:16:33
Page 23

Basic adjustment
Freeview+
Settings
AV Settings
Languages
Parental Control
Freeview +
General
OK
Exit
Exit Menu
Select
Default Recording Mode
Add to Start of Recording
Add to End of Recording
Live Pause Length
Skip Forwards Time
Skip Backwards Time
Auto Disk Management
Show AvailableSpace As
Format Hard Disk Drive
Freeview+
Default Recording Mode
This function allows you to select the mode for recording
programmes when recording from a SD channel and the
same programme is available in HD.
Item
Whenever recording is selected, a
Always Ask
High Definition
Standard Definition
message will appear on screen. You can
select to record either in High Definition
or Standard Definition quality.
Recording is performed in
High Definition.
Recording is performed in
Standard Definition.
Freeview+
Live Pause Length
This allows you to set a time limit that a Live TV
programme can be paused. This can be either 60 or 120
minutes duration.
Freeview+
Skip Forwards Time
Freeview+
Auto Disk Management
When Auto Disk Management is turned on, if the
recorder runs out of space whilst recording, old
recordings will automatically be deleted to create free
space. The internal hard drive can store up to 120 hours
of digital TC broadcast (depending on the data rate of the
recorded programme, which is set automatically set by
the broadcaster).
NOTE
Occasionally, the Recorder may miss the start or the end of the •
recording. This is not a fault of the unit, as the broadcaster may
have not updated the information.
Freeview+
Show Available Space As
This function allows you to select how much space left
on the Hard Disk Drive is displayed on screen.
Item
Percentage of Total
Space
Hours (High
Definition)
Hours (Standard
Definition)
This displays the space remaining as a
percentage.
This displays the space left for recording
in High Definition.
This displays the space left for recording
in Standard Definition.
Freeview+
Format Hard Disk Drive
This function allows you to format the hard disk drive.
NOTE
Formatting the hard disk drive will erase all recorded •
programmes.
This function allows you to set a time interval for skipping
forwards through a recorded programme. This can be
selected from either 10, 30, 40 or 60 seconds.
Freeview+
Skip Backwards Time
This function allows you to set a time interval for skipping
backwards through a recorded programme. This can be
selected from either 10, 30, 40 or 60 seconds.
23
TU-T2HR32_GB.indd 23TU-T2HR32_GB.indd 23 29/06/2010 15:16:3629/06/2010 15:16:36
Page 24

Basic adjustment
General
Settings
AV Settings
Languages
Parental Control
General
OK
Exit
Exit Menu
Select
Auto Standby
Power Save in Standby Mode
Upgrade Software
Auto Retune
Auto Retune Messages
Network Configuration
Manual Tune
First Time Installation
Enabled
General
Auto Standby
This function allows you to automatically switch the
Recorder into standby mode when there is no user
activity for 3 hours.
Item
The Recorder will automatically switch
Enabled
Disabled
into standby mode when there is no
user activity for 3 hours.
The Recorder will remain on constantly
unless switched into standby mode by
the user.
General
Power Save in Standby Mode
This function allows you to control the power saving
features of your Recorder.
Item
Enabled
Disabled
The Recorder uses a very low amount of
power when in standby.
Power saving features are disabled.
General
Auto Retune
This function allows you to control when new services
(channels) are added and stored on the Recorder.
Item
Whenever new services (channels) are
Always Start
Always Ask
detected, the Recorder will automatically
tune and store them.
Whenever new services (channels) are
detected, a message will appear on
screen. You can choose to tune and
store the new services or cancel the
auto retune.
General
Auto Retune Messages
This function controls when retune messages are
displayed.
Item
All
No Minor
Messages
Information Only
None
NOTE
During the digital switchover, Auto retune messages may be •
displayed. Follow the on-screen instructions to retune.
All messages are displayed.
Only major messages are displayed.
Only information messages are
displayed.
No messages are displayed.
General
Network Configuration
This function allows you to configure the network.
General
Upgrade Software
This function allows you to control when software
upgrades are installed.
Item
Automatic
Manual
24
TU-T2HR32_GB.indd 24TU-T2HR32_GB.indd 24 29/06/2010 15:16:4029/06/2010 15:16:40
The Recorder will automatically install
software upgrades when available.
The Recorder will display a message
allowing you to confirm or cancel the
software upgrade.
Page 25

Basic adjustment
Manually tuning channels
General
Manual tune
You can manually tune new services after the first time
installation has been completed.
Manual Tune
42
UHF Channel
641787
Frequency (kHz)
8MHz
Bandwidth
DVBT
System
Mode
2K
Guard
FEC
NID
Systems Found / Added
Tuner Lock
Signal Strength
Signal Quality
OK
Watch
You can manually tune new services after the first time
installation has been completed.
Press 1 c/d to select the desired UHF channel.
Press
2 b to select ‘Frequency (kHz).
Press 3 c/d to adjust the frequency.
Press
4 b to select ‘Bandwidth’.
Press
5 c/d to adjust the ‘bandwidth’
Press 6 b to select ‘System.
Press
7 c/d to select a ‘System’.
Press the BLUE coloured button to start
8
scanning for the specified channel. If the
channel is found it will be stored in the
Recorder and will be available in the channel
list and EPG.
UHF Channel
Frequency
Bandwidth
System
NOTE
You can enter the UHF Channel and Frequency using the 0-9 •
numeric buttons.
1/32
3/4
Mod
QAM16
====
TSID
====
==/==
Lock
Exit
Exit Menu
Start Scan
Item
The channel number you want to save
the manually tuned channel as.
The frequency of the service (channel)
you are manually tuning.
The bandwidth of the service (channel)
you are manually tuning.
The type of tuning system
General
First time installation
19%
40%
This function allows you to perform a first time installation
(page 9).
25
TU-T2HR32_GB.indd 25TU-T2HR32_GB.indd 25 29/06/2010 15:16:4329/06/2010 15:16:43
Page 26

Basic adjustment
Library
Display/close the LIBRARY screen E
Press the LIBRARY button on the remote
control or select Library from the Main Menu.
9
Library
BBC ONE
001
Breakfast
Deal or No Deal 15/06
The Simpsons 15/06
EastEnders 15/06
Escape to the Country 16/06
Royal Ascot
MOTD Live: Spain v Switzerland
Stop
1 2
Stop 1
This stops playback of a previewed recording,
selected with the H button on the remote
control.
Guide 2
Press the GUIDE button on the remote control
to view the programme guide.
Protect 3
This function allows you to protect a selected
recording, selected with the RED button on
the remote control. A P will appear on the right
hand side in the selected programme row.
Schedule 4
This function takes you to the Scheduled
Recordings menu.
Preview 5
This function allows you to preview a selected
recording, selected with the YELLOW button
on the remote control.
Delete 6
This function allows you to delete a selected
recording, selected with the BLUE button.
Wed 16 Jun 2010
2:38pm - 2:39pm
Gary Lineker introduces live coverage from Durban. Spain are favourites
to win a first-ever World Cup. Switzerland are appearing in their ninth
finals. Also in HD. [S]
AD
SUB
Channel 4
Channel 4
BBC ONE
BBC ONE
GUIDE
Protect
Schedule
Guide
3
Preview Delete Select
4 5 6 7 8
BBC ONE
MOTD Live: Spain v Switzerland
68% Remaining
15/06
RecordedBBC ONE
Viewed
Recorded
Failed
Recorded
16/06 RecordedBBC ONE
16/05 RecordedBBC ONE
OK
EXIT
Exit Menu
Select 7
Press the OK button on the remote control to
make a selection.
Exit Menu 8
Press the EXIT button on the remote control
to exit the current screen.
Hours Remaining 9
This displays the available space on the Hard
Disk Drive for recording.
Scheduled Recordings
Display/close the Scheduled E
Recordings screen
Select Scheduled Recordings from the Main
Menu.
Scheduled Recordings
Wed 16 Jun 2010
5:15pm - 6:00pm
Nine contestants paly as a team to win up to 10,000 pounds. However, only one takes the prize money
home; round by round the contestants vote off the weakest link. [S]
SUB
001
The Weakest Link
The Simpsons
Channel 4 News
Coronation Street
South Africa Walks
South Africa Walks
Breakfast
Guide 1
Press the GUIDE button on the remote control
to view the programme guide.
Series 2
This function lets you select a repeated
scheduled recording for recording as a series
of programmes. This is selected with the
GREEN button on the remote control.
Delete 3
This function allows you to delete the selected
scheduled recording. This is selected with the
BLUE button on the remote control.
Exit Menu 4
Press the EXIT button on the remote control
to exit the current screen.
Information Row 5
This row gives the details of the scheduled
recording, including the programme title, the
channel number, the date of the programme
and its current status.
BBC ONE
The Weakest Link
S
BBC ONE
Channel 4
Series
Delete
ITV1
BBC TWO
BBC TWO
1 2 3 4 5
GUIDE
Guide
68% Remaining
ScheduledBBC ONE
16/06
16/06 ScheduledChannel 4
Scheduled
16/06
Scheduled
16/06
Scheduled
17/06
Scheduled
17/06
17/06 ScheduledBBC ONE
EXIT
Exit Menu
S
S
S
S
S
S
S
S
S
S
S
S
S
S
26
TU-T2HR32_GB.indd 26TU-T2HR32_GB.indd 26 29/06/2010 15:16:4429/06/2010 15:16:44
Page 27

Appendix
Troubleshooting
The following conditions in the table below do not always indicate a problem. Please perform the checks described
below before calling for service. If the problem can not be corrected by the use of this manual, remove the mains plug
from the power socket and contact the Helpline on 0845 880 0421 in order to obtain service or advice.
Where this is not possible please visit our web site www.sharp.co.uk/customersupport.aspx
Customers without Internet access may phone 0845 880 0421 during office hours.
In the unlikely event of this equipment requiring repair during the guarantee period, you will need to provide proof of
purchase to the repair company. Please keep your purchase invoice or receipt in a safe place.
WARNING
Under no circumstances should you try and repair this product yourself. This will invalidate the warranty. Do not open the
unit as there is risk of electric shock.
Problem Possible solution
No power.•
The Recorder cannot be operated.• External influences such as lightning, static electricity, etc., may cause improper operation. In this •
Remote control unit does not operate.•
Picture is cut off.• Are screen mode adjustments (WIDE MODE) such as picture size made correctly? (Page 19)•
Power is suddenly turned off.• The Recorder’s internal temperature has increased. Remove any objects blocking the vent or clean.•
No picture.• Are connections to external equipment correct? (Pages 15 to 17)•
No sound.• Is the volume too low?•
The Recorder sometimes makes a •
cracking sound.
Freezing / Blocking• Check Freeview reception information as we have listed on the front of the manual.•
There is noise interference on the TV •
while a broadcast is being received.
Unit is making a humming / whirring •
noise
Check if you pressed • a on the remote control unit.
Is the AC power adapter disconnected?•
Check if you pressed • a on the Recorder.
case, operate the Recorder after first turning off the power, or unplugging the AC power adapter and
re-plugging it in after one or two minutes.
Are batteries inserted with polarity (• e, f) aligned?
Are batteries worn out? (Replace with new batteries.)•
Are you using it under strong or fluorescent lighting?•
Is a fluorescent light illuminating the remote control sensor?•
Is auto standby activated? (Page 24)•
Is the input signal type selected correctly after connection? (Page 19)•
Is the correct output source selected? (Page 10)•
Is the antenna connected properly? (Page 9)•
Hold the HDMI button on the remote control for 5 seconds to reset the output to 1080i. (Page 19)•
Check if you pressed mute on the remote control unit.•
This is not a malfunction. This happens when the casing slightly expands and contracts according to •
changes in temperature. This does not affect the Recorder’s performance.
Refer to page 9 to perform the First Time Installation.•
Depending on the reception of the broadcast, interference may appear on the picture while you •
watch a TV broadcast and the unit is left on. This is not a malfunction of the unit.
The unit has a fan and hard drive installed. This noise is not a malfunction of the unit.•
Cautions regarding use in high and low temperature environments
When the Recorder is used in a low temperature space (e.g., room, office), the picture may leave trails or appear slightly delayed. This •
is not a malfunction, and the Recorder will recover when the temperature returns to normal.
Do not leave the Recorder in a hot or cold location. Also, do not leave the Recorder in a location exposed to direct sunlight or near a •
heater.
Unrecordable Material
In the unlikely event that there is some problem like loss of recorded video or audio content due to HDD malfunction,
please be aware beforehand that Sharp will bear no responsibility to compensate for the content that could not be
recorded or edited, for the loss of recorded or edited video, or for other related direct or indirect damages.
If a power failure occurs
The content being recorded or timer recorded may be damaged if power failure occurs.•
The content being played back may be damaged.•
For important recording
If the HDD malfunctions, the content recorded on the HDD may be lost. If you wish to save the content permanently, we recommend •
copying or moving the content to Video or DVD.
27
TU-T2HR32_GB.indd 27TU-T2HR32_GB.indd 27 29/06/2010 15:16:4529/06/2010 15:16:45
Page 28

Appendix
Specifications
Item TU-T2HR32 Digital Terrestrial HD Recorder for Freeview HD
Receiving Signal Type (DVB-T)
Tuner /
Demodulator
Receiving Signal Type (DVB-T2)
CPU / Clock STi7105/ST40 core, 450MHz
Transport DVB Demultiplexer
System
Video
Teletext /
Subtitle
Audio
Hard Disk Drive 320Gb
Flash Memory 16MB
System Memory 128MByte X 2 DDR
Software Pixsan Elgist and MHEG middleware
CPU Core ST231 / 450MHz
Video Standards
Field / Frame Rate 60/30 Hz for NTSC or 50/25 Hz for PAL
HD/SD Decoding Capability Interlaced Mode/ Progressive Mode: 1080i, 720p, 576p, and 576i
Aspect Ratio
Video Input / Output
Output Modes
Decoding and display for supporting Closed Captions & Teletext
CPU Core ST231/ 450MHz
Audio Standards
Audio Input / Output
Digital Audio SPDIF Output Format
Sampling Rate 32, 44.1, 48, and 96 KHz
All combinations of the below parameters can be received and automatically
detected. (Except bandwidth).
Channel Bandwidth 7, 8 MHz
Modulation Type QPSK, 16QAM, 64QAM
FFT Mode 2K, 8K
Code Rate 1/2, 2/3, 3/4, 5/6, 7/8
Guard Internal 1/4, 1/8, 1/16, 1/32
All combinations of the below parameters can be received and automatically
detected. (Except bandwidth).
Channel Bandwidth 7, 8 MHz
Modulation Type QPSK, 16QAM, 64QAM, 256QAM
FFT Mode 1K, 2K, 4K, 8K, 16K, 32K
Code Rate 1/2, 3/5, 2/3, 3/4, 4/5, 5/6
Guard Internal
MPEG-1 ISO/IEC 11172-2
MPEG-2 MP@ML and MP@HL, ISO/IEC 13818-2
MPEG-4 AVC MP@L4 and HP@L4.1
16:9 Widescreen
4:3 Widescreen (16:9)
4.3 Centre Cut Out
4.3 Letter Box (16:9)
Digital Video HDMI with HDCP supported
CVBS, R/G/B for TV SCART OUT
CVBS for VCR SCART OUT
CVBS, R/G/B for VCR SCART IN
HD
SD 576i
MPEG-1 layer I & layer II, MP3
MPEG-2 layer II , Dolby Digital
MPEG-2 AAC/AAC+
AL/AR for TV SCART OUT (Volume adjustable)
AL/AR for VCR SCART OUT (Fixed volume)
AL/AR for VCR SCART IN
Optical Digital Audio SPDIF
IEC-60958 for PCM data
IEC-61937 for Encoded Bitstream Data
1/4, 5/32, 1/8, 5/64, 1/16, 1/32, 1/64,
1/128
1080P / 1080i / 720p / 576p
Output format changed by specific
hot-key (software switchable)
28
TU-T2HR32_GB.indd 28TU-T2HR32_GB.indd 28 29/06/2010 15:16:4629/06/2010 15:16:46
Page 29

Appendix
Item TU-T2HR32 Digital Terrestrial HD Recorder for Freeview HD
Software
Upgrade
Front Panel
Rear Panel
Power
Interface
Power
Consumption
Others
Over Air Download Yes, via DVB-SSU
USB Port Yes
Display
Keypad Power
IR Sensor Yes
RF Input Connector F type, Female (for NTSC)/IEC type, Female (for PAL), 75 Ohm
Loop Through Output Connector
Stereo (left & right) Audio output
CVBS, R/G/B video output
Digital Video & Audio Output
Optical Digital Audio SPDIF
RJ 45 Ethernet connection with unique Mac address
RS 232 Service only
Input Voltage 200~240 VAC, 50/60 z
Normal Operation 17W@220V/60Hz
Low Power Standby 0.8W
Accessory
EMC/ Safety Compliant to CE
ATC HDMI 1.4, HDCP
Dolby Dolby Digital Stereo, Dolby Digital+ (HE AAC)
Software
F type/IEC type, Male/Female, 75 Ohm
Dual SCART for TV/VCR
For TV SCART: w/ OSD and Volume adjustable
For VCR SCART: w/o OSD and fixed Volume
HDMI Connector
TosLink Interface
Customer Selectable Remote Controller (and Batteries)
User’s Manual
RF Cable (1.1M)
Dbook 6.1 compliant
Tested to DTG Test Suite
Audio Description, Recorder mix
MHEG5 HD Dbook 6.1
MHEG5 interaction channel
MHEG5 iPlayer ready
PIN CODE reminder
NOTE
You need to insert the PIN code here and refer it to the pages in the manual where this is covered.•
NOTE
Removal of a PIN code could be subject to a service charge and if you would like to use this feature the PIN code should be written •
down.
Trademarks
“HDMI, the HDMI logo and High-Definition Multimedia Interface are trademarks or registered trademarks of HDMI Licensing LLC.”•
Manufactured under license from Dolby Laboratories.•
“Dolby” and the double-D symbol are trademarks of Dolby Laboratories.•
29
TU-T2HR32_GB.indd 29TU-T2HR32_GB.indd 29 29/06/2010 15:16:4629/06/2010 15:16:46
Page 30

Appendix
End of life disposal
A. Information on Disposal for Users (private households)
1. In the European Union
Attention: If you want to dispose of this equipment, please do not use the ordinary dust bin!
Used electrical and electronic equipment must be treated separately and in accordance with legislation that
requires proper treatment, recovery and recycling of used electrical and electronic equipment.
Following the implementation by member states, private households within the EU states may return their
used electrical and electronic equipment to designated collection facilities free of charge*. In some countries*
your local retailer may also take back your old product free of charge if you purchase a similar new one.
Attention: Your
product is marked
with this symbol.
It means that used
electrical and
electronic products
should not be
mixed with general
household waste.
There is a separate
collection system for
these products.
*) Please contact your local authority for further details.
If your used electrical or electronic equipment has batteries or accumulators, please dispose of these
separately beforehand according to local requirements.
By disposing of this product correctly you will help ensure that the waste undergoes the necessary treatment,
recovery and recycling and thus prevent potential negative effects on the environment and human health
which could otherwise arise due to inappropriate waste handling.
2. In other Countries outside the EU
If you wish to discard this product, please contact your local authorities and ask for the correct method of
disposal.
For Switzerland: Used electrical or electronic equipment can be returned free of charge to the dealer, even if
you don’t purchase a new product. Further collection facilities are listed on the homepage of www.swico.ch
or www.sens.ch.
B. Information on Disposal for Business Users
1. In the European Union
If the product is used for business purposes and you want to discard it:
Please contact your SHARP dealer who will inform you about the take-back of the product. You might be
charged for the costs arising from take-back and recycling. Small products (and small amounts) might be
taken back by your local collection facilities.
For Spain: Please contact the established collection system or your local authority for take-back of your used
products.
2. In other Countries outside the EU
If you wish to discard of this product, please contact your local authorities and ask for the correct method of
disposal.
The battery supplied with this product contains traces of Lead.
For EU: The crossed-out wheeled bin implies that used batteries should not be put to the general household
waste! There is a separate collection system for used batteries, to allow proper treatment and recycling in
accordance with legislation. Please contact your local authority for details on the collection and recycling
schemes.
For Switzerland: The used battery is to be returned to the selling point.
For other non-EU countries: Please contact your local authority for correct method of disposal of the used
battery.
30
TU-T2HR32_GB.indd 30TU-T2HR32_GB.indd 30 29/06/2010 15:16:4629/06/2010 15:16:46
Page 31

Important Notice
Digital Switchover and Your TV Equipment
WHAT YOU NEED TO DO TO ENJOY WATCHING TV DURING AND FOLLOWING DIGITAL
SWITCHOVER
Starting in 2008 and ending in 2012, television services in the UK will go completely digital, TV region by TV region.
To continue using this digital TV equipment during and following digital switchover, you will need to “reset” your digital TV
channels.
Users of this product must reset their channels on at least 2 different occasions, normally 1 month apart when
switchover happens. Digital UK, the body leading digital TV switchover, and broadcasters will advise you when to reset
your channels on each occasion.
If you do not reset your channels, you risk losing some or all of your TV services during and following switchover.
Please refer to Page 24 of this manual for help with resetting channels.
Please note that in order to receive the maximum number of available TV services on your equipment you must perform
a first time installation and do not just add channels.
If you have questions relating to digital switchover please don’t hesitate to call us on 0845 6 50 50 50
or visit www.digitaluk.co.uk.
The FREEVIEW service is subject to coverage. An aerial upgrade may be required. The FREEVIEW
PLAYBACK word and logo are trade marks of DTV Services Ltd and are used under licence.
© DTV Services Ltd 2006.
31
TU-T2HR32_GB.indd 31TU-T2HR32_GB.indd 31 29/06/2010 15:16:4729/06/2010 15:16:47
Page 32

TERMS OF GUARANTEE
Sharp Electronics (UK) Ltd. (“Sharp”) guarantees to provide for the repair, or at its
option the replacement, of this product subject to the conditions listed below:
1. This guarantee shall only apply to faults which are due to inferior workmanship
or materials. It does not cover faults or damage caused by accident, misuse, fair
wear and tear, signal related issues, neglect, tampering with the product, or repair
other than by a Service Facility appointed by Sharp.
2. As this product is intended for private domestic use only, the guarantee will not
apply if the product is used in the course of a business, trade or profession.
3. To benefit from this guarantee, any fault which occurs must be notified to Sharp,
or its appointed Service Facility within one year from the date this product was
purchased. Proof of purchase must be provided.
4. In the unlikely event of this product requiring repair, please contact the Sharp
DTR help line on .
5. No person has any authority to vary the terms or conditions of this guarantee.
6. This guarantee is offered as an additional benefit to your statutory rights, and
does not affect these rights in any way.
If you have any difficulty operating this product, or would like information on other
Sharp products, please telephone the Sharp DTR Help Line on the number given
below.
0845 880 0421
Sharp DTR Help Line -
0845 880 0421
SHARP ELECTRONICS (U.K.) LTD.
4 Furzeground Way, Stockley Park, Uxbridge,
Middlesex, UB11 1EZ
32
TU-T2HR32_GB.indd 32TU-T2HR32_GB.indd 32 29/06/2010 15:16:4729/06/2010 15:16:47
Page 33

Notes
33
TU-T2HR32_GB.indd 33TU-T2HR32_GB.indd 33 29/06/2010 15:16:4929/06/2010 15:16:49
Page 34

TU-T2HR32 EN-05/10-dcs-8670
TU-T2HR32_GB.indd 34TU-T2HR32_GB.indd 34 29/06/2010 15:16:4929/06/2010 15:16:49
 Loading...