

Page 1
Advantages of the Top
and Bottom Bottle Cooler
TOP AND BOTTOM LOAD
WATER DISPENSER
PETUNJUK PENGGUNAAN
In Case of Power Failure
Switch Bottle from Bottom
to the Top
SWD-77EH-BK
No.Reg.: I.6.SEI2.00101.0111
The product in this manual may differ
slightly from that pictured.
PN: 5M000013XW00
Page 2
PETUNJUK PENGGUNAAN
D
AFTAR
I
SI
Pencegahan demi keamanan
Pencegahan demi keselamatan
--- Persyaratan Penggunaan Listrik…..........
Spesifikasi
Bagian & Fitur
Perakitan
Penempatan
Pengoperasian
Perawatan Selang & Pembersihan Unit
Permasalahan
SWD-77EH-BK
Pelanggan yang terhormat,
Terima kasih anda telah membeli produk SHARP.
Unit ini dilengkapi dengan pemeriksaan kualitas yang nyaman untuk memberikan anda
kepuasan. Sebelum menggunakan DISPENSER baru milik anda, dan untuk
mendapatkan hasil yang ekonomis dan penggunaan yang efisien, silahkan baca Petunjuk
Penggunaan dan simpanlah ditempat yang aman untuk referensi dimasa mendatang
2
3
4
4
5
5
6
10
12
No.Reg.:I.6.SEI2.00101.0111
2
Page 3
SAFETY PRECAUTIONS
Your safety and the safety of others are very important.
We have provided many important safety messages in this manual and your appliance. Always read and follow all
safety messages.
This is the safety alert symbol.
This symbol alerts you to potential hazards that can kill or hurt you and others.
All safety messages will follow the safety alert symbol and either the word “DANGER”or “WARNING”
These words mean:
You can be killed or seriously injured if you don′t immediately
the follow instructions.
You can be killed or seriously injured if you don′t follow the
instructions.
All safety instructions will inform you what the potential hazard is, how to reduce the chance of injury, and what can
happen if the instructions are not followed.
IMPORTANT SAFETY INSTRUCTIONS
WARNING:
■ Plug it into a grounded 3-prong outlet.
■ Do not remove the ground prong.
■ Do not use an adapter.
■ Disconnect the power before servicing.
SAVE THESE INSTRUCTIONS
When operating this dispenser, please observe the following:
• Prior to use, this dispenser must be properly assembled and installed in accordance with
this manual.
• This dispenser is intended only for water dispensing. Do NOT use other liquids. Do NOT
use for other purposes. Never use other liquids in the dispenser other than known and
microbiologically safe bottled water. Warranty is void if used with any other liquids, such
as coffee, tea, juices, beer or wine.
Location Requirements:
• Install in the area where it is protected from the elements including direct sun.
• Install and use only on a hard, flat and level surface.
• Do NOT place the dispenser inside an enclosed space or cabinet.
• Position the dispenser no closer than 4 inches from the wall with at least 4 inches
clearance on the sides to permit free airflow.
• Service should only be performed by a certified technician. Please contact us at
0-800-1-225588 for assistance.
DANGER
WARNING
To reduce the risk of fire, electric shock, or injury when using your water cooler, follow these basic precautions:
■ Replace all the parts and the panels before operating.
■ Do not use an extension cord.
■ Two or more people should move and install the water cooler
and the bottles.
3
Page 4
SAFETY PRECAUTIONS ---Electrical Requirements
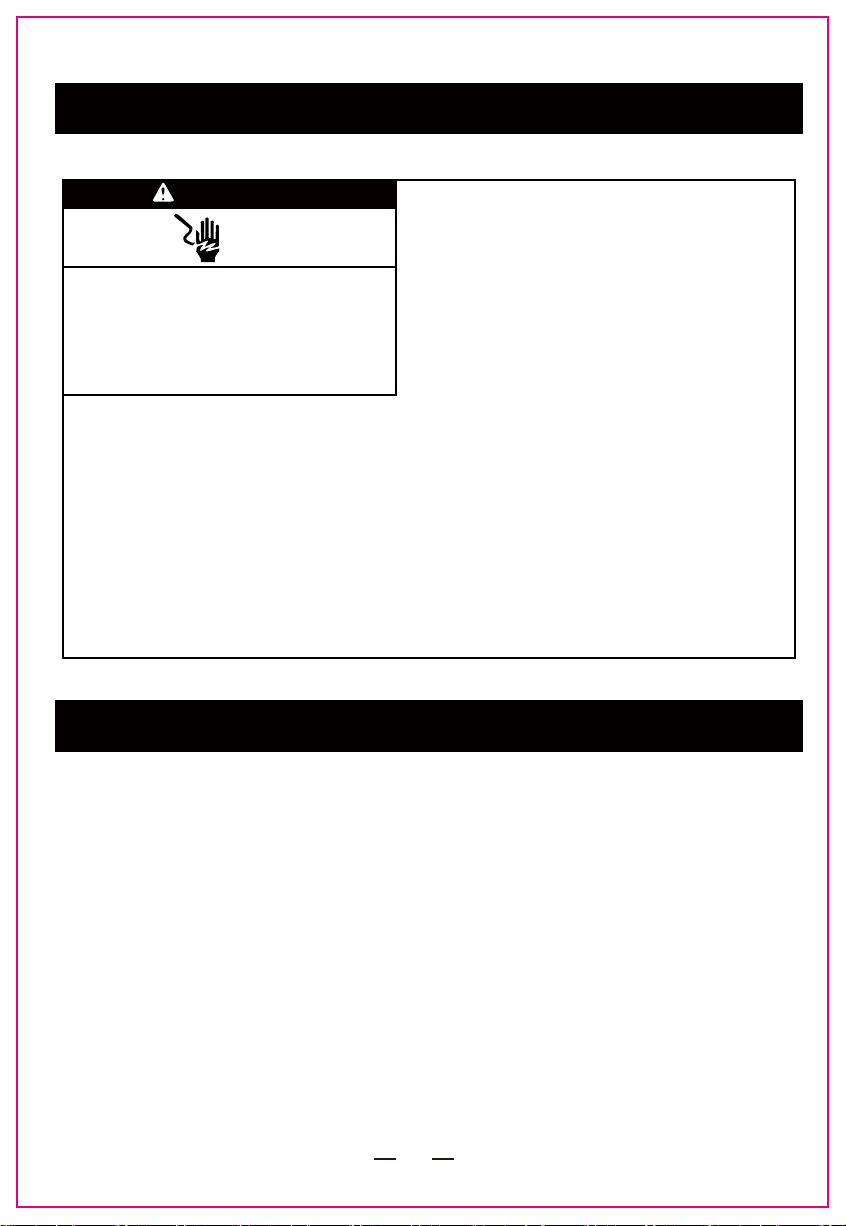
WARNING
Electrical shock Hazard
Plug into a grounded 3 prong outlet.
Do not remove ground prong.
Do not use an adapter.
Do not use an extension cord.
Failure to follow these instructions can result in death,
fire, or electrical shock.
A 120 volt, 60 Hz., AC only, 15 amp, fused electrical supply is required. A time-delay fuse or
circuit breaker is recommended.
If codes permit and a separate ground wire is used, it is recommended that a qualified
electrician determine that the ground path is adequate.
Check with a qualified electrician if you are not sure if the water cooler is properly grounded.
Proprietary design of the hot water tank assures availability of hot water and efficient energy
use.
PRODUCT FEATURES
Congratulations! You have chosen an Advanced Technology State of the Art Water
Cooler.
The refrigeration system on this cooler cools the cold water by internal evaporator of commercial design flat forms the ice around it. This feature is called an "Ice Bank". It allows for ice
cold water and keeps the water temperature consistently cold, however a Longer time in
forming the Ice Bank is required. Since ice is an insulator, the more ice is built up, the slower
next layer is made.
WHEN UNIT IS PLUGGED IN FOR THE FIRST TIME WAIT FOR UP TO 6 HOURS FOR
COLD WATER TEMPERATURES TO REACH THE COLDEST SETTINGS.
4
Page 5
SPECIFICATIONS
Daya
Tipe Pendingin
Daya air dingin
kapasitas pendingin/ jam
Tingkat suhu pendingan
Daya air panas
kapasitas pemanas/ jam
Tingkat suhu pemanas
Dimensi (WxHxDmm)
Berat bersih
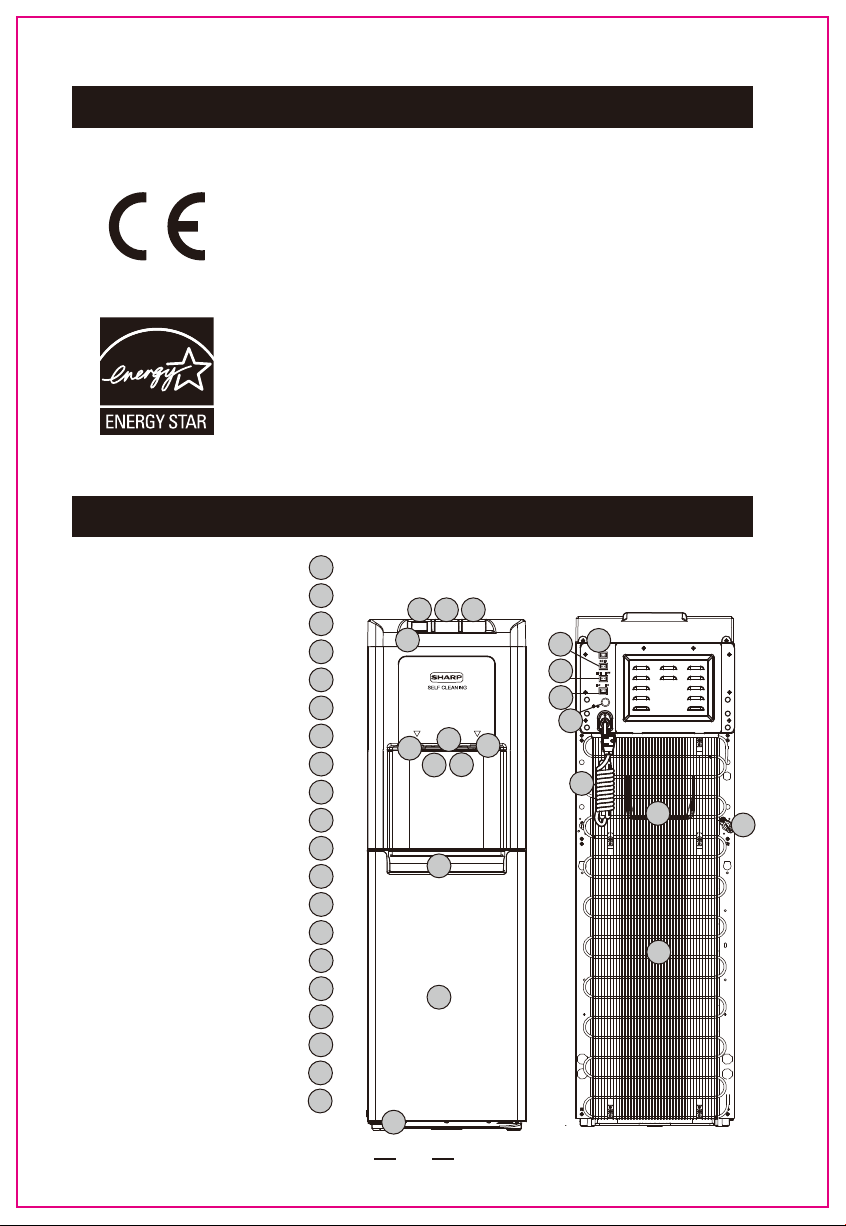
PARTS & FEATURES
Pintu
1
2
3
4
5
6
7
8
9
10
11
12
13
14
15
16
17
18
19
20
Kontrol: Air Panas
Pengeluaran air panas
Kontrol: air memasak
Kontrol: air dingin
Keran air panas
Keran air memasak
Keran air dingin
Lampu LED
Penampung tetesan
Penampan galon
Tombol HOT (hemat energi)
Tombol COLD (hemat energy)
Tombol pengatur daya pemanas
Tombol pengatur prioritas
Sekering
Pegangan
Colokan
Pijakan galon (di dalam kabinet)
Kondensor
220V~/50Hz <3.5A
R-134A
220V/70W, Max:<100W
5 L/H
3°C – 10°C
650W
4 L/H
80°C – 92°C
320x 1031.5x 380 (Small drip tray)
320 x 1031.5x 480 (Big drip tray)
37.7Ibs/17.1Kg
Depan Belakang
1 3
4
11
2
6
8
10
7
8
9
5
13
14
15
12
16
18
17
20
19
5
Page 6
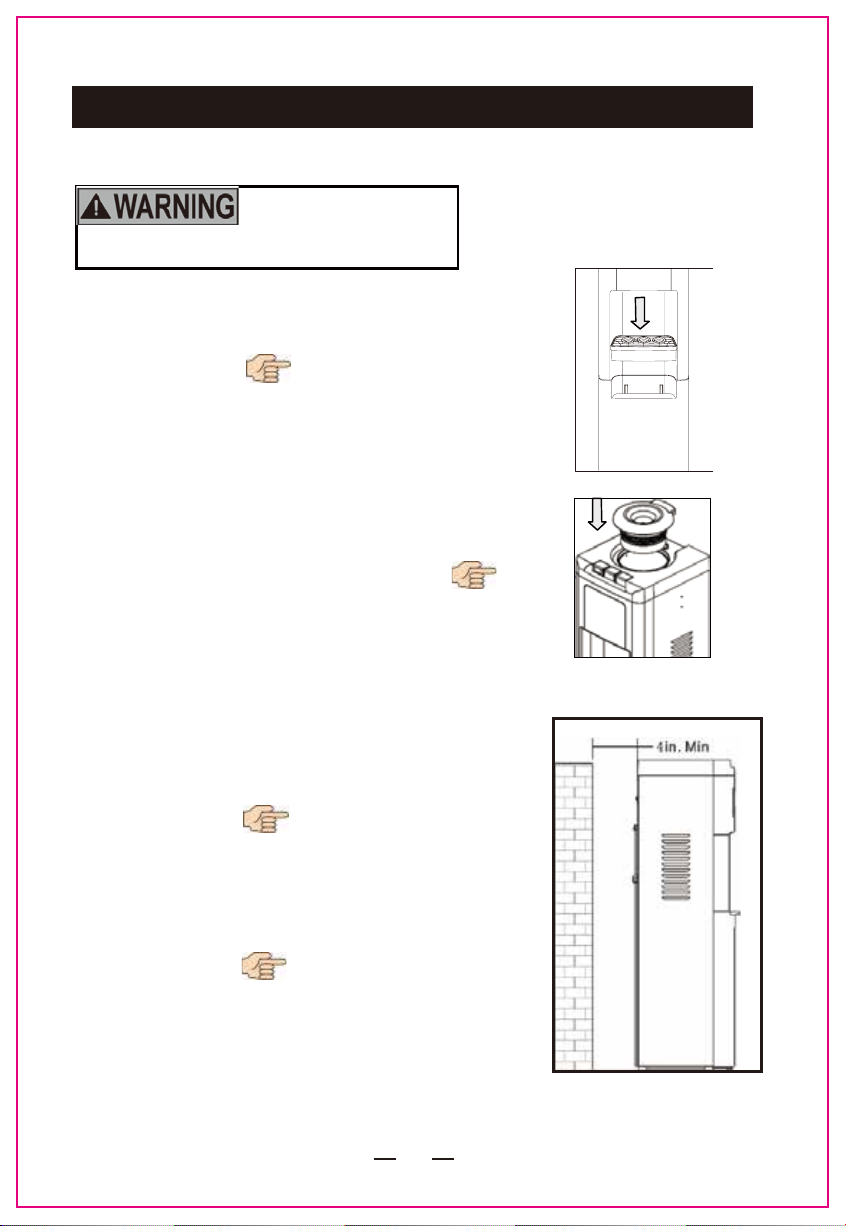
ASSEMBLY
Keep plastic bags away from children.
1. Remove dispenser from packaging.
2. Unpack the drip tray and insert into the dispenser.
As shown in figure
3. Remove the bottle receptacle from packaging and insert into
the stainless steel cold tank . As shown in figure
4. Properly dispose all packaging.
5. Find a location for your water cooler that is protected from
direct sunlight and other sources of heat. Like all other water
coolers, prolonged exposure to sunlight will discolor the
plastic exterior Place the cooler on a flat, level surface
6. To ensure the cooler is level, adjust its feet by rotating them,
adjusting 4 feet first and slightly adjust the 5th foot last.
As shown in figure
7. Make sure the back of your water cooler is at least 4 inches
away from the wall. Keep a minimum distance of at least 4
inches on each side of your water cooler free. Keep items
such as papers, clothing, and furniture at a safe distance.
As shown in figure
8. This cooler is designed and built for indoor use only. Room
temperature should not exceed 37°C /99°F.
6
Page 7

SELECTABLE WATTAGE HOT TANK OPERATING INSTRUCTIONS
1.Hot switch:
• Turn On: It will turn Hot Tank ON.
Thermostat will control temperature.
Needed to be ON for Selectable Power
to work.
• Turn OFF: Heating system stop working.
1
2.Cold switch:
• Turn ON: It will turn Cooling System ON.
Thermostat will control temperature.
• Turn OFF: Cooling system stops working.
2
3
3. Heating power management switch: Need to
have Hot switch turned ON.
• Selected to HIGH position: Full Heating
power of 385 Watts at 220V is applied to
the hot tank.
• Selected to LOW position: Low Heating
power of 185 Watts at 220V is applied to
the Hot tank.
4. Power Consumption Management system:
To operate need to have both, Hot and Cold switches turned ON:
• Hot and Cold Together Position : Heating
and cooling work together. Power consumption is a sum of Heating and Cooling
consumption. Lowest is about 285 Watts and Highest about 485 Watts.
• Hot and Cold Consecutive Position: Heating has priority. Cooling will work only
after Heating stops. Maximum Power used limited to one function only. Lowest is
100 watts for Cooling or 185 Watts for Heating only and Highest is 385 Watts for
Maximum Heater power.
4
7
Page 8

CLEANING PRIOR TO INITIAL USE
To remove any odors or dust that may have accumulated during shipment, you may
want to clean the dispenser prior to first use.
Time Required: 45 minutes.
Notice: Do NOT plug in power cord yet.
1. Move the dispenser away from the wall and turn it 90° in either
direction.
2. Turn the power switches to OFF.
3. Remove the water bottle and the probe from the water bottle.
4. Place a 2 gallon or larger bucket under the probe assembly.
5. Take apart the probe assembly, wash the probe parts by hand in
soapy water or in the dishwater.
6. Remove the air filter and wash it in soapy water.
7. Submerge the probe hand in the soapy water and rinse properly.
8. Reattach back all parts of the probe assembly.
9. Spray the dispensing nozzles of water faucets with chlorine
solution (1 teaspoon of unscented bleach composition
(I.E.5.25% sodium hypochlorite) in one glass of water).
10. Place a 2 gallon or larger bucket under the drain plug in the
rear of the dispenser.
11. Once the unit has been drained, replace the drain plug and
drain the cap.
12. Remove remaining water from the reservoirs by dispensing
it from the cold tap into a pitcher.
A
B
maximum extension 1.5-2 inches
Rinsing
13. Fill bottle with 2 gallons or tap water.
14. Insert probe assembly, place bottle into water cooler and
close the door.
15. Allow cooler to be filled with water.
16. Drain water out as in steps 10, 11 and 12.
17. If chlorine taste persist, repeat rinsing procedure.
18. Complete the installation and follow the operation instructions indicated in this manual. If
your
water has an off-taste, do not return the dispenser to the store. Call 0-800-1-225588 for
assistance.
8
Page 9

OPERATION
IMPORTANT
This unit is intended for water dispensing only. Do NOT use other liquids. Do
NOT use for other purposes. Warranty is void if used with any other liquids
such as coffee, tea, juices, beer or wine.
This dispenser has been designed to use water bottles with a 3, 5, or 5.2 gallon
capacity. Do NOT use alternative bottles.
Initial Set Up
Do NOT plug in until steps 1-2 are completed.
WARNING
Excessive Weight Hazard
Use two or more people to move and install
Electrical shock Hazard
Plug into a grounded 3 prong outlet.
Do not remove ground prong.
Do not use an adapter.
Do not use an extension cord.
Failure to follow these instructions can result in death,
fire, or electrical shock.
1. Allow the unit to sit upright for 4 hours. Make sure unit is in the
off position.
2. This model uses a pump to deliver water from the bottle to the
reservoirs:
i. Clean the bottle cap and neck.
ii. Remove the entire plastic cap from bottle.
iii. Adjust the length of the probe by pulling the B portion of the
tube to its maximum extension. Insert the probe into the bottle
and push it down. The probe will self-adjust to its appropriate
length. See illustration on right.
iv. Push down the probe head until it is seated.
v. Insert the power cord into the wall outlet.
vi. At initial start-up, it will take about 3 minutes for the reservoirs to fill with water.
the water cooler and the bottles.
Failure to do so can result in back or other injury.
WARNING
A
B
maximum extension 1.5-2 inches
9
Page 10

NOTICE: When using a 5 gallon bottle, slide it into place as shown in illustration below.
• If the probe tube A and B(see page 8) are not sealed, the pump will run a few minutes and
the night lights will flash. To correct, open the door, re-attach the probe, and close the
door.
• If the lights continue to flash, your bottle may be empty or there may be an issue with the
water tube lines. Call
3. Turn the switches at the back of the dispenser to ON.
• The red switch controls the hot water. If you do not want hot water, leave this switched
OFF.
• The blue switch controls the cold water. If you do not want cold water, leave this switched
OFF.
Note:
• For the unit to operate properly, the probe head must seal on the bottle and the door must
be fully closed.
• It will take up to 3 minutes for the reservoirs to fill with water. During this time, the pump will
run on and off. This is normal.
• Each time you dispense water from the taps, the pump will turn on to refill the tanks. This is
normal.
• Self Cleaning works every 4 hours for short time. Self Cleaning pump sound is normal.
0-800-1-225588 for assistance.
Dispensing Cold Water
Note: After setup, it will take up to 6 hours to get the water to its maximum cold temperature.
During this time, the compressor may run continuously. Compressor works to build up ice
bank, this is normal.
10
Page 11

1. Position the bottle, glass, pitcher, or cooking pot securely below the cold water tap.
• The right triangle below the cold water control indicates the location of the cold water
tap(See Parts & Features NO. 5).
• The circular shapes in the drip plate help align the flow of water. This unit dispenses
water at a fast rate. To avoid splashes, hold the cup as close to the tap as possible.
2. Press the right control downward to start dispensing water.
3. Release the control once desired the fill level is achieved.
Dispensing Hot Water
Note: After setup, hot water will be available in 15-20 minutes.
1. Position the bottle, glass, pitcher or cooking pot securely below the hot water tap.
• The left triangle below the hot water control indicates the location of the hot water
tap(See Parts & Features NO. 4).
• The circular shapes in the drip plate help align the flow of water. To avoid splashes,
hold the cup as close to the tap as possible.
2. Push the hot water release button (red) inward and press the control downward to start
dispensing water.
3. Release the control once desired the fill level is achieved.
Replacing an Empty Bottle
Note: When your bottle is empty, the dispenser will beep intermittently and the LED night lights
will blink until a fresh bottle is connected.
You may also hear a sucking sound when the bottle empties. This is normal and is another
way to be alerted that your bottle is empty.
Replace the bottle as soon as you notice that it is empty. If unavailable,
LEAVE THE DOOR AJAR OR UNPLUG THE COOLER TO STOP THE BEEPING NOISE
AND FLASHING LIGHTS.
There may be a small amount of water left in the bottle. This is normal.
1. Open door and slide bottle out.
2. Remove the probe from the bottle:
• Pull the probe straight up until completely out of bottle.
3. Install the bottle:
Excessive Weight Hazard
Use two or more people to move and install bottles.
Failure to do so can result in back or other injury.
WARNING
• Place the fresh bottle in front of the tray.
• Clean the fresh bottle using a soft cloth and warm soapy water and then rinse.
• Remove the entire plastic cap from the top of the bottle.
• Insert the probe into bottle.
• Push the probe down until it is seated.
• Slide the bottle onto the tray and close the door completely.
11
Page 12

CLEANING PRIOR TO INITIAL USE
To remove any odors or dust that may have accumulated during shipment, you may
want to clean the dispenser prior to first use.
DO NOT PLUG THE COOLER INTO AN ELECTRICAL POWER OUTLET AT THIS TIME.
Time Required for Set Up: 40 minutes.
1. Remove the bottle receptacle pulling up.
2. Remove the plastic baffle from inside the reservoir. Clean with warm soapy water, rinse.
3. Fill the reservoir with a mixture of 1 gallon tap water and 1 teaspoon or unscented bleach
(5.25% sodium hypochlorite).
4. Let sit for 30 minutes.
5. Remove the cleaning mixture from the reservoirs by dispensing the mixture from both taps
into a pitcher.
6. Wipe the inside of the reservoir with a soft cloth.
7. Fill the reservoir with 1 gallon tap water.
8. Remove the water from the reservoir by dispensing it from both taps into a pitcher.
9. Reattach bottle receptacle to this unit.
10. Complete the installation and follow the operation instructions indicated in this manual.
11. Repeat rinsing cycle if chlorine taste persist.
If your water has an off-taste, do not return the dispenser to the store. Call
for assistance.
0-800-1-225588
12
Page 13

PROPER CARE & CLEANING
General Cleaning
Perform: As needed
Time Required: 5 minutes.
Note: Do NOT use abrasive materials or chemical cleaners.
1. Clean cabinet surfaces with a soft cloth and warm soapy water.
2. Wipe dust from back of dispenser to improve efficiency.
3. Remove drip tray assembly by sliding it forward. Remove cover. Place tray and cover in
dishwasher or wipe parts clean with a soft cloth and warm soapy water.
4. Reattach drip tray assembly.
Sanitizing
Perform: Every 3 months or whenever an off-taste occurs.
Time Required: 30 minutes.
Note: Best done prior to loading a fresh bottle.
Step A: Remove Existing Water
1. Move the dispenser away from the wall and rotate it so that the drain plug ie
accesible.
2. Turn the power switches to OFF.
3. Unplug the power cord from the wall outlet.
4. Place a 2 gallon or larger bucket under the drain plug in the rear of the dispenser.
5. Use screw driver to remove screw holding drain cap and remove drain plug. Cold
water will immediately flow into the bucket. After several seconds, hot water will be
dispensed.
6. Reminder – place the drain cap and in a safe location so that they will not be lost.
7. Once the unit has been drained, replace the drain plug and the drain cap and secure
by the screw.
8. Remove the remaining water from the reservoir by dispensing from the cold tap into
a pitcher.
13
Page 14

Step B: Sanitize Probe and Taps
1. In a clean container, make a sanitizing solution of 1.5 gallons of tap water and 1.5 tablespoons of
unscented household bleach composition(I.E.5.25% sodium hypochlorite) .
2. Wipe the probe and the area around all the taps with a soft cloth moistened with
the sanitizing solution.
Step C: Sanitize Reservoirs
1. Remove the cap from a spare empty 5 gallon bottle.
2. Fill the bottle with the water and bleach mixture.
3. Insert the probe into the bottle.
4. Slide the bottle into the cabinet and close the door.
WARNING
Electrical shock Hazard
Plug into a grounded 3 prong outlet.
Do not remove ground prong.
Do not use an adapter.
Do not use an extension cord.
Failure to follow these instructions can result in death,
fire, or electrical shock.
5. Plug the power cord into a grounded wall outlet.
6. Turn the energy saving switches ON.
7. Allow the water and bleach mixture to fill up the empty reservoirs.
8. Wait 10 minutes then turn the energy saving switches OFF and unplug the power
cord.
9. Dispense 1 cup of the water/bleach solution through each tap to clean out the
waterways.
10. Place a 2 gallon or larger bucket under the drain plug in the rear of the dispenser.
11. Remove the drain cap and the drain plug. Cold water will immediately flow into the
bucket. After several seconds, hot water will be dispensed.
Reminder - place the drain cap and the drain plug in a safe location so that they
will not be lost.
12. Once the unit has been drained, replace the drain plug and the drain cap.
13. Remove the remaining water from the reservoir by dispensing from the cold tap into
a pitcher.
14
Page 15

Step D: Rinse Reservoirs
1. Dispose of the water and bleach mixture and rinse the bottle with tap
water.
2. Fill the bottle with tap water and insert the probe into the bottle.
3. Push the probe down until it is seated.
4. Slide the bottle into the cabinet and close the door.
WARNING
Excessive Weight Hazard
Use two or more people to move and install bottles.
Failure to do so can result in back or other injury.
5. Plug the power cord into a grounded wall outlet.
6. Turn the energy saving switches ON.
7. Allow the water to fill up the empty reservoirs.
8. Wait 10 minutes then turn the energy saving switches OFF and unplug the power
cord.
9. Place a 2 gallon or larger bucket under the drain plug in the rear of the dispenser.
10. Remove the drain cap and the drain plug. Cold water will immediately flow into the
bucket. After several seconds, hot water will be dispensed.
Reminder - place the drain cap and the drain plug in a safe location so that they
will not be lost.
11. Once the unit has been drained, replace the drain plug and the drain cap.
12. Remove the remaining water from the reservoir by dispensing from the cold tap
into a pitcher.
13. Return the unit to its location, install a fresh water bottle, plug the power cord back
into the grounded wall outlet and turn the energy saving switches ON.
14. The display shows the time of the day, and every 30 seconds it will flash the time
of its next self-cleaning, When self-cleaning occurs, it will flash the words: “SELF
CLEANING” Display time setting.
15. How to switch off the beeping signal: the bottle icon on the display will flash and
beep when the bottle is empty. To turn the beeper off, touch the words on the
panel marked BEEP ON/OFF for 3 seconds. The Beep ON or OFF markings are
shown here.
Electrical shock Hazard
Plug into a grounded 3 prong outlet.
Do not remove ground prong.
Do not use an adapter.
Do not use an extension cord.
Failure to follow these instructions can result in death,
fire, or electrical shock.
15
WARNING
Page 16

TROUBLESHOOTING
Dispenser is not operating.
• Make sure that the power cord is properly connected to a working outlet.
Water is leaking.
• Replace water bottle. Most common cause is a cracked bottle.
• The bottle may have a leak. Remove the bottle and replace it with a new bottle.
• If the leak remains, remove the probe from the bottle and call 0-800-1-225588 for
assistance.
Push buttons are stuck and/or faucets are leaking.
• Apply mineral oil (baby oil) to the button slides to reduce friction.
No water is coming from the taps.
WARNING
Excessive Weight Hazard
Use two or more people to move and install bottles.
Failure to do so can result in back or other injury.
• Make sure that the bottle is not empty. If so, replace it. If not, adjust the probe to an
appropriate length. Refer to step 2 in “ Cleaning Prior to Initial Use” section.
• Make sure that you fully press the water controls.
• Make sure that the probe connection with the water bottle forms a complete seal.
• Make sure that the door is closed.
Water dispensed is not cold.
• It takes up to 6 hours after setup to dispense coldest water. Compressor works to build up
ice bank, this is normal.
• Make sure that the back of the dispenser is at least 4 inches from a wall and that air is free
to flow on all 4 sides of the dispenser.
• Make sure that the cold water switch is ON.
Water dispensed is not hot.
• It takes 15-20 minutes after setup to dispense hot water.
• Make sure that the power cord is properly connected to a working outlet.
• Make sure that the hot water switch is ON.
16
Page 17

LED night lights are flashing and the dispenser is making beeping noises.
• Replace the empty bottle. If unavailable, leave the door ajar or unplug the cooler to stop the
beeping noise and the flashing lights.
• There may be an air leak. Check the air hose connections.
Dispenser is noisy.
• Make sure that the dispenser is positioned on a level surface.
Water tastes bad.
• Drain the water from the reservoirs and replace the bottle with a fresh one.
• Clean dispenser as outlined in “ Proper Care & Cleaning ” section.
SOUND’S YOU MIGHT HEAR.
Although all functions are very quiet, you might hear following sound’s:
1. When without display cooler plugged in, air pump for an ozone start to work and last for
12 seconds.
After start up it will work every 4 hours for same period of time.
Coolers with display are programmed to have ozone delivery pump to work every 4 hours
starting from 12 o’clock. Very low humming sound.
2. Water Filtration system delivers water to cold tank. Running water into cold tank can be
heard also, like a miniature water fall, or a fish aquarium. Very low sound.
Water pump sound is greater when filter is used, due to the added load.
If you need assistance call
There are two water level control devices. An Electronic sensor and mechanical float
valve. Electronic sensor activates solenoid shut off valve silently.
Mechanical float valve is similar to toilet bowl float valve. As water level nearing to be full,
near closing the valve higher pitch noise might be heard from the float valve.
This noise will last until cold water tank is full.
0-800-1-225588
.
3. How tank water heater.
During the periods of maintaining steady temperature hot tank operates in silent mode.
When water is dispensed or pre-heat button is activated Turbo function will emit “kettle”
like moderate sound few minutes before it reaches the required temperature.
4. Refrigeration compressor works when water needs to be cooled. It has very low pitch
humming noise like your refrigerator
5. In some cases sound resulting from installation on hard flooring is present. Place Sound
absorbing mat under your cooler to eliminate this noise. Mat is supplied with your cooler.
17
 Loading...