

SHARP
ATOMIC DIGITAL WALL CLOCK
with WIRELESS WEATHER DISPLAY
Instruction
manual
.
..
•
RlEJ
ii
ftlliil
~
•
Thank you for your purchase. The utmost care has gone into the design and
manufacture
of
your clock. Please read these instructions carefully and keep
them for future reference.
This
clock automatically synchronizes itself
to
the
US
Government's National
Institute
of Standards
and
Technology radio signal from Fort Collins, Colorado. The
WWVB radio signal daily broadcast ensures that the atomic clock will always
display
the most accurate date and time. This clock never needs setting.
The weather station is equipped with many functions providing weather
information to you. The receiver unit has a
clear, easy-to-read display that
shows the weather forecast, indoor temperature, time, month, date, as
well
as
the outdoor temperature measured and transmitted from the outdoor
sensor.
The 433 MHz technology means
no
wire installation is required and you can
place the sensor anywhere you like within 100 feet.
ht
Quick Start Set Up: Outdoor Sensor
1. Pick a sheltered place out of direct rain, snow
or
sunlight
2. Insert 2 x
AA
batteries
3.
Replace battery door
2nd
Quick Start Set Up: Weather Station
1.
Insert 2 x
AA
batteries
2. Press re-set button
on
the back of the clock with a
oin
or paperclip to re-start
the
clock. The clock will synchronize with the transmitter set automatically.
3.
The antenna •
'f
" flashes when the clock receives outdoor sensor signal.
NOTE:
When the antenna is flashing, it is searching for the atomic
signal. Please wait
until the flashing stops before y
ou
try
to
setup the clock. The weather station is
disabled while searching for the atomic or the outdoor signal.
PLEASE
NOTE:
· 1. Start this-clock at night and let the clock receieve the signal automatically
past midnight.
2.
Always place the
unit
away
from interfering
sources
such as
TV
set
,
computer,
metal objects and electrical appliances.
3. Areas with
access
to
windows
is recommended for
better
reception.
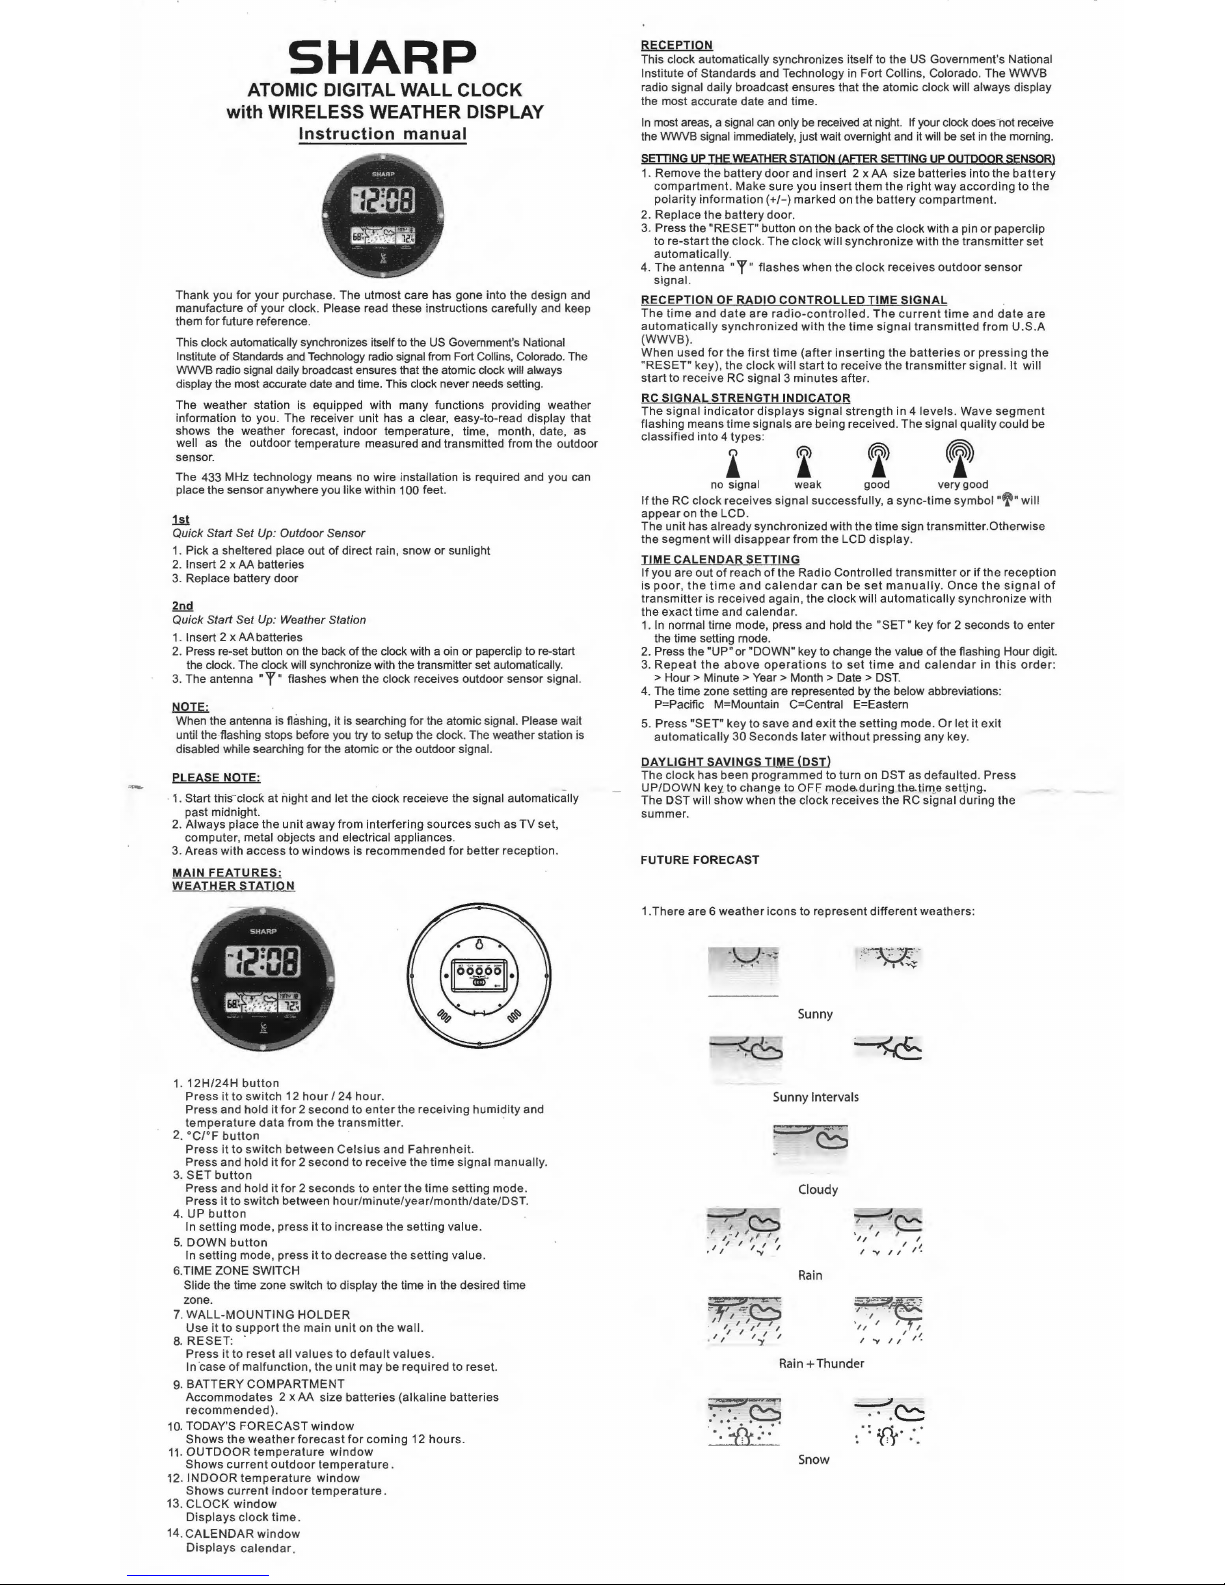
MAIN
FEATURES:
WEATHER
STATION
•
'Sl-1.C.RP
•
~
•
~--
··~n
~
•
1. 12
H/24H
button
Press
it
to
switch
12
hour/
24
hour
.
Press and
hold it
for
2 second to
enter
the
receiving
humi
dity
and
temperature
data
from
the
transmitter.
·
2. °C/°F
button
·
Press
it
to
switch
between
Celsius
and
Fahrenheit.
Press and hold
it
for 2 second
to receive the time signal
manually
.
3.
SET
button
Press and hold
it
for
2 seconds to
enter
the
time
setting mode.
Press
it
to
switch
between
hour/minute/year/month/date/DST
.
4.
UP
button
In setting mode, press
it
to
increase
the setting value.
5.
DOWN
button
In setting mode, press
it
to
decrease
the setting value.
6.TIME ZONE SWITCH
Slide
the time zone switch to display the time in the desired time
zone.
7.
WALL-MOUNTING
HOLDER
Use
it
to
support
the
main
unit
on the
wall.
B.
RESET
: .
Press
it
to
reset
all
values
to
default
values
.
In ·case
of
malfunction, the unit
may
be required to reset.
9.
BATTERY
COMPARTMENT
Accommodates
2 x
AA
size
batteries
(alkaline
batteries
recommended).
1
O.
TODAY'S
FORECAST
window
Shows
the
weather
forecast
for
coming
12
hours.
11
.
OUTDOOR
temperature
window
Shows
current
outdoor
temperature
.
12.
INDOOR
temperature
window
Shows
current
indoor
temperature
.
13.
CLOCK
window
Displays
clock
time
.
14.
CALENDAR
window
Displays
calendar
.
RECEPTION
This clock automatically synchronizes itself
to
the
US
Government's National
Institute
of
Standards and Technology
in
Fort Collins , Colorado. The WWVB
radio
signal daily broadcast ensures that the atomic clock will always display
the most accurate date and time.
In
most areas, a signal
can
only
be
received at night. If your clock does-not receive
the
WWVB signal immediately, just wait overnight
and
it
will
be
set
in
the morning.
SETTING
up
THE
WEATHER
STATION
!AFTER
SETTING
up
OUTDOOR
SENSOR\
1. Remove the battery
door
and insert 2 x
AA
size batteries into the
battery
compartment.
Make sure you
insert
them
the
right
way
according
to the
polarity
information(+/-)
marked on
the
battery
compartment.
2. Replace the
battery
door
.
3.
Press the "RESET" button on the back
of
the clock with a pin
or
paperclip
to
re-start
the
clock. The
clock
will
synchronize
with the
transmitter
set
automatically
.
4. The
antenna
"'f"
flashes
when the
clock
receives
outdoor
sensor
signal.
RECEPTION OF
RADIO
CONTROLLED
TIME
SIGNAL
The
time
and
date
are
radio-controlled. The
current
time
and
date
are
automatically
synchronized
with
the
time
signal
transmitted
from
U.S.A
(WWVB).
When used
for
the
first
time
(after
inserting
the
batteries
or
pressing
the
"RESET"
key), the
clock
will
start
to receive the
transmitter
signal. It will
start
to receive RC signal 3
minutes
after.
RC
SIGNAL
STRENGTH
INDICATOR
The
signal
indicator
displays
signal
strength
in 4
levels
. Wave
segment
flashing means time signals are being received. The signal quality could be
classified into 4
types
:
'
no
signal weak good very good
If
the RC
clock
receives
signal
successfully, a
sync-time
symbol
"f"
will
appear
on the LCD.
The unit has
already synchronized with the time sign transmitter.Otherwise
the
segment
will
disappear
from the LCD
display
.
TIME
CALENDAR
SETTING
If
you are
out
of
reach
of
the Radio Controlled
transmitter
or
if
the reception
is
poor,
the
time
and
calendar
can
be
set
manually.
Once
the
signal
of
transmitter
is received again, the
clock
will
automatically
synchronize
with
the
exact
time and calendar.
1.
In
normal time mode , press and hold the
"SET"
key for 2 seconds to enter
the time setting mode.
2. Press the
"UP" or "DOWN" key to change the value
of
the flashing Hour digit.
3.
Repeat
the
above
operations
to
set
time
and
calendar
in
this
order:
>
Hour>
Minute > Year> Month > Date >
DST.
4. The time zone setting are represented by the below abbreviations:
P=Pacific M=Mountain
C=Central E=Eastem
5. Press
"SET"
key to save and
exit
the setting mode.
Or
let
it exit
automatically
30
Seconds
later
without
pressing any key.
DAYLIGHT
SAVINGS TIME (DST)
The
clock
has been programmed to turn on DST as
defaulted
. Press
UP/DOWN
key
to change to
OFJ=
mode.during the.tirT).e settjng..
The
DST will
show
when the
clock
receives the RC signal during the
summer.
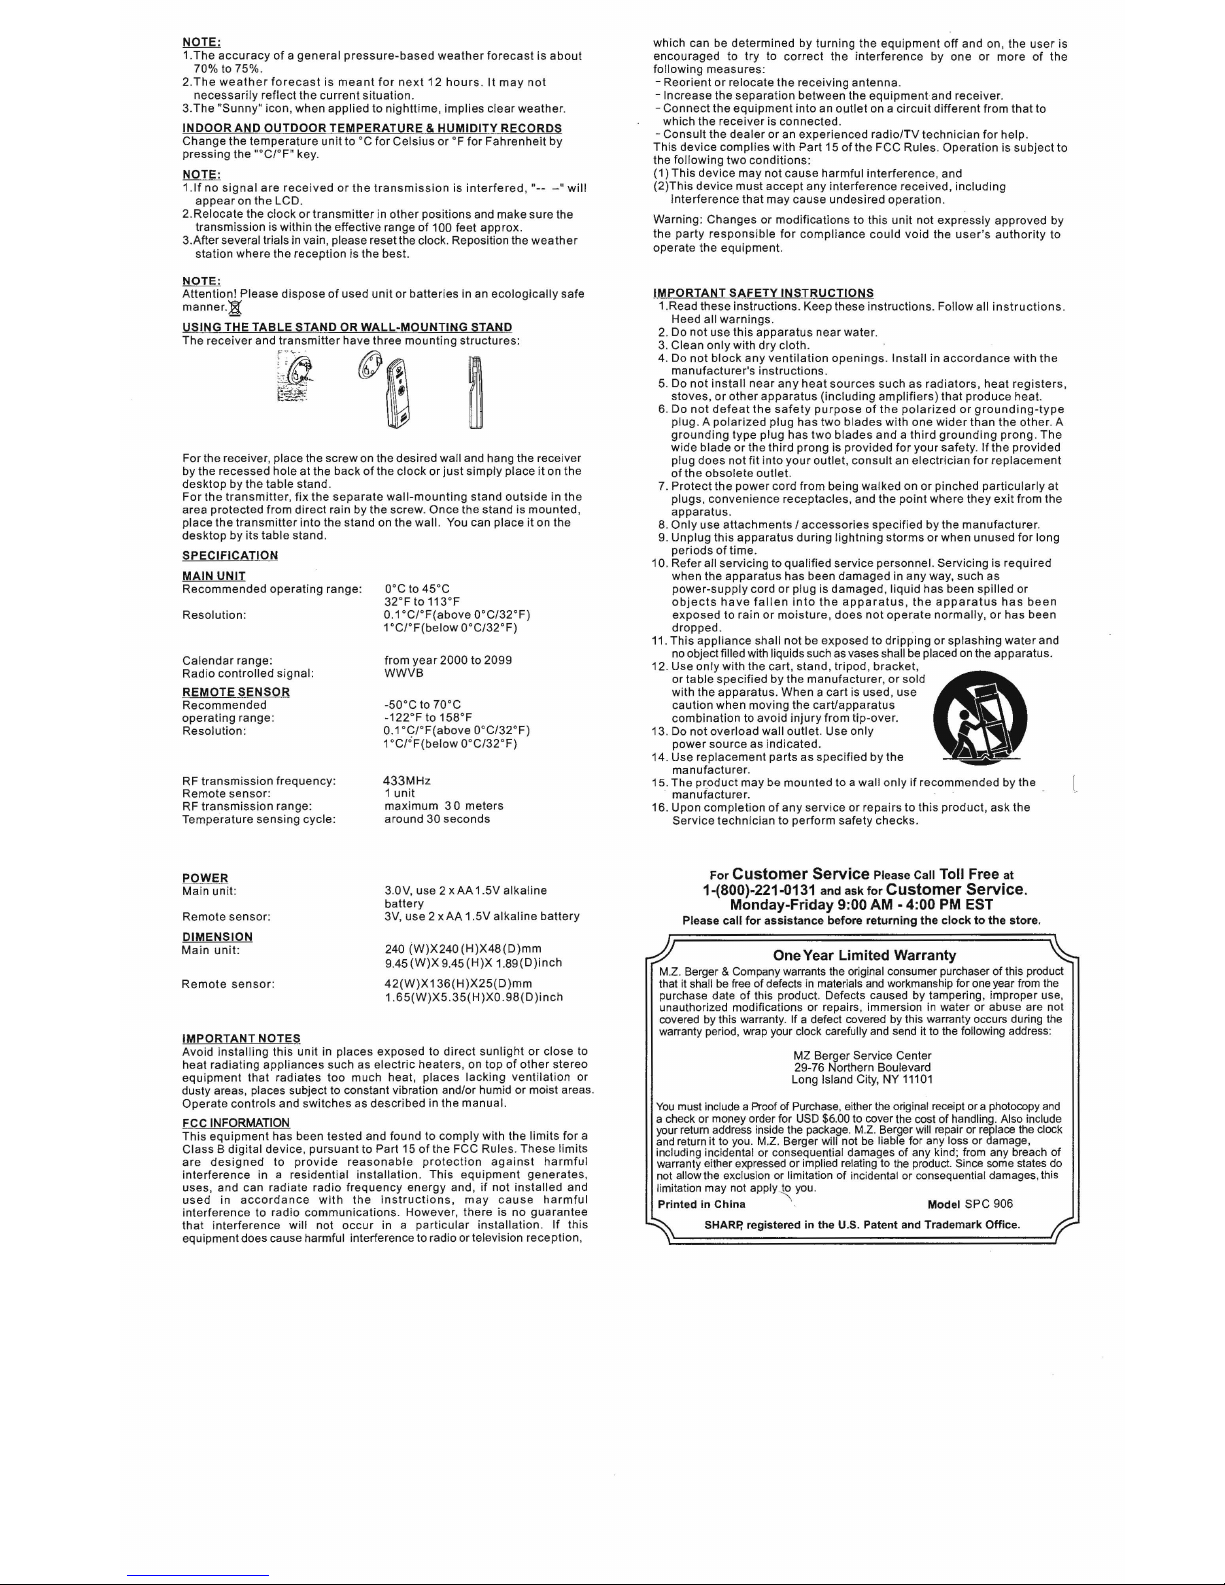
FUTURE FORECAST
1.
There
are 6 weather
icons
to represent
different
weathers
:
'.
Sunny
Sunny
Intervals
Cloudy
~
C:::
• f I
ff
f
1-v111'~
Rain
~~
·:.
":'·}
' f .
'
11
I I I
l"V/1
1
1
~
Rain+
Thunder
~B
.·
.¥it ...
. .
..
. : .
Snow
..__J
·
·.~
..
:rr·
.
. . . .
~
:
..
NOTE:
1.
The
accuracy
of a general
pressure-based
weather
forecast
is
about
70%
to 75%.
2.The
weather
forecast
is
meant
for
next
12
hours. It
may
not
necessarily
reflect
the
current
situation
.
3.The
"Sunny"
icon,
when
applied
to
nightt
ime,
implies
clear
weathe
r.
INDOOR
AND
OUTDOOR
TEMPERATURE & HUMIDITY
RECORDS
Change
the
temperature
unit
to
'C
for
Celsius
or
' F
for
Fahrenheit
by
pressing
the
"'C/'F"
key.
NOTE
:
1.lf
no
signal
are
received
or
the
transmission
is
interfered, "--
-"will
appear
on
the
LCD.
2.Relocate
the
clock
or
transmitter
in
other
positions
and make
sure
the
transmission is within the effective range
of
100 feet
approx.
3.After several trials in vain, please reset the clock. Reposition the
weathe
r
station
where
the
reception
is
the
best.
NOTE
:
Attention!
Please
dispose
of
used
unit
or
batter
ies in an
ecologically
safe
manner.~
USING
THE
TABLE
STAND
OR
WALL-MOUNTING
STAND
The
receiver
and
transmitter
have
three
mounting
structures:
©~
For
the receiver, place
the
screw
on
the
desired
wall
and hang the receiv
er
by
the
recessed
hole
at
the
back
of
the
clock
or
just
simply
place
it
on the
desktop
by
the
table
stand.
For
the
transmitter,
fix
the
separate
wall-mounting
stand
outside
in
the
area
protected
from
direct
rain
by
the
screw.
Once
the
stand
is
mounted,
place
the
transmitter
into
the
stand on
the
wall.
You can
place
it
on
the
desktop
by
its
table
stand.
SPECIFICATION
MAIN
UNIT
Recommended
operating
range
:
Resolution:
Calendar
range:
Radio
controlled
signal:
REMOTE
SENSOR
Recomm
ended
operating
range
:
Resolution
:
RF
transm
iss
ion
frequency:
Remote
sen
sor:
RF
transmission
range:
Temperature
sens
ing
cycle
:
POWER
Main unit:
Remote sensor:
DIMENSION
Main
unit
:
R
emote
sensor:
IMPORTANT
NOTES
O' C to 45'C
32'F to 113'F
0.1
'C/'
F(above O'C/3
2' F)
1
'C/'F(below O'C/32'F)
from
year
2000
to
2099
WWVB
-50
' C to 70' C
-122'F
to
158
'F
0.1 '
C/'F(above O'C/32'F)
1°C/°F(below
O' C/32'F)
433MHz
1
unit
max
imum
3 0
meters
around
30
secon
ds
3.0V, us
e 2 x
AA
1.5V
alkaline
battery
3V,
use
2 x
AA 1.5V
alk
alin e
battery
240
(W)X240(H)X48(D)mm
9.45
(W)X
9.45(
H)X
1.89(D)inch
42(W)X136(H)X25(D)mm
1.65(W)X
5.35
(H)X0.98(D)inch
Avoid i
nstalling this
unit
in
places
exposed
to
direct
sunlight
or
close
to
heat
radiating
app
lian
ces
suc
h as
elect
ric
heat
ers
, on
top
of
other stereo
equipmen
t that
radiates
too
much
heat, places
lacki
ng ventilation
or
du
sty
area
s,
places subject to constant vibration and/or humid
or
moist areas.
Operat
e co
ntrols and swit
ches as
described
in
the
manual.
FCC INFORMATION
Thi
s equipme
nt
has been tested
and
found
to
com
ply
with the li
mits for
a
Class B digital
device, pursuant
to
Part
15
of
the
FCC
Rules
. T
hese
limits
are
designed
to
provide reas
onable
protection
aga
inst
harmfu
l
interference
in
a reside
ntial
ins
tallation. This equipment
generates,
use
s,
and
can
radiate
radio
frequency
energy
and, if
not
installed
and
us
ed
in
accordance
with
the instruct
ions,
may cause harmf
ul
interferen
ce
to
radio
communications.
However, there
is no
guarantee
that interf
ere
nce
will not
occur
in a
particular inst
alla
tion
. If
this
equipment does cause harmful interference to radio or television r
ecep
tion,
which
can
be
determined
by
turning
the
equipment
off
and
on,
the
user
is
encouraged
to
try
to
correct
the interference
by
one
or
more
of
the
following
measures:
-
Reorient
or
relocate
the
receiving
antenna
.
-
Increase
the
separation
between
the
equipmentand
receiver.
-
Connect
the
equipment
into
an
outlet
on a
circuit
different
from
that
to
which
the
receiver
is
connected
.
-
Consult
the
dealer
or
an
experienced
radio/TV
technic
ian
for
help.
This
device
complies
with
Part
15
of
the
FCC
Rules.
Operation
is
subject
to
the
following
two
conditions:
(1)
This
device
may
not
cause
harmful
interference
, and
(2)This
device
must
accept
any interference
received,
including
I
nterference
that
may
cause
undesired
operation.
Warning:
Changes
or
modifications
to
this
unit
not
express
ly
approved
by
the
party
responsible
for
compliance
could
void
the
user
's
authority
to
operate
the
equipment.
IMPORTANT
SAFETY
INSTRUCTIONS
1.Read these instructions. Keep these instructions. Follow all
instructions
.
Heed
all
warnings.
2.
Do
not
use
this
apparatus
near
water.
3.
Clean
only
with
dry
cloth.
4.
Do
not
block
any
ventilation
openings.
Install
in accordance
with
the
manufacturer's
instructions.
5.
Do
not
install
near
any
heat
sources
such
as
radiators,
heat
registers
,
stoves,
or
other
apparatus
(including
amplifiers)
that
produce
heat.
6.
Do
not
defeat
the
safety
purpose
of
the
polarized
or
grounding-type
plug. A
polarized
plug
has
two blades
with
one
wider
than
the
other
. A
grounding
type
plug
has
two blades
and a third
grounding
prong. Th
e
wide
blade
or
the
third
prong
is
provided
for
your
safety. If
the
provided
plug
does
not
fit
into
your
outlet, co
nsult
an
electrician
for
rep
lacement
of
the
obsolete
outlet.
7.
Protect
the
power
cord
from
being
walked
on
or
pinched
particular
ly
at
plugs,
convenience
receptacles,
and
the poi
nt
where
they
exit
from
the
apparatus.
8.
Only
use
attachments I acc
essories
specified
by
the
manufacturer.
9.
Unplug
this
apparatus
dur
ing
lightning
storms
or
when
unused
for
long
periods
of
time
.
10.
Refer
all servicing to qualified
service
personnel. Servicing
is
required
when
the
apparatus
has
been
damaged
in any
way,
such
as
power-s
upply
cord
or
plug
is
damaged,
liquid
has
been
spilled
or
objects
have fallen into
the
appa
ratus, the
appara
tus
has
been
exposed
to
rain
or
moisture, does
not
operate
normally, or
has
been
dropped
.
11. This
appliance
shall
not
be
exposed
to
dripping
or spl
ashing
water
and
no object filled with liquids such as vases shall be placed on the apparatus.
12
Use
only
with
the
cart,
stand, tripod,
bracket,
or
table
specified
by
the
manuf
acturer,
or
sold
•
with
the
apparatus. When a cart
1s used,
use
ca
ution
when
moving
the
car
t/appara
tus
combination
to
avo
id
injury
from tip-ove
r. •
13
Do
not
overload
wall
outlet Use
only
:.\
power
source
as
indicated.
t~
14.
Use
replacement
parts
as
specified
by
the
~
manufacturer.
15. The
produ
ct
may
be
mounted
to a wa
ll o
nly
if rec
ommen
ded
by
the
·
manufacture
r.
16. Upon
completion
of
any
serv
ice
or
repairs
to this
pro
duct,
ask
the
Service
technician
to
perform
safe
ty
checks.
For
Customer
Service
Please
Call
Toll Free
at
1-(800)-221-0131
and
ask
for
Customer
Service.
Monday-Friday 9:00 AM - 4:00
PM
EST
Please
call
for
assistance
before
returning
the
clock
to
the
store
.
One Year Limited Warranty
M.Z. Berger & Company warrants the original consumer purchaser
of
this product
that it
sha
ll
be free
of
defects
in
materials a
nd workm
ans
hip
for one year from the
p
ur
chase date
of
this product. Defects caused
by
tampering, improper use,
u
na
uthorized modificat ion s or repairs, immersion in water or abuse are not
covered
by
this warranty. If a defect covered by this warranty occurs during the
warranty
pe
riod, wrap your clock carefully and se
nd
it to the following address:
MZ Berger
Service Center
29-76 Northern
Boulevard
Long Island City,
NY
11101
You
must include a Proof of Purcha
se, eith
er the origin
al
rec
eipt or a photocopy
and
a check or money order for
USD
$6.00 to cover the cost of handling. Also include
your return address inside the package. M
.Z.
Berger will repair or replace the clock
and
return it to you. M.Z. Berger will not be liable for any loss or damage,
including incidental or consequential damages
of
any kind; from any breach
of
warranty either expressed or implied relating to the product. Since some states do
not
allow the exclusion or limitation
of
incidental
or
consequential damages, this
limitation may not
apply~
you.
Printed
in
China . Model
SPC
906
SHARP,
registered
in
the U.S. Patent and Trademark Office.
 Loading...