

Page 1
SHARP.
Instruction
Manual & Warranty
Thank you for your purchase of this quality clock. The utmost care has gone into the design and
manufacture of your
clock. Please read these
instructions carefully and store them in a safe
pla
ce
for
future reference.
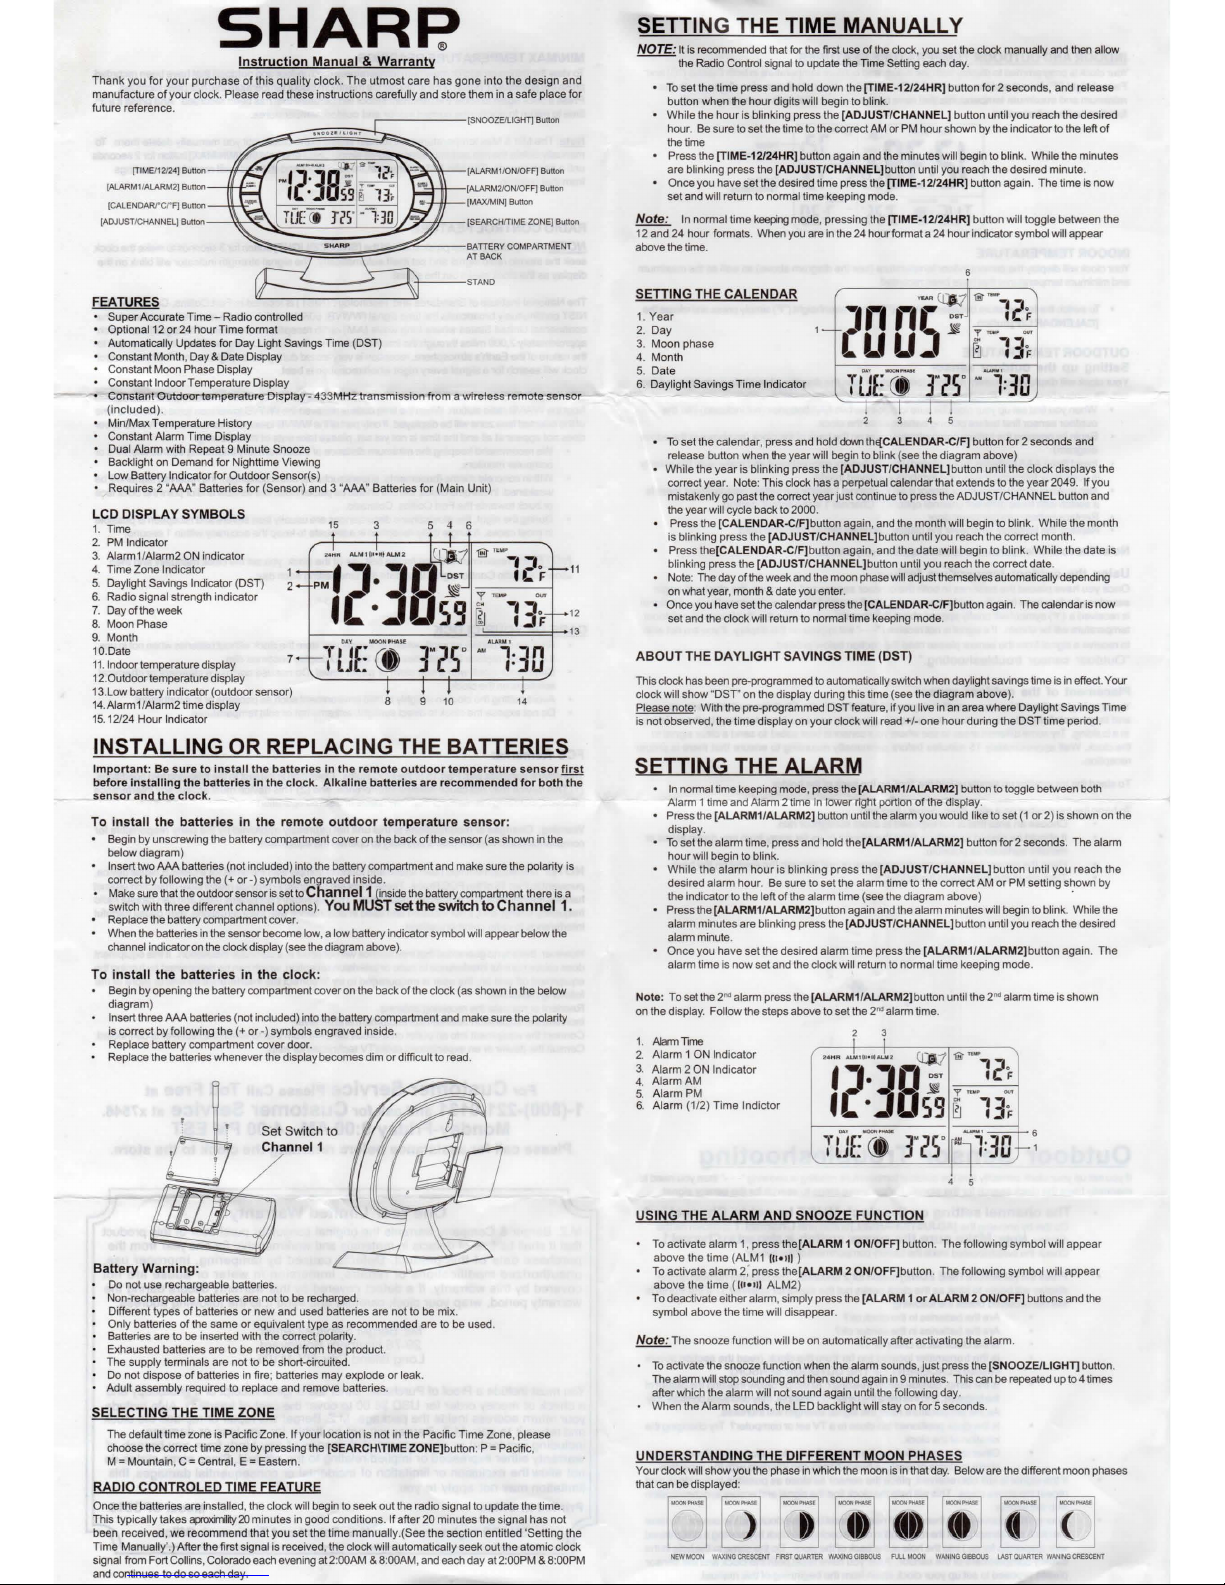
(TIME/12/24}
Button--,,
-:ii;::.0-1
L.....-
-..r-(ALARM1/0N/OFF] Button
[ALARM1/ALARM2] Bunon [ALARM210N/OFF] Butt
on
[CALENDA
RrCl"F]
Button [MAX/MIN} Button
[ADJUST/CHANNE
L}
Button---~
:~;;;;::::::~=~:;::;~~~
~
[SEARCHITIME
ZONE]
Button
:::::,""=::.:;=:~;;;;,=;'::::=""",:::;=----
BATIERY
COMPARTMENT
AT
BACK
FEATURES
Super Accurate Time - Radio ccntrol
led
Optional
12
or
24
hou
r Time format
Automatically Updates for Day Light Savings Time (DST)
Constant Month, D
ay
& Date Display
Constant Moon Phase Display
Constant Indoor Temperature Display
eonstar1t
Outdoortemp
·erature1.:>isptay- 43SMHz
transmission from
a wireless r
emote
sense
(i
ncluded).
Min/Max Temp
era
ture History
Constant
Alarm Time Display
Dua
l Alarm with
Repeat 9 Minute Snooze
Backlight
on
Demand for Nighttime Viewing
Lo
w Battery Indicator for Outdoor Sensor(s)
Requires 2
"AAA" Batteries for (Sensor) and 3 "AAA" Batteries for (Main Unit)
LCD
DISPLAY
SYMBOLS
1.
nme
2.
PM
Ind
icator
3.
Alarm1
/Alarm2
ON
indicator
4. Time
Zone Indicator
5. Daylight Savings Indicator (DST)
6. Radio signal strength Indicator
7. Dayoft
heweek
8. Moon Phase
9. Month
10.Date
11.
lndoortemperature display
12
.0utdoor temperature display
7
13
.Low battery indicator (outdoor sensor)
14.Alarm1
/Alarm2 time display
15. 12124
Hour Indicator
15
5 4
6
ALM1!h•ll)Al.M2
I
PM'~,.~'"
iT
l(·)Qsg
'"
MOOH'HJ.SI!
·r1
'f
Cl
I l.J :
3"~5
0
8
10
®"Tl.UP
-.
='·
·~
F
'f
·
~
'"
-.
-·
~
•
:ti=
""i'.3n
..
,.
u
14
INSTALLING OR REPLACING THE BATTERIES
11
12
13
Important:
Be
sure
to
install
the
batteries
in
the
remote
outdoor temperature
sensor
first
before
installing
the batteries in the
clock
. Alkaline batteries are
recommended
for
both
the
sensor
and
I.be
clock
.
To i
nstall
the
batteries
in
the
remote
outdoor
temperature
sensor
:
Begin
by
unscrewing the battery compartment ccver on
the
back of the sensor (as shown
in
the
below diagram)
Insert two AAA batteries (not inc
lud
ed) into the battery compartment and make sure the polarity is
correct by
following the(+
or-)
symbols engraved inside.
Make
sure
that
the
outdoor sensor is setto Channel 1 (inside
the
battery_
ccmpartment there is a
switch with three different
channel options). You MUST set the switch to
Channel
1.
Replace
the
battery ccmpartment ccver.
When the batteries
in
the
sensor beccme low, a
low
battery indicator symbcl will appear below
the
channel indicator
on
the
clock display
(see
the
diagram abcve).
To
install
the
batteries
in
the
clock:
Begin by opening
the
battery ccmpartment ccver on
the
back of
the
clock (as shown in
the below
diagram)
Insert three
AAA
batteries (not included) into
the
battery ccmpartment and make sure the polarity
is correct by following the(+
or-)
symbols engraved inside.
Replace battery compartment ccver door.
Replace the batteries whenever the display becomes dim or difficult
to
read.
Battery
Warning
:
Set Switch to
Channel
1
Do not use rechargeable batteries.
Non-rechargeable batteries
are
not to
be
recharged.
Different types
of batteries or new and used batteries are not to be mix.
Only batteries of the same or equivalent type
as
recommended are
to
be
used.
Batteries are to
be
inserted with
the
ccrrect polarity.
Exhausted batteries are to be removed from the product.
The supply terminals are
not
to be short-circuited.
Do
not dispose of batteries
in
fire; batteries may explode or leak.
Ad
ult assembly r
equ
ired
to
replace a
nd
remove batteries.
SELECTING
THE TIME ZONE
The
default time zone is Pacific Zone. If your location is not
in
the Pacific Time Zone, please
choose the correct time zone by pressing
the
[SEARCHITIMEZONE]button: P =Pacific,
M =Mountain ,
C =Central, E
=Ea
stern.
RADIO
CONTROL
ED
TIME FEATURE
Once the batteries are installed, the clock will begin
to
seek out
the
radio signal
to
update the time.
Th
is
typically takes
aproximnrty
20
minutes
in
good conditions. If after 20 minutes the sign
al
has not
been received, we
recommend that you set the time manually.(See the section entitled 'Setting the
Time
Manually'
.)
After the first signal is received,
the
clock will
automatically seek out the atomic clock
signal
from
Fort
Collins, Colorado
each
evening
at
2:00AM & B:
OOAM, and
each
day
at
2:00
PM & B:OOPM
and
continues
to
do
so
each
day.
SETTING THE TIME
MANUALLY
NO
TE:
It
is
reccmmend
ed
that
for
the
first
use
of
the
clock,
you
set
the
clock manually and
then
allow
---
the
Radio
Control
signal
to
update
the
nme
Setting
each
day.
To
set the time press and hold down the [TIME-12124HR] button
for2
seconds, and release
button when
the
hour digi
ts
will begin to blink.
While
the hour is blinking press the [ADJUST/CHANNEL] button until you
rea
ch the desired
hour.
Be
sure
to
set
the
time
to
the
ccrrect
AM
or
PM
hour shown by
the
indicator
to
the
left of
the
time
Press the [TIME-12/24HR] button again and the minutes will
begin
to
blink. While the minutes
are
blinking press the [ADJUST/CHANNEL] button unt
il
you rea
ch
the desired minute.
Once you have set the desired time press
the
[TIME-12124HR] button again. The time
is
now
set and
will return to normal time keepi
ng
mode.
Note:
In
normal lime keeping mode, pressing
the
[TIME-12/24HR] button will toggle between the
12
and
24
hour formats. When you are
in
the
24
hour format a
24
hour i
ndi
cator symbcl will appear
abcve
the
time.
SETIING
THE
CALENDAR
·1nr1r
~
®-
-·(!·
1-
F
-
(Lf
U)
~
'I'
...
~
~
-·3
~
'
1:
1. Year
2.
Day
3. Moon phase
4. Month
TfJE
Ct
3"25
"
~ ~,"3"
,.
u
5. Date
6. Daylight Savings Time
Ind
icator
I I
I I
To
set the calendar, press and ho
ld
cbM1
th
e{CALENDAR-C/F] button for 2 seconds and
release button when the year will begin
to
blink (see
the
diagram above)
While the year is blinking press the [ADJ UST/CHANNEL] button until the clock displays the
correct year. Note: This
clock has a perpetual calendar that extends to
the
year 2049.
If
you
mistakenly go past the ccrrect year just contin
ue
to
press
the
ADJUST/CHANNEL button and
the
year will cycle back
to
2000.
Press the [CALENDAR-C/F] button again,
and
the month will begin
to blink. While
the
month
is
blinking press the [ADJUST/CHANNEL] button until you reach
the
correct month.
Press the[CALENDAR-C /
F]
button again, and the date will begin
to
blink. While the date is
blinking press the [ADJUST/CHANNEL] button until you reach the correct date.
Note: The day of
the
week
and
the
moon
phase will
adjust themselves automaticall
y depending
on
what year, month & date you enter.
Once
you have
set
the
cale
ndar press
the
[CALENDAR-C/F]button again . The calendar
is
now
set
and
the clock will return
to
normal lime keeping mode.
ABOUT
THE DAYLIGHT SAVINGS TIME (DST)
This clock
has
been
pre-programmed to automatically switch when daylight savings time is
in
effect. Your
clock will show "DST"
on
the display during this time (see the diagram above).
Please note: With
the
pre
-programmed DST f
eatu
re, if you live
in
an
area where Daylight Savings Time
is not observed, the lime
display on your clock will read+/- one hour during the DST lime period.
SETTING THE ALARM
In
normal time keepi
ng
mode, press
the
(ALARM1/ALARM2] butt
on
to
toggle between
both
Alarm 1 lime and Alarm 2 time
In
lower~ght
portion of
the
display.
Press
the
(ALARM1/ALARM2] button until
the
alarm you would like
to
set
(1
or 2) is shown
on
the
display.
To
set the alarm time, press and hold
the
[ALARM1/ALARM2] button for 2 seconds. The alarm
hour will begin
to
blink.
While
the alarm hour is blinking press the [ADJUST/CHANNEL] button until you reach the
desired
alarm hour.
Be
sure to set the alarm lime
to
the correct
AM
or
PM
setting shown by
the indicator
to
the left of
the
alarm time (see
the
diagram above) ·
Press
the
[ALARM1/ALARM2]bu
tton
again
and
the al
arm
minutes will begin to blink. While
the
alarm minut
es
are blinking press the [ADJUST/CHANNEL] button until you reach the desired
alarm minute.
Once you have set the desired alarm time press the [ALARM1/ALARM2]button again. The
alarm time is now set and
the
clock will return
to
normal time keeping mode.
Note: To set
the 2'"
alarm press the [ALARM1/ALARM2] button until
the 2"'
alarm time is shown
on
the display. Follow the steps above
to
set the 2
'"
alarm time.
1. Alarmnme
2. Alarm 1
ON
Indicator
3. Alarm 2
ON
Indicator
4. AlarmAM
5.
Alarm
PM
6. Alarm (1/2) Time Indicter
USING THE
ALARM
AND
SNOOZE FUNCTION
To
activate alarm
1,
press the[ALARM 1 ON/OFF] button. The following symbol will appear
above the time (ALM 1
(
11.,11
)
To
activate alarm 2; press
the
[ALARM 2 ON/OFF]button. The following symbol will appear
above the lime
(111•111
ALM2)
To deactivate
ei
ther alarm, simply press the [ALARM 1
or
ALARM 2 ON/OFF] buttons and
the
symbcl above the time will disappear.
Note: The snooze function will be on automatically after activating the alarm.
To
activate
the
snooze function when the alarm sounds, ju
st
press
the
[SNOOZE/LIGHT] button.
The
alarm
will
stop sounding
and
then
sound
again
in
9 minutes. This
can
be
repeated
up
to
4 times
after which the
alarm will not sound again until
the
following day.
When the
Ala
rm
sounds, the
LED
backlight will stay on for 5 seconds.
UNDERSTANDING
THE DIFFER
ENT
MOON PHASES
Your
clock will
show
you the phase in which the moon is in that day. Below are the different moon phases
that can be displayed:
[]
[]]
[J [i] i
iJ
[]
[]
NEW
r.tOON
WAXING
CRESCENT
FIRST
QUARTER
WAXING
GIBBOUS
AA.I.
MOON
WANING
GIBSOUS
I.AST
QUARTER
WAN!NG
CRESCENT
Page 2
INDOOR AND OUTDOOR TEMPERATURE FEATURES
Your
clock is programmed to display both the
ind
oor
and
outdoor temperature
in
both Celsius (°C)
and
Fairenh
eight (°F)
format and the moon pha
se
for each da
y.
Your clock can also display both the
minimum and
maximum
temperatures
that
have
been
recorded. Below
is a
summary
of
each
function and how it operates.
AU11llt•!llAUU
C!:l1
@-
,2
·
PM:~:3Bfg
I F
'f-·
-
~
,3-
1-
F
T•'ECI
1
lJ
r2s
·
~
,.
3n
,.
u
INDOOR TEMPERATURE
-
-
Indoor
Temperature
Outdoor
Temperature
Your
clock will
display
the
current indoor temperature (see
the
diagram above)
as
well
as
the
maximum
and
minimum temperatures that have
been
recorded.
To
switch
the
temperature between Celsius (°C)
and
Fairenheight
(°
F) simply press ard
release
the
[CALENDAR C/
F]
button.
OUTDOOR TEMPERATURE
Setting up the outdoor sensor
Your
clock
will
display
the
current
outdoo
r temperature (see
the
diagram above)
via
a wireless
outdoor
remo
te
sensor (inclu
ded
).
To set
up
the
outdoor sensor follow
these
steps
:
W
hen
you first set
up
you
r clock
be
sure
to
place
the
two AAA batteries (not included) into the
outdoor sensor
first
before
placi
ng
batteries
into
the
clock.
Begin by opening the battery compartment cover on
the
back of the clock (as shown
in
the
adove
diagram)
In
sert three AAA batteries (not included)
into
the
battery compartment
and
make sure
the
polarity
is correct
by
following the
(+or-)
symbols engraved inside.
Also make
su
re
that
the
outdoor sensor
is
set
to
channel 1 (inside
the
battery compartment there is
a switch with three different channel options).
Channel 1 is the default setting.
Replace battery compartment door.
Replace the
batteries whenever the display becomes dim or difficult
to
read.
Note:
Th
e outdoor temperature is updated approx. every minute.
Using the outdoor temperature feature
Once you have placed the batteries
in
both the outdoor sensor and the clock, the clock will begin
searching for the signal from the outdoor
se
nsor
(s).
It
will search for channel 1 automatically. If a signal
is
received a
('f)
symbol will briefly appear above the channel i
ndicator on the display and the outdoor
temperature
will
be
shown. If a signal
is
not received ·- - -"will appearon
the
display.
If
you
are
notable
to
receive a sig
nal
from the sensor please
read
the
section below entitled
"Outdoor sensor troubleshooting."
Placement of the outdoor sensor
Yo
u should place
the
outdoor sensor within
approx.
90
feet of
the
clock.
Obsticles such
as;
walls.
concrete
and large metal objects can reduce the reinge. Reception can also be determined
by
the materials
in a building
. T
ry
some
different
areas
to
see
where
your
sensor is
best
suited
to
send
a clear s
ignal
to
the clock. Wait approximately 15 minutes before permanetly mounting to ensure that there is proper
reception.
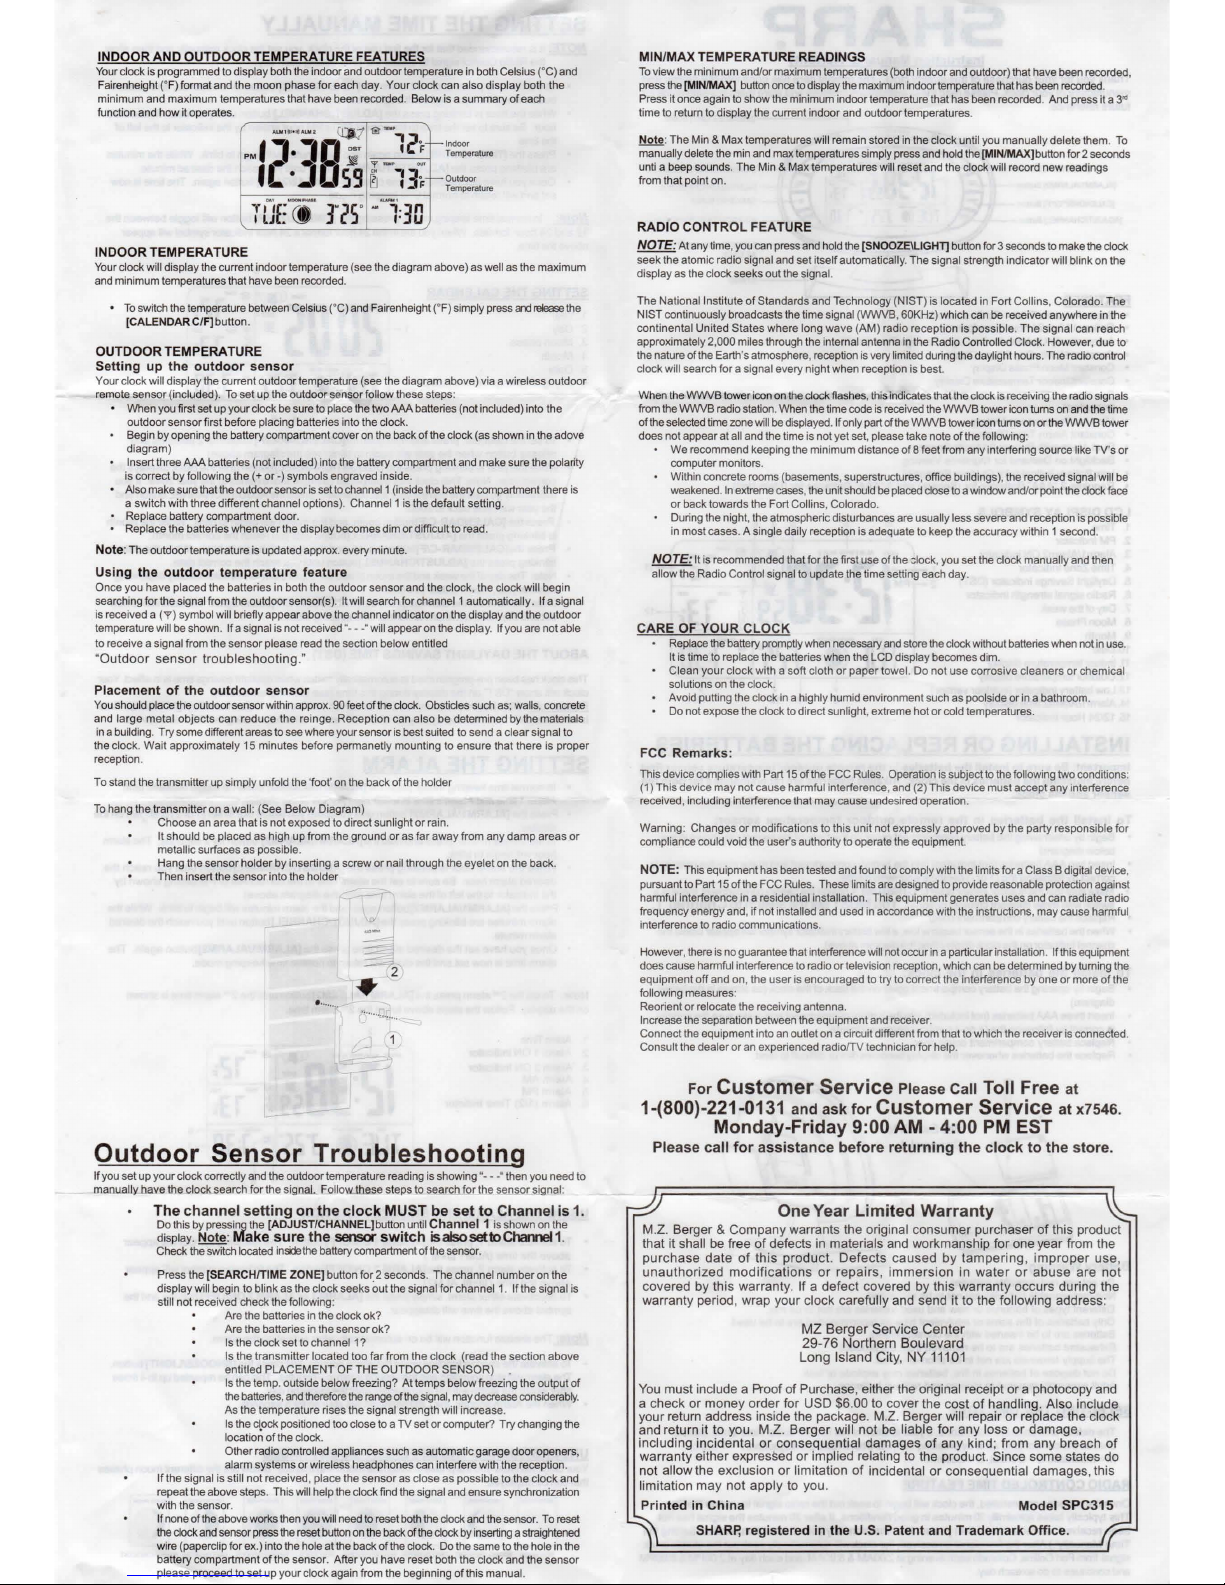
To stand
the
transmitter up simply unfold
the
'foo
t'
on
the
back of
the
holder
To
hang the transmitter on a wall
: (See Bel
ow
Diagram)
Choose
an
area that is not exposed
to
direct sunlight or rain.
It
should
be
placed as high
up
from the ground or as far away from any damp areas or
metallic
surfaces
as
possible.
Hang
the
sensor holder by inserting a screw or nail through the eyelet
on
the back.
Th
en insert
the
sensor into
the
holder
~
~
..
, 2
•
·····
......... J ...
Outdoor Sensor Troubleshooting
If
you
set
up
your
clock
correctly
and
the
outdoor
temperature
reading
is
showing"- - _
..
then
you
need
to
manually.have the
..c
lock search for the sigoal. EoJlol'i.ltles.e steps to S'lfilcilfQ.r the sensor sjgnal:
The channel setting on the clock MUST be set to Channel
is
1.
Do
this
by
pressi!19
the
[ADJUST/CHANNEL]butto~
un
til
~hannel
1
is
shown on
the
display. Note: Make sure the sensor switch isalsosettoChannel
1.
Check
the
switch located imtlethe battery compartment of
the
sensor.
Press
the
[SEARCH/TIME ZONE] button for 2 seconds. The channel number
on
the
display
will begin to blink as
the
clock seeks out
the
signal for channel 1. If the signal is
still not received check the following:
Are the
batteries
in
the clock ok?
Are the
batteries
in
the
sensor ok?
Is
the clock set
to
channel
1?
Is the transmitter located too far from the clock (read the section above
entitled
PLACEMENT OF THE OUTDOOR SENSOR)
Is
the temp. outside bel
ow
freezing? At temps below freezing the output of
the
batteries,
and
therefore
the
range
of
the
signal,
may decrease considerably .
As the temperature rises the signal strength
will increase.
Is
the
ctock positioned
too
close
to a TV
set or compute
r?
Try changing the
location of the clock.
Other radio controlled appliances such
as
automatic garage door openers,
alarm
systems
or
wireless
hea
dphon
es can interfere
with
the rece
ptio
n.
If the signal is still not received, place the sensor
as
close as possible to the clock and
repeat
the
above steps. This will help
the
clock
find
the
signal
and
ensure synchronization
with the sensor.
If
none
of
the
above works
then
you
will
need
to
res
et both
the
clock a
nd
the
sensor.
To
reset
the
clock
and
sensor press
the
reset
button
on
the
back
of
the
clock
by
inserting a straigh
tened
wi
re
(paperclip for ex.) into the hole
at
the
back of the clock.
Do
the
same
to
the hole
in
the
battery compartment of the sensor. After you have reset both the clock and the sensor
please proceed to set up your
clock again from the beginning of this manual.
MIN/MAX TEMPERATURE READINGS
To
view the minimum and/or maximum temperatures (both indoor
and
outdoor) that have been recorded,
press
the
[MINIMAX]
button
once
to
display
the
maximum
indoor temperature that
has
been
recorded.
Press it once again
to
show the minimum indoor temperature that has
been
recorded.
And
press it a 3"
time
to
return
to
display the current indoor and outdoor temperatures.
Note: The Min & Max temperatures
wi
ll
remain sto
red
in
the clock until you manually delete them.
To
manually delete
the
min
and
max temperatures simp
ly
press
and
hold
the
[MINIMAX]
button for 2 seconds
unti
a beep sounds. The Min & Max temperatures will reset and
the
clock will record new readings
from that point
on
.
RADIO CONTROL FEATURE
NOTE: At any
time, you
can
press a
nd hold
the
[SNOO
ZE\LIGHl]
button
for
3 seconds
to
make
the
clock
seek the atomic radio signal and set itself automatically. The signal strength indicator will
blink on the
display as
the
clock seeks out
the
signal.
The National Institute
of
Standards and Technology (NIST) is located
in
Fort Collins, Colorado. The
NIST continuously broadcasts
the
time signal (WWVB, 60KHz) which can
be
received anywhere
in
the
continental United States where long wave (AM) radio reception is possible. The signal can reach
approximately
2,000 miles through the internal antenna
in
the Radio Controlled Clock. However, due to
the nature of
the
Earth's atmosphere, reception
is
very limited during
the
daylight hours. The radio control
clock will search for a signal every night when reception is best.
When
the
WWVB
tower
icon
on
the
clock
flashes, this
ind
icates
that
the
clock
is
receiving
the
radio
signals
from
the
WWVB
radio station.
When
the
time code
is
recei
ved
the
WWVB tower
icon
turns
on
and the time
of
the
selected time zone
will
be
displayed. If only part
of
the
WWVB
tower
ico
n
tu
ms on or
the
WWVB
tower
does not appear at
all
and the time is not yet set, please take note of
the
following:
We recommend keeping the minimum distance of 8 feet from any
interfering source like TV's or
computer
monitors
.
Within concrete rooms (basements, superstructures, office buildings),
the
received signal will
be
weakened.
In
extreme
cases, the
unit
should
be
placed
close
to
a window
and/or
point
the
clock
face
or back towards
the
Fort Collins. Colorado.
During the night, the atmospheric disturbances are usually
less severe and reception
is
possible
in
most
cases. A single
dail
y reception
is
adequate
to
keep
the
accuracy
within 1 second
.
NOTE: It is recommended that for
the
first use of
the
:lock, you set
the clo
ck
manually and then
allow the Radio Control signal to update the time setting each day.
CARE
OF
YOUR CLOCK
Replace
the
battery promptly
when
necessary
and
store
the
clock without batteries when
not
in
use.
It
is
time
to
replace the batteries when the LCD display becomes
dim
.
Clean your clock with a soft cloth or paper towel. Do not use corrosive cleaners
or
chemical
solutions
on
the clock.
Avoid putting the clock
In
a highly humid environment such
as
poolside or
in
a bathroom.
Do not expose the
clock
to
direct sunlight, extreme hot or cold temperatures.
FCC Remarks:
This device complies with Part
15
of
the FCC Rules. Operation
is
subject
to
the
following two conditions:
(1) This
devi
ce
may
not
cause
harmful
interference,
and
(2) This device
must
accept any interference
received, including
interference
that
may cause
und
esired
operation.
Warning: Changes or modifications
to
this unit not expressly approved
by
the party responsible for
complian
ce
cou
ld
void
the
user's authority
to
operate
the equipment.
NOTE:
Th
is equipment has
been
tested and found
to
comply with
the
limits for a Class B digital device,
pursuant
to
Part 15 of
the
FCC Rules. These limits
are
designed
to
provide reasonable protection against
harmful
interference
in a residential
installation. This
equipment generates
uses
and
can
radiate
radio
frequency energy and, if not installed and used
in
accordance with the instructions, may cause harmful
interference
to
radio
communications.
However, there is
no
guarantee
that
interference
will
not
occur
in
a particular installation. If
thi
s equipment
does cause harmful interference to radio or television reception, which
can
be
determined
by
tu
ming
the
equipment off and on, the user is encouraged
to
try to correct the interference by one or more of the
following
measures:
Reorient
or
relocate
the
receiving
antenna .
Increase
the
separation
between
the
equipment
and
receiver
.
Connect
the
equipment
into
an
outlet
on a circuit
different
from
that
to
which
the
receiver
is
connected.
Consult the dealer or an experienced
radiorrv
technician for help.
For Customer Service Please Call Toll Free at
1-(800)-221-0131 and ask for Customer Service at x7546.
Monday-Friday 9:00 AM - 4:00
PM
EST
Please call for assistance before returning the clock to the store.
One Year Limited Warranty
M.Z.
Berger & Company warrants the original consumer purchaser of this product
that it
shall
be
free of defects
in
materials
and
workmansh
ip
for o
ne
year from the
purchase date
of
this product. Defects caused by tampering, improper use,
unauthorized modifications or repairs, immersion in water or abuse are not
covered by this warranty.
If a defect covered
by
this warranty occurs during the
warranty period, wrap your
clock carefully and send it to the following address:
MZ
Berger Service Center
2g_75 Northern Boulevard
Long Island City, NY
11101
You
must include a Proof of Purchase, either the original receipt or a photocopy and
a check or money order for
USO
$6.00 to cover the cost
of
handling. Also include
your return address inside the package.
M.Z.
Berger will repair or replace the clock
and retu
rn
it to you. M.Z. Berger will not
be
liable for any loss or damage,
including incidental or conse quential damages
of
any kind
; from any breach
of
warranty either expressed or implied relating
to
the produ
ct.
Since some states
do
not allow the exclusion or limitation of incident
al
or consequential damages, this
limitation may not
apply
to
you.
Printed
in
China
Model
SPC315
SHARP,
registered
in
the U.S. Patent and Trademark Office.
 Loading...