

Page 1
“Plasmacluster” and “Device of a
cluster of grapes” are trademarks of
Sharp Corporation.
“Plasmacluster” et “Device of a
cluster of grapes” sont des marques
commerciales de Sharp Corporation.
SJ-XG640M
SJ-XG690G
SJ-XG690M
SJ-XG740G
SJ-XG740M
Refrigerator-Freezer
Operation manual ........................... EN-1 – EN-14
Frigorico-Congelador
Manual de manejo ............................ES-1 – ES-14
Refrigerateur-Congelateur
Mode d’emploi .................................FR-1 – FR-14
Frigoríco-Congelador
Funcionamento manual ................... PT-1 – PT-14
Ψυγειο - Καταψυκτης
Εγχειριδιο λειτουργιας .................... EL-1 – EL-14
Kühlschrank mit Tiefkühlfach
Bedienungsanleitung ..................... DE-1 – DE-14
Koelkast-Vriezer
Gebruiksaanwijzing ..........................NL-1 – NL-14
Chłodziarko - Zamrażarka
Instrukcja obsługi ............................. PL-1 – PL-14
Hűtőszekrény-Fagyasztó
Használati utasítás ..........................HU-1 – HU-14
Frigider-Congelator
Manual de utilizare ........................ RO-1 – RO-14
Chladnička-Mrazák
Návod k obsluze .............................. CS-1 – CS-14
Chladnička-Mraznička
Návod na obsluhu .......................... SK-1 – SK-14
Šaldytuvas - Šaldiklis
Eksploatavimo instrukcija . .............. LT-1 – LT-14
Ledusskapis – Saldētājkamera
Rokasgrāmata ..................................... LV-1 – LV-14
Külmik-Sügavkülmik
Kasutusjuhend .................................. ET-1 – ET-14
Hladilnik-Zamrzovalnik
Priročnik z navodili za delovanje .... SL-1 – SL-14
Холодильник-Морозильник
Інструкція з експлуатації ..............UK-1 – UK-14
Хладилник – Фризер
Ръководство за работа ................ BG-1 – BG-14
SJ-XG640M
SJ-XG690M
SJ-XG740M
SJ-XG690G
SJ-XG740G
Page 2
I
PT
Conteúdos
• Informações de segurança ................................ PT-1
• Instalação ........................................................... PT-2
• Descrição ............................................................ PT-3
• Ícones de modos úteis ........................................ PT-5
• Painel de controlo
(SJ-XG690G, SJ-XG740G) ..........................................PT-6
• Painel de controlo
(SJ-XG640M, SJ-XG690M, SJ-XG740M) .......... PT-8
• Armazenar alimentos ........................................ PT-10
• Cuidados e limpeza .......................................... PT-11
• Antes de chamar a assistência técnica ............ PT-12
• Produto FICHE ................................................. PT-13
• Indicador de temperatura ................................. PT-13
HU
Tartalomjegyzék
• Biztonsági tájékoztató ........................................ HU-1
• Üzembe helyezés ............................................... HU-2
• Leírás ..................................................................HU-3
• Hasznos üzemmódok ikonjai .............................. HU-5
• Kezelőpanel
(SJ-XG690G, SJ-XG740G) ......................................... HU-6
• Kezelőpanel
(SJ-XG640M, SJ-XG690M, SJ-XG740M) ................... HU-8
• Ételtárolás .........................................................HU-10
• Tisztítás és ápolás ............................................ HU-11
• A szerviz hívása előtt ........................................HU-12
• Termék adatlap .................................................HU-13
• Hőmérsékletjelző .............................................. HU-13
NL
Inhoud
• Veiligheidsinformatie ......................................... NL-1
• Installatie ........................................................... NL-2
• Omschrijving ...................................................... NL-3
• Nuttige modi ....................................................... NL-5
• Bedieningspaneel
(SJ-XG690G, SJ-XG740G) ..........................................NL-6
• Bedieningspaneel
(SJ-XG640M, SJ-XG690M, SJ-XG740M) ....................NL-8
• Opslag van voedsel .......................................... NL-10
• Onderhoud en reiniging .................................... NL-11
• Voordat u de servicedienst belt ........................ NL-12
• Productche ...................................................... NL-13
• Temperatuurindicator ....................................... NL-13
Contenido
• Información de seguridad .................................. ES-1
• Instalación .......................................................... ES-2
• Descripción ......................................................... ES-3
• Modos útiles ....................................................... ES-5
• Panel de control
(SJ-XG690G, SJ-XG740G) ................................ ES-6
• Panel de control
(SJ-XG640M, SJ-XG690M, SJ-XG740M) .......... ES-8
• Almacenamiento de alimentos ......................... ES-10
• Cuidado y limpieza ........................................... ES-11
• Antes de llamar al servicio técnico ................... ES-12
• Ficha del producto ............................................ ES-13
• Indicador de temperatura ................................. ES-13
EN
Contents
• Safety information ............................................... EN-1
• Installation .......................................................... EN-2
• Description .......................................................... EN-3
• Useful modes ...................................................... EN-5
• Control panel
(SJ-XG690G, SJ-XG740G) ................................ EN-6
• Control panel
(SJ-XG640M, SJ-XG690M, SJ-XG740M) .......... EN-8
• Storing food ...................................................... EN-10
• Care and cleaning ............................................ EN-11
• Before you call for service ................................ EN-12
• Product FICHE ................................................. EN-13
• Indicator of temperature ................................... EN-13
Inhalt
• Sicherheitshinweise ............................................ DE-1
• Installation .......................................................... DE-2
• Beschreibung ...................................................... DE-3
• Nützliche Modi .................................................... DE-5
• Bedienfeld
(SJ-XG690G, SJ-XG740G).....................................DE-6
• Bedienfeld
(SJ-XG640M, SJ-XG690M, SJ-XG740M) ................. DE-8
• Aufbewahrung von Lebensmitteln .................... DE-10
• Wartung und Reinigung .................................... DE-11
• Ehe Sie sich an den Kundendienst wenden ..... DE-12
• Produktdatenblatt ............................................. DE-13
• Temperaturanzeige .......................................... DE-13
EL
Περιεχόμενα
• Πληροφορίες ασφάλειας ..................................... EL-1
• Εγκατάσταση .......................................................EL-2
• Περιγραφή ...........................................................EL-3
• Εικονίδια χρήσιμων λειτουργιών ..........................EL-5
• Πίνακας ελέγχου
(SJ-XG690G, SJ-XG740G) ..........................................EL-6
• Πίνακας ελέγχου
(SJ-XG640M, SJ-XG690M, SJ-XG740M) ..................EL-8
• Συντήρηση τροφίμων .........................................EL-10
• Φροντίδα και καθαρισμός ..................................EL-11
• Πριν καλέσετε για σέρβις ...................................EL-12
• ΔΕΛΤΙΟ προϊόντος ............................................EL-13
• Ένδειξη θερμοκρασιας ......................................EL-13
RO
Cuprins
• Informații privind siguranța .................................RO-1
• Instalarea ............................................................RO-2
• Descrierea ..........................................................RO-3
• Moduri principale ................................................RO-5
• Panou de comandă
(SJ-XG690G, SJ-XG740G).....................................RO-6
• Panou de comandă
(SJ-XG640M, SJ-XG690M, SJ-XG740M) .................RO-8
• Păstrarea alimentelor .......................................RO-10
• Îngrijirea și curățarea ........................................RO-11
• Înainte de a solicita depanarea .........................RO-12
• FIȘĂ produs ......................................................RO-13
• Indicator de temperatură ..................................RO-13
Table des matières
• Information de sécurité ...................................... FR-1
• Installation .......................................................... FR-2
• Description .......................................................... FR-3
• Icônes des modes utiles ..................................... FR-5
• Panneau de contrôle
(SJ-XG690G, SJ-XG740G) ......................................... FR-6
• Panneau de contrôle
(SJ-XG640M, SJ-XG690M, SJ-XG740M) ................. FR-8
• Conservation des aliments ............................... FR-10
• Entretien et nettoyage ...................................... FR-11
• Avant d’appeler le service après vente ............. FR-12
• Fiche du produit ................................................ FR-13
• Indicateur de température ................................ FR-13
PL
Spis treści
• Informacje dotyczące bezpieczeństwa ............... PL-1
• Instalacja .............................................................PL-2
• Opis .....................................................................PL-3
• Użyteczne tryby pracy .........................................PL-5
• Panel sterowania
(SJ-XG690G, SJ-XG740G) ..........................................PL-6
• Panel sterowania
(SJ-XG640M, SJ-XG690M, SJ-XG740M) ................... PL-8
• Przechowywanie żywności ................................PL-10
• Konserwacja i czyszczenie ................................PL-11
• Zanim zgłosisz usterkę ......................................PL-12
• Karta produktu ...................................................PL-13
• Wskaźnik temperatury .......................................PL-13
Page 3
II
ET
Sisukord
• Ohutusteave ...................................................... ET-1
• Paigaldamine ...................................................... ET-2
• Kirjeldus .............................................................. ET-3
• Kasulike režiimide ikoonid .................................. ET-5
• Juhtpaneel
(SJ-XG690G, SJ-XG740G)..................................... ET-6
• Juhtpaneel
(SJ-XG640M, SJ-XG690M, SJ-XG740M) ................. ET-8
• Toidu hoiustamine ............................................ ET-10
• Puhastamine ja hooldamine ............................. ET-11
• Enne teenindusse helistamist ........................... ET-12
• Toote andmeleht ............................................... ET-13
• Temperatuurinäidik ........................................... ET-13
CS
Obsah
• Bezpečnostní pokyny ........................................ CS-1
• Instalace ............................................................. CS-2
• Popis ................................................................... CS-3
• Užitečné režimy .................................................. CS-5
• Kontrolku panel
(SJ-XG690G, SJ-XG740G) ................................ CS-6
• Kontrolku panel
(SJ-XG640M, SJ-XG690M, SJ-XG740M) .......... CS-8
• Uložení potravin ................................................ CS-10
• Péče a čištění ................................................... CS-11
• Než zavoláte do servisu ................................... CS-12
• INFORMAČNÍ LIST výrobku ............................. CS-13
• Indikátor teploty ................................................ CS-13
SL
Vsebina
• Varnostne informacije ..........................................SL-1
• Namestitev ...........................................................SL-2
• Opis .....................................................................SL-3
• Uporabni načini ....................................................SL-5
• Nadzorna plošča
(SJ-XG690G, SJ-XG740G)......................................SL-6
• Nadzorna plošča
(SJ-XG640M, SJ-XG690M, SJ-XG740M) ..................SL-8
• Shranjevanje hrane ...........................................SL-10
• Nega in čiščenje ................................................SL-11
• Preden pokličete servis .....................................SL-12
• Podatkovna kartica izdelka ................................SL-13
• Indikator temperature ........................................SL-13
SK
Obsah
• Bezpečnostné pokyny ....................................... SK-1
• Inštalácia ............................................................ SK-2
• Popis ................................................................... SK-3
• Užitočné režimy .................................................. SK-5
• Ovládací panel
(SJ-XG690G, SJ-XG740G)..................................... SK-6
• Ovládací panel
(SJ-XG640M, SJ-XG690M, SJ-XG740M) ................. SK-8
• Uloženie potravín .............................................. SK-10
• Starostlivosť a čistenie ..................................... SK-11
• Skôr ako zavoláte do servisu ............................ SK-12
• Informačný list výrobku ..................................... SK-13
• Indikátor teploty ................................................ SK-13
UK
Зміст
• Інформація щодо безпеки ............................... UK-1
• Встановлення .................................................... UK-2
• Опис ................................................................... UK-3
• Корисні режими ................................................. UK-5
• Панель керування
(SJ-XG690G, SJ-XG740G).....................................UK-6
• Панель керування
(SJ-XG640M, SJ-XG690M, SJ-XG740M) ................. UK-8
• Зберігання продуктів....................................... UK-10
• Догляд і чищення ............................................ UK-11
• Перш ніж звертатися по обслуговування ...... UK-12
• Пояснення до паспортної таблички виробу .. UK-13
• Індикатор температури ................................... UK-13
LT
Turinys
• Saugos informacija ............................................. LT-1
• Įrengimas ............................................................. LT-2
• Aprašymas ...........................................................LT-3
• Naudingi režimų simboliai ....................................LT-5
• Valdymo skydelis
(SJ-XG690G, SJ-XG740G)......................................LT-6
• Valdymo skydelis
(SJ-XG640M, SJ-XG690M, SJ-XG740M) ..................LT-8
• Maisto laikymas ................................................. LT-10
• Priežiūra ir valymas ...........................................LT-11
• Prieš kreipiantis į techninio aptarnavimo centrą LT-12
• Gaminio vardinių parametrų lentelė ...................LT-13
• Temperatūros indikatorius ................................. LT-13
LV
Satura rādītājs
• Drošības informācija ........................................... LV-1
• Uzstādīšana .........................................................LV-2
• Apraksts ...............................................................LV-3
• Svarīgas režīmu ikonas .......................................LV-5
• Vadības panelis
(SJ-XG690G, SJ-XG740G)......................................LV-6
• Vadības panelis
(SJ-XG640M, SJ-XG690M, SJ-XG740M) ..................LV-8
• Pārtikas uzglabāšana ........................................LV-10
• Apkope un tīrīšana ............................................LV-11
• Pirms sazināties ar klientu dienestu ..................LV-12
• Speciālā zīme ....................................................LV-13
• Temperatūras indikators ....................................LV-13
BG
Съдържание
• Информация за безопасност .......................... BG-1
• Монтаж ...............................................................BG-2
• Описание ........................................................... BG-3
• Полезни режими ...............................................BG-5
• Панелът за управление
(SJ-XG690G, SJ-XG740G) ................................BG-6
• Панелът за управление
(SJ-XG640M, SJ-XG690M, SJ-XG740M) ..........BG-8
• Съхранение на храна .....................................BG-10
• Грижи и почистване ........................................ BG-11
• Преди да потърсите помощ за ремонт и обслужване ...
BG-12
• Продуктов фиш ............................................... BG-13
• Температурен индикатор ...............................BG-13
Page 4
EN-1
Household use only
Thank you very much for buying this SHARP product. Before using your SHARP
refrigerator, please read this operation manual to ensure that you gain the maximum
benet from it.
• This refrigerator is intended for making ice cubes, refrigerating and freezing food.
• This refrigerator is for household use only, with ambient temperature indicated in
the table. The climate class is specied on the rating plate.
If the refrigerator operates out of range (ambient temperature range) of the climate
class which is rated for that model, it may not be able to maintain satisfactory
internal temperatures. If the refrigerator is used at colder temperatures, the
refrigerator will not be damaged up to a temperature of +5°C.
• The refrigerator should not be subjected to temperatures of -10°C or below for a
long period of time.
Refrigerant
This refrigerator contains ammable refrigerant (R600a:
isobutane) and insulation blowing gas (cyclopentane).
Observe the following rules to prevent ignition and
explosion.
■Do not allow any pointed objects to have contact with
the refrigeration system. The refrigeration system
behind and inside the refrigerator contains refrigerant.
■Do not use mechanical devices or other means to
accelerate the defrosting process. (This refrigerator has
adopted automatic defrosting system.)
■Do not use electrical appliances inside the refrigerator.
■Do not block the space around the refrigerator.
■Do not use ammable sprays, such as spray paint near
the refrigerator.
■Do not store ammable sprays, such as spray paint in
the refrigerator.
■In the case of failure of the refrigeration system, do not
touch the wall socket and use open ames.
Open the window and let out the air from the room.
Then ask a service agent approved by SHARP for
service.
Installation
■Do not install the refrigerator in a damp or wet
location. It may cause the damage to the insulation
or electrical leak. Dew may also appear on the outer
cabinet and it causes rust.
■The refrigerator should be installed atly and rmly on
the oor.
Power cord, Plug, Socket
Read carefully the following rules to prevent electric
shock or re.
■Connect the power plug into the wall socket rmly and
directly. Do not use an extension cord or adapter plug.
■Connect the power plug to the socket with the required
rated voltage.
■Connect the earth pin to the earth terminal properly.
■Make sure to protect the power cord from being
damaged during installation or moving. If the power
plug or cord is loose, do not insert the power plug.
■Do not touch the power plug with wet hands.
■Disconnect from the main electricity supply by
removing the main plug from the socket. Do not
remove by pulling the power cord.
■Dust deposited on the power plug may cause re.
Wipe it off carefully.
■Pull out the plug if the refrigerator is not used for a long
time.
■If the exible supply cord is damaged, it must
be replaced by service agent approved by
SHARP because special cord is required.
In use
■Do not store volatile and ammable materials such as
ether, petrol, propane gas, aerosol cans, adhesive agents
and pure alcohol etc. These materials are easy to explode.
■Do not store temperature-sensitive products such as
pharmaceutical products in the refrigerator.
There are high risks of changes in product quality.
■Do not attempt to change or modify this refrigerator.
This may result in re, electric shock or injury.
■Do not place any object on the top of refrigerator.
If the object falls down from the top, it may cause injury.
■Do not hit the glass doors hard. Otherwise, they may
break and cause physical injury.
<SJ-XG690G, SJ-XG740G >
■This appliance can be used by children
aged from 8 years or above and persons
with reduced physical, sensory or mental
capabilities or lack of experience and
knowledge if they have been given
supervision or instruction concerning use of
the appliance in a safe way or understanding
the hazards involved. Children shall not
play with the appliance. Cleaning and user
maintenance shall not be done by children
without supervision.
Care and Cleaning
■Unplug the refrigerator rst to prevent electric shock.
■Do not splash water directly on the outer cabinet or the
interior. This may lead to rusting and deterioration of the
electrical insulation.
Trouble
■If you smell something burning, pull out the power plug
immediately. Then ask a service agent approved by
SHARP for service.
■In case of gas leak, ventilate the area by opening window.
Do not touch the refrigerator or the power socket.
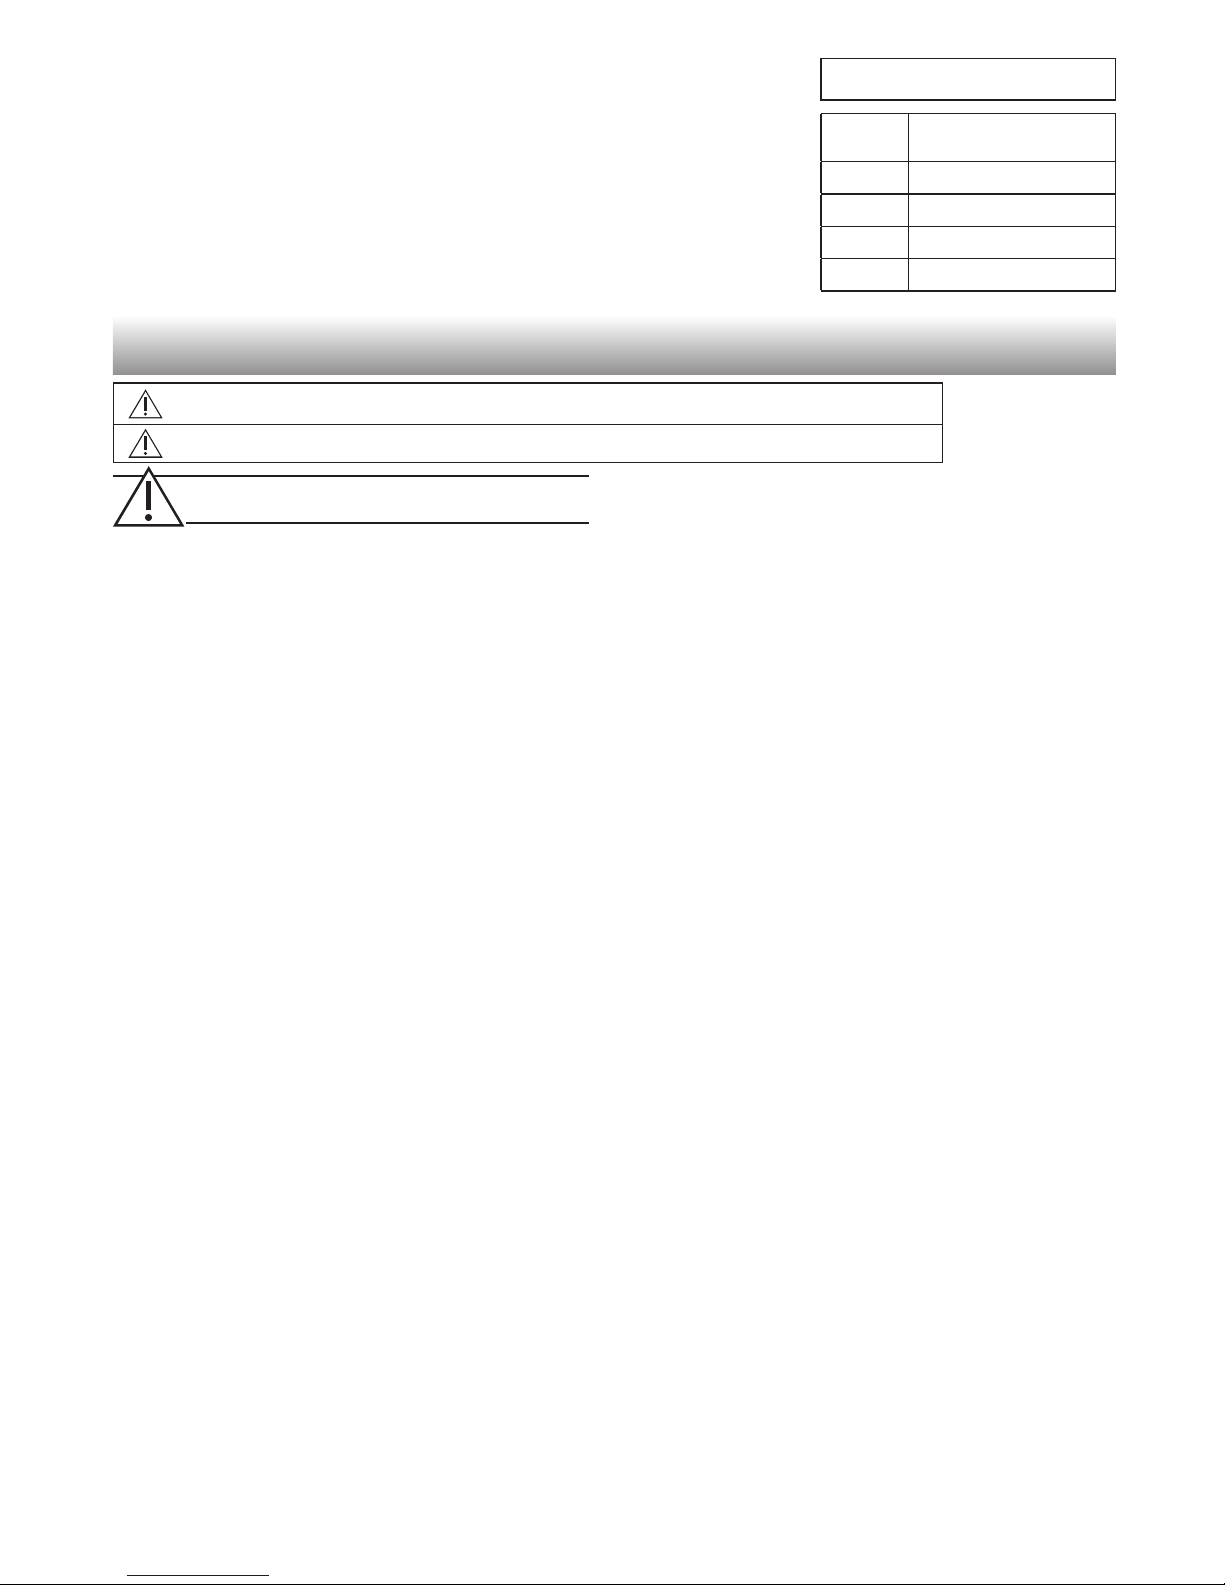
Climate
class
Acceptable range of
ambient temperature
SN +10°C to 32°C
N +16°C to 32°C
ST +16°C to 38°C
T +16°C to 43°C
Safety information
WARNING
This means that there are high risks of death or serious injury.
CAUTION
This means that there are high risks of material damage or personal injury.
WARNING
Page 5
EN-2
EN
Disposal
■Ensure that the refrigerator presents no danger to
children while being stored until disposal. (e.g. remove
the door to prevent child entrapment.)
■This refrigerator should be disposed appropriately.
Take the refrigerator to a professional recycling plant
for ammable refrigerant and insulation blowing
gases.
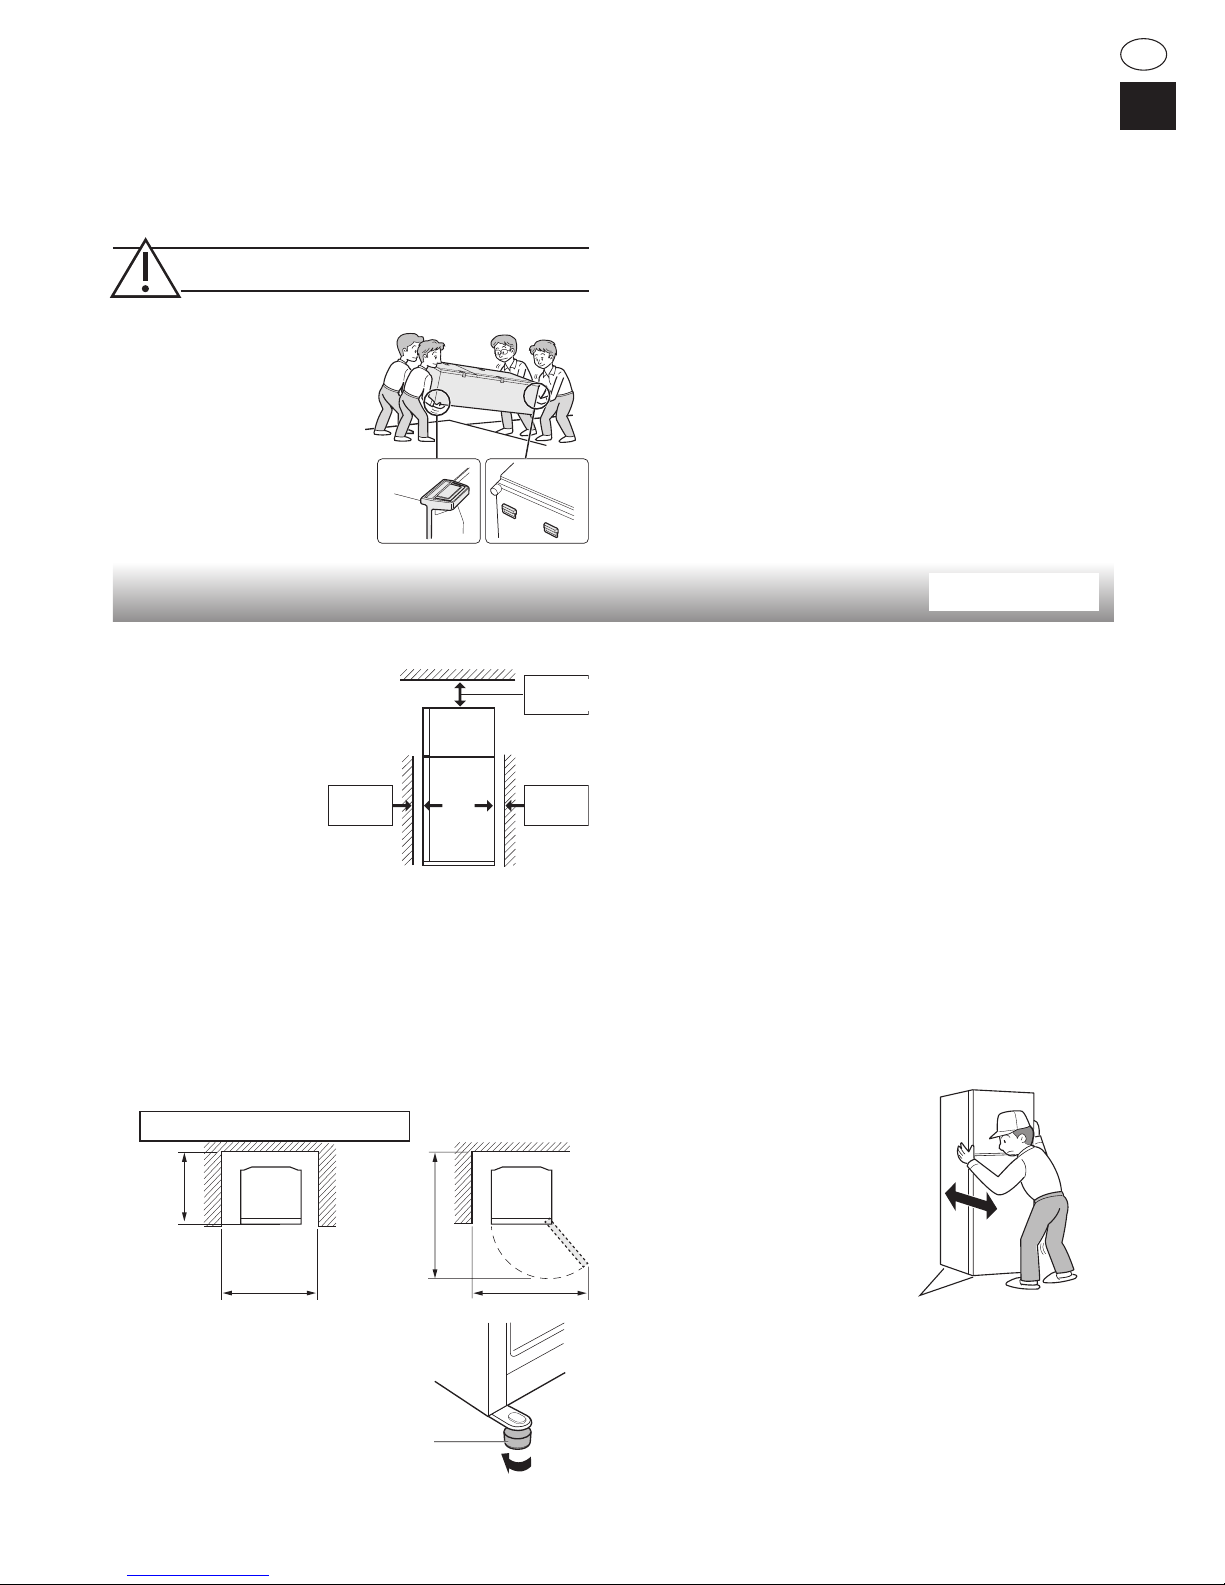
Transportation
■When you install or move
your refrigerator, use curing
mat to protect the oor from
being damaged.
■Carry the refrigerator by
holding the handles located
on the rear and bottom
side. If you lift up the
refrigerator improperly, it
may cause injury.
CAUTION
In use
■Do not touch the compressor unit or its peripheral
parts, as they become extremely hot during operation
and the metal edges may cause injury.
■Do not touch foods or metal containers in the freezer
compartment with wet hands. This may cause
frostbite.
■Do not place bottled drinks and cans in the freezer
compartment.
Especially “Express cool” is in operation, there is a
high risk that glass bottles may burst.
■Do not use other than potable water to make ice
cubes.
■Do not open or close the door when somebody put
a hand near the door. There is a risk that the other
people may catch their ngers in the door.
■Do not put oversized object in the pockets of the door.
If the object falls down from the pockets, it may cause
injury.
■Make sure to handle the glass shelves with care to
install or uninstall. If you drop the glass shelves, it
may break or cause injury.
rear
bottom
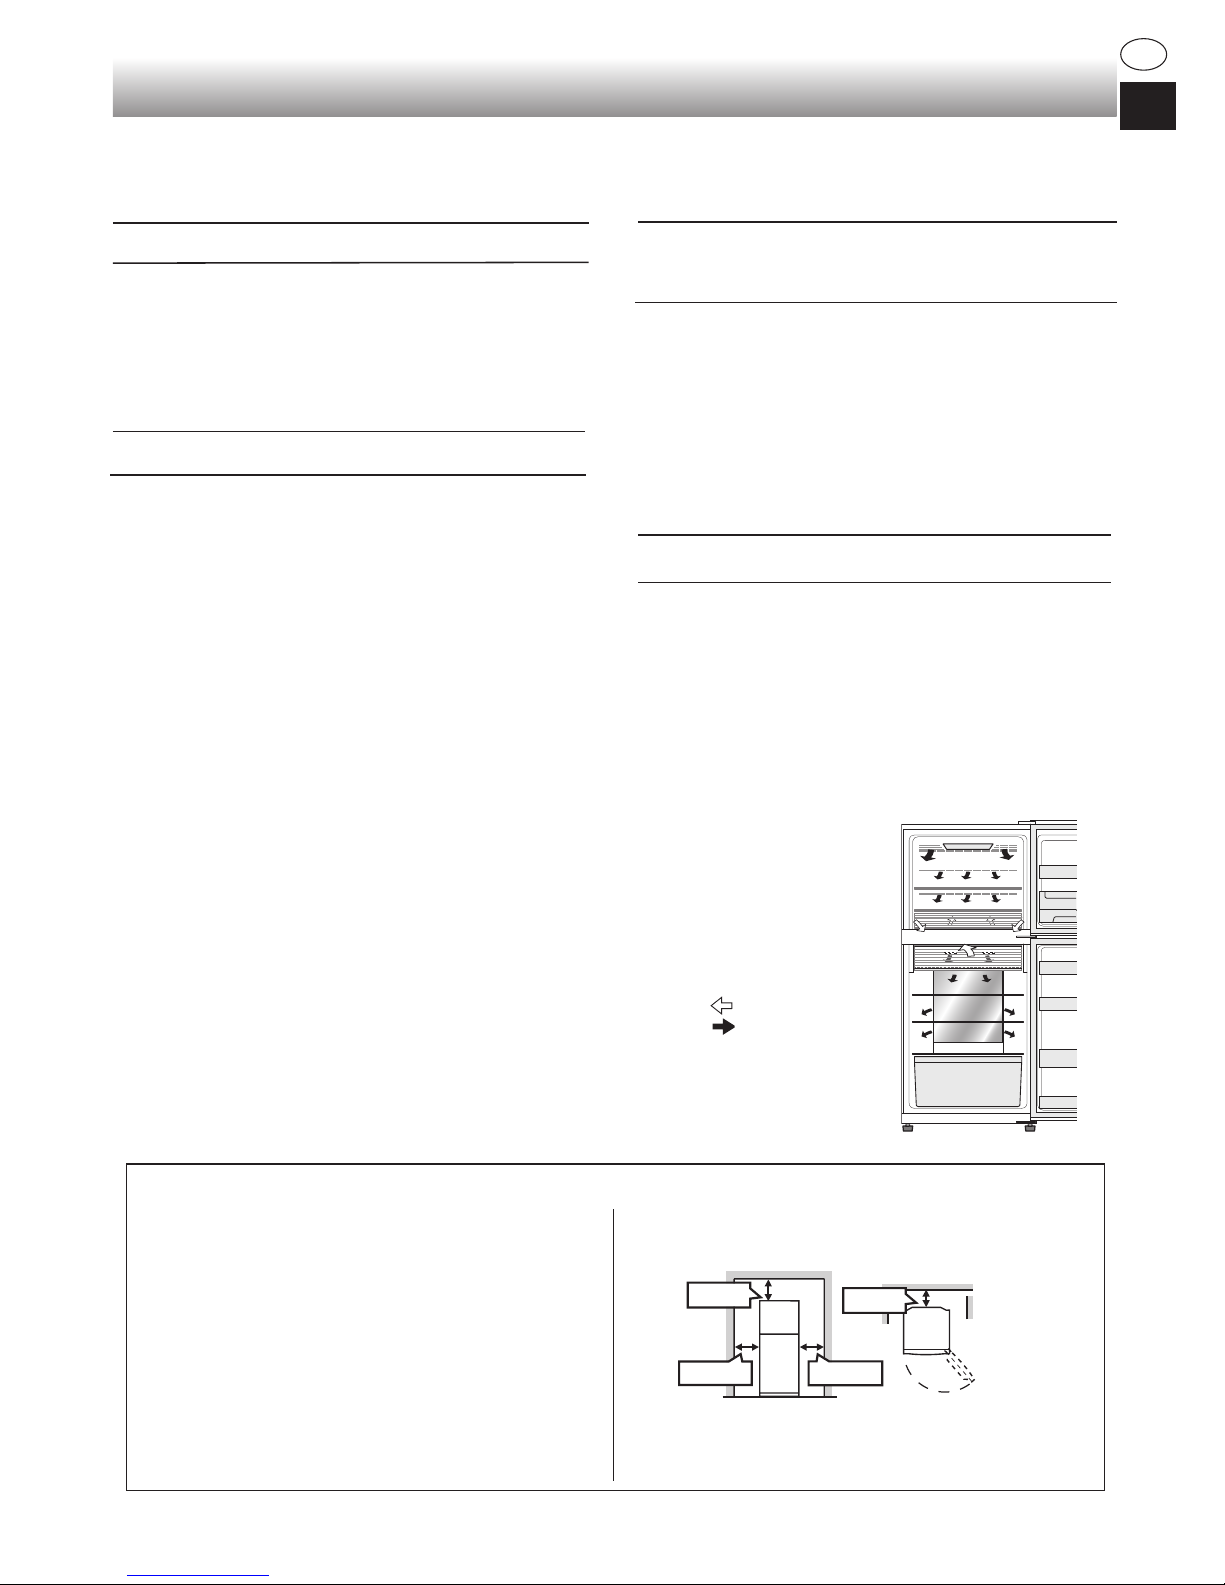
Installation
Free standing type
1
Keep adequate ventilation space around the
refrigerator.
• The picture shows
the minimum
required space
for installing the
refrigerator. The
measurement
condition of energy
consumption is
conducted under
a different space
dimension.
• By keeping greater space, the refrigerator may
consume a less amount of power consumption.
• If use the refrigerator in the smaller space
dimension than pictured below, it may cause
temperature rise in the unit, loud noise and failure.
• The space between the rear of the refrigerator
and the wall should be 50mm or more, and less
than 75mm. If the space is wider than 75mm, you
may get injured by touching compressor and its
peripheral parts which are extremely hot during
the operation.
90mm
or more
60mm
or more
60mm
or more
Overall space required in use
2
Use the two front adjustable feet
to place the refrigerator atly and
rmly on the oor.
3
Connect the appliance via a correctly installed
socket.
Note
• Place your refrigerator to access the plug.
• Keep your refrigerator out of direct sunlight and do not
place next to heat generating appliance.
• Do not place your refrigerator directly on the ground.
Insert suitable stand such as wooden board under the
refrigerator.
• When you insert the power plug with the door opened,
door alarm sounds but it is normal. This sound stops
after closing the door.
Casters are located on the bottom of the refrigerator
• The casters allow the refrigerator to move back and
forth.
Before using your refrigerator
• Clean the inside parts with a cloth soaked in warm
water.
• If you use soapy water to clean, wipe it off thoroughly
with water.
1550 mm
1450 mm
790 mm
935 mm
Adjustable foot
Casters (4 pcs)
rear
bottom
60mm or
more
90mm or
more
60mm or
more
Page 6

EN-3
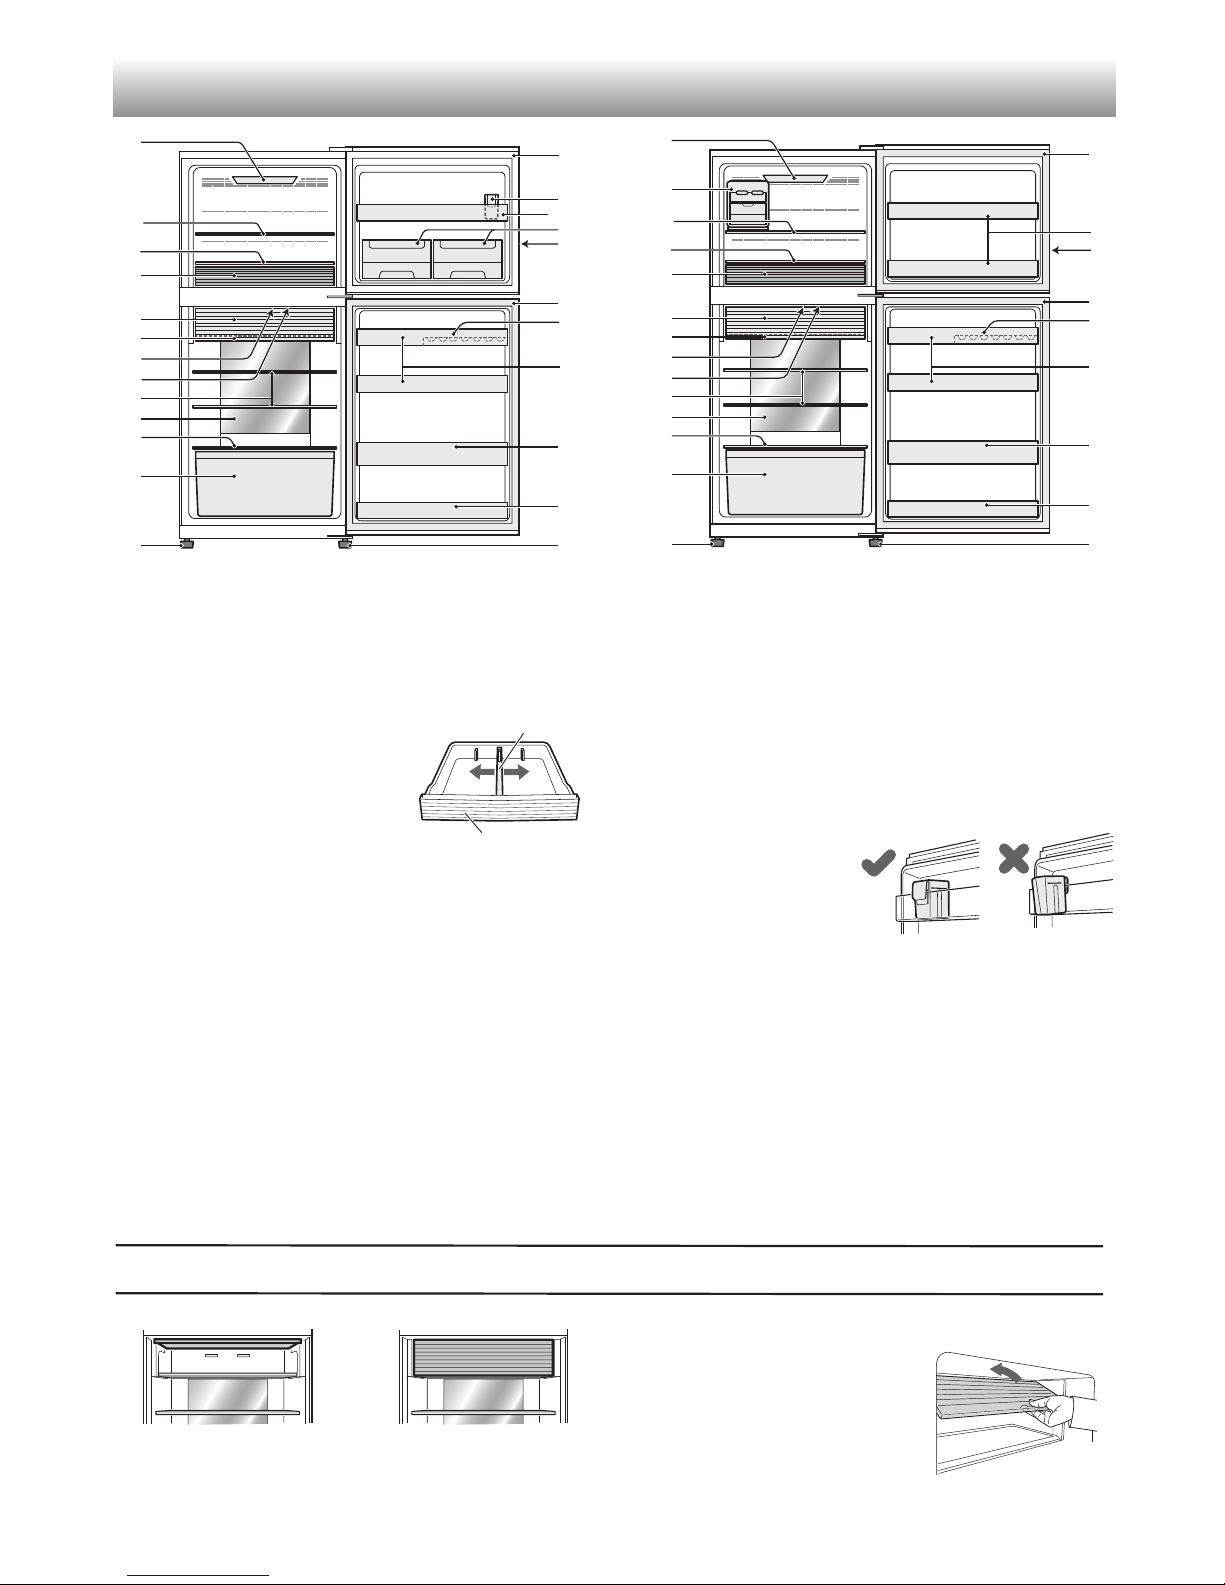
Two-way fresh room door
Description
1. Freezer light
<Only for SJ-XG690G, SJ-XG690M,
SJ-XG740G, SJ-XG740M>
2. Movable ice maker
<Only for SJ-XG640M,
SJ-XG690G, SJ-XG690M>
3. Freezer shelf (Upper)
4. Freezer shelf (Bottom)
5. Freezer case
Move the partition to t the
size of food.
6. Two-way fresh room door
7. Fresh shelf
8. Deodorizing unit
Deodorizing catalyst is installed on the routes of
cold air. There is no need to operate and clean.
9. Refrigerator light
10. Refrigerator shelf
11. Hybrid cooling panel
The panel cools the refrigerator compartment
indirectly from the rear. In this way, food is cooled
gently without being exposed to cold air ow.
12. Fruit and vegetable shelf
13. Fruit and vegetable crisper
14. Adjustable foot
15. Magnetic door seal
16. Control panel
17. Freezer door pocket
18. In-door ice maker
<Only for
SJ-XG740G, SJ-XG740M
>
(This ice maker is packed inside the freezer
compartment. Refer to the next page ”After
cleaning“ to install.)
19. Water cup
<Only for SJ-XG740G, SJ-XG740M>
(The water cup is packed inside the freezer case.
Make sure to put the cup on the position indicated
in the picture above to use.)
20. Egg pocket
21. Refrigerator pocket (Upper)
22. Bottle pocket
23. Refrigerator pocket (Bottom)
If you wish to store large items within your
refrigerator
• You may remove any shelves or any pockets numbered
2,3,5,6,7,10,13,17, 18, 19, 20, 21, 22, 23 in the picture
above.
• Cooling performance is not inuenced even if you use the
refrigerator in the above situation.
Use the space as
refrigerator room.
Use the space as
fresh room.
How to open the two-way fresh room door
1) Lift up the door.
2) Insert the door into the frame and
push it back to the stopper. It is
locked properly.
Open Close
SJ-XG740G,SJ-XG740M
SJ-XG640M, SJ-XG690G,SJ-XG690M
1
3
4
5
7
6
8
9
1
1
14
14
13
15
19
18
15
16
20
22
23
12
10
1
3
4
2
5
7
6
8
9
11
14
14
13
15
15
17
16
20
22
23
12
10
21
21
17
Partition
Freezer case
Partition
Freezer case
Open Close
Page 7
EN-4
EN
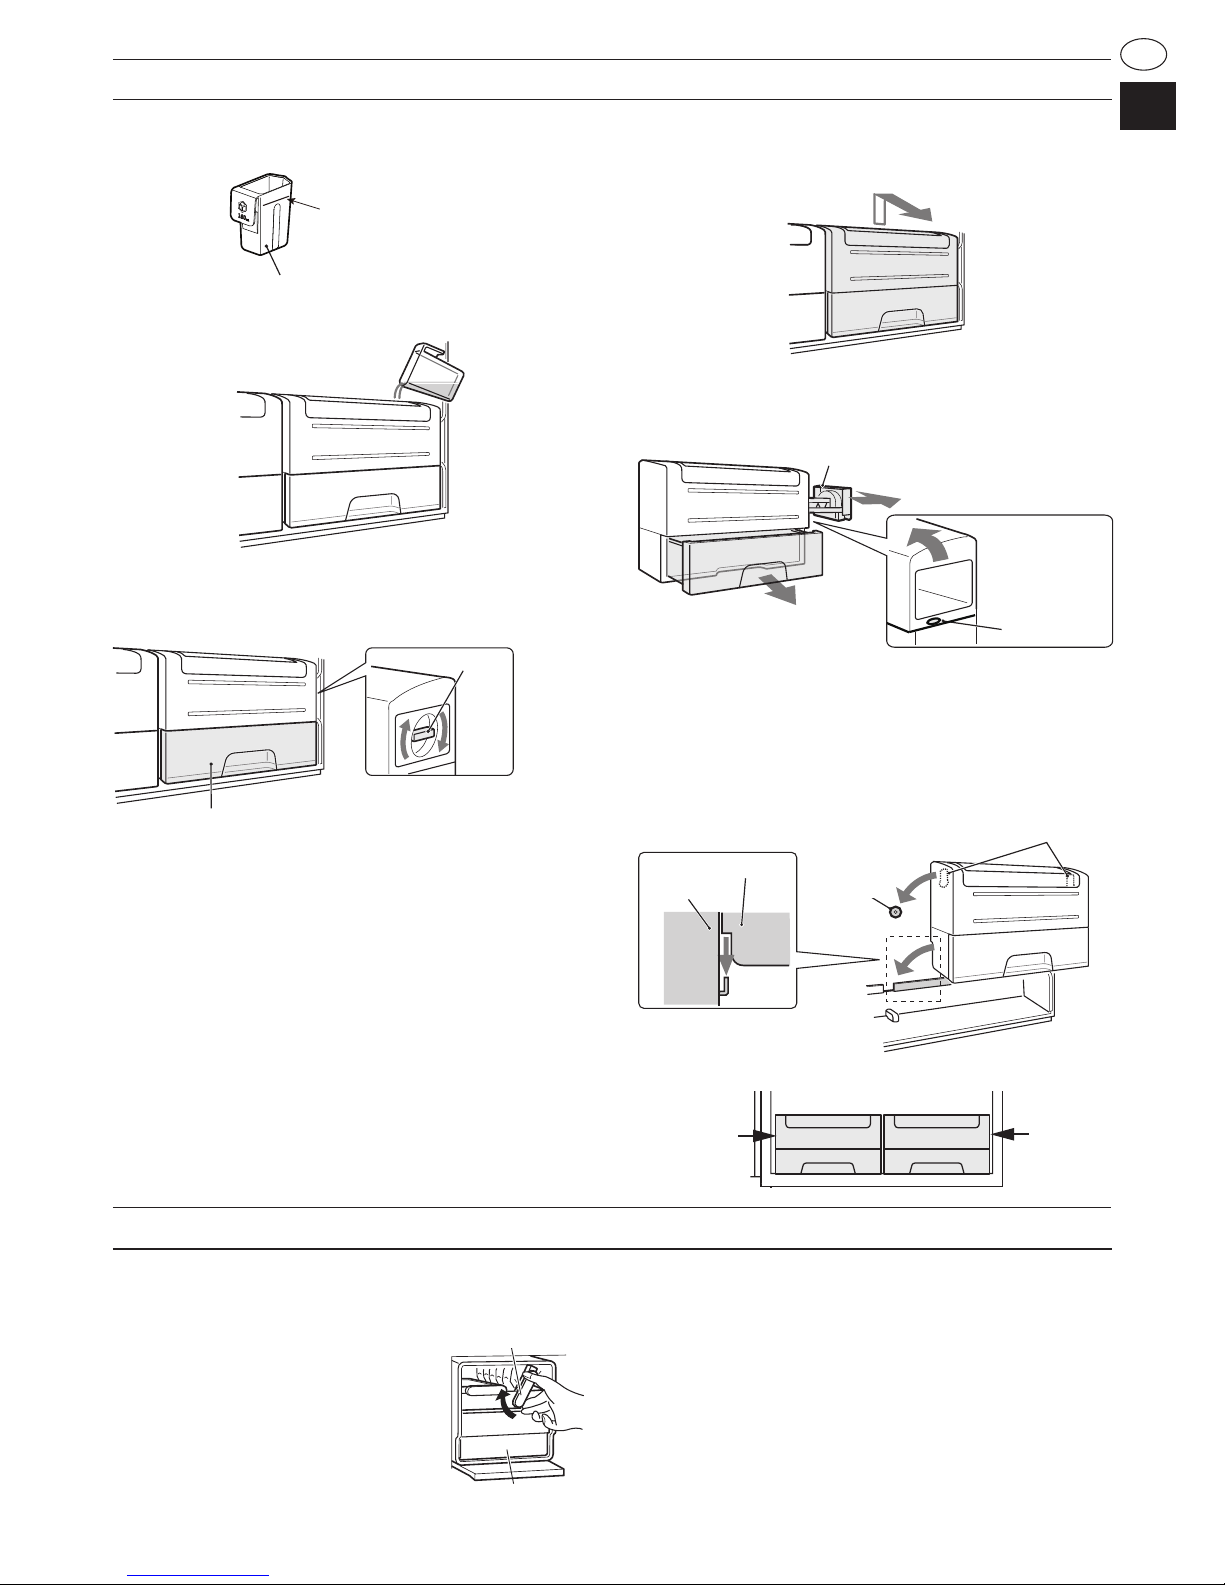
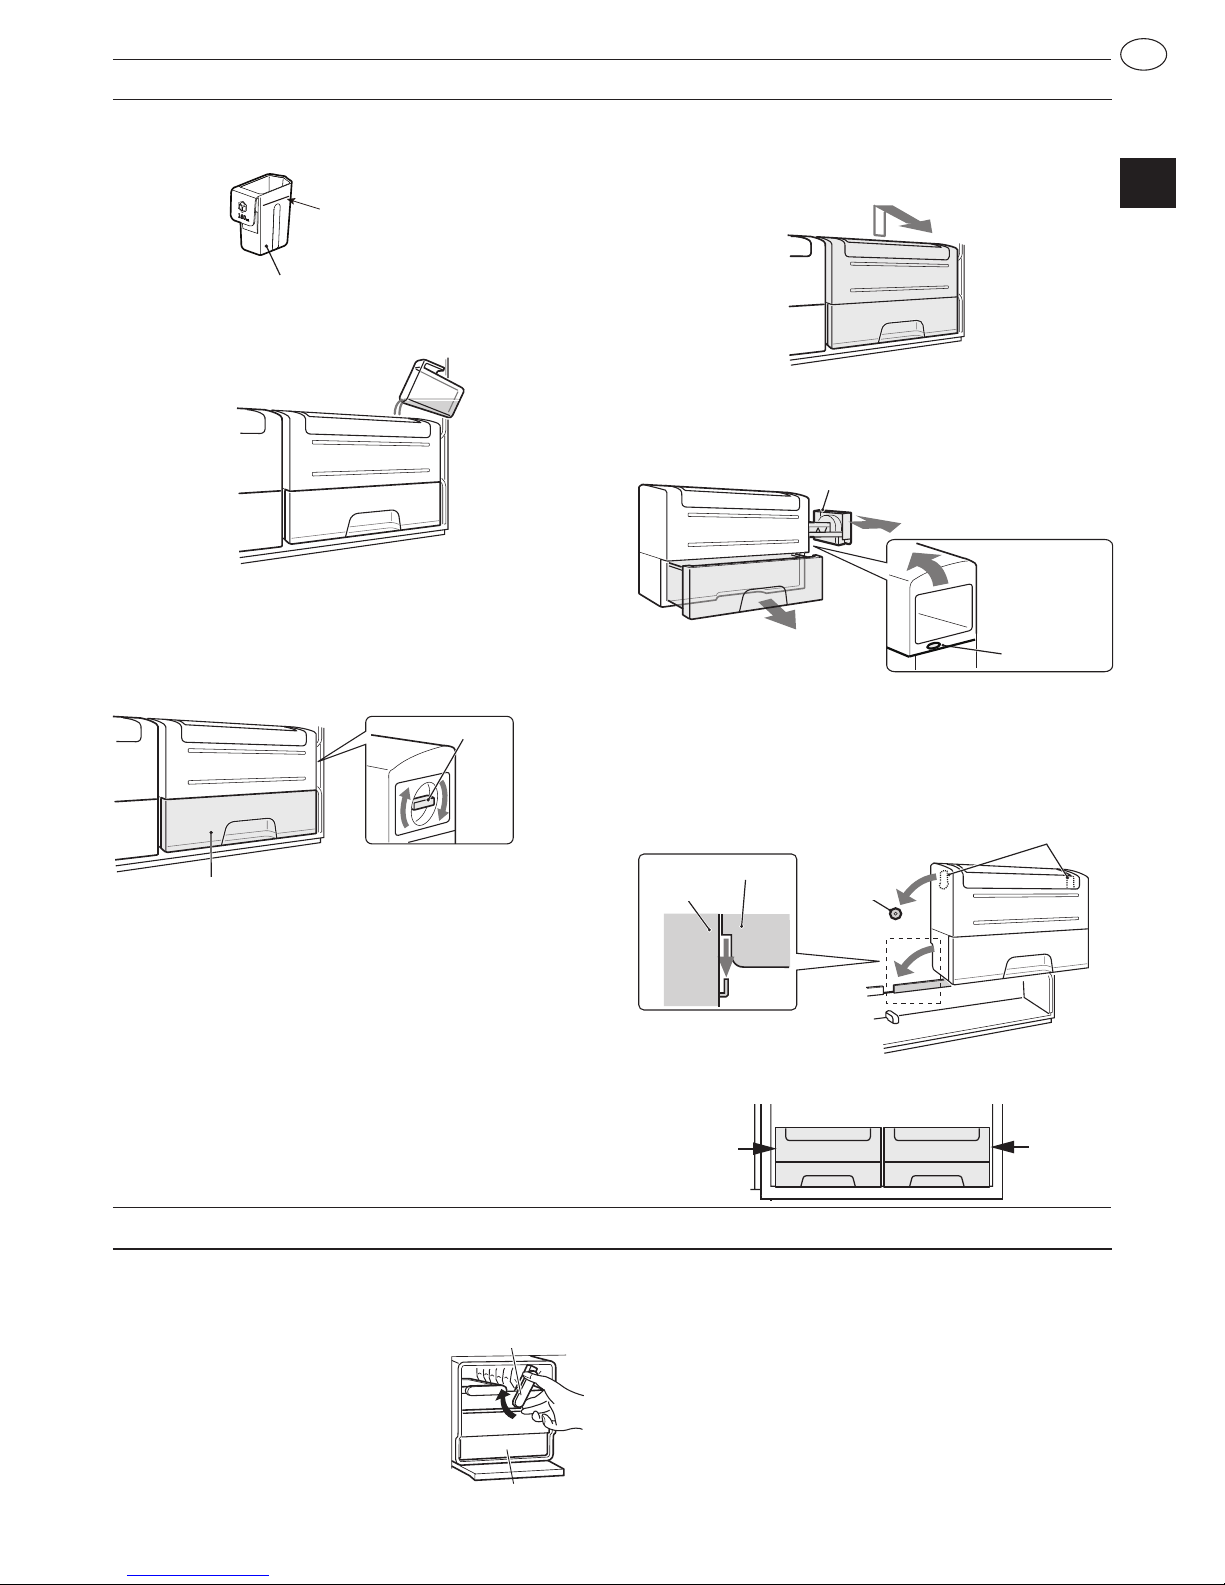
In-door ice maker (SJ-XG740G,SJ-XG740M)
Making ice cubes
1) Use the water cup to measure amount of water.
Water level
Water cup (160mL)
2) Pour water into In-door ice maker by the water cup.
3) When ice cubes are made, turn the lever clockwise to
put the ice into the ice cube box.
4) Pull the ice cube box to take out the ice cubes.
Ice cube box
Lever
Note
• To prevent the ice cube box from being damaged, do
not pour oil into it or make ice in it.
• Do not open the freezer door as much as possible
during ice making.
Cleaning In-door ice maker
• Empty the ice cube box in advance.
1) Pull upward the In-door ice maker to remove.
2) Remove ice cube tray.
3) Remove ice cube box.
4) Push the protrusion to disassemble In-door ice maker.
Ice cube tray
Protrusion
2)
3)
Note
• Do not put the ice cube tray in a dishwasher.
Otherwise, the packings are damaged.
After cleaning
1) Assemble the In-door ice maker.
(Reverse procedure to disassemble.)
2) Install the In-door ice maker securely.
Hole
Hook
In-door ice maker
Door
<Position of the lever>
Lever
Lever
Movable ice maker (SJ-XG640M, SJ-XG690G, SJ-XG690M)
It is highly recommended to use the ice maker as shown in the picture of “Description” .You can put the ice maker
anywhere in the freezer compartment.
1) Do not overll the tray with
water. Otherwise the ice
cubes will join together when
frozen.
2) When ice cubes are made,
turn the lever clockwise to
put the ice into the ice cube
box.
Note
• Make sure to place the ice maker atly not to spill out
the water from the ice tray.
• To prevent the ice cube box from being damaged, do
not pour oil into it or make ice in it.
Lever
Ice cube box
Page 8
EN-5
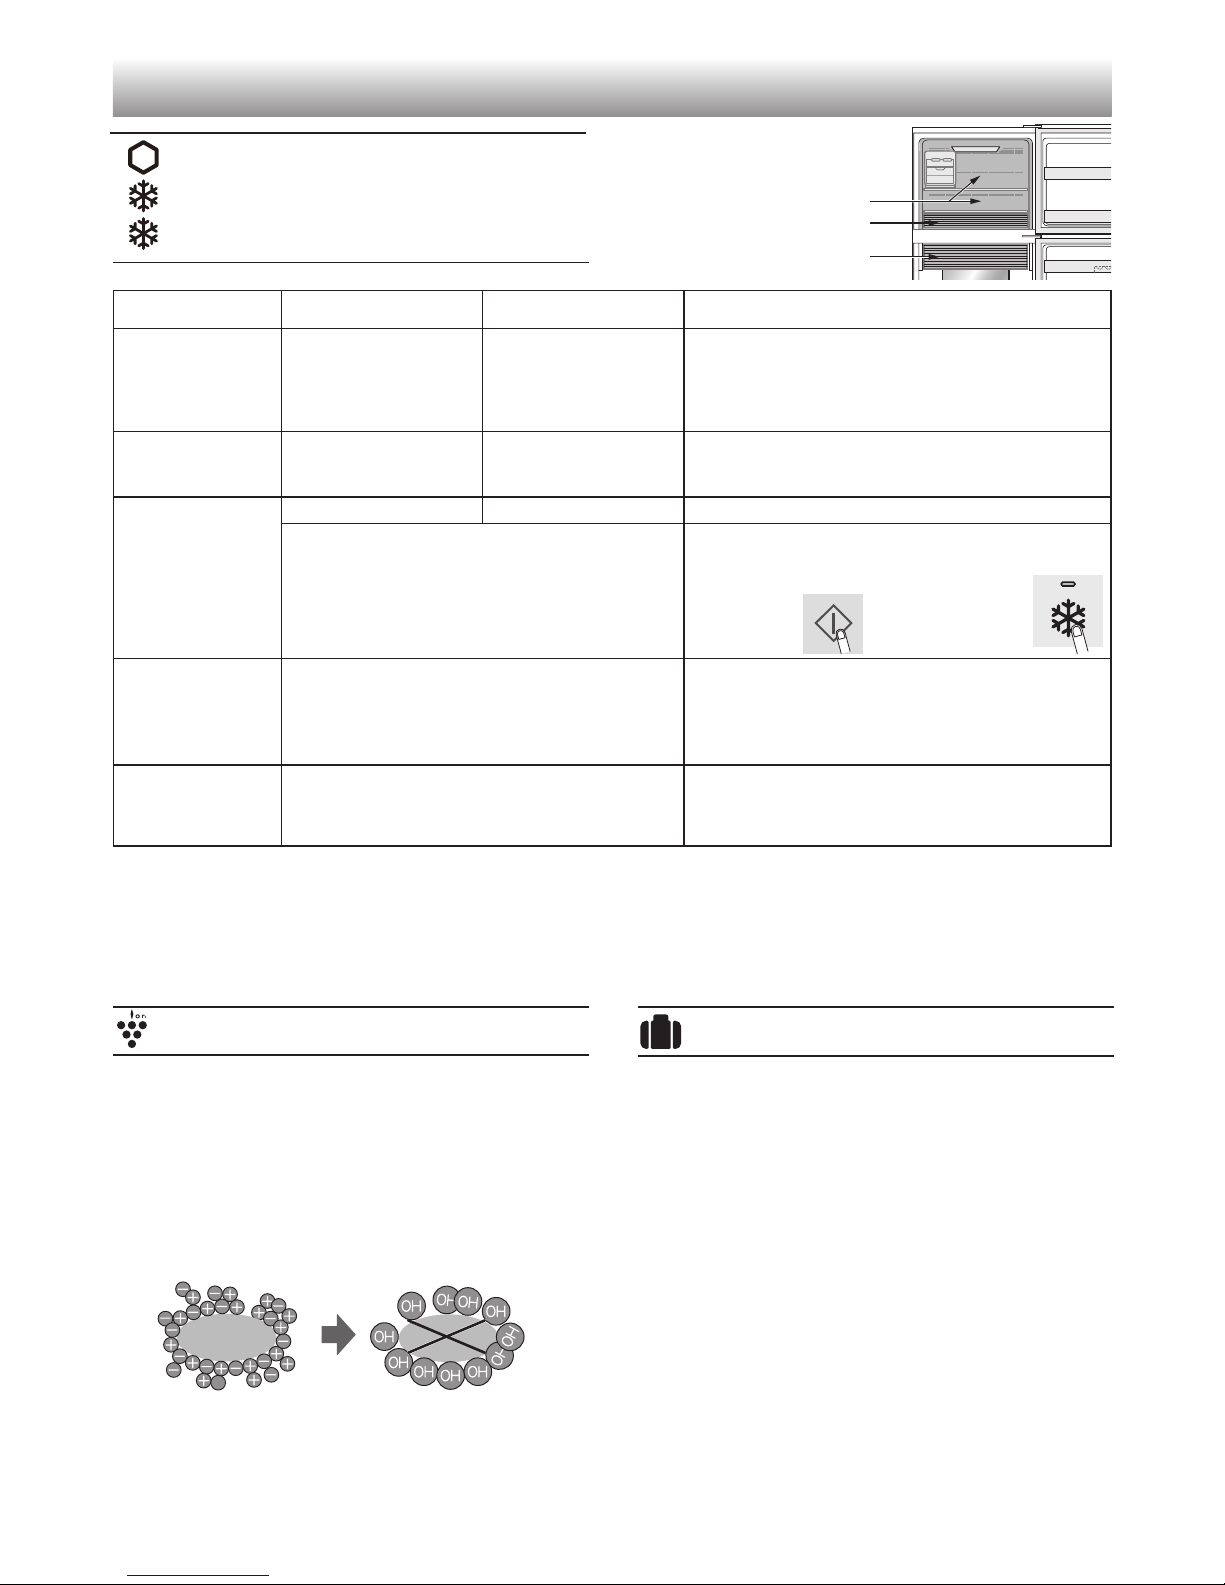
Useful modes
As for the operations, refer to chapter “Control panel”.
Extra cool
Express freezing
Express cool
Extra cool Express freezing Express cool
Feature This mode is to cool
beverages or foods to
ice-cold.
Note :
Food with high-
moisture may freeze.
This mode speeds up
the time to freeze food
or make ice.
This mode is to cool beverages or foods quickly.
Point of use Fresh room Freezer case Freezer compartment
CAUTION :
Do not place glass bottles. There is a
high risk that they may burst.
Operating time 6 hours
*
1
2 hours
*
1
30 minutes
• This mode ends automatically.
• The alarm does not sound.
• This mode ends automatically.
• The alarm sounds.
To stop the alarm *
2
After the operation
completed
• There is no need for taking beverages or
foods out.
• Be sure to take the beverages and foods out
when the alarm sounds.
• If the beverages and foods are left in the freezer
compartment over approximately 30 minutes,
they may freeze.
or
Press “Express
freezing” button.
*
1
It may take more time to complete if the operation
overlaps with defrosting. This mode starts after
defrosting is completed.
*
2
If you do not stop the alarm, it sounds 30 minutes
continuously.
Note
• Extra cool, Express freezing and Express cool are not
available at the same time while one of the modes is in
operation.
• Avoid opening the door as much as possible during the
operations of these modes.
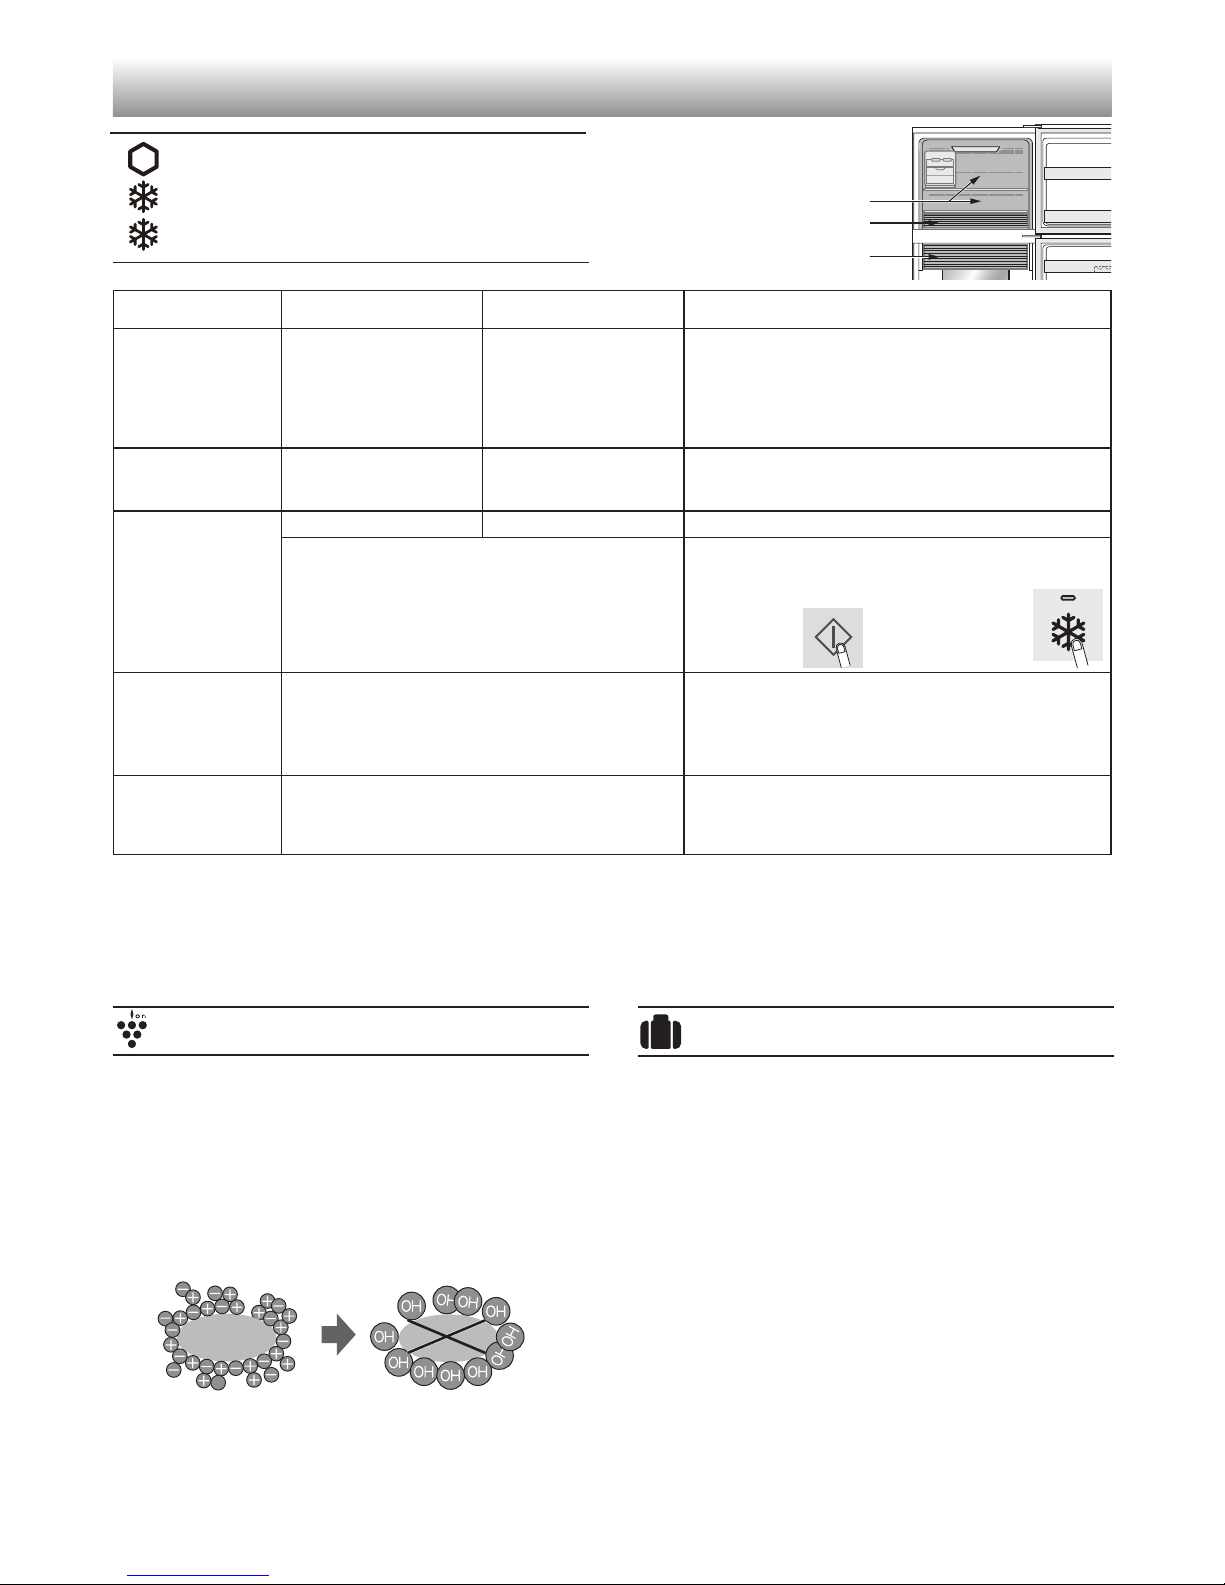
Plasmacluster
mold
fungus
Freezer
compartment
Fresh room
Vacation mode
• Use this mode when going on a trip or leaving the
house for a long time.
• The temperature inside the refrigerator compartment is
adjusted to approx. 10°C.
Press enter
key.
Note
There may be a slight odor in the refrigerator. This is the
smell of ozone generated by the ionizer. The amount
of ozone is minimum and quickly disappears in the
refrigerator.
Use this feature when you want to keep the inside of the
refrigerator clean.
The Plasmacluster automatically starts operating when
the refrigerator is powered on.
The ionizer inside your refrigerator releases clusters
of ions, which are collective masses of positive and
negative ions, into the refrigerator compartment.
These ion clusters inactivate airborne mold fungus.
At the time of
power failure
during the
operation
• This mode is automatically cancelled. • This mode is automatically restarted from the
previous state at the time of re-power.
Note
• Food storage period in the refrigerator compartment
becomes approx. 1/2-1/3 of normal operation.
Use this mode only when there is no perishable food.
• Temperature of refrigerator compartment cannot be
modied.
Freezer case
Page 9
EN-6
EN
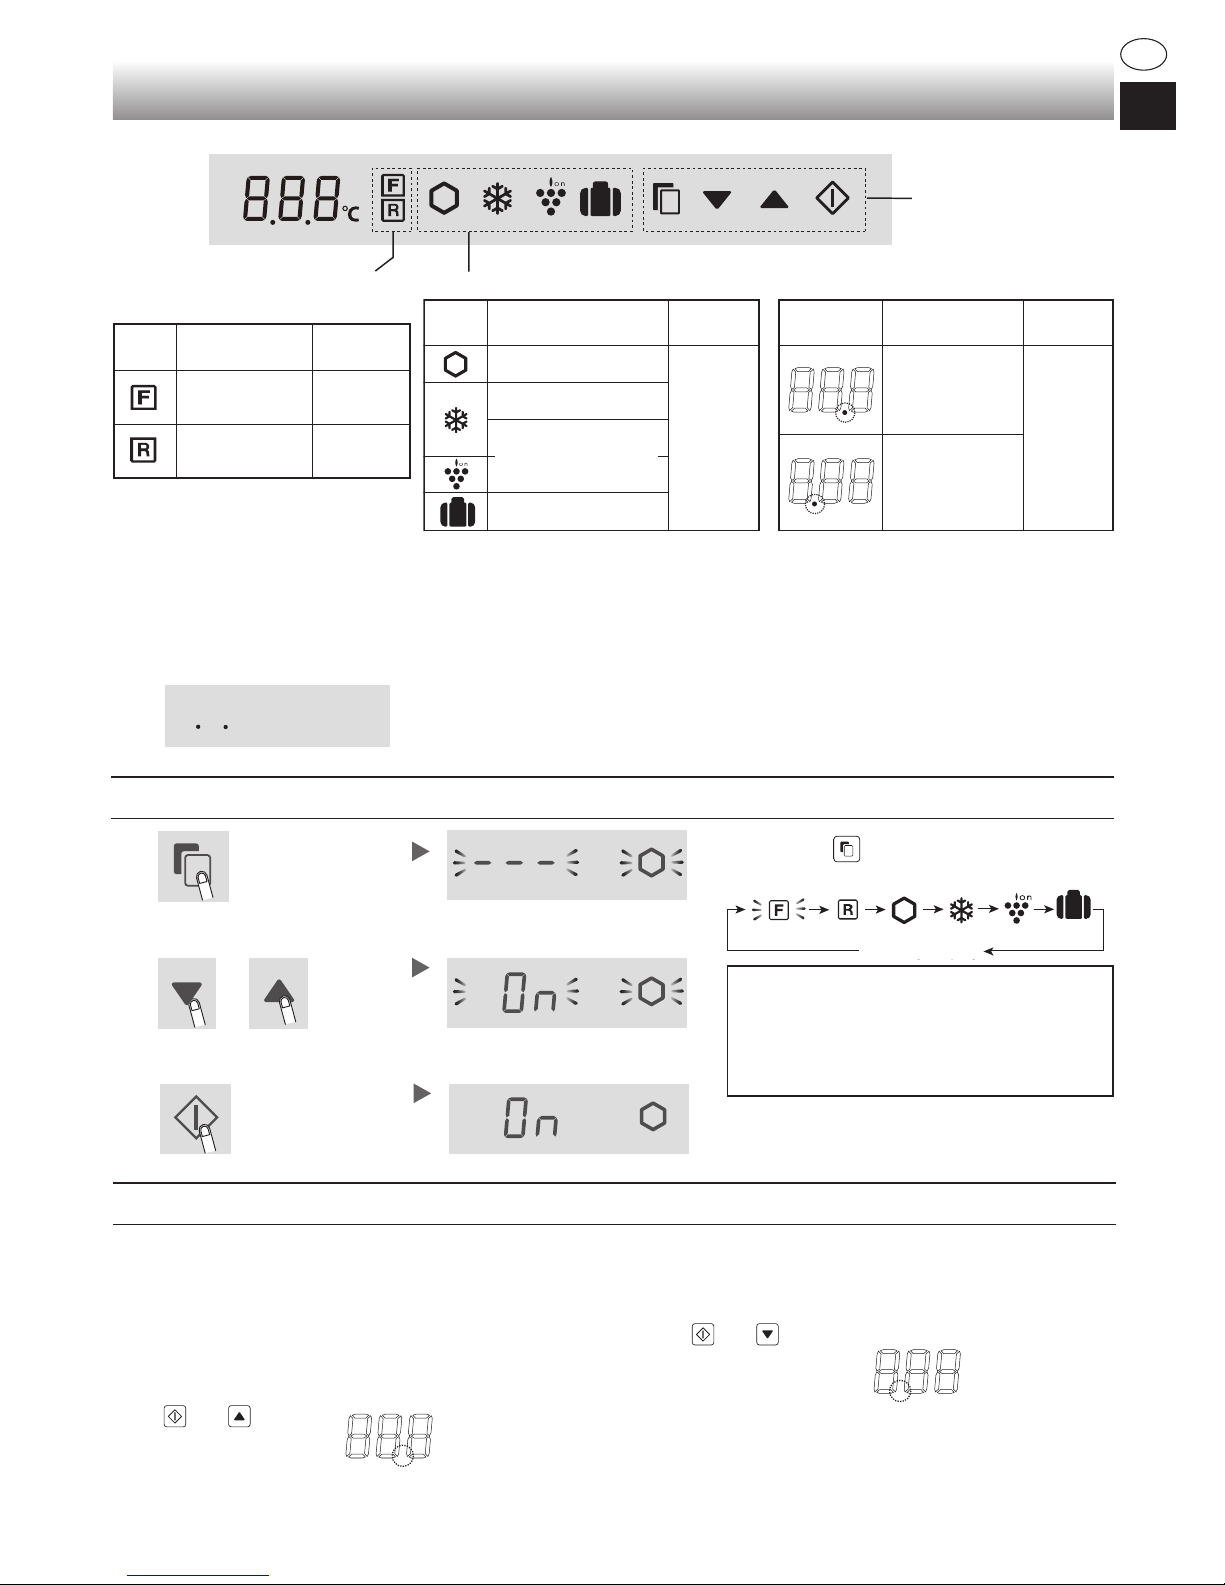
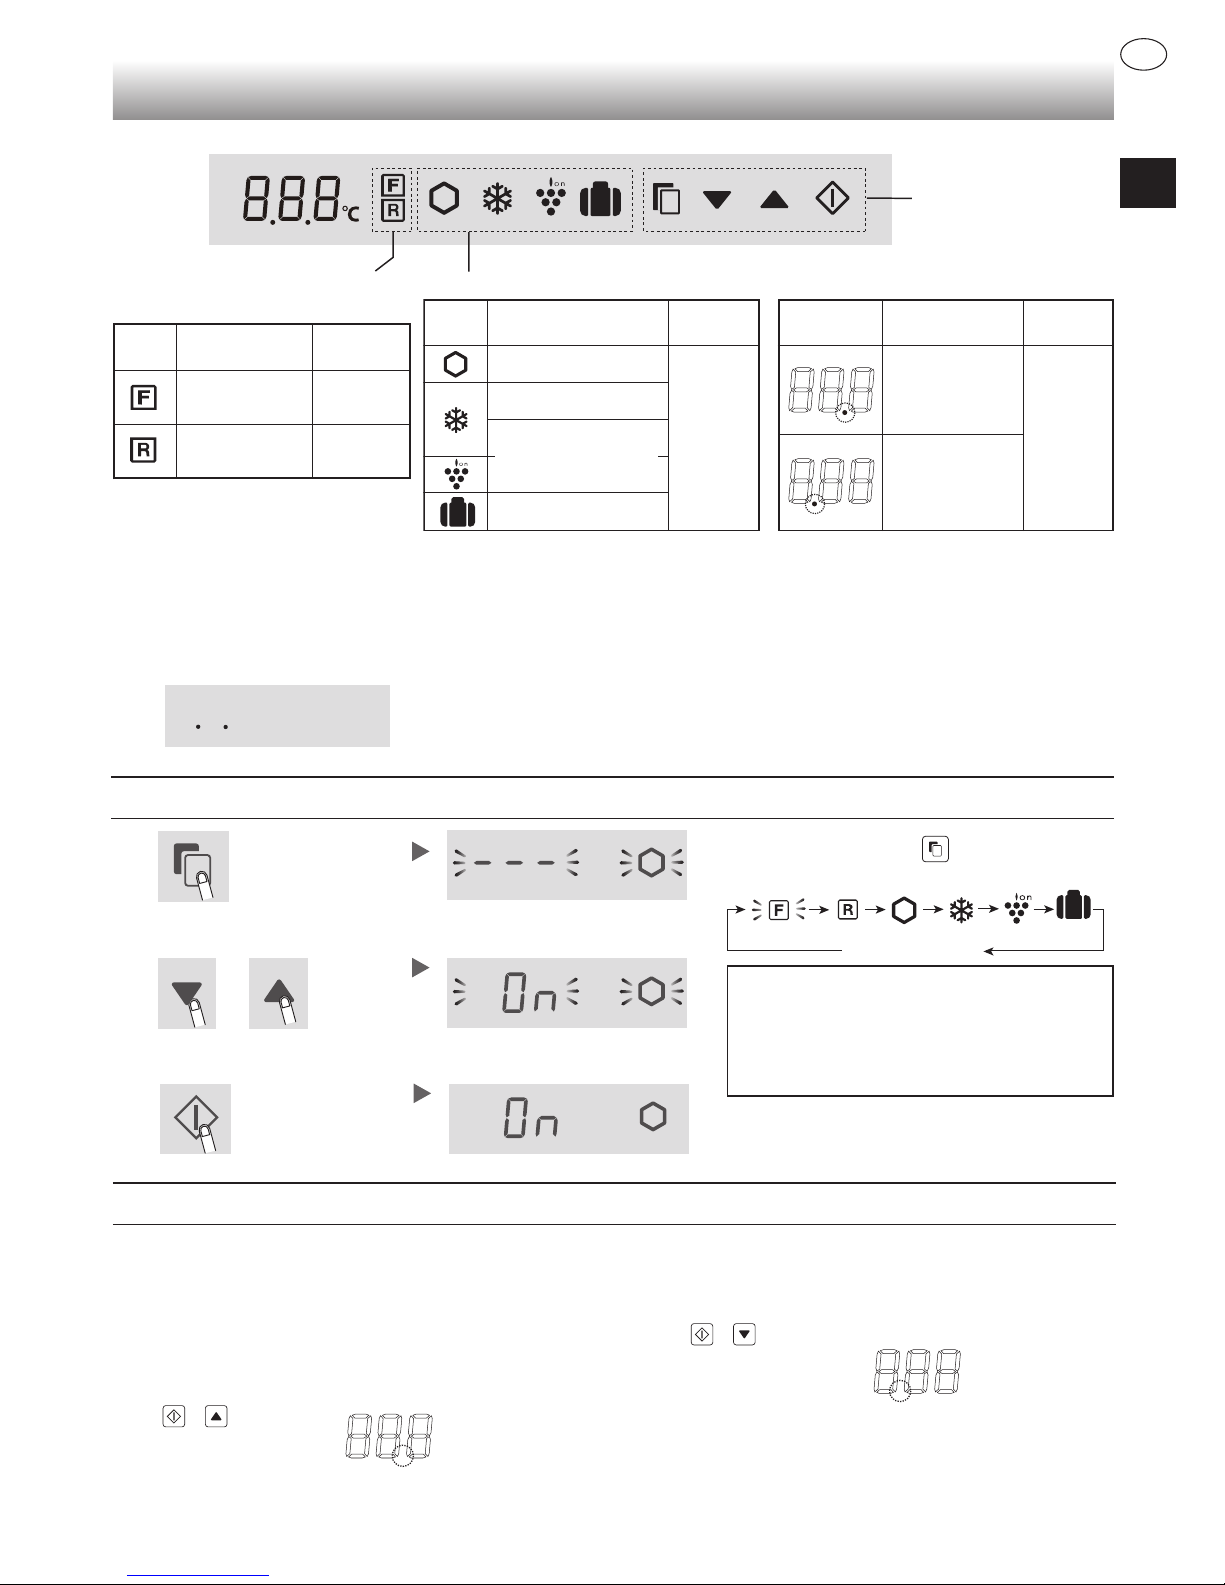
Control panel
(SJ-XG690G, SJ-XG740G)
Note
• When you press one of the keys, all icons ash once
and show the standby display.
• Mode icons or indicators in operation light up on the
standby display.
When Express cool is in operation, the icon ashes on
the standby display.
• When there is no operation for approximately 1 minute,
the display returns to the standby display automatically.
The standby display turns off if there is no operation for
another 1 minute.
• If the refrigerator stops because of power failure, the
modes except for Extra cool, Express freezing and
Express cool function the same way as before at the
time of re-power.
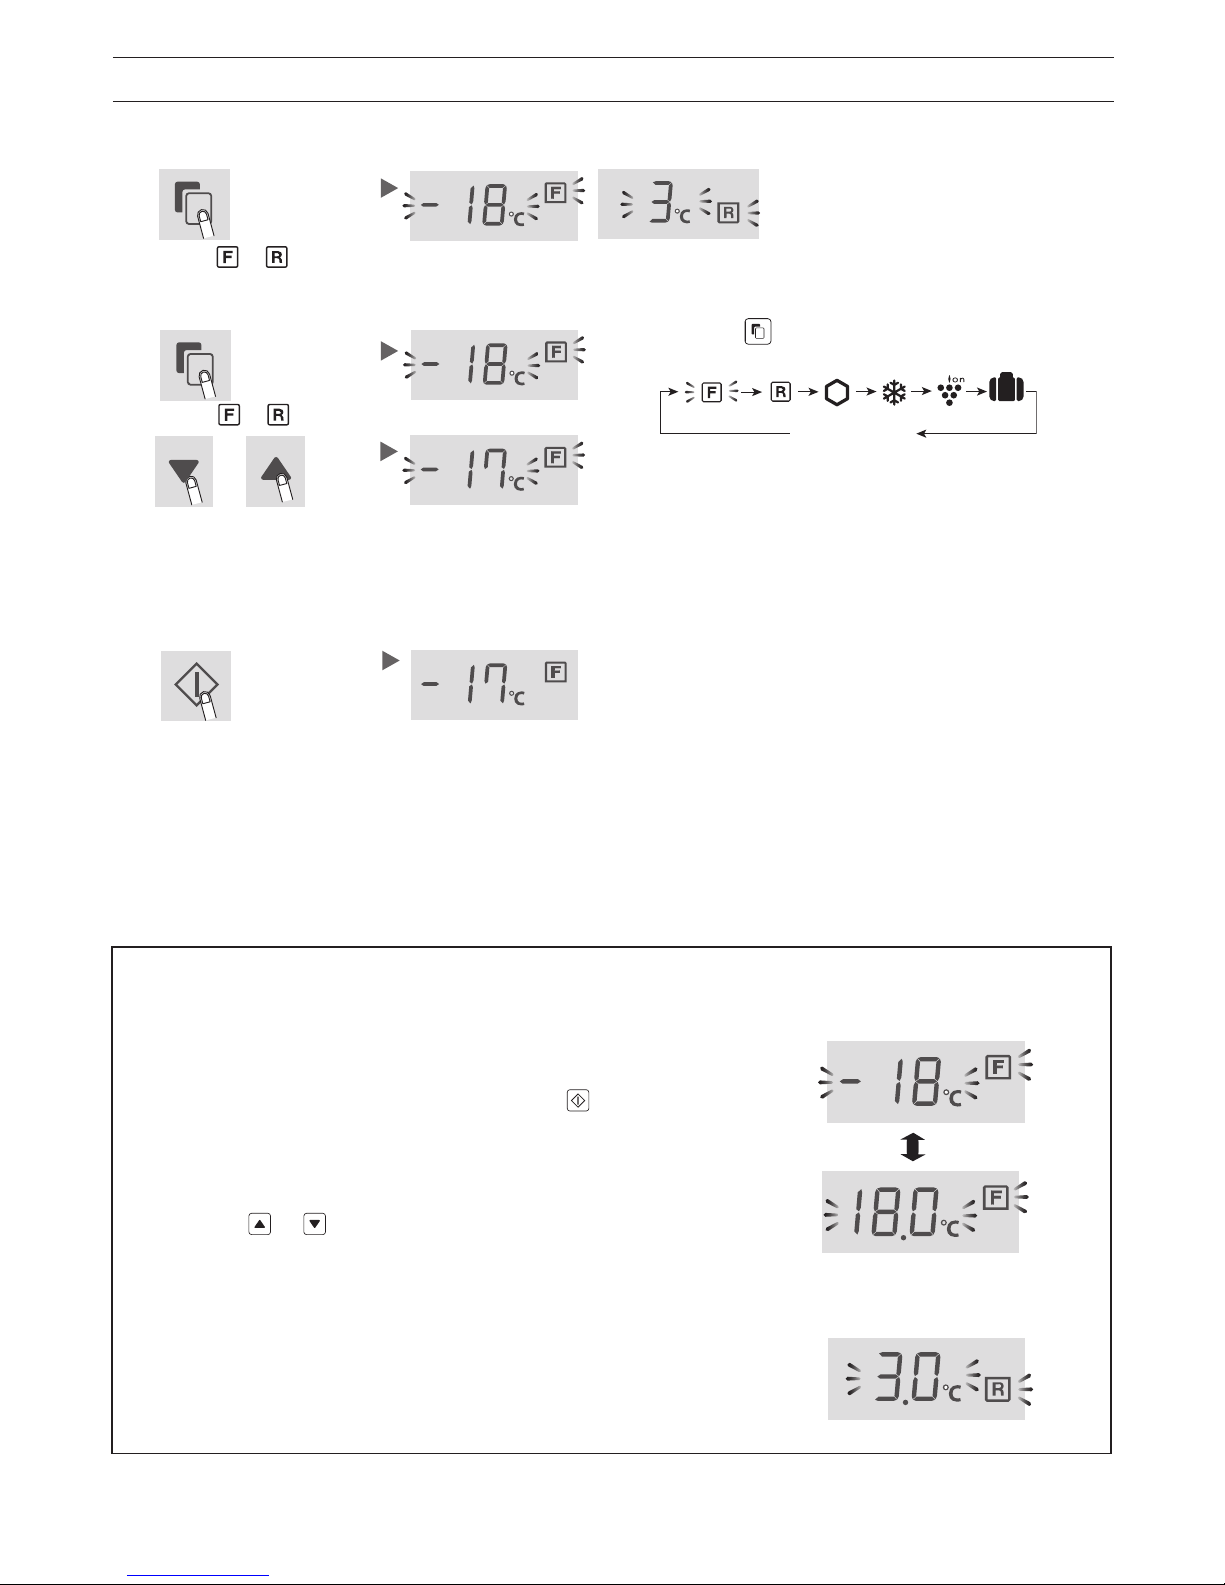
Turn-on state
When press button, the icons change in
the order shown as below.
Select the mode icon.
“Express cool”only
3
Complete the setting by pressing for
3 seconds or more.
(Beep, Beep, Beep)
Operations of useful modes
1
Standby display
or
2
3
Select on/off.
ON/OFF switches in the order by pressing the key.
Complete the setting.
Current setting
(This indication shows OFF.)
The setting is changed.
Operations of additional modes
Door alarm
• When the refrigerator door is left open for over 1
minute, door alarm sounds once, and again after 1
minute.
• If the door is left open for approx. 3 minutes, the alarm
sounds continuously.
• The alarm stops after close the door.
Turn off operation
Press and
simultaneously for 3
seconds or more.
(Beep, beep, beep)
Sound of button operation
• The electric sound is operated when touching each
keys.
Note
When you want to turn on the additional mode, follow
the same step again. (The indicator turns on.)
Turn off operation
Press and simultaneously for 3 seconds or more.
(Beep, beep, beep)
The indicator
turns off.
The indicator
turns off.
Operation keys
Freezer
compartment
-18°C
3°C
Refrigerator
compartment
Controlling temperature
icons
Useful modes icons Additional modes
Icon
Icon
Meaning
Freezer
compartment
Refrigerator
compartment
Default
setting
Default
setting
OFF
Indicator
Meaning
Default
setting
Door alarm
ON
Sound of key
operation
Standby display
Meaning
Extra cool
Express freezing
Express cool
Plasmacluster
Vacation mode
Page 10
EN-7
Controlling temperature
How to check the current temperature setting
The refrigerator controls its temperature automatically. However, you can adjust the temperature as below.
Select or icon.
Setting of Freezer/Refrigerator compartment
Freezer compartment
: Adjustable between -13°C and -21°C in step of 1°C
Refrigerator compartment
: Adjustable between 0°C and 6°C in step of 1°C
1
1
or
2
Select or icon.
Select the temperature
3
Complete the setting.
When press button, the icons change in the order
shown as below.
Standby display
The setting is changed.
switch
Freezer compartment
Refrigerator compartment
Advanced setting of Freezer/Refrigerator compartment
The temperature of freezer compartment and refrigerator
compartment can be adjusted in step of 0.5 °C by following the steps
a
to c.
a.
After the step 1 of “Basic operations”, press 3 seconds
or more. (Beep, beep, beep) The current preset temperature
returns to “Default setting”. (The display is indicated as the
picture on the right.)
b.
Press or and set the temperature.
c.
Complete the setting.
(Same as the step 3 of “Basic operations”.)
Follow the steps a to c again if you want to adjust the temperature in
step of 1°C.
Standbay display
Page 11
EN-8
EN
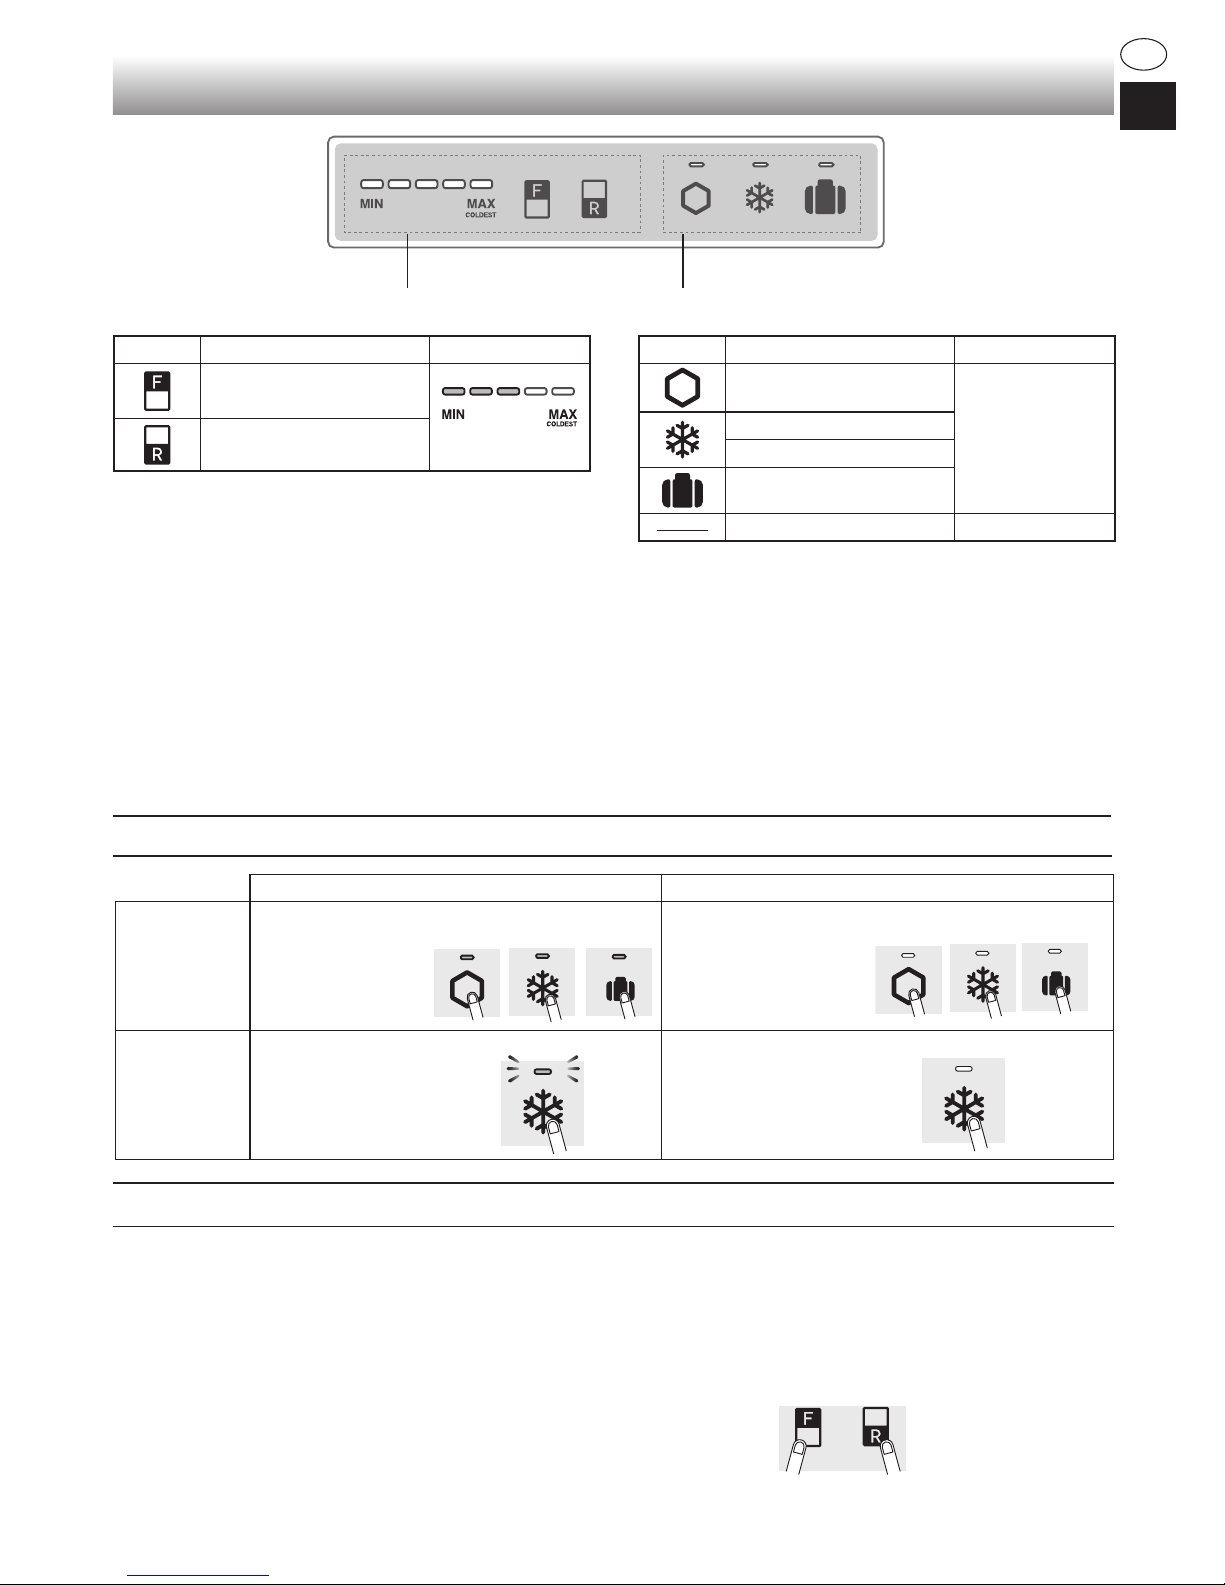
Operations of useful modes
Start operation
Cancel operation
Extra cool
Express
freezing
Vacation mode
Press the mode button.
(Beep)
Press the mode button.
(Beep)
Express cool Press the mode button for
3 seconds or more.
(Beep, beep, beep)
Press the mode button.
(Beep)
• When the refrigerator door is left open for over 1 minute, door alarm sounds once, and again after 1 minute.
• If the door is left open for approx. 3 minutes, the alarm sounds continuously.
• The alarm stops after closing the door.
If the door alarm does not stop
If the door alarm does not stop after closing all doors, it is a defect.
Contact the SHARP service center for service.
Method of stopping the door alarm temporarily
• Press “F” button and “R” button simultaneously and continuously for 3
seconds or more. (Beep, beep, beep)
• The door alarm sounds again after approximately 2 days.
Control panel
Controlling temperature icons Useful modes icons
Note
• All mode are off initially. When you press one of the
keys, control panel is active after the beep sound.
• When you press one of the keys, mode indicator in
operation lights up. When Express cool is in operation,
the indicator ashes.
• If you want to light up the temperature indicator, press
“F” or “R” button while the control panel is active.
*The Plasmacluster operates automatically when the
refrigerator is powered on.
There is no need to switch on/off.
• When there is no operation for approximately 1 minute,
the display turns off automatically.
• If the refrigerator stops because of power failure, the
modes except for Extra cool, Express freezing and
Express cool function the same way as before at the
time of re-power.
Button Meaning Default setting
Extra cool
OFF
Express freezing
Express cool
Vacation mode
Plasmacluster ON*
Button Meaning Default setting
Controlling temperature
of Freezer compartment
Controlling temperature of
Refrigerator compartment
Lighting
Turn off
Flashing Turn off
(SJ-XG640M, SJ-XG690M, SJ-XG740M)
Door Alarm
Page 12
EN-9
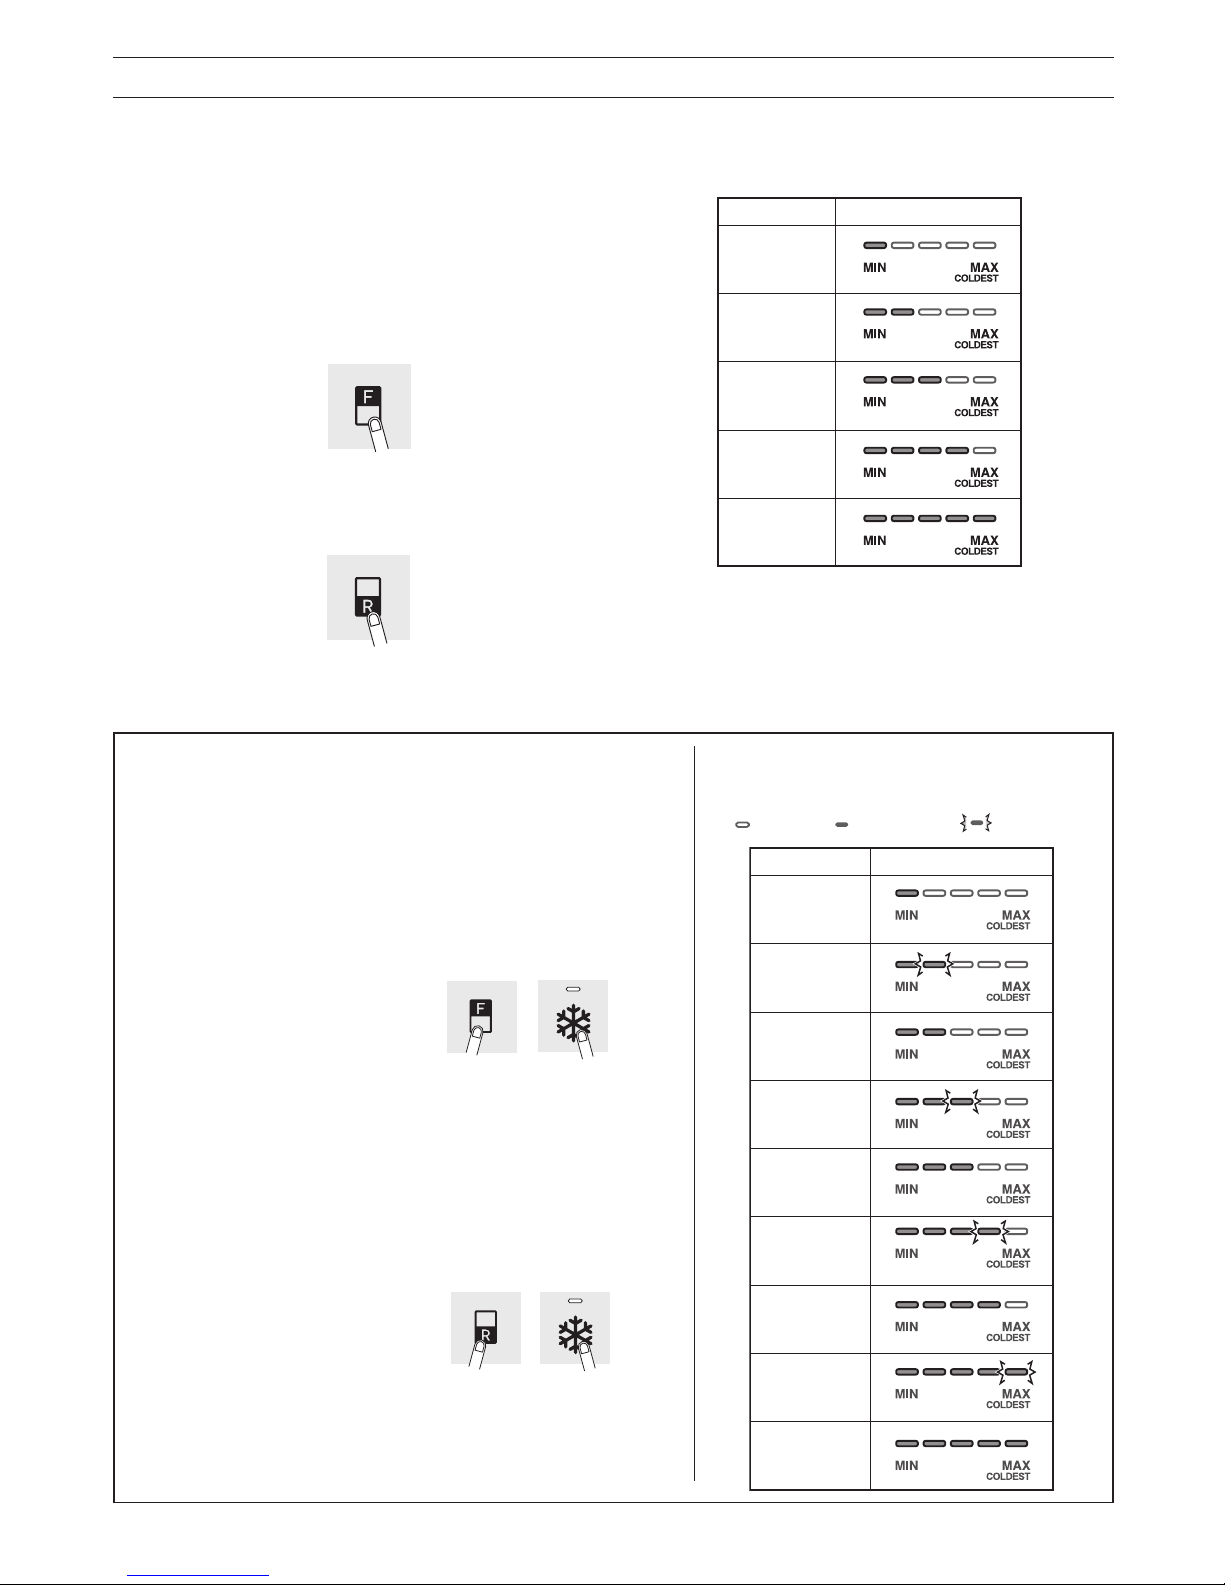
Controlling temperature
How to check the current temperature setting
The indicator lights up to show the current temperature
level by pressing “F” or “R” button.
Freezer compartment : Press “F” button.
Refrigerator compartment : Press “R” button.
Setting of Freezer/Refrigerator compartment
Freezer compartment
1.
Press “F” button.
2.
Press “F” button to change the temperature level.
Refrigerator compartment
1.
Press “R” button.
2.
Press “R” button to change the temperature level.
• Temperature indicator changes as the picture below
(
3→4→5→1→2→3
) by pressing “F” or “R” button.
Advanced setting of Freezer/Refrigerator compartment
The temperature of freezer compartment and refrigerator
compartment can be adjusted in 9 levels (level 1 ~ 9) by following
the steps a to b.
Freezer compartment
a.
Press “F” button rst.
Hold down “F” button and then press “Express freezing” button
for 3 seconds or more.
(Beep, beep, beep)
The indicator returns to “Default
setting”.
b.
Press “F” button to change the temperature level.
Follow the steps a to b if you want to adjust the temperature in 5
levels.
Refrigerator compartment
a.
Press “R” button rst.
Hold down “R” button and then press “Express freezing” button
for 3 seconds or more.
(Beep, beep,beep)
The indicator returns to “Default
setting”.
b.
Press “R” button to change the temperature level.
Follow the steps a to b if you want to adjust the temperature in 5
levels.
• Temperature indicator changes as the picture
below (
5→6→7→8→9→1→2→3→4→5
) by
pressing “F” or “R” button.
OFF Lighting Flashing
The refrigerator controls its temperature automatically. However, you can adjust the temperature as below.
Note
After adjusting the temperature level, the indicator turns
off approximately 5 seconds later.
1
2
3
4
5
Level
Indicator
Default setting
1
2
3
4
5
6
7
8
9
Default setting
Level
Indicator
... ...
...
Default setting
Level
Indicator
Default setting
Level
Indicator
Page 13
EN-10
EN
IN
OUT
• Freeze small quantities of food at a time in order to
freeze them quickly.
• Food should be properly sealed tightly or covered .
• Place foods in the freezer evenly.
• Label bags or containers to keep an inventory of
freezing food.
Advice for preventing dew or
frost inside the refrigerator
• Ensure that the food is of the freshest possible quality to maximize the storage life of perishable food. The following is
a general guide to help promote longer food storage.
• Food has a limited storage life. Make sure not to exceed use-by date indicated by manufacturer.
• The amount of energy consumption of this model is
measured as shown in the picture below.
• Install the refrigerator in a well-ventilated area and
keep the space to ventilate.
• Keep your refrigerator out of direct sunlight and do
not place it next to heat generating appliance.
• Avoid opening the door as much as possible.
• Hot food should be cooled before storing.
• Place the food evenly on the shelves to allow the
cool air to circulate efciently.
Tips for saving energy
Storing food
300
mm300 mm
90
mm
50
mm
Fruit / Vegetables
• Fruit and vegetables should be loosely enclosed in
a plastic material e.g. wrap, bags (do not seal) and
placed in the fruit and vegetable crisper to minimize
moisture loss.
• Fruits and vegetables which are easily effected by low
temperature should be stored in a cool place except
for the refrigerator.
Dairy Products & Eggs
• Most dairy products have their best-before date on
the outer packaging which informs the recommended
temperature and shelf life of the foods.
• Eggs should be stored in the egg pocket .
Meats / Fish / Poultry
• Place on a plate or a dish and cover with paper or
plastic wrap.
• For larger cuts of meat, sh, or poultry, place to the
rear of the shelves.
• Ensure all cooked food is wrapped securely or placed
in an airtight container.
• Fresh food (securely wrapped) should be stored in
limited time to prevent spoilage and badly affecting
other stored foods.
Freezer
Refrigerator
Advice for storing food
• Keep the door securely closed. If the food falls down,
it may cause a gap between the cabinet and the door.
Move it back to the shelf or the pocket.
• Open and close the door quickly as much as possible.
Dew or frost may appear if the door is left open for a
long period of time or opening and closing of the door
is very often.
• Stored items should be packed or sealed with such as
food containers or plastic wraps. (Especially food with
high-moisture)
• Evenly place the food on the shelves to allow the
cooling air to circulate efciently.
• Hot food should be cooled before storing. Storing hot
food increases the temperature in the unit and the risk
of food spoilage.
• Do not block the outlet and inlet of the cool air
circulating circuit with food or containers; otherwise the
food is not be evenly cooled throughout the refrigerator.
• Do not place food directly in front of cold air outlet. This
may lead to the food freezing.
Page 14
EN-11
Follow the tips below to prevent cracks on the
inner surfaces and plastic components
• Wipe out food oil adhered to plastic parts.
• Some household chemicals may cause damage, so
use only diluted washing-up liquid (soapy water).
• If undiluted detergent is used or soapy water is not
wiped off thoroughly, it may result in cracks of plastic
parts.
If the refrigerator needs to be switched off for an
extended period, the following steps should be taken to
reduce the growth of mold
1. Remove all food.
2. Remove the power plug from the socket.
3. Clean and dry the interior thoroughly.
4. Keep all the doors open slightly for a few days to dry.
Care and cleaning
Defrosting is automatically operated by a unique energy
saving system. (Approx. once a day.) Ice making takes
time because the temperature inside becomes slightly
higher than usual during the defrosting.
Note
• Do not use heavy-duty cleansers or solvents (lacquer,
paint, polishing powder, benzine, boiled water, etc.)
which may cause damages.
• If you pull out the power plug once, wait 5 minutes at
least before connecting the power plug again.
• The glass shelves weigh approximately 3 kg each.
Hold them rmly when remove from the cabinet and
carry.
• Do not drop objects inside the refrigerator or strike the
inner wall. This may cause cracks to inner surface.
• Remove the accessories (e.g. shelves) from the
cabinet and the door. Wash them by warm soapy
dishwashing water. After that, rinse them in clean
water and dry. (Only fruit and vegetable shelf is not
removable)
• Clean the inside with a cloth soaked in warm soapy
dishwashing water. Then, use cold water to wipe off
soapy water thoroughly.
• Wipe the exterior with a soft cloth each time it gets
dirty.
• Clean the magnetic door seal with a toothbrush and
warm soapy dishwashing water.
• Wipe the control panel with a dry cloth.
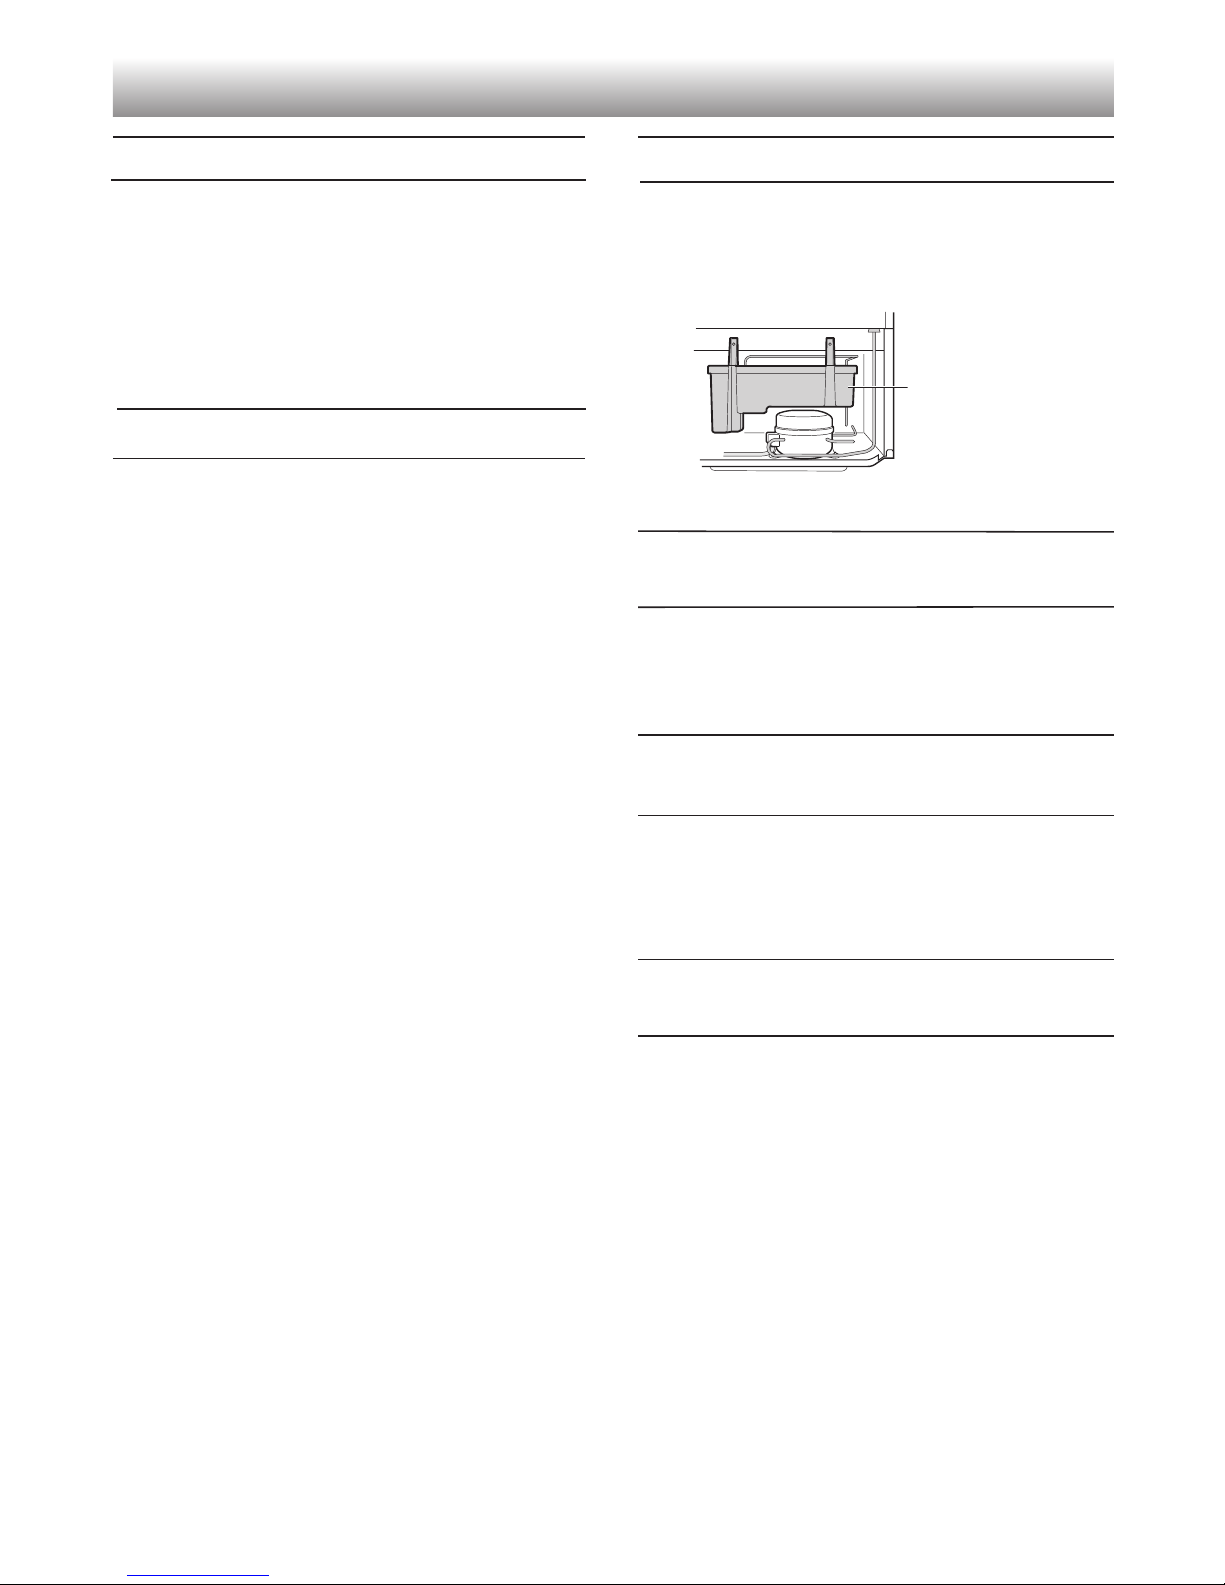
<SJ-XG640M, SJ-XG690M, SJ-XG740M>
Wipe up water in the evaporating pan. Before wiping
up the water, wait more than 1 hour after pulling out the
plug because refrigeration cycle equipment is extremely
hot. (The evaporating pan is located on the rear of the
product.)
Evaporating pan
Before transporting
Cleaning
Important
Defrosting of the cooling
unit
When the compartment
light is blown
Switching off your
refrigerator
Contact the service agent approved by SHARP to
replace the light. The light is not to be replaced other
than by qualied service personnel.
Page 15
EN-12
EN
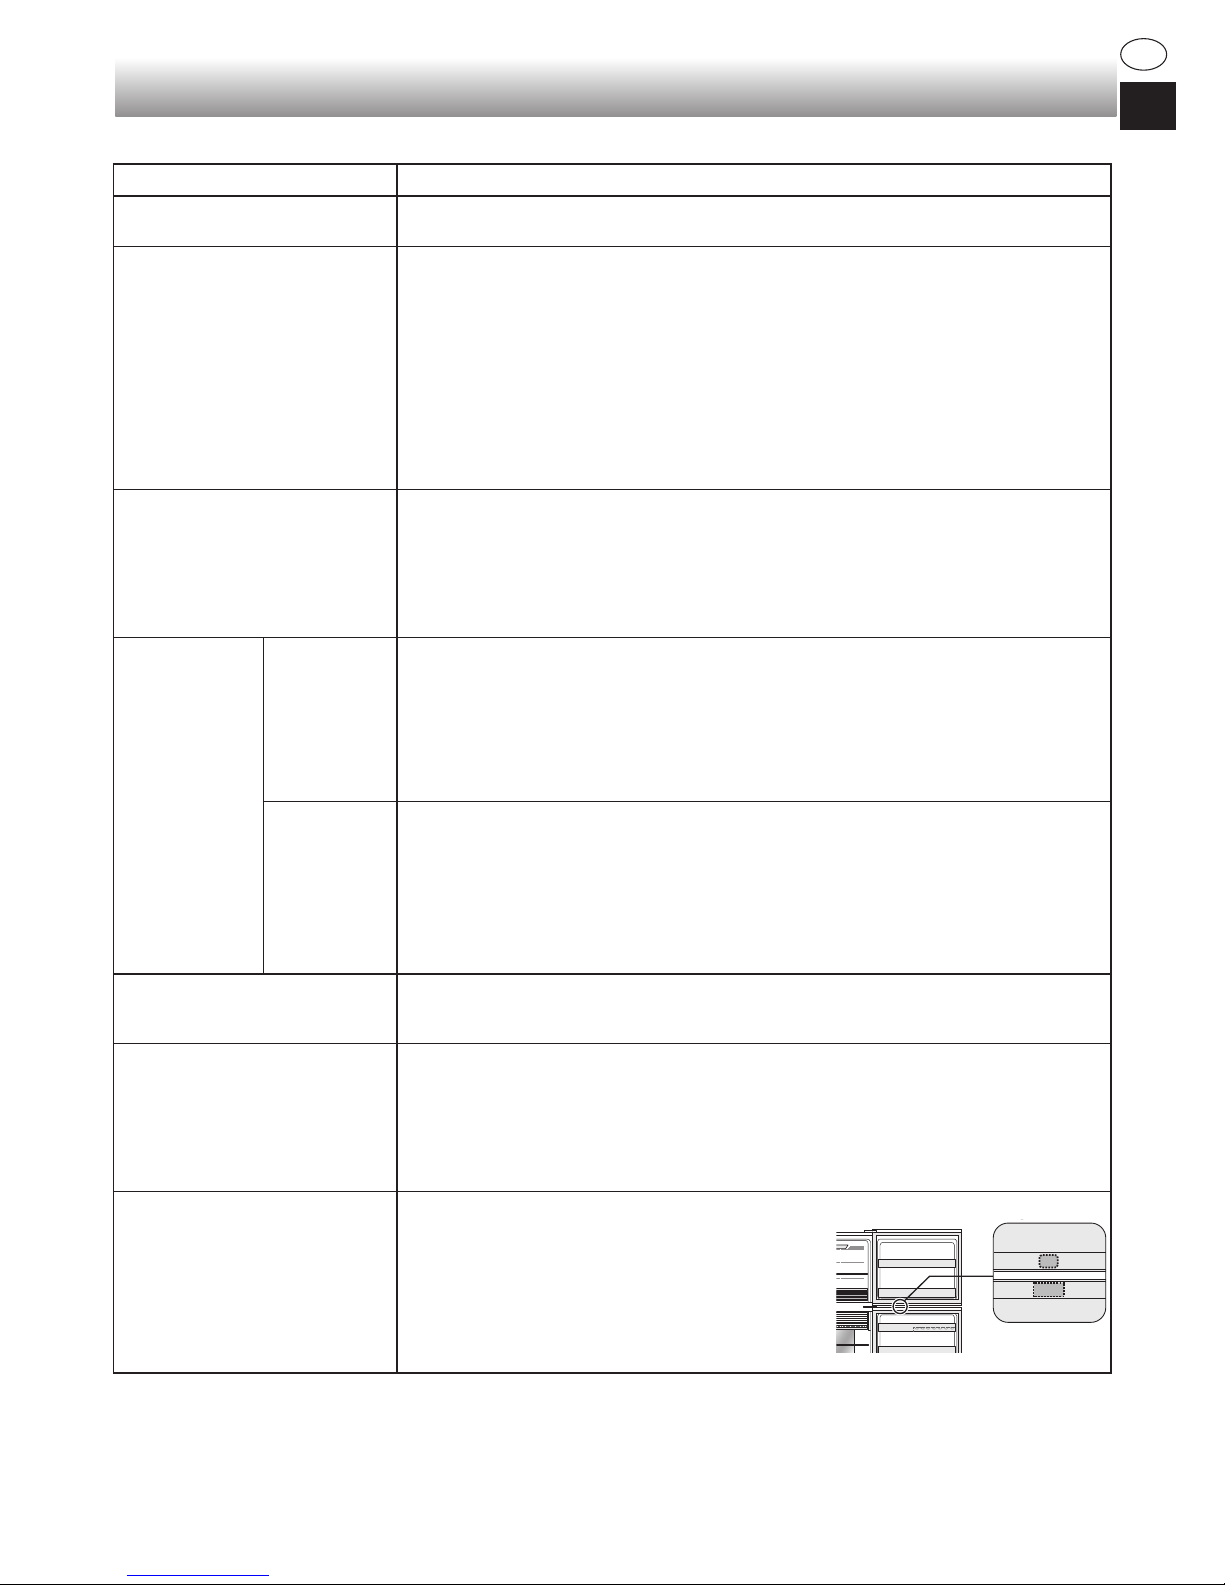
Before you call for service
Before calling for service, check the following points.
Problem Solution
The outside of the cabinet is
hot when touched.
It is normal. This is because of the hot pipe in the cabinet in order to prevent dew
generation.
Refrigerator makes loud noise. Following sounds are normal.
• The compressor makes loud noise when its operation starts.
-- Sound becomes quieter after a while.
• The compressor makes loud noise once a day.
-- Operating sound is made immediately after automatic defrost operation of the
cooling unit.
• Sound of owing uid (gurgling sound, zzing sound)
-- It is caused by refrigerant owing in pipes (sound may become louder from
time to time).
• Cracking or crunching sound, squeaking sound
-- It is caused by expansion and contraction of inner walls and internal parts
during cooling.
Frost or dew appears inside or
outside the refrigerator.
This may occur in one of the following cases. Use a wet cloth for wiping frost and a
dry cloth for wiping dew.
• When the ambient humidity is high.
• When the door is frequently opened and closed.
• When food containing plenty of moisture are stored. (Wrapping is required.)
• This phenomenon will appear more or less depending on the season (rainy
season, season), habits of usage and environmental conditions of each house.
The food in
the refrigerator
compartment
are frozen.
SJ-XG690G,
SJ-XG740G
• Is the refrigerator operated for a long time with refrigerator temperature control
set at 0°C?
-- Change the temperature control back to around 3°C.
• Is the refrigerator operated for a long time with freezer temperature control set at
-21°C?
-- Change the temperature control back to around -18°C.
• If ambient temperature is low, foods may freeze even if the refrigerator
compartment is set at 6°C.
SJ-XG640M,
SJ-XG690M,
SJ-XG740M
• Is the refrigerator operated for a long time with refrigerator temperature control
set MAX COLDEST?
-- Change the temperature control to the other setting.
• Is the refrigerator operated for a long time with freezer temperature control set
MAX COLDEST?
-- Change the temperature control to the other setting.
• If ambient temperature is low, food may freeze even if the refrigerator
compartment is set MIN.
Odors in the compartment. • Wrapping is required for the food with strong odors.
• Deodorizing unit cannot remove all odors.
• Clean the inside periodically.
The control panel does not
work.
This may occur in one of the following cases.
• The panel or your nger is soiled with dripping, oil and etc.
• When you touch the panel with gloved hand, adhesive bandage on your
nger,nail or objects.
• Sticker or tape is afxed on the keys.
• Touch position is slightly off from the keys.
• Operate time is not enough for the keys to work.
The compartment lights turn off
even if the doors are left open.
• The light switch is to turn on and off the
compartment lights.
When the angles of the doors are the same,
the lights turns off even if the doors are left
open but it is normal.
If you still require service
Refer to your nearest service agent approved by SHARP.
Light switch
Light swich
Page 16
EN-13
Product che
ANNEX
III
(EU) Regulation No.1060/2010
A
Trade mark
B
Model name
SJ-XG640M
SJ-XG690G
SJ-XG690M
SJ-XG740G
SJ-XG740M
C
Category 7
D
Energy efciency class A
++
E
EU Ecolabel award —
F
Annual energy consumption *
1
[KWh/year] 320
G
Storage volume of all compartments that do not
merit a star rating [ L ]
354 394 420
H
Storage volume of all frozen-foodstorage
compartments that merit a star rating [ L ]
162 176
I
The design temperature of “other compartment”
warmer than +14°C
—
J
Frost free
YES
K
Temperature rise time [ h ] 19
L
Freezing capacity [Kg/24h] 7.3 8.1
M
Climate class T
N
Airborne acoustic noise emission [dB(A)] 38
O
Built-in appliance No (Free-standing type)
*1 Energy consumption “XYZ” kWh per year, based on standard test results for 24 hours.
Actual energy consumption will depend on how the appliance is used and where it is located.
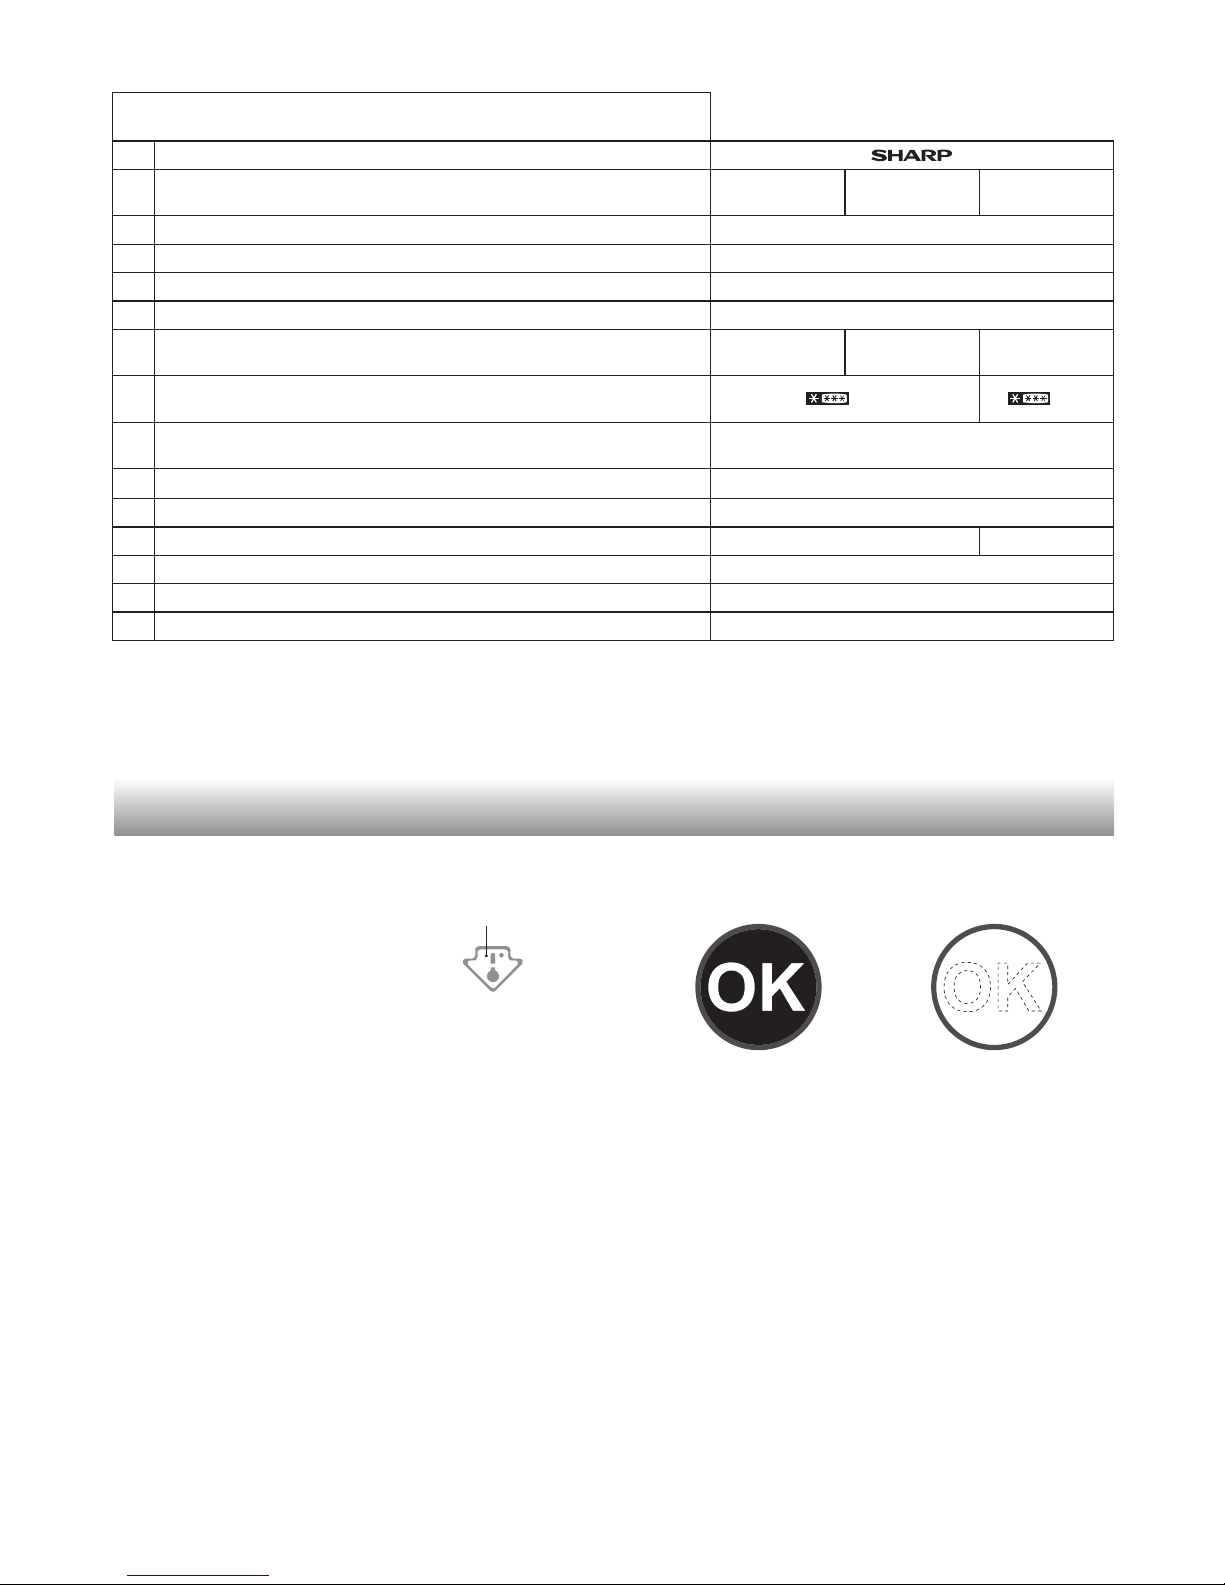
Indicator of temperature
This refrigerator is provided with an indicator of temperature in the refrigerator compartment to allow you to control the
average temperature in the coldest zone.
Coldest zone
The symbol indicates the
coldest zone in the refrigerator
compartment. (The door pocket
positioned at the same height isn’t
the coldest zone.)
Symbol
Checking the temperature in the coldest zone
You can carry out regular checks to ensure the
temperature in the coldest zone is correct and, if
necessary, adjust the refrigerator temp. control.
To maintain a correct temperature inside the appliance,
check that the indicator of temperature is always
BLUE. If the indicator of temperature turns WHITE,
the temperature is too high; in this case, increase the
refrigerator temp. control setting and wait for 6 hours
before checking the indicator of temperature again.
BLUE
Correct settings
WHITE
Temperature too high, adjust the
refrigerator temp. control.
Note
• The internal temperature of the refrigerator depends on
various factors such as the ambient temperature of the
room, the amount of food stored and the frequency of
door opening.
• When fresh food has been introduced or the door
has been left open for some time, it is normal for the
indicator of temperature to turn WHITE.
Page 17
EN-14
EN
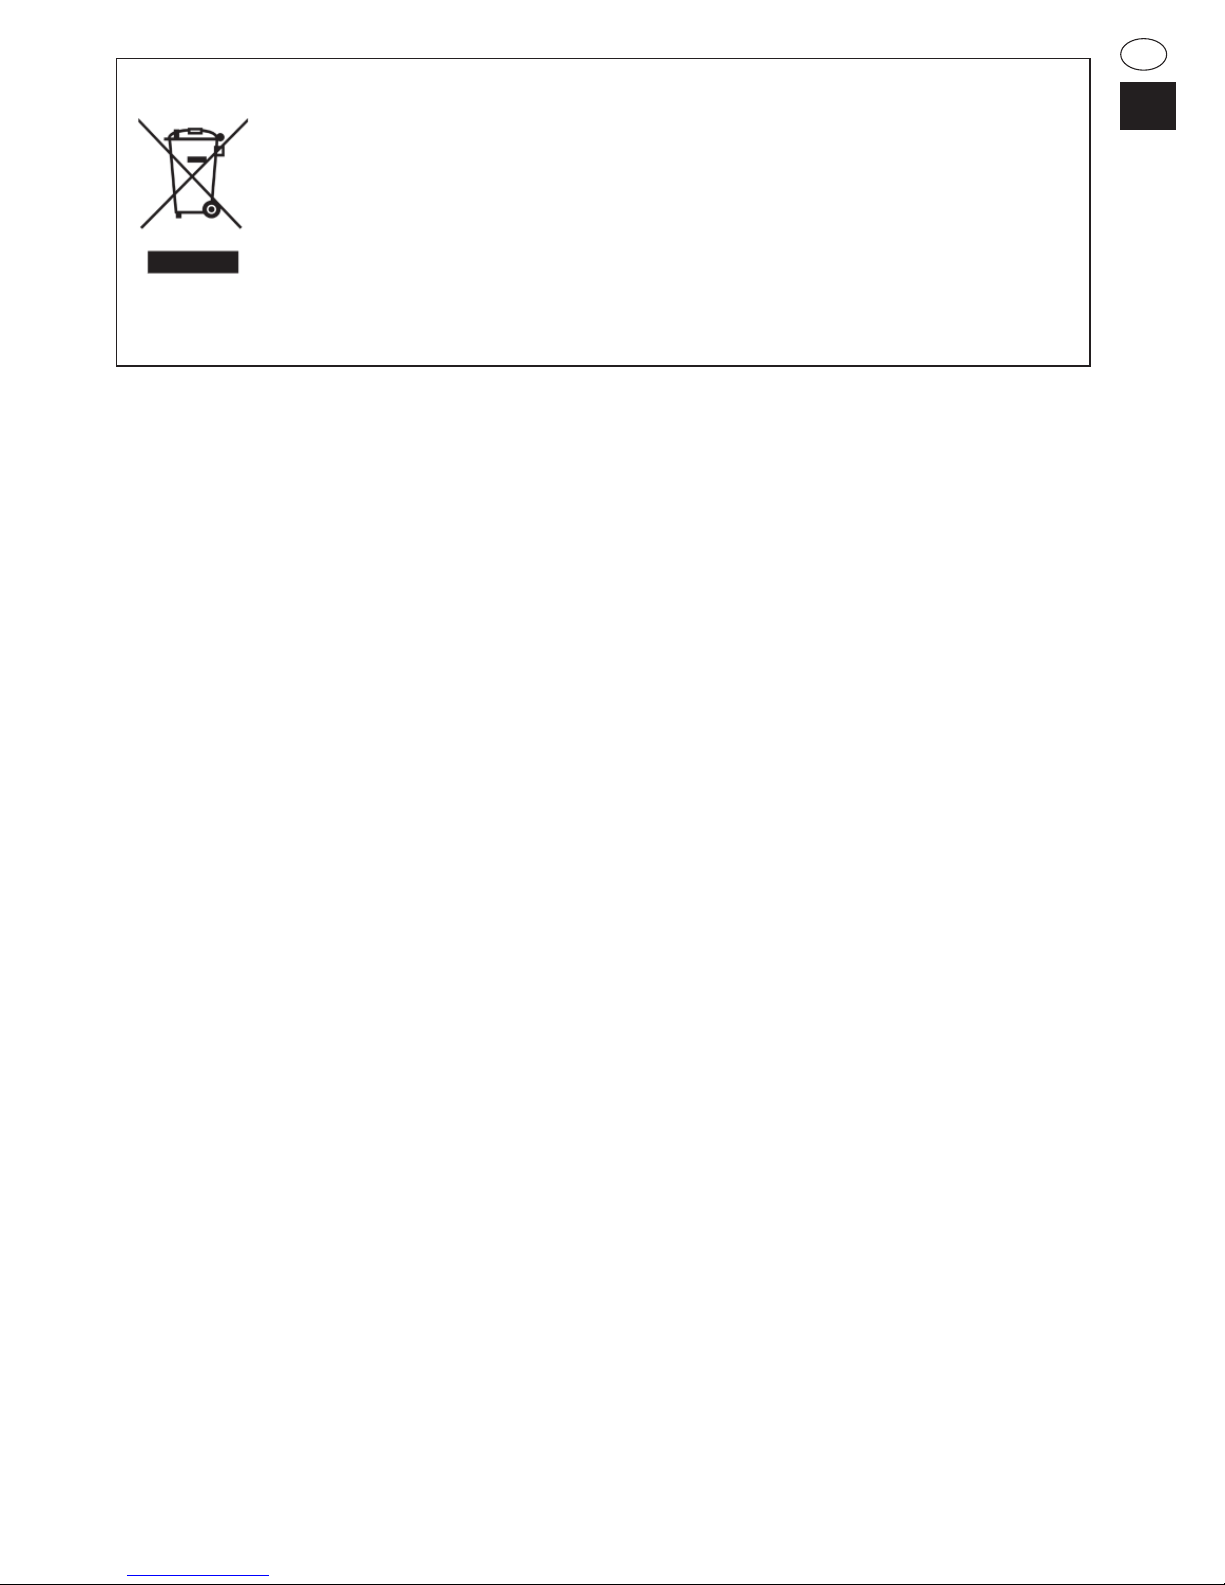
Information on the Disposal of this Equipment
IF YOU WISH TO DISPOSE OF THIS EQUIPMENT, DO NOT USE THE ORDINARY WASTE BIN, AND DO NOT
PUT THEM INTO A FIREPLACE!
Used electrical and electronic equipment should always be collected and treated SEPARATELY in accordance
with local law.
Separate collection promotes an environment-friendly treatment, recycling of materials, and minimizing nal
disposal of waste. IMPROPER DISPOSAL can be harmful to human health and the environment due to certain
substances! Take USED EQUIPMENT to a local, usually municipal, collection facility, where available.
If in doubt about disposal, contact your local authorities or dealer and ask for the correct method of disposal.
ONLY FOR USERS IN THE EUROPEAN UNION, AND SOME OTHER COUNTRIES; FOR INSTANCE NORWAY
AND SWITZERLAND: Your participation in separate collection is requested by law.
The symbol shown above appears on electrical and electronic equipment (or the packaging) to remind the users of this.
Users from PRIVATE HOUSEHOLDS are requested to use existing return facilities for used equipment. Return is free of charge.
Page 18

ES-1
Para uso doméstico únicamente
Muchas gracias por adquirir este producto SHARP. Antes de usar su refrigerador
SHARP, lea este manual de uso para asegurarse de que le saca el máximo provecho.
• Este refrigerador produce cubitos de hielo, enfría y congela alimentos.
• Este refrigerador se ha fabricado para uso doméstico únicamente a la temperatura
ambiente que se indica en la tabla. La clase climática se especica en la placa de
características.
Si el refrigerador funciona fuera del rango (rango de temperatura ambiente) de la
clase climática clasicada para ese modelo, es posible que no pueda mantener temperaturas internas correctas. Si se utiliza el refrigerador a temperaturas más frías, la
unidad no se dañará hasta una temperatura de +5 °C.
• El refrigerador no debe someterse a temperaturas de -10 °C o inferiores durante un
largo periodo de tiempo.
Refrigerante
Este refrigerador contiene refrigerante inamable (R600a: isobutano) y gas de aislamiento soplado (ciclopentano). Tenga en
cuenta las siguientes reglas para evitar incendios y explosiones.
■No permita que ningún objeto puntiagudo entre en contacto
con el sistema de refrigeración. El sistema de refrigeración en
la parte posterior e interior del refrigerador contiene refrigerante.
■No utilice dispositivos mecánicos u otros medios para acele-
rar el proceso de descongelación. (Este refrigerador integra
un sistema de descongelación automático).
■No utilice aparatos eléctricos dentro del refrigerador.
■No bloquee el espacio alrededor del refrigerador.
■No utilice rociadores inamables, como pintura en aerosol
cerca del refrigerador.
■No almacene los aerosoles inamables, como pintura en
aerosol dentro el refrigerador.
■En caso de fallo del sistema de refrigeración, no toque la
toma de pared ni use llamas abiertas. Abra la ventana y deje
salir el aire de la habitación. A continuación, solicite a un técnico de servicio aprobado por SHARP que revise el electrodoméstico.
Instalación
■No instale el refrigerador en un lugar mojado o húmedo.
Pueden producirse daños en el aislamiento o fugas eléctricas. También se puede formar rocío en el armario exterior y
provocar oxidación.
■Se debe instalar el refrigerador de forma plana y rme en el
suelo.
Cable de alimentación, enchufe y toma de corriente
Lea detenidamente las reglas que se indican a continuación
para evitar descargas eléctricas o incendios.
■Conecte de forma correcta y directa el enchufe a la toma de
corriente. No utilice un cable alargador o un adaptador.
■Conecte el enchufe a la toma de corriente con la tensión
nominal requerida.
■Conecte la clavija de toma de tierra al terminal de tierra de
forma adecuada.
■Asegúrese de proteger el cable de corriente de forma que
no se dañe durante la instalación o el traslado del electrodoméstico. Si el enchufe o el cable están sueltos, no inserte el
enchufe.
■No toque el enchufe con las manos mojadas.
■Desconecte el electrodoméstico del suministro eléctrico prin-
cipal retirando el enchufe de la toma de corriente. No tire del
cable para extraerlo.
■El polvo que se acumula en el enchufe puede provocar un
incendio. Limpie con cuidado.
■Retire el enchufe si el refrigerador no se va a utilizar durante
mucho tiempo.
■Si se daña el cable de corriente exible, lo debe
reemplazar un agente de servicio técnico aprobado
por SHARP ya que es necesario un cable especial.
En uso
■No almacene materiales volátiles e inamables como éter,
gasolina, gas propano, latas de aerosol, productos adhesivos
y alcohol puro, etc. Estos materiales pueden explotar con
facilidad.
■No guarde productos sensibles a la temperatura como fármacos en el refrigerador. Existen muchas probabilidades de que
se se deteriore la calidad del producto.
■No intente cambiar o modicar este refrigerador. Estas operaciones pueden provocar un incendio, descargas eléctricas
o lesiones.
■No coloque ningún objeto en la parte superior del refrigerador.
Si se cae algún objeto desde la parte superior, podría causar
lesiones.
■No golpee las puertas de cristal con fuerza. Si lo hace, pueden
romperse y causar lesiones. <SJ-XG690G, SJ-XG740G >
■Este aparato lo pueden utilizar niños mayores de
8 años y personas con capacidades físicas, sensoriales o mentales reducidas o falta de experiencia y conocimiento si se le supervisa o proporciona
instrucciones sobre el uso del aparato de una
forma segura o comprenden los peligros que conlleva. No deje que los niños jueguen con el electrodoméstico. Las tareas de limpieza y el mantenimiento del electrodoméstico no deben ser llevadas
a cabo por niños sin la supervisión adecuada.
Cuidado y limpieza
■Desconecte el refrigerador en primer lugar para evitar descargas eléctricas.
■Evite salpicar agua directamente sobre la parte exterior o interior del refrigerador, ya que podría provocar oxidación y el
aislamiento eléctrico podría verse afectado.
Problemas
■Si huele a quemado, extraiga el enchufe de corriente inmediatamente. A continuación, solicite a un técnico de servicio
aprobado por SHARP que revise el electrodoméstico.
■En caso de fuga de gas, ventile la zona abriendo la ventana.
No toque el refrigerador ni la toma de corriente.
Clase
climática
Intervalo aceptable de
temperaturas ambiente
SN +10°C a 32°C
N +16°C a 32°C
ST +16°C a 38°C
T +16°C a 43°C
Información de seguridad
ADVERTENCIA
Este símbolo indica que existe un alto riesgo de muerte o lesiones graves.
PRECAUCIÓN
Esto símbolo indica que existe un alto riesgo de que se produzcan daños en el material
o lesiones personales.
ADVERTENCIA
Page 19

ES-2
ES
Eliminación
■Asegúrese de que el refrigerador no resulta peligroso
para los niños mientras se almacena hasta su eliminación. (Por ejemplo, retire la puerta para evitar que
el niño quede atrapado).
■Este refrigerador se debe eliminar de la forma adecuada. Lleve el refrigerador a una planta de reciclaje
profesional para refrigerantes inamables y gases de
soplado de aislamiento.
Transporte
■Cuando instale o mueva
el refrigerador, use una
estera para evitar daños en
el suelo.
■Levante el refrigerador
con ayuda de los agarres
dispuestos en la parte posterior e inferior. Si levanta el
refrigerador de forma incorrecta, puede lesionarse.
PRECAUCIÓN
En uso
■No toque el compresor ni sus zonas periféricas,
debido a que se calientan mucho durante el
funcionamiento y los bordes metálicos pueden causar
lesiones.
■No toque los alimentos o recipientes metálicos en el
compartimento congelador con las manos mojadas
para evitar su posible congelación.
■No deje bebidas embotelladas y latas en el
congelador. Sobre todo cuando está funcionando
"Express cool" (Frío expreso), existe un alto riesgo de
que las botellas de cristal puedan estallar.
■Utilice solamente agua potable para producir cubitos
de hielo.
■No abra ni cierre la puerta si una persona coloca la
mano cerca de la puerta, para evitar el peligro de
atrapamiento de los dedos.
■No coloque objetos de gran tamaño en los
compartimentos de la puerta. Si se cae algún objeto
de los compartimentos, puede causar lesiones
personales.
■Tenga cuidado al instalar o desinstalar los estantes
de cristal. Si deja caer los estantes de cristal, pueden
romperse o causar lesiones.
rear
bottom
Instalación
Tipo independiente
1
Mantenga un espacio de ventilación adecuado alrede-
dor del refrigerador.
• La imagen muestra
el espacio mínimo
requerido para la
instalación del refrigerador. El estado
de medición del
consumo de energía
se lleva a cabo en
una dimensión de
espacio diferente.
• Si se amplía este espacio, es posible que el refrigerador consuma menos energía.
• Si usa el refrigerador en un espacio más pequeño
que el que se muestra a continuación, puede hacer
que aumente la temperatura de la unidad, haga
ruido y falle.
• El espacio entre la parte posterior del refrigerador
y la pared debe tener 50 mm o más y menos de
75 mm. Si el espacio es más ancho que 75 mm, se
podría lesionar al tocar el compresor y sus zonas
periféricas que se calientan mucho durante el funcionamiento.
90mm
or more
60mm
or more
60mm
or more
Espacio total requerido en uso
2
Utilice las dos patas delanteras
ajustables para colocar el
refrigerador de forma plana
y rme en el suelo.
3
Conecte el electrodoméstico a una toma de corriente
correctamente instalada.
Nota
• Coloque el refrigerador de forma que pueda acceder al
enchufe.
• Mantenga el refrigerador alejado de la luz solar directa
y no lo coloque junto a un aparato que genere calor.
• No coloque el refrigerador directamente en el suelo.
Inserte un soporte adecuado como una tabla de
madera debajo del refrigerador.
• Si inserte el enchufe con la puerta abierta, la alarma
de la puerta sonará, pero esto es normal. El sonido se
detendrá al cerrar la puerta
Las ruedas se encuentran en la parte inferior
del refrigerador
• Estas ruedas permiten mover el refrigerador hacia
adelante y hacia atrás.
Antes de usar el refrigerador
• Limpie las partes interiores con un paño humedecido
en agua tibia.
• Si usa una solución jabonosa para limpiarlo, retírela
a fondo con agua.
1550 mm
1450 mm
790 mm
935 mm
Pata ajustable
Ruedas (4 piezas)
parte posterior
parte inferior
60 mm o
más
90 mm o
más
60 mm o
más
Page 20
ES-3
Puerta del espacio fresco de doble dirección
Descripción
1. Luz del congelador
<solo para
SJ-XG690G, SJ-
XG690M, SJ-XG740G, SJ-XG740M
>
2. Dispensador de hielo móvil
<solo para SJ-
XG640M, SJ-XG690G, SJ-XG690M>
3. Estante congelador (superior)
4. Estante congelador (inferior)
5. Cajón del congelador
Mueva el separador para ajustar el tamaño de los alimentos.
6. Puerta del espacio fresco
de doble dirección
7. Estante fresco
8. Unidad desodorizante
El catalizador desodorizante se instala en los conductos
del aire frío. No es necesario que funcione y se limpie.
9. Luz del refrigerador
10. Estante del refrigerador
11. Panel de enfriamiento híbrido
El panel enfría el compartimiento del refrigerador indirectamente desde la parte posterior. De este modo, la comida
se enfría ligeramente sin exponerse al caudal de aire frío.
12. Estante para frutas y verduras
13. Cajón para frutas y verduras
14. Pata ajustable
15. Sello magnético de la puerta
16. Panel de control
17. Compartimento de la puerta del congelador
18. Dispensador de hielo interno
<solo para
SJ-XG740G,
SJ-XG740M
>
(Este dispensador se incluye en el compartimento
del congelador. Consulte la página siguiente "Tras
limpiar" para instalar).
19. Jarra de agua
<solo para SJ-XG740G, SJ-XG740M>
(La jarra de agua se incluye en el cajón del
congelador. Asegúrese de colocar la jarra en la
posición indicada en la gura superior para su uso).
20. Compartimento para huevos
21. Compartimento del refrigerador (superior)
22. Compartimento para botellas
23. Compartimento del refrigeración (inferior)
Si desea almacenar alimentos de gran tamaño dentro del refrigerador
• Puede retirar cualquier estante o compartimento
numerado 2,3,5,6,7,10,13,17, 18, 19, 20, 21, 22, 23 en
la imagen de arriba.
• El rendimiento de enfriamiento no se verá afectado
incluso si usa el refrigerador en la situación anterior.
Utilice el espacio como un
compartimento de refrigeración.
Utilice el espacio como
un compartimento fresco
Cómo abrir la puerta del espacio fresco de
doble dirección
1) Levante la puerta.
2) Inserte la puerta en el marco
y empuje hacia atrás hasta el
tope. Se cierra correctamente.
Open Close
SJ-XG740G,SJ-XG740M
SJ-XG640M, SJ-XG690G,SJ-XG690M
1
3
4
5
7
6
8
9
1
1
14
14
13
15
19
18
15
16
20
22
23
12
10
1
3
4
2
5
7
6
8
9
11
14
14
13
15
15
17
16
20
22
23
12
10
21
21
17
Partition
Freezer case
Separador
Cajón del
congelador
Abierto Cerrado
Page 21
ES-4
ES
Dispensador de hielos interior (SJ-XG740G,SJ-XG740M)
Producción de cubitos de hielo
1) Use la jarra para medir la cantidad de agua.
Nivel de agua
Jarra de agua (160 ml)
2) Vierta el agua en el dispensador de hielos interior con
ayuda de la jarra de agua.
3) Cuando se hayan hecho los cubitos de hielo, gire
la palanca hacia la derecha para volcarlos en el
recipiente al efecto.
4) Tire del recipiente para cubitos de hielos para sacar
los cubitos.
Recipiente para cubitos de hielo
Palanca
Nota
• Para evitar que se dañe el recipiente para cubitos de
hielo, no vierta aceite ni haga hielo en el.
• Evite abrir la puerta del congelador todo lo posible
durante la producción de hielos.
Limpieza del dispensador de cubitos hielos interior
• Vacíe el recipiente para cubitos de hielos previamente.
1) Tire hacia arriba del dispensador de cubitos de hielos
para retirarlo.
2) Retire la bandeja de cubitos de hielo.
3) Retire el recipiente para cubitos de hielo.
4) Presione la protuberancia para desmontar el
dispensador de cubitos hielos interior.
Bandeja de cubitos de hielo
Protuberancia
2)
3)
Nota
• No introduzca la bandeja de cubitos de hielos en el
lavavajillas, ya que podría dañarse el exterior.
Tras limpiar
1) Instale de nuevo el dispensador de cubitos hielos interior
(Invierta el procedimiento de desmontaje).
2) Fije de forma segura el dispensador de cubitos hielos interior.
Oricio
Enganche
Dispensador de hielo interior
Puerta
<Posición de la palanca>
Palanca
Palanca
Dispensador de hielo móvil (SJ-XG640M, SJ-XG690G, SJ-XG690M)
Es muy recomendable usar el dispensador de hielo siguiendo las indicaciones de la imagen "Descripción". Puede
colocar el dispensador de hielo en cualquier parte del compartimento del congelador.
1) No vierta demasiada agua
en la bandeja. Si lo hace, se
pegarán los cubitos de hielo
cuando se congelen.
2) Cuando se hayan hecho
los cubitos de hielo, gire la
palanca hacia la derecha
para volcarlos en el
recipiente al efecto.
Nota
• No olvide colocar la máquina de hielo de forma plana
para que no se derrame el agua de la bandeja de
hielo.
• Para evitar que se dañe el recipiente para cubitos de
hielo, no vierta aceite ni haga hielo en el.
Palanca
Recipiente para cubitos de hielo
Page 22
ES-5
Modos útiles
En cuanto a las operaciones, consulte el capítulo "Panel de control".
Frío extra
Congelación rápida
Frío rápido
Frío extra Congelación rápida Frío rápido
Características
Este modo es para enfriar
las bebidas o la comida
a la máxima potencia.
Nota:
Los alimentos con
gran cantidad de humedad pueden congelarse.
Este modo acelera el
tiempo para congelar
alimentos o hacer
hielo.
Este modo es para enfriar las bebidas o la comida
rápidamente.
Punto de uso Espacio fresco Cajón del congelador Compartimiento del congelador
PRECAUCIÓN :
No coloque botellas de cristal.
Es muy probable que estallen.
Tiempo de
funcionamiento
6 horas
*
1
2 horas
*
1
30 minutos
• Este modo naliza automáticamente.
• La alarma no suena.
• Este modo naliza automáticamente.
• La alarma suena.
Para detener la alarma *
2
o
Pulse el botón
"Express freezing"
(Congelación
exprés).
*
1
Puede tardar más tiempo en completarse el
funcionamiento si se superpone con la descongelación.
Este modo se inicia cuando termina la descongelación.
*
2
Si no apaga la alarma, suena durante 30 minutos
seguidos.
Nota
• Los modos Frío extra, la Congelación exprés y el Frío
exprés no están disponibles al mismo tiempo mientras
que uno de los modos está funcionando.
• Evite abrir la puerta cuando sea posible durante el
funcionamiento de estos modos.
Plasmacluster
hongos de
moho
Compartimiento
del congelador
Espacio fresco
Modo vacaciones
• Utilice este modo cuando vaya de viaje o salga de
casa durante un largo periodo de tiempo.
• La temperatura en el interior del compartimento del
refrigerador se ajusta a aprox. 10 °C.
Pulse la tecla
Intro.
Nota
Es posible que el refrigerador despida un olor leve. Es
el olor del ozono que genera el ionizador. La cantidad
de ozono es mínima y desaparece rápidamente en el
refrigerador.
Utilice esta función cuando quiera mantener limpio el
interior del refrigerador.
El Plasmacluster se pone en funcionamiento
automáticamente cuando se enciende el refrigerador.
El ionizador que se encuentra en el interior de su
refrigerador libera grupos de iones, que son masas
colectivas de iones positivos y negativos, en el
compartimiento del refrigerador.
Estos grupos de iones inactivan los hongos de moho
presentes en el aire.
Una vez
completada la
operación
• No es necesario que saque bebidas
o comida.
• No olvide sacar las bebidas y la comida cuando
suene la alarma.
• Si se dejan las bebidas y la comida en
el congelador durante aproximadamente
30 minutos, pueden congelarse.
En el momento
del corte de
energía durante el
funcionamiento
• Este modo se cancela automáticamente. • Este modo se reinicia automáticamente desde
el estado anterior en el momento que se vuelve
a conectar la energía.
Nota
• El periodo de almacenamiento de alimentos en el
compartimiento del refrigerador pasa a ser aprox.
de entre un 1/2 y un 1/3 con respecto al modo de
funcionamiento normal. Utilice este modo solo con
alimentos no perecederos.
• No se puede modicar la temperatura del
compartimiento del refrigerador.
Cajón del
congelador
Page 23
ES-6
ES
Panel de control
(SJ-XG690G, SJ-XG740G)
Nota
• Cuando se pulsa una de las teclas, todos los iconos
parpadean una vez y aparece la pantalla de espera.
• Los iconos de modo o indicadores en funcionamiento
se iluminan en la pantalla de espera. Cuando la
función de frío expreso se encuentra activada, el icono
parpadea en la pantalla de espera.
• Cuando no funcione durante 1 minuto
aproximadamente, la pantalla vuelve automáticamente
a la pantalla de espera. La pantalla de espera se
apagará si no funciona durante otro minuto.
• Si el refrigerador se detiene debido a un corte de
energía, los modos excepto Frío extra, Congelación
exprés y Frío exprés funcionan de la misma forma que
antes en el momento de volver a conectar la energía.
Estado de encendido
Cuando pulse el botón , los iconos
cambian en el orden que aparece a
continuación.
Seleccione el icono de modo.
"Frío exprés" solamente
3
Complete el ajuste pulsando durante
3 segundos o más.
(Pitido, pitido, pitido)
Funcionamiento de los modos útiles
1
Standby display
or
2
3
Seleccione encendido/apagado.
Encendido/Apagado cambia en el orden pulsando la tecla.
Complete el ajuste.
Ajuste actual
(El indicador muestra OFF).
Se cambia el ajuste.
Funcionamiento de modos adicionales
Alarma de la puerta
• Cuando la puerta del refrigerador se deja abierta
durante más de 1 minuto, la alarma de puerta suena
una vez, y otra vez transcurrido 1 minuto.
• Si se deja abierta la puerta durante aprox. 3 minutos, la
alarma suena continuamente.
• La alarma se detiene cuando se cierra la puerta
Apagar el funcionamiento
Pulse y a la vez
durante 3 segundos o más.
(Pitido, pitido, pitido)
Sonido del funcionamiento del botón
• El sonido eléctrico se activa al tocar cada tecla.
Nota
Cuando quiera encender el modo adicional, siga de
nuevo el mismo paso. (El indicador se enciende).
Apagar el funcionamiento
Pulse y a la vez durante 3 segundos o más.
(Pitido, pitido, pitido)
El indicador se
apaga.
El indicador se
apaga.
Teclas de funcionamiento
Freezer
compartment
-18°C
3°C
Refrigerator
compartment
Control de los iconos de
temperatura
Iconos de modos útiles Modos adicionales
Iconos
Iconos
Signica
Compartimiento
del congelador
Compartimiento
del refrigerador
Ajuste predeterminado
Ajuste pre-
determinado
APAGADO
Indicador
Signica
Ajuste pre-
determinado
Alarma de la
puerta
Encendido
Sonido del
funcionamiento
principal
Pantalla de espera
Signica
Frío extra
Congelación rápida
Frío rápido
Plasmacluster
Modo vacaciones
o
Page 24
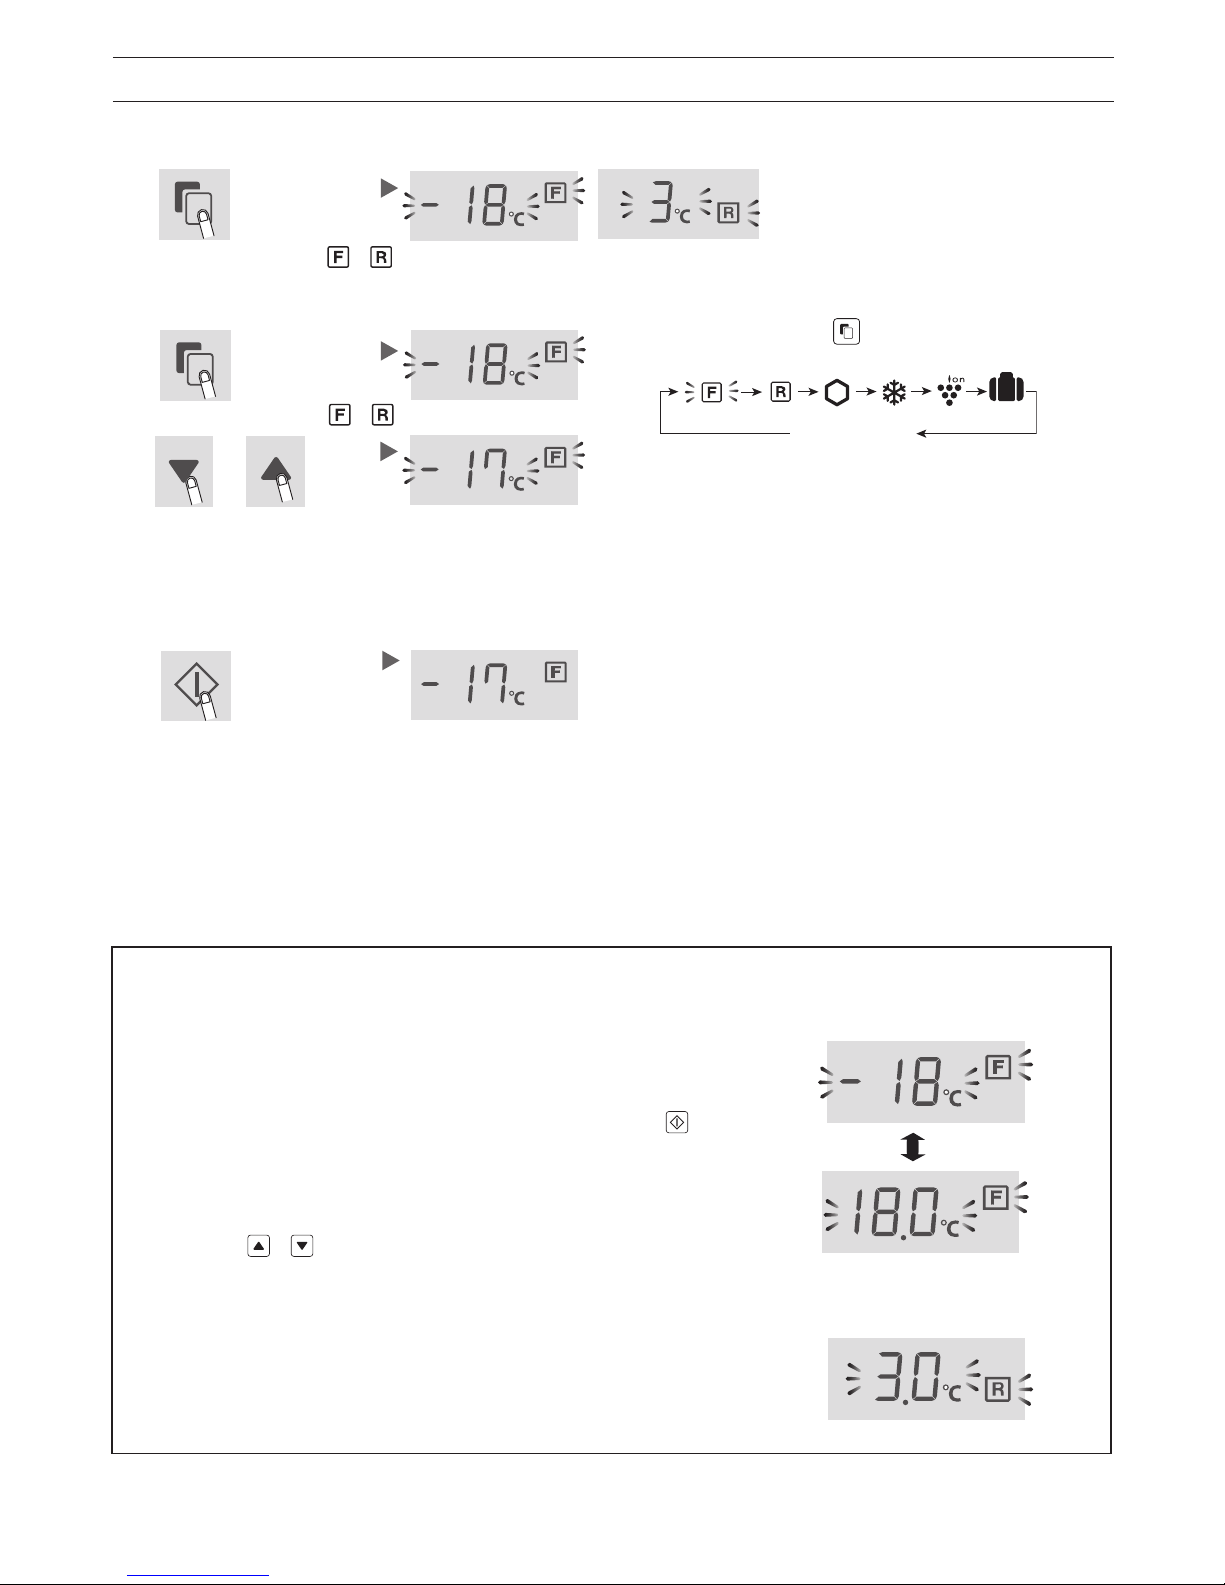
ES-7
Control de la temperatura
Cómo comprobar el ajuste de la temperatura actual
El refrigerador controla su temperatura automáticamente. Sin embargo, puede ajustar la temperatura como se indica a continuación.
Seleccione el icono o .
Ajuste del compartimento del congelador/refrigerador
Compartimiento del congelador
: Se puede ajustar entre -13°C y -21°C en pasos de 1°C
Compartimiento del refrigerador
: Se puede ajustar entre 0°C y 6°C en pasos de 1°C
1
1
or
2
Seleccione el icono o .
Seleccione la temperatura
3
Complete el ajuste.
Cuando pulse el botón , los iconos cambian en el
orden que aparece a continuación.
Standby display
Se cambia el ajuste.
interruptor
Compartimiento del congelador
Compartimiento del refrigerador
Ajuste avanzado del compartimento del congelador/refrigerador
La temperatura del compartimiento del congelador y del
compartimento del refrigerador puede ajustarse en pasos de 0,5 °C
siguiendo los pasos a hasta c.
a.
Después del paso 1 de "Funcionamiento básico", pulse
durante 3 segundos o más. (Pitido, pitido, pitido) La temperatura
preestablecida actual vuelve a "Ajuste predeterminado". (La
pantalla se indica como la imagen de la derecha).
b.
Pulse o y establezca la temperatura.
c.
Complete el ajuste.
(Lo mismo que en el paso 3 de "Funcionamiento básico").
Siga los pasos a hasta c de nuevo si quiere ajustar la temperatura
en el paso de 1°C.
Pantalla de espera
o
Page 25
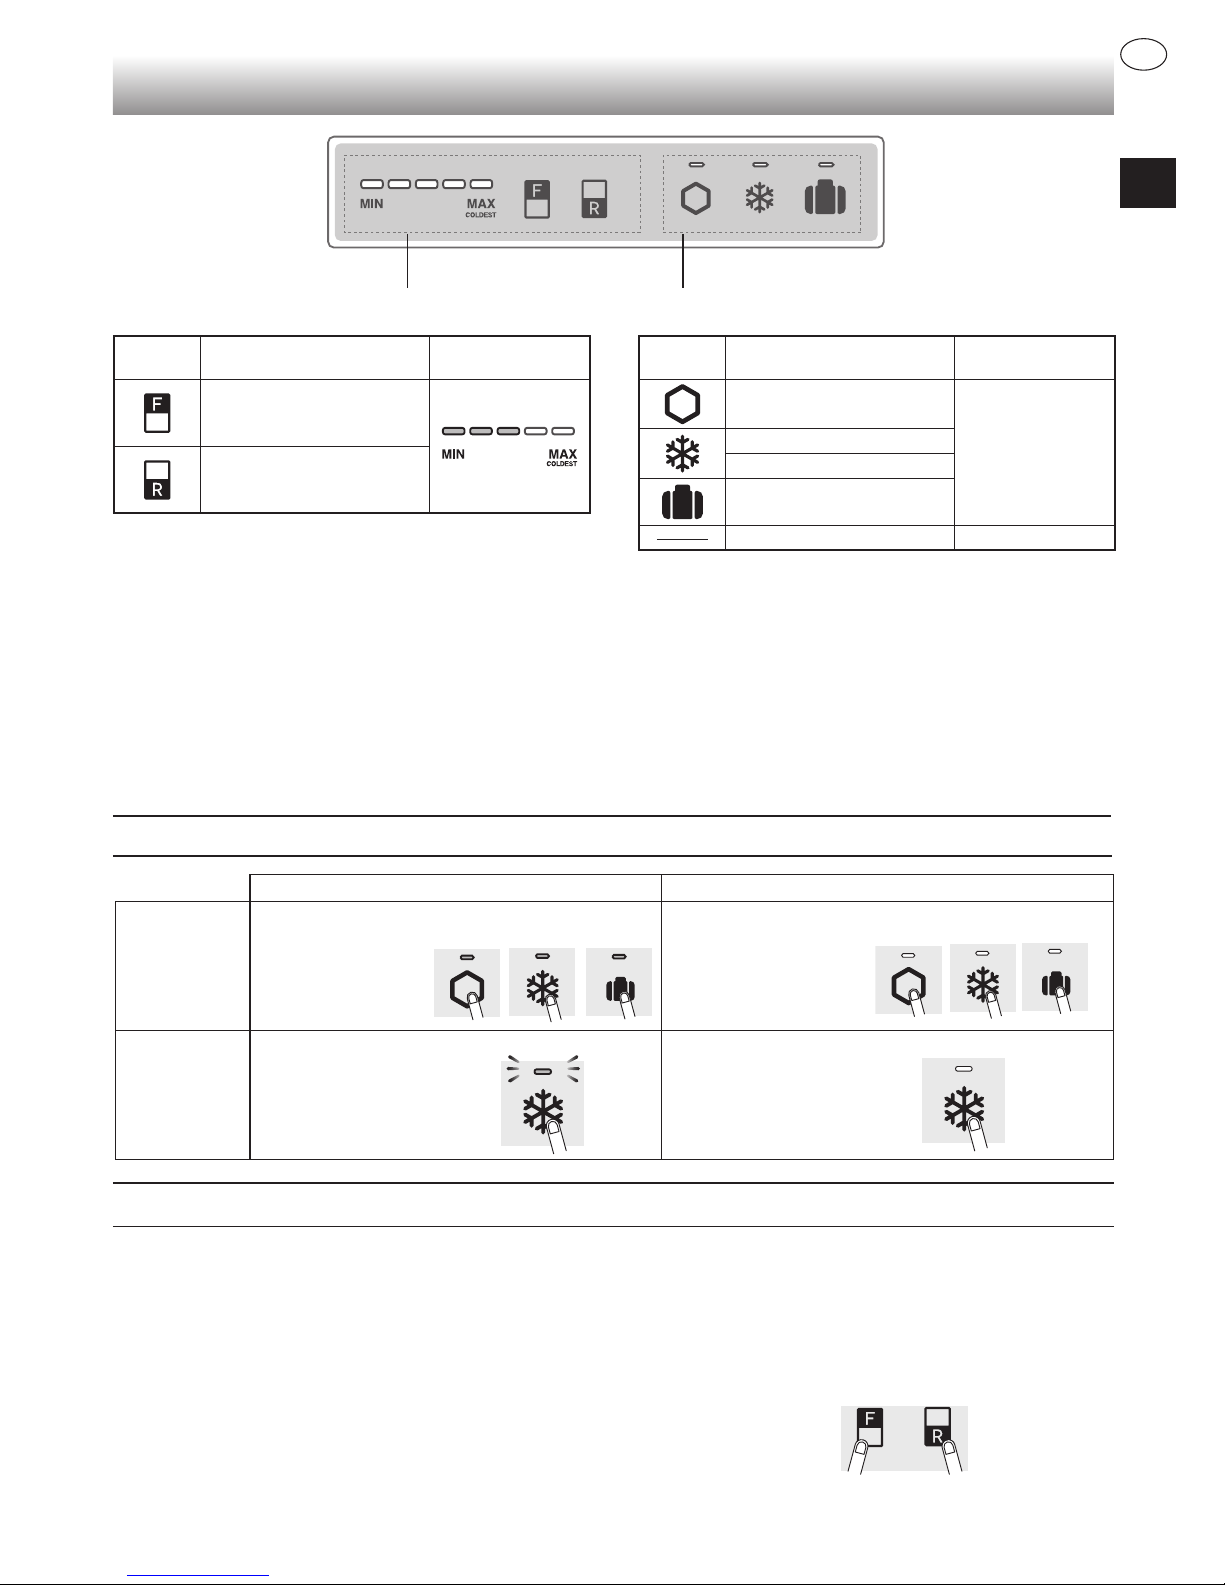
ES-8
ES
Funcionamiento de los modos útiles
Iniciar funcionamiento
Cancelar funcionamiento
Frío extra
Congelación
rápida
Modo
vacaciones
Pulse el botón de modo.
(Pitido)
Pulse el botón de modo.
(Pitido)
Frío rápido Pulse el botón de modo
durante 3 segundo o más.
(Pitido, pitido, pitido)
Pulse el botón de modo.
(Pitido)
• Cuando la puerta del refrigerador se deja abierta durante más de 1 minuto, la alarma de puerta suena una vez, y otra
vez transcurrido 1 minuto.
• Si se deja abierta la puerta durante aprox. 3 minutos, la alarma suena continuamente.
• La alarma se detiene cuando se cierra la puerta.
Si la alarma de la puerta no se detiene
Si la alarma de la puerta no se detiene después de cerrar todas las puertas, algo sucede.
Póngase en contacto con el centro de servicio técnico SHARP para obtener ayuda.
Método para detener la alarma de la puerta temporalmente
• Pulse los botones "F" y "R" a la vez y continuamente durante 3 segundos o más.
(Pitido, pitido, pitido)
• La alarma de puerta vuelve a sonar después de 2 días aproximadamente.
Panel de control
Control de los iconos de temperatura Iconos de modos útiles
Nota
• Todos los modos están apagados inicialmente. Cuando
pulsa una de las teclas, se activa el panel de control
cuando suena el pitido.
• Cuando pulsa una de las teclas, se ilumina el indicador
de modo en funcionamiento. Cuando está funcionando
Frío exprés, el indicador parpadea.
• Si quiere que se ilumine el indicador de temperatura,
pulse el botón "F" o "R" mientras está activo el panel
de control.
*El Plasmacluster funciona automáticamente cuando se
enciende el refrigerador. No es necesario encender/
apagar.
• Cuando no funcione durante 1 minuto
aproximadamente, la pantalla se apaga
automáticamente.
• Si el refrigerador se detiene debido a un corte de
energía, los modos excepto Frío extra, Congelación
exprés y Frío exprés funcionan de la misma forma que
antes en el momento de volver a conectar la energía.
Botón Signica Ajuste prede-
terminado
Frío extra
APAGADO
Congelación rápida
Frío rápido
Modo vacaciones
Plasmacluster Encendido*
Botón Signica Ajuste prede-
terminado
Control de la temperatura
del compartimento del
congelador
Control de la temperatura
del compartimiento del
refrigerador
Iluminación
Apagar
Parpadeo Apagar
(SJ-XG640M, SJ-XG690M, SJ-XG740M)
Alarma de la puerta
Page 26
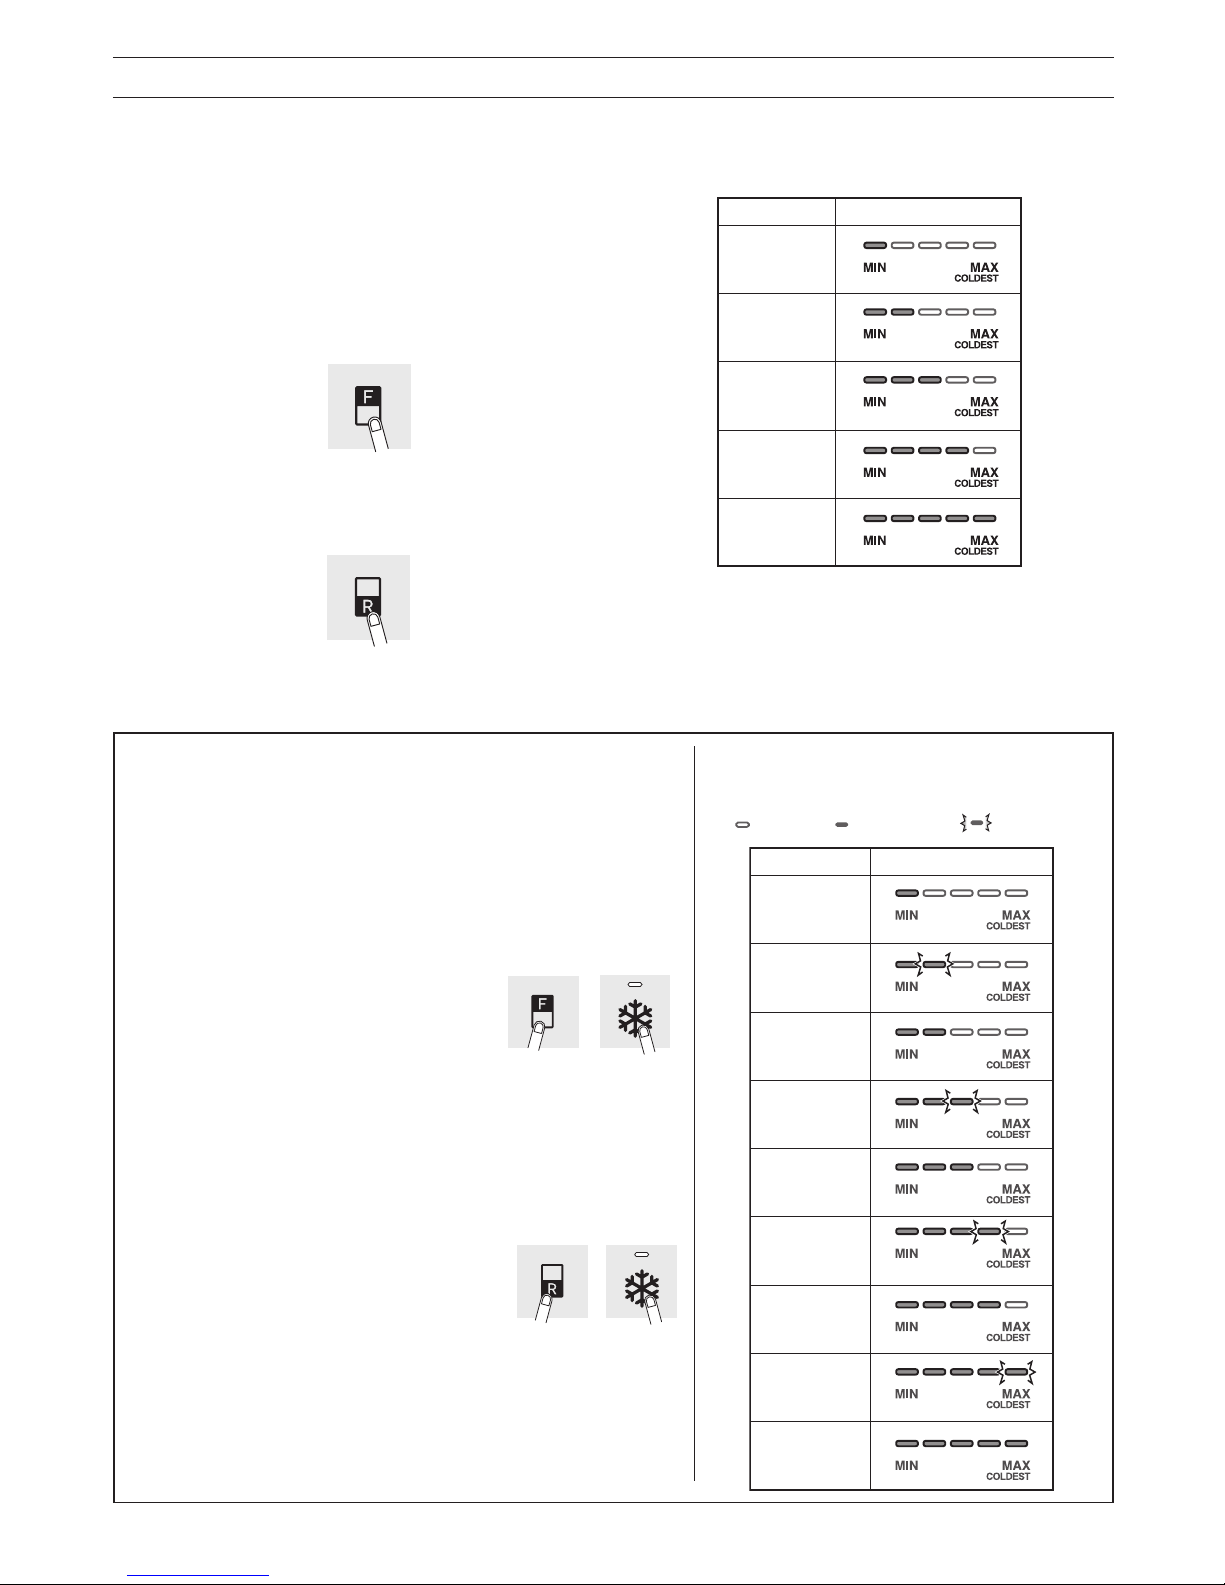
ES-9
Control de la temperatura
Cómo comprobar el ajuste de la temperatura actual
El indicador se ilumina para mostrar el nivel de
temperatura actual pulsando el botón "F" o "R".
Compartimiento del congelador: Pulse el botón "F".
Compartimiento refrigerador: Pulse el botón "R".
Ajuste del compartimento del congelador/refrigerador
Compartimiento del congelador
1.
Pulse el botón "F".
2.
Pulse el botón "F" para cambiar el nivel de temperatura.
Compartimiento del refrigerador
1.
Pulse el botón "R".
2.
Pulse el botón "R" para cambiar el nivel de temperatura.
• El indicador de temperatura cambia como aparece en la siguiente imagen (
3→4→5→1→2→3
) pulsando el botón "F" o "R".
Ajuste avanzado del compartimento del congelador/refrigerador
La temperatura del compartimiento del congelador y del
compartimento del refrigerador puede ajustarse en 9 niveles (nivel
1
~ 9) siguiendo los pasos a hasta b.
Compartimiento del congelador
a.
Pulse el botón "F" en primer lugar.
Mantenga pulsado el botón “F” y luego pulse el botón
"Congelación exprés" durante 3 segundos o más.
(Pitido, pitido, pitido)
El indicador vuelve a "Ajuste
predeterminado".
b.
Pulse el botón "F" para cambiar el nivel de temperatura.
Siga los pasos a hasta b si quiere ajustar la temperatura en 5 niveles.
Compartimiento del refrigerador
a.
Pulse el botón "R" en primer lugar.
Mantenga pulsado el botón "R" y luego pulse el botón "Congelación
exprés" durante 3 segundos o más.
(Pitido, pitido, pitido)
El indicador vuelve a "Ajuste
predeterminado".
b.
Pulse el botón "R" para cambiar el nivel de temperatura.
Siga los pasos a hasta b si quiere ajustar la temperatura en 5 niveles.
• El indicador de temperatura cambia como aparece en
la siguiente imagen (
5→6→7→8→9→1→2→3→4→5
)
pulsando el botón "F" o "R".
Apagado
Iluminación
Parpadeo
El refrigerador controla su temperatura automáticamente. Sin embargo, puede ajustar la temperatura como se indica a continuación.
Nota
Después de ajustar el nivel de temperatura, el indicador
se apaga transcurridos 5 segundos aproximadamente .
1
2
3
4
5
Level
Indicator
Default setting
1
2
3
4
5
6
7
8
9
Default setting
Level
Indicator
... ...
...
Ajuste predeterminado
Nivel
Indicador
Ajuste predeterminado
Nivel
Indicador
Page 27

ES-10
ES
DENTRO
FUERA
• Congele pequeñas cantidades de alimentos para que
se congelen rápidamente.
• La comida debe estar bien sellada o cubierta
herméticamente.
• Coloque la comida en el congelador de forma uniforme.
• Etiquete las bolsas o los recipientes para mantener un
inventario de los alimentos congelados.
Consejos para prevenir el rocío o la formación de hielo en el interior del refrigerador
• Asegúrese de que los alimentos son lo más frescos posible para maximizar su vida de almacenamiento. La siguiente
es una guía general para ayudarle a almacenar alimentos durante más tiempo.
• Los alimentos tienen una vida de almacenamiento limitada. Compruebe que la fecha de caducidad indicada por el
fabricante no ha vencido.
• El consumo de energía de este modelo se mide como
se ilustra en la siguiente imagen.
• Instale el refrigerador en una zona bien ventilada
y mantenga el espacio de ventilación.
• Mantenga el refrigerador alejado de la luz solar
directa y no lo coloque junto a un aparato que
genere calor.
• Evite abrir la puerta cuando sea posible.
• Los alimentos calientes deben dejarse enfriar
antes de guardarlos.
• Disponga los alimentos de forma uniforme en los
estantes para que el aire fresco circule bien.
Consejos para ahorrar energía
Almacenamiento de alimentos
300
mm300 mm
90
mm
50
mm
Fruta/verduras
• Las frutas y verduras se deben cerrar con holgura
en un material plástico, p. ej. envolturas, bolsas
(sin sellar) y colocar en la fruta y las verduras para
minimizar la pérdida de humedad.
• Las frutas y verduras sensibles a las bajas
temperaturas se deben almacenar en un lugar fresco
que no sea el refrigerador.
Productos lácteos y huevos
• La mayoría de productos lácteos tienen la fecha
de caducidad en el envase exterior, que indica
la temperatura recomendada y el periodo de
conservación de los alimentos.
• Los huevos se deben almacenar en el compartimento
de los huevos.
Carnes/pescado/aves
• Coloque en un plato o una fuente y cubra con papel
o un envoltorio de plástico.
• Para cortes más grandes de carne, pescado o aves,
colóquelo en la parte posterior de los estantes.
• No olvide envolver de forma segura todos los
alimentos cocinados o guardarlos en un recipiente
hermético.
• La comida fresca (bien envuelta) se debe almacenar
en un tiempo limitado para prevenir el deterioro y que
afecte seriamente a otros alimentos almacenados.
Congelador
Refrigerador
Consejos para almacenar alimentos
• Mantenga la puerta bien cerrada. Podría producirse
una separación entre la puerta y el armario del
refrigerador si se caen alimentos. Colóquelos de nuevo
en el estante o el compartimento.
• Abra y cierre la puerta lo más rápido posible. Se puede
formar rocío o el hielo si se deja abierta la puerta
durante un largo período de tiempo o si se abre y cierra
la puerta muy a menudo.
• Los alimentos almacenados se deben empaquetar o
sellar en recipientes o envoltorios de plástico. (Sobre
todo alimentos con gran cantidad de humedad)
• Coloque uniformemente la comida en los estantes
para permitir que el aire de refrigeración circule
correctamente.
• Los alimentos calientes deben dejarse enfriar antes
de guardarlos. Si se almacenan alimentos calientes, la
temperatura de la unidad puede aumentar, así como el
riesgo de que se deterioren.
• No bloquee la salida y la entrada del circuito de
aire frío con alimentos o recipientes; si lo hace, los
alimentos no se refrigerarán de modo uniforme en todo
el refrigerador.
• No coloque los alimentos
directamente delante de la
salida de aire frío. De hacerlo,
podrían congelarse.
Page 28

ES-11
Siga los consejos que se indican a continuación
para evitar que salgan grietas en las supercies
interiores y los componentes de plástico
• Limpie el aceite de los alimentos adherido a las partes
de plástico.
• Algunos productos químicos domésticos pueden causar daños; utilice únicamente detergente líquido diluido
(agua jabonosa).
• Si usa detergente sin diluir o no retira bien el agua jabonosa, pueden aparecer grietas en la piezas de plástico.
Si tiene que apagar el refrigerador durante un largo
período de tiempo, se deben seguir los siguientes pasos
para reducir el crecimiento del molde
1. Retire todos los alimentos.
2. Quite el enchufe de la toma de corriente.
3. Limpie y seque el interior a fondo.
4. Mantenga todas las puertas abiertas ligeramente
durante varios días para que se seque.
Cuidado y limpieza
El proceso de descongelación funciona automáticamente
a través de un sistema único de ahorro de energía.
(Aprox. una vez al día.) El hielo tarda tiempo en hacerse
ya que la temperatura interior aumenta más de lo normal
durante la descongelación.
Nota
• No utilice limpiadores o disolventes de uso industrial
(laca, pintura, polvo de pulido, bencina, agua hervida,
etc.) que puedan causar daños.
• Si quita el enchufe una vez, espere 5 minutos como
mínimo antes de volver a conectarlo.
• Los estantes de cristal pesan aproximadamente 3 kg
cada uno. Sosténgalos rmemente cuando los retire
de la carcasa y la mueva.
• No deje caer objetos dentro del refrigerador ni golpee
la pared interior, para evitar que aparezcan grietas en
la supercie interna.
• Retire los accesorios (p. ej., estantes) del armario
y la puerta. Lávelos con agua jabonosa tibia. Cuando
acabe, enjuáguelos con agua limpia y séquelos. (El
único estante que no se puede extraer es el de las
frutas y verduras)
• Limpie las partes interiores con un paño empapado en
agua jabonosa tibia. A continuación, utilice agua fría
para eliminar bien el agua jabonosa.
• Limpie el exterior con un paño suave cada vez que se
ensucie.
• Limpie la junta magnética de la puerta con un cepillo
de dientes y agua jabonosa tibia.
• Limpie el panel de control con un paño seco.
<SJ-XG640M, SJ-XG690M, SJ-XG740M>
Limpie el agua en el recipiente de evaporación. Antes
de secar el agua, espere más de una hora después de
sacar el tapón porque el equipo del ciclo de refrigeración
está muy caliente. (La bandeja de evaporación se
encuentra en la parte posterior del producto.)
Bandeja de evaporación
Antes de transportar
Limpieza
Importante
Descongelación de la
unidad de refrigeración
La luz del compartimiento
está fundida
Apagado del refrigerador
Póngase en contacto con un técnico de servicio
autorizado de SHARP para reemplazar la luz. Solamente
personal de servicio técnico cualicado debe reemplazar
la luz.
Page 29
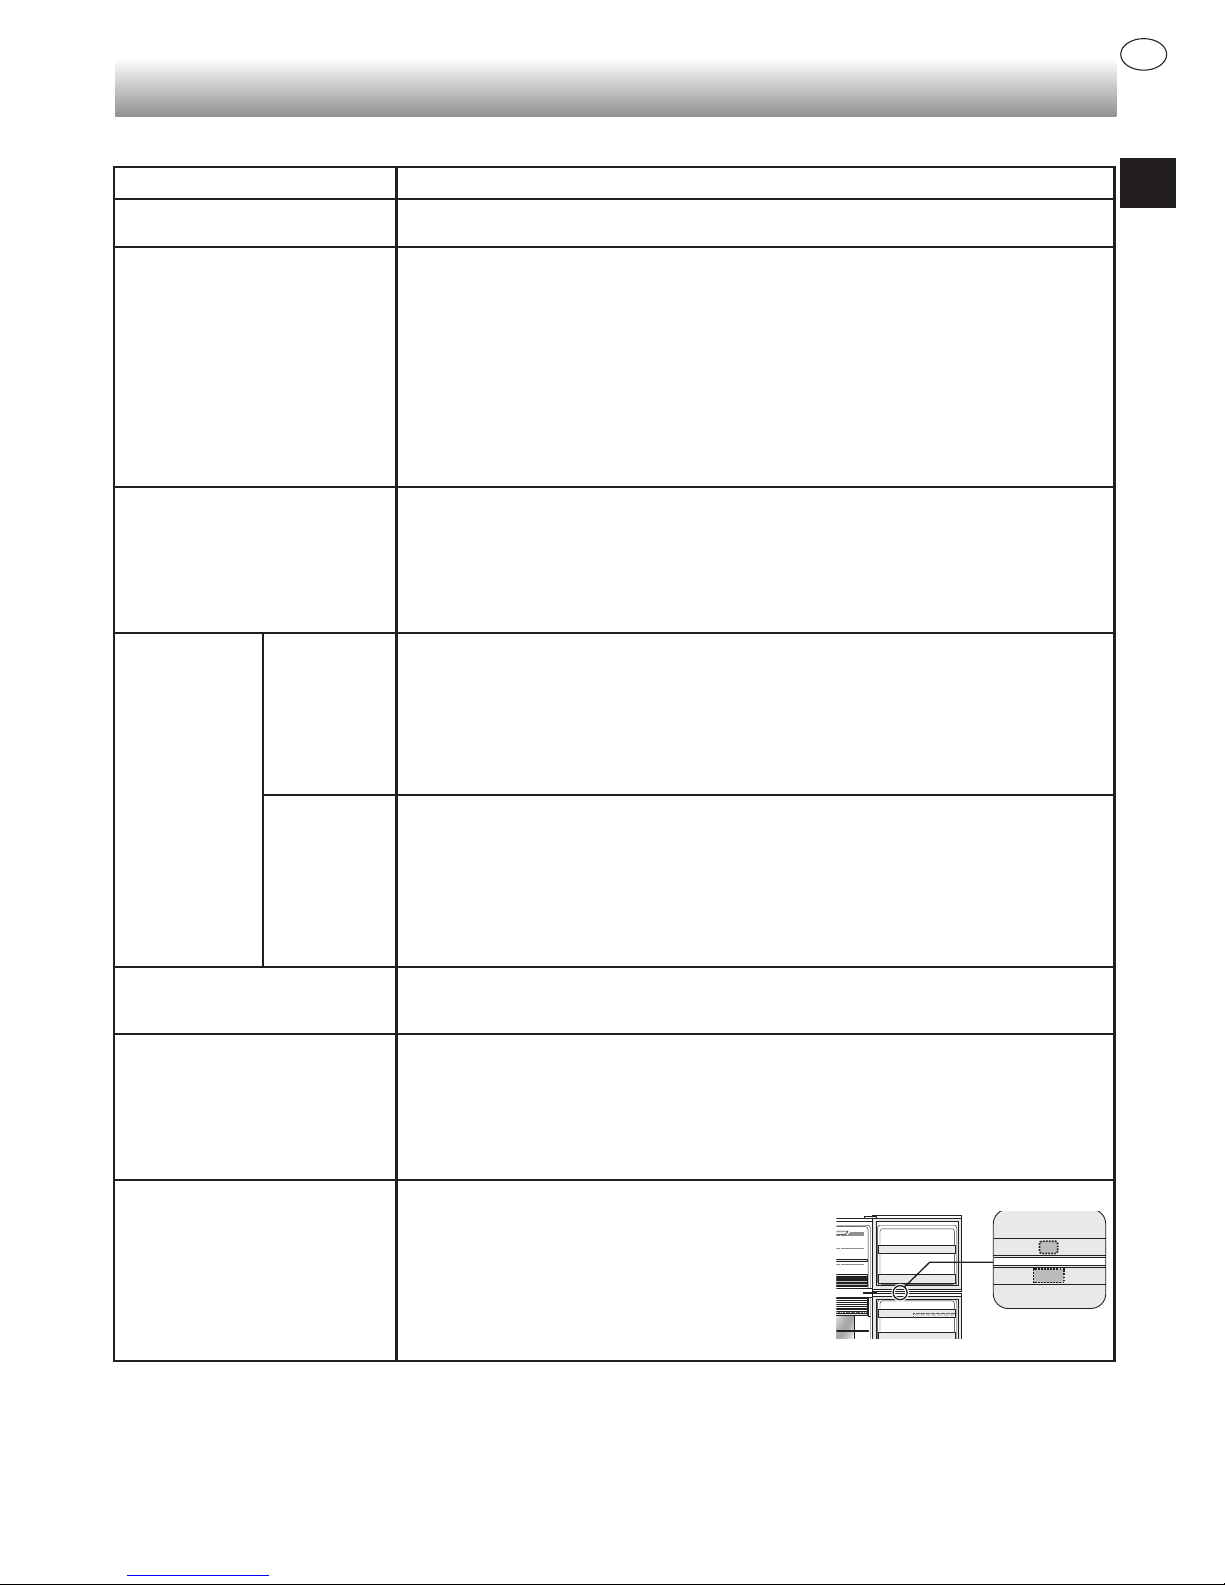
ES-12
ES
Antes de llamar al servicio técnico
Antes de llamar al servicio técnico, compruebe los siguientes puntos
Problema Solución
El exterior del armario está
caliente al tacto.
Esto normal. Esto es debido a la tubería caliente en la carcasa para evitar que se
forme rocío.
El refrigerador hace mucho
ruido.
Los siguientes sonidos son normales.
• El compresor hace ruido cuando empieza a funcionar.
- El sonido se reduce transcurrido un tiempo.
• El compresor hace mucho ruido una vez al día.
- El ruido de funcionamiento se escucha inmediatamente después de la
operación de descongelación automática de la unidad de refrigeración.
• Sonido del ujo del uido (sonido de gorgoteo, sonido efervescente)
- Es debido ujo de refrigerante en las tuberías (el sonido puede hacerse más
fuerte de vez en cuando).
• Crujidos o chirridos
- Se deben a la expansión y contracción de las paredes interiores y piezas
internas durante la refrigeración.
Formación de hielo o rocío
en el interior o exterior del
refrigerador.
Esto puede ocurrir en uno de los casos siguientes. Use un paño húmedo para
limpiar la escarcha y un paño seco para retirar el rocío.
• Cuando la humedad ambiente es alta.
• Cuando se abre y cierra la puerta muy a menudo.
• Cuando se almacenan alimentos muy húmedos. (Deben envolverse).
• Este fenómeno aparecerá más o menos según la estación (estación lluviosa,
estación soleada), hábitos de uso y condiciones ambientales de cada casa.
Los alimentos
en el
compartimiento
del refrigerador
están
congelados.
SJ-XG690G,
SJ-XG740G
• ¿Si el refrigerador funciona durante mucho tiempo con el control de temperatura
del refrigerador establecido a 0 °C?
- Cambie de nuevo el control de temperatura a unos 3 °C.
• ¿Si el refrigerador funciona durante mucho tiempo con el control de temperatura
del congelador establecido a -21 °C?
- Cambie de nuevo el control de temperatura a unos -18 °C.
• Si la temperatura ambiente es baja, la comida puede congelarse incluso si el
compartimiento del refrigerador se establece a 6°C.
SJ-XG640M,
SJ-XG690M,
SJ-XG740M
• ¿Si el refrigerador funciona durante mucho tiempo con el control de temperatura
del refrigerador establecido a MAX COLDEST?
- Cambie el control de temperatura al otro ajuste.
• ¿Si el refrigerador funciona durante mucho tiempo con el control de temperatura
del congelador establecido a MAX COLDEST?
- Cambie el control de temperatura al otro ajuste.
• Si la temperatura ambiente es baja, la comida puede congelarse incluso si el
compartimiento del refrigerador se establece a MIN.
Olores en el compartimento. • Los alimentos que desprenden olores intensos deben envolverse.
• La unidad de desodorización no puede eliminar todos los olores.
• Limpie el interior de forma regular.
El panel de control no
funciona.
Esto puede ocurrir en uno de los casos siguientes.
• Presencia de gotas, aceite, etc. en el panel o en su dedo.
• Cuando toque el panel con un guante en la mano, vendaje adhesivo en su dedo,
uñas u objetos.
• Las teclas tienen una pegatina o cinta adhesiva pegada.
• La posición táctil está ligeramente desplazada con respecto a las teclas.
• El tiempo de funcionamiento no es suciente para que las teclas funcionen.
Las luces del compartimiento
se apagan incluso si se dejan
abiertas las puertas.
• El interruptor de la luz es para encender
y apagar las luces del compartimento.
Cuando los ángulos de las puertas son los
mismos, las luces se apagan incluso si se
dejan abiertas las puertas, pero es normal.
Si todavía necesita servicio técnico
Consulte a su agente de servicio técnico más cercano aprobado por SHARP.
Light switch
Interruptor de la luz
Page 30
ES-13
Ficha del producto
ANEXO
III
(EU) N.o de normativa 1060/2010
A
Marca comercial
B
Nombre de modelo
SJ-XG640M
SJ-XG690G
SJ-XG690M
SJ-XG740G
SJ-XG740M
C
Categoría 7
D
Clase de eciencia energética A
++
E
Concesión de etiqueta ecológica de la UE —
F
Consumo anual de energía *
1
[KWh/año] 320
G
Volumen de almacenamiento de todos los
compartimentos que no merecen una calicación
por estrellas [ L ]
354 394 420
H
Volumen de almacenamiento de todos los
compartimentos de almacenamiento de alimentos
congelados que merecen una calicación por
estrellas [ L ]
162 176
I
La temperatura de diseño del "otro
compartimiento" más caliente que +14 °C
—
J
Sin escarcha
SÍ
K
Tiempo de subida de temperatura [ h ] 19
L
Capacidad de congelación [Kg/24h] 7,3 8,1
M
Clase climática T
N
Emisión de ruido acústico aéreo
[dB(A)]
38
O
Aparato integrado No (tipo independiente)
*1 Consumo de energía "XYZ" kWh al año sobre la base de los resultados de pruebas estándar durante 24 horas.
El consumo real de energía dependerá del modo en que se utilice el electrodoméstico y dónde se encuentre.
Indicador de temperatura
Este refrigerador cuenta con un indicador de temperatura en el compartimento del refrigerador para permitirle controlar la
temperatura media en la zona más fría.
Zona más fría
El símbolo indica la zona más
fría en el compartimento del
refrigerador. (El compartimento de
la puerta situado a la misma altura
no es la zona más fría).
Símbolo
Comprobación de la temperatura en la zona más fría
Puede realizar comprobaciones regulares para
asegurarse de que la temperatura en la zona más fría
es correcta y, si fuera necesario, ajustar el control de
temperatura del refrigerador.
Para mantener la temperatura correcta dentro del
electrodoméstico, compruebe que el indicador de
temperatura está siempre de color azul. Si el indicador
de temperatura se vuelve de color blanco, la temperatura
es demasiado alta; si este fuera el caso, ajuste del
control de temperatura y espere 6 horas antes de volver
a comprobar el indicador de temperatura.
AZUL
Ajustes correctos
BLANCO
Temperatura demasiado alta;
ajuste el control de temperatura del
refrigerador.
Nota
• La temperatura interna del refrigerador depende de
varios factores, como la temperatura ambiente de
la sala, la cantidad de alimentos almacenados y la
frecuencia con la que se abre la puerta.
• Cuando se introducen alimentos frescos o se deja la
puerta abierta durante cierto tiempo, es normal que el
indicador de temperatura se vuelva de color blanco.
Page 31

ES-14
ES
Información sobre la eliminación de este equipo
SI QUIERE ELIMINAR ESTE EQUIPO, NO UTILICE LA BASURA DOMÉSTICA Y NO LO PONGA EN UNA
CHIMENEA.
Los equipos eléctricos y electrónicos usados se deben recopilar y tratar siempre POR SEPARADO en
conformidad con la legislación local.
La recolección selectiva fomenta un tratamiento respetuoso del medio ambiente y el reciclaje de materiales,
y minimiza la eliminación nal de los residuos. LA ELIMINACIÓN INADECUADA puede ser perjudicial para
la salud humana y el medio ambiente debido a determinadas sustancias. Lleve el EQUIPO USADO a una
instalación de recolección local, por lo general municipal, donde esté disponible.
En caso de duda sobre la eliminación, póngase en contacto con las autoridades locales o el distribuidor y solicite
el método correcto de eliminación.
ÚNICAMENTE PARA LOS USUARIOS DE LA UNIÓN EUROPEA Y DE OTROS PAÍSES; POR EJEMPLO NORUEGA Y SUIZA: Su
participación en la recopilación por separado es requerida por la ley.
El símbolo arriba indicado aparece en el equipo eléctrico y electrónico (o el embalaje) para recordar a los usuarios de esto.
Se solicita a los usuarios de HOGARES PRIVADOS que utilicen las instalaciones de devolución existentes para equipos usados. La
devolución es gratuita.
Page 32

FR-1
Usage domestique uniquement
Nous vous remercions d'avoir acheté ce produit SHARP. Avant d’utiliser votre réfrigérateur
SHARP, veuillez lire le manuel d’utilisation an de pouvoir en tirer le maximum d’avantages.
• Ce réfrigérateur est destiné à la fabrication de glaçons, à la réfrigération et à la congélation des aliments.
• Ce réfrigérateur est destiné à un usage ménager uniquement, avec température ambiante telle qu'indiquée dans le tableau. La classe de température ambiante est indiquée
sur la plaque signalétique. Si le réfrigérateur fonctionne en dehors de ces valeurs (valeurs
de températures ambiantes) qui ont été évaluées pour ce modèle, il peut ne pas être en
mesure de conserver des températures internes satisfaisantes. Si le réfrigérateur est utilisé à des températures plus froides, il ne sera pas endommagé jusqu'à une température
de + 5°C.
• Le réfrigérateur ne doit pas être soumis à des températures de -10°C ou moins pendant
une période prolongée.
Produit réfrigérant
Ce réfrigérateur contient un uide frigorigène inammable
(R600a : isobutane) et un gaz soufant isolant (cyclopentane).
Respectez les règles suivantes pour éviter les risques d'in-
ammation et d'explosion.
■Ne laissez aucun objet pointu entrer en contact avec le sys-
tème de réfrigération. Le système de réfrigération derrière
et à l'intérieur du réfrigérateur contient du uide frigorigène.
■N'utilisez pas de dispositifs mécaniques ou d'autres moyens
pour accélérer le processus de dégivrage. (Ce réfrigérateur
a adopté un système de dégivrage automatique.)
■N'utilisez pas d'appareils électriques à l'intérieur du réfrigérateur.
■Ne bloquez pas l'espace autour du réfrigérateur.
■N'utilisez pas d'aérosols inammables, telles que des
bombes de peinture près du réfrigérateur.
■N'entreposez pas d'aérosols inammables, telles que des
bombes de peinture dans le réfrigérateur.
■En cas de défaillance du système de réfrigération, ne pas
toucher la prise murale et n'exposez pas l'appareil à des
ammes nues. Ouvrez la fenêtre et laissez évacuer l'air de
la pièce. Consultez alors votre agent de service agréé par
SHARP le plus proche pour obtenir de l'aide.
Installation
■N'installez pas le réfrigérateur dans un endroit humide ou
mouillé. Cela pourrait causer des dommages à l'isolation ou
une fuite électrique. De la condensation peut également ap-
paraître sur l'armoire extérieure et provoquer de la rouille.
■Le réfrigérateur doit être installé à plat et fermement posé
sur le sol.
Cordon d'alimentation, che, prise
Lisez attentivement les règles suivantes pour éviter les chocs
électriques ou les incendies.
■Branchez la che d'alimentation dans la prise murale fer-
mement et directement. N'utilisez pas une rallonge ou une
che d'adaptateur.
■Branchez le cordon d'alimentation à la prise avec la tension
nominale requise.
■Branchez la broche de terre à la borne de mise à la terre
correctement.
■Assurez-vous que le cordon d'alimentation ne s'abîme pas
pendant l’installation ou le déménagement. Si la prise électrique
ou le cordon est lâche, n’insérez pas la che d’alimentation.
■Ne touchez pas la prise d'alimentation avec les mains
mouillées.
■Débranchez l'alimentation électrique principale en retirant la
che principale de la prise. Ne retirez pas le cordon d'alimentation en le tirant.
■La poussière déposée sur la che d'alimentation est susceptible de provoquer un incendie. Dépoussiérez avec précaution.
■Débranchez la prise si le réfrigérateur n'est pas utilisé pendant
une longue période.
■Si le cordon d'alimentation exible est endommagé, il doit être remplacé par un agent de maintenance agréé par SHARP, car un cordon spécial
est requis.
Utilisation
■N'entreposez pas de matériaux volatils et inammables tels
que l'éther, l'essence, le gaz propane, les aérosols, les agents
adhésifs et l'alcool pur, etc. Ces matériaux explosent facilement.
■N'entreposez pas de produits thermosensibles tels que des
produits pharmaceutiques dans le réfrigérateur. La qualité des
produits risque fort de de s'en trouver modiée.
■Ne tentez pas de changer ou de modier ce réfrigérateur. Cela
pourrait provoquer un incendie, un choc électrique ou des blessures.
■Ne placez aucun objet sur le haut du réfrigérateur. Si l'objet
tombe du haut de l'appareil, il pourrait causer des blessures.
■Ne frappez pas les portes en verre violemment. Elle pourraient
se casser et causer des dommages corporels. <SJ-XG690G,
SJ-XG740G>
■Cet appareil peut être utilisé par des enfants âgés de
8 ans ou plus et des personnes ayant des capacités
physiques, sensorielles ou mentales réduites ou un
manque d'expérience et de connaissances, s'ils font
l'objet d'une supervision ou qu'ils ont reçu des instructions pour utiliser l'appareil de manière sûre ou
pour comprendre les risques encourus. Les enfants
ne doivent pas jouer avec l'appareil. Le nettoyage et
l'entretien incombant aux utilisateurs ne doit pas être
fait par des enfants sans surveillance.
Entretien et nettoyage
■Débranchez le réfrigérateur d'abord, an d'éviter les chocs
électriques.
■N'éclabousser pas d'eau directement sur le boîtier extérieur ou
à l'intérieur. Cela peut provoquer la rouille et la détérioration de
l'isolation électrique.
Défaillance
■Si vous sentez une odeur de brûlé, retirez immédiatement la
che d'alimentation. Consultez alors votre agent de service
agréé par SHARP le plus proche pour obtenir de l'aide.
■En cas de fuite de gaz, ventilez la zone en ouvrant la fenêtre.
Ne touchez pas le réfrigérateur ou la prise de courant.
Classe de
température
Fourchette de températures
ambiantes acceptables
SN +10°C à 32°C
N +16°C à 32°C
ST +16°C à 38°C
T +16°C à 43°C
Information de sécurité
AVERTISSEMENT
Cela signie qu'il existe des risques mortels ou de blessures graves.
ATTENTION !
Cela signie qu'il existe de grands risques de dommages matériels ou de blessures corporelles.
AVERTISSEMENT
Page 33

FR-2
FR
Élimination de l'appareil
■Assurez-vous que le réfrigérateur ne présente aucun danger
pour les enfants pendant leur entreposage jusqu'à leur élimina-
tion. (ex : retirez la porte pour empêcher que les enfants ne s'y
retrouvent enfermés.)
■Ce réfrigérateur doit être éliminé de façon appropriée. Emmenez
le réfrigérateur dans une centre de recyclage professionnel pour
le uide frigorigène inammable et les gaz soufants isolants.
Déplacement
■Lorsque vous installez ou
déplacez votre réfrigérateur,
utilisez un tapis de déménagement pour éviter d'endommager le sol.
■Transporter le réfrigérateur en
tenant les poignées situées
sur le côté arrière et le bas. Si
vous soulevez le réfrigérateur
de manière incorrecte, vous
risquez de provoquer des
blessures.
ATTENTION !
Utilisation
■Ne touchez pas le compresseur ou ses parties
périphériques, car ils sont extrêmement chauds
pendant le fonctionnement de l'appareil et les bords
métalliques peuvent causer des blessures.
■Ne touchez pas les aliments ou les récipients
métalliques dans le compartiment congélateur avec
les mains mouillées. Cela pourrait provoquer des
gelures.
■Ne placez pas de boissons en bouteille et en canettes
dans le compartiment congélateur. Surtout si la
fonction de « Express cool » est activée, il existe un
risque élevé que les bouteilles en verre éclatent.
■N'utilisez que de l'eau potable pour faire des glaçons.
■N'ouvrez pas ou ne fermez pas la porte lorsque
quelqu'un place la main à proximité de celle-ci.
Il existe un risque que d'autres personnes ne se
coincent les doigts dans la porte.
■Ne placez pas d'objet de taille trop grand dans les
balconnets de la porte. S'il tombe, l'objet pourrait
entrainer des blessures.
■Assurez-vous de manipuler les étagères en verre
avec soin pour les installer ou les désinstaller. Si vous
laissez tomber les étagères en verre, elles peuvent se
casser ou causer des blessures.
rear
bottom
Installation
Structure de maintien
indépendante
1
Maintenez un espace de ventilation sufsant tout au-
tour du réfrigérateur.
• L’illustration montre
le minimum d’espace nécessaire
pour installer le
réfrigérateur. Les
conditions de mesure de la consommation d'énergie est
réalisée sous une
dimension spatiale
différente.
• En maintenant un plus grand espace, le réfrigérateur
peut consommer une moindre quantité d'énergie.
• Si vous utilisez le réfrigérateur dans un espace
de dimensions plus petites que celles illustrées
ci-dessous, cela pourrait entraîner une élévation de
température dans l'unité, un son très bruyant et une
défaillance.
• L'espace entre l'arrière du réfrigérateur et le mur
doit être de 50 mm ou plus, et moins de 75 mm. Si
l'espace est supérieur à 75 mm, vous risquez de
vous blesser en touchant le compresseur et ses par-
ties périphériques extrêmement chaudes pendant le
fonctionnement.
90mm
or more
60mm
or more
60mm
or more
Espace total requis dans l'utilisation
2
Utilisez les deux pieds réglables
avant pour placer le réfrigérateur à
plat et fermement sur le sol.
3
Branchez l'appareil via une prise correctement
installée.
Remarque
• Installez votre réfrigérateur de sorte que la prise soit
accessible.
• Installez votre réfrigérateur à l’abri des rayons directs du
soleil et ne l’installez pas à proximité d’une source de
chaleur.
• Ne placez pas votre réfrigérateur directement sur le sol.
Placez un support approprié comme une planche en bois
sous le réfrigérateur.
• Lorsque vous insérez la che d'alimentation avec la porte
ouverte, l'alarme de la porte retentit, mais cela est normal.
Ce son s'interrompt après la fermeture de la porte.
Les roulettes sont situées au bas du réfrigérateur
• Les roulettes permettent au réfrigérateur de se
déplacer d'avant en arrière.
Avant d'utiliser votre réfrigérateur
• Nettoyer les pièces à l'intérieur avec un chiffon imbibé
d'eau tiède.
• Si vous utilisez de l'eau savonneuse pour nettoyer,
rincez-la complètement à l'eau claire.
1550 mm
1450 mm
790 mm
935 mm
Pied réglable
Roulettes (4 pièces).
arrière
bas
60 mm
ou plus
90 mm
ou plus
60 mm
ou plus
Page 34

FR-3
Porte du compartiment fraicheur à deux modes
Description
1. Ampoule du congélateur
<Uniquement pour
SJ-XG690G,
SJ-XG690M, SJ-XG740G, SJ-XG740M
>
2. Machine à glaçons amovible
<Uniquement pour SJ-
XG640M, SJ-XG690G, SJ-XG690M>
3. Étagère du congélateur (Supérieure)
4. Étagère du congélateur (Inférieure)
5. Boitier du congélateur
Déplacez la partition pour qu'elle corresponde à la taille de la nourriture.
6. Porte du compartiment fraicheur
à deux modes
7. Étagère des produits frais
8. Unité de désodorisation
Le catalyseur de désodorisation est installé sur les ux d’air
froid. Il n'est pas nécessaire de le manipuler et de le nettoyer.
9. Ampoule du réfrigérateur
10. Étagère du réfrigérateur
11. Panneau de refroidissement hybride
Le panneau refroidit indirectement le compartiment réfrigérateur à partir de l'arrière. De cette manière, les aliments sont re-
froidis délicatement sans être exposés au courants d'air froid.
12. Étagère à fruits et légumes
13. Bac à fruits et légumes
14. Pied réglable
15. Joint de porte magnétique
16. Panneau de contrôle
17. Balconnet de la porte du congélateur
18. Machine à glaçons intégrée à la porte
<Uniquement pour
SJ-XG740G, SJ-XG740M
>
(Cette machine à glaçons est emballée à l'intérieur du
compartiment congélateur. Reportez-vous à la page suivante
« Après le nettoyage » pour l'installation.)
19. Récipient pour l'eau
<Uniquement pour SJ-XG740G, SJ-XG740M>
(Ce récipient pour l'eau est emballé à l'intérieur du compartiment congélateur. Assurez-vous de placer le récipient
dans la position indiquée sur l'image ci-dessus lorsque vous
l'utilisez.)
20. Casier à œufs
21. Balconnet du réfrigérateur (Haut)
22. Balconnet à bouteille
23. Balconnet du réfrigérateur (Bas)
Si vous souhaitez conserver de gros articles dans
votre réfrigérateur
• Vous pouvez retirer toutes les étagères ou les balconnets
numérotés 2, 3, 5, 6, 7, 10, 13, 17, 18, 19, 20, 21, 22, 23 sur
l'illustration ci-dessus.
• Les performances de refroidissement ne sont pas inuencées
même si vous utilisez le réfrigérateur dans la situation ci-dessus.
Utilisez l'espace comme
compartiment réfrigérateur.
Utilisez l'espace comme
compartiment fraicheur.
Comment ouvrir la porte du compartiment
fraicheur à deux modes
1) Soulevez la porte.
2) Insérez la porte dans le cadre et
repoussez-la sur le stoppeur. Elle
est fermée correctement.
Open Close
SJ-XG740G,SJ-XG740M
SJ-XG640M, SJ-XG690G,SJ-XG690M
1
3
4
5
7
6
8
9
1
1
14
14
13
15
19
18
15
16
20
22
23
12
10
1
3
4
2
5
7
6
8
9
11
14
14
13
15
15
17
16
20
22
23
12
10
21
21
17
Partition
Freezer case
Partition
Boitier du congélateur
Ouvert Fermé
Page 35

FR-4
FR
Machine à glaçons intégrée à la porte (SJ-XG740G,SJ-XG740M)
Fabrication de glaçons
1) Utilisez le récipient prévu à cet effet pour mesurer la
quantité d'eau.
Niveau d'eau
Récipient pour l'eau (160mL)
2) Versez de l'eau dans la machine à glaçons intégrée
à la porte à l'aide du récipient
3) Lorsque des glaçons sont générés, tournez le levier
dans le sens des aiguilles d'une montre pour mettre
la glace dans la boîte à glaçons.
4) Tirez la glacière pour sortir les glaçons.
Glacière
Levier
Remarque
• Pour éviter que la boîte à glaçons ne soit
endommagée, n'y versez pas d'huile, et ne vous en
servez pas pour fabriquer de la glace.
• N'ouvrez pas la porte du congélateur autant que
possible pendant la fabrication de la glace.
Nettoyage de la machine à glaçons intégrée à la porte
• Videz la glacière à l'avance
1) Tirez vers le haut la machine à glaçons intégrée à la
porte pour la retirer.
2) Retirez le bac à glaçons.
3) Retirez la glacière.
4) Poussez la protubérance pour démonter la machine
à glaçons intégrée à la porte
Bac à glaçons
Protubérance
2.
3.
Remarque
• Ne mettez pas le bac à glaçons au lave-vaisselle. Cela
pourrait endommager son contenu.
Après le nettoyage
1) Assemblez la machine à glaçons intégrée à la porte
(Procédure inverse pour le démontage.)
2) Installer la machine à glaçons intégrée à la porte de
manière sûre.
Orice
Crochet
Machine à glaçons intégrée à la porte
Porte
<Position du levier>
Levier
Levier
Machine à glace amovible (SJ-XG640M, SJ-XG690G, SJ-XG690M)
Il est fortement recommandé d'utiliser la machine à glaçons comme indiqué sur la photo « Description ». Vous pouvez
placer la machine à glaçons n'importe où dans le compartiment congélateur.
1) Ne remplissez pas trop le
bac avec de l'eau. Sinon, les
glaçons se scelleront lorsqu'ils seront gelés.
2) Lorsque des glaçons sont générés, tournez le levier dans
le sens des aiguilles d'une
montre pour mettre la glace
dans la boîte à glaçons.
Remarque
• Assurez-vous de placer la machine à glaçons à plat
pour ne pas renverser l'eau du bac à glace.
• Pour éviter que la boîte à glaçons ne soit endomma-
gée, n'y versez pas d'huile, et ne vous en servez pas
pour fabriquer de la glace.
Levier
Glacière
Page 36

FR-5
Modes utiles
En ce qui concerne les opérations, reportez-vous au chapitre « Panneau de contrôle ».
Extra cool
Express freezing
Express cool
Extra cool Express freezing Express cool
Fonctionnalité Ce mode sert à rafraî-
chir les boissons ou à
réfrigérer les aliments.
Remarque :
Les aliments à haute teneur
en humidité peuvent
se congeler.
Ce mode accélère le
temps nécessaire pour
congeler des aliments
ou fabriquer de la
glace.
Ce mode sert à rafraîchir les boissons ou les
aliments rapidement.
Point d'utilisation Compartiment frais Boitier du congélateur Compartiment congélateur
ATTENTION :
Ne placez pas de bouteilles en
verre. Il existe un risque élevé qu'elles éclatent.
Durée de fonctionnement
6 heures
*
1
2 heures
*
1
30 minutes
• Ce mode se termine automatiquement.
• L'alarme ne retentit pas.
• Ce mode se termine automatiquement.
• L'alarme retentit
Pour arrêter l'alarme *
2
ou
Appuyez sur la
touche « Express
freezing ».
*
1
Cela peut prendre plus de temps à accomplir si
l'opération a lieu en même temps que le dégivrage. Ce
mode commence lorsque le dégivrage est terminé.
*
2
Si vous n'arrêtez pas l'alarme, elle sonnera pendant
30 minutes en continu.
Remarque
• Extra cool, Express freezing et Express cool ne sont pas
disponibles simultanément lorsque l'un des modes est
en cours d'opération.
• Évitez d'ouvrir la porte autant que possible pendant le
fonctionnement de ces modes.
Plasmacluster
Champignon
des moisissures
Compartiment
congélateur
Compartiment
frais
Mode vacances
• Utilisez ce mode lorsque vous voyagez ou quittez la
maison pendant une longue période.
• La température à l'intérieur du compartiment
réfrigérateur est réglée à env. 10°C.
Appuyez sur
la touche
Enter.
Remarque
Il peut y avoir une légère odeur dans le réfrigérateur.
Il s'agit de l'odeur de l'ozone générée par l'ioniseur. La
quantité d'ozone est minimale et disparaît rapidement
dans le réfrigérateur.
Utilisez cette fonction lorsque vous souhaitez garder
l'intérieur du réfrigérateur propre.
Le plasmacluster démarre automatiquement lorsque le
réfrigérateur est sous tension.
L'ioniseur à l'intérieur de votre réfrigérateur libère des
grappes d'ions, qui sont des masses collectives d'ions
positifs et négatifs, dans le compartiment réfrigérateur.
Ces grappes ioniques inactivent les champignons en
suspension dans l'air.
Une fois l'opération
terminée
• Il n'est pas nécessaire de sortir les boissons
ou les aliments.
• Assurez-vous de sortir les boissons et les
aliments lorsque l'alarme retentit.
• Si les boissons et les aliments sont laissés dans
le compartiment congélateur 30 minutes environ,
ils pourraient geler.
Lors d'une coupure
de courant
pendant l'opération
• Ce mode est automatiquement annulé. • Ce mode est automatiquement redémarré
à partir de l'état qui précède le moment de la réalimentation.
Remarque
• La période de conservation des aliments dans le
compartiment réfrigérateur devient approximativement
le tiers ou la moitié de sa durée lors d'un
fonctionnement normal. N'utilisez ce mode que lorsqu'il
n'y a pas de nourriture périssable.
• La température du compartiment réfrigérateur ne peut
pas être modiée.
Boitier du
congélateur
Page 37

FR-6
FR
Panneau de contrôle
(SJ-XG690G, SJ-XG740G)
Remarque
• Lorsque vous appuyez sur une des touches, toutes les
icônes clignotent une fois et afchent l'écran de veille.
• Les icônes de mode ou les indicateurs d'opération
en marche s'allument sur l'écran de veille. Lorsque
Express cool est en marche, l'icône clignote sur l'écran
de veille.
• Lorsqu'il n'y a plus d'opération pendant environ
1 minute, l'écran de visualisation revient
automatiquement à l'écran de veille. S'il n'y a plus
d'opération pendant 1 minute de plus, l'écran de veille
s'éteint.
• Si le réfrigérateur s'arrête en raison d'une panne de
courant, les modes fonctionnent de la même manière
qu'auparavant au moment de la réalimentation, sauf
pour Extra cool, Express freezing et Express cool.
État de marche
Lorsque vous appuyez sur la touche , les
icônes changent dans l'ordre indiqué ci-dessous.
Sélectionnez l'icône de mode.
« Express cool » uniquement
3
Terminez le réglage en appuyant
pendant 3 secondes ou plus.
(Bip, Bip, Bip)
Fonctionnement des modes utiles
1
Standby display
or
2
3
Sélectionnez on/off.
ON/OFF commute l'ordre en appuyant sur la touche.
Terminez le réglage.
Paramètre actuel
(Cette indication afche OFF.)
Le paramètre est modié.
Exploitations des modes supplémentaires
Alarme de la porte
• Lorsque la porte du réfrigérateur est laissée ouverte
pendant plus d'une minute, l'alarme de la porte sonne
une fois, et à nouveau après 1 minute.
• Si la porte est laissée ouverte pendant env. 3 minutes,
l'alarme retentit continuellement.
• L'alarme s'arrête après la fermeture de la porte.
Désactiver l'opération
Appuyez simultanément
sur et pendant
3 secondes ou plus.
(Bip, bip, bip)
Activation du son des touches
• Le son électronique fonctionne lorsque vous appuyez
sur chaque touche.
Remarque
Lorsque vous souhaitez activer le mode supplémentaire,
suivez à nouveau la même étape. (L'indicateur s'allume.)
Désactiver l'opération
Appuyez simultanément sur et pendant
3 secondes ou plus.
(Bip, bip, bip)
L'indicateur
s'éteint.
L'indicateur
s'éteint.
Touches servant aux
opérations
Freezer
compartment
-18°C
3°C
Refrigerator
compartment
Contrôler les icônes de température
Icônes des modes utiles
Modes supplémentaires
Icône
Icône
Signication
Compartiment
congélateur
Compartiment
réfrigérateur
Paramètres
par défaut
Paramètres
par défaut
OFF
Indicateur
Signication
Paramètres
par défaut
Alarme de la
porte
ON
Son des
principales
opérations
Écran de veille
Signication
Extra cool
Express freezing
Express cool
Plasmacluster
Mode vacances
ou
Page 38

FR-7
Contrôler la température
Comment vérier le réglage en cours de la température
Le réfrigérateur contrôle sa température automatiquement. Cependant, vous pouvez régler la température comme ci-dessous.
Sélectionnez l'icône ou .
Réglage du compartiment congélateur (F) / réfrigérateur (R)
Compartiment congélateur
: Réglable entre -13°C and -21°C par étape de 1°C
Compartiment réfrigérateur
: Réglable entre 0°C and 6°C par étape de 1°C
1
1
or
2
Sélectionnez l'icône ou .
Sélectionner la température
3
Terminez le réglage.
Lorsque vous appuyez sur la touche , les icônes
changent dans l'ordre indiqué ci-dessous.
Standby display
Le paramètre est modié.
commutateur de paramètres
Compartiment congélateur
Compartiment réfrigérateur
Paramètres avancés du compartiment congélateur / réfrigérateur
La température du compartiment congélateur et du compartiment
réfrigérateur peut être ajustée par étape de 0,5°C en suivant les
étapes de a à c.
a.
Après l'étape 1 des « Opérations de base », appuyez sur
pendant 3 secondes ou plus. (Bip, Bip, Bip) La température
préréglée actuelle revient à « Réglage par défaut ». (L'afchage
est indiqué comme sur l'image à droite.)
b.
Appuyez sur ou et réglez la température.
c.
Terminez le réglage.
(Comme pour l'étape 3 des « Opérations de base »)
Suivez à nouveau les étapes de a à c si vous souhaitez ajuster la
température par l'étape 1°C.
Écran de veille
ou
Page 39

FR-8
FR
Fonctionnement des modes utiles
Opération de démarrage
Opération d'annulation
Extra cool
Express
freezing
Mode
vacances
Appuyez sur la la touche
de mode.
(Bip)
Appuyez sur la la
touche de mode.
(Bip)
Express cool Appuyez sur la touche de
sélection de mode durant
3 secondes ou plus.
(Bip, bip, bip)
Appuyez sur la la
touche de mode.
(Bip)
• Lorsque la porte du réfrigérateur est laissée ouverte pendant plus d'une minute, l'alarme de la porte sonne une fois, et
à nouveau après 1 minute.
• Si la porte est laissée ouverte pendant env. 3 minutes, l'alarme retentit continuellement.
• L'alarme s'arrête après avoir fermé la porte.
Si l'alarme de la porte ne s'arrête pas
Si l'alarme de la porte ne s'arrête pas après avoir fermé toutes les portes, elle est défectueuse.
Contactez le service après vente de SHARP pour obtenir de l'assistance.
Méthode d'arrêt temporaire de l'alarme de la porte
• Enfoncez la touche « F » et « R » simultanément et sans interruption durant
3 secondes ou plus. (Bip, bip, bip)
• L'alarme de la porte retentit à nouveau après environ 2 jours.
Panneau de contrôle
Contrôler les icônes de température Icônes des modes utiles
Remarque
• Tout les modes sont désactivés initialement. Lorsque
vous appuyez sur une des touches, le panneau de
commande s'active après le bip sonore.
• Lorsque vous appuyez sur une des touches, l'indicateur
du mode en cours s'allume Lorsque Express cool est
en service, l'indicateur clignote.
• Si vous souhaitez allumer l'indicateur de température,
appuyez sur la touche « F » ou « R » lorsque le
panneau de commande est activé.
*Le plasmacluster démarre automatiquement lorsque le
réfrigérateur est sous tension.
Il n'est pas nécessaire d'allumer / éteindre.
• Lorsqu'il n'y a plus d'opération pendant environ
1 minute, l'afchage s'éteint automatiquement.
• Si le réfrigérateur s'arrête en raison d'une panne de
courant, les modes fonctionnent de la même manière
qu'auparavant au moment de la réalimentation, sauf
pour Extra cool, Express freezing et Express cool.
Touche Signication Paramètres par
défaut
Extra cool
OFF
Express freezing
Express cool
Mode vacances
Plasmacluster ON*
Touche Signication Paramètres par
défaut
Contrôler la température
du compartiment
congélateur
Contrôler la température
du compartiment
réfrigérateur
Éclairage
Éteindre
Clignotement Éteindre
(SJ-XG640M, SJ-XG690M, SJ-XG740M)
Alarme de la porte
Page 40

FR-9
Contrôler la température
Comment vérier le réglage en cours de la température
L'indicateur s'allume pour afcher le niveau de température actuel
lorsque vous appuyez sur la touche « F » ou « R ».
Compartiment congélateur : Appuyez sur la touche « F ».
Compartiment réfrigérateur : Appuyez sur la touche « R ».
Réglage du compartiment congélateur (F) / réfrigérateur (R)
Compartiment congélateur
1.
Appuyez sur la touche « F ».
2.
Appuyez sur la touche « F » pour changer le niveau de température.
Compartiment réfrigérateur
1.
Appuyez sur la touche « R ».
2.
Appuyez sur la touche « R » pour changer le niveau de température.
• L'indicateur de température change comme sur l'image ci-dessous
(
3→4→5→1→2→3
) en appuyant sur la touche « F » ou « R ».
Paramètres avancés du compartiment congélateur / réfrigérateur
La température du compartiment congélateur et du compartiment
réfrigérateur peut être ajustée en 9 niveaux (niveau 1 ~ 9) en
suivant les étapes de a à b.
Compartiment congélateur
a.
Appuyez d'abord sur la touche « F ».
Enfoncez la touche « F » et appuyez ensuite sur la touche
« Express freezing » durant 3 secondes ou plus.
(Bip, bip, bip)
L'indicateur retourne à « Réglage par
défaut ».
b.
Appuyez sur la touche « F » pour changer
le niveau de température.
Suivez les étapes de a à b si vous souhaitez ajuster la
température en 5 niveaux.
Compartiment réfrigérateur
a.
Appuyez d'abord sur la touche « R ».
Enfoncez la touche « R » et appuyez ensuite sur la touche
« Express freezing » durant 3 secondes ou plus.
(Bip, bip, bip)
L'indicateur retourne à « Réglage par défaut ».
b.
Appuyez sur la touche « R » pour changer
le niveau de température.
Suivez les étapes de a à b si vous souhaitez ajuster la
température en 5 niveaux.
• L'indicateur de température change comme sur l'image
ci-dessous (
5→6→7→8→9→1→2→3→4→5
) en ap-
puyant sur la touche « F » ou « R ».
ÉTEINT Allumé Clignotant
Le réfrigérateur contrôle sa température automatiquement. Cependant, vous pouvez régler la température comme ci-dessous.
Remarque
Après avoir réglé le niveau de température, l'indicateur
s'éteint environ 5 secondes plus tard.
1
2
3
4
5
Level
Indicator
Default setting
1
2
3
4
5
6
7
8
9
Default setting
Level
Indicator
... ...
...
Paramètres par défaut
Niveau
Indicateur
Paramètres par défaut
Niveau
Indicateur
Page 41

FR-10
FR
INTÉRIEUR
EXTÉRIEUR
• Congelez de petites quantités de nourriture à la fois an de les
congeler rapidement.
• Les aliments doivent être correctement et hermétiquement fermés
ou couverts.
• Répartissez les aliments de manière uniforme dans le congélateur.
• Étiqueter les sacs ou les récipients pour conserver un inventaire de
la congélation des aliments.
Conseils pour prévenir la condensation
ou le givre à l'intérieur du réfrigérateur
• Assurez-vous que la nourriture soit la plus fraiche possible pour maximiser la durée de conservation des aliments
périssables. Ce qui suit est un guide général destiné à promouvoir une conservation plus longue des aliments.
• La nourriture a une durée de conservation limitée. Assurez-vous de ne pas dépasser la date de péremption indiquée
par le fabricant.
• La quantité de consommation d'énergie de ce modèle
est mesurée comme indiqué sur l'image ci-dessous.
• Installez le réfrigérateur dans un endroit bien
ventilé et maintenez l'espace ventilé.
• Conservez votre réfrigérateur hors de la lumière
directe du soleil et ne le placez pas à côté d'un
appareil produisant de la chaleur.
• Évitez d'ouvrir la porte autant que possible.
• Les aliments chauds doivent être refroidis avant
de les conserver.
• Placez les aliments uniformément sur les étagères
pour permettre à l'air frais de circuler efcacement.
Conseils pour économiser de l'énergie
Conservation des aliments
300
mm300 mm
90
mm
50
mm
Fruits / Légumes
• Les fruits et les légumes doivent être enfermés dans
des contenants en plastiques comme du lm, des sacs
(non hermétiquement fermés) et placés dans le bac à
fruits et légumes an de minimiser la perte d'humidité.
• Les fruits et les légumes facilement affectés par les
basses températures doivent être conservés dans un
endroit frais, mais pas au réfrigérateur.
Produits laitiers & œufs
• La plupart des produits laitiers ont une date de
péremption sur l’emballage extérieur qui vous
renseigne sur la température de conservation
recommandée et la durée de conservation des
produits.
• Conservez les œufs dans le casier à œufs.
Viandes / Poisson / Volaille
• Posez-les sur une assiette ou un plat et recouvrez-les
de papier ou de lm plastique.
• Pour les morceaux plus gros de viande, de poisson ou
de volaille, placez-les au fond des étagères.
• Assurez-vous que toute nourriture cuisinée soit
fermement emballée ou conservée dans un récipient
hermétique.
• Les aliments frais (emballés de manière sûre) doivent
être conservés pendant une durée limitée pour éviter
qu'ils ne s'altèrent et se contamine sévèrement les
autres aliments.
Congélateur
Réfrigérateur
Conseil pour conserver les aliments
• Maintenez la porte fermement fermée. Nettoyez l'intérieur
périodiquement. Si la nourriture tombe, cela peut provoquer
un écart entre l'armoire et la porte. Retirez-la de l'étagère ou
de la poche.
• Ouvrez et fermez la porte aussi rapidement que possible. De
la condensation ou du givre peuvent apparaître si la porte
est laissée ouverte pendant une longue période de temps ou
lorsque la porte est très souvent ouverte et fermée.
• Les éléments conservés doivent être emballés ou scellés
dans des récipients pour aliments ou des emballages en
plastique. (Surtout les aliments hautement humides)
• Placez les aliments uniformément sur les étagères
pour permettre à l'air frais de circuler efcacement.
• Les aliments chauds doivent être refroidis avant de
les conserver. La conservation des aliments chauds
augmente la température dans l'unité et le risque de
détérioration des aliments.
• Ne bloquez pas la sortie et l'entrée du ux de
circulation d'air froid avec des aliments ou des
récipients ; sinon, les aliments ne seront pas refroidis
de manière uniforme dans l'ensemble du réfrigérateur.
• Ne placez pas d'aliments
directement en face de la
sortie d'air froid. Cela peut
conduire à la congélation des
aliments.
Page 42

FR-11
Suivez les conseils ci-dessous pour éviter les ssures sur
les surfaces intérieures et les composants en plastique
• Essuyez l'huile alimentaire adhérente aux pièces en plastique.
• Certains produits chimiques ménagers peuvent causer des
dégâts, alors n'utilisez que du détergent dilué (eau savonneuse).
• Si un détergent non dilué est utilisé ou si l'eau savonneuse
n'est pas complètement rincée, cela peut entraîner des ssures sur les pièces en plastique.
Si le réfrigérateur doit être éteint pendant une période
prolongée, les étapes suivantes doivent être suivies pour
réduire la prolifération des moisissures
1. Retirez tous les aliments
2. Retirez la che d'alimentation de la prise.
3. Nettoyez et séchez l'intérieur à fond.
4. Gardez toutes les portes légèrement ouvertes
pendant quelques jours pour sécher.
Entretien et nettoyage
Le dégivrage fonctionne automatiquement avec un
système unique d'économie d'énergie. (Environ une fois
par jour.) La fabrication de la glace prend du temps car
la température intérieure devient légèrement plus élevée
que d'habitude pendant le dégivrage.
Remarque
• N'utilisez pas de nettoyants ou de solvants agressifs
(laque, peinture, poudre abrasive, benzine, eau
bouillante, etc.) qui pourraient provoquer des
dommages.
• Si vous retirez la prise d'alimentation une fois, attendez
5 minutes au moins avant de brancher la che
d'alimentation à nouveau.
• Les étagères en verre pèsent environ 3 kg chacunes.
Tenez-les fermement lorsque vous les retirez du coffre
et que vous les transportez.
• Ne laissez pas tomber d'objets à l'intérieur du
réfrigérateur ou frapper la paroi intérieure. Cela peut
provoquer des ssures sur la surface intérieure.
• Retirez les accessoires (par exemple les étagères) de
l'armoire et de la porte. Lavez-les à l'eau chaude avec
du détergent de vaisselle. Ensuite, rincez-les à l'eau
propre et sécher. (Seule l'étagère des fruits et légumes
n'est pas amovible)
• Nettoyer les pièces à l'intérieur avec un chiffon
imbibé d'eau chaude avec du détergent pour la
vaisselle. Ensuite, utilisez de l'eau froide pour éliminer
efcacement l'eau savonneuse.
• Essuyez l'extérieur avec un chiffon doux chaque fois
qu'il est sale.
• Nettoyez le joint magnétique de la porte avec une
brosse à dents et de l'eau chaude avec du détergent
pour la vaisselle.
• Essuyez le panneau de contrôle avec un chiffon sec.
<SJ-XG640M, SJ-XG690M, SJ-XG740M>
Éliminez l'eau dans le récipient d'évaporation. Avant
d'éliminer l'eau, attendez plus d'une heure après avoir
retiré la prise parce que l'équipement du cycle de
réfrigération est extrêmement chaud. (Le panneau
d'évaporation se trouve à l'arrière du produit.)
Panneau d'évaporation
Avant le déplacement
Nettoyage
Important
Dégivrage de l'unité de
refroidissement
Lorsque la lampe du
compartiment est grillée
Éteindre votre réfrigérateur
Contactez l'agent de service agréé par SHARP pour
remplacer l'ampoule. La lampe ne doit pas être
remplacée autrement que par le personnel de service
qualié.
Page 43

FR-12
FR
Avant d'appeler le service après vente
Avant d'appeler le service, vériez les points suivants.
Problème Solution
L'extérieur de l'appareil est
chaud au toucher.
Cela est normal. Ceci est dû au tuyau chaud à intérieur de l'appareil permettant
d'éviter de générer de la condensation.
Le réfrigérateur est très
bruyant.
Les sons suivants sont normaux.
• Le compresseur génère de gros bruits lorsqu'il commence à fonctionner.
-- Le son devient plus discret après un certain temps
• Le compresseur génère de gros bruits une fois par jour.
-- Un bruit de fonctionnement est généré immédiatement après l'opération de
dégivrage automatique de l'unité de refroidissement.
• Bruit de uide de ottement (bruit de gargouillis, de pétillements)
-- Cela s'explique par le fait que le uide frigorigène se déverse dans les tuyaux
(le son peut devenir plus fort de temps en temps).
• Craquement ou craquèlement et grincements
-- Ils sont provoqués par la contraction et le dilatement des parois intérieures et
des pièces internes pendant le refroidissement.
Du givre ou de la rosée
apparaît à l'intérieur ou à
l'extérieur du réfrigérateur.
Cela peut se produire dans l'un des cas suivants. Utilisez un chiffon humide pour
essuyer le givre et un chiffon sec pour essuyer la condensation.
• Lorsque l'humidité ambiante est élevée.
• Lorsque la porte est ouverte et fermée fréquemment.
• Lorsque des aliments contenant beaucoup d'humidité sont conservés. (Il est
nécessaire d'emballer.)
• Ce phénomène apparaîtra plus ou moins selon la saison (saison des pluies,
saison), les habitudes d'utilisation et les conditions environnementales de chaque
maison.
Les aliments
dans le
compartiment
réfrigérateur
sont gelés.
SJ-XG690G,
SJ-XG740G
• Le réfrigérateur fonctionne-t-il depuis longtemps avec le réglage de température
de réfrigérateur à 0°C ?
-- Modiez le contrôle de température pour revenir à environ 3°C.
• Le réfrigérateur fonctionne-t-il depuis longtemps avec le réglage de température
de congélation à -21°C ?
-- Modiez le contrôle de température pour revenir à environ -18°C.
• Si la température ambiante est faible, les aliments peuvent geler même si le
compartiment réfrigérateur est réglé à 6°C.
SJ-XG640M,
SJ-XG690M,
SJ-XG740M
• Le réfrigérateur fonctionne-t-il depuis longtemps avec le réglage de température
de réfrigérateur MAX COLDEST ?
-- Modiez le contrôle de température pour l'autre réglage.
• Le réfrigérateur fonctionne-t-il depuis longtemps avec le réglage de température
de congélation MAX COLDEST ?
-- Modiez le contrôle de température pour l'autre réglage.
• Si la température ambiante est faible, les aliments peuvent geler même si le
compartiment réfrigérateur est réglé sur MIN.
Les odeurs dans le
compartiment.
• Il est est nécessaire d'emballer les aliments aux odeurs fortes.
• L'unité de désodorisation ne peut pas éliminer toutes les odeurs.
• Nettoyez l'intérieur périodiquement.
Le panneau de contrôle ne
fonctionne pas.
Cela peut se produire dans l'un des cas suivants.
• Le panneau ou votre doigt est souillé de graisse, d'huile etc.
• Lorsque vous touchez le panneau avec une main gantée, un sparadrap adhésif
sur votre doigt, votre ongle ou des objets.
• Un autocollant ou du ruban adhésif est apposé sur les touches.
• La position de contact est légèrement décalée par rapport aux touches.
• Le temps d'utilisation n'est pas sufsant pour que les touches fonctionnent.
Les ampoules du compartiment
s'éteignent même si les portes
sont ouvertes.
• L'interrupteur est destiné à allumer et
éteindre les lampes du compartiment.
Lorsque les angles des portes sont les
mêmes, les lumières s'éteignent même
si les portes sont ouvertes, mais cela est
normal.
Si vous avez toujours besoin d'assistance
Consultez votre agent de service agréé par SHARP le plus proche.
Light switch
Interrupteur
Page 44

FR-13
Fiche du produit
ANNEXE
III
(UE) Règlement No.1060 / 2010
A
Marque déposée
B
Nom du modèle
SJ-XG640M
SJ-XG690G
SJ-XG690M
SJ-XG740G
SJ-XG740M
C
Catégorie 7
D
Classe d'efcacité énergétique A
++
E
Prix Ecolabel européen —
F
Consommation annuelle d'énergie *
1
[KWh/an] 320
G
Volume de stockage de tous les compartiments
qui ne méritent pas d'étoile [ L ]
354 394 420
H
Volume de stockage de tous les compartiments
d'aliments surgelés qui méritent une étoile [ L ]
162 176
I
La température nominale pour « d'autres
compartiments » supérieure à +14°C
—
J
Sans givre
OUI
K
Durée de montée en température [ h ] 19
L
Capacité de congélation [Kg/24h] 7,3 8,1
M
Classe de température T
N
Émission de bruits aériens
[dB(A)]
38
O
Dispositif intégré Non (type de maintien autonome)
*1 Consommation d'énergie « XYZ » kWh annuel, sur base des résultats des tests standard pendant 24 heures.
La consommation d'énergie réelle dépend de la façon dont l'appareil est utilisé et où il est situé.
Indicateur de température
Ce réfrigérateur est muni d'un indicateur de température dans le compartiment réfrigérateur pour vous permettre de
contrôler la température moyenne dans la zone la plus froide.
Zone la plus froide
Le symbole indique la zone la
plus froide dans le compartiment
réfrigérateur. (Le retrait de porte
positionné à la même hauteur
n'est pas la zone la plus froide.)
Symbole
Vérication de la température dans la zone la
plus froide
Vous pouvez effectuer des contrôles réguliers pour vous
assurer que la température dans la zone la plus froide
est correcte et, si nécessaire, réglez le contrôle de la
température du réfrigérateur.
Pour maintenir une température correcte à l'intérieur de
l'appareil, vériez que l'indicateur de température est
toujours BLEU. Si l'indicateur de température devient
BLANC, la température est trop élevée ; dans ce cas,
augmentez le réglage du contrôle de la température du
réfrigérateur et attendez 6 heures avant de vérier à
nouveau l'indicateur de température.
BLEU
Réglages corrects
BLANC
Température trop élevée, réglez
le contrôle de la température du
réfrigérateur.
Remarque
• La température interne du réfrigérateur dépend de
divers facteurs, tels que la température ambiante de la
pièce, la quantité de nourriture stockée et la fréquence
d'ouverture de la porte.
• Lorsque des aliments frais ont été introduits ou que la
porte a été laissée ouverte pendant un certain temps,
il est normal que l'indicateur de température devienne
BLANC.
Page 45

FR-14
FR
Informations sur l'élimination de cet équipement
ATTENTION : SI VOUS SOUHAITEZ VOUS DÉBARRASSER DE CET APPAREIL, NE LE JETEZ PAS DANS
UNE POUBELLE ORDINAIRE !
Les appareils électriques et électroniques usagés doivent être collectés et traités SÉPARÉMENT conformément
à la législation locale.
Une collecte séparée favorise un traitement respectueux de l'environnement, le recyclage des matériaux et la
réduction de l'élimination nale des déchets. UNE ÉLIMINATION INAPPROPRIÉE de l'appareil peut nuire à la
santé humaine et à l'environnement en raison de certaines substances ! Emmenez les ÉQUIPEMENTS UTILISÉS
dans un centre de collecte local, le cas échéant.
En cas de doutes quant à l'élimination de ce produit, veuillez contacter votre administration locale ou votre
distributeur qui vous renseignera sur la méthode d'élimination correcte de cet appareil.
SEULEMENT POUR LES UTILISATEURS DE L'UNION EUROPÉENNE ET QUELQUES AUTRES PAYS ; PAR EXEMPLE LA
NORVÈGE ET LA SUISSE : Votre participation à la collecte sélective est exigée par la loi.
Le symbole ci-dessus apparaît sur les équipements électriques et électroniques (ou l'emballage) an de le rappeler aux utilisateurs.
Les utilisateurs de MÉNAGES PRIVÉS sont priés d' utiliser les centres de récupérations de matériels usagés existants. Le retour est
gratuit.
Page 46

PT-1
Apenas de uso doméstico
Agradecemos por ter comprado este produto SHARP. Antes de usar o seu frigoríco SHARP, leia este manual de instruções para garantir que terá o maior proveito
deste.
• Este frigoríco serve para fazer cubos de gelo, refrigerar e congelar alimentos.
• Este frigoríco destina-se apenas a uso doméstico, com a temperatura ambien-
te indicada na tabela. A classe climática encontra-se especicada na placa de
classicação. Caso o frigoríco funcione fora do alcance (alcance da temperatura
ambiente) da classe climática classicada para esse modelo, este pode não conseguir manter umas temperaturas internas satisfatórias. Se o frigoríco for usado
com temperaturas mais baixas, não será danicado com temperaturas até +5ºC.
• O frigoríco não deverá estar sujeito a temperaturas de -10ºC ou inferiores durante um período de tempo prolongado.
Refrigerante
Este frigoríco contém gás refrigerante inamável (R600a:
isobutano) e expansor de isolamento (ciclopentano). Siga
as seguintes regras para evitar deagração e explosão
■Não deixe que nenhuns objetos pontiagudos tenham
contacto com o sistema de refrigeração. O sistema de
refrigeração atrás e por dentro do frigoríco contém refri-
gerante.
■Não use dispositivos mecânicos ou outros meios para
acelerar o processo de descongelação. (Este frigoríco
adotou um sistema de descongelação automático.)
■Não use eletrodomésticos elétricos dentro do frigoríco.
■Não bloqueie o espaço à volta do frigoríco.
■Não use sprays inamáveis, tais como tinta em spray,
perto do frigoríco.
■Não armazene sprays inamáveis, tais como tinta em
spray, dentro do frigoríco.
■Em caso de falha do sistema de refrigeração, não toque
na tomada da parede e use chamas abertas. Abra a
janela e deixe sair o ar da divisão. Em seguida, peça
assistência técnica a um agente autorizado da SHARP.
Instalação
■Não instale o frigoríco num local húmido ou molhado.
Isso pode provocar danos no isolamento ou uma fuga
de eletricidade. Pode aparecer condensação no compartimento exterior, o que provoca ferrugem.
■O frigoríco deve ser instalado numa superfície lisa
e rme no chão.
Cabo de alimentação, cha, tomada
Leia com atenção as seguintes regras para evitar choques
elétricos ou fogo.
■Ligue a cha de alimentação à tomada de parede dire-
tamente e com rmeza. Não use uma extensão ou uma
cha adaptadora.
■Ligue a cha elétrica a uma tomada com a tensão nomi-
nal exigida.
■Ligue o pino de terra devidamente ao terminal de terra.
■Lembre-se de proteger o cabo de alimentação de danos
durante a instalação ou mudança. Se a cha ou o cabo
de alimentação estiverem soltos, não ligue a cha.
■Não toque na cha com as mãos molhadas.
■Desligue a alimentação elétrica geral removendo a cha
da tomada. Não puxe o cabo de alimentação quando
o retirar.
■O pó acumulado na cha pode provocar um incêndio. Limpe-
-o com cuidado.
■Se o frigoríco não for usado durante um período prolongado,
retire a cha da tomada.
■Se o cabo de alimentação exível for danicado,
deve ser substituído por um agente da assistência técnica autorizado pela SHARP, pois é necessário um cabo especial.
Utilização
■Não armazene materiais voláteis e inamáveis, tais como éter,
gasolina, gás propano, latas de aerossóis, agentes colantes
e álcool puro, etc. Estes materiais explodem facilmente.
■Não armazene produtos sensíveis à temperatura no frigoríco,
tais como produtos farmacêuticos. Há um risco elevado de se
alterar a qualidade do produto.
■Não tente alterar ou modicar o frigoríco. Isto pode provocar
um incêndio, choques elétricos ou lesões.
■Não coloque nenhum objeto em cima do frigoríco. Se o objeto
cair, pode provocar lesões.
■Não bata com força nas portas de vidro. Caso contrário, podem
partir-se e provocar lesões físicas. <SJ-XG690G, SJ-XG740G>
■Este eletrodoméstico pode ser usado por crianças
a partir dos 8 anos e pessoas com capacidades
físicas, sensoriais ou mentais reduzidas, ou falta de
experiência e conhecimentos, caso lhes seja dada
supervisão ou instruções relativas ao uso do eletrodoméstico de um modo seguro e compreendam o risco
envolvido. As crianças não devem brincar com o eletrodoméstico. A limpeza e a manutenção do utilizador
não devem ser feitas por crianças sem supervisão.
Cuidados e Limpeza
■Em primeiro lugar, desligue o frigoríco para evitar choques
elétricos.
■Não salpique água diretamente sobre o compartimento exte-
rior ou interior. Isto pode provocar ferrugem e deterioração do
isolamento elétrico.
Problemas
■Se cheirar a queimado, desligue imediatamente a cha da
tomada. Em seguida, peça assistência técnica a um agente
autorizado da SHARP.
■Em caso de fuga de gás, abra as janelas e ventile a área. Não
toque no frigoríco, nem na tomada elétrica.
Classe
climática
Alcance aceitável de
temperatura ambiente
SN +10°C, 32°C
N +16°C, 32°C
ST +16°C, 38°C
T +16°C, 43°C
Informações de segurança
AVISO
Isto signica que existe um risco elevado de morte ou lesões graves.
ATENÇÃO
Isto signica que existe um risco elevado de danos materiais ou lesões pessoais.
AVISO
Page 47

PT-2
PT
Eliminação
■Certique-se de que o frigoríco não representa um
perigo para crianças enquanto estiver armazenado
para ser eliminado. (por ex., retire a porta para evitar
que as crianças quem presas.)
■Este frigoríco deve ser eliminado de forma
adequada. Leve o frigoríco para uma central de
reciclagem prossional para gases refrigerante
inamável e expansor de isolamento.
Transporte
■Quando instalar ou mover
o frigoríco, use um tapete
de corte para proteger
o chão de danos.
■Transporte o frigoríco
segurando as pegas
que se encontram atrás
e em baixo. Se levantar
o frigoríco de forma
inadequada, pode provocar
lesões.
ATENÇÃO
Utilização
■Não toque na unidade compressora nem nas suas
peças periféricas, pois estas tornam-se extremamente
quentes durante o funcionamento e as pontas
metálicas podem provocar lesões.
■Não toque em alimentos ou recipientes de metal
no compartimento do congelador com as mãos
molhadas. Isto pode provocar queimaduras de frio.
■Não coloque bebidas engarrafadas nem latas
no congelador. Sobretudo quando está em
funcionamento o "Arrefecimento rápido", há um
elevado risco das garrafas de vidro rebentarem.
■Não use água não potável para fazer cubos de gelo.
■Não abra ou feche a porta quando alguém puser
a mão perto desta. Há o risco da outra pessoa poder
car com os dedos entalados.
■Não coloque objetos de tamanho fora do normal
nos compartimentos da porta. Se o objeto cair do
compartimento, pode provocar lesões.
■Maneje as prateleiras de vidro com cuidado quando
as instalar ou desinstalar. Se deixar cair as prateleiras
de vidro, estas podem partir-se ou provocar lesões.
rear
bottom
Instalação
Tipo independente
1
Mantenha um espaço de ventilação adequado
à volta do frigoríco.
• A imagem apresenta o espaço mínimo
exigido para instalar o frigoríco.
A condição de medição do consumo
de energia é feita
sob uma dimensão
espacial diferente.
• Ao deixar um es-
paço maior, o frigoríco pode consumir menos
energia.
• Se usar o frigoríco numa dimensão espacial
inferior à apresentada em baixo, isso pode provocar o aumento da temperatura na unidade, ruído
e falhas.
• O espaço entre a traseira do frigoríco e a parede deve ser de 50mm ou mais, sendo inferior
a 75 mm. Se o espaço for superior a 75 mm, pode
sofrer uma lesão ao tocar no compressor e nas
suas peças periféricas que cam extremamente
quentes durante o funcionamento.
90mm
or more
60mm
or more
60mm
or more
Espaço geral exigido durante a utilização
2
Use os dois pés reguláveis
dianteiros para colocar o frigoríco
plano e rme no chão.
3
Ligue o eletrodoméstico através de uma tomada
devidamente instalada.
Nota
• Coloque o frigoríco com acesso à cha.
• Mantenha o frigoríco longe de luz solar direta e não
o coloque ao lado de um eletrodoméstico que gere
calor.
• Não coloque o frigoríco diretamente no chão.
Insira um suporte adequado, tal como uma tábua de
madeira, por baixo do frigoríco.
• Quando inserir a cha com a porta aberta, soará
o alarme da porta, o que é normal. Este som parará
quando fechar a porta.
Há rodas localizadas na base do frigoríco.
• Estas permitem movê-lo para trás e para a frente.
Antes de usar o frigoríco
• Limpe as peças do interior com um pano embebido em
água morna.
• Se usar água com sabão, limpe-a exaustivamente com
água.
1550 mm
1450 mm
790 mm
935 mm
Pé regulável
Rodas (4 uni.)
traseira
base
60 mm
ou mais
90 mm
ou mais
60 mm
ou mais
Page 48

PT-3
Porta da divisão fresca de duas vias
Descrição
1. Luz do congelador
<Apenas para SJ-XG690G, SJ-
XG690M, SJ-XG740G, SJ-XG740M>
2. Máquina de fazer gelo movível
<Apenas para SJ-
XG640M, SJ-XG690G, SJ-XG690M>
3. Prateleira do congelador (superior)
4. Prateleira do congelador (inferior)
5. Caixa do congelador
Mova a divisória para
o alimento caber.
6. Porta da divisão fresca de
duas vias
7. Prateleira fresca
8. Unidade desodorizante
O catalisador desodorizante está instalado nas vias
do ar fresco. Não é necessário ligar e limpar.
9. Luz do frigoríco
10. Prateleira do frigoríco
11. Painel de arrefecimento híbrido
O painel arrefece o compartimento do frigoríco
de forma indireta a partir de trás. Deste modo, os
alimentos são arrefecidos de forma suave, sem
estarem expostos a um uxo de ar frio.
12. Prateleira de fruta e legumes
13. Caixa de fruta e legumes
14. Pé regulável
15. Vedação magnética da porta
16. Painel de controlo
17. Compartimento da porta do congelador
18. Máquina de fazer gelo da porta
<Apenas para
SJ-XG740G,
SJ-XG740M
>
(Esta máquina de fazer gelo encontra-se dentro
do compartimento do congelador. Veja a página
seguinte "Após a limpeza" para instalar.)
19. Copo de água
<Apenas para SJ-XG740G, SJ-XG740M>
(O copo de água encontra-se dentro da caixa do
congelador. Certique-se de que coloca o copo na
posição indicada na imagem em cima para usar.)
20. Compartimento de ovos
21. Compartimento do frigoríco (superior)
22. Compartimento de garrafas
23. Compartimento do frigoríco (inferior)
Se desejar armazenar produtos grandes no frigoríco
• Pode remover algumas das prateleiras ou
compartimentos com os números 2,3,5,6,7,10,13,17,
18,19,20,21,22,23 na imagem em cima.
• O desempenho de arrefecimento não é afetado pela
utilização do frigoríco na situação acima mencionada.
Use o espaço como
divisão do frigoríco.
Use o espaço como
divisão fresca.
Como abrir a porta da divisão fresca de duas vias
1) Levante a porta.
2) Insira a porta na armação e
empurre-a para trás para o xador.
Esta ca bloqueada devidamente.
Open Close
SJ-XG740G,SJ-XG740M
SJ-XG640M, SJ-XG690G,SJ-XG690M
1
3
4
5
7
6
8
9
1
1
14
14
13
15
19
18
15
16
20
22
23
12
10
1
3
4
2
5
7
6
8
9
11
14
14
13
15
15
17
16
20
22
23
12
10
21
21
17
Partition
Freezer case
Divisão
Caixa do congelador
Abrir Fechar
Page 49

PT-4
PT
Máquina de fazer gelo da porta (SJ-XG740G,SJ-XG740M)
Fazer cubos de gelo
1) Use o copo de água para medir a quantidade de água.
Nível da água
Copo de água (160mL)
2) Deite água na máquina de fazer gelo da porta com
o copo de água.
3) Quando os cubos de gelo estiverem feitos, gire
a patilha no sentido dos ponteiros do relógio para pôr
o gelo na caixa de gelo.
4) Puxe a caixa de gelo para retirar os cubos de gelo.
Caixa de gelo
Patilha
Nota
• Para evitar danos na caixa de gelo, não deite nela óleo
nem faça gelo com ela.
• Não abra a porta do congelador o mais possível
enquanto estiver a fazer gelo.
Limpeza da máquina de fazer gelo da porta
• Esvazie previamente a caixa de gelo.
1) Puxe a máquina de fazer gelo da porta para cima para a retirar.
2) Retire a cuvete.
3) Retire a caixa de gelo.
4) Empurre a saliência para desmontar a máquina de fazer gelo.
Cuvete
Saliência
2)
3)
Nota
• Não coloque a cuvete na máquina de lavar loiça. Caso
contrário, o revestimento ca danicado.
Após a limpeza
1) Monte a máquina de fazer gelo da porta.
(O procedimento é o inverso do de desmontar.)
2) Instale a máquina de fazer gelo com segurança.
Furo
Gancho
Máquina de fazer gelo da porta
Porta
<Posição da patilha>
Patilha
Patilha
Máquina de fazer gelo movível (SJ-XG640M, SJ-XG690G, SJ-XG690M)
É altamente recomendável que se utilize a máquina de fazer gelo como apresentado na imagem na imagem da
"Descrição". Pode colocar a máquina de fazer gelo em qualquer sítio do compartimento do congelador.
1) Não encha a cuvete excessivamente com água. Caso
contrário, os cubos de gelo
carão colados ao congelar.
2) Quando os cubos de gelo estiverem feitos, gire a patilha
no sentido dos ponteiros do
relógio para pôr o gelo na
caixa de gelo.
Nota
• Certique-se de que coloca a máquina de gelo direita
para não entornar água do tabuleiro de gelo.
• Para evitar danos na caixa de gelo, não deite nela óleo
nem faça gelo com ela.
Patilha
Caixa de gelo
Page 50

PT-5
Modos úteis
Para o funcionamento, veja o capítulo "Painel de controlo".
Arrefecimento extra
Congelação rápida
Arrefecimento rápido
Arrefecimento extra Congelação rápida Arrefecimento rápido
Característica
Este modo serve para ar-
refecer bebidas ou alimentos até carem gelados.
Nota:
Alimentos com
muita humidade podem
congelar-se.
Este modo acelera
o tempo para congelar
alimentos ou fazer
gelo.
Este modo serve para arrefecer rapidamente
bebidas ou alimentos.
Ponto de utilização Divisão fresca Caixa do congelador Compartimento do congelador
ATENÇÃO:
Não coloque garrafas de vidro. Há
um elevado risco de rebentarem.
Tempo de
funcionamento
6 horas
*
1
2 horas
*
1
30 minutos
• Este modo termina automaticamente.
• O alarme não toca.
• Este modo termina automaticamente.
• O alarme toca.
Para parar o alarme *
2
ou
Carregue no
botão "Congelar
rápido".
*
1
Pode ser necessário mais tempo para completar, caso
o funcionamento se sobreponha à descongelação. Este
modo começará assim que a descongelação terminar.
*
2
Se não parar o alarme, este tocará continuamente
durante 30 minutos.
Nota
• O Arrefecimento extra, Congelação rápida
e Arrefecimento rápido não se encontram disponíveis
em simultâneo enquanto um destes modos estiver em
funcionamento.
• Evite abrir a porta o mais possível durante
o funcionamento destes modos.
Plasmacluster
bolor
Compartimento
do congelador
Divisão fresca
Modo de férias
• Use este modo quando for viajar ou deixar a casa
durante um período prolongado.
• A temperatura dentro do compartimento do frigoríco
é denida para cerca de 10°C.
Carregue no
botão de introdução.
Nota
Pode haver um cheiro ligeiro no frigoríco. Trata-se do
cheiro do ozono gerado pelo ionizador. A quantidade de
ozono é mínima e desaparece rapidamente no frigoríco.
Use esta característica quando quiser manter o interior
do frigoríco limpo.
O Plasmacluster iniciar-se-á automaticamente quando
o frigoríco estiver ligado.
O ionizador dentro do frigoríco liberta para
o compartimento do frigoríco grupos de iões que
consistem em conjuntos de massas de iões positivos
e negativos.
Estes conjuntos de iões neutralizam fungos de bolor no ar.
Depois de terminar
o funcionamento
• Não há necessidade de retirar as bebidas ou
os alimentos.
• Certique-se de que retira as bebidas ou
alimentos quando o alarme tocar.
• Se as bebidas ou alimentos permanecerem no
compartimento do congelador durante cerca de
30 minutos, podem congelar-se.
No caso de falha
de energia durante
o funcionamento
• Este modo é automaticamente cancelado. • Este modo é automaticamente restaurado
a partir do estado anterior quando a corrente for
retomada.
Nota
• A duração do armazenamento de alimentos no
frigoríco torna-se cerca de 1/2 - 1/3 do funcionamento
normal. Use este modo apenas quando não tiver
alimentos perecíveis.
• A temperatura do compartimento do frigoríco não
pode ser alterada.
Caixa do
congelador
Page 51

PT-6
PT
Painel de controlo
(SJ-XG690G, SJ-XG740G)
Nota
• Quando carregar em algum botão, todos os ícones
piscarão uma vez e apresentarão o mostrador de
espera (standby).
• Os ícones ou indicadores dos modos em funcionamento
acender-se-ão no mostrador de espera. Quando
o Arrefecimento rápido estiver em funcionamento,
o ícone piscará no mostrador de espera.
• Quando não houver funcionamento durante cerca de
1 minuto, o mostrador regressará automaticamente ao
mostrador de espera. O mostrador de espera desliga-
se quando não houver funcionamento durante mais
1 minuto.
• Se o frigoríco parar devido a uma falha de energia,
todos os modos, à exceção do Arrefecimento extra,
Congelação rápida e Arrefecimento rápido, continuarão
a funcionar do mesmo modo quando a corrente for
retomada.
Estado ao ligar
Ao carregar no botão , os ícones mudam
pela ordem indicada em baixo.
Selecone o ícone do modo.
Apenas “Arrefecimento rápido"
3
Complete a denição carregando
durante 3 ou mais segundos.
(Pi, pi, pi)
Funções dos modos úteis
1
Standby display
or
2
3
Selecione on/off (ligado/desligado).
A indicação ON / OFF (ligado/desligado) alterna sempre que carrega no ícone.
Completar a denição.
Denição atual
(Esta indicação apresenta como desligado.)
A denição foi alterada.
Funções dos modos adicionais
Alarme da porta
• Quando a porta do frigoríco car aberta durante
1 minuto, o alarme da porta soará uma vez
e novamente ao m de 1 minuto.
• Se a porta* car aberta durante cerca de 3 minutos,
o alarme soará continuamente.
• O alarme para quando a porta se fecha.
Função de desligar
Carregue em e em
simultâneo durante 3 ou
mais segundos.
(Pi, pi, pi)
Função do som dos botões
• Ao carregar nos botões ocorre um som elétrico.
Nota
Quando desejar ligar o modo adicional, siga novamente
os mesmos passos. (O indicador ligar-se-á.)
Função de desligar
Carregue em e em simultâneo durante 3 ou mais
segundos.
(Pi, pi, pi)
O indicador
desliga-se.
O indicador
desliga-se.
Botões de funcionamento
Freezer
compartment
-18°C
3°C
Refrigerator
compartment
Ícones de controlo de temperatura
Ícones de modos úteis Modos adicionais
Ícones
Ícone
Signicado
Compartimento
do congelador
Compartimento do frigoríco
Denições
predenidas
Denições
predenidas
Desligado
Indicador
Signicado
Denições
predenidas
Alarme da porta
Ligado
Som do
funcionamento
do botão
Mostrador de espera
Signicado
Arrefecimento extra
Congelação rápida
Arrefecimento rápido
Plasmacluster
Modo de férias
ou
Page 52

PT-7
Controle de temperatura
Como vericar a denição atual de temperatura
O frigoríco controla a temperatura automaticamente. No entanto, pode acertar a temperatura como indicado em baixo.
Selecione ou ícone.
Denir o compartimento do congelador/frigoríco
Compartimento do congelador
: Pode acertar entre -13°C e -21°C em intervalos de 1°C.
Compartimento do frigoríco
: Pode acertar entre 0°C e 6°C em intervalos de 1°C.
1
1
or
2
Selecione ou ícone.
Selecione a temperatura
3
Completar a denição.
Ao carregar no botão , os ícones mudam pela ordem
indicada em baixo.
Standby display
A denição foi alterada.
alterar
Compartimento do congelador
Compartimento do frigoríco
Definições avançadas do compartimento do congela-
dor/frigoríco
A temperatura do compartimento do congelador e do frigoríco pode
ser ajustada em intervalos de 0,5 °C seguindo os passos de a a c.
a.
Depois do passo 1 de “Funções básicas", carregue em
durante 3 ou mais. (Pi, pi, pi) A atual temperatura predenida
regressará às "Denições predenidas”. (O mostrador é
indicado como na imagem à direita.)
b.
Carregue em ou e dena a temperatura.
c.
Completar a denição.
(O mesmo que no passo 3 de "Funções básicas".)
Siga novamente os passos de a a c se desejar ajustar a temperatura
em intervalos de 1°C.
Mostrador de espera
ou
Page 53

PT-8
PT
Funções dos modos úteis
Função de início
Função de cancelar
Arrefecimento
extra
Congelação
rápida
Modo de férias
Carregue no botão de modo.
(Pi)
Carregue no botão de modo.
(Pi)
Arrefecimento
rápido
Carregue no botão de
modo durante 3 ou mais
segundos.
(Pi, pi, pi)
Carregue no botão de modo.
(Pi)
• Quando a porta do frigoríco car aberta durante 1 minuto, o alarme da porta soará uma vez e novamente ao m de 1 minuto.
• Se a porta* car aberta durante cerca de 3 minutos, o alarme soará continuamente.
• O alarme para quando a porta se fecha.
O alarme da porta não para.
Se o alarme da porta não parar depois de todas as portas serem fechadas, trata-se de um defeito.
Contacte o centro de assistência técnica da SHARP para ajuda.
Método para parar temporariamente o alarme da porta
• Carregue nos botões “F” e “R” em simultâneo e continuamente durante 3 ou
mais segundos. (Pi, pi, pi)
• O alarme da porta voltará a soar ao m de cerca de 2 dias.
Painel de controlo
Ícones de controlo de temperatura Ícones de modos úteis
Nota
• Todos os modos se encontram desligados inicialmente.
Ao carregar num dos botões, o painel de controlo ca
ativo depois de um sinal sonoro.
• Ao carregar num dos botões, o indicador do modo em
funcionamento acender-se-á. Quando o arrefecimento
rápido estiver em funcionamento, o indicador piscará.
• Se desejar ligar o indicador de temperatura, carregue
no botão “F” ou “R” enquanto o painel de controlo
estiver ativo.
*O Plasmacluster funcionará automaticamente quando
o frigoríco estiver ligado. Não há necessidade de
o ligar/desligar.
• Quando não houver funcionamento durante mais
1 minuto, o mostrador desligar-se-á automaticamente.
• Se o frigoríco parar devido a uma falha de energia,
todos os modos, à exceção do Arrefecimento extra,
Congelação rápida e Arrefecimento rápido, continuarão
a funcionar do mesmo modo quando a corrente for
retomada.
Botão Signicado Denições
predenidas
Arrefecimento extra
Desligado
Congelação rápida
Arrefecimento rápido
Modo de férias
Plasmacluster Ligado*
Botão Signicado Denições
predenidas
Controlar a temperatura
do compartimento do
congelador
Controlar a temperatura
do compartimento do
frigoríco
Luz
Desligado
Piscar Desligado
(SJ-XG640M, SJ-XG690M, SJ-XG740M)
Alarme da porta
Page 54

PT-9
Controle de temperatura
Como vericar a denição atual de temperatura
O indicador acender-se-á para apresentar o nível atual
da temperatura ao carregar nos botões “F” ou “R”.
Compartimento do congelador : Carregue no botão “F”.
Compartimento do frigoríco : Carregue no botão “R”.
Denir o compartimento do congelador/frigoríco
Compartimento do congelador
1.
Carregue no botão “F”.
2.
Carregue no botão “F” para alterar o nível da temperatura.
Compartimento do frigoríco
1.
Carregue no botão “R”.
2.
Carregue no botão “R” para alterar o nível da temperatura.
• O indicador da temperatura altera-se como na imagem em
baixo (
3→4→5→1→2→3
) carregando nos botões “F” ou “R”.
Denições avançadas do compartimento do congelador/frigoríco
A temperatura do compartimento do congelador e do frigoríco
pode ser ajustada em 9 níveis (nível 1 ~ 9) seguindo os seguintes
passos de a a b.
Compartimento do congelador
a.
Carregue primeiro no botão “F”.
Mantenha o botão “F” e em seguida carregue no botão
“Congelação rápida" durante 3 ou mais
segundos.
(Pi, pi, pi)
O indicador regressa às "Denições
predenidas".
b.
Carregue no botão “F” para alterar o nível da temperatura.
Siga os passos de a a b se desejar ajustar a temperatura em 5 níveis.
Compartimento do frigoríco
a.
Carregue primeiro no botão “R”.
Mantenha o botão “R” e em seguida carregue no botão
"Arrefecimento rápido" durante 3 ou mais segundos.
(Pi, pi, pi)
O indicador regressa às "Denições
predenidas".
b.
Carregue no botão “R” para alterar o nível da temperatura.
Siga os passos de a a b se desejar ajustar a temperatura em 5 níveis.
• O indicador da temperatura altera-se como na ima-
gem em baixo (
5→6→7→8→9→1→2→3→4→5
)
carregando nos botões “F” ou “R”.
Desligado
Luz Piscar
O frigoríco controla a temperatura automaticamente. No entanto, pode acertar a temperatura como indicado em baixo.
Nota
O indicador desligar-se-á cerca de 5 segundos depois
de acertar o nível da temperatura.
1
2
3
4
5
Level
Indicator
Default setting
1
2
3
4
5
6
7
8
9
Default setting
Level
Indicator
... ...
...
Denições predenidas
Nível
Indicador
Denições predenidas
Nível
Indicador
Page 55

PT-10
PT
ENTRA
SAI
• Congele pequenas quantidades de alimentos de cada
vez, para poder congelá-los rapidamente.
• Os alimentos devem ser devidamente embalados ou
tapados com rmeza.
• Coloque os alimentos no congelador uniformemente.
• Etiquete os sacos ou recipientes para manter um
inventário dos alimentos congelados.
Conselhos para evitar condensação
ou gelo no interior do frigoríco
• Certique-se de que os alimentos são da qualidade o mais fresca possível para maximizar o tempo de armazenamento de alimentos perecíveis. Em seguida encontra-se um guia geral para ajudar a promover um armazenamento mais
prolongado dos alimentos.
• Os alimentos têm um tempo de armazenamento limitado. Certique-se de que não ultrapassa a data de consumo
indicada pelo produtor.
• A quantidade de energia consumida por este modelo
é medida como indicado na imagem em baixo.
• Instale o frigoríco numa zona bem ventilada
e deixe espaço para ventilar.
• Mantenha o frigoríco longe de luz solar direta
e não o coloque ao lado de um eletrodoméstico
que gere calor.
• Evite o mais possível abrir a porta.
• Os alimentos quentes devem ser arrefecidos
antes de armazenar.
• Coloque os alimentos uniformemente nas
prateleiras para permitir que o ar fresco circule
com ecácia.
Dicas para poupar energia
Armazenar alimentos
300
mm300 mm
90
mm
50
mm
Fruta / Legumes
• A fruta e os legumes devem ser embalados de forma
folgada em plástico, por ex., em película, sacos
(não feche) e colocados na caixa dos legumes para
minimizar a perda de humidade.
• A fruta e os legumes que são facilmente afetados por
temperaturas baixas devem ser armazenados num
local fresco, sem ser no frigoríco.
Laticínios e ovos
• A maioria dos laticínios têm o prazo de validade
marcado na embalagem exterior, que informa
sobre a temperatura recomendada e o tempo de
armazenamento do alimento.
• Os ovos devem ser guardados no compartimento de
ovos.
Carne / Peixe / Aves
• Coloque num prato e cubra com papel ou película de
plástico.
• Para cortes grandes de carne, peixe ou aves, coloque
na parte traseira das prateleiras.
• Certique-se de que todos os alimentos cozinhados
estão embalados com segurança ou colocados num
recipiente hermético.
• Os alimentos frescos (embalados com segurança)
devem ser armazenados com duração limitada para
evitar que se estraguem e afetem negativamente
outros alimentos guardados.
Congelador
Frigoríco
Conselhos para armazenar alimentos
• Mantenha a porta devidamente fechada. Se os
alimentos caírem, estes podem provocar uma abertura
entre o compartimento e a porta. Volte a colocá-los na
prateleira ou compartimento.
• Abra e feche a porta rapidamente o mais que puder.
Pode ocorrer condensação ou gelo, caso a porta que
aberta durante um período prolongado, ou seja aberta
e fechada com frequência.
• Os produtos armazenados devem estar embalados ou
fechados em recipientes para alimentos ou película
de plástico. (Especialmente alimentos com muita
humidade)
• Coloque os alimentos uniformemente nas prateleiras
para permitir que o ar fresco circule com ecácia.
• Os alimentos quentes devem ser arrefecidos antes de
armazenar. O armazenamento de alimentos quentes
aumenta a temperatura da unidade e o risco dos
alimentos se estragarem.
• Não bloqueie a saída e entrada do circuito de ar
fresco em circulação com alimentos ou recipientes.
Caso contrário, os alimentos
não serão arrefecidos
uniformemente dentro do
frigoríco.
• Não coloque os alimentos
diretamente em frente à saída
de ar fresco. Isto pode
provocar o congelamento dos
alimentos.
Page 56

PT-11
Siga as seguintes dicas para evitar ssuras nas
superfícies interiores e nos elementos de plástico.
• Limpe a gordura dos alimentos que adira aos
elementos de plástico.
• Alguns produtos químicos domésticos podem causar
danos, por isso use apenas um detergente diluído
(água com sabão).
• Se for usado detergente não diluído, ou se a água com
sabão não for devidamente enxaguada, podem ocorrer
ssuras nas peças de plástico.
Se o frigoríco precisar de ser desligado durante um
período prolongado, devem seguir-se os seguintes
passos, de modo a reduzir o aparecimento de bolor:
1. Retire todos os alimentos
2. Retire a cha da tomada.
3. Limpe e seque exaustivamente o interior.
4. Mantenha todas as portas ligeiramente abertas
durante alguns dias, para secar.
Cuidados e Limpeza
A descongelação é feita automaticamente por um
sistema de poupança de energia exclusivo. (Cerca de
uma vez por dia.) A produção de gelo leva tempo, pois
a temperatura do interior torna-se levemente mais alta
do que o normal durante a descongelação.
Nota
• Não use detergentes fortes ou solventes (laca, tinta, pó
de polimento, benzina, água a ferver, etc.), pois podem
provocar danos.
• Se retirar a cha da tomada, aguarde pelo menos
5 minutos antes de voltar a ligá-la.
• As prateleiras de vidro pesam cerca de 3 kg cada.
Segure-as com rmeza quando as retirar do
compartimento e transportar.
• Não deixe cair objetos dentro do frigoríco, nem bata
na parede interior. Isto pode provocar ssuras na
superfície interior.
• Retire os acessórios (por ex., prateleiras) do
compartimento e da porta. Lave-os com água morna
com detergente da loiça. Em seguida, enxagúe-os
com água limpa e seque. (Apenas a prateleira de fruta
e legumes não é removível)
• Limpe o interior com um pano embebido em água
morna com detergente da loiça. Depois, use água fria
para limpar devidamente a água com espuma.
• Limpe o exterior com um pano suave sempre que car
sujo.
• Limpe a vedação magnética da porta com uma escova
de dentes e água morna com detergente da loiça.
• Limpe o painel de controlo com um pano seco.
<SJ-XG640M, SJ-XG690M, SJ-XG740M>
Limpe a água do tabuleiro de evaporação. Antes de
limpar a água, espere mais de 1 hora depois de desligar
a tomada da cha, pois o equipamento do ciclo de
refrigeração está extremamente quente. (O tabuleiro de
evaporação situa-se na traseira do produto.)
Tabuleiro de evaporação
Antes de transportar
Limpeza
Importante
Descongele a unidade de
congelação
Quando a luz do
compartimento estiver fundida
Desligar o frigoríco
Contacte a assistência técnica autorizada da SHARP
para substituir a lâmpada. A lâmpada não pode ser
substituída por alguém que não pertença à assistência
técnica qualicada.
Page 57

PT-12
PT
Antes de ligar à assistência técnica verique os seguintes pontos.
Problema Solução
O exterior do compartimento
está quente
É normal. É devido ao tubo quente que se encontra no compartimento para evitar
a formação de condensação.
O frigoríco faz muito barulho. Os seguintes sons são normais.
• O compressor faz muito barulho quando começa a funcionar.
-- O som reduz-se ao m de um tempo.
• O compressor faz muito barulho uma vez por dia.
-- Logo após a descongelação automática da unidade de congelação é emitido
um som de funcionamento.
• Som de líquido a uir (gorgolejar, efervescência)
-- É provocado pelo refrigerante que ui nos tubos (o som pode tornar-se mais
alto de tempos a tempos).
• Som de estalar ou rangido -- É provocado pela expansão e contração das
paredes interiores e das peças internas durante o arrefecimento.
Aparece gelo ou condensação
dentro e fora do frigoríco.
Isto pode acontecer numa das seguintes situações. Use um pano húmido para
limpar o gelo e um pano seco para limpar a condensação.
• Quando a humidade do ar é elevada.
• Quando a porta é frequentemente aberta e fechada.
• Quando são armazenados alimentos com muita humidade. (É necessário
embalá-los.)
• Este fenómeno ocorrerá com mais ou menos frequência em função da época
do ano (época de chuvas), hábitos de utilização e condições ambientais de
cada casa.
Os
alimentos do
compartimento
do frigoríco
estão
congelados.
SJ-XG690G,
SJ-XG740G
• O frigoríco está a funcionar há muito tempo com a temperatura de controlo do
frigoríco denida para 0°C?
-- Mude a temperatura de controlo novamente para cerca de 3°C.
• O frigoríco está a funcionar há muito tempo com a temperatura de controlo do
congelador denida para -21°C?
-- Mude a temperatura de controlo novamente para cerca de -18°C.
• Se a temperatura ambiente for baixa, os alimentos podem congelar-se, mesmo
se o compartimento do frigoríco estiver denido para 6°C.
SJ-XG640M,
SJ-XG690M,
SJ-XG740M
• O frigoríco está a funcionar há muito tempo com a temperatura de controlo do
frigoríco denida para MÁXIMO FRIO?
-- Altere o controle da temperatura para outras denições.
• O frigoríco está a funcionar há muito tempo com a temperatura de controlo do
congelador denida para MÁXIMO FRIO?
-- Altere o controle da temperatura para outras denições.
• Se a temperatura ambiente for baixa, os alimentos podem congelar-se, mesmo
se o compartimento do frigoríco estiver denido para MIN.
Cheiros no compartimento. • É necessário embalar os alimentos com cheiros fortes.
• A unidade desodorizante não consegue eliminar todos os cheiros.
• Limpe periodicamente o interior.
O painel de controlo não
funciona.
Isto pode acontecer numa das seguintes situações.
• O painel ou o seu dedo está sujo com água, gordura, etc.
• Quando toca no painel com luvas, um penso no dedo, com a unha ou com
objetos.
• Há um autocolante ou ta-cola em cima dos botões.
• A posição de toque está ligeiramente ao lado dos botões.
• O tempo de funcionamento não é suciente para os botões funcionarem.
As luzes do compartimento
desligam-se mesmo quando as
portas estão abertas.
• O interruptor da luz serve para ligar
e desligar as luzes do compartimento.
Quando os ângulos das portas são os
mesmos, as luzes desligam-se mesmo se
estas carem abertas, mas isso é normal.
Se continuar a precisar de assistência técnica
Contacte a assistência técnica autorizada da SHARP mais próxima.
Antes de ligar para a assistência técnica
Light switch
Interruptor da luz
Page 58

PT-13
Ficha do produto
ANEXO
III
Regulamento (UE) Nº.1060/2010
A
Marca
B
Modelo
SJ-XG640M
SJ-XG690G
SJ-XG690M
SJ-XG740G
SJ-XG740M
C
Categoria 7
D
Classe de eciência energética A
++
E
Prémio de rótulo ecológico UE —
F
Consumo energético anual *
1
[KWh/ano] 320
G
Volume de armazenamento de todos os
compartimentos sem classicação por estrelas [ L ]
354 394 420
H
Volume de armazenamento de todos os
compartimentos com classicação por estrelas [ L ]
162 176
I
Temperatura de projeto de "outro compartimento"
com mais de +14°C
—
J
Sem gelo
SIM
K
Duração do aumento da temperatura [ h ] 19
L
Capacidade de congelação [Kg/24h] 7,3 8,1
M
Classe climática T
N
Emissão de ruído aéreo
[dB(A)]
38
O
Eletrodoméstico incorporado Não (tipo independente)
*1 Consumo energético “XYZ” kWh por ano, com base em resultados de testes padrão de 24 horas.
O atual consumo de energia depende da utilização do eletrodoméstico e da sua localização.
Indicador da temperatura
Este frigoríco contém um indicador de temperatura no compartimento do frigoríco, para permitir-lhe controlar
a temperatura média na zona mais fria.
Zona mais fria
O símbolo indica a zona mais fria
do compartimento do frigoríco.
(A prateleira da porta situada
à mesma altura não é a zona mais
fria.)
Símbolo
Vericar a temperatura da zona mais fria
Pode vericar regularmente a temperatura para garantir
que a temperatura da zona mais fria está correta
e, se necessário, ajustar o controlo de temperatura do
frigoríco.
Para manter a temperatura certa dentro do
eletrodoméstico, verique se o indicador da temperatura
está sempre AZUL. Se o indicador da temperatura car
BRANCO, a temperatura está alta demais. Neste caso,
aumente as denições do controlo de temperatura
do frigoríco e espere 6 horas até voltar a vericar
o indicador da temperatura.
AZUL
Denições corretas
BRANCO
A temperatura está alta demais.
Ajuste o controlo de temperatura do
frigoríco.
Nota
• A temperatura interna do frigoríco depende de diversos
fatores, tais como a temperatura ambiente da divisão,
a quantidade de alimentos armazenados e a frequência
com que se abre a porta.
• Quando se introduzir alimentos frescos ou a porta
tiver cado aberta durante algum tempo, é normal que
o indicador da temperatura que BRANCO.
Page 59

PT-14
PT
Informação sobre a eliminação deste equipamento
SE DESEJAR ELIMINAR ESTE EQUIPAMENTO, NÃO USE O LIXO TRADICIONAL NEM O COLOQUE NUMA
LAREIRA!
Os equipamentos elétricos e eletrónicos devem ser sempre recolhidos e tratados SEPARADAMENTE, de acordo
com a legislação local.
A recolha separada promove um tratamento amigo do ambiente, a reciclagem de materiais e a redução dos
resíduos nais. A ELIMINAÇÃO INADEQUADA pode ser nociva para a saúde humana e para o meio ambiente,
devido a certas substâncias! Leve o EQUIPAMENTO USADO para uma unidade de recolha local, frequentemente
municipal, onde for possível.
Se tiver dúvidas em relação à eliminação, contacte as autoridades locais ou o seu revendedor e pergunte qual
a melhor forma de o fazer.
APENAS PARA UTILIZADORES DA UNIÃO EUROPEIA E ALGUNS OUTROS PAÍSES, COMO A NORUEGA E A SUÍÇA:
A participação na separação da recolha é exigida por lei.
O símbolo apresentado em cima aparece nos equipamentos elétricos e eletrónicos (ou na embalagem) para lembrar os utilizadores
de tal.
Solicita-se aos utilizadores de AMBIENTES DOMÉSTICOS PRIVADOS que usem as unidades de entrega de equipamento usado
existentes. A entrega é gratuita.
Page 60

EL-1
Μόνο οικιακή χρήση
Συγχαρητήρια για την αγορά σας αυτού του προϊόντος SHARP. Πριν χρησιμοποιήσετε
το ψυγείο σας SHARP, διαβάστε αυτό το εγχειρίδιο λειτουργίας για να βεβαιωθείτε πως
αξιοποιείτε στο πλήρες τις λειτουργίες του.
• Το ψυγείο αυτό μπορεί να παράγει παγάκια, να συντηρεί και να καταψύχει τρόφιμα.
• Το ψυγείο αυτό προορίζεται μόνο για οικιακή χρήση, με θερμοκρασία περιβάλλοντος όπως
υποδεικνύεται στον πίνακα. Η κλιματική κλάση προσδιορίζεται στην ονομαστική πινακίδα.
Αν το ψυγείο λειτουργεί σε θερμοκρασία περιβάλλοντος εκτός του εύρους που αφορά την
κλιματική κλάση ταξινόμησης για αυτό το μοντέλο, είναι πιθανό να μην μπορεί να διατηρήσει ικανοποιητική εσωτερική θερμοκρασία. Αν το ψυγείο χρησιμοποιηθεί σε ψυχρότερες θερμοκρασίες, το ψυγείο δεν θα υποστεί βλάβη ακόμα και σε θερμοκρασίες +5°C.
• Το ψυγείο δεν θα πρέπει να υποβάλλεται σε θερμοκρασίες -10°C ή χαμηλότερες για
μεγάλο χρονικό διάστημα.
Ψυκτικό
Το ψυγείο αυτό περιέχει εύφλεκτο ψυκτικό (R600a: ισοβουτάνιο) και μονωτικό αέριο (κυκλοπεντάνιο). Τηρήστε τους ακόλουθους κανόνες για την αποτροπή ανάφλεξης και έκρηξης.
■Μην επιτρέπετε σε αιχμηρά αντικείμενα να έρχονται σε
επαφή με το σύστημα ψύξης. Το σύστημα ψύξης πίσω από
και μέσα στο ψυγείο περιέχει ψυκτικό.
■Μη χρησιμοποιείτε μηχανικές διατάξεις ή άλλα μέσα για
να επιταχύνετε τη διαδικασία απόψυξης. (Το ψυγείο έχει
ενσωματωμένο σύστημα αυτόματης απόψυξης.)
■Μη χρησιμοποιείτε ηλεκτρικές συσκευές εντός του ψυγείου.
■Μη φράσσετε τον χώρο γύρω από το ψυγείο.
■Μη χρησιμοποιείτε εύφλεκτα σπρέι, όπως σπρέι μπογιάς,
κοντά στο ψυγείο.
■Μην τοποθετείτε εύφλεκτα σπρέι, όπως σπρέι μπογιάς,
μέσα στο ψυγείο.
■Στην περίπτωση αστοχίας του συστήματος ψύξης, μην
αγγίζετε την πρίζα στον τοίχο και μη χρησιμοποιείτε γυμνή
φλόγα. Ανοίξτε το παράθυρο και αφήστε να ανανεωθεί ο
αέρας στον χώρο. Στη συνέχεια αναζητήστε τεχνικό σέρβις
εγκεκριμένο από τη SHARP για επισκευή.
Εγκατάσταση
■Μην εγκαθιστάτε το ψυγείο σε υγρή ή βρεγμένη θέση.
Μπορεί να προκληθεί βλάβη στη μόνωση ή ηλεκτρική
διαρροή. Επίσης μπορεί να συγκεντρωθεί υγρασία στο
εξωτερικό περίβλημα, προκαλώντας σκουριά.
■Το ψυγείο θα πρέπει να τοποθετείται οριζόντια και σταθερά
στο δάπεδο.
Καλώδιο, βύσμα τροφοδοσίας και πρίζα
Διαβάστε προσεκτικά του ακόλουθους κανόνες για την αποφυγή ηλεκτροπληξίας ή φωτιάς.
■Συνδέστε το βύσμα τροφοδοσίας στην πρίζα του τοίχου
καλά και απευθείας. Μη χρησιμοποιείτε καλώδιο επέκτασης ή βύσμα μετατροπής.
■Συνδέστε το βύσμα τροφοδοσίας στην πρίζα με την απαι-
τούμενη ονομαστική τάση.
■Συνδέστε την ακίδα γείωσης σωστά στον ακροδέκτη γείω-
σης.
■Βεβαιωθείτε πως το καλώδιο τροφοδοσίας προστατεύεται
από ζημιά κατά τη διάρκεια της εγκατάστασης ή τη μεταφορά. Αν το βύσμα του καλωδίου ή το καλώδιο είναι χαλαρά,
μην το τοποθετείτε στην πρίζα.
■Μην αγγίζετε το βύσμα τροφοδοσίας με βρεγμένα χέρια.
■Αποσυνδέετε από την ηλεκτρική παροχή αφαιρώντας το
βύσμα από την πρίζα. Μην αφαιρείτε τραβώντας από το
καλώδιο τροφοδοσίας.
■Σκόνη που συγκεντρώνεται στο βύσμα τροφοδοσίας μπορεί
να προκαλέσει φωτιά. Σκουπίζετε το βύσμα προσεκτικά.
■Τραβήξτε το βύσμα από την πρίζα αν το ψυγείο δεν πρόκειται να χρησιμοποιηθεί για μεγάλο διάστημα.
■Αν το εύκαμπτο καλώδιο τροφοδοσίας υποστεί
ζημιά, πρέπει να αντικατασταθεί από τεχνικό
σέρβις εγκεκριμένο από την SHARP διότι απαιτείται ειδικό καλώδιο.
Κατά τη χρήση
■Μην τοποθετείτε πτητικά ή εύφλεκτα υλικά όπως αιθέρα,
βενζίνη, προπάνιο, φιάλες αεροζόλ, κόλλες και καθαρό
οινόπνευμα κ.τ.λ. Τα υλικά αυτά εκρήγνυνται εύκολα.
■Μην τοποθετείτε προϊόντα που είναι ευαίσθητα στη θερμοκρασία, όπως φαρμακευτικά προϊόντα, μέσα στο ψυγείο.
Υπάρχει υψηλός κίνδυνος μεταβολής της ποιότητας του
προϊόντος.
■Μην επιχειρείτε να αλλάξετε ή να τροποποιήσετε το ψυγείο.
Αυτό μπορεί να προκαλέσει φωτιά, ηλεκτροπληξία ή τραυματισμό.
■Μην τοποθετείτε οποιοδήποτε αντικείμενο επάνω στο
ψυγείο. Αν πέσει αντικείμενο από την κορυφή του ψυγείου,
μπορεί να προκληθεί τραυματισμός.
■Μη χτυπάτε δυνατά τις γυάλινες πόρτες. Διαφορετικά, μπορεί να σπάσουν και να προκληθεί ατομικός τραυματισμός.
<SJ-XG690G, SJ-XG740G >
■Η συσκευή αυτή μπορεί να χρησιμοποιηθεί
από παιδιά ηλικίας 8 ετών ή μεγαλύτερης και
από άτομα με μειωμένες κινητικές, αισθητηριακές ή διανοητικές ικανότητες ή άτομα που
δεν έχουν εμπειρία ή γνώση, εφόσον τους
παρέχεται επίβλεψη ή καθοδηγία σχετικά με
τη χρήση της συσκευής με ασφαλή τρόπο ή
εφόσον κατανοούν τους κινδύνους που περιλαμβάνονται. Τα παιδιά δεν πρέπει να παίζουν
με τη συσκευή. Ο καθαρισμός και η συντήρηση
από τον χρήστη δεν πρέπει να εκτελείται από
παιδιά χωρίς επίβλεψη.
Φροντίδα και καθαρισμός
■Αποσυνδέστε το ψυγείο πρώτα για την αποφυγή ηλεκτροπληξίας.
■Μη ρίχνετε νερό απευθείας στο εξωτερικό περίβλημα ή στο
εσωτερικό. Αυτό μπορεί να οδηγήσει σε σκουριά και επιδείνωση της ηλεκτρικής μόνωσης.
Πρόβλημα
■Αν αντιληφθείτε μυρωδιά σαν να καίγεται κάτι, αμέσως τραβήξτε το βύσμα τροφοδοσίας από την πρίζα. Στη συνέχεια
αναζητήστε τεχνικό σέρβις εγκεκριμένο από τη SHARP για
επισκευή.
■Σε περίπτωση διαρροής αερίου, ανανεώστε τον αέρα στον
χώρο ανοίγοντας ένα παράθυρο. Μην αγγίζετε το ψυγείο ή
την πρίζα του τοίχου.
Κλιματι-
κή κλάση
Αποδεκτό εύρος θερμοκρασίας περιβάλλοντος
SN +10°C ως 32°C
N +16°C ως 32°C
ST +16°C ως 38°C
T +16°C ως 43°C
Πληροφορίες ασφάλειας
ΠΡΟΕΙΔΟΠΟΙΗΣΗ
Αυτό σημαίνει πως υπάρχει υψηλός κίνδυνος θανάτου ή σοβαρού τραυματισμού.
ΠΡΟΣΟΧΗ
Αυτό σημαίνει πως υπάρχει υψηλός κίνδυνος υλικών ζημιών ή ατομικού τραυματισμού.
ΠΡΟΕΙΔΟΠΟΙΗΣΗ
Page 61

EL-2
EL
Απόρριψη
■Βεβαιωθείτε πως το ψυγείο δεν απειλεί παιδιά κατά
την αποθήκευσή του ως την απόρριψη. (π.χ. αφαιρέστε την πόρτα ώστε να μην παγιδευτούν παιδιά στο
εσωτερικό.)
■Το ψυγείο αυτό θα πρέπει να απορρίπτεται κατάλληλα.
Μεταφέρετε το ψυγείο σε επαγγελματική μονάδα ανακύκλωσης για εύφλεκτα ψυκτικά και αέρα μόνωσης.
Μεταφορά
■Κατά την εγκατάσταση ή
μεταφορά του ψυγείου, χρησιμοποιείτε κάποιο χαλάκι για να
προστατέψετε το δάπεδο από
ζημιά.
■Μεταφέρετε το ψυγείο κρατώντας από τις λαβές που
βρίσκονται στην πίσω και κάτω
πλευρά. Αν σηκώσετε το ψυγείο
με εσφαλμένο τρόπο, μπορεί
να προκληθεί τραυματισμός.
ΠΡΟΣΟΧΗ
Κατά τη χρήση
■Μην αγγίζετε τη μονάδα συμπιεστή ή τα περιφερειακά
του εξαρτήματα, καθώς μπορεί να είναι εξαιρετικά
ζεστά κατά τη διάρκεια της λειτουργίας και μπορεί να
προκληθεί τραυματισμός στις μεταλλικές ακμές.
■Μην αγγίζετε τρόφιμα ή μεταλλικά δοχεία στο θάλαμο
της κατάψυξης με βρεγμένα χέρια. Μπορεί να
προκληθεί κρυοπάγημα.
■Μην τοποθετείτε μπουκάλια ή κουτάκια ποτών στον
θάλαμο της κατάψυξης.
Ειδικά κατά τη λειτουργία “Ταχείας ψύξης”, ο κίνδυνος
θραύσης γυάλινων μπουκαλιών είναι μεγάλος.
■Μη χρησιμοποιείτε οτιδήποτε εκτός από πόσιμο νερό
για να παράγετε παγάκια.
■Μην ανοίγετε ή κλείνετε την πόρτα αν κάποιος έχει
βάλει το χέρι του κοντά στην πόρτα. Υπάρχει κίνδυνος
να μαγκώσουν τα δάκτυλα άλλων στην πόρτα.
■Μην τοποθετείτε υπερμεγέθη αντικείμενα στις θήκες
της πόρτας. Αν το αντικείμενο πέσει από τις θήκες,
μπορεί να προκληθεί τραυματισμός.
■Βεβαιώνεστε ότι μεταχειρίζεστε τα γυάλινα ράφια με
προσοχή κατά την τοποθέτηση ή την αφαίρεσή τους.
Αν ρίξετε τα γυάλινα ράφια, μπορεί να σπάσουν ή να
προκληθεί τραυματισμός.
rear
bottom
Εγκατάσταση
Τύπος ελεύθερης
τοποθέτησης
1
Εξασφαλίζετε επαρκή αερισμό γύρω από το ψυγείο.
• Η εικόνα παρουσιάζει τον ελάχιστο
απαιτούμενο χώρο
για τοποθέτηση του
ψυγείου. Η ενέργεια
που καταναλώνει
το ψυγείο εξαρτάται
από τις διαστάσεις
του χώρου όπου
τοποθετείται.
• Σε μεγαλύτερο
χώρο, το ψυγείο
μπορεί να καταναλώνει λιγότερη ενέργεια.
• Αν χρησιμοποιείτε το ψυγείο σε χώρο μικρότερων
διαστάσεων απ' ό,τι φαίνεται στην παρακάτω
εικόνα, μπορεί να προκληθεί άνοδος της θερμοκρασίας στη μονάδα, δυνατός θόρυβος και βλάβη.
• Ο χώρος μεταξύ της πλάτης του ψυγείου και του
τοίχου θα πρέπει να είναι 50mm ή περισσότερο, και
λιγότερο από 75mm. Αν ο χώρος έχει πλάτος μεγαλύτερο των 75mm, μπορεί να τραυματιστείτε αγγίζοντας τον συμπιεστή και τα περιφερειακά του εξαρτήματα που είναι εξαιρετικά ζεστά κατά τη λειτουργία.
90mm
or more
60mm
or more
60mm
or more
Συνολικός απαιτούμενος χώρος για τη χρήση
2
Χρησιμοποιήστε τα δύο μπροστινά
προσαρμοζόμενα πόδια ώστε
να σταθεί το ψυγείο σταθερά και
οριζόντια στο δάπεδο.
3
Συνδέστε τη συσκευή μέσω πρίζας που έχει
εγκατασταθεί σωστά.
Σημείωση
• Τοποθετήστε το ψυγείο έτσι ώστε να έχετε πρόσβαση
στο βύσμα.
• Προστατέψτε το ψυγείο από άμεσο ηλιακό φως και
μην το τοποθετείτε δίπλα σε συσκευές παραγωγής
θερμότητας.
• Μην τοποθετείτε το ψυγείο απευθείας στο έδαφος.
Τοποθετήστε κατάλληλη βάση κάτω από το ψυγείο,
όπως ξύλινη σανίδα.
• Αν τοποθετήσετε στην πρίζα το βύσμα ενώ η πόρτα
είναι ανοιχτή, ακούγεται ο συναγερμός της πόρτας,
αλλά αυτό είναι φυσιολογικό. Ο ήχος σταματά αφού
κλείσετε την πόρτα.
Στη βάση του ψυγείου υπάρχουν ροδάκια
• Τα ροδάκια επιτρέπουν τη μετακίνηση του ψυγείου
μπροστά και πίσω.
Πριν χρησιμοποιήσετε το ψυγείο
• Καθαρίστε τα εσωτερικά τμήματα με ένα πανί
μουσκεμένο σε χλιαρό νερό.
• Αν χρησιμοποιήσετε σαπουνόνερο για τον καθαρισμό,
ξεπλύνετε καλά με νερό.
1550 mm
1450 mm
790 mm
935 mm
Προσαρμοζόμενο πόδι
Ροδάκια (4 τμχ)
Πίσω
βάση
60mm ή
περισσότερο
90mm ή
περισσότερο
60mm ή
περισσότερο
Page 62

EL-3
Πόρτα διπλής χρήσης χώρου φρέσκων
Περιγραφή
1. Φως κατάψυξης
<Μόνο για τα SJ-XG690G, SJ-XG690M, SJ-XG740G, SJ-XG740M>
2. Αφαιρούμενη μηχανή πάγου
<Μόνο για τα SJ-XG640M, SJ-XG690G,
SJ-XG690M>
3. Ράφι κατάψυξης (Άνω)
4. Ράφι κατάψυξης (Κάτω)
5. Θήκη κατάψυξης
Μετακινήστε το διαχωριστικό ώστε να
χωράνε τα τρόφιμα.
6. Πόρτα διπλής χρήσης χώρου φρέσκων
7. Ράφι φρέσκων
8. Μονάδα εξουδετέρωσης οσμών
Ο αποσμητικός καταλύτης εγκαθίσταται στις διαδρομές του ψυχρού
αέρα. Δεν χρειάζεται κάποιος χειρισμός ή καθαρισμός.
9. Φως ψυγείου
10. Ράφι ψυγείου
11. Υβριδικός πίνακας ψύξης
Ο πίνακας ψύχει τον θάλαμο του ψυγείου έμμεσα από την πλάτη. Με
αυτό τον τρόπο, τα τρόφιμα ψύχονται ομαλά χωρίς να εκτίθενται σε
ροή κρύου αέρα.
12. Ράφι φρούτων και λαχανικών
13. Χώρος διατήρησης υγρασίας φρούτων και λαχανικών
14. Προσαρμοζόμενο πόδι
15. Μαγνητικό στεγανωτικό πόρτας
16. Πίνακας ελέγχου
17. Θήκη πόρτας κατάψυξης
18. Μηχανή πάγου της πόρτας
<Μόνο για το
SJ-XG740G, SJ-XG740M
>
(Αυτή η μηχανή πάγου φυλάσσεται στον θάλαμο κατάψυξης.
Ανατρέξτε την επόμενη σελίδα "Μετά τον καθαρισμό" για την
εγκατάσταση.)
19. Μεζούρα νερού
<Μόνο για τα SJ-XG740G, SJ-XG740M>
(Η μεζούρα νερού φυλάσσεται μέσα στη θήκη κατάψυξης.
Βεβαιωθείτε πως τοποθετήσατε τη μεζούρα για χρήση στη θέση που
υποδεικνύεται στην παραπάνω εικόνα.)
20. Αυγοθήκη
21. Θήκη ψυγείου (Άνω)
22. Θήκη μπουκαλιών
23. Θήκη ψυγείου (Κάτω)
Αν θέλετε να συντηρήσετε μεγάλα τεμάχια μέσα στο ψυγείο
• Μπορείτε να αφαιρέσετε οποιαδήποτε από τα ράφια ή τις θήκες με αριθμό
2,3, 5,6, 7,10, 13,17, 18, 19, 20, 9,10,21, 22, 23 στην παραπάνω εικόνα.
• Η ψυκτική απόδοση δεν επηρεάζεται ακόμα και αν χρησιμοποιήσετε το
ψυγείο όπως παραπάνω.
Χρήση του χώρου
ως θαλάμου ψύξης.
Χρήση του χώρου ως
θαλάμου φρέσκων.
Άνοιγμα της πόρτας διπλής χρήσης χώρου
φρέσκων
1) Σηκώστε την πόρτα.
2) Τοποθετήστε την πόρτα μέσα στο
πλαίσιο και ωθήστε την τελείως
προς τα πίσω. Τότε ασφαλίζει
σωστά.
Open Close
SJ-XG740G,SJ-XG740M
SJ-XG640M, SJ-XG690G,SJ-XG690M
1
3
4
5
7
6
8
9
1
1
14
14
13
15
19
18
15
16
20
22
23
12
10
1
3
4
2
5
7
6
8
9
11
14
14
13
15
15
17
16
20
22
23
12
10
21
21
17
Partition
Freezer case
Διαχωριστικό
Θήκη κατάψυξης
Άνοιγμα Κλείσιμο
Page 63

EL-4
EL
Μηχανή πάγου στην πόρτα (SJ-XG740G,SJ-XG740M)
Παραγωγή πάγου
1) Χρησιμοποιήστε τη μεζούρα νερού για να μετρήσετε
την ποσότητα του νερού.
Στάθμη νερού
Μεζούρα νερού (160 mL)
2) Ρίξτε το νερό μέσα στη μηχανή πάγου της πόρτας με
τη μεζούρα νερού.
3) Όταν ετοιμαστούν τα παγάκια, γυρίστε το μοχλό κατά
τη φορά των δεικτών του ρολογιού για να πέσουν στο
δοχείο αποθήκευσης πάγου.
4) Τραβήξτε το δοχείο αποθήκευσης πάγου για να
βγάλετε τα παγάκια.
Δοχείο αποθήκευσης πάγου
Μοχλός
Σημείωση
• Για να αποφύγετε ζημιά στο δοχείο αποθήκευσης
πάγου, μην ρίχνετε λάδι μέσα σε αυτό και μην
παράγετε πάγο σε αυτό.
• Μην ανοίγετε την πόρτα της κατάψυξης όσο είναι
δυνατόν κατά την παραγωγή πάγου.
Καθαρισμός της μηχανής πάγου της πόρτας
•Αδειάστε εκ των προτέρων το δοχείο αποθήκευσης πάγου.
1) Τραβήξτε προς τα πάνω τη μηχανή πάγου της πόρτας
για να την αφαιρέσετε.
2) Αφαιρέστε την παγοθήκη.
3) Αφαιρέστε το δοχείο αποθήκευσης πάγου.
4) Σπρώξτε την προεξοχή για να αποσυναρμολογήσετε
τη μηχανή πάγου της πόρτας.
Παγοθήκη
Προεξοχή
2)
3)
Σημείωση
• Μην τοποθετείτε την παγοθήκη στο πλυντήριο πιάτων.
Διαφορετικά, μπορεί να φθαρούν οι θήκες.
Μετά τον καθαρισμό
1) Συναρμολογήστε τη μηχανή πάγου της πόρτας.
(Αντίστροφη διαδικασία από την αποσυναρμολόγηση.)
2) Εγκαταστήστε τη μηχανή πάγου της πόρτας καλά.
Οπή
Γάντζος
Μηχανή πάγου της πόρτας
Πόρτα
<Θέση του μοχλού>
Μοχλός
Μοχλός
Αφαιρούμενη μηχανή πάγου
(SJ-XG640M, SJ-XG690G, SJ-XG690M)
Συστήνεται έντονα να χρησιμοποιείτε τη μηχανή πάγου όπως φαίνεται στην εικόνα "Περιγραφή". Μπορείτε να
τοποθετήσετε τη μηχανή πάγου οπουδήποτε μέσα στον θάλαμο της κατάψυξης.
1) Μην παραγεμίζετε την
παγοθήκη με νερό. Αλλιώς
τα παγάκια θα ενωθούν όταν
παγώσουν.
2) Όταν ετοιμαστούν τα παγάκια,
γυρίστε το μοχλό κατά
τη φορά των δεικτών του
ρολογιού για να πέσουν στο
δοχείο αποθήκευσης πάγου.
Σημείωση
• Βεβαιωθείτε για την επίπεδη τοποθέτηση της μηχανής
πάγου ώστε να μην χυθεί το νερό από την παγοθήκη.
• Για να αποφύγετε ζημιά στο δοχείο αποθήκευσης
πάγου, μην ρίχνετε λάδι μέσα σε αυτό και μην
παράγετε πάγο σε αυτό.
Μοχλός
Δοχείο αποθήκευσης πάγου
Page 64

EL-5
Χρήσιμες λειτουργίες
Σχετικά με τις λειτουργίες, ανατρέξτε στο κεφάλαιο “Πίνακας ελέγχου”.
Επιπρόσθετη ψύξη
Ταχεία κατάψυξη
Ταχεία ψύξη
Επιπρόσθετη ψύξη Ταχεία κατάψυξη Ταχεία ψύξη
Χαρακτηριστικό Η λειτουργία αυτή
ψύχει πολύ ποτά ή
τρόφιμα.
Σημείωση :
Τρόφιμα
υψηλής υγρασίας
μπορεί να παγώσουν.
Η λειτουργία αυτή
επιταχύνει τον χρόνο
κατάψυξης φαγητού ή
δημιουργίας πάγου.
Η λειτουργία αυτή ψύχει ποτά ή τρόφιμα γρήγορα.
Θέση χρήσης Θάλαμος συντήρησης
(φρέσκων)
Θήκη κατάψυξης Θάλαμος κατάψυξης
ΠΡΟΣΟΧΗ :
Μην τοποθετείτε γυάλινα μπουκάλια.
Ο κίνδυνος να σπάσουν είναι μεγάλος.
Χρόνος
λειτουργίας
6 ώρες
*
1
2 ώρες
*
1
30 λεπτά
• Η λειτουργία αυτή τερματίζεται αυτόματα.
• Δεν ακούγεται συναγερμός.
• Η λειτουργία αυτή τερματίζεται αυτόματα.
• Ακούγεται συναγερμός.
Για διακοπή του συναγερμού *
2
ή
Πατήστε το
κουμπί “Ταχεία
κατάψυξη”.
*
1
Η λειτουργία μπορεί να διαρκέσει λίγο περισσότερο
αν συμβαίνει ταυτόχρονα με απόψυξη. Η λειτουργία
αρχίζει αφού ολοκληρωθεί η απόψυξη.
*
2
Αν δεν σταματήσετε τον συναγερμό, ακούγεται
συνεχόμενα για 30 λεπτά.
Σημείωση
• Οι λειτουργίες Επιπρόσθετη ψύξη, Ταχεία κατάψυξη και
Ταχεία ψύξη δεν είναι διαθέσιμες ταυτόχρονα όταν μία
από τις λειτουργίες βρίσκεται σε εξέλιξη.
• Αποφεύγετε το άνοιγμα της πόρτας όσο είναι δυνατόν
κατά τη διάρκεια αυτών των λειτουργιών.
Plasmacluster
μύκητας
μούχλας
Θάλαμος
κατάψυξης
Χώρος φρέσκων
Λειτουργία διακοπών
• Χρησιμοποιείτε αυτή τη λειτουργία αν πηγαίνετε κάποιο
ταξίδι ή αν εγκαταλείπετε το σπίτι για μεγάλο διάστημα.
• Η θερμοκρασία μέσα στον θάλαμο του ψυγείου
προσαρμόζεται περ. στους 10°C.
Πατήστε το
κουμπί enter
(επικύρωση).
Σημείωση
Μπορεί να υπάρχει ελαφριά οσμή στο ψυγείο. Είναι
η οσμή του όζοντος που παράγεται από τον ιονιστή.
Η ποσότητα όζοντος είναι ελάχιστη και εξαφανίζεται
γρήγορα μέσα στο ψυγείο.
Χρησιμοποιείτε αυτό το χαρακτηριστικό όταν θέλετε να
διατηρείτε το εσωτερικό του ψυγείου καθαρό.
Η λειτουργία Plasmacluster ξεκινά αυτόματα όταν
ενεργοποιείται το ψυγείο.
Ο ιονιστής εντός του ψυγείου απελευθερώνει ομάδες
ιόντων, δηλαδή συσσωρευμένες μάζες θετικών και
αρνητικών ιόντων, μέσα στον θάλαμο του ψυγείου.
Αυτές οι ομάδες ιόντων αδρανοποιούν τους
αερομεταφερόμενους μύκητες.
Αφού ολοκληρωθεί
η λειτουργία
• Δεν χρειάζεται να βγάλετε τα ποτά ή τα
τρόφιμα.
• Φροντίστε να βγάλετε τα ποτά και τα τρόφιμα
όταν ακουστεί ο συναγερμός.
• Αν τα ποτά και τα τρόφιμα παραμείνουν στον
θάλαμο κατάψυξης περισσότερο από περίπου
30 λεπτά, μπορεί να παγώσουν.
Σε περίπτωση
διακοπής ρεύματος
κατά τη διάρκεια
της λειτουργίας
• Η λειτουργία αυτή ακυρώνεται αυτόματα. • Η λειτουργία αυτή ξαναρχίζει αυτόματα
από την προηγούμενη κατάσταση κατά την
αποκατάσταση του ρεύματος.
Σημείωση
• Η διάρκεια συντήρησης τροφίμων στον θάλαμο ψυγείου
μειώνεται περ. στο 1/2-1/3 της κανονικής λειτουργίας.
Χρησιμοποιείτε τη λειτουργία αυτή μόνο όταν δεν
υπάρχουν τρόφιμα που αλλοιώνονται.
• Η θερμοκρασία στον θάλαμο του ψυγείου δεν μπορεί
να αλλάξει.
Θήκη
κατάψυξης
Page 65

EL-6
EL
Πίνακας ελέγχου
(SJ-XG690G, SJ-XG740G)
Σημείωση
• Όταν πατάτε ένα από τα κουμπιά, όλα τα εικονίδια
αναβοσβήνουν μία φορά και εμφανίζεται η προβολή
κατάστασης αναμονής.
• Τα εικονίδια ή οι ενδείξεις της λειτουργίας που βρίσκεται
σε εξέλιξη ανάβουν στην προβολή κατάστασης
αναμονής. Στη λειτουργία Ταχείας ψύξης, το εικονίδιο
αναβοσβήνει στην προβολή κατάστασης αναμονής.
• Αν δεν γίνει κάποιος χειρισμός για περίπου 1 λεπτό, η
οθόνη επιστρέφει αυτόματα στην προβολή κατάστασης
αναμονής. Η προβολή κατάστασης αναμονής
απενεργοποιείται αν δεν εκτελεστεί κάποια λειτουργία
για ακόμα ένα λεπτό.
• Αν σταματήσει το ψυγείο λόγω διακοπής ρεύματος, οι
λειτουργίες εκτός από αυτές της Επιπρόσθετης ψύξης,
Ταχείας κατάψυξης και Ταχείας ψύξης συνεχίζουν κατά
την αποκατάσταση του ρεύματος ως είχαν.
Κατάσταση
ενεργοποίησης
Όταν πατάτε το κουμπί , τα εικονίδια
αλλάζουν με τη σειρά που φαίνεται παρακάτω.
Επιλέξτε το εικονίδιο της λειτουργίας.
Μόνο “Ταχεία ψύξη”
3
Ολοκληρώστε τη ρύθμιση πατώντας
για 3 δευτερόλεπτα ή περισσότερο.
(Μπιπ, μπιπ, μπιπ)
Χειρισμοί χρήσιμων λειτουργιών
1
Standby display
or
2
3
Επιλέξτε ενεργοποίηση/απενεργοποίηση.
Κάθε πάτημα του κουμπιού προκαλεί μετάβαση με τη σειρά μεταξύ ΕΝΕΡΓΟΠΟΙΗΣΗΣ/ΑΠΕΝΕΡΓΟΠΟΙΗΣΗΣ.
Ολοκληρώστε τη ρύθμιση.
Τρέχουσα ρύθμιση
(Η ένδειξη αυτή δείχνει ΑΠΕΝΕΡΓΟΠΟΙΗΣΗ.)
Η ρύθμιση αλλάζει.
Χειρισμοί επιπρόσθετων λειτουργιών
Συναγερμός πόρτας
• Αν η πόρτα του ψυγείου παραμείνει ανοιχτή για περισσότερο από
1 λεπτό, ο συναγερμός της πόρτας ηχεί μία φορά και ξανά μετά από
1 λεπτό.
• Αν η πόρτα παραμείνει ανοιχτή για περ. 3 λεπτά, ο συναγερμός πόρτας ηχεί συνεχόμενα.
• Ο συναγερμός σταματά αφού κλείσει η πόρτα.
Απενεργοποίηση
Πατήστε και ταυτόχρονα για
3 δευτερόλεπτα ή περισσότερο.
(Μπιπ, μπιπ, μπιπ)
Λειτουργία ήχου κουμπιών
• Ο ηλεκτρικός ήχους ακούγεται κατά το άγγιγμα των
κουμπιών.
Σημείωση
Όταν θέλετε να ενεργοποιήσετε την επιπρόσθετη
λειτουργία, ακολουθήστε ξανά το ίδιο βήμα. (Η ένδειξη
ανάβει.)
Απενεργοποίηση
Πατήστε και ταυτόχρονα για 3 δευτερόλεπτα ή
περισσότερο.
(Μπιπ, μπιπ, μπιπ)
Η ένδειξη σβήνει.
Η ένδειξη σβήνει.
Κουμπιά λειτουργιών
Freezer
compartment
-18°C
3°C
Refrigerator
compartment
Εικονίδια ελέγχου θερμοκρασίας
Εικονίδια χρήσιμων λειτουργιών Επιπρόσθετες λειτουργίες
Εικονίδιο
Εικονίδιο
Περιγραφή
Θάλαμος
κατάψυξης
Θάλαμος
ψυγείου
Προεπιλεγμένη ρύθμιση
Προεπιλεγ-
μένη ρύθμιση
OFF
Ένδειξη
Περιγραφή
Προεπιλεγμέ-
νη ρύθμιση
Συναγερμός
πόρτας
ON
Λειτουργία
ήχου κουμπιών
Προβολή κατάστασης αναμονής
Περιγραφή
Επιπρόσθετη ψύξη
Ταχεία κατάψυξη
Ταχεία ψύξη
Plasmacluster
Λειτουργία διακοπών
ή
Page 66

EL-7
Έλεγχος θερμοκρασίας
Έλεγχος της τρέχουσας ρύθμισης θερμοκρασίας
Το ψυγείο ελέγχει τη θερμοκρασία του αυτόματα. Ωστόσο, μπορείτε να ρυθμίσετε τη θερμοκρασία ως εξής.
Επιλέξτε το εικονίδιο ή .
Ρύθμιση θαλάμου Κατάψυξης/Ψυγείου
Θάλαμος κατάψυξης
: Ρυθμίζεται μεταξύ -13°C και -21°C σε βήματα 1°C.
Θάλαμος ψυγείου
: Ρυθμίζεται μεταξύ 0°C και 6°C σε βήματα 1°C.
1
1
or
2
Επιλέξτε το εικονίδιο ή .
Επιλέξτε τη θερμοκρασία
3
Ολοκληρώστε τη ρύθμιση.
Όταν πατάτε το κουμπί , τα εικονίδια αλλάζουν με τη
σειρά που φαίνεται παρακάτω.
Standby display
Η ρύθμιση αλλάζει.
διακόπτης
Θάλαμος κατάψυξης
Θάλαμος ψυγείου
Προηγμένη ρύθμιση θαλάμου Κατάψυξης/Ψυγείου
Η θερμοκρασία του θαλάμου της κατάψυξης και του ψυγείου μπορεί
να ρυθμιστεί σε βήματα 0.5 °C ακολουθώντας τα βήματα α ως γ.
a.
Μετά το βήμα 1 στις “Βασικές λειτουργίες”, πατήστε για
3 δευτερόλεπτα ή περισσότερο. (Μπιπ, μπιπ, μπιπ) Η τρέχουσα
ρύθμιση θερμοκρασίας επανέρχεται στην "προεπιλεγμένη
ρύθμιση". (Η οθόνη παρουσιάζει την εικόνα στα δεξιά.)
b.
Πατήστε ή και ρυθμίστε τη θερμοκρασία.
c.
Ολοκληρώστε τη ρύθμιση.
(Ομοίως όπως στο βήμα 3 στις “Βασικές λειτουργίες”.)
Ακολουθήστε τα βήματα α ως γ ξανά, αν θέλετε να ρυθμίσετε τη
θερμοκρασία σε βήματα 1°C.
Προβολή κατάστασης αναμονής
ή
Page 67

EL-8
EL
Χειρισμοί χρήσιμων λειτουργιών
Έναρξη
Ακύρωση
Επιπρόσθετη
ψύξη
Ταχεία
κατάψυξη
Λειτουργία
διακοπών
Πατήστε το κουμπί
λειτουργίας.
(Μπιπ)
Πατήστε το κουμπί
λειτουργίας.
(Μπιπ)
Ταχεία ψύξη Πατήστε το κουμπί
λειτουργίας για 3
δευτερόλεπτα ή
περισσότερο.
(Μπιπ, μπιπ, μπιπ)
Πατήστε το κουμπί
λειτουργίας.
(Μπιπ)
• Αν η πόρτα του ψυγείου παραμείνει ανοιχτή για περισσότερο από 1 λεπτό, ο συναγερμός της πόρτας ηχεί μία φορά
και ξανά μετά από 1 λεπτό.
• Αν η πόρτα παραμείνει ανοιχτή για περ. 3 λεπτά, ο συναγερμός πόρτας ηχεί συνεχόμενα.
• Ο συναγερμός σταματά μετά το κλείσιμο της πόρτας.
Αν δεν σταματά ο συναγερμός της πόρτας.
Αν ο συναγερμός της πόρτας δεν σταματά μετά το κλείσιμο όλων των πορτών, υπάρχει ελάττωμα.
Επικοινωνήστε με το κέντρο σέρβις της SHARP για σέρβις.
Μέθοδος προσωρινής διακοπής του συναγερμού πόρτας
• Πατήστε το κουμπί “F” και το κουμπί “R” ταυτόχρονα και συνεχόμενα για
3 δευτερόλεπτα ή περισσότερο. (Μπιπ, μπιπ, μπιπ)
• Ο συναγερμός της πόρτας ακούγεται ξανά μετά από περίπου 2 ημέρες.
Πίνακας ελέγχου
Εικονίδια ελέγχου θερμοκρασίας Εικονίδια χρήσιμων λειτουργιών
Σημείωση
• Αρχικά όλες οι λειτουργίες είναι απενεργοποιημένες.
Όταν πατήσετε ένα από τα κουμπιά, ακούγεται ένας
ήχος και ενεργοποιείται ο πίνακας ελέγχου.
• Όταν πατήσετε ένα από τα κουμπιά, ανάβει η ένδειξη
της λειτουργίας που βρίσκεται σε εξέλιξη. Κατά τη
λειτουργία Ταχείας ψύξης, η ένδειξη αναβοσβήνει.
• Αν θέλετε να ανάψετε την ένδειξη θερμοκρασίας,
πατήστε το κουμπί “F” ή “R” ενώ ο πίνακας ελέγχου
είναι ενεργός.
*Η λειτουργία Plasmacluster αρχίζει αυτόματα όταν
ενεργοποιείται το ψυγείο.
Δεν χρειάζεται ενεργοποίηση/απενεργοποίηση.
• Στη συνέχεια, αν δεν γίνει κανένας χειρισμός για άλλο
1 λεπτό, η οθόνη απενεργοποιείται αυτόματα.
• Αν σταματήσει το ψυγείο λόγω διακοπής ρεύματος, οι
λειτουργίες εκτός από αυτές της Επιπρόσθετης ψύξης,
Ταχείας κατάψυξης και Ταχείας ψύξης συνεχίζουν κατά
την αποκατάσταση του ρεύματος ως είχαν.
Κουμπί Περιγραφή Προεπιλεγμένη
ρύθμιση
Επιπρόσθετη ψύξη
OFF
Ταχεία κατάψυξη
Ταχεία ψύξη
Λειτουργία διακοπών
Plasmacluster ON*
Κουμπί Περιγραφή Προεπιλεγμένη
ρύθμιση
Θερμοκρασία ελέγχου
θαλάμου κατάψυξης
Θερμοκρασία ελέγχου
θαλάμου ψυγείου
Αναμμένη
Απενεργοποιημένη
Παλλόμενη
Απενεργοποιημένη
(SJ-XG640M, SJ-XG690M, SJ-XG740M)
Συναγερμός πόρτας
Page 68

EL-9
Έλεγχος θερμοκρασίας
Έλεγχος της τρέχουσας ρύθμισης θερμοκρασίας
Η ένδειξη ανάβει για να εμφανίσει το τρέχον επίπεδο
θερμοκρασίας πατώντας το κουμπί “F” ή “R”.
Θάλαμος κατάψυξης : Πατήστε το κουμπί “F”.
Θάλαμος ψυγείου : Πατήστε το κουμπί “R”.
Ρύθμιση θαλάμου Κατάψυξης/Ψυγείου
Θάλαμος κατάψυξης
1.
Πατήστε το κουμπί “F”.
2.
Πατήστε το κουμπί “F” για αλλαγή του επιπέδου
θερμοκρασίας.
Θάλαμος ψυγείου
1.
Πατήστε το κουμπί “R”.
2.
Πατήστε το κουμπί “R” για να αλλάξετε το επίπεδο
θερμοκρασίας.
• Η ένδειξη θερμοκρασίας αλλάζει σύμφωνα με την παρακάτω
εικόνα (
3→4→5→1→2→3
) πατώντας τα κουμπιά “F” ή “R”.
Προηγμένη ρύθμιση θαλάμου Κατάψυξης/Ψυγείου
Οι θερμοκρασίες των θαλάμων της κατάψυξης και του ψυγείου
μπορούν να ρυθμιστούν σε 9 επίπεδα (επίπεδο 1 ~ 9)
ακολουθώντας τα βήματα α ως β.
Θάλαμος κατάψυξης
a.
Πατήστε πρώτα το κουμπί “F”.
Κ ρατήστε πατημένο το κουμπί “F” και στη συνέχεια το κουμπί
“Ταχεία κατάψυξη” για 3 δευτερόλεπτα ή περισσότερο.
(Μπιπ, μπιπ, μπιπ)
Η ένδειξη επανέρχεται στην
“Προεπιλεγμένη ρύθμιση”.
b.
Πατήστε το κουμπί “F” για αλλαγή του επιπέδου θερμοκρασίας.
Ακολουθήστε τα βήματα α ως β αν θέλετε να ρυθμίσετε τη
θερμοκρασία σε 5 επίπεδα.
Θάλαμος ψυγείου
a.
Πατήστε πρώτα το κουμπί “R”.
Κρατήστε πατημένο το κουμπί “R” και στη συνέχεια το κουμπί
“Ταχεία κατάψυξη” για 3 δευτερόλεπτα ή περισσότερο.
(Μπιπ, μπιπ, μπιπ)
Η ένδειξη επανέρχεται στην
“Προεπιλεγμένη ρύθμιση”.
b.
Πατήστε το κουμπί “R” για να αλλάξετε το επίπεδο
θερμοκρασίας.
Ακολουθήστε τα βήματα α ως β αν θέλετε να ρυθμίσετε τη
θερμοκρασία σε 5 επίπεδα.
• Η ένδειξη θερμοκρασίας αλλάζει σύμφωνα με την
παρακάτω εικόνα (
5→6→7→8→9→1→2→3→4→5
)
πατώντας το κουμπί “F” ή “R”.
Απενεργοποιημένη
Αναμμένη Παλλόμενη
Το ψυγείο ελέγχει τη θερμοκρασία του αυτόματα. Ωστόσο, μπορείτε να ρυθμίσετε τη θερμοκρασία ως εξής.
Σημείωση
Αφού ρυθμίσετε το επίπεδο θερμοκρασίας, η ένδειξη
σβήνει περίπου 5 δευτερόλεπτα αργότερα.
1
2
3
4
5
Level
Indicator
Default setting
1
2
3
4
5
6
7
8
9
Default setting
Level
Indicator
... ...
...
Προεπιλεγμένη ρύθμιση
Επίπεδο
Ένδειξη
Προεπιλεγμένη ρύθμιση
Επίπεδο
Ένδειξη
Page 69

EL-10
EL
ΜΕΣΑ
ΕΞΩ
• Καταψύχετε μικρές ποσότητες τροφίμων κάθε φορά
ώστε να καταψύχονται γρήγορα.
• Τα τρόφιμα θα πρέπει να είναι κατάλληλα σφραγισμένα
ή σκεπασμένα καλά.
• Τοποθετείτε τα τρόφιμα στην κατάψυξη ομοιόμορφα.
• Βάζετε ετικέτες στις σακούλες ή στα δοχεία για
απογραφή των καταψυγμένων τροφίμων.
Συμβουλή για την αποφυγή υγρασίας
ή πάχνης μέσα στο ψυγείο
• Βεβαιωθείτε πως το τρόφιμο είναι όσο το δυνατόν πιο φρέσκο για να μεγιστοποιήσετε τη διάρκεια συντήρησης τροφίμων που αλλοιώνονται. Τα παρακάτω είναι ένας γενικός οδηγός για να επιτυγχάνετε μακρύτερη διάρκεια συντήρησης.
• Τα τρόφιμα έχουν περιορισμένο χρόνο συντήρησης. Βεβαιωθείτε πως δεν υπερβαίνετε τη χρήση τους πέραν της ημερομηνίας που υποδεικνύεται από τον παραγωγό.
• Η ενέργεια που καταναλώνει αυτό το μοντέλο μετριέται
όπως φαίνεται στην παρακάτω εικόνα.
• Τοποθετήστε το ψυγείο σε καλά αεριζόμενο χώρο
και αφήστε κενά για αερισμό.
• Προστατέψτε το ψυγείο από άμεσο ηλιακό φως και
μην το τοποθετείτε δίπλα σε συσκευές παραγωγής
θερμότητας.
• Αποφεύγετε το άνοιγμα της πόρτας όσο είναι
δυνατόν.
• Τα ζεστά τρόφιμα θα πρέπει να κρυώνουν πριν
τοποθετηθούν στο ψυγείο.
• Τοποθετείτε τα τρόφιμα ομοιόμορφα στα ράφια
ώστε να μπορεί να κυκλοφορεί επαρκώς ο ψυχρός
αέρας.
Συμβουλές για εξοικονόμηση ενέργειας
Συντήρηση τροφίμων
300
mm300 mm
90
mm
50
mm
Φρούτα / Λαχανικά
• Τα φρούτα και τα λαχανικά θα πρέπει να περικλείονται
χαλαρά με πλαστικό υλικό, π.χ. μεμβράνη, σακούλες
(χωρίς σφράγιση) και να τοποθετούνται στη θήκη
λαχανικών για να ελαχιστοποιείται η απώλεια
υγρασίας.
• Φρούτα και λαχανικά ευαίσθητα στη χαμηλή
θερμοκρασία θα πρέπει να συντηρούνται σε δροσερό
μέρος εκτός ψυγείου.
Γαλακτοκομικά & Αυγά
• Στα περισσότερα γαλακτοκομικά προϊόντα
αναγράφεται η συνιστώμενη ημερομηνία λήξης στην
εξωτερική συσκευασία, όπου υπάρχουν πληροφορίες
για τη συστηνόμενη θερμοκρασία και διάρκεια
συντήρησης του τροφίμου.
• Τα αυγά θα πρέπει να τοποθετούνται στην αυγοθήκη.
Κρέας / Ψάρι / Πουλερικά
• Τοποθετήστε σε πιάτο ή σκεύος και καλύψτε με χαρτί
πλαστική μεμβράνη.
• Για μεγαλύτερα κομμάτια κρέατος, ψαριού ή
πουλερικών, τοποθετήστε τα στο πίσω μέρος των
ραφιών.
• Βεβαιωθείτε πως όλα τα μαγειρεμένα τρόφιμα είναι
τυλιγμένα καλά ή τοποθετούνται σε αεροστεγές δοχείο.
• Τα φρέσκα τρόφιμα (καλά τυλιγμένα) θα πρέπει να
τοποθετούνται για περιορισμένο χρόνο για να μην
χαλάνε και να μην επηρεάζονται αρνητικά τα υπόλοιπα
τρόφιμα.
Κατάψυξη
Ψυγείο
Συμβουλή για συντήρηση τροφίμων
• Φροντίστε ώστε η πόρτα να κλείνει καλά. Αν κάποιο
τρόφιμο πέσει κάτω, μπορεί να δημιουργηθεί κενό
ανάμεσα στον θάλαμο και την πόρτα. Μετακινείτε τα
τρόφιμα στο πίσω μέρος του ραφιού ή της θήκης.
• Ανοίγετε και κλείνετε την πόρτα όσο το δυνατόν
συντομότερα. Μπορεί να εμφανιστεί υγρασία ή πάχνη
αν η πόρτα μείνει ανοιχτή για μεγάλο χρονικό διάστημα
ή αν ανοιγοκλείνει πολύ συχνά.
• Τα τοποθετημένα τεμάχια θα πρέπει να είναι συσκευασμένα
ή σφραγισμένα μέσα σε δοχεία τροφίμων ή με πλαστική
μεμβράνη. (Ειδικά τρόφιμα με υψηλό ποσοστό υγρασίας)
• Τοποθετείτε τα τρόφιμα ομοιόμορφα στα ράφια ώστε να
μπορεί να κυκλοφορεί επαρκώς ο ψυχρός αέρας.
• Τα ζεστά τρόφιμα θα πρέπει να κρυώνουν πριν τοποθετη-
θούν στο ψυγείο. Η τοποθέτηση ζεστών τροφίμων αυξάνει
τη θερμοκρασία της μονάδας καθώς και τον κίνδυνο αλλοίωσης των τροφίμων.
• Μη φράσσετε την εξαγωγή και την εισαγωγή του κυκλώμα-
τος κυκλοφορίας ψυχρού αέρα με δοχεία τροφίμων, για να
εξασφαλίζετε ομοιόμορφη ψύξη των τροφίμων σε όλο το
ψυγείο.
• Μην τοποθετείτε τα τρόφιμα
απευθείας μπροστά στην εξαγωγή του ψυχρού αέρα. Έτσι
μπορεί να παγώσει το
τρόφιμο.
Page 70

EL-11
Ακολουθήστε τις παρακάτω συμβουλές για να αποφύγετε ραγίσματα στις εσωτερικές επιφάνειες και τα πλαστικά τμήματα
• Σκουπίζετε τα λάδια των τροφίμων από τα πλαστικά τμήματα.
• Ορισμένα οικιακά χημικά μπορεί να προκαλέσουν βλάβη,
οπότε χρησιμοποιείτε μόνο διαλυμένα καθαριστικά υγρά
(σαπουνόνερο).
• Αν χρησιμοποιηθεί αδιάλυτο καθαριστικό ή αν δεν καθαριστεί
καλά το σαπουνόνερο, μπορεί να προκληθούν ραγίσματα
στα πλαστικά τμήματα.
Αν πρέπει να απενεργοποιηθεί το ψυγείο για μεγάλο
χρονικό διάστημα, θα πρέπει να ακολουθήσετε τα
παρακάτω βήματα για να μειωθεί η ανάπτυξη μούχλας
1. Αφαιρέστε όλα τα τρόφιμα.
2. Αφαιρέστε το βύσμα τροφοδοσίας από την πρίζα.
3. Καθαρίστε και στεγνώστε το εσωτερικό προσεκτικά.
4. Αφήστε όλες τις πόρτες ελαφρώς ανοικτές για λίγες
μέρες ώστε να στεγνώσουν.
Φροντίδα και καθαρισμός
Η απόψυξη λειτουργεί αυτόματα μέσω ενός μοναδικού
συστήματος εξοικονόμησης ενέργειας. (Περ. μία φορά
τη μέρα.) Η δημιουργία πάγου διαρκεί γιατί η εσωτερική
θερμοκρασία γίνεται υψηλότερη από ό,τι συνήθως κατά
τη διάρκεια της απόψυξης.
Σημείωση
• Μη χρησιμοποιείτε καθαριστικά βαρέως τύπου ή
διαλύτες (βερνίκι, μπογιά, στιλβωτική σκόνη, βενζίνη,
βραστό νερό, κ.τ.λ.) καθώς μπορεί να προκληθεί ζημιά.
• Αφού αφαιρέσετε από την πρίζα το βύσμα, περιμένετε
5 λεπτά τουλάχιστον πριν το ξανασυνδέσετε στο ρεύμα.
• Τα γυάλινα ράφια ζυγίζουν περίπου 3 kg το καθένα.
Κρατάτε τα ράφια γερά όταν τα αφαιρείτε από τον
θάλαμο και τα μεταφέρετε.
• Μη ρίχνετε αντικείμενα μέσα στο ψυγείο και μη χτυπάτε
τον εσωτερικό τοίχο. Αυτό μπορεί να προκαλέσει
ραγίσματα στην εσωτερική επιφάνεια.
• Αφαιρέστε τα εξαρτήματα (π.χ. ράφια) από τον θάλαμο
και την πόρτα. Πλύντε τα εξαρτήματα με ζεστό νερό
με υγρό πιάτων. Στη συνέχεια, ξεπλύνετε με καθαρό
νερό και στεγνώστε τα. (Μόνο το ράφι φρούτων και
λαχανικών είναι αφαιρούμενο)
• Καθαρίστε το εσωτερικό με πανί μουσκεμένο σε ζεστό
νερό με υγρό πιάτων. Στη συνέχεια, χρησιμοποιήστε
κρύο νερό για να ξεπλύνετε εντελώς το σαπουνόνερο.
• Σκουπίζετε το εξωτερικό με μαλακό πανί κάθε φορά
που λερώνεται.
• Καθαρίζετε τα μαγνητικά στεγανωτικά της πόρτας με
οδοντόβουρτσα και ζεστό νερό με υγρό πιάτων.
• Σκουπίζετε τον πίνακα ελέγχου με στεγνό πανί.
<SJ-XG640M, SJ-XG690M, SJ-XG740M>
Σκουπίστε το νερό από το δοχείο εξάτμισης. Πριν
σκουπίσετε το νερό, περιμένετε περισσότερο από 1 ώρα
μετά από την αφαίρεση της πρίζας διότι ο εξοπλισμός
του ψυκτικού κύκλου είναι εξαιρετικά ζεστός. (Το δοχείο
εξάτμισης βρίσκεται στην πλάτη του προϊόντος.)
Δοχείο εξάτμισης
Πριν από τη μεταφορά
Καθαρισμός
Σημαντικό
Απόψυξη της μονάδας ψύξης
Όταν καίγεται η λυχνία του
θαλάμου
Απενεργοποίηση του
ψυγείου
Επικοινωνήστε με τεχνικό σέρβις εγκεκριμένο από
τη SHARP για αντικατάσταση της λυχνίας. Η λυχνία
δεν πρέπει να αντικαθίσταται παρά μόνο από
εξουσιοδοτημένο τεχνικό σέρβις.
Page 71

EL-12
EL
Πριν καλέσετε για σέρβις
Πριν καλέσετε για σέρβις, ελέγξτε τα ακόλουθα σημεία.
Πρόβλημα Λύση
Το εξωτερικό περίβλημα είναι
ζεστό στο άγγιγμα.
Είναι φυσιολογικό. Αυτό συμβαίνει εξαιτίας του θερμού αγωγού που βρίσκεται κάτω
από το περίβλημα για να αποτρέπεται ο σχηματισμός υγρασίας.
Το ψυγείο παράγει δυνατό
θόρυβο.
Οι παρακάτω ήχοι είναι φυσιολογικοί.
• Ο συμπιεστής παράγει δυνατό θόρυβο όταν ξεκινά η λειτουργία του.
-- Η ένταση του ήχου μειώνεται μετά από λίγο.
• Ο συμπιεστής παράγει δυνατό θόρυβο μία φορά τη μέρα.
-- Ο θόρυβος λειτουργίας ακούγεται αμέσως μετά από την αυτόματη λειτουργία
απόψυξης της μονάδας ψύξης.
• Ήχος υγρού που ρέει (πάφλασμα, σφύριγμα)
-- Προκαλείται από το ψυκτικό που ρέει στους σωλήνες (ο ήχος μπορεί να γίνεται
πιο δυνατός μερικές φορές).
• Ήχος κρότου ή θραύσης, ήχος τριξίματος
-- Οφείλεται στη διαστολή και συστολή των εσωτερικών τοιχωμάτων και των
εσωτερικών τμημάτων κατά τη διάρκεια της ψύξης.
Εμφανίζεται υγρασία ή πάχνη
μέσα ή έξω από το ψυγείο.
Αυτό μπορεί να προκύψει σε μια από τις ακόλουθες περιπτώσεις. Χρησιμοποιήστε
ένα βρεγμένο πανί για να σκουπίσετε την πάχνη και ένα στεγνό πανί για να
σκουπίσετε την υγρασία.
• Όταν η υγρασία περιβάλλοντος είναι υψηλή.
• Όταν η πόρτα ανοίγει και κλείνει συχνά.
• Όταν τοποθετείται στο ψυγείο φαγητό με υψηλή περιεκτικότητα υγρασίας.
(Απαιτείται τύλιγμα.)
• Το φαινόμενο αυτό εμφανίζεται λίγο πολύ ανάλογα με την εποχή (βροχές, εποχή),
τις συνήθειες χρήσης και τις περιβαλλοντικές συνθήκες σε κάθε σπίτι.
Τα τρόφιμα
στον θάλαμο
συντήρησης
είναι
παγωμένα.
SJ-XG690G,
SJ-XG740G
• Το ψυγείο λειτουργεί πολύ καιρό με θερμοκρασία ελέγχου στους 0°C;
-- Επαναφέρετε τη θερμοκρασία ελέγχου περίπου στους 3°C.
• Το ψυγείο λειτουργεί πολύ καιρό με θερμοκρασία ελέγχου κατάψυξης στους
-21°C;
-- Επαναφέρετε τη θερμοκρασία ελέγχου περίπου στους -18°C.
• Αν η θερμοκρασία περιβάλλοντος είναι χαμηλή, τα τρόφιμα μπορεί να παγώσουν
ακόμα και αν ο θάλαμος συντήρησης έχει ρυθμιστεί στους 6°C.
SJ-XG640M,
SJ-XG690M,
SJ-XG740M
• Το ψυγείο λειτουργεί πολύ καιρό με θερμοκρασία ελέγχου στη ΜΕΓΙΣΤΗ ΨΥΞΗ;
-- Αλλάξτε τη ρύθμιση θερμοκρασίας σε άλλη ρύθμιση.
• Το ψυγείο λειτουργεί πολύ καιρό με θερμοκρασία ελέγχου κατάψυξης στη
ΜΕΓΙΣΤΗ ΨΥΞΗ;
-- Αλλάξτε τη ρύθμιση θερμοκρασίας σε άλλη ρύθμιση.
• Αν η θερμοκρασία περιβάλλοντος είναι χαμηλή, τα τρόφιμα μπορεί να παγώσουν
ακόμα και αν ο θάλαμος συντήρησης έχει ρυθμιστεί στην ΕΛΑΧΙΣΤΗ.
Οσμές στον θάλαμο. • Απαιτείται τύλιγμα των τροφίμων με έντονες οσμές.
• Η αποσμητική μονάδα δεν μπορεί να εξουδετερώσει όλες τις οσμές.
• Καθαρίζετε τακτικά το εσωτερικό.
Ο πίνακας ελέγχου δεν
λειτουργεί.
Αυτό μπορεί να προκύψει σε μια από τις ακόλουθες περιπτώσεις.
• Ο πίνακας ή το δάχτυλό σας έχει λερωθεί με υγρά, λάδι κ.τ.λ.
• Όταν αγγίζετε τον πίνακα φορώντας γάντι, αυτοκόλλητο επίδεσμο στο δάχτυλο,
με το νύχι ή με αντικείμενα.
• Έχει προσαρμοστεί αυτοκόλλητο ή ταινία στα κουμπιά.
• Η θέση αγγίγματος είναι εκτός των κουμπιών.
• Ο χρόνος λειτουργίας δεν είναι αρκετός για να λειτουργήσουν τα κουμπιά.
Τα φώτα των θαλάμων
σβήνουν ακόμα και αν οι
πόρτες παραμένουν ανοιχτές.
• Ο διακόπτης φωτισμού χρησιμεύει για το
άναμμα και σβήσιμο του φωτισμού των
θαλάμων.
Όταν οι γωνίες των πορτών είναι ίδιες,
ο φωτισμός σβήνει ακόμα και αν οι
πόρτες μείνουν ανοιχτές, αλλά αυτό είναι
φυσιολογικό.
Αν εξακολουθείτε να χρειάζεστε σέρβις
Απευθυνθείτε στον πλησιέστερο τεχνικό σέρβις που έχει εγκριθεί από τη SHARP.
Light switch
Διακόπτης φωτισμού
Page 72

EL-13
Δελτίο προϊόντος
ΠΑΡΑΡΤΗΜΑ
III
Κανονισμός (ΕΕ) Αρ.1060/2010
Α
Εμπορικό σήμα
Β
Όνομα μοντέλου
SJ-XG640M
SJ-XG690G
SJ-XG690M
SJ-XG740G
SJ-XG740M
Γ
Κατηγορία 7
Δ
Κλάση ενεργειακής απόδοσης A
++
Ε
Απονομή Ecolabel ΕΕ —
ΣΤ
Ετήσια κατανάλωση ενέργειας *
1
[KWh/έτος] 320
Ζ
Αποθηκευτικός χώρος όλων των θαλάμων που δεν
δικαιούνται βαθμολόγηση αστεριών [ L ]
354 394 420
Η
Αποθηκευτικός χώρος όλων των θαλάμων
κατάψυξης-συντήρησης που δικαιούνται
βαθμολόγηση αστεριών [ L ]
162 176
Θ
Η θερμοκρασία σχεδιασμού “άλλου θαλάμου”
υψηλότερη από +14°C
—
Ι
Χωρίς πάχνη
ΝΑΙ
Κ
Χρόνος ανόδου θερμοκρασίας [ h ] 19
Λ
Ικανότητα κατάψυξης [Kg/24h] 7,3 8,1
Μ
Κλιματική κλάση T
N
Εκπομπή ακουστικού θορύβου διά αέρος
[dB(A)]
38
Ξ
Εντοιχισμένη συσκευή Όχι (Τύπος ελεύθερης τοποθέτησης)
*1 Κατανάλωση ενέργειας “XYZ” kWh ανά έτος, βάσει των αποτελεσμάτων πρότυπων δοκιμών για 24 ώρες.
Η πραγματική κατανάλωση ενέργειας εξαρτάται από τη χρήση και την θέση της συσκευής.
Ένδειξη θερμοκρασίας
Το ψυγείο αυτό διαθέτει ένδειξη θερμοκρασίας στο θάλαμο ψυγείου για να ελέγχετε τη μέση θερμοκρασία στην ψυχρότερη
ζώνη.
Ψυχρότερη ζώνη
Το σύμβολο υποδεικνύει την
ψυχρότερη ζώνη μέσα στον
θάλαμο ψυγείου. (Η θήκη της
πόρτας που βρίσκεται στο ίδιο
ύψος δεν είναι η ψυχρότερη ζώνη.)
Σύμβολο
Έλεγχος της θερμοκρασίας την ψυχρότερη ζώνη
Μπορείτε να ελέγχετε τακτικά τη θερμοκρασία για να
εξασφαλίσετε ότι η θερμοκρασία στην ψυχρότερη ζώνη
είναι σωστή και, αν είναι απαραίτητο, να ρυθμίζετε τη
θερμοκρασία του ψυγείου.
Για να διατηρήσετε σωστή θερμοκρασία στο εσωτερικό
της συσκευής, ελέγξτε ότι η ένδειξη θερμοκρασίας είναι
πάντα χρώματος ΜΠΛΕ. Αν η ένδειξη θερμοκρασίας
αλλάξει σε ΑΣΠΡΟ χρώμα, η θερμοκρασία είναι πολύ
υψηλή. Σε αυτή την περίπτωση, αυξήστε τη ρύθμιση
της θερμοκρασίας ψυγείου και περιμένετε 6 ώρες πριν
ελέγξετε ξανά την ένδειξη θερμοκρασίας.
ΜΠΛΕ
Σωστές ρυθμίσεις
ΑΣΠΡΟ
Πολύ υψηλή θερμοκρασία,
προσαρμόστε τη ρύθμιση θερμ.
ψυγείου.
Σημείωση
• Η εσωτερική θερμοκρασία του ψυγείου εξαρτάται
από διάφορους παράγοντες όπως η θερμοκρασία
περιβάλλοντος του δωματίου, η ποσότητα τροφίμων στη
συντήρηση και η συχνότητα ανοίγματος της πόρτας.
• Όταν εισάγονται φρέσκα φαγητά ή αν έχει ανοιχτεί η
πόρτα για αρκετή ώρα, είναι φυσιολογικό να αλλάξει η
ένδειξη της θερμοκρασίας σε ΑΣΠΡΟ χρώμα.
Page 73

EL-14
EL
Πληροφορίες σχετικά με την απόρριψη αυτού του εξοπλισμού
ΑΝ ΘΕΛΕΤΕ ΝΑ ΑΠΟΡΡΙΨΕΤΕ ΑΥΤΟΝ ΤΟΝ ΕΞΟΠΛΙΣΜΟ, ΜΗ ΧΡΗΣΙΜΟΠΟΙΕΙΤΕ ΤΟΥΣ ΚΟΙΝΟΥΣ ΚΑΔΟΥΣ
ΑΠΟΡΡΙΜΜΑΤΩΝ ΚΑΙ ΜΗΝ ΤΟΝ ΤΟΠΟΘΕΤΕΙΤΕ ΣΕ ΕΣΤΙΑ ΦΩΤΙΑΣ!
Ο μεταχειρισμένος ηλεκτρικός και ηλεκτρονικός εξοπλισμός θα πρέπει πάντοτε να συλλέγεται και να τυχαίνει
επεξεργασίας ΞΕΧΩΡΙΣΤΑ σύμφωνα με την τοπική νομοθεσία.
Η ξεχωριστή συλλογή προωθεί τη φιλική προς το περιβάλλον επεξεργασία, την ανακύκλωση των υλικών και
ελαχιστοποίηση των τελικών αποβλήτων Η ΑΚΑΤΑΛΛΗΛΗ ΑΠΟΡΡΙΨΗ μπορεί να είναι επιβλαβής για την
ανθρώπινη υγεία και το περιβάλλον λόγω ορισμένων ουσιών! Μεταφέρετε ΜΕΤΑΧΕΙΡΙΣΜΕΝΟ ΕΞΟΠΛΙΣΜΟ σε
τοπικές, συνήθως δημοτικές εγκαταστάσεις συλλογής, όπου είναι διαθέσιμες.
Αν έχετε αμφιβολίες σχετικά με την απόρριψη, επικοινωνήστε με τις τοπικές αρχές ή τον εμπορικό αντιπρόσωπο
και ρωτήστε για τη σωστή μέθοδο απόρριψης.
ΜΟΝΟ ΓΙΑ ΧΡΗΣΤΕΣ ΣΤΗΝ ΕΥΡΩΠΑΪΚΗ ΕΝΩΣΗ ΚΑΙ ΟΡΙΣΜΕΝΕΣ ΑΛΛΕΣ ΧΩΡΕΣ, ΟΠΩΣ ΓΙΑ ΠΑΡΑΔΕΙΓΜΑ ΝΟΡΒΗΓΙΑ ΚΑΙ
ΕΛΒΕΤΙΑ Η συμμετοχή σας στην ξεχωριστή συλλογή είναι υποχρεωτική διά νόμου.
Το σύμβολο που παρουσιάζεται παραπάνω εμφανίζεται σε ηλεκτρικό και ηλεκτρονικό εξοπλισμό (ή στη συσκευασία του) ώστε να
υπενθυμίζει στους χρήστες το γεγονός αυτό.
Οι χρήστες από ΙΔΙΩΤΙΚΑ ΣΠΙΤΙΑ απαιτείται να χρησιμοποιούν τις υπάρχουσες εγκαταστάσεις επιστροφής για μεταχειρισμένο
εξοπλισμό. Η επιστροφή εξοπλισμού είναι δωρεάν.
Page 74

DE-1
Nur für den Hausgebrauch
Vielen Dank, dass Sie dieses SHARP-Produkt gekauft haben. Ehe Sie Ihren
SHARP-Kühlschrank benutzen, lesen Sie diese Bedienungsanleitung, damit Sie
auch garantiert maximalen Nutzen aus dem Produkt ziehen.
• Dieser Kühlschrank wurde entwickelt, um Eiswürfel herzustellen, Lebensmittel zu
kühlen und Lebensmittel einzufrieren.
• Dieser Kühlschrank wurde nur für den Haushaltsgebrauch entwickelt – bei einer
Umgebungstemperatur, die in der Tabelle angegeben wird. Die Klimaklasse wird
auf dem Typenschild angegeben.
Wenn der Kühlschrank nicht in der Klimaklasse in Betrieb ist, in die dieses
Modell eingestuft wurde (außerhalb des Umgebungstemperaturbereichs), kann
er möglicherweise keine zufriedenstellenden Temperaturen im Kühlschrank
erzeugen. Wenn der Kühlschrank bei kälteren Temperaturen verwendet wird, wird
er bis zu einer Temperatur von +5 °C nicht beschädigt.
• Der Kühlschrank sollte über keinen langen Zeitraum hinweg Temperaturen
von -10 °C oder darunter ausgesetzt sein.
Kältemittel
Dieser Kühlschrank enthält ein brennbares Kältemittel (R600a:
Isobutan) und isolierendes Treibmittel (Cyclopentan). Beachten Sie folgende Vorschriften, um Entzündung und Explosion
zu vermeiden.
■Vermeiden Sie, dass spitze Objekte mit dem Kühlsystem in
Berührung kommen. Das Kühlsystem hinter und im Kühlschrank enthält Kältemittel.
■Benutzen Sie keine mechanischen Vorrichtungen oder an-
dere Methoden, um das Abtauen zu beschleunigen. (Dieser
Kühlschrank verfügt über eine Abtauautomatik.)
■Benutzen Sie im Kühlschrank keine Elektrogeräte.
■Blockieren Sie den Platz um den Kühlschrank nicht.
■Benutzen Sie in der Nähe des Kühlschranks keine brenn-
baren Sprays wie Sprühfarbe.
■Bewahren Sie im Kühlschrank keine brennbaren Sprays
wie Sprühfarbe auf.
■Falls das Kühlsystem nicht mehr funktioniert, sollten Sie
die Steckdose nicht berühren und keine offenen Flammen
benutzen. Öffnen Sie das Fenster und lassen Sie die Luft
aus dem Raum entweichen. Bitten Sie anschließend einen
von SHARP autorisierten Servicepartner um Kundendienst.
Aufstellung
■Stellen Sie den Kühlschrank an keinem feuchten oder
nassen Ort auf. Dies kann die Isolierung beschädigen oder
Schäden an der Elektrik verursachen. Außerdem kann sich
an der Gehäuseaußenseite Feuchtigkeit anlagern und Rost
verursachen.
■Der Kühlschrank sollte gerade aufgestellt werden und fest
auf dem Boden stehen.
Netzkabel, Stecker, Steckdose
Lesen Sie folgende Vorschriften, um Stromschlag und Brand
auszuschließen.
■Stecken Sie den Netzstecker fest und direkt in die Steck-
dose. Verwenden Sie kein Verlängerungskabel und keinen
Zwischenstecker.
■Verbinden Sie den Netzstecker mit einer Steckdose mit der
erforderlichen Nennspannung.
■Verbinden Sie den Erdungsstift ordnungsgemäß mit der
Erdungsklemme.
■Stellen Sie sicher, dass Sie das Netzkabel bei der Aufstel-
lung und beim Bewegen des Geräts nicht beschädigen.
Wenn sich der Netzstecker oder das Netzkabel lockert, sollten Sie den Netzstecker nicht einstecken.
■Berühren Sie den Netzstecker nicht mit nassen Händen.
■Trennen Sie das Gerät vom Elektrohauptanschluss, indem
Sie den Schukostecker aus der Steckdose ziehen. Trennen
Sie das Gerät nie vom Strom, indem Sie am Kabel ziehen.
■Wenn sich Staub auf dem Netzstecker ablagert, kann dies einen
Brand zur Folge haben. Wischen Sie den Staub sorgfältig ab.
■Ziehen Sie den Netzstecker aus der Steckdose, wenn der
Kühlschrank lange Zeit nicht verwendet wird.
■Wenn das exible Stromkabel beschädigt wird,
muss es durch einen von SHARP autorisierten
Servicepartner ersetzt werden, weil dafür ein
spezielles Kabel benötigt wird.
Bei der Verwendung
■Benutzen Sie das Gerät nicht, um üchtige oder entzündliche Stoffe wie Ether, Benzin, Propangas, Spraydosen,
Haftmittel und reinen Alkohol usw. aufzubewahren. Diese
Stoffe können leicht explodieren.
■Lagern Sie in diesem Kühlschrank keine temperaturemp-
ndlichen Stoffe wie Arzneimittel. Es besteht ein hohes
Risiko, dass sich die Produktqualität verändert.
■Versuchen Sie nicht, diesen Kühlschrank umzubauen oder
zu modizieren. Dies kann einen Brand, Stromschlag oder
Verletzungen verursachen.
■Stellen Sie keine Gegenstände auf den Kühlschrank. Wenn
auf dem Kühlschrank stehende Gegenstände zu Boden
fallen, kann dies Verletzungen verursachen.
■Die Glastüren dürfen keinen Erschütterungen ausgesetzt
werden. Ansonsten könnten sie brechen und Verletzungen
verursachen. <SJ-XG690G, SJ-XG740G >
■Dieses Gerät kann von Kindern ab 8 Jahren oder
von Personen mit eingeschränkten physischen
und geistigen Fähigkeiten sowie einem Mangel an
Erfahrung und Kenntnis verwendet werden, vorausgesetzt sie werden bei der Verwendung beaufsichtigt oder wurden bezüglich der möglichen Gefahren
unterwiesen. Kinder dürfen nicht mit dem Gerät
spielen. Die Reinigung und Wartung darf nicht von
Kindern ohne Aufsicht durchgeführt werden.
Wartung und Reinigung
■Stecken Sie den Kühlschrank zuerst aus, um einen Stromschlag auszuschließen.
■Spritzen Sie kein Wasser direkt von außen auf das Gehäuse
oder in das Innere des Kühlschranks. Dies könnte zu Rostbildung und einem Verschleiß der elektrischen Isolierung führen.
Probleme
■Wenn Sie bemerken, dass etwas verbrannt riecht, stecken Sie
unverzüglich den Netzstecker aus. Bitten Sie anschließend einen von SHARP autorisierten Servicepartner um Kundendienst.
■Falls Gas austritt, sollten Sie den Raum lüften, indem Sie
ein Fenster öffnen. In einem solchen Fall sollten Sie weder
den Kühlschrank noch die Netzsteckdose berühren.
Klimaklasse
Zulässiger Umge-
bungstemperaturbereich
SN +10 °C bis 32 °C
N +16 °C bis 32 °C
ST +16 °C bis 38 °C
T +16 °C bis 43 °C
Sicherheitshinweise
WARNUNG
Bei einem solchen Hinweis bestehen große Lebensgefahr oder das Risiko schwerer Verletzungen.
VORSICHT
Bei einem solchen Hinweis bestehen große Risiken von Schachschäden oder Personenschäden.
WARNUNG
Page 75

DE-2
DE
Entsorgung
■Vergewissern Sie sich, dass der Kühlschrank keine Gefahr für
Kinder darstellt, während er bis zur Entsorgung gelagert wird.
(z. B. entfernen Sie die Tür, um zu verhindern, dass ein Kind
darin eingeschlossen wird)
■Dieser Kühlschrank sollte ordnungsgemäß entsorgt werden.
Bringen Sie den Kühlschrank zu einer professionellen Recyclinganlage, die auf brennbare Kältemittel und die Isolierung
austretender Gase spezialisiert ist.
Transport
■Wenn Sie den Kühlschrank
aufstellen oder bewegen,
sollten Sie eine harte Matte
verwenden, um den Boden vor
Beschädigungen zu schützen.
■Tragen Sie den Kühlschrank
an den Griffen auf der Rückseite und Unterseite. Wenn
Sie den Kühlschrank falsch
anheben, kann dies zu Verletzungen führen.
VORSICHT
Bei der Verwendung
■Berühren Sie nicht die Luftpressereinheit oder die damit
verbundenen Teile, da sie beim Betrieb sehr heiß werden und die Metallkanten Verletzungen verursachen
können.
■Berühren Sie mit nassen Händen keine Lebensmittel
oder Metallbehälter im Gefrierfach. Dies kann Erfrierungen verursachen.
■Stellen Sie keine Getränke in Flaschen oder Dosen
in das Gefrierfach. Die Flaschen könnten platzen, vor
allem wenn der Kühlschrank auf „Schnellkühlung“ eingestellt ist.
■Verwenden Sie zur Erzeugung von Eiswürfeln nur
Trinkwasser.
■Öffnen oder schließen Sie die Tür nicht, wenn sich die
Hand einer anderen Person in der Nähe der Tür bendet. Es besteht die Gefahr, dass die Finger der anderen
Person in der Tür eingeklemmt werden.
■Stellen Sie keine überdimensionierten Gegenstände in
die Fächer der Tür. Wenn ein Gegenstand aus einem
der Fächer fällt, könnte dies Verletzungen verursachen.
■Achten Sie auf eine vorsichtige Handhabung, wenn Sie
die Glasböden einlegen oder herausnehmen. Wenn
einer der Glasböden zu Boden fällt, kann er zerbrechen
oder Verletzungen verursachen.
rear
bottom
Aufstellung
Frei stehender Typ
1
Sorgen Sie dafür, dass um den Kühlschrank herum aus-
reichend Platz für die
Belüftung ist.
• Auf dem Bild sehen
Sie den erforderlichen
Mindestabstand für
die Aufstellung des
Kühlschranks. Die
Messbedingungen für
den Energieverbrauch
werden unter anderen
Raumdimensionen
durchgeführt.
• Wenn Sie mehr freien Platz um den Kühlschrank haben,
kann er weniger Strom verbrauchen.
• Wenn Sie den Kühlschrank an einem Ort mit beengteren
Platzverhältnissen als auf dem unteren Bild benutzen,
kann die Temperatur im Inneren des Geräts steigen und
es können laute Geräusche und Fehlfunktionen auftreten.
• Der Freiraum zwischen der Rückseite des Kühlschranks
und der Wand sollte mehr als 50 mm und weniger als
75 mm betragen. Wenn der Freiraum über 75 mm beträgt,
könnten Sie sich verletzen, indem Sie den Kompressor
und seine äußeren Bauteile berühren, die beim Betrieb
des Geräts sehr heiß werden.
90mm
or more
60mm
or more
60mm
or more
Gesamtplatzbedarf bei der Verwendung
2
Stellen Sie die beiden vorderen
verstellbaren Füße ein, damit der
Kühlschrank eben und fest auf
dem Boden steht.
3
Schließen Sie das Gerät an eine ordnungsgemäß
installierte Steckdose an.
Hinweis
• Stellen Sie den Kühlschrank so auf, dass Sie leicht an
den Stecker kommen.
• Stellen Sie Ihren Kühlschrank nicht in direktes
Sonnenlicht und stellen Sie ihn nicht neben Wärme
erzeugende Geräte.
• Stellen Sie Ihren Kühlschrank nicht direkt auf Erdreich.
Stellen Sie den Kühlschrank auf eine geeignete
Standäche wie ein Holzbrett.
• Wenn Sie den Netzstecker bei geöffneter Tür
einstecken, ertönt der Türalarm – dies ist normal. Der
Türalarm hört auf, wenn Sie die Tür schließen.
Die Rollfüße benden sich unten am Kühlschrank
• Mit den Rollfüßen kann der Kühlschrank vor- und
zurückbewegt werden.
Vor der Verwendung Ihres Kühlschranks
• Reinigen Sie die Teile im Kühlschrank mit einem Tuch,
das Sie in warmes Wasser getaucht haben.
• Wenn Sie Seifenwasser zur Reinigung benutzen,
waschen Sie es gründlich mit Wasser ab.
1550 mm
1450 mm
790 mm
935 mm
Einstellbarer Fuß
Rollfüße (4 Stück)
Rückseite
Unterseite
60 mm
oder mehr
90 mm
oder mehr
60 mm
oder mehr
Page 76

DE-3
Zweiwege-Frischhaltefachtür
Beschreibung
1. Gefrierfachlicht
<Nur bei SJ-XG690G, SJ-XG690M,
SJ-XG740G, SJ-XG740M>
2. Bewegliche Eiswürfelmaschine
<Nur bei
SJ-XG640M, SJ-XG690G, SJ-XG690M>
3. Gefrierablage (oben)
4. Gefrierablage (unten)
5. Gefrierfach
Bewegen Sie die Trennwand,
um sie an die Größe der
Lebensmittel anzupassen.
6. Zweiwege-Frischhaltefachtür
7. Frischhalteregal
8. Deoeinheit
Der Deokatalysator ist in die Kaltluftwege
eingebaut. Er muss weder eingeschaltet noch
gereinigt werden.
9. Kühlschrankleuchte
10. Kühlschrankablage
11. Hybrid-Kühlplatte
Die Platte kühlt das Kühlfach indirekt von hinten. Auf
diese Weise werden die Lebensmittel sanft gekühlt,
ohne einem Kaltluftstrom ausgesetzt zu sein.
12. Obst- und Gemüseablage
13. Obst- und Gemüsefach
14. Einstellbarer Fuß
15. Magnetische Türdichtung
16. Bedienfeld
17. Gefriertürablage
18. Eiswürfelmaschine in der Tür
<Nur bei SJ-XG740G,
SJ-XG740M>
(Diese Eiswürfelmaschine ist im Gefrierfach
verpackt. Lesen Sie zur Installation die nächste
Seite „Nach der Reinigung“.)
19. Wasserbecher
<Nur bei SJ-XG740G, SJ-XG740M>
(Der Wasserbecher ist im Gefrierfach verpackt.
Vergewissern Sie sich, dass Sie den Becher zur
Benutzung in die Position setzen, die auf dem Bild
oben angegeben ist.)
20. Eiablage
21. Kühlschrankablage (oben)
22. Flaschenablage
23. Kühlschrankablage (unten)
Für die Aufbewahrung größerer Objekte in
Ihrem Kühlschrank
• Sie können alle Fächer oder Ablagen mit den Nummern
2, 3, 5, 6, 7,10,13,17,18,19, 20, 21, 22, 23 im Bild oben
herausnehmen.
• Die Kühlleistung wird nicht beeinusst, auch wenn Sie
den Kühlschrank nach dem oberen Beispiel benutzen.
Benutzen Sie das
Fach als Kühlfach.
Benutzen Sie das Fach
als Frischhaltefach.
Das Öffnen der Zweiwege-Frischhaltefachtür
1) Heben Sie die Tür an.
2) Führen Sie Tür in den Rahmen
ein und schieben Sie sie bis
Stopper zum zurück. Sie ist
ordnungsgemäß verriegelt.
Open Close
SJ-XG740G,SJ-XG740M
SJ-XG640M, SJ-XG690G,SJ-XG690M
1
3
4
5
7
6
8
9
1
1
14
14
13
15
19
18
15
16
20
22
23
12
10
1
3
4
2
5
7
6
8
9
11
14
14
13
15
15
17
16
20
22
23
12
10
21
21
17
Partition
Freezer case
Trennwand
Gefrierfach
Offen Geschlossen
Page 77

DE-4
DE
Eiswürfelmaschine in der Tür (SJ-XG740G,SJ-XG740M)
Eiswürfel machen
1) Benutzen Sie den Wasserbecher, um die
Wassermenge abzumessen.
Wasserfüllstand
Wasserbecher (160 ml)
2) Geben Sie das Wasser mit dem Wasserbecher in die
Eiswürfelmaschine in der Tür.
3) Wenn die Eiswürfel fertig sind, drehen Sie den Hebel
im Uhrzeigersinn, um sie in den Eiswürfelbehälter zu
befördern.
4) Ziehen Sie den Eiswürfelbehälter heraus, um die
Eiswürfel zu entnehmen.
Eiswürfelbehälter
Hebel
Hinweis
• Schütten Sie kein Öl in den Eiswürfelbehälter und
machen Sie darin keine Eiswürfel, da er ansonsten
beschädigt wird.
• Wenn Eiswürfel hergestellt werden, sollten Sie ein
häuges Öffnen der Gefrierfachtür vermeiden.
Reinigen der Eiswürfelmaschine in der Tür
• Leeren Sie zuvor den Eiswürfelbehälter.
1) Ziehen Sie die Eiswürfelmaschine in der Tür nach
oben, um sie herauszunehmen.
2) Nehmen Sie die Eiswürfelschale heraus.
3) Nehmen Sie den Eiswürfelbehälter heraus.
4) Drücken Sie auf die Ausbuchtung, um die
Eiswürfelmaschine in der Tür auseinanderzubauen.
Eiswürfelschale
Ausbuchtung
2)
3)
Hinweis
• Legen Sie die Eiswürfelschale nicht in die
Geschirrspülmaschine.
Ansonsten werden die Abdichtungen beschädigt.
Nach der Reinigung
1) Zusammenbau der Eiswürfelmaschine in der Tür.
(Umgekehrte Reihenfolge wie beim Zerlegen.)
2) Setzen Sie die Eiswürfelmaschine in der Tür sicher wieder ein.
Loch
Haken
Eiswürfelmaschine in der Tür
Gerätetür
<Position des Hebels>
Hebel
Hebel
Bewegliche Eiswürfelmaschine
(SJ-XG640M, SJ-XG690G, SJ-XG690M)
Es wird nachdrücklich empfohlen, dass Sie die Eiswürfelmaschine entsprechend dem Bild in der „Beschreibung“
benutzen. Sie können die Eiswürfelmaschine überall ins Gefrierfach stellen.
1) Füllen Sie nicht zu viel Wasser
in den Behälter. Ansonsten
kleben die Eiswürfel aneinander, wenn sie gefroren sind.
2) Wenn die Eiswürfel fertig
sind, drehen Sie den Hebel im
Uhrzeigersinn, um sie in den
Eiswürfelbehälter zu befördern.
Hinweis
• Vergewissern Sie sich, dass die Eiswürfelmaschine
horizontal steht, damit kein Wasser aus dem
Eiswürfelfach schwappt.
• Schütten Sie kein Öl in den Eiswürfelbehälter und
machen Sie darin keine Eiswürfel, da er ansonsten
beschädigt wird.
Hebel
Eiswürfelbehälter
Page 78

DE-5
Nützliche Modi
Beziehen Sie sich für den Betrieb auf das Kapitel „Bedienfeld“.
Extra-kalt
Schnellgefrieren
Schnellkühlung
Extra-kalt Schnellgefrieren Schnellkühlung
Funktion
Dieser Modus eignet sich
zum Kühlen von Getränken oder Lebensmitteln,
bis sie eiskalt sind.
Hinweis:
Lebensmittel
mit hohem Feuchtigkeitsgehalt können gefrieren.
Dieser Modus
beschleunigt das
Gefrieren von
Lebensmitteln oder
die Herstellung von
Eiswürfeln.
Dieser Modus eignet sich zum schnellen Kühlen
von Getränken oder Lebensmitteln.
Einsatzort Frischhaltefach Gefrierfach Gefrierfach
ACHTUNG:
Stellen Sie keine Glasaschen hin-
ein. Es ist sehr wahrscheinlich, dass sie platzen.
Betriebszeit
6 Stunden
*
1
2 Stunden
*
1
30 Minuten
• Dieser Modus schaltet sich automatisch ab.
• Es ertönt kein Alarm.
• Dieser Modus schaltet sich automatisch ab.
• Es ertönt der Alarm.
Ausschalten des Alarms *
2
oder
Drücken Sie die
Taste „Schnellge
-
frieren“.
*
1
Der Abschluss kann länger dauern, wenn sich der
Betrieb mit Abtauen überschneidet. Dieser Modus
startet, nachdem das Abtauen abgeschlossen ist.
*
2
Wenn Sie den Alarm nicht abschalten, ertönt er
durchgehend 30 Minuten lang.
Hinweis
• Die Modi Extra-kalt, Schnellgefrieren und Schnellkühlung
können nicht gleichzeitig aktiviert werden, wenn einer
der Modi bereits läuft.
• Wenn einer dieser Modi läuft, sollten Sie häuges
Öffnen der Tür vermeiden.
Plasmacluster
Schimmelpilz
Gefrierfach
Frischhaltefach
Urlaubsmodus
• Benutzen Sie diesen Modus, wenn Sie auf Reisen
gehen oder lange Zeit das Haus verlassen.
• Die Temperatur im Kühlfach ist auf etwa 10 °C
eingestellt.
Drücken Sie
die Eingabetaste.
Hinweis
Im Kühlschrank kann ein leichter Geruch auftreten. Dies
ist das Ozon, das vom Ionisator erzeugt wird. Hierbei
handelt es sich nur um eine minimale Menge Ozon, die
sich im Kühlschrank schnell verüchtigt.
Benutzen Sie diese Funktion, wenn Sie das Innere des
Kühlschranks sauber halten möchten.
Plasmacluster startet automatisch, wenn der
Kühlschrank eingeschaltet wird.
Der Ionisator in Ihrem Kühlschrank gibt Ionen-Cluster –
also massenhaft positive und negative Ionen – in das
Kühlfach ab.
Diese Ionen-Cluster machen Schimmelpilze in der Luft
unschädlich.
Nach
abgeschlossenem
Betrieb
• Sie müssen die Getränke oder Lebensmittel
nicht herausnehmen.
• Vergessen Sie nicht, die Getränke und
Lebensmittel herauszunehmen, wenn der Alarm
ertönt.
• Wenn die Getränke und Lebensmittel länger
als 30 Minuten im Gefrierfach sind, können sie
gefrieren.
Wenn beim Betrieb
der Strom ausfällt
• Dieser Modus wird automatisch abgebrochen. • Wenn der Strom wieder eingeschaltet wird, wird
dieser Modus automatisch mit dem vorherigen
Zustand aktiviert.
Hinweis
• Die Aufbewahrungsdauer der Lebensmittel im Kühlfach
verringert sich auf etwa 1/2 bis 1/3 im Vergleich zum
normalen Betrieb.
Benutzen Sie diesen Modus nur, wenn Sie keine
verderblichen Lebensmittel im Kühlschrank haben.
• Die Temperatur des Kühlfachs lässt sich nicht ändern.
Gefrierfach
Page 79

DE-6
DE
Bedienfeld
(SJ-XG690G, SJ-XG740G)
Hinweis
• Wenn Sie eine der Tasten drücken, leuchten alle
Symbole einmal auf und zeigen anschließend die
Stand-by-Anzeige.
• Auf der Stand-by-Anzeige leuchten aktive
Modussymbole oder Modusanzeigen auf.
Bei aktiver Schnellkühlung blinkt das Symbol auf der
Stand-by-Anzeige.
• Wenn etwa innerhalb 1 Minute keine Eingabe erfolgt,
kehrt die Anzeige automatisch zur Stand-by-Anzeige
zurück. Die Stand-by-Anzeige schaltet sich ab, wenn
nach einer weiteren Minute keine Eingabe erfolgt.
• Wenn der Kühlschrank wegen eines Stromausfalls
den Betrieb aussetzt, werden nach einer erneuten
Stromversorgung alle Modi außer Extra-kalt,
Schnellgefrieren und Schnellkühlung wie vor dem
Stromausfall aktiviert.
Einschaltzustand
Wenn Sie die Taste drücken, ändern sich die
Symbole zu der unten dargestellten Reihenfolge.
Wählen Sie das Modussymbol.
Nur „Schnellkühlung“
3
Schließen Sie die Einstellung ab,
indem Sie die Taste 3 Sekunden lang
oder länger drücken.
(Piep, Piep, Piep)
Bedienung nützlicher Modi
1
Standby display
or
2
3
Wählen Sie ein/aus.
EIN/AUS wird in der Reihenfolge geschaltet, wenn Sie die Taste drücken.
Schließen Sie die Einstellung ab.
Aktuelle Einstellung
(Diese Abbildung zeigt AUS.)
Die Einstellung wird geändert.
Bedienung zusätzlicher Modi
Türalarm
• Wenn die Kühlschranktür länger als 1 Minute offen
gelassen wird, ertönt der Türalarm einmal – und erneut
nach 1 weiteren Minute.
• Wenn die Tür etwa 3 Minuten lang offen gelassen wird,
ertönt der Alarm ununterbrochen.
• Der Alarm hört auf, wenn die Tür geschlossen wird.
Abschalten
Drücken Sie 3 Sekunden
lang oder länger und .
(Piep, Piep, Piep)
Ton der Tastenbedienung
• Der elektrische Ton erklingt, wenn Sie eine Taste drücken.
Hinweis
Wenn Sie den zusätzlichen Modus einschalten möchten,
befolgen Sie die gleichen Schritte noch einmal. (Die
Anzeige schaltet sich ein.)
Abschalten
Drücken Sie 3 Sekunden lang oder länger und .
(Piep, Piep, Piep)
Die Anzeige
schaltet sich ab.
Die Anzeige
schaltet sich ab.
Bedientasten
Freezer
compartment
-18°C
3°C
Refrigerator
compartment
Symbole der Temperaturregelung
Symbole nützlicher Modi Weitere Modi
Symbol
Symbol
Bedeutung
Gefrierfach
Kühlfach
Standardeinstellung
Standardein-
stellung
AUS
Anzeige
Bedeutung
Standardein-
stellung
Türalarm
EIN
Ton der Tasten-
bedienung
Stand-by-Anzeige
Bedeutung
Extra-kalt
Schnellgefrieren
Schnellkühlung
Plasmacluster
Urlaubsmodus
oder
Page 80

DE-7
Temperaturregelung
Überprüfen der aktuellen Temperatureinstellung
Der Kühlschrank regelt seine Temperatur automatisch. Sie können die Temperatur jedoch auch wie unten gezeigt einstellen.
Wählen Sie das Symbol oder .
Einstellung des Gefrier-/Kühlfachs
Gefrierfach
: Einstellbar zwischen -13 °C und -21 °C in Schritten von 1 °C
Kühlfach
: Einstellbar zwischen 0 °C und 6 °C in Schritten von 1 °C
1
1
or
2
Wählen Sie das Symbol oder .
Wählen Sie die Temperatur
3
Schließen Sie die Einstellung ab.
Wenn Sie die Taste drücken, ändern sich die
Symbole zu der unten dargestellten Reihenfolge.
Standby display
Die Einstellung wird geändert.
Schalter
Gefrierfach
Kühlfach
Erweiterte Einstellung des Gefrier-/Kühlfachs
Die Temperatur des Gefrierfachs und des Kühlfachs kann in Schritten
von jeweils 0,5 °C eingestellt werden, indem Sie die folgenden
Schritte a bis c befolgen.
a.
Drücken Sie nach Schritt 1 der „Grundfunktionen“ 3 Sekunden
oder länger die Taste . (Piep, Piep, Piep) Die aktuell
voreingestellte Temperatur kehrt zur „Standardeinstellung“
zurück. (Sie sehen die Anzeige auf dem rechten Bild.)
b.
Drücken Sie oder und stellen Sie die Temperatur ein.
c.
Schließen Sie die Einstellung ab.
(Wie bei Schritt 3 der „Grundfunktionen“.)
Befolgen Sie die Schritte a bis c erneut, wenn Sie die Temperatur in
Schritten von jeweils 1 °C einstellen möchten.
Stand-by-Anzeige
oder
Page 81

DE-8
DE
Bedienung nützlicher Modi
Betrieb aktivierten
Betrieb abbrechen
Extra-kalt
Schnellgefrieren
Urlaubsmodus
Drücken Sie die Modus-Taste.
(Piep)
Drücken Sie die
Modus-Taste.
(Piep)
Schnellkühlung Drücken Sie die Modus-
Taste etwa 3 Sekunden
lang.
(Piep, Piep, Piep)
Drücken Sie die
Modus-Taste.
(Piep)
• Wenn die Kühlschranktür länger als 1 Minute offen gelassen wird, ertönt der Türalarm einmal – und erneut nach
1 weiteren Minute.
• Wenn die Tür etwa 3 Minuten lang offen gelassen wird, ertönt der Alarm ununterbrochen.
• Der Alarm hört auf, wenn die Tür geschlossen wird.
Wenn der Alarm nicht aufhört
Wenn der Alarm nicht aufhört, nachdem Sie alle Türen geschlossen haben, liegt eine Fehlfunktion vor.
Kontaktieren Sie das SHARP Service Center wegen eines Kundendienstes.
Methode, um den Türalarm vorübergehend zu deaktivieren.
• Drücken Sie länger als 3 Sekunden gleichzeitig die Tasten „F“ und „R“. (Piep, Piep, Piep)
• Der Türalarm ertönt etwa nach 2 Tagen erneut.
Bedienfeld
Symbole der Temperaturregelung Symbole nützlicher Modi
Hinweis
• Alle Modi sind anfangs ausgeschaltet. Wenn Sie eine
der Tasten drücken, wird das Bedienfeld nach dem
Piepton aktiviert.
• Wenn Sie eine der Tasten drücken, leuchtet die aktive
Modusanzeige auf. Wenn die Schnellkühlung aktiv ist,
blinkt die Anzeige.
• Wenn Sie wollen, dass die Temperaturanzeige
aueuchtet, drücken Sie die Taste „F“ oder „R“,
während das Bedienfeld aktiviert ist.
*Plasmacluster wird automatisch aktiviert, wenn der
Kühlschrank eingeschaltet wird.
Diese Funktion muss nicht aktiviert/deaktiviert werden.
• Wenn etwa innerhalb 1 Minute keine Eingabe erfolgt,
schaltet sich die Anzeige automatisch ab.
• Wenn der Kühlschrank wegen eines Stromausfalls
den Betrieb aussetzt, werden nach einer erneuten
Stromversorgung alle Modi außer Extra-kalt,
Schnellgefrieren und Schnellkühlung wie vor dem
Stromausfall aktiviert.
Taste Bedeutung Standardein-
stellung
Extra-kalt
AUS
Schnellgefrieren
Schnellkühlung
Urlaubsmodus
Plasmacluster EIN*
Taste Bedeutung Standardein-
stellung
Temperatureinstellung
des Gefrierfachs
Temperatureinstellung
des Kühlfachs
Leuchtend
Abschalten
Blinkend Abschalten
(SJ-XG640M, SJ-XG690M, SJ-XG740M)
Türalarm
Page 82

DE-9
Temperaturregelung
Überprüfen der aktuellen Temperatureinstellung
Nachdem Sie die Taste „F“ oder „R“ gedrückt
haben, leuchtet die Anzeige auf, um das aktuelle
Temperaturniveau anzuzeigen.
Gefrierfach: Drücken Sie die Taste „F“.
Kühlfach: Drücken Sie die Taste „R“.
Einstellung des Gefrier-/Kühlfachs
Gefrierfach
1.
Drücken Sie die Taste „F“.
2.
Drücken Sie die Taste „F“, um das Temperaturniveau zu ändern.
Kühlfach
1.
Drücken Sie die Taste „R“.
2.
Drücken Sie die Taste „R“, um das Temperaturniveau zu ändern.
• Die Temperaturanzeige ändert sich entsprechend dem Bild unten
(
3→4→5→1→2→3
), wenn Sie die Taste „F“ oder „R“ drücken.
Erweiterte Einstellung des Gefrier-/Kühlfachs
Die Temperatur des Gefrierfachs und des Kühlfachs kann in
9 Stufen eingestellt werden (Stufe 1 bis 9), indem Sie folgende
Schritte a bis b befolgen.
Gefrierfach
a.
Drücken Sie zuerst die Taste „F“.
Halten Sie die Taste „F“ gedrückt und drücken Sie anschließend
mindestens 3 Sekunden lang die Taste „Schnellgefrieren“.
(Piep, Piep, Piep)
Die Anzeige kehrt zur
„Standardeinstellung“ zurück.
b.
Drücken Sie die Taste „F“, um das
Temperaturniveau zu ändern.
Befolgen Sie die Schritte a bis b, wenn Sie die Temperatur in
5 Stufen einstellen möchten.
Kühlfach
a.
Drücken Sie zuerst die Taste „R“.
Halten Sie die Taste „R“ gedrückt und drücken Sie
anschließend mindestens
3 Sekunden lang die Taste
„Schnellgefrieren“.
(Piep, Piep, Piep)
Die Anzeige kehrt zur „Standardeinstellung“ zurück.
b.
Drücken Sie die Taste „R“, um das Temperaturniveau zu ändern.
Befolgen Sie die Schritte a bis b, wenn Sie die Temperatur in
5 Stufen einstellen möchten.
• Die Temperaturanzeige ändert sich entsprechend
dem Bild unten (
5→6→7→8→9→1→2→3→4→5
),
wenn Sie die Taste „F“ oder „R“ drücken.
AUS
Leuchtend
Blinkend
Der Kühlschrank regelt seine Temperatur automatisch. Sie können die Temperatur jedoch auch wie unten gezeigt einstellen.
Hinweis
Die Anzeige schaltet sich etwa 5 Sekunden nach der
Einstellung des Temperaturniveaus ab.
1
2
3
4
5
Level
Indicator
Default setting
1
2
3
4
5
6
7
8
9
Default setting
Level
Indicator
... ...
...
Standardeinstellung
Stufe
Anzeige
Standardeinstellung
Stufe
Anzeige
Page 83

DE-10
DE
REIN
RAUS
• Gefrieren Sie kleine Mengen Lebensmittel nacheinander
ein, damit sie schnell gefrieren.
• Lebensmittel sollten ordnungsgemäß fest versiegelt oder
in Behältern verstaut werden.
• Verteilen Sie die Lebensmittel gleichmäßig im Gefrierfach.
• Beschriften Sie die Beutel oder Behälter, damit Sie wissen, welche Lebensmittel Sie im Gefrierfach aufbewahren.
Ratschlag zur Vermeidung von Feuchtigkeit oder Frost im Kühlschrank
• Vergewissern Sie sich, dass die Lebensmittel möglichst frisch sind, um die Haltbarkeit verderblicher Nahrungsmittel
zu maximieren. Nachfolgend lesen Sie einen allgemeinen Leitfaden, der Ihnen bei einer längeren Haltbarkeit der
Lebensmittel helfen wird.
• Lebensmittel sind nur begrenzt haltbar. Halten Sie sich immer an das vom Hersteller angegebene
Mindesthaltbarkeitsdatum.
• Im unteren Bild sehen Sie den Energieverbrauch
dieses Modells.
• Stellen Sie den Kühlschrank an einem
gut belüfteten Ort auf und halten Sie die
Belüftungsabstände ein.
• Stellen Sie Ihren Kühlschrank nicht in direktes
Sonnenlicht und stellen Sie ihn nicht neben
Wärme erzeugende Geräte.
• Öffnen Sie Türen nicht zu oft.
• Heiße Lebensmittel sollten abkühlen, ehe sie in
den Kühlschrank gestellt werden.
• Verteilen Sie die Lebensmittel gleichmäßig auf
den Ablageächen, damit die Kühlluft effektiv
zirkulieren kann.
Energiespartipps
Aufbewahrung von Lebensmitteln
300
mm300 mm
90
mm
50
mm
Obst/Gemüse
• Obst und Gemüse sollten locker in Kunststoffmaterial
eingeschlossen sein – z. B. in Folie oder Beuteln (nicht
versiegeln) – und sie sollten im Obst- und Gemüsefach
aufbewahrt werden, um den Feuchtigkeitsverlust zu
minimieren.
• Obst und Gemüse, das leicht durch niedrige
Temperaturen verdirbt, sollte an einem kühlen Ort
außerhalb des Kühlschranks aufbewahrt werden.
Milchprodukte und Eier
• Bei den meisten Milchprodukten steht das
Mindesthaltbarkeitsdatum außen auf der
Verpackung – d. h. Informationen über die empfohlene
Aufbewahrungstemperatur und die Haltbarkeit.
• Eier sollten in der Eiablage aufbewahrt werden.
Fleisch/Fisch/Geügel
• Legen Sie diese Lebensmittel auf einen Teller
oder in eine Schüssel und bedecken Sie sie mit
Butterbrotpapier oder Frischhaltefolie.
• Stellen Sie größere Stücke Fleisch, Fisch oder
Geügel hinten in die Ablagefächer.
• Vergewissern Sie sich, dass alle gekochten Speisen
sicher verpackt oder in einem luftdichten Behälter
eingeschlossen sind.
• Frische Lebensmittel (sicher verpackt) sollten nur
begrenzte Zeit aufbewahrt werden, damit sie nicht
verderben oder andere aufbewahrte Lebensmittel
negativ beeinträchtigen.
Gefrierfach
Kühlschrank
Tipps für die Aufbewahrung von Lebensmitteln
• Halten Sie Tür fest geschlossen. Wenn Lebensmittel
nach unten fallen, kann dies eine Lücke zwischen
Kühlschrank und Tür verursachen. Legen Sie die
Lebensmittel wieder auf eine Ablage oder in ein Fach.
• Lassen Sie die Tür möglichst kurz geöffnet. Wenn
die Tür längere Zeit geöffnet bleibt oder die Tür
sehr oft geöffnet und geschlossen wird, können sich
Feuchtigkeit oder Frost bilden.
• Die gelagerten Lebensmittel sollten in
Lebensmittelbehälter oder Frischhaltefolie eingepackt
werden oder versiegelt sein. (Vor allem Lebensmittel
mit einem hohen Feuchtigkeitsgehalt)
• Verteilen Sie die Lebensmittel gleichmäßig auf den
Ablageächen, damit die Kühlluft effektiv zirkulieren
kann.
• Heiße Lebensmittel sollten abkühlen, ehe sie in
den Kühlschrank gestellt werden. Wenn Sie heiße
Lebensmittel in den Kühlschrank stellen, erhöht sich
die Temperatur im Gerät und es besteht das Risiko,
dass andere Lebensmittel verderben.
• Blockieren Sie niemals den Ausgang und Eingang
des Kühlluftkreislaufs mit Lebensmitteln oder
Behältern – ansonsten
werden die Lebensmittel im
ganzen Kühlschrank nicht
gleichmäßig gekühlt.
• Stellen Sie keine
Lebensmittel direkt vor
den Kaltluftauslass. Dabei
könnten die Lebensmittel
gefrieren.
Page 84

DE-11
Befolgen Sie die Tipps, um Risse an den inneren
Oberächen und den Plastikbauteilen zu vermeiden.
• Wischen Sie Öl von Lebensmitteln ab, das an den
Plastikteilen haftet.
• Einige Haushaltschemikalien können Schäden verursachen, daher sollten Sie ausschließlich verdünntes
Geschirrspülmittel (Seifenwasser) verwenden.
• Wenn Sie unverdünntes Reinigungsmittel verwenden
oder das Seifenwasser nicht gründlich abgewischt
wird, können Risse in den Plastikteilen entstehen.
Wenn der Kühlschrank längere Zeit abgeschaltet werden
muss, sollten Sie folgende Schritte durchführen, um die
Schimmelbildung zu minimieren:
1. Entfernen Sie alle Lebensmittel.
2. Ziehen Sie den Netzstecker aus der Steckdose.
3. Reinigen und trocknen Sie das Innere des
Kühlschranks sorgfältig.
4. Lassen Sie alle Türen zum Trocknen einige Tage lang
leicht offen stehen.
Wartung und Reinigung
Das Abtauen erfolgt automatisch durch ein einzigartiges
Energiesparsystem. (etwa einmal am Tag) Die
Eisherstellung dauert beim Abtauen etwas länger, denn
die Temperatur im Eisfach steigt dabei ein wenig über
den Normalwert.
Hinweis
• Benutzen Sie keine besonders starken Reiniger oder
Lösungsmittel (Lack, Farbe, Polierpulver, Benzin,
kochendes Wasser usw.), die Schäden verursachen
könnten.
• Wenn Sie den Netzstecker ziehen, warten Sie
mindestens 5 Minuten, ehe Sie ihn wieder einstecken.
• Jede der Glasablagen ist für Belastungen von etwa
3 kg ausgelegt. Halten Sie sie sorgfältig fest, wenn Sie
sie aus dem Kühlschrank entfernen oder tragen.
• Lassen Sie keine Gegenstände im Kühlschrank fallen
oder gegen die Innenwände schlagen. Dies kann zu
Rissen an den inneren Oberächen führen.
• Entfernen Sie die Zubehörteile (z. B. Ablagefächer)
aus dem Kühlschrank und der Tür. Reinigen
Sie sie mit warmem Seifenwasser (Wasser mit
Geschirrspülmittel). Spülen Sie sie anschließend mit
sauberem Wasser ab und trocknen Sie sie ab. (Nur die
Obst und Gemüseablage lässt sich nicht entfernen)
• Reinigen Sie das Innere des Kühlschranks mit einem
Tuch, das Sie in warmes Seifenwasser (Wasser mit
Geschirrspülmittel) getaucht haben. Wischen Sie
danach das gesamte Seifenwasser gründlich mit
einem Lappen ab, den Sie in kaltes Wasser getaucht
haben.
• Wischen Sie die Außenseite des Kühlschranks jedes
Mal ab, wenn sie schmutzig wird.
• Reinigen Sie die magnetische Türdichtung mit einer
Zahnbürste und warmem Seifenwasser (Wasser mit
Geschirrspülmittel).
• Wischen Sie das Bedienfeld mit einem trockenen Tuch ab.
<SJ-XG640M, SJ-XG690M, SJ-XG740M>
Wischen Sie das Wasser in der Verdampferschale
auf. Ehe Sie das Wasser aufwischen, sollten Sie über
1 Stunde lang warten, nachdem Sie den Stecker
gezogen haben, da die Bauteile des Kältekreislaufs sehr
heiß sind. (Die Verdampferschale bendet sich auf der
Rückseite des Geräts.)
Verdampferschale
Vor dem Transport
Reinigung
Wichtig
Abtauen der Kühleinheit
Wenn die Lampe der Ablage
durchgebrannt ist
Abschalten Ihres
Kühlschranks
Kontaktieren Sie einen von SHARP autorisierten
Servicepartner, um die Leuchte auszutauschen.
Die Leuchte darf nur von einem qualizierten
Servicemitarbeiter ausgetauscht werden.
Page 85

DE-12
DE
Ehe Sie sich an den Kundendienst wenden
Ehe Sie sich an den Kundendienst wenden, sollten Sie folgende Punkte überprüfen.
Problem Lösung
Die Außenseite des
Kühlschranks fühlt sich heiß
an.
Das ist normal. Das liegt an einem Heizrohr, das in der Kühlschrankwand verläuft,
um die Bildung von Feuchtigkeit zu verhindern.
Der Kühlschrank erzeugt ein
lautes Geräusch.
Folgende Geräusche sind normal.
• Der Kompressor erzeugt ein lautes Geräusch, wenn er anläuft.
- Das Geräusch wird nach einer Weile leiser.
• Der Kompressor erzeugt einmal täglich ein lautes Geräusch.
- Das Betriebsgeräusch erfolgt unmittelbar nach der Abtauautomatik der
Kühleinheit.
• Geräusch ießender Flüssigkeit (gurgelndes Geräusch, zischendes Geräusch)
- Wird erzeugt, wenn das Kältemittel durch die Rohre ießt (Geräusch kann
gelegentlich lauter werden).
• Knackendes oder krachendes Geräusch, quietschendes Geräusch
- Wird durch die Ausdehnung und Kontraktion der inneren Bauteile während der
Kühlung erzeugt.
Frost oder Feuchtigkeit
bildet sich im oder außen am
Kühlschrank.
Dies kann eine der folgenden Ursachen haben. Benutzen Sie ein nasses Tuch, um
Frost abzuwischen, und ein trockenes Tuch, um Feuchtigkeit abzuwischen.
• Wenn die Umgebungsfeuchtigkeit hoch ist.
• Wenn die Tür häug geöffnet und geschlossen wird.
• Wenn Lebensmittel mit einem hohen Feuchtigkeitsgehalt aufbewahrt werden.
(Lebensmittel mit einem hohen Feuchtigkeitsgehalt müssen verpackt werden.)
• Dies ist mehr oder weniger von der Jahreszeit (Regenperiode,
Wetterbedingungen), den Nutzungsgewohnheiten und den
Umgebungsbedingungen eines Hauses abhängig.
Die
Lebensmittel
im Kühlfach
sind gefroren.
SJ-XG690G,
SJ-XG740G
• Läuft der Kühlschrank lange Zeit mit einer Kühlfach-Temperatureinstellung
von 0 °C?
- Stellen Sie die Temperatureinstellung wieder zurück auf etwa 3 °C.
• Läuft der Kühlschrank lange Zeit mit einer Gefrierfach-Temperatureinstellung
von -21 °C?
- Stellen Sie die Temperatureinstellung wieder zurück auf etwa -18 °C.
• Wenn die Umgebungstemperatur zu niedrig ist, können die Lebensmittel
gefrieren, obwohl die Kühlfachtemperatur auf 6 °C eingestellt ist.
SJ-XG640M,
SJ-XG690M,
SJ-XG740M
• Läuft der Kühlschrank lange Zeit mit einer Kühlfach-Temperatureinstellung
von MAXIMALE KÄLTE?
- Ändern Sie die Temperaturregelung auf eine andere Einstellung.
• Läuft der Kühlschrank lange Zeit mit einer Gefrierfach-Temperatureinstellung
von MAXIMALE KÄLTE?
- Ändern Sie die Temperaturregelung auf eine andere Einstellung.
• Wenn die Umgebungstemperatur zu niedrig ist, können die Lebensmittel
gefrieren, obwohl die Kühlfachtemperatur auf MINIMUM eingestellt ist.
Gerüche im Kühlschrank. • Stark riechende Lebensmittel müssen verpackt werden.
• Die Deoeinheit kann nicht alle Gerüche entfernen.
• Reinigen Sie das Innere des Kühlschranks regelmäßig.
Das Bedienfeld funktioniert
nicht.
Dies kann eine der folgenden Ursachen haben.
• Am Bedienfeld oder an Ihrem Finger bendet sich Bratenfett, Öl usw.
• Sie berühren das Bedienfeld mit einer behandschuhten Hand, mit einem
Heftpaster am Finger, mit dem Fingernagel oder mit anderen Objekten.
• Auf den Tasten klebt ein Aufkleber/Klebeband.
• Sie berühren die Tasten nicht direkt in der Mitte.
• Sie berühren die Tasten nicht ausreichend lange, um sie zu aktivieren.
Die Lampen im Kühlschrank
schalten sich ab, obwohl die
Türen offen sind.
• Der Lichtschalter schaltet die Lampen im
Kühlschrank ein und aus.
Wenn die Türen im gleichen Winkel geöffnet
sind, schalten sich die Lampen aus, obwohl
die Türen geöffnet sind, aber das ist normal.
Wenn trotzdem Kundendienst erforderlich ist
Wenden Sie sich an den nächsten von SHARP autorisierten Servicepartner.
Light switch
Lichtschalter
Page 86

DE-13
Produktdatenblatt
ANHANG
III
(EU) Verordnung Nr. 1060/2010
A
Handelsmarke
B
Modellname
SJ-XG640M
SJ-XG690G
SJ-XG690M
SJ-XG740G
SJ-XG740M
C
Kategorie 7
D
Energieefzienzklasse A
++
E
EU-Umweltgütezeichen-Auszeichnung —
F
Jahresenergieverbrauch *
1
[KWh/Jahr] 320
G
Fassungsvermögen aller Ablagen, die keine
Sternebewertung verdienen [ L ]
354 394 420
H
Fassungsvermögen aller Ablagen für gefrorene
Lebensmittel, die eine Sternebewertung verdienen [ L ]
162 176
I
Die Auslegungstemperatur „anderer Ablagen“ mit
einer Temperatur von über +14 °C
—
J
Frostfrei
JA
K
Dauer des Temperaturanstiegs [ h ] 19
L
Gefrierkapazität [kg/24 h] 7,3 8,1
M
Klimaklasse T
N
Schallemissionen in der Luft
[dB(A)]
38
O
Einbaugerät Nein (frei stehendes Gerät)
*1 Energieverbrauch „XYZ“ kWh pro Jahr, basierend auf Standard-Testergebnissen für 24 Stunden.
Der tatsächliche Energieverbrauch hängt vom Einsatz und vom Standort des Geräts ab.
Temperaturanzeige
Dieser Kühlschrank ist mit einer Temperaturanzeige im Kühlfach ausgestattet, damit Sie die durchschnittliche Temperatur
im kältesten Bereich kontrollieren können.
Kältester Bereich
Das Symbol zeigt den kältesten
Bereich im Kühlfach an. (Die
Türablage in der gleichen Höhe ist
nicht der kälteste Bereich.)
Symbol
Überprüfen der Temperatur im kältesten Bereich
Sie können regelmäßig überprüfen, ob die Temperatur
im kältesten Bereich stimmt, und wenn nötig die
Temperatureinstellung des Kühlschranks anpassen.
Um eine ordnungsgemäße Temperatur in dem Gerät
beizubehalten, überprüfen Sie, ob die Temperaturanzeige
immer BLAU leuchtet. Wenn die Temperaturanzeige
WEISS leuchtet, ist die Temperatur zu hoch. Erhöhen
Sie in diesem Fall die Temperatureinstellung des
Kühlschranks und warten Sie 6 Stunden lang, ehe Sie die
Temperaturanzeige erneut überprüfen.
BLAU
Richtige Einstellungen
WEISS
Temperatur zu hoch, stellen Sie
die Temperatureinstellung des
Kühlschranks ein.
Hinweis
• Die Temperatur im Kühlschrank hängt von
verschiedenen Faktoren ab – wie etwa der
Umgebungstemperatur des Raums, der Menge der darin
gelagerten Lebensmittel und wie oft die Kühlschranktür
geöffnet wird.
• Wenn frische Lebensmittel in den Kühlschrank gestellt
werden oder die Kühlschranktür längere Zeit offen steht,
ist es normal, dass die Temperaturanzeige WEISS
leuchtet.
Page 87

DE-14
DE
Informationen über die Entsorgung dieses Geräts
WENN SIE DAS GERÄT ENTSORGEN MÖCHTEN, WERFEN SIE DAS GERÄT WEDER IN DEN HAUSMÜLL
NOCH IN EINEN KAMIN!
Benutzte Elektrogeräte sollte immer GETRENNT entsorgt und wiederaufbereitet werden, gemäß den örtlichen
Gesetzen.
Dies unterstützt den Umweltschutz, besseres Recycling und die Verringerung der Abfallmenge. SCHLECHTE
ENTSORGUNG kann aufgrund bestimmter Substanzen gesundheitsschädlich und schädlich für die Umwelt sein!
Bringen Sie ALTGERÄTE zur nächsten Müllsammelstelle.
Wenn Sie sich bezüglich der Entsorgung nicht sicher sind, kontaktieren Sie die zuständigen Behörden oder den
Händler für weitere Informationen.
NUR FÜR NUTZER IN DER EU UND ANDEREN LÄNDERN; WIE Z. B. NORWEGEN UND DIE SCHWEIZ: Die
getrennte Entsorgung ist gesetzlich verpichtend.
Das oben gezeigte Symbol auf Elektrogeräten (oder der Verpackung) soll die Benutzer daran erinnern.
PRIVATNUTZER müssen existierende Rückgabemöglichkeiten nutzen. Die Rückgabe ist kostenlos.
Page 88

NL-1
Alleen voor huishoudelijk gebruik
Hartelijk dank voor het kopen van dit SHARP-product. Voordat u uw SHARP-koelkast in
gebruik neemt, verzoeken wij u vriendelijk om de gebruiksaanwijzing aandachtig door te
nemen om ervoor te zorgen dat u hem optimaal kunt gebruiken.
• Deze koelkast is bedoeld voor het maken van ijsblokjes en het koelen en invriezen van voedsel.
• Deze koelkast is alleen geschikt voor huishoudelijk gebruikt met een omgevingstemperatuur zoals in de tabel staat vermeld. De klimaatklasse staat aangegeven op het typeplaatje. Als de koelkast gebruikt wordt buiten het bereik (omgevingstemperatuurbereik) van de
klimaatklasse van het betreffende model, dan kan het voorkomen dat de koelkast geen bevredigende interne temperaturen kan aanhouden. Als de koelkast bij lagere temperaturen
wordt gebruikt, zal de koelkast niet beschadigd raken tot een temperatuur van +5°C.
• De koelkast mag niet voor langere tijd worden onderworpen aan een temperatuur van
-10°C of lager.
Koelmiddel
Deze koelkast bevat een ontvlambaar koelmiddel (R600:
isobutaan) en isolatieblaasgas (cyclopentaan). Neem de
volgende voorschriften in acht om ontsteking en ontplofng
te voorkomen.
■Laat geen puntige voorwerpen in contact komen met het
koelsysteem. Het koelsysteem achter en in de koelkast
bevat koelmiddel.
■Gebruik geen mechanische apparaten of andere middelen
om het ontdooiproces te versnellen. (deze koelkast heeft
een automatisch ontdooisysteem).
■Gebruik geen andere elektrische apparaten in de koelkast.
■Blokkeer niet de omgeving rond de koelkast.
■Gebruik geen ontvlambare sprays, zoals spuitverf, in de
buurt van de koelkast.
■Sla geen ontvlambare sprays, zoals spuitverf, in de koel-
kast op.
■Raak bij een defect van het koelkastsysteem niet het stop-
contact aan of gebruik hierbij open vuur. Open het raam
en ventileer de kamer. Neem daarna contact op met een
door SHARP goedgekeurde servicedienst voor reparatie.
Installatie
■Plaats de koelkast niet in een vochtige of natte ruimte. Dit
zou schade aan de isolatie of een elektrische lek kunnen
veroorzaken. Er zou ook condensatie op de buitenkant
van de koelkast kunnen ontstaan en dit veroorzaakt roest.
■De koelkast dient vlak en stevig op de grond worden geïn-
stalleerd.
Stroomkabel, stekker, stopcontact
Lees de volgende voorschriften zorgvuldig door om een elektrische schok of brand te voorkomen.
■Steek de stekker stevig en rechtstreeks in het stopcontact.
Gebruik hiervoor geen verlengsnoer of adapterstekker.
■Steek de stekker in het stopcontact met de vereiste nomi-
nale spanning.
■Verbind de aardpin op de juiste manier met de aardings-
aansluiting.
■Zorg ervoor dat u de stroomkabel tegen beschadiging be-
schermt tijdens de installatie of verplaatsing. Als de stekker of
stroomkabel los zit, steek dan niet de stekker in het stopcontact.
■Raak de stekker niet met natte handen aan.
■Ontkoppel van de stroomvoorziening door de stekker uit
het stopcontact te verwijderen. Trek hierbij niet aan de
stroomkabel.
■Stof op de stekker kan brand veroorzaken. Veeg dit voorzichtig
van de stekker af.
■Trek de stekker uit het stopcontact als de koelkast voor een
langere periode niet wordt gebruikt.
■Als het exibele netsnoer beschadigd is, dient
erkend SHARP onderhoudspersoneel dit te vervangen door een speciaal snoer.
In gebruik
■Bewaar geen vluchtige en ontvlambare materialen zoals ether,
benzine, propaangas, aerosolblikjes, lijm en pure alcohol etc.
Deze materialen zijn explosiegevoelig.
■Sla geen temperatuurgevoelige producten in de koelkast op,
zoals farmaceutische producten. Er bestaat een grote kans op
veranderingen in de productkwaliteit.
■Probeer niet om deze koelkast te veranderen of aan te passen.
Dit kan een brand, elektrische schok of letsel veroorzaken.
■Plaats geen voorwerp bovenop de koelkast. Als dit voorwerp
van de koelkast afvalt, kan dit letsel veroorzaken.
■Sla niet hard op glazen deuren. Deze kunnen breken en lichamelijk letsel veroorzaken. <SJ-XG690G, SJ-XG740G >
■Dit apparaat kan worden gebruikt door kinderen
vanaf 8 jaar en personen met verminderde fysieke, zintuiglijke of mentale vermogens of gebrek
aan ervaring en kennis indien zij onder toezicht
staan of instructie over veilig gebruik van het apparaat hebben gekregen of de mogelijke gevaren
begrijpen. Kinderen mogen niet met het apparaat
spelen. Schoonmaak en gebruiksonderhoud mag
niet door kinderen zonder toezicht worden uitgevoerd.
Onderhoud en reiniging
■Trek de stekker van de koelkast eerst uit het stopcontact om
een elektrische schok te voorkomen.
■Spat geen water rechtstreeks op de buitenkant of het interieur.
Dit kan tot roestvorming en aantasting van de elektrische isolatie leiden.
Problemen
■Indien u iets ruikt branden, trek dan onmiddellijk de stekker uit
het stopcontact. Neem daarna contact op met een door SHARP
goedgekeurde servicedienst voor reparatie.
■In het geval van een gaslek dient u de ruimte te ventileren door
een raam te openen. Raak de koelkast of het stopcontact niet aan.
Klimaat-
klasse
Acceptabel bereik van de
omgevingstemperatuur
SN +10°C tot 32°C
N +16°C tot 32°C
ST +16°C tot 38°C
T +16°C tot 43°C
Veiligheidsinformatie
WAARSCHUWING
Dit betekent dat het risico op overlijden of ernstig letsel behoorlijk hoog is.
VOORZICHTIG
Dit betekent dat de risico's op persoonlijk letsel of materiële schade behoorlijk hoog zijn.
WAARSCHUWING
Page 89

NL-2
NL
Verwijdering
■Zorg ervoor dat de koelkast geen gevaar voor
kinderen vormt, terwijl deze tot de verwijdering wordt
opgeslagen. (bijv. verwijder de deur om te voorkomen
dat kinderen bekneld kunnen raken.)
■Deze koelkast dient op de juiste manier te worden
verwijderd. Breng de koelkast naar een professionele
recyclinginstallatie voor ontvlambare koelmiddelen en
isolatieblaasgassen.
Transport
■Indien u uw koelkast installeert of verplaatst, gebruik
dan de mat om de grond
tegen beschadiging te beschermen.
■Draag de koelkast aan de
handgrepen die zich aan de
achterkant en onderkant van
de koelkast bevinden. Indien
u de koelkast onjuist optilt,
kan dit letsel veroorzaken.
VOORZICHTIG
In gebruik
■Raak de compressoreenheid of diens randapparatuur
niet aan. Deze worden extreem heet tijdens het
gebruik en de metalen randen kunnen verwondingen
veroorzaken.
■Raak voedsel of metalen bakjes in het vriesgedeelte
niet met natte handen aan. Dit kan namelijk resulteren
in bevriezing van uw handen.
■Zet geen essen en blikjes in de vriezer.
Voornamelijk als de functie “Snel afkoelen” in gebruik
is, bestaat er een groot risico dat glazen essen
barsten.
■Gebruik geen ander water dan drinkbaar water voor
het maken van ijsblokjes.
■Doe de deur niet open of dicht als iemand een hand
dichtbij de deur heeft. Er bestaat anders een risico dat
iemands vingers tussen de deur klem komen te zitten.
■Plaats geen te grote objecten in de binnenvakken van
de deur. Deze objecten kunnen anders uit de vakken
vallen en letsel veroorzaken.
■Pak de glasplanken voorzichtig vast als u deze plaatst
of verwijdert. Als u de glasplanken laat vallen, kunnen
deze breken of letsel veroorzaken.
rear
bottom
Installatie
Vrijstaand model
1
Zorg voor voldoende ventilatieruimte rond de koelkast.
• De afbeelding toont
de vereiste minimumafstand om de
koelkast te installeren. De afmeting
voor het energieverbruik is uitgevoerd
onder andere ruimteomstandigheden.
• Door de afstand te
vergroten kan de
koelkast gebruikt worden met een lager energieverbruik.
• Als de koelkast wordt gebruikt met minder ruimte
dan in de onderstaande afbeelding wordt aangegeven, kan dit een verhoging van de temperatuur,
lawaai en storingen in het apparaat veroorzaken.
• De afstand tussen de achterkant van de koelkast
en de wand dient meer dan 50 mm en minder dan
75 mm te bedragen. Als deze afstand groter is dan
75 mm, kunt u verwondingen oplopen door aanraking van de compressor en diens randapparatuur,
die tijdens het gebruik extreem heet worden.
90mm
or more
60mm
or more
60mm
or more
Zorg voor voldoende ruimte rond de koelkast voor het gebruik
2
Gebruik de twee verstelbare
voetjes aan de voorkant om de
koelkast vlak en stevig op de
grond te plaatsen.
3
Sluit het apparaat aan op een correct geïnstalleerd
stopcontact.
Opmerking
• Verplaats uw koelkast om bij de stekker te kunnen
komen.
• Houd uw koelkast uit de buurt van direct zonlicht en
plaats hem niet naast een apparaat dat warm wordt.
• Plaats uw koelkast niet direct op de grond. Zorg voor
een passende ondergrond, zoals een houten plank
onder de koelkast.
• Wanneer u de stekker in het stopcontact steekt met
een geopende deur zal er een alarm te horen zijn,
maar dat is normaal. Dit geluid stopt na het sluiten van
de deur.
Er bevinden zich vier zwenkwieltjes onder de koelkast
• Deze zwenkwieltjes maken het mogelijk om de
koelkast naar voor en achter te verplaatsen.
Voordat u uw koelkast in gebruik neemt
• Maak de binnenkant schoon met een doekje gedrenkt
in warm water.
• Indien u zeepsop gebruikt om schoon te maken, dient
u de koelkast daarna grondig met water af te nemen.
1550 mm
1450 mm
790 mm
935 mm
Verstelbaar voetje
Zwenkwieltjes (4 stuks)
achter
bodem
60 mm of
meer
90 mm of
meer
60 mm of
meer
Page 90

NL-3
Twee-wegs versvakdeur
Omschrijving
1. Vriezerlamp
<alleen voor SJ-XG690G, SJ-XG690M,
SJ-XG740G, SJ-XG740M>
2. Verplaatsbare ijsmaker
<alleen voor SJ-XG640M,
SJ-XG690G, SJ-XG690M>
3. Vriezerplank (boven)
4. Vriezerplank (onder)
5. Vriesvak
Verplaats het tussenschot naar
gelang de omvang van het
voedsel.
6. Twee-wegs versvakdeur
7. Versplank
8. Geurverdrijvingseenheid
De deodoriserende katalysator is geïnstalleerd
langs de routes van de koude lucht. Deze hoeft niet
bediend of gereinigd te worden.
9. Koelkastlamp
10. Koelkastplank
11. Hybride koelpaneel
Het paneel koelt het koelkastgedeelte indirect vanaf
de achterkant. Op deze manier wordt het voedsel
geleidelijk kouder, zonder dat het aan een koude
luchtstroom wordt blootgesteld.
12. Fruit- en groenteplank
13. Fruit-e en groentecrisper
14. Verstelbaar voetje
15. Magnetische deurafdichting
16. Bedieningspaneel
17. Deurvak vriezer
18. Deurijsmaker
<alleen voor
SJ-XG740G, SJ-XG740M
>
(Deze ijsmaker bevindt zich in de vriezer. Kijk
op de volgende pagina "Na de reiniging" voor de
installatie.)
19. Waterbeker
<alleen voor SJ-XG740G, SJ-XG740M>
(De waterbeker bevindt zich in het vriesvak. Plaats
de beker voor het gebruik in de aangegeven positie
zoals afgebeeld in bovenstaande afbeelding.)
20. Eierhouder
21. Deurvak koelkast (boven)
22. Flesvak
23. Deurvak koelkast (onder)
Als u grote producten in uw koelkast wilt bewaren
• U kunt hiervoor de planken of vakken met de nummers
2,3,5,6,7,10,13,17, 18, 19, 20, 21, 22, 23 in de
afbeelding hierboven verwijderen.
• De koelprestatie wordt niet beïnvloed, zelfs als u de
koelkast in de bovenvermelde situatie gebruikt.
Gebruik de ruimte
als koelkastruimte.
Gebruik de ruimte als
versvak.
De twee-wegs versvakdeur openen
1) Til de deur op.
2) Schuif de deur in het frame en
druk deze naar achter tot aan
de stopper. Nu is de deur juist
vergrendeld.
Open Close
SJ-XG740G,SJ-XG740M
SJ-XG640M, SJ-XG690G,SJ-XG690M
1
3
4
5
7
6
8
9
1
1
14
14
13
15
19
18
15
16
20
22
23
12
10
1
3
4
2
5
7
6
8
9
11
14
14
13
15
15
17
16
20
22
23
12
10
21
21
17
Partition
Freezer case
Tussenschot
Vriesvak
Open Dicht
Page 91

NL-4
NL
Ijsmaker in de deur (SJ-XG740G,SJ-XG740M)
Ijsklontjes maken
1)
Gebruik de waterbeker om de hoeveelheid water te meten.
Waterpeil
Waterbeker (160 ml)
2) Schenk het water in de deurijsmaker met de waterbeker.
3) Als de ijsblokjes zijn gemaakt, draai dan de hendel met
de klok mee om het ijs in de ijsopslagbak te doen.
4)
Trek aan de ijsopslagbak om de ijsklontjes eruit te halen.
Ijsopslagbak
Hendel
Opmerking
• Om te voorkomen dat de ijsopslagbak beschadigd
raakt, mag u er geen olie ingieten of ijs in maken.
• Open de diepvriesdeur zo min mogelijk als u ijs maakt.
De deurijsmaker reinigen
• Maak van tevoren de ijsopslagbak leeg.
1) Trek de deurijsmaker omhoog om deze te verwijderen.
2) Verwijder de ijslade.
3) Verwijder de ijsopslagbak.
4) Druk het uitsteeksel in om de deurijsmaker te demonteren.
Ijsopslagbak
Uitsteeksel
2)
3)
Opmerking
• Plaats de ijslade niet in de vaatwasser. Als u dit wel
doet, kunnen de pakkingen beschadigd raken.
Na de reiniging
1) Monteer de deurijsmaker.
(Omgekeerde procedure ten opzichte van demontage.)
2
) Installeer de deurijsmaker en zorg dat deze stevig vastzit.
Gat
Haak
Deurijsmaker
Deur
<Positie van de hendel>
Hendel
Hendel
Verplaatsbare ijsmaker (SJ-XG640M, SJ-XG690G, SJ-XG690M)
Het wordt sterk aanbevolen deze ijsmaker te gebruiken zoals weergegeven in de afbeelding bij "Omschrijving". U kunt
de ijsmaker overal in de vriezer plaatsen..
1) Vul dit bakje niet te vol met
water. Anders zullen de
ijsblokjes aan elkaar vast
vriezen.
2) Als de ijsblokjes zijn gemaakt, draai dan de hendel
met de klok mee om het ijs in
de ijsopslagbak te doen.
Opmerking
• Zorg ervoor dat de ijsmaker plat ligt, zodat er geen
water uit het ijsblokbakje lekt.
• Om te voorkomen dat de ijsopslagbak beschadigd
raakt, mag u er geen olie ingieten of ijs in maken.
Hendel
Ijsopslagbak
Page 92

NL-5
Nuttige modi
Bekijk voor de bediening het hoofdstuk "Bedieningspaneel".
Extra koelen
Snelvriesfunctie
Snel afkoelen
Extra koelen Snelvriesfunctie Snel afkoelen
Functie
Deze modus koelt dranken snel en koelt voedsel
af tot ijskoud.
Opmerking:
Voedsel met
een hoog vochtgehalte
zou kunnen bevriezen.
Deze modus is
bedoeld om voedsel
snel in te vriezen of
om ijs te maken.
Deze modus is voor het snel afkoelen van
dranken of voedsel.
Gebruik Versvak Vriesvak Vriezer
VOORZICHTIG:
Geen glazen essen plaatsen.
Het risico bestaat dat deze barsten.
Bedrijfstijd
6 uur
*
1
2 uur
*
1
30 minuten
• Deze modus eindigt automatisch.
• Het alarm klinkt niet.
• Deze modus eindigt automatisch.
• Het alarm klinkt.
Om het alarm te stoppen*
2
of
Druk op de
“Snelvriesfunctie”-toets.
*
1
Het kan langer duren als het gebruik het
ontdooiingsproces overlapt. Deze modus start nadat
het ontdooien is voltooid.
*
2
Als u het alarm niet uit zet, blijft het gedurende 30
minuten continu klinken.
Opmerking
• Extra koel, de snelvriesfunctie en de snelkoelfunctie zijn
niet beschikbaar als een van de andere modi in gebruik
is.
• Vermijd zoveel mogelijk het openen van de deur tijdens
het gebruik van deze modi.
Plasmacluster
schim-
mels
Vriezer
Versvak
Vakantiemodus
• Gebruik deze modus als u op reis gaat of het huis voor
langere tijd verlaat.
• De temperatuur in het koelkastcompartiment wordt
aangepast tot ca. 10°C.
Druk op de
enter-toets.
Opmerking
De koelkast kan vanbinnen een lichte geur hebben.
Dit is de geur van de ozon die door de ionisator wordt
gegenereerd. Het ozongehalte is minimaal en verdwijnt
snel uit de koelkast.
Gebruik deze modus als u de binnenkant van de
koelkast schoon wilt houden.
Het plasmacluster start automatisch als de koelkast
wordt ingeschakeld.
De ionisator binnen uw koelkast geeft clusterionen in het
koelkastcompartiment af. Dit zijn collectieve massa's van
positieve en negatieve ionen.
Deze ionenclusters inactiveren schimmels en bacteriën
in de lucht.
Nadat het gebruik
voltooid is
• Het is niet nodig om de dranken of het
voedsel eruit te halen.
• Haal de dranken en het voedsel eruit als het
alarm klinkt.
• Als u de dranken of het voedsel gedurende circa
30 minuten in de vriezer laat staan, kunnen deze
bevriezen.
Wanneer de
stroom uitvalt
tijdens het gebruik
• Deze modus wordt automatisch geannuleerd. • Deze modus wordt automatisch hervat vanuit de
vorige toestand op het moment dat de stroom
weer beschikbaar is.
Opmerking
• Voedselopslagperiode in het koelkastcompartiment
wordt ca. 1/2-1/3 van de normale werking.
Gebruik deze modus alleen als er geen bederfelijk
voedsel in de koelkast aanwezig is.
• De temperatuur van het koelkastcompartiment kan niet
worden aangepast.
Vriesvak
Page 93

NL-6
NL
Bedieningspaneel
(SJ-XG690G, SJ-XG740G)
Opmerking
• Als u op een van de toetsen drukt, knipperen alle
iconen gelijktijdig en het stand-bydisplay wordt getoond.
• Modusiconen of -indicators die in gebruik zijn, lichten
op in het stand-bydisplay.
Als de snelkoelfunctie in gebruik is, knippert het icoon
in het stand-bydisplay.
• Als er gedurende ca. 1 minuut geen toetsen worden
ingedrukt, dan keert het display automatisch terug
naar het stand-bydisplay. Het stand-bydisplay schakelt
uit als er gedurende nog eens 1 minuut geen toetsen
worden ingedrukt.
• Als de koelkast uitvalt vanwege een stroomstoring,
blijven de modi hetzelfde functioneren als op het
moment voor de stroomuitval, met uitzondering
van de Extra koel-functie, de snelvriesfunctie en de
snelkoelfunctie.
Ingeschakelde
toestand
Als u op de toets drukt, veranderen de iconenen in de hieronder aangeduide volgorde.
Selecteer het modusicoon.
Alleen “snelkoelfunctie”
3
Voltooi de instelling door deze toets gedu-
rende 3 seconden of langer in te drukken.
(Piep, piep, piep)
Gebruik van nuttige modi
1
Standby display
or
2
3
Selecteer on/off.
In- of uitschakelen door achtereenvolgens op de selectietoets te drukken.
Voltooi de instelling.
Huidige instelling
(toont ‘OFF')
De instelling is gewijzigd.
Gebruik van aanvullende modi
Deuralarm
• Als de koelkastdeur gedurende 1 minuut wordt open
gelaten, dan klinkt het alarm één keer en na 1 minuut
nog een keer.
• Als de deur ca. 3 minuten wordt open gelaten, dan
klinkt het alarm voortdurend.
• Het alarm stopt na het sluiten van de deur.
Uitschakelen
Druk gedurende 3 seconden of langer gelijktijdig op
en .
(Piep, piep, piep)
Geluid van toetsbediening
• Het elektrische geluid klinkt telkens als u de toetsen
bedient.
Opmerking
Als u wilt overschakelen naar de aanvullende modus, volg
dan nogmaals dezelfde stappen. (De indicator gaat aan.)
Uitschakelen
Druk gedurende 3 seconden of langer gelijktijdig op en .
(Piep, piep, piep)
De indicator gaat
uit.
De indicator gaat
uit.
Bedieningstoetsen
Freezer
compartment
-18°C
3°C
Refrigerator
compartment
Temperatuurregelingsiconen
Nuttige modi-iconen Aanvullende modi
Icoon
Icoon
Betekenis
Vriezer
Koelkast
Standaard
instelling
Standaard
instelling
UIT
Indicator
Betekenis
Standaard
instelling
Deuralarm
AAN
Geluid van
toetsbediening
Stand-bydisplay
Betekenis
Extra koelen
Snelvriesfunctie
Snel afkoelen
Plasmacluster
Vakantiemodus
of
Page 94

NL-7
Temperatuurregeling
De huidige temperatuurinstelling controleren
De koelkast regelt zijn temperatuur automatisch. U kunt de temperatuur echter aanpassen zoals hieronder beschreven.
Selecteer het icoon of .
De koelkast/ vriezer instellen
Vriezer
: Aanpasbaar tussen -13°C en -21°C in stappen van 1°C
Koelkast
: Aanpasbaar tussen 0°C en 6°C in stappen van 1°C
1
1
or
2
Selecteer het icoon of .
Selecteer de temperatuur
3
Voltooi de instelling.
Als u op de toets drukt, veranderen de iconenen in
de hieronder aangeduide volgorde.
Standby display
De instelling is gewijzigd.
omschakeling
Vriezer
Koelkast
Geavanceerde instelling van de koelkast/vriezer
De temperatuur van de vriezer en koelkast kan aangepast worden in
stappen van 0,5°C door de volgende stappen a tot c te volgen.
a.
Na stap 1 van de “Basisbedieningen”, drukt u gedurende
3 seconden of langer op . (Piep, piep, piep) De huidige, vooraf
ingestelde temperatuur wordt teruggezet naar de “Standaard
instelling”. (Het display ziet eruit zoals rechts afgebeeld.)
b.
Druk op of en stel de temperatuur in.
c.
Voltooi de instelling.
(Hetzelfde als stap 3 van “Basisbedieningen".)
Volg de stappen a tot c nogmaals als u de temperatuur wilt instellen
in stappen van 1°C.
Stand-bydisplay
of
Page 95

NL-8
NL
Gebruik van nuttige modi
Starten
Annuleren
Extra koelen
Snelvriesfunctie
Vakantiemodus
Druk op de modustoets.
(Piep)
Druk op de
modustoets.
(Piep)
Snel afkoelen Houd de modustoets
gedurende 3 seconden
ingedrukt.
(Piep, piep, piep)
Druk op de
modustoets.
(Piep)
• Als de koelkastdeur gedurende 1 minuut wordt open gelaten, dan klinkt het alarm één keer en na 1 minuut nog een keer.
• Als de deur ca. 3 minuten wordt open gelaten, dan klinkt het alarm voortdurend.
• Het alarm stopt na het sluiten van de deur.
Het deuralarm stopt niet.
Als het deuralarm niet stopt nadat u alle deuren gesloten hebt, is er sprake van een defect.
Neem contact op met het servicecentrum van SHARP voor hulp.
Methode om het deuralarm tijdelijk te stoppen
• Druk gelijktijdig op de toetsen “F” en “R” en houd deze gedurende
3 seconden of langer in gedrukt. (Piep, piep, piep)
• Na ca. 2 dagen klinkt het deuralarm weer.
Bedieningspaneel
Temperatuurregelingsiconen Nuttige modi-iconen
Opmerking
• Alle modi zijn in eerste instantie uitgeschakeld. Als u op
een van de toetsen drukt, dan is het bedieningspaneel
actief na de piep.
• Als u op een van de toetsen druk, dan licht de
indicator op van de modus die in gebruik is. Als de
snelkoelfunctie in gebruik is, knippert de indicator.
• Als u de temperatuur indicator wilt laten oplichten,
dan drukt u op de toets “F” of “R” terwijl het
bedieningspaneel actief is.
*Het plasmacluster werkt automatisch als de koelkast
wordt ingeschakeld.
Deze functie hoeft niet in- of uitgeschakeld te worden.
• Als er daarna gedurende 1 minuut nog niets is
ingetoetst, dan schakelt het display automatisch uit.
• Als de koelkast uitvalt vanwege een stroomstoring,
blijven de modi hetzelfde functioneren als op het
moment voor de stroomuitval, met uitzondering
van de Extra koel-functie, de snelvriesfunctie en de
snelkoelfunctie.
Toets Betekenis Standaard
instelling
Extra koelen
UIT
Snelvriesfunctie
Snel afkoelen
Vakantiemodus
Plasmacluster AAN*
Toets Betekenis Standaard
instelling
De temperatuur van de
vriezer regelen
De temperatuur van de
koelkast regelen
Lampje
Uitschakelen
Knippert Uitschakelen
(SJ-XG640M, SJ-XG690M, SJ-XG740M)
Deuralarm
Page 96

NL-9
Temperatuurregeling
De huidige temperatuurinstelling controleren
De indicator licht op om het huidige temperatuurniveau
te tonen indicator, druk hiertoe op de toets “F” of “R”.
Vriezer : Druk op de toets “F”.
Koelkast : Druk op de toets “R”.
De koelkast/ vriezer instellen
Vriezer
1.
Druk op de toets “F”.
2.
Druk op de toets “F” om het temperatuurniveau te veranderen.
Koelkast
1.
Druk op de toets “R”.
2.
Druk op de toets “R” om het temperatuurniveau te veranderen.
• Door op de toets “F” of “R” te drukken, verandert de temperatuurindicator zoals in de onderstaande afbeelding (
3→4→5→1→2→3
).
Geavanceerde instelling van de koelkast/vriezer
De temperatuur van de vriezer en koelkast kan aangepast worden
in 9 niveaus (niveau 1 ~ 9) door de stappen a tot b te volgen.
Vriezer
a.
Druk eerst op de toets “F”.
Houd de toets “F” ingedrukt en houd vervolgens de knop
“Snelvriezen” gedurende 3 seconden of langer ingedrukt.
(Piep, piep, piep)
De indicator keer terug naar de
“Standaard instelling”.
b.
Druk op de toets “F” om het
temperatuurniveau te veranderen.
Volg de stappen a tot b als u de temperatuur in 5 niveaus wilt
aanpassen.
Koelkast
a.
Druk op de toets “R”.
Houd de toets “R” ingedrukt en houd vervolgens de knop
“Snelvriezen” gedurende 3 seconden of langer ingedrukt.
(Piep, piep, piep)
De indicator keer terug naar de
“Standaard instelling”.
b.
Druk op de toets “R” om het temperatuurniveau te veranderen.
Volg de stappen a tot b als u de temperatuur in 5 niveaus wilt
aanpassen.
• Door op de toets “F” of “R” te drukken, verandert
de temperatuurindicator zoals in de onderstaande
afbeelding (
5→6→7→8→9→1→2→3→4→5
).
UIT Lampje Knippert
De koelkast regelt zijn temperatuur automatisch. U kunt de temperatuur echter aanpassen zoals hieronder beschreven.
Opmerking
Nadat u het temperatuurniveau hebt aangepast, gaat de
indicator na ca. 5 seconden uit.
1
2
3
4
5
Level
Indicator
Default setting
1
2
3
4
5
6
7
8
9
Default setting
Level
Indicator
... ...
...
Standaard instelling
Niveau
Indicator
Standaard instelling
Niveau
Indicator
Page 97

NL-10
NL
IN
UIT
• Vries kleine hoeveelheden voedsel per keer in om ze
snel te kunnen bevriezen.
• Voedsel dient op de juiste manier te worden verpakt en
goed te worden afgedekt.
• Leg het voedsel goed verdeeld in de vriezer.
• Voorzie zakken of containers van labels om de diepvriesproducten op de juiste manier te inventariseren.
Advies ter voorkoming van condens
of aanvriezing binnen de koelkast
• Zorg ervoor dat het voedsel zo vers mogelijk is om de houdbaarheid van bederfelijk voedsel te maximaliseren. Hier volgt
een algemene richtlijn om u te helpen het voedsel zo lang mogelijk op te kunnen slaan.
• Voedsel heeft een beperkte houdbaarheid. Zorg ervoor dat u de houdbaarheidsdatum van de fabrikant niet overschrijdt.
• De hoeveelheid energieverbruik van dit model
wordt gemeten zoals weergegeven in de afbeelding
hieronder.
• Installeer de koelkast in een goed geventileerde
ruimte en houd rondom ruimte over voor de
ventilatie.
• Houd uw koelkast uit de buurt van direct zonlicht
en plaats hem niet naast een apparaat dat warm
wordt.
• Vermijd zoveel mogelijk het openen van de deur.
• Warm voedsel dient te worden afgekoeld voordat
u het opslaat.
• Plaats het voedsel goed verdeeld op de planken
zodat de koele lucht efciënt kan circuleren.
Tips voor energiebesparing
Opslag van voedsel
300
mm300 mm
90
mm
50
mm
Fruit/Groente
• Fruit en groente dienen in een ruime plastic
verpakking, bijv. in folie of een zakje (niet afgesloten),
te worden bewaard en in de fruit- en groentecrisper te
worden geplaatst om vochtverlies te minimaliseren.
• Fruit en groente die gemakkelijk door een lage
temperatuur raken aangetast, dienen op een koele
plaats buiten de koelkast te worden bewaard.
Zuivelproducten & Eieren
• De meeste zuivelproducten hebben hun
houdbaarheidsdatum op de buitenverpakking staan,
die informeert over de aanbevolen temperatuur en
opslag van het voedsel.
• Eieren dienen in de eierhouder te worden bewaard.
Vlees/Vis/Gevogelte
• Leg op een bord of schotel en bedek met papier of
plastic folie.
• Plaats grotere stukken vlees, vis of gevogelte achterin
op de planken.
• Zorg ervoor dat al het gekookte voedsel zorgvuldig
wordt ingepakt of in een luchtdichte container wordt
geplaatst.
• Verse etenswaren (goed verpakt) dient gedurende een
beperkte tijd bewaard te worden om te voorkomen dat
het bederft en een slechte uitwerking heeft op andere
bewaarde etenswaren.
Vriezer
Koelkast
Advies voor het opslaan van voedsel
• Houd de deur goed gesloten. Als het voedsel naar beneden valt, kan dit een spleet tussen de koelkast en de
deur veroorzaken. Verplaats het dan terug op de plank
of in een vak.
• Open en sluit de deur zo snel mogelijk. Condens of
aanvriezing kan ontstaan als de deur gedurende lange
tijd open gelaten wordt of als de deur vaak geopend en
gesloten wordt.
• Opgeslagen artikelen dienen te worden verpakt of verzegeld met bijv. voedselcontainers of plastic folie/zakjes. (Voornamelijk etenswaren die veel vocht bevatten)
• Plaats het voedsel goed verdeeld op de planken zodat
de koele lucht efciënt kan circuleren.
• Warm voedsel dient te worden afgekoeld voordat u
het opslaat. Het opslaan van warm voedsel verhoogt
de temperatuur in de koelkast en het risico op
voedselbederf.
• Blokkeer de toe- en afvoer van het koelcirculatiecircuit
niet met het voedsel of de containers. Anders wordt het
voedsel niet gelijkmatig door de koelkast gekoeld.
• Plaats geen voedsel direct voor de koude luchtafvoer.
Hierdoor kan het voedsel
gaan bevriezen.
Page 98

NL-11
Volg de onderstaande tips om scheuren in de oppervlaktes
binnenin de koelkast en zijn plastic onderdelen te voorkomen
• Verwijder olie van het voedsel van de plastic onderdelen.
• Sommige huishoudelijke chemicaliën kunnen schade veroorzaken, dus gebruik hiervoor alleen een verdund afwasmiddel
(zeepsop).
• Als een onverdund wasmiddel of zeepsop wordt gebruikt en dit
niet grondig wordt afgeveegd, kan dit scheuren in plastic onderdelen veroorzaken.
Als uw koelkast voor een langere periode dient te
worden uitgeschakeld, dien u de volgende stappen uit te
voeren om de groei van schimmels tegen te gaan
1. Verwijder al het voedsel.
2. Trek de stekker uit het stopcontact.
3. Reinig en droog de binnenkant grondig.
4. Houd de deuren een paar dagen op een kier om te drogen.
Onderhoud en reiniging
Het ontdooien wordt automatisch uitgevoerd door
een uniek energiebesparend systeem. (Ca. een keer
per dag.) Het kost tijd om ijs te maken, omdat de
temperatuur binnenin iets hoger wordt dan normaal
tijdens het ontdooien.
Opmerking
• Gebruik geen zware reinigingsmiddelen of
oplosmiddelen (lak, verf, poetspoeder, benzine,
gekookt water etc.), want dit kan schade veroorzaken.
• Indien u de stekker uit het stopcontact hebt getrokken,
wacht dan minstens 5 minuten voordat u de stekker
weer terug in het stopcontact steekt.
• De glasplanken wegen ca. 3 kg per stuk. Houd deze
stevig vast als u deze uit de koelkast verwijdert en
draagt.
• Laat geen voorwerpen in de koelkast vallen of tegen
de binnenwanden botsen. Dit kan scheuren aan de
binnenkant van de koelkast veroorzaken.
• Verwijder de accessoires (bijv. planken) uit de koelkast
en de binnenkant van de deur. Was deze af met warm
zeepsop. Spoel ze daarna af met schoon water en
droog ze. (Alleen de fruit- en groenteplank is niet
uitneembaar)
• Maak de binnenkant schoon met een doekje gedrenkt
in warm zeepsop. Gebruik daarna koud water om het
zeepsop grondig af te vegen.
• Veeg de buitenkant van de koelkast met een zachte
doek schoon als deze vuil is.
• Reinig de magnetische deurafdichting met een
tandenborstel en warm zeepsop.
• Veeg het bedieningspaneel af met een droge doek.
<SJ-XG640M, SJ-XG690M, SJ-XG740M>
Verwijder water uit de verdampbak. Alvorens u het water
wegveegt, wacht u meer dan 1 uur nadat u de stekker uit
het stopcontact hebt getrokken. De koelcyclusapparatuur
is extreem heet. (De verdampbak bevindt zich aan de
achterkant van het product.)
Verdampbak
Voorafgaand aan het transport
Reiniging
Belangrijk
Ontdooien van de koeleenheid
Als het compartimentlicht
kapot is
Uitschakelen van uw
koelkast
Neem hiervoor contact op met een servicedienst, die
door SHARP is goedgekeurd, om het licht te vervangen.
Het licht mag niet door iemand anders dan een hiervoor
gekwaliceerde monteur worden vervangen.
Page 99

NL-12
NL
Voordat u de servicedienst belt
Voordat u de servicedienst belt, adviseren wij u om de volgende punten te controleren.
Probleem Oplossing
De buitenkant van de koelkast
voelt heet aan.
Dit is normaal. Dit komt doordat er een hete buis in de koelkast zit die de
ontwikkeling van dauw voorkomt.
De koelkast produceert een
hard geluid.
De volgende geluiden zijn normaal.
• De compressor produceert een hard geluid als hij begint te functioneren.
-- Dit geluid wordt zachter na een tijdje.
• De compressor produceert 1x per dag een hard geluid.
-- Onmiddellijk na de automatische ontdooiing van de koeleenheid hoort u een
bedrijfsgeluid.
• Het geluid van een stromende vloeistof (borrelend, bruizend geluid)
-- Dit wordt veroorzaakt door het koelmiddel in de buizen (geluid kan af en toe
wat luider zijn).
• Scheurend of krakend geluid, piepgeluid
-- Dit wordt veroorzaakt door de expansie en samentrekking van de binnenwanden
en de onderdelen binnenin tijdens het koelproces.
Er verschijnt bevriezing of dauw
binnen of buiten de koelkast.
Dit kan zich voordoen in een van de volgende gevallen. Gebruik een natte doek
voor het afvegen van bevriezing en een droge doek voor het afvegen van dauw.
• Wanneer de omgevingstemperatuur hoog is.
• Als de deur regelmatig open en dicht wordt gedaan.
• Als er voedsel met veel vocht wordt opgeslagen. (dit dient te worden verpakt)
• Dit fenomeen doet zich seizoensafhankelijk voor (regenseizoen), of afhankelijk
van gebruiksgewoonten en omgevingsfactoren van elk huis.
Het voedsel in
het koelkastcompartiment
is bevroren.
SJ-XG690G,
SJ-XG740G
• Wordt de koelkast gedurende lange tijd gebruikt met de koelkasttemperatuur
ingesteld op 0°C?
-- Verander de temperatuur terug naar ca. 3°C.
• Wordt de koelkast gedurende lange tijd gebruikt met de vriezertemperatuur
ingesteld op -21°C?
-- Verander de temperatuur terug naar ca. -18°C.
• Als de omgevingstemperatuur laag is, kan het voedsel zelfs bevriezen als het
koelkastcompartiment is ingesteld op 6°C.
SJ-XG640M,
SJ-XG690M,
SJ-XG740M
• Wordt de koelkast gedurende lange tijd gebruikt met de koelkasttemperatuur
ingesteld op MAX COLDEST?
-- Verander de temperatuurregeling naar een andere instelling.
• Wordt de koelkast gedurende lange tijd gebruikt met de vriezertemperatuur
ingesteld op MAX COLDEST?
-- Verander de temperatuurregeling naar een andere instelling.
• Als de omgevingstemperatuur laag is, kan het voedsel zelfs bevriezen als het
koelkastcompartiment is ingesteld op MIN.
Geuren in het compartiment. • Voedsel met sterke geuren dient te worden verpakt.
• De geurverdrijvingseenheid kan niet alle geuren verwijderen.
• Maak de binnenkant regelmatig schoon.
Het bedieningspaneel werkt
niet.
Dit kan zich voordoen in een van de volgende gevallen.
• Het paneel of uw vinger is nat van vocht, olie etc.
• Als u het paneel aanraakt met een handschoen, een pleister op uw vinger, uw
nagel of een voorwerp.
• Er is een sticker of tape op de toetsen aangebracht.
• De aanraakpositie bevindt zich niet precies onder de toetsen.
• Bedrijfstijd is niet lang genoeg voor de toetsen om te functioneren.
De lamp gaat uit, zelfs als de
deuren openstaan.
• De lichtschakelaar is bedoeld om de lampen
in- en uit te schakelen.
Als de hoek van de deuren hetzelfde is,
gaan de lampen uit, ondanks dat de deuren
geopend zijn. Dit is normaal.
Indien u nog steeds hulp nodig heeft
Raadpleeg uw dichtsbijzijnde servicedienst die door SHARP is goedgekeurd.
Light switch
Lichtschakelaar
Page 100

NL-13
Productche
BIJLAGE
III
(EU) Verordening nr.1060/2010
A
Merk
B
Modelnaam
SJ-XG640M
SJ-XG690G
SJ-XG690M
SJ-XG740G
SJ-XG740M
C
Categorie 7
D
Energie-efciëntieklasse A
++
E
EU Ecolabel award —
F
Jaarlijks energieverbruik *
1
[KWh/jaar] 320
G
Opslagvolume van alle compartimenten zonder
steraanduiding [ L ]
354 394 420
H
Opslagvolume van alle opslagcompartimenten
voor bevroren voedsel met een steraanduiding [ L ]
162 176
I
De designtemperatuur van een ‘ander
compartiment’ warmer dan +14°C
—
J
Vorstvrij
JA
K
Stijgtijd temperatuur [ h ] 19
L
Invriescapaciteit [Kg/24h] 7,3 8,1
M
Klimaatklasse T
N
Emissie van akoestisch luchtgeluid
[dB(A)]
38
O
Inbouwapparaat Nee (vrijstaand type)
*1 Energieverbruik "XYZ” kWh per jaar, gebaseerd op standaard testresultaten voor 24 uur.
Werkelijk energieverbruik hangt af van hoe het apparaat wordt gebruikt en waar het zich bevindt.
Temperatuurindicator
Deze koelkast is uitgerust met een temperatuurindicator in het koelkastcompartiment zodat u de gemiddelde temperatuur
in de koudste zonen kunt controleren.
Koudste zone
Het symbool geeft de koudste
zone in het koelkastcompartiment
aan. (Het deurvak dat zich op
dezelfde hoogte bevindt is niet de
koudste zone.)
Symbool
De temperatuur in de koudste zone controleren
U kunt regelmatige controles uitvoeren om ervoor te
zorgen dat de temperatuur in de koudste zone correct
is. Indien noodzakelijk kunt u de koelkasttemperatuur
aanpassen.
Om een correcte temperatuur in het apparaat
te behouden, dient u te controleren of de
temperatuurindicator altijd BLAUW is. Als de
temperatuurindicator WIT wordt, dan is de temperatuur
te hoog. Verlaag in dit geval de koelkasttemperatuur en
wacht 6 uur alvorens u de temperatuurindicator nogmaals
controleert.
BLAUW
Correcte instellingen
WIT
De temperatuur is te hoog, pas de
koelkasttemperatuur aan.
Opmerking
• De interne temperatuur van de koelkast is afhankelijk
van diverse factoren, zoals de omgevingstemperatuur
van de ruimte, de hoeveelheid voedsel dat bewaard
wordt en van het aantal keren dat de deur geopend
wordt.
• Als u vers voedsel in de koelkast ligt of als de deur
een tijdje open staat, dan is het normaal dat de
temperatuurindicator WIT wordt.
 Loading...