

Page 1
OPERATION MANUAL
& INSTALLATION INSTRUCTIONS
REFRIGERATOR
MODEL : SJG2351FS
Refrigerator: Model SJG2351FS
CUSTOMER ASSISTANCE ................................... 2
CONSUMER LIMITED WARRANTY .......................... 3
IMPORTANT SAFETY INSTRUCTIONS ...................... 4
INSTALLATION INSTRUCTIONS ............................. 7
APPEARANCE OVERVIEW .................................. 12
CONTROL AND DISPLAY PANEL ........................... 14
OPERATING REFRIGERATOR............................... 15
CARE AND CLEANING ...................................... 16
TROUBLESHOOTING .......................................17
Page 2
CUSTOMER ASSISTANCE UNITED STATES ONLY
REGISTER YOUR PRODUCT
Registering your new product is easy and offers benets that help you get the most
out of your Sharp product including:
9 Convenience: Ifyoueverneedwarrantysupport,yourproductinformationisalreadyonle.
9 Communication:StayuptodatewithimportantnoticationsandspecialoffersfromSHARP.
9 Support: Quickly access support content including Owner’s Manuals, FAQ’s,
How-toVideos,andmuchmore.
3 EASY WAYS TO REGISTER TODAY!
SCAN
Use the camera or
QR code scanning
application on your
mobile device
Scan this QR Code on your mobile device Visit http://www.sharpusa.com/register
ONLINE
Visit our sites to
learn more about
your product at
sharpusa.com and
sbl.sharpusa.com
Contact a Sharp Advisor on the phone
CALL US
US 800-BE-SHARP
800-237-4277
Mon-Fri: 7am-7pm CST
Sat-Sun: 9am-7pm CST
PRODUCT SUPPORT
If you have questions about the setup or operation of your product, please refer to
the corresponding section within this manual.
Additionally, visit www.sharpusa.com/support to access exclusive content about your
product including:
Æ FAQ’s and How-To Videos
Æ Find or Request Service
Æ Purchase an Extended Warranty
Æ Downloads including the Installation Guide, Spec Sheet, and Owner’s Manual
CONTACT US
If at any time you have questions or comments concerning your SHARP product,
please contact the SHARP Customer Assistance Center. We are available to
assist you through multiple contact methods for your convenience:
EMAIL
Available 24/7
US: sharpusa.com
See the Contact Us section on our sites U.S. | www.sharpusa.com/support Contact a Sharp Advisor on the phone
CHAT ONLINE
Mon-Fri: 7am-7pm CST
Sat-Sun: 9am-7pm CST
2
CALL US
US 800-BE-SHARP
800-237-4277
Mon-Fri: 7am-7pm CST
Sat-Sun: 9am-7pm CST
Page 3

CONSUMER LIMITED WARRANTY
SHARP ELECTRONICS CORPORATION (“Sharp”) warrants to the rst consumer purchaser that this Sharp brand product (the
“Product”), when shipped in its original container, will be free from defective workmanship and materials, and agrees that it will,
at its option, either repair the defect or replace the defective Product or part thereof with a new or remanufactured equivalent at no
charge to the purchaser for parts or labor for the period(s) set forth below.
This warranty does not apply to any cosmetic or appearance items of the Product nor to the additional excluded item(s) set forth below
nor to any Product the exterior of which has been damaged or defaced, which has been subjected to misuse, abnormal service or
handling, or which has been altered or modied in design or construction. In order to enforce the rights under this limited warranty,
the purchaser should follow the steps set forth below and provide proof of purchase to the servicer.
The limited warranty described herein is in addition to whatever implied warranties may be granted to purchasers by law. ALL
IMPLIED WARRANTIES INCLUDING THE WARRANTIES OF MERCHANTABILITY AND FITNESS FOR USE ARE
LIMITED TO THE PERIOD(S) FROM THE DATE OF PURCHASE SET FORTH BELOW. Some states do not allow limitations
on how long an implied warranty lasts, so the above limitation may not apply to you.
Neither the sales personnel of the seller nor any other person is authorized to make any warranties other than those described herein,
or to extend the duration of any warranties beyond the time period described above on behalf of Sharp. The warranties described
herein shall be the sole and exclusive warranties granted by Sharp and shall be the sole and exclusive remedy available to the purchaser.
Correction of defects, in the manner and for the period of time described herein, shall constitute complete fulllment of all liabilities
and responsibilities of Sharp to the purchaser with respect to the Product, and shall constitute full satisfaction of all claims, whether
based on contract, negligence, strict liability or otherwise. In no event shall Sharp be liable, or in any way responsible, for any damages
or defects in the Product which were caused by repairs or attempted repairs performed by anyone other than a Sharp authorized
servicer. Nor shall Sharp be liable or in any way responsible for any incidental or consequential economic or property damage. Some
states do not allow the exclusion of incidental or consequential damages, so the above exclusion may not apply to you.
THIS LIMITED WARRANTY IS VALID ONLY IN THE FIFTY (50) UNITED STATES, THE DISTRICT OF COLUMBIA AND
PUERTO RICO.
Product model number &
description:
Warranty period for this product: One (1) year parts and labor, including in-home service.
Additional item(s) excluded from
warranty coverage:
What to do to obtain service: In-home service is provided for one (1) year from date of purchase. Service can be arranged
TO OBTAIN SUPPLY, ACCESSORY OR PRODUCT INFORMATION, CALL 1-800-BE-SHARP or visit www.sharpusa.com.
SAVE THE PROOF OF PURCHASE AS IT IS NEEDED SHOULD YOUR REFRIGERATOR/FREEZER EVER REQUIRE
WARRANTY SERVICE.
SJG2351FS, Refrigerator/Freezer
Five (5) years parts and labor, for sealed system (condenser, dryer, connecting tube and
evaporator) and compressor, including in-home service.
Commercial, non-residential, or use inconsistent with published installation and product
operational instructions.
Light bulbs.
Any food or medicine loss due to refrigerator or freezer product failures.
In home instruction on how to use your product.
by calling 1-800-BE-SHARP. Be sure to have Proof of Purchase, Model, and Serial Number
available.
3
Page 4

IMPORTANT SAFETY INSTRUCTIONS
MEANING OF SAFETY WARNING
SYMBOLS
PROHIBIT
This is a prohibition symbol. Any incompliance with
instructions marked with this symbol may result in damage
to the product or endanger the personal safety of the user.
WARNING
This is a warning symbol. It is required to operate in strict
observance of instructions marked with this symbol; or
otherwise damage to the product or personal injury may be
caused.
CAUTION
This is a cautioning symbol. Instructions marked with this
sy mb ol requi re special caution. In su fci ent caution may r esult
in slight or moderate injury, or damage to the product.
State of California Proposition 65 Warnings:
WARNING: This product contains one or more chemicals
known to the State of California to cause cancer.
WARNING: This product contains one or more chemicals
known to the State of California to cause birth defects or
other reproductive harm.
WARNING
• Keep ventilation openings, in the appliance enclosure or in
the built-in structure, clear of obstruction.
• Do not use mechanical devices or other means to accelerate
the defrosting process, other than those recommended by
the manufacturer.
• Do not damage the refrigerant circuit.
• Do not use electrical appliances inside the food storage
compartments of the appliance, unless they are of the type
recommended by the manufacturer.
• Please recycle the refrigerator according to local regulators
for it use ammable blowing gas and refrigerant.
• When positioning the appliance, ensure the supply cord is
not trapped or damaged.
• Do not locate multiple portable socket-outlets or portable
power supplies at the rear of the appliance.
DANGER
Risk of child entrapment. Before you throw away your
refrigerator or freezer:
• Take off the doors.
• Leave the shelves in place so that children may not easily
climb inside.
• To prevent a child from being entrapped, keep out of reach
of children and not in the vicinity of freezer (or refrigerator).
SAFETY WARNINGS
WARNING
RISK OF FIRE/ FLAMMABLE MATERIALS
• This appliance is intended to be used in household and similar
applications such as staff kitchen areas in shops, ofces and
other working environments; farm houses and by clients in
hotels, motels and other residential type environments; bed
and breakfast type environments; catering and similar nonretail applications.
• This appliance is not intended for use by persons (including
children) with reduced physical, sensory or capabilities, or
lack of experience and knowledge, unless they been given
supervision or instruction concerning use of the appliance
by a person responsible for their safety. Children should be
supervised to ensure that they do not play with the appliance.
• If the supply cord is damaged, it must be replaced by the
manufacturer, its service agent or similarly qualied persons
in order to avoid a hazard.
• Do not store explosive substances such as aerosol cans with
ammable propellant in this appliance.
• The appliance has to be unplugged after use and before
carrying out user maintenance on the appliance.
• Do not use extension cords or ungrounded (two prong)
adapters.
• The refrigerator must be disconnected from the source
of electrical supply before attempting the installation of
acc ess ory.
Refrigerant and cyclopentane foaming material used for the
appliance are ammable. Therefore, when the appliance is
scrapped, it shall be kept away from any re source and be
recovered by a special recovering company with corresponding
qualication other than be disposed by combustion, so as to
prevent damage to the environment or any other harm.
Children should be supervised to ensure that they do not play
with the appliance.
This appliance can be used by children aged from 8 years and
above and persons with reduce physical sensory or mental
capabilities or lack of experience and knowledge if they have
been given supervision or instruction concerning use of the
appliance in a safe way and understand the hazards involved.
Children shall not play with the appliance. Cleaning and user
maintenance shall not be made by children without supervision.
Children aged from 3 to 8 years are not allowed to load and
unload refrigerating appliances.
To avoid contamination of food, please respect the following
instructions:
• Opening the door for long periods can cause a signicant
increase of the temperature in the compartments of the
appliance.
• Clean regularly surfaces that can come in contact with food
and accessible drainage systems.
• Clean water tanks if they have not been used for 48 hr; ush
the water system connected to a water supply if water has not
been drawn for 5 days.
4
Page 5
IMPORTANT SAFETY INSTRUCTIONS
• Store raw meat and fish in suitable containers in the
refrigerator, so that it is not in contact with or drip onto
other food.
• If the refrigerating appliance is left empty for long periods,
switch off, defrost, clean, dry and leave the door open to
prevent mold developing within the appliance.
WARNING
• To avoid a hazard due to instability of the appliance, it must
be xed in accordance with the instructions.
• Connect to potable water supply only. (Suitable for ice
making machine.)
ELECTRICITY RELATED WARNINGS
• Do not pull the power cord when pulling the power plug of
the refrigerator. Please rmly grasp the plug and pull it out
from the socket directly.
• To ensure safe use, do not damage the power cord or use the
power cord when it is damaged or worn.
WARNING
• Please use a dedicated power socket and the power socket
shall not be shared with other electrical appliances. The
power plug should be rmly contacted with the socket or
else res might be caused.
• Please ensure that the grounding electrode of the power
socket is equipped with a reliable grounding line.
• In case of leakage of gas and other ammable gases, please
turn off the valve of the leaking gas and then open the doors
and windows Do not unplug the refrigerator and other
electrical appliances considering that spark may cause a re.
WARNINGS FOR USING
PROHIBIT
• Do not arbitrarily disassemble or reconstruct the
refrigerator, nor damage the refrigerant circuit;
maintenance of the appliance must be conducted by a
specialist
• Damaged power cord must be replaced by the
manufacturer, its maintenance department or related
professionals in order to avoid danger.
• Do not allow any child to get into or climb the
refrigerator; otherwise suffocation or falling injury of
the child may be caused.
WARNING
• The gaps between refrigerator doors and between doors
and refrigerator body are small, be noted not to put your
hand in these areas to prevent from squeezing the nger.
Please be gentle when close the refrigerator door to avoid
falling articles.
• Do not pick foods or containers with wet hands in the
freezing chamber when the refrigerator is running,
especially metal containers in order to avoid frostbite.
DANGER
• Do not place heavy objects on the top of the refrigerator
considering that objects may fall when close or open the
door, and accidental injuries might be caused.
• Please pull out the plug in case of power failure or cleaning.
Do not connect the refrigerator to power supply within
ve minutes to prevent damages to the compressor due to
successive starts.
PROHIBIT
• Do not use electrical appliances on the top of the
appliance, unless they are of the type recommended
by the manufacturer.
WARNINGS FOR PLACEMENT OF
ITEMS
WARNING
• Do not put flammable, explosive, volatile and highly
corrosive items in the refrigerator to prevent damages to
the product or re accidents.
• Do not place ammable items near the refrigerator to
avoid res.
• The refrigerator is intended for household use, such as
storage of foods; it shall not be used for other purposes,
such as storage of blood, drugs or biological products, etc.
• Do not store beer, beverage or other uid contained in
bottles or enclosed containers in the freezing chamber of the
refrigerator; or otherwise the bottles or enclosed containers
may crack due to freezing to cause damages.
5
Page 6

IMPORTANT SAFETY INSTRUCTIONS
WARNINGS FOR ENERGY
1. Refrigerating appliances might not operate consistently
(possibility of defrosting of contents or temperature
becoming too warm in the frozen food compartment) when
sited for an extended period of time below the cold end of the
range of temperatures for which the refrigerating appliance
is designed.
2. The fact that effervescent drinks should not be stored in
food freezer compartments or cabinets or in low-temperature
compartments or cabinets, and that some products such as
water ices should not be consumed too cold;
3. The need to not exceed the storage time(s) recommended by
the food manufacturers for any kind of food and particularly
for commercially quick-frozen food in food-freezer and
frozen-food storage compartments or cabinets;
4. The precautions necessary to prevent an undue rise in
the temperature of the frozen food while defrosting the
refrigerating appliance, such as wrapping the frozen food in
several layers of newspaper.
5. The fact that a rise in temperature of the frozen food during
manual defrosting, maintenance or cleaning could shorten
the storage life.
6. The necessity that, for doors or lids tted with locks and
keys, the keys be kept out of the reach of children and not in
the vicinity of the r ef rige ra ting appliance, in order to prevent
children from being locked inside.
WARNINGS FOR DISPOSAL
PROHIBIT
Refrigerant and cyclopentane foaming material used for the
refrigerator are ammable. Therefore, when the refrigerator
is recycled, it shall be kept away from any re source and be
recovered by a special recovering company with corresponding
qualication other than be disposed by combustion, so as to
prevent damage to the environment or any other harm.
WARNING
When the refrigerator is recycled, disassemble the doors, and
remove gasket of door and shelves; put the doors and shelves
in a proper place, so as to prevent trapping of any child.
Correct Disposal of this product
collection systems or contact the retailer where the product was
purchased. They can take this product for environmental safe
recycling.
WARNING
WARNING: Cancer and Reproductive Harm -
www.P65Warnings.ca.gov
This marking indicates that this product
should not be disposed with other
household wastes. To prevent possible
harm to the environment or human health
from uncontrolled wa st e disposal, recycle
it responsibly to promote the sustainable
reuse of material resources. To return your
used device, please use the return and
6
Page 7

INSTALLATION INSTRUCTIONS
APPLIANCE/INSTALLATION DIMENSIONS
FRONT VIEW SIDE VIEW
A
B
C2
C1
C
TOP VIEW
C
D
F
E
DIMENSIONS SIZE(IN)
Height A 69.9
Width B 35.8
Depth without Doors C2 24.4
Depth without Handles C1 29. 0
Depth with Handles C 30.9
Door open 90° Depth D 43.1
Door open 90° Width E 44.1
Door open 135° Depth F 41.3
Door open 135° Width G 64.6
G
7
Page 8
INSTALLATION INSTRUCTIONS
INSTALLATION LOCATION
• This refrigerator is designed for indoor, household use only.
• Keep away from heat and avoid direct sunlight or places near
a heat source, such as an oven or a radiator.
• Do not place the refrigerator in moist or watery places to
prevent rust or reduction of insulating effect to affect the
electrical insulation properties of the refrigerator.
• The refrigerator is placed in a dry and well-ventilated indoor
place.
• The ground shall be at, and sturdy (rotate the adjustable leg
left or right to adjust for leveling if unstable.)
• The temperature of the location ranges from a minimum of
55°F to a maximum of 110°F. However, for better energy
usage and superior cooling, the temperature is preferred to
be between 60°F and 90°F.
• For proper air circulation and electric connections, allow a
3/4" clearance on each side and behind the refrigerator. Allow
a 3/8" clearance at top of the refrigerator.
• Spare enough space for convenient opening of the doors and
drawers, especially when the refrigerator is installed next to
a xed wall to allow the door to swing open.
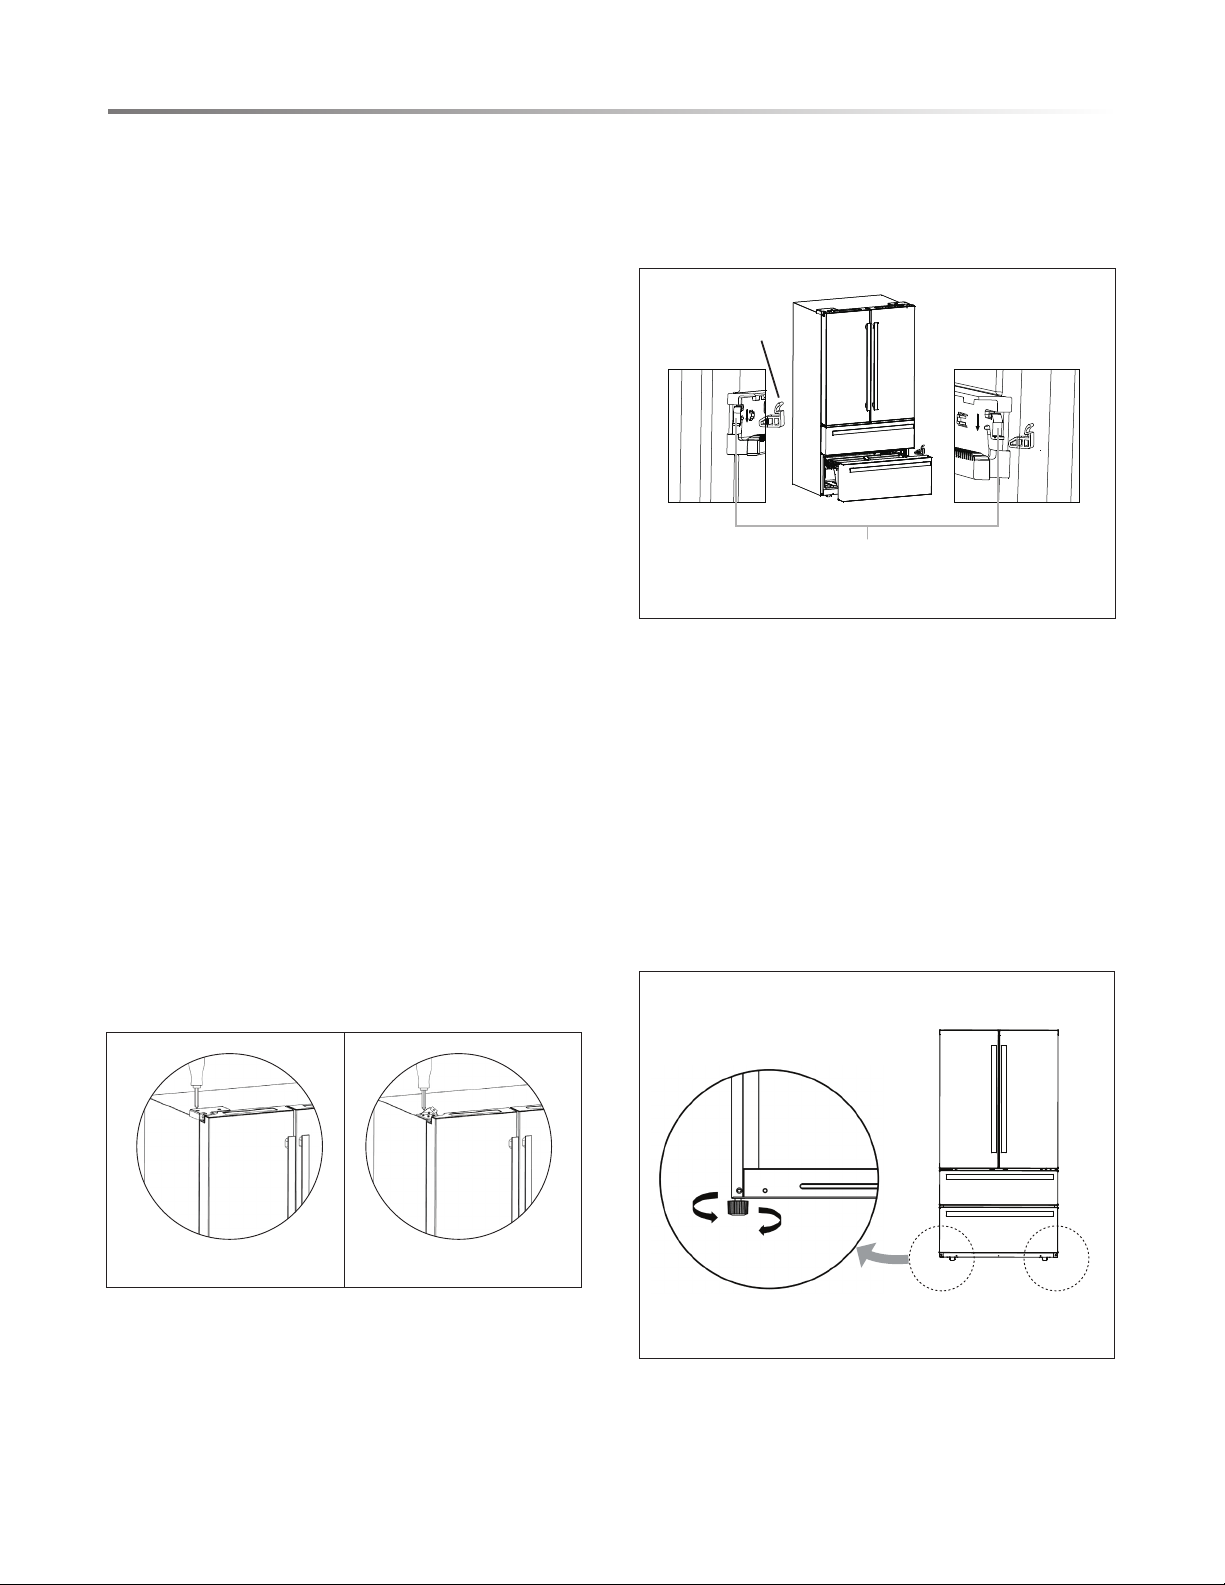
DISASSEMBLY OF REFRIGERATOR
DOOR/DRAWER
In some cases you need to remove the fridge doors and freezer
drawers to move the refrigerator through a doorway. The doors
and drawers can be removed by the following steps. If not
necessary, DO NOT remove the doors and drawer.
1. Use screwdriver to remove the 2 pcs screws, and then remove
the upper hinge cover of the Left door. See Figure 1.
2. Use the screwdriver to loosen the 3 screws and 1 earth screw
xing the upper hinge, then remove the plug terminal and
then remove the Left door body. See Figure 2.
3. For the Right door, there is no earth screw. Follow the rest
of the steps for the Left door.
Note:
To install the drawer in place, inserting the glide rails in the rail
housing and slowly push the drawer toward the back.
Make sure that the rail assemblies are securely installed and put
the security blocks on the lock buttons.
The security
block
Lock button
Figure 3
LEVELING THE REFRIGERATOR
Precautions before operation
1. Information in the Instruction Manual is only for reference.
Before operation of accessories, it shall be ensured that the
refrigerator is disconnected from power. Before adjusting
the leveling feet, precautions shall be taken to prevent any
personal injury.
2. Adjusting procedures, see Figure 4:
A. Turn the feet clockwise to raise the refrigerator.
B. Turn the feet counterclockwise to lower the refrigerator.
C. Adjust the right and left feet based on the procedures
above to a horizontal level.
Schematic diagram of the leveling feet.
Figure 1 Figure 2
4. For a drawer, rst remove the security block for the stopper
by hand. See Figure 3.
5. Press the lock buttons of both the left and right glide rails
and slowly pull the drawer out. See Figure 3.
Lower
8
Higher
Figure 4
Page 9

INSTALLATION INSTRUCTIONS
LEVELING THE DOORS
Precautions before operation
1. Before operation of accessories, it shall be ensured that the
refrigerator is disconnected from power. Before adjusting
the door, precautions shall be taken to prevent any personal
inj ury.
2. Raise the lower door up to the level of the higher door.
3. Insert the supplied fastener-ring by using pliers in the gap
between the hinge-grommet and the lower hinge.
The number of fasten-rings you will need to insert depends
on the gap. See Figure 5.
List of tools to be provided by the user
Pliers
Schematic diagram of adjusting the door.
Not level
CONNECTING THE WATER LINE
INSTALLING THE WATER LINE
Water line installation kits are available as an additional
accessory from your dealer or at a local hardware store.
CONNECTING TO THE WATER SUPPLY LINE
1. First, shut off the main water supply line. See Figure 6.
2. Locate the nearest cold water supply valve.
3. After connecting the water supply to the water valve, turn
your main water supply back on and ush several gallons of
water to clear the water supply line.
Figure 5
Lower hinge
Hinge
grommet
Fastener-ring
Pliers
Figure 6
CONNECTING THE WATER LINE TO THE
REFRIGERATOR
There are several items that you need to purchase to complete
this connection.
You will nd these items sold as a kit at your local hardware
store.
1. First, water tubes (supplied) insert into corresponding hole
of water connector (supplied). See Figure 7.
2. Second. water line installation kit (not included) inserts into
another hole of water connector (supplied).
3. Turn water valve on and check for any leakage.
Water line installation kit
Water tube
Water connector
Figure 7
9
Page 10

INSTALLATION INSTRUCTIONS
CONNECTING THE WATER LINE
TO A DRINKABLE WATER SOURCE
If your water line is NOT drinkable, please add an external
water lter.
If you must repair or disassemble the water line, cut off the
plastic tu bi ng t o ma ke sure you get a snug, lea k-f ree conne ct io n.
INSTALLING DOOR HANDLES
Precautions shall be taken to prevent fall of the handle from
causing any personal injury.
List of tools to be provided by the user
Phillips screwdriver
Inner hexagon spanner
IN STALL ATION PRO CE DU RES
1. Take out bolt 1 from accessory bag, then use Phillips
screwdriver to fix the bolt 1 into the bolt hole 2 of
refrigerator doors. See Figure 8.
2. Put the handle on the door through the bolt 1 and make su re
the handle contact the door surface closely. See Figure 9.
3. Fix the handle by rotating the handle screw 3 to the end, then
to shake the handle for verifying if it already be xed tightly.
4. Put the cap 4 on the handle screw hole to complete this
installation.
Figure 9
Notes:
1 Bolt 3 Handle screw
2 Bolt hole 4 Screw hole cap
BEFORE USING THE REFRIGERATOR
• Before use, remove all packing materials, including bottom
cushions, foam pads and tapes inside of the refrigerator; tear
off the protective lm on the doors and the refrigerator body.
• Before turning the refrigerator on, keep the refrigerator still
for two hours before connecting it to power supply.
• Before putting any fresh or frozen foods, the refrigerator shall
have run for 2-3 hours, or for above 4 hours in summer when
the ambient temperature is high.
Figure 8
10
Page 11

ENERGY SAVING TIPS
• The appliance should be located in the coolest area of the
room, away from heat producing appliances or heating ducts,
and out of the direct sunlight.
• Let hot foods cool to room temperature before placing in the
appliance. Overloading the appliance forces the compressor
to run longer. Foods that freeze too slowly may lose quality,
or spoil.
• Be sure to wrap foods properly, and wipe containers dry
before placing them in the appliance. This cuts down on frost
build-up inside the appliance.
• Appliance storage bin should not be lined with aluminum foil,
wax paper, or paper toweling. Liners interfere with cold air
circulation, making the appliance less efcient.
• Organiz e and la bel food to reduce door openings a nd extended
searches. Remove as many items as needed at one time, and
close the door as soon as possible.
WARNING
Precautions before installation:
Before installation or adjusting of accessories, it shall be
ensured that the refrigerator is disconnected from power.
Precautions shall be taken to prevent fall of the handle from
causing any personal injury.
INSTALLATION INSTRUCTIONS
11
Page 12

APPEARANCE OVERVIEW
Control and Display PanelLED Lighting
Dairy Bin
Door Bin
Humidity
Controlled
Crispers
Pantry
Drawer
Auto Ice Maker (inside)
Upper Freezer Drawer
Shelf
Slide-in
Shelf
Door Bin
Lower Freezer Drawer
12
Page 13
Ice Storage Bin
APPEARANCE OVERVIEW
Refrigerator Body
Upper Freezer Drawer
Lower Freezer Drawer
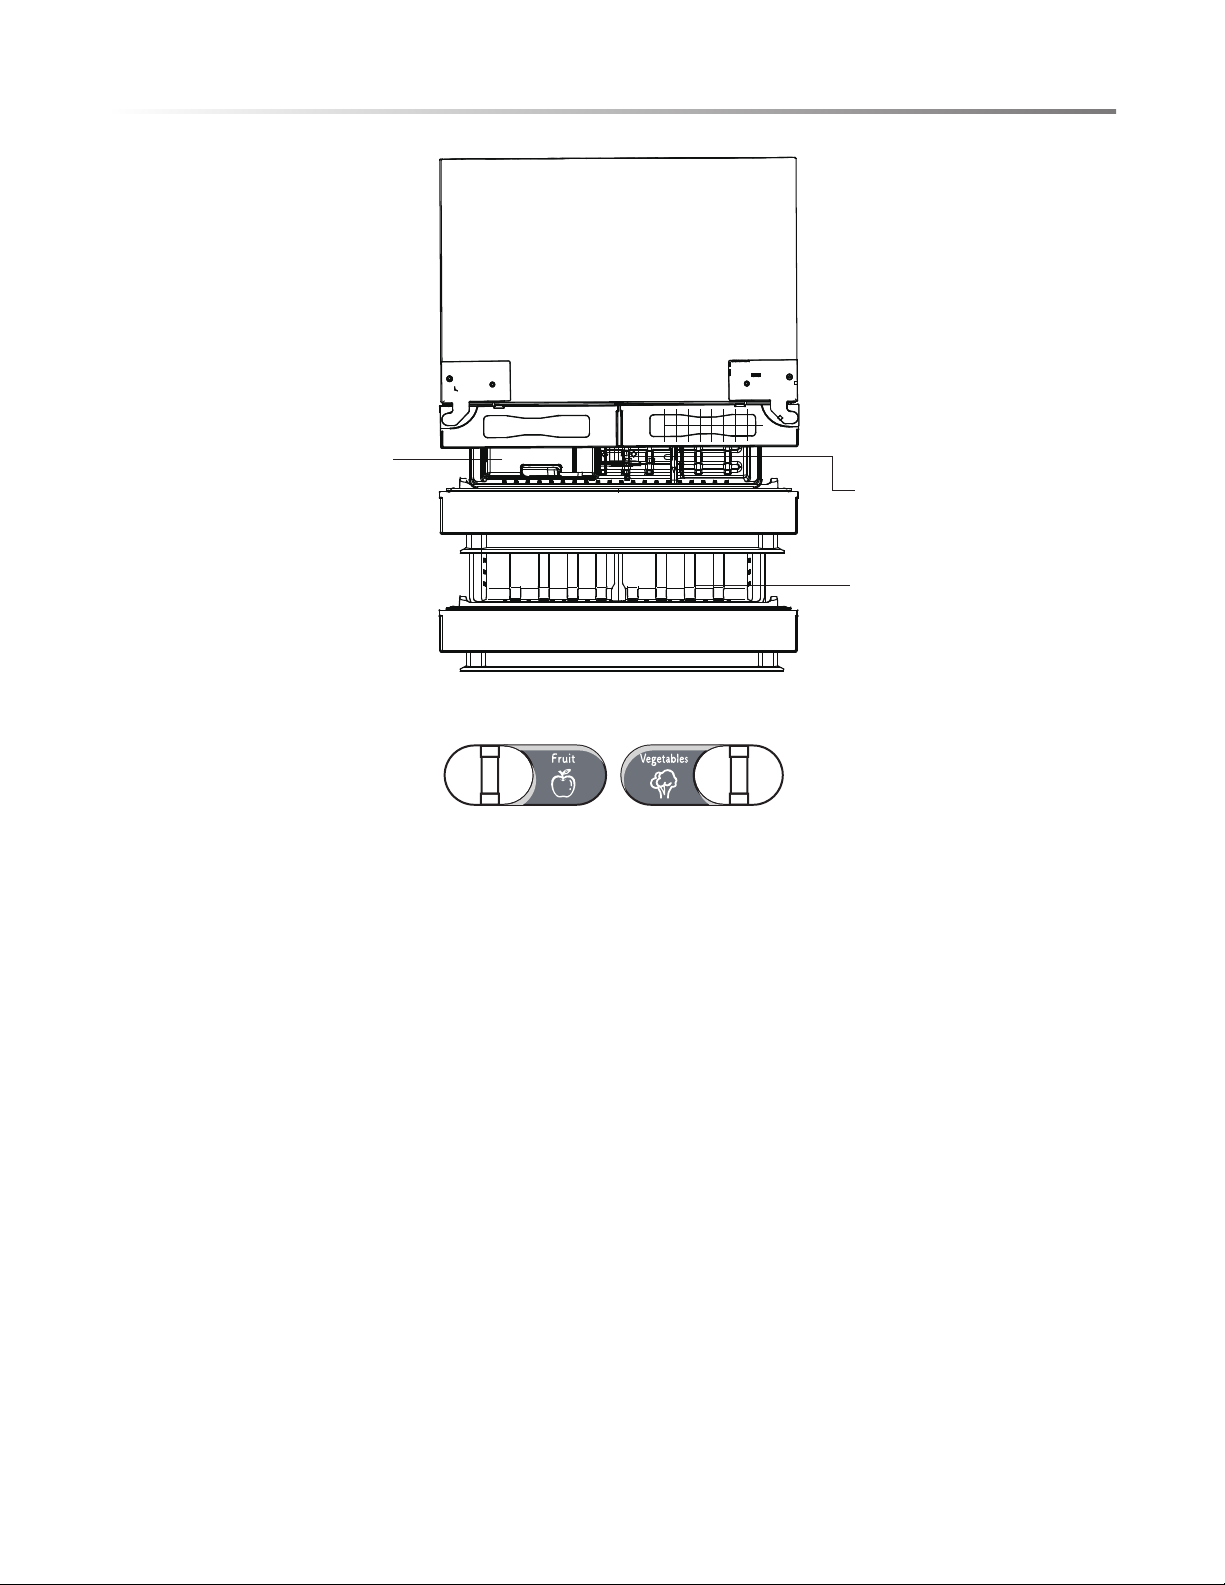
REFRIGERATING CHAMBER
• The refrigerating chamber is suitable for storage of a variety
of fruits, vegetables, beverages, and other food consumed in
the short term.
• Cooking foods shall not be put in the refrigerating chamber
until cooled to room temperature.
• Foods are recommended to be sealed up before putting onto
the refrigerator.
• The glass shelves can be adjusted up or down for a reasonable
amount of storage space and easy use
• When the paddle of the humidify control is slid to the
right, the pattern shows the vegetable icon. At this time, the
moisturizing effect is good, and the crisper is suitable to store
vegetables; when the paddle is slid to the left side, the fruit
icon is displayed, the moisturizing effect is controlled, and
the crisper is suitable to store fruit.
FREEZING CHAMBER
• The low temperature freezing chamber may keep food fresh
for a long time and it is mainly used to store frozen foods
and making ice.
• The freezing chamber is suitable for storage of meat, sh,
rice balls and other foods not to be consumed in short term.
• Chunks of meats are preferably to be divided into small pieces
for easy access. Please be noted food shall be consumed
within the shelf time.
Note: Storage of too much food during operation after the initial
connection to power may adversely affect the freezing effect
of the refrigerator. Food stored shall not block the air outlet; or
otherwise the freezing effect will also be adversely affected.
13
Page 14
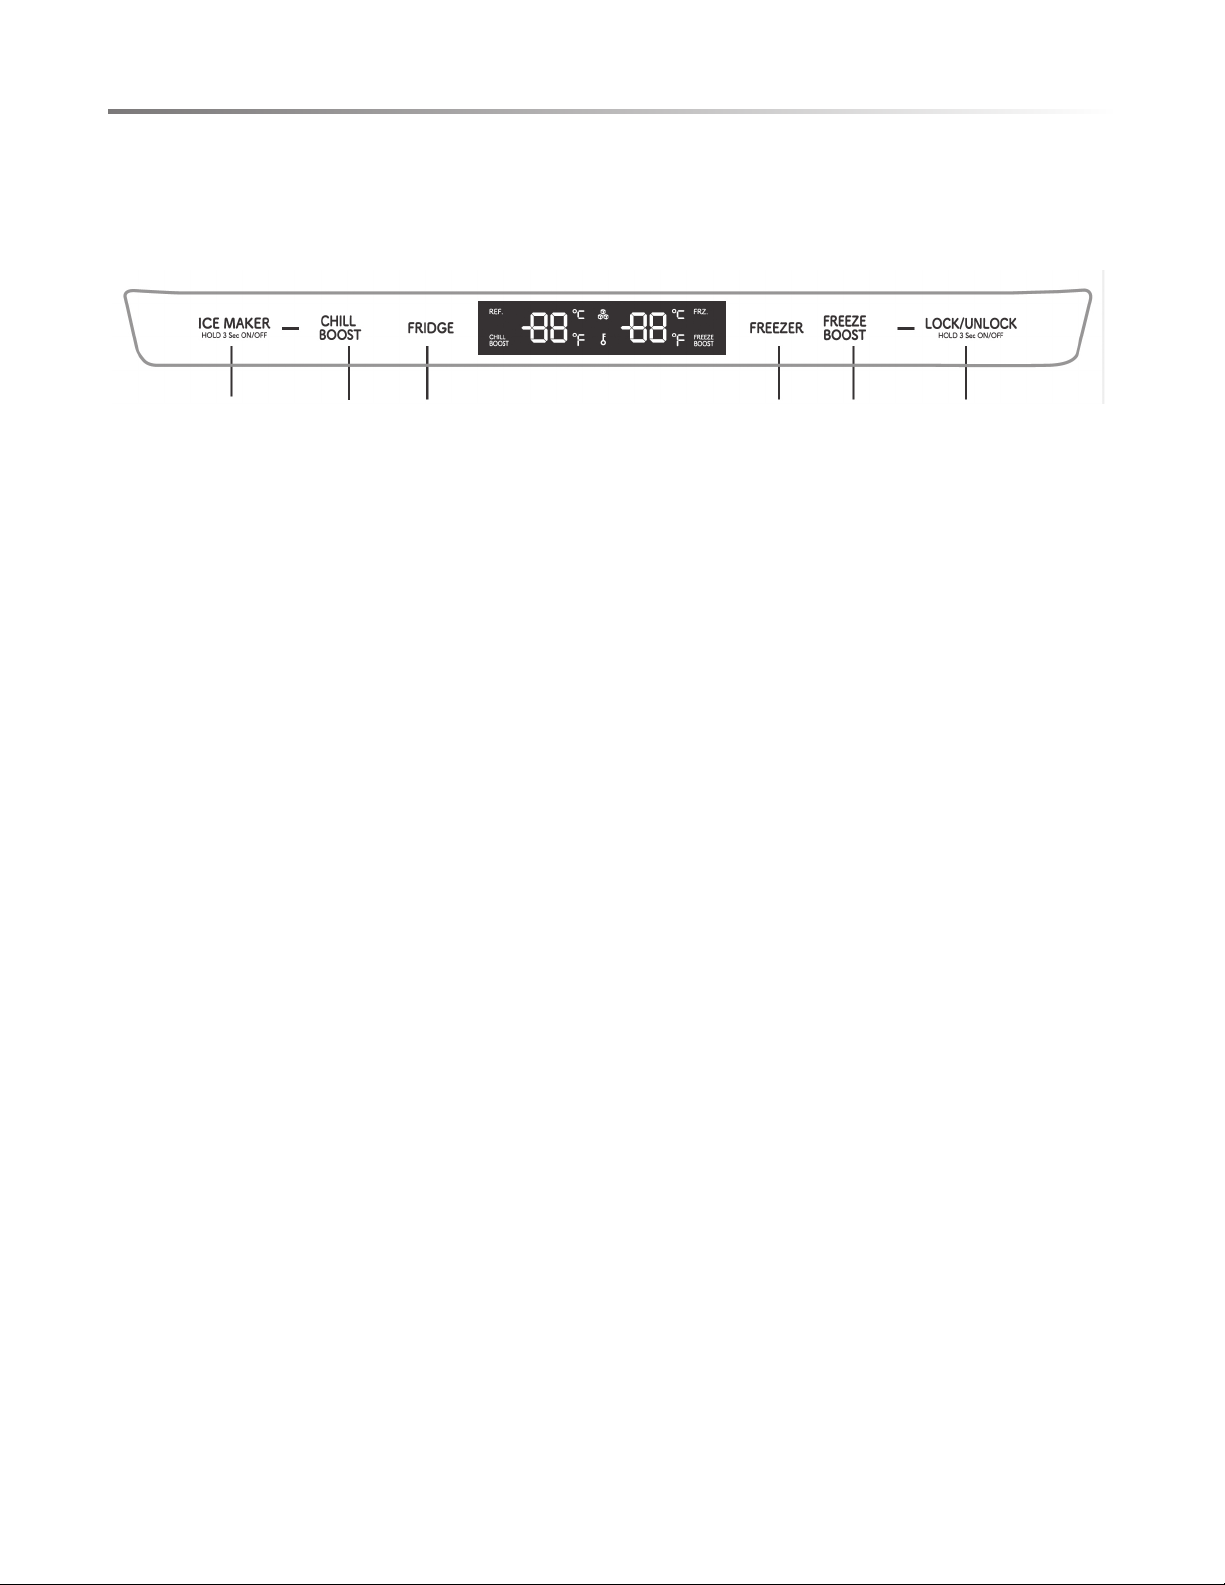
CONTROL AND DISPLAY PANEL
1 2 3 4 5 6
BUTTONS
1 Ice-Making button
2 Chill Boost button
3 Temperature control button of refrigerator room
4 Temperature control button of freezer room
5 Freeze Boost button
6 Lock/unlock button
14
Page 15

OPERATING REFRIGERATOR
DISP L AY
A. When plugging in the refrigerator, the display screen will
totally display for 3 seconds, meanwhile the starting up
bell rings, then the display screen enters the normal display
of operation.(When power-on for rst time, the default set
temperature of the refrigerator room and the freezer room
is 41˚F/ 0˚F).
B. It will display the set temperature of both refrigerator and
freezer rooms when there is no fault.
C. Under normal circumstances, the display light will go out
after 30 seconds in the lock state, button operation on display
panel would wake up the display screen; if the opening door
action wakes up the display screen, the display light would
go out immediately when the door is closed.
D. When an error occurs, the display will light up with a
corresponding error code and stay on for 30 seconds before
going out.
LOCK/UNLOCK
A. In the unlock state, press and hold the lock/unlock button for
3 seconds to enter the lock state, and the buzzer sound rings.
B. In the lock state, press and hold the lock button for 3 seconds
to enter the unlock state and the buzzer sound rings.
C. It will enter the lock state if there is no opening door action
or any buttons operation within 30 seconds.
D. The alarm sound can be stopped by pressing any one button
in the lock state, but all other button operations need to be
performed in the unlock state. If you operate in the lock state,
an error beep will be given.
REFRIGERATOR TEMPERATURE
SETTING
Click the temperature control button of refrigerator room to
change the set temperature of refrigerator room, Each time
click the button, the set temperature will drop 1˚F. when the
set temperature reaches the 34˚F, click the button again, the set
temperature will switch to 44˚F. The temperature setting will
take effect after the display panel is locked
FREEZER TEMPERATURE SETTING
Click the temperature control button of freezer room to change
the set temperature of freezer room, Each time click the button,
the set temperature will drop 1˚F. When the set temperature
reaches the -7˚F, click the button again, the set temperature will
switch to 7˚F. The temperature setting will take effect after the
display panel is locked.
MODE SETTING
A. Press the CHILL BOOST button to start the rapid cooling
function. The refrigerator room is set at 34˚F automatically,
and the CHILL BOOST icon shines. When exit the CHILL
BOOST mode, the set temperature of refrigerator room will
go back to the set temperature before CHILL BOOST mod e.
B. Press the FREEZE BOOST but ton to sta rt th e rapid freezi ng
function. The freezer room is set at -7˚F automatically, and
the FREEZE BOOST icon shines. When exit the FREEZE
BOOST mode, the set temperature of freezer room will go
back to the set temperature before FREEZE BOOST mod e.
C. Press the ICE MAKER button, the ice-making function
could be switched between on/off. When the
it indicates that the ice-making function is activated.
icon is on,
ERROR CODE
When the following tips to appear on the display screen,
it indicates a problem with the refrigerator. Although the
refrigerator in the following fault case can still provide cool/
freeze functions, but the user should contact maintenance
personnel, ensure the normal use of refrigerator.
ERROR
CODE
E1 Temperature sensor failure of refrigerator room
E2 Temperature sensor failure of freezer room
E5 Defrost sensor error of freezer room
E6 Communication error
E7 Ambient temperature sensor error
EH Humidity sensor error
Eo Ice maker error
ERROR DESCRIPTION
15
Page 16

CARE AND CLEANING
OVERALL CLEANING
• Dusts behind the refrigerator and on the ground shall be
timely cleaned to improve the cooling effect and energy
saving. The interior of the refrigerator should be cleaned
regularly to avoid odor. Soft towels or sponge dipped in
water and non-corrosive neutral detergents are suggested
for cleaning. The freezer shall be nally cleaned with clean
water and dry cloth. Open the door for natural drying before
the power is turned on.
• Do not use hard brushes, clean steel balls, wire brushes,
abrasives, such as toothpastes, organic solvents (such as
alcohol, acetone, banana oil, etc.), boiling water, acid or
alkaline items clean refrigerator considering that this may
damage the fridge surface and interior.
• Do not rinse with water so as not to affect the electrical
insulation properties.
DANGER
Please unplug the refrigerator for defrost and cleaning.
CLEANING OF DOOR TRAY
Figure 10
• According to the direction arrow in the gure below, use both
hands to squeeze the tray, and push it upward, then you can
take it out. See Figure 10.
• After washing the tray having been taken out, you can adjust
its installing height in accordance with your requirement.
CLEANING OF SHELF
Please dismantle the cantilever shelf according to the arrows as
shown in the illustration. See Figure 11.
1. Hold the front edge of shelf, and tilt the shelf inwards until
the lower end of xed leg is separated from the slot of
supporting iron.
2. Uplift the whole shelf until it can not rise anymore;
3. Take out the shelf horizontally.
During installation, put the upper end of the xed leg into one
of the upper slots on the supporting iron rst and then put the
lower end of the xed leg into the third slot on the lower part
of the supporting iron.
DEFROSTING
The refrigerator is made based on the air-cooling principle and
thus has automatic defrosting function. Frost formed due to
change of season or temperature may also be manually removed
by disconnection of the appliance from power supply or by
wiping with a dry towel.
OUT OF OPERATION
• Power failure: In case of power failure, even if it is in
summer, foods inside the appliance can be kept for several
hours; during the power failure, the times of door opening
shall be reduced, and no more fresh food shall be put into
the appliance.
• Long-time nonuse: The appliance shall be unplugged and
then cleaned; then the doors are left open to prevent odor.
• Moving: Before the refrigerator is moved, take all objects
inside out, x the glass partitions, vegetable holder, freezing
chamber drawers and etc. with tape, and tighten the levelling
feet; close the doors and x them with tape. During moving,
the appliance shall not be laid upside down or horizontally,
or be vibrated; the inclination during movement shall be no
more than 45˚.
DANGER
The appliance shall run continuously once it is started.
Generally, the operation of the appliance shall not be
interrupted; otherwise the service life may be impaired.
Lower end
of fixed leg
Upper end
of fixed leg
Figure 11
Slot
CHANGING THE LIGHT
Any replacement or maintenance of the LED lamps is intended
to be made by the manufacturer, its service agent or similar
3
2
1
qualied person.
16
Page 17

TROUBLE SHOOTING
You may try to solve the following simple problems by yourself. If them cannot be solved, please contact the after-sales department.
Failed operation • Check whether the appliance is connected to power or whether the plug is in well contact.
• Check whether the voltage is too low.
• Check whether there is a power failure or partial circuits have tripped.
Odor • Odorous foods shall be tightly wrapped.
• Check whether there is any rotten food.
• Clean the inside of the refrigerator.
Long-time operation of
the compressor
Light fails to get lit • Check whether the refrigerator is connected to power supply and whether the illuminating light is
Doors cannot be
properly closed
Loud noise • Check whether the oor is level and whether the refrigerator is placed stably.
Door seal fails to be
tight
Water pan overows • There is too much food in the chamber or food stored contains too much water,resulting in heavy
Hot housing • Heat dissipation of the built-in condenser via the housing, which is normal.
• Long operation of the refrigerator is normal in summer when the ambient temperature is high.
• It is not recommended having too much food in the appliance at the same time.
• Food shall get cool before being put into the appliance.
• The doors are opened too frequently.
damaged.
• The door is stuck by food packages.
• The refrigerator is tilted.
• Check whether accessories are placed at proper locations.
• Remove foreign matters on the door seal.
• Heat the door seal and then cool it for restoration (or blow it with an electrical drier or use a hot towel
for heating).
def rosting.
• The doors are not closed properly, resulting in frosting due to entry of air and increased water due to
def rosting.
• When housing becomes hot due to high ambient temperature and storage of too much food, it is
recommended to provide sound ventilation to facilitate heat dissipation.
Surface condensation • Condensation on the exterior surface and door seals of the refrigerator is normal when the ambient
humidity is too high. Just wipe the condensate with a clean towel.
Abnormal noise • Buzz: The compressor may produce buzzes during operation, and the buzzes are loud particularly upon
start or stop. This is normal.
• Creak: Refrigerant owing inside of the appliance may produce creak, which is normal.
1717
Page 18

Page 19

Page 20

SHARP ELECTRONICS CORPORATION • 100 Paragon Drive • Montvale, New Jersey 07645 • USA
June 18, 2020
 Loading...