

Page 1

MODEL
SF-1116
SF-1118
ELECTROSTATIC
COPYING MACHINE
OPERATION MANUAL
•GETTING STARTED
•MAKING COPIES
•STATUS INDICATORS
•GENERAL INFORMATION
•OPTIONAL EQUIPMENT
Page
2
8
21
26
47
Page 2
In some areas, the “POWER” switch positions are marked “ I ” and “ ” on the copier
instead of “ON” and “OFF”.
The symbol “ ” denotes the copier is not completely de-energized but in a stand-by
condition at this “POWER” switch position.
If your copier is so marked, please read “I” for “ON” and “ ” for “OFF”.
Caution!
For a complete electrical disconnection, pull out the main plug.
The socket-outlet shall be installed near the equipment and shall be easily
accessible.
The CE mark logo label is affixed on an equipment in case that the directives described in the above
sentence are applicable to the product. (This sentence is not applicable in any country where the
above directives are not required.)
Page 3

INTRODUCTION
The SF-1116 and SF-1118 copiers are designed
to provide convenient copying features in a
minimum amount of office space and with
maximum operational ease. Their main features
are:
●
Space conservation with a fixed platen and
a front-loading paper tray
●
Easy operation
●
Automatic exposure control
●
PHOTO mode copying
●
Convenient functions such as DUAL PAGE
COPYING, MARGIN SHIFT, EDGE ERASE,
and INTERNAL AUDITOR
●
Power savings with preheat and auto power
shut-off modes
The machine can also be equipped with an
optional automatic document feeder (ADF) for
automatic feeding of original documents and
an optional sorter or staple sorter to provide
finished copy sets ready for distribution.
To ensure optimum use of all copier functions,
please familiarise yourself with this manual and
the copier. Be sure to keep this manual available
for quick reference during copier operation.
CONTENTS
GETTING STARTED
●
A WORD ON COPIER INSTALLATION ............. 2
●
CAUTIONS .................................. 2
●
●
MAKING COPIES
●
●
●
●
●
●
●
●
●
●
●
STATUS INDICATORS
●
●
●
LOADING COPY PAPER.................... 3
ADDING TONER .......................... 6
AUDITING ACCOUNTS ........................ 8
NORMAL COPYING ........................... 9
REDUCTION/ENLARGEMENT/ZOOM ............. 11
DUAL PAGE COPYING ....................... 13
MARGIN SHIFT ............................. 14
EDGE ERASE............................... 15
SPECIAL PAPERS (manual feed)................ 16
TWO-SIDED COPYING ........................ 17
INTERRUPTING A COPY RUN .................. 18
AUTOMATIC EXPOSURE ADJUSTMENT .......... 19
TONER SAVE MODE ......................... 20
MISFEED REMOVAL ..................... 21
DEVELOPER REQUIRED .................. 25
MAINTENANCE REQUIRED ................ 25
Page
GETTING STARTED
MAKING COPIES
STATUS INDICATORS
AB series (metric) and inch series
references
Both specifications are quoted where applicable.
●
The inch series specifications are quoted in
brackets.
For example:
Page 16....................A6 to A3 (5-1/2" x
8-1/2" to 11" x 17")
Page 11, step 2-A.....86%, 81%, 70%, and
50% (95%, 77%, 64%,
and 50%)
●
In the illustration of the operation panel, only
the AB series indications are shown.
●
In certain regions where the AB series is
used, B5 and B5R are standard sizes, in
place of A5.
GENERAL INFORMATION
●
PART NAMES AND FUNCTIONS ................ 26
Overall layout ............................... 26
Operation panel.............................. 28
●
USER PROGRAMS........................... 30
Setting for auditing accounts .................... 33
●
POWER SAVE MODES........................ 37
●
USER MAINTENANCE ........................ 39
●
COPIER TROUBLE?.......................... 40
●
SUPPLIES ................................. 43
Types and sizes of copy paper ................... 43
Genuine supplies statement ..................... 44
●
SPECIFICATIONS ........................... 45
OPTIONAL EQUIPMENT
●
SYSTEM CONFIGURATION .................... 48
●
AUTOMATIC DOCUMENT FEEDER (SF-A18) ....... 49
●
10-BIN SORTER (SF-S17N)/
10-BIN STAPLE SORTER (SF-S54) .............. 52
●
MULTI BYPASS FEEDER (SF-MF15) ............. 62
●
PAPER TRAY (SF-UB15) ...................... 65
GENERAL INFORMATION
OPTIONAL EQUIPMENT
1
Page 4
GETTING STARTED
A word on copier installation/Cautions
A WORD ON COPIER INSTALLATION
Improper installation may damage the copier. Please note the following
during initial installation and whenever the copier is moved.
1. Be sure to use the rated power supply and to ground the copier.
●
For this copier’s power supply requirements, see the name plate
located on the right hand side of the copier, below the manual
bypass.
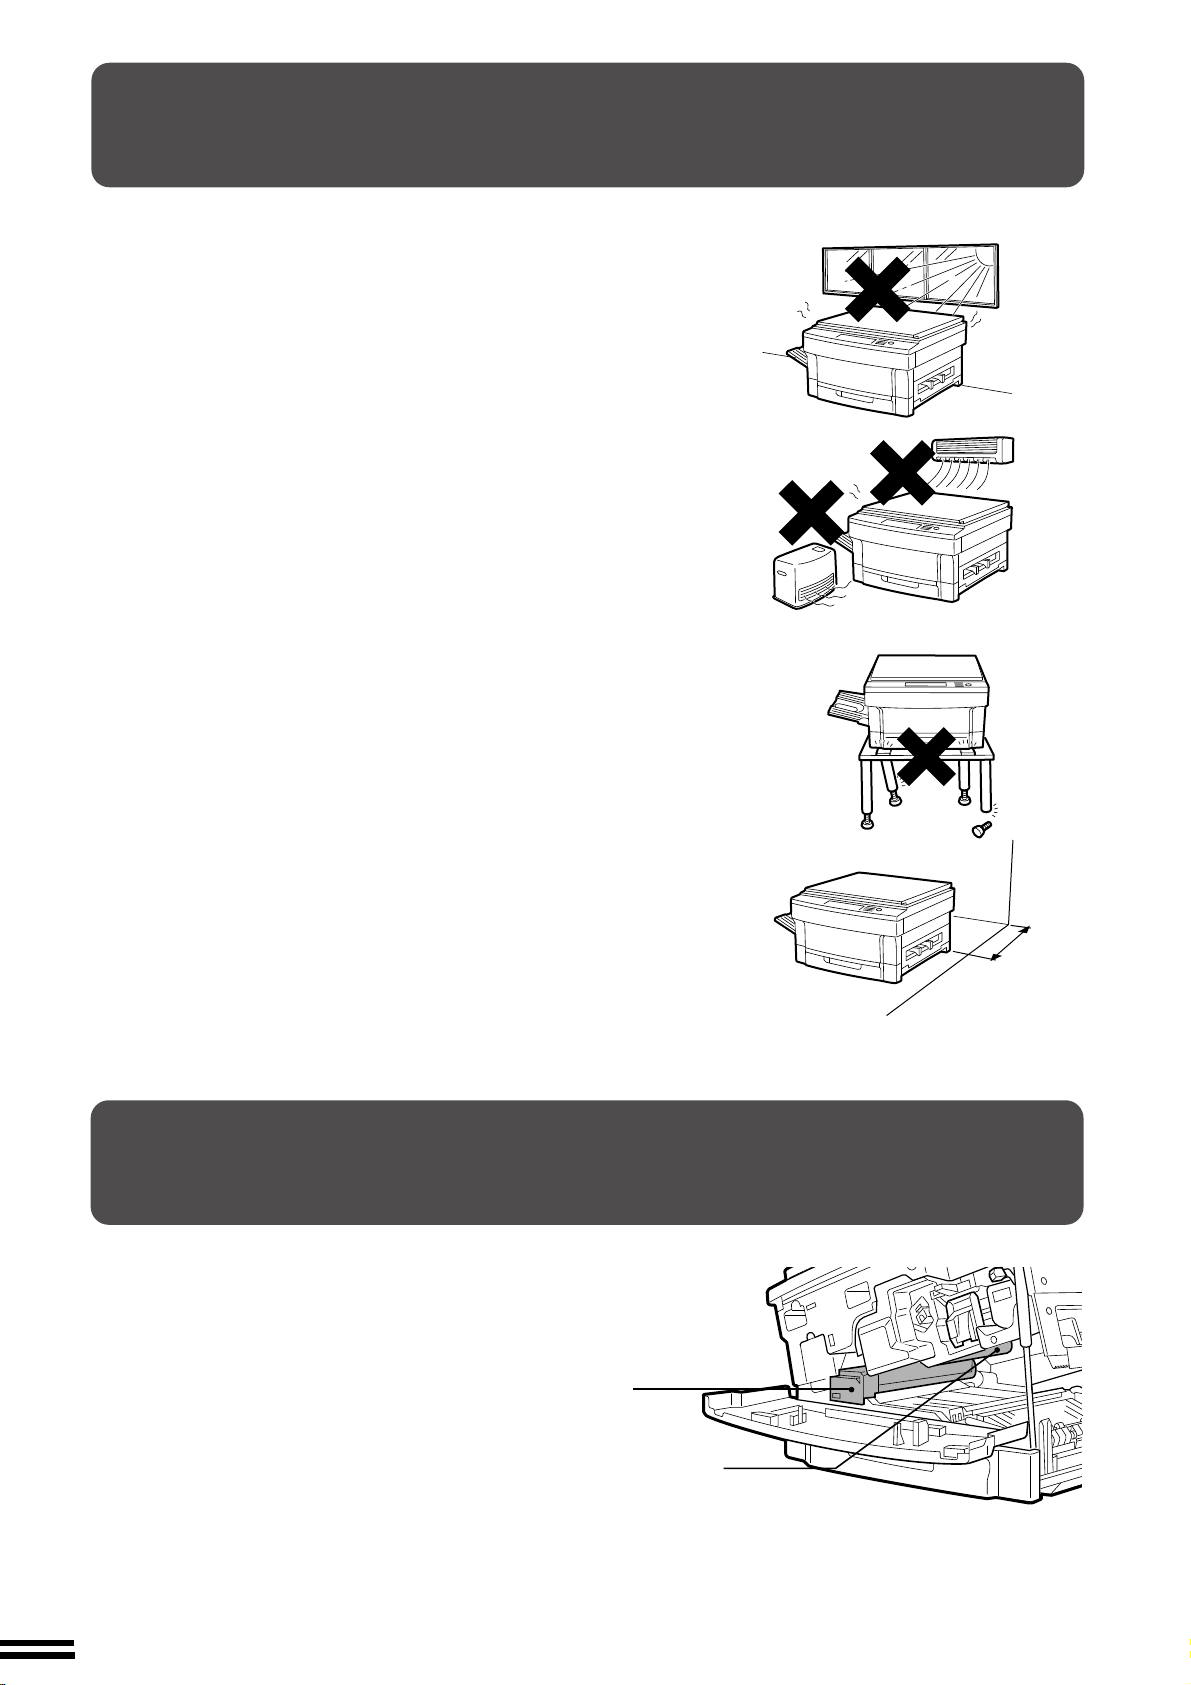
2. Do not install the copier in areas that are:
●
damp or humid,
●
exposed to direct sunlight,
●
extremely dusty,
●
poorly ventilated,
●
subject to extreme temperature or humidity changes, e.g., near an
air conditioner or heater.
3. Place the copier on a firm, level surface.
4. Keep the copier at least 10 cm (4 inches) back from the wall for
proper ventilation and cooling.
CAUTIONS
1. Do not touch the photoconductive drum. Scratches or smudges
on the drum will cause dirty copies.
2. The fusing area is hot. Exercise care in this area.
Fusing unit
Photoconductive drum
10cm
(4 inches)
2
Page 5
LOADING COPY PAPER
To save space, this copier has been designed with an adjustable frontloading tray, which is easily opened for paper loading. For best results,
use only Sharp recommended paper. (See page 43.)
The paper required ( ) indicator will light up when there is no copy
paper in the selected paper feed station, or when the selected paper
tray is not installed or is improperly installed.
When paper runs out while the optional multi bypass feeder is being
used, a blinking will appear in the copy quantity display. (See
page 64.)
For convenience of quickly changing paper sizes, additional trays
(SF-UB15) are also available. These are sold separately. (See page
65.)
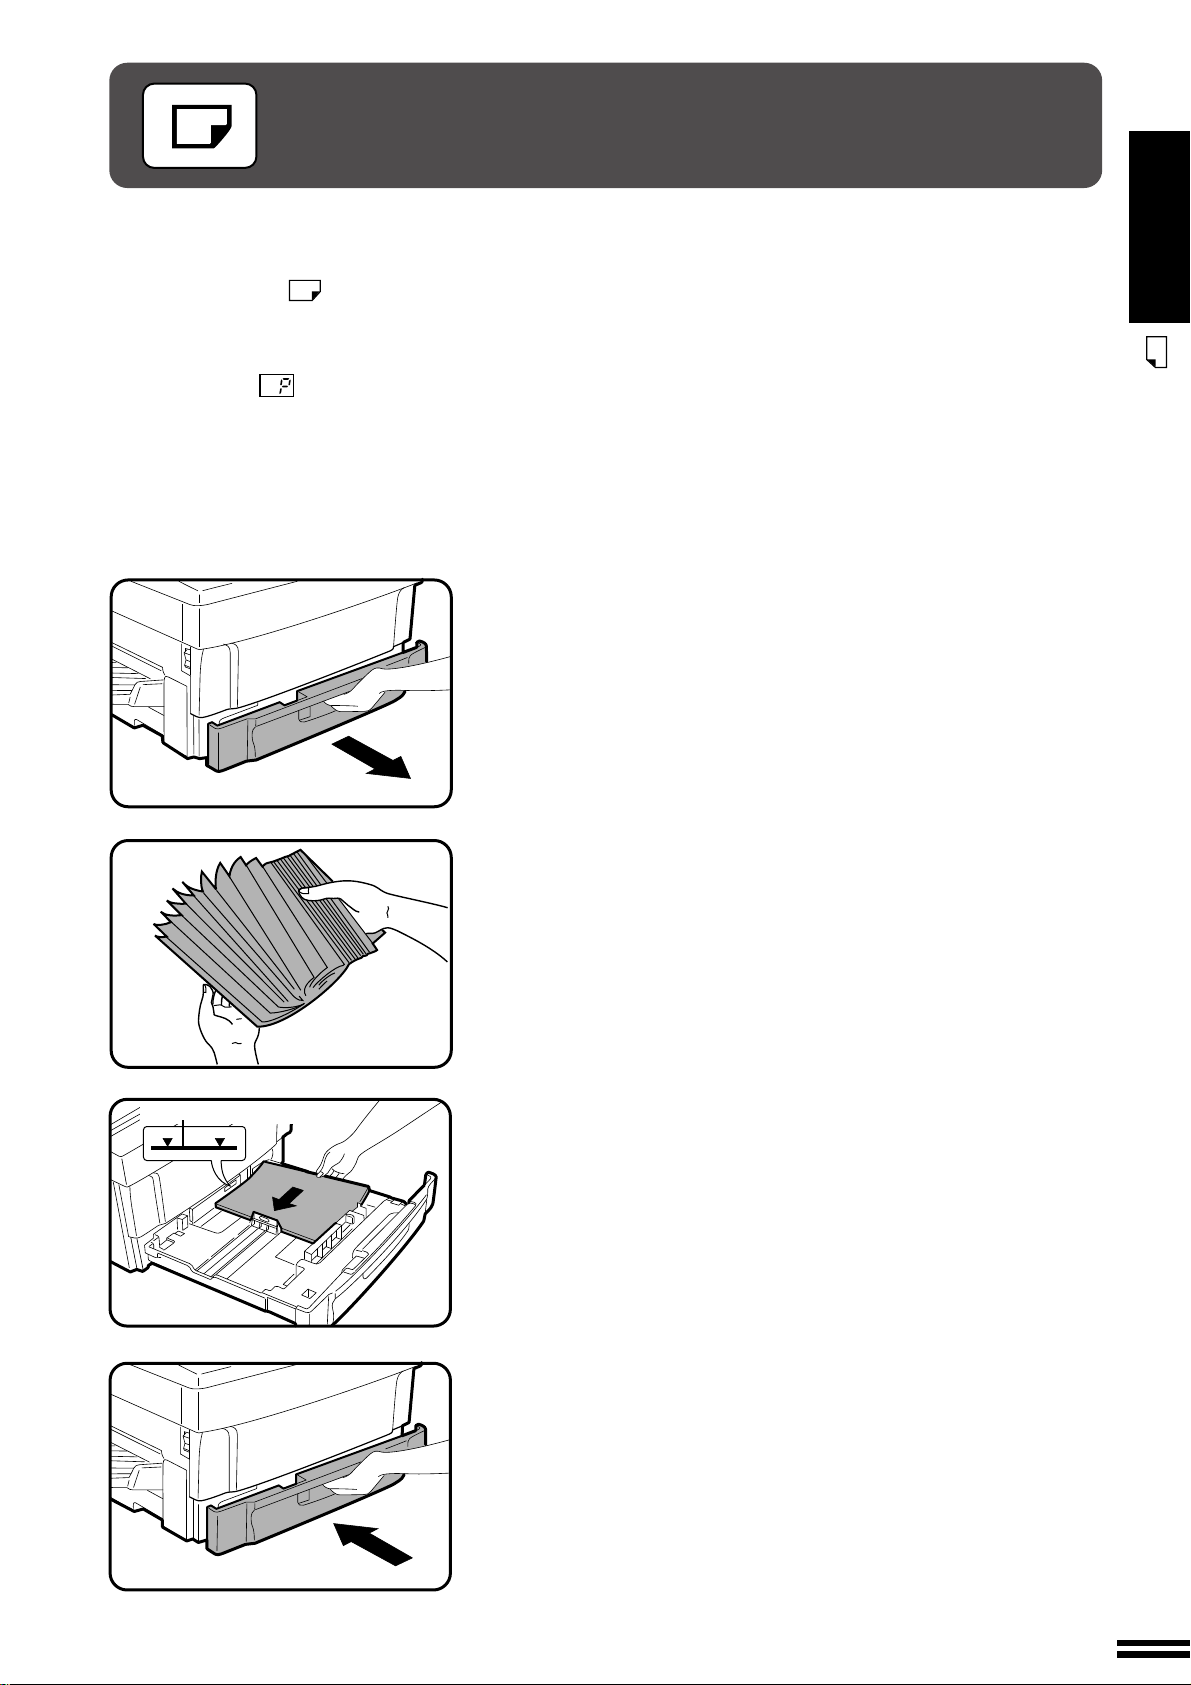
Gently lift and pull out the paper tray.
1
GETTING STARTED
Loading copy paper
Maximum height line
Fan the copy paper and insert it into the tray.
2
●
If you change to a different size of copy paper, the tray must be
adjusted. See the next page.
●
Set the paper along the guides.
●
The tray holds up to 250 sheets of paper.
Do not load paper above the maximum height line.
●
When adding paper, first remove remaining paper, combine it
with the paper to be added and then reload as a single stack.
Push the paper tray firmly back into the copier.
3
3
Page 6
LOADING COPY PAPER
GETTING STARTED
Loading copy paper
Changing the copy paper size in the tray
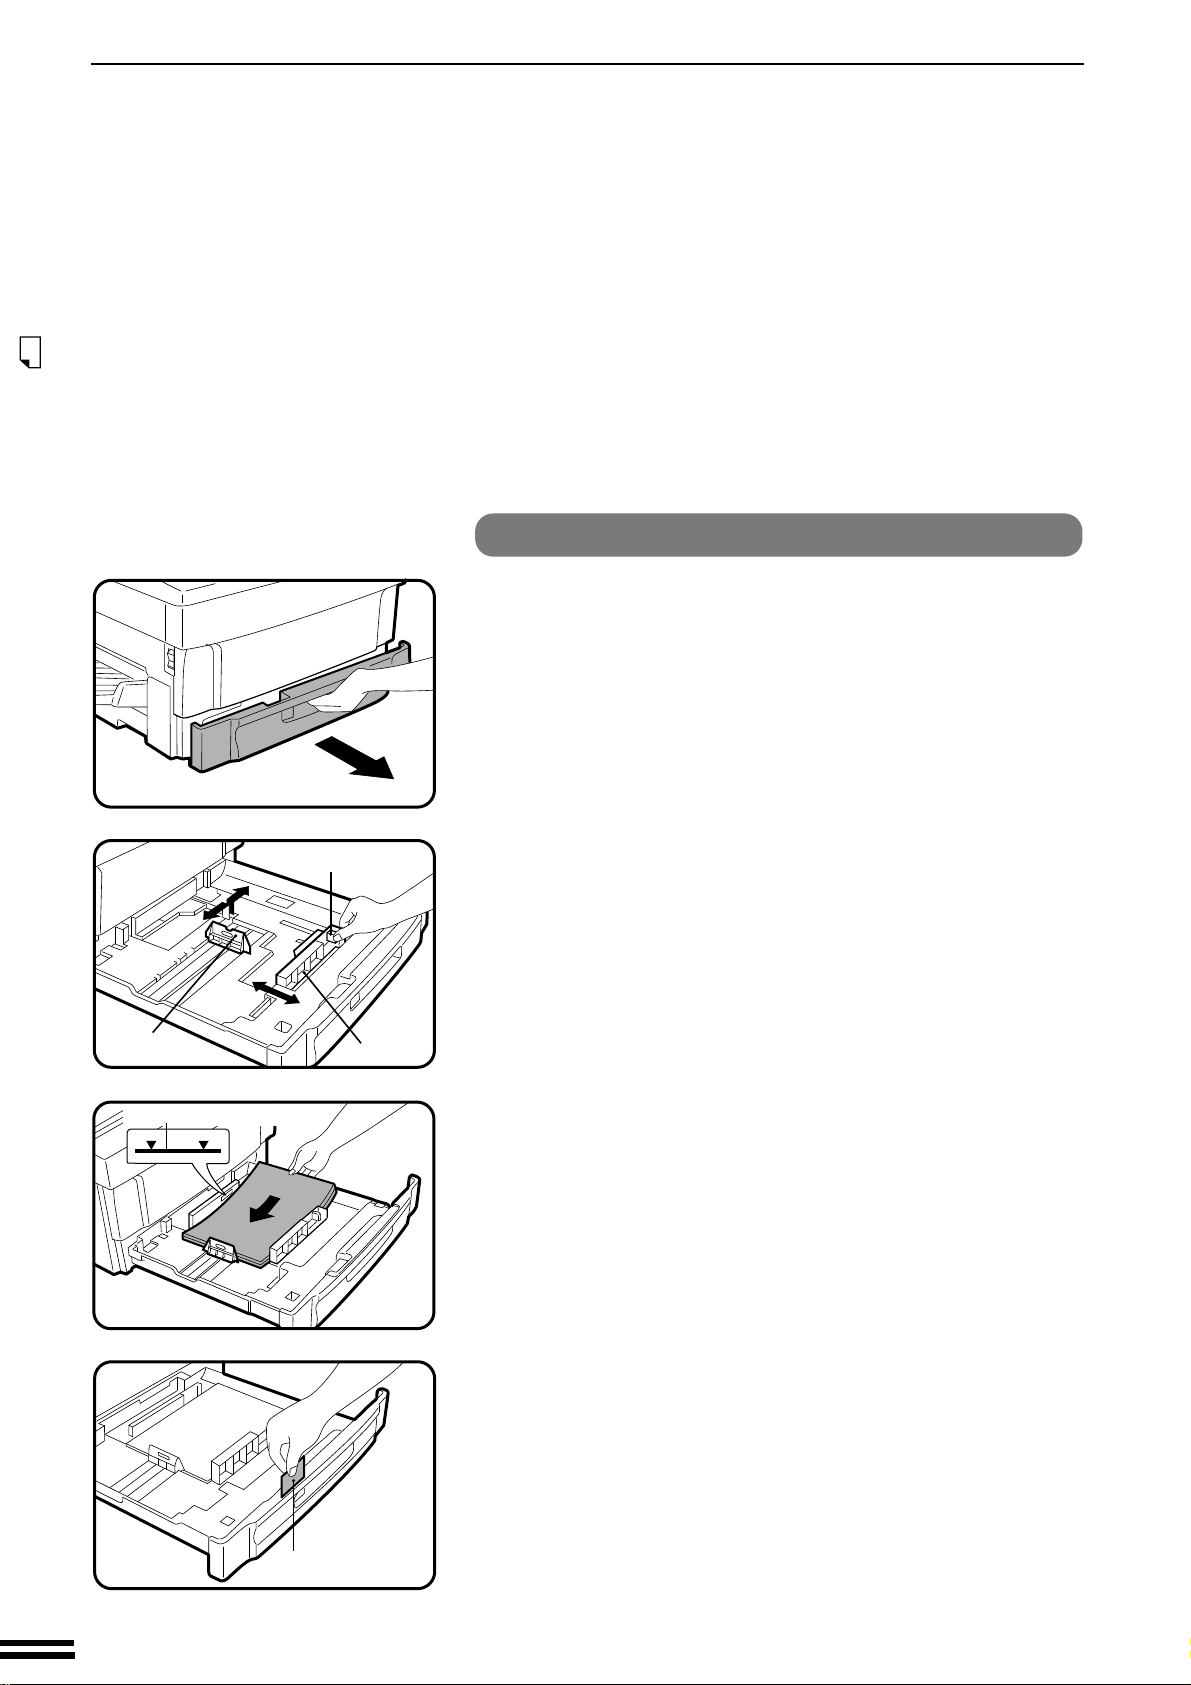
Gently lift and pull out the paper tray until it stops.
1
Left guide
Maximum height line
Lever
Front guide
Squeeze the lock lever of the front guide and slide the
front guide to match the width of the paper.
2
Move the left guide to the appropriate slot as marked on
the tray.
3
●
With inch system machines, when using 11" x 17" copy paper,
store the left guide in the slot to the left of the front guide.
Load copy paper into the tray.
4
Place the paper size plate in the front of the paper tray.
5
●
The paper size indication which shows through the slot on the
front of the copier should match the selected paper size.
4
Push the paper tray firmly back into the copier.
6
Paper size plate
Page 7
LOADING COPY PAPER
200%
50%
115%
86%
141%
122%
81%
70%
100%
A3
A4
A4
A5
B4
A3 A5
A3 B4
B4 A3
A4 B4
A5 A3
B4 A4
A4 A5 A3 A4
R
EXTRA
,
A4 A3 A5 A4
,
✕
1
2
/
8
13
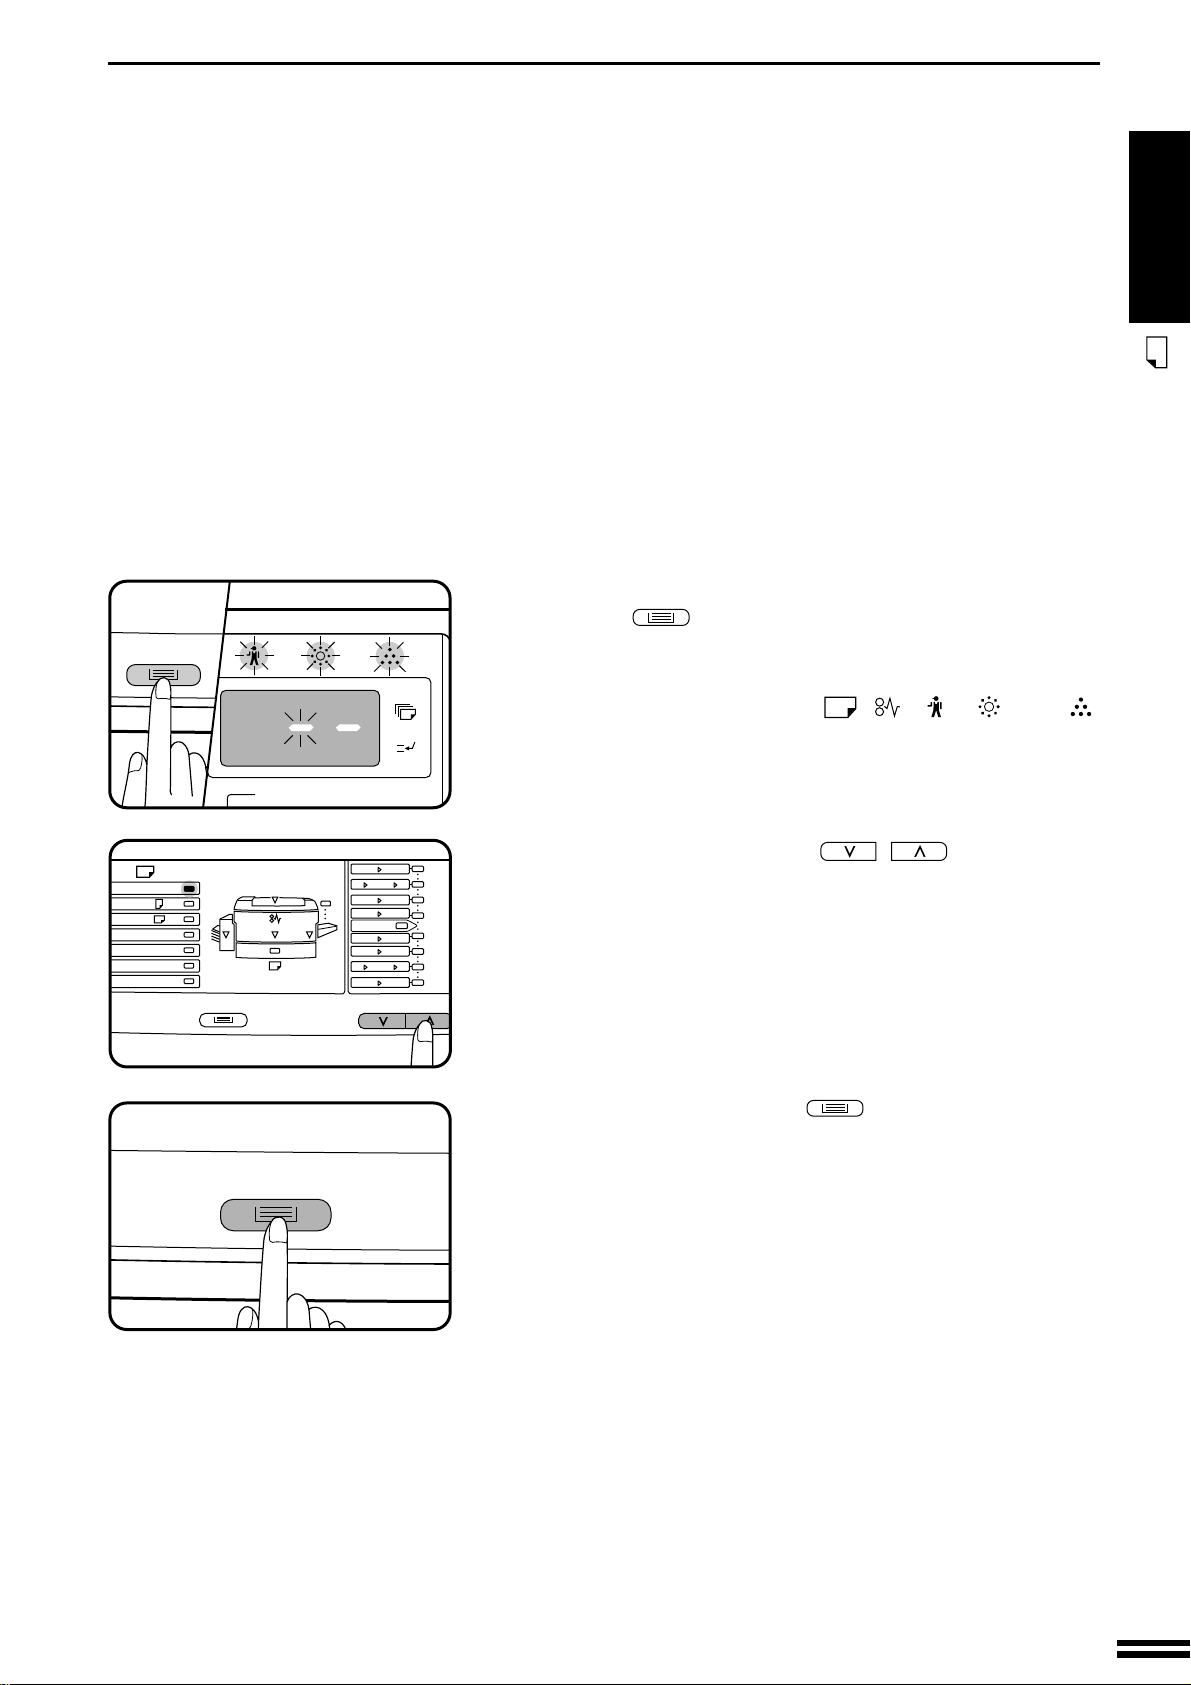
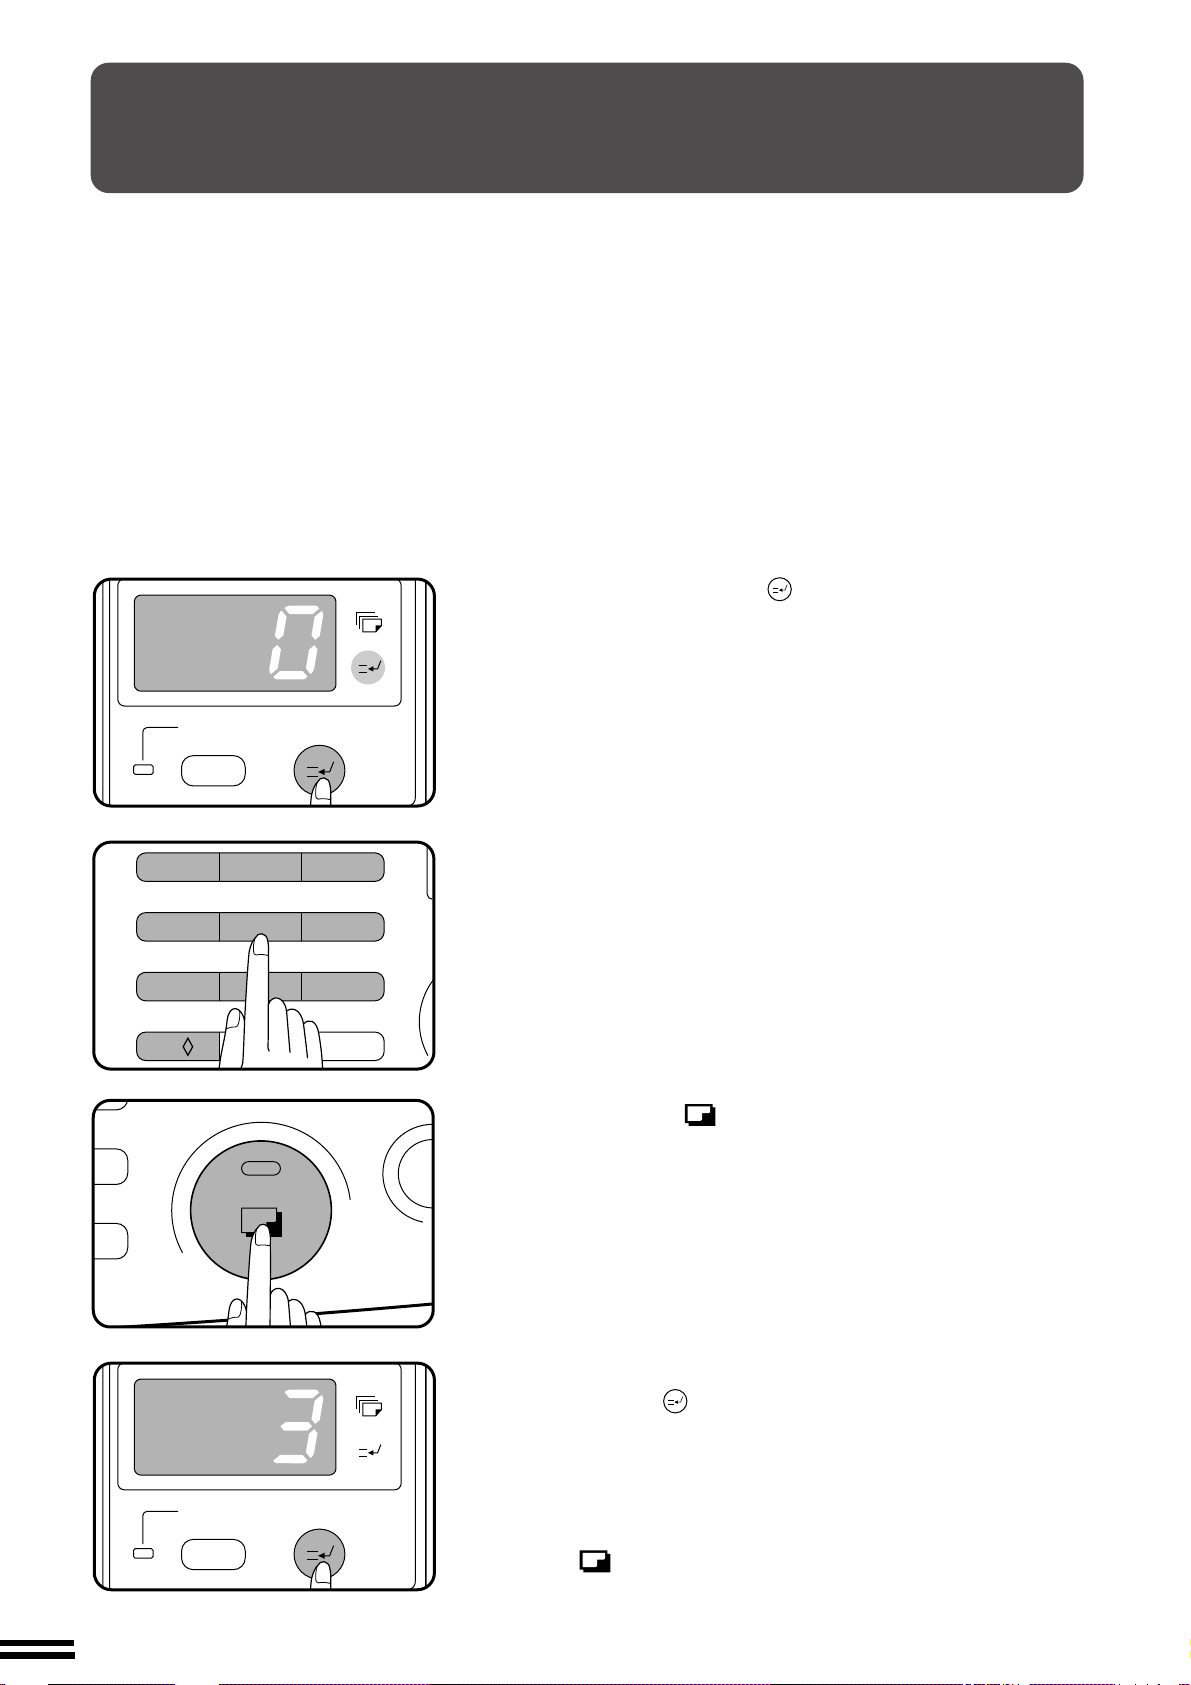
To set the selected paper size, press and hold the TRAY
SELECT (
7
alarm indicators* blink and “– –” appears in the copy
quantity display.
) key for more than 5 seconds until all the
GETTING STARTED
Loading copy paper
ZOOM
* The alarm indicators are the , , , , and
indicators.
Use the copy ratio selector ( , ) keys to select
the paper size which is set.
8
●
Each time a copy ratio selector key is pressed, the paper size will
be indicated with a paper size indicator.
Press the TRAY SELECT ( ) key.
9
●
All the alarm indicators will go out.
5
Page 8
GETTING STARTED
ADDING TONER
The toner required ( ) indicator will light up when toner
concentration level in the developer unit is low. Please read on
to determine when toner must be added. If copying is continued
while the indicator is lit, copies will gradually become
lighter until the copier stops and the indicator begins blinking.
The indicator may also begin blinking during long copy
Adding toner
runs of multiple dark originals, even though toner is left. If the
indicator begins to blink, the copier will stop making copies.
Open and close the front cover. After a sufficient amount of
toner has been fed, the indicator will go out and the
READY indicator will light up. Press the print ( ) button to
resume copying.
After completion of toner replenishment, if the indicator
and the READY indicator are both on, or if the indicator
blinks while the READY indicator is off, then toner must be
added as described below.
For best copying results, be sure to use only
Sharp products.
The package of Sharp toner has the Genuine
Supplies label.
GENUINE SUPPLIES
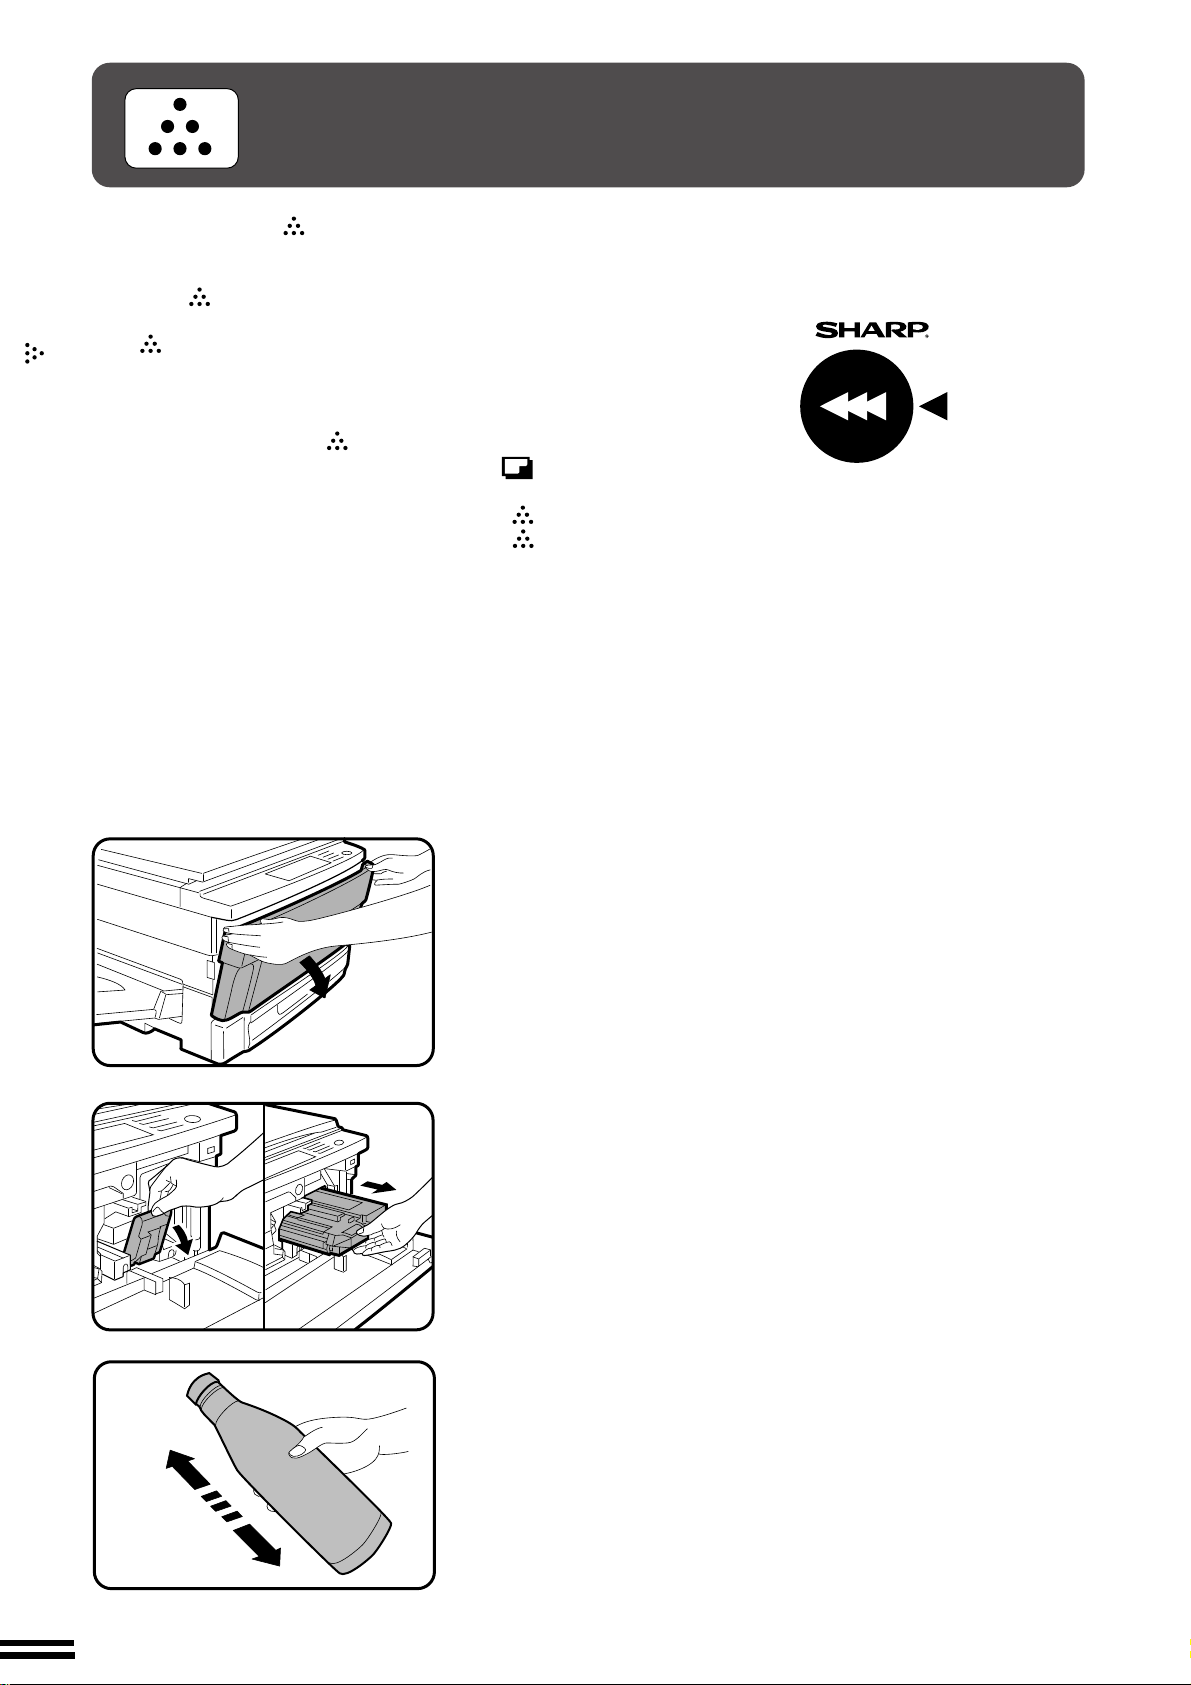
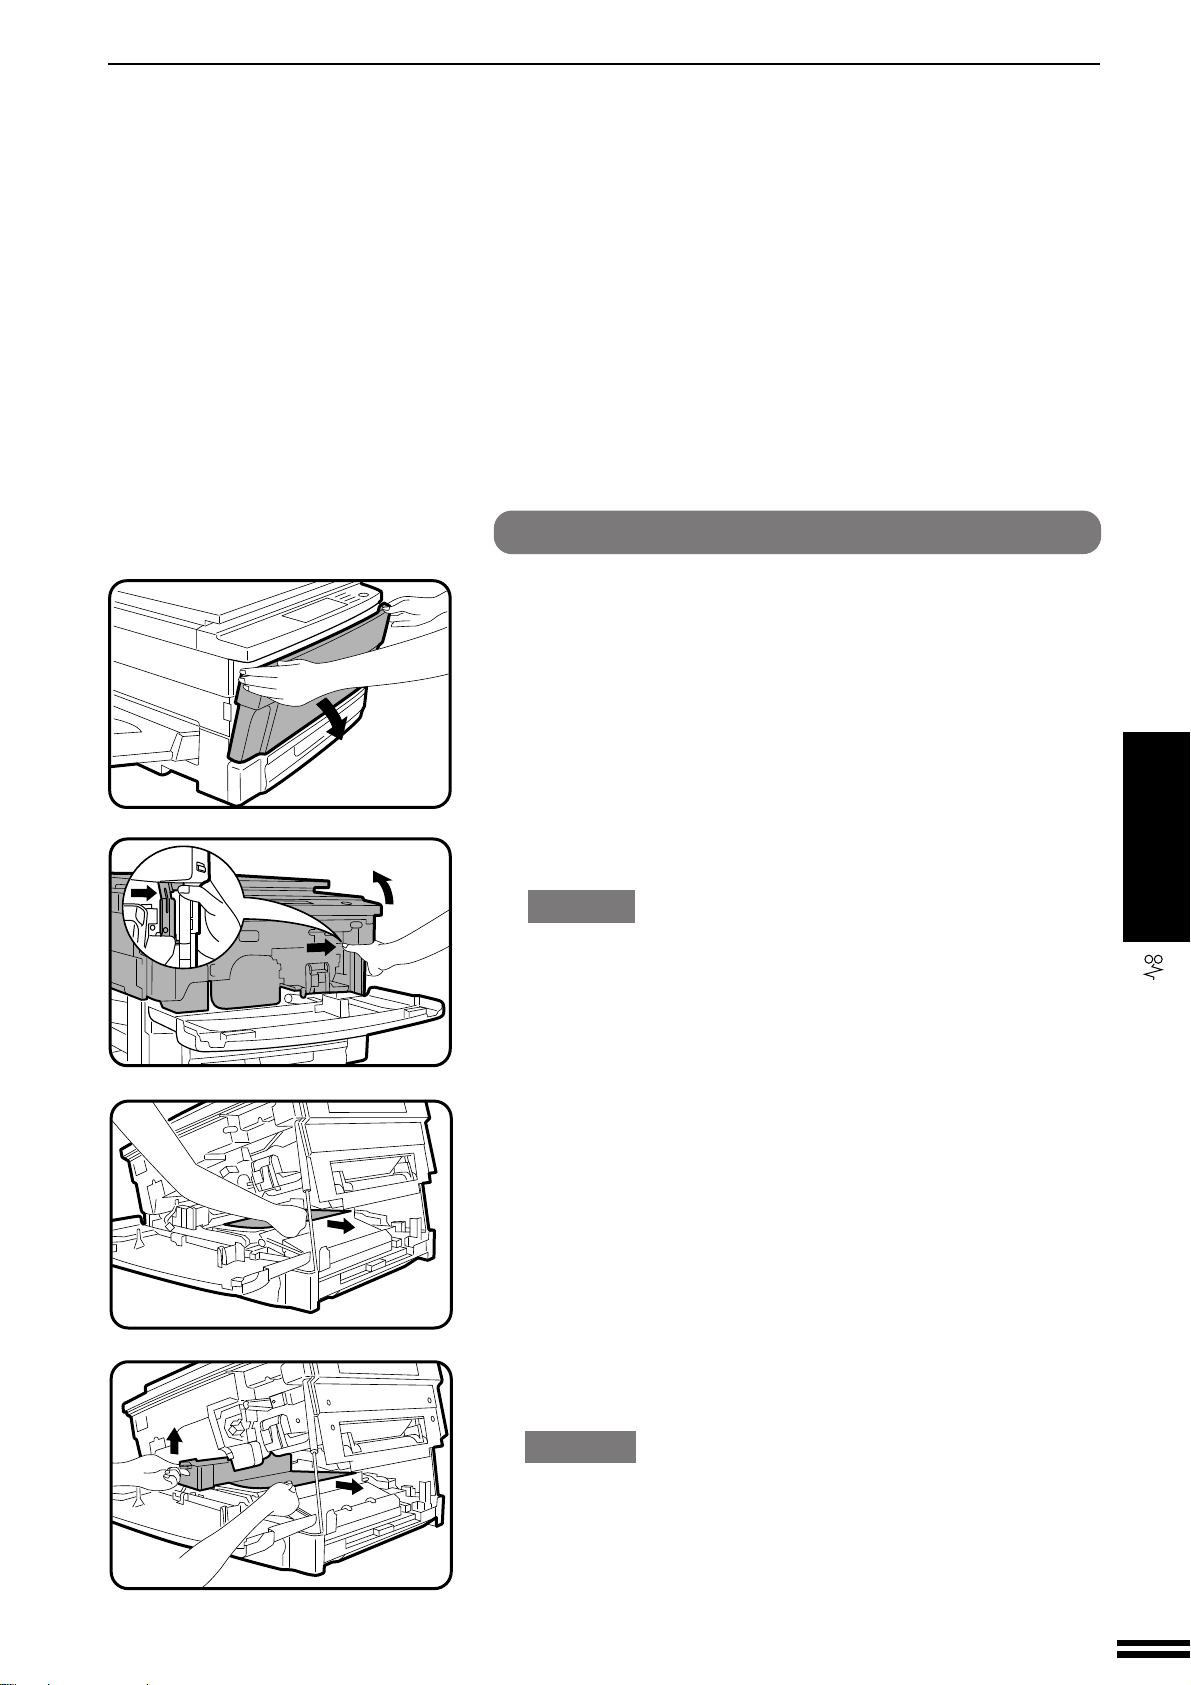
Open the front cover.
1
Pull down the developer unit lock lever and pull the
developer unit out slowly until it stops.
2
Hold the new toner bottle as shown and shake it four or
five times.
3
4 or 5 times
6
Page 9
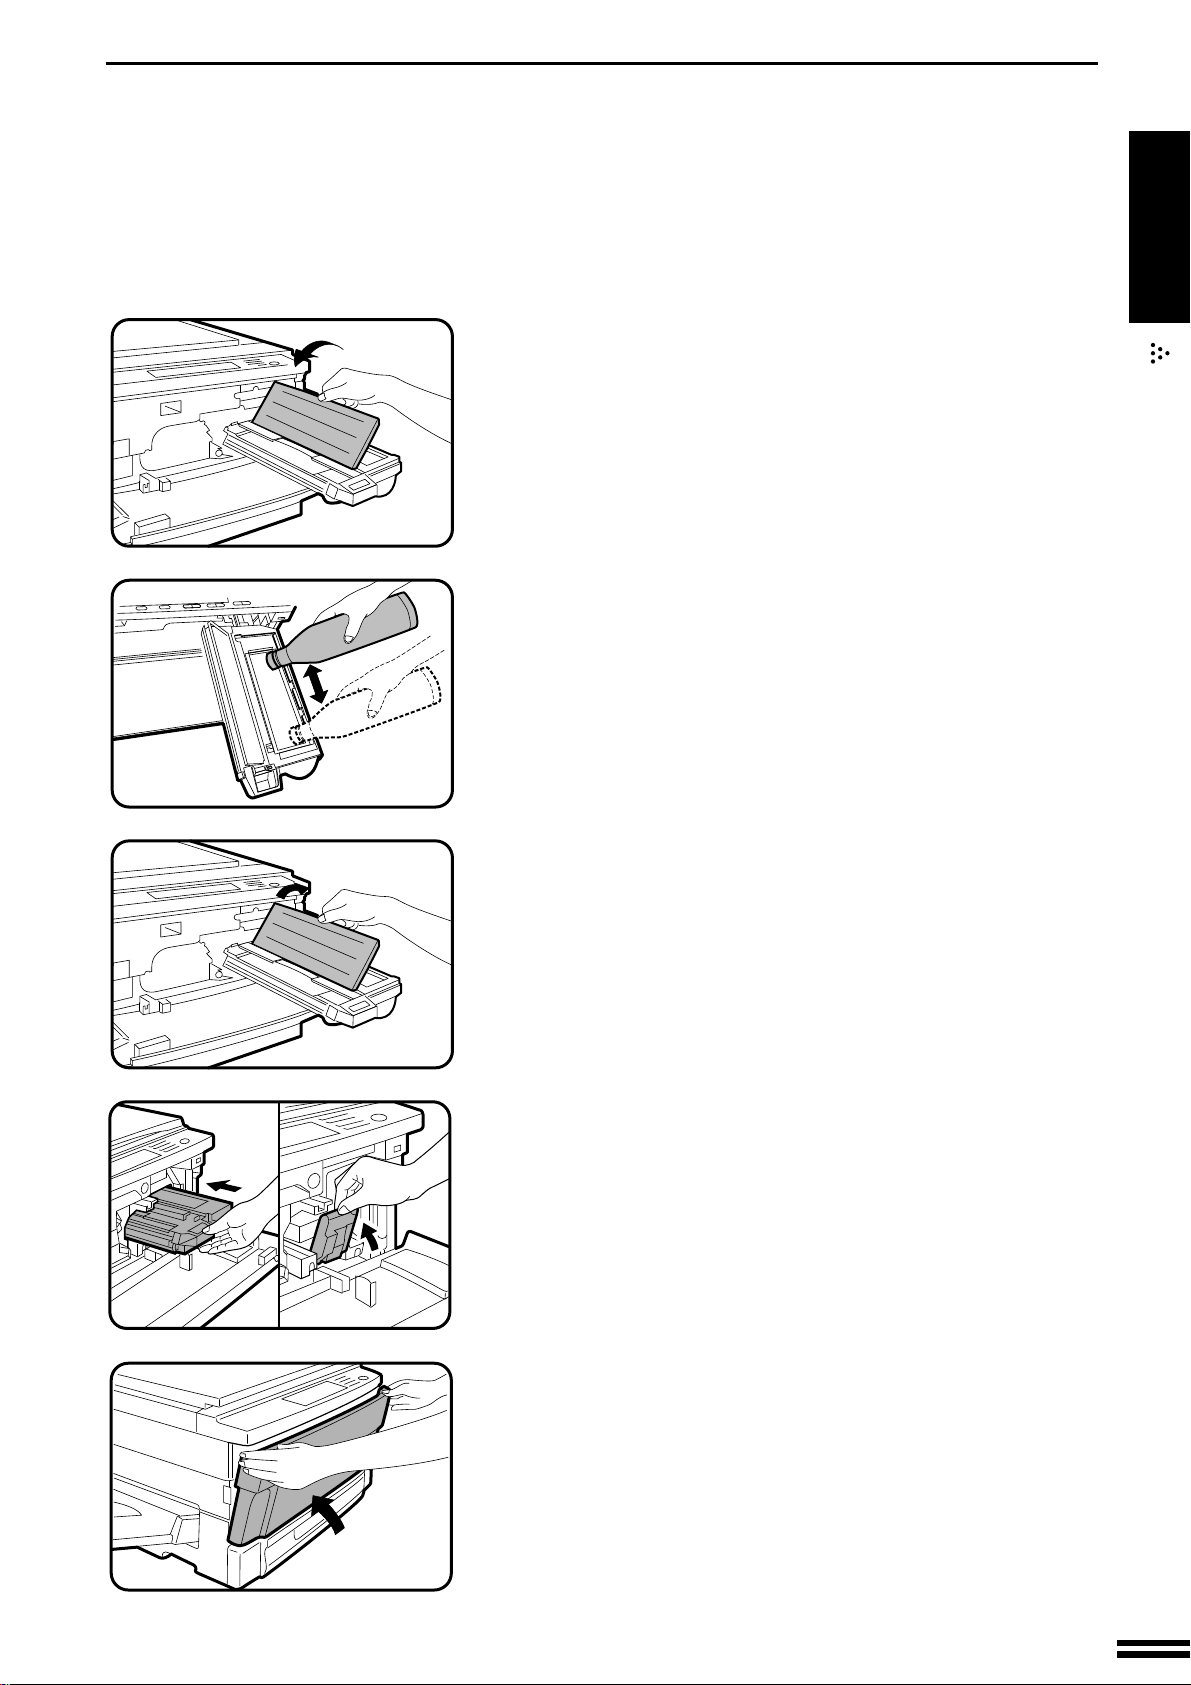
Open the toner hopper cover.
4
Pour the toner evenly into the toner hopper.
5
ADDING TONER
GETTING STARTED
Adding toner
Close the toner hopper cover.
6
Slide the developer unit into the copier.
7
Return the developer unit lock lever into place.
8
Close the front cover.
9
7
Page 10
AUDITING ACCOUNTS
%
ZOOM
If this copier has been programmed in the auditing mode, it will not
function until an assigned 3-digit account number has been entered.
See page 33 for setting the auditing mode.
MAKING COPIES
Auditing accounts
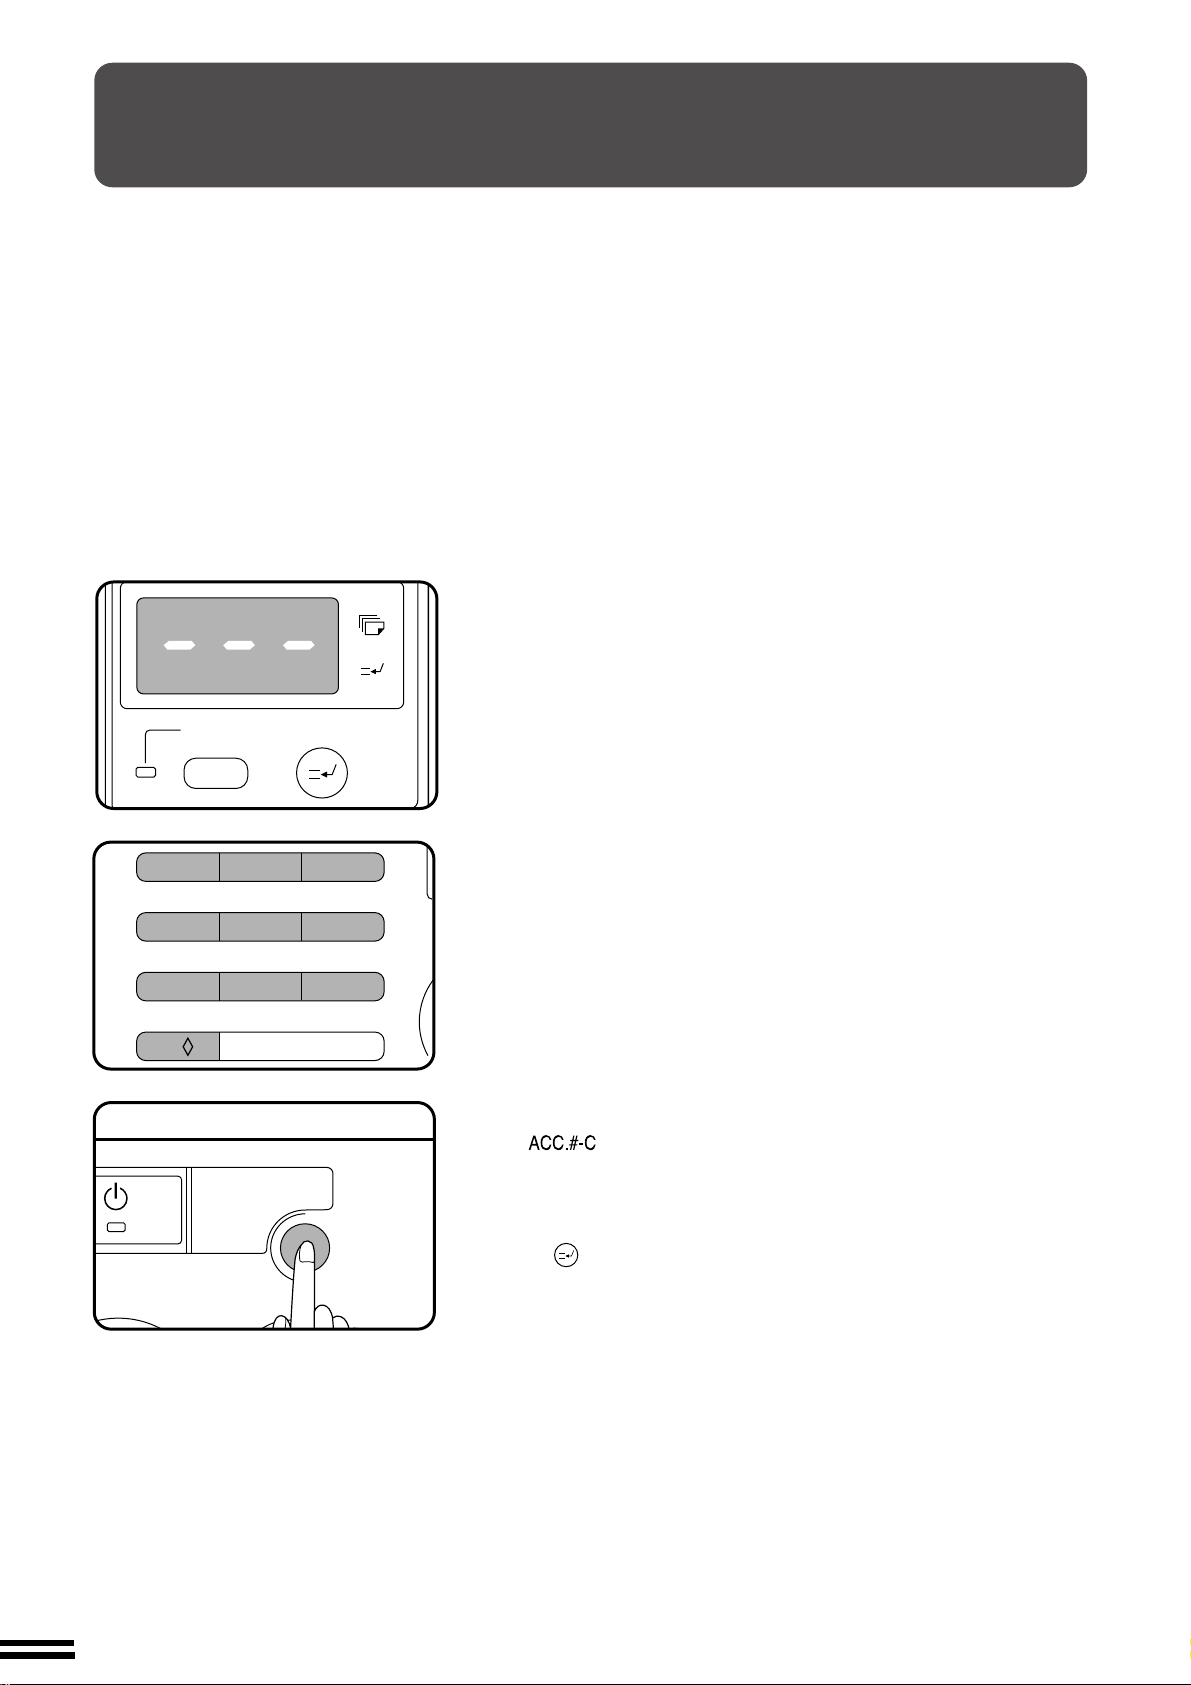
If the copier has been programmed in the auditing mode, “–––” will
appear in the copy quantity display in the initial conditions.
1
23
45
7
0/
8
C
ACC.#-C
6
9
Enter your account number using the 10-key pad.
1
●
As each digit is entered, the dashes in the copy quantity display
will disappear.
●
After the number is entered, the copy quantity display will
change to 0 and the READY indicator will light up.
●
If an unassigned number is entered, “–––” will appear again in
the copy quantity display, indicating that the number was not
accepted.
When a copy run is completed, press the AUDIT CLEAR
2
(
●
●
) key.
“–––” will appear again in the copy quantity display, indicating
the auditing mode.
In the interrupt copy mode (see page 18), press the INTERRUPT
( ) key after an interrupt copy run is completed.
8
Page 11
NORMAL COPYING
A3
A4
A4
A5
R
PAPER SIZE
AUTO
12345
E
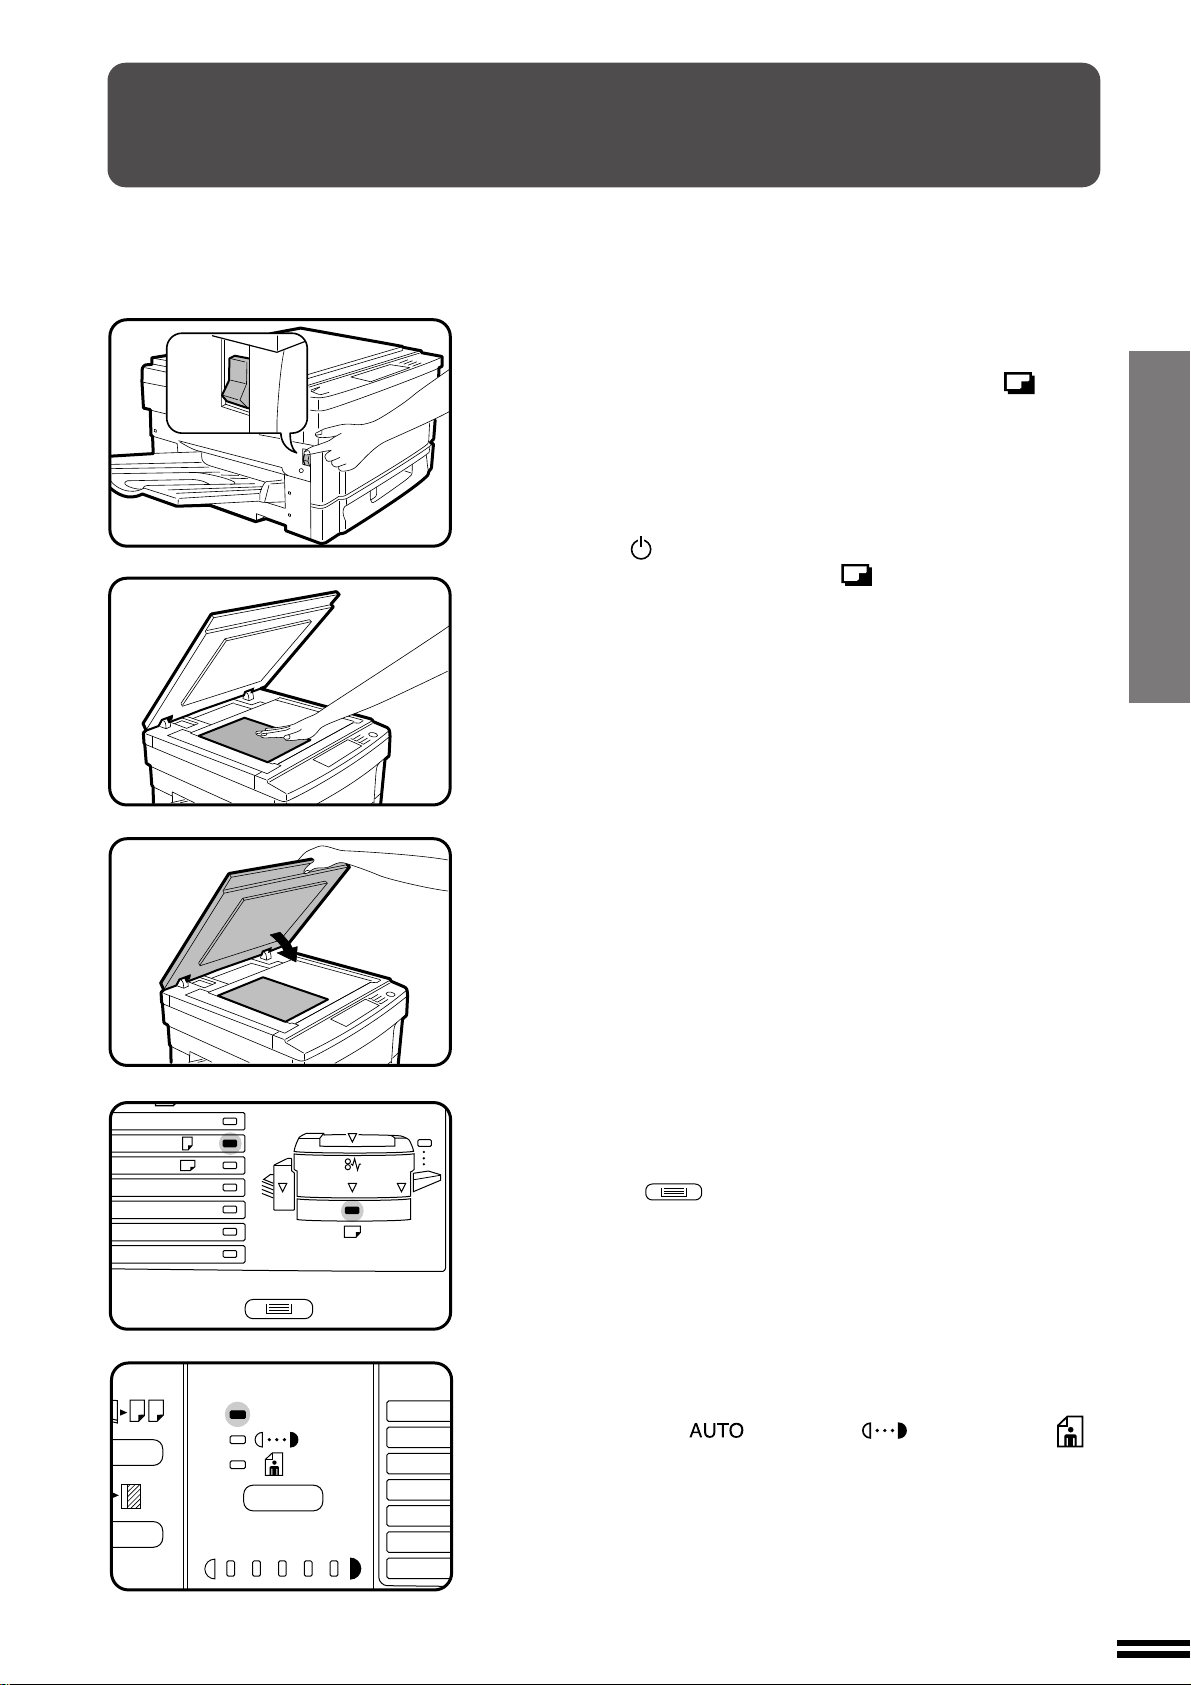
Turn the power switch on.
●
1
2
It will take about 35 seconds for the copier to warm up. However,
you can make desired settings and press the print ( ) button
during warm-up. Copying will start after warm-up.
●
If the copier has been programmed in the auditing mode, the
READY indicator will not light up and “–––” will appear in the
copy quantity display. Enter an assigned 3-digit account number.
See page 8.
●
If the power is already on and all indicators except the POWER
SAVE ( ) indicator are off, the copier is in the auto power
shut-off mode. Press the print ( ) button in this case. See
page 37, POWER SAVE MODES.
Place the original face down on the document glass.
Align it with the original size scale.
●
Image loss (max. 4 mm (5/32")) can occur at the leading and
trailing edges of the copies.
MAKING COPIES
Normal copying
B4
1
✕
13
8
2
/
EXTRA
Close the document cover.
3
Ensure that the copy paper size in the paper tray is the
same size as the original.
4
●
If an optional multi bypass feeder is installed, use the TRAY
SELECT ( ) key to select the paper feed station containing
paper the same size as the original.
Adjust the copy density.
5
●
This copier has three exposure modes to choose from —
AUTOMATIC ( ), MANUAL ( ), and PHOTO ( ).
●
Automatic exposure is the standard initial setting for this copier.
In this mode, the characteristics of the original are “read” by the
exposure system and adjustments are automatically made. This
optimizes the contrast of the copied images by reducing the
effect of coloured or shaded background areas. See page 19 to
adjust the automatic exposure level.
9
Page 12

NORMAL COPYING
1
23
45
6
7
8
9
0/
C
%
ZOOM
C
AUTO
MAKING COPIES
12345
●
For manual copy density adjustment, press the AUTO/
MANUAL/PHOTO ( / / ) key to select
MANUAL ( ) and adjust with the LIGHT ( ) and
DARK ( ) keys as desired.
●
For photographs, select PHOTO ( ) and then adjust with the
LIGHT ( ) and DARK ( ) keys as desired.
AUTO
Normal copying
●
12345
There are 9 exposure steps indicated by 5 indicator lights. (The
indicators light up one or two at a time.)
Successive pushes of the LIGHT ( ) key will change the
indicator lights in the order (3) / (3•2) / (2) / (2•1) / (1).
Successive pushes of the DARK ( ) key will change the
indicator lights in the order (3) / (3•4) / (4) / (4•5) / (5).
3
Set the number of copies using the 10-key pad.
6
●
A single copy can be made with the initial setting, i.e., when “0”
is displayed.
●
Press the clear ( ) key to clear an entry if a mistake is
made.
Press the print ( ) button.
7
●
The number in the copy quantity display will decrease by 1 each
time a copy is made.
●
Press the key to stop copying in the middle of a run.
●
To repeat the same copy sequence for a different original,
simply replace the original and press the print ( ) button.
10
How to remove the document cover
The document cover can be removed to allow copying of
bulky objects. To remove it, open the document cover and
lift it at a slight backward angle.
●
To re-attach the document cover, reverse the above procedure.
Page 13
REDUCTION/ENLARGEMENT/ZOOM
200%
50%
115%
86%
141%
122%
81%
70%
100%
A3 A5
A3 B4
B4 A3
A4 B4
A5 A3
B4 A4
A4 A5 A3 A4
,
A4 A3 A5 A4
,
0
%
50%
115%
86%
122%
81%
70%
ZOOM
200%
50%
115%
86%
141%
122%
81%
70%
100%
A3 A5
A3 B4
B4 A3
A4 B4
A5 A3
B4 A4
A4 A5 A3 A4
,
A4 A3 A5 A4
,
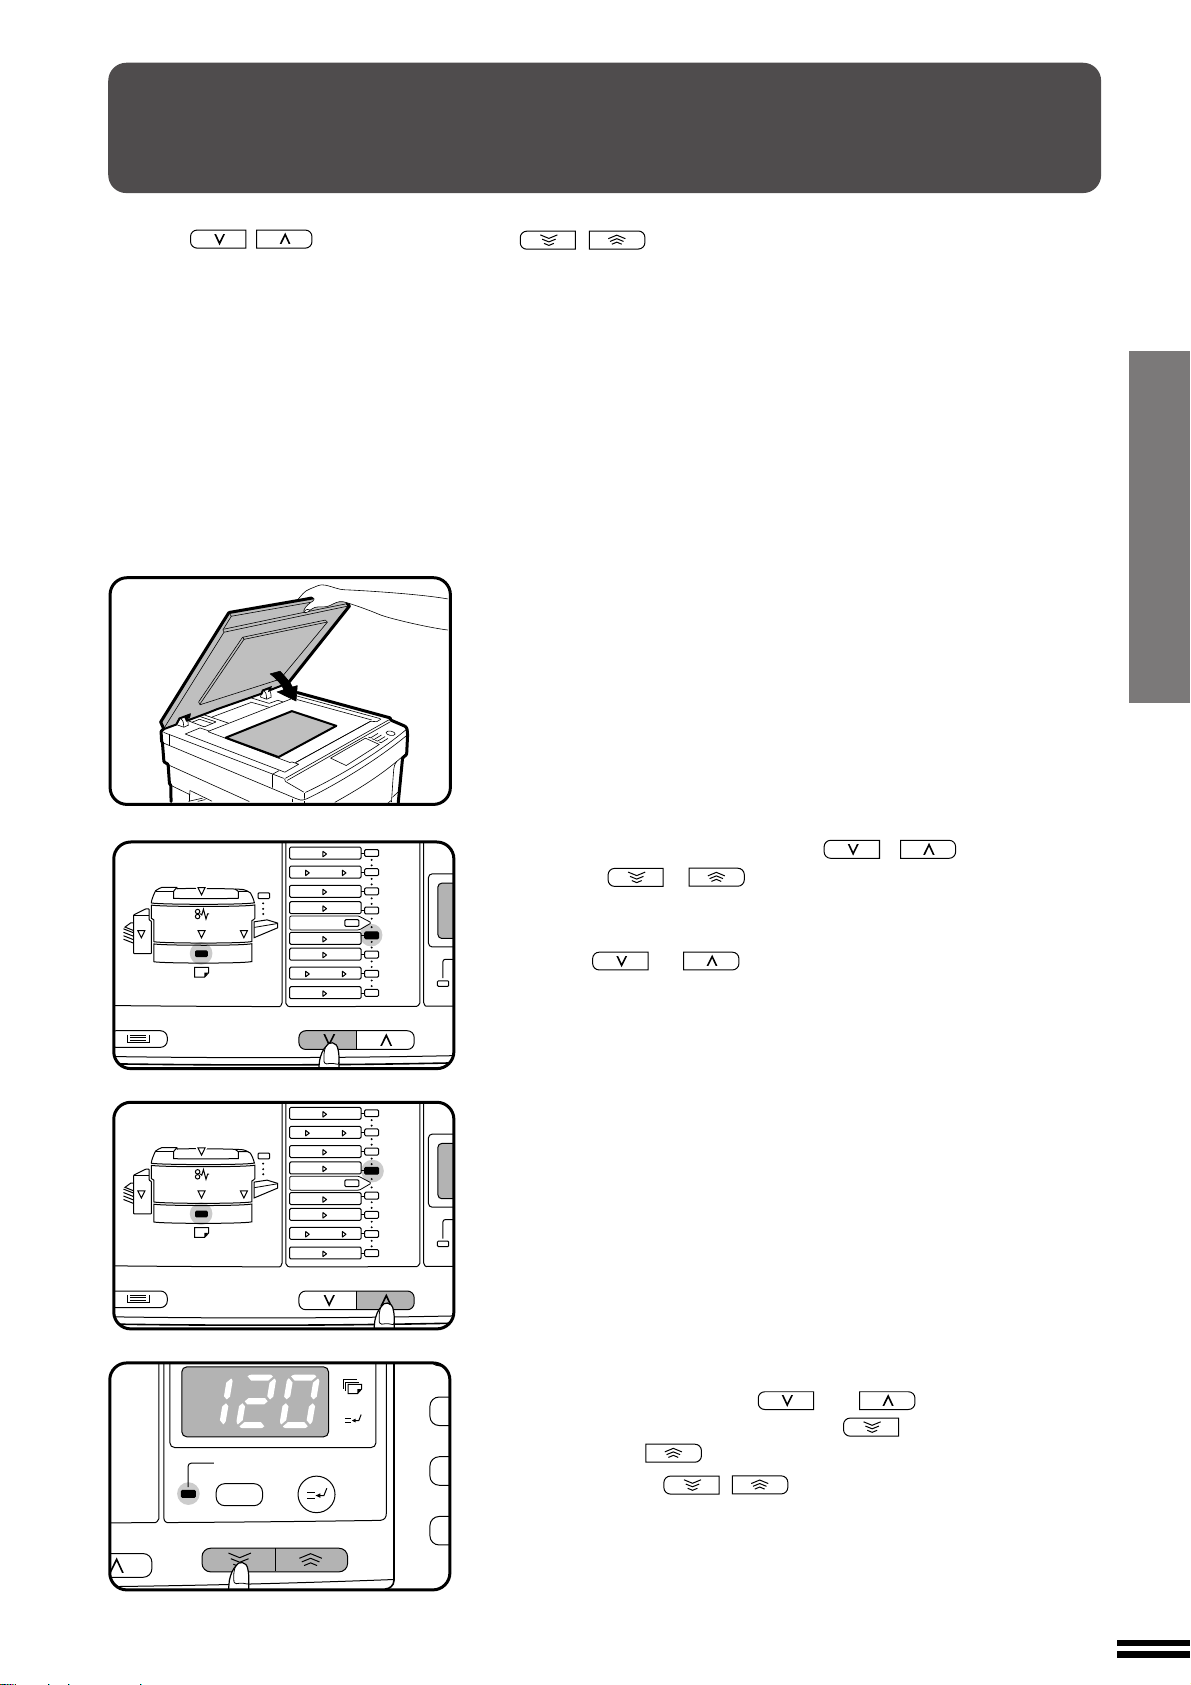
Reduction and enlargement ratios can be selected with the copy ratio
selector ( , ) keys and/or the zoom ( , ) keys.
The zoom function enables precise copy ratio selection from 50% to
200% in 1% increments.
Place the original on the document glass and close the
document cover.
1
MAKING COPIES
Reduction/enlargement/zoom
Use the copy ratio selector ( , ) keys and the
2
zoom (
, ) keys to select the desired copy
ratio.
●
To select a preset reduction or enlargement copy ratio, press
the or key repeatedly until the indicator for the
desired copy ratio is lit.
A. Preset reduction ratios are: 86%, 81%, 70%, and 50% (95%,
77%, 64%, and 50%).
B. Preset enlargement ratios are: 115%, 122%, 141%, and 200%
(121%, 129%, 141%, and 200%).
C. Zoom ratios: Any ratio from 50% to 200% can be set, in 1%
increments. Press the or key to set the approximate ratio, then press the key to decrease the
ratio or the key to increase the ratio.
When a zoom ( , ) key is pressed, the ZOOM indicator
will light up and the zoom ratio will be displayed in the copy quantity
display for at least one second.
11
Page 14
REDUCTION/ENLARGEMENT/ZOOM
0
%
50%
115%
86%
122%
81%
70%
ZOOM
200%
50%
115%
86%
141%
122%
81%
70%
100%
A3 A5
A3 B4
B4 A3
A4 B4
A5 A3
B4 A4
A4 A5 A3 A4
,
A4 A3 A5 A4
,
A3
A4
A4
A5
B4
R
EXTRA
✕
1
2
/
8
13
1
23
45
6
7
8
9
0/
C
MAKING COPIES
Reduction/enlargement/zoom
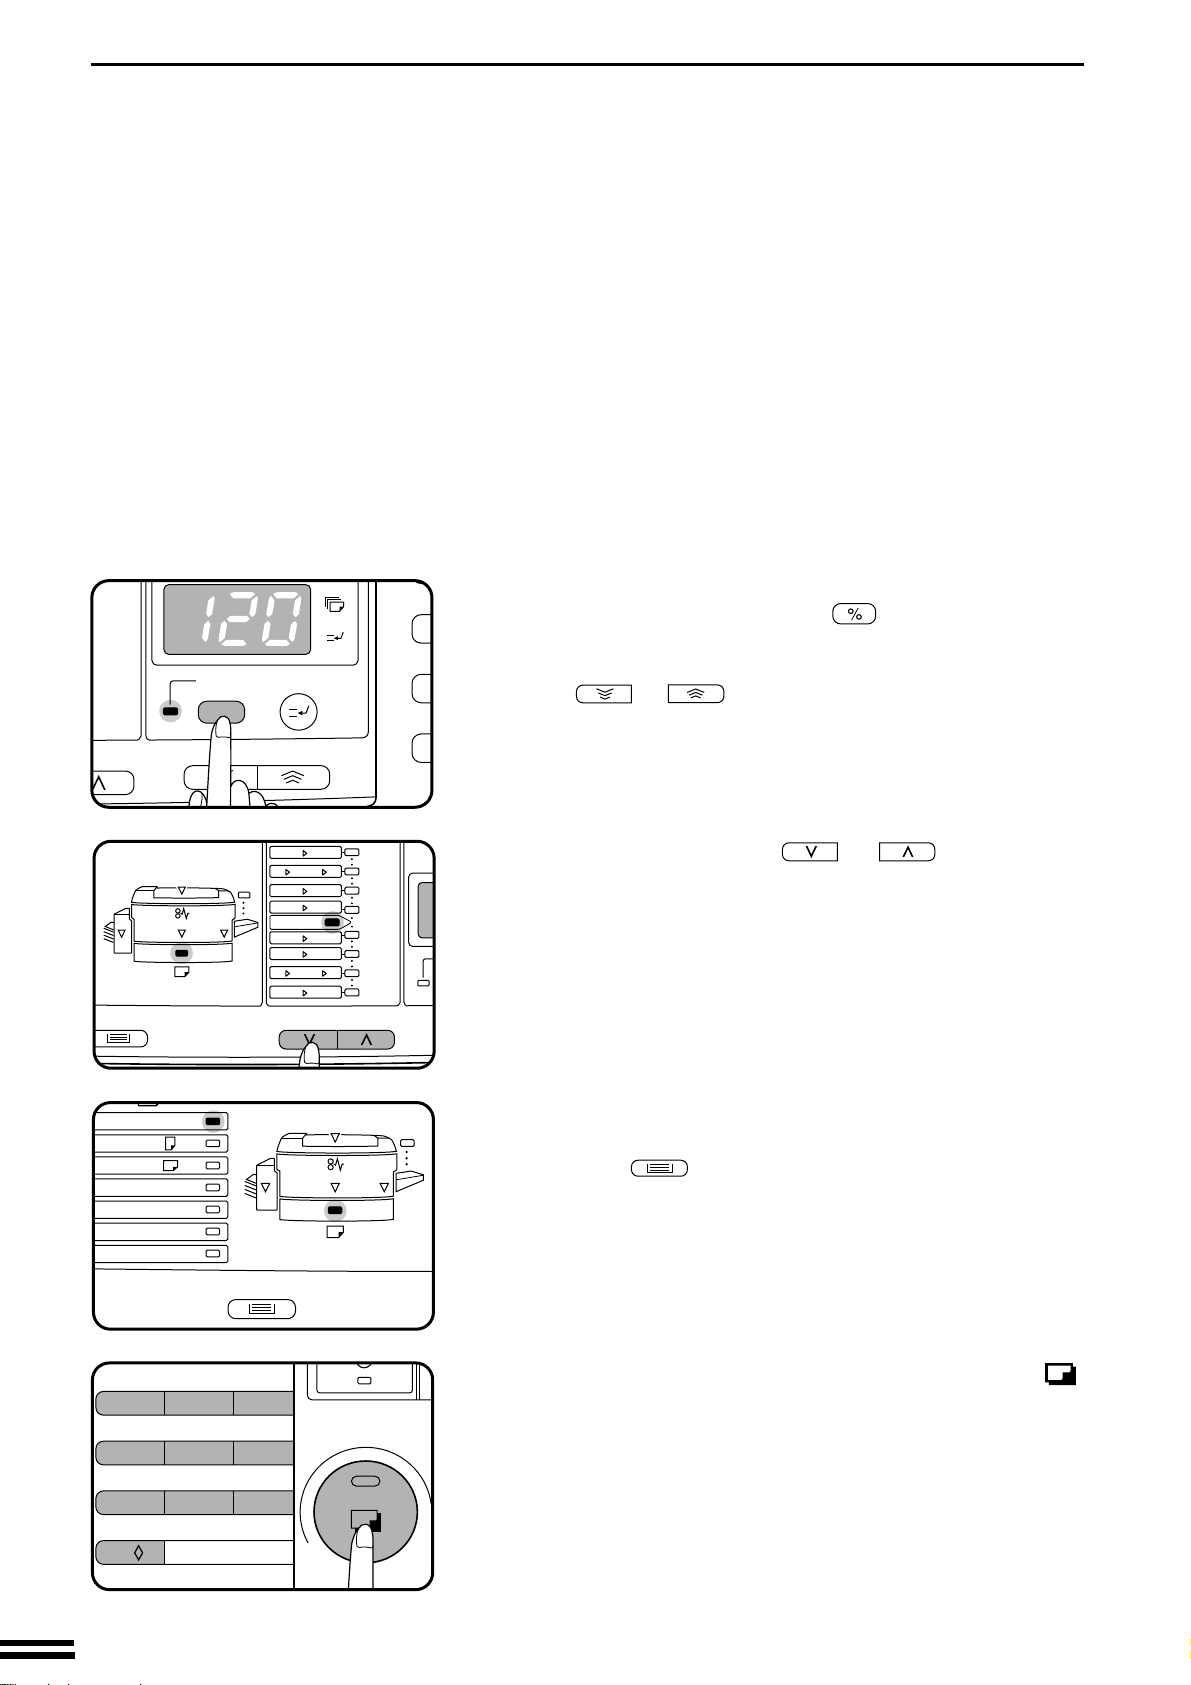
To verify a zoom setting without changing the zoom ratio, press
and hold the copy ratio display ( ) key. When the key is
released, the display will return to the copy quantity display.
●
To decrease or increase the zoom ratio rapidly, press and hold
the or key. However the value will stop at the
preset reduction or enlargement ratios. To move beyond these
ratios, release the key and then press and hold it again.
D. Same-size reset: Press the or key repeatedly
until the copy ratio returns to 100%.
Check the copy paper size.
3
●
If an optional multi bypass feeder is installed, use the TRAY
SELECT ( ) key to select the desired paper size.
Set the number of copies and press the print ( )
button.
4
12
Page 15
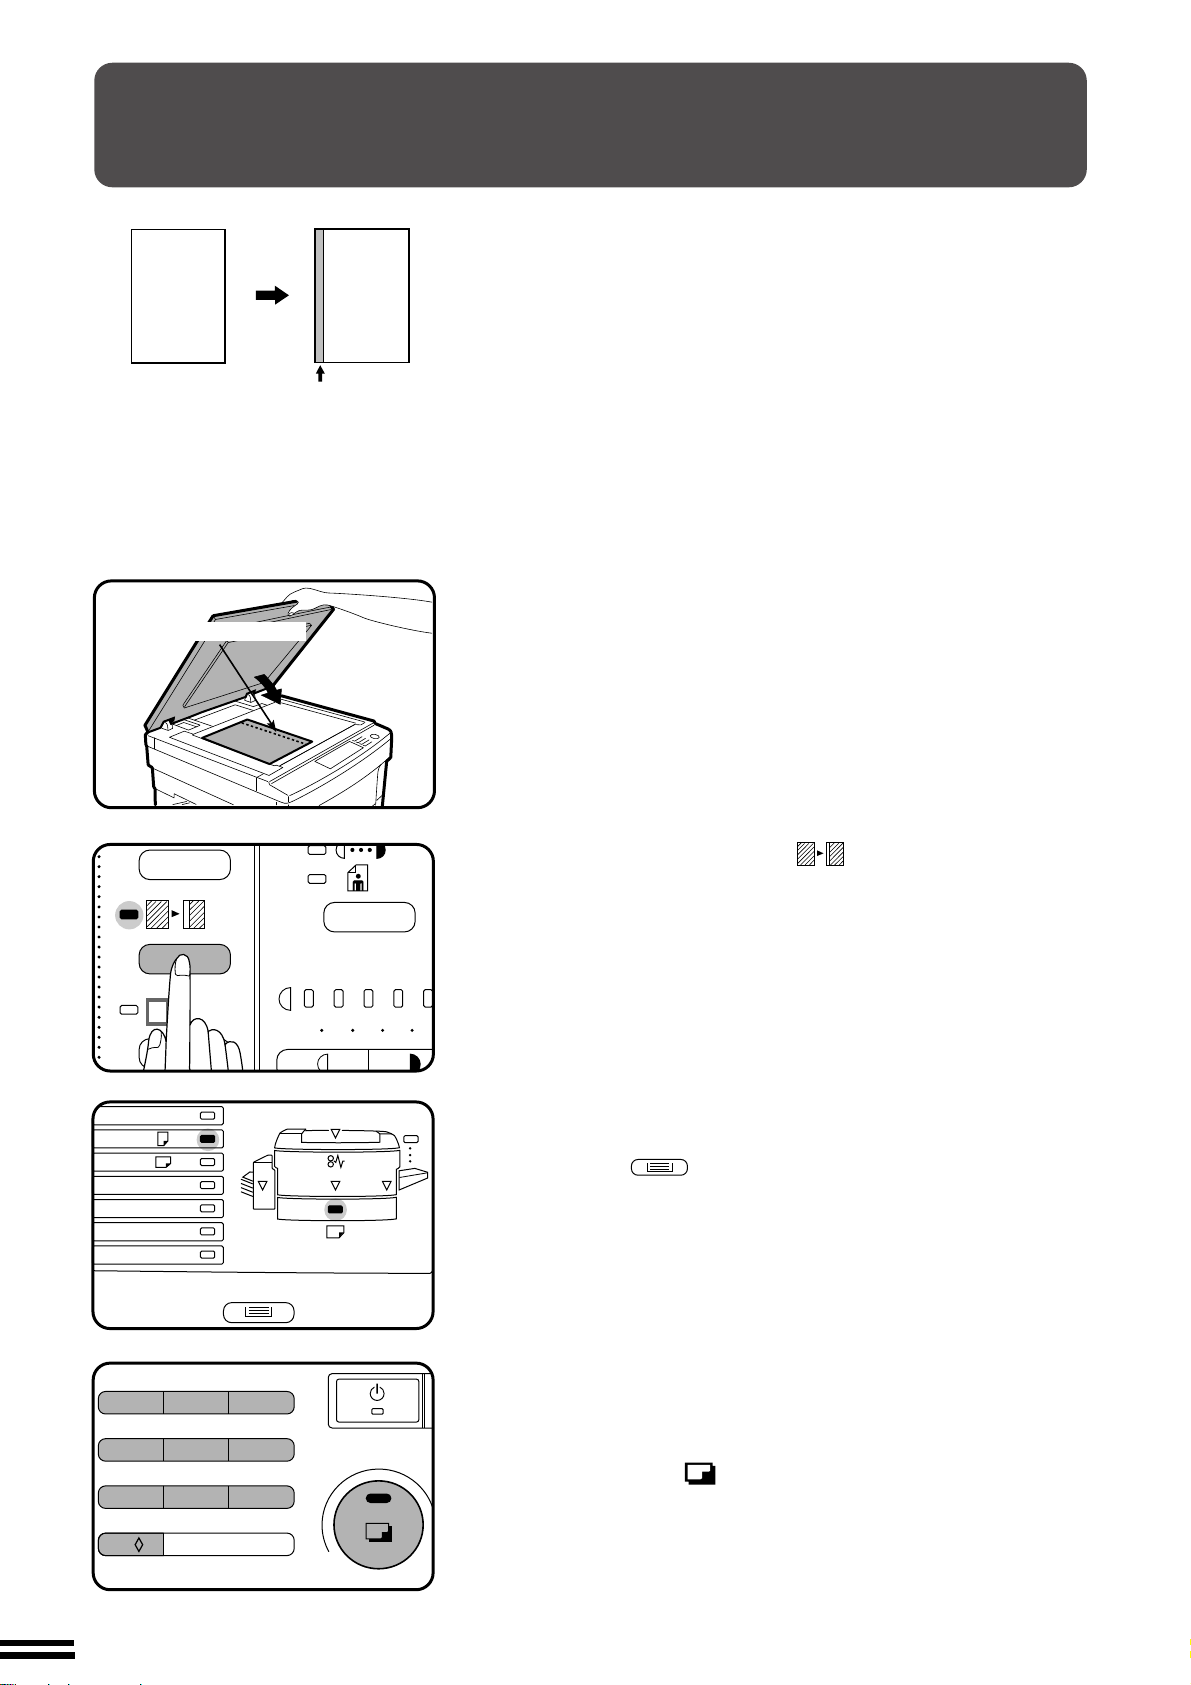
DUAL PAGE COPYING
C
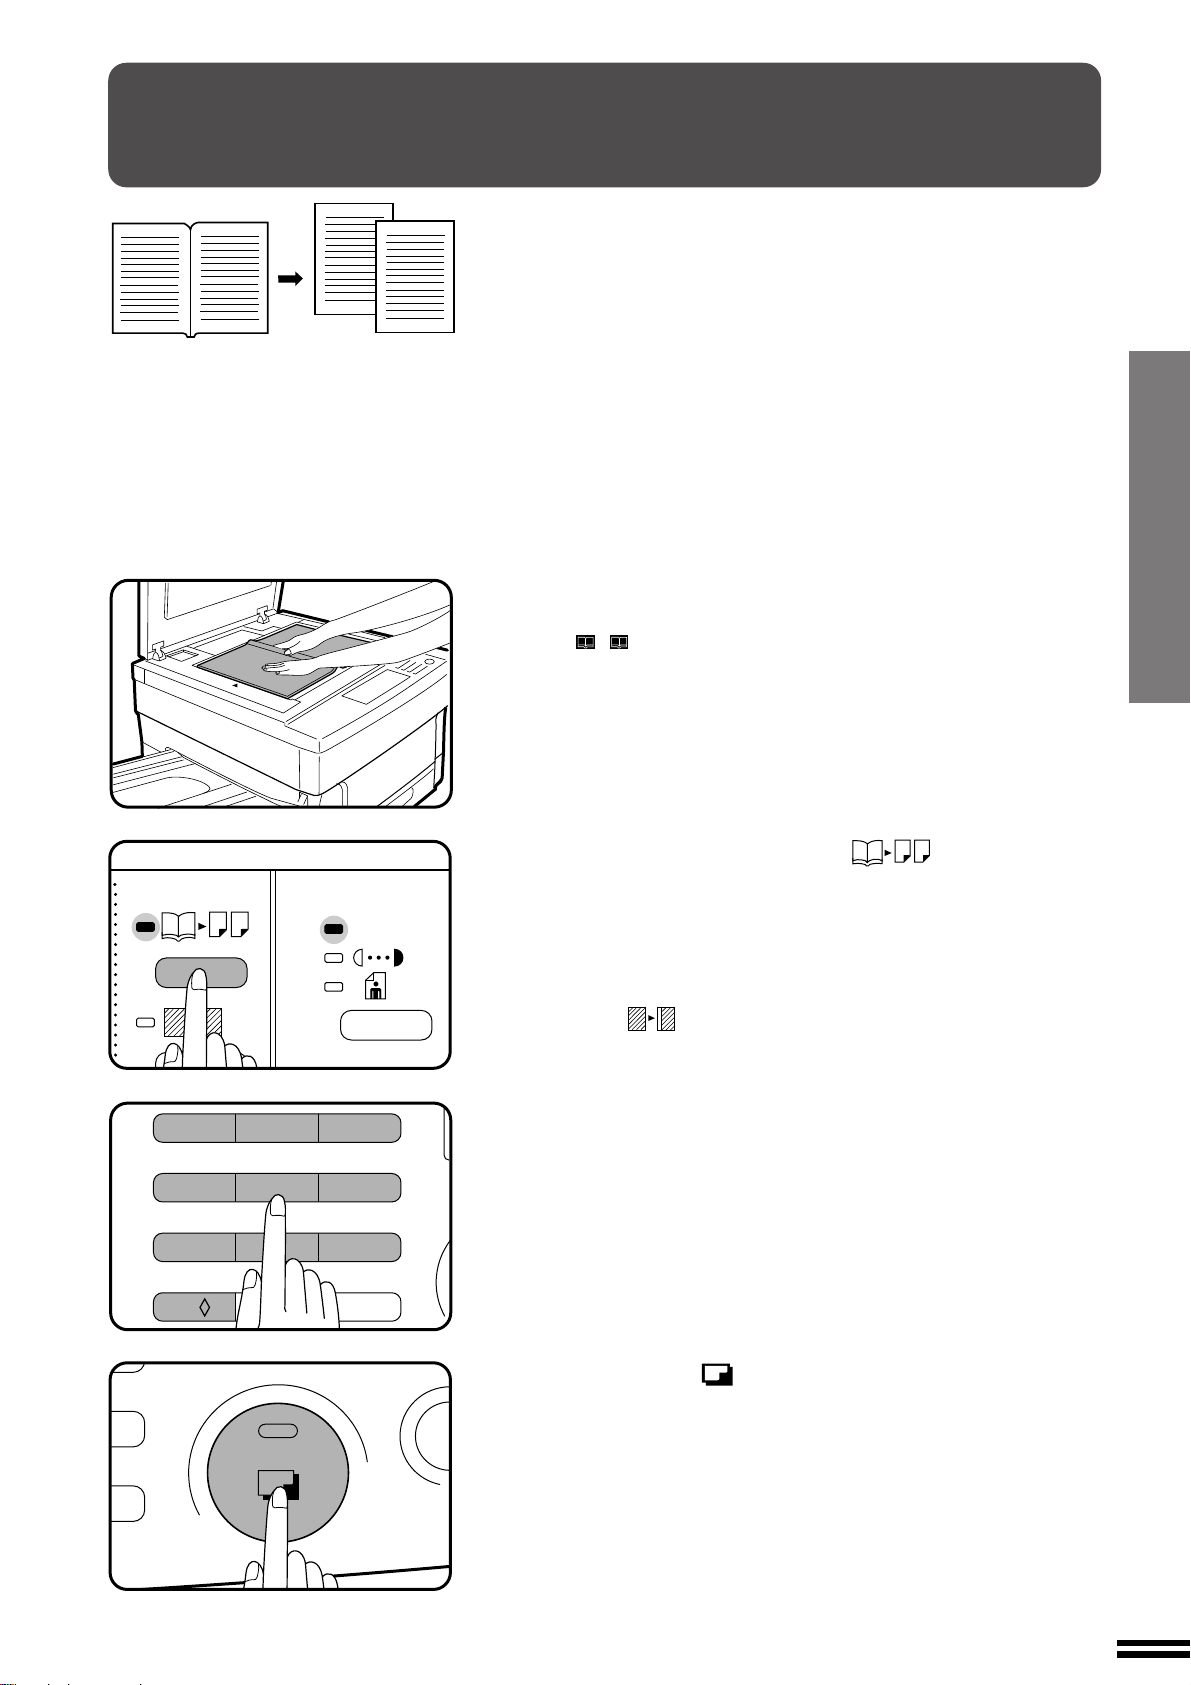
The DUAL PAGE COPY feature produces individual copies of two
documents placed side by side on the document glass. It is especially
useful when copying books and other bound documents. This feature
can be used with the EDGE ERASE and MARGIN SHIFT features.
Place the originals on the document glass with the
centre of the two pages aligned with the paper size index
1
(A4
●
( 81/2 )). Close the document cover.
Set the page to be copied first on the left part of the document
glass.
MAKING COPIES
Dual page copying
1
23
45
7
0/
8
C
AUTO
6
9
Press the DUAL PAGE COPY ( ) key.
2
●
Check to be sure that the copy paper size in the paper tray is A4
(8-1/2" x 11").
●
To erase shadows caused by document binding, use the EDGE
ERASE feature. See page 15.
●
To leave a binding margin on the copy, press the MARGIN
SHIFT ( ) key. See page 14. The MARGIN SHIFT feature
applies only to the left page on the document glass.
Set the number of copies.
3
Press the print ( ) button.
4
13
Page 16
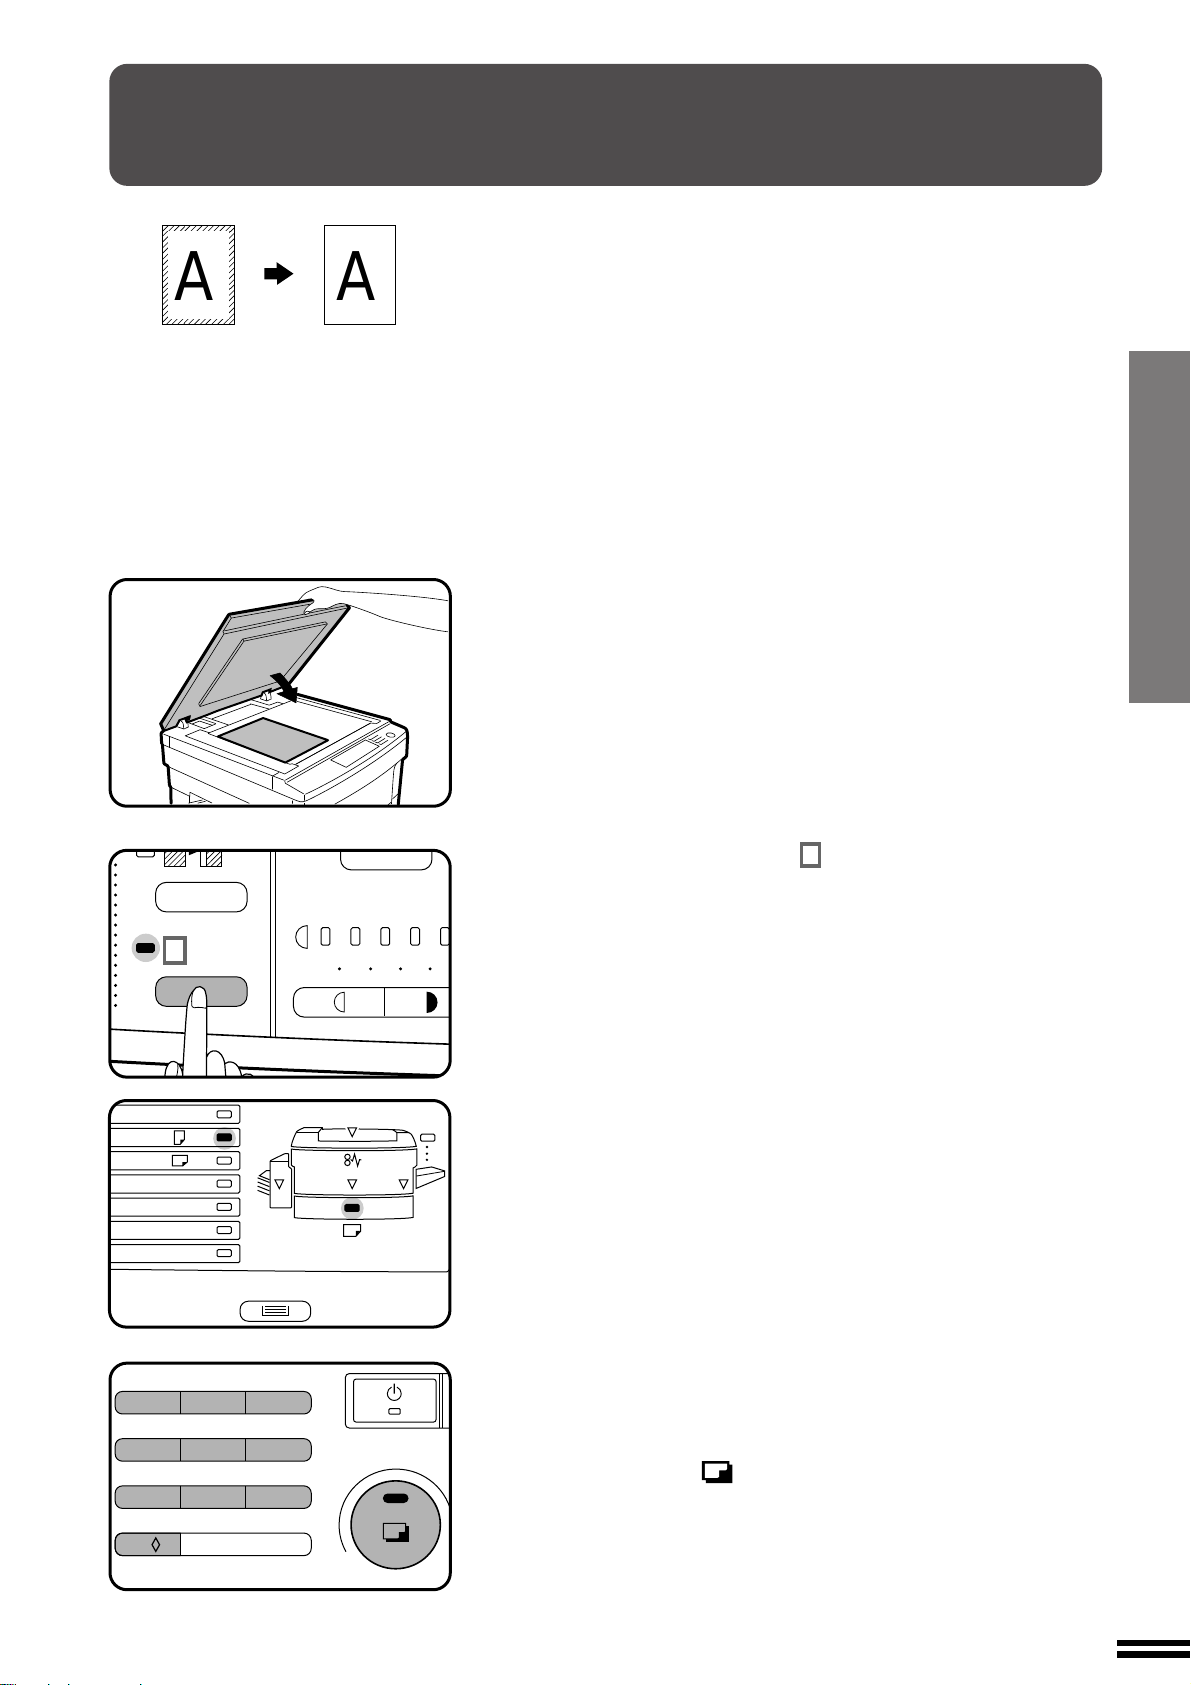
MARGIN SHIFT
1
23
45
6
7
8
9
0/
C
A
Original
MAKING COPIES
Margin is expanded here.
Margin shift
Copy
Expanded margin
The MARGIN SHIFT feature automatically shifts the text or image to
the right to increase the left margin by approximately 9 mm (1/4").
Place the original on the document glass and close the
document cover.
1
●
If an optional automatic document feeder (ADF) is installed, it
can also be used for this feature.
A3
A4
R
A4
A5
B4
1
✕
13
8
2
/
EXTRA
12345
Press the MARGIN SHIFT ( ) key.
2
Check the copy paper size.
3
●
If an optional multi bypass feeder is installed, use the TRAY
SELECT ( ) key to select the desired paper size.
Set the number of copies.
4
14
Press the print ( ) button.
5
Page 17
EDGE ERASE
1
23
45
6
7
8
9
0/
C
A
The EDGE ERASE feature erases dark areas from the copy edges to
make a neater, cleaner copy. It is especially useful when copying thick
documents which might create shadow lines at their edges.
A
A
1
Place the original on the document glass and close the
document cover.
●
If an optional automatic document feeder (ADF) is installed, it
can also be used for this feature.
MAKING COPIES
Edge erase
A3
A4
R
A4
A5
B4
1
✕
13
8
2
/
EXTRA
12345
Press the EDGE ERASE ( ) key.
2
Check the copy paper size.
3
●
This feature will work only when standard size copy paper is
used.
Set the number of copies.
4
Press the print ( ) button.
5
15
Page 18
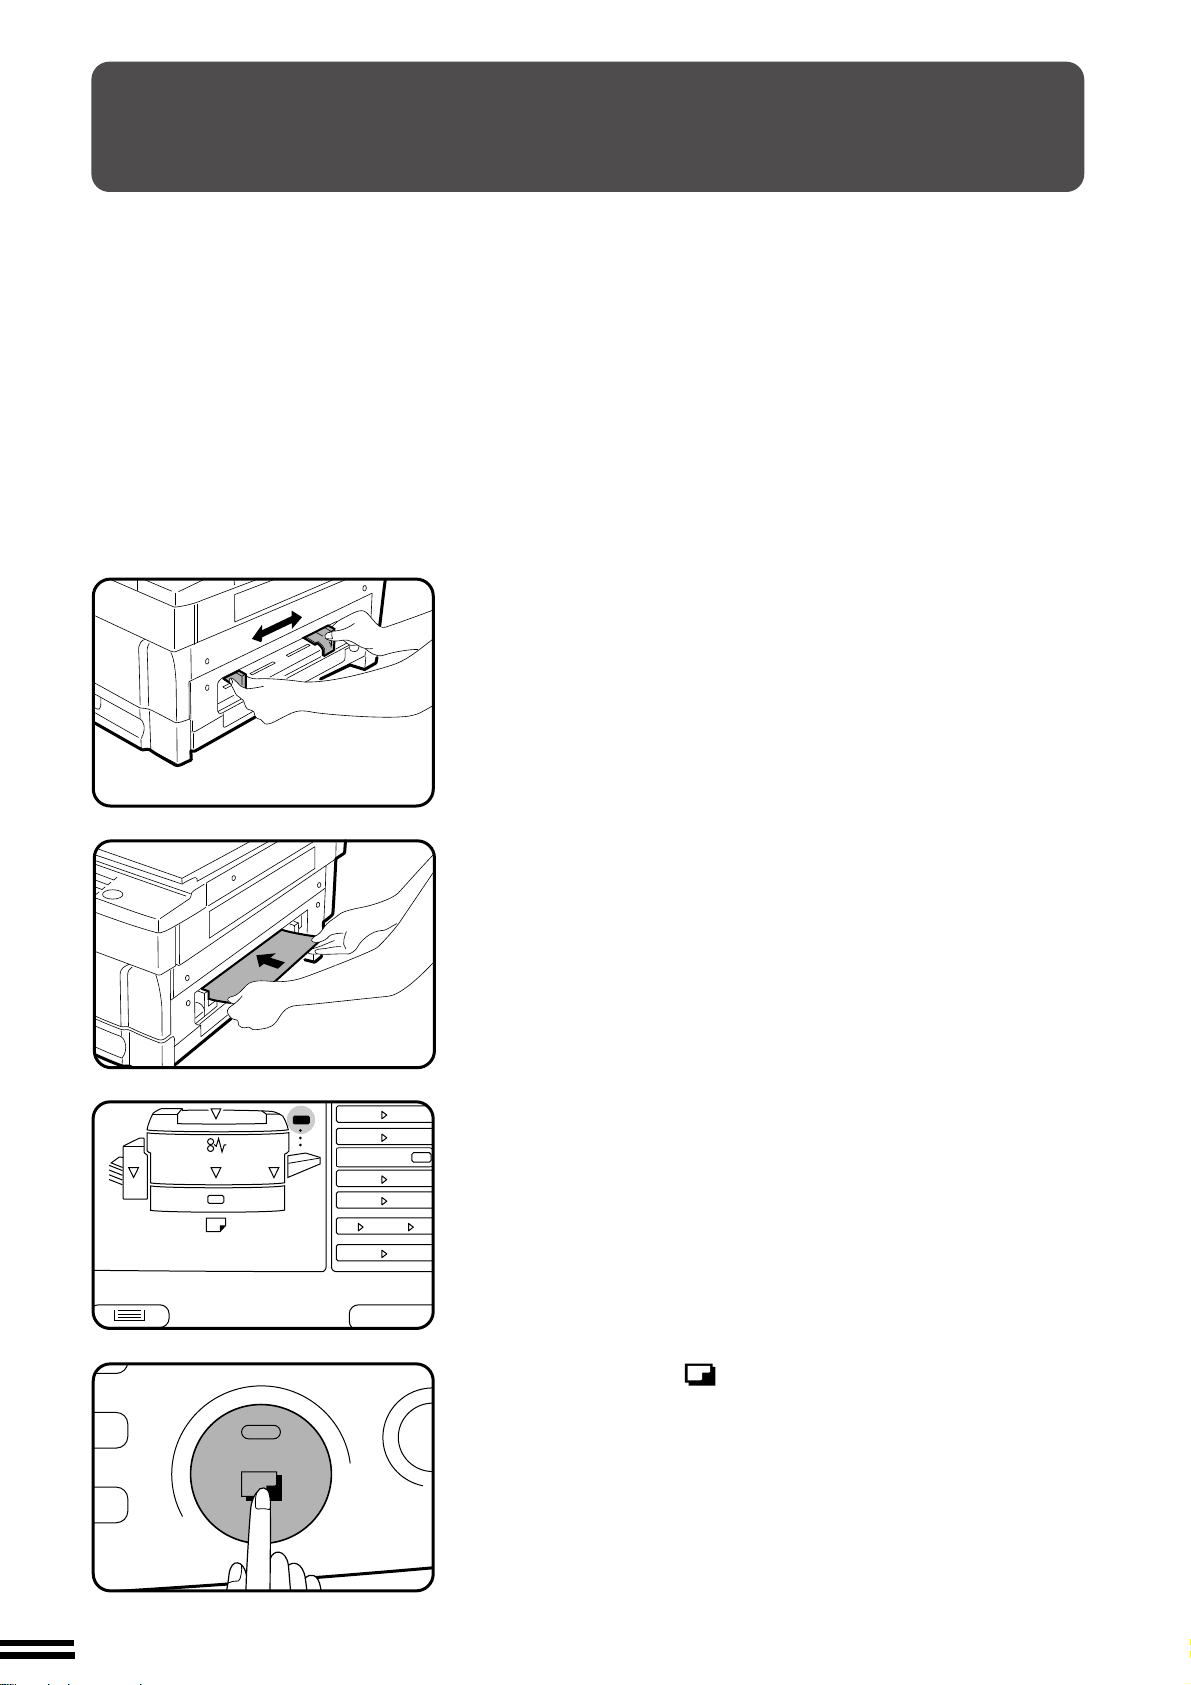
SPECIAL PAPERS (manual feed)
100%
A3 A5
A3 B4
B4 A3
A4 B4
B4 A4
A4 A5 A3 A4
,
C
The single-sheet manual bypass can be used to feed standard paper,
transparency film, label stock, tracing paper and other special purpose
papers measuring from A6 to A3 (5-1/2" x 8-1/2" to 11" x 17"). (See
page 43.)
MAKING COPIES
Special papers (manual feed)
Place the original on the document glass and close the
document cover.
1
Adjust the manual bypass paper guides to the width of
the copy paper.
2
Insert a single sheet of paper all the way into the feed
slot.
3
●
A6 sized paper must be fed narrow side into the feed slot.
●
The bypass indicator in the TRAY SELECT section of the
operation panel will light up.
Press the print ( ) button.
4
16
Page 19
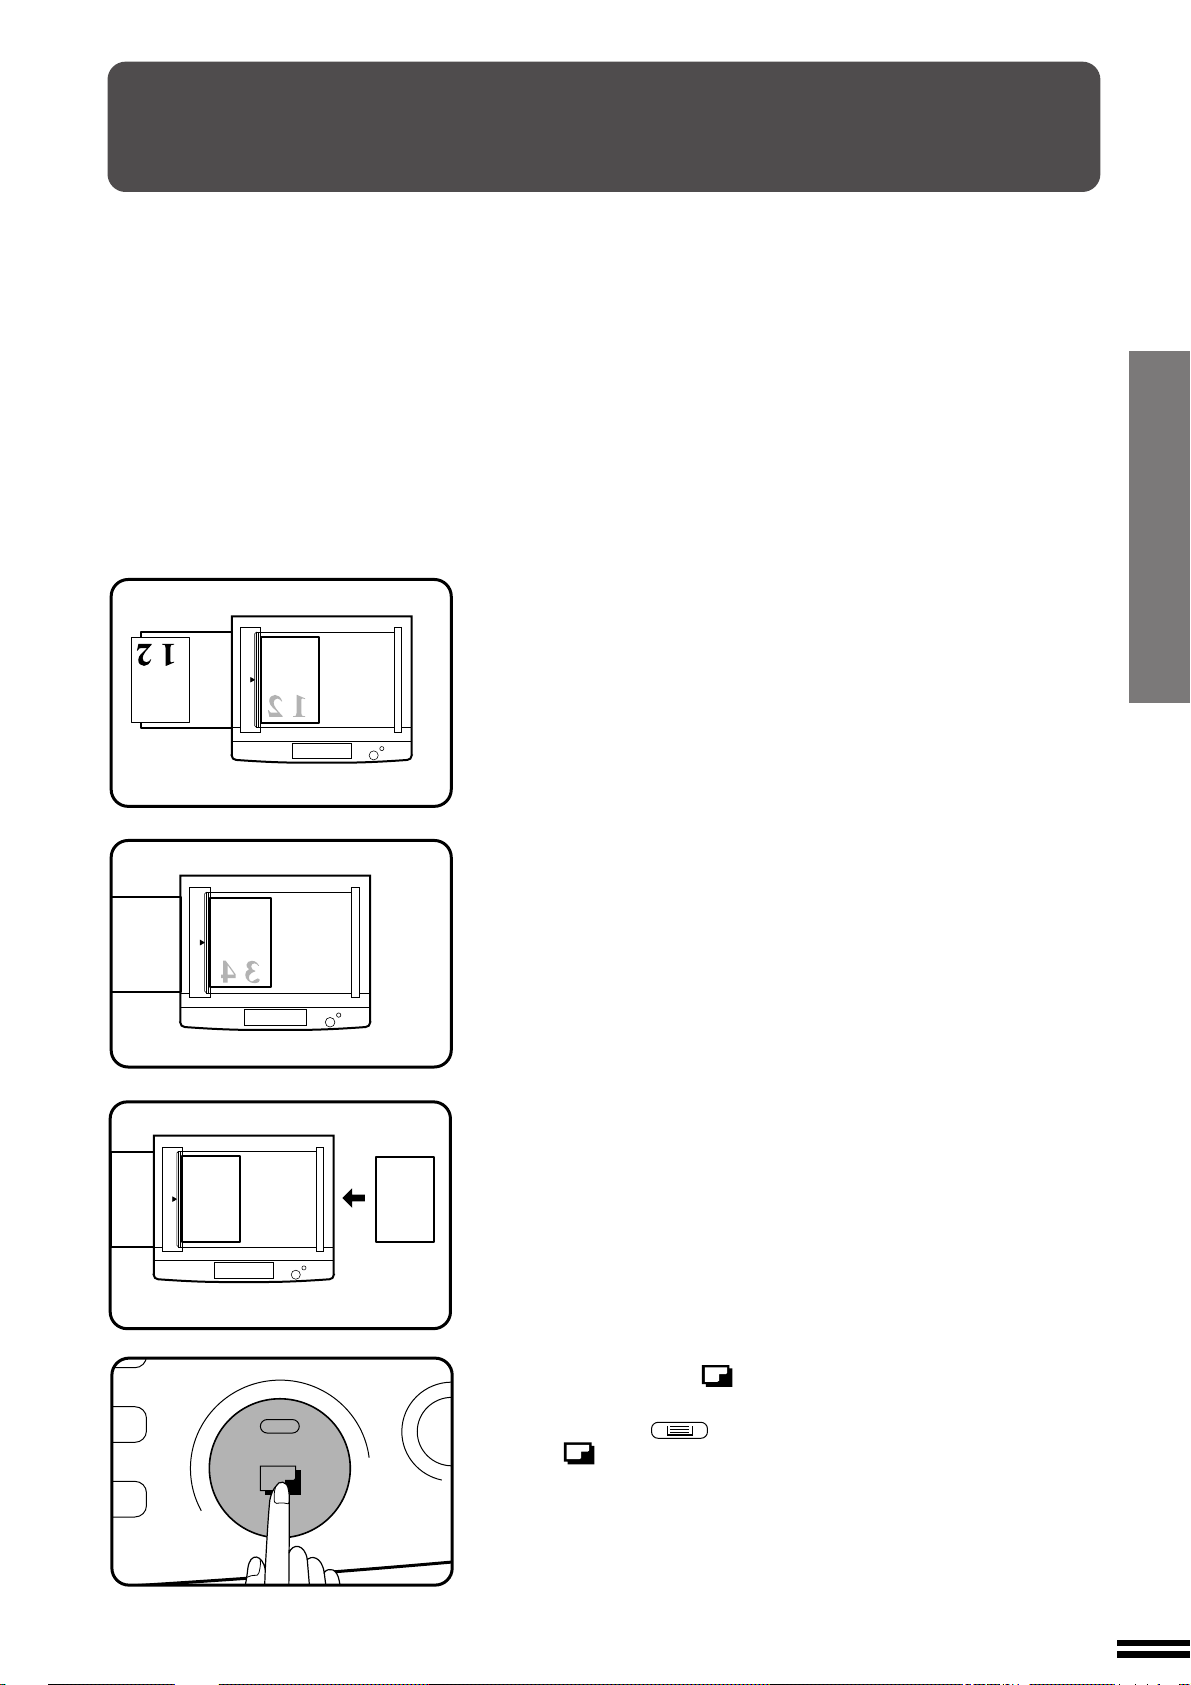
TWO-SIDED COPYING
C
Two-sided copies can be made on this copier using the single-sheet
manual bypass or the optional multi bypass feeder (SF-MF15).
Place the first original on the document glass and make
a copy.
1
●
The first copy can be made using any of the paper feed stations.
MAKING COPIES
Two-sided copying
3 4
1 2
Replace the first original with the second original. Close
the document cover.
2
●
Make sure that the first and second originals are oriented in the
same way on the document glass.
Turn the first copy over without changing its top-bottom
orientation and feed it into the manual bypass.
3
Press the print ( ) button.
4
●
When using the optional multi bypass feeder, use the TRAY
SELECT ( ) key to select the bypass and press the print
( ) button. Be sure to feed the copies one sheet at a time.
17
Page 20
INTERRUPTING A COPY RUN
%
ZOOM
C
%
ZOOM
INTERRUPT is used to interrupt a long copy run so that another job
can be done.
●
Reduction/enlargement/zoom, exposure adjustments, dual page
copying, margin shift, and edge erase can be selected during
interrupt copying.
An optional ADF can be used for interrupt copying.
●
Sort, group, and staple sort cannot be selected during interrupt
copying.
●
INTERRUPT will not function during staple sort copying (when an
MAKING COPIES
Interrupting a copy run
optional staple sorter is installed).
Press the INTERRUPT ( ) key.
●
1
The copier will return to the initial settings.
●
If this copier has been programmed in the auditing mode using
user program No. 10, “–––” will appear in the copy quantity
display. Enter your account number using the 10-key pad. The
number of copies of the interrupt copying will be accumulated
against this account number. See page 33.
●
When an optional ADF is being used, the copier will stop after
completing the copying of the originals which have been fed into
the ADF. An original will be left on the document glass.
1
23
45
7
0/
8
C
6
9
When the copier stops, remove the original from the
document glass and place the original for interrupt
2
copying on the document glass. Close the document
cover.
Select the desired available copier functions.
3
Set the number of copies.
4
Press the print ( ) button.
5
When all INTERRUPT copies are finished, press the
INTERRUPT (
6
mode, and remove the original used for interrupt copying.
●
The previous copy quantity, copy ratio, copy density, and paper
size will be automatically reset.
) key again to cancel the INTERRUPT
18
Replace the original for the interrupted job and press the
7
print (
) button to resume copying.
Page 21
AUTOMATIC EXPOSURE ADJUSTMENT
The automatic exposure level can be adjusted to suit your copying
needs.
MAKING COPIES
AUTO
12345
AUTO
12345
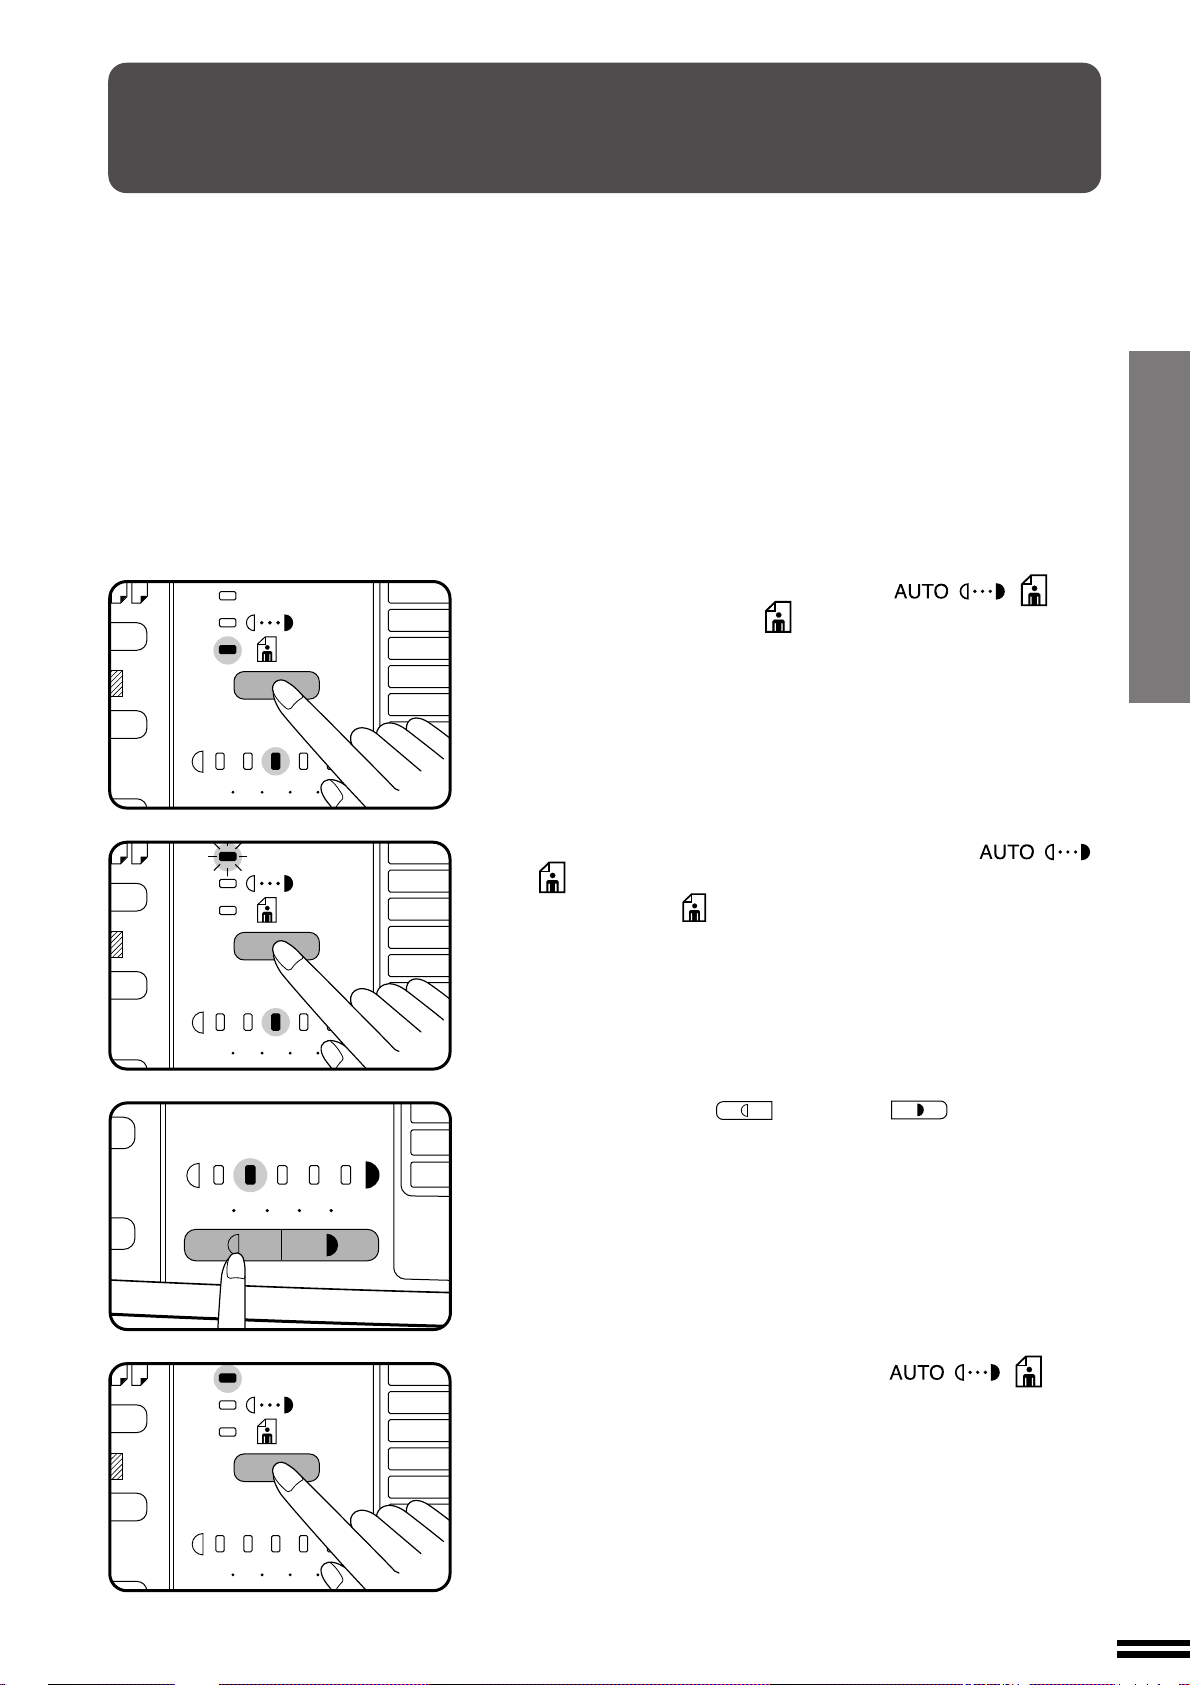
Press the AUTO/MANUAL/PHOTO ( / / ) key
to select the PHOTO (
1
Press and hold the AUTO/MANUAL/PHOTO ( / /
2
3
) key for approximately 5 seconds.
●
The PHOTO ( ) indicator will go out and the AUTO indicator
will begin to blink.
●
One or two exposure indicators corresponding to the automatic
exposure level which has been selected will light up. The factory
default setting is level “3”.
Press the LIGHT ( ) or DARK ( ) key to lighten
or darken the automatic exposure level as desired.
) mode.
Automatic exposure adjustment
12345
AUTO
12345
Press the AUTO/MANUAL/PHOTO ( / / ) key.
4
●
The AUTO indicator will stop blinking and will light up steadily.
●
This automatic exposure level will remain in effect until you
change it again by this procedure.
19
Page 22
TONER SAVE MODE
This mode reduces toner consumption by approximately 10% in the
automatic and manual exposure modes. Copies will be lighter but still
adequate for general use. Selection of this mode does not affect the
photo mode. Follow the procedure below for setting the toning level.
MAKING COPIES
Toner save mode
AUTO
12345
AUTO
12345
12345
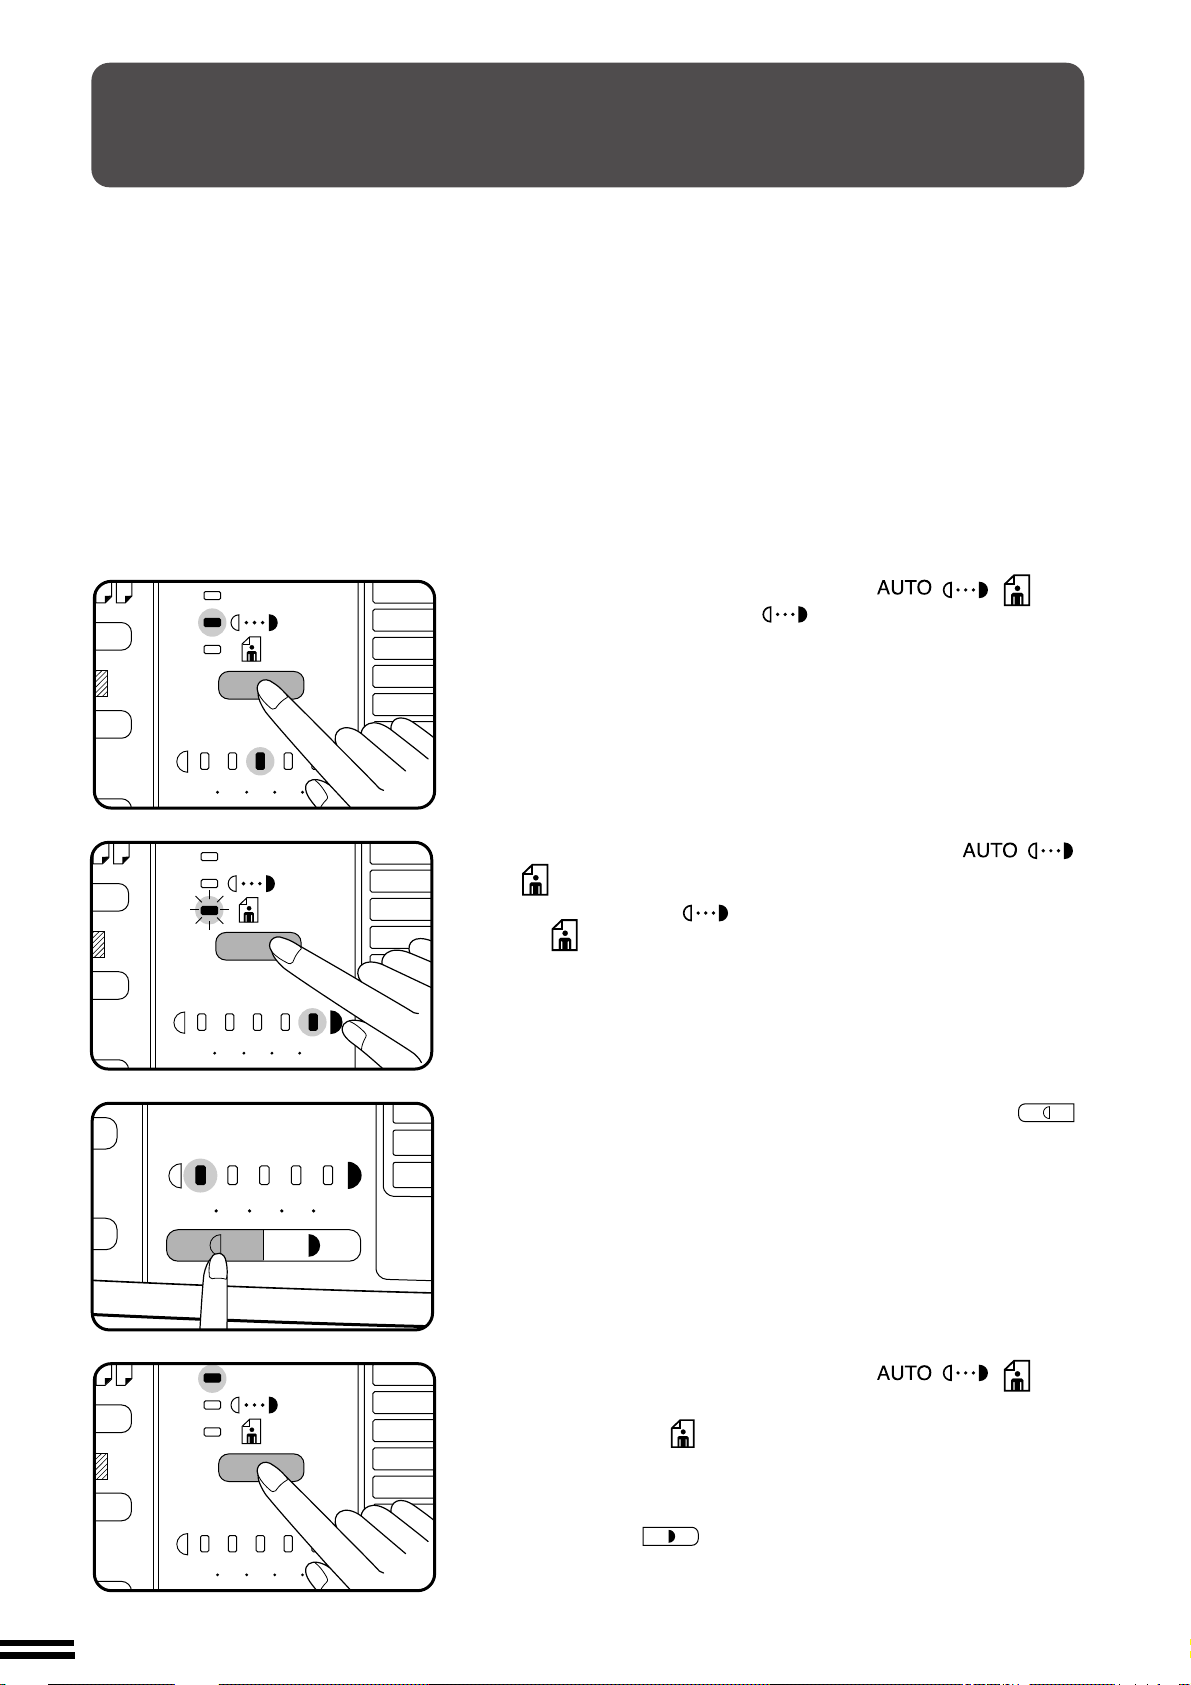
Press the AUTO/MANUAL/PHOTO ( / / ) key
to select the MANUAL (
1
Press and hold the AUTO/MANUAL/PHOTO ( / /
2
3
) key for approximately 5 seconds.
●
The MANUAL ( ) indicator will go out and the PHOTO
( ) indicator will begin to blink.
●
The exposure indicator marked “5” will light up, indicating that
the standard toner mode is active.
To enter the toner save mode, press the LIGHT ( )
key.
●
The exposure indicator marked “1” will light up, indicating that
the toner save mode is selected.
) mode.
20
AUTO
12345
Press the AUTO/MANUAL/PHOTO ( / / ) key
twice.
4
●
The PHOTO ( ) indicator will stop blinking and the AUTO
indicator will light up steadily. The toner save mode is now
active.
●
To return to the standard mode, repeat the procedure but use
the DARK ( ) key to select exposure level “5” in step 3.
Page 23

MISFEED REMOVAL
The copier will stop when a misfeed occurs. The
misfeed ( ) indicator will blink, and blinking red
misfeed location indicators will indicate the approximate
misfeed location.
After removing the misfed paper, open and close the
front cover and ensure that all the misfeed indicators
have gone out.
If paper is accidentally torn during removal, be sure to
remove all pieces.
( P. 51)
( P. 23, 59)
Be careful not to damage the photoconductive drum or
the corona wires.
For misfeeds in optional equipment, see the
respective sections of the operation manual.
If a misfeed occurs in the optional multi bypass feeder,
may blink in the copy quantity display. See page
64.
First confirm the misfeed location.
Misfeed in the bypass tray
( P. 23)
( P. 21, 22)
STATUS INDICATORS
Misfeed in the manual bypass
Gently pull the misfed paper out.
1
Open and close the front cover to cancel the
indicator.
2
jj
j
jj
Misfeed removal
21
Page 24

MISFEED REMOVAL
Misfeed in the paper tray
Open the front cover and press the release lever to open
the copier.
1
STATUS INDICATORS
Misfeed removal
CAUTION
Be sure to open the upper unit slowly and gently, and do not let go
of it until it is fully open.
Remove the misfed paper.
2
●
Be careful not to tear the misfed paper during removal.
Push down the upper half of the copier as illustrated to
close it.
3
22
Close the front cover.
4
●
Confirm that the indicator has gone out.
●
If an optional sorter is installed, push the sorter back into
position.
Page 25
MISFEED REMOVAL
Misfeed in the transport area, fusing area and exit area
Open the front cover.
1
Press the release lever to open the copier.
2
CAUTION
Be sure to open the upper unit slowly and gently, and do not let go
of it until it is fully open.
Carefully remove the misfed paper.
3
STATUS INDICATORS
Misfeed removal
●
If the misfed paper is stuck in the fusing area, raise the fusing
unit lever and remove the paper.
CAUTION
The fusing area is hot. Take care in removing paper.
23
Page 26

MISFEED REMOVAL
Push down the upper half of the copier as illustrated to
close it.
4
STATUS INDICATORS
Misfeed removal
Close the front cover.
5
●
Confirm that the indicator has gone out.
●
If an optional sorter is installed, push the sorter back into
position.
24
Page 27

DEVELOPER REQUIRED
When the indicator lights up, the developer should be replaced.
DEVELOPER REPLACEMENT SHOULD ONLY BE DONE BY AN
AUTHORISED SHARP SERVICE TECHNICIAN. Contact your Service
Centre as soon as possible.
MAINTENANCE REQUIRED
When the indicator lights up or blinks, service by an authorised
Sharp Service Technician is required. Contact your Service Centre as
soon as possible.
STATUS INDICATORS
Developer required/
Maintenance required
25
Page 28

PART NAMES AND FUNCTIONS
Overall layout
q
w
e
t
y
r
u
i
o
r
GENERAL INFORMATION
q Document cover
Place the original on the document glass and close
the document cover before copying starts.
w Document glass
Place the document to be copied here.
e Exit tray
Finished copies are deposited in the exit tray.
Part names and functions
r Handles
t Manual bypass
Special papers (including transparency film) and
copy paper can be fed from the manual bypass.
!0
y Manual bypass guides
Adjust to the width of the copy paper.
u Operation panel
All copier controls are located here for easy
operation.
i Front cover
Open to remove misfeeds and to service the copier.
o Power switch
Press to turn copier power on and off.
!0 Paper tray
Holds 250 sheets of copy paper.
26
Page 29

!1 !2
PART NAMES AND FUNCTIONS
!4 !5
!3
!1 Developer unit
Pull out to add toner.
!2 Toner hopper
Contains toner.
!3 Fusing unit
The fusing unit is hot. Exercise care in this area.
!6
GENERAL INFORMATION
!5 Release lever
Press to release the upper half of the copier.
!6 Photoconductive drum
Copy images are formed on the photoconductive
drum.
!4 Developer unit lock lever
Pull down to release the developer unit.
Part names and functions
Accessories
Operation manual . . . . . . . . . . . . . . . . . . . . 1
27
Page 30

PART NAMES AND FUNCTIONS
Operation panel
q
q SORTER ( / / ) key and
indicators (p. 52)
Press to select a sorter mode when an optional
sorter or staple sorter is installed.
w
!6
e
12345
r
AUTO
8
EXTRA
!7
A3
A4
A4
A5
B4
1
/
t
R
✕
13
2
o Copy quantity display
Displays the specified copy quantity during the
ready condition and displays the copy countdown
as copies are made. Also see items @2 and @5.
!8
y
u
!9
w DUAL PAGE COPY ( ) key and indicator
(p. 13)
Use to make individual copies of two originals
placed side by side on the document glass.
e MARGIN SHIFT ( ) key and indicator (p.14)
Shifts text or image on the copy to leave a binding
margin on the left side of the copy.
GENERAL INFORMATION
r AUTO/MANUAL/PHOTO ( / / ) key
and indicators (p. 9)
Use to sequentially select the exposure modes:
AUTO, MANUAL, or PHOTO.
t PAPER SIZE ( ) indicators
Light up to show the selected copy paper size.
The paper sizes vary depending on the country or
area.
y Misfeed ( ) indicator (p. 21)
Blinks when a paper misfeed occurs.
Part names and functions
u Paper feed location/misfeed location indica-
tors (p. 21)
The selected paper feed location is shown by a lit
indicator ( ).
The general location of misfed paper is shown by
a blinking red indicator ( ).
i Preset ratio indicators (p. 11)
Displays the preset copy ratios for reductions or
enlargements.
!0 Maintenance required ( ) indicator (p. 25)
Lights up or blinks when maintenance is required.
Call your authorised Sharp Service Centre.
!1 Developer replacement required ( ) indicator
(p. 25)
When lit, indicates that the developer needs to be
replaced. Call your authorised Sharp Service
Centre.
!2 Toner required ( ) indicator (p. 6)
Lights up or blinks when toner is required.
!3 10-key pad
Use to select the desired copy quantity or to make
user program entries.
!4 POWER SAVE ( ) indicator (p. 37)
Lights up when the copier is in a power save mode.
!5 AUDIT CLEAR ( ) key (p. 8)
Clears audit account information.
!6 EDGE ERASE ( ) key and indicator (p. 15)
Use to erase dark areas from copy edges.
!7 LIGHT ( ) and DARK ( ) keys and
indicators (p. 10)
Use to adjust the MANUAL ( ) or PHOTO
( ) exposure level.
28
Page 31

PART NAMES AND FUNCTIONS
A5 A3
,
A4 A3 A5 A4
A4 B4
B4 A3
100%
A3 B4
B4 A4
,
A4 A5 A3 A4
A3 A5
i
o
!0
!1 !2
200%
141%
122%
115%
86%
81%
70%
50%
@0 @1 @2
ZOOM
%
@3
@4
!8 TRAY SELECT ( ) key (p. 9)
Use to manually select a paper tray.
!3 !4
1
23
45
7
0/
@5
8
C
@6
6
9
!5
ACC.#-C
CA
Inch system
@7
@8
✕
11
1
✕
8
2
/
1
✕
8
2
/
1
✕
8
2
/
1
✕
8
2
/
EXTRA
t
17
14
11
1
5
2
/
R
11
8
8
8
8
11 17
8
11 17
8
11 17
1
2
/
1
2
/
1
2
/
1
2
/
✕
1
2
/
✕
1
2
/
✕
1
✕
5111117
/
✕
1
✕
5
/
✕
14
100%
✕
14
✕
11
i
✕
200%
2
141%
✕
11 17
1
✕
129%
11
8
2
2
/
✕
11 17
121%
1
✕
14
8
2
/
1
✕
11
8
2
/
1
✕
8
11
2
/
1
1
✕
8
5
2
2
/
/
1
1
✕
8
5
2
2
/
/
Note: A3 (11" x 17") size copies are counted as
two copies.
95%
77%
64%
50%
!9 Paper required ( ) indicator (p. 3)
Lights up when there is no copy paper in the paper
tray.
@0 Copy ratio selector ( , ) keys (p. 11)
Use to sequentially select preset reduction/
enlargement copy ratios: 50%, 70%, 81%, 86%,
100%, 115%, 122%, 141%, 200% (50%, 64%,
77%, 95%, 100%, 121%, 129%, 141%, 200%).
@1 ZOOM indicator (p.11)
Lights up when a zoom ratio is set.
@2 Copy ratio display ( ) key (p. 12)
Press and hold during standby to display the copy
ratio in the copy quantity display.
@3 Zoom ( , ) keys (p. 11)
Use to select any reduction or enlargement copy
ratio from 50 to 200% in 1% increments.
@4 INTERRUPT ( ) key and indicator (p. 18)
Interrupts a copy run.
@5 Zero/readout (
) key
0/
Use as part of 10-key pad to enter copy quantity.
Press during a continuous copy run to display the
number of copies completed in the current run.
Press during standby to display the total number of
copies made to date.
1st display 2nd display
@6 Clear ( ) key
Press to clear the copy quantity display, or press
during a copy run to terminate copying.
@7 Print ( ) button and READY indicator
Copying is possible when the indicator is on.
Press the print button to start copying.
@8 Clear all ( ) key
Clears all selected settings and returns the copier
to the initial settings.
Initial settings
The copier assumes the initial settings when it is first
turned on, when the clear all ( ) key is pressed, and
approximately one minute* after the last copy is made
in any mode.
●
Copy ratio: 100%
●
Exposure: Automatic
●
Copy quantity: 0
●
All special copier modes: Off
●
Paper feed station: Previously selected tray
* This time (auto clear time) can be changed. See
page 30, USER PROGRAMS.
GENERAL INFORMATION
Part names and functions
0/
Press and hold the key.
12,345
▼
▼
copies made to date
29
Page 32

USER PROGRAMS
The user programs allow the parameters of certain functions to be set,
changed, or cancelled as desired.
NOTE:
If operation of the user programs by general users (other than the
copier manager) causes problems, detach pages 31 to 36 and store
them in a safe place.
List of user programs
This copier has the following user programs.
Program No. Program name Description
1 Auto clear time Sets the auto clear time. The copier returns to the initial settings
when the auto clear time elapses after the last copy is made.
2 Preheat mode Sets the time that elapses before the copier enters the preheat
mode after any operation is made. See page 37.
3 Auto power shut-off Sets the time that elapses before the copier enters the auto power
4 Auto power save Enables or disables the automatic power save control function.
5 Stream feeding Enables or disables the stream feeding mode when an optional
7 Sorter bin access Enables or disables the sorter bin access mode when an optional
GENERAL INFORMATION
User programs
10 Auditing mode Enables or disables the auditing mode, which controls access to
11 Account number Registers accounts for auditing mode.
12 Account number Changes account numbers for auditing mode.
13 Account number Deletes accounts for auditing mode.
14 Number of copies Displays the total number of copies made against account numbers.
timer shut-off mode after any operation is made. See page 37.
control See page 37.
mode* automatic document feeder is installed. See page 50.
mode* sorter or staple sorter is installed. See page 52.
copier. See page 8.
entry
change
deletion
per account
15 Resetting account Resets all audit accounts or resets any desired individual accounts.
20 Auto power shut-off Enables or disables the auto power shut-off mode. See page 37.
setting
* These programs do not affect the copier functions unless certain optional equipment is installed.
30
Page 33

1
45
7
0/
23
8
C
ZOOM
6
9
ZOOM
%
USER PROGRAMS
Setting the user programs
Press and hold the TRAY SELECT ( ) key for more
than 5 seconds until all the alarm indicators* blink and
1
“– –” appears in the copy quantity display.
* The alarm indicators are the , , , , and
indicators.
Enter a program number using the 10-key pad.
2
●
The selected program number will blink in the copy quantity
display.
●
If a mistake is made in steps 2 to 4, press the clear ( ) key.
You will return to step 2.
●
The program numbers are shown in the table below.
For example, to change the setting of the auto clear time, press
key 1.
For operation of these programs after
step 3, see page 33.
ZOOM
%
Program name Program No.
Auto clear time 1
Preheat mode 2
Auto power shut-off timer 3
Auto power save control 4
Stream feeding mode 5
Sorter bin access mode 7
Auditing mode 10
Account number entry 11
Account number change 12
Account number deletion 13
Number of copies per account 14
Resetting account 15
Auto power shut-off setting 20
Press the print ( ) button.
3
●
For programs 1 to 7 and 20, the entered program number will be
steadily lit on the left side of the copy quantity display and the
currently selected parameter number for the program will blink
on the right side.
●
For programs 10 to 15 (programs for auditing accounts), the
display varies with the program number. See page 33 for setting
programs 10 to 15.
GENERAL INFORMATION
User programs
31
Page 34

USER PROGRAMS
C
A3
A4
A4
A5
A4
R
A4
1
45
7
0/
23
6
8
9
C
ZOOM
%
Select the desired parameter using the 10-key pad.
4
●
The entered parameter number will blink on the right side of the
copy quantity display.
●
The parameters are shown in the table below.
For example, to change the setting of the auto clear time to “90
sec.”, press key 3.
Program name Parameters
Auto clear time 0 e OFF 1 e 30 sec. * 2 e 60 sec.
3 e 90 sec. 4 e 120 sec.
Preheat mode * 0 e OFF 1 e 1 min. 2 e 15 min.
3 e 60 min. 4 e 120 min.
Auto power shut-off 1 e 5 min. 2 e 15 min. * 3 e 30 min.
timer 4 e 60 min. 5 e 120 min. 6 e 240 min.
Auto power save 0 e OFF * 1 e ON
control
Stream feeding * 0 e OFF 1 e ON
mode
Sorter bin access 0 e OFF * 1 e ON
mode
Auto power shut-off * 0 e OFF 1 e ON
setting
GENERAL INFORMATION
User programs
B4
1
✕
13
8
2
/
EXTRA
Factory default settings are indicated with an asterisk (*).
NOTE:
If you select “0” (OFF) in a program, the corresponding function will be disabled.
Press the print ( ) button.
5
●
The right-hand number in the copy quantity display will be
steadily lit and the entered value will be stored.
To continue with other user programs, press the
key and then repeat steps 2 to 5. To exit the user
6
program mode, press the TRAY SELECT (
●
All the alarm indicators will go out.
) key.
32
Page 35

Setting for auditing accounts
Setting of user programs No. 10 to 15 varies with the program number.
For setting of all programs, first follow steps 1 to 3 in “Setting the user
programs” on page 31 to select a program. (1. Press the TRAY
SELECT ( ) key for more than 5 seconds. 2. Enter a program
number (10 to 15) using the 10-key pad. 3. Press the print ( )
button.) Then follow the appropriate instructions for the program.
Program No. 10: Auditing mode
If the auditing mode is enabled, copying is limited to operators with an
assigned 3-digit account number. A maximum of 20, 3-digit account
numbers can be assigned. Use program No. 11 to register account
numbers.
When program No. 10 is entered, the current setting (0: OFF, 1:ON)
will blink on the right side of the copy quantity display.
USER PROGRAMS
1. Select the desired setting using the 10-key pad.
1
45
7
0/
23
8
C
6
9
2. Press the print ( ) button.
0: OFF
1: ON
●
The setting will be stored.
3. To continue with other user programs, press the
key and enter other program numbers. To exit the user
program mode, press the TRAY SELECT (
Program No. 11: Account number entry
Program No. 11 is used to register accounts. When program No. 11
is entered, “–––” will blink in the copy quantity display.
●
If the number of accounts has reached the upper limit (20), “11E”
will appear in the copy quantity display. Press the key. You
will return to step 2 on page 31.
) key.
GENERAL INFORMATION
1
45
7
0/
23
8
C
6
9
1. Enter a 3-digit account number using the 10-key pad.
●
Any 3-digit number except 000 can be registered as an account
number.
2. Press the print ( ) button.
●
If a number that is already registered or “000” is entered, the
number will blink in the copy quantity display.
3. Repeat steps 1 and 2 for other account numbers.
4. To continue with other user programs, press the
key and enter other program numbers. To exit the user
program mode, press the TRAY SELECT (
) key.
33
User programs
Page 36

USER PROGRAMS
%
ZOOM
%
ZOOM
Program No. 12: Account number change
Program No. 12 is used to change account numbers. When program
No. 12 is entered, an account number will appear in the copy quantity
display.
●
If no account number has been registered, “12E” will appear in the
copy quantity display. Press the key. You will return to step
2 on page 31.
1. Use the copy ratio display ( ) key to select the
account number to be changed.
●
Use the key to advance through the account numbers.
2. Press the print ( ) button.
●
“–––” will blink in the copy quantity display.
3. Enter a new account number using the 10-key pad.
1
45
7
0/
23
6
8
9
C
4. Press the print (
●
If a number that is already registered or “000” is entered, the
number will blink in the copy quantity display.
5. Repeat steps 1 to 4 for other account numbers.
6. To continue with other user programs, press the
key and enter other program numbers. To exit the user
program mode, press the TRAY SELECT (
) button.
) key.
Program No. 13: Account number deletion
Program No. 13 is used to delete accounts. When program No. 13 is
entered, “0” will blink on the right side of the copy quantity display.
●
If no account number has been registered, “13E” will appear in the
GENERAL INFORMATION
User programs
copy quantity display. Press the key. You will return to step
2 on page 31.
1
23
45
7
0/
8
C
6
9
1. To delete an individual account, press key 0 on the 10key pad.
To delete all accounts, press key 1.
2. Press the print (
●
If you have pressed key 0 in step 1, an account number will
appear in the copy quantity display. Proceed to step 3.
●
If you have pressed key 1, all account numbers will be deleted.
Proceed to step 5.
) button.
3. Use the copy ratio display ( ) key to select the
account number to be deleted.
●
Use the key to advance through the account numbers.
4. Press the print ( ) button.
●
The specified account will be deleted.
34
5. To continue with other user programs, enter other
program numbers. To exit the user program mode,
press the TRAY SELECT (
) key.
Page 37

Program No. 14: Number of copies per account
%
ZOOM
1
23
45
6
7
8
9
0/
C
Program No. 14 is used to display the total number of copies made
against each account number. When program No. 14 is entered, an
account number will appear in the copy quantity display.
●
If no account number has been registered, “14E” will appear in the
copy quantity display. Press the key. You will return to step
2 on page 31.
1. Use the copy ratio display ( ) key to select the
account number.
●
Use the key to advance through the account numbers.
ZOOM
%
2. Press and hold the 0 key.
●
The number of copies made against the specified account
number will be displayed. The two higher digits (“–” is displayed
before the two digits.) and the three lower digits will appear
alternately while the 0 key is pressed.
USER PROGRAMS
▼
Example: 1,234 copies
●
The upper limit for the number of copies is 49,999. If the number
of copies made reaches 50,000, the number will be reset to 0
and counting will start again from 0.
▼
3. Repeat steps 1 and 2 for other account numbers.
4. To continue with other user programs, press the
key and select other program numbers. To exit the user
program mode, press the TRAY SELECT (
) key.
GENERAL INFORMATION
User programs
35
Page 38

USER PROGRAMS
%
ZOOM
Program No. 15: Resetting account
Program No. 15 is used to reset all accounts or to reset any desired
individual accounts. When program No. 15 is entered, “0” will blink on
the right side of the copy quantity display.
●
If no account number has been registered, “15E” will appear in the
copy quantity display. Press the key. You will return to step
2 on page 31.
1. To reset an individual account, press key 0 on the 10-key
1
45
7
0/
23
8
C
6
9
pad.
To reset all accounts, press key 1.
2. Press the print (
●
If you have pressed key 0 in step 1, an account number will
appear in the copy quantity display. Proceed to step 3.
●
If you have pressed key 1, the number of copies against all
account numbers will be reset. Proceed to step 5.
3. Use the copy ratio display ( ) key to select the
account number to be reset.
●
Use the key to advance through the account numbers.
) button.
GENERAL INFORMATION
4. Press the print ( ) button.
●
The number of copies against the specified account number will
be reset.
5. To continue with other user programs, enter other
program numbers. To exit the user program mode,
press the TRAY SELECT (
) key.
User programs
36
Page 39

POWER SAVE MODES
3
6
9
CA
3
6
9
CA
The copier has two POWER SAVE modes of operation — preheat
mode and auto power shut-off mode.
The copier will enter a power save mode once the set time has elapsed
without any copier operation after the last copy of a run is made or
power is turned on.
Both of the power save modes can be automatically controlled by the
auto power save control function. When enabled, this function will
automatically establish new set times for the preheat and auto power
shut-off modes based upon copier usage patterns.
ACC.#-C
ACC.#-C
Preheat mode
When the copier enters the preheat mode, the POWER SAVE ( )
indicator will light up and other indicators will remain on or off as before.
In this condition, the fuser in the copier is maintained at a lower heat
level, thereby saving power. The preheat level is, however, high
enough to allow the copier to come to a ready condition or begin
copying within 10 seconds after any key input or copier operation such
as paper tray operation is performed.
Auto power shut-off mode
When the copier enters the auto power shut-off mode, the POWER
SAVE ( ) indicator will light up and all other indicators will go out.
The auto power shut-off mode saves more power but requires a longer
time to warm up before copying can begin.
Auto power save control
The auto power save control function automatically controls the power
save modes. If this function is enabled, the copier will enter the preheat
mode a certain length of time after any copier operation and then will
enter the auto power shut-off mode. The time that elapses before the
copier enters the preheat mode or auto power shut-off mode is set
automatically by the copier, which calculates the proper time depending
on the user’s copying frequency and copy quantity.
If the POWER SAVE ( ) indicator is on and some other indicators
are on, the copier is in the preheat mode.
If the POWER SAVE ( ) indicator is on and all other indicators are
off, the copier is in the auto power shut-off mode.
GENERAL INFORMATION
Power save modes
37
Page 40

POWER SAVE MODES
3
6
9
CA
3
6
9
CA
3
6
9
CA
Setting the power save modes
The auto power save control function can be enabled or disabled as
desired using user program No. 4. If this function is disabled, the time
that elapses before the copier enters a power save mode after any
operation is made can be set manually. This time is set with user
program No. 2 for the preheat mode and user program No. 3 for the
auto power shut-off mode. If the auto power save control function is
enabled, the settings of user programs No. 2 and No. 3 will be ignored.
For these settings, see page 31.
●
The copier will enter first the preheat mode and then the auto power
shut-off mode when no copier operation is made.
If the time set for the preheat mode is not shorter than that for the
auto power shut-off mode, the copier will enter only the auto power
shut-off mode when the time set for the auto power shut-off mode
has elapsed.
●
If the auto power shut-off timer is set using user program No. 3 when
the auto power shut-off mode has been disabled (program No. 20),
the auto power shut-off mode will be automatically enabled.
It is recommended that these power save modes be enabled for
energy saving.
GENERAL INFORMATION
Power save modes
ACC.#-C
ACC.#-C
ACC.#-C
Copying from the preheat mode
Make desired copier selections and press the print ( )
button using the normal copying procedure.
●
When any key input is made or any other copier operation is
made, the POWER SAVE ( ) indicator will start to blink.
●
When the print ( ) button is pressed, the READY indicator will
go out and copying will start within 10 seconds. The POWER
SAVE ( ) indicator will go out when copying starts.
Copying from the auto power shut-off mode
Press the print ( ) button.
1
●
The copier will exit the auto power shut-off mode and the
POWER SAVE ( ) indicator will start to blink.
Make desired copier selections and press the print ( )
button using the normal copying procedure.
2
●
It will take approximately 35 seconds for the copier to start
copying. However, you can make desired settings and press the
print ( ) button during warm-up. Copying will start after warmup is finished.
38
Page 41

USER MAINTENANCE
Proper care is essential for clean, sharp copies. Please take a few
minutes to regularly clean your copier.
Document glass and document cover
Stains on the document glass or document cover will
also be copied. Wipe the document glass and document cover with a soft, clean cloth.
●
If necessary, dampen the cloth with water. Do not use thinner,
benzene, or similar volatile cleaning agents.
●
If an optional automatic document feeder (ADF) is installed,
wipe the transport belt with a soft, clean cloth.
GENERAL INFORMATION
User maintenance
39
Page 42

COPIER TROUBLE?
Problem Solution
●
Copier plugged in?
Copier does not operate.
●
Power switch ON?
●
Copies are too dark or
too light.
Blank copies.
Copy density properly adjusted?
●
Is the original placed face down?
Plug the copier into a grounded outlet.
Turn the power switch ON.
See page 9.
See pages 9 and 19.
Place the original face down on the
document glass.
Copies smear if rubbed.
GENERAL INFORMATION
Paper misfeeds
frequently.
Copier trouble?
●
Paper too heavy?
●
Paper damp?
●
Non-standard paper used?
●
Paper properly installed?
●
Pieces of paper inside copier?
●
Paper curled or damp?
Use copy paper within the specified range.
See page 43.
Replace with dry copy paper.
Be sure to store copy paper in a dry
location. See page 44.
Use standard paper. If using special paper,
feed the paper through the manual bypass.
See pages 16 and 43.
Make sure the paper is properly installed.
See pages 3 and 16.
Remove all pieces of misfed paper.
See page 21.
Store copy paper flat in the wrapper in a
dry location. See page 44.
40
Page 43

Problem Solution
●
Document glass or document
cover dirty?
Dust, dirt, smudges
appear on copies.
●
Original smudged or blotchy?
COPIER TROUBLE?
Clean regularly. See page 39.
Use a clean original.
Power is on but copying
is not possible.
●
Is the
●
Is the indicator on?
●
Is the indicator blinking?
●
Is the POWER SAVE ( )
indicator on?
indicator blinking?
●
Is only the POWER SAVE
( ) indicator on?
●
Is steadily lit in the copy
quantity display?
Developer is required. Contact your Sharp
Service Centre as soon as possible.
See page 25.
Maintenance is required. Contact your
Sharp Service Centre as soon as possible.
See page 25.
Wait until warm-up is complete.
Warm-up time is approximately 35
seconds.
The copier is in the auto power shut-off
mode. Press the print ( ) button. See
page 37, POWER SAVE MODES.
The copier is in the auditing mode.
Enter your account number using the 10key pad. See page 8.
GENERAL INFORMATION
●
Is the indicator on?
●
Has a blinking appeared
in the copy quantity display?
Copy paper is needed. See page 3,
LOADING COPY PAPER.
1. Paper has run out in an optional multi
bypass feeder. Add paper to continue.
2. Paper has failed to feed from an
optional multi bypass feeder.
See page 64.
Copier trouble?
41
Page 44

COPIER TROUBLE?
Problem Solution
Power is on but copying
is not possible.
●
Is steadily lit in the copy
quantity display?
●
Is the indicator blinking?
●
Is the indicator blinking?
●
Is the front cover firmly closed?
Please contact your authorised Sharp Service Centre immediately if
a problem persists after checking the above.
1. The optional sorter or staple sorter is
not latched to the copier. Slide the
sorter or staple sorter toward the copier
to latch it into place.
2. The stapler cover of the optional staple
sorter is open. Close the stapler cover.
Toner is required. See page 6, ADDING
TONER.
A misfeed has occurred. See page 21,
MISFEED REMOVAL.
Close the front cover firmly.
GENERAL INFORMATION
Copier trouble?
Self-diagnostic function
An automatic self-diagnostic function is built into the copier. Should
the copier malfunction, the self-diagnostic function will locate the
problem and stop the copier to prevent damage. An alphanumeric
code will appear in the copy quantity display.
Example
Should the copier completely stop and a letter and a number appear
▲
▼
alternately, contact your authorised Sharp Service Centre immediately.
42
Page 45

SUPPLIES
Types and sizes of copy paper
ORDINARY PAPER
●
Automatic feeding from the paper tray
▲
A5 A3 A6 A3
Size:
(5-1/2" x 8-1/2") (11" x 17")
▲
●
Manual bypass (single sheet feed)
▲
Size:
▲
(5-1/2" x 8-1/2")
(11" x 17")
2
Weight:
▲
(15 lbs.)
80 g/m56 g/m
▲
Weight:
(21 lbs.)
A4 (8-1/2" x 11") is the maximum size for paper weighing
from104 to 128 g/m2 (28 to 34 lbs.).
SPECIAL PAPERS
Special papers must be fed one sheet at a time through the manual
bypass. See page 16.
Transparency
film
Labels
Tracing paper
52 g/m
(14 lbs.)
2
104 g/m
▲
▲
(28 lbs.)
2
128 g/m
▲
▲
22
(34 lbs.)
GENERAL INFORMATION
43
Supplies
Page 46

SUPPLIES
Genuine supplies statement
Standard supplies for this copier that are to be replaced by the user
are copy paper, toner, and staple cartridges for an optional staple
sorter.
Photoconductive drum
The SF-1116 and SF-1118 Copiers have advanced process control
technology which improves copy quality uniformity. This feature stabilizes
copy quality throughout the life of the photoconductive drum by
automatically compensating for changes in drum characteristics due to
wear, operator use patterns, and environmental conditions. The automatic
adjustments are made in response to a sensor that detects the reflectance
characteristics of a special area of the drum.
For best copying results, be sure to use
only Sharp products.
The package of Sharp toner has the
Genuine Supplies label.
GENUINE SUPPLIES
GENERAL INFORMATION
Supplies
WARNING
This feature requires drums containing the special reflectance area
(recommended genuine SHARP photoconductive drum). If you use other
drums, the process control system cannot run properly. To prevent
improper control and possible damages to the copier, the copier will make
only low level density copies.
Proper storage
1. Store the supplies in a location that is:
●
clean and dry,
●
at a stable temperature,
●
not exposed to direct sunlight.
2. Store copy paper in the wrapper and lying flat.
●
Paper stored out of the wrapper or in packages standing on end
may curl or get damp, resulting in paper misfeeds.
44
Page 47

SPECIFICATIONS
Type Desktop
Copy system Dry, electrostatic transfer
Originals Sheets, bound documents
Original sizes Max. A3 (11" x 17")
Copy sizes Max. A3 (11" x 17")
Copying speed 16 copies/min. 18 copies (A4 )
(at 100% copy ratio) 13 copies/min. 14 copies (A4R)
SF-1116 SF-1118
Min. A6 (5-1/2" x 8-1/2")
Image loss: Max. 4 mm (5/32") (leading and
trailing edges)
(A4 (8-1/2" x 11"))
(A4R (8-1/2" x 11"R))
11 copies/min. 12 copies (B4)
(B4 (8-1/2" x 14"))
9 copies/min. 10 copies (A3)
(A3 (11" x 17"))
Continuous copy Max. 99 copies Max. 250 copies
First-copy time 5.3 sec. (except in a power save mode)
Warm-up time Approx. 35 sec.
Copy ratio Variable: 50% to 200%, in 1% increments
(total 151 steps)
Fixed preset: 50%, 70%, 81%, 86%, 100%,
115%, 122%, 141%, 200% (50%, 64%, 77%,
95 %, 100%, 121%, 129%, 141%, 200%)
Exposure system Moving optical source, slit exposure (stationary
platen) with automatic exposure function
Copy paper feed One paper tray with automatic feed (250 sheets),
one manual bypass
Fusing system Heat rollers
Developer system Magnetic brush development
Light source Halogen lamp
Power supply Local voltage ±10% (For this copier’s power
supply requirements, see the name plate
located on the right hand side of the copier,
below the manual bypass.)
GENERAL INFORMATION
Specifications
Power consumption Max. 1.5 kW
45
Page 48

SPECIFICATIONS
Overall dimensions 885 mm (W) x 595 mm (D)
(with exit tray) (34-27/32" (W) x 23-7/16" (D))
Weight Approx. 41 kg (90.4 lbs.)
(with document cover)
Copier dimensions 600 mm (W) x 595 mm (D) x 365 mm (H)
(23-5/8" (W) x 23-7/16" (D) x 14-3/8" (H))
Operating conditions Temperature: 15°C to 30°C (59°F to 86°F)
Humidity: 20% to 85%
GENERAL INFORMATION
Optional equipment Automatic document feeder (SF-A18)
10-bin sorter (SF-S17N)
10-bin staple sorter (SF-S54)
Multi bypass feeder (SF-MF15)
Paper tray (SF-UB15)
Specifications are subject to change for improvement without notice.
Specifications
46
Page 49

OPTIONAL
EQUIPMENT
CONTENTS
●
SYSTEM CONFIGURATION ......................... 48
●
AUTOMATIC DOCUMENT FEEDER (SF-A18) ............ 49
●
Part names .................................... 49
●
Specifications .................................. 49
●
Using the ADF .................................. 50
●
Misfeed removal ................................ 51
●
10-BIN SORTER (SF-S17N)
10-BIN STAPLE SORTER (SF-S54) ................... 52
●
Part names .................................... 52
●
Using a sorter .................................. 53
●
Sorter capacities ................................ 54
●
Staple sort (SF-S54) ............................. 55
●
Staple cartridge replacement/staple jam removal (SF-S54).. 57
●
Misfeed removal ................................ 59
●
Specifications .................................. 61
●
MULTI BYPASS FEEDER (SF-MF15) .................. 62
●
Specifications .................................. 62
●
Using the multi bypass feeder....................... 63
●
PAPER TRAY (SF-UB15) ........................... 65
//
/
//
Page
OPTIONAL EQUIPMENT
47
Page 50

SYSTEM CONFIGURATION
A number of options are available for the copier which allow you to
configure a copier system to meet your needs. The options include the
following.
Automatic document feeder
(SF-A18)
10-bin sorter (SF-S17N)
Multi bypass feeder
(SF-MF15)
10-bin staple sorter
(SF-S54)
System configuration
OPTIONAL EQUIPMENT
Paper tray (SF-UB15)
48
Page 51

AUTOMATIC DOCUMENT FEEDER (SF-A18)
The automatic document feeder (ADF) holds up to 50 originals for
automatic feeding.
PART NAMES
Feeding roller cover
Original guides
Document feeder tray
Document feeder cover
Specifications
Document feeder indicators
Document feeder indicators
Indicates the originals in the tray will be fed.
Indicates an original is still on the document glass.
Acceptable Weight: 50 to 128 g/m2 (14 to 34 lbs.)
originals Size: A5 to A3 (5-1/2" x 8-1/2" to 11" x 17")
Original feed indicator
Original reminder
Capacity: Up to 50 sheets for A5 and A4 (5-1/2" x 8-1/2"
and 8-1/2" x 11") originals, provided the total
aggregate thickness does not exceed 6.5 mm
or 1/4" (50 to 80 g/m2 or 14 to 20 lbs.) or 5 mm
or 3/16" (80 to 128 g/m2 or 21 to 34 lbs.)
Up to 30 sheets for B4 and A3 (8-1/2" x 14" and
11" x 17") originals
Automatic document feeder (SF-A18)
OPTIONAL EQUIPMENT
Power supply Drawn from the copier
Weight Approx. 11.5 kg (25.4 lbs.)
Dimensions 571 mm (W) x 521 mm (D) x 110 mm (H)
(22-31/64" (W) x 20-33/64" (D) x 4-11/32" (H))
Specifications are subject to change for improvement without notice.
49
Page 52

AUTOMATIC DOCUMENT FEEDER (SF-A18)
1
23
45
6
7
8
9
0/
C
A
Using the ADF
●
Be sure to remove any staples or paper clips from the
originals.
●
Damaged or crumpled originals may misfeed in the
document feeder. It is recommended that these
originals be copied from the document glass.
●
For best feeding of originals which have binding
holes punched into them, insert them so that the
holes are positioned to the right or along the side
guides.
●
Special originals such as transparency film and tracing
paper should not be fed through the document feeder
but should be copied from the document glass.
●
Image loss (max. 4 mm (5/32")) can occur at the
leading and trailing edges of the copies.
Stream feeding mode
If the stream feeding mode has been enabled using user
program No. 5, the original feed indicator will continue to blink
for approximately 5 seconds after feeding of all originals is
completed. While this indicator is blinking, any new originals
placed in the document feeder will be fed and copied
automatically. See page 30, USER PROGRAMS.
Automatic document feeder (SF-A18)
A3
A4
R
A4
A5
B4
1
✕
13
8
2
/
EXTRA
OPTIONAL EQUIPMENT
Set the original guides to the width of the originals, and
set the originals face up in the document feeder tray.
1
●
If an original is left on the document glass, the original reminder
indicator will blink. Remove the original from the document
glass in this case.
Ensure that the copy paper size in the paper tray is the
same size as the original.
2
●
If an optional multi bypass feeder is installed, use the TRAY
SELECT ( ) key to select the paper feed station containing
paper the same size as the original.
Select all other desired copier functions, set the number
of copies, and press the print (
3
●
To cancel a copy run, press the clear all ( ) key. Copying will
stop. An original will be left on the document glass and the
original reminder will light up.
) button.
50
Page 53

Misfeed removal
AC B
Location A
Feeding roller cover
AUTOMATIC DOCUMENT FEEDER (SF-A18)
An original misfeed may occur at one of three locations: (A)
in the feed section, (B) in the exit roller, or (C) under the
transport belt.
(A) Open the feeding roller cover and pull the original gently
to the right and out from the document feeder tray.
●
Be sure to open and close the document feeder cover to cancel
the misfeed location indicator.
Location B
Location C
(B) Gently pull the original out.
●
Be sure to open and close the document feeder cover to cancel
the misfeed location indicator.
(C) Open the feeding roller cover, open the document feeder
cover and remove the original.
NOTE:
After misfed originals are removed from locations A, B and/or C, a
number may appear in the copy quantity display, indicating the
number of originals that must be returned to the document feeder
tray. Return the originals and press the print ( ) button to resume
copying.
Automatic document feeder (SF-A18)
OPTIONAL EQUIPMENT
51
Page 54
10-BIN SORTER (SF-S17N
)
10-BIN STAPLE SORTER (SF-S54
The SF-S17N 10-Bin Sorter has two sorter modes for
different copying jobs: one sorts copies into sets
matching the sequence of the originals and the second
groups copies from different originals into separate sort
bins.
The SF-S54 10-Bin Staple Sorter has, in addition to the
above two modes, a STAPLE SORT mode. Sorted
copies can be automatically stapled together.
The maximum allowable number of copies varies with
the selected mode.
The number of copies will be automatically reset to the
maximum number allowable for the selected mode
when copying begins if this maximum is exceeded.
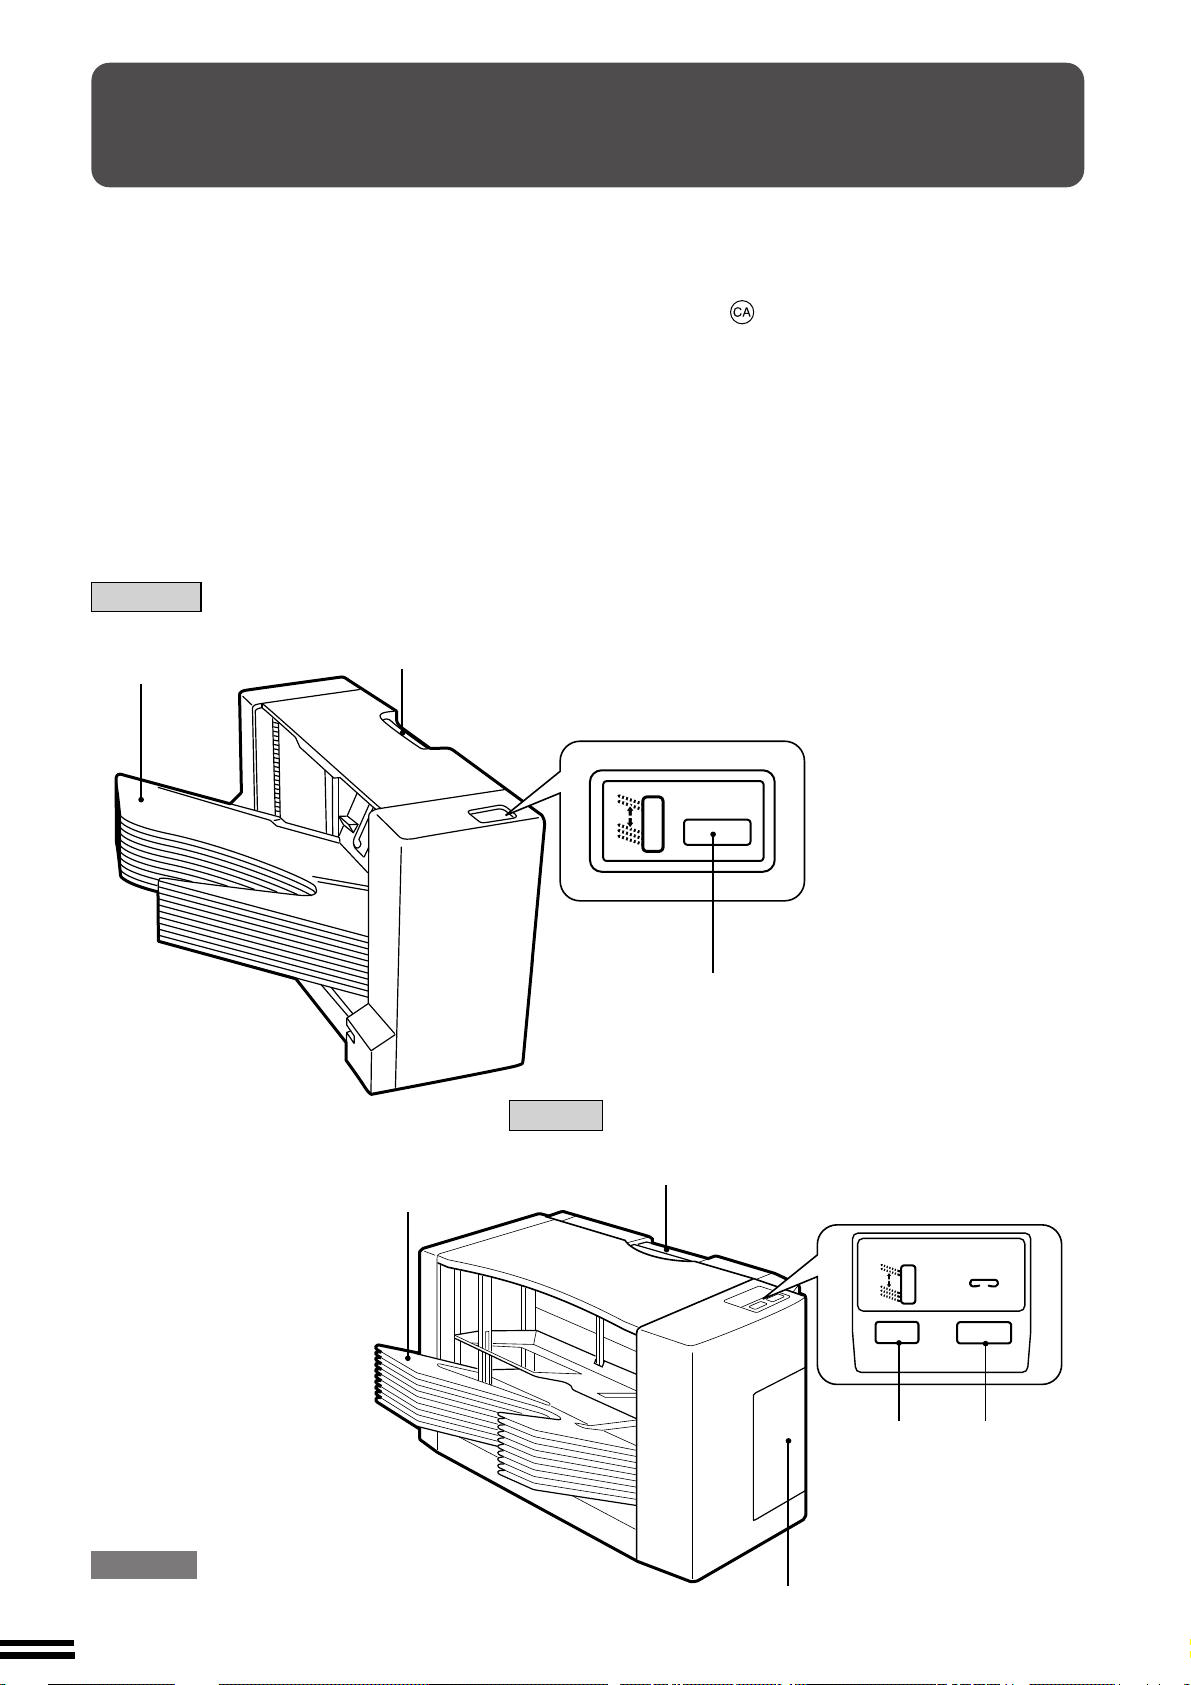
PART NAMES
SF-S17N
Sorter lock lever
Sort bins
NOTE:
The bin intervals of the sorter and the staple sorter are
narrow for space conservation. When copying from an
optional automatic document feeder is completed or
the clear all ( ) key or the sorter bin access key is
pressed in the document glass mode, the bins will move
three at a time and the space between them will
become larger so that copies can be easily taken out.
This sorter bin access mode can be disabled by user
program No. 7. See page 30, USER PROGRAMS.
)
10-bin sorter (SF-S17N)
10-bin staple sorter (SF-S54)
OPTIONAL EQUIPMENT
Sort bins
SF-S54
BIN ACCESS
Bin access key
Sorter lock lever
BIN ACCESS
STAPLE
CAUTION
Do not put pressure on the sorter or subject it to undue force.
52
Stapler cover
Bin access
key
Manual staple
key
Page 55

10-BIN SORTER (SF-S17N)/10-BIN STAPLE SORTER (SF-S54)
Using a sorter
SORT
GROUP
Press the SORTER ( / / ) key to select the desired
mode.
(The STAPLE SORT ( ) mode cannot be selected for the
SF-S17N.)
To cancel the mode, press the SORTER ( / / ) key
until the SORT ( ), STAPLE SORT ( ), and GROUP
( ) indicators all go out.
NON-SORT mode
When none of the three sorter modes, SORT ( ), STAPLE SORT
( ) or GROUP( ) is selected, the copier is in the NONSORT mode. In this mode, all copies will be deposited in the top bin
of the sorter.
Be sure to use the NON-SORT mode when copying onto special
papers such as transparency film or label stock.
SORT mode
Press the SORTER ( / / ) key to select the SORT
( ) mode.
SORT is used for automatic copy collating. Copies of each original are
sequentially deposited in the sort bins.
STAPLE SORT mode (SF-S54 only)
Press the SORTER ( / / ) key to select the STAPLE
SORT ( ) mode.
10-bin sorter (SF-S17N)
10-bin staple sorter (SF-S54)
In this mode, copies will be automatically sorted and finished sets of
copies will be automatically stapled when used in conjunction with an
optional automatic document feeder (ADF). When copying from the
document glass, this mode cannot be selected.
GROUP mode
Press the SORTER ( / / ) key to select the GROUP
( ) mode.
In the GROUP ( ) mode, all copies of the same original are
deposited in the same bin.
53
OPTIONAL EQUIPMENT
Page 56

10-BIN SORTER (SF-S17N)/10-BIN STAPLE SORTER (SF-S54)
SORTER CAPACITIES
SF-S17N SF-S54
Top bin
100 sheets in the NON-SORT mode
Sort bins
SORT mode:
Paper size
A5, A4, A4R
(5-1/2" x 8-1/2",
8-1/2" x 11",
8-1/2" x 11"R)
B4, A3
(8-1/2" x 14", 15
11" x 17")
GROUP mode:
Paper size
A5, A4, A4R
(5-1/2" x 8-1/2",
8-1/2" x 11",
8-1/2" x 11"R)
B4, A3
(8-1/2" x 14", 15
11" x 17")
Bin capacity
(max.)
30
Bin capacity
(max.)
20
Top bin
100 sheets in the NON-SORT mode
Sort bins
SORT or STAPLE SORT mode:
Paper size
A5, A4, A4R
(5-1/2" x 8-1/2",
8-1/2" x 11",
8-1/2 "x 11"R)
B4, A3
(8-1/2" x 14", 15
11" x 17")
GROUP mode:
Paper size
A5, A4, A4R
(5-1/2" x 8-1/2",
8-1/2" x 11",
8-1/2" x 11"R)
B4, A3
(8-1/2" x 14", 15
11" x 17")
Bin capacity
(max.)
30
Bin capacity
(max.)
20
The limits for the number of originals which can be used and the number of copies that can be set for each
paper size are as follows:
SF-S17N SF-S54
Mode Paper size
Min.: A6
NON- (5-1/2" x 8-1/2")
SORT Max.: A3
10-bin sorter (SF-S17N)
10-bin staple sorter (SF-S54)
SORT 8-1/2" x 11"R) 10
GROUP 8-1/2" x 11"R) 10
OPTIONAL EQUIPMENT
(11" x 17")
A5, A4, A4R (5-1/2" x
8-1/2", 8-1/2" x 11", 30
B4, A3
(8-1/2" x 14", 11" x 17")
A5, A4, A4R (5-1/2" x
8-1/2", 8-1/2" x 11", 20
B4, A3
(8-1/2" x 14", 11" x 17")
Max. No. Max. No.
of of copies
originals to be set
–99
15
15
Max. No. Max. No.
Mode Paper size
of of copies
originals to be set
Min.: A6
NON- (5-1/2" x 8-1/2")
SORT Max.: A3
–99
(11" x 17")
A5, A4, A4R (5-1/2" x
SORT/ 8-1/2", 8-1/2" x 11", 30
STAPLE 8-1/2" x 11"R) 10
SORT
B4, A3
(8-1/2" x 14", 11" x 17")
15
A5, A4, A4R (5-1/2" x
8-1/2", 8-1/2" x 11", 20
GROUP 8-1/2" x 11"R) 10
B4, A3
(8-1/2" x 14", 11" x 17")
15
NOTES:
●
If the specified number of copies is more than the maximum number of copies that can be set, the copy quantity
display will change to the corresponding number in the above table in the SORT, STAPLE SORT, or GROUP
mode after copying starts.
●
If the number of originals exceeds the maximum number in the STAPLE SORT mode, the copier will stop and
the orange indicator on the staple sorter will light up. If copying is continued by pressing the print ( ) button,
staples may jam.
●
Do not use special paper in the SORT, STAPLE SORT, or GROUP mode.
54
Page 57

10-BIN STAPLE SORTER (SF-S54)
1
23
45
6
7
8
9
0/
C
A
Staple sort (SF-S54)
The STAPLE SORT ( ) mode staples copies of A5, A4, A4R,
B4, and A3 (5-1/2" x 8-1/2", 8-1/2" x 11", 8-1/2" x 11"R, 8-1/2" x 14",
and 11" x 17") sizes.
●
In some areas, 8-1/2" x 13" size copies can be stapled.
Using the document glass
Stapling location
Set the original on the document glass with the corner
to be stapled to the upper right.
1
●
Copy from the last page to the first page.
●
If the number of copies to be delivered into each bin is more than
30 for A5, A4 or A4R (5-1/2" x 8-1/2", 8-1/2" x 11" or 8-1/2" x
11"R) paper or 15 for B4 or A3 (8-1/2" x 14" or 11" x 17") paper,
the orange indicator on the staple sorter will light up. Do not
staple the copies in this case.
Press the SORTER ( / / ) key to select the
SORT (
2
●
Make sure that there is no paper in any sort bin before selecting
the SORT ( ) mode.
●
When using the document glass, the STAPLE SORT ( )
mode cannot be selected.
Set the number of copies.
3
●
Up to 10 sets can be made.
) mode.
10-bin staple sorter (SF-S54)
Press the print ( ) button.
4
When all copies are made and sorted, press the manual
staple key.
5
●
Each set of copies will be stapled.
●
Sets of copies containing copies of different width will not be
stapled.
55
OPTIONAL EQUIPMENT
Page 58

10-BIN STAPLE SORTER (SF-S54)
1
23
45
6
7
8
9
0/
C
A
C
Using the ADF
Stapling location
10-bin staple sorter (SF-S54)
Set the originals in the document feeder tray face up
with the stapling position in the upper left corner.
1
●
If the number of copies to be delivered into each bin is more than
30 for A5, A4 or A4R (5-1/2" x 8-1/2", 8-1/2" x 11" or 8-1/2" x
11"R) paper or 15 for B4 or A3 (8-1/2" x 14" or 11" x 17") paper,
the copies will not be stapled.
Do not press the manual staple key in this case.
Press the SORTER ( / / ) key to select the
STAPLE SORT (
2
●
Make sure that there is no paper in any sort bin before selecting
the STAPLE SORT ( ) mode.
Set the number of copies.
3
●
Up to 10 sets can be made.
) mode.
OPTIONAL EQUIPMENT
56
Press the print ( ) button.
4
●
When copying and sorting are completed, each set of copies will
be automatically stapled.
●
Sets of copies containing copies of different width will not be
stapled.
Page 59

10-BIN STAPLE SORTER (SF-S54)
Staple cartridge replacement/staple jam removal (SF-S54)
When the staple cartridge is empty or staples become jammed in the
STAPLE SORT mode, the STAPLE SORT ( ) mode indicator
will blink, the misfeed location indicator for the sorter will blink, and the
red manual staple key indicator on the staple sorter will light up.
NOTES:
●
If the staple cartridge is empty or only a few staples are left, replace
the cartridge with a new one following the procedure below.
●
If there are still many staples left, then staples have jammed in the
stapler. See next page.
Staple cartridge replacement
Open the stapler cover.
1
STAPLE TEAR line
Lifting the green release lever, remove the staple
cartridge from the stapler.
2
●
A few staples will be left in the cartridge. Remove and discard
them.
Check that the first staple in the new cartridge is at the
tip of the cartridge.
3
●
If the first staple is not at the tip, pull it to the tip. If any staples
are protruding past the cartridge tip, tear them off at the
STAPLE TEAR line and align the first staple with the tip.
●
A cartridge holds 5,000 staples.
Push the new staple cartridge in until it clicks in place.
4
10-bin staple sorter (SF-S54)
OPTIONAL EQUIPMENT
Close the stapler cover.
5
●
The stapler feeds staples automatically.
●
To check that the stapler works properly, copy an original and
staple it.
57
Page 60

10-BIN STAPLE SORTER (SF-S54)
Staple jam removal
Open the stapler cover.
1
10-bin staple sorter (SF-S54)
OPTIONAL EQUIPMENT
Close the stapler cover.
2
●
Jammed staples will be removed automatically.
Remove all copies from the bins of the staple sorter.
3
●
To check that the stapler works properly, copy an original and
staple it.
58
Page 61

Misfeed removal
The copier will stop when a misfeed occurs. The misfeed ( )
indicator will blink and blinking red misfeed location indicators will
indicate the approximate misfeed location.
SF-S17N 10-bin sorter
Pull the sorter lock lever and carefully slide the sorter
away from the copier.
1
10-BIN SORTER (SF-S17N)
Remove the misfed paper from the sorter or from the exit
area of the copier.
2
Slide the sorter back toward the copier and latch it into
place.
3
10-bin sorter (SF-S17N)
OPTIONAL EQUIPMENT
Open and close the front cover to cancel the indicator.
4
●
If the indicator is still blinking, check the inside of the copier
and remove any remaining misfed paper.
59
Page 62

10-BIN STAPLE SORTER (SF-S54)
SF-S54 10-bin staple sorter
Pull the sorter lock lever and carefully slide the staple
sorter away from the copier.
1
10-bin staple sorter (SF-S54)
OPTIONAL EQUIPMENT
Remove the misfed paper from the staple sorter or from
the exit area of the copier.
2
Slide the staple sorter back toward the copier and latch
it into place.
3
60
Open and close the front cover to cancel the indicator.
4
●
If the indicator is still blinking, check the inside of the copier
and remove any remaining misfed paper.
Page 63

10-BIN SORTER (SF-S17N)/10-BIN STAPLE SORTER (SF-S54)
Specifications
SF-S17N
No. of bins 10
Bin capacity NON-SORT: 100 sheets (top bin)
SORT: 30 sheets (A5, A4, A4R (5-1/2" x 8-1/2",
8-1/2" x 11", 8-1/2" x 11"R))
15 sheets (B4, A3 (8-1/2" x 14", 11" x 17"))
GROUP: 20 sheets (A5, A4, A4R (5-1/2" x 8-1/2",
8-1/2" x 11", 8-1/2" x 11"R))
15 sheets (B4, A3 (8-1/2" x 14", 11" x 17"))
Paper size Top bin: Max. A3 (11" x 17")
Min. A6 (5-1/2" x 8-1/2")
Sort bins: Max. A3 (11" x 17")
Min. A5 (5-1/2" x 8-1/2")
Power supply Drawn from the copier
Weight Approx. 9.8 kg (21.6 lbs.) (including mounted fittings)
Dimensions 335 mm (W) x 493 mm (D) x 298 mm (H)
(13-13/64" (W) x 19-27/64" (D) x 11-47/64" (H))
SF-S54
No. of bins 10
Bin capacity NON-SORT: 100 sheets (top bin)
SORT/ 30 sheets (A5, A4, A4R (5-1/2" x 8-1/2",
STAPLE 8-1/2" x 11", 8-1/2" x 11"R))
SORT: 15 sheets (B4, A3 (8-1/2" x 14", 11" x 17"))
GROUP: 20 sheets (A5, A4, A4R (5-1/2" x 8-1/2",
8-1/2" x 11", 8-1/2" x 11"R))
15 sheets (B4, A3 (8-1/2" x 14", 11" x 17"))
Paper size Top bin: Max. A3 (11" x 17")
Min. A6 (5-1/2" x 8-1/2")
Sort bins: Max. A3 (11" x 17")
Min. A5 (5-1/2" x 8-1/2")
10-bin sorter (SF-S17N)
10-bin staple sorter (SF-S54)
Stapling capacity 30 sheets (80 g/m2 (21 lbs.))
Power supply Drawn from the copier
Weight Approx. 15 kg (33.1 lbs.) (including mounted fittings)
Dimensions 390 mm (W) x 542 mm (D) x 400 mm (H)
(15-23/64" (W) x 21-11/32" (D) x 15-3/4" (H))
Specifications are subject to change for improvement without notice.
OPTIONAL EQUIPMENT
61
Page 64

MULTI BYPASS FEEDER (SF-MF15)
The multi bypass feeder automatically feeds up to 50 sheets of
standard copy paper.
Specifications
Multi bypass feeder (SF-MF15)
OPTIONAL EQUIPMENT
Paper guides
Acceptable copy (Automatic feed)
paper Weight: 56 to 80 g/m2 (15 to 21 lbs.)
Size: A6 to A3 (5-1/2" x 8-1/2" to 11" x 17")
Capacity: Up to 50 sheets, provided the total
aggregate thickness does not exceed
5 mm (3/16")
(Single sheet feed)
Weight: 52 to 128 g/m2 (14 to 34 lbs.)
Size: A6 to A3 (5-1/2" x 8-1/2" to 11" x 17")
A4 (8-1/2" x 11") is the maximum size for
paper weighing from 104 to 128 g/m
(28 to 34 lbs.).
2
62
Weight Approx. 2 kg (4.5 lbs.)
Dimensions 350 mm (W) x 493 mm (D) x 185 mm (H)
(13-25/32" (W) x 19-27/64" (D) x 7-19/64" (H))
Power supply Drawn from the copier
Specifications are subject to change for improvement without notice.
Page 65

Using the multi bypass feeder
1
MULTI BYPASS FEEDER (SF-MF15)
Unfold the multi bypass feeder.
●
When feeding A4R, B4, or A3 (8-1/2" x 11"R, 8-1/2" x 14", or
11" x 17") sized paper, extend the feeder tray.
Set the paper guides to the copy paper width.
2
●
A6 sized paper must be fed narrow side into the feed slot.
Insert the copy paper all the way into the multi bypass
feeder.
3
●
Up to 50 sheets of standard copy paper measuring from A6 to
A3 (5-1/2" x 8-1/2" to 11" x 17") can be loaded in the multi bypass
feeder.
●
Transparency film, labels, tracing paper, and other special
purpose papers must be fed individually.
●
When adding paper, first remove remaining paper, combine it
with the paper to be added and then reload as a single stack.
Multi bypass feeder (SF-MF15)
OPTIONAL EQUIPMENT
63
Page 66

MULTI BYPASS FEEDER (SF-MF15)
A3
A4
A4
A5
B4
R
C
Press the TRAY SELECT ( ) key to select the bypass.
4
1
✕
13
8
2
/
EXTRA
Multi bypass feeder (SF-MF15)
OPTIONAL EQUIPMENT
AC
Leave the copy quantity at 0 if using special papers. Set
the number of copies if using standard copy paper.
5
Press the print ( ) button.
6
●
Blinking
If the bypass feeder becomes empty during continuous copying,
will blink in the copy quantity display informing the operator
that paper should be added. If blinks when copy paper is
present in the bypass feeder, paper has not been fed correctly.
Gently pull out the misfed paper in this case. If the paper cannot
be pulled out, remove it referring to page 23, “Misfeed in the
transport area, fusing area and exit area”.
In either case, after carrying out the necessary remedy, press
the print ( ) button to cancel the blinking and to restart
copying. To cancel the blinking without restarting copying,
press the clear ( )key.
64
Page 67

PAPER TRAY (SF-UB15)
The paper tray in the copier can be replaced with an optional paper
tray. To replace the paper tray, follow the procedure below.
To load copy paper into the paper tray, see page 3, LOADING COPY
PAPER.
Gently lift and pull out the paper tray until it stops.
1
Gently lift and remove the paper tray.
2
Insert the new paper tray at an angle, as shown.
3
Push the paper tray firmly back into the copier.
4
Paper tray (SF-UB15)
OPTIONAL EQUIPMENT
Use the procedure described on page 5 to set the copy
paper size.
5
65
Page 68

MEMO
OPTIONAL EQUIPMENT
66
Page 69

MEMO
67
OPTIONAL EQUIPMENT
Page 70

MEMO
OPTIONAL EQUIPMENT
68
Page 71

Required in IEC-950 (EN 60 950) - Europe
• The equipment should be installed near an accessible socket outlet for easy disconnection.
Required in Appendix ZB of BS 7002 (En 60 950) — United Kingdom
MAINS PLUG WIRING INSTRUCTIONS
The mains lead of this equipment is already fitted with a mains plug which is either a non-rewireable
(moulded) or a rewireable type. Should the fuse need to be replaced, a BSI or ASTA approved fuse
to BS1362 marked or and of the same rating as the one removed from the plug must
be used.
Always refit the fuse cover after replacing the fuse on the moulded plug. Never use the plug without
the fuse cover fitted.
In the unlikely event of the socket outlet in your home not being compatible with the plug supplied
either cut-off the moulded plug (if this type is fitted) or remove by undoing the screws if a rewireable
plug is fitted and fit an appropriate type observing the wiring code below.
DANGER: The fuse should be removed from the cut-off plug and the plug destroyed immediately
and disposed of in a safe manner. Under no circumstances should the cut-off plug be inserted
elsewhere into a 13A socket outlet as a serious electric shock may occur.
To fit an appropriate plug to the mains lead, follow the instructions below:
IMPORTANT: The wires in this mains lead are coloured in accordance with the following code:
As the colours of the wires in this mains lead may not correspond with coloured markings
identifying the terminals in your plug, proceed as follows:
The wire which is coloured GREEN-AND YELLOW must be connected to the terminal in the plug
which is marked with the letter E, or by the safety earth symbol Å@, or coloured green or greenand-yellow.
The wire which is coloured BLUE must be connected to the terminal which is marked with the letter
N or coloured black.
The wire which is coloured BROWN must be connected to the terminal which is marked with the
letter L or coloured red.
If you have any doubt, consult a qualified electrician.
WARNING: THIS APPARATUS MUST BE EARTHED.
GREEN-AND-YELLOW: Earth
BLUE: Neutral
BROWN: Live
Page 72

SF-1116/SF-1118
SHARP CORPORATION
PRINTED IN JAPAN
97K KS➀
TINSE1653 FCZZ
 Loading...