

Page 1
SD-WH1000U
ENGLISHESPAÑOL
WIRELESS UNIVERSAL PLAYER
REPRODUCTOR UNIVERSAL
INALÁMBRICO
OPERATION MANUAL
MANUAL DE MANEJO
Page 2

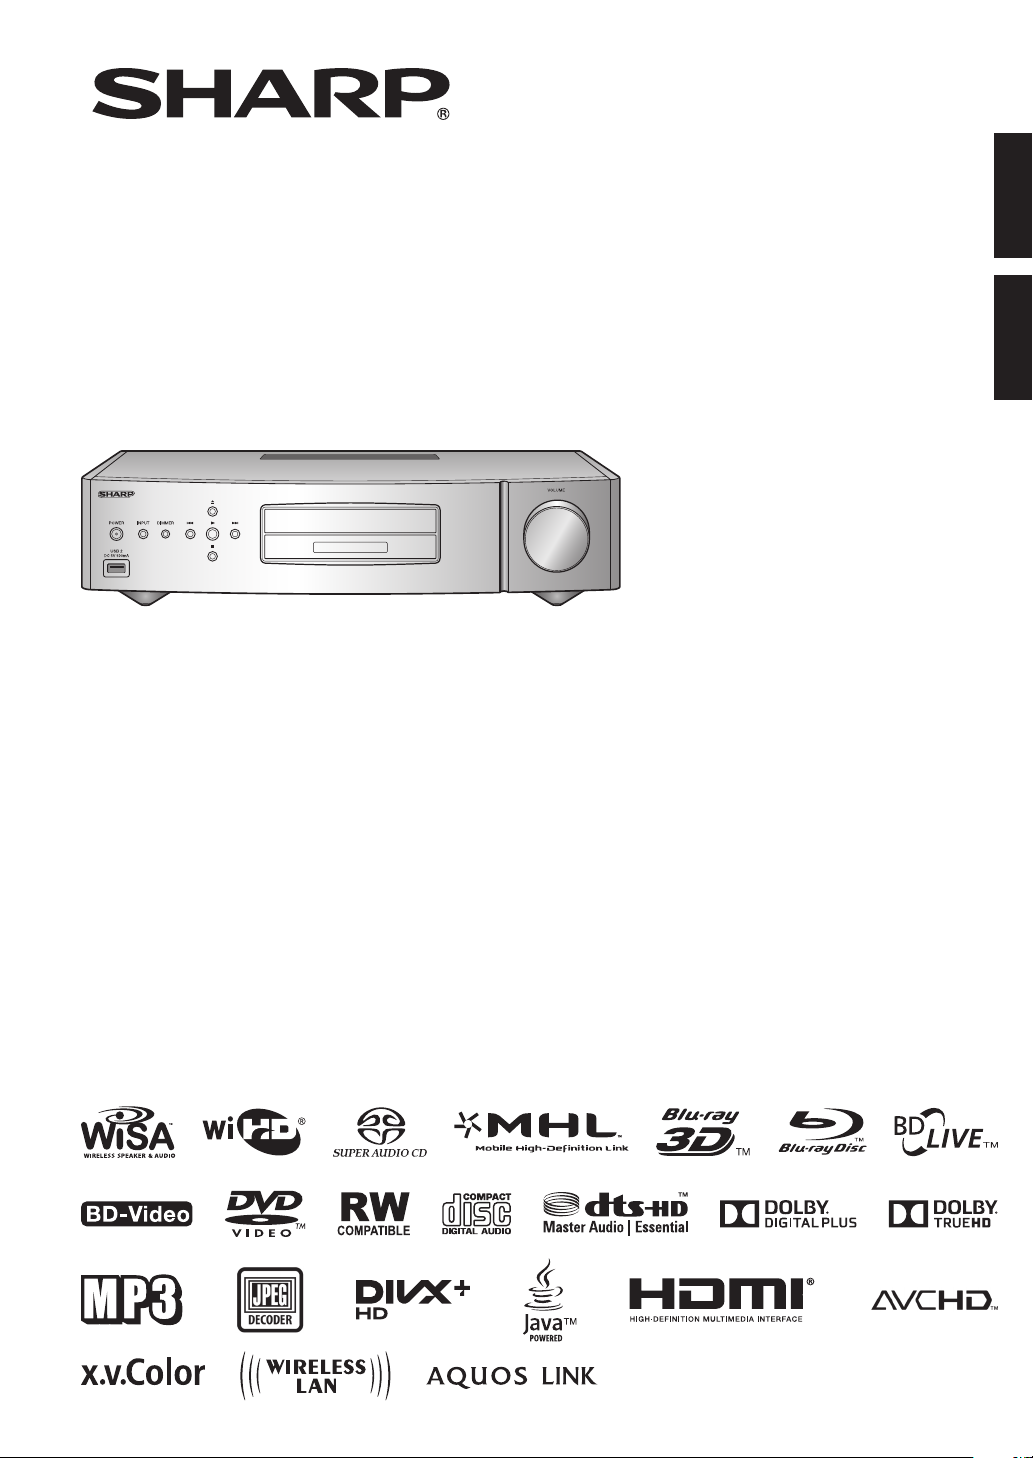
Congratulations and Thank You for purchasing the SD-WH1000U Wireless High Resolution Audio
Player.
For the rst time you will be able to experience uncompressed, high resolution (24bit/96kHz)
audio delivered without wires. The player works with any audio system from 2.0 up to 7.1. You can
play virtually everything in your media library though the Sharp Wireless High Resolution Audio
Player, which supports an extremely wide variety of physical and digital media formats. Your high
resolution music les have never sounded better. Hear FLAC, WAV, AIFF, ALAC, AAC, SACD and DSD
les at up to 24bit/96kHz delity.* The player can access les through a built-in SACD and Blu-ray
drive or on a hard drive (via USB). It can also connect to a home network to access les stored on
a network-attached storage device. The Sharp Wireless High Resolution Audio Player makes it easy
to access all your les. With the Sharp mobile app, available for iOS and Android, you can create
playlists, lter by genre, artist or album and access full le details, all from your mobile device. The
Sharp player also transmits uncompressed Full HD (1080p) video to your TV wirelessly using the
Wireless HD (WiHD) standard and included adapters.
To achieve audiophile quality (24bit/96kHz) sound, the Sharp Wireless High Resolution Audio Player
uses the Wireless Speakers and Audio (WiSA) standard. High quality audio signals from the player
can be transmitted to any WiSA-compliant speaker system, or to any traditional audio system via
the Sharp Wireless Bridge (VR-WR100U - sold separately). Together they can bring the full freedom
and delity of high resolution music to any audio system.
Sophisticated construction techniques and premium materials give Sharp’s Wireless High
Resolution Audio Player absolute delity and supreme reliability. From all power supply
components to all audio path components, only the nest components have been selected.
Page 3

BASIC INDEX
Introduction
Supplied Accessories ...........................................................................................6
Major Components .......................................................................................... 7 - 9
Connection
Speakers Settings ...............................................................................................16
WiHD Settings ...............................................................................................19 - 20
Preparation
Using the Mobile App .................................................................................. 24 - 25
Playback
Audio CD/SACD Playback...................................................................................35
Audio Data Playback ...........................................................................................36
Settings
Playback Settings ................................................................................................42
Video Settings .....................................................................................................43
WiSA Settings .............................................................................................. 45 - 46
System Setting ............................................................................................. 49 - 53
Appendix
Troubleshooting .............................................................................................. ii - v
Page 4

INDEX
Introduction
SAFETY INFORMATION .................................................................................... 1 - 2
DEAR SHARP CUSTOMER .....................................................................................3
IMPORTANT SAFETY INSTRUCTIONS ............................................................. 3 - 4
PRECAUTIONS .........................................................................................................5
Getting Started .........................................................................................................6
Supplied Accessories ......................................................................................................... 6
Major Components ............................................................................................ 7 - 9
Wireless Universal Player Unit (Front) ...............................................................................7
Wireless Universal Player Unit (Rear) ................................................................................ 7
WiHD Transmitter Unit ........................................................................................................ 8
WiHD Receiver Unit ........................................................................................................... 8
Remote Control Unit ........................................................................................................... 9
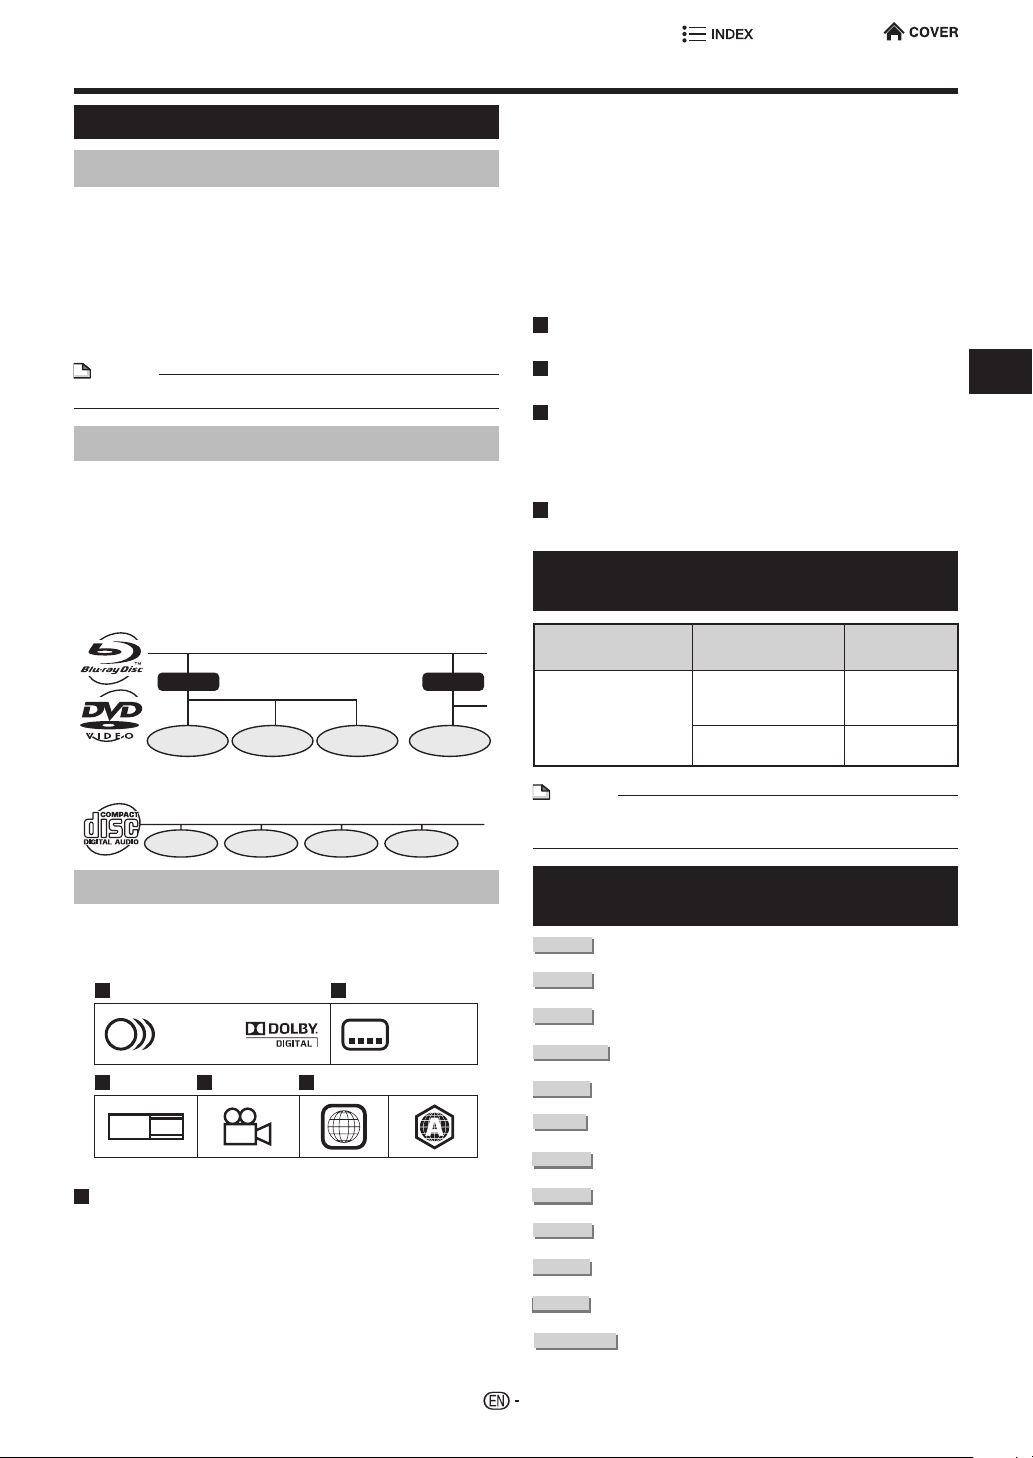
About Media Types .........................................................................................10 - 12
Blu-ray Disc ...................................................................................................................... 10
Types of Discs that Can Be Used with This Player .......................................................... 10
Discs that Cannot Be Used with This Player .................................................................... 10
About Disc Contents ........................................................................................................ 12
Types of Media Formats that Can Be Used with This Player ........................................... 12
The Icons Used in This Operation Manual ....................................................................... 12
Important Information ...........................................................................................13
Disc Precautions .............................................................................................................. 13
License and Copyright ..................................................................................................... 13
Wireless Audio System .........................................................................................14
Connection
Preparation
Playback
Settings
Appendix
Page 5

INDEX
Introduction
Connection
Notes WiSA installation .........................................................................................15
Speakers Settings ..................................................................................................16
To Speakers using Sharp’s WIRELESS BRIDGE ............................................................ 16
To WiSA-enabled Speakers. Adjust Speaker settings using on screen display ................ 16
Analog Audio Connection .....................................................................................17
Connecting to the ANALOG AUDIO OUT Terminal .......................................................... 17
Digital Audio Connection ......................................................................................18
Connecting to the Digital Audio Terminal ......................................................................... 18
WiHD Settings .................................................................................................19 - 20
WiHD Transmitter Connection .......................................................................................... 19
WiHD Receiver Connection ............................................................................................. 20
Video Connection ..................................................................................................21
Connecting to the HDMI Terminal .................................................................................... 21
Broadband Internet Connection ................................................................... 22 - 23
Internet Connection (LAN cable) ...................................................................................... 22
Internet Connection (Wireless LAN).................................................................................23
Preparation
Playback
Settings
Appendix
Page 6

INDEX
Introduction
Connection
Preparation
Using the Mobile App .................................................................................... 24 - 25
How to Download the Mobile App ....................................................................................24
Before Starting Playback .............................................................................. 26 - 29
Loading the Batteries in the Remote Control ................................................................... 26
Remote Control Code Setting .......................................................................................... 26
Using AQUOS LINK .........................................................................................................27
Using a Smartphone with the Player ................................................................................ 27
Control Panel ................................................................................................................... 28
Connecting the AC Cord .................................................................................................. 29
Turning the Power On ......................................................................................................29
To Dim the Display ........................................................................................................... 29
Playback
Settings
Appendix
Page 7

INDEX
Introduction
Connection
Preparation
Playback
Basic Operation .....................................................................................................30
Volume control ................................................................................................................. 30
Mute ................................................................................................................................. 30
SOUND MODE ................................................................................................................ 30
INPUT select .................................................................................................................... 30
Picture Mute ..................................................................................................................... 30
Music/Video/Picture Playback ...................................................................... 31 - 38
Loading a Disc/Ejecting a Disc ........................................................................................31
BD/DVD Video Playback .................................................................................................. 31
BD/DVD Menus ................................................................................................................ 32
Enjoying BONUSVIEW or BD-LIVE ................................................................................. 33
DVD-R/-RW (VR format) / BD-RE/-R (BDAV format) Playback ........................................ 34
Audio CD/SACD Playback ............................................................................................... 35
Audio Data Playback ........................................................................................................ 36
Displaying Still Images (JPEG les) ................................................................................. 37
Video Playback ................................................................................................................ 38
Lipsync (audio/video synchronizing) ................................................................................ 38
Playback Functions ...............................................................................................39
Fast Forward/Reverse (Search) ....................................................................................... 39
Skipping to the Next or the Start of the Current Chapter (Track/Title) .............................. 39
Pause/Frame Advance Playback ...................................................................................... 39
Slow Playback .................................................................................................................. 39
Displaying the Audio Information...................................................................................... 39
Settings During Playback .....................................................................................40
Function Control ............................................................................................................... 40
Settings
Appendix
Page 8

INDEX
Introduction
Connection
Preparation
Playback
Settings
SETTINGS ...............................................................................................................41
Common Operations ........................................................................................................ 41
Playback Settings ..................................................................................................42
SACD Priority ................................................................................................................... 42
Auto Play Mode ................................................................................................................ 42
Parental Control ............................................................................................................... 42
Disc Language (Disc Priority Language) .........................................................................42
Angle Mark Display .......................................................................................................... 42
Video Settings ........................................................................................................43
HDMI Video Setup ........................................................................................................... 43
4K Upscale....................................................................................................................... 43
24p Output ....................................................................................................................... 43
SUPER PICTURE ............................................................................................................ 43
3D Mode ..........................................................................................................................43
3D Notice ......................................................................................................................... 43
Audio Settings .......................................................................................................44
Audio Out ......................................................................................................................... 44
Secondary Audio .............................................................................................................. 44
DSD DAC Direct ............................................................................................................... 44
Dynamic Range Control ................................................................................................... 44
Analog Output Volume .....................................................................................................44
WiSA Settings ................................................................................................ 45 - 46
Status Information ............................................................................................................ 45
Manual Search ................................................................................................................. 45
Speaker Conguration ..................................................................................................... 45
Crossover ......................................................................................................................... 46
WiSA Cong Clear ........................................................................................................... 46
Communication Setup................................................................................... 47 - 48
Cable/Wireless Select ......................................................................................................47
When using a LAN Cable ................................................................................................. 47
When using Wireless LAN ............................................................................................... 47
BD Internet Access .......................................................................................................... 48
IP Control Setup ............................................................................................................... 48
System Setting ............................................................................................... 49 - 53
Version ............................................................................................................................. 49
USB Management............................................................................................................ 49
Manual Update ................................................................................................................. 50
On Screen Language ....................................................................................................... 52
Quick Start ....................................................................................................................... 52
Auto Power Off ................................................................................................................. 52
Front Display/LED ............................................................................................................52
AQUOS LINK ................................................................................................................... 52
Control Panel ................................................................................................................... 52
Auto Update Setting ......................................................................................................... 52
Remote Control Code ...................................................................................................... 52
DivX(R) Registration ........................................................................................................ 52
DivX(R) Deregistration ..................................................................................................... 52
System Reset ................................................................................................................... 52
Audio Output Selection Formats ...................................................................................... 53
Appendix
Page 9

INDEX
Introduction
Connection
Preparation
Playback
Settings
Appendix
RS-232C port specications ....................................................................................i
Troubleshooting ................................................................................................. ii - v
Specications .........................................................................................................vi
Network Service Disclaimer.................................................................................viii
About Software License .........................................................................................ix
Calling for Service ...................................................................................................x
LIMITED WARRANTY ...............................................................................................x
Page 10
OPERATION MANUAL
Introduction
SAFETY INFORMATION
ENGLISH
ENGLISH
This symbol warns the user of
uninsulated voltage within the
unit that can cause dangerous
electric shocks.
This symbol alerts the user
that there are important
operating and maintenance
instructions in the literature
accompanying this unit.
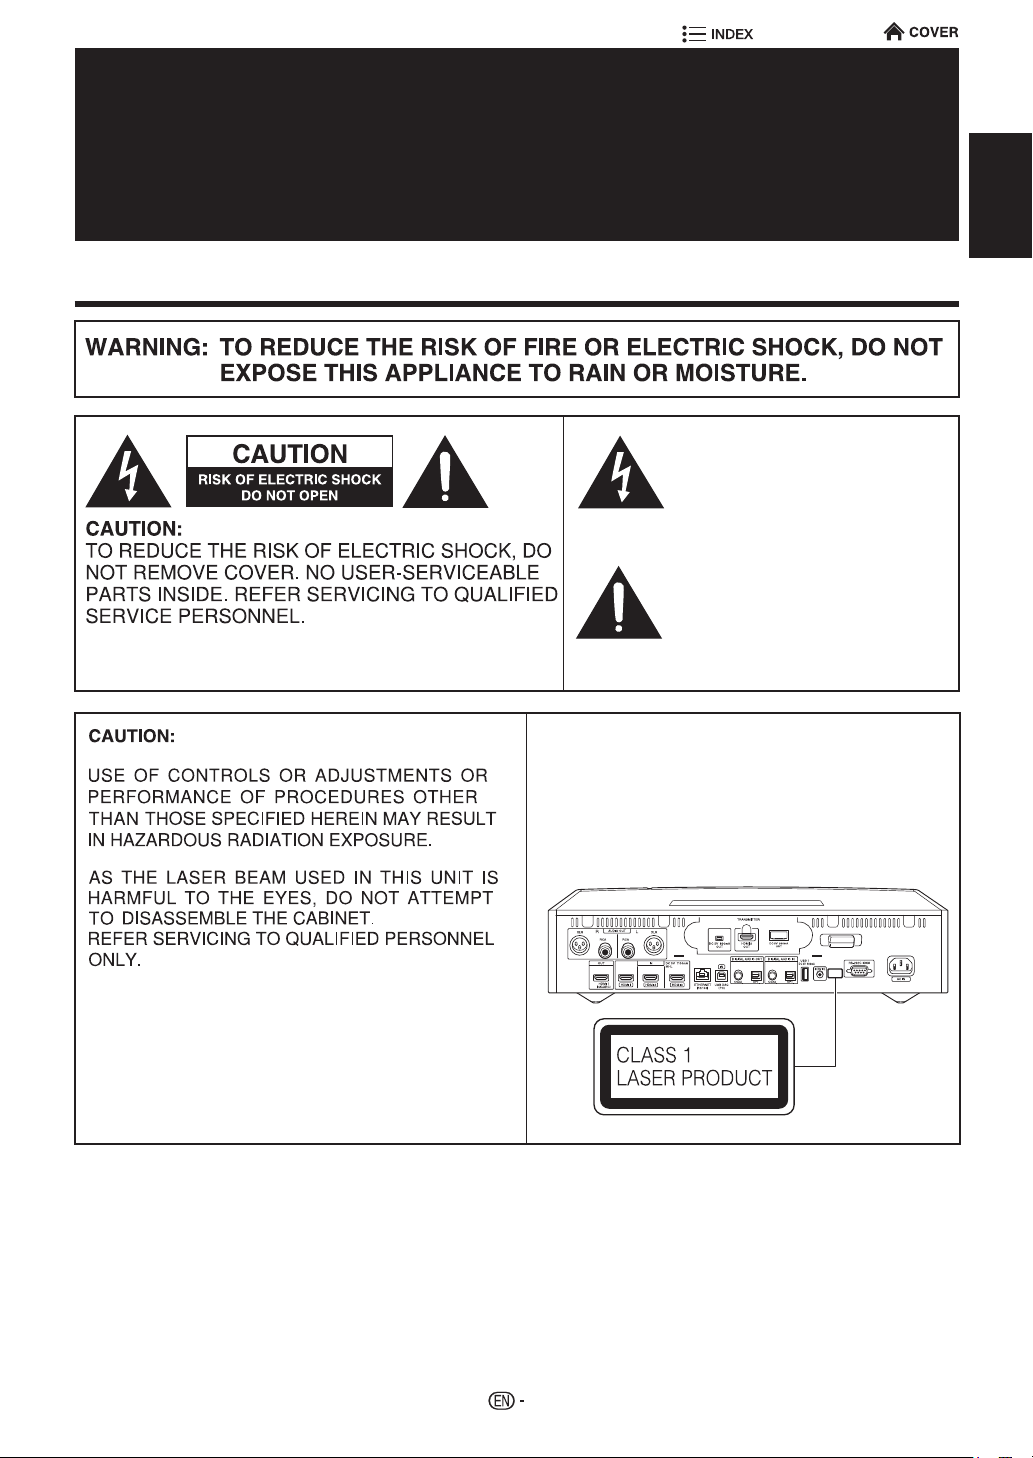
• This Player is classified as a CLASS 1 LASER product.
• The CLASS 1 LASER PRODUCT label is located on
the rear cabinet.
• This product contains a low power laser device. To
ensure continued safety do not remove any cover or
attempt to gain access to the inside of the product.
Refer all servicing to qualified personnel.
1
Page 11
SAFETY INFORMATION
FCC Compliance Statement
This device complies with part 15 of the FCC Rules. Operation is subject to the following two conditions:
(1) This device may not cause harmful interference, and (2) this device must accept any interference received, including
interference that may cause undesired operation.
Wireless Radio
For product available in the USA market, only channel 1–11 can be operated. Selection of other channels is not possible.
This device is going to be operated in 5.15-5.25GHz frequency range, it is restricted in indoor environment only.
Important: Any changes or modifications not expressly approved by the party responsible for compliance could void the user’s
authority to operate the equipment.
FCC Radiation Exposure Statement: This equipment complies with FCC radiation exposure limits set forth for an uncontrolled
environment. This equipment should be installed and operated with minimum distance 20cm between the radiator & your body.
Introduction
2
Page 12
DEAR SHARP CUSTOMER
Thank you for your purchase of the SHARP WIRELESS UNIVERSAL PLAYER. To ensure safety and
many years of trouble-free operation of your product, please read the Important Safety Instructions
carefully before using this product.
IMPORTANT SAFETY INSTRUCTIONS
Electricity is used to perform many useful functions, but it can also cause personal injuries and property damage if
improperly handled. This product has been engineered and manufactured with the highest priority on safety. However,
improper use can result in electric shock and/or re. In order to prevent potential danger, please observe the following
instructions when installing, operating and cleaning the product. To ensure your safety and prolong the service life of
your WIRELESS UNIVERSAL PLAYER, please read the following precautions carefully before using the product.
1) Read these instructions.
2) Keep these instructions.
3) Heed all warnings.
4) Follow all instructions.
5) Do not use this apparatus near water.
6) Clean only with dry cloth.
7) Do not block any ventilation openings. Install in accordance with the manufacturer’s instructions.
8) Do not install near any heat sources such as radiators, heat registers, stoves, or other apparatus (including
ampliers) that produce heat.
9) Do not defeat the safety purpose of the polarized or grounding-type plug. A polarized plug has two blades with
one wider than the other. A grounding type plug has two blades and a third grounding prong. The wide blade or the
third prong are provided for your safety. If the provided plug does not t into your outlet, consult an electrician for
replacement of the obsolete outlet.
10) Protect the power cord from being walked on or pinched particularly at plugs, convenience receptacles, and the
point where they exit from the apparatus.
11) Only use attachments/accessories specied by the manufacturer.
12) Use only with the cart, stand, tripod, bracket, or table specied by the manufacturer, or sold with the apparatus.
When a cart is used, use caution when moving the cart/apparatus combination to avoid injury from tip-over.
13) Unplug this apparatus during lightning storms or when unused for long periods of time.
14) Refer all servicing to qualied service personnel. Servicing is required when the apparatus has been
damaged in any way, such as power-supply cord or plug is damaged, liquid has been spilled or objects
have fallen into the apparatus, the apparatus has been exposed to rain or moisture, does not operate
normally, or has been dropped.
Additional Safety Information
15) Power Sources—This product should be operated only from the type of power source indicated on the marking
label. If you are not sure of the type of power supply to your home, consult your product dealer or local power
company. For products intended to operate from battery power, or other sources, refer to the operating instructions.
16) Overloading—Do not overload wall outlets, extension cords, or integral convenience receptacles as this can result
in a risk of re or electric shock.
17) Object and Liquid Entry—Never push objects of any kind into this product through openings as they may touch
dangerous voltage points or short-out parts that could result in a re or electric shock. Never spill liquid of any kind
on the product.
18) Damage Requiring Service—Unplug this product from the wall outlet and refer servicing to qualied service
personnel under the following conditions:
a) When the AC cord or plug is damaged,
b) If liquid has been spilled, or objects have fallen into the product,
c) If the product has been exposed to rain or water,
d) If the product does not operate normally by following the operating instructions.
Adjust only those controls that are covered by the operating instructions as an improper adjustment of other
controls may result in damage and will often require extensive work by a qualied technician to restore the
product to its normal operation,
e) If the product has been dropped or damaged in any way, and
f) When the product exhibits a distinct change in performance - this indicates a need for service.
19) Replacement Parts—When replacement parts are required, be sure the service technician has used replacement
parts specied by the manufacturer or have the same characteristics as the original part. Unauthorized
substitutions may result in re, electric shock, or other hazards.
20) Safety Check—Upon completion of any service or repairs to this product, ask the service technician to perform
safety checks to determine that the product is in proper operating condition.
21) The main AC plug is used as disconnect device and shall always remain readily operable.
Introduction
3
Page 13
IMPORTANT SAFETY INSTRUCTIONS
• Water and Moisture—Do not use this product near water - for example, near a bath tub,
wash bowl, kitchen sink, or laundry tub; in a wet basement; or near a swimming pool;
and the like.
• Stand—Do not place the product on an unstable cart, stand, tripod or table. Placing the
product on an unstable base can cause the product to fall, resulting in serious personal
injuries as well as damage to the product. Use only a cart, stand, tripod, bracket or table
recommended by the manufacturer or sold with the product.
• Selecting the location—Select a place with no direct sunlight and good ventilation.
• Ventilation—The vents and other openings in the cabinet are designed for ventilation.
Do not cover or block these vents and openings since insufficient ventilation can cause
overheating and/or shorten the life of the product. Do not place the product on a bed,
sofa, rug or other similar surface, since they can block ventilation openings. This product
is not designed for built-in installation; do not place the product in an enclosed place
such as a bookcase or rack, unless proper ventilation is provided or the manufacturer’s
instructions are followed.
• Heat—The product should be situated away from heat sources such as radiators, heat
registers, stoves, or other products (including ampliers) that produce heat.
• Lightning—For added protection for this product during a lightning storm, or when it is
left unattended and unused for long periods of time, unplug it from the wall outlet. This
will prevent damage to the product due to lightning and power-line surges.
• To prevent re, never place any type of candle or ames on the top or near the product.
• To prevent re or shock hazard, do not expose this product to dripping or splashing.
No objects lled with liquids, such as vases, should be placed on the product.
• To prevent re or shock hazard, do not place the AC cord under the product or other
heavy items.
Introduction
4
Page 14
PRECAUTIONS
Precautions on viewing stereoscopic 3D images
• Do not view stereoscopic 3D images if you have a history of photosensitivity, heart disease or poor health. This may
cause the symptoms to worsen.
• If you experience any health problems such as fatigue and discomfort while viewing stereoscopic 3D images,
immediately discontinue viewing. Continuing viewing after symptoms appear may cause health risks. Take a break until
the symptoms have completely disappeared.
• Ages of 5–6 or over are recommended for viewing stereoscopic 3D images. Symptoms such as fatigue and discomfort
are difficult to determine in young children, therefore they may suddenly become ill. When viewing 3D images with
children, please watch for eye strain symptoms.
• When viewing stereoscopic 3D images, take a moderate break after watching one title. Viewing for extended periods
may cause visual strain.
Precautions when cleaning this product
• Turn off the main power and unplug the AC cord from the wall outlet before handling.
• To clean the outer cabinet, periodically wipe it with a soft cloth (cotton, annel, etc.).
• For severe dirt, soak a soft cloth (cotton, annel, etc.) in some neutral detergent diluted with water, wring the cloth out
thoroughly, wipe off the dirt, then wipe again with a soft, dry cloth.
• Do not use chemicals or a chemically treated cloth for cleaning. It may damage the cabinet nish.
Notes on using Wireless LAN
• When this player is connected to a wireless LAN network, transmissions between the wireless LAN components
inside this player and a wireless LAN compatible broadband router (commercially available) are carried out.
Precautions on using Wireless LAN
• The following devices, radio stations, etc. use the same frequency bands. Do not use wireless LAN near them.
Manufacturing/scientic/diagnostic equipment such as pacemakers, etc.
Specied low power radio stations (radio stations that do not require a license)
If this player is used near these devices, there is a possibility that radio wave interference may occur. Therefore
transmission may not be possible or speed may be reduced.
• Mobile phones, radios, etc. use different radio frequency bands from wireless LAN, so there will not be any effect on
the transmissions of these devices or wireless LAN if this player is used near them.
However, if a wireless LAN product is placed near one of these devices, audio or video noise may occur due to the
electromagnetic waves that emit from wireless LAN products.
• Radio waves will pass through the wood, glass, etc. used in standard housing, however they will not pass through
reinforcing bars, metal, concrete, etc. Radio waves will not pass through walls and oors if these materials are used.
Introduction
5
Page 15
Getting Started
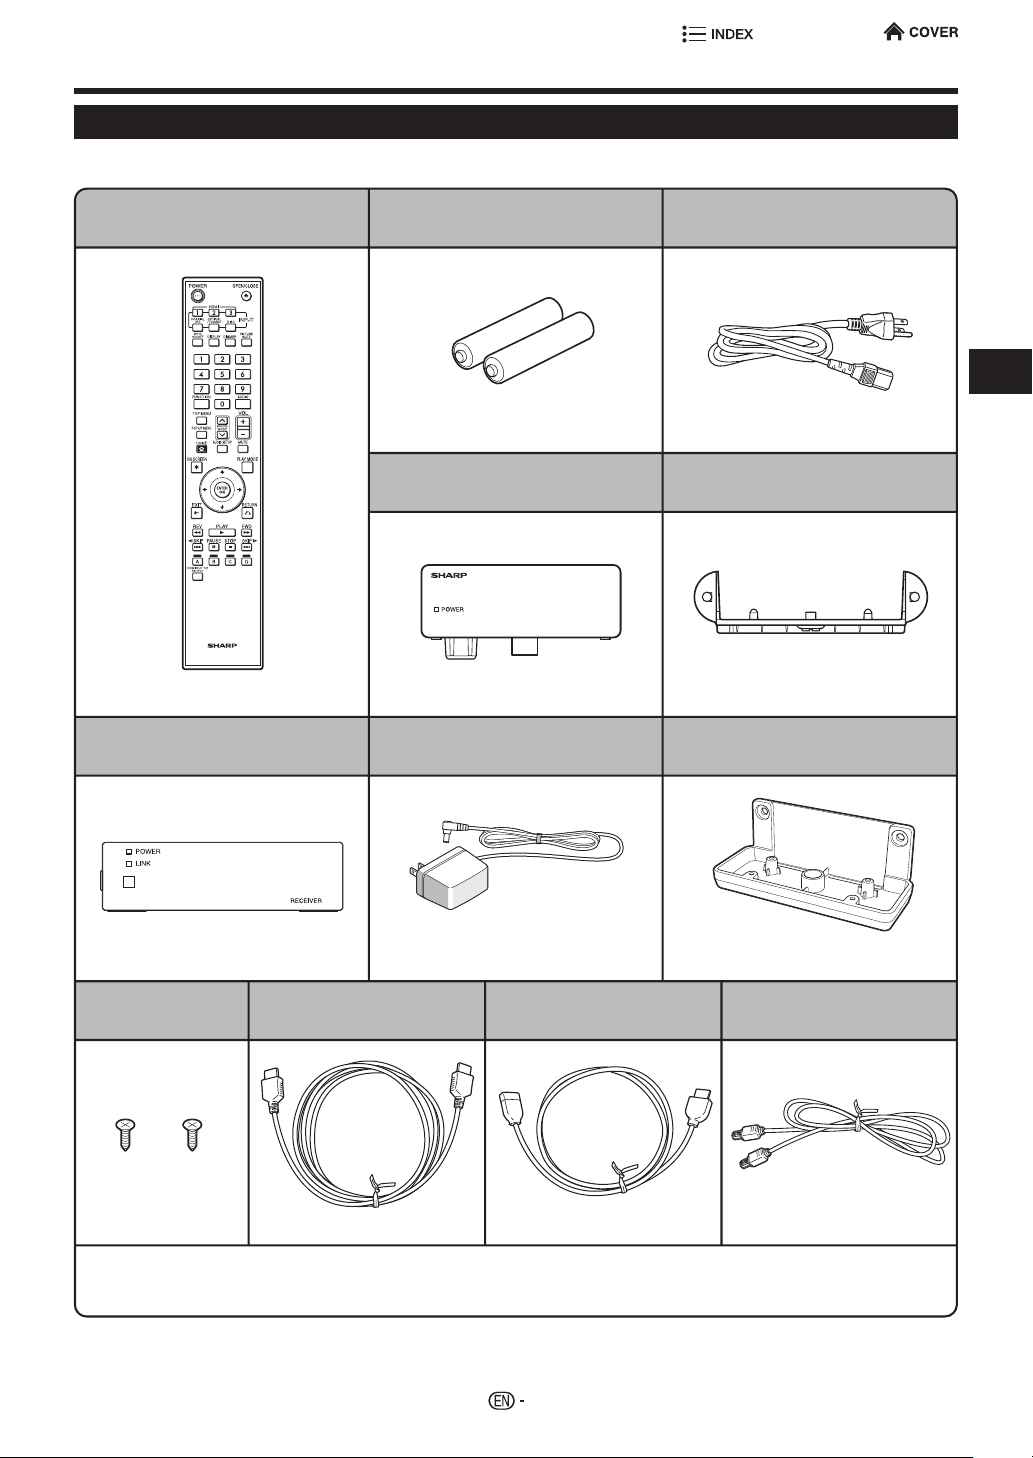
Supplied Accessories
Make sure the following accessories are provided with the product.
Remote control unit
Pages 9 , 26
WiHD Receiver unit AC adapter for WiHD Receiver unit
“AA” size battery (x2) AC cord
Page 26 Page 29
WiHD Transmitter unit
Page 19
WiHD Transmitter Attachment
Introduction
Page 19
Wall mount adapter for WiHD
Receiver unit
Page 20
Screw for wall mount
adapter (x2)
Page 20 Page 20 Page 19 Page 19
n Reference Documents
n Quick Setup & Start Guide
n Registration card
HDMI cable
Page 20
WiHD Transmitter unit extension
cable (HDMI)
Page 20
WiHD Transmitter unit extension
cable (DC power)
WARNING: The AC adapter and AC cord supplied with this player must not be used with other equipment.
AC adapters other than the ones supplied must not be used with this player.
6
Page 16
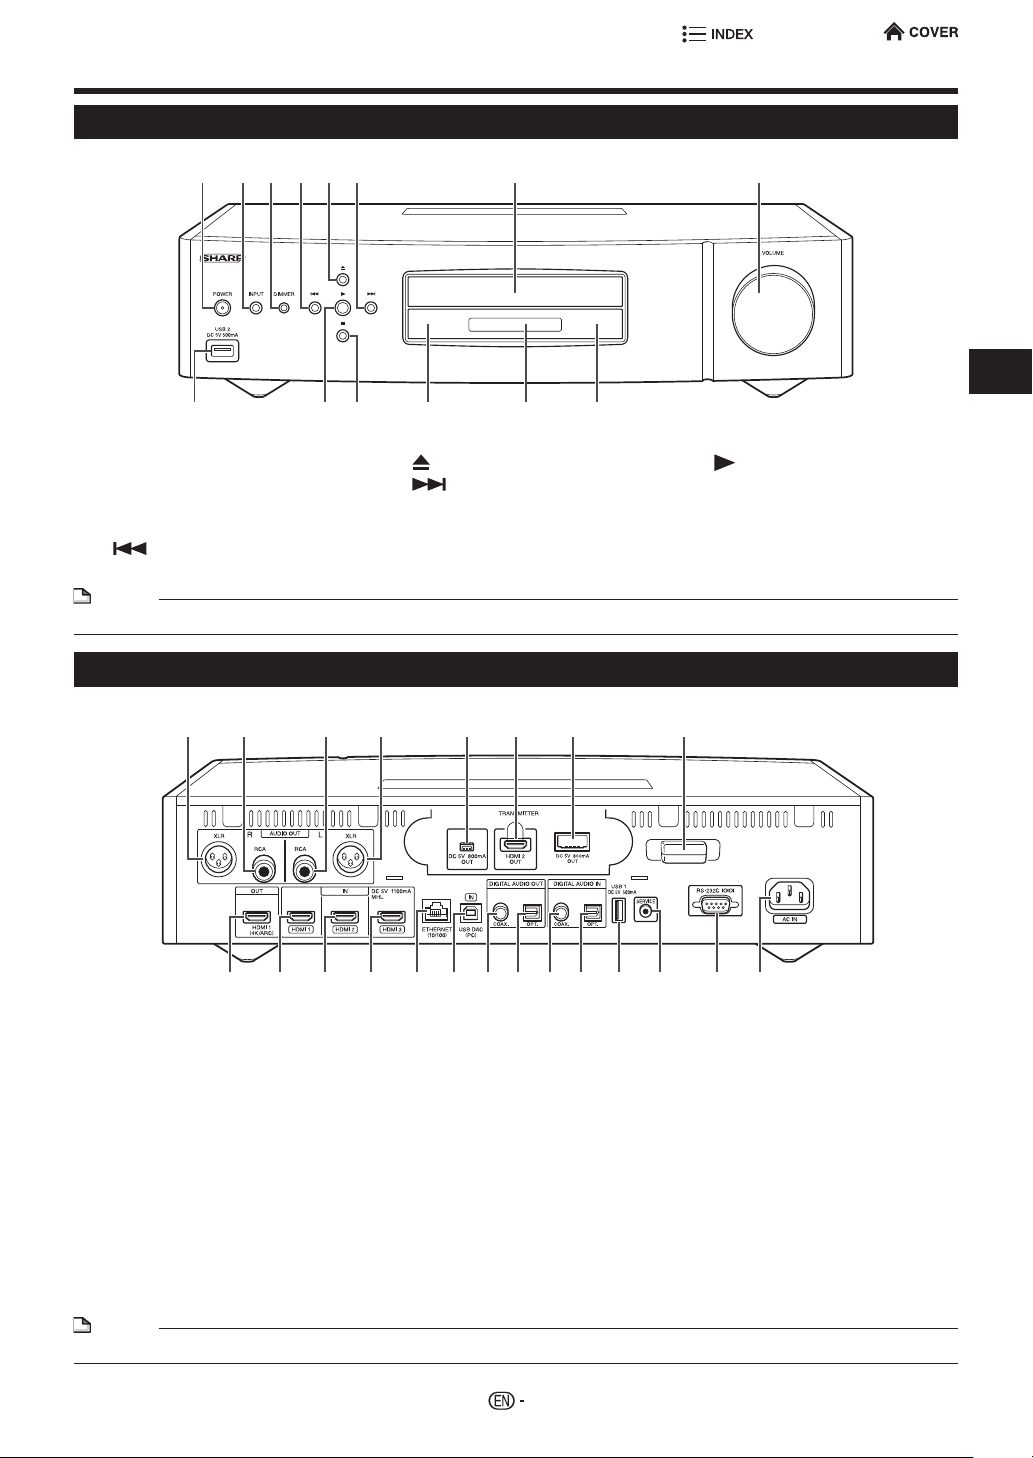
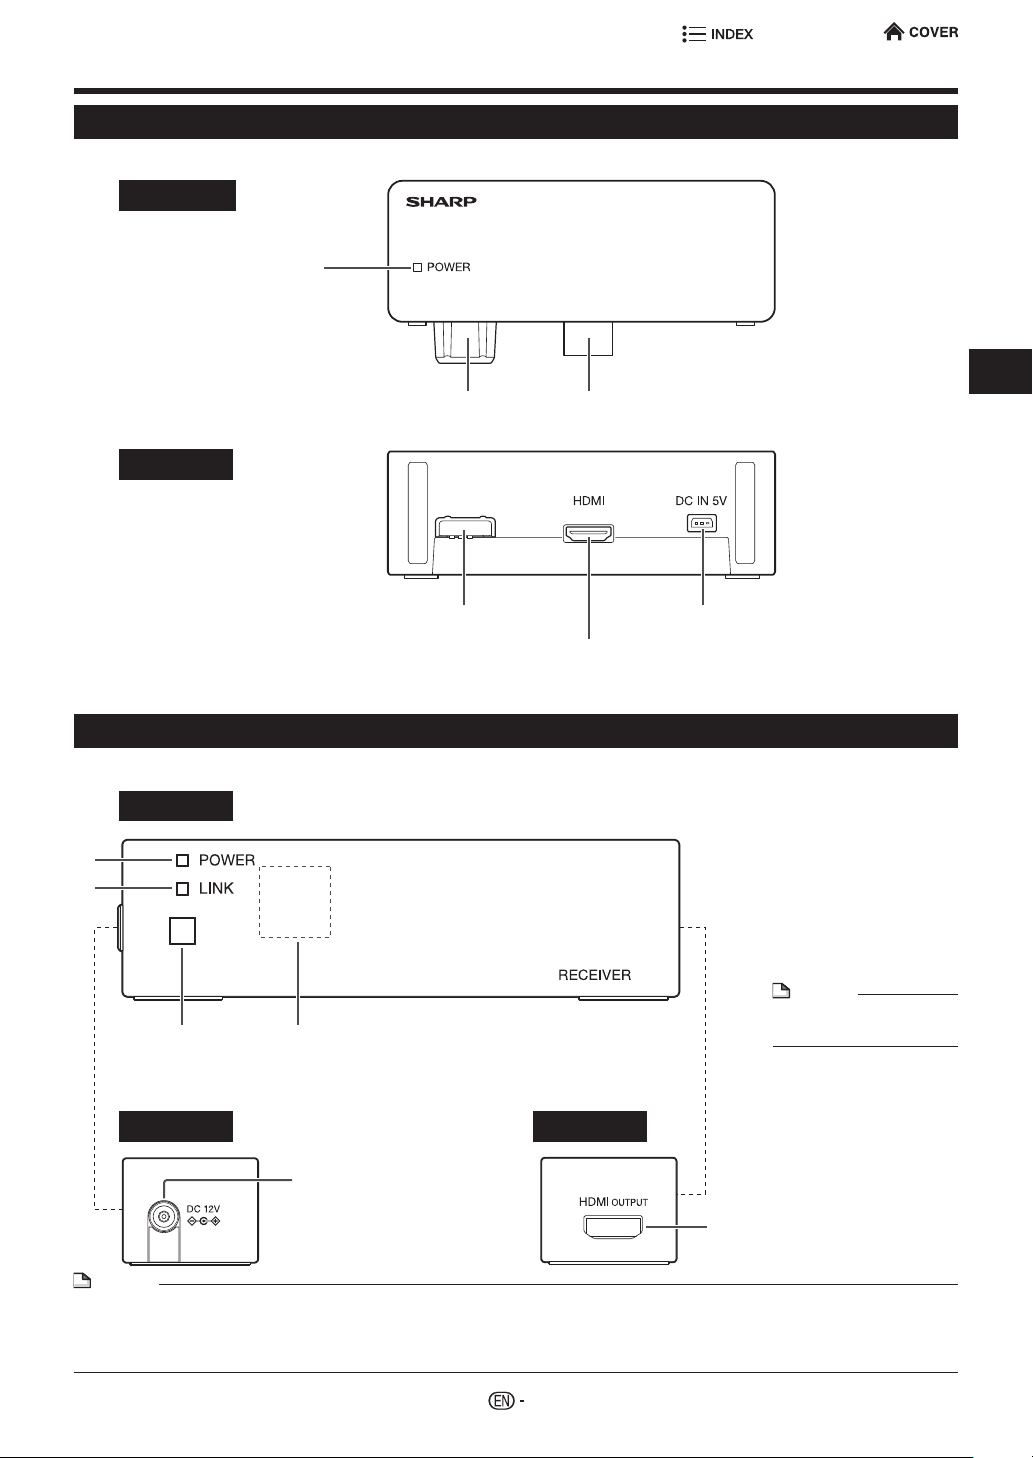
Major Components
Wireless Universal Player Unit (Front)
1 2 3 4 6 7
141312119 10
1 POWER/POWER (ON/STANDBY)
indicator (p. 29)
2 INPUT (p. 30)
3 DIMMER (p. 29)
4 SKIP REV (SLOW REV)
(p. 39)
NOTE
• When you insert or remove a USB memory device, be sure to turn the main power off.
5 OPEN/CLOSE (p. 31)
6 SKIP FWD (SLOW FWD) (p. 39)
7 Disc tray (p. 31)
8 VOLUME (p. 30)
9 USB 2 terminal (pp. 33 , 49 , 51)
Wireless Universal Player Unit (Rear)
1 4 5 6 7 82 3
85
10 PLAY (pp. 31 , 39)
11 H STOP (p. 31)
12 Remote control sensor (p. 26)
13 Front panel display (p. 29)
14 WiSA indicator (p. 29)
Introduction
9 10 11 12 13 14 1516 17 18 2219 20 21
1 AUDIO OUT-R (XLR Balanced) (p. 17)
2 AUDIO OUT-R (RCA) (p. 17)
3 AUDIO OUT-L (RCA) (p. 17)
4 AUDIO OUT-L (XLR Balanced) (p. 17)
5 DC 5V OUT terminal for WiHD Transmitter unit
6 HDMI 2 OUT terminal for WiHD Transmitter unit
7 DC OUT terminal for WiHD Transmitter unit (p. 19)
8 Wireless LAN antenna (p. 23)
9 HDMI 1 OUT terminal (4K·ARC) (p. 21)
10 HDMI 1 IN terminal (p. 21)
11 HDMI 2 IN terminal (p. 21)
12 HDMI 3 IN terminal (MHL) (p. 21)
(p. 19)
(p. 19)
NOTE
• Some optical and/or HDMI cables may not t in the compartment.
13 ETHERNET terminal (p. 22)
14 USB DAC (PC) IN terminal
15 COAXIAL DIGITAL AUDIO OUT terminal (p. 18)
16 OPTICAL DIGITAL AUDIO OUT terminal (p. 18)
17 COAXIAL DIGITAL AUDIO IN terminal (p. 18)
18 OPTICAL DIGITAL AUDIO IN terminal (p. 18)
19 USB 1 terminal (pp. 33 , 49 , 51)
20 SERVICE terminal
21 RS-232C terminal (p. i)
22 AC IN terminal (p. 29)
7
Usually do not connect anything to this terminal as it is
reserved only for service personnel.
Page 17
Major Components
WiHD Transmitter Unit
TOP
POWER indicator
When power on,
indicator lit green.
Rear
DC IN terminal (p. 19) HDMI IN terminal (p. 19)
Introduction
DC IN terminal (p. 19)
WiHD Receiver Unit
Front
1
2
3
Left Side Right Side
4
DC IN terminal (p. 20)
DC IN terminal (p. 19)
HDMI IN terminal (p. 19)
1 POWER indicator (p. 20)
When power on, indicator
lit green.
2 LINK indicator (p. 20)
When a connection to
the WiHD Transmitter is
established, the indicator
NOTE
• The indicator blinks
during search.
3 Remote control sensor
4 Antenna
HDMI OUTPUT terminal (p. 20)
NOTE
• The transmitter and receiver of WiHD are already a pair.
• A setting of a pairing of the transmitter and receiver is required when combination changes by service etc.
• To have Dolby TrueHD, DTS-HD Master Audio or SACD transmitted in its original format, use an HDMI cable to connect the
HDMI 1 OUT terminal on this player to the HDMI terminal on an AV receiver or other equipment.
8
Page 18
Major Components
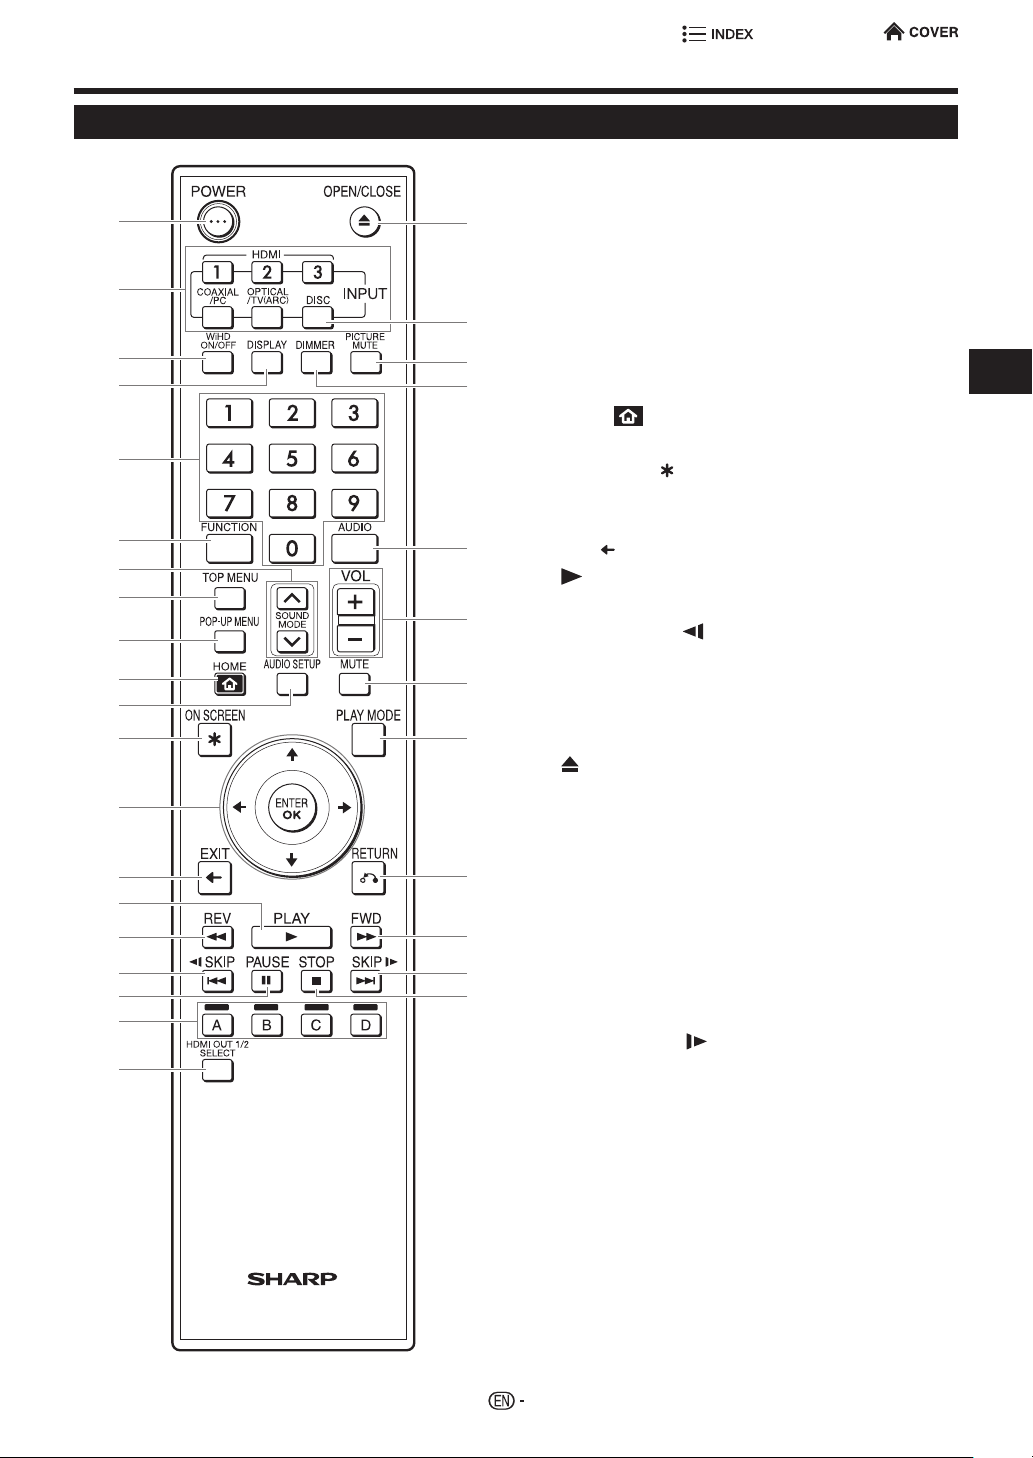
Remote control unit
Remote Control Unit
1
2
3
4
5
6
7
8
9
10
11
12
13
14
15
16
17
18
19
20
1 POWER (p. 29)
2 INPUT select (p. 30)
3 WiHD ON/OFF (p. 20)
21
4 DISPLAY (p. 31)
5 Number buttons (pp. 35 , 40)
6 FUNCTION (p. 40)
22
7 SOUND MODE (p. 30)
8 TOP MENU (pp. 32 , 34)
23
9 POP-UP MENU (p. 32)
24
10 HOME
11 AUDIO SETUP (p. 38)
12 ON SCREEN
13 Cursor buttons (a/b/c/d),
ENTER OK (p. 41)
14 EXIT
25
15
PLAY (pp. 31 , 39)
16 S REV (p. 39)
26
17 T SKIP REV/
18 F PAUSE (p. 39)
27
19 A (Red), B (Green), C (Blue), D (Yellow)
(pp. 34 , 37)
20 HDMI OUT 1/2 SELECT (p. 43)
28
21
OPEN/CLOSE (p. 31)
22 DISC (p. 30)
23 PICTURE MUTE (p. 30)
24 DIMMER (p. 29)
25 AUDIO (p. 39)
29
26 VOLUME (p. 30)
27 MUTE (p. 30)
30
28 PLAY MODE (p. 40)
31
29 n RETURN (p. 41)
32
30 V FWD (p. 39)
31 U SKIP FWD/
32 H STOP (p. 31)
(p. 41)
(p. 40)
(p. 41)
SLOW REV (p. 39)
SLOW FWD (p. 39)
Introduction
9
Page 19
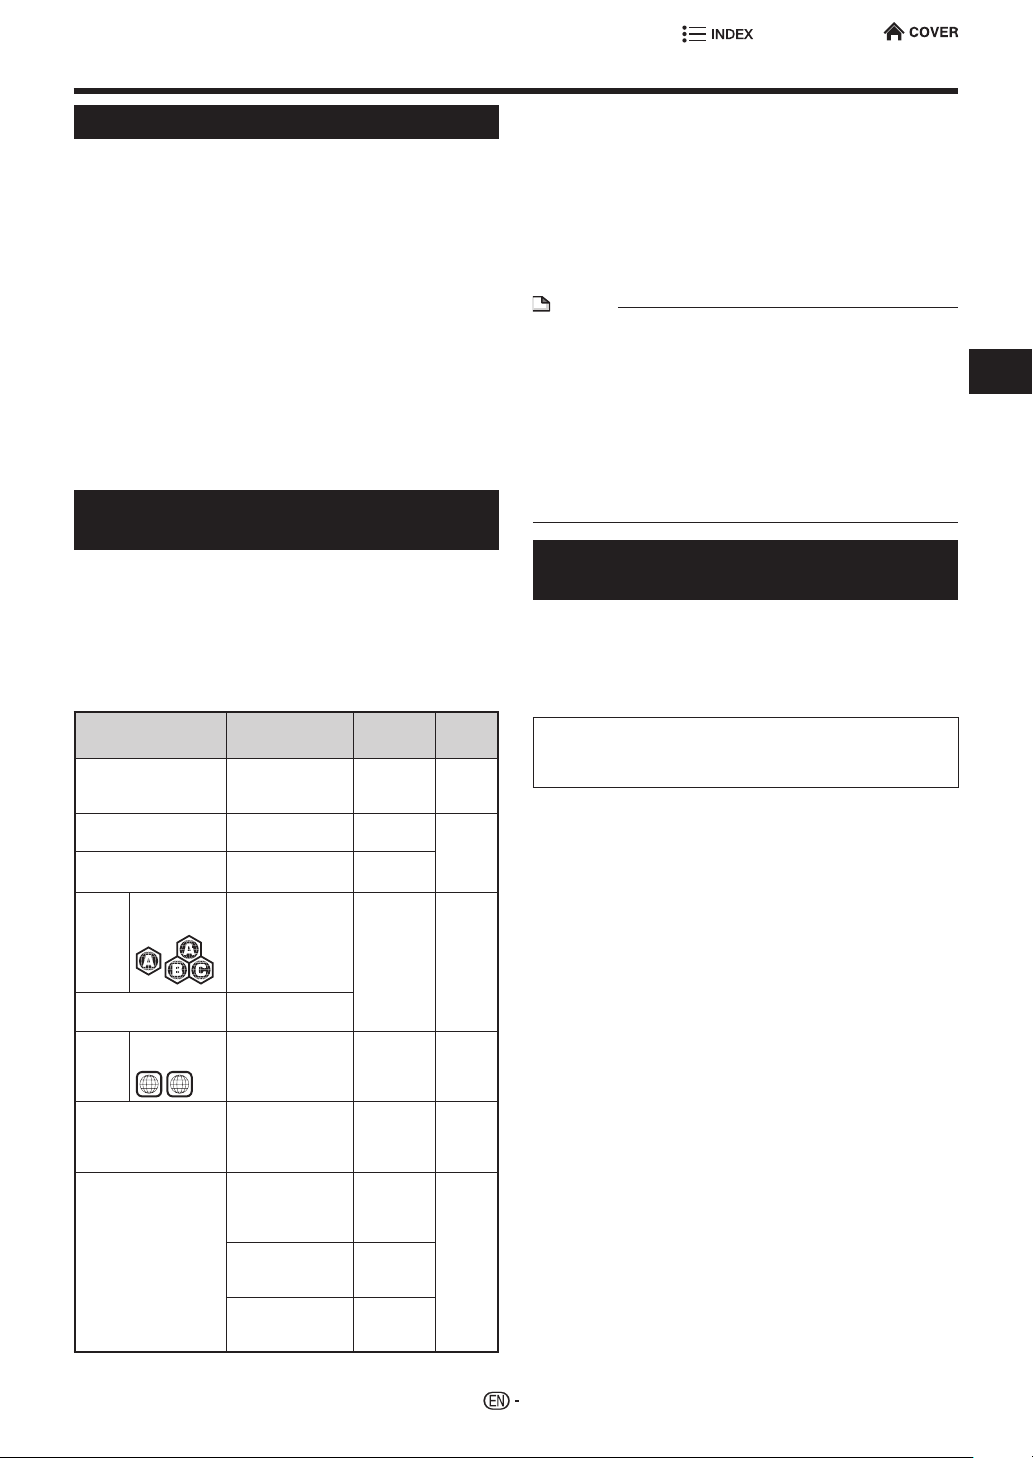
About Media Types
Blu-ray Disc
Blu-ray Disc is the ultimate next generation optical
media format, offering the following key features:
• Largest capacity (25 GB single layer – 50 GB dual layer)
– with over 5 times the amount of content possible with
current DVDs, particularly well suited for high denition
feature lms with extended levels of interactive features
• Pristine picture quality with the capability for full high
denition 1920 x 1080p resolution
• Best audio possible with uncompressed surround sound
(higher quality than even theater audio)
• Broadest industry support – ensuring more choice for
consumers in the marketplace
• Hardware products will be backward compatible with
DVDs, allowing continued enjoyment of existing DVD
libraries.
• Disc Durability – new breakthroughs in hard coating
technologies gives Blu-ray Discs the strongest resistance
to scratches and nger prints.
Types of Discs that Can Be Used with This Player
• The following discs can be played back in this Player. Do
not use an 8 cm (3”) to 12 cm (5”) adapter.
• Use discs that conform to compatible standards as
indicated by the presence of official logos on the disc
label. Playback of discs not complying with these
standards is not guaranteed. In addition, the image quality
or sound quality is not guaranteed even if the discs can be
played back.
Disc Type
SACD SACD/
Audio CD*
CD-RW/CD-R Audio CD
BD
Video
BD-RE/BD-RE DL
BD-R/BD-R DL
DVD
Video
DVD+RW/DVD+R
DVD-RW/DVD-R
DVD+R DL/DVD-R DL
BD-RE/BD-RE DL
BD-R/BD-R DL
DVD+RW/DVD+R
DVD-RW/DVD-R
DVD+R DL/DVD-R DL
CD-RW/CD-R
1
Region code
A/ALL
Region code
1/ALL
ALL
1
Recording
Format
Audio CD
(CD-DA)
Audio CD (CDDA)
(CD-DA)
— Audio +
BDMV/BDAV
format
Video format Audio +
Video/VR/AVCHD
format (nalized
disc only)
DSF, DSDIFF,
WAV, FLAC,
AIFF, ALAC, AAC,
WMA, MP3*
DivX Plus
(H.264/MKV)
2
JPEG*
®
HD
Contents
Audio 12 cm
Audio 12 cm
Audio
Video
(Movie)
Video
(Movie)
Audio +
Video
(Movie)
Audio
3
Audio +
Video
(Movie)
Still image
(JPEG
le)
Disc
Size
(5”)
(5”)
8 cm
(3”)
12 cm
(5”)
12 cm
(5”)
8 cm
(3”)
12 cm
(5”)
8 cm
(3”)
12 cm
(5”)
8 cm
(3”)
• BD/DVD video players and discs have region codes,
which dictate the regions in which a disc can be played.
This Player's region code is A for BD and 1 for DVD.
(Discs marked ALL will play in any player.)
• BD/DVD video operations and functions may be different
from the explanations in this manual and some operations
may be prohibited due to disc manufacturer's settings.
• If a menu screen or operating instructions are displayed
during playback of a disc, follow the operating procedure
displayed.
NOTE
• Playback for some of the discs in the left side column
tables may not be possible depending on the disc.
• “Finalize” refers to a recorder processing a recorded disc
so that it will play in other DVD players/recorders as well
as this player. Only nalized DVD discs will play back
in this player. (This player does not have a function to
nalize discs.)
• Some discs cannot be played back depending on the
recording format.
• If an AIFF, ALAC, or AAC le cannot be played back,
update the software of this player (page 50).
Discs that Cannot Be Used with This Player
The following discs cannot be played back or will
not play back properly on this Player. If such a
disc is mistakenly played back, speaker damage
may occur. Never attempt to play back these
discs.
CDG, Video CD, Photo CD, CD-ROM, CD-TEXT, SVCD,
PD, CDV, CVD, DVD-RAM, DVD-Audio, BD-RE with the
cartridge, CD-WMA, HDCD
Discs with unusual shapes cannot be played.
• Discs with unusual shapes (heart-shaped or hexagonal
discs, etc.) cannot be used. The use of such discs will
cause malfunction.
The following BD video discs cannot be played.
• Discs not displaying “A” or “ALL” for the region code (discs
sold outside the authorized marketing area).*
• Discs produced illegally.
• Discs recorded for commercial use.
* The region code for this product is A.
The following DVD video discs cannot be played.
• Discs not displaying “1” or “ALL” for the region code (discs
sold outside the authorized marketing area).*
• Discs produced illegally.
• Discs recorded for commercial use.
* The region code for this product is 1.
The following BD-RE/R, DVD-RW/R and
DVD+RW/R discs cannot be played.
• Discs on which data has not been recorded cannot be
played back.
*1
The following Audio CD discs cannot be played.
• Discs containing a signal for the purpose of protecting
copyrights (copy control signal) may not be played back
with this Player.
• This Player has been designed on the premise of playing
back Audio CDs that comply with CD (Compact Disc)
standards.
Introduction
10
(Continued on the next page)
Page 20
About Media Types
The following CD-RW/R discs cannot be played.
• Discs on which data has not been recorded cannot be
played back.
• Discs recorded in a format other than an Audio CD and
JPEG/audio le format cannot be played back.
• Discs may not be played back depending on their
recording status or the status of the disc itself.
• Discs may not be played back depending on their
compatibility with this Player.
*2
About the JPEG le format
JPEG is a type of le format for storing still-image les
(photos, illustrations, etc.). The Player lets you play JPEG
format still-image les.
File formats that are not compatible.
• Still images in formats other than JPEG (such as TIFF)
cannot be played.
• There may be some les that cannot be played even if
they are in JPEG format.
• Progressive JPEG les cannot be played.
• Moving image les as well as Motion JPEG format les
cannot be played, even though they are JPEG les.
Other les that cannot be played back.
• You may not be able to play some still images which you
have created, touched up, copied or otherwise edited on
your computer.
• You may not be able to play some still images you have
processed (rotated or saved by overwriting other images
you have imported from the Internet or e-mail).
You may experience one or more of the following
symptoms when playing les.
• It may take some time to play les depending on the
number of folders, number of les and volume of data
involved.
• EXIF information will not be displayed. EXIF stands for
Exchangeable Image File Format, and is a standard for
storing interchange information in image les, especially
those using JPEG compression. (Refer to http://exif.org
for more information.)
*3
About audio le format
There are several audio le formats played on this player
below.
FLAC (***.ac), WAV (***.wav), DSF (***.dsf), DSDIFF (***.dff),
MP3 (***.mp3), WMA (***.wma), AIFF (***.aiff, ***.aif), ALAC
(***.m4a), AAC (***.mp4, ***.m4a, ***.aac, ***.m4b), see page
36 for detail.
Playing audio le
• Some les that have above extensions or les that have
not been recorded in above format will produce noise or
cannot by played.
• Audio les are not played in the order they were recorded.
• It is recommended to record data at a lower speed as
data recorded at a fast speed can produce noise and may
not be able to be played.
• The more folders there are, the longer the reading time.
• Depending on the folder tree, reading audio les can take
time.
• The playing time may not be correctly displayed during
audio le playback.
The following les cannot be played on this player.
• When both Audio CD [CD-DA] format and audio le
formats are recorded on a disc. (The disc is recognized to
be an Audio CD [CD-DA] only tracks in Audio CD [CD-DA]
format are played back.)
• Multi-session discs cannot be played.
• DRM encrypted WMA cannot be played.
• Compressed DSD format (DST) cannot be played.
About les/folders for Still images
(JPEG les) and audio data
You can play still images (JPEG les) /audio data (FLAC,
WAV, DSF/DSDIFF, AIFF, ALAC, AAC, WMA. MP3 les) with
this unit by making folder(s) on discs or USB devices as
shown below.
Example of a folder structure:
Root
001.jpg/001.mp3
xxx.jpg/xxx.mp3
01 Folder
xxx Folder
4
Including the root directory, the maximum number of
*
folders and les in each folder is limited to 256 in total.
4
*
Folder
001.jpg/001.mp3
255.jpg/255.mp3
001.jpg/001.mp3
256.jpg/256.mp3
4
*
001.jpg/001.mp3
256.jpg/256.mp3
4
*
4
*
File and folder requirements
• The discs or USB devices which this player can play back
(recognize) are limited to the following properties:
Contains EXIF format les (only JPEG les)
Picture resolution: Between 32 x 32 and 6528 x 3672
pixels (only JPEG les)
Maximum number of folders and les in each folder:
256
Maximum hierarchy level of folders: 5
File size: 8 MB or less (JPEG les)
200 MB or less (MP3 les)
NOTE
• File and folder names displayed on this player may differ
from those displayed on PCs.
• If an AIFF, ALAC, or AAC le cannot be played back,
update the software of this player (page 50).
DIVX
This DivX Certied® device has passed rigorous testing to
ensure it plays DivX® video.
To play purchased DivX movies, rst register your device
at vod.divx.com. Find your registration code in the DivX®
Registration of System Settings.
ABOUT DIVX VIDEO-ON-DEMAND
This DivX Certied® device must be registered in order to
play purchased DivX Video-on-Demand (VOD) movies. To
obtain your registration code, locate the DivX VOD section
in your device setup menu. Go to vod.divx.com for more
information on how to complete your registration.
11
Introduction
Page 21
About Media Types
1
2
3
5
BD VIDEO
Home Network
About Disc Contents
BD Video
Enjoy BD-specic functions including BONUSVIEW (BDROM Prole 1 Version 1.1), such as picture-in-picture, and
BD-LIVE (page 33).
For the BD video discs compatible with BONUSVIEW/BDLIVE, you can enjoy additional contents by copying the data
from the discs or downloading it via the Internet. For instance,
this function is capable of playing the original movie as the
primary video while playing video commentary from the lm
director on a small screen as a secondary video.
NOTE
• The available functions differ depending on the disc.
Title, Chapter and Track
• Blu-ray discs and DVDs are divided into “Titles” and
“Chapters”. If the disc has more than one movie on it,
each movie would be a separate “Title”. “Chapters”, on the
other hand, are subdivisions of titles. (See Example 1.)
• Audio CDs are divided into “Tracks”. You can think of a
“Track” as one tune on an Audio CD. (See Example 2.)
Example 1: Blu-ray disc or DVD
Title 1
Chapter 1 Chapter 2 Chapter 3 Chapter 1
Example 2: Audio CD
Track 1 Track 2 Track 3 Track 4
Title 2
DTS
DTS is a digital sound system developed by DTS, Inc.
for use in cinemas.
Linear PCM
Linear PCM is a signal recording format used for Audio
CDs and on some DVD and Blu-ray discs. The sound
on Audio CDs is recorded at 44.1 kHz with 16 bits.
(Sound is recorded between 48 kHz with 16 bits and
96 kHz with 24 bits on DVD video discs and between
48 kHz with 16 bits and 192 kHz with 24 bits on BD
video discs.)
Subtitle languages
This indicates the kind of subtitles.
Screen aspect ratio
Movies are shot in a variety of screen modes.
4
Camera angle
Recorded onto some BD/DVD discs are scenes which
have been simultaneously shot from a number of
different angles (the same scene is shot from the front,
from the left side, from the right side, etc.).
Region code
This indicates the region code (playable region code).
Types of Media Formats that Can Be Used with This Player
Media Format Recording Format Contents
USB device (USB
HDD, USB memory
device)
NOTE
• If an AIFF, ALAC, or AAC le cannot be played back,
update the software of this player (page 50).
MP3, DSF, DSDIFF,
WAV, FLAC, AIFF,
ALAC, AAC, WMA
JPEG Still image
Audio
(JPEG le)
Introduction
Icons Used on DVD Video Disc Cases
The back of the case of a DVD that is commercially
available usually contains various information about
the contents of the disc.
1 2
1. English
2
2. Chinese
3 4 5
LB
16:9
2
DVD Video BD Video
21 3
54 6
2
1. English
2. Chinese
Audio tracks and audio formats
DVD discs can contain up to 8 separate tracks with a
different language on each. The rst in the list is the
original track.
This section also details the audio format of each
soundtrack — Dolby Digital, DTS, MPEG etc.
Dolby Digital
A sound system developed by Dolby Laboratories Inc. that
gives movie theater ambience to audio output when the
Player is connected to a Dolby Digital processor or amplier.
The Icons Used in This Operation Manual
........... Indicates the functions that can be
BD-RE
BD-R
DVD VIDEO
DVD-RW
DVD-R
AUDIO CD
SACD
CD-R
CD-RW
USB
12
performed for BD Video discs.
........... Indicates the functions that can be
performed for BD-RE discs.
........... Indicates the functions that can be
performed for BD-R discs.
....... Indicates the functions that can be
performed for DVD Video discs.
...........Indicates the functions that can be
performed for DVD-RW discs.
............ Indicates the functions that can be
performed for DVD-R discs.
........... Indicates the functions that can be
performed for Audio CDs.
........... Indicates the functions that can be
performed for SACD discs.
...........Indicates the functions that can be
performed for CD-R discs.
........... Indicates the functions that can be
performed for CD-RW discs.
...........Indicates the functions that can be
performed for USB devices.
....Indicates the functions that can be
performed for Home Network equipments.
Page 22
Important Information
Disc Precautions
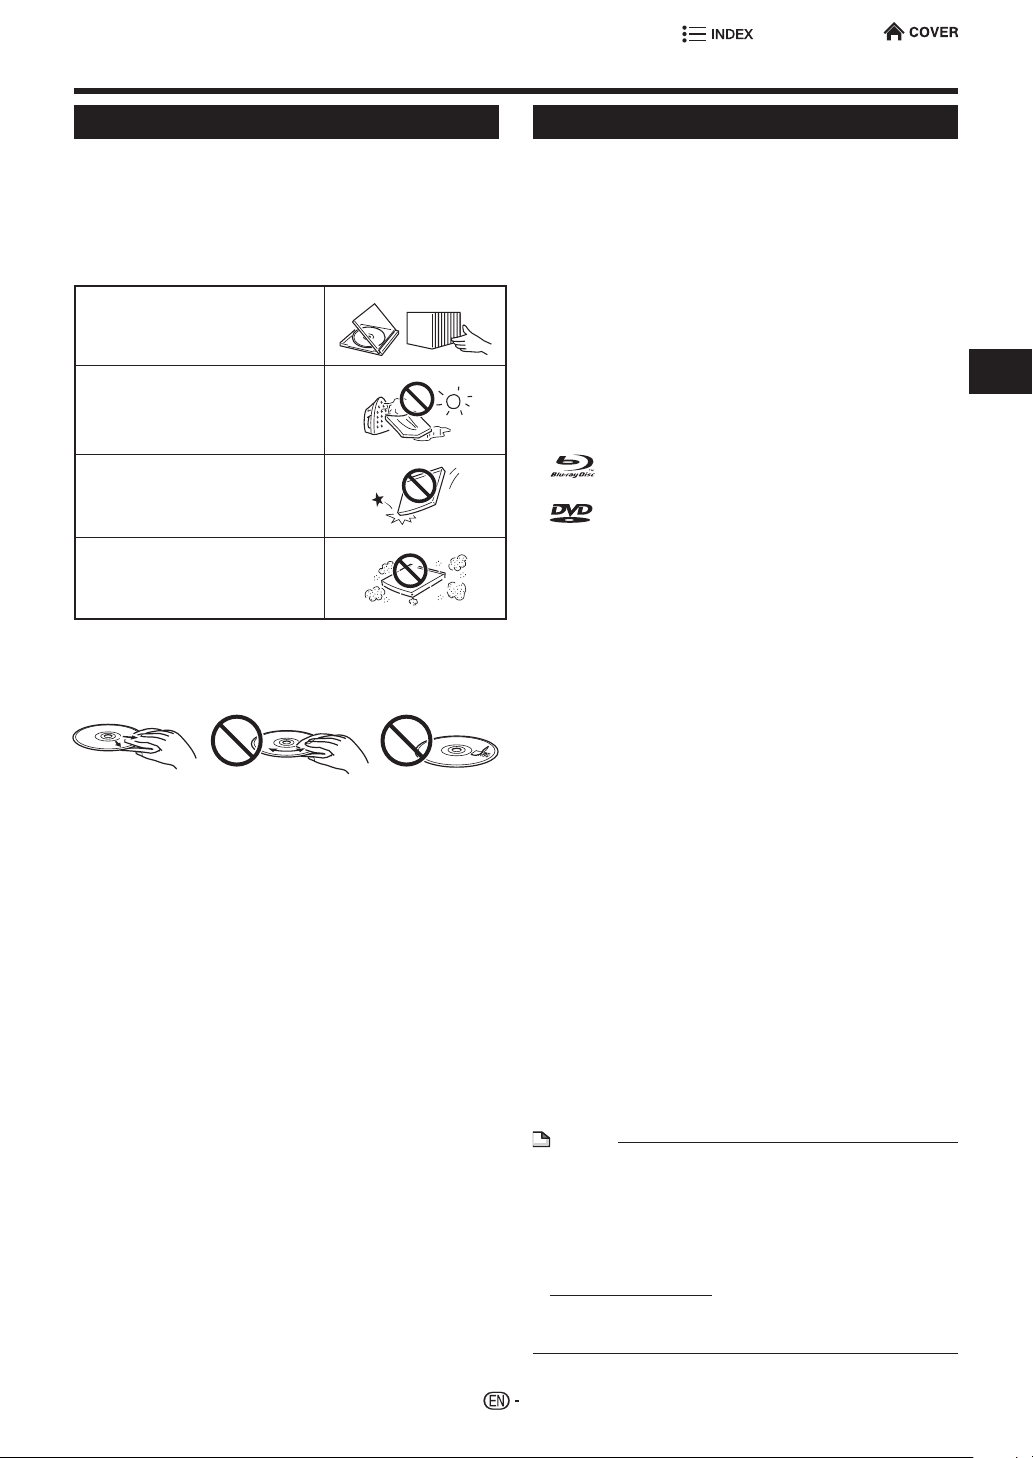
Be Careful of Scratches and Dust
• BD, DVD and CD discs are sensitive to dust, ngerprints
and especially scratches. A scratched disc may not be
able to be played back. Handle discs with care and store
them in a safe place.
Proper Disc Storage
Place the disc in the center of
the disc case and store the case
and disc upright.
Avoid storing discs in locations
subject to direct sunlight, close
to heating appliances or in
locations of high humidity.
Do not drop discs or subject
them to strong vibrations or
impacts.
Avoid storing discs in locations
where there are large amounts of
dust or moisture.
Handling Precautions
• If the surface is soiled, wipe gently with a soft, damp
(water only) cloth. When wiping discs, always move the
cloth from the center hole toward the outer edge.
• Do not use record cleaning sprays, benzene, thinner,
static electricity prevention liquids or any other solvent.
• Do not touch the surface.
• Do not stick paper or adhesive labels to the disc.
• If the playing surface of a disc is soiled or scratched, the
Player may decide that the disc is incompatible and eject
the disc, or it may fail to play the disc correctly. Wipe any
dirt off the playing surface with a soft cloth.
Cleaning the Pick Up Lens
• Never use commercially available cleaning discs. The use
of these discs can damage the lens.
• Request the nearest service center approved by SHARP
to clean the lens.
Warnings about dew formation
• Condensation may form on pick up lens or disc in the
following conditions:
− Immediately after a heater has been turned on.
− In a steamy or very humid room.
− When the Player is suddenly moved from a cold
environment to a warm one.
When condensation forms:
• It becomes difficult for the Player to read the signals
on the disc and prevents the Player from operating
properly.
To remove condensation:
• Take out the disc and leave the Player with the
power off until the condensation disappears. Using
the Player when there is condensation may cause
malfunction.
License and Copyright
Audio-visual material may consist of copyrighted works
which must not be recorded without the authority of the
owner of the copyright. Refer to relevant laws in your country.
• “This item incorporates copy protection technology that is
protected by U.S. patents and other intellectual property
rights of DivX, LLC. Reverse engineering and disassembly
are prohibited.”
• Manufactured under license from Dolby Laboratories.
“Dolby” and the double-D symbol are trademarks of Dolby
Laboratories.
• For DTS patents, see http://patents.dts.com.
Manufactured under license from DTS Licensing Limited.
DTS, DTS-HD, the Symbol, & DTS and the Symbol
together are registered trademarks, and DTS-HD Master
Audio | Essential is a trademark of DTS, Inc. © DTS, Inc.
All Rights Reserved.
• is a trademark.
• “BD-LIVE” logo is a trademark of Blu-ray Disc Association.
• is a trademark of DVD Format/Logo Licensing
Corporation.
• Super Audio CD, SACD and the SACD logo are joint
trademarks of Sony Corporation and Philips Electronics
N.V. Direct Stream Digital (DSD) is a trademark of Sony
Corporation.
• HDMI, the HDMI logo and High-Denition Multimedia
Interface are trademarks or registered trademarks of
HDMI Licensing LLC.
• “x.v.Color” and “x.v.Color” logo are trademarks of Sony
Corporation.
• Java and all Java-based trademarks and logos
are trademarks or registered trademarks of Oracle
Corporation in the United States and/or other countries.
• “BONUSVIEW” logo is a trademark of Blu-ray Disc
Association.
• “AVCHD” and the “AVCHD” logo are trademarks of
Panasonic Corporation and Sony Corporation.
• “Blu-ray 3D” and “Blu-ray 3D” logo are trademarks of Bluray Disc Association.
• DivX®, DivX Certied®, DivX Plus® HD and associated
logos are trademarks of DivX, LLC and are used under
license.
• MHL, the MHL Logo, and Mobile High-Denition Link are
trademark or registered trademarks of MHL LLC in the
United States and other countries.
• The WiSA logo is a trademark or registered trademark of
WiSA, LLC in the United States and other countries.
• WirelessHD is a registered trademark of WirelessHD LLC.
• “Copyright 2004-2013 Verance Corporation. Cinavia™
is a Verance Corporation trademark. Protected by U.S.
Patent 7,369,677 and worldwide patents issued and
pending under license from Verance Corporation. All
rights reserved.”
NOTE
Cinavia Notice
• This product uses Cinavia technology to limit the use of
unauthorized copies of some commercially-produced lm
and videos and their soundtracks. When a prohibited use
of an unauthorized copy is detected, a message will be
displayed and playback or copying will be interrupted.
• More information about Cinavia technology is provided
at the Cinavia Online Consumer Information Center at
http://www.cinavia.com. To request additional information
about Cinavia by mail, send a postcard with your mailing
address to: Cinavia Consumer Information Center, P.O.
Box 86851, San Diego, CA, 92138, USA.
Introduction
13
Page 23
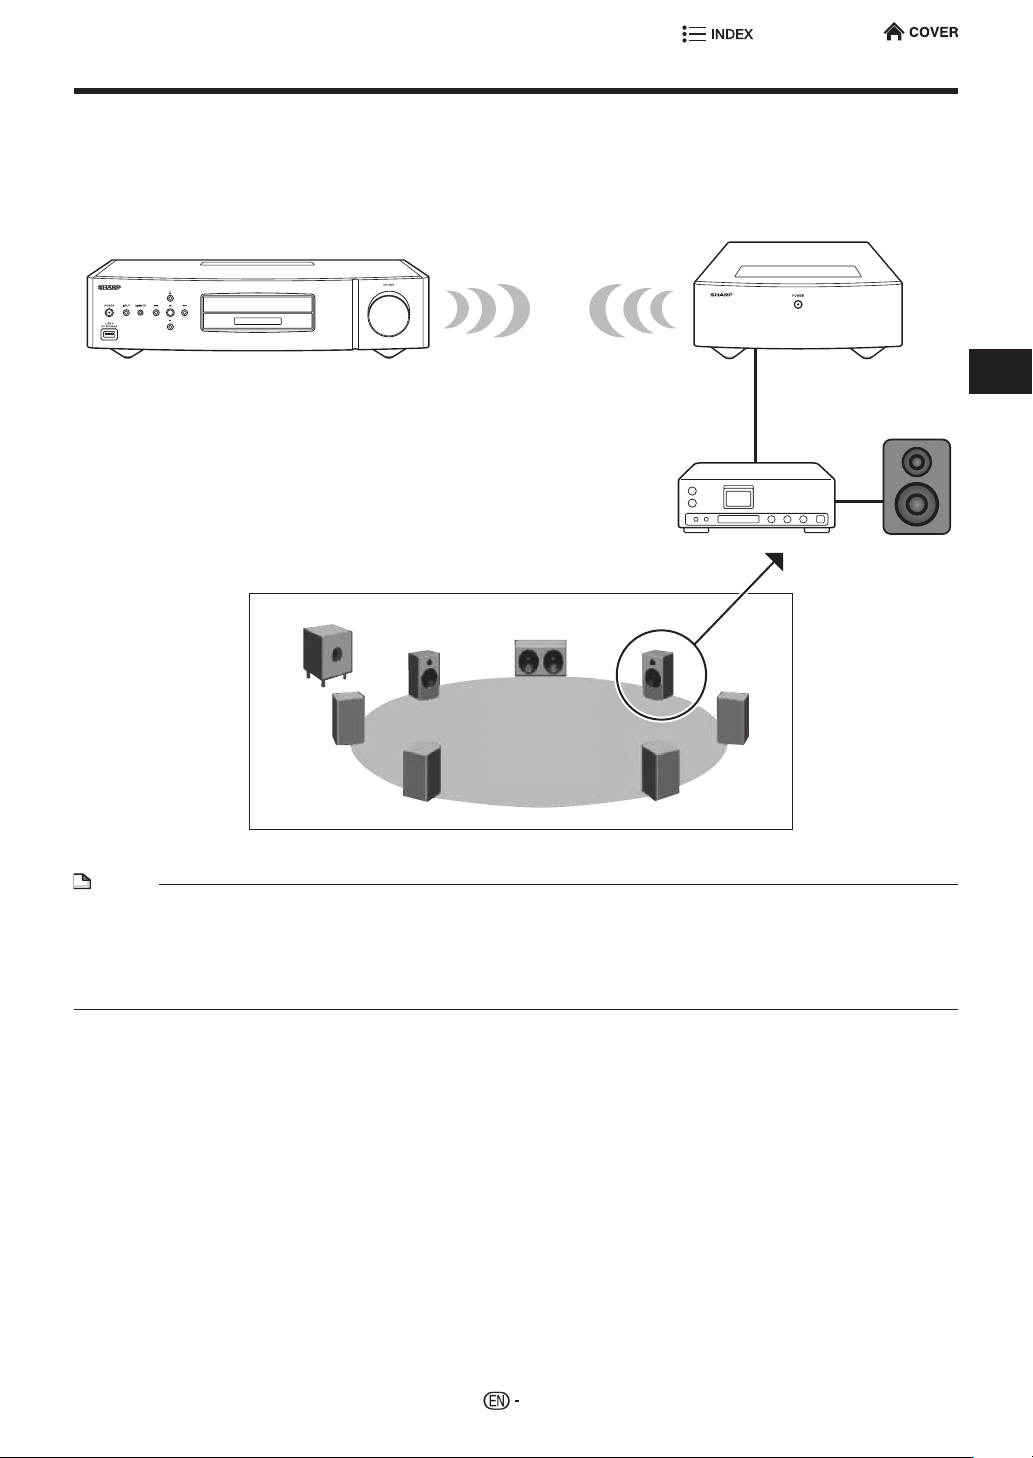
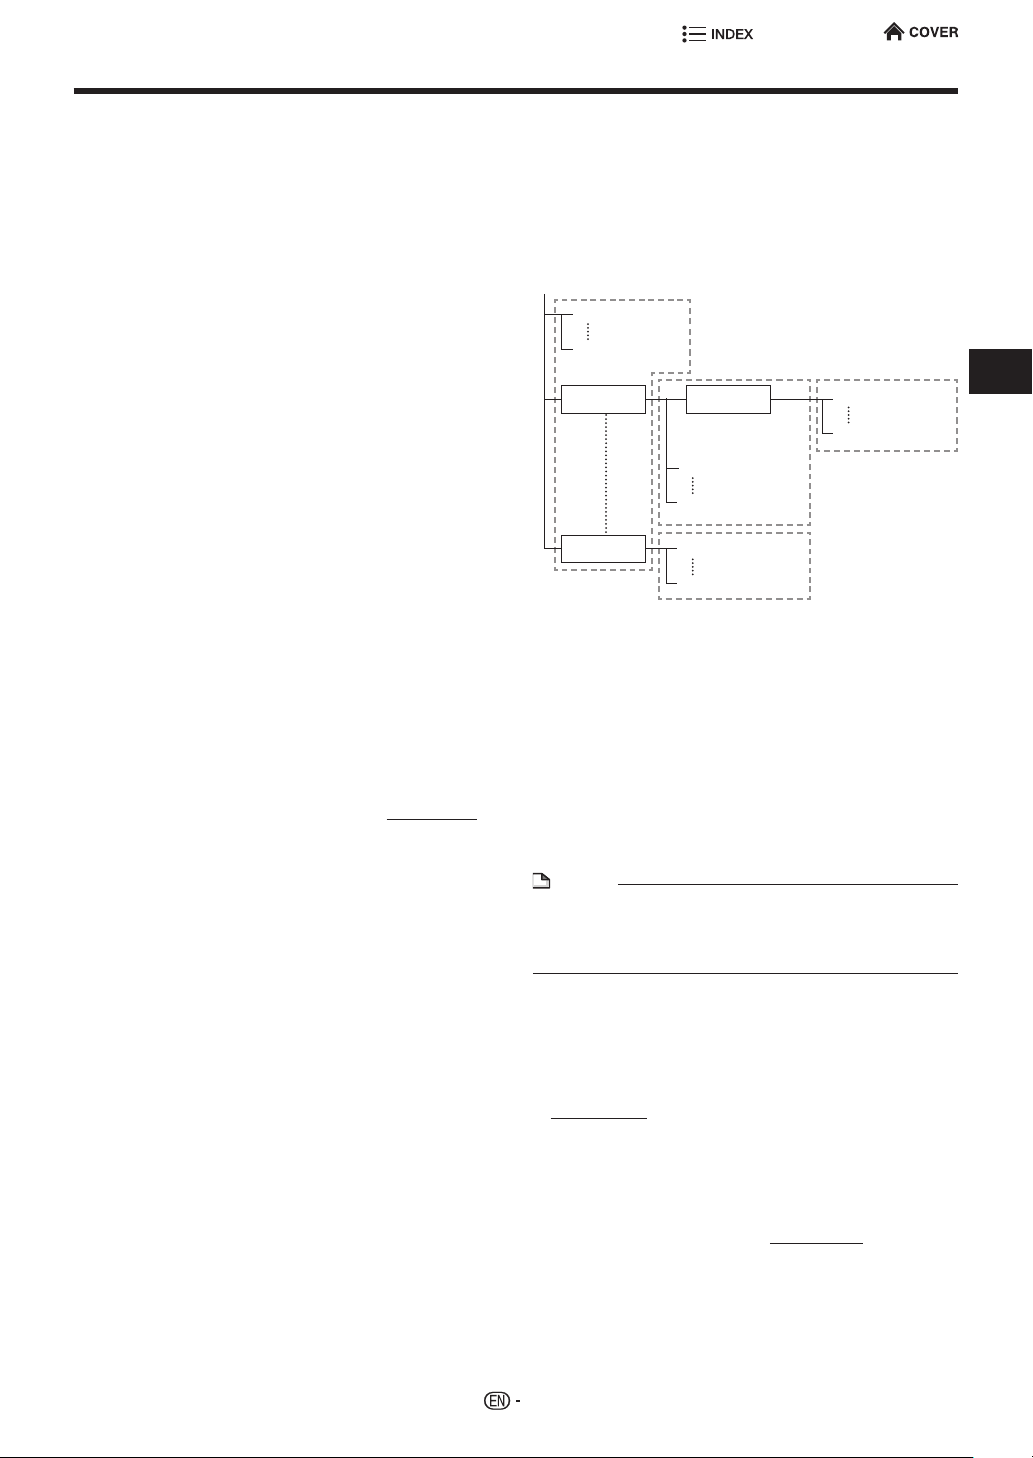
Wireless Audio System
This Wireless Universal Player has a WiSA compliant Wireless Audio Transmitter. With a Wireless Bridge
(optional)/Amplier/Speaker (commercially available), you can use a wireless connection to the Audio Amplier.
Wireless Universal Player with WiSA
compliant Wireless Audio Transmitter
SW
LS
Wireless Bridge (optional)
wireless
(commercially available)
L
Audio Amplier
C
Example
R
Speaker
(commercially
available)
RS
Introduction
LB
RB
NOTE
• For the Wireless Bridge/Amplier/Speaker connections, see the operation manual provided with the Wireless Bridge before
making the connections.
• A separate Wireless Bridge (optional) is required for each Audio Amplier/Speaker (commercially available).
• For the settings for communications between the Wireless Universal Player and a separately purchased Wireless Bridge,
see “WiSA setting” (pages 45 , 46 ).
• Prior to powering the Wireless Bridge “On” or “Off”, rst switch the power of the Audio Amplier to “Off”.
14
Page 24
Connection
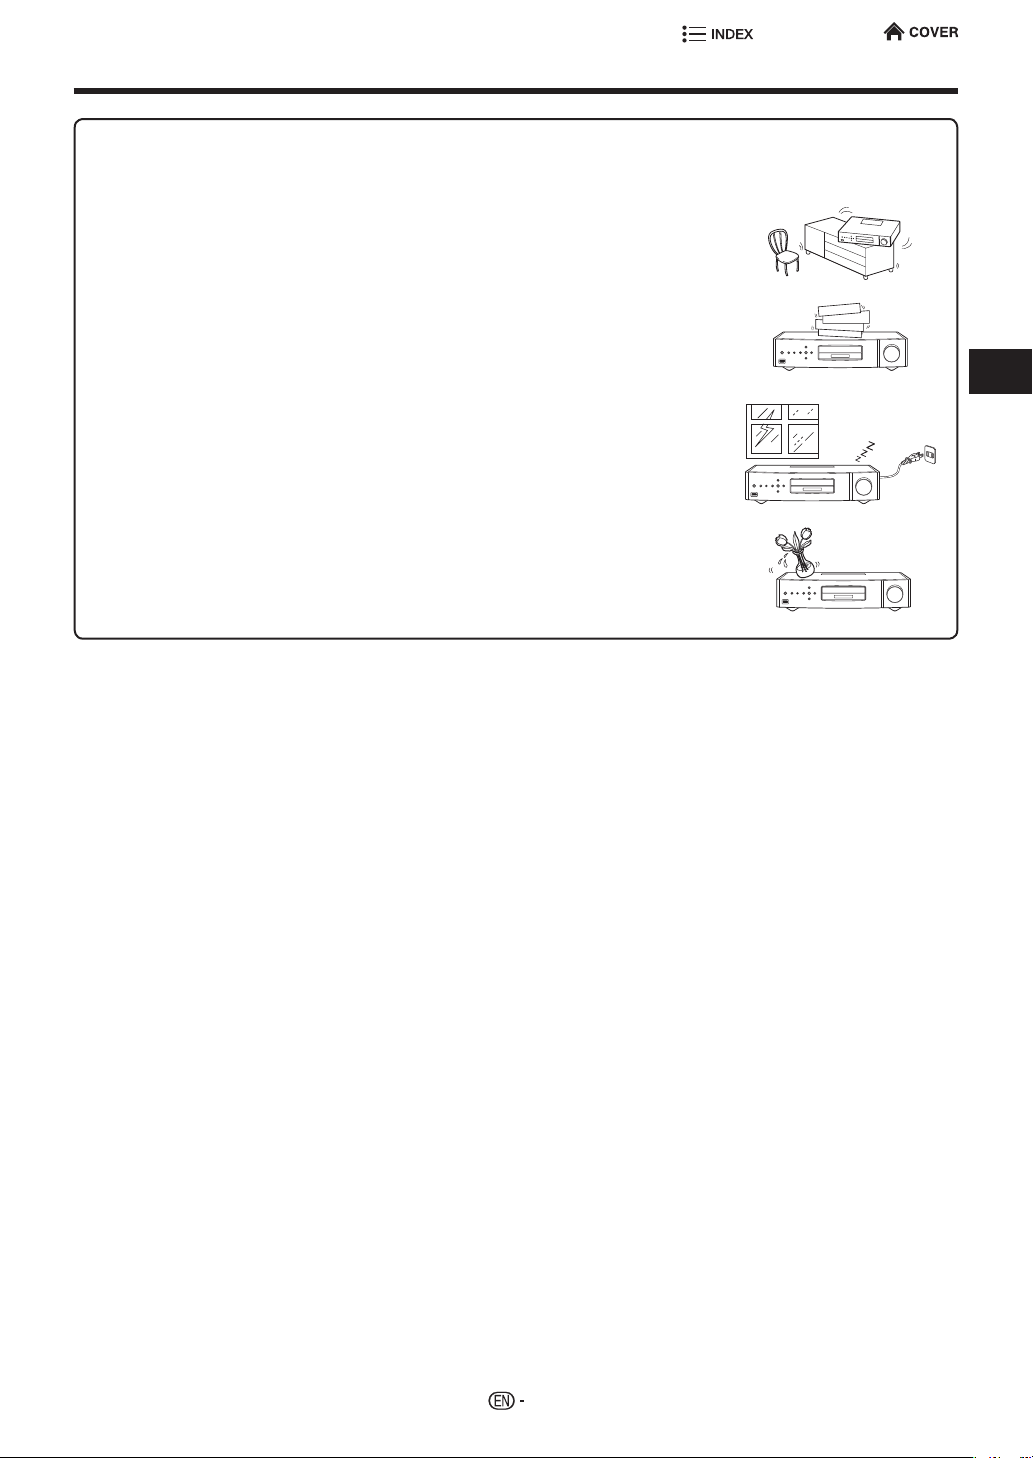
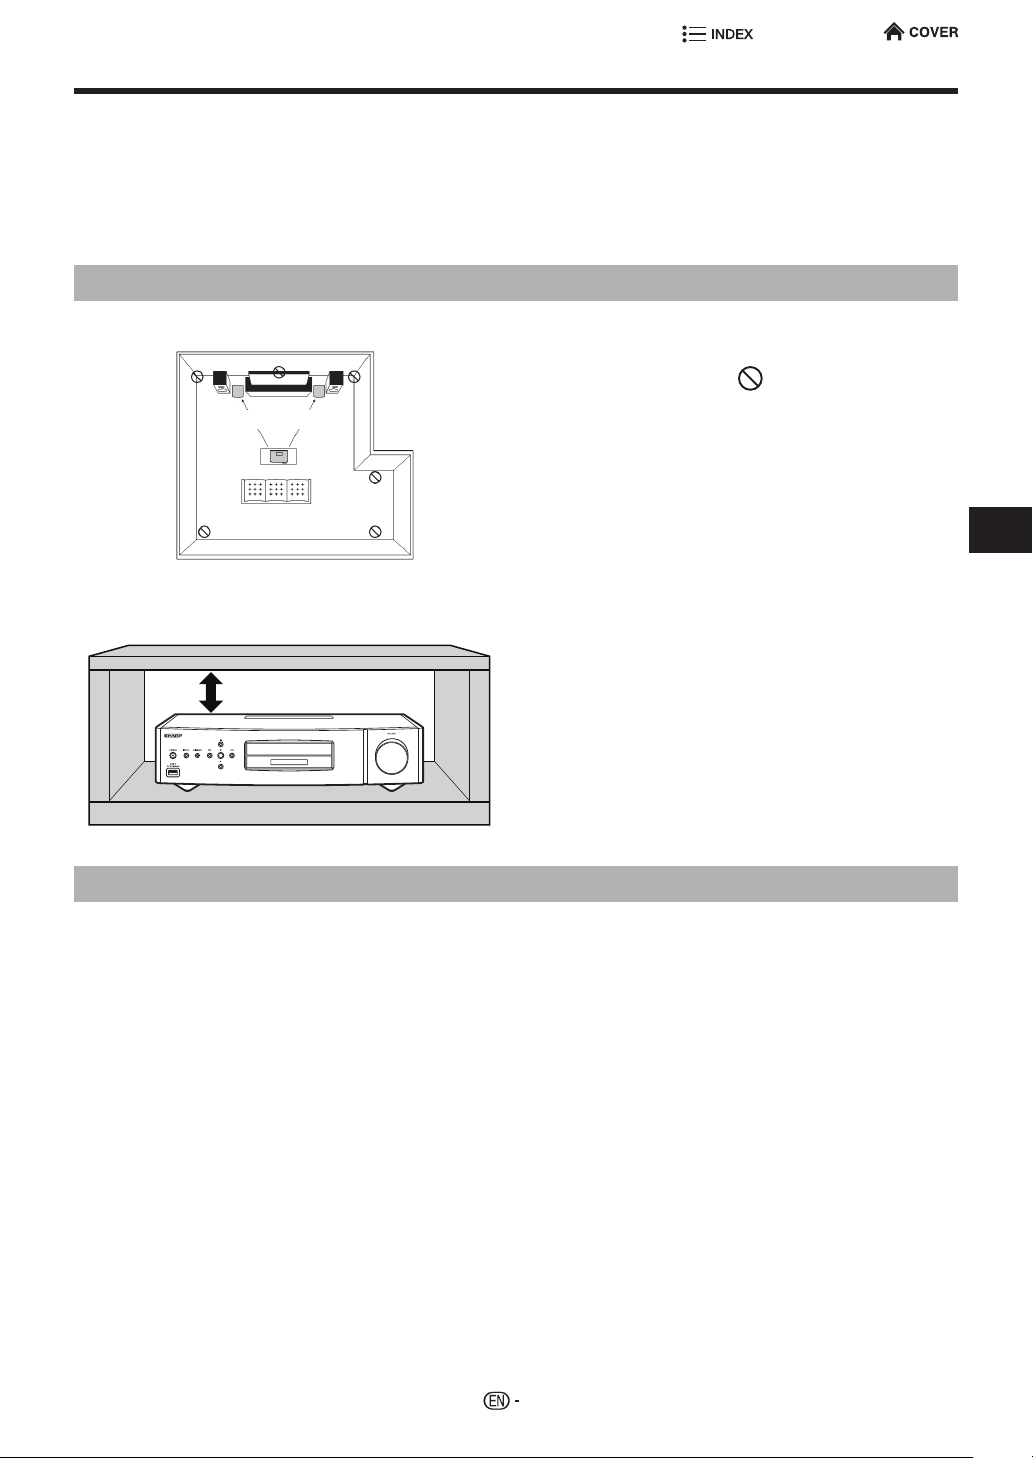
Notes WiSA installation
This Player (the SD-WH1000U) communicates with the Wireless Bridge (the VR-WR100U) via wireless waves
reected from walls and the ceiling.
Take note of the following when installing these units.
• Optimal distance (Player & Wireless Bridge) - Within 33 ft (10 m)
• Optimal room size - Within 30 ft Wide
30 ft Long
10 ft Height (Ceiling)
Installing the Player and Wireless Bridge
1 Installing in the center of the room or on a wall
• Do not install the Player or the Wireless Bridge in
Within about 33 ft (10 m)
• Do not place electronic products or the supplied
• Do not place tall furniture or electronic products
• Do not install the Wireless Bridge behind a TV or
2 Installing in a TV rack or a rack built into a wall
any place indicated by a
WiHD Transmitter or WiHD Receiver on top of the
Player or the Wireless Bridge.
between the Player and the Wireless Bridge.
another electronic product, or in a corner of the
room.
mark.
• The Player and the Wireless Bridge each have an
internal antenna near the top of the unit. Do not
Leave a gap above the Player
install the Player or the Wireless Bridge in a metal
rack or an enclosed rack with no openings.
• When installing in a rack, leave a gap of about 1
inch at the top of the rack. Or, install on the top
shelf of the rack.
• A rack without a front door and with an opening on
the rear side is recommended.
Interference from other communication devices
• There may be no sound or the sound may be interrupted when other communication devices or devices
using wireless waves are used in the vicinity. Try moving those devices away from the Player and Wireless
Bridge, or turning them off.
Connection
15
Page 25

Speakers Settings
To Speakers using Sharp's WIRELESS BRIDGE
When combining the Player with a Wireless Bridge, make the
following settings before turning on the power for the rst time.
1 Set the rotary switch on the rear panel of the Wireless Bridge to
the channel of the speaker that you want to connect (L/R/C/LS/
RS/LB/RB/SW).
2 Turn on the power switch of the Wireless Bridge.
• The LED on the front panel starts to ash.
3 Turn on the power of the Player.
• The Player starts to search for the Wireless Bridge.
• When a link is established, the LED of the Wireless Bridge stops
ashing and lights.
4 When “Complete?” appears in the front panel display, press
ENTER on the remote control. When “Finish?” appears in the
front panel display, press ENTER on the remote control.
• This completes the settings on the Player and the Wireless Bridge.
While high quality audio signals from the player can be transmitted
to any WiSA-compliant speaker system, the SHARP Wireless
Bridge (VR-WR100U - SOLD SEPARATELY) can be used with
any traditional passive speaker to receive High Resolution Audio
wireless in any conguration from 2.0 to 7.1.
In the case “Output Conict” is shown on the display, please conrm
that Rotary switch of the WIRELESS BRIDGE is correctly setup,
and turn off and on all of the system.
Rotary swich
Connection
To WiSA-enabled Speakers. Adjust Speaker settings using on screen display
When combining the Player with speakers that comply with a WiSA-compliant wireless audio receiver from
another manufacturer, make the following settings.
1 Turn on the power of the receiver or internal speaker.
2 Connect the Player to a display, and turn on the power.
3 From the HOME menu of the Player, select “Settings” > “WiSA Settings”.
4 Select “Manual Search” and press ENTER.
• The Player begins to search for the receiver.
5 Assign channels to each of the receiver or speakers that appear on the screen.
• This completes the settings.
• Check to conrm that sound is output correctly from each of the channels.
16
Page 26
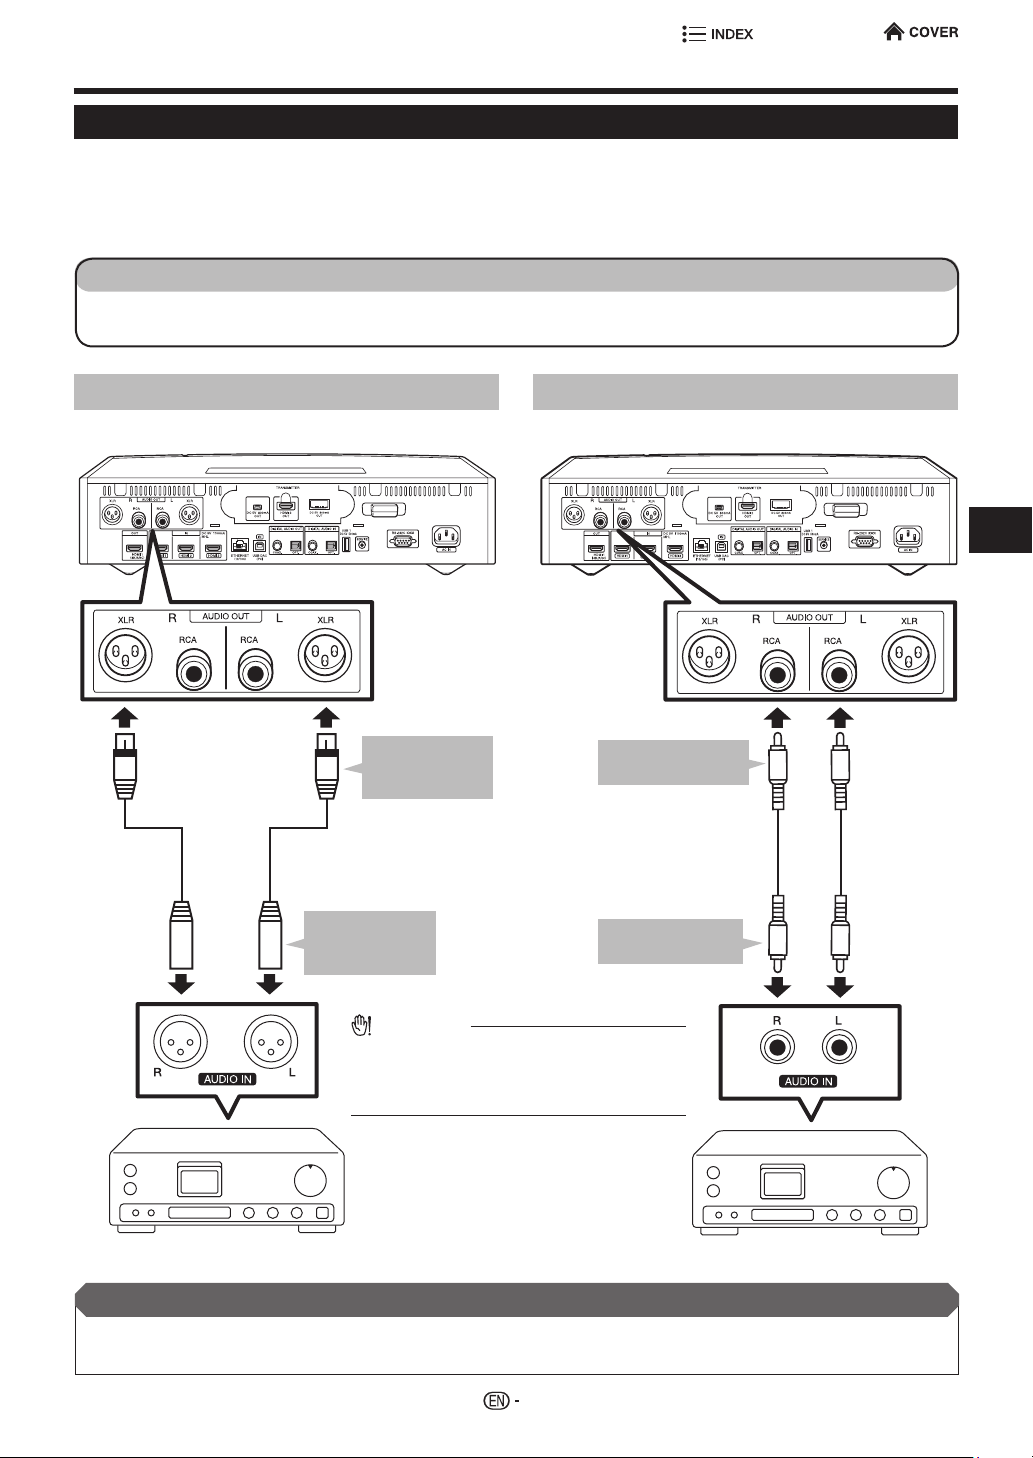
Analog Audio Connection
Connecting to the ANALOG AUDIO OUT Terminal
• If you would like to connect a stereo audio amplier, you can enjoy high quality analog audio sound through
ANALOG AUDIO OUT terminals.
• This player have two type terminals which the XLR balanced terminal and RCA terminal. Preference should
be given to the XLR balanced terminals since they may provide better noise rejection and signal integrity.
STEPS
1 Be sure turn off this Player and the equipment before making connections.
2 Firmly connect an audio interconnection cable (commercially available) to the AUDIO OUT terminals (1 and 2).
XLR balanced type terminals RCA type terminals
This Player
1
To XLR balanced
type AUDIO
OUT terminal
Audio Interconnect Cable
(XLR balanced audio cable:
commercially available)
To XLR balanced
type AUDIO IN
terminal
2
This Player
To RCA type AUDIO
1
OUT terminal
Audio Interconnect Cable
(RCA type audio cable:
commercially available)
To RCA type
2
AUDIO IN terminal
Connection
CAUTION
• Do not use the XLR to RCA adapter
(commercially available) or the XLR to RCA
conversion cable (commercially available).
This may cause malfunction.
Stereo audio amplier
After connecting
• If necessary, perform the Audio Settings (page 44).
• Prepare the desired disc or content and start playback (pages 31 - 40).
17
Stereo audio amplier
Page 27
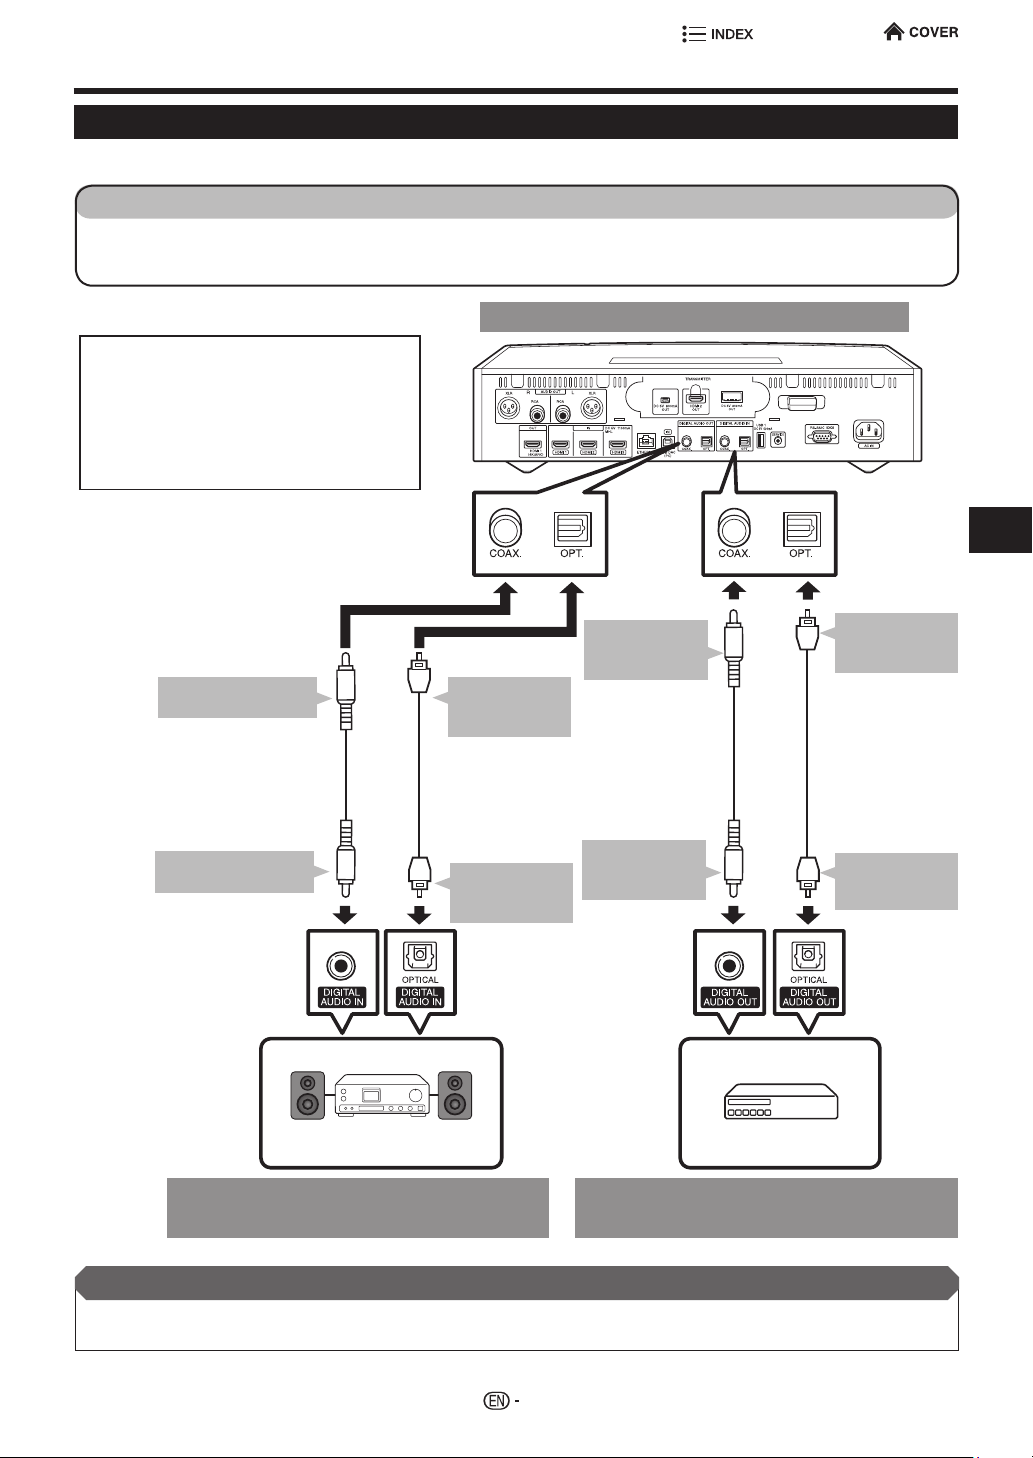
Digital Audio Connection
Connecting to the Digital Audio Terminal
• You can connect audio equipment or the TV to the OPTICAL/COAXIAL DIGITAL AUDIO OUT terminal.
STEPS
1 Be sure to turn off this Player and the equipment before making any connections.
2 Firmly connect an optical digital cable (commercially available) to the optical digital audio terminals (1 and 2).
Or rmly connect a RCA type cable (commercial available) to the coaxial digital audio terminals (1 and 2).
This Player
• When using OPTICAL/COAXIAL DIGITAL
AUDIO OUT,
5.1 ch Digital Output is available.
7.1 ch Digital Output is not available.
NOTE:
7.1 ch Audio is available via the HDMI
terminal.
1
To COAXIAL DIGITAL
AUDIO OUT terminal
RCA type cable
(commercially available)
2
To COAXIAL DIGITAL
AUDIO IN terminal
Amplier
1
To OPTICAL
DIGITAL AUDIO
OUT terminal
Optical digital cable
(commercially available)
2
To OPTICAL
DIGITAL AUDIO
IN terminal
1
To COAXIAL
DIGITAL AUDIO
IN terminal
RCA type cable
(commercially
available)
2
To COAXIAL
DIGITAL AUDIO
OUT terminal
Optical digital
cable
(commercially
available)
Digital TV box, etc.
1
To OPTICAL
DIGITAL AUDIO
IN terminal
2
To OPTICAL
DIGITAL AUDIO
OUT terminal
Connection
Audio equipment with a digital audio
Audio equipment with a digital audio
input terminal
After connecting
• If necessary, perform the Audio Settings (page 44).
• Prepare the desired disc or content and start playback (pages 31 - 40).
18
output terminal
Page 28
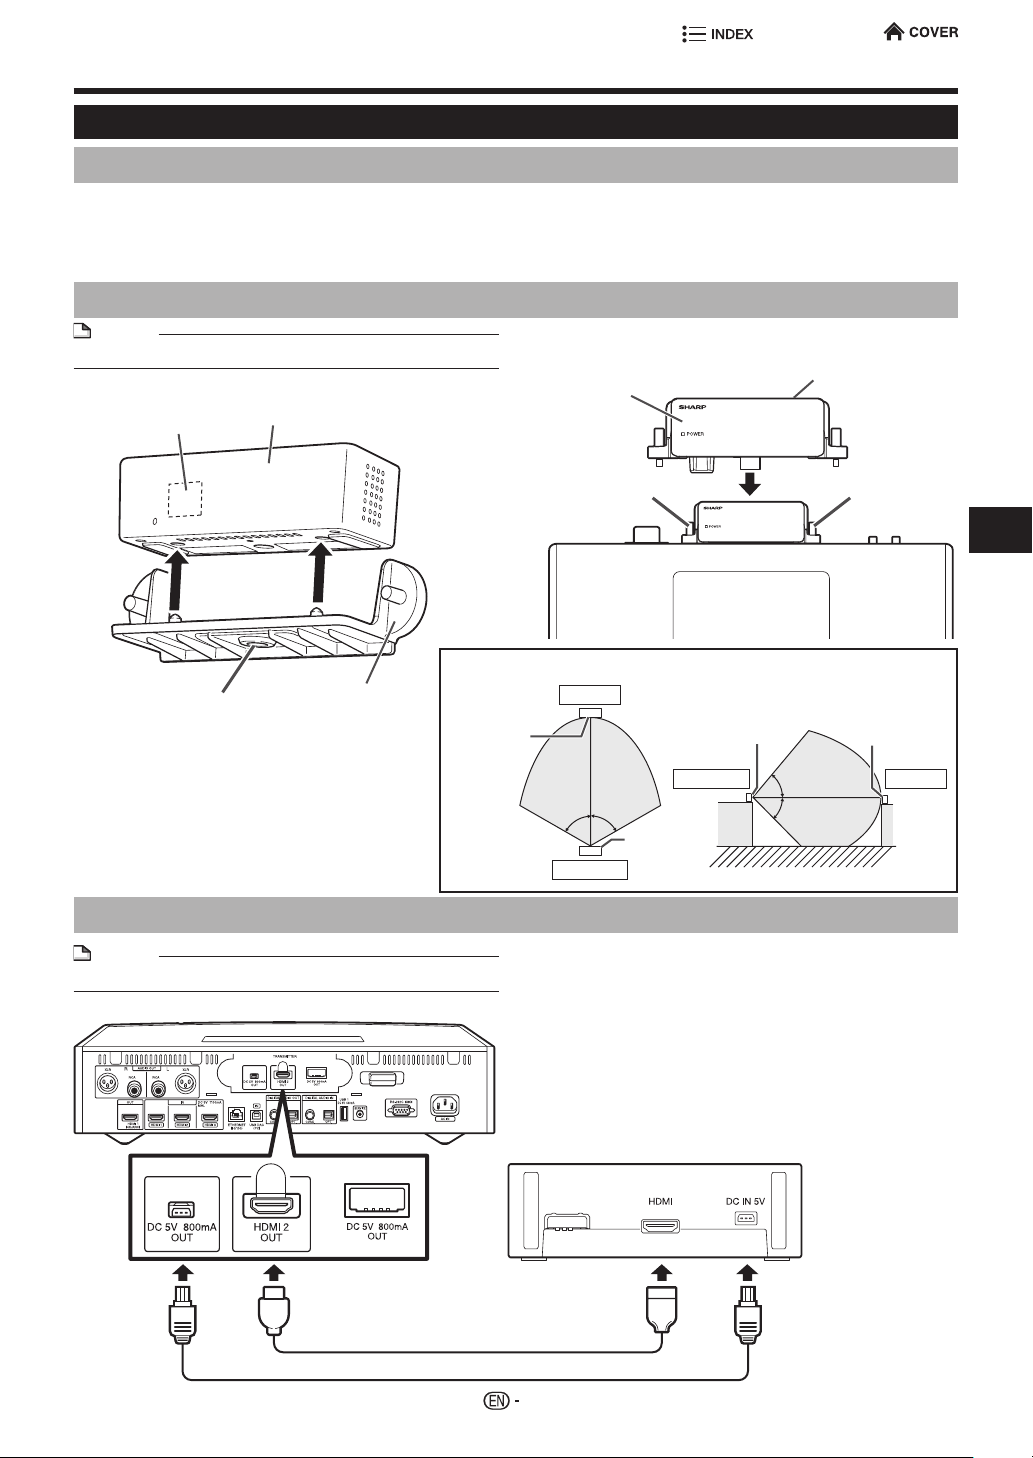
WiHD Settings
WiHD Transmitter unitWiHD Transmitter unit extension cable (DC power)WiHD Transmitter unit extension cable (HDMI)WiHD Transmitter Attachment
WiHD Transmitter Connection
For wireless Video playback (up to 1080p) to an optional display
When using the WiHD Transmitter and WiHD Receiver supplied with the Player, you can enjoy wireless 1080p high-denition video.
• Connect the WiHD Receiver to a TV, projector, or other video playback device.
• If your video device has a CEC (Consumer Electronics Control) link function, you can turn the WiHD Receiver on and off
together with the Player. If it does not have a link function, operate by pointing the remote control at the WiHD Receiver and
pressing WiHD ON/OFF.
1 When mounting the WiHD Transmitter on the Player
NOTE
• Unplug the AC cord from the wall outlet before settings.
1 -1 Place the WiHD Transmitter on the Attachment
from above.
Antenna
WiHD Transmitter
1-1
1 -3 Attach the WiHD Transmitter/Attachment to the
Player, and fasten the xing screws on the left
WiHD Transmitter/Attachment
and right.
Fixing screw Fixing screw
This Player
Antenna
1-2
Fixing screw
1 -2 Fasten the xing screw from below.
WiHD Transmitter
Attachment
Horizontal direction
Antenna side
Let antenna side of the WiHD Transmitter and
front (antenna) side of the WiHD Receiver
face each other. If it is not possible to face
16 ft (5 m)
both, connect the WiHD Transmitter to the
Player with the supplied extension cables.
(See the illustration on the right.)
2 When connecting using the supplied extension cables
NOTE
• Unplug the AC cord from the wall outlet before settings.
This Player
WiHD Transmitter
Vertical direction
Receiver
Antenna side
33 ft
(10 m)
60°60°
Transmitter
2 -1 Using the HDMI extension cable (supplied),
connect the WiHD Transmitter HDMI terminal to
the HDMI 2 OUT terminal of the Player. Do not
connect to the HDMI 1 OUT terminal. If connect
to the HDMI 1 OUT terminal, WiHD transmitter
can not correctly work.
2 -2 Using the DC power extension cable (supplied),
connect the WiHD Transmitter DC IN terminal to
the DC OUT terminal of the Player.
Transmitter
Antenna side
16 ft (5 m)
50°
45°
Antenna side
33 ft
(10 m)
Connection
Receiver
2-1 HDMI extension cable (supplied)
2-2 DC power extension cable (supplied)
19
Page 29
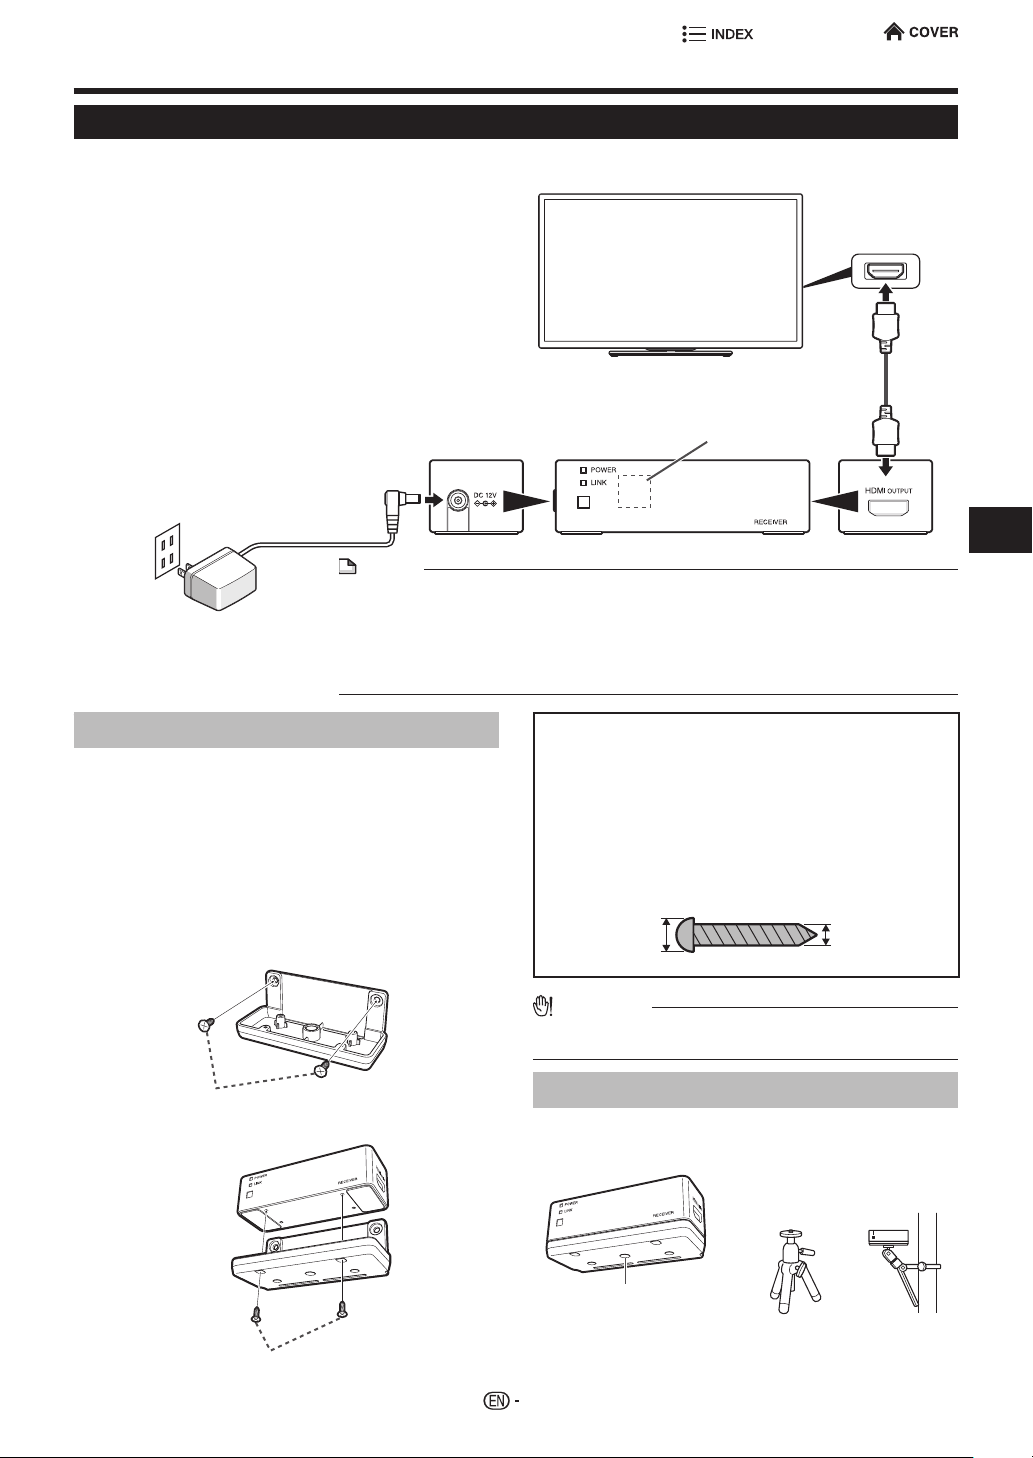
WiHD Settings
WiHD Receiver unitHDMI cableAC adapter for WiHD Receiver unit
WiHD Receiver Connection
• Position the WiHD Receiver close to the TV or
other display monitor.
• Position the WiHD Receiver horizontally.
1 Using an HDMI cable (supplied), connect the TV
or other display monitor to the HDMI OUTPUT
terminal of the WiHD Receiver.
2 Connect the AC adapter (for WiHD Receiver) to
the DC IN terminal of the WiHD Receiver.
3 Plug the AC adapter (for WiHD Receiver) into an
AC outlet.
4 Turn WiHD power on and off by pointing the
remote control at the Receiver and pressing
WiHD ON/OFF on the remote control.
It may not be turned off while the video signal
is being transferred.
2
3
NOTE
• Communications are not possible from one room to another, or where there are other
obstacles. Communications only take place within a room.
• Use the transmitter and receiver for one-to-one operation.
• You can use up to two pairs of WiHD at the same time.
• The AC adapter may become warm after long-time use. This is normal and does not
indicate malfunction.
TV or other display monitor
commercially available)
WiHD Receiver
Antenna
HDMI input terminal
HDMI cable
(supplied 1 pc.,
1
Connection
Wall mount adapter for WiHD Receiver unit
Screw for wall mount adapter (x2)
Wall mounting
1 Place the wall mount adapter for WiHD Receiver
unit (supplied) against the wall, and mark the
positions of the screw holes on the wall with a
pencil or the like.
2 Using screws (commercially available), x the
wall mount adapter to the wall.
3 Using the screws for wall mount adapter
(supplied), attach the WiHD Receiver to the wall
mount adapter.
1
2 Screws (x2)
(commercially available)
Things you will need (commercially
available)
• Two screws for attaching the wall mount adapter to the
wall
The type and length of screw required depends on the
material and strength of the wall.
Consult a retailer or contractor when obtaining the
screws.
Recommended screw dimensions (mm)
3.8-4.27.8-8.4
CAUTION
• Do not place anything other than the WiHD Receiver on
the wall mount adapter.
Tripod mounting
Use the threaded hole for tripod mounting to x the
receiver/wall mount adapter to the tripod.
Tripod, etc.
(commercially available)
Threaded hole for
tripod mounting
3 Screws for wall mount adapter
(supplied)
20
Page 30
Video Connection
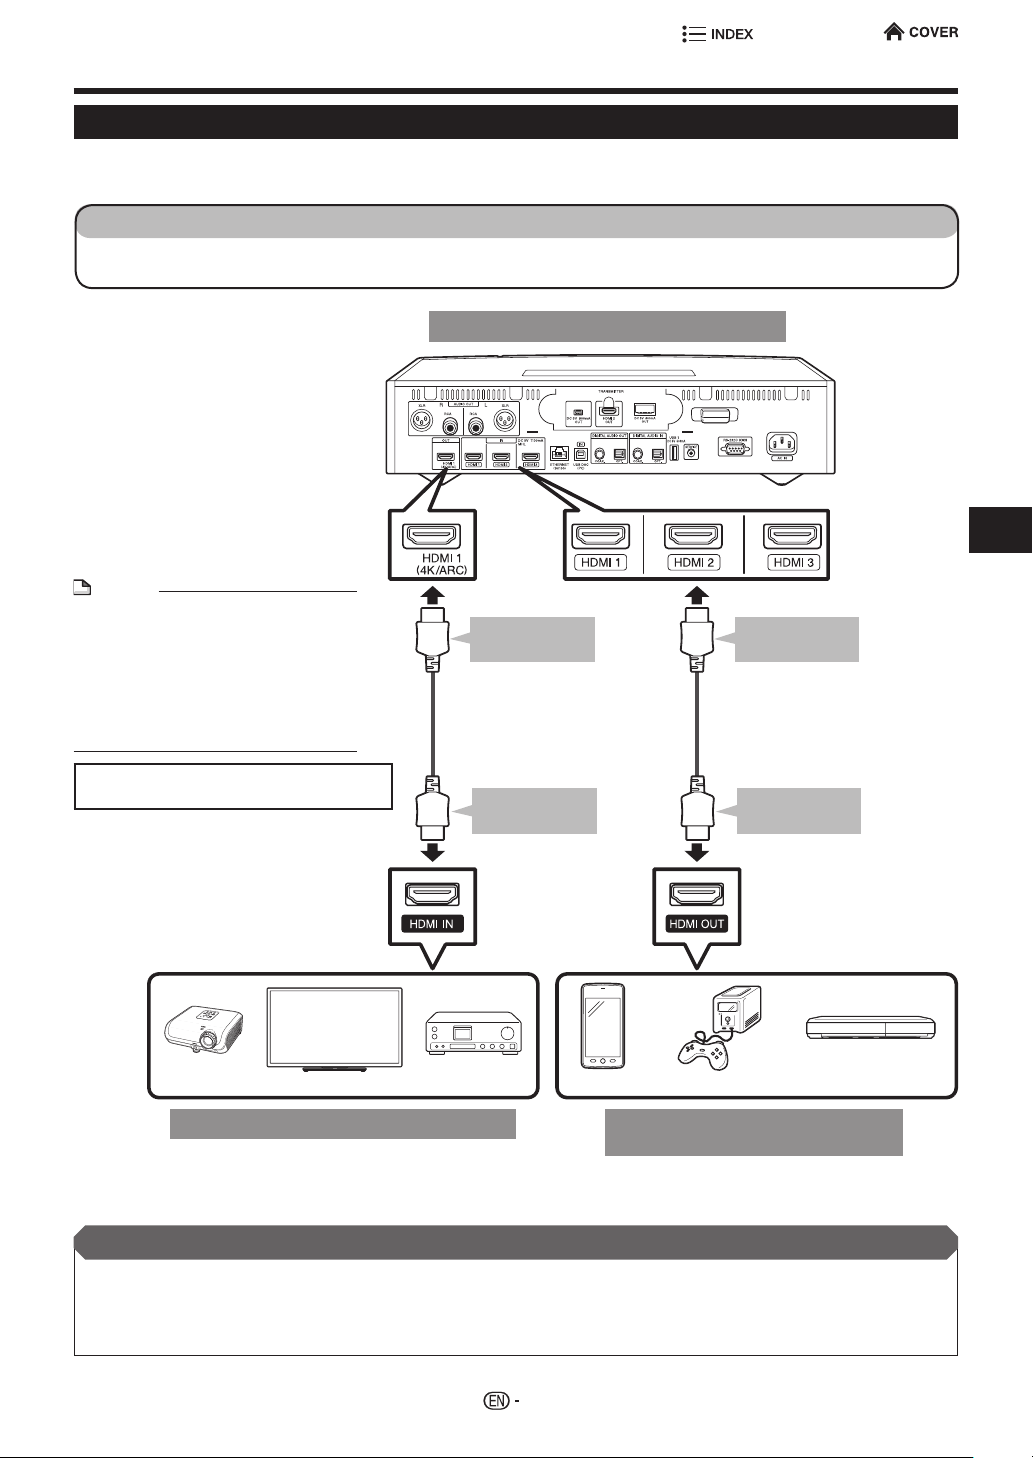
Connecting to the HDMI Terminal
• You can enjoy high quality digital picture and sound through the HDMI terminal.
• When you use AQUOS LINK, make sure to use a certied HDMI cable.
STEPS
1 Be sure to turn off this Player and the equipment before making any connections.
2 Firmly connect an HDMI cable (supplied) to the HDMI terminals (1 and 2).
This Player
NOTE
• Audio transmitted in Dolby Digital
Plus, Dolby TrueHD, DTS-HD High
Resolution Audio and DTS-HD
Master Audio formats is output from
the HDMI terminal as Bitstream.
Connect an amplier with a builtin decoder to enjoy the ne sound
quality.
To HDMI 1 OUT
terminal
HDMI cable
(supplied 1 pc.,
commercially available)
1
To HDMI IN
terminal
HDMI cable
(supplied 1 pc.,
commercially available)
1
Connection
• When using an HDMI output, 7.1 ch
Digital Output is available.
Projector
Equipment with an HDMI terminal
TV
To HDMI IN
terminal
AV receiver
2
Smartphone*
Audio/Video Equipment
Game Console
with HDMI terminal
* Connect an MHL-compatible portable device to the
HDMI 3 IN (MHL) terminal.
After connecting
• If desired, connect audio equipment (page 17).
• If necessary, perform the Video Settings and Audio Settings (pages 43 , 44).
• Refer to AQUOS LINK function (pages 27 , 52).
• Prepare the desired disc or content and start playback (pages 31 - 40).
To HDMI OUT
terminal
Digital TV box, etc.
2
21
Page 31

Broadband Internet Connection
Internet Connection (LAN cable)
• By connecting this player to the Internet, you can enjoy a variety of content on your TV using BD-LIVE
functions, and also perform software updates.
• When using the Internet, a broadband Internet connection as shown below is required.
STEPS
1 Be sure to turn off this Player and the equipment before making any connections.
2 Firmly connect a LAN cable (commercially available) to the ETHERNET terminal (1 and 2).
This Player
• When an Internet connection is made,
wired and wireless connections cannot
be used at the same time. Use only
one of the connection types.
CAUTION
• When a LAN cable is connected to this player, a wireless
LAN connection is not available. To use wireless LAN, do
not connect a LAN cable to this player.
• When using a broadband Internet connection, a contract
with an Internet service provider is required. For more
details, contact your nearest Internet service provider.
• Refer to the operation manual of the equipment you have
as the connected equipment and connection method may
differ depending on your Internet environment.
NOTE
• Use a LAN cable/router supporting 10BASE-T/100BASETX.
• SHARP cannot guarantee that all brands’ hubs will
operate with this player.
Internet Modem Hub or broadband router PC
To ETHERNET
terminal
LAN cable
(commercially available)
To LAN
terminal
LAN
Example of a Broadband Internet Connection
After connecting
• Perform the communication settings (pages 47 , 48).
• When enjoying content on your TV using BD-LIVE functions, refer to BD-LIVE (page 33).
• To update the software via the Internet, perform Software Update Settings (page 50).
Connection
1
2
22
Page 32

Broadband Internet Connection
Internet Connection (Wireless LAN)
• By connecting this player to the Internet, you can enjoy a variety of content on your TV using BD-LIVE
functions, and also perform software updates.
• You can connect to a network using a wireless router/access point.
STEPS
1 Be sure to turn off this Player and the equipment before making any connections.
This Player
• When an Internet connection is made, wired and
wireless connections cannot be used at the same
time. Use only one of the connection types.
• This player is equipped with an IEEE 802.11n internal
wireless unit, which also supports the 802.11a/b/g
standards.
Connection
CAUTION
• When a LAN cable is connected to this player, a wireless
LAN connection is not available. To use wireless LAN, do
not connect a LAN cable to this player.
• When using a broadband Internet connection, a contract
with an Internet service provider is required. For more
details, contact your nearest Internet service provider.
• Refer to the operation manual of the equipment you have
as the connected equipment and connection method may
differ depending on your Internet environment.
Wireless router/
access point
NOTE
• You must use a wireless router/access point that supports
IEEE802.11 a/b/g/n. (a, n is recommended for stable
operation of the wireless network.)
• Wireless LAN, in its nature, may cause interference,
depending on the usage conditions (access point
performance, distance, obstacles, interference by other
radio devices, etc.).
• Set the wireless router/access point to Infrastructure
mode. Ad-hoc mode is not supported.
• SHARP cannot guarantee that all brands’ wireless routers
will operate with this player.
a Broadband Internet Connection
Example of
After connecting
• Perform the communication settings (pages 47 , 48).
• When enjoying content on your TV using BD-LIVE functions, refer to BD-LIVE (page 33).
• To update the software via the Internet, perform Software Update Settings (page 50).
PC
InternetModem
23
Page 33

Preparation
Using the Mobile App
How to Download the Mobile App
Sharp AudioCentral mobile app allows simple navigation and control for your compatible Sharp Wireless High
Resolution Audio Player (SD-WH1000U).
The application allows you to operate the Wireless High Resolution Audio Player and makes it easy to access
all your les.
The application has the following features:
• Easy Operation of SD-WH1000U using your mobile device
• Create playlists, lter by genre, artist or album and access full le details
This is a description of SD-WH1000U’s setup for using Mobile App for Smartphone
or Tablet PC.
1 Turn on SD-WH1000U.
2 From Home Menu Select “Settings” > “Communication Setup”. Press ENTER Select “IP Control Setup”.
• Select “Change” in “IP Control Setup” and push ENTER. Select “Enable” and push ENTER.
• Select the following items and Setup in the character entry screen.
Device name: This is a name of the SD-WH1000U.
Please leave note
Login ID: Input Login ID using no fewer than 1, nor more than 8 characters.
Password: Input Login ID using no fewer than 1, nor more than 8 characters.
Control port: Please leave it as default settings, or you may change it if the port number of
You can put any new name or use the initial name.
your router has some limitation.
3 Select “OK” and push ENTER button of the remote control.
• Select the type of your LAN.
As above selection and Conrm “IP Address”.
Select “Ethernet Setup (Cable)” or “Ethernet Setup (Wireless)”.
The initial setting of SD-WH1000U side completed.
• Please keep to turn the power of SD-WH1000U on. Next, please start the setting for Smartphone or Tablet PC.
In case you turn the power on/off from Mobile App side, please set Quick Start to On in System Setting of
HOME MENU.
When you connect SD-WH1000U to internet, please conrm the operation manual of router or hub you are
using.
Preparation
24
Page 34

Using the Mobile App
Setting the App on the Smartphone or Tablet PC.
1 Install the “Sharp AudioCentral Remote” App from the Apple Store or Google Play.
Turn on SD-WH1000U and go to “HOME”.
2 Start the application.
Follow the instructions on the screen to register the Player. App will automatically begin searching for player
connected to
• When the icon of your named player appears, select by tapping the icon. Enter Login credentials established during
“IP Control Setup”.
App will begin “Initial Setup”. This may take up to several minutes. This is normal. Do not exit App during Initial
Setup.
• When Mobile App is not able to detect, return to “Searching” icon again.
Tap “Add audio player” icon in that case.
the same network as mobile device.
IP Address
Port (Control port)
Login (ID)
Password
• Tap “ADD” icon after input each item.
• Tap “OK” icon after display “Connected to audio player successfully”.
The setting of Mobile App have been completed.
• After this, the connection is done automatically when you select SD-WH1000U
from the screen of Mobile App. And then you can enjoy the playback of music.
NOTE
• The screen may be changed depending on the software version.
• If folder/le names contain symbols such as “*:/<>?\¥|`&,$.- and/or non-
alphanumeric characters, those names may not be correctly displayed in
Mobile App or on the front panel display on the player, and consequently
the les may not be played back. In such case, rename the folder/le before
attempting to play it.
• Symbols and alphanumeric characters allowed in folder and le names:
!#%’()+0123456789;=@ABCDEFGHIJKLMNOPQRSTUVWXYZ[]^_
abcdefghijklmnopqrstuvwxyz{}~
Playback of music le
• Please select the function which equipment of playback is connected from Source in the screen of Mobile App.
• The application allow to display the music list per album or artist. The playback start when you tap the music you want to
listen.
• When you tap the icon of remote control in Mobile App, you can use smartphone, tablet PC as the remote controller, such
as Disc playback.
Preparation
25
Page 35

Before Starting Playback
“AA” size battery (x2)
Loading the Batteries in the Remote Control
Approximate operating range of
remote control
1
Remove the battery cover towards the direction
of the arrow.
2 Load the two “AA” size batteries (R-06 size, UM/
SUM-3). Place batteries with their terminals
corresponding to the m and n indications in
battery compartment.
3 Insert the tab of the battery cover, and close the
cover until it clicks.
Remote control sensor
15º
º03º03
15º
c Remote control unit
* Approx. 20 feet (6 m)
from the sensor
NOTE
• Do not subject the remote control unit to shock, water or
excessive humidity.
• The remote control unit may not function if the Player's
remote sensor is in direct sunlight or any other strong
light.
• Incorrect use of batteries may cause them to leak or
burst. Read the battery warnings and use the batteries
properly.
• Do not mix old and new batteries, or mix different brands.
• Remove the batteries if you will not use the remote
control unit for an extended period of time.
WARNING
• Do not use or store batteries in direct sunlight or other
excessively hot place, such as inside a car or near a
heater.
This can cause batteries to leak, overheat, explode or
catch re.
It can also reduce the life or performance of batteries.
Remote Control Code Setting
This player can respond to one of three sets of
remote control codes. If you have other SHARP
products in the vicinity of this player, the other
products may respond to this player remote control.
To prevent this, you can select a different remote
code.
If you have selected a new remote code on the
player, you must set the remote control handset to
use the same code (see page 52).
• Hold down the 1, 2, or 3 button and press ENTER for at
least 5 seconds. (Select the same number as selected on
the Player.)
NOTE
• If the batteries in the remote control unit are exhausted,
or when you change the batteries, the remote control
number may revert to 1.
Preparation
26
Page 36

Before Starting Playback
Using AQUOS LINK
Controlling the Wireless universal
player using AQUOS LINK
What is AQUOS LINK?
Using the HDMI CEC (Consumer Electronics Control), with
AQUOS LINK you can interactively operate this player with
your SHARP AQUOS TV.
What you can do with AQUOS LINK
When you connect this player to the LCD TV compatible
with AQUOS LINK using an HDMI cable, you can perform
the functions listed below. (See page 21 for connecting to the
HDMI terminal.)
E Automatic input select function
When you start playback of this player, the input selector of
the LCD TV will automatically switch to the LCD TV input
terminal connected to the player and the playback image
will appear on the screen, even if you are watching a TV
program.
E Automatic power off function
If you turn off the LCD TV when this player is in stop mode,
the power of this player will be turned off automatically.
(However, when playing back a disc or other content using
this player, the power does not turn off.)
E Automatic power on function
When you switch to the LCD TV input terminal connected
to this player, the power of this player will be turned on
automatically.
Using a Smartphone with the Player
This function enables you to connect the Player to a
smartphone that supports Mobile High-Denition Link
(MHL) using an MHL-compatible cable.
To connect the HDMI 3 IN (MHL) terminal on this
Player to your MHL-compatible smartphone, be
sure to use an MHL-compatible cable (commercially
available).
• You can view pictures and video on a large screen.
• You can play back music les.
NOTE
• In order to make AQUOS LINK available, connect an LCD
TV to this player using an HDMI terminal. Set “AQUOS
LINK” to “ON” (see page 52).
Refer to the Operation Manual of the TV for details
regarding setup.
• This function is available using HDMI 1 OUT terminal
only.
• This function is unavailable in MUSIC MODE by using
Mobile App.
MHL-compatible cable
Preparation
NOTE
• An MHL-compatible portable device is required to use
this function. Connect the device to the HDMI 3 IN (MHL)
terminal.
• This product incorporates MHL 1.
• When you want to charge smartphone, turn on this player.
• Use an MHL-compatible cable which can work with your
smart phone or tablet PC for the connection.
This player supports Roku Ready™.
When using a commercially available Roku Streaming
Stick, connect it to the HDMI 3 IN (MHL) terminal.
27
Page 37

Before Starting Playback
Control Panel
This function allows you to operate this player using
the TV remote control by displaying the control panel
on the TV screen.
• To operate this function, connect this player from HDMI 1
OUT terminal to a TV compatible with HDMI CEC
(Consumer Electronics Control) using an HDMI cable
(see page 21). Make sure that “Control Panel” is set to “On”
(see page 52). When the settings are completed, perform
the following operations.
NOTE
• When using HDMI 2 OUT, this function is not available.
• The control panel may not be displayed depending on
the TV. Also, it may not be available depending on the
content.
• When operating using the remote control of the player,
the control panel does not appear.
1 Switch the TV input to the input source to which
this player is connected (HDMI input).
2 Press the PLAY button on the TV remote control.
• The control panel appears on the TV screen.
Control Panel
POP-UP
MENU
TOP MENU
TITLE LIST
FUNC.
Major functions of each button icon
POP-UP
MENU
TOP MENU
TITLE LIST
FUNC.
• Display the pop-up menu screen
for BD video and the menu
screen for DVD video.
• Display the top menu screen for
BD video and DVD video.
• Display the Function Control
screen for BD video, DVD video,
etc.
• Fast reverse (search).
• Play.
• Fast forward (search).
• Skip to the beginning of a
chapter.
Select
Enter
• When there is no operation for approximately 10
seconds, the control panel disappears automatically.
To display the control panel, press the PLAY button
on the TV remote control.
PANEL
OFF
3 Press a/b/c/d on the TV remote control
to select the desired button icon, then press
ENTER.
• The function of the selected button icon is available.
PANEL
OFF
• Pause.
Preparation
• Skip to the next chapter.
• Jump backward (approx. 10
seconds). (This function is used
when you want to re-watch a
scene that has just been shown.)
• Stop.
• Jump ahead (approx. 30
seconds).
• Turn off the control panel.
28
Page 38

Before Starting Playback
AC cord
Connecting the AC Cord
1 Plug the supplied AC cord into the AC IN terminal
on the rear of the Player.
2 Then, plug into an AC outlet with ground hole.
Entering standby
Press POWER to enter standby.
• The POWER indicator lights red.
• If you press POWER again immediately after entering
standby, the Player may not turn on. If this happens, wait
for 10 seconds or more and then turn on the power again.
• Week electric power is still consumed even when the
player is turned off.
NOTE
• When you turn off the Player, the WiSA system will
automatically stop.
AC cord
NOTE
• Place the Player close to the AC outlet, and keep the
power plug within reach.
• TO PREVENT RISK OF ELECTRIC SHOCK, DO NOT
TOUCH THE UN-INSULATED PARTS OF ANY CABLES
WHILE THE AC CORD IS CONNECTED.
• If you are not going to use this Player for a long period of
time, be sure to remove the AC cord from the AC outlet.
Turning the Power On
Indicators on the Player
POWER (ON/STANDBY) indicator
Blue on Power on
Red on Standby
NOTE
• The POWER indicator blinks while the Player is preparing
for starting up. You cannot turn the Player on until the
POWER indicator stops blinking.
WiSA indicator
Blue on WiSA System On mode
(When “Audio Out” is
selected at “WiSA Output”
on page 44).
To Dim the Display
If you feel that the front panel display and indicator
on the player are too bright when watching movies,
you can dim the front panel display except for the
POWER indicator.
Preparation
POWER/POWER
(ON/STANDBY) indicator
WiSA indicator
Turning the power on
Press POWER to turn on the power of the Player.
• The POWER indicator lights blue.
NOTE
• To change language, please see the language setting
(see page 52).
• When you turn on this player, the WiSA system is
automatically started if “Audio Out” is selected at “WiSA
Output” on page 44.
• If any associated WiSA-compliant receivers and speakers
are not found, an alert message of “A registered receiver
is not found” will be displayed on the screen.
DIMMER Front panel display
Press DIMMER to turn the front panel display and
indicator is turned Dimmer1, Dimmer2, Dimmer3 or
OFF (see page 52).
29
Page 39

Playback
Basic Operation
INPUT Front panel display
POWER
Volume control
The volume control affects all of the associated WiSA
compliant bridges and speakers.
It only affects the analog audio outputs, when “Analog
Output Volume” is set to “Variable” (see page 44).
It does not affect digital audio outputs (HDMI, Coaxial
and Optical).
Mute
The mute affects all of the associated WiSAcompliant bridges and speakers.
It only affects the analog audio outputs, when “Analog
Output Volume” is set to “Variable” (see page 44).
It does not affect digital audio outputs (HDMI, Coaxial
and Optical).
SOUND MODE
This function produced a sound effect with WiSA
output. You can select the desired mode, which can
vary due to type of sound.
Press SOUND MODE r, s to select the desired
sound mode.
INPUT select
Press INPUT on the player or direct select button on
the remote control to select the desired input source.
Input Source
• HDMI1: Audio/Video signal from HDMI1 IN terminal
• HDMI2: Audio/Video signal from HDMI2 IN terminal
• HDMI3: MHL/Audio/Video signal from HDMI3 IN terminal
• COAXIAL: Audio signal from COAXIAL DIGITAL AUDIO
IN terminal
• OPTICAL: Audio signal from OPTICAL DIGITAL AUDIO
IN terminal
• USB DAC PC: Audio signal from USB DAC (PC) IN
terminal
• TV(ARC): Audio signal of TV (ARC) from HDMI 1
OUTPUT terminal
• DISC: “HOME MENU” screen
NOTE
• Audio Return Channel (ARC) is a feature, which allows you to
send digital audio signals from the television back to the player.
Instead of listening through TV speakers, ARC allows the sound
to be processed and produced by the home theater audio
system.
• You need to make sure the HDMI input port on the TV is
ARC capable. Usually, ARC has to be enabled in the TV’s
settings.
• ARC function is not available when “Audio Out” select
item “HDMI Output” (page 44).
• If the USB DAC (PC) IN terminal cannot be used, update
the software of this player (page 50).
• To use a USB DAC, download and install the following le
from the below website on the connected PC.
http://www.sharpusa.com/CustomerSupport/
SharpCareCenter/Downloads.aspx
Picture Mute
Press the PICTURE MUTE button on the remote control to
turn off picture output.
The display of TV disappears and only sound is outputted.
Press the PICURE MUTE button again to resume picture
output.
Playback
Modes
DIRECT, STANDARD, MODE 1, MODE 2, MODE 3
30
Page 40

Music/Video/Picture Playback
Loading a Disc/Ejecting a Disc
POWER
OPEN/CLOSE
1 Press POWER to turn on the power.
2 Press OPEN/CLOSE to open the disc tray.
Load a disc on the disc tray.
• Insert the disc with the label face up.
• In case of disc recorded on both sides, face down
the side to play back.
BD/DVD Video Playback
BD-RBD VIDEO BD-RE
DVD VIDEO DVD-R
DVD-RW
This section explains playback of commercially
available BD Video and DVD Video discs (like
movies) and recorded DVD-RW/R discs.
• This player supports DVD upscaling during DVD playback.
• For a description of other playback functions, refer to
“Playback Functions” on page 39.
1 Load a disc.
• Playback may begin automatically, depending on the disc.
• Playback begins from the rst title.
• The menu may be displayed rst, depending on the
disc. Perform playback operation by following the
directions on the screen.
• When loading a disc containing 3D content (3D BD
video) with “On” selected in the “3D Notice” setting
(page 43), playback will be stopped and the 3D notice
will be displayed on the TV screen. In such cases,
press ENTER for conrmation, and then playback
will start.
2 Press d PLAY if playback does not begin
automatically or playback is stopped.
To eject a disc
While in stop mode, press OPEN/CLOSE.
NOTE
• The disc load time may vary depending on the disc.
Regarding playback of BD video discs
• Some of the newly released BD video discs cannot be
played back unless you update the player software to the
latest version. Therefore, it may be required to update the
software of the player.
• Refer to pages 50 , 51 for more information regarding
software updates for the player.
To stop playback
Press H STOP.
Resume playback function
• If you press d PLAY next, playback will resume from
the point where the Player was previously stopped. To
playback from the beginning, cancel resume mode by
pressing H STOP, then press d PLAY. (This may not
work depending on the type of disc.)
NOTE
• Resume playback may not function depending on the disc.
• The resume playback function for discs will be cancelled
if streaming content is viewed after disc playback. Disc
playback will start from the beginning after viewing
streaming content.
Displaying the front panel display
Playback
Press DISPLAY to switch display information.
31
Page 41

Music/Video/Picture Playback
BD VIDEO
BD/DVD Menus
• This section explains how to play back a BD/DVD
video disc with a top menu, disc menu or pop-up
menu.
• The titles listed in the top menu and a disc guide
(for options like subtitles and audio languages) are
given in the disc menu.
Start playback by selecting a title
from the top menu
BD VIDEO
DVD VIDEO
1 Press TOP MENU.
• The top menu screen is displayed if present on the
BD/DVD video disc.
Example
T O P M E N U
1
Jazz
2
Latin
Using the disc menu
DVD VIDEO
Example: Select “SUBTITLE LANGUAGE”.
1 Press TOP MENU.
• The disc menu screen is displayed if present on the
DVD video disc.
2 Press a/b to select “SUBTITLE LANGUAGE”,
then press ENTER.
• The screen for selecting the subtitle language is
displayed.
Example
MENU
1 AUDIO LANGUAGE
2 SUBTITLE LANGUAGE
3 AUDIO
3 Press a/b to select the subtitle language, then
press ENTER.
4 Press TOP MENU to exit.
Using the pop-up menu
3
Classic
4
Rock
2 Press a/b/c/d to select the title, then press
ENTER.
• The selected title is played back.
NOTE
• The procedure explained on this page is the basic
operation procedure. Procedures vary depending on
the BD/DVD video disc, so you may need to follow the
instructions in the BD/DVD video disc manual or the
instructions displayed on the screen.
Top menu
• With some BD/DVD discs, the top menu may be referred
to as the “Title Menu”. Use TOP MENU on the remote
control when the instructions refer to “Title Menu”.
• If no top menu is available, the TOP MENU button will
have no effect.
1 Press POP-UP MENU during playback.
• The pop-up menu screen is displayed.
• The menu contents displayed vary depending on the
disc. For details on how to see and operate the popup menu, refer to the manual for the disc.
Example
Pop-up menu
Previous page
Next page
2 Press a/b/c/d to select the desired item, then
press ENTER.
3 Press POP-UP MENU to exit.
• The pop-up menu will automatically disappear for
some discs.
Playback
32
Page 42

Music/Video/Picture Playback
Enjoying BONUSVIEW or BD-LIVE
BD VIDEO
This Player is compatible with additional functions of
BD-Video, BONUSVIEW (BD-ROM Prole 1 Version
1.1) and BD-LIVE.
For BD-Video discs compatible with BONUSVIEW,
the functions of Picture in Picture and Virtual
Package are available. For BD-LIVE compatible
discs, you can enjoy a variety of functions via the
Internet in addition to the BONUSVIEW functions.
Virtual Package/BD-LIVE data is saved in Local
Storage (USB memory device connected to this
Player). To enjoy these functions, connect a USB
memory device (2GB or greater, 2TB and under)
supporting USB 2.0 High Speed (480Mbit/s) to the
USB terminal on this player.
When you insert or remove a USB memory device, be sure
to turn the main power off.
USB memory
device
• If there is insufficient storage space, the data will not be
copied/downloaded. Delete unneeded data or use a new
USB memory device.
• If a USB memory device containing other data (previously
recorded) is used, the video and audio may not play back
properly.
• If the USB memory device is disconnected from this
player during playback of Virtual Package/BD-LIVE data,
playback of the disc will stop.
• Some time may be required for the data to load (read/
write).
• Refer to “USB Management” on page 49 for erasing the
Virtual Package data and the BD-LIVE data in the USB
memory device.
NOTE
• SHARP cannot guarantee that all brands’ USB memory
devices will operate with this player.
• Only USB memory devices formatted with FAT 32/16 are
compatible.
When formatting a USB memory device using a PC,
perform the following settings.
Format File System: FAT32
Allocation Unit Size: Default Allocation Size
• Do not use a USB extension cable when connecting a
USB memory device to the USB terminal of the player.
− Using a USB extension cable may prevent the player
from performing correctly.
Use of Picture in Picture function
(secondary audio/video playback)
BD-Video that includes secondary audio and video
compatible with Picture in Picture can be played back
with secondary audio and video simultaneously as a
small video in the corner.
Primary audio/
video
• You can display secondary video from the disc menu.
Secondary audio/
video
NOTE
• To listen to secondary audio, make sure that “Secondary
Audio” is set to “On” (see page 44).
• The secondary audio and video for Picture In Picture may
automatically play back and be removed depending on
the content. Also, playable areas may be restricted.
Virtual Package
For BD-Video discs compatible with Virtual Package,
data is copied from the discs or Internet to local
storage. It is automatically copied to the local storage
prior to playback. You can enjoy a variety of additional
functions including secondary video, secondary
audio, subtitles, movie trailers, etc.
• The playback methods vary depending on the disc. For
details, refer to the disc manual.
BD-LIVE
In this Player, a variety of contents with interactive
functions are available through BD-LIVE compatible
Blu-ray discs by connecting to the Internet. You
can enjoy the download of bonus features such as
latest movie trailers to the USB memory device,
communication compatible BD-J interactive games, etc.
• The available functions differ depending on the disc.
NOTE
• Regarding playback method of BD-LIVE contents,
etc., perform the operations in accordance with the
instructions in the BD disc manual.
• To enjoy BD-LIVE functions, perform the broadband
Internet connection (pages 22 , 23) and communication
settings (pages 47 , 48).
• Before using this function, please read “Network Service
Disclaimer” (page viii).
• Refer to page 48 regarding the setup to restrict access to
BD-LIVE contents.
• If the BD-LIVE screen does not appear for a while after
you select the BD-LIVE function in the BD disc menu, the
USB memory device may not have enough free space.
In such cases, eject the disc from the player, and then
erase the data in the USB memory device in the “USB
Management” menu on page 49.
Playback
33
Page 43

Music/Video/Picture Playback
DVD-R/-RW (VR format) / BD-RE/-R (BDAV format) Playback
DVD-R
DVD-RW
You can play back a recorded disc (DVD: VR format
nalized disc only / BD: BDAV format disc only).
• For a description of other playback functions, refer to
”Playback Functions” on page 39.
NOTE
• “Finalize” refers to a recorder processing a recorded disc
so that it will play in other DVD players/recorders as well
as this player. Only nalized DVD discs will play back
in this player. (This player does not have a function to
nalize discs.)
• Some discs cannot be played back depending on the
audio format.
• BD-RE/-R discs recorded from a BD recorder comply
with AACS copyright protection technology. As this player
is not intended to be compliant with AACS, such discs
cannot be played back.
(AACS: Advanced Access Content System)
BD-RE BD-R
Playback by selecting a title
1
Load a recorded disc.
• The Title List screen is display.
• If the Title List screen is not display, press H STOP,
and then press TOP MENU.
• When loading a BD disc with usage restrictions
placed by a BD recorder, the password input screen
appears. Then, input your password.
If you input a wrong password three times, the disc
will be ejected. Load the disc again, and then input a
correct password.
2 Press a/b/c/d to select the desired title, then
press ENTER to start playback.
• If you want to select additional titles, switch pages by
pressing KSKIP or LSKIP.
• You can playback by pressing d PLAY instead of
pressing ENTER.
• You can be chosen the following while the Title
screen is displayed.
A (Red): Title name/Thumbnail
B (Green): By Chapter/By Title/Sorting
C (Blue): Playlist/Original
D (Yellow): Functions
3 Press H STOP to stop playback.
34
Playback
Page 44

Music/Video/Picture Playback
Audio CD/SACD Playback
AUDIO CD SACD
This Player can play back audio CD and SACD discs.
• For a description of other playback functions, refer to
“Playback Functions” on page 39.
Playback from the beginning
1
Load an audio CD or SACD disc.
• You can picture output to turn off/on by the PICTURE
MUTE button.
• Playback may begin automatically, depending on the
disc.
2 Press d PLAY if playback does not begin
automatically or playback is stopped.
3 To pause the playback at any time, press F PAUSE.
• Press d PLAY or F PAUSE to return to playback.
4 Press H STOP to stop playback.
To skip the track during playback
Press KSKIP or LSKIP.
• Press KSKIP to skip backward.
• Press LSKIP to skip forward.
Operation procedure for the
“Functions” menu
1
Press FUNCTION when the CD screen is
displayed.
• The “Functions” menu is activated.
2 Press a/b to select the desired setting, then
press ENTER.
• When playback is stopped, only “Track” can be
selected.
• For a description of each setting, see “Functions
which can be set” (page 40).
3 Press a/b/c/d to set, then press ENTER.
• Operations vary depending on the setting. Follow the
operation instructions on the screen.
4 Press FUNCTION to exit the “Functions” menu.
NOTE
• The displayed items vary depending on the disc.
NOTE
• Time display for each track will not be indicated on the
screen until the track is played back.
To play another track during
Playback
Press the Number buttons to enter the track number
you want to play.
Or press a/b to select the track you want to play,
then press ENTER.
• The chosen track will be played.
Playback
35
Page 45

Music/Video/Picture Playback
Home Network
Audio Data Playback
CD-R
CD-RW
This Player can play back audio data recorded on
CD-R/RW discs, DVD-R/RW discs, BD-R discs,
BD-RE discs, USB devices and Home Network
equipments.
• For details on the audio data that you can play using this
player, refer to page 12.
DVD-R
BD-REBD-R
DVD-RW
USB
Playing back Audio data
When you insert/remove a USB device or connect/
disconnect the Home Network equipment, be sure to
turn the main power off.
1 Press a/b to select “Music”, then press d or
ENTER.
2 Press a/b to select “DISC*”, “USB-1, 2” or
“Home Network”, then press d or ENTER.
* Display name varies depending on the type of media
inserted.
3 Press a/b to select a folder or le.
• When you select a folder, press ENTER to open it,
and then press a/b to select a le in the folder.
Shows item varies depending on the type of media.
4 Press ENTER to play back the selected le.
• Playback of the selected le will begin.
5 To pause the playback at any time, press F PAUSE.
• Press d PLAY or F PAUSE to return to playback.
6 Press H STOP to stop playback.
To play another le during Playback
Press a/b to select the le you want to play, then
press ENTER.
• The chosen le will be played.
To skip the le during Playback
Press KSKIP or LSKIP.
• Press KSKIP to skip backward.
• Press LSKIP to skip forward.
NOTE
• The Fast Forward/Reverse function does not work.
• The Repeat function does not work.
• This player can play back music data stored on your
home network servers such as a DLNA certied PC.
• If an AIFF, ALAC, or AAC le cannot be played back,
update the software of this player (page 50).
• HE-AAC les are played back as AAC-LC les.
About Audio File Formats
Format Extension Channel Sampling Rate
DSF/DSDIFF
WAV wav
FLAC ac
WMA wma 2 ch
mp3 mp3 2 ch
dsf
dff
2 ch/3 ch/3.1 ch/
4 ch/5 ch/5.1 ch
2 ch/5.1 ch/
7.1 ch
2 ch/3 ch/4 ch/
5 ch/5.1 ch/
6.1 ch/7.1 ch
2.8 MHz,
5.6 MHz
32 kHz, 44.1 kHz,
48 kHz, 88.2 kHz,
96 kHz,
176.4 kHz,
192 kHz
32 kHz, 44.1 kHz,
48 kHz, 88.2 kHz,
96 kHz,
176.4 kHz,
192 kHz
32 kHz, 44.1 kHz,
48 kHz
32 kHz, 44.1 kHz,
48 kHz
Playback
AIFF
ALAC m4a 1 ch/2 ch
AAC
aiff
aif
mp4, m4a,
aac, m4b
36
1 ch/2 ch
1 ch/2 ch
32 kHz, 44.1 kHz,
48 kHz, 88.2 kHz,
96 kHz,
176.4 kHz,
192 kHz
32 kHz, 44.1 kHz,
48 kHz, 88.2 kHz,
96 kHz,
176.4 kHz,
192 kHz
32 kHz, 44.1 kHz,
48 kHz
Page 46

Music/Video/Picture Playback
Home Network
Displaying Still Images (JPEG les)
CD-R
CD-RW
This Player can display still images (JPEG les)
recorded on CD-R/RW discs, DVD-R/RW discs, BD-R
discs, BD-RE discs, USB memory devices and Home
Network equipments.
• For details on the still images that you can display using
this player, refer to page 12.
• Still images are played one by one while during “Slide
show”, they are automatically replaced one after another.
DVD-R
BD-REBD-R
DVD-RW
USB
Displaying Still Images (JPEG les)
When you insert/remove a USB device or connect/
disconnect the Home Network equipment, be sure to
turn the main power off.
1 Press a/b to select “Picture”, then press d or
ENTER.
2 Press a/b to select “DISC*”, “USB-1, 2” or
“Home Network”, then press d or ENTER.
* Display name varies depending on the type of media
inserted.
3 Press a/b to select a folder or le.
• When you select a folder, press ENTER to open it,
and then press a/b to select a le in the folder.
• To set slide show speed/repeat playback, press C
(Blue)*. For details, refer to the following table.
• You can be chosen the following, and then follow the
on-screen instructions.
C (Blue): Slide menu
Shows item varies depending on the type of media.
Slide Show Menu
Slide Show
Speed
Repeat Mode
Setting
Guide Display
Setting
Setting of slide show playback speed
Setting of slide show repeat playback
Guide display setting during still
image display
4 Press ENTER to display the selected le.
• The selected still image appears on the screen.
1/77
Operational buttons during still image
display
Buttons Description
A (Red) Guide display on/off
C (Blue) Rotate the picture by 90 degrees to
D (Yellow) Rotate the picture by 90 degrees to
the left.
the right.
5 Press KSKIP or LSKIP to replace one
image with another.
• The same operation can be performed by pressing
S REV/V FWD.
• Press n RETURN if you wish to return to the
selection screen.
6 To stop the still image display at any time, press
H STOP.
Playing back Slide Show
1
To play back Slide Show, in Step 6 of the
“Displaying Still Images (JPEG les)”, press
d PLAY (Slide Show).
• The still images inside the selected folder are played
as a slide show.
2 To pause the playback at any time, press
F PAUSE.
• Press d PLAY to return to playback of a slide show.
3 To stop the playback at any time, press
H STOP.
Playback
NOTE
• Thumbnail data will be displayed when JPEG les from a
digital camera contain thumbnail data.
• An icon will be displayed for JPEG les which do not
contain thumbnail data.
• This player can play back picture data stored on your
home network servers such as a DLNA certied PC.
37
Page 47

Music/Video/Picture Playback
DVD-RW
Video Playback
CD-R
This Player can display video les recorded on CD-R/
RW discs, DVD-R/RW discs, BD-R discs, BD-RE
discs.
• For details on the video les that you can display using
this player, refer to page 12.
CD-RW
DVD-R
BD-REBD-R
Viewing a video
1
Press a/b to select “Video”, then press d or
ENTER.
2 Press a/b to select “DISC*”, then press d or
ENTER.
* Display name varies depending on the type of media
inserted.
• If only a DISC is connected, the “DISC”, selection
screen does not appear. In such cases, after step 1,
proceed to step 3.
3 Press a/b to select a folder or le.
• When you select a folder, press ENTER to open it,
and then press a/b to select a le in the folder.
Lipsync (audio/video synchronizing)
Some motions have a slightly delay when showing
Video playback.
By adding a bit of sound delay, you can adjust the
sound of WiSA output and Analog output to match
the video.
When you connected display supports the automatic
audio/video synchronizing capability (“lipsync”)
with an HDMI cable, and delay setting set to “Auto”,
automatically adjusted the sound delay time to match
the video. If you nd the automatically set delay time
unsuitable, set the delay time manually.
1 Press AUDIO SETUP to display “Audio Delay”.
2 Press a/b to adjust the gap between audio and
video.
(Off, Auto, 1 to 800 msec.)
NOTE
• About Digital output, when sampling frequency of
contents is not 48 kHz, maximum delay will be 200 msec.
Shows item varies depending on the type of media.
4 Press ENTER to play back the selected le.
• The selected video le will start playback.
5 To stop the playback at any time, press H STOP.
Playback
38
Page 48

Playback Functions
DVD VIDEO
DVD-R
DVD-RW
BD VIDEO
BD-R
BD-RE
DVD VIDEO
DVD-R
USB
Home Network
DVD VIDEO
DVD-R
BD VIDEO
BD-R
BD-RE
DVD VIDEO
DVD-R
DVD-R
DVD-RW
NOTE
• Some operations in the following playback functions
cannot be performed depending on the specications of
the disc.
Fast Forward/Reverse (Search)
BD VIDEO BD-R BD-RE
Pause/Frame Advance Playback
BD VIDEO BD-R BD-RE
DVD-RW
The Pause function is enabled when F PAUSE is
pressed during playback. (If you are playing back an
audio CD, SACDs, audio data or still images [JPEG
les], these will also pause.)
The Frame Advance Playback function is enabled when
U SKIP is pressed during pause.
• Frame Advance Playback may not function properly with
discs other than DVD-RW/R (VR format).
NOTE
• Some BD/DVD Video discs are not compatible with
Pause/Frame Advance Playback.
• Frame Reverse Playback cannot be performed with this
player.
• Frame Reverse Playback cannot be performed for DivX
video.
SACD
AUDIO CD SACD
The Fast Forward/Reverse function is enabled when
G REV or J FWD is pressed during playback.
Example: When J FWD is pressed
• The search speed will change each time you press the
button.
When playing back a DVD
• You cannot perform Fast Forward/Fast Reverse from one
title and continue to another title (except when playing
audio CDs). At the end or beginning of the title, Fast
Forward/Fast Reverse will be cancelled and normal
playback will automatically resume.
NOTE
• Subtitles are not played back with BD/DVD video discs
during Fast Forward and Fast Reverse.
Skipping to the Next or the Start of the Current Chapter (Track/Title)
DVD-RW
SACDAUDIO CD CD-R CD-RW
The Skipping (to the beginning of a chapter, track or
title) function is enabled when T SKIP or
U SKIP is pressed during playback.
Slow Playback
DVD-RW
The Slow Playback function is enabled when
U SKIP /
or T SKIP / is pressed for
more than 2 seconds during pause.
• Press d PLAY to return to normal playback.
NOTE
• This doesn't work for audio CDs or SACDs.
• You cannot perform Slow Playback between titles. At
the end of the title, Slow Playback will be cancelled and
normal playback will automatically resume.
• Reverse Slow Playback cannot be performed for BD
video and DVD discs in AVCHD format.
• Reverse Slow Playback cannot be performed for DivX video.
Displaying the Audio Information
You can display the audio information on the disc
currently being played back by pressing AUDIO.
• The displayed contents vary depending on the disc.
BD VIDEO
The audio channel currently being played back will be
displayed.
If multiple audio channels are recorded, you can
switch the audio channel by pressing AUDIO.
When a recorded broadcast with stereo or
monaural audio is played back:
“Stereo” is displayed. (Audio cannot be switched.)
DVD VIDEO
Playback
NOTE
• When you play a program recorded in stereo or monaural,
and if you are listening to the Bitstream sound via the
digital output jack, you cannot select the audio channel.
Set the digital audio output setting to “PCM” (page 44).
• Settings for audio can also be changed in the Function
Control screen (page 40).
• The operation of audio differs according to each disc. You
may need to refer to the operation manual of the disc.
• The display for audio information automatically
disappears after 5 seconds.
39
Page 49

Settings During Playback
DVD VIDEO
DVD-R
Function Control
BD VIDEO BD-R BD-RE
DVD-RW
SACDAUDIO CD
This allows you to adjust various settings at once,
like subtitles, angle settings and the title selection for
Direct Playback. You can adjust the video and audio
to suit your preferences. The operations are the same
for BD and DVD.
Function control operation
procedure
1 Press FUNCTION during playback.
• The Function Control screen is displayed on the TV.
2 Press a/b to select the desired setting, then
press ENTER.
BD-VIDEO
1/3
5 5 / 2
0 0 : 2 0 : 3 0
2 English
1
1 DTS
Delay Auto
Off
3 Press a/b/c/d to set, then press ENTER.
• Operations vary depending on the setting. Follow the
operation instructions on the screen.
4 Press n RETURN or FUNCTION to close the
Function Control screen.
NOTE
• If “– –” is displayed for an option like title number or
subtitles, the disc has no titles or subtitles which can be
selected.
• The displayed items vary depending on the disc.
• If you access the Function Control screen during playback
of a BD/DVD video, it may be impossible to operate the
BD/DVD video playback. In cases like this, close the
Function Control screen.
• These functions may not work with all discs.
• You can display the disc information by pressing ON
SCREEN during playback.
Item: All, Elapsed playback time, No Display (All Disc
Information disappears after about 1 minute elapses
without performing any operations.)
Functions which can be set
Title/Track Number (Direct Title/Track Skip)
• Shows the title number being played back (or track
number when playing back an audio CD). You can
skip to the start of the title (or track).
• To skip to the start of a selected title (or track),
press the Number buttons to enter the title (or track)
number when this option is highlighted.
Chapter Number (Direct Chapter Skip)
• Shows the chapter number being played back. You
can skip to the start of the chapter.
• To skip to the start of a selected chapter, press the
Number buttons to enter the chapter number when
this option is highlighted.
Playback Elapsed Time (Direct Time Skip)
• Shows the time elapsed from the beginning of the
current disc title (or track). This lets you skip to a
specic time.
• Press c/d to select the Hour, Minute or Second,
then press a/b or the Number buttons to set the
time. Press ENTER to start playback at the set time.
Subtitle Language
• Shows the currently selected subtitle language. If
subtitles are provided in other languages, you can
switch to your preferred language.
Angle Number
• Shows the currently selected angle number. If the
video is recorded with multiple angles, you can switch
the angle.
Audio
• Shows the currently selected type of audio. You can
select the desired type of audio.
Delay
• Some motions have a slightly delay when showing
Video playback.
By adding a bit of sound delay, you can adjust the
sound to match the video.
Repeat
• The current Title (or Chapter) or partial segments can
be repeatedly played back.
• Playback Title: Repeats the title currently being played
back.
• Playback Chapter: Repeats the chapter currently
being played back.
• Scene Selection: Repeats the specied scene of title
or chapter.
NOTE
• Repeat playback is also possible with PLAY MODE on
the remote control.
Playback
40
Page 50

Settings
SETTINGS
Common Operations
The “menu” enables various audio/visual settings and adjustments on the functions using the remote control
unit. You need to call up the On Screen Display to perform settings for this player. The following is the
explanation for the basic operations of the “menu”.
Example: Setting “AQUOS LINK”
1
Music
Video
Picture
Settings
Display the menu screen
Press DISC to select DISC function.
• The same operation can be
performed by pressing INPUT
repeatedly on the main unit.
Press a/b to select “Settings”, then
press d or ENTER.
2
Select a menu item
Press a/b to select “System settings”,
then press d or ENTER.
Press a/b to select “AQUOS LINK”,
then press d or ENTER.
Version
USB Management
Manual Update
On Screen Language
Quick Start
Auto Power Off
Front Display/LED
AQUOS LINK
Control Panel
3
Press a/b to select the desired item, then press ENTER.
Press n RETURN to return to the previous “menu” page.
Select the next item
4
Exit the menu screen
Press HOME or EXIT to exit.
Regarding the instruction on the manual
On this manual, the following expression is often used in order to simplify instructions.
• Go to “Home” > “Settings” > “Playback Settings” > . . .
This indicates how to navigate through the HOME screen Using a/b/c/d and ENTER.
41
Settings
Page 51

Playback Settings
Go to “HOME” > “Settings” > “Playback Settings” >
SACD Priority
This lets you select which audio layer to play for
SACD (Super Audio CD).
• Before change item, eject and re-load the disc.
Item
Multi-channel: Play the high resolution multi-channel
surround audio layer.
Stereo: Play the high resolution 2-channel stereo audio
layer.
CD Mode: Play the CD layer of a hybrid SACD disc.
Auto Play Mode
This lets you select whether the player will start
playing a Disc automatically.
Item
On: The disc starts playing upon insertion into the player.
Off: The player waits for the user to start playback by
pressing PLAY.
Parental Control
Disc Language (Disc Priority Language)
This lets you select the language for subtitles, audio
and menus displayed on the screen.
Item (Menu Language)
Select the menu language you want to display.
Item (Audio Language)
Select the audio language you want to hear.
Item (Subtitle Language)
Select the subtitle language you want to display.
Angle Mark Display
This lets you turn the Angle Mark Display on or off
when BD/DVD video recorded with multiple angles
is played back. (The Angle Mark is displayed in the
lower right screen.)
Item
On, Off
This lets you set the Parental Control for BD-ROM/
DVD-VIDEO depending on the disc content.
The 4-digit password number needs to be entered
before the Parental Control Levels and the Country
Code are set. The Parental Control Levels and the
Country Code cannot be set if a password has not
been created or the password is not entered.
• Select the rating level appropriate for the age of the user.
Item (BD-ROM, DVD-VIDEO)
Select parental levels for prohibits play with
corresponding ratings recorded on them.
Item (Country Code)
Select the country code.
• The ratings differ according to the country.
Item (Password Setting)
Set the 4-digit password.
NOTE
• Refer to “Common Operations” on page 41 for details.
Settings
42
Page 52

Video Settings
Go to “HOME” > “Settings” > “Video Settings” >
HDMI Video Setup
This sets the resolution of the HDMI video output.
Some TVs are not fully compatible with the Wireless
Universal Player, which may cause the image
distortion.
Item
Auto, 1080p, 1080i, 720p, 480p
NOTE
• You can select HDMI Output mode by pressing HDMI
OUT 1/2 SELECT on the remote control when both HDMI
Output ports are in use.
Item: HDMI 1 OUT only, HDMI 2 OUT only
4K Upscale
When the Player is connected to a 4K-compatible TV
and the “4K Upscale” is set to “Auto”, 4K video signal
will outputs with up scaling to 4K video signal.
Item
Auto, Off
NOTE
• When using HDMI 1 OUT is available outputs 4K video
signal, and “HDMI Video Out” set to the “Auto”.
• When using HDMI 2 OUT (WiHD transmitter) is not
available outputs 4K video signal.
3D Mode
This sets output of 3D images.
To view 3D images, playback of 3D content (3D BD
video) is necessary with a 3D compatible TV and 3D
glasses in addition to this player.
Item
Auto: Video signals are output as 3D when 3D content
(3D BD video) is played or as 2D when 2D content is
played.
2D: Even if 3D content (3D BD video) is played, video
signals are output as 2D at all times.
CAUTION
• When viewing 3D images, viewing for a long period of
time or lying on your back may cause eye strain and
discomfort. In addition, 3D images may affect the eyesight
of young children/infants, so keep them from viewing the
images.
3D Notice
This sets whether or not a notice is displayed (“On” or
“Off”) on the connected TV every time 3D content (3D
BD video) is played.
Item
On, Off
24p Output
This let you to set the 24p output options for video
encoded at 24Hz frame rate.
Item
Auto: When the Player is connected to a 24Hz
compatible TV, 24p will automatically be displayed
when compatible discs are played back.
Off: Output as converted to 60Hz (NTSC).
SUPER PICTURE
You can enjoy video images with higher image
quality. This enhances the quality of video images
with pixel by pixel processing technology.
Item
On, Off
Settings
43
Page 53

Audio Settings
Go to “HOME” > “Settings” > “Audio Settings” >
Audio Out
This lets you set the digital audio output format
according to the capabilities of the connected audio
equipment.
• For details, refer to the audio output format selection table
on page 53.
Item
WiSA Output
Analog Output
HDMI Output: Auto, PCM
Digital Output: Bitstream, 192 kHz PCM,
96 kHz PCM,48 kHz PCM
NOTE
• Make sure to select a compatible digital audio output
format, otherwise you will hear no sound or a garbled
noise.
• If the HDMI device (Receiver, TV) is not compatible with
compressed formats (Dolby Digital, DTS, DSD), the audio
signal outputs as PCM.
• If you play MPEG audio soundtracks, the audio signal
format will be PCM regardless of digital audio output
format selection (PCM or Bitstream).
Secondary Audio
This let you to set the Secondary Audio Program
mixing option.
Dynamic Range Control
This lets you adjust the range between the loudest
and softest sounds (dynamic range) for playback
at average volume. Use this when it is hard to hear
dialog.
Item
Normal: The same audio output range is played as the
original recorded audio output range.
Shift*: When Dolby Digital audio is played back, the
dynamic range of the audio is adjusted so that the
dialog portion can be heard easily. (If the audio
sounds abnormal, set to “Normal”.)
Auto: When you play back audio in the Dolby TrueHD
format, the dynamic range is automatically adjusted.
* Lower the audio volume before setting. If you do not do
so, the speakers may emit a loud sound or excessive
output may be applied to the speakers.
Analog Output Volume
This let you to enable or disable the analog volume
controls.
Item
Variable: Enables the analog volume control. Use the
Volume control to increase/decrease the analog audio
output level (the maximum is 100).
Fixed: The analog audio output level is xed to 100.
Item
On: The Secondary Audio Program and menu sounds
are mixed into the primary audio.
Off (default): The Secondary Audio Program and menu
sounds are not mixed into the primary audio and you
cannot hear the secondary audio or menu sounds.
NOTE
• This function is only effective for Blu-ray contents.
• The secondary audio is all output after converted to 48
kHz PCM data.
• Secondary and Effect audio is not present on DVD video.
DSD DAC Direct
This lets you send the original signal (DSD data) in a
SACD or DSF/DSDIFF le directly to the DAC.
Faithful sound to the original can be output from the
analog audio terminals (RCA/XLR).
Item
On (default): DSD data is directly input to the analog DAC.
Off: DSD data is rst converted to PCM data and then
input to the analog DAC.
NOTE
• Multi-channel DSD data is always converted to PCM data
regardless of the current settings.
• Set “Audio Out” to “Analog Output”.
Settings
44
Page 54

WiSA Settings
Go to “HOME” > “Settings”> “WiSA Settings”>
Status Information
This shows how many RX devices are associated
with this player and shows the channel assignment of
all associated RX devices in the WiSA network of this
player. RX devices should be WiSA-compliant and
those include Wireless Bridges, Wireless Ampliers
and Wireless Speakers. The WiSA network is a
connected set of one player and between one and
eight RX devices. The list of Mac Address of the
associated RX devices and its channel assignment is
displayed on the screen.
Mac Address
Six groups of two hex numbers label on each RX
devices.
Channel assignment
L: Left Front Speaker
R: Right Front Speaker
C: Center Speaker
SW: Sub Woofer Speaker
LS: Left Side Speaker
RS: Right Side Speaker
LB: Left Back Speaker
RB: Right Back Speaker
--: Not assigned
And this lets you remove one of listed RX devices
from the network of this player.
1 Press ENTER.
2 Press a/b/c/d to select the device.
3 Press c/d to select “Yes”, then press ENTER.
NOTE
• The RX device removed from the WiSA network will be
placed in Associate Mode.
Manual Search
This lets you initiate the Association process that the
player discover and admit the RX devices into the
network.
• When you have not yet constructed the WiSA network,
you can do it with this method.
• If you want to reconstruct the WiSA network of this player,
you can reset the existing network by executing WiSA
conguration clear (p. 46) before this operation.
• To add RX devices to the existing WiSA network of
this player without resetting the network, perform the
following.
1 Power on all RX devices.
2 Place only the previously unassociated RX
devices into Associate mode using the method
described in its User Manual.
3 Press a/b to select “Yes”, then press ENTER.
NOTE
• When it nishes the Manual Search, the player
automatically saves RX device associations.
• If no RX devices are found through the Association
process, the alert message of “Cannot detect a receiver”
is displayed on the screen.
• If conicting output selections are found through the
Association process, the alert message of “Conicting
output selections” is displayed on the screen.
Speaker Conguration
This lets you reassign channel for the associated
RX devices and adjust the settings conguration
(environment) for each RX devices.
1 Press a/b/c/d to select output which you want
to reassign and adjust, then press ENTER.
2 Press c/d to select item which you want to
change, then press a/b to select setting.
Item
Size: The size of the speaker of this channel
Large, Small, No
Distance: The distance of the speaker from the place of
listener (in feet).
0ft, 1ft, 2ft, --- 40ft
Level: The offset of volume level adjustment (in dB)
-12dB, -11dB, ----, +11dB, +12dB
Select: The channel reassignment. Assign a new Mac
address (RX) to the current position.
3 Repeat step 1 and 2 to set a each channel
4 Press n RETURN, then setting is
automatically saved.
5 Press a/b/c/d to select “Test Start”, then press
ENTER to start a test tone.
6 Press n RETURN.
7 Press a/b/c/d to select “Finish”, then press
ENTER.
NOTE
• If you have difficulty in hearing the test tone from the sub
woofer, adjust the sub woofer’s volume by listening to the
other contents you play.
• If SW is not exist, the Size of L/R is xed to Large.
Settings
45
Page 55

WiSA Settings
Crossover
This lets you set the Bass Management kick-in
frequency for all speakers. When the speaker size
is set to Small in Speaker Conguration, bass
information below this frequency is not passed to
the speakers to reduce possible distortion, and if
the sub woofer is available, bass information will be
redirected the subwoofer. When all speaker sizes are
set to Large, there is no Bass Management.
Item
40/50/60/---/190/200 Hz
WiSA Cong Clear
This clears all WiSA settings and dismisses all RX
devices from the existing WiSA network of this player,
then automatically powers down.
Item
Yes, No
46
Settings
Page 56

Communication Setup
This allows you to perform and/or change the
communication settings and select the type of
Internet connection from Cable or Wireless (built-in).
This setting is required to use BD-LIVE functions, and
software updates that connect to the Internet.
NOTE
• For manually performing the setting, the following
information of the connected router or modem is required.
Conrm the information prior to the setting.
− IP address, netmask, gateway, DNS address
Cable/Wireless Select
Go to “HOME” > “Settings” > “Communication
Setup” >
1 Select internet connection type.
Press a/b to select “Cable/Wireless select”, then
press d or ENTER.
2 Press a/b to select “Cable” or “Wireless”, then
press ENTER.
When using a LAN Cable
NOTE
• Make sure that the LAN cable is connected to this player
if a wired Internet connection is made (see page 22). This
setting cannot be performed when a LAN cable is not
connected.
Ethernet Quick Setup (Cable)
4 Press ENTER.
• If selecting “Auto IP” in the step 3, go to the step 8.
5 Enter your IP address, Netmask, Gateway, DNS
1, DNS 2.
• Regarding each of the setup values, conrm the
specications of your broadband router.
6 Press a/b to select “Proxy” then press d or
ENTER.
7 For setting the Proxy, press a/b to select “Use”
or “Not Use”, then press ENTER.
• If selecting “Use”: Access the Internet via proxy
server. Enter your Proxy Address and Proxy Port.
Select “Next”, then press ENTER.
• If selecting “Not Use”: Disables the use of a proxy
server.
8 For testing the connection to the Internet, after
conrming the settings, press a/b to select
“Test”, then press ENTER.
• “Test” is available only when setting to obtain the IP
address automatically. “Test” cannot be selected if
the IP address has not been obtained automatically.
• As a result of the test, if the Internet connection fails,
enter the setup values manually. Press a/b to
select “Complete”, then press ENTER.
When using Wireless LAN
CAUTION
• When performing the wireless communication setup,
security information for the wireless router/access
point (WEP, WPA or WPA2 key) is required. Check your
wireless router/access point’s information prior to setup.
Go to “HOME” > “Settings” > “Communication
Setup” >
1 Press a/b to “Ethernet Quick Setup (Cable)”,
then press ENTER. The IP address and other
network setting is automatically obtained.
2 Press a/b to select “Change”, then press
ENTER.
3 For testing network setting, press a/b to select
“Test”, then press ENTER.
• If the test has failed, an error message appears. Try
to “Ethernet Setup (Cable)” setting as below. Press
a/b to select “Complete”, then press ENTER.
Ethernet Setup (Cable)
Go to “HOME” > “Settings” > “Communication
Setup” >
1 Press a/b to select “Ethernet Setup (Cable)”,
then press d or ENTER.
2 Press a/b to select “Change”, then press
ENTER.
• For initializing the current setting, select “Initialize”,
then press ENTER.
3 Press a/b to select “Auto IP” or “Manual IP”
• If selecting “Auto IP”: The IP address is automatically
obtained.
• If selecting “Manual IP”: The IP address, netmask,
gateway, DNS 1 and DNS 2 are manually entered.
NOTE
• Before this player can access the Internet wirelessly,
setup of a wireless router/access point is required.
Go to “HOME” > “Settings” > “Communication Setup” >
1 Press a/b to select “Ethernet Setup (Wireless)”,
then press d or ENTER.
2 Press a/b to select “Change”, then press ENTER.
• For initializing the current setting, select “Initialize”,
then press ENTER.
3 The player scans all of the available access
points and displays the points with the “Other
Network” selection bar on the screen.
• When no available access points are retrieved, only
the “Other Network” selection bar is displayed on the
screen.
4 Press a/b to select desired access point or
“Other Network”, then press ENTER.
• For access points which are set to hide the SSID
using the wireless router, select “Other Network” to
set the access point.
• If selecting desired access point, go to step 7.
• If selecting “Other Network”, go to the next step.
5 Enter the access point name.
6 Select “Next”, then press ENTER.
Settings
47
(Continued on the next page)
Page 57

Communication Setup
7 Press a/b to select your appropriate security
key, then press ENTER.
• When selecting WPA/WPA2, selectable security keys
are PSK/TKIP and PSK/AES.
8 Press ENTER, then enter the security key code.
• Enter the exact same security key which has been
set in the wireless router.
• The security key code is manually entered using the
screen for inputting characters.
9 Select “Next”, then press ENTER.
10 For testing after conrming the settings, select
“Test”, then press ENTER.
• If the test has failed, an error message appears.
Retry to perform the settings after checking that the
connection (page 23) is performed properly.
• Follow 3-8 of (“Ethernet Setup (Cable)” on page 47 to
complete the network connection settings.
11 Press a/b to select “Complete”, then press
ENTER.
Information on Mac addresses
A Mac address is a unique ID number for network
equipment. A Mac address is necessary for Mac
address ltering on the wireless router/access
point.
Before the wireless communication setup is
performed, we recommend writing down the Mac
address and keeping it in a safe place. (The Mac
address is displayed on the “Current Ethernet
setup info.” screen when wireless communication
is set (See step 2).)
Mac address
BD Internet Access
This allows you to set access restriction to BD-LIVE
contents.
Item
Permit: Allows all BD-LIVE discs.
Limit: Allows only discs with owner certication.
Prohibit: Prohibits all BD-LIVE discs.
IP Control Setup
This player can be controlled from a PC, Home
Control, Smart phone, Tablet PC using IP.
If you want to control by using Mobile App., you have
to enable this item.
Use a cross-type RS-232C cable, ETHERNET cable
(commercially available) or wireless LAN for the
connections.
Press a/b to select “Change”, then press ENTER.
• For initializing the current setting, select “Initialize”, then
press ENTER.
Item
Enable: Enables local network streaming. A broadband
internet connection is required, and special hardware/
software congurations are required.
Disable: Disables local network streaming.
NOTE
• This operation system should be used by a person who is
accustomed to using computers.
Communication conditions for IP
Connect to the player with the following settings
made for IP on the PC, Smart phone, Tablet PC, etc.
IP protocol: TCP/IP
Host IP address: Set the IP address on the player
menu
Service: None (Do not select Telnet or SSH)
TCP port#: Set a port number on the player
menu
When you set your ID and password on the player
menu, you need to enter them as soon as you
connect to the player.
NOTE
• The connection will be cut off when there has been no
communication for 3 minutes.
• Communication procedure (see page i)
NOTE
• The available functions differ depending on the disc.
• Regarding playback method of BD-LIVE contents,
etc., perform the operations in accordance with the
instructions in the BD disc manual.
• To enjoy BD-LIVE functions, perform the broadband
Internet connection (pages 22 , 23) and communication
settings (pages 47 , 48).
Settings
48
Page 58

System Setting
Go to “HOME” > “Settings” > “System Settings”
Version
When you select “Version”, the system software
version is displayed.
Before using the USB memory device
CAUTION:
• Do not remove the USB memory device or unplug the
AC cord while the operations for “USB Management”
or “Manual Update from USB memory device” are
being performed.
• Do not use a USB extension cable when connecting
a USB memory device to the USB terminal on the
player.
− Using a USB extension cable may prevent the
player from performing correctly.
NOTE:
• SHARP cannot guarantee that all brands’ USB
memory devices will operate with this player.
• Only USB memory devices (2GB or greater, 2TB and
under) formatted with FAT 32/16 are compatible.
When formatting a USB memory device using a PC,
perform the following settings.
Format File System: FAT32
Allocation Unit Size: Default Allocation Size
USB Management
The following instructions explain how to delete data
such as the Virtual Package data and the BD-LIVE
data in a USB memory device.
When you insert or remove a USB memory device,
be sure to turn the main power off.
Insert the USB memory device into the USB 2
terminal on this player.
USB memory
device
Go to “HOME” > “Settings” > “System Settings”
1 Press a/b to select “USB Management”, then
press
d or
ENTER.
• “No USB Memory” appears when no USB memory
is inserted.
2 Press
a/b
press d or ENTER to proceed.
Erase: Deletes only BD-VIDEO data written on the USB
memory device such as BD-LIVE data.
Format: Delete all of the data
to select “Erase” or “Format”, and then
3 Press a/b to select “Yes”, then press ENTER.
4 Start the process.
• The screen for the current operation will display.
5 Press ENTER.
NOTE
• Data which has been saved to the player’s internal
memory (game score, etc.) will also be deleted.
49
Settings
Page 59

System Setting
Manual Update
In this player, the software version can be updated
using either one of the following methods.
• Manual Update from Network
• Manual Update from USB memory device
Manual Update from Network
This function allows you to perform the update
operation by accessing an Internet connection
manually to check if there is a new rmware version.
NOTE
• Make sure that the LAN cable is connected to this player
if a wired Internet connection is made. Make sure that the
wireless router/access point is connected to the Internet if
a wireless Internet connection is made (see pages 22 , 23).
• Make sure to perform the communication settings (see
pages 47 , 48).
• It may take time to access and download the update
depending on the Internet connection and other factors.
CAUTION
• While downloading or updating the software, do not
remove the LAN cable when it is used for the Internet
connection, do not unplug the AC cord, do not remove
any cables from the router/access point and do not turn
off the router/access point.
Go to “HOME” > “Settings” > “System Settings”
1 Press a/b to select “Manual Update”, then press
d or ENTER.
2 Press a/b to select “Network”.
3 Press ENTER to start checking the latest version
of rmware data on the network.
• After checking, the current version of this unit
software and the latest version of the update le on
the network are displayed when latest version of
rmware has been found.
To update this player software with update le, select
“Yes”.
4 Press ENTER to start updating.
• Please wait for the update screen to appear. Do not
unplug the AC cord.
5 When the software is successfully updated, a
screen is displayed indicating that the update
process is completed.
6 Press POWER to turn off the player.
NOTE
• If the rmware has already been updated to the latest
version, you do not need to update.
• If the Internet connection has failed, an error message
appears.
Retry the update after checking if the broadband Internet
connection (pages 22 , 23) and communication settings
(pages 47 , 48) are performed properly.
Settings
50
Page 60

System Setting
Manual Update from USB memory
device
This function allows software updates by inserting a
USB memory device with the update le into the USB
2 terminal on this player.
• When a software update is performed, the software
update data must be written onto the USB memory device
in advance using a PC.
• The USB memory device must be clear of all les except
software update data to allow new software uploading.
To check for the availability of a software update,
visit www.sharpusa.com/products/support/. If you
have any questions, please call 1-800-BE-SHARP
(800-237-4277).
• When software update data is released, copy the data
onto a USB memory device after downloading it to a PC.
• For methods such as downloading and copying to a USB
memory device, carefully read the description shown on
the website before performing the operation.
NOTE
• Only USB memory devices (2GB or greater, 2TB and
under) formatted with FAT 32/16 are compatible.
When formatting a USB memory device using a PC,
perform the following settings.
Format File System: FAT32
Allocation Unit Size: Default Allocation Size
• Do not extract the rmware update le to any folders
other than the root directory on the USB memory device.
The rmware update le must be only one le directly in
the root directory.
3 Press ENTER to start checking data in the USB
memory device.
• After checking, the current version of this unit
software and the version of the update le on the
USB memory device are displayed. To update this
player software with update le, select “Yes”.
NOTE
• If the USB memory device is not properly installed or the
correct update le cannot be found on the USB memory
device, an error message is displayed.
Check the le on the USB memory device, and then
reinsert the USB memory device correctly.
4 Press ENTER to start updating.
• Please wait for the update screen to appear. Do not
unplug the AC cord.
5 When the software is successfully updated, a
screen is displayed indicating that the update
process is completed.
• If the update has failed, check the le in the USB
device and try Software Update again.
6 Press POWER to turn off the player.
• Delete unneeded software update data using a PC
after the software update process is completed.
7 Remove the USB memory device.
NOTE
• If you’ve set your password, please enter the password
from the update screen.
CAUTION
• Do not remove the USB memory device or unplug the AC
cord while the software is being updated.
When you insert a USB memory device, be sure to
turn the main power off.
Insert the USB memory device with the update le
into the USB 2 terminal on this player.
USB memory
device
Press POWER to turn on the power.
Go to “HOME” > “Settings” > “System Settings”
1 Press a/b to select “Manual Update”, then press
d or ENTER.
2 Press a/b to select “USB Memory”.
Settings
51
Page 61

System Setting
Go to “HOME” > “Settings” > “System Settings”
On Screen Language
You can set the language you want to display on the
screen.
Item
English, Español, Français
Quick Start
You can reduce the player's start-up time after turning
on the power.
Item
On: The player quickly starts up from standby.
Off: Power consumption is small during standby.
Auto Power Off
This sets the Player so that power is automatically
shut off if playback is stopped and you do not perform
any operations for about 180, 60 or 10 minutes.
Item
On (180 min), On (60 min), On (10 min), Off
Front Display/LED
If you feel that the front panel display and indicators
on the player are too bright when watching movies,
you can dim them or turn them off except for the
POWER indicator.
Item
Control: Dimmer1 Dimmer2, Dimmer3, Off
Dimmer1: Brightness control during 100% to 10%
Dimmer2: Brightness control during 100% to 10%
Dimmer3: Brightness control during 100% to 10%
Control Panel
This lets you set display of the control panel on the
TV screen to on or off.
Item
On, Off
Auto Update Setting
This lets you to set whether the player should
automatically check for new rmware versions on the
network and noties you about new rmware.
Item
On: Checks for rmware updates automatically and
noties you about new rmware.
Off: Does not check for new rmware version automatically.
Remote Control Code
This player can respond to one of three sets of
remote control codes. If you have other SHARP
products in the vicinity of this player, the other
products may respond to this player remote control.
To prevent this, you can select a different remote code.
Item
RC-1 (default), RC-2, RC-3
NOTE
• If you have selected a new remote code, you must set the
remote control handset to use the same code (see page 26).
DivX(R) Registration
The DivX registration code is displayed.
Item
OK
AQUOS LINK
This lets you set the Player to receive the control
signal from the AQUOS LINK remote control via the
HDMI cable.
Item
LINK : On, Off
POWERLINK:
Yes: POWER On/Off link together
No: POWER On/Off not link together
NOTE
• This function is available using HDMI 1 OUT terminal
only.
• For details, refer to the operation manual of TV.
NOTE
• To learn more, visit www.divx.com/vod.
DivX(R) Deregistration
You can deactivate your DivX information on the
player.
Item
Yes, No
NOTE
• To learn more, visit www.divx.com/vod.
System Reset
You can reset all settings to the factory presets.
Item
Reset, Not Reset
52
Settings
Page 62

System Setting
Audio Output Selection Formats
About Output of Audio Formats
Audio Out
Settings
WiSA Output
Analog Output
HDMI Output
Digital Output
The audio from speaker
connect with WiSA wireless
bridge
When connect to audio
amplier from Analog AUDIO
OUT terminal.
When connect to AV
amplier from HDMI OUT
terminal.
When connect to AV
amplier from Optical or
Coaxial DIGITAL AUDIO
OUT terminal.
Use
*1 When input HDMI IN terminal, the audio is not outputted.
*2 When playback the SACD or DSD, the audio is not outputted.
Maximum
number of
channels
7.1ch, 96kHz
2 ch, 192kHz
Down mixed
7.1ch, 192kHz
PCM or
Bitstream
2ch, 192kHz
PCM or Bitstream
of Dolby Digital,
DTS
WiSA
Analog (It is not outputted.)
HDMI
Optical/Coaxial
WiSA (It is not outputted. )
Analog
HDMI
Optical/Coaxial (It is not outputted.)
WiSA (It is not outputted.)
Analog
HDMI
Optical/Coaxial (It is not outputted.)
WiSA (It is not outputted.)
Analog
HDMI
Optical/Coaxial
Output
Terminal
Output Note
3
The audio is PCM 2ch output.
3
The audio may not be output for some
audio signal in which copyright-protected
3
contents are recorded.*
3
• The audio is PCM 2ch output.
• The audio may not be output for
3
3
3
3
3
3
some audio signal in which copyrightprotected contents are recorded.*
The audio may not be output for some
audio signal in which copyright-protected
contents are recorded.*
The audio is PCM 2ch output.
The audio may not be output for some
audio signal in which copyright-protected
contents are recorded.*
1 *2
1
1
1 *2
53
Settings
Page 63

Appendix
RS-232C port specications
RS-232C port specications
Using Custom Control Devices with this
Player
• When a program is set, this Player can be controlled from
the custom control device using the RS-232C terminal.
The power can be turned on or off (standby) and
automatic programmed playback is possible.
• Use an RS-232C cable cross-type (commercially
available) for the connections.
NOTE
• This operation system should be used by a person who is
accustomed to using custom control devices.
RS-232C serial control cable
(cross type)
Communication conditions
Set the RS-232C communications settings on the custom
control device to match this player’s communications
conditions. This player’s communications settings are as
follows:
Baud rate: 9,600 bps
Data length: 8 bits
Parity bit: None
Stop bit: 1 bit
Flow control: None
Communication procedure
Send the control commands from the custom control device
via the RS-232C connector.
This Player operates according to the received command and
sends a response message to the custom control device.
Do not send multiple commands at the same time. Wait until
the custom control device receives the OK response before
sending the next command.
Make sure to send “A” with the carriage return and conrm
that “ERR” returns before operating.
Command format
Eight ASCII codes eCR
C1 C2 C3 C4 P1 P2 P3 P4
Command 4-digits Parameter 4-digits Return code
Command 4-digits: Command. The text of four characters.
Parameter 4-digits: Parameter 0 – 9, blank
Parameter
Input the parameter values, aligning left, and ll with
blank(s) for the remainder. (Be sure that four values are
input for the parameter.)
When the input parameter is not within an adjustable range,
“ERR” returns. (Refer to “Response code format”.)
1
Response code format
Normal response
O K
Return code (0DH)
Problem response (communication error or incorrect
command)
E R R
Return code (0DH)
After sending the return code (0DH), make sure to send line
feed (0AH) as well.
RC-232C (IP control) command list
CONTROL ITEM COMMAND PARAMETER
POWER ON P O W R 1 _ _ _
POWER OFF P O W R 0 _ _ _
POWER STATUS P O W R ? ? ? ?
PLAY D P L Y _ _ _ _
STOP D S T P _ _ _ _
FWD D F W D _ _ _ _
REV D R E V _ _ _ _
TOP MENU D T M N _ _ _ _
UP a
DOWN b
LEFT c
RIGHT d
ENTER D E N T _ _ _ _
RETURN D R E T _ _ _ _
EXIT D E X T _ _ _ _
HOME D S E T _ _ _ _
POP-UP MENU D P M N _ _ _ _
SKIPK
SKIPL
PAUSE D P U S _ _ _ _
OPEN/CLOSE D E J T _ _ _ _
FUNCTION D F N C _ _ _ _
REPEAT D R E P _ _ _ _
*: NUMBER 0 to 9 D N M * _ _ _ _
A D A K Y _ _ _ _
B D B K Y _ _ _ _
C D C K Y _ _ _ _
D D D K Y _ _ _ _
REPLAY D R P L _ _ _ _
SKIP SEARCH D S K S _ _ _ _
AUDIO D A U D _ _ _ _
SUB TITLE D S B T _ _ _ _
ANGLE D A N G _ _ _ _
DISPLAY D D S P _ _ _ _
VOLUME UP D V L U _ _ _ _
VOLUME DOWN D V L D _ _ _ _
MUTE D M U T _ _ _ _
“–” mark: space
i
D U P K _ _ _ _
D D W N _ _ _ _
D L F T _ _ _ _
D R G T _ _ _ _
D S K B _ _ _ _
D S K F _ _ _ _
Appendix
Page 64

Troubleshooting
The following problems do not always suggest a defect or malfunction of this Player.
Refer to the problems and lists of possible solutions below before calling for service.
Power
Problem Possible causes and solutions
The Player power cannot be turned
on.
The Player power is turned off. • Is “Auto Power Off” set to “On”? When “Auto Power Off” is set to “On”, the power will
Basic Operation
Problem Possible causes and solutions
The remote control does not work. • Use the remote control within its operating range (page 26).
Cannot operate the Player. • Are you operating the Player within the specied operating temperature range
Playback
Problem Possible causes and solutions
The Player cannot play a disc. • Take out the disc and clean it (page 13).
The disc is automatically ejected
after loading a disc.
Video stops. • Has the Player been subjected to shock or impact? Are you using it in an unstable
The Player makes a snapping
sound when starting playback or
loading a disc.
• Make sure that the AC cord is connected to the AC IN terminal on the rear of the
player, the AC cord is plugged into an AC outlet (page 29).
be automatically turned off after the setting time (180, 60 or 10 min.) continuous
minutes of inactivity (no playback) (page 52).
• Replace the batteries (page 26).
• Reset the remote control.
− Press and hold 1 (the number button) rst and then ENTER on the remote
control together for more than 5 seconds.
(page vi)?
• Make sure that the disc is loaded properly (label-side up) (page 31).
• Make sure that region code on the disc matches that of this Player (page 10).
• Allow any condensation in or near the Player to dry (page 13).
• Check that the disc is recorded in the compatible TV system (PAL or NTSC) (page
10).
• The Player cannot play back video which was not recorded normally.
• Proper playback may be impossible due to the state of the disc recording, a
scratched, warped or dirty disc, the state of the pick-up, or compatibility issues
between this Player and the disc being used (pages 10 , 13).
• When the recorded time of a disc is unusually short, playback may not be
possible.
• BD-RE/R discs recorded in a format other than BDMV/BDAV cannot be played
back (page 10).
• Make sure that the disc is loaded properly (label-side up) (page 31).
• Take out the disc and clean it (page 13).
• Make sure that the disc is playable (page 10).
location? The Player will stop if it senses shock or vibration.
• The player may sometimes make a snapping sound when starting playback if it
has not been operated in a while. These sounds are not malfunctions of the player
but are normal operating conditions.
Appendix
(Continued on the next page)
ii
Page 65

Troubleshooting
Picture
Problem Possible causes and solutions
No picture. • If the picture output was mute, turned off picture output.
Screen freezes and operation
buttons do not work.
Square noise (mosaic) appears on
the screen.
Audio is not output, or images are
not played back properly.
3D images cannot be output to a TV. • Is an HDMI cable used?
Noise appears on the screen. • When you watch TV broadcasts with the power of this player turned on, noise may
The display of the smart phone
connected to the HDMI 3 IN (MHL)
terminal cannot be output to a TV.
Audio is not output, or images are
not played back when this player is
connected over WiHD.
Press PICTURE MUTE to resume picture output (page 30).
• Make sure that the cables are connected correctly (page 21).
• Make sure that the connected TV or the AV receiver is set to the correct input
(page 21).
• Take out the disc and clean it (page 13).
• Make sure that region code on the disc matches that of this Player (page 10).
• There is no picture from the HDMI output.
− Are the settings performed correctly? Please check the settings (page 43).
• Press and hold HDMI OUT 1/2 SELECT on the remote control to dual display
mode.
• Turn off the power and turn on the power again.
• Is the disc damaged or dirty? Check the condition of the disc (page 13).
• Blocks in images may be visible in scenes with rapid movement due to the
characteristics of digital image compression technology.
• The audio may not be output or the images may not be played back properly for
some discs in which copyright-protected contents are recorded.
• Are a 3D compatible TV and 3D glasses used?
• Is a proper connection made between the HDMI OUT terminal of the player and
the HDMI input terminal of the 3D compatible TV?
• Is the 3D setting on this player correct (page 43)?
• Is the 3D setting on the TV correct?
• Is a 3D compatible BD disc being played back?
appear on the TV screen. In such cases, turn off the power to this player or keep
this player away from the TV.
• Use an MHL-compatible cable which can work with your smart phone or tablet PC
for the connection (page 27).
Try the following procedure:
• Turn off the power to this player using the remote control, wait for 10 seconds or
more, and then turn on the power again (page 29).
• When the power to the WiHD Receiver is on (indicator lit green), point the remote
control at the WiHD Receiver, and press and hold WiHD ON/OFF on the remote
control for more than 10 seconds.
• Position the WiHD Receiver more than 3.3 ft (1 m) away from the WiHD
Transmitter. After you nish the above, wait until the connection between the WiHD
Transmitter and WiHD Receiver is established.
iii
Appendix
Page 66

Troubleshooting
Sound
Problem Possible causes and solutions
No sound, or sound is distorted. • If the volume of the TV or amplier is set to minimum, turn the volume up.
Audio is not output, or images are
not played back properly.
Audio folder and le names are not
displayed; audio data cannot be
played back, when controlled with
Mobile App.
Names of les you want to play
back by remote control are not
displayed in Mobile App or on the
front panel display on the player.
• There is no sound during still mode, slow motion playback, fast forward and fast
reverse (page 39).
• Check that the audio cable is connected correctly (page 17).
• Check that the cable plugs are clean.
• Take out the disc and clean it (page 13).
• Audio may not be output depending on the audio recording status, such as when
audio other than an audio signal or non-standard audio is recorded for the audio
content of the disc (page 10).
• The audio may not be output or the images may not be played back properly for
some discs in which copyright-protected contents are recorded.
• If folder/le names contain symbols such as “*:/<>?\¥|`&,$.- and/or nonalphanumeric characters, those names may not be correctly displayed in Mobile
App or on the front panel display on the player, and consequently the les may not
be played back. In such case, rename the folder/le before attempting to play it.
• Symbols and alphanumeric characters allowed in folder and le names:
!#%’()+0123456789;=@ABCDEFGHIJKLMNOPQRSTUVWXYZ[]^_
abcdefghijklmnopqrstuvwxyz{}~
WiSA
Problem Possible causes and solutions
No sound.
Sound is interrupted or noisy.
1) If the LED of Wireless Bridge ashes for a minute or more, or if it lights in red,
refer to the separate Quick Setup & Start GUIDE and redo the settings.
2) Installation of the Player and Wireless Bridge
• The Player and Wireless Bridge may be too far apart.
Try moving the Player and Wireless Bridge closer to each other.
They should be within about 33 ft (10 m) of each other.
The transmission distance may be shorter, depending on the size of the room.
• Is the path between the Player and Wireless Bridge blocked by columns, walls,
doors, large items of furniture or electronic equipment?
Or do people cross frequently between the Player and the Wireless Bridge?
Arrange the Player and the Wireless Bridge so there is nothing to block the path
between them.
• Are the Player and the Wireless Bridge installed in a narrow closed space such as
in a rack or cabinet without any openings around the Player and Wireless Bridge?
Leave an opening above the Player and Wireless Bridge, or install them on the
top shelf.
Reception may improve if you move the Player and Wireless Bridge a few inches
forward.
3) Interference from other devices
• Are any other communication devices or electronic devices using wireless waves
in the vicinity?
Try moving the other communications devices away, or turning them off.
The Player is designed to avoid interference from other devices automatically.
If there is interference, you may hear noise from the speakers, or the audio may
be interrupted.
This is a temporary phenomenon that lasts while the Player is selecting an
appropriate frequency. It is not a malfunction.
The Player and the Wireless Bridge use the 5.2–5.8GHz band to transmit audio
signals. If many other devices are using the same band in the vicinity, the Player
may fail to establish connections, and noise and audio interruptions may occur
from time to time.
iv
Appendix
Page 67

Troubleshooting
Network
Problem Possible causes and solutions
Cannot connect to the Internet. When the wired Internet connection is made
Cannot download BD-LIVE
contents.
• Is the LAN cable connected properly?
• Is the wrong cable such as a modular cable used? Connect a LAN cable to the
ETHERNET terminal (page 22).
• Is the power for the connected equipment, such as a broadband router or modem
turned on?
• Is the broadband router and/or modem properly connected?
• Is the proper value(s) set in the network setting? Check “Communication Setup”
(pages 47 , 48).
When the wireless Internet connection is made
• Is the power for the connected equipment, such as a wireless router or access
point turned on?
• Is the wireless router or access point properly connected?
• Are there any obstacles, such as physical structures (brick and concrete walls,
etc.) and electronics (microwave, etc.) between the wireless router/access point
and the player? As this may cause interference with the wireless signal, make
sure to keep obstacles away.
• Is the proper value(s) set in the network setting? Check “Communication Setup”
(pages 47 , 48).
• Make sure that this player is connected to the Internet.
• Is the USB memory device properly connected? Check that the USB memory
device is connected to the USB terminal of this Player.
• Check if the BD disc supports BD-LIVE.
• Check the setting for “BD Internet Access” (page 48).
Other
Problem Possible causes and solutions
The TV operates incorrectly. • Some TVs with wireless remote control capability may operate incorrectly when
The Player heats up during use. • When using this Player, the console cabinet may heat up depending on the usage
POWER indicator will remain lit. • When the AC cord is removed from the outlet, the POWER indicator will remain lit
using the remote control of this Player. Use such TVs away from this Player.
environment. This is not a malfunction.
for a short period. This is normal and is not a malfunction.
To Reset this Player
• If this Player receives strong interference from a source such as excessive static electricity, strong external noise,
malfunction of power supply, or voltage caused by lightning during use or a wrong operation is sent to the Player, errors like
the Player not accepting an operation may occur.
Press and hold POWER on the Player until “RESET” appear on the front panel on the player.
• When a reset is performed while the power is on, the Player will turn off. Turn the power on again. At this point, it may take
a few moments for the system processing to nish before the Player is ready for use.
• When the problem persists even after performing a reset, unplug the AC cord and plug it in again. If this does not solve the
problem, contact the nearest service center approved by SHARP.
Appendix
v
Page 68

Specications
Specications are subject to change without notice.
Wireless Universal Player unit
General
Power requirements AC 120V, 60Hz
Power consumption 47 W (1.5 W Standby)
Dimensions with WiHD transmitter
without
WiHD transmitter
Weight Approx. 27.6 lbs. (12.5 kg)
Operating temperature 41°F to 95°F (5°C to 35°C)
Operating humidity 10 % to 80 % (no condensation)
TV systems NTSC system
Approx. 17
Approx. 435 mm g 107 mm g 355 mm (W g H g D)
Approx. 17
Approx. 435 mm g 107 mm g 333 mm (W g H g D)
Playback
Playable discs SACD, BD-ROM, BD-RE, BD-R, DVD Video,
Region code A or ALL for BD, 1 or ALL for DVD
DVD+RW/+R/-RW/-R,
Audio CD (CD-DA), CD-RW/R
USB device (USB HDD (2TB and under), USB memory device (2GB or greater)),
(Format File System: FAT32)
1
/8 g 4 7/32 g 13 31/32 inch (W g H g D)
1
/8 g 4 7/32 g 13 1/8 inch (W g H g D)
Terminals
HDMI 1 IN HDMI (HDMI input: 4K)
HDMI 2 IN HDMI (HDMI input: 4K)
HDMI 3 IN HDMI (HDMI input: 4K), MHL (MHL input)
HDMI 1 OUT HDMI (HDMI output: 4K, ARC, Deep Color, AQUOS LINK)
HDMI 2 OUT HDMI (HDMI output: WirelessHD)
DIGITAL AUDIO IN-OPTICAL OPTICAL S/PDIF digital audio input
DIGITAL AUDIO IN-COAXIAL COAXIAL digital audio input
DIGITAL AUDIO OUT-OPTICAL OPTICAL S/PDIF digital audio output
DIGITAL AUDIO OUT-COAXIAL COAXIAL digital audio output
AUIOD OUT RCA-L/R AUDIO OUT-L/R, RCA terminal
AUIOD OUT XLR-L/R AUDIO OUT-L/R, XLR Balanced terminal
USB 1 (Rear) USB 2.0
USB 2 (Front) USB 2.0
USB DAC (PC) IN USB 2.0
ETHERNET 10BASE-T/100BASE-TX
RS-232C D-sub 9-pin connector
DC 5V OUT DC 5V OUTPUT for WiHD transmitter with Wired
DC OUT DC 5V OUTPUT for WiHD transmitter
AC IN AC 120V, 60Hz
NOTE
• The HDMI 1/2/3 IN terminals allow 4K pass-through (24p/25p/30p).
• When using the HDMI 1 OUT terminal for 4K output, connect this terminal to a compatible TV.
• When connecting a WirelessHD device to the HDMI 2 OUT terminal, the audio output is partially limited.
vi
Appendix
Page 69

Specications
WiHD Transmitter unit
Terminals HDMI IN HDMI (HDMI input)
DC 5V IN DC 5V INPUT with Wired
DC IN DC 5V INPUT
WiHD Receiver unit
Power consumption (Normal) 3 W
Terminals HDMI OUT HDMI (HDMI output)
DC 12V IN DC 12V INPUT
AC Adaptor WiHD Receiver unit
Power requirements AC 120V, 60Hz
Rated output DC 12V, 1A OUTPUT for WiHD Receiver
WiHD Transmitter/Receiver unit
Wireless System Standard WirelessHD 1.1
Transfer mode HRP (AV Streaming transfer) / LRP (Control/CEC transfer)
Center Frequency 60.48GHz (CH2) / 62.64GHz (CH3)
Band width 1.76GHz
Transfer power
10mW
Wireless LAN (Internal antenna)
Standard IEEE802.11a/b/g/n
Frequency band 2400-2483MHz, 5150-5850MHz
Modulation DBPSK @ 1Mbps
Transport power and
sensitivity
Security AP (Infrastructure) mode supports
Tx output power:
(Typical)
Rx sensitivity:
(Typical)
DQPSK@ 2Mbps
CCK@ 5.5/11 Mbps
BPSK@ 6/9 Mbps
QPSK@ 12/18Mbps
16-QAM@ 24/36 Mbps
64-QAM@ 48/54 Mbps and above, Rx up to 300Mbps
2.4GHz
11b 15±2dBm
11g 15±2dBm
11n 15±2dBm (HT20)
5GHz
11a 13±2dBm
11n 13±2dBm (HT20)
-89 dBm @11 Mbps
-72 dBm @54 Mbps
-70 dBm @64-QAM, 20MHz channel spacing
-67 dBm @64-QAM, 40MHz channel spacing
- Static WEP that support both 64 and 128 bit keys.
- WPA/WPA2-PSK(TKIP)
- WPA/WPA2-PSK(AES)
WiSA compliant Wireless Audio Transmitter (Internal antenna)
Frequency band 5150-5850MHz
Band width 20MHz
Transport power 13dBm (Typical), 15dBm (Maximum)
vii
Appendix
Page 70

Network Service Disclaimer
This Sharp device facilitates the access to content and services provided by third parties. The content and
services accessible via this device belong to and may be proprietary to third parties. Therefore, any use of such
third party content and services must be in accordance with any authorization or terms of use provided by such
content or service provider. Sharp shall not be liable to you or any third party for your failure to abide by such
authorization or terms of use. Unless otherwise specically authorized by the applicable content or service
provider, all third party content and services provided are for personal and non-commercial use; you may not
modify, copy, distribute, transmit, display, perform, reproduce, upload, publish, license, create derivative works
from, transfer or sell in any manner or medium any content or services available via this device.
Sharp is not responsible, nor liable, for customer service-related issues related to the third party content or
services. Any questions, comments or service-related inquiries relating to the third party content or service
should be made directly to the applicable content or service provider.
You may not be able to access content or services from the device for a variety of reasons which may be
unrelated to the device itself, including, but not limited to, power failure, other Internet connection, or failure to
congure your device properly. Sharp, its directors, officers, employees, agents, contractors and affiliates shall
not be liable to you or any third party with respect to such failures or maintenance outages, regardless of cause
or whether or not it could have been avoided.
ALL THIRD PARTY CONTENT OR SERVICES ACCESSIBLE VIA THIS DEVICE IS PROVIDED TO YOU
ON AN “AS-IS” AND “AS AVAILABLE” BASIS AND SHARP AND ITS AFFILIATES MAKE NO WARRANTY
OR REPRESENTATION OF ANY KIND TO YOU, EITHER EXPRESS OR IMPLIED, INCLUDING,
WITHOUT LIMITATION, ANY WARRANTIES OF MERCHANTABILITY, NON-INFRINGEMENT, FITNESS
FOR A PARTICULAR PURPOSE OR ANY WARRANTIES OF SUITABILITY, AVAILABILITY, ACCURACY,
COMPLETENESS, SECURITY, TITLE, USEFULNESS, LACK OF NEGLIGENCE OR ERROR-FREE OR
UNINTERRUPTED OPERATION OR USE OF THE CONTENT OR SERVICES PROVIDED TO YOU OR THAT
THE CONTENT OR SERVICES WILL MEET YOUR REQUIREMENTS OR EXPECTATIONS.
SHARP IS NOT AN AGENT OF AND ASSUMES NO RESPONSIBILITY FOR THE ACTS OR OMISSIONS OF
THIRD PARTY CONTENT OR SERVICE PROVIDERS, NOR ANY ASPECT OF THE CONTENT OR SERVICE
RELATED TO SUCH THIRD PARTY PROVIDERS.
IN NO EVENT WILL SHARP AND/OR ITS AFFILIATES BE LIABLE TO YOU OR ANY THIRD PARTY FOR
ANY DIRECT, INDIRECT, SPECIAL, INCIDENTAL, PUNITIVE, CONSEQUENTIAL OR OTHER DAMAGES,
WHETHER THE THEORY OF LIABILITY IS BASED ON CONTRACT, TORT, NEGLIGENCE, BREACH
OF WARRANTY, STRICT LIABILITY OR OTHERWISE AND WHETHER OR NOT SHARP AND/OR ITS
AFFILIATES HAVE BEEN ADVISED OF THE POSSIBILITY OF SUCH DAMAGES.
viii
Appendix
Page 71

About Software License
Information on the Software License for This Product
Software composition
The software included in this product is comprised of various software components whose individual copyrights are held by
SHARP or by third parties.
Software developed by SHARP and open source software
The copyrights for the software components and various relevant documents included with this product that were developed
or written by SHARP are owned by SHARP and are protected by the Copyright Act, international treaties, and other relevant
laws. This product also makes use of freely distributed software and software components whose copyrights are held by
third parties. These include software components covered by a GNU General Public License (hereafter GPL), a GNU Lesser
General Public License (hereafter LGPL) or other license agreement.
Obtaining source code
Some of the open source software licensors require the distributor to provide the source code with the executable software
components. GPL and LGPL include similar requirements. For information on obtaining the source code for the open source
software and for obtaining the GPL, LGPL, and other license agreement information, visit the following website:
http://www.sharpusa.com/gpl
We are unable to answer any questions about the source code for the open source software. The source code for the
software components whose copyrights are held by SHARP is not distributed.
Acknowledgements
The following open source software components are included in this product:
•bash•busybox•Curl•DirectFB•DroidSansfont•DroidSansFallbackfont•expat•FreeType•Giib•glib•ImageMagick
•mtd/jffs2•libac•libiconv•libjpeg•libmpeg2•Libpng•LibPThread•Librt•Libstdc++•libsysfs•Libxml2•linuxkernel
•modutils•NanoXML•ncurses•OpenSSL/libcrypto•org.apache.oro.text.regex•uclibc•zlib•libalac•libgcc
Software License Notice
Software License Notice Requirements
The software components incorporated into this product include components whose copyright holders require license notices.
The license notices for these software components are shown below.
OpenSSL License
This product includes software developed by the OpenSSL Project for use in the OpenSSL Toolkit. (http://www.openssl.
org)
Original SSLeay License
This product includes cryptographic software written by Eric Young (eay@cryptsoft.com).
BSD License
This product includes software developed by the University of California, Berkeley and its contributors.
Appendix
ix
Page 72

Calling for Service
For location of the nearest Sharp Authorized Service, or to obtain product literature, accessories, supplies, or
customer assistance, please call 1-800-BE-SHARP.
LIMITED WARRANTY
CONSUMER LIMITED WARRANTY
SHARP ELECTRONICS CORPORATION warrants to the rst consumer purchaser that this Sharp brand Wireless Universal Player
product (the “Product”), when shipped in its original container, will be free from defective workmanship and materials, and agrees
that it will, at its option, either repair the defect or replace the defective Product or part thereof with a new or remanufactured
equivalent at no charge to the purchaser for parts or labor for the period(s) set forth below.
This warranty does not apply to any appearance items of the Product or if the serial number or model number affixed to the Product
has been removed, defaced, changed, altered or tampered with. This warranty does not cover installation or signal reception problems.
This limited warranty will not apply if the Product has been or is being used in a commercial setting or application; this warranty is meant
solely for the non-commercial, household use of the Product by consumers in their home or residence. If you intend to or already use this
Product for commercial purposes or in a commercial setting, there are warranties available to cover your use of this Product, the terms of
which may vary. Please contact 1-888-GO-SHARP for further information.
In order to enforce your rights under this limited warranty, you should follow the steps set forth below. You must be able to provide
proof of purchase to the servicer, which proof must include the date of purchase.
To the extent permitted by applicable state law, the warranties set forth are in lieu of, and exclusive of, all other warranties,
express or implied. Specically ALL OTHER WARRANTIES OTHER THAN THOSE SET FORTH ABOVE ARE EXCLUDED, ALL
EXPRESS AND IMPLIED WARRANTIES INCLUDING THE WARRANTIES OF MERCHANTABILITY, FITNESS FOR USE, AND
FITNESS FOR A PARTICULAR PURPOSE ARE SPECIFICALLY EXCLUDED. IF, UNDER APPLICABLE STATE LAW, IMPLIED
WARRANTIES MAY NOT VALIDLY BE DISCLAIMED OR EXCLUDED, THE DURATION OF SUCH IMPLIED WARRANTIES
IS LIMITED TO THE PERIOD(S) FROM THE DATE OF PURCHASE SET FORTH BELOW. THIS WARRANTY GIVES YOU
SPECIFIC LEGAL RIGHTS. YOU MAY ALSO HAVE OTHER RIGHTS WHICH VARY FROM STATE TO STATE.
The warranties given herein shall be the sole and exclusive warranties granted by Sharp and shall be the sole and exclusive remedy available
to the purchaser and only for the time periods set forth herein. No other representations or promises made by anyone are permitted. Correction
of defects, in the manner and for the period of time described herein, shall constitute complete fulllment of all liabilities and responsibilities of
Sharp to the purchaser with respect to the Product, and shall constitute full satisfaction of all claims, whether based on contract, negligence,
strict liability or otherwise. Sharp does not warrant nor shall Sharp be liable, or in any way
responsible, for Products which have been subject to abuse (including, but not limited to, improper voltage), accident, misuse, negligence, lack
of reasonable care, alteration, modication, tampering, misuse, improper operation or maintenance or any damages or defects in the Product
which were caused by repairs or attempted repairs performed by anyone other than a Sharp authorized servicer. Nor shall Sharp be liable or
in any way responsible for any incidental or consequential economic or property damage. Some states do not allow limits on warranties or on
remedies for breach in certain transactions; in such states, the limits herein may not apply.
THIS LIMITED WARRANTY IS VALID ONLY IN THE FIFTY (50) UNITED STATES, THE DISTRICT OF COLUMBIA AND PUERTO RICO.
Model Specic Section
Your Product Model Number & Description:
Warranty Period for this Product:
Additional Exclusions from
Warranty Coverage (if any):
Where to Obtain Service:
What to do to Obtain Service:
TO OBTAIN PRODUCT INFORMATION OR PURCHASE ACCESSORIES AND EXTENDED WARRANTIES, CALL
SD-WH1000U WIRELESS UNIVERSAL PLAYER
(Be sure to have this information available when you need service for your Product.)
Two (2) years parts and labor from the date of purchase.
In order for the Product to be serviced, the Product must be readily available to the
servicer, free and clear of any complex or non-standard installation, mounting or
other encumbrance which would unreasonably interfere with servicing the Product.
The Servicer will remount the Product after service, provided that such remounting
is not into a complex or non-standard installation. Any additional labor and materials
required to remove and/or reinstall a Product above and beyond the foregoing
are not covered by this warranty, may result in additional charges and are the
responsibility of the consumer.
Image Retention resulting from a xed image being displayed for long periods of
time is not covered by this Limited Warranty (see Operation Manual on how to
prevent this).
From a Sharp Authorized Servicer located in the United States. To nd the location
of the nearest Sharp Authorized Servicer, please call Sharp toll free at 1-800-BESHARP.
In home service is not available in all areas and Sharp may, at our option and in
our sole discretion, elect to require pre-paid shipment or delivery of the Product to
and from an Authorized Service Center in those areas.
For Products that are eligible for in home service, a servicer will come to your
location. If necessary, the servicer may remove the unit for repair at the service
facility and return it once completed.
For Products that are not eligible for in home service and for which pre-paid
shipment or delivery is required, be sure the Product is insured and packaged
securely. Transport it in original packaging or packaging that provides comparable
protection of the Product, and ensure that the Product is covered to avoid scratches
and damage. Sharp shall not be responsible for lost, stolen or misdirected mail or
for damage to the product incurred during shipping.
1-800-BE-SHARP
OR VISIT www.sharpusa.com
Appendix
x
Page 73

Le felicitamos y le agradecemos su adquisición del Reproductor inalámbrico de audio de alta
resolución SD-WH1000U.
Por primera vez podrá disfrutar del audio de alta resolución (24bit/96kHz) sin comprimir y
transmitido sin necesidad de cables. El reproductor funciona con cualquier sistema de audio de 2.0
a 7.1 canales. Con este reproductor inalámbrico de audio de alta resolución Sharp podrá reproducir
prácticamente todo lo que tenga en su biblioteca multimedia gracias a su compatibilidad con una
gran variedad de formatos de medios físicos y digitales. Sus archivos de música de alta resolución
nunca habían sonado mejor. Escuche los archivos FLAC, WAV, AIFF, ALAC, AAC, SACD y DSD
con una delidad de hasta 24bit/96kHz*. El reproductor puede acceder a los archivos a través de
la unidad de discos SACD y Blu-ray incorporada o de un disco duro (a través de USB). También
se puede conectar a una red doméstica para acceder a los archivos que tenga guardados en un
dispositivo de almacenamiento conectado a la red. El reproductor inalámbrico de audio de alta
resolución Sharp facilita el acceso a todos sus archivos. Con la aplicación móvil de Sharp, que está
disponible para iOS y Android, podrá crear listas de reproducción, ltrar el contenido por el género
musical, artista o álbum y podrá acceder a todos los detalles del archivo, todo desde su dispositivo
móvil. Este reproductor Sharp también transmite vídeo sin comprimir en formato Full HD (1080p) a
su televisor de forma inalámbrica mediante la normativa para alta denición inalámbrica Wireless
HD (WiHD) y los adaptadores incluidos.
Para conseguir un sonido de calidad de nivel de audiólo (24bit/96kHz), el reproductor inalámbrico
de audio de alta resolución Sharp utiliza la normativa para altavoces y audio inalámbricos (WiSA).
Las señales de audio de alta calidad procedentes del reproductor se pueden transmitir a cualquier
sistema de altavoces compatible con WiSA o a cualquier sistema de audio tradicional a través de
la unidad inalámbrica Wireless Bridge de Sharp (VR-WR100U – que está a la venta por separado).
Esta combinación puede proporcionar plena libertad y la delidad de la música de alta resolución a
cualquier sistema de audio.
Las sosticadas técnicas de construcción y los materiales de primera calidad han hecho posible
que el reproductor inalámbrico de audio de alta resolución Sharp pueda ofrecer una delidad
incuestionable y una abilidad suprema. Se han seleccionado minuciosamente los mejores
componentes, desde todos los del suministro de energía hasta todos los componentes de la ruta
de audio.
Page 74

ÍNDICE BÁSICO
Introducción
Accesorios suministrados ...................................................................................6
Componentes principales .............................................................................. 7 - 9
Conexión
Ajustes de altavoz ...............................................................................................16
Ajustes de WiHD ...........................................................................................19 - 20
Preparativos
Utilización de la app del móvil ................................................................... 24 - 25
Reproducción
Reproducción de Audio CD/SACD .....................................................................35
Reproducción de datos de audio .......................................................................36
Ajustes
Ajustes de la Reproducción ...............................................................................42
Ajustes de Vídeo ..................................................................................................43
Ajustes de WiSA .......................................................................................... 45 - 46
Conguración del sistema ......................................................................... 49 - 53
Apéndice
Solución de problemas ................................................................................... ii - v
Page 75

ÍNDICE
Introducción
INFORMACIÓN DE SEGURIDAD....................................................................... 1 - 2
ESTIMADO CLIENTE DE SHARP ............................................................................3
PRECAUCIONES DE SEGURIDAD IMPORTANTES ......................................... 3 - 4
PRECAUCIONES ......................................................................................................5
Comenzando ............................................................................................................6
Accesorios suministrados .................................................................................................. 6
Componentes principales ................................................................................. 7 - 9
Unidad del reproductor universal inalámbrico (Frontal)...................................................... 7
Unidad del reproductor universal inalámbrico (Posterior) ..................................................7
Unidad del transmisor WiHD .............................................................................................. 8
Unidad del receptor WiHD ................................................................................................. 8
Unidad de control remoto ................................................................................................... 9
Acerca de los tipos de medios ......................................................................10 - 12
Disco Blu-ray .................................................................................................................... 10
Tipos de discos que pueden utilizarse con este reproductor ........................................... 10
Discos que no pueden ser utilizados con este reproductor ............................................. 10
Acerca del contenido del disco ........................................................................................ 12
Tipos de formatos de medios que pueden utilizarse con este reproductor ...................... 12
Los iconos utilizados en este manual de manejo ............................................................ 12
Información importante ........................................................................................13
Precauciones con los discos ............................................................................................ 13
Licencia y derechos de propiedad intelectual .................................................................. 13
Sistema de audio inalámbrico ..............................................................................14
Conexión
Preparativos
Reproducción
Ajustes
Apéndice
Page 76

ÍNDICE
Introducción
Conexión
Observaciones acerca de la instalación de WiSA ..............................................15
Ajustes de altavoz .................................................................................................16
Para conectar los altavoces utilizando los bridges inalámbricos de Sharp...................... 16
Para conectar los altavoces compatibles con WiSA mediante la visualización en
pantalla On-Screen ....................................................................................................... 16
Conexión para audio analógico ...........................................................................17
Conexión al terminal ANALOG AUDIO OUT .................................................................... 17
Conexión para audio digital .................................................................................18
Conexión al terminal de audio digital ............................................................................... 18
Ajustes de WiHD .............................................................................................19 - 20
Conexión del transmisor WiHD ........................................................................................ 19
Conexión del receptor WiHD ............................................................................................ 20
Conexión para vídeo .............................................................................................21
Conexión al terminal HDMI .............................................................................................. 21
Conexión a Internet de banda ancha ........................................................... 22 - 23
Conexión a Internet (cable LAN) ...................................................................................... 22
Conexión a Internet (LAN inalámbrica) ............................................................................ 23
Preparativos
Reproducción
Ajustes
Apéndice
Page 77

ÍNDICE
Introducción
Conexión
Preparativos
Utilización de la app del móvil ..................................................................... 24 - 25
Cómo descargar la aplicación móvil ................................................................................ 24
Antes de comenzar a reproducir .................................................................. 26 - 29
Instalación de las pilas en el control remoto .................................................................... 26
Conguración del código del control remoto .................................................................... 26
Utilización de AQUOS LINK ............................................................................................. 27
Uso de un teléfono inteligente con el reproductor ............................................................ 27
Panel de control ............................................................................................................... 28
Conexión del cable de CA ................................................................................................ 29
Conexión de la alimentación ............................................................................................ 29
Atenuar la pantalla de visualización ................................................................................. 29
Reproducción
Ajustes
Apéndice
Page 78

ÍNDICE
Introducción
Conexión
Preparativos
Reproducción
Operación básica ...................................................................................................30
Control de volumen .......................................................................................................... 30
Silencio ............................................................................................................................30
SOUND MODE ................................................................................................................ 30
Selección de INPUT......................................................................................................... 30
PICTURE MUTE .............................................................................................................. 30
Reproducción de música/vídeo/imagen ...................................................... 31 - 38
Cargar o expulsar un disco .............................................................................................. 31
Reproducción de BD/DVD-Vídeo ..................................................................................... 31
Menús BD/DVD ................................................................................................................ 32
Disfrutar de BONUSVIEW o BD-LIVE .............................................................................33
Reproducción de DVD-R/-RW (formato VR) / BD-RE/-R (formato BDAV) .......................34
Reproducción de Audio CD/SACD ................................................................................... 35
Reproducción de datos de audio ..................................................................................... 36
Visualización de imágenes jas (archivos JPEG) ............................................................ 37
Reproducción de videos ..................................................................................................38
Sincronía labial (sincronización de audio/vídeo) .............................................................. 38
Funciones de reproducción ..................................................................................39
Avance/retroceso rápido (Búsqueda) ............................................................................... 39
Saltando al siguiente capítulo (pista/título) o al principio del actual ................................. 39
Pausa/Reproducción de avance de fotograma ................................................................39
Reproducción lenta .......................................................................................................... 39
Visualización de la información del audio ........................................................................ 39
Ajustes durante la reproducción ..........................................................................40
Control de función ............................................................................................................ 40
Ajustes
Apéndice
Page 79

ÍNDICE
Introducción
Conexión
Preparativos
Reproducción
Ajustes
AJUSTES ................................................................................................................41
Operaciones comunes ..................................................................................................... 41
Ajustes de la Reproducción .................................................................................42
Prioridad SACD ................................................................................................................ 42
Modo Auto Play ................................................................................................................ 42
Control Paterno ................................................................................................................42
Idioma de Disco (idioma de prioridad del disco) .............................................................. 42
Visul. Marca Ángulo ......................................................................................................... 42
Ajustes de Vídeo ....................................................................................................43
Conguración de vídeo HDMI .......................................................................................... 43
4K Escala de salida .........................................................................................................43
Salida 24p ........................................................................................................................ 43
SUPER PICTURE ............................................................................................................ 43
Modo 3D ..........................................................................................................................43
Noticación 3D ................................................................................................................. 43
Ajustes de Audio....................................................................................................44
Salida de Audio ................................................................................................................ 44
Audio Secundario ............................................................................................................. 44
DSD DAC directo ............................................................................................................. 44
Control Gama Dinámica ................................................................................................... 44
Volumen de Salida Análogo ............................................................................................. 44
Ajustes de WiSA ............................................................................................ 45 - 46
Información de Estado ..................................................................................................... 45
Búsqueda Manual ............................................................................................................ 45
Conguración de los Altavoces ........................................................................................ 45
Paso ................................................................................................................................. 46
WiSA Cong Claro ........................................................................................................... 46
Cong. de Comunicaciones ......................................................................... 47 - 48
Selección Cable/Inalámbrica ...........................................................................................47
Cuando se utiliza un cable LAN ....................................................................................... 47
Si utiliza una LAN inalámbrica ......................................................................................... 47
Acceso a BD Internet ....................................................................................................... 48
Conguración de Control IP ............................................................................................. 48
Conguración del sistema ............................................................................ 49 - 53
Versión ............................................................................................................................. 49
Manejo de USB ................................................................................................................ 49
Actualiz. Manual ............................................................................................................... 50
Idioma en la Pantalla .......................................................................................................52
Inicio Rápido .................................................................................................................... 52
Apagado Automático ........................................................................................................ 52
Visor Frontal/LED ............................................................................................................. 52
AQUOS LINK ................................................................................................................... 52
Panel de Control .............................................................................................................. 52
Ajustes de Actualiz. Autom. .............................................................................................. 52
Código del Control Remoto .............................................................................................. 52
DivX(R) Registración .......................................................................................................52
Darse de Baja DivX(R) ..................................................................................................... 52
Reinicio Sistema .............................................................................................................. 52
Formatos de selección de salida de audio ....................................................................... 53
Apéndice
Page 80

ÍNDICE
Introducción
Conexión
Preparativos
Reproducción
Ajustes
Apéndice
Especicaciones del puerto RS-232C ....................................................................i
Solución de problemas ..................................................................................... ii - v
Especicaciones ....................................................................................................vi
Renuncia de Responsabilidad del servicio de red ............................................viii
Acerca de la licencia del software .........................................................................ix
Page 81

operación y de mantenimiento en la
ducto contiene un dispositivo láser de baja potencia.
MANUAL DE MANEJO
ES
ESPAÑOL
Introducción
INFORMACIÓN DE SEGURIDAD
AVISO: PARA REDUCIR EL RIESGO DE INCENDÍO O ELECTROCHOQUE NO
EXPONGA ESTE APARATO A LA HUMEDAD.
ESPAÑOL
PRECAUCIÓN
PELIGRO DE DESCARGA
ELECTRICA NO ABRIR
PRECAUCIÓN:
PARA REDUCIR EL RIESGO DE DESCARGA ELECTRICA,
NO QUITE LA CUBIERTA. EL USUARIO NO DEBERA DAR
NINGUN TIPO DE SERVICIO A NINGUNA PARTE
INTERNA. DEBERA SER REALIZADO SOLO POR
PERSONAL DE SERVICIO CALIFICADO.
PRECAUCIÓN:
SI USA CONTROLES, AJUSTES O
PROCEDIMIENTOS DISTINTOS A LOS
ESPECIFICADOS EN ESTE DOCUMENTO SE
PUEDE EXPONER A RADIACIÓN PELIGROSA.
COMO LOS RAYOS LASER UTILIZADOS EN ESTA
UNIDAD PUEDEN RESULTAR PERJUDICIALES
PARA SUS OJOS, NO INTENTE DESARMAR EL
GABINETE.
SOLICITE EL SERVICIO UNICAMENTE A
PERSONAL CALIFICADO.
• Este reproductor está clasificado como un producto
CLASS 1 LASER.
• La etiqueta CLASS 1 LASER PRODUCT se encuentra en
la caja posterior.
• Este pro
Para garantizar su seguridad, no retire ninguna cubierta ni
trate de tener acceso al interior del producto. Solicite todas
las reparaciones sólo a personal cualificado.
Este símbolo previene al usuario
del voltaje aislado dentro de la
unidad que puede provocar
descargas eléctricas peligrosas.
Este símbolo advierte al usuario
que existen instrucciones de
literatura incluida en esta unidad.
1
Page 82

INFORMACIÓN DE SEGURIDAD
ES
“ADVERTENCIA—Las reglas de la FCC (Comisión Federal de Comunicaciones) estipulan
que cualquier modificación o cambio a este equipo no aprobado expresamente por el
fabricante podrá anular la autorización del usuario para operar este equipo”.
INFORMACIÓN
Este equipo se ha sometido a todo tipo de pruebas y cumple con las normas establecidas para dispositivo
digital de Clase B, de conformidad con la Parte 15 de las reglas de la FCC (Comisión Federal de
Comunicaciones). Estas reglas están diseñadas para asegurar una protección razonable contra interferencias
perjudiciales en las instalaciones residenciales. Este equipo genera, utiliza y puede emitir energía de
radiofrecuencia y, si no se instala y utiliza debidamente, es decir, conforme a las instrucciones, podrían
producirse interferencias perjudiciales en las radiocomunicaciones. Sin embargo, no se garantiza que estas
interferencias no se produzcan en una instalación determinada. Si este equipo ocasiona interferencias en la
recepción de radio o televisión, lo cual puede comprobarse con sólo apagar y encender el equipo, intente
corregir el problema mediante una o una combinación de las siguientes medidas:
—Reoriente la antena receptora o cámbiela de lugar.
—Aumente la separación entre el equipo y el receptor.
—Enchufe el equipo a una toma de corriente situada en un circuito distinto del receptor.
—Consulte a su distribuidor o a un técnico experto en radio/televisión.
Declaración de conformidad con la FCC
Este dispositivo cumple con el Apartado 15 de las Normas FCC. Su funcionamiento está sujeto a las dos condiciones
siguientes:
(1) Este dispositivo no deberá causar interferencias perjudiciales, y (2) deberá aceptar cualquier interferencia que reciba,
incluyendo interferencias que puedan causar un funcionamiento no deseado.
Radio inalámbrica
En el producto disponible en el mercado de EE.UU sólo se pueden utilizar los canales 1-11. No se pueden seleccionar otros
canales.
Este dispositivo se va a utilizar en el rango de frecuencias de 5,15 a 5,25 GHz y su uso está restringido a entornos interiores.
Importante: Cualquier cambio o modicación no aprobado expresamente por la parte responsable de la conformidad podría
anular la autorización del usuario para utilizar el equipo.
Declaración de exposición a las radiaciones de la FCC: Este equipo cumple con los límites de exposición a las radiaciones
establecidos por la FCC para entornos no controlados. El equipo deberá instalarse y utilizarse con una distancia mínima de
20cm entre el radiador y su cuerpo.
2
Page 83

ESTIMADO CLIENTE DE SHARP
ES
Gracias por haber adquirido el REPRODUCTOR UNIVERSAL INALÁMBRICO SHARP. Para garantizar
su seguridad y muchos años de uso sin problemas de su producto, por favor lea cuidadosamente las
precauciones de seguridad importantes antes de usar este producto.
PRECAUCIONES DE SEGURIDAD IMPORTANTES
La electricidad se usa para realizar muchas funciones útiles, pero también puede causar lesiones en personas y daños
en la propiedad si se utiliza incorrectamente. Este producto ha sido diseñado y fabricado con la más alta prioridad en
la seguridad. Sin embargo, su uso incorrecto puede provocar descargas eléctricas y/o incendios. Para evitar peligros
potenciales, por favor tenga muy en cuenta las instrucciones siguientes al instalar, operar y limpiar el producto. Para
garantizar su seguridad y prolongar la duración de su REPRODUCTOR UNIVERSAL INALÁMBRICO, lea cuidadosamente
las precauciones siguientes antes de utilizarlo.
1) Lea estas instrucciones.
2) Guarde estas instrucciones.
3) Preste atención a todas las advertencias.
4) Siga todas las instrucciones.
5) No utilice este aparato cerca del agua.
6) Límpielo solamente con un paño seco.
7) No tape las aberturas de ventilación. Instale el aparato de acuerdo con las instrucciones del fabricante.
8) No instale el aparato cerca de ninguna fuente de calor como, por ejemplo, radiadores, salidas de aire caliente,
estufas u otros aparatos (incluyendo amplicadores) que produzcan calor.
9) No anule la seguridad de la clavija polarizada ni la de la clavija con conexión a tierra. Una clavija polarizada
tiene dos patillas, una más ancha que la otra. Una clavija con conexión a tierra tiene dos patillas y una espiga de
conexión a tierra. La patilla ancha y la espiga se proporcionan para su seguridad. Si la clavija proporcionada no
entra en su toma de corriente, consulte a un electricista para reemplazar la toma de corriente obsoleta.
10) Proteja el cable de alimentación para que nadie lo pise ni quede aplastado, especialmente en las clavijas, tomas
de corriente y puntos por donde sale del aparato.
11) Utilice solamente los accesorios suministrados por el fabricante.
12) Utilice el aparato solamente con el carrito, soporte, trípode, ménsula o mesa especicado por el
fabricante, o vendido con el propio aparato. Cuando utilice un carrito, tenga cuidado cuando mueva la
combinación del carrito y el aparato para evitar que se caiga y se estropee.
13) Desenchufe este aparato durante las tormentas eléctricas o cuando no lo utilice durante largos periodos de tiempo.
14) Solicite todos los trabajos de reparación al personal calicado solamente. Las reparaciones serán necesarias
cuando se haya dañado el aparato de cualquier forma: cuando se haya estropeado el cable o la clavija de
alimentación, se hayan derramado líquidos o hayan caído objetos en el interior del aparato, cuando éste haya
estado expuesto a la lluvia o a la humedad, cuando no funcione normalmente o cuando se haya caído.
Información de seguridad adicional
15) Fuentes de energía — Este producto deberá utilizarse solamente con el tipo de fuente de energía indicado en
la etiqueta de especicaciones. Si no está seguro del tipo de suministro de energía de su casa, consulte a su
distribuidor o a la compañía de electricidad de su localidad. Para los productos diseñados para funcionar con pilas
o otra fuente de energía, consulte las instrucciones de operación.
16) Sobrecarga — No sobrecargue las tomas de corriente, los cables de prolongación o los receptáculos de
conveniencia integrales porque se puede correr el riesgo de causar un incendio o recibir una descarga eléctrica.
17) Entrada de objetos y líquidos — No meta nunca objetos de ninguna clase en este producto a través de las
aberturas porque pueden tocar puntos de alto voltaje peligrosos o cortocircuitar partes que podrían causar un
incendio o una descarga eléctrica. No derrame nunca líquidos de ningún tipo sobre el producto.
18) Daños que necesitan ser reparados — Desenchufe este producto de la toma de corriente y solicite las
reparaciones al personal de servicio calicado cuando se den las condiciones siguientes:
a) Cuando el cable o la clavija de ca está dañado.
b) Si se ha derramado algún líquido o han caído objetos en el interior del producto.
c) Si el producto ha sido expuesto a la lluvia o al agua.
d) Si el producto no funciona normalmente siguiendo las instrucciones de operación.
Ajuste solamente aquellos controles descritos en las instrucciones de operación, ya que un ajuste
incorrecto de otros controles podrá causar daños que a menudo requieren un arduo trabajo de ajuste por
parte de un técnico calicado para que el producto pueda volver a funcionar normalmente.
e) Si el producto se ha caído o dañado de cualquier forma.
f) Cuando el producto muestra un cambio notable en su rendimiento, lo que indica que necesita ser reparado.
19) Piezas de repuesto — Cuando se necesiten piezas de repuesto, asegúrese de que el técnico de servicio utilice
las piezas de repuesto especicadas por el fabricante u otras cuyas características sean similares a las de las
piezas originales. El uso de piezas no autorizadas puede causar incendios, descargas eléctricas u otros peligros.
20) Vericación de seguridad — Una vez completado cualquier trabajo de mantenimiento o reparación en este
producto, pida al técnico de servicio que realice vericaciones de seguridad para determinar si el producto está
en condiciones de funcionamiento apropiadas.
21) El enchufe de alimentación de red de ca se utiliza como un dispositivo de desconexión y siempre debe
permanecer disponible para operación.
Introducción
3
Page 84

PRECAUCIONES DE SEGURIDAD IMPORTANTES
ES
• Agua y humedad — No utilice este producto cerca del agua como, por ejemplo, una
bañera, palangana, fregadero de cocina o lavadora; en un sótano húmedo; cerca de una
piscina o un lugar similar.
• Soporte — No coloque el producto en un carrito, soporte, trípode o mesa inestable. La
colocación del producto en una base inestable puede ser la causa de que el producto
se caiga, lo que podrá causar lesiones graves a personas y también daños al producto.
Utilice solamente un carrito, soporte, trípode, ménsula o mesa recomendado por el
fabricante o vendido junto con el producto.
• Selección de la ubicación — Seleccione un lugar donde no dé directamente la luz del
sol y haya buena ventilación.
• Ventilación — Los oricios de ventilación y otras aberturas de la caja han sido
diseñados para ventilar el producto. No cubra ni bloquee estos oricios de ventilación
y aberturas porque la falta de ventilación puede causar recalentamiento y/o reducir
la duración del producto. No coloque el producto en una cama, sofá, alfombra o otra
supercie similar porque las aberturas de ventilación podrán quedar bloqueadas. Este
producto no ha sido diseñado para ser empotrado; no lo coloque en un lugar cerrado
como, por ejemplo, un mueble librería o estantería a menos que disponga de la
ventilación apropiada o se sigan las instrucciones del fabricante.
• Calor — El producto deberá colocarse alejado de las fuentes de calor como, por
ejemplo, radiadores, salidas de aire caliente, estufas u otros productos (incluyendo
amplicadores) que produzcan calor.
• Tormentas eléctricas — Para una mayor protección de este producto durante una
tormenta de rayos, y cuando se deja descuidado y sin usar durante largos periodos de
tiempo, desenchúfelo del toma de corriente de la pared. Esto evitará daños al producto
debido a rayos y subidas de tensión.
• Para impedir un incendio, no ponga nunca ningún tipo de vela o llama al descubierto
encima o cerca del producto.
• Para impedir un incendio o una descarga eléctrica, no exponga este producto al goteo ni
a las salpicaduras.
Tampoco deberán ponerse encima del producto, objetos llenos de líquidos como, por
ejemplo, oreros.
• Para impedir un incendio o una descarga eléctrica, no ponga el cable de ca debajo del
producto u otros objetos pesados.
Introducción
4
Page 85

PRECAUCIONES
ES
Precauciones al ver imágenes en 3D estereoscópicas
• No vea imágenes en 3D estereoscópicas si tiene antecedentes de fotosensibilidad, enfermedad cardíaca o
padecimientos de salud. Esto puede causar que los síntomas empeoren.
• Si experimentara problemas de salud, como fatiga o malestar, mientras ve imagines en 3D estereoscópicas,
interrumpa el visionado inmediatamente. Continuar el visionado luego que se presenten estos síntomas puede
conducir a peligros para la salud. Descanse hasta que los síntomas hayan desaparecido completamente.
• La edad recomendada para ver imágenes en 3D estereoscópicas es 5–6 años o mayor. Debido a que resulta difícil
identicar síntomas como fatiga y molestia en niños pequeños, los mismos pueden caer enfermos súbitamente. Al ver
imágenes en 3D con niños, esté atento a síntomas de fatiga visual.
• Al ver imágenes en 3D estereoscópicas, tome un descanso moderado después de ver un título. El visionado durante
períodos prolongados puede causar fatiga visual.
Precauciones al limpiar este producto.
• Apague el aparato y desconecte el cable de ca de la toma de corriente antes de manipularlo.
• Para limpiar la caja exterior, pásele periódicamente un paño suave (algodón, franela, etc.).
• Si está muy sucia, empape un paño suave (algodón, franela, etc.) en detergente neutro diluido con agua, escurra
bien el paño, limpie la suciedad, y después limpie otra vez con un paño suave y seco.
• No utilice productos químicos ni un paño tratado químicamente para la limpieza. Se puede dañar el acabado de la caja.
Notas sobre el uso de LAN inalámbrica
• Cuando este reproductor está conectado a una red LAN inalámbrica, se realizan transmisiones entre el adaptador
de LAN inalámbrica (BD-AMS10U: VR-WL25, se vende por separado/BD-AMS20U: suministrado) y un enrutador de
banda ancha compatible con LAN inalámbrica (disponible en el comercio).
Precauciones sobre el uso de LAN inalámbrica
• Los siguientes equipos, emisoras de radio, etc., usan las mismas bandas de frecuencia. No use LAN inalámbrica
cerca de los mismos.
Equipos de fabricación/cientícos/de diagnóstico como marcapasos, etc.
Determinadas emisoras de radio de baja potencia (emisoras de radio que no requieren una licencia)
Si este reproductor se usa cerca de estos equipos, existe la posibilidad de ocurrencia de interferencia de ondas
radiales. Por tanto, puede que no sea posible la transmisión o que la velocidad de la misma se reduzca.
• Los teléfonos móviles, radios, etc., usan bandas de frecuencia de radio diferentes a las de LAN inalámbrica, por tanto,
si este reproductor se usa cerca de los mismos no habrá ningún efecto sobre la transmisión de estos equipos o de la
LAN inalámbrica. Sin embargo, si un producto para LAN inalámbrica se coloca cerca de uno de estos equipos, puede
ocurrir ruido de audio o vídeo debido a las ondas electromagnéticas que emiten los productos para LAN inalámbrica.
• Las ondas de radio pasarán a través de madera, cristal, etc., que se usan en casas normales, sin embargo, no
pasarán a través de barras de refuerzo, metal, hormigón, etc. Si se usan dichos materiales, las ondas de radio no
pasarán a través de paredes y pisos.
Introducción
5
Page 86

Comenzando
ES
Accesorios suministrados
Asegúrese de que los siguientes accesorios han sido suministrados con el producto.
Unidad de control remoto
Páginas 9 y 26
Unidad del receptor WiHD
Pila tamaño “AA” (x2) Cable de CA
Página 26 Página 29
Unidad del transmisor WiHD
Página 19
Adaptador de CA para la unidad del
receptor WiHD
Accesorio del transmisor WiHD
Adaptador de montaje en la pared para
la Unidad del receptor WiHD
Introducción
Página 19
Página 20
Tornillo para el
adaptador de montaje
de pared (x2)
Página 20
n Documentos de Referencia
n Conguración rápida y Guía de Inicio
n Tarjeta de registro
Cable HDMI
Página 20
Página 20
Cable alargador de la unidad del
transmisor WiHD (HDMI)
Página 19
Página 20
Cable alargador de la
unidad del transmisor WiHD
(alimentación CC)
Página 19
ADVERTENCIA: El adaptador y el cable de CA suministrados con este reproductor no se deben utilizar con
otros equipos.
No se deben utilizar otros adaptadores de CA distintos a los suministrados con este reproductor.
6
Page 87

Componentes principales
ES
Unidad del reproductor universal inalámbrico (Frontal)
1 2 3 4 6 7
141312119 10
1 POWER/Indicador POWER
(ENCENDIDO/EN ESPERA) (Pág. 29)
2 INPUT (Pág. 30)
3 DIMMER (Pág. 29)
4 SKIP REV (SLOW REV) (Pág. 39)
NOTA
• Al insertar o extraer un dispositivo de memoria USB, asegúrese de apagar la alimentación.
5 OPEN/CLOSE (Pág. 31)
6 SKIP FWD (SLOW FWD) (Pág. 39)
7 Bandeja de disco (Pág. 31)
8 VOLUME (Pág. 30)
9 Terminal USB 2 (Págs. 33, 49 y 51)
10 PLAY (Págs. 31 y 39)
11 H STOP (Pág. 31)
12 Sensor del control remoto (Pág. 26)
13 Visor del panel delantero (Pág. 29)
14 Indicador WiSA (Pág. 29)
Unidad del reproductor universal inalámbrico (Posterior)
1 4 5 6 7 82 3
85
Introducción
9 10 11 12 13 14 1516 17 18 2219 20 21
1 AUDIO OUT-R (XLR equilibrado) (Pág. 17)
2 AUDIO OUT-R (RCA) (Pág. 17)
3 AUDIO OUT-L (RCA) (Pág. 17)
4 AUDIO OUT-L (XLR equilibrado) (Pág. 17)
5 Terminal DC 5V OUT para la unidad del transmisor WiHD
(Pág. 19)
6 Terminal HDMI 2 OUT para la unidad del transmisor WiHD
(Pág. 19)
7 Terminal DC OUT para la unidad del transmisor WiHD
(Pág. 19)
8 Antena LAN inalámbrica (Pág. 23)
9 Terminal HDMI 1 OUT (4K·ARC) (Pág. 21)
10 Terminal HDMI 1 IN (Pág. 21)
11 Terminal HDMI 2 IN (Pág. 21)
NOTA
• Es posible que algunos cables ópticos o HDMI no encajen en el compartimento.
12 Terminal HDMI 3 IN (MHL) (Pág. 21)
13 Terminal ETHERNET (Pág. 22)
14 Terminal USB DAC (PC) IN
15 Terminal COAXIAL DIGITAL AUDIO OUT (Pág. 18)
16 Terminal OPTICAL DIGITAL AUDIO OUT (Pág. 18)
17 Terminal COAXIAL DIGITAL AUDIO IN (Pág. 18)
18 Terminal OPTICAL DIGITAL AUDIO IN (Pág. 18)
19 Terminal USB 1 (Págs. 33, 49 y 51)
20 Terminal SERVICE
Normalmente, no debe conectar nada a este
terminal, ya que está reservado para el personal de
mantenimiento.
21 Terminal RS- 232C (Pág. i)
22 Terminal AC IN (Pág. 29)
7
Page 88

Componentes principales
ES
Unidad del transmisor WiHD
Parte superior
Indicador POWER
Cuando la alimentación
está encendida, se
ilumina el indicador verde.
Terminal DC IN (Pág. 19) Terminal HDMI IN (Pág. 19)
Parte trasera
Introducción
Terminal DC IN (Pág. 19)
Unidad del receptor WiHD
Parte delantera
1
2
3
Parte izquierda Parte derecha
4
Terminal DC IN (Pág. 20)
Terminal DC IN (Pág. 19)
Terminal HDMI IN (Pág. 19)
1 Indicador POWER (Pág. 20)
Cuando la alimentación
está encendida, se ilumina
el indicador verde.
2 Indicador LINK (Pág. 20)
Cuando se establece una
conexión con el transmisor
WiHD, se ilumina el
indicador verde.
NOTA
• El indicador parpadea
durante la búsqueda.
3 Sensor del control remoto
4 Antena
Terminal HDMI OUTPUT (Pág. 20)
NOTA
• El transmisor y el receptor WiHD ya están apareados.
• Es necesario llevar a cabo el apareamiento del transmisor y del receptor cuando se han efectuado cambios de la
combinación debido al servicio técnico, etc.
• Para que los formatos Dolby TrueHD, DTS-HD Master Audio o SACD puedan transmitirse en su formato original, utilice un cable
HDMI para conectar el terminal HDMI OUT 1 de este reproductor al terminal HDMI de un receptor audiovisual u otro equipo.
8
Page 89

Componentes principales
ES
Unidad de control remoto
1
2
3
4
5
6
7
8
9
10
11
12
13
14
15
16
17
18
19
20
1 POWER (Pág. 29)
2 Selección de INPUT (Pág. 30)
3 WiHD ON/OFF (Pág. 20)
21
4 DISPLAY (Pág. 31)
5 Botones numéricos (Págs. 35 y 40)
6 FUNCTION (Pág. 40)
7 SOUND MODE (Pág. 30)
22
8 TOP MENU (Págs. 32 y 34)
23
9 POP-UP MENU (Pág. 32)
24
10 HOME
11 AUDIO SETUP (Pág. 38)
12 ON SCREEN
13 Botones del cursor (a/b/c/d),
ENTER OK (Pág. 41)
14 EXIT
25
15
PLAY (Págs. 31 y 39)
16 S REV (p. 39)
17 T SKIP REV/
26
18 F PAUSE (p. 39)
19 A (Rojo), B (Verde), C (Azul) y D (Amarillo)
27
28
29
30
31
32
(Págs. 34 y 37)
20 HDMI OUT 1/2 SELECT (Pág. 43)
21
OPEN/CLOSE (Pág. 31)
22 DISC (Pág. 30)
23 PICTURE MUTE (Pág. 30)
24 DIMMER (Pág. 29)
25 AUDIO (Pág. 39)
26 VOLUME (Pág. 30)
27 MUTE (Pág. 30)
28 PLAY MODE (Pág. 40)
29 n RETURN (Pág. 41)
30 V FWD (Pág. 39)
31 U SKIP FWD/
32 H STOP (Pág. 31)
(Pág. 41)
(Pág. 40)
(Pág. 41)
SLOW REV (Pág. 39)
SLOW FWD (Pág. 39)
Introducción
9
Page 90

Acerca de los tipos de medios
ES
Disco Blu-ray
El disco Blu-ray es lo más avanzado en formato de
medio óptico de próxima generación, ofreciendo las
siguientes prestaciones principales:
• La mayor capacidad (25 GB cara única – 50 GB cara
doble) – con más de 5 veces la cantidad de contenido
posible con los DVD actuales, especialmente muy
apropiado para películas en alta denición con niveles
ampliados de funciones interactivas
• Calidad de imagen prístina con capacidad para
resolución 1920 x 1080p de alta denición total
• El mejor audio posible con sonido envolvente sin
comprimir (una calidad más alta que incluso el audio del
cine de más calidad)
• El soporte más extendido en la industria – garantizando
más opciones para los consumidores en el mercado
• Los equipos seguirán siendo compatibles con DVD,
permitiendo continuar disfrutando de las videotecas en
DVD existentes.
• Durabilidad del disco – los nuevos avances en
tecnologías de recubrimiento duro otorgan a los discos
Blu-ray la mayor resistencia contra raspaduras y huellas
dactilares.
Tipos de discos que pueden utilizarse con este reproductor
• Con este reproductor se pueden reproducir los siguientes
discos. No utilice adaptador de 8 cm (3”) a 12 cm (5”).
• Utilice discos que sean compatibles con los estándares
indicados mediante la presencia de los siguientes
logotipos ociales marcados en la etiqueta del disco.
La reproducción de discos que no cumplan con estos
estándares no está garantizada. Además, la calidad de
imagen o calidad de sonido no está garantizada incluso si
tales discos se pueden reproducir.
Tipo de disco
SACD SACD/Audio CD
Audio CD*
CD-RW/CD-R
BDVídeo
BD-RE/BD-RE DL
BD-R/BD-R DL
DVDVídeo
DVD+RW/DVD+R
DVD-RW/DVD-R
DVD+R DL/
DVD-R DL
BD-RE/BD-RE DL
BD-R/BD-R DL
DVD+RW/DVD+R
DVD-RW/DVD-R
DVD+R DL/DVD-R
DL
CD-RW/CD-R
1
Código de
región A/ALL
Código de
región 1/ALL
ALL
1
Formato de
grabación
(CD-DA)
Audio CD (CDDA)
Audio CD (CDDA)
— Audio + Vídeo
Formato BDMV/
BDAV
Formato Vídeo Audio + Vídeo
Formato Vídeo/
VR/AVCHD
(solamente disco
nalizado)
DSF, DSDIFF,
WAV, FLAC,
AIFF, ALAC,
AAC, WMA,
3
MP3*
®
DivX Plus
(H.264/MKV)
JPEG*
HD
2
Contenido
Audio
Audio
Audio
(Película)
(Película)
Audio + Vídeo
(Película)
Audio
Audio + Vídeo
(Película)
Imagen ja
(Archivo
JPEG)
Tamaño
del disco
12 cm
(5”)
12 cm
(5”)
8 cm (3”)
12 cm
(5”)
12 cm
(5”)
8 cm (3”)
12 cm
(5”)
8 cm (3”)
12 cm
(5”)
8 cm (3”)
• Los reproductores de BD/DVD-Vídeo y los discos tienen
códigos de región, que dictan las regiones en las que un
disco puede ser reproducido. El código de región para
este reproductor es A para BD y 1 para DVD. (Los discos
marcados con ALL se reproducirán en cualquier reproductor.)
• Las operaciones y funciones de BD/DVD-Vídeo podrán
ser diferentes de las explicaciones en este manual y
algunas operaciones quizás estén prohibidas debido al
ajuste del fabricante del disco.
• Si se visualiza una pantalla de menú o instrucciones de
funcionamiento durante la reproducción de un disco, siga
el procedimiento de funcionamiento visualizado.
NOTA
• Según cada disco, puede que no sea posible la reproducción
de algunos de los discos en las tablas de la columna
izquierda.
• “Finalizar” en este manual se reere a asegurarse de que
un dispositivo de grabación procese el disco de forma que
pueda reproducirse en otros reproductores/grabadoras de
DVD y en este reproductor. En este reproductor sólo se
reproducirán discos DVD nalizados. (Este reproductor no
tiene una función para nalizar discos.)
• Algunos discos no pueden reproducirse, dependiendo del
formato de grabación.
• Si no se puede reproducir un archivo AIFF, ALAC o AAC,
actualice el software de este reproductor (página 50).
Discos que no pueden ser utilizados con este reproductor
Los siguientes discos no podrán ser reproducidos o
no se reproducirán debidamente en este reproductor.
Si se reproduce por error tal disco, podrá dañarse el
altavoz. No intente nunca reproducir tales discos.
CDG, Video CD, Photo CD, CD-ROM, CD-TEXT, SVCD, PD,
CDV, CVD, DVD-RAM, DVD-Audio, BD-RE con el cartucho y
CD-WMA, HDCD
Los discos con formas raras no se pueden reproducir.
• Los discos con formas raras (discos con forma de
corazón o hexagonales, etc.) no se pueden utilizar. La
utilización de tales discos ocasionará un fallo.
Los siguientes discos BD-Vídeo no se pueden
reproducir.
• Los discos que no contengan “A” o “ALL” para el
código de región (discos vendidos fuera del área de
comercialización autorizada).*
• Discos producidos ilegalmente.
• Discos grabados para uso comercial.
* El código de región para este producto es A.
Los siguientes discos DVD-Vídeo no se pueden
reproducir.
• Los discos que no contengan “1” o “ALL” para el
código de región (discos vendidos fuera del área de
comercialización autorizada).*
• Discos producidos ilegalmente.
• Discos grabados para uso comercial.
* El código de región para este producto es 1.
No se pueden reproducir los siguientes discos de
tipo BD-RE/R, DVD-RW/R y DVD+RW/R.
• Aquellos discos en los que no se hayan grabado datos no
se pueden reproducir.
*1
Los siguientes discos Audio CD no se pueden
reproducir.
• Los discos que contengan una señal con el n de
proteger los derechos de autor (señal de control
de copia) quizás no se puedan reproducir en este
reproductor.
• Este reproductor ha sido diseñado con la premisa de
reproducir Audio CDs que cumplan con los estándares de
CD (Disco compacto).
10
(Continúa en la página siguiente)
Introducción
Page 91

Acerca de los tipos de medios
ES
Los siguientes discos CD-RW/R no se pueden
reproducir.
• Aquellos discos en los que no se hayan grabado datos no
se pueden reproducir.
• No se pueden reproducir discos grabados en un formato
que no sea Audio CD y archivos de audio/JPEG.
• Los discos no podrán reproducirse dependiendo de su
estado de grabación o el estado del propio disco.
• Los discos no podrán reproducirse dependiendo de su
compatibilidad con este reproductor.
*2
Acerca del formato de archivo JPEG
JPEG es un tipo de formato de archivo para guardar
archivos de imágenes jas (fotografías, ilustraciones, etc.). El
reproductor le permite reproducir archivos de imágenes jas
en formato JPEG.
Formatos de archivo que no son compatibles.
• No se pueden reproducir imágenes jas en formatos que
no sean JPEG (como TIFF).
• Puede haber algunos archivos que no se puedan
reproducir incluso si están en formato JPEG.
• No se pueden reproducir archivos JPEG progresivos.
• No se pueden reproducir archivos de imagen animada ni
tampoco archivos de formato JPEG animado, incluso si
están en formato JPEG.
Otros archivos que no pueden reproducirse.
• Es posible que no pueda reproducir algunas imágenes
jas que haya creado, retocado, copiado o editado en
alguna forma en su PC.
• Quizá no pueda reproducir algunas imágenes jas que
haya procesado (rotadas o guardadas sobrescribiendo
otras imágenes que haya importado desde Internet o
correo electrónico).
Al reproducir archivos, puede experimentar uno o
más de los siguientes síntomas.
• Puede tomar un tiempo el reproducir archivos
dependiendo del número de carpetas, el número de
archivos y el volumen de datos de que se trate.
• No se visualiza información EXIF. EXIF son las siglas en
inglés de Formato de Archivo de Imagen Intercambiable, y
es una norma para almacenar información en archivos de
imágenes, especialmente en aquellos que utilizan compresión
JPEG. (Para información adicional, visite http://exif.org.)
*3
Acerca del formato de archivos de audio
Este reproductor reproduce los diversos formatos de
archivos de audio que se indican a continuación.
FLAC (***.ac), WAV (***.wav), DSF (***.dsf), DSDIFF (***.dff),
MP3 (***.mp3), WMA (***.wma), AIFF (***.aiff, ***.aif), ALAC
(***.m4a), AAC (***.mp4, ***.m4a, ***.aac, ***.m4b); consulte la
página 36 para encontrar más detalles.
Reproducción de archivos de audio
• Algunos archivos con las extensiones arriba indicadas
o los archivos que no están grabados en los formatos
anteriores producen ruido y no pueden reproducirse.
• Los archivos de audio no se reproducen en el orden en el
que han sido grabados.
• Se recomienda grabar los datos a baja velocidad porque
los datos grabados a alta velocidad pueden producir
ruido e incluso es posible que no puedan reproducirse.
• Cuanto mayor sea el número de carpetas, más tardará
en llevarse a cabo la lectura.
• La lectura puede tomar cierto tiempo dependiendo del
árbol de carpetas.
• Es posible que el tiempo de reproducción no se muestre
correctamente durante la reproducción de archivos de audio.
Los archivos siguientes no pueden reproducirse
en este reproductor.
• Cuando en un mismo disco se han grabado archivos
con formato de Audio CD [CD-DA] y con formatos de
archivos de audio. (Se reconocerá el disco como Audio
CD [CD-DA] y sólo se reproducirán las pistas que tengan
el formato Audio CD [CD-DA].)
• Los discos multisesión no pueden reproducirse.
• Los archivos WMA codicados con DRM no pueden
reproducirse.
• El formato DSD comprimido (DST) no puede reproducirse.
Acerca de los archivos y las carpetas
para imágenes jas (archivos JPEG) y
datos de audio
Puede reproducir imágenes jas (archivos JPEG) /datos
de audio (archivos FLAC, WAV, DSF/DSDIFF, AIFF, ALAC,
AAC, WMA y MP3) con esta unidad creando carpetas en
discos o dispositivos USB como se muestra a continuación.
Ejemplo de una estructura de carpeta:
Raíz
001.jpg/001.mp3
xxx.jpg/xxx.mp3
Carpeta 01
Carpeta xxx
4
Incluyendo el directorio raíz, el número máximo de
*
carpetas y archivos en cada carpeta está limitado 256 en
total.
4
*
Carpeta
001.jpg/001.mp3
255.jpg/255.mp3
001.jpg/001.mp3
256.jpg/256.mp3
4
*
001.jpg/001.mp3
256.jpg/256.mp3
4
*
4
*
Requerimientos de archivo y carpeta
• Los discos o dispositivos USB que este reproductor puede
reproducir (reconocer) están limitados a las siguientes
propiedades:
Contienen archivos de formato EXIF (sólo archivos
JPEG)
Resolución de la imagen: Entre 32 x 32 y
6528 x 3672 píxeles (sólo archivos JPEG)
Número máximo de carpetas y archivos en cada carpeta:
256
Nivel de jerarquía máximo de las carpetas: 5
Tamaño de archivo: 8 MB o menor (archivos JPEG)
200 MB o menor (archivos MP3)
NOTA
• Los nombres de archivo y carpeta visualizados en este
reproductor pudieran diferir de los visualizados en el PC.
• Si no se puede reproducir un archivo AIFF, ALAC o AAC,
actualice el software de este reproductor (página 50).
DIVX
Este dispositivo DivX Certied® ha pasado rigurosas
pruebas para asegurar que reproduce vídeo DivX®.
Para poder reproducir películas DivX de venta en el mercado,
primero debe registrarse el dispositivo en vod.divx.com.
Busque su código de registro en Registro de DivX® de
Conguración del sistema.
ACERCA DE DIVX VÍDEO-ON-DEMAND
Es necesario registrar este dispositivo DivX Certied® para
reproducir las películas compradas en DivX Vídeo-onDemand (VOD). Para obtener su código de registro, busque
la sección DivX VOD en el menú de conguración de su
dispositivo. Vaya a la página vod.divx.com para obtener más
información sobre cómo completar el registro.
11
Introducción
Page 92

Acerca de los tipos de medios
1
2
3
5
BD-R
AUDIO CD
SACD
USB
ES
Acerca del contenido del disco
BD-Vídeo
Disfrute de funciones especícas para BD, incluyendo
BONUSVIEW (BD-ROM Perl 1 Versión 1.1), como imagenen-imagen, y BD-LIVE (página 33).
Para los discos BD-Vídeo compatibles con BONUSVIEW/BDLIVE, puede disfrutar de contenido adicional copiando los datos
desde discos o descargándolos desde Internet. Por ejemplo,
esta función es capaz de reproducir la película original como el
vídeo primario a la vez que en una pantalla pequeña reproduce
comentarios en vídeo del director de la película, como un vídeo
secundario.
NOTA
• Las funciones disponibles dieren dependiendo del disco.
Título, capítulo y pista
• Los discos Blu-ray y los DVDs están divididos en “Títulos” y
“Capítulos”. Si el disco tiene más de una película en él, cada
película será un “Título” separado. Los “Capítulos”, por el
contrario, son subdivisiones de títulos. (Consulte el Ejemplo 1.)
• Los Audio CDs están divididos en “Pistas”. Podrá pensar
de una “Pista” como una melodía en un Audio CD.
(Consulte el Ejemplo 2.)
Ejemplo 1: Disco Blu-ray o DVD
Título 1
Título 2
DTS
DTS es un sistema de sonido digital desarrollado por
DTS, Inc. para uso en salas de cine.
PCM Lineal
PCM Lineal es un formato de grabación de señal
utilizado para Audio CDs y en algunos discos DVD y
Blu-ray. El sonido de Audio CDs se graba a 44,1 kHz
con 16 bits. (En discos de DVD-Vídeo el sonido se
graba a entre 48 kHz con 16 bits y 96 kHz con 24 bits
y en discos BD-Vídeo entre 48 kHz con 16 bits y 192
kHz con 24 bits.)
Idiomas de los subtítulos
Esto indica el tipo de los subtítulos.
Proporciones dimensionales de pantalla
Las películas son rodadas en una variedad de modos
de pantalla.
4
Ángulo de la cámara
En algunos discos BD/DVD hay grabadas escenas que
han sido rodadas simultáneamente desde un número
de ángulos diferentes (la misma escena es rodada
desde el frente, desde el lado izquierdo, desde el lado
derecho, etc.).
Código de región
Esto indica el código de región (código de región
reproducible).
Tipos de formatos de medios que pueden utilizarse con este reproductor
Introducción
Capítulo 1 Capítulo 2 Capítulo 3 Capítulo 1
Ejemplo 2: Audio CD
Pista 1 Pista 2 Pista 3 Pista 4
Iconos utilizados en las cajas de
discos de DVD-Vídeo
El reverso de la caja de un DVD disponible a la venta
por lo general contiene información acerca de los
contenidos del disco.
1 2
1. English
2
2. Chinese
3 4 5
LB
16:9
2
DVD-Vídeo BD-Vídeo
Pistas de audio y formatos de audio
Los discos DVD pueden contener hasta 8 pistas
distintas con un idioma diferente cada una. La primera
de la lista es la pista original.
Esta sección también indica el formato de audio de
cada pista sonora —Dolby Digital, DTS, MPEG, etc.
Dolby Digital
Un sistema de sonido desarrollado por Dolby
Laboratories Inc. que proporciona ambiente de sala de
cine a la salida de audio cuando el reproductor está
conectado a un procesador o amplicador Dolby Digital.
21 3
54 6
2
1. English
2. Chinese
Formato de medio
Dispositivo USB
(HDD USB, dispositivo
de memoria USB)
Recording Format Contents
MP3, DSF, DSDIFF,
WAV, FLAC, AIFF,
ALAC, AAC, WMA
JPEG Imagen ja
Audio
(Archivo JPEG)
NOTA
• Si no se puede reproducir un archivo AIFF, ALAC o AAC,
actualice el software de este reproductor (página 50).
Los iconos utilizados en este manual de manejo
........... Indica las funciones que pueden realizarse
BD VIDEO
BD-RE
DVD VIDEO
DVD-RW
DVD-R
CD-R
CD-RW
Home Network
12
para discos BD-Vídeo.
........... Indica las funciones que pueden realizarse
para discos BD-RE.
........... Indica las funciones que pueden realizarse
para discos BD-R.
....... Indica las funciones que pueden realizarse
para discos DVD-Vídeo.
...........Indica las funciones que pueden realizarse
para discos DVD-RW.
............ Indica las funciones que pueden realizarse
para discos DVD-R.
........... Indica las funciones que pueden realizarse
para Audio CDs.
........... Indica las funciones que pueden realizarse
para discos SACD.
...........Indica las funciones que pueden realizarse
para discos CD-R.
........... Indica las funciones que pueden realizarse
para discos CD-RW.
...........Indica las funciones que pueden realizarse
para dispositivos USB.
....Indica las funciones que pueden realizarse
para equipos de redes domésticas.
Page 93

Información importante
ES
Precauciones con los discos
Tenga cuidado con las raspaduras y polvo
• Los discos BD, DVD y CD son sensibles al polvo, huellas
dactilares y especialmente raspaduras. Un disco raspado
quizás no pueda ser reproducido. Maneje los discos con
cuidado y almacénelos en un lugar seguro.
Almacenamiento apropiado de los discos
Ponga el disco en el centro de
la caja y almacene la caja y el
disco en posición vertical.
Evite guardar discos en lugares
con luz de sol directa, cerca
dispositivos de calefacción o en
lugares con humedad alta.
No deje caer los discos ni los
someta a vibraciones o impactos
fuertes.
Evite almacenar los discos en
lugares donde haya mucha
cantidad de polvo o humedad.
Precauciones para el manejo
• Si la supercie está manchada, limpie suavemente
con un paño suave humedecido (con agua solamente).
Cuando limpie los discos, mueva siempre el paño desde
el oricio central hacia el borde exterior.
• No utilice pulverizadores de limpieza de discos de
vinilo, bencina, diluyente, líquidos para prevención de
electricidad estática u otros disolventes.
• No toque la supercie.
• No adhiera papel ni etiquetas adhesivas en el disco.
• Si la supercie de reproducción de un disco está manchada
o raspada, el reproductor podrá decidir que el disco es
incompatible y expulsarlo, y también es posible que no
reproduzca el disco correctamente. Limpie cualquier mancha
de la supercie de reproducción con un paño suave.
Limpieza del lente lector
• No utilice nunca discos de limpieza disponibles en el
comercio. La utilización de esos discos podrá dañar la
lente.
• Solicite la limpieza del lente al centro de servicio
aprobado por SHARP más cercano.
Advertencias sobre la formación de condensación
• Podrá formarse condensación en el lente lectora o disco
en las siguientes condiciones:
− Inmediatamente después de haber encendido una estufa.
− En una habitación con vapor o muy húmeda.
− Cuando el reproductor sea movido repentinamente de
un ambiente frío a uno cálido.
Cuando se forme condensación:
• Resultará difícil al reproductor leer las señales de los
discos e impedirá al reproductor funcionar debidamente.
Para quitar la condensación:
• Extraiga el disco y deje el reproductor con la
alimentación desactivada hasta que desaparezca
la condensación. Si utiliza el reproductor con
formación de condensación podrá ocasionar un mal
funcionamiento.
Licencia y derechos de propiedad intelectual
El material audio-visual puede consistir en productos de
propiedad intelectual que no deben ser grabados sin la
autorización del poseedor de dicha propiedad intelectual.
Sírvase remitirse a las leyes aplicables de su país.
• “Este producto contiene tecnología de protección contra
copia, la cual esta protegida por patentes de los EE. UU. y
otros derechos de propiedad intelectual de DivX, LLC. Se
prohibe la ingenieria inversa o desarmado de la unidad.”
• Fabricado con licencia de Dolby Laboratories. “Dolby” y el
símbolo de la doble D son marcas comerciales de Dolby
Laboratories.
• Para las patentes de DTS, visite la página http://patents.
dts.com. Fabricado con licencia de DTS Licensing
Limited. DTS, DTS-HD, el símbolo, y DTS y el símbolo
juntos son marcas comerciales registradas, mientras que
DTS-HD Master Audio | Essential es una marca comercial
de DTS, Inc. © DTS, Inc. Todos los derechos reservados.
• es una marca comercial.
• El logotipo “BD-LIVE” es una marca comercial de Blu-ray
Disc Association.
• es una marca comercial de Formato de DVD/Logo
Licensing Corporation.
• Super Audio CD, SACD y el logotipo de SACD son
marcas comerciales conjuntas de Sony Corporation y
Philips Electronics N.V. Direct Stream Digital (DSD) es
una marca comercial de Sony Corporation.
• HDMI, el logotipo HDMI y High-Denition Multimedia
Interface son marcas comerciales o marcas registradas
de HDMI Licensing LLC.
• “x.v.Color” y el logotipo “x.v.Color” son marcas
comerciales de Sony Corporation.
• Java y todas las marcas comerciales y logotipos basados
en Java son marcas comerciales o marcas registradas de
Oracle Corporation en Estados Unidos y/o en otros países.
• El logotipo “BONUSVIEW” es una marca comercial de
Blu-ray Disc Association.
• “AVCHD” y el logotipo “AVCHD” son marcas comerciales
de Panasonic Corporation y Sony Corporation.
• “Blu-ray 3D” y el logotipo de “Blu-ray 3D” son marcas
comerciales de Blu-ray Disc Association.
• DivX®, DivX Certied®, DivX Plus® HD y los logotipos
asociados son marcas comerciales de DivX, LLC y se
utilizan bajo licencia.
• MHL, el logotipo de MHL y Mobile High-Denition Link son
marcas comerciales o marcas comerciales registradas de
MHL LLC en Estados Unidos y en otros países.
• El logotipo de WiSA es una marca comercial o marca
comercial registrada de WiSA, LLC en Estados Unidos y
otros países.
• WirelessHD es una marca comercial registrada de
WirelessHD LLC.
• “Derechos de autor 2004-2013 Verance Corporation.
Cinavia™ es una marca comercial de Verance Corporation.
Protegida por la patente 7 369 677 de EE.UU. y por otras
patentes internacionales emitidas y pendientes con la licencia
de Verance Corporation. Todos los derechos reservados”.
NOTA
Noticación Cinavia
• Este producto utiliza la tecnología Cinavia para limitar el
uso de copias no autorizadas de algunas películas y videos
producidos comercialmente, así como de sus bandas
sonoras. Cuando se detecta el uso prohibido de una copia no
autorizada, se emite un mensaje y la reproducción o copia
queda interrumpida.
• Podrá encontrar más información sobre la tecnología
Cinavia en el Centro de información al consumidor en línea
de Cinavia, en http://www.cinavia.com. Para solicitar más
información sobre Cinavia por correo, envíe una tarjeta
postal con su dirección de correo a: Cinavia Consumer
Information Center, P.O. Box 86851, San Diego, California,
EE. UU., 92138.
13
Introducción
Page 94

Sistema de audio inalámbrico
ES
Este reproductor universal inalámbrico dispone de un transmisor de audio inalámbrico compatible con WiSA.
Con un bridge inalámbrico (opcional), un amplicador o un altavoz (disponibles en el mercado), puede llevar a
cabo una conexión inalámbrica con el amplicador de audio.
Transmisor de audio inalámbrico compatible con
WiSA en el reproductor universal inalámbrico
SW
LS
L
inalámbrico
Amplicador de audio
(disponible en el comercio)
C
Bridge inalámbrico
(opcional)
Ejemplo
R
RS
Introducción
Altavoz
(disponible
en el mercado)
LB
RB
NOTA
• Para conectar el bridge inalámbrico, amplicador o altavoz, consulte el manual de manejo suministrado con el bridge
inalámbrico antes de hacer las conexiones.
• Se necesita un bridge inalámbrico independiente (opcional) para cada amplicador o altavoz de audio (disponibles en el
mercado).
• Para los ajustes de la comunicación entre el reproductor universal inalámbrico y un bridge inalámbrico comprado por
separado, consulte la sección “Ajustes de WiSA” (páginas 45 y 46).
• Antes de “Encender” o “Apagar” la alimentación del bridge inalámbrico, apague primero la alimentación del amplicador de
audio.
14
Page 95

Conexión
ES
Observaciones acerca de la instalación de WiSA
Este reproductor (el SD-WH1000U) se comunica con el bridge inalámbrico (el VR-WR100U) a través de ondas inalámbricas
reejadas de las paredes y el techo.
Tenga en cuenta lo siguiente al instalar estas unidades.
• La distancia entre el reproductor y el bridge inalámbrico debe estar dentro de aprox. 33 pies (10 m).
• La distancia de comunicación varía dependiendo de la anchura de la estancia y la altura del techo.
En una habitación grande, digamos de 30 pies (9 m) de ancho por 30 pies (9 m) de largo o más, con una
altura de techo de aprox. 10 pies (3 m), la distancia de comunicación se acorta y puede haber ruido o
perderse la señal.
Instalación del reproductor y el bridge inalámbrico
1 Instalación en el centro de la habitación o en una pared
• No coloque el reproductor ni el bridge inalámbrico
en ningún lugar con una marca
• No coloque artículos electrónicos o el transmisor
Dentro de aprox. 33 pies (10 m)
WiHD o el receptor WiHD suministrados encima
del reproductor o el bridge inalámbrico.
• No coloque mobiliario alto o artículos electrónicos
entre el reproductor o el bridge inalámbrico.
• No instale el bridge inalámbrico detrás de un
televisor u otro artículo electrónico, o en un rincón
de la habitación.
2 Instalación en un estante de televisor o una estantería empotrada en la pared
.
• Tanto el reproductor como el bridge inalámbrico
tienen una antena interna cerca de la parte
Deje un hueco encima del reproductor.
superior de la unidad. No instale el reproductor o el
bridge inalámbrico en una estantería metálica o en
una estantería cerrada sin aberturas.
• Cuando lo instale en una estantería, deje un hueco
de aprox. una pulgada encima de la estantería. O
instálelo en el estante superior de la estantería.
• Se recomienda una estantería sin puerta delantera
y con una abertura en la parte trasera.
Interferencia con otros dispositivos de comunicación
• Podría no haber sonido alguno o el sonido podría interrumpirse cuando otros dispositivos de comunicación
o dispositivos que emplean ondas inalámbricas se utilicen cerca. Trate de apartar esos dispositivos del
reproductor o el bridge inalámbrico o apáguelos.
Conexión
15
Page 96

Ajustes de altavoz
ES
Para conectar los altavoces utilizando los bridges inalámbricos de Sharp
Al combinar el reproductor con un bridge inalámbrico, realice los
siguientes ajustes antes de encender por primera vez.
1 Ajuste el interruptor giratorio del panel trasero del bridge
inalámbrico al canal del altavoz al que lo desea conectar
(L/R/C/LS/RS/LB/RB/SW).
2 Encienda el interruptor de alimentación del bridge inalámbrico.
• El LED del panel delantero comienza a parpadear.
3 Encienda el reproductor.
• El reproductor comienza a buscar el bridge inalámbrico.
• Una vez se establece la vinculación, el LED del bridge inalámbrico
deja de parpadear y se ilumina.
4 Cuando aparezca “Complete?” en la pantalla del panel
delantero, pulse ENTER en el control remoto. Cuando aparezca
“Finish?” en la pantalla del panel delantero, pulse ENTER en el
control remoto.
• Con esto se completan los ajustes del reproductor y el bridge
inalámbrico.
Aunque las señales de audio de alta calidad procedentes del
reproductor se pueden transmitir a cualquier sistema de altavoces
compatible con WiSA, el bridge inalámbrico SHARP (VR-WR100U
- que se vende por separado) puede utilizarse con cualquier altavoz
pasivo tradicional para recibir de forma inalámbrica audio de alta
resolución en cualquier conguración, desde 2.0 a 7.1.
Interruptor giratorio
Conexión
Si aparece “Salida contradictoria” en la pantalla, asegúrese de
conrmar que el interruptor giratorio del BRIDGE INALÁMBRICO
esté correctamente congurado y luego desconecte y vuelva a
conectar la alimentación de todo el sistema.
Para conectar los altavoces compatibles con WiSA mediante la visualización en pantalla On-Screen
Al combinar el reproductor con altavoces que sean compatibles con un receptor de audio inalámbrico a su vez
compatible con WiSA, realice los siguientes ajustes.
1 Encienda el receptor o altavoz interno.
2 Conecte el reproductor a una pantalla y enciéndalo.
3 Desde el menú HOME del reproductor, seleccione “Ajustes” > “Ajustes de WiSA”.
4 Seleccione “Búsqueda Manual” y pulse ENTER.
• El reproductor comienza a buscar el receptor.
5 Asigne canales a cada uno de los receptores o altavoces que aparecen en la pantalla.
• Con esto se completan los ajustes.
• Compruebe que la salida de sonido de cada uno de los canales sea correcta.
16
Page 97

Conexión para audio analógico
ES
Conexión al terminal ANALOG AUDIO OUT
• Si desea conectar un amplicador de audio estéreo, podrá disfrutar del sonido analógico de alta calidad a
través de los terminales ANALOG AUDIO OUT.
• Este reproductor cuenta con dos tipos de terminales: XLR equilibrado y RCA. Es necesario dar preferencia a los
terminales XLR equilibrados, ya que proporcionan un mejor rechazo al ruido y una mayor integridad de la señal.
PASOS
1 Antes de hacer cualquier conexión, asegúrese de apagar este reproductor y el equipamiento.
2 Conecte rmemente un cable de interconexión de audio (disponible en el mercado) a los terminales AUDIO OUT
(1 y 2).
Terminales tipo XLR equilibrados Terminales tipo RCA
Este reproductor
1
Al terminal
AUDIO OUT
de tipo XLR
equilibrado
Cable de interconexión de audio
(Cable de audio XLR
equilibrado: disponible en el
mercado)
Al terminal
de AUDIO IN
de tipo XLR
equilibrado
2
Este reproductor
Al terminal de
1
AUDIO OUT tipo
RCA
Cable de interconexión de
audio
(Cable de audio tipo RCA:
disponible en el mercado)
Al terminal de
2
AUDIO IN tipo
RCA
Conexión
PRECAUCIÓN
• No utilice el adaptador de XLR a RCA
(disponible en el mercado) ni el cable de
conversión de XLR a RCA (disponible en
el mercado). Podrían ocasionar un mal
funcionamiento.
Amplicador de audio estéreo
Amplicador de audio estéreo
Después de la conexión
• De ser necesario, realice los Ajustes de audio. (Página 44)
• Prepare el disco o contenido deseado y comience la reprodución. (Páginas 31 - 40)
17
Page 98

Conexión para audio digital
ES
Conexión al terminal de audio digital
• Puede conectar un equipo de audio o un televisor al terminal OPTICAL/COAXIAL DIGITAL AUDIO OUT.
PASOS
1 Antes de hacer cualquier conexión asegúrese de apagar este reproductor y el equipamiento.
2 Conecte rmemente un cable digital óptico (disponible en el comercio) a los terminales de audio digitales
ópticos (1 y 2); o conecte rmemente un cable tipo RCA (disponible en el mercado) a los terminales de audio
digitales coaxiales (1 y 2).
Este reproductor
• Al utilizar la salida OPTICAL/COAXIAL
DIGITAL AUDIO OUT:
La salida digital 5.1 ch está disponible.
La salida digital 7.1 ch no está disponible.
NOTA:
Audio 7.1 ch está disponible a través del
terminal HDMI.
1
Al terminal COAXIAL
DIGITAL AUDIO
OUT
Cable tipo RCA
(disponible en el
comercio)
2
Al terminal COAXIAL
DIGITAL AUDIO IN
Televisor
1
Al terminal
OPTICAL
DIGITAL AUDIO
OUT
Cable digital óptico
(disponible en el
comercio)
2
Al terminal
OPTICAL DIGITAL
AUDIO IN
1
Al terminal
COAXIAL
DIGITAL AUDIO
IN
Cable tipo RCA
(disponible
en el mercado)
2
Al terminal
COAXIAL
DIGITAL AUDIO
OUT
Cable digital óptico
(disponible
en el mercado)
Decodicador
digital, etc.
1
Al terminal
OPTICAL
DIGITAL AUDIO
IN
2
Al terminal
OPTICAL DIGITAL
AUDIO OUT
Conexión
Equipo de sonido con terminal de
entrada de audio digital
Equipo de sonido con terminal de salida
de audio digital
Después de la conexión
• De ser necesario, realice los Ajustes de audio. (Página 44)
• Prepare el disco o contenido deseado y comience la reprodución. (Páginas 31 - 40)
18
Page 99

Ajustes de WiHD
ES
Cable alargador de la unidad del transmisor WiHD (alimentación CC)Accesorio del transmisor WiHDCable alargador de la unidad del transmisor WiHD (HDMI)Unidad del transmisor WiHD
Conexión del transmisor WiHD
Para la reproducción de vídeo inalámbrica (hasta 1080p) con una pantalla opcional
Cuando se utiliza el transmisor WiHD y el receptor WiHD suministrados con el reproductor, puede disfrutar de vídeo de alta
denición a 1080p de modo inalámbrico.
• Onecte el receptor WiHD a un televisor, proyector u otro dispositivo de reproducción de vídeo.
• Si su dispositivo de vídeo posee una función de enlace CEC (Control electrónico del consumidor), puede encender o
apagar el receptor WiHD junto con el reproductor. Si carece de una función de enlace, hágalo funcionar apuntando el
control remoto al receptor WiHD y pulsando WiHD ON/OFF.
1 Al instalar el transmisor WiHD en el reproductor
NOTA
• Desenchufe el cable de CA de la toma de corriente antes
de realizar ajustes.
1 -1 Coloque el transmisor WiHD sobre el accesorio
desde arriba.
Antena
Transmisor WiHD
1 -3 Acople el accesorio o el transmisor WiHD al
reproductor y apriete los tornillos de jación de
la derecha y de la izquierda.
Antena
Accesorio o
transmisor
WiHD
Tornillo de jación
Este
reproductor
1 -1
1 -2
Tornillo de jación
1 -2 Apriete el tornillo de jación desde abajo.
Accesorio del
transmisor WiHD
Disponga el lado de la antena del transmisor
WiHD y el lado frontal (antena) del receptor
WiHD de modo que queden encarados entre
sí. Sino pueden quedar encarados entre sí,
Dirección horizontal
Lado de la
antena
16 pies (5 m)
Receptor
33 pies
(10 m)
60°60°
conecte el transmisor WiHD al reproductor
con los cables alargadores suministrados.
(Consulte la ilustración de la derecha.)
Transmisor
2 Al conectarlo mediante los cables alargadores suministrados
NOTA
• Desenchufe el cable de CA de la toma de corriente antes
de realizar ajustes.
Este reproductor
Transmisor WiHD
2 -1 Utilizando el cable alargador HDMI
(suministrado), conecte el terminal HDMI del
transmisor WiHD al terminal HDMI 2 OUT del
reproductor. No conecte al terminal HDMI 1
OUT. Si se conecta al terminal HDMI 1 OUT, el
transmisor WiHD no funcionará correctamente.
2 -2 Utilizando el cable alargador de alimentación
de CC (suministrado), conecte el terminal DC
IN del transmisor WiHD al terminal DC OUT del
reproductor.
Lado de la antena
Lado de la
antena
Tornillo de jación
Dirección vertical
16 pies (5 m)
50°
45°
33 pies
(10 m)
Lado de la
antena
ReceptorTransmitter
Conexión
2-1 Cable alargador HDMI (suministrado)
2-2 Cable alargador de CC (suministrado)
19
Page 100

Ajustes de WiHD
ES
Adaptador de CA para la unidad del receptor WiHD
Cable HDMIUnidad del receptor WiHD
Conexión del receptor WiHD
• Coloque el receptor WiHD cerca del televisor o de
otra pantalla de visualización.
• Coloque el receptor WiHD de forma horizontal.
1 Con un cable HDMI (suministrado), conecte el
televisor o la pantalla de visualización al terminal
HDMI OUTPUT del receptor WiHD.
2 Conecte el adaptador de CA (para el receptor
WiHD) al terminal DC IN del receptor WiHD.
3 Enchufe el adaptador de CA (para el receptor
WiHD) en una toma de CA.
4 Encienda y apague el WiHD apuntando el control
remoto al receptor y pulsando WiHD ON/OFF en
el control remoto.
Es posible que no se apague mientras se esté
transriendo la señal de vídeo.
2
3
NOTA
• No será posible la comunicación entre habitaciones diferentes ni se establecerá la comunicación
en caso de que existan otros obstáculos. La comunicación solo tiene lugar dentro de una
habitación.
• Utilice el transmisor y el receptor para el funcionamiento de un dispositivo a otro.
• Podrá utilizar hasta dos pares de WiHD al mismo tiempo.
• El adaptador de CA puede calentarse después de un uso prolongado. Esto es normal y no
indica un mal funcionamiento.
TV u otra pantalla de visualización
Receptor WiHD
Terminal de entrada
HDMI
Cable HDMI
(una unidad suministrada,
disponible en el mercado)
Antena
1
Conexión
Adaptador de montaje en la pared para la Unidad del receptor WiHD
Montaje de pared
1 Coloque el adaptador de montaje de pared para la
unidad del receptor WiHD (suministrado) contra la
pared y marque las posiciones de los oricios para
los tornillos con un lápiz o un objeto similar.
2 Utilice tornillos (disponibles en el mercado) para
jar el adaptador de montaje a la pared.
3 Utilizando los tornillos para el adaptador de
montaje de pared (suministrados), acople el
receptor WiHD al adaptador de montaje de pared.
1
2 Tornillos (x2)
(disponible en el comercio)
3 Tornillos para el adaptador de
montaje de pared (suministrados)
Artículos que necesitará (disponibles
en el mercado)
• Dos tornillos para acoplar el adaptador de montaje a
la pared.
El tipo y la longitud de los tornillos necesarios
dependerán del material y de la dureza de la pared.
Pregunte a su vendedor o contratista cuando compre
los tornillos.
Dimensiones recomendadas para los tornillos (mm)
3,8-4,27,8-8,4
PRECAUCIÓN
• No coloque ningún objeto que no sea el receptor WiHD
en el adaptador de montaje de pared.
Montaje sobre trípode
Utilice el oricio roscado para el montaje sobre
trípode, para jar el receptor o el adaptador de
montaje de pared al mismo.
Trípode, etc.
(disponible en el comercio)
Oricio roscado para
el montaje sobre
trípode
20
 Loading...