

Page 1

1-BIT DIGITAL AUDIO COMPONENT
CHAÎNE AUDIO NUMÉRIQUE 1-BIT
SD-SG11
OPERA TION MANUAL
MODE D’EMPLOI
ENGLISH
Please refer to
pages i, ii and
E-1 to E-48.
FRANÇAIS
Se reporter aux
pages F-1 à F-48.
Page 2

SD-SG11
Important Instruction
Special Notes (for Users in the U.S.A.)
NOTE
This equipment has been tested and found to comply with the limits for a Class B digital device, pursuant to Part 15 of the FCC Rules. These limits are designed to provide
reasonable protection against harmful interference in a residential installation. This
equipment generates, uses, and can radiate radio frequency energy and, if not installed and used in accordance with the instructions, may cause harmful interference
to radio communications. However, there is no guarantee that interference will not oc-
CAUTION: TO REDUCE THE RISK OF ELECTRIC SHOCK, DO NOT
REMOVE COVER (OR BACK).
NO USER-SERVICEABLE PARTS INSIDE. REFER SERVICING TO
QUALIFIED SERVICE PERSONNEL.
Explanation of Graphical Symbols:
The lightning flash with arrowhead symbol, within an
equilateral triangle, is intended to alert the user to the
presence of uninsulated “dangerous voltage” within
the product’s enclosure that may be of sufficient magnitude to constitute a risk of electric shock to persons.
The exclamation point within an equilateral triangle is
intended to alert the user to the presence of important
operating and maintenance (servicing) instructions in
the literature accompanying the appliance.
WARNING: TO REDUCE THE RISK OF FIRE OR ELECTRIC
SHOCK, DO NOT EXPOSE THIS APPLIANCE TO RAIN OR
MOISTURE.
Special Notes (for Users in the U.S.A.)
Caution - use of controls or adjustments or performance of procedures other than those specified herein may result in hazardous
radiation exposure.
NOTES
It is the intent of Sharp that this product be used in full compliance with the copyright
laws of the United States and that prior permission be obtained from copyright owners whenever necessary.
US and foreign patents licensed from Dolby Laboratories.
cur in a particular installation. If this equipment does cause harmful interference to radio or television reception, which can be determined by turning the equipment off and
on, the user is encouraged to try to correct the interference by one or more of the following measures:
Reorient or relocate the receiving antenna.
Increase the separation between the equipment and receiver.
Connect the equipment into an outlet on a circuit different from that to which the receiver is connected.
Consult the dealer or an experienced radio/TV technician for help.
WARNING
FCC Regulations state that any unauthorized changes or modifications to this equipment not expressly approved by the manufacturer could void the user's authority to
operate this equipment.
For your assistance in reporting this unit in case of loss or theft, please record
below the model number and serial number which are located on the rear of the
unit.
Please retain this information.
Note to CATV system installer:
This reminder is provided to call the CATV system installer's attention to Article 82040 of the National Electrical Code that provides guidelines for proper grounding and,
in particular, specifies that the cable ground shall be connected to the grounding system of the building, as close to the point of cable entry as practical.
FOR YOUR RECORDS
Model number .................................................................................
Serial number .................................................................................
Date of purchase .................................................................................
Place of purchase .................................................................................
i
common.fm01/7/13
Page 3
Important Safeguards
SD-SG11
CAUTION
All the safety and operating instructions should be read before the appliance is
operated, and should be retained for future reference.
Electrical energy can perform many useful functions. This unit has been engineered
and manufactured to assure your personal safety. Improper use can result in
potential electrical shock or fire hazards. In order not to defeat the safeguards,
observe the following basic rules for its installation, use and servicing.
1 Heed Warnings - All warnings on the appliance and in the operating instructions
should be adhered to.
2 Follow Instructions - All operating and use instructions should be followed.
3 Water and Moisture - The appliance should not be used near water - for ex-
ample, near a bathtub, washbowl, kitchen sink, laundry tub, in a wet basement, or near a swimming pool, etc.
4 Carts and Stands - The appliance should be used only with a cart or stand that is
recommended by the manufacturer.
● An appliance and cart combination should be moved with care.
Quick stops, excessive force, and uneven surfaces may cause the
appliance and cart combination to overturn.
5 Wall or Ceiling Mounting - The appliance should be mounted to a wall or ceiling
only as recommended by the manufacturer.
6 V entilation - The appliance should be situated so that its location or position does
not interfere with its proper ventilation. For example, the appliance should not be
situated on a bed, sofa, rug, or similar surface that may block the ventilation openings; or, placed in a built-in installation, such as a bookcase or cabinet that may
impede the flow of air through the ventilation openings.
7 Heat - The appliance should be situated away from heat sources such as
radiators, heat registers, stoves, or other appliances (including amplifiers)
that produce heat.
8 Power Sources - The appliance should be connected to a power supply only of
the type described in the operating instructions or as marked on the appliance.
9 Power-Cord Protection - Power-supply cords should be routed so that they are
not likely to be walked on or pinched by items placed upon or against them, paying particular attention to cords at plugs, convenience receptacles, and the point
where they exit from the appliance.
10 Do not use liquid cleaners or aerosol cleaners. Use a damp cloth for cleaning.
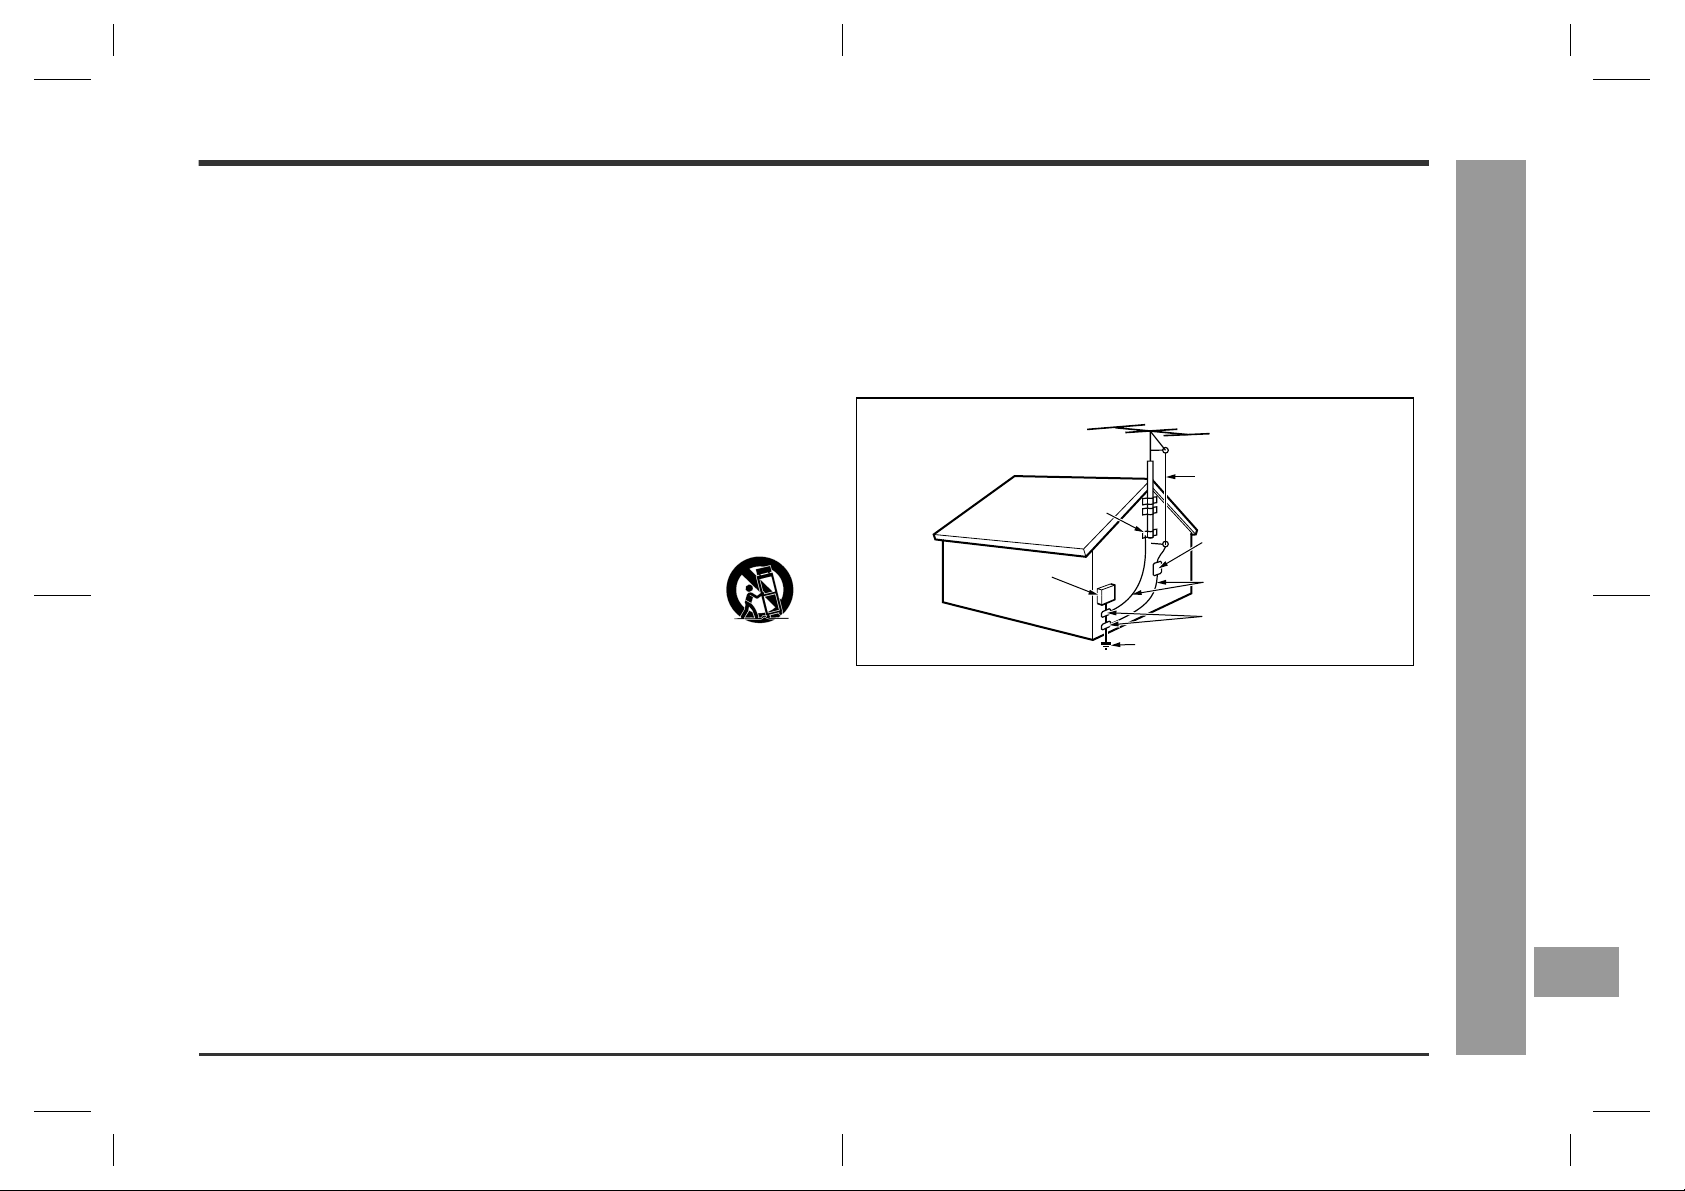
11 Power Lines - An outdoor antenna should be located away from power lines.
12 Outdoor Antenna Grounding - If an outside antenna is connected to the receiver,
be sure the antenna system is grounded so as to provide some protection against
voltage surges and built-up static charges. Section 810 of the National Electrical
Code, ANSI/NFP A No. 70-1984, provides information with respect to proper grounding of the mast and supporting structure, grounding of the lead-in wire to an antenna discharge unit, size of grounding conductors, location of antenna-discharge
unit, connection to grounding electrodes, and requirements for the grounding electrode.
EXAMPLE OF ANTENNA GROUNDING AS PER NATIONAL ELECTRICAL CODE
ANTENNA LEAD IN WIRE
GROUND CLAMP
ANTENNA DISCHARGE UNIT
ELECTRIC SERVICE
EQUIPMENT
NEC - NATIONAL ELECTRICAL CODE
S2898A
POWER SERVICE GROUNDING ELECTRODE SYSTEM
(NEC ART 250, PART H)
(NEC SECTION 810-20)
GROUNDING CONDUCTORS
(NEC SECTION 810-21)
GROUND CLAMPS
13 Nonuse Periods - The power cord of the appliance should be unplugged from the
outlet when left unused for a long period of time.
14 Object and Liquid Entry - Care should be taken so that objects do not fall and
liquids are not spilled into the enclosure through openings.
15 Damage Requiring Service - The appliance should be serviced by qualified ser-
vice personnel when:
A The power-supply cord or the plug has been damaged; or
B Objects have fallen, or liquid has been spilled into the appliance; or
C The appliance has been exposed to rain; or
D The appliance does not appear to operate normally or exhibits a marked change
in performance; or
E The appliance has been dropped, or the enclosure damaged.
16 Servicing - The user should not attempt to service the appliance beyond that
described in the operating instructions. All other servicing should be referred to
qualified service personnel.
17 Grounding or Polarization - Precautions should be taken so that the grounding or
polarization means of an appliance is not defeated.
Important Instruction
Special Notes (for Users in the U.S.A.)
E
F
ii
common.fm01/7/13
Page 4

SD-SG11
ENGLISH
Introduction
Introduction / Contents
General Information
Thank you for purchasing this SHARP product. To obtain the best performance
from this product, please read this manual carefully. It will guide you in operating your SHARP product.
Contents
Page
General Information
Precautions . . . . . . . . . . . . . . . . . . . . . . . . . . . . . . . . . . . . . . . . . . . . . . . . . . . . 2 - 3
Accessories . . . . . . . . . . . . . . . . . . . . . . . . . . . . . . . . . . . . . . . . . . . . . . . . . . . . . . . 3
Controls and Indicators . . . . . . . . . . . . . . . . . . . . . . . . . . . . . . . . . . . . . . . . . . 4 - 7
Preparation for Use
Remote Control . . . . . . . . . . . . . . . . . . . . . . . . . . . . . . . . . . . . . . . . . . . . . . . . . . . . 8
System Connections . . . . . . . . . . . . . . . . . . . . . . . . . . . . . . . . . . . . . . . . . . . . 9 - 11
Basic Operation
General Control . . . . . . . . . . . . . . . . . . . . . . . . . . . . . . . . . . . . . . . . . . . . . . . . . . . 12
Sound Control . . . . . . . . . . . . . . . . . . . . . . . . . . . . . . . . . . . . . . . . . . . . . . . . . . . .13
Setting the Clock . . . . . . . . . . . . . . . . . . . . . . . . . . . . . . . . . . . . . . . . . . . . . . . . . . 14
CD Playback
Listening to a CD . . . . . . . . . . . . . . . . . . . . . . . . . . . . . . . . . . . . . . . . . . . . . . 15 - 17
MD Playback
Listening to a MiniDisc . . . . . . . . . . . . . . . . . . . . . . . . . . . . . . . . . . . . . . . . . 18 - 20
Advanc ed CD/M D Playback
Direct Play . . . . . . . . . . . . . . . . . . . . . . . . . . . . . . . . . . . . . . . . . . . . . . . . . . . . . . . 21
Repeat or Random Play . . . . . . . . . . . . . . . . . . . . . . . . . . . . . . . . . . . . . . . . . . . . 21
Programmed Play . . . . . . . . . . . . . . . . . . . . . . . . . . . . . . . . . . . . . . . . . . . . . . . . .22
SD-SG11 1-Bit Digital Audio Component consisting of MD/CD/tuner unit and amplifier unit (without speakers).
Page
Radio
Listening to the Radio . . . . . . . . . . . . . . . . . . . . . . . . . . . . . . . . . . . . . . . . . 23 - 24
MD Recording
Before Recording to a MiniDisc . . . . . . . . . . . . . . . . . . . . . . . . . . . . . . . . . . . . . . 25
Recording to a MiniDis c from a CD . . . . . . . . . . . . . . . . . . . . . . . . . . . . . . . 26 - 29
Recording to a MiniDi s c from the Radio . . . . . . . . . . . . . . . . . . . . . . . . . . . . . . . 30
Checking Displays . . . . . . . . . . . . . . . . . . . . . . . . . . . . . . . . . . . . . . . . . . . . . . . . 31
MD Editing
Titling a MiniDisc . . . . . . . . . . . . . . . . . . . . . . . . . . . . . . . . . . . . . . . . . . . . . 32 - 33
Editing a Recorded MiniDisc . . . . . . . . . . . . . . . . . . . . . . . . . . . . . . . . . . . . 34 - 37
Advanced Features
Timer and Sleep Operation . . . . . . . . . . . . . . . . . . . . . . . . . . . . . . . . . . . . . 38 - 42
Enhancing Your Stere o Sy s tem . . . . . . . . . . . . . . . . . . . . . . . . . . . . . . . . . . 42 - 43
References
What is a MiniDisc? . . . . . . . . . . . . . . . . . . . . . . . . . . . . . . . . . . . . . . . . . . . . . . . 44
MiniDisc System Limitat ions . . . . . . . . . . . . . . . . . . . . . . . . . . . . . . . . . . . . . . . . 44
Error Messages . . . . . . . . . . . . . . . . . . . . . . . . . . . . . . . . . . . . . . . . . . . . . . . . . . . 45
Troubleshooting Chart . . . . . . . . . . . . . . . . . . . . . . . . . . . . . . . . . . . . . . . . . 46 - 47
Maintenance . . . . . . . . . . . . . . . . . . . . . . . . . . . . . . . . . . . . . . . . . . . . . . . . . . . . . 47
Specifications . . . . . . . . . . . . . . . . . . . . . . . . . . . . . . . . . . . . . . . . . . . . . . . . . . . . 48
E-1
01/7/12 01-14.fm
Page 5
Precautions
General
Please ensure that the equipment is positioned in a well-ventilated area and that
there is at least 4" (10 cm) of free space along the sides and back. There must
also be a minimum of 8" (20 cm) of free space on the top of the unit.
8" (20 cm)
Left speaker
Right speaker
In case of an electrical storm, unplug the unit for
safety.
Hold the AC power plug by the head when removing
it from the AC outlet, as pulling the cord can damage
internal wires.
SD-SG11
4" (10 cm)
Use the unit on a firm, level surface free from
vibration.
Keep the unit away from direct sunlight, strong
magnetic fields, excessive dust, humidity and
electronic/electrical equipment (home computers, facsimiles, etc.) which generates electrical
noise.
Do not place anything on top of the unit.
Do not expose the unit to moisture, to temperatures higher than 140°F (60°C) or to
extreme low temperatures.
If your system does not work properly, disconnect the AC power cord from the AC
outlet. Plug the AC power cord back in, and then turn on your system.
4" (10 cm)
4" (10 cm)
Do not remove the outer cover, as this may result in electric shock. Refer internal service to
your local SHARP service facility.
This unit should only be used within the range of 41°F - 95°F (5°C - 35°C).
Warning:
The voltage used must be the same as that specified on this unit. Using this product with a higher voltage other than that which is specified is dangerous and may
result in a fire or other type of accident causing damage. SHARP will not be held
responsible for any damage resulting from use of this unit with a voltage other than
that which is specified.
This product is equipped with a cooling fan on the back of the amplifier for better
heat radiation.
Precautions
General Information
E
F
E-2
01-14.fm01/7/13
Page 6
SD-SG11
Precautions (continued)
Accessories
Precautions / Accessories
General Information
Volume control
The sound level at a given volume setting depends on speaker efficiency, location,
and various other factors. It is advisable to avoid exposure to high volume levels,
which occurs while turning the unit on with the volume control setting up high, or
while continually listening at high volumes.
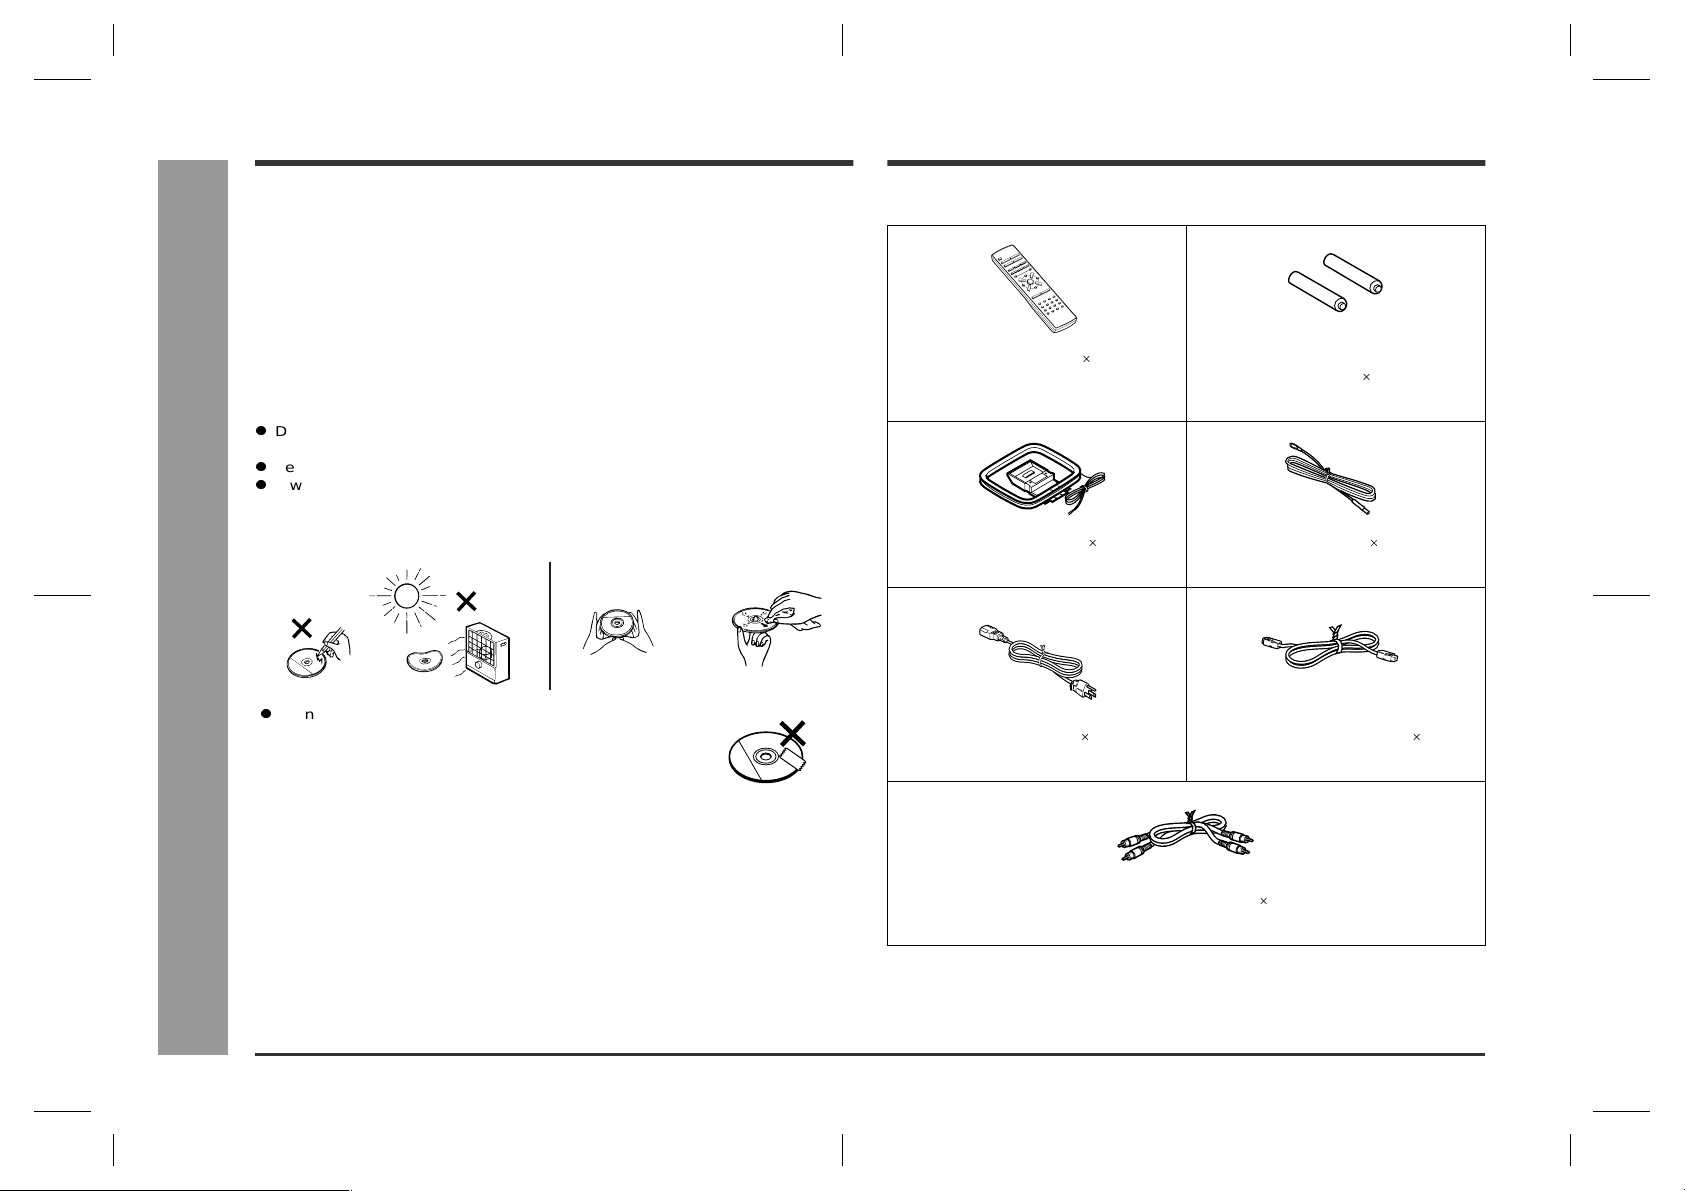
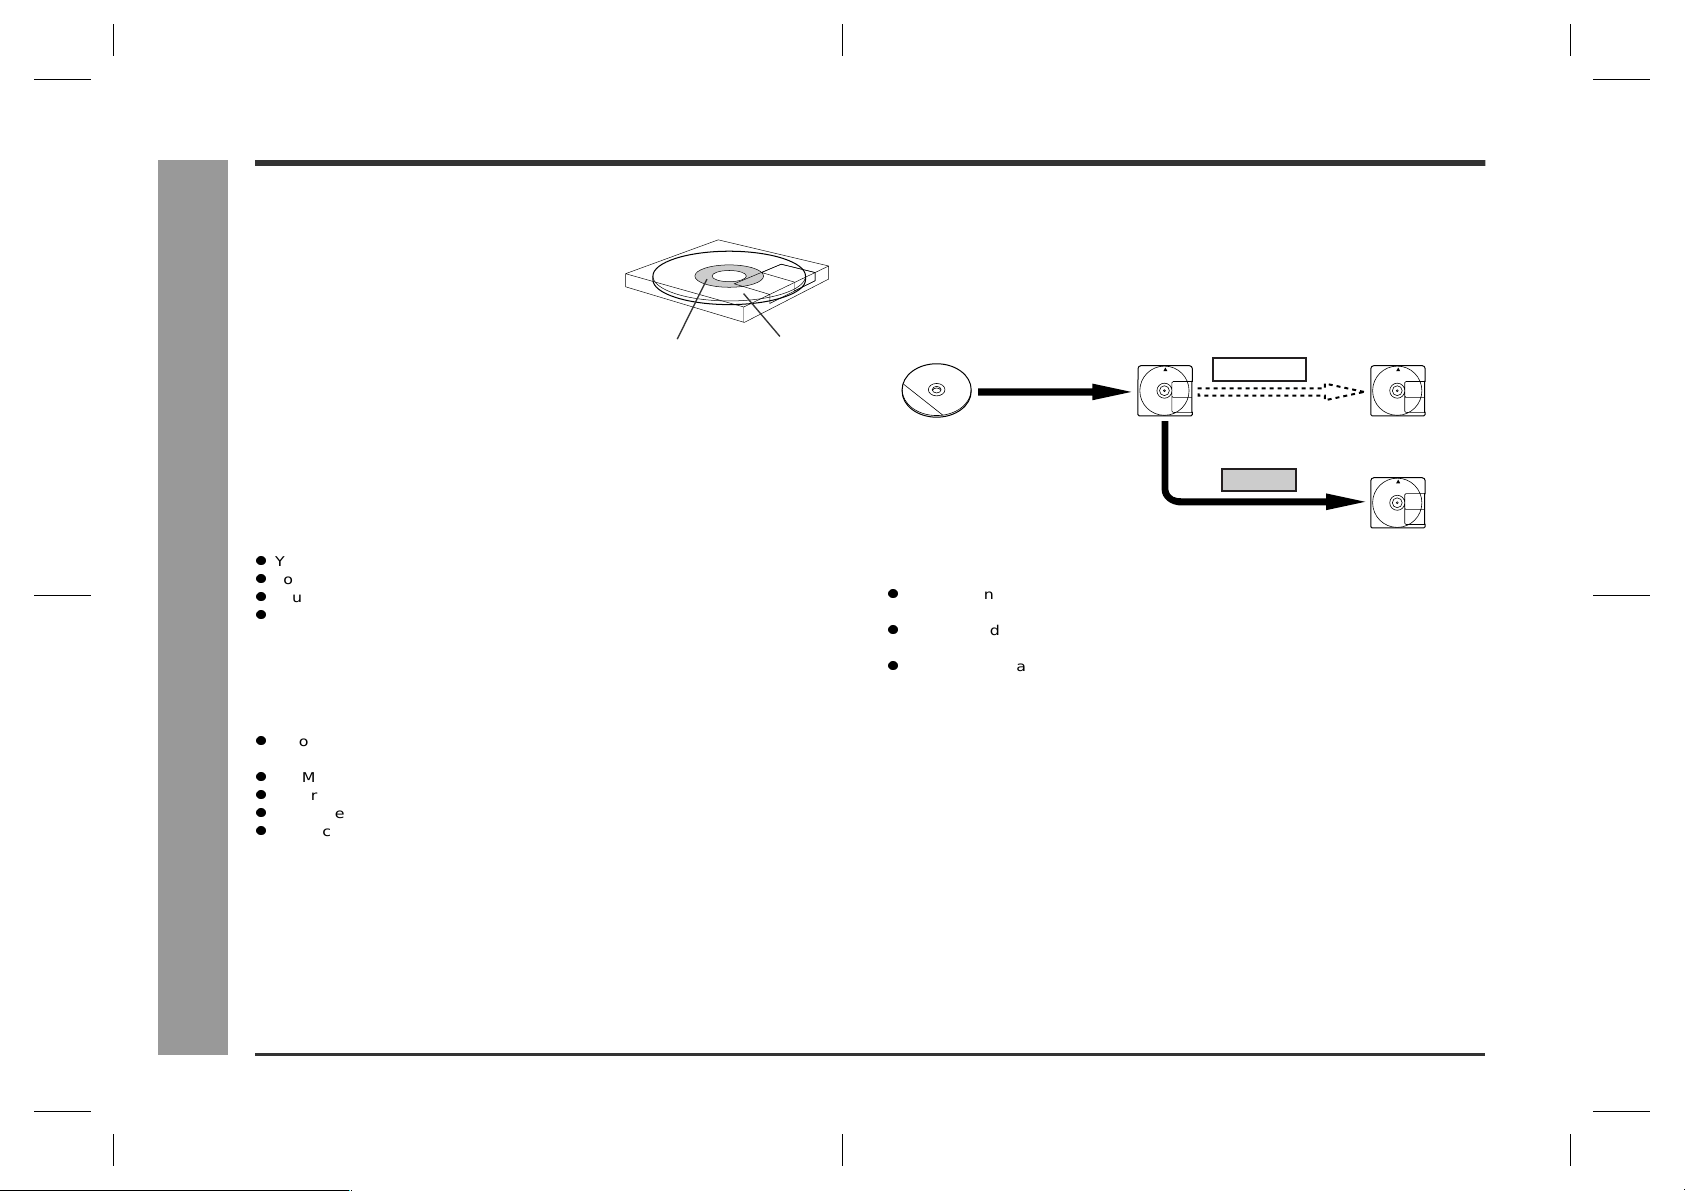
Care of compact discs
Compact discs are fairly resistant to damage, however mistracking can occur due to
an accumulation of dirt on the disc surface. Follow the guidelines below for maximum
enjoyment from your CD collection and player.
Do not write on either side of the disc, particular ly the non-label side from which
signals are read. Do not mark this surface.
Keep your discs awa y from direct sunlight, heat, and excessive moisture.
Always hold the CDs by the edges. Fingerprints, dirt, or water on the CDs can
cause noise or mistracking. If a CD is dirty or does not play properly, clean it with a
soft, dry cloth, wiping straight out from the center, along the radius.
Do not attach labels or adhesive tapes on the CD. It may
cause malfunction to the unit.
Please confirm that the following accessories are included.
Remote control 1 "AAA" size batteries (UM-4, R03, HP-16
or similar) 2
RRMCG0301AWSA UBATU0111AFZZ
AM loop antenna 1 FM antenna 1
QANTL0012AWZZ 92LFANT1535A
AC power cord 1 System connection cord 1
QACCD0029AW00 QCNWG0033AWZZ
E-3
Sound connection cord 1
QCNWG0031AWZZ or QCNWG0035AWZZ
Note:
Only the above accessories are included.
01-14.fm01/7/13
Page 7
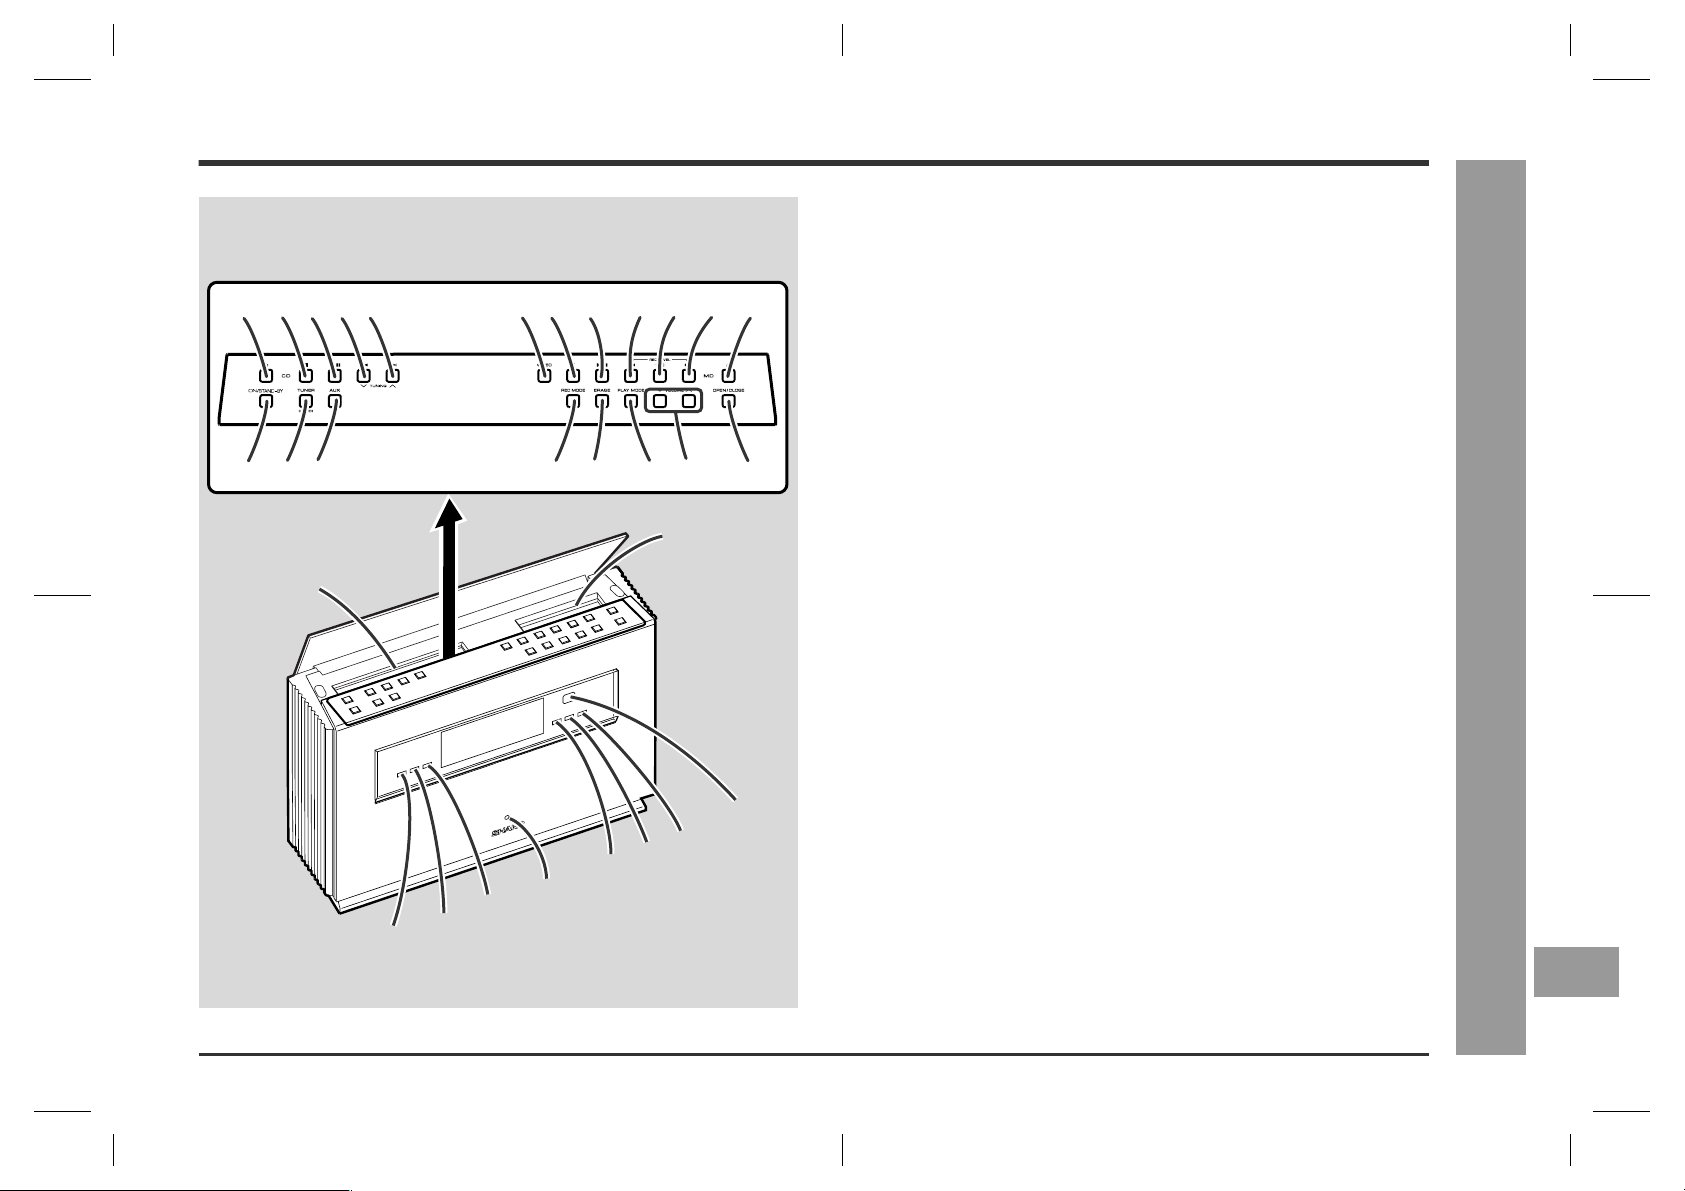
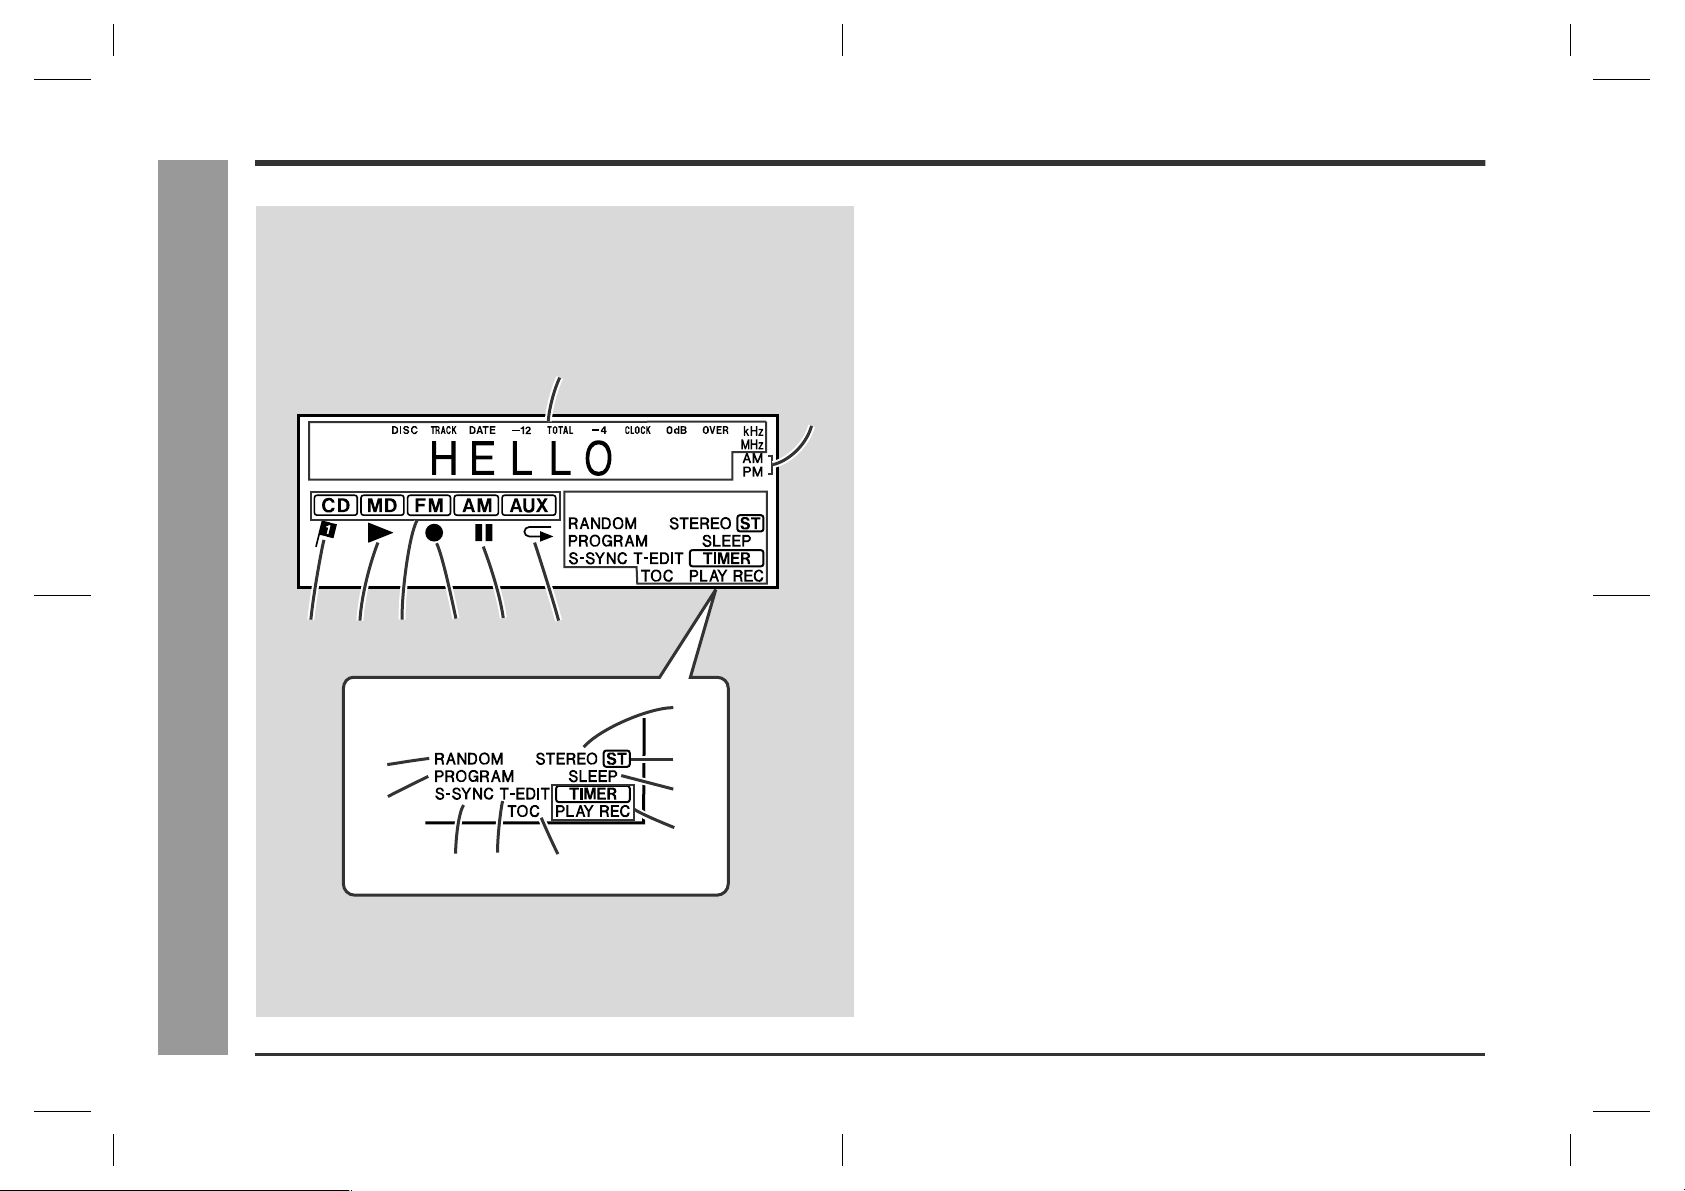
Controls and Indicators
1 2 345 67 8 1011912
13 1415 16 17 18 19 20
22
21
30
29
28
27
26
25
24
23
MD/CD/tuner unit front panel
1.CD Eject Button . . . . . . . . . . . . . . . . . . . . . . . . . . . . . . . . . . . . . . . . . 16
2.CD Stop Button . . . . . . . . . . . . . . . . . . . . . . . . . . . . . . . . . . . . . . . . . 15
3.CD Play/Pause Button . . . . . . . . . . . . . . . . . . . . . . . . . . . . . . . . . . . .15
4.CD Fast Reverse/Tuning Down Button . . . . . . . . . . . . . . . . . . . 16, 23
5.CD Fast Forward/Tuning Up Button . . . . . . . . . . . . . . . . . . . . . . 16, 23
6.MD Record Button . . . . . . . . . . . . . . . . . . . . . . . . . . . . . . . . . . . . . . . 29
7.MD Stop Button . . . . . . . . . . . . . . . . . . . . . . . . . . . . . . . . . . . . . . . . . 19
8.MD Play/Pause Button . . . . . . . . . . . . . . . . . . . . . . . . . . . . . . . . . . . 18
9.MD Recording Level/MD Fast Reverse Button . . . . . . . . . . . . . 19, 29
10.MD +10 Track Up Button . . . . . . . . . . . . . . . . . . . . . . . . . . . . . . . . . . 19
11.MD Recording Level/MD Fast Forward Button . . . . . . . . . . . . . 19, 29
12.MD Eject Button . . . . . . . . . . . . . . . . . . . . . . . . . . . . . . . . . . . . . . . . 19
13.On/Stand-by Button . . . . . . . . . . . . . . . . . . . . . . . . . . . . . . . . . . . . . 15
14.Tuner (Band) Button . . . . . . . . . . . . . . . . . . . . . . . . . . . . . . . . . . . . . 23
15.Auxiliary Button . . . . . . . . . . . . . . . . . . . . . . . . . . . . . . . . . . . . . . . .43
16.MD Record Mode Button . . . . . . . . . . . . . . . . . . . . . . . . . . . . . . . . . 26
17.Erase Button . . . . . . . . . . . . . . . . . . . . . . . . . . . . . . . . . . . . . . . . . . . 37
18.CD/MD Play Mode Select Button . . . . . . . . . . . . . . . . . . . . . . . . . . . 21
19.Volume Up and Down Buttons . . . . . . . . . . . . . . . . . . . . . . . . . . . . . 13
20.CD/MD Cover Open/Close Button. . . . . . . . . . . . . . . . . . . . . . . . . . . 15
21.CD Compartment . . . . . . . . . . . . . . . . . . . . . . . . . . . . . . . . . . . . . . . .15
22.MD Compartment . . . . . . . . . . . . . . . . . . . . . . . . . . . . . . . . . . . . . . . 18
23.Timer Indicator . . . . . . . . . . . . . . . . . . . . . . . . . . . . . . . . . . . . . . . . . 39
24.Sleep Indicator . . . . . . . . . . . . . . . . . . . . . . . . . . . . . . . . . . . . . . . . .41
25.Monaural Recording Indicator . . . . . . . . . . . . . . . . . . . . . . . . . . . . . 2 6
26.Power Indicator
27.Stereo Recording Indicator . . . . . . . . . . . . . . . . . . . . . . . . . . . . . . . 26
28.2 times Long Recording (stereo) Indicator . . . . . . . . . . . . . . . . . . .26
29.4 times Long Recording (stereo) Indicator . . . . . . . . . . . . . . . . . . .26
30.Remote Sensor . . . . . . . . . . . . . . . . . . . . . . . . . . . . . . . . . . . . . . . . . . 8
Reference page
SD-SG11
Controls and Indicators
General Information
E
F
E-4
01-14.fm01/7/12
Page 8
SD-SG11
Controls and Indicators (continued)
1
Multi-function LCD display
1.Level Meter/Character Information/Frequency Indicator
2.AM/PM Indicator
3.Top Position Indicator
4.CD/MD Play Indicator
5.Function Indicator
6.Record Indicator
7.MD Record Pause Indicator
8.CD/MD Repeat Indicator
2
9.Random Play Indicator
10.Program Play Indicator
11.Sound Synchronized Recording Indicator
12.Track Edit Indicator
13.TOC Indicator
14.FM Stereo Mode Indicator
15.FM Stereo Indicator
16.Sleep Indicator
17.Timer Play/Recording Indicator
General Information
E-5
4
3
Controls and Indicators
5
9
10
7
68
14
15
16
17
11 12 13
01-14.fm01/7/12
Page 9
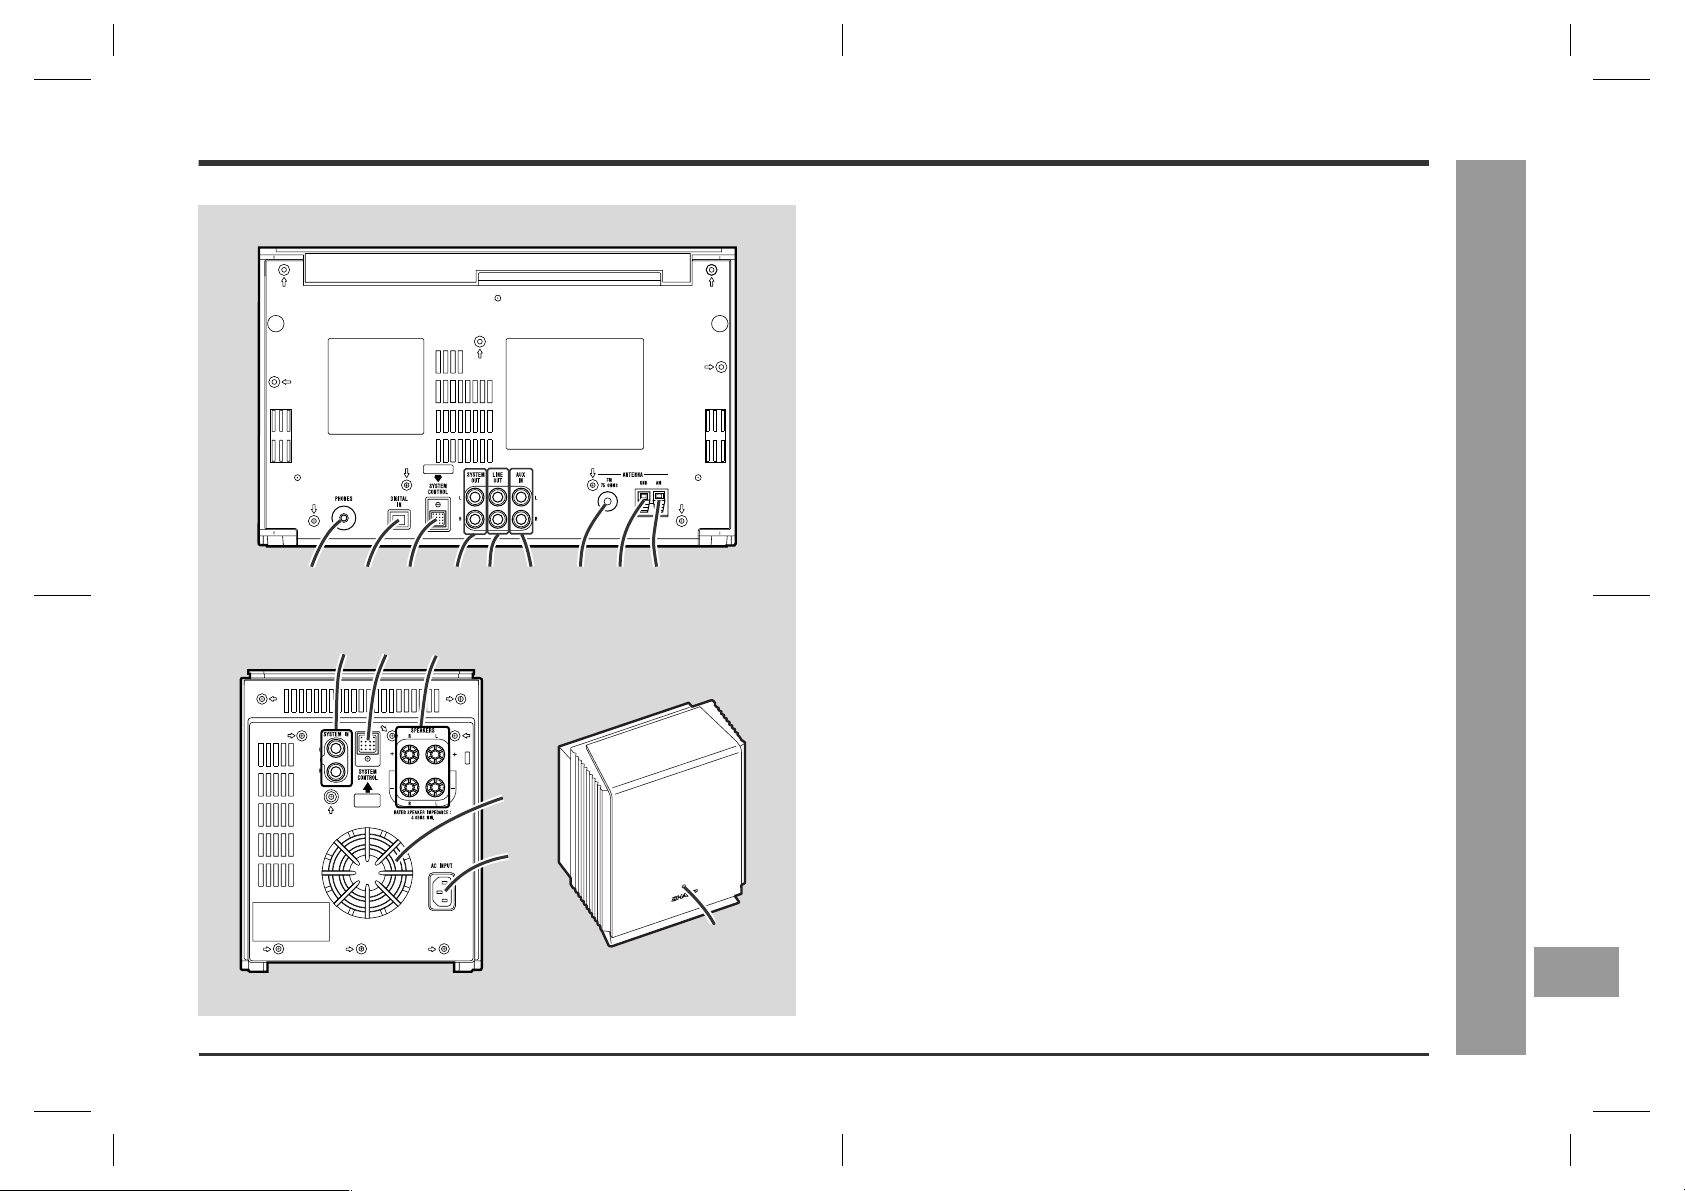
SD-SG11
MD/CD/tuner unit rear panel
Reference page
Reference page
Controls and Indicators
123456789
1
2
3
1.Headphone Jack . . . . . . . . . . . . . . . . . . . . . . . . . . . . . . . . . . . . . . . . 43
2.Digital Input Jack . . . . . . . . . . . . . . . . . . . . . . . . . . . . . . . . . . . . . . . 42
3.System Control Jack . . . . . . . . . . . . . . . . . . . . . . . . . . . . . . . . . . . . . 11
4.System Output Jacks . . . . . . . . . . . . . . . . . . . . . . . . . . . . . . . . . . . . 11
5.Line Output Jacks . . . . . . . . . . . . . . . . . . . . . . . . . . . . . . . . . . . . . . . 42
6.Auxiliary Input Jacks . . . . . . . . . . . . . . . . . . . . . . . . . . . . . . . . . . . .42
7.FM 75 Ohms Antenna Jack . . . . . . . . . . . . . . . . . . . . . . . . . . . . . . . 10
8.Antenna Ground Terminal . . . . . . . . . . . . . . . . . . . . . . . . . . . . . . . . 11
9.AM Loop Antenna Terminal . . . . . . . . . . . . . . . . . . . . . . . . . . . . . . .10
Amplifier unit rear panel
1.System Input Jacks . . . . . . . . . . . . . . . . . . . . . . . . . . . . . . . . . . . . . . 11
2.System Control Jack . . . . . . . . . . . . . . . . . . . . . . . . . . . . . . . . . . . . . 11
3.Speaker Terminals . . . . . . . . . . . . . . . . . . . . . . . . . . . . . . . . . . . . . . 10
4.Cooling Fan
5.AC Input Jack . . . . . . . . . . . . . . . . . . . . . . . . . . . . . . . . . . . . . . . . . .11
Amplifier unit front panel
1.Power Indicator
General Information
4
5
1
E
F
E-6
01-14.fm01/7/12
Page 10
SD-SG11
General Information
Controls and Indicators (continued)
1
2
3
4
*5
*6
7
*8
9
10
Controls and Indicators
*11
12
*13
*14
*15
*16
*17
18
19
20
21*
22
23*
24*
25
26
27*
28*
29*
30*
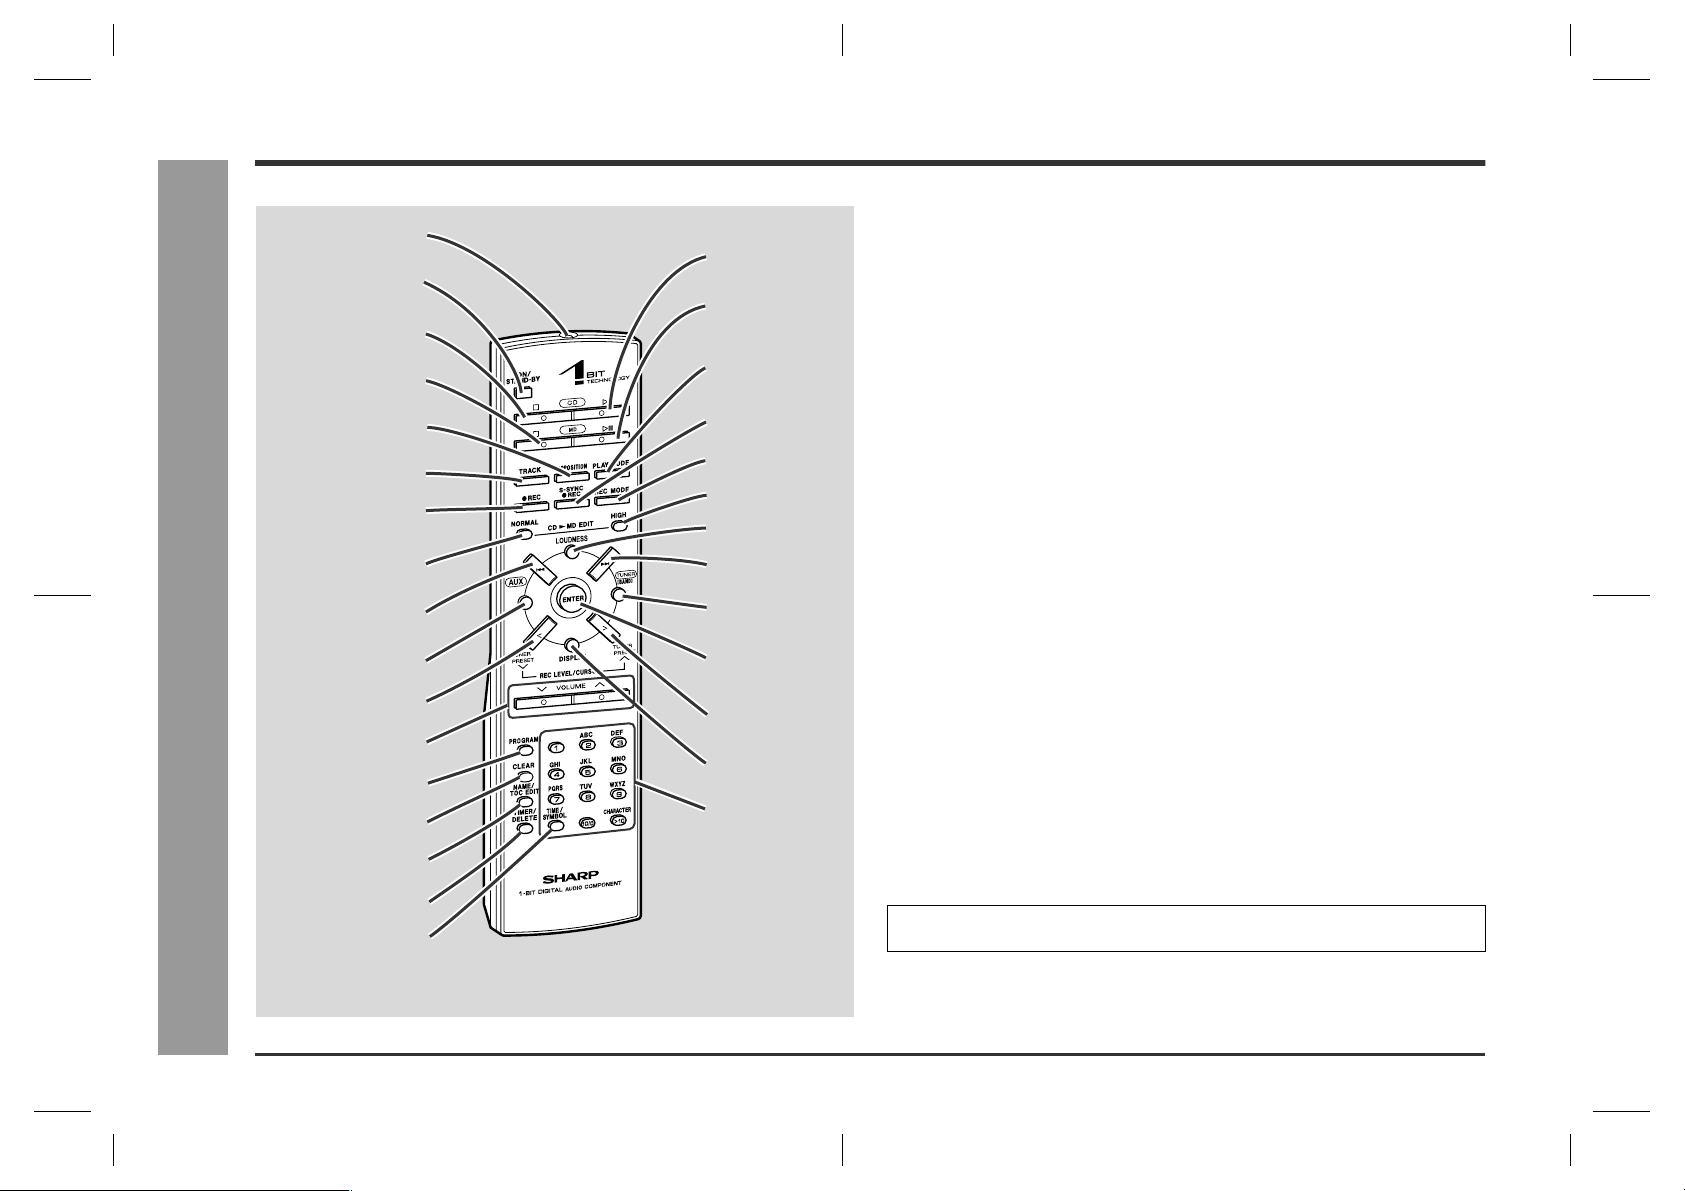
Remote control
1.Remote Control Transmitter . . . . . . . . . . . . . . . . . . . . . . . . . . . . . . . .8
On/Stand-by Button
2.
CD Stop Button
3.
MD Stop Button
4.
5.Top Position Button . . . . . . . . . . . . . . . . . . . . . . . . . . . . . . . . . . . . . .29
6.Track Edit Button . . . . . . . . . . . . . . . . . . . . . . . . . . . . . . . . . . . . . . . .28
MD Record Button
7.
8.CD/MD Edit Button (NORMAL) . . . . . . . . . . . . . . . . . . . . . . . . . . . . .26
CD/MD Fast Reverse, Tuning Down Button
9.
Auxiliary Input Button
10.
11.Recording Level/Cursor/Tuner Preset Button . . . . . . . . . . .23, 29, 32
Volume Up and Down Buttons
12.
13.CD/MD Program Button . . . . . . . . . . . . . . . . . . . . . . . . . . . . . . . . . . .22
14.Clear Button . . . . . . . . . . . . . . . . . . . . . . . . . . . . . . . . . . . . . . . . . . . .22
15.Name/TOC-Edit Button . . . . . . . . . . . . . . . . . . . . . . . . . . . . . . . . . . .32
16.Timer/Delete Button . . . . . . . . . . . . . . . . . . . . . . . . . . . . . . . . . . .14, 38
17.Time Button . . . . . . . . . . . . . . . . . . . . . . . . . . . . . . . . . . . . . . . . .17, 20
CD Play/Pause Button
18.
MD Play/Pause Button
19.
CD/MD Play Mode Select Button
20.
21.Sound Synchronize Record Button . . . . . . . . . . . . . . . . . . . . . . . . .43
MD Record Mode Button
22.
23.CD/MD Edit Button (HIGH) . . . . . . . . . . . . . . . . . . . . . . . . . . . . . . . . .26
24.Loudness Button . . . . . . . . . . . . . . . . . . . . . . . . . . . . . . . . . . . . . . . . 13
CD/MD Fast Forward, Tuning Up Button
25.
Tuner (Band) Button
26.
27.Enter Button . . . . . . . . . . . . . . . . . . . . . . . . . . . . . . . . . . . . . . . . . . . .14
28.Recording Level/Cursor/Tuner Preset Button . . . . . . . . . . .23, 29, 32
29.Display Button . . . . . . . . . . . . . . . . . . . . . . . . . . . . . . . . . . . . . . .17, 20
30.Character Input/CD, MD, Tuner Direct Buttons . . . . . . . . . . . . .21, 32
Buttons with "*" mark in the illustration can be operated on the remote control only.
Other buttons will operate both the main unit and the remote control.
Reference page
E-7
01-14.fm01/7/12
Page 11
Remote Control
SD-SG11
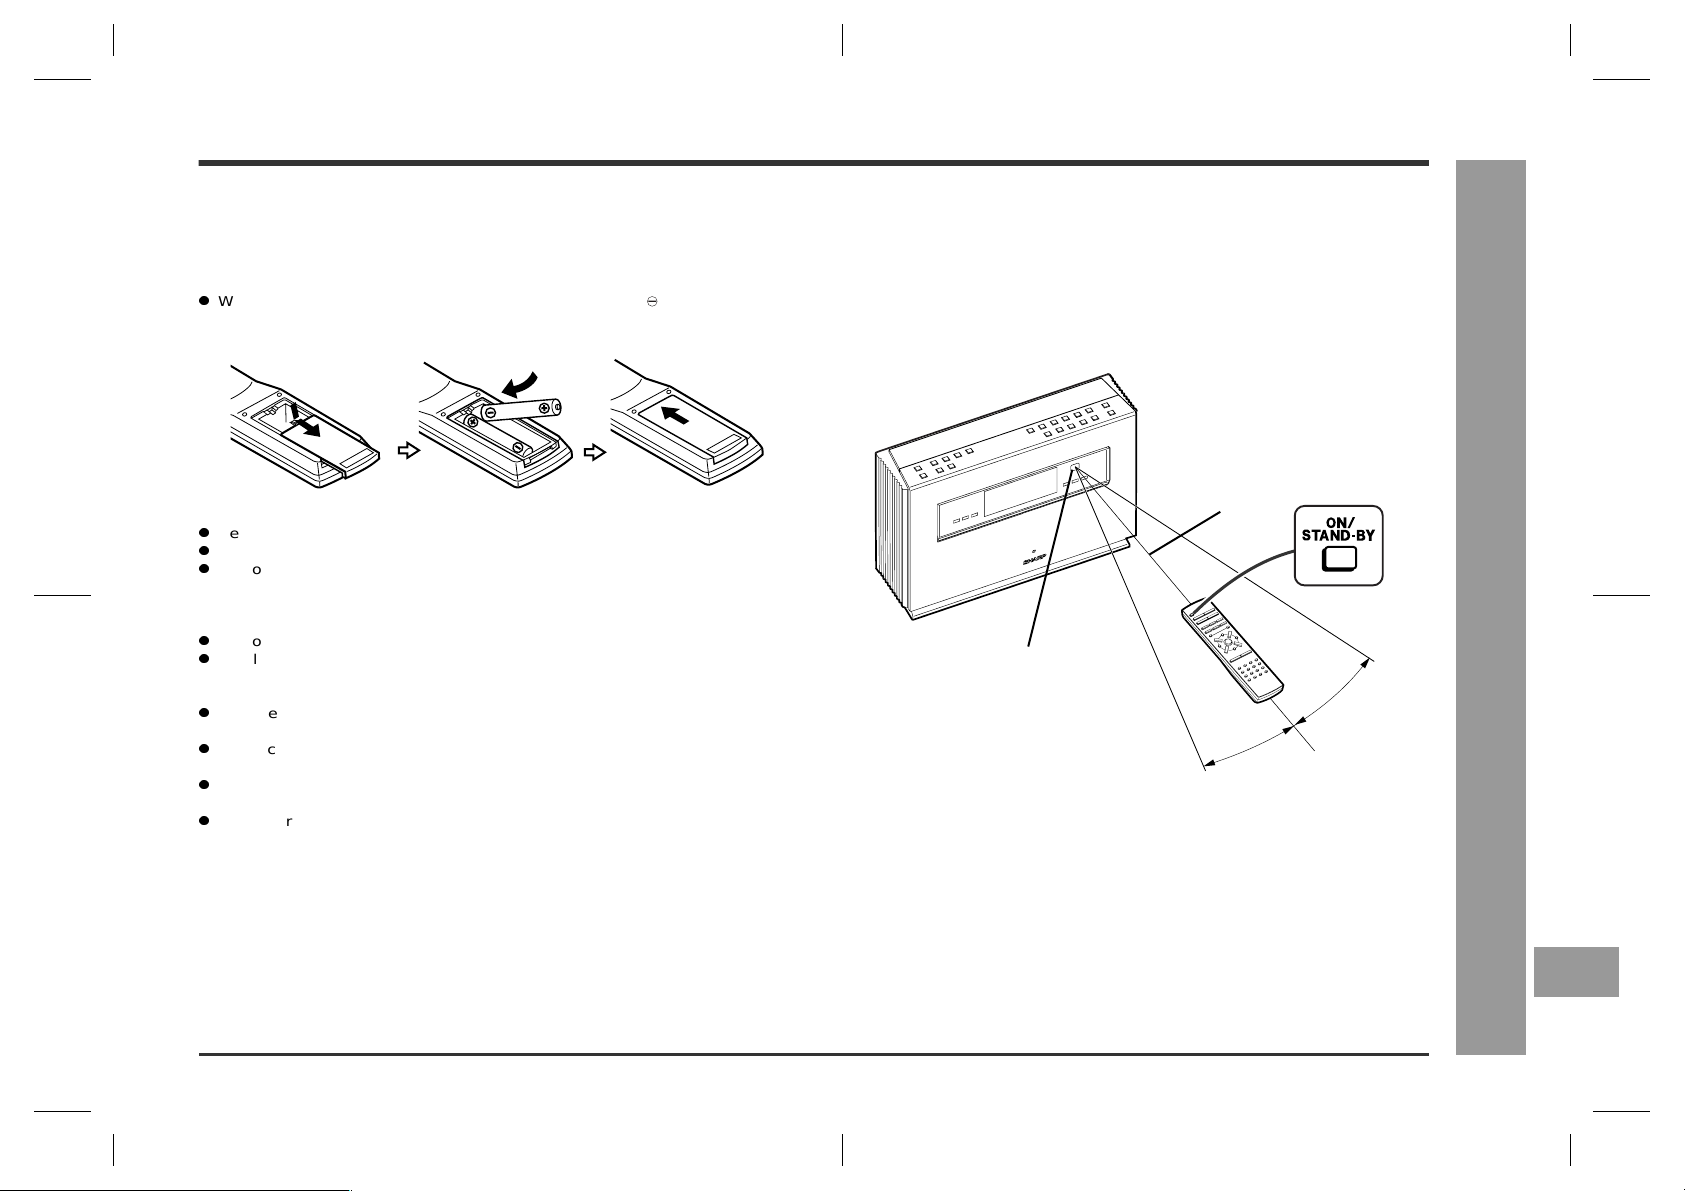
Battery installation
1
Open the battery cover.
2
Insert the supplied batteries according to the direction indicated in
the battery compartment.
When inserting or removing the batteries, push them toward .
3
Close the battery cover.
Precautions for battery use:
Replace all old batteries with new ones at the same time.
Do not mix old and new batteries.
Remove the batteries if the unit will not be used for long periods of time. This will
prevent potential damage due to battery leakage.
Caution:
Do not use rechargeable batteries (nickel-cadmium battery, etc.).
Installing the batteries incorrectly may cause the unit to malfunction.
Notes concerning use:
Replace the batteries if the operating distance is reduced or if the operation
becomes erratic. Purchase 2 "AAA" size batteries (UM-4, R03, HP-16 or similar).
Periodically clean the transmitter on the remote control and the sensor on the stereo system with a soft cloth.
Exposing the sensor on the stereo system to strong light may interfere with operation. Change the lighting or the direction of the stereo system.
Keep the remote control away from moisture, heat, shock, and vibrations.
Test of the remote control
Check the remote control after checking all connections have been made correctly.
(See pages 9 - 11.)
Face the remote control directly to the remote sensor on the unit.
The remote control can be used within the range shown below:
Press the ON/STAND-BY button. Does the power turn on? Now, you can enjoy your
system.
8" - 20'
(0.2 m - 6 m)
Remote sensor
15˚
15˚
Remote Control
Preparation for Use
E
F
E-8
01-14.fm01/7/12
Page 12
SD-SG11
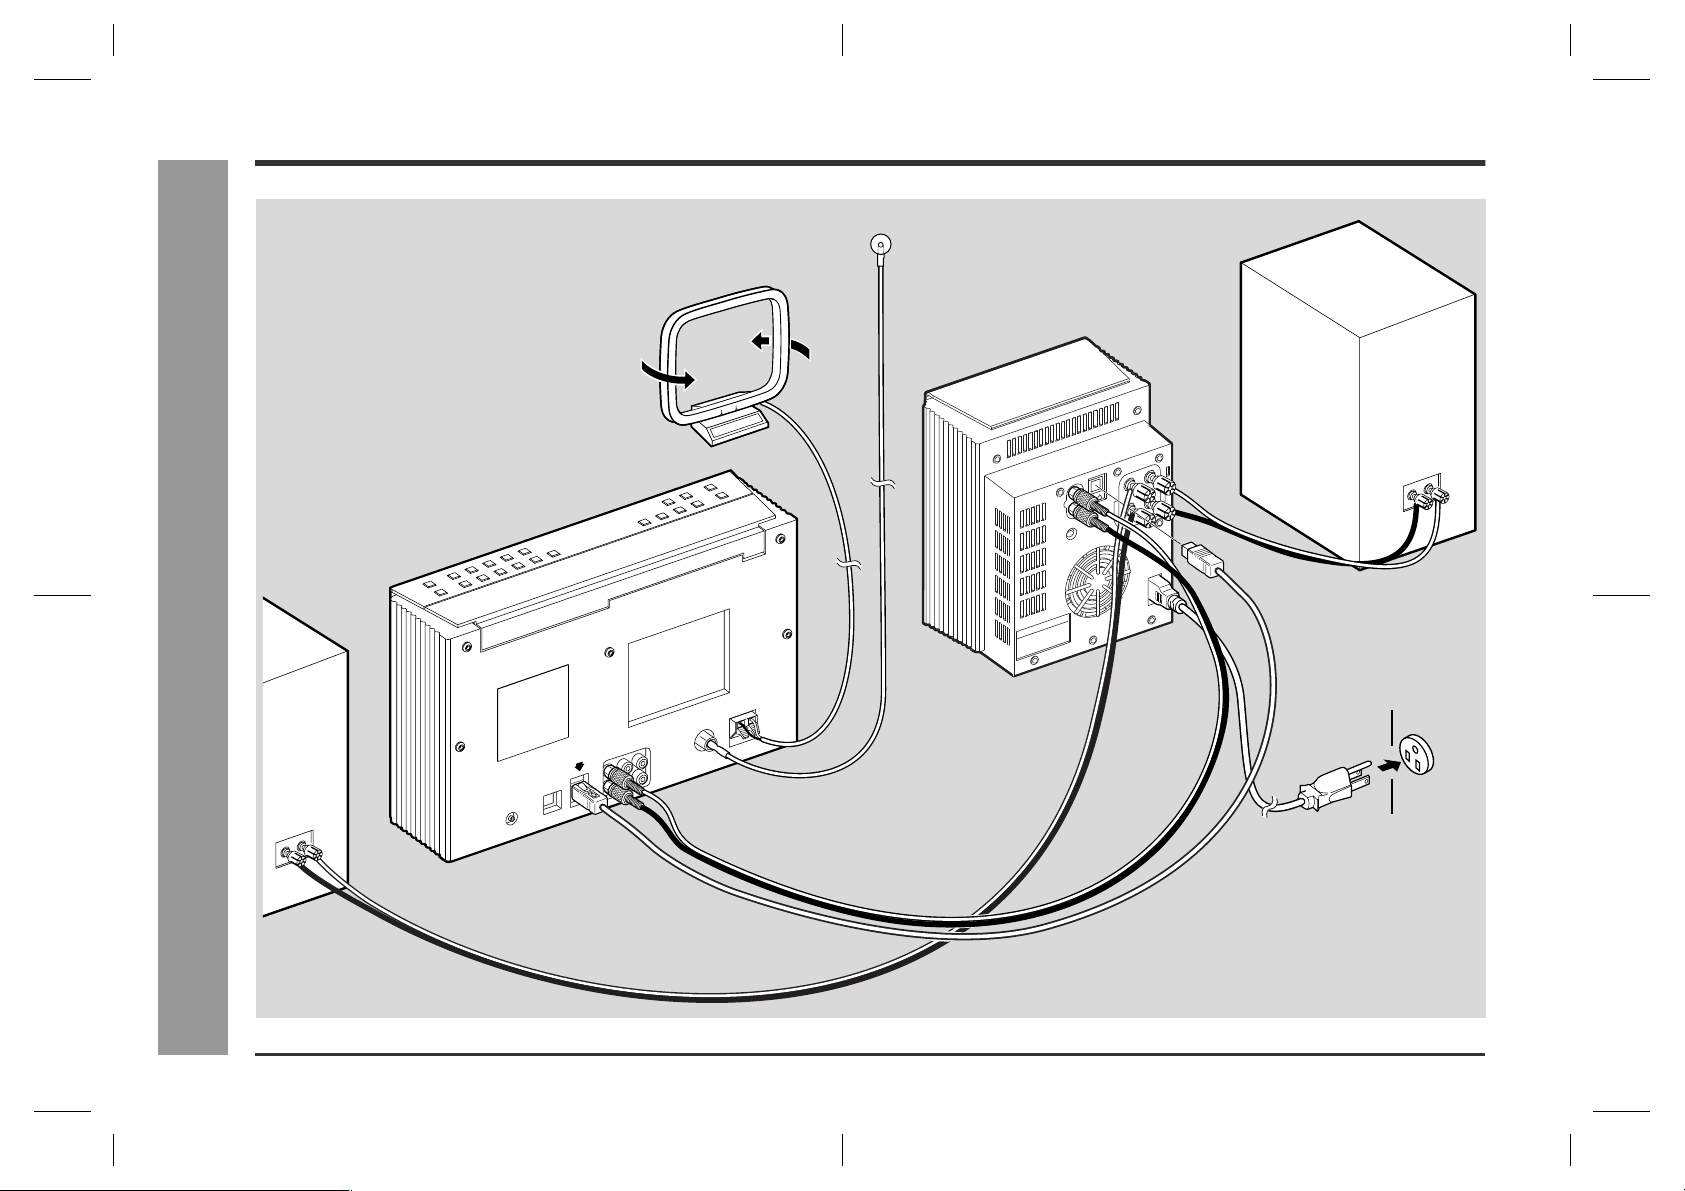
System Connections
Preparation for Use
Right speaker
(Not supplied)
System Connections
AM loop antenna
FM antenna
Left speaker
(Not supplied)
Speaker wire (Not supplied)
AC outlet
(AC 120V, 60 Hz)
E-9
Caution:
The SYSTEM CONTROL jacks are
for the MD/CD/tuner unit and the
amplifier unit of SD-SG11 only.
Do not connect to other equipments.
Speaker wire (Not supplied)
01-14.fm01/7/12
Page 13
SD-SG11
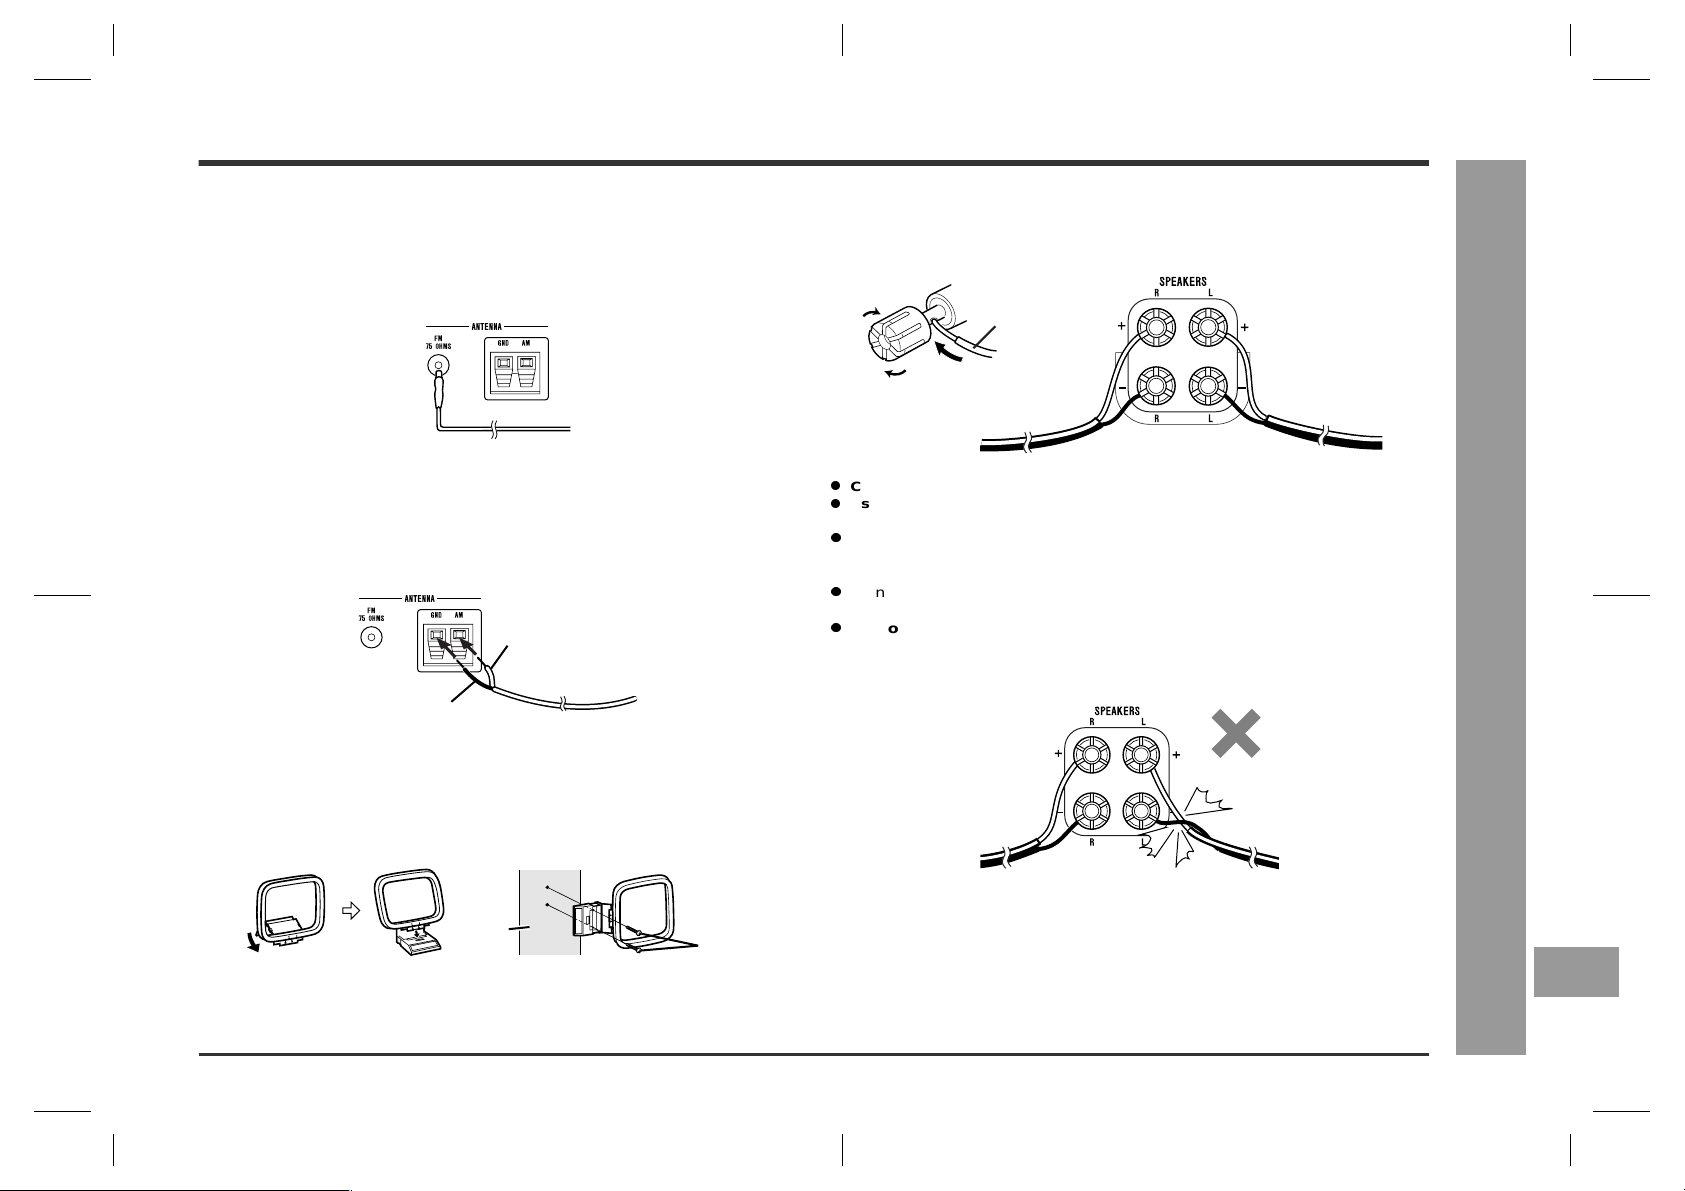
Antenna connection
Supplied FM antenna:
Connect the FM antenna wire to the FM 75 OHMS jack and position the FM antenna
wire in the direction where the strongest signal can be received.
Supplied AM loop antenna:
Connect the AM loop antenna wire to the AM and GND terminals. Position the AM
loop antenna for optimum reception. Place the AM loop antenna on a shelf, etc., or
attach it to a stand or wall with screws (not supplied).
White
Black
Note:
Keep the FM/AM antenna away from the amplifier unit, MD/CD/tuner unit, AC power
cord, and speaker cord. If they are too close, the noise may be heard.
Installing the AM loop antenna:
< Assembling > < Attaching to the wall >
Speaker connection
Connect the speaker wire (not supplied) to SPEAKERS terminals.
Speaker wire
Caution:
Connect the speaker wires to the speakers first, then to the unit.
Use a speaker system which has 50 W or more rated power input and 4 oh ms
impedance.
If the volume is turned up too high with the speakers of less than 4 ohms impedance connected, the protection circuit of the amplifier activates. Nothing is heard
temporarily.
Do not mistake the right and the left channels. The right speaker is the one on the
right side when you face the unit.
Do not short-circuit the speaker lead. If it happ ens with the power on, the
protection circuit is activated and the unit is set to the power stand-by mode.
In this case, check that the speaker lead i s connected correctly before turning on the power again.
System Connections
Preparation for Use
Wall
Screws
(Not supplied)
E
F
E-10
01-14.fm01/7/12
Page 14
SD-SG11
AC outlet
(AC 120V, 60 Hz)
System Connections (continued)
Preparation for Use
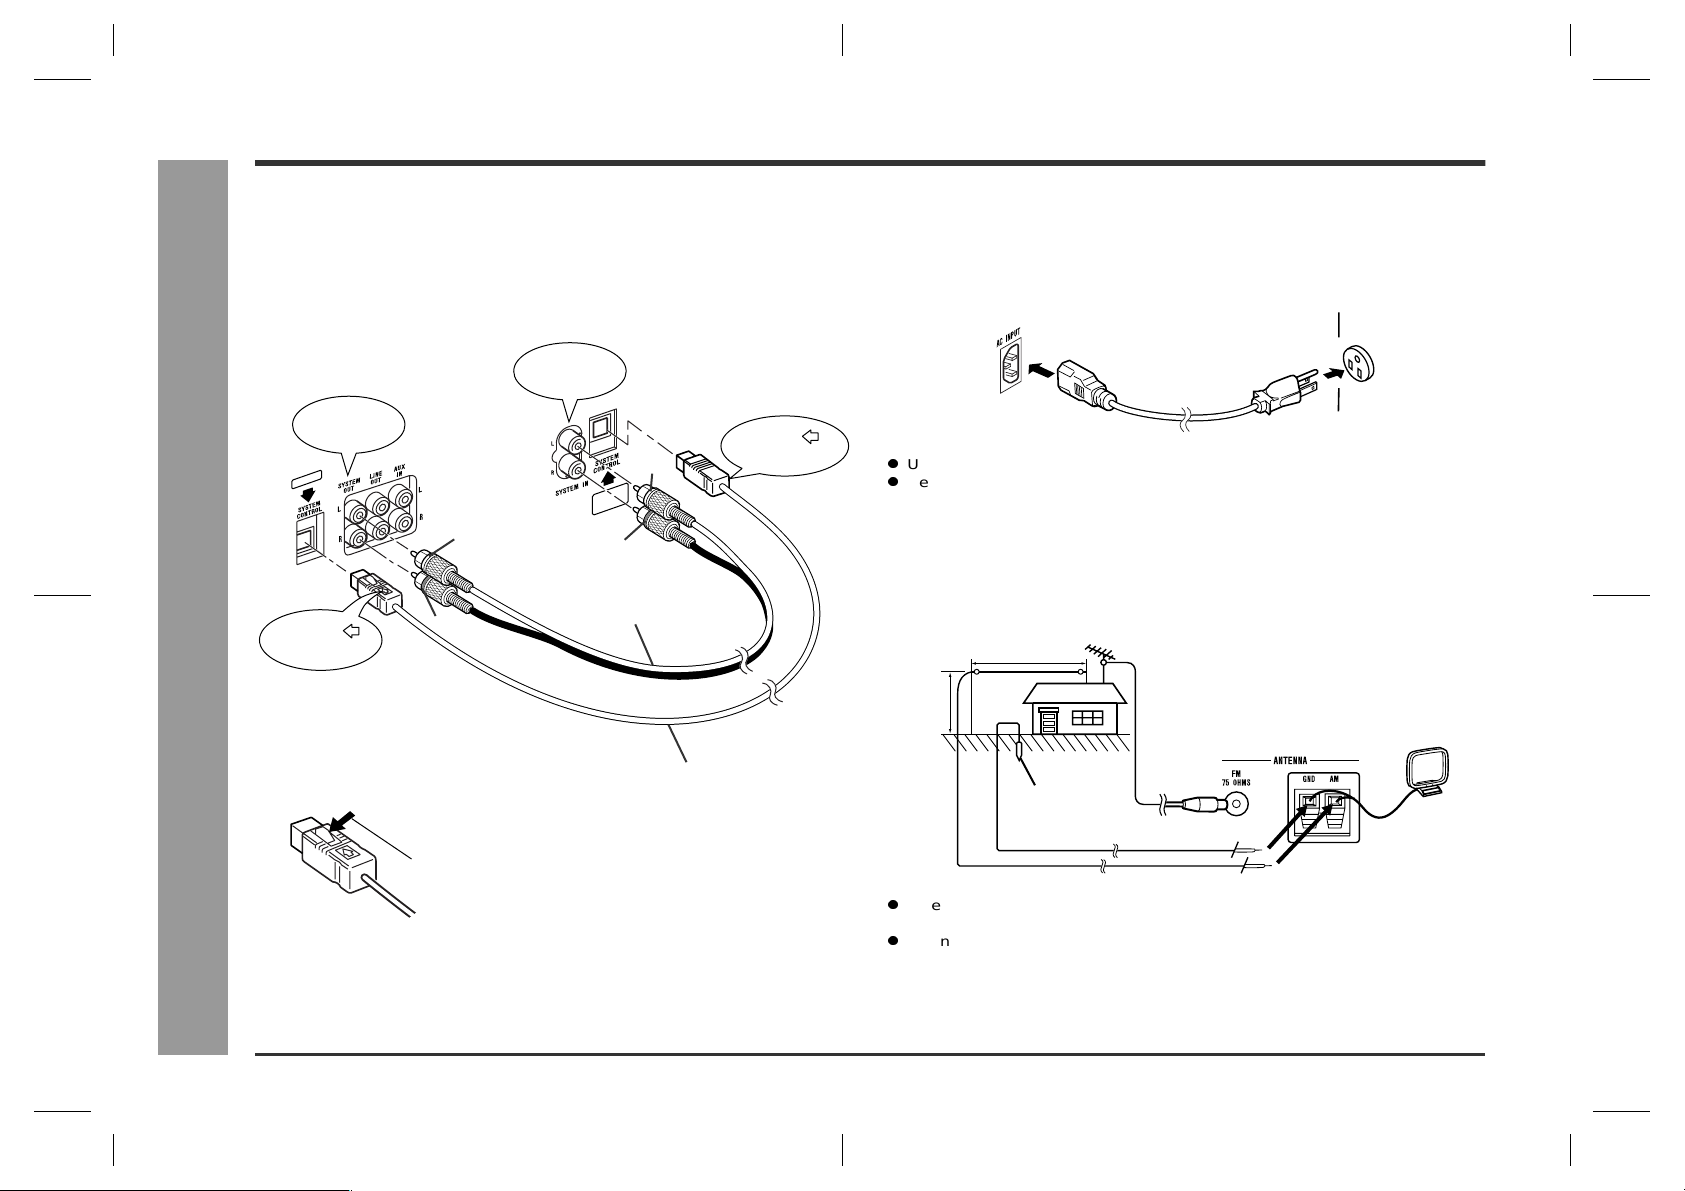
Connecting MD/CD/tuner unit and amplifier
unit
Connect the tuner unit and the amplifier unit using the sound connection cord and the
system connection cord included with this unit.
Amplifier unit
SYSTEM IN
White
Red
Sound connection cord
System connection cord
Plug in with
mark facing down.
System Connections
MD/CD/tuner unit
SYSTEM OUT
Plug in with
mark facing up.
White
Red
Connecting the AC po wer cord
After checking all the connections have been made correctly, connect the AC power
cord to the AC power input jack, then plug the AC power cord of this unit into the AC
outlet.
Notes:
Unplug the unit if it will not be used for a prolonged period of time.
Never use a power cord other than the one supplied. Otherwise, a malfunction or
an accident may occur.
Outdoor FM or AM antenna
Use an outdoor FM or AM antenna if you require better reception. Consult your
dealer.
Outdoor AM antenna
49 feet (15 m)
25 feet
(7.5 m)
Ground rod
Outdoor FM antenna
E-11
Unplug it while pressing the lug on the connector.
AM loop antenna
Notes:
When an outdoor FM antenna is used, disconnect t he supplied FM antenna wire
from the FM 75 OHMS jack.
When using an outdoor AM antenna, be sure to keep the wire of the AM loop
antenna connected.
01-14.fm01/7/13
Page 15
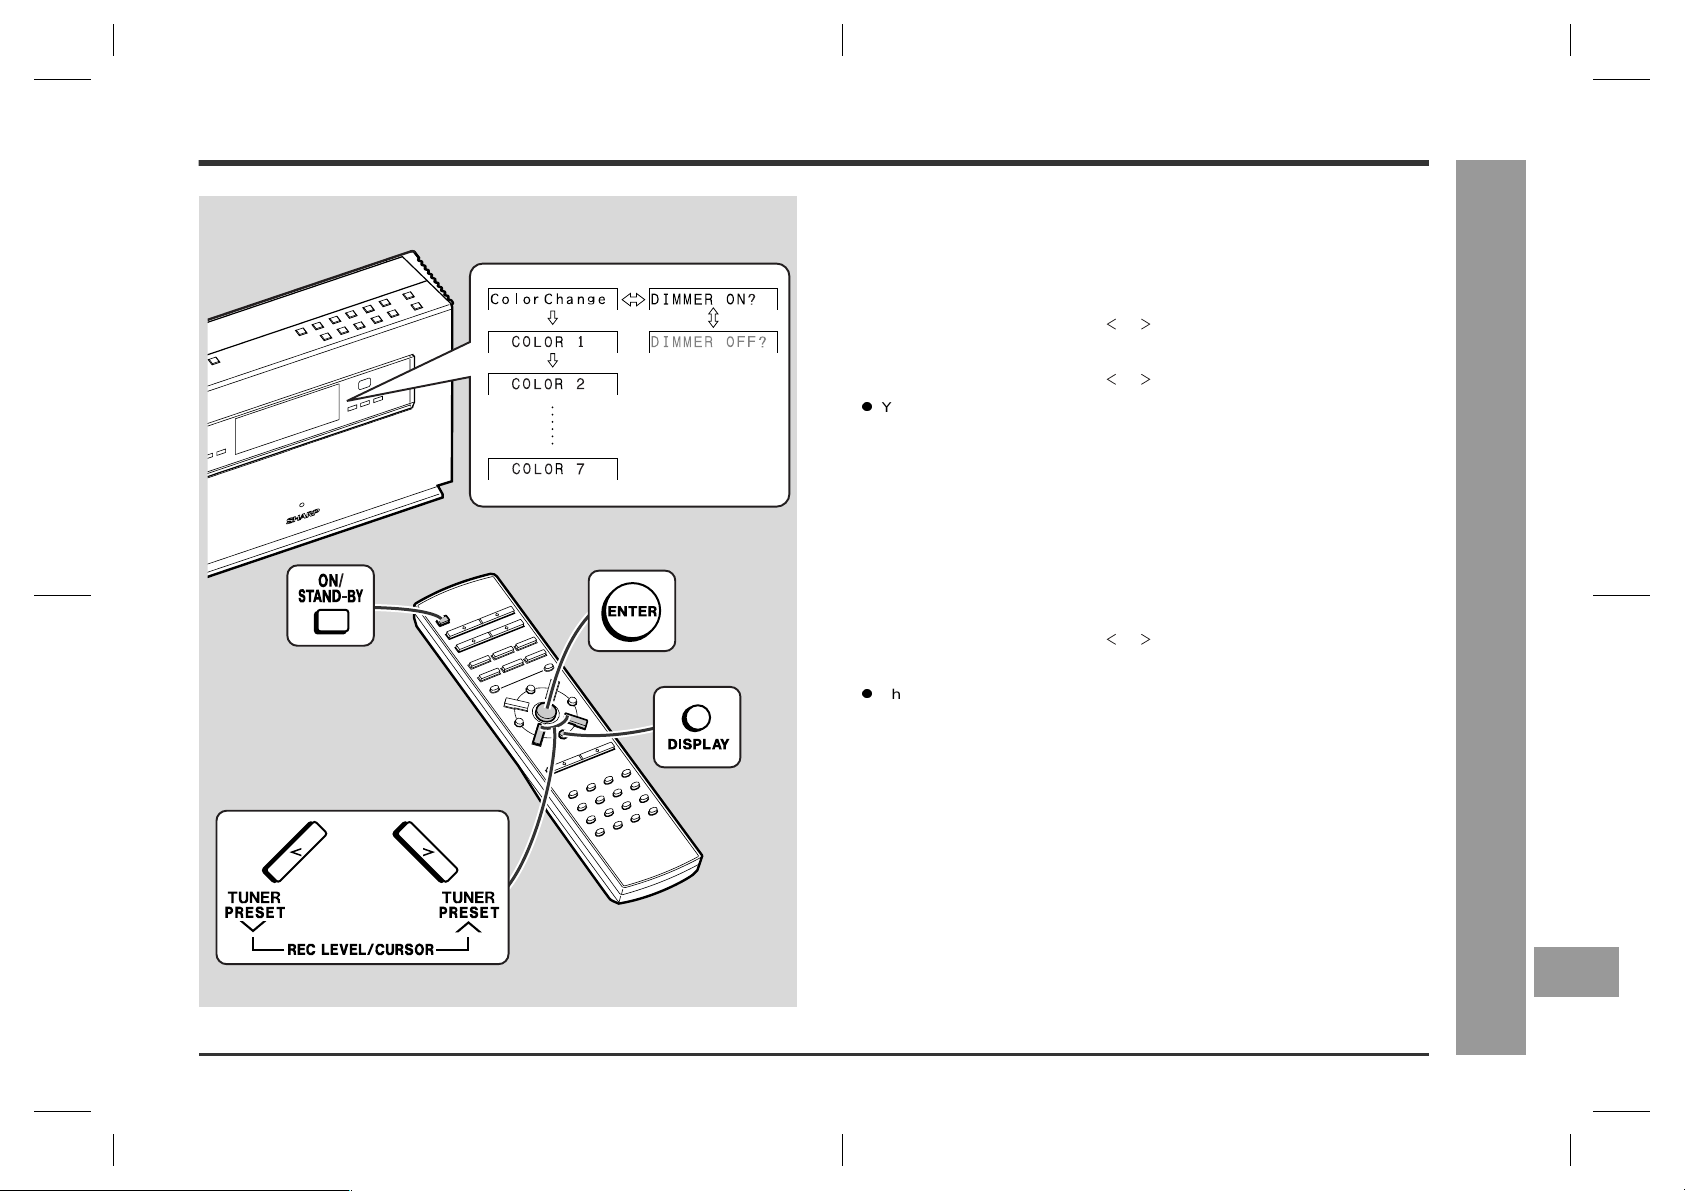
General Control
You can select and change to the color you
prefer from 7 different colors.
1 Press the ON/STAND-BY button to turn the power on.
2 Hold the DISPLAY button down for 2 seconds or mo re .
3 Press the REC LEVEL/CURSOR or button to select "Color Change".
4 Press the ENTER button.
5 Press the REC LEVEL/CURSOR or button.
You can select the color you like from 7 colors (COLOR 1 to COLOR 7).
6 Press the ENTER button.
To change the display illumination bright-
ness
To dim:
1 Press the ON/STAND-BY button to turn the power on.
2 Hold the DISPLAY button down for 2 seconds or mo re .
3 Press the REC LEVEL/CURSOR or button to select "DIMMER ON?".
4 Press the ENTER button.
The light goes out and characters are dimmed.
SD-SG11
General Control
To brighten:
1 Hold the DISPLAY button down for 2 seconds or mo re .
2 Press the ENTER button.
01-14.fm01/7/12
Basic Operation
E
F
E-12
Page 16
SD-SG11
Sound Control
Volume control
Press the VOLUME button to increase the volume and the VOLUME button to
decrease the volume.
Loudness
Press the LOUDNESS button repeatedly until the desired sound mode appears.
Bass and treble are emphasized.
Basic Operation
E-13
Sound Control
Bass and treble are more emphasized.
Canceled.
01-14.fm01/7/12
Page 17
Setting the Clock
In this example, the clock is set for 9:30 AM on August 15, 2001.
1
Press the ON/STAND-BY button to turn the power on.
2
Press the TIMER/DELETE button.
3
Within 10 seconds, press the REC LEVEL/CURSOR or button to
select the "TIME ADJUST".
4
Within 10 seconds, press the ENTER button.
5
Press the REC LEVEL/CURSOR or button to adjust the year,
and then press the ENTER button.
6
Press the REC LEVEL/CURSOR or button to adjust the month,
and then press the ENTER button.
7
Press the REC LEVEL/CURSOR or button to adjust the date,
and then press the ENTER button.
8
Press the REC LEVEL/CURSOR or button to adjust the hour,
and then press the ENTER button.
The 12-hour display will appear.
"AM" will change to "PM" automatically.
9
Press the REC LEVEL/CURSOR or button to adjust the minutes,
and then press the ENTER button.
The hour will not advance even if minutes advance from "59" to "00".
The clock starts from "0" second. (Seconds are not displayed.) The time display
will disappear after a few seconds.
To confirm the time display:
[When the unit is in the stand-by mode]
Press the DISPLAY button on the remote control.
The time display will appear for about 5 seconds.
[When the power is on]
Press the TIMER/DELETE button.
Within 10 seconds, press the REC LEVEL/CURSOR or button.
The time display will appear for about 10 seconds.
Note:
The clock setting will be cleared when the unit is unplugged or the power failure
occurs.
To reset the clock:
Perf orm "Setting the Clock" from the beginning.
AM 12:00 is 12 o'clock midnight.
PM 12:00 is 12 o'clock noon.
SD-SG11
Setting the Clock
Basic Operation
E
F
E-14
01-14.fm01/7/13
Page 18

SD-SG11
CD Playback
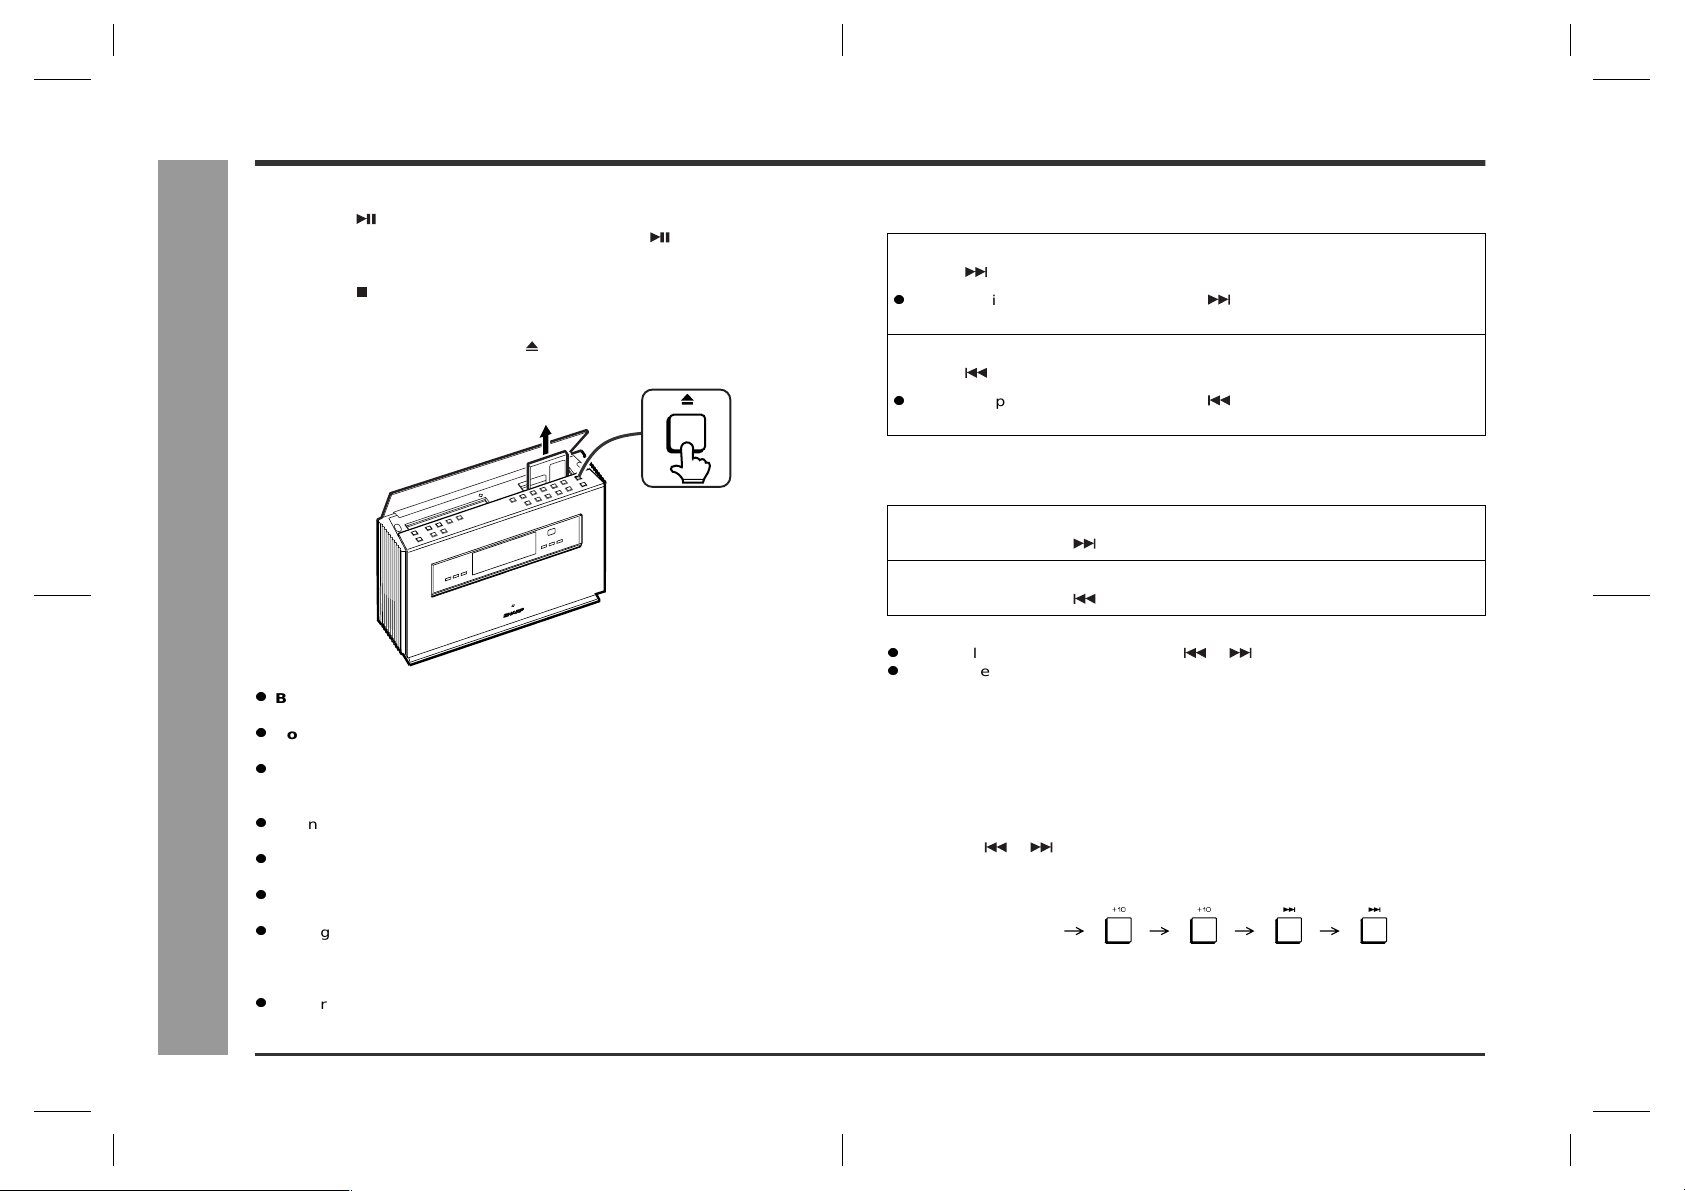
Listening to a CD
Listening to a CD
1
Press the ON/STAND-BY button to turn the power on.
2
Press the CD button.
3
Press the OPEN/CLOSE button to open the CD/MD cover.
4
Load a CD into the CD compartment with the label side facing toward you.
Total number of tracks Total playing time
5
Press the CD button to start playback.
The CD/MD cover will be closed.
When the last track has finished playing, the CD player will stop automatically.
To interrupt playb a ck:
Press the CD button.
To resume playback from the same point, press the CD button again.
E-15
To stop playback:
Press the CD button.
15-24.fm01/7/12
Page 19

SD-SG11
To remove the CD:
While in the stop mode, press the CD button.
Notes:
When reloading a half-ejected CD, take it out and insert it again.
For an 3" (8cm) CD, it will come out a little more if the CD button is pressed
twice.
If the recorded side of the CD is touched or becomes dirty, refer to "Care of compact discs" (page 3) and clean it.
After use:
Press the OPEN/CLOSE button and close the CD/MD cover.
If the unit is set to the power stand-by mode while the CD/MD cover is open, the
cover will be closed automatically.
Caution:
Be careful not to jam your fingers with the CD/MD cover when opening and
closing it.
Do not stop or move the CD/MD cover manually. It may cause malfunctions
to the unit.
CD and MD insertion slots are facing upward. Be careful not to drop coins or
the like into them. Also to avoid dust, close the CD/MD cover when the unit is
not used.
Subjecting the unit to shock or vibration may cause mistracking.
Playing certain compact discs at a h igh volume may cause mistracking. In this
case, listen at a lower volume.
If TV or radio interference occurs during CD operation, move the unit away from
the TV or radio.
If an error message is displayed during CD operation, see "Error Messages" on
page 45.
To locate the beginning of a track
To move to the beginning of the next track:
Press the button during playback.
You can skip to any track by pressing the button repeatedly until the desired
track number appears.
To restart the track being played:
Press the button during playback.
You can skip to any track by pressing the button repeatedly until the desired
track number appears.
To locate the desired portion
For audible fast forward:
Press and hold down the button during playback.
For audible fast reverse:
Press and hold down the button during playback.
Notes:
Normal playback will resume when the or button is released.
When the end of the last track is reached during fast forward, "END" will appear in
the display and CD operation will be paused. When the beginning of the first track
is reached during fast reverse, the unit will enter the playback mode.
CD-R discs may not be played depending on the device they were recorded with
or their conditions.
This unit cannot play back CD-RW discs.
Listening to a CD
CD Playback
E
F
E-16
15-24.fm01/7/12
Page 20
SD-SG11
Listening to a CD (continued)
Switching the time display
Each time the TIME/SYMBOL button on the remote control is pressed during playback, the display will change.
The elapsed playing time for the current track will be displayed.
The remaining playing time for the current track will be displayed.
The total remaining playing time for the disc will be displayed.
CD Playback
E-17
Switching the display
Each time the DISPLAY button on the remote control is pressed during playback, the
Listening to a CD
display will change.
The elapsed playing time for the current track will be displayed.
The level meter will be displayed.
Notes:
During random play, the total remaining playing time will not be displayed.
Depending on the CD, the playing time display may not match the total playing
time which is indicated on the CD jacket, as the time between tracks is not
included.
15-24.fm01/7/12
Page 21
Listening to a MiniDisc
A track can be played in the mode it is recorded: monaural or 2 times or 4 times long
recording (stereo) mode (MiniDisc Long Play Mode).
1
Press the ON/STAND-BY button to turn the power on.
2
Press the MD button.
3
Press the OPEN/CLOSE button to open the CD/MD cover.
4
Load a MiniDisc into the MD compartment with the label side facing toward you.
SD-SG11
Disc name Total number of
If the MiniDisc is loaded in a wrong way, "? MD DISC" or "Can't READ" appears
on the display. In that case, press the MD button.
The disc name will be displayed only when it has been programmed, and then the
total number of tracks and the total playing time on the MiniDisc will be displayed.
5
Press the MD button to start playback.
If the MiniDisc has a track name, it will appear and scroll across the display. Then,
the elapsed playing time will appear.
If the MiniDisc has no track names, the elapsed playing time will appear.
When the last track has finished playing, the MD player will stop automatically.
tracks
Total playing time
15-24.fm01/7/12
MD Playback
E-18
Listening to a MiniDisc
E
F
Page 22
SD-SG11
(5th track)
(15th) (25th) (26th) (27th)
Listening to a MiniDisc (continued)
MD Playback
To interrupt playb a ck:
Press the MD button.
To resume playback from the same point, press the MD button again.
To stop playback:
Press the MD button.
To remove a MiniDisc:
While in the stop mode, press the MD button.
Caution:
Be careful not to jam your fingers with the CD/MD cover when opening and
Listening to a MiniDisc
closing it.
Do not stop or move the CD/MD cover manually. It may cause malfunctions
to the unit.
CD and MD insertion slots are facing upward. Be careful not to drop coins or
the like into them. Also to avoid dust, close the CD/MD co ver when the unit is
not used.
When loading a MD, make sure to turn the power on. If the MD is inser ted forcibly
without turning the power on, it may cause malfunctions.
When transporting the unit, take out the MD. It may be jammed inside and cause
malfunctions.
If TV or radio interference occurs during MiniDisc operation, move the unit away
from the TV or radio.
Although MiniDiscs will not normally skip due to vibration, you may hear skipping
in the sound if there is continuous vibration. If the volume is turned up too high,
sound skipping may occur depending on the contents of the MiniDisc. If this happens, turn the volume down and the skipping should stop.
If an error message is displayed during MiniDisc operation, see "Error Messages"
on page 45.
To locate the beginning of a track
To move to the beginning of the next track:
Press the button during playback.
You can skip to any track by pressing the button repeatedly until the desired
track number appears.
To restart the track being played:
Press the button during playback.
You can skip to any track by pressing the button repeatedly until the desired
track number appears.
To locate the desired portion
For audible fast forward:
Press and hold down the button during playback.
For audible fast reverse:
Press and hold down the button during playback.
Notes:
Normal playback will resume when the or button is released.
When the end of the last track is reached during fast forward, "END" will appear in
the display and MiniDisc operation will be paused. When the beginning of the first
track is reached during fast reverse, the unit will enter the playback mode.
To select a track more than 10 tracks
ahead
While in the stop mode or playback:
1 Press the +10 button to forward by 10 tracks.
2 Press the or button to move forward or backward by 1 track.
For example, to move to the 27th track when listening to the 5th track:
E-19
15-24.fm01/7/12
Page 23

Switching the time display
Each time the TIME/SYMBOL button on the remote control is pressed during playback, the display will change.
The elapsed playing time for the current track will be displayed.
The remaining playing time for the current track will be displayed.
Switching the track name or level meter
etc.
Each time the DISPLAY button on the remote control is pressed during playback, the
display will change.
The elapsed playing time for the current
track will be displayed.
The track name is displayed.
"NO NAME" is displayed if the track is not named.
The level meter is displayed.
Tracks recorded in monaural is indicated as "M".
Remaining recording time is displayed.
SD-SG11
The total remaining playing time for the disc will be displayed.
Notes:
During random play, the total remaining playing time will not be displayed.
Depending on the MiniDisc, the playing time display may not match the total playing time which is indicated on the MiniDisc jacket, as the time between tracks is
not included.
Date of recording is displayed.
Time of recording is displayed.
Notes:
When the level meter is displayed, it remains unchanged during playback.
It returns to normal when the MD is removed.
The remaining recording time, and the date and the time of recording are not displayed f or playback-only MD.
15-24.fm01/7/12
MD Playback
E-20
Listening to a MiniDisc
E
F
Page 24
SD-SG11
Direct Play
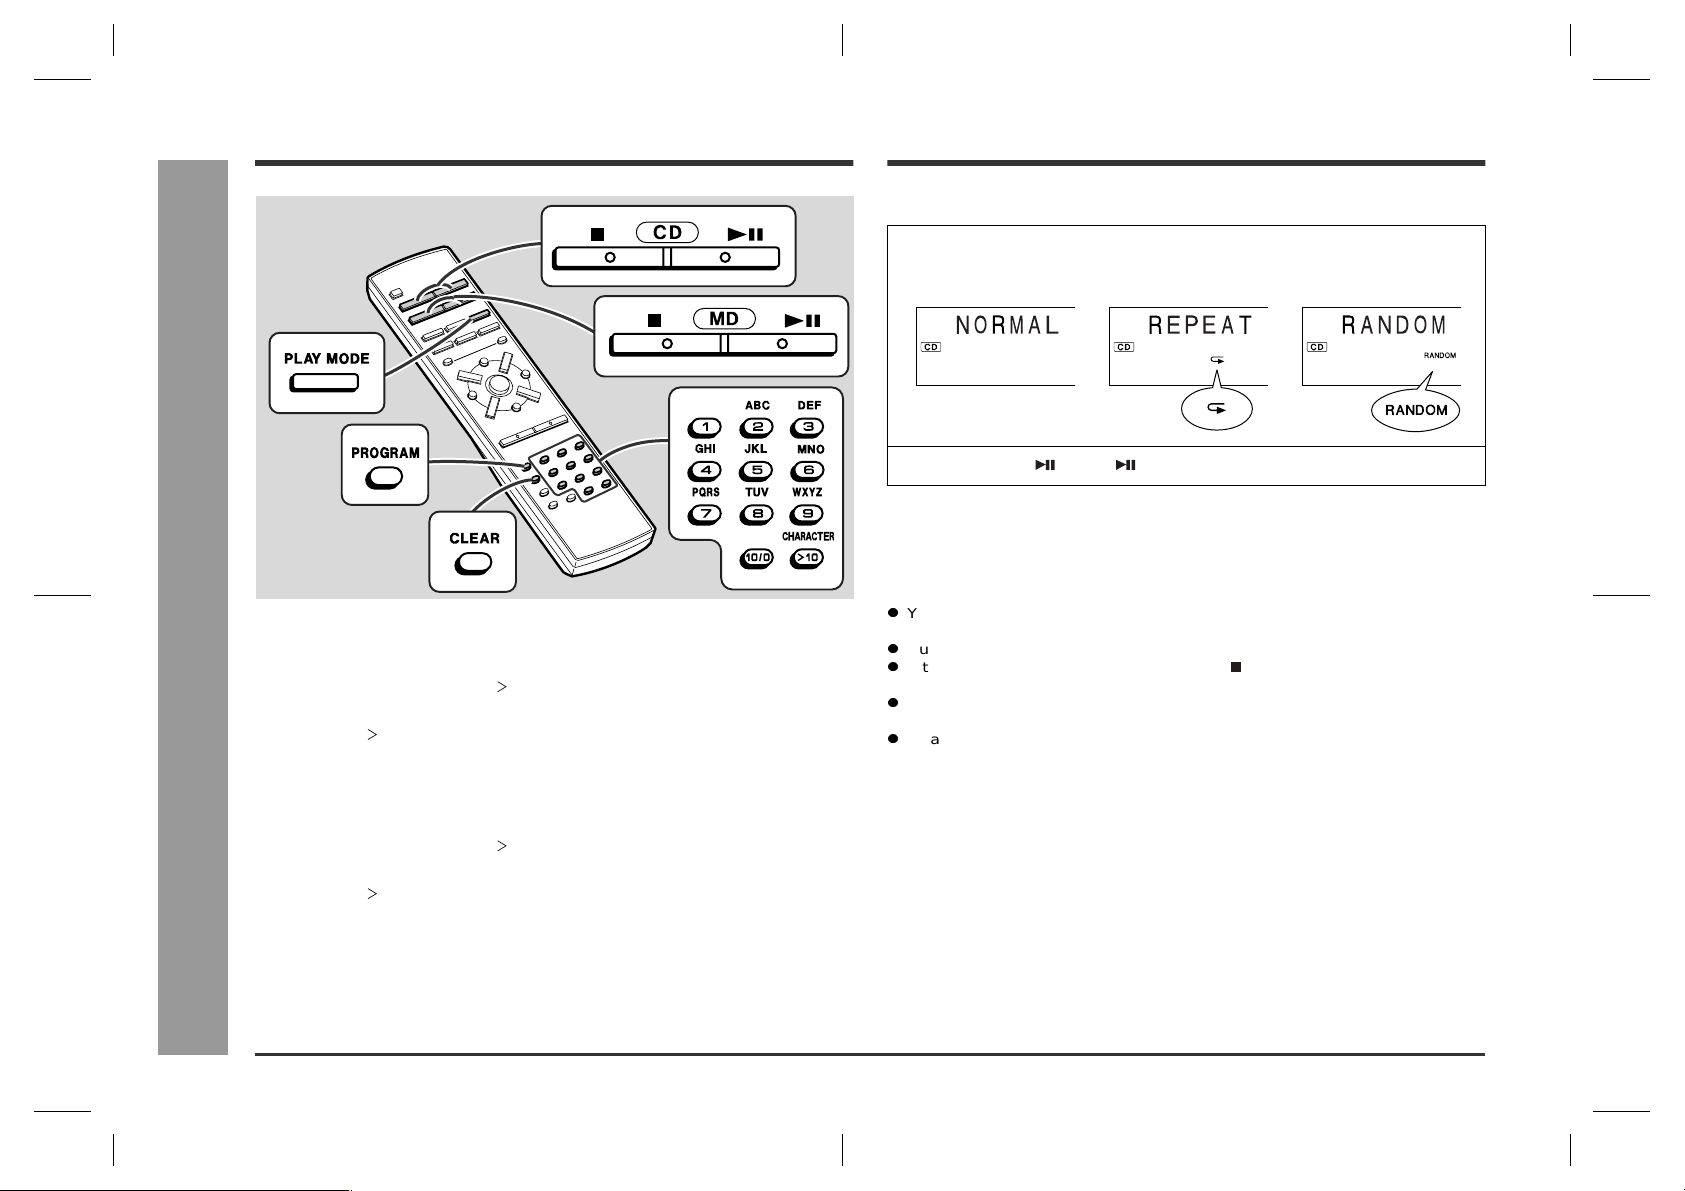
Repeat or Random Play
You can select the CD or MD playback mode; "Repeat play", "Random play" and
"Normal play".
1
When in the CD or MD mode, press the PLAY M ODE button repeatedly to select the playback mode.
2
Press the CD or MD button to start playback.
To repeat a programmed sequence:
Perf orm steps 1 - 5 in the "Programmed Pla y" section and then select the repeat playback.
Advanced CD/MD Playback
E-21
When in the CD or MD mode, press the direct buttons to select the desired tracks.
To select a track between the 11th and 99th tracks:
Select the track after pressing the 10 button.
A. For example, to choose 28
1 Press the " 10" button.
2 Press the "2" button.
Direct Play / Repeat or Random Play
3 Press the "8" button.
To select a track beyond the 100th track (MD only):
Select the track after pressing the 10 button twice.
B. For example, to choose 105
1 Press the " 10" button twice.
2 Press the "1" button.
3 Press the "10/0" button.
4 Press the "5" button.
Notes:
You can select the playback mode by pressing the PLAY MODE button on the
main unit.
During program operation, random play is not possible.
After using repeat play, be sure to press the button. Otherwise, the disc(s) will
play continuously.
The random play will stop automatically when all tracks are played once. (The
same track will not be played back twice.)
In random play, the CD or MiniDisc player will select and play tracks automatically.
(You cannot select the order of the tracks.)
To cancel repeat or random play:
Press the PLAY MODE button repeatedly to select the normal play mode.
15-24.fm01/7/12
Page 25
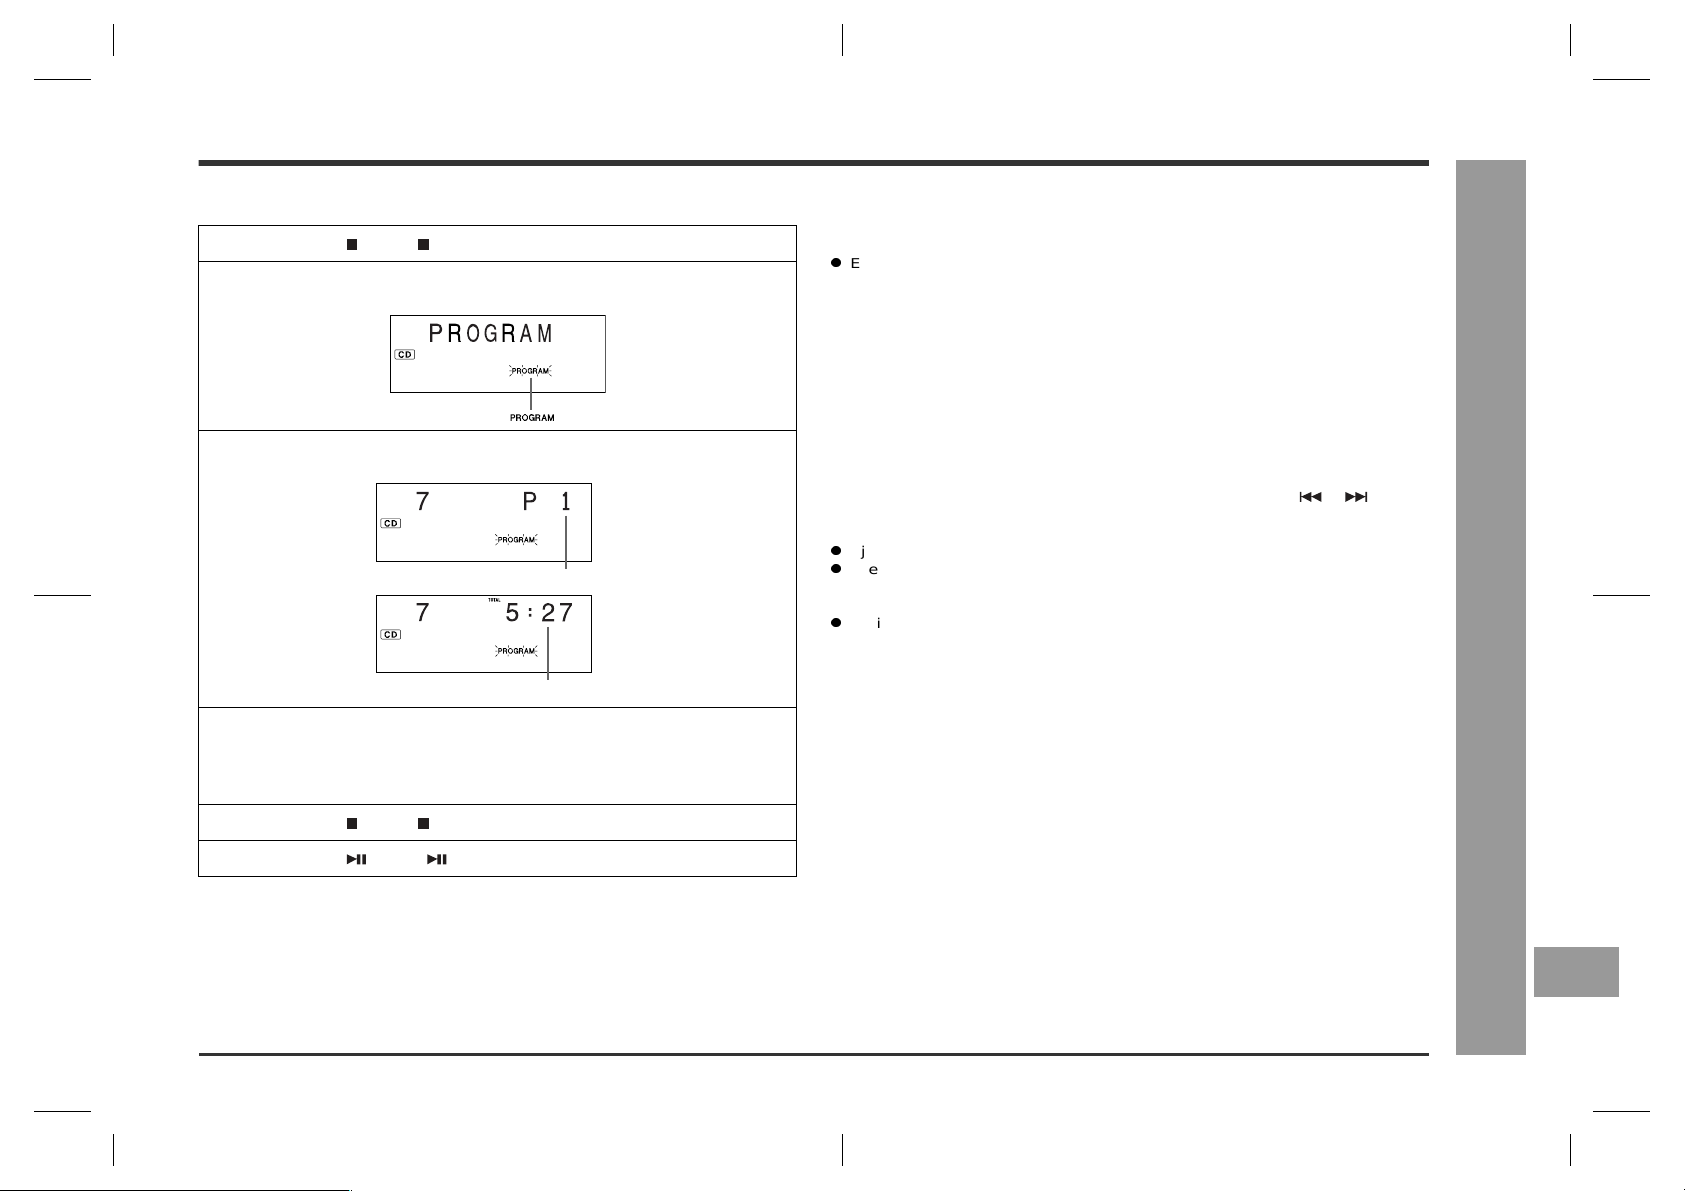
Programmed Play
SD-SG11
Up to 20 CD tracks or 20 MD tracks can be programmed.
You cannot program CD and MiniDisc tracks together at the same time.
1
Press the CD or MD button.
2
Press the PROGRAM button to enter the programmi ng save mod e.
3
Press the direct buttons to select the desired track.
Playback order
Playback time
4
Repeat step 3 for any other track. Up to 20 tracks can be programmed.
If the total programmed playback time exceeds 400 minutes, "--:--" is displayed.
However, it is properly memorized.
5
Press the CD or MD button.
To clear the programmed selections:
Press the CLEAR button while the "PROGRAM" indicator is flashing.
Each time the button is pressed, one track will be cleared, beginning with the last
track programmed.
To cancel the programmed play mode:
While in the stop mode, press the CLEAR button. The "PROGRAM" indicator will disappear and all the programmed content will be cleared.
Adding tracks to the program:
If a program has been previously stored, the "PROGRAM" indicator will be displayed.
Then follow steps 1 - 5 to add trac ks . The new tracks will be stored after the last track
of the original program.
To check which tracks are programmed:
While the unit is stopped in the programmed play mode, press the or button.
Notes:
Ejecting a CD or MiniDisc automatically cancels the programmed sequence.
Even if you press the ON/STAND-BY button to enter the stand-by mode or change
the function from CD or MD to another function, the programmed selections will
not be cleared.
During program operation, random play is not possible.
Programmed Play
Advanced CD/MD Playback
6
Press the CD or MD button to start playback.
E
F
E-22
15-24.fm01/7/12
Page 26
SD-SG11
Radio
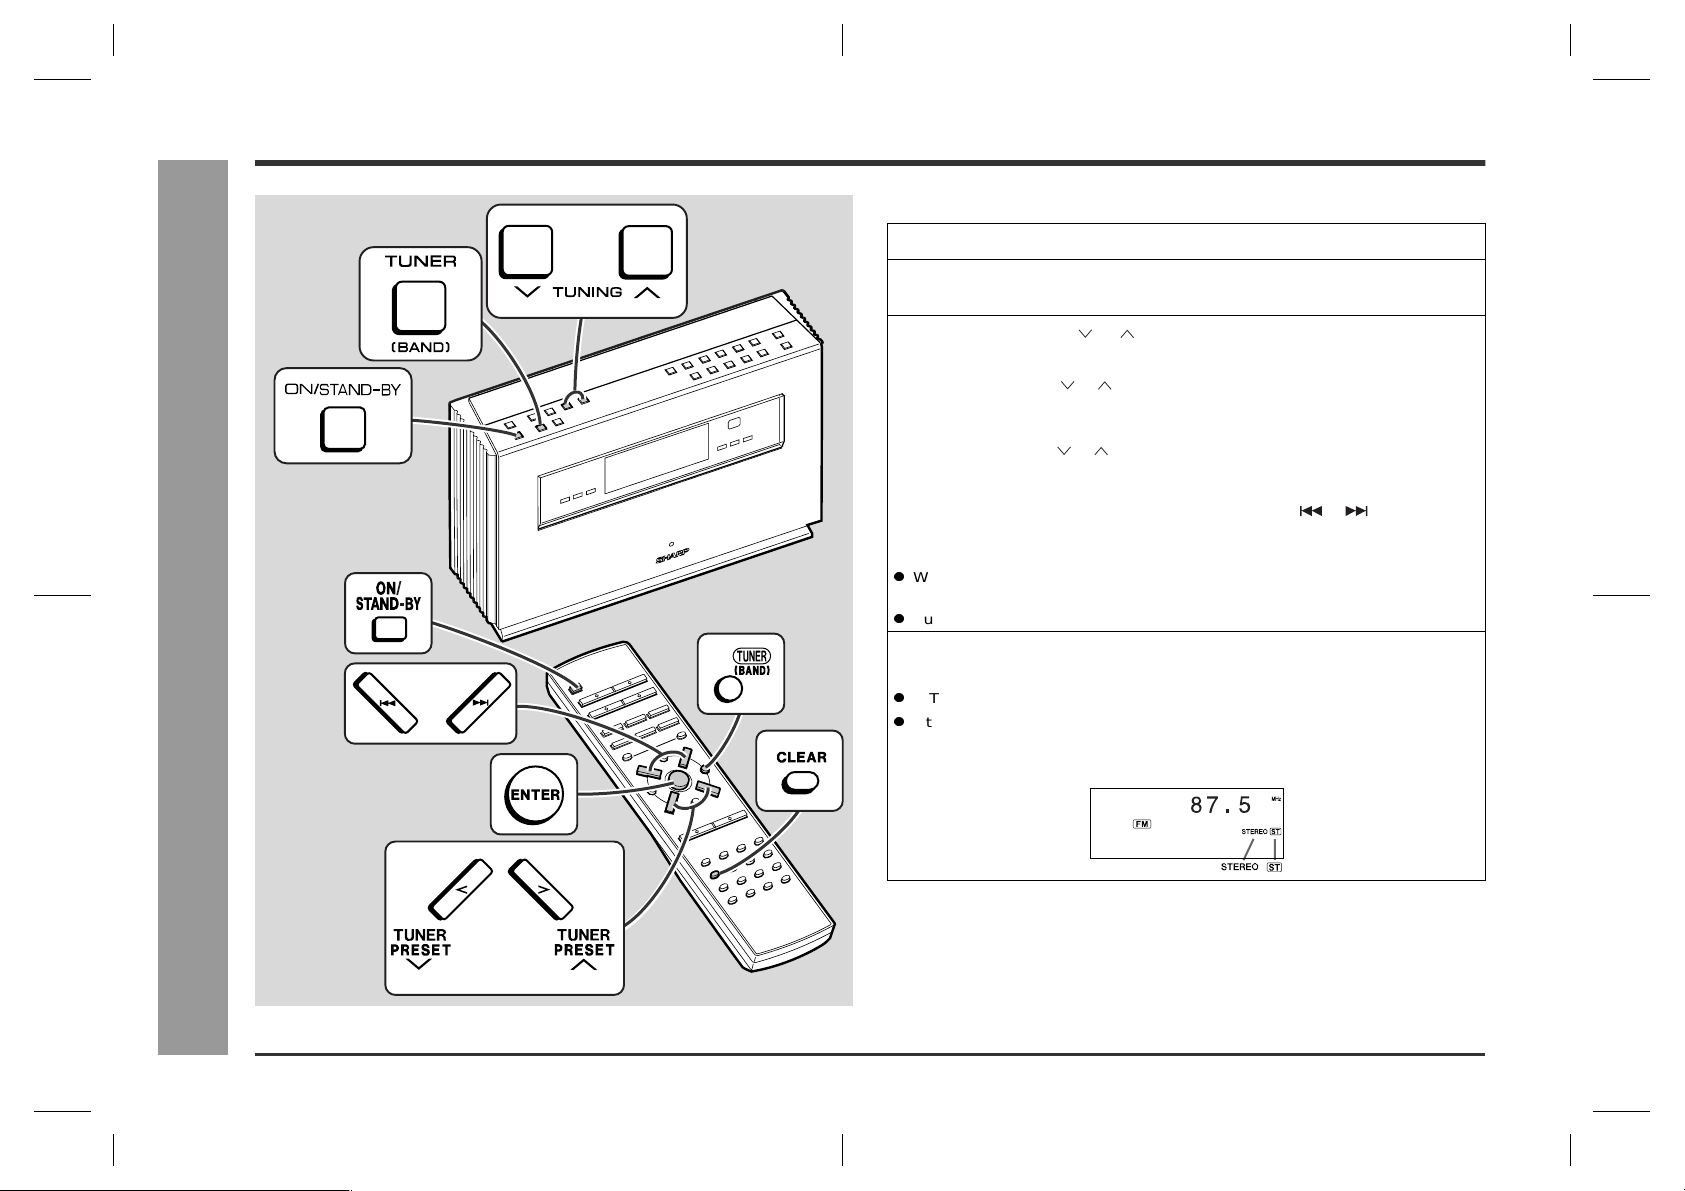
Listening to the Radio
Listening to the Radio
Tuning
1
Press the ON/STAND-BY button to turn the power on.
2
Press the TUNER (BAND) button repeatedly to select the desired
frequency band (FM STEREO, FM or AM).
3
Press the TUNING or button to tune in to the desired station.
Manual tuning:
Press the TUNING or button as many times as required to tune in to the
desired station.
Auto tuning:
When the TUNING or button is pressed for more than 0.5 seconds, scanning will start automatically and the tuner will stop at the first receivable broadcast station.
You can tune in to the desired station by pressing the or button on the
remote control.
Notes:
When radio interference occurs, auto scan tuning may stop automatically at that
point.
Auto scan tuning will skip weak signal stations.
4
To receive an FM stereo transmission, press the TUNER (BAND)
button. The "STEREO" indicator lights up.
"ST" will appear when an FM broadcast is in stereo.
If the FM reception is weak, press the TUNER (BAND) button. The "STEREO" indicator goes out. The reception changes to monaural, and the sound becomes
clearer.
E-23
After use:
Press the ON/STA ND-BY button to enter the stand-by mode.
15-24.fm01/7/12
Page 27
SD-SG11
Preset tuning
(Remote control operation)
You can store 40 AM and FM stations in memory and recall them at the push of a button.
1
Perform steps 1 - 4 in the "Tuning" section on page 23.
2
Press the ENTER button to enter the preset tuning saving mode.
3
Within 5 seconds, press the TUNER PRESET or button to select the preset channel number.
Store the stations in memory, in order, starting with preset channel 1.
4
Within 5 seconds, press the ENTER button to store that station in
memory.
If the preset number indicator goes out before the station is memorized, repeat
the operation from step 2.
5
Repeat steps 1 - 4 to set other stations, or to change a preset station.
When a new station is stored in memory, the station previously memorized will be
erased.
Note:
The backup function protects the memorized stations for a few hours should there be
a power failure or the AC power cord disconnection.
To recall a memorized station
(Remote control operation)
Press the TUNER PRESET o r button to select the desired station.
The direct buttons allow you to recall a memorized station.
To select a preset station between the 11 and 40:
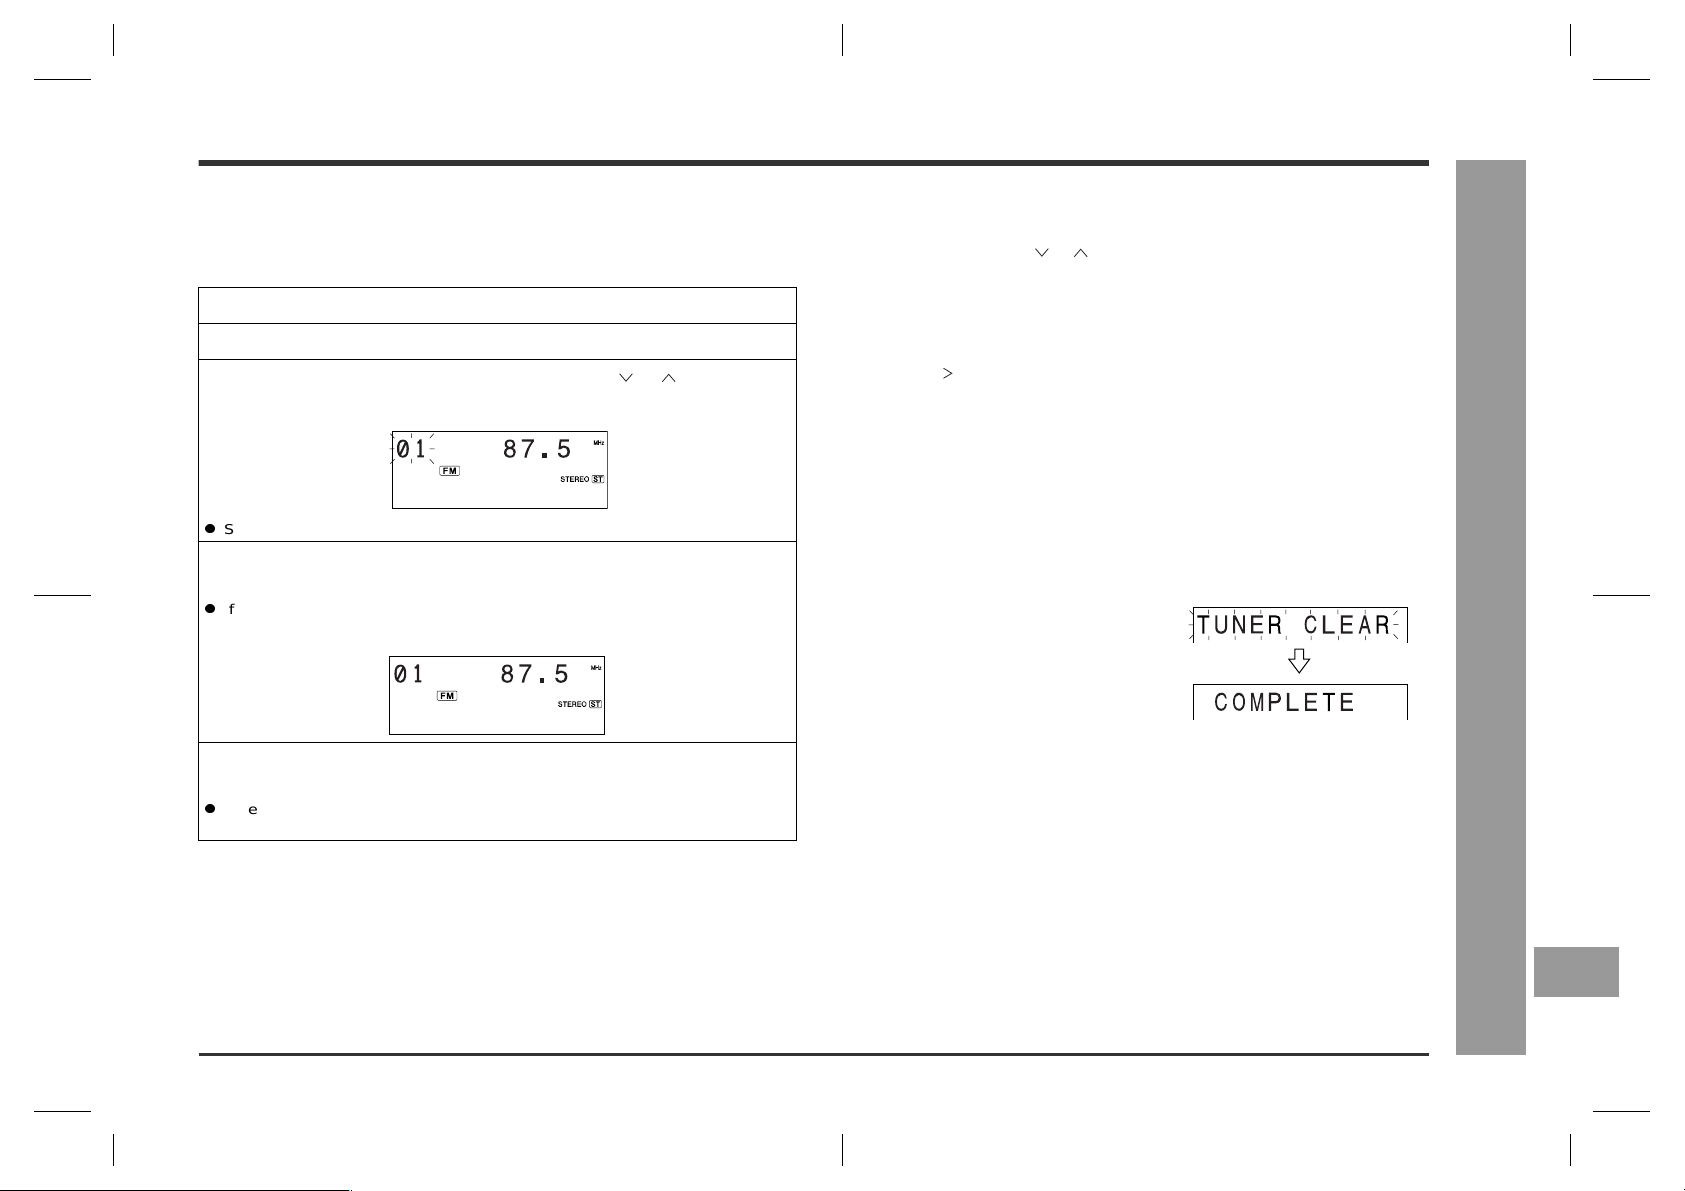
For example, to choose 28
1 Press the " 10" button.
2 Press the "2" button.
3 Press the "8" button.
To erase all the contents of the preset
memory
(Remote control operation)
1 Press the TUNER (BAND) button.
2 Hold the CLEAR button down for 3 seconds
or more.
3 Press the ENTER button.
Radio
Listening to the Radio
E
F
E-24
15-24.fm01/7/12
Page 28
SD-SG11
Before Recording to a MiniDisc
MD Recording
Before Recording to a MiniDisc
Disc writing (TOC)
The TOC (Table of Contents) is information on
track numbers and recording areas to allow the
unit to recognize musical selections or sounds.
The entire MiniDisc is controlled depending on
this TOC, which enables the unit to find the beginning of a track quickly or to automatically
record in a vacant area.
Area for TOC
(recording track
numbers, track
names, etc.)
When you start recording or editing, "TOC" will appear on the display.
This indicates that information in the TOC is now being changed according to the
recording or editing being performed. (The changed TOC is not yet recorded on the
MiniDisc at this time.)
The TOC is recorded when
You stop recording.
You switch to another input source.
You eject the MiniDisc.
You set the unit to the stand-by mode.
Do NOT unplug the power cord while the TOC is being recorded ("TOC" is flashing)
and do NOT impart shock to the unit. Otherwise, TOC will not be correctly recorded,
and consequently proper playback may not be possible.
Recordings cannot be made in the following si tuations.
If you try recording on a playback-only MiniDisc (commercially available music
MiniDisc).
If a MiniDisc is protected against accidental erasure. (See page 44.)
If there is no more recording time left on the disc. (See page 45.)
When the "TOC FULL" message appears. (See page 45.)
If a disc's TOC has been damaged.
Sampling rate converter
This system is equipped with a sampling rate converter, which automatically converts
the sampling frequencies of the connected digital tuners or DAT decks (32 kHz, 48
kHz) to 44.1 kHz. You can digitally record from equipment with different sampling frequencies.
Area for record-
ing the sound
Serial Copy Management System (SCMS)
This player is equipped with a digital copy prevention mechanism which complies
with the SCMS. The SCMS limits the production of d igital copies to one generation
for copyright protection. If a digital copy (first generation copy) is made from a copyright-protected digital source (audio CD or the like), no further digital copying (from
the second generation) is allowed. The SCMS does not affect analog recording.
Audio CD
Digital recording
Notes for recording
SHARP is not liable for damage or loss of your recording arising from malfunction
of this unit.
When recording important selections, be sure to make a preliminary test to ensure
that the desired material is being properly recorded.
The VOLUME and LOUDNESS controls can be adjusted with no effect to the
recorded signal (Variable Sound Monitor).
About ATRAC
The ATRAC (Adaptive TRansform Acoustic Coding) system com presses the sound
data into 1/5 by cutting out the inaudible sound. Since the sound is selected based on
psychoacoustics masking, the sound quality is not impaired.
This unit is equipped with the ATRAC3 compressing system that can reduce the
sound data to 1/10 or 1/20 of it's original size.
By employing this system, 2 times and 4 times long recording is enabled in stereo
mode.
MiniDisc
(1st generation copy)
Impossible
Digital connection
"Can't COPY" will appear, and
no recording is allowed.
Possible
Analogue connection
MiniDisc
(2nd generation copy)
E-25
25-37.fm01/7/9
Page 29
Recording to a MiniDisc from a CD
1
Press the ON/STAND-BY button to turn the power on.
2
Press the CD button and load the desired CD.
3
Load a recordable MiniDisc into the MD compartment.
4
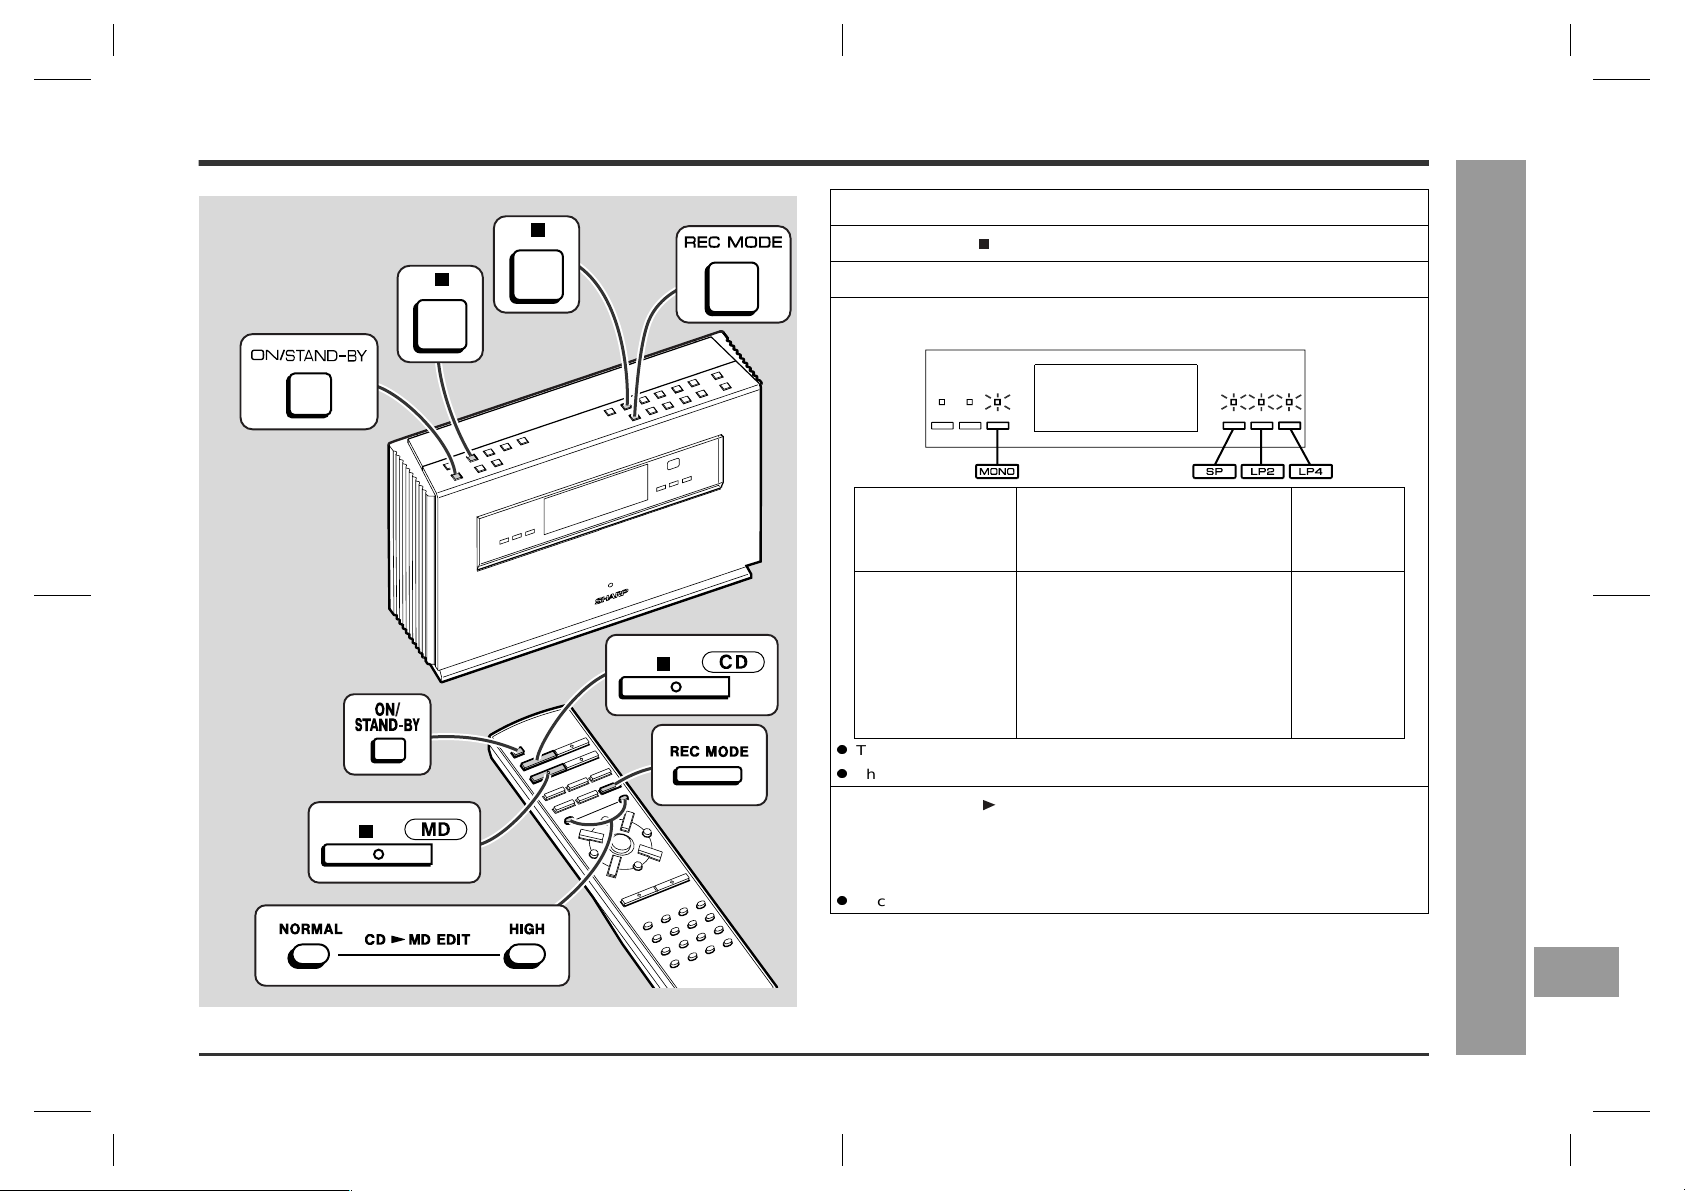
Press the REC MODE button to select the recording mode.
The recording mode cannot be changed while recording.
The recording mode remains unchanged until a new mode is selected.
5
Press the CD MD EDIT (HIGH/NORMAL) button to start recording.
HIGH : High speed recording.
NORMAL : Normal speed recording.
Recording is performed digitally.
Indication Recording mode Recording
(to record on
80-minute
MD)
SP Stereo recording Maximum 80
minutes
LP2 2 times long recording (stereo) Maximum 160
minutes
LP4 4 times long recording (stereo) Maximum 320
minutes
MONO Monaural recording Maximum 160
minutes
SD-SG11
MD Recording
Recording to a MiniDisc from a CD
E
F
E-26
25-37.fm01/7/9
Page 30
SD-SG11
Recording to a MiniDisc from a CD (continued)
MD Recording
Recording to a MiniDisc from a CD
Notes:
Recording from a CD to a MiniDisc starts even if all the tracks on the CD cannot fit
in the MiniDisc. In that case, both the CD and MD stop when the MD becomes full.
When the CD reaches its end, recording to MD will stop simultaneously.
You can record from a CD you programmed.
Recording can be performed in repeat playback mode. The repeat playback can
be switched during recording.
To stop recording:
Press the CD or MD button.
The CD and MiniDisc will stop.
After use:
Press the ON/STA ND-BY button to enter the power stand-by mode.
About track numbers:
New track numbers will be created automatically according to the original tracks
(Synchro mark function).
When you record from a CD to a MiniDisc, the track numbers recorded on the
MiniDisc may not match the track numbers on the CD.
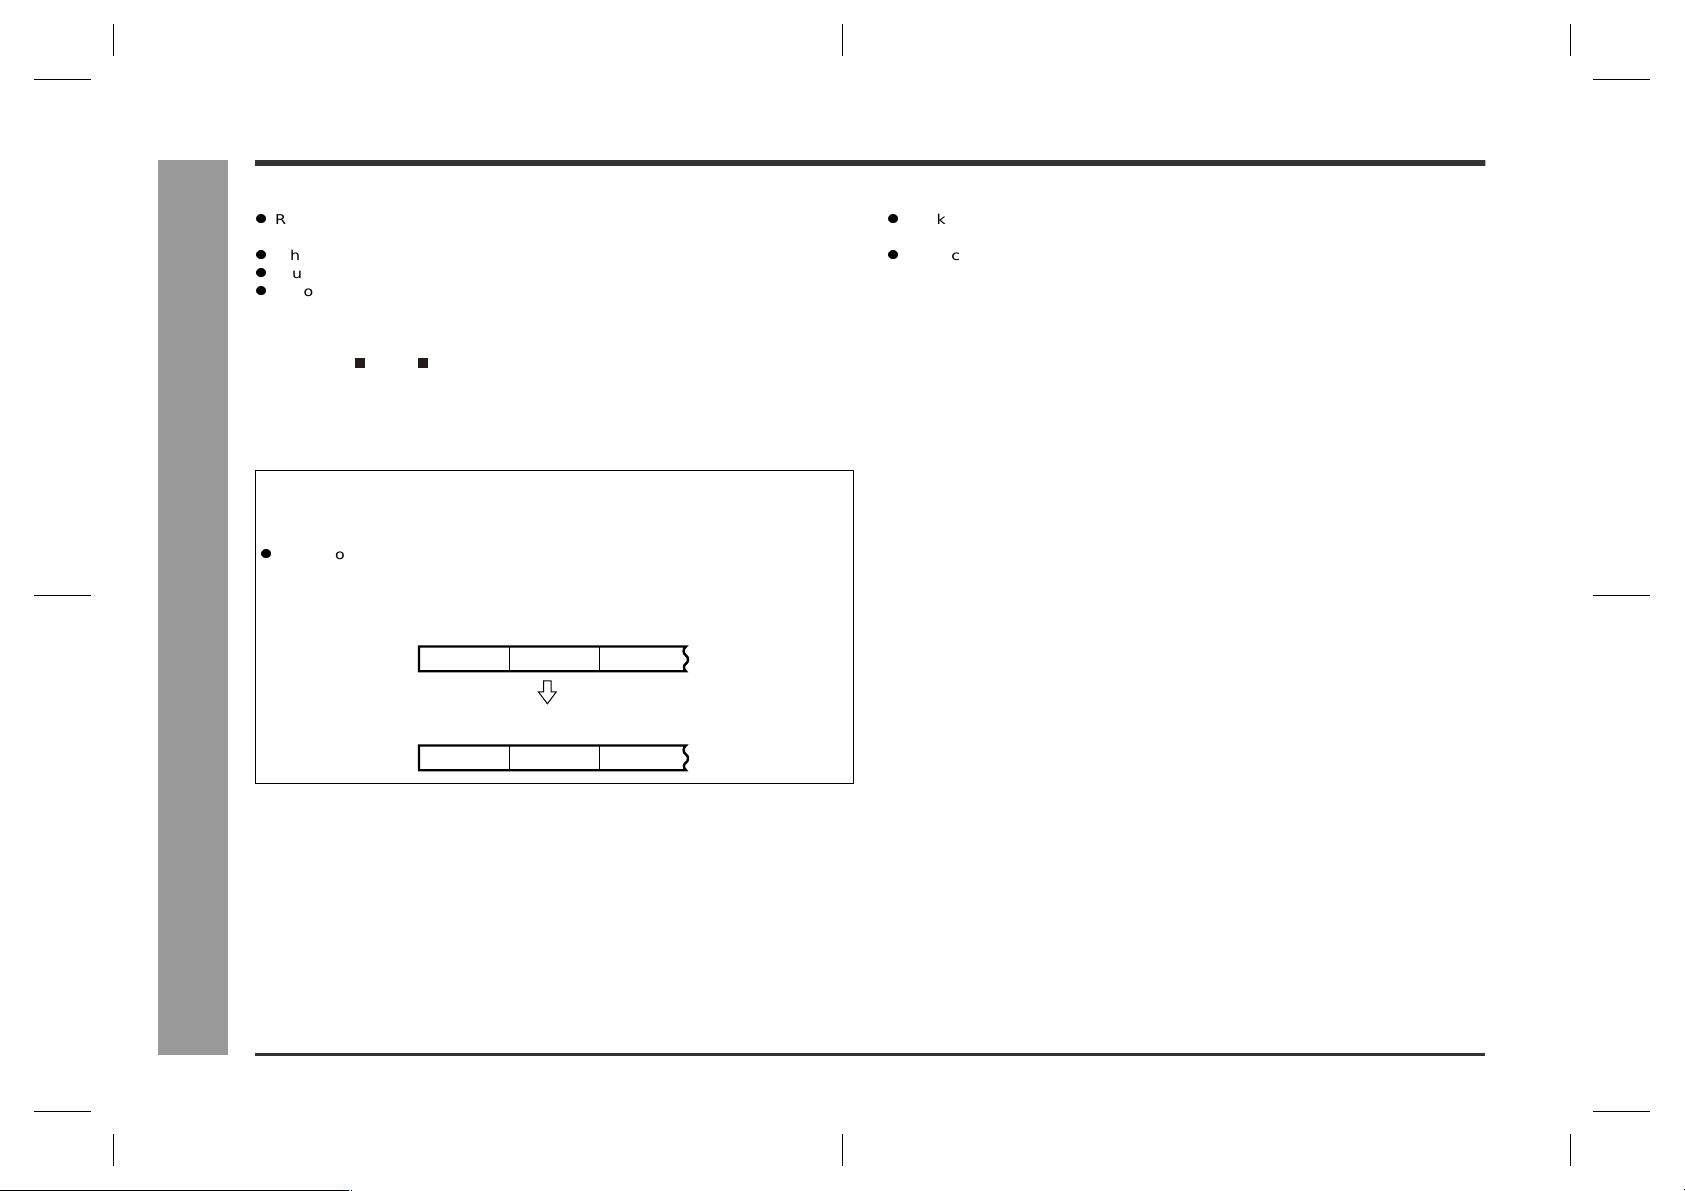
CD
First track
Track A
MiniDisc
First track Third trackSecond track
Track A Track B Track C
Track B Track C
Third trackSecond track
Notes for long recording mode (LP2/LP4):
Tracks recorded in 2 times long recording or 4 times long recording mode cannot
be played with units that do not support these modes.
On such a unit, "LP :" is displayed at the beginning of the track and no sound is
heard. (The operation and the display may vary depending on the unit.)
Note for high speed recording:
If the source CD is of poor quality due to scratches or dir t, recording at high speed
may be unreliable. It may be recorded with noise or pauses. If this occurs, set recording speed to normal.
Caution for 4 times long recording (LP4):
To realise 4 times long stereo recording, special compression methods are used.
Due to the high levels of compression the sound quality may be adversely affected
and some noise may be recorded. If sound quality is the main concern it is recommended that 2 times long or normal recording is used.
E-27
25-37.fm01/7/9
Page 31

Recording the desired tracks of the CD
1
Press the ON/STAND-BY button to turn the power on.
2
Press the CD button and load the desired CD.
3
Load a recordable MiniDisc into the MD compartment.
4
Press the or button to select the desired track.
6
Repeat steps 4 - 5 for other tracks. Up to 20 tracks can be programmed.
If more than 20 tracks are selected, "EDIT OVER" is displayed and the 21st track
will not be memorized.
7
Press the CD MD EDIT (HIGH/NORMAL) button to start recording.
When the recording is finished, the selected tracks will be cleared.
To memorize a track while listening to it:
1 When you hear a track you want to record during playback, press the TRACK
button.
The track is memorized. (Maximum 20 tracks can be memorized.)
2 After the track is memorized, press the CD button to stop playback.
3 Press the HIGH or NORMAL button to start recording.
To clear the memorized tracks:
Press the CD button while in the stop mode.
SD-SG11
MD Recording
Recording to a MiniDisc from a CD
5
Press the TRACK button to program the track number.
Selected track number T-EDIT
E
F
E-28
25-37.fm01/7/9
Page 32

SD-SG11
Recording to a MiniDisc from a CD (continued)
MD Recording
Recording to a MiniDisc from a CD
Recording on the top position of a
recorded MiniDisc
1
Prepare for recording.
To record from a CD: To record from the radio:
Load the desired CD and a recordable
MiniDisc.
2
Press the TOPPOSITION button.
One more press will cancel the top position mode.
3
Start recording.
To record from a CD: To record from the radio:
Press the HIGH or NORMAL button. Press the MD button after pressing
When the recording is finished, the top position mode will be canceled.
The recorded track will be the first track on the MiniDisc.
All the tracks previously recorded will be renumbered.
Note:
While in the pause mode or recording, the top position mode cannot be set or canceled.
Tune in to the desired station and load
a recordable MiniDisc.
the REC button.
Adjusting the recording level
You can adjust the recording level depending on the recording source by wat ching the
level meter.
1
Press the CD button.
2
Press the or button to select the desired track.
3
Press the REC MODE button to select the recording mode.
4
Press the CD button to start playback.
5
Press the REC button to pause recording.
6
Press the REC LEVEL/CURSOR or button to adjust the recording level.
0dB -4dB ··· +10dB
Level meter Recording level
Maximum level should not exceed "0dB".
The recording level can be adjusted at 2dB intervals between - 4dB and + 10dB.
At this time, you can adjust the recording level with the or button.
7
Press the CD button.
8
Press the or button again to select the desired track to be
recorded.
9
Press the CD button again to start recording.
E-29
To stop recording:
Press the MD button.
The MiniDisc will stop.
The CD will continue playback.
25-37.fm01/7/9
Page 33

Recording to a MiniDisc from the Radio
Track A
Single track
First track
MiniDisc
Radio
Third trackSecond track
Track B Track C
(Track A) (Track B) (Track C)
1
Tune in to the desired station. (See page 23.)
2
Load a recordable MiniDisc into the MD compartment.
3
Press the REC MODE button to select the recording mode.
4
Press the REC button.
The unit will enter the recording stand-by mode.
5
Press the MD button to start recording.
To interrupt recording:
Press the MD button.
To resume recording from the same point of MiniDisc, press the MD button again.
To stop recording:
Press the MD button.
The MiniDisc will stop.
About track numbers:
A recording is p erformed as a s ingle track, and
only one number is created.
SD-SG11
MD Recording
Recording to a MiniDisc from the Radio
To mark track numbers while recording from the radio:
Press the REC button at the desired position during recording to create a new track
number. The track counter will be increased by one every time the button is pressed.
25-37.fm01/7/9
E
F
E-30
Page 34

SD-SG11
Elapsed playing time
"NO NAME" appears.
Level meter
Remaining recording time
Checking Displays
Checking Displays
MD Recording
To check the recording mode and remain-
ing recording time
While in the stop mode in MD function, press the REC MODE button.
Each time the button is pressed, the display will change as follows.
Remaining time in stereo recording mode
Remaining time in 2 times long recording mode
Remaining time in 4 times long recording mode
To check the displa y whil e in the recor ding
mode
While in the recording mode, press the DISPLAY button.
Each time the button is pressed, the display will change as follows.
When recording is finished, the display will return to normal.
Even if the recording mode is monaural, the level meter is displayed in stereo.
E-31
Remaining time in monaural recording mode
After the remaining recording time is displayed, the display will return to normal.
When resuming recording, it will be started in the recording mode that is con-
firmed in this procedure.
25-37.fm01/7/9
Page 35

Titling a MiniDisc
Creating disc and track names
You can give a name to discs and tracks.
One disc name and up to 255 track names can be created per disc (A maximum of 40
characters for the disc and each track name and a total of 1,700 characters can be
entered).
Playback-only MiniDisc cannot be edited.
1
Press the MD button and load a MiniDisc. (See page 18.)
2
Select either "DISC NAME" or "TRACK NAME".
To create a disc name: To create a track name:
While in the stop mode of MiniDisc,
press the NAME/TOC EDIT button,
and within 10 seconds, press the REC
LEVEL/CURSOR or button to select "DISC NAME".
3
Within 10 seconds, press the ENTER button.
To cancel the operation, press the NAME/TOC EDIT button.
During playback or in the pause mode
of MiniDisc, press the NAME/TOC
EDIT button to select "TRACK NAME".
SD-SG11
MD Editing
Titling a MiniDisc
The unit will enter the character input mode.
E
F
E-32
25-37.fm01/7/9
Page 36

SD-SG11
Titling a MiniDisc (continued)
MD Editing
4
Press the 1 - 10, SYMBOL and CHARACTER buttons to enter the
characters.
The CHARACTER button allows switching between capital and small letters.
You can enter the following symbols by pressing the SYMBOL button.
5
When the name has been completely entered, press the ENTER
button.
Characters (symbols):
Capital
letters
Titling a MiniDisc
Small
letters
1 ABC 2 DEF 3 GHI 4 JKL 5
– . , / : ? & ( ) ! " # $ % ∗ ; < = > @ _ ` + '
: indicates a space.
MNO 6
PQRS 7
TUV 8
WXYZ 9
wxyz 9
To erase disc and track names:
1 Perform steps 1- 2 in the "Creating disc and track names" section on page 32.
2 Press the TIMER/DELETE button for 3 seconds or more.
"NAME CLEAR?" will appear.
3 Press the ENTER button to finish.
To delete a character:
1 Perform steps 1- 3 in the "Creating disc and track names" section on page 32.
2 Press the REC LEVEL/CURSOR or button on the remote control t o flash t he
character to be deleted.
3 Press the TIMER/DELETE button.
4 Press the ENTER button to finish.
To add a character:
1 Perform steps 1- 3 in the "Creating disc and track names" section on page 32.
2 Press the REC LEVEL/CURSOR or button on the remote control t o flash t he
0
01 abc 2 def 3 ghi 4 jkl 5 mno 6 pqrs 7 tuv 8
character before which you want to add a new character.
3 Select a character to enter, press the ENTER button.
To change a character:
Example) To change "LAVE" to "LOVE"
1 Perform steps 1 - 3 in the "Creating disc and track names" section on page 32.
2 Press the REC LEVEL/CURSOR or button on the remote control t o flash t he
character to be changed.
3 Press the TIMER/DELETE button.
4 Enter a new character.
5 Press the ENTER button.
E-33
25-37.fm01/7/9
Page 37

Editing a Recorded MiniDisc
Notes:
First, put the two tracks next to each other in the order you want using the MOVE
function. Then combine them using the COMBINE function.
This function cannot be used in the random play mode and programmed play
mode.
If both tracks to be combined have a name, or only the first track has a name, the
first track name will be used.
When the first track does not have a name, the combined track will be named as
follows.
The second track name will be used for tracks recorded in monaural or stereo.
No name will be given to tracks recorded in 2 times or 4 times long recording
mode.
In the following cases, tracks may not be combined.
Digital recorded track and analog recorded track.
Tracks recorded in different recording modes (monaural, stereo, 2 times long
recording, 4 times long recording) cannot be combined.
Short tracks may not be combined (8 seconds for stereo, 16 seconds for monaural
and 2 times long recording, 32 seconds for 4 times long recording).
To combine tracks
1
While in the stop mode, select the second of the two adjacent
tracks you want to combine by pressing the or button. Or
start playing the second of the two tracks you want to combine,
and then press the MD button.
2
Press the NAME/TOC EDIT button, and within 10 seconds, select
"COMBINE" by pressing the REC LEVEL/CURSOR or button.
3
Within 10 seconds, press the ENTER button.
To cancel the operation, press the NAME/TOC EDIT button.
4
Press the ENTER button again.
The two tracks are combined, and the unit is stopped at the beginning of the combined track.
The numbers of the tracks that come after the combined track are automatically
decreased by one.
SD-SG11
MD Editing
Editing a Recorded MiniDisc
E
F
E-34
25-37.fm01/7/9
Page 38

SD-SG11
Editing a Recorded MiniDisc (continued)
MD Editing
To divide a track
1
Play the track which yo u want to di vide in to two, a nd press the M D
button at the point where you want to divide the track.
2
Press the NAME/TOC EDIT button, and within 10 seconds, select
"DIVIDE" by pressing the REC LEVEL/CURSOR or button.
3
Within 10 seconds, press the ENTER button.
To cancel the operation, press the NAME/TOC EDIT button.
4
Press the ENTER button again.
The track is divided, and the unit is stopped at the beginning of the second of the
two tracks.
The numbers of the tracks which come after the divided track are automatically
Editing a Recorded MiniDisc
increased by one.
Notes:
If you divide a track that has a name and the date of recording, the two new tracks
will have the same name and the date of recording.
However, if there is not enough space to memorize the characters in "TOC", the
second track will not be named.
Each disc can hold up to 255 tracks. However, even if the number of assigned
tracks has not reached 255, it might not be possible to make any further divisions
of tracks.
To move a track
1
While in the stop mode, select the track you want to move by
pressing the or button. Or start playing the track to be
moved, and then press the MD button.
2
Press the NAME/TOC EDIT button, and within 10 seconds, select
"MOVE" by pressing the REC LEVEL/CURSOR or button.
3
Within 10 seconds, press the ENTER button.
4
Select the new track position by pressing the or button.
To cancel the operation, press the NAME/TOC EDIT button.
5
Press the ENTER button again.
The track is moved, and the unit is stopped at its beginning.
E-35
25-37.fm01/7/9
Page 39

SD-SG11
To move the programmed tracks
1
Program the tracks you want to move. (See page 22.)
2
Press the NAME/TOC EDIT button.
3
Within 10 seconds, press the ENTER button.
To cancel the operation, press the NAME/TOC EDIT button.
4
Press the ENTER button again.
Tracks are rearranged.
The programmed tracks will come to the top of the disc.
Note:
If a track is programmed twice or more, the first instruction will precede to the oth-
ers.
To erase one track
1
While in the stop mode, select the track you want to erase by
pressing the or button. Or start playing the track to be
erased, and then press the MD button to enter the paus e m ode .
2
Press the ERASE button.
To cancel the operation, press the MD button.
3
Press the ERASE button for 2 seconds or more.
The track is erased, and the unit is stopped at the beginning of the next track.
Caution:
Once a track has been erased, it cannot be recovered. Check the track number
before erasing it.
Notes:
When a track is erased, the numbers assigned to the tracks following the erased
track will be automatically decreased by one.
When a track is erased, the track name will be erased at the same time.
It is also possible to erase tracks by selecting either menu of "ERASE" or "ALL
ERASE" with the NAME/TOC EDIT button on the remote control.
MD Editing
Editing a Recorded MiniDisc
E
F
E-36
25-37.fm01/7/9
Page 40

SD-SG11
Editing a Recorded MiniDisc (continued)
MD Editing
To erase all the tracks at once
1
Press the MD button.
2
Press the ERASE button.
To cancel the operation, press the MD button.
3
Press the ERASE button for 3 seconds or more.
All the track numbers and track names are erased.
Editing a Recorded MiniDisc
To erase the programmed tracks at once
1
Program the tracks you want to erase. (See page 22.)
Up to 20 tracks can be programmed.
2
Press the NAME/TOC EDIT button on the remote control.
3
Within 10 seconds, press the REC LEVEL/CURSOR or button
on the remote control to select the "PRGM ERASE".
4
Within 10 seconds, press the ENTER button on the remote control.
To cancel the operation, press the MD button.
5
Press the ENTER button on the remote control.
E-37
The programmed tracks are erased.
25-37.fm01/7/9
Page 41

Timer and Sleep Operation
SD-SG11
Timer playback:
The unit turns on and plays the desired source (CD, MD, TUNER, AUX, OPT) at the
preset time. At the end time, the unit enters the power stand-by mode automatically.
Timer recording:
The unit turns on and starts recording from the desired source (TUNER, AUX, OPT)
at the preset time. At the end time, the unit enters the po wer stand-by mode automatically.
Timer playback/Timer recording
Before setting timer:
While the power is in the stand-by mode, press the DISPLAY button on the remote control to check that the clock is on time.
1
Press the ON/STAND-BY button to turn the power on.
2
Press the TIMER/DELETE button.
3
Within 10 seconds, press the REC LEVEL/CURSOR or button
to select "TIMER SET".
Timer and Sleep Operation
Advanced Features
4
Within 10 seconds, press the ENTER button.
38-48.fm01/7/12
Continued to the next page
E
F
E-38
Page 42

SD-SG11
Timer and Sleep Operation (continued)
Advanced Features
Timer and Sleep Operation
5
Press the REC LEVEL/CURSOR or button to select "TIMER
PLAY" or "TIMER REC" mode.
For timer playback: For timer recording:
6
Press the ENTER button.
7
Press the REC LEVEL/CURSOR or button to specify the hour
to start, and press the ENTER button.
8
Press the REC LEVEL/CURSOR or button to specify the minutes, and press the ENTER button.
Unless the timer setting is changed, the ending time will automatically be set for
one hour after the starting time.
9
Press the REC LEVEL/CURSOR or button to specify the hour
to stop, and press the ENTER button.
10
Press the REC LEVEL/CURSOR or button to specify the min-
utes, and press the ENTER button.
11
Press the REC LEVEL/CURSOR or button to select the desired
function.
To select the timer playback source: CD, MD, TUNER, AUX or OPT.
To select the timer recording source: TUNER, AUX or OPT.
12
Press the ENTER button.
13
Press the REC LEVEL/CURSOR or button to adjust the volume.
Be careful not to turn the volume up too high.
14
Press the ENTER button.
Timer playback Timer recording
The timer setting is displayed in order.
The unit will enter the stand-by mode and
then the playback or recording stand-by
mode automatically.
E-39
When the preset time is reached, playback or recording will start.
In timer playback, the volume will increase gradually. In timer recording, it will
start with the volume you set.
When the timer end time is reached, the system will enter the power stand-by
mode automatically.
38-48.fm01/7/12
Page 43

SD-SG11
Using the same timer setting
Once memorized, the timer setting can be used as follows.
1
Press the TIMER/DELETE button.
2
Within 10 seconds, press the REC LEVEL/CURSOR or button
to select "STANDBY".
If "STANDBY" is not displayed, the clock setting has been cleared.
In this case, reset the clock and the timer.
3
Within 10 seconds, press the ENTER button.
The timer setting is displayed in order.
The unit will enter the stand-by mode and then the playback or recording stand-by
mode automatically.
Notes:
The timer setting will be cleared when the unit is unplugged or the power failure
occurs.
The timer playback is possible with a CD or MD even if the repeat, random, or pro-
grammed playback is set.
When performing timer playback or recording using another unit connected to the
AUX IN or DIGITAL IN jacks, select "AUX" or "OPT" in step 11. At this time, only
this stereo system will enter the stand-by mode automatically. (Another unit will not
be turned off.)
To check the timer setting:
1 While in the timer playback or timer recording stand-by mode, press the TIMER/
DELETE button.
2 Within 10 seconds, press the REC LEVEL/CURSOR or button to select
"TIMER CALL".
3 Press the ENTER button.
After the timer setting is displayed in order, the display will return to normal.
To change the timer setting:
Perf orm "Timer playbac k/Timer recording" from the beginning. (See pages 38 -39).
To cancel the timer playback/timer recording:
If the power is turned on while in the playback or recording stand-by mode, the
timer setting will be canceled.
Proceed as follows to cancel without turning the power on.
1 Press the TIMER/DELETE button.
2 Within 10 seconds, press the REC LEVEL/CURSOR or button to select
"CANCEL".
Timer and Sleep Operation
Advanced Features
3 Press the ENTER button.
E
F
E-40
38-48.fm01/7/12
Page 44

SD-SG11
Timer and Sleep Operation (continued)
Advanced Features
Sleep operation
The radio, CD, and MiniDisc can all be turned off automatically.
1
Play back the desired sound source.
2
Press the TIMER/DELETE button.
3
Within 10 seconds, press the REC LEVEL/CURSOR or button
to select "SLEEP".
4
Within 10 seconds, press the ENTER button.
5
Press the REC LEVEL/CURSOR or button to specify the sleep
time.
(Maximum: 2 hours - Minimum: 1 minute)
6
Timer and Sleep Operation
Press the ENTER button.
To confirm the remaining sleep time:
1 Press the TIMER/DELETE button while the sleep timer is set.
2 Within 10 seconds, press the REC LEVEL/CURSOR or button to select
"SLEEP".
Remaining sleep time
The display will return to normal after approximately 10 seconds.
You can change the sleep time.
Press the ENTER button while the sleep remaining time is displayed (see steps 5
- 6 on the left).
To cancel the sleep operation:
The sleep timer is canceled when the unit enters the stand-by mode.
To cancel only the sleep timer without setting the unit to the stand-by mode, proceed
as follows.
1 Press the TIMER/DELETE button while the sleep timer is set.
2 Within 10 seconds, press the REC LEVEL/CURSOR or button to select
"SLEEP OFF".
E-41
7
Your system will enter the power stand-by mode automatically after the preset time has elapsed.
The volume will be turned down 1 minute before the sleep operation finishes.
3 Within 10 seconds, press the ENTER button.
38-48.fm01/7/12
Page 45

Enhancing Your Stereo System
SD-SG11
To use sleep and timer playback in combi-
nation
You can fall asleep to the radio and wake up with the sound from a CD.
1
Set the sleep time (steps 1 - 6, page 41).
2
Set the timer playback (steps 1 - 14, pages 38 - 39).
To use sleep and timer recording in combi-
nation
You can fall asleep to the sound from a CD and record the desired station while you
are sleeping.
1
Set the sleep time (steps 1 - 6, page 41).
2
Set the timer recording (steps 1 - 14, pages 38 - 39).
1. Sleep timer setting
2. Timer playback (recording) setting
1 minute - 2 hours
Sleep operation will
automatically stop.
Timer playback (recording)
start time
Desired time
End time
Before connecting external units, set this unit to the stand-by mode and turn off the
power of the external units.
VCR, DVD, etc.
Connecting cable
for digital recording
To the line output
jacks
Commercially
available RCA cord
Advanced Features
MD deck, digital tuners
or DAT decks
To the optical line
output jack
To the analog
input jacks
Timer and Sleeo Operation / Enhancing Your Stereo System
E
F
E-42
38-48.fm01/7/12
Page 46

SD-SG11
Enhancing Your Stereo System (continued)
Advanced Features
Listening to the playback sounds from the
connected equipment
1
Press the AUX button to select "AUX ANALOG" or "AUX DIGITAL".
In analog input In digital input
In "AUX DIGITAL" input, "NO SIGNAL" may be displayed depending on the connected
equipment.
2
Play the connected equipment.
3
Adjust the volume using the VOLUME buttons.
Recording on a MiniDisc (Normal record-
ing)
1
Press the AUX button to select "AUX ANALOG" or "AUX DIGITAL".
2
Load a recordable Mi niDisc into the MD c ompartment, label sid e facing toward you.
3
Press the REC button.
4
Play the connected equipment.
5
Enhancing Your Stereo System
Press the REC LEVEL/CURSOR or button to adjust the recording
level.
Recording on a MiniDisc (Sound synchr o-
nized recording)
1
Press the AUX button.
2
Load a recordable MiniDisc into the MD compartment, label side
facing toward you.
3
Press the S-SYNC REC button on the remote control.
4
Play the connected equipment.
Recording will start automatically.
The recording level is the level adjusted in the previous recording. (This level can
also be adjusted while recording.)
Headphones
Before plugging in or unplugging the headphones, reduce the volume.
Be sure your headphones have a 1/8"(3.5 mm) diameter plug and are between 16
ohms and 50 ohms impedance. The recommended impedance is 32 ohms.
Plugging in the headphones disconnects the speakers automatically. Adjust the
volume using the VOLUME buttons.
E-43
0dB -4dB ··· +10dB
Maximum level should not exceed "0dB".
The recording level can be adjusted at 2dB intervals between - 4dB and + 10dB.
If the recording level is too low, the sound volume will be decreased. If it is t oo high,
the sound will be distorted.
6
Press the MD button.
Level meter Recording level
38-48.fm01/7/12
Page 47

What is a MiniDisc?
Recordable Recording
prevented
MiniDisc System Limitations
SD-SG11
The disc is stored in a cartridge. You can handle it easily without worrying about dust, fingerprints, etc. However, dust entering the opening of the cartridge, dirt on the cartridge,
warping, etc. may cause malf unctions. Please note the following.
To prevent recorded MiniDiscs from being
erased accidentally
Slide the accidental erase prevention tab, located on the side of the MiniDisc, in the direction indicate d by th e ar r ow.
The MiniDisc is then be protected agains t accidental erasure.
To add a recording to such a MiniDisc, slide the accidental erase prevention tab back to its
original position.
Helpful tip when attaching a label
When attaching a label to a MiniDisc cartridge, be sure to note the following. If the label is
not attached properly, the MiniDisc may jam inside the unit and it may not be possible to
remove it.
If the label peels off or partially lifts away, replace it with a new
one.
Do not put a new label on top of an existing one.
Attach the label only in the specified location.
Types of discs
There are two types of discs: playback-only and recordable types.
Playback-only MiniDisc:
This type of MiniDisc is used for commercially available
prerecorded music. Thi s is the same kind of optical di sc as
CDs. Playback is performed using an optical pickup. (Recording and editing are not possible.)
A shutter will be used on only
Recordable MiniDisc:
This is a "raw disc" on which recording can be perfo rmed.
A magneto optical disc is used. Recordings are made using a laser and magnetic fie ld. Repeat ed re cordin g is p ossible.
one side (back).
Shutters will be used on both
sides.
Even if the maximum recording time of a MiniDisc has not
been reached, "TOC FULL"
may be displayed.
Even if the maximum recording time of a MiniDisc has not
been reached, "DISC FULL"
may be displayed.
Even if several short tracks
are erased, the remaining recording time may not show an
increase.
Two tracks may not be combined in editing.
The total of the recorded time
and time remaining on a disc
may not add up to the maximum possible recording time.
If recorded tracks are fast reversed or fast forwarded, the
sound may skip.
In the MD system, the delimiter of the recording area
on a MiniDisc is programmed in a TOC. If partial
erasing, recording and eiditing are repeated several
times, TOC information will fill up, even though the
number of tracks has not reached the limit (255
tracks), and further recording will be impossible. (If
you use the all erase function, this MiniDisc can be
used from the beginning.)
If there is any flaw on the MiniDisc, that part is automatically excluded from the space available for recording. Therefore, the recording time becomes
shorter.
When the remaining recording time of a disc is displayed, short tracks less than 12 seconds long may
not be included in the total.
For MiniDiscs on which repeated recording and eiditing operations were performed, the COMBINE
function may not work. A track recorded from a CD
(digital recording) and a track recorded from a radio
or other equipment (analog recording) cannot be
combined.
A cluster (about 2 seconds) is normally the minimum
unit of recording. So, even if a track is less than 2
seconds long, it will use about 2 seconds of space
on the disc. Therefore, the time actually available for
recording may be less than the remaining time displayed.
If there are scratches on discs, those sections will be
automatically avoided (no recording will be placed in
those areas). Therefore, the recording time will be
reduced.
A MiniDisc which has been recorded or edited repeatedly may skip during fast reverse or fast forward.
References
What is a MiniDisc? / MiniDisc System Limitations
E
F
E-44
38-48.fm01/7/12
Page 48

SD-SG11
Error Messages
References
When an error message is displayed, proceed as follo ws:
Error messages Meaning Remedy
BLANK MD
Can't COPY
Can't EDIT
Can't READ*
(*: Number or
symbol)
Can't REC
Can't T REC
Can't WRITE
Error Messages
CD NO DISC
DISC FULL
EDIT OVER
Er - MD **
(**: Number or
symbol)
Nothing is recorded. (Neither
music nor disc name is recorded.)
You tried to record from a
copy prohibited CD.
A track cannot be edited.
The disc is damaged.
TOC information cannot be
read.
MiniDisc not specified.
Recording cannot be performed correctly due to vibration or shock in the unit.
Timer recording is impossible
or there is no available space
on the MD.
The disc is out of recording
space.
The TOC information could
not be created properly du e to
a mechanical shock or to
scratche s on the disc.
A CD has not been loaded.
The CD data cannot be read.Reload the CD.
The disc is out of recording
space.
You chose 21 or more tracks
for track editing.
A MiniDisc is not working
properly.
Replace it with another disc.
Replace the CD.
Change the stop position of the
track and then try editing it.
Replace it with another disc.
Erase the disc and try recording
again.
Re-record or replace the MiniDisc.
Replace it with another recordable disc.
Set this unit to the stand-by
mode and try to write the TOC
again. (Rem ove any source of
shock or vibration while writing.)
Load a CD.
Replace the disc with another
recordable disc.
Decrease the number of tracks.
Press the MD button.
Set this unit to the stand-by
mode and turn the power on
again.
Error messages Meaning Remedy
MD NO DISC
NAME FULL
NOT AUDIO
PLAYBACK MD
PROTECTED
TEMP OVER
TOC FORM **
(**: Number or
symbol)
TOC FULL
TOC FULL 1
? MD DISC
A MiniDisc has not been loaded.
The MiniDisc data cannot be
read.
The number of characters for
the disc name or track name
exceeds 40.
The data recorded on th is disc
is not audio data.
You tried to record on a playback-only disc.
The disc is write protected.
The temperature is too high.
TOC information recorded on
the MD does not match the
MiniDisc specifications or it
cannot be read.
There is no space left for recording track numbers.
There is no space left for recording character informati on.
The data contains an error.
MiniDisc not specified.
Load a MiniDisc.
Reload the MiniDisc.
Shorten the disc or tra ck na m e .
Replace the disc.
Replace it with another recordable disc.
Move the write pro tection tab
back to its original position.
Set this unit to the stand-by
mode and wait for a while.
Replace it with another disc.
Erase the disc and try recording
again.
Replace it with another recordable disc.
Replace it with another recordable disc.
Erase the needless char ancters.
Press the MD button.
Replace it with another disc.
E-45
38-48.fm01/7/12
Page 49

Troubleshooting Chart
SD-SG11
Many potential "problems" can be resolved by the owner without calling a service
technician.
General
Symptom Possible cause
"TIME ADJUST" appears when the
clock tim e is checked.
When a button is pressed, the unit
does not respond.
No sound is heard.
The picture on the TV screen is distorted.
Cannot adjust the volume.
CD player
Symptom Possible cause
Even though a disc has been loaded,
"CD NO DISC" or "Can't READ" is
displayed.
Playback does not start.
Playback stops in the middle or is not
performed properly.
Playback sounds are skipped , or
stopped in the middle of a track.
Did a power failure occur? Reset the clock.
(Refer to page 14.)
Set this unit to the power stand -by mode and
then turn it back on.
Is the volume level set to "0"?
Are the headphones connected?
Are the speaker wires disconnected?
When a radio or TV whic h uses an i ndoor antenna is placed near the unit, the picture on
the TV screen may be distorted or the radio
may not function properly.
It is recommended that you use an outdoor
antenna.
Is the sound connection cord connected to
the LINE OUT jacks on the MD/CD/tuner
unit? Set the unit to the stand-by mode and
connect the cord to the SYSTEM OUT jacks.
(See page 11.)
The disc is very dirty.
Is the unit located near excessive vibrations?
Has condensation formed inside the unit?
The disc is loaded upside down.
The disc does not satisfy the standards.
The disc is distorted or scratched.
Is the unit located near excessive vibrations?
The disc is very dirty.
Has condensation formed inside the unit?
MiniDisc
Symptom Possible cause
A recording cannot be made.
Even though a disc has been loaded,
"MD NO DISC" or "Can't READ" is
displayed.
Playback sounds are skipped.
Tuner
Symptom Possible cause
Radio makes unusual noise consecutively.
The preset channel cannot be recalled.
Remote control
Symptom Possible cause
The remote control does not operate.
Is the MiniDisc protected against accidental
erasure?
Did you try to make recording o n a p layback only MiniDisc?
Can you see the "DISC FULL" or "TOC
FULL" message in the display?
The disc is very dirty.
Is the unit located near excessive vibrations?
Has condensation formed inside the unit?
The stereo system is placed ne ar the TV or
computer.
FM/AM loop antenna is not placed properly.
Move the AC power cord away from the antenna if located near.
Did a power failure occur?
Preset the channel again.
Is the AC power cord of the stereo system
plugged in?
The battery pol a rit y is no t co rr e ct .
The batteries are dead.
Incorrect distance or angle.
Does the remote control sensor rec eive
strong light?
References
Troubleshooting Chart
E
F
E-46
38-48.fm01/7/12
Page 50

SD-SG11
Troubleshooting Chart (continued)
Maintenance
References
If trouble occurs (reset)
When this product is subjected to strong external interference (mechanical shock,
excessive static electricity, abnormal supply voltage due to lightning, etc.) or if it is
operated incorrectly, it may malfunction.
If such a problem occurs, do the following:
Unplug the power cord from the AC outlet. Then, plug it in again and retry the
operation.
Caution:
This operation will erase all data stored in memory including clock, timer settings,
tuner preset, and CD or MiniDisc program.
Condensation
Sudden temperature changes, storage or
operation in an extremely humid environment may cause condensation inside the
cabinet (CD pickup, MD pickup, etc.) or on
the transmitter on the remote control.
Condensation can cause the unit to malfunction. If this happens, leave the power on
with no disc in the unit until normal playback
is possible (about 1 hour). Wipe off any condensation on the transmitter with a soft cloth
before operating the unit.
Before transporting the unit
Remove the CD and MiniDisc from the unit. Your unit checks whether there are any
discs inside. "NO DISC" appears if no disc is inside. Then, set the unit to the power
stand-by mode. Carrying the unit with discs left inside can damage it.
Troubleshooting Chart / Maintenance
Cleaning the cabinet
Periodically wipe the cabinet with a soft cloth and a diluted soap solution, then with a
dry cloth.
Caution:
Do not use chemically treated cleaning cloths or other chemicals.
E-47
38-48.fm01/7/12
Page 51

Specifications
SD-SG11
As part of our policy of continuous impro vement, SHARP reserves th e right to mak e de s ign
and specification changes for product improvement without prior notice. The performance
specification figures indicated are nominal values of production units. There may be some
deviations from these values in individual units.
General
Power source
Power consumption
Dimensions MD/CD/tuner unit
Weight MD/CD/tuner unit
Input/output terminals MD/CD/tuner unit
AC 120 V, 60 Hz
54 W
Width: 12-9/16" (318 mm)
Height: 8-5/16" (210 mm)
Depth: 3-11/16" (93 mm)
Amplifier unit
Width: 6-5/16" (160 mm)
Height: 8-5/16" (210 mm)
Depth: 6 (153 mm)
8.2 lbs. (3.7 kg)
Amplifier unit
8.2 lbs. (3.7 kg)
Auxiliary input: 500 mV/47 kohms
Digital input (optical)
System output (RCA)
Line output: 500 mV/47 kohms
Headphones: 16 - 50 ohms (recommend ed: 32 ohms)
System control (SD-SG11 amplifier unit only)
Amplifier unit
System input (RCA)
Speakers: 4 ohms
System control (SD-SG11 MD/CD/tuner unit only)
CD player
Type
Signal readout
D/A converter
Frequency response
Dynamic range
MiniDisc
Type
Signal readout
Rotation speed
Error correction
Quantization
Coding
Sampling frequency
Recoridng method
Frequency response
D/A converter
Wow and flutter
Signal/noise ratio
Dynamic range
Audio channel
1-disc slot-in type compact disc player
Non-contact, 3-beam semiconductor laser pickup
1-bit D/A converter
20 - 20,000 Hz
90 dB (1 kHz)
MiniDisc recorder
Non-contact, 3-beam semiconductor laser pickup
400 - 900 rpm CLV, Approx
ACIRC (Advanced Cross Inte rleave Reed-Solomon Code)
20-bit linear (A/D converter)
ATRAC (Adaptive TRansform Acoustic Coding), ATRAC 3
44.1 kHz
Magnetic modulation overwrite method
20 - 20,000 Hz
1-bit D/A converter
Unmeasurable (less than 0.001% W. peak)
95 dB (1 kHz)
90 dB (1 kHz)
Stereo: 2 channels (SP, LP2, LP4)
Monaural: 1 channel (MONO)
Specifications
References
Amplifier
Amplification system
Output power
A/D noise shaping
64fs 1-bit switching
(Remarks:fs = 44.1 kHz)
Power output (FTC): 22 watts minimum RMS per channel
Rated power output: 25 W + 25 W at 4 ohms, 1 kHz
Frequency response: 20 Hz - 40 kHz (± 3dB)
Total harmonic distortion: 0.02% at 1 kHz, 1 W
7th-order (delta - sigma) modulation
into 4 ohms from 20 Hz to 20 kHz,
2 % total harmonic distortion
Tuner
Frequency range
FM: 87.5 - 108 MHz
AM: 530 - 1,720 kHz
E
F
E-48
38-48.fm01/7/12
Page 52

SD-SG11
FRANÇAIS
Informations générales
Introduction
Nous vous remercions d'avoir porté votre choix sur ce produit SHARP. Pour en
tirer le meilleur parti, veuillez lire ce mode d'emploi très attentivement.
Chaîne audio numérique 1-bit SD-SG11 composée d'une unité M D/CD/tuner et d'un
amplificateur (sans enceintes).
Table des matières
Informations générales
Précautions . . . . . . . . . . . . . . . . . . . . . . . . . . . . . . . . . . . . . . . . . . . . . . . . . . . . 2 - 3
Accessoires . . . . . . . . . . . . . . . . . . . . . . . . . . . . . . . . . . . . . . . . . . . . . . . . . . . . . . . 3
Commandes et voyants . . . . . . . . . . . . . . . . . . . . . . . . . . . . . . . . . . . . . . . . . . 4 - 7
Avant l'utilisa t ion
Télécommande . . . . . . . . . . . . . . . . . . . . . . . . . . . . . . . . . . . . . . . . . . . . . . . . . . . . 8
Raccordement du système . . . . . . . . . . . . . . . . . . . . . . . . . . . . . . . . . . . . . . 9 - 11
Fonctionnement de base
Commande générale . . . . . . . . . . . . . . . . . . . . . . . . . . . . . . . . . . . . . . . . . . . . . . . 12
Réglage du son . . . . . . . . . . . . . . . . . . . . . . . . . . . . . . . . . . . . . . . . . . . . . . . . . . . 13
Réglage de l'horloge . . . . . . . . . . . . . . . . . . . . . . . . . . . . . . . . . . . . . . . . . . . . . . . 14
Lecture CD
Introduction / Table des matières
Écoute du CD . . . . . . . . . . . . . . . . . . . . . . . . . . . . . . . . . . . . . . . . . . . . . . . . . 15 - 17
Lecture MD
Écoute d'un minidisc . . . . . . . . . . . . . . . . . . . . . . . . . . . . . . . . . . . . . . . . . . 18 - 20
Lecture avancée de CD/MD
Lecture directe . . . . . . . . . . . . . . . . . . . . . . . . . . . . . . . . . . . . . . . . . . . . . . . . . . . 21
Répétition et lecture au hasard . . . . . . . . . . . . . . . . . . . . . . . . . . . . . . . . . . . . . . 21
Lecture des morceaux programmés . . . . . . . . . . . . . . . . . . . . . . . . . . . . . . . . . . 22
Page
Remarques spéciales
Le matériel audio-visuel peut comporter des oeuvres faisant l'objet de droits
d'auteur qui ne peuvent pas être enregistrées sans l'autorisation du possesseur
du droit d'auteur, v eillez vous référer aux réglementations nationales en vigueur.
Licences de brevets É.-U. et étrangers obtenues de Dolby Laboratories.
Page
Radio
Écoute de la radio . . . . . . . . . . . . . . . . . . . . . . . . . . . . . . . . . . . . . . . . . . . . . 23 - 24
Enregistrement sur un MD
Av ant d'enregistrer sur un minidisc . . . . . . . . . . . . . . . . . . . . . . . . . . . . . . . . . . 25
Enregistrement d'un CD sur un MD . . . . . . . . . . . . . . . . . . . . . . . . . . . . . . 26 - 29
Enregistrement de la radio vers un minidisc . . . . . . . . . . . . . . . . . . . . . . . . . . . 30
Vérification de l'affichage . . . . . . . . . . . . . . . . . . . . . . . . . . . . . . . . . . . . . . . . . . . 31
Montage MD
Titrage d'un minidisc . . . . . . . . . . . . . . . . . . . . . . . . . . . . . . . . . . . . . . . . . . 32 - 33
Montage d'un minidisc enregistré . . . . . . . . . . . . . . . . . . . . . . . . . . . . . . . . 34 - 37
Fonctions avancées
Opérations programmées et mise en arrêt différée . . . . . . . . . . . . . . . . . . 38 - 42
Enrichissement du système . . . . . . . . . . . . . . . . . . . . . . . . . . . . . . . . . . . . 42 - 43
Références
Qu'est-ce qu'un mini dis c ? . . . . . . . . . . . . . . . . . . . . . . . . . . . . . . . . . . . . . . . . . 44
Limites du minidisc . . . . . . . . . . . . . . . . . . . . . . . . . . . . . . . . . . . . . . . . . . . . . . . 44
Messages affichés . . . . . . . . . . . . . . . . . . . . . . . . . . . . . . . . . . . . . . . . . . . . . . . . 45
Dépannage . . . . . . . . . . . . . . . . . . . . . . . . . . . . . . . . . . . . . . . . . . . . . . . . . . . 46 - 47
Entretien . . . . . . . . . . . . . . . . . . . . . . . . . . . . . . . . . . . . . . . . . . . . . . . . . . . . . . . . 47
Fiche technique . . . . . . . . . . . . . . . . . . . . . . . . . . . . . . . . . . . . . . . . . . . . . . . . . . . 48
F-1
01/7/13 F-01-14.fm
Page 53

Précautions
Général
Vérifier que l'appareil est installé dans un lieu bien aéré et qu'il est dégagé de tous
côtés (pas d'obstacle à moins de 10 cm de l'appareil). Pas d'obstacle à moins de
20 cm au-dessus de l'appareil.
20 cm
Enceinte gauche
Enceinte droite
En cas d'orage, débrancher l'appareil.
Débrancher le cordon d'alimentation en le tenant par
la fiche pour ne pas abîmer les fils internes.
SD-SG11
10 cm10 cm
Installer l'appareil sur un socle stable, horizontal et exempt de vibrations.
Mettre l'appareil à l'abri du soleil, du champ
magnétique, de la poussière excessive ou de
l'humidité. On l'écartera aussi d'un appareil
électronique (ordinateur domestique, télécopieur, etc.) qui provoquerait des parasites.
Ne rien placer sur l'appareil.
Mettre l'appareil à l'abri de l'humidité, de la chaleur excessive (supérieure à 60°C)
ou du froid excessif.
Si le système ne fonctionne pas correctement, débrancher et r ebrancher le système. Puis on le rallumera.
10 cm
Ne pas ôter l'enveloppe, on s'exposera à la secousse électrique. Pour toute réparation interne,
s'adresser au revendeur SHARP.
Utiliser ce produit dans une plage de température comprise entre 5°C et 35°C.
Avertissement:
Respecter la tension indiquée sur l'appareil. Le fonctionnement sur une tension
plus élevée est dangereux et risque de provoquer un incendie ou tout autre type
d'accident. SHARP ne sera pas tenu pour responsable des dommages causés par
le non-respect de la tension spécifiée.
Ce produit est doté d'un ventilateur de refroidissement à l'arrière de l'amplificateur
afin d'assurer le bon dégagement de la chaleur.
Précautions
Informations générales
E
F
F-2
F-01-14.fm01/7/13
Page 54

SD-SG11
Précautions (suite)
Accessoires
Informations générales
Commande de volume
Le niveau sonore réel dans un réglage donné dépend de divers éléments: rendement
des enceintes, lieu d'écoute, etc. Éviter une augmentation brusque du volume. Elle
se produit, par exemple, lors de la mise sous tension avec un réglage du volume
élevé. Éviter aussi une longue écoute à niveau élevé.
Entretien des compact discs
Le compact disc résiste bien aux dommages, mais il peut se produire un mauvais alignement dû à l'encrassement de la surface du disque. Afin de profiter au maximum
des disques et de ce lecteur, suivre les conseils ci-dessous.
Éviter d'écrire sur le disque, notamment sur la face non munie d'une étiquette. La
lecture se fait sur la face non munie d'une étiquette.
Éviter d'exposer les disques directement au soleil, à la chaleur et à l'humidité.
Tenir le com pact disc par les bords. Les traces de doigts, la saleté et l'eau sur le
compact disc sont à l'origine de bruit ou d'un alignement erroné. Si le compact
disc est encrassé ou ne fonctionne pas correctement, nettoyer le disque avec un
chiffon doux et sec. Essuyer du centre vers la périphérie, en ligne droite.
Précautions / Accessoires
Ne pas coller une étiquette ou un morceau de bande adhésive sur le CD. L'appareil peut mal fonctionner.
Vérifier que les accessoires ci-dessous sont présents dans l'emballage.
Télécommande 1 Piles au format de "AAA" (UM-4, R03,
HP-16 ou équivalent) 2
RRMCG0301AWSA UBATU0111AFZZ
Cadre-antenne AM 1 Antenne FM 1
QANTL0012AWZZ 92LFANT1535A
Cordon d'alimentation 1 Cordon de raccordement du système 1
QACCD0029AW00 QCNWG0033AWZZ
F-3
Cordon de raccordement de son 1
QCNWG0031AWZZ ou QCNWG0035AWZZ
Note:
L'appareil est livré seulement avec les accessoires ci-dessus.
F-01-14.fm01/7/13
Page 55

Commandes et voyants
1 2 345 67 8 1011912
13 1415 16 17 18 19 20
22
21
30
29
28
27
26
25
24
23
Façade de l'unité MD/CD/tuner
1.Touche d'éjection CD . . . . . . . . . . . . . . . . . . . . . . . . . . . . . . . . . . . . 16
2.Touche d'arrêt CD . . . . . . . . . . . . . . . . . . . . . . . . . . . . . . . . . . . . . . . 15
3.Touche de lecture/pause CD . . . . . . . . . . . . . . . . . . . . . . . . . . . . . . 15
4.Touche d'inversion CD/accord bas . . . . . . . . . . . . . . . . . . . . . . 16, 23
5.Touche d'avance rapide CD/accord haut . . . . . . . . . . . . . . . . . 16, 23
6.Touche d'enregistrement MD . . . . . . . . . . . . . . . . . . . . . . . . . . . . . .29
7.Touche d'arrêt MD . . . . . . . . . . . . . . . . . . . . . . . . . . . . . . . . . . . . . . .19
8.Touche de lecture/pause MD . . . . . . . . . . . . . . . . . . . . . . . . . . . . . .18
9.Touche de niveau d'enregistrement MD/inversion MD . . . . . . 19, 29
10.Touche de plage haut +10 MD . . . . . . . . . . . . . . . . . . . . . . . . . . . . . 19
11.Touche de niveau d'enregistrement MD/avance rapide MD . . 19, 29
12.Touche d'éjection MD . . . . . . . . . . . . . . . . . . . . . . . . . . . . . . . . . . . . 19
13.Touche marche/arrêt . . . . . . . . . . . . . . . . . . . . . . . . . . . . . . . . . . . . . 1 5
14.Touche de tuner (gamme d'ondes) . . . . . . . . . . . . . . . . . . . . . . . . . 23
15.Touche auxiliaire . . . . . . . . . . . . . . . . . . . . . . . . . . . . . . . . . . . . . . . . 43
16.Touche de mode d'enregistrement MD . . . . . . . . . . . . . . . . . . . . . . 26
17.Touche d'effacement . . . . . . . . . . . . . . . . . . . . . . . . . . . . . . . . . . . . .37
18.Sélecteur de mode de lecture CD/MD . . . . . . . . . . . . . . . . . . . . . . . 21
19.Touches de volume haut et bas . . . . . . . . . . . . . . . . . . . . . . . . . . . .13
20.Touche d'ouverture/fermeture de CD/MD . . . . . . . . . . . . . . . . . . . .15
21.Compartiment de CD . . . . . . . . . . . . . . . . . . . . . . . . . . . . . . . . . . . . 15
22.Compartiment de MD . . . . . . . . . . . . . . . . . . . . . . . . . . . . . . . . . . . . 18
23.Voyant de minuterie . . . . . . . . . . . . . . . . . . . . . . . . . . . . . . . . . . . . . 39
24.Voyant de mise en arrêt différée . . . . . . . . . . . . . . . . . . . . . . . . . . .41
25.Voyant d'enregistrement monaural . . . . . . . . . . . . . . . . . . . . . . . . . 26
26.Voyant d'alimentation
27.Voyant d'enregistrement stéréo . . . . . . . . . . . . . . . . . . . . . . . . . . . . 26
28.Voyant d'enregistrement 2 fois plus long (stéréo) . . . . . . . . . . . . . 26
29.Voyant d'enregistrement 4 fois plus long (stéréo) . . . . . . . . . . . . . 26
30.Capteur de télécommande . . . . . . . . . . . . . . . . . . . . . . . . . . . . . . . . . 8
Page de référence
SD-SG11
Commandes et voyants
Informations générales
E
F
F-4
F-01-14.fm01/7/12
Page 56

SD-SG11
Commandes et voyants (suite)
1
Afficheur LCD multi-fonction
1.Voyant de compteur de niveau/information en caractères/fréquence
2.Voyant AM/PM
3.Voyant de position tête
4.Voyant de lecture CD/MD
5.Voyant de fonction
6.Voyant d'enregistrement
7.Voyant de pause d'enregistrement MD
8.Voyant de répétition CD/MD
2
9.Voyant de lecture au h asard
10.Voyant de lecture des morceaux programmés
11.Voyant d'enregistrement synchronisé de son
12.Voyant de montage de morceau
13.Voyant TOC
14.Voyant de mode FM stéréo
15.Voyant de FM stéréo
16.Voyant de mise en arrêt différée
17.Voyant de lecture/enregistrement programmés
F-5
Informations générales
Commandes et voyants
4
3
5
7
68
14
9
10
15
16
17
11 12 13
F-01-14.fm01/7/12
Page 57

SD-SG11
Dos de l'unité MD/CD/tuner
Page de référence
Page de référence
Commandes et voyants
Informations générales
123456789
1
2
3
4
5
1.Jack de casque . . . . . . . . . . . . . . . . . . . . . . . . . . . . . . . . . . . . . . . . . 43
2.Jack d'entrée numérique . . . . . . . . . . . . . . . . . . . . . . . . . . . . . . . . . 42
3.Jack de commande du système . . . . . . . . . . . . . . . . . . . . . . . . . . . 11
4.Jacks de sortie du système . . . . . . . . . . . . . . . . . . . . . . . . . . . . . . . 11
5.Jacks de sortie de ligne . . . . . . . . . . . . . . . . . . . . . . . . . . . . . . . . . . 42
6.Jacks d'entrée auxiliaire . . . . . . . . . . . . . . . . . . . . . . . . . . . . . . . . . .42
7.Jack d'antenne de FM 75 ohms . . . . . . . . . . . . . . . . . . . . . . . . . . . . 10
8.Borne de terre d'antenne . . . . . . . . . . . . . . . . . . . . . . . . . . . . . . . . . 11
9.Borne de cadre-antenne AM . . . . . . . . . . . . . . . . . . . . . . . . . . . . . .10
MODÈLE N ° SD-SG11
CHAÎNE AUDIO NUMÉRIQUE 1-BIT
UNITÉ MD/CD/TUNER
GAMME DE FRÉQUENCES: FM 87,5 - 108 MHz
N° DE SÉRIE
SHARP CORPORATION
Dos de l'amplificateur
1.Jacks d'entrée du système . . . . . . . . . . . . . . . . . . . . . . . . . . . . . . . . 11
2.Jack de commande du système . . . . . . . . . . . . . . . . . . . . . . . . . . . 11
3.Bornes d'enceinte . . . . . . . . . . . . . . . . . . . . . . . . . . . . . . . . . . . . . . .10
4.Ventilateur de refroidissement
5.Jack d'entrée CA . . . . . . . . . . . . . . . . . . . . . . . . . . . . . . . . . . . . . . . .11
Façade de l'amplificateur
1.Voyant d'alimentation
AM 530 - 1720 kHz
FABRIQUÉ EN MALAISIE
MODÈLE N ° SD-SG11
1
CHAÎNE AUDIO NUMÉRIQUE 1-BIT
AMPLIFICATEUR
120V CA 60Hz 54W
SHARP CORPORATION
FABRIQUÉ EN MALAISIE
E
F
F-6
F-01-14.fm01/7/13
Page 58

SD-SG11
Informations générales
Commandes et voyants (suite)
1
2
3
4
*5
*6
7
*8
9
10
Commandes et voyants
*11
12
*13
*14
*15
*16
*17
18
19
20
21*
22
23*
24*
25
26
27*
28*
29*
30*
Télécommande
1.Émetteur de télécommande . . . . . . . . . . . . . . . . . . . . . . . . . . . . . . . .8
Touche marche/arrêt
2.
Touche d'arrêt CD
3.
Touche d'arrêt MD
4.
5.Touche de position tête . . . . . . . . . . . . . . . . . . . . . . . . . . . . . . . . . . .29
6.Touche de montage de morceau . . . . . . . . . . . . . . . . . . . . . . . . . . .28
Touche d'enregistrement MD
7.
8.Touche de montage CD/MD (NORMAL) . . . . . . . . . . . . . . . . . . . . . .26
Touche d'inversion CD/MD, accord bas
9.
Touche d'entrée auxiliaire
10.
11.Touche de niveau d'enregistrement/curseur/présélection
de tuner . . . . . . . . . . . . . . . . . . . . . . . . . . . . . . . . . . . . . . . . . .23, 29, 32
Touches de volume haut et bas
12.
13.Touche de programme CD/MD . . . . . . . . . . . . . . . . . . . . . . . . . . . . .22
14.Touche d'effacement . . . . . . . . . . . . . . . . . . . . . . . . . . . . . . . . . . . . .22
15.Touche de montage de titre/TOC . . . . . . . . . . . . . . . . . . . . . . . . . . .32
16.Touche de minuterie/effacement . . . . . . . . . . . . . . . . . . . . . . . .14, 38
17.Touche de minuterie . . . . . . . . . . . . . . . . . . . . . . . . . . . . . . . . . .17, 20
Touche de lecture/pause CD
18.
Touche de lecture/pause MD
19.
Sélecteur de mode de lecture CD/MD
20.
21.Touche d'enregi strement synchronisé de son . . . . . . . . . . . . . . . .43
Touche de mode d'enregistrement MD
22.
23.Touche de montage CD/MD (HIGH). . . . . . . . . . . . . . . . . . . . . . . . . .26
24.Touche de correction physiologique . . . . . . . . . . . . . . . . . . . . . . . .13
Touche d'avance rapide CD/MD, accord haut
25.
Touche de tuner (gamme d'ondes)
26.
27.Touche d'entrée . . . . . . . . . . . . . . . . . . . . . . . . . . . . . . . . . . . . . . . . .14
28.Touche de niveau d'enregistrement/curseur/présélection
de tuner . . . . . . . . . . . . . . . . . . . . . . . . . . . . . . . . . . . . . . . . . .23, 29, 32
29.Touche d'affichage . . . . . . . . . . . . . . . . . . . . . . . . . . . . . . . . . . . .17, 20
30.Touches directes de saisie de caractères/CD, MD, tuner . . . . .21, 32
Les touches portant la marque "*" dans l'illustration ne peuvent être que par la télécommande. Les autres touches peuvent être commandées par l'appareil principal et
la télécommande.
Page de référence
F-7
F-01-14.fm01/7/12
Page 59

Télécommande
SD-SG11
Mise en place des piles
1
Retirer le couvercle.
2
Installer les piles fournies en respectant les polarités indiquées
dans le logement de piles.
Pour introduire ou retirer les piles, on les poussera vers les bornes .
3
Remettre le couvercle en place.
Précautions à prendre:
Remplacer en même temps toutes les piles par des neuves.
Ne pas utiliser en même temps des piles neuves et anciennes.
Pour éviter un endommagement éventuel dû à la fuite, on retirera les piles en
période de non-emploi prolongée.
Attention:
Éviter d'utiliser des piles rechargeables (pile nickel-cadmium, etc.).
La mauvaise installation des piles peut entraîner un mauvais fonctionnement de
l'appareil.
Notes:
Remplacer les piles si la distance télécomm andable est réduite ou si le fonctionnement est irrégulier. Se procurer 2 piles au format "AAA" (UM-4, R03, HP-16 ou
équivalent).
Avec un chiffon doux, nettoyer régulièrement l'émetteur de la télécommande et le
capteur de l'appareil principal.
Une forte lumière frappant le capteur gênera le fonctionnement. Modifier l'éclairage ou changer l'orientation de l'appareil.
Mettre la télécommande à l'abri de l'humidité, la chaleur, le choc et les vibrations.
Essai de la télécommande
Vérifier la télécommande après avoir examiné tous les raccordements (voir pages 9 -
11.)
Diriger la télécommande vers le capteur placé sur l'appareil.
La télécommande peut être utilisée dans le rayon illustré ci-dessous:
Appuyer sur la touche ON/ST A ND-BY. Le système s'est allumé ? On peut maintenant
écouter de la musique.
0,2 m - 6 m
Capteur de télécommande
15˚
15˚
Télécommande
Avant l'utilisation
E
F
F-8
F-01-14.fm01/7/12
Page 60

SD-SG11
Raccordement du système
Cadre-antenne AM
Enceinte droite
(non fournie)
Antenne FM
Enceinte gauche
(non fournie)
Fil d'enceinte
(non fourni)
Prise murale
(120 V CA, 60 Hz)
F-9
Avant l'utilisation
Raccordement du système
Attention:
Les jacks SYSTEM CONTROL ont été
conçus seulement pour l'unité
MD/CD/tuner et l'amplificateur de SD-
SG11.
Fil d'enceinte (non fourni)
F-01-14.fm01/7/12
Page 61

SD-SG11
Raccordement des antennes
Antenne FM fournie:
Raccorder l'antenne FM au jack FM 75 OHMS et diriger l'antenne FM vers la direction qui assure la meilleure réception.
Cadre-antenne AM fourni:
Raccorder le cadre-antenne AM aux bornes AM et GND. Positionner le cadre-antenne de façon à assurer la meilleure récep tion. Placer le cadre-antenne AM sur un
meuble ou une étagère ou le visser sur une lampe ou au mur (vis non fournies).
Blanc
Noir
Note:
Écarter l'antenne FM/AM de l'amplificateur, de l'unité MD/CD/ tuner, du cordon d'alimentation et enfin des fils des enceintes. S'ils se trouvent à proximité, il peut se produire du bruit.
Mise en place du cadre AM:
< Montage > < Fixation au mur >
Raccordement des enceintes
Raccorder le fil d'enceinte (non f ourni) aux bornes SPEAKERS.
Fil d'enceinte
Attention:
Raccorder les fils aux enceintes et puis sur l'appareil.
Utiliser une enceinte dont la puissance d'e n trée nom ina le est égale ou supérieure
à 50 W et ayant une im pédance de 4 ohms.
Si on augmente trop le volume alors que les enceintes ont une impédance moins
de 4 ohms, le circuit de protection de l'ampli s'active. On n'entendra rien temporairement.
Ne pas prendre le canal droit pour le canal gauche. L'enceinte de droite est celle
située à droite quand on se place devant le système.
Ne pas court-circuiter les fils des enceintes. Si le cas se présente alors que
l'appareil est allumé, le circuit de protection s'active pour le mettre en
attente. On vérifiera alors le raccordement des enceintes et puis rallumera
l'appareil.
Avant l'utilisation
Raccordement du système
Mur
Vis
(non fournies)
E
F
F-10
F-01-14.fm01/7/12
Page 62

SD-SG11
Prise murale
(120 V CA, 60 Hz)
Raccordement du système (suite)
Avant l'utilisation
Raccordement de l'unité MD/CD/tuner et de
l'amplificateur
Relier l'unité MD/CD/tuner et l'amplificateur au moyen des cordons de raccordement
de son et de système qui accompagnent l'appareil.
Amplificateur unit
Unité MD/CD/tuner
Brancher en
tournant la marque
vers le haut.
Raccordement du système
SYSTEM OUT
Blanc
Rouge
SYSTEM IN
Brancher en
tournant la marque
Blanc
Rouge
Cordon de
raccordement de son
Cordon de raccordement du système
vers le bas.
Branchement du cordon d'alimentation
Après avoir vérifié tous les raccordements, raccorder le cordon d'alimentation à
l'appareil et puis sur une prise de courant.
Notes:
Débrancher l'appareil en période de non-utilisation prolongée.
Utiliser seulement le cordon d'alimentation livrée avec l'appareil. Un autre peut
causer un mauvais fonctionnement ou un incendie.
Antenne extérieure FM ou AM
Utiliser une antenne extérieure FM ou AM pour obtenir une meilleure réception. Se
renseigner auprès du revendeur.
Antenne extérieure AM
15 m
7,5 m
Antenne extérieure FM
F-11
Débrancher tout en pressant la languette sur le connecteur.
Piquet de terre
Cadre-antenne AM
Notes:
Pour utiliser une antenne extérieure FM, débrancher l'antenne FM du jack FM 75
OHMS.
Pour utiliser une antenne extérieure AM, laisser le cadre-antenne AM branché à
l'appareil.
F-01-14.fm01/7/13
Page 63

Commande générale
On peut sélectionner l'une des 7 couleurs.
1 Éteindre l'appareil en appuyant sur la touche ON/STAND-BY.
2 Maintenir la touche DISPLAY enfoncée pour plus de 2 secondes.
3 Appuyer sur la touche REC LEVEL/CURSOR ou pour sélectionner "Co-
lor Change".
4 Appuyer sur la touche ENTER.
5 Appuyer sur la touche REC LEVEL/CURSOR ou .
On peut sélectionner l'une des 7 couleurs (COLOR 1 à COLOR 7).
6 Appuyer sur la touche ENTER.
Pour modifier la luminosité de l'affichage
Pour assombrir:
1 Éteindre l'appareil en appuyant sur la touche ON/STAND-BY.
2 Maintenir la touche DISPLAY enfoncée pour plus de 2 secondes.
3 Appuyer sur la touche REC LEVEL/CURSOR ou pour sélectionner
"DIMMER ON?".
4 Appuyer sur la touche ENTER.
L'éclairage s'éteint et les caractères s'assombrissent.
Pour éclaircir:
1 Maintenir la touche DISPLAY enfoncée pour plus de 2 secondes.
2 Appuyer sur la touche ENTER.
SD-SG11
Commande générale
Fonctionnement de base
E
F
F-12
F-01-14.fm01/7/12
Page 64

SD-SG11
Réglage du son
Commande de volume
Appuyer sur la touche VOLUME pour augmenter le niveau sonore et sur la touche
VOLUME pour le baisser.
Correction physiologique
Afficher le mode en agissant à plusieurs reprises sur la touche LOUDNESS.
Les graves et les aigus sont amplifiés.
Fonctionnement de base
F-13
Réglage du son
Les graves et les aigus sont plus amplifiés.
Annulé.
F-01-14.fm01/7/12
Page 65

Réglage de l'horloge
Dans cet exemple, l'horloge est réglée pour le 15 août 2001, 9:30 a.m.
1
Appuyer sur la touche ON/STAND-BY pour allumer l'appareil.
2
Appuyer sur la touche TIMER/DELETE.
3
Avant 10 secondes, appuyer sur la touche REC LEVEL/CURSOR
ou pour sélectionner "TIME ADJUST".
4
Dans les 10 secondes, appuyer sur la touche ENTER.
5
Appuyer sur la touche REC LEVEL/CURSOR ou pour déclarer
l'année et puis appuyer sur la touche ENTER.
6
Appuyer sur la touche REC LEVEL/CURSOR ou pour déclarer
le mois et puis appuyer sur la touche ENTER.
7
Appuyer sur la touche REC LEVEL/CURSOR ou pour déclarer
la date et puis appuyer sur la touche ENTER.
8
Appuyer sur la touche REC LEVEL/CURSOR ou pour déclarer
les heures et puis appuyer sur la touche ENTER.
L'affichage 12 heures apparaît.
"AM" passe automatiquement à "PM".
9
Appuyer sur la touche REC LEVEL/CURSOR ou pour déclarer
les minutes et puis appuyer sur la touche ENTER.
L'heure n'avance pas même si les minutes passent de "59" à "00".
L'horloge part à partir de "0" seconde (les secondes ne s'affichent pas). L'horloge
disparaît quelques secondes après.
Pour vérifier l'heure:
[Lorsque l'appareil est en attente]
Appuyer sur la touche DISPLAY de la télécommande.
L'afficheur indiquera l'heure pour 5 secondes environ.
[Lorsque l'appareil est allumé]
Appuyer sur la touche TIMER/DELETE.
Av ant 10 secondes, appuyer sur la touche REC LEVEL/CURSOR ou .
L'afficheur indiquera l'heure pour 10 secondes environ.
Note:
Le réglage de l'horloge sera annulé si l'appareil est débranché ou s'il se produit une
panne de courant.
Pour remettre l'horloge à l'heure:
Renouveler "Réglage de l'horloge".
"AM 12:00" signifie le minuit et
"PM 12:00" le midi.
SD-SG11
Réglage de l'horloge
Fonctionnement de base
E
F
F-14
F-01-14.fm01/7/13
Page 66

SD-SG11
Écoute du CD
Écoute du CD
Lecture CD
1
Appuyer sur la touche ON/STAND-BY pour allumer l'appareil.
2
Appuyer sur la touche CD .
3
Appuyer sur la touche OPEN/CLOSE pour ouvrir le compartiment
CD/MD.
4
Mettre un CD dans le compartiment CD en tournant la face d'étiquette ver s soi.
Nombre total de morceaux Durée totale de lecture
5
Déclencher la lecture en appuyant sur la touche CD .
Le compartiment CD/MD se referme.
Lorsque le dernier morceau est terminé, le lecteur CD se met en arrêt automatiquement.
Interruption de la lec ture:
Appuyer sur la touche CD .
Pour relancer la lecture, réappuyer sur la touche CD .
F-15
Arrêt de la lecture:
Appuyer sur la touche CD .
F-15-24.fm01/7/9
Page 67

SD-SG11
Pour retirer le CD:
En mode d'arrêt, appuyer sur la touche CD .
Notes:
Pour réintroduire un CD éjecté à moitié, il faut le sortir et l'insérer de nouveau.
Pour sortir un CD de 8 cm davantage, appuyer deux fois sur la touche CD .
Nettoyer la face enregistrée du CD si on l'a touchée du doigt ou si elle est encrassée. Se reporter à "Entretien des compact discs" (page 3) et nettoyer le disque.
Après utilisation:
Appuyer sur la touche OPEN/CLOSE et refermer le compartiment CD/MD.
Si on met l'appareil en attente en laissant le compartiment CD/MD ouvert, ce der nier se referme automatiquement.
Attention:
Veiller à ne pas se pincer le doigt dans le compartiment CD/MD.
Ne pas arrêter ou pousser le couvercle CD/MD à la main. L'appareil peut mal
fonctionner.
Les CD et les MD s'insèrent dans les emplacements par le haut. Veiller à ne
pas y laisser tomber des pièces de monnaie ou autres. En cas de nonemploi, il faut les couvrir pour les protéger contre la poussière.
Mettre l'appareil à l'abri des vibrations ou des chocs. On risque un mauvais alignement.
Éviter également d'écouter un compact disc à volume élevé. On risque un mauvais alignement.
En cas de parasites sur télévision ou radio au cours de l'utilisation de disques,
éloigner l'appareil du téléviseur ou du poste de radio.
Si un message d'erreur s'affiche en cours de fonctionnement CD, se reporter à
"Messages affichés", page 45.
Pour localiser un morceau
Pour passer au morceau suivant:
Appuyer, pendant la lecture, sur la touche .
On peut sauter directement à un morceau souhaité. Afficher son numéro en agissant à plusieurs reprises sur la touche .
Pour repasser le morceau en cours:
Appuyer, pendant la lecture, sur la touche .
On peut sauter directement à un morceau souhaité. Afficher son numéro en agissant à plusieurs reprises sur la touche .
Pour localiser un passage souhaité
Pour l'avance rapide audible:
En cours de lecture, presser la touche .
Pour l'inversion audible:
En cours de lecture, presser la touche .
Notes:
La lecture normale se déclenche dès qu'on relâche la touche ou .
Lorsque l'avance rapide atteint la fin du dernier morceau, l'appareil affiche "END"
et entre en pause. Lorsque l'opération d'inversion atteint le début du premier morceau, l'appareil passe en mode de lecture.
Certains disques CD-R ne peuvent pas être lus selon l'appareil sur lequel l'enregistrement s'est fait ou les conditions d'enregistrement.
Cet appareil ne permet de reproduire les disques CD-RW.
Écoute du CD
Lecture CD
E
F
F-16
F-15-24.fm01/7/9
Page 68

SD-SG11
Écoute du CD (suite)
Affichage de temps
Chaque fois que la touche TIME/SYMBOL sur la télécommande est pressée, l'affichage change.
L'afficheur indique le temps écoulé sur le morceau.
L'appareil affiche le temps de lecture restant sur le morceau.
L'afficheur indique le temps restant sur le morceau.
Écoute du CD
Lecture CD
F-17
Changement de l' af f ich age
Chaque fois que la touche DISPLAY sur la télécommande est pressée, l'affichage
change.
L'afficheur indique le temps écoulé sur le morceau.
Le compteur de niveau s'affiche.
Notes:
Pendant la lecture au hasard, l'appareil n'affiche pas le temps de lecture restant.
Selon les CD, le temps de lecture total affiché peut ne pas coïncider avec celui
indiqué sur la pochette de CD. Le temps entre morceaux n'est pas pris en considération.
F-15-24.fm01/7/9
Page 69

Écoute d'un minidisc
Le morceau peut être reproduit dans le mode selon lequel il a été enregistré: monaural, 2 ou 4 fois plus long (stéréo) (mode de lecture prolongée de MD).
1
Allumer l'appareil en pressant la touche ON/STAND-BY.
2
Appuyer sur la touche MD .
3
Appuyer sur la touche OPEN/CLOSE pour ouvrir le compartiment
CD/MD.
4
Mettre un MD dans le compartiment MD en tournant la face d'éti-
quette vers soi.
SD-SG11
Titre de disque Nombre total de
Si le minidisc n'est pas bien mis en place, l'appareil affiche "? MD DISC" ou "Can't
READ". On pressera alors sur la touche MD .
Le titre de disque s'affiche seulement lorsqu'il est enregistré. L'appareil affiche le
nombre des morceaux et le temps de lecture total sur le minidisc.
5
Déclencher la lecture en appuyant sur la touche MD .
Si le minidisc porte un titre de morceau, ce dernier se déplace sur l'afficheur. L'appareil affiche ensuite le temps de lecture écoulé.
Si le minidisc ne porte pas de titre de morceau, l'appareil affiche le temps de lecture écoulé.
Lorsque le dernier morceau est terminé, le lecteur MD se met en arrêt automatiquement.
morceaux
Durée totale de lec-
F-15-24.fm01/7/9
ture
Lecture MD
Écoute d'un minidisc
F-18
E
F
Page 70

SD-SG11
(5ème morceau)
(15ème) (25ème) (26ème) (27ème)
Écoute d'un minidisc (suite)
Interruption de la lec ture:
Appuyer sur la touche MD .
Pour relancer la lecture, réappuyer sur la touche MD .
Arrêt de la lecture:
Appuyer sur la touche MD .
Pour retirer un minidisc:
En mode d'arrêt, appuyer sur la touche MD .
Lecture MD
Attention:
Écoute d'un minidisc
Veiller à ne pas se pincer le doigt dans le compartiment CD/MD.
Ne pas arrêter ou pousser le couvercle CD/MD à la main. L'appareil peut mal
fonctionner.
Les CD et les MD s'insèrent dans les emplacements par le haut. Veiller à ne
pas y laisser tomber des pièces de monnaie ou autres. En cas de nonemploi, il faut les couvrir pour les protéger contre la poussière.
Avant de mettre un MD en place, penser à allumer l'appareil. Si on introduit un MD
sans allumer l'appareil, ce dernier peut mal fonctionner.
Pour transporter l'appareil, retirer le MD. Il peut être coincé et causera un problème.
Si le fonctionnement de MD parasite une émission télévisée ou radiodiffusée, éloigner l'appareil du téléviseur ou du poste de radio.
Le MD a été conçu à bien résister aux vibrations, mais le son peut sauter si l'appareil subit des vibrations successives. Si le niveau sonore est trop éle vé, le son peut
sauter selon la nature de l'enregistrement sur MD. On baissera alors le volume
pour supprimer le saut de son.
Si un message d'erreur apparaît pendant le fonctionnement de MD, se reporter à
"Messages affichés" à la page 45.
Pour localiser un morceau
Pour passer au morceau suivant:
Appuyer, pendant la lecture, sur la touche .
On peut sauter directement à un morceau souhaité. Afficher son numéro en agissant à plusieurs reprises sur la touche .
Pour repasser le morceau en cours:
Appuyer, pendant la lecture, sur la touche .
On peut sauter directement à un morceau souhaité. Afficher son numéro en agissant à plusieurs reprises sur la touche .
P o ur localiser un passage souhaité
Pour l'avance rapide audible:
En cours de lecture, presser la touche .
Pour l'inversion audible:
En cours de lecture, presser la touche .
Notes:
La lecture normale se déclenche dès qu'on relâche la touche ou .
Lorsque l'avance rapide atteint la fin du dernier morceau, l'appareil affiche "END"
en mettant le MD en pause. Lorsque l'inversion atteint le début du premier morceau, l'appareil repasse en mode de lecture.
Pour sélectionner un morceau en en sau-
tant 10
En arrêt ou en lecture:
1 Appuyer sur la touche +10 pour sauter 10 morceaux en avant.
2 Appuyer sur la touche ou pour avancer ou reculer de 1 morceau.
Par exemple, pour passer du morceau 5 au morceau 27
F-19
F-15-24.fm01/7/9
Page 71

Affichage de temps
Chaque fois que la touche TIME/SYMBOL sur la télécomma nde est pressée, l'aff ichage change.
L'afficheur indique le temps écoulé sur le morceau.
L'appareil affiche le temps de lecture restant sur le morceau.
Commutation vers le titre de morceau, le
compteur de niveau, etc.
Chaque fois que la touche DISPLAY sur la télécommande est pressée, l'affichage
change.
L'afficheur indique le temps écoulé sur le
morceau.
Le titre de morceau s'inscrit.
"NO NAME" s'affiche si le morceau n'est pas titré.
Le compteur de niveau apparaît.
Les morceaux enregistrés en monaural sont indiqués comme "M".
L'appareil affiche le temps d'enregistrement restant.
L'appareil affiche la date d'enregistrement.
SD-SG11
Lecture MD
Écoute d'un minidisc
L'afficheur indique le temps restant sur le morceau.
Notes:
Pendant la lecture au hasard, l'appareil n'affiche pas le temps de lecture restant.
Le temps de lecture affiché peut ne pas coïncider à celui indiqué sur la pochette
de MD, car le temps entre morceaux n'est pas conclu.
L'appareil affiche le temps d'enregistrement.
Notes:
Une fois affiché, le compteur de niveau reste inchangé pendant la lecture.
L'affichage repasse à son état initial dès le retrait de MD.
S'il s'agit d'un MD non-enregistrable, l'appareil n'affiche pas le temps restant, la
date ou l'heure pour l'enregistrement MD.
F-15-24.fm01/7/9
E
F
F-20
Page 72

SD-SG11
Lecture avancée de CD/MD
Lecture directe
En mode CD ou MD, les touches directes permettent de sélectionner des morceaux
souhaités.
Pour sélectionner un morceau portant un numéro entre 11 et 99:
Sélectionner le morceau après avoir pressé la touche 10.
A. Par exemple, pour choisir 28
1 Appuyer sur la touche " 10".
2 Appuyer sur la touche "2".
3 Appuyer sur la touche "8".
Lecture directe / Répétition et lecture au hasard
Pour sélec tionner un m or ceau portant un n umér o supé rieur à 100 (MD
seulement):
Sélectionner le morceau après avoir pressé deux fois sur la touche 10.
B. Par exemple, pour choisir 105
1 Appuyer deux fois sur la touche " 10".
2 Appuyer sur la touche "1".
3 Appuyer sur la touche "10/0".
4 Appuyer sur la touche "5".
Répétition et lecture au
hasard
On peut sélectionner un mode de lecture pour le CD ou le MD: répétition, lecture au
hasard, lecture normale.
1
En mode CD ou MD, appuyer à plusieurs reprises sur la touche
PLAY MODE pour sélectionner le mode de lecture.
2
Appuyer sur la touche CD ou MD pour déclenche r la l ectu re.
Pour répét e r une s é que nc e programmée:
Suivre les étapes 1 - 5 dans le paragraphe "Lecture des morceaux programmés" et
répéter la lecture.
Notes:
On peut sélectionner le mode de lecture en appuyant sur la touche PLAY MODE
sur l'appareil principal.
La lecture au hasard n'est pas utilisable pour la lecture des morceaux programmés.
En fin de répétition, penser à appuyer sur la touche . Sinon, l'appareil lira des
disques indéfiniment.
La lecture au hasard s'arrête lorsque tous les morceaux sont reproduits une fois.
(Un même morceau ne sera jamais lu deux fois.)
La lecture au hasard consiste à reproduire automatiquement des morceaux sur
CD ou MD dans un ordre aléatoire. (On ne peut pas spécifier l'ordre de la lecture.)
Pour annuler la répétition ou la lecture au hasard:
Sélectionner une lecture ordinaire en agissant sur la touche PLAY MO DE .
F-21
F-15-24.fm01/7/9
Page 73

Lecture des morceau x programmés
SD-SG11
Possible de programmer 20 morceaux sur CD ou 20 morceaux sur MD.
On peut programmer à la fois des morceaux CD et MD.
1
Appuyer sur la touche CD ou MD .
2
Appuyer sur la touche PROGRAM po ur pa sse r en m ode de s auv egarde de programmation.
3
Sélectionner un morceau souhaité en agissant sur les touches directes.
Ordre de lecture
Temps de lecture
4
Refaire l'étape 3 pour un a utre mor ceau . Programm able ju squ' à 20
morceaux.
Si le temps d'enregistrement des morceaux programmés excède 400 minutes, l'appareil affiche "--:--". Mais la programmation est bien mise en mémoire.
5
Appuyer sur la touche CD ou MD .
Effacement de morceaux programmés:
Appuyer sur la touche CLEAR avant que "PROGRAM" ne cesse de clignoter.
Chaque pression annule une plage à par ti r de la dern ière.
Pour annuler la lecture des morceaux programmés:
En mode d'arrêt, appuyer sur la touche CLEAR. Le voyant "PROGRAM" disparaît et
les morceaux programmés sont tous effacés.
Ajout de morceaux au programme:
Si un programme a été stocké préalab lement, "PROGRAM" apparaît. On suivra alors
les étapes 1 - 5 pour ajouter des morceaux. Ces der niers seront placés à la suite du
programme d'origine.
Pour vérifier les morceaux programmés:
Pendant l'arrêt ou le mode de lecture des morceaux programmés, appuyer sur la touche ou .
Notes:
Le retrait du CD ou du MD annule automatiquement la séquence programmée.
Les morceaux programmés ne seront pas effacés même si on appuie sur la touche ON/STAND-BY pour passer en attente ou si on passe d'une fonction CD à une
autre.
La lecture au hasard n'est pas utilisable pour la lecture des morceaux programmés.
Lecture des morceaux programmés
Lecture avancée de CD/MD
6
Appuyer sur la touche CD ou MD pour décle nch er la lectu re.
E
F
F-22
F-15-24.fm01/7/9
Page 74

SD-SG11
Radio
Écoute de la ra d io
Écoute de la radio
Accord
1
Éteindre l'appareil en appuyant sur la touche ON/STAND-BY.
2
Appuyer à plusieurs reprises sur la touche TUNER (BAND) pour
sélectionner une gamme d'ondes souhaitée (FM STEREO, FM ou
AM).
3
Appuyer sur la touche TUNING ou pour faire l'accord sur une
station souhaitée.
Accord manuel:
Appuyer sur la touche TUNING ou autant de fois qu'il est nécessaire pour
faire l'accord sur une station souhaitée.
Accord automatique:
Si on appuie sur la touche TUNING ou plus de 0,5 seconde, le balayage se
déclenche automatiquement et le tuner se cale sur la première station qu'il capte.
On peut faire l'accord sur une station souhaitée en pressant sur la touche ou
de la télécommande.
Notes:
La recherche automatique s'arrêtera dès qu'il se produira des parasites.
Le balayage automatique sautera des stations à faible puissance.
4
Pour capter une émission FM en stéréo, app uyer sur la touche TUNER (BAND). "STEREO" s'allume.
"ST" apparaît lorsque l'appareil capte une émission FM en stéréo.
Si la réception d'une émission FM n'est pas bonne, appuyer sur la touche TUNER
(BAND). Le voyant "STEREO" s'éteint. L'émission passe en monaural et le son
devient plus clair.
F-23
Après utilisation:
Appuyer sur la touche ON/STAND-BY pour mettre l'appareil en mode d'attente.
F-15-24.fm01/7/9
Page 75

SD-SG11
Accord de présélection
(Télécommande)
Il est possible de mémoriser 40 stations au total (FM et AM) et de rappeler par une
simple pression d'une touche.
1
Suivre les étapes 1 - 4 dans le paragraphe "Accord", page 23.
2
Appuyer sur la touche ENTER pour pa sser en mode de s auvegarde
de présélection.
3
Avant 5 secondes, appuyer sur la touche TUNER PRESET ou
pour sélectionner le numéro de présélection.
Stocker des stations en mémoire dans l'ordre à partir du canal de présélection 1.
4
Avant 5 secondes, appuyer sur la touche ENTER pour mettre la
station en mémoire.
Si le voyant de numéro de présélection s'éteint avant la mise en mémoire de la
station, renouveler l'opération depuis l'étape 2.
5
Renouvele r les étapes 1 - 4 p our mémoris er d'autres stations ou
remplacer une stati on mise en m émoire.
Une nouvelle station remplace celle déjà mise en mémoire.
Note:
La fonction de protection conserve les stations en mémoire pendant plusieurs heures
même s'il se produit une panne de courant ou un débranchement de l'appareil.
Rappel d'une station mémorisée
(Télécommande)
Appuyer sur la touche TUNER PRESET ou pour sélectionner une station
souhaitée.
Les touches directes permettent de rappeler une station mise en mémoire.
Pour sélectionner une station préréglée entre 11 et 40:
Pour choi sir, par exemple, 28
1 Appuyer sur la touche " 10".
2 Appuyer sur la touche "2".
3 Appuyer sur la touche "8".
Pour effacer toutes les stations mémori-
sées
(Télécommande)
1 Appuyer sur la touche TUNER (BAND).
2 Maintenir la touche CLEAR enfoncée pour
plus de 3 secondes.
3 Appuyer sur la touche ENTER.
Radio
Écoute de la ra d io
E
F
F-24
F-15-24.fm01/7/9
Page 76

SD-SG11
Avant d'enregistrer sur un minidisc
Avant d'enregistrer sur un minidisc
Enregistrement sur un MD
Écriture de disque (TOC)
Le TOC (Table of Contents) est une sorte de table des matières qui permet de reconnaître les
numéros de morceaux et leur endroit sur le disque. Grâce à cette table, l'appareil peut localiser
rapidement des morceaux et effectuer automatiquement l'enregistrement sur une place disponible.
Zone pour TOC
(enregistrement de numéros ou de titres
de morceaux,
etc.)
Lorsque l'on déclenche l'enregistrement ou le montage, l'appareil affiche "TOC".
Cela indique que les informations dans le TOC est en cours de modification selon
l'enregistrement ou que le montage est e n cours. (Le TOC n'est pas encore inscrit
sur le MD.)
Le TOC est inscrit lorsque
On arrête l'enregistrement.
On passe à une autre source d'entrée.
On éjecte le minidisc.
On met l'appareil en attente.
Ne pas débrancher l'appareil pendant l'enregistrement sur TOC ("TOC" en clignotement) et éviter le choc. Dans le cas contraire, l'enregistrement ne se fait pas correctement et une lecture correcte n'est donc pas assurée.
L'enregistrement ne se fait pas dans les cas suivants.
S'il s'agit d'un minidisc non-enregistrable (minidisc musical vendu dans le commerce).
S'il s'agit d'un MD protégé contre l'effacement accidentel (voir page 44).
S'il n'y a plus de place disponible sur le disque (voir page 45).
Lorsque le message "TOC FULL" apparaît (voir page 45).
S'il s'agit d'un disque dont le TOC est endommagé.
Zone pour l'en-
registrement so-
nore
Serial Copy Management System (SCMS)
Ce lecteur est doté d'un mécanisme compatible SCMS qui permet une seule copie
numérique (une génération) pour protéger le droit d'auteur. Si on copie numériquement une source numérique protégée (CD audio ou autres), cette copie (première
génération) ne sera plus copiée numériquement.
CD audio
Enregistrement
Notes pour l'enregistrement
SHARP n'est pas tenu responsable de tout dommage (ou perte d'enregistrement)
qui pourrait résulter d'un mauvais fonctionnement de l'appareil.
Avant tout enregistrement important, faire un essai pour s'assurer que l'enregistrement se fait correctement.
On peut agir sur les commandes VOLUME et LOUDNESS sans affecter de
signaux enregistrés (surveillance de son variable).
ATRAC
Le système ATRAC (Adaptive TRansform Acoustic Coding) permet de compresser
les données sonores à 1/5 en supprimant les sons inaudibles. L'opération se fait en
basant sur l'assourdissement psychoacoustique, la qualité sonore reste inchangé.
Cet appareil est doté d'un système ATRAC3 permettant de réduire les données à 1/
10 ou 1/20.
Grâce à ce système de compr ession, l'enregistrement 2 ou 4 fois plus long peut se
réaliser en stéréo.
(Copie en 1ère génération)
numérique
Minidisc
Impossible
Raccordement
"Can't COPY" apparaît et aucun
enregistrement n'est autorisé.
Raccordement analogique
(Copie en 2ème génération)
numérique
Possible
Minidisc
F-25
Convertisseur de taux d'échantillonnage
Ce système est doté d'un convertisseur de taux d'échantillonnage qui convertit automatiquement la fréquence d'échantillonnage d'un tuner numérique ou d'une platine
DAT (32 kHz, 48 kHz) en 44,1 kHz. O n peut donc effectuer un enregistrement numérique à partir d'un élément raccordé sans se soucier de la fréquence d'échantillonnage.
F-25-37.fm01/7/9
Page 77

Enregistrement d'un CD sur un MD
1
Appuyer sur la touche ON/STAND-BY pour allumer l'appareil.
2
Appuyer sur la touche CD et mettre un CD souhaité en place.
3
Mettre un MD enregistrable dans le compartiment MD.
4
Appuyer sur la touche REC MODE pour sélectionner un mode
d'enregistrement.
SD-SG11
Indication Mode d'enregistrement Enregistre-
SP Enregistrement stéréo 80 minutes
LP2 Enregistrement 2 fois plus long (sté-
LP4 Enregistrement 4 fois plus long (sté-
MONO Enregistrement monaural 160 minutes
Le mode d'enregistrement ne peut pas être changé pendant l'enregistrement.
Le mode d'enregistrement reste inchangé jusqu'à un changement.
5
Appuyer sur la touche CD MD EDIT (HIGH/NORMAL) pour déclencher l'enregistrement.
HIGH : Enregistrement accéléré.
NORMAL : Enregistrement à vitesse normale.
L'enregistrement se fait numériquement.
réo)
réo)
ment
(Pour enregis-
trer sur un MD
de 80 minutes)
maxi.
160 minutes
maxi.
320 minutes
maxi.
maxi.
Enregistrement d'un CD sur un MD
Enregistrement sur un MD
E
F
F-26
F-25-37.fm01/7/9
Page 78

SD-SG11
Enregistrement d'un CD sur un MD (suite)
Notes:
L'enregistrement d'un CD vers un MD se déclenche même si tous les morceaux
sur CD ne se recopient pas sur le MD. Le CD et le MD se mettront en ar rêt dès
que le MD sera rempli.
Lorsque le CD atteint la fin, l'enregistrement sur MD est aussi mis en arrêt.
On peut effectuer l'enregistrement à partir d'un CD qu'on a programmé.
Il est possible d'effectuer l'enregistrement au cours de la répétition. Elle peut être
commutée au cours de l'enregistrement.
Arrêt de l'enregistremen t:
Appuyer sur la touche CD ou MD .
Le CD et le MD se mettent en arrêt.
Après utilisation:
Appuyer sur la touche ON/STAND-BY pour passer en veille.
Du numéro de morceau:
Les nouveaux morceaux sont automatiquement numérotés suivant l'ordre d'origine
(numérotage synchronisé).
Lorsque l'on effectue l'enregistrement d'un CD vers un MD, les numéros enregistrés sur le MD peuvent ne pas correspondre à ceux portés sur le CD.
CD
Premier morceau
Morceau A
Minidisc
Enregistrement d'un CD sur un MD
Premier morceau
Morceau A Morceau B Morceau C
Deuxième morceau
Morceau B Morceau C
Deuxième morceau
Troisième morceau
Troisième morceau
Note pour le mode de long enregistrement (LP2/LP4):
Les morceaux enregistrés en mode d'enregistrement 2 ou 4 fois plus long ne peuvent pas être reproduits sur un appareil qui ne supporte pas ces modes.
Un tel appareil affiche "LP :" au début du morceau et on n'entend aucun son.
(L'opération et l'affichage peuvent varier suivant les appareils.)
Note pour l'enregistrement accéléré:
S'il s'agit d'un CD de mauvaise qualité (rayures ou encrassement), l'enregistrement à
grande vitesse peut être parasité ou mêlé de pauses. Opter alors pour l'enregistrement à vitesse normale.
Précautions pour l'enregis trement 4 fois plus long (LP4):
Pour effectuer l'enregistrement 4 fois plus long en stéréo, une méthode spéciale est
adoptée.
Le niveau très élevé de compression peut dégrader la qualité sonore et causer du
bruit dans l'enregistrement. Si on insiste sur la qualité sonore, il est conseillé d'opter
l'enregistrement 2 fois plus long ou normal.
Enregistrement sur un MD
F-27
F-25-37.fm01/7/9
Page 79

Enregistrement de morceaux souhaités du
CD
1
Éteindre l'appareil en appuyant sur la touche ON/STAND-BY.
6
Renouveler les étapes 4 - 5 pour d'autres morceaux. 20 morceaux
au total sont programmables.
Si on choisit plus de 20 morceaux, l'appareil affiche "EDIT OVER" et refuse de
mémoriser le 21ème morceau.
7
Appuyer sur la touche CD MD EDIT (HIGH/NORMAL) pour déclencher l'enregistrement.
Lorsque l'enregistrement est terminé, les morceaux sélectionnés disparaissent
de l'afficheur.
Pour mémoriser un morceau en cours:
1 Si on entend un morceau à enregistrer, appuyer sur la touche TRACK.
Le morceau est ainsi mis en mémoire. (Enregistrable jusqu'à 20 morceaux.)
2Après la mise en mémoire du morceau, appuyer sur la touche CD pour arrêter
la lecture.
3 Appuyer sur la touche HIGH ou NORMAL pour déclencher l'enregistrement.
Pour effacer les morceaux mémorisés:
Appuyer en mode d'arrêt sur la touche CD .
SD-SG11
2
Appuyer sur la touche CD et mettre un CD souhaité en place.
3
Mettre un MD enregistrable dans le compartiment MD.
4
Appuyer sur la touche ou pour sélectionner une plage.
5
Appuyer sur la touche TRACK pour programmer le numéro de
morceau.
Numéro de plage sélectionné T-EDIT
Enregistrement d'un CD sur un MD
Enregistrement sur un MD
E
F
F-28
F-25-37.fm01/7/9
Page 80

SD-SG11
Enregistrement d'un CD sur un MD (suite)
Enregistrement d'un CD sur un MD
Enregistrement sur un MD
Enregistrement en tête d'un MD
1
Préparer l'enregistrement.
Pour enregistrer à partir d'un CD: Pour enregistrer à partir de la ra-
Mettre un CD et un MD enregistrable
en place.
2
Appuyer sur la touche TOPPOSITION.
Une autre pression permet d'annuler le mode de position en tête.
3
Déclencher l'enregistrement.
Pour enregistrer à partir d'un CD: Pour enregistrer à partir de la ra-
Appuyer sur la touche HIGH ou NORMAL.
Lorsque l'enregistrement est terminé, le mode de position tête est annulé.
Le morceau ainsi enregistré sera placé en tête du MD.
Tous les morceaux préalablement enregistrés seront renumérotés.
Note:
En mode d'enregistrement ou de pause, le mode de position tête ne peut pas être
activé ou désactivé.
dio:
Faire l'accord sur une station et mettre un MD enregistrable en place.
dio:
Appuyer sur la touche MD après la
touche REC .
Réglage du niveau d'enregistrement
On peut ajuster le niveau d'enregistrement selon la source. Il faut observer le com pteur de niveau.
1
Appuyer sur la touche CD .
2
Appuyer sur la touche ou pour sélectionner une plage.
3
Appuyer sur la touche REC MODE pour sélectionner un mode
d'enregistrement.
4
Déclencher la lecture en appuyant sur la touche CD .
5
Appuyer sur la touche REC pour mettre l'enregistrement en pause.
6
Appuyer sur la touche REC LEVEL/CURSOR ou pour ajuster
l'enregistrement.
0dB -4dB ··· +10dB
Compteur de niveau Niveau d'enregistrement
Le niveau maximal ne devra pas dépasser "0dB".
Le niveau d'enregistrement peut être ajusté par paliers de 2dB entre - 4dB et +
10dB.
On peut alors ajuster le niveau d'enregistrement en agissant sur la touche ou
.
7
Appuyer sur la touche CD .
F-29
8
Réappuyer sur la touche ou pour sélectionner un morceau
à enregistrer.
9
Réappuyer sur la touche CD pour déclencher l'enregistrement.
Arrêt de l'enregistrement:
Appuyer sur la touche MD .
Le minidisc se met en arrêt.
Le CD poursuit la lecture.
F-25-37.fm01/7/9
Page 81

Enregistrement de la radio vers un minidisc
Morceau A
Un seul morceau
Premier morceau
Minidisc
Radio
Troisième morceau
Deuxième morceau
Morceau B Morceau C
(Morceau A) (Morceau B) (Morceau C)
1
Faire l'accord sur une station souhaitée (voir page 23).
2
Mettre un MD enregistrable dans le compartiment MD.
3
Appuyer sur la touche REC MODE pour sélectionner un mode
d'enregistrement.
4
Appuyer sur la touche REC .
L'appareil entre en attente pour l'enregistrement.
5
Appuyer sur la touche MD pour déclencher l'enregistrement.
Pour interrompre l'enregistrement:
Appuyer sur la touche MD .
Pour reprendre l'enregistrement, réappuyer sur la touche MD .
SD-SG11
Arrêt de l'enregistrement:
Appuyer sur la touche MD .
Le minidisc se met en arrêt.
Du numéro de morceau:
Enregistré comme un mo r c e au, l'enregi strement portera un seul numéro.
Pour numéroter des morceaux pendant l'enregistrement à partir de la radio:
Appuyer sur la touche REC en arrivant à un point souhaité. Le compteur augmente
chaque fois que la touche est pressée.
F-25-37.fm01/7/9
Enregistrement sur un MD
F-30
Enregistrement de la radio vers un minidisc
E
F
Page 82

SD-SG11
Temps écoulé
"NO NAME" apparaît.
Compteur de niveau
Temps restant
Vérification de l'affichage
Vérification de l'affichage
Enregistrement sur un MD
Pour vérifier le mode d'enregistrement et
le temps restant
En mode d'arrêt pour MD, appuyer sur la touche REC MODE.
Chaque fois que la touche est pressée, l'affichage se modifie comme suit.
Temps restant en mode d'enregistrement stéréo
Temps restant en mode d'enregistrement
2 fois plus long
Temps restant en mode d'enregistrement
4 fois plus long
Pour vérifier l'affichage en cours d'enregis-
trement
En mode d'enregistrement, appuyer sur la touche DISPLAY.
Chaque fois que la touche est pressée, l'affichage se modifie comme suit.
Lorsque l'enregistrement est terminé, l'affichage repasse à l'état précédent.
S'il s'agit d'un enregistrement monaural, le compteur de niveau s'affiche comme
si c'était en stéréo.
F-31
Temps restant en mode d'enregistrement
monaural
L'appareil affiche le temps d'enregistrement restant et repasse à l'affichage précédent.
L'enregistrement reprendra dans le mode confirmé ici.
F-25-37.fm01/7/9
Page 83

Titrage d'un minidisc
Titrage de disques et de morceaux
On peut nommer des disques et des morceaux.
Il est possible de titrer le disque et 255 morceaux enregistrés. (Chaque titre peut
atteindre 40 caractères et on peut utiliser 1.700 caractères au total par disque.)
Le minidisc non-enregistrable ne peut pas être édité.
1
Appuyer sur la touche MD et mettre un minidisc (voir page 18).
2
Sélectionner "DISC NAME" ou "TRACK NAME".
Pour titrer un disque: Pour titr e r un mo r c e au :
En mode d'arrêt, appuyer sur la tou-
che NAME/TOC EDIT. Avant 10 secondes, appuyer sur la touche REC
LEVEL/CURSOR ou pour sélectionner "DISC NAME".
3
Dans les 10 secondes, appuyer sur la touche ENTER.
Pour annuler l'opération, appuyer sur la touche NAME/TOC EDIT.
En mode de lecture ou de pause, appuyer sur la touche NAME/TOC EDIT
pour sélectionner "TRACK NAME".
SD-SG11
Montage MD
Titrage d'un minidisc
L'appareil passe en mode d'entrée de caractères.
F-25-37.fm01/7/9
E
F
F-32
Page 84

SD-SG11
Titrage d'un minidisc (suite)
Montage MD
4
Agir sur les touches 1 - 10, SYMBOL et CHARACTER pour saisir
des caractères.
La touche CHARACTER permet de basculer entre les majuscules et les minuscules.
On peut saisir les symboles suivants en pressant sur la touche SYMBOL.
5
La saisie de caractères terminée, on pressera sur la touche ENTER.
Caractères (symboles):
Majuscules
Titrage d'un minidisc
Minuscules
– . , / : ? & ( ) ! " # $ % ∗ ; < = > @ _ ` + '
1 ABC 2 DEF 3 GHI 4 JKL 5
: représente un espace.
MNO 6
PQRS 7
TUV 8
WXYZ 9
wxyz 9
Pour effacer des titres de disque ou de morceaux:
1 Suivre les étapes 1 - 2 dans le chapitre "Titrage de disques et de morceaux" à la
page 32.
2 Appuyer plus de 3 secondes sur la touche TIMER/DELETE.
"NAME CLEAR?" apparaît.
3 Appuyer sur la touche ENTER pour valider.
Pour effacer un caractère:
1 Suivre les étapes 1 - 3 dans le chapitre "Titrage de disques et de morceaux" à la
page 32.
2 Appuyer sur la touche REC LEVEL/CURSOR ou de la télécommande pour
faire clignoter le caractère à effacer.
3 Appuyer sur la touche TIMER/DELETE.
4 Appuyer sur la touche ENTER pour valider.
Pour ajouter un caractère:
1 Suivre les étapes 1 - 3 dans le chapitre "Titrage de disques et de morceaux" à la
page 32.
0
01 abc 2 def 3 ghi 4 jkl 5 mno 6 pqrs 7 tuv 8
2 Appuyer sur la touche REC LEVEL/CURSOR ou de la télécommande pour
faire clignoter le caractère avant lequel un nouveau caractère s'insère.
3Sélectionner un caractère à saisir et appuyer sur la touche ENTER.
Pour remplacer un caractère:
Exemple) Pour changer "LAVE" pour "LOVE"
1 Suivre les étapes 1 - 3 dans le chapitre "Titrage de disques et de morceaux" à
la page 32.
2 Appuyer sur la touche REC LEVEL/CURSOR ou de la télécommande pour
faire clignoter le caractère à remplacer.
3 Appuyer sur la touche TIMER/DELETE.
4 Saisir un caractère.
5 Appuyer sur la touche ENTER.
F-33
F-25-37.fm01/7/9
Page 85

Montage d'un minidisc enregistré
1
2
Notes:
On placera d'abord deux morceaux l'un à la suite de l'autre au m oyen de la fonction MOVE. Et puis on les fusionnera avec la fonction COMBINE.
Cette fonction n'est pas utilisable en mode de lecture au hasard ou de lecture des
morceaux programmés.
Si les deux morceaux à fusionner sont titrés (ou seul le premier est titré), le titre du
premier sera utilisé.
Si le premier n'est pas titré, le nouveau morceau est titré comme suit.
Le titre du deuxième sera utilisé s'il s'agit de morceaux enregistrés en monaural
ou en stéréo.
Il ne sera pas titré s'il s'agit de morceaux enregistrés en mode d'enregistrement 2
ou 4 fois plus long.
Deux morceaux ne seront pas fusionnés dans les cas suivants.
L'un enregistré numériquement et l'autre analogiquement.
Il est impossible de fusionner deux morceaux enregistrés dans des modes différents (monaural, stéréo, 2 fois plus long, 4 fois plus long).
Des morceaux de cour te durée peuvent ne pas être fusionnés (8 secondes pour
stéréo, 16 secondes pour monaural et 2 fois plus long, 32 secondes pour 4 fois
plus long).
3
4
P our fusionner des morceaux
En mode d'arrêt, sélectionner le deuxième des deux morceaux à
fusionner en pressant la touche ou . Ou reproduire le d euxiè-
me et puis appuyer sur la touche MD .
Appuyer sur la touche NAME/TOC EDIT et, a vant 10 secondes, sélectionner "COMBINE" en appuyant sur la touche REC LEVEL/
CURSOR ou .
Dans les 10 secondes, appuyer sur la touche ENTER.
Pour annuler l'opération, appuyer sur la touche NAME/TOC EDIT.
Réappuyer sur la touche ENTER.
Les deux morceaux sont raccordés. L'appareil s'arrête au début du nouveau morceau.
L'appareil renumérote les morceaux qui suivent le nouveau morceau. Leur numéro augmente d'une unité.
SD-SG11
Montage MD
Montage d'un minidisc enregistré
E
F
F-34
F-25-37.fm01/7/9
Page 86

SD-SG11
Montage d'un minidisc enregistré (suite)
Montage MD
Pour diviser un morceau
1
Reproduire un morceau à diviser et appuyer sur la touche MD
lorsqu'on arrive à un point par lequel on le coupe.
2
Appuyer sur la touche NAME/TOC EDIT e t, av ant 1 0 s eco ndes , sélectionner "DIVIDE" en appuyant sur la touche REC LEVEL/CUR-
SOR ou .
3
Dans les 10 secondes, appuyer sur la touche ENTER.
Pour annuler l'opération, appuyer sur la touche NAME/TOC EDIT.
4
Réappuyer sur la touche ENTER.
Le morceau se divise et l'appareil s'arrête au début de la deuxième partie.
L'appareil renumérote les morceaux qui suivent le morceau divisé. Leur numéro
augmente d'une unité.
Notes:
Montage d'un minidisc enregistré
Si on divise un morceau portant un titre et une date d'enregistrement, l'appareil les
donnera à deux nouveaux morceaux.
S'il n'y a plus de place suffisante pour stocker des caractères en "TOC", le
deuxième ne sera pas titré.
Chaque disque peut contenir 255 morceaux au total. Toutefois, le disque peut ne
pas arriver à en contenir autant et n'accepte plus la division de morceaux.
Pour déplacer un morceau
1
En mode d'arrêt, sélectionner un morceau à déplacer en pressant
sur la touche ou . Ou reproduire le morceau à déplacer et ap-
puyer sur la touche MD .
2
Appuyer sur la touche NAME/TOC EDIT e t, av ant 1 0 s eco ndes , s é-
lectionner "MOVE" en appuyant sur la touche REC LEVEL/CUR-
SOR ou .
3
Dans les 10 secondes, appuyer sur la touche ENTER.
4
Sélectionner une position pour le nouveau morceau en appuyant
sur la touche ou .
F-35
Pour annuler l'opération, appuyer sur la touche NAME/TOC EDIT.
5
Réappuyer sur la touche ENTER.
Le morceau une fois déplacé, l'appareil se calera au début du morceau.
F-25-37.fm01/7/9
Page 87

SD-SG11
Pour déplacer le s morceaux programmés
1
Programmer des morceaux à déplacer (voir page 22).
2
Appuyer sur la touche NAME/TOC EDIT.
3
Dans les 10 secondes, appuyer sur la touche ENTER.
Pour annuler l'opération, appuyer sur la touche NAME/TOC EDIT.
4
Réappuyer sur la touche ENTER.
Les morceaux sont réarrangés.
Les morceaux programmés viennent en tête du disque.
Note:
Si on programme un même morceau deux fois ou plus, la première programmation est valable.
Pour effacer un morceau
1
En mode d'arrêt, sélectionner un caractère à effacer en pressant
sur la touche ou . Ou reproduire ce morceau et puis ap puyer
sur la touche MD pour passer en pause.
2
Appuyer sur la touche ERASE.
Pour annuler l'opération, appuyer sur la touche MD .
3
Presser la touche ERASE pour plus de 2 secondes.
Le morceau s'efface et l'appareil se cale sur le morceau suivant.
Attention:
Le morceau, un e fois effacé, ne sera plus restauré. Il faut bien réfléchir avant
de l'effacer.
Notes:
L'effacement terminé, l'appareil renumérote les morceaux qui suivent le morceau
supprimé. Leur numéro baisse d'une unité.
Le titre d'un morceau effacé est supprimé en même temps.
Il est également possible d'effacer des morceaux en sélectionnant "ERASE" ou
"ALL ERASE" dans le menu à l'aide de la touche NAME/TOC EDIT se trouvant sur
la télécommande.
Montage MD
Montage d'un minidisc enregistré
E
F
F-36
F-25-37.fm01/7/9
Page 88

SD-SG11
Montage d'un minidisc enregistré (suite)
Montage MD
P o ur efface r tous les mor ceaux d'un seul
coup
1
Appuyer sur la touche MD .
2
Appuyer sur la touche ERASE.
Pour annuler l'opération, appuyer sur la touche MD .
3
Presser la touche ERASE pour plus de 3 secondes.
Tous les numéros et tous les titres s'effacent.
Montage d'un minidisc enregistré
Pour effacer les morceaux programmés
d'un seul coup
1
Programmer des morceaux à effacer (voir page 22).
On peut programmer jusqu'à 20 morceaux.
2
Appuyer sur la touche NAME/TOC EDIT de la télécommande.
3
Avant 10 secondes, appuye r sur la touche REC LEVEL/CURSOR
ou de la télécommande pour sélectionner "PRGM ERASE".
4
Avant 10 secondes, appuyer sur la touche ENTER de la télécom-
mande.
Pour annuler l'opération, appuyer sur la touche MD .
5
Appuyer sur la touche ENTER de la télécommande.
F-37
Les morceaux programmés sont ainsi effacés.
F-25-37.fm01/7/9
Page 89

Opérations programmées et mise en arrêt différée
SD-SG11
Lecture programmée:
L'appareil s'allume et reproduit la source souhaitée (CD, MD, TUNER, AUX , OPT) à
l'heure préréglée. Après, il se met en veille automatiquement.
Enregistrement programmé:
À l'heure programmée, l'appareil s'allume et déclenche l'enregistrement à partir de la
source souhaitée (TUNER, AUX, OPT). Après, il passe en veille automatiquement.
Opérations programmées (lecture et enre-
gistrement)
Avant de régler la minuterie:
Mettre le système en attente et appuyer sur la touche DISPLAY pour vérifier
que l'horloge est à l'heure.
1
Appuyer sur la touche ON/STAND-BY pour allumer l'appareil.
2
Appuyer sur la touche TIMER/DELETE.
3
Avant 10 secondes, appuyer sur la touche REC LEVEL/CURSOR
ou pour sélectionner "TIMER SET".
Fonctions avancées
4
Dans les 10 secondes, appuyer sur la touche ENTER.
F-38-48.fm01/7/12
Suite à la page suivante
Opérations programmées et mise en arrêt différée
E
F
F-38
Page 90

SD-SG11
Opérations programmées et mise en arrêt différée (suite)
5
6
7
8
Fonctions avancées
9
Opérations programmées et mise en arrêt différée
Appuyer sur la touche REC LEVEL/CURSOR ou pour sélectionner "TIMER PLAY" ou "TIMER REC".
Pour la lecture programmée: Pour l'enregistrement pro-
grammé:
Appuyer sur la touche ENTER.
Appuyer sur la touche REC LEVEL/CURSOR ou pour spécifier
les heures de départ et appuyer sur la touche ENTER.
Appuyer sur la touche REC LEVEL/CURSOR ou pour spécifier
les minutes et appuyer sur la touche ENTER.
La durée sera portée automatiquement à une heure à moins qu'on ne la modifie.
Appuyer sur la touche REC LEVEL/CURSOR ou pour spécifier
les heures d'arrêt et appuyer sur la touche ENTER.
10
Appuyer sur la touche REC L EVEL/CURSOR ou pour spécifier
les minutes et appuyer sur la touche ENTER.
11
Appuyer sur la touche REC LEVEL/CURSOR ou pour sélec-
tionner une fonction souhaitée.
Pour sélectionner une source pour la lecture programmée: CD, MD, TUNER, AUX
ou OPT.
Pour sélectionner une source pour l'enregistrement programmé: TUNER, AUX ou
OPT.
12
Appuyer sur la touche ENTER.
13
Régler le volume en agissant sur la touche REC LEVEL/CURSOR
ou .
Veiller à ne pas trop augmenter le volume.
14
Appuyer sur la touche ENTER.
Lecture programmée Enregistrement
Le réglage de la minuterie s'affiche dans
l'ordre.
L'appareil entre en veille et puis passe automatiquement en attente pour la lecture ou
l'enregistrement.
programmé
F-39
À l'heure programmée, la lecture ou l'enregistrement se déclenche.
Dans la lecture programmée, le volume augmente petit à petit. Dans l'enregistrement programmé, l'opération se fait à un volume qu'on a réglé.
À l'heure de fin, le système se met en veille automatiquement.
F-38-48.fm01/7/12
Page 91

SD-SG11
Pour réutiliser le réglage de la minuterie
Une fois mis en mémoire, le réglage de la minuterie peut être réutilisé comme
suit.
1
Appuyer sur la touche TIMER/DELETE.
2
Avant 10 secondes, appuyer sur la touche REC LEVEL/CURSOR
ou pour sélectionner "STANDBY".
Si l'appareil n'affiche pas "STANDBY", le réglage de l'horloge est effacé.
Il faut alors remettre l'horloge à l'heure et régler la minuterie.
3
Dans les 10 secondes, appuyer sur la touche ENTER.
Le réglage de la minuterie s'affiche dans l'ordre.
L'appareil entre en veille et puis passe automatiquement en attente pour la lecture
ou l'enregistrement.
Notes:
Le réglage de la minuterie s'annulera si l'appareil est débranché ou s'il se produit
une panne de courant.
Il est possible de programmer la lecture d'un CD ou d'un MD, quel que soit le
réglage de la lecture: répétition, lecture au hasard, lecture des morceaux programmés.
Pour programmer la lecture ou l'enregistrement avec un élément raccordé aux
jacks AUX IN ou DIGITAL IN, sélectionner "AUX" ou "OPT" à l'étape 11. Cette
chaîne stéréo se met alors en attente automatiquement (l'autre élément ne s'éteint
pas).
Pour vérifie r le réglage de la minuterie:
1 En attente pour l'opération programmée (lecture ou enregistrement), appuyer
sur la touche TIMER/DELETE.
2 Avant 10 secondes, appuyer sur la touche REC LEVEL/CURSOR ou pour
sélectionner "TIMER CALL".
3 Appuyer sur la touche ENTER.
L'appareil affiche le réglage de la minuterie dans l'ordre et puis passe à l'afficha-
ge précédent.
Pour modifier le réglage de la minuterie:
Suivre "Opérations programmées (lecture et enregistrement)" depuis le début (voir
pages 38 -39).
Pour annuler l'opér a tion programmée:
Si on allume l'appareil en cours d'attente pour la lecture ou l'enregistrement, le
réglage de la minuterie sera annulé.
Procéder à l'annulation comme suit sans allumer l'appareil.
1 Appuyer sur la touche TIMER/DELETE.
2 Avant 10 secondes, appuyer sur la touche REC LEVEL/CURSOR ou pour
sélectionner "CANCEL".
Fonctions avancées
3 Appuyer sur la touche ENTER.
Opérations programmées et mise en arrêt différée
E
F
F-40
F-38-48.fm01/7/12
Page 92

SD-SG11
Opérations programmées et mise en arrêt différée (suite)
Le tuner, le CD et le minidisc peuvent être éteints automatiquement.
1
2
3
4
5
6
Fonctions avancées
Mise en arrêt différée
Reproduire la source souhaitée.
Appuyer sur la touche TIMER/DELETE.
Avant 10 secondes, appuyer s ur la touc he REC L EVEL/CURSOR
ou pour sélectionner "SLEEP".
Dans les 10 secondes, appuyer sur la touche ENTER.
Appuyer sur la touche REC LEVEL/CURSOR ou pour spécifier
la durée pour la mise en arrêt différée.
(Maximum: 2 heures - minimum: 1 minute)
Appuyer sur la touche ENTER.
Pour vérifier le temps restant pour la mise en arrêt différée:
1 Appuyer sur la touche TIMER/DELETE pendant la lecture déclenchée pour la
mise en arrêt
2 Avant 10 secondes, appuyer sur la touche REC LEVEL/CURSOR ou pour
sélectionner "SLEEP".
Temps restant pour la mise en arrêt
L'affichage repasse à son état normal 10 secondes après.
On peut modifier la durée pour la mise en arrêt différée.
Appuyer sur la touche ENTER pendant que l'appareil affiche le temps restant pour
la mise en arrêt (suivre les étapes 5 - 6 ci-contre).
Annulation de la mise en arrêt différée:
La mise en arrêt différée est annulée lorsque l'appareil passe en attente.
Pour annuler la mise en arrêt sans passer en attente, procéder comme suit.
1 Appuyer sur la touche TIMER/DELETE pendant la lecture déclenchée pour la
mise en arrêt
2 Avant 10 secondes, appuyer sur la touche REC LEVEL/CURSOR ou pour
sélectionner "SLEEP OFF".
F-41
Opérations programmées et mise en arrêt différée
7
La durée programmée écoulée, l e système entre au tomatiqueme nt
en veille.
Le niveau sonore baisse dans la dernière minute de la lecture programmée.
3 Dans les 10 secondes, appuyer sur la touche ENTER.
F-38-48.fm01/7/12
Page 93

Enrichissement du système
SD-SG11
Pour programmer à la fois la mise en arrêt
différée et une lecture
On peut s'endormir en écoutant la radio et se réveiller avec un CD préféré.
1
Régler la durée pour la mise en arrêt d ifférée (étap es 1 - 6, pa ge 41).
2
Programmer la lecture (étapes 1 - 14, pages 38 - 39).
Pour programmer à la fois la mise en arrêt
différée et un enregistrement
On peut s'endormir en écoutant un CD et enregistrer une émission préférée pendant
qu'on dort.
1
Régler la durée pour la mise en arrêt d ifférée (étap es 1 - 6, pa ge 41).
2
Programmer l'enregistrement (étapes 1 - 14, pages 38 - 39).
1. Réglage pour la mise en arrêt
2. Préparation de l'opération programmée
(lecture/enregistrement)
1 minute à 2 heures
La mise en arrêt
différée s'arrête
automatiquement.
Durée programmée
Heure de début de l'opération
programmée (lecture/enregistrement)
Fin d'opération
Avant de raccorder des éléments extérieurs, mettre l'appareil en attente et éteindre
les éléments.
Magnétoscope,
lecteur DVD, etc.
Câble de raccordement pour
l'enregistrement numérique
Vers les jacks de
sortie de ligne
Cordon RCA vendu
dans le commerce
Fonctions avancées
Platine MD, tuner numérique
ou platine DAT
Vers le jack de
sortie de ligne optique
Vers les jacks
d'entrée analogique
F-38-48.fm01/7/12
F-42
Opérations programmées et mise en arrêt différée / Enrichissement du système
E
F
Page 94

SD-SG11
Enrichissement du système (suite)
1
En entrée "AUX DIGITAL", l'appareil peut afficher "NO SIGNAL" selon un élément raccordé.
2
3
1
2
3
4
Enrichissement du système
Fonctions avancées
5
Écoute du son en provenance d'un élément raccordé
Appuyer sur la touche AUX pour sélectionner "AUX ANALOG" ou
"AUX DIGITAL".
Entrée analogique Entrée numérique
Déclencher la lecture sur l'élément raccordé.
Régler le volume en pressant sur les touches VOLUME.
Enregistrement sur un MD (enregistrement
normal)
Appuyer sur la touche AUX pour sélectionner "AUX ANALOG" ou
"AUX DIGITAL".
Mettre un MD enregistrable dans le compa rtiment MD, côté étiquette
vers soi.
Appuyer sur la touche REC .
Déclencher la lecture sur l'élément raccordé.
Appuyer sur la touche REC LEVEL/CURSOR ou pour ajuster l'en-
registrement.
Enregistrement sur un MD (enregistrement
synchronisé avec le son)
1
Appuyer sur la touche AUX.
2
Mettre un MD enregis trable dans le com partiment MD, côté étiquette vers soi.
3
Appuyer sur la touche S-SYNC REC de la télécommande.
4
Déclencher la lecture sur l'élément raccordé.
L'enregistrement se déclenche automatiquement.
Le niveau d'enregistrement est celui réglé pour le dernier enregistrement. (Ce niveau peut aussi être ajusté pendant l'enregistrement.)
Casque
Avant de brancher ou de débrancher le casque, réduire le niveau sonore.
Utiliser un casque muni d'une fiche de 3,5 mm de diamètre et ayant une impédance de 16 à 50 ohms. L'impédance préconisée est de 32 ohms.
Lorsque le casque est branché, les enceintes sont automatiquement déconnectées. Régler le volume en pressant les touches VOLUME.
F-43
0dB -4dB ··· +10dB
6
Compteur de niveau Niveau d'enregistrement
Le niveau maximal ne devra pas dépasser "0dB".
Le niveau d'enregistrement peut être ajusté par paliers de 2dB entre - 4dB et +
10dB.
Si le niveau d'enregistrement est trop bas, le niveau de reproduction baisse aussi.
S'il est trop élevé, le son peut être distordu.
Appuyer sur la touche MD .
F-38-48.fm01/7/12
Page 95

Qu'est-ce qu'un minidisc ?
Enregisterable Enregistrement
interdit
Limites du minidisc
SD-SG11
Un disque est enfermé dans une cartouche qui permet une manipulation facile et qui le
protège contre la poussière et l'encrassement. Toutefois, si un corps étranger y pénètre ou
si la cartouche est sale ou voilée, l'appareil peut mal fonctionner. Prendre les précautions
suivantes.
Pour protéger le MD contre l'effacement
accidentel
Déplacer le cavalier de protection, situé sur le côté, dans le sens indiqué par la flèche.
Le minidisc est alors protégé contre l'effacement accidentel.
Pour effectuer un nouvel enregistrement, déplacer le cavalier de protection vers la position
d'origine.
Collage d'une étiquette
Coller une étiquette sur le MD en prenant les précautions suivantes. Si l'étiquette est mal
collée, le minidisc peut être coincé dans l'appareil et refuser d'en sortir.
Remplacer l'étiquette si celle-ci est d écollée ou cornée.
Ne pas coller une étiquette sur une autre.
Afficher l'étiquette sur une place prévue sur le disque.
Types de disques
Il existe deux types de disques: non-enregistrable et enregistrable.
Minidisc non-enregistrable:
Ce type de minidisc est un disque musical vendu dans le
commerce. Il s'agit d'un disque optique comme un CD. La
lecture s'effectue grâce à un capteur optique.
Un volet se trouve au dos seu-
Minidisc enregistrable:
Il s'agit d'un disque "vierge", magnéto-optiqu e, qui permet
l'enregistrement. L'enregistrement se fait au moyen d'un
système laser et d'un champ magnétique. Réinscriptible à
volonté.
lement.
L'appareil peut afficher "TOC
FULL" même si le t emp s t otal
d'enregistrement n'atteint pas
le temps spécifié.
L'appareil peut afficher "DISC
FULL" même si le t emp s t otal
d'enregistrement n'atteint pas
le temps spécifié.
Le temps restant peut demeurer inchangé même si on efface des morceaux de courte
durée.
Il peut être impossible de raccorder deux morceaux lors du
montage.
Le total du temps d'enregistrement effectué et du temps
restant sur le disque peut ne
pas correspondre au temps
d'enregistrement maximal.
Il se produit une perte de son
lors des repérages avant et
arrière.
Dans le système MD, le délimiteur de la zone d'enregistrement est programmé dans le TOC. Si on répète à plusieurs reprises l'effacement,
l'enregistrement et le montage, l'information dans le
TOC devient pleine. L'appareil peut alors ne plus accepter l'enregistrement malgré le nombre de morceaux inférieur à la limite (255 morceaux). (Si on
efface tout, le MD peut être réutilisé.)
S'il y a des rayures sur le minidisc, l'appareil saute
ces parties automatiquement pour ne pas effectuer
l'enregistrement dessus. La durée d'enregistrement
sera donc réduite.
Le temps d'enregistrement restant sur le disque ne
tient pas compte de morceaux qui durent moins de
12 secondes.
La fonction de fusion peut ne pas fonctionner avec
un MD sur lequel on a souvent effectué l'enregistrement ou le montage. Impossible de fusionner un
morceau numériquement enregistré (CD) et un morceau analogiquement enregistré (tuner ou autres).
L'enregistrement se fait en employant des "clusters"
(unité minimale d'enregistrement, durée de 2 secondes). Même si l'enregistrement n'atteint pas cette
durée, un cluster est utilisé. Il se peut donc que le
temps réellement restant sur le disque soit plus court
que celui indiqué sur l'afficheur.
En plus, si le disque porte des rayures, l'appareil
peut sauter ces parties (ces clusters) pour ne pas
enregistrer dessus. La durée d'enregistrement sera
donc réduite.
Le son peut sauter pendant l'inversion ou l'avance
rapide s'il s'agit d'un minidisc sur lequel on a répété
l'enregistrement ou le montage.
Références
Qu'est-ce qu'un minidisc ? / Limites du minidisc
Deux volets, un sur chaque
côté.
E
F
F-44
F-38-48.fm01/7/12
Page 96

SD-SG11
Messages affichés
Références
Si l'appareil affiche un message d'erreur, procéde r comme suit:
BLANK MD
Can't COPY
Can't EDIT
Can't READ*
(*: numéro ou
symbole)
Can't REC
Can't T REC
Can't WRITE
Messages affichés
CD NO DISC
DISC FULL
EDIT OVER
Er - MD **
(**: numéro ou
symbole)
Messages
d'erreur
Signification Solution
Rien n'est enregistré (ni musique ni titre).
On a tenté d'enregistrer un
CD protégé contre la copie.
Impossible de monter un morceau.
Le disque est abîmé.
Les informations TOC ne so nt
pas possibles à lire.
Minidisc non spécifié.
L'enregistrement ne peut pas
être effectué correctement à
cause des vibrations ou des
chocs subis.
L'enregistrement programmé
est impossible ou il n'y a plus
d'espace libre sur le MD.
Le disque n'a plus de place
pour l'enregistrement.
L'information TOC n'est pas
correctement établie à cause
d'un choc mécanique ou
d'une rayure sur le disque.
Aucun CD n'est en place.
Les données sur le CD ne
peuvent pas être lues.
Le disque n'a plus de place
pour l'enregistrement.
On a sélectionné 21 mor-
ceaux ou plus pour le montage.
Le minidisc fonctionne mal.
Remplacer le disque.
Remplacer le CD.
Modifier la position d' arrêt sur le
morceau et refaire le montage.
Remplacer le disque.
Effacer le disque et renouveler
l'enregistrement.
Ré-enregistrer ou remplacer le
minidisc.
Remplacer le disque.
Mettre l'appareil en veille pour
permettre l'écriture sur le TOC.
(Éviter le choc ou les vibrations
pendant l'écriture.)
Mettre un CD en place.
Remettre le CD en place.
Remplacer le disque.
Réduire le nombre de morceaux.
Appuyer sur la touche MD .
Mettre l'appareil en veille et le
rallumer.
Messages
d'erreur
MD NO DISC
NAME FULL
NOT AUDIO
PLAYBACK MD
PROTECTED
TEMP OVER
TOC FORM **
(**: numéro ou
symbole)
TOC FULL
TOC FULL 1
? MD DISC
Signification Solution
Aucun MD n'est en place.
Les données sur le MD ne
peuvent pas être lues.
On utilise plus de 40 caractè-
res pour le titre de disque ou
de morceau.
Les données sur le disque ne
sont pas audio.
On a tenté d'enregistrer sur un
disque non-enregistrable.
Le disque est protégé contre
l'écriture.
La température est trop éle-
vée.
L'information TOC écrite sur
le MD ne correspond pas à la
norme de MD ou elle n'est pas
lisible.
Il n'y a plus de place pour en-
registrer des numéros de morceaux.
Il n'y a plus de place pour en-
registrer des caractères.
Il s'est glissé une erreur dans
les données.
Minidisc non spécifié.
Mettre un minidisc en place.
Remettre le disque en place.
Raccourcir le titre.
Remplacer le disque.
Remplacer le disque.
Ramener le cavalier du disque
sur la position d'origine.
Mettre l'appareil en attente et
patienter un instant.
Remplacer le disque.
Effacer le disque et renouveler
l'enregistrement.
Remplacer le disque.
Remplacer le disque.
Effacer des caractères inutiles.
Appuyer sur la touche MD .
Remplacer le disque.
F-45
F-38-48.fm01/7/12
Page 97

Dépannage
SD-SG11
L'utilisateur peut résoudre pas mal de problèmes sans faire appel à un dépanneur.
Général
Problème Cause
"TIME ADJUST" apparaît lors de la
vérification de l'heure.
L'appareil ne répond pas à la pres-
sion d'une touche.
Aucun son n' e s t entendu.
L'image sur le téléviseur est distor-
due.
Ne permet pas de régler le volume.Le câble de raccordement de s on e st-il bran-
Lecteur CD
Problème Cause
L'appareil affiche "CD NO DISC" ou
"Can't READ" malgré la présence
d'un disque.
La lecture ne démarre pas.
La lecture s'arrête au milieu ou ne se
fait pas correctement .
La lecture est intermitte nte ou s'a rrê-
te.
Y a-t-il eu une panne de courant? Remet tre
l'horloge à l'heure (voir page 14).
Mettre l'appareil en veille et le rallumer.
Le volume est-il réglé sur "0"?
Le casque est-il branché?
Les fils des enceintes sont-ils débranchés?
Cela arrive si un poste de radio ou un télévi-
seur utilisant une antenne interne se trouve à
proximité de l'appareil.
Utiliser une antenne extérieure.
ché sur les jacks LINE OUT sur l'unité MD/
CD/tuner? Mettre l'appareil en att ente et raccorder le câble aux jacks SYSTEM OUT
(voir page 11).
Le disque est encrassé.
L'appareil subit-il des vibration s ?
Une condensation est-elle formée dans l'ap-
pareil?
Le disque est mis à l'envers.
Le disque ne satisfait pas à la norme.
Le disque est voilé ou rayé.
L'appareil subit-il des vibration s ?
Le disque est encrassé.
Une condensation est-elle formée dans l'ap-
pareil?
Minidisc
Problème Cause
Enregistrement impossible.
L'appareil affiche "MD NO DIS C" ou
"Can't READ" malgré la présence
d'un disque.
Il se produit des pertes de son.
Tuner
Problème Cause
L'émission radiodiffusée est parasi-
tée consécutivement.
Le canal de présélection ne peut pas
être rappelé.
Télécommande
Problème Cause
La télécommande ne fonctionne
pas.
Le minidisc n'est-il pas protégé contre un ef-
facement accidentel?
Ne s'agit-il pas d'un minidisc non-enre gistra-
ble?
L'appareil affiche-t- il le message "DISC
FULL" ou "TOC FU L L"?
Le disque est encrassé.
L'appareil subit-il des vibratio ns ?
Une condensation est-elle for mée dans l'ap-
pareil?
Le système se trou ve à pr oximité d'un télévi-
seur ou d'un PC.
L'antenne FM/AM est mal dirigée. Éloigner le
cordon d'alimentation.
Y a-t-il eu une panne de courant?
Programmer de nouveau le canal pour la
présélection.
Le système est-il bien branché?
Les polarités de la pile ne sont pas cor rectes.
Les piles sont épuisées.
Télécommande trop éloignée ou mal dirigée.
Le capteur de télécommande reçoit-il une
forte lumière?
Dépannage
Références
E
F
F-46
F-38-48.fm01/7/12
Page 98

SD-SG11
Dépannage (suite)
Entretien
Références
En cas de problème (réiniti alisation)
Si l'appareil a subi une force extérieure (chocs, électricité statique, surtension due à
un foudre, etc.) ou une mauvaise manipulation, il peut mal fonctionner.
Procéder alors comme suit:
Débrancher et rebrancher le cordon d'alimentation. On recommencera alors
l'opération.
Attention:
Cette opération efface toutes les données en mémoire: réglage pour l'horloge et la
minuterie et programmes pour CD ou MD.
Condensation
Le changement brusque de la température
et la conservation ou l'utilisation dans un
lieu très humide peuvent occasionner une
formation de condensation à l'intérieur de
l'appareil (cellule porte-laser pour CD et MD
etc.) ou sur l'émetteur de la télécommande.
La condensation peut entraîner un mauvais
fonctionnement de l'appareil. Si le cas se
présente, laisser l'appareil sous tension
sans aucun disque dedans pour 1 heure environ afin d'assurer une lecture normale. Essuyer l'émetteur de la télécommande avec
un chiffon doux.
Avant de transporter l'appareil
Dépannage / Entretien
Retirer tous les CD et tous les MD qui risquent d'endomm ager l'appareil en cours de
transport. L'appareil vérifie la présence de disques et affiche "NO DISC" s'il n'y a plus
de disque. On mettra ensuite l'appareil en attente et le transportera.
Nettoyage du coffret
Essuyer régulièrement le coffret à l'aide d'un chiffon doux et d'une solution d'eau
savonneuse, puis essuyer à l'aide d'un chiffon sec.
Attention:
Éviter d'utiliser des chiffons traités chimiquement ou autres produits chimiques.
F-47
F-38-48.fm01/7/12
Page 99

Fiche technique
SD-SG11
SHARP se réserve le droit d'apporter des modificat ion s à la prése ntati on et aux car act éristiques des appareils à fin d'amélioration. Les valeurs indiquées dans ce document sont les
valeurs nominale s des appareils de série mais de légères diff érences peuvent être constatées d'un appareil à l'autre.
Général
Alimentation 120 V CA, 60 Hz
Consommation 54 W
Dimensions Unité MD/CD/tuner
Poids Unité MD/CD/tuner
Borne d'entrée/sortie Unité MD/CD/tuner
Amplificateur
Système d'amplification Commutation à 1 bit de 64fs
Puissance de sortie Sortie de pussance (FTC): RMS 22 watts minimum par ca-
Mise en forme de bruit A/N Modulation (delta sigma) de 7ème ordre
Largeur: 318 mm
Hauteur: 210 mm
Profondeur: 93 mm
Amplificateur
Largeur: 160 mm
Hauteur: 210 mm
Profondeur: 153 mm
3,7 kg
Amplificateur
3,7 kg
Entrée auxiliaire: 500 mV/47 kilohms
Entrée numérique (optique)
Sortie du système (RCA)
Sortie de ligne: 500 mV/47 kilohms
Casque: 16 - 50 ohms (recommandé: 32 ohms)
Commande du système (amplificateur SD-SG11 seule-
ment)
Amplificateur
Entrée de système (RCA)
Enceintes: 4 ohms
Commande du système: (unité MD/CD/tuner SD-SG11
seulement)
(note: fs = 44,1 kHz)
nal sur 4 ohms, de 20 Hz à 20
kHz, 2 % de distorsion harmo-
nique totale
Sortie de puissance nominale: 25 W + 25 W sur 4 ohms, 1 kHz
Réponse en fréquence: 20 Hz - 40 kHz (± 3dB)
Distorsion harmonique totale: 0,02 % à 1 kHz, 1 W
Lecteur CD
Type Lecteur de 1 disque compact "slot-in"
Procédé de lecture Sans contact, par laser à se mi-conducteur à 3 faisceaux
Convertisseur N/A 1 bit
Réponse en fréquence 20 - 20.000 Hz
Gamme dynamique 90 dB (1 kHz)
Minidisc
Type Enregistreur MD
Procédé de lecture Sans contact, par laser à se mi-conducteur à 3 faisceaux
Vitesse de rotation 400 - 900 tr/mn CLV, environ
Système de correction A C IRC (Advanced Cross Interleave Reed-Solomon Code)
Quantification Linéaire à 20 bits (convertisseur A/N)
Codage ATRAC (Adaptive TRansform Acoustic Coding), ATRAC3
Fréquence d'échantillon-
nage
Enregistrement Écrasement par réécriture (ov erwrite) à modulat ion magné-
Réponse en fréquence 20 - 20.000 Hz
Convertisseur N/A 1 bit
Pleurage et sc intillemen t Non mesurable (au-dessous de 0,001%, crête, pondéré)
Rapport signal/bruit 95 dB (1 kHz)
Gamme dynamique 90 dB (1 kHz)
Canal audio Stéréo: 2 canaux (SP, LP2, LP4)
Tuner
Gamme de fréquences FM: 87,5 - 108 MHz
44,1 kHz
tique
Monaural: 1 canal (MONO)
AM: 530 - 1.720 kHz
Références
Fiche technique
E
F
F-48
F-38-48.fm01/7/12
Page 100

VALID IN U.S.A. ONLY
CONSUMER LIMITED WARRANTY
SHARP ELECTRONICS CORPORATION warrants to the first consumer purchaser that this Sharp brand product (the “Product”), when shipped in its original container, will be free from defective workmanship and materials, and agrees that it will, at its option, either repair the defect or replace the defective Product or part thereof
with a new or remanufactured equivalent at no charge to the purchaser for parts or labor for the period(s) set forth below.
This warranty does not apply to any appearance items of the Product nor to the additional excluded item(s) set forth below nor to any Product the exterior of which has
been damaged or defaced, which has been subjected to improper voltage or other misuse, abnormal service or handling, or which has been altered or modified in
design or construction.
In order to enforce the rights under this limited warranty, the purchaser should follow the steps set forth below and provide proof of purchase to the servicer.
The limited warranty described herein is in addition to whatever implied warranties may be granted to purchasers by law. ALL IMPLIED WARRANTIES INCLUDING
THE WARRANTIES OF MERCHANT ABILITY AND FITNESS FOR USE ARE LIMITED T O THE PERIOD(S) FROM THE DA TE OF PURCHASE SET FORTH BELOW .
Some states do not allow limitations on how long an implied warranty lasts, so the above limitation may not apply to you.
Neither the sales personnel of the seller nor any other person is authorized to make any warranties other than those described herein, or to extend the duration of any
warranties beyond the time period described herein on behalf of Sharp.
The warranties described herein shall be the sole and exclusive warranties granted by Sharp and shall be the sole and exclusive remedy available to the purchaser.
Correction of defects, in the manner and for the period of time described herein, shall constitute complete fulfillment of all liabilities and responsibilities of Sharp to the
purchaser with respect to the Product, and shall constitute full satisfaction of all claims, whether based on contract, negligence, strict liability or otherwise. In no event
shall Sharp be liable, or in any way responsible, for any damages or defects in the Product which were caused by repairs or attempted repairs performed by anyone
other than an authorized servicer. Nor shall Sharp be liable or in any way responsible for any incidental or consequential economic or property damage. Some states
do not allow the exclusion of incidental or consequential damages, so the above exclusion may not apply to you.
THIS WARRANTY GIVES YOU SPECIFIC LEGAL RIGHTS. YOU MAY ALSO HAVE OTHER RIGHTS WHICH VARY FROM STATE TO STATE.
Model Specific Section
Your Product Model Number & Description:
Warranty Period for this Product: One (1) year parts and labor from the date of purchase.
Additional Item(s) Excluded from Warranty Coverage (if any): Non-functional accessories, supplies, and consumable items.
Where to Obtain Service: At a Sharp Authorized Servicer located in the United States.
What to do to Obtain Service: Ship prepaid or carry in your Product to a Sharp Authorized Servicer.
SD-SG11 1-Bit Digital Audio Component
(Be sure to have this information available when you need service for your Product.)
T o find a location of the nearest Sharp Authorized Servicer , call Sharp toll free at 1-800-BE-SHARP.
Be sure to have Proof of Purchase available. If you ship the Product, be sure it is insured and
packaged securely.
TINSK0122AWZZ
TO OBTAIN SUPPLY, ACCESSORY OR PRODUCT INFORMATION, CALL 1-800-BE-SHARP.
SHARP ELECTRONICS CORPORATION
Sharp Plaza, Mahwah, New Jersey 07430-2135
SHARP CORPORATION
9906
0005
PRINTED IN MALAYSIA
IMPRIMÉ EN MALAISIE
A0107.YT
 Loading...