

Page 1

1-BIT DIGITAL HOME THEATER WITH DVD
ENSEMBLE HOME THEATER 1-BIT AVEC DVD
MODEL MODELO
MODÈLE
SD-AT100W
SISTEMA 1-BIT PARA HOME THEATER CON DVD
ENGLISH
Please refer to
pages E-1 to E-70.
FRANÇAIS
Se reporter aux
pages F-1 à F-70.
ESPAÑOL
Consulte las
páginas S-1 a S-70.
SDAT100W(X)_FRONT 02.2.27, 6:54 PM1
OPERATION MANUAL
MODE D’EMPLOI
MANUAL DE MANEJO
Page 2

SD-AT100W
ENGLISH
ENGLISH
Introduction
Thank you for purchasing this SHARP product. To obtain the best performance from
this product, please read this manual carefully. It will guide you in operating your
SHARP product.
Special notes
Warning:
When the ON/STAND-BY button is set at STAND-BY position, mains voltage is
!
still present inside the unit. When the ON/STAND-BY button is set at STAND-BY
position, the unit may be brought into operation by the timer mode or remote control.
This unit contains no user serviceable parts. Never remove covers unless qualified
!
to do so. This unit contains dangerous volt ages, always remove mains plug from
the socket before any service operation and when not in use for a long period.
To prevent fire or shock hazard, do not expose this appliance to dripping or
!
splashing. No objects filled with liquids, such as vases, should be placed on t he
apparatus.
CAUTION
This product is classified as a CLASS 1 LASER product.
!
Use of controls, adjustments or performance of procedures other than those spec-
!
ified herein may result in hazardous radiation exposure.
As the laser beam used in this compact disc player is harmful to the eyes, do not
attempt to disassemble the cabinet. Refer servicing to qualified personnel only.
- Introduction / Special notes -
Important Instruction
SD-AT100W 1-Bit Digital Home Cinema with DVD consisting of SD-AT100W (main
unit), CP-AT100WF (front speakers), CP-AT100WC (centre speaker), CP-AT100WR
(surround speakers) and CP-AT100WSW (subwoofer).
Laser Diode Properties
Material: GaAIAs
Wavelength: 780 nm
Emission Duration: continuous
Laser Output: max. 0.6 mW
E-1
Note:
! Audio-visual material may consist of copyrighted works which must not be
recorded without the authority of the owner of the copyright. Please refer to the relevant laws in your country.
! Manufactured under license from Dolby Laboratories. "Dolby", "Pro Logic" and the
double-D symbol are trademarks of Dolby Laboratories. Confidential unpublished
works. 1992- 1997 Dolby Laboratories. All rights reserved.
Manufactured under license from Digital Theater Systems, Inc. US Pat.
!
No.5,451,942 and other world-wide patents issued and pendi ng. " DTS" and "DTS
Digital Surround" are trademarks of Digital Theater Syst ems, Inc. 1996 Digital
Theater Systems, Inc. All rights reserved.
02/2/27 SD-AT100W(X)E1.fm
Page 3

Accessories
Please confirm that the following accessories are included.
SD-AT100W
ENGLISH
Types of playable discs
Remote control 1 "AAA" size battery (UM-4, R03, HP-16
AM loop aerial 1 FM aerial 1
AC power lead 1 Video cable 1
White
approx. 5m approx. 5m approx. 5m
Blue Grey Purple
approx. 15m approx. 15m approx. 5m
Speaker connection lead 6
Red Green
Note:
Only the above accessories are included.
or similar) 2
Types of unplayable discs
DVDs without the region number on
!
the back of the unit or "ALL".
DVDs with SECAM system
!
DVD-ROM
!
DVD-RAM
!
DVD-Audio
!
(As for the details, see pages 5, 6.)
CDG
!
Photo CD
!
CD-ROM
!
SACD
!
Discs recorded in special formats,
!
etc.
Icons used in this operation manual
Some functions may not be available depending on discs. The following icons indicate the discs that can be used in the section.
...
Indicates DVDs.
...
Indicates video CDs.
...
Indicates audio CDs.
Some operations may not be performed depending on discs even if they are de-
!
scribed in this manual.
During operation, " " may be displayed on the screen. This means that the oper-
!
ations described in this manual are prohibited by the disc.
- Accessories -
General Information
4
E-2
SD-AT100W(X)E1.fm02/2/27
Page 4

SD-AT100W
ENGLISH
General Information
Contents
"
General Information
Accessories . . . . . . . . . . . . . . . . . . . . . . . . . . . . . . . . . . . . . . . . . . . . . . . . . . . . . . .3
Precautions . . . . . . . . . . . . . . . . . . . . . . . . . . . . . . . . . . . . . . . . . . . . . . . . . . . . . . . 4
Description of discs . . . . . . . . . . . . . . . . . . . . . . . . . . . . . . . . . . . . . . . . . . . . . . 5, 6
Controls and indicators . . . . . . . . . . . . . . . . . . . . . . . . . . . . . . . . . . . . . . . . . 7 - 12
"
Preparation for Use
Speaker connection . . . . . . . . . . . . . . . . . . . . . . . . . . . . . . . . . . . . . . . . . . . . 13, 14
Aerial connection . . . . . . . . . . . . . . . . . . . . . . . . . . . . . . . . . . . . . . . . . . . . . . . . .14
TV connection . . . . . . . . . . . . . . . . . . . . . . . . . . . . . . . . . . . . . . . . . . . . . . . . 15 - 17
Turning the power on . . . . . . . . . . . . . . . . . . . . . . . . . . . . . . . . . . . . . . . . . . . . . . 17
General control . . . . . . . . . . . . . . . . . . . . . . . . . . . . . . . . . . . . . . . . . . . . . . . . . . . 18
System installation . . . . . . . . . . . . . . . . . . . . . . . . . . . . . . . . . . . . . . . . . . . . . . . . 19
Remote control . . . . . . . . . . . . . . . . . . . . . . . . . . . . . . . . . . . . . . . . . . . . . . . . . . .20
Changing the initial setting of DVD . . . . . . . . . . . . . . . . . . . . . . . . . . . . . . . 21 - 25
Setting the clock . . . . . . . . . . . . . . . . . . . . . . . . . . . . . . . . . . . . . . . . . . . . . . . . . .26
"
Basic Operation
Listening to the r a dio . . . . . . . . . . . . . . . . . . . . . . . . . . . . . . . . . . . . . . . . . . . . . . 27
Listening to the me mo rised station . . . . . . . . . . . . . . . . . . . . . . . . . . . . . . . . . . 28
Playing a disc . . . . . . . . . . . . . . . . . . . . . . . . . . . . . . . . . . . . . . . . . . . . . . . . . 29, 30
"
- Contents -
Advanced Disc Features
Basic operation
To locate the beginning of a chapter (track) (skip) . . . . . . . . . . . . . . . . . . . . . . 31
Fast forward/Fast reverse (search) . . . . . . . . . . . . . . . . . . . . . . . . . . . . . . . . . . . 31
Slow-motion play . . . . . . . . . . . . . . . . . . . . . . . . . . . . . . . . . . . . . . . . . . . . . . . . .32
Still picture/Frame advance . . . . . . . . . . . . . . . . . . . . . . . . . . . . . . . . . . . . . . . . . 32
To start playback from the desired point (direct play) . . . . . . . . . . . . . . . . 33, 34
To resume playback after stopping (sequential playback) . . . . . . . . . . . . . . . . 34
Useful features
To play in the desired order (programmed playback) . . . . . . . . . . . . . . . . .35, 36
To play in random or d e r (random play) . . . . . . . . . . . . . . . . . . . . . . . . . . . . . . . 37
To play repeat e dly (repeat play) . . . . . . . . . . . . . . . . . . . . . . . . . . . . . . . . . . . . . 3 7
To play the contents between the specified points repeatedly (A-B repeat) . 38
To select a title from the top menu of the disc . . . . . . . . . . . . . . . . . . . . . . . . . . 38
Page
Various settings
To change the subtitle language . . . . . . . . . . . . . . . . . . . . . . . . . . . . . . . . . . . . . 39
To hide the subtitle . . . . . . . . . . . . . . . . . . . . . . . . . . . . . . . . . . . . . . . . . . . . . . . . 39
To change the audio language . . . . . . . . . . . . . . . . . . . . . . . . . . . . . . . . . . . . . . 40
To change the angle . . . . . . . . . . . . . . . . . . . . . . . . . . . . . . . . . . . . . . . . . . . . . . . 40
To brighten an image . . . . . . . . . . . . . . . . . . . . . . . . . . . . . . . . . . . . . . . . . . . . . . 41
To improve the image quality . . . . . . . . . . . . . . . . . . . . . . . . . . . . . . . . . . . . . . . 41
To zoom in on an ima g e ( zoom) . . . . . . . . . . . . . . . . . . . . . . . . . . . . . . . . . . . . . 42
To change the dis play on TV screen . . . . . . . . . . . . . . . . . . . . . . . . . . . . . . . . . . 43
To change the dis play on the unit . . . . . . . . . . . . . . . . . . . . . . . . . . . . . . . . . . . . 43
DVD mode operati on indicators . . . . . . . . . . . . . . . . . . . . . . . . . . . . . . . . . . . . . 44
To change the se t t ing on the playback contro l s c r e en . . . . . . . . . . . . . . . . . . . 45
To set on the disc menu . . . . . . . . . . . . . . . . . . . . . . . . . . . . . . . . . . . . . . . . . . . . 46
"
Advanced Features
Enjoy the surround sound (sound mode) . . . . . . . . . . . . . . . . . . . . . . . . . 47 - 49
Speaker settings . . . . . . . . . . . . . . . . . . . . . . . . . . . . . . . . . . . . . . . . . . . . . . 50 - 52
Timer and sleep operation . . . . . . . . . . . . . . . . . . . . . . . . . . . . . . . . . . . . . . 53 - 55
Connecting other equipment . . . . . . . . . . . . . . . . . . . . . . . . . . . . . . . . . . . . 56 - 59
Operating other equipment . . . . . . . . . . . . . . . . . . . . . . . . . . . . . . . . . . . . . . . . . 60
Changing the registration in the remote control . . . . . . . . . . . . . . . . . . . . . 61, 62
"
References
Troubleshooting chart . . . . . . . . . . . . . . . . . . . . . . . . . . . . . . . . . . . . . . . . . 63 - 65
Maintenanc e . . . . . . . . . . . . . . . . . . . . . . . . . . . . . . . . . . . . . . . . . . . . . . . . . . . . . 65
Error indicator s a nd w ar nings . . . . . . . . . . . . . . . . . . . . . . . . . . . . . . . . . . . . . . . 66
Specifications . . . . . . . . . . . . . . . . . . . . . . . . . . . . . . . . . . . . . . . . . . . . . . . . . 67, 68
Optional accessories . . . . . . . . . . . . . . . . . . . . . . . . . . . . . . . . . . . . . . . . . . . . . . 68
Language cod e lis t for disc language . . . . . . . . . . . . . . . . . . . . . . . . . . . . . . . . . 69
Glossary . . . . . . . . . . . . . . . . . . . . . . . . . . . . . . . . . . . . . . . . . . . . . . . . . . . . . . . . . 70
Copyright Information:
Unauthorised copying, broadcast, public display, transmission, public perfor-
!
mance and rental (regardless of whether or not such activities are for profit) of disc
contents are prohibited by law.
This device is equipped with copy protection technology that causes substantial
!
degradation of images when the contents of a disc are copied to video tape.
This device is protected by U. S. patent s and other intellectual property rights, t he
!
copyright for which belongs to Macrovisi on Corporation. The us e of Macr ovision's
copy protection technology in the device is authorised by Macrovision and is
intended for home use only, unless otherwise authorised in writing by Macrovision.
Reverse engineering or disassembly is prohibited.
Page
E-3
SD-AT100W(X)E1.fm02/2/27
Page 5

Precautions
"
General
Please ensure that the equipment is posi tioned in a well ventilated area and that
!
there is at least 10 cm (4") of free space along the sides and back. There must
also be a minimum of 15 cm (6") of free space on the top of the unit.
15 cm (6")
10 cm (4") 10 cm (4")
10 cm (4")
Use the unit on a firm, level surface free from vibration.
!
Keep the unit away from direct sunlight, st rong magnetic fields, excessive dust,
!
humidity and electronic/electrical equipment (home computers, facsimiles, etc.)
which generates electrical noise.
Do not place anything on top of the unit.
!
Do not expose the unit to moisture, to temperatures higher than 60°C (140°F) or to
!
extremely low temperatures.
If your system does not work properly, disconnect the AC power lead from the wall
!
socket. Plug the AC power lead back in, and then turn on your system.
In case of an electrical storm, unplug the unit for safety.
!
Hold the AC power plug by the head when removing it from the wall socket, as
!
pulling the lead can damage internal wires.
!
Do not remove the outer cover, as this may result in electric shock. Refer
internal service to your local SHARP service facility.
The ventilation should not be impeded by covering the ventilation openings with
!
items, such as newspapers, tablecloths, curtains, etc.
No naked flame sources, such as lighted candles, should be placed on the appa-
!
ratus.
Attention should be drawn to the environmental aspects of battery disposal.
!
This unit should only be used within the range of 5°C - 35°C (41°F - 95°F).
!
Warning:
The voltage used must be the same as that specified on this uni t. Using this product
with a higher voltage other than that which is spec ified is dangerous and may result
in a fire or other type of accident causing damage. SHARP will not be held responsible for any damage resulting from use of this unit with a voltage other than that which
is specified.
Caution:
This unit is fitted with a cooling fan at the rear for im-
!
proved cooling. It begins to run automatically when
the unit is turned on. Do not cover the opening in this
section with any obstacles.
Cooling fan
During use the unit will get warm, do not touch warm areas of the unit for pro-
!
longed periods to avoid damage to you or the unit.
This product is equipped with sp eci al function which protects amplifier ci rcuit from
!
damages. When it is activated, sound switch is turned off. In this case, set the unit
to the stand-by mode and turn it on again.
"
Volume control
The sound level at a given volume setting depends on speaker efficiency, location,
and various other factors. It is advisable t o avoid exposure t o high vol ume levels, t o
avoid this do not turn the volume on to full at switch on and listen to m usi c at moderate levels.
"
Care of DVD/CD discs
DVD/CD discs are fairly resis tant to damage, h owever mistrack ing can occur due to
an accumulation of dirt on the disc surface. Follow the guidelines below for maximum
enjoyment from your DVD/CD collection and player.
Do not write on either side of the disc, particularly the non-label side from which
!
signals are read. Do not mark this surface.
Keep your discs away from direct sunlight, heat, and excessive moisture.
!
Always hold the DVD/CDs by the edges. Fingerprints, di rt, or water on the DVD/
!
CDs can cause noise or mistracking. If a DVD/CD is dirty or does not play properly, clean it with a soft, dry cloth, wiping straight out f rom the centre, along the
radius.
NO
YES
Correct
SD-AT100W
ENGLISH
- Precautions -
General Information
4
E-4
SD-AT100W(X)E1.fm02/2/27
Page 6

SD-AT100W
ENGLISH
Description of discs
"
Types of playable discs
The unit can play back discs bearing any of the following marks:
Disc type Disc contents Disc size
DVD Video Disc Audio and video (movies) 12 cm (5")
8 cm (3")
Or DVD-R/DVD-RW recorded in video mode (*1)
Video CD Audio and video (movies) 12 cm (5")
8 cm (3")
Audio CD Audio 12 cm (5")
8 cm (3")
Or CDV (*2)
Audio CD-R/CD-RW (*3) Audio 12 cm (5")
8 cm (3")
"
Discs that cannot be played
DVDs without the region number on
!
the back of the unit or "ALL".
DVDs with SECAM system
!
DVD-ROM
!
DVD-RAM
!
DVD-Audio
!
You need the PAL-compliant TV to watch DV D/Video CDs recorded in PAL sys -
!
tem.
The discs above cannot be played at all, or no sound is heard although images
!
appear on the screen or vice versa.
Faulty playback may damage the speakers and can have an advers e effect on
!
your hearing when played at high volume settings.
You cannot play illegally produced discs.
!
CDG
!
Photo CD
!
CD-ROM
!
SACD
!
Discs recorded in special formats, etc.
!
Notes:
A disc that has scratches or fingerprints on it may not play properly. Refer to "Care
!
of DVD/CD discs (page 4)" and clean the disc.
Do not play the discs of special shapes (heart or oct agon shaped) as they can be
!
ejected from the machine whilst rotating and cause injury.
"
Title, chapter and track
DVDs are divided into "titles" and "chapter s". I f t he disc has more than one movie on
it, each movie is a separate "title". "Chapters" are subdivisions of titles.
General Information
E-5
- Description of discs -
Or CD-R/CD-RW recorded
in MP3 format (*4)
(*1): The DVD-R/DVD-RW may not be played back due to properties and scratch-
es of the disc, dirty optical pickup lens, etc.
(*2): Only the audio on the CDV can be played.
(*3): The CD-R/CD-RW may not be played back properly depending on the record-
ing equipment or the disc.
(*4): Only discs in MP3 format can be played (MPEG 1 Audio Layer 3, 44.1kHz or
48kHz). However, some of them may not be played depending on their con-
ditions or format.
MP3 multi-session disc is not supported by this system.
Title 1 Title 2
Chapter 1
The video and audio CDs consist of "tracks".
A "track" is each tune on an audio CD.
Track 1 Track 2 Track 3 Track 4 Track 5
Note:
Title, chapter, or track numbers may not be recorded on some discs.
Chapter 2 Chapter 3 Chapter 1 Chapter 2
SD-AT100W(X)E1.fm02/2/27
Page 7

!
Icons used on DVD discs
Check the icons of the DVD case before playing your discs.
Display Description
Region number (playable area number) DVD discs are programed with region
2 3 4
Format recorded on the DVD To adopt the video format to the connect-
Recorded in 4:3.
You can enjoy wide images on a wide-screen TV, and letterbox size
images on the 4:3 size TV.
You can enjoy wide images on a wide-screen TV, and sides-cut 4:3
images on the 4:3 size TV.
ALL
Type of subtitles recorded
2
Example: Re corded subtitle language.
1: English A desired language can be selected with
2: Japanese
Number of camera angles
2
Number of audio track and audio
recording system
Example:
1: Original <English>
(DTS 5.1 Surround)
2: Japanese (Dolby Digital 5.1 Surround)
numbers indicating countries in which
they can be played. This system can play
discs with region number on the back of
the unit or "ALL".
ed TVs ("wide-screen TV" or "4:3 size
TV").
the SUBTITLE button.
Number of angles recorded on the DVD.
A desired angle can be selected with the
ANGLE button.
The number of audio tracks and audio recording system are indicated.
"
The audio recorded on the DVD can
be switched by using the SOUND
button.
"
Audio and recording system vary depending on the DVD. Check them in
the DVD's manual.
Types of playable DVD discs vary depending on the region. This unit can play back
only DVDs with the same region number are written on the back of the unit or with
"ALL".
2 3 4
and
ALL
SD-AT100W
ENGLISH
- Description of discs -
General Information
4
E-6
SD-AT100W(X)E1.fm02/2/27
Page 8

SD-AT100W
ENGLISH
Controls and indicators
- Controls and indicators -
General Information
1 2 3 654
!
Front panel
1.Disc Cover . . . . . . . . . . . . . . . . . . . . . . . . . . . . . . . . . . . . . . . . . . . . . 29
2.On/Stand-by Button . . . . . . . . . . . . . . . . . . . . . . . . . . . . . . . . . . . . . 19
3.Disc Cover Open/Close Button . . . . . . . . . . . . . . . . . . . . . . . . . . . . 29
4.Sound Mode Indicator . . . . . . . . . . . . . . . . . . . . . . . . . . . . . . . . 48, 49
5.Remote Sensor . . . . . . . . . . . . . . . . . . . . . . . . . . . . . . . . . . . . . . . . . 20
6.Disc Play or Pause Button . . . . . . . . . . . . . . . . . . . . . . . . . . . . . 29, 30
7.Disc Stop Button . . . . . . . . . . . . . . . . . . . . . . . . . . . . . . . . . . . . . . . 30
8.DVD Chapter Skip, VCD/CD Track Down or
Tuning Down Button . . . . . . . . . . . . . . . . . . . . . . . . . . . . . . . . . 27, 31
Reference page
7 8 9 10
11 12 13 14 15
Reference page
9.DVD Chapter Skip, VCD/CD Track Up or
Tuning Up Button . . . . . . . . . . . . . . . . . . . . . . . . . . . . . . . . . . . .27, 31
10.Power Indicator . . . . . . . . . . . . . . . . . . . . . . . . . . . . . . . . . . . . . . . . .17
11.Timer Set Indicator . . . . . . . . . . . . . . . . . . . . . . . . . . . . . . . . . . . . . .54
12.Function Button . . . . . . . . . . . . . . . . . . . . . . . . . . . . . . . . . . . . . . . . .27
13.Tuner Band, Digital Input Button . . . . . . . . . . . . . . . . . . . . . . . .27, 60
14.Volume Up and Down Buttons . . . . . . . . . . . . . . . . . . . . . . . . . . . . .19
15.Headphone Socket . . . . . . . . . . . . . . . . . . . . . . . . . . . . . . . . . . . . . .58
E-7
SD-AT100W(X)E1.fm02/2/27
Page 9

!
Display
1.Timer Play Indicator
2.Sleep Indicator
3.Playback Control Indicator
(1) (2) (3)
(4)
(5) (6)
1
2
(7)
3
(8)4(9)
(12)
(10)
(11)
(13)
5
4.Audio Signal Indicators/Speaker Indicators
(1) Front Left Signal Indicator (8) Left Front Speaker Indicator
(2) Centre Signal Indicator (9) Centre Speaker Indicator
(3) Front Right Signal Indicator (10)Right Front Speaker Indicator
(4) Low Frequency Effect Indicator (11)Subwoofer Indicator
(5) Surround Left Signal Indicator (12) Left Surround Speaker Indicator
(6) Surround Monaural Signal
Indicator
(7) Surround Right Signal Indicator
5.Programme indicator
6.Disc Indicator
7.VCD/CD Random Play Indicator
8.FM Stereo Receiving Indicator
9.VCD/CD Track Name Indicator
10.DVD Title Indicator
11.VCD/CD Total Indicator
12.DVD Chapter Indicator
13.DVD Angle Indicator
14.FM Stereo Mode Indicator
15.VCD/CD Repeat or Disc A - B Repeat Indicator
(13)Right Surround Speaker Indicator
SD-AT100W
ENGLISH
6
7
8
- Controls and indicators -
General Information
4
14
9
11
12 13 1510
E-8
SD-AT100W(X)E1.fm02/2/27
Page 10

SD-AT100W
ENGLISH
Controls and indicators (continued)
- Controls and indicators -
General Information
1
10
!
Rear panel
1.Speaker Terminals . . . . . . . . . . . . . . . . . . . . . . . . . . . . . . . . . . . 13, 14
2.Video Output Selector Switch . . . . . . . . . . . . . . . . . . . . . . . . . . 15, 16
3.Monitor Output Sockets . . . . . . . . . . . . . . . . . . . . . . . . . . . . . . . . . . 15
4.Audio Digital Output Socket . . . . . . . . . . . . . . . . . . . . . . . . . . . . . . 58
5.Audio Digital Input Socket . . . . . . . . . . . . . . . . . . . . . . . . . . . . . . . . 57
6.AV 1 (TV) Input socket . . . . . . . . . . . . . . . . . . . . . . . . . . . . . . . . . . . 17
7.FM 75 Ohms Aerial Socket . . . . . . . . . . . . . . . . . . . . . . . . . . . . . . . 14
8.Aerial Earth Terminal . . . . . . . . . . . . . . . . . . . . . . . . . . . . . . . . . . . . 14
9.AM Loop Aerial Terminal . . . . . . . . . . . . . . . . . . . . . . . . . . . . . . . . . 14
11
Reference page
2
12
10.AC Power Input Socket . . . . . . . . . . . . . . . . . . . . . . . . . . . . . . . . . . .17
11.Cooling Fan . . . . . . . . . . . . . . . . . . . . . . . . . . . . . . . . . . . . . . . . . . . . .4
12.Mounting Holes for Wall Bracket (Optionally available) . . . . . . . .68
13.Component Video Output sockets . . . . . . . . . . . . . . . . . . . . . . . . . .16
14.Video and Audio Input sokets (AV 2) . . . . . . . . . . . . . . . . . . . . . . . .56
15.Video and Audio Input sockets (AV 3) . . . . . . . . . . . . . . . . . . . . . . .57
16.Video and Audio Output sockets (AV 2) . . . . . . . . . . . . . . . . . . . . .56
17.Subwoofer Pre Output Socket . . . . . . . . . . . . . . . . . . . . . . . . . . . . .59
3
13
5
4
6
7
9
8
17
161514
Reference page
E-9
SD-AT100W(X)E1.fm02/2/27
Page 11

SD-AT100W
ENGLISH
!
Front speaker 2 (magnetically shielded)
Front Back
1
3
2
1.Tweeter
2.Woofer
3.Mounting Holes for Stand or Bracket (Optionally available)
4.Speaker Terminals
!
Centre speaker 1 (magnetically shielded)
Front Back
1
2
4
3
1.Woofer
2.Tweeter
3.Mounting Holes for Stand or Bracket (Optionally available)
4.Speaker Terminals
!
Surround speaker 2
Front Back
2
1
1.Woofer
2.Mounting Holes for Stand or Bracket (Optionally available)
3.Speaker Terminals
!
Subwoofer 1
Front Side Back
3
4
- Controls and indicators -
General Information
21 3
1.Bass Reflex Duct
2.Woofer
3.Speaker Terminals
4
E-10
SD-AT100W(X)E1.fm02/2/27
Page 12

SD-AT100W
ENGLISH
General Information
Controls and indicators (continued)
[Front]
1
2
3
4
5
6
7
8
9
10
11
- Controls and indicators -
12
13
14
15
16
17
18
19
20
21
22
23
24
25
26
27
28
!
Remote control
1.Remote Control Transmitter . . . . . . . . . . . . . . . . . . . . . . . . . . . . . . .20
2.On/Stand-by Button . . . . . . . . . . . . . . . . . . . . . . . . . . . . . . . . . . . . . . .17
3.VCD/CD Play Mode Select Button . . . . . . . . . . . . . . . . . . . . . . . . . .37
4.TV On/Stand-by Button . . . . . . . . . . . . . . . . . . . . . . . . . . . . . . . . . . .60
5.TV Volume Up and Down Buttons . . . . . . . . . . . . . . . . . . . . . . . . . .60
6.TV Input Select Button . . . . . . . . . . . . . . . . . . . . . . . . . . . . . . . . . . .60
7.Tuner (Band) Button . . . . . . . . . . . . . . . . . . . . . . . . . . . . . . . . . . . . .27
8.Function Buttons . . . . . . . . . . . . . . . . . . . . . . . . . . . . . . . . . . . . . . . . .27
9.Disc Fast Reverse, Tuner Preset Down Button . . . . . . . . . . . . . . .28, 31
10.DVD Chapter Skip, VCD/CD Track Down Button . . . . . . . . . . . . . . . .31
11.Enter Button . . . . . . . . . . . . . . . . . . . . . . . . . . . . . . . . . . . . . . . . .38, 46
12.Volume Up and Down Buttons . . . . . . . . . . . . . . . . . . . . . . . . . . . . . . .18
13.Return Button . . . . . . . . . . . . . . . . . . . . . . . . . . . . . . . . . . . . . . . . . . .21
14.DVD Zoom Button . . . . . . . . . . . . . . . . . . . . . . . . . . . . . . . . . . . . . . .42
15.TV Display Select Button . . . . . . . . . . . . . . . . . . . . . . . . . . . . . . . . .43
16.Disc Cover Open/Close Button . . . . . . . . . . . . . . . . . . . . . . . . . . . . . .29
17.Sound Mode Select Buttons . . . . . . . . . . . . . . . . . . . . . . . . . . . . . . .49
18.Dynamic Sound Select Button . . . . . . . . . . . . . . . . . . . . . . . . . . . . .49
19.Main Unit Display Select Button . . . . . . . . . . . . . . . . . . . . . . . . .18, 43
20.TV Channel Select Buttons . . . . . . . . . . . . . . . . . . . . . . . . . . . . . . . .60
21.Disc Play or Pause Button . . . . . . . . . . . . . . . . . . . . . . . . . . . . . . .29, 30
22.Disc Stop Button . . . . . . . . . . . . . . . . . . . . . . . . . . . . . . . . . . . . . . . . .30
23.Disc Fast Forward, Tuner Preset Up Button . . . . . . . . . . . . . . . . .28, 31
24.DVD Chapter Skip, VCD/CD Track Up Button . . . . . . . . . . . . . . . . . . .31
25.Cursor Button . . . . . . . . . . . . . . . . . . . . . . . . . . . . . . . . . . . .38, 42, 46
26.Extra Bass Button . . . . . . . . . . . . . . . . . . . . . . . . . . . . . . . . . . . . . . .18
27.DVD Top Menu Button . . . . . . . . . . . . . . . . . . . . . . . . . . . . . . . . . . . .38
28.DVD Menu Button . . . . . . . . . . . . . . . . . . . . . . . . . . . . . . . . . . . . . . .46
Buttons with " " mark in the illust rat ion can be operated on the remote control
only.
Reference page
E-11
SD-AT100W(X)E2.fm02/2/27
Page 13

[Back]
1
2
3
4
5
6
7
8
9
10
11
12
13
14
15
16
17
18
19
20
21
22
23
24
25
26
27
!
Remote control
1.DVD Subtitle Button . . . . . . . . . . . . . . . . . . . . . . . . . . . . . . . . . . . . . 39
2.Playback Control Button . . . . . . . . . . . . . . . . . . . . . . . . . . . . . . . . . 45
3.Disc A - B Repeat Button . . . . . . . . . . . . . . . . . . . . . . . . . . . . . . . . . 38
4.DVD/VCD Digital Gamma Button . . . . . . . . . . . . . . . . . . . . . . . . . . .41
5.DVD/VCD Frame Advance Button . . . . . . . . . . . . . . . . . . . . . . . . . .32
6.Direct Button . . . . . . . . . . . . . . . . . . . . . . . . . . . . . . . . . . . . . . . .33, 34
7.Programme Button . . . . . . . . . . . . . . . . . . . . . . . . . . . . . . . . . . . 35, 36
8.Clear Button . . . . . . . . . . . . . . . . . . . . . . . . . . . . . . . . . . . . . . . . . 35, 36
9.DVD Initial Setting Button . . . . . . . . . . . . . . . . . . . . . . . . . . . . . . . . 21
10.Amplifier Initial Setting Button . . . . . . . . . . . . . . . . . . . . . . . . 50 - 52
11.Timer Button . . . . . . . . . . . . . . . . . . . . . . . . . . . . . . . . . . . . . . . 53 - 55
12.Return Button . . . . . . . . . . . . . . . . . . . . . . . . . . . . . . . . . . . . . . . . . . . 21
13.VCR On/Stand-by Button . . . . . . . . . . . . . . . . . . . . . . . . . . . . . . . . . 60
14.VCR Channel Select Buttons . . . . . . . . . . . . . . . . . . . . . . . . . . . . . . 60
15.DVD Angle Button . . . . . . . . . . . . . . . . . . . . . . . . . . . . . . . . . . . . . . . 40
16.DVD Sound Select Button . . . . . . . . . . . . . . . . . . . . . . . . . . . . . . . .40
17.DVD/VCD Super Picture Button . . . . . . . . . . . . . . . . . . . . . . . . . . . .41
18.Disc Play or Pause Button . . . . . . . . . . . . . . . . . . . . . . . . . . . . . .29, 30
19.DVD/VCD Slow Button . . . . . . . . . . . . . . . . . . . . . . . . . . . . . . . . . . . 3 2
20.Direct Number Buttons . . . . . . . . . . . . . . . . . . . . . . . . . . . . . . . . 35, 36
21.Enter Button . . . . . . . . . . . . . . . . . . . . . . . . . . . . . . . . . . . . . . . . . . . .26
22.Cursor Buttons . . . . . . . . . . . . . . . . . . . . . . . . . . . . . . . . . . . . . . .21, 45
23.VCR Stop Button . . . . . . . . . . . . . . . . . . . . . . . . . . . . . . . . . . . . . . . . 60
24.VCR Play Button . . . . . . . . . . . . . . . . . . . . . . . . . . . . . . . . . . . . . . . .60
25.VCR Fast Forward Button . . . . . . . . . . . . . . . . . . . . . . . . . . . . . . . . 60
26.VCR Rewind Button . . . . . . . . . . . . . . . . . . . . . . . . . . . . . . . . . . . . .60
27.Sliding Cover . . . . . . . . . . . . . . . . . . . . . . . . . . . . . . . . . . . . . . . . . . .20
Buttons with " " mark in the illustration can be operated on the back of the remote
control. Other buttons can be operated on both sides of the remote control only.
Reference page
SD-AT100W
ENGLISH
- Controls and indicators -
General Information
4
E-12
SD-AT100W(X)E2.fm02/2/27
Page 14

SD-AT100W
ENGLISH
Speaker connection
Front speaker
(right)
Black
Red
Green
Centre
speaker
Black
Red
Green
Front speaker
(left)
Black
Red
Preparation for Use
Red
Red
Grey
Purple
Surround speaker
Black
(right)
Red
Grey
- Speaker connection -
Subwoofer
Black
Purple
White
Blue
Red
Surround speaker
(left)
Black
Blue
White
You can connect
separately available
woofer to enjoy more
of the bass sound.
(see page 59 .)
Red
E-13
SD-AT100W(X)E2.fm02/2/27
Page 15

The speaker terminals on the main unit, the tube and plugs of the speaker lead, and
speaker labels are distinguished by colours.
Connect the speaker and the unit by matching the colours.
Connect the speaker wires to the speakers first, then to the unit.
Speaker
Speaker terminals
Red
Tube
Black
Label
Main unit
Label
Speaker Plug
Caution:
Make sure to connect the speakers after unplugging the unit.
"
Do not mistake the and , and right and left terminals of the speaker leads. (The
"
right speaker is placed on the right when you face the unit.)
"
Never short-circuit the speaker leads. If the
speaker leads are short-circuited, the protection circuit is activated and the power is turned
off. In such a case, check that the leads are
properly connected before turning the power
on again.
Only the supplied speakers should be used with this product.
"
Do not stand or sit on the speakers. You may be injured.
"
Insert the speaker plug fully with the rising side facing up.
"
Hold the speaker plug when removing it from the mai n unit. Pulling the lead may
"
cause malfunction to the unit.
Plug in with the rising
side facing up.
Aerial connection
Supplied FM aerial:
Connect the FM aerial wire to the FM 75 OHMS
socket and position the FM aerial wire in the direction where the strongest signal can be received.
Supplied AM loop aerial:
Connect the AM loop aerial wire to the AM and
GND terminals. Position the AM loop aerial for
optimum reception. Place the AM loop aerial on
a shelf, etc., or attach it to a stand or a wall with
screws (not supplied).
Black
Notes:
Placing the aerial on the unit or near the AC power lead may c ause noise pickup.
"
Place the aerial away from the unit for better reception.
When static is still heard even after adjusting the position of the AM loop aerial, try
"
reversing the wire connections.
Installing the AM loop aerial:
< Assembling > < Attaching to the wall >
Wall Screws (not supplied)
External FM or AM aerial:
Use an external FM or AM aerial if you require better reception. Consult your dealer.
External
FM aerial
15 m (49 feet)
External AM aerial
7.5 m (25 feet)
Earth rod
Note:
When using an external AM aerial, be sure to keep the wire of the AM loop aerial
connected.
White
AM loop aerial
SD-AT100W
ENGLISH
Preparation for Use
- Speaker connection / Aerial connection -
4
E-14
SD-AT100W(X)E2.fm02/2/27
Page 16

SD-AT100W
ENGLISH
TV connection
This unit has two sokets to output images in addition to the MONITOR OUT
(VIDEO)socket. To enjoy clearer DVD images, connect your TV to these
sokets.
MONITOR OUT (S-VIDEO)
socket:
COMPONENT VIDEO OUT
socket:
Connecting to TV with video cable:
Transmits the image signal by dividing it into the luminance signal (Y) and the color signal (C) to realize clearer images than the video output socket.
Directly transmits the image information, which is
composed of the luminance signal (Y) and the component signal (PB, PR) to ensure the fidelity of colour compared with the S1 video output coket.
Caution:
Before connecting the TV, turn off all the equipment.
!
Connecting to TV with video cable
Move the VIDEO OUT SELECTOR switch to S-VIDEO/VIDEO.
To video output socket
Preparation for Use
- TV connection -
Video cable (supplied)
TV
Connecting to TV with S-video cable:
(See page 16.)
S-video cable (not supplied)
TV
Connecting to TV with Component video cable:
(See page 16.)
Component video cable (not supplied)
TV
Video cable
(supplied)
TV
To video input
socket
Notes:
Change the TV input in accordance with the connected socket.
"
Do not connect other equipment between the TV and this unit. If they are con-
"
nected via a VCR, pictures may be distorted.
You need the PAL-compliant TV to watch DV D/Video CDs recorded in PAL sys -
"
tem.
E-15
SD-AT100W(X)E2.fm02/2/27
Page 17

SD-AT100W
ENGLISH
!
Connecting to TV with S-video cable
Move the VIDEO OUT SELECTOR switch to S-VIDEO/VIDEO.
To S-video
output socket
S-video cable
(not supplied)
TV
To S-video input
socket
Note:
When the video and S-video cables are both connected, the images from the S-video
input socket appears on your TV.
!
Connecting to TV with Component video
cable
Move the VIDEO OUT SELECTOR switch to COMPONENT.
To Component video
output sockets
To Component video
input sockets
Component video cable (not supplied)
Notes:
If your TV has different indications for the component video inputs (Y, CB and CR
"
or Y, B-Y and P-Y), connect sockets with its matching colour.
Do not connect to a component video input socket designed for the high-vision
"
system, which is not DVD-compatible (the images may be distorted or not
appear).
TV
- TV connection -
Preparation for Use
4
E-16
SD-AT100W(X)E2.fm02/2/27
Page 18

SD-AT100W
ENGLISH
TV connection (continued)
To listen to the TV sound via the speakers of this unit:
Using the audio cable, you can listen to the TV sound with this unit.
(The audio cable is not supplied. Purchase a commercially available cable.)
To audio
input sockets
Turning the power on
After checking all the connections have been m ade correct ly, connec t the AC power
lead to the AC power input socket, then plug the AC power lead of this unit i nto the
wall socket.
Preparation for Use
E-17
TV
- TV connection / Turning the power on -
Note:
For TV sound operations, refer to page 60.
Red
Audio cable
(not supplied )
Red
To audio
output sockets
White
White
Notes:
Never use a power lead other than the one supplied. Otherwis e, a malfunction or
"
an accident may occur.
Unplug the unit if it is not to be used for a prolonged period of time.
"
!
To turn the power on
Press the ON/STAND-BY button to turn the power on.
To set the unit to stand-by mode:
Press the ON/STAND-BY button again.
Power indicator
SD-AT100W(X)E2.fm02/2/27
Page 19

General control
!
Volume control
Press the VOLUME button to increase the volume and the VOLUME button for
decreasing.
SD-AT100W
ENGLISH
[Front]
012 39 40
!
Bass control
When the X-BASS button is pressed, the current mode setting will be displayed . To
change to a different mode, press the X-BASS button.
Bass frequencies are
emphasised.
This function is enabled only when the sound mode is set to "STEREO" or "VIRTUAL" (page 49).
!
To change the display brightness (2 levels)
You can switch the display brightness by holding down the DISPLAY but ton on the
remote control for 2 seconds or more.
Dimmed Brightened
.....
The sound is not modified.
- General control -
Preparation for Use
4
E-18
SD-AT100W(X)E2.fm02/2/27
Page 20

SD-AT100W
ENGLISH
System installation
!
Placing the speaker system
The best surround effect will be achieved by placing each speaker at the same distance from the listening position.
It is recommended to arrange the speakers as shown below.
Centre
Front
speaker (left)
Subwoofer
speaker
Front
speaker (right)
The speaker stands and brackets are opti onally avai lable. Refer t o their m anuals f or
assembly.
Preparation for Use
Surround
speaker (left)
10 cm (4")
Same distance
- System installation -
Subwoofer
Front speaker (left)
Surround
speaker (right)
Centre speaker
Same distance
Notes:
Place the TV halfway between the front speakers.
"
It is recommended that the centre speaker be placed near the television.
"
Keep the free space of at least 10 cm (4") along the left side of the subwoofer.
"
Place the surround speakers at a position just above the height of your ears.
"
The speaker grille is not removable.
"
The front and centre speakers may be placed beside or near the TV as they are magnetically shielded. However, colour variation may occur, depending on the type of the
TV.
If colour variation occurs...
Turn off the TV (from the power switch).
After 15 - 30 minutes, turn the TV on again.
Front speaker (right)
If the colour variation is still present...
Move the speakers further away from the TV.
Refer to the user's manual of the TV for details.
Caution:
Do not place the surround speakers and the subwoofer near the TV as they are
not magnetically shielded.
E-19
SD-AT100W(X)E2.fm02/2/27
Page 21

Remote control
!
Battery installation
1 Remove the battery cover.
2 Insert the batteries according to the direction indicated in the bat-
tery compartment.
When inserting or removing the batteries, push them towards the battery terminals.
3 Rep lace the cover.
Precautions for battery use:
Replace all old batteries with new ones at the same time.
"
Do not mix old and new batteries.
"
Remove the batteries if the unit is not to be used for long periods of time. This will
"
prevent potential damage due to battery leakage.
!
Test of the remote control
Point the remote control directly at the remote sensor on the unit.
The remote control can be used within the range shown below:
Press the ON/STAND-BY button. Does the power turn on? Now, you can enjoy your
system.
Remote sensor
0.2 m - 6 m
(8" - 20')
SD-AT100W
ENGLISH
Caution:
Do not use rechargeable batteries (nickel-cadmium battery, etc.).
"
Installing the batteries incorrectly may cause the unit to malfunctio n .
"
Notes concerning use:
Replace the batteries if the operating distance is reduced or if the operation
"
becomes erratic. Purchase 2 "AAA" size batteries (UM-4, R03, HP-16 or similar).
Periodically clean the transmitter o n the remote control and the sensor on the unit
"
with a soft cloth.
Exposing the sensor on the unit to strong light may interfere with operation.
"
Change the lighting or the direction of the unit.
Keep the remote control away from moisture, heat, shock, and vibrations.
"
!
How to open the sliding cover
This remote control has buttons on its front and back.
To use the buttons on the back, open the sliding cover.
Slide the cover
until it clicks.
Notes:
"
When operating the buttons on the back of the remo te control, be careful not
to press the buttons on the front side. The unit may malfunction.
Close the sliding cover on the back whilst using the buttons on the front side.
"
You can control the TV and VCR with this remote control (pages 61, 62).
"
SD-AT100W(X)E2.fm02/2/27
- Remote control -
Preparation for Use
4
E-20
Page 22

SD-AT100W
ENGLISH
Changing the initial setting of DVD
Turn on the TV, and switch the input to the "VIDEO 1" or "VIDEO 2" etc. accordingly.
You can change the settings for TV mode, parental level, audio output, disc language, and OSD language.
A new setting will be retained even if the unit is set to the stand-by mode. If you want
to restore or change the setting, reset it.
[Back]
Press the ON/STAND-BY button to turn the power on.
1
The startup screen appears.
After pressing the DVD/CD button, press the SETUP DVD button.
2
Press the or button to select the menu and press the ENT but-
3
ton.
Preparation for Use
The initial settings vary depending on the area. See the mark in the label attached on
the rear panel of the unit.
- Changing the initial setting of DVD -
WA / WB / WN / WP / WW / WZ
TV mode
Parental level
Audio output
MP
OVDESETUT
4:3
MTV
DE :
CNTO:S
LB
MP
OVDESETUT
4:3
MTV
LPACNTS
DE :
CNTO:S
LB
Disc language
WA/WB/WW/WZ: WP/WN:
OSD language
Press the , , or button to change the setting and press the
4
ENTER
SELECT
ENTER
RETURN
ENTER
SELECT
ENTER
ENT button.
Example: "OSD LANGUAGE SETUP" is selected
LSD ANGUAGE ESTUPO
LANGUAGE: ENGLI SH
ENGL I SH
FRANÇA I
DEUTSCH
ITALIANO
ESPAÑOL
SVENSKA
S
NEDERLANDS
ENTER
ENTER
SELECT
Repeat the operation as instructed.
(The number of repetition depends on the setting item.)
To change other settings, begin from step 3.
Press the SETUP DVD button.
5
The new setting is memorised.
Notes:
You cannot display the setup screen whilst a disc is playing.
!
See page 25 for selecting another language for disc menus.
!
The previous screen appears by pressing the RETURN button whilst selec ting
!
an item or setting.
CNTS
RETURN
RETURN
E-21
SD-AT100W(X)E3.fm02/2/27
Page 23

Setting Default (factory setting) Parameters Description
TV mode TV MODE: TV MODE: , , The video format can be set to , or (see page 24
MTV ODE ESTUP
for details).
*1: WA/WB/WW/WZ: NTSC PAL
MTV ODE ESTUP
4:3
MTV
DE :
CNTO:S
LB
LPACNTS
*1
MTV ODE
4:3
:
:
LB
4:3
PS
4:3
LB
16 : 9
WN/WP: NTSC
SD-AT100W
ENGLISH
NTSC: NTSC PAL NTSC Used to specify the colour system in accordance with the TV con-
nected when playing back an NTSC disc.
NTSC PAL NTSC:
Select this setting when an NTSC TV or an NTSC-compatible Multi-
MTV ODE ESTUP
MTV
DE :
CNTO:S
MTV ODE ESTUP
4:3
LB
LPACNTS
MTV ODE
CNT :SCNTS
4:3
:
:
LB
CNTS
System TV is connected to the unit.
NTSC PAL:
Select this setting when a PAL TV is connected to the unit. This setting converts the NTSC signal to a modified PAL signal.
LPACNTS
When you play back the PAL discs, either setting of "NTSC
!
PAL" or "NTSC" can be used on a PAL TV or a Multi-System TV.
Parental level PASSWORD: ? ? ? ? Level 1 - 8, OFF Depending on DVDs, you can set a country code and parental level
that are defined for a particular country (see page 24 for details).
CODE Enter a 4-digit password.
If you forget your password, you can cancel the registered pass-
NARE T AL ESTUPP
LANGUAGE : ENGL I SH
PASSWORD:
FRAN‚ AI S
12345678OFF
DEUTSCH NEDERLANDS
NO
IUSARATIALCODE :
ESPA„ OL
????
VENSKAS
NARE T AL ESTUPP
LANGUAGE : ENGL I SH
R
SELEC VELTLE
FRAN‚ AI S
12345678OFF
DEUTSCH NEDERLANDS
I
C
*2
ODE :
ESPA„ OL
NO
VENSKAS
USARATIAL
word by pressing the STILL button 4 times.
*2: WZ: GERMANY
WA: AUSTRALIA
WN/WP: USA
WW/WB: CHINA
Preparation for Use
- Changing the initial setting of DVD -
4
E-22
SD-AT100W(X)E3.fm02/2/27
Page 24

SD-AT100W
ENGLISH
Preparation for Use
Changing the initial setting of DVD (continued)
Setting Default (factory setting) Parameters Description
Audio setting DIGITAL: BITSTREAM BITSTREAM You can set the audio output according to the equipment connected
D-PCM
IUD O ESTUPA
LANGUAGE : ENGL
COMPRESS I ON: OFF
D
IGITAL:
MPEG :
DEUTSCH
ITALIANO
ESPA„ OL
BITSTREAM
PCM
IUD O ESTUPA
LANGUAGE : ENGL
COMPRESS I ON: OFF
D
IGITAL:
MPEG :
DEUTSCH
ITALIANO
ESPA„ OL
BITSTREAM
BITSTREAM
D PCM
MPEG: PCM PCM You can set the audio output according to the equipment connected
BITSTREAM
Disc language setting SUB TITLE: ENGLISH
AUDIO: ENGLISH
MENU: ENGLISH
- Changing the initial setting of DVD -
IUD O ESTUPA
LANGUAGE : ENGL
COMPRESS I ON: OFF
D
IGITAL:
MPEG :
DEUTSCH
ITALIANO
ESPA„ OL
LISC ANGUAGED
LANGUAGE : ENGL I SH
SUB T I ENGL I SH
L
AUDI O
:
MENU :
CH
ITALIANO
ESPA„ OL
LE :T
ENGL I SH
ENGL I SH
IS
ENGL I SH
NEDERLANDS
BITSTREAM
ESTUP
PCM
ENGLISH, FRENCH, GERMAN, ITALIAN, SPANISH, CHINESE, SWEDISH,
DUTCH, OTHER ( )
IUD O ESTUPA
LANGUAGE : ENGL
COMPRESS I ON: OFF
D
IGITAL:
MPEG :
DEUTSCH
ITALIANO
ESPA„ OL
LSUB T I ENGL I SHLE :T
LENG I S CH I N ESEH
NFRE CH
MGER AN DUTCH
LITA IA OTHERN
NSPA I S
H
BITSTREAM
PCM
PCM
BITSTREAM
ESTUPLISC ANGUAGED
SWED I SH
()
OSD language setup LANGUAGE: ENGLISH ENGLISH, FRENCH, GERMAN, ITAL-
IAN, SPANISH, CHINESE, SWEDISH,
DUTCH
to the optical digital output socket.
BITSTREAM:
When the unit is connected to a processor or amplifier that supports
Dolby Digital (5.1ch).
D-PCM:
When the unit is connected to the 2-channel audio equipment or an
MD recorder, the Dolby Digital does not function.
to the optical digital output socket.
PCM:
When the unit is connected to the 2-channel audio equipment or an
MD recorder, the MPEG multichannel does not function.
BITSTREAM:
When the unit is connected to a processor or amplifier that supports
MPEG multichannel.
If you set audio output of the MPEG multichannel to "BIT-
!
STREAM", no sound is heard.
You can select a language for "subtitles", "audio" or "menu screens"
if your DVD is recorded in multiple languages.
Language code list (See page 69.)
If the language you select is not recorded on the disc, a language
preset on the disc is played (displayed). Check the languages recorded on the disc before setting.
You can select the desired OSD (On Screen Display) language for
initial setting or playback control screens.
E-23
LSD ANGUAGE ESTUPO
LANGUAGE : ENGLI SH
LSD ANGUAGE ESTUPO
LANGUAGE : ENGLI SH
ENGL I SH
FRANÇAI
DEUTSCH
ITALIANO
ESPAÑOL
SVENSKA
S
NEDERLANDS
SD-AT100W(X)E3.fm02/2/27
Page 25

SD-AT100W
ENGLISH
"
Video format
Indicator Setting
When playing a wide image (16:9) disc,
the left and right sides of the image are
cut (pan scan) to display a natural-looking 4:3 size image.
A wide image disc without pan scan
is played back in letter box .
A 4:3 disc is played in 4:3.
When playing a wide image (16:9) disc,
black bands are inserted at the top and
bottom and you can enjoy full wide images (16:9) on a 4:3 size TV.
A 4:3 disc is played in 4:3.
A wide image (16:9) is displayed when
playing a wide image (16:9) disc.
When playing a 4:3 image disc, the image size depends on the
!
setting of the connected TV.
If you play back a wide image (16:9) disc with this unit connected
!
to a 4:3 TV, the vertically shrunk image is displayed.
Note:
When playing the disc with a fixed video format, it will not change even if the TV
screen size is changed.
"
Parental setting
Certain discs come preset with country codes an d parental level settings that are
defined for particular countries. Discs equipped wit h the parental lock function are
rated according to their content. The rated content allowed by a parental lock level
and the way a DVD can be controlled may vary from disc to disc. Some discs, for
example, may let you edit out viol ent scenes and replace them with scenes more
suitable for viewing by children. You can also use the pa rental lock to disable playback of the DVD entirely.
This system supports the following parental level settings.
Parental level: Defines the parental level, which controls the types of scenes that are
Code: Allows selection of a country code available on a disc.
played back from a disc.
Notes:
You can use the parental lock function only wi th DVDs t hat are equi pped with t he
!
parental lock feature.
The parental level depends on countri es. If you do not set t he country code cor-
!
rectly, it fails to work cor r e ct ly .
When you cancel parental setting, DVD discs can be played back regardless of
!
the parental level.
On some DVDs, the parental level setting is fixed and cannot be modified.
!
Country codes:
This system supports country codes for the following countries.
Country code list:
USA SWEDEN MALAYSIA
CANADA HOLLAND INDONESIA
JAPAN NORWAY TAIWAN
GERMANY DENMARK PHILIPPINE
FRANCE FINLAND AUSTRALIA
UK BELGIUM RUSSIA
ITALY HONG KONG CHINA
SPAIN SINGAPORE SWISS THAILAND -
Passwords:
The parental level setting of this system can be protected by a password against
unauthorised changes. Once you set a password, it must be input to perform the following operations.
To change the parental level.
!
To temporarily change the parental level during playback.
!
Preparation for Use
- Changing the initial setting of DVD -
4
E-24
SD-AT100W(X)E3.fm02/2/27
Page 26

SD-AT100W
ENGLISH
Changing the initial setting of DVD (continued)
Preparation for Use
"
Disc language
Indicator Setting
Subtitle A language for subtitle can be set.
The subtitle is displayed in a specified language.
English French
Thank you
Audio A language for audio can be set.
You can specify a language for conversation and narration.
English French
Thank you
Disc menu A language for disc menus can be set.
- Changing the initial setting of DVD -
Menu screens are displayed in a specified language.
English French
Merci
"
Setting other disc languages
Example: When you select HU (Hungarian)
After selecting "DISC LANGUAGE" on the initial setup screen
1
(page 21, steps 1 - 3), select "OTHER" and press the ENT button.
SWED I SH
ENTER
ENTER
ESTUPLISC ANGUAGED
(A)
A
SELECT
RETURN
LSUB T I ENGL I SHLE :T
LENG I S CHI NE SEH
NFRE CH
MGER AN DUTCH
LITA IA OTHERN
NSPA I SH
Press the or button to select "H" for the first letter.
2
OTHER
(A)
H
ENTER
SELECT
RETURN
ENTER
Press the or button to move the cursor to the position next to
3
the first letter.
erci
M
Press the or button to select "U" for the second letter.
4
ENTER
OTHER
()
SELECT
ENTER
HA
RETURN
OTHER
()
HU
ENTER
SELECT
RETURN
ENTER
E-25
CAST
STAFF
ACTEURS
PERSONNEL
Press the ENT button.
5
Press the SETUP DVD button.
6
Language code list (See page 69.)
SD-AT100W(X)E3.fm02/2/27
Page 27

Setting the clock
By setting the unit on time, you can use it not only as a cl ock but also f or timer play back.
[Back]
In this example, the clock is set for 9:30.
Press the ON/STAND-BY button to turn the power on.
1
Press the TIMER button.
2
Within 10 seconds, press the or button to select "ADJUST",
3
and then press the ENT button.
Press the or button to adjust the
4
hour and then press the ENT button.
Press the or button once to advance the time by 1 hour. Hold it down to advance continuously.
Press the or button to adjust the
5
minutes and then p ress th e ENT b utton.
Press the or button once to advance the time by 1 minute. Hold it down
!
to advance continuously.
The hour will not advance even if minutes advance from "59" to "00".
!
The clock starts from "0" second. (Seconds are not displayed.)
!
To confirm the time display:
[When the unit is in the stand-by mode]
Press the DISPLAY button on the remote control.
The time display will appear for about 5 seconds.
[When the power is on]
Press the TIMER button.
Within 10 seconds, press the or button to select "CLOCK".
The time display will appear for about 10 seconds.
To readjust the clock:
Perform "Setting the clock" from the beginning.
In step 2, "TIMER STANDBY" appears. If the clock is cleared, "SLEEP" appears.
!
In step 3, press the or button to selec t "CLOCK", a nd the pres s the E NT but-
!
ton.
Caution:
Unplugging the unit or power failure will clear the clock setting.
Perform "Setting the clock" from the beginning.
SD-AT100W
ENGLISH
- Setting the clock -
Preparation for Use
4
E-26
SD-AT100W(X)E3.fm02/2/27
Page 28

SD-AT100W
ENGLISH
Listening to the radio
[Front]
Press the TUNING ( or ) button to tune in to the desired station.
3
Manual tuning:
Press the TUNING button as many times as required to tune in to the desired
station.
Auto tuning:
When the TUNING button is pressed for more than 0.5 seconds, scanning will
start automatically and the tuner will stop at the first receivable broadcast station.
Notes:
This can be operated by pressing the or button on the remote control.
!
When radio interference occurs, auto scan tuning may stop automatically at
!
that point.
Auto scan tuning will skip weak signal stations.
!
To stop the auto tuning, press the TUNING button again.
!
To receive an FM stereo transmission:
Press the BAND button to display the "STEREO" indicator.
"ST" will appear when an FM broadcast is in stereo.
!
FM stereo mode indicator
Basic Operation
E-27
- Listening to the radio -
Press the ON/STAND-BY button to turn the power on.
1
Press the FUNCTION button to display FM or AM, and then the
2
BAND button repeatedly to select the desired frequency band (FM
STEREO, FM or AM).
When operating with the remote control, press the TUNER (BAND) button repeatedly to select the desired frequency band (FM STEREO, FM or AM).
FM stereo receiving indicator
If the FM reception is weak, press the BAND button to extinguish the "STEREO"
!
indicator. The reception changes to monaural, and the sound becomes clearer.
After use:
Press the ON/STAND-BY button to enter the power stand-by mode.
SD-AT100W(X)E3.fm02/2/27
Page 29

Listening to the memorised station
"
Memorising a station
(Remote control operation)
You can store 40 AM and FM stations in memory and recall them at the push of a
button. (Preset tuning)
Perform steps 1 - 3 in "Listening to the radio" on page 27.
1
Press the ENTER button to enter the preset tu n-
2
ing saving mode.
Within 5 seconds, press the TUNER PRESET (
3
or ) button to select the preset channel number.
Store the stations in memory, in order, starting with preset channel 1.
Within 5 seconds, press the ENTER button to
4
store that station in memory.
"
To recall a memorised station
(Remote control operation)
Press the TUNER PRESET ( or ) button to select the desired station.
"
Setting the AM/FM interval (valid only in
some areas)
The AM/FM span can be changed in some areas.
Before using the unit, be sure to set it to the AM/FM tuni ng interval (span) used in
your area.
SD-AT100W
ENGLISH
Preset channel Frequency and frequency band
If the "MEMORY" and preset number indicators go out before the station is
memorised, repeat the operation from step 2.
Repeat steps 1 - 4 to set other stations, or to change a preset sta-
5
tion.
When a new station is stored in memory, the station previously memorised will
be erased.
Note:
The backup function protects the memorised stations for a few hours should there be
a power failure or the AC power lead disconnection.
"
To erase all the contents of the preset
memory
(Remote control operation)
1 Press the TUNER (BAND) button.
2 Hold the CLEAR button down for 3 seconds
or more.
3 Whilst "CLEAR" is displayed, press the EN-
TER button.
To change from a 9 kHz AM (50 kHz FM) interval to a 10 kHz AM (100
kHz FM) interval:
1 Press the ON/STNA-BY button to enter the stand-by mode.
2 Hold down the button and the button for at least 4 seconds. Release the
buttons when "AM SP 10 kHz" and "FM SP 100 kHz" are displayed alternately.
To return to a 9 kHz AM (50 kHz FM) interval:
1 Press the ON/STNAD-BY button to enter the stand-by mode.
2 Hold down the button and the button for at least 4 seconds. Release the
buttons when "AM SP 9 kHz" and "FM SP 50 kHz" are displayed alternately.
Caution:
When the unit is left for a few hours after the span has been switched and the AC
!
power lead disconnected, the AM span will be automatically returned to 9 kHz (FM
span to 50 kHz). If this happens, set the span again.
When the span is switched, all the memorised stations will be cancelled.
!
SD-AT100W(X)E3.fm02/2/27
Basic Operation
E-28
- Listening to the memorised station -
4
Page 30

SD-AT100W
ENGLISH
Playing a disc
Turn on the TV, and switch the input to the "VIDEO 1" or "VIDEO 2" etc. accordingly.
[Front]
- Playing a disc -
Press the ON/STAND-BY button to
1
turn the power on.
The startup screen appears.
Press the FUNCTION button to set the input to "DVD".
2
Select "DVD" when playing a video or audio CD.
!
The same operation can be performed by pressing the DVD/CD button on
!
the remote control.
Press the OPEN/CLOSE button to open the disc compartment.
3
The disc size is automatically detected by
!
Data side
the unit (12 cm (5") or 8 cm (3")). Place the
disc in the proper position on the disc holder.
Place the disc with the label side facing to-
!
ward you.
If you are playing a double-sided disc, place
!
it with the side you want to play facing inside
the unit.
Basic Operation
E-29
Disc holder
Press the OPEN/CLOSE button to close the disc compartment.
4
If the disc you are using supports auto start, it starts playing automatically (even
if you do not press the button), as soon as you close the disc compartment.
If you cannot start playback in step 4, press the button.
5
This can be operated by pressing the DVD/CD button on the remote control.
Note:
When the unit is turned on or the input source is switched to "DVD", no operation will
be accepted for 5 seconds as the unit is proceeding the initial setting.
SD-AT100W(X)E3.fm02/2/27
Page 31

Caution:
Close the disc compartment when it is not in use. Otherwise, dust may accumulate
!
inside and cause malfunction to the unit.
The unit is slightly heated when used for a long time. It does not mean the unit is
!
damaged.
Be careful not to jam your fingers in the disc compartment cover.
!
Notes:
A safety feature automatically sets the unit to the power stand-by mode if you set
!
the volume level too high whilst playing certain types of discs. If this happens,
lower the volume level and restart playback.
Stop positions may be recorded on some discs. When you play such a disc, play-
!
back stops there.
During an operation, " " may appear indicating that the operation is disabled by
!
the disc.
[Front]
[Back]
"
To interrupt playback
Press the DVD/CD button.
To resume playback from the same point, press the DVD/CD button again.
"
To stop playback
Press the DVD/CD button.
"
To play a video CD with P. B. C. (playback
control)
Press the DVD/CD button.
1
The menu screen appears.
Select the desired menu number using the direct
2
buttons (0 - 9).
Press the ENT button to start playback.
3
The operation may vary depending on the video CD. Refer to its manual for details.
To play without displaying the menu:
After pressing the DVD/CD button, press the button.
The P. B. C. function will be cancelled, and the normal playback
will begin.
Display
SD-AT100W
ENGLISH
- Playing a disc -
Note:
Depending on the P. B. C. of the disc to be played, buttons such as , , and
may function differently.
SD-AT100W(X)E3.fm02/2/27
Basic Operation
4
E-30
Page 32

SD-AT00W
ENGLISH
Basic operation
You can skip the current chapter or t rack and pl ay the next one, or search a desired
chapter or track whilst checking the playback.
[Front]
!
Fast forward/Fast reverse (search)
Whilst a disc is playing, press the or button.
1
Example: When the button is pressed
Advanced Disc Features
- Basic operation -
!
To locate the beginning of a chapter (track)
(skip)
Whilst a disc is playing, press the or button.
The button skips to the next chapter.
"
" The button skips to the beginning of the current chapter. Press the but-
ton again to skip to the beginning of the previous chapter.
Note:
The skip feature is disabled on some discs. Some discs do not display the chapt er
(track).
15/
13/
0
00
::01 23
The scanning speed will change as follows at each press of the button.
"
1 (about 2)
The disc is forwarded by the button and reversed by the but ton.
"
Press the DVD/CD button to return to the normal playback.
2
Notes:
On some discs, the search function is disabled.
"
On a DVD, search does not operate between titles.
"
Whilst searching on a DVD or video CD the s ound is not heard and the subtit les
"
will not appear. With an audio CD you will not hear the sound.
On a video or audio CD, the search speed changes from 1 (about 2) to 2 (about
"
8). You cannot choose 3 (about 32).
When search is performed during the DVD playback, pictures may not be for-
"
warded or reversed in the s earch speed specified in this manual, dependi ng on
the disc or the scene being played.
The same operation can be performed by h olding down the or button on
"
the main unit for 2 seconds or more.
C
1
DDV
2 (about 8)
3 (about 32)
E-31
SD-AT100W(X)E4.fm02/2/27
Page 33

You can slow down or pause the playback. Whil st pausing, you can use the frame
advance feature.
[Back]
!
Slow-motion play
Whilst a disc is playing, press the SLOW button.
1
Three speeds are available. Each time the button is pressed, the speed of slowmotion playback changes in the following sequence:
SD-AT00W
ENGLISH
1 (about 1/2)
Press the button to return to the normal playback.
2
Note:
On some discs, the slow-motion playback functions are disabled.
!
Still picture/Frame advance
Whilst a disc is playing, press the button.
1
This freezes the image on the screen.
Whilst pausing, press the STILL button.
2
The picture changes frame by frame each time the STILL
Press the button to return to the normal playback.
3
Note:
Still and frame adv an ce fea tures are disabled on some d is cs .
2 (about 1/8)
3 (about 1/16)
button is pressed.
Advanced Disc Features
- Basic operation -
4
E-32
SD-AT100W(X)E4.fm02/2/27
Page 34

SD-AT00W
ENGLISH
Basic operation (continued)
You can select and play the desired title (track) or chapter.
[Back]
- Basic operation -
!
To start playback from the desired point
(direct play)
To select and play the desired title (track):
Whilst in the stop or playback
1
mode, press the DIRECT button.
Within 10 seconds, enter the title
2
(track) number using the direct
buttons (0 - 9), and then press the
ENT button.
If you enter the wrong number, press the CLEAR button and then reenter.
"
You can also select the title (track) number by pressing the or button.
"
Notes:
The direct play function is not performed with discs on which no titles (tracks) are
"
recorded.
Direct play feature is disabled on some discs.
"
Playback starts from the first chapter of the title.
"
Playback does not start if you specify a title (track) number that is not listed on the
"
disc.
Example: Display during playback
5/
83/0
01
::30 08
Example: Display during playback
5/5
83/0
01
::30 08
Advanced Disc Features
E-33
SD-AT100W(X)E4.fm02/2/27
Page 35

To select and play the desired chapter:
SD-AT00W
ENGLISH
You can resume playback from the point that the playback is stopped.
During playback, press the DIRECT button
1
twice.
Within 10 seconds, enter th e chapter number us-
2
ing the direct buttons (0 - 9), and then press the
ENT button.
If you enter the wrong number, press the CLEAR button and then reenter.
"
You can also select the chapter number by pressing the or button.
"
2
5/
3/0
01: :30 08
2
5/
10 3/0
01: :30 08
Notes:
Some DVDs may not display the chapter number.
"
Playback does not start if a chapter number higher than that on the disc is
"
selected.
To play by specifying time:
During playback, press the DIRECT button 3
1
times.
Within 10 seconds, specify the time with the di-
2
rect buttons (0 - 9) and then press the ENT button.
To specify 1 hour 23 minutes and 40 seconds, enter "012340".
"
If you enter the wrong number, press the CLEAR button and then reenter.
"
If the time is entered with the or buttons whilst setting the time, press the
"
or buttons to switch between hours, minutes, and seconds.
5/
2
10
3/0
::
2
5/
10
3/0
01: :23 40
Note:
Playback does not start if you specify the time exceeding the actual recording time.
[Front]
!
To resume playback after stopping
(sequential playback)
Whilst the disc is playing, press the DVD/CD button.
1
The system stores the point you stopped.
To restart play, press the DVD/CD button.
2
Play resumes from the point you stopped.
To cancel this operation, press the DVD/CD button twice.
3
Notes:
The sequential playback feature is disabled on some discs.
"
Depending on the disc, playback may resume from slightly b efore the stopped
"
position.
To start playback from the beginning, cancel this operation.
"
Opening the disc compartment will cancel the sequential playback operation.
"
Advanced Disc Features
- Basic operation -
4
E-34
SD-AT100W(X)E4.fm02/2/27
Page 36

SD-AT00W
ENGLISH
Useful features
You can play back the desired titles (tracks) or chapters in the sequence you want.
Maximum of 20 titles (tracks) or chapters can be programmed.
[Back]
- Useful features -
!
To play in the desired order (programmed
playback)
To play in the desired title (track) order:
Example: To enter the 12th title on a DVD
Whilst stopped, press the PROGRAM
1
button.
The programming screen is displayed.
Use the or button to select the de-
2
sired title (track) number, and then
press the ENT button.
The cursor moves to the next position when programming is completed.
"
Repeat the procedure above if you want to enter other title numbers. You can
"
enter up to 20 titles in the sequence you want to play.
If you enter the wrong number, press the CLEAR button and then reenter.
"
Press the button to start play.
3
The unit stops after playing the tracks in the programmed order.
"
The programme conte nt w ill be stor ed in the memory.
"
To change the programmed contents:
Repeat the above procedures from step 1.
LIT E PROGRAMT
LANGUAGE :
-- -- -- --
T T T T
T--------
T T T T
-- -- -- --
T T T T
LIT E PROGRAMT
T T T T
12
T--------
T T T T
-- -- -- --
T T T T
=T ITLE
T
=T ITLE
T
-- -- --
Advanced Disc Features
E-35
SD-AT100W(X)E4.fm02/2/27
Page 37

To play chapters in the desired sequence within a title:
Whilst stopped, press the PROGR AM
1
button twice.
The programming screen is displayed.
Use the or button to sele ct the de-
2
sired title number, and then press the
ENT button.
If you enter the wrong number, press the CLEAR button and then reenter.
Use the or button to sele ct the de-
3
sired chapter number, and then press
the ENT button.
The cursor moves to the next position when programming is completed.
!
Repeat the procedure above if you want to enter other chapter numbers. You
!
can enter up to 20 chapters in the sequence you want to play.
Press the button to start play.
4
The unit stops after playing the chapters in the programmed order.
!
The programme conte nt w ill b e stor e d in the mem or y.
!
To change the programmed contents:
Repeat the above procedures from step 1.
PHA T PROER GRAMC
--
-
C
-- -- -- --
C--------
-- -- -- --
C C C C
PHA T PROER GRAMC
-------
C C C C
C--------
-- -- -- ---
C C C C
PHA T PROER GRAMC
01 -- -- --
C C C C
C--------
-- -- -- --
C C C C
-
C C C
-
C C C
-
-
-
-
-
-
-
C C C
-
-
5
-
-
C C C
-
-
-
SD-AT00W
ENGLISH
Notes:
You can also select the title (track) or c hapter number by pressing the 0 - 9 but-
!
tons.
Programming cannot be performed whilst paused or in the playback mode.
PHA TE RC=
CLIT E:T=T
-
-
-
-
-
-
!
Sequence programming does not work w ith a disc that does not include title or
!
chapter information.
Sequence programming does not work with a disc that disables programming.
!
The number you enter is not stored in memory if there is no corresponding title
!
(track) or chapter number on the disc.
To exit the programming procedure halfway thr ough, press the RETURN but-
PHA TE RC=
CLI2TE:0T=T
-
-
-
-
-
-
!
ton.
Once programmed, the contents will be memorised until they are changed or the
!
disc is removed. To perform programmed playback with the same disc, pr ess the
PROGRAM button and start playback.
You can refer to the display on the unit to
!
Programme indicator
programme a CD.
PHA TE RC=
CLI2TE:0T=T
-
-
-
-
-
-
Track number Programme number
- Useful features -
Advanced Disc Features
4
E-36
SD-AT100W(X)E4.fm02/2/27
Page 38

SD-AT00W
ENGLISH
Useful features (continued)
You can play tracks in random order or play all the tracks repeatedly.
[Front]
"
To play in random order (random play)
Whilst the disc is stopped, press the PLAY MODE button repeatedly
to select "RANDOM" and press the DVD/CD button.
Random play will start.
- Useful features -
"
To play repeatedly (repeat play)
Whilst the disc is stopped, press the PLAY MODE button repeatedly
to select "REPEAT" and press the DVD/CD button.
Repeat play will start.
To cancel repeat play:
Press the PLAY MODE button repeatedly to select "NORMAL".
Caution:
After performing repeat play, be sure to press the D VD/CD button. Otherwise, the
disc will play continuously.
Notes:
You may not be able to use this function with some discs.
!
If you select "REPEAT" during playback, repeat play starts from that point.
!
Advanced Disc Features
E-37
To cancel random play:
Press the PLAY MODE button repeatedly to select "NORMAL".
Notes:
You may not be able to use this function with some discs.
!
When all of the tracks have been played in random playback mode, playback will
!
stop automatically.
If you select "RANDOM" during playback, random play starts from that point.
!
Random play is not allowed during programmed playback.
!
SD-AT100W(X)E4.fm02/2/27
Page 39

[Back]
[Front]
"
To play the contents between the specified
points repeatedly (A-B repeat)
You can play the desired portion repeatedly by specifying it during playback.
Whilst the disc is playing, press the A
1
- B REPEAT button.
This registers the start point (A).
Press the A - B REPEAT button again.
2
This starts A-B repeat from the start point (A) to the end point (B).
To cancel A - B repeat play:
Press the A - B REPEAT button.
Notes:
A-B repeat play is disabled on some discs.
!
A-B repeat play is possible only within a title.
!
A-B repeat function does not operate on the portion with multiple angles.
!
A-B repeat play is not possible during the programmed playback.
!
"
To select a title from the top menu of the
25/
83/
0
25/
83/
0
A
AB
disc
On a DVD with multiple titles, you can select a title from the top menu.
Whilst the disc is stopped, press the
1
TOP MENU button to display its title
menu.
Use the , , or button to select the tit le, and then press the EN-
2
TER button.
The selected title is played.
!
Depending on the disc, a title can be selected by pressing the direct buttons
!
(0 - 9) on the back of the remote control.
Notes:
The procedure shown here provides onl y general steps. The actual procedur e for
!
using the title menu depends on the disc you are using. See the disc jacket for
details.
If the disc you are using does not have a title menu, nothing appears on the
!
screen.
Example
21 Drama Action
43 SF Comedy
DDV
DDV
SD-AT00W
ENGLISH
Advanced Disc Features
- Useful features -
4
E-38
SD-AT100W(X)E4.fm02/2/27
Page 40

SD-AT00W
ENGLISH
Various settings
You can change the subtitle language or hide the subtitle during playback.
Setting the unit to the power stand-by mode or replacing the discs displays the language of the initial setting.
To always display a chosen language, set it on the initial setting screen (page 21).
[Back]
"
To change the subtitle language
but-
Whilst a disc is playing, press the SUBTITLE
1
button.
Within 10 seconds, press the SUBTITLE
2
ton repeatedly to select the desired subtitle language.
You can perform the same operation by pressing the or button.
Notes:
Some DVDs prohibit changing the subtitle language.
!
If no subtitles are recorded on the disc, "XX" is displayed.
!
It may take a little time to switch the subtitle language to the selected one.
!
"
To hide the subtitle
NGL I SHE
1
ERMANG
2
Advanced Disc Features
E-39
Whilst the subtitle is displayed, press the SUBTITLE
1
Within 10 seconds, press the SUBTITLE
2
ton repeatedly to select "OFF".
You can perform the same operation by pressing the or button.
- Various settings -
Note:
Some DVDs prohibit the removal of subtitles.
but-
button.
OFF
SD-AT100W(X)E4.fm02/2/27
Page 41

During playback, you can change the audio language.
Turning the power off or replacing the discs change the audio language to the one of
the initial s etting.
To listen to a selected audio language, set it on the initial setting screen (page 21).
[Back]
"
To change the audio language
You can change the audio language if multiple audio languages or other audio systems are recorded on the disc.
Whilst a disc is playing, press the
1
SOUND button.
Within 10 seconds, press the SOUND button repeatedly to se-
2
lect the desired audio number.
The audio language or audio system is changed to the selected one.
!
You can perform the same operation by pressing the or button.
!
Example:
1
2
The audio language on some DVDs may not be changed.
!
The audio language on some DVDs may not be cha nged ev en if the SOUND
!
button is pressed during playback. In t hat case, change the setting on the disc
menu (see page 46).
For audio language and audio system, refer to the manual of the disc.
!
"
To change the angle
You can change the angle of view when playing a DVD video disc that contains
scenes recorded from multiple angles.
1: Original <English> (DTS 5.1 Surround)
D
2: Japanese (Dolby Digital 5.1 Surround)
hc15
.
1
SD-AT00W
ENGLISH
- Various settings -
When "ANGLE" is displaye d on the m ain u n it, p ress th e A NG LE
1
button.
Within 10 seconds, press the ANGL E button repeatedly to select
2
the desired angle number.
You can perform the same operation by pressing the or button.
Notes:
Some DVDs prohibit changing the angle.
!
The angle number is not displayed if the disc on which angle not recorded is
!
entered. "XX" is displayed instead.
Refer to the manual of the disc as the operation may vary depending on the disc.
!
SD-AT100W(X)E4.fm02/2/27
Advanced Disc Features
E-40
4
Page 42

SD-AT00W
ENGLISH
Advanced Disc Features
Various settings (continued)
The image or its quality can be adjusted during playback.
[Back]
- Various settings -
!
To brighten an image
During playback, press the DIGITAL
1
GAMMA button repeatedly to select
"ON".
"ON" and "OFF" will be switched by each press of this button.
Within 10 seconds, press the or
2
button to set the level.
To restore the original brightness , press the DIGITAL G AMMA but-
3
ton repeatedly to select "OFF".
Level Setting Level Setting
OFF Normal image ON Brighter
ON Slightly brighter ON A lot brighter
!
To improve the image quality
During playback, press the DIGITAL
1
S.PICTURE button repeatedly to select "ON".
"ON" and "OFF" will be switched by each press of this button.
Within 10 seconds, press the or
2
button to set the level.
G
ON
G
ON
S
ON
S
ON
DDV
E-41
To restore the original picture quality, select "OFF" by pressing
3
the DIGITAL S.PICTURE button repeatedly.
Level Setting Level Setting
OFF Normal ON A lot clearer
ON Slightly clearer ON Soft image quality
ON Clearer
SD-AT100W(X)E5.fm02/2/27
Page 43

ESPA„ OL
You can magnify images during DVD playback.
[Front]
!
To zoom in on an image (zoom)
Whilst a disc is playing, press the
1
ZOOM button.
Each press of the ZOOM button cycles through the zoom settings as follows:
ZOOM: 1 ( 1.2) ZOOM: 2 ( 1.5) ZOOM: 3 ( 2.0) Off (The indicator goes
out.).
Note that all of the above zoom factors are approximate only.
To shift the view and display the desired part of a zoomed image,
2
ENTER
ENTER
ZOOM indicator
press the , , or button repeatedly.
SELECT
ZOOM:1
RETURN
SD-AT00W
ENGLISH
Press the button.
Press the
ZOOM button.
Press the button.
To return to the normal image size, press the ZOOM button repeat-
3
Press the button.
Press the button.
edly to select "ZOOM OFF" (The indicator goes out.).
Shifting of the zoomed image is cancelled by canceling the zoom operation.
Notes:
An image may become distorted when zoomed.
"
Subtitles cannot be zoomed.
"
When the zoom indicator changes from white to red whilst shifting t he image, you
"
cannot shift it any further.
When the scene with multiple angles appears whi lst shifting t he image, the zoom
"
operation is cancelled automatically.
When the TV mode in the initial setting is set to , the zoom factor will not be
"
set to "ZOOM: 3" with a pan scan disc.
SD-AT100W(X)E5.fm02/2/27
Advanced Disc Features
E-42
- Various settings -
4
Page 44

SD-AT00W
ENGLISH
Various settings (continued)
You can display or hide the operation indicators on the TV screen, or change the display on the unit.
[Front]
!
To change the display on the unit
Whilst the disc is playing, press the DISPLAY butto n. (The display is changed at
each press of this button.)
DVD
Disc Indicator
Advanced Disc Features
- Various settings -
!
To change the display on TV screen
Whilst the disc is playing, press the ON SCREE N button. (The di splay is changed at
each press of this button.)
Example: DVD
Always displayed Not displayed Displayed for approx. 3
25/
83/
01
0
::23 40
DDV
25/
83/
01
::23 40
seconds
0
Title number (up to
99)
Chapter
number (up
to 999)
Elapsed time of chapter Elapsed time of title
Audio CD or video CD
PBC indicator
Track
number
(up to 99)
Elapsed
time of track
Track
number
Total
elapsed
time
Notes:
"PBC" is displayed during the playback of a video CD with P. B. C. (playback con-
"
trol) and the track number does not appear.
The title number, chapter (track) number, or elapsed time may not be displayed
"
with some dis cs.
DDV
E-43
SD-AT100W(X)E5.fm02/2/27
Page 45

!
DVD mode operation indicators
The following are examples of display indicators that appear during DVD playback.
SD-AT00W
ENGLISH
Operation T V screen On the unit
Pause
Operation T V screen On the unit
When the power is
on without a disc
Disc data is being
read
The word scrolls.
Type of disc
DDV
Stop
DDV
Play
DDV
Displayed for approx. 3 seconds
Slow
Fast Forward
Fast Reverse
When resume
function can be
used
1
1
1
DDV
DDV
DDV
DDV
DDV
RESUME
Displayed for approx. 3 seconds
Displayed for approx. 3 seconds
Advanced Disc Features
- Various settings -
4
E-44
SD-AT100W(X)E5.fm02/2/27
Page 46

SD-AT00W
ENGLISH
Advanced Disc Features
Various settings (continued)
On the playback control screen, various settings can be changed at the same time.
[Back]
!
To change the setting on the playback
control screen
Whilst a disc is playing, press the PLAY CONTROL button.
1
- Various settings -
Press the or button to select the item, and press the ENT but-
2
ton.
Example: DVD
1 Title number
2 Chapter number
3 Elapsed play time
4 Subtitle
5 Angle
6 Audio language
7Gamma
8 Super picture
9 BITRATE indicator (unchangeable)
1
2
3
4
5
6
7
8
G
S
01
1
1
1
ON
ON
25/
83/
0
::30 08
NGL I SHE
00 10
BITRATE
SELECT
ENTER
ENTER
DDV
Mbps
RETURN
9
Press the , , or button to change the setting and press the
3
ENT button.
Example: Gamma is selected
N2CMP
L
hc15
.
G
ON
S
ON
00 10
BITRATE
ENTER
ENTER
SELECT
RETURN
Repeat the operation as instructed.
(The number of repetition depends on the setting item.)
To change other settings, begin from step 2.
Press the PLAY CONTROL button.
4
The setting is memorised and the playback screen reappears.
Notes:
Some items may not be selected depending on the type of the disc.
"
If the RETURN button is pressed whilst selecti ng an item or setting, t he previ-
"
ous screen appears.
To select items directly, use the following buttons.
(Refer to pages 33 - 34 and 39 - 41 for details.)
Item Button Item Button
Direct title
skip
Direct chapter skip
Direct time
skip
Subtitle Press the SUBTITLE
Press the DIRECT button once.
Press the DIRECT button twice.
Press the DIRECT button 3 times.
button.
Angle Press the ANGLE but-
ton.
Audio language
Press the SOUND
button.
Gamma Press the DIGITAL
GAMMA button.
Super picture Pres s the DIGITAL
S.PICTURE button.
Mbps
E-45
SD-AT100W(X)E5.fm02/2/27
Page 47

You can select the desired subtitle or audio language and sound system (Dolby Digital (5.1ch) or DTS sound) on your DVD if it has a disc menu.
[Front]
!
To set on the disc menu
Whilst the disc is stoppe d or played,
1
press the MENU button to display
the disc menu.
12Audio
Press the , , or button to select the item to be changed, and
2
press the ENTER button.
Press the , , or button to change the setting and press the
3
ENTER button.
The playback display reappears by pressing the MENU button.
Note:
The procedure shown here provides only general steps. The actual procedure fo r
using the disc menu depends on the disc you are using. See the disc jacket for
details.
Example
MENU
Subtitle
SD-AT00W
ENGLISH
- Various settings -
Advanced Disc Features
4
E-46
SD-AT100W(X)E5.fm02/2/27
Page 48

SD-AT00W
ENGLISH
Enjoy the surround sound (sound mode)
Types of surround Source Contents Switchable sound
Dolby Digital
One of the digital audio systems for theatrial use. You can enjoy the stereophonic effect in the home theatre system.
Stereo
mode
DTS (Digital Theater Systems)
Dolby Pro Logic II
Advanced Features
- Enjoy the surround sound (sound mode) -
Disc with this trademark The disc recorded in the Dolby Dig it al system is recognised
by this unit automatically when it is played back.
One of the digital audio systems for theatrical use. As the
sound quality is emphasised, you can enjoy the realistic
sound effect in the home theatre system. The disc recorded
in the DTS system is recognised by this unit automatically
when it is played back.
Disc with this trademark Virtual
Stereo-recorded discs and videotapes When playing a stereo-recorded disc or videotape, it is recog-
nised by the Dolby Pro Logic II function and the sound is
changed to the 5.1ch digital surround sound automatically.
More natural sound effect can be achieved.
If (*) is selected, the " " indicator goes out.
Virtual
Standard
Dynamic sound
Stereo
Standard
Dynamic sound
Stereo (*)
Virtual (* )
Standard
Dynamic sound
E-47
SD-AT100W(X)E5.fm02/2/27
Page 49

Acoustic effect
Standard
The maximum of 5.1ch surround sound
is reproduced to provide three-dimensional effect. This unit automatically
emits the 5.1ch sound according to the
recorded audio signal.
appears in the display
of the unit.
Dynamic sound
You can enjoy the normal surround with various scenes.
MOVIE: The bass level is increased for powerful sound effect.
MUSIC: You can enjoy lively sound by producing the articulate sound.
NIGHT: Soft but powerful sound is achieved even at low volumes.
Virtual
Although no sound is heard from the
surround speakers, you can still enjoy
the 2.1ch surround sound as if they exist.
It sounds as if speakers are also placed
in .
appears in the display
of the unit.
Stereo
You can enjoy the great acoustic effects of the front speakers and subwoofer.
The input signal is recognised automatically and the indicator lights up.
This indicator is lit when the 2ch signals are ent ered to extend them to the 5.1c h
"
surround sound.
Even the 2ch sound recorded with Dolby Digital will be extended to the 5.1ch.
"
Caution:
Dolby Digital does not function if the audio output is set to "D-PCM" (page 23).
Notes:
You can switch the audio whilst playing the di sc of multiple types (Dolby Digital,
"
DTS, etc.) (page 40).
When the surround mode is set to normal, the sound of monaural signals is heard
"
only from the centre speaker.
When the surround mode is set to virtual, the same monaural sound is reproduced
"
in the both of the right and left channels.
The surround indicator is lit according to the input audio source.
"
1 Front Left Signal Indicator
2 Centre Signal Indicator
3 Front Right Signal Indicator
4LFE indicator
5 Surround Left Signal Indicator
6 Surround Monaural Signal Indicator
7 Surround Right Signal Indicator
4
1
5
23
6
SD-AT00W
ENGLISH
Advanced Features
- Enjoy the surround sound (sound mode) -
7
4
E-48
SD-AT100W(X)E5.fm02/2/27
Page 50

SD-AT00W
ENGLISH
Enjoy the surround sound (sound mode) (continued)
!
Sound mode
To enjoy in standard mode
Whilst the disc is playing, press the STANDARD
button.
appears in the display of the unit.
To enjoy in virtual mode
Whilst the disc is playing, press the VIRTUAL button.
appears in the display of the unit.
To enjoy in stereo mode
Whilst the disc is playing, press the STEREO button.
Advanced Features
Notes:
- Enjoy the surround sound (sound mode) -
In the standard mode, you can change t he dynamic sound to "MOVIE", "M USIC",
"
or "NIGHT".
" Some discs are recorded at 96kHz of sampling frequency. When this type of disc
is played, the sound mode is changed to "STEREO" aut omatically. The sound
mode cannot be changed during its playback.
Example: Dolby Digital 5.1ch
Example: Dolby Digital 5.1ch
Example: Dolby Digital 5.1ch
!
To enjoy with dynamic sound
Whilst the disc is playing, press the DYNAMIC SOUND button.
Each press of this button changes the mode in the order of "MOVIE" "MUSIC"
"NIGHT".
MOVIE: The bass level is increased for powerful sound effect.
MUSIC: You can enjoy lively sound by producing the articulate sound.
NIGHT: Soft but powerful sound is achieved even at low volumes.
Press the STANDARD button to restore the normal surround sound.
Note:
The sound mode is changed to "STANDARD" by pressing the DYNAMIC SOUND
button whilst in the stereo or virtual mode.
[Front]
E-49
SD-AT100W(X)E5.fm02/2/27
Page 51

Speaker settings
[Back]
!
Speaker size setting
You can change the sizes of the front speakers, centre speaker, and surround speakers, or turn on or off the centre speaker, surround speakers, or subwoofer.
The speaker settings are not displayed on the TV screen.
"
Press the SET UP AMP button.
1
Within 10 seconds, press the or button to select "SP SIZE", and
2
press the ENT button.
Within 10 seconds, press the or button to
3
select the desired sp eaker.
The indicators of selected speakers flash.
Within 10 seconds, press the or button to select their sizes.
4
To set sizes of other speakers, repeat the operation from step 3.
"
You can complete the setting operation by pressing the RETURN button
"
twice.
Speaker type Speaker size
Front speaker (Left, Right) F-LARGE * Large diameter
F-SMALL Small diameter
Centre speaker C-LARGE Large diameter
C-SMALL * Small diameter
C-NO OFF
Surround speaker (Left, Right) S-LARGE Large diameter
S-SMALL * Small diameter
S-NO OFF
Subwoofer SW-YES * ON
SW-NO OFF
(*) indicates the default setting (recommended for the supplied speakers).
Caution:
To set the speaker size, set the sound mode to "STANDARD". In the stereo or vir-
"
tual mode, only the subwoofer can be set.
F-SMALL and SW-NO cannot be combined. If the su bwoofer is changed to SW-
"
NO whilst the front speakers are set to F-SMALL, they are changed t o F-LARGE.
When the front speakers are changed to F-SMALL whilst the subwoofer is set to
SW-NO, it is changed to SW-YES.
SD-AT00W
ENGLISH
- Speaker settings -
Advanced Features
4
E-50
SD-AT100W(X)E5.fm02/2/27
Page 52

SD-AT00W
ENGLISH
Speaker settings (continued)
[Back]
- Speaker settings -
!
Speaker delay setting
Advanced Features
When some of the speakers are at a different distance from the listening point, you
can select the speaker delay to make i t seem as though the speak er distances are
the same.
Press the SET UP AMP button.
1
Within 10 seconds, press the or button to select "SP DELAY",
2
and press the ENT button.
Within 30 seconds, press the or button to select the desired
3
speaker.
Within 30 seconds, press the or button to select the distance
4
and press the ENT button.
You can change the distance in 0.1 m steps.
"
To set the distance of other speakers, repeat the operation from step 3.
"
You can complete the setting operation by pressing the RETURN button
"
twice.
Speaker type Adjustable range
FL Front speaker (Left) 0.1 - 9.0 m
CT Centre speaker 0.1 - 9.0 m
FR Front speaker (Right) 0.1 - 9.0 m
SR Surround speaker (Right) 0.1 - 9.0 m
SL Surround speaker (Left) 0.1 - 9.0 m
SW Subwoofer 0.1 - 9.0 m
Initial setting of the distance of all the speakers is 2.0 m.
Measure the distance between each speaker and the listening position, and set
the speaker delay.
CT
FL
SW
SL
In the above illustration, the front speaker s, c entr e speaker, and subwoofer are positioned at 3 m, and the surround speakers are at 4 m from the listening position.
This unit calculates the delay time automatically according to the distance you set,
and provide the same effect as if they are placed at the sam e distance from the listening position.
3 m
3 m
4 m
FR
3 m
3 m
4 m
SR
E-51
SD-AT100W(X)E6.fm02/2/27
Page 53

SD-AT00W
ENGLISH
!
Speaker level setting
If sounds from the speakers are uneven, you can equalise them by adjusting the
speaker levels.
Press the SET UP AMP button.
1
Within 10 seconds, press the or button to select "SP LEVEL",
2
and press the ENT button.
Within 10 seconds, press the or button to select the desired
3
speaker.
Within 10 seconds, press the or button to adjust the level.
4
You can adjust the level at 1 dB intervals.
"
To adjust the levels of other speakers, repeat the operation from step 3.
"
You can complete the setting operation by pressing the RETURN button
"
twice.
Speaker type Adjustable range
FL Front speaker (Left) - 6 dB - + 6 dB
CT Centre speaker - 6 dB - + 6 dB
FR Front speaker (Right) - 6 dB - + 6 dB
SR Surround speaker (Right) - 6 dB - + 6 dB
SL Surround speaker (Left) - 6 dB - + 6 dB
SW Subwoofer - 10 dB - + 10 dB
Note:
Adjust the level of the subwoofer if the sound from it is distorted.
!
Test tone
You can check the sound output from t he speakers. (If the speaker levels are not
equalised, they can be adjusted, too.)
Press the SET UP AMP button.
1
Within 10 seconds, press the or button to select "TONE", and
2
press the ENT button.
The test tone will be heard from each speaker, in order, at about 2-second intervals.
FL CT FR
SW SL SR
To finish checking, press the RETURN button twice.
3
If the levels are not equal:
Whilst the test tone sounds, press the or to adjust the level.
You can select a speaker by pressing the or button.
Note:
If NO (OFF) is selected for a speaker in the speaker size setting, no test tone will be
heard from it.
- Speaker settings -
Advanced Features
4
E-52
SD-AT100W(X)E6.fm02/2/27
Page 54

SD-AT00W
ENGLISH
Advanced Features
Timer and sleep operation
The unit turns on and plays the desired source (DVD, video CD, CD, tuner) at the
preset time.
[Back]
- Timer and sleep operation -
!
Setting the timer
Before setting timer:
1 Set the unit on time (page 26).
If it is not on time, you cannot use the timer function.
2 Prepare for playback and set the TV to the desired channel.
Turn the power on and press the TIMER but-
1
ton.
Set the unit on time if "TIMER STANDBY" does not appear.
Within 10 seconds, press the or button to
2
select "TIMER SET", and press the ENT button.
Press the or button to adjust the hour and
3
then press the ENT button.
Press the or button to adjust the minutes and then press the
4
ENT button.
The start time is set and the finish time (1 hour later) will be displayed automatically.
Set the time to finish as in steps 3 and 4 above.
5
Switch input with the or button,
6
and then press the ENT button.
When you select the tuner, select a station
by pressing the or button, and then
press the ENT button.
Adjust the volume with the or button and press the E NT button.
7
Settings are displayed in order and the unit
will enter the timer stand-by mode.
DVD/CD AV1
AV3-A
TUNER
AV3-D
AV2
E-53
SD-AT100W(X)E6.fm02/2/27
Page 55

To check the timer setting: Reusing the memorised timer setting:
1 Whilst in the timer playback stand-by mode,
press the TIMER button.
2 Within 10 seconds, press the or button to select "TIMER CALL", and press
the ENT button.
The unit returns to the timer playback stand-by mode after the setting contents
are displayed in order.
The timer setting will be memorised once it is entered. To reuse the same setting,
perform the following operations.
1 Turn the power on and press the TIMER button.
2 Within 10 seconds, press the ENT button.
After the setting contents are displayed in order, the unit is set to the timer playback stand-by mode.
Changing the timer setting:
Turn the power on, and repeat the operation from s tep 1 in " Setting the t imer" ( page
53).
SD-AT00W
ENGLISH
When the start time is reached:
Playback starts automatically and the volume increases gradually.
The timer playback indicator flashes.
Timer playback indicator Timer setting indicator
When the finish time is reached:
The unit is set to the power stand-by mode automatically.
Cancelling the timer playback:
Timer playback is cancelled by turning the power on whilst in the timer playback
stand-by mode. The same operation can be performed in the following procedure
without turning the power on.
1 Press the TIMER button.
"TIMER CANCEL" will appear.
2 Within 10 seconds, press the ENT button.
Timer playback will be cancelled (th e contents of the setting w ill not be canc elled).
Caution:
The contents of the setting will be erased if the unit is unplugged or a power failure
"
occurs. In such cases, set the timer again.
This unit cannot set the timer of other equipment.
"
When setting the timer playback using the digital tuner, TV, VCR, or the connected
"
equipment should be set to timer playback at the same time.
Note:
The timer operation is disabled with discs containing menus.
- Timer and sleep operation -
Advanced Features
4
E-54
SD-AT100W(X)E6.fm02/2/27
Page 56

SD-AT00W
ENGLISH
Timer and sleep operation (continued)
!
Setting the sleep timer
You can set the unit to the power stand-by mode at the specified time.
Whilst the disc is playing, press the TIMER
1
button.
Within 10 seconds, press the or button to
2
select "SLEEP SET", and press the ENT button.
Press the or button to select set the time.
3
(Maximum: 3 hours - Minimum: 1 minute)
"
"
Press the ENT button.
4
The sleep timer indicator lights up and playback begins.
- Timer and sleep operation -
Advanced Features
2 hours - 5 minutes 5-minute intervals
5 minutes - 1 minute 1-minute intervals
To confirm the remaining sleep time:
1 Whilst "SLEEP" is indicated, press the TIMER button.
2 Within 10 seconds, press the or button to select "SLEEP".
Remaining sleep time
The remaining sleep time is displayed for about 10 seconds.
"
You can change the remaining sleep time whilst it is di splayed by pressing the
"
ENT button (steps 3 - 4).
To cancel the sleep operation:
Sleep operation is cancelled by turning the power on whilst "SLEEP" is indicated.
The same operation can be performed in the following procedure without turning the
power on.
1 Press the TIMER button.
2 Within 10 seconds, press the or button to select "SLEEP OFF", and press the
ENT button.
!
To use timer and sleep operation together
You can fall asleep and wake up to the same CD.
Set the sleep timer (steps 1 - 4).
1
Sleep operation starts.
Set the timer playback.
2
(Setting the timer on page 53, steps 1 - 7)
Sleep timer setting Timer playback setting Timer playback start
E-55
Your system will enter the power stand-by mode automatically af-
5
ter the preset time has elapsed.
The volume will be turned down 1 minute before the sleep operation finishes.
You cannot change the volume.
Caution:
This unit cannot set the sleep timer of other equipment.
When setting the sleep timer using the digital tuner, TV, or VCR, the connected
equipment should be set to sleep timer at the same time.
1 minute - 2 hours
automatically stop
Desired time1minute - 2hours
Finish timeSleep operation will
SD-AT100W(X)E6.fm02/2/27
Page 57

Connecting other equipment
!
Connecting VCR
To connect to the VIDEO socket (AV 2) with video cable:
To connect to the S-VIDEO socket (AV 2) with S-video cable:
Audio cable
(commercially available)
SD-AT00W
ENGLISH
To video
input socket
To video
output socket
Video audio cable
(commercially available)
To audio
input sockets
To audio
output sockets
To video
input socket
To audio
input sockets
VCR
Video audio cable
(commercially available)
To video
output socket
To audio
output sockets
To S-video
input
socket
To S-video
output socket
S-video cable
(commercially available)
VCR
To audio
input sockets
S-video cable
(commercially available)
To audio
output sockets
Audio cable
(commercially available)
To audio
input
sockets
To S-video
input socket
To audio
output
sockets
To S-video
output socket
- Connecting other equipment -
Advanced Features
4
Notes:
To record sound with VCR, set the sound mode t o "STEREO". If it is set to "VIR-
"
TUAL", you will hear the virtual sound. If set to "STANDARD", the s ound will not
be recorded.
Do not plug in or unplug the headphones whilst recording. The sound may skip.
"
SD-AT100W(X)E6.fm02/2/27
E-56
Page 58

SD-AT00W
ENGLISH
Connecting other equipment (continued)
!
Connecting digital tuner, etc.
The S-video cable offers you clearer images. You can hear the sound by connecting
one of the audio cable or optical digital cable. I f you are using the digital tuner with
the optical output socket, you can enjoy better sound by connecting the tuner to the
optical digital input socket of this unit.
To connect to the VIDEO socket (AV 3) with video cable:
To optical digital audio
input socket
To connect to the S-VIDEO socket (AV 3) with S-video cable:
- Connecting other equipment -
Advanced Features
Digital tuner, etc.
To S-video
input socket
S-video cable
(commercially available)
To S-video
output socket
To optical digital audio
input socket
Optical digital cable
(option: AD-M3DC)
To audio
input sockets
Audio cable
(commercially available)
To audio
output sockets
To optical digital audio
output socket
Optical digital cable
(option: AD-M3DC)
To video
input socket
Digital tuner, etc.
To video
output socket
To audio
input sockets
Video audio cable
(commercially available)
To audio
output sockets
To optical digital audio
output socket
Caution:
Turn off the other equipment before making this connection.
Notes:
Change the audio between analogue and digital with the AV 3 button. (page 60)
"
When connecting the cable to the S-video socket of this unit, connect the other
"
end of the cable to the S-video socket on the TV monitor. This unit cannot convert
the S-video signals into video signals or the other way.
Insert the plugs fully to avoid fuzzy pictures or noise.
"
E-57
SD-AT100W(X)E6.fm02/2/27
Page 59

SD-AT00W
ENGLISH
!
Digitally connecting MD recorder or surround processor, etc.
By connecting this unit to processors or amplifiers that support Dolby Digital/DTS surround, you can enjoy the sound via external equipment. An MD recor der can al so be
connected to this unit. (Refer to the operation manual of the equipment to be connected.)
To optical digital audio
output socket
MD recorder
To optical digital
audio input socket
Optical digital cable
(option: AD-M1DC)
Dolby Digital/DTS
processor or amplifier
Optical digital socket cap
When using the optical digital socket, remove the cap
first. After using the socket, replace the cap.
Caution:
Turn off the other equipment before making this connection.
Notes:
Do not change the sound mode whilst recording. The sound may skip.
"
Do not plug in or unplug the headphones whilst recording. The sound may skip.
"
To record the Dolby Digital of a DVD, set the audio output to "D-PCM" (se e page
"
23).
If the PCM sound is recorded on the DVD, set the audio output to PCM (see page
"
40).
DTS sound on a DVD cannot be recorded.
"
- Connecting other equipment -
Advanced Features
4
To optical digital audio
input socket
Optical digital cable
(option: AD-M3DC)
E-58
SD-AT100W(X)E6.fm02/2/27
Page 60

SD-AT00W
ENGLISH
Connecting other equipment (continued)
!
Using alternate subwoofer
The bass sound can be emphasised by connecting a commercially available subwoofer.
Commercially available subwoofer
(amplifier built in)
- Connecting other equipment -
Advanced Features
To subwoofer
output socket
Audio cable
(commercially available)
!
Headphones
Before plugging in or unplugging the headphones, reduce the volume.
"
Be sure your headphones have a 3.5 mm (1/8") diameter plug and are between 16
"
ohms and 50 ohms impedance. The recommended impedance is 32 ohms.
Plugging in the headphones disconnects the speakers automatically. Adjust the
"
volume using the VOLUME buttons.
You cannot use the surround feature with headphones.
"
E-59
To subwoofer
input socket
Notes:
No sound is heard from the speaker in which an amplifier is not built in.
"
By changing the speaker settings, both the supplied and separately purchased
"
subwoofers can be set simultaneously.
SD-AT100W(X)E6.fm02/2/27
Page 61
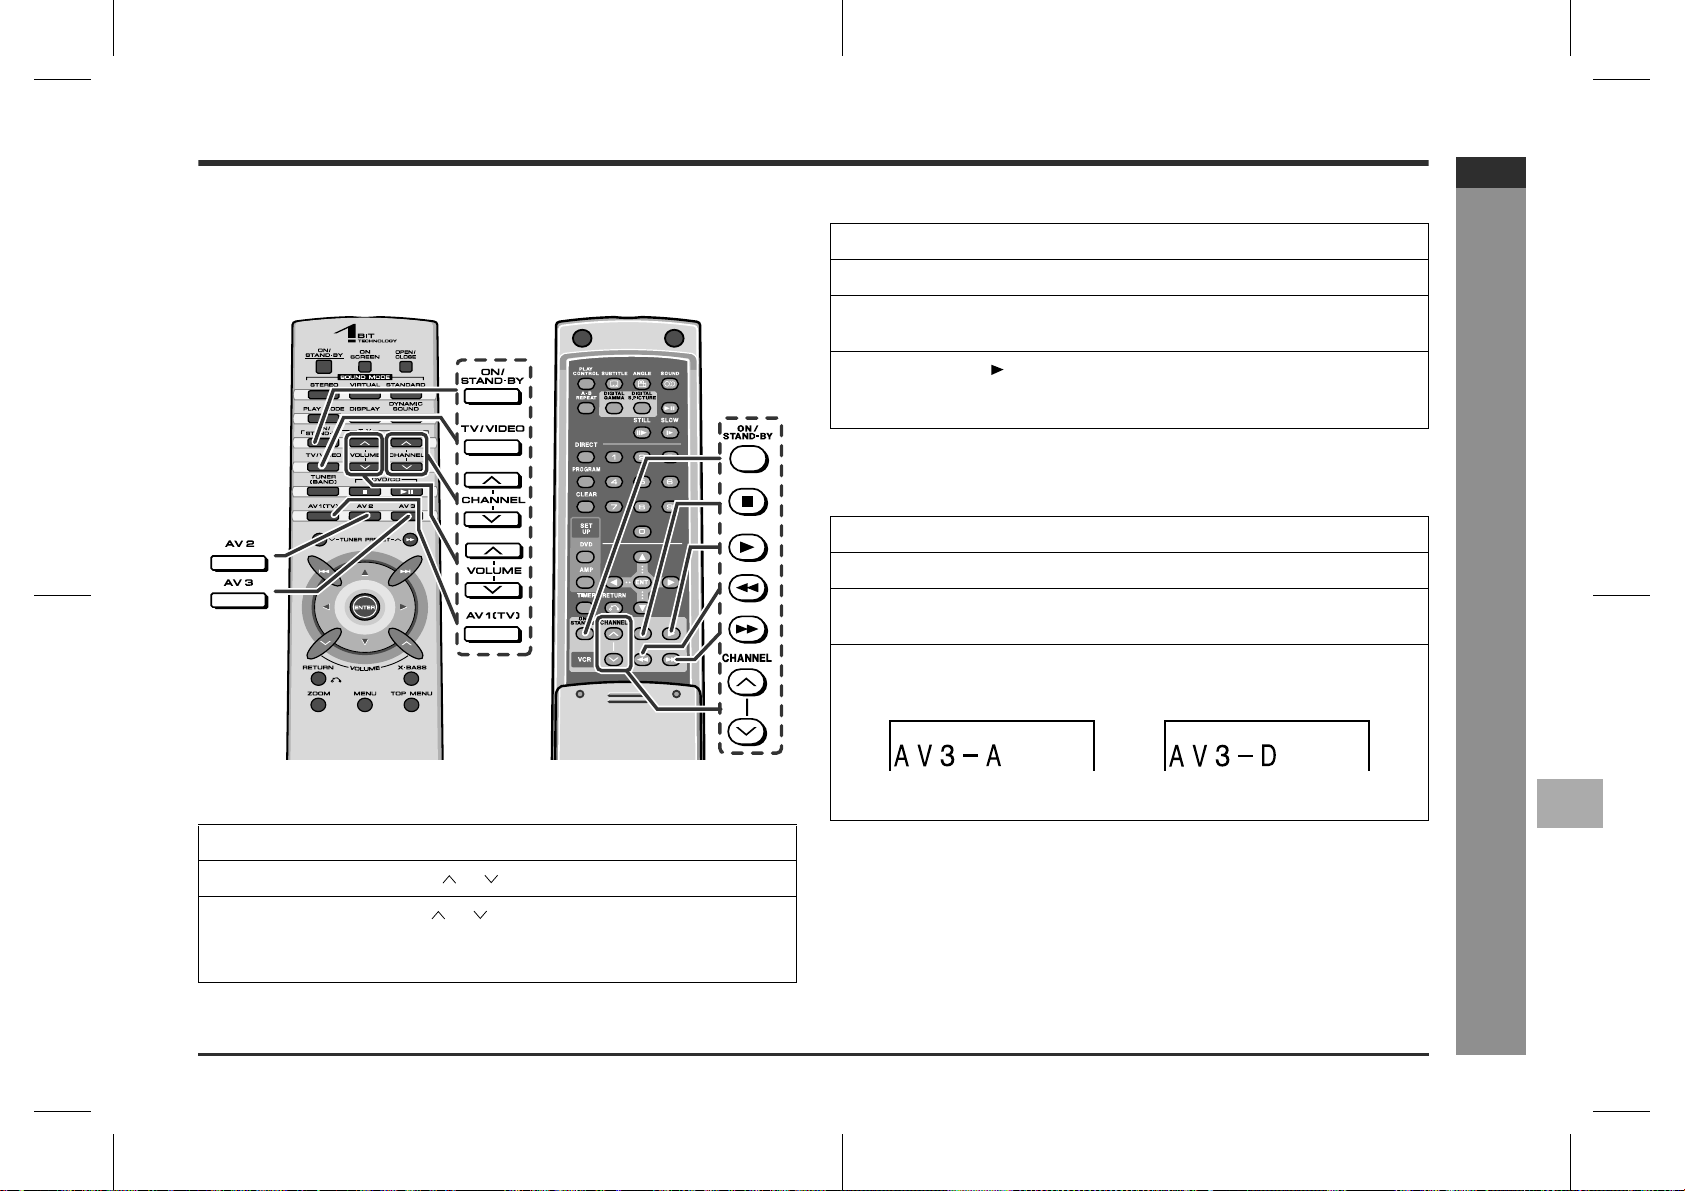
Operating other equipment
The connected TV and VCR can be operated with the remote control of this unit. The
factory setting allows you to operate Sharp's TVs and VCRs with it.
To operate those of other manufacturers, change the contents registered in the
remote control.
[Front] [Back]
TV
operation
VCR
operation
!
Watching VCR
Turn on the power of this unit and press the AV 2 button.
1
Press the VCR ON/STAND-BY button.
2
Press the TV/VIDEO button, and set the TV to VIDEO 1, VIDEO 2,
3
etc.
Press the VCR button to start playback.
4
Not only the playback but also stop, fast forward, fast rewind, and channel setting
operations can be performed.
!
Watching digital tuner, etc.
Turn on the power of this unit and press the AV 3 button.
1
Turn on the digital tuner, etc.
2
Press the TV/VIDEO button, and set the TV to VIDEO 1, VIDEO 2,
3
etc.
Press the AV 3 button to switch between "AV3-A" and "AV3-D".
4
Analogue connection Digital connection
SD-AT00W
ENGLISH
!
Watching TV
Press the TV ON/STAND-BY button to turn on the TV.
1
Press the TV CHANNEL ( or ) button to set the channel.
2
Press the TV VOLUME ( or ) button to control the TV volume.
3
To enjoy the sound from the speakers of this unit:
Turn on the power of this unit and press the AV 1(TV) button.
The same operation can be performed by pressing the DIGITAL INPUT button
on the main unit.
Caution:
Some Sharp TVs and VCRs cannot be operated with this remote control.
SD-AT100W(X)E6.fm02/2/27
- Operating other equipment -
Advanced Features
4
E-60
Page 62

SD-AT00W
ENGLISH
Changing the registration in the remote control
Sharp's TVs and VCRs can be operated with the remote control of this unit without
registering the operation (except for some models). You can al so operate TVs of
other manufacturers by changing the registration in the remote control.
Operations of TVs and VCRs can be registered respectively.
!
[Front]
TV
[Back]
VCR
Advanced Features
- Changing the registration in the remote control -
E-61
SD-AT100W(X)E7.fm02/2/27
Page 63

SD-AT00W
ENGLISH
"
Changing the TV registration
Use buttons on both sides of the remote control.
Whilst holding down the TV ON/STAND-BY button, press the TV
1
CHANNEL button.
Enter the manufacturer setting number (2 digits) with the direct
2
buttons (0 - 9) and press the PROGRAM button.
The setting is registered and the TV can be operated with the remote control of
this unit.
TV manufacturer Setting number TV manufacturer Setting number
SHARP 01(*), 02 EMERSON 37, 38, 39, 40
PANASONIC 03, 04, 05 FISHER 23
JVC 06, 07, 08 GE 41, 42
SONY 09 GOLDSTAR 43
MITSUBISHI 10, 11, 12, 13 MAGNAVOX 44, 45
HITACHI 14, 15, 16, 17 RCA 46, 47, 48, 49
TOSHIBA 18, 19 ZENITH 50, 51
PIONEER 20 PHILIPS 52, 53
SANYO 21, 22, 23, 24 THOMSON 54
FUJITSU 25 GRUNDIG 55
AIWA 26 FERGUSON 56, 57
FUNAI 27, 28, 29, 30, 31, 32ITT NOKIA 58, 59
SAMSUNG 33, 34, 35, 36 LOEWE 60, 61
(*): The default manufact urer number is 01 (SHARP).
"
Changing the VCR registration
Use buttons on the back of the remote control.
Whilst holding down the VIDEO ON/STAND-BY button, press the
1
VIDEO CHANNEL button.
Enter the manufacturer setting number (2 digits) with the direct
2
buttons (0 - 9) and press the PROGRAM button.
The setting is registered and the VCR can be operated with the remote control
of this unit.
VCR manufacturer
SHARP 01(*), 02, 03 GOLDSTAR 50
PANASONIC 04, 05, 06, 07 MAGNAVOX 51, 52
JVC 08, 09, 10, 11, 12,
SONY 17, 18, 19, 20, 21 PHILIPS 52, 55, 56
MITSUBISHI 22, 23, 24, 25, 26, 27THOMSON 57, 58
HITACHI 28, 29, 30, 31 FERGUSON 60, 61
TOSHIBA 32, 33, 34 ITT NOKIA 62
SANYO 35, 36, 37, 69 LOEWE 63, 64
NEC 38, 39 DAEWOO 65
FUNAI 40 NEC 66, 67
SAMSUNG 41, 42, 43 PHILCO 52
EMERSON 44, 45, 46, 47, 48 QUASAR 52, 68
FISHER 37, 69 REALISTIC 01, 03, 06, 36, 37,
GE 49
(*): The default manufact urer number is 01 (SHARP).
Notes:
As for manufacturers with 2 or more setting numbers, select one of those numbers
!
with which you can operate the TV or VCR.
Once you set a number, the number previously memorised will be cancelled.
!
After replacing the batteries in the remote control, the registered number may
!
automatically be set to 01 (SHARP). If it occurs, register the desired number
again.
Registration cannot be executed depending on TVs or VCRs. Even if numbers can
!
be set, some buttons may not work.
The number will not be set unless the registration is completed within 30 seconds.
!
In that case, try registration again.
Setting number
13, 14, 15, 16
VCR manufacturer
RCA 53
ZENITH 54
GRUNDIG 59
43, 51, 52, 69, 70
Setting number
Advanced Features
4
- Changing the registration in the remote control -
E-62
SD-AT100W(X)E7.fm02/2/27
Page 64

SD-AT00W
ENGLISH
References
Troubleshooting chart
Many potential problems can be resolved by the owner without calling a service technician.
If something is wrong with this product, check the following before calling your authorised SHARP dealer or service centre.
"
General
Symptom Possible cause Reference
No sound is heard.
The sounds from speakers
are not well balanced.
Noise is heard during playback.
When a button is pressed,
the unit does not respond.
Interference or noise occurs
on the TV image.
- Troubleshooting chart -
Timer playback does not
start.
The display on the unit is
dark.
Is the volume level set to "0"? P. 18
!
Are the headphones connected? P. 59
!
Are the speaker wires disconnect-
!
ed?
Is the speaker size set to NO (OFF)? P. 50
!
Are the speaker leads connected to
!
the wrong channels?
Is each speaker placed at the same
!
distance from the listener?
Are speakers adjusted to the same
!
level?
Move the unit away from any com-
!
puters or mobile phones.
Set this unit to the power stand-by
!
mode and then turn it back on. If the
unit still malfunctions, reset it.
Is the unit placed near TV with inter-
!
nal aerial? Use an external aerial.
Did you remove the plug from the
!
wall socket, or did a power failure
occur?
Hold down the DISPLAY button on
!
the remote control for 2 seconds or
more to select "DIMMER OFF".
page
P. 13
P. 14
P. 19
P. 52
P. 65
P. 14
P. 26
P. 18
Symptom Possible cause Reference
The power is not turned on.
The sound is not reproduced
in the Dolby Digital 5.1 ch.
No images are displayed.
The sound is not recorded
with VCR.
"
Tuner
Symptom Possible cause Reference
Radio makes unusual noise
consecutively.
Is the unit unplugged? P. 17
!
The protection circuit may be acti-
!
vated. Unplug the unit and plug it in
again.
Is the "Audio setting" on the initial
!
setup screen set to "D-PCM"?
Change it to "BITSTREAM".
Is TV turned on? P. 60
!
Is the input of TV switched? P. 60
!
Is the VIDEO OUT SELECTOR
!
switched to the connected source?
Is the sound mode set to "STE-
!
REO"?
Is the unit placed near the TV or
!
computer?
Is the FM aerial or AM loop aerial
!
placed properly? Move the AC power lead or the unit away from the
aerial if located near.
page
P. 14
P. 23
P. 15
P. 56
page
P. 14
P. 14
E-63
SD-AT100W(X)E7.fm02/2/27
Page 65

SD-AT00W
ENGLISH
"
DVD/CD player
Symptom Possible cause Reference
Even though a disc has been
loaded, "NO DISC" or "NO
PLAY" is displayed.
Playback sounds are
skipped.
The track number, etc. are
not displayed when a disc is
loaded.
The control buttons do not
function. Music or video playback is interrupted.
Pictures and sound are
skipped.
The unit does not operate
even if the power is on.
Image cannot be played
back. (Sound is not heard.)
Is the disc loaded upside down?
!
Is the disc very dirty?
!
Does the disc satisfy the standards?
!
Is the unit located near excessive vi-
!
brations?
Has condensation formed inside the
!
unit?
Is the input not set to DVD? P. 21
!
Is the disc very dirty?
!
Does the disc satisfy the standards?
!
Is the unit located near excessive vi-
!
brations?
Has condensation formed inside the
!
unit?
Is the disc very dirty?
!
Is the unit located near excessive vi-
!
brations?
Has condensation formed inside the
!
unit?
Is a disc other than DVD (having re-
!
gion number on the back of the unit
or "ALL"), video CD or audio CD
loaded?
Are the video and audio cables con-
!
nected improperly?
Is a disc other than DVD (having re-
!
gion number on the back of the unit
or "ALL"), video CD or audio CD
loaded?
Is the disc very dirty?
!
Is the disc loaded upside down?
!
Clean the optical pickup if it is dirty. P. 65
!
Is the TV input set to "VIDEO 1/VID-
!
EO 2" etc.?
Is the unit turned on? P. 17
!
page
P. 64
P. 64
P. 64
P. 6
P. 15, 17
P. 5, 6
P. 60
"
Remote control
Symptom Possible cause Reference
The remote control does not
operate properly.
The unit cannot be turned on
with the remote control.
"
Condensation
Sudden temperature changes, storage or operation in an extremely humid environment may cause condensation inside the cabinet (laser pick up, etc. ) or on the trans mitter on the remote control.
Condensation can cause the unit to malfunction. If this happens, leav e the power on
with no disc in the unit until normal playback is possible (about 1 hour). Wipe off any
condensation on the transmitter with a soft cloth before operating the unit.
Is the battery polarity respected? P. 20
!
Are the batteries dead?
!
Is the distance or angle incorrect? P. 20
!
Are there any obstructions in front of
!
the unit?
Is the remote control sensor ex-
!
posed to strong light (inverter fluorescent light, direct sunlight, etc.)?
Is the remote control for another
!
equipment used simultaneously?
Are buttons on the front and back
!
faces of the remote control pressed
simultaneously?
Is the AC power lead of the unit
!
plugged in?
Are the batteries inserted? P. 20
!
page
P. 20
P. 17
References
- Troubleshooting chart -
4
E-64
SD-AT100W(X)E7.fm02/2/27
Page 66

SD-AT00W
ENGLISH
References
Troubleshooting chart (continued)
"
If trouble occurs
When this product is subjected to strong external interference (mechanical shock,
excessive static electricity, abnor mal supply voltage due to lightning, etc.) or if it is
operated incorrectly, it may malfunction.
If such a problem occurs, do the following:
Clearing all the memory (reset)
1 Unplug the unit.
2 Whilst holding down the ON/STAND-BY button, plug in the AC power lead.
At this time, the unit will not be turned on.
3 Press the ON/STAND-BY button again to turn the power on.
To a wall socket
Caution:
This operation will erase all data stored in memory and restore various settings to the
initial status (default).
"
Before transporting the unit
1 Press the ON/STAND-BY button to turn the power on.
- Troubleshooting chart / Maintenance -
2 Open the disc compartment and remove the disc.
3 Close the disc compartment and enter the unit to stand-by mode.
4 After the power indicator goes off, unplug the unit.
Maintenance
"
Cleaning the cabinet
Periodically wipe the cabinet with a soft
cloth and a diluted soap solution, then with
a dry cloth.
Do not use chemicals for cleaning
!
(petrol, paint thinner, etc.). It may damage the cabinet finish.
Do not apply oil to the inside of the unit.
!
It may cause malfunctions.
"
Cleaning the laser pickup lens
Do not touch the laser pickup lens. If fi ngerprints or dust acc umulate on the pickup,
clean it gently with a dry cotton swab.
Laser pickup lens
Notes:
Close the disc compartment when it is not used.
!
Be careful not to damage the optical pickup or to touch it by hand.
!
E-65
SD-AT100W(X)E7.fm02/2/27
Page 67

Error indicators and warnings
hc15
.
hc15
.
When you load an unplayable disc or fail to perform operations properly, the following
messages are displayed on the unit and the TV screen.
Display Meaning
The disc is not loaded.
!
The disc is scratched or dirty and cannot be recogn-
!
ised.
The disc is loaded up-side down.
!
The disc is scratched or dirty and cannot be played.
!
The disc does not satisfy the standards.
!
The disc is scratched or dirty and data cannot be
!
read.
The disc does not satisfy the standards.
!
The optical pickup cannot be located.
!
Set this unit to the stand-by mode and turn the power
on again. (*)
The unit considers the DVD mechanism is defective.
!
Place the unit away from noise source or plug the
!
AC power lead to another AC socket. (*)
The TV screen does not display correctly.
!
Place the unit away from noise source or plug the
!
AC power lead to another AC socket. (*)
The digital audio input socket is not connected prop-
!
erly.
Unspecified signal is received and cannot be recog-
!
nised.
The temperature is too high.
!
Set this unit to the stand-by mode and wait for a
while.
The speaker is not connected properly.
!
The amplifier is defective.
!
Set this unit to the stand-by mode and turn the power
on again. (*)
The amplifier is defective.
!
Set this unit to the stand-by mode and turn the power
on again. (*)
Display Meaning
The amplifier is defective.
!
Place the unit away from noise source or plug the
!
AC power lead to another AC socket. (*)
The cooling fan on the back of the main unit does not
!
run due to foreign objects caught in it.
Set this unit to the stand-by mode and remove the
foreign objects around the fan.
(*): Should the same message appear even if the unit is unplugged and plugged in or
is set to the stand-by mode and on again, contact your local dealer where you purchased the unit.
TV screen Meaning
The disc cannot be played with this unit or the
15/
WRO NG D CIS T EYP
83/
0
01
::23 40
C
disc is loaded in an incorrect way.
The region number of the DVD is not the num-
15/
REG NIO DCO E RER OR
83/
0
01
::23 40
C
ber on the back of the unit or "ALL".
A disc has not been loaded.
15/
NO DISC
83/
01
O1N
G
ON
S
ON
O1N
G
ON
S
ON
0
::23 40
BITRATE
ENTER
BITRATE
ENTER
C
00 10
00 10
Mbps
NOT
SELECT
LAL OWED
ENTER
RETURN
Mbps
ACC SES
SELECT
NDE I ED
ENTER
RETURN
! You are trying to perform an incorrect oper-
ation.
The operation is prohibited.
!
The disc does not support the operation described in this operation manual.
SD-AT00W
ENGLISH
References
- Error indicators and warnings -
4
E-66
SD-AT100W(X)E8.fm02/2/27
Page 68

SD-AT00W
ENGLISH
References
Specifications
As part of our policy of continuous improvement, SHARP reserves the right to make
design and specification changes f or product improvem ent without prior not ice. The
performance specification figures indicat ed are nominal values of production units.
There may be some deviations from these values in individual units.
"
General
Power source
Power consumption
Dimensions
Weight
Terminals
- Specifications -
"
Amplifier
Amplification system
Output power
A/D noise shaping
AC 220 - 240 V, 50/60 Hz
60 W
Width: 450 mm (17-3/4")
Height: 152 mm (6")
Depth: 119 mm (4-11/16")
4.8 kg (10.6 lbs.)
Front speakers, Centre speaker, Surround speakers and
Subwoofer: 4 ohms
Headphones: 16 - 50 ohms (recommended: 32 ohms)
Monitor output: S-video/video
Subwoofer Pre Out: 10 kohms
Digital output: Optical
S-video output (AV 2): S-terminal
Video output (AV 2): RCA type
Audio output (AV 2): RCA type (L/R)
Audio input [AV 1 (TV)]: RCA type
S-video input (AV 2, 3): S-terminal
Video input (AV 2, 3): RCA type
Audio input (AV 2, 3): RCA type (L/R)
Digital input (AV 3): Optical
Component video output: RCA type
64fs 1-bit switching (Remarks: fs = 44.1 kHz)
Front speakers:
RMS: 50 W (25 W + 25 W) (10 % T.H.D., 1 kHz)
Centre speaker:
RMS: 25 W (10 % T.H.D., 1 kHz)
Surround speakers:
RMS: 50 W (25 W + 25 W) (10 % T.H.D., 1 kHz)
Subwoofer:
RMS: 25 W (10 % T.H.D., 100 Hz)
7th-order (delta - sigma) modulation
"
DVD/CD player
Signal system
Supported disc types
Video signal
Audio signals
"
Tuner
Frequency range
"
Front speaker
Type
Maximum input power
Rated input power
Impedance
Dimensions
Weight
NTSC/PAL
DVD, audio CD, CD-R, CD-RW
Horizontal resolution: 500 lines
S/N ratio: 60 dB
Frequency characteristics:
Linear PCM DVD: 4 Hz to 22 kHz (48 kHz sampling) /
4 Hz to 44 kHz (96 kHz sampling)
CD: 4 Hz to 20 kHz
S/N ratio: 96 dB 1 kHz (CD)
Dynamic range: 96 dB (Linear PCM DVD)
96 dB (CD)
Total harmonic distortion ratio: 0.006 % maximum
FM: 88 - 108 MHz
AM: 531 - 1,602 kHz
2-way type speaker system (Magnetic shield)
80 mm (3-1/8") Woofer
40 mm (1-5/8") Tweeter
50 W
25 W
4 ohms
Width: 110 mm (4-3/8")
Height: 195 mm (7-11/16")
Depth: 134 mm (5-5/16")
1.0 kg (2.2 lbs.)/each
E-67
SD-AT100W(X)E8.fm02/2/27
Page 69

"
Centre speaker
Type
Maximum input power
Rated input power
Impedance
Dimensions
Weight
"
Surround speaker
Type
Maximum input power
Rated input power
Impedance
Dimensions
Weight
"
Subwoofer
2-way type speaker system (Magnetic shield)
80 mm (3-1/8") Woofer
40 mm (1-5/8") Tweeter
50 W
25 W
4 ohms
Width: 185 mm (7-5/16")
Height: 125 mm (4-15/16")
Depth: 134 mm (5-5/16")
1.0 kg (2.2 lbs.)
80 mm (3-1/8") full-range speaker
50 W
25 W
4 ohms
Width: 110 mm (4-3/8")
Height: 195 mm (7-11/16")
Depth: 134 mm (5-5/16")
0.8 kg (1.8 lbs.)/each
Optional accessories
Use only the specified optional accessories to operate this product properly.
FLOOR SPEAKER STAND TABLE SPEAKER STAND
Model: AD-AT10ST Model: AD-AT10LS
SPEAKER WALL BRACKET MAIN UNIT WALL BRACKET
Model: AD-AT10SA Model: AD-AT10WA
OPTICAL DIGITAL CABLE OPTICAL DIGITAL CABLE
Model: AD-M1DC Model: AD-M3DC
SD-AT00W
ENGLISH
References
Type
Maximum input power
Rated input power
Impedance
Dimensions
Weight
160 mm (6-1/2") Woofer
50 W
25 W
4 ohms
Width: 164 mm (6-1/2")
Height: 360 mm (14-3/16")
Depth: 371 mm (14-5/8")
4.9 kg (10.8 lbs.)
The appearance of optional accessories may differ from the illustrations above.
SD-AT100W(X)E8.fm02/2/27
E-68
- Specifications / Optional accessories -
4
Page 70

SD-AT00W
ENGLISH
References
Language code list for disc language
Code Language name Code Language name
AA Afar FY Frisian
AB Abkhazian GA Irish
AF Afr ikaans GD Scots Gaelic
AM Ameharic GL Galician
AR Arabic GN Guarani
AS Assamese GU Gujarati
AY Aymara HA Hausa
AZ Azerbaijani HI Hindi
BA Bashkir HR Croatian
BE Byelorussian HU Hungarian
BG Bulgarian HY Armenian
BH Bihari IA Interlingua
BI Bislama IE Interlingue
BN Bengali; IK Inupiaq
Bangla IN Indonesian
BO Tibetan IS Icelandic
BR Breton IT Italian
CA Catalan IW Hebrew
CO Corsican JA Japanese
CS Czech JI Yiddish
CY Welsh JW Javanese
DA Danish KA Georgian
DE German KK Kazakh
DZ Bhutanese KL Greenlandic
EL Greek KM Cambodian
EN English KN Kannada
- Language code list for disc language -
EO Esperanto KO Korean
ES Spanish KS Kashmiri
ET Estonian KU Kurdish
EU Basque KY Kirghiz
FA Persian LA Latin
FI Finnish LN Lingala
FJ Fiji LO Laotian
FO Faroese LT Lithuanian
FR French LV Latvian, Lettish
Code Language name Code Language name
MG Malagasy SN Shona
MI Maori SO Somali
MK Macedonian SQ Albanian
ML Malayalam SR Serbian
MN Mongolian SS Siswat
MO Moldavian ST Sesotho
MR Marathi SU Sundanese
MS Malay SV Swedish
MT Maltese SW Swahili
MY Burmese TA Tamil
NA Nauruan TE Telugu
NE Nepali TG Tajik
NL Dutch TH Thai
NO Norwegian TI Tigrinya
OC Occitan TK Turkmen
OM (Afan) Oromo TL Tagalog
OR Oriya TN Setswana
PA Panjabi TO Tonga
PL Polish TR Turkish
PS Pashto, Pushto TS Tsonga
PT Portuguese TT Tatar
QU Quechua TW Twi
RM Rhaeto-Romance UK Ukrainian
RN Kirundi UR Urdu
RO Romanian UZ Uzbek
RU Russian VI Vietnamese
RW Kinyarwanda VO Volapuk
SA Sanskrit WO Wolof
SD Sindhi XH Xhosa
SG Sango YO Yoruba
SH Serbo-Croatian ZH Chinese
SI Singhalese ZU Zulu
SK Slovak
SL Slovenian
SM Samoan
E-69
SD-AT100W(X)E8.fm02/2/27
Page 71

Glossary
When playing a wide image (16:9) disc, black bands are i nserted at the top and bottom to display images in 4:3 size. You can enjoy full wide images.
When playing a wide image (16:9) disc, the left and right sides of the image are cut
(pan scan) to display natural-looking 4:3 size images.
Angle
You can enjoy a scene from various angles on DVDs with multiple angles.
SD-AT00W
ENGLISH
Optical pickup
Laser device that reads the data from a disc.
Parental level
Some DVDs allows you to restrict undesirable scenes according to the age of viewers.
Playback control (PBC)
This is a playback system for video CDs which allows you to select information to be
displayed during playback.
Chapter
A title is divided into chapters.
Disc menu
The menu recorded on a DVD, where you can select a subtitle language, audio language, sound system (Dolby Digital 5.1ch/DTS), etc.
Dolby Digital
One of the digital audio systems for t heatrical use. You can enjoy t he stereophonic
effect in the home theatre system.
Dolby Pro Logic II
When playing a stereo-recorded disc or videotape, the Dolby Pro Logic II function
converts the sound to the 5.1ch digital sound automatically. More natural sound
effect can be achieved.
DTS
One of the digital audio systems for theatrical use. As the sound quality is emphasised, you can enjoy the realistic sound effect in the home theatre system.
GAMMA
Corrects gradations in dark areas of images to make them clearer.
Region number
A DVD bears a number of the region where the disc can be played.
SUPER PICTURE
This function sharpens the picture quality.
Title
A title is one movie on a DVD on which more than one movie are recorded.
Top menu
The menu recorded on a DVD, where you can select the title to be played.
Track
Each one of multiple tunes that are recorded on a CD.
Virtual
Although no sound is heard from the surround speakers, you can still enjoy the 2.1ch
surround sound as if they exist.
Zoom
You can enlarge the size of the displayed image.
- Glossary -
References
4
E-70
SD-AT100W(X)E8.fm02/2/27
Page 72

SD-AT100W
FRANÇAIS
FRANÇAIS
Introduction
Instructions importantes
Nous vous remercions d'avoir porté votre choix sur ce produit SHARP. Pour en tirer
le meilleur parti, veuillez lire ce mode d'emploi très attentivement.
Remarques spéciales
Avertissement:
Lorsque la touche ON/STAND-BY est mise en STAND-BY, l'appareil est toujours
!
sous tension. Lorsque la touche ON/STAND-BY se trouve sur la position STANDBY, l'appareil est prêt à fonctionner par la minuterie ou la télécommande.
Cet appareil contient des pièces non réparables p ar l'utilisateur. Personne non
!
qualifiée n'enlèvera jamais les couvercles. L'appareil cont enant des organes portés à haute tension, débrancher l'appareil avant toute réparation ou en période de
non-utilisation.
Pour éviter un incendie ou une secousse électrique, mettre l'appareil à l'abri d'eau
!
(éclaboussure, goutte). Ne pas poser sur l'appareil un récipient contenant du
liquide.
ATTENTION
Ce produit est classifié comme étant un LASER DE CLASSE 1.
!
Respecter les indications données relatives à la manipulation, au réglage et au
!
fonctionnement. En cas de non-respect, on s'exposera à une radiation dangereuse.
Éviter absolument de démonter l'appareil, qui utilise un rayon laser nuisible aux
yeux. Pour toute réparation, s'adresser à une personne qualifiée.
- Introduction / Remarques spéciales -
Ensemble home cinema 1-bit avec DVD SD-AT100W composé de SD-AT100W (appareil principal), de CP-AT100WF (enceintes avant), de CP-AT100WC (enceinte centrale), de CP-AT100WR (enceintes surround) et de CP-AT100WSW (woofer
auxiliaire).
Caractéristiques de la diode laser
Matière: GaAIAs
Longueur d'onde: 780 nm
Durée d'émission: ininterrompue
Puissance de sortie laser maximale: 0,6 mW
Note:
Le matériel audio-visuel peut comporter des oeuvres faisant l'objet de droits
!
d'auteur qui ne peuvent être enregistrées sans l'autorisati on du possesseur du
droit d'auteur, veuillez vous référer aux réglementations nationales en vigueur.
Fabriqué sous licence de Dolby Laboratories. "Dolby", "Pro Logic" et le symbole
!
double D sont des marques de commerce de Dolby Laboratories. Oeuvres confidentielles non publiées. 1992-1997 Dolby Laboratories. Tous droits réservés.
Fabriqué sous licence de Digital Theater Systems, Inc. Les brevets US Pat.
!
No.5,451,942 et autres internationaux délivrés et demandés. "DTS" et "DTS Digital Surround" sont des marques de commerce de Di gital Theater Systems, Inc .
1996 Digital Theater Systems. Tous droits réservés.
F-1
02/2/27 SD-AT100W(X)F1.fm
Page 73

Accessoires
Vérifier que les accessoires ci-dessous sont présents dans l'emballage.
SD-AT100W
FRANÇAIS
Types de disques utilisables
Télécommande 1 Pile "AAA" (UM-4, R03, HP-16
Cadre-antenne PO 1 Antenne FM 1
Cordon d'alimentation 1 Câble vidéo 1
Blanc
environ 5m environ 5m environ 5m
Bleu Gris Violet
environ 15m environ 15m environ 5m
Cordon de raccordement d'enceinte 6
Rouge Vert
ou équivalent) 2
Note:
L'appareil est livré seulement avec les accessoires ci-dessus.
Types de disques non-utilisables
DVD ne portant pas le numéro indi-
!
qué au dos de l'appareil ou le code
"ALL"
DVD selon le système SECAM
!
DVD-ROM
!
DVD-RAM
!
DVD-audio
!
(Pour plus de détails, voir pages 5, 6.)
CDG
!
CD photo
!
CD-ROM
!
SACD
!
Disques enregistrés sous formats
!
spéciaux etc.
Icônes utilisées dans ce manuel
Certaines fonctions ne sont pas utilisables selon les disques. Les icônes suivantes
indiquent les disques utilisables dans le chapitre correspondant.
...
Représente le DVD.
...
Représente le CD vidéo.
...
Représente le CD audio.
Certaines opérations ne peuvent pas être réalisées selon les disques malgré leur
!
description dans ce manuel.
Pendant le fonctionnement, on peut voir apparaître " " qui indique que l'opéra-
!
tion tentée est interdite par le disque.
- Accessoires -
Informations générales
5
F-2
SD-AT100W(X)F1.fm02/2/27
Page 74

SD-AT100W
FRANÇAIS
Informations générales
Table des matières
"
Informations générales
Accessoires . . . . . . . . . . . . . . . . . . . . . . . . . . . . . . . . . . . . . . . . . . . . . . . . . . . . . . . 3
Précautions . . . . . . . . . . . . . . . . . . . . . . . . . . . . . . . . . . . . . . . . . . . . . . . . . . . . . . . 4
Description de disques . . . . . . . . . . . . . . . . . . . . . . . . . . . . . . . . . . . . . . . . . . . . 5, 6
Commandes et voyants . . . . . . . . . . . . . . . . . . . . . . . . . . . . . . . . . . . . . . . . . 7 - 12
"
Avant l'utilisa t io n
Raccordement des enceintes . . . . . . . . . . . . . . . . . . . . . . . . . . . . . . . . . . . .13, 14
Raccordement des antennes . . . . . . . . . . . . . . . . . . . . . . . . . . . . . . . . . . . . . . . .14
Raccordement d'un téléviseur . . . . . . . . . . . . . . . . . . . . . . . . . . . . . . . . . . . 15 - 17
Mise sous tens ion . . . . . . . . . . . . . . . . . . . . . . . . . . . . . . . . . . . . . . . . . . . . . . . . . 17
Commande généra le . . . . . . . . . . . . . . . . . . . . . . . . . . . . . . . . . . . . . . . . . . . . . . . 18
Mise en place du système . . . . . . . . . . . . . . . . . . . . . . . . . . . . . . . . . . . . . . . . . . 19
Télécommande . . . . . . . . . . . . . . . . . . . . . . . . . . . . . . . . . . . . . . . . . . . . . . . . . . .20
Modification du réglage initial de DVD . . . . . . . . . . . . . . . . . . . . . . . . . . . . 21 - 25
Réglage de l'horloge . . . . . . . . . . . . . . . . . . . . . . . . . . . . . . . . . . . . . . . . . . . . . . . 26
"
Fonctionnement de base
Écoute de la radio . . . . . . . . . . . . . . . . . . . . . . . . . . . . . . . . . . . . . . . . . . . . . . . . . 27
Écoute d'une station mise en mémoire . . . . . . . . . . . . . . . . . . . . . . . . . . . . . . . 28
Lecture d'un disque . . . . . . . . . . . . . . . . . . . . . . . . . . . . . . . . . . . . . . . . . . . .29, 30
"
Fonctions avancées des disques
Fonctionnement de base
Pour localiser le début d'un chapitre ( pla ge) (saut) . . . . . . . . . . . . . . . . . . . . . . 31
- Table des matières -
Avance rapide/in v e rsion (recherche) . . . . . . . . . . . . . . . . . . . . . . . . . . . . . . . . . 31
Ralenti . . . . . . . . . . . . . . . . . . . . . . . . . . . . . . . . . . . . . . . . . . . . . . . . . . . . . . . . . . 32
Image fixe/avance image . . . . . . . . . . . . . . . . . . . . . . . . . . . . . . . . . . . . . . . . . . . 32
Pour déclencher la lecture à partir d'un point souhaité
(lecture directe) . . . . . . . . . . . . . . . . . . . . . . . . . . . . . . . . . . . . . . . . . . . . . . . . 33, 34
Pour reprendre la lec ture après l'a rrê t (lecture séquen t ie lle) . . . . . . . . . . . . . . 34
Fonctions utiles
Pour la lecture dans un ordre souhaité (lecture à programmation) . . . . . . 35, 36
Lecture dans un ordre aléatoire (lecture au hasard) . . . . . . . . . . . . . . . . . . . . . 37
Pour répéter la lectu r e (répétition) . . . . . . . . . . . . . . . . . . . . . . . . . . . . . . . . . . . 37
Pour répéter la lecture entre deux points spécifiés (répétition A-B) . . . . . . . . 38
Pour sélectionner un titre sur le menu d'accueil du disque . . . . . . . . . . . . . . . 38
Page
Divers réglages
Pour changer la langue de sous-titrage . . . . . . . . . . . . . . . . . . . . . . . . . . . . . . . 39
Pour cacher le sous-titre . . . . . . . . . . . . . . . . . . . . . . . . . . . . . . . . . . . . . . . . . . . 39
Pour changer la langue de dialogue . . . . . . . . . . . . . . . . . . . . . . . . . . . . . . . . . . 40
Pour changer l'angle . . . . . . . . . . . . . . . . . . . . . . . . . . . . . . . . . . . . . . . . . . . . . . 40
Pour éclaircir l'image . . . . . . . . . . . . . . . . . . . . . . . . . . . . . . . . . . . . . . . . . . . . . . 41
Amélioration de la qualité d'image . . . . . . . . . . . . . . . . . . . . . . . . . . . . . . . . . . . 41
Pour agrandir une image (zoom avant) . . . . . . . . . . . . . . . . . . . . . . . . . . . . . . . 42
Pour modifier l'af f ic h a ge sur l'écran . . . . . . . . . . . . . . . . . . . . . . . . . . . . . . . . . . 43
Pour modifier l'af f ic ha ge sur l'appareil . . . . . . . . . . . . . . . . . . . . . . . . . . . . . . . . 43
Voyants d'opér a ti on e n mode DVD . . . . . . . . . . . . . . . . . . . . . . . . . . . . . . . . . . . 44
Pour modifier le rég la ge à l'é c ra n de co nt r ôle de lecture . . . . . . . . . . . . . . . . . 45
Pour paramétre r sur le menu de disque . . . . . . . . . . . . . . . . . . . . . . . . . . . . . . . 46
"
Fonctions avancées
Son surround (mode de son) . . . . . . . . . . . . . . . . . . . . . . . . . . . . . . . . . . . . 47 - 49
Réglages des enceintes . . . . . . . . . . . . . . . . . . . . . . . . . . . . . . . . . . . . . . . . 50 - 52
Opérations programmées et mise en arrêt différée . . . . . . . . . . . . . . . . . . 53 - 55
Raccordement d'un autre élément . . . . . . . . . . . . . . . . . . . . . . . . . . . . . . . 56 - 59
Manipulation d'a u t re s é lé ments . . . . . . . . . . . . . . . . . . . . . . . . . . . . . . . . . . . . . 60
Modification de l' en re gistrement dans la télé c om mande . . . . . . . . . . . . . . 61, 62
"
Références
Dépannage . . . . . . . . . . . . . . . . . . . . . . . . . . . . . . . . . . . . . . . . . . . . . . . . . . . 63 - 65
Entretien . . . . . . . . . . . . . . . . . . . . . . . . . . . . . . . . . . . . . . . . . . . . . . . . . . . . . . . . 65
Voyants d'erreur et leur message . . . . . . . . . . . . . . . . . . . . . . . . . . . . . . . . . . . . 66
Fiche technique . . . . . . . . . . . . . . . . . . . . . . . . . . . . . . . . . . . . . . . . . . . . . . . . 67, 68
Accessoires en option . . . . . . . . . . . . . . . . . . . . . . . . . . . . . . . . . . . . . . . . . . . . . 68
Codes de langue . . . . . . . . . . . . . . . . . . . . . . . . . . . . . . . . . . . . . . . . . . . . . . . . . . 69
Glossaire . . . . . . . . . . . . . . . . . . . . . . . . . . . . . . . . . . . . . . . . . . . . . . . . . . . . . . . . 70
Renseignements sur les droits d'auteur
La copie, la diffusion, l'affichage public, la transmission, la représentation publique
!
ou la location non autorisés (que ces activités soient à but lucratif ou non) du contenu d'un disque sont interdits par la loi.
Cet appareil est équipé d'une technologie de protection contre les copies qui
!
cause une importante dégradation de l'image quand le contenu d'un disque est
copié sur une vidéocassette.
Cet appareil est protégé par des brevets déposés aux États-Unis et par d'autres
!
droits de propriété intellectuelle, et par des droits d'auteurs qui appartiennent à
Macrovision Corporation. L'utilisa tion de la technologie de protection contre les
copies de Macrovision dans cet appareil est autorisée par Macrovision et est destinée uniquement à une utilisation domestique, sans une autorisation écrite spécifique de Macrovision. L'ingénierie inv erse ou le désassemblage est interdit.
Page
F-3
SD-AT100W(X)F1.fm02/2/27
Page 75

Précautions
"
Général
Vérifier que l'appareil est installé dans un lieu bien aéré et qu'il est dégagé de tous
!
côtés (pas d'obstacle à moins de 10 cm de l'appareil). ll don't y avoir 15 cm
d'espace libre au-dessus de l'appareil.
15 cm
10 cm 10 cm
10 cm
Installer l'appareil sur un socle stable, horizontal et exempt de vibrations.
!
Mettre l'appareil à l'abri du soleil, du champ magnétique, de la poussière exces-
!
sive ou de l'humidité. On l'écartera aussi d'un appareil électronique (ordi nateur
domestique, télécopieur, etc.) qui provoquerait des parasites.
Ne rien placer sur l'appareil.
!
Mettre l'appareil à l'abri de l'humidité, de la chaleur excessive (supérieure à 60°C)
!
ou du froid excessif.
Si le système ne fonctionne pas correctement, débrancher et rebrancher le sys-
!
tème. Puis on le rallumera.
En cas d'orage, débrancher l'appareil.
!
Débrancher le cordon d'alimentation en le tenant par la f iche pour ne pas ab îmer
!
les fils internes.
!
Ne pas ôter l'enveloppe, on s'exposera à la secousse électrique. Pour toute
réparation interne, s'adresser au revendeur SHARP.
Veiller à ne pas couvrir les ouvertures de venti lation de journaux, de nappes, de
!
rideaux, etc.
Éviter de placer sur l'appareil une bougie qui brûle.
!
Il faut traiter une pile usée selon la réglementation environnementale.
!
Utiliser ce produit dans une plage de température comprise entre 5°C et 35°C.
!
Avertissement:
Respecter la tension indiquée sur l'appareil. Le fonctionnement sur une t ension plus
élevée est dangereux et risqu e de provoquer un incendie ou tout autre type d'acci dent. SHARP ne sera pas tenu pour responsable des dommages caus és par le nonrespect de la tension spécifiée.
Attention:
Sur le dos de ce produit se trouve un ventilateur de
!
refroidissement pour assurer le bon dégagement de
chaleur. Il se met tourner dès la mise sous tension.
Ne pas obstruer cette partie ouverte.
Ventilateur de refroidissement
Pendant le fonctionnement, l'appareil chauffe légèrement dû à la chaleur engen-
!
drée à l'intérieur. On peut se brûler si on le touche longuement.
Ce produit est muni d'une fonc tion spéciale qui protège le circuit d'amp lification.
!
Une fois activée, elle coupe le son. On mettra alors l'appareil en attente et le rallumera.
"
Commande de volume
Le niveau sonore réel dans un réglage donné dépend de divers éléments: rendement des enceintes, lieu d'écoute, etc. Éviter une augmentation brusque du v olume.
Elle se produit, par exemple, lors de la mise sous tension avec un réglage du volume
élevé. Éviter aussi une longue écoute à niveau élevé.
"
Entretien des disques DVD/C D
Les disques DVD/CD résistent bien aux dommages, mais il peut se produire un mauvais alignement dû à l'encrassement de la surface du disque. Afin de profiter au
maximum des DVD/CD et de ce lecteur, suivre les conseils ci-dessous.
Éviter d'écrire sur le disque, notamment sur l a face non munie d'une étiquette. La
!
lecture se fait sur la face non munie d'une étiquette.
Éviter d'exposer les disques directement au soleil, à la chaleur et à l'humidité.
!
Tenir le DVD/CD par les bords. Les traces de doigts, la saleté et l'eau sur le DVD/
!
CD sont à l'origine de bruit ou d'un alignement erroné. Si le DVD/CD est encrassé
ou ne fonctionne pas correctement, nettoyer le disque avec un chiffon doux et sec.
Essuyer du centre vers la périphérie, en ligne droit.
NON
OUI
Correct
SD-AT100W
FRANÇAIS
- Précautions -
Informations générales
5
F-4
SD-AT100W(X)F1.fm02/2/27
Page 76

SD-AT100W
FRANÇAIS
Description de disques
"
Types de disques utilisables
L'appareil peut reproduire des disques portant les marques suivantes.
Type de disque Contenu du disque Taille de disque
Disque DVD vidéo Audio et vidéo (films) 12 cm
8 cm
Ou disques DVD-R/DVDRW enregistrés en mode vidéo (*1)
CD vidéo Audio et vidéo (films ) 12 cm
8 cm
CD audio Audio 12 cm
8 cm
Ou CDV (*2)
CD-R/CD-RW audio (*3) Audio 12 cm
8 cm
"
Disques ne pouvant pas être reproduits
DVD ne portant pas le numéro indiqué
!
au dos de l'appareil ou le code "ALL"
DVD selon le système SECAM
!
DVD-ROM
!
DVD-RAM
!
DVD-audio
!
Un téléviseur compatible avec PAL est exigé pour regarder des DVD/CD vidéo
!
enregistrés selon le système PAL.
Les disques ci-dessus ne sont pas possibles à reproduire. Ou bien aucun son ne
!
sera entendu ou aucune image n'apparaît sur l'écran.
Une lecture erronée peut endommager les enceintes ou l'ouïe à l'écoute par le
!
casque à volume élevé.
On ne peut pas reproduire les disques illégalement fabriqués.
!
CDG
!
CD photo
!
CD-ROM
!
SACD
!
Disques enregistrés sous formats spé-
!
ciaux etc.
Notes:
S'il s'agit d'un disque rayé, encrassé ou mis à l'env ers, la lecture n' est pas assu-
!
rée. Se reporter à "Entretien des disques DVD/CD (page 4)" et nettoyer le disque.
Éviter d'utiliser des disques au format spécial (coeur ou octogone) qui risquent de
!
s'éjecter en cours de rotation. On risque de se blesser.
"
Titre, chapitre et plage
Le DVD est composé de "titres" et de "chapitres". Si le disque contient deux films ou
plus, le "titre" représente un film. Le titre est subdivisé en "chapitres".
F-5
Informations générales
- Description de disques -
Ou CD-R/CD-RW enregistré au format MP3 (*4)
(*1): Le DVD-R/DVD-RW peut ne pas être reproduit à cause de leur caractéristi-
ques, les rayures du disque, l'encrassement de l'objectif, etc.
(*2): Seule la partie audio du CDV est reproduite.
(*3): Le CD-R/CD-RW peut ne pas être reproduit selon l'élément d'enregistrement
ou le disque.
(*4): Seuls les disques au format MP3 peuvent être reproduits (MPEG1 Audio
Layer 3, 44,1 kHz ou 48 kHz). Toutefois, certains disques ne peuvent pas être
reproduits selon leur nature ou format.
Le disque à multi-session MP3 n'est pas supporté par ce système.
Titre 1 Titre 2
Chapitre 1
Les CD vidéo et audio sont composés de "plages".
Une "plage" représente un morceau de musique sur CD audio.
Plage 1 Plage 2 Plage 3 Plage 4 Plage 5
Chapitre 2 Chapitre 3 Chapitre 1 Chapitre 2
Note:
Certains disques ne portent pas de numéros pour titres, chapitres ou plages.
SD-AT100W(X)F1.fm02/2/27
Page 77

!
Icônes sur DVD
Vrifiez les icnes de la pochette de DVD avant de reproduire les disques.
Affichage Descriptions
Code de région (numéro de zone utilisable)
2 3 4
Format utilisé sur le DVD Pour adopter le format vidéo au télévi-
Enregistré en 4:3.
On peut visionner une image large sur un téléviseur à écran large et
une image letter-box sur l'écran 4:3.
On peut visionner une image large sur un téléviseur à écran large et
une image coupée en 4:3 sur l'écran 4:3.
ALL
Type de sous-titres enregistrés
2
Exemple: Langues de sous-titrage enregistrés.
1: Anglais On peut spécifier une langue de son
2: Japonais
Nombre d'angles de prise de vue
2
Nombre de pistes audio et système d'enregistrement audio
Exemple:
1: Original <anglais>
(DTS 5.1 Surround)
2: Japonais (Dolby Digital 5.1 Surround)
Les disques DVD portent des codes de
région qui indiquent dans quels pays ils
peuvent être reproduits. Ce système
peut reproduire des disques portant le
numéro indiqué à l'arrière de l'appareil ou
le code "ALL".
seur connecté ("écran large" ou "format
4:3").
choix pour le sous-titrage au moyen de la
touche SUBTITLE .
Nombre des angles de prise de vue enregistrés su r l e DVD.
On peut spécifier un angle souhaité avec
la touche ANGLE .
Indique le nombre des pistes audio et le
système d'enregistrement audio.
On peut changer les pistes audio du
"
DVD au moyen de la touche SOUND
.
L'audio et le système d'enregistre-
"
ment varient selon les DVD. Consulter
le manuel de DVD.
Les types de DVD pouvant être reproduits varient selon la région. Cet appareil peut
reproduire seulement des disques portant le même numéro que celui indiqué à
l'arrière de l'appareil ou le code "ALL".
et
2 3 4
ALL
SD-AT100W
FRANÇAIS
- Description de disques -
Informations générales
5
F-6
SD-AT100W(X)F1.fm02/2/27
Page 78

SD-AT100W
FRANÇAIS
Commandes et voyants
Informations générales
1 2 3 654
!
Façade
1.Couvercle de disque . . . . . . . . . . . . . . . . . . . . . . . . . . . . . . . . . . . . 29
- Commandes et voyants -
2.Touche marche/attente . . . . . . . . . . . . . . . . . . . . . . . . . . . . . . . . . . 19
3.Touche d'ouverture/fermeture de disque . . . . . . . . . . . . . . . . . . . . 29
4.Voyant de mode de son . . . . . . . . . . . . . . . . . . . . . . . . . . . . . . . 48, 49
5.Capteur de télécommande . . . . . . . . . . . . . . . . . . . . . . . . . . . . . . . 20
6.Touche de lecture ou pause de disque . . . . . . . . . . . . . . . . . . 29, 30
7.Touche d'arrêt de disque . . . . . . . . . . . . . . . . . . . . . . . . . . . . . . . . . 30
8.Touche de saut de chapitre DVD,
de plage bas VCD/CD ou d' accord bas de tuner . . . . . . . . . . 27, 31
Page de référence
7 8 9 10
11 12 13 14 15
Page de référence
9.Touche de saut de chapitre DVD,
de plage haut VCD/CD ou d'accord haut de tuner . . . . . . . . . .27, 31
10.Voyant d'alimentation . . . . . . . . . . . . . . . . . . . . . . . . . . . . . . . . . . . .17
11.Vo y ant de réglage de la minuterie . . . . . . . . . . . . . . . . . . . . . . . . . .54
12.Touche de fonction . . . . . . . . . . . . . . . . . . . . . . . . . . . . . . . . . . . . . .27
13.Touche de gammes d'onde, d'entrée numérique . . . . . . . . . . .27, 60
14.Touches de volume haut et bas . . . . . . . . . . . . . . . . . . . . . . . . . . . .19
15.Prise de casque . . . . . . . . . . . . . . . . . . . . . . . . . . . . . . . . . . . . . . . . .58
F-7
SD-AT100W(X)F1.fm02/2/27
Page 79

!
Affichage
1.Voyant de lecture programmée
2.Voyant de mise en arrêt différée
3.Voyant de contrôle de lecture
(1) (2) (3)
(4)
(5) (6)
1
2
(7)
3
(8)4(9)
(12)
(10)
(11)
(13)
5
4.Voyants de signal audio/voyants d'enceinte
(1) Voyant de signal avant gauche (8) Voyant de l'enceinte avant gauche
(2) Voyant de signal central (9) Voyant de l'enceinte centrale
(3) Voyant de signal avant droite (10)Voyant de l'enceinte avant droite
(4) Voyant d'effet à faible fréquence (11)Voyant de woofer auxiliaire
(5)
Voyant de signal surround gauche
(6)
Voyant de signal surround
monaural
(7)
Voyant de signal surround droite
5.Voyant de programme
6.Voyant de disque
7.Voyant de lecture au hasard VCD/CD
8.Voyant de réception en FM stéréo
9.Voyant de titre de plage VCD/CD
10.Voyant de titre DVD
11.Voyant total VCD/CD
12.Voyant de chapitre DVD
13.Voyant d'angle DVD
14.Voyant de mode FM stéréo
15.Voyant de répétition VCD/CD ou de répétition A-B
(12)Voyant de l'enceinte surround
gauche
(13)Voyant de l'enceinte surround
droite
SD-AT100W
FRANÇAIS
6
7
- Commandes et voyants -
8
Informations générales
5
14
9
11
12 13 1510
F-8
SD-AT100W(X)F1.fm02/2/27
Page 80

SD-AT100W
FRANÇAIS
Commandes et voyants (suite)
Informations générales
1
10
!
- Commandes et voyants -
Panneau arrière
1.Bornes d'enceinte . . . . . . . . . . . . . . . . . . . . . . . . . . . . . . . . . . . 13, 14
2.Commutateur de sélection de sortie vidéo . . . . . . . . . . . . . . . 15, 16
3.Prises de sortie du moniteur . . . . . . . . . . . . . . . . . . . . . . . . . . . . . . 15
4.Prise de sortie numérique audio . . . . . . . . . . . . . . . . . . . . . . . . . . . 58
5.Prise d'en trée numérique audio . . . . . . . . . . . . . . . . . . . . . . . . . . . 57
6.Prise d'en trée AV 1 (TV) . . . . . . . . . . . . . . . . . . . . . . . . . . . . . . . . . . 17
7.Prise d'antenne de FM 75 ohms . . . . . . . . . . . . . . . . . . . . . . . . . . . 14
8.Borne de terre d'antenne . . . . . . . . . . . . . . . . . . . . . . . . . . . . . . . . . 14
9.Borne de cadre-antenne PO . . . . . . . . . . . . . . . . . . . . . . . . . . . . . . 14
11
Page de référence
2
12
10.Prise d'entrée CA . . . . . . . . . . . . . . . . . . . . . . . . . . . . . . . . . . . . . . . .17
11.Ventilateur de refroidissement . . . . . . . . . . . . . . . . . . . . . . . . . . . . . .4
12.Trous de support murale (option) . . . . . . . . . . . . . . . . . . . . . . . . . . 68
13.Prises de sortie vidéo component . . . . . . . . . . . . . . . . . . . . . . . . . .16
14.Prises d'entrée vidéo et audio (AV 2) . . . . . . . . . . . . . . . . . . . . . . . .56
15.Prises d'entrée vidéo et audio (AV 3) . . . . . . . . . . . . . . . . . . . . . . . .57
16.Prises de sortie vidéo et audio (AV 2) . . . . . . . . . . . . . . . . . . . . . . .56
17.Prise de pré-sortie de woofer auxiliaire . . . . . . . . . . . . . . . . . . . . . .59
3
13
5
4
6
7
9
8
17
161514
Page de référence
F-9
SD-AT100W(X)F1.fm02/2/27
Page 81

SD-AT100W
FRANÇAIS
!
Enceinte avant 2 (magnétiquement blindée)
Face Dos
1
3
2
1.Tweeter
2.Woofer
3.Trous pour les pieds ou les supports (option)
4.Bornes d'enceinte
!
Enceinte centrale 1 (magnétiquement
4
blindée)
Face Dos
1
2
!
Enceinte surround 2
Face Dos
2
1
1.Woofer
2.Trous pour les pieds ou les supports (option)
3.Bornes d'enceinte
!
Woofer auxiliaire 1
Face Côté Dos
4
3
- Commandes et voyants -
1.Woofer
2.Tweeter
3.Trous pour les pieds ou les supports (option)
4.Bornes d'enceinte
3
1.Évent de baffle réflex
2.Woofer
3.Bornes d'enceinte
21 3
Informations générales
5
F-10
SD-AT100W(X)F1.fm02/2/27
Page 82

SD-AT100W
FRANÇAIS
Informations générales
Commandes et voyants (suite)
[Face]
1
2
3
4
5
6
7
8
9
10
11
- Commandes et voyants -
12
13
14
15
16
17
18
19
20
21
22
23
24
25
26
27
28
!
Télécommande
1.Émetteur de télécommande . . . . . . . . . . . . . . . . . . . . . . . . . . . . . . .20
2.Touche marche/attente . . . . . . . . . . . . . . . . . . . . . . . . . . . . . . . . . . . .17
3.Touche de sélection de mode de lecture VCD/CD . . . . . . . . . . . . .37
4.Touche marche/arrêt de télé . . . . . . . . . . . . . . . . . . . . . . . . . . . . . . .60
5.Touches de volume haut/bas de télé . . . . . . . . . . . . . . . . . . . . . . . .60
6.Touche de sélection d'entrée de télé . . . . . . . . . . . . . . . . . . . . . . . .60
7.Touche de tuner (gamme d'ondes) . . . . . . . . . . . . . . . . . . . . . . . . .27
8.Touches de fonction . . . . . . . . . . . . . . . . . . . . . . . . . . . . . . . . . . . . . .27
9.Touche d'inversion de disque, de présélection bas de tuner . . . . .28, 31
10.Touche de saut de chapitre DVD, de plage bas VCD/CD . . . . . . . . . .31
11.Touche d'entrée . . . . . . . . . . . . . . . . . . . . . . . . . . . . . . . . . . . . . .38, 46
12.Touches de volume haut et bas . . . . . . . . . . . . . . . . . . . . . . . . . . . . . .18
13.Touche de retour . . . . . . . . . . . . . . . . . . . . . . . . . . . . . . . . . . . . . . . .21
14.Touche de zoom DVD . . . . . . . . . . . . . . . . . . . . . . . . . . . . . . . . . . . .42
15.Touche de sélection d'affichage de télé . . . . . . . . . . . . . . . . . . . . .43
16.Touche d'ouverture/fermeture de disque . . . . . . . . . . . . . . . . . . . . . . .29
17.Touches de sélection de mode de son . . . . . . . . . . . . . . . . . . . . . .49
18.Touche de sélection de son dynamique . . . . . . . . . . . . . . . . . . . . .49
19.Touche de sélection d'affichage de l'appareil principal . . . . . .18, 43
20.Touches de sélection de chaîne de télé . . . . . . . . . . . . . . . . . . . . .60
21.Touche de lecture ou pause de disque . . . . . . . . . . . . . . . . . . . . .29, 30
22.Touche d'arrêt de disque . . . . . . . . . . . . . . . . . . . . . . . . . . . . . . . . . . . 30
23.Touche d'avance rapide de disque, de présélection de tuner . . . .28, 31
24.Touche de saut de chapitre DVD, de plage haut VCD/CD . . . . . . . . .31
25.Touche de curseur . . . . . . . . . . . . . . . . . . . . . . . . . . . . . . . . .38, 42, 46
26.Touche d'extra-graves . . . . . . . . . . . . . . . . . . . . . . . . . . . . . . . . . . . .18
27.Touche de menu d'accueil DVD . . . . . . . . . . . . . . . . . . . . . . . . . . . .38
28.Touche de menu DVD . . . . . . . . . . . . . . . . . . . . . . . . . . . . . . . . . . . .46
Les touches portant la marque " " dans l'illustration ne peuvent être comman-
dées que par la télécommande.
Page de référence
F-11
SD-AT100W(X)F2.fm02/2/27
Page 83

[Dos]
1
2
3
4
5
6
7
8
9
10
11
12
13
14
15
16
17
18
19
20
21
22
23
24
25
26
27
!
Télécommande
1.Touche de sous-titre DVD . . . . . . . . . . . . . . . . . . . . . . . . . . . . . . . . 39
2.Touche de contrôle de lecture . . . . . . . . . . . . . . . . . . . . . . . . . . . . . 45
3.Touche de répétition A-B . . . . . . . . . . . . . . . . . . . . . . . . . . . . . . . . . 38
4.Touche de gamma numérique DVD/VCD . . . . . . . . . . . . . . . . . . . . 41
5.Touche d'avance image DVD/VCD . . . . . . . . . . . . . . . . . . . . . . . . . . 32
6.Touche directe . . . . . . . . . . . . . . . . . . . . . . . . . . . . . . . . . . . . . . . 33, 34
7.Touche de programme . . . . . . . . . . . . . . . . . . . . . . . . . . . . . . . . 35, 36
8.Touche d'effacement . . . . . . . . . . . . . . . . . . . . . . . . . . . . . . . . .35, 36
9.Touche de réglage initial DVD . . . . . . . . . . . . . . . . . . . . . . . . . . . . . 21
10.Touche de réglage initial d'ampli . . . . . . . . . . . . . . . . . . . . . . . 50 - 52
11.Touche de minuterie . . . . . . . . . . . . . . . . . . . . . . . . . . . . . . . . . 53 - 55
12.Touche de retour . . . . . . . . . . . . . . . . . . . . . . . . . . . . . . . . . . . . . . . . . 21
13.Touche marche/arrêt de magnétoscope . . . . . . . . . . . . . . . . . . . . . 60
14.Touches de sélection de chaîne du magnétoscope . . . . . . . . . . .60
15.Touche d'angle de prise de vue DVD . . . . . . . . . . . . . . . . . . . . . . .40
16.Touche de sélection de son DVD . . . . . . . . . . . . . . . . . . . . . . . . . . 40
17.Touche de super-image DVD/VCD . . . . . . . . . . . . . . . . . . . . . . . . . . 41
18.Touche de lecture ou pause de disque . . . . . . . . . . . . . . . . . . . . . 29, 30
19.Touche de ralenti DVD/VCD . . . . . . . . . . . . . . . . . . . . . . . . . . . . . . . 32
20.Touches de numéro directes . . . . . . . . . . . . . . . . . . . . . . . . . . .35, 36
21.Touche d'entrée . . . . . . . . . . . . . . . . . . . . . . . . . . . . . . . . . . . . . . . . .26
22.Touches de curseur . . . . . . . . . . . . . . . . . . . . . . . . . . . . . . . . . . . 21, 45
23.Touche d'arrêt de magnétoscope . . . . . . . . . . . . . . . . . . . . . . . . . . 60
24.Touche de lecture de magnétoscope . . . . . . . . . . . . . . . . . . . . . . . 60
25.Touche d'avance rapide de magnétoscope . . . . . . . . . . . . . . . . . . 60
26.Touche rebobinage de magnétoscope . . . . . . . . . . . . . . . . . . . . . .60
27.Couvercle glissant . . . . . . . . . . . . . . . . . . . . . . . . . . . . . . . . . . . . . . 20
Les touches avec " " dans l'illustration peuvent être manoeuvrées sur le dos de
la télécommande. Les autres touches peuvent être utilisables sur les deux faces
de la télécommande.
Page de référence
SD-AT100W
FRANÇAIS
- Commandes et voyants -
Informations générales
5
F-12
SD-AT100W(X)F2.fm02/2/27
Page 84

SD-AT100W
FRANÇAIS
Raccordement des enceintes
Enceinte avant
Noir
(droite)
Vert
Rouge
Enceinte
centrale
Noir
Rouge
Vert
Enceinte avant
(gauche)
Noir
Rouge
Rouge
Rouge
Gris
Enceinte surround
(droite)
Avant l'utilisation
- Raccordement des enceintes -
Noir
Rouge
Gris
Violet
Woofer
auxiliaire
Noir
Violet
Blanc
Bleu
Rouge
Noir
Bleu
Blanc
On peut connecter
un caisson de grave
en option pour
profiter davantage
des graves.
(voir page 59.)
Enceinte surround
(gauche)
Rouge
F-13
SD-AT100W(X)F2.fm02/2/27
Page 85

Les bornes, les bandes, les fiches et les étiquettes concernant les enceintes se dis tinguent par leur couleur différente.
Raccorder les enceintes et l'appareil en respectant leur couleur.
Raccorder les fils aux enceintes et puis sur l'appareil.
Enceintes
Bornes d'enceinte
Rouge
Bande
Noir
Étiquette
Appareil principal
Étiquette
Fiche d'enceinte
Attention:
Raccorder les enceintes après avoi r débranché l'ap parei l.
"
Respecter les polarités et et la droite et la gauche des enceint es. (L' enceinte
"
droite signifie celle située à droite en se plaçant en face de l'appareil.)
"
Ne pas court-circuiter les fils d'enceinte. Si le
cas se présente, l'appar e il s'éteint en activant
le circuit de protection. Vérifier alors le bon
raccordement des fils avant de rallumer l'appareil.
Utiliser seulement les enceintes livrées avec l'appareil.
"
Éviter de monter (ou s'asseoir) sur les enceintes. On risque de se blesser en tom-
"
bant.
Bien introduire la fiche d'encei nte en tournant le côté montant (courbé) vers le
"
haut.
Bien tenir la fiche pour retirer le fil d'enceinte. Dans le cas contraire, l'appareil peut
"
mal fonctionner.
Brancher en tournant le côté
montant (couebé) vers le haut.
Raccordement des antennes
Antenne FM fournie:
Raccorder l'antenne FM à la prise FM 75 OHMS
et diriger l'antenne FM vers la direction qui assure la meilleure réception.
Cadre-antenne PO fourni:
Raccorder le cadre-antenne PO aux bornes PO
et GND. Diriger le cadre-antenne PO pour obtenir la meilleure réception. Placer le cadre PO sur
une étagère ou le visser sur une lampe ou au
mur (vis non fournies).
Noir
Notes:
Éloigner l'antenne de l'appareil ou du cordon d'alimentation pour assurer une
"
meilleure réception.
Si des parasites se manifestent toujours après le repositionnement du cadre-
"
antenne PO, remplacer les fils l'un par l'autre.
Mise en place du cadre PO:
< Montage > < Fixation au mur >
Mur Vis (non fournies)
Antenne extérieure FM ou PO:
Utiliser une antenne extérieure FM ou PO pour obtenir une meilleure réception. Se
renseigner auprès du revendeur.
Antenne
extérieure
15 m
Piquet de terre
Antenne extérieure PO
7,5 m
Note:
Pour utiliser une antenne extérieure PO, laisser le cadre-antenne PO branché à
l'appareil.
Blanc
Cadre-antenne
PO
SD-AT100W
FRANÇAIS
Avant l'utilisation
5
- Raccordement des enceintes / Raccordement des antennes -
F-14
SD-AT100W(X)F2.fm02/2/27
Page 86

SD-AT100W
FRANÇAIS
Raccordement d'un téléviseur
Cet appareil dispose de deux prises pour envoyer des images en plus à la prise MONITOR OUT (VIDEO). Pour profiter des images DVD plus claires, raccorder le téléviseur à ces prises.
Prise MONITOR OUT
(S-VIDEO):
Prise COMPONENT
VIDEO OUT:
Transmet des signaux vidéo en les divisant en signal
de luminance (Y) et en signal de chrominance (C) pour
réaliser des images plus claires que celles de la prise
de sortie vidéo.
Transmet directement des informations vidéo, qui so nt
composées de signaux de luminance (Y) et de signaux
component (PB, PR) pour restituer les couleurs plus fidèles par rapport à la prise de sortie S-vidéo.
Attention:
Avant de raccorder à la télé, éteindre tous les éléments.
!
Raccordement à la télé avec un câble
vidéo
Déplacer le commutateur VIDEO OUT SELECTOR vers S-VIDEO/
VIDEO.
Raccordement à la télé avec un câble vidéo:
Raccordement à la télé avec un câble S-vidéo:
(Voir page 16.)
Avant l'utilisation
- Raccordement d'un téléviseur -
Raccordement à la télé avec un câble vidéo component:
(Voir page 16.)
Câble vidéo (fourni)
Télé
Câble S-vidéo (non fourni)
Télé
Câble vidéo component (non fourni)
Télé
Vers la prise de sortie vidéo
Câble vidéo
(fourni)
Télé
Vers la prise
d'entrée vidéo
Notes:
Modifier l'entrée du téléviseur selon la prise utilisée.
"
Ne pas insérer un élément entre la télé et cet appareil. S'ils sont raccord és par
"
l'intermédiaire d'un autre, l'image risque d'être distordue.
Un téléviseur compatible avec PAL est exigé pour regarder des DVD/CD vidéo
"
enregistrés selon le système PAL.
F-15
SD-AT100W(X)F2.fm02/2/27
Page 87

SD-AT100W
FRANÇAIS
!
Raccordement à la télé avec un câble Svidéo
Déplacer le commutateur VIDEO OUT SELECTOR vers S-VIDEO/
VIDEO.
Vers la prise
de sortie S-vidéo
Câble S-vidéo
(non fourni)
Télé
Vers la prise
d'entrée S-vidéo
Note:
Lorsque les câbles vidéo et S-vidéo sont raccordés à la fois, les im ages en provenance de la prise d'entrée S-vidéo apparaissent sur l'écran de télé.
!
Raccordement à la télé avec un câble
vidéo component
Déplacer le commutateur VIDEO OUT SELECTOR vers COMPONENT.
Vers les prises
de sortie vidéo component
Vers les prises d'entrée
vidéo component
Câble vidéo component (non fourni)
Notes:
"
Si le téléviseur porte des indications différentes pour les entrées vidéo component
(Y, CB et CR ou Y, B-Y et P-Y), effectuer le raccordement en respectant les couleurs des prises.
"
Ne pas raccorder une prise d'entrée vidéo component conçu pour le système
"high-vision" qui n'est pas c ompatible avec DVD (les images peuvent être distordues ou n'apparaissent pas du tout).
Télé
Avant l'utilisation
- Raccordement d'un téléviseur -
5
F-16
SD-AT100W(X)F2.fm02/2/27
Page 88

SD-AT100W
FRANÇAIS
Raccordement à la télé (suite)
Pour écouter le son de télé à travers cet appareil:
Avec un câble audio, on peut écouter le son en provenance de la télé à travers les
enceintes de cet appareil.
(Aucun câble audio n'est pas fourni. S'en procurer un vendu dans le commerce.)
Vers les prises
d'entrée audio
Blanc
Câble audio
(non fourni)
Blanc
Télé
Rouge
Rouge
Mise sous tension
Après avoir vérifié tous les raccordements, brancher le cordon d'alimentation sur
l'appareil et puis sur secteur.
Notes:
"
Utiliser seulement un cordon d'alimentation livré avec l'appareil . Un autre peut
causer un mauvais fonctionnement ou un accident.
"
Débrancher l'appareil en période de non-utilisation prolongée.
!
Pour allumer l'appareil
Appuyer sur la touche ON/STAND-BY pour allumer l'appareil.
Pour mettre l'appareil en attente:
Réappuyer sur la touche ON/STAND-BY.
Voyant d'alimentation
Avant l'utilisation
- Raccordement d'un téléviseur / Mise sous tension -
Note:
Pour les opérations, se reporter à la page 60.
F-17
Vers les prises de
sortie audio
SD-AT100W(X)F2.fm02/2/27
Page 89

Commande générale
!
Commande de volume
Appuyer sur la touche VOLUME pour augmenter le volume et la touche VOLUME
pour l'effet contraire.
SD-AT100W
FRANÇAIS
[Face]
012 39 40
!
Commande de graves
Lorsque la touche X-BASS est pressée, le réglage de mode en cours s'affiche. Pour
passer à un autre mode, appuyer sur la touche X-BASS.
Les basses fréquences sont
Cette fonction n'est autorisée que lorsque le mode de so n est réglé sur "STEREO"
ou "VIRTUAL" (page 49).
!
Pour modifier la luminosité de l'affichage
amplifiées.
.....
Le son n'est pas modifié.
(2 niveaux)
On peut modifier la luminosité tout en maintenant la touche DISPLAY de la télécommande enfoncée pour 2 secondes ou plus.
Assombri Éclairci
- Commande générale -
Avant l'utilisation
5
F-18
SD-AT100W(X)F2.fm02/2/27
Page 90

SD-AT100W
FRANÇAIS
Mise en place du système
!
Positionnement des enceintes
Le meilleur effet surround s'obtient en plaçant les enceintes à une même distance de
l'auditeur.
Il est recommandé de positionner les enceintes comme suit.
Enceinte
Enceinte avant
(gauche)
Woofer auxiliaire
centrale
Enceinte avant
(droite)
Les pieds et les supports d'enceintes sont disponibles en opt i on. E n ce qui concerne
le montage, se reporter aux manuels qui les accompagnent.
Enceinte surround
(gauche)
10 cm
Distance égale Distance égale
Woofer auxiliaire
- Mise en place du système -
Avant l'utilisation
Enceinte avant
(gauche)
Notes:
"
Placer le téléviseur juste au milieu entre les enceintes avant.
"
Il est conseillé de placer l'enceinte centrale à proximité du téléviseur.
"
Laisser un espace d'au moins 10 cm au côté gauche du woofer auxiliaire.
"
Placer les enceintes surround à une hauteur un peu plus élevée que l'auditeur.
"
La façade des enceintes n'est pas amovible.
Enceinte surround
(droite)
Enceinte centrale
Enceinte avant
(droite)
Les enceintes avant et centrale, magnétiquement blindées, peuvent être posées à
côté ou à proximité du téléviseur. Toutefois, les couleurs peuvent s'altérer selon le
type du téléviseur.
S'il se produit une altération des couleurs ...
Éteindre le téléviseur (avec le commutateur marche/arrêt).
15 - 30 minutes après, rallumer le téléviseur.
Si les couleurs restent toujours altérées ...
Éloigner les enceintes du téléviseur.
Pour plus de détails, se reporter au manuel qui accompagne le téléviseur.
Attention:
Éviter de placer les enceintes surround et le woofer auxiliaire à proximité du
téléviseur. Ils ne sont pas magnétiquement blindés.
F-19
SD-AT100W(X)F2.fm02/2/27
Page 91

Télécommande
!
Mise en place des piles
1 Retirer le couvercle.
2 Installer les piles en respectant les polarités indiquées dan s le loge-
ment de piles.
Pour introduire ou retirer les piles, on les poussera vers les bornes .
3 Remettre le couvercle en place.
Précautions à prendre:
"
Remplacer en même temps toutes les piles par des neuves.
"
Ne pas utiliser en même temps des piles neuves et anciennes.
"
Pour éviter un endommagement éventuel dû à la fuite, on retirera les piles en
période de non-emploi prolongée.
Attention:
"
Éviter d'utiliser des piles rechargeables (pile nickel-cadmium, etc.).
"
La mauvaise installation des piles peut entraîner un mauvais fonctionnement de
l'appareil.
Notes:
"
Remplacer toutes les piles si la distance télécommandable est réduite ou si le
fonctionnement est irrégulier. Se procurer 2 piles au format de "AAA" (UM-4, R03,
HP-16 ou équivalent).
"
Avec un chiffon doux, nettoyer régulièrement l'émetteur de la télécommande et le
capteur de l'appareil.
"
Une forte lumière frappant le capteur gênera le fonctionnement . Modifier l'éclairage ou changer l'orientation de l'appareil.
"
Mettre la télécommande à l'abr i de l'h umid it é, la chaleur, le choc et les vibrations.
!
Essai de la télécommande
Diriger la télécommande vers le capteur placé sur l'appareil.
La télécommande peut être utilisée dans le rayon illustré ci-dessous:
Appuyer sur la touche ON/STAND-BY. Le s ystème s'est allumé ? On peut maintenant écouter de la musique.
Capteur de télécommande
0,2 m - 6 m
!
Comment glisser le couvercle
Cette télécommande porte des touches sur les deux faces.
Pour utiliser les touches au dos, glisser le couverc le .
Glisser le couvercle
jusqu'à un déclic.
Notes:
"
Pour manoeuvrer les touches au dos de la télécommande, veiller à ne pas
presser celles de l'autre côté. L'appareil peut mal fonctionner.
"
Fermer le couvercle sur le dos pour utiliser les touches de la face.
"
On peut commander à distance le téléviseur et le magnétoscope (pages 61, 62).
SD-AT100W
FRANÇAIS
- Télécommande -
Avant l'utilisation
5
F-20
SD-AT100W(X)F2.fm02/2/27
Page 92

SD-AT100W
FRANÇAIS
Modification du réglage initial de DVD
Allumer le téléviseur et régler l'entrée sur "VIDEO 1", "VIDEO 2", etc.
On peut modifier le réglage du mode de visionnage, du niveau de contrôle parental,
de la sortie audio, de la langue de disque et de la langue OSD.
Un nouveau réglage reste en mémoire même si l'appareil est mis en mode d'attente.
Pour restaurer ou modifier le réglage, il faut le réinitialiser.
[Dos]
Appuyer sur la touche ON/STAND-BY pour allumer l'appareil.
1
L'écran de démarrage apparaît.
Après avoir pressé l a touche DVD/CD , appuyer sur la touche SE-
2
TUP DVD.
Appuyer sur la touche ou pour sélectionner le menu et appuyer
3
sur la touche ENT.
Les réglages initiaux varient selon les zones. Vérifier le symbole dans l'éti quette col-
Avant l'utilisation
lée à l'arrière de l'appareil.
- Modification du réglage initial de DVD -
WA / WB / WN / WP / WW / WZ
Mode de visionnage
Niveau de
contrôle parental
WA/WB/WW/WZ: WP/WN:
MP
OVDESETUT
4:3
MTV
DE :
CNTO:S
LB
LPACNTS
MP
OVDESETUT
4:3
MTV
DE :
CNTO:S
LB
Sortie audio
Langue de disque
Langue OSD
Appuyer sur la touche , , ou pour changer le paramétrage et
4
ENTER
SELECT
ENTER
RETURN
ENTER
SELECT
ENTER
puis presser la touche ENT.
Exemple: "OSD LANGUAGE SETUP" est sélectionné
LSD ANGUAGE ESTUPO
LANGUAGE: ENGLI SH
ENGL I SH
FRANÇAI
DEUTSCH
ITALIANO
ESPAÑOL
SVENSKA
S
NEDERLANDS
ENTER
ENTER
SELECT
Renouveler les opérations suivant les instructions.
(Répéter autant de fois que le paramétrage nécessite.)
Pour changer d'autres paramètres, commencer par l'étape 3.
Appuyer sur la touche SETUP DVD.
5
Un nouveau réglage est mémorisé.
Notes:
On ne peut pas ouvrir l'écran de réglage pendant la lecture d'un disque.
!
Voir page 25 pour sélectionner une autre langue pour le menu de disque.
!
Pendant les opérations sur les menus, la touche RETURN permet de repasser
!
à l'écran précédent.
CNTS
RETURN
RETURN
F-21
SD-AT100W(X)F3.fm02/2/27
Page 93

SD-AT100W
FRANÇAIS
Réglage Réglage par défaut
Paramètres Descriptions
(en sortie de l'usine)
Mode de visionnage MODE DE VISIONNAGE: MODE DE VISIONNAGE: , , Le format peut être réglé sur , ou (voir page 24
pour plus de détails).
*1: WA/WB/WW/WZ: NTSC PAL
MTV ODE ESTUP
MTV
DE :
CNTO:S
4:3
LB
LPACNT S
*1
MTV ODE ESTUP
:
MTV ODE
:
WN/WP: NTSC
4:3
LB
4:3
PS
4:3
LB
16 : 9
NTSC: NTSC PAL NTSC S'utilise, lors de la reproduction d'un disque NTSC, pour spécifier le
système couleur en fonction d'un téléviseur raccordé.
NTSC PAL NTSC:
Sélectionner ce réglage s'il s'agit d'un téléviseur NTSC ou compa-
MTV ODE ESTUP
MTV
DE :
CNTO:S
MTV ODE ESTUP
4:3
LB
LPACNT S
MTV ODE
CNT :SCNTS
4:3
:
:
LB
CNT S
tible NTSC (multi-système).
NTSC PAL:
S'il sagit d'un téléviseur PAL, opter pour ce réglage qui permet de
convertir le signal NTSC en un signal PAL modifié.
LPACNT S
Pour visionner un disque PAL sur un téléviseur PAL ou multi-
!
système, on peut utiliser le réglage "NTSC PAL" ou "NTSC".
Niveau de contrôle parental
MOT DE PASSE: ? ? ? ? Niveau 1 - 8, ARRET La plupart des DVD permettent de régler un code de pays et le ni-
veau parental correspondant (voir page 24 pour plus de détails).
CODE Saisir un mot de passe à 4 chiffres.
En cas d'oubli, on peut annuler le mot de passe enregistré en pres-
NARE T AL ESTUPP
LANGUAGE : ENGL I SH
PASSWORD:
FRAN‚ AI S
12345678OFF
DEUTSCH NEDERLANDS
NO
IUSARATIALCODE :
ESPA„ OL
????
VENSKAS
NARE T AL ESTUPP
LANGUAGE : ENGL I SH
R
SELEC VELTLE
FRAN‚ AI S
12345678OFF
DEUTSCH NEDERLANDS
I
C
*2
ODE :
ESPA„ OL
NO
VENSKAS
USARATIAL
sant la touche STILL 4 fois.
*2: WZ: GERMANY
WA: AUSTRALIA
WN/WP: USA
WW/WB: CHINA
Avant l'utilisation
- Modification du réglage initial de DVD -
5
F-22
SD-AT100W(X)F3.fm02/2/27
Page 94

SD-AT100W
FRANÇAIS
Modification du réglage initial de DVD (suite)
Réglage Réglage par défaut
Paramétrage audio DIGITAL: BITSTREAM BITSTREAM On peut régler la sortie audio selon l'élément raccordé à la prise de
MPEG: PCM PCM On peut régler la sortie audio selon l'élément raccordé à la prise de
Choix de langues SOUS-TITRE: ANGLAIS
DIALOGUE: ANGLAIS
MENU: ANGLAIS
Avant l'utilisation
- Modification du réglage initial de DVD -
Paramétrage de langues OSD
LANGUE: ANGLAIS ANGLAIS, FRANÇAIS, ALLEMAND,
(en sortie de l'usine)
IUD O ESTUPA
LANGUAGE : ENGL
COMPRESS I ON: OF F
D
IGITAL:
MPEG :
DEUTSCH
ITALIANO
ESPA„ OL
IUD O ESTUPA
LANGUAGE : ENGL
COMPRESS I ON: OF F
D
IGITAL:
MPEG :
DEUTSCH
ITALIANO
ESPA„ OL
LISC ANGUAGED
LANGUAGE : ENGL I SH
SUB T I ENGL I SH
L
AUDI O
:
MENU :
CH
ITALIANO
ESPA„ OL
LE :T
ENGL I SH
ENGL I SH
IS
ENGL I SH
NEDERLANDS
BITSTREAM
BITSTREAM
ESTUP
PCM
PCM
Paramètres Descriptions
D-PCM
IUD O ESTUPA
LANGUAGE : ENGL
COMPRESS I ON: OF F
D
IGITAL:
MPEG :
DEUTSCH
ITALIANO
ESPA„ OL
BITSTREAM
BITSTREAM
D PCM
BITSTREAM
IUD O ESTUPA
LANGUAGE : ENGL
COMPRESS I ON: OF F
D
IGITAL:
MPEG :
DEUTSCH
ITALIANO
ESPA„ OL
BITSTREAM
PCM
PCM
BITSTREAM
ANGLAIS, FRANÇAIS, ALLEMAND,
ITALIEN, ESPAGNOL, CHINOIS, SUÈDOIS, NEERLANDAIS, AUTRES ( )
H
ESTUPLISC ANGUAGED
SWED I SH
()
LSUB T I ENGL I SHLE :T
LENG I S CH I NE SEH
NFRE CH
MGER A N DUTCH
LITA IA OTHERN
NSPA I S
ITALIEN, ESPAGNOL, CHINOIS, SUÈDOIS, NEERLANDAIS, AUTRES
sortie numérique optique.
BITSTREAM:
Lorsque l'appareil est raccordé à un processeur (ou amplificateur)
supportant Dolby Digital 5.1.
D-PCM:
Lorsque l'appareil est raccordé à un élément audio à 2 canaux ou à
un enregistreur MD, la fonction Dolby Digital n'est pas utilisable.
sortie numérique optique.
PCM:
Lorsque l'appareil est raccordé à un élément audio à 2 canaux ou à
un enregistreur MD, la fonction MPEG multicanal ne marche pas.
BITSTREAM:
Lorsque l'appareil est raccordé à un processeur (ou ampli) qui support MPEG multicanal.
Si on règle la sortie audio du multicanal MPEG sur "BITS-
!
TREAM", aucun son ne sera entendu.
On peut sélectionner une langue pour le sous-titrage, le dialogue et
les menus s'il s'agit d'un DVD enregistré en de multiples langues.
Liste des codes de pays (Voir page 69.)
Si la langue spécifiée n'est pas enregistrée sur le disque, la langue
préréglée est adoptée. Vérifier les langues enregistrées avant
l'opération.
On peut sélectionner une langue OSD (On Screen Display) pour
l'écran de réglage initial ou de lecture.
F-23
LSD ANGUAGE ESTUPO
LANGUAGE : ENGLI SH
LSD ANGUAGE ESTUPO
LANGUAGE : ENGLI SH
ENGL I SH
FRANÇAI
DEUTSCH
ITALIANO
ESPAÑOL
SVENSKA
S
NEDERLANDS
SD-AT100W(X)F3.fm02/2/27
Page 95

SD-AT100W
FRANÇAIS
"
Format vidéo
Voyant Réglage
Lorsque l'on reproduit un disque au format vidéo 16:9, les deux côtés de l'image sont coupés (pan scan) pour
l'afficher en 4:3 de manière naturelle.
Une image large sans pan scan
est reproduite en letter box .
Un disque 4:3 est reproduit en 4:3.
Lorsque l'on reproduit un disque au for-
mat vidéo 16:9, les bandes noires sont
ajoutés automatiquement en haut et en
bas de l'image. On peut donc profiter
d'une image 16:9 même sur un téléviseur 4:3.
Un disque 4:3 est reproduit en 4:3.
Une image large (16:9) est assurée lors
de la lecture d'un disque au format vidéo 16:9.
Lorsqu'il s'agit d'un disque au format vidéo 4:3, le format d'affi-
!
chage dépend du réglage du téléviseur.
Si on reproduit une image 16:9 en raccordant cet appareil à un
!
téléviseur 4:3, elle est compressée verticalement.
Note:
S'il s'agit d'un disque à format vidéo fixe, le forma t n'est pas modifiable même si on
règle le format d'affichage.
"
Contrôle parental
Certains disques ont été préréglés pour permettre de changer le niveau de contrôle
parental selon leur contenu et les codes de pays. Le réglage de ce contrôle varie
d'un disque à l'autre. Par exemple, certains disques permettent de remplacer les scènes violentes par celles adaptées pour être vues par les enfants. On a aussi la possibilité d'interdire la lecture de DVD.
Ce système supporte le contrôle parental comme suit.
Niveau de contrôle parental:Permet de modifier le niveau selon la nature d'un film enCode Permet de régler le niveau de contrôle suivant les codes
registré sur le DVD.
de pays enregistrés sur le DVD.
Notes:
Pour effectuer le contrôle parental, l e DVD devra être compatible avec cette fonc-
!
tion.
Les niveaux de contrôle diffèrent selon les pays. Il faut s électionner correct ement
!
le code de pays pour protéger les enfant s.
Si on annule le contrôle parental, tous les DVD sont reproduits quel que soit le
!
niveau de contrôle.
Sur certains DVD, le niveau de contrôle est fixé et non-modifiable.
!
Codes de pays:
Ce système supporte les codes des pays suivants.
Liste des codes de pays:
ÉTATS-UNIS SUÈDE MALAISIE
CANADA HOLLANDE INDONÉSIE
JAPON NORVÈGE TAÏWAN
ALLEMAGNE DANEMARK PHILIPPINES
FRANCE FINLANDE AUSTRALIE
ROYAUME-UNI BELGE RUSSIE
ITALIE HONG KONG CHINE
ESPAGNE SINGAPOUR SUISSE THAÏLANDE -
Mot de passe:
Ce système permet d'interdire aux aut res de modi fier le niveau de contr ôle parental
une fois sélectionné. Pour cela, il suffit d'entrer un mot de passe qui sera nécessaire
aux opérations suivantes.
Modification du niveau de contrôle.
!
Changement du niveau en cours de lecture.
!
Avant l'utilisation
- Modification du réglage initial de DVD -
5
F-24
SD-AT100W(X)F3.fm02/2/27
Page 96

SD-AT100W
FRANÇAIS
Modification du réglage initial de DVD (suite)
"
Langue de disque
Voyant Réglage
Sous-titre On peut sélectionner une langue pour le sous-titrage.
Le sous-titre s'affiche dans une langue spécifiée.
Anglais Français
Thank you
Audio On peut sélectionner une langue pour le dialogue.
Le dialogue sur l'écran se fait en langue spécifiée.
Anglais Français
Avant l'utilisation
- Modification du réglage initial de DVD -
Menu de disque
On peut spécifier une langue pour les menus de disque.
Les menus s'affichent dans une langue spécifiée.
Anglais Français
CAST
STAFF
Thank you
Merci
ACTEURS
PERSONNEL
"
Sélection d'autres langues
Exemple: Quand on sélectionne HU (hongrois)
Sélectionner "DISC LANGUAGE" sur l'écran de réglage initial (page
1
21, étapes 1 - 3) et puis opter pour "OTHER". Après, appuyer sur la
touche ENT.
SWED I SH
ENTER
ENTER
ESTUPLISC ANGUAGED
(A)
A
SELECT
RETURN
LSUB T I ENGL I SHLE :T
LENG I S CH I NESEH
NFRE CH
MGER A N DUTCH
LITA IA OTHERN
NSPA I SH
Appuyer sur la touche ou pour sélectionner "H" pour la pre-
2
mière lettre.
OTHER
(A)
H
ENTER
SELECT
RETURN
ENTER
Appuyer sur la touche ou pour déplacer le curseur vers la
3
erci
M
droite.
OTHER
()
HA
ENTER
SELECT
RETURN
ENTER
Appuyer sur la touche ou pour sélectionner "U" pour la
4
deuxième.
OTHER
()
HU
ENTER
SELECT
RETURN
ENTER
Appuyer sur la touche ENT.
5
Appuyer sur la touche SETUP DVD.
6
Liste des codes de pays (Voir page 69.)
F-25
SD-AT100W(X)F3.fm02/2/27
Page 97

Réglage de l'horloge
En mettant l'appareil à l'heure, on peut l'utiliser non seulement comme horloge mais
aussi comme programmateur pour la lecture.
[Dos]
Dans cet exemple, l'horloge est réglée sur 9:30.
Appuyer sur la touche ON/STAND-BY pour allumer l'appareil.
1
Appuyer sur la touche TIMER.
2
Avant 10 secondes, appuyer sur la touche ou pour sélection-
3
ner "ADJUST" et puis presser la touche ENT.
Appuyer sur la touche ou pour ré-
4
gler l'heure et puis presse r la touch e
ENT.
Appuyer une fois sur la touche ou pour avancer de 1 minute. Pour avancer
rapidement, on la maintiendra enfoncée.
Appuyer sur la touche ou pour ré-
5
gler les minutes et puis presser la
touche ENT.
Appuyer une fois sur la touche ou pour avancer l'heure de 1 minute. Pour
!
avancer rapidement, on le maintiendra enfoncé.
L'heure n'avance pas même si les minutes passent de "59" à "00".
!
L'horloge part à partir de "0" seconde (les secondes ne s'affichent pas
!
d'ailleurs).
Pour vérifier l'heure:
[Lorsque l'appareil est en attente]
Appuyer sur la touche DISPLAY de la télécommande.
L'afficheur indiquera l'heure pour 5 secondes environ.
[Lorsque l'appareil est allumé]
Appuyer sur la touche TIMER.
Avant 10 secondes, appuyer sur la touche ou pour sélect io nner "CLOCK".
L'afficheur indiquera l'heure pour 10 secondes environ.
Pour remettre l'horloge à l'heure:
Renouveler "Réglage de l'horloge".
À l'étape 2, "TIMER STANDBY" apparaît. Si l'horloge est réinitialis ée, l'appareil
!
affiche "SLEEP".
Appuyer à l'étape 3 sur la touche ou pour sélectionner "CLOCK" et puis pres-
!
ser la touche ENT.
Attention:
Le débranchement de l'appareil ou une panne de courant annule le réglage de l'horloge.
Renouveler "Réglage de l'horloge".
SD-AT100W
FRANÇAIS
- Réglage de l'horloge -
Avant l'utilisation
5
F-26
SD-AT100W(X)F3.fm02/2/27
Page 98

SD-AT100W
FRANÇAIS
Écoute de la radio
[Face]
Appuyer sur la touche TUNING ( ou ) pour faire l'accord sur la
3
station souhaitée.
Accord manuel:
Appuyer sur la touche TUNING autant de fois qu'il est nécessaire pour régler le
tuner sur la station.
Accord automatique:
Si on presse la touche TUNING plus de 0,5 seconde, le tuner part en recherche
et se cale sur la première station qu'il capte.
Notes:
Cette opération se fait au moyen de la touche ou de la télécommande.
!
La recherche automatique s'arrêtera dès qu'il se produira des parasites.
!
Le balayage automatique sautera des stations à faible puissance.
!
Pour arrêter la recherche, réappuyer sur la touche TUNING.
!
Pour recevoir une émission FM stéréo:
Appuyer sur la touche BAND pour allumer le voyant "STEREO".
"ST" apparaît lorsque l'émission FM captée est en stéréo.
!
Voyant de mode FM stéréo
Fonctionnement de base
F-27
- Écoute de la radio -
Voyant de réception en FM stéréo
Si la réception en FM n'est pas bonne, appuyer sur la touche BAND pour éteindre
!
"STEREO". La réception passe en mono, mais le son devient plus clair.
Après utilisation:
Appuyer sur la touche ON/STAND-BY pour allumer l'appareil.
1
Appuyer sur la touche FUNCTION pour affich er FM ou AM et ag ir à
2
plusieurs reprises sur la touche BAND pour sélectionne r une gamme d'onde (FM STEREO, FM ou AM).
Lorsque l'on utilise la télécommande, agir à plusieurs reprises sur la touche TUNER (BAND) pour sélectionner une gamme d'onde (FM STEREO, FM ou AM).
Appuyer sur la touche ON/STAND-BY pour passer en veille.
SD-AT100W(X)F3.fm02/2/27
Page 99

Écoute d'u ne station m ise en mémoire
"
Mise en mémoire d'une station
(Télécommande)
Il est possible de stocker 40 stations en PO et en FM et de les rappeler par une simple pression d'une touche (accord de présélection).
Suivre les étapes 1 - 3 dans "Écoute de la radio", page 27.
1
Appuyer sur la touche ENTER pour passer en
2
mode de sauvegarde de présélection.
Avant 5 secondes, appuyer sur la touche TU-
3
NER PRESET ( ou ) pour sélectionner le numéro de présélection.
Stocker des stations en mémoire dans l'ordre à partir du canal de présélection 1.
Avant 5 secondes, appuyer sur la touche EN-
4
TER pour mettre la station en mémoire.
Si le voyant "MEMORY" et le voyant de numéro de présélection s'éteignent
avant la mise en mémoire de la station, renouveler l'opération depuis l'étape 2.
Renouvele r les éta pes 1 - 4 pour mé moriser d'autres statio ns ou
5
remplacer une station mise en mémoire.
Une nouvelle station remplace celle déjà mise en mémoire.
Note:
La fonction de protection conserve les stations en mémoire pendant plusieurs heures
même s'il se produit une panne de courant ou un débranchement de l'appareil.
"
Pour effacer toutes les stations mémorisées
(Télécommande)
1 Appuyer sur la touche TUNER (BAND).
2 Maintenir la touche CLEAR enfoncée pour 3
secondes ou plus.
3 Pendant l'affichage de "CLEAR", appuyer sur
la touche ENTER.
"
Rappel d'une station mémorisée
(Télécommande)
Appuyer sur la touche TUNER PRESET ( ou ) pour sélectionner
une station souhaitée.
Canal de présélection Fréquence et gamme d'ondes
"
Réglage de l'intervalle PO/FM (seulement
dans certaines régions)
L'intervalle PO/FM peut être modifié dans certaines régions.
Avant d'utiliser l'appareil, penser à le régler sur un intervalle (portée) PO/FM de la
région.
Pour passer de l'intervalle PO de 9 kHz (50 kHz en FM) à l'intervalle PO
de 10 kHz (100 kHz en FM):
1 Appuyer sur la touche ON/STNA-BY pour mettre l'appareil en mode d'attente.
2 Presser plus de 4 secondes sur les touches et . On les relâchera dès que
l'appareil affichera alternativement "AM SP 10 kHz" et "FM SP 100 kHz".
Pour revenir à l'intervalle PO de 9 kHz (50 kHz en FM):
1 Appuyer sur la touche ON/STNAD-BY pour mettre l'appareil en mode d'attente.
2 Presser plus de 4 secondes sur les touches et . On les relâchera dès que
l'appareil affichera alternativement "AM SP 9 kHz" et "FM SP 50 kHz".
Attention:
Si l'on laisse l'appareil débranché pour quelques heures après avoir changé
!
d'intervalle, l'appareil repasser a automatiquement sur un intervalle d e 9 kHz (50
kHz en FM). Si le cas se présente, il faudra réajuster l'intervalle.
Si on commute l'intervalle, les stations mises en mémoire seront effacées.
!
SD-AT100W
FRANÇAIS
Fonctionnement de base
- Écoute d'une station mise en mémoire -
5
F-28
SD-AT100W(X)F3.fm02/2/27
Page 100

SD-AT100W
FRANÇAIS
Lecture d'un disque
Allumer le téléviseur et régler l'entrée sur "VIDEO 1", "VIDEO 2", etc.
[Face]
Appuyer sur la touche ON/STAND-BY
1
pour allumer l'appareil.
L'écran de démarrage apparaît.
Appuyer sur la touche FUNCTION pour régler l'entrée sur "DVD".
2
Sélectionner "DVD" pour écouter un CD vidéo ou audio.
!
On peut effectuer la même opération en pressant sur la touche DVD/CD de
!
la télécommande.
Appuyer sur la touche OPEN/CLOSE pour ouvrir le compa rtimen t.
3
L'appareil détecte automatiquement la taille
!
Face
données
du disque (12 cm ou 8 cm). Placer le disque
en place sur le porte-disque.
Mettre le disque en place en tournant la
!
face étiquette vers soi.
S'il s'agit d'un disque à double face, tourner
!
la face à écouter vers l'intérieur de l'appareil.
Fonctionnement de base
F-29
- Lecture d'un disque -
Porte-disque
Appuyer sur la touche OPEN/CLOSE pour refermer le comparti-
4
ment.
Si le disque est compatible avec le démarrage automatique, il part automatiquement pour la lecture (sans avoir à presser la touche ) dès la fermeture du
compartiment.
Si on n'arrive pas à déclencher la lecture à l'étape 4, appuyer sur
5
la touche .
On peut effectuer l'opération en appuyant sur la touche DVD/CD de la télécommande.
Note:
Lorsque l'on allume l'appareil et change l a source d'entrée pour "DVD", aucune opération ne sera exécutée pendant 5 secondes où l'appareil effectuera le réglage initial.
SD-AT100W(X)F3.fm02/2/27
 Loading...