

Page 1
SHARP SERVICE MANUAL
HOT & COLD WATER DISPENSER
MODEL SB-29
SB-29S
In the interests of user-safety (Required by safety
regulations in some countries) the set should be restore
to its original condition and only parts identical to those
specied should be used.
SHARP CORPORATION
TABLE OF CONTENTS
PARTS IDENTIFICATION AND SPECIFIC INFORMATION ...................................................
CAUTIONS FOR USE .............................................................................................................
IMPORTANT SAFETY INSTRUCTIONS ................................................................................
WIRING DIAGRAM AND CIRCUIT DIAGRAM .......................................................................
COOLING SYSTEM DIAGRAM AND HOT SYSTEM DIAGRAM ...........................................
COMPONENT REPLACEMENT PROCEDURE .....................................................................
TROUBLESHOOTING ............................................................................................................
SERVICE PARTS LIST ...........................................................................................................
Page
2
3
3
4
5
6 - 13
14
15 - 19
Page 2
2
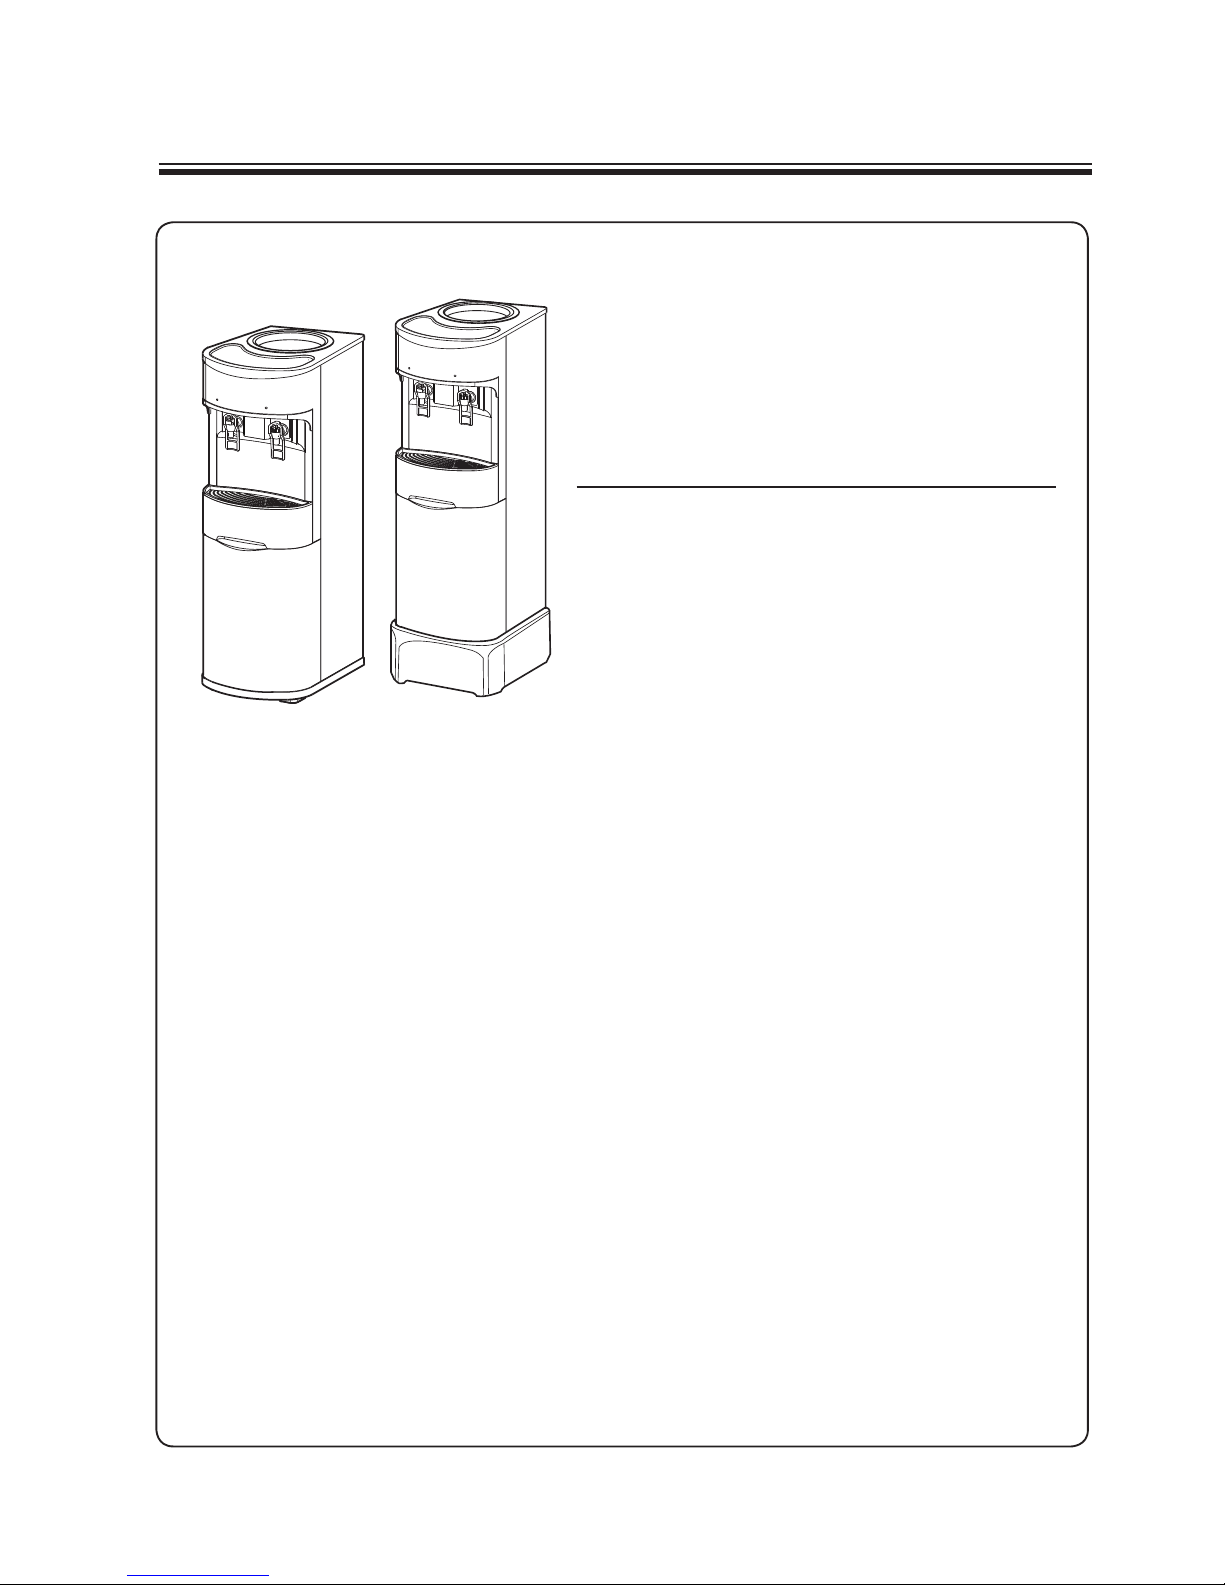
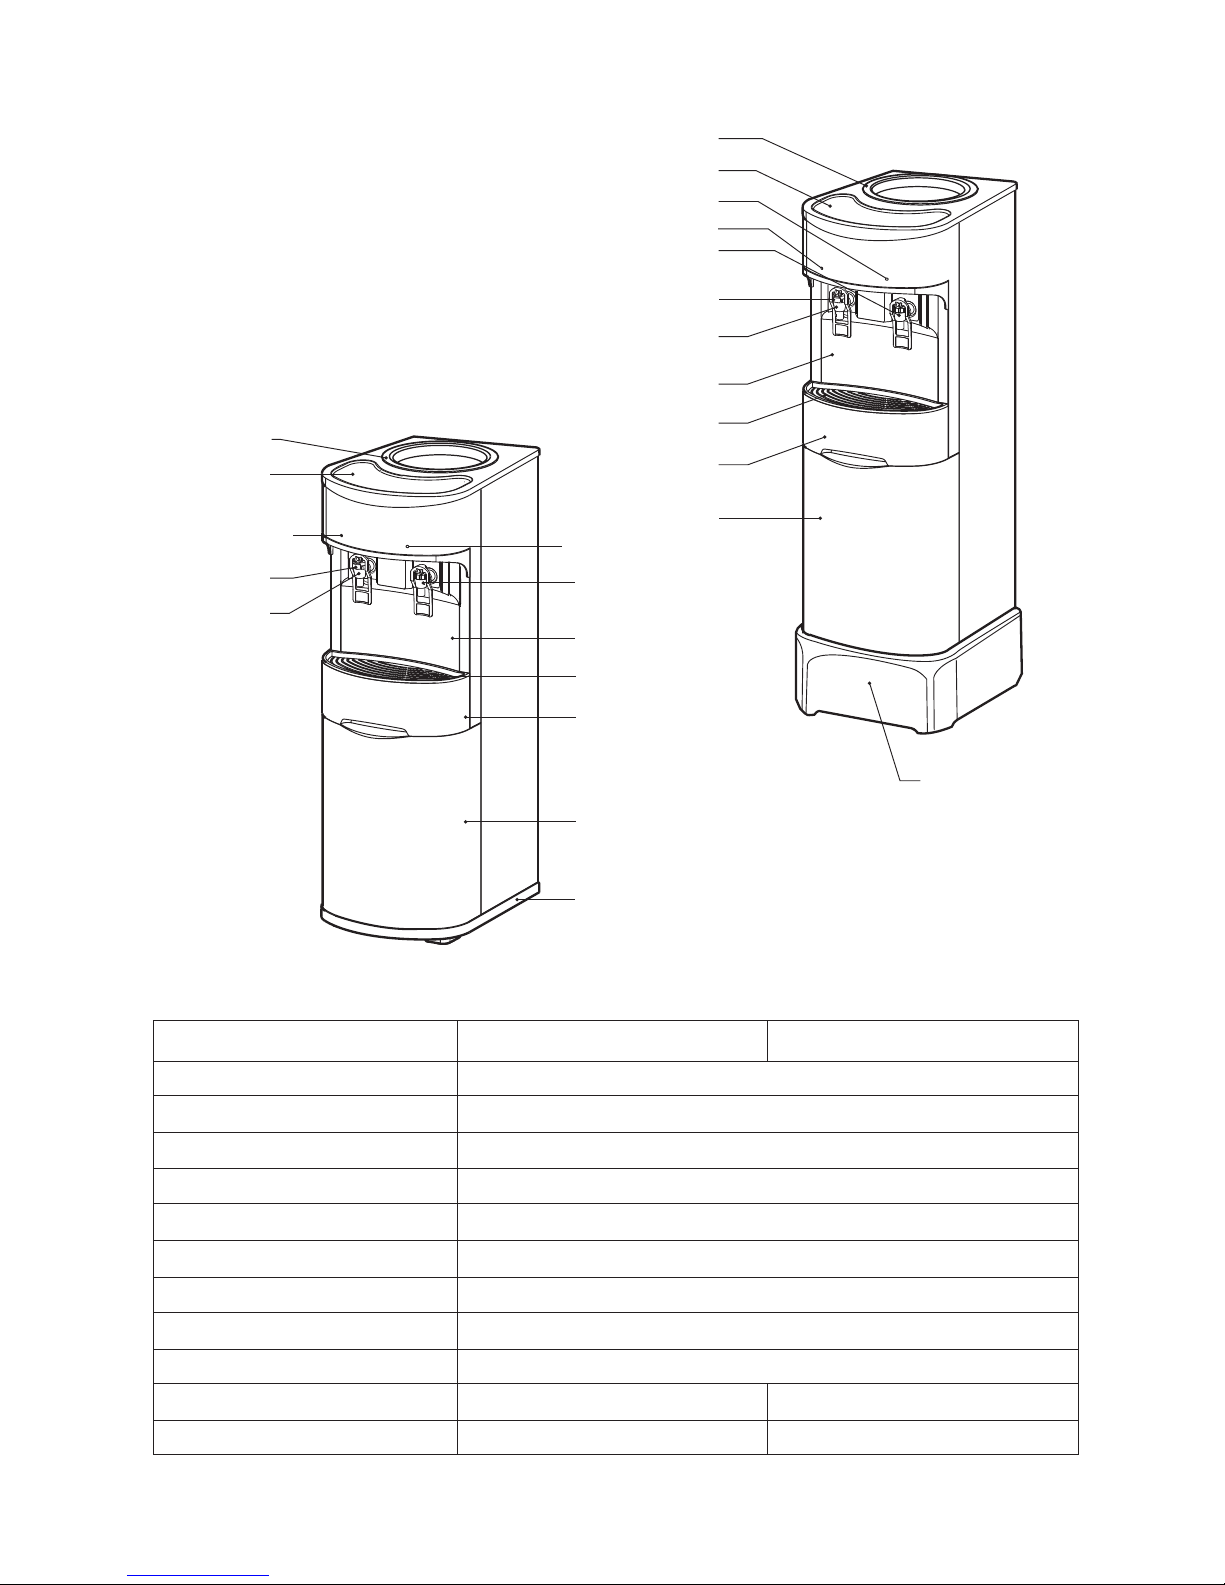
PARTS IDENTIFICATION
SPECIFIC INFORMATION
Model
Rated voltage (V)
Rated frequency (Hz)
Power consumption
Hot water capacity (Litre/Hr)
Cold water capacity (Litre/Hr)
Refrigerant HFCR-134a (g)
Rated current (A)
Compressor rated input (W)
Temperature control
Dimensions (W x D x H) (mm)
Weight (kg)
SB-29 SB-29S
220
6
4
50
610
35
0.70
96
Thermostat
305 x 380 x 997
305 x 380 x 1,080
16.4 17.4
Model : SB-29
Model : SB-29S
Panel-B
Drain tray support
Drain tray support
Panel-B
Faucet ass’y
Faucet ass’y
(Hot water)
(Cold water)
Faucet ass’y
Faucet ass’y
Push button
Lamp indicator (Hot)
Lamp indicator (Hot)
Top plate
Top plate
Bottle connector
Bottle connector
Stand
Stand
Lamp indicator (Cool)
Lamp indicator (Cool)
(Cool water)
(Hot water)
Drain tray
Drain tray
Panel-A
Panel-A
Push button
Page 3
3
CAUTIONS FOR USE
1. Do not locate your Hot & Cold water dispenser where the environment would offer any risk of water
contamination.
2. The Hot & Cold water dispenser must be located on a oor which is smooth, level and easily cleaned.
3. Do not locate the Hot & Cold water dispenser in direct sunlight.
4. Do not locate the Hot & Cold water dispenser next to a radiator.
5. Do not locate the Hot & Cold water dispenser within or directly adjacent to toilet facilities.
6. Do not use the Hot & Cold water dispenser or water bottle as a shelf for plants or objects.
7. Do not use sprays, mists or vapors around the Hot & Cold water dispenser.
8. Do not put any other liquid other than water into the Hot & Cold water dispenser.
9. Do not lay the Hot & Cold water dispenser on its side.
10. Do not leave the Hot & Cold water dispenser without a bottle tted.
11. Do not attempt to move the Hot & Cold water dispenser if there is a bottle in place.
12. The plastic part should be cleaned using mild soap and water. Do NOT use bleach or any cleaning agents
containing bleach or chlorine.
13. If the wire condenser is dusty or dirty. Wipe or blow it out cleaning so that unit can run in full efciency.
IMPORTANT SAFETY INSTRUCTIONS
1. Read all instructions before using the Hot & Cold water dispenser.
2. Keep the unit be checked by the authorized service center every 6 months is recommended.
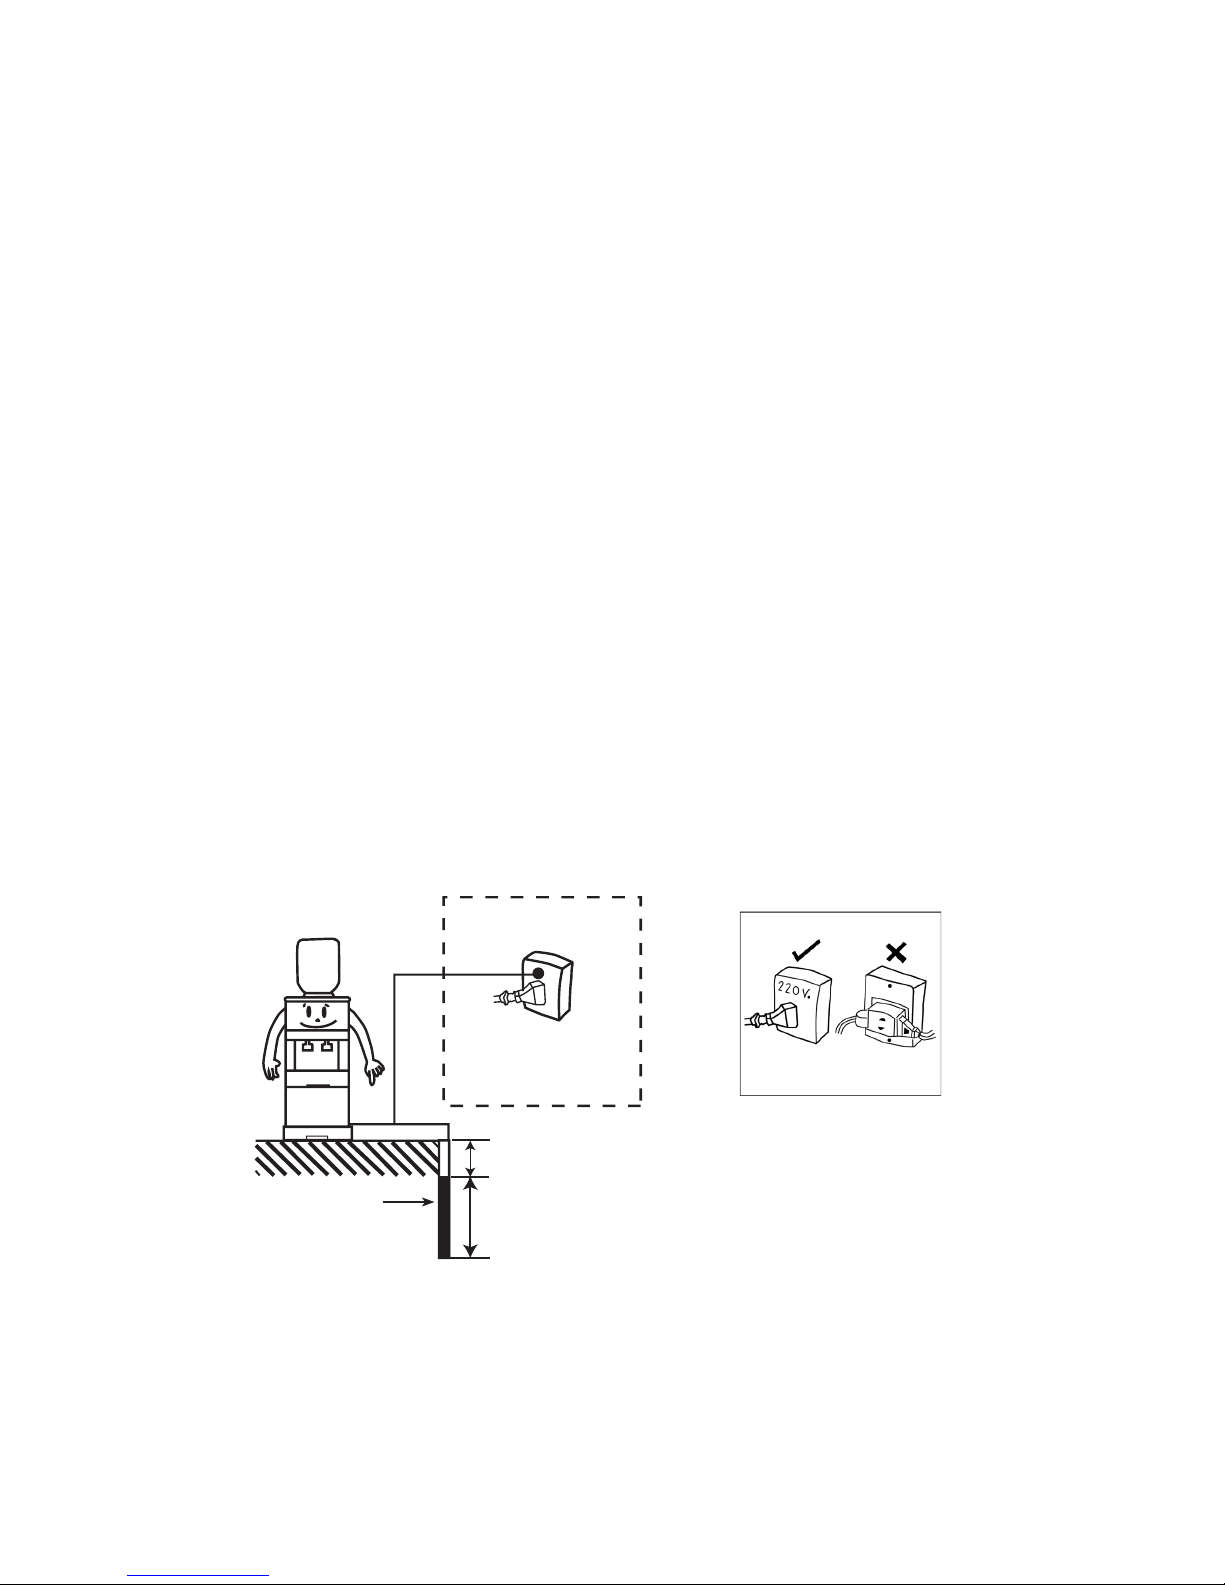
3. Before operating this appliance, this unit must be grounded properly in order to prevent risk of current leakage.
Installation must be done together with electricity leakage protector unit.
4. Do not plug other electronic equipment in the same socket because the socket will overheat and may
result in re.
5. If the appliance is malfunction. Do not try to repair this appliance. For your own safety and using this
appliance with high efciency, contact the nearest SHARP service facility for repair.
In case of indoor installation.
Connect the grounded wire
to the three-prong outlet at
grounded wire position.
Copper rod 1.5 cm.
and 240 cm. in length.
(Embed into the ground)
About 30 cm.
Page 4
4
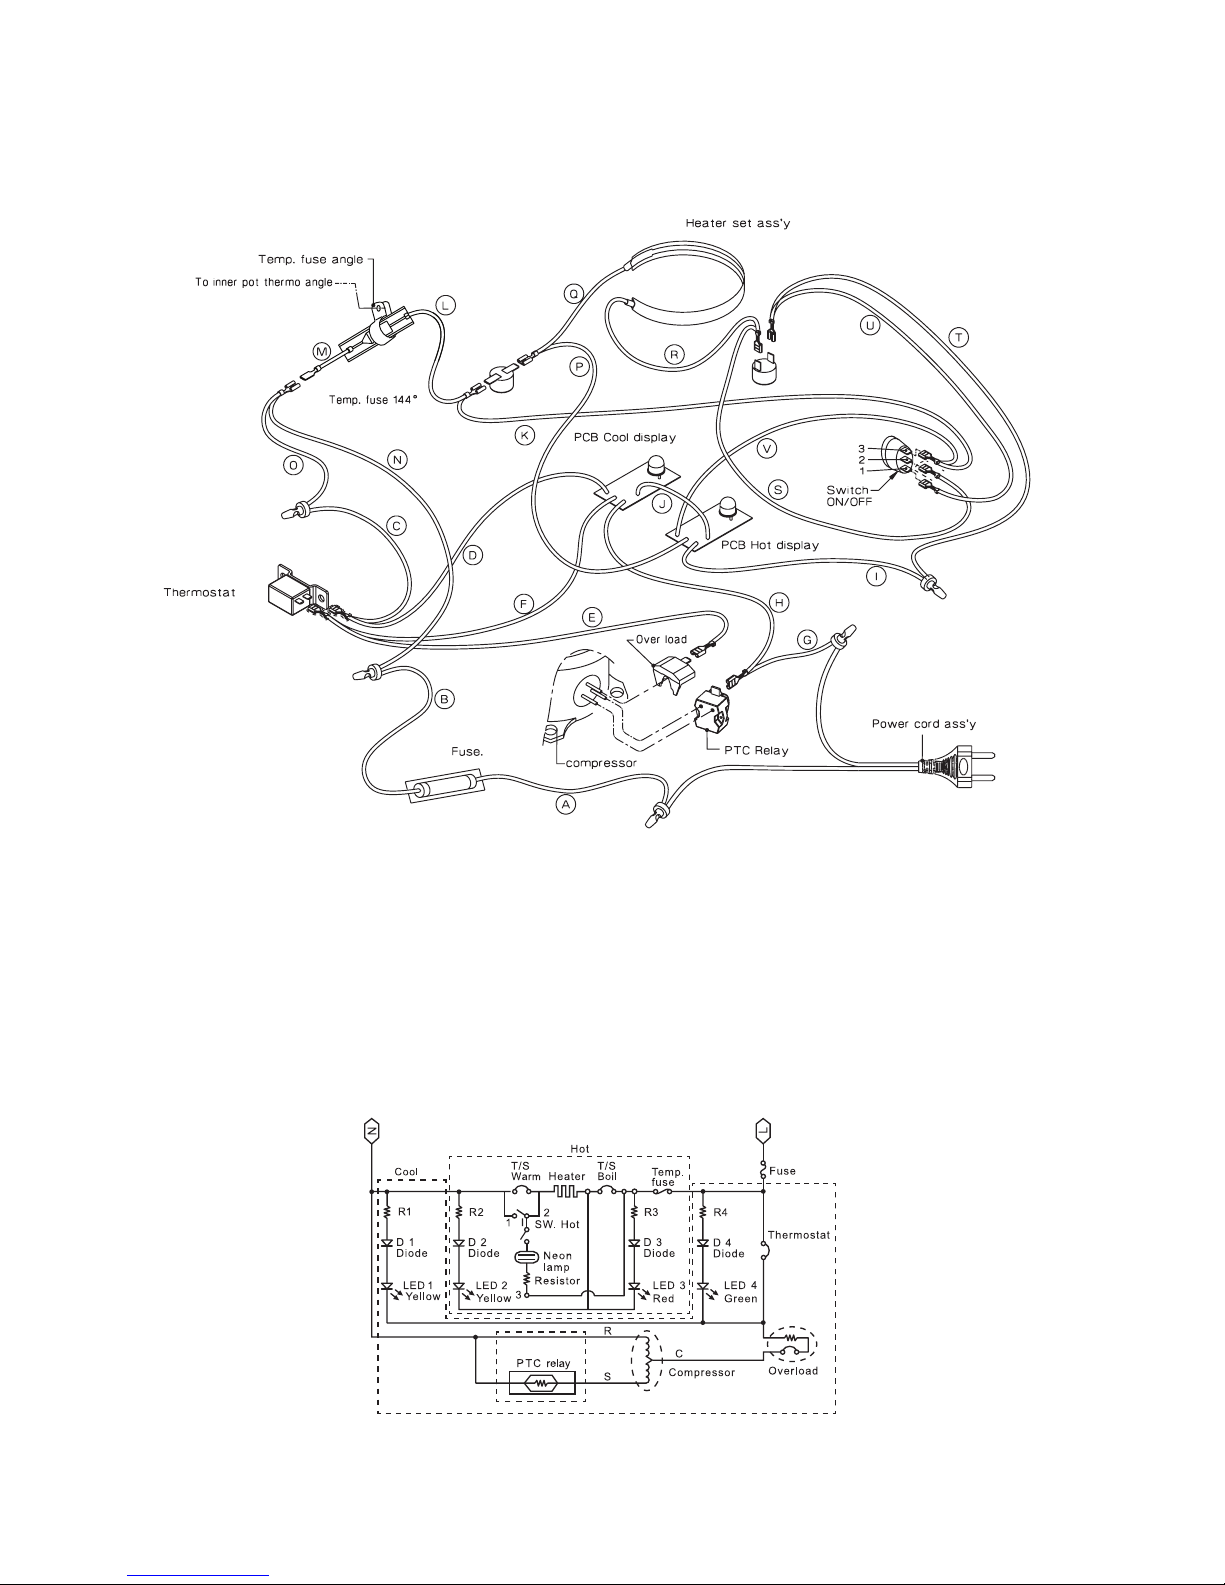
WIRING DIAGRAM
CIRCUIT DIAGRAM
Page 5
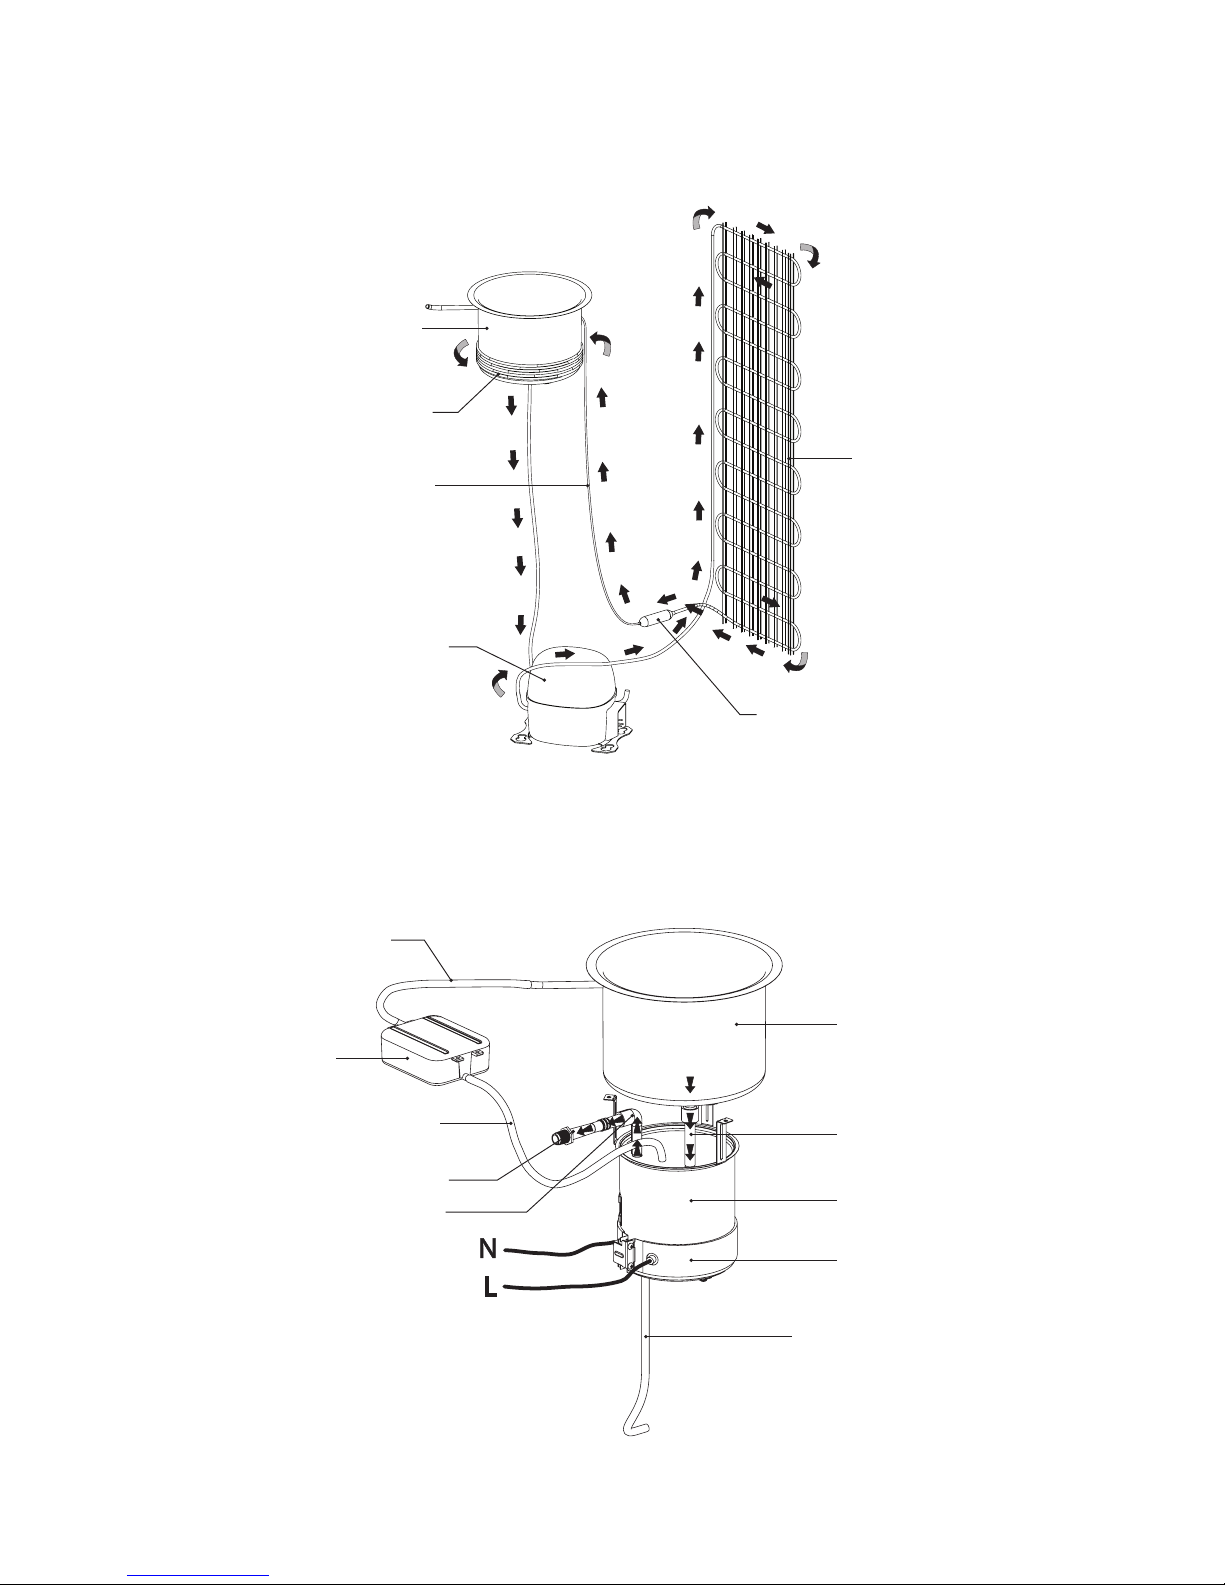
COOLING SYSTEM DIAGRAM
HOT WATER SYSTEM DIAGRAM
5
Compressor
Tank cooler
Hot water inlet tube
Silicone tube
Hot water outlet tube
Connector pipe
Silicone tube
Space tank
Heater tank ass’y
Heater set ass’y
Drain tube
Filter driers
Condenser ass’y
Capillary tube
Cooling coil
Tank cooler
Page 6

6
COMPONENT REPLACEMENT PROCEDURE
Before beginning the service inspection and/or repair you will need to disconnect the power cord
from the Hot & Cold water dispenser and remove the bottle from the reservoir.
1. Remove the insulating seal cork tape from terminal cover.
2. Remove the cover strap xing the terminal cover.
3. Disconnect the lead wire blue and remove the PTC relay from compressor.
4. Now the PTC relay is free.
REMOVE OF PTC RELAY
REMOVE OF THERMO MOTOR
Fig. 2
Compressor
Lead wire yellow
Terminal cover
Cover strap
Thermo motor
PTC relay
1. Remove the PTC relay in accordance with “REMOVE OF PTC RELAY”.
2. Disconnect the lead wire yellow and remove the thermo motor from compressor.
3. Now the thermo motor is free.
Fig. 1
Compressor
Cover strap
Terminal cover
Lead wire blue
PTC relay
Page 7

7
1. Remove 5 screws holding the condenser ass’y.
2. Disconnect 2 terminals lead wire from thermostat.
3. Remove 2 screws holding the thermostat to the thermo xing plate.
4. Now the thermostat is free.
REMOVE OF THERMOSTAT
1. Remove the terminal cover.
2. Remove the screw holding the power cord ass’y
3. Remove 2 closed terminal to power cord ass’y.
4. Now the power cord ass’y is free.
REMOVE OF POWER CORD ASS’Y
REMOVE OF FUSE ASS’Y
1. Remove the thermostat in accordance with “REMOVE OF THERMOSTAT”.
2. Disconnect the lead wire fuse.
3. Now the fuse is free.
Thermostat
Terminal
Condenser ass’y
Screw
Screw
Screw
Thermo xing plate
Fig. 4
Cover strap
Terminal cover
Thermo motor
Closed terminal
Power cord ass’y
Screw
Compressor
Stand
Fig. 3
PTC relay
Page 8

8
REMOVE OF PANEL B-A AND FAUCET ASS’Y
1. Remove the drain tray ass’y from the panel-B.
2. Remove 2 screws holding the top plate.
3. Separate out the top plate from the unit.
4. Remove 4 screws holding the faucet cover and detach the faucet cover.
5. Remove 2 screws holding the faucet ass’y.
6. Push the push button and insert the jig into the faucet ass’y (Hot water), push up the jig and remove the
lever faucet from the faucet body. Lift up the lever faucet of faucet ass’y (Cool water) to front.
7. Remove 4 screws holding the panel B-A and separate from the unit.
8. Release 2 faucet from the panel-B and remove the panel-A and panel-B from the stand.
9. Remove 2 screws holding the PCB Hot display and PCB Cool display from the panel-B.
10. Remove 2 screws holding the panel-A and panel-B.
11. Now the panel B-A and faucet ass’y are free.
Fig. 5
Fig. 6
Screw
Top plate
Hot water
outlet tube
Cool water
outlet tube
Cord band
Connector pipe
PCB Cool display
PCB Hot display
Screw
Screw
Faucet ass’y (Hot water)
Faucet ass’y (Cool water)
Faucet cover
Faucet mounting plate
Screw
Drain tray ass’y
Panel-A
Lift up
Lever faucet
Panel-B
Faucet body
Faucet ass’y (Hot water)
Faucet ass’y (Cool water)
Panel-B
Screw
Screw
Push
Push up
Jig
Lever faucet
Push button
Faucet body
Page 9

9
REMOVE OF TEMP. FUSE ASS’Y
1. Disconnect 2 lead wires Temp. fuse ass’y and cut lead wire from the PCB Hot display.
2. Disconnect 2 terminals from thermostat and switch ON/OFF.
2. Remove the screw holding the temp. fuse ass’y to the temp. fuse angle.
3. Remove the temp. fuse ass’y from the temp. fuse angle.
4. Now the temp. fuse ass’y is free.
REMOVE OF THERMOSTAT (42oC, 93oC)
1. Disconnect 4 terminals from the thermostat.
2. Remove 4 screws holding thermostat to heater tank ass’y.
3. Now the thermostat are free.
Heater tank ass’y
Screw
Thermostat 42oC
Thermostat 93oC
Terminal
Fig. 8
Fig. 7
REMOVE OF PCB HOT DISPLAY AND PCB COOL DISPLAY
1. Remove the panel B-A in accordance with “REMOVE OF PANEL B-A”.
2. Remove 2 screws holding PCB Hot display and PCB Cool display.
3. Cut lead wires from the PCB Hot display and PCB Cool display.
4. Now the PCB Hot display and PCB Cool display are free.
PCB Hot display
PCB Cool display
Panel-B
Panel-A
Screw
Fig. 9
Thermostat
Temp. fuse angle
Temp. fuse
Screw
Lead wire for
temp. fuse white
Lead wire for temp. fuse white
Lead wire for
temp. fuse white
Terminal
PCB Hot display
Switch ON/OFF
Page 10

10
Note : Recheck the Hot & Cold water dispenser for water leaks, after replace or repair the faucet connector
parts and tank connector.
REMOVE OF FAUCET CONNECTOR AND TANK CONNECTOR
1. Remove the water partition from the tank cooler ass’y.
2. Remove the panel B-A and faucet ass’y in accordance with “REMOVE OF PANEL B-A AND FAUCET
ASS’Y”.
3. Remove the side plate L-R in accordance with “REMOVE OF SIDE PLATE L-R”.
4. Cut the charge tube and let compressor’s coolant out off the compressor about 1 minute.
5. Blow gas 2 joints, and remove the cooling coil from the compressor, the capillary tube from the lter
driers.
6. Remove the adhesive foam tape from the faucet connector and the tank connector.
7. Cut 2 cord bands holding the hot water inlet tube and cool water outlet tube.
8. Remove the faucet ass’y (Cool water) and remove 3 screws holding the heater tank ass’y.
9. Remove the thermostat ass’y from tank cooler ass’y.
10. Remove the insulation foam from the tank cooler ass’y.
11. Remove 2 mounting nuts by toolbox and detach the faucet connector and tank connector from tank cooler
ass’y.
12. Now the faucet connector and tank connector are free.
Fig. 10
Toolbox
Compressor
Heater tank ass’y
Hot water inlet tube
Screw
Cord band
Tank support
Insulation foam
Mounting nut
Cooling coil
Tank cooler ass’y
Bellow cap
packing
Faucet connector
Water partition
Tank connector
Cool water outlet tube
Cord band
Joint
Joint
Cooling coil
Capillary tube
Filter driers
2
1
Page 11

11
REMOVE OF SIDE PLATE L-R
1. Remove the panel B-A and faucet ass’y in accordance with “REMOVE OF PANEL B-A”.
2. Put the jig into rear of the unit.
3. Remove 2 screws holding the switch ON/OFF ass’y.
4. Remove 4 screws holding the condenser ass’y and remove 6 screws from the side plate L-R to the tank
support.
5. Remove 4 screws holding the back plate and remove lead wire earth from side plate-L.
6. Turn front unit and remove 4 screws holding the side plate reinforce to the stand.
7. Now the side plate L-R are free.
Fig. 11
Stand
Side plate-L
Lead wire earth
Screw
Screw
Side plate reinforce
Side plate-R
Screw
Condenser ass’y
Jig
Tank support
Switch ON/OFF
SW. xing plate
Screw
Screw
Screw
Back plate
REMOVE OF SPACE TANK
1. Remove 2 screws holding the top plate and detach out the top plate from the unit.
2. Remove 4 screws holding the space tank.
3. Remove 2 clamp for silicone tube from space tank.
4. Now the space tank is free.
Fig. 12
Top plate
Tank cooler ass’y
Silicone tube
Clamp for silicone tube
Screw
Space tank
Page 12

12
REMOVE OF HEATER TANK ASS’Y
1. Remove the panel B-A and faucet ass’y in accordance with “REMOVE OF PANEL B-A AND FAUCET
ASS’Y”.
2. Remove the thermostat in accordance with “REMOVE OF THERMOSTAT”.
3. Remove the heater set ass’y.
4. Cut 3 cord bands and remove the clamp for silicone tube.
5. Detach all tube from heater tank ass’y.
6. Remove 3 screws holding the heater tank ass’y.
7. Now the heater tank ass’y is free.
REMOVE OF HEATER SET ASS’Y
1. Remove the panel B-A and faucet ass’y in accordance with “REMOVE OF PANEL B-A AND FAUCET
ASS’Y”.
2 Remove 2 screws holding the heater set support.
3. Unfasten 2 screws at the heater ass’y and then pull the heater set ass’y out of the heater tank ass’y.
Fig. 13
4. Now the heater set ass’y is free.
Tank support
Cord band
Cord band
Clamp for silicone tube
Heater tank
Heater tank support
Heater set
Heater holder-B
Heater holder-A
Screw
Screw
Cord band
Drain tube
Screw
Hot water inlet tube
Fig. 13
Page 13

13
1. Remove the side plate L-R in accordance with “REMOVE OF SIDE PLATE L-R”.
2. Cut the charge tube and let compressor’s coolant out off the compressor about 1 minute.
3. Blow gas 2 joints, and remove the lter driers from the condenser ass’y and the capillary tube.
4. Now the lter driers is free.
REMOVE OF FILTER DRIERS
Condenser ass’y
Capillary tube
Filter driers
Capillary tube
Joint
Joint
Condenser ass’y
Charge tube
Compressor
Fig. 14
1. Remove the panel B-A and faucet ass’y in accordance with “REMOVE OF PANEL B-A” AND FAUCET ASS’Y”.
2. Cut the charge tube and let compressor’s coolant out off the compressor about 1 minute.
3. Disconnect 2 lead wires terminal of the compressor.
4. Remove the insulating seal cork tape and push up the cooling coil insulation tube.
5. Blow gas joint the cooling coil and joint the condenser ass’y to the compressor.
6. Remove 4 screws holding the compressor to the stand.
7. Now the compressor is free.
REMOVE OF COMPRESSOR
Cooling coil
Cooling coil
insulation tube
Stand
Screw
Condenser ass’y
Joint
Joint
Compressor
Condenser ass’y
Insulating seal
cork tape
Fig. 15
Page 14

14
TROUBLESHOOTING
Problem Possible Cause Corrective Action
1. No voltage received by water
dispenser.
2. Faulty wires.
3. Faulty starting relay.
4. Faulty compressor overload.
5. Faulty compressor.
No cold water and compressor not
running.
1. Plugged into the outlet.
2. Repaired or replaced power
cord ass’y.
3. Replaced starting relay.
4. Replaced compressor
over load.
5. Replaced compressor.
No cold water and compressor running.
1. Faulty a refrigerant leak.
2. Faulty a restriction in capillary
line or strainer.
3. Faulty compressor.
1. Repaired or replaced parts
involved with refrigerant
system.
2. Repaired or replaced capillary
line or strainer.
3. Replace compressor.
Unit runs noisily.
1. Faulty vibrations caused by loose
screws.
2. Faulty vibrations at refrigeration
lines.
3. Faulty compressor.
1. Turned screws to t.
2. Fitted refrigeration lines.
3. Repaired or replaced
compressor.
Water leaks.
1. Faulty cracked plastic bottle.
2. Faulty damaged reservoir.
3. Faulty loose faucet or damaged
gasket.
1. Replaced plastic bottle.
2. Repaired or replaced reservoir.
3. Repaired or replaced faucet
and gasket.
Oil on refrigerant lines.
1. Unplug service cord and
contact refrigeration
repairman.
1. Replaced plastic bottle.
2. Decrease the water to remain
a half.
1. Replaced heater tank.
2. Repaired space tank.
1. Replace.
2. Repair.
1. Repair.
2. Replace.
1. Repaired PCB Hot display.
1. Faulty cracked plastic bottle.
2. Turn over the bottle when the
tank cooler is ll.
1. Faulty heater tank leak.
2. Faulty space tank to crack.
1. Disconnection in heating circuit.
2. Erroneous wiring.
1. Erroneous wiring.
2. Poor operation.
1. Faulty PCB Hot display.
Water overow from tank cooler.
Hot water leaks.
Water temperature is kept low.
Boiling continue
Hot indicator lamp lights up all time.
Page 15

15
REF. NO
PARTS CODE
DESCRIPTION Q’TY PRICE
(FEC)
PRINTING & PACKAGING MATERIAL
1-1 31B101 INSTRUCTION BOOK 1
1-2 31B102 CARTON BOX 1
1-3 31B103 SHARP BADGE 1
1-4 31B104 NAME PLATE 1
1-5 31A1051 POP WATER DISPENSER 1
1-6 31B107 BOTTLE STICKER 1
1-7 31A108 WARNING STICKER 1
1-8 31B109 HOT WATER STICKER 1
1-9 31B118 INSTRUCTION STICKER 1
1-10 31A112L UPPER PAD FOAM-L 1
1-11 31A112R UPPER PAD FOAM-R 1
1-12 31B114 UNDER PAD FOAM 1
MECHANICAL PARTS
2-1 31A202 BOTTLE CONNECTOR 1
2-2 31B203 TOP PLATE 1
2-3 31B512 TANK RUBBER SEAL 1
2-4 31B220 WATER PARTITION 1
2-5 31B301SET TANK COOLER SET 1
2-5-1 31B301 TANK COOLER 1
2-5-2 31A302 THERMO PLATE 1
2-5-3 31B217 FAUCET CONNECTOR 1
2-5-4 3C108 BELLOW CAP PACKING 1
2-5-5 31B224ASY TANK CONNECTOR AS’Y 1
2-5-6 31B303 COOLING COIL 1
2-5-7 31B115 INSULATION FOAM 1
2-5-8 31B3051 TANK SUPPORT 1
2-5-9 31A704 COOLING COIL INSULATION TUBE 1
2-5-10 31A2181 MOUNTING NUT 2
2-6 31B230 SPACE TANK 1
2-7 31B518 SILICONE TUBE L = 380 mm. 1
2-8 31B334 CLAMP-9 for SILICONE TUBE 1
2-9 31B510 COOL WATER OUTLET TUBE 1
2-10 31B509 HOT WATER OUTLET TUBE 1
2-11 31B508 HOT WATER INLET TUBE 1
2-12 31B322ASY HEATER TANK AS’Y 1
2-13 31B511 DRAIN TUBE L = 300 mm. 1
2-14 31B222 DRAIN VALVE JOINT 1
2-15 31B312 BACK PLATE 1
2-16 31B514 O-RING (ID) 5.5*1.5 mm. 1
2-17 31B223 DRAIN VALVE CAP 1
2-18 31B307 CONDENSER AS’Y 1
2-19 31B332 SWITCH FIXING PLATE 1
2-20 31B308 THERMO FIXING PLATE 1
2-21 31B3101 SIDE PLATE-R 1
2-22 31B3091 SIDE PLATE-L 1
2-23 31A311 SIDE PLATE REINFORCE 2
2-24 31B204B PANEL-B 1
2-25 31B204A PANEL-A 1
2-26 31B214 PANEL SWITCH 1
2-27 31B205 FAUCET COVER 1
2-28 31B206 DRAIN TRAY SUPPORT 1
2-29 31B207 DRAIN TRAY 1
2-30 31B208CSET COOL FAUCET SET 1
SERVICE PARTS LIST
SB-29
Page 16

16
REF. NO
PARTS CODE
DESCRIPTION Q’TY PRICE
(FEC)
MECHANICAL PARTS
2-30-1 31B209 FAUCET BODY 1
2-30-2 31B506 RUBBER VALVE 1
2-30-3 31B213 PIN VALVE 1
2-30-4 31B313 SPRING VALVE 1
2-30-5 31B211 CAP VALVE 1
2-30-6 31B208 LEVER FAUCET 1
2-30-7 31B516 O-RING (ID) 10.8*2.4 mm. 1
2-30-8 31B210 FAUCET MOUNTING PLATE 1
2-30-9 31B212 CONNECTOR PIPE 1
2-31 31B208HSET HOT FAUCET SET 1
2-31-1 31B209HASY HOT FAUCET BODY AS’Y 1
MECHANICAL PARTS
2-32 31B216 STAND 1
2-33 31A219 TERMINAL COVER 1
2-34 31A320 COVER STRAP 1
2-35 31A502 GROMMET 4
2-36 31A316 SLEEVE GROMMET 4
2-37 31A321 WASHER FLAT 4
ELECTRIC PARTS
3-1 31B404ASY POWER CORD WITH PLUG 1
3-2 31B401SET COMPRESSOR SET 1
3-2-1 31B401 COMPRESSOR 1
3-2-2 31A4021 PTC RELAY 1
3-2-3 31A407 THERMO MOTOR 1
3-3 31B405SET HEATER SET 1
3-4 31B4061 SWITCH ON/OFF 1
3-5 31A403 THERMOSTAT 250V, 3A 1
3-6 31A306 FILTER DRIERS 1
3-7 31B413 THERMOSTAT 42oC 1
3-8 3G2131 THERMOSTAT 93oC 1
3-9 31B412 TEMP. FUSE AS’Y 1
3-10 31B408 PCB HOT DISPLAY 1
3-11 31B407 PCB COOL DISPLAY 1
3-12 E03B2000XG EARTH WIRE 1
3-13 31B409 FUSE AS’Y 1
3-14 31B410 L-WIRE for SWITCH ON/OFF {Thermostat 42oC + Sw. On/Off} 1
FIXING PARTS
4-1 122G0645 SCREW TAP P-PH+BT Zn-CR3+ M6*45 4
4-2 9A603 MOTOR SPACER WASHER 2
Page 17

REF. NO
PARTS CODE
DESCRIPTION Q’TY PRICE
(FEC)
PRINTING & PACKAGING MATERIAL
1-1 31B101 INSTRUCTION BOOK 1
1-2 31F102 CARTON BOX 1
1-3 31F103 SHARP BADGE 1
1-4 31F104 NAME PLATE 1
1-5 31A1051 POP WATER DISPENSER 1
1-6 31B107 BOTTLE STICKER 1
1-7 31A108 WARNING STICKER 1
1-8 31B109 HOT WATER STICKER 1
1-9 31B118 INSTRUCTION STICKER 1
1-10 31A112 UPPER PAD FOAM 1
1-11 31A114 UNDER PAD FOAM 1
MECHANICAL PARTS
2-1 31A202 BOTTLE CONNECTOR 1
2-2 31B203 TOP PLATE 1
2-3 31B512 TANK RUBBER SEAL 1
2-4 31B220 WATER PARTITION 1
2-5 31B301SET TANK COOLER SET 1
2-5-1 31B301 TANK COOLER 1
2-5-2 31A302 THERMO PLATE 1
2-5-3 31B217 FAUCET CONNECTOR 1
2-5-4 3C108 BELLOW CAP PACKING 1
2-5-5 31B224ASY TANK CONNECTOR AS’Y 1
2-5-6 31B303 COOLING COIL 1
2-5-7 31B115 INSULATION FOAM 1
2-5-8 31B3051 TANK SUPPORT 1
2-5-9 31A704 COOLING COIL INSULATION TUBE 1
2-5-10 31A2181 MOUNTING NUT 2
2-6 31B230 SPACE TANK 1
2-7 31B518 SILICONE TUBE L = 380 mm. 1
2-8 31B334 CLAMP-9 for SILICONE TUBE 1
2-9 31B510 COOL WATER OUTLET TUBE 1
2-10 31B509 HOT WATER OUTLET TUBE 1
2-11 31B508 HOT WATER INLET TUBE 1
2-12 31B322ASY HEATER TANK AS’Y 1
2-13 31B511 DRAIN TUBE L = 300 mm. 1
2-14 31B222 DRAIN VALVE JOINT 1
2-15 31B312 BACK PLATE 1
2-16
31B514 O-RING (ID) 5.5*1.5 mm. 1
2-17 31B223 DRAIN VALVE CAP 1
2-18 31B307 CONDENSER AS’Y 1
2-19 31B332 SWITCH FIXING PLATE 1
2-20 31B308 THERMO FIXING PLATE 1
2-21 31B3101 SIDE PLATE-R 1
2-22 31B3091 SIDE PLATE-L 1
2-23 31A311 SIDE PLATE REINFORCE 2
2-24 31B204B PANEL-B 1
SB-29S
17
Page 18

REF. NO
PARTS CODE
DESCRIPTION Q’TY PRICE
(FEC)
MECHANICAL PARTS
2-25 31B204A PANEL-A 1
2-26 31B214 PANEL SWITCH 1
2-27 31B205 FAUCET COVER 1
2-28 31B206 DRAIN TRAY SUPPORT 1
2-29 31B207 DRAIN TRAY 1
2-30 31B208CSET COOL FAUCET SET 1
2-30-1 31B209 FAUCET BODY 1
2-30-2 31B506 RUBBER VALVE 1
2-30-3 31B213 PIN VALVE 1
2-30-4 31B313 SPRING VALVE 1
2-30-5 31B211 CAP VALVE 1
2-30-6 31B208 LEVER FAUCET 1
2-30-7 31B516 O-RING (ID) 10.8*2.4 mm. 1
2-30-8 31B210 FAUCET MOUNTING PLATE 1
2-30-9 31B212 CONNECTOR PIPE 1
2-31 31B208HSET HOT FAUCET SET 1
2-31-1 31B209HASY HOT FAUCET BODY AS’Y 1
2-32 31F216 STAND 1
2-33 31A219 TERMINAL COVER 1
2-34 31A320 COVER STRAP 1
2-35 31A502 GROMMET 4
2-36 31A316 SLEEVE GROMMET 4
2-37 31A321 WASHER FLAT 4
ELECTRIC PARTS
3-1 31B404ASY POWER CORD WITH PLUG 1
3-2 31B401SET COMPRESSOR SET 1
3-2-1 31B401 COMPRESSOR 1
3-2-2 31A4021 PTC RELAY 1
3-2-3 31A407 THERMO MOTOR 1
3-3 31B405SET HEATER SET 1
3-4 31B4061 SWITCH ON/OFF 1
3-5 31A403 THERMOSTAT 250V, 3A 1
3-6 31A306 FILTER DRIERS 1
3-7 31B413 THERMOSTAT 42oC 1
3-8 3G2131 THERMOSTAT 93oC 1
3-9 31B412 TEMP. FUSE AS’Y 1
3-10 31B408 PCB HOT DISPLAY 1
3-11 31B407 PCB COOL DISPLAY 1
3-12 E03B2000XG EARTH WIRE 1
3-13 31B409 FUSE AS’Y 1
3-14 31B410 L-WIRE for SWITCH ON/OFF {Thermostat 42oC + Sw. On/Off} 1
FIXING PARTS
4-1 122G0645 SCREW TAP P-PH+BT Zn-CR3+ M6*45 4
4-2 9A603 MOTOR SPACER WASHER 2
18
Page 19

19
 Loading...