

Page 1
R-761M
E
900W
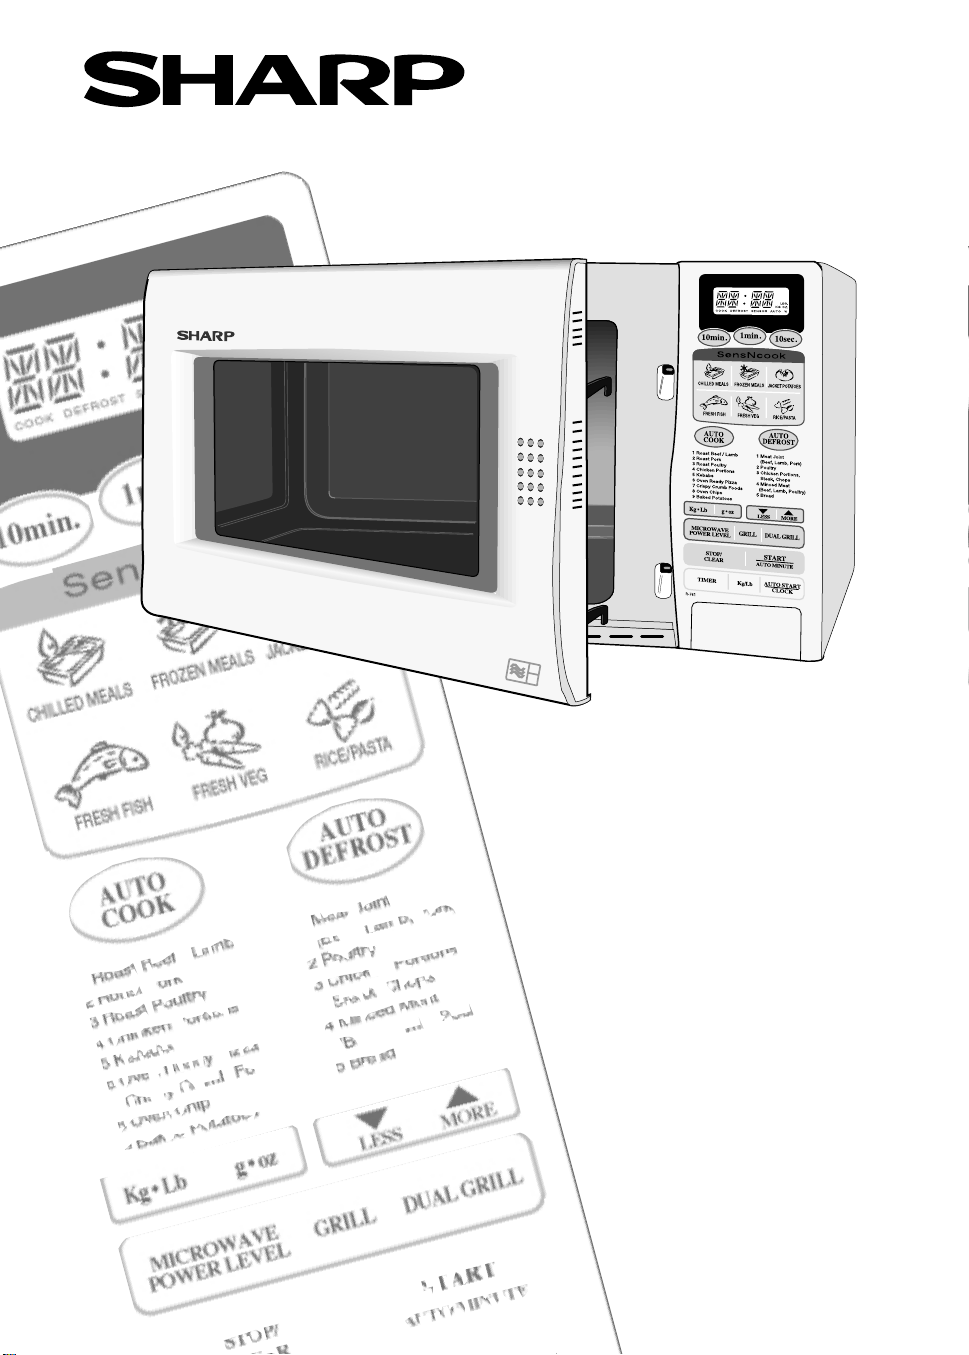
MICROWAVE OVEN WITH GRILL AND SENSOR
OPERATION MANUAL WITH COOKBOOK
IMPORTANT:
CAREFULLY READ THIS OPERATION MANUAL BEFORE INSTALLING OR USING
THE MICROWAVE OVEN. PAY SPECIAL ATTENTION TO THE IMPORTANT SAFETY
INSTRUCTIONS. ALWAYS USE THE MANUAL WITH THE OVEN AND KEEP IT NEAR
TO ENABLE EASY REFERENCE.
900W (IEC 705)
Page 2

Page 3

CONTENTS
Contents . . . . . . . . . . . . . . . . . . . . . . . . . . . . . . . . . . . . . . . . . . . . . . . . . . . . .1
Oven Features & Accessories . . . . . . . . . . . . . . . . . . . . . . . . . . . . . . . . . . .2
Control Panel . . . . . . . . . . . . . . . . . . . . . . . . . . . . . . . . . . . . . . . . . . . . . . . . .3
Safety:
Important Safety Instructions . . . . . . . . . . . . . . . . . . . . . . . . . . . . . . . . . . . . . .4
Installation . . . . . . . . . . . . . . . . . . . . . . . . . . . . . . . . . . . . . . . . . . . . . . . . . .4 - 5
Before Operation . . . . . . . . . . . . . . . . . . . . . . . . . . . . . . . . . . . . . . . . . . . . .5
Basic Operation:
Setting the clock . . . . . . . . . . . . . . . . . . . . . . . . . . . . . . . . . . . . . . . . . . . . . .6
How to operate the oven . . . . . . . . . . . . . . . . . . . . . . . . . . . . . . . . . . . . . . . .7
Microwave Power Levels . . . . . . . . . . . . . . . . . . . . . . . . . . . . . . . . . . . . . . . .8
Auto Minute . . . . . . . . . . . . . . . . . . . . . . . . . . . . . . . . . . . . . . . . . . . . . . . . .8
Defrosting . . . . . . . . . . . . . . . . . . . . . . . . . . . . . . . . . . . . . . . . . . . . . . . . . .8
Grilling . . . . . . . . . . . . . . . . . . . . . . . . . . . . . . . . . . . . . . . . . . . . . . . . . . . .9
Dual Grilling . . . . . . . . . . . . . . . . . . . . . . . . . . . . . . . . . . . . . . . . . . . . . . . .10
Advanced/Auto Operation:
Auto Cook / Defrost . . . . . . . . . . . . . . . . . . . . . . . . . . . . . . . . . . . . . . . . . . .11
Auto Cook / Defrost Charts . . . . . . . . . . . . . . . . . . . . . . . . . . . . . . . . . . . . . .12-13
SensNcook . . . . . . . . . . . . . . . . . . . . . . . . . . . . . . . . . . . . . . . . . . . . . . . . .14
SensNcook Chart . . . . . . . . . . . . . . . . . . . . . . . . . . . . . . . . . . . . . . . . . . . . .15-16
Less and More Keys . . . . . . . . . . . . . . . . . . . . . . . . . . . . . . . . . . . . . . . . . . .17
Timer . . . . . . . . . . . . . . . . . . . . . . . . . . . . . . . . . . . . . . . . . . . . . . . . . . . . . .18
Sequence Programming . . . . . . . . . . . . . . . . . . . . . . . . . . . . . . . . . . . . . . . .18
Other Convenient Functions
Auto Start . . . . . . . . . . . . . . . . . . . . . . . . . . . . . . . . . . . . . . . . . . . . . . . . . . .19
Maff Heating Category . . . . . . . . . . . . . . . . . . . . . . . . . . . . . . . . . . . . . . . . .20
Cooking Advice: . . . . . . . . . . . . . . . . . . . . . . . . . . . . . . . . . . . . . . . . . . . . .2 0
Suitable Cookware . . . . . . . . . . . . . . . . . . . . . . . . . . . . . . . . . . . . . . . . . . . .2 1 - 22
Food Handling & Preparation . . . . . . . . . . . . . . . . . . . . . . . . . . . . . . . . . . . .2 2 - 23
Advice for Defrosting . . . . . . . . . . . . . . . . . . . . . . . . . . . . . . . . . . . . . . . . . .24
Advice for Cooking & Reheating . . . . . . . . . . . . . . . . . . . . . . . . . . . . . . . . . .25
CookBook: . . . . . . . . . . . . . . . . . . . . . . . . . . . . . . . . . . . . . . . . . . . . . . . . . . .26 - 53
Aftercare:
Cleaning & Maintenance . . . . . . . . . . . . . . . . . . . . . . . . . . . . . . . . . . . . . . .54
Troubleshooting . . . . . . . . . . . . . . . . . . . . . . . . . . . . . . . . . . . . . . . . . . . . . .54 - 55
T o replace the mains plug . . . . . . . . . . . . . . . . . . . . . . . . . . . . . . . . . . . . . . .55
Calling for Service . . . . . . . . . . . . . . . . . . . . . . . . . . . . . . . . . . . . . . . . . . . .56
Guarantee . . . . . . . . . . . . . . . . . . . . . . . . . . . . . . . . . . . . . . . . . . . . . . . . . .56
Specifications . . . . . . . . . . . . . . . . . . . . . . . . . . . . . . . . . . . . . . . . . . . . . . . . .57
Important
This operation manual contains important information which you should read carefully
IMPORT ANT: There may be a serious risk to health if this operation manual is not followed or if the oven is
modified so that it operates with the door open.
OPERATION MANUAL
before using your microwave oven.
1
Page 4
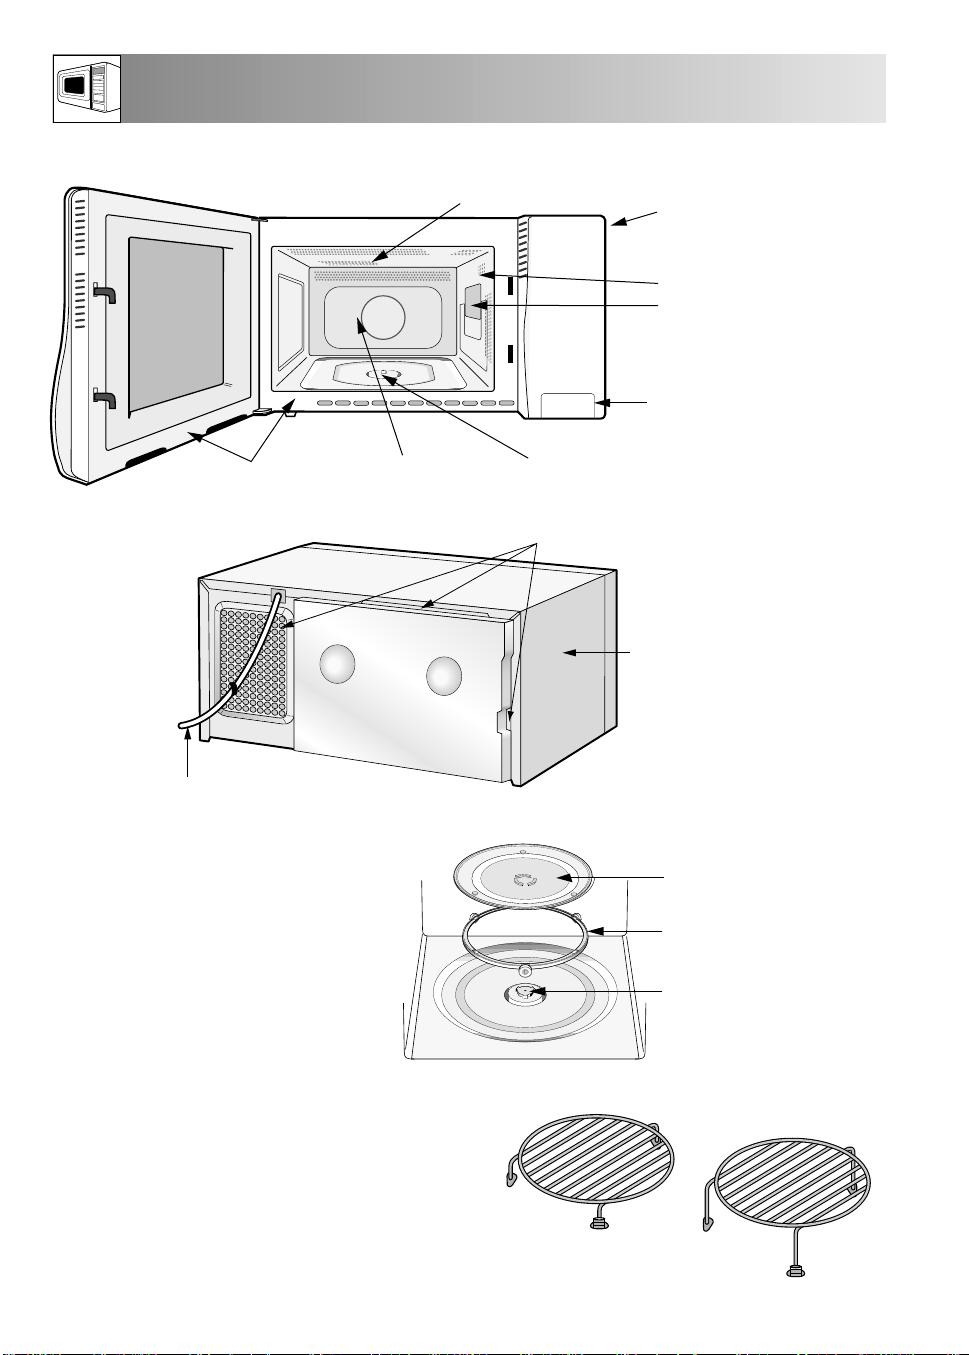
OVEN & ACCESSORIES
Door opening button
Waveguide cover
(distributing microwaves)
Oven cavity
Turntable support system
Door seals
& sealing surfaces
Control panel
(see facing page
for detail)
Oven lamp
Turntable
Turntable
support
Coupling
Place the turntable support
in the centre of the oven
floor so that it can freely
rotate around the coupling.
Place the turntable onto
the turntable support so
that it locates firmly into
the coupling.
To avoid turntable damage, ensure dishes
or containers are lifted clear of the turntable
rim when removing them from the oven.
NOTE: When you order accessories, please
mention two details: part name and model
name to your dealer or SHARP authorised
service agent.
❏
❏
❏
Air vent openings
Outer cabinet
Power supply cord
For use, see pages 20-21
Low and High Racks
Grill heating element
❏
For use, see page 21.
2
Page 5
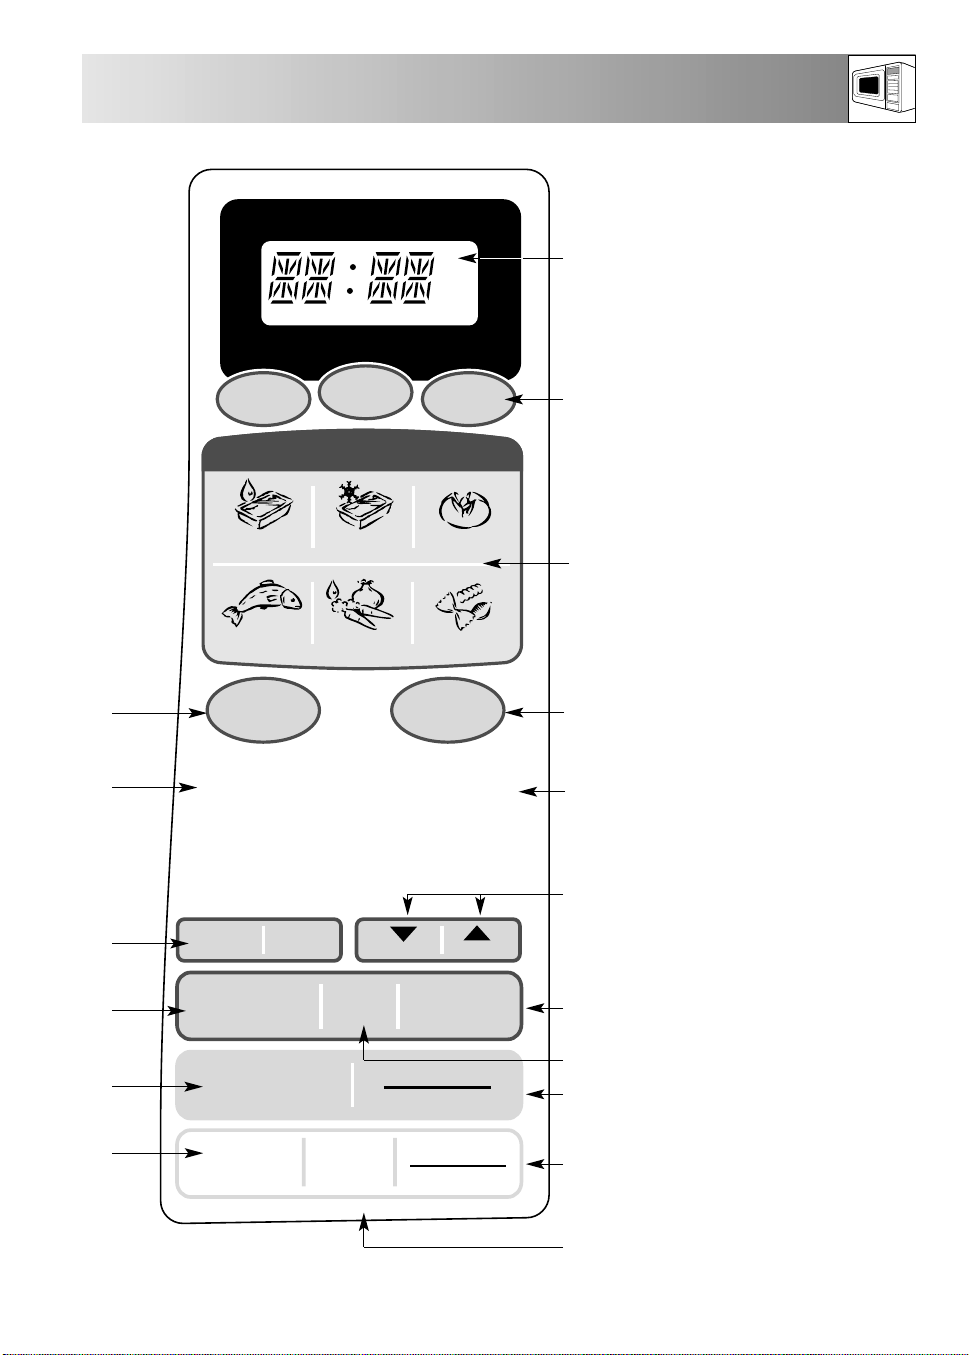
COOK DEFROST SENSOR AUTO %
10min.
1min.
SensNcook
CHILLED MEALS
FRESH FISH
FROZEN MEALS
FRESH VEG
LBS.
KG OZ.
10sec.
JACKET POT ATOES
RICE/PASTA
CONTROL PANEL
1. DIGITAL DISPLAY
2. TIME keys
3. SensNcook keys: Press to
1
2
3
select a menu
4. AUTO DEFROST key
5. AUTO DEFROST menus
6. LESS/MORE keys
7. DUAL GRILL key
8. GRILL key
9. START/AUTO MINUTE key
10. AUTO START/CLOCK key
11. WEIGHT CONVERSION key
12. TIMER key
13. STOP/CLEAR key
14. MICROWAVE POWER
LEVEL key
15. WEIGHT keys
16. AUTO COOK menus
17. AUTO COOK key
17
16
15
14
13
12
AUTO
COOK
1 Roast Beef / Lamb
2 Roast Pork
3 Roast Poultry
4 Chicken Portions
5 Kebabs
6 Oven Ready Pizza
7 Crispy Crumb Foods
8 Oven Chips
9 Baked Potatoes
Kg • Lb g • oz
MICROWAVE
POWER LEVEL
STOP/
CLEAR
TIMER Kg/Lb
R-761
AUTO
DEFROST
1 Meat Joint
(Beef, Lamb, Pork)
2 Poultry
3 Chicken Portions,
Steak, Chops
4 Minced Meat
(Beef, Lamb, Poultry)
5 Bread
LESS MORE
GRILL DUAL GRILL
START
AUTO MINUTE
AUTO START
CLOCK
4
5
6
7
8
9
10
11
3
Page 6

IMPORTANT SAFETY INSTRUCTIONS
READ CAREFULLY AND KEEP FOR FUTURE REFERENCE
Oven Use:
• This oven is for domestic food preparation only .
Never operate when empty .
• Do not leave or store anything inside the oven
when not in use.
• Never attempt to use the oven with the door open.
It is important not to defect or tamper with the door
safety latches. This may result in exposure to
microwave energy .
• Never operate the oven with any object caught in
the door sealing surfaces, this again may cause
microwave leakage.
• Do not insert fingers or objects in the holes of the
door latches or air vent openings as this may
damage the oven and cause an electric shock.
INSTALLATION
Inspect the Oven: Check the oven carefully for
damage before and regularly after installation.
• Make sure the door closes properly, that it is not
misaligned or warped.
• Check the hinges and door safety latches are not
broken or loose.
• Ensure the door seal and sealing surfaces are not
damaged.
• Inspect the oven interior and door for dents.
W ARNING:
If the door or seals are damaged, the oven must not
be operated until it has been repaired by a competent
person.
Important:
If any damage is apparent, do not operate the oven
in any way . Contact your dealer or an authorised
Service Technician appointed by SHARP.
W ARNING:
It is hazardous for anyone other than a competent
person to carry out any service or repair operation
which involves the removal of a cover which gives
protection against exposure to microwave energy .
If water or food drops inside the air vent openings
switch off the oven immediately , unplug it and call a
Service Technician appointed by SHARP.
• Never attempt to move the oven while it is
operating.
Childcare: Only allow children to use the oven
without supervision when adequate instuctions have
been given so that the child is able to use the oven in
a safe way and understands the hazards of improper
use.
Pacemaker: If you have a heart pacemaker,
consult your doctor or the pacemaker manufacturer
prior to oven use.
1 . Remove all packing materials and the feature label,
(if attached). Do not remove the plastic film from the
inside of the oven window as this protects it from
dirt.
2 . Place oven on a secure, level surface, strong
enough to take the oven weight, plus the heaviest
item likely to be cooked in the oven.
3 . Ensure there is a minimum of free space above
the oven of 19cm.
4 . Do not place the oven where heat, moisture or
high humidity are generated, (for example, near
or above a conventional oven) or near
combustible materials (for example, curtains).
Do not block or obstruct air vent openings, as
obstructions may ignite due to the emission of
hot air.
5 . Make sure the power supply cord is undamaged,
(See Installation next page), and that it does not
run under the oven or over any hot or sharp
surfaces.
6 . The socket must be readily accessible so that it
can be easily unplugged in an emergency .
7. The oven door becomes hot during cooking. T o
prevent burning, the oven should be placed at
least 85cm or more above the floor.
8 . Do not use the oven outdoors.
4
Page 7

STOP/
CLEAR
BUILDING-IN-KIT.
INSTALLATION
An installation frame is available which enables the
microwave oven to be integrated within a kitchen unit.
The microwave oven is not designed to be built above
or near a conventional oven.
SHARP recommend the use of the build in kit, EBR4500, available from your SHARP dealer. Only the
use of this frame will guarantee the quality and safety
of the oven. When building, follow installation
instructions (for B type) supplied carefully .
IMPORTANT! ELECTRICAL CONNECTION.
• Do not allow water to come into contact with the
power supply cord or plug.
• Insert the plug properly into the socket as the plug
may otherwise overheat and catch fire.
• Do not connect other appliances to the same socket
using an adaptor plug as it may cause the house
wiring to overheat and catch fire.
• If the plug or socket is loose or the power supply
cord is damaged, do not operate the oven, it must
be replaced by the manufacturer or their service
agent or a similarly qualified person in order to
avoid a hazard. A defective plug, power supply
cord or socket may overheat and catch fire during
operation or cause an electrical shock.
• When removing the plug from the socket always
grip the plug, never the mains lead as this may
damage the power supply cord and the
connections inside the plug.
• The product is fitted with a re-wireable plug. Should
it not be suitable for the socket outlet in your home,
remove the plug and fit an appropriate type,
observing the wiring code given in ‘To replace the
mains plug’on page 55 .
If you wish to remove or replace the plug supplied,
ensure the plug is removed properly and not cut off.
When replacing the plug please ensure that you use a
BSI or AST A approved plug to BS1363, this should be
fitted with a brown coloured 13 amp fuse approved
by BSI or AST A to BS1362. If you have any doubt
about electrical connection seek the help of a
qualified electrician.
WARNING
THIS APPLIANCE MUST BE EARTHED
T o wire an appropriate plug, follow the wiring code
given in ‘T o replace the mains plug’ on page 53.
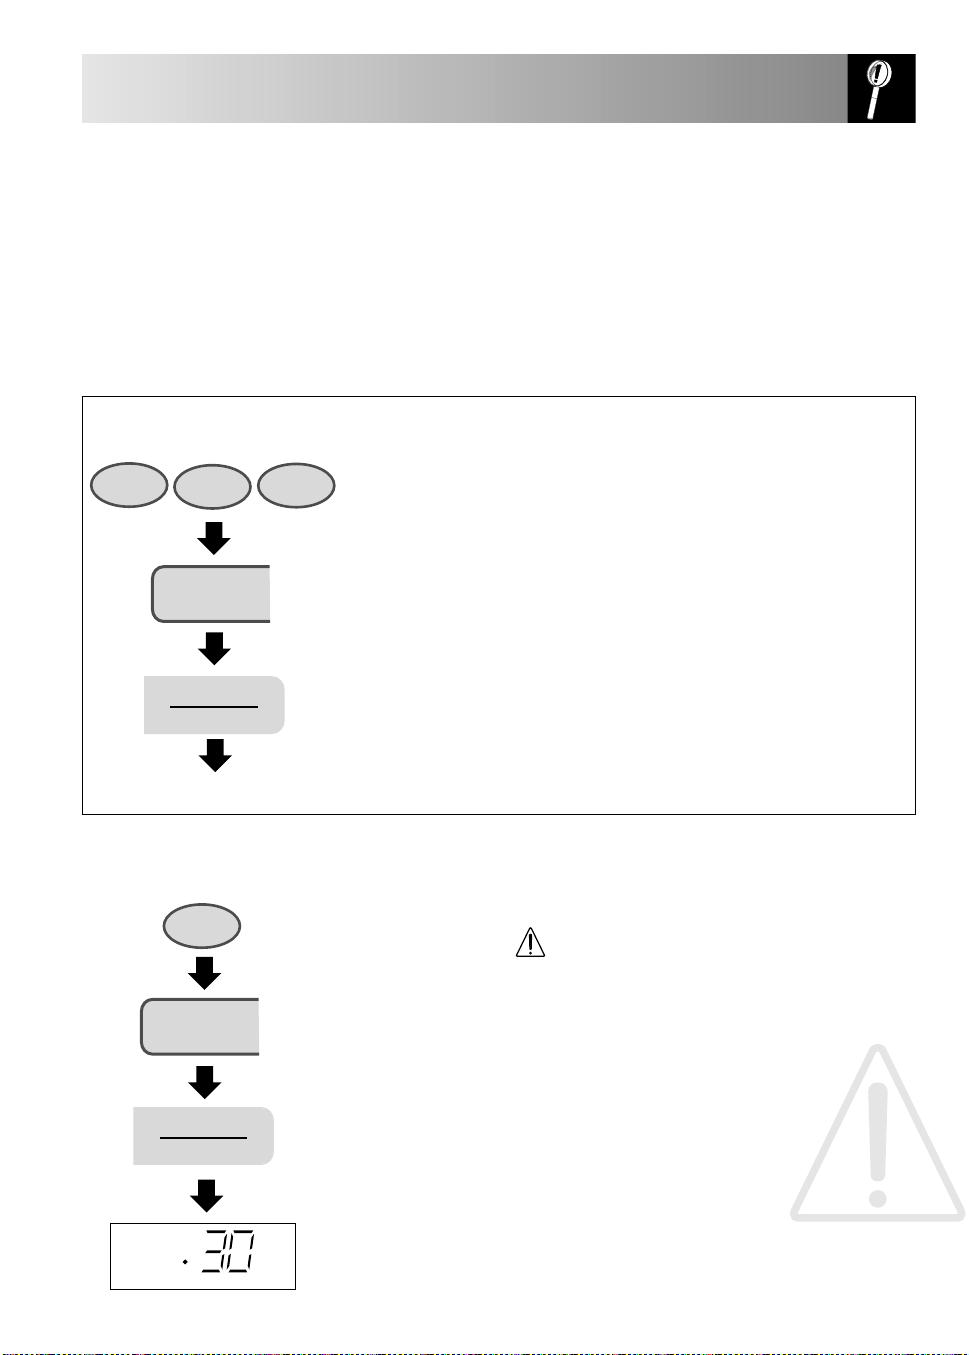
Plug in the oven.
1. The oven display will flash:
2 . Press the STOP/CLEAR key the display will show:
(Heat the grill with the oven empty for 20 minutes.
See the NOTE and the instructions for grilling on
page 9).
T o set the clock, refer to the next page.
BEFORE OPERATION
1.
2.
x1
5
Page 8
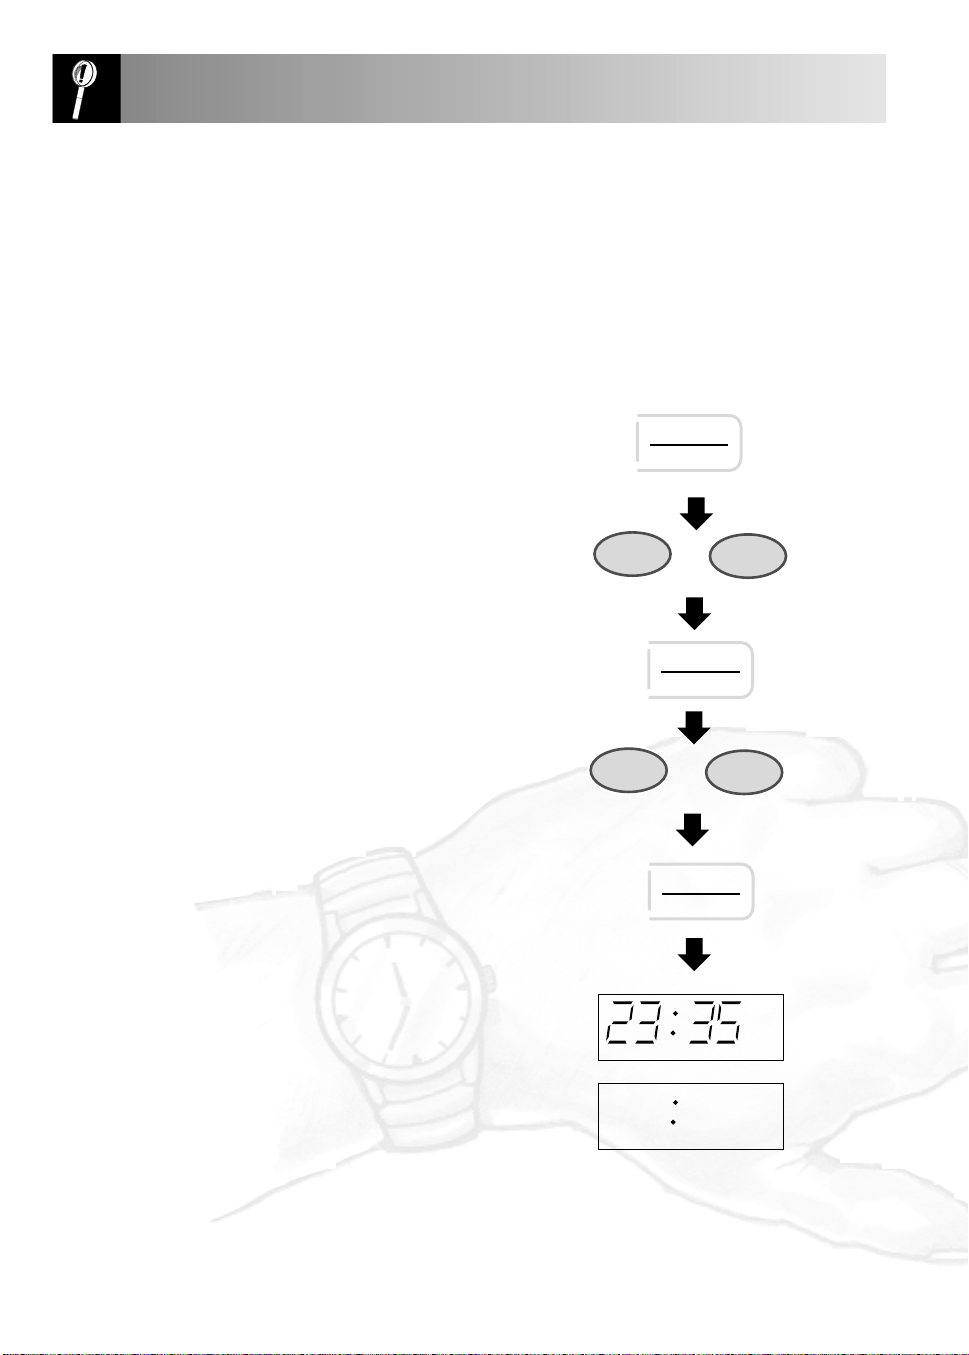
SETTING THE CLOCK
AUTO START
CLOCK
AUTO START
CLOCK
10min.
1min.
10min.
1min.
AUTO START
CLOCK
There are two setting modes: 12 hour clock and 24
hour clock.
Press AUTO START/CLOCK once to select
the 12 hour clock, twice to select the 24 hour clock.
Example
To set the24 hour clock to 23:35.
1. Press AUTO START/CLOCK twice to select
the 24 hour clock.
2. Enter the hours. Press the 10 MINUTE key
twice and the 1 MINUTE key three times.
3. Press AUTO START/CLOCK again.
x2
x3x2
4. Enter the minutes. Press the 10 MINUTE key
3 times and the 1 MINUTE key 5 times.
5. Press AUTO START/CLOCK again to set
the clock.
NOTES:
Once the time of day is set you need only reset
when the clocks change, if there is a power cut or if
you disconnect the oven from the power socket.
If the clock is set and cooking is complete, the
display will return to show the correct time of day.
If the clock has not been set, the display will show:
x1
x5x3
x1
6
Page 9
HOW TO OPERATE THE OVEN
COOK
10min.
1min.
10sec.
10sec.
AUTO MINUTE
START
AUTO MINUTE
START
MICROWAVE
POWER LEVEL
MICROWAVE
POWER LEVEL
MICROWAVING
Introduction: Water, sugar and fat in food are
absorbed by the microwaves and causes them to
vibrate. This creates heat by friction, in the same way
your hands get warm when you rub them together.
Outer areas of food are heated by microwave
energy , and remaining portions by conduction. It is,
therefore, important to turn, rearrange or stir food
to ensure even heating. Where recommended, allow
GETTING STARTED:
Getting started in three simple steps:
1. Press the TIME
keys to enter the
cooking time.
2 . Select power level.
(See Power Levels,
page 8).
3 . Press
x1
START/AUTO
MINUTE
once to
start cooking.
Display will count down through cooking time.
food to stand, this is not optional but necessary to
ensure thorough cooking and is particularly important
for dense food, such as joints of meat.
Microwaves pass through non-metallic dishes and
utensils and heat the food inside the dishes.
Microwaves are reflected by metal. The oven is lined
with metal and has a fine metallic mesh in the door to
prevent microwave leakage. Metallic dishes are not
suitable for microwaving. (Refer to suitable cookware
page 21-22)
Prepare and place food in a suitable container onto
the turntable or directly onto the turntable. Close the
door.
Opening and closing the door: T o open the
oven door, press the door opening button. The oven
lamp will come on while the door is open. Close the
door firmly and the oven lamp will go out.
Stopping the oven: If you wish to stop the oven
during cooking press STOP/CLEAR or open the
oven door. To start the oven, close the door and
press START/AUTO MINUTE. If you wish to
cancel the cooking programme, press
STOP/CLEAR twice.
Example:
T o melt 50g (2oz) butter on 100P (HIGH) power for 30 seconds.
x3
Enter heating time,
press the 10 SEC.
key three times.
Press MICROW A VE
POWER LEVEL once
x1
for 100P (HIGH).
Press START/AUTO
MINUTE
x1
cooking.
Display will count
down through
heating time.
once to start
WARNING
Always operate the oven with the turntable and
support fitted correctly, see page 2. This promotes
thorough even cooking.
A badly fitted turntable may rattle, may not rotate
properly and damage the oven.
The turntable rotates clockwise or counter
clockwise. The rotary direction may change each
time you start the oven. This does not affect
cooking performance.
7
Page 10
MICROWAVE POWER LEVELS
AUTO MINUTE
START
COOK DEFROST SENSOR AUTO %
NP.
LBS.
KG OZ
COOK DEFROST SENSOR AUTO %
LBS.
KG OZ
MICROWAVE
POWER LEVEL
COOK DEFROST SENSOR AUTO %COOK DEFROST SENSOR AUTO %
NPNP.
LBS.LBS.
KG OZKG OZ
MICROWAVE
POWER LEVEL
COOK DEFROST SENSOR AUTO %
NP.
LBS.
KG OZ
MICROWAVE
POWER LEVEL
COOK DEFROST SENSOR AUTO %
NP.
LBS.
KG OZ
MICROWAVE
POWER LEVEL
COOK DEFROST SENSOR AUTO %
NP.
LBS.
KG OZ
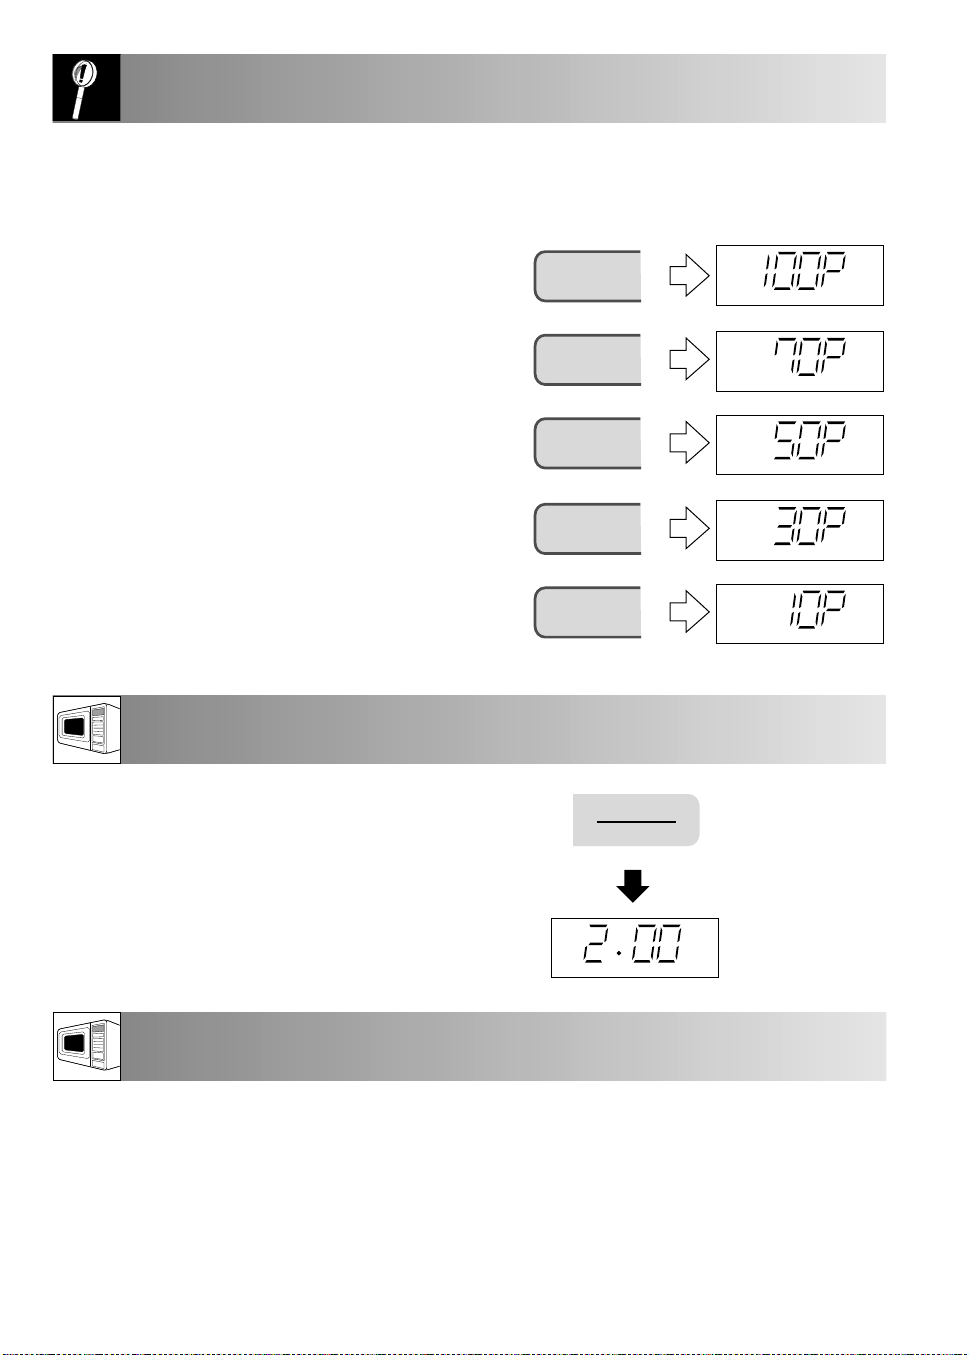
To check the power level during cooking /
defrosting: Press the MICROWAVE POWER
LEVEL key and the power level will be displayed
as long as the key is pressed. This does not affect
the programme or cooking time.
Important: The microwave power level will default
to 100P (HIGH) unless you press MICROW AVE
POWER LEVEL to the desired setting. T o help you
decide which power level is suitable, for Defrosting
advice see below, also charts, Page 28, and for
cooking, see charts, Page 29-31 . For advice on
Reheating, see Page 32 .
Power level: The microwave power level is
varied by the microwave energy switching on and
off. When using power levels other than 100P
(HIGH) you will be able to hear the microwave
energy pulsing on and off as the food cooks or
defrosts.
AUTO MINUTE
Enter required time and select the power level: There are
5 microwave power levels:
100P (HIGH)
MICROWAVE
POWER LEVEL
x1
COOK DEFROST SENSOR AUTO %
70P (MEDIUM HIGH)
x2
50P (MEDIUM)
x3
30P (MEDIUM LOW)
x4
10P (LOW)
x5
NPNP.
LBS.
KG OZ
AUTO MINUTE enables you to cook on 100P
(HIGH) microwave power in multiples of 1 minute,
or extend cooking time in multiples of 1 minute.
x2
Example:
T o cook on 100P (HIGH) for 2 minutes, press the
START/AUTO MINUTE key twice.
AUTO MINUTE enables you to extend cooking
time in multiples of 1 minute during cooking.
DEFROSTING
T o defrost foods not included in the Auto Defrost menu, use microwave power levels 30P (MEDIUM LOW) or
10P (LOW). Stir or turn food at least 2-3 times during defrosting.
After defrosting, cover food or wrap in aluminium foil and leave to stand until thoroughly defrosted. Refer to the
defrosting charts in the cookbook section of this manual.
8
Page 11
GRILLING
10min.
1min.
10sec.
AUTO MINUTE
START
GRILL
1min.
AUTO MINUTE
START
AUTO MINUTE
START
GRILL
STOP/
CLEAR
The grill at the top of the oven cavity has one
GETTING STARTED: Getting started in three simple steps:
power setting. Assisted by the turntable which
rotates to ensure even browning, the grill is both
economical and ideal for cooking bacon, gammon
steaks, fish fingers and tea cakes or for making
1. Press the TIME
keys to enter
grilling time.
cheese on toast. It is also ideal for browning and
crisping food which has been microwaved.
It is not necessary to preheat the grill. Follow
x1
2 . Press GRILL once.
recommended grilling times and procedures in the
cookbook section of this manual.
NOTE:
When first using the grill heater, smoke and odour
will be given off. T o avoid this happening when
food is being cooked, heat the grill heating element
without food for approximately 20 minutes.
x1
Display will count down through grilling time.
3 . Press
START/AUTO
MINUTE to start
grilling.
The high rack is recommended for grilling small items such as toast, bacon or steak, turn over halfway
through grilling. Place food directly on the rack, in a flan dish or on a heat-resistant plate.
When browning or crisping foods in a casserole dish, use the high rack if the container is shallow enough.
However, it is advisable to place such containers directly onto the turntable or low rack - allow a little extra
time to brown and crisp.
Example:
Example:
T o grill 6 rashers of bacon for 8 minutes. Place the bacon
in a flan dish on the high rack. Close the oven door.
1. Enter the grilling time, press the 1 MINUTE key
eight times.
2 . Press GRILL once.
3 . Press START/AUTO MINUTE once to start
grilling.
The display will count down through grilling time.
4 . Halfway through cooking, open the door (or press
STOP/CLEAR once, then open the door). Turn the
bacon over.
5 . Press START/AUTO MINUTE once to continue
grilling.
The display will count down through grilling time and
will show at regular intervals
x8
x1
x1
x1
x1
9
Page 12

DUAL GRILLING
10min.
1min.
AUTO MINUTE
START
AUTO MINUTE
START
MICROWAVE
POWER LEVEL
DUAL GRILL
STOP/
CLEAR
DUAL GRILL combines the power of the microwave with the grill. The DUAL GRILL default setting combines
the GRILL with 30P ( MEDIUM LOW) microwave power. Please note that microwave level 100P (HIGH) cannot
be set for DUAL GRILL.
The combination of microwaves with the grill reduces cooking time and provides a crisp, brown finish giving you
the convenience of fast cooking with a traditional appetising appearance.
Use the high rack for dual grilling small items such as toast, bacon or steak, turn over halfway through cooking.
Food can be placed directly on the rack, on a heat-resistant plate or in a flan dish.
When browning or crisping foods in a casserole dish, use the high rack if the container is shallow enough.
However, it is advisable to place such containers directly onto the turntable or low rack - allow a little extra time
to brown and crisp.
Example:
T o cook 450g (1lb) boneless pork chops using dual grill, 70P (MEDIUM HIGH) microwave power for 11
minutes.
Place the chops on the high rack.
1. Press the 10 MINUTE key once and the
1 MINUTE key once to enter the grilling time of
11 minutes.
x1
x1
2 . Press DUAL GRILL once.
3 . Press MICROWAVE POWER LEVEL twice for
70P (MEDIUM HIGH).
4 . Press START/AUTO MINUTE once to start
cooking.
The display will count down through cooking time.
5 . Halfway through cooking, open the door (or press
STOP/CLEAR once, then open the door). Turn the
chops over.
6 . Press START/AUTO MINUTE once to continue
cooking.
The display will count down through cooking time
and will show at regular intervals.
x1
x2
x1
x1
10
Page 13

AUTO COOK / DEFROST
AUTO
COOK
COOK DEFROST SENSOR AUTO %
NP.
LBS.
KG OZ
COOK DEFROST SENSOR AUTO
AUTO MINUTE
START
AUTO
COOK
AUTO
DEFROST
Kg • Lb g • oz
AUTO COOK / AUTO DEFROST
This function enables you to cook or defrost the foods
listed on the control panel of the microwave oven.
(shown opposite)
WEIGHT CONVERSION
T o change the weight unit press the WEIGHT
CONVERSION key before entering the weight.
The oven memorises the weight unit of the last operation.
WEIGHT RANGE:
Food weight should be rounded up to the nearest
0.1kg or 1oz, for example, 0 .65kg to 0.7kg and
1 2.5oz to 13oz. You are restricted to enter a weight
within the range given (see chart on the following
page). T o cook/defrost weights below or above that
range, refer to the charts in the SHARP Cookbook.
HOW TO OPERATE AUTO COOK / AUTO
DEFROST:
• Press AUTO COOK or AUTO DEFROST until the
number corresponding to the food listed on the
control panel appears in the display .
• In the example given here, AUTO COOK is
pressed once to select the first item; Roast
Beef/Lamb. The display shows AC-1.
1. Roast Beef/Lamb
2. Roast Pork
3. Roast Poultry
4. Chicken Portions
5. Kebabs
6. Oven Ready Pizza
7. Crispy Crumb Foods
8. Oven Chips
9. Baked Potatoes
1. Meat Joint
(Beef, Lamb, Pork)
2. Poultry
3. Chicken Portions,
Steak, Chops
4. Minced Meat
(Beef, Lamb, Poultry)
5. Bread
x1
• Enter the weight in kg/g or lbs/oz.
In the example, 1.8kg is entered by pressing the
Kg•Lb key once and the g•oz key eight times.
Y ou can enter weight in Lbs/oz or Kgs/g. To
convert to either weight range press
WEIGHT CONVERSION key once before
entering weight.
Note: Some foods require their weight input by
‘pieces’. Y ou can use both of the WEIGHT keys to
enter the quantity .
• Press START/AUTO MINUTE once to start
cooking.
• The display counts down through the cooking time.
NOTES:
As recommended in the chart on the following page, press the MORE or LESS keys immediately before pressing
START/AUTO MINUTE.
If you enter a weight less than or higher than those listed for each menu on pages 1 2 and 13 the error message will be
displayed: . Press STOP/CLEAR and re-start the programme. When the oven is in grill or dual grilling mode,
the display will show or at regular intervals.
11
x1
x8
x1
Page 14

AUTO COOK CHART
AUTO COOK
MENU NUMBER
AC-1
Roast Beef / Lamb
AC-2
Roast Pork
AC-3
Roast Poultry
AC-4
Chicken Portions
AC-5
Kebabs
AC-6
Oven Ready Pizza
AC-7
Crispy Crumb Foods
WEIGHT RANGE
0.6 - 1.8kg
(1lb 5oz - 3lb 1 5oz)
0.6 - 1.8kg
(1lb 5oz - 3lb 1 5oz)
1.2 - 1.8kg
(2lb 10oz - 3lb 15oz)
1-4 Pieces
(1 Piece=250g)
(10oz)
1-4 Pieces
(1 Piece=2 00g)
(7oz)
0.1 - 0 .9kg
(4oz - 2lb)
0.1 - 0 .4kg
(4oz - 14oz)
COOKING PROCEDURE
• Place meat in a flan dish on the low rack.
• Turn meat over when the oven indicates.
• After cooking, leave meat to stand wrapped in aluminium foil for
10 minutes.
NOTE: Use the MORE key for meat which is well done and the
LESS key (for beef/lamb only) for meat which is rare.
NOTE: It is not possible to use the LESS key for pork.
• Place poultry breast side down in a flan dish on the low rack.
• As above point 2 .
• As above point 3 .
NOTE: It is not possible to use the LESS key for poultry.
• Place chicken portions on the high rack (best side down).
• Turn chicken over when the oven indicates.
• After cooking, leave chicken to stand wrapped in aluminium foil
for 4-5 minutes.
NOTE: It is not possible to use the LESS key for chicken.
• Prepare kebabs as shown in the recipe below.
• Place kebabs on the high rack.
• Turn over when the oven indicates.
NOTE: It is not possible to use the LESS key for kebabs.
• Place the pizza on the high rack.
• Stand for 2-3 minutes after cooking.
• Place in a flan dish on the high rack.
• Turn over when the oven indicates.
• Stand for 2-3 minutes after cooking.
NOTE: Use the MORE key for frozen crispy crumb foods.
AC-8
Oven Chips
AC-9
Baked Potatoes
AC-5 Recipe
Kebabs - 4 pieces
Ingredients:
4 wooden skewers
350g (1 2oz) pork steaks
75g (3oz) Bacon
225g (8oz) tomatoes
75g (3oz) green pepper
75g(3oz) onion
5 tbsp (90ml) oil
6tsp (30ml) paprika
2tsp (10ml) cayenne pepper
2tsp (10ml) W orcestershire sauce
0.1 - 0 .4kg
(4oz - 14oz)
1-4 Pieces
(1 Piece=250g)
(10oz)
• Place in a flan dish on the high rack.
• Turn over when the oven indicates.
NOTE: Use the LESS key for French Fried oven chips.
• Pierce each potato in several places and place towards the edge of the
turntable.
• Turn over when the oven indicates.
Method:
• Chop all the meat and vegetables into chunks.
• Mix the oil, paprika, cayenne pepper and
W orcestershire sauce together and leave the pork
to marinade in the mixture for 30 minutes.
• Thread pieces of pork, bacon, tomatoes, green
pepper and onion onto each skewer in a regular
sequence, leave no wood exposed.
• Place kebabs on the high rack.
• Turn over when the oven indicates.
• Stand for 2-3 minutes after cooking.
12
Page 15

AUTO DEFROST
AUTO DEFROST CHART
MENU NUMBER
AD-1
Meat (Beef/Lamb
and Pork Joints)
AD-2
Poultry (Whole)
AD-3
Chicken Portions,
Steaks, Chops
AD-4
Minced Meat
(Beef, Lamb
& Poultry)
AD-5
Bread
Auto defrost: If necessary, small pieces of aluminium foil can be used to shield small areas of meat if they
become warm during defrosting. Ensure foil does not touch oven walls.
Do not cook meat until thoroughly defrosted.
WEIGHT RANGE
0.6 - 1.8kg
(1lb 5oz - 3lb 1 5oz)
1.2 - 1.8kg
(2lb 10oz - 3lb 1 5oz)
0.2 - 1.0kg
(7oz - 2lb 3oz)
0.2 - 1.0kg
(7oz - 2lb 3oz)
0.1 - 0 .8kg
(4oz - 1lb 1 2oz)
COOKING PROCEDURE
• Place meat in a flan dish on the turntable.
• Turn over when oven indicates.
• Leave to stand, wrapped in foil, for 45-60 minutes until thoroughly
defrosted.
• Place meat in a flan dish on the turntable.
• Turn over when oven indicates.
• Leave to stand, wrapped in foil, for 45-60 minutes until thoroughly
defrosted
• Place meat in a flan dish on the turntable.
• Turn over when oven indicates.
• Leave to stand for 5-10 minutes until thoroughly defrosted.
• Place in a flan dish directly on the turntable.
• Turn over or stir when oven indicates and remove any defrosted
parts.
• Leave to stand, covered with foil for 5 minutes or until thoroughly
defrosted.
• Arrange on the turntable.
• Turn over/rearrange as oven indicated and remove any defrosted
slices.
• Leave to stand until thoroughly defrosted before using.
13
Page 16
LESS MORE
COOK DEFROST SENSOR
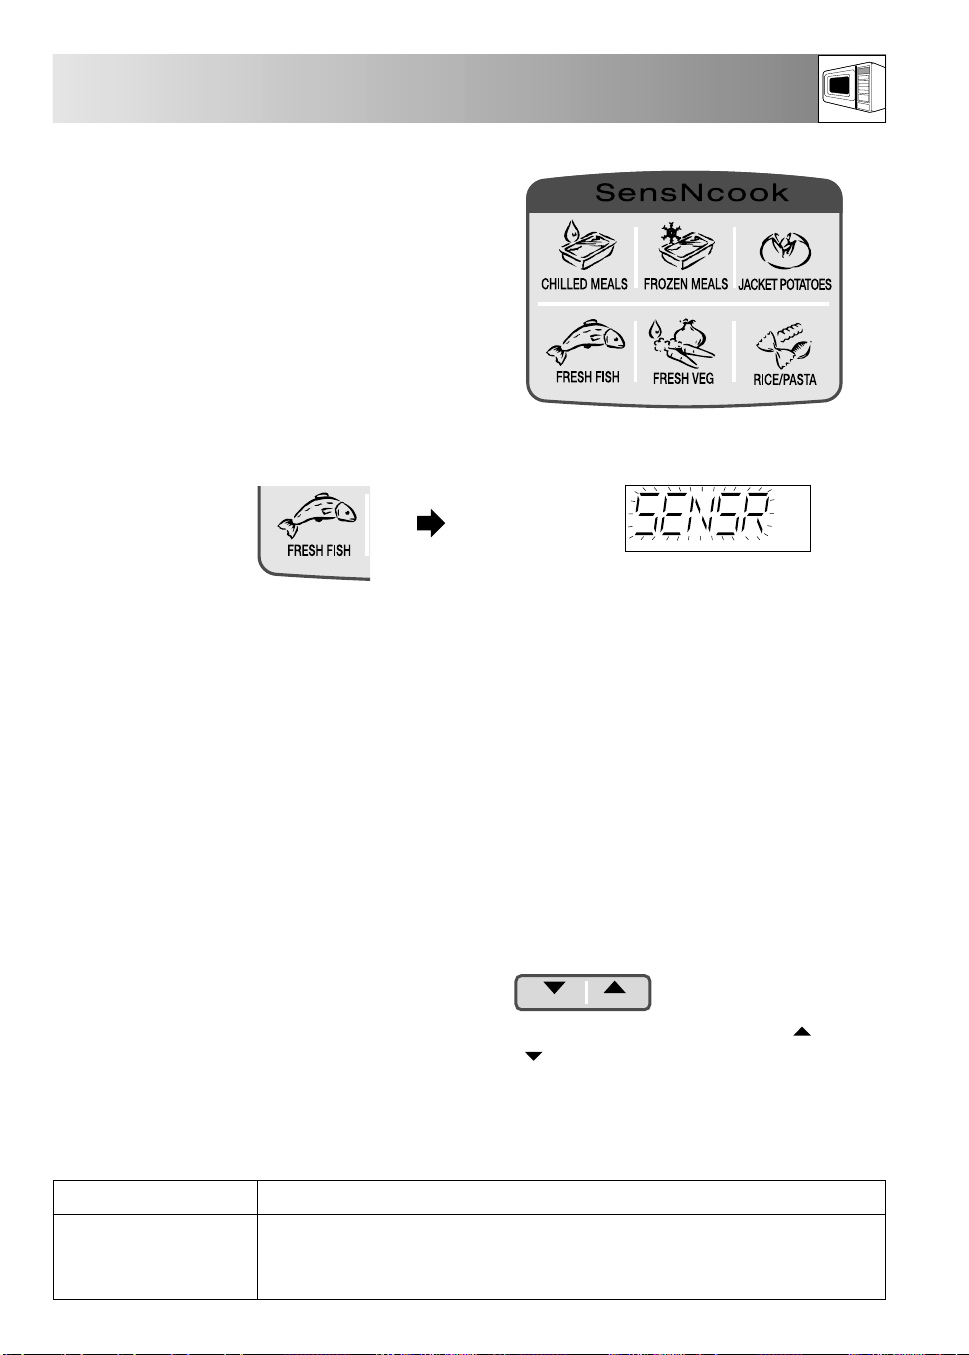
SensNcook, Can be used for cooking a range of
foods using a special SensNcook technology.
Simply press the chosen food key and the oven will do
the rest for you.
Always refer to the SensNcook chart on
page 1 5-16 before operating this function.
If food requires manipulation (i.e. turn over or stir) then
open the door, follow the instruction, close the door
and press START/AUTO MINUTE.
Example: To cook 0.5kg Fresh Fish.
SensNcook
Press the FRESH FISH
key once within one
minute of closing the
door
Important notes for SensNcook food:
After the oven is plugged in, wait 2 minutes before
1.
using SensNcook.
Once a SensNcook programme has started, do
2.
not open the door or press STOP/CLEAR until
‘SENSR’ has stopped flashing on the display.
During this time, Sensor technology senses
humidity emitted from food as it heats and
determines the heating time. Opening the door or
stopping the oven disturbs the humidity content
and affects the cooking result. If this happens
‘ERROR’ will be displayed, then you must cook
food according to the manufacturers instructions.
Ensure food is thoroughly heated before serving. If
3.
additional heating is required, cook this manually .
For best results with SensNcook, ensure both oven
4.
and cookware are dry and cool (approx. 20°C).
The SensNcook chilled/frozen meals
5.
programme is not suitable for heating convenience
ready meals not recommended for microwaving.
x1
The oven will
automatically start
cooking.
If the food container is made from aluminium foil,
6.
remove as/if instructed by food manufacturer,
place in a suitable container, cover tightly with
cling film and pierce in 5 places before heating.
as shown in SensNcook chart on page 15.
If the film covering the food is not suitable for
7.
microwaving, or is not sealed correctly, remove
and recover tightly with cling film and pierce in 5
places as indicated on page 1 6.
If the food container is damaged, cracked or split
8.
follow food manufacturers’ cooking instructions:-
Do not use SensNcook.
The SensNcook food programme is suitable for
9.
the food types indicated on page 1 5-16 only .
10.
Where necessary, press the MORE ( ) or LESS
( ) keys, once only before pressing the
SensNcook key. (as recommended in the charts
on page 1 5-16).
NOTE: During some SensNcook programmes certain instructions will be displayed:
DISPLAY MEANING
“STIR” Stir food, replace in the oven to continue.
“STIR / STAND” Stir food and allow to stand for a short period. Cooking is now complete.
“STAND COVER” Cover food and allow to stand.
14
Page 17

SensNcook CHART
No MENU WEIGHT MENU INCLUDES UTENSILS COOKING PROCEDURE
AUTO COOK RANGE
Chilled ready
1.
meals
0.3kg -
0.6kg
Stirrable:
Tagliatelle
Spaghetti
Non-stirrable:
Lasagne
Vegetable Bake
• Using a skewer, pierce the film
covering in five places.
For one section containers:
For two section containers:
rice
For bag types:
+
• Place the meal on the centre of the
turntable and press the CHILLED MEALS
key once. Cooking will start
automatically after 2-3 seconds.
• When the audible signal sounds, stir
and recover, replace into the oven
and press start.
NOTES:
• Press LESS (▼) for cooking rice only.
• Press MORE (▲) for cooking
non-stirable meals.
• If the packaging is damaged place
food in a similar shape and size
dish, wrap in cling film, pierce as
above and cook.
• For DEEP DISH lasagne cook as
manufacturers instructions.
meat
Frozen ready
2.
meals
Jacket potatoes
3.
0.3kg -
0.6kg
1-4 pieces
250g
each
Stirrable:
Tagliatelle
Spaghetti
Non-stirrable:
Lasagne
Vegetable Bake
Baking Potatoes
15
Plate for
bag
types.
As above but press the FROZEN
MEALS key.
• The LESS (▼) key cannot be used for
this menu, an error message will be
displayed.
• Press MORE (▲) key for cooking
non-stirable meals.
• If the packaging is damaged, place
the food in a similar shape and size
dish, wrap in cling film, pierce as
above and cook.
• Wash and dry the potatoes.
• Pierce each potato three times on
each side.
• Place on the outside of the turntable
evenly spaced.
• Press the JACKET POTATO key once.
• When the audible signal sounds,
turn over and press start.
• Stand for 2-3 mins before serving.
Page 18

SensNcook CHART
No MENU WEIGHT MENU INCLUDES UTENSILS COOKING PROCEDURE
AUTO COOK RANGE
Fresh fish
4.
Fresh vegetables
5.
0.1kg -
0.5kg
0.1kg -
0.5kg
Fillets
Steaks
Whole
Broccoli
Cabbage
Sprouts
Peas
Flan dish
Cling film
Casserole
dish
1.0L=0.1 kg
1.5L=0.3kg
2.5L=0.5 kg
• Choose fish of a similar shape and
size.
• Place in a single layer in a flan dish.
• Cover with cling film and pierce in
five places:
• Place on the centre of the turntable
and press the FRESH FISH key once.
• Stand for 2-3 mins before serving.
• Cut, chop and slice into evenly sized
pieces.
• Place into a suitable sized dish.
• Add 15ml water per 100g
vegetables.
• Cover with cling film and pierce in
five places.
6.
Rice/Pasta
0.1kg -
0.3kg
Long grain
rice/Pasta
Flan dish
• Press the FRESH VEGETABLE key once.
• When the audible signal sounds, stir,
recover and replace into the oven
and press start.
• Stand for 2-3 minutes before serving
• Place in a suitable sized dish and
add boiling water.
• Place the dish on the centre of the
turntable.
• Press the RICE/PASTA key once.
• When the audible signal sounds, stir,
replace into the oven and press start.
• Stand for 2-3 mins after cooking.
NOTES:
RICE: Add 3 times the volume of
boiling water to the quantity of rice.
PASTA/BROWN RICE: Add 4 times the
volume of boiling water to the quantity
of rice/pasta.
DO NOT COVER THE DISH-RINSE IN
BOILING WATER BEFORE SERVING.
16
Page 19

LESS ( ) AND MORE ( ):
The LESS and MORE pads allow you to cook food
more or less than the pre-set programmes.
For example, if you prefer beef which is rare, use
the LESS key. Alternatively, if you prefer beef well
done, use the MORE key.
GUIDE TO THE USE OF LESS AND MORE
WITH AUTOMATIC PROGRAMMES:
AUTO COOK/AUTO DEFROST:
Use LESS or MORE where recommended on
Pages 1 2-13.
Press LESS/MORE immediately before pressing
START/AUTO MINUTE.
NOTE: To cancel LESS or MORE, simply press
the same key again.
SENSNCOOK:
Use LESS/MORE where recommended on pages
15-16. Press LESS/MORE immediately before
pressing SENSCOOK key
LESS AND MORE KEYS
LESS MORE
LESS and MORE keys
LESS
MORE
LESS COOKING TIME
MORE COOKING TIME
GUIDE FOR USE OF LESS OR MORE KEYS
DURING MANUAL OVEN OPERATION:
To alter cooking or defrosting time whilst the oven
is in operation, use LESS or MORE. Press LESS/
MORE to decrease/increase the cooking or
defrosting time in multiples of 1 minute. The overall
cooking time can be increased to a maximum of
99 minutes.
Example: To cook on 50P (MEDIUM) for 10
minutes and then decrease the cooking time by 2
minutes.
• Press 10 MINUTE key once.
• Press MICROWAVE POWER LEVEL key 3
times for 50P (MEDIUM).
• Press START/AUTO MINUTE once to start
cooking.
• The display will count down
The time can be extended or shortened at any
stage during the 10 minutes.
• Press LESS twice to shorten the cooking time by
2 minutes.
Example:
10min.
x1
MICROWAVE
POWER LEVEL
x3
START
AUTO MINUTE
x1
Display counts down through
the 10 minute cooking time,
LESS
Cooking time is reduced by two
minutes and continues to count down.
x2
17
Page 20

TIMER / SEQUENCE PROGRAMMING
TIMER
TIMER
COOK DEFROST SENSOR AUTO %
NP.
LBS.
KG OZ
1min.
AUTO MINUTE
START
TIMER:
You can use the timer for timing where microwave
cooking is not involved. For example, to time
boiled eggs cooked on a conventional hob, to
monitor the standing time for microwaved food or
to remind you of the time when making a phone
call.
You can enter any time up to 99 minutes, 90
seconds. To cancel the timer whilst counting down,
simply press STOP/CLEAR and the display will
return to the time of day, if set.
Example:
To set the timer for 3 minutes to boil an egg on a
conventional hob.
• Press TIMER once.
TIMER key
x1
• Press 1 MINUTE key 3 times.
• When the water comes to the boil, add the egg
and press START/AUTO MINUTE once.
• The display will count down. When the display
reaches zero, the 'beep' signal will sound.
SEQUENCE PROGRAMMING:
This facility enables continued, uninterrupted
operation of up to three different sequences.
• To programme a series of sequences: Input the
cooking time followed by the desired cooking
mode (eg microwave, micro + grill/grill only).
• Repeat this procedure twice, to a maximum of
three sequences.
• Finally, press START/AUTO MINUTE to start
sequence cooking.
x3
x1
SEQUENCE PROGRAMME:
1. INPUT COOKING TIME
2. INPUT COOKING MODE
REPEAT 1. AND 2.
Note:
It is not possible to programme Grill + Grill + Grill
or Grill + Grill + Dual Grill.
18
Page 21

AUTO START
10min.
1min.
AUTO MINUTE
START
MICROWAVE
POWER LEVEL
AUTO START enables you to programme the oven manually to come on during the next 12 hours (if the 12
hr clock is set) or during the next 24 hours (if the 24 hr clock is set).
IMPORTANT: Always attend the oven when in use. Check to ensure the oven is
programmed correctly. Exceeding power levels and/or cooking times can lead to
overheating and fire. Check the display is showing the correct time of day.
• After AUTO START is programmed the display will return to show the time of day and AUTO.
• To check the AUTO ST ARTtime press and hold the AUTO START/CLOCK key .
• If the door is opened after programming, close the door and press the START key to continue.
• To cancel AUTO ST ART/CLOCK, press STOP/CLEARtwice.
Example:
T o reheat a casserole on 50P (MEDIUM) for 20
minutes at 4:00.
• Enter the time you want cooking to start. Press
1 Minute key 4 times to start cooking at 4 o’clock.
(1 2 hour clock is already set).
x4
•
Press the AUTO START/CLOCK key once.
• Enter cooking time for 20 minutes by pressing the
10 Minute key twice.
• Set the power level by pressing the
MICROW AVE POWER LEVEL key 3 times for
50P (MEDIUM) power.
• Press START/AUTO MINUTE.
AUTO START
CLOCK
x1
x2
x3
x1
The current time and AUTO will now be displayed.
Oven will start pre-programmed cooking at set time.
19
Page 22

MAFF HEATING CATEGORY
E
900W
The heating category (a letter A to E) developed
by MAFF (Ministry of Agriculture, Fisheries and
Food) with microwave oven and food
manufacturers shows the ability of the oven to heat
small quantities of food (up to 500g [1lb 2oz]). It
does not represent the general performance of the
oven.
Microwave output power in
watts (based on international
(IEC 705) standard.
Letter representing the oven
heating category.
Microwave
Symbol.
Food packs carry cooking instructions for heating
categories A to E. Follow instructions for the letter
corresponding to the oven’s heating category.
The higher the output power and heating category
of the oven, the less heating time is required, as
shown opposite.
COOKING ADVICE
W ARNING -
Always attend the oven when in use. Carefully follow the SHARP Operation Manual at all times. If
you exceed recommended cooking times and/or use power levels that are too high, food may
overheat, burn, and in extreme circumstances, catch fire and damage the oven. The microwave
power level will default to 100P (HIGH) unless you press the MICROW AVE POWER LEVEL key to
the desired setting. T ake care when heating foods with high sugar or fat content, for example,
Christmas pudding, mince pies and fruit cakes.
Before use, the user should check that utensils are suitable for use in microwave ovens.
Lids: Always remove lids from food jars and containers before you use them in the oven. If you do
not, steam and pressure will build up inside and the container may explode. Liquids and other foods
must not be heated in sealed containers since they are liable to explode.
Do not place hot foods/utensils on a cold turntable, or cold foods/utensils on a hot turntable.
OVEN
OUTPUT
POWER
OVEN
OUTPUT
CA TEGORY
Less heating time required
600 700 800 900 1000 W atts
More heating time required
Less heating time required
A B C D E
More heating time required
A variety of cookware can be used for microwaving. Round/oval dishes rather than square/oblong ones are
recommended, as food in corners tends to overcook.
20
Page 23

SUITABLE COOKWARE
COOKWARE
Heat resistant glass,
(e.g. Pyrex®,
Fire King®,
Corning Ware ®).
Microwave-safe
plastic cookware.
Microwave cling film,
microwave roasting
bags.
Heat resistant china
and ceramics.
SUITABLE FOR
MICROWAVING GRILL DUAL
YES YES YES
YES NO NO
YES NO NO
Microwave cling film and bags must be
vented for steam to escape, pierce in 4-5
places. Do not use plastic or metal ties
as they may melt or catch fire due to
electrical ‘arcing’.
YES/NO* NO YES/
NO*
* Dishes with metallic decoration must
not be used.
Disposable containers:
Thin plastic, paper,
straw and wooden
containers.
Kitchen paper.
Metal Racks.
YES NO NO
Always attend the oven closely . Only
use for warming food. Pay special
attention as over-heating may cause a
fire in your oven.
YES NO NO
Always attend the oven closely . Only
use to absorb fat and moisture when
warming food. Pay special attention as
over-heating may cause a fire in your
oven.
YES YES YES
The metal racks supplied have been
specifically designed for all cooking
modes, their use will not cause arcing
or damage to the oven.
21
Page 24

SUITABLE COOKWARE
COOKWARE
Browning dishes
& self-heating
packages.
Metal cookware.
SUITABLE FOR
MICROWAVING GRILL DUAL
YES
Always place on an up-turned plate on the
turntable to prevent heat stress. Follow
manufacturers' instructions. Be careful as
these become very hot. Popcorn: Only
use microwave popcorn within
recommended packaging (follow popcorn
manufacturer's instructions). Never use oil
unless the manufacturer recommends and
never cook for longer than instructed.
NO
NO NO
YES NO
Metal trays
may be used
Aluminium
foil & foil
containers, made
from
"Micro Foil®".
YES/NO
Use small pieces of aluminium foil to shield
food from overheating. Keep foil at least
2cm from the oven walls. Foil containers
are not recommended unless specified by
the manufacturer, eg. MicroFoil ®, follow
instructions carefully .
FOOD HANDLING & PREPARATION
Face & Hands: Always use oven gloves to remove food or cookware from the oven. Stand back
when opening the oven door to allow heat or steam to disperse. When removing covers (such as
cling film), opening roasting bags or popcorn packaging, direct steam away from face and hands.
For even cooking stir, turn or rearrange food during
cooking. Where recommended, leave food to stand
after cooking or defrosting.
The initial temperature of food affects the amount of
cooking time needed, eg. chilled food requires
more cooking than food at room temperature.
Check the temperature of food and drink and stir
(Before serving). Take special care when serving
babies, children or the elderly . The contents of
feeding bottles and baby food jars should be stirred
or shaken and the temperature checked before
consumption to avoid burns.
YES YES/NO
See method
recommended
for cooking
& defrosting
Stir , turn &
stand
Initial and final
temperature of
food.
The temperature of the container is not a true
indication of the temperature of the food or drink. Cut
into foods with fillings, for example, jam doughnuts,
to release heat or steam.
22
Page 25

FOOD HANDLING & PREPARATION
Quality &
Composition
Piercing
Arrangement
Covering
Food high in fat or sugar (Christmas cake, mince pies)
requires less heating time and should be watched,
over-heating can lead to fire.
Good quality ingredients should be used for
microwaving. Economical cuts of meat are
recommended for casseroles.
Food with skin (such as potatoes, apples, fish,
chicken), or with membrane (such as the white and
yolk of eggs), must be pierced in several places. If not,
steam will build up and may cause food to explode.
Note: Eggs in their shells and whole hard boiled
eggs should not be heated in microwave ovens since
they may explode even after microwave heating has
ended. Canned potatoes should not be heated in the
microwave oven as they may burst.
Place thickest parts of food on the outside of the dish,
for example, the meaty ends of chicken drumsticks
should be placed on the outside of the dish.
Fish, vegetables and certain other foods benefit from
being covered during microwave cookery, follow
recommendations where given and use vented
microwave cling film or a suitable lid.
Size & Shape
Density &
Quantity
Hygiene
Food size and shape affect the amount of cooking time
required. When cooking more than one portion of the
same food ensure they are of a similar size and shape.
Food density and quantity affect the amount of
cooking time needed, for example, potatoes require
more cooking than peas; four potatoes will take
longer to cook than two.
Food hygiene standards (storage,
handling and preparation) apply to
microwaving. Always store convenience
foods as recommended by the food
manufacturer and keep no longer than
the "use by" date.
23
Page 26

ADVICE FOR DEFROSTING
Meat joints
Poultry
Steak, Chops
& Chicken
Portions
Cubed &
Minced Meat
Place in a flan dish, turn over at least 4-5 times
during defrosting, shield any warm areas with small,
flat pieces of foil. After defrosting, wrap in foil and
allow meat to stand for 45-60 minutes, until
thoroughly defrosted.
Place in a flan dish, turn over at least 3-4 times
during defrosting, shield any warm areas with small,
pieces of foil. After defrosting, wrap in foil and allow
poultry to stand for 45-60 minutes, until thoroughly
defrosted.
NOTE: Do not defrost poultry with giblets.
Place in a flan dish, separate during defrosting and
turn over at least 2-3 times. Shield if necessary.
Place in a flan dish, turn over at least 3-4 times
during defrosting, remove defrosted parts each time.
Whole fish
& Fillets
Prepacked
Frozen Foods
Place in a flan dish, separate during defrosting and
turn over at least twice. Shield if necessary
Remove packaging, including any foil and place in a
suitable dish.
NOTES:
• T o defrost food, use either 30P (MEDIUM LOW) or
10P (LOW) microwave power.
• Shield warm areas with small pieces of foil if
necessary.
• It is important to turn food over, separate (where
appropriate) and rearrange to ensure even
defrosting,
• Standing time is necessary to ensure thorough
defrosting.
24
Page 27

ADVICE FOR COOKING & REHEATING
Fire: If food overheats, starts to smoke or burn: Keep oven door closed; Turn oven off; Switch off the
power at the socket and disconnect the plug from the socket. Failure to follow this procedure may
result in fire and oven damage.
Oil & Fat: Never heat oil or fat for deep frying as this may lead to overheating and fire. Stand back
when opening the oven door to allow heat or steam to disperse. When removing covers (such as cling
film), opening roasting bags or popcorn packaging, direct steam away from face and hands.
Liquids: Take care when microwaving liquids and beverages. To prevent delayed eruptive boiling
of liquid and possible scalding: Stir liquid prior to and during heating/reheating, let liquid stand in
the oven at the end of cooking.
Never heat liquids in narrow necked containers such as baby bottles, as this could result in the
contents erupting from the container and may cause burns.
• Remove food from foil or metal containers before reheating.
• Reheating times will be affected by the shape, depth, quantity and temperature of food together
with the size, shape and material of the container.
• T o avoid overheating and fire, special care must be taken when reheating foods with a high sugar
or fat content, for example, Mince pies or Christmas pudding. Canned potatoes should not be
heated in the microwave oven, follow the manufacturer’s instructions on the can.
Plated meals
Casseroles
Poultry portions
Sliced meat
Pies
Remove any poultry or meat portions, reheat
these separately, see below. Place smaller items
of food to the centre of the plate, larger and thicker
foods to the edge. Cover with vented microwave cling
film and reheat on 50P (MEDIUM), stir/rearrange
halfway through reheating. Ensure thoroughly reheated
before serving.
Cover with vented microwave clingfilm or suitable lid,
reheat on 50P (MEDIUM). Stir frequently to ensure
even reheating.
Place thickest parts of the portions on the outside of
the dish, cover with microwave cling film and reheat
on 70P (MEDIUM HIGH). Turn over halfway through.
NOTE: Ensure poultry is thoroughly reheated, before serving.
Cover with vented microwave cling film and reheat on
50P (MEDIUM). Rearrange at least once to ensure
even reheating. NOTE: Ensure meat is thoroughly
reheated before serving.
Place pies on a plastic rack or in a flan dish. Reheat
meat pies on 70P (MEDIUM HIGH) and fruit pies on
50P (MEDIUM).
V egetables
Cover with vented microwave cling film or suitable lid
and reheat on 50P (MEDIUM). Stir at least once
during reheating.
25
Page 28

INTRODUCTION
This Cookbook contains a wide variety of recipes
developed specifically for your
microwave oven. These will give
you successful results and
will save time and electricity.
The recipes demonstrate the
capabilities of your oven and
prove that microwave technology
combined with grilling provides
an efficient and effective alternative to conventional cooking.
CONTENTS
Cooking Hints............................27
Defrosting (Microwave)
(Meat, Poultry, Fish, Fruit, General).... 28
Microwave (Cooking)
Meat, Poultry, Fish ............................29
Vegetables (Fresh/Frozen), Fruit ........ 30
Rice, Pasta, Eggs................................ 31
Microwave (Reheating) ..................32
Grilling ....................................... 33
Dual Grill
(Microwave & Grill).............................. 34-35
Recipes:
Starters...................................... 36-37
Fish ........................................... 38
Meat .......................................... 39-40
Poultry ....................................... 41-42
Vegetarian.................................43-44
Cheese & Eggs ......................... 45
Rice & Pasta ............................. 46
Desserts .................................... 47-48
Cakes & Biscuits ....................... 48-50
Bread & Scones ........................ 50-51
Sauces ...................................... 52
Preserves & Sweets.................. 53
26
Page 29

COOKING HINTS
COOKERY NOTES:
1 All ingredients are given in both metric and
imperial measures. Use either set but not a
combination of both measures.
The cookery notes below compliment all of the
cooking procedures in this book and should
be read in advance of recipe preparation.
6 Where it is necessary to blend foods, use a
food processor, liquidiser or press through a
sieve.
2 Food temperatures are:-
Frozen: -180C, Chilled: 50C, Room: 200C
3 When cooking Rice & Pasta (see page 44),
cooking time is constant for any quantity of rice
or pasta; boiling water must be adjusted
according to quantity of rice or pasta. After
leaving the Rice/Pasta to stand, rinse in boiling
water prior to serving.
4 Butter and margarine can be interchanged in
recipes, as preferred.
5 Half fat, skimmed or full fat milk may be used
in all recipes, as preferred.
CONVERSION CHARTS
7 Refer to operation manual for advice on
suitable cookware.
8 Where dishes are covered, use vented
microwave cling film unless otherwise stated.
Where dishes are lined, use greaseproof paper
unless otherwise stated.
9 All preparation times and serving quantities
are approximate.
10 Serve all dishes immediately unless otherwise
stated.
11 For sequence programming refer to the
operation manual.
SYMBOLS:
●Method: Where shielding is necessary use small pieces of foil.
■Poultry Chart: Chicken, turkey and duck must be defrosted without giblets.
▲Standing Time: During recommended standing time, wrap or cover food in foil.
27
Page 30

EFROSTING (MICROWAVE)
D
FOOD
Meat Joints
(Beef, Lamb, Pork)
Minced Beef
Steak
3
2cm (
/4") thick
Chops &
Sausages
Bacon
■
Whole poultry (Chicken,
Turkey, Duck)
■
Chicken Portions
■
Chicken/T urkey Breast
& Drumsticks
■
Minced Turkey
Whole Fish
(Trout, Mackerel)
Fish Fillets/
Steaks
Apples
Blackcurrants/
Redcurrants
Raspberries/
Blackberries
DEFROST
TIME
30-32 Minutes
450g (1lb)
8-9 Minutes
450g (1lb)
10 Minutes
450g (1lb)
14 Minutes
450g (1lb)
11 Minutes
450g (1lb)
20 Minutes
450g (1lb)
8 Minutes
450g (1lb)
11 Minutes
450g (1lb)
11 Minutes
450g (1lb)
8 Minutes
450g (1lb)
7 Minutes
450g (1lb)
7 Minutes
450g (1lb)
6 Minutes
450g (1lb)
MICRO
POWER LEVEL
10P (LOW)
30P (MEDIUM
LOW)
30P (MEDIUM
LOW)
30P (MEDIUM
LOW)
30P (MEDIUM
LOW)
10P (LOW)
30P (MEDIUM
LOW)
30P (MEDIUM
LOW)
30P (MEDIUM
LOW)
30P (MEDIUM
LOW)
30P (MEDIUM
LOW)
30P (MEDIUM
LOW)
30P (MEDIUM
LOW)
METHOD
●
Place in a flan dish Turn over 4-5 times
during defrosting. Shield.
●
Place on a plate or in a bowl. Turn
over/stir 3-4 times, removing defrosted
mince each time.
●
Place in a flan dish. Turn over 2-3
times, separate during defrosting.Shield.
●
Place in a flan dish. Turn over 2-3
times, separate during defrosting.Shield.
●
Place on a plate. Separate and
rearrange twice during defrosting. Shield.
●
Place in a flan dish. Turn over 4-5
times during defrosting. Shield.
●
Place in a flan dish. Turn over , rearrange
2-3 times during defrosting. Shield.
●
Place in a flan dish. Turn over , rearrange
2-3 times during defrosting. Shield.
●
Place on plate or in a bowl. Turn over/
stir 3-4 times removing defrosted mince
each time.
●
Place in a flan dish. Turn over twice
during defrosting. Shield.
●
Place in a flan dish. Turn over twice,
separate during defrosting. Shield.
Place in a dish. Stir during defrosting.
Place in a dish. Stir during defrosting.
STANDING
TIME
▲
45-60
Minutes
▲
15-20
Minutes
▲
25-30
Minutes
▲
25-30
Minutes
▲
5-10
Minutes
▲
45-60
Minutes
▲
25-30
Minutes
▲
25-30
Minutes
▲
15-20
Minutes
▲
15
Minutes
▲
15
Minutes
10
Minutes
10
Minutes
Gooseberries
Rhubarb/
Strawberries
Bread (sliced)
Pastry
(Puff or Shortcrust)
Meat & Fruit Pies
(cooked)
Note: Ensure you read all cookery notes on page 27, for advice and explanations of symbols before proceeding.
7 Minutes
450g (1lb)
5 Minutes
400g (14oz)
5 Minutes
450g (1lb)
7 Minutes
large pie
30P (MEDIUM
LOW)
30P (MEDIUM
LOW)
30P (MEDIUM
LOW)
30P (MEDIUM
LOW)
Place in a dish. Stir during defrosting.
Place on the turntable. Separate and
rearrange during defrosting.
Place on a plate.
Turn over halfway through defrosting.
Remove from foil container.
Place in a shallow flan dish.
10
Minutes
5-10
Minutes
10-15
Minutes
15-20
Minutes
28
Page 31

ICROWAVE - COOKING CHARTS
M
FOOD
Beef (rare)
(Topside, Silverside)
Beef (medium)
(Topside, Silverside)
Beef (well done)
(Topside, Silverside)
Beefburgers
COOKING
TIME
9-10 Minutes
450g (1lb)
12-13 Minutes
450g (1lb)
16-17 Minutes
450g (1lb)
10 Minutes
450g (1lb)
Minced Meat
8 Minutes
450g (1lb)
Sausages
(thick)
4 Minutes
4 sausages
6 Minutes
8 sausages
Sausages
(thin)
Lamb (Fillet, Shoulder,
Leg)
Lamb Chops
2 Minutes
4 sausages
17 Minutes
450g (1lb)
10 Minutes
450g (1lb)
Pork
(Loin, Leg)
Pork Chops
(with bone)
Pork Chops
(boneless)
Gammon Joint
18-19 Minutes
450g (1lb)
17 Minutes
450g (1lb)
13 Minutes
450g (1lb)
18-19 Minutes
450g (1lb)
Bacon
3 Minutes
4 slices
Whole Poultry
Chicken, T urkey, & Duck
Chicken Portions
Chicken/Turkey
10 Minutes
450g (1lb)
10 Minutes
450g (1lb)
Breasts & Drumsticks
Minced Turkey
8 Minutes
450g (1lb)
Fish Fillets
6-7 Minutes
450g (1lb)
Whole Fish & Steaks
7 Minutes
450g (1lb)
MICRO
POWER LEVEL
70P (MEDIUM
HIGH)
70P (MEDIUM
HIGH)
70P (MEDIUM
HIGH)
70P (MEDIUM
HIGH)
70P (MEDIUM
HIGH)
100P (HIGH)
100P (HIGH)
100P (HIGH)
70P (MEDIUM
HIGH)
70P (MEDIUM
HIGH)
70P (MEDIUM
HIGH
70P (MEDIUM
HIGH)
70P (MEDIUM
HIGH)
70P (MEDIUM
HIGH)
100P (HIGH)
100P (HIGH)
100P (HIGH)
100P (HIGH)
100P (HIGH)
100P (HIGH)
METHOD
●
Place in a flan dish.
Turn over halfway through cooking.
●
Place in a flan dish.
Turn over halfway through cooking.
●
Place in a flan dish.
Turn over halfway through cooking.
●
Place in a flan dish.
Turn over halfway through cooking.
●
Place in a bowl. Stir 2-3 times during
cooking.
●
Place in a flan dish.
Turn over halfway through cooking.
●
Place in a flan dish.
Turn over halfway through cooking.
●
Place in a flan dish.
Turn over halfway through cooking.
●
Place in a flan dish.
Turn over halfway through cooking.
●
Place in a flan dish.
Turn over halfway through cooking.
●
Place in a flan dish.
Turn over halfway through cooking.
●
Place in a flan dish.
Turn over halfway through cooking.
●
Place in a flan dish.
Turn over halfway through cooking.
●
Place in a flan dish.
Turn over 4 times during cooking.
●
Place on a plate.
Turn over halfway through cooking.
●
Place in a flan dish.
Turn over halfway through cooking.
●
Place in a flan dish.
Turn over halfway through cooking.
●
Place in a bowl. Stir 2-3 times during
cooking.
●
Place in a single layer in a flan dish.
Cover and cook
●
Place in a single layer in a flan dish.
Cover and cook
STANDING
TIME*
▲
6
Minutes
▲
8
Minutes
▲
10
Minutes
▲
2-3
Minutes
▲
2-3
Minutes
▲
2
Minutes
▲
2
Minutes
▲
2
Minutes
▲
10
Minutes
▲
5
Minutes
▲
10
Minutes
▲
4-5
Minutes
▲
4-5
Minutes
▲
10
Minutes
▲
1
Minutes
▲
10
Minutes
▲
5
Minutes
▲
5
Minutes
▲
2-3
Minutes
▲
2-3
Minutes
Note: Ensure you read all cookery notes on page 27, for advice and explanations of symbols before proceeding.
29
Page 32

ICROWAVE COOKING
M
FOOD
Aubergines &
Broccoli (fresh)
COOKING
TIME
4-5 Minutes
225g (8oz)
MICRO
POWER LEVEL
100P (HIGH)
METHOD
Slice. Add 30ml (2tbsp) water. Cover
dish. Stir halfway through cooking.
STANDING
TIME
2
Minutes
Beans
(green) (fresh)
Brussels
Sprouts (fresh)
Cabbage, Carrots,
Cauliflower & Celery
(fresh)
Corn on the Cob
(fresh)
Courgettes &
Leeks (fresh)
Parsnips &
Spinach (fresh)
Peas (fresh)
Potatoes, Jacket (250g
(9oz) each) (fresh)
Potatoes, boiled
(old & new) (fresh)
Swede & Turnips
(fresh)
Beans & Cabbage
(green) (frozen)
5 Minutes
225g (8oz)
5 Minutes
225g (8oz)
5 Minutes
225g (8oz)
6 Minutes
2 cobs
4 Minutes
225g (8oz)
5 Minutes
225g (8oz)
4 Minutes
225g (8oz)
10 Minutes
2 potatoes
9 Minutes
450g (1lb)
7 Minutes
225g (8oz)
5 Minutes
225g (8oz)
100P (HIGH)
100P (HIGH)
100P (HIGH)
100P (HIGH)
100P (HIGH)
100P (HIGH)
100P (HIGH)
100P (HIGH)
100P (HIGH)
100P (HIGH)
100P (HIGH)
Add 30ml (2tbsp) water. Cover dish.
Stir halfway through cooking.
Add 45ml (3tbsp) water. Cover dish.
Stir halfway through cooking.
Slice or break into florets. Add 30ml
(2tbsp) of water. Cover dish. Stir
halfway through cooking.
Add 45ml (3tbsp) water. Cover dish.
Turn over halfway through cooking.
Slice. Add 30ml (2tbsp) water. Cover
dish. Stir halfway through cooking.
Slice. Add 45ml (3tbsp) water. Cover
dish. Stir halfway through cooking.
Add 30ml (2tbsp) water. Cover dish.
Stir halfway through cooking.
Prick in several places.
Place on the edge of the turntable.
Cut into quarters. Add 60ml (4tbsp) water .
Cover. Stir halfway through cooking.
Dice. Add 45ml (3tbsp) water. Cover
dish. Stir halfway through cooking.
Place in a dish. Add 15ml (1tbsp) water.
Cover. Stir halfway through cooking.
2
Minutes
2
Minutes
2
Minutes
2
Minutes
2
Minutes
2
Minutes
2
Minutes
4
Minutes
4
Minutes
2
Minutes
2
Minutes
Broccoli, Leaf Spinach
& Brussels Sprouts
(frozen)
Carrots (sliced)
(frozen)
Cauliflower (florets)
(frozen)
Corn on the Cob
(frozen)
Peas, Sweetcorn &
Mixed Vegetables
(frozen)
Apples
Rhubarb
Blackberries,
Raspberries
Blackcurrants
Redcurrants
Gooseberries
Note: Ensure you read all cookery notes on page 27, for advice and explanations of symbols before proceeding.
6 Minutes
225g (8oz)
6 Minutes
225g (8oz)
5 Minutes
225g (8oz)
10 Minutes
2 cobs
5 Minutes
225g (8oz)
5 Minutes
450g (1lb)
5 Minutes
450g (1lb)
100P (HIGH)
100P (HIGH)
100P (HIGH)
100P (HIGH)
100P (HIGH)
100P (HIGH)
100P (HIGH)
Place in a dish. Add 15ml (1tbsp) water.
Cover. Stir halfway through cooking.
Place in a dish. Add 15ml (1tbsp) water.
Cover. Stir halfway through cooking.
Place in a dish. Add 15ml (1tbsp) water.
Cover. Stir halfway through cooking.
Place in a dish. Cover.
Turn over halfway through cooking.
Place in a dish. Cover.
Stir halfway through cooking.
Peel and slice. Place in a dish and
cover. Stir during cooking.
Place in a dish and cover.
Stir during cooking.
2
Minutes
3
Minutes
2
Minutes
3
Minutes
2
Minutes
2
Minutes
2
Minutes
30
Page 33

ICROWAVE COOKING
M
FOOD
White rice
(long grain)
Brown rice
Spaghetti
(short cut)
Pasta shells/
twists
Macaroni
(short cut)
Tagliatelle
Scrambled
Eggs
Baked/
Poached
Eggs
Fried Eggs
COOKING
TIME
13-14 Minutes
20-21 Minutes
10-11 Minutes
11-12 Minutes
9-10 Minutes
1
15g (
/2oz) butter
2 eggs (size 3)
30ml (2tbsp) milk
salt & pepper
2 eggs (size 3)
10ml (2tsp) oil
1 egg (size 3)
MICRO
POWER LEVEL
70P
(MEDIUM
HIGH)
70P
(MEDIUM
HIGH)
70P
(MEDIUM
HIGH)
70P
(MEDIUM
HIGH)
70P
(MEDIUM
HIGH)
100P
(HIGH)
100P
(HIGH)
100P
(HIGH)
METHOD
Add 300ml (
1
/2
pint) boiling water/100g (4oz) rice.
Do not cover. Stir twice during cooking.
Add 400ml (14fl.oz) boiling water/100g (4oz) rice.
Do not cover. Stir twice during cooking.
Add 300ml (1/2
pint) boiling water/100g (4oz) pasta.
Do not cover. Stir halfway through cooking.
Add 300ml (
1
/2
pint) boiling water/100g (4oz) pasta.
Do not cover. Stir halfway through cooking.
Add 300ml (1/2
pint) boiling water/100g (4oz) pasta.
Do not cover. Stir halfway through cooking.
Melt butter in a bowl on100P ( HIGH) for 30
seconds. Add eggs, milk, season, mix well.
Cook on 100P (HIGH) for 2 minutes, stirring
every 30 seconds.
Break each egg into a ramekin dish.
Carefully pierce white and yolk in 3-4 places.
Cover and cook on 100P (HIGH) for 1 minute.
Place the oil in a 17.8cm (7") shallow dish. Heat
on 100P (HIGH) for 1 minute. Break the egg
into the oil. Pierce yolk and white in 3-4 places.
Cook on 100P (HIGH) for 40-50 seconds.
STANDING
TIME
5
Minutes
5
Minutes
4
Minutes
4
Minutes
4
Minutes
30
Seconds
30
Seconds
30
Seconds
Note: Ensure you read all cookery notes on page 27, for advice and explanations of symbols before proceeding.
31
Page 34

ICROWAVE REHEATING
M
FOOD
Canned foods
(soups, beans,
vegetables, etc.)
Christmas
pudding
Bread rolls/
Croissants
Sausage rolls
(cooked, chilled
approx. 50g
(2oz) each)
Quiche,
(cooked, chilled)
METHOD
Remove from the can. Place in a dish, cover.
Stir halfway through cooking. Stand for 2
minutes after cooking.
Place in a flan dish. Do not exceed cooking
time advised by food manufacturer. Stand for
30 seconds after cooking.
As above
Place in a flan dish. Do not exceed cooking
time advised by food manufacturer. Stand for 1
minute after cooking.
Place on the turntable
Place in a flan dish on the low rack. Stand for 2
minutes after cooking.
Remove foil container. Place in a flan dish on the low
rack. Stand for 3 minutes after cooking.
COOKING
TIME
5 Minutes for
425g (15oz) can
40 seconds for
125g (5oz) slice
1 Minute for 175g
(6oz) pudding
4 Minutes for
450g (1lb)
pudding
20 seconds
for 2
6 Minutes for
6 sausage rolls
11 Minutes for
450g (1lb) quiche
COOKING
MODE
HIGH
MEDIUM HIGH
MEDIUM HIGH
MEDIUM HIGH
MEDIUM HIGH
DUAL GRILL,
MEDIUM LOW.
DUAL GRILL,
MEDIUM LOW.
Meat Pie
(cooked, chilled)
Fruit Pie
(cooked, chilled)
Note: Ensure you read all cookery notes on page 27, for advice and explaination of symbols before proceeding.
Remove foil container. Place in a flan dish on the low
rack. Stand for 3 minutes after cooking.
Remove foil container. Place in a flan dish on the low
rack. Stand for 3 minutes after cooking.
7 Minutes for
450g (1lb) pie
8 Minutes for
450g (1lb) pie
DUAL GRILL,
MEDIUM.
DUAL GRILL, LOW.
32
Page 35

RILLING
G
FOOD
Bacon/
Thin
Sausages
METHOD
Place in a flan dish on the high rack.
Turn over halfway through cooking.
Stand for 1-2 minutes after cooking.
COOKING
TIME
8 Minutes
for 1-6 rashers
COOKING
MODE
GRILL
Beef/Gammon
Steak
Fish Fingers
(frozen)
Crumpets
Cheese on
toast
Tea cakes &
Muffins
& Toast
Note: Ensure you read all cookery notes on page 27, for advice and explanations of symbols before proceeding.
Place on the high rack.
Turn over halfway through cooking.
Stand for 3 minutes after cooking.
Place on the high rack.
Turn over halfway through cooking.
Stand for 2 minutes after cooking.
Place on the high rack. Turn over after 3
minutes. No standing time is required.
Place bread on the high rack. Grill one side for
3 minutes turn over and cover with 50g (2oz)
grated cheese. Grill for remaining time. No
standing time is required.
Slice in half. Place on the high rack. Turn over
halfway through cooking. No standing time is
required.
10-12 Minutes
for 1-2 steaks
10-12 Minutes
for 1-12
fingers
5-8 Minutes
for 1-4 slices
6 Minutes
for 2 slices
5 Minutes
for 1-4 halves
GRILL
GRILL
GRILL
GRILL
GRILL
33
Page 36

UAL GRILL - (MICROWAVE & GRILL)
D
FOOD
METHOD
COOKING
TIME
COOKING
MODE
Beef (rare)
Beef/Lamb
(medium)
Beef/Lamb
(well done)
Pork
Poultry
(Max. 1.8kg
(4lb)
Place fat side down in a flan dish on the low
rack. Calculate the cooking time.
Use sequence programming:
Stage 1: Cook on 70P (MEDIUM HIGH) for first
half of cooking time. Turn over, remove juices.
Stage 2: Cook on 50P (MEDIUM) for second half
of cooking time.
Stage 3: Cook on DUAL GRILL, 50P (MEDIUM)
for the final 4 minutes of cooking time.
Stand for 6-8 minutes after cooking.
As above
As above
Place fat side down in a flan dish on the low
rack. Calculate the cooking time.
Use sequence programming:
Stage 1: Cook on 70P (MEDIUM HIGH)
throughout, apart from the last 4 minutes. Turn
over, remove juices halfway through Stage 1.
Stage 2: Cook on DUAL GRILL, 70P (MEDIUM
HIGH) for the final 4 minutes of cooking time.
Stand for 10 minutes after cooking.
Place breast side down in a flan dish on the
low rack. Calculate the cooking time.
Use sequence programming:
Stage 1: Cook on 100P (HIGH) throughout,
apart from the last 4 minutes. Turn over, remove
juices halfway through Stage 1.
Stage 2: Cook on DUAL GRILL, 70P (MEDIUM
HIGH) for the final 6 minutes of cooking time.
Stand for 10 minutes after cooking.
11-12 Minutes
per 450g (1lb)
13-14 Minutes
per 450g (1lb)
17-18 Minutes
per 450g (1lb)
20 Minutes
per 450g (1lb)
11 Minutes
per 450g (1lb)
Stage 1: MEDIUM HIGH.
Stage 2: MEDIUM.
Stage 3: DUAL GRILL,
MEDIUM.
as above
as above
Stage 1: MEDIUM HIGH.
Stage 2: DUAL GRILL,
MEDIUM.
Stage 1: HIGH.
Stage 2: DUAL GRILL,
MEDIUM HIGH.
Chicken
Portions
Pork chops
(with bone)
Lamb chops
& Boneless
Pork Chops
Sausages
(thick)
Beefburgers
(frozen)
Note: Ensure you read all cookery notes on page 27, for advice and explanations of symbols before proceeding.
Place best side down in a flan dish on the high
rack. Calculate the cooking time.
Use sequence programming:
Stage 1: Cook on 100P (HIGH) throughout
cooking time, apart from the last 4 minutes. Turn
over, remove juices halfway through Stage 1.
Stage 2: Cook on DUAL GRILL, 70P (MEDIUM
HIGH) for the final 6 minutes of cooking time.
Stand for 5 minutes after cooking.
Place in a flan dish on the high rack.
Turn over halfway through cooking.
Stand for 3-4 minutes after cooking.
As above
Place in a flan dish on the high rack.
Turn over after halfway through cooking.
Stand for 2-3 minutes after cooking.
As above
11 Minutes
per 450g (1lb)
13-14 Minutes
per 450g (1lb)
chops
12-13 Minutes
per 450g (1lb)
chops
9 Minutes
per 450g (1lb)
sausages
8-9 Minutes
per 450g (1lb)
beefburgers
Stage 1: HIGH.
Stage 2: DUAL GRILL,
DUAL GRILL, MEDIUM.
DUAL GRILL, MEDIUM.
DUAL GRILL, MEDIUM.
DUAL GRILL, MEDIUM
LOW.
MEDIUM HIGH.
34
Page 37

UAL GRILL - (MICROWAVE & GRILL)
D
FOOD
Crispy crumb
foods (chilled
& frozen)
Oven ready
Pizza
(chilled)
Oven chips
(frozen)
METHOD
Place in a flan dish on the high rack.
Use sequence programming:
Stage 1: Cook on DUAL GRILL, 30P (MEDIUM)
LOW for first half of cooking time. Turn over.
Stage 2: GRILL for second half of cooking time.
▲
Stand for 2-3 minutes after cooking.
As above
As above
Place in a flan dish on the low rack
▲
Stand for 2-3 minutes after cooking.
As above
As above
Place in a flan dish on the high rack.
Turn over halfway through cooking.
No standing time is required.
As above
COOKING
TIME
8-9 Minutes
for 100g (4oz)
10-1 1 Minutes
for 200g (7oz)
11-12 Minutes
for 400g (14oz)
5 Minutes
for 200g (7oz)
6 Minutes
for 350g (12oz)
7 Minutes
for 450g (1lb)
10 Minutes
for 225g (8oz)
11-12 Minutes
for 450g (1lb)
COOKING
MODE
Stage 1: DUAL GRILL,
MEDIUM LOW.
Stage 2: GRILL.
Stage 1: DUAL GRILL,
MEDIUM LOW.
Stage 2: GRILL.
Stage 1: DUAL GRILL,
MEDIUM LOW.
Stage 2: GRILL.
DUAL GRILL, MEDIUM.
DUAL GRILL, MEDIUM.
DUAL GRILL, MEDIUM.
DUAL GRILL, MEDIUM
LOW.
DUAL GRILL, MEDIUM
LOW.
Baked
Potatoes
Pierce each potato in several places.
Place in a flan dish on the low rack.
Turn over after 8 minutes of the cooking time.
15-16 Minutes
for 500g (1lb
2oz) 250g each
DUAL GRILL, MEDIUM
HIGH.
No standing time is required.
23-24 Minutes
Roast
Potatoes
Garlic
Bread
Cut into even sized pieces. Brush with oil.
Place in a flan dish on the low rack.
Turn over halfway through cooking.
No standing time is required.
Remove any packaging.
Place in a flan dish on the low rack.
for a 675g
(11/2lb)
potatoes
of evenly sized
potatoes
5 Minutes
for 1 baguette.
DUAL GRILL, MEDIUM.
DUAL GRILL, LOW.
No standing time is required.
Toasted
Sandwich
Prepare sandwich:
Place two slices of ham and 50g (2oz) grated
5 Minutes
for 1 sandwich
DUAL GRILL, LOW.
cheese between 2 slices of bread and butter.
Place sandwich in a flan dish on the high rack.
Turn over after 3 minutes of the cooking time.
No standing time is required.
Note: Ensure you read all cookery notes on page 27, for advice and explanations of symbols before proceeding.
35
Page 38

TARTERS
S
AKED AVOCADOS WITH HAM
B
SERVES 2 OR 4
50g (2oz) butter
50g (2oz) fresh brown breadcrumbs
100g (4oz) cooked ham, finely chopped
90ml (6tbsp) double cream
salt and pepper to taste
5ml (1tsp) fresh parsley, chopped
2 large ripe avocados (see Tip, page 46)
15ml (1tbsp) lemon juice
50g (2oz) cheese, grated
Garnish with fresh sprigs of parsley to serve
USHROOM SOUP
M
SERVES 4
1 medium onion, chopped
175g (6oz) mushrooms, sliced
25g (1oz) butter
25g (1oz) plain flour
300ml (
2.5ml (
salt and pepper to taste
300ml (
1
/2 pint) hot vegetable stock
1
/2 tsp) dried marjoram (see Tip, page 38)
1
/2 pint) milk
1 Place the butter in a bowl and heat on 100P
(HIGH) for 1 minute. Stir in the breadcrumbs and
ham, add enough cream to bind the mixture.
Season with salt and pepper to taste and stir in
the parsley, cook on 100P (HIGH) for 2-3 minutes.
2 Cut the avocados in half, remove the stone and
brush the flesh with lemon juice. Fill each avocado
half with the breadcrumb mixture.
3 Place the avocados in a large flan dish and
sprinkle with the grated cheese.
4 Place the dish on the high rack, use sequence
programming to cook on 100P (HIGH) for 1
minute, then on GRILL for 5-6 minutes until
brown and crispy.
1 Cook the onion, mushrooms and butter together in
a bowl on 100P (HIGH) for 3 minutes.
2 Stir in the flour to form a paste, gradually add the
stock.
3 Stir in the marjoram, salt and pepper to taste. Cook
on
100P (HIGH) for 8-9 minutes, stir after 4 minutes.
4 Blend and add the milk, cook on
6 minutes.
100P (HIGH) for
ROCCOLI & BLUE CHEESE SOUP
B
SERVES 4
15ml (1tbsp) sunflower oil
1 large onion, finely chopped
400g (14oz) broccoli, broken into small florets
1 litre (1
900ml (1
100g (4oz) Blue Stilton/Danish Blue, crumbled
salt and pepper to taste
C
3
/4 pints) hot vegetable stock
1
/2 pint) low fat natural yoghurt
RISPY STUFFED MUSHROOMS
SERVES 4
12 medium open cap mushrooms
75g (3oz) butter
2 cloves garlic, crushed (See Tip, page 42)
75g (3oz) fresh breadcrumbs
50g (2oz) cheese, grated
Variation:
Stilton Stuffed Mushrooms: Omit garlic and grated
cheese. Add 100g (4oz) Stilton, crumbled at Stage 2.
1 Place oil, onion and broccoli in a large bowl, mix
well. Cover and cook on 100P (HIGH) for 4-5
minutes.
2 Add the stock, mix well. Cover and cook on
(HIGH)
3 Blend in a food processor. Return to bowl, stir in
yoghurt and cheese. Season. Heat on 70P
(MEDIUM HIGH) for 6-7 minutes, stir every 2
minutes.
1 Remove and chop mushroom stalks. Place
2 Heat butter with garlic on 100P (HIGH) for 1
3 Place dish on the high rack and cook on DUAL
for 8-10 minutes.
mushroom caps in a large flan dish open side up.
minute, stir in chopped mushroom stalks and
breadcrumbs. Fill mushrooms with mixture,
sprinkle with cheese.
GRILL, 50P (MEDIUM) for 6 minutes.
36
100P
Page 39

TARTERS
S
ALAD PROVENCALE
S
SERVES 2 - 4
225g (8oz) courgettes, sliced
1
/2 red pepper, seeded and sliced
1
/2 green pepper, seeded and sliced
1 small aubergine, sliced
60ml (4tbsp) olive oil
8 cherry tomatoes
2 cloves garlic, crushed (see Tip, page 42)
30ml (2tbsp) fresh parsley, chopped
50g (2oz) whole black olives
15ml (1tbsp) lemon juice
salt and pepper to taste
ISH
F
HEESY GOUJONS
C
SERVES 4
450g (1lb) white fish fillets
100g (4oz) fresh white breadcrumbs
50g (2oz) Parmesan cheese
salt and pepper to taste
1 egg (size 3), beaten
olive oil
ISH KEBABS
F
SERVES 4
4 wooden skewers
2 courgettes, cut into 8 chunks
4 medium mushrooms, stalks removed
450g (1lb) firm fleshed fish skinned and cut
into 8 cubes
4 slices of orange
2 firm medium tomatoes, halved
5ml (1tsp) fresh dill, chopped
50g (2oz) butter
1 Place the courgettes, red and green pepper,
aubergine and olive oil in a large bowl, cook on
70P (MEDIUM HIGH) for 6-7 minutes or until the
vegetables have softened. Stir after half the
cooking time.
2 Stir in the remaining ingredients and cook on 70P
(MEDIUM HIGH) for a further 4-5 minutes. Toss
gently and transfer to a serving dish, chill before
serving.
1 Cut fish into thin strips approx. 6.4cm (2.5") long.
2 Combine breadcrumbs and cheese. Season.
3 Dip fish strips first into egg, then into breadcrumb
mixture, coat evenly.
4 Brush a large flan dish with olive oil and spread
half the coated fish in a single layer over the base.
5 Place on high rack. Use sequence programming
to cook on DUAL GRILL,10P ( LOW) for 11-12
minutes, then on GRILL for 9 minutes, turn over
after 6 minutes. Repeat for the remaining fish.
1 Thread pieces of courgette, mushroom, fish,
orange and tomato onto each skewer in a regular
sequence. Leave no wood exposed.
2 Heat the dill and butter in a small bowl on 100P
(HIGH) for 1 minute. Brush kebabs with the dill
butter, place in a flan dish on the high rack.
3 Cook on DUAL GRILL, 50P (MEDIUM) for 12-13
minutes. Turn over and rearrange the kebabs
every 3-4 minutes.
37
Page 40

ISH
F
UNA GRATIN
T
SERVES 4
100g (4oz) butter
1 large onion, finely chopped
225g (8oz) pasta
600ml (1 pint) boiling water
350g (12oz) Tuna
300ml (
225g (8oz) cooked broccoli
225g (8oz) grated cheddar cheese
T
1
/2 pint) white sauce
ROUT WITH ORANGE & ALMONDS
SERVES 2
2 medium trout (approx. 225g (8oz) each)
salt and pepper to taste
juice and rind of 1 orange
50g (2oz) flaked almonds
Garnish with slices of orange to serve.
1 Place butter in a large bowl, heat on 100P ( HIGH ) for
1 minute until melted. Stir in onion, cook on 100P
(HIGH) for a further minute. Stir in pasta and boiling
water, cook on 70P (MEDIUM HIGH) for 11-12
minutes until pasta is tender. Stir 2-3 times during
cooking. Drain if necessary.
2 Mix the Tuna, sauce and broccoli with the
seasoning. Cook on 100P (HIGH) for 4-5 minutes,
stir after 2 minutes.
3.Add grated cheese and grill for 4-6 minutes until
golden.
1 Wash the trout. Discard heads and tails and pat
dry. Place in a large flan dish, pierce in several
places. Season. Pour over the orange juice and
sprinkle with the rind and flaked almonds.
2 Place on low rack, cook on DUAL GRILL, 50P
(MEDIUM) for 8-9 minutes.
EAT
M
ICNIC PASTIES
P
SERVES 4
200g (7oz) cooked ham, roughly chopped
25g (1oz) margarine
100g (4oz) button mushrooms, finely sliced
4-6 spring onions, finely sliced
5ml (1tsp) dried mixed herbs
salt and pepper to taste
100g (4oz) cheese, grated
pastry:
100g (4oz) plain flour
100g (4oz) plain wholemeal flour
5ml (1tsp) dried mixed herbs
salt and pepper to taste
100g (4oz) margarine
cold water to mix
1 egg (size 3), beaten to glaze
1 Combine ham, margarine, mushrooms, onion,
herbs and seasoning. Cook on 100P (HIGH) for
2-3 minutes. Stir in cheese, allow to cool.
2 To make pastry mix flour, herbs and seasoning.
Rub in margarine until mixture resembles
breadcrumbs. Add enough water to form a soft
dough. Roll out pastry, cut out four 20.4cm (8")
circles of pastry and dampen edge with water.
3
Spoon ham mixture into the centre of each pastry
circle. Fold pastry over to form a semi-circle pasty.
Pinch edges together and brush surface with egg.
Place two pasties in a greased flan dish.
4 Place on low rack and cook on DUAL GRILL, 70P
(MEDIUM HIGH )for 10 minutes until brown and
crispy. Repeat for the remaining two pasties.
Microwave Tip: Drying herbs
Place a handful of fresh herbs between two sheets
of kitchen paper on the turntable. Heat on MEDIUM
HIGH for 2 minutes until dry. Ensure the herbs do
not become too dry. Woody herbs take a little longer
to dry than leafy herbs.
38
Page 41

EAT
M
EXICAN TACOS
M
SERVES 4
225g (8oz) lean minced beef, pork or lamb
2 cloves garlic, crushed (see Tip, page 42)
1 small onion, chopped
2 fresh, green chillis, chopped
225g (8oz) canned, chopped tomatoes
100g (4oz) canned, red kidney beans
8 taco shells, pre-cooked
175g (6oz) Cheddar cheese, grated
Mexican dish of spicy filled corn tortillas. Serve with
Guacamole, soured cream and crisp salad.
EEF STROGANOFF
B
SERVES 4
1kg (2lb) rump steak, cut into strips
50g (2oz) plain flour
salt and pepper to taste
1 large onion, finely chopped
30ml (2tbsp) tomato purée
450ml (
150ml (
100g (4oz) mushrooms, thinly sliced
150ml (
3
/4 pint) hot beef stock
1
/4 pint) red wine
1
/4 pint) soured cream
1 Place the mince, garlic and onion in a bowl, mix
well. Cook on 100P (HIGH) for 7 minutes, stir
twice.
2 Stir in chillis, tomatoes and beans. Cook on 100P
(HIGH) for 18 minutes. Place taco shells on
kitchen paper on turntable. Heat on 100P (HIGH)
for 2 minutes. Fill with chilli bean mixture, sprinkle
with cheese.
3 Pack tacos together, open end up in a large
casserole or flan dish. Place on turntable, cook on
DUAL GRILL, 30P (MEDIUM LOW) for 7 minutes.
1 Place the steak, flour, salt and pepper in a 2.5
litre (approx. 4 pint) casserole dish, mix well.
2 Stir in the onion, purée, stock and wine.
Cover and cook on 50P (MEDIUM) for 40 min-
utes, stir 2-3 times during cooking.
3 Stir in mushrooms, cook on 50p (MEDIUM )for 6
minutes.
4 Stir in the cream before serving.
Serve on a bed of tagliatelle or rice.
OLOGNESE SAUCE
B
SERVES 4
50g (2oz) butter
45ml (3tbsp) vegetable oil
2 small onions, finely chopped
2 sticks of celery, finely chopped
2 cloves garlic, crushed (see Tip, page 42)
3 rashers of bacon, finely chopped
1 bay leaf
400g (14oz) canned, chopped tomatoes
30ml (2tbsp) tomato purée
450g (1lb) lean minced beef
30ml (2tbsp) dried mixed herbs (see Tip, page 38)
300ml (
300ml (
salt and pepper to taste
1
/2 pint) dry red wine
1
/2 pint) hot beef stock
1 Melt the butter and oil in a large bowl on 100P
(HIGH) for 1 minute. Stir in the onion, celery,
garlic and bacon. Cover and cook on 100P (HIGH)
for 7 minutes.
2 Add the bay leaf, tomatoes, purée and minced
beef to the vegetable mixture. Cook on 100P
(HIGH ) for 8 minutes, stir 2-3 times during
cooking.
3 Add herbs, wine, stock. Season, mix well. Cover
and cook on 100P (HIGH) for 5 minutes, then for
20 minutes on 50P (MEDIUM) until sauce is
thick. Stir 2-3 times during cooking. Serve hot
with spaghetti.
Shepherd's Pie: Make as above, omit wine. Place
in a dish and top with 700g (1
Place on turntable and cook on DUAL GRILL, 50P
(MEDIUM HIGH) for 10 minutes until evenly brown.
Chilli con carne: Make as above. At Stage 3 add
450g (1lb) canned red kidney beans and 5-15ml
(1-3tsp) chilli powder, to taste.
1
/2lb) mashed potato.
39
Page 42

EAT
M
TEAK AND KIDNEY PUDDING
S
SERVES 4
450g (1lb) stewing steak, chopped
100g (4oz) kidney, chopped
1 medium onion, chopped
1
2.5ml (
450ml (
15ml (1tbsp) cornflour mixed with a little water
pastry:
225g (8oz) self-raising flour
2.5ml (
5ml (1tsp) baking powder
100g (4oz) suet
150ml (
15ml (1tbsp) milk
P
C
/2tsp) dried mixed herbs (see Tip, page 38)
3
/4 pint) beef stock
1
/2tsp) salt
1
/4 pint) cold water
OULTRY
HICKEN & CAMEMBERT PARCELS
SERVES 4
4 large chicken breast fillets, skinned
100g (4oz) Camembert, finely chopped
3 spring onions, finely chopped
2.5ml (
salt and pepper to taste
cocktail sticks to secure
75 g (3oz) cheddar cheese, grated
Sprinkle with toasted almonds to serve.
1
/2tsp) dried parsley
1 Place steak, kidney, onion, mixed herbs and
stock in a casserole dish. Cover and cook on 50P
(MEDIUM) for 40 minutes. Stir after half the
cooking time and add the cornflour to thicken.
2 To make the pastry, place the flour, salt, baking
powder and suet in a bowl, mix well.
Add enough cold water to form a soft dough. Roll
3
2
/3 of the pastry and use it to line the base and
out
sides of a greased 1.2 litre (2 pint) pudding basin.
4 Fill pastry lined basin with meat. Roll out remaining
pastry, cut out a circle to cover pudding. Brush
with milk. Make a slit in the centre. Cover with
cling film, cook on 100P ( HIGH) for 12 minutes.
1
Open out chicken breasts, flatten with a rolling pin.
2 Place Camembert, onions, parsley and
seasoning in a bowl, mix well. Place a quarter of
the mixture in the centre of each breast. Fold
up into a tight parcel. Secure with cocktail sticks.
Ensure no filling is visible.
3 Place the breasts seam side upwards in a flan dish.
4 Place on the low rack and cook on 70P (MEDIUM
HIGH), DUAL GRILL for 14 minutes, turn over
and add cheese after 8 minutes.
HICKEN SATAY
C
SERVES 4
450g (1lb) chicken fillets, cubed
Marinade:
15Ml (1tbsp) groundnut oil
15 ml (1tbsp) lemon juice
30ml (2tbsp) satay sauce
1 clove crushed garlic
Tobasco sauce to taste
1
Place all the marinade ingredients in a large bowl,
mix well. Stir in the chicken, refrigerate for 2hours
to marinate.
2 Thread the chicken onto skewers leaving no
wood exposed. Place in a large flan dish on the
high rack.
3 Cook on 70P (MEDIUM HIGH), DUAL GRILL for
10-11 minutes. Turn over and rearrange the
skewers every 3 minutes.
40
Page 43

OULTRY
P
HICKEN & CASHEW NUT STIR FRY
C
SERVES 4
sauce:
15ml (1tbsp) dry sherry
15ml (1tbsp) demerara sugar
30ml (2tbsp) soy sauce
30ml (2tbsp) chilli sauce
150ml (
15ml (1tbsp) cornflour mixed with a little water
stir fry:
30ml (2tbsp) groundnut oil
2 cloves garlic, crushed (see Tip, page 42)
2.5cm (1") piece of root ginger, peeled & grated
225g (8oz) chicken fillet, cut into strips
175g (6oz) broccoli, broken into small florets
125g (5oz) can of water chestnuts, drain & slice
125g (5oz) bean sprouts
125g (5oz) bamboo shoots
1
/2 red pepper, sliced
1
/2 yellow pepper, sliced
100g (4oz) cashew nuts, unsalted
1
/4 pint) hot vegetable stock
1 To prepare the sauce, place sherry, sugar, soy
sauce, chilli sauce and stock in a bowl. Mix well,
stir in the cornflour.
2 Heat on 100P (HIGH) for 5 minutes, stir every
minute until thickened. Allow to cool whilst
preparing the rest of the dish.
3 Prepare the stir fry, place the oil, garlic and
ginger in a large bowl, heat on 100P (HIGH) for
1 minute. Mix in the chicken and cook on 70P
(MEDIUM HIGH) for 5 minutes. Stir once.
4 Add the broccoli, chestnuts, beansprouts,
bamboo shoots, red and yellow pepper and the
sauce. Mix well and cook on 70P (MEDIUM
HIGH) for 10 minutes, stir twice during cooking.
5 Stir in the cashew nuts, cook on 100P (HIGH) for
2 minutes. Serve immediately.
HICKEN KORMA
C
SERVES 6
A MILD FLAVOURED, CREAMY INDIAN DISH. SERVE WITH RICE AND POPPADUMS.
900g (2lb) chicken, cut into large pieces
175g (6oz) natural yoghurt
2 cloves garlic, crushed (see Tip, page 42)
25g (1oz) creamed coconut
10ml (2tsp) turmeric
25g (1oz) butter
1 large onion, sliced
5cm (2") piece fresh ginger, grated
2.5ml (
5ml (1tsp) coriander seeds
5 whole cloves
5ml (1tsp) cinnamon
10ml (2tsp) cornflour
100g (4oz) single cream
25g (1oz) roasted cashew nuts
1
/2tsp) chilli powder
1 Place chicken in a bowl, stir in yoghurt, garlic,
creamed coconut and turmeric. Cover and
marinate for at least 1 hour in the refrigerator.
Place butter in a large bowl, heat on
2
for 1 minute, until melted. Add the onion and cook
100P (HIGH)
on
chilli powder and coriander, cook on
for 1 minute.
3 Add the chicken and marinade, mix well. Stir in
the cloves and cinnamon. Cover and cook on
100P (HIGH) for 8 minutes, stirring after 3 minutes.
4 Rearrange the chicken pieces and cook on 50P
(MEDIUM) for 6 minutes.
5 Combine the cornflour with the cream and stir
into the chicken. Cook on 100P (HIGH) for 6
minutes, stir after 3 minutes. Sprinkle with
cashew nuts.
for 2 minutes. Stir in the ginger,
100P (HIGH)
100P (HIGH)
41
Page 44

OULTRY
P
HICKEN BREASTS PARMESAN
C
SERVES 6
IDEALLY SERVED WITH NEW POTATOES, CRISP VEGETABLES AND A GLASS OF RED WINE.
50g (2oz) fresh breadcrumbs
50g (2oz) Parmesan cheese, freshly grated
1 egg (size 3), beaten
675g (1
25g (1oz) plain flour
400g (14oz) canned chopped tomatoes
1 clove garlic, crushed (see Tip, below)
10ml (2tsp) fresh oregano, chopped
300ml (
salt and pepper to taste
50g (2oz) Cheddar or Parmesan cheese, grated
H
1
/2lb) boneless chicken breasts
1
/2 pint) chicken stock
Microwave Tip: Peeling garlic easily
Place 3-4 cloves of garlic on the turntable. Heat on
HIGH for 30 seconds, squeeze at one end until clove
pops out.
ONEYED CHICKEN
1 Combine breadcrumbs and cheese.
2 Beat the egg on a plate. Dip each breast first into
the egg and then into the breadcrumb mixture
until thoroughly coated, place in a 2.5 litre (approx.
4 pint) casserole dish and put to one side.
3 Place flour in a bowl, mix to a paste with a little of
the tomato juice. Stir in the rest of the tomatoes,
garlic, oregano and chicken stock, salt and pepper,
mix well. Heat on 100P (HIGH) for 3-4 minutes,
stirring every minute until thickened.
4 Spoon tomato mixture over the chicken breasts
and sprinkle generously with grated cheese.
5 Place on turntable, use sequence programming to cook
on 70P (MEDIUM HIGH) for 24 minutes then on DUAL
GRILL, (MEDIUM HIGH) for 6 mins.
SERVES 4
4 chicken breasts (boneless)
30ml (2tbsp) clear honey
5ml (1tsp) whole grain mustard
2.5ml (
15ml (1tbsp) tomato purée
150ml (
salt and pepper
1
/2tsp) dried tarragon
1
/4 pint) chicken stock
1 Place the chicken breasts in a casserole dish.
2 Mix all remaining ingredients together and pour
over the chicken.
3 Cook on 70P (MEDIUM HIGH) for 10-11
minutes. Coat the chicken with the sauce
several times during cooking.
HICKEN CACCIATORE
C
SERVES 4
225g (8oz) mushrooms, sliced
1 medium onion, chopped
1 clove garlic, crushed (see Tip, page 42)
60ml (4tbsp) tomato purée
300ml (
5ml (1tsp) dried oregano (see Tip, page 38)
5ml (1tsp) dried parsley (see Tip, page 38)
salt and pepper to taste
4 chicken portions
1
/2 pint) red wine
1 Place the mushrooms, onion and garlic in a 2.5
litre (approx. 4 pint) casserole dish. Cook on
100P (HIGH) for 3 minutes.
2 Stir in remaining ingredients except the chicken,
mix well.
3 Add chicken portions and coat with the sauce.
4 Cook on 70P (MEDIUM HIGH) for 30-33 minutes,
stir and coat the chicken twice during cooking.
Serve with rice or jacket potatoes.
42
Page 45

EGETARIAN
V
AULIFLOWER BIRYANI WITH QUORN
C
SERVES 4-6
15ml (1tbsp) vegetable oil
10ml (2tsp) mustard seeds
10ml (2tsp) sesame seeds
225g (8oz) brown Basmati rice
5ml (1tsp) chilli powder
5ml (1tsp) turmeric
5ml (1tsp) ground coriander
5ml (1tsp) garam masala
15ml (1tbsp) water
1 medium cauliflower, cut into small florets
175g (6oz) quorn, cut into 2cm (
1
/2 a red pepper, seeded and cut into strips
1
/2 a green pepper, seeded and cut into strips
400g (14oz) canned chopped tomatoes
60ml (4tbsp) natural yoghurt
EGETABLE CHILLI
V
3
/4") cubes
SERVES 4-6
30ml (2tbsp) olive oil
2 medium onions, chopped
2 cloves garlic, crushed (see Tip, page 42)
225g (8oz) small carrots, chopped
1 large red pepper, seeded and sliced
100g (4oz) mushrooms, cut into quarters
5ml (1tsp) ground cumin
5ml (1tsp) dried oregano
10ml (2tsp) mild chilli powder
2.5ml (
225g (8oz) canned tomatoes
75g (3oz) tomato purée
225g (8oz) canned haricot beans
225g (8oz) canned red kidney beans
1 bay leaf
300ml (
salt and pepper to taste
1
/2tsp) cayenne pepper
1
/2 pint) hot vegetable stock
1 Place oil, mustard and sesame seeds in a large
bowl, heat on 100P (HIGH) for 1 minute. Add rice,
mix well. Cook on 100P (HIGH) for 2 minute.
2 In a separate bowl mix the chilli powder, turmeric,
coriander and garam masala. Add water and mix
to a paste. Stir the paste into the rice, add the
cauliflower, quorn, red and green pepper, mix
well. Cook on 100P (HIGH) for 2 minutes.
3 Drain the tomatoes and reserve the juice. Add the
tomatoes to the rice mixture, mix well.
4 Add enough boiling water to the tomato juice to
make 600ml (1 pint) of liquid, pour into the rice
mixture, mix well. Cook on 70P (MEDIUM HIGH)
for 24 minutes, stir every 5 minutes.
5 Stir in yoghurt and serve with poppadums.
1 Place the oil, onion and garlic in a large bowl, heat
on 100P (HIGH) for 2 minutes.
2 Add the carrots, red pepper and mushrooms, mix
well. Cook on 100P (HIGH) for 2 minutes.
3 Stir in the remaining ingredients, mix well. Cook
on 70P (MEDIUM HIGH) for 24 minutes, stir 3-4
times during cooking.
4 Remove the bay leaf before serving.
Serve hot with rice or as a filling for tacos.
Microwave Tip: Heating taco shells
Place 8-10 pre-cooked crisp taco shells on kitchen
paper on the turntable. Heat on 100P: (HIGH) for 11/22 minutes until warm. Spoon in filling as preferred.
43
Page 46

EGETARIAN
V
PINACH & MUSHROOM LASAGNE
S
SERVES 4-6
75g (3oz) butter
225g (8oz) mushrooms, thickly sliced
1 vegetable stock cube, crumbled
900g (2lb) frozen spinach
1
2.5ml (
325g (12oz) cottage cheese
salt and pepper to taste
12 pieces of lasagne
300ml (
100g (4oz) Cheddar or Parmesan cheese, grated
Microwave Tip: Garlic bread
75g (3oz) butter, 2 cloves garlic, crushed, one small
French stick, sliced. Mix butter and garlic together
and spread onto the sliced bread. Wrap the stick in
kitchen paper and heat on MEDIUM for 1-2 minutes
until butter has melted.
Q
/2tsp) nutmeg
1
/2 pint) cheese sauce (see page52)
UORN KEBABS
SERVES 4
3 small courgettes, cut into 2.5cm (1") slices
1 red pepper, cut into 3.8cm (2
1yellow pepper, cut into 3.8cm (2
2 small aubergines, cut into 2.5cm (1") pieces
8 closed cap muchrooms
175 g (6oz) Quorn, cut into 2.5cm (1") cubes
Marinade:
150ml (
3 cloves garlic, crushed
15ml Worcestershire sauce
1.25 ml (
V
1
/4 pint) olive oil
1
/4 tsp) all spice
EGETABLE CURRY
1
/2 ") pieces
1
/2 ") pieces
SERVES 4-6
1 x 15ml (1tbsp) oil
cauliflower, cut into florets
900g (2lb) Parsnips, carrots cut into sticks,
total courgettes, celery, leeks and
weight apple sliced
30ml (2tbsp) sultanas
75g (3oz) plain flour
30-45ml (2-3tbsp) curry powder to taste
5ml (1tsp) tumeric, seasoning
600ml (1pt) vegetable or chicken stock
1 Place 50g (2oz) butter in a bowl, heat on 100P
(HIGH) for 1 minute. Add mushrooms and stock
cube, mix well. Cook on 100P (HIGH) for 2
minutes.
2 Heat spinach on 100P (HIGH) for 12 minutes, stir
2-3 times. Drain. Stir in remaining butter, nutmeg,
cheese, seasoning and mushroom mixture.
3 Line the base of a deep square 20.4cm (8") dish
with a layer of lasagne, followed by a layer of
spinach mixture, cheese sauce and another layer
of lasagne. Layer until all ingredients have been
used, ensuring the final layer is lasagne, with
enough cheese sauce to cover the surface.
Sprinkle generously with grated cheese.
4 Place on turntable, cook on 70P (MEDIUM HIGH)
for 20 minutes, then on DUAL GRILL, 70P
(MEDIUM HIGH) for 8 minutes.
1 Place vegetables and quorn in a large bowl.
Mix well.
2 To prepare the marinade, place all the ingredients
in a bowl and mix well.
3 Pour the maridade over the vegetables and Quor,
mix well. Leave to marinate for at least an hour,
stir occasionally.
4 Thread the vegetables and Quorn onto the
skewers in a regular pattern. Leave no wood
exposed, place in a flan dish.
5.Place on low rack, cook on dual grill, 30P (MEDIUM
LOW) for 22-24 minutes. Turn over and rearrange the skewers every 5 minutes until the
vegatables are tender and evenly brown.
1 Place the cauliflower, carrots, parsnips and oil in
a dish. Cook at 100P (HIGH) for 5 minutes. Stir
once.
2 Stir in the flour, curry powder, tumeric and
seasoning.
3 Add the remaining ingredients, and stir in the
stock.
4 Cover and cook for 9minutes at 100P (HIGH)
stirring twice.
5.Serve with rice.
44
Page 47

HEESE & EGGS
C
HEESE, HAM & POTATO CASSEROLE
C
SERVES 4
450g (1lb)par-boiled potatoes, thinly sliced.
225g (8oz) Cheddar cheese, thinly sliced
2 medium onions, sliced
100g (4oz) cooked ham, chopped
300ml (1/2 pt) white sauce ( see page 52)
25g (1oz) cheese, grated
Serve as a snack or light main meal with a crisp
salad
IZZA WITH SALAMI & MUSHROOMS
P
SERVES 4
125g (5oz) white self raising flour
125g (5oz) granary flour
2.5ml (
5ml (1tsp) baking powder
45ml (3tbsp) olive oil
150ml (
90ml (6tbsp) tomato relish
5ml (1tsp) Worcestershire sauce
15ml (1tbsp) fresh oregano
2 salami snack sausages, sliced
100g (4oz) mushrooms, sliced
1
3 medium tomatoes, sliced
100g (4oz) Mozzarella cheese, grated
salt and pepper to taste
Variations:
Tuna and olive: Substitute salami with 200g (7oz)
canned tuna, chopped and top with 8 whole black olives.
1
/2tsp) salt
1
/4 pint) milk
/2 green pepper, thinly sliced
1 Place alternate layers of potato, cheese, onion,
ham and white sauce in a 2.5 lt (4pt) casserole
dish until all ingredients are used. Top with
grated cheese.
2 Place the casserole dish on low rack, use se-
quence programming to cook at 70P (MEDIUM
HIGH) for 14 minutes then on DUAL GRILL, 70P
(MEDIUM HIGH) for 6-8 minutes.
1 Place flours, salt and baking powder in a large
bowl, mix well. Blend oil and milk together, stir
into the flour to make a firm dough.
2
Roll out to make a 25.4cm (10") circle. Place in a
greased 25.4cm (10") flan dish, cook on 100P
(HIGH) for 4 minutes. Carefully turn over, cover
with topping.
3 To prepare the topping, combine the tomato
relish, Worcestershire sauce and 5ml (1tsp) of
oregano. Spread evenly over the uncooked side
of the pizza base. Arrange the salami,
mushrooms, green pepper and tomatoes on top
and sprinkle with the Mozzarella and remaining
oregano. Season with salt and pepper.
4 Place on low rack, cook on DUAL GRILL, 70P
(MEDIUM HIGH) for 12 minutes until the
vegetables are tender and the cheese is brown
and crispy.
Ham and pineapple: Substitute salami with 100g
(4oz) chopped, cooked ham, add 3 pineapple rings.
UICHE LORRAINE
Q
SERVES 4-6
275g (10oz) short crust pastry
6 rashers of bacon, chopped
1 large onion, finely chopped
4 eggs (size 3)
300ml (
salt and pepper to taste
5ml (1tsp) dried mixed herbs
100g (4oz) Cheddar cheese, grated
Stilton & mushrooms: Replace bacon with 125g
(5oz) sliced mushrooms and Cheddar with Stilton.
1
/2 pint) milk
1 Line a 20.4cm (8") flan dish with pastry.
2 Place bacon and onion in a bowl, cook on 100P
(HIGH) for 4 minutes.
3 Place eggs, milk, seasoning in a bowl, mix well.
4 Spread bacon and onion evenly over the pas-
try. Pour egg mixture over, top with grated
cheese.
5 Place on low rack, use sequence programme
to cook on 30P (MEDIUM LOW) for 30 minutes
then on DUAL GRILL, 30P (MEDIUM LOW) for
8 minutes.
45
Page 48

ICE & PASTA
R
ASTA WITH PINENUTS
P
SERVES 4-6
285g (8oz) pasta, e.g. Farfalle (pasta bows)
600ml (1pint) boiling water 50g (2oz) pine nuts
1 quantity of blue cheese sauce (see page 52)
15ml (tbsp) fresh parsley, chopped to garnish
ANNELLONI
C
ERVES 4
S
1 medium onion, chopped
1 clove garlic, crushed (see Tip, page 42)
25g (1oz) butter
450g (1lb) lean minced beef
100g (4oz) mushrooms, chopped
15ml (1tbsp) tomato purée
400g (14oz) canned chopped tomatoes
150ml (
salt and pepper to taste
12 pieces of lasagne
300ml (
extra grated cheese to sprinkle
15ml (1tbsp) fresh oregano, chopped to garnish
B
1
/4 pint) hot beef stock
1
/2 pint) cheese sauce (see page 52)
Microwave Tip: Improving smells in the oven
Place half a lemon in a bowl, add 300ml (
water and heat on100P ( HIGH) for 10-12 minutes.
Wipe the oven using a dry cloth.
1
/2 pint)
EEF RISOTTO
SERVES 4
30ml (2tbsp) olive oil
1 medium onion, finely chopped
1 stick celery, finely sliced
1 green pepper, seeded and sliced
1 red pepper, seeded and sliced
175g (6oz) beef fillet, thinly sliced into
5cm (2") strips
2.5ml (
5ml (1tsp) ground cumin
grated rind of 1 lemon
75g (3oz) peas
225g (8oz) white long grain rice
600ml (1 pint) hot beef stock
salt and pepper to taste
1
/2tsp) cayenne pepper
1 Place pasta in a large bowl add boiling water and
cook at 70P (MEDIUM HIGH) for 10 - 11 minutes
until tender, drain.
2 Add the pinenuts and mix well. Place in a warm
serving dish and cover with sauce.
Serve hot garnished with parsley.
1
Place onion, garlic and butter in a bowl, heat on
100P(HIGH) for 3 minutes. Add the mince, cook on
100P (HIGH) for 7 minutes, stir halfway through
cooking.
2 Add mushrooms, purée, tomatoes, stock and
seasoning. Cook on 70P (MEDIUM HIGH) for 20
minutes until thickened, stir every 5-6 minutes.
Place 3-4 pieces of lasagne in a bowl, cover with
3
boiling water. Cook on 100P (HIGH) for 4 minutes
until tender enough to bend. Remove from water,
dry on kitchen paper. Repeat for the remaining
lasagne.
4 Place a large spoonful of meat mixture at one
end of a piece of lasagne, roll up and place seam
side down in a deep, square 20.4cm (8") dish.
Repeat for remaining lasagne. Place any
remaining meat around the filled lasagne.
Pour the cheese sauce on top of the filled lasagne.
5
Sprinkle generously with cheese and parsley.
6 Place on turntable, use sequence programming
to cook on 70P (MEDIUM HIGH) for 12 minutes,
then on DUAL GRILL, 70P (MEDIUM HIGH) for
8 minutes until brown and crispy.
1 Place the oil, onion, celery, red and green pepper
in a large bowl, mix well. Heat on 100P (HIGH) for
2 minutes. Stir in the beef and cook on 100P
(HIGH) for 5-6 minutes, stir halfway through
cooking.
2 Stir in the remaining ingredients and cook on 70P
(MEDIUM HIGH) for 13-14 minutes until the rice
is tender and all the beef stock has been absorbed,
stir 2-3 times during cooking.
Microwave Tip: Softening avocados
Pierce an unpeeled avocado in several places.
Place on the turntable and heat on 100P (HIGH) for
1 minute. Allow to cool before peeling.
46
Page 49

ESSERTS
D
ECAN PIE
P
SERVES 4-6
pastry:
125g (5oz) plain flour
100g (4oz) plain wholemeal flour
125g (5oz) butter
cold water to mix
filling:
225g (8oz) pecan nuts
225g (8oz) brown sugar
90ml (6tbsp) golden syrup
75g (3oz) butter, melted
3 eggs (size 3), beaten
5ml (1tsp) vanilla essence
Variation:
Pecan nuts can be substituted with walnuts.
ASPBERRY, APPLE & ALMOND CRUMBLE
R
1 To prepare pastry combine the flours and rub in
the butter until mixture resembles fine
breadcrumbs. Add enough cold water to make a
soft but not sticky dough.
2 Line a greased 25.4cm (10") flan dish with pastry.
Spread pecan nuts evenly over base, prepare filling.
3 Beat the sugar, syrup, butter, eggs and vanilla
essence together until smooth. Pour over nuts.
4 Place on the low rack, use sequence programming
to cook on 30P (MEDIUM LOW) for 14 minutes,
then on DUAL GRILL, 30P (MEDIUM LOW) for 56 minutes until golden brown.
SERVES 4-6
1
filling:
225g (8oz) raspberries, fresh or frozen
2 eating apples, peeled and thinly sliced
50g (2oz) brown sugar
15ml (1tbsp) Crème de Cassis (optional)
crumble:
75g (3oz) butter
125g (5oz) plain flour
50g (2oz) ground almonds
75g (3oz) caster sugar
50g (2oz) toasted flaked almonds
TICKY TOFFEE PUDDING
S
Place raspberries, apples, sugar and crème de
cassis in a 1.5 litre (2
well. Heat on 100P (HIGH) for 6 minutes, stir every
minute. Put to one side whilst preparing crumble.
2 Rub the butter into the flour until mixture
resembles fine breadcrumbs, stir in the ground
almonds and caster sugar.
3 Spoon the crumble evenly on top of the fruit.
4 Place on the low rack, cook on DUAL GRILL, 30P
(MEDIUM LOW) for 6 minutes.
Top with toasted flaked almonds to serve.
SERVES 4-6
175g (6oz) stoned dates, chopped
200ml (7floz) boiling water
3.75ml (
2.5ml (
10ml (2tsp) instant coffee dissolved in a little water
75g (3oz) butter
125g (5oz) caster sugar
2 eggs (size 3), beaten
175g (6oz) plain flour
1 quantity of Toffee & Walnut sauce.
(see page 50)
3
/4tsp) bicarbonate of soda
1
/2tsp) vanilla essence
1 Place the dates in a large bowl, add the boiling water,
bicarbonate of soda, vanilla essence and dissolved
coffee, mix well.
2 Cream butter and sugar together in a separate
bowl until light and fluffy, beat in the eggs. Fold in
the flour and dates, mix well . The resulting
mixture will be sloppy. Grease and line the base
of a 1.2 litre (2 pint) pudding basin with kitchen
paper, pour in the pudding mixture.
Place on turntable, cook on 50P (MEDIUM) for 12-13
3
minutes until a skewer comes out clean.
4 Pour the sauce over the pudding. Serve hot.
1
/2 pint) casserole dish, mix
47
Page 50

ESSERTS
D
PPLE PIE
A
SERVES 6
100g (4oz) butter
225g (8oz) flour
25g (1oz) water
1 egg yolk (size 3)
cold water to mix
Filling:
1kg (2lb) cooking apples, peeled & sliced
100g (4oz) demerara sugar
10ml (2tsp) ground cinnamon (optional)
grated rind of 1 orange (optional)
1 egg (size 3) mixed with a little milk to glaze
demerara sugar
1 For pastry, rub butter into flour until mixture
resembles breadcrumbs. Stir in sugar and bind
with egg yolk. Add enough cold water to make a
soft but not sticky dough. Chill whilst making the
filling.
2 For filling, combine apple, sugar, cinnamon (if
using) and orange rind (if using) in a large bowl.
Cook on 100P (HIGH) for 8 minutes, stirring
twice.
3 Line the base of a greased, 20.4 x 2.5cm (8x1")
pie dish with half the pastry. Cook the pastry
base on 50P (MEDIUM) for 7-8 minutes. Spoon
in apple mixture, roll out remaining pastry and
cover.
4 Pinch pastry edges to seal and make a slit in the
centre with a sharp knife. Brush with egg mixture
to glaze and sprinkle generously with sugar.
5 Place on the turntable, use Sequence
Programming to cook on 50P (MEDIUM) for 6
minutes and then on DUAL GRILL, 50P
(MEDIUM) for a further 6 minutes until golden.
AKES & BISCUITS
C
OIST CARROT CAKE
M
SERVES 6-8
150ml (1/4 pint) sunflower oil
225g (8oz) soft brown sugar
3 eggs (size 3), beaten
175g (6oz) self raising flour
5ml (1tsp) bicarbonate of soda
1.25 ml (
10ml (2tsp) cinnamon
2 large carrots, grated
100g (4oz) walnut halves, roughly chopped
icing:
225g (8oz) cream cheese
grated rind of 1 lemon
5ml (1tsp) lemon juice
30ml (2 tbsp) icing sugar
25g (1oz) walnuts, finely chopped to sprinkle
1
/4tsp) salt
1 Combine the oil, sugar and eggs. Fold in the flour,
bicarbonate of soda, salt and cinnamon. Add the
carrots and walnuts, mix well.
2 Grease and line a 20.4cm (8") soufflé dish with
greaseproof paper, pour in the cake mixture.
3 Place on turntable, cook on 50P (MEDIUM) for
20-22 minutes until a skewer comes out clean.
Allow to cool before decorating.
4 To prepare icing, combine cream cheese, lemon
rind, lemon juice and icing sugar until smooth.
Spread on top of the cake, sprinkle with walnuts.
48
Page 51

AKES & BISCUITS
C
HERRY & ALMOND CAKE
C
SERVES 6
175g (6oz) butter
175g (6oz) caster sugar
3 eggs (size 3)
175g (6oz) plain flour
5ml (1tsp) baking powder
100g (4oz) glacé cherries, quartered
75g (3oz) ground almonds
5ml (1tsp) almond essence
15ml (1tbsp) milk
Microwave Tip: Softening hard marzipan
Remove marzipan from packaging, place on
turntable and heat on 100P ( HIGH) for 30
seconds.
LAIN MICROWAVE CAKE
P
SERVES 4-6
100g (4oz) margarine
100g (4oz) caster sugar
2 eggs (size 3), beaten
100g (4oz) self raising flour
30-45ml (2-3tbsp) water
1 Cream the butter and sugar together until light
and fluffy, beat in the eggs.
2 Fold in flour and baking powder, stir in cherries,
ground almonds, almond essence and milk.
3 Grease and line the base of a 17.8cm (7") cake
dish with greaseproof paper. Spoon in the cake
mixture and smooth the surface.
4 Place on turntable, use sequence programming
to cook on 50P (MEDIUM) for 9 minutes, then on
DUAL GRILL, 30P ( MEDIUM LOW) for 5-6
minutes until a skewer comes out cleanly.
1 Cream margarine and sugar, beat in the eggs.
Fold in the flour and water. Grease and line the
base of a 17.8cm (7") cake dish with kitchen
paper. Spoon mixture into dish and smooth.
2 Cook on100P (HIGH) for 4-5 minutes until firm.
Allow to cool slightly before turning out.
ARAMEL SHORTBREAD
C
SERVES 6-8
shortbread:
100g (4oz) butter
50g (2oz) caster sugar
125g (5oz) plain flour
25g (1oz) ground rice
caramel:
50g (2oz) butter
50g (2oz) caster sugar
200g (7oz) condensed milk
15ml (1tbsp) golden syrup
topping:
100g (4oz) milk chocolate, in small pieces
Variation:
Shortbread: Omit caramel and chocolate. Make as to
Stage 3. Before cooling, dredge with sugar, prick all
over with a skewer and cut into wedges.
1 To prepare the shortbread, cream the butter and
sugar until light and fluffy, gradually add the flour
and ground rice to make a firm dough.
2 Press the dough evenly into a greased 17.8cm
(7") flan dish, cook on 50P (MEDIUM) for 6
minutes.
3 Press the hot shortbread firmly down with the
back of a spoon, allow to cool.
4 To prepare the caramel, place all ingredients in a
bowl, mix well. Cook on 100P (HIGH) for 5 min-
utes, stir every minute until toffee coloured.
5 Pour caramel onto the shortbread, chill to set.
6 When caramel is cold, place the chocolate in a
small bowl and heat on 100P (HIGH) for 1-2
minutes, stir every minute until evenly melted.
Spread on to the caramel, chill to set the choco-
late before cutting into slices.
49
Page 52

AKES & BISCUITS
C
ICH FLAPJACK
R
SERVES 6-8
175g (6oz) butter
100g (4oz) caster sugar
175g (6oz) golden syrup
275g (10oz) jumbo oats
HOCOLATE BROWNIES
C
SERVES 6-8
225g (8oz) margarine
225g (8oz) caster sugar
7.5ml (1
4 eggs (size 3), beaten
100g (4oz) plain flour
50g (2oz) cocoa powder
2.5ml (
75g (3oz) walnuts, roughly chopped
1
/2tsp) vanilla essence
1
/2tsp) baking powder
1 Place the butter, sugar and syrup in a large bowl,
heat on 100P (HIGH) for 4 minutes, stir every
minute until melted, add the oats, mix well.
2 Spoon mixture into a greased 20.3cm (8") flan
dish, smooth the surface.
3 Place on low rack, use sequence programming to
cook on 50P (MEDIUM) for 6-8 minutes, then on
DUAL GRILL, 30P (MEDIUM LOW) for 4 minutes
until brown.
1 Combine the margarine, sugar, vanilla essence
and eggs together until smooth.
2 Stir in the remaining ingredients.
3 Grease and line the base of a deep, square
20.4cm ( 8") dish with greaseproof paper, spoon
in the brownie mixture and smooth the surface.
4 Place on turntable, cook on 50P (MEDIUM) for 20
minutes until a skewer comes out cleanly.
READ & SCONES
B
OTATO BREAD
P
SERVES 4
275g (10oz) potato, cooked and mashed
275g (10oz) self raising flour
100g (4oz) mature Cheddar cheese, grated
5ml (1tsp) salt
5ml (1tsp) mixed dried herbs
2 cloves garlic, crushed (see Tip, Page 42)
10ml (2tsp) whole grain mustard
1 egg (size 3), beaten
75ml (5tbsp) milk
1 egg (size 3), beaten to glaze
5ml (1tsp) fresh parsley, chopped to sprinkle
1 Place the potato, flour, cheese, salt, herbs, garlic
and mustard in a large bowl, mix well.
2 Add the egg and milk, mix to form a soft dough.
Knead the dough into a round shape approx.
20.4cm (8") in diameter. Place in a 25.4cm (10")
flan dish, brush with egg to glaze, sprinkle with
parsley.
3 Place on the low rack, use sequence programming
to cook on 50P ( MEDIUM) for 8 minutes, then on
DUAL GRILL, 50P ( MEDIUM) for 8 minutes until
golden.
Serve with soup, cheese or salad.
50
Page 53

READ & SCONES
B
ILK BREAD
M
MAKES 2 LOAVES
675g (11/2lb) strong white flour
1 x 7g sachet of easy blend yeast
10ml (2tsp) caster sugar
5ml (1tsp) salt
50g (2oz) butter
450ml (
1 egg (size 3), beaten to glaze
Variations:
Wholemeal Bread: Substitute strong white flour
with strong wholemeal flour.
Crisp wholemeal rolls: Divide into 12 even pieces
at Stage 4. Place in two greased flan dishes and
prove one layer at a time on LOW for 3-4 minutes.
Place on the low rack and cook on DUAL GRILL,
50P (MEDIUM) for 7-8 minutes until golden.
3
/4 pint) hand hot milk
1 Place flour, yeast, sugar and salt in a large bowl, mix
well. Rub in the butter, add milk, mix to a soft, pliable
dough. Turn out and knead for 3-4 minutes until
smooth. Return dough to bowl, cover with cling film.
2 Place on turntable and prove on 10P (LOW) for 8-
9 minutes until almost double in size.
Divide dough into two equal pieces, knead each in
3
turn for 2-3 minutes. Shape dough into oblongs to
fit two greased, 1.5 litre (2
dishes. Cover with cling film, return to oven to prove.
4 Prove on 10P (LOW) for 6 minutes.
5 Remove cling film. Glaze with egg, using scissors,
make shallow snips all over the surface to make
a “spiky” effect (optional).
6 Place both dishes on turntable, use sequence
programming to cook on 50P ( MEDIUM) for 16
minutes, then on DUAL GRILL, 50P (MEDIUM)
for 5-6 minutes until golden.
1
/2 pint) Pyrex® loaf
ATE & WALNUT BREAD
D
SERVES 6-8
175g (6oz) dates, chopped
150ml (
225g (8oz) plain flour
125g (5oz) wholemeal flour
125g (5oz) caster sugar
2.5ml (
2.5ml (
100g (4oz) butter
125g (5oz) walnuts, roughly chopped
150ml (
1 egg (size 3), beaten
Serve sliced, spread generously with butter.
1
/4 pint) boiling water
1
/2tsp) salt
1
/2tsp) bicarbonate of soda
1
/4 pint) milk
1 Place dates in a large bowl, add the boiling water,
leave aside to cool.
2 Place flours, sugar, salt and bicarbonate of soda
in a bowl, mix well. Rub in butter until mixture
resembles fine breadcrumbs, stir in walnuts.
3 Add the date mixture, milk and egg, mix well.
4 Grease and line the base of a 1.5 litre (2
straight-sided loaf dish with greaseproof paper.
Spoon in loaf mixture and smooth the surface.
5 Place on turntable, use sequence programming
to cook on 70P (MEDIUM HIGH) for 8 minutes,
then on DUAL GRILL, 70P (MEDIUM HIGH) for 6
minutes until a skewer comes out clean.
51
1
/2 pint),
Page 54

AUCES
S
HITE SAUCE
W
MAKES 300ML (1/2 PINT)
25g (1oz) butter
25g (1oz) plain flour
300ml (
salt and pepper to taste
Variations:
Cheese sauce: Add 75g (3oz) grated cheese and 5ml (1tsp)
mustard powder at Stage 2. Serve with vegetables, fish, meat.
Parsley sauce: Stir 15-30ml (1-2tbsp) chopped
parsley into the finished sauce. Serve with fish.
Onion sauce:
into finished sauce. Heat on HIGH for 1 minute. Serve
with meat or vegetables.
S
MAKES 600ML (1
8 large tomatoes, chopped
1 large onion, chopped
2 cloves garlic, crushed (see Tip, page 42)
300ml (
2.5ml (
15ml (1tbsp) whole grain mustard
30ml (2tbsp) tomato paste
1
/2 pint) milk
Stir 1 large cooked onion, finely chopped,
PICY TOMATO SAUCE
PINT)
1
/2 pint) red wine
1
/2tsp) chilli powder
1 Place the butter in a bowl, heat on 100P ( HIGH)
for 30 seconds until melted.
2 Stir in the flour and whisk in the milk. Cook on
100P (HIGH) for 5 minutes, stir every minute until
thick and smooth. Season with salt and pepper
Mushroom sauce: Add 2 sliced spring onions, 50g
(2oz) chopped mushrooms and 5ml (1tsp) chopped
parsley at the beginning of Stage 2. Serve with fish.
Sweet white sauce: Omit salt and pepper from the
basic recipe. Add 50g (2oz) caster sugar at Stage 2.
Serve with puddings as an alternative to custard.
1 Combine all ingredients in a large bowl. Cook on
100P (HIGH) for 24 minutes, stir every 5-6
minutes.
2 Blend in a food processor until smooth.
Serve with chicken, pasta or stuffed tofu,
(see page 39).
LUE CHEESE SAUCE
B
MAKES 150ML (1/4
75g (3oz) Danish Blue cheese, finely chopped
45ml (3tbsp) soured cream
30ml (2tbsp) fresh parsley, chopped
salt and pepper to taste
OFFEE & WALNUT SAUCE
T
PINT)
MAKES 300ML (1/2 PINT)
125g (5oz) butter
175g (6oz) dark soft brown sugar
90ml (6tbsp) double cream
50g (2oz) walnuts, finely chopped
1 Place the cheese, soured cream and parsley in a
bowl, mix well. Season.
2 Heat on 100P (HIGH) for 2-3 minutes.
Serve with Pasta with Pinenuts (page 44).
1 Combine all ingredients in a bowl, heat on 70P
(MEDIUM HIGH) for 5-6 minutes, stir every minute
until sugar has dissolved and the mixture is thick
and glossy.
Serve hot with ice-cream or Sticky Toffee Pudding.
(See page 45)
52
Page 55

RESERVES & SWEETS
P
TRAWBERRY JAM
S
MAKES 675g (11/2LB)
1
675g (1
45ml (3tbsp) lemon juice
675g (1
*setting point: Place 5 ml (1tsp) jam onto chilled
saucer. Stand for 1 min. Move surface of the jam
gently with finger, if surface wrinkles then setting
point has been reached.
L
/2lb) strawberries, washed and hulled
1
/2lb) caster sugar
EMON CURD
MAKES 300g (12OZ )
100g (4oz) butter
225g (8oz) caster sugar
15ml (1tbsp) cornflour
Juice of 3 medium lemons
Grated rind of 2 lemons
4 egg yolks(size 3), beaten
REACLE TOFFEE
T
MAKES 600g (20OZ)
450g (8oz) soft dark brown sugar
150ml (10tbsp) water
10ml (2tsp) treacle
50g (2oz) butter
50ml (4tbsp) malt vinegar
1 Place strawberries and lemon juice in a very large bowl.
2 Heat on 100P (HIGH) for 5 minutes until straw-
berries have softened. Add the sugar, mix well.
3 Cook on 70P ( MEDIUM HIGH) for 35-40 minutes
setting point* is reached, stir every 4-5
until
minutes.
4 Pour into hot, clean jars. Cover, seal and label.
1 Place butter and sugar in a bowl. Heat on 100P (HIGH)
for 2 minutes until melted.
2 Mix cornflour, lemon juice and rind. Stir into the butter
and sugar mixture. Heat on 100P (HIGH) for 2 minutes
until sugar has dissolved. Cool slightly.
3 Beat in the egg yolks and cook on 50P (MEDIUM) for
10-12 minutes, stir every 2 minutes until thickened.
4 Pour into hot, clean jars. Cover, seal and label.
1 Place all ingredients in a bowl, mix well.
Heat on 70P (MEDIUM HIGH) for 26-28 minutes, stir every 2-3 minutes until toffee
reaches
2 Pour into a greased, square 15.3cm (8")
dish. Chill to set before breaking.
hard crack* stage.
EANUT BRITTLE
P
MAKES 300g (10OZ)
100g (4oz) caster sugar
75g (3oz) golden syrup
60ml (4tbsp) water
1
2.5ml (
25g (1oz) butter
125g (5oz) unsalted peanuts, blanched
C
/2tsp) baking powder
*Hard crack: To determine drop a teaspoon of
mixture into a glass of cold water and the toffee
should be hard to the touch.
HOCOLATE FUDGE
MAKES 675g (11/2LB)
100g (4oz) milk chocolate, broken into pieces
100g (4oz) butter, melted
450g (1lb) icing sugar
45ml (3tbsp) milk
1 Mix sugar, syrup and water in a bowl. Heat on
100P (HIGH) for 2 minutes, stir every minute until
sugar has dissolved.
2 Add the baking powder and butter, mix well. Heat
on 100P (HIGH) for 1 minute. Stir in the peanuts,
cook on 70P (MEDIUM HIGH) for 4-5 minutes,
stir every minute until
3 Pour the mixture into a greased, square 15.3cm
(6") dish, chill to set before breaking.
1 Place the chocolate in a bowl and heat on 100P
(HIGH) for 2 minutes, stir every 30 seconds until
melted.
2 Stir in butter, icing sugar and milk. Heat on
100 P (HIGH) for 3 minutes, stir vigorously every
minute until the mixture is thick and glossy.
3 Pour into a greased, rectangular 20.4 x 15.3cm
(8 x 6") dish, chill to set before cutting.
53
hard crack* stage is reached.
Page 56

CLEANING & MAINTENANCE
OVEN INTERIOR
Clean the microwave oven cavity , after each use with
a mild detergent solution on a soft cloth, pay special
attention to the waveguide cover. Take care not to let
soapy water drip through the small holes in the oven
walls and the cavity floor particularly if the turntable
and roller stay are removed. Excess water spillage
through these holes will cause damage to the oven
interior. It is important that the door seals and sealing
surfaces are kept clean at all times, wipe regularly
with a damp cloth.
• T o prevent splashing, cover food wherever possible.
TURNTABLE & SUPPORT
Leave to cool before cleaning to prevent them from
breaking.
TROUBLESHOOTING
If you think the oven is not working properly there are
some simple checks you can carry out yourself before
calling an engineer. This will help prevent unnecessary
service calls if the fault is something simple.
Simply answer “YES” or “NO” to the following questions:
1 Does the oven lamp come on when you open the
door? YES/NO
Put half a cup of water in the oven, on the turntable
and close the door. Select 100P (HIGH) and
programme the oven to cook for 1 minute.
2 Does the oven lamp come on? YES/NO
3 Does the turntable rotate? YES/NO
4 Does the cooling fan work? (Check by placing
your hand above the air vent openings)YES/NO
5 After 1 minute does the "Beep" signal sound?
YES/NO
6 Is the water in the cup hot? YES/NO
7 Press 1minute key 3 times and then press GRILL
followed by AUTO MINUTE/START .
At the end of 3 minutes does the
grill heater become hot? YES/NO
If you answer “NO” to any question first check that the
oven is plugged in properly and the fuse has not
blown, if there is no fault with either, contact the dealer
or supplier from whom the oven was purchased in
OUTER CABINET
Wipe the outside cabinet with a mild detergent
solution on a soft cloth. The control panel must be
wiped clean whilst the door is open, therefore
inactivating the oven.
WARNINGS
• Do not allow grease or dirt to build up on the door
seals and adjacent parts as this may prevent the
door from closing correctly and may cause a
leakage of microwaves.
• Keep the waveguide cover clean at all times. If you
leave grease or fat in the cavity , it may overheat,
smoke or even catch fire when next using the oven.
• Never use spray cleaners, oven keys or abrasive
scourers as these damage the surface of the oven.
order to obtain service. Where this is not possible,
please contact the telephone number which follows.
Y ou will then be given details of how to obtain service.
T elephone: LoCall 0345 125387 (All calls will be
charged at local rate).
For general information & assistance with oven
queries, please contact our Customer Information
Centre: Telephone: 0161 2 05 2623.
WARNINGS:
• The door seal stops microwave leakage during oven
operation, but does not form an airtight seal. It is
normal to see drops of water, light or feel warm air
around the oven door. Food with a high moisture
content will release steam and cause condensation
inside the door which may drip from the oven.
• Repairs & Modifications: Do not attempt to operate
the oven if it is not working properly .
• Never adjust, repair or modify the oven yourself,
or allow anyone other than a Service Technician,
appointed by SHARP to carry out the service.
• Outer Cabinet & Lamp Access: Never remove the
outer cabinet. This would be very dangerous due
to high voltage parts inside which must never be
touched, as this could be fatal. As your oven is not
fitted with a lamp access cover, if the lamp fails,
do not attempt to replace the lamp yourself, call a
Service Technician appointed by SHARP.
54
Page 57

TROUBLESHOOTING
PROBLEM
Digital display does not
light-up.
Draught circulates around
the door.
Condensation forms in the
oven, and may drip from
the door.
Flashing or arcing form
within the cavity when
cooking.
Arcing potatoes.
Control panel buttons do
not operate.
Oven cooks too slowly .
Oven makes a noise.
POSSIBLE CAUSE
Check the oven is plugged in.
Plug in another appliance to check the mains supply is feeding the socket.
Replace the fuse.
When oven is working, air circulates within the cavity . The door does not form an
airtight seal so air may escape from the door.
The oven cavity will normally be colder than the food being cooked, and so steam
produced when cooking will condense on the colder surface. The amount of steam
produced depends on the water content of the food being cooked. Some foods,
such as potatoes have a high moisture content. Condensation trapped in the door
glass should clear after a few hours.
Arcing will occur when a metallic object comes into close proximity to the oven
cavity during cooking. This may remove some of the paint and possibly roughen
the surface of the cavity, but would not otherwise damage the oven.
Ensure all “eyes” are removed and stand directly onto the turntable or in a heat
resistant flan dish or similar.
Check the door is closed properly .
Ensure correct mode and power level has been selected.
The cooking fan generates noise.
The microwave energy pulses ON/OFF during cooking/defrosting.
TO REPLACE THE MAINS PLUG
The wires in the mains cable are colour coded as
shown opposite:
As the colours of the cores in the mains lead of your
oven may not correspond with the coloured marking
identifying the terminals in your plug, connect the
wires as shown:
Make sure the terminal screws are tight and the cable
is held securely by the cable grip where it enters the
plug. Like most appliances in your home, your oven
must be connected to a single phase 230/240 V olt,
50Hz alternating current supply.
If you do not make the proper electrical connections
you might damage the oven or injure yourself. Neither
SHARP nor the supplier will be liable if this happens..
green and yellow stripes = EARTH
blue = NEUTRAL
brown = LIVE
• The green and yellow wire to the plug terminal
marked E or or coloured green or coloured
green and yellow.
• The blue wire to the plug terminal marked N or
coloured black or coloured blue.
• The brown wire to the plug terminal marked L or
coloured red or coloured brown.
IF YOU HAVE ANY DOUBTS ABOUT YOUR
ELECTRICAL SUPPL Y ASK A QUALIFIED
ELECTRICIAN.
55
Page 58

CALLING FOR SERVICE
• If you are unable to resolve a problem using the
checks covered on the last few pages, do not
attempt to service this Microwave Oven yourself.
• For service please contact your dealer. If this is not
possible please call our Customer Information Centre
on: 0345 1 25387 for details of your nearest Sharp
Service Centre.
• Replacement parts and accessories may be
obtained from our main parts distributor Willow
V ale Electronics Ltd, telephone numbers follow.
GUARANTEE
Subject to the conditions listed below, SHARP
Electronics (U.K.) Ltd (hereafter called “the
Company”), guarantee to provide for the repair of,
or, at its option replace this SHARP equipment, or any
component thereof, (other than Glass Turntables),
which is faulty or below standard, as a result of
inferior workmanship or materials.
The conditions of the Guarantee:
1 This Guarantee shall only apply to defects or faults
which are notified to the Company , or its Service
T echnician appointed by Sharp, within one year
from the date of purchase of the equipment,
provided that this Guarantee shall extend for a
further period of one year in respect of microwave
oven magnetron parts only.
2 This Guarantee covers equipment intended for
private domestic use only . This oven is suitable for
domestic food preparation and is not designed for
commercial, industrial or laboratory use. This
Guarantee does not apply to equipment used in
the course of a business, trade or profession. Only
use the microwave oven for cooking, defrosting or
reheating of food. SHARP declines any liability for
damages caused by improper use.
3 This Guarantee does not cover any faults or
defects caused by accident, misuse, fair wear and
tear, neglect, tampering with the equipment, or
any attempt at adjustment or repair other than by a
Service Technician Appointed by Sharp. Please
T elephone: Manchester: 01 61 682 1415
Reading: 0734 876444
W ARNING
For your own safety , certain microwave
oven parts must be replaced by a qualified
Engineer appointed by SHARP, these are,
therefore, unavailable to customers.
clean your microwave oven regularly and remove
any stains or fat residues without delay . Failure to
do this may affect the quality and safety of the
product or prejudice your guarantee.
4 In the unlikely event of your equipment requiring
repair, please contact the dealer or supplier from
whom it was purchased. Y ou will need to provide
proof of date of purchase to the repairing
company . Please keep your invoice or receipt,
which is supplied at the time of purchase. Where it
is not possible to contact the dealer or supplier
from whom the oven was purchased, please
contact the telephone number given below. You
will then be given details of how to obtain service.
T elephone: 0345 125387
(All calls will be charged at local rate.)
6 This Guarantee is offered as an additional benefit
to the consumer’s statutory rights and does not
affect these rights in any way .
SHARP parts and accessories have been specifically
designed for SHARP Microwaves.
No liability can be accepted for any inaccuracies or
omissions in this publication, although every possible
care has been taken to make it as complete and
accurate as possible.
56
Page 59

SPECIFICATIONS
AC Line V oltage
AC Power required: Microwave
Grill
Dual
Maff Heating Category:
Output power: Microwave
Grill
Microwave Frequency
Outside Dimensions
Cavity Dimensions
Oven Capacity
Turntable
W eight
This oven complies with the requirements of
Directives 89/336/EEC and 73/23/EEC as
amended by 93/68/EEC.
As part of a policy of continuous improvement, we
reserve the right to alter design and specification
without notice.
Single phase 230/240V , 50Hz
1.55kW
1.25kW
2 .75kW
E
900W (IEC 705)
1 200W (600W x 2)
2450MHz
52 0(W) x 305(H) x 413(D) mm
342(W) x 2 07(H) x 368(D) mm
0.9 cu.ft (26 litres)
Diameter (325mm)
Approx. 18kg
No part of this publication may be reproduced,
stored in a retrieval system or transmitted in any
form, electronically, mechanically, photocopied,
recorded, translated or other means without prior
permission from SHARP Electronics (U.K.) Ltd.
The illustrations, technical information and data
contained in this publication to our best
knowledge, were correct at the time of going to
print. The right to change specifications, at any
time, without notice, is reserved as part of our
policy of continuous development and
improvement.
57
Page 60

SHARP ELECTRONICS (U.K.) LTD
Sharp House, Thorp Road, Newton Heath,
Manchester, M40 5BE, United Kingdom.
TINS-AO76URRO
 Loading...