


VBRHJDJKZJDFY GTXM
MICROWAVE OVEN
HR
MODEL
Herjdjlcndj gj ärcgkefnfwbb b rekbzfhbb
OPERATION MANUAL AND COOKING GUIDE
R-210B
CJLTHÖFZBT
Bzajhvfwby j cthnbabrfwbb ghjlerwbb
Vths ghtljcnjhjözjcnb .................................. 1
Jcj<st erfpfzby ................................................ 2
Bzcnherwby gj ecnfzjdrt .................................3
J<obq dbl gtxb ................................................. 3
Gfztkm eghfdktzby ............................................. 4
Hf<jnf c gfztkm+ eghfdktzby ..........................5
Lheubt elj<zst aezrwbb .................................6
Ltvjzcnhfwbjzzsq htöbv ............................. 6
Eüjl pf gtxm+ ..................................................... 7
Gthtl ntv rfr dspdfnm vfcnthf ...................... 7
Ntüzbxtcrbt üfhfrnthbcnbrb ........................... 7
Herjdjlcndj gj rekbzfhbb ...............................8
CONTENTS
Warning...................................................... E-1
Special Notes ............................................. E-2
Installation Instructions............................. E-3
Oven Diagram............................................ E-3
Control Panel ............................................. E-4
Operation of Control Panel ....................... E-5
Other Convenient Feature......................... E-6
Demonstration Mode ..............................E-6
Care and Cleaning .....................................E-7
Service Call Check .....................................E-7
Specifications............................................. E-7
Cooking Guide ........................................... E-8

BZAJHVFWBY J CTHNBABRFWBB GHJLERWBB
VBRHJDJKZJDFY GTXM
VJLTKM R-210B IFHG
cthnbabwbhjdfzf Rjvgfzbtq HJCNTCN – VJCRDF,
jabwbfkmzsv ghtlcnfdbntktv UJCCNFZLFHNF Hjccbb
VJLTKM R-210B IFHG
cjjndtncndetn nht<jdfzbyv
zjhvfnbdzsü ljrevtznjd:
Dj bcgjkztzbt Cnfnmb 5 Pfrjzf Hjccbqcrjq Atlthfwbb ≤J pfobnt ghfd gjnht<bntktq≥, f nfröt Erfpf
Ghfdbntkmcndf Hjccbqcrjq Atlthfwbb @ 720 jn 16 b+zy 1997 u. ecnfzfdkbdftncy chjr ckeö<s lfzzjq
vjltkb-7 ktn c vjvtznf ghjbpdjlcndf ghb eckjdbb bcgjkmpjdfzby d cnhjujv cjjndtncndbb c
bzcnherwbtq gj ärcgkefnfwbb b ghbvtzytvsvb ntüzbxtcrbvb cnfzlfhnfvb.
In accordance with Article 5 of the Russian Consumer Rights Protection Law and the Russian Federation Government
Decree @ 720 dated June 16, 1997, the lifetime for this product is established as 7 years from the date of production,
provided this product is used in full conformity with its instruction manual and the applicable technical standards.
gj <tpjgfczjcnb —
UJCN H VÄR 335-2-25-1994
gj ÄVC —
UJCN 23450-83, zjhvs URHX 5>-80

WARNING
Read all instructions before using the appliance.
1. To reduce the risk of fire in the oven cavity:
a.Do not overcook food.
b.Remove wire twist-ties from paper or plastic bags before placing bag in the oven.
c.Do not heat oil or fat for deep frying. The temperature of the oil cannot be controlled.
d.Look at the oven from time to time when food is heated in disposable containers made of
plastic, paper or other combustible materials for signs of smoke or burning.
e.If materials inside the oven should ignite, or smoke is observed, keep oven door closed, turn
oven off, and disconnect the power cord, or shut off power at the fuse or circuit breaker panel.
2. To reduce the risk of explosion and sudden boiling:
a.Do not place sealed containers in the oven. Babies bottles fitted with a screw cap or teat are
considered to be sealed containers.
b.When boiling liquids in the oven, use a wide-mouthed container and stand about 20 seconds
at the end of cooking to avoid delayed eruptive boiling of liquids.
3. This oven is for home food preparation only and should only be used for cooking food .
It is not suitable for commercial, or laboratory use.
4. Never operate the oven whilst any object is caught or jammed between the door and the oven.
5. Do not try to adjust or repair the oven yourself. The oven must be adjusted or repaired by a qualified
service technician trained by SHARP.
6. Do not operate the oven if it is not working correctly or damaged until it has been repaired by a
qualified service technician trained by SHARP. It is particularly important that the oven door closes
properly and that there is no damage to:
(1) Door (warped), (2) Hinges and Latches (broken or loosened), (3) Door Seals and Sealing
Surfaces.
7. Do not catch the utensil, your clothes or accessories on the door safety latches when you take out
the food from the oven.
8. Always use oven mittens to prevent burns when handling utensils that are in contact with hot food.
Enough heat from the food can transfer through utensils to cause skin burns.
9. Should the supply cord become damaged, it must be replaced with a special cord supplied by a
SERVICE CENTRE APPROVED BY SHARP. And it must be replaced by a qualified service technician
trained by SHARP.
10.Avoid steam burns by directing steam away from the face and hands.
Slowly lift the furthest edge of a dish's cover and microwave plastic wrap and carefully open
popcorn and oven cooking bags away from the face.
11.Make sure that the power supply cord is undamaged, and that it does not run under the oven or
over any hot surfaces or sharp edges.
12.If the oven lamp fails please consult your dealer or a qualified service technician trained by SHARP.
13.To prevent the turntable from breaking:
a.Before cleaning the turntable with water, leave the turntable to cool.
b.Do not place anything hot on a cold turntable.
c.Do not place anything cold on a hot turntable.
14.This appliance must be earthed.
E-1

SPECIAL NOTES
DO DON’T
Eggs, fruits,
vegetables,
sausages and
oysters
Popcorn
Baby food
General
* Puncture egg yolks and whites and
oysters before cooking to prevent
"explosion".
* Pierce skins of potatoes, apples,
squash, hot dogs, sausages and
oysters so that steam escapes.
* Use specially bagged popcorn for the
microwave oven.
* Listen while popping corn for the
popping to slow to 1-2 seconds.
* Transfer baby food to small dish and
heat carefully, stirring often. Check for
suitable temperature.
* Remove the screw cap and teat
before warming baby bottles. After
warming shake thoroughly. Check for
suitable temperature.
* Food with filling should be cut after
heating, to release steam and avoid
burns.
* Stir liquids briskly before and after
cooking for even heating.
* Use a deep bowl when cooking liquids
or cereals to prevent boiling over.
* For boiling or cooking liquids see
WARNING on page E-1.
* Cook eggs in shells to prevent
"explosion". which may damage the
oven or injure yourself.
* Reheat whole eggs.
* Overcook oysters.
* Pop popcorn in regular brown bags or
glass bowls.
* Exceed maximum time on popcorn
package.
* Heat disposable bottles.
* Overheat baby bottles.
Only heat until warm.
* Heat bottles with nipples on.
* Heat baby food in original jars.
* Heat or cook in closed glass jars or air
tight containers.
* Deep fat fry.
* Dry wood, herbs, wet papers, clothes or
flowers.
* Operate the oven empty.
Canned foods
Sausage rolls,
Pies, Christmas
pudding
Meats
Utensils
Aluminium foil
Browning dish
* Remove food from can.
* Cook for the recommended time.
(These foods have high sugar and/ or
fat contents.)
* For microwave cooking, use a
microwave proof roasting rack to
collect drained juices.
Roasting rack:
* Check the utensils are suitable for
MICROWAVE cooking before you use
them.
* Use to shield food to prevent over
cooking.
* Watch for sparking. Reduce foil or
keep clear of cavity walls.
* Place a suitable insulator such as
microwave and heat proof dinner plate
between the turntable and the
browning dish.
E-2
* Heat or cook food while in cans.
* Overcook as they may catch fire.
* Place meat directly on the turntable for
cooking.
* Use metal utensils for MICROWAVE
cooking. Metal reflects microwave
energy and may cause an electrical
discharge known as arcing.
* Use too much.
* Shield food close to cavity walls.
Sparking can damage the cavity.
* Exceed the preheating time recom-
mended by the manufacturer. Exces-
sive preheating can cause the glass
turntable to shatter and/or damage
internal parts of the oven.
INSTALLATION INSTRUCTIONS
1. Remove all packing materials from the oven cavity . Check the unit for any damage, such as a
misaligned door, damaged gaskets around the door or dents inside the oven cavity or on the door.
If there is any damage, please do not operate the oven until it has been checked by a SERVICE CENTRE
APPROVED BY SHARP and repaired, if necessary.
2. Accessories provided
1) Turntable tray
2) Roller stay
3) Operation manual and cooking guide
3. Locate the roller stay in the centre of the oven, then fit the turntable on the roller stay. Make sure the
turntable and roller stay are centrally located and locked together. NEVER OPERATE THE OVEN
WITHOUT THE ROLLER STAY AND TURNTABLE.
4. The oven should not be installed in any area where excessive heat and steam are generated, for
example, next to a conventional oven unit. The oven should be installed so as not to block ventilation
openings.
Allow at least 15 cm on the top of the oven for free air space.
5. Neither the manufacturer nor the distributors can accept any liability for damage to the machine or
personal injury for failure to observe the correct electrical connecting procedure.
The A.C. voltage must be single phase 220V, 50Hz.
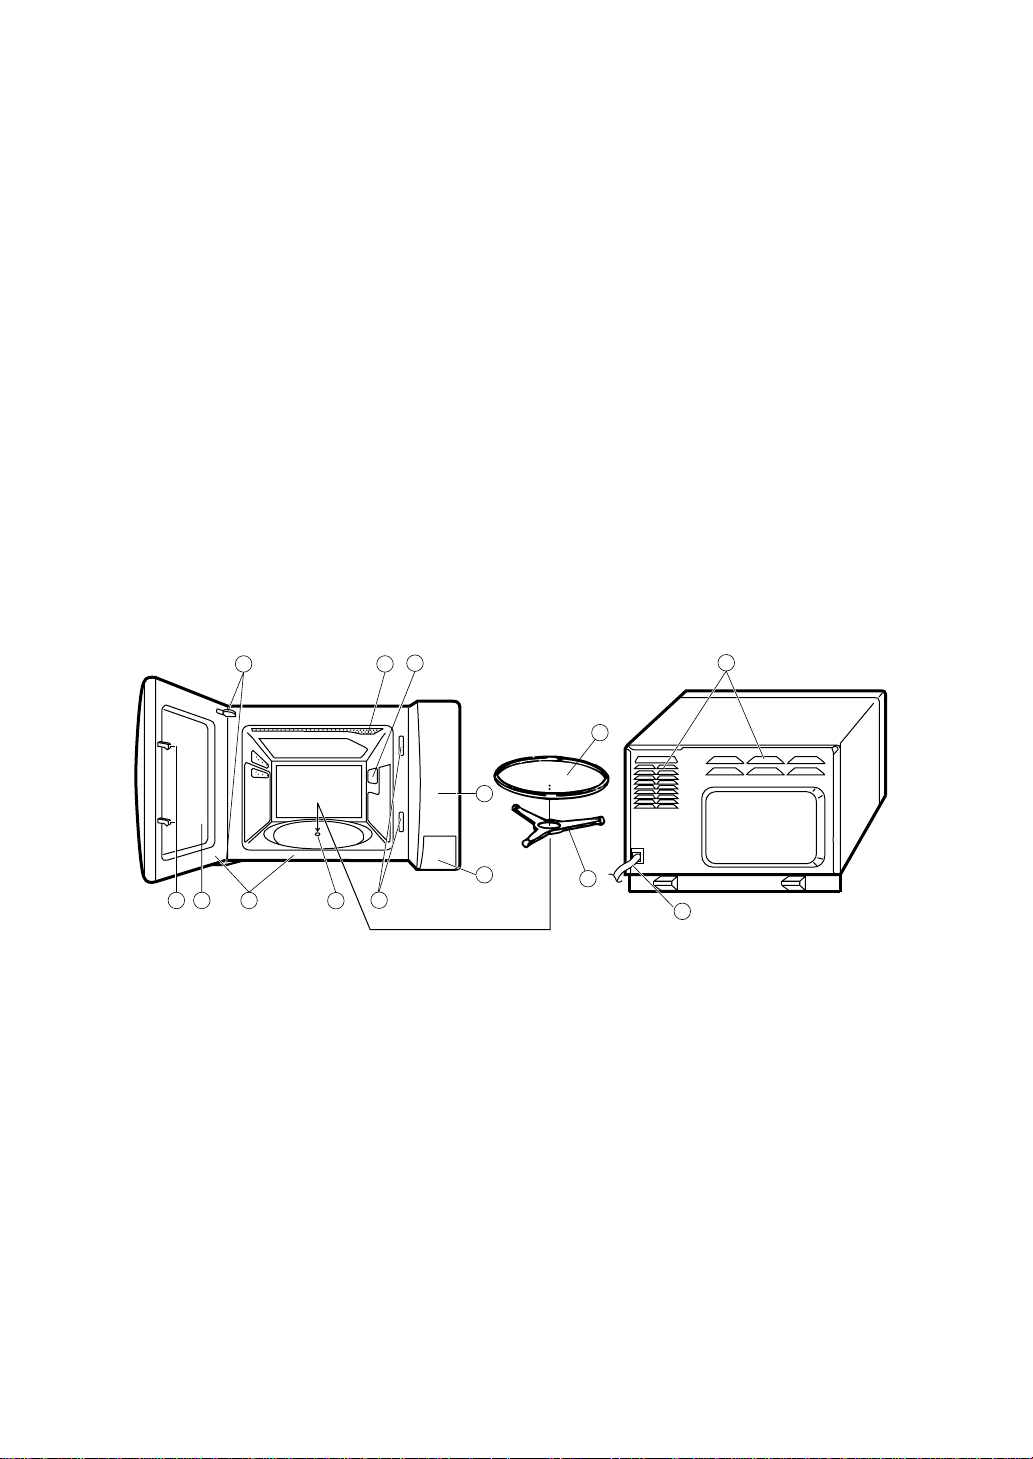
OVEN DIAGRAM
3 2
654 4
1. Ventilation openings
2. Oven lamp
3. Door hinges
4. Door safety latches
5. See through door
6. Door seals and sealing surfaces
7. Coupling
7
10
12
9
8
13
8. Door open button
9. Control panel (See page E-4)
10.Waveguide cover
11.Power supply cord
12.Turntable
13.Roller stay
1
11
E-3

CONTROL PANEL
Cdtnjdjq wbath<kfn
Chtlzbq Zbprbq
Chtlzbq Dscjrbq
Zbprbq
Chtlzbq
Dscjrbq
COOKING CONTROL
HFPVJHJPRF
Chtlzbq Zbprbq
MED LOW MED HIGH
Zbprbq
LOW
0
30
1.0kg
Chtlzbq
MED
Chtlzbq Dscjrbq
Cdtnjdjq wbath<kfn
Light Up Dial
2
3
1
4
11
25
20
15
0.5kg
14
13
12
Dscjrbq
HIGH
5
6
7
8
9
10
VARIABLE COOKING CONTROL
There are five power levels. The approximate percentage of microwave power for
each setting is:
HIGH 100%
MED HIGH (MEDIUM HIGH) 70%
MED (MEDIUM) 50%
MED LOW/DEFROST 30%
(MEDIUM LOW/DEFROST)
LOW 10%
LIGHT UP DIAL (0-30 minutes)
Turn to set cooking time or weight of
defrost food.
JNRHSNBT LDTHWS
DOOR OPEN
MEAT DEFROST GUIDE
E-4
OPERATION OF CONTROL PANEL
HFPVJHJPRF
Dscjrbq
Cdtnjdjq wbath<kfn
Cdtnjdjq wbath<kfn
Your oven can be programmed up to 30 minutes. The input unit of cooking (defrosting) time varies from 15
seconds to 5 minutes. It depends on the total length of the cooking (defrosting) time as shown on the table
below.
Cooking time Increasing unit
0-1 minute 15 seconds
1-4 minutes 30 seconds
4-15 minutes 1 minute
15-30 minutes 5 minutes
1.
COOKING DEFROSTING
Suppose you want to cook on HIGH for 10 min. Suppose you want to defrost 0.5 kg meat.
HFPVJHJPRF
Chtlzbq Zbprbq
MED LOW
Select desired power
level.
Set the cooking time by
2.
rotating the LIGHT UP
DIAL.
Cdtnjdjq wbath<kfn
Light Up Dial
1
0
30
25
20
1.0kg
2
15
0.5kg
Dscjrbq
3
4
5
10
11
12
13
14
Select DEFROST
HIGH
setting.
Rotate the LIGHT UP
DIAL to the weight of the
meat (0.5 kg) as
6
indicated on the scale.
7
8
9
0
30
1.0kg
The oven starts automatically.
The cooking time is shown by flashing.
Cdtnjdjq wbath<kfn
Light Up Dial
2
3
1
25
12
13
20
14
15
0.5kg
4
5
6
7
8
9
10
11
3.
The cooking time will count down to “0”. When the cooking time reaches “0”, an audible signal will sound
and the oven will automatically turn off. If you wish to stop cooking before the end of the cooking time,
turn the dial back to “0” or simply open the door.
Everytime the door is opened, microwave activity stops immediately.
NOTE
* This oven can only operate within 1 minute after cooking, or closing the door.
* The scale of the MEAT DEFROST GUIDE is calibrated, refer to the defrosting guide on page E-11 in the
cooking guides.
To defrost other types of food, select the DEFROST setting and rotate the LIGHT UP DIAL to the
required minutes.
* The oven door may be opened at any time during the cooking process.
If you wish to continue cooking, close the door.
* If you wish to alter the cooking time at any time during the operation, just turn the dial forward or
backward as desired.
E-5

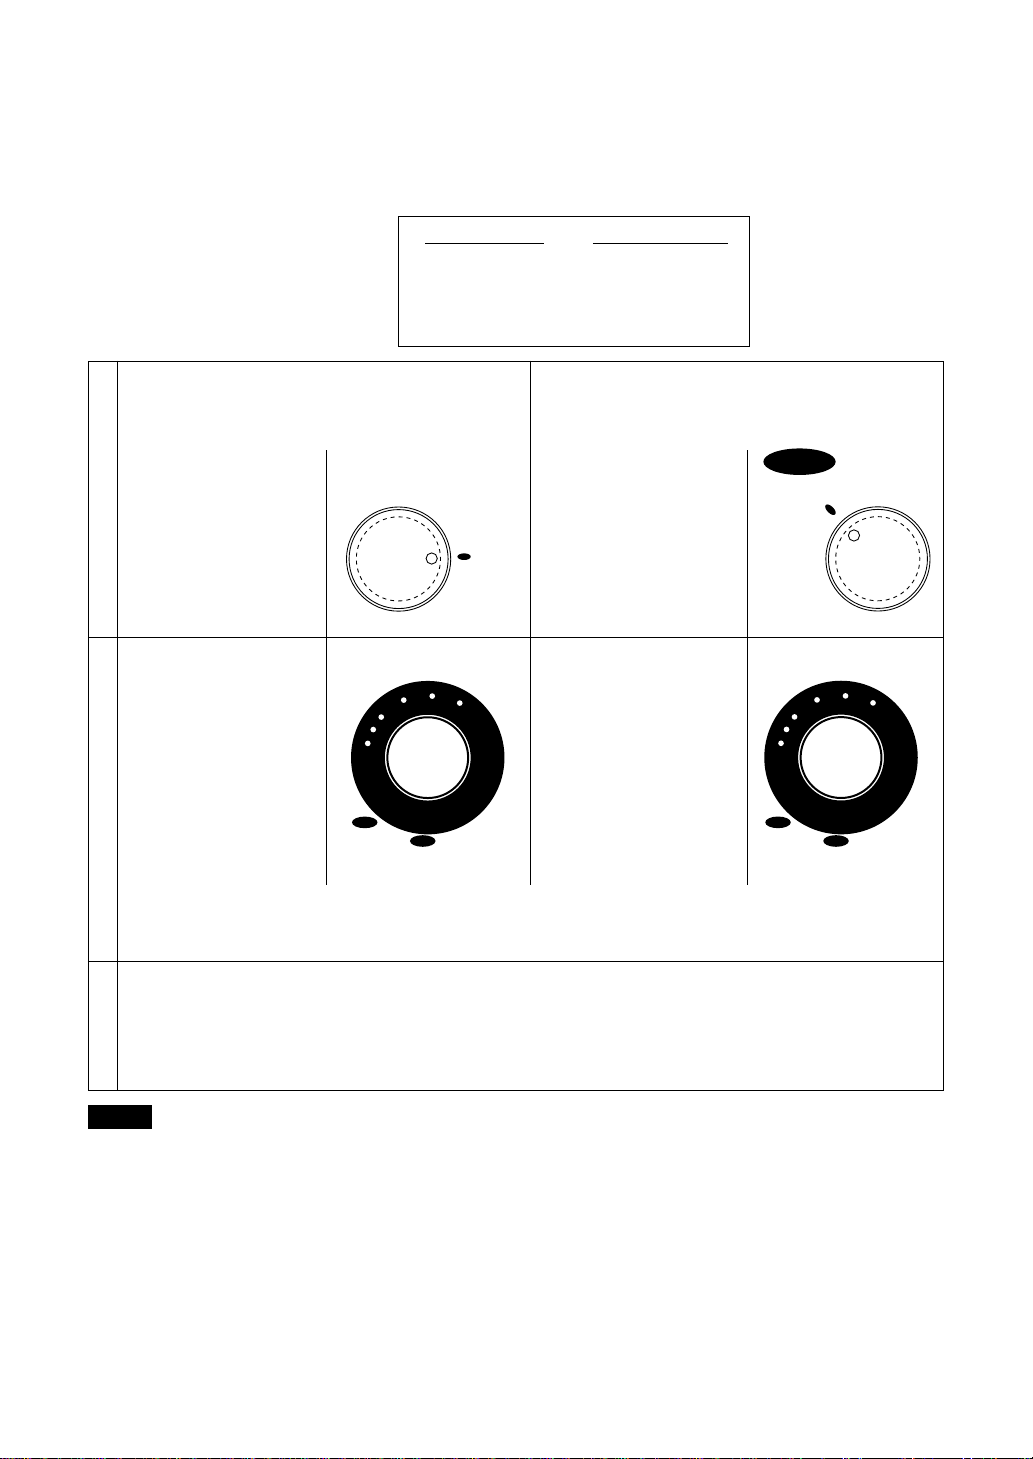
OTHER CONVENIENT FEATURE
Demonstration Mode
This feature is mainly for use by retail outlets, and also allows you to practice the dial operation.
* To set the demonstration mode.
1.
Open the door.
2.
Turn the LIGHT UP DIAL to 30 and then back to 0.
And repeat that again.
3.
Close the door.
4.
Repeat step 1-3.
5.
An audible signal will sound.
Now, demonstration mode is set.
Carry out these steps within 20 seconds.
NOTE
• During the demonstration mode, the light up dial is flashing.
• Cooking operation can be demonstrated with no power in the oven and counted down to zero at sixty
times the speed.
• To cancel the demonstration mode:
Disconnect the oven from the power supply or carry out step 1-5 above.
E-6

CARE AND CLEANING
Exterior:
The outside may be cleaned with mild soap and warm water, wipe clean with a damp cloth. Avoid the use of
harsh abrasive cleaners.
Door:
Wipe the door and window on both sides and the door seals frequently with a damp cloth to remove any spills
or spatters. Do not use abrasive cleaner.
Control Panel:
Care should be taken in cleaning the control panel. Open the oven door before cleaning to inactivate the control
panel. Wipe the panel with a cloth dampened slightly with water only.
Do not scrub or use any sort of chemical cleaners. Avoid the use of excess water.
CAUTION : Take care not to move the light up dial from "0" (off) position during cleaning, or the oven will start
Interior walls:
To clean the interior surfaces, wipe with a soft cloth and warm water. After use wipe the waveguide cover in the
oven with a soft damp cloth to remove any food splashes. Built-up splashes may overheat and begin to smoke
or catch fire. Do not remove the waveguide cover. DO NOT USE A COMMERCIAL OVEN CLEANER,
ABRASIVE OR HARSH CLEANERS AND SCOURING PADS ON ANY PART OF YOUR MICROWAVE OVEN.
Avoid using excess water. After cleaning the oven, ensure any water is removed with a soft cloth.
Turntable/Roller Stay:
Wash with mild soapy water and dry thoroughly.
as soon as you close the door.
SERVICE CALL CHECK
Please check the following before calling for service:
Place one cup of water (approx. 250 ml) in a glass measure in the oven and close the door securely.
Cook the water for two minutes on HIGH power.
A. Does the oven lamp light? YES _______ NO _______
B. Does the cooling fan work? YES _______ NO _______
(Put your hand over the rear ventilation openings.)
C. Does the turntable rotate? YES _______ NO _______
(The turntable can rotate clockwise or counterclockwise. This is quite normal.)
D. After two minutes, did an audible signal sound? YES _______ NO _______
E. Is the water inside the oven hot? YES _______ NO _______
If “NO” is the answer to any of the above questions, please check your wall socket and the fuse in your meter
box.
If both the wall socket and the fuse are functioning properly, CONTACT YOUR NEAREST SERVICE CENTRE
APPROVED BY SHARP.
NOTE: If time in the display is counting down rapidly, check Demonstration Mode. (See page E-6 for detail.)
SPECIFICATIONS
AC Line Voltage Single phase 220V, 50Hz
AC Power Required 1.06 kW
Output Power 700 W* (IEC-705)
Microwave Frequency 2450 MHz
Outside Dimensions 450mm(W) x 295mm(H) x 355mm(D)
Cavity Dimensions 288mm(W) x 205mm(H) x 319mm(D)
Cooking Uniformity Turntable (ø272mm tray) system
Weight Approx. 13 kg
* This measurement is based on the international Electrotechnical Commission's standardised method for
measuring output power.
E-7

COOKING GUIDE
Microwave Cooking
Techniques
Microwave
Safe Cookware
Defrosting Guide
Charts
•Fresh Vegetables E-12
•Frozen VegetablesE-13
•Reheating Foods E-13
Recipes
E-9
E-10
E-11
E – 8
•Appetizers/Soup E-14
•Seafood E-15
•Poultry E-16
•Meat E-17
•Vegetables E-18
•Desserts E-19

MICROWAVE COOKING TECHNIQUES
Arrange food carefully
Watch cooking time
Cover foods before cooking
Shield foods
Stir foods
Turn foods
Rearrange foods
Allow standing time
Place thickest areas toward outside of dish.
Cook for the shortest amount of time indicated and add more time
as needed.
Food severely over-cooked can smoke or ignite.
Check recipe for suggestions: paper towels, microwave plastic
wrap or a lid. See Table on page E-10.
Covers prevent spattering and help foods to cook evenly.
(Helps keep oven clean)
Use small pieces of aluminum foil to cover thin areas of meats or
poultry in order to avoid overcooking.
Stir foods from outside to center of dish once or twice during
cooking, if possible.
Foods such as chicken, hamburgers or steaks should be turned
over once during cooking.
Rearrange foods like meatballs halfway through cooking both
from top to bottom and from the center of the dish to the outside.
After cooking ensure adequate standing time.
Remove food from oven and stir if possible.
Cover for standing time which allows the food to finish cooking
without overcooking.
Check for doneness
Condensation
Microwave safe plastic wrap
Microwave safe plastic
cookware
Look for signs indicating that cooking temperatures have been
reached.
Doneness signs include
– Food steams throughout, not just at edge.
– Poultry thigh joints move easily.
– Pork and poultry show no pinkness.
– Fish is opaque and flakes easily with a fork.
Condensation is a normal part of microwave cooking. The humidity and moisture in food will influence the amount of moisture in
the oven. Generally, covered foods will not cause as much condensation as uncovered foods. Ensure that the ventilation openings
are not blocked.
For cooking food with high fat content, do not bring the wrap in
contact with the food as it may melt.
Some microwave safe plastic cookware are not suitable for cooking foods with high fat and sugar content.
E – 9

MICROWAVE SAFE COOKWARE
Oven-proof glassware
Alminum foil
Paper towels
Glassware/ceramic
(heat resistant)
Metalcookware
Oven bags
Dinner ware
(heat resistant)
Dinner ware
(not heat resistant)
Aluminium foil
Noninflammable paper
Grease-proof paper
Yes
No
Yes
Yes
Yes
For shielding
Yes
Yes
Microwave safe cookware with
central apertures
Rectangular cookware,
microwave safe
Defrosting rack
Wax paper
Plastic foil
Paper towels
Plastic cookware,
microwave safe
Glazed cookware
Defrosting rack
Microwave safe thermometers
Conventional thermometers
Yes
Yes
Yes
Yes
Yes
For defrosting only
Yes
No
E – 10

Food
DEFROSTING GUIDE
Approx. Cooking Time
Power : MED LOW(30%)
Procedure
Steak
Chops
*See NOTE below.
Poultry
Minced Beef
*See NOTE below.
15–17min./500g
17–20min./500g
15–17min./500g
• Shield thin end of chops or steaks with
foil.
• Position the food with thinner parts in
the centre in a single layer on a
defrost rack.
If pieces are stuck together, try to separate as soon as possible.
• Turn food over approximately half
way through defrosting. Shield warm
portions.
• After defrost time, stand covered with
aluminium foil for 10–15 mins.
• Remove from original wrapper.
Shield wing and leg tips with foil.
• Place breast side down on a defrost
rack.
• Turn food over approximately half
way through defrosting. Shield warm
portions.
• After defrost time, stand covered with
aluminium foil for 15–30 mins.
N.B. After standing run under cold
water to remove giblets if necessary.
• Place frozen minced beef on a defrost
rack.
• Turn food over approximately half
way through defrosting. Shield warm
portions.
• After defrost time, stand covered with
aluminium foil for 10–15 mins.
Chicken
Pieces
*See NOTE below.
Roast/Beef
Pork
Lamb
NOTE
• When freezing minced beef, shape it into flat even sizes.
• For chicken pieces, steaks and chops, freeze separately in single flat layers and if necessary
interleave with freezer plastic to separate layers. This will ensure even defrosting.
• It is also a good idea to label the packs with the correct weights.
15–17min./500g
17–20min./500g
15–18min./500g
• Shield the exposed bone with foil.
• Place chicken on a defrost rack.
• Turn food over approximately half
way through defrosting. Shield warm
portions.
• After defrost time, stand covered with
aluminium foil for 10–15 mins.
• Shield the edge with foil strips about
2.5 cm wide.
• Place joint with lean side face upwards
(if possible) on a defrost rack.
• Turn food over approximately half
way through defrosting. Shield warm
portions.
• After defrost time, stand covered with
aluminium foil for 15–30 mins.
E – 11

CHARTS
FRESH VEGETABLE CHART
VEGETABLE
Artichokes
Asparagus
Beans
Beet
Broccoli
Brussels sprouts
Cabbage
Carrots
Cauliflower
Chokos
Corn (on cob)
Eggplant
Mushrooms
Peas - Green
- Snow
Potatoes (jacket)
(boiled)
Pumpkin
Spinach
Squash
Sweet Potato
Tomatoes
Zucchini
* Allow vegetables to stand for 1-2 minutes before serving.
AMOUNT
2 medium
250 g
250 g
2 medium
4 small
500 g
500 g
250 g
250 g
500 g
500 g
500 g (2)
2
4
500 g
500 g
500 g
250 g
2 medium
4 small
2 medium
4 small
500 g
250 g
250 g
500g
500 g
250 g
COOKING PROCEDURE
Trim. Rinse well. Place onto a dinner plate. Cover
with plastic wrap.
Wash and place in a freezer bag.
Cut into 4 cm pieces. Cook in 1-litre casserole dish
with 1 tablespoon water. Cover.
Arrange in a 1.5-litre casserole dish.
Combine beet with 1/2 cup water. Cover.
Cut into uniform florets. Arrange with flower to-
wards centre. Cover.
Arrange in a 23 cm flan dish. Arrange with stalk
towards outside. Cover.
Shred and cook in a 1-litre casserole dish with 2
tablespoons water. Cover.
Arrange in a 1.5-litre casserole dish. Combine car-
rots with 1 tablespoon water. Cover.
WHOLE. Wash well. Place on a dinner plate: cover
with plastic wrap: turn over after 3 minutes.
Stand, covered with foil, for 5 minutes.
Cut into uniform florets. Arrange with flower towards centre, with 1 tablespoon water. Cover.
Peel, cut into quarters. Place in a 20 cm pie plate with
1 tablespoon of water. Cover.
Arrange in a 1-litre casserole dish with 1/4 cup
water. Cover. Turn over during cooking.
Arrange in a 1.5-litre casserole dish with 1/3 cup
water. Cover. Turn over during cooking.
Cut into 2 cm cubes. Place in a 1-litre casserole dish
with 2 tablespoons water. Cover.
Sliced or whole. Place in a 1-litre casserole dish with
2 teaspoons butter. Cover.
Cook in a 1-litre casserole dish with 1 teaspoon
sugar and 1 tablespoon water. Cover.
Remove string from pod. Cook in a 1-litre casserole
dish with 1 tablespoon water.
Pierce skin with a fork. Place on turntable. Turn over
halfway through cooking. Allow to stand wrapped
in foil for 2-3 minutes.
Peel and cube potatoes. Cook, covered, in a 1-litre
casserole dish with 1/2 cup water.
Peel and cut into serving-size pieces. Place in a 1litre casserole dish. Cover.
Wash and shred. Cook, covered, in a 1.5-litre casserole dish with 2 tablespoons water.
Wash and place in a casserole dish with 1 tablespoon of butter or water. Cover. Pierce whole squash
with a fork.
Peel and cube potatoes. Cook, covered, in a 1-litre
casserole dish with 1/2 cup water.
Cut into quarters. Place in a 1-litre casserole dish.
Season and cover.
Cut into uniform-size pieces. Place in a 1-litre casserole dish with 1 tablespoon water and 1 tablespoon
butter. Cover.
E – 12
MICROWAVE
TIME AT 100%
3-4 minutes
2-3 minutes
3-4 minutes
6-8 minutes
4-5 minutes
3-4 minutes
4-6 minutes
3-4 minutes
10-12 minutes
4-6 minutes
6-8 minutes
7-9 minutes
14-16 minutes
6-8 minutes
4-6 minutes
2-4 minutes
2-3 minutes
4-6 minutes
7-9 minutes
5-7 minutes
3-5 minutes
4-5 minutes
5-7 minutes
4-5 minutes
3-4 minutes

FROZEN VEGET ABLE CHAR T
1. Cook vegetables in a flan dish. Cover with a lid or plastic wrap.
2. Stir halfway through cooking.
3. Allow to stand 1-2 minutes before serving.
VEGETABLE
Beans (green, cut)
Broccoli
Brussels sprouts
Carrots (whole)
(sliced)
Cauliflower
Corn (on cob)
(kernel)
Peas (green)
Spinach
Mixed Vegetables
WEIGHT
250 g
500 g
500 g
500 g
500 g
500 g
4 pieces
(500 g)
250 g
250 g
250 g
250 g
MICROWAVE
TIME AT 100%
4-6 minutes
8-10 minutes
7-9 minutes
7-9 minutes
7-9 minutes
8-10 minutes
10-12 minutes
4-6 minutes
4-6 minutes
5-6 minutes
4-5 minutes
SPECIAL PROCEDURES
Break apart as soon as possible.
Arrange with flower towards the centre.
Break apart as soon as possible. Arrange
with flower towards the centre.
Add 1/2 cup water and 1 teaspoon sugar.
Turn 3-4 times during cooking.
Add 3 tablespoons water and 1 teaspoon of
butter.
Break apart as soon as possible.
FOOD
Beverage
250 ml per cup
(room temp.)
Canned food
(eg. Spaghetti,
Baked Beans)
(room temp.)
Canned Soup
250 ml per cup
(room temp.)
Dinner Plate-400 g
per serve
(refrigerated)
Casserole
250 g per serve
(refrigerated)
REHEATING-FOOD CHART
WEIGHT
1 cup
2 cups
440 g can
740 g can
1 cup
2 cups
1 serve
1 serve
2 serves
COOKING TIME AND
POWER LEVEL
1
/2 minutes on 100%
2-2
1
/2 minutes on 100%
4-4
4-5 minutes on 100%
7-8 minutes on 100%
2-21/2 minutes on 100%
41/2-51/2 minutes on 100%
81/2-91/2 minutes on 50%
6-7 minutes on 50%
11-12 minutes on 50%
NOTE: Room Temperature +20˚C
SPECIAL INSTRUCTIONS
Stir after heating.
Place food in bowl.
Cover with plastic wrap or lid.
Stir halfway through cooking.
Stir halfway through cooking.
Stir after heating.
Cover plate with plastic wrap. Place
directly on turntable. Allow to stand
2-3 minutes.
* Slice potato.
Place in a casserole dish, cover with
lid. Place directly on turntable. Stir
halfway through cooking. Allow to
stand for 2-3 mins.
Refrigerator Temperature +3˚C
E – 13

RECIPES
APPETIZERS/SOUP
SAVOURY MUSHROOMS
24 small cup mushrooms
6 slices multigrain bread
4 rashers bacon, chopped
4 shallots, finely chopped
1/2 cup grated cheese
2 eggs
2 tablespoons mixed herbs
(thyme, oregano, sage, marjoram, parsley)
1. Remove stalks from mushrooms.
2. Process bread into fine crumbs.
3. Cook bacon between paper-towel for 2 minutes on 100%. Add shallots and cook a further
minute.
4. Mix breadcrumbs, bacon, shallots, cheese,
eggs and herbs until well combined.
5. Spoon mixture into mushrooms. Place 12
mushrooms on the outside of the turntable
and cook for 1-1
QUICK NACHOS
250 g barbecue-flavour dip
2 tablespoons tomato paste
1/4 cup grated tasty cheese
1. Place corn chips in base of a flan dish.
2. Mix dip and sour cream together. Pour over
corn chips.
3. Spread tomato paste over dip.
4. Sprinkle with cheese.
5. Cook for 4-5 minutes on 100%.
6. Serve immediately with guacamole (avocado
dip).
1 kg pumpkin, peeled and chopped
2 small onions, chopped
Place pumpkin, onion and stock in a large bowl.
1.
2. Cover and cook for 15-18 minutes on 100%.
3. Place in a blender or processor and blend until
smooth.
4. Transfer to a serving bowl and stir in cream
and nutmeg. Season to taste.
1/2
minute on 100%.
200 g packet corn chips
1/2 cup sour cream
PUMPKIN SOUP
1 cup chicken stock
1 cup cream
nutmeg
salt and pepper to taste
Makes 24
Serves 4
Serves 4-6
CREAM OF TOMATO SOUP
1 small onion, peeled and chopped
1 rasher bacon, rind removed, and chopped
30 g butter
1 carrot, peeled and sliced
1 stick celery, chopped
2 tablespoons flour
3 large tomatoes, quartered
600 mL chicken stock
bouquet garni (A combination of dried herbs
such as thyme, parsley and bay)
salt and pepper
2 tablespoons cream
chopped parsley
1. Cook onion and bacon in the butter for 3
minutes on 100%.
2. Add carrot and celery. Cover and cook a further 3 minutes on 100%.
3. Sprinkle in flour and stir. Add the quartered
tomatoes, stock and bouquet garni. Cover and
cook for 15-20 minutes on 100%.
4. Remove bouquet garni; purée.
5. Return to the microwave, adding cream, parsley and seasonings. Cover and cook for 3-5
minutes on 70%.
Serves 4
VEGETABLE FRITTATA
2 large potatoes, peeled and thinly sliced
1 onion, thinly sliced
5 eggs
450 g sour cream
340 g can asparagus spears, drained
1/2 red capsicum, cut into strips
2 zucchinis, cut into strips
2 tablespoons parmesan cheese
1. Arrange potatoes and onion over base of
greased 25 cm pie plate.
2. Combine eggs and sour cream. Pour half the
mixture over potatoes.
3. Cook for 18-22 minutes on 70%.
4. Arrange asparagus, capsicum and zucchinis in
a circle over potato. Pour over remaining egg
mixture. Sprinkle with cheese.
5. Cook for 22-24 minutes on 70%.
6. Stand covered in foil for 5 minutes.
7. Cut into wedges.
Serves 4
E – 14

SEAFOOD
CRAB MORNAY
60 g butter
1/3 cup plain flour
1/2 teaspoon dry mustard
2 cups milk
1 onion, finely chopped
2 x 170 g cans crab meat, drained
2 hard-boiled eggs, sliced
salt and pepper
1/2 cup finely grated cheese
2 tablespoons cornflake crumbs
1. Melt butter for 1 minute on 100%. Stir in flour
and mustard. Cook a further 1 minute on 100%.
2. Gradually stir in milk. Cook for 5-7 minutes on
100%, stirring every 2 minutes.
3. Stir in onion, crab meat, eggs, salt and pepper
and 1/4 cup cheese.
4. Place into a 1-litre serving dish. Sprinkle with
cornflake crumbs and remaining cheese.
5. Cook for 8-9 minutes on 50%.
6. Serve with fresh garden salad.
Serves 6
GARLIC PRAWNS
24 green king prawns
1/3 cup olive oil
2 tablespoons butter
3 cloves garlic, crushed
1 tablespoon chopped parsley
1. Peel and devein prawns, leaving tails intact.
2. Combine olive oil and butter. Cook for 3 minutes on 100%. Stir in garlic. Cook for 1 minute
on 100%.
3. Stir in prawns. Cook for 4-6 minutes on 50%,
tossing every minute. Spinkle with parsley.
4. Serve in individual dishes with garlic bread.
Serves 4
CHEESY SALMON ROLLS
ROLLS
12 lasagne noodles
(The broadest of the ribbon pasta)(200 g packet)
250 g ricotta cheese (An Italian fresh,unripened
cheese with smooth and mild-tasting)
90 g cheddar cheese, grated
salt and pepper to taste
2 eggs, lightly beaten
210 g can red salmon, drained
2 teaspoons lemon juice
SAUCE
1 tablespoon cornflour
415 g can tomato purée
2 tablespoons parsley, chopped
ROLLS
1. Pour 1 litre (4 cups) hot water into a large dish.
Layer noodles into water. Cook 4-5 minutes on
100%.
2. Combine ricotta cheese, cheddar cheese, salt
and pepper, eggs, salmon and lemon juice;
mix well.
3. Place a spoonful of salmon mixture into each
lasagne sheet. Roll up tightly. Place in a single
layer in a shallow heat-proof dish, seam-side
down.
SAUCE
1. Combine cornflour with 2 tablespoons of tomato purée to form a smooth paste. Stir in
remaining purée and parsley.
2. Pour tomato purée over salmon rolls and cook
for 12-14 minutes on 70% or until noodles are
tender.
Serves 4-6
E – 15

POULTRY
CHICKEN IN A POT
4 chicken thighs
1/4 cup plain flour
2 rashers bacon, finely chopped
1 green capsicum, diced
1 onion, finely chopped
425 g can peeled tomatoes
1 tablespoon tomato paste
2 chicken stock cubes
1 tablespoon soy sauce
salt and pepper
100 g mushrooms, sliced
1. Toss chicken thighs in flour.
2. Combine all ingredients, except mushrooms,
in a 2-litre casserole dish.
3. Cover and cook for 25-30 minutes on 70%.
Stir 2-3 times during cooking.
4. Add mushrooms. Cook, uncovered, a further
5-7 minutes on 70%.
Serves 4-6
CHICKEN WITH BACON AND
LEEK SEASONING
1.5 kg chicken
60 g butter, melted
1 leek, finely chopped
11/2 cups wholemeal breadcrumbs
1 egg yolk
salt and pepper
20 g butter, melted, extra
1. Combine all stuffing ingredients.
2. Fill cavity of chicken with stuffing and secure
with a toothpick.
3. Brush chicken with extra melted butter.
4. Place chicken on a rack, breast-side down,
cook for 18-22 minutes on 70%.
5. Turn over, cook a further 18-22 minutes on
70%.
6. Allow to stand covered with aluminium foil for
10 minutes before serving.
Serves 4
APRICOT CHICKEN
4 chicken thighs
1 packet French onion soup
1 tablespoon plain flour
250 mL apricot nectar
825 g can apricot halves, drained
1. Toss chicken in combined French onion soup
and plain flour.
2. Cook chicken for 15 minutes on 70%.
3. Pour over apricot nectar and apricots.
4. Cook, covered, for 15-20 minutes on 70%.
5. Serve hot with pasta.
Serves 4
CHEESE AND HERB CHICKEN
LEGS
1 tablespoon chopped parsley
2 teaspoons basil
1 teaspoon tarragon
1 teaspoon dill
1 teaspoon mustard powder
1/2 teaspoon paprika
salt and pepper
2 teaspoons sesame seeds
45 g butter, melted
4 large chicken drumsticks
60 g crushed crackers + 15 g cheese (grated)
1. Mix parsley, basil, tarragon, dill, mustard powder, paprika, salt and pepper, sesame seeds
and one-third of butter together in a small
bowl.
2. Using a sharp knife, lift skin back from the
chicken drumsticks.
3. Spread herb mixture between skin and chicken.
4. Brush chicken with remaining butter, coat with
biscuit crumbs.
5. Place on rack, cook for 10-12 minutes on 70%,
turning over halfway through cooking.
Serves 4
E – 16

MEAT
SHEPHERD’S PIE
2 large potatoes
1 tablespoon butter
1 tablespoon milk
salt and pepper
500 g minced beef
1 onion, chopped
1 tablespoon gravy powder
1/2 cup tomato sauce
1 tablespoon Worcestershire sauce
(A hot sauce containing soy sauce, vineger,
molasses, chilis and tropical fruits and spices)
1 tomato, chopped
2 tablespoons parsley
1 egg, beaten
1. Peel and cut potatoes into 2.5 cm cubes. Add 2
tablespoons water; cover and cook for 14-16
minutes on 100% or until tender. Drain.
2. Mash potatoes; add butter, milk, salt and pepper.
3. In a large bowl, combine mince and onion and
cook for 10-12 minutes on 70%, stirring every
2 minutes. Drain juices from meat.
4. Add gravy powder, tomato sauce, Worcestershire sauce, tomato and parsley. Mix well.
5. Spoon mixture into a 3-litre casserole dish.
6. Spread mashed potato evenly over top of
mixture. Brush with beaten egg.
7. Cook for 20-22 minutes on 70%.
8. Allow to stand for 10 minutes before serving.
Serves 4-6
SPRINGTIME LAMB CASSEROLE
1 packet (30 g) French onion soup
1/4 cup plain flour
750 g lamb, cubed
4 spring onions, quartered
2 carrots, thinly sliced
1 cup chicken stock
310 g can corn kernels, drained
2 sticks celery, finely chopped
300 mL carton sour cream
1. Combine French onion soup mix and flour in a
2-3 litre casserole dish. Toss the lamb in flour
mixture, coating thoroughly.
2. Add onions and carrots, stir in chicken stock
and mix well.
3. Cover and cook for 28-30 minutes on 50%,
stirring during cooking.
4. Add corn, celery and sour cream. Mix well.
5. Cook a further 12-15 minutes on 50%.
Serves 4
LASAGNE
MEAT SAUCE
30 g butter
1 onion, chopped
1 kg topside mince
1/4 cup tomato paste
240 g jar bolognese sauce
(pasta sauce made from
minced meat and tomato)
200 g can champignons, drained
1 clove garlic, crushed (optional)
CHEESE SAUCE
90 g butter
1/3 cup flour
1 3/4 cups milk
125 g tasty cheese, grated
200 g packet instant lasagne noodles
100 g mozzarella cheese, grated
(An Italian unripened curd cheese
with a mild, creamy taste)
MEAT SAUCE
1. Place butter and onion in a Pyrex bowl. Cook
for 2-3 minutes on 100%.
2. Stir in mince. Cook, uncovered, for 12-15 minutes on 70%, stirring every 2 minutes. Drain
excess fat.
3. Stir in tomato paste, bolognese sauce, champignons and garlic.
CHEESE SAUCE
1. Melt butter for 40-50 seconds on 100%. Stir in
flour; cook for further 1 minute on 100%.
2. Gradually stir in milk, Cook for 5-6 minutes on
100%, stirring every minute.
3. Stir in tasty cheese.
TO ASSEMBLE
1. Cover base of a 26 cm round dish with meat
sauce. Dip lasagne noodles in hot water then
place a layer of lasagne noodles on top. Spoon
in one-third of remaining meat sauce. Spread
with one-third of cheese sauce.
2. Repeat process, ending with cheese sauce.
3. Sprinkle with mozzarella cheese.
4. Cook for 20-24 minutes on 70%.
5. Allow to stand 10 minutes before serving.
6. Serve with a fresh garden salad and bread.
Serves 8
E – 17

VEGETABLES
CAULIFLOWER AU GRA TIN
500 g cauliflower florets
30 g butter
2 tablespoons flour
1 cup milk
1 teaspoon mustard
1/2 cup grated cheese
paprika
1. Place cauliflower in a flan dish. Cover and cook
for 6-8 minutes on 100%, until tender. Drain.
1/2
2. Melt butter in a Pyrex jug for 1-1
100%.
3. Stir in flour. Cook for 1 minute on 100%.
4. Gradually stir in milk and mustard. Cook for 34 minutes on 100%, stirring every minute.
5. Stir in cheese until melted.
6. Pour over cauliflower. Sprinkle with paprika.
7. Cook for 3-4 minutes on 100%.
minutes on
Serves 4-6
SCALLOPED POTATOES
3 large potatoes (approx. 500 g),
peeled and sliced thinly
1/4 cup water
1 large onion, sliced
200 g carton light sour cream
1 egg
90 g cheddar cheese, finely grated
paprika
1. Place potatoes in a round or oval shallow dish,
add water, cover, and cook for 6 minutes on
100%.
2. Drain off water.
3. Arrange sliced onion over potatoes.
4. Combine sour cream and egg. Mix well and
pour over potatoes. Sprinkle with cheese and
a little paprika if desired.
5. Cook uncovered, 11-13 minutes on 70%.
Serves 4-6
EASY HOME-MADE RICE RISOTTO
1 onion, diced
60 g butter
4 rashers bacon, diced
(or 1 cup cooked chicken or ham)
3 chicken or beef stock cubes
2 cups boiling water
1 cup long-grain rice, washed well
1 cup assorted finely chopped vegetables, e.g.
carrots, zucchinis, mushrooms
1. Place onion, butter and bacon in large casserole dish. Cook for 3-5 minutes on 100%. Stir
well.
2. Dissolve stock cubes in boiling water; add to
onion and bacon. Add all other ingredients.
Cover with a lid and cook for 15-20 minutes on
100%. Do not stir while cooking.
3. At the end of this time, all the liquid will have
been absorbed.
4. Leave to stand for 5 minutes and stir with a fork
before serving.
Serves 6-8
HONEY CARROTS
500 g carrots, sliced lengthwise
60 g butter
1 tablespoon grated orange rind
2 tablespoon honey
1. Combine all ingredients in a casserole dish.
2. Cover and cook for 9-11 minutes on 100%.
Serves 4
VEGETABLE PLATTER
200 g carrots, sliced
200 g broccoli, cut into florets
100 g zucchinis, sliced
1. Arrange vegetables in a shallow dish with the
harder vegetables positioned around the outside and the softer vegetables in the centre.
2. Cover with a lid or plastic wrap.
3. Cook for 6-8 minutes on 100%.
Serves 4
E – 18

DESSERTS
CALIFORNIAN APPLE CRUNCH
800 g can pie apple
340 g buttercake mix (see * below)
125 g hard butter, cut into thin slices
3 tablespoons brown sugar
3 tablespoons coconut
2 tablespoons crushed nuts
1 teaspoon cinnamon
1. Place pie apple in a shallow casserole dish.
2. Sprinkle evenly with dry cake mix.
3. Layer sliced butter over cake mix, covering
completely.
4. Combine last 4 ingredients and sprinkle over
sliced butter.
5. Cook for 8-9 minutes on 100%.
6. Serve warm with whipped cream.
Serves 6-8
* You can also use the mixture of the following
instead of the cake mix;
1 1/2 cup flour
3 teaspoons suger
3 teaspoons skim milk powder
salt
BAKED APPLES
3/4 cup walnuts
1/4 cup brown sugar
2 teaspoons mixed spice
4 large apples
2 tablespoons lemon juice
30 g butter, melted
1. Place walnuts, sugar and mixed spice in a
blender or food processor, process until nuts
are finely chopped.
2. Peel and core apples, brush with lemon juice.
3. Brush apples with butter. Toss in walnut mixture until evenly coated.
4. Place in base of a 20 cm pie plate. Fill centre of
apples with any remaining walnut mixture.
5 Cook for 7-9 minutes on 100%. Allow to stand
for 5 minutes.
6. Serve with whipped cream.
Serves 4
SHARP CORPORATION OSAKA, JAPAN TINS-A651WRR0-HR82
E – 19
 Loading...