

Page 1
Page 2
1
Page 3

WARNINGS
IMPORTANT SAFETY INSTRUCTIONS: READ CAREFULLY AND KEEEP FOR FUTURE REFERENCE.
a. Do not overcook food.
b. Remove wire twist ties from paper or plastic bags before plac ing bag in the oven.
c. Do not heat oil or fat for deep frying. The t emperature of the oil cannot be controlled.
d. Look at the oven from time to time when food is heated in disposabl e containers made of plastic, paper or other combustibl e
materials for signs of smoke or burning.
e. If materials inside the oven should ignite, or smoke is observed, keep oven door closed , turn oven off, and disconnect the
power plug, or shut off power at the fuse or circuit breaker panel.
To reduce the risk of an explosion or delayed eruptive boili ng when handling the container.
Your microwave oven is capable of heating food and bever ages very quickly therefore, it is very importa nt that you select the appro priate
cooking time and power level for the type and quantit y of food to be heated. If you are unsure of the cooking time & power lev el required,
begin with low cooking times and power levels until t he food is sufficiently heated evenly throughout.
Additionally :
a. Do not place sealed containers in the oven. Babies bottles fit ted with a screw cap or teat are considered to be sealed conta iners.
b. Do not use excessive amount of time.
c. When boiling liquids in the oven, use a wide-mout hed container.
d. Stand at least for 20 seconds at the end of cooking to avoid del ayed eruptive boiling of liquids.
e. Stir the liquid before and during cooking. Use extreme care when handling the container or inserting a spoon or other utensil into the
container.
This oven is for home food preparation only and should only be us ed for heating, cooking and defrosting food and beverage.
It is not suitable for commercial, labora tory use, or heating therapeutic devices e g. Wheat bags.
Never operate the oven whilst a ny object is caught or jammed between the door and the oven.
Do not try to adjust or repair the oven yourse lf. It is hazardous for anyone other than a qualifi ed service technician trained by SHARP to
carry out any service or repair operation. Es pecially those which involve the removal of a cover which g ives protection against exposure
to microwave energy are very hazardous. Do not oper ate the oven if it is not working correctly or damaged until it has been repaired by a
qualified service technician trained by SHARP. I t is particularly important that the oven door cl oses properly and that there is no damage
to:
(1) Door (warped), (2) Hinges and Latches (broken or loo sened), (3) Door Seals, Sealing Surfaces and oven cavit y (buckled or
deformed), (4) Burn marks on the door seal faces. Do not bump , or catch utensils, loose clothes & your accessori es on the door safety
latches when removing food from th e oven.
Never poke an object, particularly a metal object, t hrough a grille or between the door & the oven while the oven is ope rating.
Never tamper with or deactivate the door safety latches.
Always use oven gloves to prevent burns when handling ut ensils that are in contact with hot food. Enough heat fro m the food can transfer
through utensils to cause skin burns.
Should the power supply cord become damaged, it must be replaced with a speci al cord supplied by a SERVICE CENTRE APPROVED
BY SHARP & it must be replaced by a qualified service technician tr ained by SHARP in order to avoid a hazard. If the oven lamp fa ils
please consult your dealer or a qualified service techn ician trained by SHARP. Avoid steam burns by directing steam away from t he face
and hands. Slowly lift the furthest edge of a dish's cover incl uding microwave plastic wrap etc., & carefully open popcor n and oven
cooking bags away from the face. Make sure that the power s upply cord is undamaged, & that it does not run under the ov en or over any
hot surfaces or sharp edges.
To prevent the turntable from breaking:
a. Before cleaning the turntable with water, leave the turntable to cool.
b. Do not place anything hot on a cold turntable.
c. Do not place anything cold on a hot turntable.
Do not place anything on the outer cabinet. Do not store food or an y other items inside the oven. Make sure the utensil does no t touch
the interior walls during cooking. Only allow ch ildren to use the oven without supervision when ade quate instructions have been given so
that the child is able to use the oven in a safe way and underst ands the hazards of improper use. This appliance is not in tended for use
by persons (including children) with reduc ed physical, sensory or mental capabilities, or lack of experience and knowledge, unless they
have been given supervision or instruction con cerning use of the appliance by a person responsible f or their safety. Children should be
supervised to ensure that they do not play with th e appliance.
2
Page 4

SPECIAL NOTES AND WARNINGS
DO DON’T
Eggs, fruits,
vegetables, nuts,
seeds, sausages
and oysters
Popcorn
Baby food * Transfer baby food to small dish and heat
General * Food with filling should be cut after
Liquids
(Beverages)
Canned foods * Remove food from can. * Heat or cook food while in cans.
Sausage rolls,
Pies, Christmas
Pudding
Meats * Use a microwave proof roasting rack to
Utensils Check the utensils are suitable for
Aluminium foil * Use to shield food to prevent over cooking.
Browning dish * Place a suitable insulator such as a
* Puncture egg yolks and whites and
oysters before cooking to prevent
“explosion”.
* Pierce skins of potatoes, apples, squash, hot
dogs, sausages and oysters so that steam
escapes.
Use specially bagged popcorn for the
microwave oven.
Listen while popping corn for the popping to
slow to 1-2 seconds.
carefully, stirring often. Check for suitable
temperature to prevent burns.
* Remove the screw cap and teat before
warming baby bottles. After warming shake
thoroughly. Check for suitable temperature
heating, to release steam and avoid burns.
* Use a deep bowl when cooking liquids or
cereals to prevent boiling over.
* For boiling or cooking liquids see
WARNING on page 2 to prevent explosion and
delayed eruptive boiling.
* Cook for the recommended time.
(These foods have high sugar and/or fat
content.)
Collect drained juices.
MICROWAVE cooking before you use them .
* Watch for sparking. Reduce foil or keep
clear of cavity walls
microwave and heat proof dinner plate between
the turntable and the browning dish.
* Exceed the preheating time recommended by
the manufacturer.
* Excessive preheating can cause the glass
turntable to shatter and/or damage
* Cook eggs in shells. This prevents “explosion”,
which may damage the oven or injure yourself.
* Cook hard/soft boiled eggs.
* Overcook oysters.
* Dry nuts or seeds in shells.
Pop popcorn in regular brown bags or glass
bowls.
Exceed maximum time on popcorn package .
* Heat disposable bottles.
* Overheat baby bottles.
* Only heat until warm.
* Heat bottles with nipples on.
* Heat baby food in original jars.
* Heat or cook in closed glass jars or
airtight containers.
* Deep fat fry.
* Heat or dry wood, herbs, wet papers, clothes or
flowers.
* Operate the oven without a load (i.e. an
absorbing material such as food or water) in the
oven cavity.
* Heat for longer than recommended time.
* Overcook as they may catch fire.
* Place meat directly on the turntable for cooking.
* Use metal utensils for MICROWAVE cooking.
Metal reflects microwave energy and may cause
an electrical discharge known as arcing.
* Use too much.
* Shield food close to cavity walls.
* Sparking can damage the cavity.
* Exceed the preheating time recommended by
the manufacturer.
Excessive preheating can cause the
glass turntable to shatter and/or damage internal
parts of the oven.
3
Page 5
INSTALLATION INSTRUCTIONS
1. Make sure that all the packing materials are removed from the inside of the door.
2. WARNING: Check the oven for any damage, such as misaligned or bent door, damaged door
seals and sealing surface, broken or loose door hinges and latches and dents inside the cavity
or on the door, broken wave guide. Do not remove the wave guide cover. If there is any
damage, do not operate the oven and contact SERVICE CENTRE APPROVED BY SHARP.
3. Place the roller stay in the coupling on the oven floor, then place the turntable on the roller stay,
ensuring it is located firmly. Refer to OVEN DIAGRAM below. NEVER operate the oven
without the roller stay and turntable.
4. This microwave oven must be placed on a flat, stable surface to hold its weight and the
heaviest food likely to be cooked in the oven.
5. Neither the manufacturer nor the distributors can accept any liability for damage to the
machine or personal injury for failure to observe the correct electrical connecting procedure.
The A.C voltage must be single phase 230-240V, 50Hz.
6. Do not place the oven where heat, moisture, or high humidity are generated, or near
combustible materials.
7. For correct operation, the oven must have sufficient airflow. Allow 20cm of space above the
oven, 10cm at back and 5cm at both sides. Do not cover or block any openings on the
appliance. Do not remove feet.
8. This appliance must be earthed.
9. Make sure that the power supply cord is undamaged and does not run under the oven or over
any hot or sharp surface.
10. The socket must be readily accessible so that it can be easily unplugged in an emergency.
11. Do not use the oven outdoors. Operate the oven from a general purpose domestic outlet. If a
generator is used, do not operate the oven with non-sinusoidal outputs.
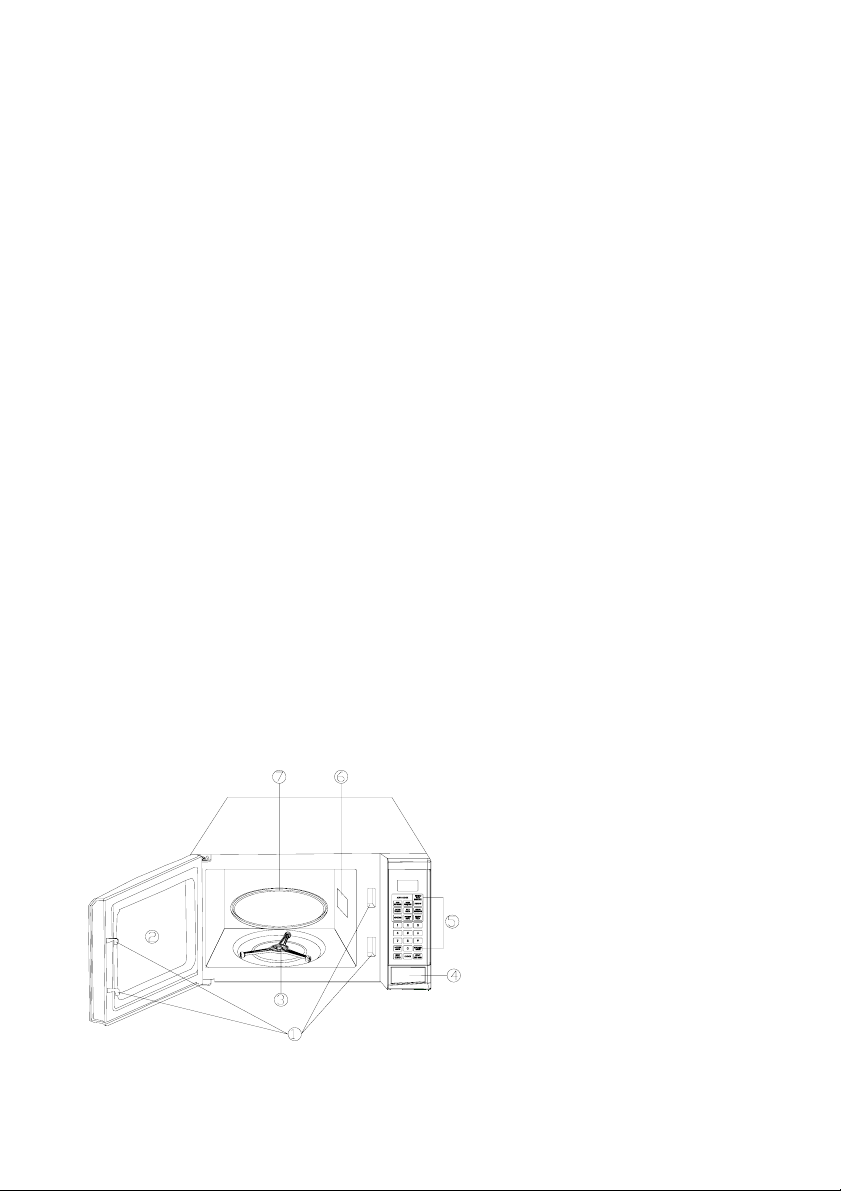
OVEN DIAGRAM
1. Door Safety Lock System.
2. Oven Window.
3. Turntable Roller.
4. Door Release Button.
5. Control Panel.
6. Wave Guide.
7. Glass Turntable.
Accessories:
Glass Turntable
Turntable Roller
Operation Manual
4
Page 6
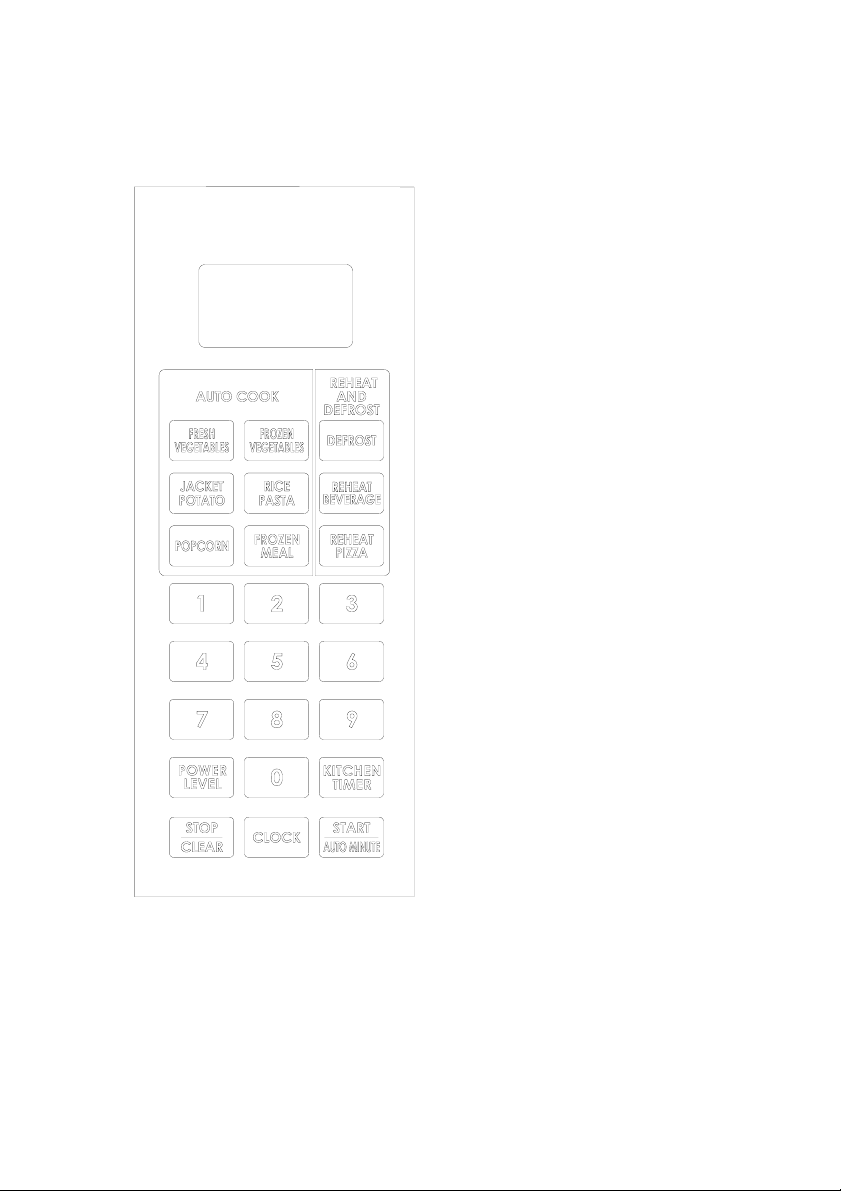
CONTROL PANEL
z DISPLAY
¾ Cooking time, power, indicators and
present time are displayed.
z AUTO COOK PADS
¾ Instant settings to cook popular foods.
z REHEAT & DEFROST
¾ Press key to defrost food and Reheat
beverage & pizza.
z NUMBER PADS
¾ Press keys to set times or weights.
z POWER LEVEL
¾ Use to set microwave power level.
z KITCHEN TIMER
¾ Press key to set kitchen timer function.
z STOP/CLEAR
¾ Press key to stop or cancel a cooking
program.
¾ It is also used to set or release child lock
function.
z CLOCK
¾ Use to set clock time.
z START/AUTO MINUTE
¾ Press key to start the cooking or defrosting
programs.
¾ Or during microwave or QUICK START
cooking, touch to add cooking time.
¾ In standby mode of the oven, touch to set
QUICK START function.
(Also see following pages for more detail.)
5
Page 7

HOW TO SET THE OVEN CONTROLS
Each time a button is touched, a beep will sound to acknowledge the touch.
SETTING THE CLOCK
This is a 12-hour cycle clock.
1. Press CLOCK button once.
2. Press number pads to enter time.
3. Press Clock button to confirm.
NOTE:
During the cooking, press the CLOCK button, the clock time and “CLOCK” will display 5 seconds.
MICROWAVE COOKING
For microwave cooking, the longest cooking time is 99 minutes and 99 seconds. You can select power
level by pressing the POWER LEVEL button.
Suppose you want to cook food at 60% microwave power.
1. Place food into oven, and close the door.
2. Touch POWER LEVEL pad repeatedly to select cooking power.
3. Use the number pads to set a cooking time.
4. Touch START/AUTO MINUTE to start.
NOTE:
During the cooking process, touch POWER LEVEL pad to check cooking power level.
Power level Display
100% P100
90% P90
80% P80
70% P70
60% P60
50% P50
40% P40
30% P30
20% P20
10% P10
0% P00
6
Page 8

HOW TO SET THE OVEN CONTROLS (continued)
QUICK START COOKING
Use this feature to program the oven to microwave food at 100% power conveniently. Place food
into oven, and close the door. Press START/AUTO MINUTE in quick succession to set the
cooking time, the oven will start automatically. The longest cooking time you can set is 99
minutes and 59 seconds.
AUTO WEIGHT DEFROST
Suppose you want to defrost 100g mince.
1. Place the mince onto a microwave safe defrosting dish and then into oven, and close the door.
2. Touch DEFROST pad once. “ENTER”, “100” and “G” display.
3. Touch DEFROST pad repeatedly to ENTER food weight.
4. Touch START/AUTO MINUTE pad to confirm.
5. After defrosting stand the food covered in aluminum foil.
NOTE:
1. The weight of food to be defrosted should vary between 100g and 2000g.
2. During defrosting process, the system will pause and sounds beeps to remind user to turn food
over, after that, press START/AUTO MINUTE pad to resume defrosting.
3. Cooking results will vary according to the condition of the food, utensils and oven. Please check
the result and if necessary, extend cooking times manually.
MULTISTAGE COOKING
The oven has the ability to be programmed to
do several consecutive functions.
Suppose you want to set the following cooking
program:
1. 1st stage MICROWAVE cooking;
2. 2nd stage MICROWAVE cooking;
3. 3rd stage MICROWAVE cooking.
ADDING TIME
During microwave cooking or quick start cooking process, touch START/AUTO MINUTE pad to add
cooking time by one minute. You can add to 99 minutes and 59 seconds.
CHILD LOCK
Use to prevent unsupervised operation of the oven by little children. The CHILD LOCK indicator will
show up on display screen, and the oven can not be operated while the CHILD LOCK is set.
To set the CHILD LOCK: In waiting mode, press and hold the STOP/CLEAR button for 3 seconds, a
beep sounds and LOCK indicator display.
To cancel the CHILD LOCK: Press and hold the STOP/CLEAR button for 3 seconds until LOCK
indicator on display goes off with a beep.
Steps:
1. Place food into oven, and close the door.
2. Enter the first stage program.
3. Touch POWER LEVEL pad.
4. Enter the second stage program.
5. Enter the third stage program.
6. Touch START/AUTO MINUTE pad to
confirm.
7
Page 9

HOW TO SET THE OVEN CONTROLS (continued)
AUTO COOK
To Select press desired Menu button. For example, to cook two units of jacket potato.
1. Place food into oven, and close the door.
2. Press the JACKET POTATO pad once. “ENTER” and “1” display.
3. Press JACKET POTATO a number of times to enter the number of servings.
4. Press START/AUTO MINUTE pad to confirm.
AUTO COOK MENUS:
Food Cooking Procedure Note
FRESH
VEGETABLES
Wash vegetables & place in a large microwave safe
glass bowl. Cover with a glass lid or plastic wrap. After
cooking, stir then stand covered for 1-5 mins.
The display will show the weight of Vegetables.
FROZEN
VEGETABLES
JACKET
POTATO
RICE PASTA Prewash rice until water runs clear. Place rice/pasta in
POPCORN Use specifically bagged popcorn for the m icrowave
FROZEN
MEAL
REHEAT
BEVERAGE
REHEAT
PIZZA
Place the vegetables in a large microwave safe glass
bowl. Cover with a glass lid or plastic wrap. After
cooking, stir then stand covered for 1-5 mins.
Pierce skin with a fork twice on each side. Place
directly on the turntable.
a large microwave safe glass bowl. Cover with hot tap
water (refer to the Note section for instruction char t).
Cook uncovered. When signal beeps, stir rice/pasta
then press START/AUTO MINUTE t o resume cooking.
After cooking stir & stand uncovered fo r 2 mins.
oven. Place the bag directly onto the turntable. Listen
while popping corn for the popping to slow to 1-2
seconds.
Remove from foil container. Place in a same size dish
Cover with plastic wrap or a lid. When signal beeps,
stir meal then press START/AUTO MINUTE to
resume cooking. Allow to stand for 2 m ins.
Place beverage in a microwave safe mug an d place
directly on the turntable. Stir after he ating.
Place in paper towel. Place directly on the turntable .
Allow to stand for 2 mins.
The display will show the weight of Vegetables.
The display will show the number of servings.
The display will show the weight of Rice/Pasta.
Rice/Pasta 100g 200g 300g
Hot Water 1 ½
Press the POPCORN pad once to cook 100g of popcorn,
then press START/AUTO MINUTE to start. If the default
cooking time for 100g popcorn is not suitable, just touch
POPCORN pad twice and press number pads to enter a
suitable cooking time. Press START/AUTO MINUTE to
start. This new cooking time will be set as the default one
until you reset it or next power on.
The display will show the weight of the Frozen Meal.
The display will show the number of servings
The display will show the weight of Pizza.
Cups 2 Cups 3 Cups
Note: The result of auto cook will vary according to the condition of the food, utensils & oven. Please
check the result & if necessary, extend cooking times manually.
8
Page 10

MANUAL COOKING CHARTS
Defrost Times for Meat, Poultry, Bread and Pies
1. Remove wrapping and place frozen item on a shallow, Microwave safe plastic defrost rack. If
necessary, shield thin areas with aluminum foil to prevent the item from cooking while defrosting
2. Defrost by following the steps in the “Microwave Time” column.
3. Set the microwave to 30% power.
4. When turning over, re-shield any warm areas so it continues to defrost without cooking
BEEF (Roast)
CUT MICROWAVE TIME STANDING TIME
Steaks
Minced Beef
PORK (Roast)
Chops
Ribs
Minced Pork
8-10 minutes/500g
9-11 minutes/500g
11-13 minutes/500g
8-10 minutes/500g
9-11 minutes/500g
9-11 minutes/500g
11-13 minutes/500g
10 – 15 minutes
5 – 10 minutes
5 – 10 minutes
10 – 15 minutes
5 – 10 minutes
5 – 10 minutes
5 – 10 minutes
LAMB (Roast)
Shoulder
Chops
POULTRY
Chicken (Whole)
Pieces
BREAD / PIES MICROWAVE TIME PROCEDURE
2 Slices of Bread 35-40 seconds
4 Slices of Bread 50-60 seconds
1 Bread Roll 25-30 seconds
2 Bread Rolls 1 minute 20 seconds
Individual Pies 4½-5 minutes Remove from packaging. Place between paper
8-10 minutes/500g
8-10 minutes/500g
9-11 minutes/500g
7-9 minutes/500g
11-13 minutes/500g
Place between paper towel and place directly
on the turntable.
towel and place directly on the turntable. Turn
over halfway. Allow to stand 3-5 minutes before
reheating.
10 – 15 minutes
10 – 15 minutes
5 – 10 minutes
10 – 15 minutes
5 – 10 minutes
9
Page 11

Frozen Vegetable Chart
1. Place vegetables in a medium/large microwave safe bowl and cover with plastic wrap.
2. Halfway through cooking, stir the vegetables to ensure even cooking.
3. Allow to stand for 2 minutes before draining any water and serving.
Vegetable Weight Microwave Time (100%) Special Procedures
Beans (green, cut)
Broccoli
Carrots (whole)
Carrots (sliced)
Cauliflower
Corn on the Cob
Peas (green)
Spinach
Mixed Vegetables
(i.e. carrots, beans
and corn kernels)
Rice and Pasta Cooking Chart
1. Wash and strain rice before measuring amounts.
2. Place rice/pasta in a large microwave safe bowl with water. Cook uncovered, stirring halfway
through cooking. Allow to stand for 2 minutes before straining any remaining water and serving.
Food Other Ingredients Cooking Time
Pasta
White Rice
Quick Oats
Scrambled Egg Guide
Place butter, eggs and milk in a small/medium microwave safe bowl. Beat with a fork until well combined
and yolks of eggs are completely stirred in. Cook uncovered, stirring halfway through cooking.
Egg(s) Butter Milk Cooking Medium High (70%)
1 1 tsp 1 tbsp 2 minutes
2 2 tsp 1 tbsp 3 minutes
3 1 tbsp 2 tbsp 4 minutes
4 1 tbsp ¼ cup 5 minutes 30 seconds
500g 10½-11 minutes
500g 11-11½ minutes Break apart as soon as
possible. Arrange with
flower towards the
centre.
500g 11-11½ minutes Stir halfway through.
500g 10-11 minutes Stir halfway through.
500g 11-12 minutes Break apart as soon as
possible. Arrange with
flower towards the
centre.
4 pieces 10-11 minutes
500g 9-10 minutes
250g 7½-8 minutes Break apart as soon as
possible.
500g 9-10 minutes Break apart as soon as
possible.
1 Cup 2 cups Hot Water 16 minutes on HIGH 100%
2 Cups 4 cups Hot Water 18 minutes on HIGH 100%
4 Cups 6 cups Hot Water 22 minutes on HIGH 100%
1 Cup 2 cups Hot Water 20 minutes on HIGH 100%
2 Cups 4 cups Hot Water 25 minutes on HIGH 100%
4 Cups 6 cups Hot Water 32 minutes on HIGH 100%
1 Cup 2 ¼ cups Milk 8 minutes on HIGH 100%
10
Page 12

Fresh Vegetable Chart
1. Cover required dishes with plastic wrap or a lid.
2. Drain any remaining water after standing before serving.
Vegetable Amount Microwave Time at
Asparagus
(halved)
Beans
(top and tailed)
Broccoli
(uniform florets)
Brussels
Sprouts
Cabbage
(shredded)
Carrots
(sliced)
Cauliflower
(uniform florets)
Corn on the
Cob
Mushrooms
(quartered)
Peas (green;
top and tailed)
Potatoes –
Jacket
Potatoes –
Baked
Pumpkin
(2cm cubes)
Spinach
(shredded)
Snow Peas
(top and tailed)
Squash (whole) 500g 7 minutes Pierce with a fork. Place in a shallow casserole dish.
Sweet Potato
(2cm cubes)
Zucchini (sliced
or quartered)
500g 5 minutes Place in a shallow microwave safe dish. Cover.
500g 7 minutes Place in a shallow casserole dish with 1 tablespoon
500g 8-8½ minutes Place in a shallow casserole dish. Cover. Stand for 3
500g 6½-7 minutes Place in a shallow casserole dish. Cover. Stand for 3
500g 7 minutes Place in a shallow casserole dish with 2 tablespoons
500g 8-9 minutes Place in a shallow microwave safe dish. Cover.
500g 8-9 minutes Place in a shallow casserole dish with 1 tablespoon
2 pieces 8-9 minutes Rinse corn under cold water. Place corn in husk and
500g 6-6½ minutes Place in a shallow casserole dish with 2 tablespoons
500g 6 minutes Place in a shallow casserole dish with 1 tablespoon
4 Medium 7-7½ minutes Pierce with a fork. Turn over during cooking. Stand
4 small 8 Minutes Peel and quarter potatoes. Cook in a dish with ⅓ cup
500g 9 minutes Place in a shallow casserole dish. Cover. Stand for 3
500g 7-8 minutes Place in a shallow casserole dish with 2 tablespoons
500g 3½ -4 minutes Place in a shallow casserole dish with 1 tablespoon
500g 9-10 minutes Place in a shallow casserole dish. Cover. Stand for 5
500g 7 minutes Place in a shallow casserole dish with 1 tablespoon
100%
Stand for 3 minutes
of water. Cover. Stand for 3 minutes
minutes
minutes
of water. Cover. Stand for 3 minutes
Stand for 3 minutes (cook for longer for less crunch)
of water. Cover. Stand for 3 minutes
place directly on the turntable. Turn over during
cooking. Stand for 3 minutes.
of butter. Cover. Stand for 3 minutes
of water and 1 teaspoon of sugar. Cover. Stand for 3
minutes
for 3 minutes
water. Cook covered. Stand for 3 minutes.
minutes
of water. Cover. Stand for 3 minutes
of water. Cover. Stand for 3 minutes (cook for longer
for less crunch)
Cover. Stand for 3 minutes
minutes
of water and 1 tablespoon of butter. Cover. Stand for
3 minutes
Cooking Procedure
11
Page 13

Reheating/Defrosting Convenience Food Chart
FOOD WEIGHT COOKING TIME AND
Beverage
(room temp.)
250mL per cup
Canned Food
(room temp.)
(e.g. Spaghetti,
Baked Beans)
Canned Soup
(room temp)
250mL per cup
(thin soup)
Meat Pie
(refrigerated)
Individual 180g
each
Frozen Rice/Pasta
Dinners
(e.g. Lasange,
Risotto)
Dinner Plate
(refrigerated)
350g-400g per
serve
Casserole
(refrigerated)
250g per serve
Croissants (frozen) 1
Fruit Pie individual
(frozen)
135g each
Danish Pastry
whole
(frozen)
NOTE: Room Temperature +20ºC
Refrigerator Temperature +3ºC
Frozen Temperature -18ºC
1 cup
2 cups
1 cup
2 cups
1 cup
2 cups
1 pie
4 pies
300-500g
1 serve 5 minutes on HIGH (100%) Slice potato. Cover plate
1 serve
2 serves
2
1
2
400g 5 minutes on MEDIUM
POWEL LEVEL
2 minutes on HIGH (100%)
3 ½ minutes on HIGH
(100%)
5 minutes on MEDIUM
(50%)
9 minutes on MEDIUM
(50%)
2 ½ minutes on HIGH
(100%)
4 ½ minutes on HIGH
(100%)
6 minutes on MEDIUM
(50%)
12 minutes on MEDIUM
(50%)
8-9 minutes on HIGH
(100%)
4-5 minutes on HIGH
(100%)
7 ½-8 minutes on HIGH
(100%)
1 minute 30 seconds on
MEDIUM LOW (30%)
2 minutes on MEDIUM
LOW (30%)
3 ½-4 minutes on MEDIUM
LOW (30%)
5-5 ½ minutes on MEDIUM
LOW (30%)
HIGH (70%) followed by
5 ½ minutes on MEDIUM
LOW (30%)
SPECIAL
INSTRUCTIONS
Stir after heating. _
Place food in bowl.
Cover with plastic wrap
and pierce 5 times with a
skewer. Stir halfway.
Place food in bowl.
Cover with plastic wrap or
lid. Stir halfway.
Place directly on
turntable, face side down.
Cover with paper towel.
Turn over halfway.
Remove from foil
container. Cover with
plastic wrap or lid. Allow
to stand
with plastic wrap and
pierce 5 times with a
skewer. Place directly on
turntable. Allow to stand.
Place in a bowl, cover
with plastic wrap. Place
directly on turntable. Stir
halfway. Allow to stand,
then stir.
Place between paper
towels. Place directly on
the turntable.
Remove from foil
container. Place on a
plate and then onto the
turntable. Allow to stand.
Remove from foil
container. Place on
dinner plate. Allow to
stand.
STANDING
TIME
1-3
minutes
3 minutes
2 minutes
5 minutes
1-3
minutes
2 minutes
2 minutes
_
_
12
Page 14

BEFORE YOU CALL FOR SERVICE
If you think the oven is not working properly there are some simple checks you can carry out yourself
before calling for service:
1. Check to ensure that the oven is plugged in securely. If it is not, remove the plug from the outlet,
wait 10 seconds, and plug it in again securely.
2. Check for a blown circuit fuse or a tripped main circuit breaker. If these seem to be operating
properly, test the outlet with another appliance.
3. Check to ensure that the door is securely closed engaging the door safety lock system. Otherwise,
the microwave energy will not flow into the oven.
Follow this simple check below:
Place a cup of water on the turntable and close the door. Select Power Level key for 100% and set
cooking time for 1 minute.
1. Does the oven lamp come on when it is cooking?
2. Does the turntable rotate?
3. Does the cooling fan work? (Check by placing your hand above the air vent openings).
4. After 1 minute does the audible signal sound?
5. Is the water in the cup hot?
If there is no fault with either, check against the chart below.
QUERY ANSWER
Draught circulates around the
door.
Condensation forms in the
oven, and may drip from the
door.
Flashing or arching from within
the cavity when cooking.
Arcing potatoes Ensure all “eyes” are removed and the potatoes have been pierced, place directly onto
The display is lit but the control
panel will not work when
pressed.
Oven cooks too slowly Ensure correct power level has been selected.
Oven makes a noise. The microwave energy pulses ON and OFF during cooking/defrosting.
Outer cabinet is hot. The cabinet may become warm to the touch – keep children away.
When the oven door is working, air circulates within the cavity. The door does not form an
airtight seal so air may escape from the door.
The oven cavity will normally be colder than the food being cooked, and so steam
produced when cooking will condense on the colder surface. The amount of steam
produced depends and the water content of the food being cooked. Some foods, such as
potatoes have high moisture content. Condensation trapped in the door glass should
clear after a few hours.
Arcing will occur when a metallic object comes into close proximity to the oven cavity
during cooking. This may possibly roughen the surface of the cavity, but would not
otherwise damage the oven.
the turntable or in a heat resistant flan dish or similar.
Check the door is closed.
IF NONE OF THE ABOVE RECTIFIES THE SITUATION, THEN CONTACT A SERVICE CENTRE
APPROVED BY SHARP. DO NOT TRY TO ADJUST OR REPAIR THE OVEN YOURSELF.
13
Page 15

UTENSILS GUIDE
1.
The ideal material for a microwave utensil is transparent to microwave, it allows energy to pass
through the container and heat the food.
2. Microwave cannot penetrate metal, so metal utensils or dishes with metallic trim should not be used.
3. Do not use recycled paper products when microwave cooking, as they may contain small metal
fragments which may cause sparks and/or fires.
4. Round /oval dishes rather than square/oblong ones are recommend, as food in corners tends to
overcook.
The list below is a general guide to help you select the correct utensils.
COOKWARE MICROWAVE
Heat–Resistant Glass Yes
Non Heat–Resistant Glass No
Heat–Resistant Ceramics Yes
Microwave–Safe Plastic Dish Yes
Kitchen Paper Yes
Metal Tray No
Metal Rack No
Aluminum Foil & Foil Containers No*
*Narrow strips of aluminum foil may be used during cooking and defrosting to prevent overcooking of
exposed areas. Be careful and don’t use too much, keep a distance of 1 inch (2.54cm) between foil
and cavity.
14
Page 16

CLEANING AND CARE
.
Disconnect the power supply cord before cleaning or leave the door open to inactivate the
CLEAN THE OVEN AT REGULAR INTERVALS - Keep the oven clean and remove any food deposits or it
could lead to deterioration of the surface. This could adversely affect the life of the appliance and possibly
result in a hazardous situation.
Exterior:
The outside may be cleaned with mild soap and warm water, wipe clean with a damp cloth. Avoid the use of
harsh abrasive cleaners. Keep the ventilation openings free of dust.
Door:
Wipe the door and window on both sides, the door seals and adjacent parts frequently with a damp cloth to
remove any spills or spatters. Do not use abrasive cleaners.
Touch Control Panel:
Wipe the panel with a cloth dampened slightly with water only.
Do not scrub or use any sort of chemical cleaners. Avoid the use of excess water.
Interior walls:
To clean the interior surfaces, wipe with a soft cloth and warm water. After use wipe the waveguide cover in
the oven with a soft damp cloth to remove any food splashes. Built-up splashes may overheat and begin to
smoke or catch fire. Do not remove the waveguide cover. DO NOT USE A COMMERCIAL OVEN CLEANER,
ABRASIVE OR HARSH CLEANERS AND SCOURING PADS ON ANY PART OF YOUR MICROWAVE OVEN.
NEVER SPRAY OVEN CLEANERS DIRECTLY ONTO ANY PART OF YOUR OVEN.
Avoid using excess water. After cleaning the oven, ensure any water is removed with a soft cloth.
Turntable/Roller Stay:
Wash with mild soapy water and dry thoroughly.
1. If steam accumulates inside or around the outside of the oven door, wipe with a soft cloth. This
may occur when the microwave oven is operated under high humidity condition, this is normal.
2. It is occasionally necessary to remove the glass tray for cleaning. Wash the tray in warm sudsy
water or in a dishwasher.
3. The roller ring and oven floor should be cleaned regularly to avoid excessive noise. Simply wipe
the bottom surface of the oven with mild detergent. The roller ring may be washed in mild sudsy
water or dishwasher. When removing the roller ring from cavity floor for cleaning, be sure to
replace in the proper position.
4. Remove odors from your oven by combining a cup of water with the juice and skin of one lemon
in a deep microwaveable bowl, microwave for 5 minutes. Wipe thoroughly and dry with a soft
cloth.
5. When it becomes necessary to replace the oven light, please consult a dealer to have it replaced.
6. Please do not dispose this appliance into the domestic rubbish bin; it should be disposed to the
particular disposal center provided by the municipalities.
oven
15
Page 17

SPECIFICATIONS
Input Power Consumption:
Output Power (MWO): 800W* (IEC Test Procedure)
Operation Frequency: 2450MHz (Class B/Group 2)**
Outside Dimensions: 262mm(H)×452mm(W)×342mm(D)
Oven Cavity Dimensions:
Cooking Uniformity: Turntable System
Net Weight: Approx.12 kg
* When tested in accordance with AS/NZS 2895.1:2007
** This is the classification of ISM (Industrial, Scientific and Medical) equipment described in
the International Standard CISPR11.
230V-240V~50Hz, 1200W(Microwave)
173mm(H)×280mm(W)×293mm(D)
16
 Loading...