

Page 1

Home Appliances
For Life
User Manual
EN
Dishwashing
Fullsize Dishwasher
QW-C13F472W-DE
Page 2

Page 3
EN-3
CHAPTER-1: EXPLANATION OF PRODUCT
Technical specications 5
Conformity with the standards and Test data 5
CHAPTER-2: SAFETY INFORMATION AND RECOMMENDATIONS
Recycling 6
Safety information 6
R e c o m m e n d a t i o n s 8
Items not suitable for dishwashing 8
CHAPTER-3: INSTALLING THE MACHINE
Positioning the machine 8
Water connections 9
Water inlet hose 9
Water outlet hose 9
Electrical connection 10
Fitting the machine undercounter 11
Prior to using the machine 13
CHAPTER-4: PREPARING THE MACHINE FOR USE
The importance of water decalcication 13
Filling with salt 13
Testing strip 13
Adjusting salt consumption 14
Detergent usage 14
Filling the detergent compartment 14
Combined detergent 15
Filling with rinse aid and making the setting 15
CHAPTER-5: LOADING YOUR DISHWASHER
Dish rack 16
Alternative basket loads 18
CHAPTER -6: PROGRAMME DESCRIPTIONS
Programme items 19
CHAPTER -7: SWITCHING ON THE MACHINE AND SELECTING A PROGRAMME
Switching on the machine 21
Programme follow-up 21
Changing a programme 21
Changing a programme with resetting 22
Switching the machine off 22
CHAPTER-8: MAINTENANCE AND CLEANING
Filters 23
Spray arms 23
Hose lter 23
CHAPTER-9: FAILURE CODES AND WHAT TO DO İN CASE OF FAILURE 24
CHAPTER-10: PRACTICAL AND USEFUL INFORMATION 25
Dear Customer,Our goal is to offer you, high quality products that exceed your expectations. Your appliance is
produced in modern facilities and is carefully, particularly tested for quality.
This manual is prepared in order to help you use your appliance, which has been manufactured using the most
recent technology with condence and maximum efcien.
Before using your appliance, carefully read this guide which includes basic information to safe installation,
maintenance and use. Please contact your nearest Authorized Service centre for the installation of your product.
The operating instructions apply to several models. Differences may therefore occur.
CONTENTS
Page 4
EN-4
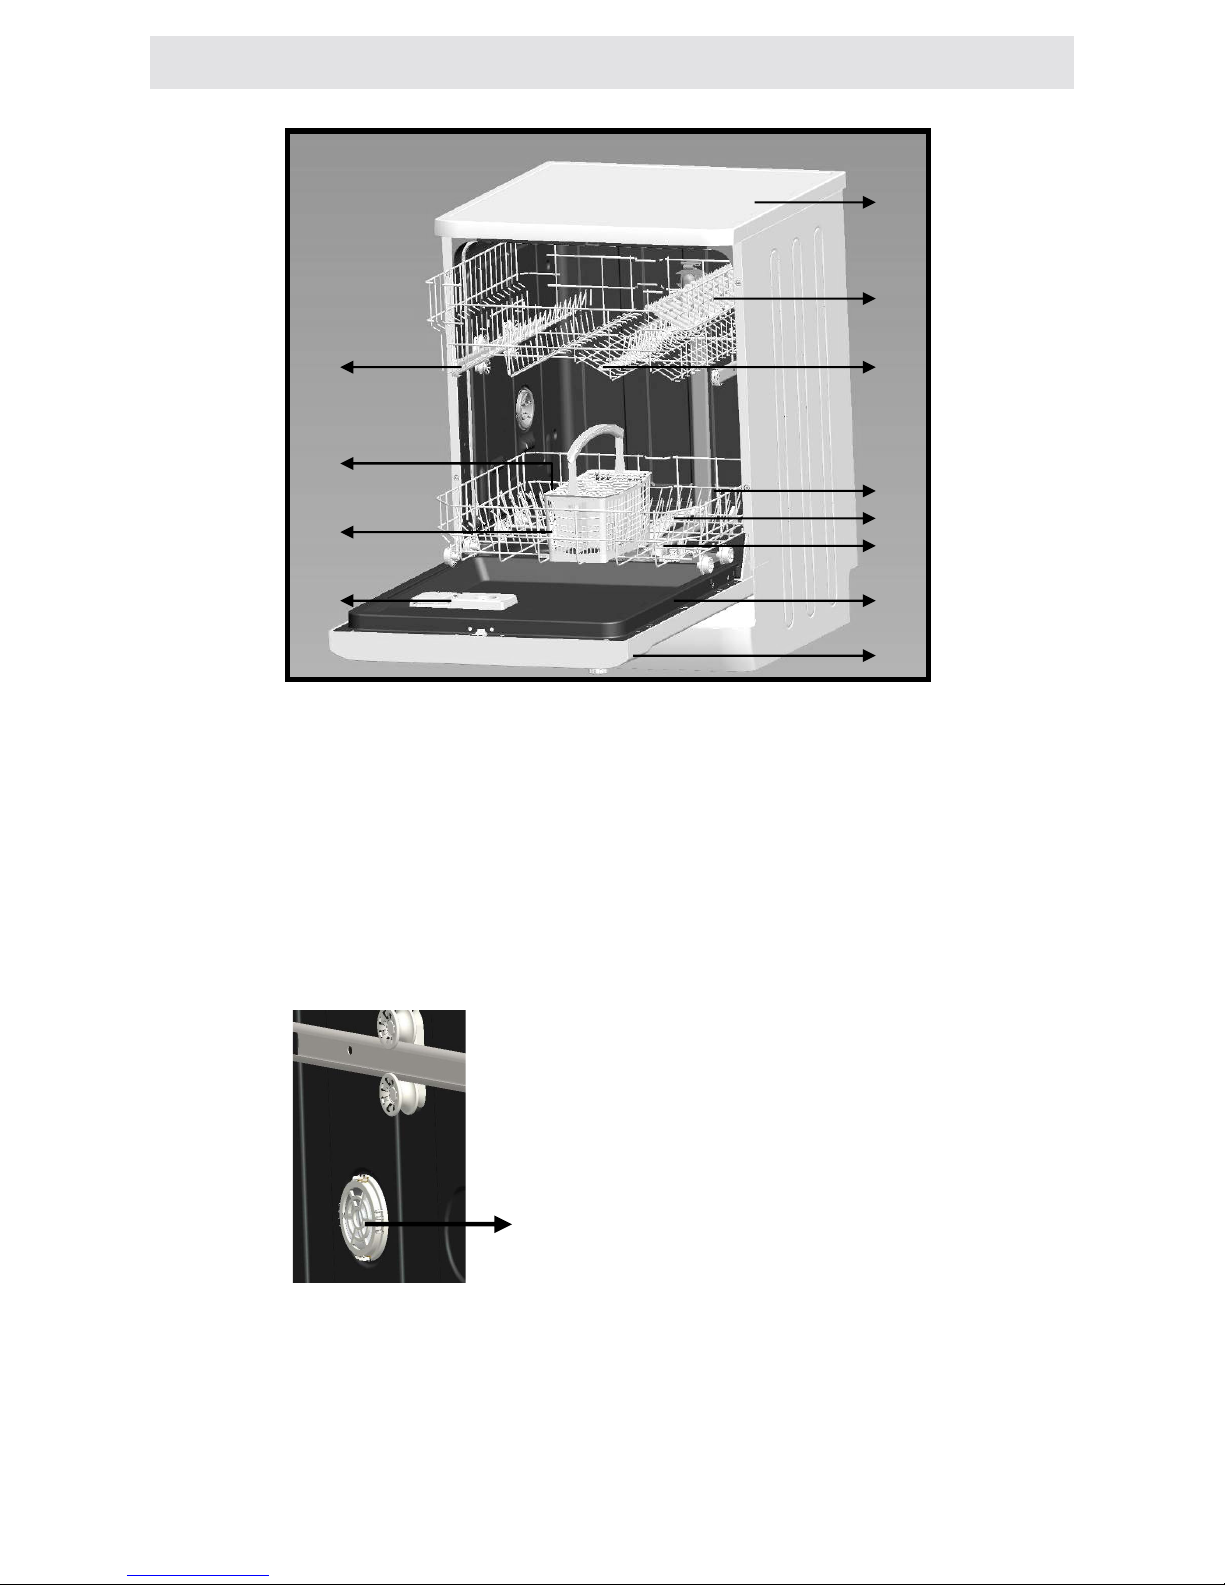
1. Worktop
2. Upper basket with racks
3. Upper spray arm
4. Lower basket
5. Lower spray arm
6. Filters
13. Active Drying Unit:
This system provides better
drying performance for your
dishes.
CHAPTER -1: EXPLANATION OF PRODUCT
1
2
3
5
6
7
8
9
10
11
12
4
7. Rating plate
8. Control Panel
9. Detergent and rinse-aid dispenser
10. Cutlery basket
11. Salt dispenser
12. Upper basket track latch
Page 5
EN-5
Capacity 12 place settings
Height 850 mm
Height (without worktop) 820 mm
Width 598 mm
Depth 598 mm
Net Weight 46 kg
Electricity input 220-240 V, 50 Hz
Total Power 1900 W
Heating Power 1800 W
Pump Power 100 W
Drain Pump Power 25 W
Water supply pressure 0.03 MPa (0,3 bar)-1 MPa (10 bar)
Current 10 A
Technical specifications
Conformity with the standards and Test data / EU Declaration
of Conformity
This product meets the requirements of all applicable EU directives with the corresponding harmonised standards, which provide for CE marking.
Important Note for User:For softcopy of this user manual, please contact following address:
"dishwasher@standardtest.info”.In your e-mail, please provide the model
name and serial number (20 digits) which you can find on the appliance door.
CHAPTER -1: TECHNICAL SPECIFICATIONS
Page 6

EN-6
CHAPTER -2: SAFETY INFORMATION AND
RECOMMENDATIONS
SAFETY INFORMATION AND RECOMMENDATIONS
Recycling
• The recyclable materials are used in certain components and packaging.
• Plastic parts are marked with international abbreviations: (>PE< , >PS< ,
>POM<, >PP<, )
• Cardboard parts have been produced from recycled paper which should be
disposed of into waste paper collection containers for recycling.
• Such materials are not suitable for garbage bins. They should be delivered to
recycling centres instead.
• Contact relevant centres in order to obtain information on methods and points
of disposal.
Safety Information
When you take delivery of your machine
• If you see any damage on your machine’s packaging, please contact with
authorised service.
• Unwrap the packaging materials as indicated and dispose of them in
accordance with the rules.
The points to pay attention during machine installation
• Choose a suitable, safe and level place to install your machine.
• Carry out the installation and connection of your machine by following the
instructions.
• This machine should be installed and repaired by an authorised service only.
• Only original spare parts should be used with the machine.
• Before installing, be sure that the machine is unplugged.
• Check whether the indoor electrical fuse system is connected according to
the regulations.
• All electrical connections must match valuse on the rating plate.
• Be sure that the machine does not stand on the electricity supply cable.
• Never use an extension cord or a multiple socket for making a connection.
The plug should be comfortably accessible after installation.
• After installation, run it unloaded for the first time.
In daily use
• This machine is for household use; do not use it for any other purpose.
Commercial usage of the dishwasher will void the guarantee.
• Do not get up, sit or place a load when the door open, it may fall over.
• Never use detergent and rinse aid which is not produced specifically for
dishwashers.Our company will not take responsibilty for this.
• The water in the machine’s washing section is no drinking water do not drink it.
• Due to danger of explosion, do not put any chemical dissolving agents such
as solvents into the machines washing section.
• Check whether plastic items are heat-resistant before washing.
Page 7

EN-7
•This appliance can be used by children aged from 8 years and above and persons
with reduced physical, sensory or mental capabilities or lack of experience and
knowledge if they have been given supervision or instruction concerning use
of the appliance in a safe way and understand the hazards involved. Children
shall not play with the appliance.Cleaning and user maintenance should not be
made by children without supervision.
• Do not put unsuitable and heavy items above the basket capacity into your
machine.Our company will not be responsible for any damage on the inner
parts.
• The door must not open while the machine is operating. In any case, a safety
devices ensures that the machine stops if the door is opened.
• Do not leave the door open, for avoid an accident.
• Place knives and other sharp-ended objects in the cutlery basket in bladedown position.
• If the supply cord is damaged, it must be replaced by the manufacturer, its
service agent or competents persons in order to avoid a hazard.
• If an EnergySave option is selected as “Yes”, The door will be opened at the
end of the program. Do not force to close the door to avoid harm auto door
mechanism during 1 minutes. The door must be open during 30 minutes to get
effective drying.( in models with auto door opening system )
Warning: Do not stand in front of the door after the signal sounds belonging
auto-open.
For your children’s safety
• After removing the machine’s packaging, make sure that the packaging
material is out of reach of children.
• Do not allow children to play with or start the machine.
• Keep children away from detergents and rinse aids.
• Keep children away from the machine while it is open because there may still
be residues of cleaning substances inside the machine.
• Be sure that your old machine does not pose any threat to your children.
Children are known to have gotten themselves locked in old machines. To
forestall such a situation, break your machine’s door lock and tear off the
electrical cables.
In case of malfunctioning
• Any repairing performed by anyone other than authorized service personnel
will result out of scope warranty to your machine.
• Prior to any repair work on the machine, be sure that the machine is cut off
from the mains.Switch off the fuse or unplug the machine.Do not pull by the
cable when unplugging. Make sure to turn off the water tap.
CHAPTER -2: SAFETY INFORMATION AND
RECOMMENDATIONS
Page 8

EN-8
CHAPTER -2: SAFETY INFORMATION AND RECOMMENDATIONS
Recommendations
• For energy and water saving, remove coarse residues on your dishes before
placing the dishes into the machine. Start your machine after having fully
loaded it.
• Use the pre-wash programme only whenever necessary.
• Place such hollow items as bowls, glasses and pots into the machine in such
a way that they will face down.
• You are recommended not to load into your machine any dishes different or
more than indicated.
Items not suitable for dishwashing:
• Cigarette ashes, candle leftovers, polish, paint, chemical substances, ironalloy materials;
• Forks, spoons and knives with wooden or bone, or ivory or nacre-coated
handles; glued items,items soiled with abrasive, acidic or base chemicals.
• Plastic items that are not heat-resistant, copper or tin-coated containers.
• Aluminium and silver objects (they may discolour, become dull).
• Certain delicate glass types, porcelains with ornamental printed patterns
as they fade even after the first wash; certain crystal items as they lose their
transparency over time, adhered cutlery that is not heat-resistant, lead crystal
glasses, cutting boards, items manufactured with synthetic fibre;
• Absorbent items as sponges or kitchen rags are not suitable for dishwashing.
Warning:Take care to buy dishwasher-proof sets in your future purchases.
INSTALLING THE MACHINE
Positioning the machine
When determining the installation place, take care to accesible places for easily
load and unload dishes.
Do not put your machine in any location where there is the probability for the
room temperature to fall below 0°C.
Before positioning, take the machine out of its packaging by following the
warnings located on the packaging.
Position the machine close to a water tap or drain. You need to site your
machine, taking into consideration that its connections will not be altered once
they are made.
Do not grip the machine by its door or panel in order to move it.
Take care to leave sufficient clearance from all sides of the machine for moving
comfortably back and forth during cleaning.
Make sure that the water inlet and outlet hoses do not get squeezed while
positioning the machine. Also, make sure that the machine does not stand on
the electrical cable.
Adjust the machine’s adjustable feet so that it can stand level and balanced.
Proper positioning of the machine ensures problem-free opening and closing
of the door.
Page 9
EN-9
If the door of machine does not close properly, check if the machine is stable on
the floor it stands; if not, adjust the feet and ensure its stable position.
Water connection
İndoor plumbing must be suitable for installing a dishwasher. Also, we recommend
that you fit a filter at the entrance of your place or apartment so as to avoid
any damage to your machine because of any contamination (sand, clay, rust
etc.) that might be occasionally carried in through the mains water supply or the
indoor plumbing, and to forestall such complaints as yellowing and formation of
deposits after washing.
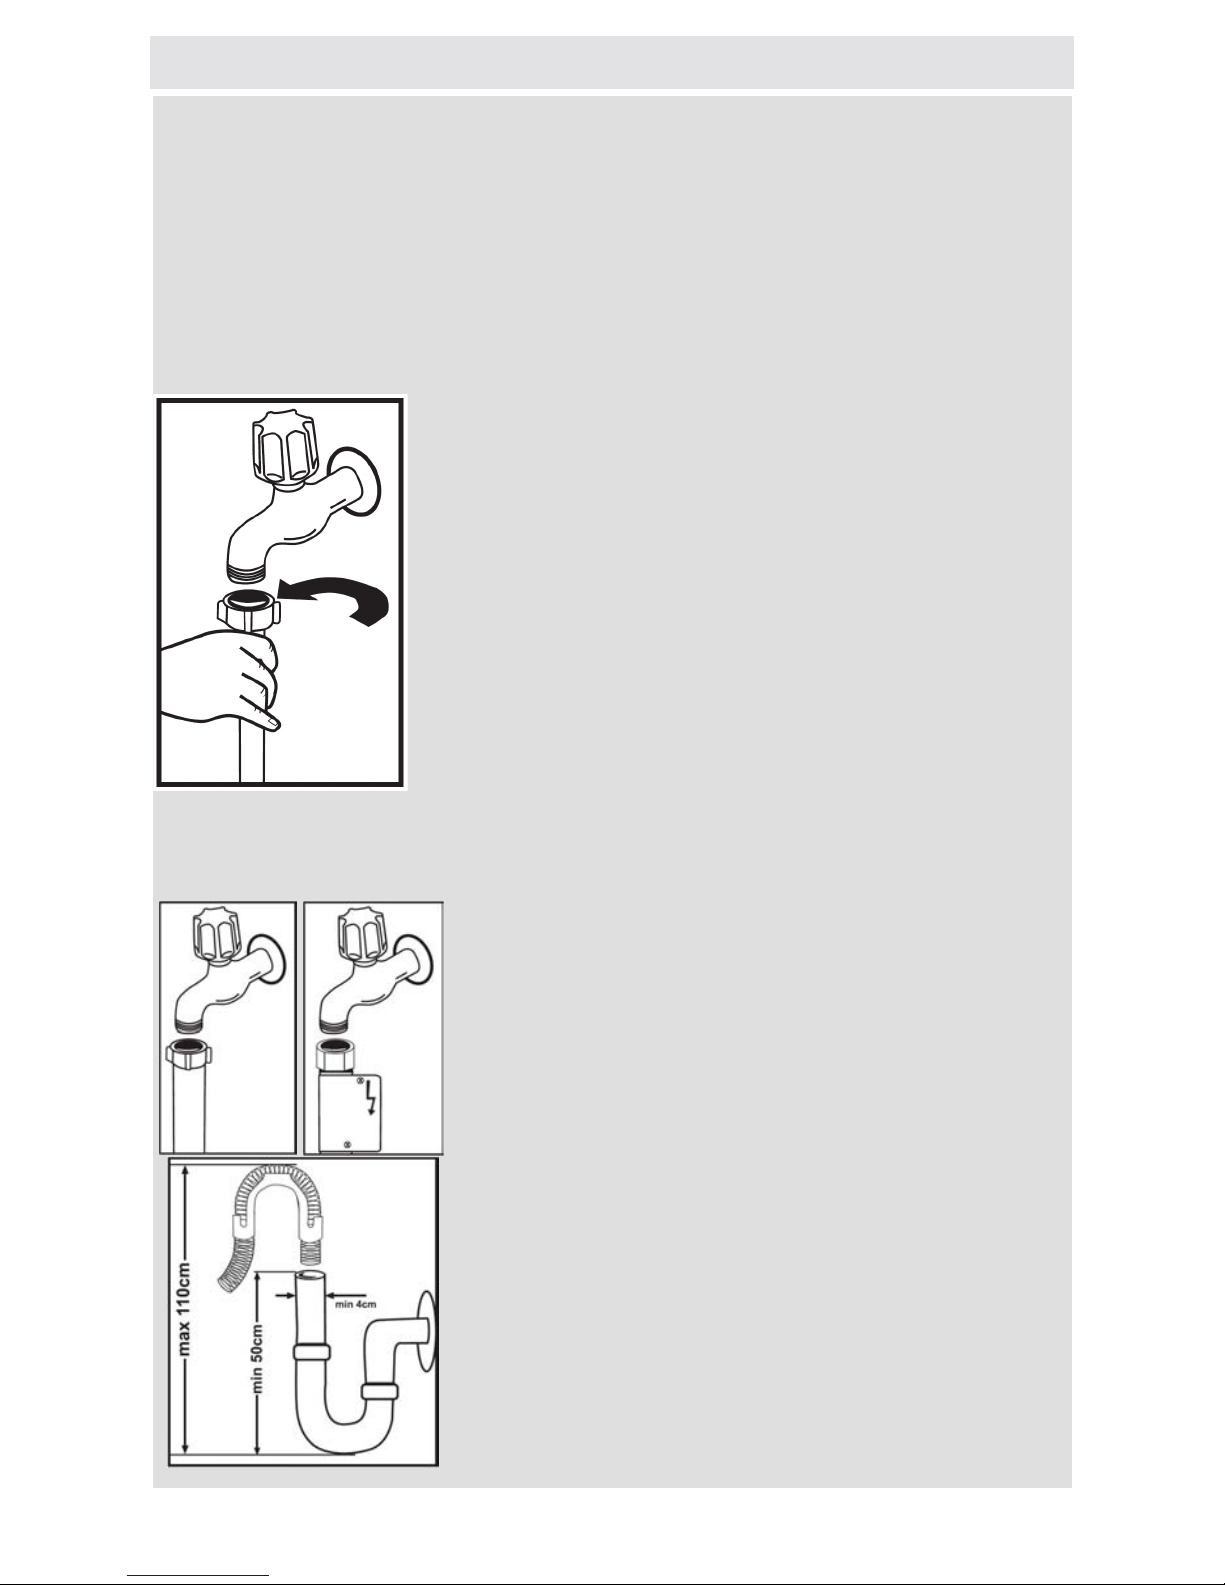
Water inlet hose
Do not use the water inlet hose of your old machine.
Use the new one supplied with your machine instead. If
you will connect a new or long - unused water inlet hose
to your machine ,run water through it for a while before
making the connection. Connect the water inlet hose
directly to the water inlet tap. The pressure supplied by
the tap should be at a minimum of 0.03 Mpa and and at
a maximum of 1 Mpa.If the water pressure is above 1
Mpa,a pressure-relief valve should be fitted inbetween.
After making connections, the tap should be turned on fully and checked for
water tightness.For the safety of machine, turn off the water inlet tap after
finishing each wash programme.
NOTE: Aquastop water spout is used in some
models. In case of using Aquastop, a dangerous
tension exists.Do not cut Aquastop water spout. Do
not let it get folded or twisted.
Water outlet hose
The water drain hose can be connected either directly
to the water drain hole or to the sink outlet spigot.
Using a special bent pipe (if available), the water can
be drained directly into the sink via hooking the bent
pipe over the edge of the sink. This connection should
be between 50 and 110 cm from the floor plane.
CHAPTER -3: INSTALLING THE MACHINE
Page 10

EN-10
Warning: When a drain hose longer than 4 m is used, the dishes might
remain dirty. In that case, our company will not accept responsibility.
Electrical connection
The earthed plug of your machine should be connected to an earthed outlet
supplied by suitable voltage and current. If there is no earthing installation,
have a competent electrician to carry out it. In case of usage without earthing
installed, our company will not be responsible for any loss of usage that might
occur.
The indoor fuse current value should be 10-16 A.
Your machine is set according to 220-240 V. If the mains voltage in your loca-
tion is 110 V, connect a transformer of 110/220 V and 3000 W inbetween. The
machine should not be plugged in during positioning. Always use the coated
plug supplied with your machine. Running in low voltage will cause a decline
in washing quality. The machine’s electrical cable should be replaced by an
authorised service or an authorised electrician only. Failure to do so may lead
to accidents. For safety purposes, always make sure to disconnect the plug
when a wash programme is finished.
In order not to cause an electric shock, do not unplug when your hands are
wet. When disconnecting your machine from the mains supply, always pull
from the plug. Never pull the cord itself.
CHAPTER -3: INSTALLING THE MACHINE
Page 11

EN-11
Fitting the machine undercounter
If you wish to fit your machine undercounter, check whether you have sufficient
space under your countertop and whether the wiring-plumbing is suitable to
do so.1 If you decide that the space under the countertop is suitable for fitting
your machine, remove the worktop as shown in the illustration. 2
Warning:The stand part which we will settle our machine under it by removing
its worktop has to be stable in such a way not to allow balance disorder.
To remove the worktop, remove the screws that hold the worktop which are
located at the rear of the machine; then push the front panel 1 cm from the
front side towards the rear and lift it.
CHAPTER -3: INSTALLING THE MACHINE
Page 12

EN-12
CHAPTER -3: INSTALLING THE MACHINE
H
Adjust the machine feet according to the slope of the floor.3 Fit your machine by
pushing it undercounter without letting the hoses get crushed or bent.4
Warning: After removal of worktop, the machine should be placed in cavity of
which dimensions are shown at fig.
Product
Without Insulation With Insulation
All Product For 2nd Basket For 3rd Basket
Height 820 mm 830 mm 835 mm
Page 13

EN-13
CHAPTER -4: PREPARING THE MACHINE FOR USE
Prior to using the machine for the rst time
• Check whether the electricity and supply water specications match the values indicated by the installation
instructions for the machine.
• Remove all packaging materials inside the machine.
• Set the water softener.
• Add 1 kg salt into the salt compartment and ll with water up to a level at which it will almost overow.
• Fill the rinse aid compartment.
PREPARING THE MACHINE FOR USE
The importance of water decalcication
For a good washing function, the dishwasher needs soft, i.e. less calcareous water. Otherwise, white lime
residues will remain on the dishes and the interior. This will negatively affect your machines’
washing, drying and shining performance. For this reason, a softener system is used on dishwashers. The
softener system has to be refreshed so that it operates with the same performance also during the next wash.
For this purpose, dishwasher salt is used.
Filling with salt
Use softener salt specically produced for use in
dishwashers. To put softener salt, rst remove the
lower basket and then open the salt compartment
cap by turning it counter clock wise. (1) (2) At rst use
ll the compartment with 1 kg salt and water (3) at
overowing level If available, using a funnel
(4) will make lling easier. Ret the cap and
close it. After every 20th-30th wash, add salt into
your machine until it lls up (approx. 1 kg). Fill
the salt compartment with water at rst use only.
We recommend to use small grained or powder
softener salt. Do not put table salt into your
machine. Otherwise, the function of the softener the
compartment may decrease over time. When you
start the machine, the salt compartment gets lled
with water. There fore, add the softener salt in prior
to starting your machine. This way, overowing
salt gets immediately cleaned up through the
wash operation. If you will not wash any dishes
immediately after adding salt, then run a short
washing program with an empty machine in order
to avoid corrosion on your machine due to the salt
overow while lling the salt container. In order
to understand whether or not the amount of
softener salt in the machine is sufcient, check the transparent section on the salt compartment cap. There is
sufcient salt if the transparent section is green. Salt has to be added if it is not green.
Testing strip
The washing effectiveness of your machine depends on the softness of the tap water. For this reason,
your machine is equipped with a system that reduces the hardness in mains water supply. The
washing effectiveness will increase when the system is correctly set. To nd out the water hardness
level of water in your area, contact your local water board or determine water hardness level by using
the test strip(if available).
Open the
testing
strip
Run water
through
your tap
for 1 min.
Keep the
testing
strip in
water for
1.sec.
Shake the
testing strip
after taking it
out of water
Water for
1 min.
Make your machine’s water hardness setting according to the result
obtained through the testing strip.
Level 1 No Lime
Level 2
Very low
lime content
Level 3 Low
lime content
Level 4 Medium
lime content
Level 5
Lime content
Level 6 High
lime content
Page 14

EN-14
Adjusting salt consumption
In accordance with the degree dened on the test track, perform the water hardness setting of your machine as
indicated below.
Power of the machine by switching the On/Off (4) button of the machine to off position (1).
Press and hold Start/Pause (3) key.
Set the On/Off button (4) to number 2 position by rotating it clockwise (rightward) 1 step.
Press and hold the Start/Pause key until all the lights start to blink. (3)
Press and hold the Start/Pause key until “SL” goes off on the display. (5)
After “SL” goes off, release the Start/Pause key (3).
The machine will display the most recent water hardness setting (see Setting table for water hardness degree)
You can adjust the water hardness setting by pressing “+” and “-” keys on the display (5).
After selecting the water hardness degree, power of the machine by switching the On/Off button (4) to off
position (1). The last selected water hardness setting will be stored in the memory.
Warning:In case of moving, it is important to congure the water hardness setting according to the water
hardness of the area you have moved is important for the effectiveness of washing.
Detergent usage
Use a detergent specically designed for use in domestic dishwashers. You can nd powder,gel,and tablet detergents that have been designed for household dishwashers. Detergent should be put into the compartment prior
to starting the machine. Keep your detergents in cool, dry places out of reach of your children. Do not overll the
detergent compartment; otherwise it may cause scratches on your glasses as well as lead to a poorly dissolved
detergent. Should you need more information concerning the detergent you will use, contact the detergent manufacturers directly.
Filling the detergent compartment
Push the latch to open the detergent container as shown in the image. 1 Detergent pod has level lines inside.
Detergent pod can take a total of 40 cm3 detergent. Open the dishwasher detergent and pour into the larger compartment b 25 cm3 if dishes are heavily soiled or less 15 cm3.2 If dishes have been kept dirty for a very long time ,
dried food wastes on them or overly loaded the dishwasher, pour a 5cm3 detergent into the prewash compartment
and start machine. You may have to add more detergent into your machine, depending on the degree of soil and
on the water hardness level in your area.
Water
hardness
level
German
hardness
level dH
French
hardness
level dF
British
hardness
level dE
Hardness Level Indicator
1 0-5 0-9 0-6 L1 is seen on display.
2 6-11 10-20 7-14 L2 is seen on display.
3 12-17 21-30 15-21 L3 is seen on display.
4 18-22 31-40 22-28 L4 is seen on display.
5 23-31 41-55 29-39 L5 is seen on display.
6 32-50 56-90 40-63 L6 is seen on display.
CHAPTER -4: PREPARING THE MACHINE FOR USE
4
5
Page 15

EN-15
Combined detergents
Combined detergents may include various properties in it. Before using the detergent, the instruction of
detergent can be observed well. Generally combined detergents produce sufcent results under certain
conditions only.
Points to consider when using this type of products:
• Check the specications of the product whether it is combined or not.
• Check if the detergent used is appropriate for the hardness of mains water.
• Observe the instructions of products on packagings.
• Always put the tablets into the detergent compartment in the detergent dispenser.
• You need to contact the manufacturers and nd out about the suitable conditions of use.
• If you use appropriate products, they ensure savings in salt and/or rinse aid consumption.
• The scope of warranty for your machine does not cover any complaints caused by the use of these types of
detergents.
Recommended usage: If you want to obtain better results while using combined detergents, add salt and rinse
aid into your machine and adjust the water hardness setting and the rinse aid setting to the lowest position.
Solubility of the tablet detergents produced by different companies can vary depending on
the temperature and time. Therefore, it is not recommended to use such detergents in short
programs. It is more suitable to use powder detergents in such programs.
Warning: Should any problem, which you have not encountered before, arise with the use of this type of
detergents, contact the detergent manufacturers directly.
When you give up using combined detergents
• Fill the salt and rinse aid compartments.
• Adjust the water hardness setting to the highest position and run an empty-wash.
• Adjust the water hardness level.
• Make the suitable rinse aid setting.
Filling with rinse aid and making the setting
Adequate amount of rinse aid prevents the stay of white water drops, lime stains, white lm stripshaped. It also
increases drying performance.
To put rinse aid, remove the rinse aid compartment cap by turning it.1 Fill the rinse aid compartment with rinse
aid until the rinse aid level indicator becomes dark;2 ret the cap and close it by turning it in a way that the nails
will correspond to one another. By checking the rinse aid level indicator on the detergent dispenser, you can
understand whether or not your machine needs rinse aid. A dark indicator b means that there is rinse aid in the
compartment, while a light indicator a shows that you need to ll the compartment with rinse aid.
The rinse aid level adjuster can be set to a position between 1 and 6. Factory setting for rinse aid is the
position 3.
You need to increase the degree of the adjuster if water stains form on your dishes after a wash,
whereas you need to decrease the degree if a blue stain is left when wiped by hand. 3
Warning: Use only those rinse aid materials which are allowed for use in the machine. As rinse aid residues left
as a result of overowing will create extremely high amounts of foam and thus reduce the washing performance,
remove the excess amount of rinse aid by wiping it with a rag.
1
3
CHAPTER -4: PREPARING THE MACHINE FOR USE
Page 16

EN-16
LOADING YOUR DISHWASHER
Place dishes properly into the machine.
There are two seperate baskets to load dishes into your machine.The lower basket is for round and deep items.
The upper basket is for thin and narrow items. You are recommended to use the cutlery grid in order to obtain
the best result.
To avoid any possible injuries, long-handle and sharp-pointed dishes with their sharp points facing down or
horizontally on the baskets.
Warning: Place your dishes into your machine in a way that they will not prevent the upper and lower spray
arms from spinning.
Dish rack
You can place different sizes of glasses under these racks thanks to
adjustable height feature. You can use racks in 3 different heights.
Top basket height adjustment
The top basket of machine is in the upper position. Whwn you take the top basket to the lower position, you can
place and wash big sized plates on the top basket. Open the basket retaining parts at the end of top basket rails
by turning them to the sides, and take the basket out. Change the position of the wheels; reinstall the basket to
the rail, and close basket retainer parts. In this way, you take the top basket to the lower position.
Lower Basket
Folding Racks
Folding racks consisting of four parts in order to let you place big items easier such as pots, pans, etc. If
requested, each part can be folded separately in order to obtain larger space.
CHAPTER-5: LOADING YOUR DISHWASHER
Page 17

EN-17
CHAPTER-5: LOADING YOUR DISHWASHER
The movable cutlery basket can be slid between the front and rear
wires of the bottom basket. Thanks to this feature, the cutlery basket
can be placed at the desired location.
Page 18

EN-18
Alternative basket loads
Lower Basket
Top basket
Incorrect Loads
Important Note for Test Laboratories
For detailed information on performance tests, please contact following address:
“dishwasher@standardtest.info” . In your email, please provide the model name and serial number (20 digits)
which you can nd on the appliance door.
CHAPTER-5: LOADING YOUR DISHWASHER
Page 19

EN-19
PROGRAMME DESCRIPTIONS
Programme items
Warning:Short programs do not include a drying step.
The values declared above are the values obtained under laboratory conditions according to relevant standards. These values can change depending on conditons
of product’s use and environment (network tension, water pressure, water input temperature and environment
temperature).
Programme No Reference
Programme
names and
temperatures
Quick 30 min.
40°C
Eco
50° C
Express 50’
min. 65° C
Intensive
65° C
Type of food
waste
coffee, milk,
tea, cold meats,
vegetables,
not kept for long
coffee, milk,
tea, cold meats,
vegetables, not
kept for long
soups,
sauces,
pasta, eggs,
pilaf, potato
and
oven dishes,
fried foods
soups,
sauces,
pasta, eggs,
pilaf, potato
and
oven dishes,
fried foods
Level of soil small medium medium high
Detergent
amount
B: 25 cm3 /
15 cm3
A: 5 cm3
B A+B A+B A+B
40°C Wash Prewash 65°C wash 45°C wash
Cold Rinse 50°C wash Intermediate
rinse
65°C wash
Hot rinse Hot rinse Hot rinse Cold rinse
End Dry End Hot rinse
End Dry
End
Programme
duration
(min.)
30 165 50 117
Electricity
consumption
(kW hours)
0.90 0,90 1,35 1,61
Water
consumption
(litres)
12,4 12,0 12,7 17,2
If the half load button is used, the values will be as follows;
Programme
duration
(min.)
30 150 47 100
Electricity
consumption
(kW hours)
0,90 0,87 1,22 1,40
Water
consumption
(litres)
12,4 12,0 12,7 12,2
CHAPTER -6: PROGRAMME DESCRIPTIONS
Page 20

EN-20
Programme Selection and Operating the Machine
1. Remaining Time Indicator
Remaining Time Indicator shows the duration of the programmes and the remaining time during the programme
ow. Besides, you can put off the programme delay time for 1-19 hours by pressing the keys on the indicator
before the programme is started. If you want to make any changes in the delay time, you can adjust it by pressing
the Start/Pause key and using “+” and “-” keys on the display. Press the Start/Pause key again to activate it. If the
user switches the programme selection button to off position after enabling the delay time and the programme has
started, the remaining delay time is stored and the programme resumes after the remaining delay time has passed upon selecting a new programme. To cancel the delay, you need to switch to 0 h by using the ‘’+ and -’’ keys.
2. Door Handle
Use the door handle to open/close the door of your machine.
3. Half Load Button
Thanks to the half load function in your machine, you can shorten the durations of the programmes that you have
selected and reduce the energy and water consumption by using half load electricity and water (see programme
listing p 24)
Note: If you have used any extra function (such as the delay or half load) in the washing programme that you
last used and then cut off the energy of the machine and re-energised it, that function you have selected will not
be active in the next washing programme. If you would like to use this feature in the programme you have newly
selected, you may select the desired functions once again.
4. Start/Pause Key
When you press the Start/Pause key, the programme you have selected with the programme selection button will
start operating and the washing light will be on. After the programme has started, the Start/Pause light will go off.
In the Stop (Hold) position, the Start/Pause light blinks while the washing light is lit.
5. On/Off Programme Selection Button
It cuts off the energy of the machine when in off position In other positions, the machine is energised and programme selection can be performed. 6 Salt Missing Warning Indicator
Check the salt missing warning indicator light on the display to have an idea whether the softening salt in your
machine is enough. When salt missing warning indicator is lit, ll the salt compartment.
7. Rinse Aid Missing Warning Indicator
Check the rinse aid missing warning indicator light on the display to have an idea whether the amount of the
rinse aid in your machine is enough. When rinse aid missing warning indicator is lit, ll the rinse aid compartment.
8. Programme Monitoring Lights
You can monitor the programme ow with the programme lights on the control panel.
• Wash
• Rinse
• Dry
• End
•
Using the Child Lock
Press + and - keys on the remaining time indicator at the same time for 3 seconds so as to activate the child lock.
At that time, on the remaining time indicator, “CL” is displayed for 2 seconds. To deactivate the function, Press +
and - keys again at the same time for 3 seconds. “CL” will blink for two seconds.
CHAPTER -7: SWITCHING ON THE MACHINE AND SELECTING
A PROGRAMME
8
Page 21

EN-21
CHAPTER -7: SWITCHING ON THE MACHINE AND SELECTING
A PROGRAMME
Operating the Machine
Programme Monitoring
You can monitor the programme ow with the programme lights on the control panel.
Changing the Programme
If you would like change a programme while a washing programme is running on:
By rotating the programme
selection button, energise
the machine and select
the suitable programme.
Start the programme
by pressing the Start/
Pause key.
Do not open the door
before the End light is lit.
After the programme has
ended, the End light is lit.
As long as the washing, rinsing
and drying processes are running
on, the lights for Washing, Rinsing
and Drying are on. The machine
becomes remains silent for 40-50
minutes while the drying light is on.
Press the Start/Pause key.
When the programme is stopped,
Start/Pause light will blink.
You can select the desired
programme with the help of the
programme selection button after
the programme has stopped.
You can start the programme
that you have newly
selected by pressing the
Start/Pause key again.
The machine determines a
new programme flow and time
according to the programme you
have launched and resumes
on that flow and time.
After rotating the programme
selection button and energising
the machine, the light on
the Start/Pause is lit.
When the programme is started the light on the
Start/Pause goes off and Washing light is lit.
1.
2.
Page 22

EN-22
CHAPTER -7: SWITCHING ON THE MACHINE AND SELECTING
A PROGRAMME
Cancelling the Programme
If you would like cancel a programme while a washing programme is running on:
Switching the Machine Off
NOTE: In order for the drying process to be performed more quickly, you may slightly open the machine door after
few minutes when the programme has ended and the End light has been lit.
NOTE: The washing programme resumes on where it has left if the machine door is opened and then closed or if
the machine power is cut off and then supplied during the washing process.
NOTE: If the power is interrupted during the drying process, the programme is terminated. And your machine
becomes ready for the new programme selection.
Later on, unplug
your machine and
turn off the tap.
Switch your machine off with the
On/Off program selection button
after the programme has ended
and the End light has become on.
After 3 seconds,
programme cancellation
step starts and the water
inside the machine is
discharged for 30 seconds.
Press and hold the Start/
Pause key for 3 seconds.
When the End light is
on, the programme will
have been cancelled.
Page 23

EN-23
Cleaning the machine in regular intervals prolongs the machine’s service life.
Oil and lime may accumulate in the machine’s washing section. In case of such accumulation;
-Fill the detergent compartment without loading any dishes into the machine, run the machine at high
temperature. In case this is not sufcient, use special cleansing material.
Cleaning the seals in the machine door,
-Wipe the seals regularly by using a dampened cloth.
Cleaning machine,
Clean the lters and spray arms at least once a week.
Unplug your machine and turn off its tap before starting the cleaning.
Wipe with a ne cleaning material and a dampened cloth.
Filters
If any food wastes have remained on the coarse and ne lters, remove the lters and clean them thoroughly
under the water tap.
a. Micro Filter
b. Coarse Filter
c. Metal/Plastic Filter
To remove and clean the lter combination, turn it counter clockwise and take it out by lifting upwards.1
Pull and remove the metal/plastic lter. 2 Then pull the coarse lter out of the micro lter.3 Rinse it with lots
of water under the tap. Ret the metal/plastic lter. Insert the coarse lter into the micro lter in a way that the
marks will correspond to one another. Attach micro lter into the metal/plastic lter and turn to the direction of
arrow and it is locked when the arrow on micro lter can be seen from across. 4
• Never use your dishwasher without any lter.
• Incorrect tting of the lter will reduce the washing effectiveness.
• Clean lters are very important in terms of the proper running of the machine.
Spray arms
Check the holes for the upper and lower spray arms. If there is any clogging, remove the spray arms and clean
them under water.
You can remove the lower spray arm by pulling it upwards, while the upper spray arm nut can be removed by
turning the nut to the left. Be sure that the nut is perfectly tightened when retting the upper spray arm.
Hose lter
Check the lter and the hose from time to time and clean them
to forestall yellowing and formation of deposits after washing. To
clean the lter, rst turn off your tap and then remove the hose.
After removing the lter from the hose, clean it under the tap.
Insert the cleaned lter back into its place inside the hose. Ret
the hose.
CHAPTER -8: MAINTENANCE AND CLEANING
Page 24

EN-24
ERROR
CODE
ERROR
DESCRIPTION
CONTROL
F5
Inadequate water
supply
• Make sure the water input tap is totally open and that there is no
water cut.
• Close the water input tap, separate the water input hose from the
tap and clean the lter at the connection end of the hose.
• Restart your machine, contact the service if the error resumes.
F3
Error of continuous
water input
• Close the tap.
• Contact for service.
F2
The waste water in the
machine cannot be
discharged.
• Water discharge hose is clogged.
• The lters of your machine might be clogged.
• Power off-on your machine and activate the program
cancellation command.
• If the error continues, contact for service.
F8 Heater error • Contact for service.
F1
Alarm is active against
water overow
• Power off your machine and close the tap.
• Contact for service.
FE Faulty electronic card • Contact for service.
F7
Overheating error
(temperature in the
machine is
too high)
• Contact for service.
F6 Faulty heater sensor • Contact for service.
If one of program monitor lights is on and start/Pause light is on and off,
Your machine’s door is open, shut the door.
If the programme won’t start
• Check if the plug is connected.
• Check your indoor fuses.
• Be sure that the water inlet tap is turned on.
• Be sure that you have closed the machine door.
• Be sure that you switched off the machine by pressing the Power On / Off button.
• Be sure that the water inlet lter and the machine lters are not clogged.
If the lamps “Wash” and “End” keep ashing
• Water overow alarm is active
• Turn off your tap and contact an authorised service.
If the control lamps won’t go out after a wash operation
The Power On/Off button is released yet.
If detergent residues are left in the detergent compartment
Detergent has been added when the detergent compartment was wet.
If water is left inside the machine at the end of the programme
• The water drain hose is clogged or twisted.
• The lters are clogged.
• The programme is not nished yet.
If the machine stops during a wash operation
• Power failure.
• Water inlet failure.
• Program can be on standby mode.
If shaking and hitting noises are heard during a wash operation
• Dishes placed incorrectly.
• Spray arm hitting the dishes.
If there are partial food wastes left on the dishes
• Dishes placed incorrectly into the machine, sprayed water did not reach related places.
• Basket overly loaded.
• Dishes leaning against one another.
• Small amount of detergent added.
• An unsuitable, rather weak wash programme selected.
• Spray arm clogged with food wastes.
• Filters clogged.
• Filters incorrectly tted.
• Water drain pump clogged.
If there are whitish stains on the dishes
• A small amount of detergent is being used.
• Rinse aid dosage setting at a very low level.
• No special salt is being used despite the high degree of water hardness.
• Water softener system setting is at a very low level.
• Salt compartment cap not closed well.
CHAPTER -9: FAILURE CODES AND WHAT TO DO IN CASE OF
FAILURE
Page 25

EN-25
If the dishes won’t dry up
• A programme without a dry operation selected.
• Rinse aid dosage set too low
• Dishes unloaded too fast.
If there are rust stains on the dishes
• Stainless-steel quality of the dishes washed is insufcient.
• High rate of salt in the wash water.
• Salt compartment cap not closed well.
• Too much salt spilt into the sides and into the machine while lling it with salt.
• Unhealthy mains grounding.
Call an authorised service if the problem still persists or in case of any malfunction not described
above.
PRACTICAL AND USEFUL INFORMATION
1- Whenever you will not be operating your machine
• Unplug the machine and then turn the water off.
• Leave the door slightly ajar in order to prevent the formation of unpleasant smells.
• Keep the machine interior clean.
2- Eliminating water droplets
• Wash the dishes with the intensive programme.
• Take all of the metal containers in the machine out.
• Do not add detergent.
3- If you properly place your dishes into the machine, you will be using it in the best way in
terms of energy consumption, washing and drying performance.
4- Clean all rough waste before you place dirty dishes to the machine.
5- Operate the machine after it is completely full.
6- Use pre-washing program only when necessary.
7- Observe program information and average consumption values table when selecting a
program.
8- Since the machine will reach high temperatures, it should not be mounted near refrigerator.
9- If the appliance is located in a place where the risk of freezing exists, you must completely drain
the water that has remained in the machine. Turn off the water tap, disconnect the water inlet hose
from the tap and allow the interior water to drain.
The dishwasher contains biocidal product in the PP sump lter to prevent bacterial growth.
Active Substance: zinc pyrithione (CAS No: 13463-41-7)
CHAPTER -10: PRACTICAL AND USEFUL INFORMATION
Page 26

EN-26
This symbol on the product or package implies that the product should not be treated as domestic waste. Instead,
it should be delivered to applicable waste collection places recycling electrical and electronic equipment. You will
contribute to avoid potential negative results regarding environment and human health. Recycling materials will
help natural resources be preserved. For more detailed information regarding recycling of this product, please
contact local municipality, domestic waste annihilation service or the shop you have purchased the product.
DISPOSAL OF YOUR OLD MACHINE
Page 27

EN-27
Service
& Support
Visit our website:
www.sharphomeappliances.com
Or contact us:
52192563 R23
 Loading...